using profile - how to internet file slipsintuitglobal.intuit.com/delivery/cms/prod/sites/... ·...
TRANSCRIPT
Using ProFile - How to Internet File Slips
The following slips/information can be Internet filed using ProFile:
Federal:
• T4
• T4A
• T4A-NR
• T5
• T5018
• NR4 (Profile Form module and T3 module)
• T5008
• T5013 slips and summary
• T5013 FIN and schedules (coming in future release)
Québec:
• RL1
• RL2
• RL3
• RL8
• RL15
• RL24
• RL25
• RL16 (T3 module)
Slips ProFile can Internet file
Setting up for Internet
filing slips
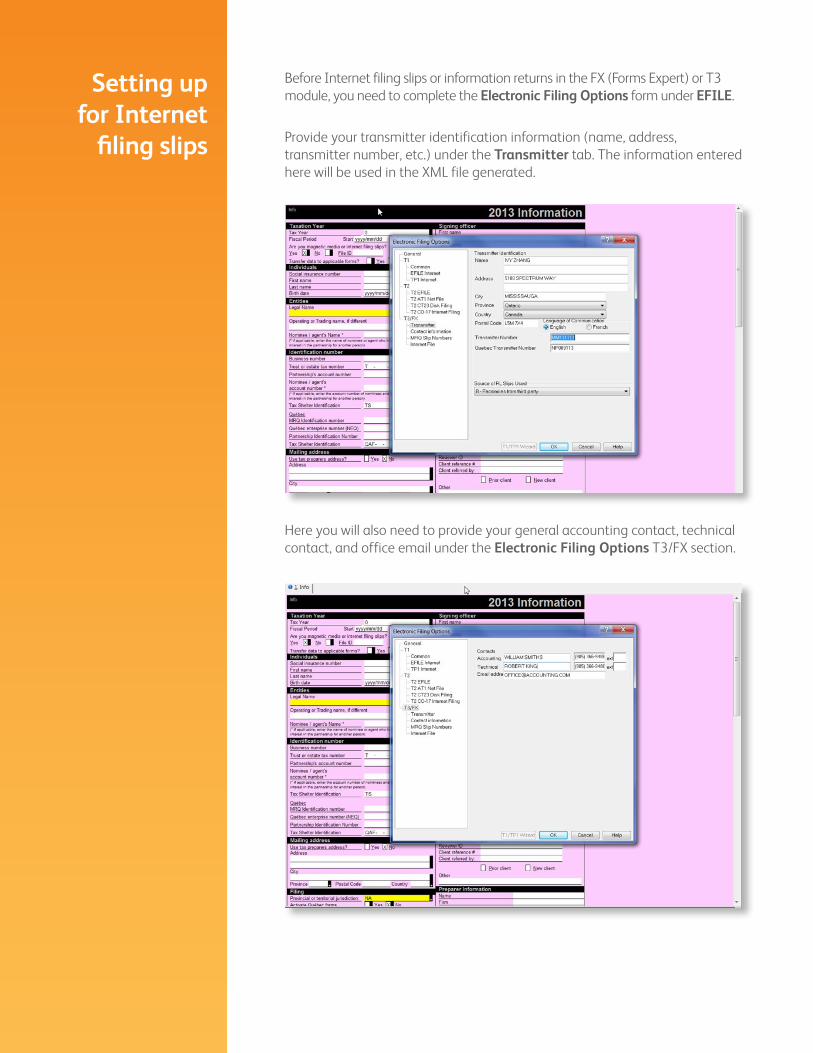
Before Internet filing slips or information returns in the FX (Forms Expert) or T3 module, you need to complete the Electronic Filing Options form under EFILE.
Provide your transmitter identification information (name, address, transmitter number, etc.) under the Transmitter tab. The information entered here will be used in the XML file generated.
Here you will also need to provide your general accounting contact, technical contact, and office email under the Electronic Filing Options T3/FX section.

For filing Revenu Québec slips, Relevés, you need to enter your slip’s sequential number. The sequential number should have been provided to you by Revenu Québec. When slips are Internet filed, Relevé slips display two sequence numbers:
• The top number is associated with your magnetic media (digital) submission to Revenu Québec and is assigned when you process the XML output, not when the slips are printed.
• The bottom number is associated with your paper copy and is assigned when the forms are printed.
How to Internet file slips
• If there is missing information on your Electronic Filing Options form, ProFile automates certain steps through the EFILE wizard. Simply answer the questions that appear in your browser window to complete the transmission.

• Make sure you save the file before moving on to the next step.
• From the EFILE menu, select Internet File Slips. Select the Slip Type and then select the Data type. Click OK.
• A detail form (for example, T4Detail, RL1Detail) will appear and require you to select the Slip type from the drop-down menu.
• Select File > Properties. Next to the slips you want to file, in the Slips Status pane, the status in the Magmedia column must be Ready to file not Working in progress. If this is not the case, click the Slips Status box and select Ready to file from the drop-down menu and click OK.

• ProFile will attempt to create the XML file of slip data, formatted for Internet filing. The build process reports progress using a tree view. An indicator to the left of the filename will show a red “X” if there are issues and a green check mark if it is successful. If there is an error, you will see a [+] beside a failed Internet Slip file. Click on the [+] to get a brief summary of any problems affecting the file.
• Once you have successfully completed processing your slips and see a green check mark on the pop-up dialogue window, you can click OK. You will be brought to the CRA’s browser.
• ProFile stores your completed slip information (FX client data files) in a default folder under Options > Environment > File > File directories > FX module.

• ProFile will automatically launch your Internet browser in the Build dialog box.
• Read the disclaimer and indicate your agreement to continue with the transmission.
• In the Identification section, supply the Web Access Code (WAC) that the CRA provided to you for the business you are filing slips for.
• ProFile will complete the business number (BIN) automatically, based on your EFILE options.
• ProFile automatically selects the first XML file in the default folder where the FX files have been stored. If the selection does not happen automatically, use the browse function to go to the FX folder on your computer and select the XML file you are ready to transmit.

• Following a successful transmission, you will see a confirmation of receipt with a confirmation number. Record this number for your files; we recommend you print the final page and file it for your records.
• Profile will change file status to “EFILED”.