using qgis to extract and save specific openstreetmap data...
TRANSCRIPT

Using QGIS to Extract and Save Specific OpenStreetMap Data into a GIS format
What you need✓ QGIS 2.2 or above✓ Internet access or an .osm file (tutorial data here)
Tutorial overviewThis tutorial will show you how to download data from OpenStreetMap (OSM) with QGIS and how to select and then save the features you want into a GIS format. It is divided into three parts. In the first part, you will learn how to download OSM data with QGIS. In the second part, we will show you how to import those data into QGIS and finally, the last part will explain how to select and save the data you want.For that purpose, we will assume that you want to map the ski infrastructure and ski pistes of a ski region in Switzerland. You already have a base map, however you are still looking for the ski-lifts and pistes.
(A) Download data directly from OSM
GOAL: download data from OSM using the QGIS embedded tool.
>>>> If you are using the tutorial data, you can skip part A. <<<<
! ! ! From our experience, there might be some features missing if you use the download tool embedded in QGIS, instead of downloading the data directly from the OSM website ! ! !
1. Go to the menu Vector > OpenStreetMap > Download data (see Figure 1).
Figure 1: Download data tool
Open Source Geospatial Laboratory at ETHZ Tutorial
N. Panchaud 1 / 10

2. Define the extent by entering coordinates (check Manual). You could define the extent base on the extent of your map canvas or of a specific layer (see Figure 2).
>>>> You need to enter latitude and longitude degrees as coordinates. <<<<
3. Give a name for your output file and define its location using the ... .4. Click OK, when you are done. The download will start.5. The file will be downloaded and saved as define in step 3. You can go through the Finder
and see if the file has been downloaded correctly.
>>>> This download tool has a limitation. Thus if you need a bigger area, you might want to download the file in .osm format from another source. However, keep in mind that if you try to
render too many features at the same time, QGIS will slow down. If that is the case, you can try unchecking the Render option (bottom right corner of the map canvas) and zoom in before
rechecking the Render option. If the file is really too big, you might not be able to load it. <<<<
Figure 2: Define extent
Open Source Geospatial Laboratory at ETHZ Tutorial
N. Panchaud 2 / 10

(B) Import your .osm file into QGIS
GOAL: import the downloaded file in part A into a local database using QGIS
1. Go to the menu Vector > OpenStreetMap > Import topology from XML (see Figure 3).
2. Click on the ... to select the file you downloaded in A or use the tutorial data (see Figure 4).3. QGIS define the name of the database based on the name of your file. You can change it if
you want.
4. Click OK.5. You can use the DB Manager in QGIS to see if the database has been correctly created.
(Menu Database > DB Manager, then open the tab with SpatiaLite).
>>>> The OSM data have a special structure that stores the geometries only in the nodes and then uses references to the node IDs in other types of features (ways and relations). This original structure is saved in the database and this is why you cannot load the OSM features directly from
that database into QGIS (there is no geometry in the tables, except the one with nodes). <<<<
Figure 3: Import topology tool
Figure 4: Generate database
Open Source Geospatial Laboratory at ETHZ Tutorial
N. Panchaud 3 / 10

(C) Load the osm data into the QGIS Map Canvas
GOAL: generate the geometries and their attributes from the database, load them into the Map Canvas and save them as shapefiles.
1. Go to the menu Vector > OpenStreetMap > Export topology to SpatiaLite (see Figure 5).
2. Click on the ... to load the database created in part B (see Figure 6).
3. According to the OSM rules, ski lifts are lines tagged with aerialway and ski pistes are lines or areas tagged with piste:type. Thus, we will start with polylines. Click on the button Polylines (open ways).
4. Click on Load from the DB to see all the possible tags in the file.
Figure 5: Export topology tool
Figure 6: Export OSM to SpatiaLite window
Open Source Geospatial Laboratory at ETHZ Tutorial
N. Panchaud 4 / 10

5. Select the following tags in order to extract only the lifts and pistes: aerialway, aerialway:capacity, aerialway:length, aerialway:occupacy, name, piste:type, piste:difficulty, piste:grooming, and piste:name. (see Figures 7)
>>>> The selected tags play the role of filter (only features with at least one existing tag will be selected. But it also defined which attribute columns will be generated for the table/layer. <<<<
! ! ! Besides the tags allowing for the selection of the features that are wanted, we added the tag “name” in order to export the attribute column with the name of ski lifts and pistes. But it also
means that any other feature with a value in that attribute column will be taken as well. ! ! !
6. Click OK.
>>>> Although it says “Output layer name”, what happens here is the definition of a new table in the database according to the parameters given in steps 3 to 5. Then, the table is loaded into the
canvas (if the box in the bottom-left corner is checked). <<<<
Figure 7: Export parameters for polylines (open ways)
Open Source Geospatial Laboratory at ETHZ Tutorial
N. Panchaud 5 / 10
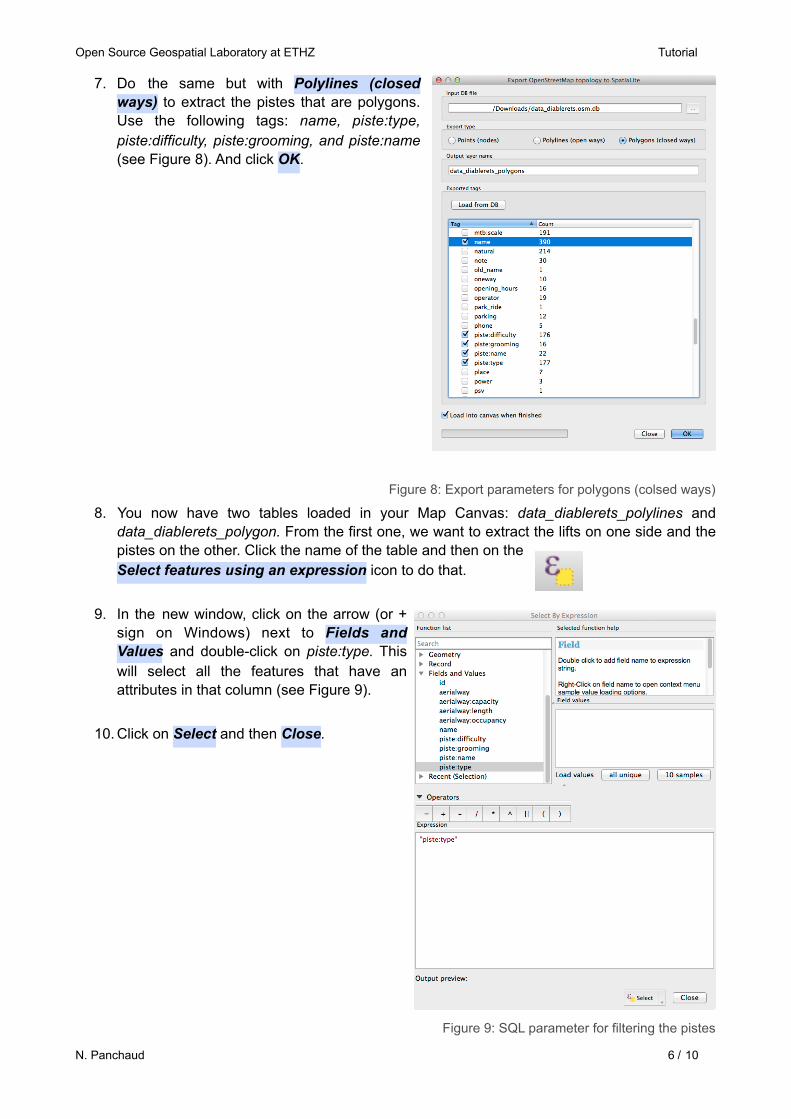
7. Do the same but with Polylines (closed ways) to extract the pistes that are polygons. Use the following tags: name, piste:type, piste:difficulty, piste:grooming, and piste:name (see Figure 8). And click OK.
8. You now have two tables loaded in your Map Canvas: data_diablerets_polylines and data_diablerets_polygon. From the first one, we want to extract the lifts on one side and the pistes on the other. Click the name of the table and then on theSelect features using an expression icon to do that.
9. In the new window, click on the arrow (or + sign on Windows) next to Fields and Values and double-click on piste:type. This will select all the features that have an attributes in that column (see Figure 9).
10. Click on Select and then Close.
Figure 8: Export parameters for polygons (colsed ways)
Figure 9: SQL parameter for filtering the pistes
Open Source Geospatial Laboratory at ETHZ Tutorial
N. Panchaud 6 / 10
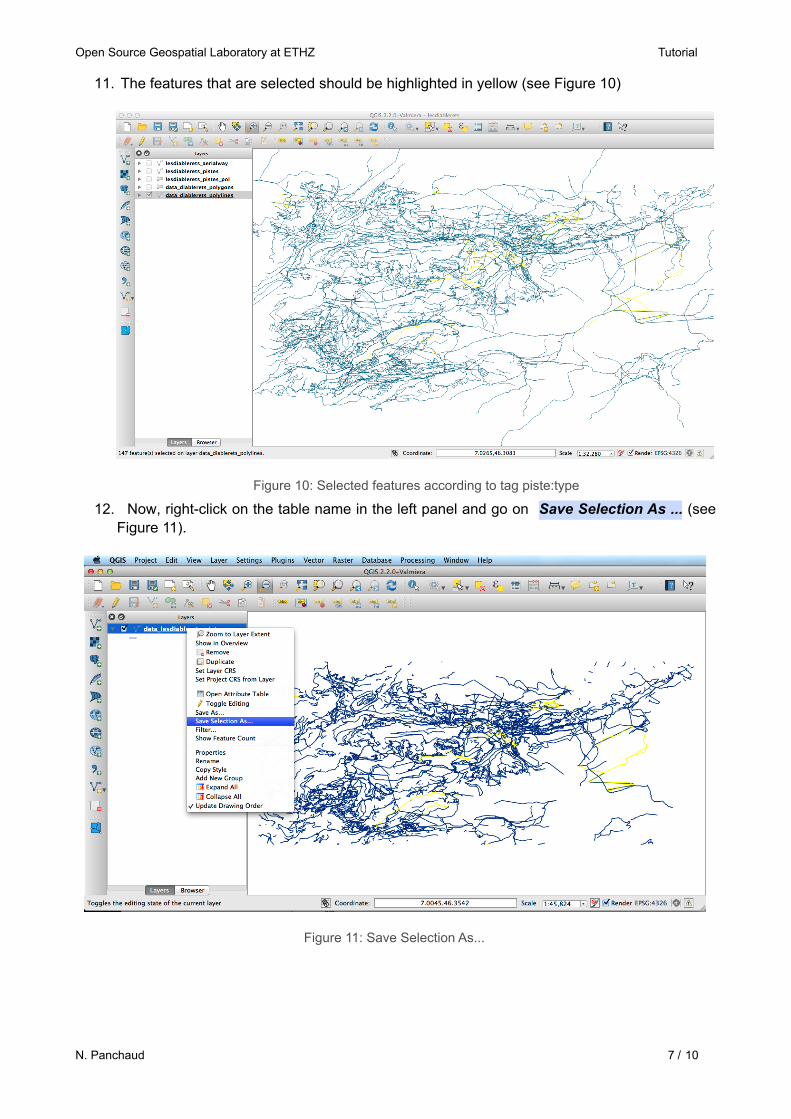
11. The features that are selected should be highlighted in yellow (see Figure 10)
12. Now, right-click on the table name in the left panel and go on Save Selection As ... (see Figure 11).
Figure 10: Selected features according to tag piste:type
Figure 11: Save Selection As...
Open Source Geospatial Laboratory at ETHZ Tutorial
N. Panchaud 7 / 10

13. Save your selection as a ESRI Shapefile and give it a name and do not forget to check the box next to Add saved file to the map (see Figure 12). Click OK.
! ! ! Do not change the projection system now. If you need to, do it in a second step because when done at the same time as saving as from a table, it seems to crash QGIS all the time. ! ! !
14. Repeat steps 8 to 13, changing the parameter in step 9 to aerialway (see Figure 13), as well
as the name of the file in step 13 (see Figure 14).
Figure 12: Save vector layer as...
Figure 13: SQL parameter for filtering the aerialway
Open Source Geospatial Laboratory at ETHZ Tutorial
N. Panchaud 8 / 10
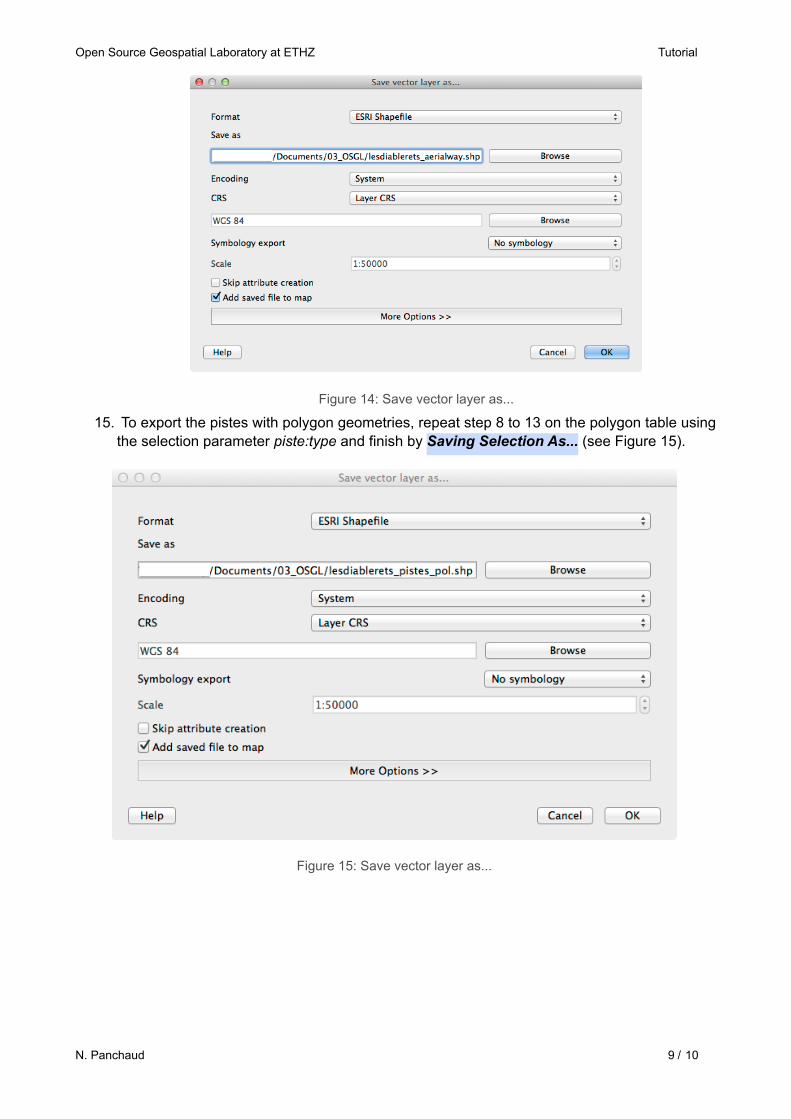
15. To export the pistes with polygon geometries, repeat step 8 to 13 on the polygon table using the selection parameter piste:type and finish by Saving Selection As... (see Figure 15).
Figure 14: Save vector layer as...
Figure 15: Save vector layer as...
Open Source Geospatial Laboratory at ETHZ Tutorial
N. Panchaud 9 / 10

16. If you need the shapefile in a another projection system, right-click on the shapefile name in the left panel and go on Save As... and change the projection while saving under a new name.
17. If not, you are done! Congratulations!
>>>> In the folder containing the data for the tutorial, you will find three files defining the styles you can see above. To use them, double-click on the name of a layer, go to the style tab and click on
Load Style... <<<<
This work is licensed under a Creative Commons Attribution-NonCommercial-ShareAlike 4.0 International License.
Open Source Geospatial Laboratory at ETHZ Tutorial
N. Panchaud 10 / 10