using the minirae 3000
DESCRIPTION
Using the MiniRAE 3000. MiniRAE 3000 & ppbRAE 3000. Agenda. Self-cleaning User Interface Turning on the MiniRAE 3000 Recommended Daily Start-up procedure Hygiene mode & displays Alarm signals Programming mode Charging station. MiniRAE 3000: Self-Cleaning. - PowerPoint PPT PresentationTRANSCRIPT

Using the
MiniRAE 3000

MiniRAE 3000 & ppbRAE 3000
MiniRAE 3000 (Model Number PGM7320)
Lamp Range Resolution
10.6 eV 0.1 ppm to 15,000 ppm
0.1 ppm
9.8 eV 0.1 ppm to 5,000 ppm
0.1 ppm
11.7 eV 0.1 ppm to 2,000 ppm
0.1 ppm
ppbRAE 3000 (Model Number PGM7340)
Lamp Range Resolution
10.6 eV 1 ppb to 10,000 ppm 1 ppb
9.8 eV 0.01 ppm to 5,000 ppm
1 ppb
11.7 eV 0.01 ppm to 2,000 ppm
1 ppb

Agenda
• Self-cleaning
• User Interface
• Turning on the MiniRAE 3000
• Recommended Daily Start-up procedure
• Hygiene mode & displays
• Alarm signals
• Programming mode
• Charging station

MiniRAE 3000: Self-Cleaning
Patented RAE Systems Breakthrough!
• Lamp runs for 4 hours during charging• Generates small amounts of ozone to scrub
sensor and lamp clean• Without probe user will see lamp glow purple
during charging• Increases lamp life• Drastically increases PID stability and reduces
requirement for cleaning (Refer to TN-165)

MiniRAE 3000: Self-Cleaning duty-cycle
• Normal operation, pump shows inflow and outflow• Duty-cycle, pump shows inflow and pump stopped• With pump stopped, lamp generates small amounts of ozone which
helps to scrub sensor and lamp clean• Pump starts, dirt is removed from lamp• Drastically increases PID stability and reduces requirement for
cleaning (Refer to TN-165)
Normal operating pump
Pump during duty-cycle

• User Interface: – Y/+: tests alarms– N/- – MODE (on)– Flashlight on/off key
User Interface
Display
MODE key
Flashlighton/off key
LEDs and flashlight

Control Buttons
• Y/+ always controls left-hand response & increases numerical values
• N/- controls right-hand response & moves to next digit• MODE controls center & returns to previous menu

Start-up: Turning On
• Press and hold
• Release Mode key
• Self-test
• Final display

Start-up: Programmable Zero calibration
• Unit performs Zero calibration after warm-up• “apply zero gas…” • If in fresh air, the M3K can be calibrated,• The ppbRAE 3000 needs Zero grade air, or a
Zeroing kit

Start-up: Lamp Alarm
• “Lamp” alarm may occur on start-up• This indicates that PID lamp has failed to light
– Wait 1-2 minutesWait 1-2 minutes
• If “Lamp” message remains, turn off MiniRAE 3000 and restart– “Lamp” alarm clears and MiniRAE 3000 is ready for use
• If after restart, “Lamp” message remains, the PID needs service

Start-up: Humidity Check
• It is important to check if the instrument responds to moisture
1. Cup hand over inlet or breathe into inlet for 10-20 seconds
2. Do not block flow• If M2K reads >2 ppm or
ppbRAE reads >500 ppb, then the sensor needs cleaning

Hygiene/Search Mode
Two main operating modes: • Hygiene Mode: The factory default
mode. After warm-up the meter samples continuously
• Search Mode: After warm-up the pump shuts off and “Ready…” is displayed.

Hygiene Mode/Basic User
*Dashed (- - -) line is automatic return

Hygiene Mode/Advanced User
*Dashed (- - -) line is automatic return

Hygiene Mode/Advanced User
• Change reference gas without entering Programming Mode
• Change measurement gas when reference gas is Isobutylene

Hygiene Mode
• Reading in ppm• Gas information• Calibration needed• Wireless status• Battery status• Datalog• Pump Status• Press N/- to move to next screen
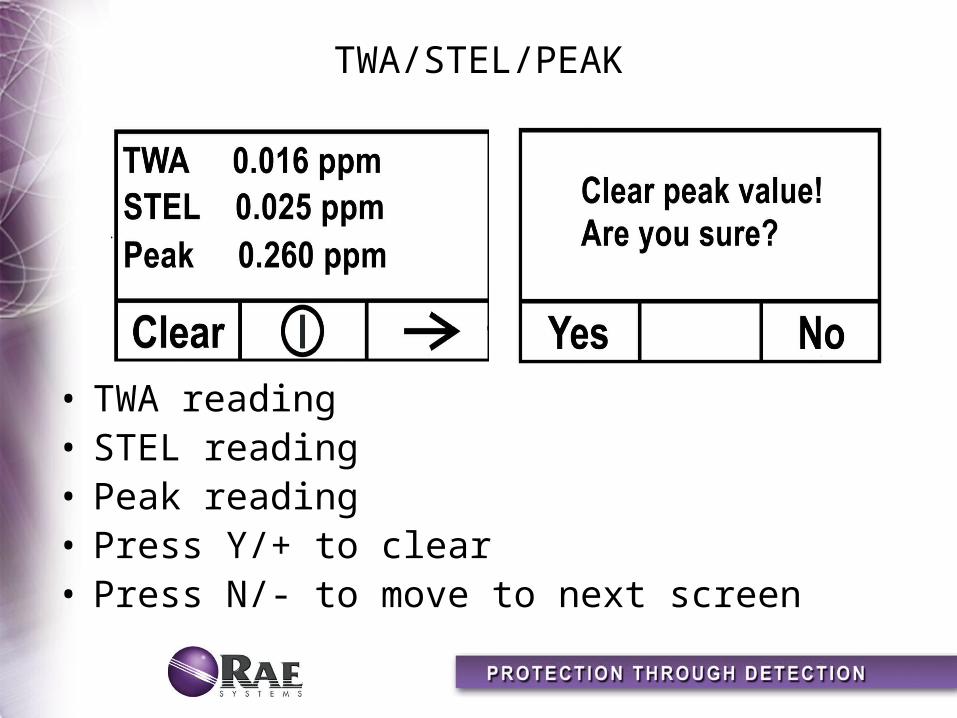
TWA/STEL/PEAK
• TWA reading• STEL reading• Peak reading• Press Y/+ to clear• Press N/- to move to next screen

Date/Time/Temp
• Date• Time• Internal temperature• Press N/- to move to next screen

Gas Display
• Calibration Gas• Measurement Gas• Correction factor• Press N/- to move to next screen

PC Communication
• Enter PC communication and stop sampling• Press Y/+ to enter PC Comm mode
– Press Y/+ to exit after communication is complete
• Press N/- to move to next screen

Alarm signals

Search Mode
• A discrete sampling mode can easily start/stop datalogging for many points
• Perfect for drum or headspace sampling
• Optional graphic screen

Optional Graphic Screen
• Using ProRAE Studio, set display to graphic display Or
• Leave display in ppm reading
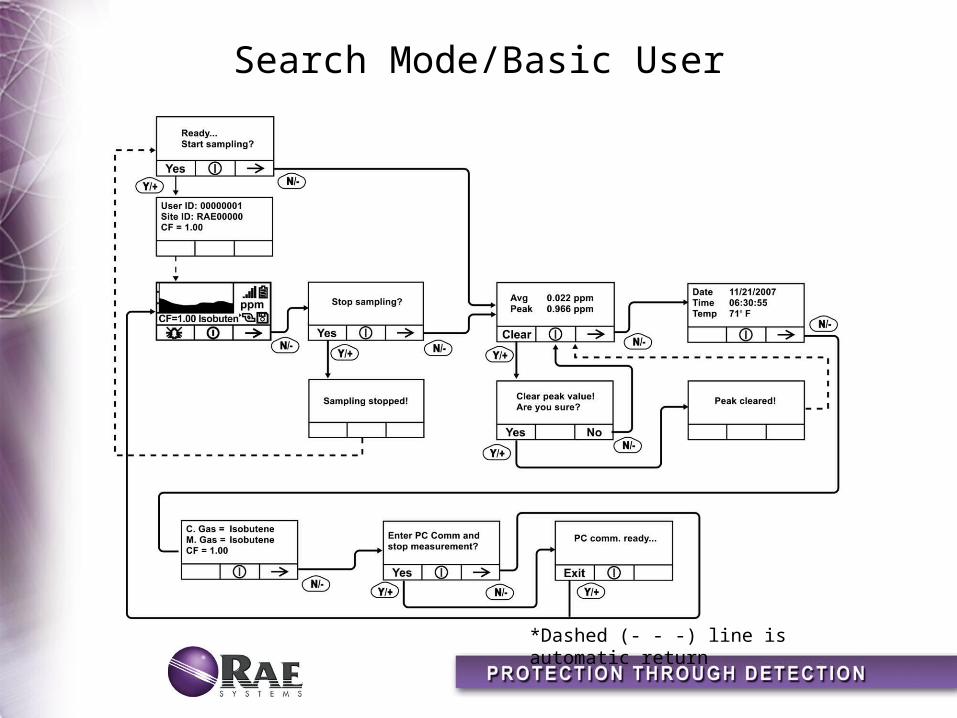
Search Mode/Basic User
*Dashed (- - -) line is automatic return

Search Mode/Advanced User
• Change reference gas without entering Programming Mode
• Change measurement gas when reference gas is Isobutylene

Programming Mode
• Press and Hold N/- and MODE to enter Programming
• Input password “0000”• Or Press MODE

Programming Mode
• Navigate using interface of “Select,” “Back,” and “Next”
• Press “MODE” to exit Programming
• Y/+ to increase numerical values or confirm a question
• N/- to decrease numerical values or deny a question

Two-Point Calibration
*Dashed (- - -) line is automatic return

Zero calibration
• Press Y/+ to select Zero Calibration
• Press MODE to return to main display
• Press N/- to select Span Calibration

Zero calibration
• If in fresh air, the M3K can be calibrated,• The ppbRAE 3000 needs Zero grade air, or a
Zeroing kit• Press Y/+ to start calibration

Span Calibration
• The menu will return to calibration selection with Span Calibration highlighted– Using a Matched-flow regulator, tedlar bag, or 500
cc/min regulator, attach 100ppm Isobutylene for the MiniRAE 3000 or 10ppm Isobutylene for the ppbRAE 3000
• Press Y/+ to enter Span calibration.• Press N/- to skip Span calibration and return to
Zero calibration.• Press MODE to exit and return to the top
calibration menu.

Span Calibration
• Turn on your span calibration gas.• Press Y/+ to initiate calibration. • Press N/- to abort calibration

Span Calibration
• Calibration is complete when instrument reads: Span 1 is done! Reading = xxx. ppm• Instrument then returns to Zero Calibration menu• Select MODE to return to regular Operations• Instrument will then update settings

Power Off
• Hold for full 3 seconds• Audible alarm will beep and unit will countdown
5 seconds• Release when you see “Unit Off…”• Unit will stay on if you release MODE key before
countdown completes

Charging unit
• To Charge unit– Push instrument down
on charger– Set back of unit
against back wall of charger
• To remove unit from charger– Push down on
instrument– Pull unit towards you

Removing battery
• Rubber boot stays on monitor
• First push down on tab
• Then pull battery from instrument

Charging battery
• Use back of charging station to charge battery externally– Push into contacts– Lay battery flat
• To remove battery– Push battery towards
station– Lift battery off of
charging station

Maintenance
• Clean PID Lamp & Sensor– When display creeps upwards after good zero– When PID responds to moisture– When movement of PID results in response on
display
No dirt build-up to foster a decrease in airspace resistance
Clean Sensor Dirty Sensor
Bias Electrode
Sensing Electrode
Bias Electrode
Sensing Electrode
Dirt build-up absorbs water and breaks down airspace resistance leading to sensor “leakage” or moisture response
