using the programming workspace: sas(r) windowing...
TRANSCRIPT

Using the Programming Workspace:SAS® Windowing EnvironmentFor Use with the SAS®Certification Prep Guide:Base Programming for SAS®9
The correct bibliographic citation for this manual is as follows: SAS Institute Inc. 2004. Using the Programming Workspace: SAS® Windowing Environment. Cary, NC: SAS Institute Inc.
Using the Programming Workspace: SAS® Windowing Environment
Copyright © 2004, SAS Institute Inc., Cary, NC, USA
All rights reserved. Produced in the United States of America. Your use of this e-book shall be governed by the terms established by the vendor at the time you acquire this e-book.
U.S. Government Restricted Rights Notice: Use, duplication, or disclosure of this software and related documentation by the U.S. government is subject to the Agreement with SAS Institute and the restrictions set forth in FAR 52.227-19, Commercial Computer Software-Restricted Rights (June 1987). SAS Institute Inc., SAS Campus Drive, Cary, North Carolina 27513. 1st printing, August 2004 2nd printing March 2006 SAS Publishing provides a complete selection of books and electronic products to help customers use SAS software to its fullest potential. For more information about our e-books, e-learning products, CDs, and hard-copy books, visit the SAS Publishing Web site at support.sas.com/pubs or call 1-800-727-3228. SAS® and all other SAS Institute Inc. product or service names are registered trademarks or trademarks of SAS Institute Inc. in the USA and other countries. ® indicates USA registration. Other brand and product names are trademarks of their respective companies.

Using the Programming Workspace: SAS Windowing Environment
Introduction ..................................................................................................................................................................2 Exploring the Programming Workspace .....................................................................................................................2
The Explorer Window............................................................................................................................................3 The Editor Window................................................................................................................................................4 The Log Window....................................................................................................................................................5 The Output Window ...............................................................................................................................................5 The Results Window...............................................................................................................................................6 Features of the SAS Windows ................................................................................................................................7 Types of Online Help .............................................................................................................................................8
Working with SAS Data Sets ........................................................................................................................................9 View Files in a SAS Library...................................................................................................................................9 Define a Library ..................................................................................................................................................11 Add and Rename a SAS Data Set.........................................................................................................................12 Open a SAS Data Set ...........................................................................................................................................13 View General Data Properties ............................................................................................................................14 View Column Attributes.......................................................................................................................................14 Change a Column Format ...................................................................................................................................16 View Available Informats ....................................................................................................................................18
Creating and Running SAS Programs.......................................................................................................................19 Enter and View Text in the Editor Window .........................................................................................................20 Use the Editor Window Features.........................................................................................................................21 Use Commands ....................................................................................................................................................22 Set Enhanced Editor Options...............................................................................................................................24 Submit the Program and View the Output ...........................................................................................................24 View the Log ........................................................................................................................................................26 Use the Results Window.......................................................................................................................................26 Create HTML Output...........................................................................................................................................27 Modify the Program.............................................................................................................................................28 Use the SAS System Options Window..................................................................................................................30 Correct Syntax Errors..........................................................................................................................................30 Resubmit a Revised Program...............................................................................................................................33 View and Save the Results ...................................................................................................................................33 Save a SAS Program and Set Up a Favorite Folder............................................................................................35 Create a File Shortcut .........................................................................................................................................37 Open a Saved Program Using the Open Window................................................................................................38

2 SAS Windowing Environment
Introduction
SAS is designed to be easy to use. It provides windows for accomplishing all the basic SAS tasks you need to access, manage, analyze, and present your data. SAS has two different interface environments, SAS Enterprise Guide and the SAS windowing environment. SAS Enterprise Guide is a Windows client application that serves as an interface to SAS. This tutorial contains a series of tasks showing how to use the SAS windowing environment to work with data sets and create and run programs. To practice using your programming workspace, you can perform these tasks in SAS as you read.
If you use SAS Enterprise Guide, you should read the companion tutorial, Using the Programming Workspace: SAS Enterprise Guide, instead.
Before beginning this tutorial, you should read Chapter 1, Basic Concepts, in the SAS Certification Prep Guide: Base Programming for SAS9. In Chapter 1, Basic Concepts, you learn how SAS programs are structured and processed.
Exploring the Programming Workspace
In this section, you learn about the main SAS windows. When you first start SAS, the following windows open: the Explorer, Editor, Log, Output, and Results windows. You will practice using these windows throughout this tutorial. First, however, let's look at each of the main SAS windows individually.

Using the Programming Workspace 3
For instructional purposes, some SAS windows depicted in this tutorial have been resized. When you open SAS, you will see the SAS windowing environment at maximum size.
This tutorial shows SAS windows in the Windows operating environment.
The Explorer Window
In the Explorer window, you can view and manage your SAS files, which are stored in SAS data libraries. A library name is a logical name for the physical location of the files (such as a folder). You use the Explorer window to
• create new libraries and SAS files
• open SAS files
• perform most file management tasks such as moving, copying, and deleting files
• create shortcuts to files that were not created with SAS.
You can display the Explorer window either with or without a tree view of its contents, as shown in these displays:

4 SAS Windowing Environment
The Editor Window
You can use the following editors to write and edit SAS programs: • the enhanced Editor window
• the Program Editor window
• the SAS Notepad window
• the host editor of your choice.
This tutorial uses the enhanced Editor, which is available only in the Windows environment and which is the default Editor window. The Editor window enables you to perform standard editing tasks such as
• opening SAS programs
• entering, editing, and submitting SAS programs
• using the command line or menus
• saving SAS programs
• clearing contents.
In addition, the Editor window also provides useful editing features including • color coding and syntax checking of the SAS programming language
• expandable and collapsible sections
• recordable macros
• support for keyboard shortcuts (ALT or SHIFT plus keystroke)
• multi-level undo and redo.
In the Windows operating environment, an Editor window opens by default. You can have multiple Editor windows open at the same time.

Using the Programming Workspace 5
The Log Window
The Log window displays messages about your SAS session and about any SAS programs that you submit.
The Output Window
The Output window displays the listing output from SAS programs that you submit. It is positioned behind the Log and Editor windows until there is output to display. It automatically opens or moves to the front of your display when you create output.
Not all SAS programs create listing output in the Output window. Some programs open interactive windows, such as the Report window. Other programs only produce messages in the Log window. If you create HTML output, you can view it in the Results Viewer window, which is the internal browser for SAS, or in a standard Web browser.

6 SAS Windowing Environment
The Results Window
The Results window lists all output that has been generated in the current SAS session. You can view, save, and print individual items of output. (The Results window is not the same as the Results Viewer window. The Results Viewer window is where you actually view HTML output.) The Results window is empty until you submit a SAS program that creates output. Then, it opens or moves to the front of your display. The Results window displays separate icons for listing output and HTML output. In the example below, the first Print folder contains both types of output.
Using the Programming Workspace 7
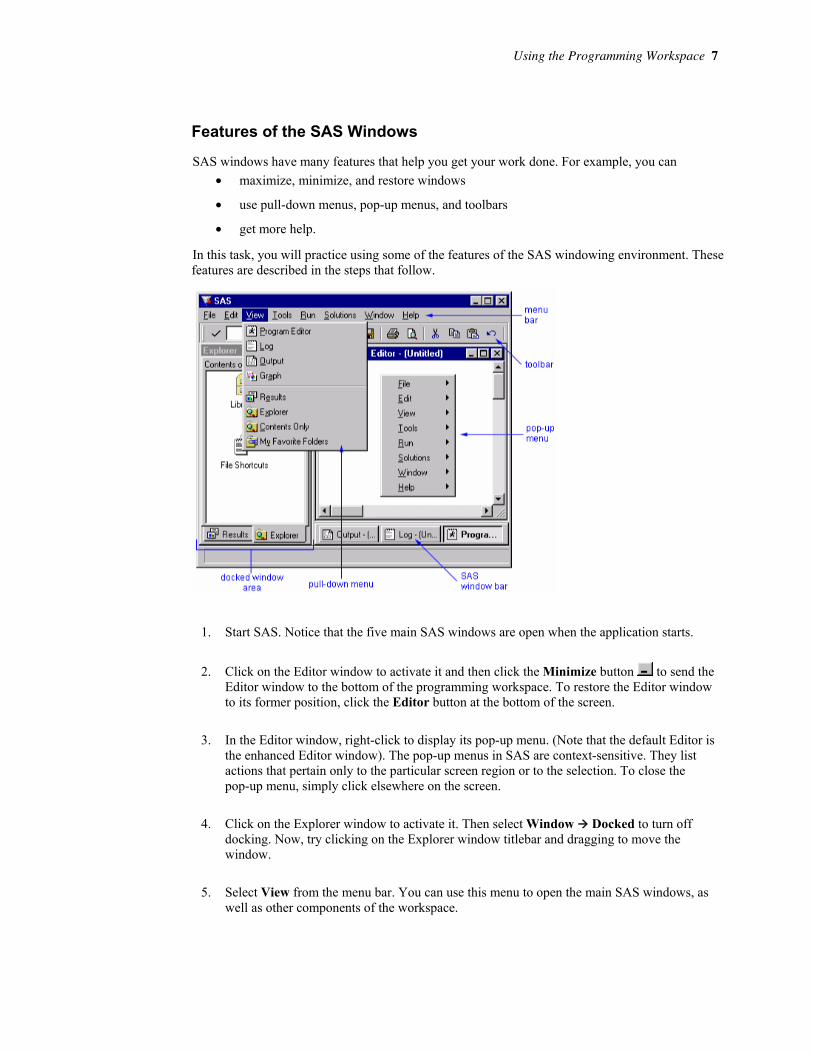
Features of the SAS Windows
SAS windows have many features that help you get your work done. For example, you can • maximize, minimize, and restore windows
• use pull-down menus, pop-up menus, and toolbars
• get more help.
In this task, you will practice using some of the features of the SAS windowing environment. These features are described in the steps that follow.
1. Start SAS. Notice that the five main SAS windows are open when the application starts.
2. Click on the Editor window to activate it and then click the Minimize button to send the Editor window to the bottom of the programming workspace. To restore the Editor window to its former position, click the Editor button at the bottom of the screen.
3. In the Editor window, right-click to display its pop-up menu. (Note that the default Editor is the enhanced Editor window). The pop-up menus in SAS are context-sensitive. They list actions that pertain only to the particular screen region or to the selection. To close the pop-up menu, simply click elsewhere on the screen.
4. Click on the Explorer window to activate it. Then select Window Docked to turn off docking. Now, try clicking on the Explorer window titlebar and dragging to move the window.
5. Select View from the menu bar. You can use this menu to open the main SAS windows, as well as other components of the workspace.

8 SAS Windowing Environment
6. Select Tools from the menu bar. You can use this menu to open available editors, work with macros, and customize many features of the SAS windowing environment such as toolbars, pop-up menus, and icons.
7. Select Help from the menu bar. You will learn more about SAS help in the next section of this tutorial.
Types of Online Help
You've learned about the SAS windows that are used to perform common SAS tasks. As you begin working in SAS, be sure to take advantage of the different types of online help that are available from the Help menu.
• Using This Window is task-oriented help for the active window.
• SAS Help and Documentation is a complete guide to syntax, how to, examples, procedures, concepts, what's new, and tutorials.
• Getting Started with SAS Software teaches both new and experienced programmers how to use Base SAS software.
• Learning SAS Programming enables you to create data that is used in online training courses, and displays SAS OnlineTutor if you have a site license.
• SAS on the Web provides links to information including Technical Support and Frequently Asked Questions if you have Internet access.
• About SAS System tells you what version of SAS you are running.

Using the Programming Workspace 9
Working with SAS Data Sets
Before you can work with your data in SAS, it must be in a special form called a SAS data set. As you learned in Chapter 1, Basic Concepts, in the SAS Certification Prep Guide: Base Programming for SAS9, a SAS data set is a file containing descriptor information and related data values. The file is organized as a table of observations (rows) and variables (columns) that SAS can process. All SAS files are stored in a SAS library. To access a library, you can use SAS code to assign a name to the library (also known as a libref or library reference). You can also define libraries using the SAS windowing interface.
In this section of the tutorial, you'll learn about defining SAS libraries, and then you'll work with SAS data sets in a library. Each task in this section contains a set of steps you can perform in SAS or in the SAS Learning Edition. Because these tasks build on each other, you should complete them in sequence.
View Files in a SAS Library
SAS defines three libraries automatically each time you start SAS. Depending on your installation of SAS, you might see additional libraries. In this task, you learn about the three automatically-defined libraries and view file types in the Sashelp library.
1. If you have not started a SAS session, start SAS.
2. In the Explorer window, double-click on Libraries. Notice that there are at least three basic libraries. These libraries are automatically defined each time you start SAS:
Sashelp a permanent library that contains sample data and other files that control how SAS works at your site. This is a read-only library. Sasuser a permanent library that contains SAS files from a Profile catalog that stores your personal settings. This is also a convenient place to store your own files.
10 SAS Windowing Environment
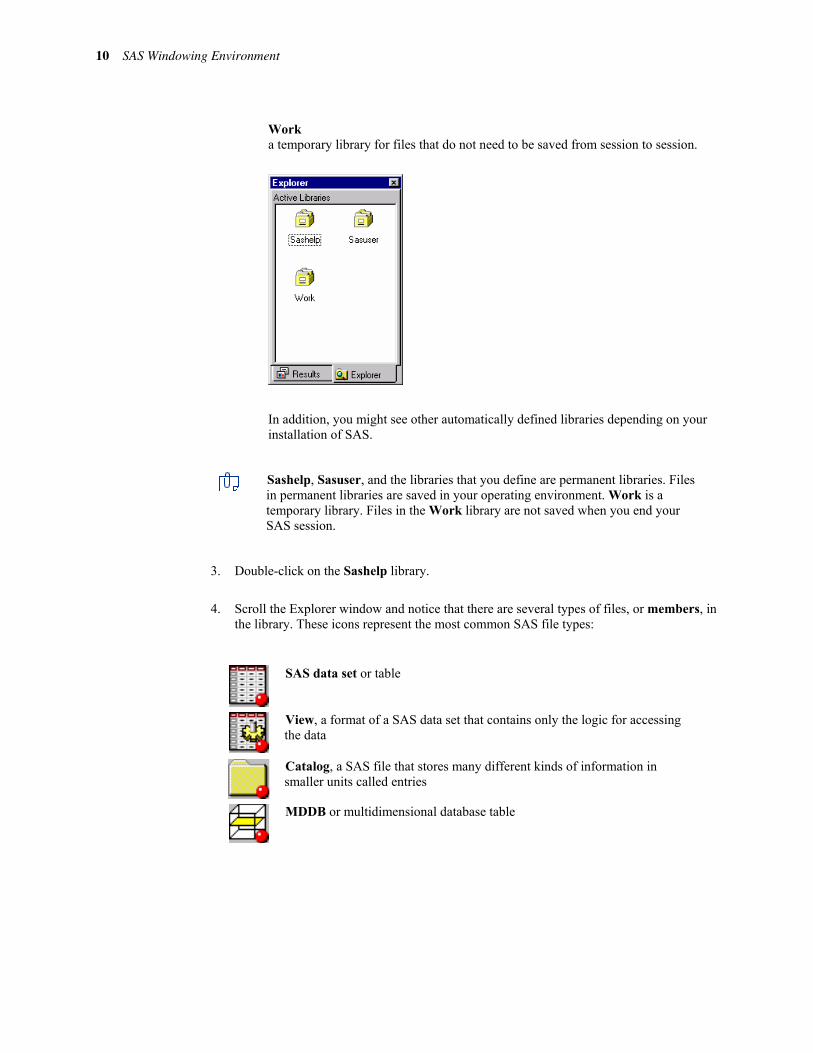
Work a temporary library for files that do not need to be saved from session to session.
In addition, you might see other automatically defined libraries depending on your installation of SAS.
Sashelp, Sasuser, and the libraries that you define are permanent libraries. Files in permanent libraries are saved in your operating environment. Work is a temporary library. Files in the Work library are not saved when you end your SAS session.
3. Double-click on the Sashelp library.
4. Scroll the Explorer window and notice that there are several types of files, or members, in the library. These icons represent the most common SAS file types:
SAS data set or table
View, a format of a SAS data set that contains only the logic for accessing the data
Catalog, a SAS file that stores many different kinds of information in smaller units called entries
MDDB or multidimensional database table

Using the Programming Workspace 11
Define a Library
When you define a library, you indicate the location of your SAS files to SAS. After you define a library, you can manage SAS files within the library. In this task, you use the New Library window to assign a library to use in this tutorial.
1. On the toolbar, click the New Library tool ( ). The New Library window opens.
2. In the Name text box, type MyLib.
Remember that library names
o are limited to 8 characters
o must start with a letter or underscore
o can contain only letters, numbers, or underscores.
3. Select the Enable at Startup check box. This library will be automatically assigned each time you start a SAS session.
4. Click Browse. Select the default location or select another location in your operating environment. Any files that you save to the Mylib library will be saved in the directory or folder that you designate in the Path text box. Click OK.
5. Click OK to close the New Library window.
You can delete SAS libraries. When you delete a SAS library, SAS no longer has access to the directory. However, the contents of the library still exist in your operating environment.

12 SAS Windowing Environment
Add and Rename a SAS Data Set
In this task, you add a SAS data set to the new library.
1. With the Explorer window active, select View Show Tree. The libraries are displayed in the left pane of the window. To see the tree, you might need to adjust the size of the left pane by clicking and dragging its border inside the Explorer window.
2. Click the Sashelp library.
3. Drag the Prdsale data set from the right pane and drop it into the Mylib library in the left pane.
4. Click Mylib. Notice that Prdsale has been copied (not moved) there.
5. Right-click on Prdsale and select Rename. Type ProductSales for the new name and click OK.
Remember that SAS data set names o can be 1 to 32 characters long
o must begin with a letter (A–Z, either uppercase or lowercase) or an underscore (_)
o can continue with any combination of numbers, letters, or underscores.

Using the Programming Workspace 13
Open a SAS Data Set
In this task, you view the data in the data set that you copied and renamed in the previous task.
1. In the Explorer window, double-click on the ProductSales table in the Mylib library. (Or, select the filename, and then select Open from the pop-up menu.) The table opens in the VIEWTABLE window.
2. Scroll the VIEWTABLE window and notice that there are 1440 rows (also called observations) and 10 columns (also called variables). There might be only 1000 rows (observations) shown if you are using the SAS Learning Edition.
3. Close the VIEWTABLE window.
There are many ways to get your data into a SAS data set, including using SAS windows to enter data directly into a SAS data set and using SAS/ACCESS software to connect to other vendors' data files. The SAS Certification Prep Guide: Base Programming for SAS9 focuses on using programming statements to read raw data into a SAS data set and to read and modify existing SAS data sets.

14 SAS Windowing Environment
View General Data Properties
The descriptor portion of a SAS data set contains information about the data set, such as the number of observations and variables in the data set. In this task, you see this information by viewing the general properties of a data set.
1. In the Explorer window, right-click on the ProductSales table and select Properties.
2. In the General tab, view the data set's properties. (Don't close the window yet. You'll need it for the next step.)
View Column Attributes
In addition to general information about the data set, the descriptor portion contains attribute information for each variable (column) in the data set. The attribute information includes the variable's name, type, length, format, informat, and label. In this task, you view the column attributes.
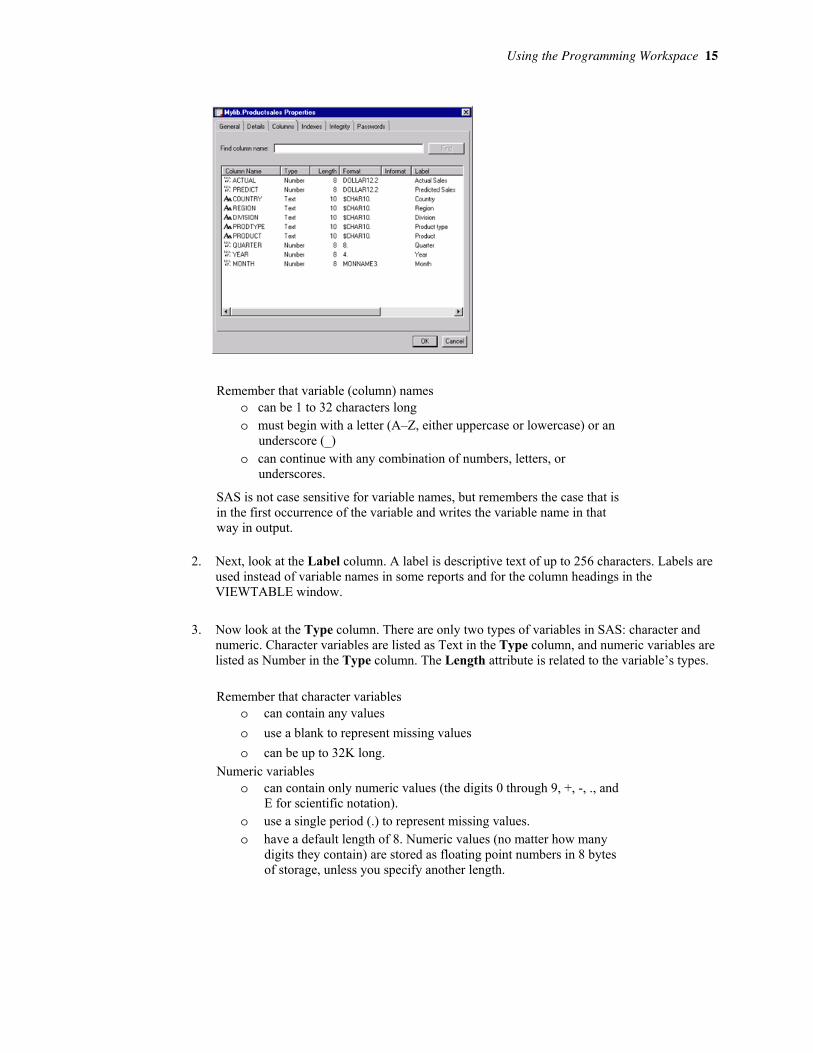
1. In the Mylib.Productsales Properties window, click the Columns tab. In the Column Name column, notice that all the variables for the data set are listed along with a symbol that indicates the variable's type.
Using the Programming Workspace 15
Remember that variable (column) names o can be 1 to 32 characters long o must begin with a letter (A–Z, either uppercase or lowercase) or an
underscore (_) o can continue with any combination of numbers, letters, or
underscores.
SAS is not case sensitive for variable names, but remembers the case that is in the first occurrence of the variable and writes the variable name in that way in output.
2. Next, look at the Label column. A label is descriptive text of up to 256 characters. Labels are used instead of variable names in some reports and for the column headings in the VIEWTABLE window.
3. Now look at the Type column. There are only two types of variables in SAS: character and numeric. Character variables are listed as Text in the Type column, and numeric variables are listed as Number in the Type column. The Length attribute is related to the variable’s types.
Remember that character variables o can contain any values o use a blank to represent missing values o can be up to 32K long.
Numeric variables o can contain only numeric values (the digits 0 through 9, +, -, ., and
E for scientific notation). o use a single period (.) to represent missing values. o have a default length of 8. Numeric values (no matter how many
digits they contain) are stored as floating point numbers in 8 bytes of storage, unless you specify another length.

16 SAS Windowing Environment
Change a Column Format
Formats are variable attributes that affect the way data values are written. SAS offers a variety of formats for numeric and character data. The following characteristics apply to formats:
• a name
• a w value, which specifies the column width (number of characters) that is used for displaying the value
• a period following the w value.
Numeric SAS formats, such as the DOLLARw.d format, can also specify a d value, which is the number of decimal places to be displayed. In this task, you change the format of a variable.
1. In the Mylib.Productsales Properties window, click the Columns tab. Look at the Format column. The ACTUAL variable uses the DOLLAR12.2 format. This format displays the value 12345 as $12,345.00 in a report.
2. Click Cancel to close the Properties window.
3. Open the ProductSales table if it is not already open. Right-click on the Actual Sales column heading and select Column Attributes from the pop-up menu.
4. In the Column Attributes window, click the [...] selector button next to the Format field.

Using the Programming Workspace 17
5. In the Format window, view the available formats and their descriptions. When you select a format in this list, an example is displayed in the Format Details area.
Let's say that you want to drop the decimal places for the values of the ACTUAL variable. Change the value in the Decimal box to 0. Click OK.
6. In the Column Attributes window, click Apply. Then click Close.
7. View the ProductSales table and notice that the values in the Actual Sales column no longer contain decimal places.

18 SAS Windowing Environment
View Available Informats
An informat (input format) is the instruction that specifies how SAS reads raw data. SAS provides many informats for reading data values. The following characteristics apply to informats:
• Each informat contains a w value to indicate the width of the raw data field.
• Each informat also contains a period, which is a required delimiter.
• For some informats, the optional d value specifies the number of implied decimal places.
• Informats for reading character data always begin with the dollar sign ($).
In this task, you view the available informats for your data set.
1. In the ProductSales table, right-click on the Predicted Sales column heading and select Column Attributes.
2. In the Column Attributes window, notice that the Predict column uses the 12. informat. This is the W.D informat with a width of 12 and decimal places of 0. This informat reads standard numeric values.
3. Click the [...] selector button next to the Informat field. In the Informat window, scroll the list to see the informats that are available for reading numeric data.
4. In the Informat window, click Cancel. In the Column Attributes window, click Close.
5. In the ProductSales table, right-click on the Country column heading and select Column Attributes.

Using the Programming Workspace 19
6. In the Column Attributes window, click the [...] selector button next to the Informat field. In the Informat window, notice that the informats for reading character values begin with a dollar sign ($).
7. Scroll the list of character informats and their descriptions to see what is available.
8. Click Cancel. Then close the Column Attributes window and the VIEWTABLE window.
Now you've seen both the data and descriptor portions of the ProductSales data set. In the next section of this tutorial, you'll learn about writing SAS programs.
Creating and Running SAS Programs
Let's briefly review the basic components of a SAS program. As you learned in Chapter 1, Basic Concepts, in the SAS Certification Prep Guide: Base Programming for SAS9, a DATA step begins with the keyword DATA, and a PROC step begins with the keyword PROC. Generally, a step ends with a RUN statement or when a new DATA or PROC step begins. A RUN statement tells SAS to process all the preceding lines of the step.
In this section of the tutorial, you will write, run, and modify a SAS program that is similar to the program just shown. Each task contains a set of steps that you can perform in SAS. Because these tasks build on each other, you should complete them in sequence.

20 SAS Windowing Environment
Enter and View Text in the Editor Window
In this task, you run a program that creates a new SAS data set from an existing SAS data set and then prints a listing of the new data set.
The Mylib.ProductSales data set was created in the previous section of this tutorial, “Working with SAS Data Sets.” If you didn't create the data set, return to the task to define the library and create the data set before proceeding here.
1. If the Editor window is not displayed, select View Enhanced Editor. The initial Editor window title is Editor - Untitledn (where n is a number). When you open a file or save the contents of the Editor window to a file, the window title changes to reflect that file name. When you modify the contents of the Editor window, an asterisk is added to the title and remains in the title until you save the file again.
2. Type the following code into the Editor window: data test; set mylib.productsales; run; proc print data=test; run;
When you press the Enter key, you automatically indent the next line by the amount of space that the current line is indented. You can also indent using the Tab key.
3. Notice that when you type text into the Editor window, SAS keywords are color-coded and the program steps are separated by horizontal lines. For example, keywords for DATA and PROC steps are dark blue and bold, and keywords for statements within DATA and PROC steps are blue. Quoted text, when present, is magenta.
The DATA step creates a new SAS data set named Test. Test is a one-level name. Because no library name is specified for the Test data set, SAS uses the Work library to temporarily store the file. The Test data set is created from the ProductSales data set that you stored in your MyLib library. Notice that mylib.productsales is a two-level name. The PROC PRINT step lists all the data in the Test data set. You will view this output later.
Using the Programming Workspace 21
Use the Editor Window Features
In this task, you practice using some features of the Editor window.
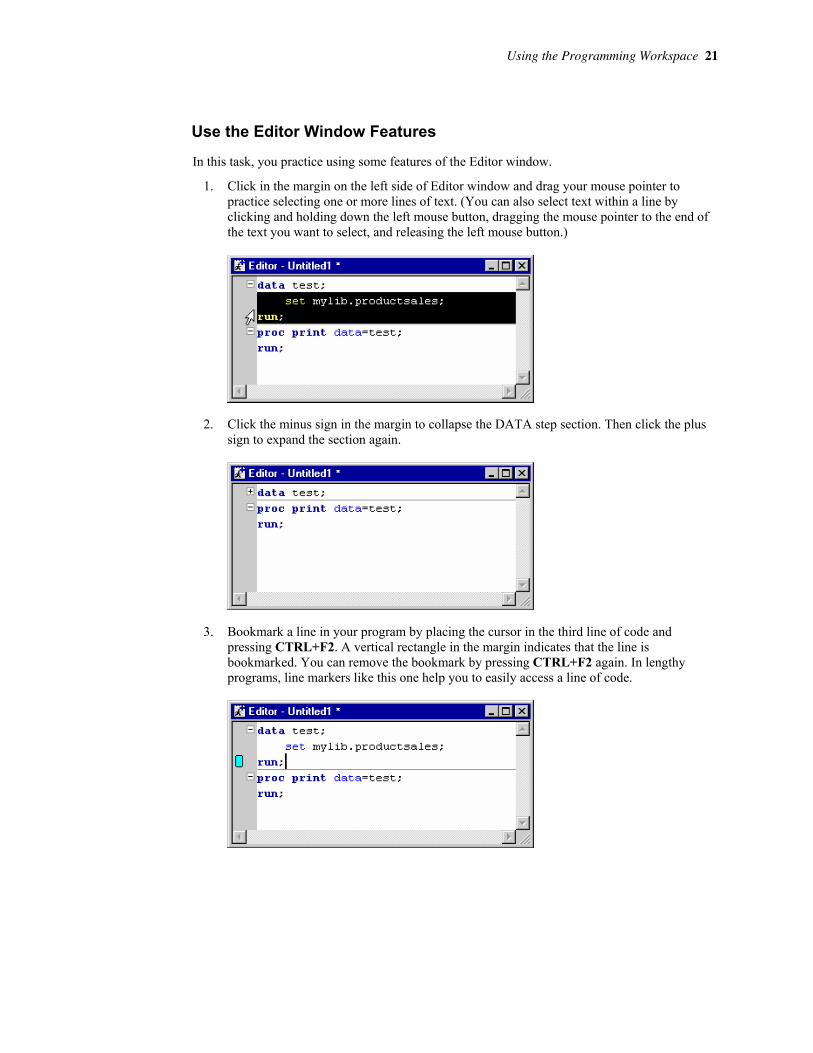
1. Click in the margin on the left side of Editor window and drag your mouse pointer to practice selecting one or more lines of text. (You can also select text within a line by clicking and holding down the left mouse button, dragging the mouse pointer to the end of the text you want to select, and releasing the left mouse button.)
2. Click the minus sign in the margin to collapse the DATA step section. Then click the plus sign to expand the section again.
3. Bookmark a line in your program by placing the cursor in the third line of code and pressing CTRL+F2. A vertical rectangle in the margin indicates that the line is bookmarked. You can remove the bookmark by pressing CTRL+F2 again. In lengthy programs, line markers like this one help you to easily access a line of code.

22 SAS Windowing Environment
4. Select Edit Find or press CTRL+F to display the Find window. To practice finding text in the Editor window, search for the word run. When searching for text in your program, you can select commonly used find options. You can also specify whether to search in the code only, in the comments only, or in both the code and comments. When you finish practicing, close the Find window.
5. To open multiple views of the same file, click the window that you want to replicate. Then, select Window New Window. Notice that the filename in the title bar is appended with a colon and a view number.
6. Try typing in the new window. Then, try bookmarking a line in the new window. Changes that you make to a file in one view, such as changing text or bookmarking a line, occur in all views simultaneously. Actions such as scroll bar movement, text selection, and expanding or contracting a section of code occur only in the active window. Remember, while you are working with multiple views, you are working with only one file, not multiple copies of the same file. When you finish practicing, close the second window.
Use Commands
Earlier in this tutorial, you practiced using pull-down menus and pop-up menus. You can also perform many tasks by typing commands, either on the command line or in the command box. In this task, you use commands to turn on line numbers and display the command line.
Use of the command line and command box are optional. See the online help for a complete list of command-line commands.

Using the Programming Workspace 23
1. To display the command line, type command in the command box and press ENTER. The command line displays in the Editor window.
2. To activate line numbers, type nums in the command box or on the command line and press Enter. The Editor window displays line numbers. Activating line numbers can make it easier for you to edit your program regardless of your operating environment.
3. The use of line numbers is optional. If you do not want to use line numbers, type nums in the command line and press Enter to turn line numbers off.
Line numbers activated by the NUMS command are temporary. To permanently display line numbers, set an Enhanced Editor option, as shown in the next task.

24 SAS Windowing Environment
Set Enhanced Editor Options
You can customize the Editor window by setting Enhanced Editor options. When you set Enhanced Editor options, the settings persist in future SAS sessions. In this task, you set an option to change the number of spaces in your tab size.
1. Activate the Editor window and select Tools Options Enhanced Editor. If the General tab is not displayed, select it. Notice the options available that are on this tab, including an option to show line numbers. Select the Show line numbers check box to display line numbers by default.
2. Type a new number in the Tab size field.
3. When you are finished, click OK.
Submit the Program and View the Output
When you submit a SAS program, SAS compiles and executes the code and returns any results to the Output window. In this task, you submit your SAS program and view the output.
1. With the Editor window active, select Run Submit.
To submit only a portion of a program in the Editor window, highlight the portion that you want to submit, right-click on the highlighted area, and select Submit Selection.

Using the Programming Workspace 25
2. The Output window automatically moves to the front of your display. Scroll the window and notice that the PRINT procedure has printed all the data from the ProductSales data set. In addition, the procedure has automatically formatted the data into rows and columns.
If SAS has previously been set up to produce HTML output, the output appears in either the Results Viewer, which is an internal SAS browser, or in your default Web browser, depending on how you set your options. You learn how to set these options later in this tutorial. If the output is displayed in a browser, you can select View Output to view the text output in the Output window.
You just submitted a program interactively using the Editor window. You can also submit SAS programs using • batch or background mode • interactive line mode • noninteractive line mode.
For more information about these methods for submitting SAS programs, consult your SAS documentation.

26 SAS Windowing Environment
View the Log
Each time a step is executed, SAS generates a log of the processing activities and the results of the processing. The SAS log collects messages about the processing of SAS programs and any errors that might occur. In this task, you view the SAS log for the program you submitted previously.
1. Click the Log window to activate it.
2. There are separate messages for the DATA and PROC steps. The messages from the DATA step tell you that SAS read 1440 observations from the ProductSales data set and that there are 1440 observations and 10 variables in the new data set Test. The messages from the PROC step tell you that 1440 observations were read during the PRINT procedure. There are no error messages.
It's important that you understand how SAS processes DATA steps (one observation at a time) and PROC steps. You should also learn methods and tips for debugging SAS programs. For details on these topics, see the SAS Certification Prep Guide: Base Programming for SAS9 and the References section at the end of this tutorial.
Use the Results Window
After you create output, the Results window opens, overlaying the Explorer window. In this task, you practice using the Results window to view the program output.
You can switch between the Explorer window and the Results window by using the tabs at the bottom of the window.
1. Look at the Results window. The Results node at the top of the window contains a folder for the output of the PRINT procedure. The folder is labeled with the procedure name and the title of the report (the default title is “The SAS System”).

Using the Programming Workspace 27
2. Click the expansion icon next to the the folder. A result icon displays. (If SAS is set up for HTML output, you will also see an HTML result icon.)
3. Double-click on Data Set WORK.TEST. The Output window scrolls to the top of the output.
Each time you run a program that creates output, the new output is appended to the last output in the Output window. You can double-click on the output item in the Results window to scroll the Output window to the top of that particular output. If you clear the Output window, the links in the Results window will be deleted.
Create HTML Output
You've seen that you can create SAS listing output in the Output window, but you can also set preferences to create HTML output. Your preferences are stored from session to session. In this task, you set HTML preferences.
1. Select Tools Options Preferences.
2. Click the Results tab.
3. Select the Create HTML check box (if the SAS session on your machine is already set up for HTML output, this check box already will be selected). By default, SAS stores HTML output in the Work folder. If you want to store the output elsewhere, deselect the Use WORK folder check box and browse to the appropriate folder.

28 SAS Windowing Environment
4. Notice that you can display results using either the Internal browser (called the Results Viewer window) or the Preferred web browser, a browser that is external to SAS and that you can specify in the Web tab of the Preferences window.
5. Click OK. When you create HTML output, the files are stored in the folder that you specify and are incrementally named sashtml.htm, sashtml1.htm, sashtml2.htm, and so on, throughout your SAS session.
Modify the Program
Now that you have seen the output and formatting for the PRINT procedure, let's try modifying the program. In this task you add options to the program to do these things:
• remove the date from the top of each page
• replace the default title “The SAS System”
• use the column label rather than the column name in the output
• remove the Obs column.
You can do this by using a SAS system option, a TITLE statement, and options on the PROC PRINT statement.

Using the Programming Workspace 29
1. To remove the date from the top of each page, use the NODATE system option. Type the following OPTIONS statement at the top of the program, above the DATA step:
options nodate;
2. To replace the default title, use the TITLE statement. Type the following line above the RUN statement for the PRINT procedure:
title “Product Sales Report“;
By including the TITLE statement in the PROC step, the title is applied to the output of the procedure.
You can use either double or single quotation marks, but make sure that they match. Otherwise, SAS will generate an error message.
3. To remove the Obs column and use column labels, use options on the PROC PRINT statement. Change the PROC PRINT statement to add the LABEL and NOOBS options. Your program should look like this.
4. Select Run Submit and view the HTML output in the Results viewer.

30 SAS Windowing Environment
Use the SAS System Options Window
In the previous task, you learned how to specify system options in a SAS program. In this task, you view the SAS System Options window. It offers an alternative method to set system options. However, you cannot store the option settings in your SAS programs as you can when you use the OPTIONS statement.
1. To view the SAS System Options window, select Tools Options System from the menu bar. Right-click on the name of any option group or subgroup, and click Find Option. The Find Option dialog box appears.
2. Type nodate, and click OK.
3. The SAS System Options window expands to the appropriate option subgroup. All subgroup options also appear.
4. Right-click on Date, and display its pop-up menu. Notice that you can change the option's value or return it to the default setting. Close the pop-up menu.
5. Click OK to exit.
Correct Syntax Errors
When working in the Editor window, you can use its color-coding for program elements, quoted strings, and comments to help you find coding errors. For example, if one or more statements in the program are magenta, check to see if you have unbalanced quotation marks, places where either the beginning or ending quotation marks are missing. For most errors, you can correct the error and resubmit your program, just as you would after making any modification to the program. In this task, you will look at a special case that requires additional steps to correct the error. When you have unbalanced quotation marks, SAS is often unable to detect the end of the statement in which the error occurs. Simply adding a quotation mark and resubmitting your program usually does not solve the problem. SAS still considers the quotation marks to be unbalanced. Therefore, you need to resolve the unbalanced quotation mark by canceling the submitted statements before you recall, correct, and resubmit the program.

Using the Programming Workspace 31
1. In the Editor window, modify your program by removing the second set of quotation marks in the TITLE statement. The program should now look like this:
options nodate; data test; set mylib.productsales; run; proc print data=test label noobs; title “Product Sales Report; run;
2. Select Run Submit. Notice that when the program is submitted, SAS is unable to resolve the PROC PRINT step, and a “PROC PRINT running” message appears at the top of the active window.
3. Press the CTRL and BREAK keys or click the the break icon on the toolbar. In the Tasking Manager dialog box, select 1. Cancel Submitted Statements, then click OK.
4. Select Y to cancel submitted statements, then click OK.

32 SAS Windowing Environment
5. Correct the error, but don't resubmit the program yet. In the next step, you will learn how to clear the Log window before resubmitting the program.
See the following table for additional suggestions about finding syntax errors using the Editor window.
To Find These Errors Perform These Tasks
Undefined or misspelled keywords In the Appearance tab of the Enhanced Editor Options dialog box, set the file elements Defined keyword, User defined keyword, and the Undefined keyword to unique color combinations.
When SAS recognizes a keyword, the keyword changes to the defined colors. You'll be able to easily spot undefined keywords by looking for the colors that you selected for undefined keywords.
Unmatched strings enclosed in quotation marks
Look for one or more lines of the program that are the same color.
Text following a quotation mark remains the same color until the string is closed with a matching quotation mark.
Unmatched comments Look for one or more lines of the program that are the same color.
Text that follows an open comment symbol ( /* ) remains the same color until the comment is closed with a closing comment symbol ( */).
Matching DO-END pairs Place the cursor within a DO-END block and press ALT+[.
The cursor moves first to the DO keyword. If one of the keywords is not found, the cursor remains as positioned.
When both of the keywords exist, pressing ALT+[ moves the cursor between the DO-END keywords.
Matching parentheses or brackets Place the cursor on either side of the parenthesis or bracket. Press CTRL+].
The cursor moves to the matching parenthesis or bracket. If one is not found, the cursor remains as positioned.
Missing semicolons ( ; ) Look for keywords that appear in non-bolded text.

Using the Programming Workspace 33
Resubmit a Revised Program
After correcting your program, you can submit it again. However, before doing so, it's a good idea to clear the messages from the Log window so that you don't confuse the old error messages with the new messages. In this task, you clear the Log window so you that can resubmit the program and view any resulting output.
1. Activate the Log window.
2. Select Edit Clear All from the menu bar.
You can use the same menu command to clear the Output and Editor windows when necessary.
3. Resubmit the program. Notice that the Results Viewer displays HTML output (this might take a moment to appear).
You can also clear the contents of a window by activating the window and then issuing the CLEAR command. Text that has been cleared from the Output and Log windows cannot be recalled. However, in the Editor window, you can select Edit Undo to redisplay the text.
View and Save the Results
In this task, you view HTML results and save them as HTML files.
1. In the Results Viewer window, scroll the HTML results of the program that you submitted in the previous task. You can change the style of the HTML output by selecting a different style on the Results tab of the Preferences window.
34 SAS Windowing Environment
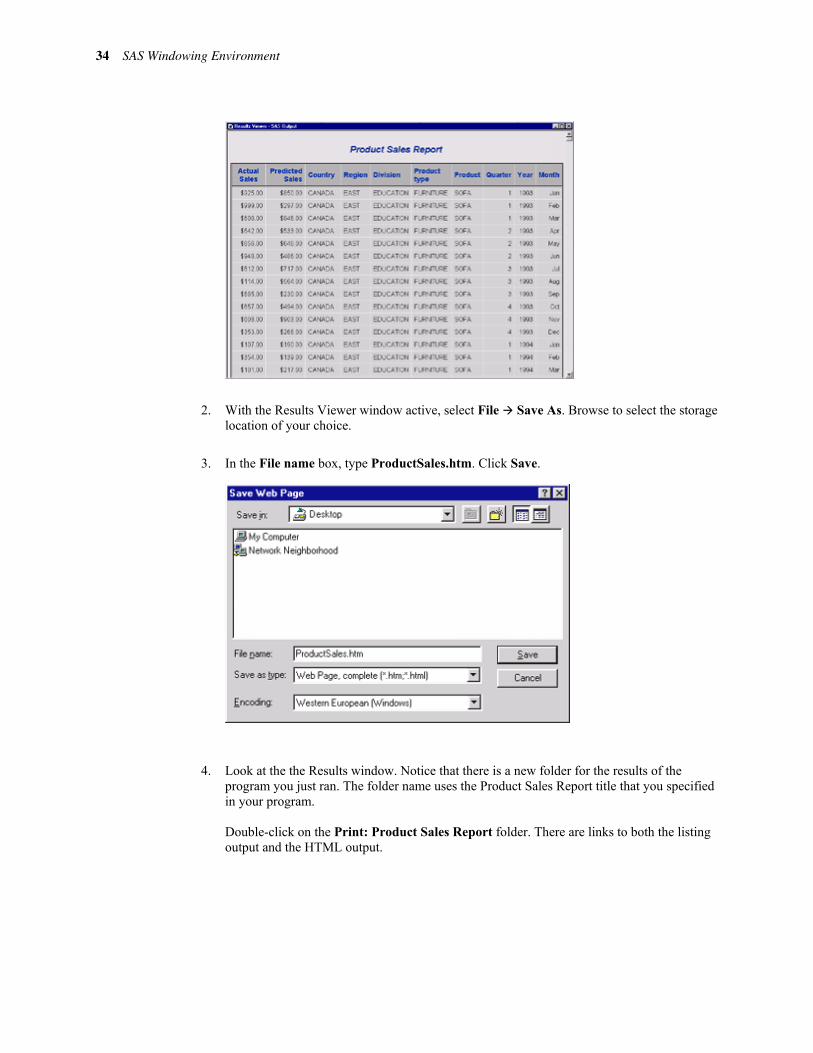
2. With the Results Viewer window active, select File Save As. Browse to select the storage location of your choice.
3. In the File name box, type ProductSales.htm. Click Save.
4. Look at the the Results window. Notice that there is a new folder for the results of the program you just ran. The folder name uses the Product Sales Report title that you specified in your program. Double-click on the Print: Product Sales Report folder. There are links to both the listing output and the HTML output.

Using the Programming Workspace 35
Save a SAS Program and Set Up a Favorite Folder
When you save your SAS programs, you can store them in a folder that's easy to access from the Explorer window. In this task, you save your SAS program to a Favorite Folder.
1. With the Editor window active, select File Save As.
2. The Save As window opens to a default folder on your system. You can browse to select a different location if desired. In the File name box, type prodsales. Click Save. The file is saved with a .sas extension, indicating that it is a SAS program.
3. In the Explorer window, double-click Favorite Folders.
4. Right-click in the Favorite Folders window and select New Favorite Folder.
5. In the New Favorite Folder window, type SAS programs in the New Favorite Folder Name text box.

36 SAS Windowing Environment
6. Click Browse. The Select window opens to the same default location where you saved the program. Verify that prodsales.sas is in the directory. Click OK to close the Select window.
7. Click OK to close the New Favorite Folder window. The SAS programs folder is added to the Favorite Folders window. This gives you a convenient way of accessing your SAS programs.

Using the Programming Workspace 37
When you want to view your program again, you can select Open from the pop-up menu for the file. You can also select Submit from the pop-up menu to execute the file directly from My Favorite Folders.
8. Close the Editor window.
Create a File Shortcut
You've seen how to save your program to a Favorite Folder. In this task, you create a file shortcut to your program. A file shortcut (or fileref) is an optional name that is used to identify an external file to SAS. File shortcuts are stored in the File Shortcuts folder in the Explorer window. You can use a file shortcut to open, browse, and submit a file.
1. In the top level of the Explorer window, open File Shortcuts.
2. Select File New. In the File Shortcut Assignment window,
o type Prodsale as the file shortcut name.
o leave DISK as the method.
o select Enable at startup so that the file shortcut is created each time you start SAS.
38 SAS Windowing Environment
If you cannot see the OK button on the File Shortcut Assignment window, reset your computer's display properties to a resolution of 1024 X 768 or higher.
3. Click Browse and select a file or type the path for the prodsales.sas program that you created in the previous task. Then click Open or OK if shown.
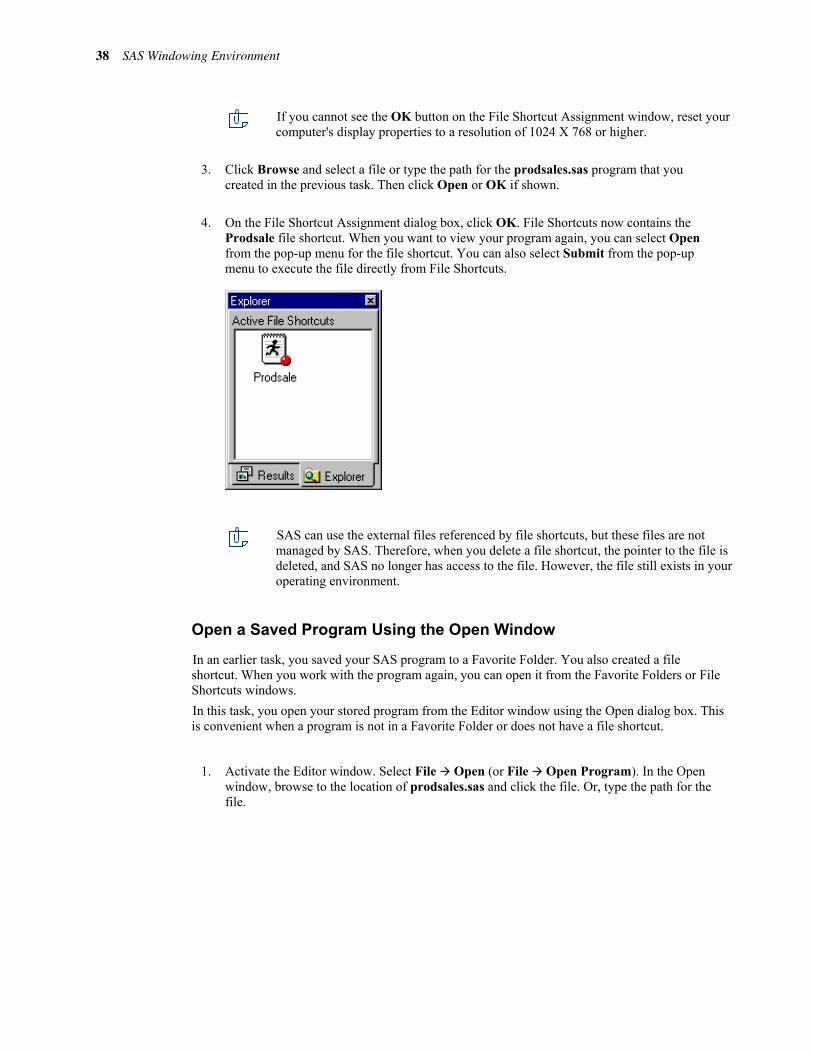
4. On the File Shortcut Assignment dialog box, click OK. File Shortcuts now contains the Prodsale file shortcut. When you want to view your program again, you can select Open from the pop-up menu for the file shortcut. You can also select Submit from the pop-up menu to execute the file directly from File Shortcuts.
SAS can use the external files referenced by file shortcuts, but these files are not managed by SAS. Therefore, when you delete a file shortcut, the pointer to the file is deleted, and SAS no longer has access to the file. However, the file still exists in your operating environment.
Open a Saved Program Using the Open Window
In an earlier task, you saved your SAS program to a Favorite Folder. You also created a file shortcut. When you work with the program again, you can open it from the Favorite Folders or File Shortcuts windows. In this task, you open your stored program from the Editor window using the Open dialog box. This is convenient when a program is not in a Favorite Folder or does not have a file shortcut.
1. Activate the Editor window. Select File Open (or File Open Program). In the Open window, browse to the location of prodsales.sas and click the file. Or, type the path for the file.

Using the Programming Workspace 39
2. Click Open or OK. The file opens in the active Editor window, with the file name in the window titlebar.
You can submit your file directly from the Open window by selecting the Submit check box before clicking Open.
Congratulations! You have learned to use the SAS windowing environment to accomplish your programming tasks. You are ready to move on to Chapter 2, Referencing Files and Setting Option, in the SAS Certification Prep Guide: Base Programming for SAS9.