v12 operating and maintenance manual for mini bubble king...
TRANSCRIPT
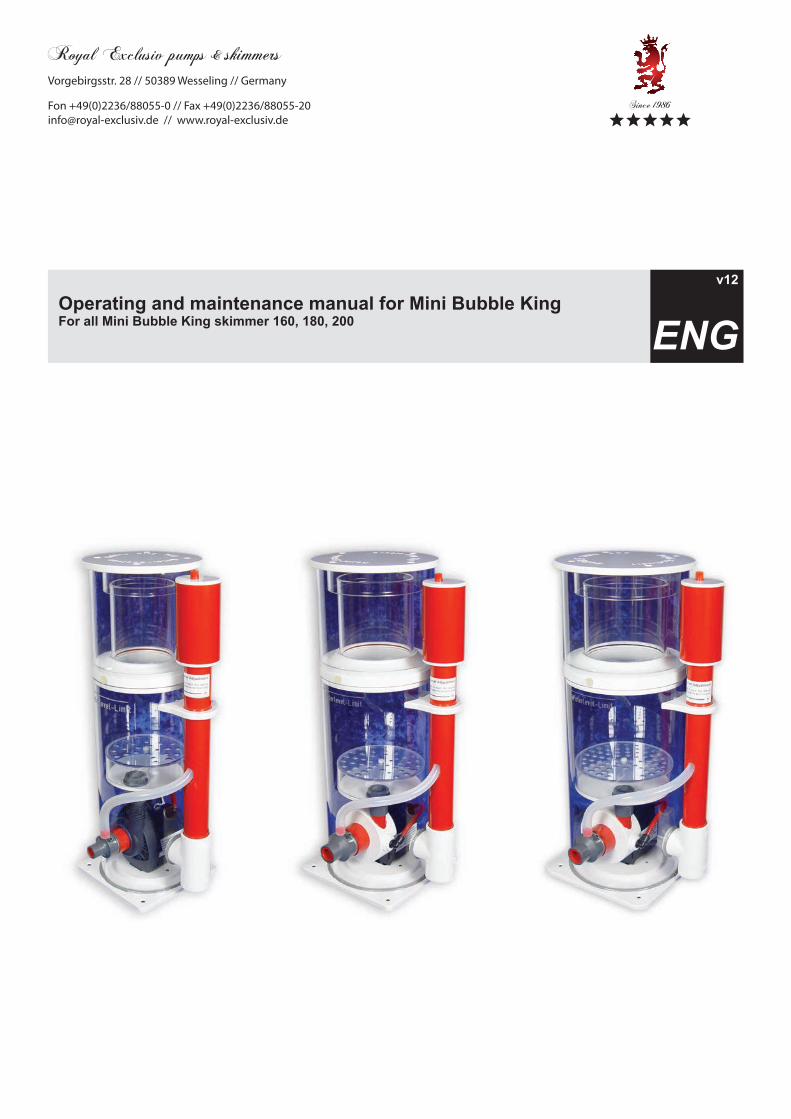
Operating and maintenance manual for Mini Bubble King For all Mini Bubble King skimmer 160, 180, 200
ENG
v12
Royal Exclusiv pumps & skimmersVorgebirgsstr. 28 // 50389 Wesseling // Germany
Fon +49(0)2236/88055-0 // Fax +49(0)2236/[email protected] // www.royal-exclusiv.de
Since 1986
For more information, please visit www.royal-exclusiv.de. Simply enter the part number or name into the search box or email: [email protected].
All information subject to change. We try our best, but printing errors reserved.
Royal Exclusiv pumps & skimmersVorgebirgsstr. 28 // 50389 Wesseling // Germany
Fon +49(0)2236/88055-0 // Fax +49(0)2236/[email protected] // www.royal-exclusiv.de
Since 1986
Operating and maintenance manual for Mini Bubble King For all Mini Bubble King skimmer 160, 180, 200
1. Installation (putting into operation) of the Mini Bubble King ....................................2
2. Maintenance ....................................3
3. Disassembling the Mini Bubble King pump ....................................5
3.1. Dismantling of the AKB(anti-lime-bypass)-hose of MBK pump
by Mini Bubble King 160 skimmer ....................................5
by Mini Bubble King 180 - 200 skimmer ....................................5
4. Cleaning and decalcifing the wheel unit ....................................6
4.1. Assembly of the rear bearing ....................................6
5. Assembly of the skimmer ....................................6
6. Resonator ....................................8
7. Possible sources of error ....................................9
8. Defects and claims for compensation, disclaimer ..................................10
9. Manufacturer’s declaration ..................................11
9.1. Manufacturer ..................................11
9.2. Informations and support ..................................11
Important NoticePlease read this manual carefully before you install the device. We recommend not to proceed the installation of the device until you read the manual. This prevents any questions and problems that might occur in installation process. As soon as you power-on the skimmer for the first time, you agree that you read and understood this manual. In doubt or if anything is unclear please contact your supplier/vendor or dealer before you start-up the skimmer.
1

For more information, please visit www.royal-exclusiv.de. Simply enter the part number or name into the search box or email: [email protected].
All information subject to change. We try our best, but printing errors reserved.
Royal Exclusiv pumps & skimmersVorgebirgsstr. 28 // 50389 Wesseling // Germany
Fon +49(0)2236/88055-0 // Fax +49(0)2236/[email protected] // www.royal-exclusiv.de
Since 1986
1. Installation (putting into operation)
Take the Mini Bubble King (MBK) out of the packa ge and check the skimmer for shipping damages. Your local dealer must be notified about any damages within 24 hours.The Mini Bubble King (MBK) is preinstalled and ready for opera-tion and may be put into the filter sump for instant operation.In order to get familiar with the device, do not install the skimmer head yet.
The lower water level of the Mini Bubble King should not be below 13 cm and should not exceed 30 cm.
The water level should ideally between 20 and 22 cm.
Plug the power cable into the corresponding socket. Please note that sub water level pumps require a ground fault circuit interrupter (FI safety switch).Furthermore we recommend a frame connector with volt-age surge protection which, in the case of a short circuit in the mains, protects the Red Dragon® (RD) pump from electric shocks which would burn the internal fuse.The motor cannot be repaired if the RD fuse blows - it must be replaced.
Shortly after the pump is put into operation, a foam cush-ion should appear, as demonstrated on the figure below.(skimmer after starting the pump 1 - 2 - 3 - 4)
Run the skimmer in this way for several hours without the skimmer head.
It takes a while for new skimmers to be able
to produce solid foam.
New skimmers may contain several substances such as grease and glue residue which prevent foam from forming.
Depending on the contamination of your aquarium water it may take from 2 minutes up to 1 week for solid foam to form. It is not possible to make an accurate prediction as to how long it will take for the skimmer to be properly run in.
Once the foam is solid enough, place the skimmer head on the skimmer post. Before installing the skimmer head make sure that the internal red o-ring is correctly placed with no ripples or similar irregularities. These may cause slight leakage.
If the foam is sufficiently solid, the water level can be ad-justed by turning the wedge shaped tube clockwise or counter-clockwise.
The small screw on the side of the wedge-shaped tube fastens the tube to its holder. The tool should only be light-ly screwed and without the use of tools.
2
1
2
43
For more information, please visit www.royal-exclusiv.de. Simply enter the part number or name into the search box or email: [email protected].
All information subject to change. We try our best, but printing errors reserved.
Royal Exclusiv pumps & skimmersVorgebirgsstr. 28 // 50389 Wesseling // Germany
Fon +49(0)2236/88055-0 // Fax +49(0)2236/[email protected] // www.royal-exclusiv.de
Since 1986
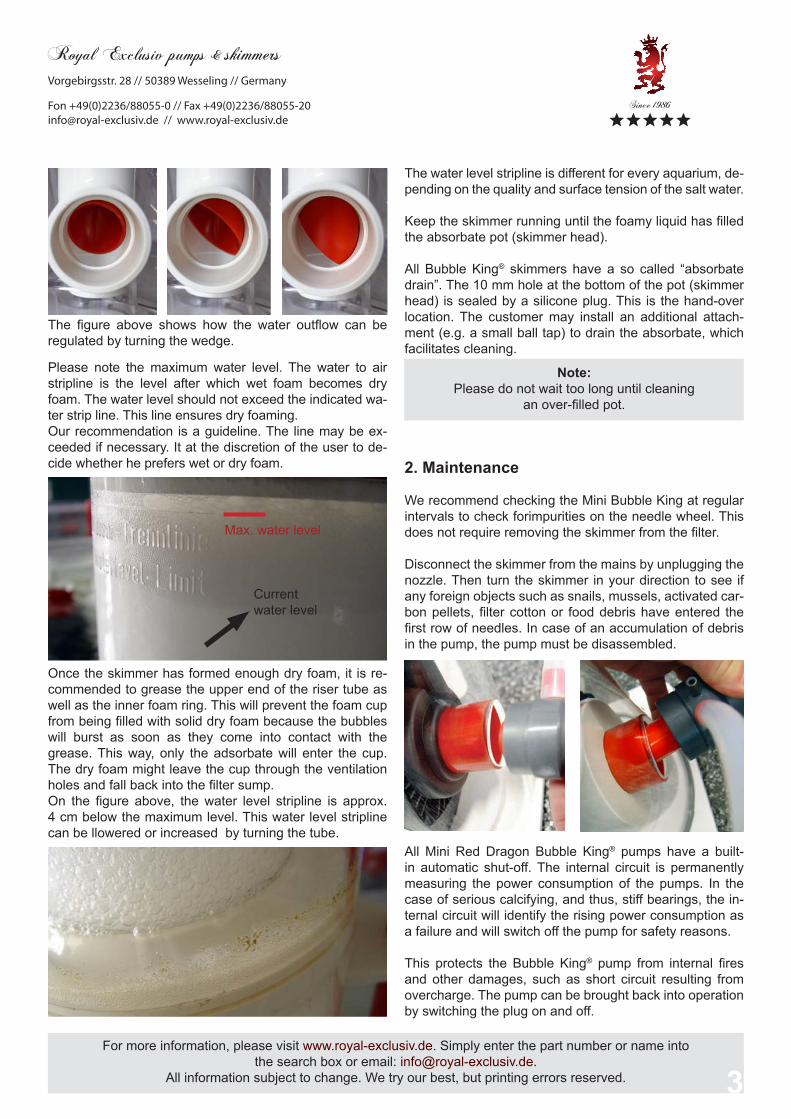
Max. water level
Current water level
The figure above shows how the water outflow can be regulated by turning the wedge.
Please note the maximum water level. The water to air stripline is the level after which wet foam becomes dry foam. The water level should not exceed the indicated wa-ter strip line. This line ensures dry foaming. Our recommendation is a guideline. The line may be ex-ceeded if necessary. It at the discretion of the user to de-cide whether he prefers wet or dry foam.
Once the skimmer has formed enough dry foam, it is re-commended to grease the upper end of the riser tube as well as the inner foam ring. This will prevent the foam cup from being filled with solid dry foam because the bubbles will burst as soon as they come into contact with the grease. This way, only the adsorbate will enter the cup. The dry foam might leave the cup through the ventilation holes and fall back into the filter sump.On the figure above, the water level stripline is approx. 4 cm below the maximum level. This water level stripline can be llowered or increased by turning the tube.
The water level stripline is different for every aquarium, de-pending on the quality and surface tension of the salt water.
Keep the skimmer running until the foamy liquid has filled the absorbate pot (skimmer head).
All Bubble King® skimmers have a so called “absorbate drain”. The 10 mm hole at the bottom of the pot (skimmer head) is sealed by a silicone plug. This is the hand-over location. The customer may install an additional attach-ment (e.g. a small ball tap) to drain the absorbate, which facilitates cleaning.
Note:Please do not wait too long until cleaning
an over-filled pot.
2. Maintenance
We recommend checking the Mini Bubble King at regular intervals to check forimpurities on the needle wheel. This does not require removing the skimmer from the filter.
Disconnect the skimmer from the mains by unplugging the nozzle. Then turn the skimmer in your direction to see if any foreign objects such as snails, mussels, activated car-bon pellets, filter cotton or food debris have entered the first row of needles. In case of an accumulation of debris in the pump, the pump must be disassembled.
All Mini Red Dragon Bubble King® pumps have a built-in auto matic shut-off. The internal circuit is permanently measu ring the power consumption of the pumps. In the case of seri ous calcifying, and thus, stiff bearings, the in-ternal circuit will identify the rising power consumption as a failure and will switch off the pump for safety reasons.
This protects the Bubble King® pump from internal fires and other damages, such as short circuit resulting from overcharge. The pump can be brought back into operation by switching the plug on and off.
3
For more information, please visit www.royal-exclusiv.de. Simply enter the part number or name into the search box or email: [email protected].
All information subject to change. We try our best, but printing errors reserved.
Royal Exclusiv pumps & skimmersVorgebirgsstr. 28 // 50389 Wesseling // Germany
Fon +49(0)2236/88055-0 // Fax +49(0)2236/[email protected] // www.royal-exclusiv.de
Since 1986
We do not advise repeatedly switching on and off to force the internal pump back into operation. If a Red Dragon pump switched itself off, there is a defect which needs to be resolved. Often, a clean is all that is required.Permanently tricking the circuit may result in severe motor damage, which is not covered by warranty.
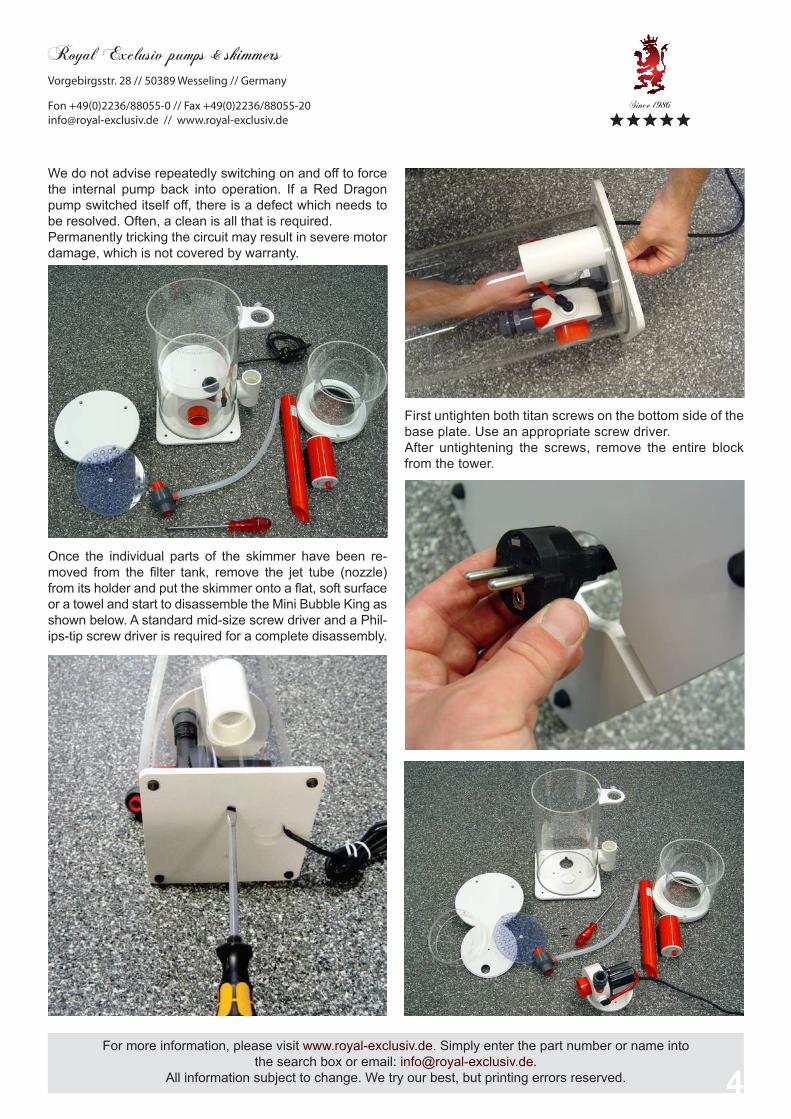
Once the individual parts of the skimmer have been re-moved from the filter tank, remove the jet tube (nozzle) from its holder and put the skimmer onto a flat, soft surface or a towel and start to disassemble the Mini Bubble King as shown below. A standard mid-size screw driver and a Phil-ips-tip screw driver is required for a complete disassembly.
First untighten both titan screws on the bottom side of the base plate. Use an appropriate screw driver. After untightening the screws, remove the entire block from the tower.
>10cm>10cm
4
For more information, please visit www.royal-exclusiv.de. Simply enter the part number or name into the search box or email: [email protected].
All information subject to change. We try our best, but printing errors reserved.
Royal Exclusiv pumps & skimmersVorgebirgsstr. 28 // 50389 Wesseling // Germany
Fon +49(0)2236/88055-0 // Fax +49(0)2236/[email protected] // www.royal-exclusiv.de
Since 1986
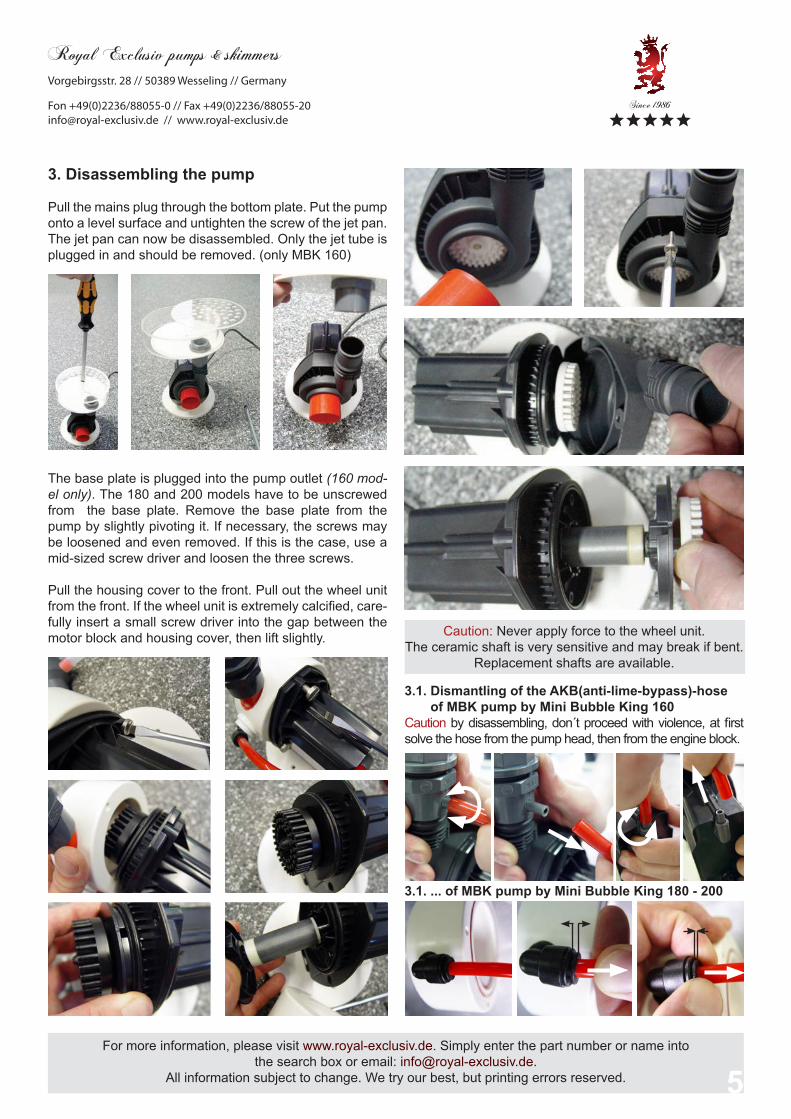
3. Disassembling the pump
Pull the mains plug through the bottom plate. Put the pump onto a level surface and untighten the screw of the jet pan.The jet pan can now be disassembled. Only the jet tube is plugged in and should be removed. (only MBK 160)
The base plate is plugged into the pump outlet (160 mod-el only). The 180 and 200 models have to be unscrewed from the base plate. Remove the base plate from the pump by slightly pivoting it. If necessary, the screws may be loosened and even removed. If this is the case, use a mid-sized screw driver and loosen the three screws.
Pull the housing cover to the front. Pull out the wheel unit from the front. If the wheel unit is extremely calcified, care-fully insert a small screw driver into the gap between the motor block and housing cover, then lift slightly. Caution: Never apply force to the wheel unit.
The ceramic shaft is very sensitive and may break if bent.Replacement shafts are available.
3.1. Dismantling of the AKB(anti-lime-bypass)-hose of MBK pump by Mini Bubble King 160Caution by disassembling, don t́ proceed with violence, at first solve the hose from the pump head, then from the engine block.
3.1. ... of MBK pump by Mini Bubble King 180 - 200
5

For more information, please visit www.royal-exclusiv.de. Simply enter the part number or name into the search box or email: [email protected].
All information subject to change. We try our best, but printing errors reserved.
Royal Exclusiv pumps & skimmersVorgebirgsstr. 28 // 50389 Wesseling // Germany
Fon +49(0)2236/88055-0 // Fax +49(0)2236/[email protected] // www.royal-exclusiv.de
Since 1986
4. Cleaning and decalcifing the wheel unit
Decalcify the wheel unit using a suitable decalcifying bath.
NEVER use hydrochloric acid even if diluted!!!
The pump could get seriously damaged. Applicable are for-mic acid, acetic acid and phosphoric acid or even house-hold decalcifiers for water conditioners and coffee ma-chines. Generally, the wheel bearing of the motor should be also decalcified. Thick, greasy residues should be re-moved under running water using a relatively hard brush.When using dealcifieers, please comply with the cor-responding safety regulations on each packaging. Wear protective clothing and safety goggles.
Important: Special attention must be paid
to the backside bearing of the wheel unit as most errors originate there.
If the bearing fits on the shaft when pulled out, as shown on the left picture above, then manually remove it from the shaft. The picture to the right shows the bearing once it has been removed from the shaft.
The bearing must never be placed loosely onto the shaft and the wheel unit then inserted into the motor block. The bearing would not fit into its slide and the pump would therefore drone heavily dur-ing operation. The bearing must be securely installed into its slide before assem-bling the wheel unit.
4.1. Assembly of the rear bearingIt is important to position the bearing correctly in its groove. The O-ring must be on top, as demonstrated in the figure.The runner should not be started if the O-ring is pointing
downwards. The whole wheel unit will be pushed forwards by approx. 2 mm. This touches the fan on the front of the cover, causing extreme noise. The bearings must not be mounted in this position.
The device can be reassembled once all the decalcified parts have been rinsed thoroughly.
5. Assembly of the skimmer
After a complete clean, reassemble the skimmer accord-ing to the followig instructions:Start by checking that the bearing sleeve of the wheel unit on the back is placed correctly. Now take hold of the wheel unit and place it in such a way that the rectangular slide points upwards. Before installing the wheel unit please assemble the O-ring seal. The left picture shows a correctly positioned O-ring. Please use silicon grease for the O-ring.
6
O-Ring in correct position O-Ring in wrong position
Once the bearing is placed on its slide, the O-ring seal must be securely attached to the groove using a mid-size screw driver.
For more information, please visit www.royal-exclusiv.de. Simply enter the part number or name into the search box or email: [email protected].
All information subject to change. We try our best, but printing errors reserved.
Royal Exclusiv pumps & skimmersVorgebirgsstr. 28 // 50389 Wesseling // Germany
Fon +49(0)2236/88055-0 // Fax +49(0)2236/[email protected] // www.royal-exclusiv.de
Since 1986
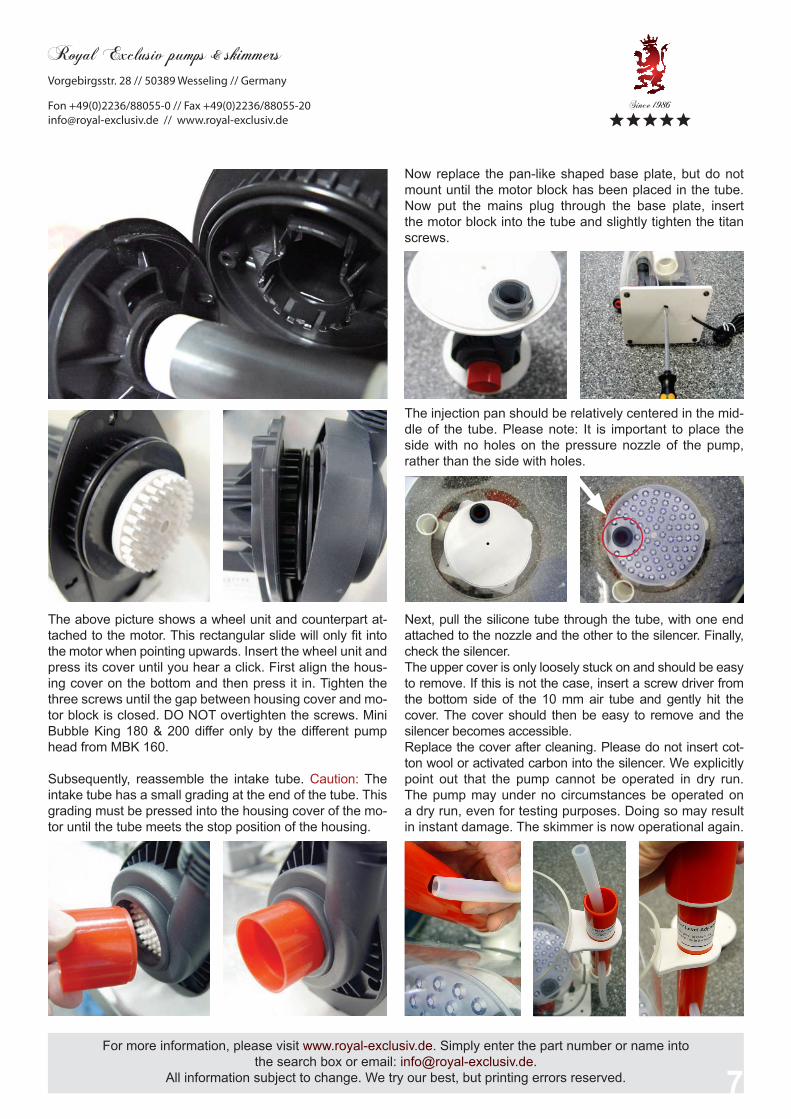
The above picture shows a wheel unit and counterpart at-tached to the motor. This rectangular slide will only fit into the motor when pointing upwards. Insert the wheel unit and press its cover until you hear a click. First align the hous-ing cover on the bottom and then press it in. Tighten the three screws until the gap between housing cover and mo-tor block is closed. DO NOT overtighten the screws. Mini Bubble King 180 & 200 differ only by the different pump head from MBK 160.
Subsequently, reassemble the intake tube. Caution: The intake tube has a small grading at the end of the tube. This grading must be pressed into the housing cover of the mo-tor until the tube meets the stop position of the housing.
Now replace the pan-like shaped base plate, but do not mount until the motor block has been placed in the tube. Now put the mains plug through the base plate, insert the motor block into the tube and slightly tighten the titan screws.
The injection pan should be relatively centered in the mid-dle of the tube. Please note: It is important to place the side with no holes on the pressure nozzle of the pump, rather than the side with holes.
Next, pull the silicone tube through the tube, with one end attached to the nozzle and the other to the si lencer. Finally, check the silencer. The upper cover is only loosely stuck on and should be easy to remove. If this is not the case, insert a screw driver from the bottom side of the 10 mm air tube and gently hit the cover. The cover should then be easy to remove and the silencer becomes accessible.Replace the cover after cleaning. Please do not insert cot-ton wool or activated carbon into the silencer. We explicitly point out that the pump cannot be operated in dry run. The pump may under no circumstances be operated on a dry run, even for testing purposes. Doing so may result in instant damage. The skimmer is now operational again.
7
For more information, please visit www.royal-exclusiv.de. Simply enter the part number or name into the search box or email: [email protected].
All information subject to change. We try our best, but printing errors reserved.
Royal Exclusiv pumps & skimmersVorgebirgsstr. 28 // 50389 Wesseling // Germany
Fon +49(0)2236/88055-0 // Fax +49(0)2236/[email protected] // www.royal-exclusiv.de
Since 1986
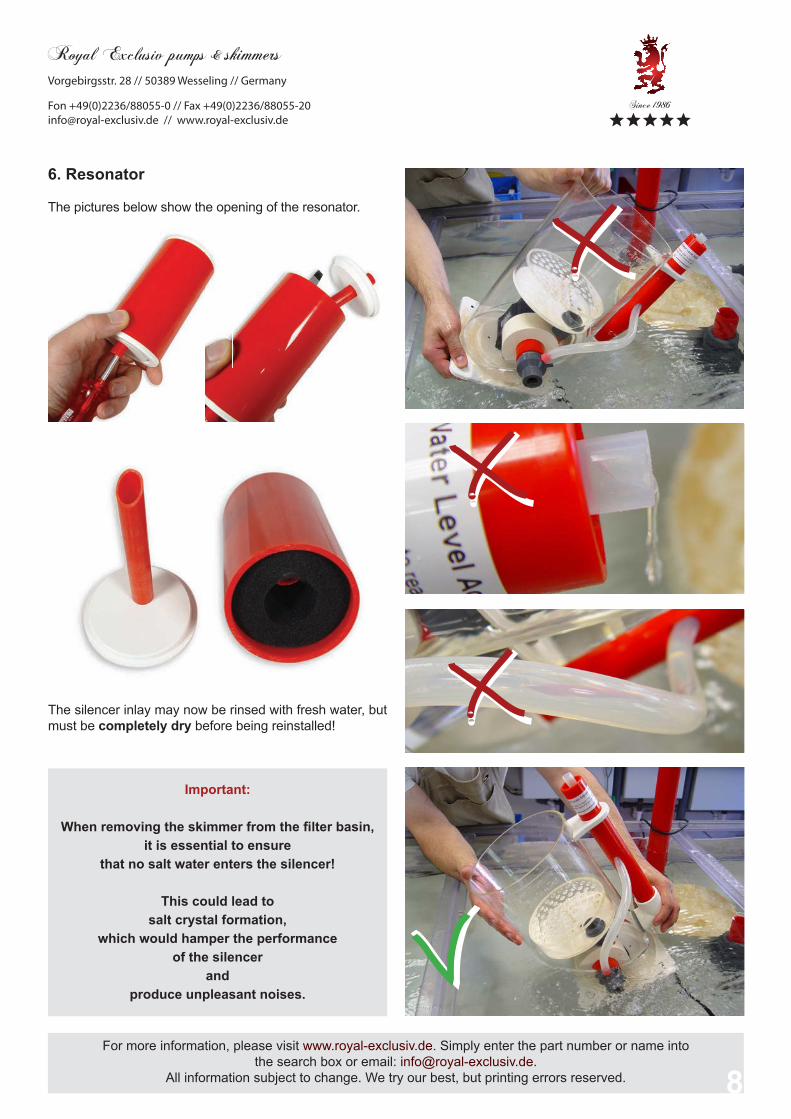
Important:
When removing the skimmer from the filter basin, it is essential to ensure
that no salt water enters the silencer!
This could lead tosalt crystal formation,
which would hamper the performance of the silencer
and produce unpleasant noises.
6. Resonator
The pictures below show the opening of the resonator.
The silencer inlay may now be rinsed with fresh water, but must be completely dry before being reinstalled!
8
For more information, please visit www.royal-exclusiv.de. Simply enter the part number or name into the search box or email: [email protected].
All information subject to change. We try our best, but printing errors reserved.
Royal Exclusiv pumps & skimmersVorgebirgsstr. 28 // 50389 Wesseling // Germany
Fon +49(0)2236/88055-0 // Fax +49(0)2236/[email protected] // www.royal-exclusiv.de
Since 1986
9
7. Possible sources of error
For optimal skimming results, please note the following information:
1. Water does not become water straight away! As a result of the different composition, the skimmer may need a few days before it starts to skim. (Particularly with new products)
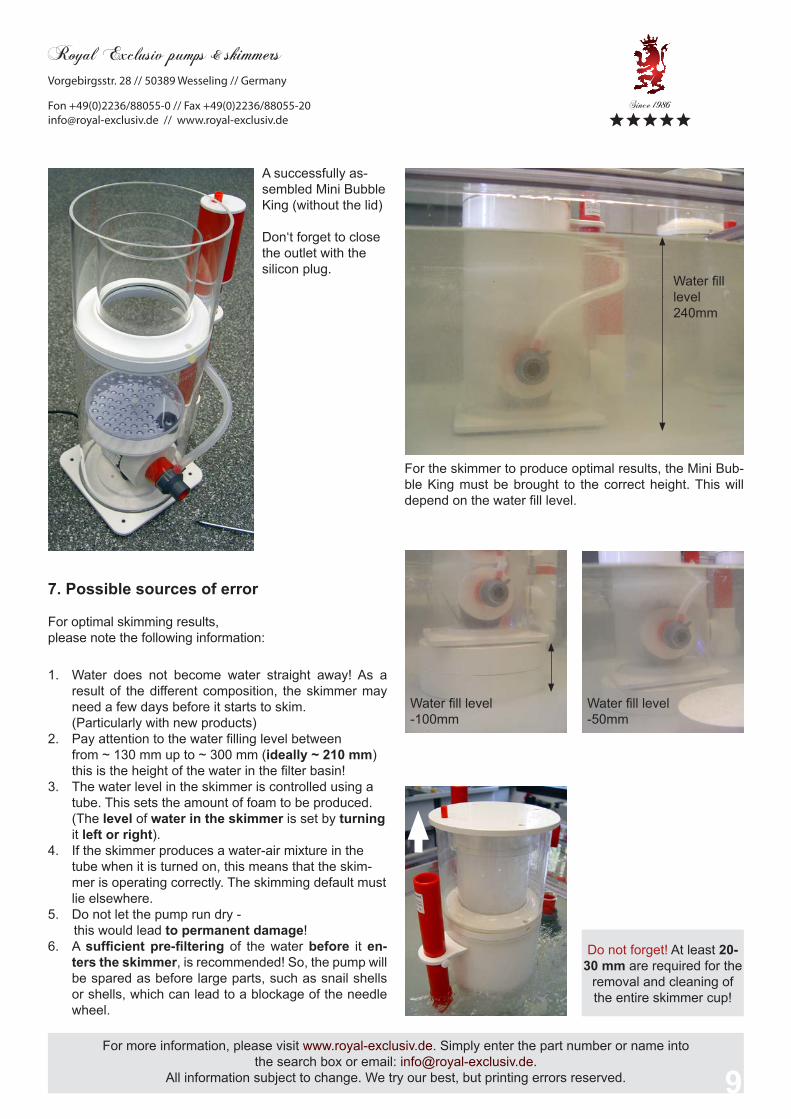
2. Pay attention to the water filling level between from ~ 130 mm up to ~ 300 mm (ideally ~ 210 mm) this is the height of the water in the filter basin!
3. The water level in the skimmer is controlled using a tube. This sets the amount of foam to be produced. (The level of water in the skimmer is set by turning it left or right).
4. If the skimmer produces a water-air mixture in the tube when it is turned on, this means that the skim-mer is operating correctly. The skimming default must lie elsewhere.
5. Do not let the pump run dry - this would lead to permanent damage!6. A sufficient pre-filtering of the water before it en-
ters the skimmer, is recommended! So, the pump will be spared as before large parts, such as snail shells or shells, which can lead to a blockage of the needle wheel.
For the skimmer to produce optimal results, the Mini Bub-ble King must be brought to the correct height. This will depend on the water fill level.
A successfully as-sembled Mini Bubble King (without the lid)
Don‘t forget to close the outlet with the silicon plug.
Water filllevel240mm
Water fill level-100mm
Water fill level -50mm
Do not forget! At least 20-
30 mm are required for the removal and cleaning of the entire skimmer cup!
For more information, please visit www.royal-exclusiv.de. Simply enter the part number or name into the search box or email: [email protected].
All information subject to change. We try our best, but printing errors reserved.
Royal Exclusiv pumps & skimmersVorgebirgsstr. 28 // 50389 Wesseling // Germany
Fon +49(0)2236/88055-0 // Fax +49(0)2236/[email protected] // www.royal-exclusiv.de
Since 1986
8. Defects and claims for compensation, disclaimer
8. Defects and claims for compensation
8.1. Barring any further claims we are only liable that the supplied goods are free of defects until the initial transfer of perils. Insignificant variations of the contracted appearance and workmanship or marginal limitation of the usability or suitability of the product are unremarkable. The warranted condition, endurance and usability the prod-uct is solely subject to the specification agreed in writing, in the product specification and / or in this manual. Further oral agreements, especially from preliminary talks, advertising and / or in related industrial standards will are only valid as integral part of a written contract. Only conditions and speci-fications assured specifically by us are valid. We do not ac-cept conditions or specifications made by third parties. Spe-cifically the specification assured in this manual are valid.
If the customer wants to use the product for other than the intended purpose, he is obliged to thoroughly the suitability of the product for the other purposes. We give no warran-ty and no liability accrues for any applications that are not agreed on by us explicitly and in written form.Any manipulation of the pump, the (needle whell) impeller or the electronic as well as any attempt to modify the soft-ware, to influence the software or to read out or re-engineer the software of the driver unit immediately causes a loss of warranty and all claims and rights expire.
Every user is held responsible for the appropriate usage of his Mini Bubble King skimmer. The user manual does not discharge you from your liability for a safe, appropriate and secure application, installation, operation and maintenance. By using this manual you agree that in no circumstances the manufacturer can or will be held liable for any personal injuries or property damages which possibly occur due to the usage of the device. This applies specifically for any damages that are due to inappropriate piping or plumbing. Insufficient or missing cleaning- or maintenance intervals and damages that might result due to these are not cov-ered by warranty. This applies especially for calcinations (salt water usage) and accumulated foreign particles (pond usage) such as sand or gravel, which lead to damages on rotors, bearings, rotor housing or motor housing, that are not covered by warranty.
8.2. Our warranty for defects is strictly limited to supplemen-tary performance. This is upon our choice either removal of defects or replacement delivery free from defects. In the case of challenge, impossibility or failure of the supplemen-tary performance the customer has the right for impairment or the right to withdraw from the contract.Additional expenses which arise because the customer has brought the sales item to another place than his subsidiary. The manufacturer explicitly limits the warranty to the pump itself. We are not reliable for consequential damages, or damages that are caused by a malfunction or failure of the skimmer, such as a loss of animals. It is in the responsibility of the customer to provide back-up devices for the case of a potential malfunction or failure of the pump. 8.3. The customer has to check the goods immediately thoroughly, also for product safety. Apparent damages have to be reported in written form immediately. Hidden damages have to be reported immediately after their dis-covery. The customer is liable to report transport damages within 24 hours to the carrier and/or the delivery service. Disregarding the rules for checking and reporting results in a loss of warranty. 8.4. Furthermore we are not liable for the consequences of inappropriate application, usage, maintenance and han-dling of the product by the customer or his subsidiaries, neither for normal abrasion. This applies specifically to the consequences of thermal, chemical, electrochemical or electrical influences as well as for infringements against our uses- and maintenance manuals. The same applies to damages which are the result of changes or adjustments by the customer which have not been approved by us in beforehand. 8.5. Our liability for wanton negligence is limited to claims of injury of life, body and health, to claims based upon the law on product liability and to claims from culpable fundamental breach of the contract which peril contractual obligations. For the rest our liabilities for wantonly negligent breach of contractual obligations, which are foreseeable at the time of the conclusion of the contract, are barred.
Damages, which are unambiguously attributed to inappro-priate usage of the product, are in general to be accounted for by the customer. In the case of returns of the product the customer has to use break-proof packaging for the product. The customer is liable for any damages that can be ac-counted to an inappropriate packaging.
10
For more information, please visit www.royal-exclusiv.de. Simply enter the part number or name into the search box or email: [email protected].
All information subject to change. We try our best, but printing errors reserved.
Royal Exclusiv pumps & skimmersVorgebirgsstr. 28 // 50389 Wesseling // Germany
Fon +49(0)2236/88055-0 // Fax +49(0)2236/[email protected] // www.royal-exclusiv.de
Since 1986
8.6. Claims against us become time-barred within a year after the initial delivery of the goods to the customer. The same applies to claims for damages regardless of their ju-ridical cause. The limitation period does not apply to claims based upon the malicious concealment of damages from the injury of life, health or body and for other damages that result out of intention or wanton negligence.
8.7. If it becomes apparent during our examination of dam-ages reported by the customer or in the course of our re-moval of defects, that the reported damages or claims were made wantonly negligent or unwarranted, we may charge an adequate consideration for our examination and for the removal of defects. The customer has the right to neglect a necessary repairing and to demand the return of the skim-mer. In general every examination of damages is bound to lump-sum compensation if it occurs that the customer has to be accounted for the damages.
8.8. Spare partsOur liability to deliver and hold spare parts available is limit-ed to the period of 5 years after initial shipment of the prod-uct. Our respective list prices apply for spare parts.
8.9. Disposal We offer our customers to take back products that fall under the restriction of hazardous substances directive (ElektroG) within Germany free of charge, for products, which were brought into circulation after the 13th of August 2005. We will take care for the disposal. If a customer chooses not to let us take care for the disposal, he takes the responsibility of a disposal according to legal regulations and discharges us from our liabilities according to §10 sect. 2 ElektroG and any associated liabilities of others.
8.10. Subject to alterationsThe manufacture has the right for changes in hardware and software of the product at any time without preliminary no-tice, as long as these changes advance reliability or quality of the skimmer. No claims can be made if for instance de-sign, functionality or performance of the skimmer changes elementary. The assured specification of the skimmer is always guaranteed.
9. Manufacturer’s declaration
Titles against Royal Exclusiv® concerning the products described in this manual adress on the Royal Exclusiv® guarantee clauses.Specification may vary due technical improvements.
9.1. Manufacturer Royal Exclusiv® pumps and skimmers
Vorgebirgsstr. 28 // 50389 Wesseling // Germany
Fon +49(0)2236/88055-0 // Fax +49(0)2236/88055-20
[email protected] // www.royal-exclusiv.de
Made in Germany
Royal-Exclusiv® EAR-number: WEE.Reg.Nr. 83082352
9.2. Informations and support Thank your for purchasing a Royal Exclusiv® Mini Bubble King protein skimmer. This protein skimmer is a high quality product made in Germany with the highest manufacturing demands on modern CNC maschines. This manual is supposed to help you to setup the protein skim-mer for use and to advice you with the necessarily mainte-nance procedures.
To ensure longlasting satisfaction with this product we please you to read this manual carefully and follow our guidelines.Royal Exclusiv® guarantees 5 years of spare part availability for the Mini Bubble King protein skimmer.
Should the device in some way not meet the high demands you expect from Royal Exclusiv® please contact the dealer where you purchases your Mini Bubble King protein skimmer. This is usually the best way for product support. However you may feel free to contact our support on our website: http://www.royal-exclusiv.de
11