v1_cp2602-l - creating a command
DESCRIPTION
autocad programmingTRANSCRIPT
Creating a Command in AutoCAD® with VB.NET or C#James E. Johnson – Synergis Software
CP2602-L This hands-on lab will show you how to create a new project in Visual Studio® and do setup for an AutoCAD® plug-in. You will learn how to add code to create a simple command and add a splash screen or other initialization code. After that we will create a command that uses a dialog to display a user selection.
Learning ObjectivesAt the end of this class, you will be able to:• Start and set up a Visual Studio project as an AutoCAD® plugin• Create custom commands to be used within AutoCAD• Create and use dialogs with custom AutoCAD® commands• Create initialization code for command line prompts, splash screen, or other initial settings required on
loading
About the SpeakerJames has worked with CAD products for more than 25 years, involved in many positions from being a CAD drafter to writing automation applications. In his current position, he is doing CAD integration for Adept document management system. In previous positions, he has used Autodesk® RealDWG® to write custom automation to create AutoCAD® drawings of industrial kitchen equipment, and has worked at Autodesk resellers in software development groups doing custom applications for Inventor® and AutoCAD®. He has taught AutoCAD® and VBA classes while working for resellers, and was a CAD instructor at two different community colleges.
Email: [email protected]

Getting Started with .NET and AutoCAD® plugin development
To get started developing AutoCAD plugins you will need to have a version of Microsoft Visual Studio installed. You can use the free versions of Visual Studio Express either VB.Net or C# depending on the language you prefer. You will need to download and install the ObjectARX SDK and should have a copy of AutoCAD installed for debugging…
Would also suggest downloading and installing the “AutoCAD_2010-2012_dotNET_Wizards” at http://usa.autodesk.com/adsk/servlet/index?siteID=123112&id=1911627, these wizards create a startup project that assists in starting a new project with debugging setup…
While at the above site there are several videos and other files that may be of interest to download.
Start and set up a Visual Studio project as an AutoCAD® plugin
The first thing we will do is to create a very simple plugin without using the AutoCAD wizard project.
1.Start Visual Studio
Use the Start menu and scroll to Microsoft Visual Studio 2010.
Then Select Microsoft Visual Studio 2010...
Or on the desktop double click the icon for Microsoft Visual Studio 2010.
Creating a Command in AutoCAD® with VB.NET or C#
2
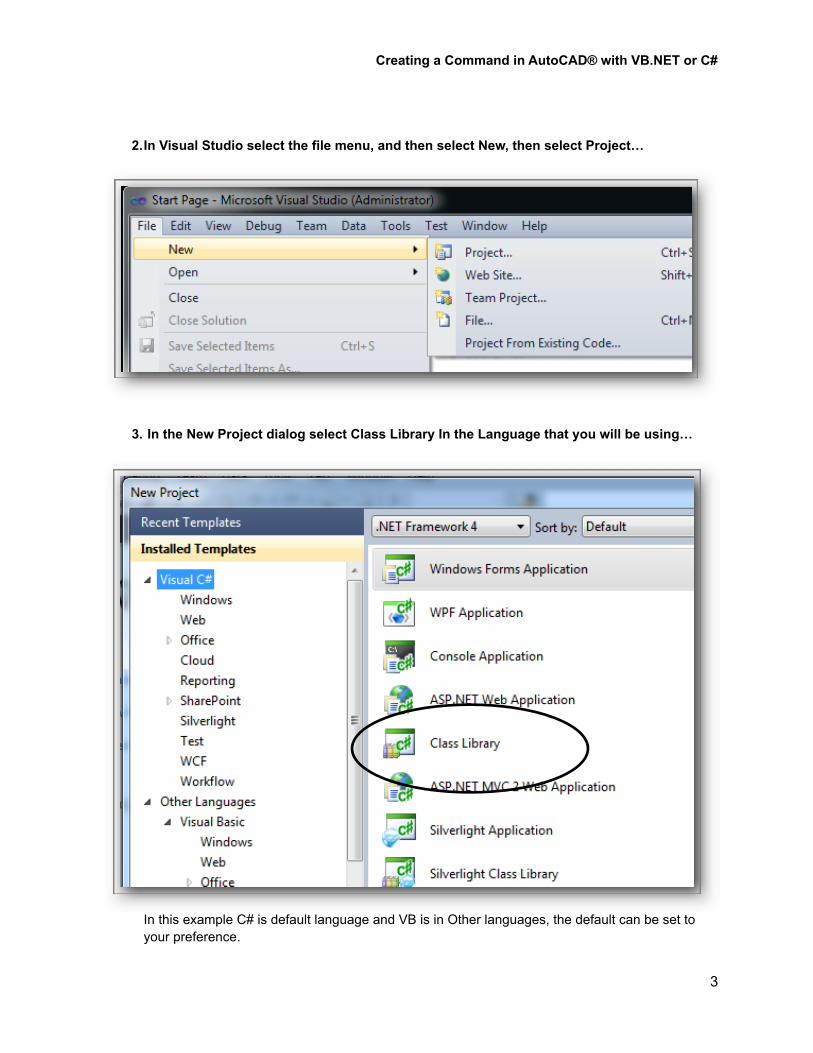
2.In Visual Studio select the file menu, and then select New, then select Project…
3. In the New Project dialog select Class Library In the Language that you will be using…
In this example C# is default language and VB is in Other languages, the default can be set to your preference.
Creating a Command in AutoCAD® with VB.NET or C#
3

4.At the Bottom of the New Project dialog enter the name of the project..
Use the Browse button on right side to browse to folder to store project.
Then select OK button on right side
We now have an empty Class Library project started…
Creating a Command in AutoCAD® with VB.NET or C#
4

The project is started with an empty class named Class1 and has just basic required references.
Creating a Command in AutoCAD® with VB.NET or C#
5
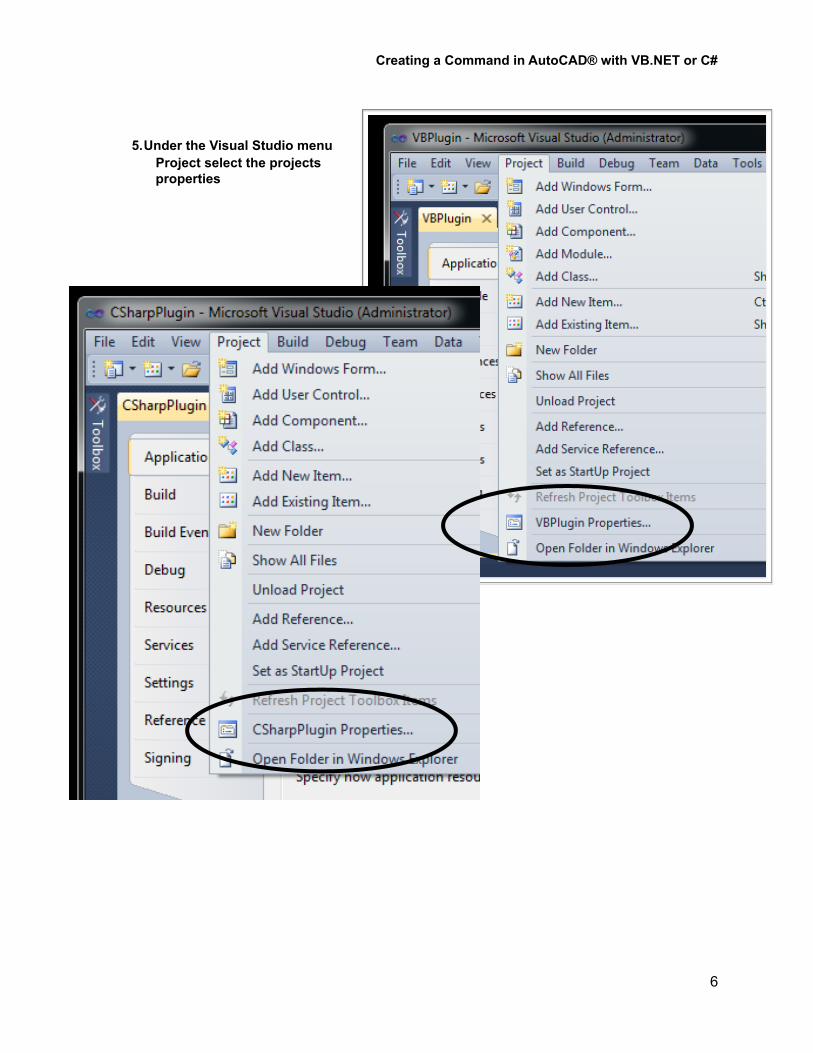
5.Under the Visual Studio menu Project select the projects properties
Creating a Command in AutoCAD® with VB.NET or C#
6
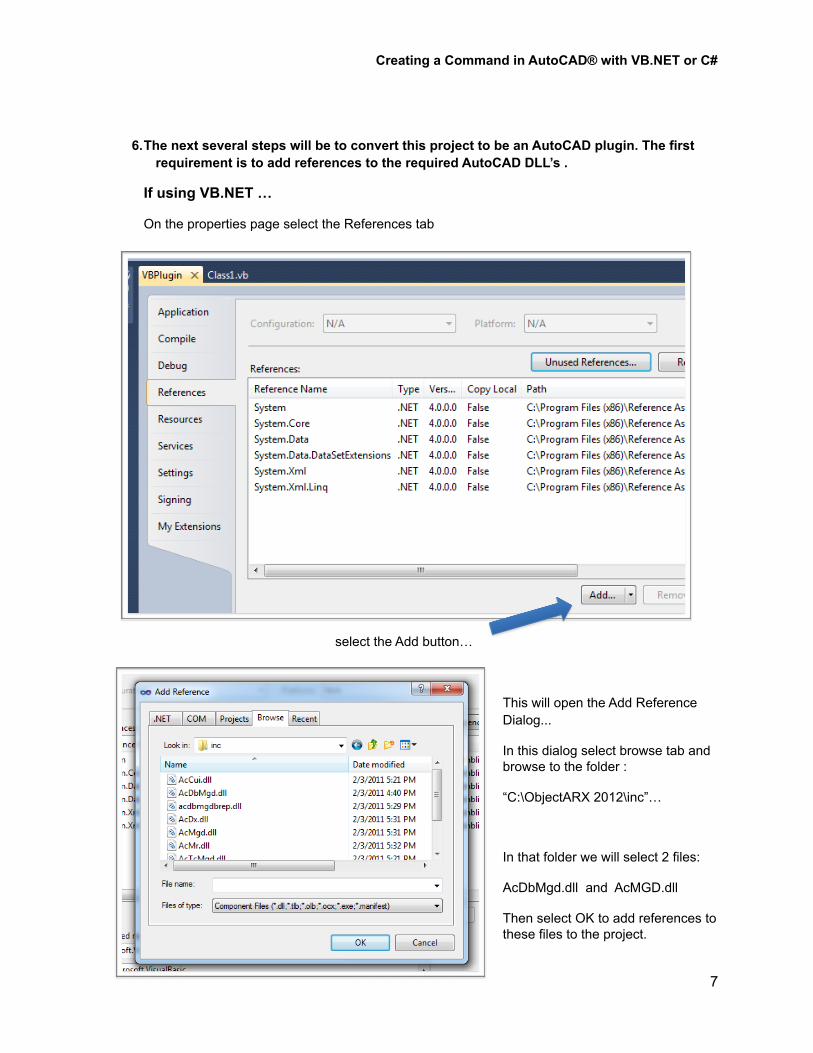
6.The next several steps will be to convert this project to be an AutoCAD plugin. The first requirement is to add references to the required AutoCAD DLL’s .
If using VB.NET …
On the properties page select the References tab
select the Add button…
This will open the Add Reference Dialog...
In this dialog select browse tab and browse to the folder :
“C:\ObjectARX 2012\inc”…
In that folder we will select 2 files:
AcDbMgd.dll and AcMGD.dll
Then select OK to add references to these files to the project.
Creating a Command in AutoCAD® with VB.NET or C#
7

If Using C#...
In C# the easiest way to add references is in the Solution Explorer
Right-click on the Project and select Add Reference.
This opens the Add Reference dialog and you will browse to the ObjectARX 2012 folder the same as above in the VB instructions.
7.After adding the References to the AcDbMgd.dll and the AcMgd.dll we need to adjust the setting for the DLL to be copied local…
In the properties window Select the property Copy Local and set it to False for both the AcDbMgd.dll and the AcMgd.dll…
Now it is time to start adding code...
Creating a Command in AutoCAD® with VB.NET or C#
8

8.The next step is to add Imports (VB) and using (C#) statements to add references to the namespaces we will be using…
….In Vb.Net use ‘Imports’
In C# use ‘using’……………
9. Add a CommandClassAttibute definition
Adding the CommandClassAttribute definition is considered Optional…
Creating a Command in AutoCAD® with VB.NET or C#
9
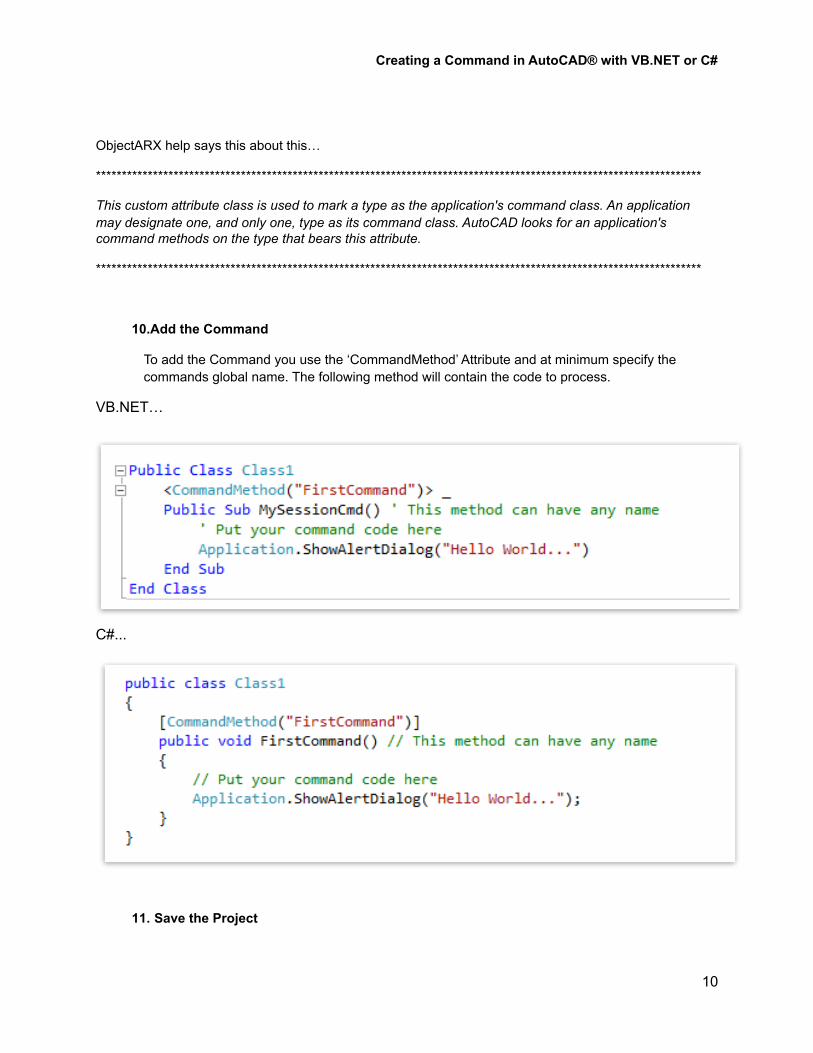
ObjectARX help says this about this…
*********************************************************************************************************************
This custom attribute class is used to mark a type as the application's command class. An application may designate one, and only one, type as its command class. AutoCAD looks for an application's command methods on the type that bears this attribute.
*********************************************************************************************************************
10.Add the Command
To add the Command you use the ‘CommandMethod’ Attribute and at minimum specify the commands global name. The following method will contain the code to process.
VB.NET…
C#...
11. Save the Project
Creating a Command in AutoCAD® with VB.NET or C#
10

12.The project now needs to be built…
Right-click on the project
In the Solution Explorer…
…….Select Build
13.To test the command Start a Session of AutoCAD
14.At AutoCAD Command line type the Command ‘Netload’
15.Browse to the location of the project and select the compiled DLL
16.Issue the command (our example is FirstCommand)
Creating a Command in AutoCAD® with VB.NET or C#
11
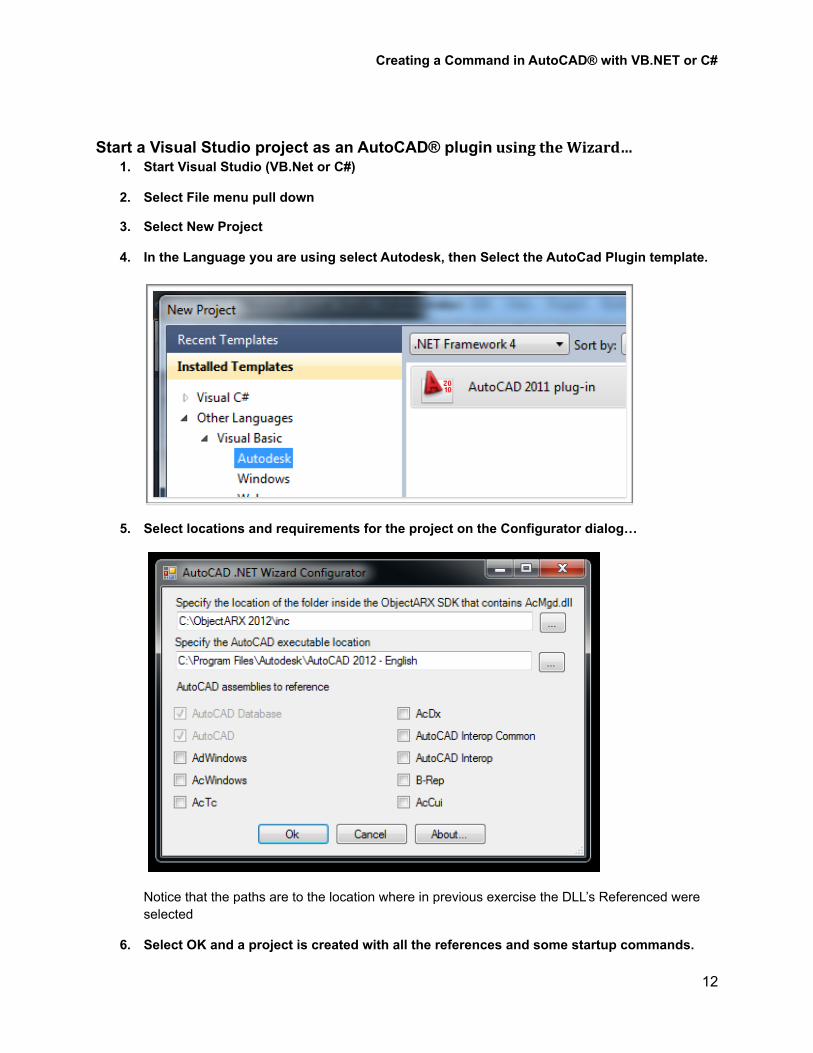
Start a Visual Studio project as an AutoCAD® plugin using the Wizard…1. Start Visual Studio (VB.Net or C#)
2. Select File menu pull down
3. Select New Project
4. In the Language you are using select Autodesk, then Select the AutoCad Plugin template.
5. Select locations and requirements for the project on the Configurator dialog…
Notice that the paths are to the location where in previous exercise the DLL’s Referenced were selected
6. Select OK and a project is created with all the references and some startup commands.
Creating a Command in AutoCAD® with VB.NET or C#
12
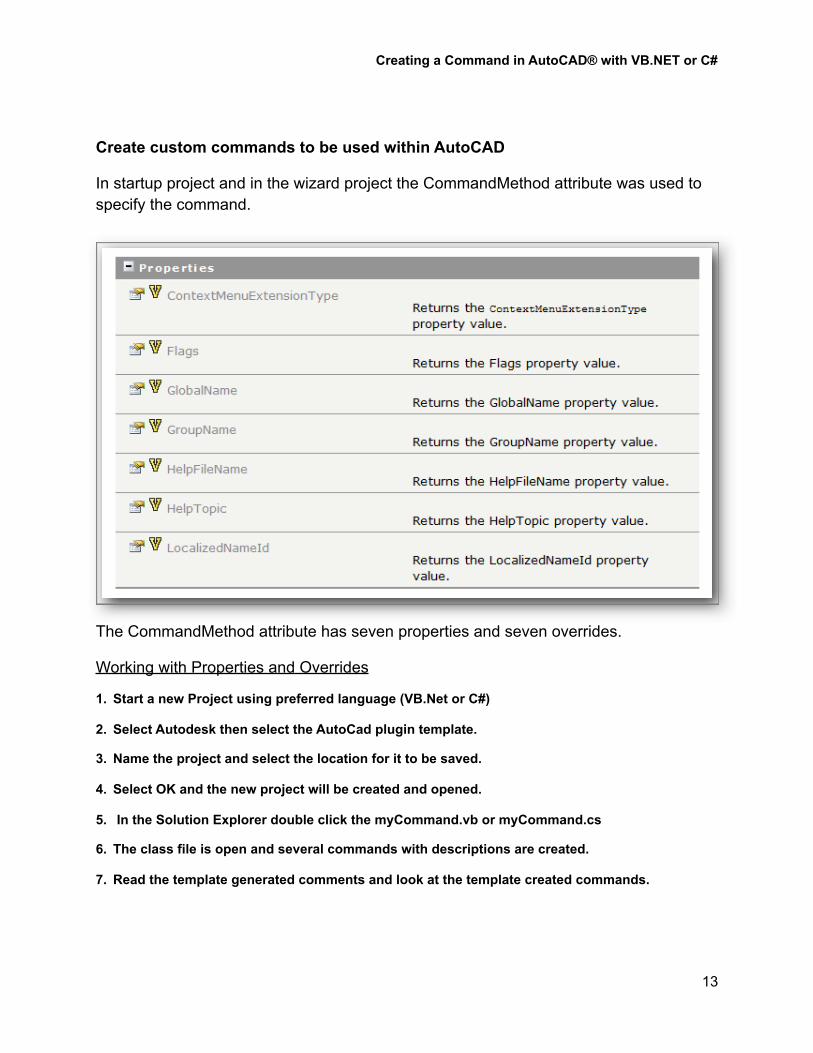
Create custom commands to be used within AutoCAD
In startup project and in the wizard project the CommandMethod attribute was used to specify the command.
The CommandMethod attribute has seven properties and seven overrides.
Working with Properties and Overrides
1. Start a new Project using preferred language (VB.Net or C#)
2. Select Autodesk then select the AutoCad plugin template.
3. Name the project and select the location for it to be saved.
4. Select OK and the new project will be created and opened.
5. In the Solution Explorer double click the myCommand.vb or myCommand.cs
6. The class file is open and several commands with descriptions are created.
7. Read the template generated comments and look at the template created commands.
Creating a Command in AutoCAD® with VB.NET or C#
13
8. Create a new Simple Command:
VB
<CommandMethod("FirstCommand")> _ Public Sub fCommand() ' This method can have any name ' Put your command code here Dim doc As Document = Application.DocumentManager.MdiActiveDocument Dim db As Database = doc.Database Dim ed As Editor = doc.Editor
ed.WriteMessage("Writing message to he command line...\n")
End Sub
C#
// Command only [CommandMethod("FirstCommand")] public void fCommand() // This method can have any name { // Put your command code here Document doc = Application.DocumentManager.MdiActiveDocument; Database db = doc.Database; Editor ed = doc.Editor;
ed.WriteMessage("Writing message to he command line...\n"); }
9. Create a command using flags
a. Open the arxmgd.chm ObjectArx help file in C:\Objectarx 2012\docs
b. Search on commandflags
c. this lists the available command flags
d. add command flag to command:
VB: <CommandMethod("FirstCommand", CommandFlags.Modal)> _
C#: [CommandMethod("FirstCommand", CommandFlags.Modal)]
10.Add a global name to the command created above and test in AutoCAD
VB: <CommandMethod("FirstCommand", "_FirstCommand", CommandFlags.Modal)> _
C#: [CommandMethod("FirstCommand","_FirstCommand", CommandFlags.Modal)]
Creating a Command in AutoCAD® with VB.NET or C#
14

Create and use dialogs with custom AutoCAD® commands
1. In Solution Explorer right-click on project.a. select Add on the context menub. select New Item
c. select Windows Form and name the form in text box
d. This creates the form, now use toolbox and add a button
e. After adding modify properties in properties window.f. double click on the button and a new method will be created... in the method type :
VB: close() C#: close();
2. In solution explorer double click on the myCommand class
Creating a Command in AutoCAD® with VB.NET or C#
15

3. With myCommand class opened, now add a new command:
VB: <CommandMethod("FormShow", "_FormShow", CommandFlags.Modal)> _ Public Sub frmShow() Dim doc As Document = Application.DocumentManager.MdiActiveDocument Dim frm As New Form1 Application.ShowModalDialog(Application.MainWindow.Handle, frm) End Sub
C#: [CommandMethod("FormShow", "_FormShow", CommandFlags.Modal)] public void frmShow() { Document doc = Application.DocumentManager.MdiActiveDocument; Form1 frm = new Form1(); Application.ShowModalDialog(Application.MainWindow.Handle, frm); }
4. Build and debug
5. The previous command created a Modal dialog, change the command to: Application.ShowModelessDialog(Application.MainWindow.Handle, frm)
6. Set the startup position of the form: frm.StartPosition = System.Windows.Forms.FormStartPosition.CenterParent
Creating a Command in AutoCAD® with VB.NET or C#
16
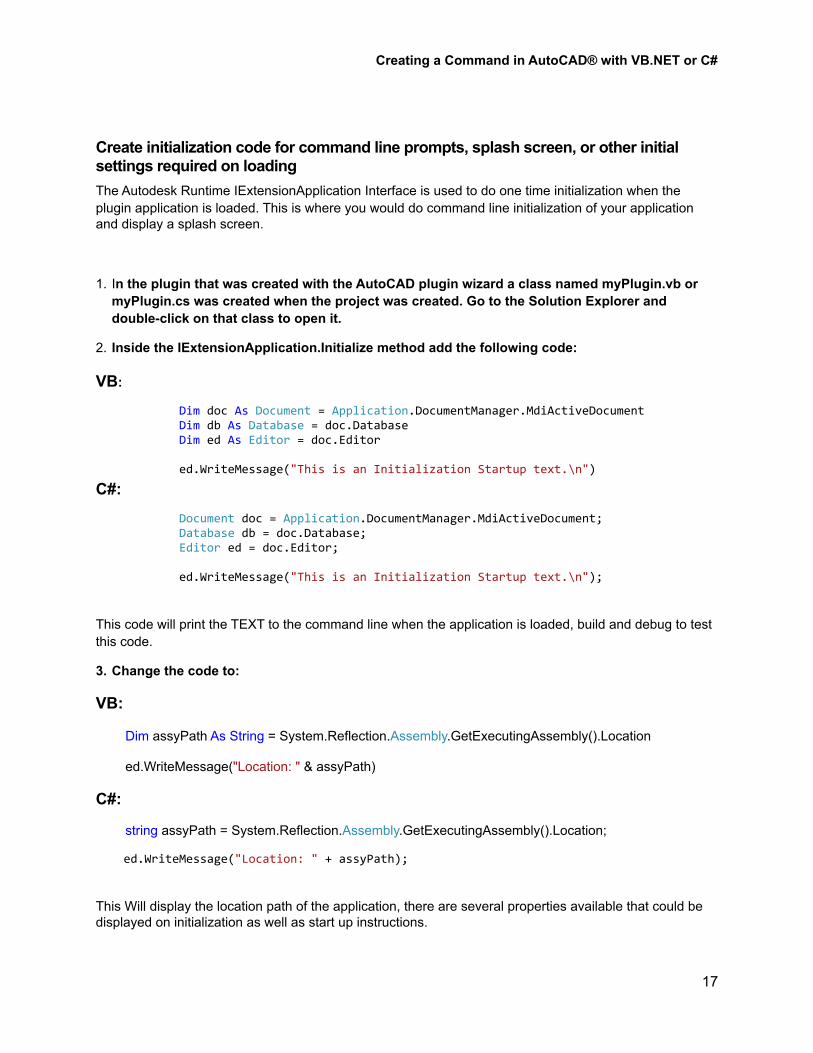
Create initialization code for command line prompts, splash screen, or other initial settings required on loadingThe Autodesk Runtime IExtensionApplication Interface is used to do one time initialization when the plugin application is loaded. This is where you would do command line initialization of your application and display a splash screen.
1. In the plugin that was created with the AutoCAD plugin wizard a class named myPlugin.vb or myPlugin.cs was created when the project was created. Go to the Solution Explorer and double-click on that class to open it.
2. Inside the IExtensionApplication.Initialize method add the following code:
VB:
Dim doc As Document = Application.DocumentManager.MdiActiveDocument Dim db As Database = doc.Database Dim ed As Editor = doc.Editor
ed.WriteMessage("This is an Initialization Startup text.\n")
C#:
Document doc = Application.DocumentManager.MdiActiveDocument; Database db = doc.Database; Editor ed = doc.Editor;
ed.WriteMessage("This is an Initialization Startup text.\n");
This code will print the TEXT to the command line when the application is loaded, build and debug to test this code.
3. Change the code to:
VB:
Dim assyPath As String = System.Reflection.Assembly.GetExecutingAssembly().Location
ed.WriteMessage("Location: " & assyPath)
C#:
string assyPath = System.Reflection.Assembly.GetExecutingAssembly().Location;
ed.WriteMessage("Location: " + assyPath);
This Will display the location path of the application, there are several properties available that could be displayed on initialization as well as start up instructions.
Creating a Command in AutoCAD® with VB.NET or C#
17

4. To create a Splash screen we Add a new form like we did above for displaying a dialog.
5. In Solution Explorer right-click on the project
a. select Add on the context menub. select New Item
c. select Windows Form and name the form in text box
6. A new form is created that we will use for the splash screen. In the new forms properties change the border style to NONE.
This will turn off the title and all of the buttons, leaving an empty container.
7.Set the BackGround image in properties to an image.
Creating a Command in AutoCAD® with VB.NET or C#
18

8. Add the following code to in the IExtensionApplication.Initialize method of the myPlugin class:
VB:
Dim ss As New splash() ss.StartPosition = System.Windows.Forms.FormStartPosition.CenterScreen ss.TopMost = True ss.Opacity = 0.8 Application.ShowModelessDialog(Application.MainWindow.Handle, ss, False) System.Threading.Thread.Sleep(3000) ss.Close()
C#:
splash ss = new splash(); ss.StartPosition = System.Windows.Forms.FormStartPosition.CenterScreen; ss.TopMost = true; ss.Opacity = 0.8; Application.ShowModelessDialog(Application.MainWindow.Handle, ss, false); System.Threading.Thread.Sleep(3000); ss.Close();
This will display the splash screen in the center of the screen for a few seconds when the Application is loaded.
Creating a Command in AutoCAD® with VB.NET or C#
19

The LispFunction attribute allows adding methods in your plugin application that can be used as AutoLisp functions. There is a sample method in the myCommand class in the project created with the wizard. Take a look at that and experiment with various settings.
Thanks for Attending...
Creating a Command in AutoCAD® with VB.NET or C#
20