v4805 v1205 uk - black+deckerservice.blackanddecker.fr/.../eu/docs//docpdf/v4805_uk.pdf ·...
TRANSCRIPT
1
ww
w.b
lackandd
ecker.co.uk
1 2 3
5
4
6
1 2 3
4
6
1 2 3
4
6

2
2
3
1
1
A
C
E
8
7
B
D
F
5 9
3
13
14
9
10
3
9
10
G
I
K
H
J
L
12 11

4
17
15
16M N
5
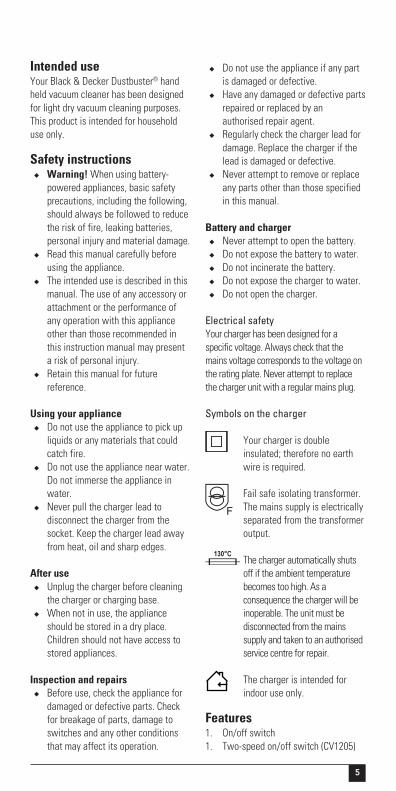
Intended useYour Black & Decker Dustbuster® handheld vacuum cleaner has been designedfor light dry vacuum cleaning purposes.This product is intended for householduse only.
Safety instructions◆ Warning! When using battery-
powered appliances, basic safetyprecautions, including the following,should always be followed to reducethe risk of fire, leaking batteries,personal injury and material damage.
◆ Read this manual carefully beforeusing the appliance.
◆ The intended use is described in thismanual. The use of any accessory orattachment or the performance ofany operation with this applianceother than those recommended inthis instruction manual may presenta risk of personal injury.
◆ Retain this manual for futurereference.
Using your appliance◆ Do not use the appliance to pick up
liquids or any materials that couldcatch fire.
◆ Do not use the appliance near water.Do not immerse the appliance inwater.
◆ Never pull the charger lead todisconnect the charger from thesocket. Keep the charger lead awayfrom heat, oil and sharp edges.
After use◆ Unplug the charger before cleaning
the charger or charging base.◆ When not in use, the appliance
should be stored in a dry place.Children should not have access tostored appliances.
Inspection and repairs◆ Before use, check the appliance for
damaged or defective parts. Checkfor breakage of parts, damage toswitches and any other conditionsthat may affect its operation.
◆ Do not use the appliance if any partis damaged or defective.
◆ Have any damaged or defective partsrepaired or replaced by anauthorised repair agent.
◆ Regularly check the charger lead fordamage. Replace the charger if thelead is damaged or defective.
◆ Never attempt to remove or replaceany parts other than those specifiedin this manual.
Battery and charger◆ Never attempt to open the battery.◆ Do not expose the battery to water.◆ Do not incinerate the battery.◆ Do not expose the charger to water.◆ Do not open the charger.
Electrical safetyYour charger has been designed for aspecific voltage. Always check that themains voltage corresponds to the voltage onthe rating plate. Never attempt to replacethe charger unit with a regular mains plug.
Symbols on the charger
Your charger is doubleinsulated; therefore no earthwire is required.
Fail safe isolating transformer.The mains supply is electricallyseparated from the transformeroutput.
The charger automatically shutsoff if the ambient temperaturebecomes too high. As aconsequence the charger will beinoperable. The unit must bedisconnected from the mainssupply and taken to an authorisedservice centre for repair.
The charger is intended forindoor use only.
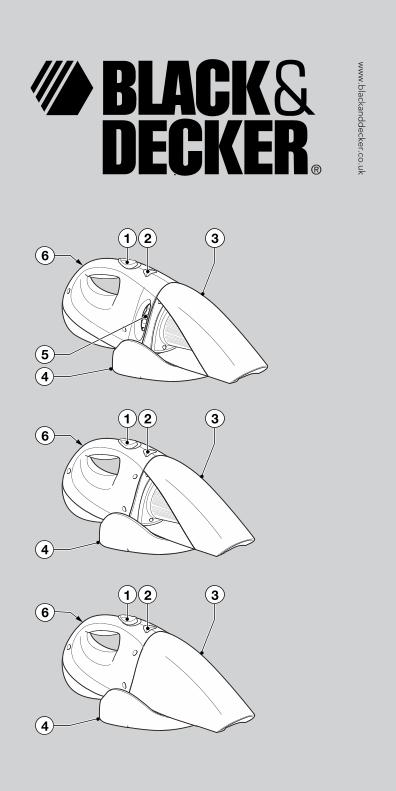
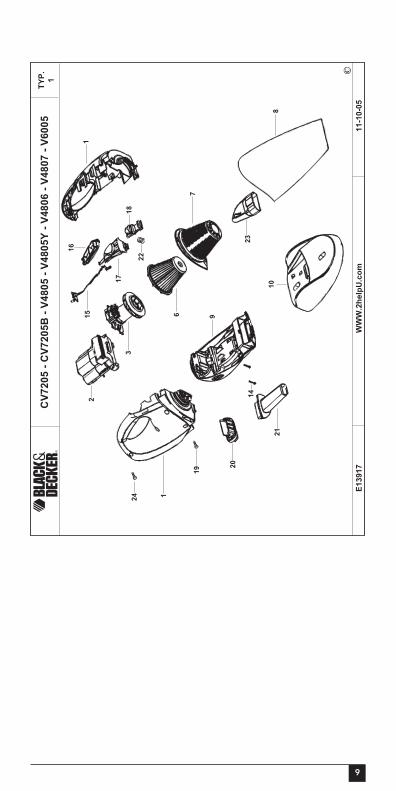
Features1. On/off switch1. Two-speed on/off switch (CV1205)

6
2. Release button3. Dust bowl4. Charging base5. Filter cleaning wheel (CV9605/CV1205)6. Charging indicator
Fig. A7. Crevice tool8. Brush tool
Installation
Fitting the charging base to the wall(fig. B)The charging base can be placed on aworktop or fitted to the wall to provide aconvenient storage and charging point forthe appliance.
Assembly
Fitting the accessories (fig. A & C)These models are supplied with thefollowing accessories:- a crevice tool (7) for confined spaces- a brush tool (8) for furniture and stairs
To fit an accessory, proceed as follows:◆ Take the accessories from the
appliance.◆ Insert the appropriate accessory into
the front of the appliance.
Use◆ Before first use, the battery must be
charged for at least 16 hours.◆ Place the appliance on the charging
base whenever it is not in use.
Charging the battery (fig. B)◆ Make sure that the appliance is
switched off. The battery will not becharged with the on/off switch in theon position.
◆ Place the appliance on the chargingbase as shown.
◆ Plug in the charger. Switch on at themains.
The charging indicator (6) will be lit.◆ Leave the appliance to charge for at
least 16 hours.
Whilst charging, the charger may becomewarm. This is normal and does notindicate a problem. The appliance can beleft connected to the charger indefinitely.The charging indicator will be lit as longas the appliance is connected to theplugged-in charger.
Warning! Do not charge the battery atambient temperatures below 4 °C orabove 40 °C.
Switching on and off (fig. D)◆ To switch the appliance on, slide the
on/off switch (1) forward.◆ To switch the appliance off, slide the
on/off switch back.
CV9605/CV1205 - Optimising thesuction force (fig. E)In order to keep the suction forceoptimised, the filter must be clearedregularly during use.
◆ Rotate the wheel (5) a few turns toshake out dust clogging the filter (9).
Cleaning and maintenanceWarning! Regularly clean the filters.
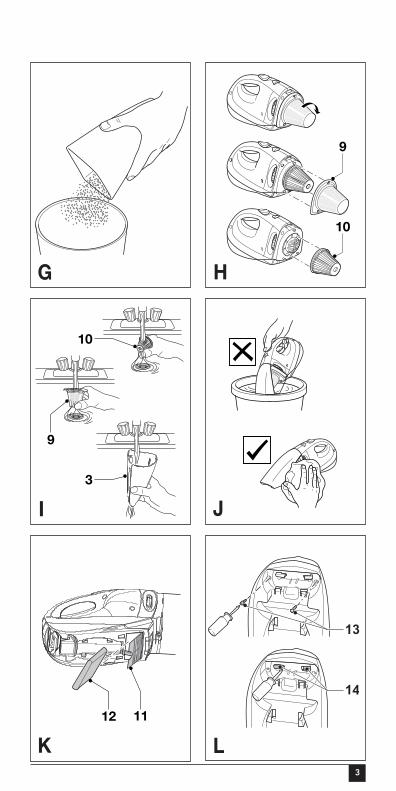
Cleaning the dust bowl and filters(fig. F - I)The filters are re-usable and should becleaned regularly.
◆ Press the release button (2) andremove the dust bowl (3) (fig. F).
◆ Empty the dust bowl (fig. G).◆ Remove the filters (9 & 10) by
twisting them clockwise (fig. H).◆ Brush any loose dust off the filters.◆ Wash the filters in warm, soapy
water (fig. I). The bowl can also bewashed if necessary. Do not immersethe appliance in water (fig. J).
◆ Make sure the dust bowl and filtersare dry.
◆ Refit the filters (9 & 10) onto theappliance, twisting themcounterclockwise until they lock intoplace.
◆ Refit the dust bowl onto theappliance. Make sure the dust bowlclicks into place.
7
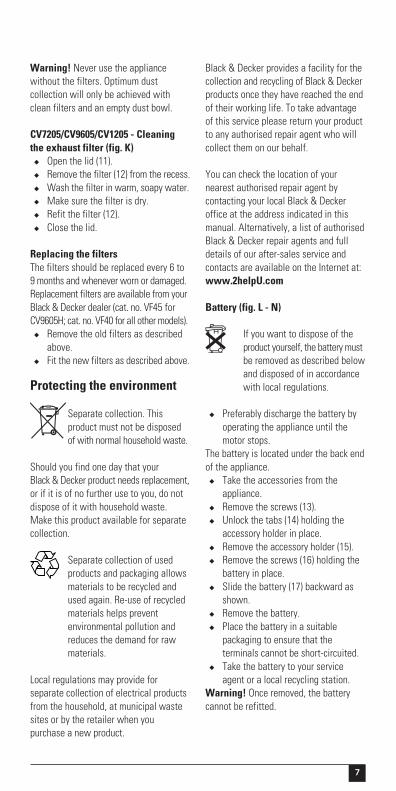
Warning! Never use the appliancewithout the filters. Optimum dustcollection will only be achieved withclean filters and an empty dust bowl.
CV7205/CV9605/CV1205 - Cleaningthe exhaust filter (fig. K)
◆ Open the lid (11).◆ Remove the filter (12) from the recess.◆ Wash the filter in warm, soapy water.◆ Make sure the filter is dry.◆ Refit the filter (12).◆ Close the lid.
Replacing the filtersThe filters should be replaced every 6 to9 months and whenever worn or damaged.Replacement filters are available from yourBlack & Decker dealer (cat. no. VF45 forCV9605H; cat. no. VF40 for all other models).
◆ Remove the old filters as describedabove.
◆ Fit the new filters as described above.
Protecting the environment
Separate collection. Thisproduct must not be disposedof with normal household waste.
Should you find one day that yourBlack & Decker product needs replacement,or if it is of no further use to you, do notdispose of it with household waste.Make this product available for separatecollection.
Separate collection of usedproducts and packaging allowsmaterials to be recycled andused again. Re-use of recycledmaterials helps preventenvironmental pollution andreduces the demand for rawmaterials.
Local regulations may provide forseparate collection of electrical productsfrom the household, at municipal wastesites or by the retailer when youpurchase a new product.
Black & Decker provides a facility for thecollection and recycling of Black & Deckerproducts once they have reached the endof their working life. To take advantageof this service please return your productto any authorised repair agent who willcollect them on our behalf.
You can check the location of yournearest authorised repair agent bycontacting your local Black & Deckeroffice at the address indicated in thismanual. Alternatively, a list of authorisedBlack & Decker repair agents and fulldetails of our after-sales service andcontacts are available on the Internet at:www.2helpU.com
Battery (fig. L - N)
If you want to dispose of theproduct yourself, the battery mustbe removed as described belowand disposed of in accordancewith local regulations.
◆ Preferably discharge the battery byoperating the appliance until themotor stops.
The battery is located under the back endof the appliance.
◆ Take the accessories from theappliance.
◆ Remove the screws (13).◆ Unlock the tabs (14) holding the
accessory holder in place.◆ Remove the accessory holder (15).◆ Remove the screws (16) holding the
battery in place.◆ Slide the battery (17) backward as
shown.◆ Remove the battery.◆ Place the battery in a suitable
packaging to ensure that theterminals cannot be short-circuited.
◆ Take the battery to your serviceagent or a local recycling station.
Warning! Once removed, the batterycannot be refitted.
8
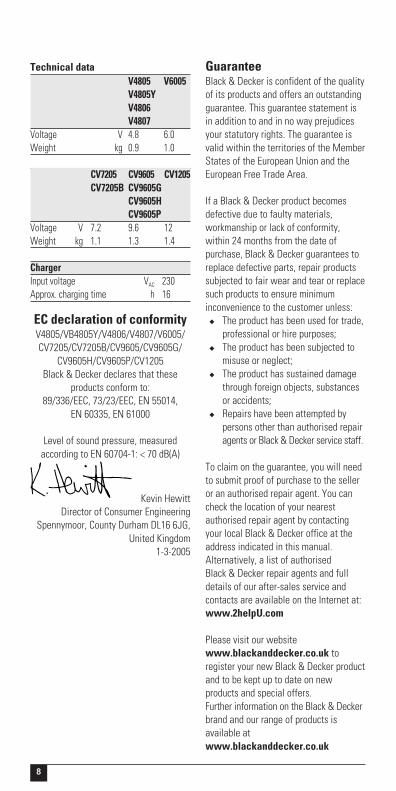
Technical dataV4805 V6005V4805YV4806V4807
Voltage V 4.8 6.0Weight kg 0.9 1.0
CV7205 CV9605 CV1205CV7205B CV9605G
CV9605HCV9605P
Voltage V 7.2 9.6 12Weight kg 1.1 1.3 1.4
ChargerInput voltage VAC 230Approx. charging time h 16
EC declaration of conformityV4805/VB4805Y/V4806/V4807/V6005/CV7205/CV7205B/CV9605/CV9605G/
CV9605H/CV9605P/CV1205Black & Decker declares that these
products conform to:89/336/EEC, 73/23/EEC, EN 55014,
EN 60335, EN 61000
Level of sound pressure, measuredaccording to EN 60704-1: < 70 dB(A)
Kevin HewittDirector of Consumer Engineering
Spennymoor, County Durham DL16 6JG,United Kingdom
1-3-2005
GuaranteeBlack & Decker is confident of the qualityof its products and offers an outstandingguarantee. This guarantee statement isin addition to and in no way prejudicesyour statutory rights. The guarantee isvalid within the territories of the MemberStates of the European Union and theEuropean Free Trade Area.
If a Black & Decker product becomesdefective due to faulty materials,workmanship or lack of conformity,within 24 months from the date ofpurchase, Black & Decker guarantees toreplace defective parts, repair productssubjected to fair wear and tear or replacesuch products to ensure minimuminconvenience to the customer unless:
◆ The product has been used for trade,professional or hire purposes;
◆ The product has been subjected tomisuse or neglect;
◆ The product has sustained damagethrough foreign objects, substancesor accidents;
◆ Repairs have been attempted bypersons other than authorised repairagents or Black & Decker service staff.
To claim on the guarantee, you will needto submit proof of purchase to the selleror an authorised repair agent. You cancheck the location of your nearestauthorised repair agent by contactingyour local Black & Decker office at theaddress indicated in this manual.Alternatively, a list of authorisedBlack & Decker repair agents and fulldetails of our after-sales service andcontacts are available on the Internet at:www.2helpU.com
Please visit our websitewww.blackanddecker.co.uk toregister your new Black & Decker productand to be kept up to date on newproducts and special offers.Further information on the Black & Deckerbrand and our range of products isavailable atwww.blackanddecker.co.uk
9
TY
P.
1C
V7
20
5 -
CV
72
05
B -
V4
80
5 -
V4
80
5Y
- V
48
06
- V
48
07
- V
60
05
24 1
2
3
615
17
16
18
22
1
7
23
810
9
21
14
20
19
WW
W.2
help
U.c
om
11-1
0-0
5E
13917

10
TY
P.
1
.ww
w2h
elp
U.c
om
20-1
0-0
5E
13918
CV
96
05
- C
V9
60
5G
- C
V9
60
5H
- C
V9
60
5P
- C
V1
20
5
24 1
9
12
16
15
1
17
22
3
4
18
14
13
5
6
10
78
21
11
12
20
9
23
846

11
12
T-10/06
AustraliaBlack & Decker (Australia) Pty. Ltd. Tel. 03-8720 510020 Fletcher Road, Mooroolbark,Victoria, 3138 Fax 03-9727 594065
New ZealandBlack & Decker Tel. 09 579 760081 Hugo Johnston Drive Fax 09 579 8200Penrose, Auckland, New Zealand
United KingdomBlack & Decker Tel. 01753 511234210 Bath Road Fax 01753 551155Slough, Berkshire SL1 3YD Helpline 01753 574277
90501927