valve body |service and repair, removal and replacement ... · 13. remove the pressure tap plug (2)...
TRANSCRIPT

REMOVAL
1. Remove the engine cover. 2. Remove the negative battery. 3. Drain the radiator See: Cooling System > Procedures. 4. Remove clamps at the lower radiator hose. 5. Remove the lower radiator hose. 6. Remove shift cable (1) from manual lever (2).
7. Remove the fasteners (1) and the Front Sound Damper Cover (2).
Valve Body |Service and Repair, Removal and Replacement: 62TE Auto... http://repair.alldata.com/alldata/article/display.action?componentId=199...
1 of 5 2/25/2017 3:16 PM
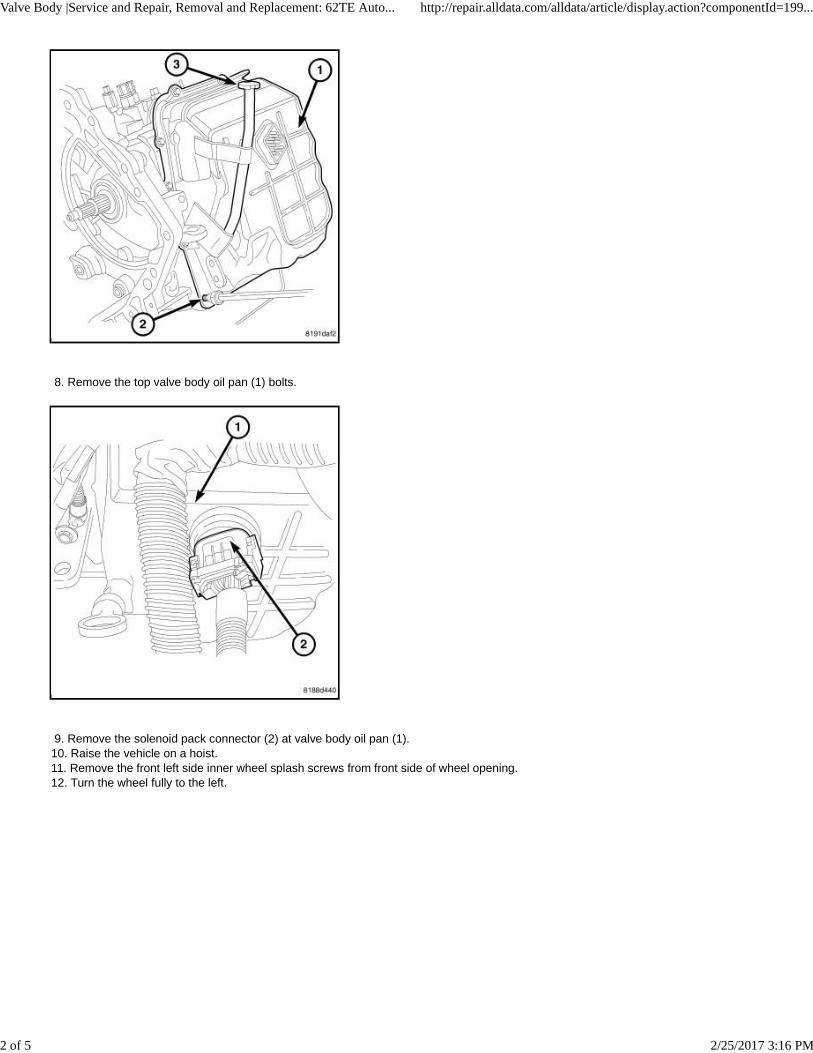
8. Remove the top valve body oil pan (1) bolts.
9. Remove the solenoid pack connector (2) at valve body oil pan (1). 10. Raise the vehicle on a hoist. 11. Remove the front left side inner wheel splash screws from front side of wheel opening. 12. Turn the wheel fully to the left.
Valve Body |Service and Repair, Removal and Replacement: 62TE Auto... http://repair.alldata.com/alldata/article/display.action?componentId=199...
2 of 5 2/25/2017 3:16 PM

13. Remove the pressure tap plug (2) at valve body oil pan. 14. Remove the lower valve body oil pan bolts (1) and drain transmission fluid. 15. Remove the valve body oil pan.
16. Remove the electrical connector (1) at the valve body (2).
Valve Body |Service and Repair, Removal and Replacement: 62TE Auto... http://repair.alldata.com/alldata/article/display.action?componentId=199...
3 of 5 2/25/2017 3:16 PM

17. Remove screw at detente arm (2). 18. Remove detente arm (1).
19. Remove the twenty one valve body to case bolts (1).
Valve Body |Service and Repair, Removal and Replacement: 62TE Auto... http://repair.alldata.com/alldata/article/display.action?componentId=199...
4 of 5 2/25/2017 3:16 PM
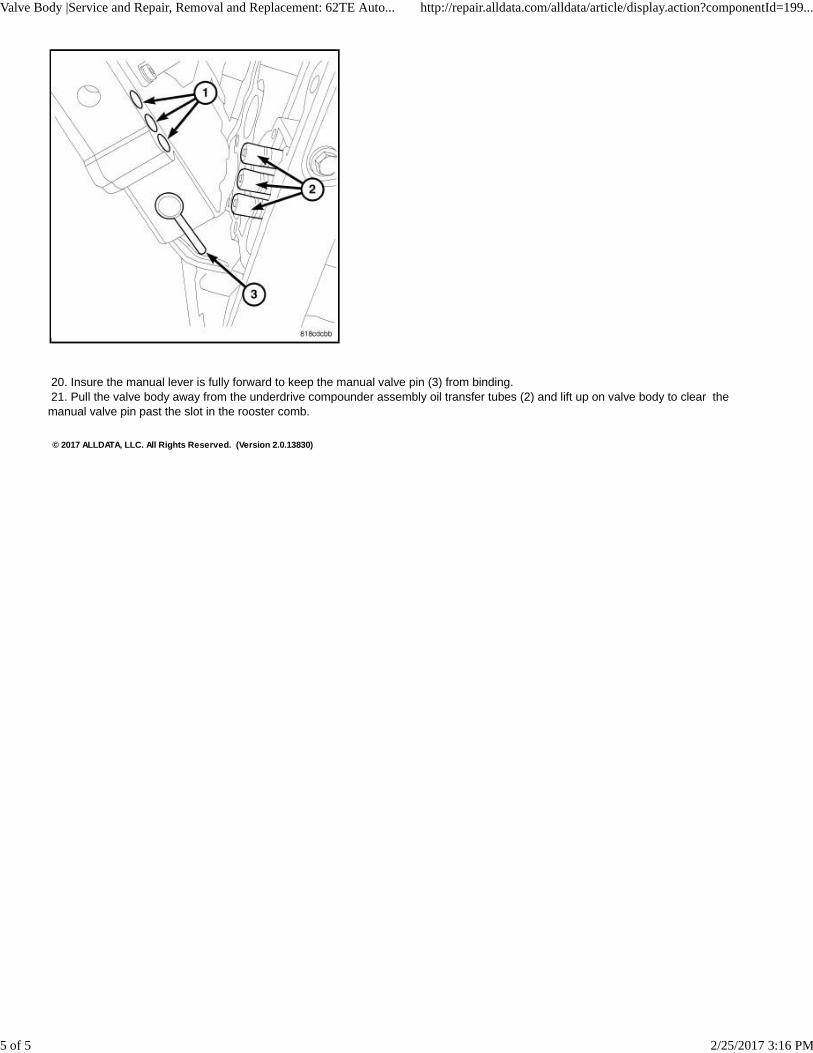
20. Insure the manual lever is fully forward to keep the manual valve pin (3) from binding. 21. Pull the valve body away from the underdrive compounder assembly oil transfer tubes (2) and lift up on valve body to clear themanual valve pin past the slot in the rooster comb.
© 2017 ALLDATA, LLC. All Rights Reserved. (Version 2.0.13830)
Valve Body |Service and Repair, Removal and Replacement: 62TE Auto... http://repair.alldata.com/alldata/article/display.action?componentId=199...
5 of 5 2/25/2017 3:16 PM
REMOVAL
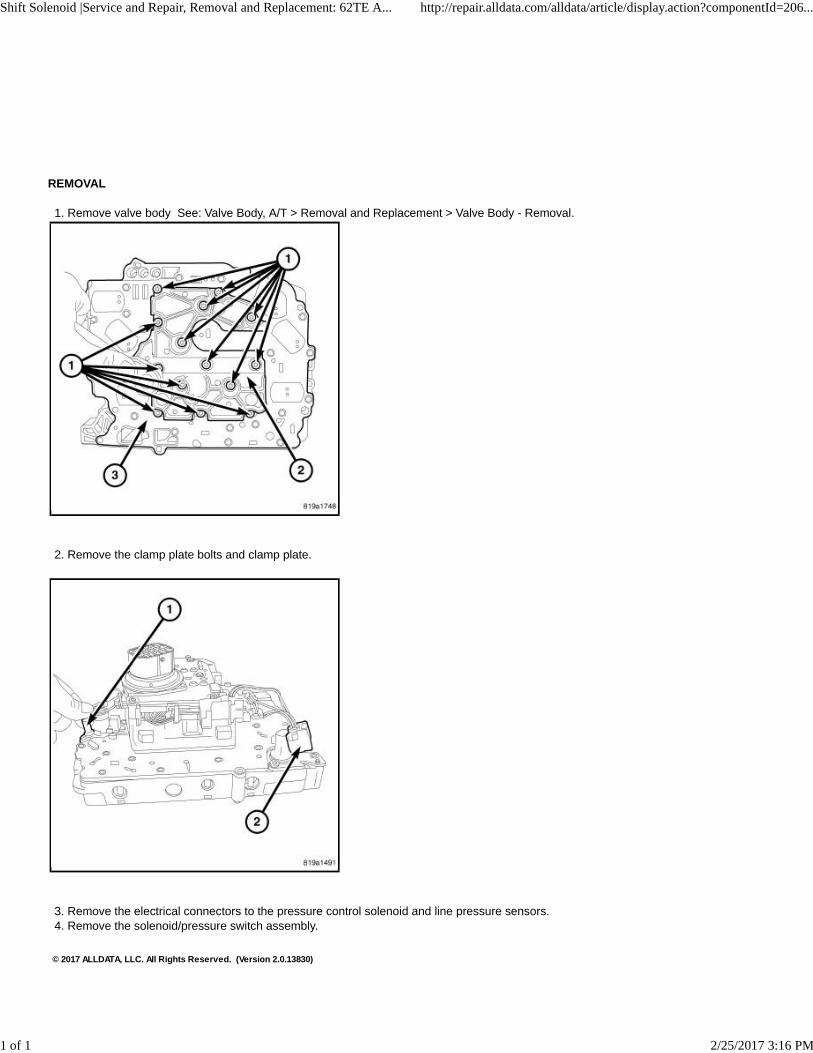
1. Remove valve body See: Valve Body, A/T > Removal and Replacement > Valve Body - Removal.
2. Remove the clamp plate bolts and clamp plate.
3. Remove the electrical connectors to the pressure control solenoid and line pressure sensors. 4. Remove the solenoid/pressure switch assembly.
© 2017 ALLDATA, LLC. All Rights Reserved. (Version 2.0.13830)
Shift Solenoid |Service and Repair, Removal and Replacement: 62TE A... http://repair.alldata.com/alldata/article/display.action?componentId=206...
1 of 1 2/25/2017 3:16 PM

INSTALLATION
1. Install the solenoid/pressure switch assembly. 2. Install mounting bolts (1) at clamp plate (2) and tighten to 6 Nm (50 in. lbs.).
3. Connect the electrical connectors (1, 2) to the pressure control solenoid and line pressure sensors. 4. Install valve body See: Valve Body, A/T > Removal and Replacement > Valve Body - Installation.
© 2017 ALLDATA, LLC. All Rights Reserved. (Version 2.0.13830)
Shift Solenoid |Service and Repair, Removal and Replacement: 62TE A... http://repair.alldata.com/alldata/article/display.action?componentId=206...
1 of 1 2/25/2017 3:17 PM
INSTALLATION
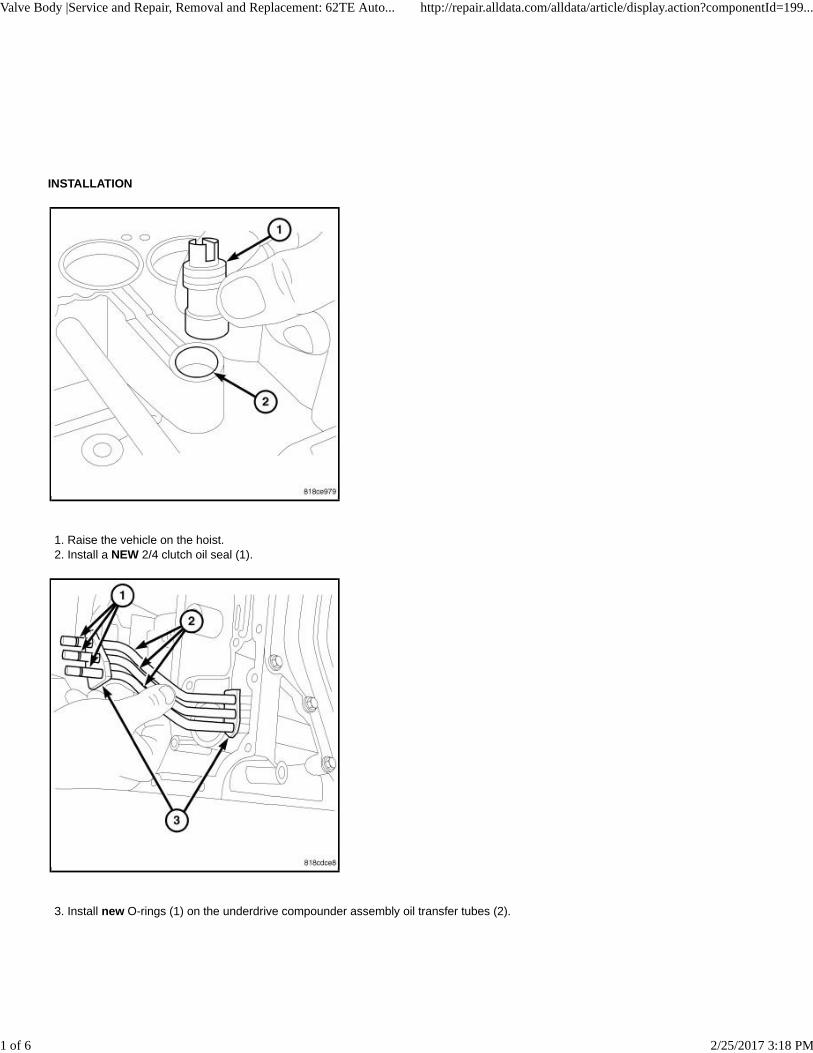
1. Raise the vehicle on the hoist. 2. Install a NEW 2/4 clutch oil seal (1).
3. Install new O-rings (1) on the underdrive compounder assembly oil transfer tubes (2).
Valve Body |Service and Repair, Removal and Replacement: 62TE Auto... http://repair.alldata.com/alldata/article/display.action?componentId=199...
1 of 6 2/25/2017 3:18 PM

4. Insure the manual lever is fully forward to keep the manual valve pin (3) from binding. 5. Set the manual valve pin (3) into the slot in the rooster comb. 6. Set the valve body into the underdrive compounder assembly oil transfer tubes (2) and press the valve body into place.
7. Install the twenty one valve body to case bolts and tighten to 6 Nm (50 in. lbs.).
Valve Body |Service and Repair, Removal and Replacement: 62TE Auto... http://repair.alldata.com/alldata/article/display.action?componentId=199...
2 of 6 2/25/2017 3:18 PM
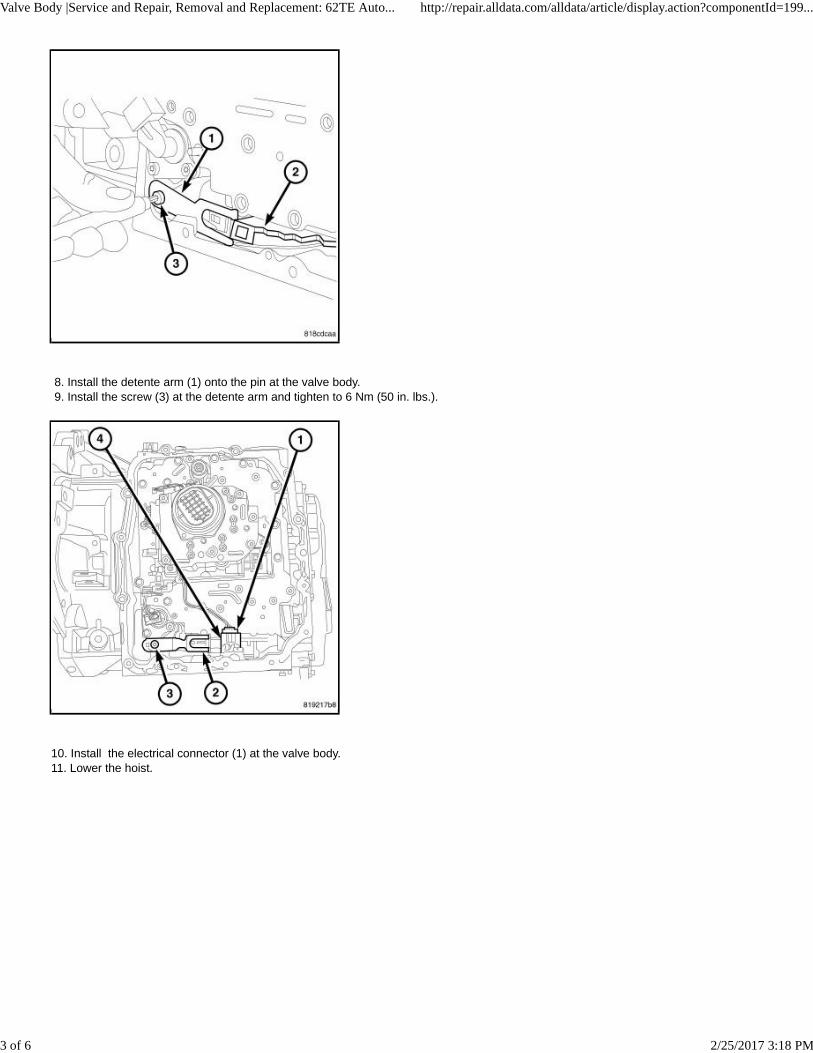
8. Install the detente arm (1) onto the pin at the valve body. 9. Install the screw (3) at the detente arm and tighten to 6 Nm (50 in. lbs.).
10. Install the electrical connector (1) at the valve body. 11. Lower the hoist.
Valve Body |Service and Repair, Removal and Replacement: 62TE Auto... http://repair.alldata.com/alldata/article/display.action?componentId=199...
3 of 6 2/25/2017 3:18 PM

12. Install the valve body oil pan, use a bead of MOPAR(R) ATF RTV (MS-GF41). 13. Install the upper valve body oil pan bolts and tighten to 6 Nm (50 in. lbs.). 14. Install the pressure tap at valve body oil pan and tighten to 6 Nm (50 in. lbs.). 15. Lower the vehicle on a hoist.
16. Install the solenoid pack connector (2) at valve body oil pan. 17. Raise the vehicle on the hoist.
Valve Body |Service and Repair, Removal and Replacement: 62TE Auto... http://repair.alldata.com/alldata/article/display.action?componentId=199...
4 of 6 2/25/2017 3:18 PM
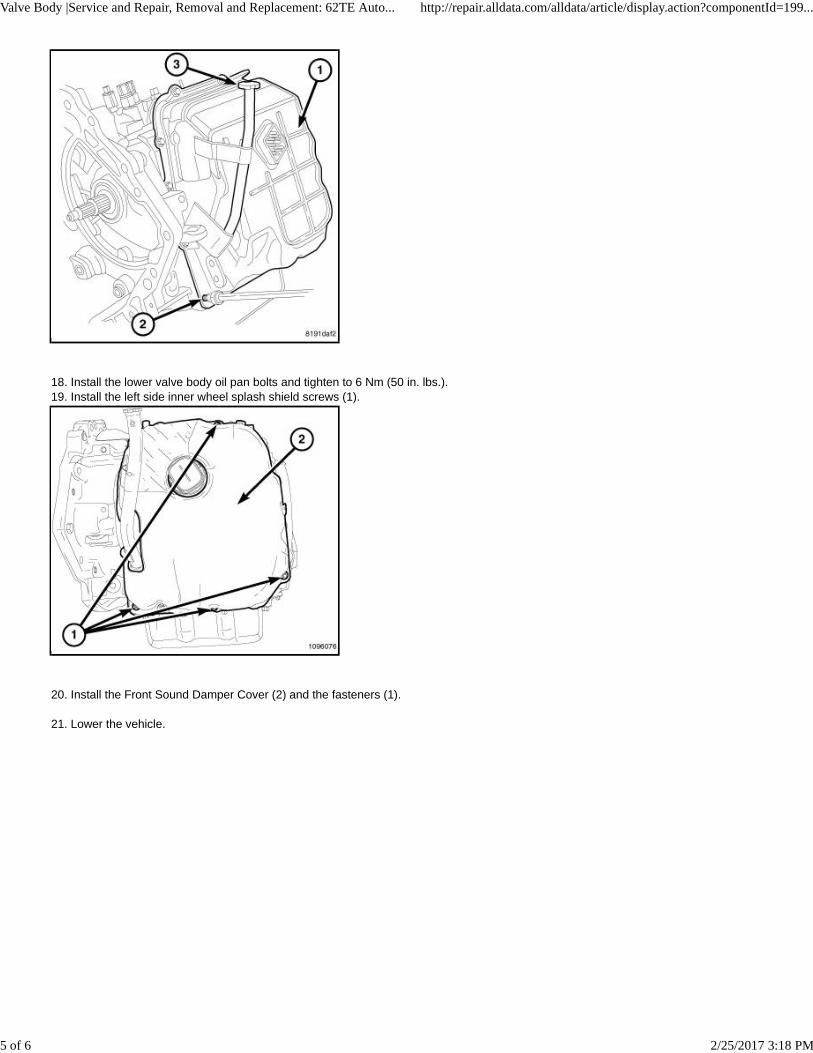
18. Install the lower valve body oil pan bolts and tighten to 6 Nm (50 in. lbs.). 19. Install the left side inner wheel splash shield screws (1).
20. Install the Front Sound Damper Cover (2) and the fasteners (1).
21. Lower the vehicle.
Valve Body |Service and Repair, Removal and Replacement: 62TE Auto... http://repair.alldata.com/alldata/article/display.action?componentId=199...
5 of 6 2/25/2017 3:18 PM

22. Install shift cable (1) to manual lever (2). 23. Install lower radiator hose and clamps. 24. Fill the cooling system See: Cooling System > Procedures. 25. Install the battery cable. 26. Fill transmission and road test See: Automatic Transmission/Transaxle > Procedures > Fluid/Filter Service.
© 2017 ALLDATA, LLC. All Rights Reserved. (Version 2.0.13830)
Valve Body |Service and Repair, Removal and Replacement: 62TE Auto... http://repair.alldata.com/alldata/article/display.action?componentId=199...
6 of 6 2/25/2017 3:18 PM