vault of the wyrm prince - dungeonoracle.files.wordpress.com · vault of the wyrm prince 2 vault of...
TRANSCRIPT
BackBackBackBack pocket dungeon pocket dungeon pocket dungeon pocket dungeon 2222::::
VAULT OF THE WYRM PRINCEVAULT OF THE WYRM PRINCEVAULT OF THE WYRM PRINCEVAULT OF THE WYRM PRINCE
DUNGEON DUNGEON DUNGEON DUNGEONORACLEORACLEORACLEORACLE.COM.COM.COM.COM © 2012 Dr. Davy Jones
DUNGEONS & DRAGONS, the DUNGEONS & DRAGONS Compatibility Logo, D&D, PLAYER’S HANDBOOK, PLAYER’S HANDBOOK 2, DUNGEON MASTER’S GUIDE, MONSTER MANUAL, MONSTER
MANUAL 2, and ADVENTURER’S VAULT are trademarks of Wizards of the Coast in the USA and other countries and are used with permission. Certain materials, including 4E References in this
publication, D&D core rules mechanics, and all D&D characters and their distinctive likenesses, are property of Wizards of the Coast, and are used with permission under the Dungeons &
Dragons 4th Edition Game System License. All 4E References are listed in the 4E System Reference Document, available at www.wizards.com/d20. DUNGEONS & DRAGONS 4th Edition
PLAYER’S HANDBOOK, written by Rob Heinsoo, Andy Collins, and James Wyatt; DUNGEON MASTER’S GUIDE, written by James Wyatt; and MONSTER MANUAL, written by Mike Mearls,
Stephen Schubert and James Wyatt; PLAYER’S HANDBOOK 2, written by Jeremy Crawford, Mike Mearls, and James Wyatt; MONSTER MANUAL 2, written by Rob Heinsoo, and Chris Sims;
Adventurer’s Vault, D&D 4E Game System License ©2008, 2009 Wizards of the Coast written by Logan Bonner, Eytan Bernstein, and Chris Sims. © 2008, 2009 Wizards of the Coast. All rights
reserved. FOURTHCORE ARMORY: A COMPENDIUM OF TREASURES MYTHIC AND DEADLY by Mario Podeschi, Sersa V, and Colin Oldenkamp © 2011 Sersa V and SVD Press.
DesignDesignDesignDesign Dr. Davy Jones
Editing Editing Editing Editing Daniel Roanoke
Card LayoutsCard LayoutsCard LayoutsCard Layouts C. Steven Ross
Playtester Playtester Playtester Playtester Jennifer Loftfield
Playtester Playtester Playtester Playtester Milwaukee Joe
www.dungeonoracle.com Vault of the wyrm prince
2
Vault of the wyrm princeVault of the wyrm princeVault of the wyrm princeVault of the wyrm prince A first-level fourthcore dungeon delve for 2-5
players, designed as an impromptu
dungeon delve for casual play at
conventions or as a backup for game days
when 1 or more players cancel.
DungeonDungeonDungeonDungeon Oracle Oracle Oracle Oracle © 2012 Dr. Davy Jones
dungeonoracle.com
Adventure BackgroundAdventure BackgroundAdventure BackgroundAdventure Background When the fires smoldered in the belly of an
ancient red dragon tyrant, and his thirst had
been slaked by the blood of countless
innocents, the old wyrm made a deal with a
succubus to spawn him a son and ensure his
name would live forever. The demon held
true, though she imbued the wyrmling with
her own infernal blood. Those who fear and
serve the abominable spawn of this pact
know him as the Wyrm Prince. Cast into the
abyss centuries ago by the legendary Three-
River Paladin, the Wyrm Prince licked his
wounds and recovered his strength. The
Three-River Paladin has passed into legend,
and the Wyrm Prince has resurfaced, his
vengeance awakened along with his
hunger. The Wyrm Prince sacked the high
city Zhaldanis, slaying its people and
claiming the greatest gift from the gods—
the Soulstone. At this late hour, you must
venture into the catacombs of the Wyrm
Prince before the Soulstone loses its power
and all mortal souls are damned.
Time LimitTime LimitTime LimitTime Limit The Wyrm Prince has possession of both the
Soulstone and its divine guardian, the
angelic avatar Azira. While Azira still lives,
the Wyrm Prince cannot destroy the stone.
But according to the elders of the realm,
Azira’s life will end at midnight on
Winterwatch—this very night. The crusaders
have four hours of real time to complete the
quest. Should time run out, Azira perishes
and the Wyrm Prince destroys the Soulstone,
claiming its full power and cursing the realm
to an eternity of torment. Extended rests are
not allowed in this game.
Death and Death and Death and Death and RESPAWNINGRESPAWNINGRESPAWNINGRESPAWNING When a crusader dies within the Vault, their
spirit lingers for a moment before being
pulled through a swirling portal of ghostly
flames, damned unless the Soulstone is
retrieved.
If the player of a slain crusader chooses,
they may re-enter the Vault with another
character. If so, the new crusader joins the
other crusaders at the end of the current
encounter, or instantly if there is no ongoing
encounter. The players take a 10-minute
penalty to their remaining time. Make the
players aware of this option before the
game so that they may prepare or select
backup characters. If a player chooses to sit
out, allow them to participate in discussions
about potential courses of action, the
solutions to puzzles, and so on. A total party
kill immediately ends the game in failure.
RUMORSRUMORSRUMORSRUMORS
The cult of the Wyrm Prince scarred the
realm, and tales of his lair are still told to
those willing to listen.
At the beginning of the adventure, shuffle
the rumor cards and allow each player to
draw one. Each player then reads his or her
rumor aloud. Each rumor is marked as either
reliable or unreliable. Inform the players that
four of the five reliable rumors are true and
one of the five unreliable rumors is true.
DestiniDestiniDestiniDestinieseseses
Each crusader must follow a unique path to
death and glory. Destiny cards represent
paths to glory that each crusader may take.
After distributing the rumor cards, shuffle the
destiny cards and allow each player to
draw one. Each player then reads his or her
destiny aloud. Each destiny outlines a
specific goal for the crusader who holds it. If
the crusader achieves the goal, he or she
claims the boon for achieving the goal.
There is no penalty for not fulfilling a destiny.
Dungeon EnvironmentDungeon EnvironmentDungeon EnvironmentDungeon Environment Unless otherwise noted, the dungeon has
the following features:
Walls: Finely carved granite, shaped as
endless writhing devils (Athletics DC 10 to
climb).
Doors: Reinforced black iron, unlocked.
Floors: Reflective red-and-black tiled
marble.
Illumination: Darkness.
www.dungeonoracle.com Vault of the wyrm prince
3
Entering the vaultEntering the vaultEntering the vaultEntering the vault As a ghoulish yellow moon peeks over the
broken spires of Zhaldanis, the crusaders
journey to the supposed location of the
Wyrm Prince’s lair. At the base of a
shattered watchtower, a jagged, 20-foot
wide hole in the flagstone leads down into a
barely-lit chamber 30 feet below. The
crusaders may lower themselves down
without making checks.
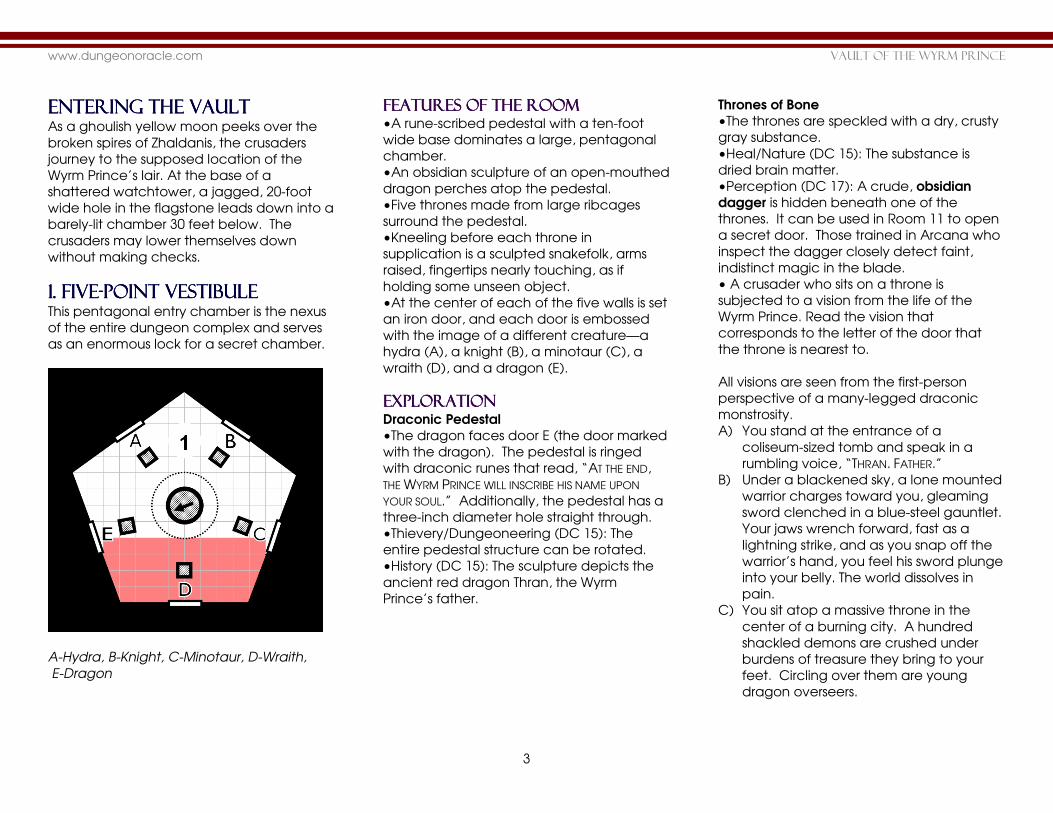
1111.... FiveFiveFiveFive----Point VestibulePoint VestibulePoint VestibulePoint Vestibule
This pentagonal entry chamber is the nexus
of the entire dungeon complex and serves
as an enormous lock for a secret chamber.
A-Hydra, B-Knight, C-Minotaur, D-Wraith,
E-Dragon
FEATURES OF THE ROOMFEATURES OF THE ROOMFEATURES OF THE ROOMFEATURES OF THE ROOM •A rune-scribed pedestal with a ten-foot
wide base dominates a large, pentagonal
chamber.
•An obsidian sculpture of an open-mouthed
dragon perches atop the pedestal.
•Five thrones made from large ribcages
surround the pedestal.
•Kneeling before each throne in
supplication is a sculpted snakefolk, arms
raised, fingertips nearly touching, as if
holding some unseen object.
•At the center of each of the five walls is set
an iron door, and each door is embossed
with the image of a different creature—a
hydra (A), a knight (B), a minotaur (C), a
wraith (D), and a dragon (E).
EXPLORATIONEXPLORATIONEXPLORATIONEXPLORATION Draconic Pedestal
•The dragon faces door E (the door marked
with the dragon). The pedestal is ringed
with draconic runes that read, “AT THE END,
THE WYRM PRINCE WILL INSCRIBE HIS NAME UPON
YOUR SOUL.” Additionally, the pedestal has a
three-inch diameter hole straight through.
•Thievery/Dungeoneering (DC 15): The
entire pedestal structure can be rotated.
•History (DC 15): The sculpture depicts the
ancient red dragon Thran, the Wyrm
Prince’s father.
Thrones of Bone
•The thrones are speckled with a dry, crusty
gray substance.
•Heal/Nature (DC 15): The substance is
dried brain matter.
•Perception (DC 17): A crude, obsidian
dagger is hidden beneath one of the
thrones. It can be used in Room 11 to open
a secret door. Those trained in Arcana who
inspect the dagger closely detect faint,
indistinct magic in the blade.
• A crusader who sits on a throne is
subjected to a vision from the life of the
Wyrm Prince. Read the vision that
corresponds to the letter of the door that
the throne is nearest to.
All visions are seen from the first-person
perspective of a many-legged draconic
monstrosity.
A) You stand at the entrance of a
coliseum-sized tomb and speak in a
rumbling voice, “THRAN. FATHER.”
B) Under a blackened sky, a lone mounted
warrior charges toward you, gleaming
sword clenched in a blue-steel gauntlet.
Your jaws wrench forward, fast as a
lightning strike, and as you snap off the
warrior’s hand, you feel his sword plunge
into your belly. The world dissolves in
pain.
C) You sit atop a massive throne in the
center of a burning city. A hundred
shackled demons are crushed under
burdens of treasure they bring to your
feet. Circling over them are young
dragon overseers.
www.dungeonoracle.com Vault of the wyrm prince
4
D) A red mist coalesces before you into an
infernal spirit, flanked by two white
dragons. You speak to the spirit in a
voice that shakes the dark chamber:
“YOU HAVE INTERFERED WITH MY DESIGNS FOR THE
LAST TIME, GOLGOTHAN.” You nod once,
and the spirit screams or perhaps laughs
as the dragons breathe a frozen torrent
on it.
E) You look down on a marble pedestal,
atop which sits a crystalline sphere
glowing with countless points of light
that dance skitterishly within it. You
laugh—a deep, heartless sound—and
seize the sphere with a claw, swallowing
it with a single bite.
Embossed Doors •Each of the doors has a creature
embossed on it (A-Dragon, B-Knight, C-
Minotaur, D-Wraith, E-Hydra). Furthermore,
each image prominently features a single
many-faceted diamond set into the door.
•Thievery (DC 17): The crusader removes a
diamond from the door. If a diamond is
removed, obliteration rays fired at that door
do not scatter. Furthermore, the puzzle
cannot be solved while a diamond has
been removed.
•Perception (DC 13): Door E (the Dragon
door) is magically sealed by three bar locks.
•Perception (DC 17): The floor in the area
near the door is perforated with countless
needle-thin holes (a result of the scattered
obliteration ray, see below).
•If any door is touched, the dragon
sculpture atop the pedestal fires an
obliteration ray at whatever door it points to.
The ray passes straight through the empty
space between the hands of the snakefolk
and into the diamond set in the door. The
ray scatters, affecting squares up to the
dais. For example, if the ray is fired at Door
D, the shaded squares are affected (see
figure on previous page).
Activated doors make the following attack:
Creatures directly in the line of the primary
ray must make a saving throw.
Fail: the target takes 2d6+9 unhealable
radiant and lightning damage.
Crusaders sitting on the throne in the line of
fire must make a saving throw:
Fail: the obliteration ray pierces the
crusader’s skull, killing him or her instantly.
SOLVING THE PUZZLESOLVING THE PUZZLESOLVING THE PUZZLESOLVING THE PUZZLE The entire chamber works as a kind of
combination lock. To solve the puzzle, the
crusaders must place the great emerald
from Room 2 in the hands of the snakefolk
statues, then fire the obliteration ray through
it. Filtered through the emerald, the ray
turns green, and when it strikes the diamond
set in one of the doors, that door glows with
green runes that do not fade. The entire
dais can be rotated with some kind of rod or
staff inserted through the hole in the
pedestal. To open the lock, the crusaders
must activate the doors in the following
order: Knight (B), Wraith (D), Minotaur (C),
Hydra (A), Dragon (E). The reason for this
order lies in the draconic runes on the
pedestal, which read, “AT THE END, THE WYRM
PRINCE WILL INSCRIBE HIS NAME UPON YOUR SOUL.”
The Prince’s inherited name is Thran, which
can be spelled with the final letter in each
of the creatures’ names.
If the doors are activated in the proper
order using the great emerald, the dais
opens, revealing a spiral staircase leading
down into Room 10. If the doors are
activated in the wrong order, a poisonous
gas pours out of the dragon’s mouth and fills
the chamber, causing the following attack
against all creatures in the chamber:
Putrescent Balor Blood Vapor
Attack: All creatures in room; +6 vs. Fortitude.
Hit: The target loses 1d4 healing surges and
takes a cumulative -1 penalty to Fortitude
and Will for the remainder of the game.
Crusaders reduced to 0 or fewer healing
surges by this attack die of asphyxiation.
Scattered Obliteration Ray
Attack: Close blast 4; +6 vs. Reflex.
Hit: 2d6+9 radiant and lightning damage.
www.dungeonoracle.com Vault of the wyrm prince
5
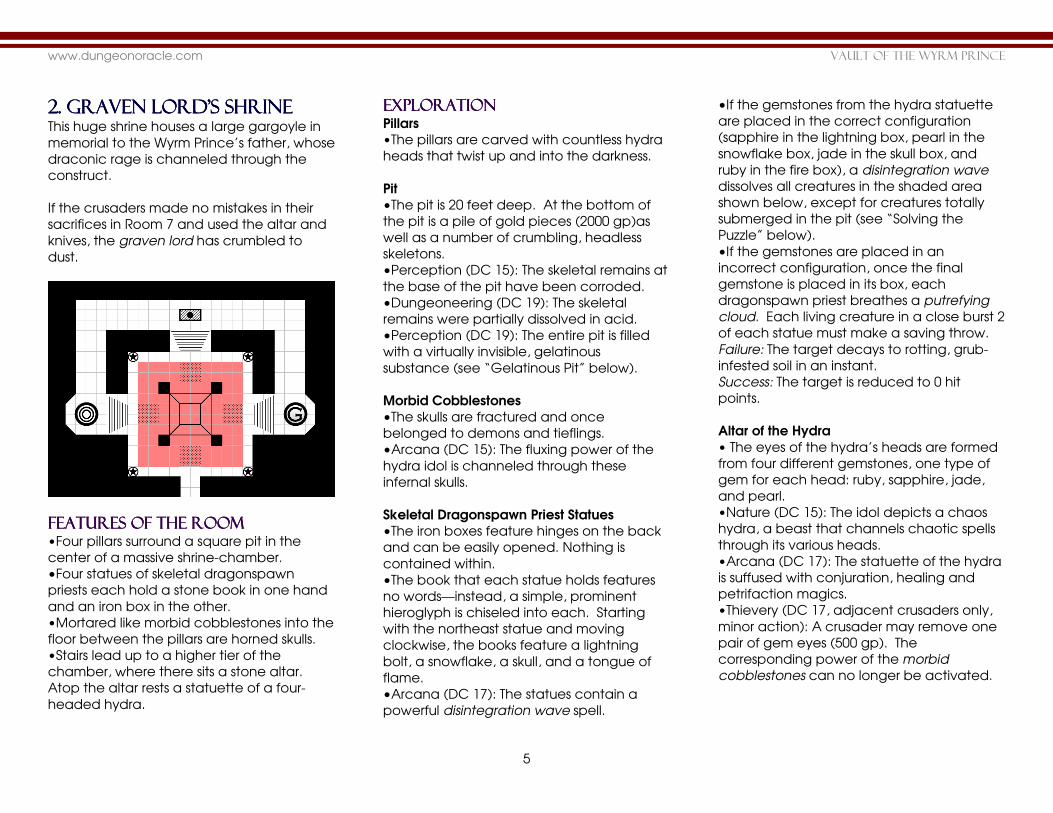
2. GRAVEN LORD’S SHRINE2. GRAVEN LORD’S SHRINE2. GRAVEN LORD’S SHRINE2. GRAVEN LORD’S SHRINE This huge shrine houses a large gargoyle in
memorial to the Wyrm Prince’s father, whose
draconic rage is channeled through the
construct.
If the crusaders made no mistakes in their
sacrifices in Room 7 and used the altar and
knives, the graven lord has crumbled to
dust.
FEATURES OF THE ROOMFEATURES OF THE ROOMFEATURES OF THE ROOMFEATURES OF THE ROOM •Four pillars surround a square pit in the
center of a massive shrine-chamber.
•Four statues of skeletal dragonspawn
priests each hold a stone book in one hand
and an iron box in the other.
•Mortared like morbid cobblestones into the
floor between the pillars are horned skulls.
•Stairs lead up to a higher tier of the
chamber, where there sits a stone altar.
Atop the altar rests a statuette of a four-
headed hydra.
EXPLEXPLEXPLEXPLORATIONORATIONORATIONORATION Pillars •The pillars are carved with countless hydra
heads that twist up and into the darkness.
Pit •The pit is 20 feet deep. At the bottom of
the pit is a pile of gold pieces (2000 gp)as
well as a number of crumbling, headless
skeletons.
•Perception (DC 15): The skeletal remains at
the base of the pit have been corroded.
•Dungeoneering (DC 19): The skeletal
remains were partially dissolved in acid.
•Perception (DC 19): The entire pit is filled
with a virtually invisible, gelatinous
substance (see “Gelatinous Pit” below).
Morbid Cobblestones
•The skulls are fractured and once
belonged to demons and tieflings.
•Arcana (DC 15): The fluxing power of the
hydra idol is channeled through these
infernal skulls.
Skeletal Dragonspawn Priest Statues
•The iron boxes feature hinges on the back
and can be easily opened. Nothing is
contained within.
•The book that each statue holds features
no words—instead, a simple, prominent
hieroglyph is chiseled into each. Starting
with the northeast statue and moving
clockwise, the books feature a lightning
bolt, a snowflake, a skull, and a tongue of
flame.
•Arcana (DC 17): The statues contain a
powerful disintegration wave spell.
•If the gemstones from the hydra statuette
are placed in the correct configuration
(sapphire in the lightning box, pearl in the
snowflake box, jade in the skull box, and
ruby in the fire box), a disintegration wave
dissolves all creatures in the shaded area
shown below, except for creatures totally
submerged in the pit (see “Solving the
Puzzle” below).
•If the gemstones are placed in an
incorrect configuration, once the final
gemstone is placed in its box, each
dragonspawn priest breathes a putrefying
cloud. Each living creature in a close burst 2
of each statue must make a saving throw.
Failure: The target decays to rotting, grub-
infested soil in an instant.
Success: The target is reduced to 0 hit
points.
Altar of the Hydra
• The eyes of the hydra’s heads are formed
from four different gemstones, one type of
gem for each head: ruby, sapphire, jade,
and pearl.
•Nature (DC 15): The idol depicts a chaos
hydra, a beast that channels chaotic spells
through its various heads.
•Arcana (DC 17): The statuette of the hydra
is suffused with conjuration, healing and
petrifaction magics.
•Thievery (DC 17, adjacent crusaders only,
minor action): A crusader may remove one
pair of gem eyes (500 gp). The
corresponding power of the morbid
cobblestones can no longer be activated.
www.dungeonoracle.com Vault of the wyrm prince
6
Ancient Dragon Gargoyle
•A gargoyle fashioned as an ancient red
dragon perches on a pedestal down the
eastern corridor. Chunks of the gargoyle’s
ribcage are missing, revealing a massive
green emerald pulsing with blinding light
within the gargoyle’s chest.
Dais
•Down the western corridor sits a wide stone
dais. A bleeding tiefling, whipped nearly to
death, is chained to the dais.
•Thievery (DC 17) or basic attack (1 hp, AC
and Fort 15): The tiefling is freed. She thanks
the crusader for letting her die a free being,
and whispers a power word as she dies;
“Infernum nix.” If the party uses a healing
power on the tiefling, she lives long enough
to tell them, “The emerald is the key.”
•If the crusaders wish to speak with the
tiefling, use the following notes to guide your
interactions:
•Her name is Aeshma, servant of the
Hungering Flame.
•Aeshma vehemently despises all
dragonkind, especially the Wyrm Prince,
who decimated and enslaved her race.
•Aeshma came to the lair with her
tiefling clan, equipped with the power
word she learned from a scrying ritual,
and a rumor from the clan elder. If the
crusaders inquire about the rumor, they
may draw one extra rumor card.
•In their exploration of the dungeon, the
clan quickly surmised that the emerald
contained a powerful magic, though its
exact nature could not be discerned
before they were defeated by the
gargoyle. Her brethren were slain,
tortured to death one-by-one. Aeshma
is all that remains.
•At the beginning of the third round of
combat, Aeshma dies.
“Infernum nix”: This power word can be used
in this chamber to exert some control over
both the gelatinous pit and the morbid
cobblestones (see below). It can also be
used in Room 8 to cast the damned
wretches back into the pit.
Solving the PuzzleSolving the PuzzleSolving the PuzzleSolving the Puzzle In order to summon the disintegration wave
and instantly destroy the gargoyle, the
crusaders must make the connection
between the gemstones and the boxes of
the skeletal dragonspawn priests. The key to
solving the puzzle is connecting each of the
hieroglyphs to the breath weapon of a
specific chromatic dragon and then
connecting each chromatic dragon to its
corresponding gem by color (red/ruby,
blue/sapphire, green/jade, white/pearl).
EncounterEncounterEncounterEncounter Starting the Encounter:
The encounter begins when a crusader
moves past the first two pillars. The graven
lord gargoyle animates and moves to
attack the crusaders. The first time a
crusader moves between the graven lord
and the gelatinous pit, the graven lord uses
a readied horned charge attack against
the triggering crusader.
Threats:
The crusaders must navigate a gelatinous pit
and the morbid cobblestones as they
engage the graven lord gargoyle. The
graven lord uses its horned charge and
stone tail whip to force crusaders into the
pit.
Ending the Encounter: The encounter ends
when the graven lord gargoyle is destroyed
and any crusaders in the gelatinous pit die
or are rescued.
www.dungeonoracle.com Vault of the wyrm prince
7
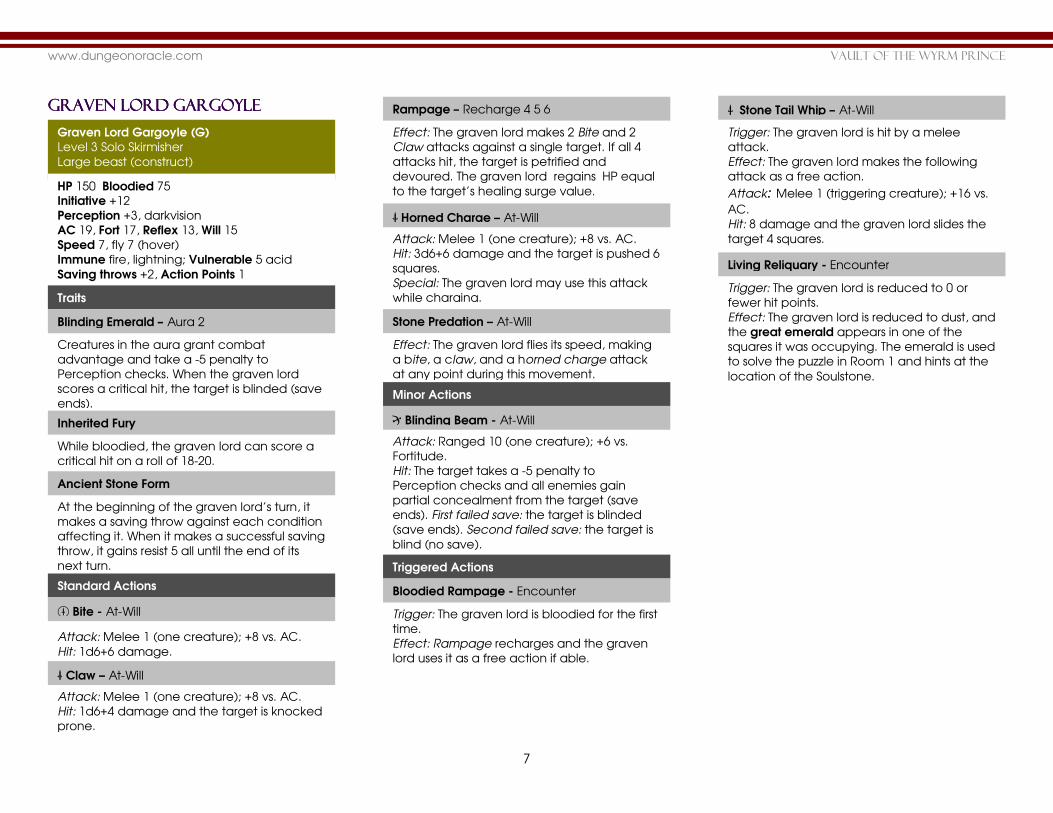
Graven LordGraven LordGraven LordGraven Lord GArgoyle GArgoyle GArgoyle GArgoyle
Graven Lord Gargoyle (G)
Level 3 Solo Skirmisher
Large beast (construct)
HP 150 Bloodied 75
Initiative +12
Perception +3, darkvision
AC 19, Fort 17, Reflex 13, Will 15
Speed 7, fly 7 (hover)
Immune fire, lightning; Vulnerable 5 acid
Saving throws +2, Action Points 1
Traits
Blinding Emerald – Aura 2
Creatures in the aura grant combat
advantage and take a -5 penalty to
Perception checks. When the graven lord
scores a critical hit, the target is blinded (save
ends).
Inherited Fury
While bloodied, the graven lord can score a
critical hit on a roll of 18-20.
Ancient Stone Form
At the beginning of the graven lord’s turn, it
makes a saving throw against each condition
affecting it. When it makes a successful saving
throw, it gains resist 5 all until the end of its
next turn.
M Claw – At-Will
Attack: Melee 1 (one creature); +8 vs. AC.
Hit: 1d6+4 damage and the target is knocked
prone.
Rampage – Recharge 4 5 6
Effect: The graven lord makes 2 Bite and 2
Claw attacks against a single target. If all 4
attacks hit, the target is petrified and
devoured. The graven lord regains HP equal
to the target’s healing surge value.
M Horned Charge – At-Will
Attack: Melee 1 (one creature); +8 vs. AC.
Hit: 3d6+6 damage and the target is pushed 6
squares.
Special: The graven lord may use this attack
while charging.
Stone Predation – At-Will
Effect: The graven lord flies its speed, making
a bite, a claw, and a horned charge attack
at any point during this movement.
Minor Actions
R Blinding Beam - At-Will
Attack: Ranged 10 (one creature); +6 vs.
Fortitude.
Hit: The target takes a -5 penalty to
Perception checks and all enemies gain
partial concealment from the target (save
ends). First failed save: the target is blinded
(save ends). Second failed save: the target is
blind (no save).
M Stone Tail Whip – At-Will
Trigger: The graven lord is hit by a melee
attack.
Effect: The graven lord makes the following
attack as a free action.
Attack: Melee 1 (triggering creature); +16 vs.
AC.
Hit: 8 damage and the graven lord slides the
target 4 squares.
Living Reliquary - Encounter
Trigger: The graven lord is reduced to 0 or
fewer hit points.
Effect: The graven lord is reduced to dust, and
the great emerald appears in one of the
squares it was occupying. The emerald is used
to solve the puzzle in Room 1 and hints at the
location of the Soulstone.
Triggered Actions
Bloodied Rampage - Encounter
Trigger: The graven lord is bloodied for the first
time.
Effect: Rampage recharges and the graven
lord uses it as a free action if able.
Standard Actions
m Bite - At-Will
Attack: Melee 1 (one creature); +8 vs. AC.
Hit: 1d6+6 damage.
www.dungeonoracle.com Vault of the wyrm prince
8
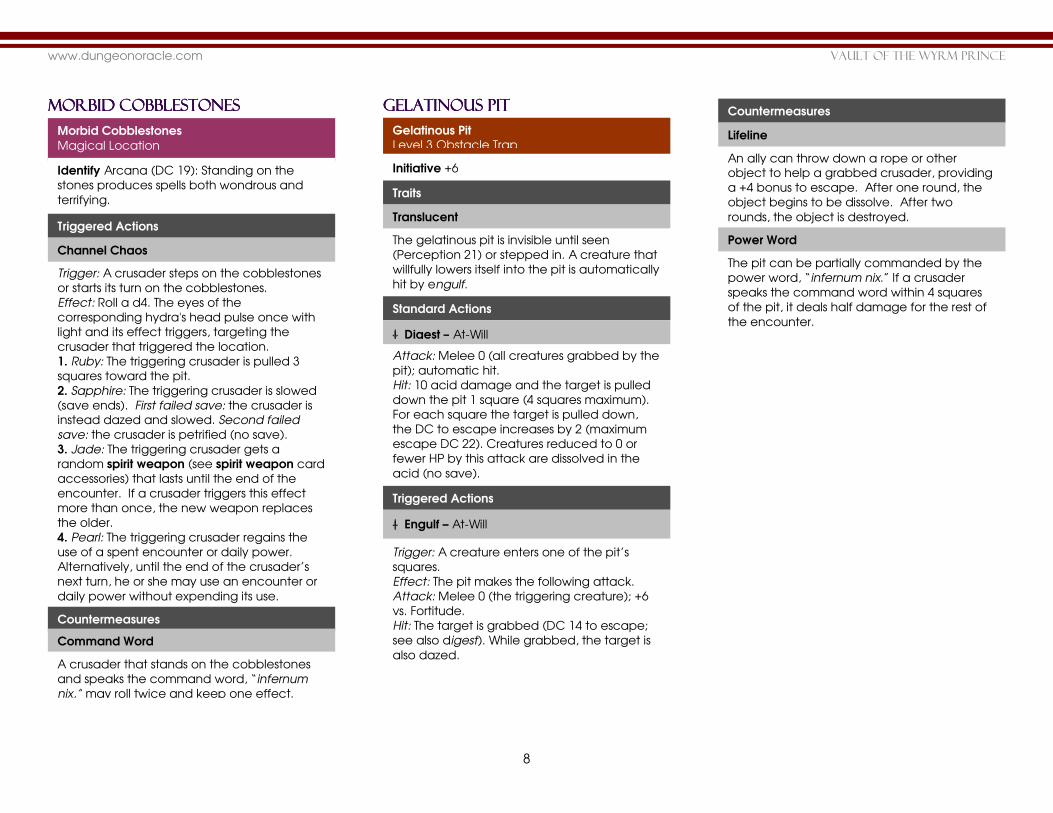
Morbid CobblestonesMorbid CobblestonesMorbid CobblestonesMorbid Cobblestones
Gelatinous pitGelatinous pitGelatinous pitGelatinous pit
Countermeasures
Lifeline
An ally can throw down a rope or other
object to help a grabbed crusader, providing
a +4 bonus to escape. After one round, the
object begins to be dissolve. After two
rounds, the object is destroyed.
Power Word
The pit can be partially commanded by the
power word, “infernum nix.” If a crusader
speaks the command word within 4 squares
of the pit, it deals half damage for the rest of
the encounter.
Morbid Cobblestones
Magical Location
Identify Arcana (DC 19): Standing on the
stones produces spells both wondrous and
terrifying.
Triggered Actions
Channel Chaos
Trigger: A crusader steps on the cobblestones
or starts its turn on the cobblestones.
Effect: Roll a d4. The eyes of the
corresponding hydra's head pulse once with
light and its effect triggers, targeting the
crusader that triggered the location.
1. Ruby: The triggering crusader is pulled 3
squares toward the pit.
2. Sapphire: The triggering crusader is slowed
(save ends). First failed save: the crusader is
instead dazed and slowed. Second failed
save: the crusader is petrified (no save).
3. Jade: The triggering crusader gets a
random spirit weapon (see spirit weapon card
accessories) that lasts until the end of the
encounter. If a crusader triggers this effect
more than once, the new weapon replaces
the older.
4. Pearl: The triggering crusader regains the
use of a spent encounter or daily power.
Alternatively, until the end of the crusader’s
next turn, he or she may use an encounter or
daily power without expending its use.
Countermeasures
Command Word
A crusader that stands on the cobblestones
and speaks the command word, “infernum
nix,” may roll twice and keep one effect.
Gelatinous Pit Level 3 Obstacle Trap
Initiative +6
Traits
Translucent
The gelatinous pit is invisible until seen
(Perception 21) or stepped in. A creature that
willfully lowers itself into the pit is automatically
hit by engulf.
Standard Actions
M Digest – At-Will
Attack: Melee 0 (all creatures grabbed by the
pit); automatic hit.
Hit: 10 acid damage and the target is pulled
down the pit 1 square (4 squares maximum).
For each square the target is pulled down,
the DC to escape increases by 2 (maximum
escape DC 22). Creatures reduced to 0 or
fewer HP by this attack are dissolved in the
acid (no save).
Triggered Actions
M Engulf – At-Will
Trigger: A creature enters one of the pit’s
squares.
Effect: The pit makes the following attack.
Attack: Melee 0 (the triggering creature); +6
vs. Fortitude.
Hit: The target is grabbed (DC 14 to escape;
see also digest). While grabbed, the target is
also dazed.
www.dungeonoracle.com Vault of the wyrm prince
9
3. SENTRY OF SHIELDS3. SENTRY OF SHIELDS3. SENTRY OF SHIELDS3. SENTRY OF SHIELDS This room serves as both a place to execute
heretics to the Wyrm Prince’s cause and a
safeguard against intruders. But if the
crusaders keep their wits about them, they
can enter a hidden crypt.
FEATURES OF THE ROOMFEATURES OF THE ROOMFEATURES OF THE ROOMFEATURES OF THE ROOM •The chamber is awash with a searing light;
a cyclone of flame slowly revolves in the
center of the room. Floating within the
flames is a multitude of charred skeletons,
tossed about slowly as though through
water.
•Four pedestals fashioned as dragon’s
claws stand in the chamber, atop which rest
stone skull-shaped basins. Each contains a
faintly glowing liquid, the light from which is
easily visible from the room’s entrance.
•Six statues of dragonspawn brandishing
shields are set into alcoves in the north and
south walls.
EXPLORATIONEXPLORATIONEXPLORATIONEXPLORATION Stone Basins
•Starting with the northwest basin and
moving counterclockwise, the basins have
the following characteristics:
•Northwest: Filled with clear green liquid,
a brass key rests at the bottom.
•Southwest: Filled with clear white liquid.
Nothing else is contained in it.
•Southeast: Filled with clear, hot, red
liquid. A set of iron tongs rest at the
bottom.
•Northeast: Filled with clear black liquid.
Nothing else is contained in it.
•Arcana (DC 17): Both the green and the
red liquids are enchanted with a
teleportation spell.
•Arcana (DC 19): The liquids have
alchemical properties when mixed.
•If a crusader touches either the green or
the red liquid, the crusader is instantly
teleported into the fiery cyclone, and the
trap is triggered (see “Encounter” below).
•If any other item, including a magical item,
touches the green or red liquid, the item is
destroyed. Only the iron tongs can safely
touch the green and red liquids.
Fiery Cyclone
•A reflection of the flames on metal
repeatedly gleams from within the fiery
cyclone.
•Perception (DC 17): One of the charred
skeletons clutches a set of warforged tools.
Dragonspawn Statues
•The shields bear the symbol of a four-
horned dragon.
•Perception (DC 15): The shields of the two
statues at the middle of the room are
spattered with dried blood.
•Thievery/Dungeoneering (DC 17): The two
statues at the middle of the room have
mechanical joints in the arms.
•If a crusader walks in one of the four
squares between a statue and the fiery
cyclone (shaded red on the map), the
statue makes a shield bash attack:
Attack: +7 vs. Fortitude
Hit: The target is pushed 2 squares. (See
“Encounter” below).
East Doors
•The doors are locked, and feature a brass
lock fashioned as a demonic skull.
•Thievery (DC 17): The lock can be picked.
On a failure, however, the would-be thief
must make a saving throw, or have his or her
body sucked through the lock and sprayed
into the corridor beyond the doors.
SoSoSoSolving the Puzzlelving the Puzzlelving the Puzzlelving the Puzzle The brass key opens the east doors, but
getting the key is the trick. The white and
black liquids can be safely manipulated.
When they are mixed together, they make a
cold, blue liquid. Mixing this blue liquid with
the hot, red liquid renders it inert, allowing
access to the iron tongs. The iron tongs can
then be used to retrieve the key. The puzzle
might also be solved by other inventive
means; for example, the liquid could be
conjured away.
www.dungeonoracle.com Vault of the wyrm prince
10
EncounterEncounterEncounterEncounter Starting the Encounter:
The encounter begins when a crusader
enters the fiery cyclone, whether by
touching one of the liquids in the basins or
by being shoved in by one of the statues.
Threats:
The fiery cyclone imprisons and burns would-
be intruders and eventually spews forth
charred skeletons and tongues of fire.
Meanwhile, a sliding wall trap threatens to
seal the crusaders in the chamber.
Ending the Encounter:
The encounter ends in one of two ways. If
the crusaders open the east doors, the
charred skeletons crumble to dust and the
fiery cyclone spews out any captive
crusaders. The east doors open onto a short
passage ending in the illusion of a blank
stone wall, which can be passed through as
though it did not exist. Alternatively, if the
crusaders escape the way they came, the
skeletons return to the fiery cyclone.
Fiery CyFiery CyFiery CyFiery Cycccclonelonelonelone
Fiery Cyclone (F) Level 3 Solo Lurker Trap
Initiative +10
All defenses 17
Immune non-cold attacks, damage
Traits
Grasp of the Damned
Creatures that enter the fiery cyclone take 5
fire damage and are grabbed by the charred
skeletons within (DC 17 to escape; see also
countermeasures).
Treasure in the Flames
One of the charred skeletons clutches a set of
warforged tools. A creature grabbed by the
fiery cyclone can grab it with a DC 17
Thievery check as a standard action.
Standard Actions
M Skeletonize – At-Will
Attack: Melee 0 (one grabbed creature), +6
vs. Fort.
Hit: 6d6 fire and necrotic damage. A
crusader reduced to 0 or fewer HP by this
attack has the flesh melted from his or her
bones and instantly spawns as a charred
skeleton (see below) outside the fiery
cyclone.
Minor Actions
Spew Charred Skeletons – Recharge 3 4 5 6
Effect: The fiery cyclone spews forth 4 charred
skeletons (see below), which attempt to pull
the crusaders into the cyclone. Place the
charred skeletons in unoccupied squares
adjacent to the fiery cyclone.
Tongues of Unhallowed Flame – At-Will
Attack: Ranged 10 (up to four different
creatures); +6 vs. Reflex.
Hit: 1d6+6 fire damage and ongoing 5
necrotic damage (save ends).
Countermeasures
Pull from the Flames
A crusader can try to pull a trapped ally from
the fiery cyclone with a DC 15 Athletics
check. Succeed or fail, the crusader takes 5
fire damage.
Freeze
Though the fiery cyclone is immune to
damage, it can be attacked by powers with
the cold keyword. When the cyclone takes
cold damage, it is weakened until the end of
its next turn. Similarly, the cold blue liquid
produced by mixing the white and black
liquids can be splashed on the cyclone to
similar effect.
www.dungeonoracle.com Vault of the wyrm prince
11
Sliding WallSliding WallSliding WallSliding Wall
Charred SkeletonCharred SkeletonCharred SkeletonCharred Skeleton
Sliding Wall
Level 1 Obstacle Trap
Initiative acts on an initiative count of 0
Standard Actions
Seal the Chamber – At-Will
The hidden wall slides 1 square north to south
along the shaded squares until the way out is
blocked.
Countermeasures
Hold Open the Way
A crusader can try to use his or her physical
strength to push the way open with a DC 15
Athletics check. A successful check prevents
the wall from closing on its next turn. A
creature between the sliding wall and the
south wall while the wall is closing takes 3d6+5
damage and is shunted to an adjacent
square (only if the gap is exactly 1 square).
Brace the Wall
A crusader can use an object to hold the wall
open. When the sliding wall strikes the object,
roll a d20. On an 11-20, the object holds and
the wall does not close this turn. On a 1-10,
the object is destroyed and the wall acts
normally.
Pry Open
Once closed, the wall can be slid open 1
square with a DC 19 Athletics check.
Charred Skeleton
Level 1 Minion Soldier
Medium natural animate (undead)
HP 1; missed attacks never damage minions.
Initiative acts after fiery cyclone
Perception +1, darkvision
AC 15, Fort 15, Reflex 13, Will 11
Speed 6
Immune disease, poison
Standard Actions
m Seize – At-Will
Attack: Melee 1 (one creature); +6 vs. AC.
Hit: 5 damage and the target is grabbed.
Move Actions
Drag to the Flames – At-Will
Effect: The charred skeleton shifts 2 squares
and pulls any creature it is grabbing with it.
Triggered Actions
C Turn to Ash – Encounter
Trigger: The charred skeleton is reduced to 0
or fewer HP.
Effect: The charred skeleton makes the
following attack as a free action.
Attack: Close burst 1 (enemies in burst); +4 vs.
Fortitude.
Hit: 10 fire and necrotic damage.
www.dungeonoracle.com Vault of the wyrm prince
12
4. 4. 4. 4. THREE RIVERTHREE RIVERTHREE RIVERTHREE RIVER CRYPT CRYPT CRYPT CRYPT
The Wyrm Prince honors his long-dead foe,
the Three-River Paladin, in this small crypt in
the hope that another worthy adversary
may come to challenge him. But he has left
two guards over the crypt, and the Paladin
will not hand over his hallowed blade to
unworthy crusaders.
Features of the Features of the Features of the Features of the RoomRoomRoomRoom •Four pillars of polished black stone support
a domed ceiling above.
•Three identical large stone sarcophagi
stand in triangular alcoves, each depicting
a knight in repose, a powerful gauntlet
clutching a sword across his chest.
•A great seal in the center of the crypt
reads, “Here rests the only foe worthy the
Wyrm Prince. He who names the honored
dead may wield the blade again.”
ExplorationExplorationExplorationExploration Sarcophagi
•Every detail of these three standing
sarcophagi is exactly the same.
•Thievery/Dungeoneering/Perception (DC
15): The lids of each of the sarcophagi are
set on hinges so that they can swing open.
•Arcana (DC 15): Necromantic power is
contained within the sarcophagi.
•If a sarcophagus is touched or disturbed in
any way, it springs open and out steps a
desiccated corpse wearing a decrepit suit
of armor and missing its left hand (see
“Encounter” below).
Great Seal
•The words of the seal surround the image
of three paladins, identical except that one
holds a shining sword to the sky, while the
other two hold broken swords.
•Dungeoneering/Perception (DC 21): The
great seal is a hatch that can be opened,
though the way to open it is not apparent.
Pillars
•The pillars are warm to the touch. Tiny
tendrils of smoke rise from pores in the black
stone of the pillars.
EncounterEncounterEncounterEncounter Naming the Three-River Paladin:
The encounter begins once one of the
sarcophagi is disturbed. Only one of the
sarcophagi, the southern one, contains the
true Three-River Paladin; the other two are
phantom doppelgangers. The crusaders’
task is to identify the true Three-River
Paladin. All three of the undead look
exactly the same. When each emerges, it
speaks the following:
“HAIL ME AS THE THREE-RIVER PALADIN, THAT YOU
MIGHT SLAY THE PRINCE.”
Only the undead in the disturbed
sarcophagus emerges, so the crusaders
might make the mistake (or have the good
fortune) of naming the first undead they
encounter. If the crusaders name the true
Paladin, the two false paladins crumble to
dust, and the crusaders must prove their
worthiness (see below). If, however, the
crusaders name one of the phantom
doppelgangers as the Paladin, the true
Paladin crumbles to dust, and the two false
paladins take the following action:
Phantasmal Possession
The false paladins change to phantom form
and attack the crusader who failed to name
the true Paladin. That crusader must make 2
saving throws:
Two successful saves: 1d10 unhealable
necrotic damage.
One failed save: 1d10 unhealable necrotic
damage and the target is possessed (no
save). The first time the target acts in any
combat encounter, he or she is dominated by
a phantom. Tell the target that he or she is
possessed, but do not share the game effects
until they take place.
Two failed saves: The target becomes a
phantom, losing his or her free will. The former
crusader travels through the walls of the crypt
directly to Room 14.
www.dungeonoracle.com Vault of the wyrm prince
13
Determining the True Paladin:
In order to name the true Three-River
Paladin, the crusaders must ask each of the
undead creatures questions and measure
their answers carefully. The following section
contains some sample questions the
crusaders may ask along with answers from
each of the undead. It also contains
general guidelines to determine how each
creature might respond to other questions
the crusaders will ask. The essential key in
discerning the identity of the true paladin,
however, is that while the false paladins
glorify themselves and those who serve
them, the true paladin honors the gods from
whom his power derives.
North Sarcophagus (False Paladin)
•General Guideline: This “paladin” attributes
his success to his own physical strength, his
skill with a blade, and his unflinching
courage.
West Sarcophagus (False Paladin)
•General Guideline: This “paladin” attributes
his success to his own virtue, his will to
sacrifice, and his own compassion.
South Sarcophagus (True Paladin)
•General Guideline: The true Paladin does
not glorify himself, but rather the gods he
serves and the people and the lands he
fought to protect.
Sample Questions
•“Whom do you serve?”
•North: “THE MEN AND WOMEN WHO HAVE
FOUGHT AND DIED AT MY RIGHT HAND.”
•West: “THOSE WHO HEAR MY WORD AND HEED
MY CALL TO REPENT.”
•South: “THE GOD OF JUSTICE, RETRIBUTION,
AND PEACE, ALONG WITH ALL WHO LONG FOR
SUCH THINGS.”
•“What are the Three Rivers?”
•North: “THEY ARE MY BLOOD, MY SWEAT, AND
MY TEARS, WHICH GIVE ME THE MIGHT TO
VANQUISH MY FOES.”
•West: “THEY ARE THREE SACRED RIVERS, THE EL,
THE VOLAS, AND THE RED, WHICH WERE MADE
HOLY BY THE SACRIFICE OF MY LIFE.”
•South: “THEY ARE WISDOM, PURPOSE, AND
STRENGTH, WHICH POUR FORTH FROM THE MOUTHS
OF THE GODS.”
•“Are you the Three-River Paladin?”
•All: “I AM.”
Proving Worthiness to Wield the Blade:
If the crusaders name the true Paladin, the
two false paladins dissolve to dust, their
screams fading quickly into the quiet of the
room. The true Paladin steps forward,
saying, “You have answered truthfully. But
are you worthy to bear Solfang, the blade
given me by the gods?” The crusaders must
then engage in the A Sign of Your Worth skill
challenge.
A SIGN OF YOUR WORTHA SIGN OF YOUR WORTHA SIGN OF YOUR WORTHA SIGN OF YOUR WORTH
A Sign of Your Worth
Level 2 Complexity 2 Skill Challenge
Goal: The crusaders need to convince the
Three-River Paladin to bestow his sword upon
them.
Skill Checks
Primary DC 21 Secondary DC 15
Trump: A crusader proves that he or she is a
worshiper of a good god (earns 1 success; 1
per challenge). A crusader channels radiant
power (earns 1 success; 1 per challenge). A
crusader reveals a body part of a dead
dragon (earns 1 success; 1 per challenge).
Trick: A crusader offers a mildly convincing
reason (+2 to next check). A crusader offers a
fairly convincing reason (+5). A crusader
offers a highly convincing reason (+10). Fold: A crusader uses Intimidate on the
Paladin (earns 1 failure). A crusader boasts of
his or her personal skill (earns 1 failure). At least
one crusader is a worshiper of an evil god
(earns 2 failures). A crusader attempts to fight
the Paladin (earns 3 failures).
Resolution
Success (6)
The Paladin bows, and the great seal lifts,
revealing a spiral staircase that descends into
Room 11B. The Paladin offers the crusaders a
blessing in their quest to slay the Wyrm Prince
before returning to his sarcophagus.
Failure (3)
The Paladin's body dissolves in a howling
wind, and his disembodied voice mourns,
"WHEN WILL THE WORTHY ONE COME?" The great seal
cannot be removed.
www.dungeonoracle.com Vault of the wyrm prince
14
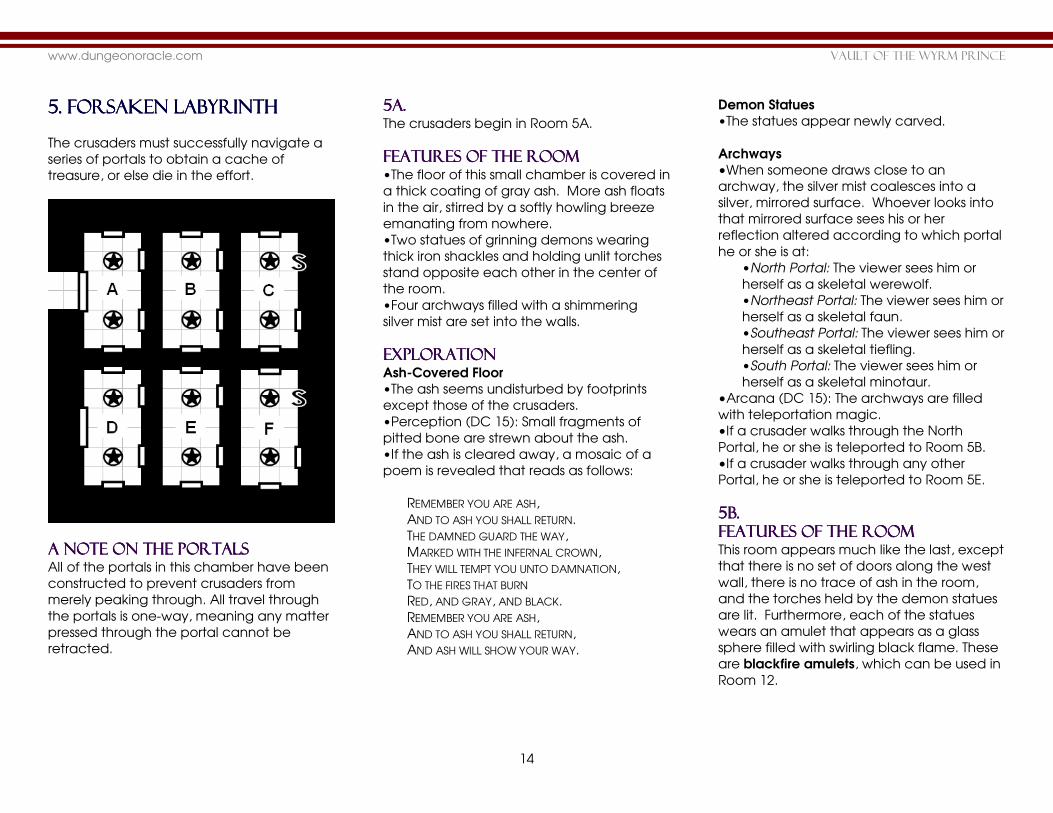
5. forsaken labyrinth5. forsaken labyrinth5. forsaken labyrinth5. forsaken labyrinth
The crusaders must successfully navigate a
series of portals to obtain a cache of
treasure, or else die in the effort.
A Note on the portalsA Note on the portalsA Note on the portalsA Note on the portals All of the portals in this chamber have been
constructed to prevent crusaders from
merely peaking through. All travel through
the portals is one-way, meaning any matter
pressed through the portal cannot be
retracted.
5A.5A.5A.5A. The crusaders begin in Room 5A.
Features of the Features of the Features of the Features of the roomroomroomroom •The floor of this small chamber is covered in
a thick coating of gray ash. More ash floats
in the air, stirred by a softly howling breeze
emanating from nowhere.
•Two statues of grinning demons wearing
thick iron shackles and holding unlit torches
stand opposite each other in the center of
the room.
•Four archways filled with a shimmering
silver mist are set into the walls.
ExplorationExplorationExplorationExploration Ash-Covered Floor
•The ash seems undisturbed by footprints
except those of the crusaders.
•Perception (DC 15): Small fragments of
pitted bone are strewn about the ash.
•If the ash is cleared away, a mosaic of a
poem is revealed that reads as follows:
REMEMBER YOU ARE ASH,
AND TO ASH YOU SHALL RETURN.
THE DAMNED GUARD THE WAY,
MARKED WITH THE INFERNAL CROWN,
THEY WILL TEMPT YOU UNTO DAMNATION,
TO THE FIRES THAT BURN
RED, AND GRAY, AND BLACK.
REMEMBER YOU ARE ASH,
AND TO ASH YOU SHALL RETURN,
AND ASH WILL SHOW YOUR WAY.
Demon Statues
•The statues appear newly carved.
Archways
•When someone draws close to an
archway, the silver mist coalesces into a
silver, mirrored surface. Whoever looks into
that mirrored surface sees his or her
reflection altered according to which portal
he or she is at:
•North Portal: The viewer sees him or
herself as a skeletal werewolf.
•Northeast Portal: The viewer sees him or
herself as a skeletal faun.
•Southeast Portal: The viewer sees him or
herself as a skeletal tiefling.
•South Portal: The viewer sees him or
herself as a skeletal minotaur.
•Arcana (DC 15): The archways are filled
with teleportation magic.
•If a crusader walks through the North
Portal, he or she is teleported to Room 5B.
•If a crusader walks through any other
Portal, he or she is teleported to Room 5E.
5B.5B.5B.5B. FEATURES OF THE ROOMFEATURES OF THE ROOMFEATURES OF THE ROOMFEATURES OF THE ROOM This room appears much like the last, except
that there is no set of doors along the west
wall, there is no trace of ash in the room,
and the torches held by the demon statues
are lit. Furthermore, each of the statues
wears an amulet that appears as a glass
sphere filled with swirling black flame. These
are blackfire amulets, which can be used in
Room 12.
www.dungeonoracle.com Vault of the wyrm prince
15
EXPLORATIONEXPLORATIONEXPLORATIONEXPLORATION Archways
•When someone draws close to an
archway, the silver mist billows out,
becoming a thick cloud that fully obscures
the archway.
•Insight or Nature (DC 15): The silver mist is
combustible.
•If a flame is touched to the silver mist, it
briefly burns a color as follows:
•North Portal: The flames are gray.
•Northeast Portal: The flames are red.
•Southeast Portal: The flames are purple.
•South Portal: The flames are black.
•If a crusader walks through the Southeast
Portal, he or she is teleported to Room 5C.
•If a crusader walks through any other
Portal, he or she is teleported to Room 5F.
5C.5C.5C.5C. Features of the Features of the Features of the Features of the RoomRoomRoomRoom The torches are again unlit, and there are
no doors in the west wall. Furthermore,
there are only three portals in this room.
ExplorationExplorationExplorationExploration Archways
• The silver mist makes no reaction when
approached.
•If a crusader applies ash to the section of
the wall where a fourth portal should be, the
secret portal is revealed.
•If a crusader walks through the Secret
Portal, he or she is teleported to Room 5G.
•If a crusader walks through any other
Portal, roll a d20. On a 1-10, he or she is
teleported to 5D; on an 11-20, he or she is
teleported to 5A.
5D.5D.5D.5D. When a crusader appears in this room, he or
she loses 1 healing surge and appears ten
years older.
Room 5D appears exactly as 5A, except the
statues appear cracked and crumbling,
and the double doors in the west wall open
onto blank stone. All other features of Room
5D (including the poem beneath the ash-
covered floor) are the same as 5A, except
for the following:
•If a crusader walks through the North
Portal, he or she is teleported to Room 5B.
•If a crusader walks through any other
Portal, he or she is teleported to Room 5E.
5E.5E.5E.5E. When a crusader appears in this room, he or
she loses 1 healing surge and appears ten
years older.
Room 5E appears exactly as 5B, except the
statues appear cracked and crumbling,
and the flagstones in this room have
crumbled almost to dust. All other features
of Room 5E are the same as 5B, except for
the following:
•If a crusader walks through the Southeast
Portal, he or she is teleported to Room 5C.
•If a crusader walks through any other
Portal, he or she is teleported to Room 5F.
5F.5F.5F.5F. When a crusader appears in this room, he or
she loses 1 healing surge and appears ten
years older.
Room 5F appears exactly as 5C, except the
statues have crumbled to mounds of rubble.
There are a number of skeletons in the room
equal to the number of crusaders in the
party, and they carry the same magic
weapons the party carry. When these items
are touched, they turn to dust. All other
features of Room 5F are the same as 5C,
except for the following:
•If a crusader walks through the Secret
Portal, he or she is teleported to Room 5A.
•If a crusader walks through any other
Portal, roll a d20. On a 1-10, he or she is
teleported to 5D; on an 11-20, he or she is
teleported to 5A.
If a crusader ever drops to 0 or fewer
healing surges in the Forsaken Labyrinth, he
or she dissolves to ashes, killed instantly.
5G.5G.5G.5G. The floor of this chamber glitters with
treasure (see “Treasure Cache” below). The
statues of demons have been replaced by
statues of dragonspawn priests, their hands
clasped as if in prayer. A set of double
doors inscribed with the symbol of a
pentagon lies ahead, to the right of which
stands a portal filled with a crimson mist.

www.dungeonoracle.com Vault of the wyrm prince
16
NAVIGATING THE LABYRNAVIGATING THE LABYRNAVIGATING THE LABYRNAVIGATING THE LABYRINTHINTHINTHINTH To safely navigate the labyrinth, the
crusaders must locate the mosaic poem
beneath the ash-covered floor in Room 5A
or 5D and correctly interpret its cryptic clues:
REMEMBER YOU ARE ASH,
AND TO ASH YOU SHALL RETURN.
[Just as ash begins the journey
through the labyrinth, so too does it
end it.]
THE DAMNED GUARD THE WAY,
MARKED WITH THE INFERNAL CROWN,
THEY WILL TEMPT YOU UNTO DAMNATION,
[The “infernal crown” refers to the
horns of demons. Of the reflections in
the portals, only the werewolf lacks
horns.]
TO THE FIRES THAT BURN
RED, AND GRAY, AND BLACK.
[“Damnation,” or death in the
labyrinth, lies behind the portals
whose mist burns red, gray, and
black. Therefore, only the purple-
flamed portal is safely passed.]
REMEMBER YOU ARE ASH,
AND TO ASH YOU SHALL RETURN,
AND ASH WILL SHOW YOUR WAY.
[Ash “shows the way” when applied
to the empty space of the wall.]
6. SHADOW SANCTUARY6. SHADOW SANCTUARY6. SHADOW SANCTUARY6. SHADOW SANCTUARY
A cipher puzzle in this sanctuary will allow
the crusaders to move deeper into the lair.
One wrong move, however, will make
solving the puzzle much more difficult, and
much more dangerous.
FEATURES OF THE FEATURES OF THE FEATURES OF THE FEATURES OF THE ROOMROOMROOMROOM •An unnatural, perfect darkness fills most of
the sanctuary, save for four small pools of
light afforded by torches of silver flame
placed into holders on the east and west
walls.
•The four torches create a pool of light that
extends 20 feet before being abruptly
swallowed by darkness.
•The stench of sulfur hangs on the stale air,
and the sound of dripping emanates from
the darkness.
EXPLORATIONEXPLORATIONEXPLORATIONEXPLORATION Unnatural Darkness
•The silver-flamed torches afford 4 squares
of illumination. All other light sources
illuminate only 1 square.
•Arcana (DC 15): The darkness is a cloud of
summoned shadow.
Silver-Flamed Torches
•These torches burn without heat and are
easily removed from their holders.
•Arcana (DC 15): The torches are
everburning.
•Thievery/Perception (DC 17): Each of the
torches is depressing a carefully-hidden
pressure plate.
•If a torch is removed without a successful
DC 17 Thievery check, the cloud of shadow
collects into the massive hourglass in the
center of the room and begins pouring from
the top half to the bottom (see “Encounter”
below).
TREASURE CACHETREASURE CACHETREASURE CACHETREASURE CACHE The chamber contains 500 gp and a
Fragment of Foebreaker. Additionally, each
crusader may draw 1 treasure card. The
pentagon-inscribed doors lead back to Room
1, and the portal leads to Room 9. Creatures
that leave Room 5 revert to their usual
appearance.
www.dungeonoracle.com Vault of the wyrm prince
17
FURTHER FEATURES OF FURTHER FEATURES OF FURTHER FEATURES OF FURTHER FEATURES OF THE THE THE THE ROOMROOMROOMROOM The following features are revealed once
the trap has been triggered, or when the
crusaders begin exploring the rest of the
room:
•Water drips from the ceiling, draining down
the sides of a massive, 20-foot tall, bronze
hourglass that rests at the center of the
room. A series of symbols etched on the
floor surrounds the hourglass on each side.
•Another set of similar runes is etched onto
a set of double doors at the far end of the
chamber (Attachment #1).
•In alcoves toward the back of the room
stand four statues of hooded dragonspawn
priests weeping tears of searing liquid sulfur.
The statues hold large basins, each basin
made of a different material. Starting with
the northwest statue and moving
counterclockwise, the basins are
respectively made of crystal, steel, stone,
and ivory.
ENCOUNTERENCOUNTERENCOUNTERENCOUNTER As long as the crusaders avoid triggering the
trapped torches, they can leisurely take
their time in solving the puzzle. If, however,
the crusaders remove a silver-flamed torch
without taking the proper precautions, they
activate a trap that will limit the time they
have to solve the puzzle. If a torch is
triggered, an iron gate falls behind the
crusaders and the cloud of shadow collects
in the hourglass. Once the cloud of shadow
begins to flow through the hourglass, the
crusaders have 10 minutes of real time to
solve the puzzle. When time expires, the
sulfuric tears from the statues vaporize, filling
the chamber with caustic gas. Creatures in
the room must make a DC 15 Endurance
check or become a statue of crystallized
sulfur, perfectly aware of their surroundings
but unable to take any action. Consider
them dead. Creatures that succeed instead
lose 1d4 healing surges. Creatures that are
reduced to 0 or fewer healing surges in this
way are likewise crystallized.
FURTHER EXPLORATIONFURTHER EXPLORATIONFURTHER EXPLORATIONFURTHER EXPLORATION Bronze Hourglass
•The wrought bronze of the hourglass has
been shaped to depict legions of dragons
brandishing whips at demons, who are
being forced into a lake of a boiling liquid,
choking on the gas that billows up from it.
Dragonspawn Priest Statues
•Each of the basins held by the statues is
filled with wine.
•Perception (DC 15): The floor near all of the
statues is coated with a very light dusting of
some powdered substance.
•Heal/History (DC 17): The substance is
Kingsbane, an exceptionally deadly poison
that is completely undetectable once
dissolved in liquid, making it a favorite of
assassins.
•All but the stone basin are poisoned: If any
crusader drinks from any but the stone
basin, they soon begin to cough up blood.
Inform the crusader that he or she will be
dead in one hour of real time unless an
antidote can be found. If a poisoned
crusader drinks from another poisoned
vessel, he or she dies instantly.
•Drinking from the stone basin has no
harmful effect. Instead the alcove revolves
halfway, revealing a secret passage to
Room 5G.
Southern Doors
•The doors are thick steel, warm to the
touch, and locked tightly.
•Perception (DC 15): The smell of burning
embers and the sound of crackling flames
seep out of the cracks around the door.
•Arcana/Thievery (DC 15): The locking
mechanism is quite complex and has some
kind of magical trigger.
•The doors open only when the puzzle has
been solved.
SOLVING THE PUZZLESOLVING THE PUZZLESOLVING THE PUZZLESOLVING THE PUZZLE The runes surrounding the hourglass are a
cipher, each corresponding to a cardinal
direction (North, East, South, West). Once
the crusaders figure out the cipher, they
should be able to decode the runes on the
doors. Once decoded, the runes read as
follows: “TO OPEN THE GATES, STIR WATER AND THE
TEARS WITH THE WINE. // DRINK FROM THE STONE BASIN
TO OPEN A SECRET DOOR.”
The crusaders will not have all the letters
they need to decode the runes, so there will
be a limited amount of guesswork. If the
crusaders add water and the sulfuric tears
to each basin of wine, the doors at the far
side of the chamber unlock, the trap (if
triggered) stops, the iron gate (if down) lifts,
and the southern doors unlock.
www.dungeonoracle.com Vault of the wyrm prince
18
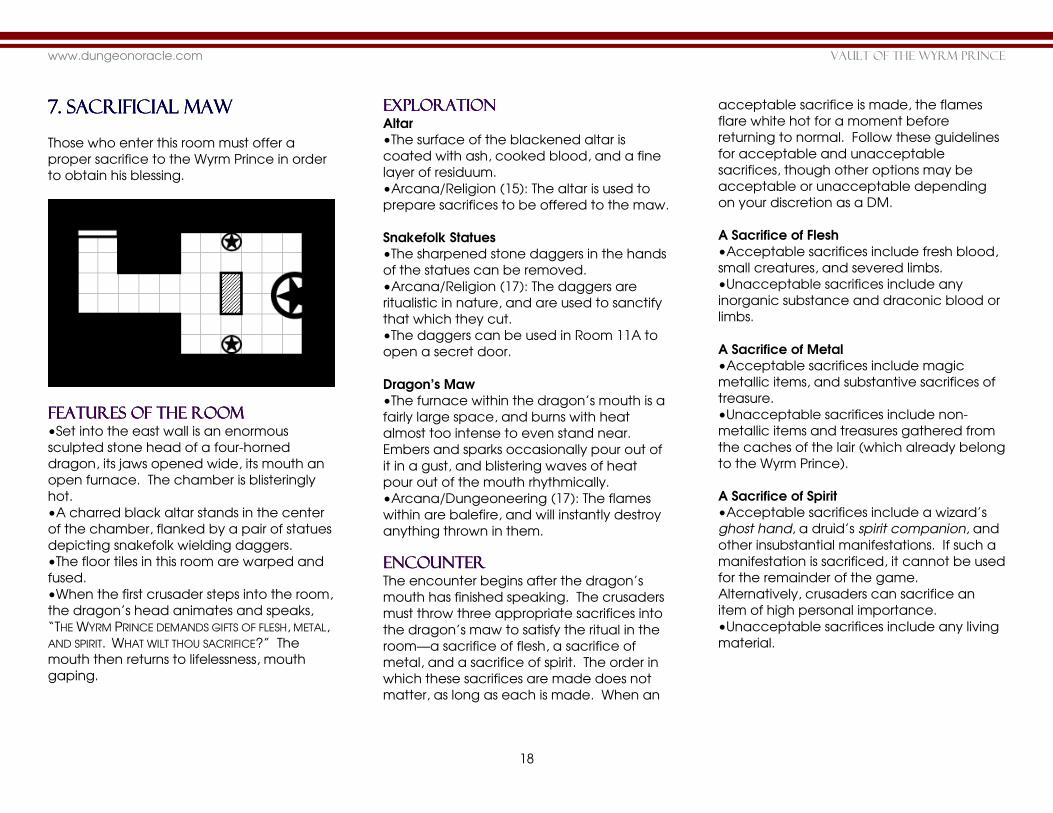
7. Sacrificial maw7. Sacrificial maw7. Sacrificial maw7. Sacrificial maw
Those who enter this room must offer a
proper sacrifice to the Wyrm Prince in order
to obtain his blessing.
FEATURES OF THE FEATURES OF THE FEATURES OF THE FEATURES OF THE ROOMROOMROOMROOM •Set into the east wall is an enormous
sculpted stone head of a four-horned
dragon, its jaws opened wide, its mouth an
open furnace. The chamber is blisteringly
hot.
•A charred black altar stands in the center
of the chamber, flanked by a pair of statues
depicting snakefolk wielding daggers.
•The floor tiles in this room are warped and
fused.
•When the first crusader steps into the room,
the dragon’s head animates and speaks,
“THE WYRM PRINCE DEMANDS GIFTS OF FLESH, METAL,
AND SPIRIT. WHAT WILT THOU SACRIFICE?” The
mouth then returns to lifelessness, mouth
gaping.
EXPLORATIONEXPLORATIONEXPLORATIONEXPLORATION Altar
•The surface of the blackened altar is
coated with ash, cooked blood, and a fine
layer of residuum.
•Arcana/Religion (15): The altar is used to
prepare sacrifices to be offered to the maw.
Snakefolk Statues
•The sharpened stone daggers in the hands
of the statues can be removed.
•Arcana/Religion (17): The daggers are
ritualistic in nature, and are used to sanctify
that which they cut.
•The daggers can be used in Room 11A to
open a secret door.
Dragon’s Maw
•The furnace within the dragon’s mouth is a
fairly large space, and burns with heat
almost too intense to even stand near.
Embers and sparks occasionally pour out of
it in a gust, and blistering waves of heat
pour out of the mouth rhythmically.
•Arcana/Dungeoneering (17): The flames
within are balefire, and will instantly destroy
anything thrown in them.
EEEENCOUNTERNCOUNTERNCOUNTERNCOUNTER The encounter begins after the dragon’s
mouth has finished speaking. The crusaders
must throw three appropriate sacrifices into
the dragon’s maw to satisfy the ritual in the
room—a sacrifice of flesh, a sacrifice of
metal, and a sacrifice of spirit. The order in
which these sacrifices are made does not
matter, as long as each is made. When an
acceptable sacrifice is made, the flames
flare white hot for a moment before
returning to normal. Follow these guidelines
for acceptable and unacceptable
sacrifices, though other options may be
acceptable or unacceptable depending
on your discretion as a DM.
A Sacrifice of Flesh
•Acceptable sacrifices include fresh blood,
small creatures, and severed limbs.
•Unacceptable sacrifices include any
inorganic substance and draconic blood or
limbs.
A Sacrifice of Metal
•Acceptable sacrifices include magic
metallic items, and substantive sacrifices of
treasure.
•Unacceptable sacrifices include non-
metallic items and treasures gathered from
the caches of the lair (which already belong
to the Wyrm Prince).
A Sacrifice of Spirit
•Acceptable sacrifices include a wizard’s
ghost hand, a druid’s spirit companion, and
other insubstantial manifestations. If such a
manifestation is sacrificed, it cannot be used
for the remainder of the game.
Alternatively, crusaders can sacrifice an
item of high personal importance.
•Unacceptable sacrifices include any living
material.
www.dungeonoracle.com Vault of the wyrm prince
19
When a crusader makes a sacrifice that
could be acceptable, the dragon’s mouth
asks, “WHY DOES THIS SACRIFICE BEFIT THE MAJESTY
OF THE PRINCE?” The crusaders must then
provide an appropriate answer to the
question. Keep in mind the following points
when measuring the appropriateness of the
crusaders’ responses:
•The Wyrm Prince believes that dragons are
a master race, destined to rule all worlds.
Anything that promotes the interests of
dragon-kind will be looked on with favor by
the Wyrm Prince.
•The Wyrm Prince despises all demons. He
believes his mother, a she-demon, caused
the downfall of his father. Anything that
serves as a curse to demon-kind will be
looked on with favor by the Wyrm Prince.
Conversely, if the crusaders try to honor his
infernal heritage, their attempt will
automatically fail.
•The Wyrm Prince is incredibly vain and
responds well to gratuitous worship.
•The Wyrm Prince respects his ancient foe,
the Three-River Paladin, and thus respects
courage and self-sacrifice. Those who
honor the Three-River Paladin will do well
with the Wyrm Prince. Conversely, he will
not tolerate those who disparage the Three-
River Paladin.
If the crusaders provide any unacceptable
sacrifice, or if their justifications for the
sacrifice are judged insufficient, the
dragon’s maw makes the following attack:
Once the crusaders fulfill each of the
sacrifices, the maw speaks a final time—
“YOUR SACRIFICES ARE ACCEPTABLE. THE WAY IS
OPEN.” The maw closes, and the crusaders
hear three distinct scrapes of metal
somewhere in the chambers behind. In
Room 1, Door E (the Dragon Door) has
unlocked. Additionally, if the crusaders used
the sacrificial knives and altar and
managed not to trigger the maw’s attack,
they also hear the deafening sound of
crumbling stone—the graven lord in Room 2
crumbles to dust, leaving the great emerald
exposed.
As a final note, creatures that enter the
dragon’s maw are instantly killed.
Breath of the Maw
Attack: All creatures in Room 7 and the
adjoining corridor; +6 vs. AC
Hit: 2d10+3 fire damage (miss: half damage).
This damage cannot be healed until the ritual
ends.
www.dungeonoracle.com Vault of the wyrm prince
20
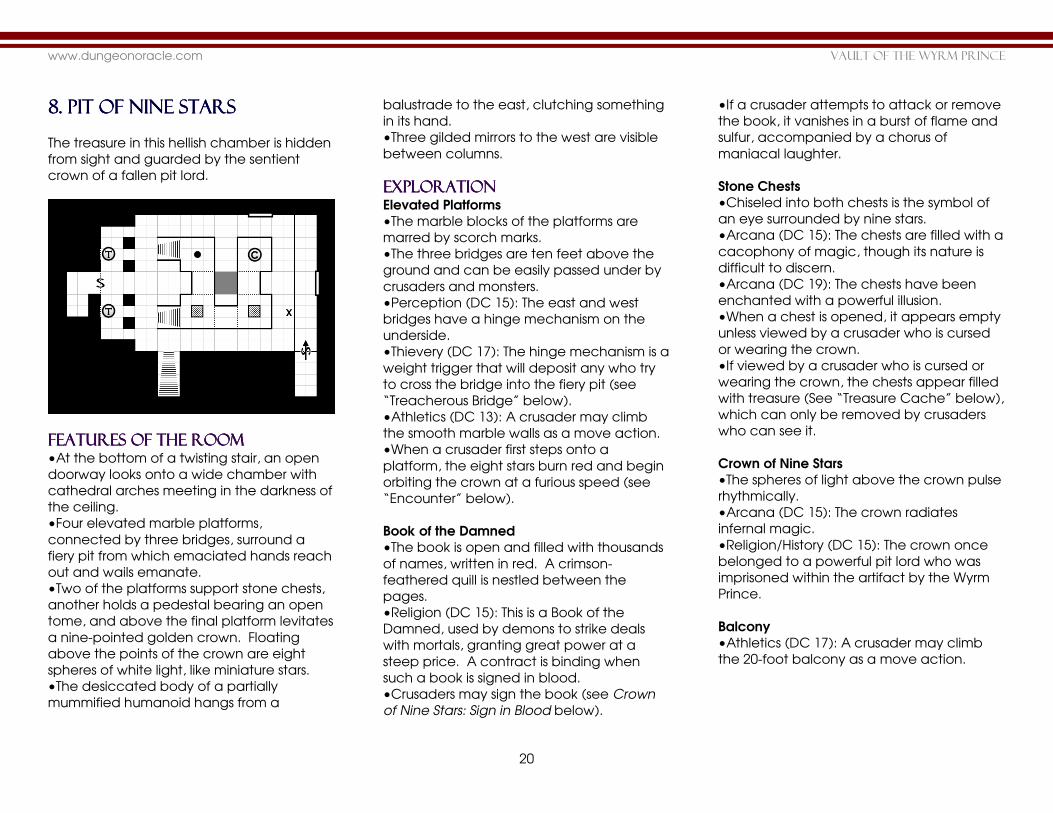
8. Pit of Ni8. Pit of Ni8. Pit of Ni8. Pit of Nine Starsne Starsne Starsne Stars
The treasure in this hellish chamber is hidden
from sight and guarded by the sentient
crown of a fallen pit lord.
FEATURES OF THE FEATURES OF THE FEATURES OF THE FEATURES OF THE ROOMROOMROOMROOM •At the bottom of a twisting stair, an open
doorway looks onto a wide chamber with
cathedral arches meeting in the darkness of
the ceiling.
•Four elevated marble platforms,
connected by three bridges, surround a
fiery pit from which emaciated hands reach
out and wails emanate.
•Two of the platforms support stone chests,
another holds a pedestal bearing an open
tome, and above the final platform levitates
a nine-pointed golden crown. Floating
above the points of the crown are eight
spheres of white light, like miniature stars.
•The desiccated body of a partially
mummified humanoid hangs from a
balustrade to the east, clutching something
in its hand.
•Three gilded mirrors to the west are visible
between columns.
EXPLORATIONEXPLORATIONEXPLORATIONEXPLORATION Elevated Platforms
•The marble blocks of the platforms are
marred by scorch marks.
•The three bridges are ten feet above the
ground and can be easily passed under by
crusaders and monsters.
•Perception (DC 15): The east and west
bridges have a hinge mechanism on the
underside.
•Thievery (DC 17): The hinge mechanism is a
weight trigger that will deposit any who try
to cross the bridge into the fiery pit (see
“Treacherous Bridge” below).
•Athletics (DC 13): A crusader may climb
the smooth marble walls as a move action.
•When a crusader first steps onto a
platform, the eight stars burn red and begin
orbiting the crown at a furious speed (see
“Encounter” below).
Book of the Damned
•The book is open and filled with thousands
of names, written in red. A crimson-
feathered quill is nestled between the
pages.
•Religion (DC 15): This is a Book of the
Damned, used by demons to strike deals
with mortals, granting great power at a
steep price. A contract is binding when
such a book is signed in blood.
•Crusaders may sign the book (see Crown
of Nine Stars: Sign in Blood below).
•If a crusader attempts to attack or remove
the book, it vanishes in a burst of flame and
sulfur, accompanied by a chorus of
maniacal laughter.
Stone Chests
•Chiseled into both chests is the symbol of
an eye surrounded by nine stars.
•Arcana (DC 15): The chests are filled with a
cacophony of magic, though its nature is
difficult to discern.
•Arcana (DC 19): The chests have been
enchanted with a powerful illusion.
•When a chest is opened, it appears empty
unless viewed by a crusader who is cursed
or wearing the crown.
•If viewed by a crusader who is cursed or
wearing the crown, the chests appear filled
with treasure (See “Treasure Cache” below),
which can only be removed by crusaders
who can see it.
Crown of Nine Stars
•The spheres of light above the crown pulse
rhythmically.
•Arcana (DC 15): The crown radiates
infernal magic.
•Religion/History (DC 15): The crown once
belonged to a powerful pit lord who was
imprisoned within the artifact by the Wyrm
Prince.
Balcony
•Athletics (DC 17): A crusader may climb
the 20-foot balcony as a move action.
www.dungeonoracle.com Vault of the wyrm prince
21
Fiery Pit
•This ten-foot wide pit looks like a sinkhole
into hell itself. The pit descends thousands of
feet out of sight into a fiery abyss.
Thousands of emaciated wretches line the
walls of the pit, stretching their hands out to
any who draw near.
Hanging Mummy (X)
•Visible beneath the unraveling wrappings is
a set of dusty thief’s tools. The humanoid
husk clutches a scroll tube in its right hand.
•The scroll tube may be removed as minor
action. Elven runes encircling the tube
read, “ALL IS NOT AS IT SEEMS.” The tube
contains a scroll of summoning. When read,
the scroll summons a random treasure.
•Perception/Thievery (DC 15): The scroll
tube has a false bottom. Hidden beneath it
is a small, glowing sphere of light (white or
red, depending if combat has begun or
not)—the ninth star.
Gilded Mirrors
•The mirrors show the crusaders, their eyes
gouged out by encircling crows.
•Perception/Dungeoneering (DC 19): The
middle mirror is a secret door. It opens easily
as a minor action.
•At the beginning of the third round of
combat, two tormented reflections step out
of the mirrors, acting after the damned
wretches.
ENCOUNTERENCOUNTERENCOUNTERENCOUNTER Starting the Encounter:
The encounter begins when a crusader
takes his or her first step onto one of the
raised platforms. Note that the crusaders
may avoid the encounter altogether and
simply leave if they avoid the platforms.
Threats:
The crown of nine stars rains down infernal
spells while damned wretches crawl from
the pit. Tormented reflections emerge from
the mirrors at the top of the second round.
Ending the Encounter:
The encounter ends when the crown is
destroyed or disabled, at which point all of
the monsters instantly dissolve to ash. The
monsters do not pursue the crusaders from
the room.
CROWN OF NINE STARSCROWN OF NINE STARSCROWN OF NINE STARSCROWN OF NINE STARS
Crown of Nine Stars (C)
Level 3 Elite Blaster Trap
HP 130, Bloodied 65
Initiative +10
AC 14, Fort 16, Reflex 12, Will 18
Resist 5 poison, radiant, lightning, fire,
necrotic, all conditions, all ongoing damage
except acid
Vulnerable 5 acid
Traits
Regal Vision
Creatures wearing the crown of nine stars can
see the invisible treasure in the chests.
Standard Actions
Attack – At-Will
The crown makes one of the following attacks
each round in the order shown. After the sixth
round, the sequence repeats.
Round 1 – Hellfire Bolt
Attack: Ranged 10 (one, two , or three
creatures); +6 vs. Reflex.
Hit: 2d6+6 fire and lightning damage, and the
target grants combat advantage until the
end of the crown's next turn.
Round 2 – Infernal Moon Curse
Attack: Ranged 10 (one creature); +6 vs.
Fortitude.
Hit: 3d8+4 damage, and the target is held
immobilized 5 feet off the ground by an
enormous summoned moon (save ends). First
failed save: the summoned moon falls and
crushes the target to death before
disappearing.
Round 3 – Hellfire Bolt (as above)
Round 4 – Upsetting Onslaught
Attack: Close burst 5 (enemies in burst); +6 vs.
Will.
Hit: 1d8+6 damage, and the target is dazed
until the end of its next turn. The target can
negate being dazed by using a free action to
deal 2d8 damage to itself.
Round 5 – Feast of Souls
Attack: Area burst 1 within 10 squares (each
creature in burst); +6 vs. Will.
Hit: The target loses 1d4 healing surges and is
dazed (save ends). If the target is already
dazed, instead its soul is consumed. Its body
continues living, unmoving and uncaring.
Consider the crusader dead. Targets reduced
to 0 or fewer healing surges by this attack are
likewise killed.
Round 6 – Recharge
Effect: The crown of nine stars regains 32 HP.
www.dungeonoracle.com Vault of the wyrm prince
22
Once the crown is disabled, reduced to 0 hit
points, or reunited with the ninth star, the
stars become invisible, and the crown falls
to the ground inert. The crusaders can use
the crown in Room 9.
PIT OF THE DAMNEDPIT OF THE DAMNEDPIT OF THE DAMNEDPIT OF THE DAMNED
Minor Actions
Shadow Armor – Recharge 6
Effect: The crown gains a +2 bonus to all
defenses until the end of the encounter. As a
minor action, the crown may end this effect
to teleport 5 squares, becoming invisible until
it makes an attack.
A Mirror Darkly – Recharge 6
Effect: The crown conjures a shadowy copy of
itself in an unoccupied square within 5
squares. The copy lasts until the end of the
crown's next turn. The copy can be attacked.
It uses the crown’s defenses and is destroyed
if it takes any damage. While the copy
persists, the original crown is insubstantial and
can attack from the copy's square.
Aftereffect: The crown may teleport to the
square formerly occupied by the copy.
Countermeasures
Counterspell
A crusader within 5 squares of the crown
trained in Arcana can ready an action to
counter its next attack. When the crown
attacks, the creature makes a DC 19 Arcana
check. On a success, the attack is rebounded
and the spell turret takes 10 damage. On a
failure, the crown uses infernal moon curse on
the crusader as a free action. Disable
Crusaders adjacent to the crown can
attempt a skill challenge to disable it (6
successes before 3 failures; Arcana or Thievery
DC 17). Success disables the crown. Failure
resets the challenge and causes the crown to
use upsetting onslaughts and feast of souls as
free actions. Skill checks made to disable the
spell turret while it recharges gain a +5 bonus.
Restore the Ninth Star
A crusader may reaffix the ninth star to the
crown as a standard action. The crown
clangs to the ground, its powers gone, and
the monsters discorporate. The treasure
becomes visible to all.
Sign in Blood
Crusaders that sign their names in the Book of
the Damned are immune to attacks until the
end of the encounter and become cursed.
At the beginning of the encounter in Room
14, reveal the Curse of Nine Stars card and
leave it in play.
Claim the Crown
A crusader adjacent to the crown may put it
on as a minor action. The crown may be
removed as a free action. When a crusader
puts on the crown or starts its turn with the
crown on, he or she is subjected to the
following attack:
Attack: Melee 0 (the creature wearing the
crown); +6 vs. Will, automatically misses
cursed creatures (see sign in blood).
Hit: The target is dominated (save ends).
Aftereffect: The crown teleports 5 squares.
Miss: The crusader may choose either to deal
25 damage to the crown or to automatically
receive 2 successes in the disable skill
challenge.
Pit of the Damned
Level 3 Obstacle Hazard
Initiative acts after crown of nine stars
Standard Actions
Pull Apart – At-Will
Attack: Melee 0 (all creatures grabbed by the
pit), automatic hit.
Hit: 2d6+3 damage.
Minor Actions
The Damned Rise – Recharge 3 4 5 6
Effect: 4 damned wretches emerge from the
pit, occupying squares adjacent to it.
Triggered Actions
Grab – At-Will
Trigger: A creature enters one of the pit's
squares.
Attack: Melee 0 (triggering creature), +6 vs.
Fortitude.
Hit: The target is grabbed (DC 15 to escape,
see also back you devils!).
Countermeasures
Back You Devils!
A grabbed crusader can make an attack
against the wretches grabbing him or her (see
defenses below). On a hit, the crusader gains
a +5 bonus to escape. A successful area
attack gains a +10 bonus instead.
Command Word
A crusader may speak the command word,
“infernum nix,” which causes any damned
wretches within 5 squares of the pit to be
sucked back in, destroying them (limit once
per encounter).

www.dungeonoracle.com Vault of the wyrm prince
23
TREACHEROUSTREACHEROUSTREACHEROUSTREACHEROUS BRIDGE BRIDGE BRIDGE BRIDGE
DAMNED WRETCHDAMNED WRETCHDAMNED WRETCHDAMNED WRETCH
TWISTED REFLECTIONTWISTED REFLECTIONTWISTED REFLECTIONTWISTED REFLECTION
Treacherous Bridge
Level 1 Obstacle Trap
Triggered Actions
Tilt
Trigger: A creature steps on one of the
bridge's spaces.
Effect: The bridge tilts down toward the pit of
the damned, making the following attack on
the triggering creature.
Attack: Melee 0 (triggering creature); +6 vs.
Reflex.
Hit: The target falls into the pit of the damned.
Miss: The target may move into any square on
the platform adjacent to the bridge.
Countermeasures
Disable
A crusader can disable the bridge’s trap
mechanism with a DC 19 Thievery check.
Leap Over
A crusader can jump over the bridge with a
DC 21 Athletics check or a DC 11 Athletics
check (running start).
Damned Wretch
Level 1 Minion Soldier
Medium natural animate (undead)
HP 1; missed attacks never damage minions.
Initiative acts after pit of the damned
Perception +1, darkvision
AC 13, Fort 14, Reflex 14, Will 11
Speed 6
Immune necrotic, disease, poison
Standard Actions
m Claw – At-Will
Attack: Melee 1 (one creature); +6 vs. AC.
Hit: 6 damage.
Triggered Actions
C Corrupting Ichor Explosion – Encounter
Trigger: The damned wretch is reduced to 0 or
fewer HP.
Attack: Close burst 1 (one creature); +6 vs.
AC.
Hit: 6 damage.
Effect: The damned wretch explodes into a
plume of ichor. Squares in the burst become
corrupted. Crusaders standing on corrupted
ground grant combat advantage and can
neither heal nor be healed.
Twisted Reflection (T)
Level 3 Brute
Medium natural beast (horror)
HP 30 Bloodied 15
Initiative acts after damned wretches
Perception +4, blindsight
AC 17, Fort 15, Reflex 13, Will 15
Speed 6
Immune fear
Resist 5 psychic
Traits
Mirror Image
When a twisted reflection enters combat, it
takes on the appearance of the closest
crusader, except with eyes gouged out and
encircled by carrion crows. Each reflection
must duplicate a different crusader. The
duplicated crusader takes a -2 penalty to
attack rolls against the reflection copying him
or her.
Carrion Crows – Aura 1
Bloodied enemies that enter the aura or start
their turn in the aura take 5 damage.
Standard Actions
m Envious Strike – At-Will
Attack: Melee 1 (one creature); +8 vs. AC.
Hit: 1d8+5 damage.
Special: If the target is the reflection's mirror
image, the reflection makes 2 attacks instead
of 1.
A Murder of Crows – Recharge 5 6
Attack: Area burst 1 within 10 (enemies in
burst); +6 vs. Fortitude.
Hit: 1d8+5 damage.
Triggered Actions
M Mirrored Strike – Recharge 5 6
Trigger: The twisted reflection sees its mirror
image make an encounter or at-will attack.
Effect (free action): The twisted reflection
makes the same attack, choosing new
targets.
TREASURE CACHETREASURE CACHETREASURE CACHETREASURE CACHE The east stone chest contains a jewel-
encrusted statuette of a many-legged
dragon (500 gp). The west stone chest
contains a Fragment of Foebreaker.
Additionally, each crusader may draw 1
treasure card.
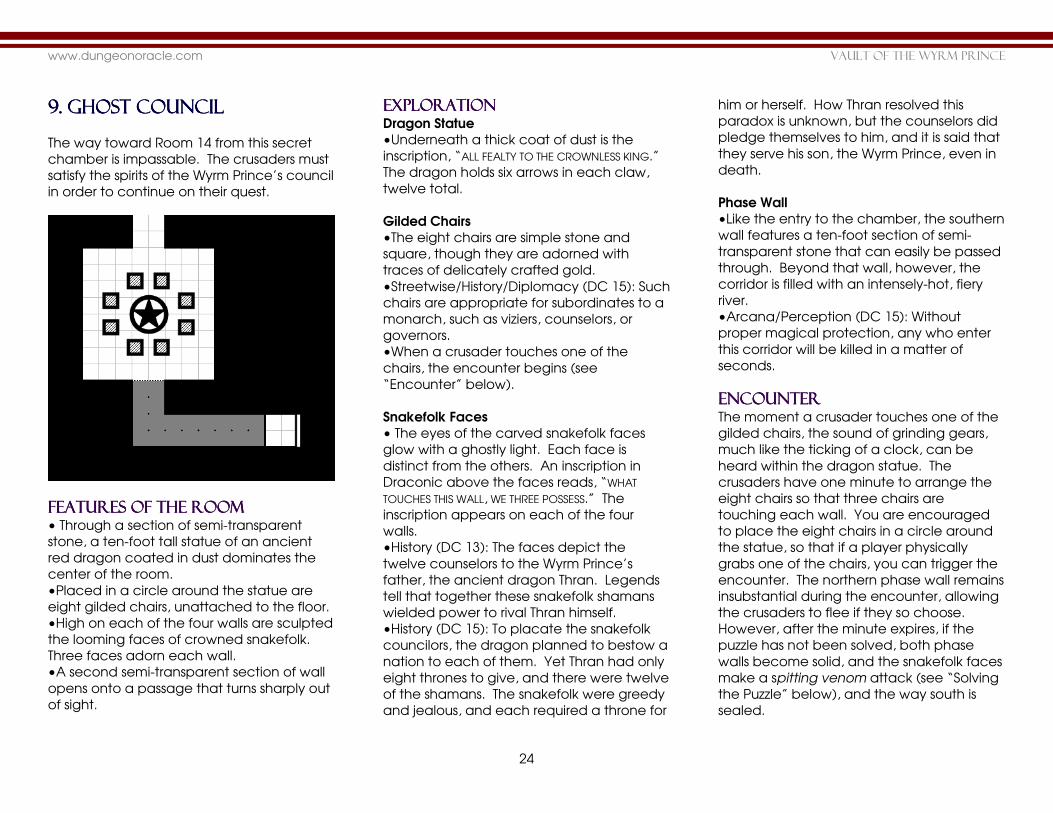
www.dungeonoracle.com Vault of the wyrm prince
24
9. GHOST COUNCIL9. GHOST COUNCIL9. GHOST COUNCIL9. GHOST COUNCIL
The way toward Room 14 from this secret
chamber is impassable. The crusaders must
satisfy the spirits of the Wyrm Prince’s council
in order to continue on their quest.
FEATURES OF THE FEATURES OF THE FEATURES OF THE FEATURES OF THE ROOMROOMROOMROOM • Through a section of semi-transparent
stone, a ten-foot tall statue of an ancient
red dragon coated in dust dominates the
center of the room.
•Placed in a circle around the statue are
eight gilded chairs, unattached to the floor.
•High on each of the four walls are sculpted
the looming faces of crowned snakefolk.
Three faces adorn each wall.
•A second semi-transparent section of wall
opens onto a passage that turns sharply out
of sight.
EXPLORATIONEXPLORATIONEXPLORATIONEXPLORATION Dragon Statue
•Underneath a thick coat of dust is the
inscription, “ALL FEALTY TO THE CROWNLESS KING.”
The dragon holds six arrows in each claw,
twelve total.
Gilded Chairs
•The eight chairs are simple stone and
square, though they are adorned with
traces of delicately crafted gold.
•Streetwise/History/Diplomacy (DC 15): Such
chairs are appropriate for subordinates to a
monarch, such as viziers, counselors, or
governors.
•When a crusader touches one of the
chairs, the encounter begins (see
“Encounter” below).
Snakefolk Faces
• The eyes of the carved snakefolk faces
glow with a ghostly light. Each face is
distinct from the others. An inscription in
Draconic above the faces reads, “WHAT
TOUCHES THIS WALL, WE THREE POSSESS.” The
inscription appears on each of the four
walls.
•History (DC 13): The faces depict the
twelve counselors to the Wyrm Prince’s
father, the ancient dragon Thran. Legends
tell that together these snakefolk shamans
wielded power to rival Thran himself.
•History (DC 15): To placate the snakefolk
councilors, the dragon planned to bestow a
nation to each of them. Yet Thran had only
eight thrones to give, and there were twelve
of the shamans. The snakefolk were greedy
and jealous, and each required a throne for
him or herself. How Thran resolved this
paradox is unknown, but the counselors did
pledge themselves to him, and it is said that
they serve his son, the Wyrm Prince, even in
death.
Phase Wall
•Like the entry to the chamber, the southern
wall features a ten-foot section of semi-
transparent stone that can easily be passed
through. Beyond that wall, however, the
corridor is filled with an intensely-hot, fiery
river.
•Arcana/Perception (DC 15): Without
proper magical protection, any who enter
this corridor will be killed in a matter of
seconds.
ENCOUNTERENCOUNTERENCOUNTERENCOUNTER The moment a crusader touches one of the
gilded chairs, the sound of grinding gears,
much like the ticking of a clock, can be
heard within the dragon statue. The
crusaders have one minute to arrange the
eight chairs so that three chairs are
touching each wall. You are encouraged
to place the eight chairs in a circle around
the statue, so that if a player physically
grabs one of the chairs, you can trigger the
encounter. The northern phase wall remains
insubstantial during the encounter, allowing
the crusaders to flee if they so choose.
However, after the minute expires, if the
puzzle has not been solved, both phase
walls become solid, and the snakefolk faces
make a spitting venom attack (see “Solving
the Puzzle” below), and the way south is
sealed.
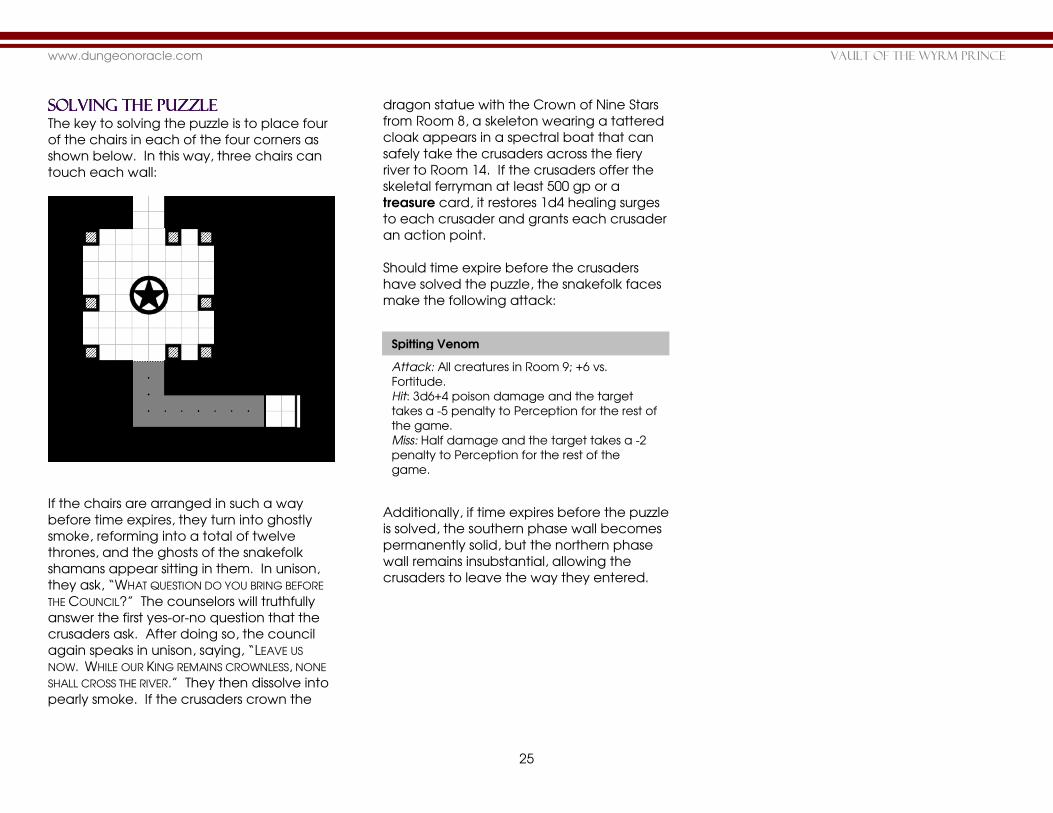
www.dungeonoracle.com Vault of the wyrm prince
25
SOLVING THE PUZZLESOLVING THE PUZZLESOLVING THE PUZZLESOLVING THE PUZZLE The key to solving the puzzle is to place four
of the chairs in each of the four corners as
shown below. In this way, three chairs can
touch each wall:
If the chairs are arranged in such a way
before time expires, they turn into ghostly
smoke, reforming into a total of twelve
thrones, and the ghosts of the snakefolk
shamans appear sitting in them. In unison,
they ask, “WHAT QUESTION DO YOU BRING BEFORE
THE COUNCIL?” The counselors will truthfully
answer the first yes-or-no question that the
crusaders ask. After doing so, the council
again speaks in unison, saying, “LEAVE US
NOW. WHILE OUR KING REMAINS CROWNLESS, NONE
SHALL CROSS THE RIVER.” They then dissolve into
pearly smoke. If the crusaders crown the
dragon statue with the Crown of Nine Stars
from Room 8, a skeleton wearing a tattered
cloak appears in a spectral boat that can
safely take the crusaders across the fiery
river to Room 14. If the crusaders offer the
skeletal ferryman at least 500 gp or a
treasure card, it restores 1d4 healing surges
to each crusader and grants each crusader
an action point.
Should time expire before the crusaders
have solved the puzzle, the snakefolk faces
make the following attack:
Additionally, if time expires before the puzzle
is solved, the southern phase wall becomes
permanently solid, but the northern phase
wall remains insubstantial, allowing the
crusaders to leave the way they entered.
Spitting Venom
Attack: All creatures in Room 9; +6 vs.
Fortitude.
Hit: 3d6+4 poison damage and the target
takes a -5 penalty to Perception for the rest of
the game.
Miss: Half damage and the target takes a -2
penalty to Perception for the rest of the
game.
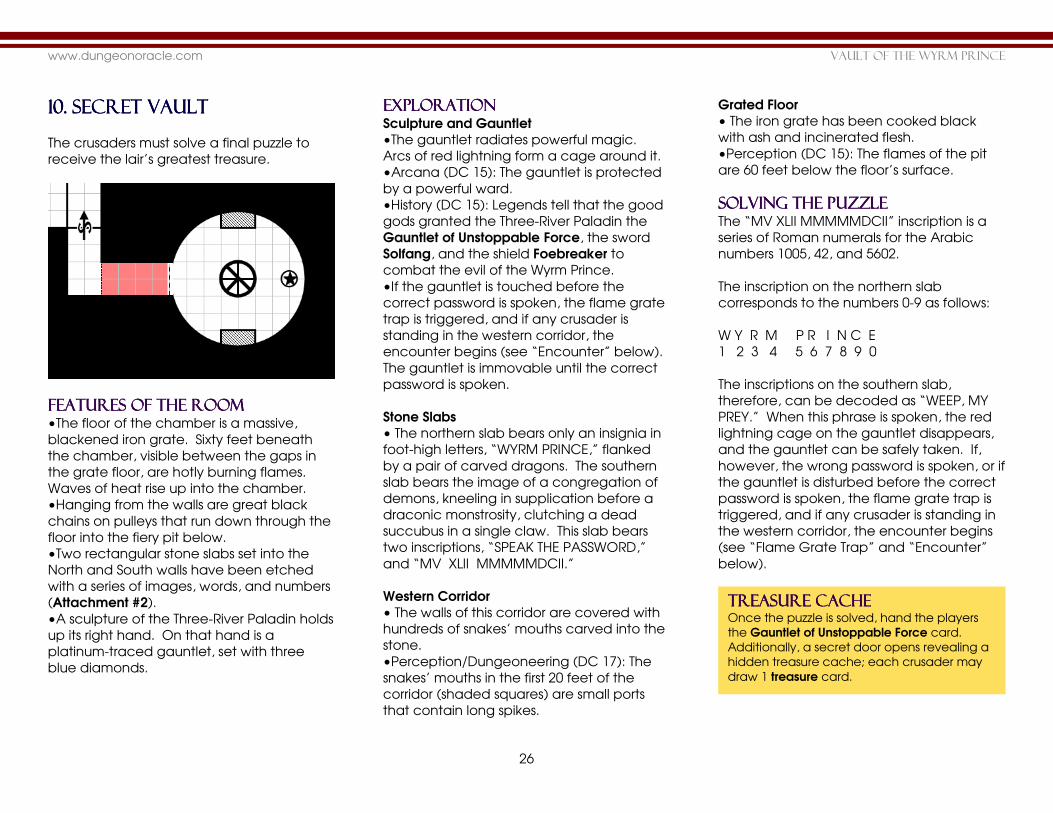
www.dungeonoracle.com Vault of the wyrm prince
26
10. SECRET VAULT10. SECRET VAULT10. SECRET VAULT10. SECRET VAULT
The crusaders must solve a final puzzle to
receive the lair’s greatest treasure.
FEATURES OF THE FEATURES OF THE FEATURES OF THE FEATURES OF THE ROOMROOMROOMROOM •The floor of the chamber is a massive,
blackened iron grate. Sixty feet beneath
the chamber, visible between the gaps in
the grate floor, are hotly burning flames.
Waves of heat rise up into the chamber.
•Hanging from the walls are great black
chains on pulleys that run down through the
floor into the fiery pit below.
•Two rectangular stone slabs set into the
North and South walls have been etched
with a series of images, words, and numbers
(Attachment #2).
•A sculpture of the Three-River Paladin holds
up its right hand. On that hand is a
platinum-traced gauntlet, set with three
blue diamonds.
EXPLORATIONEXPLORATIONEXPLORATIONEXPLORATION Sculpture and Gauntlet
•The gauntlet radiates powerful magic.
Arcs of red lightning form a cage around it.
•Arcana (DC 15): The gauntlet is protected
by a powerful ward.
•History (DC 15): Legends tell that the good
gods granted the Three-River Paladin the
Gauntlet of Unstoppable Force, the sword
Solfang, and the shield Foebreaker to
combat the evil of the Wyrm Prince.
•If the gauntlet is touched before the
correct password is spoken, the flame grate
trap is triggered, and if any crusader is
standing in the western corridor, the
encounter begins (see “Encounter” below).
The gauntlet is immovable until the correct
password is spoken.
Stone Slabs
• The northern slab bears only an insignia in
foot-high letters, “WYRM PRINCE,” flanked
by a pair of carved dragons. The southern
slab bears the image of a congregation of
demons, kneeling in supplication before a
draconic monstrosity, clutching a dead
succubus in a single claw. This slab bears
two inscriptions, “SPEAK THE PASSWORD,”
and “MV XLII MMMMMDCII.”
Western Corridor
• The walls of this corridor are covered with
hundreds of snakes’ mouths carved into the
stone.
•Perception/Dungeoneering (DC 17): The
snakes’ mouths in the first 20 feet of the
corridor (shaded squares) are small ports
that contain long spikes.
Grated Floor
• The iron grate has been cooked black
with ash and incinerated flesh.
•Perception (DC 15): The flames of the pit
are 60 feet below the floor’s surface.
SOLVING THE PUZZLESOLVING THE PUZZLESOLVING THE PUZZLESOLVING THE PUZZLE The “MV XLII MMMMMDCII” inscription is a
series of Roman numerals for the Arabic
numbers 1005, 42, and 5602.
The inscription on the northern slab
corresponds to the numbers 0-9 as follows:
W Y R M P R I N C E
1 2 3 4 5 6 7 8 9 0
The inscriptions on the southern slab,
therefore, can be decoded as “WEEP, MY
PREY.” When this phrase is spoken, the red
lightning cage on the gauntlet disappears,
and the gauntlet can be safely taken. If,
however, the wrong password is spoken, or if
the gauntlet is disturbed before the correct
password is spoken, the flame grate trap is
triggered, and if any crusader is standing in
the western corridor, the encounter begins
(see “Flame Grate Trap” and “Encounter”
below).
TREASURE CACHETREASURE CACHETREASURE CACHETREASURE CACHE Once the puzzle is solved, hand the players
the Gauntlet of Unstoppable Force card.
Additionally, a secret door opens revealing a
hidden treasure cache; each crusader may
draw 1 treasure card.

www.dungeonoracle.com Vault of the wyrm prince
27
FLAME GRATE TRAPFLAME GRATE TRAPFLAME GRATE TRAPFLAME GRATE TRAP
Flames rise up from the deep chasm
beneath the grated floor, attacking all
creatures in the circular chamber. The
great chains rumble, bringing the fiery pit
closer to the level of the floor.
ENCOUNTERENCOUNTERENCOUNTERENCOUNTER Starting the Encounter:
The encounter begins only if one or more
crusaders are standing in the western
corridor, and only when the wrong
password is spoken or the gauntlet is
disturbed before the correct password is
spoken. When this happens, two portcullises
fall, trapping creatures in the squares
shaded red.
Threats:
Long spikes spring out of the carved snakes’
mouths, and the walls begin to close
together, threatening to impale and crush
any who are trapped within.
Ending the Encounter:
The walls pull back when the puzzle is
solved. The encounter also ends when all
trapped crusaders escape the trap.
CRUSHING SPIKE WALLSCRUSHING SPIKE WALLSCRUSHING SPIKE WALLSCRUSHING SPIKE WALLS
Rising Flames
Attack: +6 vs. Fortitude.
Hit: 2d10+5 fire damage.
Miss: half damage.
Effect: the fiery pit below rises 20 feet closer to
the surface of the floor. The trap deals an
extra d10 damage on its next attack. When
the flames reach the top, all crusaders on the
grate are killed.
Crushing Spike Walls
Level 1 Obstacle Trap
Initiative acts on an initiative count of 0
Standard Actions
Impaling Crush – At-Will
The spike walls close in, producing the
following effects each round.
Round 1 – The walls begin to close together.
Round 2 – The walls make the following
attack:
Attack: (all trapped creatures) +5 vs.
Fortitude.
Hit: 20 damage.
Miss: 10 damage.
Round 3 – The walls make the following
attack:
Attack: (all trapped creatures) +14 vs.
Fortitude.
Hit: 30 damage.
Miss: 15 damage.
Round 4 – The walls close completely, killing all
creatures trapped within.
Countermeasures
Disable
Crusaders adjacent to the trap can attempt
a skill challenge to disable it (4 successes
before 3 failures;
Athletics/Thievery/Dungeoneering DC 19).
Success disables the crushing spike walls.
Push Back
A trapped crusader can attempt to push
back the closing walls with a DC 17 Athletics
check. On a success, the walls are pushed
back partially, causing the trap to move
backward 1 step in its round-by-round action.
Brace the Wall
A crusader can use an object to hold the
walls open. At the beginning of the crushing
spike wall’s turn, roll a d20. On a 11-20, the
object holds and the wall does not act this
turn. On a 1-10, the object is destroyed, but
the crushing spike walls must repeat its last
round's action.
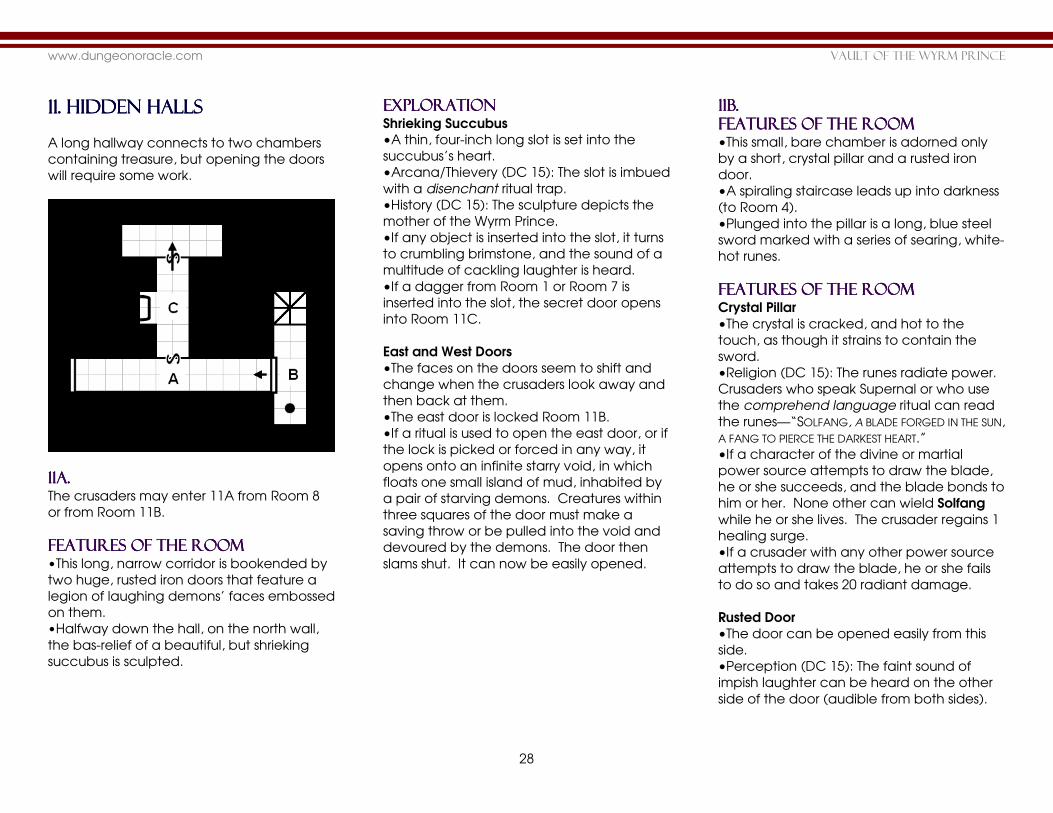
www.dungeonoracle.com Vault of the wyrm prince
28
11. HIDDEN HALLS11. HIDDEN HALLS11. HIDDEN HALLS11. HIDDEN HALLS
A long hallway connects to two chambers
containing treasure, but opening the doors
will require some work.
11A.11A.11A.11A. The crusaders may enter 11A from Room 8
or from Room 11B.
FEATURES OF THE FEATURES OF THE FEATURES OF THE FEATURES OF THE ROOMROOMROOMROOM •This long, narrow corridor is bookended by
two huge, rusted iron doors that feature a
legion of laughing demons’ faces embossed
on them.
•Halfway down the hall, on the north wall,
the bas-relief of a beautiful, but shrieking
succubus is sculpted.
EXPLORATIONEXPLORATIONEXPLORATIONEXPLORATION Shrieking Succubus
•A thin, four-inch long slot is set into the
succubus’s heart.
•Arcana/Thievery (DC 15): The slot is imbued
with a disenchant ritual trap.
•History (DC 15): The sculpture depicts the
mother of the Wyrm Prince.
•If any object is inserted into the slot, it turns
to crumbling brimstone, and the sound of a
multitude of cackling laughter is heard.
•If a dagger from Room 1 or Room 7 is
inserted into the slot, the secret door opens
into Room 11C.
East and West Doors
•The faces on the doors seem to shift and
change when the crusaders look away and
then back at them.
•The east door is locked Room 11B.
•If a ritual is used to open the east door, or if
the lock is picked or forced in any way, it
opens onto an infinite starry void, in which
floats one small island of mud, inhabited by
a pair of starving demons. Creatures within
three squares of the door must make a
saving throw or be pulled into the void and
devoured by the demons. The door then
slams shut. It can now be easily opened.
11B.11B.11B.11B. FEATURES OF THE ROOMFEATURES OF THE ROOMFEATURES OF THE ROOMFEATURES OF THE ROOM •This small, bare chamber is adorned only
by a short, crystal pillar and a rusted iron
door.
•A spiraling staircase leads up into darkness
(to Room 4).
•Plunged into the pillar is a long, blue steel
sword marked with a series of searing, white-
hot runes.
Features of the RoomFeatures of the RoomFeatures of the RoomFeatures of the Room Crystal Pillar
•The crystal is cracked, and hot to the
touch, as though it strains to contain the
sword.
•Religion (DC 15): The runes radiate power.
Crusaders who speak Supernal or who use
the comprehend language ritual can read
the runes—“SOLFANG, A BLADE FORGED IN THE SUN,
A FANG TO PIERCE THE DARKEST HEART.”
•If a character of the divine or martial
power source attempts to draw the blade,
he or she succeeds, and the blade bonds to
him or her. None other can wield Solfang
while he or she lives. The crusader regains 1
healing surge.
•If a crusader with any other power source
attempts to draw the blade, he or she fails
to do so and takes 20 radiant damage.
Rusted Door
•The door can be opened easily from this
side.
•Perception (DC 15): The faint sound of
impish laughter can be heard on the other
side of the door (audible from both sides).
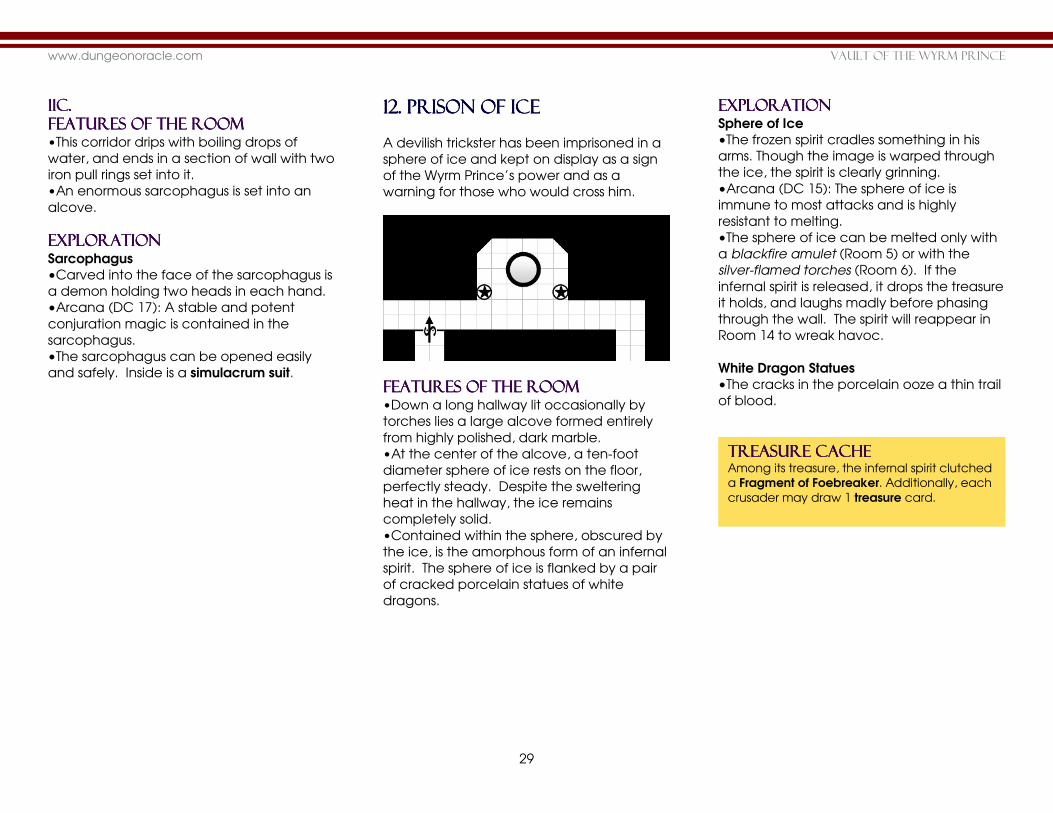
www.dungeonoracle.com Vault of the wyrm prince
29
11C.11C.11C.11C. FEATURES OF THE FEATURES OF THE FEATURES OF THE FEATURES OF THE ROOMROOMROOMROOM •This corridor drips with boiling drops of
water, and ends in a section of wall with two
iron pull rings set into it.
•An enormous sarcophagus is set into an
alcove.
EXPLORATIONEXPLORATIONEXPLORATIONEXPLORATION Sarcophagus
•Carved into the face of the sarcophagus is
a demon holding two heads in each hand.
•Arcana (DC 17): A stable and potent
conjuration magic is contained in the
sarcophagus.
•The sarcophagus can be opened easily
and safely. Inside is a simulacrum suit.
12. PRISON OF ICE12. PRISON OF ICE12. PRISON OF ICE12. PRISON OF ICE
A devilish trickster has been imprisoned in a
sphere of ice and kept on display as a sign
of the Wyrm Prince’s power and as a
warning for those who would cross him.
FEATURES OF THE FEATURES OF THE FEATURES OF THE FEATURES OF THE ROOMROOMROOMROOM •Down a long hallway lit occasionally by
torches lies a large alcove formed entirely
from highly polished, dark marble.
•At the center of the alcove, a ten-foot
diameter sphere of ice rests on the floor,
perfectly steady. Despite the sweltering
heat in the hallway, the ice remains
completely solid.
•Contained within the sphere, obscured by
the ice, is the amorphous form of an infernal
spirit. The sphere of ice is flanked by a pair
of cracked porcelain statues of white
dragons.
EXPLORATIONEXPLORATIONEXPLORATIONEXPLORATION Sphere of Ice
•The frozen spirit cradles something in his
arms. Though the image is warped through
the ice, the spirit is clearly grinning.
•Arcana (DC 15): The sphere of ice is
immune to most attacks and is highly
resistant to melting.
•The sphere of ice can be melted only with
a blackfire amulet (Room 5) or with the
silver-flamed torches (Room 6). If the
infernal spirit is released, it drops the treasure
it holds, and laughs madly before phasing
through the wall. The spirit will reappear in
Room 14 to wreak havoc.
White Dragon Statues
•The cracks in the porcelain ooze a thin trail
of blood.
TREASURE TREASURE TREASURE TREASURE CACHECACHECACHECACHE Among its treasure, the infernal spirit clutched
a Fragment of Foebreaker. Additionally, each
crusader may draw 1 treasure card.
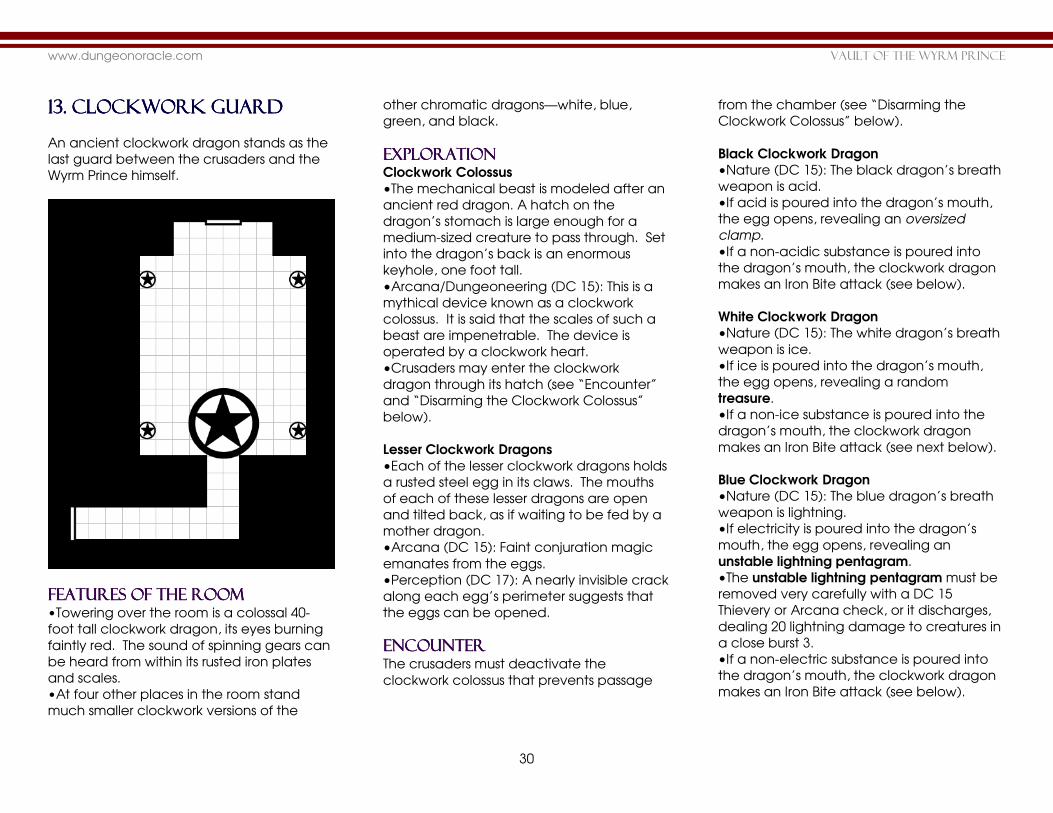
www.dungeonoracle.com Vault of the wyrm prince
30
13. CLOCKWORK GUARD13. CLOCKWORK GUARD13. CLOCKWORK GUARD13. CLOCKWORK GUARD
An ancient clockwork dragon stands as the
last guard between the crusaders and the
Wyrm Prince himself.
FEATURES OF THE FEATURES OF THE FEATURES OF THE FEATURES OF THE ROOMROOMROOMROOM •Towering over the room is a colossal 40-
foot tall clockwork dragon, its eyes burning
faintly red. The sound of spinning gears can
be heard from within its rusted iron plates
and scales.
•At four other places in the room stand
much smaller clockwork versions of the
other chromatic dragons—white, blue,
green, and black.
EXPLORATIONEXPLORATIONEXPLORATIONEXPLORATION Clockwork Colossus
•The mechanical beast is modeled after an
ancient red dragon. A hatch on the
dragon’s stomach is large enough for a
medium-sized creature to pass through. Set
into the dragon’s back is an enormous
keyhole, one foot tall.
•Arcana/Dungeoneering (DC 15): This is a
mythical device known as a clockwork
colossus. It is said that the scales of such a
beast are impenetrable. The device is
operated by a clockwork heart.
•Crusaders may enter the clockwork
dragon through its hatch (see “Encounter”
and “Disarming the Clockwork Colossus”
below).
Lesser Clockwork Dragons
•Each of the lesser clockwork dragons holds
a rusted steel egg in its claws. The mouths
of each of these lesser dragons are open
and tilted back, as if waiting to be fed by a
mother dragon.
•Arcana (DC 15): Faint conjuration magic
emanates from the eggs.
•Perception (DC 17): A nearly invisible crack
along each egg’s perimeter suggests that
the eggs can be opened.
ENCOUNTERENCOUNTERENCOUNTERENCOUNTER The crusaders must deactivate the
clockwork colossus that prevents passage
from the chamber (see “Disarming the
Clockwork Colossus” below).
Black Clockwork Dragon
•Nature (DC 15): The black dragon’s breath
weapon is acid.
•If acid is poured into the dragon’s mouth,
the egg opens, revealing an oversized
clamp.
•If a non-acidic substance is poured into
the dragon’s mouth, the clockwork dragon
makes an Iron Bite attack (see below).
White Clockwork Dragon
•Nature (DC 15): The white dragon’s breath
weapon is ice.
•If ice is poured into the dragon’s mouth,
the egg opens, revealing a random
treasure.
•If a non-ice substance is poured into the
dragon’s mouth, the clockwork dragon
makes an Iron Bite attack (see next below).
Blue Clockwork Dragon
•Nature (DC 15): The blue dragon’s breath
weapon is lightning.
•If electricity is poured into the dragon’s
mouth, the egg opens, revealing an
unstable lightning pentagram.
•The unstable lightning pentagram must be
removed very carefully with a DC 15
Thievery or Arcana check, or it discharges,
dealing 20 lightning damage to creatures in
a close burst 3.
•If a non-electric substance is poured into
the dragon’s mouth, the clockwork dragon
makes an Iron Bite attack (see below).
www.dungeonoracle.com Vault of the wyrm prince
31
Green Clockwork Dragon
•Nature (DC 15): The green dragon’s breath
weapon is poison.
•If poison is poured into the dragon’s
mouth, the egg opens, revealing a cube
puzzle.
•Once solved, the cube puzzle is a map of
the interior of the colossus. It can be solved
with a DC 17 Perception or Insight check.
•If a non-poison substance is poured into
the dragon’s mouth, the clockwork dragon
makes an Iron Bite attack (see below).
DISARMING THE CLOCKWDISARMING THE CLOCKWDISARMING THE CLOCKWDISARMING THE CLOCKWORK ORK ORK ORK COLOSSUSCOLOSSUSCOLOSSUSCOLOSSUS
Iron Bite (Lesser Clockwork Dragons)
Attack: close burst 1 (creatures in burst) +8 vs.
AC.
Hit: 2d8+5 damage.
Disarming the Clockwork Colossus
Level 2 Complexity 2 Skill Challenge
Goal: The crusaders must work together to
deactivate the clockwork colossus, and that
means someone has to go inside.
Traits
Piecemeal Challenge
To succeed in the skill challenge, the
crusaders must complete the following steps
in order. Each step requires a certain number
of successful skill checks to complete. For
each failed check, the colossus makes a
counterattack.
Enter the Colossus – 1 Success
Primary DC 15, Secondary DC 13
Trump: Another crusader distracts the colossus
by attempting to flank it (1 success).
Fold: A crusader attempts to directly attack
the colossus (1 failure).
Right Tools for the Job
If the crusaders inside the colossus make use
of the warforged tools, they gain a +5 bonus
to skill checks they make.
Counterattack – Ironclaw Rebuke
Attack: Melee 3 (creature that failed the
check); +8 vs. AC.
Hit: 1d10+8 damage and the target is pushed
20 squares.
Locate the Clockwork Heart – 2 Successes
Primary DC 17, Secondary DC 15
Trump: The crusaders use the cube puzzle to
navigate within the colossus (1 success).
Fold: A crusader moves without making a
Stealth check (1 failure).
Counterattack – Internal Body Spikes
Attack: Melee 0 (creatures inside the
colossus); +6 vs. Fortitude.
Hit: 2d10+5 damage and the target takes a
-2 penalty to its next skill check.
Disarm the Clockwork Heart – 3 Successes
Primary DC 19, Secondary DC 17
Trump: The crusaders use the oversized clamp
to remove the heart (1 success).
Fold: A crusader attacks the heart (1 success
and 1failure).
Counterattack – Fireball
Attack: area burst 2 within 10 (creatures
outside the colossus); +6 vs. Reflex.
Hit: 3d6+10 fire damage.
Miss: half damage.
Resolution
Success (6)
The gears of the colossus wind down, the
burning light in its eyes diminishes, and the
mechanical monstrosity is rendered inert. The
colossus collapses forward, allowing the
crusaders to pass into the corridor beyond. A
crusader in the colossus may attempt to
remove the heart with a DC 17 Thievery
check.
Success: The crusader receives the clockwork
heart.
Miss: The heart explodes, dealing 4d12 fire
damage to all crusaders in the colossus.
Failure (3) – Rage of the Colossus
If the crusaders fail a total of 3 checks while
one or more crusaders are inside the colossus,
the colossus spews them out in a mass of
caustic oil. Each crusader spewed out take
25 acid damage. The skill challenge resets.
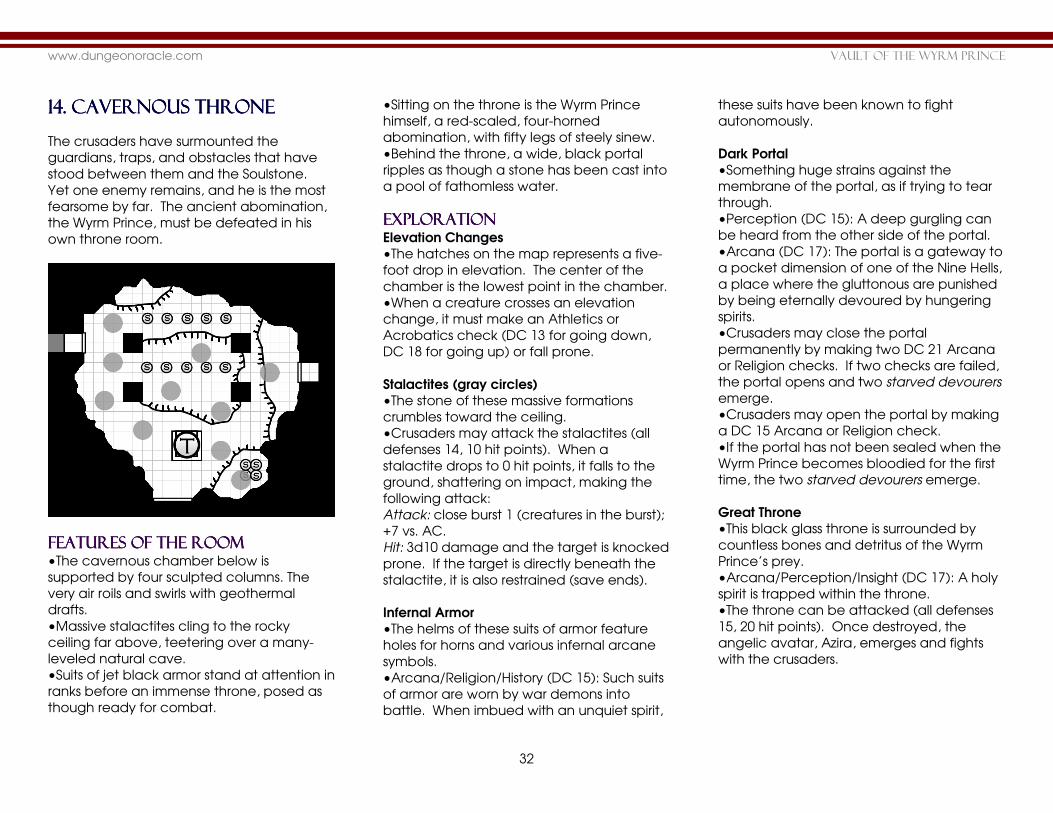
www.dungeonoracle.com Vault of the wyrm prince
32
14. CAVERNOUS THRONE14. CAVERNOUS THRONE14. CAVERNOUS THRONE14. CAVERNOUS THRONE
The crusaders have surmounted the
guardians, traps, and obstacles that have
stood between them and the Soulstone.
Yet one enemy remains, and he is the most
fearsome by far. The ancient abomination,
the Wyrm Prince, must be defeated in his
own throne room.
Features of the Features of the Features of the Features of the RoomRoomRoomRoom •The cavernous chamber below is
supported by four sculpted columns. The
very air roils and swirls with geothermal
drafts.
•Massive stalactites cling to the rocky
ceiling far above, teetering over a many-
leveled natural cave.
•Suits of jet black armor stand at attention in
ranks before an immense throne, posed as
though ready for combat.
•Sitting on the throne is the Wyrm Prince
himself, a red-scaled, four-horned
abomination, with fifty legs of steely sinew.
•Behind the throne, a wide, black portal
ripples as though a stone has been cast into
a pool of fathomless water.
EXPLORATIONEXPLORATIONEXPLORATIONEXPLORATION Elevation Changes
•The hatches on the map represents a five-
foot drop in elevation. The center of the
chamber is the lowest point in the chamber.
•When a creature crosses an elevation
change, it must make an Athletics or
Acrobatics check (DC 13 for going down,
DC 18 for going up) or fall prone.
Stalactites (gray circles)
•The stone of these massive formations
crumbles toward the ceiling.
•Crusaders may attack the stalactites (all
defenses 14, 10 hit points). When a
stalactite drops to 0 hit points, it falls to the
ground, shattering on impact, making the
following attack:
Attack: close burst 1 (creatures in the burst);
+7 vs. AC.
Hit: 3d10 damage and the target is knocked
prone. If the target is directly beneath the
stalactite, it is also restrained (save ends).
Infernal Armor
•The helms of these suits of armor feature
holes for horns and various infernal arcane
symbols.
•Arcana/Religion/History (DC 15): Such suits
of armor are worn by war demons into
battle. When imbued with an unquiet spirit,
these suits have been known to fight
autonomously.
Dark Portal
•Something huge strains against the
membrane of the portal, as if trying to tear
through.
•Perception (DC 15): A deep gurgling can
be heard from the other side of the portal.
•Arcana (DC 17): The portal is a gateway to
a pocket dimension of one of the Nine Hells,
a place where the gluttonous are punished
by being eternally devoured by hungering
spirits.
•Crusaders may close the portal
permanently by making two DC 21 Arcana
or Religion checks. If two checks are failed,
the portal opens and two starved devourers
emerge.
•Crusaders may open the portal by making
a DC 15 Arcana or Religion check.
•If the portal has not been sealed when the
Wyrm Prince becomes bloodied for the first
time, the two starved devourers emerge.
Great Throne
•This black glass throne is surrounded by
countless bones and detritus of the Wyrm
Prince’s prey.
•Arcana/Perception/Insight (DC 17): A holy
spirit is trapped within the throne.
•The throne can be attacked (all defenses
15, 20 hit points). Once destroyed, the
angelic avatar, Azira, emerges and fights
with the crusaders.
www.dungeonoracle.com Vault of the wyrm prince
33
ENCOUNTERENCOUNTERENCOUNTERENCOUNTER Starting the Encounter:
The encounter begins the moment the
crusaders enter the cavern.
Threats:
The Wyrm Prince himself descends upon the
intrepid crusaders, summoning infernal
armor and starved devourers to fight at his
side.
Ending the Encounter:
The encounter ends when the Wyrm Prince
has been slain and the crusaders have
regained possession of the Soulstone.
THE WYRM PRINCETHE WYRM PRINCETHE WYRM PRINCETHE WYRM PRINCE
THE FINAL BATTLETHE FINAL BATTLETHE FINAL BATTLETHE FINAL BATTLE
The complexity and danger of this
encounter depend greatly on the
actions of the crusaders throughout the
dungeon.
•If a crusader was turned into a phantom
in Room 4, he or she appears at the
Wyrm Prince’s side as an Infernal Sentry,
but with a +2 to all defenses. If the
phantom is destroyed, the fallen
crusader reappears, naked and without
any of his or her possessions.
•If any crusaders were cursed in Room 8,
start the combat with the curse of nine
stars card in play.
•If the infernal spirit was released from
the prison in Room 12, it appears near the
ceiling in this chamber, randomly
knocking down one stalactite at the
beginning of each round.
The Wyrm Pince (T)
Level 5 Solo Soldier
Huge unnatural beast (demon, dragon)
HP 200 Bloodied 100
Initiative +12
Perception +3, darkvision
AC 21, Fort 15, Reflex 14, Will 17
Speed 8, fly 6, climb 6
Immune fire, forced movement, falling prone
Saving throws +5, Action Points 3
Traits
Predator Tyrant
The Wyrm Prince treats prone enemies as
though they were helpless.
Draconic Arrogance
When the Wyrm Prince is marked, no mark
may supersede that mark while the enemy
who marked him lives. The Wyrm Prince
becomes bent on that creature’s destruction.
Standard Actions
m, C Multitude of Claws – At-Will
Attack: Close burst 1 (enemies in burst); +11
vs. AC.
Hit: 2d8+10 damage and the target is
grabbed.
Special: When an enemy provokes multitude
of claws as an attack of opportunity, the
Wyrm Prince attacks all enemies in the burst.
M, R Screaming Fireball – At-Will Effect: One creature grabbed by the Wyrm
Prince takes ongoing 10 fire damage (save
ends) and is hurled at another creature as a
secondary attack.
Secondary attack: Ranged 10 (one creature);
+9 vs. Reflex.
Hit: Both the target and the hurled creature
fall prone and take 3d6+8 damage, and the
target takes ongoing 10 fire damage.
Miss: The hurled creature takes 3d6+8
damage and lands prone adjacent to the
target.
A Maw of the Void – Recharge 5 6 Effect: The Wyrm Prince spews forth a medium
sphere of annihilation up to 10 squares away.
Attack: Burst 5 around the sphere of
annihilation (enemies in burst); +9 vs.
Fortitude.
Hit: The target is pulled 1d6 squares toward
the sphere of annihilation and is slowed (save
ends). Enemies that enter the sphere of
annihilation are utterly destroyed.
Miss: The target is slowed (save ends).
Aftereffect: The sphere persists for one more
turn, making the same attack during the
Wyrm Prince’s turn.
A Balefire Breath Weapon – Recharge when
first bloodied
Attack: Close blast 10 (creatures in blast); +15
vs. Fortitude.
Hit: 6d6 fire and necrotic damage and
ongoing 6 fire and necrotic damage. Reroll
any 6 in the damage roll, adding the result to
the total damage. Repeat as necessary.
Many Limbed
The Wyrm Prince may grab any number of
creatures.

www.dungeonoracle.com Vault of the wyrm prince
34
INFERNAL INFERNAL INFERNAL INFERNAL SENTRYSENTRYSENTRYSENTRY
STARVED DEVOURERSTARVED DEVOURERSTARVED DEVOURERSTARVED DEVOURER
Minor Actions
R Consume Essence – At-Will
Attack: Ranged 5 (one creature); +9 vs. Will.
Hit: 2d6+2 damage, and if the target is
reduced to 0 or fewer HP, the Wyrm Prince
regains HP equal to the target’s bloodied
value.
Triggered Actions
Bow to No One – At-Will
Trigger: The Wyrm Prince becomes dazed,
slowed, stunned, or weakened, or begins
taking ongoing damage.
Effect: The Wyrm Prince makes a save against
the triggering condition.
Living Reliquary – Encounter
Trigger: The Wyrm Prince is reduced to 0 or
fewer HP.
Effect: The Wyrm Prince’s body bursts into
hellflames and is reduced to ash, leaving only
the Soulstone within him unharmed.
Infernal Sentry (S)
Level 1 Minion Lurker
Medium immortal construct (demon)
HP 1; missed attacks never damage minions.
Initiative acts after the Wyrm Prince
Perception +1, darkvision
AC 16, Fort 12, Reflex 15, Will 12
Speed 6
Immune disease, poison
Traits
Summoned Infernal Spirits
All of the infernal sentries begin the encounter
inanimate. After the Wyrm Prince’s turn each
round, choose 1d8 more Sentries to animate.
Standard Actions
m Black Blade – At-Will
Attack: Melee 1 (one creature); +6 vs. AC.
Hit: 5 damage and the target is marked until
the beginning of the infernal sentry’s next turn.
Invulnerability
If the infernal sentry does not move during its
turn, it is immune to attacks and damage until
the beginning of its next turn.
Starved Devourer
Level 3 Soldier
Large shadow humanoid (undead)
HP 30 Bloodied 15
Initiative acts after infernal sentries
Perception +10, darkvision
AC 13, Fort 11, Reflex 14, Will 12
Speed 8
Traits
Starved
The starved devourer is always considered to
be bloodied for the purposes of resolving
powers. The starved devourer must attack
the crusader with the lowest number of hit
points. If the devourer ends its turn without a
creature trapped within it, it takes 5 damage.
Spirit Ward
The starved devourer gains a +2 bonus to all
defenses while it has a creature trapped. Standard Actions
m Hungering Claws – At-Will
Attack: Melee 2 (one creature); +8 vs. AC.
Hit: 1d8+6 damage.
R Trap Spirit – At-Will
Attack: Ranged 5 (one creature); +6 vs.
Fortitude.
Hit: 1d8+6 necrotic damage and the target is
trapped in the starved devourer’s ribcage
(save ends). The trapped creature is removed
from play and can take no actions. If it
succeeds on a saving throw, it escapes and
appears in an unoccupied space of its
choice adjacent to the starved devourer. A
trapped creature automatically escapes
when the starved devourer is destroyed. Only
one creature can be trapped at a time.
C Spirit Rupture – At-Will, usable only after the
starved devourer uses devour spirit and only
on the same turn
Attack: Close burst 1 (enemies in burst); +6 vs.
Will.
Hit: 2d8+7 necrotic damage and the target is
immobilized (save ends).
Minor Actions
Devour Spirit – At-Will
The starved devourer deals 10 necrotic
damage to a creature it has trapped. The
starved devourer regains 10 HP. A creature
killed by this power can never be returned to
life with the raise dead ritual.
www.dungeonoracle.com Vault of the wyrm prince
35
AZIRA, AVATAR OF THEAZIRA, AVATAR OF THEAZIRA, AVATAR OF THEAZIRA, AVATAR OF THE SOULSTONE SOULSTONE SOULSTONE SOULSTONE
DESTROYING THE WYRDESTROYING THE WYRDESTROYING THE WYRDESTROYING THE WYRM PRINCE M PRINCE M PRINCE M PRINCE If a crusader uses the daily power of the
Gauntlet of Unstoppable Force while within 5
squares of the Wyrm Prince, the Soulstone is
ripped out of the Wyrm Prince’s belly,
dealing damage to him equal to his
bloodied value.
The crusaders may choose to escape with
the Soulstone rather than destroy the Wyrm
Prince once and for all.
Once the Wyrm Prince is destroyed, all other
enemies are instantly destroyed,
evaporating in a wisp of flame.
ENDING THE ADVENTUREENDING THE ADVENTUREENDING THE ADVENTUREENDING THE ADVENTURE If the crusaders retrieve the Soulstone from
the Wyrm Prince, but leave him alive, the
abomination once again retreats beneath
the earth to slumber, biding his time and
plotting his revenge. The crusaders have
staved off the damnation of Zhaldanis for
now.
However, if the crusaders slay the Wyrm
Prince, they have completed the crusade of
the Three-River Paladin, and saved the
people of the high city from utter
destruction. But unbeknownst to them, they
have also destroyed the only force holding
the demonic hordes in check.
Azira, Avatar of the Soulstone
Level 4 Soldier
Medium immortal humanoid (angel)
HP 40 Bloodied 20 (see long captivity)
Initiative +5
Perception +5, truesight
AC 18, Fort 15, Reflex 14, Will 19
Speed 6, fly 8 (hover)
Traits
Aura of Protection – Aura 5
Allies in the aura gain a +2 to defenses.
Long Captivity
Azira begins combat bloodied.
Standard Actions
m Radiant Greatsword Cleave – At-Will
Attack: Melee 1 (one or two creatures); +10
vs. AC.
Hit: 15 radiant damage.
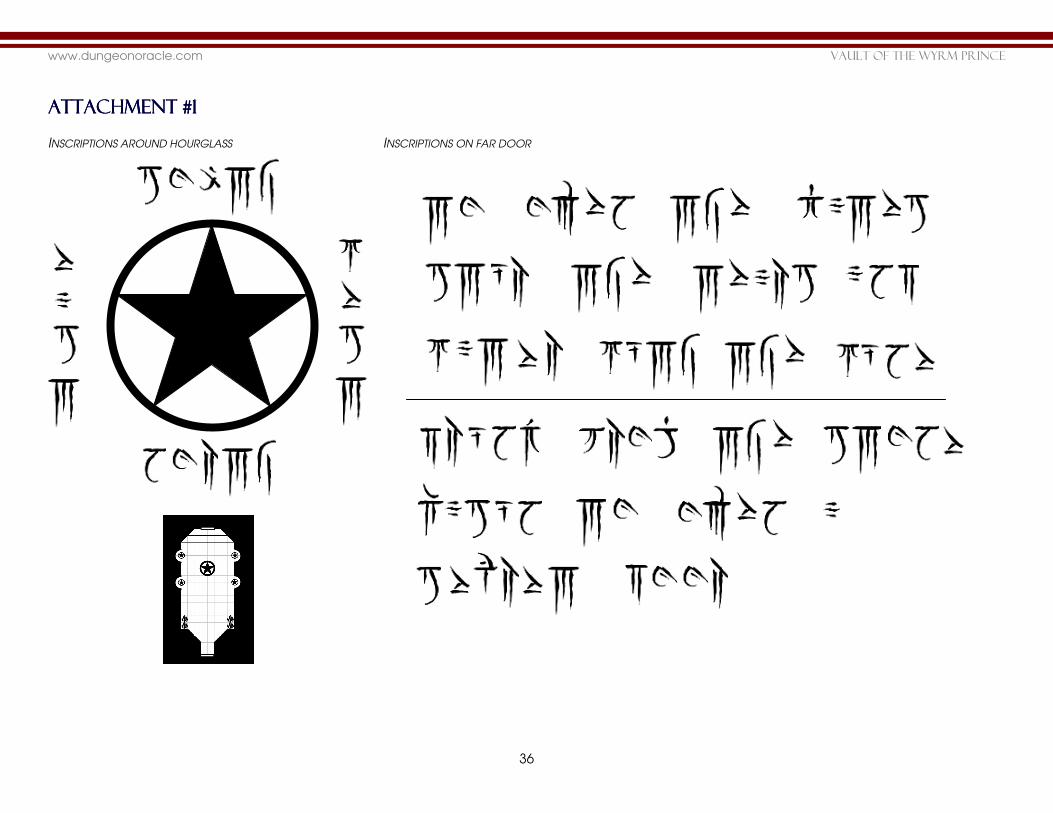
www.dungeonoracle.com Vault of the wyrm prince
36
Attachment #Attachment #Attachment #Attachment #1111
INSCRIPTIONS AROUND HOURGLASS
INSCRIPTIONS ON FAR DOOR
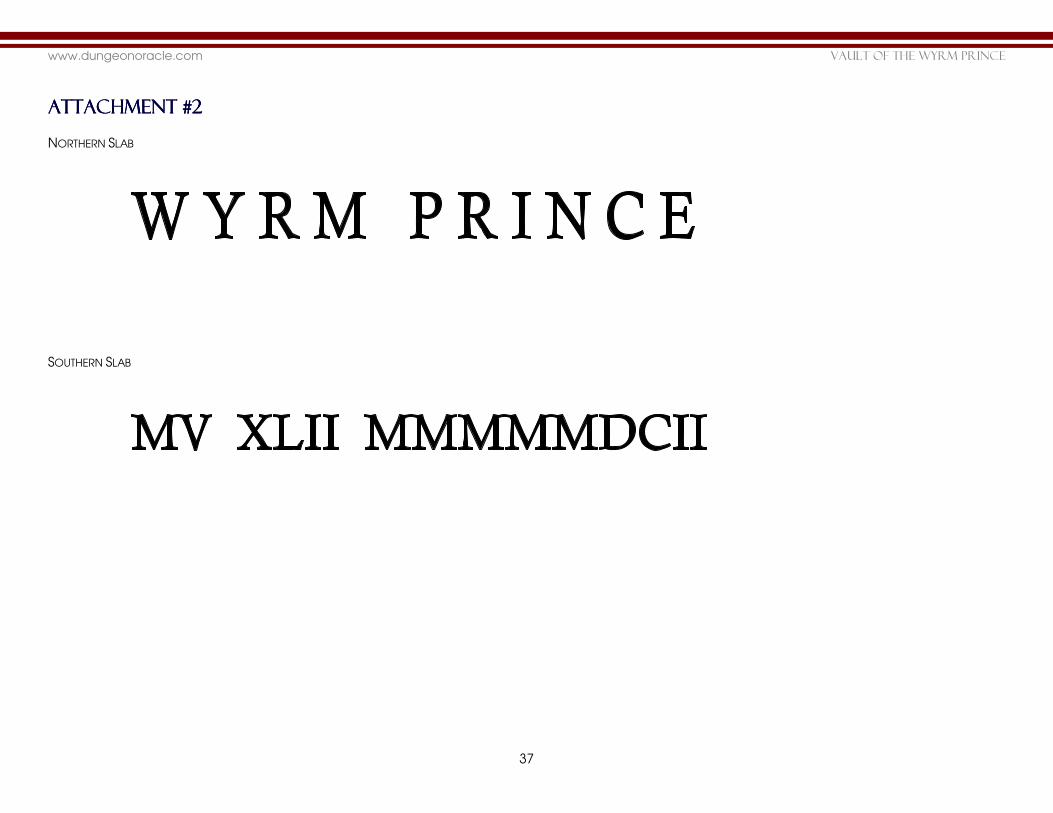
www.dungeonoracle.com Vault of the wyrm prince
37
Attachment #2Attachment #2Attachment #2Attachment #2
NORTHERN SLAB
SOUTHERN SLAB
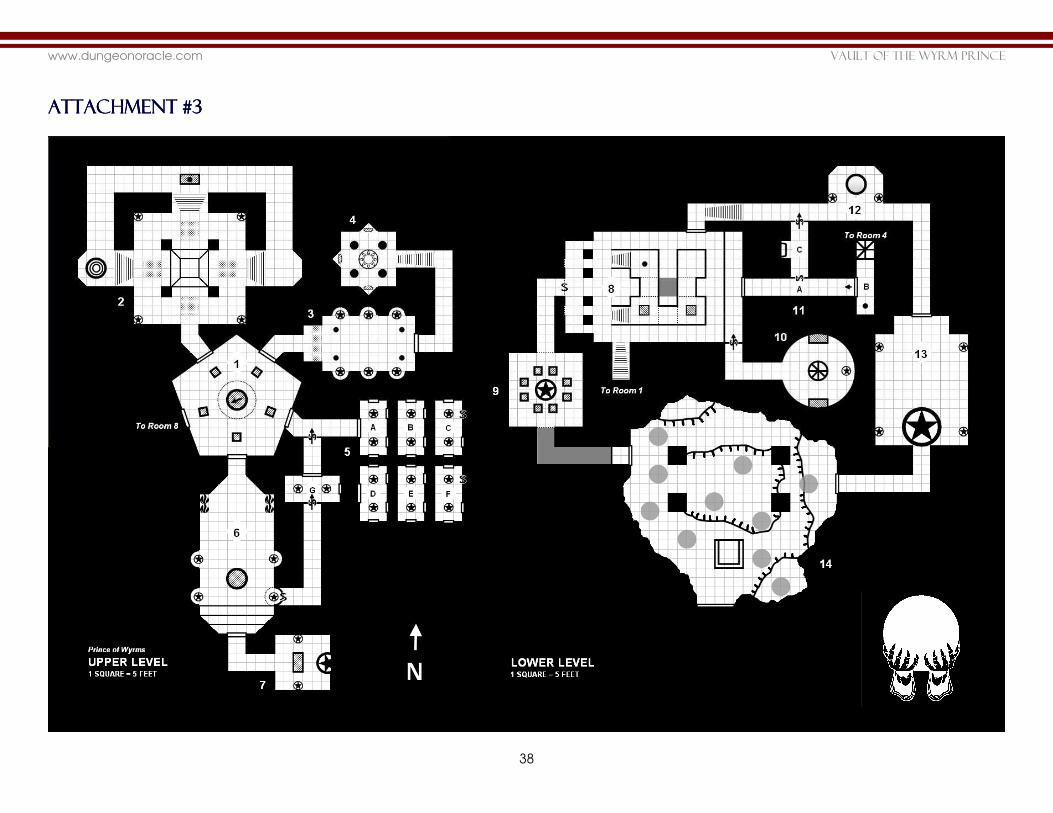
www.dungeonoracle.com Vault of the wyrm prince
38
Attachment #3Attachment #3Attachment #3Attachment #3