velux integra kli 310/311/312/media/marketing/au... · velux® 3 english pages 3-28 espaÑol...
TRANSCRIPT

VAS 454332-2018-03
VELUX INTEGRA® KLI 310/311/312
ENGLISH: Instructions for wall switch
ESPAÑOL: Instrucciones para el interruptor de pared
FRANÇAIS : Instructions pour le clavier mural
日本語 : リモコン KLI 310 / 311 / 312 の取扱説明書
VELUX® 3
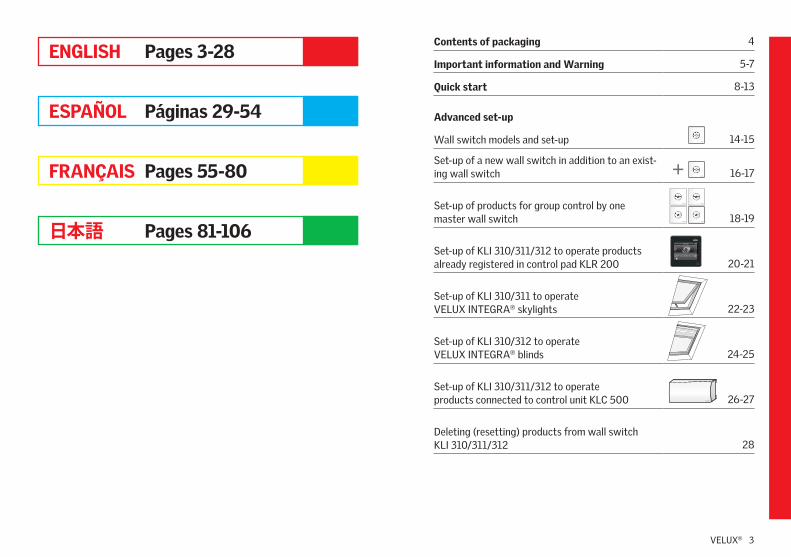
ENGLISH Pages 3-28
ESPAÑOL Páginas 29-54
FRANÇAIS Pages 55-80
日本語 Pages 81-106
Contents of packaging 4
Important information and Warning 5-7
Quick start 8-13
Advanced set-up
Wall switch models and set-up 14-15
Set-up of a new wall switch in addition to an exist-ing wall switch 16-17
Set-up of products for group control by one master wall switch 18-19
Set-up of KLI 310/311/312 to operate products already registered in control pad KLR 200 20-21
Set-up of KLI 310/311 to operate VELUX INTEGRA® skylights 22-23
Set-up of KLI 310/312 to operate VELUX INTEGRA® blinds 24-25
Set-up of KLI 310/311/312 to operate products connected to control unit KLC 500 26-27
Deleting (resetting) products from wall switch KLI 310/311/312 28
+

4 VELUX® VELUX® 5
� 4 mm
1 2
Contents of packaging1 : Wall switch
2 : Two batteries (type AAA, 1.5 V), screws, wall anchors, wall bracket and spacer bar
IMPORTANT INFORMATIONWARNING – TO REDUCE THE RISK OF SEVERE INJURY OR DEATH:Read instructions carefully before installation and operation. Keep instructions for future reference and hand them over to any new user.
Safety• The wall switch can be used by persons (aged 8 years and above) with
sufficient experience and knowledge if they have been given instruc-tion concerning safe use and understand the hazards involved. Clean-ing and user maintenance must not be done by unsupervised children.
• Children should be supervised to ensure that they do not play with the wall switch. It should be fitted out of reach of children at a minimum height of 4 feet (1.2 m).
• The wall switch must not be put into operation until it has been fitted according to these instructions.
• Before operating, ensure that the wall switch can be operated without risk of damage to property or injury to people or animals.
• The wall switch should be fixed at a position where the product to be operated is within sight.
• The wall switch has been designed for use with genuine VELUX INTEGRA® products.
• The wall switch is a Class 2 Low Voltage product (3 V d.c.).
• The wall switch complies with part 15 of the FCC and RSS-210 of the IC rules. Operation is subject to the following two conditions: (1) The wall switch may not cause harmful interference, and (2) the wall switch must accept any interference received, including interference that may cause undesired operation.
6 VELUX® VELUX® 7
io-homecontrol® provides advanced and secure radio technology that is easy to install. io-homecontrol® labelled products communicate with each other, improving comfort, security and energy savings.
www.io-homecontrol.com
• The wall switch has been tested and found to comply with the limits for a Class B digital device, pursuant to part 15 of the FCC Rules. These limits are designed to provide reasonable protection against harmful interference in a residential installation. The wall switch generates, uses and can radiate radio frequency energy and, if not installed and used in accordance with the instructions, may cause harmful interfer-ence to radio communications. However, there is no guarantee that interference will not occur in a particular installation. If the wall switch does cause harmful interference to radio or television reception, which can be determined by turning the wall switch off and on, the user is encouraged to try to correct the interference by one or more of the following measures: - Reorient or relocate the receiving antenna. - Increase the separation between the wall switch and receiver. - Connect the wall switch into an outlet on a circuit different from
that to which the receiver is connected. - Consult the dealer or an experienced radio/TV technician for help. Changes or modifications not expressly approved by the party respon-
sible for compliance could void the user's authority to operate the wall switch.
• FCC Radiation Exposure Statement: The wall switch complies with FCC RF radiation exposure limits set forth for an uncontrolled environ-ment.
• The term "IC:" before the wall switch certification number only signi-fies that the Industry Canada technical specifications were met.
Installation• The wall switch is for indoor use only.• Installation in rooms with a high level of humidity and with hidden
wiring must comply with relevant regulations (contact a qualified electrician if necessary).
• Before fixing the wall switch to the wall, verify that it can operate the product in question from the proposed position.
Product• The wall switch has a built-in RF (radio frequency) unit and will not be
operative if placed in a metal cabinet.
• Electrical products must be disposed of in conformity with all local codes, ordinances, rules and regulations for electronic waste and not with household waste.
• Used batteries must not be disposed of together with household waste but have to be disposed of in conformity with the relevant national environmental regulations. Batteries contain substances that can be harmful if not handled and recycled correctly.
• Use local authority battery disposal point where available.
• The packaging can be disposed of with usual household waste.
• Radio frequency band: 2.4 GHz.
• Radio frequency range: 110 yards (100 m) free field. Depending on building construction, the indoor range is approx 30 ft (10 m). How-ever, constructions with reinforced concrete, metal ceilings and plaster walls with steel members may reduce the range.
Maintenance and service• The wall switch requires a minimal amount of maintenance. The sur-
face may be cleaned with a soft, damp cloth using a small amount of household cleaner diluted in water.
• If you have any technical questions, please contact your VELUX sales company, see telephone list or www.velux.com.

8 VELUX® VELUX® 9
+
+
+
+
RESET
BatteriesInsert batteries as shown.
Turn on the power to the solar blinds by turning on the power switch.
Power on products
Turn on the power to the electrical skylights at the mains and to the solar skylights by turning on the power switch.
QUICK START QUICK START

10 VELUX® VELUX® 11
ba
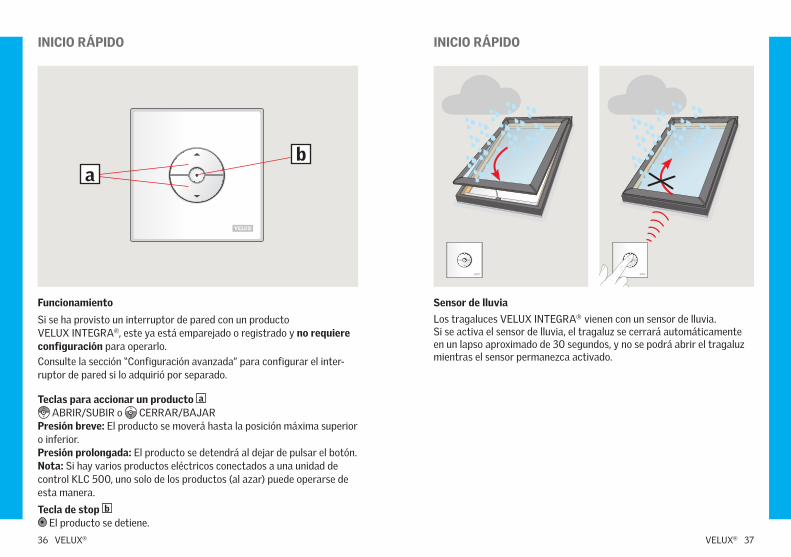
Operation
A wall switch provided with a VELUX INTEGRA® product has been pre-paired with/registered in this product and needs no additional set-up to operate the product.See “Advanced set-up” for set-up of wall switch purchased separately.
Keys for operating the product a OPEN/UP or CLOSE/DOWN
Short key pressure: The product will travel to maximum top or bottom position.Long key pressure: The product will travel only until the key is released. Note: If several electrical products are connected to a control unit KLC 500, only one of the products (random) can be operated in this way.
Stop key b The product stops.
Rain sensor VELUX INTEGRA® skylights come with a rain sensor.If the rain sensor is activated, the skylight will close automatically within approximately 30 seconds and the rain sensor will not allow the skylight to open as long it is activated.
QUICK START QUICK START

12 VELUX® VELUX® 13
Do not fix the wall switch to the wall until it has been verified that the products can be operated from the proposed position.
Fix the wall bracket to the wall with screws as shown.
Attach the wall switch to the bracket as shown.
For installation of more wall switches in a group, temporarily use the red spacer bar as shown.
QUICK START QUICK START

14 VELUX® VELUX® 15
KLI 310 is universal for all VELUX INTEGRA® products.
To push the buttons, use a pointed tool.
The Gear button “Open for registration”.
The Pair button “Register”.
The wall switch has two buttons used for advanced set-up:KLI 311 is provided with every VELUX INTEGRA® skylight.
The icon indicates which products it can oper-ate. Note: KLI 311 for skylights cannot be set up with blinds.
KLI 312 is provided with every VELUX INTEGRA® blind.
The icon indicates which products it can oper-ate. Note: KLI 312 for blinds cannot be set up with skylights.
A wall switch provided with a VELUX INTEGRA® product has been pre-paired with/registered in this product and needs no additional set-up to operate the product.
Wall switch models and set-up
16 VELUX® VELUX® 17
A
A
B
B
A B1 2
1 sec1 sec
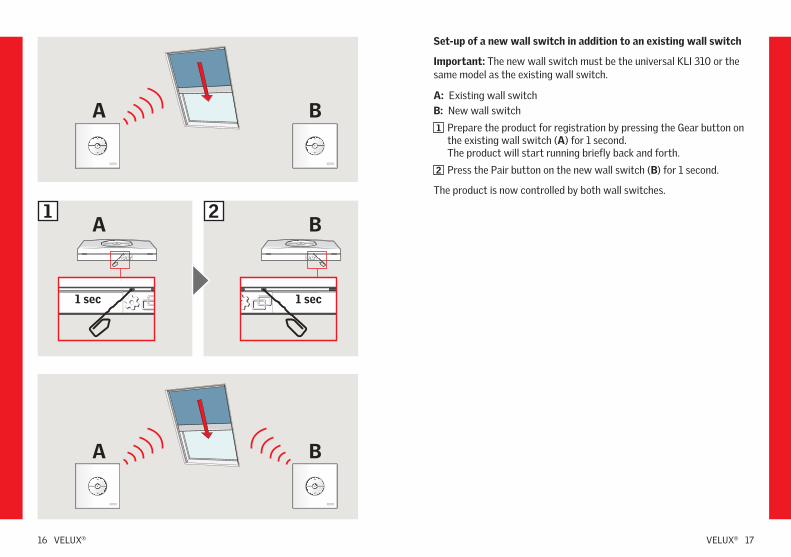
Set-up of a new wall switch in addition to an existing wall switch
Important: The new wall switch must be the universal KLI 310 or the same model as the existing wall switch.
A: Existing wall switchB: New wall switch
1 Prepare the product for registration by pressing the Gear button on the existing wall switch (A) for 1 second. The product will start running briefly back and forth.
2 Press the Pair button on the new wall switch (B) for 1 second.
The product is now controlled by both wall switches.

18 VELUX® VELUX® 19
a
a
a1 2
1 sec1 sec
Set-up of products for group control by one master wall switch (a)
Important: All wall switches must be the same model or the universal KLI 310.
1 Prepare each of the selected products for registration by pressing each of their wall switch Gear buttons for 1 second. The products will start running briefly back and forth.
2 Press the Pair button on the master wall switch for 1 second.
All products are now controlled simultaneously by the master wall switch (a).
Repeat the procedure for products failing set-up and for adding ad-ditional products.

20 VELUX® VELUX® 21
1
4
7
2
5 6
8
3
KLI 310/311/312 KLR 200
KLR 200 KLR 200 KLR 200
KLR 200 KLR 200 KLR 200
KLI 310/311/312 KLR 200
2 2
1
1
1 sec
Set-up of KLI 310/311/312 to operate products already registered in control pad KLR 200
Important: The wall switch must be the universal KLI 310 or the model matching the product.
1 Tap .
2 Tap "New product".
3 Tap "Prepare one-way control".
4 Tap "Choose products".
5 Scroll down the display and choose product type 1 . Tap 2 .
6 Scroll down the display and tap the product to be added 1 . Note: The individual products can be identified by tapping the icon. Tap 2 .
You now have 10 minutes to execute step 7 with the wall switch.
7 Press the Pair button on the wall switch for 1 second to register the product.
8 Tap to finish. Note: To add more products, tap "Choose more" and repeat steps 5-8.
The products can now be operated by KLI 310/311/312 as well.
22 VELUX® VELUX® 23
1 2 3
4
5
1 sec
A A
10 sec
max 3 sec
1 sec
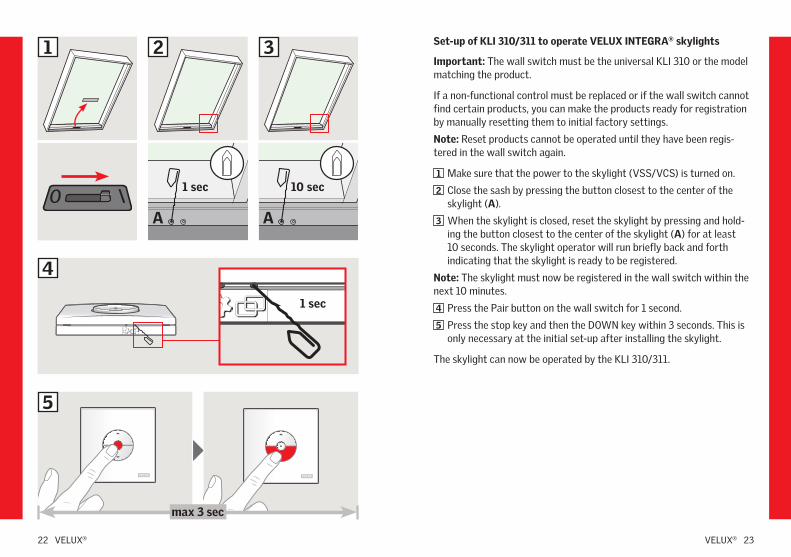
Set-up of KLI 310/311 to operate VELUX INTEGRA® skylights
Important: The wall switch must be the universal KLI 310 or the model matching the product.
If a non-functional control must be replaced or if the wall switch cannot find certain products, you can make the products ready for registration by manually resetting them to initial factory settings.
Note: Reset products cannot be operated until they have been regis-tered in the wall switch again.
1 Make sure that the power to the skylight (VSS/VCS) is turned on.
2 Close the sash by pressing the button closest to the center of the skylight (A).
3 When the skylight is closed, reset the skylight by pressing and hold-ing the button closest to the center of the skylight (A) for at least 10 seconds. The skylight operator will run briefly back and forth indicating that the skylight is ready to be registered.
Note: The skylight must now be registered in the wall switch within the next 10 minutes.
4 Press the Pair button on the wall switch for 1 second.
5 Press the stop key and then the DOWN key within 3 seconds. This is only necessary at the initial set-up after installing the skylight.
The skylight can now be operated by the KLI 310/311.

24 VELUX® VELUX® 25
RESET
1 sec
1B1A
10 sec10 sec
2
3
max 3 sec
Set-up of KLI 310/312 to operate VELUX INTEGRA® blinds
Important: The wall switch must be the universal KLI 310 or the model matching the product.
If a non-functional control must be replaced or if the wall switch cannot find certain products, you can make the products ready for registration by manually resetting them to initial factory settings.
Note: Reset products cannot be operated until they have been regis-tered in the wall switch again.
Reset the blind. The solar-powered blinds can have two different designs:
1A Solar-powered blind with sliding switch on the right, bottom side of motor unit: Slide switch to the right and hold for 10 seconds. The blind will run briefly back and forth indicating that it is ready to be registered.
1B Solar-powered blind with button behind door at the bottom of motor unit: Open solar battery door, press button behind the door for 10 sec-onds and close solar battery door. The blind will run briefly back and forth indicating that it is ready to be registered.
Note: The blind must now be registered in the wall switch within the next 10 minutes.
2 Press the Pair button on the wall switch for 1 second.
3 Press the stop key and then the DOWN key within 3 seconds. This is only necessary at the initial set-up after installing the blind.
The blind can now be operated by KLI 310/312.

26 VELUX® VELUX® 27
10 sec
KLC 500
1 sec
1
2
3
max 3 sec
Set-up of KLI 310/311/312 to operate products connected to control unit KLC 500
Important: The wall switch must be the universal KLI 310 or the model matching the product(s).
If a non-functional control must be replaced or if the wall switch cannot find certain products, you can make the products ready for registration by manually resetting them to initial factory settings.
Note: Reset products cannot be operated until they have been regis-tered in the wall switch again.
1 The control unit can be reset by removing the cover and pressing the test button for at least 10 seconds. The connected products will run briefly back and forth in random order to indicate that they are ready for registration.
2 Press the Pair button on the wall switch for 1 second.
3 Press the stop key and then the DOWN key within 3 seconds. This is only necessary at the initial set-up after installing the product.
The products can now be operated by KLI 310/311/312.
VELUX® 2928 VELUX®
1 sec1 sec
Contenido del embalaje 30
Información importante y Advertencia 31-33
Inicio rápido 34-39
Configuración avanzada
Modelos de interruptores de pared y configuración 40-41
Configuración de un nuevo interruptor de pared agregado a otro ya existente 42-43
Configuración de productos para control grupal con un interruptor de pared maestro (a) 44-45
Configuración del KLI 310/311/312 para operar productos ya registrados en un teclado de control KLR 200 46-47
Configuración del KLI 310/311 para operar los tragaluces VELUX INTEGRA® 48-49
Configuración del KLI 310/312 para operar las persianas VELUX INTEGRA® 50-51
Configuración del KLI 310/311/312 para operar pro-ductos conectados a la unidad de control KLC 500 52-53
Eliminar (restablecer) productos de los interrupto-res de pared KLI 310/311/312 54
+
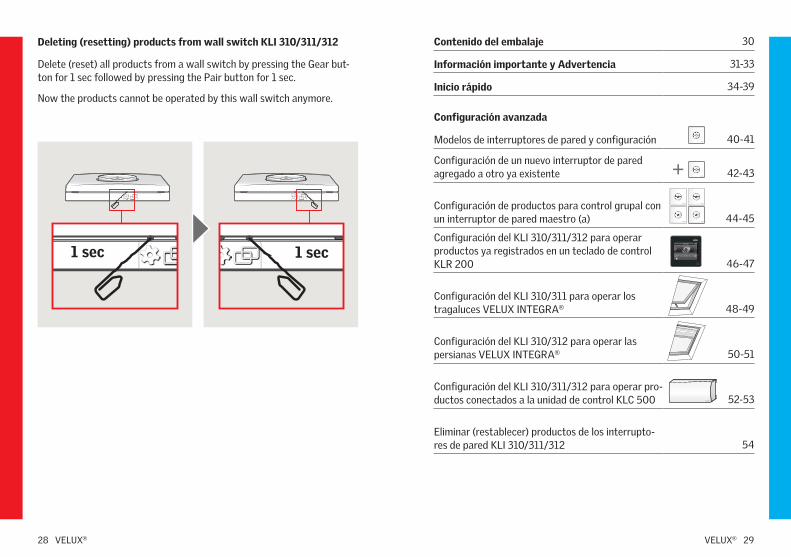
Deleting (resetting) products from wall switch KLI 310/311/312
Delete (reset) all products from a wall switch by pressing the Gear but-ton for 1 sec followed by pressing the Pair button for 1 sec.
Now the products cannot be operated by this wall switch anymore.

30 VELUX® VELUX® 31
� 4 mm
1 2
Contenido del embalaje1 : Interruptor de pared
2 : Dos baterías (tipo AAA, 1.5 V), tornillos, anclajes de pared, soportes de pared y barra espaciadora
INFORMACIÓN IMPORTANTEADVERTENCIA – PARA RE-DUCIR LOS PELIGROS DE LE-SIONES GRAVES Y MUERTE:Lea atentamente las instrucciones antes de comenzar la instalación y operación. Conserve las instrucciones para su uso posterior y entrégue-las a todo nuevo usuario.
Seguridad• El interruptor de pared puede ser utilizado por personas (a partir de 8
años y nunca por menores de 8 años) con experiencia y conocimiento suficientes, si se han dado instrucciones sobre su correcto uso y se entienden los riesgos involucrados. El mantenimiento de limpieza y uso no debe ser realizado por un niño sin supervisión.
• Los niños deben tener supervisión para asegurarse de que no jueguen con el interruptor de pared. Debe mantenerse alejado del alcance de los niños a un mínimo de 4 pies de altura (1.2 m).
• El interruptor de pared no debe ponerse en funcionamiento hasta que se haya instalado según las presentes instrucciones.
• No haga funcionar el interruptor de pared sin antes asegurarse de que puede funcionar sin riesgo de causar daños a bienes o lesiones a personas o animales.
• El interruptor de pared debería instalarse en una posición en la que el producto que desea hacer funcionar esté a la vista.
• El interruptor de pared ha sido diseñado para ser usado con productos originales VELUX INTEGRA®.
• El interruptor de pared es un producto Clase 2 de baja tensión (3 V CD.).

32 VELUX® VELUX® 33
io-homecontrol® provides advanced and secure radio technology that is easy to install. io-homecontrol® labelled products communicate with each other, improving comfort, security and energy savings.
www.io-homecontrol.com
• El interruptor de pared cumple con la parte 15 de las normas de FCC y con RSS-210 de las normas de IC. Su funcionamiento depende de las dos condiciones siguientes: (1) El interruptor de pared no debe causar interferencia nociva, y (2) el interruptor de pared debe aceptar toda interferencia recibida, incluso interferencia que pueda causar un funcionamiento no deseado.
• El interruptor de pared ha sido probado y se ha determinado que cum-ple con los límites de los dispositivos digitales Clase B, conforme con la parte 15 de las normas de FCC. Estos límites están diseñados para brindar una protección razonable contra interferencia nociva en una instalación residencial. El interruptor de pared genera, utiliza y puede irradiar energía de radiofrecuencia. Si no se lo instala y utiliza según las instrucciones, puede causar interferencia nociva a las comunicacio-nes radioeléctricas. No obstante, no se puede garantizar que no haya interferencia en una instalación en particular. Si el interruptor de pared causa interferencia nociva en la recepción de radio o televisión, que puede verificarse encendiendo y apagando el interruptor de pared, se recomienda al usuario que intente corregir la interferencia mediante una o más de las siguientes medidas: - Reorientar o reubicar la antena de recepción. - Aumentar la distancia entre el interruptor de pared y el receptor. - Conectar el interruptor de pared a un tomacorriente de un circuito
distinto al que está conectado el receptor.- Consultar con el vendedor o con un técnico especializado de radio/TV. Los cambios o modificaciones que no estén expresamente aprobados por el responsable de cumplimiento podrían anular la autoridad del usuario para operar el interruptor de pared.
• Declaración de cumplimiento con las normas FCC de exposición a la radiación: El interruptor de pared cumple con las normas de FCC res-pecto de los límites de exposición a la radiación RF establecidos para un medioambiente no controlado.
• El término "IC:" delante del número de certificación del interruptor de pared significa solamente que el interruptor de pared cumple con las especificaciones técnicas de Industry Canada.
Instalación• El interruptor de pared es sólo para uso en interior.
• Cuando se instale en habitaciones con un alto nivel de humedad y con
cableado oculto, debe respetarse la normativa correspondiente (con-sulte a un electricista calificado si fuera necesario).
• Antes de fijar el interruptor de pared a la pared, compruebe que desde esa posición hace funcionar el producto en cuestión.
Producto• El interruptor de pared tiene una unidad de radiofrecuencia (RF) incor-
porada que no funcionará si se introduce en una caja metálica.
• Los productos eléctricos deben desecharse de acuerdo con los códigos, ordenanzas, normas y reglamentaciones para residuos electrónicos y no con los residuos hogareños.
• Las baterías usadas no deben desecharse junto con la basura domés-tica, sino que deben eliminarse de acuerdo a la normativa nacional correspondiente sobre medio ambiente. Las baterías contienen sustancias que pueden ser nocivas si no se manipulan y se reciclan correctamente.
• Si hubiere, utilice el punto de reciclaje de baterías establecido por la autoridad local.
• El embalaje puede eliminarse con los residuos hogareños.
• Banda de radiofrecuencia: 2.4 GHz.
• Alcance de la señal de radio: hasta 110 yardas (100 m) al aire libre. Dependiendo del tipo de construcción, el alcance en interior es de 30 pies (10 m) aproximadamente. Sin embargo, las construcciones de hormigón armado, los techos metálicos y las paredes de yeso con elementos de acero pueden reducirlo.
Mantenimiento y servicio• El interruptor de pared requiere un mantenimiento mínimo. La super-
ficie puede limpiarse con un paño suave humedecido con una pequeña cantidad de limpiador de uso casero diluido en agua.
• Si tiene alguna consulta técnica, póngase en contacto con su distribui-dor VELUX; consulte el listado telefónico o visite el sitio www.velux.com.

34 VELUX® VELUX® 35
+
+
+
+
RESET
BateríasInserte las baterías como se indica.
INICIO RÁPIDO
Conecte la alimentación de las persianas solares mediante el interruptor.
Conecte la alimentación de los productos
Conecte la alimentación de los tragaluces eléctricos y encienda los tragaluces solares mediante el interruptor.
INICIO RÁPIDO
36 VELUX® VELUX® 37
ba
Funcionamiento
Si se ha provisto un interruptor de pared con un producto VELUX INTEGRA®, este ya está emparejado o registrado y no requiere configuración para operarlo.Consulte la sección “Configuración avanzada” para configurar el inter-ruptor de pared si lo adquirió por separado.
Teclas para accionar un producto a ABRIR/SUBIR o CERRAR/BAJAR
Presión breve: El producto se moverá hasta la posición máxima superior o inferior.Presión prolongada: El producto se detendrá al dejar de pulsar el botón. Nota: Si hay varios productos eléctricos conectados a una unidad de control KLC 500, uno solo de los productos (al azar) puede operarse de esta manera.
Tecla de stop b El producto se detiene.
INICIO RÁPIDO INICIO RÁPIDO
Sensor de lluviaLos tragaluces VELUX INTEGRA® vienen con un sensor de lluvia.Si se activa el sensor de lluvia, el tragaluz se cerrará automáticamente en un lapso aproximado de 30 segundos, y no se podrá abrir el tragaluz mientras el sensor permanezca activado.

38 VELUX® VELUX® 39
No monte el interruptor de pared a la pared hasta verificar que se pue-den operar los productos desde la posición seleccionada.
Fije el soporte a la pared con los tornillos, como se indica.
Fije el interruptor de pared al soporte, como se indica.
Para instalar otros interruptores de pared en un grupo, use temporal-mente la barra espaciadora roja, tal como se indica.
INICIO RÁPIDO INICIO RÁPIDO

40 VELUX® VELUX® 41
KLI 310 es universal para todos los productos VELUX INTEGRA®.
Modelos de interruptores de pared y configuratión
Para presionar los botones, use un objeto con punta.
El botón del equipo “Listo para registrarse”.
El botón para emparejar “Registrar”.
El interruptor de pared tiene dos botones para la configuración avan-zada:
KLI 311 viene con todos los tragaluces VELUX INTEGRA®.
El ícono indica con qué productos funciona. Nota: KLI 311 para tragaluces no sirve para las persianas.
KLI 312 viene con todas las persianas VELUX INTEGRA® .
El ícono indica con qué productos funciona. Nota: KLI 312 para persianas no sirve para los tragaluces.
Si se ha provisto un interruptor de pared con un producto VELUX INTEGRA® , este ya está emparejado o registrado y no requiere configuración para operarlo.

42 VELUX® VELUX® 43
A
A
B
B
A B1 2
1 sec1 sec
Configuración de un nuevo interruptor de pared agregado a otro ya existente
Importante: El nuevo interruptor de pared debe ser el modelo universal KLI 310 o el mismo modelo que el interruptor de pared existente.
A: Interruptor de pared existenteB: Interruptor de pared nuevo
1 Prepare el producto para registrarlo presionando el botón Equipo en el interruptor existente (A) durante 1 segundo. El producto comenzará a moverse brevemente hacia adelante y hacia atrás.
2 Presione el botón Emparejar en el interruptor de pared nuevo (B) durante 1 segundo.
El producto ahora puede controlarse con los dos interruptores.

44 VELUX® VELUX® 45
a
a
a1 2
1 sec1 sec
Configuración de productos para control grupal con un interruptor de pared maestro (a)
Importante: Todos los interruptores de pared deben ser el mismo mode-lo o el universal KLI 310.
1 Prepare cada uno de los productos seleccionados para registrarlos presionando en el interruptor de cada uno el botón Equipo correspon-diente durante 1 segundo. Los productos comenzarán a moverse brevemente hacia adelante y hacia atrás.
2 Presione el botón Emparejar en el interruptor de pared maestro durante 1 segundo.
Ahora pueden controlarse todos los productos simultáneamente con el interruptor maestro (a).
Repita el procedimiento si falla la configuración de algún producto o para agregar nuevos productos.

46 VELUX® VELUX® 47
1
4
7
2
5 6
8
3
KLI 310/311/312 KLR 200
KLR 200 KLR 200 KLR 200
KLR 200 KLR 200 KLR 200
KLI 310/311/312 KLR 200
2 2
1
1
1 sec
Configuración del KLI 310/311/312 para operar productos ya regis-trados en un mando a distancia táctil KLR 200
Importante: El interruptor de pared debe ser el modelo universal KLI 310 o el modelo que corresponda al producto.
1 Pulse .
2 Pulse "Nuevo producto".
3 Pulse "Preparar control unidireccional".
4 Pulse "Elija productos".
5 Desplácese hacia abajo de la pantalla y elija el tipo de producto 1 . Pulse 2 .
6 Desplácese hacia abajo de la pantalla y elija el producto para agregar 1 .
Nota: Los distintos productos pueden identificarse pulsando el ícono correspondiente. Pulse 2 .
Ahora tiene 10 minutos para ejecutar el paso 7 con el interruptor de pared.
7 Presione el botón Emparejar en el interruptor de pared durante 1 segundo para registrar el producto.
8 Pulse para finalizar. Nota: Para agregar más productos, pulse "Elija más" y repita los pasos 5 al 8.
Los productos ahora también pueden operarse con el KLI 310/311/312.

48 VELUX® VELUX® 49
1 2 3
4
5
1 sec
A A
10 sec
max 3 sec
1 sec
Configuración del KLI 310/311 para operar los tragaluces VELUX INTEGRA®
Importante: El interruptor de pared debe ser el modelo universal KLI 310 o el modelo que corresponda al producto.
Si debe reemplazarse un control que no funciona o si no encuentra en el interruptor de pared ciertos productos, puede configurar los productos para el registro si los reinicia manualmente con su configuración de fábrica.
Nota: No puede accionar productos que han sido reiniciados hasta que han sido registrados en el interruptor de pared de nuevo.
1 Verifique que el tragaluz (VSS/VCS) está conectado a la corriente eléctrica.
2 Cierre la hoja presionando el botón más cercano al centro del tragaluz (A).
3 Cuando el tragaluz está cerrado, restablezca el funcionamiento del tragaluz presionando y manteniendo presionado el botón más cercano al centro del tragaluz (A) durante un mínimo de 10 segundos. El operador del tragaluz se moverá brevemente hacia adelante y hacia atrás para indicar que el tragaluz está listo para registrarse.
Nota: Tiene un máximo de 10 minutos para registrar el tragaluz en el interruptor de pared.
4 Presione el botón Emparejar en el interruptor de pared durante 1 segundo.
5 Presione la tecla de parada (stop) y luego la tecla ABAJO (DOWN) en los 3 segundos siguientes. Esto solo hace falta durante la configura-ción inicial después de instalar el tragaluz.
Ya puede controlar el tragaluz con KLI 310/311.

50 VELUX® VELUX® 51
RESET
1 sec
1B1A
10 sec10 sec
2
3
max 3 sec
Configuración del KLI 310/312 para operar las persianas VELUX INTEGRA®
Importante: El interruptor de pared debe ser el modelo universal KLI 310 o el modelo que corresponda al producto.
Si debe reemplazarse un control que no funciona o si no encuentra en el interruptor de pared ciertos productos, puede configurar los productos para el registro si los reinicia manualmente con su configuración de fábrica.
Nota: No puede accionar productos que han sido reiniciados hasta que han sido registrados en el interruptor de pared de nuevo.
Restablezca el funcionamiento de la persiana. Las persianas solares pueden tener dos diseños diferentes:
1A Persiana solar con interruptor deslizable en la parte inferior derecha de la unidad del motor: Deslice el interruptor a la derecha y sosténgalo durante 10 segundos. La persiana se moverá brevemente hacia adelante y hacia atrás para indicar que está lista para registrarse.
1B Persiana solar con botón detrás del compartimiento sobre la parte inferior de la unidad del motor: Abra el compartimiento de la batería solar, presione el botón ubica-do detrás de la tapa durante 10 segundos y ciérrelo. La persiana se moverá brevemente hacia adelante y hacia atrás para indicar que está lista para registrarse.
Nota: Tiene un máximo de 10 minutos para registrar la persiana en el interruptor de pared.
2 Presione el botón Emparejar del interruptor de pared durante 1 segundo.
3 Presione la tecla de parada (stop) y luego la tecla ABAJO (DOWN) en los 3 segundos siguientes. Esto solo hace falta durante la configu-ración inicial después de instalar la persiana.
Ya puede controlar la persiana con KLI 310/312.

52 VELUX® VELUX® 53
10 sec
KLC 500
1 sec
1
2
3
max 3 sec
Configuración del KLI 310/311/312 para operar productos conectados a la unidad de control KLC 500
Importante: El interruptor de pared debe ser el modelo universal KLI 310 o el modelo que corresponda al producto o productos.
Si debe reemplazarse un control que no funciona o si no encuentra en el interruptor de pared ciertos productos, puede configurar los productos para el registro si los reinicia manualmente con su configuración de fábrica.
Nota:No puede accionar productos que han sido reiniciados hasta que han sido registrados en el interruptor de pared de nuevo.
1 Puede restablecerse la unidad de control retirando la tapa y presio-nando el botón de prueba (test) durante al menos 10 segundos. Los productos conectados se moverán brevemente hacia adelante y hacia atrás en orden aleatorio para indicar que están listos para registrarse.
2 Presione el botón Emparejar del interruptor de pared durante 1 segundo.
3 Presione la tecla de parada (stop) y luego la tecla ABAJO (DOWN) en los 3 segundos siguientes. Esto solo hace falta durante la configura-ción inicial después de instalar el producto.
Ya puede operar los productos con KLI 310/311/312.

VELUX® 5554 VELUX®
1 sec1 sec
Contenu de l'emballage 56
Information importante et Avertissement 57-59
Démarrage rapide 60-65
Configuration avancée
Modèles de clavier mural et installation 66-67
Mise en place d'un nouveau clavier mural en plus d'un clavier mural existant 68-69
Configuration pour le contrôle de groupe par un clavier mural maître 70-71
Configuration du KLI 310/311/312 pour opérer les produits déjà enregistrés dans une commande tactile KLR 200 72-73
Configuration du KLI 310/311 pour opérer les puits de lumière VELUX INTEGRA® 74-75
Configuration du KLI 310/312 pour opérer les stores VELUX INTEGRA® 76-77
Configuration du KLI 310/311/312 pour faire fonc-tionner des produits connectés au bloc transforma-teur KLC 500 78-79
Suppression (réinitialisation) des produits du clavier mural KLI 310/311/312 80
+
Eliminar (restablecer) productos de los interruptores de pared KLI 310/311/312
Elimine (restablezca) todos los productos de un interruptor de pared presionando el botón Equipo (Gear) durante 1 segundo y luego presione el botón Emparejar durante 1 segundo.
Los productos ya no pueden ser controlados por este interruptor de pared.

56 VELUX® VELUX® 57
� 4 mm
1 2
Contenu de l'emballage1 : Clavier mural
2 : Deux piles (type AAA, 1,5 V) vis, chevilles, support mural et barre d’espacement
INFORMATION IMPORTANTEAVERTISSEMENT – POUR REDUIRE LES RISQUES DE BLESSURE GRAVE OU DE MORT :Lisez attentivement la totalité des instructions avant l'installation et l'activation. Conservez ces instructions pour référence ultérieure en cas de besoin et ne pas oubliez de les transmettre à tout nouvel utilisateur.
Sécurité• Le clavier mural peut être utilisée par des personnes (âgés de 8 ans
et plus) ayant suffisamment d'expériences et de connaissances s'ils ont reçu des instructions appropriées concernant une utilisation de manière sûre et comprennent les risques associés. Le nettoyage et la maintenance ne doivent pas être réalisés par des enfants sans surveillance.
• Les enfants doivent être supervisés afin de s'assurer qu'ils ne jouent pas avec le clavier mural. Il doit être tenu hors de la portée des enfants à hauteur minimum de 4 pieds (1,2 m).
• Le clavier mural ne doit pas être mis sous tension jusqu'à l'installation complète en conformité avec les instructions d'installation fournies.
• Avant toute manœuvre, assurez-vous que le clavier mural peut être actionné sans risque de dommages matériels ou de blessures à une personne ou un animal domestique.
• Le clavier mural doit être positionné de façon à ce que le produit à actionner soit visible.
• Le clavier mural a été conçu pour fonctionner avec des produits de marque VELUX INTEGRA®.

58 VELUX® VELUX® 59
io-homecontrol® provides advanced and secure radio technology that is easy to install. io-homecontrol® labelled products communicate with each other, improving comfort, security and energy savings.
www.io-homecontrol.com
• Le clavier mural est un produit à basse tension avec puissance de sortie classe 2 (3 V c. c.).
• Le clavier mural est conforme avec la section 15 du FCC et du RSS-210 de la réglementation IC. Son fonctionnement est soumis aux deux conditions suivantes : (1) le clavier mural ne doit pas provoquer d'interférences nuisibles, et (2) le clavier mural doit accepter toutes interférences reçues, y compris les interférences pouvant provoquer un fonctionnement indésirable.
• Le bloc numérique a été testé et est conforme aux normes pour un appareil numérique Classe B, selon la section 15 de la réglementation de FCC. Ces normes sont établies afin de procurer une protection acceptable contre les interférences nuisibles pour une installation résidentielle. Le clavier mural génère, utilise et peut émettre des fré-quences radioélectriques et, si non installé et utilisé en conformité avec les instructions, peut causer des interférences nuisibles à la radiocom-munication. Toutefois, il n'y a pas de garantie qu'il n'y ait aucune inter-férence dans une installation particulière. Advenant le cas où le clavier mural génère des interférences nuisibles à la réception d'ondes radio ou télévision, ce qui peut être déterminé en mettant le clavier mural hors tension, l'utilisateur est encouragé à corriger l'interférence selon une ou plusieurs de ces mesures correctives : - Réorientez ou déplacer l'antenne de réception. - Éloignez le bloc numérique du récepteur. - Connectez le clavier mural sur une prise d'alimentation électrique
différente de celle du récepteur. - Consultez le détaillant ou un technicien experimenté en radio/télévi-
sion pour de l'assistance. Des modifications ou changements apportés et non autorisés par la
partie responsable de la conformité pourraient compromettre l'autori-sation de l'utilisateur à opérer le clavier mural.
• Avis d'exposition au rayonnement de la FCC : Le clavier mural est conforme aux limites d'exposition au rayonnement RF établies par la FCC pour un environnement non contrôlé.
• Le terme "IC:" en avant du numéro de certification du bloc numérique signifie seulement que le bloc numérique satisfait les caractéristiques techniques d'Industrie Canada.
Installation• Le bloc numérique est uniquement prévu pour usage intérieur.• L'installation dans une pièce à taux d'humidité élevé ou avec câblage
encastré oblige à se conformer à la réglementation nationale corres-pondante (contactez un électricien qualifié si nécessaire).
• Avant de fixer le clavier mural au mur, vérifiez que celui-ci permet de contrôler le produit en question de cet emplacement.
Produit• Le clavier mural possède un système RF intégré (radiofréquence) et ne
sera pas opérationnel s'il est placé dans une armoire métallique.• Les produits électriques/électroniques doivent être disposés conformé-
ment à la réglementation sur les déchets électroniques en vigueur et ne doivent en aucun cas être jetés aux ordures ménagères.
• Les piles usagées ne doivent pas être jetées avec les déchets ménagers mais doivent être collectées conformément à la réglementation natio-nale en vigueur. Les piles contiennent des substances qui peuvent être dangereuses, si elles ne sont pas utilisées et recyclées correctement.
• Utilisez les points de collecte locaux ou déchetteries si disponible.• L'emballage peut être jeté aux ordures ménagères.• Fréquence radio : 2,4 GHz.• Portée de la transmission radio : 330 pieds (100 m) à l'extérieur,
sans obstacle. Selon le type de construction, la portée intérieure est d'environ 30 pieds (10 m). Cependant les constructions en béton armé, les plafonds métalliques et les plaques de plâtre avec des ossatures en acier peuvent réduire cette valeur.
Entretien et service après-vente• Le clavier mural requiert un entretien minimal. La surface peut être
nettoyée avec un linge doux humide et un produit nettoyant ménager dilué avec de l'eau.
• Si vous avez une question technique, contactez s'il vous plait votre société de vente VELUX, voyez numéro indiqué ou www.velux.com.

60 VELUX® VELUX® 61
+
+
+
+
RESET
PilesInsérez les piles, tel qu'illustré.
DÉMARRAGE RAPIDE
Allumez les stores solaires en allumant l'interrupteur d'alimentation.
Alimentez les produits
Allumez les puits de lumière électriques par le disjoncteur principal et les puits de lumière solaires en allumant l'interrupteur d'alimentation.
DÉMARRAGE RAPIDE
62 VELUX® VELUX® 63
ba
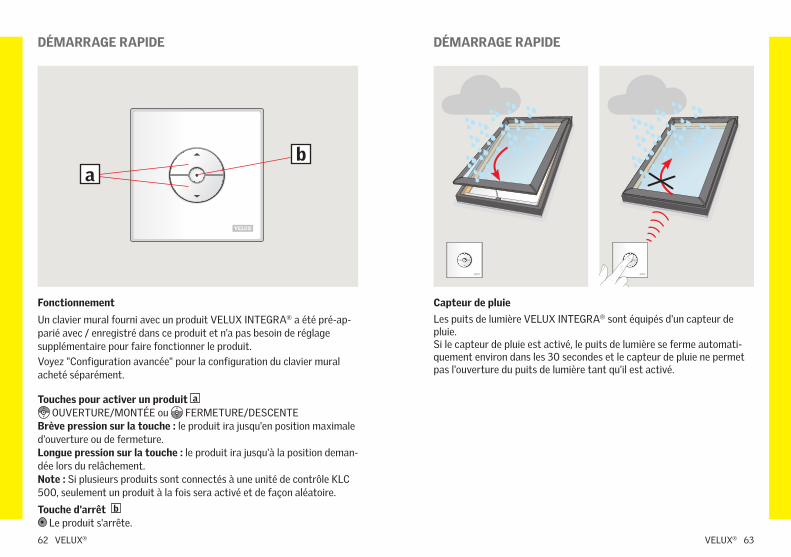
Fonctionnement
Un clavier mural fourni avec un produit VELUX INTEGRA® a été pré-ap-parié avec / enregistré dans ce produit et n'a pas besoin de réglage supplémentaire pour faire fonctionner le produit.Voyez "Configuration avancée" pour la configuration du clavier mural acheté séparément.
Touches pour activer un produit a OUVERTURE/MONTÉE ou FERMETURE/DESCENTE
Brève pression sur la touche : le produit ira jusqu'en position maximale d'ouverture ou de fermeture.Longue pression sur la touche : le produit ira jusqu'à la position deman-dée lors du relâchement. Note : Si plusieurs produits sont connectés à une unité de contrôle KLC 500, seulement un produit à la fois sera activé et de façon aléatoire.
Touche d'arrêt b Le produit s'arrête.
DÉMARRAGE RAPIDE DÉMARRAGE RAPIDE
Capteur de pluie Les puits de lumière VELUX INTEGRA® sont équipés d'un capteur de pluie.Si le capteur de pluie est activé, le puits de lumière se ferme automati-quement environ dans les 30 secondes et le capteur de pluie ne permet pas l'ouverture du puits de lumière tant qu'il est activé.

64 VELUX® VELUX® 65
Ne fixez pas le clavier mural au mur avant d'avoir vérifié que les produits peuvent être actionnés à partir de la position proposée.
Fixez le support mural au mur avec les vis, comme indiqué.
Fixez le clavier mural au support mural comme indiqué.
Pour installer plusieurs claviers muraux dans un groupe, utilisez tempo-rairement la barre d'espacement rouge comme indiqué.
DÉMARRAGE RAPIDE DÉMARRAGE RAPIDE

66 VELUX® VELUX® 67
KLI 310 est universel pour tous les produit VELUX INTEGRA®.
Modèles de clavier mural et installation
Pour pousser les boutons, utilisez un outil pointu.
Le bouton d'engrenage (Gear) "Ouvrez pour l'enregistrement".
Le bouton Pair “Enregistrez”.
Le clavier mural a deux boutons, utilisés pour une configuration avancée:KLI 311 est fourni avec chaque puits de lumière VELUX INTEGRA®.
L'icône indique quels produits peuvent être utilisés. Note : KLI 311 pour les puits de lumière ne peut pas être configuré avec des stores.
KLI 312 iest fourni avec chaque stores VELUX INTEGRA® .
L'icône indique quels produits peuvent être utilisés. Note : KLI 312 pour stores ne peut pas être installé avec des puits de lumière.
Un clavier mural fourni avec un produit VELUX INTEGRA® a été pré-ap-parié avec / enregistré dans ce produit et n'a pas besoin de réglage supplémentaire pour faire fonctionner le produit.

68 VELUX® VELUX® 69
A
A
B
B
A B1 2
1 sec1 sec
Mise en place d'un nouveau clavier mural en plus d'un clavier mural existant
Important: Le nouveau clavier mural doit être le KLI 310 universel ou le même modèle que le clavier mural existant.
A: Clavier mural existantB: Nouveau clavier mural
1 Préparez le produit pour l'enregistrement en appuyant sur le bouton d’engrenage (Gear) du clavier mural existant (A) pendant 1 seconde. Le produit commencera à fonctionner brièvement d'avant et d’arrière.
2 Appuyez sur le bouton Pair du nouveau clavier mural (B) pendant 1 seconde.
Le produit est maintenant contrôlé par les deux claviers muraux.

70 VELUX® VELUX® 71
a
a
a1 2
1 sec1 sec
Configuration pour le contrôle de groupe par un clavier mural maître (a)
Important: Tous les claviers muraux doivent être du même modèle ou le KLI 310 universel.
1 Préparez chacun des produits sélectionnés pour l'enregistrement en appuyant sur chacun des boutons d'engrenage (Gear) du clavier mural pendant 1 seconde. Les produits commenceront à fonctionner brièvement d'avant et d’arrière.
2 Appuyez sur le bouton Pair du clavier mural maître pendant 1 seconde.
Tous les produits sont maintenant contrôlés simultanément par le clavier mural maître (a).
Répétez la procédure pour les produits en panne de configuration et pour l'ajout de produits supplémentaires.

72 VELUX® VELUX® 73
1
4
7
2
5 6
8
3
KLI 310/311/312 KLR 200
KLR 200 KLR 200 KLR 200
KLR 200 KLR 200 KLR 200
KLI 310/311/312 KLR 200
2 2
1
1
1 sec
Configuration du KLI 310/311/312 pour opérer les produits déjà enregistrés dans une commande tactile KLR 200
Important: Le clavier mural doit être le KLI 310 universel ou le modèle correspondant au produit.
1 Appuyez sur .
2 Appuyez "Nouveau produit".
3 Appuyez sur "Transférer vers commande une-voie".
4 Appuyez sur "Choisir produits".
5 Faites défiler l'écran et choisissez le type de produit 1 . Appuyez 2 .
6 Faites défiler l'écran et appuyez sur le produit à ajouter 1 . Note : Les produits individuels peuvent être identifiés en appuyant sur l'icône.
Appuyez sur 2 .
Vous avez maintenant 10 minutes pour exécuter l'étape 7 avec le clavier mural.
7 Appuyez sur le bouton Pair du clavier mural pendant 1 seconde pour enregistrer le produit.
8 Appuyez sur pour terminer. Note : Pour ajouter plus de produits, appuyez sur "Choisir autres" et répétez les étapes 5 à 8.
Les produits peuvent maintenant être utilisés avec le KLI 310/311/312 aussi.

74 VELUX® VELUX® 75
1 2 3
4
5
1 sec
A A
10 sec
max 3 sec
1 sec
Configuration du KLI 310/311 pour opérer les puits de lumière VELUX INTEGRA®
Important: Le clavier mural doit être le KLI 310 universel ou le modèle correspondant au produit.
Si une unité de commande non-fonctionnelle doit être remplacée ou si le clavier mural ne trouve pas certains produits, ils peuvent être préparés pour l'enregistrement en étant réinitialisé manuellement aux réglages d'usine.
Note : Les produits réinitialisés ne peuvent plus être manœuvrés, tant qu'ils n'ont pas été enregistrés à nouveau dans le clavier mural.
1 Assurez-vous que l'alimentation du puits de lumière (VSS / VCS) est activée.
2 Fermez le volet en appuyant sur le bouton le plus proche du centre du puits de lumière (A).
3 Lorsque le puits de lumière est fermé, réinitialisez le puits de lumière en appuyant sur le bouton le plus proche du centre du puits de lu-mière (A) et en le maintenant enfoncé pendant au moins 10 secondes. L'opérateur du puits de lumière va brièvement s’allumer et s’éteindre, indiquant que le puits de lumière est prêt à être enregistré.
Note : Le puits de lumière doit maintenant être enregistré dans le clavier mural dans les 10 prochaines minutes.
4 Appuyez sur le bouton Pair du clavier mural pendant 1 seconde.
5 Appuyez sur la touche stop puis sur la touche DOWN (en bas) dans les 3 secondes. Ceci n'est nécessaire que lors de la configuration initiale après l'installation du puits de lumière.
Le puits de lumière peut maintenant être utilisé avec le KLI 310/311.

76 VELUX® VELUX® 77
RESET
1 sec
1B1A
10 sec10 sec
2
3
max 3 sec
Configuration du KLI 310/312 pour opérer les stores VELUX INTEGRA®
Important: Le clavier mural doit être le KLI 310 universel ou le modèle correspondant au produit.
Si une unité de commande non-fonctionnelle doit être remplacée ou si le clavier mural ne trouve pas certains produits, ils peuvent être préparés pour l'enregistrement en étant réinitialisé manuellement aux réglages d'usine.
Note : Les produits réinitialisés ne peuvent plus être manœuvrés, tant qu'ils n'ont pas été enregistrés à nouveau dans le clavier mural.
Réinitialisez le store. Les stores solaire peuvent avoir deux conceptions différentes :
1A Store solaire avec interrupteur coulissant sur le côté inférieur droit du moteur : Faites glisser l'interrupteur vers la droite et maintenez pendant 10 secondes. Le store fonctionnera brièvement d'avant et d’arrière indiquant qu'il est prêt à être enregistré.
1B Store solaire avec bouton derrière la porte au bas du moteur: Ouvrez la porte de la batterie solaire, appuyez sur le bouton derrière la porte pendant 10 secondes et fermez la porte de la batterie. Le store fonctionnera brièvement d'avant et d’arrière indiquant qu'il est prêt à être enregistré.
Note : Le store doit maintenant être enregistré dans le clavier mural dans les 10 prochaines minutes.
2 Appuyez sur le bouton Pair du clavier mural pendant 1 seconde.
3 Appuyez sur la touche stop puis sur la touche DOWN (en bas) dans les 3 secondes. Ceci n'est nécessaire que lors de la configuration initiale après l'installation du store.
Le store peut maintenant être utilisé avec le KLI 310/312.

78 VELUX® VELUX® 79
10 sec
KLC 500
1 sec
1
2
3
max 3 sec
Configuration du KLI 310/311/312 pour faire fonctionner des produits connectés au bloc transformateur KLC 500
Important: Le clavier mural doit être le KLI 310 universel ou le modèle correspondant au (x) produit (s).
Si une unité de commande non-fonctionnelle doit être remplacée ou si le clavier mural ne trouve pas certains produits, ils peuvent être préparés pour l'enregistrement en étant réinitialisé manuellement aux réglages d'usine.
Note : Les produits réinitialisés ne peuvent plus être manœuvrés, tant qu'ils n'ont pas été enregistrés à nouveau dans le clavier mural.
1 L'unité de commande peut être réinitialisée en retirant le couvercle et en appuyant sur le bouton de test pendant au moins 10 secondes. Les produits connectés fonctionneront brièvement dans un ordre au hasard pour indiquer qu'ils sont prêts pour l'enregistrement.
2 Appuyez sur le bouton Pair du clavier mural pendant 1 seconde.
3 Appuyez sur la touche stop puis sur la touche DOWN (en bas) dans les 3 secondes. Ceci n'est nécessaire que lors de la configuration initiale après l'installation du produit.
Les produits peuvent maintenant être utilisés avec le KLI 310/311/312.

VELUX® 8180 VELUX®
1 sec1 sec
Suppression (réinitialisation) des produits du clavier mural KLI 310/311/312
Effacez (réinitialisez) tous les produits d'un clavier mural en appuyant sur le bouton d’engrenage (Gear) pendant 1 seconde, puis en appuyant sur le bouton Pair pendant 1 seconde.
Maintenant, les produits ne peuvent plus être utilisés par ce clavier mural.
同梱品 82
大切なお知らせ 83-85
基本操作 86-91
詳細設定
リモコンの種類と設定 92-93
新しいリモコンを既存のリモコンに加える設定 94-95
一つのマスターリモコンでグループ操作する設定 96-97
KLR 200 リモコンに登録済みの製品を KLI 310 / 311 / 312 で操作するための設定 98-99
VELUX INTEGRA® 天窓を操作するための KLI 310 / 311の設定 100-101
VELUX INTEGRA® ブラインドを操作するための KLI 310 / 312 の設定 102-103
コントロールユニット KLC 500 に接続された
製品を操作するための KLI 310 / 311 / 312 の設定 104-105
KLI 310 / 311 / 312 から製品を削除(リセット) 106
+
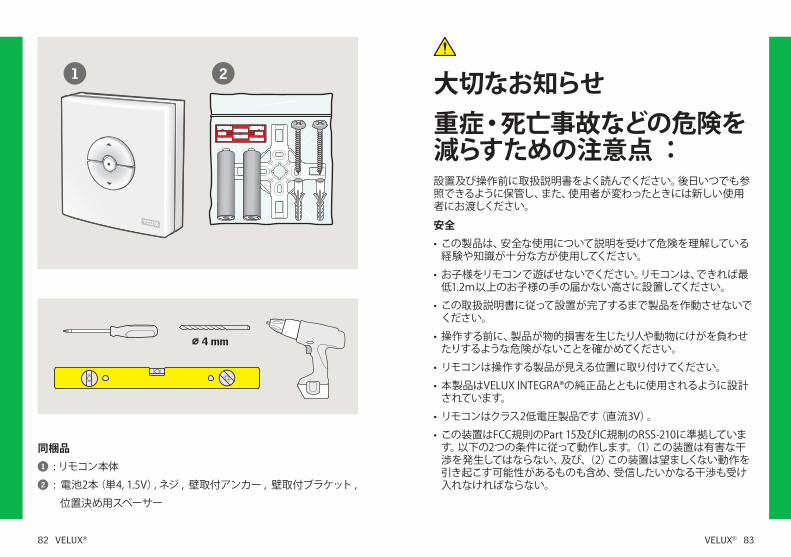
82 VELUX® VELUX® 83
� 4 mm
1 2
同梱品 1 : リモコン本体2 : 電池2本(単4, 1.5V), ネジ , 壁取付アンカー , 壁取付ブラケット ,
位置決め用スペーサー
大切なお知らせ重症・死亡事故などの危険を減らすための注意点 :設置及び操作前に取扱説明書をよく読んでください。後日いつでも参照できるように保管し、また、使用者が変わったときには新しい使用者にお渡しください。
安全• この製品は、安全な使用について説明を受けて危険を理解している
経験や知識が十分な方が使用してください。
• お子様をリモコンで遊ばせないでください。リモコンは、できれば最低1.2m以上のお子様の手の届かない高さに設置してください。
• この取扱説明書に従って設置が完了するまで製品を作動させないでください。
• 操作する前に、製品が物的損害を生じたり人や動物にけがを負わせたりするような危険がないことを確かめてください。
• リモコンは操作する製品が見える位置に取り付けてください。
• 本製品はVELUX INTEGRA®の純正品とともに使用されるように設計されています。
• リモコンはクラス2低電圧製品です(直流3V)。
• この装置はFCC規則のPart 15及びIC規制のRSS-210に準拠しています。以下の2つの条件に従って動作します。(1)この装置は有害な干渉を発生してはならない、及び、(2)この装置は望ましくない動作を引き起こす可能性があるものも含め、受信したいかなる干渉も受け入れなければならない。

84 VELUX® VELUX® 85
io-homecontrol® は設定が簡単で、高度で安全な無線技術を提供しています。io-homecontrol® 対応品は快適性、安全性、省エネルギー性を向上し、製品間の相互通信を可能にします。
www.io-homecontrol.com
• この装置はテスト済みであり、FCC規則Part 15による仕様のクラスBデジタル装置の制限に適合していることが確認されています。これらの制限は、住居設置において有害な干渉に対する適正な保護を提供するために設定されています。この装置は、高周波エネルギーを発生し、使用し、また、それを放射する可能性があり、取扱説明書に従って設置及び使用されなかった場合、無線通信に有害な干渉を生じる可能性があります。また、特定の設置において干渉が起こらないという保証はありません。この装置が装置の電源を切ったり入れたりすることによって確認することができるラジオまたはテレビの受信に対する有害な干渉を生じる場合、使用者は干渉に対して以下の措置のうちの一つ以上の措置を取ることが推奨されます :
- 受信アンテナの向きを変える、または、移動させる。 - 装置と受信機の間の距離を離す。 - 受信機が接続されている回路と異なる回路のコンセントに装置を接続する。
- 販売店または熟練したラジオ / テレビ技術者に相談する。 コンプライアンスの責任者によって明確に承認されていない変更や改造を行った場合、使用者は本装置を操作する権限を失う場合があります。
• FCC被ばくステートメント : この装置は、制御されていない環境に対して規定された FCC 被ばく範囲に準拠しています。
• 装置の認証番号の前の「IC : 」はカナダ産業省技術仕様に適合していることを意味しています。
設置• この装置は屋内で使用してください。
• 湿度が高い部屋や隠れた配線がある部屋に設置する場合には関連基準に適合しなければなりません(必要であれば資格のある電気技師に相談してください)。
• この装置を壁付けする前に、その位置から製品の操作が可能か確認をしてください。
製品• このリモコンはRF(無線周波数)ユニットを内蔵していますので、金
属キャビネットの中に置くと作動しなくなります。
• 電気製品は電子機器廃棄物の国内規定に従って廃棄してください。家庭廃棄物と一緒に廃棄しないでください。
• 使用済み電池は家庭廃棄物と一緒に捨てないでください。所定の国内環境規定に従って廃棄されなければなりません。電池は正しい取扱いやリサイクルをしなければ有害となり得る物質を含んでいます。
• 自治体の電池廃棄処理所があれば、そこをご利用ください。
• 梱包材は通常の家庭廃棄物と一緒に廃棄することができます。
• 無線周波数帯域 : 2.4GHz.
• 無線周波数範囲 : 障害物がない状態で100m。建造物によりますが、屋内範囲はおよそ10mです。ただし、鉄筋コンクリート、金属製の天井および鋼材を有する間仕切り壁などによる建造物では範囲が縮小される場合があります。
メンテナンスとサービス• この製品は最小限の保守のみを必要とします。表面を拭く際は、水
で薄めた少量の家庭用洗剤で湿らせた柔らかい布をご使用ください。
• 技術的な質問がありましたら、日本ベルックス㈱にお問い合わせください。電話またはメールでお問い合わせいただけます。日本ベルックス㈱のウェブサイトwww.velux.comをご覧ください。

86 VELUX® VELUX® 87
+
+
+
+
RESET
電池図のように電池を入れてください。
ソーラーブラインドはスイッチをスライドして中央に合わせてください。
製品の電源電動天窓は電源につないでください。ソーラー天窓は電源スイッチをONにしてください。
基本操作 基本操作

88 VELUX® VELUX® 89
ba
操作VELUX INTEGRA® 製品に同梱されているリモコンは事前に設定 / 登録されていますので、操作前に設定を行う必要はありません。
個別に購入したリモコンを設定するときには、詳細設定をご覧ください。
製品を操作するためのキー a
開く / 上げる または 閉じる / 下げる
キーの短押し : 製品は最上端または最下端まで移動します。 キーの長押し : 製品はキーが押されている間だけ移動します。 注意 : 複数の製品が1つのコントロールユニット KLC 500 に接続されている場合、この方法では製品のうちの1つがランダムに動作します。
ストップキー b 製品を停止します。
吹込みセンサー / 雨センサーVELUX INTEGRA® 天窓 VSE / VSS は雨を感知するセンサーが装備されています。
センサーに雨があたると、天窓は約30秒で自動的に閉じ、センサーが感知している間は天窓を開けることはできません。
基本操作 基本操作
90 VELUX® VELUX® 91
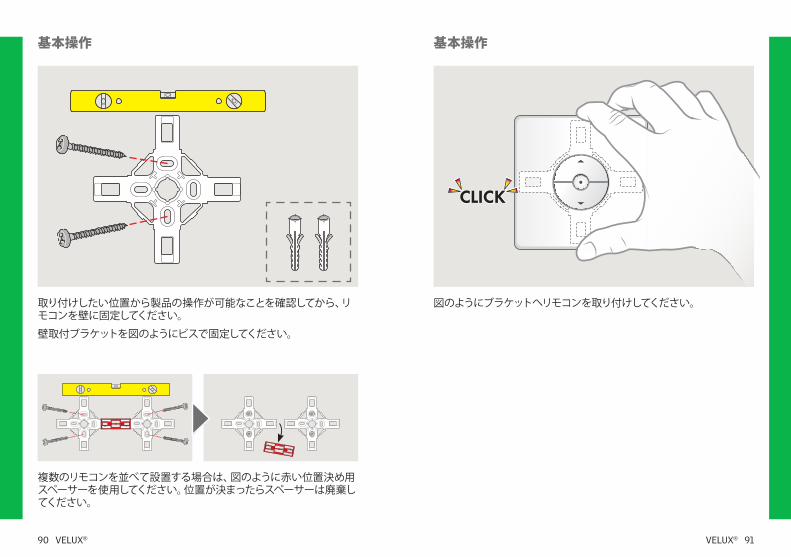
取り付けしたい位置から製品の操作が可能なことを確認してから、リモコンを壁に固定してください。
壁取付ブラケットを図のようにビスで固定してください。
図のようにブラケットへリモコンを取り付けしてください。
複数のリモコンを並べて設置する場合は、図のように赤い位置決め用スペーサーを使用してください。位置が決まったらスペーサーは廃棄してください。
基本操作 基本操作

92 VELUX® VELUX® 93
KLI 310 は全ての VELUX INTEGRA® 製品に対応可能です。
ボタンを押す時には、細くとがったものを使用してください。
ギアボタンは[登録の用意]に使用します。
ペアボタン(四角が2つのボタン)は[登録]に使用します。
このリモコンには詳細設定を行うためのボタンが2つあります : KLI 311 は VELUX INTEGRA® 天窓に同梱されています。
このアイコンはリモコンで操作可能な製品の種類を示しています。 注意 : KLI 311 は天窓専用で、ブラインドには使用できません。
KLI 312 は VELUX INTEGRA® ブラインドに同梱されています。
このアイコンはリモコンで操作可能な製品の種類を示しています。 注意 : KLI 312 はブラインド専用で、天窓には使用できません。
VELUX INTEGRA® 製品に同梱されている KLI は事前に設定 / 登録しているので、操作前に設定を行う必要はありません。
リモコンの種類と設定

94 VELUX® VELUX® 95
A
A
B
B
A B1 2
1 sec1 sec
新しいリモコンを既存のリモコンに加える設定重要 : 新しいリモコンは KLI 310 または既存のリモコンと同じモデルをご使用ください。
A : 既存のリモコン
B : 新しいリモコン
1 既存のリモコン(A)のギアボタンを1秒押して、登録の用意をします。 製品が少しの間動作します。
2 新しいリモコン(B)のペアボタンを1秒押します。
これで製品は両方のリモコンで操作できるようになります。

96 VELUX® VELUX® 97
a
a
a1 2
1 sec1 sec
1つのマスターリモコン(a)でグループ操作する設定重要 : KLI 310 またはすべて同じモデルのリモコンをご使用ください。
1 グループ操作したい製品それぞれのリモコンのギアボタンを1秒押してください。 製品が少しの間動作します。
2 マスターリモコンのペアボタンを1秒押します。
すべての製品がマスターリモコン(a)で同時に操作ができるようになります。
設定失敗の場合や、追加の製品を設定する場合は、同じ手順を繰り返してください。

98 VELUX® VELUX® 99
1
4
7
2
5 6
8
3
KLI 310/311/312 KLR 200
KLR 200 KLR 200 KLR 200
KLR 200 KLR 200 KLR 200
KLI 310/311/312 KLR 200
2 2
1
1
1 sec
KLR 200 リモコンに登録済みの製品を KLI 310 / 311 / 312 で操作するための設定重要 : KLI 310 または製品に対応したリモコンをご使用ください。1 KLR 200 の をタップします。2 [新しい製品]をタップします。3 [1-wayリモコンの準備]をタップします。4 [製品を選ぶ]をタップします。5 ディスプレイを下にスクロールして製品タイプ 1 を選択します。
2 をタップします。6 ディスプレイを下にスクロールして追加する製品 1 を選択しま
す。 注意: アイコンをタップすると個々の製品を特定できます。 2 をタップします。
10分以内に7の操作を行ってください。7 KLI のペアボタンを1秒押して、製品の登録をしてください。8 KLR 200 の をタップし、終了してください。
注意: さらに製品を追加するには、「製品の追加」をタップして5-8の手順を繰り返します。
KLI 310 / 311 / 312 でも製品の操作ができるようになります。

100 VELUX® VELUX® 101
1 2 3
4
5
1 sec
A A
10 sec
max 3 sec
1 sec
VELUX INTEGRA® 天窓を KLI 310 / KLI 311 で操作するための設定重要 : KLI 310 または KLI 311 をご使用ください。
機能していないリモコンを交換する場合や、リモコンが特定の製品と通信しない場合には手動で工場出荷の状態にリセットし、再登録の用意を行ってください。
注意 : リセットされた製品は、再度リモコンに登録されるまで操作できません。
1 天窓の電源が入っていることを確認してください。
2 天窓が開いている場合は、中心寄りのボタン(A)を短く押して窓を閉じてください。
3 天窓が閉じた状態になったら、(A)ボタンを10秒以上長押しして天窓をリセットしてください。リセットされたことを示すために、天窓が少しの間開閉動作をします。
注意 : リセット完了後10分以内にリモコンに再登録を行ってください。
4 リモコンのペアボタンを1秒押します。
5 ストップキーを押し、3秒以内に下向きのキーを押します。天窓設置後に必要な初期設定は以上です。
KLI 310 / 311 で天窓を操作できるようになります。

102 VELUX® VELUX® 103
RESET
1 sec
1B1A
10 sec10 sec
2
3
max 3 sec
VELUX INTEGRA® ブラインドを KLI 310 / KLI 312 で操作するための設定重要 : KLI 310 または KLI 312 をご使用ください。
機能していないリモコンを交換する場合や、リモコンが特定の製品と通信しない場合には手動で工場出荷の状態にリセットし、再登録の用意を行ってください。
注意 : リセットされた製品は、再度リモコンに登録されるまで操作できません。
ブラインドのリセット ソーラーブラインドは2種類あります :
1A ブラインド本体の右端にスライド式スイッチがあるタイプ :
スイッチを右側へスライドして10秒間保持してください。 リセットされたことを示すために、ブラインドが少しの間昇降動作します。
1B スイッチがモーターユニット内にあるタイプ :
本体左右のロックをずらしカバーを開けて、内部にあるボタンを押して10秒間保持してからカバーを閉じてください。 リセットされたことを示すために、ブラインドが少しの間昇降動作します。
注意 : リセット完了後10分以内にリモコンに再登録を行ってください。
2 リモコンのペアボタンを1秒押します。
3 ストップキーを押し、3秒以内に下向きのキーを押します。ブラインド設置後に必要な初期設定は以上です。
KLI 310 / 312 でブラインドを操作できるようになります。

104 VELUX® VELUX® 105
10 sec
KLC 500
1 sec
1
2
3
max 3 sec
コントロールユニット KLC 500 に接続された製品を KLI 310 / 311 / 312 で操作するための設定重要 : KLI 310 または製品に対応した KLI をご使用ください。
機能していないリモコンを交換する場合や、リモコンが特定の製品と通信しない場合には手動で工場出荷の状態にリセットし、再登録の用意を行ってください。注意 : リセットされた製品は、再度リモコンに登録されるまで操作できません。1 KLC 500 はカバーを外してテストボタンを10秒以上押すとリセット
されます。 リセットされたことを示すために、接続されている製品がランダムに少しの間動作します。
2 KLI のペアボタンを1秒押します。3 ストップキーを押し、3秒以内に下向きのキーを押します。製品設
置後に必要な初期設定は以上です。KLI 310 / 311 / 312で製品を操作できるようになります。

106 VELUX®
1 sec1 sec
KLI 310 / 311 / 312 から製品を削除(リセット)ギアボタンを1秒押した後に続けて、ペアボタンを1秒押すと、リモコンから製品が削除(リセット)されます。
このリモコンではもう製品を操作することができなくなります。

INS
TR
UC
TIO
NS
FOR
KLI
310
/311
/312
©20
18 V
ELU
X G
RO
UP
®V
ELU
X, T
HE
VEL
UX
LO
GO
, VEL
UX
INT
EGR
A, i
o-ho
mec
ontr
ol A
ND
TH
E io
-hom
econ
trol
LO
GO
AR
E R
EGIS
TER
ED T
RA
DEM
AR
KS
USE
D U
ND
ER L
ICEN
SE B
Y T
HE
VEL
UX
GR
OU
P
INST
RU
CTIO
NS
POU
R K
LI 3
10/3
11/3
12 ©
2018
VEL
UX
GR
OU
P ®
VEL
UX
, LE
LOG
O V
ELU
X, V
ELU
X IN
TEG
RA, i
o-ho
mec
ontr
ol E
T LE
LO
GO
io-h
omec
ontr
ol S
ON
T D
ES M
AR
QU
ES D
E CO
MM
ERCE
D
ÉPO
SÉES
ET
EMPL
OYÉE
S SO
US
LICE
NCE
DE
VEL
UX
GR
OU
P
US: VELUX America LLC 1-800-88-VELUX www.veluxusa.com
CD: VELUX Canada Inc. 1 800 88-VELUX (888-3589) www.velux.ca
AU: VELUX Australia Pty. Ltd 1300 859 856 www.velux.com.au
NZ: VELUX New Zealand Ltd. 0800 650 445 www.velux.co.nz
JP: 日本ベルックス株式会社 0570-00-8145 www.velux.co.jp
www.velux.com
ENGLISH: Additional operational features and functions are available in the online User manual for controls KLR 100 and KLR 200 located on the websites listed below:
ESPANOL: Puede encontrar otras características de operación y funcio-nes en el Manual del usuario del control KLR 100 y KLR 200 en línea en los sitios web que se enumeran abajo:
FRANÇAIS : Autres fonctions et caractéristiques opérationnelles sont disponibles au moyen de la Notice d'utilisation de la commande KLR 100 et KLR 200 en ligne aux sites web suivants :
日本語:さらなる操作上の特徴と機能をご覧いただけるリモコンKLR用のオンラインユーザーマニュアルは、以下のウェブサイトにございます: