veritasnetbackup™ opscenteradministrator's guide · opscenter server alert service reporting...
TRANSCRIPT

Veritas NetBackup™OpsCenter Administrator'sGuide
Windows and UNIX
Release 7.7.3
Veritas NetBackup™ OpsCenter Administrator'sGuide
Legal NoticeCopyright © 2016 Veritas Technologies LLC. All rights reserved.
Veritas, the Veritas Logo, and NetBackup are trademarks or registered trademarks of VeritasTechnologies LLC or its affiliates in the U.S. and other countries. Other names may betrademarks of their respective owners.
This product may contain third party software for which Veritas is required to provide attributionto the third party (“Third Party Programs”). Some of the Third Party Programs are availableunder open source or free software licenses. The License Agreement accompanying theSoftware does not alter any rights or obligations you may have under those open source orfree software licenses. Refer to the third party legal notices document accompanying thisVeritas product or available at:
https://www.veritas.com/about/legal/license-agreements
The product described in this document is distributed under licenses restricting its use, copying,distribution, and decompilation/reverse engineering. No part of this document may bereproduced in any form by any means without prior written authorization of Veritas TechnologiesLLC and its licensors, if any.
THE DOCUMENTATION IS PROVIDED "AS IS" AND ALL EXPRESS OR IMPLIEDCONDITIONS, REPRESENTATIONS AND WARRANTIES, INCLUDING ANY IMPLIEDWARRANTY OF MERCHANTABILITY, FITNESS FOR A PARTICULAR PURPOSE ORNON-INFRINGEMENT, ARE DISCLAIMED, EXCEPT TO THE EXTENT THAT SUCHDISCLAIMERS ARE HELD TO BE LEGALLY INVALID. VERITAS TECHNOLOGIES LLCSHALL NOT BE LIABLE FOR INCIDENTAL OR CONSEQUENTIAL DAMAGES INCONNECTION WITH THE FURNISHING, PERFORMANCE, OR USE OF THISDOCUMENTATION. THE INFORMATION CONTAINED IN THIS DOCUMENTATION ISSUBJECT TO CHANGE WITHOUT NOTICE.
The Licensed Software and Documentation are deemed to be commercial computer softwareas defined in FAR 12.212 and subject to restricted rights as defined in FAR Section 52.227-19"Commercial Computer Software - Restricted Rights" and DFARS 227.7202, et seq."Commercial Computer Software and Commercial Computer Software Documentation," asapplicable, and any successor regulations, whether delivered by Veritas as on premises orhosted services. Any use, modification, reproduction release, performance, display or disclosureof the Licensed Software and Documentation by the U.S. Government shall be solely inaccordance with the terms of this Agreement.
Veritas Technologies LLC500 E Middlefield RoadMountain View, CA 94043
http://www.veritas.com

.
Technical SupportTechnical Support maintains support centers globally. All support services will be deliveredin accordance with your support agreement and the then-current enterprise technical supportpolicies. For information about our support offerings and how to contact Technical Support,visit our website:
https://www.veritas.com/support
You can manage your Veritas account information at the following URL:
https://my.veritas.com
If you have questions regarding an existing support agreement, please email the supportagreement administration team for your region as follows:
[email protected] (except Japan)
DocumentationMake sure that you have the current version of the documentation. Each document displaysthe date of the last update on page 2. The latest documentation is available on the Veritaswebsite:
https://sort.veritas.com/documents
Documentation feedbackYour feedback is important to us. Suggest improvements or report errors or omissions to thedocumentation. Include the document title, document version, chapter title, and section titleof the text on which you are reporting. Send feedback to:
You can also see documentation information or ask a question on the Veritas community site:
http://www.veritas.com/community/
Veritas Services and Operations Readiness Tools (SORT)Veritas Services and Operations Readiness Tools (SORT) is a website that provides informationand tools to automate and simplify certain time-consuming administrative tasks. Dependingon the product, SORT helps you prepare for installations and upgrades, identify risks in yourdatacenters, and improve operational efficiency. To see what services and tools SORT providesfor your product, see the data sheet:
https://sort.veritas.com/data/support/SORT_Data_Sheet.pdf
Chapter 1 Overview of NetBackup OpsCenter ............................. 19
About OpsCenter ......................................................................... 19About OpsCenter functions ....................................................... 20About OpsCenter Analytics functions .......................................... 20About monitoring and managing NetBackup and NetBackup
appliances ...................................................................... 22About alerting in OpsCenter ...................................................... 22About reporting in OpsCenter Analytics ....................................... 22
About OpsCenter components ........................................................ 24About the OpsCenter Server ..................................................... 24About the OpsCenter Agent ...................................................... 27About the OpsCenter OpsCenter View Builder ............................. 30
About using the OpsCenter console ................................................. 30About starting the OpsCenter console ............................................... 31
About web browser considerations ............................................. 31About accessing the OpsCenter console ..................................... 34Logging on to the OpsCenter console as a default admin
user ............................................................................... 42Customizing the OpsCenter login page ....................................... 46Logging out of the OpsCenter console ........................................ 46Configuring the OpsCenter session timeout interval ....................... 47Possible OpsCenter console issues ........................................... 47
About OpsCenter console components ............................................. 48About using the links on the title bar ........................................... 50About using tabs and subtabs ................................................... 51About refreshing the OpsCenter console ..................................... 51Changing the Task pane .......................................................... 52About the View pane ............................................................... 52Using the quick links in the Task pane ......................................... 56Viewing alerts from the Alert Summary pane ................................ 56Sizing the Content pane ........................................................... 57About the OpsCenter status bar ................................................ 59Status icons and colors in the console ........................................ 59About using tables .................................................................. 61
Common tasks in OpsCenter .......................................................... 65About using Web browser bookmarks ............................................... 68
Contents
About OpsCenter documentation ..................................................... 68
Chapter 2 Installing OpsCenter ......................................................... 70
About planning an OpsCenter installation .......................................... 70Software components that OpsCenter uses ................................. 71About the OpsCenter licensing model ......................................... 72OpsCenter DVDs ................................................................... 75Managed NetBackup master server considerations ....................... 75About designing your OpsCenter Server ..................................... 77Supported upgrade paths in OpsCenter ...................................... 78About planning an OpsCenter Agent deployment .......................... 79Preparation for installation or upgrade ........................................ 82
Installing OpsCenter on Windows and UNIX ...................................... 88About installing OpsCenter on Windows ...................................... 89About installing OpsCenter on UNIX ........................................... 94About installing OpsCenter silently on Windows ............................ 97
About OpsCenter upgrade on Windows and UNIX ............................. 115About importing authentication settings during OpsCenter
upgrade ........................................................................ 116Upgrading OpsCenter on Windows ........................................... 121Upgrading OpsCenter on UNIX ................................................ 129
About files and folders that are protected during OpsCenterupgrade .............................................................................. 131
About OpsCenter upgrade failure scenarios ..................................... 132About post-installation tasks ......................................................... 135
Setting up trust between OpsCenter and NBAC-enabledNetBackup or PureDisk .................................................... 135
Verifying that OpsCenter is running properly ............................... 135About starting to use OpsCenter .............................................. 136About the start up tasks that OpsCenter performs ........................ 137
About uninstalling OpsCenter on Windows and UNIX ......................... 137Uninstalling OpsCenter on Windows ......................................... 138Uninstalling OpsCenter on UNIX ............................................. 139
About clustering OpsCenter .......................................................... 139About OpsCenter clusters ....................................................... 139Supported OS and cluster solutions .......................................... 140About running commands on the active node ............................. 141Connecting Authentication Service and Veritas Private Branch
Exchange ..................................................................... 141Clustering OpsCenter on Windows ........................................... 143Uninstalling OpsCenter from the Windows cluster ........................ 151
5Contents
Chapter 3 OpsCenter Getting Started feature ............................. 153
About the OpsCenter Getting Started feature .................................... 153OpsCenter user roles .................................................................. 155Learn more about adding NetBackup Master Servers ......................... 157Learn more about OpsCenter Views ............................................... 157Add Users ................................................................................. 158Edit User ................................................................................... 159Reset password ......................................................................... 160Add NetBackup Master Server ...................................................... 161Add OpsCenter Agent .................................................................. 161Add OpsCenter Views/Groups ....................................................... 162Configure SMTP Server ............................................................... 162
Chapter 4 Administering OpsCenter .............................................. 164
About OpsCenter services and processes used by OpsCenter ............. 164Services used by OpsCenter on Windows .................................. 165Controlling the OpsCenter services .......................................... 165Processes used by OpsCenter on UNIX .................................... 166
OpsCenter server scripts on Windows and UNIX ............................... 167Commands to control OpsCenter services and processes ............. 169About dependency of services ................................................. 170About nbproxy processes on NetBackup master servers ............... 171
About OpsCenter database administration ....................................... 172OpsCenter database commands .............................................. 172Moving the OpsCenter database and database logs to a different
hard disk ....................................................................... 175Moving OpsCenter server to a different machine ......................... 179About database troubleshooting .............................................. 184
About backup and restore of OpsCenter and OpsCenterAnalytics ............................................................................. 185Backing up OpsCenter in case of a disaster ............................... 185Restoring OpsCenter ............................................................. 187
About communication and firewall considerations .............................. 190Communication ports used by key OpsCenter components ........... 191Ports required to communicate with backup products ................... 193Web browser to OpsCenter Web graphical user interface
connection .................................................................... 194About OpsCenter Web GUI to OpsCenter server software
communication ............................................................... 194About OpsCenter server to NetBackup master server (NBSL)
communication ............................................................... 194About SNMP traps ................................................................ 195
6Contents

About OpsCenter Web GUI/OpsCenter server to Sybase databasecommunication ............................................................... 195
About OpsCenter Web GUI to OpsCenter server emailcommunication ............................................................... 195
Gathering troubleshooting data with the support script ........................ 196About OpsCenter log files ............................................................. 199
VxUL log files ....................................................................... 199OpsCenter application log files ................................................ 201About OpsCenter log files on Windows servers ........................... 202About OpsCenter log files on UNIX servers ................................ 204
Chapter 5 Understanding OpsCenter settings ............................ 207
OpsCenter settings ..................................................................... 208Setting user preferences .............................................................. 209
Settings > User Preferences options ......................................... 210Changing your OpsCenter password ........................................ 213
About managing licenses ............................................................. 214Settings > Configuration > License options ................................. 214Adding OpsCenter license keys ............................................... 215Viewing OpsCenter license keys .............................................. 215Deleting OpsCenter license keys ............................................. 216
Configuring the data purge period on the OpsCenter Server ................ 216Settings > Configuration > Data Purge options ............................ 216
About storing the SMTP Server configurations in OpsCenter ............... 218Configuring SMTP server settings for OpsCenter .............................. 218
Settings > Configuration > SMTP server options ......................... 219Adding host aliases in OpsCenter .................................................. 220
Settings > Configuration > Host Alias options ............................. 220Merging objects (hosts) in OpsCenter ............................................. 221
Settings > Configuration > Object Merger options ........................ 222Modifying tape library information in OpsCenter ................................ 222
Settings > Configuration > Tape Library options .......................... 223Copying a user profile in OpsCenter ............................................... 223
Settings > Configuration > Copy User Profile options ................... 224Setting report export location in OpsCenter ...................................... 224
Settings > Configuration > Report Export Location options ............ 225About managing Object Types in OpsCenter .................................... 225
Settings > Configuration > Object Type options ........................... 225Adding object types in OpsCenter ............................................ 226Deleting object types in OpsCenter ........................................... 226Modifying object types in OpsCenter ......................................... 227Adding attributes to object types in OpsCenter ............................ 227
7Contents

Deleting attributes from object types in OpsCenter ....................... 227About managing OpsCenter users ................................................. 228
About managing user password ............................................... 228About adding AD / LDAP user groups in OpsCenter ..................... 229Settings > Users > Users options ............................................. 231User access rights and functions in OpsCenter user interface ...
2 3 3Viewing OpsCenter user account information ............................. 237Adding new users to OpsCenter .............................................. 238Editing OpsCenter user information .......................................... 240Resetting an OpsCenter user password .................................... 240Resetting password of the OpsCenter Security Admin .................. 241Deleting OpsCenter users ...................................................... 242Viewing OpsCenter user groups .............................................. 243Settings > Users > User Groups options .................................... 243Adding OpsCenter user groups ................................................ 243Editing OpsCenter user groups ................................................ 244Deleting OpsCenter user groups .............................................. 244
About managing recipients in OpsCenter ......................................... 244Viewing email recipients in OpsCenter ...................................... 245Settings > Recipients > Email options ....................................... 245Viewing SNMP trap recipients in OpsCenter ............................... 246Settings > Recipients > SNMP trap recipient options .................... 246Creating OpsCenter email recipients ......................................... 247Settings > Recipients > Email > Add Email Recipient options ......... 247Creating OpsCenter SNMP trap recipients ................................. 248Settings > Recipients > SNMP > Add SNMP trap recipient
options ......................................................................... 249Modifying OpsCenter Email or SNMP recipient information ............ 250Deleting OpsCenter Email or SNMP trap recipient ....................... 250
About managing cost analysis and chargeback for OpsCenterAnalytics ............................................................................. 251Setting the default currency for OpsCenter cost reports ................ 251Settings > Chargeback > Currency Settings options ..................... 252Editing the OpsCenter global currency list .................................. 252Settings > Chargeback > Currency Settings > Edit Currency List
options ......................................................................... 253Settings > Chargeback > Cost Variable options ........................... 253Creating cost variables in OpsCenter ........................................ 254Modifying cost variables in OpsCenter ...................................... 256Deleting cost variables in OpsCenter ........................................ 256Settings > Chargeback > Cost Formulae options ......................... 257Creating cost formulae in OpsCenter ........................................ 257
8Contents
Modifying cost formulae in OpsCenter ...................................... 257Deleting a cost formulae in OpsCenter ...................................... 258Estimating chargeback costs using the OpsCenter Formula
Modeling Tool ................................................................ 258Settings > Chargeback > Cost Estimation options ........................ 259
Chapter 6 Understanding data collection ..................................... 261
About data collection in OpsCenter ................................................. 261About OpsCenter Agents ........................................................ 262About OpsCenter Agent logs ................................................... 262OpsCenter Data Collector types ............................................... 262
About managing OpsCenter Agents ................................................ 266Settings > Configuration > Agent options ................................... 266Viewing OpsCenter Agent status .............................................. 267Configuring an OpsCenter Agent ............................................. 267Settings > Configuration > Agent > Create Agent or Edit Agent
options ......................................................................... 267Modifying an OpsCenter Agent ................................................ 268Deleting OpsCenter Agents .................................................... 268
About managing OpsCenter Data Collectors .................................... 269Viewing OpsCenter Data Collector status .................................. 269Configuring an OpsCenter Data Collector .................................. 270Data Collector Wizard settings ................................................. 271Modifying an OpsCenter Data Collector configuration ................... 272Deleting OpsCenter Data Collectors ......................................... 273
About configuring data collection for NetBackup ................................ 273Settings > Configuration > NetBackup options ............................ 274NetBackup data collection view ............................................... 275How OpsCenter collects data from NetBackup ............................ 276About the Breakup Jobs option ................................................ 277Viewing master server details and data collection status ............... 283Adding a master server or appliance in OpsCenter ...................... 287Adding a NetBackup 7.0 or later master server ........................... 288Configuring a master server or appliance master server for server
access and data collection by OpsCenter ............................ 291Settings > Configuration > NetBackup > Add Master Server
options ......................................................................... 293Adding a master server or an appliance master server in the
OpsCenter console ......................................................... 295Editing a master server or an appliance master server in
OpsCenter .................................................................... 295
9Contents
Deleting a master server or an appliance master server inOpsCenter .................................................................... 296
Controlling data collection for a master server in OpsCenter .......... 296Configuring Backup Exec data collector ........................................... 297Collecting data from PureDisk ....................................................... 298
Setting up a trust between the PureDisk SPA host and theOpsCenter OpsCenter host ............................................... 299
Configuring PureDisk data collector .......................................... 300
Chapter 7 Managing OpsCenter views ........................................ 302
About OpsCenter views ............................................................... 302Settings > Views options ........................................................ 304OpsCenter view types ............................................................ 305OpsCenter user interface access for specific view types ............... 306About access rights for a view ................................................ 307About OpsCenter view levels .................................................. 309About nodes and objects ........................................................ 309
About managing OpsCenter views ................................................. 309Settings > Views > Manage Nodes and Objects options ................ 310Looking at OpsCenter views and their details ............................. 310Creating OpsCenter views ...................................................... 311Modifying OpsCenter views .................................................... 312Deleting OpsCenter views ...................................................... 312Modifying alias view levels in OpsCenter ................................... 313
About managing nodes and objects in OpsCenter ............................. 313Adding nodes to a view in OpsCenter ............................................. 314Modifying node details in OpsCenter ............................................... 314Deleting nodes in OpsCenter ........................................................ 315Adding objects to a view node in OpsCenter ..................................... 315Deleting objects from a view node in OpsCenter ............................... 316View filters in OpsCenter .............................................................. 317
Creating a view object filter in OpsCenter .................................. 317Modifying view object filters in OpsCenter .................................. 318Deleting view object filters in OpsCenter .................................... 319
Chapter 8 Monitoring NetBackup using OpsCenter .................. 320
About the Monitor views ............................................................... 322Controlling the scope of Monitor views ............................................ 322
About time frame selection ..................................................... 323About monitoring NetBackup using the Overview tab ......................... 324
Viewing the Job Summary by State ......................................... 325Viewing the Media Summary by Status ..................................... 325
10Contents

About Top 7 Job Error Log Summary ........................................ 326Viewing the Services Summary ............................................... 327Viewing the Master Server Summary ........................................ 327Viewing the Job Summary by Job Status ................................... 328Viewing the Drive Summary by Status ....................................... 329Top 7 Policies by Failed Jobs .................................................. 330Viewing the Alert Summary by Severity ..................................... 330
About monitoring NetBackup jobs .................................................. 331Monitor > Jobs List View options .............................................. 331About monitoring jobs using the List View .................................. 334Viewing the details for a single NetBackup job ............................ 334Viewing the details for a master server associated with a job ......... 335Viewing policy information for a job ........................................... 335Filtering on NetBackup job type and state .................................. 336Controlling NetBackup jobs ..................................................... 337Reconciling NetBackup jobs ................................................... 337Changing the job priority ........................................................ 338Change Job Priority dialog box options ...................................... 339Exporting NetBackup job logs .................................................. 339About using the Summary View for monitoring jobs ...................... 340Viewing the Job Summary by Job Status ................................... 340Viewing the Job Summary by State .......................................... 341Viewing the Job Summary by Type ........................................... 342About the Group Component Summary table .............................. 343About using the Hierarchical View for monitoring jobs ................... 345Viewing the details for a single NetBackup job ............................ 347Viewing the details for a master server associated with a job ......... 347Viewing policy information for a job ........................................... 348Filtering on NetBackup job state .............................................. 348
Monitor > Services view ............................................................... 349Filtering on NetBackup service type .......................................... 350Controlling NetBackup services ............................................... 351About monitoring NetBackup policies ........................................ 351Monitor > Policies List View .................................................... 352About using the List View to monitor NetBackup policies ............... 355Filtering on NetBackup policy type ............................................ 356Monitor > Policies page .......................................................... 356Viewing details for a single NetBackup policy ............................. 357Viewing the details for a master server associated with a
policy ........................................................................... 357Viewing the details for a volume pool associated with a
policy ........................................................................... 358Activating or deactivating a job policy ........................................ 358
11Contents
Starting a manual backup ....................................................... 358Viewing the history for a single job policy .................................. 359Monitor > Policies Summary View ............................................ 359About Top 5 Policies by Data Backed up .................................... 360About Top 7 Policies by Failed Jobs .......................................... 360About Top 7 Policies by No. of Jobs .......................................... 361About monitoring NetBackup media .......................................... 361Monitor > Media List View options ............................................ 362
About using the List View to monitor NetBackup media ....................... 364Viewing the details for NetBackup media ......................................... 365Viewing the details for a master server associated with the media ......... 365Filtering on NetBackup media type ................................................. 365Controlling media ........................................................................ 366Monitor > Media Summary View options .......................................... 367Hierarchical View by Volume Pool for monitoring media ...................... 368Viewing the details for volume pool ................................................. 369Viewing the details for media ......................................................... 369Controlling media ........................................................................ 369Hierarchical View by Volume Group for monitoring media .................... 370Viewing the details for a volume group ............................................ 370Viewing the details for media ......................................................... 371Controlling media in OpsCenter ..................................................... 371Monitoring NetBackup devices ...................................................... 372Monitor > Devices > Drives List View options .................................... 372About using the List View for monitoring drives ................................. 374Viewing the details for a single drive ............................................... 375Viewing the details for a master server associated with a drive ............. 375Filtering on NetBackup drive category ............................................. 375Controlling drives ........................................................................ 376Monitor > Devices > Drives Summary View ...................................... 376Viewing the Drive Summary by Status ............................................. 377Monitor > Devices > Disk Pools options ........................................... 378Viewing the details for a single disk pool .......................................... 379About monitoring NetBackup hosts ................................................. 379Monitor > Hosts > Master Servers view ........................................... 380Filtering by NetBackup master server type and status ........................ 381Monitor > Hosts > Media Servers view ............................................ 382Viewing the details of a master server that is associated with a media
server ................................................................................. 383Monitor > Hosts > Clients view ...................................................... 383Viewing the details for a single master server ................................... 384About monitoring NetBackup alerts ................................................. 384Monitor > Alerts List View ............................................................. 385
12Contents
About using the List View to monitor NetBackup alerts ....................... 386Viewing the details for a single alert ................................................ 386Viewing the details of a single alert for Appliance hardware
failure ................................................................................. 387Viewing the details of the alert policy associated with an alert .............. 388Filtering by alert type ................................................................... 389Responding to alerts ................................................................... 390Summary View for monitoring NetBackup alerts ................................ 393Viewing alerts by severity ............................................................. 394Viewing alerts by NetBackup Master Server ..................................... 394About monitoring Audit Trails ........................................................ 395
Additional information about the Audit Trails report ...................... 395What Audit Trails track ........................................................... 395Audit Trails report ................................................................. 396About OpsCenter features for Audit Trails .................................. 397Creating a custom filter to view audit trail data ............................ 397About managing Audit Trails settings ........................................ 398
Monitor > Appliance Hardware > Master Server ................................ 398Monitor > Appliance Hardware > Media Server ................................. 401Monitor > Appliance Hardware > NetBackup .................................... 404Monitor > Appliance Hardware > Deduplication ................................. 408Appliance hardware details ........................................................... 411Monitor > Cloud options ............................................................... 416
Chapter 9 Managing NetBackup using OpsCenter ................... 418
About the Manage views .............................................................. 418Controlling the scope of Manage views ........................................... 419About managing alert policies ........................................................ 420
About OpsCenter alert policies ................................................ 420Manage > Alert Policies view .................................................. 421Viewing the details for a single alert policy ................................. 422Filtering on type of alert policy ................................................. 422About creating (or changing) an alert policy ................................ 423Managing an alert policy ........................................................ 439Viewing the alerts associated with an alert policy ......................... 440
About managing NetBackup storage ............................................... 441Manage > Storage > Storage Unit view ..................................... 441Manage > Storage > Storage Unit Group view ............................ 443Manage > Storage > Storage Lifecycle Policy view ...................... 445
About managing NetBackup devices .............................................. 446Manage > Devices > Drive view ............................................... 447Manage > Devices > Robot view .............................................. 451
13Contents
Manage > Devices > Disk Pool view ......................................... 453Manage > Devices > SAN Client view ....................................... 455Manage > Devices > FT Server view ........................................ 457
About Operational Restore and Guided Recovery operations ............... 459About Operational Restores from OpsCenter .............................. 459About OpsCenter Guided Recovery .......................................... 490
About managing NetBackup Hosts ................................................. 500Managing audit trails settings .................................................. 500
About managing NetBackup Deployment Analysis ............................. 501About the traditional license report ........................................... 501Prerequisites and data collection for a traditional licensing
report ........................................................................... 503Traditional Licensing page ...................................................... 503Create Traditional Licensing Report Wizard ................................ 503Generating a Traditional Licensing report ................................... 506Traditional Licensing report and log file locations ......................... 507Possible Traditional License report issues .................................. 508Capacity License report ......................................................... 509Data compilation for the Capacity License report ......................... 510Generating a Capacity Licensing report ..................................... 511Possible Capacity License report issues .................................... 513
Chapter 10 Supporting Replication Director inOpsCenter .................................................................... 515
About monitoring Replication Director from OpsCenter ....................... 515About the Open Storage alert condition ........................................... 515How the events are generated ....................................................... 516Adding an alert policy ................................................................. 517About monitoring replication jobs ................................................... 518Disk pool monitoring .................................................................... 519Storage lifecycle policy reporting .................................................... 520Reporting on storage units, storage unit groups, and storage lifecycle
policies ............................................................................... 521
Chapter 11 Understanding and configuring OpsCenteralerts .............................................................................. 523
About using SNMP ...................................................................... 523About SNMP ........................................................................ 524About SNMP versions ............................................................ 524SNMP versions supported in OpsCenter .................................... 525
14Contents
About the Management Information Base (MIB) and OpsCentersupport ......................................................................... 525
SNMP traps ......................................................................... 525Alert descriptions in OpsCenter ............................................... 528Configuring the SNMP trap community name for OpsCenter .......... 540Configuring the SNMP version for sending SNMP traps ................ 541About customizing Alert Manager settings .................................. 542Frequently asked SNMP and OpsCenter questions ...................... 543
About managing OpsCenter alerts using Microsoft System CenterOperations Manager 2007 ...................................................... 544
About managing OpsCenter alerts using HP OpenView Network NodeManager 7.50/7.51 on Windows ............................................... 544
Chapter 12 Reporting in OpsCenter ................................................. 546
About OpsCenter reports .............................................................. 546OpsCenter reporting user interface ........................................... 547Report creation wizards in OpsCenter ....................................... 548Reports > Report Templates ................................................... 548About custom reports in OpsCenter Analytics ............................. 550About custom SQL query in OpsCenter Analytics ........................ 550About supporting OpsCenter custom reports and custom SQL
queries ......................................................................... 550Report Templates in OpsCenter ..................................................... 551
About report filters in OpsCenter .............................................. 553Creating an OpsCenter report using a Report Template ................ 553Using report formats .............................................................. 554
About managing reports in OpsCenter ............................................ 555Save report and email report dialog boxes ................................. 555Saving an OpsCenter report .................................................... 557Exporting an OpsCenter report ................................................ 558File formats available in OpsCenter .......................................... 559Emailing a report in OpsCenter ................................................ 561Configuring number of rows in a tabular report for email or
export ........................................................................... 562Adding email recipients to an OpsCenter report mailing ................ 563Add email recipients dialog box options ..................................... 564
Creating a custom report in OpsCenter ........................................... 564About Custom Report Wizard parameters .................................. 570
Creating an OpsCenter report using SQL query ................................ 577About managing My Reports ......................................................... 579
Creating a report using the My Reports tab ................................ 579Deleting a saved report using the My Reports tab ........................ 579
15Contents

Viewing a saved report using the My Reports tab ........................ 580Editing a saved report using the My Reports tab .......................... 580Exporting a saved report ........................................................ 580Emailing a saved report ......................................................... 581
About managing My Dashboard ..................................................... 582Reports > My Dashboard options ............................................. 582Adding reports to a dashboard ................................................ 583Modifying a dashboard section ................................................ 583Deleting a dashboard section .................................................. 583Emailing dashboard sections .................................................. 584Refreshing My Dashboard ...................................................... 584
About managing reports folders in OpsCenter ................................... 584Reports > Manage Folders options ........................................... 584Adding a reports folder in OpsCenter ........................................ 585Editing a reports folder in OpsCenter ........................................ 585Deleting reports folders in OpsCenter ....................................... 585Deleting reports from a folder in OpsCenter ................................ 586
Using report schedules in OpsCenter .............................................. 586Reports > Schedules options ........................................................ 588About managing report schedules in OpsCenter ................................ 589
Viewing report schedule details in OpsCenter ............................. 590Report Schedule Wizard ........................................................ 590Creating a report schedule in OpsCenter ................................... 592Editing a report schedule in OpsCenter ..................................... 593Deleting a report schedule in OpsCenter ................................... 593Enabling or disabling a report schedule ..................................... 593
About managing time schedules in OpsCenter .................................. 594Reports > Schedules > Create or Edit Time Schedule
options ......................................................................... 594Viewing time schedule details .................................................. 595Creating a time schedule ........................................................ 595Editing a time schedule .......................................................... 595Deleting a time schedule ........................................................ 596
Appendix A Additional information on PureDisk datacollection ...................................................................... 597
About AT configuration in OpsCenter .............................................. 597About Scenario 1: Root brokers on local hosts .................................. 598About Scenario 2: Local root broker for OpsCenter server and remote
root broker for PureDisk SPA .................................................. 598Setting up a trust between the PureDisk SPA AT host and the
OpsCenter Server host .......................................................... 599
16Contents

Appendix B Attributes of NetBackup data ....................................... 601
Backup data attributes ................................................................. 601
Appendix C Man pages for CLIs ......................................................... 632
changeDbPassword .................................................................... 633configurePorts ............................................................................ 635dbbackup .................................................................................. 636dbdefrag ................................................................................... 637nbfindfile ................................................................................... 638opsadmin .................................................................................. 642opsCenterAgentSupport ............................................................... 644opsCenterSupport ...................................................................... 645runstoredquery ........................................................................... 648startagent .................................................................................. 649startdb ...................................................................................... 650startgui ..................................................................................... 651startserver ................................................................................. 652stopagent .................................................................................. 653stopdb ...................................................................................... 654stopgui ..................................................................................... 655stopserver ................................................................................. 656view_exportimport ....................................................................... 657
Appendix D Creating views using CSV, TSV, and XMLfiles ................................................................................. 662
About using CSV, TSV, and XML files to create views ........................ 663About creating CSV files .............................................................. 663About creating TSV files ............................................................... 666About creating XML files .............................................................. 668XML DTD structure ..................................................................... 669DTD elements ........................................................................... 670DTD <application> element ........................................................... 670DTD <objects> and <object> elements ............................................ 671DTD <attribute> elements ............................................................. 672DTD <view> element ................................................................... 672DTD <node> elements ................................................................. 673DTD <aliaslevel> elements ........................................................... 674Examples of XML files ................................................................ 674Example 1: Adding an object ......................................................... 674Example 2: Adding a view ............................................................ 675Example 3: Updating an object ...................................................... 676
17Contents

Example 4: Merging objects .......................................................... 678
Appendix E Error messages in OpsCenter ..................................... 679
OpsCenter Error Messages .......................................................... 679
OpsCenter Glossary ..................................................................................... 697
Index .................................................................................................................. 698
18Contents
Overview of NetBackupOpsCenter
This chapter includes the following topics:
■ About OpsCenter
■ About OpsCenter components
■ About using the OpsCenter console
■ About starting the OpsCenter console
■ About OpsCenter console components
■ Common tasks in OpsCenter
■ About using Web browser bookmarks
■ About OpsCenter documentation
About OpsCenterOpsCenter is a Web-based software application that helps organizations by providingvisibility into their data protection environment. By using OpsCenter, you can trackthe effectiveness of backup operations by generating comprehensive reports.
OpsCenter is a convergence of NetBackup Operations Manager (NOM) and VeritasBackup Reporter (VBR) and is available in the following two versions:
This OpsCenter version does not require any license.
OpsCenter provides single deployment configuration and user interfacefor monitoring, alerting, and reporting functionality.
OpsCenter
1Chapter
OpsCenter Analytics is the licensed version of OpsCenter.
In addition to the features available in the unlicensed OpsCenter version,Analytics offers report customization, and chargeback reporting.
OpsCenterAnalytics
About OpsCenter functionsThe unlicensed version of Veritas NetBackup OpsCenter is called OpsCenter.
OpsCenter can perform the following functions:
■ Monitor NetBackup and NetBackup Appliance setups.
■ Manage or administer NetBackup and NetBackup Appliance setups.Note that OpsCenter can only monitor and manage NetBackup or NetBackupAppliance. It cannot monitor or manage other products like NetBackup PureDisk,deduplication appliance and so on.
■ Generate alerts depending on the conditions that you have defined.
■ Create and customize views using OpsCenter View Builder (formerly calledJava View Builder).
■ Provide operational reporting on the following Veritas products:
■ Veritas NetBackup
■ Veritas NetBackup Appliance
■ Veritas NetBackup PureDisk
■ Veritas Backup Exec
About OpsCenter Analytics functionsThe licensed version of Veritas NetBackup OpsCenter is called OpsCenter Analytics.
OpsCenter Analytics can perform the following functions:
■ Monitor NetBackup and NetBackup Appliance setups.
■ Manage or administer NetBackup and NetBackup Appliance setups.See “ About monitoring and managing NetBackup and NetBackup appliances”on page 22.Note that OpsCenter Analytics can only monitor and manage NetBackup orNetBackup Appliance. It cannot monitor or manage other products like NetBackupPureDisk, Backup Exec, Deduplication Appliance and so on.
■ Generate alerts depending on the conditions that you have defined.See “About alerting in OpsCenter” on page 22.
20Overview of NetBackup OpsCenterAbout OpsCenter
■ Create and customize views using OpsCenter View Builder.
■ Provide operational and business-level reporting on the following Veritasproducts:
■ Veritas NetBackup
■ Veritas NetBackup Appliance
■ Veritas NetBackup PureDisk
■ Veritas Backup Exec
■ Provide chargeback, custom, and custom SQL reports
OpsCenter Analytics displays customizable, multi-level views of backup resourcesand customizable reports for tracking service usage and expenditures. It alsocontains tools for defining cost metrics and chargeback formulas or handling alerts.
A wide range of audiences can benefit from the reporting capabilities andmanagement capabilities of OpsCenter Analytics. The audiences include IT(Information Technology) managers, application owners, IT finance teams, externalcompliance auditors, legal teams, line-of-business managers, external customers,IT architects, and capacity planning teams.
The primary objectives of OpsCenter Analytics are as follows:
■ Help organizations assess their compliance with business standards by allowingthem to accomplish the following:
■ Help organizations to establish the Service Level Agreements by reportingon them
■ Report to legal departments, auditors, IT managers, and administrators
■ Verify compliance with internal as well as external business-level regulations.
■ Identify risks in terms of shortfall of backup resources.
■ Assess the recovery of clients and applications.
■ Assist organizations in effective business planning by enabling them to do thefollowing:
■ Estimate future backup requirements with the help of backup trend analysis.
■ Calculate the cost of data protection management and chargeback tocustomers and business units.
21Overview of NetBackup OpsCenterAbout OpsCenter
About monitoring and managing NetBackup and NetBackupappliances
OpsCenter can manage and monitor NetBackup master and media servers, clients,policies, and additionally appliance master and media servers. It can manage upto 100 NetBackup master servers that are distributed across multiple locations. Itdoes not require you to separately log on to each NetBackup master or mediaserver.
OpsCenter lets you view the operational status and health of your distributed dataprotection environment.
OpsCenter focuses on how to maintain your backup environment after you completethe NetBackup configuration. You need to use the NetBackup Administration Consoleand command-line interfaces for core NetBackup administrative functions such asconfiguring media, storage units, and policies.
About alerting in OpsCenterOpsCenter provides a policy-based alert system, which monitors and notifies youbefore serious problems happen to your backup environment. You can usepredefined alert conditions to create alert policies to monitor typical issues orthresholds within NetBackup, NetBackup Appliance or other products. You cansend an email or SNMP notification in response to an actual alert, which letsadministrators focus on other job responsibilities. They no longer need to be loggedon to a terminal to monitor systems continuously.
See “About managing alert policies” on page 420.
About reporting in OpsCenter AnalyticsThese topics state the benefits that you can get from the OpsCenter Analyticsreports.
See “About OpsCenter reports” on page 546.
See “About compliance reporting” on page 22.
See “About business planning” on page 23.
About compliance reportingOpsCenter Analytics helps organizations evaluate their compliance with internaland external business standards by providing accurate and customizable reports.By using internal compliance reports, you can measure system performance againsta service level agreement (SLA). You can then use the results to optimize dataprotection management. Reports such as history or trend analysis ensure your
22Overview of NetBackup OpsCenterAbout OpsCenter
compliance with the SLA. By using these reports, you can track the use of backupresources and identify the risks involved. For example, you can generate a reportthat anticipates a shortfall of resources in the future based on the current backuptrend. This report is then used to determine the time that is required to purchasenew tape drives, master servers, or media servers.
External compliance reports help you follow the policies that are laid down by variousfederal regulations. Such policies include the Sarbanes-Oxley Act (SOX) and theHealth Insurance Portability and Accountability Act (HIPAA).
In addition to tracking the backup information, OpsCenter reports ensure recoveryof key information assets. The reports can help you ensure that the data recoverymeets the recovery-time and recovery-point objectives.
OpsCenter can generate reports that are filtered by views. A view shows a set ofenterprise assets (hosts or file systems) organized in logical groups. For example,you can create views to display assets according to their locations in theorganization, the line of business they represent, or the applications that are installed.OpsCenter can generate reports according to views created. These reports helpyou identify locations or departments containing assets with critical data. Thesereports are then used in resource planning.
About business planningOpsCenter Analytics is a management tool that helps you optimize your dataprotection environment with effective business planning. It delivers backup servicesto organizations, which include reporting on backup and recovery trends andmanaging datacenters . This product supports a wide range of backup and recoverysolutions including NetBackup and Backup Exec. It seamlessly integrates withbackup products and provides consistent reporting across them. It can collect datafrom the following target products:
■ Veritas NetBackup
■ Veritas NetBackup Appliance
■ Veritas Backup Exec
■ Veritas NetBackup PureDisk
OpsCenter’s ability to forecast backup resource requirements helps datacenterexecutives to decide whether to maintain the existing resources or add new capacity.The detailed, drill-down OpsCenter reports help you determine the applications,databases, or business departments that are the heaviest consumers of backupresources. For example, in an environment running 20 instances of Oracleapplications, you can generate a report showing resource consumption bydepartment, server, or location. Depending on this information, organizations canprovide appropriate resource planning in advance.
23Overview of NetBackup OpsCenterAbout OpsCenter
OpsCenter Analytics offers you a set of chargeback reports that detail backupservice expenditures. By using these reports, you can track the backup use andrecovery use and the associated cost. By using the chargeback function, you candefine pricing models for backup service delivery and allocate costs to customersbased on these models. For example, you can create a formula that determinescharges based on kilobytes of backed up data over a period of time. Using thischargeback data, you can then present itemized invoices to internal customers,export chargeback tables to third-party billing systems, or use the data to analyzeand justify expenditures.
About OpsCenter componentsThis section describes the following OpsCenter components:
About the OpsCenter ServerThe OpsCenter Server, the core of the architecture, is a Web application thatnormalizes backup data that it collects from various applications. This normalizeddata is used for reporting on backup-related information.
OpsCenter Server is supported on Windows and UNIX platforms.
Note: You must install OpsCenter Server, Agent, and View Builder of the sameversions. For example, Server 7.7 is compatible only with Agent 7.7 and ViewBuilder 7.7.
The OpsCenter Server comprises the following components:
A Sybase SQL Anywhere database management system containing datarelated to back up service usage and expenditure, cost metrics andchargeback formulas, and alerts.
See “About the OpsCenter database” on page 26.
OpsCenter database
A set of common authentication runtime libraries and processes that enableusers to log on once to access multiple products.
OpsCenter AT validates identities based on external name spaces. Examplesof name spaces are Active Directory or other LDAP servers, UNIX identitiesbased on password files, NIS/NIS+ repositories, or any identities that canbe authenticated through PAM (Pluggable Authentication Module). It alsoprovides a private user repository for service identities.
See “About OpsCenter AT” on page 27.
OpsCenter AT
24Overview of NetBackup OpsCenterAbout OpsCenter components
A component that provides policy-based alert management, includingnotification, custom actions, and SNMP management capabilities.
Alert Manager
A common Web server (that uses Java Server Pages) and a JRE to servethe OpsCenter console.
Web Server and Java RuntimeEnvironment (JRE)
A common Veritas Licensing Module and API used to add, change, andremove Veritas product license keys.
Veritas Licensing Manager
A common component that uses socket passing to reduce the number ofports that are required to be open across a firewall. Symantec Private BranchExchange uses a paradigm similar to the paradigm of a telephoneswitchboard. Calls placed to a switchboard are redirected to a knownextension. In the PBX exchange, client connections that are sent to theexchange’s port are redirected to an extension that is associated with theOpsCenter Server.
Symantec Private Branch Exchange
Figure 1-1 shows the architecture of the OpsCenter Server.
25Overview of NetBackup OpsCenterAbout OpsCenter components
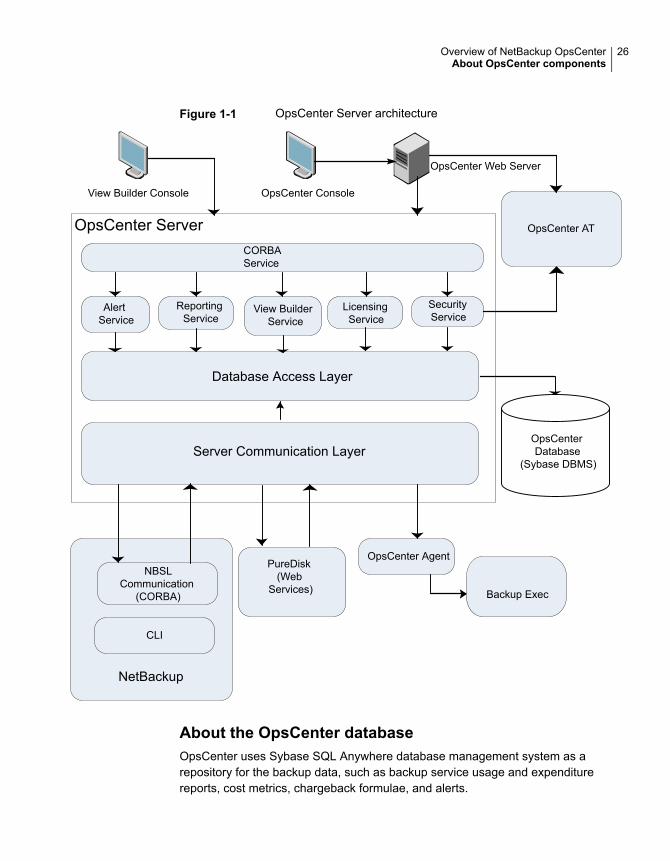
Figure 1-1 OpsCenter Server architecture
OpsCenter Server
AlertService
ReportingService
View BuilderService
LicensingService
SecurityService
OpsCenter AT
CORBAService
Database Access Layer
OpsCenterDatabase
(Sybase DBMS)Server Communication Layer
Backup Exec
OpsCenter Agent
NetBackup
View Builder Console OpsCenter Console
OpsCenter Web Server
NBSLCommunication
(CORBA)
CLI
PureDisk(Web
Services)
About the OpsCenter databaseOpsCenter uses Sybase SQL Anywhere database management system as arepository for the backup data, such as backup service usage and expenditurereports, cost metrics, chargeback formulae, and alerts.
26Overview of NetBackup OpsCenterAbout OpsCenter components
OpsCenter uses a Sybase SQL Anywhere database installation that is separatefrom the NetBackup database.
Except for a very small number of system settings, all information that is in the Webuser interface is contained in the OpsCenter database, which consists of a singlecross-platform database file.
The OpsCenter database is completely embedded and requires no additionalinstallation steps. The Sybase database is also self tuning and does not require adatabase administrator to maintain it.
OpsCenter does not support upgrades from NOM and VBR.
About OpsCenter ATThe Authentication Service (AT), which consists of Root Broker and AuthenticationBroker is embedded with the OpsCenter Server software. This AT service is veryspecific to OpsCenter and therefore, it is called OpsCenter AT.
Note: No other Veritas product can use OpsCenter AT for user authentication.
In a clustered OpsCenter setup, each cluster node has an embedded AT binary.All cluster nodes share the same AT configuration and the authentication data existson a shared disk.
Name of the OpsCenter Authentication Service is opsatd.
About the OpsCenter AgentThe OpsCenter Agent collects data from Backup Exec. The OpsCenter Agent relieson the Java Runtime Environment (JRE) to perform its functions. It also requiresembedded AT (Authentication Service) to authenticate itself with the OpsCenterServer. Both JRE and AT libraries are installed automatically with the Agentinstallation.
OpsCenter Agent is supported on Windows.
Note: You must install OpsCenter Server, Agent, and View Builder of the sameversions. For example, Server 7.7 is compatible only with Agent 7.7 and ViewBuilder 7.7.
OpsCenter formats the information collected from the following target products anddisplays it through the OpsCenter console:
■ NetBackup and NetBackup Appliance
27Overview of NetBackup OpsCenterAbout OpsCenter components
Note: You do not need to install and configure OpsCenter Agent to collect datafrom NetBackup. OpsCenter uses NetBackup's NBSL component or bpjavaprotocol to collect data from NetBackup.
■ Backup Exec (Windows only)
OpsCenter Server collects NetBackup data using NBSL in the following scenarios:
■ If you want to collect tape drive information, media, policy and schedule, job, orskipped file data from a NetBackup master server of any supported version.
■ If you want to collect any data type (except traditional and capacity license data)from NetBackup master servers of 7.6 or later version.
The core of the OpsCenter Agent is a Java Virtual Machine (JVM) on which yourun different data collectors. The OpsCenter Agent communicates with theOpsCenter Server, schedules backup data collection data types, and receivescommands through the CORBA API.
As the OpsCenter Server relies on AT to authenticate connections between theOpsCenter Agent and OpsCenter Server, the AT client libraries reside on the Agenthost.
The OpsCenter Agent consists of the scheduler, CORBA Client/Server, and datacollectors that collect backup data from all available backup applications. TheScheduler and CORBA form the agent core.
These parts of the agent are described in the following topics:
See “About the scheduler” on page 28.
See “About the CORBA Client/Server ” on page 29.
See “About data collectors” on page 29.
About the schedulerThe scheduler performs three basic functions for the OpsCenter Agent:
■ Checks and queues the data collection schedules of all running data collectors.
■ Sends periodic heartbeat messages to the OpsCenter server to ensure thereliability of communications between the Agent and the Server.
■ Monitors modifications that are made to the Agent configuration using theOpsCenter console, which are stored on the OpsCenter Server.
28Overview of NetBackup OpsCenterAbout OpsCenter components
About the CORBA Client/ServerThe OpsCenter Agent implements a CORBA server that listens on a configurableport that allows the OpsCenter console to get the runtime status of the Agent. (Thedefault port is 7806.) When you send a request to get the Agent status through theOpsCenter user interface, the OpsCenter Server sends the request to the CORBAServer to receive the requested information.
The Agent behaves as a CORBA client when sending data or alerts to the OpsCenterServer.
About data collectorsThe data collectors convert the data specific to back up products into a format thatcan be used by the OpsCenter Server. Each data collector must conform to aninterface that defines its interaction with the OpsCenter Agent. The data collectoris implemented in a way that suits the underlying backup product.
Data collector configurations consist of general parameters, such as logconfigurations and data collection event definitions, which are shared by all datacollectors, and product-specific values.
You must configure a data collector on the OpsCenter Agent host that collects datafrom a backup product host.
About Agent configuration and loggingAgent configuration settings are stored in the OpsCenter database. The OpsCenterAgent also caches the latest version of the configuration settings in the agent.conf
file. The agent compares the local agent.conf file with the one stored in thedatabase when the agent process is started. If the agent process has alreadystarted, any changes made to the local agent.conf file do not take place until theagent is restarted.
Note: You should not modify the agent.conf file. You should change the agentconfiguration settings using the OpsCenter Agent configuration user interface.
Any changes that you make to the Agent configuration settings are reflected afterthe next heartbeat.
A heartbeat is a request that the OpsCenter Agent sends to the OpsCenter Serverto check for any new changes in the configuration settings. By default, a heartbeatis sent every minute.
Logging for the agent core and individual data collector is administered in the samefashion but written to different log files.
29Overview of NetBackup OpsCenterAbout OpsCenter components
About the OpsCenter OpsCenter View BuilderThe OpsCenter View Builder is an application in which an administrator creates,modifies, and manages access to the OpsCenter views that users see in the console.
The OpsCenter View Builder relies on the AT client libraries which is installedautomatically to communicate properly with the OpsCenter Server. To use theOpsCenter View Builder, you need to provide logon credentials as you do whilelogging onto the OpsCenter console.
See “Logging on to the OpsCenter console as a default admin user” on page 42.
When you run the OpsCenter View Builder .exe file, it is directly connected to theOpsCenter Server. The View Builder fetches the existing object view definitionsfrom the OpsCenter database and displays them in the OpsCenter console. Theactions that you perform using the View Builder console are then stored in theOpsCenter database.
Note: You must install OpsCenter Server, Agent, and View Builder of the sameversions. For example, Server 7.7 is compatible only with Agent 7.7 and ViewBuilder 7.7.
About using the OpsCenter consoleThe following sections describe how to access and use OpsCenter. They includehow to log on and log off and how the console works.
For information on how to understand and use the various OpsCenter views andrelated tasks, see the OpsCenter online Help. Context-sensitive help is availablefor all console views, task dialog boxes, and wizard task screens.
To access the online Help, use the Help option in most dialog boxes and wizardscreens. You can also use the Help option on the title bar of OpsCenter views.
The OpsCenter online documentation assumes that the user has a good workingknowledge of NetBackup and its concepts and components.
Portions of the online Help may refer the user to other NetBackup documentationfor descriptions of NetBackup fields and components.
The following NetBackup documents are referenced in the OpsCenter online Help:
■ NetBackup Administration Console Help
■ NetBackup Administrator's Guide for UNIX, Windows, and Linux, Volume I
■ NetBackup Troubleshooting Guide for UNIX, Windows, and Linux
30Overview of NetBackup OpsCenterAbout using the OpsCenter console
About starting the OpsCenter consoleThe OpsCenter Server is the focal point for centralized management of theNetBackup servers (version 7.0 and later) in your backup environment.
When you install OpsCenter, you select the computer that serves as the OpsCenterserver. When you start the OpsCenter console to manage and monitor yourNetBackup environment, you open a connection to the OpsCenter Web interface.
About web browser considerationsConsider the following recommendations and requirements for the web browser tobe able to access the OpsCenter console.
The following requirements and recommendations should be considered for theweb browser to access OpsCenter console:
■ The OpsCenter console uses pop-up menus. If you use pop-up blockers withyour web browser, some of these menus may not display properly. You mustdisable pop-up blocking or add the OpsCenter web address to the list ofacceptable sites in your browser.
■ JavaScript should be enabled for all the browsers.
■ In case Win2000, WinXP SP3, Win2003, or WinCE clients need to connect tothe OpsCenter server using Internet Explorer version 6,7,or 8 with 128 bit cipherconfiguration, then following steps need to be followed:
■ Find server.xml file atOpsCenter\gui\webserver\conf for Windows server/opt/SYMCOpsCenterGUI/gui/webserver/conf for UNIX/Linux server.
■ Find below cipher configuration in server.xml file.<Connector SSLEnabled="True" URIEncoding="UTF-8"
acceptCount="100" ciphers="SSL_RSA_WITH_RC4_128_MD5,
SSL_RSA_WITH_RC4_128_SHA, TLS_RSA_WITH_AES_128_CBC_SHA,
TLS_DHE_RSA_WITH_AES_128_CBC_SHA,
TLS_DHE_DSS_WITH_AES_128_CBC_SHA, SSL_RSA_WITH_3DES_EDE_CBC_SHA,
SSL_DHE_RSA_WITH_3DES_EDE_CBC_SHA,
SSL_DHE_DSS_WITH_3DES_EDE_CBC_SHA"
compressableMimeType="text/html,text/xml,text/javascript,text/css"
compression="on" compressionMinSize="10"
connectionTimeout="20000" disableUploadTimeout="true"
enableLookups="false"
keystoreFile="C:\PROGRA~1\Symantec\OpsCenter\gui\Security\Keystore"
keystorePass="opscenter" maxHttpHeaderSize="8192"
31Overview of NetBackup OpsCenterAbout starting the OpsCenter console
maxThreads="150" minSpareThreads="25"
noCompressionUserAgents="gozilla, traviata" port="443"
protocol="HTTP/1.1" scheme="https" secure="true"
sslProtocol="TLS" useBodyEncodingForURI="true"/>
■ Append below list of ciphers in 'ciphers' attribute.SSL_RSA_WITH_RC4_128_MD5,
SSL_RSA_WITH_RC4_128_SHA,
SSL_RSA_WITH_3DES_EDE_CBC_SHA,
SSL_DHE_RSA_WITH_3DES_EDE_CBC_SHA,
SSL_DHE_DSS_WITH_3DES_EDE_CBC_SHA
■ Restart OpsCenter WebServer service.
■ In case of Internet Explorer 7.0, ActiveX should be enabled. This is becauseAjax is supported through ActiveX for Internet Explorer 7.0.
■ Ensure that the character encoding for the browser is Unicode (UTF 8) beforeyou access the OpsCenter console.Open the Internet Explorer browser and select View > Encoding > Unicode(UTF-8).Open the Mozilla Firefox browser and select View > Character Encoding >Unicode (UTF 8).
■ On some server systems, you may see a blank page when you try to accessOpsCenter using Internet Explorer 7.0 and above versions. This issue is causeddue to high security level in server systems. If you encounter this issue, openInternet Explorer and click Tools > Internet Options. Click the Security taband select 'Internet' icon as the zone. Click Custom Level.... In the SecuritySettings dialog box, browse to Miscellaneous > Allow META REFRESH andselect Enable. Click Yes to confirm that you want to change the security settingsfor the zone, and then click OK.
Note: In case you do not want to change your security settings, you mustmanually append /opscenter to the OpsCenter URL. This action must be takenevery time you access OpsCenter and face this issue.
■ On some server-class systems, an enhanced security configuration can causesome pages to not display properly in Internet Explorer. If you encounter thisissue, add the OpsCenter URL to the Trusted-sites list and lower the securitysetting. To resolve this issue, open Internet Explorer and select Tools > InternetOptions > Security to configure the Trusted-sites list and lower the securitylevel.
32Overview of NetBackup OpsCenterAbout starting the OpsCenter console

■ If you use Internet Explorer 8.0 or 9.0 to access the OpsCenter console, securitycertificate warnings appear when you access a pop-up menu. Select Continueto this website (not recommended) to open the pop-up menu. Once you selectthis option, the security certificate warnings do not appear on the pop-up menus.
■ If you use Internet Explorer 9.0 to access the OpsCenter console, you may notbe able to download or view reports, jobs, or audit trails data when you exportit from OpsCenter. More details on how to resolve this issue are available.See “Exporting OpsCenter reports or data with IE 9.0” on page 36.
■ If you use Internet Explorer 8.0 or 9.0 to access the OpsCenter console, ensurethat you select the standard versions of IE 8.0 or 9.0 and not their compatibilitymode.To select the standard version on your IE 8.0 or 9.0 window, press F12. TheF12 window opens. From the Menu bar click Browser Mode:, you can view thedifferent IE versions - Internet Explorer 7, Internet Explorer 8, InternetExplorer 9, Internet Explorer 9 Compatibility View. Select Internet Explorer8 or Internet Explorer 9 to access the OpsCenter console.
■ If you use Internet Explorer 10 to access the OpsCenter console, you mustchange the default browser mode from Internet Explorer 10 Compatibility Viewto Internet Explorer 10.To change the browser compatibility view mode, press F12 from the browserto open the Developer Tools window. From the Menu bar, click BrowserMode:Internet Explorer Compat View, and then select Internet Explorer 10.
■ A known issue in Firefox 8.x causes the downloaded attachments to be namedas ExportReportAction.do or some other file name and type which cannot beopened. This issue affects you if you use Firefox 8.x to access the OpsCenterconsole and generally occurs when you export a report or export job and auditlogs. Because of the Firefox 8.x issue, when you export an OpsCenter reportfor instance, the report is saved by the name ExportReportAction.do anddoes not open if you try to open it.To resolve this issue, Veritas recommends that you upgrade to Firefox 9.0.In case you want to continue using Firefox 8.x, when you export a report or joblogs using Firefox 8.x and are prompted to open or save the exported file, clickSave File. In the Enter name of file to save to dialog box, select the Save astype asAll Files and then rename the file with the proper extension (like replacethe default name ExportReportAction.dowith filecount.pdf) and click Save.You can then open this report.
Note: If you do not see Enter name of file to save to dialog box, click Firefox> Options > General and check Always ask me where to save files option.
33Overview of NetBackup OpsCenterAbout starting the OpsCenter console
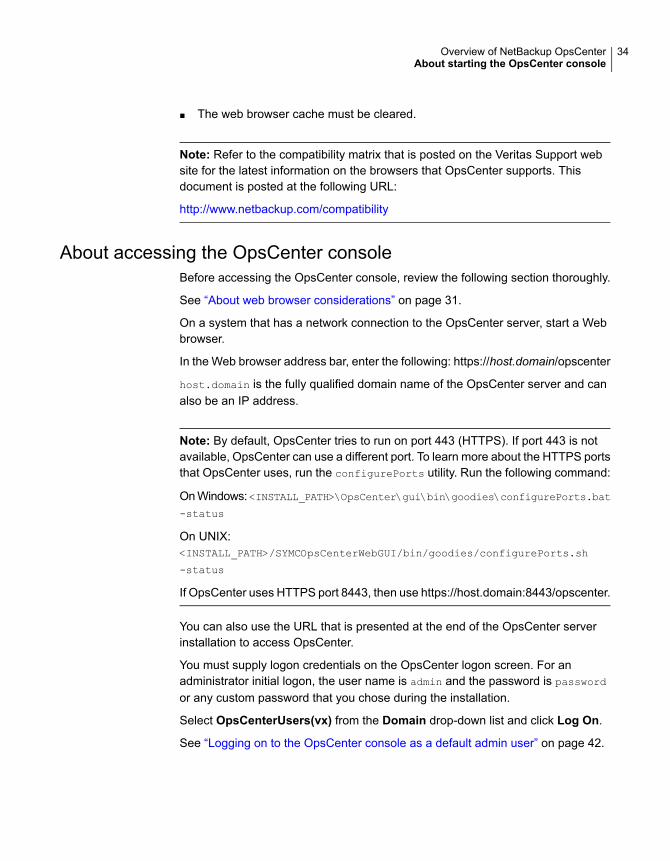
■ The web browser cache must be cleared.
Note: Refer to the compatibility matrix that is posted on the Veritas Support website for the latest information on the browsers that OpsCenter supports. Thisdocument is posted at the following URL:
http://www.netbackup.com/compatibility
About accessing the OpsCenter consoleBefore accessing the OpsCenter console, review the following section thoroughly.
See “About web browser considerations” on page 31.
On a system that has a network connection to the OpsCenter server, start a Webbrowser.
In the Web browser address bar, enter the following: https://host.domain/opscenter
host.domain is the fully qualified domain name of the OpsCenter server and canalso be an IP address.
Note: By default, OpsCenter tries to run on port 443 (HTTPS). If port 443 is notavailable, OpsCenter can use a different port. To learn more about the HTTPS portsthat OpsCenter uses, run the configurePorts utility. Run the following command:
On Windows: <INSTALL_PATH>\OpsCenter\gui\bin\goodies\configurePorts.bat-status
On UNIX:<INSTALL_PATH>/SYMCOpsCenterWebGUI/bin/goodies/configurePorts.sh
-status
If OpsCenter uses HTTPS port 8443, then use https://host.domain:8443/opscenter.
You can also use the URL that is presented at the end of the OpsCenter serverinstallation to access OpsCenter.
You must supply logon credentials on the OpsCenter logon screen. For anadministrator initial logon, the user name is admin and the password is password
or any custom password that you chose during the installation.
Select OpsCenterUsers(vx) from the Domain drop-down list and click Log On.
See “Logging on to the OpsCenter console as a default admin user” on page 42.
34Overview of NetBackup OpsCenterAbout starting the OpsCenter console

Disabling the Untrusted Connection page inMozilla FirefoxWhen you access OpsCenter in Mozilla Firefox, you may see the following UntrustedConnection page.
--------------------------------------------------------------
This Connection is Untrusted
You have asked Firefox to connect
securely to <OpsCenterhost.domain>, but we can't confirm
that your connection is secure.
Normally, when you try to connect securely,
sites will present trusted identification to prove that you are
going to the right place. However, this site's identity can't be verified.
What Should I do?
If you usually connect to
this site without problems, this error could mean that someone is
trying to impersonate the site, and you shouldn't continue.
Technical Details
I Understand the Risks
--------------------------------------------------------------
Your choice is either to click Get me out of here, which takes you to the MozillaFirefox start page, or to click Add Exception (when you expand the I Understandthe Risks section) and permanently disable the page.
To disable the Untrusted Connection page in Mozilla Firefox
1 On the Untrusted Connection page, expand I Understand the Risks sectionand click Add Exception.
2 In the Add Security Exception dialog box, click Get Certificate.
3 To make this exception permanent, make sure that the Permanently storethis exception option is checked. This option is checked by default.
4 Click Confirm Security Exception.
5 Restart your browser for the changes to take effect.
35Overview of NetBackup OpsCenterAbout starting the OpsCenter console
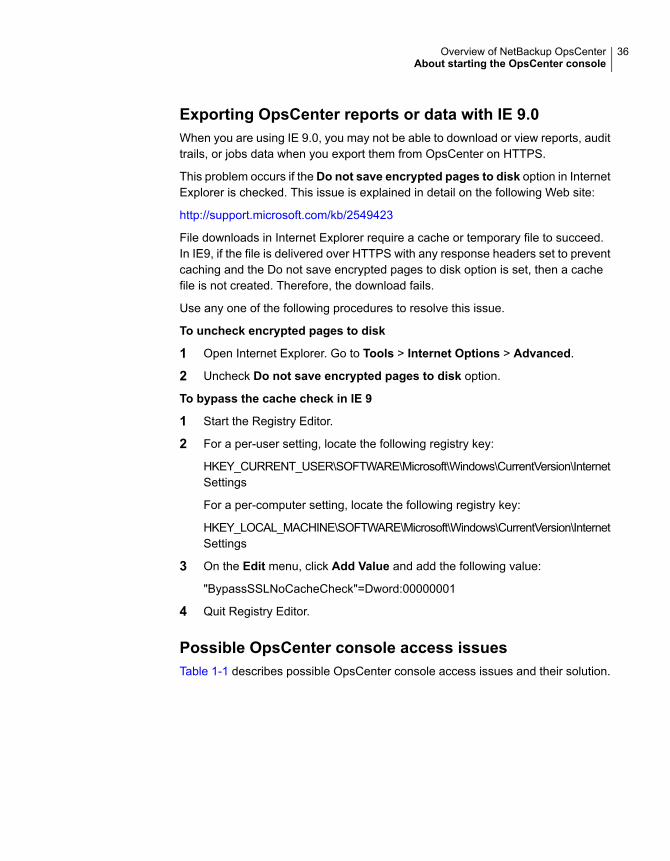
Exporting OpsCenter reports or data with IE 9.0When you are using IE 9.0, you may not be able to download or view reports, audittrails, or jobs data when you export them from OpsCenter on HTTPS.
This problem occurs if the Do not save encrypted pages to disk option in InternetExplorer is checked. This issue is explained in detail on the following Web site:
http://support.microsoft.com/kb/2549423
File downloads in Internet Explorer require a cache or temporary file to succeed.In IE9, if the file is delivered over HTTPS with any response headers set to preventcaching and the Do not save encrypted pages to disk option is set, then a cachefile is not created. Therefore, the download fails.
Use any one of the following procedures to resolve this issue.
To uncheck encrypted pages to disk
1 Open Internet Explorer. Go to Tools > Internet Options > Advanced.
2 Uncheck Do not save encrypted pages to disk option.
To bypass the cache check in IE 9
1 Start the Registry Editor.
2 For a per-user setting, locate the following registry key:
HKEY_CURRENT_USER\SOFTWARE\Microsoft\Windows\CurrentVersion\InternetSettings
For a per-computer setting, locate the following registry key:
HKEY_LOCAL_MACHINE\SOFTWARE\Microsoft\Windows\CurrentVersion\InternetSettings
3 On the Edit menu, click Add Value and add the following value:
"BypassSSLNoCacheCheck"=Dword:00000001
4 Quit Registry Editor.
Possible OpsCenter console access issuesTable 1-1 describes possible OpsCenter console access issues and their solution.
36Overview of NetBackup OpsCenterAbout starting the OpsCenter console
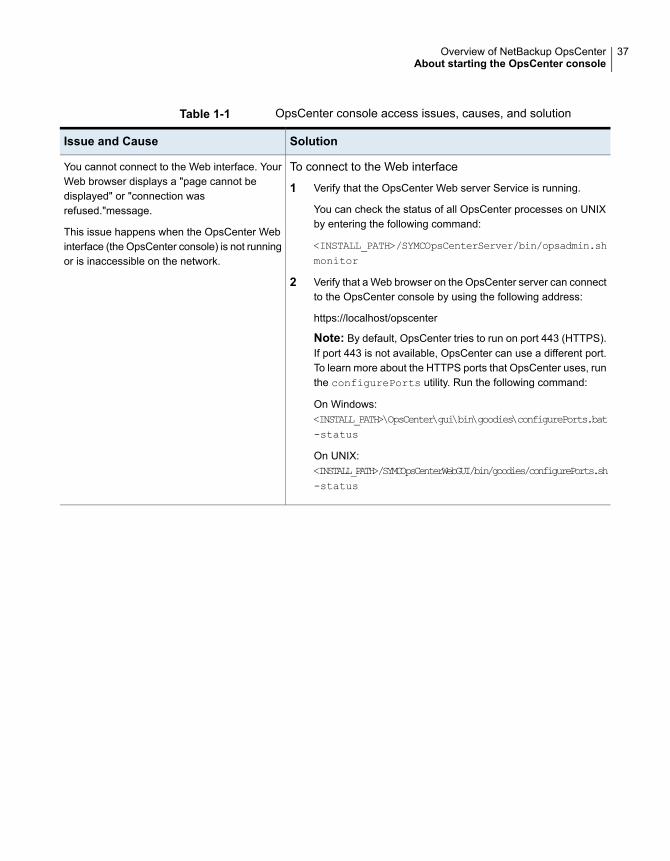
Table 1-1 OpsCenter console access issues, causes, and solution
SolutionIssue and Cause
To connect to the Web interface
1 Verify that the OpsCenter Web server Service is running.
You can check the status of all OpsCenter processes on UNIXby entering the following command:
<INSTALL_PATH>/SYMCOpsCenterServer/bin/opsadmin.shmonitor
2 Verify that a Web browser on the OpsCenter server can connectto the OpsCenter console by using the following address:
https://localhost/opscenter
Note: By default, OpsCenter tries to run on port 443 (HTTPS).If port 443 is not available, OpsCenter can use a different port.To learn more about the HTTPS ports that OpsCenter uses, runthe configurePorts utility. Run the following command:
On Windows:<INSTALL_PATH>\OpsCenter\gui\bin\goodies\configurePorts.bat-status
On UNIX:<INSTALL_PATH>/SYMCOpsCenterWebGUI/bin/goodies/configurePorts.sh-status
You cannot connect to the Web interface. YourWeb browser displays a "page cannot bedisplayed" or "connection wasrefused."message.
This issue happens when the OpsCenter Webinterface (the OpsCenter console) is not runningor is inaccessible on the network.
37Overview of NetBackup OpsCenterAbout starting the OpsCenter console

Table 1-1 OpsCenter console access issues, causes, and solution(continued)
SolutionIssue and Cause
To resolve an HTTP STATUS 404 error on Windows
1 Locate the opscenter.war file in the following directory toverify that the OpsCenter application is installed:
INSTALL_PATH\OpsCenter\gui\webserver\webapps
2 Verify that all the OpsCenter server services are running.
3 Start all the OpsCenter Server services by using the followingcommand:
INSTALL_PATH\OpsCenter\server\bin\opsadmin.batstart
To resolve an HTTP STATUS 404 error on UNIX:
1 Locate the opscenter.war file in the following directory toverify that the OpsCenter application is installed:
<INSTALL_PATH>/SYMCOpsCenterGUI
2 To verify that all OpsCenter Server processes are running, usethe following command:
<INSTALL_PATH>/SYMCOpsCenterServer/bin/opsadminmonitor
3 Start all the OpsCenter Server processes by using the followingcommands:
<INSTALL_PATH>/SYMCOpsCenterServer/bin/opsadmin.shstart
The OpsCenter Web interface is running, butthe OpsCenter console is not available. YourWeb browser displays an HTTP STATUS 404error.
This issue happens when the OpsCenterconsole application is not loaded.
38Overview of NetBackup OpsCenterAbout starting the OpsCenter console
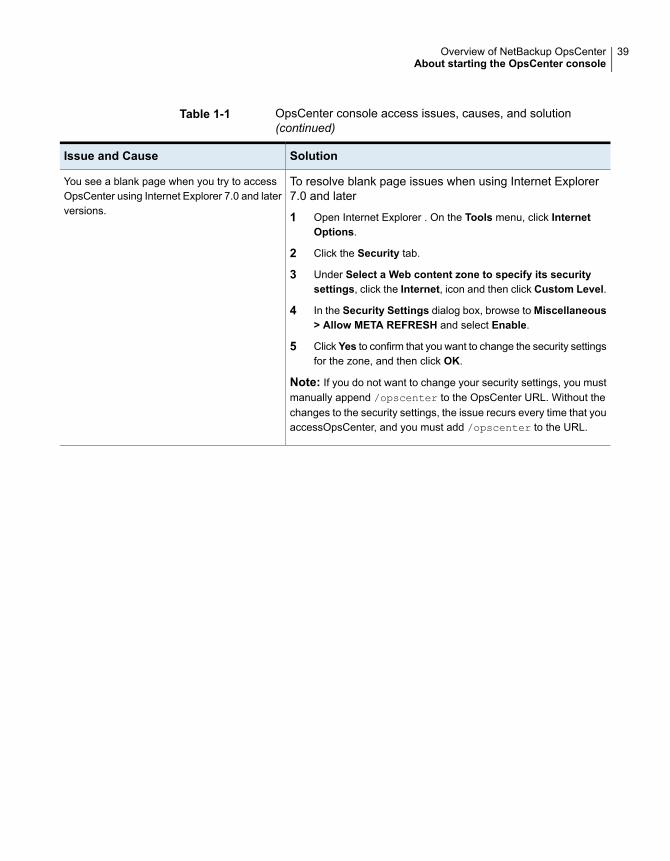
Table 1-1 OpsCenter console access issues, causes, and solution(continued)
SolutionIssue and Cause
To resolve blank page issues when using Internet Explorer7.0 and later
1 Open Internet Explorer . On the Tools menu, click InternetOptions.
2 Click the Security tab.
3 Under Select a Web content zone to specify its securitysettings, click the Internet, icon and then click Custom Level.
4 In the Security Settings dialog box, browse to Miscellaneous> Allow META REFRESH and select Enable.
5 Click Yes to confirm that you want to change the security settingsfor the zone, and then click OK.
Note: If you do not want to change your security settings, you mustmanually append /opscenter to the OpsCenter URL. Without thechanges to the security settings, the issue recurs every time that youaccessOpsCenter, and you must add /opscenter to the URL.
You see a blank page when you try to accessOpsCenter using Internet Explorer 7.0 and laterversions.
39Overview of NetBackup OpsCenterAbout starting the OpsCenter console

Table 1-1 OpsCenter console access issues, causes, and solution(continued)
SolutionIssue and Cause
You get the following error when you accessOpsCenter by clicking Start > Programs >OpsCenter > WebUI Login on Windows:
Windows cannot findhttps://<MACHINE_NAME>:<PORT_NUMBER>/opscenter.Make sure you typed the namecorrectly, and then try again. Tosearch for a file, click the Startbutton and then click Search.
40Overview of NetBackup OpsCenterAbout starting the OpsCenter console
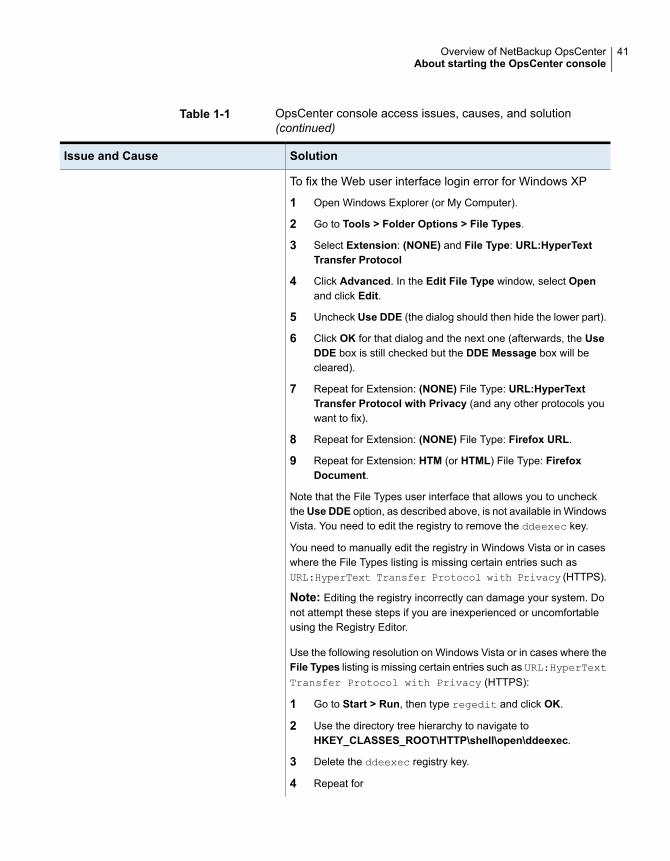
Table 1-1 OpsCenter console access issues, causes, and solution(continued)
SolutionIssue and Cause
To fix the Web user interface login error for Windows XP
1 Open Windows Explorer (or My Computer).
2 Go to Tools > Folder Options > File Types.
3 Select Extension: (NONE) and File Type: URL:HyperTextTransfer Protocol
4 Click Advanced. In the Edit File Type window, select Openand click Edit.
5 Uncheck Use DDE (the dialog should then hide the lower part).
6 Click OK for that dialog and the next one (afterwards, the UseDDE box is still checked but the DDE Message box will becleared).
7 Repeat for Extension: (NONE) File Type: URL:HyperTextTransfer Protocol with Privacy (and any other protocols youwant to fix).
8 Repeat for Extension: (NONE) File Type: Firefox URL.
9 Repeat for Extension: HTM (or HTML) File Type: FirefoxDocument.
Note that the File Types user interface that allows you to unchecktheUse DDE option, as described above, is not available in WindowsVista. You need to edit the registry to remove the ddeexec key.
You need to manually edit the registry in Windows Vista or in caseswhere the File Types listing is missing certain entries such asURL:HyperText Transfer Protocol with Privacy (HTTPS).
Note: Editing the registry incorrectly can damage your system. Donot attempt these steps if you are inexperienced or uncomfortableusing the Registry Editor.
Use the following resolution on Windows Vista or in cases where theFile Types listing is missing certain entries such as URL:HyperTextTransfer Protocol with Privacy (HTTPS):
1 Go to Start > Run, then type regedit and click OK.
2 Use the directory tree hierarchy to navigate toHKEY_CLASSES_ROOT\HTTP\shell\open\ddeexec.
3 Delete the ddeexec registry key.
4 Repeat for
41Overview of NetBackup OpsCenterAbout starting the OpsCenter console
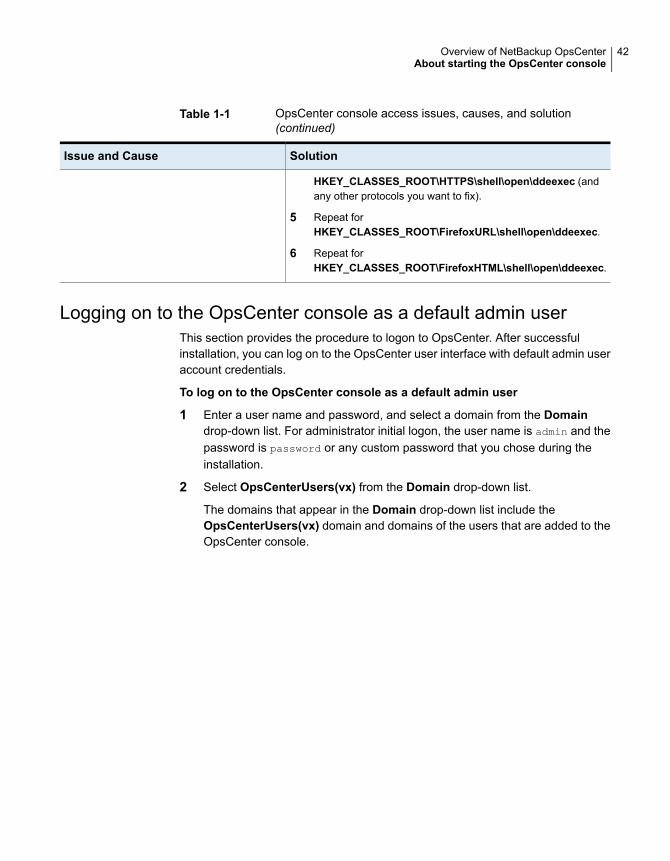
Table 1-1 OpsCenter console access issues, causes, and solution(continued)
SolutionIssue and Cause
HKEY_CLASSES_ROOT\HTTPS\shell\open\ddeexec (andany other protocols you want to fix).
5 Repeat forHKEY_CLASSES_ROOT\FirefoxURL\shell\open\ddeexec.
6 Repeat forHKEY_CLASSES_ROOT\FirefoxHTML\shell\open\ddeexec.
Logging on to the OpsCenter console as a default admin userThis section provides the procedure to logon to OpsCenter. After successfulinstallation, you can log on to the OpsCenter user interface with default admin useraccount credentials.
To log on to the OpsCenter console as a default admin user
1 Enter a user name and password, and select a domain from the Domaindrop-down list. For administrator initial logon, the user name is admin and thepassword is password or any custom password that you chose during theinstallation.
2 Select OpsCenterUsers(vx) from the Domain drop-down list.
The domains that appear in the Domain drop-down list include theOpsCenterUsers(vx) domain and domains of the users that are added to theOpsCenter console.
42Overview of NetBackup OpsCenterAbout starting the OpsCenter console
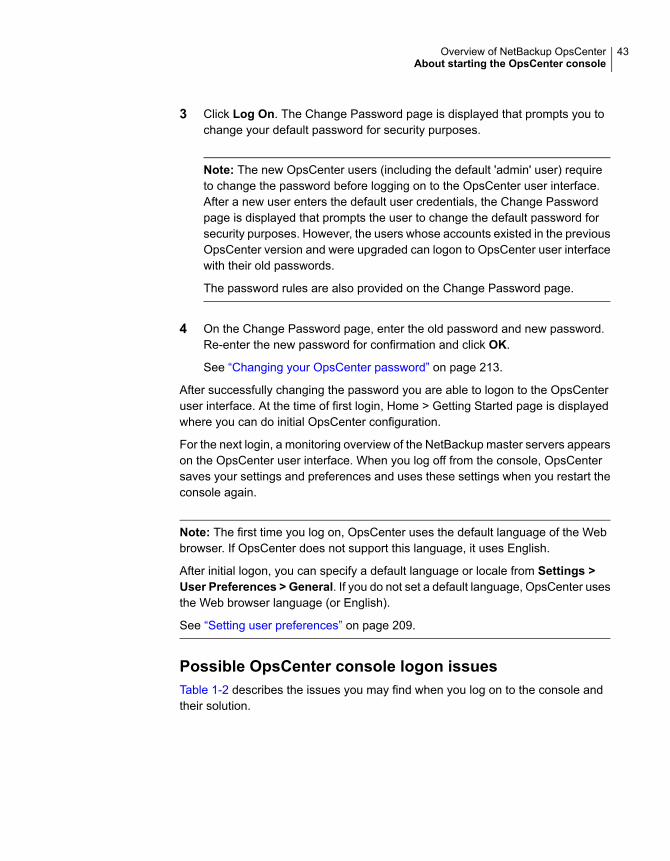
3 Click Log On. The Change Password page is displayed that prompts you tochange your default password for security purposes.
Note: The new OpsCenter users (including the default 'admin' user) requireto change the password before logging on to the OpsCenter user interface.After a new user enters the default user credentials, the Change Passwordpage is displayed that prompts the user to change the default password forsecurity purposes. However, the users whose accounts existed in the previousOpsCenter version and were upgraded can logon to OpsCenter user interfacewith their old passwords.
The password rules are also provided on the Change Password page.
4 On the Change Password page, enter the old password and new password.Re-enter the new password for confirmation and click OK.
See “Changing your OpsCenter password” on page 213.
After successfully changing the password you are able to logon to the OpsCenteruser interface. At the time of first login, Home > Getting Started page is displayedwhere you can do initial OpsCenter configuration.
For the next login, a monitoring overview of the NetBackup master servers appearson the OpsCenter user interface. When you log off from the console, OpsCentersaves your settings and preferences and uses these settings when you restart theconsole again.
Note: The first time you log on, OpsCenter uses the default language of the Webbrowser. If OpsCenter does not support this language, it uses English.
After initial logon, you can specify a default language or locale from Settings >User Preferences > General. If you do not set a default language, OpsCenter usesthe Web browser language (or English).
See “Setting user preferences” on page 209.
Possible OpsCenter console logon issuesTable 1-2 describes the issues you may find when you log on to the console andtheir solution.
43Overview of NetBackup OpsCenterAbout starting the OpsCenter console
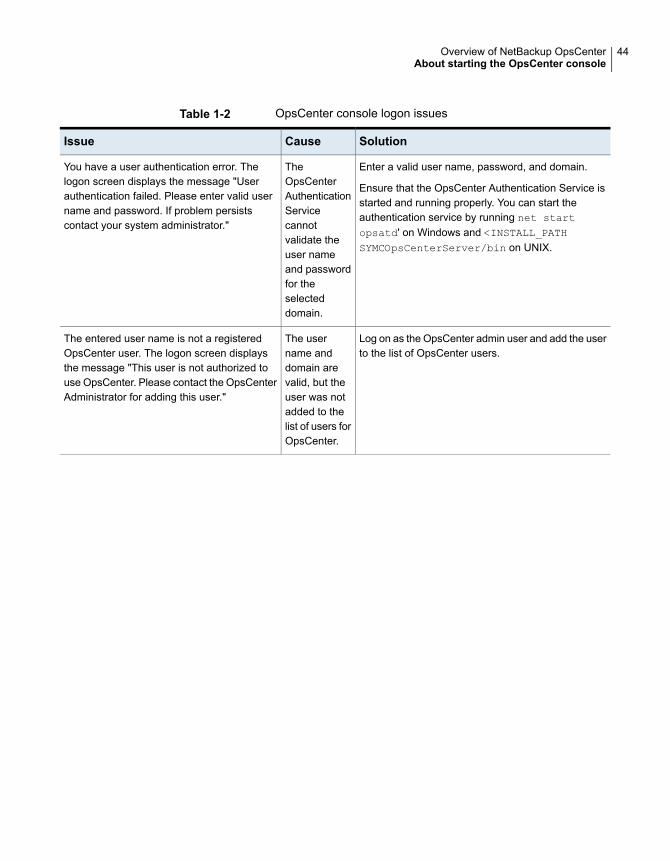
Table 1-2 OpsCenter console logon issues
SolutionCauseIssue
Enter a valid user name, password, and domain.
Ensure that the OpsCenter Authentication Service isstarted and running properly. You can start theauthentication service by running net startopsatd' on Windows and <INSTALL_PATHSYMCOpsCenterServer/bin on UNIX.
TheOpsCenterAuthenticationServicecannotvalidate theuser nameand passwordfor theselecteddomain.
You have a user authentication error. Thelogon screen displays the message "Userauthentication failed. Please enter valid username and password. If problem persistscontact your system administrator."
Log on as the OpsCenter admin user and add the userto the list of OpsCenter users.
The username anddomain arevalid, but theuser was notadded to thelist of users forOpsCenter.
The entered user name is not a registeredOpsCenter user. The logon screen displaysthe message "This user is not authorized touse OpsCenter. Please contact the OpsCenterAdministrator for adding this user."
44Overview of NetBackup OpsCenterAbout starting the OpsCenter console
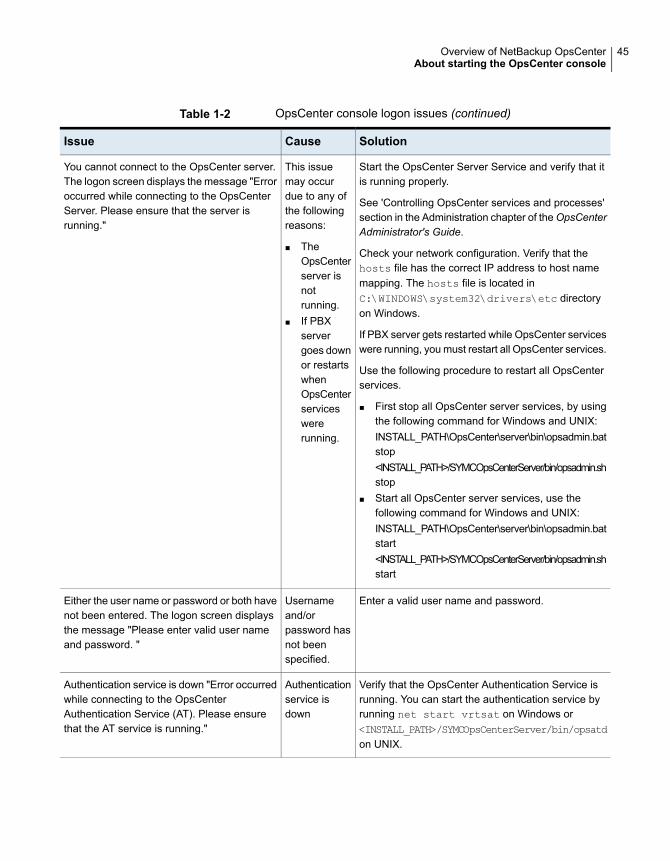
Table 1-2 OpsCenter console logon issues (continued)
SolutionCauseIssue
Start the OpsCenter Server Service and verify that itis running properly.
See 'Controlling OpsCenter services and processes'section in the Administration chapter of the OpsCenterAdministrator's Guide.
Check your network configuration. Verify that thehosts file has the correct IP address to host namemapping. The hosts file is located inC:\WINDOWS\system32\drivers\etc directoryon Windows.
If PBX server gets restarted while OpsCenter serviceswere running, you must restart all OpsCenter services.
Use the following procedure to restart all OpsCenterservices.
■ First stop all OpsCenter server services, by usingthe following command for Windows and UNIX:INSTALL_PATH\OpsCenter\server\bin\opsadmin.batstop<INSTALL_PATH>/SYMCOpsCenterServer/bin/opsadmin.shstop
■ Start all OpsCenter server services, use thefollowing command for Windows and UNIX:INSTALL_PATH\OpsCenter\server\bin\opsadmin.batstart<INSTALL_PATH>/SYMCOpsCenterServer/bin/opsadmin.shstart
This issuemay occurdue to any ofthe followingreasons:
■ TheOpsCenterserver isnotrunning.
■ If PBXservergoes downor restartswhenOpsCenterserviceswererunning.
You cannot connect to the OpsCenter server.The logon screen displays the message "Erroroccurred while connecting to the OpsCenterServer. Please ensure that the server isrunning."
Enter a valid user name and password.Usernameand/orpassword hasnot beenspecified.
Either the user name or password or both havenot been entered. The logon screen displaysthe message "Please enter valid user nameand password. "
Verify that the OpsCenter Authentication Service isrunning. You can start the authentication service byrunning net start vrtsat on Windows or<INSTALL_PATH>/SYMCOpsCenterServer/bin/opsatdon UNIX.
Authenticationservice isdown
Authentication service is down "Error occurredwhile connecting to the OpsCenterAuthentication Service (AT). Please ensurethat the AT service is running."
45Overview of NetBackup OpsCenterAbout starting the OpsCenter console
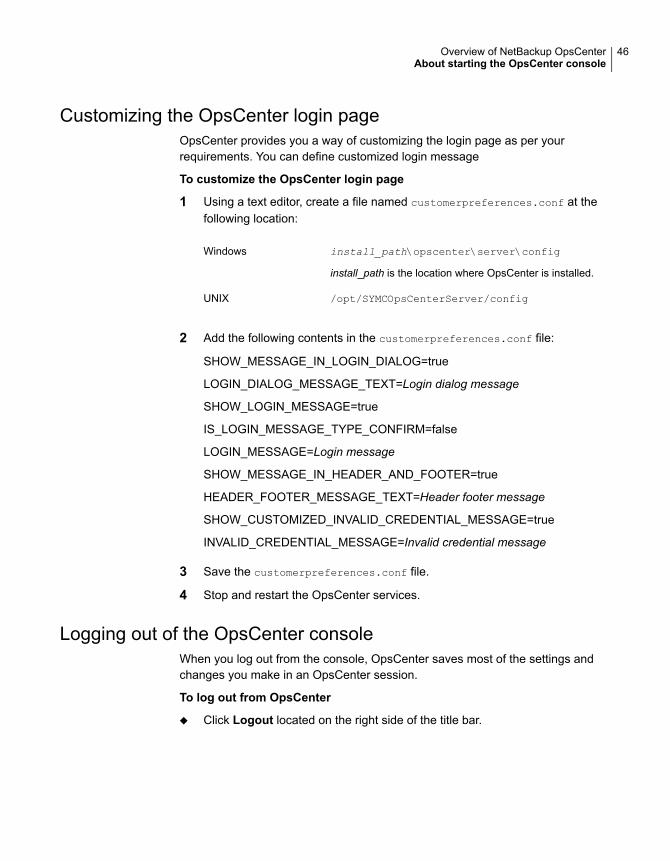
Customizing the OpsCenter login pageOpsCenter provides you a way of customizing the login page as per yourrequirements. You can define customized login message
To customize the OpsCenter login page
1 Using a text editor, create a file named customerpreferences.conf at thefollowing location:
install_path\opscenter\server\config
install_path is the location where OpsCenter is installed.
Windows
/opt/SYMCOpsCenterServer/configUNIX
2 Add the following contents in the customerpreferences.conf file:
SHOW_MESSAGE_IN_LOGIN_DIALOG=true
LOGIN_DIALOG_MESSAGE_TEXT=Login dialog message
SHOW_LOGIN_MESSAGE=true
IS_LOGIN_MESSAGE_TYPE_CONFIRM=false
LOGIN_MESSAGE=Login message
SHOW_MESSAGE_IN_HEADER_AND_FOOTER=true
HEADER_FOOTER_MESSAGE_TEXT=Header footer message
SHOW_CUSTOMIZED_INVALID_CREDENTIAL_MESSAGE=true
INVALID_CREDENTIAL_MESSAGE=Invalid credential message
3 Save the customerpreferences.conf file.
4 Stop and restart the OpsCenter services.
Logging out of the OpsCenter consoleWhen you log out from the console, OpsCenter saves most of the settings andchanges you make in an OpsCenter session.
To log out from OpsCenter
◆ Click Logout located on the right side of the title bar.
46Overview of NetBackup OpsCenterAbout starting the OpsCenter console

Configuring the OpsCenter session timeout intervalWhen the timeout interval is left at its default value, users are automatically loggedout of the OpsCenter console when a session is left inactive for 30 minutes.However, the session timeout interval can be reconfigured.
To configure the session timeout interval
1 Open the web.xml configuration file in a text editor from the following locations:
INSTALL_PATH\OpsCenter\gui\webserver\conf\web.xmlFor Windows:
<INSTALL_PATH>/SYMCOpsCenterGUI/webserver/conf/web.xmlFor UNIX:
2 In the web.xml file, locate the session-timeout parameter:
<session-config>
<session-timeout>30</session-timeout>
</session-config>
3 Change the session timeout parameter value to the desired length by changingthe number that is encapsulated by the XML tags for session-timeout (in theexample above, change 30 to the desired value).
This value is set in minutes.
4 Stop the OpsCenter services. Enter the following command:
INSTALL_PATH\OpsCenter\server\bin\opsadmin.bat stopWindows
<INSTALL_PATH>/SYMCOpsCenterServer/bin/opsadmin.shstop
UNIX
5 Restart the OpsCenter services. Enter the following command:
INSTALL_PATH\OpsCenter\server\bin\opsadmin.bat startWindows
<INSTALL_PATH>/SYMCOpsCenterServer/bin/opsadmin.shstart
UNIX
Possible OpsCenter console issuesTable 1-3 describes the issues you may find when you use the console.
47Overview of NetBackup OpsCenterAbout starting the OpsCenter console
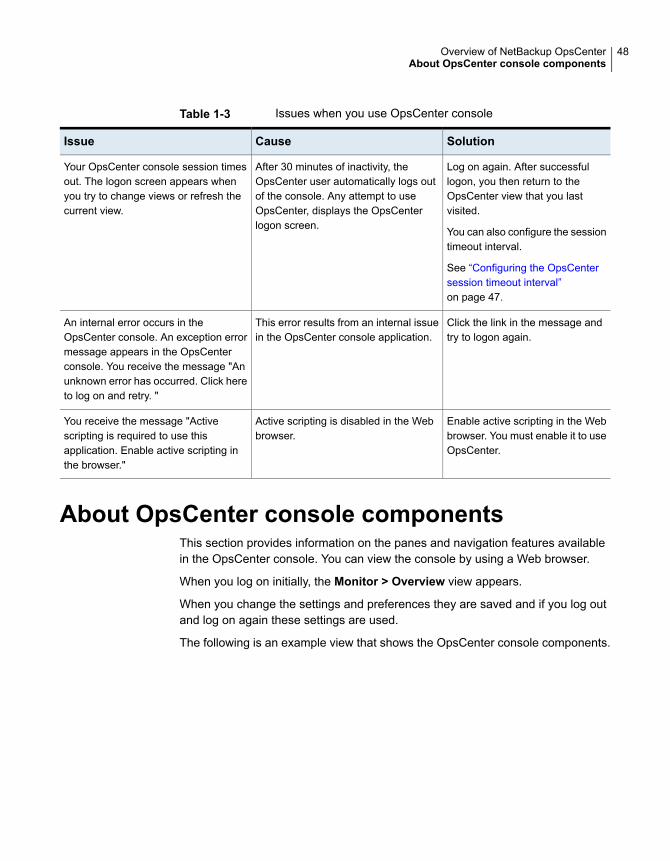
Table 1-3 Issues when you use OpsCenter console
SolutionCauseIssue
Log on again. After successfullogon, you then return to theOpsCenter view that you lastvisited.
You can also configure the sessiontimeout interval.
See “Configuring the OpsCentersession timeout interval”on page 47.
After 30 minutes of inactivity, theOpsCenter user automatically logs outof the console. Any attempt to useOpsCenter, displays the OpsCenterlogon screen.
Your OpsCenter console session timesout. The logon screen appears whenyou try to change views or refresh thecurrent view.
Click the link in the message andtry to logon again.
This error results from an internal issuein the OpsCenter console application.
An internal error occurs in theOpsCenter console. An exception errormessage appears in the OpsCenterconsole. You receive the message "Anunknown error has occurred. Click hereto log on and retry. "
Enable active scripting in the Webbrowser. You must enable it to useOpsCenter.
Active scripting is disabled in the Webbrowser.
You receive the message "Activescripting is required to use thisapplication. Enable active scripting inthe browser."
About OpsCenter console componentsThis section provides information on the panes and navigation features availablein the OpsCenter console. You can view the console by using a Web browser.
When you log on initially, the Monitor > Overview view appears.
When you change the settings and preferences they are saved and if you log outand log on again these settings are used.
The following is an example view that shows the OpsCenter console components.
48Overview of NetBackup OpsCenterAbout OpsCenter console components

Figure 1-2 OpsCenter console components
The following sections describe the main elements of the console in greater detail.
Table 1-4 lists the topics that describe the main elements of the console in greaterdetail.
Table 1-4 Topics covered in this section
LinkTopic Description
See “About using the links on the title bar” on page 50.Use the links available from the title bar, such asLogout and Help.
See “About using tabs and subtabs” on page 51.Overview about the tabs and subtabs available inthe console.
See “About refreshing the OpsCenter console” on page 51.Control the frequency that the OpsCenter consolerefreshes to reflect changes in your backupenvironment.
See “Changing the Task pane” on page 52.Overview about the Task pane.
See “About the View pane” on page 52.Overview about the View pane.
See “Using the quick links in the Task pane” on page 56.Overview about quick links in the task panes.
See “Viewing alerts from the Alert Summary pane” on page 56.Use the pane that displays a quick visual summaryof any current alerts.
49Overview of NetBackup OpsCenterAbout OpsCenter console components
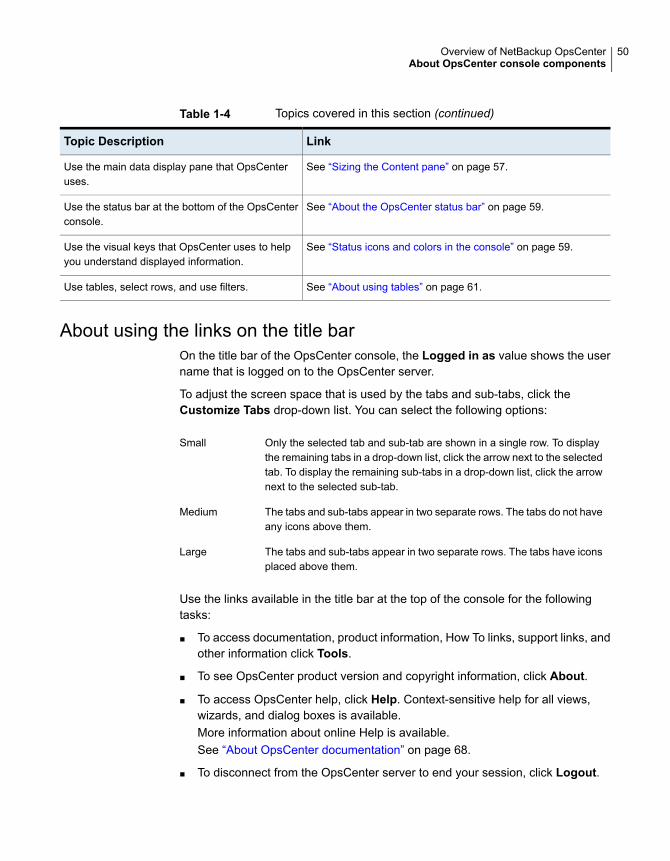
Table 1-4 Topics covered in this section (continued)
LinkTopic Description
See “Sizing the Content pane” on page 57.Use the main data display pane that OpsCenteruses.
See “About the OpsCenter status bar” on page 59.Use the status bar at the bottom of the OpsCenterconsole.
See “Status icons and colors in the console” on page 59.Use the visual keys that OpsCenter uses to helpyou understand displayed information.
See “About using tables” on page 61.Use tables, select rows, and use filters.
About using the links on the title barOn the title bar of the OpsCenter console, the Logged in as value shows the username that is logged on to the OpsCenter server.
To adjust the screen space that is used by the tabs and sub-tabs, click theCustomize Tabs drop-down list. You can select the following options:
Only the selected tab and sub-tab are shown in a single row. To displaythe remaining tabs in a drop-down list, click the arrow next to the selectedtab. To display the remaining sub-tabs in a drop-down list, click the arrownext to the selected sub-tab.
Small
The tabs and sub-tabs appear in two separate rows. The tabs do not haveany icons above them.
Medium
The tabs and sub-tabs appear in two separate rows. The tabs have iconsplaced above them.
Large
Use the links available in the title bar at the top of the console for the followingtasks:
■ To access documentation, product information, How To links, support links, andother information click Tools.
■ To see OpsCenter product version and copyright information, click About.
■ To access OpsCenter help, click Help. Context-sensitive help for all views,wizards, and dialog boxes is available.More information about online Help is available.See “About OpsCenter documentation” on page 68.
■ To disconnect from the OpsCenter server to end your session, click Logout.
50Overview of NetBackup OpsCenterAbout OpsCenter console components
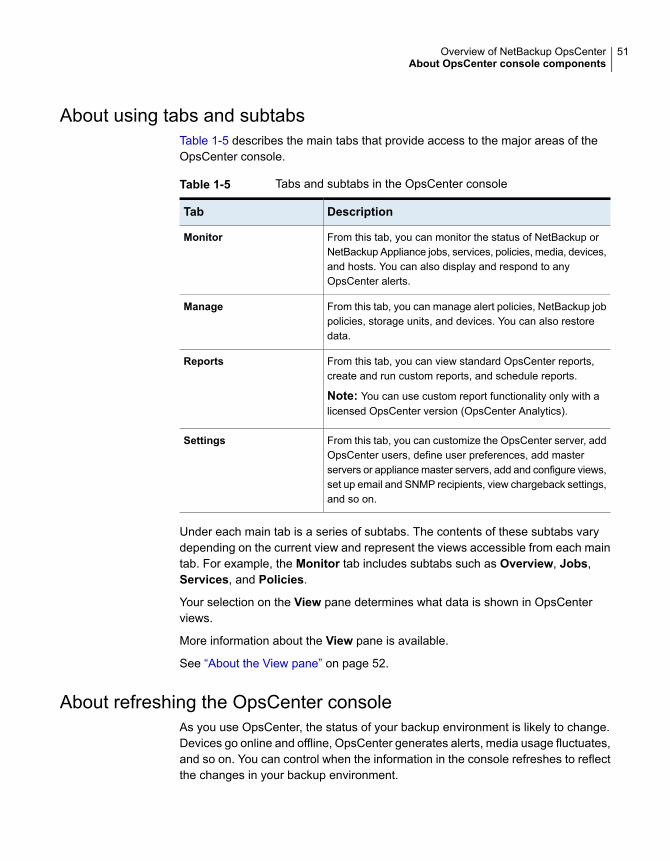
About using tabs and subtabsTable 1-5 describes the main tabs that provide access to the major areas of theOpsCenter console.
Table 1-5 Tabs and subtabs in the OpsCenter console
DescriptionTab
From this tab, you can monitor the status of NetBackup orNetBackup Appliance jobs, services, policies, media, devices,and hosts. You can also display and respond to anyOpsCenter alerts.
Monitor
From this tab, you can manage alert policies, NetBackup jobpolicies, storage units, and devices. You can also restoredata.
Manage
From this tab, you can view standard OpsCenter reports,create and run custom reports, and schedule reports.
Note: You can use custom report functionality only with alicensed OpsCenter version (OpsCenter Analytics).
Reports
From this tab, you can customize the OpsCenter server, addOpsCenter users, define user preferences, add masterservers or appliance master servers, add and configure views,set up email and SNMP recipients, view chargeback settings,and so on.
Settings
Under each main tab is a series of subtabs. The contents of these subtabs varydepending on the current view and represent the views accessible from each maintab. For example, the Monitor tab includes subtabs such as Overview, Jobs,Services, and Policies.
Your selection on the View pane determines what data is shown in OpsCenterviews.
More information about the View pane is available.
See “About the View pane” on page 52.
About refreshing the OpsCenter consoleAs you use OpsCenter, the status of your backup environment is likely to change.Devices go online and offline, OpsCenter generates alerts, media usage fluctuates,and so on. You can control when the information in the console refreshes to reflectthe changes in your backup environment.
51Overview of NetBackup OpsCenterAbout OpsCenter console components

You can change the refresh setting from Settings > User Preferences > Generalview in the OpsCenter console.
See “Setting user preferences” on page 209.
Changing the Task paneIn many views in the console, a Task pane is available.
The Task pane is located on the left side of the console and contains the Viewpane and Quick Links at the bottom.
To change the Task pane
1 To enlarge the Task pane, click the Collapse Task Panel icon between theTask pane and the Content pane.
2 To show all panes after you enlarged the Task pane, click the Collapse TaskPanel icon again.
3 To resize the Task pane, drag the line separating the Task pane and theContent pane.
The minimize or maximize settings are applicable only for the current session.
You cannot resize the Task pane from the Monitor > Overview page.
About the View paneThe View pane is a key navigation and configuration tool in OpsCenter. This panelets you select the views to control the scope of your console views.
Using OpsCenter views, you can view NetBackup information for your entiremanagement domain (with the ALL MASTER SERVERS view), a specific viewtype, an individual server, or NetBackup appliances.
A Security Administrator or an Administrator can create views from Settings >Views or by using the OpsCenter View Builder. For example, an admin can createa view named Geography to display details about master servers in a particularregion, such as Europe. An admin can also create client or policy views.
More information about how to create views from Settings > Views is available.
See “About OpsCenter views” on page 302.
See the OpsCenter View Builder Help for more information about creating viewsusing OpsCenter View Builder.
The View pane has the following features:
■ It is available in any OpsCenter view where you can change the view.
52Overview of NetBackup OpsCenterAbout OpsCenter console components
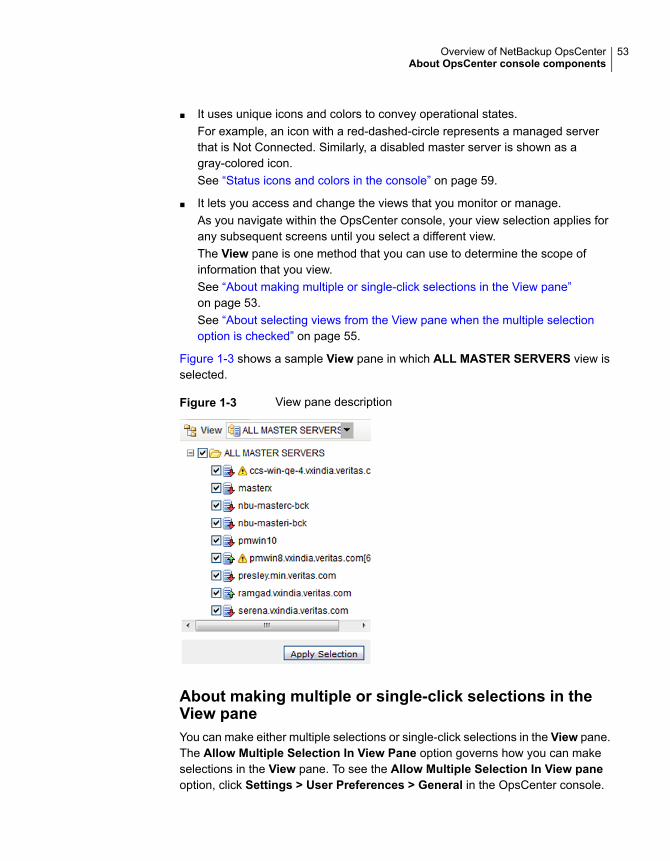
■ It uses unique icons and colors to convey operational states.For example, an icon with a red-dashed-circle represents a managed serverthat is Not Connected. Similarly, a disabled master server is shown as agray-colored icon.See “Status icons and colors in the console” on page 59.
■ It lets you access and change the views that you monitor or manage.As you navigate within the OpsCenter console, your view selection applies forany subsequent screens until you select a different view.The View pane is one method that you can use to determine the scope ofinformation that you view.See “About making multiple or single-click selections in the View pane”on page 53.See “About selecting views from the View pane when the multiple selectionoption is checked” on page 55.
Figure 1-3 shows a sample View pane in which ALL MASTER SERVERS view isselected.
Figure 1-3 View pane description
About making multiple or single-click selections in theView paneYou can make either multiple selections or single-click selections in the View pane.The Allow Multiple Selection In View Pane option governs how you can makeselections in the View pane. To see the Allow Multiple Selection In View paneoption, click Settings > User Preferences > General in the OpsCenter console.
53Overview of NetBackup OpsCenterAbout OpsCenter console components
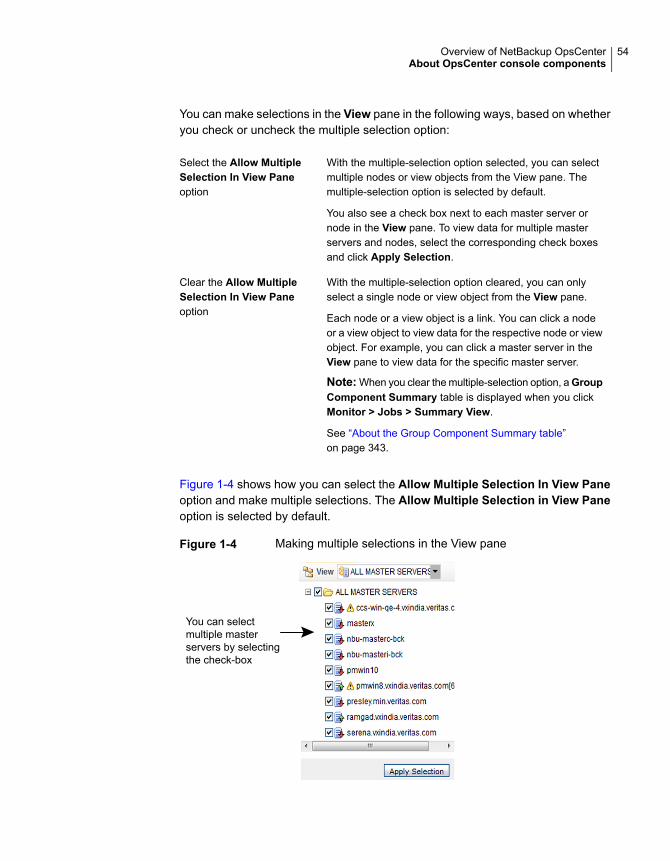
You can make selections in the View pane in the following ways, based on whetheryou check or uncheck the multiple selection option:
With the multiple-selection option selected, you can selectmultiple nodes or view objects from the View pane. Themultiple-selection option is selected by default.
You also see a check box next to each master server ornode in the View pane. To view data for multiple masterservers and nodes, select the corresponding check boxesand click Apply Selection.
Select the Allow MultipleSelection In View Paneoption
With the multiple-selection option cleared, you can onlyselect a single node or view object from the View pane.
Each node or a view object is a link. You can click a nodeor a view object to view data for the respective node or viewobject. For example, you can click a master server in theView pane to view data for the specific master server.
Note:When you clear the multiple-selection option, aGroupComponent Summary table is displayed when you clickMonitor > Jobs > Summary View.
See “About the Group Component Summary table”on page 343.
Clear the Allow MultipleSelection In View Paneoption
Figure 1-4 shows how you can select the Allow Multiple Selection In View Paneoption and make multiple selections. The Allow Multiple Selection in View Paneoption is selected by default.
Figure 1-4 Making multiple selections in the View pane
You can selectmultiple masterservers by selectingthe check-box
54Overview of NetBackup OpsCenterAbout OpsCenter console components
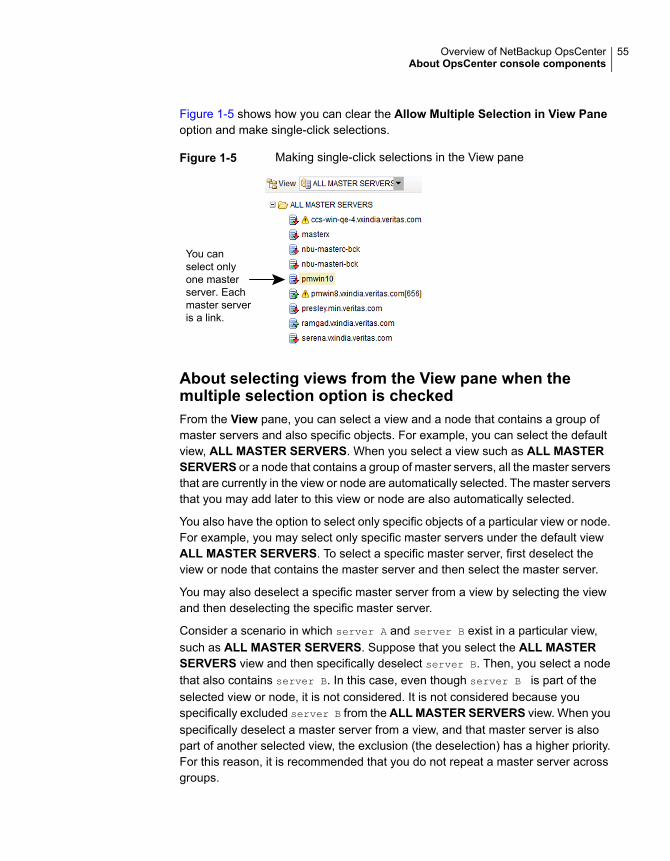
Figure 1-5 shows how you can clear the Allow Multiple Selection in View Paneoption and make single-click selections.
Figure 1-5 Making single-click selections in the View pane
You canselect onlyone masterserver. Eachmaster serveris a link.
About selecting views from the View pane when themultiple selection option is checkedFrom the View pane, you can select a view and a node that contains a group ofmaster servers and also specific objects. For example, you can select the defaultview, ALL MASTER SERVERS. When you select a view such as ALL MASTERSERVERS or a node that contains a group of master servers, all the master serversthat are currently in the view or node are automatically selected. The master serversthat you may add later to this view or node are also automatically selected.
You also have the option to select only specific objects of a particular view or node.For example, you may select only specific master servers under the default viewALL MASTER SERVERS. To select a specific master server, first deselect theview or node that contains the master server and then select the master server.
You may also deselect a specific master server from a view by selecting the viewand then deselecting the specific master server.
Consider a scenario in which server A and server B exist in a particular view,such as ALL MASTER SERVERS. Suppose that you select the ALL MASTERSERVERS view and then specifically deselect server B. Then, you select a nodethat also contains server B. In this case, even though server B is part of theselected view or node, it is not considered. It is not considered because youspecifically excluded server B from the ALLMASTER SERVERS view. When youspecifically deselect a master server from a view, and that master server is alsopart of another selected view, the exclusion (the deselection) has a higher priority.For this reason, it is recommended that you do not repeat a master server acrossgroups.
55Overview of NetBackup OpsCenterAbout OpsCenter console components
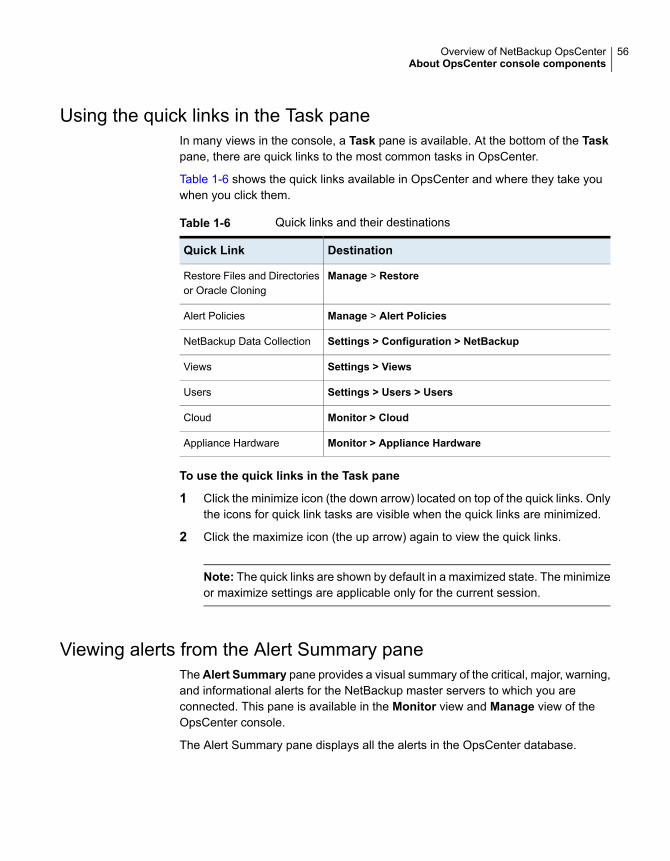
Using the quick links in the Task paneIn many views in the console, a Task pane is available. At the bottom of the Taskpane, there are quick links to the most common tasks in OpsCenter.
Table 1-6 shows the quick links available in OpsCenter and where they take youwhen you click them.
Table 1-6 Quick links and their destinations
DestinationQuick Link
Manage > RestoreRestore Files and Directoriesor Oracle Cloning
Manage > Alert PoliciesAlert Policies
Settings > Configuration > NetBackupNetBackup Data Collection
Settings > ViewsViews
Settings > Users > UsersUsers
Monitor > CloudCloud
Monitor > Appliance HardwareAppliance Hardware
To use the quick links in the Task pane
1 Click the minimize icon (the down arrow) located on top of the quick links. Onlythe icons for quick link tasks are visible when the quick links are minimized.
2 Click the maximize icon (the up arrow) again to view the quick links.
Note: The quick links are shown by default in a maximized state. The minimizeor maximize settings are applicable only for the current session.
Viewing alerts from the Alert Summary paneTheAlert Summary pane provides a visual summary of the critical, major, warning,and informational alerts for the NetBackup master servers to which you areconnected. This pane is available in the Monitor view and Manage view of theOpsCenter console.
The Alert Summary pane displays all the alerts in the OpsCenter database.
56Overview of NetBackup OpsCenterAbout OpsCenter console components

To view alerts from the Alert Summary pane
◆ Click any of the four available alert counts.
A filtered detail view for that alert category appears. This view is a shortcut tothe Monitor > Alerts view.
Sizing the Content paneWhen you initially log on to Veritas NetBackup OpsCenter, the content pane displaysa summary of information for all master servers in the OpsCenter console.
Initially, a monitoring overview appears (Monitor > Overview). Information in thecontent pane varies and is context-sensitive to current selections in the View pane,the tabs and subtabs, and the time frame.
To size the Content pane
1 To enlarge the Content pane, click the Collapse Task Panel icon between theTask pane and the Content pane.
2 To show all panes after you enlarged the Content pane, click the CollapseTask Panel icon again.
3 To resize the Content pane, drag the line separating the Task pane and theContent pane.
The minimize or maximize settings are applicable only for the current session.
Note: You cannot resize the Content pane from Monitor > Overview page.
Using the List, Summary, Hierarchical, and Details viewsMost of the OpsCenter Monitor views and Manage views present information inthree main viewing modes: List View, Summary View, and Hierarchical View.You can view information about your NetBackup environment in any of the availableviews. Use the drop-down list on the top-right corner of the OpsCenter console toswitch these views.
Note:Not all viewing modes are available for allMonitor views andManage views.If the viewing modes are available, the drop-down list is displayed.
57Overview of NetBackup OpsCenterAbout OpsCenter console components
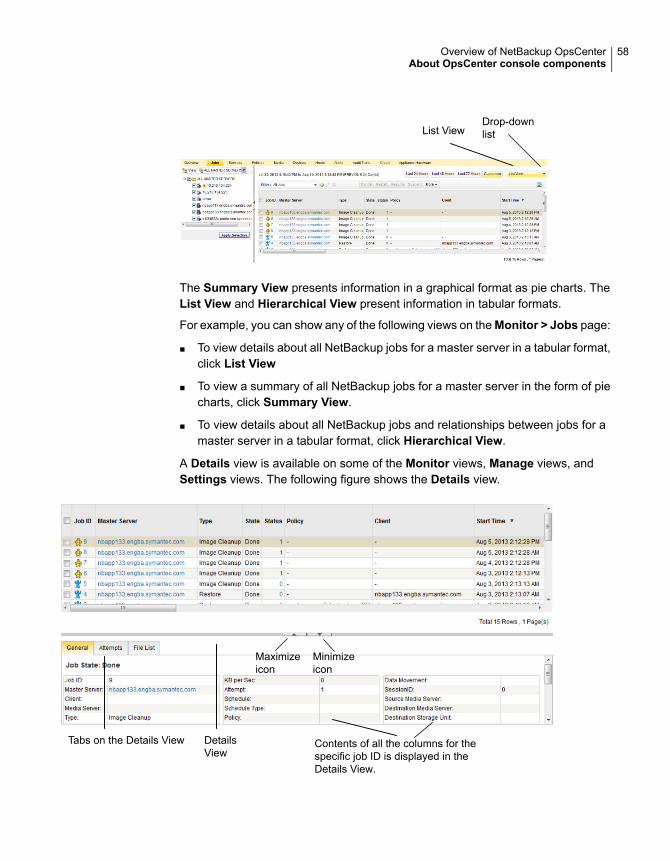
List ViewDrop-downlist
The Summary View presents information in a graphical format as pie charts. TheList View and Hierarchical View present information in tabular formats.
For example, you can show any of the following views on theMonitor > Jobs page:
■ To view details about all NetBackup jobs for a master server in a tabular format,click List View
■ To view a summary of all NetBackup jobs for a master server in the form of piecharts, click Summary View.
■ To view details about all NetBackup jobs and relationships between jobs for amaster server in a tabular format, click Hierarchical View.
A Details view is available on some of the Monitor views, Manage views, andSettings views. The following figure shows the Details view.
Tabs on the Details View DetailsView
Maximizeicon
Minimizeicon
Contents of all the columns for thespecific job ID is displayed in theDetails View.
58Overview of NetBackup OpsCenterAbout OpsCenter console components
The Details view presents detailed information about an entity and shows contentsof all the tabular columns for the specific entity. The view presents details on thedisplayed information and on the available information for the specific entity. Forexample, the Details view on the Monitor > Jobs page (List View) shows detailedinformation about a specific job ID. Information in the Details view can be viewedfrom tabs available in the view.
To change the Details view
1 To minimize the Details view, click the icon (the down arrow) between theDetails view and the upper part of the Content pane.
2 To maximize theDetails view, click the icon (the up arrow) between theDetailsview and the upper part of the Content pane.
The minimize or maximize settings are applicable only for the current session.
3 To resize the Details view, drag the line separating the upper part of theContent pane and Details view.
About the OpsCenter status barThe status bar at the bottom of the OpsCenter console shows a Page generatedvalue. The Page generated value shows the date and time on the OpsCenter serverto which you logged on. The date and time are adjusted to match your time zone.This value updates when the view changes or refreshes.
More information on how to specify your time zone is available.
See “Setting user preferences” on page 209.
Status icons and colors in the consoleTo help you understand the information it presents, OpsCenter uses status iconsand color. Tool tips provide brief descriptions of the tool and the status icons thatappear in OpsCenter views. A tool tip appears when you place the mouse over anicon.
When OpsCenter detects a condition for a managed NetBackup server, job, drive,or drive path, you see a status icon. The icons use colors to represent critical,warning, or informational conditions. Together, the icons and colors let you quicklydetermine the status of a particular area in your NetBackup environment. Forexample, the Monitor > Jobs view contains green icons for running jobs.
Unique icons appear in the drive details view for shared drives available with theNetBackup Shared Storage Option (SSO). These icons represent the shared drivesthat are operating on all servers that share the drive. Icons also appear for shared
59Overview of NetBackup OpsCenterAbout OpsCenter console components

drives where the drive status is mixed (operating on some servers and not operatingon other servers that share the drive).
Table 1-7 lists the icons that are used for managed NetBackup master servers inthe View pane.
Table 1-7 Icons used for managed NetBackup master servers
DescriptionIcon
A blue server icon with a green upward arrow means that themaster server is connected.
A blue server icon with a red downward arrow means that theconnection to the master server is lost. OpsCenter tries to connectagain after 10 minutes.
A gray server icon with a line means that data collection for themaster server was disabled by the user.
A gray server icon with a red cross means that the master serveris retired.
A gray server icon with blue question mark means that the masterserver state is unknown.
A blue server icon with a green upward arrow means that theNetBackup Appliance master server is connected.
A blue server icon with a red downward arrow means that theconnection to the NetBackup Appliance master server is lost.OpsCenter tries to connect again after 10 minutes.
A gray server icon with a line means that data collection for theNetBackup Appliance master server was disabled by the user.
A gray server icon with a red cross means that the NetBackupAppliance master server is retired.
A gray server icon with blue question mark means that theNetBackup Appliance master server state is unknown.
OpsCenter uses the following colors in the interface:
■ Red indicates a critical condition that may cause the system to be unable toperform an important function. Investigate critical conditions immediately.
■ Green indicates a normal condition, result, or operation.
60Overview of NetBackup OpsCenterAbout OpsCenter console components

■ Blue-gray generally indicate conditions such as enabled or assigned, while grayindicates conditions such as disabled or unassigned.
About using tablesOpsCenter collects information about aspects of your NetBackup environment andpresents much of this information in tables. This section describes how to changethe tables to display the information you want to see. The following is a sampletable showing task icons.
Figure 1-6 shows the task options for tables.
Figure 1-6 Sample screen with task options for tables
Table page controls
Table Settings iconCreate, Edit, andDelete filter icons
Customizing tables for your needsYou can customize the tables in the following manner.
You can perform the following operations to a table:
See “Specifying which columns appear in atable” on page 62.
Add or remove columns
See “Moving a column” on page 62.Rearrange the order of the columns for yourindividual requirements
61Overview of NetBackup OpsCenterAbout OpsCenter console components
See “Choosing the number of table rows thatappear per page” on page 63.
Choose the number of rows and columns todisplay
See “Sorting the contents of a table column”on page 63.
Sort columns in ascending or descendingorder
See “Changing the width of a column”on page 63.
Change the widths of columns
See “Accessing multiple pages of data in atable” on page 63.
Configure pagination
See “Selecting rows in tables” on page 64.Select rows in tables
The table refreshes after the operation and shows the changes you made.
For these operations, OpsCenter saves and reloads your customized settings whenyou log on to the OpsCenter server again. Each user can have different customizedtable settings.
Specifying which columns appear in a tableUse the following procedure to specify which columns appear in a table.
To specify which columns appear in a table
1 Click the Change Table Settings icon at the top-right corner of the table.
2 Initially, some OpsCenter tables do not show all available columns. To viewany of these columns, you may first have to remove one or more columns fromthe table and then add the missing columns.
To remove columns you do not want to appear, select the column in SelectedColumns and click Remove.
To add any columns that currently do not appear, select the column in theAvailable Columns list and click Add. Added columns appear as the lastcolumn in the table.
Moving a columnUse the following procedure to move columns in a table.
To move a column
1 Click the Change Table Settings icon at the top of the table.
2 Select the name of the column in Selected Columns.
3 Click Move Up to move the column to the left in the table.
Click Move Down to move the column to the right in the table.
62Overview of NetBackup OpsCenterAbout OpsCenter console components
Choosing the number of table rows that appear per pageUse the following procedure to choose the number of table rows that appear perpage.
To choose the number of table rows that appear per page
1 Click the Change Table Settings icon at the top of the table.
2 Select a number from the Rows Per Page drop-down list .
3 Select Apply To All Tables if you want the Rows Per Page setting to applyto all tables in OpsCenter. The setting applies to reports also.
Sorting the contents of a table columnUse the following procedure to sort the contents of a column or multiple columns.
To sort the contents of a column or multiple columns
◆ In a table, click the column name. The column sorts in ascending order bydefault.
To sort in descending order, click the column name again.
Changing the width of a columnUse the following procedure to change the width of a column.
To change the width of a column
1 Select the edge of the column heading and hold down the left mouse option.
2 Drag the edge of the column heading to the right or left.
Accessing multiple pages of data in a tableMuch of the monitoring information appears in a table format. OpsCenter tablesdisplay 10 rows at one time by default. To change the number of rows that aredisplayed, use the Change Table Settings icon.
When you have more data to display than can fit in a table, the table containsmultiple pages. Use the table page controls that are located below the table to helpyou navigate the pages.
To display the next 10 rows or to return to a previous set of rows in large tables,use the table page controls.
To access a specific page in a table
◆ Click the page number.
To access the previous or the next page in a table
◆ Click the left arrow or the right arrow.
63Overview of NetBackup OpsCenterAbout OpsCenter console components
To access the first or the last page in a table
◆ Click the double left arrow or the double right arrow.
Selecting rows in tablesFor many tables in OpsCenter, you must select a row or rows to enable the tasks.
To select a row in a table
◆ Click the check box for that row. Click the check box again to deselect theselected row.
To select all rows on the current page of the table
◆ Click the check box in the header row of the table. Click the check box againto deselect all selected rows.
Creating, applying, editing, and removing custom viewfiltersMany tables in OpsCenter let you display a subset of the information available bycreating and using custom filters, or by using the predefined (ready-to-use) filters.A filter screens information that is based on a set of conditions that you define.Once you create a filter, you can save it, edit it, or remove it.
In the views that allow filtering, filtering icons appear above the table.
The following procedures describe how you can create, apply, edit, or remove afilter.
To create a custom filter
1 Select the Create Filter icon.
2 Type a name for the filter in the Name field.
3 For Column, select the column name that you want to filter on from thedrop-down list.
For Operator, select an operator. Use != if you do not want to match a specificvalue.
For Value, enter or select a value.
If you select Start Time or End Time for Column, a calendar icon appears forValue. Click the calendar icon to choose a date and time and then click OK.
4 From the drop-down list, select And or Or to build the filter query.
For Link, click Add to add another clause to the query. If the clause is not whatyou want, click Remove to remove the clause from the query.
64Overview of NetBackup OpsCenterAbout OpsCenter console components
5 To continue building the filter, select another column.
Repeat 3 and 4.
6 Click OK when you finish building the filter. Your new filter is available in thefilter drop-down list.
To apply a filter
◆ From the drop-down list, select a custom filter or a OpsCenter built-in filter.
OpsCenter filters the table according to the criteria you specify. The viewremains in effect until you change it by selecting another filter.
To edit a custom filter
1 From the drop-down list, select a custom filter.
Note: You cannot modify the predefined OpsCenter filters. You can only modifycustom filters.
2 Click the Edit filter icon.
3 See “To create a custom filter” on page 64.
This lists the instructions for using the dialog to edit a filter.
4 Make your changes and click OK.
To remove a custom filter
1 From the drop-down list, select a custom filter.
Note: You cannot delete the predefined filters.
2 Click the Delete filter icon.
3 Click OK to remove the filter.
Common tasks in OpsCenterTable 1-8 lists common tasks and corresponding links to the documentation.
65Overview of NetBackup OpsCenterCommon tasks in OpsCenter

Table 1-8 Quick links to the OpsCenter documentation
Go to this topicTasksOpsCenterfunctions
See “About managing OpsCenter users ”on page 228.
See “Setting user preferences” on page 209.
Create, update, deleteusers
Create, update, delete usergroups
Add, remove users fromuser groups
Assign, remove roles tousers and user groups
UserManagement
See “Adding a master server or appliance inOpsCenter” on page 287.
See “Editing a master server or an appliancemaster server in OpsCenter” on page 295.
See “Deleting a master server or an appliancemaster server in OpsCenter” on page 296.
See “About managing OpsCenter Agents”on page 266.
See “About managing cost analysis andchargeback for OpsCenter Analytics”on page 251.
See “About managing recipients in OpsCenter”on page 244.
See “Configuring SMTP server settings forOpsCenter” on page 218.
Add, update, or deletemaster servers
Add, update, or deleteOpsCenter Agents
Set default currency,SNMP, SMTP server
OpsCenterManagement
See “Activating or deactivating a job policy”on page 358.
See “Controlling NetBackup jobs” on page 337.
See “Controlling media” on page 366.
See “Controlling drives” on page 376.
Change states of theNetBackup entities asfollows:
Policy (Activate ordeactivate)
Job (Stop, start, suspend,or resume)
Media (Assign, freeze,unfreeze)
Drives (Up or down)
NetBackupOperations
66Overview of NetBackup OpsCenterCommon tasks in OpsCenter
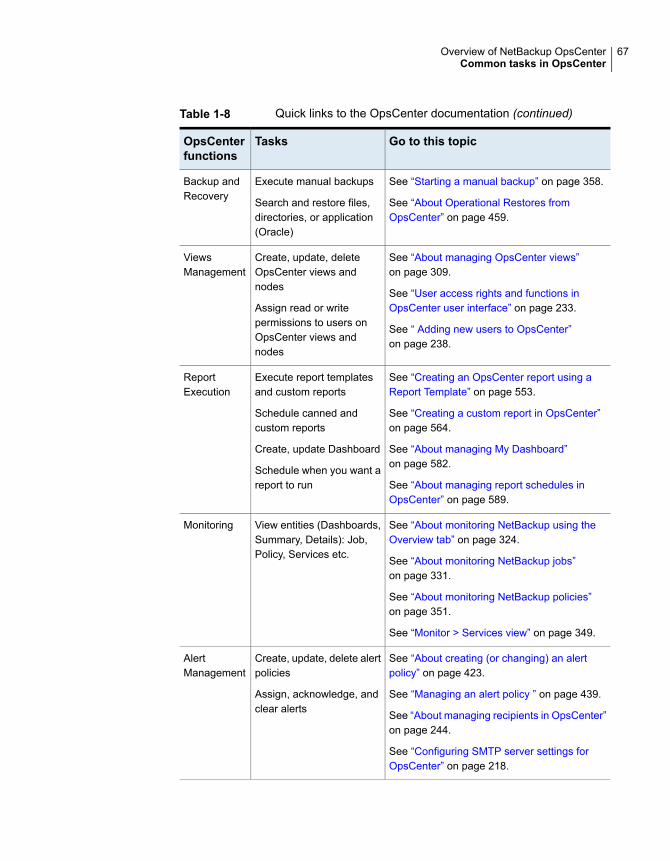
Table 1-8 Quick links to the OpsCenter documentation (continued)
Go to this topicTasksOpsCenterfunctions
See “Starting a manual backup” on page 358.
See “About Operational Restores fromOpsCenter” on page 459.
Execute manual backups
Search and restore files,directories, or application(Oracle)
Backup andRecovery
See “About managing OpsCenter views”on page 309.
See “User access rights and functions inOpsCenter user interface” on page 233.
See “ Adding new users to OpsCenter”on page 238.
Create, update, deleteOpsCenter views andnodes
Assign read or writepermissions to users onOpsCenter views andnodes
ViewsManagement
See “Creating an OpsCenter report using aReport Template” on page 553.
See “Creating a custom report in OpsCenter”on page 564.
See “About managing My Dashboard”on page 582.
See “About managing report schedules inOpsCenter” on page 589.
Execute report templatesand custom reports
Schedule canned andcustom reports
Create, update Dashboard
Schedule when you want areport to run
ReportExecution
See “About monitoring NetBackup using theOverview tab” on page 324.
See “About monitoring NetBackup jobs”on page 331.
See “About monitoring NetBackup policies”on page 351.
See “Monitor > Services view” on page 349.
View entities (Dashboards,Summary, Details): Job,Policy, Services etc.
Monitoring
See “About creating (or changing) an alertpolicy” on page 423.
See “Managing an alert policy ” on page 439.
See “About managing recipients in OpsCenter”on page 244.
See “Configuring SMTP server settings forOpsCenter” on page 218.
Create, update, delete alertpolicies
Assign, acknowledge, andclear alerts
AlertManagement
67Overview of NetBackup OpsCenterCommon tasks in OpsCenter

About using Web browser bookmarksUse your Web browser to add a bookmark for any view in the OpsCenter consoleand return to it as needed.
You can use the bookmark to return to the same view when you log onto the consoleagain.
About OpsCenter documentationNetBackup OpsCenter documentation set comprises the following:
■ The OpsCenter Administrator's Guide (NetBackup_AdminGuide_OpsCenter.pdf)provides information on how to use OpsCenter. It includes information abouthow to monitor and manage NetBackup, collect data from Veritas products,generate alerts, and create various reports. It also provides details on the newenhancements in and also how you can install OpsCenter.The online version of the OpsCenter Administrator's Guide can be found at:http://www.veritas.com/docs/000003387
■ The OpsCenter Reporting Guide (NetBackup_OpsCenter_Reporting.pdf)provides information on all OpsCenter reports. The online version of theOpsCenter OpsCenter Reporting Guide can be found at:http://www.veritas.com/docs/000003387
■ The new OpsCenter Performance and Tuning Guide provides information onhow to tune OpsCenter for improved performance. The online version of theOpsCenter Performance and Tuning Guide can be found at:http://www.veritas.com/docs/000003387
■ Refer to the NetBackup hardware and software compatibility matrix for the latestinformation on the backup products, operating systems, and web browsers thatOpsCenter supports. This document is posted at the following URL:http://www.netbackup.com/compatibility
■ You can find more information about OpsCenter in NetBackup Release Notes.Always refer to the OpsCenter sections of this document for any last-minutechanges to the information that is presented in this document. The ReleaseNotes also include any restrictions or limitations for OpsCenter. The onlineversion of the NetBackup Release Notes can be found at:http://www.veritas.com/docs/000003214
In addition to the PDFs, OpsCenter is also shipped with the following online helpdocuments:
68Overview of NetBackup OpsCenterAbout using Web browser bookmarks
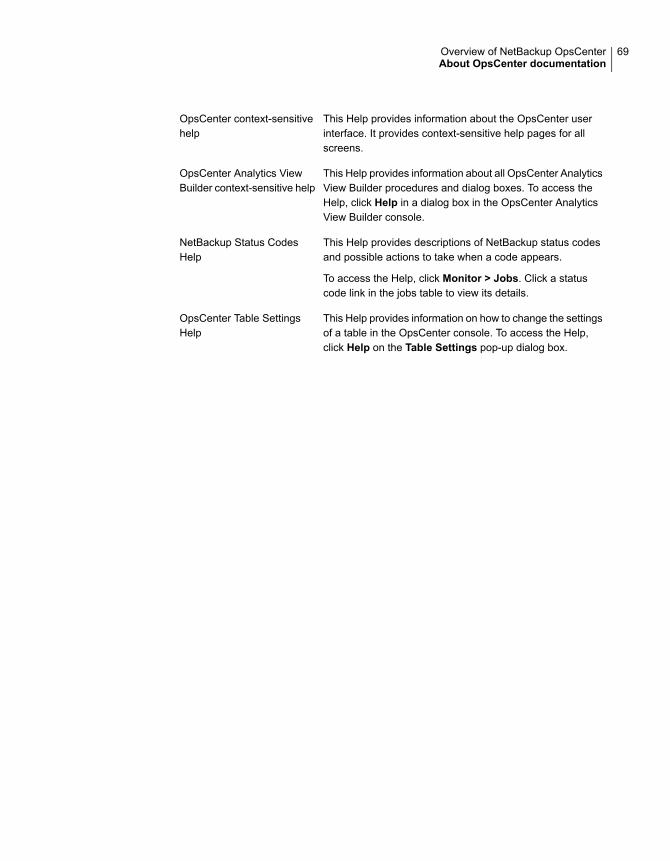
This Help provides information about the OpsCenter userinterface. It provides context-sensitive help pages for allscreens.
OpsCenter context-sensitivehelp
This Help provides information about all OpsCenter AnalyticsView Builder procedures and dialog boxes. To access theHelp, click Help in a dialog box in the OpsCenter AnalyticsView Builder console.
OpsCenter Analytics ViewBuilder context-sensitive help
This Help provides descriptions of NetBackup status codesand possible actions to take when a code appears.
To access the Help, click Monitor > Jobs. Click a statuscode link in the jobs table to view its details.
NetBackup Status CodesHelp
This Help provides information on how to change the settingsof a table in the OpsCenter console. To access the Help,click Help on the Table Settings pop-up dialog box.
OpsCenter Table SettingsHelp
69Overview of NetBackup OpsCenterAbout OpsCenter documentation

Installing OpsCenterThis chapter includes the following topics:
■ About planning an OpsCenter installation
■ Installing OpsCenter on Windows and UNIX
■ About OpsCenter upgrade on Windows and UNIX
■ About files and folders that are protected during OpsCenter upgrade
■ About OpsCenter upgrade failure scenarios
■ About post-installation tasks
■ About uninstalling OpsCenter on Windows and UNIX
■ About clustering OpsCenter
About planning an OpsCenter installationThe following topics provide information on concepts to understand and steps totake before you install or upgrade OpsCenter.
See “Software components that OpsCenter uses” on page 71.
See “About the OpsCenter licensing model” on page 72.
See “ OpsCenter DVDs” on page 75.
See “Managed NetBackup master server considerations” on page 75.
See “About designing your OpsCenter Server” on page 77.
See “Supported upgrade paths in OpsCenter” on page 78.
See “About planning an OpsCenter Agent deployment” on page 79.
See “Preparation for installation or upgrade” on page 82.
2Chapter

For sizing guidelines, refer to the new OpsCenter Performance and Tuning Guideat the following location:
http://www.veritas.com/docs/000003387
Refer to the NetBackup hardware and software compatibility matrix for the latestinformation on the backup products, operating systems, and web browsers thatOpsCenter supports. This document is posted at the following URL:
http://www.netbackup.com/compatibility
Software components that OpsCenter usesAlong with OpsCenter-specific components, OpsCenter uses some Veritascomponents that are shared.
OpsCenter uses the following components that are also shared with other Veritasapplications:
■ Veritas Private Branch Exchange (PBX)PBX lets applications share a common TCP/IP port, which reduces the requirednumber of open ports in firewalls. PBX also integrates with the Veritas ProductAuthentication Service to allow for authenticated connections and non-authenticatedconnections.Because PBX is an independent component, its port number can be changed usingPBX configuration files.
Note: If you change the PBX port number on the OpsCenter server, OpsCentermay fail.
■ JRE (Java Runtime Environment )The Veritas NetBackup OpsCenter Web server and the OpsCenter applicationrequire this component.
Note: The NetBackup Access Control (NBAC) does not need to be configured on yourmanaged NetBackup master servers.
See the NetBackup Security and Encryption Guide for information about NBAC.
Components that are sharedwith other Veritas applications
71Installing OpsCenterAbout planning an OpsCenter installation

OpsCenter uses the following components that are not shared with other Veritasapplications:
■ Apache Tomcat Web serverThe OpsCenter user interface runs under the Apache Tomcat Web server.
■ Veritas Unified Logging (VxUL)VxUL is installed with the OpsCenter Server and the Agent. OpsCenter uses VxULto configure and view logs.See the NetBackup Troubleshooting Guide for more information about VxUL logs.http://www.veritas.com/docs/000003214
■ Sybase databaseOpsCenter uses a Sybase SQL Anywhere database installation that is separatefrom the NetBackup database.More information about the Sybase component is available at the following location:http://www.sybase.com/support/manuals
OpsCenter components
About the OpsCenter licensing modelOpsCenter requires no license. You need a license key to enable OpsCenterAnalytics that provides additional functionality.
The licensed version of OpsCenter is called OpsCenter Analytics. The unlicensedversion of OpsCenter is called Veritas NetBackup OpsCenter. The product nameis visible from the title bar and logon page of the OpsCenter console.
The charges for Veritas NetBackup OpsCenter licenses are based on how manyentities you report on.
For backup environments, the charges are based on the number of backup clients.
OpsCenter Analytics license keysOpsCenter Analytics has two types of license keys:
The demo key is valid for 60 days from the day the key is generated.The demo key lets you try the product before you purchase it.
Demo key
A permanent key does not have an expiry date.
■ NetBackup ENT Capacity key enables all the features ofOpsCenter Analytics like business reporting, etc.
■ GOLD key enables all the features of OpsCenter Analytics.
Permanent key
You can access the licensed features with both demo keys and permanent keys.With OpsCenter Analytics, you can perform advanced reporting and create customreports.
72Installing OpsCenterAbout planning an OpsCenter installation
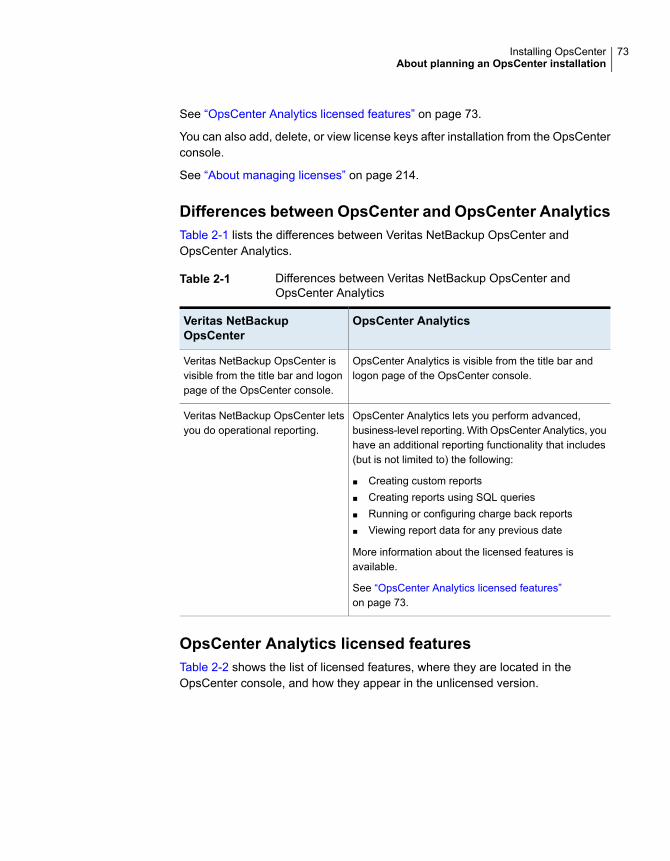
See “OpsCenter Analytics licensed features” on page 73.
You can also add, delete, or view license keys after installation from the OpsCenterconsole.
See “About managing licenses” on page 214.
Differences between OpsCenter and OpsCenter AnalyticsTable 2-1 lists the differences between Veritas NetBackup OpsCenter andOpsCenter Analytics.
Table 2-1 Differences between Veritas NetBackup OpsCenter andOpsCenter Analytics
OpsCenter AnalyticsVeritas NetBackupOpsCenter
OpsCenter Analytics is visible from the title bar andlogon page of the OpsCenter console.
Veritas NetBackup OpsCenter isvisible from the title bar and logonpage of the OpsCenter console.
OpsCenter Analytics lets you perform advanced,business-level reporting. With OpsCenter Analytics, youhave an additional reporting functionality that includes(but is not limited to) the following:
■ Creating custom reports■ Creating reports using SQL queries■ Running or configuring charge back reports■ Viewing report data for any previous date
More information about the licensed features isavailable.
See “OpsCenter Analytics licensed features”on page 73.
Veritas NetBackup OpsCenter letsyou do operational reporting.
OpsCenter Analytics licensed featuresTable 2-2 shows the list of licensed features, where they are located in theOpsCenter console, and how they appear in the unlicensed version.
73Installing OpsCenterAbout planning an OpsCenter installation

Table 2-2 Licensed features in OpsCenter Analytics
Access on the unlicensedVeritas NetBackup OpsCenterconsole
Access on the OpsCenterAnalytics console
Licensed feature
Create a custom report option isdisabled.
Reports > Report Templates >Create a New Report > Create aCustom Report
Reports > My Reports > Create aNew Report > Create a CustomReport
Create a Custom Report
Create a report using SQL queryoption is disabled.
Reports > Report Templates >Create a New Report > Create areport using SQL query
Reports > My Reports > Create aNew Report > Create a report usingSQL query
Create a report using SQL query
Charge back reports are disabled.Report > Report Templates >Charge back Reports
Run or view charge back reports
Charge back settings are disabled.Settings > Charge backControl charge back settings
You cannot view data older than 60days.
Report > Report Templates > CreateNew Report (Relative and AbsoluteTime frame window on the SelectParameters page.)
Reports >My Reports > Create NewReport (Relative and Absolute Timeframe window on the SelectParameters page.)
Report > Report templates (Run areport, click Edit Report and thenRelative and Absolute Time framewindow.)
Reports > My Reports (Run a report,click Edit Report and then Relativeand Absolute Time frame window.)
Full control over report time frameselection. You can view report data forany previous date.
The Reconcile option is disabled.Monitor > Jobs. The Reconcileoption under the More drop-down listis disabled.
Reconcile Task
74Installing OpsCenterAbout planning an OpsCenter installation
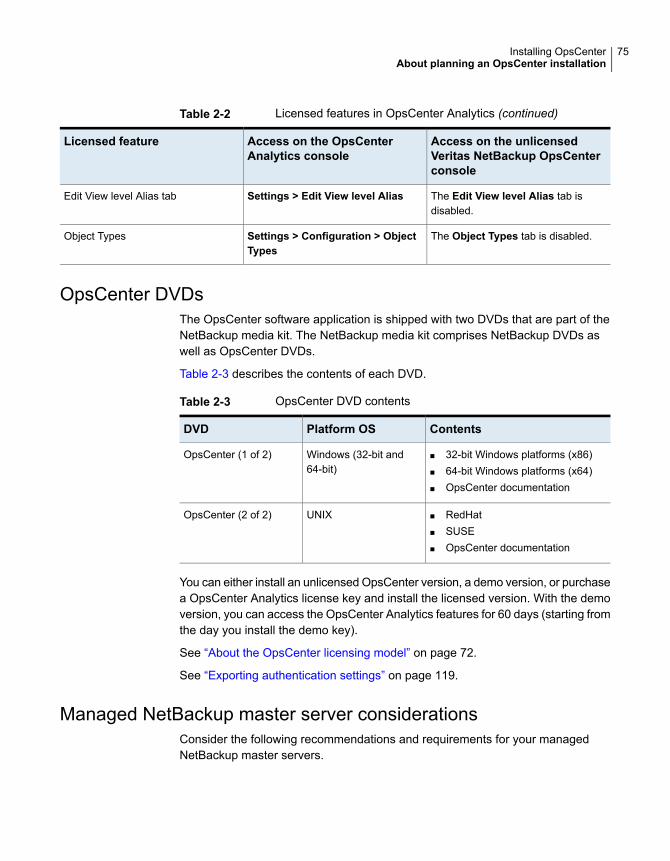
Table 2-2 Licensed features in OpsCenter Analytics (continued)
Access on the unlicensedVeritas NetBackup OpsCenterconsole
Access on the OpsCenterAnalytics console
Licensed feature
The Edit View level Alias tab isdisabled.
Settings > Edit View level AliasEdit View level Alias tab
The Object Types tab is disabled.Settings > Configuration > ObjectTypes
Object Types
OpsCenter DVDsThe OpsCenter software application is shipped with two DVDs that are part of theNetBackup media kit. The NetBackup media kit comprises NetBackup DVDs aswell as OpsCenter DVDs.
Table 2-3 describes the contents of each DVD.
Table 2-3 OpsCenter DVD contents
ContentsPlatform OSDVD
■ 32-bit Windows platforms (x86)■ 64-bit Windows platforms (x64)■ OpsCenter documentation
Windows (32-bit and64-bit)
OpsCenter (1 of 2)
■ RedHat■ SUSE■ OpsCenter documentation
UNIXOpsCenter (2 of 2)
You can either install an unlicensed OpsCenter version, a demo version, or purchasea OpsCenter Analytics license key and install the licensed version. With the demoversion, you can access the OpsCenter Analytics features for 60 days (starting fromthe day you install the demo key).
See “About the OpsCenter licensing model” on page 72.
See “Exporting authentication settings” on page 119.
Managed NetBackup master server considerationsConsider the following recommendations and requirements for your managedNetBackup master servers.
75Installing OpsCenterAbout planning an OpsCenter installation
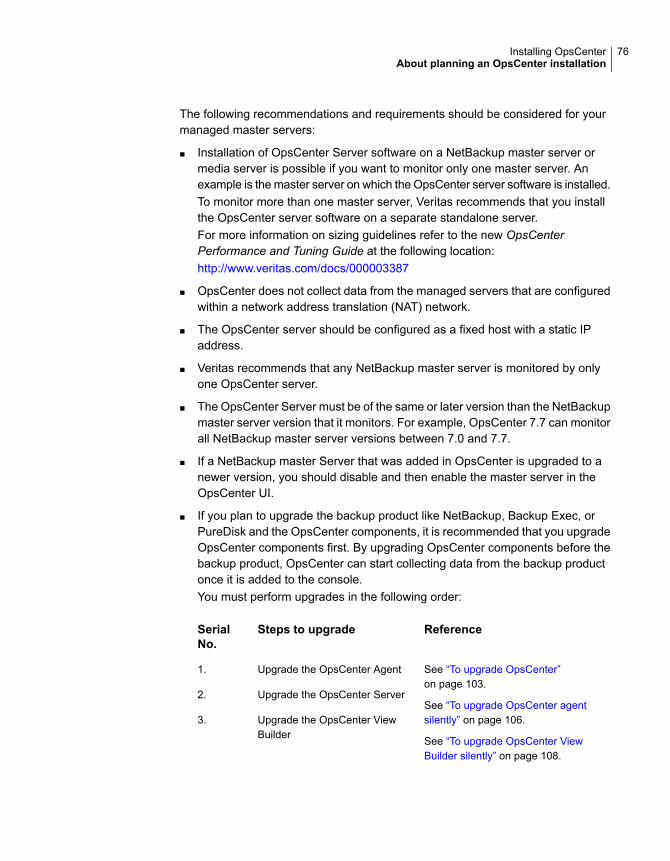
The following recommendations and requirements should be considered for yourmanaged master servers:
■ Installation of OpsCenter Server software on a NetBackup master server ormedia server is possible if you want to monitor only one master server. Anexample is the master server on which the OpsCenter server software is installed.To monitor more than one master server, Veritas recommends that you installthe OpsCenter server software on a separate standalone server.For more information on sizing guidelines refer to the new OpsCenterPerformance and Tuning Guide at the following location:http://www.veritas.com/docs/000003387
■ OpsCenter does not collect data from the managed servers that are configuredwithin a network address translation (NAT) network.
■ The OpsCenter server should be configured as a fixed host with a static IPaddress.
■ Veritas recommends that any NetBackup master server is monitored by onlyone OpsCenter server.
■ The OpsCenter Server must be of the same or later version than the NetBackupmaster server version that it monitors. For example, OpsCenter 7.7 can monitorall NetBackup master server versions between 7.0 and 7.7.
■ If a NetBackup master Server that was added in OpsCenter is upgraded to anewer version, you should disable and then enable the master server in theOpsCenter UI.
■ If you plan to upgrade the backup product like NetBackup, Backup Exec, orPureDisk and the OpsCenter components, it is recommended that you upgradeOpsCenter components first. By upgrading OpsCenter components before thebackup product, OpsCenter can start collecting data from the backup productonce it is added to the console.You must perform upgrades in the following order:
ReferenceSteps to upgradeSerialNo.
See “To upgrade OpsCenter”on page 103.
See “To upgrade OpsCenter agentsilently” on page 106.
See “To upgrade OpsCenter ViewBuilder silently” on page 108.
Upgrade the OpsCenter Agent1.
Upgrade the OpsCenter Server2.
Upgrade the OpsCenter ViewBuilder
3.
76Installing OpsCenterAbout planning an OpsCenter installation
ReferenceSteps to upgradeSerialNo.
Refer to the appropriate productmanuals.
Upgrade the backup product thatyou are using like NetBackup.
4.
The order also holds true if you plan to upgrade only OpsCenter and not thebackup product. Always upgrade the OpsCenter Agent first followed by theServer and the View Builder.
■ OpsCenter can be used to monitor a NetBackup cluster.SeeNetBackup High Availability Administrator's Guide for more details on settingup a NetBackup cluster environment.
More information about adding managed NetBackup master servers in OpsCenteris available.
See “Adding a master server or an appliance master server in the OpsCenterconsole” on page 295.
About using NBSL to collect data from NetBackup masterserversThe OpsCenter Server uses the NetBackup Service Layer (NBSL) to collect mostof the data types from a NetBackup master server.
To collect the data types like capacity and traditional license from NetBackup,OpsCenter uses the bpjava protocol.
Beginning with NetBackup version 6.0, NBSL components are included as a partof NetBackup on master and media servers.
OpsCenter requires NBSL for all NetBackup monitoring, managing, and controlfunctions. OpsCenter is affected if NBSL stops running on a managed NetBackupserver.
If NBSL stops, OpsCenter may not capture any changes that were made to theNetBackup configuration. When NBSL restarts, OpsCenter correctly recaptures thelatest state.
About designing your OpsCenter ServerBefore setting up an OpsCenter Server, review the recommendations andrequirements that are listed in the earlier sections.
See “Managed NetBackup master server considerations” on page 75.
77Installing OpsCenterAbout planning an OpsCenter installation

About the OpsCenter database requirementsThe Sybase database that OpsCenter uses is similar to the database that NetBackupuses. The database is installed as part of the OpsCenter server installation.
Note the following:
■ After you configure OpsCenter, OpsCenter disk space depends on the volumeof data initially loaded on the OpsCenter server from the managed NetBackupservers.The initial data load on the OpsCenter server is in turn dependent on the followingdata present in the managed master servers:
■ Number of policy data records
■ Number of job data records
■ Number of media data records
■ The rate of OpsCenter database growth depends on the quantity of manageddata. This data can be policy data, job data, or media data.
For information on how to adjust database values for better OpsCenter performance,refer to the new OpsCenter Performance and Tuning Guide at the following location:
http://www.veritas.com/docs/000003387
Supported upgrade paths in OpsCenterOpsCenter supports direct upgrades from the following versions:
■ OpsCenter 7.0 to OpsCenter 7.7
■ OpsCenter 7.0.1 to OpsCenter 7.7
■ OpsCenter 7.1 to OpsCenter 7.7
■ OpsCenter 7.1.0.x to OpsCenter 7.7
■ OpsCenter 7.5 to OpsCenter 7.7
■ OpsCenter 7.5.0.x to OpsCenter 7.7
■ OpsCenter 7.6.0.x to OpsCenter 7.7
■ OpsCenter 7.6.1 to OpsCenter 7.7
■ OpsCenter 7.6.1.x to OpsCenter 7.7
Note: If you have NOM or VBR, first upgrade to OpsCenter 7.0 or 7.1 and thenupgrade to 7.7.
78Installing OpsCenterAbout planning an OpsCenter installation
About planning an OpsCenter Agent deploymentBefore deploying an OpsCenter Agent, you must decide if you need an OpsCenterAgent. To make this decision, you must examine the following parameters:
Note: Starting from OpsCenter 7.6.1, you do not need to install OpsCenter Agentto collect NetBackup data. Prior to OpsCenter 7.6.1, OpsCenter required the Agentto collect capacity and traditional licensing data from NetBackup.
See “When do you need an Agent?”on page 79.
Do I need an Agent?
See “Can a single Agent monitor differentproduct versions?” on page 79.
Can a single Agent monitor multiple productversions?
See “Where should I install the Agent?”on page 80.
Should I install the Agent on the product host?
Should I install the Agent on a differentplatform?
See “About the OpsCenter Agent deploymentmatrix” on page 81.
Quickly glance through the Agent deploymentmatrix
When do you need an Agent?You require an OpsCenter Agent to collect data from Backup Exec. You do notneed an OpsCenter Agent to collect data from PureDisk or NetBackup.
You do not require an OpsCenter Agent to collect data from PureDisk.PureDisk
You require OpsCenter Agent to collect data from Backup Exec.Backup Exec
Can a single Agent monitor different product versions?A single Agent can monitor multiple versions of Backup Exec.
Note: PureDisk data collection does not require a separate Agent. You can usethe Integrated Agent of the OpsCenter Server for data collection. To create orconfigure the data collector, select the Agent that is installed as the IntegratedAgent.
See “Configuring PureDisk data collector” on page 300.
79Installing OpsCenterAbout planning an OpsCenter installation
You can use the same Agent to collect data from BackupExec servers with different versions.
Note: To collect data from a Backup Exec server host, youneed to install the Agent on a compatible Windows host.
Backup Exec
Where should I install the Agent?Installing the OpsCenter Agent has an impact on the backup environment. TheOpsCenter Agent must be compatible with the operating system of the backupapplication host.
You can deploy the OpsCenter Agent on any of the following hosts:
The product host is the host where the backup product is installed. Forexample, a product host can be Backup Exec host.
Advantages of installing OpsCenter Agent on a product host are thefollowing:
■ Ease of maintenance for upgrades, because you only service one host.■ Minimal intrusion on backup hosts, because only one agent is installed
on a backup host.
Disadvantages of installing OpsCenter Agent on the product host are thefollowing:
■ The Agent may use significant system resources, which can affect theproduct host’s performance.
Product host
80Installing OpsCenterAbout planning an OpsCenter installation
The OpsCenter Agent can be installed on a host different from the producthost; this is sometimes called a Remote Agent. The different host may bethe OpsCenter Server host or a separate host.
You should deploy a Remote Agent in the following situations:
■ When the OpsCenter Agent is not compatible with the operating systemof the product (such as HP-UX).
■ When the product host system has insufficient resources to supportco-location of the OpsCenter Agent and the backup application.
In such situations, the Agent should remotely communicate with backupproducts.
Advantages of installing OpsCenter Agent on the Server host or a separatehost are the following:
■ You do not have to install additional software on backup applicationhosts, because the backup data is gathered remotely.
■ If you install Agent on the OpsCenter Server host, you need to maintainonly one host for both the OpsCenter Agent and the Server, whichavoids the maintenance that might otherwise be involved in upgradingthe Agent.
Disadvantages of installing OpsCenter Agent on the Server host includethe following:
■ You must install a component of the backup application on theOpsCenter Server host.
■ In some situations, a backup application license key is required for thecomponent that is installed on the OpsCenter Server host.
OpsCenterServer host or aseparate host
Note the following points about installing an OpsCenter Agent:
■ Only one OpsCenter Agent can be installed on any host.
■ A single Agent can be configured for multiple data collectors which collect datafrom the respective product hosts.
About the OpsCenter Agent deployment matrixTable 2-4 compiles Agent-related information for each backup product. The Agentdeployment matrix can help you in deploying the OpsCenter Agent.
81Installing OpsCenterAbout planning an OpsCenter installation
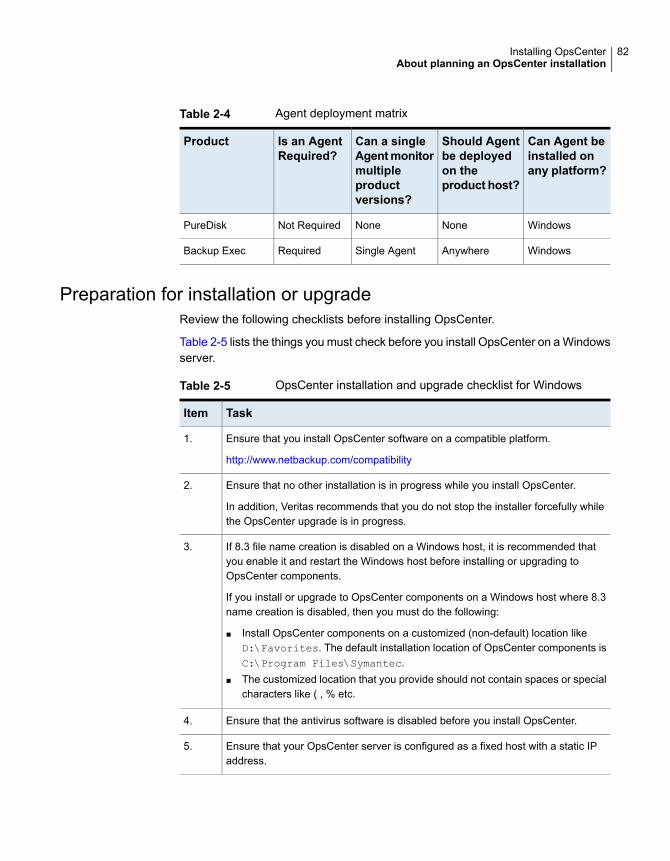
Table 2-4 Agent deployment matrix
Can Agent beinstalled onany platform?
Should Agentbe deployedon theproduct host?
Can a singleAgentmonitormultipleproductversions?
Is an AgentRequired?
Product
WindowsNoneNoneNot RequiredPureDisk
WindowsAnywhereSingle AgentRequiredBackup Exec
Preparation for installation or upgradeReview the following checklists before installing OpsCenter.
Table 2-5 lists the things you must check before you install OpsCenter on a Windowsserver.
Table 2-5 OpsCenter installation and upgrade checklist for Windows
TaskItem
Ensure that you install OpsCenter software on a compatible platform.
http://www.netbackup.com/compatibility
1.
Ensure that no other installation is in progress while you install OpsCenter.
In addition, Veritas recommends that you do not stop the installer forcefully whilethe OpsCenter upgrade is in progress.
2.
If 8.3 file name creation is disabled on a Windows host, it is recommended thatyou enable it and restart the Windows host before installing or upgrading toOpsCenter components.
If you install or upgrade to OpsCenter components on a Windows host where 8.3name creation is disabled, then you must do the following:
■ Install OpsCenter components on a customized (non-default) location likeD:\Favorites. The default installation location of OpsCenter components isC:\Program Files\Symantec.
■ The customized location that you provide should not contain spaces or specialcharacters like ( , % etc.
3.
Ensure that the antivirus software is disabled before you install OpsCenter.4.
Ensure that your OpsCenter server is configured as a fixed host with a static IPaddress.
5.
82Installing OpsCenterAbout planning an OpsCenter installation
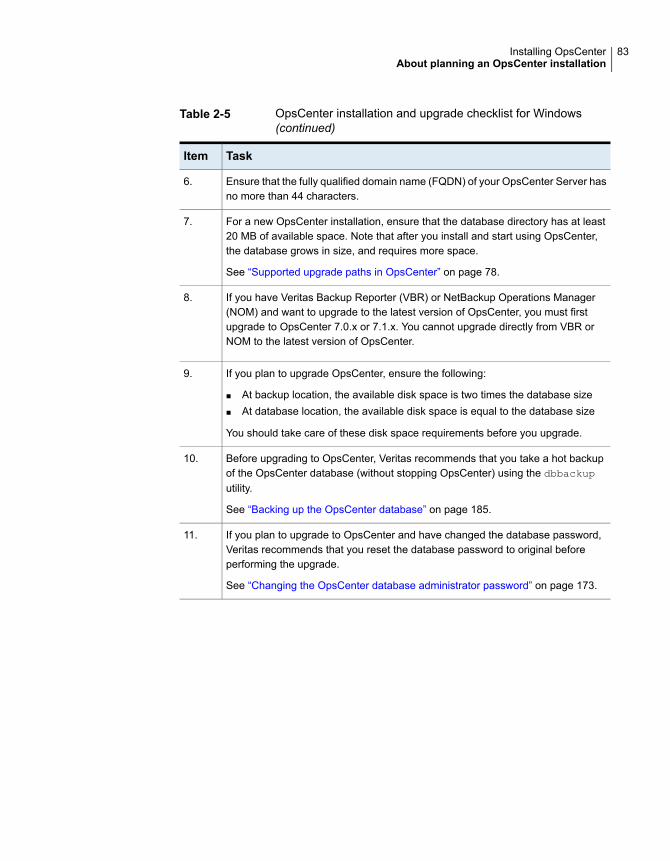
Table 2-5 OpsCenter installation and upgrade checklist for Windows(continued)
TaskItem
Ensure that the fully qualified domain name (FQDN) of your OpsCenter Server hasno more than 44 characters.
6.
For a new OpsCenter installation, ensure that the database directory has at least20 MB of available space. Note that after you install and start using OpsCenter,the database grows in size, and requires more space.
See “Supported upgrade paths in OpsCenter” on page 78.
7.
If you have Veritas Backup Reporter (VBR) or NetBackup Operations Manager(NOM) and want to upgrade to the latest version of OpsCenter, you must firstupgrade to OpsCenter 7.0.x or 7.1.x. You cannot upgrade directly from VBR orNOM to the latest version of OpsCenter.
8.
If you plan to upgrade OpsCenter, ensure the following:
■ At backup location, the available disk space is two times the database size■ At database location, the available disk space is equal to the database size
You should take care of these disk space requirements before you upgrade.
9.
Before upgrading to OpsCenter, Veritas recommends that you take a hot backupof the OpsCenter database (without stopping OpsCenter) using the dbbackuputility.
See “Backing up the OpsCenter database” on page 185.
10.
If you plan to upgrade to OpsCenter and have changed the database password,Veritas recommends that you reset the database password to original beforeperforming the upgrade.
See “Changing the OpsCenter database administrator password” on page 173.
11.
83Installing OpsCenterAbout planning an OpsCenter installation

Table 2-5 OpsCenter installation and upgrade checklist for Windows(continued)
TaskItem
If you plan to upgrade both the backup product like NetBackup, Backup Exec, orPureDisk and the OpsCenter components, it is recommended that you upgradeOpsCenter components first. By upgrading OpsCenter components before thebackup product, OpsCenter can start collecting data from the backup product onceit is added to the console.
You must perform upgrades in the following order:
■ Upgrade the OpsCenter Agent (in case of Backup Exec)■ Upgrade the OpsCenter Server■ Upgrade the OpsCenter View Builder■ Upgrade the backup product that you are using like NetBackup.
The above order also holds true if you plan to upgrade only OpsCenter and notthe backup product. Always upgrade the OpsCenter Agent first followed by theServer and the View Builder.
12.
If you plan to upgrade OpsCenter and have installed the OpsCenter database ona custom location, ensure that the free space on the drive where OS is installed isequal to or more than size of the current OpsCenter database.
In case free space on the drive where OS is installed is less than size of the currentOpsCenter database, use the following procedure before you upgrade:
1 Create a directory (say temp) where the OpsCenter database is installed:<OpsCenterDatabaseCustomLocation>\temp.
2 From My Computer > Properties > Advanced > Environment Variables,create a new system variable with variable name SATMP and value as:<OpsCenterDatabaseCustomLocation>\temp.
3 Run the OpsCenter installer.
4 After successful upgrade, delete the environment variable SATMP and thedirectory temp from <OpsCenterDatabaseCustomLocation>.
13.
Ensure that the necessary ports are opened before you install OpsCenter on ahardened server.
See “About communication and firewall considerations” on page 190.
14.
Ensure that the name of the folder in which you install OpsCenter does not containany special characters such as %, ~, !, @, $, &, ^, or #.
15.
If a file called program exists in the C: folder of your OpsCenter Server, renameor delete the file before you install OpsCenter.
16.
84Installing OpsCenterAbout planning an OpsCenter installation
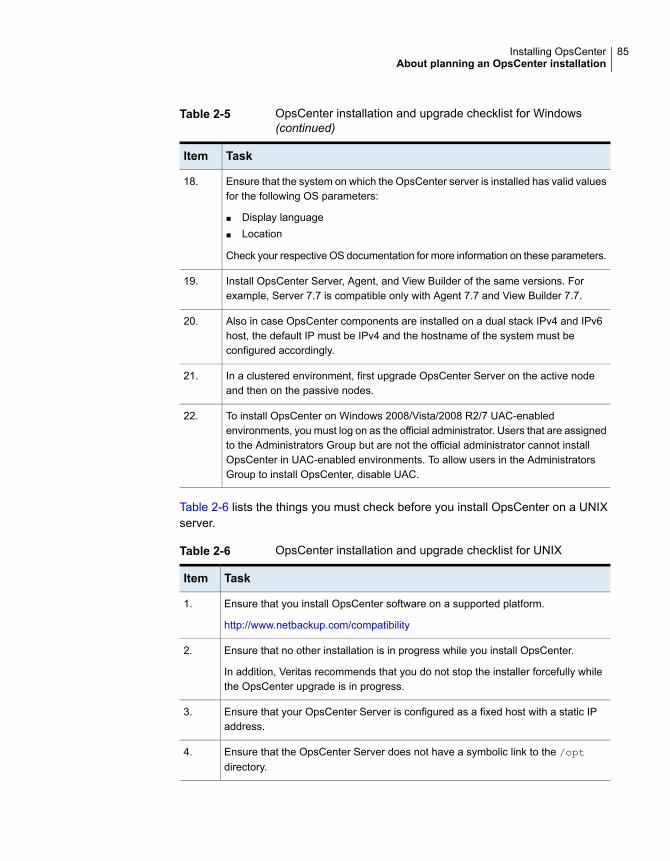
Table 2-5 OpsCenter installation and upgrade checklist for Windows(continued)
TaskItem
Ensure that the system on which the OpsCenter server is installed has valid valuesfor the following OS parameters:
■ Display language■ Location
Check your respective OS documentation for more information on these parameters.
18.
Install OpsCenter Server, Agent, and View Builder of the same versions. Forexample, Server 7.7 is compatible only with Agent 7.7 and View Builder 7.7.
19.
Also in case OpsCenter components are installed on a dual stack IPv4 and IPv6host, the default IP must be IPv4 and the hostname of the system must beconfigured accordingly.
20.
In a clustered environment, first upgrade OpsCenter Server on the active nodeand then on the passive nodes.
21.
To install OpsCenter on Windows 2008/Vista/2008 R2/7 UAC-enabledenvironments, you must log on as the official administrator. Users that are assignedto the Administrators Group but are not the official administrator cannot installOpsCenter in UAC-enabled environments. To allow users in the AdministratorsGroup to install OpsCenter, disable UAC.
22.
Table 2-6 lists the things you must check before you install OpsCenter on a UNIXserver.
Table 2-6 OpsCenter installation and upgrade checklist for UNIX
TaskItem
Ensure that you install OpsCenter software on a supported platform.
http://www.netbackup.com/compatibility
1.
Ensure that no other installation is in progress while you install OpsCenter.
In addition, Veritas recommends that you do not stop the installer forcefully whilethe OpsCenter upgrade is in progress.
2.
Ensure that your OpsCenter Server is configured as a fixed host with a static IPaddress.
3.
Ensure that the OpsCenter Server does not have a symbolic link to the /optdirectory.
4.
85Installing OpsCenterAbout planning an OpsCenter installation
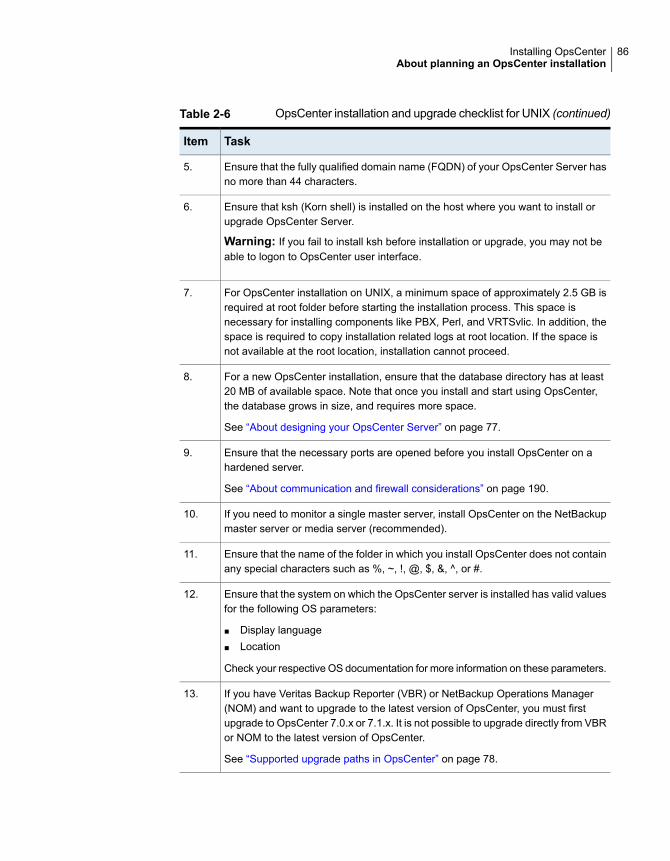
Table 2-6 OpsCenter installation and upgrade checklist for UNIX (continued)
TaskItem
Ensure that the fully qualified domain name (FQDN) of your OpsCenter Server hasno more than 44 characters.
5.
Ensure that ksh (Korn shell) is installed on the host where you want to install orupgrade OpsCenter Server.
Warning: If you fail to install ksh before installation or upgrade, you may not beable to logon to OpsCenter user interface.
6.
For OpsCenter installation on UNIX, a minimum space of approximately 2.5 GB isrequired at root folder before starting the installation process. This space isnecessary for installing components like PBX, Perl, and VRTSvlic. In addition, thespace is required to copy installation related logs at root location. If the space isnot available at the root location, installation cannot proceed.
7.
For a new OpsCenter installation, ensure that the database directory has at least20 MB of available space. Note that once you install and start using OpsCenter,the database grows in size, and requires more space.
See “About designing your OpsCenter Server” on page 77.
8.
Ensure that the necessary ports are opened before you install OpsCenter on ahardened server.
See “About communication and firewall considerations” on page 190.
9.
If you need to monitor a single master server, install OpsCenter on the NetBackupmaster server or media server (recommended).
10.
Ensure that the name of the folder in which you install OpsCenter does not containany special characters such as %, ~, !, @, $, &, ^, or #.
11.
Ensure that the system on which the OpsCenter server is installed has valid valuesfor the following OS parameters:
■ Display language■ Location
Check your respective OS documentation for more information on these parameters.
12.
If you have Veritas Backup Reporter (VBR) or NetBackup Operations Manager(NOM) and want to upgrade to the latest version of OpsCenter, you must firstupgrade to OpsCenter 7.0.x or 7.1.x. It is not possible to upgrade directly from VBRor NOM to the latest version of OpsCenter.
See “Supported upgrade paths in OpsCenter” on page 78.
13.
86Installing OpsCenterAbout planning an OpsCenter installation
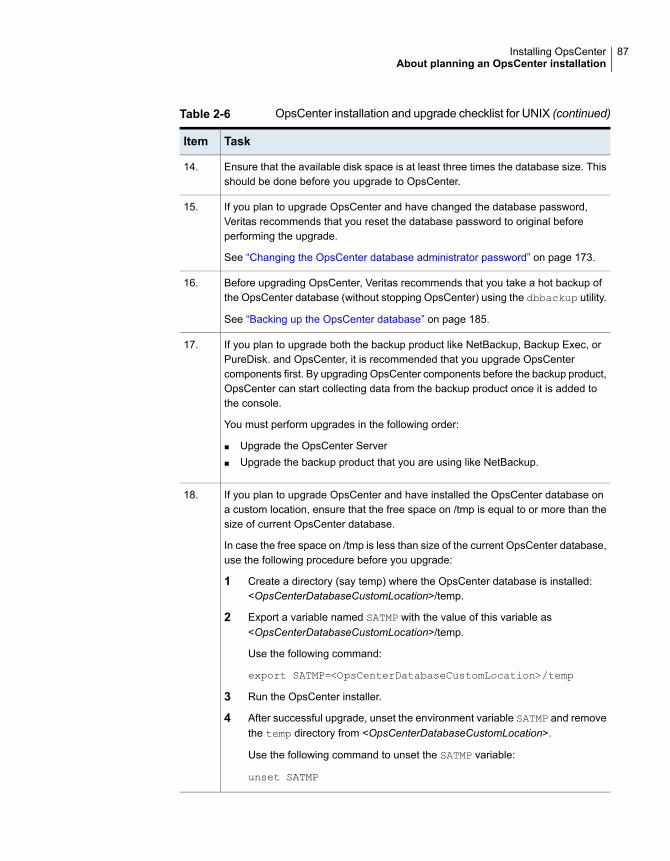
Table 2-6 OpsCenter installation and upgrade checklist for UNIX (continued)
TaskItem
Ensure that the available disk space is at least three times the database size. Thisshould be done before you upgrade to OpsCenter.
14.
If you plan to upgrade OpsCenter and have changed the database password,Veritas recommends that you reset the database password to original beforeperforming the upgrade.
See “Changing the OpsCenter database administrator password” on page 173.
15.
Before upgrading OpsCenter, Veritas recommends that you take a hot backup ofthe OpsCenter database (without stopping OpsCenter) using the dbbackup utility.
See “Backing up the OpsCenter database” on page 185.
16.
If you plan to upgrade both the backup product like NetBackup, Backup Exec, orPureDisk. and OpsCenter, it is recommended that you upgrade OpsCentercomponents first. By upgrading OpsCenter components before the backup product,OpsCenter can start collecting data from the backup product once it is added tothe console.
You must perform upgrades in the following order:
■ Upgrade the OpsCenter Server■ Upgrade the backup product that you are using like NetBackup.
17.
If you plan to upgrade OpsCenter and have installed the OpsCenter database ona custom location, ensure that the free space on /tmp is equal to or more than thesize of current OpsCenter database.
In case the free space on /tmp is less than size of the current OpsCenter database,use the following procedure before you upgrade:
1 Create a directory (say temp) where the OpsCenter database is installed:<OpsCenterDatabaseCustomLocation>/temp.
2 Export a variable named SATMP with the value of this variable as<OpsCenterDatabaseCustomLocation>/temp.
Use the following command:
export SATMP=<OpsCenterDatabaseCustomLocation>/temp
3 Run the OpsCenter installer.
4 After successful upgrade, unset the environment variable SATMP and removethe temp directory from <OpsCenterDatabaseCustomLocation>.
Use the following command to unset the SATMP variable:
unset SATMP
18.
87Installing OpsCenterAbout planning an OpsCenter installation
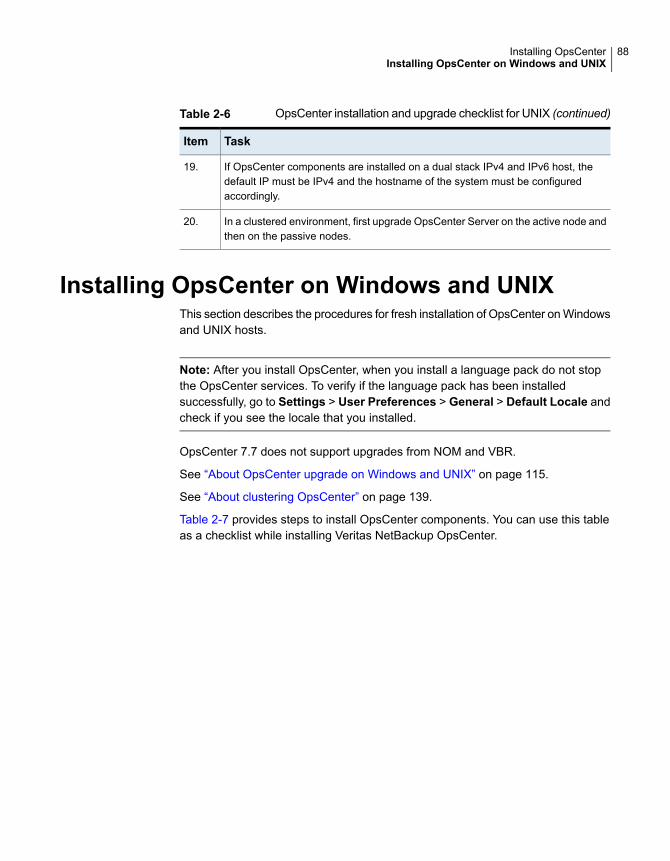
Table 2-6 OpsCenter installation and upgrade checklist for UNIX (continued)
TaskItem
If OpsCenter components are installed on a dual stack IPv4 and IPv6 host, thedefault IP must be IPv4 and the hostname of the system must be configuredaccordingly.
19.
In a clustered environment, first upgrade OpsCenter Server on the active node andthen on the passive nodes.
20.
Installing OpsCenter on Windows and UNIXThis section describes the procedures for fresh installation of OpsCenter on Windowsand UNIX hosts.
Note: After you install OpsCenter, when you install a language pack do not stopthe OpsCenter services. To verify if the language pack has been installedsuccessfully, go to Settings > User Preferences > General > Default Locale andcheck if you see the locale that you installed.
OpsCenter 7.7 does not support upgrades from NOM and VBR.
See “About OpsCenter upgrade on Windows and UNIX” on page 115.
See “About clustering OpsCenter” on page 139.
Table 2-7 provides steps to install OpsCenter components. You can use this tableas a checklist while installing Veritas NetBackup OpsCenter.
88Installing OpsCenterInstalling OpsCenter on Windows and UNIX

Table 2-7 Steps to install, upgrade, and cluster Veritas NetBackupOpsCenter
Reference topicStepStep number
■ See “About planning an OpsCenter installation”on page 70.
■ http://www.netbackup.com/compatibility■ See “About communication and firewall considerations”
on page 190.■ See “About planning an OpsCenter Agent deployment”
on page 79.■ See “Preparation for installation or upgrade” on page 82.
■ Review the hardwarerequirements and softwarerequirements for OpsCenterServer and Agent hosts,carefully.
■ Make sure that you satisfy theoperating systemrequirements.
■ Go through the firewallsettings and port numberinformation.
■ Go through the Agentdeployment section.
■ Review the Install/Upgradechecklists before installingOpsCenter.
1
See “About installing OpsCenter on Windows” on page 89.
See “About installing OpsCenter on UNIX” on page 94.
See “About OpsCenter upgrade on Windows and UNIX”on page 115.
See “About clustering OpsCenter” on page 139.
Go through the appropriateinstallation section.
Different sections are availablefor fresh installation, upgrade, andclustering.
Note: After installation, verify ifOpsCenter is running properly.
2
About installing OpsCenter on WindowsUse the Installation Wizard to install OpsCenter on a Windows host. The twoOpsCenter DVDs contain OpsCenter software for all available platforms.
Review the following considerations before installing OpsCenter components onWindows:
■ Veritas recommends that you enable 8.3 file name creation before installingOpsCenter components. If 8.3 file name creation is disabled, enable it and restartthe Windows host before installing or upgrading to OpsCenter components.
■ You must not run any other installation while installing OpsCenter components.Additionally after an installation is complete, you should wait for some timebefore installing other OpsCenter components.
89Installing OpsCenterInstalling OpsCenter on Windows and UNIX
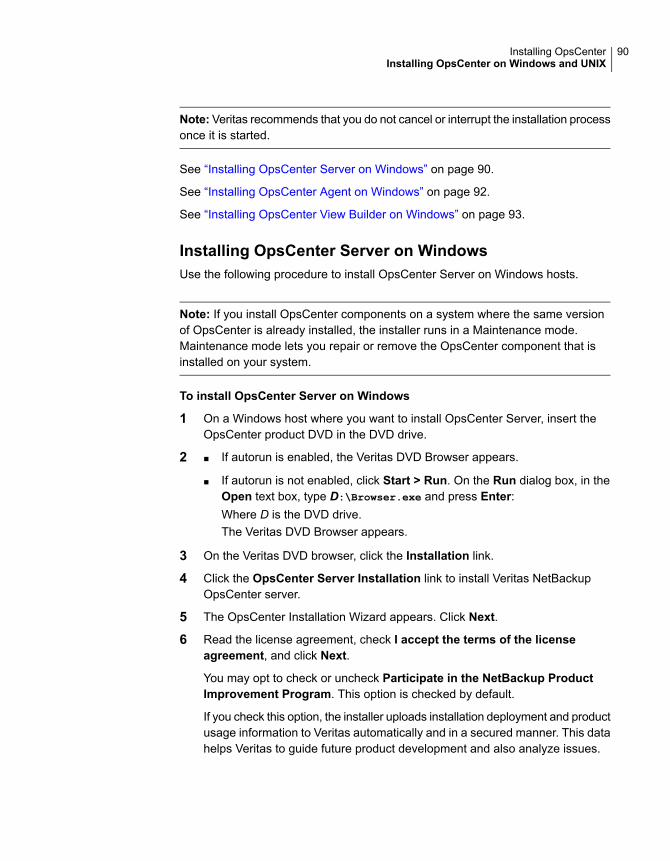
Note: Veritas recommends that you do not cancel or interrupt the installation processonce it is started.
See “Installing OpsCenter Server on Windows” on page 90.
See “Installing OpsCenter Agent on Windows” on page 92.
See “Installing OpsCenter View Builder on Windows” on page 93.
Installing OpsCenter Server on WindowsUse the following procedure to install OpsCenter Server on Windows hosts.
Note: If you install OpsCenter components on a system where the same versionof OpsCenter is already installed, the installer runs in a Maintenance mode.Maintenance mode lets you repair or remove the OpsCenter component that isinstalled on your system.
To install OpsCenter Server on Windows
1 On a Windows host where you want to install OpsCenter Server, insert theOpsCenter product DVD in the DVD drive.
2 If autorun is enabled, the Veritas DVD Browser appears.■
■ If autorun is not enabled, click Start > Run. On the Run dialog box, in theOpen text box, type D:\Browser.exe and press Enter:Where D is the DVD drive.The Veritas DVD Browser appears.
3 On the Veritas DVD browser, click the Installation link.
4 Click the OpsCenter Server Installation link to install Veritas NetBackupOpsCenter server.
5 The OpsCenter Installation Wizard appears. Click Next.
6 Read the license agreement, check I accept the terms of the licenseagreement, and click Next.
You may opt to check or uncheck Participate in the NetBackup ProductImprovement Program. This option is checked by default.
If you check this option, the installer uploads installation deployment and productusage information to Veritas automatically and in a secured manner. This datahelps Veritas to guide future product development and also analyze issues.
90Installing OpsCenterInstalling OpsCenter on Windows and UNIX

7 The following options are displayed on the Installation Choice screen:
Select this option to install OpsCenter Server on thishost.
Install to this computer only
Select this option to install OpsCenter Server on allselected nodes, in a clustered mode. You need to installOpsCenter Server manually on each node of thecluster.
This option is enabled if you have Cluster Serverinstalled.
See “Clustering OpsCenter on Windows” on page 143.
Install a clusteredOpsCenter Server
Select Install to this computer only.
In the Installation Method section, click Typical to use the default settings,installation location, or port numbers. Compare the space that the installationrequires with the actual space available in the installation directory.
Click Custom if you want to change the default settings, locations, or portnumbers.
Click Next.
8 On the License Keys panel, enter your demo or permanent key that you havereceived with the purchase of OpsCenter and click Add Key.
See “OpsCenter Analytics license keys” on page 72.
You can also add the license keys later from the OpsCenter console.
See “About managing licenses” on page 214.
9 Click Next. The installer shows the summary of the settings that you haveselected for installation.
Check Save Summary to field to save the installation summary. ClickBrowseto save the installation summary in your preferred location.
10 Click Install.
The installer starts installing the OpsCenter Server software.
Note: The default OpsCenter database location on Windows is:
C:\Program Files\Symantec\OpsCenter\server\db\data
91Installing OpsCenterInstalling OpsCenter on Windows and UNIX

11 After successful installation, you can view the OpsCenter console or viewinstallation logs.
The installation logs are generated in the followinglocation:%ALLUSERSPROFILE%\Symantec\OpsCenter\INSTALLLOGS\OpsCenterServerInstallLog.htm.
If you run the installer in a maintenance modelater,OpsCenterServerMaintenanceInstallLog.htm is also generated in thesame location.
12 Click Finish.
Installing OpsCenter Agent on WindowsUse the following procedure to install OpsCenter Agent on a Windows host.
To install OpsCenter Agent on Windows
1 You can install the OpsCenter Agent either on the OpsCenter Server host,product host, or a separate host. To decide where you want to install theOpsCenter Agent, review the information on Agent deployments.
See “About planning an OpsCenter Agent deployment” on page 79.
2 On a Windows host where you want to install OpsCenter Agent, insert theOpsCenter product DVD in the DVD drive.
3 If autorun is enabled, the Veritas DVD Browser appears.■
■ If autorun is not enabled, click Start > Run. On the Run dialog box, in theOpen text box, type D:\Browser.exe and press Enter:Where D is the DVD drive.The Veritas DVD Browser appears.
4 On the Veritas DVD Browser, click the Installation link.
5 Click the OpsCenter Agent Installation link to install OpsCenter Agent.
6 The OpsCenter Installation Wizard appears. Click Next.
7 Read the license agreement, check I accept the terms of the licenseagreement and click Next.
You may opt to check or uncheck Participate in the NetBackup ProductImprovement Program. This option is checked by default.
If you check this option, the installer uploads installation deployment and productusage information to Veritas automatically and in a secured manner. This datahelps Veritas to guide future product development and also analyze issues.
92Installing OpsCenterInstalling OpsCenter on Windows and UNIX
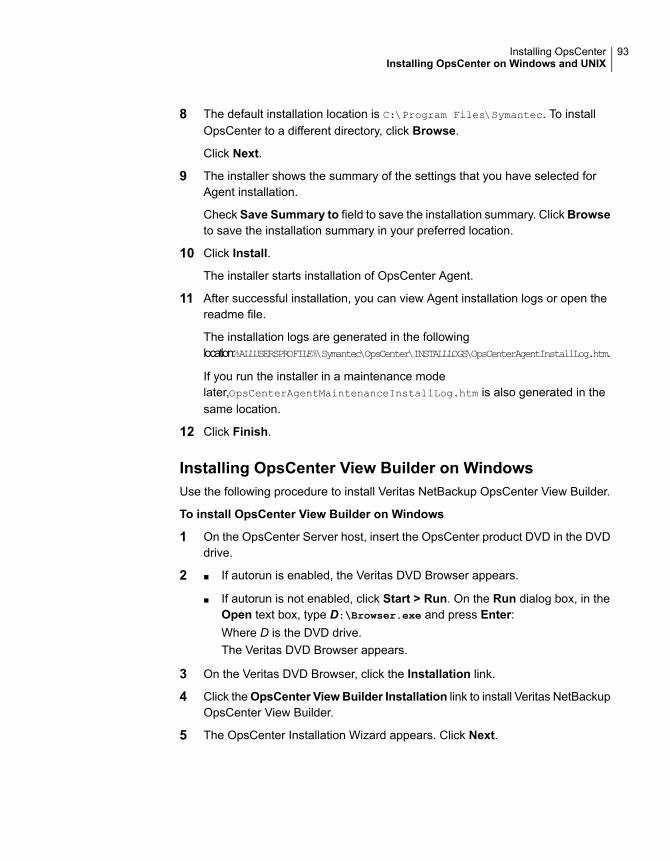
8 The default installation location is C:\Program Files\Symantec. To installOpsCenter to a different directory, click Browse.
Click Next.
9 The installer shows the summary of the settings that you have selected forAgent installation.
Check Save Summary to field to save the installation summary. ClickBrowseto save the installation summary in your preferred location.
10 Click Install.
The installer starts installation of OpsCenter Agent.
11 After successful installation, you can view Agent installation logs or open thereadme file.
The installation logs are generated in the followinglocation:%ALLUSERSPROFILE%\Symantec\OpsCenter\INSTALLLOGS\OpsCenterAgentInstallLog.htm.
If you run the installer in a maintenance modelater,OpsCenterAgentMaintenanceInstallLog.htm is also generated in thesame location.
12 Click Finish.
Installing OpsCenter View Builder on WindowsUse the following procedure to install Veritas NetBackup OpsCenter View Builder.
To install OpsCenter View Builder on Windows
1 On the OpsCenter Server host, insert the OpsCenter product DVD in the DVDdrive.
2 If autorun is enabled, the Veritas DVD Browser appears.■
■ If autorun is not enabled, click Start > Run. On the Run dialog box, in theOpen text box, type D:\Browser.exe and press Enter:Where D is the DVD drive.The Veritas DVD Browser appears.
3 On the Veritas DVD Browser, click the Installation link.
4 Click theOpsCenter ViewBuilder Installation link to install Veritas NetBackupOpsCenter View Builder.
5 The OpsCenter Installation Wizard appears. Click Next.
93Installing OpsCenterInstalling OpsCenter on Windows and UNIX

6 Read the license agreement, check ‘I accept the terms of the licenseagreement’ and click Next.
You may opt to check or uncheck Participate in the NetBackup ProductImprovement Program. This option is checked by default.
If you check this option, the installer uploads installation deployment and productusage information to Veritas automatically and in a secured manner. This datahelps Veritas to guide future product development and also analyze issues.
7 On the Installation Location screen, click Browse if you want to change thedefault location for Veritas NetBackup OpsCenter View Builder installation.
Note: The default installation location on a Windows 64-bit computer isC:\Program Files (x86)\Symantec.
8 Select a new location and click Next.
9 The installer shows the summary of the settings that you have selected forVeritas NetBackup OpsCenter View Builder installation.
Check Save Summary to field to save the installation summary. ClickBrowseto save the installation summary in your preferred location.
10 Click Install.
The installer starts installation of Veritas NetBackup OpsCenter View Builder.
11 After successful installation, you can view the installation logs or open thereadme file.
The installation logs are generated in the followinglocation:%ALLUSERSPROFILE%\Symantec\OpsCenter\INSTALLLOGS\OpsCenterViewBuilderInstallLog.htm.
If you run the installer in a maintenance modelater,OpsCenterViewBuilderMaintenanceInstallLog.htm is also generatedin the same location.
12 Click Finish.
About installing OpsCenter on UNIXThis section provides you with the procedure to install OpsCenter on a UNIX host.
You can install OpsCenter components from the OpsCenter DVD's. Three DVD'sfor OpsCenter are available—one for Windows and two for UNIX. Select theappropriate OpsCenter DVD based on the platform on which you plan to install.
94Installing OpsCenterInstalling OpsCenter on Windows and UNIX

Note: Veritas recommends that you do not cancel or interrupt the installation processonce it is started.
See “Installing Veritas NetBackup OpsCenter Server on UNIX” on page 95.
Installing Veritas NetBackup OpsCenter Server on UNIXUse the following procedure to install OpsCenter Server software on UNIX hosts.
To install OpsCenter Server on UNIX
1 Open a UNIX console and log on as root on the target host.
2 Mount the appropriate OpsCenter product DVD on the computer where youare installing OpsCenter.
3 Type the following command: ./install. Press Enter.
4 The Welcome message is displayed. Press Enter to continue.
5 The installer then checks if OpsCenter Server is installed on the system or not.It prompts you in case OpsCenter Server is already installed. The installer alsoexamines the system for existing packages.
6 The installer displays a list of components that get installed like PBX, AT,OpsCenter Server, OpsCenter GUI etc. Review this list and press Enter tocontinue.
7 The installer prompts you with the following question:
Where do you want to install Veritas OpsCenter? </opt>
Type a directory path where you want to install the OpsCenter Server packagesand press Enter.
To accept the default path (/opt), press Enter without typing a directory path.
8 Type y to confirm the directory path and press Enter.
9 The installer prompts you with the following question:
Participate in the NetBackup Product Improvement Program? [y,n,q] (y)
If you type y and press Enter, the installer uploads installation deployment andproduct usage information to Veritas automatically and in a secured manner.This data helps Veritas to guide future product development and also analyzeissues.
95Installing OpsCenterInstalling OpsCenter on Windows and UNIX

10 OpsCenter Server is installed on the system.
The installer prompts for the following information:
Specify a local directory for the Veritas OpsCenter database.
A directory named 'OpsCenterServer' will be created within the
directory that you specify. (/var/symantec/)
Type a directory path under which to install the OpsCenter database and pressEnter.
If you create an alternate database directory, the script creates the folderOpsCenterServer below your directory.
To accept the default database installation directory (/var/Symantec), pressEnter without typing a directory path.
In case the database installation directory (/var/symantec) does not exist onthe host, the following information is displayed:
Directory "/var/symantec" does not exist. Do
you want to create the directory? [y,n,q] y
Type y to confirm and press Enter.
The following information is displayed:
The OpsCenter database server may require up to
1 GB of temporary space at runtime. By default, temporary files
will be created in the database installation directory
/var/Symantec/OpsCenterServer
11 You are prompted with the following message:
Would you like to use an alternate directory for
database server temporary space? [y,n,q] (n)
To use the database installation directory for database server temporary space,press Enter without typing a directory path.
To specify an alternate directory, type y and press Enter.
Type a directory path for the database server temporary space and pressEnter.
12 Review the installation options you selected. The location of database directoryand the database temp directory is also displayed.
96Installing OpsCenterInstalling OpsCenter on Windows and UNIX
13 Type y and press Enter to confirm the selection and continue.
Type n and press Enter to repeat the configuration steps and revise yourselection.
Configuration changes are made to the system.
14 You are prompted for license information. The installer prompts you with thefollowing:
Please enter a Veritas OpsCenter Analytics license key
or press <Return>:
Enter a valid demo or permanent key that you have received with the purchaseof OpsCenter and press Enter.
If you do not enter a key, you get an unlicensed version. With the unlicensedversion (OpsCenter), you cannot access the licensed features.
See “OpsCenter Analytics license keys” on page 72.
You can also add the license keys later from the OpsCenter console.
See “About managing licenses” on page 214.
About installing OpsCenter silently on WindowsThis section explains how you can install the OpsCenter components silently onWindows platform. It also covers how you can track the progress of silent installationand some troubleshooting tips.
See “Installing OpsCenter Server software silently” on page 97.
See “About editing the response file” on page 110.
See “About tracking the progress of silent installation” on page 112.
Installing OpsCenter Server software silentlyA silent installation avoids the need for interactive input. A silent installation usesa response file to automate OpsCenter installation. Use a silent installation whenyou need to perform an identical installation on several servers.
You must create a response file first and then use the file to perform a silentinstallation. The procedure for creating a response file requires that you run throughthe Installation Wizard. The values that you specify in the Wizard pages are savedto the response file.
You can also edit the response file if required.
See “About editing the response file” on page 110.
97Installing OpsCenterInstalling OpsCenter on Windows and UNIX
Note the following points about silent installation:
■ Silent installation of OpsCenter is only supported on Windows platforms.
■ Silent installation of OpsCenter is not supported on clusters.
To install OpsCenter server software silently
1 Log on as administrator to the system where you want to install OpsCenterserver software.
2 Insert the appropriate OpsCenter product DVD in the DVD drive.
3 Open the command prompt on your system.
Navigate to <DVD Drive>\<Architecture>\Server directory.
4 Enter the following command:
SETUP.EXE -NoInstall
Note that the switch -NoInstall is case-sensitive .
This command starts the Installation Wizard where you can specify yourpreferences. Note that the Installation Wizard creates the response file basedon your inputs and does not install the product.
5 TheWelcome panel of the OpsCenter Installation Wizard appears. ClickNext.
6 Read the license agreement, check I accept the terms of the licenseagreement and click Next.
You may opt to check or uncheck Participate in the NetBackup ProductImprovement Program. This option is checked by default.
If you check this option, the installer uploads installation deployment and productusage information to Veritas automatically and in a secured manner. This datahelps Veritas to guide future product development and also analyze issues.
7 Select Install to this computer only on the Installation Choice panel.
In the Installation Method section, click Typical to use the default settings,installation location, or port numbers. Also compare the space that is requiredby the installation with the actual space available in the installation directory.
Note: Click Custom if you want to change the default settings, locations, orport numbers.
Click Next.
98Installing OpsCenterInstalling OpsCenter on Windows and UNIX
8 On the License Keys panel, enter your demo or permanent key that you havereceived with the purchase of OpsCenter and click Add Key.
If you do not enter a key, you get an unlicensed version. With the unlicensedversion (OpsCenter), you cannot access the licensed features.
See OpsCenter Administrator's Guide for licensing details.
Click Next.
9 The installer shows the summary of the settings that you have selected forinstallation. Check Save Summary to field to save the installation summary.Click Browse to save the installation summary in your preferred location.
Click Install. Note that clicking Install does not install the product.
10 The Installation Status panel is displayed. Click Finish.
11 A response file named Server-<DD-MM-YY-HH-MIN-SS>.XML is created at thefollowing location:
Drive:\windows\temp\Symantec\OpsCenter
For example: C:\windows\temp\Symantec
This XML file can be used to install OpsCenter Server software on multiplecomputers.
12 On the command prompt, ensure that you are in the directory where SETUP.EXE
is located.
13 Enter the following command to run the silent installation:
SETUP -Silent -RespFile <path of the response file>
Example: Setup -Silent -RespFile C:\Server-07-12-09-06-11-31.xml
Note that the switches -Silent and -RespFile are case-sensitive .
14 The installation logs are generated in the following location:
%ALLUSERSPROFILE%\Symantec\OpsCenter\
INSTALLLOGS\OpsCenterServerInstallLog.htm.
If you run the installer in a maintenance modelater,OpsCenterServerMaintenanceInstallLog.htm is also generated in thesame location.
See the following section to track the progress of the installation.
See “About tracking the progress of silent installation” on page 112.
After successful installation, you can see OpsCenter Server in Add/RemovePrograms.
99Installing OpsCenterInstalling OpsCenter on Windows and UNIX

To install OpsCenter Agent silently
1 Log on as administrator to the system where you want to install OpsCenterAgent software.
2 Insert the appropriate OpsCenter product DVD in the DVD drive.
3 Open the command prompt on your system.
Navigate to <DVD Drive>\<Architecture>\Agent directory.
Example: D:\x86\Agent
4 Enter the following command:
SETUP.EXE -NoInstall
Note that the switch -NoInstall is case-sensitive .
This command starts the Installation Wizard where you can specify yourpreferences. Note that the Installation Wizard creates the response file basedon your inputs and does not install the product.
5 The OpsCenter Installation Wizard appears. Click Next.
6 Read the license agreement, check I accept the terms of the licenseagreement and click Next.
You may opt to check or uncheck Participate in the NetBackup ProductImprovement Program. This option is checked by default.
If you check this option, the installer uploads installation deployment and productusage information to automatically and in a secured manner. This data helpsVeritas to guide future product development and also analyze issues.
7 The default installation location is C:\Program Files\Symantec. To installOpsCenter to a different directory, click Browse.
Click Next.
8 The installer shows the summary of the settings that you have selected forAgent installation. Check Save Summary to field to save the installationsummary. Click Browse to save the installation summary in your preferredlocation.
9 Click Install. Note that clicking Install does not install the product.
10 The Installation Status panel is displayed. Click Finish.
100Installing OpsCenterInstalling OpsCenter on Windows and UNIX
11 A response file named Agent-<DD-MM-YY-HH-MIN-SS>.XML is created at thefollowing location:
C:\windows\temp\Symantec\OpsCenter
This XML file can be used to install OpsCenter Agent software on multiplecomputers.
12 On the command prompt, ensure that you are in the directory where SETUP.EXE
is located.
13 Enter the following command to run the silent installation:
SETUP -Silent -RespFile <path of the response file>
Example: Setup -Silent -RespFile C:\Agent-07-12-09-06-11-31.xml
Note that the switches -Silent and -RespFile are case-sensitive .
14 The installation logs are generated in the following location:
%ALLUSERSPROFILE%\Symantec\OpsCenter\
INSTALLLOGS\OpsCenterAgentInstallLog.htm.
If you run the installer in a maintenance modelater,OpsCenterAgentMaintenanceInstallLog.htm is also generated in thesame location.
See the following section to track the progress of the installation.
See “About tracking the progress of silent installation” on page 112.
After successful installation, you can see OpsCenter Agent in Add/RemovePrograms.
To install View Builder silently
1 Log on as administrator to the system where you want to install OpsCenterView Builder software.
2 Insert the appropriate OpsCenter product DVD in the DVD drive.
3 Open the command prompt on your system.
Navigate to <DVD Drive>\<Architecture>\ViewBuilder directory.
Example: D:\x86\ViewBuilder
101Installing OpsCenterInstalling OpsCenter on Windows and UNIX
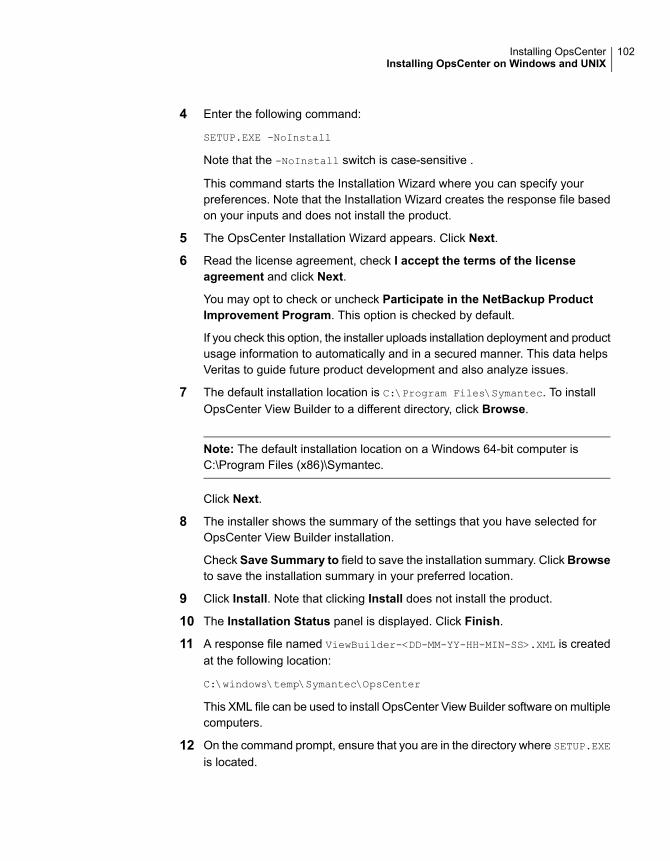
4 Enter the following command:
SETUP.EXE -NoInstall
Note that the -NoInstall switch is case-sensitive .
This command starts the Installation Wizard where you can specify yourpreferences. Note that the Installation Wizard creates the response file basedon your inputs and does not install the product.
5 The OpsCenter Installation Wizard appears. Click Next.
6 Read the license agreement, check I accept the terms of the licenseagreement and click Next.
You may opt to check or uncheck Participate in the NetBackup ProductImprovement Program. This option is checked by default.
If you check this option, the installer uploads installation deployment and productusage information to automatically and in a secured manner. This data helpsVeritas to guide future product development and also analyze issues.
7 The default installation location is C:\Program Files\Symantec. To installOpsCenter View Builder to a different directory, click Browse.
Note: The default installation location on a Windows 64-bit computer isC:\Program Files (x86)\Symantec.
Click Next.
8 The installer shows the summary of the settings that you have selected forOpsCenter View Builder installation.
Check Save Summary to field to save the installation summary. ClickBrowseto save the installation summary in your preferred location.
9 Click Install. Note that clicking Install does not install the product.
10 The Installation Status panel is displayed. Click Finish.
11 A response file named ViewBuilder-<DD-MM-YY-HH-MIN-SS>.XML is createdat the following location:
C:\windows\temp\Symantec\OpsCenter
This XML file can be used to install OpsCenter View Builder software on multiplecomputers.
12 On the command prompt, ensure that you are in the directory where SETUP.EXE
is located.
102Installing OpsCenterInstalling OpsCenter on Windows and UNIX

13 Enter the following command to run the silent installation:
SETUP -Silent -RespFile <path of the response file>
Example: Setup -Silent -RespFile
C:\ViewBuilder-07-12-09-06-11-31.xml
Note that the switches -Silent and -RespFile are case-sensitive .
14 The installation logs are generated in the following location:
%ALLUSERSPROFILE%\Symantec\OpsCenter\
INSTALLLOGS\OpsCenterViewBuilderInstallLog.htm.
If you run the installer in a maintenance modelater,OpsCenterViewBuilderMaintenanceInstallLog.htm is also generatedin the same location.
See the following section to track the progress of the installation.
See “About tracking the progress of silent installation” on page 112.
After successful installation, you can see OpsCenter View Builder inAdd/Remove Programs.
Upgrading OpsCenter silentlyUse the following procedures to upgrade to OpsCenter components silently.
To upgrade OpsCenter
1 If you are using OpsCenter to monitor NetBackup, ensure that you upgradeOpsCenter before upgrading NetBackup.
2 Log on as administrator to the OpsCenter system that you want to upgrade.
3 Insert the appropriate OpsCenter DVD in the DVD drive.
4 Open the command prompt on your system.
Navigate to <DVD Drive>\<Architecture>\Server directory.
5 Enter the following command:
SETUP.EXE -NoInstall
Note that the -NoInstall switch is case-sensitive .
This command starts the Installation Wizard where you can specify yourpreferences. Note that the Installation Wizard creates the response file basedon your inputs and does not install the product.
103Installing OpsCenterInstalling OpsCenter on Windows and UNIX

6 The Installation Wizard detects an existing installation of OpsCenter on thesystem. For example, the following message may be displayed on the Welcomescreen:
The installer has detected that Veritas OpsCenter Server is
already installed on your system that will now be upgraded to
version.
Click Next.
7 Read the license agreement, check I accept the terms of the licenseagreement and click Next.
You may opt to check or uncheck Participate in the NetBackup ProductImprovement Program. This option is checked by default.
If you check this option, the installer uploads installation deployment and productusage information to Veritas automatically and in a secured manner. This datahelps Veritas to guide future product development and also analyze issues.
8 In the Installation Method section, click Typical to use the default settings,installation location, or port numbers. Typical is selected by default.
Also compare the space that is required for installing OpsCenter server andthe actual space that is available.
Click Next.
Note: The Custom option is disabled when you upgrade from to OpsCenter.You cannot customize the default settings, locations, or port numbers whileupgrading to OpsCenter.
104Installing OpsCenterInstalling OpsCenter on Windows and UNIX

9 Specify a location for saving the old OpsCenter database. The default locationis C:\Program Files\Symantec\OpsCenter_SavedData.
Warning: In case of sequential OpsCenter upgrades (for example, 7.1 > 7.5> 7.6 > 7.7), the old OpsCenter_SavedData folder may already exist. If theOpsCenter_SavedData folder is overwritten during upgrade, the OpsCenterGUI may not start properly. To avoid this problem, you should rename the oldOpsCenter_SavedData folder before upgrading to OpsCenter.
Click Browse to specify a different location.
In case the directory C:\Program Files\Symantec\OpsCenter_SavedData
does not exist, you are prompted to create it. Click Yes to create the directory.
Note: Ensure that the database location has adequate space by going throughthe Disk space requirements section on this page. A green checkmarkappears in the Required column if there is adequate disk space.
10 On the License Keys panel, enter your demo or permanent key that you havereceived with the purchase of OpsCenter and click Add Key.
See “OpsCenter Analytics license keys” on page 72.
Click Next.
11 The installer shows a summary of the installation settings.
CheckSave Summary to option to save the installation summary. ClickBrowseto save the installation summary in your preferred location.
Click Install. Note that clicking Install does not install the product.
12 The Installation Status panel is displayed. Click Finish.
13 A response file named Server-<DD-MM-YY-HH-MIN-SS>.XML is created at thefollowing location:
C:\windows\temp\Symantec\OpsCenter
This XML file can be used to upgrade OpsCenter Server software on multiplecomputers.
14 On the command prompt, ensure that you are in the directory where SETUP.EXE
is located.
105Installing OpsCenterInstalling OpsCenter on Windows and UNIX
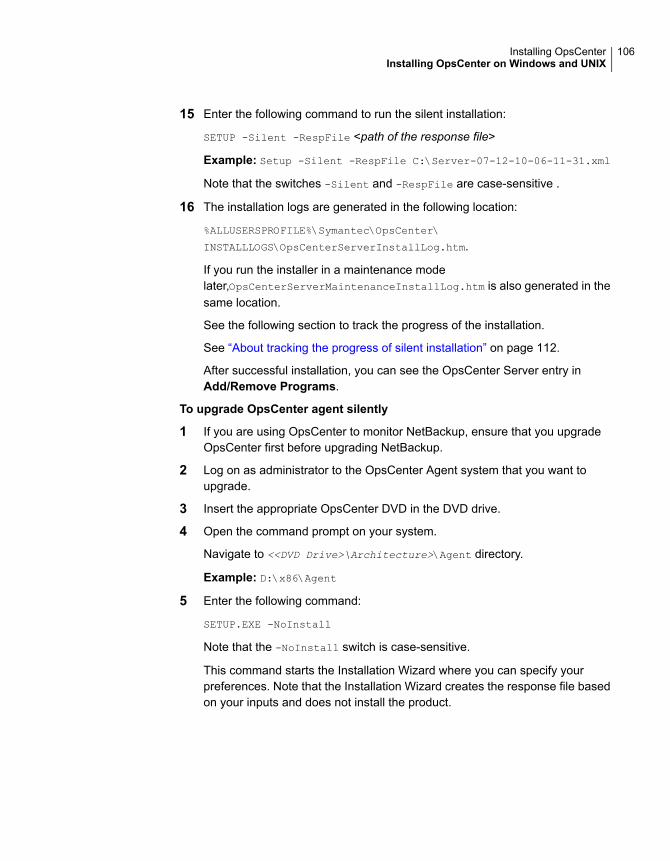
15 Enter the following command to run the silent installation:
SETUP -Silent -RespFile <path of the response file>
Example: Setup -Silent -RespFile C:\Server-07-12-10-06-11-31.xml
Note that the switches -Silent and -RespFile are case-sensitive .
16 The installation logs are generated in the following location:
%ALLUSERSPROFILE%\Symantec\OpsCenter\
INSTALLLOGS\OpsCenterServerInstallLog.htm.
If you run the installer in a maintenance modelater,OpsCenterServerMaintenanceInstallLog.htm is also generated in thesame location.
See the following section to track the progress of the installation.
See “About tracking the progress of silent installation” on page 112.
After successful installation, you can see the OpsCenter Server entry inAdd/Remove Programs.
To upgrade OpsCenter agent silently
1 If you are using OpsCenter to monitor NetBackup, ensure that you upgradeOpsCenter first before upgrading NetBackup.
2 Log on as administrator to the OpsCenter Agent system that you want toupgrade.
3 Insert the appropriate OpsCenter DVD in the DVD drive.
4 Open the command prompt on your system.
Navigate to <<DVD Drive>\Architecture>\Agent directory.
Example: D:\x86\Agent
5 Enter the following command:
SETUP.EXE -NoInstall
Note that the -NoInstall switch is case-sensitive.
This command starts the Installation Wizard where you can specify yourpreferences. Note that the Installation Wizard creates the response file basedon your inputs and does not install the product.
106Installing OpsCenterInstalling OpsCenter on Windows and UNIX
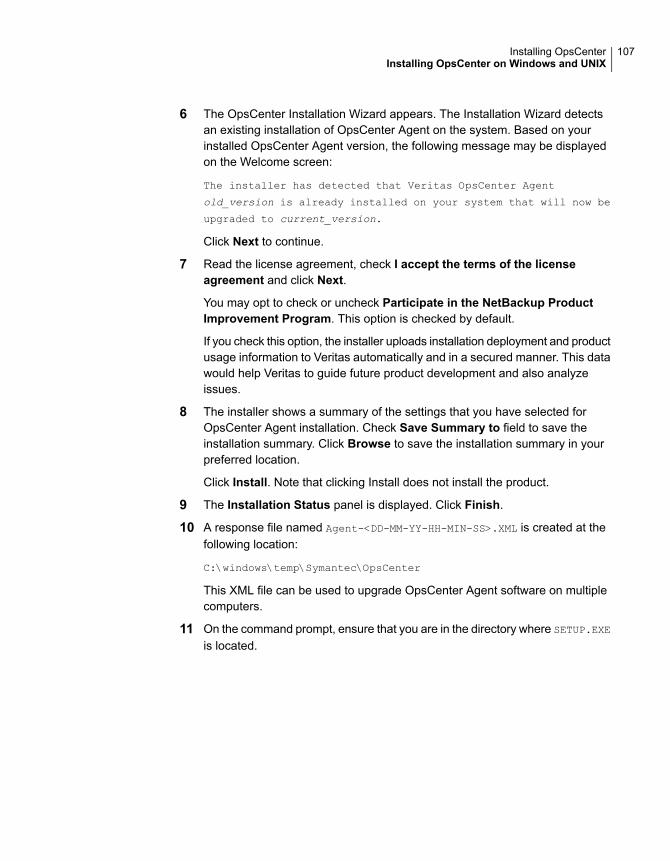
6 The OpsCenter Installation Wizard appears. The Installation Wizard detectsan existing installation of OpsCenter Agent on the system. Based on yourinstalled OpsCenter Agent version, the following message may be displayedon the Welcome screen:
The installer has detected that Veritas OpsCenter Agent
old_version is already installed on your system that will now be
upgraded to current_version.
Click Next to continue.
7 Read the license agreement, check I accept the terms of the licenseagreement and click Next.
You may opt to check or uncheck Participate in the NetBackup ProductImprovement Program. This option is checked by default.
If you check this option, the installer uploads installation deployment and productusage information to Veritas automatically and in a secured manner. This datawould help Veritas to guide future product development and also analyzeissues.
8 The installer shows a summary of the settings that you have selected forOpsCenter Agent installation. Check Save Summary to field to save theinstallation summary. Click Browse to save the installation summary in yourpreferred location.
Click Install. Note that clicking Install does not install the product.
9 The Installation Status panel is displayed. Click Finish.
10 A response file named Agent-<DD-MM-YY-HH-MIN-SS>.XML is created at thefollowing location:
C:\windows\temp\Symantec\OpsCenter
This XML file can be used to upgrade OpsCenter Agent software on multiplecomputers.
11 On the command prompt, ensure that you are in the directory where SETUP.EXE
is located.
107Installing OpsCenterInstalling OpsCenter on Windows and UNIX
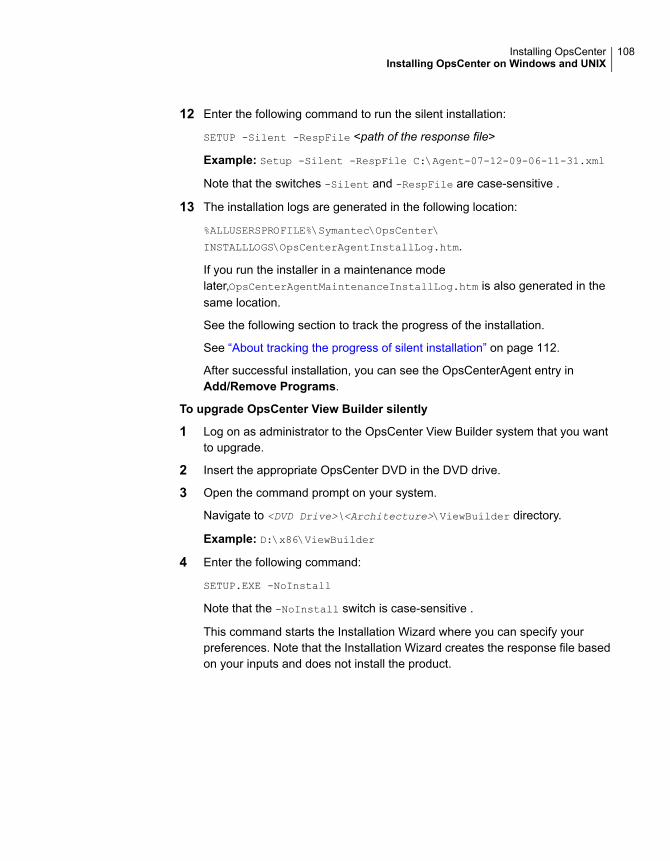
12 Enter the following command to run the silent installation:
SETUP -Silent -RespFile <path of the response file>
Example: Setup -Silent -RespFile C:\Agent-07-12-09-06-11-31.xml
Note that the switches -Silent and -RespFile are case-sensitive .
13 The installation logs are generated in the following location:
%ALLUSERSPROFILE%\Symantec\OpsCenter\
INSTALLLOGS\OpsCenterAgentInstallLog.htm.
If you run the installer in a maintenance modelater,OpsCenterAgentMaintenanceInstallLog.htm is also generated in thesame location.
See the following section to track the progress of the installation.
See “About tracking the progress of silent installation” on page 112.
After successful installation, you can see the OpsCenterAgent entry inAdd/Remove Programs.
To upgrade OpsCenter View Builder silently
1 Log on as administrator to the OpsCenter View Builder system that you wantto upgrade.
2 Insert the appropriate OpsCenter DVD in the DVD drive.
3 Open the command prompt on your system.
Navigate to <DVD Drive>\<Architecture>\ViewBuilder directory.
Example: D:\x86\ViewBuilder
4 Enter the following command:
SETUP.EXE -NoInstall
Note that the -NoInstall switch is case-sensitive .
This command starts the Installation Wizard where you can specify yourpreferences. Note that the Installation Wizard creates the response file basedon your inputs and does not install the product.
108Installing OpsCenterInstalling OpsCenter on Windows and UNIX
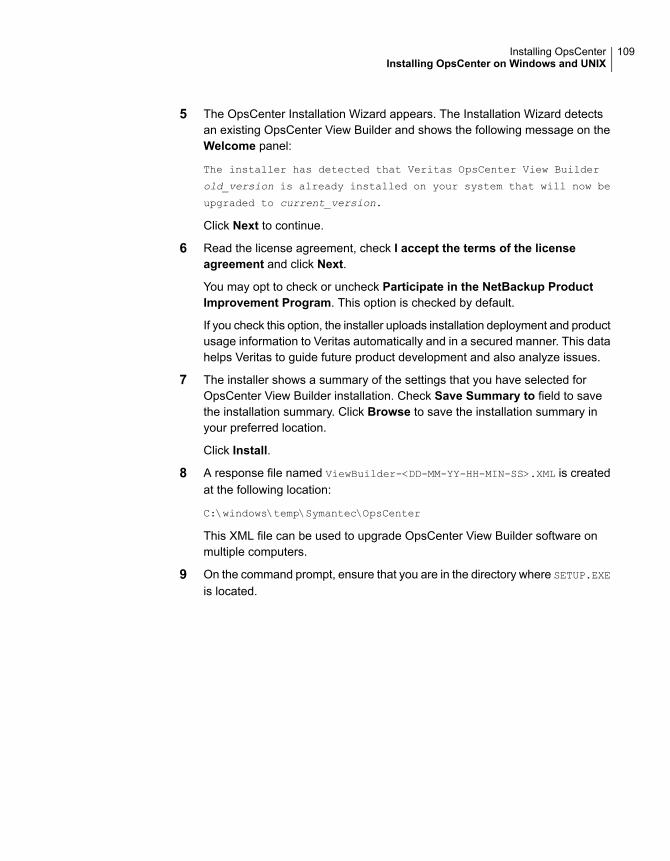
5 The OpsCenter Installation Wizard appears. The Installation Wizard detectsan existing OpsCenter View Builder and shows the following message on theWelcome panel:
The installer has detected that Veritas OpsCenter View Builder
old_version is already installed on your system that will now be
upgraded to current_version.
Click Next to continue.
6 Read the license agreement, check I accept the terms of the licenseagreement and click Next.
You may opt to check or uncheck Participate in the NetBackup ProductImprovement Program. This option is checked by default.
If you check this option, the installer uploads installation deployment and productusage information to Veritas automatically and in a secured manner. This datahelps Veritas to guide future product development and also analyze issues.
7 The installer shows a summary of the settings that you have selected forOpsCenter View Builder installation. Check Save Summary to field to savethe installation summary. Click Browse to save the installation summary inyour preferred location.
Click Install.
8 A response file named ViewBuilder-<DD-MM-YY-HH-MIN-SS>.XML is createdat the following location:
C:\windows\temp\Symantec\OpsCenter
This XML file can be used to upgrade OpsCenter View Builder software onmultiple computers.
9 On the command prompt, ensure that you are in the directory where SETUP.EXE
is located.
109Installing OpsCenterInstalling OpsCenter on Windows and UNIX
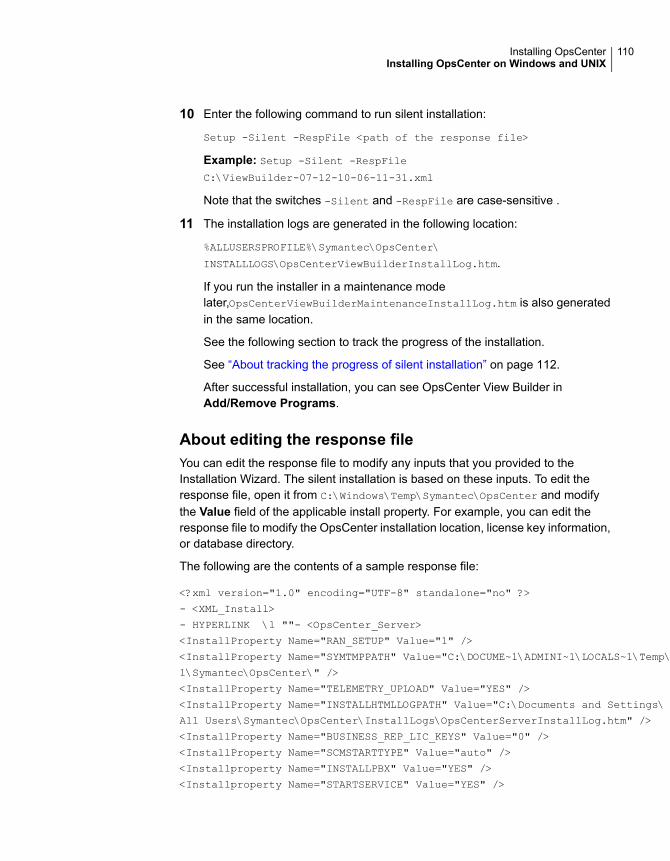
10 Enter the following command to run silent installation:
Setup -Silent -RespFile <path of the response file>
Example: Setup -Silent -RespFile
C:\ViewBuilder-07-12-10-06-11-31.xml
Note that the switches -Silent and -RespFile are case-sensitive .
11 The installation logs are generated in the following location:
%ALLUSERSPROFILE%\Symantec\OpsCenter\
INSTALLLOGS\OpsCenterViewBuilderInstallLog.htm.
If you run the installer in a maintenance modelater,OpsCenterViewBuilderMaintenanceInstallLog.htm is also generatedin the same location.
See the following section to track the progress of the installation.
See “About tracking the progress of silent installation” on page 112.
After successful installation, you can see OpsCenter View Builder inAdd/Remove Programs.
About editing the response fileYou can edit the response file to modify any inputs that you provided to theInstallation Wizard. The silent installation is based on these inputs. To edit theresponse file, open it from C:\Windows\Temp\Symantec\OpsCenter and modifythe Value field of the applicable install property. For example, you can edit theresponse file to modify the OpsCenter installation location, license key information,or database directory.
The following are the contents of a sample response file:
<?xml version="1.0" encoding="UTF-8" standalone="no" ?>
- <XML_Install>
- HYPERLINK \l ""- <OpsCenter_Server>
<InstallProperty Name="RAN_SETUP" Value="1" />
<InstallProperty Name="SYMTMPPATH" Value="C:\DOCUME~1\ADMINI~1\LOCALS~1\Temp\
1\Symantec\OpsCenter\" />
<InstallProperty Name="TELEMETRY_UPLOAD" Value="YES" />
<InstallProperty Name="INSTALLHTMLLOGPATH" Value="C:\Documents and Settings\
All Users\Symantec\OpsCenter\InstallLogs\OpsCenterServerInstallLog.htm" />
<InstallProperty Name="BUSINESS_REP_LIC_KEYS" Value="0" />
<InstallProperty Name="SCMSTARTTYPE" Value="auto" />
<Installproperty Name="INSTALLPBX" Value="YES" />
<Installproperty Name="STARTSERVICE" Value="YES" />
110Installing OpsCenterInstalling OpsCenter on Windows and UNIX
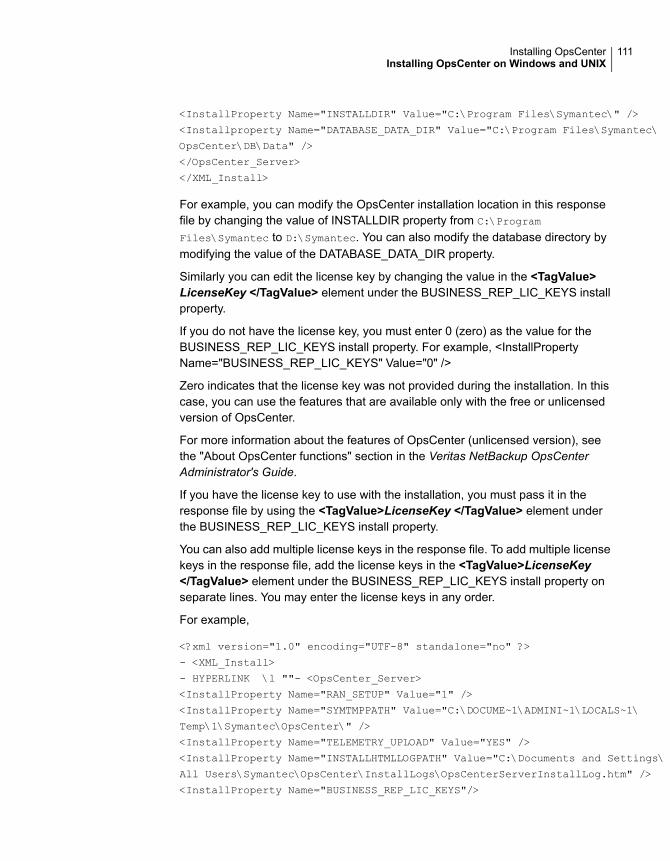
<InstallProperty Name="INSTALLDIR" Value="C:\Program Files\Symantec\" />
<Installproperty Name="DATABASE_DATA_DIR" Value="C:\Program Files\Symantec\
OpsCenter\DB\Data" />
</OpsCenter_Server>
</XML_Install>
For example, you can modify the OpsCenter installation location in this responsefile by changing the value of INSTALLDIR property from C:\Program
Files\Symantec to D:\Symantec. You can also modify the database directory bymodifying the value of the DATABASE_DATA_DIR property.
Similarly you can edit the license key by changing the value in the <TagValue>LicenseKey </TagValue> element under the BUSINESS_REP_LIC_KEYS installproperty.
If you do not have the license key, you must enter 0 (zero) as the value for theBUSINESS_REP_LIC_KEYS install property. For example, <InstallPropertyName="BUSINESS_REP_LIC_KEYS" Value="0" />
Zero indicates that the license key was not provided during the installation. In thiscase, you can use the features that are available only with the free or unlicensedversion of OpsCenter.
For more information about the features of OpsCenter (unlicensed version), seethe "About OpsCenter functions" section in the Veritas NetBackup OpsCenterAdministrator's Guide.
If you have the license key to use with the installation, you must pass it in theresponse file by using the <TagValue>LicenseKey </TagValue> element underthe BUSINESS_REP_LIC_KEYS install property.
You can also add multiple license keys in the response file. To add multiple licensekeys in the response file, add the license keys in the <TagValue>LicenseKey</TagValue> element under the BUSINESS_REP_LIC_KEYS install property onseparate lines. You may enter the license keys in any order.
For example,
<?xml version="1.0" encoding="UTF-8" standalone="no" ?>
- <XML_Install>
- HYPERLINK \l ""- <OpsCenter_Server>
<InstallProperty Name="RAN_SETUP" Value="1" />
<InstallProperty Name="SYMTMPPATH" Value="C:\DOCUME~1\ADMINI~1\LOCALS~1\
Temp\1\Symantec\OpsCenter\" />
<InstallProperty Name="TELEMETRY_UPLOAD" Value="YES" />
<InstallProperty Name="INSTALLHTMLLOGPATH" Value="C:\Documents and Settings\
All Users\Symantec\OpsCenter\InstallLogs\OpsCenterServerInstallLog.htm" />
<InstallProperty Name="BUSINESS_REP_LIC_KEYS"/>
111Installing OpsCenterInstalling OpsCenter on Windows and UNIX
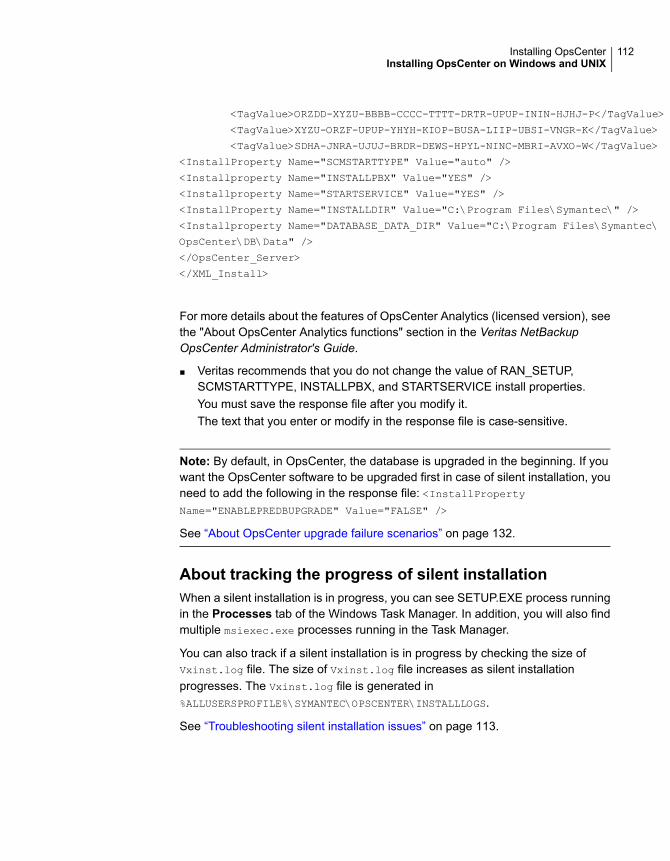
<TagValue>ORZDD-XYZU-BBBB-CCCC-TTTT-DRTR-UPUP-ININ-HJHJ-P</TagValue>
<TagValue>XYZU-ORZF-UPUP-YHYH-KIOP-BUSA-LIIP-UBSI-VNGR-K</TagValue>
<TagValue>SDHA-JNRA-UJUJ-BRDR-DEWS-HPYL-NINC-MBRI-AVXO-W</TagValue>
<InstallProperty Name="SCMSTARTTYPE" Value="auto" />
<Installproperty Name="INSTALLPBX" Value="YES" />
<Installproperty Name="STARTSERVICE" Value="YES" />
<InstallProperty Name="INSTALLDIR" Value="C:\Program Files\Symantec\" />
<Installproperty Name="DATABASE_DATA_DIR" Value="C:\Program Files\Symantec\
OpsCenter\DB\Data" />
</OpsCenter_Server>
</XML_Install>
For more details about the features of OpsCenter Analytics (licensed version), seethe "About OpsCenter Analytics functions" section in the Veritas NetBackupOpsCenter Administrator's Guide.
■ Veritas recommends that you do not change the value of RAN_SETUP,SCMSTARTTYPE, INSTALLPBX, and STARTSERVICE install properties.You must save the response file after you modify it.The text that you enter or modify in the response file is case-sensitive.
Note: By default, in OpsCenter, the database is upgraded in the beginning. If youwant the OpsCenter software to be upgraded first in case of silent installation, youneed to add the following in the response file: <InstallPropertyName="ENABLEPREDBUPGRADE" Value="FALSE" />
See “About OpsCenter upgrade failure scenarios” on page 132.
About tracking the progress of silent installationWhen a silent installation is in progress, you can see SETUP.EXE process runningin the Processes tab of the Windows Task Manager. In addition, you will also findmultiple msiexec.exe processes running in the Task Manager.
You can also track if a silent installation is in progress by checking the size ofVxinst.log file. The size of Vxinst.log file increases as silent installationprogresses. The Vxinst.log file is generated in%ALLUSERSPROFILE%\SYMANTEC\OPSCENTER\INSTALLLOGS.
See “Troubleshooting silent installation issues” on page 113.
112Installing OpsCenterInstalling OpsCenter on Windows and UNIX
Troubleshooting silent installation issuesUse the following procedure to troubleshoot silent installation issues. This proceduremust be performed after the silent installation ends.
To troubleshoot silent installation issues
1 After the silent installation ends, navigate to the following location:
%ALLUSERSPROFILE%\SYMANTEC\OPSCENTER\INSTALLLOGS.
2 Check if a file named OpsCenterInstallLog.htm is present. IfOpsCenterInstallLog.htm is not present, see 7.
3 Open OpsCenterInstallLog.htm and check the timestamp and the OpsCentercomponent it is for to ensure that it is the appropriate log file.
You must check the timestamp because OpsCenterInstallLog.htm may havebeen generated as a result of previous silent installations.
In addition, the same OpsCenterInstallLog.htm file is generated when youinstall OpsCenter server, Agent, or View Builder. Hence you must check thespecific OpsCenter component that is associated withOpsCenterInstallLog.htm.
4 You can check the timestamp by opening OpsCenterInstallLog.htm andseeing the first line in the file. For example, the following is the first line froma sample OpsCenterInstallLog.htm file:
01-19-2010,13:35:30: -Silent _RespFile "C:\Documents and
Settings\Administrator\Agent-19-01-10-13-04-21.xml"
In this example, the timestamp is 01-19-2010, 13:35:30.
113Installing OpsCenterInstalling OpsCenter on Windows and UNIX
5 To know the OpsCenter component the log file is associated with, search forthe following keywords in the OpsCenterInstallLog.htm file:
You will find matches when you search forOpsCenter Server in the file. This meansthat the log file is for OpsCenter server.
OpsCenter Server
You will find matches when you search forOpsCenter Agent in the file. This meansthat the log file is for OpsCenter Agent.
OpsCenter Agent
You will find matches when you search forOpsCenter View Builder in the file. Thismeans that the log file is for OpsCenterView Builder.
OpsCenter View Builder
Note: If you have checked the timestamp and the OpsCenter componentassociated with all present OpsCenterInstallLog.htm files and do not find avalid OpsCenterInstallLog.htm file, see 7.
6 Use the OpsCenterInstallLog.htm file to troubleshoot silent installation issues.Open the OpsCenterInstallLog.htm file to see if the installation was successfulor to understand why the installation failed. This file shows the installationstatus at the end. Installation errors are flagged in this file in red color. Youmay also see a description about why the error occurred and troubleshootaccordingly.
Ignore the subsequent steps of this procedure.
7 If OpsCenterInstallLog.htm is not present or you cannot find a validOpsCenterInstallLog.htm file, check if OpsCenter<Product>InstallLog.htmfile is present. In OpsCenter<Product>InstallLog.htm, <Product> can beServer, Agent, or View Builder depending on the OpsCenter component thatyou are installing.
114Installing OpsCenterInstalling OpsCenter on Windows and UNIX

8 Always ensure that the OpsCenter<Product>InstallLog.htm file is appropriateby checking the timestamp. You can check the timestamp by opening theOpsCenter<Product>InstallLog.htm file and seeing the first line of the file.For example, the following is the first line from a sampleOpsCenter<Product>InstallLog.htm file:
01-19-2010,13:35:30: -Silent _RespFile "C:\Documents and
Settings\Administrator\Agent-19-01-10-13-04-21.xml"
In this example, the timestamp is 01-19-2010, 13:35:30.
9 Use the OpsCenter<Product>InstallLog.htm file to troubleshoot silentinstallation issues. You can open the OpsCenter<Product>InstallLog.htmfile to see if the installation was successful or to understand why the installationfailed. This file shows the installation status at the end. Installation errors areflagged in this file in red color. You may also see a description about why theerror occurred and troubleshoot accordingly.
See “About tracking the progress of silent installation” on page 112.
About OpsCenter upgrade onWindows and UNIXThis section describes how you can upgrade OpsCenter on Windows and UNIXplatforms.
Note: Starting with version 7.7, NetBackup OpsCenter no longer supports Search& Hold functionality. However, OpsCenter continues to show certain hold relatedinformation. When you upgrade to NetBackup OpsCenter 7.7, you cannot performa search for backup images. The existing saved searches of backup images andcorresponding results are deleted. The legal holds are converted to user holds. Youcan manage the holds by using the nbholdutil command of NetBackup. For moreinformation about the command, see NetBackup Commands Reference Guide.The Hold reports are deleted after you upgrade to version 7.7. If you have savedcustom reports containing the filters related to indexing, those filters are automaticallydeleted from the report.
See “Upgrading OpsCenter on UNIX” on page 129.
Review the following procedures before you upgrade to OpsCenter:
See “About importing authentication settings during OpsCenter upgrade” on page 116.
See “About OpsCenter upgrade scenarios with respect to OpsCenter AT”on page 116.
See “Exporting authentication settings” on page 119.
115Installing OpsCenterAbout OpsCenter upgrade on Windows and UNIX
See “Important notes regarding OpsCenter upgrade ” on page 120.
About importing authentication settings during OpsCenter upgradeThis section provides the information that you may require before OpsCenterupgrade. While upgrading to latest version of OpsCenter from a version that is olderthan 7.6, you need to do a few tasks because of a few changes in the AT (VeritasProduct Authentication Service) service.
AT is used for user authentication. For example, AT is used while importingauthentication settings from a previous OpsCenter setup.
Starting from OpsCenter 7.6, authentication service (formerly it was known asVeritas Product Authentication Service or AT) is embedded with the OpsCenterServer. Each OpsCenter 7.6 setup has its own AT configuration, which is calledOpsCenter AT. Depending on the various installation and upgrade scenarios, thetasks vary that you need to carry out before and after the installation.
See “About OpsCenter AT” on page 27.
See “About OpsCenter upgrade scenarios with respect to OpsCenter AT”on page 116.
See “Exporting authentication settings” on page 119.
See “Important notes regarding OpsCenter upgrade ” on page 120.
About OpsCenter upgrade scenarios with respect toOpsCenter ATTable 2-8 describes various scenarios of OpsCenter upgrade:
116Installing OpsCenterAbout OpsCenter upgrade on Windows and UNIX

Table 2-8 OpsCenter upgrade scenarios
What happens after theinstallation?
Which additional tasks are required?Which installation scenario?
The installer installsOpsCenter AT on theOpsCenter server host
OpsCenter uses its ownOpsCenter AT for userauthentication
Note: If OpsCenter isdeployed in a clusteredmode, each OpsCenter nodehas OpsCenter ATconfiguration of its own. Eachcluster node has embeddedAT binary and all nodesshare the same ATconfiguration andauthentication data exists ona shared disk.
NoneFresh OpsCenter installation
The installer installsOpsCenter AT on theOpsCenter server host
OpsCenter uses its ownOpsCenter AT for userauthentication
The shared AT broker's datastore is imported toOpsCenter AT broker's datastore
Only OpsCenterUsers(vx )domain users are importedto OpsCenter AT
All credentials of PureDiskand NBAC-enabledNetBackup are imported fromremote AT to OpsCenter AT
All importedOpsCenterUsers(vx ) userscan logon to OpsCenter afterthe installation.
NoneUpgrade to OpsCenter:Non-clustered setup and shared ATin previous OpsCenter version
117Installing OpsCenterAbout OpsCenter upgrade on Windows and UNIX

Table 2-8 OpsCenter upgrade scenarios (continued)
What happens after theinstallation?
Which additional tasks are required?Which installation scenario?
The installer installsOpsCenter AT on theOpsCenter server host
OpsCenter uses its ownOpsCenter AT for userauthentication
All credentials of PureDiskand NBAC-enabledNetBackup are imported fromremote AT to OpsCenter AT
Only OpsCenterUsers(vx)domain users are importedto OpsCenter AT
All importedOpsCenterUsers(vx) userscan logon to OpsCenter afterthe installation.
Pre-upgrade tasks: Export the shared AT broker'sdata to an XML file using the atutil utility
See “Exporting authentication settings”on page 119.
Note: While copying the exported xml file, theDOS to UNIX conversion may be improper thatmay result in garbage characters in the xml file.This may cause failure of import. To avoid this,copy the xml file through FTP and with binaryformat.
Upgrade tasks: During OpsCenter upgrade, whenprompted, import this XML file to add theauthentication settings from the shared AT toOpsCenter AT
See “About importing authentication settingsduring OpsCenter upgrade” on page 116.
Post-upgrade tasks:
If the import is not successful, the defaultOpsCenter user needs to reset the passwords ofOpsCenterUsers(vx ) domain users that you haveimported from the earlier OpsCenter version.
Trust between NBAC-enabled NetBackup /PureDisk servers and OpsCenter server need tobe established again.
See “Setting up trust between OpsCenter andNBAC-enabled NetBackup or PureDisk”on page 135.
Upgrade to OpsCenter:Non-clustered setup and remote ATin previous OpsCenter version
118Installing OpsCenterAbout OpsCenter upgrade on Windows and UNIX
Table 2-8 OpsCenter upgrade scenarios (continued)
What happens after theinstallation?
Which additional tasks are required?Which installation scenario?
The installer installsOpsCenter AT on theOpsCenter server host
OpsCenter uses its ownOpsCenter AT for userauthentication
All credentials of PureDiskand NBAC-enabledNetBackup are imported fromremote AT to OpsCenter AT
Only OpsCenterUsers(vx)domain users are importedto OpsCenter AT
All importedOpsCenterUsers(vx) userscan logon to OpsCenter afterthe installation.
Pre-upgrade tasks: Export the shared AT broker'sdata to an XML file using the atutil utility
See “Exporting authentication settings”on page 119.
Note: While copying the exported xml file, theDOS to UNIX conversion may be improper thatmay result in garbage characters in the xml file.This may cause failure of import. To avoid this,copy the xml file through FTP and with binaryformat.
Upgrade tasks: During OpsCenter upgrade, whenprompted, import this XML file to add theauthentication settings from the shared AT toOpsCenter AT
See “About importing authentication settingsduring OpsCenter upgrade” on page 116.
Post-upgrade tasks:
If the import is not successful, the defaultOpsCenter user needs to reset the passwords ofOpsCenterUsers(vx ) domain users that you haveimported from the earlier OpsCenter version.
Trust between NBAC-enabled NetBackup /PureDisk servers and OpsCenter server need tobe established again.
See “Setting up trust between OpsCenter andNBAC-enabled NetBackup or PureDisk”on page 135.
Upgrade to OpsCenter: Clusteredsetup and remote AT in previousOpsCenter version
Exporting authentication settingsExport OpsCenterUsers(vx) users and certificates using the atutil utility.
Refer to the following procedures to export the authentication settings from theearlier OpsCenter versions:
119Installing OpsCenterAbout OpsCenter upgrade on Windows and UNIX
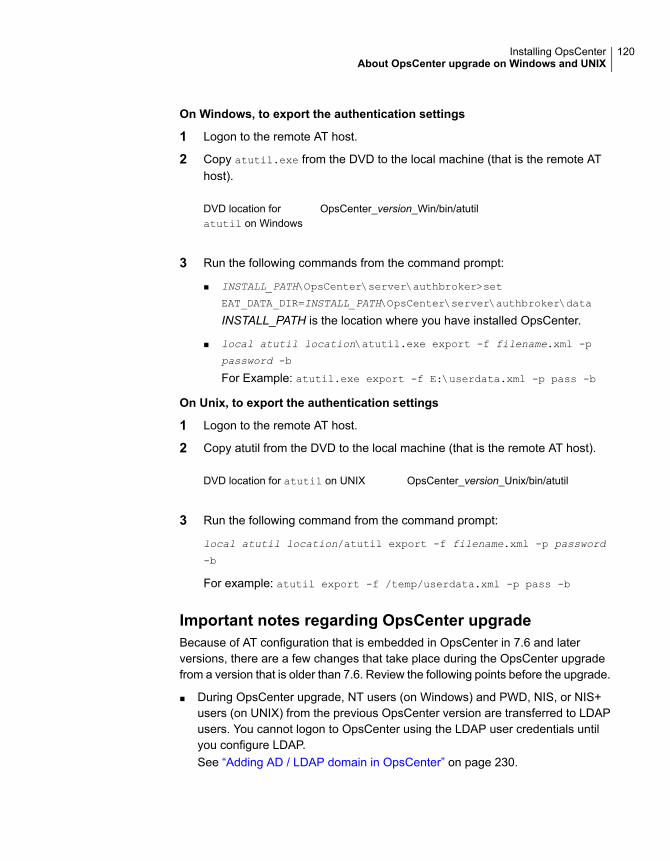
On Windows, to export the authentication settings
1 Logon to the remote AT host.
2 Copy atutil.exe from the DVD to the local machine (that is the remote AThost).
OpsCenter_version_Win/bin/atutilDVD location foratutil on Windows
3 Run the following commands from the command prompt:
■ INSTALL_PATH\OpsCenter\server\authbroker>set
EAT_DATA_DIR=INSTALL_PATH\OpsCenter\server\authbroker\data
INSTALL_PATH is the location where you have installed OpsCenter.
■ local atutil location\atutil.exe export -f filename.xml -p
password -b
For Example: atutil.exe export -f E:\userdata.xml -p pass -b
On Unix, to export the authentication settings
1 Logon to the remote AT host.
2 Copy atutil from the DVD to the local machine (that is the remote AT host).
OpsCenter_version_Unix/bin/atutilDVD location for atutil on UNIX
3 Run the following command from the command prompt:
local atutil location/atutil export -f filename.xml -p password
-b
For example: atutil export -f /temp/userdata.xml -p pass -b
Important notes regarding OpsCenter upgradeBecause of AT configuration that is embedded in OpsCenter in 7.6 and laterversions, there are a few changes that take place during the OpsCenter upgradefrom a version that is older than 7.6. Review the following points before the upgrade.
■ During OpsCenter upgrade, NT users (on Windows) and PWD, NIS, or NIS+users (on UNIX) from the previous OpsCenter version are transferred to LDAPusers. You cannot logon to OpsCenter using the LDAP user credentials untilyou configure LDAP.See “Adding AD / LDAP domain in OpsCenter” on page 230.
120Installing OpsCenterAbout OpsCenter upgrade on Windows and UNIX
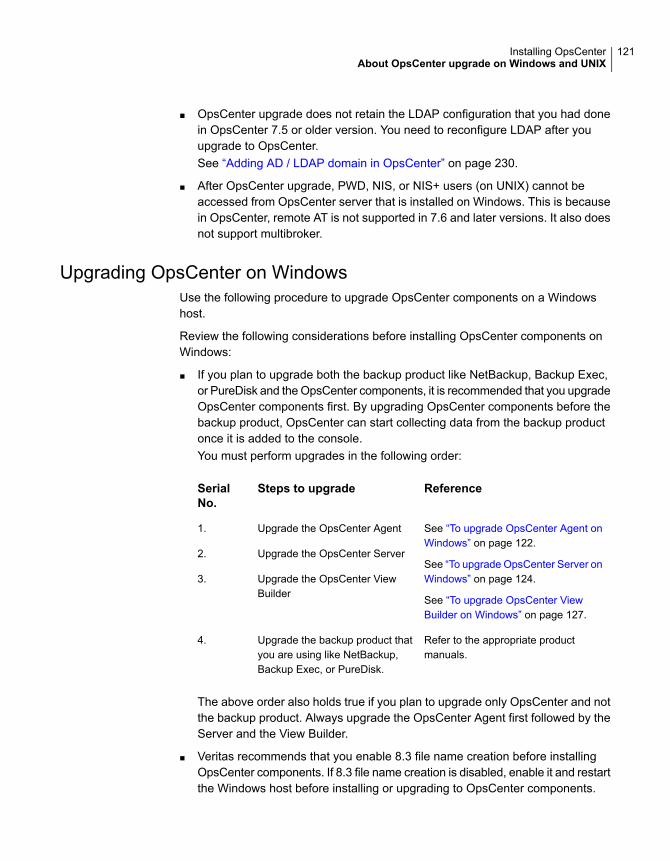
■ OpsCenter upgrade does not retain the LDAP configuration that you had donein OpsCenter 7.5 or older version. You need to reconfigure LDAP after youupgrade to OpsCenter.See “Adding AD / LDAP domain in OpsCenter” on page 230.
■ After OpsCenter upgrade, PWD, NIS, or NIS+ users (on UNIX) cannot beaccessed from OpsCenter server that is installed on Windows. This is becausein OpsCenter, remote AT is not supported in 7.6 and later versions. It also doesnot support multibroker.
Upgrading OpsCenter on WindowsUse the following procedure to upgrade OpsCenter components on a Windowshost.
Review the following considerations before installing OpsCenter components onWindows:
■ If you plan to upgrade both the backup product like NetBackup, Backup Exec,or PureDisk and the OpsCenter components, it is recommended that you upgradeOpsCenter components first. By upgrading OpsCenter components before thebackup product, OpsCenter can start collecting data from the backup productonce it is added to the console.You must perform upgrades in the following order:
ReferenceSteps to upgradeSerialNo.
See “To upgrade OpsCenter Agent onWindows” on page 122.
See “To upgrade OpsCenter Server onWindows” on page 124.
See “To upgrade OpsCenter ViewBuilder on Windows” on page 127.
Upgrade the OpsCenter Agent1.
Upgrade the OpsCenter Server2.
Upgrade the OpsCenter ViewBuilder
3.
Refer to the appropriate productmanuals.
Upgrade the backup product thatyou are using like NetBackup,Backup Exec, or PureDisk.
4.
The above order also holds true if you plan to upgrade only OpsCenter and notthe backup product. Always upgrade the OpsCenter Agent first followed by theServer and the View Builder.
■ Veritas recommends that you enable 8.3 file name creation before installingOpsCenter components. If 8.3 file name creation is disabled, enable it and restartthe Windows host before installing or upgrading to OpsCenter components.
121Installing OpsCenterAbout OpsCenter upgrade on Windows and UNIX
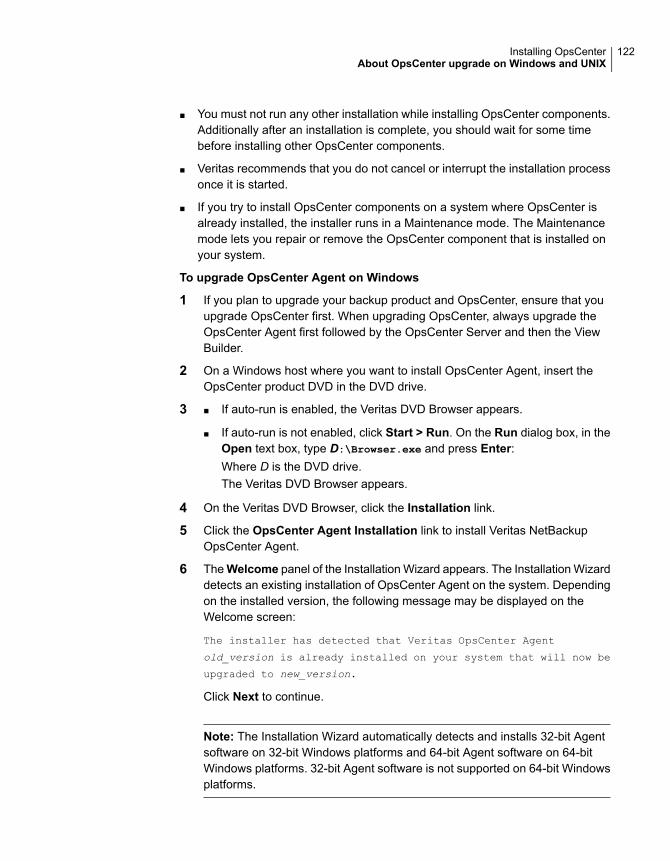
■ You must not run any other installation while installing OpsCenter components.Additionally after an installation is complete, you should wait for some timebefore installing other OpsCenter components.
■ Veritas recommends that you do not cancel or interrupt the installation processonce it is started.
■ If you try to install OpsCenter components on a system where OpsCenter isalready installed, the installer runs in a Maintenance mode. The Maintenancemode lets you repair or remove the OpsCenter component that is installed onyour system.
To upgrade OpsCenter Agent on Windows
1 If you plan to upgrade your backup product and OpsCenter, ensure that youupgrade OpsCenter first. When upgrading OpsCenter, always upgrade theOpsCenter Agent first followed by the OpsCenter Server and then the ViewBuilder.
2 On a Windows host where you want to install OpsCenter Agent, insert theOpsCenter product DVD in the DVD drive.
3 If auto-run is enabled, the Veritas DVD Browser appears.■
■ If auto-run is not enabled, click Start > Run. On the Run dialog box, in theOpen text box, type D:\Browser.exe and press Enter:Where D is the DVD drive.The Veritas DVD Browser appears.
4 On the Veritas DVD Browser, click the Installation link.
5 Click the OpsCenter Agent Installation link to install Veritas NetBackupOpsCenter Agent.
6 TheWelcome panel of the Installation Wizard appears. The Installation Wizarddetects an existing installation of OpsCenter Agent on the system. Dependingon the installed version, the following message may be displayed on theWelcome screen:
The installer has detected that Veritas OpsCenter Agent
old_version is already installed on your system that will now be
upgraded to new_version.
Click Next to continue.
Note: The Installation Wizard automatically detects and installs 32-bit Agentsoftware on 32-bit Windows platforms and 64-bit Agent software on 64-bitWindows platforms. 32-bit Agent software is not supported on 64-bit Windowsplatforms.
122Installing OpsCenterAbout OpsCenter upgrade on Windows and UNIX

If you have an existing 32-bit Agent installation on a 64-bit system and youinstall OpsCenter Agent, the Installer automatically uninstalls the older 32-bitsoftware and installs 64-bit Agent software. You need to perform the followingtasks after you upgrade to 64-bit OpsCenter Agent:
■ If 32-bit Agent software is upgraded to 64-bit, all Agent tuning configurationsin OpsCenterAgentService.xml file that you may have made earlier shouldbe performed again manually. The OpsCenterAgentService.xml file isused to specify how much memory is allocated for the Agent Java processand can be located in <INSTALL_PATH>\agent\bin.
■ If 32-bit Agent software is upgraded to 64-bit software and the Agent is notinstalled on the OpsCenter Server, any Agent configurations in the log.conf
file that you may have made earlier must be performed manually again afteryou upgrade. Possible Agent configuration in log.conf can be changingthe Agent logging level etc. The log.conf file is located in<INSTALL_PATH>\agent.
7 Read the license agreement, check I accept the terms of the licenseagreement.
You may opt to check or uncheck Participate in the NetBackup ProductImprovement Program. This option is checked by default.
If you check this option, the installer uploads installation deployment and productusage information to Veritas automatically and in a secured manner. This datahelps Veritas to guide future product development and also analyze issues.
Click Next.
8 The installer shows the summary of the installation settings. Check Savesummary to option to save the installation summary. Click Browse to savethe installation summary in your preferred location.
Click Install to begin the installation. The installer installs OpsCenter Agentsoftware.
9 After successful installation, you can view the installation logs or view theReadme.
Click Finish.
The installation logs are generated in the following location:
%ALLUSERSPROFILE%\Symantec\OpsCenter\INSTALLLOGS\OpsCenterAgentInstallLog.htm
Note: If you run the installer in a maintenance mode later,OpsCenterAgentMaintenanceInstallLog.htm is also generated in the samelocation.
123Installing OpsCenterAbout OpsCenter upgrade on Windows and UNIX
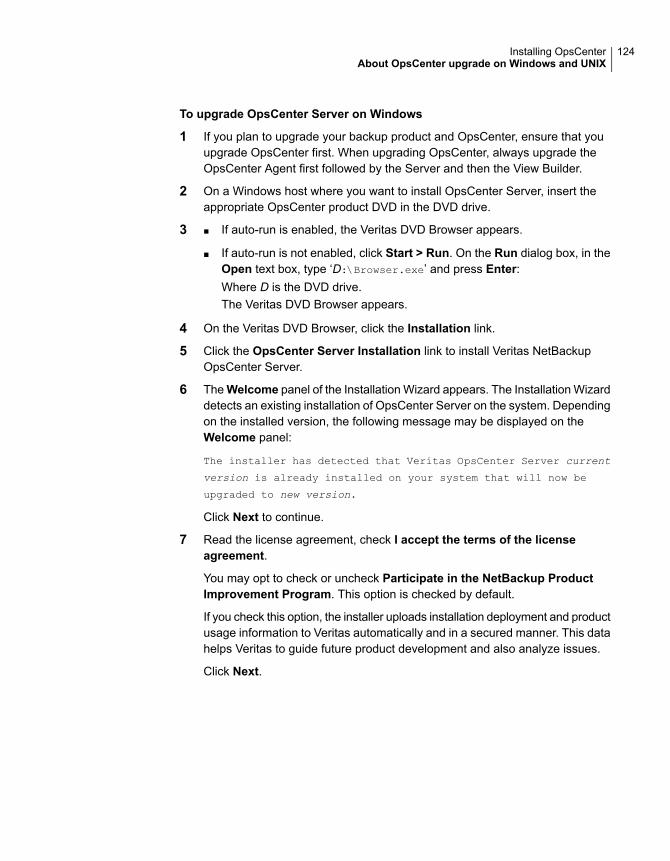
To upgrade OpsCenter Server on Windows
1 If you plan to upgrade your backup product and OpsCenter, ensure that youupgrade OpsCenter first. When upgrading OpsCenter, always upgrade theOpsCenter Agent first followed by the Server and then the View Builder.
2 On a Windows host where you want to install OpsCenter Server, insert theappropriate OpsCenter product DVD in the DVD drive.
3 If auto-run is enabled, the Veritas DVD Browser appears.■
■ If auto-run is not enabled, click Start > Run. On the Run dialog box, in theOpen text box, type ‘D:\Browser.exe’ and press Enter:Where D is the DVD drive.The Veritas DVD Browser appears.
4 On the Veritas DVD Browser, click the Installation link.
5 Click the OpsCenter Server Installation link to install Veritas NetBackupOpsCenter Server.
6 TheWelcome panel of the Installation Wizard appears. The Installation Wizarddetects an existing installation of OpsCenter Server on the system. Dependingon the installed version, the following message may be displayed on theWelcome panel:
The installer has detected that Veritas OpsCenter Server current
version is already installed on your system that will now be
upgraded to new version.
Click Next to continue.
7 Read the license agreement, check I accept the terms of the licenseagreement.
You may opt to check or uncheck Participate in the NetBackup ProductImprovement Program. This option is checked by default.
If you check this option, the installer uploads installation deployment and productusage information to Veritas automatically and in a secured manner. This datahelps Veritas to guide future product development and also analyze issues.
Click Next.
124Installing OpsCenterAbout OpsCenter upgrade on Windows and UNIX
8 On the Installation Choice panel, click Typical to use the default settings,installation location, or port numbers. Typical is selected by default.
Also compare the space that is required for installing OpsCenter Server andthe actual space that is available.
Note: The Custom option is disabled when you upgrade to OpsCenter. Youcannot customize the default settings, locations, or port numbers whileupgrading to OpsCenter.
Click Next.
9 Specify a location for saving the old OpsCenter database. The default locationis C:\Program Files\Symantec\OpsCenter_SavedData.
Warning: In case of sequential OpsCenter upgrades (for example, 7.1 > 7.5> 7.6.1 > 7.7), the old OpsCenter_SavedData folder may already exist. If theOpsCenter_SavedData folder is overwritten during upgrade, the OpsCenteruser interface may not start properly. To avoid this problem, you should renamethe old OpsCenter_SavedData folder before upgrading to OpsCenter.
Click Browse to specify a different location.
In case the directory C:\Program Files\Symantec\OpsCenter_SavedData
does not exist, you are prompted to create it. Click Yes to create the directory.
Note: Ensure that the database location has adequate space by going throughthe Disk space requirements section on this page. A green checkmarkappears in the Required column if there is adequate disk space.
10 Click Next.
125Installing OpsCenterAbout OpsCenter upgrade on Windows and UNIX

11 On the Import Authentication Settings panel, select one of the following options:
Select this option if you do not want to import users from the earlierOpsCeOpsCenter versions into OpsCenter database. Only defaultOpsCenter user is created who can logon to OpsCenter and resetpasswords for all other existing passwords.
Note: Starting from OpsCenter 7.6, Veritas Product AuthenticationService is not a shared component and is local to each Veritasproduct. The authentication service (Root Broker and AuthenticationRoot Broker) that is installed with OpsCenter is called OpsCenterAT.
Do not importusers
Select this option if you want to import users from earlier OpsCenterversions into OpsCenter database.
Import users
For more details, refer to the About Importing Authentication Settings section.
See “About importing authentication settings during OpsCenter upgrade”on page 116.
If import of authentication settings and users from the older OpsCenter versionfails, you need to reset passwords of all OpsCenter(vx) users using the defaultOpsCenter user credentials.
See “Resetting an OpsCenter user password” on page 240.
12 On the License Keys panel, enter your demo or permanent key that you havereceived with the purchase of OpsCenter and click Add Key.
See “OpsCenter Analytics license keys” on page 72.
126Installing OpsCenterAbout OpsCenter upgrade on Windows and UNIX
13 The installer shows the summary of the installation settings. Check Savesummary to option to save the installation summary. Click Browse to savethe installation summary in your preferred location.
Click Install to begin the installation. The installer installs OpsCenter Serversoftware and also migrates data to the OpsCenter database. The databasemigration may take some time based on the size of your database.
14 After successful installation, you can view the installation logs or view theReadme.
Click Finish.
The installation logs are generated in the following location:
%ALLUSERSPROFILE%\Symantec\OpsCenter\
INSTALLLOGS\OpsCenterServerInstallLog.htm
Note: If you run the installer in a maintenance mode later,OpsCenterServerMaintenanceInstallLog.htm is also generated in the samelocation.
Note: In OpsCenter, the database upgrade logs are stored at the followinglocation:
%ALLUSERSPROFILE%\Symantec\OpsCenter\INSTALLLOGS\pre-install-config\db\log
See “About OpsCenter upgrade failure scenarios” on page 132.
To upgrade OpsCenter View Builder on Windows
1 If you plan to upgrade your backup product and OpsCenter, ensure that youupgrade OpsCenter first. When upgrading OpsCenter, always upgrade theOpsCenter Agent first followed by the Server and then the View Builder.
2 On a Windows host where you want to install OpsCenter View Builder, insertthe OpsCenter product DVD in the DVD drive.
3 If auto-run is enabled, the Veritas DVD Browser appears.■
■ If autorun is not enabled, click Start > Run. On the Run dialog box, in theOpen text box, type D:\Browser.exe and press Enter:Where D is the DVD drive.The Veritas DVD Browser appears.
4 On the Veritas DVD Browser, click the Installation link.
127Installing OpsCenterAbout OpsCenter upgrade on Windows and UNIX
5 Click theOpsCenter ViewBuilder Installation link to install Veritas NetBackupOpsCenter View Builder.
6 TheWelcome panel of the Installation Wizard appears. The Installation Wizarddetects an existing installation of OpsCenter View Builder on the system.Depending on the installed version, the following message is displayed on theWelcome panel:
The installer has detected that Veritas OpsCenter View Builder
old_version is already installed on your system that will now be
upgraded to new_version.
Click Next to continue.
7 Read the license agreement, check I accept the terms of the licenseagreement.
You may opt to check or uncheck Participate in the NetBackup ProductImprovement Program. This option is checked by default.
If you check this option, the installer uploads installation deployment and productusage information to Veritas automatically and in a secured manner. This datahelps Veritas to guide future product development and also analyze issues.
Click Next.
8 The installer shows the summary of the installation settings. Check Savesummary to option to save the installation summary. Click Browse to savethe installation summary in your preferred location.
Click Install to begin the installation. The installer installs OpsCenter ViewBuilder software.
9 After successful installation, you can view the installation logs or view theReadme.
Click Finish.
The installation logs are generated in the following location:
%ALLUSERSPROFILE%\Symantec\OpsCenter\
INSTALLLOGS\OpsCenterViewBuilderInstallLog.htm
Note: If you run the installer in a maintenance mode later,OpsCenterViewBuilderMaintenanceInstallLog.htm is also generated in thesame location.
128Installing OpsCenterAbout OpsCenter upgrade on Windows and UNIX
Upgrading OpsCenter on UNIXUse the following procedure to upgrade to OpsCenter software on UNIX hosts.
Note: Veritas recommends that you do not cancel or interrupt the installation processonce it is started.
To upgrade OpsCenter Server on UNIX
1 If you plan to upgrade your backup product and OpsCenter, ensure that youupgrade OpsCenter first. When upgrading OpsCenter, always upgrade theOpsCenter Agent first followed by the Server and then the View Builder.
2 Open a UNIX console and log on as root on the target host.
3 Mount the OpsCenter product DVD on the OpsCenter Server that you want toupgrade.
4 Type the following command: ./install. Press Enter.
5 The Welcome message is displayed. Press Enter to continue.
6 The installer then checks if OpsCenter Server is installed on the system or not.It prompts you in case OpsCenter Server is already installed. The installer alsoexamines the system for existing packages.
7 The following prompt is displayed:
Where should the existing OpsCenter
database and configuration files be backed up?
An 'OpsCenterServer_backup' directory will be created within
the directory that you specify to store these
files. (/var/symantec/)
Type the directory name in which the existing OpsCenter database andconfiguration files can be saved and then press Enter.
To accept the default directory path (/var/symantec), press Enter.
8 The installer displays a list of components that will be installed or upgradedlike PBX, OpsCenter Server, OpsCenter user interface and so on. Review thislist and press Enter to continue.
9 The installer prompts you with the following question:
installOpsCenterServer is now ready to
upgrade OPSCENTERSERVER.
Are you sure you want to upgrade OPSCENTERSERVER? [y,n,q] (y)
Press Enter to continue OpsCenter upgrade.
129Installing OpsCenterAbout OpsCenter upgrade on Windows and UNIX
10 The installer prompts you with the following question:
Participate in the NetBackup Product Improvement program? [y,n,q] (y)
Press Enter if you want to participate in the NetBackup Product Improvementprogram or press n if you do not want to participate.
11 The installer prompts you with the following question:
Do you want to import users from <remote AT host name> to OpsCenter AT?
Press Enter to import users from the earlier OpsCenter versions.
For more details, refer to the About Importing Authentication Settings section.
If the import fails, you need to reset password of all OpsCenter(vx) users.
See “Resetting an OpsCenter user password” on page 240.
12 By default, in OpsCenter, the database is upgraded in the beginning. However,you can choose to first upgrade the OpsCenter software.
See “About OpsCenter upgrade failure scenarios” on page 132.
The database upgrade process starts. In this process, the OpsCenter data ismigrated to the new OpsCenter database version. The database process maytake time depending on your database size.
The following message is displayed:
The database upgrade is in progress.
This may take some time based on the database size.
You can see the progress and current status in
/var/tmp/(directory)/db/log/dbManager_<timestamp>_.log file.
After complete installation, the logs are copied to the followinglocation:/var/VRTS/install/logs/LogDirectory/db/log
LogDirectory is generated during the upgrade progress.
130Installing OpsCenterAbout OpsCenter upgrade on Windows and UNIX

13 The installer displays the OpsCenter packages that are installed. Dependingon the installed packages, the following message may be displayed:
The following packages were found on the system. However the package
versions are older than the ones required by OpsCenter.
SYMCOpsCenterServer 7.0 was found on the system, but OpsCenter requires
SYMCOpsCenterServer 7.7.0.0
SYMCOpsCenterGUI 7.0 was found on the system, but OpsCenter requires
SYMCOpsCenterGUI 7.7.0.0
VRTSOpsCenterLegacyServer 7.0 was found on the system, but OpsCenter
requires VRTSOpsCenterLegacyServer 7.7.0.0
The installer then uninstalls the older packages and installs new version ofOpsCenter Server.
14 OpsCenter Server is installed. Configuration changes are made to the system.
15 All the OpsCenter processes are started. The following information is alsodisplayed:
■ Web URL to access OpsCenter console
■ Location of install log and summary files.
About files and folders that are protected duringOpsCenter upgrade
This section provides a list of files and folders that are protected during OpsCenterupgrade.
Note: The locations of all files and folders that are listed here are default locations.
For UNIX, following is the list of files and folders that are protected duringupgrade:
For OpsCenter Server
■ /opt/SYMCOpsCenterGUI/webserver/conf/server.xml
■ /opt/SYMCOpsCenterServer/db/data/vxpmdb.log
■ /opt/SYMCOpsCenterServer/db/data/vxpmdb.db
■ /opt/SYMCOpsCenterServer/db/data/symcOpscache.db
■ /opt/SYMCOpsCenterServer/db/data/symcopsscratchdb.db
131Installing OpsCenterAbout files and folders that are protected during OpsCenter upgrade

■ /opt/SYMCOpsCenterServer/db/data/symcsearchdb.db
■ /opt/SYMCOpsCenterServer/config
■ /opt/SYMCOpsCenterServer/bin/startserver
■ /opt/SYMCOpsCenterServer/db/conf
■ /opt/SYMCOpsCenterGUI/config/
■ /opt/SYMCOpsCenterServer/authbroker/data/
ForWindows, following is the list of files and folders that are protected duringupgrade:
For OpsCenter Server
■ C:\Program Files\OpsCenter\gui\webserver\conf\server.xml
■ C:\Program Files\OpsCenter\gui\bin\WebUI_Login.url
■ C:\Program Files\OpsCenter\gui\bin\OpsCenterGUIService.xml
■ C:\Program Files\OpsCenter\server\bin\OpsCenterServerService.xml
■ C:\Program Files\OpsCenter\server\db\data\vxpmdb.db
■ C:\Program Files\OpsCenter\server\db\data\symcOpscache.db
■ C:\Program Files\OpsCenter\server\db\data\symcopsscratchdb.db
■ C:\Program Files\OpsCenter\server\db\data\symcsearchdb.db
■ C:\Program Files\OpsCenter\server\db\data\vxpmdb.log
■ C:\Program Files\OpsCenter\gui\config
■ C:\Program Files\OpsCenter\server\db\CONF
■ C:\Program Files\OpsCenter\server\authbroker\data
For OpsCenter Agent
■ C:\Program Files\OpsCenter\agent\bin\OpsCenterAgentService.xml
■ C:\Program Files\OpsCenter\agent\config
For OpsCenter View Builder
■ C:\Program Files\OpsCenter\jvb\bin\OpsCenterViewBuilder.xml
About OpsCenter upgrade failure scenariosIn the versions prior to OpsCenter 7.6, the upgrade process first upgrades theOpsCenter software and then the database. If the upgrade fails, the database canbecome inconsistent and you cannot get it back to the original state.
132Installing OpsCenterAbout OpsCenter upgrade failure scenarios

Starting from OpsCenter 7.6, the database is upgraded in the beginning that isduring the pre-installation process. In case of upgrade failure, the older OpsCentersetup is still available for use.
By default, the OpsCenter database is upgraded in the beginning. If you want theOpsCenter software to be upgraded first, you need to do the following:
To change the default upgrade sequence to upgrade database in the end
◆ Make the following ENABLEPREDBUPGRADE registry entry on the OpsCenterServer host:
■ Create a registry value ENABLEPREDBUPGRADE=FALSE at thefollowing location:HKLM\\SOFTWARE\\Symantec\\OpsCenter\\Server
Windows
■ Before starting the upgrade, run the following command: EXPORTENABLEPREDBUPGRADE=FALSE
UNIX
Note: In case of Windows silent installation, you need to add the following inthe response file: <InstallProperty Name="ENABLEPREDBUPGRADE"
Value="FALSE" />
See “About editing the response file” on page 110.
Table 2-9 describes the possible upgrade failure scenarios and how you can recoverthe database in OpsCenter even though the upgrade has failed.
133Installing OpsCenterAbout OpsCenter upgrade failure scenarios
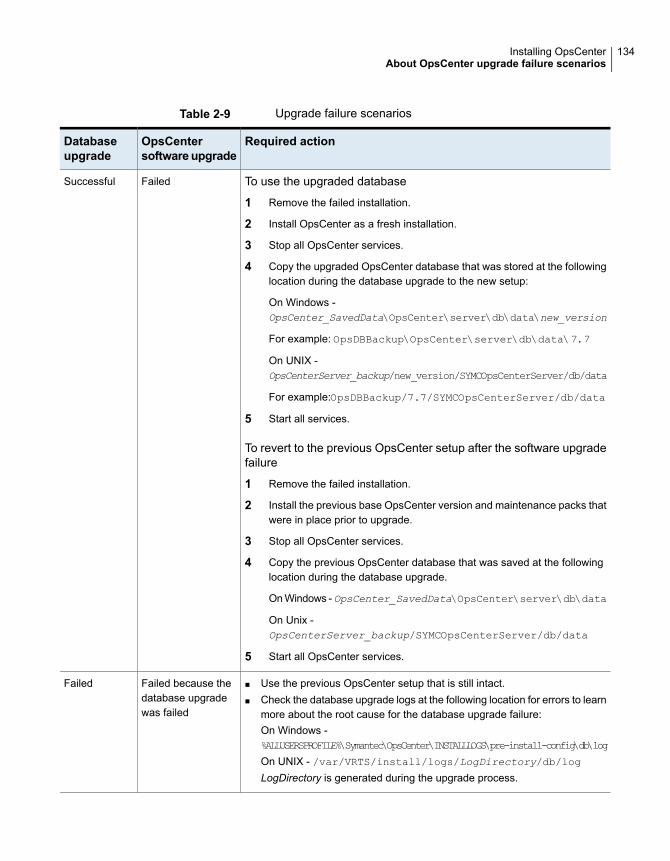
Table 2-9 Upgrade failure scenarios
Required actionOpsCentersoftwareupgrade
Databaseupgrade
To use the upgraded database
1 Remove the failed installation.
2 Install OpsCenter as a fresh installation.
3 Stop all OpsCenter services.
4 Copy the upgraded OpsCenter database that was stored at the followinglocation during the database upgrade to the new setup:
On Windows -OpsCenter_SavedData\OpsCenter\server\db\data\new_version
For example: OpsDBBackup\OpsCenter\server\db\data\7.7
On UNIX -OpsCenterServer_backup/new_version/SYMCOpsCenterServer/db/data
For example:OpsDBBackup/7.7/SYMCOpsCenterServer/db/data
5 Start all services.
To revert to the previous OpsCenter setup after the software upgradefailure
1 Remove the failed installation.
2 Install the previous base OpsCenter version and maintenance packs thatwere in place prior to upgrade.
3 Stop all OpsCenter services.
4 Copy the previous OpsCenter database that was saved at the followinglocation during the database upgrade.
On Windows -OpsCenter_SavedData\OpsCenter\server\db\data
On Unix -OpsCenterServer_backup/SYMCOpsCenterServer/db/data
5 Start all OpsCenter services.
FailedSuccessful
■ Use the previous OpsCenter setup that is still intact.■ Check the database upgrade logs at the following location for errors to learn
more about the root cause for the database upgrade failure:On Windows -%ALLUSERSPROFILE%\Symantec\OpsCenter\INSTALLLOGS\pre-install-config\db\log
On UNIX - /var/VRTS/install/logs/LogDirectory/db/logLogDirectory is generated during the upgrade process.
Failed because thedatabase upgradewas failed
Failed
134Installing OpsCenterAbout OpsCenter upgrade failure scenarios

About post-installation tasksThe following sections explain how to start using OpsCenter and includes someperformance tuning tips for OpsCenter.
See “Setting up trust between OpsCenter and NBAC-enabled NetBackup orPureDisk” on page 135.
See “Verifying that OpsCenter is running properly” on page 135.
See “About starting to use OpsCenter” on page 136.
See “About the start up tasks that OpsCenter performs” on page 137.
For performance and tuning information, refer to the new OpsCenter Performanceand Tuning Guide at the following location:
http://www.veritas.com/docs/000003387
Setting up trust between OpsCenter and NBAC-enabled NetBackupor PureDisk
Use the following procedure to setup the trust between the OpsCenter server andNBAC-enabled NetBackup Master Server or PureDisk Server.
To setup trust
1 Logon to the NetBackup Master Server or PureDisk Server host.
2 vssat setuptrust --broker OpsCenter
hostname:1556:OPSCENTER_PBXSSLServiceID --securitylevel high
Verifying that OpsCenter is running properlyAfter installing OpsCenter on either Windows or UNIX, perform a check to verifythat OpsCenter is running properly.
135Installing OpsCenterAbout post-installation tasks
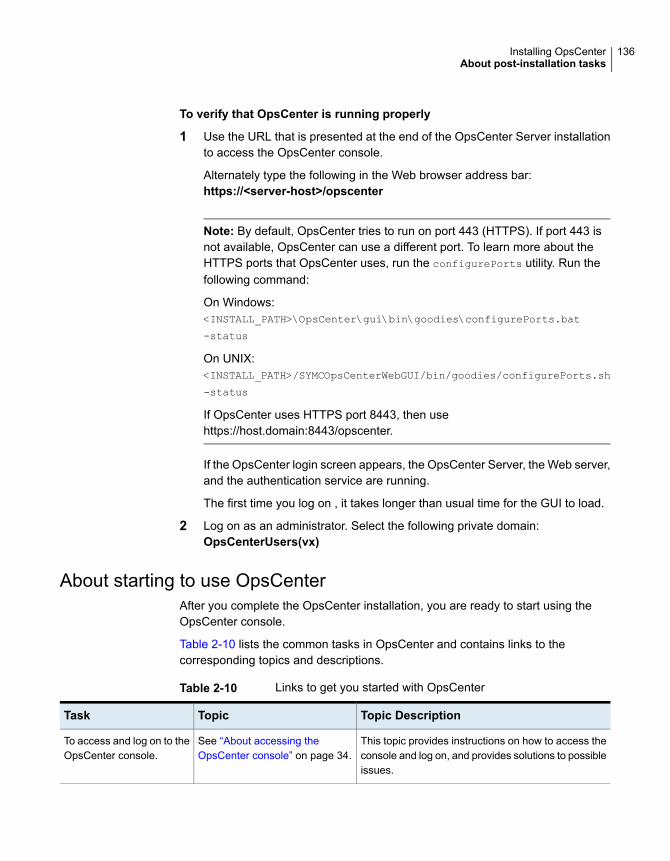
To verify that OpsCenter is running properly
1 Use the URL that is presented at the end of the OpsCenter Server installationto access the OpsCenter console.
Alternately type the following in the Web browser address bar:https://<server-host>/opscenter
Note: By default, OpsCenter tries to run on port 443 (HTTPS). If port 443 isnot available, OpsCenter can use a different port. To learn more about theHTTPS ports that OpsCenter uses, run the configurePorts utility. Run thefollowing command:
On Windows:<INSTALL_PATH>\OpsCenter\gui\bin\goodies\configurePorts.bat
-status
On UNIX:<INSTALL_PATH>/SYMCOpsCenterWebGUI/bin/goodies/configurePorts.sh
-status
If OpsCenter uses HTTPS port 8443, then usehttps://host.domain:8443/opscenter.
If the OpsCenter login screen appears, the OpsCenter Server, the Web server,and the authentication service are running.
The first time you log on , it takes longer than usual time for the GUI to load.
2 Log on as an administrator. Select the following private domain:OpsCenterUsers(vx)
About starting to use OpsCenterAfter you complete the OpsCenter installation, you are ready to start using theOpsCenter console.
Table 2-10 lists the common tasks in OpsCenter and contains links to thecorresponding topics and descriptions.
Table 2-10 Links to get you started with OpsCenter
Topic DescriptionTopicTask
This topic provides instructions on how to access theconsole and log on, and provides solutions to possibleissues.
See “About accessing theOpsCenter console” on page 34.
To access and log on to theOpsCenter console.
136Installing OpsCenterAbout post-installation tasks
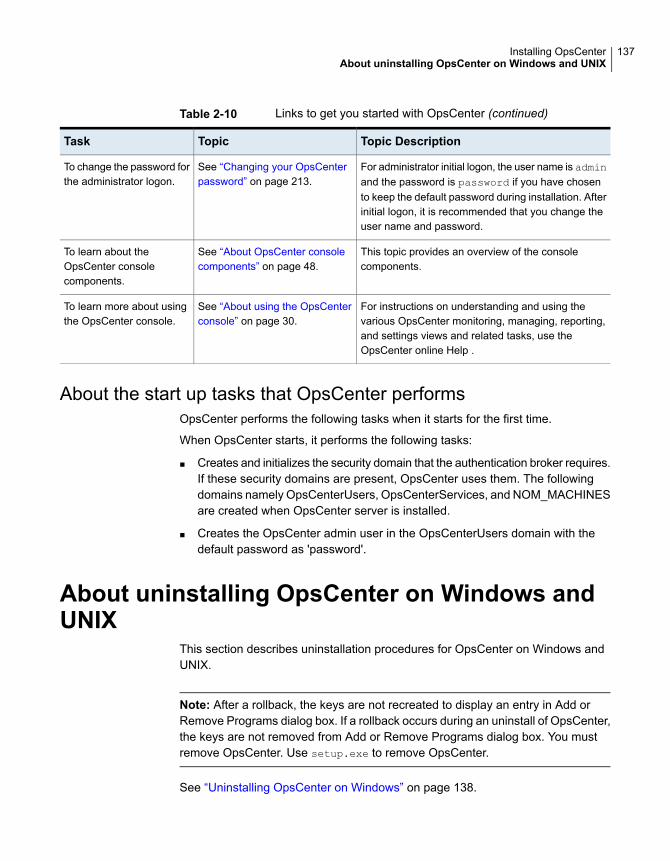
Table 2-10 Links to get you started with OpsCenter (continued)
Topic DescriptionTopicTask
For administrator initial logon, the user name is adminand the password is password if you have chosento keep the default password during installation. Afterinitial logon, it is recommended that you change theuser name and password.
See “Changing your OpsCenterpassword” on page 213.
To change the password forthe administrator logon.
This topic provides an overview of the consolecomponents.
See “About OpsCenter consolecomponents” on page 48.
To learn about theOpsCenter consolecomponents.
For instructions on understanding and using thevarious OpsCenter monitoring, managing, reporting,and settings views and related tasks, use theOpsCenter online Help .
See “About using the OpsCenterconsole” on page 30.
To learn more about usingthe OpsCenter console.
About the start up tasks that OpsCenter performsOpsCenter performs the following tasks when it starts for the first time.
When OpsCenter starts, it performs the following tasks:
■ Creates and initializes the security domain that the authentication broker requires.If these security domains are present, OpsCenter uses them. The followingdomains namely OpsCenterUsers, OpsCenterServices, and NOM_MACHINESare created when OpsCenter server is installed.
■ Creates the OpsCenter admin user in the OpsCenterUsers domain with thedefault password as 'password'.
About uninstalling OpsCenter on Windows andUNIX
This section describes uninstallation procedures for OpsCenter on Windows andUNIX.
Note: After a rollback, the keys are not recreated to display an entry in Add orRemove Programs dialog box. If a rollback occurs during an uninstall of OpsCenter,the keys are not removed from Add or Remove Programs dialog box. You mustremove OpsCenter. Use setup.exe to remove OpsCenter.
See “Uninstalling OpsCenter on Windows” on page 138.
137Installing OpsCenterAbout uninstalling OpsCenter on Windows and UNIX

See “Uninstalling OpsCenter on UNIX ” on page 139.
Uninstalling OpsCenter on WindowsBefore uninstalling OpsCenter components, ensure that NetBackup-Windows GUIis not running. Close any NetBackup-Windows GUI consoles that are open beforeuninstalling OpsCenter components.
Use the Windows Add/Remove Programs utility to uninstall OpsCenter on a Windowshost.
Note: To uninstall OpsCenter from Windows 2008/Vista/2008 R2/7 UAC-enabledenvironments, you must log on as the official administrator. Users that are assignedto the Administrators Group but are not the official administrator cannot uninstallOpsCenter from UAC-enabled environments. To allow users in the AdministratorsGroup to uninstall OpsCenter, disable UAC.
To uninstall OpsCenter Server on Windows
1 Log on to the target host as a user with administrator privileges.
2 In the Windows Control Panel, click Add/Remove Programs.
3 Click Veritas OpsCenter Server and click Remove.
For Windows 64-bit systems, click Veritas OpsCenter Server (64bit) and clickRemove.
4 Click Next to continue and remove OpsCenter Server from your computer.
To uninstall OpsCenter Agent on Windows
1 Log on to the target host as a user with administrator privileges.
2 In the Windows Control Panel, click Add/Remove Programs.
3 Click Veritas OpsCenter Agent and click Remove.
4 Click Next to continue and remove OpsCenter Agent from your computer.
To uninstall OpsCenter View Builder on Windows
1 Log on to the target host as a user with administrator privileges.
2 In the Windows Control Panel, click Add/Remove Programs.
3 Click Veritas OpsCenter View Builder and click Remove.
4 ClickNext to continue and remove OpsCenter View Builder from your computer.
138Installing OpsCenterAbout uninstalling OpsCenter on Windows and UNIX
Uninstalling OpsCenter on UNIXUse the Uninstall Script, which resides in the root directory of the product DVD andalso in opt/VRTS/install directory, to uninstall OpsCenter on a UNIX host.
Note: If you want to reinstall OpsCenter components, use the product DVD. Youcannot reinstall OpsCenter components using the install scripts in theopt/VRTS/install directory.
Note: Veritas recommends that you do not cancel or interrupt the uninstallationprocess once it is started.
To uninstall OpsCenter Server on UNIX
1 Open a UNIX console and log on as root on the target host.
2 Change to the following directory:
opt/VRTS/install
3 Type the following command and press Enter:
./uninstallOpsCenterServer
The Uninstall Script checks the components that are installed on the system.
4 When asked to confirm if you want to uninstall OpsCenter Server, do one ofthe following:
■ Type y.Press Enter to start the uninstall process.The Uninstall Script stops all processes and then uninstalls the componentpackages. When the uninstall is complete, it displays a summary of theuninstall, including the location of the uninstall log files.
■ Type n.Press Enter to cancel the uninstall procedure.
About clustering OpsCenterThe following sections describe how you can cluster OpsCenter.
About OpsCenter clustersClusters provide high availability of applications and data to users. In a cluster, twoor more nodes are linked in a network and work collectively as a single system.
139Installing OpsCenterAbout clustering OpsCenter

Each node can access the shared disks with the help of cluster software. All nodesin a cluster are constantly aware of the status of resources on the other nodes. Ifa node becomes unavailable, resources running on that node migrate to an availablenode.
Veritas NetBackup OpsCenter (OpsCenter) operates in an active or passive failoverconfiguration. OpsCenter Server must be installed on the active node and thepassive (or failover nodes). When a failover occurs in an OpsCenter cluster,OpsCenter is shut down on the active node and starts on one of the failover nodesin the cluster. During failover, users experience only a short interruption in service.This failover provides high availability for OpsCenter. You can cluster only theOpsCenter Server. Installing OpsCenter in a clustered environment makesOpsCenter a highly available application.
Supported OS and cluster solutionsAn OpsCenter cluster is supported on Windows platform. You can install anOpsCenter cluster on the following platforms:
■ Windows 2008 R2 x64
■ Windows 2008 x64
■ Windows 2003 SP2 x64
For OpsCenter to be clustered, you must have Cluster Server (VCS) installed.
Table 2-11 lists the supported versions of Cluster Server (VCS).
Table 2-11 OpsCenter cluster support matrix
Start of supportLatest supportedversion
Platform
4.2 RP25.1VCS Windows
Cluster Server (VCS) is a high-availability solution for cluster configurations. WithVCS you can monitor systems and application services, and restart services on adifferent system when hardware or software fails.
For more information about VCS, see the Veritas Cluster Server User's Guide.
Note:Clustered OpsCenter is not supported on Windows Server Failover Clustering(WSFC). WSFC was earlier referred to as MSCS (Microsoft Cluster Server).
140Installing OpsCenterAbout clustering OpsCenter

About running commands on the active nodeFor a clustered OpsCenter server, you must run commands on the active node.You may get unexpected results if you run a command on an inactive node. Thecommand may fail to run and may sometimes result in an unexpected behavior.
For example, running the dbbackup command on an inactive node may result inthe following unexpected result:
Command: E:\OpsCenter\server\bin>dbbackup.bat E:\temp
Result: "Could not find Z:\OpsCenter\server\config\db.conf file"
In addition, the OpsCenter service group may failover if the command requiresrestarting the OpsCenter services. Some OpsCenter commands or utilities like thesupport utility require restarting the services.
Connecting Authentication Service and Veritas Private BranchExchange
An OpsCenter cluster requires that the authentication service (OpsCenter AT) andPBX components that are installed on the remote host are connected. To check ifAT and PBX are connected, verify whether pbxexchflag of the authenticationservice is set or not. When pbxexchflag is set, its value is equal to 1 and this meansthat PBX and AT are connected.
Note: The information in this section applies to OpsCenter clusters only.
Note: Starting from OpsCenter 7.6, Veritas Product Authentication Service is nota shared component and is local to each Veritas product. The authentication service(Root Broker and Authentication Root Broker) that is installed with OpsCenter iscalled OpsCenter AT.
Before setting the value of pbxexchflag, you must stop all OpsCenter Serverservices, Authentication Service and Veritas Private Branch Exchange. After settingthe value of pbxexchflag to 1, you must restart these services.
Use the following procedure to connect the authentication service and PBXcomponents.
141Installing OpsCenterAbout clustering OpsCenter
To connect Authentication Service and Veritas Private Branch Exchange onWindows
1 Open the command prompt and enter the following command:
<INSTALL_PATH>\Security\Authentication\bin\vssat.exe showispbxexchflag
This command gives the value of pbxexchflag. If the value of pbxexchflag is0, you need to set it to 1.
In case the value of pbxexchflag is 1, you do not need to follow the remainingsteps.
2 Navigate to <INSTALL_PATH>\Security\Authentication\bin directory. Enterthe following command at the bin directory to set the value of pbxexchflag:
vssat.exe setispbxexchflag --enable
The value of pbxexchflag is set to 1.
Verify if the value of pbxexchflag is 1.
See step 1.
3 Stop all the OpsCenter Server services by executing the following command:
<INSTALL_PATH>\OpsCenter\server\bin\opsadmin.bat stop
4 Stop Authentication Service by performing either of the following steps:
■ Use the stop option in the Windows Service pane, or
■ Execute the following command in a command console:
net stop opsatd
5 Restart Authentication Service by performing either of the following steps:
■ Use the start option in the Windows Service pane, or
■ Execute the following command in a command console:
net start opsatd
6 Restart all the OpsCenter Server services by performing the following steps:
■ Navigate to <INSTALL_PATH>\OpsCenter\server\bin directory.
■ Restart all the OpsCenter Server services by executing the followingcommand:
opsadmin.bat start
142Installing OpsCenterAbout clustering OpsCenter
Clustering OpsCenter on WindowsThis section provides information about installing OpsCenter in a clustered mode,on a Windows host.
Table 2-12 provides the Windows clustering steps.
Table 2-12 OpsCenter clustering steps
Reference topicDescriptionStep
See “Limitations of OpsCentercluster on Windows” on page 143.
Understand the limitations of anOpsCenter cluster
1
See “Prerequisites for OpsCentercluster on Windows” on page 143.
Make sure that you have met allprerequisites.
2
See “About installing OpsCenteron Windows” on page 89.
Install OpsCenter.3
Limitations of OpsCenter cluster on WindowsAn OpsCenter cluster has the following limitations:
■ Only the OpsCenter Server can be clustered.OpsCenter Agent and theOpsCenter View Builder cannot be clustered.
■ Upgrades from previous versions of NOM or VBR to clustered OpsCenter Serveris not supported.
■ OpsCenter cluster cannot co-exist with any other Veritas product running insecure mode using the Veritas Product Authentication Service.
■ OpsCenter does not support clustered AT.
Prerequisites for OpsCenter cluster on WindowsThis section contains information about the requirements that must be met beforeyou install and configure OpsCenter in a clustered mode, on a Windows host.
Prerequisites:
■ Verify that VCS and OpsCenter support your hardware. For a list of supportedstorage devices, visit the following Web site:http://www.veritas.com/support
■ Verify that the supported version of VCS is correctly installed and configured.Follow the steps in the Veritas Cluster Server Installation Guide.
■ For VCS Windows 4.2 versions, ensure that the patch is installed before installingOpsCenter. For OpsCenter, the supported VCS version starts from 4.2 RP2.
143Installing OpsCenterAbout clustering OpsCenter
The patch is available at the following URL:http://www.veritas.com/docs/000029739This Technote is applicable to OpsCenter.
■ Verify that no VCS resource group and resource exist with the same name asthat which you intend to use for OpsCenter.
■ The SharedDisk must be configured and accessible to all cluster nodes whereyou want to install OpsCenter.
■ Verify that you have an IP address and host name (virtual host name) to beassigned to the OpsCenter resource in VCS. Only use these for the OpsCenterresource. The virtual host name must be the short name and less than 15characters.Also, ping the IP address and verify that the IP address is not plumbed.
■ Verify that you can mount the disk.
■ Verify that you have the OpsCenter installation program and a valid license key.
■ For a Windows cluster, verify that the cluster disk groups and dynamic volumesfor OpsCenter are created on the shared storage. Refer to the Veritas StorageFoundation Administrator’s Guide for details.
■ Verify that all VCS services are up and running on all the nodes in the cluster.
■ Verify that OpsCenter installation is carried out with the domain admin account.
■ PBX is installed when you install OpsCenter Agent.
■ Verify that PBX on the remote host is connected.See “Connecting Authentication Service and Veritas Private Branch Exchange”on page 141.
Installing OpsCenter Server on a Windows clusterTo cluster OpsCenter and make it highly available, you must install and configureOpsCenter in a clustered mode.
Note: To install OpsCenter Server in clustered mode, first install the OpsCenterServer on the active node and then on the passive nodes. Also, you need to installOpsCenter Server manually on all the nodes.
To install OpsCenter Server on a Windows cluster
1 On an active cluster node where you want to install OpsCenter server, insertthe OpsCenter DVD in the DVD drive.
2 If auto-run is enabled, the Veritas OpsCenter Installation Wizard appears.■
144Installing OpsCenterAbout clustering OpsCenter
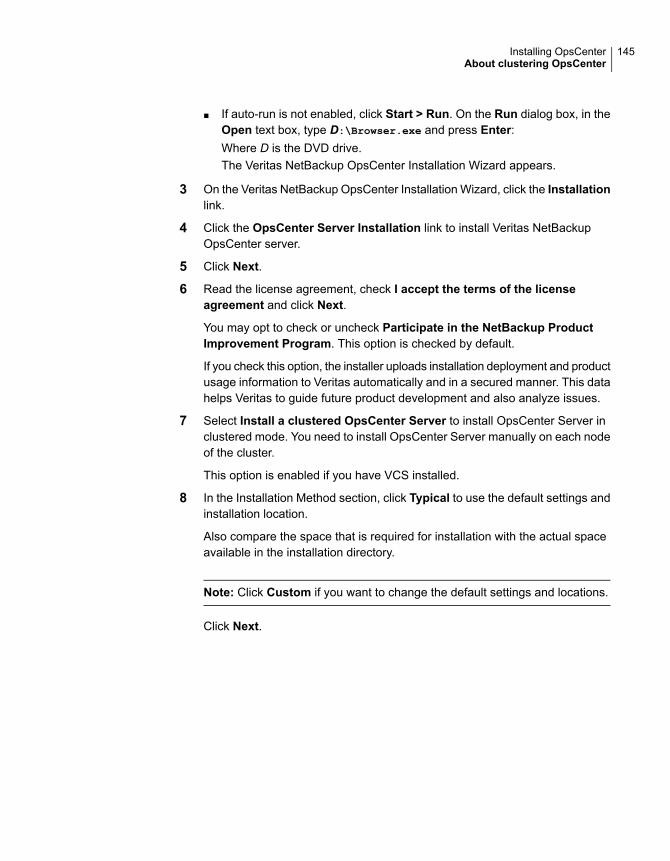
■ If auto-run is not enabled, click Start > Run. On the Run dialog box, in theOpen text box, type D:\Browser.exe and press Enter:Where D is the DVD drive.The Veritas NetBackup OpsCenter Installation Wizard appears.
3 On the Veritas NetBackup OpsCenter Installation Wizard, click the Installationlink.
4 Click the OpsCenter Server Installation link to install Veritas NetBackupOpsCenter server.
5 Click Next.
6 Read the license agreement, check I accept the terms of the licenseagreement and click Next.
You may opt to check or uncheck Participate in the NetBackup ProductImprovement Program. This option is checked by default.
If you check this option, the installer uploads installation deployment and productusage information to Veritas automatically and in a secured manner. This datahelps Veritas to guide future product development and also analyze issues.
7 Select Install a clustered OpsCenter Server to install OpsCenter Server inclustered mode. You need to install OpsCenter Server manually on each nodeof the cluster.
This option is enabled if you have VCS installed.
8 In the Installation Method section, click Typical to use the default settings andinstallation location.
Also compare the space that is required for installation with the actual spaceavailable in the installation directory.
Note: Click Custom if you want to change the default settings and locations.
Click Next.
145Installing OpsCenterAbout clustering OpsCenter
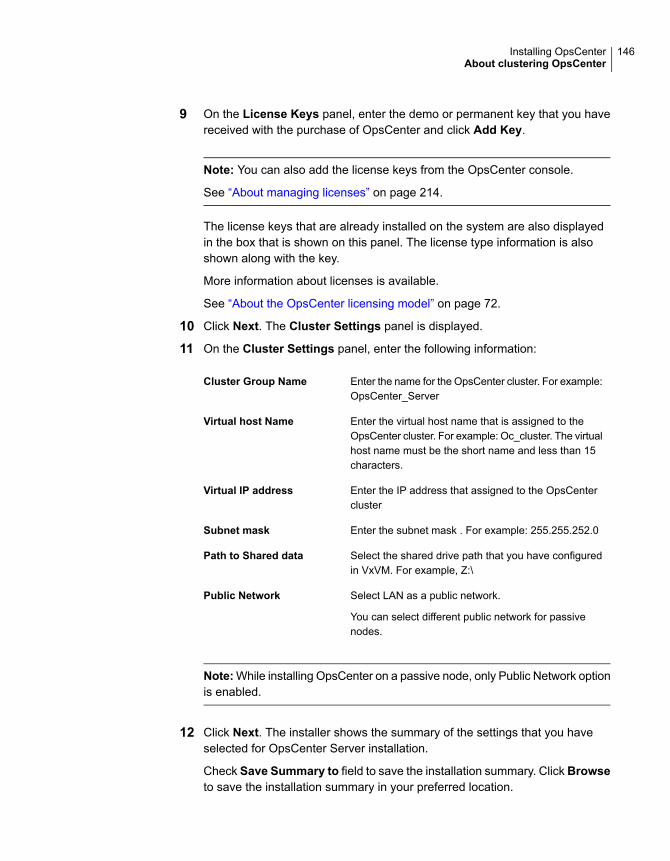
9 On the License Keys panel, enter the demo or permanent key that you havereceived with the purchase of OpsCenter and click Add Key.
Note: You can also add the license keys from the OpsCenter console.
See “About managing licenses” on page 214.
The license keys that are already installed on the system are also displayedin the box that is shown on this panel. The license type information is alsoshown along with the key.
More information about licenses is available.
See “About the OpsCenter licensing model” on page 72.
10 Click Next. The Cluster Settings panel is displayed.
11 On the Cluster Settings panel, enter the following information:
Enter the name for the OpsCenter cluster. For example:OpsCenter_Server
Cluster Group Name
Enter the virtual host name that is assigned to theOpsCenter cluster. For example: Oc_cluster. The virtualhost name must be the short name and less than 15characters.
Virtual host Name
Enter the IP address that assigned to the OpsCentercluster
Virtual IP address
Enter the subnet mask . For example: 255.255.252.0Subnet mask
Select the shared drive path that you have configuredin VxVM. For example, Z:\
Path to Shared data
Select LAN as a public network.
You can select different public network for passivenodes.
Public Network
Note:While installing OpsCenter on a passive node, only Public Network optionis enabled.
12 Click Next. The installer shows the summary of the settings that you haveselected for OpsCenter Server installation.
Check Save Summary to field to save the installation summary. ClickBrowseto save the installation summary in your preferred location.
146Installing OpsCenterAbout clustering OpsCenter

13 Click Install.
The installer starts installing the OpsCenter Server software.
In a clustered mode, the default OpsCenter database location on Windows isthe following location on the shared drive:
OpsCenter\Server\db
14 After successful installation, you can view the OpsCenter console or viewinstallation logs.
15 Click Finish. Repeat this procedure for all the cluster nodes.
Note: After installing an OpsCenter cluster on Windows 2008 R2 x64 system,you need to manually bring the NetBackupOpsCenterVCS resource online. Youcan bring the NetBackupOpsCenterVCS resource online from the CLI or byusing the cluster GUI. Use the following command:
hares -online <resource name> -sys <Name of the active node>
Example: hares -online newonelatest-OpsCenter -sys OPS-CLUSTER-1
Upgrading OpsCenter cluster on WindowsUse the following procedure to upgrade OpsCenter cluster on Windows.
Note: To upgrade to OpsCenter Server in a clustered mode, first install theOpsCenter Server on the active node and then on the passive nodes. Also, youneed to install OpsCenter Server manually on all the nodes.
To upgrade OpsCenter cluster on Windows
1 From the active node of the OpsCenter cluster that you want to upgrade, insertthe OpsCenter DVD in the DVD drive.
2 If auto-run is enabled, the Veritas OpsCenter Installation Wizard appears.■
■ If auto-run is not enabled, click Start > Run. On the Run dialog box, in theOpen text box, type D:\Browser.exe and press Enter:Where D is the DVD drive.The Veritas NetBackup OpsCenter Installation Wizard appears.
3 On the OpsCenter Installation Wizard, click the Installation link.
4 Click the OpsCenter Server Installation link to install Veritas NetBackupOpsCenter server.
147Installing OpsCenterAbout clustering OpsCenter
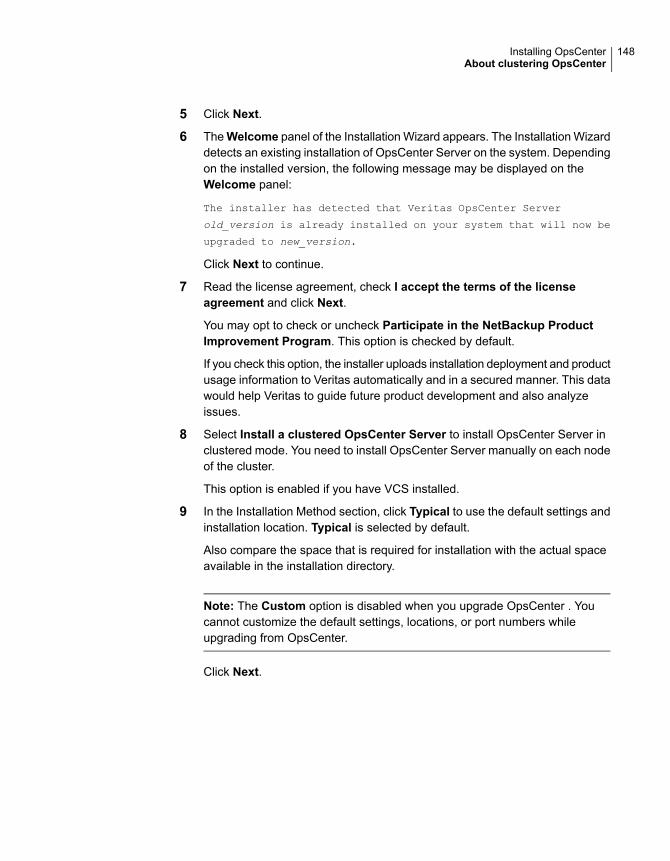
5 Click Next.
6 TheWelcome panel of the Installation Wizard appears. The Installation Wizarddetects an existing installation of OpsCenter Server on the system. Dependingon the installed version, the following message may be displayed on theWelcome panel:
The installer has detected that Veritas OpsCenter Server
old_version is already installed on your system that will now be
upgraded to new_version.
Click Next to continue.
7 Read the license agreement, check I accept the terms of the licenseagreement and click Next.
You may opt to check or uncheck Participate in the NetBackup ProductImprovement Program. This option is checked by default.
If you check this option, the installer uploads installation deployment and productusage information to Veritas automatically and in a secured manner. This datawould help Veritas to guide future product development and also analyzeissues.
8 Select Install a clustered OpsCenter Server to install OpsCenter Server inclustered mode. You need to install OpsCenter Server manually on each nodeof the cluster.
This option is enabled if you have VCS installed.
9 In the Installation Method section, click Typical to use the default settings andinstallation location. Typical is selected by default.
Also compare the space that is required for installation with the actual spaceavailable in the installation directory.
Note: The Custom option is disabled when you upgrade OpsCenter . Youcannot customize the default settings, locations, or port numbers whileupgrading from OpsCenter.
Click Next.
148Installing OpsCenterAbout clustering OpsCenter
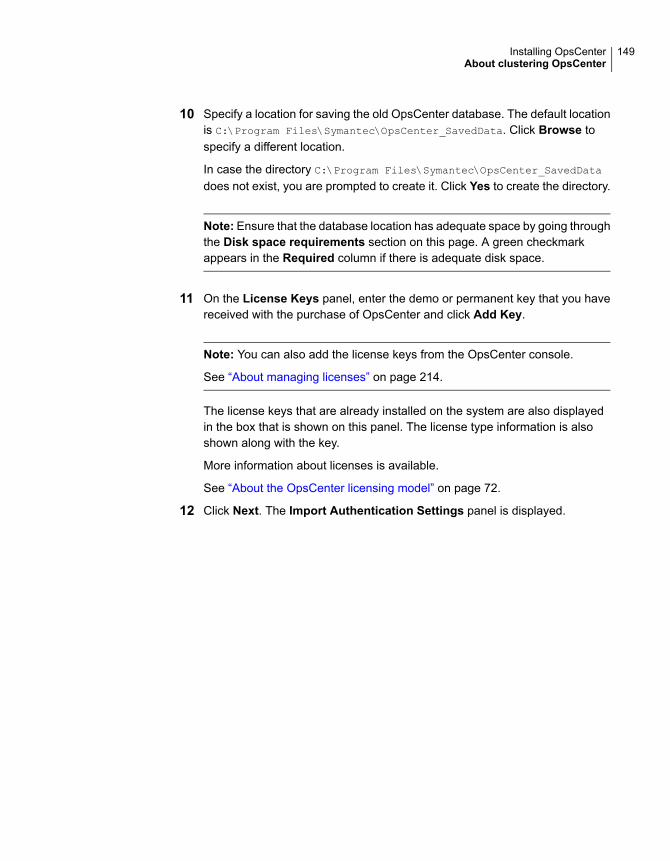
10 Specify a location for saving the old OpsCenter database. The default locationis C:\Program Files\Symantec\OpsCenter_SavedData. Click Browse tospecify a different location.
In case the directory C:\Program Files\Symantec\OpsCenter_SavedData
does not exist, you are prompted to create it. Click Yes to create the directory.
Note: Ensure that the database location has adequate space by going throughthe Disk space requirements section on this page. A green checkmarkappears in the Required column if there is adequate disk space.
11 On the License Keys panel, enter the demo or permanent key that you havereceived with the purchase of OpsCenter and click Add Key.
Note: You can also add the license keys from the OpsCenter console.
See “About managing licenses” on page 214.
The license keys that are already installed on the system are also displayedin the box that is shown on this panel. The license type information is alsoshown along with the key.
More information about licenses is available.
See “About the OpsCenter licensing model” on page 72.
12 Click Next. The Import Authentication Settings panel is displayed.
149Installing OpsCenterAbout clustering OpsCenter
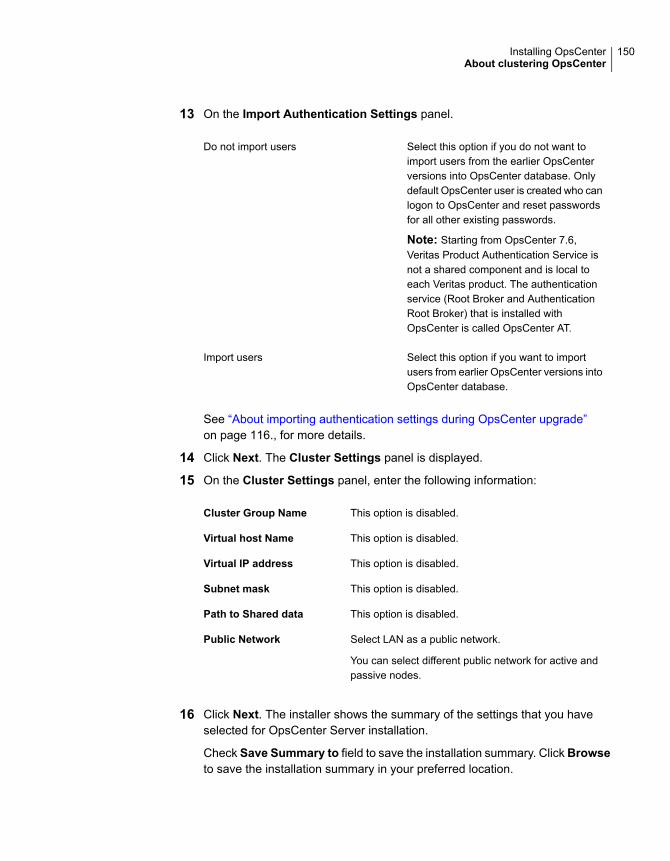
13 On the Import Authentication Settings panel.
Select this option if you do not want toimport users from the earlier OpsCenterversions into OpsCenter database. Onlydefault OpsCenter user is created who canlogon to OpsCenter and reset passwordsfor all other existing passwords.
Note: Starting from OpsCenter 7.6,Veritas Product Authentication Service isnot a shared component and is local toeach Veritas product. The authenticationservice (Root Broker and AuthenticationRoot Broker) that is installed withOpsCenter is called OpsCenter AT.
Do not import users
Select this option if you want to importusers from earlier OpsCenter versions intoOpsCenter database.
Import users
See “About importing authentication settings during OpsCenter upgrade”on page 116., for more details.
14 Click Next. The Cluster Settings panel is displayed.
15 On the Cluster Settings panel, enter the following information:
This option is disabled.Cluster Group Name
This option is disabled.Virtual host Name
This option is disabled.Virtual IP address
This option is disabled.Subnet mask
This option is disabled.Path to Shared data
Select LAN as a public network.
You can select different public network for active andpassive nodes.
Public Network
16 Click Next. The installer shows the summary of the settings that you haveselected for OpsCenter Server installation.
Check Save Summary to field to save the installation summary. ClickBrowseto save the installation summary in your preferred location.
150Installing OpsCenterAbout clustering OpsCenter
17 Click Install.
The installer starts installing the OpsCenter Server software.
Note: In clustered mode, the default OpsCenter database location on Windowsis the following location on the shared drive:
OpsCenter\Server\db
18 After successful installation, you can view the OpsCenter console or viewinstallation logs.
19 Click Finish. Repeat this procedure for the passive nodes.
Known issue in upgrading OpsCenter cluster setupWhile upgrading from OpsCenter cluster, there may be a problem in getting shareddrive access during installation or upgrade. Due to a configuration issue, installermay not get access of shared drive which in turn causes an issue in creating thedomain.
To create domain again in cluster,
1 Freeze the cluster setup.
2 Stop the OpsCenter services.
3 Open security.conf file on the path Shared_Drive\OpsCenter\Server\config.
4 Change the value of parameter vxss.initialized from False to True(vxss.initialized = True).
5 Restart the OpsCenter services again.
6 Unfreeze the cluster setup.
7 Access OpsCenter.
Uninstalling OpsCenter from the Windows clusterUse the Windows Add/Remove Programs utility to uninstall OpsCenter Serverfrom a Windows cluster. Use the following procedure to uninstall OpsCenter fromall the cluster nodes.
To uninstall Veritas NetBackupOpsCenter Server completely from the cluster
1 Log on to the active node as a user with administrator privileges.
2 Log on to the cluster web user interface.
151Installing OpsCenterAbout clustering OpsCenter
3 Right-click the selected cluster monitor panel and click Explorer View fromthe menu to access Cluster Explorer.
4 Click the Service Groups tab in the Cluster Explorer configuration tree.
5 Right-click the OpsCenter resource group and select Offline > All Systems.
6 Click Yes to forcefully take the resource group offline.
7 In the Windows Control Panel, click Add/Remove Programs.
8 Click Veritas OpsCenter Server and click Remove.
9 Click Next to continue and remove Veritas OpsCenter Server from yourcomputer.
10 Uninstall OpsCenter software from all the nodes. Repeat steps 7 through 9 forall the passive nodes.
11 Delete the OpsCenter resource groups manually. Note that the installer doesnot remove the OpsCenter resource groups. These must be removed manually.
See “Deleting OpsCenter resource group from the cluster” on page 152.
Deleting OpsCenter resource group from the clusterUse the following procedure to delete OpsCenter resource group from the cluster.
To delete OpsCenter resource group from the cluster
1 Log on to the cluster web user interface.
2 Right-click the selected cluster monitor panel and click Explorer View fromthe menu to access Cluster Explorer.
3 Click the Service Groups tab in the Cluster Explorer configuration tree.
4 Right-click the OpsCenter resource group and select Offline > All Systems.
5 Click Yes to forcefully take the resource group offline.
6 Right-click the OpsCenter resource group and select Delete.
7 Click Yes to delete the OpsCenter resource group.
See “Uninstalling OpsCenter from the Windows cluster” on page 151.
152Installing OpsCenterAbout clustering OpsCenter
OpsCenter Getting Startedfeature
This chapter includes the following topics:
■ About the OpsCenter Getting Started feature
■ OpsCenter user roles
■ Learn more about adding NetBackup Master Servers
■ Learn more about OpsCenter Views
■ Add Users
■ Edit User
■ Reset password
■ Add NetBackup Master Server
■ Add OpsCenter Agent
■ Add OpsCenter Views/Groups
■ Configure SMTP Server
About the OpsCenter Getting Started featureOpsCenter provides you with the Getting Started feature that assists you in theinitial OpsCenter configuration. When you logon to OpsCenter for the first time, youneed to do a few initial configurations in the following recommended sequence tostart monitoring NetBackup:
3Chapter
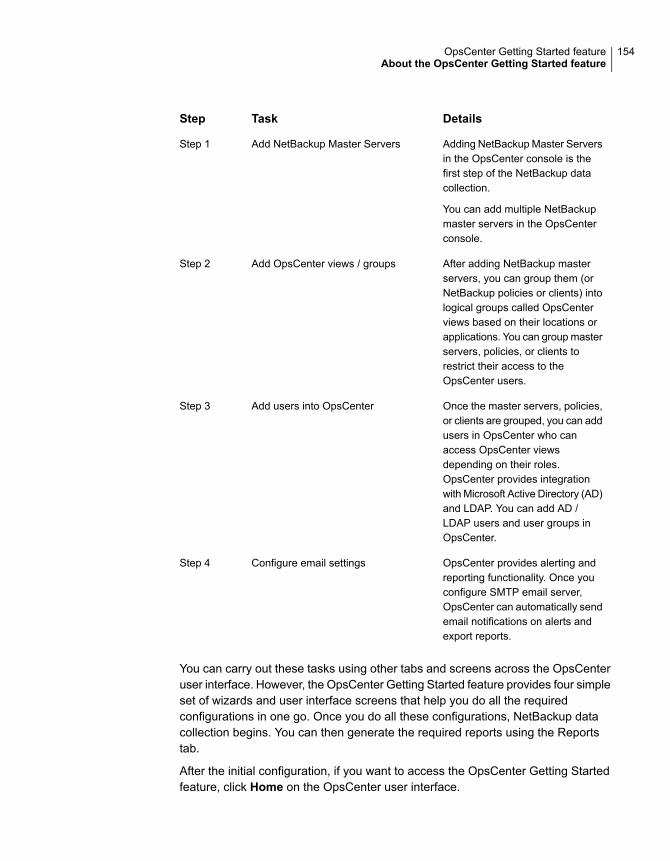
DetailsTaskStep
Adding NetBackup Master Serversin the OpsCenter console is thefirst step of the NetBackup datacollection.
You can add multiple NetBackupmaster servers in the OpsCenterconsole.
Add NetBackup Master ServersStep 1
After adding NetBackup masterservers, you can group them (orNetBackup policies or clients) intological groups called OpsCenterviews based on their locations orapplications. You can group masterservers, policies, or clients torestrict their access to theOpsCenter users.
Add OpsCenter views / groupsStep 2
Once the master servers, policies,or clients are grouped, you can addusers in OpsCenter who canaccess OpsCenter viewsdepending on their roles.OpsCenter provides integrationwith Microsoft Active Directory (AD)and LDAP. You can add AD /LDAP users and user groups inOpsCenter.
Add users into OpsCenterStep 3
OpsCenter provides alerting andreporting functionality. Once youconfigure SMTP email server,OpsCenter can automatically sendemail notifications on alerts andexport reports.
Configure email settingsStep 4
You can carry out these tasks using other tabs and screens across the OpsCenteruser interface. However, the OpsCenter Getting Started feature provides four simpleset of wizards and user interface screens that help you do all the requiredconfigurations in one go. Once you do all these configurations, NetBackup datacollection begins. You can then generate the required reports using the Reportstab.
After the initial configuration, if you want to access the OpsCenter Getting Startedfeature, click Home on the OpsCenter user interface.
154OpsCenter Getting Started featureAbout the OpsCenter Getting Started feature
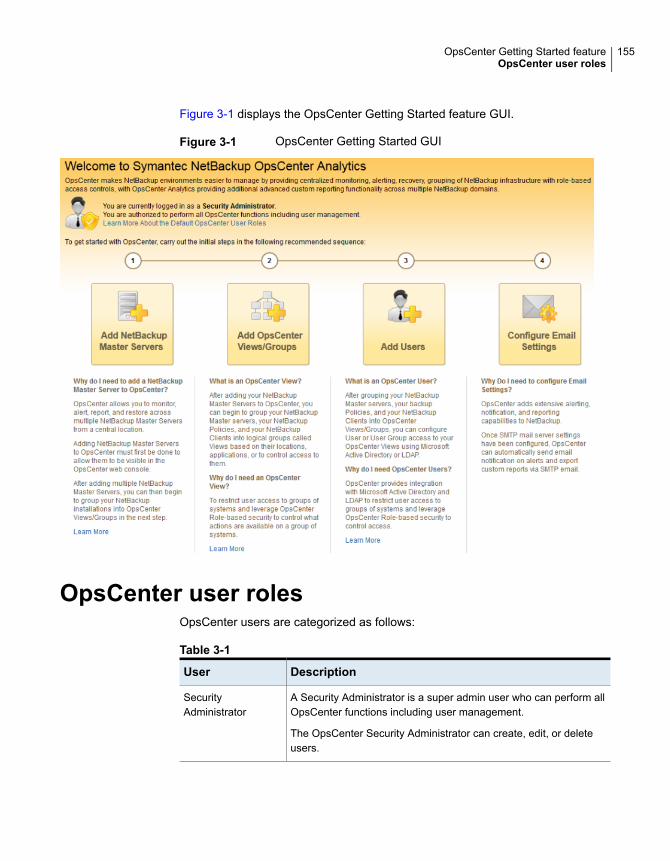
Figure 3-1 displays the OpsCenter Getting Started feature GUI.
Figure 3-1 OpsCenter Getting Started GUI
OpsCenter user rolesOpsCenter users are categorized as follows:
Table 3-1
DescriptionUser
A Security Administrator is a super admin user who can perform allOpsCenter functions including user management.
The OpsCenter Security Administrator can create, edit, or deleteusers.
SecurityAdministrator
155OpsCenter Getting Started featureOpsCenter user roles

Table 3-1 (continued)
DescriptionUser
This user can perform all OpsCenter functions except for usermanagement.
Administrator
This user is not involved in the activities that are related to managingusers, OpsCenter Server, and NetBackup configuration.
Operator
The role of this user is to mainly perform restore operations. TheRestore Operator can monitor, perform alert operations and runstandard or custom reports.
Restore Operator
The role of this user is to mainly generate the operational andbusiness-level reports for further analysis. A Reporter would be ableto view only those schedules that they themselves create. TheSecurity Administrator, Administrator, and Operator would howeverbe able to access all the schedules.
Reporter
Note: You can assign a user role to a user group of an authorized AD / LDAPdomain. The same user role is assigned to each user of the authorized domaingroup.
See “About adding AD / LDAP user groups in OpsCenter” on page 229.
Table 3-2 lists the OpsCenter user roles and the OpsCenter UI functions that theseusers can perform.
Table 3-2 User roles
ReporterRestoreOperator
OperatorAdministratorSecurityAdministrator
OpsCenterfunction
NNNNYUser Management
NNNYYOpsCenterManagement
NPartial (Onlyperformoperationson RestoreJobs)
YYYNetBackup Operations
NYYYYBackup and Recovery
NNNYYViews Management
156OpsCenter Getting Started featureOpsCenter user roles
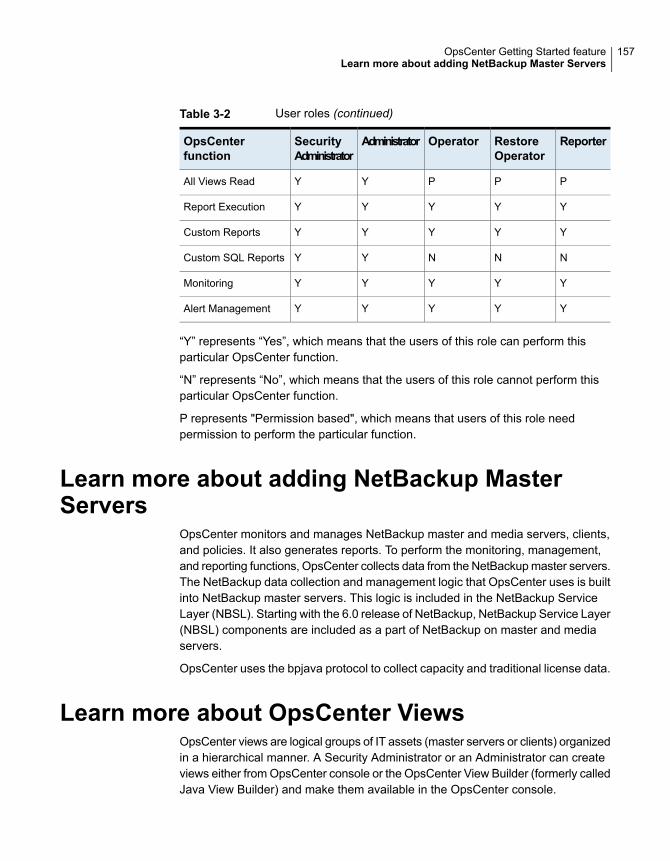
Table 3-2 User roles (continued)
ReporterRestoreOperator
OperatorAdministratorSecurityAdministrator
OpsCenterfunction
PPPYYAll Views Read
YYYYYReport Execution
YYYYYCustom Reports
NNNYYCustom SQL Reports
YYYYYMonitoring
YYYYYAlert Management
“Y” represents “Yes”, which means that the users of this role can perform thisparticular OpsCenter function.
“N” represents “No”, which means that the users of this role cannot perform thisparticular OpsCenter function.
P represents "Permission based", which means that users of this role needpermission to perform the particular function.
Learn more about adding NetBackup MasterServers
OpsCenter monitors and manages NetBackup master and media servers, clients,and policies. It also generates reports. To perform the monitoring, management,and reporting functions, OpsCenter collects data from the NetBackup master servers.The NetBackup data collection and management logic that OpsCenter uses is builtinto NetBackup master servers. This logic is included in the NetBackup ServiceLayer (NBSL). Starting with the 6.0 release of NetBackup, NetBackup Service Layer(NBSL) components are included as a part of NetBackup on master and mediaservers.
OpsCenter uses the bpjava protocol to collect capacity and traditional license data.
Learn more about OpsCenter ViewsOpsCenter views are logical groups of IT assets (master servers or clients) organizedin a hierarchical manner. A Security Administrator or an Administrator can createviews either from OpsCenter console or the OpsCenter View Builder (formerly calledJava View Builder) and make them available in the OpsCenter console.
157OpsCenter Getting Started featureLearn more about adding NetBackup Master Servers
In an OpsCenter view, IT assets that are scattered across organization can bearranged according to their locations, business units, or applications. You cangenerate various OpsCenter reports that are filtered by views. With these reports,you can identify the locations or departments with hosts storing business criticaldata. After you install and run the OpsCenter Server and the OpsCenter Agent,OpsCenter detects the IT assets, which are then stored in the database. TheOpsCenter View Builder makes these IT assets available when a view is created.
Add UsersYou can either add the existing users that are discovered from various domains toOpsCenter or create users in the private “OpsCenterUsers” domain.
You can add AD / LDAP domain groups to OpsCenter to authorize all users fromthat group to access OpsCenter.
All users from the authorized domain group can logon to OpsCenter with their AD/ LDAP credentials. Any changes like addition or removal of a user from anauthorized AD / LDAP domain group are automatically reflected in OpsCenter.
Note: Only a Security Administrator can add or modify user profiles by using theOpsCenter console.
158OpsCenter Getting Started featureAdd Users
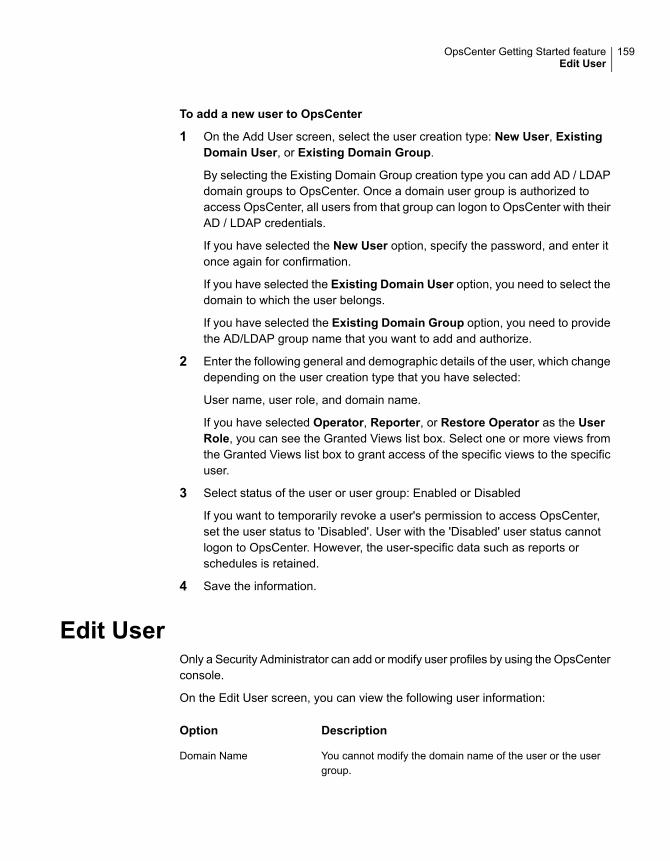
To add a new user to OpsCenter
1 On the Add User screen, select the user creation type: New User, ExistingDomain User, or Existing Domain Group.
By selecting the Existing Domain Group creation type you can add AD / LDAPdomain groups to OpsCenter. Once a domain user group is authorized toaccess OpsCenter, all users from that group can logon to OpsCenter with theirAD / LDAP credentials.
If you have selected the New User option, specify the password, and enter itonce again for confirmation.
If you have selected the Existing Domain User option, you need to select thedomain to which the user belongs.
If you have selected the Existing Domain Group option, you need to providethe AD/LDAP group name that you want to add and authorize.
2 Enter the following general and demographic details of the user, which changedepending on the user creation type that you have selected:
User name, user role, and domain name.
If you have selected Operator, Reporter, or Restore Operator as the UserRole, you can see the Granted Views list box. Select one or more views fromthe Granted Views list box to grant access of the specific views to the specificuser.
3 Select status of the user or user group: Enabled or Disabled
If you want to temporarily revoke a user's permission to access OpsCenter,set the user status to 'Disabled'. User with the 'Disabled' user status cannotlogon to OpsCenter. However, the user-specific data such as reports orschedules is retained.
4 Save the information.
Edit UserOnly a Security Administrator can add or modify user profiles by using the OpsCenterconsole.
On the Edit User screen, you can view the following user information:
DescriptionOption
You cannot modify the domain name of the user or the usergroup.
Domain Name
159OpsCenter Getting Started featureEdit User
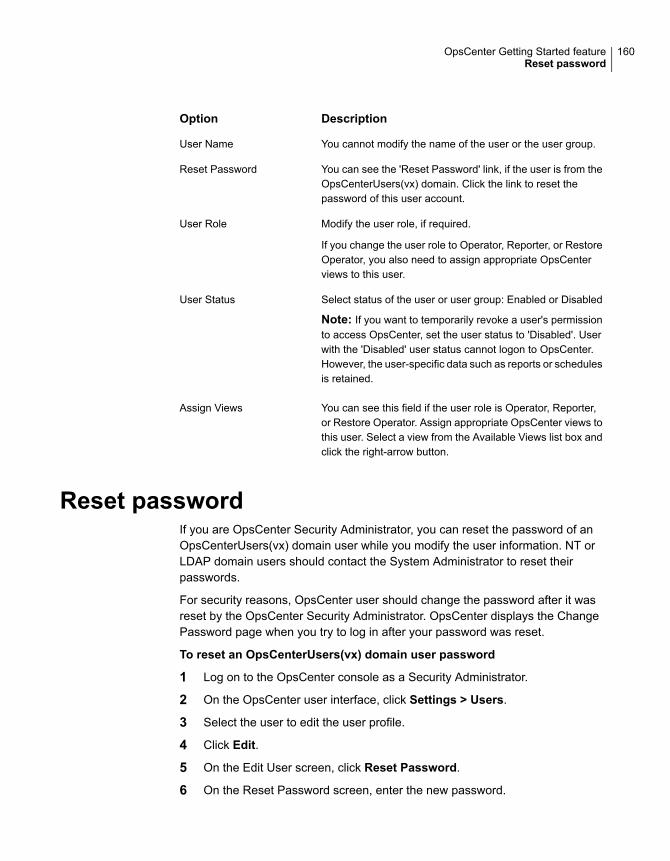
DescriptionOption
You cannot modify the name of the user or the user group.User Name
You can see the 'Reset Password' link, if the user is from theOpsCenterUsers(vx) domain. Click the link to reset thepassword of this user account.
Reset Password
Modify the user role, if required.
If you change the user role to Operator, Reporter, or RestoreOperator, you also need to assign appropriate OpsCenterviews to this user.
User Role
Select status of the user or user group: Enabled or Disabled
Note: If you want to temporarily revoke a user's permissionto access OpsCenter, set the user status to 'Disabled'. Userwith the 'Disabled' user status cannot logon to OpsCenter.However, the user-specific data such as reports or schedulesis retained.
User Status
You can see this field if the user role is Operator, Reporter,or Restore Operator. Assign appropriate OpsCenter views tothis user. Select a view from the Available Views list box andclick the right-arrow button.
Assign Views
Reset passwordIf you are OpsCenter Security Administrator, you can reset the password of anOpsCenterUsers(vx) domain user while you modify the user information. NT orLDAP domain users should contact the System Administrator to reset theirpasswords.
For security reasons, OpsCenter user should change the password after it wasreset by the OpsCenter Security Administrator. OpsCenter displays the ChangePassword page when you try to log in after your password was reset.
To reset an OpsCenterUsers(vx) domain user password
1 Log on to the OpsCenter console as a Security Administrator.
2 On the OpsCenter user interface, click Settings > Users.
3 Select the user to edit the user profile.
4 Click Edit.
5 On the Edit User screen, click Reset Password.
6 On the Reset Password screen, enter the new password.
160OpsCenter Getting Started featureReset password
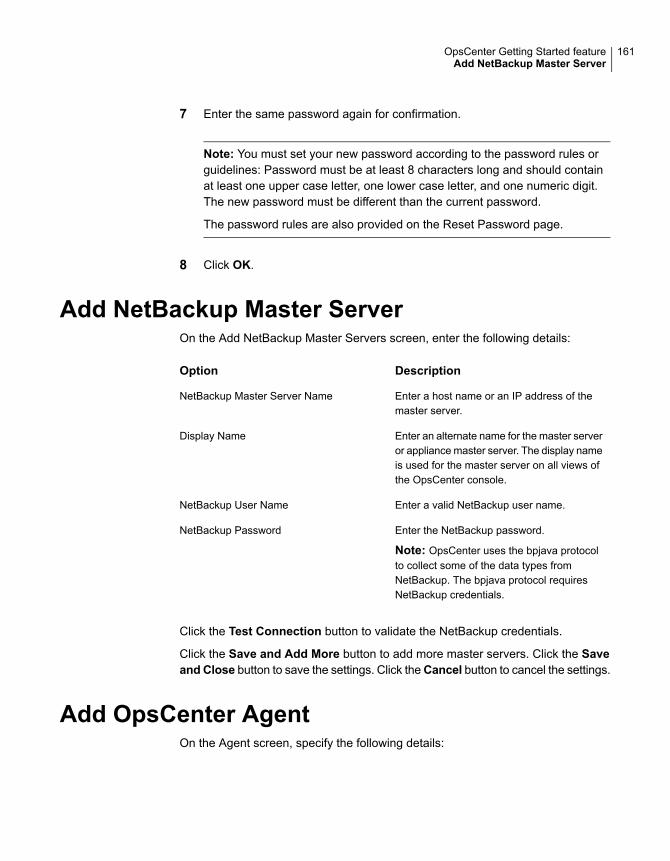
7 Enter the same password again for confirmation.
Note: You must set your new password according to the password rules orguidelines: Password must be at least 8 characters long and should containat least one upper case letter, one lower case letter, and one numeric digit.The new password must be different than the current password.
The password rules are also provided on the Reset Password page.
8 Click OK.
Add NetBackup Master ServerOn the Add NetBackup Master Servers screen, enter the following details:
DescriptionOption
Enter a host name or an IP address of themaster server.
NetBackup Master Server Name
Enter an alternate name for the master serveror appliance master server. The display nameis used for the master server on all views ofthe OpsCenter console.
Display Name
Enter a valid NetBackup user name.NetBackup User Name
Enter the NetBackup password.
Note: OpsCenter uses the bpjava protocolto collect some of the data types fromNetBackup. The bpjava protocol requiresNetBackup credentials.
NetBackup Password
Click the Test Connection button to validate the NetBackup credentials.
Click the Save and Add More button to add more master servers. Click the Saveand Close button to save the settings. Click theCancel button to cancel the settings.
Add OpsCenter AgentOn the Agent screen, specify the following details:
161OpsCenter Getting Started featureAdd NetBackup Master Server
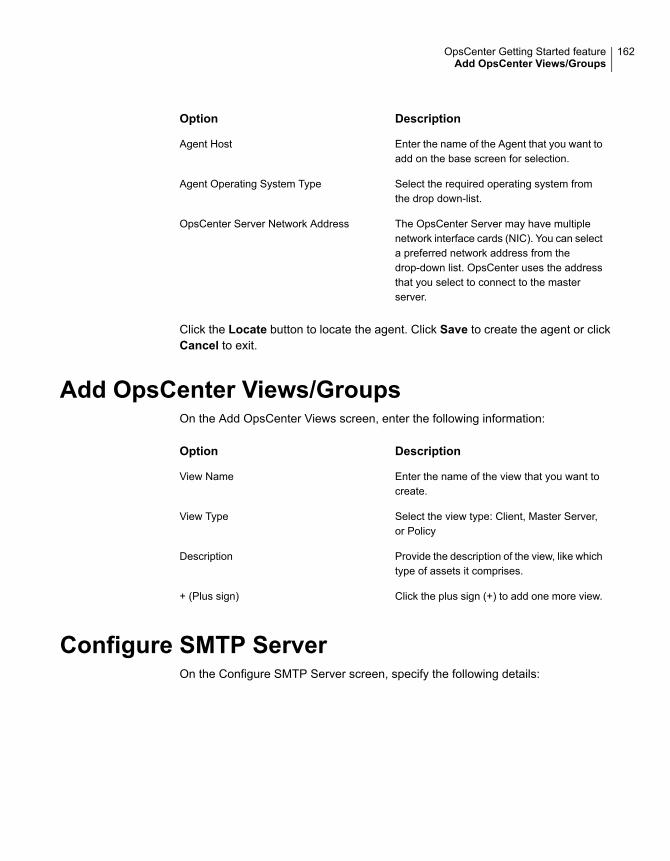
DescriptionOption
Enter the name of the Agent that you want toadd on the base screen for selection.
Agent Host
Select the required operating system fromthe drop down-list.
Agent Operating System Type
The OpsCenter Server may have multiplenetwork interface cards (NIC). You can selecta preferred network address from thedrop-down list. OpsCenter uses the addressthat you select to connect to the masterserver.
OpsCenter Server Network Address
Click the Locate button to locate the agent. Click Save to create the agent or clickCancel to exit.
Add OpsCenter Views/GroupsOn the Add OpsCenter Views screen, enter the following information:
DescriptionOption
Enter the name of the view that you want tocreate.
View Name
Select the view type: Client, Master Server,or Policy
View Type
Provide the description of the view, like whichtype of assets it comprises.
Description
Click the plus sign (+) to add one more view.+ (Plus sign)
Configure SMTP ServerOn the Configure SMTP Server screen, specify the following details:
162OpsCenter Getting Started featureAdd OpsCenter Views/Groups
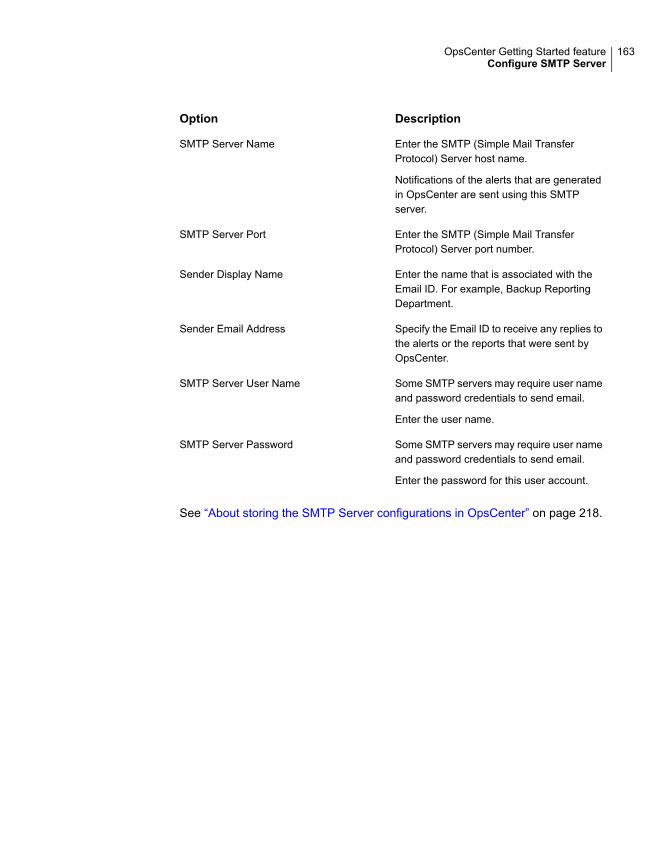
DescriptionOption
Enter the SMTP (Simple Mail TransferProtocol) Server host name.
Notifications of the alerts that are generatedin OpsCenter are sent using this SMTPserver.
SMTP Server Name
Enter the SMTP (Simple Mail TransferProtocol) Server port number.
SMTP Server Port
Enter the name that is associated with theEmail ID. For example, Backup ReportingDepartment.
Sender Display Name
Specify the Email ID to receive any replies tothe alerts or the reports that were sent byOpsCenter.
Sender Email Address
Some SMTP servers may require user nameand password credentials to send email.
Enter the user name.
SMTP Server User Name
Some SMTP servers may require user nameand password credentials to send email.
Enter the password for this user account.
SMTP Server Password
See “About storing the SMTP Server configurations in OpsCenter” on page 218.
163OpsCenter Getting Started featureConfigure SMTP Server
Administering OpsCenterThis chapter includes the following topics:
■ About OpsCenter services and processes used by OpsCenter
■ OpsCenter server scripts on Windows and UNIX
■ About OpsCenter database administration
■ About backup and restore of OpsCenter and OpsCenter Analytics
■ About communication and firewall considerations
■ Gathering troubleshooting data with the support script
■ About OpsCenter log files
About OpsCenter services and processes usedby OpsCenter
This section provides information about OpsCenter services and processes andhow you can control these services.
These topics assume you already installed OpsCenter on a server.
If you have not installed OpsCenter, review the installation chapter.
See “Services used by OpsCenter on Windows” on page 165.
See “Controlling the OpsCenter services” on page 165.
See “Processes used by OpsCenter on UNIX” on page 166.
4Chapter
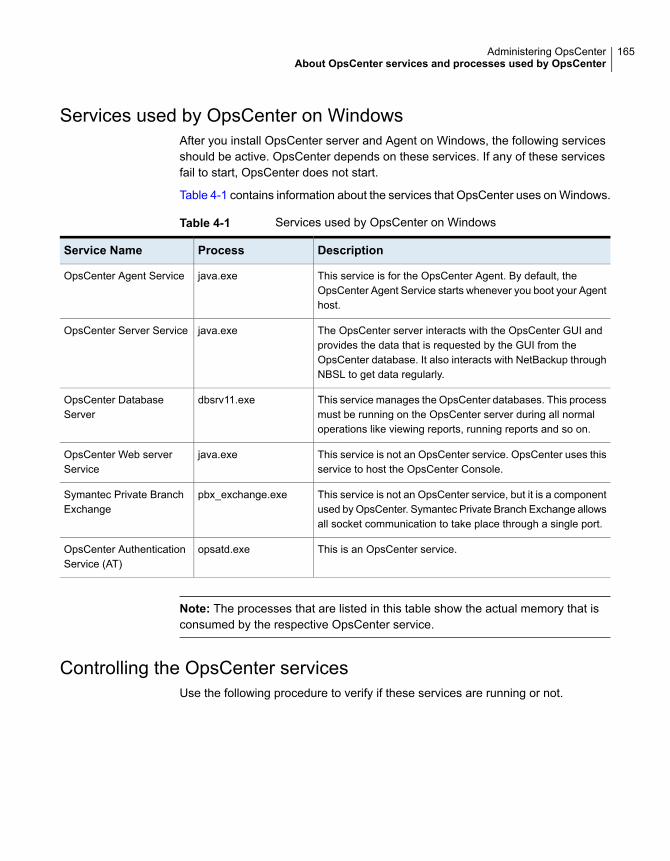
Services used by OpsCenter on WindowsAfter you install OpsCenter server and Agent on Windows, the following servicesshould be active. OpsCenter depends on these services. If any of these servicesfail to start, OpsCenter does not start.
Table 4-1 contains information about the services that OpsCenter uses on Windows.
Table 4-1 Services used by OpsCenter on Windows
DescriptionProcessService Name
This service is for the OpsCenter Agent. By default, theOpsCenter Agent Service starts whenever you boot your Agenthost.
java.exeOpsCenter Agent Service
The OpsCenter server interacts with the OpsCenter GUI andprovides the data that is requested by the GUI from theOpsCenter database. It also interacts with NetBackup throughNBSL to get data regularly.
java.exeOpsCenter Server Service
This service manages the OpsCenter databases. This processmust be running on the OpsCenter server during all normaloperations like viewing reports, running reports and so on.
dbsrv11.exeOpsCenter DatabaseServer
This service is not an OpsCenter service. OpsCenter uses thisservice to host the OpsCenter Console.
java.exeOpsCenter Web serverService
This service is not an OpsCenter service, but it is a componentused by OpsCenter. Symantec Private Branch Exchange allowsall socket communication to take place through a single port.
pbx_exchange.exeSymantec Private BranchExchange
This is an OpsCenter service.opsatd.exeOpsCenter AuthenticationService (AT)
Note: The processes that are listed in this table show the actual memory that isconsumed by the respective OpsCenter service.
Controlling the OpsCenter servicesUse the following procedure to verify if these services are running or not.
165Administering OpsCenterAbout OpsCenter services and processes used by OpsCenter
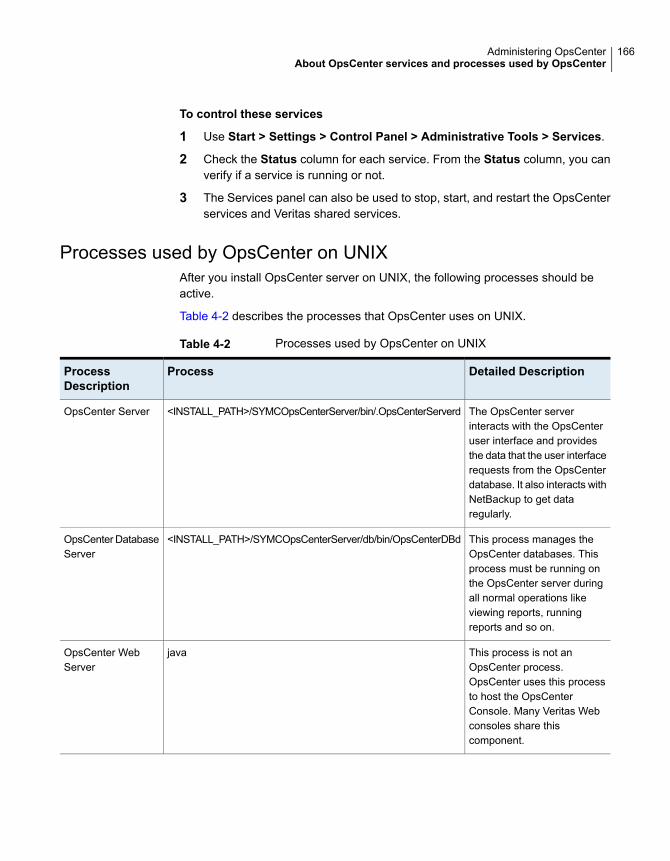
To control these services
1 Use Start > Settings > Control Panel > Administrative Tools > Services.
2 Check the Status column for each service. From the Status column, you canverify if a service is running or not.
3 The Services panel can also be used to stop, start, and restart the OpsCenterservices and Veritas shared services.
Processes used by OpsCenter on UNIXAfter you install OpsCenter server on UNIX, the following processes should beactive.
Table 4-2 describes the processes that OpsCenter uses on UNIX.
Table 4-2 Processes used by OpsCenter on UNIX
Detailed DescriptionProcessProcessDescription
The OpsCenter serverinteracts with the OpsCenteruser interface and providesthe data that the user interfacerequests from the OpsCenterdatabase. It also interacts withNetBackup to get dataregularly.
<INSTALL_PATH>/SYMCOpsCenterServer/bin/.OpsCenterServerdOpsCenter Server
This process manages theOpsCenter databases. Thisprocess must be running onthe OpsCenter server duringall normal operations likeviewing reports, runningreports and so on.
<INSTALL_PATH>/SYMCOpsCenterServer/db/bin/OpsCenterDBdOpsCenter DatabaseServer
This process is not anOpsCenter process.OpsCenter uses this processto host the OpsCenterConsole. Many Veritas Webconsoles share thiscomponent.
javaOpsCenter WebServer
166Administering OpsCenterAbout OpsCenter services and processes used by OpsCenter

Table 4-2 Processes used by OpsCenter on UNIX (continued)
Detailed DescriptionProcessProcessDescription
This process is not anOpsCenter process. but it is acomponent used byOpsCenter. PBX allows allsocket communication to takeplace through a single port.
<INSTALL_PATH>/VRTSpbx/bin/pbx_exchangeSymantec PrivateBranch Exchange
This is an OpsCenter process.<INSTALL_PATH>/SYMCOpsCenterServer/bin/opsatdOpsCenterAuthenticationService (AT)
Note: The processes that are listed in this table show the actual memory consumedby the respective OpsCenter process.
OpsCenter server scripts on Windows and UNIXThe following scripts are used within OpsCenter. The OpsCenter administrator mayuse many of these scripts. Use the -h option for help about these scripts.
Table 4-3 lists the OpsCenter server scripts on Windows.
Table 4-3 OpsCenter server scripts on Windows
Invokes orIs Invokedby
FunctionLocationScript
OpsCenterAdministrator
Starts or stops the OpsCenter Serverservice that is OpsCenterServerd.
INSTALL_PATH\OpsCenter\server\binstartserver.bat
and
stopserver.bat
OpsCenterAdministrator
Starts or stops the OpsCenter AT servicethat is opsatd.
INSTALL_PATH\OpsCenter\server\binstartat.bat
and
stopat.bat
OpsCenterAdministrator
Backs up the OpsCenter databaseINSTALL_PATH\OpsCenter\server\bindbbackup.bat
OpsCenterAdministrator
Starts or stops the OpsCenter databaseINSTALL_PATH\OpsCenter\server\binstartdb.bat andstopdb.bat
167Administering OpsCenterOpsCenter server scripts on Windows and UNIX
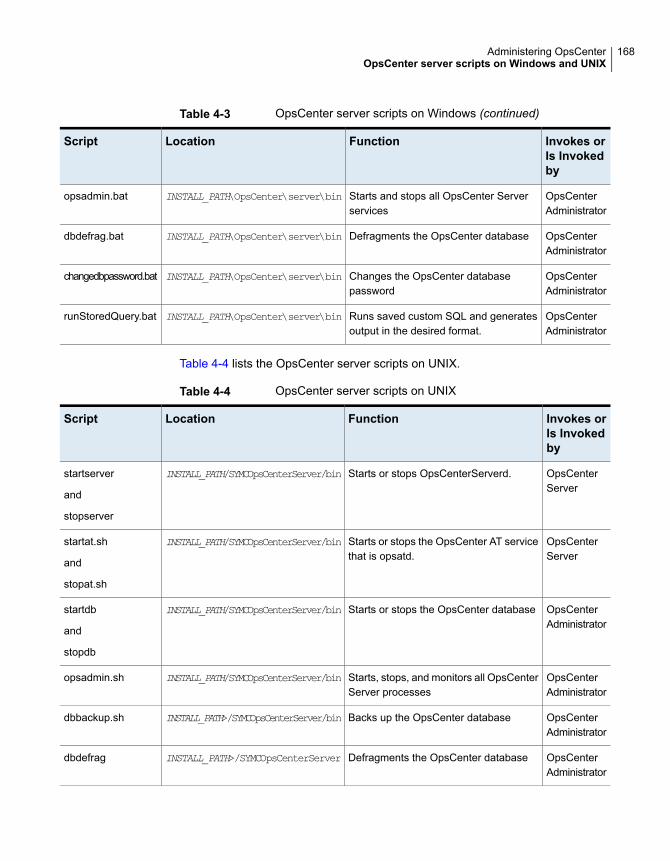
Table 4-3 OpsCenter server scripts on Windows (continued)
Invokes orIs Invokedby
FunctionLocationScript
OpsCenterAdministrator
Starts and stops all OpsCenter Serverservices
INSTALL_PATH\OpsCenter\server\binopsadmin.bat
OpsCenterAdministrator
Defragments the OpsCenter databaseINSTALL_PATH\OpsCenter\server\bindbdefrag.bat
OpsCenterAdministrator
Changes the OpsCenter databasepassword
INSTALL_PATH\OpsCenter\server\binchangedbpassword.bat
OpsCenterAdministrator
Runs saved custom SQL and generatesoutput in the desired format.
INSTALL_PATH\OpsCenter\server\binrunStoredQuery.bat
Table 4-4 lists the OpsCenter server scripts on UNIX.
Table 4-4 OpsCenter server scripts on UNIX
Invokes orIs Invokedby
FunctionLocationScript
OpsCenterServer
Starts or stops OpsCenterServerd.INSTALL_PATH/SYMCOpsCenterServer/binstartserver
and
stopserver
OpsCenterServer
Starts or stops the OpsCenter AT servicethat is opsatd.
INSTALL_PATH/SYMCOpsCenterServer/binstartat.sh
and
stopat.sh
OpsCenterAdministrator
Starts or stops the OpsCenter databaseINSTALL_PATH/SYMCOpsCenterServer/binstartdb
and
stopdb
OpsCenterAdministrator
Starts, stops, and monitors all OpsCenterServer processes
INSTALL_PATH/SYMCOpsCenterServer/binopsadmin.sh
OpsCenterAdministrator
Backs up the OpsCenter databaseINSTALL_PATH>/SYMCOpsCenterServer/bindbbackup.sh
OpsCenterAdministrator
Defragments the OpsCenter databaseINSTALL_PATH>/SYMCOpsCenterServerdbdefrag
168Administering OpsCenterOpsCenter server scripts on Windows and UNIX
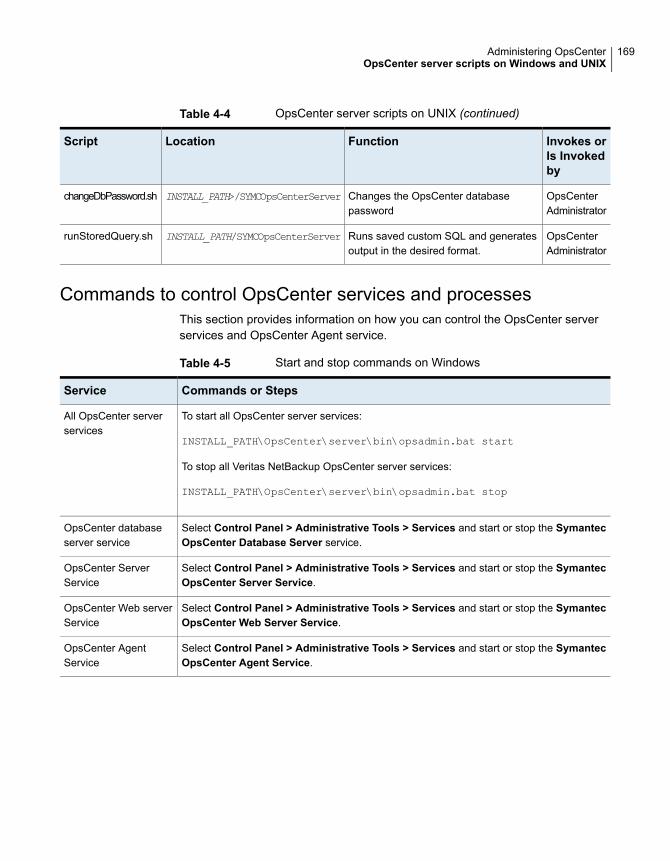
Table 4-4 OpsCenter server scripts on UNIX (continued)
Invokes orIs Invokedby
FunctionLocationScript
OpsCenterAdministrator
Changes the OpsCenter databasepassword
INSTALL_PATH>/SYMCOpsCenterServerchangeDbPassword.sh
OpsCenterAdministrator
Runs saved custom SQL and generatesoutput in the desired format.
INSTALL_PATH/SYMCOpsCenterServerrunStoredQuery.sh
Commands to control OpsCenter services and processesThis section provides information on how you can control the OpsCenter serverservices and OpsCenter Agent service.
Table 4-5 Start and stop commands on Windows
Commands or StepsService
To start all OpsCenter server services:
INSTALL_PATH\OpsCenter\server\bin\opsadmin.bat start
To stop all Veritas NetBackup OpsCenter server services:
INSTALL_PATH\OpsCenter\server\bin\opsadmin.bat stop
All OpsCenter serverservices
Select Control Panel > Administrative Tools > Services and start or stop the SymantecOpsCenter Database Server service.
OpsCenter databaseserver service
Select Control Panel > Administrative Tools > Services and start or stop the SymantecOpsCenter Server Service.
OpsCenter ServerService
Select Control Panel > Administrative Tools > Services and start or stop the SymantecOpsCenter Web Server Service.
OpsCenter Web serverService
Select Control Panel > Administrative Tools > Services and start or stop the SymantecOpsCenter Agent Service.
OpsCenter AgentService
169Administering OpsCenterOpsCenter server scripts on Windows and UNIX

Table 4-6 Start and stop commands on UNIX
Commands or StepsProcess
To start all OpsCenter server processes:
<INSTALL_PATH>/SYMCOpsCenterServer/bin/opsadmin.sh start
To stop all OpsCenter server processes:
<INSTALL_PATH>/SYMCOpsCenterServer/bin/opsadmin.sh stop
To monitor all processes:
<INSTALL_PATH>/SYMCOpsCenterServer/bin/opsadmin.sh monitor
All OpsCenter serverprocesses
<INSTALL_PATH>/SYMCOpsCenterServer/bin/startdb
<INSTALL_PATH>/SYMCOpsCenterServer/bin/stopdb
OpsCenter databaseserver process
<INSTALL_PATH>/SYMCOpsCenterServer/bin/startserver
<INSTALL_PATH>/SYMCOpsCenterServer/bin/stopserver
OpsCenter serverprocess
<INSTALL_PATH>/SYMCOpsCenterGUI/bin/startgui.sh
<INSTALL_PATH>/SYMCOpsCenterGUI/bin/stopgui.sh
OpsCenter Web serverprocess
About dependency of servicesThe OpsCenter server service requires that the following OpsCenter services(processes) are running:
■ OpsCenter Database Server
■ OpsCenter Authentication Service
■ Symantec Private Branch Exchange
If you stop any of these services, then the OpsCenter server also stops.
170Administering OpsCenterOpsCenter server scripts on Windows and UNIX

Note: After a reboot, the OpsCenter processes do not start automatically on SUSELinux systems. Veritas recommends that you start the OpsCenter processes afteryou perform a reboot.
Also after you reboot a SUSE 11 Server, and even though OpsCenter Serverservices are running, an attempt to logon may not succeed. Occasionally, OpsCenterservices may not start on reboot in case of SUSE 11. This issue may happenbecause of the PBX taking time to start.
About nbproxy processes on NetBackup master serversWhen OpsCenter is connected to a master server, you may find one or morenbproxy processes running on the master server. You may also see nbproxy
processes when NetBackup-Java GUI or NetBackup-Windows GUI request certaindata from NetBackup (like LiveUpdate , storage lifecycle policies).
Most of the nbproxy processes are started, managed, and removed by NBSL. Thissection talks about the nbproxy processes that NBSL manages.
Note: Not all nbproxy processes on the master server are managed by NBSL. Forexample, some of the nbproxy processes are managed by nbjm and nbpem.
An nbproxy process runs to retrieve the following NetBackup data for OpsCenter:
■ Policies
■ Catalogs
■ Storage lifecycle policies
■ LiveUpdate
■ Client details
Note the following points about the NBSL-managed nbproxy processes:
■ If the data collection for a master server is disabled or a master server is removedfrom the OpsCenter console, all nbproxy processes are stopped immediately.
■ If OpsCenter crashes (or is abruptly closed), the nbproxy process is removedwithin an hour.
■ If NetBackup is stopped (and NBSL is already killed), all nbproxy processesare stopped immediately.
■ If NBSL crashes (or is abruptly closed), all nbproxy processes exit within 10minutes.
171Administering OpsCenterOpsCenter server scripts on Windows and UNIX
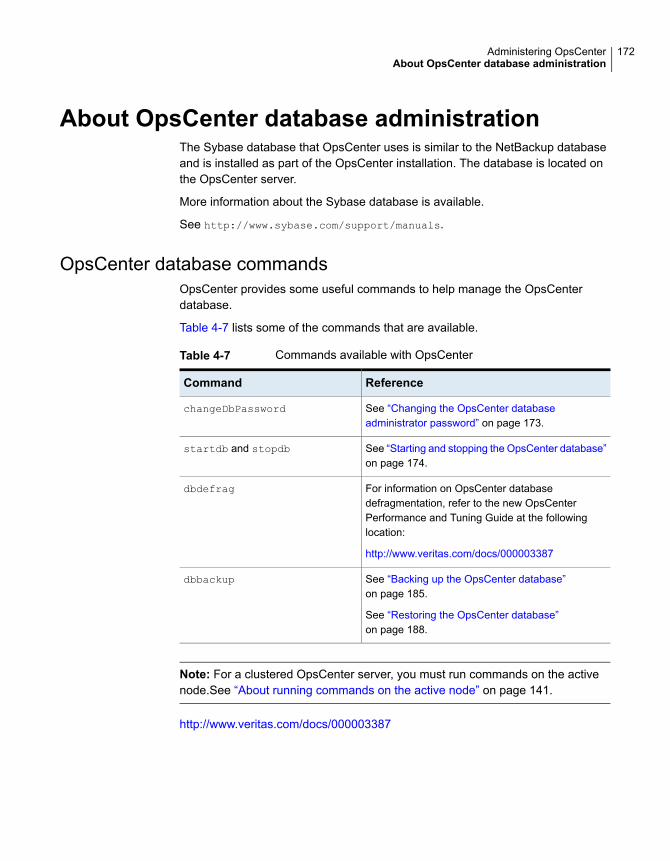
About OpsCenter database administrationThe Sybase database that OpsCenter uses is similar to the NetBackup databaseand is installed as part of the OpsCenter installation. The database is located onthe OpsCenter server.
More information about the Sybase database is available.
See http://www.sybase.com/support/manuals.
OpsCenter database commandsOpsCenter provides some useful commands to help manage the OpsCenterdatabase.
Table 4-7 lists some of the commands that are available.
Table 4-7 Commands available with OpsCenter
ReferenceCommand
See “Changing the OpsCenter databaseadministrator password” on page 173.
changeDbPassword
See “Starting and stopping the OpsCenter database”on page 174.
startdb and stopdb
For information on OpsCenter databasedefragmentation, refer to the new OpsCenterPerformance and Tuning Guide at the followinglocation:
http://www.veritas.com/docs/000003387
dbdefrag
See “Backing up the OpsCenter database”on page 185.
See “Restoring the OpsCenter database”on page 188.
dbbackup
Note: For a clustered OpsCenter server, you must run commands on the activenode.See “About running commands on the active node” on page 141.
http://www.veritas.com/docs/000003387
172Administering OpsCenterAbout OpsCenter database administration
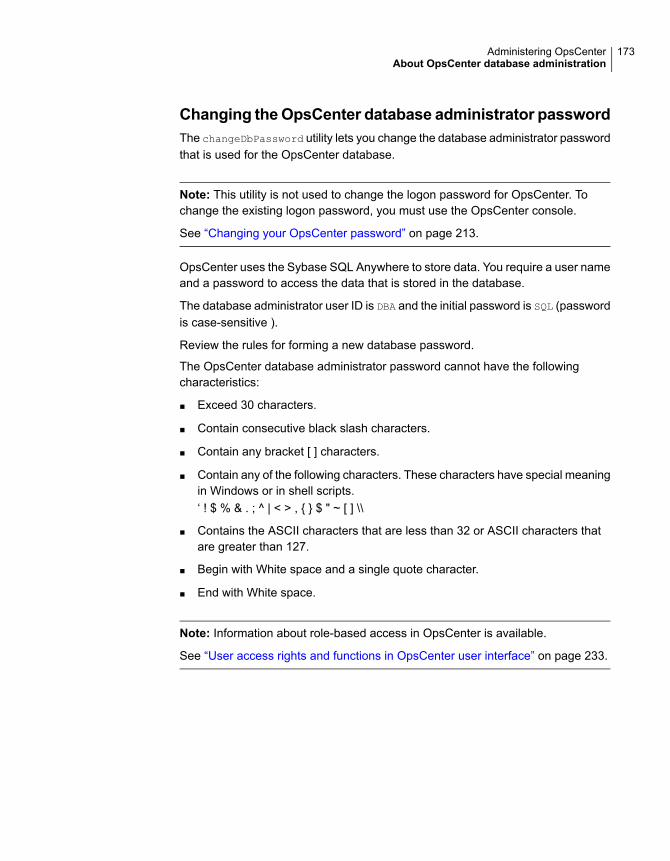
Changing theOpsCenter database administrator passwordThe changeDbPassword utility lets you change the database administrator passwordthat is used for the OpsCenter database.
Note: This utility is not used to change the logon password for OpsCenter. Tochange the existing logon password, you must use the OpsCenter console.
See “Changing your OpsCenter password” on page 213.
OpsCenter uses the Sybase SQL Anywhere to store data. You require a user nameand a password to access the data that is stored in the database.
The database administrator user ID is DBA and the initial password is SQL (passwordis case-sensitive ).
Review the rules for forming a new database password.
The OpsCenter database administrator password cannot have the followingcharacteristics:
■ Exceed 30 characters.
■ Contain consecutive black slash characters.
■ Contain any bracket [ ] characters.
■ Contain any of the following characters. These characters have special meaningin Windows or in shell scripts.‘ ! $ % & . ; ^ | < > , { } $ " ~ [ ] \\
■ Contains the ASCII characters that are less than 32 or ASCII characters thatare greater than 127.
■ Begin with White space and a single quote character.
■ End with White space.
Note: Information about role-based access in OpsCenter is available.
See “User access rights and functions in OpsCenter user interface” on page 233.
173Administering OpsCenterAbout OpsCenter database administration

To change the database administrator password on Windows and UNIX
1 Enter the following command on Windows:
INSTALL_PATH\OpsCenter\server\bin\changeDbPassword.bat
Enter the following command on UNIX:
<INSTALL_PATH>/SYMCOpsCenterServer/bin/changeDbPassword.sh
2 You are prompted for the current database administrator password. Enter thecurrent database password.
3 You are prompted for a new database administrator password. Enter the newpassword.
4 Restart the OpsCenter services and processes on Windows and UNIXplatforms.
Enter the following commands to stop and then start the OpsCenterservices:
INSTALL_PATH\OpsCenter\server\bin\opsadmin.bat stop
INSTALL_PATH\OpsCenter\server\bin\opsadmin.bat stop
Windows
Enter the following commands to stop and then start the OpsCenterprocesses:
<INSTALL_PATH>/SYMCOpsCenterServer/bin/opsadmin.sh stop
<INSTALL_PATH>/SYMCOpsCenterServer/bin/opsadmin.sh start
UNIX
Starting and stopping the OpsCenter databaseThe startdb script is used to start the OpsCenter database. The stopdb script isused to stop the OpsCenter database.
To start the database server on Windows and UNIX
◆ To start the OpsCenter database on Windows, run the following command:
INSTALL_PATH\OpsCenter\server\bin\startdb.bat
To start the OpsCenter database on UNIX, run the following command:
<INSTALL_PATH>/SYMCOpsCenterServer/bin/startdb
174Administering OpsCenterAbout OpsCenter database administration
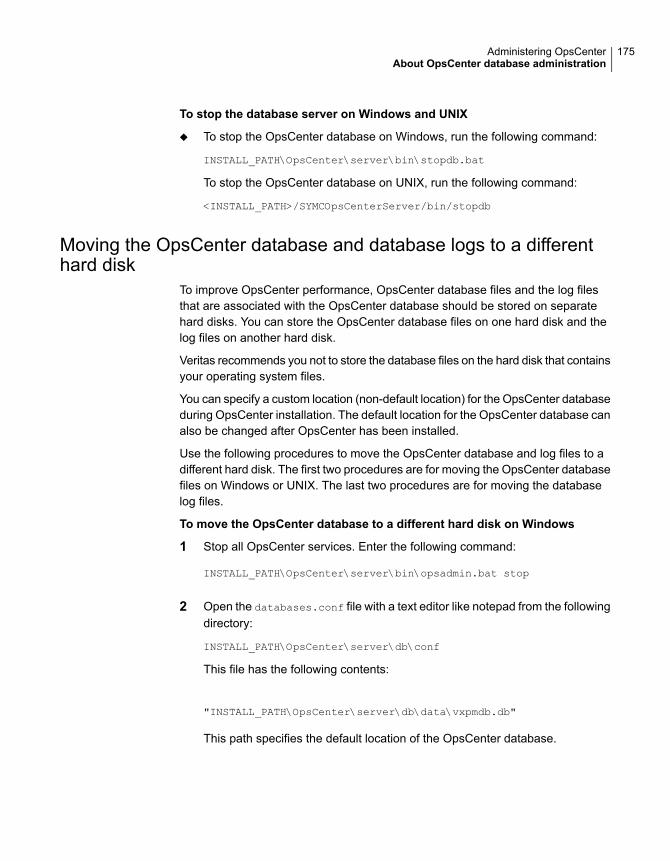
To stop the database server on Windows and UNIX
◆ To stop the OpsCenter database on Windows, run the following command:
INSTALL_PATH\OpsCenter\server\bin\stopdb.bat
To stop the OpsCenter database on UNIX, run the following command:
<INSTALL_PATH>/SYMCOpsCenterServer/bin/stopdb
Moving the OpsCenter database and database logs to a differenthard disk
To improve OpsCenter performance, OpsCenter database files and the log filesthat are associated with the OpsCenter database should be stored on separatehard disks. You can store the OpsCenter database files on one hard disk and thelog files on another hard disk.
Veritas recommends you not to store the database files on the hard disk that containsyour operating system files.
You can specify a custom location (non-default location) for the OpsCenter databaseduring OpsCenter installation. The default location for the OpsCenter database canalso be changed after OpsCenter has been installed.
Use the following procedures to move the OpsCenter database and log files to adifferent hard disk. The first two procedures are for moving the OpsCenter databasefiles on Windows or UNIX. The last two procedures are for moving the databaselog files.
To move the OpsCenter database to a different hard disk on Windows
1 Stop all OpsCenter services. Enter the following command:
INSTALL_PATH\OpsCenter\server\bin\opsadmin.bat stop
2 Open the databases.conf file with a text editor like notepad from the followingdirectory:
INSTALL_PATH\OpsCenter\server\db\conf
This file has the following contents:
"INSTALL_PATH\OpsCenter\server\db\data\vxpmdb.db"
This path specifies the default location of the OpsCenter database.
175Administering OpsCenterAbout OpsCenter database administration
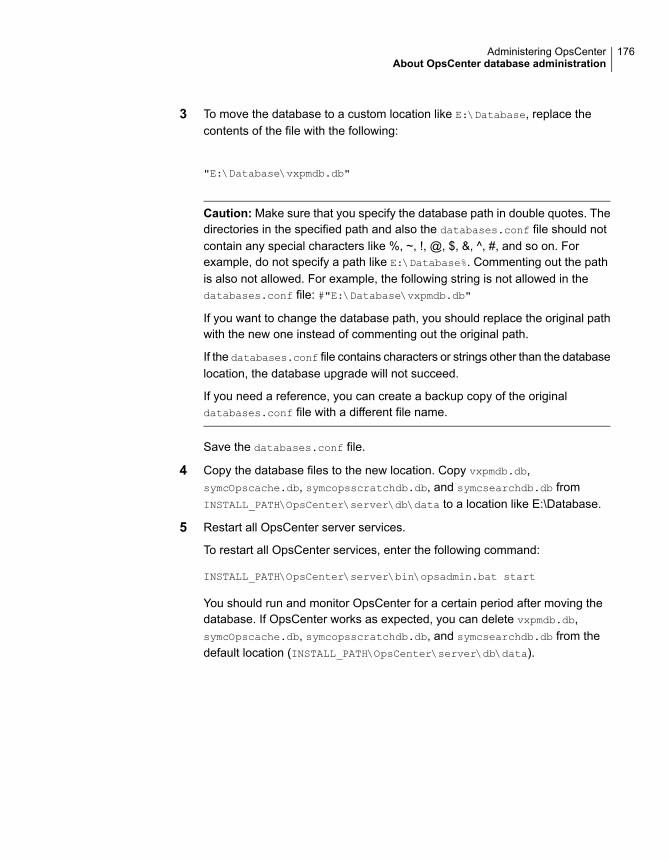
3 To move the database to a custom location like E:\Database, replace thecontents of the file with the following:
"E:\Database\vxpmdb.db"
Caution: Make sure that you specify the database path in double quotes. Thedirectories in the specified path and also the databases.conf file should notcontain any special characters like %, ~, !, @, $, &, ^, #, and so on. Forexample, do not specify a path like E:\Database%. Commenting out the pathis also not allowed. For example, the following string is not allowed in thedatabases.conf file: #"E:\Database\vxpmdb.db"
If you want to change the database path, you should replace the original pathwith the new one instead of commenting out the original path.
If the databases.conf file contains characters or strings other than the databaselocation, the database upgrade will not succeed.
If you need a reference, you can create a backup copy of the originaldatabases.conf file with a different file name.
Save the databases.conf file.
4 Copy the database files to the new location. Copy vxpmdb.db,symcOpscache.db, symcopsscratchdb.db, and symcsearchdb.db fromINSTALL_PATH\OpsCenter\server\db\data to a location like E:\Database.
5 Restart all OpsCenter server services.
To restart all OpsCenter services, enter the following command:
INSTALL_PATH\OpsCenter\server\bin\opsadmin.bat start
You should run and monitor OpsCenter for a certain period after moving thedatabase. If OpsCenter works as expected, you can delete vxpmdb.db,symcOpscache.db, symcopsscratchdb.db, and symcsearchdb.db from thedefault location (INSTALL_PATH\OpsCenter\server\db\data).
176Administering OpsCenterAbout OpsCenter database administration
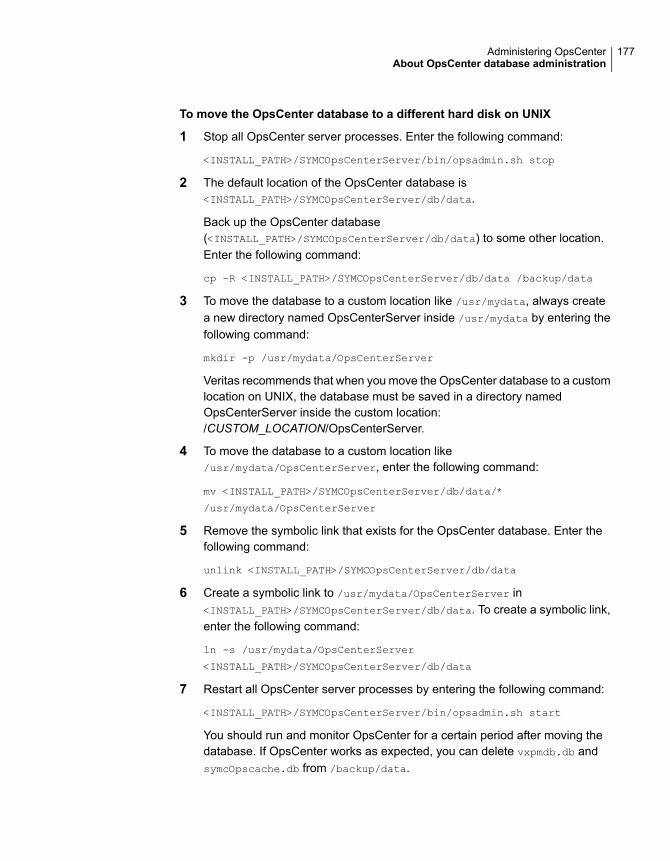
To move the OpsCenter database to a different hard disk on UNIX
1 Stop all OpsCenter server processes. Enter the following command:
<INSTALL_PATH>/SYMCOpsCenterServer/bin/opsadmin.sh stop
2 The default location of the OpsCenter database is<INSTALL_PATH>/SYMCOpsCenterServer/db/data.
Back up the OpsCenter database(<INSTALL_PATH>/SYMCOpsCenterServer/db/data) to some other location.Enter the following command:
cp –R <INSTALL_PATH>/SYMCOpsCenterServer/db/data /backup/data
3 To move the database to a custom location like /usr/mydata, always createa new directory named OpsCenterServer inside /usr/mydata by entering thefollowing command:
mkdir -p /usr/mydata/OpsCenterServer
Veritas recommends that when you move the OpsCenter database to a customlocation on UNIX, the database must be saved in a directory namedOpsCenterServer inside the custom location:/CUSTOM_LOCATION/OpsCenterServer.
4 To move the database to a custom location like/usr/mydata/OpsCenterServer, enter the following command:
mv <INSTALL_PATH>/SYMCOpsCenterServer/db/data/*
/usr/mydata/OpsCenterServer
5 Remove the symbolic link that exists for the OpsCenter database. Enter thefollowing command:
unlink <INSTALL_PATH>/SYMCOpsCenterServer/db/data
6 Create a symbolic link to /usr/mydata/OpsCenterServer in<INSTALL_PATH>/SYMCOpsCenterServer/db/data. To create a symbolic link,enter the following command:
ln -s /usr/mydata/OpsCenterServer
<INSTALL_PATH>/SYMCOpsCenterServer/db/data
7 Restart all OpsCenter server processes by entering the following command:
<INSTALL_PATH>/SYMCOpsCenterServer/bin/opsadmin.sh start
You should run and monitor OpsCenter for a certain period after moving thedatabase. If OpsCenter works as expected, you can delete vxpmdb.db andsymcOpscache.db from /backup/data.
177Administering OpsCenterAbout OpsCenter database administration
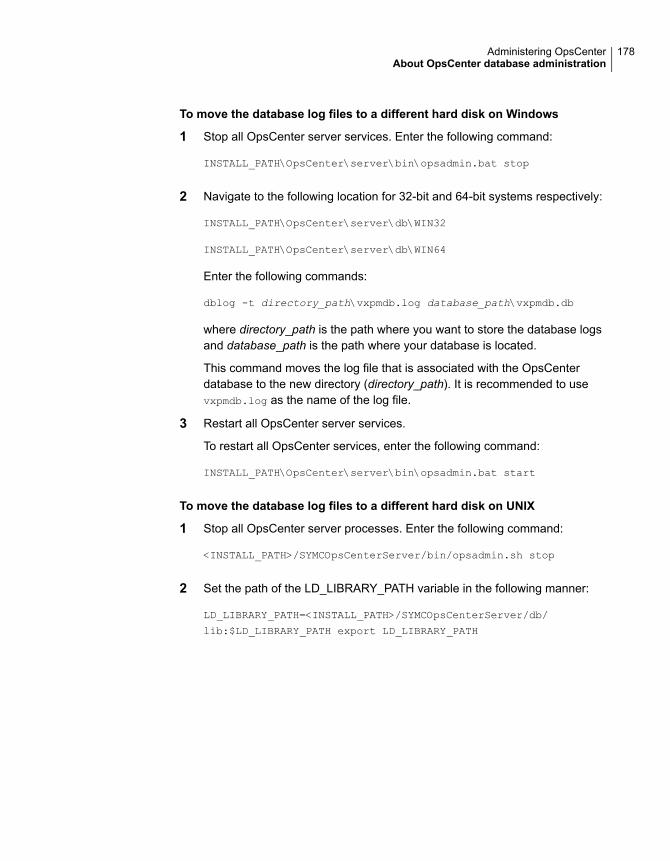
To move the database log files to a different hard disk on Windows
1 Stop all OpsCenter server services. Enter the following command:
INSTALL_PATH\OpsCenter\server\bin\opsadmin.bat stop
2 Navigate to the following location for 32-bit and 64-bit systems respectively:
INSTALL_PATH\OpsCenter\server\db\WIN32
INSTALL_PATH\OpsCenter\server\db\WIN64
Enter the following commands:
dblog -t directory_path\vxpmdb.log database_path\vxpmdb.db
where directory_path is the path where you want to store the database logsand database_path is the path where your database is located.
This command moves the log file that is associated with the OpsCenterdatabase to the new directory (directory_path). It is recommended to usevxpmdb.log as the name of the log file.
3 Restart all OpsCenter server services.
To restart all OpsCenter services, enter the following command:
INSTALL_PATH\OpsCenter\server\bin\opsadmin.bat start
To move the database log files to a different hard disk on UNIX
1 Stop all OpsCenter server processes. Enter the following command:
<INSTALL_PATH>/SYMCOpsCenterServer/bin/opsadmin.sh stop
2 Set the path of the LD_LIBRARY_PATH variable in the following manner:
LD_LIBRARY_PATH=<INSTALL_PATH>/SYMCOpsCenterServer/db/
lib:$LD_LIBRARY_PATH export LD_LIBRARY_PATH
178Administering OpsCenterAbout OpsCenter database administration
3 Navigate to the following location:
<INSTALL_PATH>/SYMCOpsCenterServer/db/bin
Enter the following commands:
./dblog -t directory_path/vxpmdb.log database_path/vxpmdb.db
where directory_path is the path where you want to store your database logfile and database_path is the path where the OpsCenter database is located.
This command moves the log file that is associated with the OpsCenterdatabase to the new directory (directory_path). It is recommended to usevxpmdb.log as the name of the log file.
4 Restart all OpsCenter server processes by entering the following command:
<INSTALL_PATH>/SYMCOpsCenterServer/bin/opsadmin.sh start
Moving OpsCenter server to a different machineThis section talks about the scenarios in which you need to move OpsCenter serverto a different machine.
Consider the following scenarios:
■ Scenario 1: You have OpsCenter 7.5 (or 7.5.0.x) setup that you want to upgradeto OpsCenter 7.7. If OpsCenter 7.5 is installed on a platform that is not supportedby OpsCenter 7.7 (for example, AIX), you need to move the OpsCenter serverto a different machine that has a supported platform.See “Moving OpsCenter 7.5 server to a different OpsCenter 7.7 machine”on page 179.
■ Scenario 2: You want to move OpsCenter 7.7 server to a different machine fora certain reason, for example: Hardware of the existing machine is faultySee “Moving OpsCenter server to a different machine” on page 182.
Moving OpsCenter 7.5 server to a different OpsCenter 7.7machineThis section provides the procedure to move OpsCenter 7.5 server to a differentmachine where you want to install OpsCenter 7.7. The following example explainsthe scenario in detail:
You have OpsCenter 7.5 (or 7.5.0.x) setup that you want to upgrade to OpsCenter7.7. If OpsCenter 7.5 is installed on a platform that is not supported by OpsCenter7.7 (for example, AIX), you need to move the OpsCenter server to a differentmachine that has a supported platform.
179Administering OpsCenterAbout OpsCenter database administration
You need to carry out a few steps on the OpsCenter 7.5 server host and a few onthe new host where you want to install OpsCenter 7.7.
Tomove OpsCenter 7.5 (or 7.5.0.x) server to a different machine that will haveOpsCenter 7.7 installed
1 Steps to be carried out on the OpsCenter 7.5 (or 7.5.0.x) server host
Stop all OpsCenter 7.5 (or 7.5.0.x) services.
See “OpsCenter server scripts on Windows and UNIX” on page 167.
2 Copy all the database files (including log files that is *.*) from the installedlocation to a location other than the installed location.
The database location is as follows:
<OpsCenterInstallLocation>\ OpsCenter\server\db\dataWindows
<OpsCenterInstallLocation>/SYMCOpsCenterServer/db/dataUNIX
3 OpsCenter 7.5 server host may have AT (Symantec Product AuthenticationService) data that you want to import into OpsCenter 7.7. You need to firstexport the AT data on the OpsCenter 7.5 server host, which you can importinto OpsCenter 7.7.
Export the shared or remote AT broker's data to an xml file using the atutil
utility. AT data comprises OpsCenterUsers(vx) users and certificates.
See “Exporting authentication settings” on page 119.
See “About OpsCenter AT” on page 27.
See “About OpsCenter upgrade scenarios with respect to OpsCenter AT”on page 116.
4 Copy the xml file that you have created in the earlier step to the host whereyou want to install OpsCenter 7.7.
Note: While copying the exported xml file, the DOS to UNIX conversion mayresult into garbage characters in the xml file that can cause import failure. Toavoid this problem, copy the xml file through FTP and with binary format.
5 Steps to be carried out on the host where you want to install OpsCenter7.7
Install OpsCenter 7.7 on the new host.
See “Installing OpsCenter on Windows and UNIX” on page 88.
180Administering OpsCenterAbout OpsCenter database administration

6 Stop all OpsCenter 7.7 services.
See “OpsCenter server scripts on Windows and UNIX” on page 167.
7 Carry out the performance tuning steps that you had done earlier.
The new OpsCenter Performance and Tuning Guide provides information onhow to tune OpsCenter for improved performance. The online version of theOpsCenter Performance and Tuning Guide can be found at:
http://www.veritas.com/docs/000003387
8 Copy the backed up database files from the temporary location to the OpsCenterdatabase location.
The database location is as follows:
<OpsCenterInstallLocation>\OpsCenter\server\db\dataWindows
<OpsCenterInstallLocation>/SYMCOpsCenterServer/db/dataUNIX
9 Upgrade the database using dbUpgrade command.
Run the following command:
dbUpgrade.bat install <old_version_number><new_version_number>
For example:<OpsCenterInstallLocation>\OpsCenter\server\bin\dbUpgrade.bat install7.5.0.3 7.7
Windows
dbUpgrade.sh install <old_version_number><new_version_number>
For example:<OpsCenterInstallLocation>/SYMCOpsCenterServer/bin/dbUpgrade.shinstall 7.5.0.3 7.7
UNIX
10 Check the progress of database upgrade in the upgrade logs at the followinglocation:
<OpsCenterInstallLocation>\ OpsCenter\server\db\logWindows
<OpsCenterInstallLocation>/SYMCOpsCenterServer/db/logUnix
181Administering OpsCenterAbout OpsCenter database administration
11 Import old authentication or AT data into OpsCenter 7.7 server host.
Make sure that you have copied the export xml file that you have created onthe OpsCenter 7.5 server host to OpsCenter 7.7 server host.
Run the following command:
<OpsCenterInstallLocation>\OpsCenter\server\authbroker\bin\atutilimport -p <password of exported xml file> -f<location of xml file that contains old AT data> -z<location of AT data folder> –overwrite
For example: atutil import -p “password” -f\temp\userdata.xml -z C:ProgramFiles\Symantec\OpsCenter\server\authbroker\data–overwrite
Windows
<OpsCenterInstallLocation>/SYMCOpsCenterServer/authbroker/bin/atutilimport -p <password of exported xml file> -f<location of xml file that contains old AT data> -z<location of AT data folder> –overwrite
For example: atutil import -p “password” -f/temp/userdata.xml -z/opt/SYMCOpsCenterServer/authbroker/data –overwrite
UNIX
Note: If the import is not successful, the default OpsCenter user needs to resetthe passwords of OpsCenterUsers(vx ) domain users that you have importedfrom the earlier OpsCenter version. Trust between NBAC-enabled NetBackup/ PureDisk server and OpsCenter server need to be established again.
See “About OpsCenter upgrade failure scenarios” on page 132.
12 Start OpsCenter services.
See “OpsCenter server scripts on Windows and UNIX” on page 167.
Moving OpsCenter server to a different machineThis section provides the procedure to move OpsCenter server to a differentmachine. You need to move OpsCenter server to a different machine in certainscenarios for example:
■ Faulty hardware
■ Hardware upgrade
■ Operating System upgrade
182Administering OpsCenterAbout OpsCenter database administration

■ Moving from physical machine to virtual machine (or from virtual machine tophysical machine)
To move OpsCenter server to a different machine
1 Steps to be carried out on the OpsCenter source host
Stop all OpsCenter services.
2 Copy all the database files (including log files that is *.*) from the installedlocation to a location other than the installed location.
The database location is as follows:
<OpsCenterInstallLocation>\OpsCenter\server\db\dataWindows
<OpsCenterInstallLocation>/SYMCOpsCenterServer/db/dataUNIX
3 OpsCenter source host may have authentication (AT) data that you want toimport into OpsCenter target host. You need to first export the AT data on theOpsCenter source host, which you can import into OpsCenter target host.
Export the AT data to an xml file using the atutil utility. AT data comprisesOpsCenterUsers(vx) users and certificates.
See “Exporting authentication settings” on page 119.
4 Copy the xml file to the OpsCenter target host.
Note: While copying the exported xml file, the DOS to UNIX conversion mayresult into garbage characters in the xml file that can cause import failure. Toavoid this problem, copy the xml file through FTP and with binary format.
5 Steps to be carried out on the OpsCenter target host
Install OpsCenter on the new host that is target host.
See “Installing OpsCenter on Windows and UNIX” on page 88.
6 Stop all OpsCenter services.
7 Carry out the performance tuning steps that you had done earlier.
The new OpsCenter Performance and Tuning Guide provides information onhow to tune OpsCenter for improved performance. The online version of theOpsCenter Performance and Tuning Guide can be found at:
http://www.veritas.com/docs/000003387
183Administering OpsCenterAbout OpsCenter database administration

8 Copy the backed up database files from the temporary location to the OpsCenterdatabase location.
The database location is as follows:
<OpsCenterInstallLocation>\OpsCenter\server\db\dataWindows
<OpsCenterInstallLocation>/SYMCOpsCenterServer/db/dataUNIX
9 Import old authentication or AT data into OpsCenter target host.
Make sure that you have copied the export xml file that you have created onthe OpsCenter source host to OpsCenter target host.
Run the following command for import:
<OpsCenterInstallLocation>\OpsCenter\server\authbroker\bin\atutilimport -p <password of exported xml file> -f <locationof xml file that contains old AT data> -z <locationof AT data folder> –overwrite
Windows
<OpsCenterInstallLocation>/SYMCOpsCenterServer/authbroker/bin/atutilimport -p <password of exported xml file> -f <locationof xml file that contains old AT data> -z <locationof AT data folder> –overwrite
UNIX
Note: If the import is not successful, the default OpsCenter user needs to resetthe passwords of OpsCenterUsers(vx ) domain users that you have importedfrom the earlier OpsCenter version. Trust between NBAC-enabled NetBackup/ PureDisk server and OpsCenter server need to be established again.
10 Start OpsCenter services.
About database troubleshootingSecurity information about the OpsCenter database is available.
See “About OpsCenter Web GUI/OpsCenter server to Sybase databasecommunication” on page 195.
Information about the log files on Windows and UNIX servers is available.
See “About OpsCenter log files on Windows servers” on page 202.
See “About OpsCenter log files on UNIX servers” on page 204.
184Administering OpsCenterAbout OpsCenter database administration
About backup and restore of OpsCenter andOpsCenter Analytics
The procedures in this section explain how you can back up and restore OpsCenterand OpsCenter Analytics in case of a disaster.
See “Backing up OpsCenter in case of a disaster” on page 185.
See “Restoring OpsCenter” on page 187.
Backing up OpsCenter in case of a disasterThe sequence of steps gives an overview about the steps that need to be followedto back up OpsCenter.
To back up OpsCenter in case of a disaster
1 Take a hot backup of the OpsCenter database (vxpmdb.db, symcOpscache.db,symcopsscratchdb.db, and symcsearchdb.db) using the dbbackup script.This script can be run whenever you need to back up your OpsCenter database.
See “Backing up the OpsCenter database” on page 185.
2 Along with the OpsCenter database, the user information that Symantec ProductAuthentication Service manages must be saved in a directory or by using aNetBackup backup policy.
See “Saving the OpsCenter user profiles managed by OpsCenter AuthenticationService” on page 186.
Note: You can also create schedules for taking regular database andauthentication profile backups. In this case, NetBackup policies can be createdto back up the specified directories that contain OpsCenter database snapshotsand the authentication service user configuration files.
See the NetBackup Administrator’s Guide, Volume I for more information onhow to configure a policy and schedule.
3 If you want to change the OpsCenter database password, you also need toback up the database password file.
Backing up the OpsCenter databaseOpsCenter is shipped with a database backup script that performs backup of thedatabase without interrupting its operations, which is referred to as hot backup. OnUNIX as well as Windows platforms, the script overwrites existing database (db)
185Administering OpsCenterAbout backup and restore of OpsCenter and OpsCenter Analytics

files before backing up or restoring the database. The database files are as follows:vxpmdb.db, symcOpscache.db, and vxpmdb.log. The script backs up or restoresthe vxpmdb.db, symcOpscache.db, and vxpmdb.log file (if it exists).
Note: Regular file system backups are not sufficient for backing up the OpsCenterdatabase. You must schedule periodic hot backups for the OpsCenter database toavoid losing any important data.
To back up the OpsCenter database
1 Log on to the OpsCenter database server host in one of the following ways:
As an administrator or user in the Administrator groupWindows
rootUNIX
2 Open the Windows command prompt or the UNIX console.
3 Run the backup script that is appropriate for your platform. Specify one of thefollowing backup directories depending on your platform:
INSTALL_PATH\OpsCenter\server\bin\dbbackup.batC:\MyDbBackupFolder
Windows
<INSTALL_PATH>/SYMCOpsCenterServer/bin/dbbackup.sh/my_db_backup_dir
UNIX
The backup script creates vxpmdb.db, symcOpscache.db, and vxpmdb.log (ifit exists) in the backup directory that you specified.
Saving theOpsCenter user profilesmanaged byOpsCenterAuthentication ServiceUse the following procedures to save the authentication service profiles on Windowsand UNIX servers.
To save authentication service profiles on Windows servers
◆ Do one of the following to save the user profiles:
■ Copy the folderINSTALL_PATH\VERITAS\Security\Authentication\systemprofile toanother folder.
■ Create a NetBackup job policy to back up the authentication servicesystemprofile folder.
186Administering OpsCenterAbout backup and restore of OpsCenter and OpsCenter Analytics

To save authentication service profiles on UNIX servers
◆ Do one of the following to save the user profiles:
■ Copy the folder /var/VRTSat to another folder.
■ Create a NetBackup job policy to back up the authentication service profilefolder.
Backing up the OpsCenter database password fileIf you want to change the OpsCenter database password, you need to back up thefollowing password file (along with the backup of the OpsCenter database files andauthentication service profile folders).
To back up the OpsCenter database password file on Windows
◆ Back up the db.conf file that is located inINSTALL_PATH\OpsCenter\server\config directory.
To back up the OpsCenter database password file on UNIX
◆ Back up the db.conf file that is located in<INSTALL_PATH>/SYMCOpsCenterServer/config directory.
Restoring OpsCenterA restore of OpsCenter requires that the new OpsCenter server has the same hostname and IP address of the old server that crashed. This limitation is due to acouple of reasons. Some of the reasons are the following:
■ The authentication service credentials (host name and IP address) are storedon the old OpsCenter server.
■ To enable data collection, you must configure the master servers for datacollection. This involves adding the OpsCenter hostname to the Server List ofthe NetBackup master servers. After this, you must add the master servers tothe OpsCenter console.See “Adding a master server or appliance in OpsCenter” on page 287.
Note: The following procedures assume that you have OpsCenter databasesnapshots and the authentication service user profiles saved in folders.
The sequence of steps gives an overview about the steps that need to be followedto restore OpsCenter.
187Administering OpsCenterAbout backup and restore of OpsCenter and OpsCenter Analytics
To restore OpsCenter in case of a disaster
1 Install OpsCenter on a server with the same name as the server where problemshappened.
2 Stop all OpsCenter server services.
3 Restore the OpsCenter database snapshot files and authentication serviceuser profiles from the backup image.
See “Restoring the OpsCenter database” on page 188.
See “Restoring the OpsCenter user profiles managed by OpsCenterAuthentication Service” on page 190.
4 If you saved a copy of the OpsCenter database password file, copy the file tothe corresponding location on the newly installed OpsCenter server. Copy thedb.conf file to INSTALL_PATH/OpsCenter/server/config directory onWindows or <INSTALL_PATH>/SYMCOpsCenterServer/config directory onUNIX.
5 Restart all OpsCenter server services.
Restoring the OpsCenter databaseAfter you back up the database, you can restore it. On Windows and UNIX hosts,the restore operation automatically stops the database, restores the backup databasefiles, and restarts the database. The dbbackup script overwrites existing database(db) files before backing up or restoring the database. The database files are asfollows: vxpmdb.db, symcOpscache.db, and vxpmdb.log. The script backs up orrestores the vxpmdb.db, symcOpscache.db, and vxpmdb.log file (if it exists).
188Administering OpsCenterAbout backup and restore of OpsCenter and OpsCenter Analytics

To restore a backed up OpsCenter database
1 On the OpsCenter server with backup data you want to restore, open a UNIXconsole or a Windows command prompt and log on as root (on UNIX) or asan administrator or user in the Administrators group (on Windows).
Open a Windows command prompt and log on as an administratoror user in the Administrators group.
Windows
Open a UNIX console and then log on as root.UNIX
All the paths that are shown in the steps that follow are the default databaseinstall paths. These paths may different for your site if the database wasinstalled anywhere other than the default location.
2 To restore the backed up database, do one of the following:
Type the following command and press Enter.
INSTALL_PATH\OpsCenter\server\bin\dbbackup.bat<backupDir> -restore <restoreDir>
Windows
Type the following command and press Enter.
<INSTALL_PATH>/SYMCOpsCenterServer/bin/dbbackup.sh<backupDir> -restore <restoreDir>
UNIX
where backupDir is the directory where the backed up database resides, and<restoreDir> is the location of the current OpsCenter database.
restoreDir is optional.
If not used, the dbbackup script restores to the default database directory:
INSTALL_PATH\OpsCenter\server\db\dataWindows
<INSTALL_PATH>/SYMCOpsCenterServer/db/dataUNIX
If you specified a non-default directory location, you must specify the restoreDiroption.
The script prompts you with a message similar to the following:
WARNING: this operation will overwrite the active
OpsCenter data on this host.
Do you wish to continue ? [y/n] (n)
189Administering OpsCenterAbout backup and restore of OpsCenter and OpsCenter Analytics
3 To continue with the restore, press Enter on Windows hosts.
To continue with the restore, type y on UNIX hosts.
The dbbackup script automatically stops and restarts the database.
Restoring the OpsCenter user profiles managed byOpsCenter Authentication ServiceUse the following procedures to save the authentication service profiles on Windowsand UNIX servers.
To restore the authentication user profiles on Windows
1 Stop all OpsCenter server services. Enter the following command:
INSTALL_PATH\OpsCenter\server\bin\opsadmin.bat stop
2 Copy or overwrite the folder containing the authentication service user profilesto INSTALL_PATH\VERITAS\Security\Authentication\systemprofile.
3 Start all OpsCenter server services. Enter the following command:
INSTALL_PATH\OpsCenter\server\bin\opsadmin.bat start
To restore the authentication user profiles on UNIX
1 Stop all OpsCenter server processes. Enter the following command:
<INSTALL_PATH>/SYMCOpsCenterServer/bin/opsadmin.sh stop
2 Copy or overwrite the folder containing the authentication service user profilesto /var/VRTSat
3 Start all OpsCenter server processes. Enter the following command:
<INSTALL_PATH>/SYMCOpsCenterServer/bin/opsadmin.sh start
About communication and firewall considerationsFigure 4-1 shows the key OpsCenter components and the communication portsthat are used.
190Administering OpsCenterAbout communication and firewall considerations

Figure 4-1 Key OpsCenter components and how they communicate
OpsCenter Server
OpsCenter WebGUI
Web Browser
Hosts where backupproducts like Backup
Exec, PureDisk etc. areinstalled
NetBackup MasterServer without NBAC
Hosts where backupproducts like Backup
Exec, PureDisk etc..areinstalled
OpsCenter Database
SNMPtraps Port 162
DefaultPort 13786
SMTPemail
PossibleFirewall
PossibleFirewall
PossibleFirewall
NetBackup MasterServer with NBAC
PBXdefault port
1556
The following HTTPS ports are checked for availability in thespecified sequence and the first available port is used as the
default HTTPS port - Port 443, Port 8443, and Port 8553.
View BuilderConsole
OpsCenterAgent
PossibleFirewall
See “Communication ports used by key OpsCenter components” on page 191.
Communication ports used by key OpsCenter componentsThe following table shows the default port settings for OpsCenter.
191Administering OpsCenterAbout communication and firewall considerations
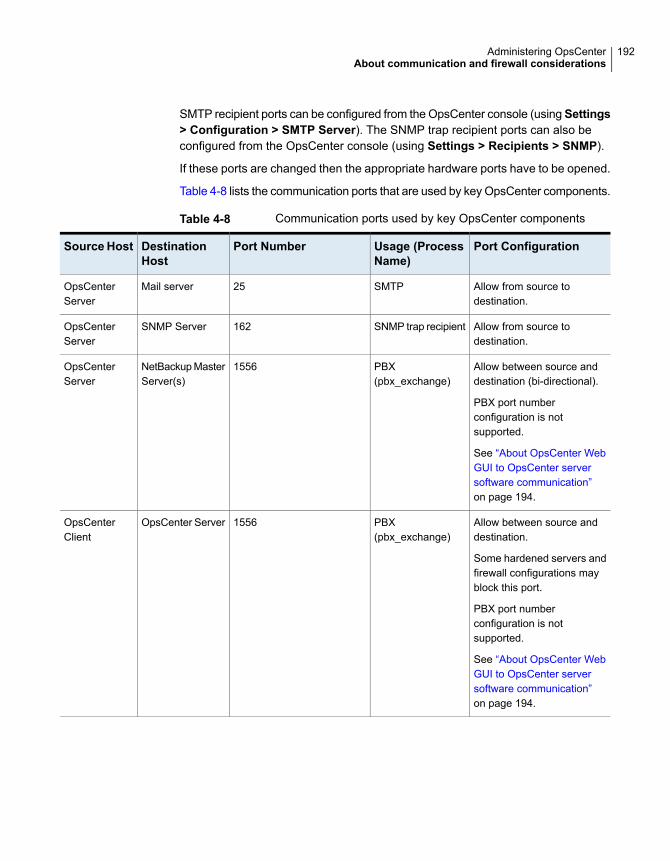
SMTP recipient ports can be configured from the OpsCenter console (usingSettings> Configuration > SMTP Server). The SNMP trap recipient ports can also beconfigured from the OpsCenter console (using Settings > Recipients > SNMP).
If these ports are changed then the appropriate hardware ports have to be opened.
Table 4-8 lists the communication ports that are used by key OpsCenter components.
Table 4-8 Communication ports used by key OpsCenter components
Port ConfigurationUsage (ProcessName)
Port NumberDestinationHost
SourceHost
Allow from source todestination.
SMTP25Mail serverOpsCenterServer
Allow from source todestination.
SNMP trap recipient162SNMP ServerOpsCenterServer
Allow between source anddestination (bi-directional).
PBX port numberconfiguration is notsupported.
See “About OpsCenter WebGUI to OpsCenter serversoftware communication”on page 194.
PBX(pbx_exchange)
1556NetBackup MasterServer(s)
OpsCenterServer
Allow between source anddestination.
Some hardened servers andfirewall configurations mayblock this port.
PBX port numberconfiguration is notsupported.
See “About OpsCenter WebGUI to OpsCenter serversoftware communication”on page 194.
PBX(pbx_exchange)
1556OpsCenter ServerOpsCenterClient
192Administering OpsCenterAbout communication and firewall considerations
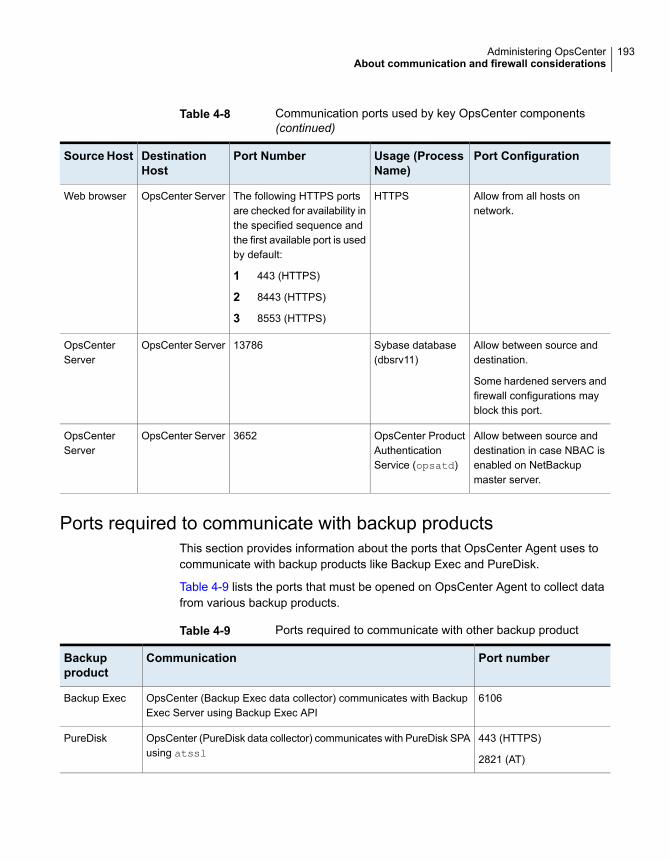
Table 4-8 Communication ports used by key OpsCenter components(continued)
Port ConfigurationUsage (ProcessName)
Port NumberDestinationHost
SourceHost
Allow from all hosts onnetwork.
HTTPSThe following HTTPS portsare checked for availability inthe specified sequence andthe first available port is usedby default:
1 443 (HTTPS)
2 8443 (HTTPS)
3 8553 (HTTPS)
OpsCenter ServerWeb browser
Allow between source anddestination.
Some hardened servers andfirewall configurations mayblock this port.
Sybase database(dbsrv11)
13786OpsCenter ServerOpsCenterServer
Allow between source anddestination in case NBAC isenabled on NetBackupmaster server.
OpsCenter ProductAuthenticationService (opsatd)
3652OpsCenter ServerOpsCenterServer
Ports required to communicate with backup productsThis section provides information about the ports that OpsCenter Agent uses tocommunicate with backup products like Backup Exec and PureDisk.
Table 4-9 lists the ports that must be opened on OpsCenter Agent to collect datafrom various backup products.
Table 4-9 Ports required to communicate with other backup product
Port numberCommunicationBackupproduct
6106OpsCenter (Backup Exec data collector) communicates with BackupExec Server using Backup Exec API
Backup Exec
443 (HTTPS)
2821 (AT)
OpsCenter (PureDisk data collector) communicates with PureDisk SPAusing atssl
PureDisk
193Administering OpsCenterAbout communication and firewall considerations
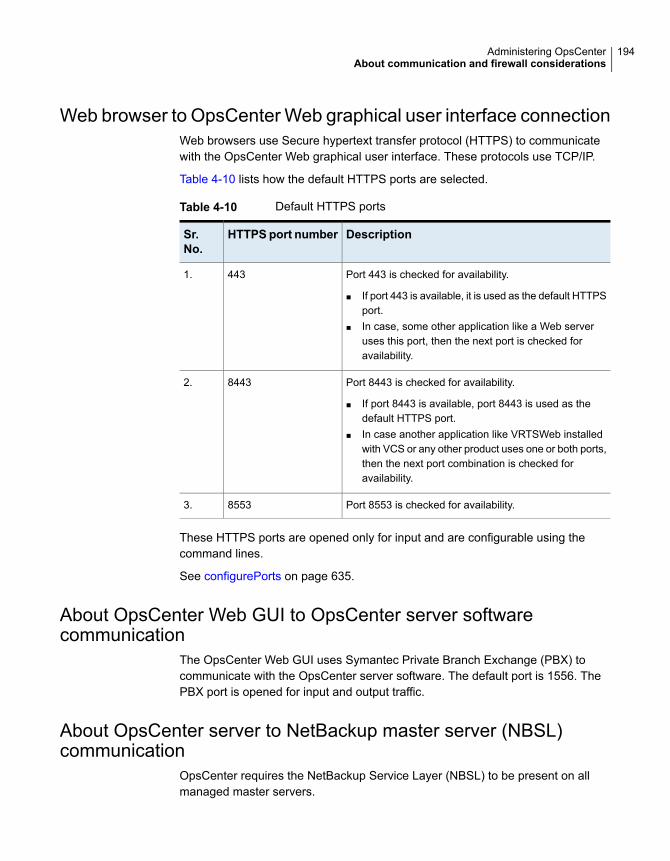
Web browser to OpsCenter Web graphical user interface connectionWeb browsers use Secure hypertext transfer protocol (HTTPS) to communicatewith the OpsCenter Web graphical user interface. These protocols use TCP/IP.
Table 4-10 lists how the default HTTPS ports are selected.
Table 4-10 Default HTTPS ports
DescriptionHTTPS port numberSr.No.
Port 443 is checked for availability.
■ If port 443 is available, it is used as the default HTTPSport.
■ In case, some other application like a Web serveruses this port, then the next port is checked foravailability.
4431.
Port 8443 is checked for availability.
■ If port 8443 is available, port 8443 is used as thedefault HTTPS port.
■ In case another application like VRTSWeb installedwith VCS or any other product uses one or both ports,then the next port combination is checked foravailability.
84432.
Port 8553 is checked for availability.85533.
These HTTPS ports are opened only for input and are configurable using thecommand lines.
See configurePorts on page 635.
About OpsCenter Web GUI to OpsCenter server softwarecommunication
The OpsCenter Web GUI uses Symantec Private Branch Exchange (PBX) tocommunicate with the OpsCenter server software. The default port is 1556. ThePBX port is opened for input and output traffic.
About OpsCenter server to NetBackup master server (NBSL)communication
OpsCenter requires the NetBackup Service Layer (NBSL) to be present on allmanaged master servers.
194Administering OpsCenterAbout communication and firewall considerations
The OpsCenter server software collects data from NBSL in the following ways:
■ Initial data load
■ Listening for change notifications or events
Whenever OpsCenter server software starts, when data collection for a masterserver is enabled or when a master server is added to OpsCenter, the OpsCenterserver starts collecting all the available data from NetBackup master server intothe OpsCenter database using NBSL. The initial data load happens serially for eachdata type. As soon as the initial data load is complete, the OpsCenter server softwarelistens to the notifications that are sent by NBSL for any change in NetBackup data.Then OpsCenter updates the OpsCenter database.
Symantec Private Branch Exchange (PBX) is used for communication and requiresa port opened on the OpsCenter server and the NetBackup master server for inputand output. The default PBX port that is used is 1556. Configuring the PBX port isnot supported in OpsCenter 7.5.
About SNMP trapsSNMP trap protocol is used for outbound UDP traffic and requires a port that opensfor output. The port number is 162.
About OpsCenter Web GUI/OpsCenter server to Sybase databasecommunication
The OpsCenter Web GUI communicates with the OpsCenter Sybase SQL Anywheredatabase server by using the default port 13786.
The Sybase database server port is closed to all inbound connections. The databaseis available only to resident OpsCenter components on the OpsCenter server.
About OpsCenter Web GUI to OpsCenter server email communicationSMTP email server protocol is used for outgoing mail. The port number is definedwhen the user specifies the SMTP server port (see Settings > Configuration >SMTP Server in the OpsCenter console to specify this port). The port is openedfor output only.
195Administering OpsCenterAbout communication and firewall considerations
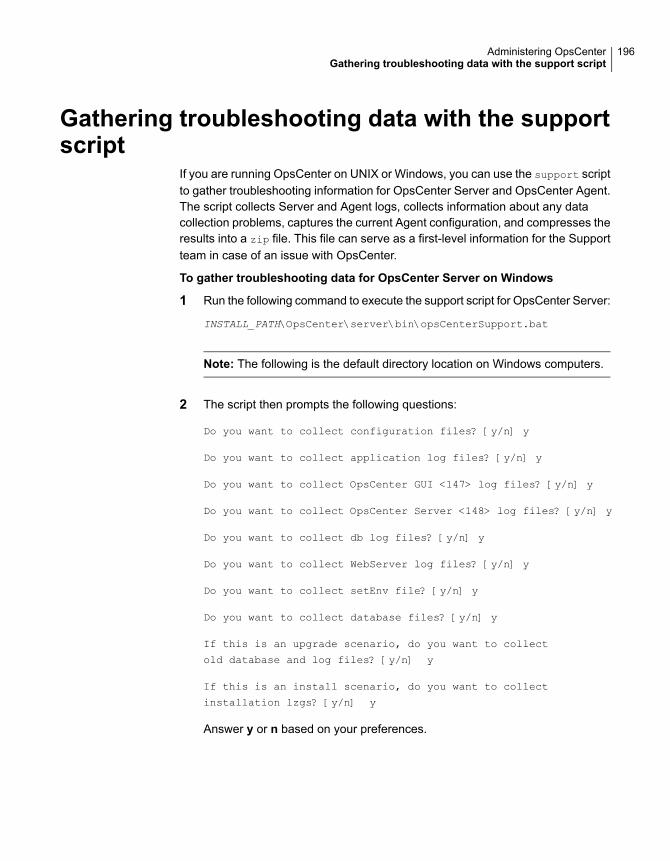
Gathering troubleshooting data with the supportscript
If you are running OpsCenter on UNIX or Windows, you can use the support scriptto gather troubleshooting information for OpsCenter Server and OpsCenter Agent.The script collects Server and Agent logs, collects information about any datacollection problems, captures the current Agent configuration, and compresses theresults into a zip file. This file can serve as a first-level information for the Supportteam in case of an issue with OpsCenter.
To gather troubleshooting data for OpsCenter Server on Windows
1 Run the following command to execute the support script for OpsCenter Server:
INSTALL_PATH\OpsCenter\server\bin\opsCenterSupport.bat
Note: The following is the default directory location on Windows computers.
2 The script then prompts the following questions:
Do you want to collect configuration files? [y/n] y
Do you want to collect application log files? [y/n] y
Do you want to collect OpsCenter GUI <147> log files? [y/n] y
Do you want to collect OpsCenter Server <148> log files? [y/n] y
Do you want to collect db log files? [y/n] y
Do you want to collect WebServer log files? [y/n] y
Do you want to collect setEnv file? [y/n] y
Do you want to collect database files? [y/n] y
If this is an upgrade scenario, do you want to collect
old database and log files? [y/n] y
If this is an install scenario, do you want to collect
installation lzgs? [y/n] y
Answer y or n based on your preferences.
196Administering OpsCenterGathering troubleshooting data with the support script
3 This script collects system information and OpsCenter configuration informationbased on your preferences. It then compresses all this information in a file thatis called Support.zip. You can use OpsCenter and run the support script inthe background.
Note: Adding log files and OpsCenter database files can increase the file sizeof the resulting Support.zip file.
4 The Support.zip file is stored in the following directory:
INSTALL_PATH\OpsCenter\server\temp\support
To gather troubleshooting data for OpsCenter Agent on Windows
1 Run the following command to execute the support script for OpsCenter Agent:
INSTALL_PATH\OpsCenter\Agent\bin\opsCenterAgentSupport.bat
Note: This is the default directory location on Windows computers.
2 The script stops the OpsCenter Agent service and then collects the OpsCenterAgent logs. It then collates this information in a Support.zip file.
3 This zip file is stored in the following directory:
INSTALL_PATH\OpsCenter\Agent\temp\support
4 After the Support.zip file is created, the script starts the OpsCenter Agentservice.
197Administering OpsCenterGathering troubleshooting data with the support script
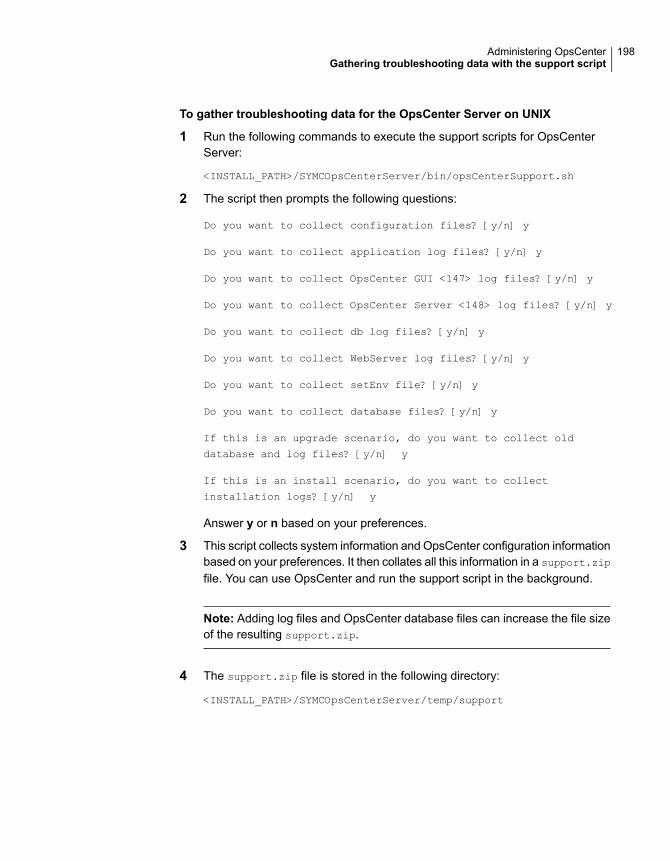
To gather troubleshooting data for the OpsCenter Server on UNIX
1 Run the following commands to execute the support scripts for OpsCenterServer:
<INSTALL_PATH>/SYMCOpsCenterServer/bin/opsCenterSupport.sh
2 The script then prompts the following questions:
Do you want to collect configuration files? [y/n] y
Do you want to collect application log files? [y/n] y
Do you want to collect OpsCenter GUI <147> log files? [y/n] y
Do you want to collect OpsCenter Server <148> log files? [y/n] y
Do you want to collect db log files? [y/n] y
Do you want to collect WebServer log files? [y/n] y
Do you want to collect setEnv file? [y/n] y
Do you want to collect database files? [y/n] y
If this is an upgrade scenario, do you want to collect old
database and log files? [y/n] y
If this is an install scenario, do you want to collect
installation logs? [y/n] y
Answer y or n based on your preferences.
3 This script collects system information and OpsCenter configuration informationbased on your preferences. It then collates all this information in a support.zip
file. You can use OpsCenter and run the support script in the background.
Note: Adding log files and OpsCenter database files can increase the file sizeof the resulting support.zip.
4 The support.zip file is stored in the following directory:
<INSTALL_PATH>/SYMCOpsCenterServer/temp/support
198Administering OpsCenterGathering troubleshooting data with the support script

About OpsCenter log filesOpsCenter creates log files that you can use to troubleshoot installation,performance, and other issues. OpsCenter writes log files using Veritas UnifiedLogging (VxUL), legacy, and other log file formats.
See “About OpsCenter log files on Windows servers” on page 202.
See “About OpsCenter log files on UNIX servers” on page 204.
VxUL log filesThe VxUL log file creates log file names and messages in a format that isstandardized across all Veritas components. These messages use VxUL IDs (aproduct ID and an originator ID) that identify the component that wrote the logmessage.
OpsCenter components create most log messages in VxUL format.
Table 4-11 shows the originator IDs used by OpsCenter and key shared components.
Table 4-11 VxUL IDs used by OpsCenter components
Originator nameVxUL originator ID
Symantec Private Branch Exchange service (PBX)103
NetBackup Service Layer (NBSL)132
OpsCenter Agent146
OpsCenter Web GUI147
OpsCenter Server148
Application log file423
OpsCenter AT18
In Windows, OpsCenter writes VxUL logs to the following directory:
INSTALL_PATH\OpsCenter\server\logs
In UNIX, OpsCenter writes VxUL logs to the following directory:
INSTALL_PATH/SYMCOpsCenterServer/logs
You can control how OpsCenter writes log files for OpsCenter Server, OpsCenterAgent, OpsCenter Web GUI, and also application log files.
199Administering OpsCenterAbout OpsCenter log files

The following OID values must be used for OpsCenter Server, OpsCenter Agent,OpsCenter Web GUI, and application logging.
148OpsCenter Server
146OpsCenter Agent
147OpsCenter Web GUI
423Application logging
Table 4-12 lists the commands by which you can control logging on Windows.
Table 4-12 Control logging on Windows
CommandControl Logging
INSTALL_PATH\OpsCenter\server\bin\vxlogcfg.exe-a -p 58330 -o <OID> -s LogDirectory="<New logdirectory location>"
Note: 58330 is the OpsCenter product ID.
To change the log directory destination(default value is
<INSTALL_PATH>\OpsCenter\server\logs)
INSTALL_PATH\OpsCenter\server\bin\vxlogcfg.exe-a -p 58330 -o <OID> -s DebugLevel=1
To configure the verbosity level (defaultvalue is 1)
INSTALL_PATH\OpsCenter\server\bin\vxlogcfg.exe-a -p 58330 -o <OID> -s DiagnosticLevel=1
To configure the diagnostic level (defaultvalue is 1)
INSTALL_PATH\OpsCenter\server\bin\vxlogcfg.exe-a -p 58330 -o <OID> -s NumberOfLogFiles=100
To configure the number of log files thatare created (default value is 100)
Table 4-13 lists the commands by which you can control logging on UNIX.
Table 4-13 Control logging on UNIX
CommandControl logging
<INSTALL_PATH>/SYMCOpsCenterServer/bin/vxlogcfg-a -p 58330 -o <OID> -s LogDirectory="<New logdirectory location>"
Note: 58330 is the OpsCenter product ID.
To change the log directory destination(default value is <INSTALL_PATH>/SYMCOpsCenterServer/logs)
<INSTALL_PATH>/SYMCOpsCenterServer/bin/vxlogcfg-a -p 58330 -o <OID> -s DebugLevel=<New debuglevel>
To configure the debug level (defaultvalue is 1)
200Administering OpsCenterAbout OpsCenter log files
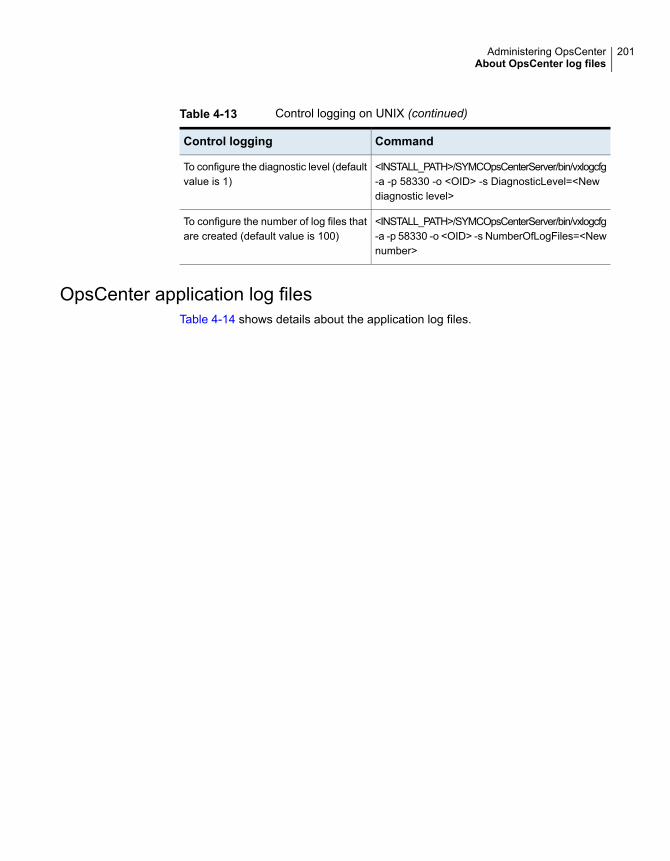
Table 4-13 Control logging on UNIX (continued)
CommandControl logging
<INSTALL_PATH>/SYMCOpsCenterServer/bin/vxlogcfg-a -p 58330 -o <OID> -s DiagnosticLevel=<Newdiagnostic level>
To configure the diagnostic level (defaultvalue is 1)
<INSTALL_PATH>/SYMCOpsCenterServer/bin/vxlogcfg-a -p 58330 -o <OID> -s NumberOfLogFiles=<Newnumber>
To configure the number of log files thatare created (default value is 100)
OpsCenter application log filesTable 4-14 shows details about the application log files.
201Administering OpsCenterAbout OpsCenter log files
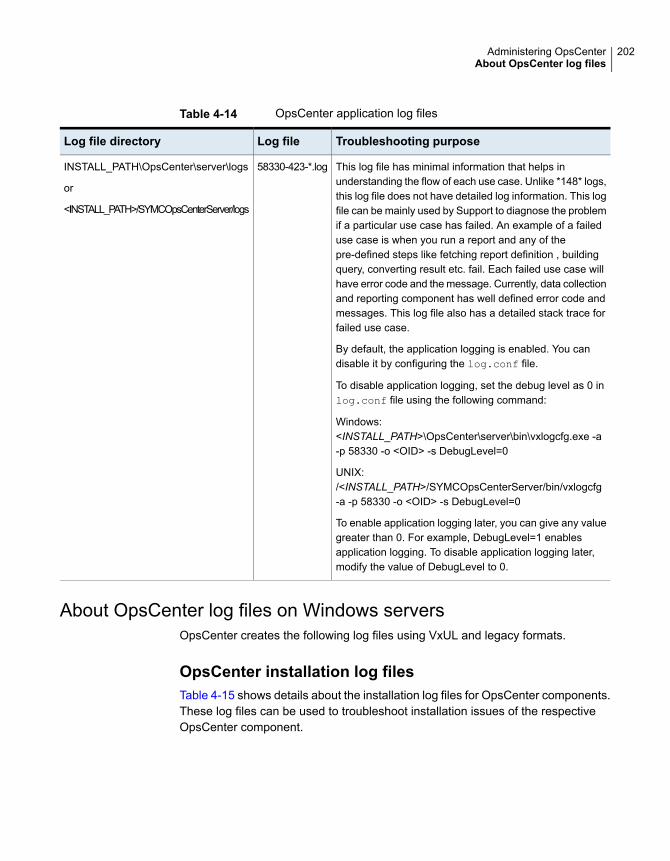
Table 4-14 OpsCenter application log files
Troubleshooting purposeLog fileLog file directory
This log file has minimal information that helps inunderstanding the flow of each use case. Unlike *148* logs,this log file does not have detailed log information. This logfile can be mainly used by Support to diagnose the problemif a particular use case has failed. An example of a faileduse case is when you run a report and any of thepre-defined steps like fetching report definition , buildingquery, converting result etc. fail. Each failed use case willhave error code and the message. Currently, data collectionand reporting component has well defined error code andmessages. This log file also has a detailed stack trace forfailed use case.
By default, the application logging is enabled. You candisable it by configuring the log.conf file.
To disable application logging, set the debug level as 0 inlog.conf file using the following command:
Windows:<INSTALL_PATH>\OpsCenter\server\bin\vxlogcfg.exe -a-p 58330 -o <OID> -s DebugLevel=0
UNIX:/<INSTALL_PATH>/SYMCOpsCenterServer/bin/vxlogcfg-a -p 58330 -o <OID> -s DebugLevel=0
To enable application logging later, you can give any valuegreater than 0. For example, DebugLevel=1 enablesapplication logging. To disable application logging later,modify the value of DebugLevel to 0.
58330-423-*.logINSTALL_PATH\OpsCenter\server\logs
or
<INSTALL_PATH>/SYMCOpsCenterServer/logs
About OpsCenter log files on Windows serversOpsCenter creates the following log files using VxUL and legacy formats.
OpsCenter installation log filesTable 4-15 shows details about the installation log files for OpsCenter components.These log files can be used to troubleshoot installation issues of the respectiveOpsCenter component.
202Administering OpsCenterAbout OpsCenter log files

Table 4-15 OpsCenter installation log files
Log fileOpsCentercomponent
%ALLUSERSPROFILE%\Symantec\OpsCenter\INSTALLLOGS\OpsCenterServerInstallLog.htmlOpsCenterServer
%ALLUSERSPROFILE%\Symantec\OpsCenter\INSTALLLOGS\OpsCenterAgentInstallLog.htmlOpsCenterAgent
%ALLUSERSPROFILE%\Symantec\OpsCenter\INSTALLLOGS\OpsCenterViewBuilderInstallLog.htmlOpsCenterViewBuilder
OpsCenter log filesTable 4-16 shows details about the OpsCenter log files.
Table 4-16 OpsCenter log files
Troubleshooting purposeLog fileLog file directory
These log files for system.err andsystem.out of OpsCenter server service.
ServerService_timestamp.logINSTALL_PATH\OpsCenter\server\logs\
Log files associated with Authentication ServiceTable 4-17 lists the log files that are associated with Authentication Service.
Table 4-17 Log files for Authentication Service
Troubleshooting purposeLog fileLog file directory
User authentication activityvxatd.logOn Windows platforms:INSTALL_PATH\OpsCenter\server\authbroker\bin
OpsCenter database log filesTable 4-18 lists the log files that are associated with the OpsCenter database.
Table 4-18 Log files associated with the OpsCenter database
Troubleshooting purposeLog fileLog file directory
OpsCenter Sybase database activity.server.logINSTALL_PATH\OpsCenter\server\db\log\
203Administering OpsCenterAbout OpsCenter log files
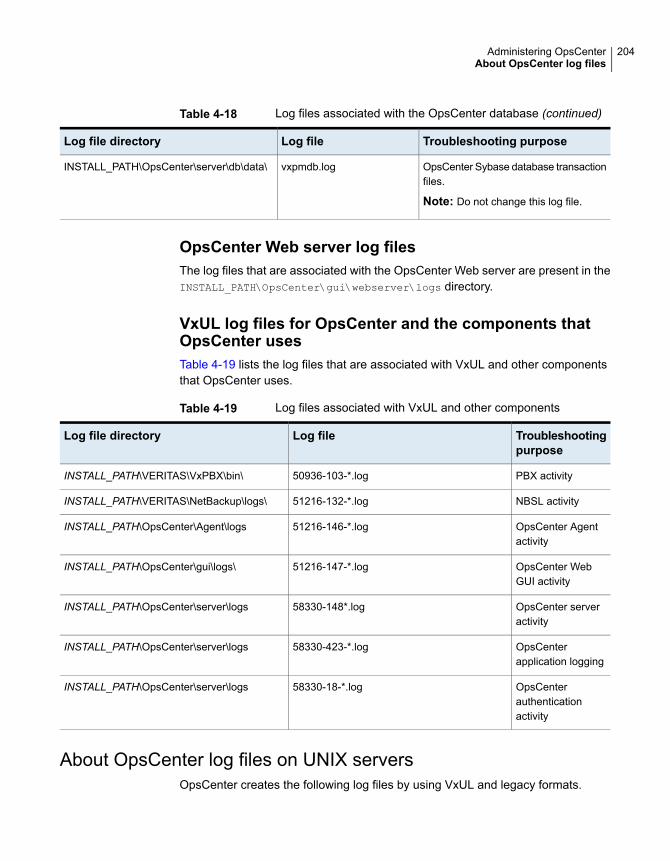
Table 4-18 Log files associated with the OpsCenter database (continued)
Troubleshooting purposeLog fileLog file directory
OpsCenter Sybase database transactionfiles.
Note: Do not change this log file.
vxpmdb.logINSTALL_PATH\OpsCenter\server\db\data\
OpsCenter Web server log filesThe log files that are associated with the OpsCenter Web server are present in theINSTALL_PATH\OpsCenter\gui\webserver\logs directory.
VxUL log files for OpsCenter and the components thatOpsCenter usesTable 4-19 lists the log files that are associated with VxUL and other componentsthat OpsCenter uses.
Table 4-19 Log files associated with VxUL and other components
Troubleshootingpurpose
Log fileLog file directory
PBX activity50936-103-*.logINSTALL_PATH\VERITAS\VxPBX\bin\
NBSL activity51216-132-*.logINSTALL_PATH\VERITAS\NetBackup\logs\
OpsCenter Agentactivity
51216-146-*.logINSTALL_PATH\OpsCenter\Agent\logs
OpsCenter WebGUI activity
51216-147-*.logINSTALL_PATH\OpsCenter\gui\logs\
OpsCenter serveractivity
58330-148*.logINSTALL_PATH\OpsCenter\server\logs
OpsCenterapplication logging
58330-423-*.logINSTALL_PATH\OpsCenter\server\logs
OpsCenterauthenticationactivity
58330-18-*.logINSTALL_PATH\OpsCenter\server\logs
About OpsCenter log files on UNIX serversOpsCenter creates the following log files by using VxUL and legacy formats.
204Administering OpsCenterAbout OpsCenter log files
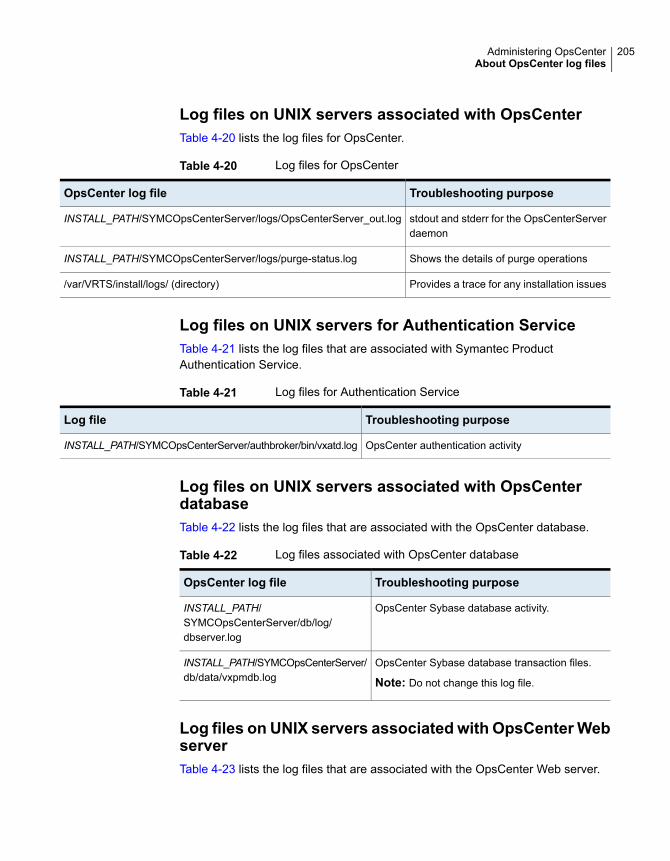
Log files on UNIX servers associated with OpsCenterTable 4-20 lists the log files for OpsCenter.
Table 4-20 Log files for OpsCenter
Troubleshooting purposeOpsCenter log file
stdout and stderr for the OpsCenterServerdaemon
INSTALL_PATH/SYMCOpsCenterServer/logs/OpsCenterServer_out.log
Shows the details of purge operationsINSTALL_PATH/SYMCOpsCenterServer/logs/purge-status.log
Provides a trace for any installation issues/var/VRTS/install/logs/ (directory)
Log files on UNIX servers for Authentication ServiceTable 4-21 lists the log files that are associated with Symantec ProductAuthentication Service.
Table 4-21 Log files for Authentication Service
Troubleshooting purposeLog file
OpsCenter authentication activityINSTALL_PATH/SYMCOpsCenterServer/authbroker/bin/vxatd.log
Log files on UNIX servers associated with OpsCenterdatabaseTable 4-22 lists the log files that are associated with the OpsCenter database.
Table 4-22 Log files associated with OpsCenter database
Troubleshooting purposeOpsCenter log file
OpsCenter Sybase database activity.INSTALL_PATH/SYMCOpsCenterServer/db/log/dbserver.log
OpsCenter Sybase database transaction files.
Note: Do not change this log file.
INSTALL_PATH/SYMCOpsCenterServer/db/data/vxpmdb.log
Log files on UNIX servers associated with OpsCenterWebserverTable 4-23 lists the log files that are associated with the OpsCenter Web server.
205Administering OpsCenterAbout OpsCenter log files

Table 4-23 Log files associated with the OpsCenter Web server
Troubleshooting purposeOpsCenter log directory
OpsCenter Web GUI application activity (stdout).<INSTALL_PATH>/SYMCOpsCenterGUI/webserver/logs
Log files on UNIX associated with VxUL and othercomponentsTable 4-24 lists the log files that are associated with VxUL and other components.
Table 4-24 Log files associated with VxUL and other components
Troubleshooting purposeOpsCenter log file
PBX activityINSTALL_PATH/VRTSpbx/log/50936-103-*.log
NBSL activityINSTALL_PATH/openv/logs/51216-132-*.log
OpsCenter Web GUI activityINSTALL_PATH/SYMCOpsCenterGUI/logs/51216-147-*.log
OpsCenter server activityINSTALL_PATH/SYMCOpsCenterServer/logs/558330-148*.log
OpsCenter application loggingINSTALL_PATH/SYMCOpsCenterServer/logs/58330-423-*.log
OpsCenter authentication activityINSTALL_PATH/SYMCOpsCenterServer/logs/58330-18-*.log
206Administering OpsCenterAbout OpsCenter log files
Understanding OpsCentersettings
This chapter includes the following topics:
■ OpsCenter settings
■ Setting user preferences
■ About managing licenses
■ Configuring the data purge period on the OpsCenter Server
■ About storing the SMTP Server configurations in OpsCenter
■ Configuring SMTP server settings for OpsCenter
■ Adding host aliases in OpsCenter
■ Merging objects (hosts) in OpsCenter
■ Modifying tape library information in OpsCenter
■ Copying a user profile in OpsCenter
■ Setting report export location in OpsCenter
■ About managing Object Types in OpsCenter
■ About managing OpsCenter users
■ About managing recipients in OpsCenter
■ About managing cost analysis and chargeback for OpsCenter Analytics
5Chapter
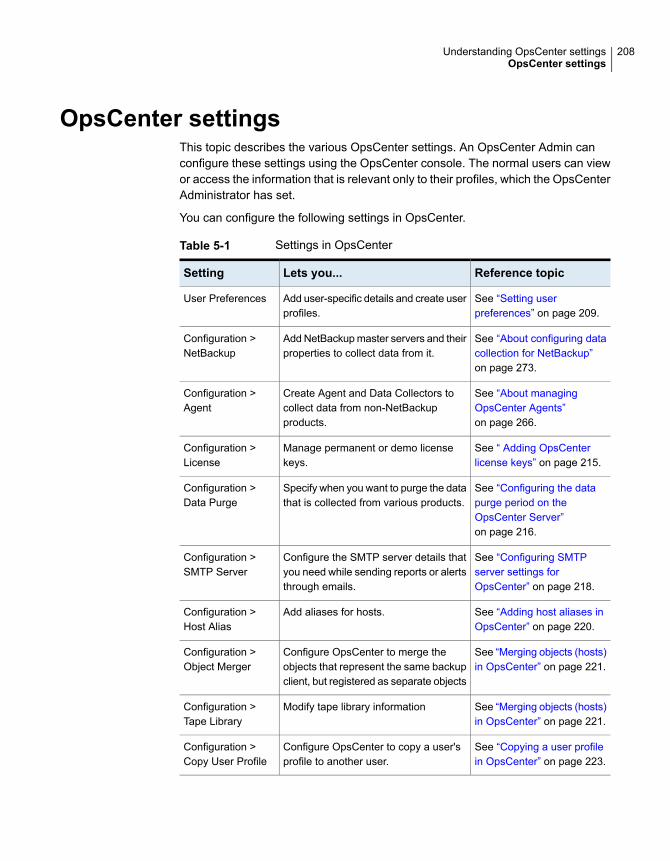
OpsCenter settingsThis topic describes the various OpsCenter settings. An OpsCenter Admin canconfigure these settings using the OpsCenter console. The normal users can viewor access the information that is relevant only to their profiles, which the OpsCenterAdministrator has set.
You can configure the following settings in OpsCenter.
Table 5-1 Settings in OpsCenter
Reference topicLets you...Setting
See “Setting userpreferences” on page 209.
Add user-specific details and create userprofiles.
User Preferences
See “About configuring datacollection for NetBackup”on page 273.
Add NetBackup master servers and theirproperties to collect data from it.
Configuration >NetBackup
See “About managingOpsCenter Agents”on page 266.
Create Agent and Data Collectors tocollect data from non-NetBackupproducts.
Configuration >Agent
See “ Adding OpsCenterlicense keys” on page 215.
Manage permanent or demo licensekeys.
Configuration >License
See “Configuring the datapurge period on theOpsCenter Server”on page 216.
Specify when you want to purge the datathat is collected from various products.
Configuration >Data Purge
See “Configuring SMTPserver settings forOpsCenter” on page 218.
Configure the SMTP server details thatyou need while sending reports or alertsthrough emails.
Configuration >SMTP Server
See “Adding host aliases inOpsCenter” on page 220.
Add aliases for hosts.Configuration >Host Alias
See “Merging objects (hosts)in OpsCenter” on page 221.
Configure OpsCenter to merge theobjects that represent the same backupclient, but registered as separate objects
Configuration >Object Merger
See “Merging objects (hosts)in OpsCenter” on page 221.
Modify tape library informationConfiguration >Tape Library
See “Copying a user profilein OpsCenter” on page 223.
Configure OpsCenter to copy a user'sprofile to another user.
Configuration >Copy User Profile
208Understanding OpsCenter settingsOpsCenter settings
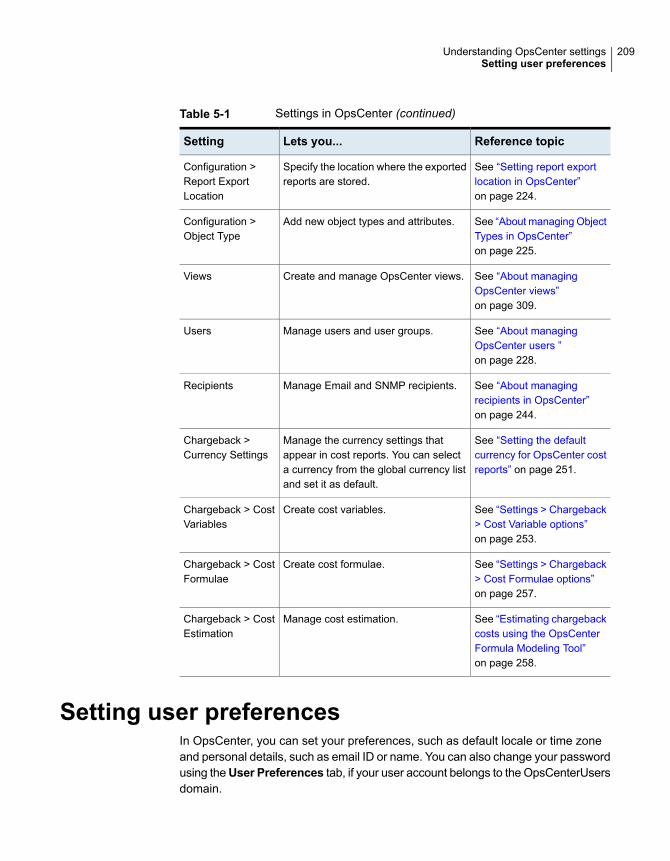
Table 5-1 Settings in OpsCenter (continued)
Reference topicLets you...Setting
See “Setting report exportlocation in OpsCenter”on page 224.
Specify the location where the exportedreports are stored.
Configuration >Report ExportLocation
See “About managing ObjectTypes in OpsCenter”on page 225.
Add new object types and attributes.Configuration >Object Type
See “About managingOpsCenter views”on page 309.
Create and manage OpsCenter views.Views
See “About managingOpsCenter users ”on page 228.
Manage users and user groups.Users
See “About managingrecipients in OpsCenter”on page 244.
Manage Email and SNMP recipients.Recipients
See “Setting the defaultcurrency for OpsCenter costreports” on page 251.
Manage the currency settings thatappear in cost reports. You can selecta currency from the global currency listand set it as default.
Chargeback >Currency Settings
See “Settings > Chargeback> Cost Variable options”on page 253.
Create cost variables.Chargeback > CostVariables
See “Settings > Chargeback> Cost Formulae options”on page 257.
Create cost formulae.Chargeback > CostFormulae
See “Estimating chargebackcosts using the OpsCenterFormula Modeling Tool”on page 258.
Manage cost estimation.Chargeback > CostEstimation
Setting user preferencesIn OpsCenter, you can set your preferences, such as default locale or time zoneand personal details, such as email ID or name. You can also change your passwordusing theUser Preferences tab, if your user account belongs to the OpsCenterUsersdomain.
209Understanding OpsCenter settingsSetting user preferences

To set user preferences
1 In the OpsCenter console, click Settings > User Preferences. The userpreferences options are organized in the General and My Profile tabs.
2 Click the General tab to set Default Locale, Data Display Time Zone, Start24 Hour Day at, Disable Auto Refresh, Auto Refresh Interval (Minutes),and Allow Multiple Selection in View Pane.
3 Click Save.
4 Click the My Profile tab to see or modify User Name, Password, User Role,and Domain Name
Settings > User Preferences optionsUse the General tab options as follows:
Table 5-2 General options
DescriptionOption
Select a locale of your choice from the drop-down list. Forexample, if you select English as a default locale, allOpsCenter GUI screens use English as a default language.
Default Locale
Select a preferred time zone - either OpsCenter Server timezone or any other time zone from the Other drop-down list.OpsCenter displays time on the GUI screens according tothe selected time zone.
Data Display Time Zone
Enter the time that is used as the start time of a day in reports.Report data is grouped depending on this start time.
Start 24 Hour Day at
Select this check box if you do not want to automaticallyrefresh the OpsCenter GUI.
By default, the auto-refresh option is enabled.
Disable Auto Refresh
Enter auto-refresh interval in minutes. For example, if youwant to refresh the OpsCenter GUI to show updated dataafter every 5 minutes, enter five in theAuto Refresh Intervaltext box.
Auto Refresh Interval(Minutes)
View Preferences
210Understanding OpsCenter settingsSetting user preferences
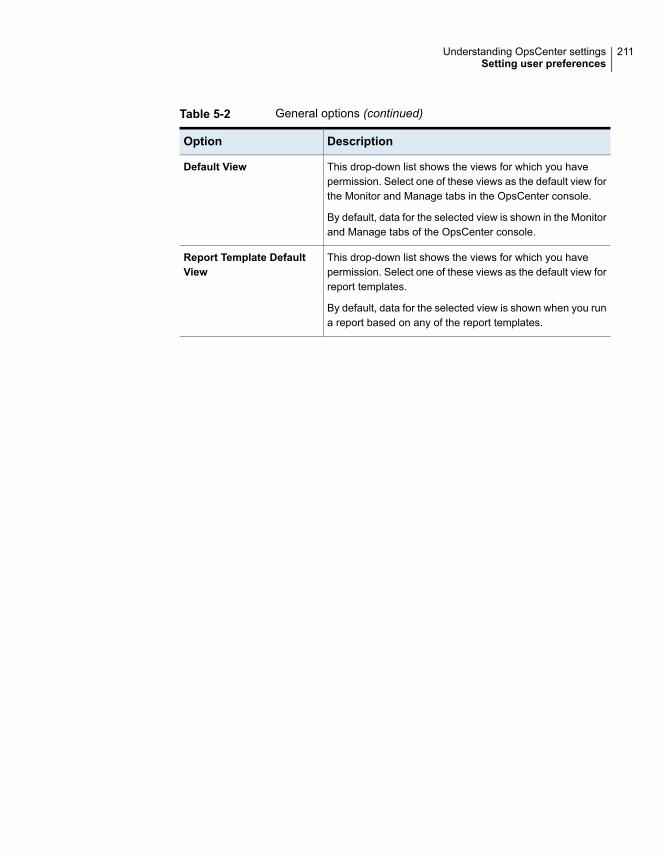
Table 5-2 General options (continued)
DescriptionOption
This drop-down list shows the views for which you havepermission. Select one of these views as the default view forthe Monitor and Manage tabs in the OpsCenter console.
By default, data for the selected view is shown in the Monitorand Manage tabs of the OpsCenter console.
Default View
This drop-down list shows the views for which you havepermission. Select one of these views as the default view forreport templates.
By default, data for the selected view is shown when you runa report based on any of the report templates.
Report Template DefaultView
211Understanding OpsCenter settingsSetting user preferences
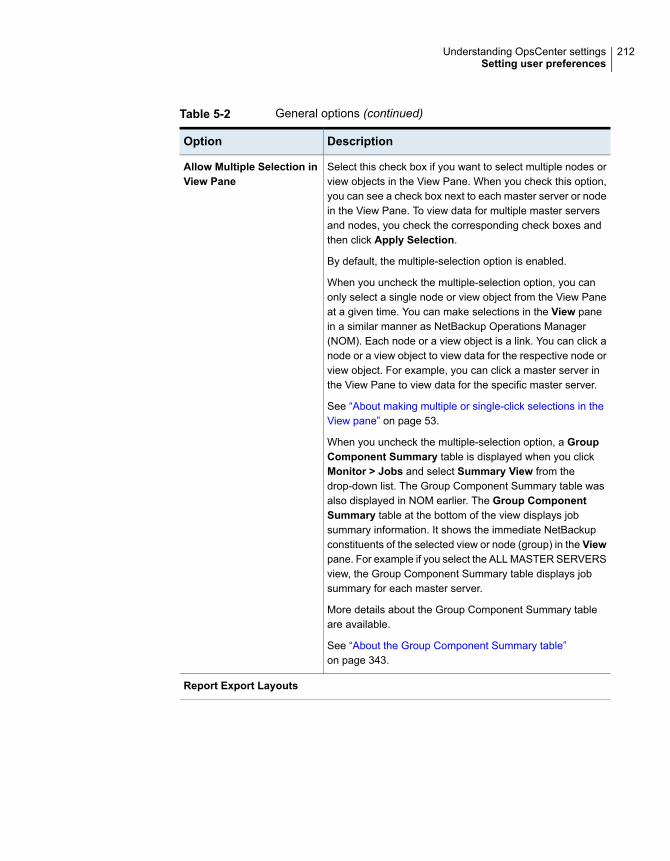
Table 5-2 General options (continued)
DescriptionOption
Select this check box if you want to select multiple nodes orview objects in the View Pane. When you check this option,you can see a check box next to each master server or nodein the View Pane. To view data for multiple master serversand nodes, you check the corresponding check boxes andthen click Apply Selection.
By default, the multiple-selection option is enabled.
When you uncheck the multiple-selection option, you canonly select a single node or view object from the View Paneat a given time. You can make selections in the View panein a similar manner as NetBackup Operations Manager(NOM). Each node or a view object is a link. You can click anode or a view object to view data for the respective node orview object. For example, you can click a master server inthe View Pane to view data for the specific master server.
See “About making multiple or single-click selections in theView pane” on page 53.
When you uncheck the multiple-selection option, a GroupComponent Summary table is displayed when you clickMonitor > Jobs and select Summary View from thedrop-down list. The Group Component Summary table wasalso displayed in NOM earlier. The Group ComponentSummary table at the bottom of the view displays jobsummary information. It shows the immediate NetBackupconstituents of the selected view or node (group) in the Viewpane. For example if you select the ALL MASTER SERVERSview, the Group Component Summary table displays jobsummary for each master server.
More details about the Group Component Summary tableare available.
See “About the Group Component Summary table”on page 343.
Allow Multiple Selection inView Pane
Report Export Layouts
212Understanding OpsCenter settingsSetting user preferences
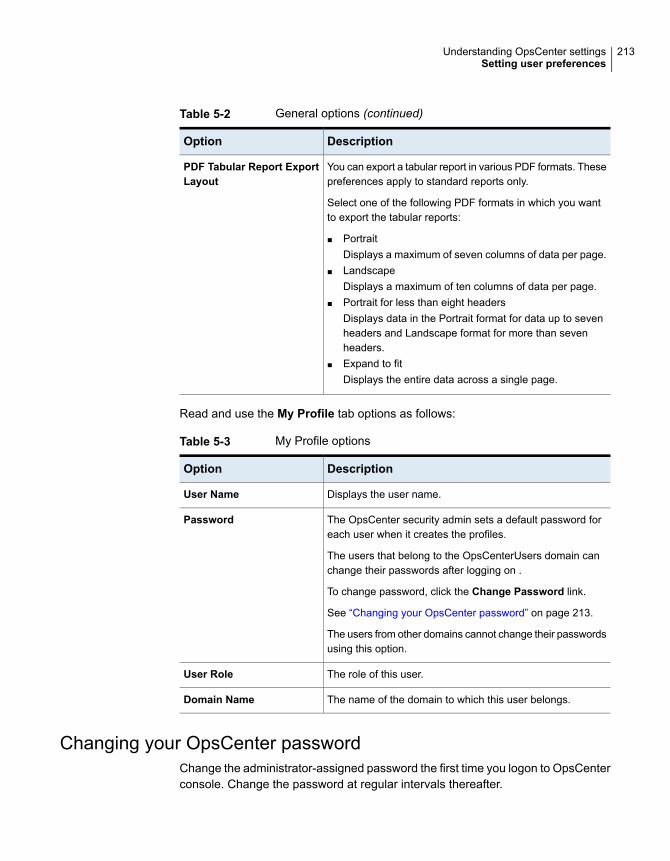
Table 5-2 General options (continued)
DescriptionOption
You can export a tabular report in various PDF formats. Thesepreferences apply to standard reports only.
Select one of the following PDF formats in which you wantto export the tabular reports:
■ PortraitDisplays a maximum of seven columns of data per page.
■ LandscapeDisplays a maximum of ten columns of data per page.
■ Portrait for less than eight headersDisplays data in the Portrait format for data up to sevenheaders and Landscape format for more than sevenheaders.
■ Expand to fitDisplays the entire data across a single page.
PDF Tabular Report ExportLayout
Read and use the My Profile tab options as follows:
Table 5-3 My Profile options
DescriptionOption
Displays the user name.User Name
The OpsCenter security admin sets a default password foreach user when it creates the profiles.
The users that belong to the OpsCenterUsers domain canchange their passwords after logging on .
To change password, click the Change Password link.
See “Changing your OpsCenter password” on page 213.
The users from other domains cannot change their passwordsusing this option.
Password
The role of this user.User Role
The name of the domain to which this user belongs.Domain Name
Changing your OpsCenter passwordChange the administrator-assigned password the first time you logon to OpsCenterconsole. Change the password at regular intervals thereafter.
213Understanding OpsCenter settingsSetting user preferences
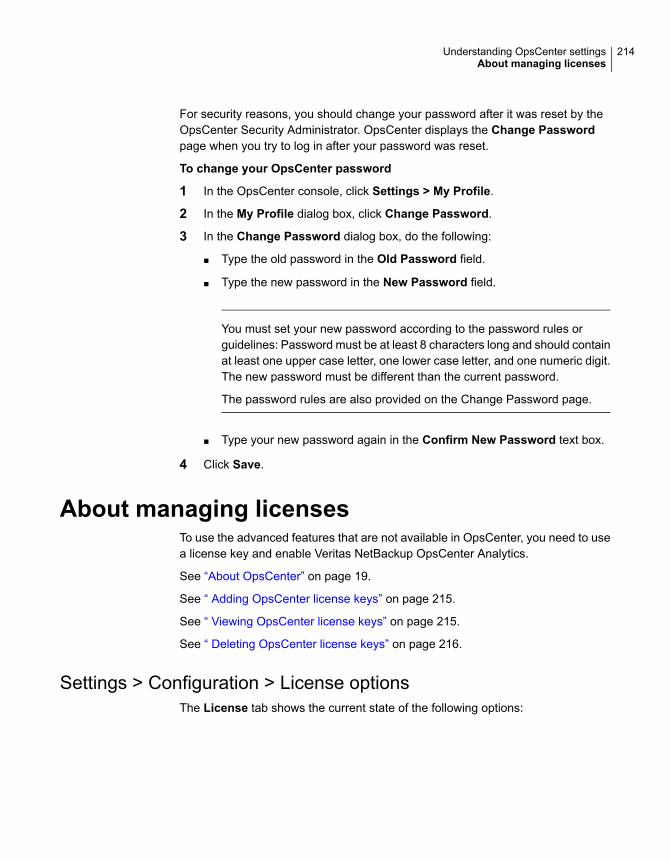
For security reasons, you should change your password after it was reset by theOpsCenter Security Administrator. OpsCenter displays the Change Passwordpage when you try to log in after your password was reset.
To change your OpsCenter password
1 In the OpsCenter console, click Settings > My Profile.
2 In the My Profile dialog box, click Change Password.
3 In the Change Password dialog box, do the following:
■ Type the old password in the Old Password field.
■ Type the new password in the New Password field.
You must set your new password according to the password rules orguidelines: Password must be at least 8 characters long and should containat least one upper case letter, one lower case letter, and one numeric digit.The new password must be different than the current password.
The password rules are also provided on the Change Password page.
■ Type your new password again in the Confirm New Password text box.
4 Click Save.
About managing licensesTo use the advanced features that are not available in OpsCenter, you need to usea license key and enable Veritas NetBackup OpsCenter Analytics.
See “About OpsCenter” on page 19.
See “ Adding OpsCenter license keys” on page 215.
See “ Viewing OpsCenter license keys” on page 215.
See “ Deleting OpsCenter license keys” on page 216.
Settings > Configuration > License optionsThe License tab shows the current state of the following options:
214Understanding OpsCenter settingsAbout managing licenses
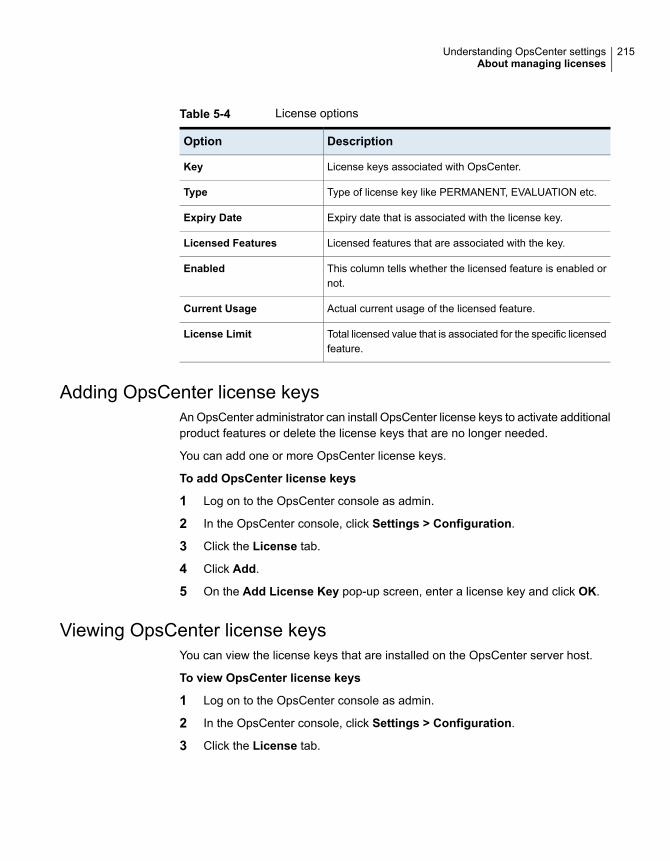
Table 5-4 License options
DescriptionOption
License keys associated with OpsCenter.Key
Type of license key like PERMANENT, EVALUATION etc.Type
Expiry date that is associated with the license key.Expiry Date
Licensed features that are associated with the key.Licensed Features
This column tells whether the licensed feature is enabled ornot.
Enabled
Actual current usage of the licensed feature.Current Usage
Total licensed value that is associated for the specific licensedfeature.
License Limit
Adding OpsCenter license keysAn OpsCenter administrator can install OpsCenter license keys to activate additionalproduct features or delete the license keys that are no longer needed.
You can add one or more OpsCenter license keys.
To add OpsCenter license keys
1 Log on to the OpsCenter console as admin.
2 In the OpsCenter console, click Settings > Configuration.
3 Click the License tab.
4 Click Add.
5 On the Add License Key pop-up screen, enter a license key and click OK.
Viewing OpsCenter license keysYou can view the license keys that are installed on the OpsCenter server host.
To view OpsCenter license keys
1 Log on to the OpsCenter console as admin.
2 In the OpsCenter console, click Settings > Configuration.
3 Click the License tab.
215Understanding OpsCenter settingsAbout managing licenses
Deleting OpsCenter license keysYou can remove one or more OpsCenter Analytics license keys from the OpsCenterServer, on which you are connected as an administrator.
To delete OpsCenter Analytics license keys
1 Log on to the OpsCenter console as admin.
2 In the OpsCenter console, click Settings > Configuration.
3 Click the License tab.
4 Select the check box in front of the license key that you want to delete.
5 Click Delete.
Configuring the data purge period on theOpsCenter Server
You can configure the OpsCenter Server retention periods for the data types thatare logged, such as Job, Policy, and Skipped Files.
Note: The details of the purged data are stored in the purge-status.log file, whichis located in the OpsCenter server logs directory.
To configure the data purge period on the OpsCenter Server
1 Log on to the OpsCenter console as admin.
2 In the OpsCenter click Settings > Configuration.
3 Click the Data Purge tab.
By default, data purge is enabled.
4 Edit the default data purge settings as necessary.
See “Settings > Configuration > Data Purge options” on page 216.
5 In the Time of Purge text box, enter the time of day (in 24-hour clock format)when you want to purge the data.
6 Click Save.
Settings > Configuration > Data Purge optionsBy default, data purge is enabled.
216Understanding OpsCenter settingsConfiguring the data purge period on the OpsCenter Server
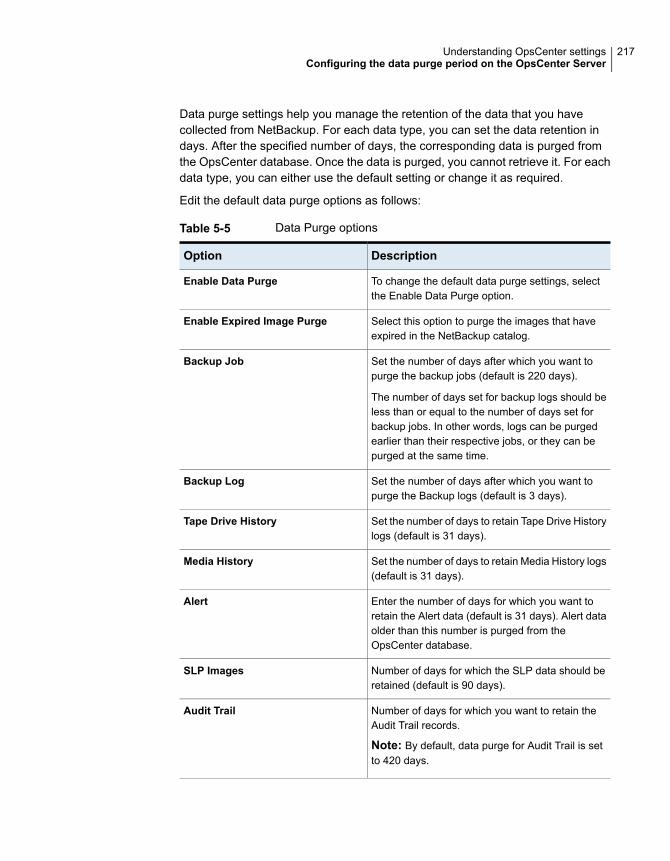
Data purge settings help you manage the retention of the data that you havecollected from NetBackup. For each data type, you can set the data retention indays. After the specified number of days, the corresponding data is purged fromthe OpsCenter database. Once the data is purged, you cannot retrieve it. For eachdata type, you can either use the default setting or change it as required.
Edit the default data purge options as follows:
Table 5-5 Data Purge options
DescriptionOption
To change the default data purge settings, selectthe Enable Data Purge option.
Enable Data Purge
Select this option to purge the images that haveexpired in the NetBackup catalog.
Enable Expired Image Purge
Set the number of days after which you want topurge the backup jobs (default is 220 days).
The number of days set for backup logs should beless than or equal to the number of days set forbackup jobs. In other words, logs can be purgedearlier than their respective jobs, or they can bepurged at the same time.
Backup Job
Set the number of days after which you want topurge the Backup logs (default is 3 days).
Backup Log
Set the number of days to retain Tape Drive Historylogs (default is 31 days).
Tape Drive History
Set the number of days to retain Media History logs(default is 31 days).
Media History
Enter the number of days for which you want toretain the Alert data (default is 31 days). Alert dataolder than this number is purged from theOpsCenter database.
Alert
Number of days for which the SLP data should beretained (default is 90 days).
SLP Images
Number of days for which you want to retain theAudit Trail records.
Note: By default, data purge for Audit Trail is setto 420 days.
Audit Trail
217Understanding OpsCenter settingsConfiguring the data purge period on the OpsCenter Server
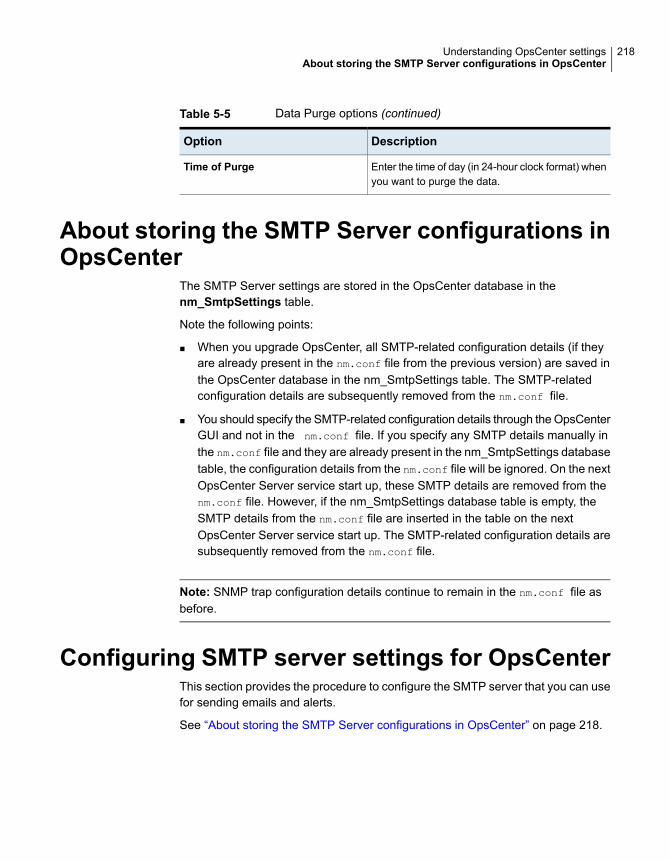
Table 5-5 Data Purge options (continued)
DescriptionOption
Enter the time of day (in 24-hour clock format) whenyou want to purge the data.
Time of Purge
About storing the SMTP Server configurations inOpsCenter
The SMTP Server settings are stored in the OpsCenter database in thenm_SmtpSettings table.
Note the following points:
■ When you upgrade OpsCenter, all SMTP-related configuration details (if theyare already present in the nm.conf file from the previous version) are saved inthe OpsCenter database in the nm_SmtpSettings table. The SMTP-relatedconfiguration details are subsequently removed from the nm.conf file.
■ You should specify the SMTP-related configuration details through the OpsCenterGUI and not in the nm.conf file. If you specify any SMTP details manually inthe nm.conf file and they are already present in the nm_SmtpSettings databasetable, the configuration details from the nm.conf file will be ignored. On the nextOpsCenter Server service start up, these SMTP details are removed from thenm.conf file. However, if the nm_SmtpSettings database table is empty, theSMTP details from the nm.conf file are inserted in the table on the nextOpsCenter Server service start up. The SMTP-related configuration details aresubsequently removed from the nm.conf file.
Note: SNMP trap configuration details continue to remain in the nm.conf file asbefore.
Configuring SMTP server settings for OpsCenterThis section provides the procedure to configure the SMTP server that you can usefor sending emails and alerts.
See “About storing the SMTP Server configurations in OpsCenter” on page 218.
218Understanding OpsCenter settingsAbout storing the SMTP Server configurations in OpsCenter

To configure SMTP server settings for OpsCenter
1 Log on to the OpsCenter console as admin.
2 In the OpsCenter console, click Settings > Configuration.
3 Click SMTP Server.
OpsCenter uses these global server settings to send email notifications usingthe SMTP server that you specify.
4 Enter the required information.
See “Settings > Configuration > SMTP server options” on page 219.
5 Click Save.
Settings > Configuration > SMTP server optionsA description of the Settings > Configuration > SMTP Server options follows inthe table.
Table 5-6 SMTP server options
DescriptionOption
Enter the SMTP (Simple Mail Transfer Protocol) Server hostname.
Notifications of the alerts that are generated in OpsCenterare sent using this SMTP server.
SMTP Server Name
Enter the SMTP (Simple Mail Transfer Protocol) Server portnumber.
SMTP Server port
Enter the name that is associated with the Email ID. Forexample, Backup Reporting Department.
Sender Display Name
Specify the Email ID to receive any replies to the alerts orthe reports that were sent by OpsCenter.
Sender Email Address
Some SMTP servers may require user name and passwordcredentials to send email.
Enter the user name.
Server User Name
Some SMTP servers may require user name and passwordcredentials to send email.
Enter the password for this user account.
Server User Password
See “About storing the SMTP Server configurations in OpsCenter” on page 218.
219Understanding OpsCenter settingsConfiguring SMTP server settings for OpsCenter

Adding host aliases in OpsCenterThis section provides the procedures to add aliases for hosts.
The host’s primary alias is displayed in all console functions and reports. Other hostaliases are used when you search in OpsCenter or gather and collate data.
Warning: Your alias names must be compatible with your hosts’ DNS names orwith the names by which they are known to applications such as NetBackup andBackup Exec. For example, if you use an alias that is unknown to OpsCenter, theexplorer stops collecting information from the OpsCenter host. Instead the explorerattempts to collect data from a host with the alias name.
To add a host alias
1 In the OpsCenter console, click Settings > Configuration > Host Alias.
2 From the drop-down list select a host name or type a host name and clickShow Alias.
All the existing aliases are displayed.
3 Click Add Alias.
4 Enter the alias name for the host that you have selected from the drop-downlist.
5 Click Save.
Settings > Configuration > Host Alias optionsA description of the Settings > Configuration > Host Alias options follows in thetable.
Table 5-7 Host Alias options
DescriptionOption
From the drop-down list select a host name or type a hostname.
Select Host
Click Show Alias to display the aliases associated with theselected host.
Show Alias
A selected host can have one or more alias associated withit.
You can clear and save the alias for removing the particularalias.
Alias 1, 2, 3, etc.
220Understanding OpsCenter settingsAdding host aliases in OpsCenter
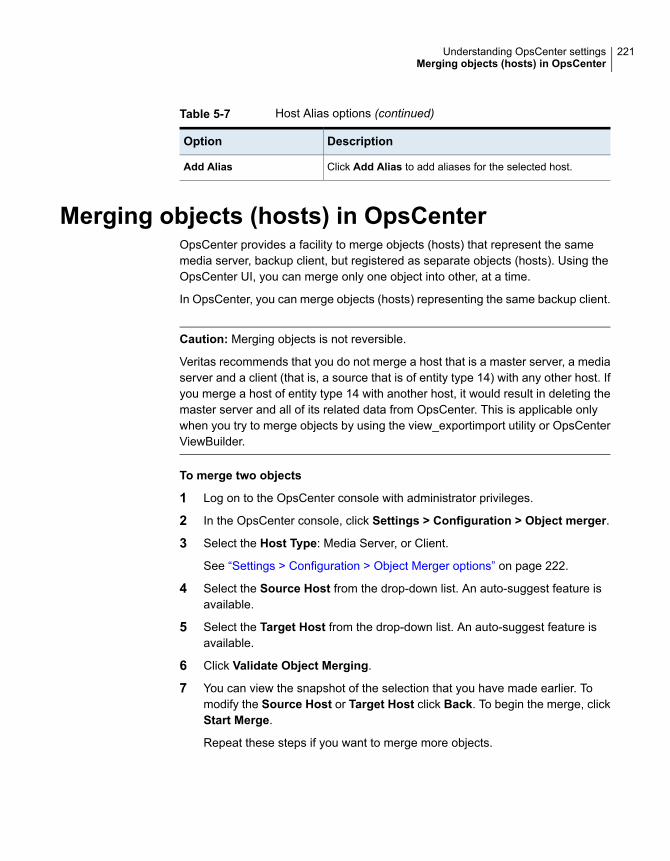
Table 5-7 Host Alias options (continued)
DescriptionOption
Click Add Alias to add aliases for the selected host.Add Alias
Merging objects (hosts) in OpsCenterOpsCenter provides a facility to merge objects (hosts) that represent the samemedia server, backup client, but registered as separate objects (hosts). Using theOpsCenter UI, you can merge only one object into other, at a time.
In OpsCenter, you can merge objects (hosts) representing the same backup client.
Caution: Merging objects is not reversible.
Veritas recommends that you do not merge a host that is a master server, a mediaserver and a client (that is, a source that is of entity type 14) with any other host. Ifyou merge a host of entity type 14 with another host, it would result in deleting themaster server and all of its related data from OpsCenter. This is applicable onlywhen you try to merge objects by using the view_exportimport utility or OpsCenterViewBuilder.
To merge two objects
1 Log on to the OpsCenter console with administrator privileges.
2 In the OpsCenter console, click Settings > Configuration > Object merger.
3 Select the Host Type: Media Server, or Client.
See “Settings > Configuration > Object Merger options” on page 222.
4 Select the Source Host from the drop-down list. An auto-suggest feature isavailable.
5 Select the Target Host from the drop-down list. An auto-suggest feature isavailable.
6 Click Validate Object Merging.
7 You can view the snapshot of the selection that you have made earlier. Tomodify the Source Host or Target Host click Back. To begin the merge, clickStart Merge.
Repeat these steps if you want to merge more objects.
221Understanding OpsCenter settingsMerging objects (hosts) in OpsCenter
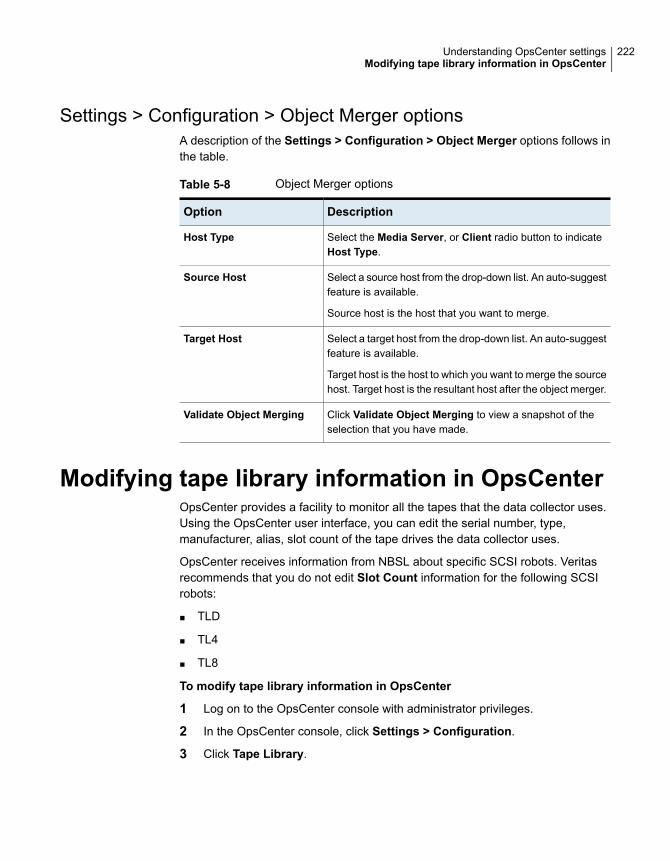
Settings > Configuration > Object Merger optionsA description of the Settings > Configuration > Object Merger options follows inthe table.
Table 5-8 Object Merger options
DescriptionOption
Select the Media Server, or Client radio button to indicateHost Type.
Host Type
Select a source host from the drop-down list. An auto-suggestfeature is available.
Source host is the host that you want to merge.
Source Host
Select a target host from the drop-down list. An auto-suggestfeature is available.
Target host is the host to which you want to merge the sourcehost. Target host is the resultant host after the object merger.
Target Host
Click Validate Object Merging to view a snapshot of theselection that you have made.
Validate Object Merging
Modifying tape library information in OpsCenterOpsCenter provides a facility to monitor all the tapes that the data collector uses.Using the OpsCenter user interface, you can edit the serial number, type,manufacturer, alias, slot count of the tape drives the data collector uses.
OpsCenter receives information from NBSL about specific SCSI robots. Veritasrecommends that you do not edit Slot Count information for the following SCSIrobots:
■ TLD
■ TL4
■ TL8
To modify tape library information in OpsCenter
1 Log on to the OpsCenter console with administrator privileges.
2 In the OpsCenter console, click Settings > Configuration.
3 Click Tape Library.
222Understanding OpsCenter settingsModifying tape library information in OpsCenter
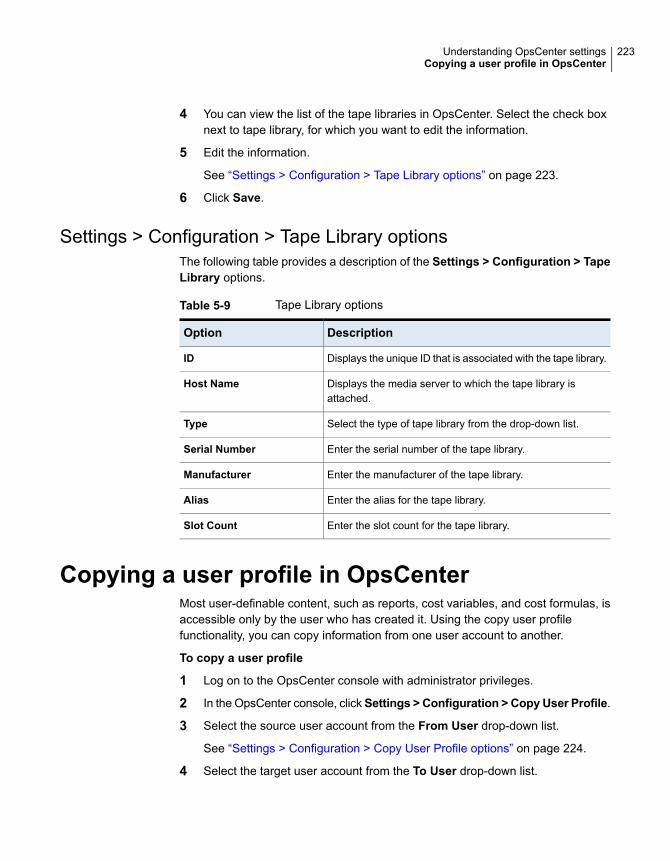
4 You can view the list of the tape libraries in OpsCenter. Select the check boxnext to tape library, for which you want to edit the information.
5 Edit the information.
See “Settings > Configuration > Tape Library options” on page 223.
6 Click Save.
Settings > Configuration > Tape Library optionsThe following table provides a description of the Settings > Configuration > TapeLibrary options.
Table 5-9 Tape Library options
DescriptionOption
Displays the unique ID that is associated with the tape library.ID
Displays the media server to which the tape library isattached.
Host Name
Select the type of tape library from the drop-down list.Type
Enter the serial number of the tape library.Serial Number
Enter the manufacturer of the tape library.Manufacturer
Enter the alias for the tape library.Alias
Enter the slot count for the tape library.Slot Count
Copying a user profile in OpsCenterMost user-definable content, such as reports, cost variables, and cost formulas, isaccessible only by the user who has created it. Using the copy user profilefunctionality, you can copy information from one user account to another.
To copy a user profile
1 Log on to the OpsCenter console with administrator privileges.
2 In the OpsCenter console, clickSettings > Configuration > CopyUser Profile.
3 Select the source user account from the From User drop-down list.
See “Settings > Configuration > Copy User Profile options” on page 224.
4 Select the target user account from the To User drop-down list.
223Understanding OpsCenter settingsCopying a user profile in OpsCenter
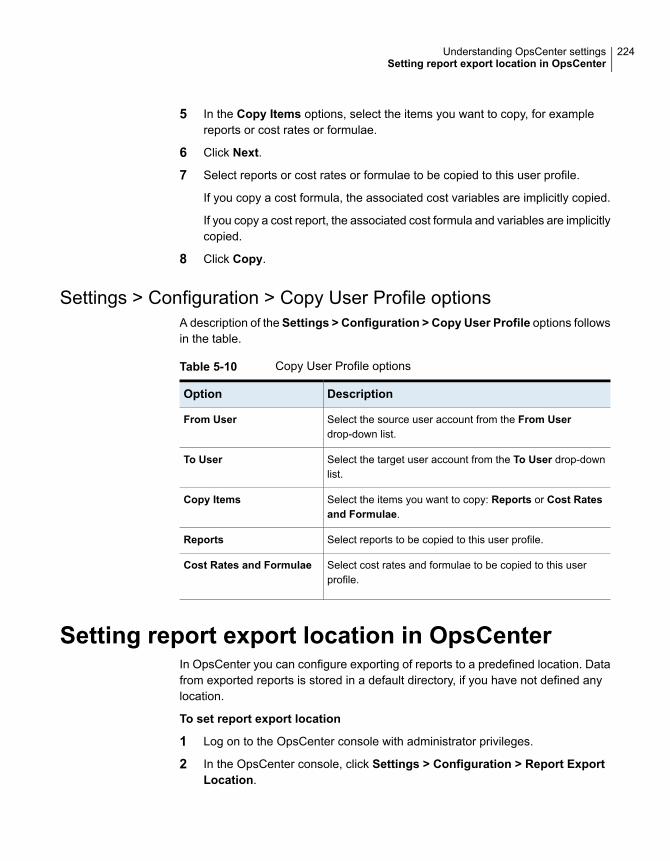
5 In the Copy Items options, select the items you want to copy, for examplereports or cost rates or formulae.
6 Click Next.
7 Select reports or cost rates or formulae to be copied to this user profile.
If you copy a cost formula, the associated cost variables are implicitly copied.
If you copy a cost report, the associated cost formula and variables are implicitlycopied.
8 Click Copy.
Settings > Configuration > Copy User Profile optionsA description of the Settings > Configuration > Copy User Profile options followsin the table.
Table 5-10 Copy User Profile options
DescriptionOption
Select the source user account from the From Userdrop-down list.
From User
Select the target user account from the To User drop-downlist.
To User
Select the items you want to copy: Reports or Cost Ratesand Formulae.
Copy Items
Select reports to be copied to this user profile.Reports
Select cost rates and formulae to be copied to this userprofile.
Cost Rates and Formulae
Setting report export location in OpsCenterIn OpsCenter you can configure exporting of reports to a predefined location. Datafrom exported reports is stored in a default directory, if you have not defined anylocation.
To set report export location
1 Log on to the OpsCenter console with administrator privileges.
2 In the OpsCenter console, click Settings > Configuration > Report ExportLocation.
224Understanding OpsCenter settingsSetting report export location in OpsCenter
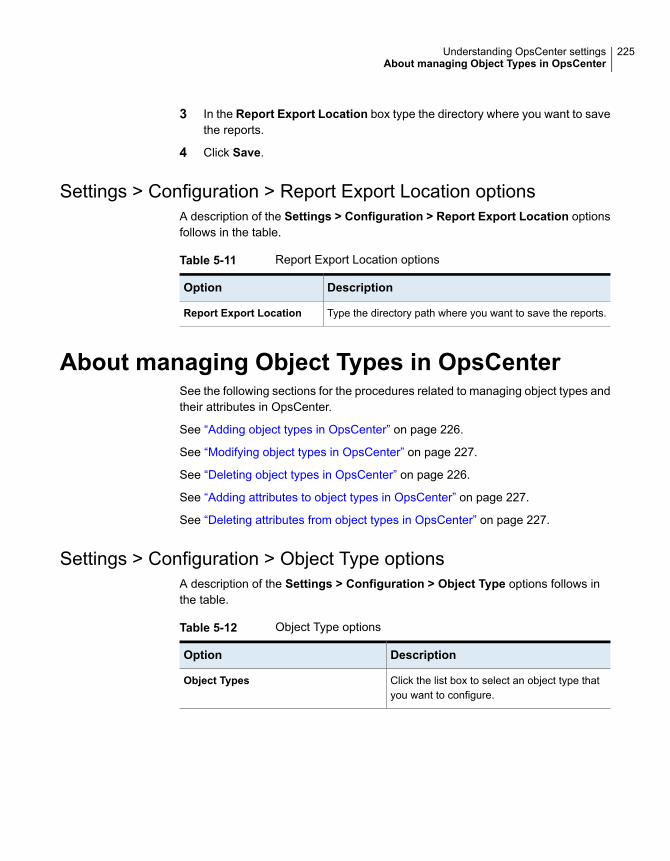
3 In the Report Export Location box type the directory where you want to savethe reports.
4 Click Save.
Settings > Configuration > Report Export Location optionsA description of the Settings > Configuration > Report Export Location optionsfollows in the table.
Table 5-11 Report Export Location options
DescriptionOption
Type the directory path where you want to save the reports.Report Export Location
About managing Object Types in OpsCenterSee the following sections for the procedures related to managing object types andtheir attributes in OpsCenter.
See “Adding object types in OpsCenter” on page 226.
See “Modifying object types in OpsCenter” on page 227.
See “Deleting object types in OpsCenter” on page 226.
See “Adding attributes to object types in OpsCenter” on page 227.
See “Deleting attributes from object types in OpsCenter” on page 227.
Settings > Configuration > Object Type optionsA description of the Settings > Configuration > Object Type options follows inthe table.
Table 5-12 Object Type options
DescriptionOption
Click the list box to select an object type thatyou want to configure.
Object Types
225Understanding OpsCenter settingsAbout managing Object Types in OpsCenter

Table 5-12 Object Type options (continued)
DescriptionOption
Located to the right of the Object Typesdrop-down list. Click to add, edit, or deleteobject types.
Note: You can edit or delete only user-definedobjects.
Add/Edit/Delete
Located above theAttributes check box. Clickto add or delete attributes.
Add/Delete
Attributes associated with the selected objecttype.
Attributes
Adding object types in OpsCenterIn OpsCenter you can add or edit attributes of predefined object types. You canalso add new object types and attributes for those new object types.
To add an object type
1 Log on to the OpsCenter console with administrator privileges.
2 In the OpsCenter console, click Settings > Configuration > Object Types.
3 Click Add.
4 Enter the name in the Add Object Type dialog box..
5 Click OK.
Deleting object types in OpsCenterYou can only delete an object type that you have created. You cannot delete thepredefined objects in the drop-down list.
To delete object types
1 Log on to the OpsCenter console with administrator privileges.
2 In the OpsCenter console, click Settings > Configuration > Object Types.
3 Select the object type from the drop-down list. You can delete the object typesthat you have created. You cannot delete predefined object types.
4 Click Delete.
See “Adding object types in OpsCenter” on page 226.
226Understanding OpsCenter settingsAbout managing Object Types in OpsCenter
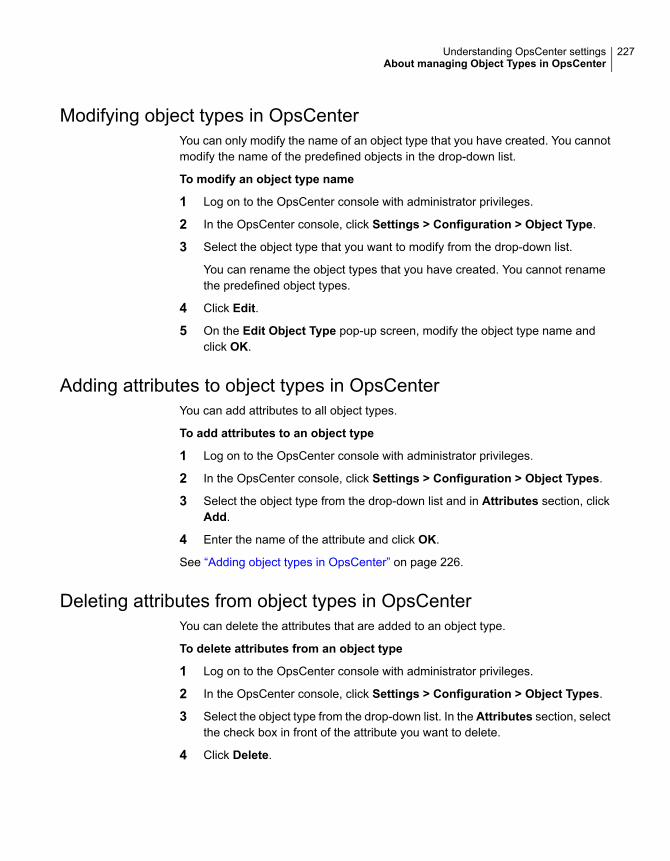
Modifying object types in OpsCenterYou can only modify the name of an object type that you have created. You cannotmodify the name of the predefined objects in the drop-down list.
To modify an object type name
1 Log on to the OpsCenter console with administrator privileges.
2 In the OpsCenter console, click Settings > Configuration > Object Type.
3 Select the object type that you want to modify from the drop-down list.
You can rename the object types that you have created. You cannot renamethe predefined object types.
4 Click Edit.
5 On the Edit Object Type pop-up screen, modify the object type name andclick OK.
Adding attributes to object types in OpsCenterYou can add attributes to all object types.
To add attributes to an object type
1 Log on to the OpsCenter console with administrator privileges.
2 In the OpsCenter console, click Settings > Configuration > Object Types.
3 Select the object type from the drop-down list and in Attributes section, clickAdd.
4 Enter the name of the attribute and click OK.
See “Adding object types in OpsCenter” on page 226.
Deleting attributes from object types in OpsCenterYou can delete the attributes that are added to an object type.
To delete attributes from an object type
1 Log on to the OpsCenter console with administrator privileges.
2 In the OpsCenter console, click Settings > Configuration > Object Types.
3 Select the object type from the drop-down list. In the Attributes section, selectthe check box in front of the attribute you want to delete.
4 Click Delete.
227Understanding OpsCenter settingsAbout managing Object Types in OpsCenter

About managing OpsCenter usersAfter you install OpsCenter, you need to create user accounts. The OpsCenterAuthentication Service (AT) validates credentials of OpsCenter users based onWindows, NIS, or private domains.
See “User access rights and functions in OpsCenter user interface” on page 233.
See “ Adding new users to OpsCenter” on page 238.
See “Resetting an OpsCenter user password” on page 240.
See “ Viewing OpsCenter user account information” on page 237.
See “ Adding new users to OpsCenter” on page 238.
See “ Editing OpsCenter user information” on page 240.
See “ Deleting OpsCenter users” on page 242.
About managing user passwordThis section provides the information on how you can manage your passwordsusing the OpsCenter GUI.
You can change your default password at the time of first login using the ChangePassword UI. If you want to change your password while you are logged in, go toSettings > User preferences > My Profile > Change Password.
See “Changing your OpsCenter password” on page 213.
Note: If you are an OpsCenter(vx) domain user and have forgotten the password,contact the OpsCenter Security Administrator to reset your password. OpsCenterSecurity Administrator can reset passwords only for OpsCenter(vx) domain users.NT or LDAP domain users should contact the System Administrator to reset theirpasswords.
If you are an OpsCenter Security Administrator and you need to reset the passwordof an OpsCenter(vx) domain user, go to Settings > Users > Edit User > ResetPassword.
See “Resetting an OpsCenter user password” on page 240.
If you are a Security Administrator and you have forgotten the OpsCenter useraccount password, you can manually reset your password.
See “Resetting password of the OpsCenter Security Admin” on page 241.
228Understanding OpsCenter settingsAbout managing OpsCenter users

About adding AD / LDAP user groups in OpsCenterYou can add AD / LDAP domain user groups in OpsCenter and assign user rolesto them. All users in the group inherit the same user role and they can accessOpsCenter using their AD / LDAP credentials. With this enhancement, you do notneed to add and authenticate each user of the group in OpsCenter. Any changesto the user group like addition or removal of a user is automatically reflected inOpsCenter.
Active Directory (AD) is a directory service created by Microsoft for Windows domainnetworks. It is included in most Windows Server operating systems.
Active Directory provides a central location for network administration and security.Server computers that run Active Directory are called domain controllers. An ADdomain controller authenticates and authorizes all users and computers in aWindows domain type network - assigning and enforcing security policies for allcomputers and installing or updating software. For example, when a user logs intoa computer that is part of a Windows domain, Active Directory checks the submittedpassword and determines whether the user is a system administrator or a normaluser.
Active Directory uses Lightweight Directory Access Protocol (LDAP), which is anapplication protocol for accessing and maintaining distributed directory informationservices over an Internet Protocol (IP) network.
The AD / LDAP user groups that you have added in OpsCenter are listed on theOpsCenter GUI on the Settings > Users > Users tab.
Some important notes and considerations about adding AD / LDAP user groups inOpsCenter:
■ In OpsCenter, an AD / LDAP user group and a single user can be differentiatedwith the help of the User column in the Users table.
■ A single user is indicated as ‘Individual’ and an AD / LDAP user group is indicatedas ‘Group’.
■ If an individual OpsCenter user is a part of an AD / LDAP user group, the userinherits the role that was individually assigned, irrespective of the role of theuser group. For example: UserA is added as an OpsCenter individual user.UserA is also part of an AD / LDAP user group called GroupA. The role of UserAis ‘Administrator’ and the role of GroupA is ‘Reporter’. In this scenario, the userrole of UserA is always ‘Administrator’.
■ If a user is part of multiple AD / LDAP user groups, the user inherits the highestrole in the hierarchy out of all user group roles. For example: UserA is part ofthree AD / LDAP user groups: GroupA, GroupB, and GroupC. User role ofGroupA is ‘Administrator’, of GroupB is ‘Security Administrator’, and of GroupCis ‘Reporter’. In this scenario, UserA inherits the role ‘Security Administrator’.
229Understanding OpsCenter settingsAbout managing OpsCenter users
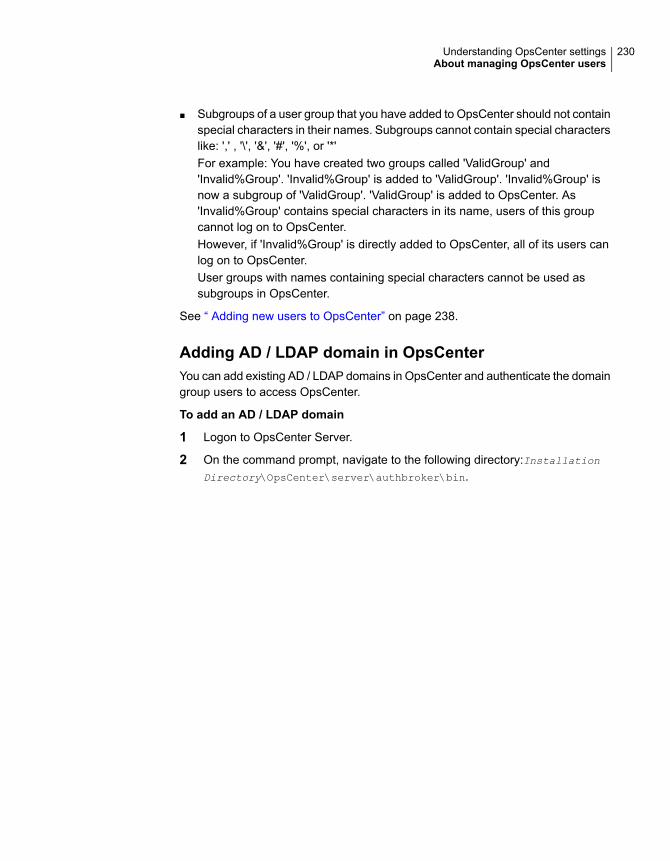
■ Subgroups of a user group that you have added to OpsCenter should not containspecial characters in their names. Subgroups cannot contain special characterslike: ',' , '\', '&', '#', '%', or '*'For example: You have created two groups called 'ValidGroup' and'Invalid%Group'. 'Invalid%Group' is added to 'ValidGroup'. 'Invalid%Group' isnow a subgroup of 'ValidGroup'. 'ValidGroup' is added to OpsCenter. As'Invalid%Group' contains special characters in its name, users of this groupcannot log on to OpsCenter.However, if 'Invalid%Group' is directly added to OpsCenter, all of its users canlog on to OpsCenter.User groups with names containing special characters cannot be used assubgroups in OpsCenter.
See “ Adding new users to OpsCenter” on page 238.
Adding AD / LDAP domain in OpsCenterYou can add existing AD / LDAP domains in OpsCenter and authenticate the domaingroup users to access OpsCenter.
To add an AD / LDAP domain
1 Logon to OpsCenter Server.
2 On the command prompt, navigate to the following directory:InstallationDirectory\OpsCenter\server\authbroker\bin.
230Understanding OpsCenter settingsAbout managing OpsCenter users
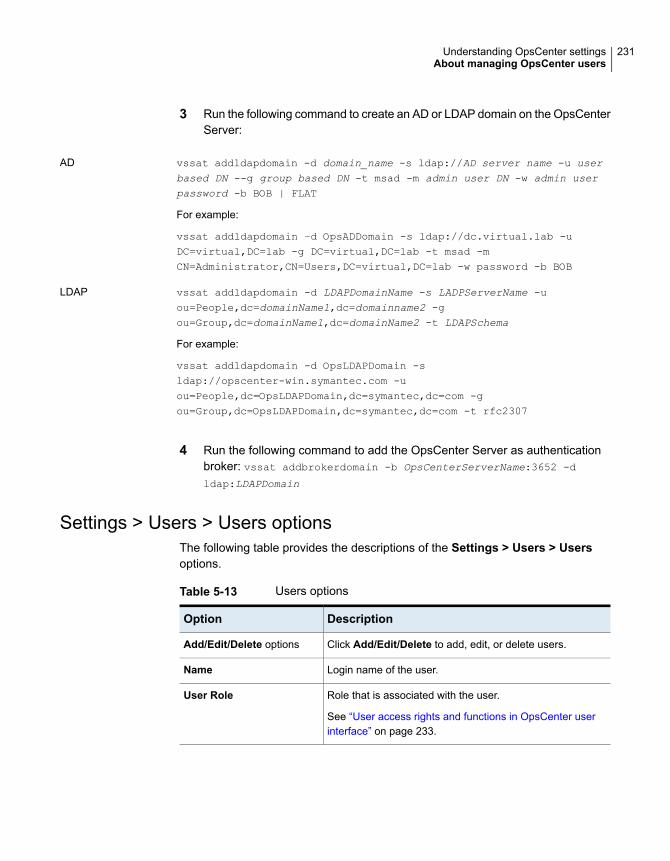
3 Run the following command to create an AD or LDAP domain on the OpsCenterServer:
vssat addldapdomain -d domain_name -s ldap://AD server name -u userbased DN --g group based DN -t msad -m admin user DN -w admin userpassword -b BOB | FLAT
For example:
vssat addldapdomain –d OpsADDomain -s ldap://dc.virtual.lab -uDC=virtual,DC=lab -g DC=virtual,DC=lab -t msad -mCN=Administrator,CN=Users,DC=virtual,DC=lab -w password -b BOB
AD
vssat addldapdomain -d LDAPDomainName -s LADPServerName -uou=People,dc=domainName1,dc=domainname2 -gou=Group,dc=domainName1,dc=domainName2 -t LDAPSchema
For example:
vssat addldapdomain -d OpsLDAPDomain -sldap://opscenter-win.symantec.com -uou=People,dc=OpsLDAPDomain,dc=symantec,dc=com -gou=Group,dc=OpsLDAPDomain,dc=symantec,dc=com -t rfc2307
LDAP
4 Run the following command to add the OpsCenter Server as authenticationbroker: vssat addbrokerdomain -b OpsCenterServerName:3652 -d
ldap:LDAPDomain
Settings > Users > Users optionsThe following table provides the descriptions of the Settings > Users > Usersoptions.
Table 5-13 Users options
DescriptionOption
Click Add/Edit/Delete to add, edit, or delete users.Add/Edit/Delete options
Login name of the user.Name
Role that is associated with the user.
See “User access rights and functions in OpsCenter userinterface” on page 233.
User Role
231Understanding OpsCenter settingsAbout managing OpsCenter users

Table 5-13 Users options (continued)
DescriptionOption
Type of the user: Individual User or Group User.
You can add AD / LDAP domain groups to OpsCenter toauthorize all users from that group to access OpsCenter.
All users from the authorized domain group can logon toOpsCenter with their AD / LDAP credentials. Any changeslike addition or removal of a user from an authorized AD /LDAP domain group are automatically reflected in OpsCenter.
User
Status of the user: Enabled or Disabled
If you want to temporarily revoke a user's permission toaccess OpsCenter, set the user status to 'Disabled'. Userwith the 'Disabled' user status cannot logon to OpsCenter.However, the user-specific data such as reports or schedulesis retained.
User Status
Domain type (like vx) that the user is a member of and alsospecified while adding the user.
Domain Type
Domain name (like OpsCenterUsers) that the user is amember of and also specified while adding the user .
Domain Name
The Security Administrator can view the list of views that each user can accessunder the Assigned Views tab at the bottom. The Assigned Views tab is only visibleif you log on as a Security Administrator (like admin).
The following columns are shown in the table:
This column lists the views to which a user is permitted.Name
This column lists the type of the specific view like Client, MasterServer, or Policy.
Type
The Security Administrator can assign a view directly to a user usingthe OpsCenter console. A Security Administrator or Administratorcan also assign a view directly to a user group using the OpsCenterView Builder.
This column lists if the view was assigned directly to the selecteduser or via a user group.
Permission Type
This column lists the date and time when the view was created.Created On
This column lists the name of the user who owns the specific view.Owner
232Understanding OpsCenter settingsAbout managing OpsCenter users
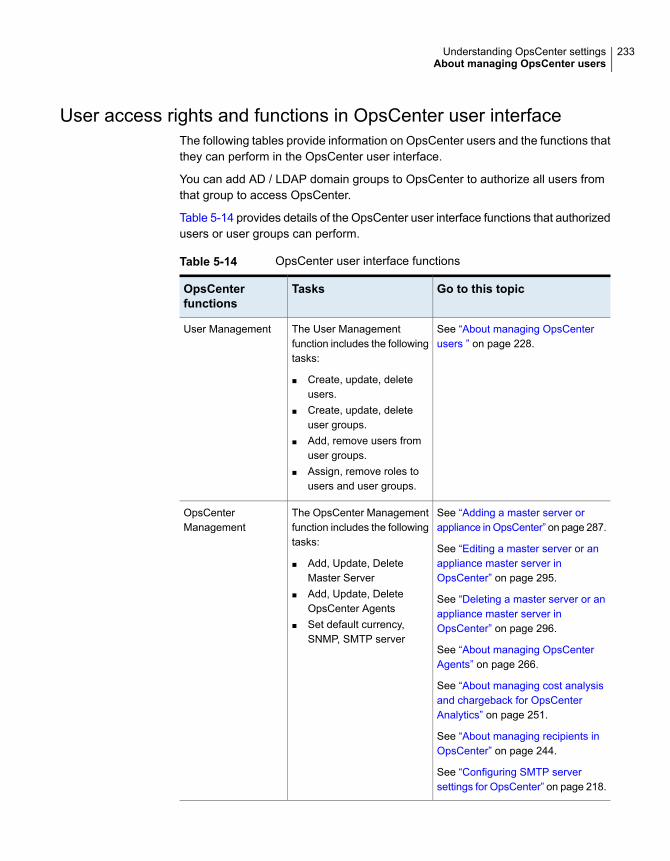
User access rights and functions in OpsCenter user interfaceThe following tables provide information on OpsCenter users and the functions thatthey can perform in the OpsCenter user interface.
You can add AD / LDAP domain groups to OpsCenter to authorize all users fromthat group to access OpsCenter.
Table 5-14 provides details of the OpsCenter user interface functions that authorizedusers or user groups can perform.
Table 5-14 OpsCenter user interface functions
Go to this topicTasksOpsCenterfunctions
See “About managing OpsCenterusers ” on page 228.
The User Managementfunction includes the followingtasks:
■ Create, update, deleteusers.
■ Create, update, deleteuser groups.
■ Add, remove users fromuser groups.
■ Assign, remove roles tousers and user groups.
User Management
See “Adding a master server orappliance in OpsCenter” on page 287.
See “Editing a master server or anappliance master server inOpsCenter” on page 295.
See “Deleting a master server or anappliance master server inOpsCenter” on page 296.
See “About managing OpsCenterAgents” on page 266.
See “About managing cost analysisand chargeback for OpsCenterAnalytics” on page 251.
See “About managing recipients inOpsCenter” on page 244.
See “Configuring SMTP serversettings for OpsCenter” on page 218.
The OpsCenter Managementfunction includes the followingtasks:
■ Add, Update, DeleteMaster Server
■ Add, Update, DeleteOpsCenter Agents
■ Set default currency,SNMP, SMTP server
OpsCenterManagement
233Understanding OpsCenter settingsAbout managing OpsCenter users
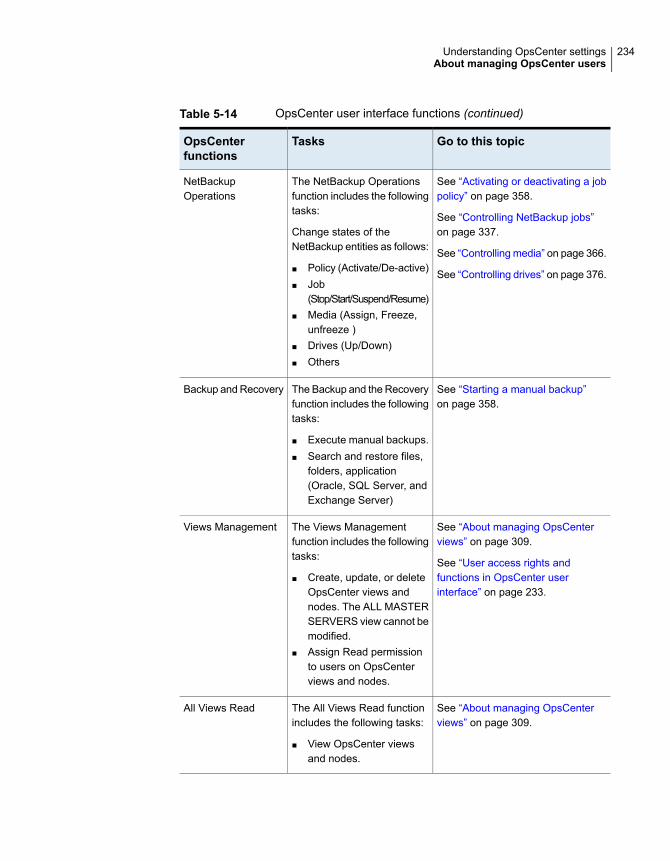
Table 5-14 OpsCenter user interface functions (continued)
Go to this topicTasksOpsCenterfunctions
See “Activating or deactivating a jobpolicy” on page 358.
See “Controlling NetBackup jobs”on page 337.
See “Controlling media” on page 366.
See “Controlling drives” on page 376.
The NetBackup Operationsfunction includes the followingtasks:
Change states of theNetBackup entities as follows:
■ Policy (Activate/De-active)■ Job
(Stop/Start/Suspend/Resume)■ Media (Assign, Freeze,
unfreeze )■ Drives (Up/Down)■ Others
NetBackupOperations
See “Starting a manual backup”on page 358.
The Backup and the Recoveryfunction includes the followingtasks:
■ Execute manual backups.■ Search and restore files,
folders, application(Oracle, SQL Server, andExchange Server)
Backup and Recovery
See “About managing OpsCenterviews” on page 309.
See “User access rights andfunctions in OpsCenter userinterface” on page 233.
The Views Managementfunction includes the followingtasks:
■ Create, update, or deleteOpsCenter views andnodes. The ALL MASTERSERVERS view cannot bemodified.
■ Assign Read permissionto users on OpsCenterviews and nodes.
Views Management
See “About managing OpsCenterviews” on page 309.
The All Views Read functionincludes the following tasks:
■ View OpsCenter viewsand nodes.
All Views Read
234Understanding OpsCenter settingsAbout managing OpsCenter users
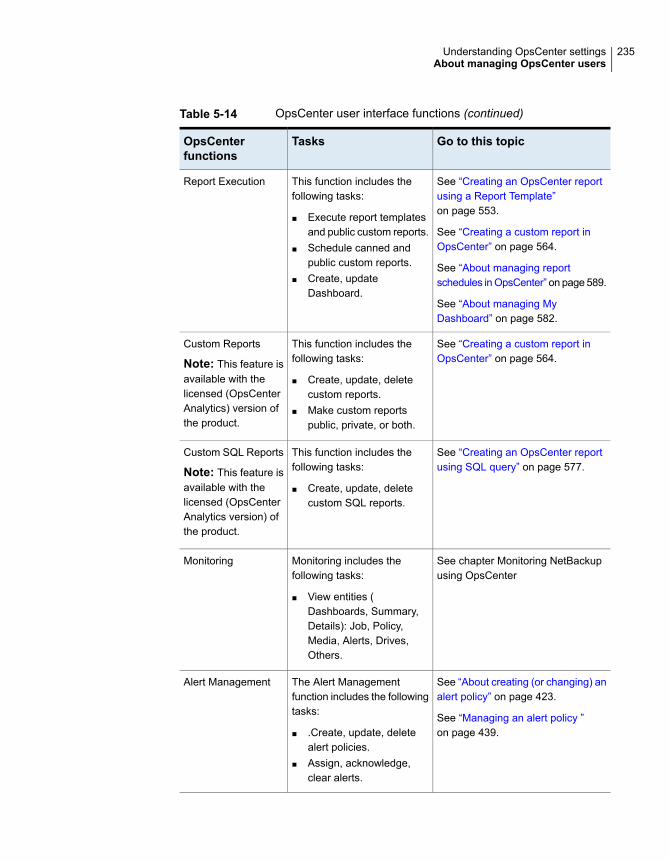
Table 5-14 OpsCenter user interface functions (continued)
Go to this topicTasksOpsCenterfunctions
See “Creating an OpsCenter reportusing a Report Template”on page 553.
See “Creating a custom report inOpsCenter” on page 564.
See “About managing reportschedules in OpsCenter” on page 589.
See “About managing MyDashboard” on page 582.
This function includes thefollowing tasks:
■ Execute report templatesand public custom reports.
■ Schedule canned andpublic custom reports.
■ Create, updateDashboard.
Report Execution
See “Creating a custom report inOpsCenter” on page 564.
This function includes thefollowing tasks:
■ Create, update, deletecustom reports.
■ Make custom reportspublic, private, or both.
Custom Reports
Note: This feature isavailable with thelicensed (OpsCenterAnalytics) version ofthe product.
See “Creating an OpsCenter reportusing SQL query” on page 577.
This function includes thefollowing tasks:
■ Create, update, deletecustom SQL reports.
Custom SQL Reports
Note: This feature isavailable with thelicensed (OpsCenterAnalytics version) ofthe product.
See chapter Monitoring NetBackupusing OpsCenter
Monitoring includes thefollowing tasks:
■ View entities (Dashboards, Summary,Details): Job, Policy,Media, Alerts, Drives,Others.
Monitoring
See “About creating (or changing) analert policy” on page 423.
See “Managing an alert policy ”on page 439.
The Alert Managementfunction includes the followingtasks:
■ .Create, update, deletealert policies.
■ Assign, acknowledge,clear alerts.
Alert Management
235Understanding OpsCenter settingsAbout managing OpsCenter users

OpsCenter users are categorized as follows:
Table 5-15 User categories
DescriptionUser
A Security Administrator is a super admin user who canperform all OpsCenter functions including user management.
The OpsCenter Security Administrator can create, edit, ordelete users.
Security Administrator
This user can perform all OpsCenter functions except foruser management.
The OpsCenter Administrator cannot create, edit, or deleteusers.
Administrator
This user is not involved in the activities that are related tomanaging users, OpsCenter Server, and NetBackupconfiguration.
Operator
The role of this user is to mainly perform restore operations.The Restore Operator can monitor, perform alert operationsand run standard or custom reports.
Restore Operator
The role of this user is to mainly generate the operationaland business-level reports for further analysis. A Reporterwould be able to view only those schedules that theythemselves create. The Security Administrator, Administrator,and Operator would however be able to access all theschedules.
Reporter
Note: You can also assign a user role to a user group of an authorized AD / LDAPdomain. The same user role is assigned to each user of the authorized domaingroup.
Table 5-16 lists the OpsCenter user roles and the OpsCenter UI functions that theseusers can perform.
Table 5-16 User roles
ReporterRestoreOperator
OperatorAdministratorSecurityAdministrator
OpsCenterfunction
NNNNYUserManagement
236Understanding OpsCenter settingsAbout managing OpsCenter users
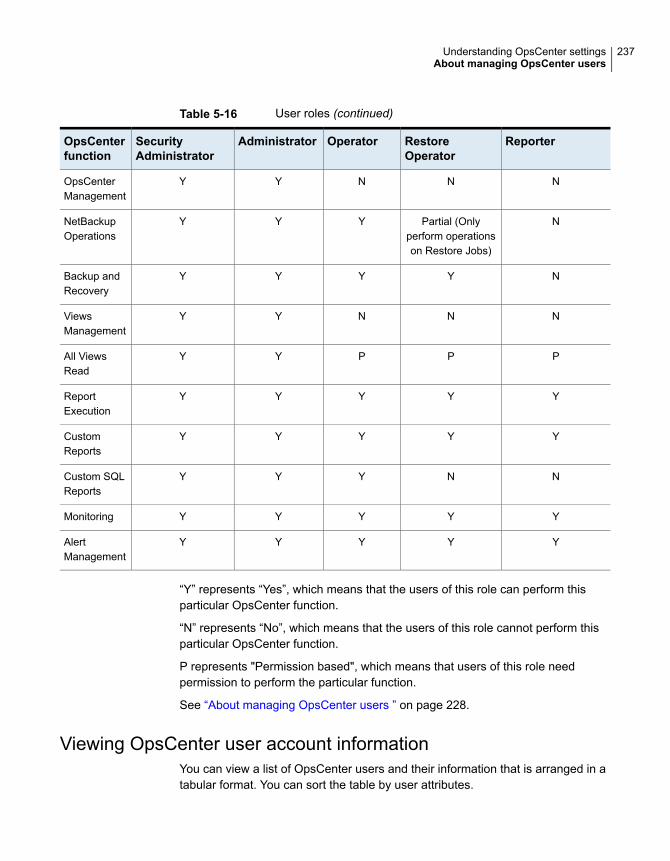
Table 5-16 User roles (continued)
ReporterRestoreOperator
OperatorAdministratorSecurityAdministrator
OpsCenterfunction
NNNYYOpsCenterManagement
NPartial (Onlyperform operationson Restore Jobs)
YYYNetBackupOperations
NYYYYBackup andRecovery
NNNYYViewsManagement
PPPYYAll ViewsRead
YYYYYReportExecution
YYYYYCustomReports
NNYYYCustom SQLReports
YYYYYMonitoring
YYYYYAlertManagement
“Y” represents “Yes”, which means that the users of this role can perform thisparticular OpsCenter function.
“N” represents “No”, which means that the users of this role cannot perform thisparticular OpsCenter function.
P represents "Permission based", which means that users of this role needpermission to perform the particular function.
See “About managing OpsCenter users ” on page 228.
Viewing OpsCenter user account informationYou can view a list of OpsCenter users and their information that is arranged in atabular format. You can sort the table by user attributes.
237Understanding OpsCenter settingsAbout managing OpsCenter users
In OpsCenter, you can view the following information in addition to user name, userrole, domain name, and domain type.
Type of the user: Individual User or GroupUser.
All users from the authorized domain groupcan logon to OpsCenter with their AD / LDAPcredentials. Any changes like addition orremoval of a user from an authorized AD /LDAP domain group are automaticallyreflected in OpsCenter.
Note: You can add AD / LDAP domaingroups to OpsCenter to authorize all usersfrom that group to access OpsCenter.
User
Status of the user: Enabled or Disabled
If you want to temporarily revoke a user'spermission to access OpsCenter, set the userstatus to 'Disabled'. User with the 'Disabled'user status cannot logon to OpsCenter.However, the user-specific data such asreports or schedules is retained.
User Status
To view OpsCenter user account information
1 Log on to the OpsCenter console with administrator privileges.
2 In the Veritas NetBackup OpsCenter console, click Settings > Users.
3 Click Users to view the list of users.
Adding new users to OpsCenterYou can either add the existing users that are discovered from various domains toOpsCenter or create users in the private “OpsCenterUsers” domain.
You can also add AD / LDAP domain groups to OpsCenter to authorize all usersfrom that group to access OpsCenter.
Individual users or domain user groups that you add in OpsCenter are listed on theSettings > Users > Users tab.
All users from the authorized domain group can logon to OpsCenter with their AD/ LDAP credentials. Any changes like addition or removal of a user from anauthorized AD / LDAP domain group are automatically reflected in OpsCenter.
238Understanding OpsCenter settingsAbout managing OpsCenter users
Note: Only a Security Administrator can add or modify user profiles by using theOpsCenter console.
To add a new user to OpsCenter
1 Log on to the OpsCenter console as a Security Administrator.
2 In the OpsCenter console, click Settings > Users.
3 On the Users tab, click Add.
4 Select the user creation type: New User, Existing Domain User, or ExistingDomain Group.
In OpsCenter, by selecting the Existing Domain Group creation type you canadd AD / LDAP domain groups to OpsCenter. Once a domain user group isauthorized to access OpsCenter, all users from that group can logon toOpsCenter with their AD / LDAP credentials.
If you have selected the New User option, specify the password, and enter itonce again for confirmation.
If you have selected the Existing Domain User option, you need to select thedomain to which the user belongs.
If you have selected the Existing Domain Group option, you need to providethe AD/LDAP group name that you want to add and authorize.
5 Enter the following general and demographic details of the user, which changedepending on the user creation type that you have selected:
User name, user role, domain name, email ID, first name, last name,department, cost center, work number, mobile number, and contact details.
See “User access rights and functions in OpsCenter user interface” on page 233.
If you have selected Operator, Reporter, or Restore Operator as the UserRole, you can see the Granted Views list box. Select one or more views fromthe Granted Views list box to grant access of the specific views to the specificuser.
6 Select status of the user or user group: Enabled or Disabled
If you want to temporarily revoke a user's permission to access OpsCenter,set the user status to 'Disabled'. User with the 'Disabled' user status cannotlogon to OpsCenter. However, the user-specific data such as reports orschedules is retained.
7 Click Save.
239Understanding OpsCenter settingsAbout managing OpsCenter users
Editing OpsCenter user informationOnly a Security Administrator can edit the existing users.
To edit an existing user in OpsCenter
1 Log on to the OpsCenter console as a Security Administrator.
2 In the OpsCenter console, click Settings > Users.
3 On the Users tab, click the check box in front of the user that you want to edit.
4 Click Edit.
5 Modify the user information.
You cannot modify the domain of the user.
You can also reset passwords of the OpsCenter users using this page.
You can modify the views that you want a user to access. You can modify theviews for user roles like Operator, Restore Operator, or Reporter. Select oneor more views from the Granted Views list to grant access of the specific viewsto the user.
See “Resetting an OpsCenter user password” on page 240.
6 Click Save.
Resetting an OpsCenter user passwordIf you are OpsCenter Security Administrator, you can reset the password of anOpsCenterUsers(vx) domain user while you modify the user information. NT orLDAP domain users should contact the System Administrator to reset theirpasswords.
For security reasons, OpsCenter user should change the password after it wasreset by the OpsCenter Security Administrator. OpsCenter displays the ChangePassword page when you try to log in after your password was reset.
To reset an OpsCenterUsers(vx) domain user password
1 Log on to the OpsCenter console as a Security Administrator.
2 In the OpsCenter console, click Settings > Users.
3 On the Users tab, click the check box in front of the user for whom you wantto reset the password.
4 Click Edit.
5 On the Edit User page, click Reset Password.
240Understanding OpsCenter settingsAbout managing OpsCenter users
6 On the Reset Password page, enter the new password and confirm passwordfor the selected user.
Note: You must set your new password according to the password rules orguidelines: Password must be at least 8 characters long and should containat least one upper case letter, one lower case letter, and one numeric digit.The new password must be different than the current password.
The password rules are also provided on the Reset Password page.
7 Click OK.
See “About managing OpsCenter users ” on page 228.
Resetting password of the OpsCenter Security AdminThis section provides the procedure to reset password for the OpsCenter SecurityAdministrator (Security Admin). For security purposes, password reset function forthe Security Admin is not provided on the OpsCenter GUI. The Security Admin canreset his or her password manually through OpsCenter Authentication Service(OpsCenter AT).
For security reasons, the OpsCenter Security Administrator should change thepassword after it was reset. OpsCenter displays the Change Password page whenyou try to log in after your password was reset.
Note: If an OpsCenter user forgets the password, the OpsCenter SecurityAdministrator can reset it using the Reset Password page on the OpsCenter GUI.Navigation to the Reset Password page:Settings > Users > Edit User > ResetPassword
See “Resetting an OpsCenter user password” on page 240.
To reset Security Admin password on Windows
1 Logon to OpsCenter Server host with the Administrator's credentials.
2 On the Command Prompt, run the following command:OpsCenterInstallPath\Symantec\OpsCenter\server\bin\setEnv.bat.
241Understanding OpsCenter settingsAbout managing OpsCenter users
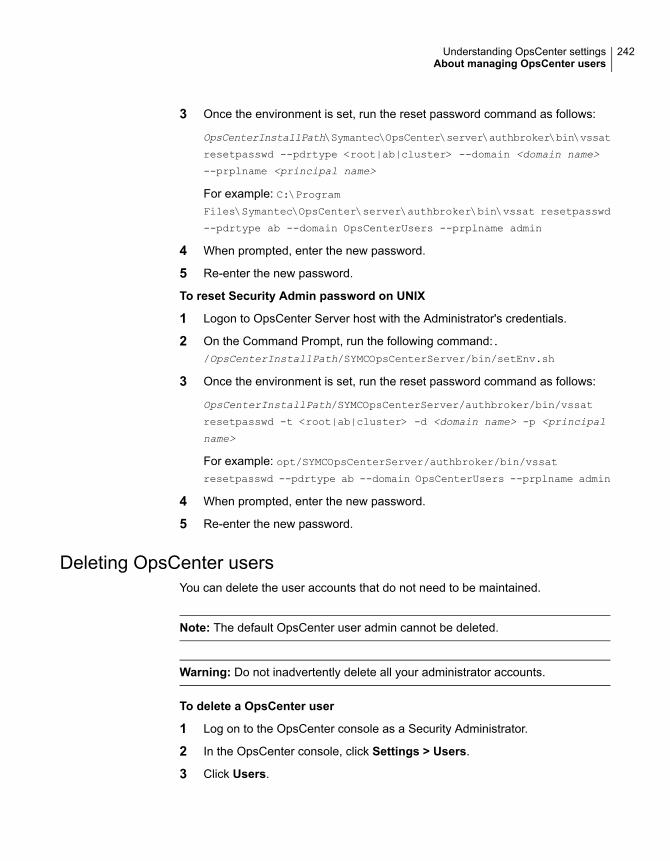
3 Once the environment is set, run the reset password command as follows:
OpsCenterInstallPath\Symantec\OpsCenter\server\authbroker\bin\vssat
resetpasswd --pdrtype <root|ab|cluster> --domain <domain name>
--prplname <principal name>
For example: C:\ProgramFiles\Symantec\OpsCenter\server\authbroker\bin\vssat resetpasswd
--pdrtype ab --domain OpsCenterUsers --prplname admin
4 When prompted, enter the new password.
5 Re-enter the new password.
To reset Security Admin password on UNIX
1 Logon to OpsCenter Server host with the Administrator's credentials.
2 On the Command Prompt, run the following command:./OpsCenterInstallPath/SYMCOpsCenterServer/bin/setEnv.sh
3 Once the environment is set, run the reset password command as follows:
OpsCenterInstallPath/SYMCOpsCenterServer/authbroker/bin/vssat
resetpasswd -t <root|ab|cluster> -d <domain name> -p <principal
name>
For example: opt/SYMCOpsCenterServer/authbroker/bin/vssatresetpasswd --pdrtype ab --domain OpsCenterUsers --prplname admin
4 When prompted, enter the new password.
5 Re-enter the new password.
Deleting OpsCenter usersYou can delete the user accounts that do not need to be maintained.
Note: The default OpsCenter user admin cannot be deleted.
Warning: Do not inadvertently delete all your administrator accounts.
To delete a OpsCenter user
1 Log on to the OpsCenter console as a Security Administrator.
2 In the OpsCenter console, click Settings > Users.
3 Click Users.
242Understanding OpsCenter settingsAbout managing OpsCenter users
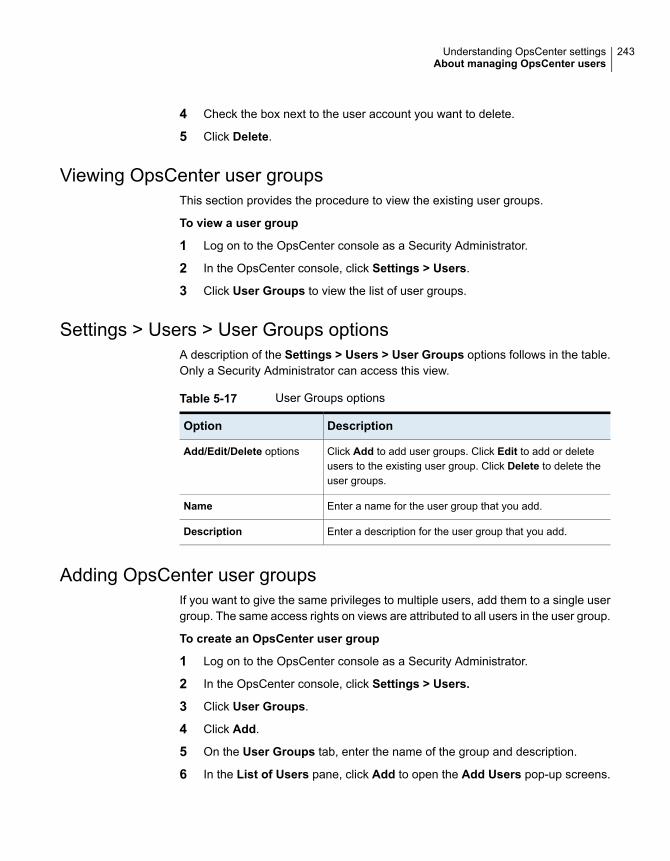
4 Check the box next to the user account you want to delete.
5 Click Delete.
Viewing OpsCenter user groupsThis section provides the procedure to view the existing user groups.
To view a user group
1 Log on to the OpsCenter console as a Security Administrator.
2 In the OpsCenter console, click Settings > Users.
3 Click User Groups to view the list of user groups.
Settings > Users > User Groups optionsA description of the Settings > Users > User Groups options follows in the table.Only a Security Administrator can access this view.
Table 5-17 User Groups options
DescriptionOption
Click Add to add user groups. Click Edit to add or deleteusers to the existing user group. Click Delete to delete theuser groups.
Add/Edit/Delete options
Enter a name for the user group that you add.Name
Enter a description for the user group that you add.Description
Adding OpsCenter user groupsIf you want to give the same privileges to multiple users, add them to a single usergroup. The same access rights on views are attributed to all users in the user group.
To create an OpsCenter user group
1 Log on to the OpsCenter console as a Security Administrator.
2 In the OpsCenter console, click Settings > Users.
3 Click User Groups.
4 Click Add.
5 On the User Groups tab, enter the name of the group and description.
6 In the List of Users pane, click Add to open the Add Users pop-up screens.
243Understanding OpsCenter settingsAbout managing OpsCenter users

7 On the Add Users dialog box, select the users that you want to add to this usergroup.
8 Click OK.
9 On the User Group tab, click Save.
Editing OpsCenter user groupsYou can modify an existing user group.
To edit a OpsCenter user group
1 Log on to the OpsCenter console as a Security Administrator.
2 In the OpsCenter console, click Settings > Users.
3 Click User Groups.
4 Select the check box in front of the user group that you want to edit.
5 Click Edit.
6 Modify the user group name or description.
7 Add or delete the users using the List of Users pane and Add Users pop-upscreens.
8 Click Save.
Deleting OpsCenter user groupsYou can delete a user group that you no longer need.
To delete a Veritas NetBackup OpsCenter user group
1 Log on to the OpsCenter console as a Security Administrator.
2 In the OpsCenter console, click Settings > Users.
3 Click User Groups.
4 Select the check box next to the user groups that you want to delete.
5 Click Delete.
About managing recipients in OpsCenterYou can specify the recipients to whom you want to send alert notifications or emailreports.
244Understanding OpsCenter settingsAbout managing recipients in OpsCenter
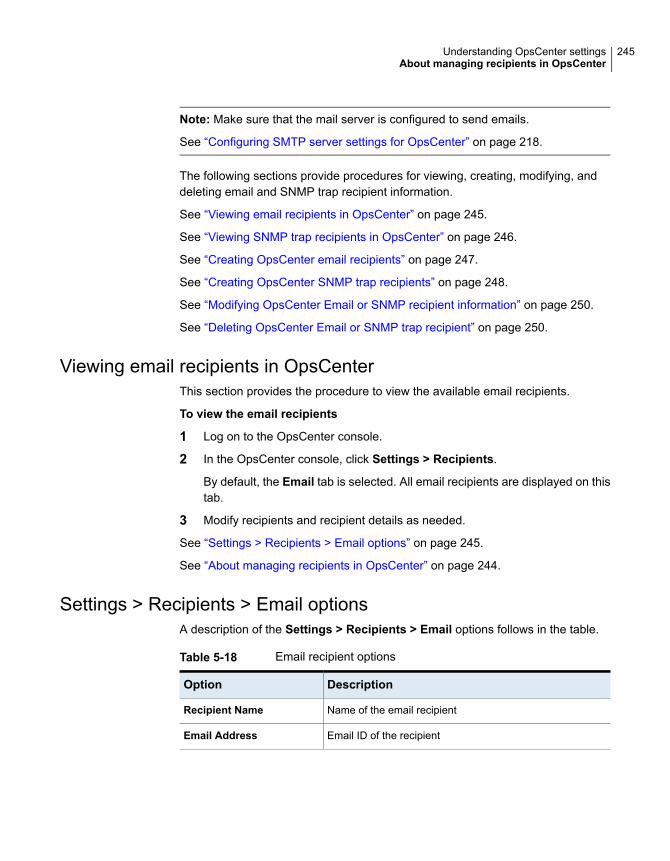
Note: Make sure that the mail server is configured to send emails.
See “Configuring SMTP server settings for OpsCenter” on page 218.
The following sections provide procedures for viewing, creating, modifying, anddeleting email and SNMP trap recipient information.
See “Viewing email recipients in OpsCenter” on page 245.
See “Viewing SNMP trap recipients in OpsCenter” on page 246.
See “Creating OpsCenter email recipients” on page 247.
See “Creating OpsCenter SNMP trap recipients” on page 248.
See “Modifying OpsCenter Email or SNMP recipient information” on page 250.
See “Deleting OpsCenter Email or SNMP trap recipient” on page 250.
Viewing email recipients in OpsCenterThis section provides the procedure to view the available email recipients.
To view the email recipients
1 Log on to the OpsCenter console.
2 In the OpsCenter console, click Settings > Recipients.
By default, the Email tab is selected. All email recipients are displayed on thistab.
3 Modify recipients and recipient details as needed.
See “Settings > Recipients > Email options” on page 245.
See “About managing recipients in OpsCenter” on page 244.
Settings > Recipients > Email optionsA description of the Settings > Recipients > Email options follows in the table.
Table 5-18 Email recipient options
DescriptionOption
Name of the email recipientRecipient Name
Email ID of the recipientEmail Address
245Understanding OpsCenter settingsAbout managing recipients in OpsCenter
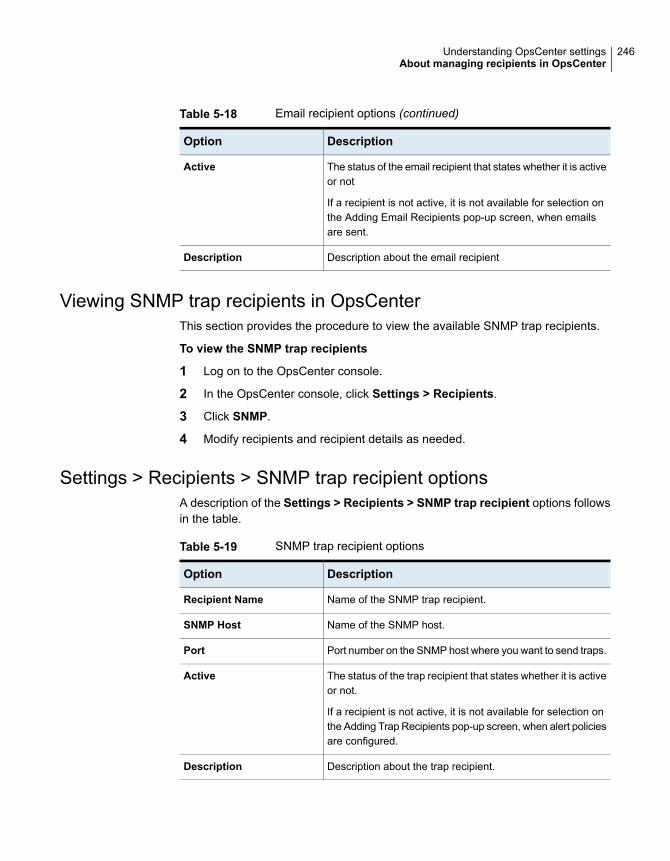
Table 5-18 Email recipient options (continued)
DescriptionOption
The status of the email recipient that states whether it is activeor not
If a recipient is not active, it is not available for selection onthe Adding Email Recipients pop-up screen, when emailsare sent.
Active
Description about the email recipientDescription
Viewing SNMP trap recipients in OpsCenterThis section provides the procedure to view the available SNMP trap recipients.
To view the SNMP trap recipients
1 Log on to the OpsCenter console.
2 In the OpsCenter console, click Settings > Recipients.
3 Click SNMP.
4 Modify recipients and recipient details as needed.
Settings > Recipients > SNMP trap recipient optionsA description of the Settings > Recipients > SNMP trap recipient options followsin the table.
Table 5-19 SNMP trap recipient options
DescriptionOption
Name of the SNMP trap recipient.Recipient Name
Name of the SNMP host.SNMP Host
Port number on the SNMP host where you want to send traps.Port
The status of the trap recipient that states whether it is activeor not.
If a recipient is not active, it is not available for selection onthe Adding Trap Recipients pop-up screen, when alert policiesare configured.
Active
Description about the trap recipient.Description
246Understanding OpsCenter settingsAbout managing recipients in OpsCenter
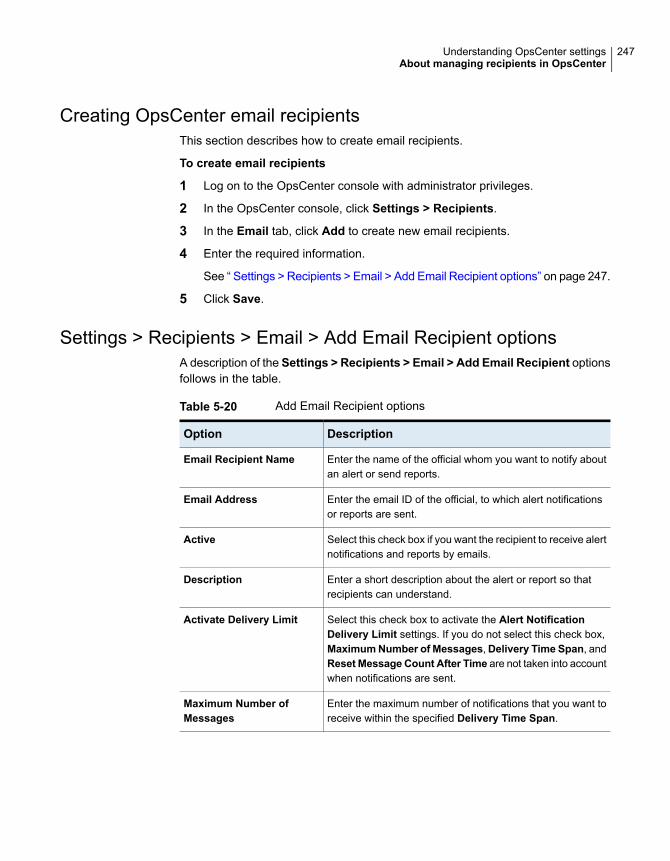
Creating OpsCenter email recipientsThis section describes how to create email recipients.
To create email recipients
1 Log on to the OpsCenter console with administrator privileges.
2 In the OpsCenter console, click Settings > Recipients.
3 In the Email tab, click Add to create new email recipients.
4 Enter the required information.
See “ Settings > Recipients > Email > Add Email Recipient options” on page 247.
5 Click Save.
Settings > Recipients > Email > Add Email Recipient optionsA description of the Settings > Recipients > Email > Add Email Recipient optionsfollows in the table.
Table 5-20 Add Email Recipient options
DescriptionOption
Enter the name of the official whom you want to notify aboutan alert or send reports.
Email Recipient Name
Enter the email ID of the official, to which alert notificationsor reports are sent.
Email Address
Select this check box if you want the recipient to receive alertnotifications and reports by emails.
Active
Enter a short description about the alert or report so thatrecipients can understand.
Description
Select this check box to activate the Alert NotificationDelivery Limit settings. If you do not select this check box,MaximumNumber of Messages,Delivery Time Span, andReset Message Count After Time are not taken into accountwhen notifications are sent.
Activate Delivery Limit
Enter the maximum number of notifications that you want toreceive within the specified Delivery Time Span.
Maximum Number ofMessages
247Understanding OpsCenter settingsAbout managing recipients in OpsCenter
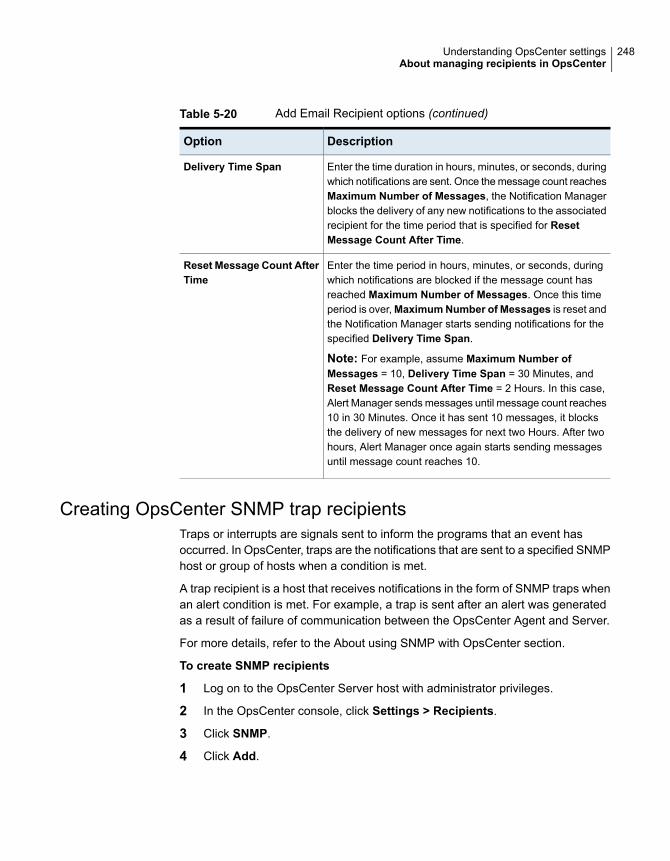
Table 5-20 Add Email Recipient options (continued)
DescriptionOption
Enter the time duration in hours, minutes, or seconds, duringwhich notifications are sent. Once the message count reachesMaximum Number of Messages, the Notification Managerblocks the delivery of any new notifications to the associatedrecipient for the time period that is specified for ResetMessage Count After Time.
Delivery Time Span
Enter the time period in hours, minutes, or seconds, duringwhich notifications are blocked if the message count hasreached Maximum Number of Messages. Once this timeperiod is over,MaximumNumber of Messages is reset andthe Notification Manager starts sending notifications for thespecified Delivery Time Span.
Note: For example, assume Maximum Number ofMessages = 10, Delivery Time Span = 30 Minutes, andReset Message Count After Time = 2 Hours. In this case,Alert Manager sends messages until message count reaches10 in 30 Minutes. Once it has sent 10 messages, it blocksthe delivery of new messages for next two Hours. After twohours, Alert Manager once again starts sending messagesuntil message count reaches 10.
Reset Message Count AfterTime
Creating OpsCenter SNMP trap recipientsTraps or interrupts are signals sent to inform the programs that an event hasoccurred. In OpsCenter, traps are the notifications that are sent to a specified SNMPhost or group of hosts when a condition is met.
A trap recipient is a host that receives notifications in the form of SNMP traps whenan alert condition is met. For example, a trap is sent after an alert was generatedas a result of failure of communication between the OpsCenter Agent and Server.
For more details, refer to the About using SNMP with OpsCenter section.
To create SNMP recipients
1 Log on to the OpsCenter Server host with administrator privileges.
2 In the OpsCenter console, click Settings > Recipients.
3 Click SNMP.
4 Click Add.
248Understanding OpsCenter settingsAbout managing recipients in OpsCenter
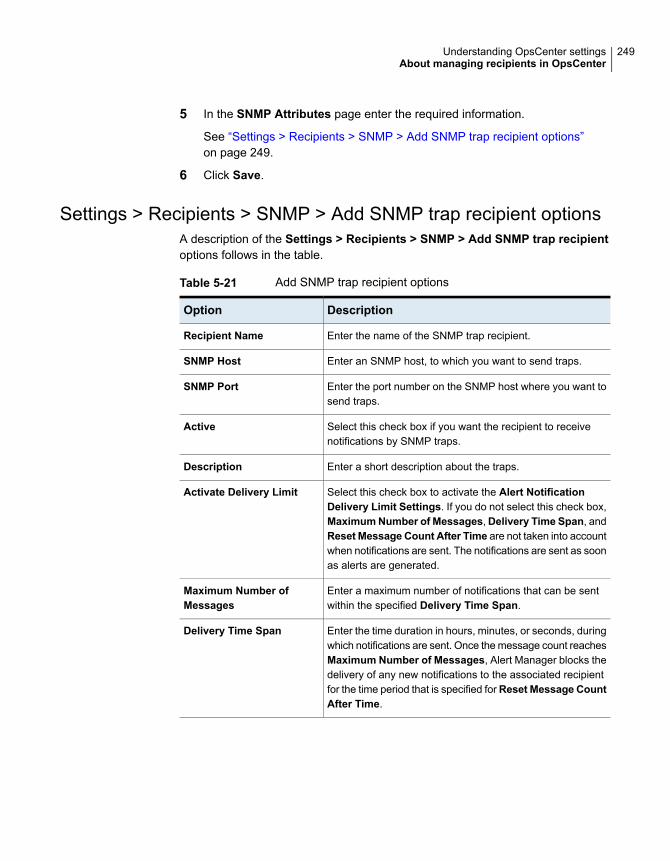
5 In the SNMP Attributes page enter the required information.
See “Settings > Recipients > SNMP > Add SNMP trap recipient options”on page 249.
6 Click Save.
Settings > Recipients > SNMP > Add SNMP trap recipient optionsA description of the Settings > Recipients > SNMP > Add SNMP trap recipientoptions follows in the table.
Table 5-21 Add SNMP trap recipient options
DescriptionOption
Enter the name of the SNMP trap recipient.Recipient Name
Enter an SNMP host, to which you want to send traps.SNMP Host
Enter the port number on the SNMP host where you want tosend traps.
SNMP Port
Select this check box if you want the recipient to receivenotifications by SNMP traps.
Active
Enter a short description about the traps.Description
Select this check box to activate the Alert NotificationDelivery Limit Settings. If you do not select this check box,MaximumNumber of Messages,Delivery Time Span, andReset Message Count After Time are not taken into accountwhen notifications are sent. The notifications are sent as soonas alerts are generated.
Activate Delivery Limit
Enter a maximum number of notifications that can be sentwithin the specified Delivery Time Span.
Maximum Number ofMessages
Enter the time duration in hours, minutes, or seconds, duringwhich notifications are sent. Once the message count reachesMaximum Number of Messages, Alert Manager blocks thedelivery of any new notifications to the associated recipientfor the time period that is specified forReset Message CountAfter Time.
Delivery Time Span
249Understanding OpsCenter settingsAbout managing recipients in OpsCenter

Table 5-21 Add SNMP trap recipient options (continued)
DescriptionOption
Enter the time period in hours, minutes, or seconds, duringwhich notifications are blocked if the message count hasreached Maximum Number of Messages. Once this timeperiod is over,MaximumNumber of Messages is reset andAlert Manager starts sending notifications for the specifiedDelivery Time Span.
Reset Message Count AfterTime
Modifying OpsCenter Email or SNMP recipient informationOnly OpsCenter administrators can modify email or trap recipient information.
See “Creating OpsCenter email recipients” on page 247.
See “Creating OpsCenter SNMP trap recipients” on page 248.
To modify email or SNMP trap recipient information
1 In the OpsCenter console, click Settings > Recipients.
2 In the Email Recipients tab or SNMP Recipients tab, select the email or traprecipient that you want to edit.
3 Click Edit.
4 On the modify email or trap recipient page, change Email Recipient or SNMPTrap Recipient attributes and Alert Notification Delivery Limit Settings.
5 Click Save.
Deleting OpsCenter Email or SNMP trap recipientOnly OpsCenter administrator can delete email or trap recipient.
See “Creating OpsCenter email recipients” on page 247.
To delete Email or SNMP trap recipient
1 In the OpsCenter console, click Settings > Recipients.
2 In the Email Recipients tab or SNMP Recipients tab, select the email or traprecipient(s) from the table that you want to delete.
3 Click Delete.
4 Click Save.
250Understanding OpsCenter settingsAbout managing recipients in OpsCenter
About managing cost analysis and chargebackfor OpsCenter Analytics
This feature is accessible only to OpsCenter Analytics users.
In OpsCenter Analytics, you can choose the currency that you want to be displayedon cost reports. If you have OpsCenter administrator privilege, you can set multipleglobal currencies, one of which can be set as default currency. You can set thecost variable, cost formulae, and cost estimation that you want to run the costreports.
You cannot access the Settings > Chargeback feature if you do not haveOpsCenter Analytics. This feature is disabled for unlicensed OpsCenter version.
The following sections provide procedures for managing cost analysis andchargeback.
See “Setting the default currency for OpsCenter cost reports” on page 251.
See “Editing the OpsCenter global currency list” on page 252.
See “Settings > Chargeback > Cost Variable options” on page 253.
See “Settings > Chargeback > Cost Formulae options” on page 257.
Setting the default currency for OpsCenter cost reportsThis section provides the procedure to set the default currency that you want to bedisplayed on OpsCenter cost reports.
Note: Setting the default currency gives you the flexibility of displaying cost reportvalues in the currency of your choice. However, OpsCenter does not supportconversion of currencies.
To set the default currency for cost reports
1 Log on to the OpsCenter console with administrator privileges.
2 In the OpsCenter console, click Settings > Chargeback.
You cannot access the Settings > Chargeback feature if you do not haveOpsCenter Analytics. This feature is disabled for unlicensed OpsCenter version.
3 On the Currency Settings tab, in the Default Currency drop-down list, allglobal currencies that are set by the administrator are available for selection.Select a currency from the drop-down list.
See “Editing the OpsCenter global currency list” on page 252.
251Understanding OpsCenter settingsAbout managing cost analysis and chargeback for OpsCenter Analytics
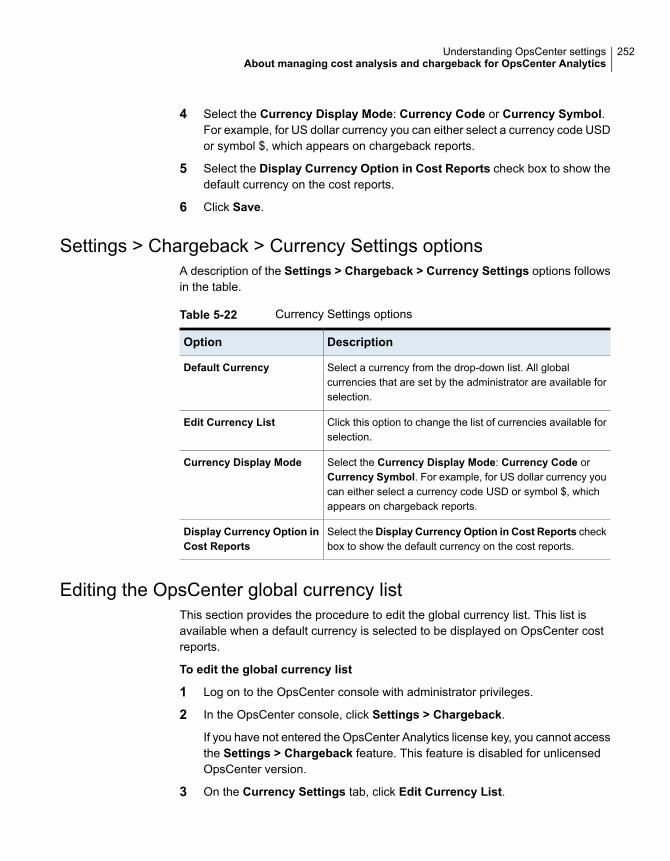
4 Select the Currency Display Mode: Currency Code or Currency Symbol.For example, for US dollar currency you can either select a currency code USDor symbol $, which appears on chargeback reports.
5 Select the Display Currency Option in Cost Reports check box to show thedefault currency on the cost reports.
6 Click Save.
Settings > Chargeback > Currency Settings optionsA description of the Settings > Chargeback > Currency Settings options followsin the table.
Table 5-22 Currency Settings options
DescriptionOption
Select a currency from the drop-down list. All globalcurrencies that are set by the administrator are available forselection.
Default Currency
Click this option to change the list of currencies available forselection.
Edit Currency List
Select the Currency Display Mode: Currency Code orCurrency Symbol. For example, for US dollar currency youcan either select a currency code USD or symbol $, whichappears on chargeback reports.
Currency Display Mode
Select theDisplay Currency Option in Cost Reports checkbox to show the default currency on the cost reports.
Display Currency Option inCost Reports
Editing the OpsCenter global currency listThis section provides the procedure to edit the global currency list. This list isavailable when a default currency is selected to be displayed on OpsCenter costreports.
To edit the global currency list
1 Log on to the OpsCenter console with administrator privileges.
2 In the OpsCenter console, click Settings > Chargeback.
If you have not entered the OpsCenter Analytics license key, you cannot accessthe Settings > Chargeback feature. This feature is disabled for unlicensedOpsCenter version.
3 On the Currency Settings tab, click Edit Currency List.
252Understanding OpsCenter settingsAbout managing cost analysis and chargeback for OpsCenter Analytics
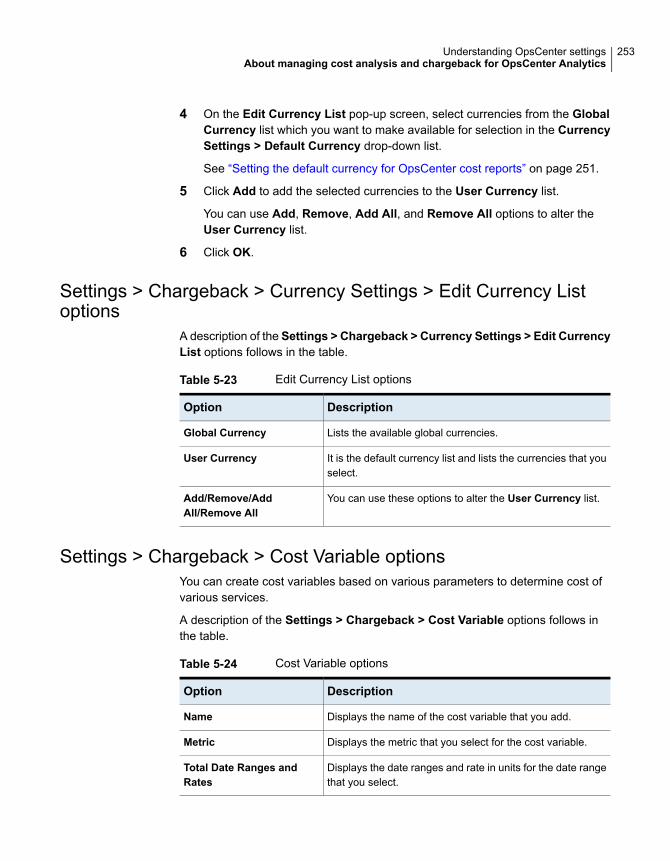
4 On the Edit Currency List pop-up screen, select currencies from the GlobalCurrency list which you want to make available for selection in the CurrencySettings > Default Currency drop-down list.
See “Setting the default currency for OpsCenter cost reports” on page 251.
5 Click Add to add the selected currencies to the User Currency list.
You can use Add, Remove, Add All, and Remove All options to alter theUser Currency list.
6 Click OK.
Settings > Chargeback > Currency Settings > Edit Currency Listoptions
A description of the Settings > Chargeback > Currency Settings > Edit CurrencyList options follows in the table.
Table 5-23 Edit Currency List options
DescriptionOption
Lists the available global currencies.Global Currency
It is the default currency list and lists the currencies that youselect.
User Currency
You can use these options to alter the User Currency list.Add/Remove/AddAll/Remove All
Settings > Chargeback > Cost Variable optionsYou can create cost variables based on various parameters to determine cost ofvarious services.
A description of the Settings > Chargeback > Cost Variable options follows inthe table.
Table 5-24 Cost Variable options
DescriptionOption
Displays the name of the cost variable that you add.Name
Displays the metric that you select for the cost variable.Metric
Displays the date ranges and rate in units for the date rangethat you select.
Total Date Ranges andRates
253Understanding OpsCenter settingsAbout managing cost analysis and chargeback for OpsCenter Analytics
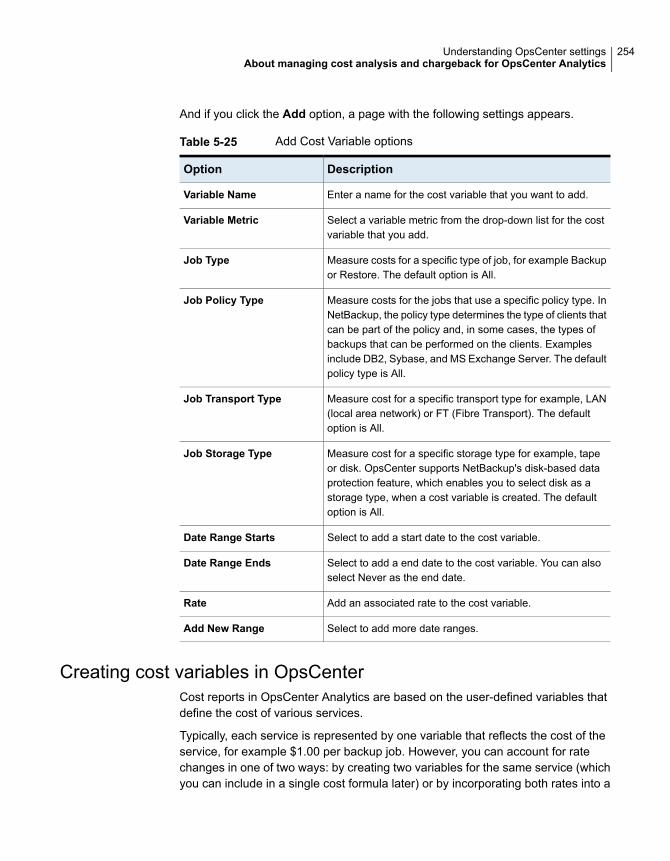
And if you click the Add option, a page with the following settings appears.
Table 5-25 Add Cost Variable options
DescriptionOption
Enter a name for the cost variable that you want to add.Variable Name
Select a variable metric from the drop-down list for the costvariable that you add.
Variable Metric
Measure costs for a specific type of job, for example Backupor Restore. The default option is All.
Job Type
Measure costs for the jobs that use a specific policy type. InNetBackup, the policy type determines the type of clients thatcan be part of the policy and, in some cases, the types ofbackups that can be performed on the clients. Examplesinclude DB2, Sybase, and MS Exchange Server. The defaultpolicy type is All.
Job Policy Type
Measure cost for a specific transport type for example, LAN(local area network) or FT (Fibre Transport). The defaultoption is All.
Job Transport Type
Measure cost for a specific storage type for example, tapeor disk. OpsCenter supports NetBackup's disk-based dataprotection feature, which enables you to select disk as astorage type, when a cost variable is created. The defaultoption is All.
Job Storage Type
Select to add a start date to the cost variable.Date Range Starts
Select to add a end date to the cost variable. You can alsoselect Never as the end date.
Date Range Ends
Add an associated rate to the cost variable.Rate
Select to add more date ranges.Add New Range
Creating cost variables in OpsCenterCost reports in OpsCenter Analytics are based on the user-defined variables thatdefine the cost of various services.
Typically, each service is represented by one variable that reflects the cost of theservice, for example $1.00 per backup job. However, you can account for ratechanges in one of two ways: by creating two variables for the same service (whichyou can include in a single cost formula later) or by incorporating both rates into a
254Understanding OpsCenter settingsAbout managing cost analysis and chargeback for OpsCenter Analytics

single variable. For example, a single variable can incorporate the rate of $1.00 perbackup job until 31 December 2004 and the rate of $1.25 per backup job startingon 1 January 2005.
Note: To generate deduplication savings reports, you must create a cost variablewith the Protected Job Size (GB) metric.
To set up OpsCenter to run cost reports, you need to create the variables that definethe cost of various services.
To create a cost variable
1 Log on to the OpsCenter console with administrator privileges.
2 In the OpsCenter console, click Settings > Chargeback.
Click Cost Variable.
3 On the Cost Variable tab, click Add.
4 Enter the variable name.
5 Select any of the following variable metrics from the drop-down list:
■ Daily Occupancy
■ Job Count
■ Job Size
■ Protected Job Size
■ Storage Size
6 If necessary, select additional parameters to refine the metric you selected.For Job Count, Job Size, and Protected Job Size select the Job Type, JobPolicy Type, Job Transport Type, and Job Storage Type.
Note: These fields are not applicable for the Daily Occupancy and StorageSize variable metrics. For Storage Size, Cloud Provider field is available.
See “Settings > Chargeback > Cost Variable options” on page 253.
7 Add one or more date ranges using the drop-down lists for Month, Day, Year,and Time. Add an associated rate by typing a cost per service unit (such asbackup jobs or backed-up GB) in the Rate field.
Add at least one date range.
255Understanding OpsCenter settingsAbout managing cost analysis and chargeback for OpsCenter Analytics

8 Optionally, to add more date ranges, click Add New Range.
This can be useful for defining multiple date ranges to represent historical orfuture changes in service costs. You can also modify the variable later to addor delete date ranges as costs change.
9 Click OK .
You can now use the variable you created to build the formulas that form thebasis for cost reports.
See “Creating cost formulae in OpsCenter” on page 257.
Modifying cost variables in OpsCenterYou can update cost variables and formulas without having to recreate the reportsthat rely on them. For example, you can modify the name, date ranges and ratesof a variable to reflect changing conditions in your enterprise.
To modify a cost variable
1 Log on to the OpsCenter console with administrator privileges.
2 In the OpsCenter console, click Settings > Chargeback.
Click Cost Variables.
3 Select the check box in front of the variable name that you want to modify.
4 Click Edit.
5 Modify the cost variable details.
6 Click OK.
Deleting cost variables in OpsCenterYou can variables you no longer need. Deleting a cost variable removes itpermanently from the database, and you must update any formulas that use thevariable. To restore a deleted variable, you must recreate the variable manually.
To delete a cost variable
1 Log on to the OpsCenter console with administrator privileges.
2 In the OpsCenter console, click Settings > Chargeback.
3 Click Cost Variables.
4 Select the check box in front of the cost variable that you want to delete.
5 Click Delete.
256Understanding OpsCenter settingsAbout managing cost analysis and chargeback for OpsCenter Analytics

Settings > Chargeback > Cost Formulae optionsBased on cost variables you can create the cost formulas that you can use togenerate cost reports.
A description of the Settings > Chargeback > Cost Formulae options follows inthe table.
Table 5-26 Cost Formulae options
DescriptionOption
Displays the name of the cost formulae added.Name
Displays the number of cost variables added to the costformulae.
Total Cost Variables
Creating cost formulae in OpsCenterAfter you create cost variables, create the formula that define the cost of variousservices to run cost reports.
To create a cost formula
1 Log on to the OpsCenter console with administrator privileges.
2 In the OpsCenter console, click Settings > Chargeback.
Click Cost Formulae.
3 On the Cost Formulae tab, click Add.
4 Enter the name of the formula.
5 Select a cost variable from the drop-down list.
You need to select at least one cost variable.
6 Optionally, to define formulae containing more than one variable, click Addnew cost variable. Select a different variable from the drop-down list.
You can also modify the formulae later to add or delete variables.
7 Click OK.
You now can use the formula to create cost reports. These reports help youevaluate the cost of services and make decisions about what to charge forperforming those services.
Modifying cost formulae in OpsCenterYou can modify the name and variables of a cost formula that you have created.
257Understanding OpsCenter settingsAbout managing cost analysis and chargeback for OpsCenter Analytics
You can update chargeback formulas without having to recreate the reports thatrely on them. For example, you might want to update a formula that is calledRecoveryRate to reflect a change in the hourly rate that is charged for recoveryoperations.
To modify a cost formulae
1 Log on to the OpsCenter console with administrator privileges.
2 In the OpsCenter console, click Settings > Chargeback.
Click Cost Formulae.
3 On the Cost Formulae tab, select the cost formulae that you want to modify.
4 Click Edit.
5 Modify the details of the cost formula.
6 Click OK.
Deleting a cost formulae in OpsCenterYou can also delete formulae that you no longer need. Deleting a cost formularemoves it permanently from the database.
To delete cost formulae
1 Log on to the OpsCenter console with administrator privileges.
2 In the OpsCenter console, click Settings > Chargeback.
Click Cost Formulae.
3 On the Cost Formulae tab, select the cost formulae that you want to delete.
4 Click Delete.
5 On the confirmation dialog box, click OK.
Estimating chargeback costs using the OpsCenter Formula ModelingTool
The Formula Modeling Tool offers an easy way to estimate baseline rates for theIT services you provide. Using historical data, it provides you with an estimate ofhow much it costs your organization to provide a specific kind of service.
For example, suppose you anticipate spending $500,000 over the next year toprovide backup services throughout your enterprise. By inserting the metric DailyOccupancy into the tool, along with the amount $500,000, you can obtain an estimateper kilobyte that is based on the backup activity you performed last year.
See “Creating cost variables in OpsCenter” on page 254.
258Understanding OpsCenter settingsAbout managing cost analysis and chargeback for OpsCenter Analytics

See “Creating cost formulae in OpsCenter” on page 257.
To estimate baseline (chargeback) costs using the Formula Modeling Tool
1 Log on to the OpsCenter console with administrator privileges.
2 In the OpsCenter console, click Settings > Chargeback.
Click Cost Estimation.
3 Select a Report Grouping parameter to define the model’s scope.
4 Use the Metric Selection parameters to specify the metric whose rate youwant to estimate:
See “Settings > Chargeback > Cost Estimation options” on page 259.
5 Use the following Time Frame parameters to define the time intervals for whichdata is modeled.
6 ClickRunModel to input different values into the model, or to run a new model.
Settings > Chargeback > Cost Estimation optionsA description of the Settings > Chargeback > Cost Estimation options follows inthe table.
Table 5-27 Cost Estimation options
DescriptionOption
Select a report grouping parameter to define the model'sscope.
Examples: All Master Servers or User
Report Grouping
Select a metric or category of service.
Example: Daily Occupancy
Metric
Specify the total amount of money, in dollars, you expect tocharge for service within that category in a given time frame.
Examples: $50000, $10000, or $10000.00
Amount
259Understanding OpsCenter settingsAbout managing cost analysis and chargeback for OpsCenter Analytics
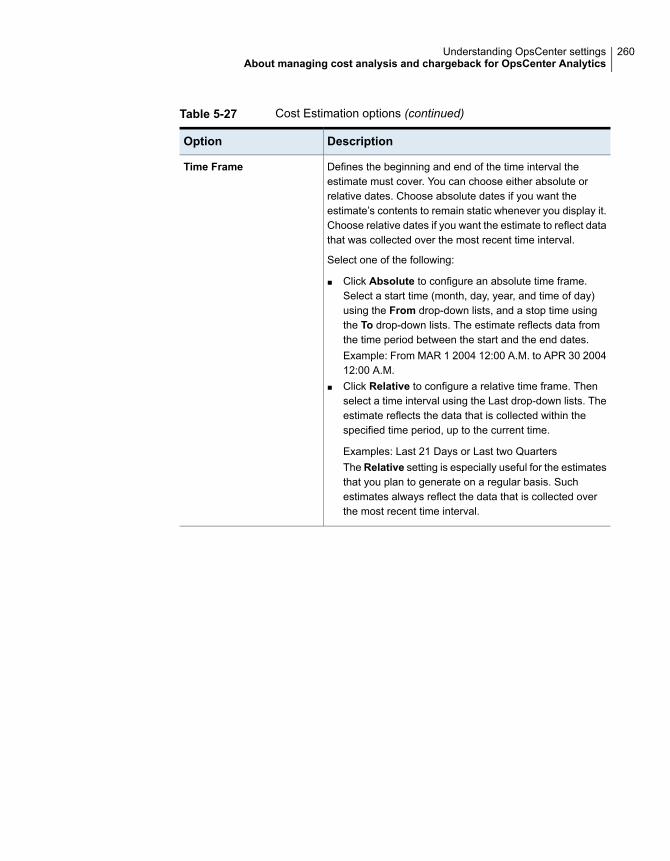
Table 5-27 Cost Estimation options (continued)
DescriptionOption
Defines the beginning and end of the time interval theestimate must cover. You can choose either absolute orrelative dates. Choose absolute dates if you want theestimate’s contents to remain static whenever you display it.Choose relative dates if you want the estimate to reflect datathat was collected over the most recent time interval.
Select one of the following:
■ Click Absolute to configure an absolute time frame.Select a start time (month, day, year, and time of day)using the From drop-down lists, and a stop time usingthe To drop-down lists. The estimate reflects data fromthe time period between the start and the end dates.Example: From MAR 1 2004 12:00 A.M. to APR 30 200412:00 A.M.
■ Click Relative to configure a relative time frame. Thenselect a time interval using the Last drop-down lists. Theestimate reflects the data that is collected within thespecified time period, up to the current time.
Examples: Last 21 Days or Last two QuartersThe Relative setting is especially useful for the estimatesthat you plan to generate on a regular basis. Suchestimates always reflect the data that is collected overthe most recent time interval.
Time Frame
260Understanding OpsCenter settingsAbout managing cost analysis and chargeback for OpsCenter Analytics
Understanding datacollection
This chapter includes the following topics:
■ About data collection in OpsCenter
■ About managing OpsCenter Agents
■ About managing OpsCenter Data Collectors
■ About configuring data collection for NetBackup
■ Configuring Backup Exec data collector
■ Collecting data from PureDisk
About data collection in OpsCenterOpsCenter provides extensive reporting on the data that is collected from backupproducts. An OpsCenter Agent comprises the product-specific data collectors thatcollect data from point products and return it to the OpsCenter Server.
Note: Only one OpsCenter Agent can be installed on a single host.
An OpsCenter Agent consists of the data collectors that can collect data from thefollowing backup products:
■ Backup Exec (Windows only)
Note: To collect data from Backup Exec server host, you need to install theOpsCenter Agent on a Windows host.
6Chapter
■ NetBackup PureDisk
See “About configuring data collection for NetBackup” on page 273.
See “About OpsCenter Agents” on page 262.
See “OpsCenter Data Collector types” on page 262.
About OpsCenter AgentsThe OpsCenter Agent collects data from various Veritas backup products. Theseproducts can reside on the OpsCenter Agent host or on remote hosts.
For more details on OpsCenter Agent installation and deployment scenarios, referto the Installing OpsCenter chapter.
Note: When you install the OpsCenter Server, OpsCenter Integrated Agent is alsoinstalled and configured, which you can use to collect only PureDisk data. To collectPureDisk data, you do not need to manually install or configure OpsCenter Agent.
You cannot delete the Integrated Agent.
You can collect PureDisk data only through the OpsCenter Integrated Agent.
About OpsCenter Agent logsOpsCenter Agent logs are stored at the following location:
InstallPath\Symantec\OpsCenter\Agent\logs
Where InstallPath is the location where you have installed the OpsCenter Agent.
By default the InstallPath is: C:\Program Files
Naming convention for the OpsCenter Agent log file:
5*-146-*.log
An example of the OpsCenter Agent log file name:
58330-146-2567491850-091129-0000000000.log
OpsCenter Data Collector typesThe OpsCenter data collectors, collect data from backup product hosts. Each datacollector collects data from a single product host. You can configure multiple datacollectors on a single OpsCenter Agent host.
You can create data collectors to communicate with the various products, such asBackup Exec. These data collectors collect the specified data type as specified in
262Understanding data collectionAbout data collection in OpsCenter
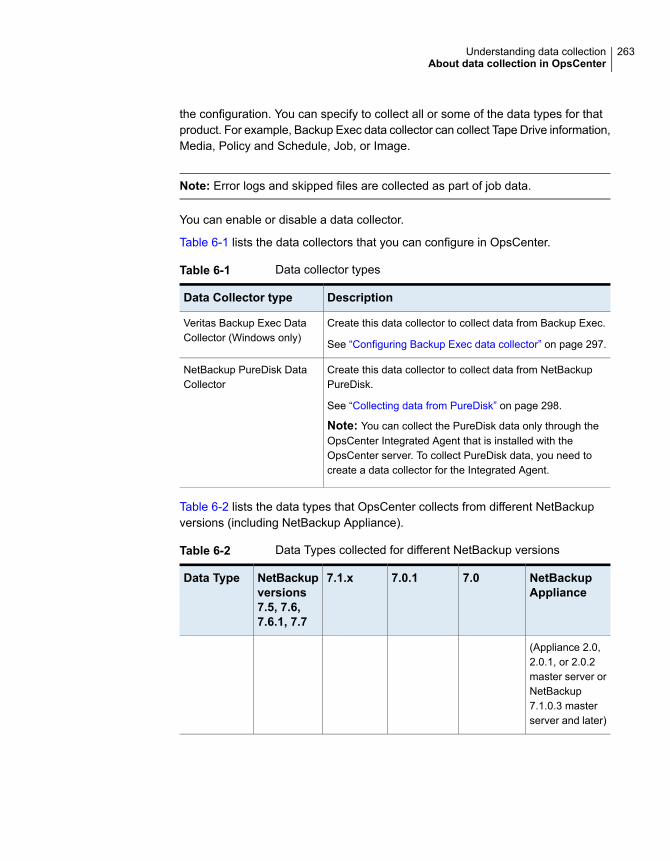
the configuration. You can specify to collect all or some of the data types for thatproduct. For example, Backup Exec data collector can collect Tape Drive information,Media, Policy and Schedule, Job, or Image.
Note: Error logs and skipped files are collected as part of job data.
You can enable or disable a data collector.
Table 6-1 lists the data collectors that you can configure in OpsCenter.
Table 6-1 Data collector types
DescriptionData Collector type
Create this data collector to collect data from Backup Exec.
See “Configuring Backup Exec data collector” on page 297.
Veritas Backup Exec DataCollector (Windows only)
Create this data collector to collect data from NetBackupPureDisk.
See “Collecting data from PureDisk” on page 298.
Note: You can collect the PureDisk data only through theOpsCenter Integrated Agent that is installed with theOpsCenter server. To collect PureDisk data, you need tocreate a data collector for the Integrated Agent.
NetBackup PureDisk DataCollector
Table 6-2 lists the data types that OpsCenter collects from different NetBackupversions (including NetBackup Appliance).
Table 6-2 Data Types collected for different NetBackup versions
NetBackupAppliance
7.07.0.17.1.xNetBackupversions7.5, 7.6,7.6.1, 7.7
Data Type
(Appliance 2.0,2.0.1, or 2.0.2master server orNetBackup7.1.0.3 masterserver and later)
263Understanding data collectionAbout data collection in OpsCenter

Table 6-2 Data Types collected for different NetBackup versions (continued)
NetBackupAppliance
7.07.0.17.1.xNetBackupversions7.5, 7.6,7.6.1, 7.7
Data Type
YN.A.N.A.Collectedonly for7.1.0.3 andlaterversions
YApplianceHardware
YN.A.N.A.YYAudit
YYYYYBMR, SkippedFiles and JobThroughput
N.A.N.A.N.A.N.A.N.A.Catalog
YYYYYClient
YYYYYDisk
YYYYYError Logs
YYYYYFT
YN.A.N.A.YYHostProperties
YYYYYImages
YYYYYJob
YYYYYMedia server
YYYYYPolicy andSchedule
YYYYYRetentionLevel
YYYYYRobot
YYYYYScheduledjobs
YYYYYService
264Understanding data collectionAbout data collection in OpsCenter

Table 6-2 Data Types collected for different NetBackup versions (continued)
NetBackupAppliance
7.07.0.17.1.xNetBackupversions7.5, 7.6,7.6.1, 7.7
Data Type
YN.A.N.A.YYSLP Image
YYYYYStorageservice
YYYYYStorage unit
YYYYYStorage unitGroup
Ybpjavaprotocol
bpjavaprotocol
YYSubJobs
YYYYYTape driveInformation
N.A.N.A.N.A.N.A.N.A.Throughput
YYYYYVirtualmachine
YYYYYVolume/Media
YYYYYVolume group
YYYYYVolume Pool
Table 6-3 lists the data types that OpsCenter collects from various Veritas backupproducts other than NetBackup.
Table 6-3 Data types collected from products other backup products
PureDiskBackup ExecData Types
(6.2.x, 6.5.x, 6.6, 6.6.0.1,6.6.0.2, 6.6.0.3, 6.6.1, 6.6.1.2)
(11.x, 12.x, 2010, 2010 R2,2010 R3)
YYJob
YYPolicy and Schedules
NYTape drive Information
NYMedia
265Understanding data collectionAbout data collection in OpsCenter

About managing OpsCenter AgentsThe following topics provide more information about viewing, modifying, creating,and deleting an OpsCenter Agent configuration.
See “About the OpsCenter Agent” on page 27.
See “Viewing OpsCenter Agent status” on page 267.
See “Configuring an OpsCenter Agent” on page 267.
See “Modifying an OpsCenter Agent” on page 268.
See “Deleting OpsCenter Agents” on page 268.
Settings > Configuration > Agent optionsA description of the Settings > Configuration > Agent options follows in the table.
Table 6-4 Settings > Configuration > Agent options
DescriptionOption
Select the Create Agent or Edit Agent option tocreate an agent or modify the details of an agent.
Select Delete Agent to delete the selected agent.
See “Settings > Configuration > Agent > CreateAgent or Edit Agent options” on page 267.
Create/Edit/Delete Agent
Select the Create Data Collector or Edit DataCollector option to create an agent or modify thedetails of an agent using the Data Collector Wizard.
Select Delete Data Collector to delete theselected agent.
See “Data Collector Wizard settings” on page 271.
Create/Edit/Delete Data Collector
Name of the Agent host.Name
Host from where Agent collects the data likeBackup Exec server , PureDisk server etc.
Product Host
Data collection status for policy and schedule onthe product host.
Policy and Schedule
Data collection status for tapes on the product host.Tape Drive Information
Data collection status for media on the producthost.
Media
266Understanding data collectionAbout managing OpsCenter Agents
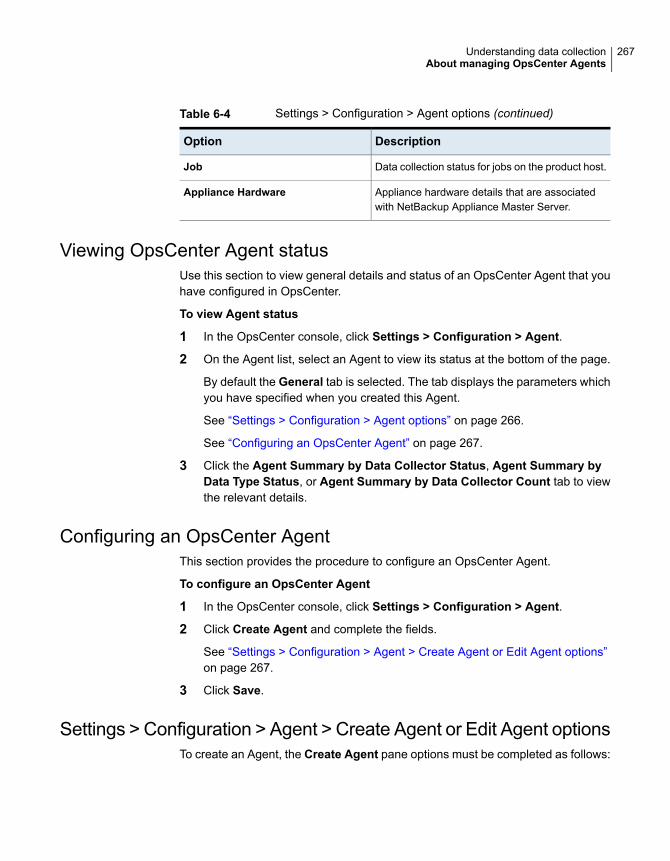
Table 6-4 Settings > Configuration > Agent options (continued)
DescriptionOption
Data collection status for jobs on the product host.Job
Appliance hardware details that are associatedwith NetBackup Appliance Master Server.
Appliance Hardware
Viewing OpsCenter Agent statusUse this section to view general details and status of an OpsCenter Agent that youhave configured in OpsCenter.
To view Agent status
1 In the OpsCenter console, click Settings > Configuration > Agent.
2 On the Agent list, select an Agent to view its status at the bottom of the page.
By default the General tab is selected. The tab displays the parameters whichyou have specified when you created this Agent.
See “Settings > Configuration > Agent options” on page 266.
See “Configuring an OpsCenter Agent” on page 267.
3 Click the Agent Summary by Data Collector Status, Agent Summary byData Type Status, or Agent Summary by Data Collector Count tab to viewthe relevant details.
Configuring an OpsCenter AgentThis section provides the procedure to configure an OpsCenter Agent.
To configure an OpsCenter Agent
1 In the OpsCenter console, click Settings > Configuration > Agent.
2 Click Create Agent and complete the fields.
See “Settings > Configuration > Agent > Create Agent or Edit Agent options”on page 267.
3 Click Save.
Settings > Configuration > Agent > Create Agent or Edit Agent optionsTo create an Agent, the Create Agent pane options must be completed as follows:
267Understanding data collectionAbout managing OpsCenter Agents
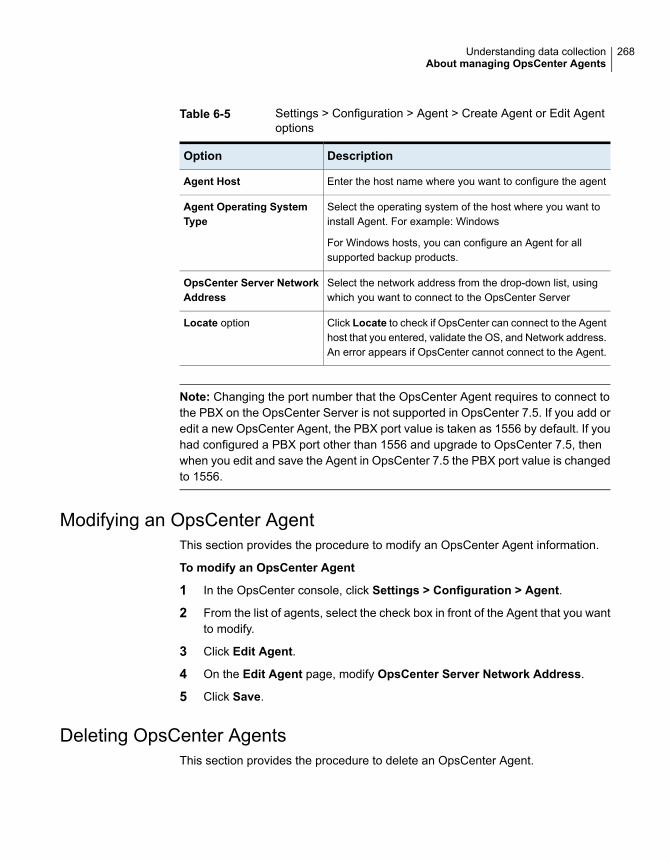
Table 6-5 Settings > Configuration > Agent > Create Agent or Edit Agentoptions
DescriptionOption
Enter the host name where you want to configure the agentAgent Host
Select the operating system of the host where you want toinstall Agent. For example: Windows
For Windows hosts, you can configure an Agent for allsupported backup products.
Agent Operating SystemType
Select the network address from the drop-down list, usingwhich you want to connect to the OpsCenter Server
OpsCenter Server NetworkAddress
Click Locate to check if OpsCenter can connect to the Agenthost that you entered, validate the OS, and Network address.An error appears if OpsCenter cannot connect to the Agent.
Locate option
Note: Changing the port number that the OpsCenter Agent requires to connect tothe PBX on the OpsCenter Server is not supported in OpsCenter 7.5. If you add oredit a new OpsCenter Agent, the PBX port value is taken as 1556 by default. If youhad configured a PBX port other than 1556 and upgrade to OpsCenter 7.5, thenwhen you edit and save the Agent in OpsCenter 7.5 the PBX port value is changedto 1556.
Modifying an OpsCenter AgentThis section provides the procedure to modify an OpsCenter Agent information.
To modify an OpsCenter Agent
1 In the OpsCenter console, click Settings > Configuration > Agent.
2 From the list of agents, select the check box in front of the Agent that you wantto modify.
3 Click Edit Agent.
4 On the Edit Agent page, modify OpsCenter Server Network Address.
5 Click Save.
Deleting OpsCenter AgentsThis section provides the procedure to delete an OpsCenter Agent.
268Understanding data collectionAbout managing OpsCenter Agents
To delete an OpsCenter Agent
1 In the OpsCenter console, click Settings > Configuration > Agent.
2 From the list of agents, select the check box in front of the Agent that you wantto delete.
3 Click Delete.
About managing OpsCenter Data CollectorsThe following topics provide more information about viewing, configuring, modifying,or deleting a data collector.
See “Viewing OpsCenter Data Collector status” on page 269.
See “ Configuring an OpsCenter Data Collector” on page 270.
See “ Modifying an OpsCenter Data Collector configuration” on page 272.
See “ Deleting OpsCenter Data Collectors” on page 273.
Viewing OpsCenter Data Collector statusUse this section to view general details and status of a Data Collector that you haveconfigured for an Agent.
To view data collector status
1 In the OpsCenter console, click Settings > Configuration > Agent.
2 On the Agent list, expand an Agent to view the Data Collectors that areconfigured for this Agent.
269Understanding data collectionAbout managing OpsCenter Data Collectors
3 Select a Data Collector to view its details and status at the bottom of the page.
By default the General tab is selected displaying the following Data Collectordetails, which you have specified when you created this Data Collector.
See “ Configuring an OpsCenter Data Collector” on page 270.
Displays the name of the product type, for which this Data Collector isconfigured.
For example: Veritas Backup Exec
Product
Displays the name of the target host, which this Data Collector collectsdata from.
ProductHost
Displays the status of the Data Collector as Enabled or Disabled thatyou have set.
If the Data Collector status is disabled, the data is not collected from thetarget host.
Status
4 Select the Data Collection Status tab.
More information is available about the parameters that are displayed on thistab.
See “Data collection status of a master server” on page 284.
Configuring an OpsCenter Data CollectorOpsCenter is designed to provide extensive reporting on the data that is receivedfrom backup products. OpsCenter consists of Server, Agent, OpsCenter ViewBuilder, and a console. The OpsCenter Agent contains product-specific datacollectors collecting data from the products and returning it to the OpsCenter Server.You can generate various business reports on this backup data.
After you install and configure an OpsCenter Agent, configure the data collectors.
See “Configuring an OpsCenter Agent” on page 267.
To configure a data collector
1 In the OpsCenter console, click Settings > Configuration > Agent.
2 On the Agent list, select a check box in front of the Agent, for which you wantto configure a Data Collector.
3 Click Create Data Collector.
4 Complete the fields on the Create Data Collector: Product Selection page.
270Understanding data collectionAbout managing OpsCenter Data Collectors
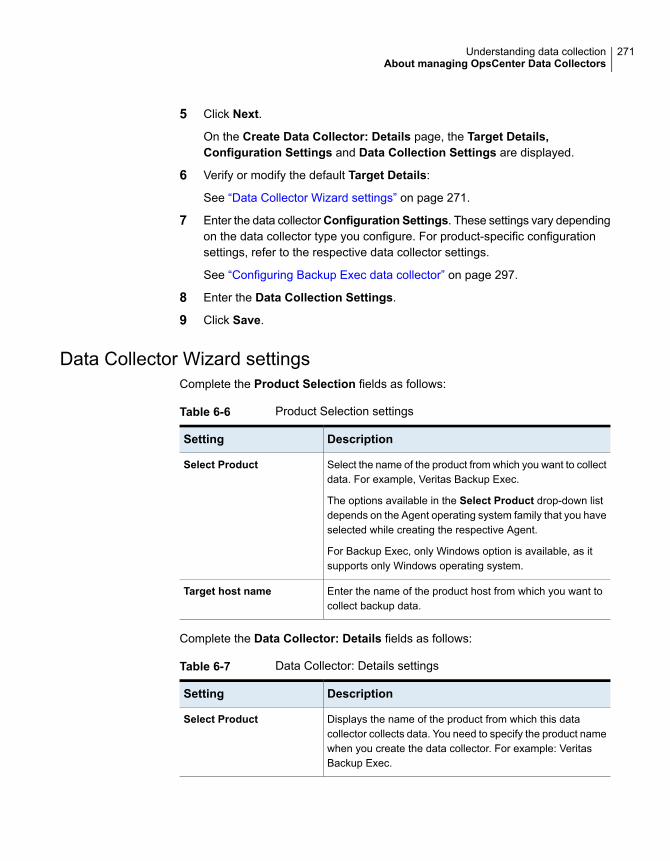
5 Click Next.
On the Create Data Collector: Details page, the Target Details,Configuration Settings and Data Collection Settings are displayed.
6 Verify or modify the default Target Details:
See “Data Collector Wizard settings” on page 271.
7 Enter the data collectorConfiguration Settings. These settings vary dependingon the data collector type you configure. For product-specific configurationsettings, refer to the respective data collector settings.
See “Configuring Backup Exec data collector” on page 297.
8 Enter the Data Collection Settings.
9 Click Save.
Data Collector Wizard settingsComplete the Product Selection fields as follows:
Table 6-6 Product Selection settings
DescriptionSetting
Select the name of the product from which you want to collectdata. For example, Veritas Backup Exec.
The options available in the Select Product drop-down listdepends on the Agent operating system family that you haveselected while creating the respective Agent.
For Backup Exec, only Windows option is available, as itsupports only Windows operating system.
Select Product
Enter the name of the product host from which you want tocollect backup data.
Target host name
Complete the Data Collector: Details fields as follows:
Table 6-7 Data Collector: Details settings
DescriptionSetting
Displays the name of the product from which this datacollector collects data. You need to specify the product namewhen you create the data collector. For example: VeritasBackup Exec.
Select Product
271Understanding data collectionAbout managing OpsCenter Data Collectors
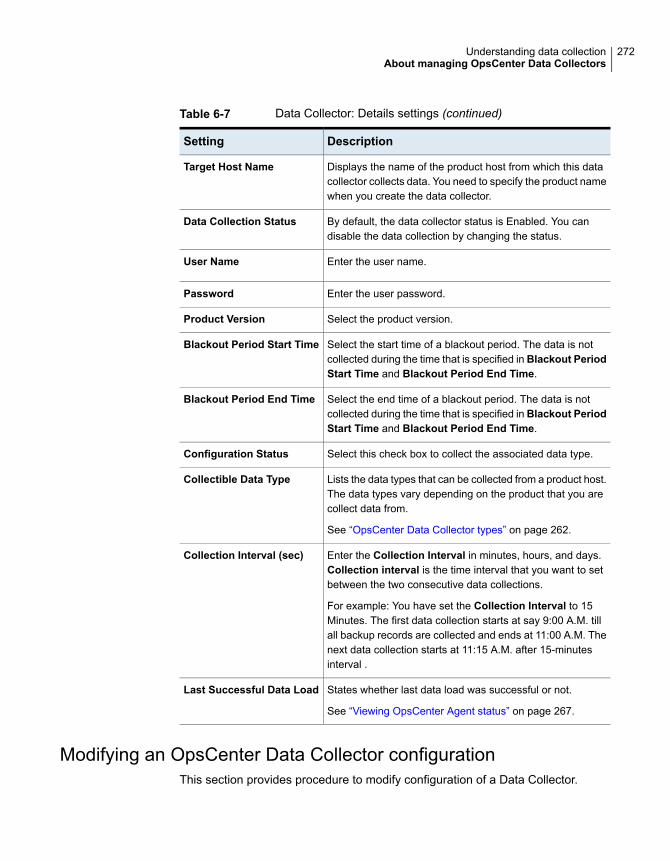
Table 6-7 Data Collector: Details settings (continued)
DescriptionSetting
Displays the name of the product host from which this datacollector collects data. You need to specify the product namewhen you create the data collector.
Target Host Name
By default, the data collector status is Enabled. You candisable the data collection by changing the status.
Data Collection Status
Enter the user name.User Name
Enter the user password.Password
Select the product version.Product Version
Select the start time of a blackout period. The data is notcollected during the time that is specified in Blackout PeriodStart Time and Blackout Period End Time.
Blackout Period Start Time
Select the end time of a blackout period. The data is notcollected during the time that is specified in Blackout PeriodStart Time and Blackout Period End Time.
Blackout Period End Time
Select this check box to collect the associated data type.Configuration Status
Lists the data types that can be collected from a product host.The data types vary depending on the product that you arecollect data from.
See “OpsCenter Data Collector types” on page 262.
Collectible Data Type
Enter the Collection Interval in minutes, hours, and days.Collection interval is the time interval that you want to setbetween the two consecutive data collections.
For example: You have set the Collection Interval to 15Minutes. The first data collection starts at say 9:00 A.M. tillall backup records are collected and ends at 11:00 A.M. Thenext data collection starts at 11:15 A.M. after 15-minutesinterval .
Collection Interval (sec)
States whether last data load was successful or not.
See “Viewing OpsCenter Agent status” on page 267.
Last Successful Data Load
Modifying an OpsCenter Data Collector configurationThis section provides procedure to modify configuration of a Data Collector.
272Understanding data collectionAbout managing OpsCenter Data Collectors
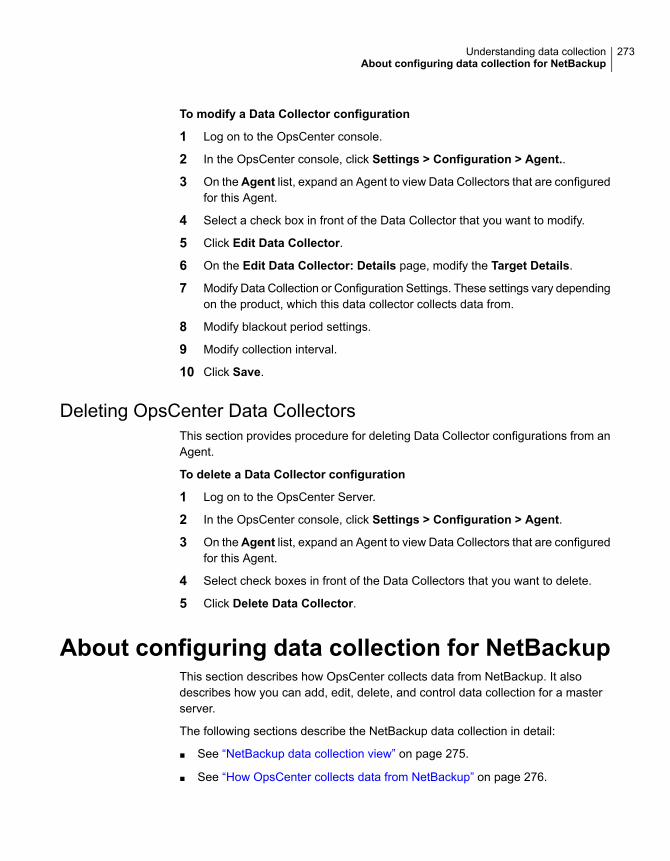
To modify a Data Collector configuration
1 Log on to the OpsCenter console.
2 In the OpsCenter console, click Settings > Configuration > Agent..
3 On theAgent list, expand an Agent to view Data Collectors that are configuredfor this Agent.
4 Select a check box in front of the Data Collector that you want to modify.
5 Click Edit Data Collector.
6 On the Edit Data Collector: Details page, modify the Target Details.
7 Modify Data Collection or Configuration Settings. These settings vary dependingon the product, which this data collector collects data from.
8 Modify blackout period settings.
9 Modify collection interval.
10 Click Save.
Deleting OpsCenter Data CollectorsThis section provides procedure for deleting Data Collector configurations from anAgent.
To delete a Data Collector configuration
1 Log on to the OpsCenter Server.
2 In the OpsCenter console, click Settings > Configuration > Agent.
3 On theAgent list, expand an Agent to view Data Collectors that are configuredfor this Agent.
4 Select check boxes in front of the Data Collectors that you want to delete.
5 Click Delete Data Collector.
About configuring data collection for NetBackupThis section describes how OpsCenter collects data from NetBackup. It alsodescribes how you can add, edit, delete, and control data collection for a masterserver.
The following sections describe the NetBackup data collection in detail:
■ See “NetBackup data collection view” on page 275.
■ See “How OpsCenter collects data from NetBackup” on page 276.
273Understanding data collectionAbout configuring data collection for NetBackup
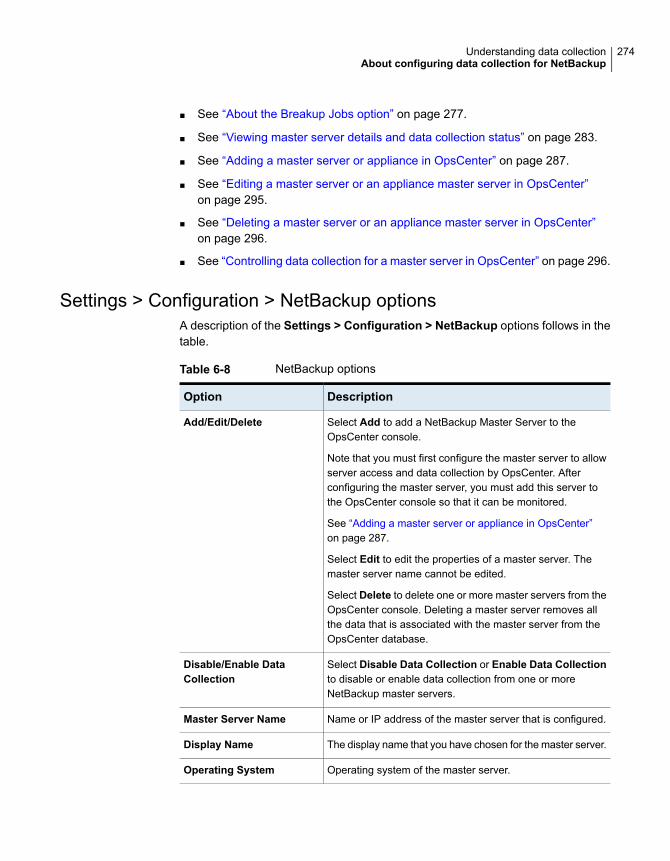
■ See “About the Breakup Jobs option” on page 277.
■ See “Viewing master server details and data collection status” on page 283.
■ See “Adding a master server or appliance in OpsCenter” on page 287.
■ See “Editing a master server or an appliance master server in OpsCenter”on page 295.
■ See “Deleting a master server or an appliance master server in OpsCenter”on page 296.
■ See “Controlling data collection for a master server in OpsCenter” on page 296.
Settings > Configuration > NetBackup optionsA description of the Settings > Configuration > NetBackup options follows in thetable.
Table 6-8 NetBackup options
DescriptionOption
Select Add to add a NetBackup Master Server to theOpsCenter console.
Note that you must first configure the master server to allowserver access and data collection by OpsCenter. Afterconfiguring the master server, you must add this server tothe OpsCenter console so that it can be monitored.
See “Adding a master server or appliance in OpsCenter”on page 287.
Select Edit to edit the properties of a master server. Themaster server name cannot be edited.
Select Delete to delete one or more master servers from theOpsCenter console. Deleting a master server removes allthe data that is associated with the master server from theOpsCenter database.
Add/Edit/Delete
Select Disable Data Collection or Enable Data Collectionto disable or enable data collection from one or moreNetBackup master servers.
Disable/Enable DataCollection
Name or IP address of the master server that is configured.Master Server Name
The display name that you have chosen for the master server.Display Name
Operating system of the master server.Operating System
274Understanding data collectionAbout configuring data collection for NetBackup

Table 6-8 NetBackup options (continued)
DescriptionOption
Backup product and version from where the data is collected.Product
The master server can show any of the following states:
■ Connected■ Not Connected■ Disabled
If the server status is 'Connected', the time since when theOpsCenter Server and the and master server are connectedis also displayed. This does not necessarily represent thelast time that OpsCenter collected information from the masterserver.
See “NetBackup Master Server states in OpsCenter”on page 287.
Server Status
Reason if any for the current server status.Reason
NetBackup data collection viewThis view is displayed when you select Settings > Configuration > NetBackupfrom the OpsCenter console. This view shows details of master servers.
The table that appears in this view shows the following columns:
Name or IP address of the master server that is configured.Master Server Name
The display name that you have chosen for the master server.Display Name
Operating system of the master server.Operating System
Backup product and version from where the data is collected.Product
The master server can show any of the following states:
■ Connected■ Not Connected■ Disabled
If the server status is 'Connected', the time since when theOpsCenter Server and the NetBackup Master Server areconnected is also displayed. This does not necessarily representthe last time that OpsCenter collected information from the masterserver.
See “NetBackup Master Server states in OpsCenter” on page 287.
Server Status
275Understanding data collectionAbout configuring data collection for NetBackup

Reason if any for the current state.Reason
How OpsCenter collects data from NetBackupOpsCenter is used to monitor, manage, and report on NetBackup master and mediaservers, clients, and policies. To perform the monitoring, management, and reportingfunctions, OpsCenter collects data from the NetBackup master servers. TheNetBackup data collection and management logic that OpsCenter uses is built intoNetBackup master servers. This logic is included in the NetBackup Service Layer(NBSL). Starting with the 6.0 release of NetBackup, NetBackup Service Layer(NBSL) components are included as a part of NetBackup on master and mediaservers.
Note:OpsCenter only uses the NBSL on master servers for data collection. ThoughNBSL is also included on media servers, OpsCenter does not use it. You must addonly master servers to the OpsCenter console. You must not add any media serversto the OpsCenter console.
NBSL provides a single point of access to key NetBackup data, objects, and changeevents. The NetBackup UI also uses NBSL. NBSL runs as a service or daemonand has local configuration information, but no local database.
OpsCenter uses NBSL for all NetBackup monitoring, managing, and controlfunctions. If NBSL service stops running on a managed NetBackup server,OpsCenter gets affected.
If NBSL stops, OpsCenter may not capture any changes that were made to theNetBackup configuration. When NBSL restarts, OpsCenter correctly recaptures thelatest state.
See “Data collection status of a master server” on page 284.
Note: For 7.0.x master servers, use the bpjava protocol, only if you want to collectbreakup jobs, capacity, or traditional license data.
The OpsCenter Server software collects data from NBSL in the following ways:
■ Initial data load
■ Listening for change notifications
Whenever OpsCenter server software starts, when data collection for a masterserver is enabled or when a master server is added to OpsCenter, the OpsCenterserver starts collecting all the available data from NetBackup master server intothe OpsCenter database using NBSL. The initial data load happens serially for each
276Understanding data collectionAbout configuring data collection for NetBackup
data type. As soon as the initial data load is complete, OpsCenter server softwarelistens to the notifications from NBSL for any change in NetBackup data, and updatesthe OpsCenter database.
Note: Consider a scenario when you add a master server or when OpsCenterServer software starts after a long time, or when the data collection for a masterserver is enabled after a long time. In this case, it may take some time for theOpsCenter server to collect all data (such as media, jobs, images, drives etc.) fromthe NetBackup master server and insert it into the OpsCenter database.
Consider a scenario where a master server is already added on the OpsCenterconsole, and you uninstall and then reinstall NetBackup on the master server. Inthis case, you should disable the data collection (Settings > Configuration >NetBackup) before you uninstall NetBackup. Once NetBackup installationcompletes, you must enable the master server. Enabling the master server marksthe existing master server as retired and also create a new master server with thefreshly installed NetBackup.
See “Adding a master server or an appliance master server in the OpsCenterconsole” on page 295.
Note: After you install a NetBackup Master Server, you should enter the OpsCenterServer name in the NetBackup Host Properties.
See “Configuring a master server or appliance master server for server access anddata collection by OpsCenter” on page 291.
Veritas Private Branch Exchange (PBX) is used for communication and requires aport to be opened on the OpsCenter server and the NetBackup master server forinput and output. The default PBX port that is used is 1556. You cannot configurethe PBX port in OpsCenter.
About the Breakup Jobs optionThis section describes the NetBackup-specific Breakup Jobs option that you canset in OpsCenter while adding a master server. The Breakup Jobs functionality wasearlier available in Veritas Backup Reporter (VBR). With the Breakup Jobs option,detailed file-level information like size and backup file count for each backupselection (associated with a NetBackup job) is collected and displayed as a part ofcustom reports in OpsCenter. The Breakup Jobs functionality is most effective ifyou have multiple backup selection lists in the NetBackup policy.
You can either enable or disable the breakup job option for master servers. Whenthe Breakup Jobs option is enabled, OpsCenter collects a greater level of job detail
277Understanding data collectionAbout configuring data collection for NetBackup
at a file-system level. In addition to other job attributes, OpsCenter collects jobattributes like size, file count, and directory name from the master server. Forexample, when the Breakup Jobs option is enabled, you can see how much datawas backed up per file system.
You can enable or disable the Breakup Jobs functionality for master server versionsearlier than 7.1. The Breakup Jobs option can be enabled or disabled when youadd a master server from Settings > Configuration > NetBackup. To enable theBreakup Jobs functionality for master server versions earlier than 7.1, select theEnable Breakup Job data collection option from the Advanced Data CollectionProperties section.
More information on how to enable or disable the Breakup Jobs functionality formaster server versions earlier than 7.1 is available.
See “Settings > Configuration > NetBackup > Add Master Server options”on page 293.
The Breakup Jobs functionality is disabled by default for 7.1 and later master servers.To enable the Breakup Jobs functionality for 7.1 or later master servers, you mustconfigure the scl.conf file.
More information on how you can enable the Breakup Jobs functionality for 7.1master servers is available.
See “Configuring the Breakup Jobs option for master servers” on page 279.
Note: Enabling the Breakup Jobs option increases the load on the master server,the load on the Agent (applicable for master servers earlier than 7.1), and the timeit takes to gather and load data in OpsCenter.
You can also configure the jobs for which you want to collect breakup job information.The job selection is based on the maximum number of files that a job backs up. Bydefault, breakup job information is not collected for the jobs whose file count isgreater than 1000000. This applies to all master server versions.
See “Configuring the Breakup Jobs option for master servers” on page 279.
Review the following considerations with respect to the Breakup Jobs functionality:
■ The Breakup Jobs functionality is specific to NetBackup and does not apply toany other product.
■ The Breakup Jobs data collection only happens for the jobs that are collectedafter you upgrade to OpsCenter Analytics 7.1. The breakup jobs data is notcollected for the jobs that already exist in the OpsCenter database.
■ The Breakup Jobs data collection happens through image ID's. Veritasrecommends that you enable image data collection for the master server if you
278Understanding data collectionAbout configuring data collection for NetBackup
want to collect the breakup jobs data. For 7.1 or later master servers, the imagedata collection happens automatically by NBSL.For NetBackup master servers before 7.1, you can enable image data collectionwhile adding a master server.See “Adding a master server or an appliance master server in the OpsCenterconsole” on page 295.
■ The Breakup Jobs option is only valid for the backup jobs whose Job State isDone.
■ For NetBackup 7.1 and later master servers, the breakup jobs data is collecteddirectly from the master server by NBSL.The OpsCenter Agent is required if you have a master server version earlierthan 7.1 (like 7.0, 7.0.1 etc.) and want to collect breakup jobs data for the masterserver. The OpsCenter Agent uses the bplist command to collect data fromthe NetBackup master server.More information about deploying the OpsCenter Agent is available.See “About planning an OpsCenter Agent deployment” on page 79.
■ Data for the breakup jobs is collected from NetBackup after every 15 minutes.
■ The Breakup Jobs functionality applies to OpsCenter Analytics only. The BreakupJobs functionality cannot be used with Veritas NetBackup OpsCenter (freeversion).
■ If you were using OpsCenter and applied the appropriate license keys for thelicensed version (OpsCenter Analytics), breakup jobs may still not be displayed.To display breakup jobs, you must disable and then enable data collection forthe master server from Settings > Configuration.See “Controlling data collection for a master server in OpsCenter” on page 296.
■ If you upgrade from VBR to OpsCenter Analytics 7.1, the breakup job informationfrom VBR is migrated to the OpsCenter database.
Configuring the Breakup Jobs option for master serversYou can configure the Breakup Jobs option for master servers from the scl.conffile. You can configure the scl.conf file to enable the Breakup Jobs option for 7.1or later master servers (disabled by default). Note that enabling or disabling theBreakup Jobs option using scl.conf applies to 7.1 or later master servers only.
Note: Enabling the Breakup Jobs option increases the load on the master serverand the time it takes to gather and load data in OpsCenter.
279Understanding data collectionAbout configuring data collection for NetBackup
You can also configure the jobs for which you want to collect breakup job information.The job selection is based on the maximum number of files that a job backs up. Bydefault, breakup job information is not collected for the jobs whose file count isgreater than 1000000. This applies to all master server versions.
To enable the Breakup Jobs option for 7.1 or later master servers
1 Log on to the OpsCenter Server host. Stop all OpsCenter Server services onWindows and UNIX:
INSTALL_PATH\OpsCenter\server\bin\opsadmin.bat stopWindows
<INSTALL_PATH>/SYMCOpsCenterServer/bin/opsadmin.sh stopUNIX
2 Open scl.conf file from the following directory on Windows and UNIX:
INSTALL_PATH\OpsCenter\Server\config\scl.confWindows
<INSTALL_PATH>/SYMCOpsCenterServer/configUNIX
3 The Breakup Jobs option is disabled by default. To enable the Breakup Jobsoption for 7.1 or later master servers, add the following text to scl.conf file:
nbu.scl.collector.enableBreakupJobDataCollection=true
Note: To disable the Breakup Jobs option for 7.1 or later master servers, addthe following text to scl.conf file:
nbu.scl.collector.enableBreakupJobDataCollection=false
4 Save scl.conf file.
5 Restart all OpsCenter Server services on Windows and UNIX:
INSTALL_PATH\OpsCenter\server\bin\opsadmin.bat startWindows
<INSTALL_PATH>/SYMCOpsCenterServer/bin/opsadmin.sh startUNIX
280Understanding data collectionAbout configuring data collection for NetBackup
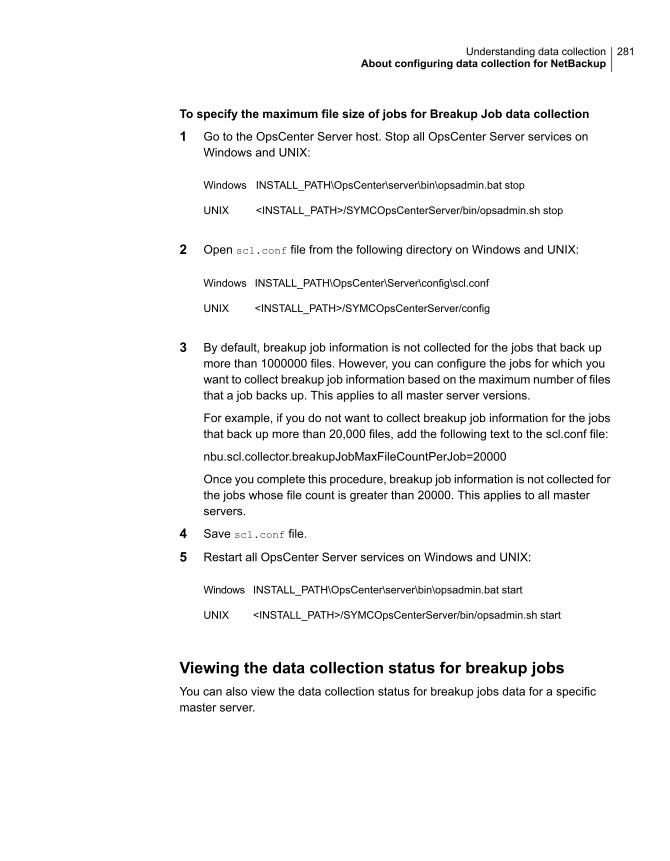
To specify the maximum file size of jobs for Breakup Job data collection
1 Go to the OpsCenter Server host. Stop all OpsCenter Server services onWindows and UNIX:
INSTALL_PATH\OpsCenter\server\bin\opsadmin.bat stopWindows
<INSTALL_PATH>/SYMCOpsCenterServer/bin/opsadmin.sh stopUNIX
2 Open scl.conf file from the following directory on Windows and UNIX:
INSTALL_PATH\OpsCenter\Server\config\scl.confWindows
<INSTALL_PATH>/SYMCOpsCenterServer/configUNIX
3 By default, breakup job information is not collected for the jobs that back upmore than 1000000 files. However, you can configure the jobs for which youwant to collect breakup job information based on the maximum number of filesthat a job backs up. This applies to all master server versions.
For example, if you do not want to collect breakup job information for the jobsthat back up more than 20,000 files, add the following text to the scl.conf file:
nbu.scl.collector.breakupJobMaxFileCountPerJob=20000
Once you complete this procedure, breakup job information is not collected forthe jobs whose file count is greater than 20000. This applies to all masterservers.
4 Save scl.conf file.
5 Restart all OpsCenter Server services on Windows and UNIX:
INSTALL_PATH\OpsCenter\server\bin\opsadmin.bat startWindows
<INSTALL_PATH>/SYMCOpsCenterServer/bin/opsadmin.sh startUNIX
Viewing the data collection status for breakup jobsYou can also view the data collection status for breakup jobs data for a specificmaster server.
281Understanding data collectionAbout configuring data collection for NetBackup
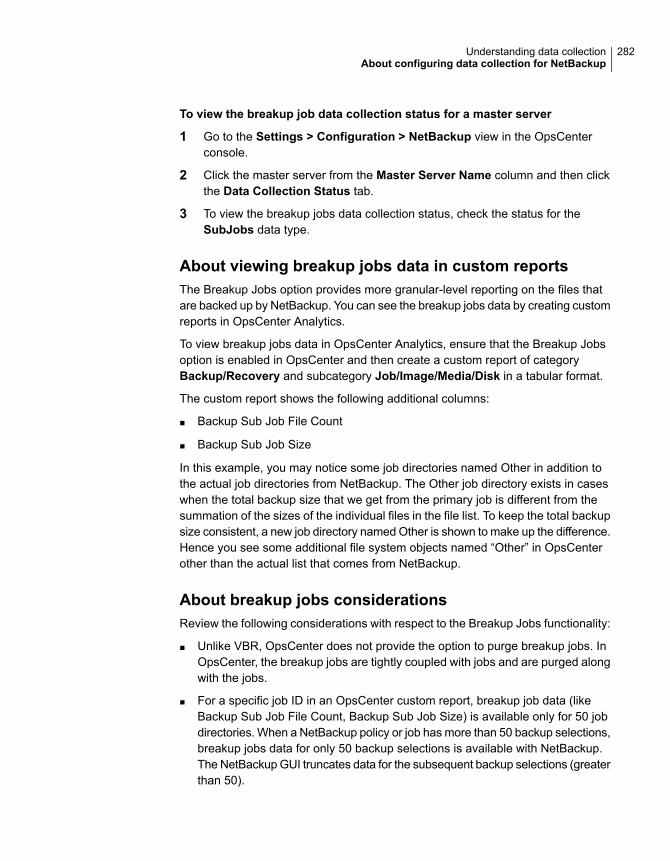
To view the breakup job data collection status for a master server
1 Go to the Settings > Configuration > NetBackup view in the OpsCenterconsole.
2 Click the master server from the Master Server Name column and then clickthe Data Collection Status tab.
3 To view the breakup jobs data collection status, check the status for theSubJobs data type.
About viewing breakup jobs data in custom reportsThe Breakup Jobs option provides more granular-level reporting on the files thatare backed up by NetBackup. You can see the breakup jobs data by creating customreports in OpsCenter Analytics.
To view breakup jobs data in OpsCenter Analytics, ensure that the Breakup Jobsoption is enabled in OpsCenter and then create a custom report of categoryBackup/Recovery and subcategory Job/Image/Media/Disk in a tabular format.
The custom report shows the following additional columns:
■ Backup Sub Job File Count
■ Backup Sub Job Size
In this example, you may notice some job directories named Other in addition tothe actual job directories from NetBackup. The Other job directory exists in caseswhen the total backup size that we get from the primary job is different from thesummation of the sizes of the individual files in the file list. To keep the total backupsize consistent, a new job directory named Other is shown to make up the difference.Hence you see some additional file system objects named “Other” in OpsCenterother than the actual list that comes from NetBackup.
About breakup jobs considerationsReview the following considerations with respect to the Breakup Jobs functionality:
■ Unlike VBR, OpsCenter does not provide the option to purge breakup jobs. InOpsCenter, the breakup jobs are tightly coupled with jobs and are purged alongwith the jobs.
■ For a specific job ID in an OpsCenter custom report, breakup job data (likeBackup Sub Job File Count, Backup Sub Job Size) is available only for 50 jobdirectories. When a NetBackup policy or job has more than 50 backup selections,breakup jobs data for only 50 backup selections is available with NetBackup.The NetBackup GUI truncates data for the subsequent backup selections (greaterthan 50).
282Understanding data collectionAbout configuring data collection for NetBackup
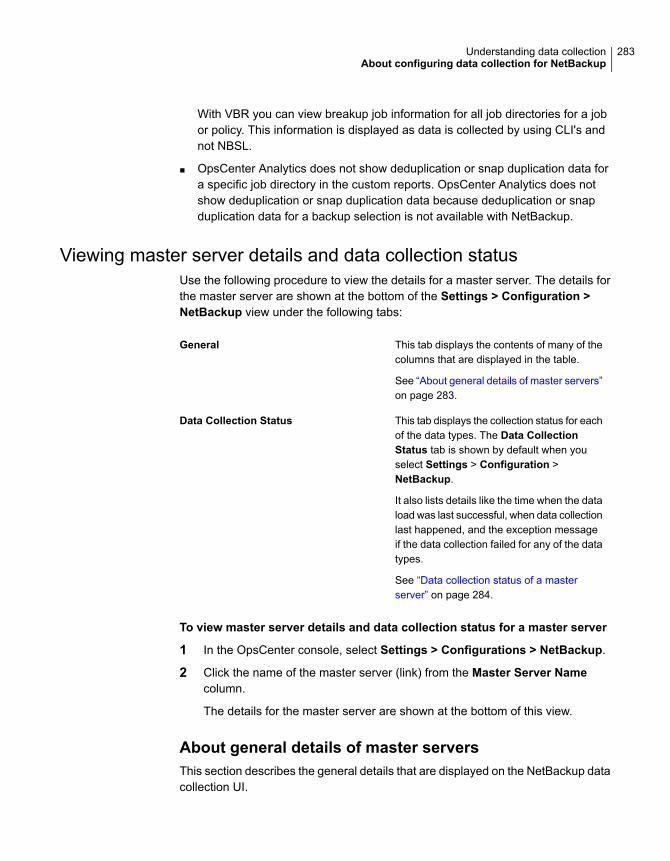
With VBR you can view breakup job information for all job directories for a jobor policy. This information is displayed as data is collected by using CLI's andnot NBSL.
■ OpsCenter Analytics does not show deduplication or snap duplication data fora specific job directory in the custom reports. OpsCenter Analytics does notshow deduplication or snap duplication data because deduplication or snapduplication data for a backup selection is not available with NetBackup.
Viewing master server details and data collection statusUse the following procedure to view the details for a master server. The details forthe master server are shown at the bottom of the Settings > Configuration >NetBackup view under the following tabs:
This tab displays the contents of many of thecolumns that are displayed in the table.
See “About general details of master servers”on page 283.
General
This tab displays the collection status for eachof the data types. The Data CollectionStatus tab is shown by default when youselect Settings > Configuration >NetBackup.
It also lists details like the time when the dataload was last successful, when data collectionlast happened, and the exception messageif the data collection failed for any of the datatypes.
See “Data collection status of a masterserver” on page 284.
Data Collection Status
To view master server details and data collection status for a master server
1 In the OpsCenter console, select Settings > Configurations > NetBackup.
2 Click the name of the master server (link) from the Master Server Namecolumn.
The details for the master server are shown at the bottom of this view.
About general details of master serversThis section describes the general details that are displayed on the NetBackup datacollection UI.
283Understanding data collectionAbout configuring data collection for NetBackup
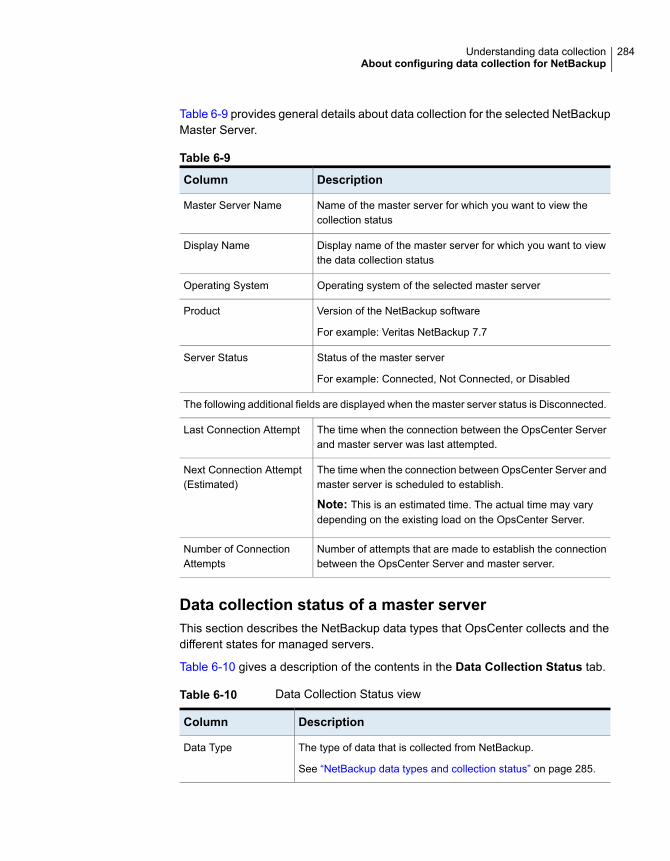
Table 6-9 provides general details about data collection for the selected NetBackupMaster Server.
Table 6-9
DescriptionColumn
Name of the master server for which you want to view thecollection status
Master Server Name
Display name of the master server for which you want to viewthe data collection status
Display Name
Operating system of the selected master serverOperating System
Version of the NetBackup software
For example: Veritas NetBackup 7.7
Product
Status of the master server
For example: Connected, Not Connected, or Disabled
Server Status
The following additional fields are displayed when the master server status is Disconnected.
The time when the connection between the OpsCenter Serverand master server was last attempted.
Last Connection Attempt
The time when the connection between OpsCenter Server andmaster server is scheduled to establish.
Note: This is an estimated time. The actual time may varydepending on the existing load on the OpsCenter Server.
Next Connection Attempt(Estimated)
Number of attempts that are made to establish the connectionbetween the OpsCenter Server and master server.
Number of ConnectionAttempts
Data collection status of a master serverThis section describes the NetBackup data types that OpsCenter collects and thedifferent states for managed servers.
Table 6-10 gives a description of the contents in the Data Collection Status tab.
Table 6-10 Data Collection Status view
DescriptionColumn
The type of data that is collected from NetBackup.
See “NetBackup data types and collection status” on page 285.
Data Type
284Understanding data collectionAbout configuring data collection for NetBackup
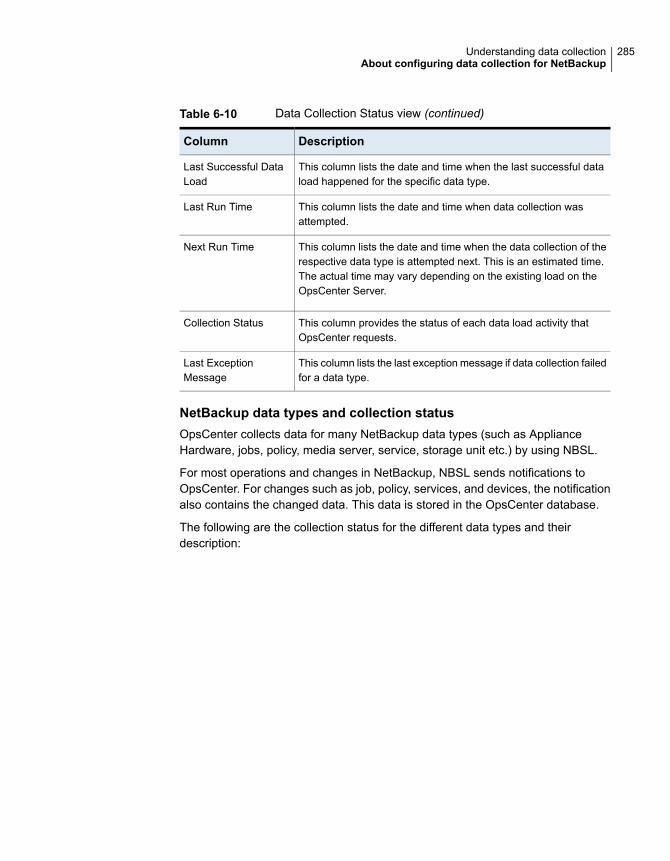
Table 6-10 Data Collection Status view (continued)
DescriptionColumn
This column lists the date and time when the last successful dataload happened for the specific data type.
Last Successful DataLoad
This column lists the date and time when data collection wasattempted.
Last Run Time
This column lists the date and time when the data collection of therespective data type is attempted next. This is an estimated time.The actual time may vary depending on the existing load on theOpsCenter Server.
Next Run Time
This column provides the status of each data load activity thatOpsCenter requests.
Collection Status
This column lists the last exception message if data collection failedfor a data type.
Last ExceptionMessage
NetBackup data types and collection statusOpsCenter collects data for many NetBackup data types (such as ApplianceHardware, jobs, policy, media server, service, storage unit etc.) by using NBSL.
For most operations and changes in NetBackup, NBSL sends notifications toOpsCenter. For changes such as job, policy, services, and devices, the notificationalso contains the changed data. This data is stored in the OpsCenter database.
The following are the collection status for the different data types and theirdescription:
285Understanding data collectionAbout configuring data collection for NetBackup
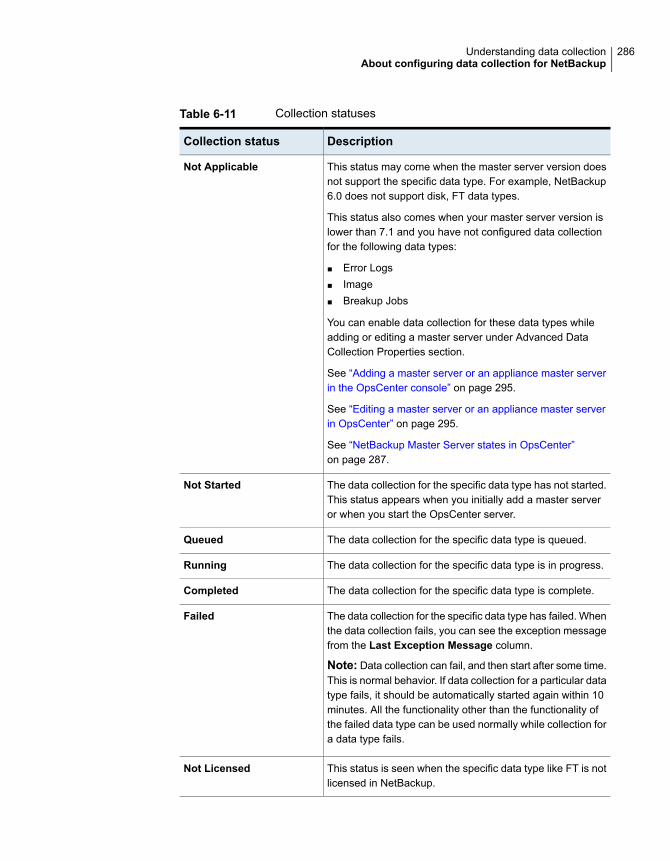
Table 6-11 Collection statuses
DescriptionCollection status
This status may come when the master server version doesnot support the specific data type. For example, NetBackup6.0 does not support disk, FT data types.
This status also comes when your master server version islower than 7.1 and you have not configured data collectionfor the following data types:
■ Error Logs■ Image■ Breakup Jobs
You can enable data collection for these data types whileadding or editing a master server under Advanced DataCollection Properties section.
See “Adding a master server or an appliance master serverin the OpsCenter console” on page 295.
See “Editing a master server or an appliance master serverin OpsCenter” on page 295.
See “NetBackup Master Server states in OpsCenter”on page 287.
Not Applicable
The data collection for the specific data type has not started.This status appears when you initially add a master serveror when you start the OpsCenter server.
Not Started
The data collection for the specific data type is queued.Queued
The data collection for the specific data type is in progress.Running
The data collection for the specific data type is complete.Completed
The data collection for the specific data type has failed. Whenthe data collection fails, you can see the exception messagefrom the Last Exception Message column.
Note: Data collection can fail, and then start after some time.This is normal behavior. If data collection for a particular datatype fails, it should be automatically started again within 10minutes. All the functionality other than the functionality ofthe failed data type can be used normally while collection fora data type fails.
Failed
This status is seen when the specific data type like FT is notlicensed in NetBackup.
Not Licensed
286Understanding data collectionAbout configuring data collection for NetBackup
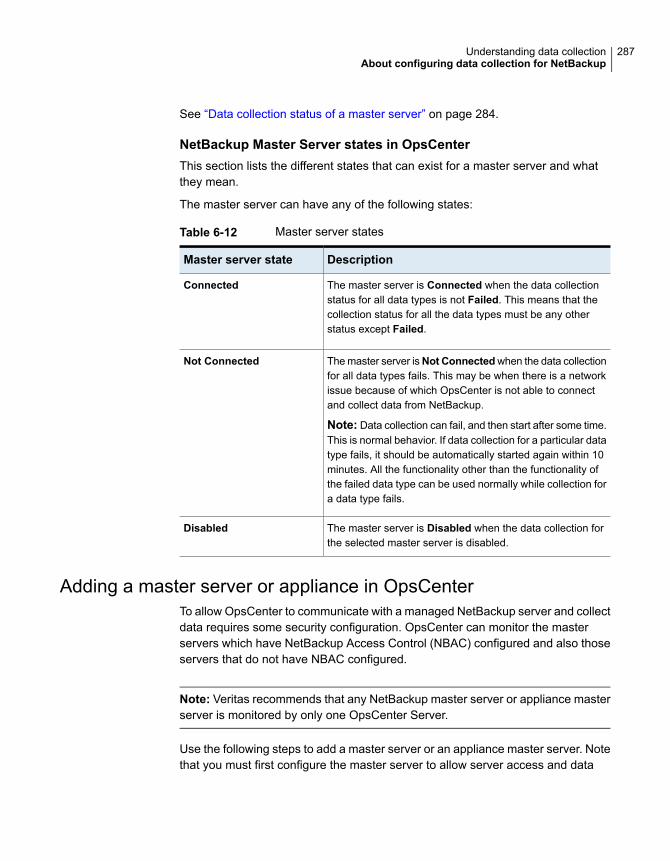
See “Data collection status of a master server” on page 284.
NetBackup Master Server states in OpsCenterThis section lists the different states that can exist for a master server and whatthey mean.
The master server can have any of the following states:
Table 6-12 Master server states
DescriptionMaster server state
The master server is Connected when the data collectionstatus for all data types is not Failed. This means that thecollection status for all the data types must be any otherstatus except Failed.
Connected
The master server isNot Connectedwhen the data collectionfor all data types fails. This may be when there is a networkissue because of which OpsCenter is not able to connectand collect data from NetBackup.
Note: Data collection can fail, and then start after some time.This is normal behavior. If data collection for a particular datatype fails, it should be automatically started again within 10minutes. All the functionality other than the functionality ofthe failed data type can be used normally while collection fora data type fails.
Not Connected
The master server is Disabled when the data collection forthe selected master server is disabled.
Disabled
Adding a master server or appliance in OpsCenterTo allow OpsCenter to communicate with a managed NetBackup server and collectdata requires some security configuration. OpsCenter can monitor the masterservers which have NetBackup Access Control (NBAC) configured and also thoseservers that do not have NBAC configured.
Note: Veritas recommends that any NetBackup master server or appliance masterserver is monitored by only one OpsCenter Server.
Use the following steps to add a master server or an appliance master server. Notethat you must first configure the master server to allow server access and data
287Understanding data collectionAbout configuring data collection for NetBackup

collection by OpsCenter. After configuring the master server, you must add thisserver to the OpsCenter console so that it can be monitored.
Note: You cannot add an appliance media server to the OpsCenter console. Tomonitor an appliance media server, you can add a master appliance or a regularmaster server to which it is connected.
To add a master server or an appliance master server
1 Configure your managed master server or appliance master server to allowserver access and data collection by OpsCenter.
See “Configuring a master server or appliance master server for server accessand data collection by OpsCenter” on page 291.
2 After configuring the master server or appliance master server, you mustadd the master server or appliance to the OpsCenter consoleso that it can be monitored.
See “Adding a master server or an appliance master server in the OpsCenterconsole” on page 295.
Note: You can use an alternate procedure to add a NetBackup 7.0 or later masterserver to OpsCenter. This procedure can be used for both NBAC and non-NBACservers.
See “Adding a NetBackup 7.0 or later master server” on page 288.
Adding a NetBackup 7.0 or later master serverUse the following procedure to add a NetBackup master server or a NetBackupAppliance master server to the OpsCenter console. This procedure can be usedfor both NBAC and non-NBAC servers.
In case of a clustered NetBackup setup, use this procedure for each node of thecluster.
288Understanding data collectionAbout configuring data collection for NetBackup

To add a NetBackup 7.0 or later master server or appliance master server tothe OpsCenter console on Windows and UNIX
1 Log on to the managed master server or NetBackup 52xx Appliance 2.0 masterserver as Administrator or root for Windows and UNIX respectively.
2 Browse to the following NetBackup installation directory:
INSTALL_PATH/bin/admincmdWindows
INSTALL_PATH/bin/admincmdUNIX
3 Run the following command on the master server or the appliance masterserver:
nbregopsc -add <Name of the OpsCenter Server>
As a part of usability enhancements, a command that is called nbregopsc hasbeen added to NetBackup 7.0 and later versions. In addition, a new entry thatis called OPS_CENTER_SERVER_NAME has been added to the bp.conf file. Thenbregopsc command registers OpsCenter with the current master server andadds this master server to OpsCenter. This command also establishes a trustrelationship from the authentication broker of NetBackup master server to theauthentication broker of OpsCenter server.
289Understanding data collectionAbout configuring data collection for NetBackup

4 Ignore this step for master servers for which NBAC is not configured.
In case of OpsCenter, this step is optional even for NBAC-enabled masterserver.
However if it is an earlier OpsCenter version and the master server isNBAC-enabled, a trust relationship must be established from the authenticationbroker of the OpsCenter server to the authentication broker (AB) of theNetBackup master server. OpsCenter cannot monitor NetBackup servers ifthe trust relationship has not been set up between OpsCenter and NetBackupserver.
To establish the trust relationship, log on as Administrator or root on theOpsCenter server host and navigate to the following OpsCenter installationdirectory:
INSTALL_PATH\server\authbroker\binWindows
INSTALL_PATH/SYMC/Opscenter/Server/authbroker/binUNIX
On the OpsCenter server host, run the following command depending on yourspecific master server version:
vssat setuptrust --broker<MasterServerhost:2821> --securitylevel high
7.0 and 7.0.1 masterserver
vssat setuptrust --broker<MasterServerhost:13783> --securitylevel high
7.1 or later masterserver or appliancemaster server
vssat setuptrust --broker<MasterServerhost:2821> --securitylevel high
This is an optional step for OpsCenter 7.6 and later versions.
7.6 or later masterserver or appliancemaster server
Note that <MasterServerhost> is the name of the master server.
290Understanding data collectionAbout configuring data collection for NetBackup
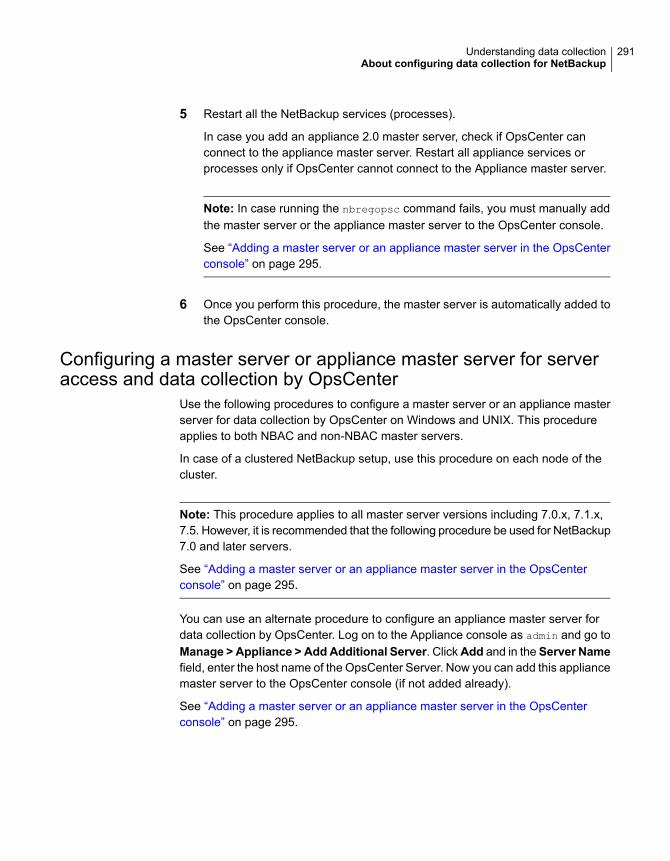
5 Restart all the NetBackup services (processes).
In case you add an appliance 2.0 master server, check if OpsCenter canconnect to the appliance master server. Restart all appliance services orprocesses only if OpsCenter cannot connect to the Appliance master server.
Note: In case running the nbregopsc command fails, you must manually addthe master server or the appliance master server to the OpsCenter console.
See “Adding a master server or an appliance master server in the OpsCenterconsole” on page 295.
6 Once you perform this procedure, the master server is automatically added tothe OpsCenter console.
Configuring a master server or appliance master server for serveraccess and data collection by OpsCenter
Use the following procedures to configure a master server or an appliance masterserver for data collection by OpsCenter on Windows and UNIX. This procedureapplies to both NBAC and non-NBAC master servers.
In case of a clustered NetBackup setup, use this procedure on each node of thecluster.
Note: This procedure applies to all master server versions including 7.0.x, 7.1.x,7.5. However, it is recommended that the following procedure be used for NetBackup7.0 and later servers.
See “Adding a master server or an appliance master server in the OpsCenterconsole” on page 295.
You can use an alternate procedure to configure an appliance master server fordata collection by OpsCenter. Log on to the Appliance console as admin and go toManage > Appliance > Add Additional Server. ClickAdd and in the Server Namefield, enter the host name of the OpsCenter Server. Now you can add this appliancemaster server to the OpsCenter console (if not added already).
See “Adding a master server or an appliance master server in the OpsCenterconsole” on page 295.
291Understanding data collectionAbout configuring data collection for NetBackup

To configure a master server or appliance master server for server accessand data collection on Windows and UNIX
1 Log on to the managed master server or the appliance master server asAdministrator or root on Windows and UNIX respectively.
2 Start the NetBackup Administration Console.
3 Expand NetBackup Management > Host Properties > Master Servers.
4 Double-click the master server name to view its properties. TheMaster ServerProperties dialog box appears.
5 For a NetBackup server, select the Servers tab and then the OpsCenterservers tab from the Master Server Properties dialog box. The OpsCenterservers tab displays all of the OpsCenter servers that can access the currentlyselected NetBackup master server.
For NetBackup servers older than 7.6, select the Servers tab from the MasterServer Properties dialog box to display the server list.
6 To add the OpsCenter server to the server list, click Add. The Add a NewServer Entry dialog box appears.
7 Type the OpsCenter server name in the field and click Add to add the serverto the list.
Ensure that the OpsCenter server name that you add is reachable from theNetBackup server.
8 Click Close.
9 In the Master Server Properties dialog box, click OK.
292Understanding data collectionAbout configuring data collection for NetBackup
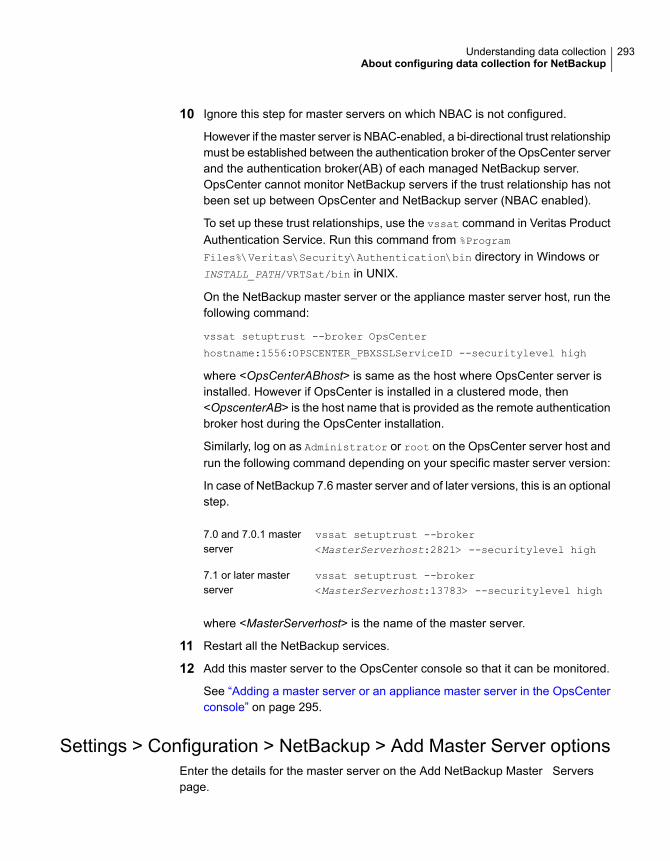
10 Ignore this step for master servers on which NBAC is not configured.
However if the master server is NBAC-enabled, a bi-directional trust relationshipmust be established between the authentication broker of the OpsCenter serverand the authentication broker(AB) of each managed NetBackup server.OpsCenter cannot monitor NetBackup servers if the trust relationship has notbeen set up between OpsCenter and NetBackup server (NBAC enabled).
To set up these trust relationships, use the vssat command in Veritas ProductAuthentication Service. Run this command from %Program
Files%\Veritas\Security\Authentication\bin directory in Windows orINSTALL_PATH/VRTSat/bin in UNIX.
On the NetBackup master server or the appliance master server host, run thefollowing command:
vssat setuptrust --broker OpsCenter
hostname:1556:OPSCENTER_PBXSSLServiceID --securitylevel high
where <OpsCenterABhost> is same as the host where OpsCenter server isinstalled. However if OpsCenter is installed in a clustered mode, then<OpscenterAB> is the host name that is provided as the remote authenticationbroker host during the OpsCenter installation.
Similarly, log on as Administrator or root on the OpsCenter server host andrun the following command depending on your specific master server version:
In case of NetBackup 7.6 master server and of later versions, this is an optionalstep.
vssat setuptrust --broker<MasterServerhost:2821> --securitylevel high
7.0 and 7.0.1 masterserver
vssat setuptrust --broker<MasterServerhost:13783> --securitylevel high
7.1 or later masterserver
where <MasterServerhost> is the name of the master server.
11 Restart all the NetBackup services.
12 Add this master server to the OpsCenter console so that it can be monitored.
See “Adding a master server or an appliance master server in the OpsCenterconsole” on page 295.
Settings > Configuration > NetBackup > Add Master Server optionsEnter the details for the master server on the Add NetBackup Master Serverspage.
293Understanding data collectionAbout configuring data collection for NetBackup
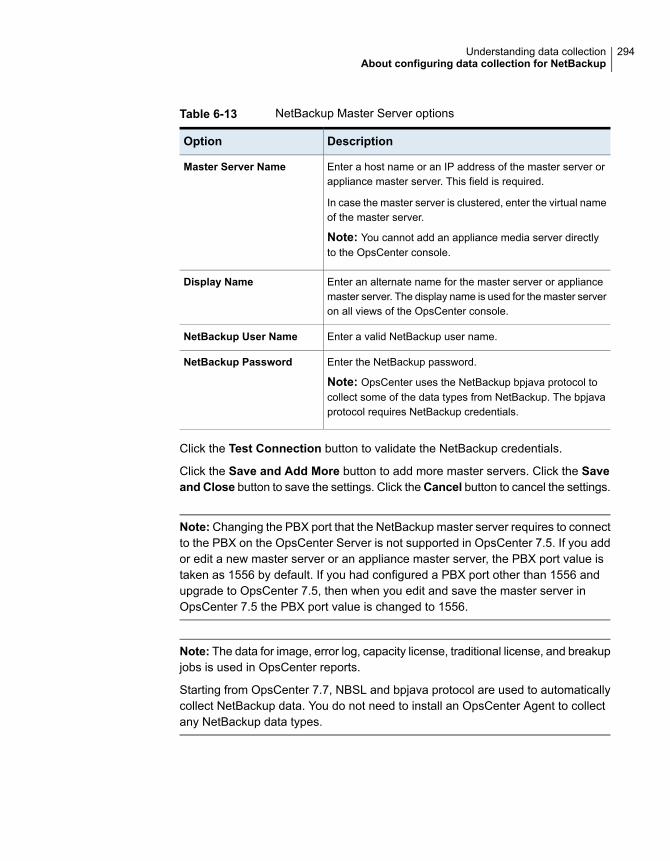
Table 6-13 NetBackup Master Server options
DescriptionOption
Enter a host name or an IP address of the master server orappliance master server. This field is required.
In case the master server is clustered, enter the virtual nameof the master server.
Note: You cannot add an appliance media server directlyto the OpsCenter console.
Master Server Name
Enter an alternate name for the master server or appliancemaster server. The display name is used for the master serveron all views of the OpsCenter console.
Display Name
Enter a valid NetBackup user name.NetBackup User Name
Enter the NetBackup password.
Note: OpsCenter uses the NetBackup bpjava protocol tocollect some of the data types from NetBackup. The bpjavaprotocol requires NetBackup credentials.
NetBackup Password
Click the Test Connection button to validate the NetBackup credentials.
Click the Save and Add More button to add more master servers. Click the Saveand Close button to save the settings. Click theCancel button to cancel the settings.
Note:Changing the PBX port that the NetBackup master server requires to connectto the PBX on the OpsCenter Server is not supported in OpsCenter 7.5. If you addor edit a new master server or an appliance master server, the PBX port value istaken as 1556 by default. If you had configured a PBX port other than 1556 andupgrade to OpsCenter 7.5, then when you edit and save the master server inOpsCenter 7.5 the PBX port value is changed to 1556.
Note: The data for image, error log, capacity license, traditional license, and breakupjobs is used in OpsCenter reports.
Starting from OpsCenter 7.7, NBSL and bpjava protocol are used to automaticallycollect NetBackup data. You do not need to install an OpsCenter Agent to collectany NetBackup data types.
294Understanding data collectionAbout configuring data collection for NetBackup

Adding a master server or an appliance master server in theOpsCenter console
You must add a master server or an appliance master server to the OpsCenterconsole so that it can be monitored. Use the following procedure to add a masterserver or an appliance master server.
To add a master server or an appliance master server
1 In the OpsCenter console, select Settings > Configurations > NetBackup .
2 Click Add.
3 Enter the required details for the master server.
See “Settings > Configuration > NetBackup > Add Master Server options”on page 293.
4 Click the Test Connection button to validate the information that you entered.This would validate the credentials for the master server.
5 Click Save and Add more to save the master server and to add more masterservers.
6 Click Save and Close to save the master server.
Alternately, you can click Cancel to exit.
7 In case you add an appliance 2.0 master server, restart all appliance servicesor processes only if OpsCenter cannot connect to the Appliance master server.See the Appliance documentation for details on how to restart services.
Editing a master server or an appliance master server in OpsCenterUse the following procedure to change the configuration information for a NetBackupmaster server or an appliance master server.
To edit a master server or an appliance master server
1 In the OpsCenter console, select Settings > Configurations > NetBackup.
2 Use the checkbox to select a master server or an appliance master server fromthe Master Server Name column.
3 Click Edit.
295Understanding data collectionAbout configuring data collection for NetBackup

4 Edit the information that is displayed on the Edit Master Server page.
A description of the fields present in these sections is available.
See “Adding a master server or an appliance master server in the OpsCenterconsole” on page 295.
Note that you cannot edit the Master Server Name for the master server. TheMaster Server Name field falls under the NetBackup Master Server Detailssection.
5 Click Save.
Deleting a master server or an appliance master server in OpsCenterYou can delete one or more master servers or appliance master servers using thefollowing procedure. Note that deleting a master server deletes all the data that isassociated with the master server.
Note: Deleting a master server may take some time.
To delete a master server
1 In the OpsCenter console, select Settings > Configurations > NetBackup .
2 Use the checkbox to select one or more master servers from theMaster ServerName column.
3 Click Delete.
4 The following warning message appears:
Deletion of the selected master server(s)
will delete all related data. Do you want to proceed?
Click OK.
Controlling data collection for a master server in OpsCenterYou can disable or enable OpsCenter data collection for a particular managedNetBackup master server or an appliance master server depending on your needs.
Note: If you disable data collection it may appear to be a loss of data in OpsCenter.For example, a drive may have the same status until you enable OpsCenter datacollection again.
296Understanding data collectionAbout configuring data collection for NetBackup

To disable data collection for a master server
1 In the OpsCenter console, select Settings > Configurations > NetBackup.
2 Use the checkbox to select one or more master servers from theMaster ServerName column.
3 Click Disable Data Collection.
To enable data collection for a master server
1 In the OpsCenter console, select Settings > Configurations > NetBackup .
2 Use the checkbox to select one or more master servers from theMaster ServerName column.
3 Click Enable Data Collection.
Configuring Backup Exec data collectorThis section describes data collection from Backup Exec.
Caution: The Backup Exec data collector requires the following component to beinstalled on the OpsCenter Agent host, to collect data properly.
Microsoft Visual C++ 2005 SP1 Redistributable Package (x86) that isvcredist_x86.exe
VC Redistributable Package is available at:
http://www.microsoft.com/downloads/details.aspx?familyid=200B2FD9-AE1A-4A14-984D-389C36F85647&displaylang=en
Once you install this component on the Agent host, configure the Backup Exec datacollector as described in the following section.
To configure Backup Exec data collector
1 Click Settings > Configuration > Agent.
2 On the Agent list, select a check box in front of the Agent, for which you wantto configure a Data Collector.
3 Click Create Data Collector.
4 On theCreate Data Collector: Product Selection page, select Veritas BackupExec from the Select Product drop-down list.
5 In the Target Host Name text box, enter the Backup Exec server host name,from which you want to collect data.
6 Click Next.
297Understanding data collectionConfiguring Backup Exec data collector
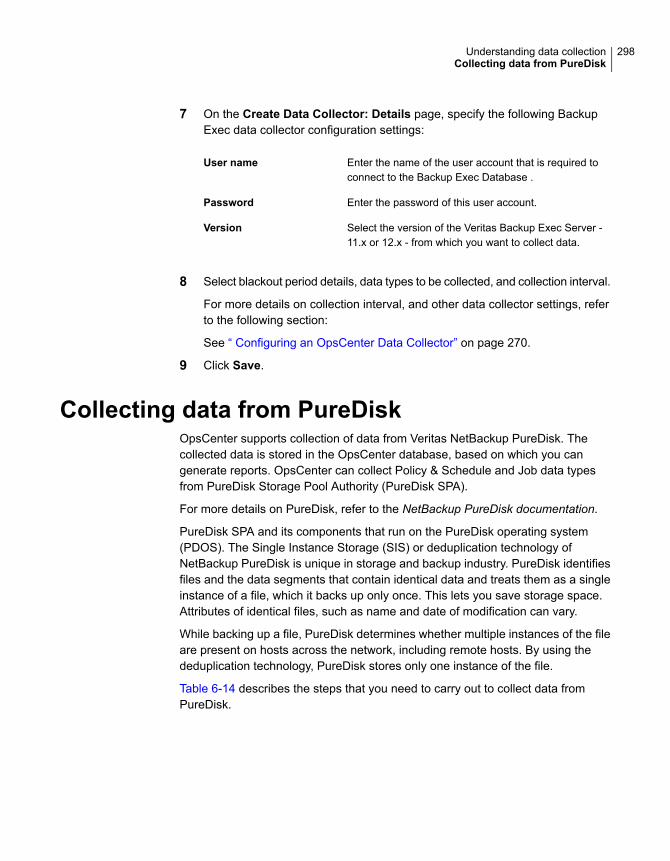
7 On the Create Data Collector: Details page, specify the following BackupExec data collector configuration settings:
Enter the name of the user account that is required toconnect to the Backup Exec Database .
User name
Enter the password of this user account.Password
Select the version of the Veritas Backup Exec Server -11.x or 12.x - from which you want to collect data.
Version
8 Select blackout period details, data types to be collected, and collection interval.
For more details on collection interval, and other data collector settings, referto the following section:
See “ Configuring an OpsCenter Data Collector” on page 270.
9 Click Save.
Collecting data from PureDiskOpsCenter supports collection of data from Veritas NetBackup PureDisk. Thecollected data is stored in the OpsCenter database, based on which you cangenerate reports. OpsCenter can collect Policy & Schedule and Job data typesfrom PureDisk Storage Pool Authority (PureDisk SPA).
For more details on PureDisk, refer to the NetBackup PureDisk documentation.
PureDisk SPA and its components that run on the PureDisk operating system(PDOS). The Single Instance Storage (SIS) or deduplication technology ofNetBackup PureDisk is unique in storage and backup industry. PureDisk identifiesfiles and the data segments that contain identical data and treats them as a singleinstance of a file, which it backs up only once. This lets you save storage space.Attributes of identical files, such as name and date of modification can vary.
While backing up a file, PureDisk determines whether multiple instances of the fileare present on hosts across the network, including remote hosts. By using thededuplication technology, PureDisk stores only one instance of the file.
Table 6-14 describes the steps that you need to carry out to collect data fromPureDisk.
298Understanding data collectionCollecting data from PureDisk
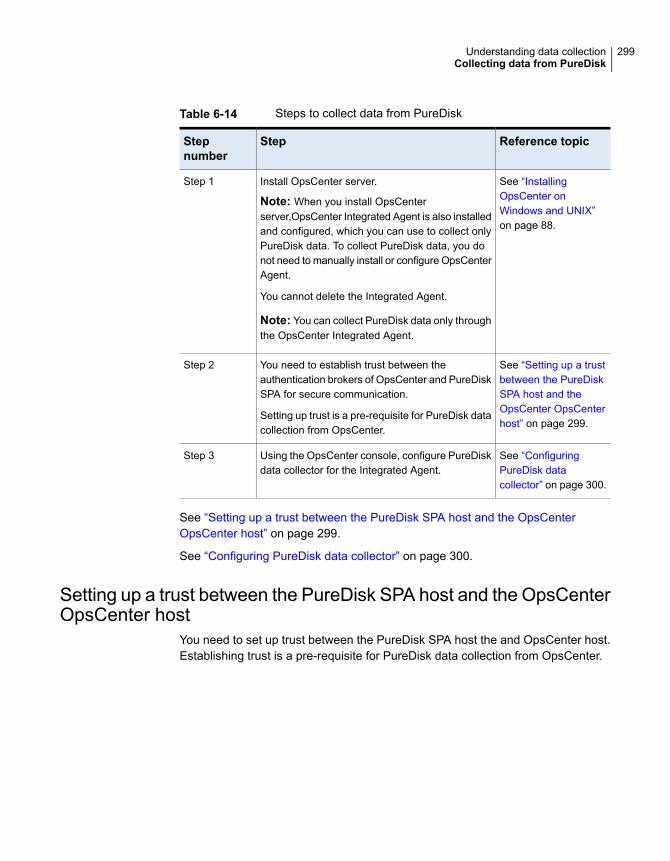
Table 6-14 Steps to collect data from PureDisk
Reference topicStepStepnumber
See “InstallingOpsCenter onWindows and UNIX”on page 88.
Install OpsCenter server.
Note: When you install OpsCenterserver,OpsCenter Integrated Agent is also installedand configured, which you can use to collect onlyPureDisk data. To collect PureDisk data, you donot need to manually install or configure OpsCenterAgent.
You cannot delete the Integrated Agent.
Note: You can collect PureDisk data only throughthe OpsCenter Integrated Agent.
Step 1
See “Setting up a trustbetween the PureDiskSPA host and theOpsCenter OpsCenterhost” on page 299.
You need to establish trust between theauthentication brokers of OpsCenter and PureDiskSPA for secure communication.
Setting up trust is a pre-requisite for PureDisk datacollection from OpsCenter.
Step 2
See “ConfiguringPureDisk datacollector” on page 300.
Using the OpsCenter console, configure PureDiskdata collector for the Integrated Agent.
Step 3
See “Setting up a trust between the PureDisk SPA host and the OpsCenterOpsCenter host” on page 299.
See “Configuring PureDisk data collector” on page 300.
Setting up a trust between the PureDisk SPA host and the OpsCenterOpsCenter host
You need to set up trust between the PureDisk SPA host the and OpsCenter host.Establishing trust is a pre-requisite for PureDisk data collection from OpsCenter.
299Understanding data collectionCollecting data from PureDisk

Note:OpsCenter host is the host where the OpsCenter server is installed. However,if OpsCenter is installed in a clustered mode, then the OpsCenter host is the hostname that was provided as the remote authentication broker host during theOpsCenter installation.
The OpsCenter host name is stored in the vxss.hostname parameter in the followingfile:
On Windows: INSTALL_PATH\server\config\security.conf
On UNIX: INSTALL_PATH/SYMCOpsCenterServer/config/security.conf
This section provides the manual steps that you need to carry out on the PureDiskSPA host, to setup trust between the PureDisk SPA host and the OpsCenterauthentication broker host.
To set up a trust between PureDisk SPA host and OpsCenter host
1 On the PureDisk SPA host, logon as root and run the following command:
su www-data
2 As a “www-data” user, run the following command:
INSTALL_PATH/VRTSat/bin/vssat setuptrust --broker
OpsCenterhost:3652 --securitylevel low
After successfully setting up a trust between the PureDisk SPA host and theOpsCenter host, the following message is displayed:
setuptrust
----------------------
----------------------
Setup Trust With Broker: OpsCenterhost
After setting up the trust between OpsCenter Server host and PureDisk SPA host,logon to the OpsCenter GUI and configure PureDisk data collector to start collectingPureDisk data.
See “Configuring PureDisk data collector” on page 300.
Configuring PureDisk data collectorThis section provides the procedure to configure NetBackup PureDisk data collectoron the OpsCenter GUI.
300Understanding data collectionCollecting data from PureDisk
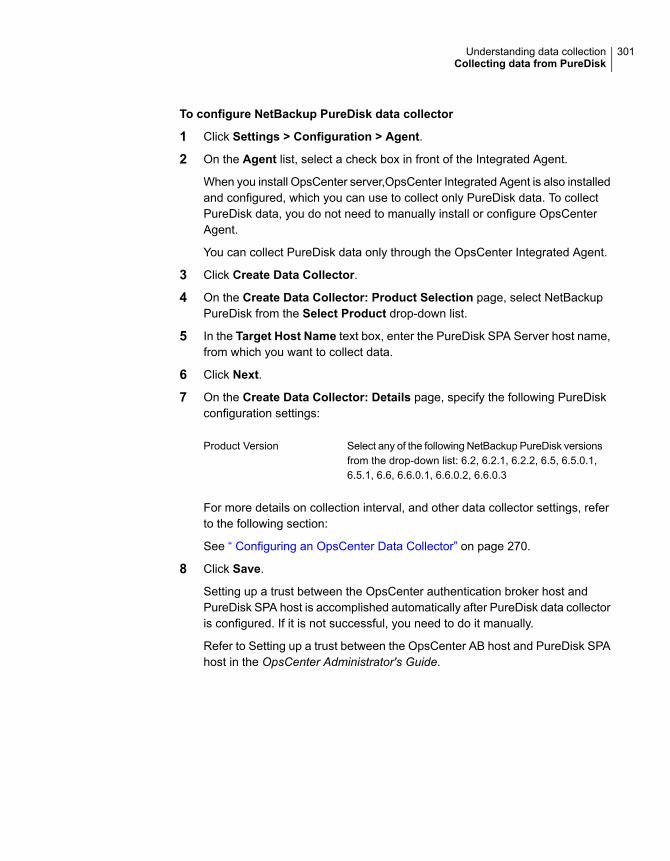
To configure NetBackup PureDisk data collector
1 Click Settings > Configuration > Agent.
2 On the Agent list, select a check box in front of the Integrated Agent.
When you install OpsCenter server,OpsCenter Integrated Agent is also installedand configured, which you can use to collect only PureDisk data. To collectPureDisk data, you do not need to manually install or configure OpsCenterAgent.
You can collect PureDisk data only through the OpsCenter Integrated Agent.
3 Click Create Data Collector.
4 On the Create Data Collector: Product Selection page, select NetBackupPureDisk from the Select Product drop-down list.
5 In the Target Host Name text box, enter the PureDisk SPA Server host name,from which you want to collect data.
6 Click Next.
7 On the Create Data Collector: Details page, specify the following PureDiskconfiguration settings:
Select any of the following NetBackup PureDisk versionsfrom the drop-down list: 6.2, 6.2.1, 6.2.2, 6.5, 6.5.0.1,6.5.1, 6.6, 6.6.0.1, 6.6.0.2, 6.6.0.3
Product Version
For more details on collection interval, and other data collector settings, referto the following section:
See “ Configuring an OpsCenter Data Collector” on page 270.
8 Click Save.
Setting up a trust between the OpsCenter authentication broker host andPureDisk SPA host is accomplished automatically after PureDisk data collectoris configured. If it is not successful, you need to do it manually.
Refer to Setting up a trust between the OpsCenter AB host and PureDisk SPAhost in the OpsCenter Administrator's Guide.
301Understanding data collectionCollecting data from PureDisk
Managing OpsCenterviews
This chapter includes the following topics:
■ About OpsCenter views
■ About managing OpsCenter views
■ About managing nodes and objects in OpsCenter
■ Adding nodes to a view in OpsCenter
■ Modifying node details in OpsCenter
■ Deleting nodes in OpsCenter
■ Adding objects to a view node in OpsCenter
■ Deleting objects from a view node in OpsCenter
■ View filters in OpsCenter
About OpsCenter viewsVeritas NetBackup OpsCenter views are logical groups of IT assets (master serversor clients) organized in a hierarchical manner. A Security Administrator or anAdministrator can create views either from OpsCenter console or the OpsCenterView Builder (formerly called Java View Builder) and make them available in theOpsCenter console.
Figure 7-1 shows the details that are displayed on the Views tab in the OpsCenterconsole.
7Chapter
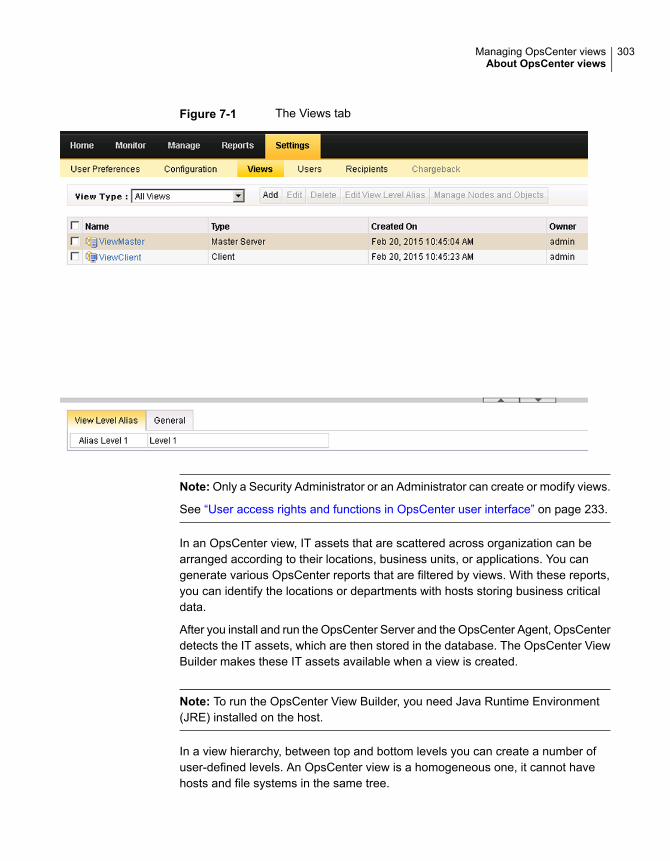
Figure 7-1 The Views tab
Note: Only a Security Administrator or an Administrator can create or modify views.
See “User access rights and functions in OpsCenter user interface” on page 233.
In an OpsCenter view, IT assets that are scattered across organization can bearranged according to their locations, business units, or applications. You cangenerate various OpsCenter reports that are filtered by views. With these reports,you can identify the locations or departments with hosts storing business criticaldata.
After you install and run the OpsCenter Server and the OpsCenter Agent, OpsCenterdetects the IT assets, which are then stored in the database. The OpsCenter ViewBuilder makes these IT assets available when a view is created.
Note: To run the OpsCenter View Builder, you need Java Runtime Environment(JRE) installed on the host.
In a view hierarchy, between top and bottom levels you can create a number ofuser-defined levels. An OpsCenter view is a homogeneous one, it cannot havehosts and file systems in the same tree.
303Managing OpsCenter viewsAbout OpsCenter views

Settings > Views optionsOpsCenter displays all view types that are supported by OpsCenter View Builder(like File System) on the Settings > Views pane. However, you cannot performoperations like add, edit, delete, manage nodes and objects from the OpsCenterGUI on view types like File System. Use the OpsCenter View Builder to add, edit,delete, or manage these view types.
You can manage only the Master Server, Client, and Policy view types using theOpsCenter GUI.
A description of the Views tab options follows in the table.
Table 7-1 Views tab options
DescriptionOption
Select the type of view from the drop-down list. The optionsare All Views, Client, Master Server, and Policy.
See “OpsCenter view types” on page 305.
View Type
Select to add new views, or to edit and delete the availableviews. These options are available only when you log on asa Security Administrator or an Administrator.
In addition, you can add, edit, or delete only the MasterServer, Client, and Policy view types using the OpsCenterGUI. You can only delete the File System view type. However,you cannot add a new or edit an existing File System viewin OpsCenter GUI
Add/Edit/Delete
Select to edit the view level aliases. This option is availableonly when you log on as a Security Administrator or anAdministrator.
This option is available only for Master Server, Client, andPolicy view types. The Edit View Level Alias option isdisabled if you select any other view type like File System.
Edit View Level Alias
Select to view the objects on the node and objects that arenot in the selected view. This option is available only whenyou log on as a Security Administrator or an Administrator.
This option is available only for Master Server, Client, andPolicy view types. The Manage Nodes and Objects optionis disabled if you select any other view type like File System.
Manage Nodes andObjects
Displays the names of the views that you can access.Name
304Managing OpsCenter viewsAbout OpsCenter views
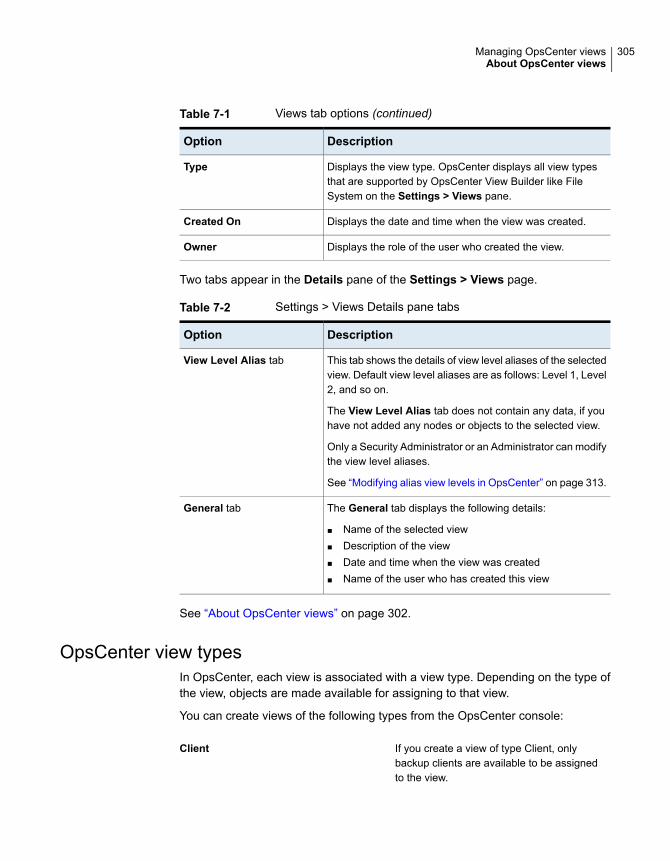
Table 7-1 Views tab options (continued)
DescriptionOption
Displays the view type. OpsCenter displays all view typesthat are supported by OpsCenter View Builder like FileSystem on the Settings > Views pane.
Type
Displays the date and time when the view was created.Created On
Displays the role of the user who created the view.Owner
Two tabs appear in the Details pane of the Settings > Views page.
Table 7-2 Settings > Views Details pane tabs
DescriptionOption
This tab shows the details of view level aliases of the selectedview. Default view level aliases are as follows: Level 1, Level2, and so on.
The View Level Alias tab does not contain any data, if youhave not added any nodes or objects to the selected view.
Only a Security Administrator or an Administrator can modifythe view level aliases.
See “Modifying alias view levels in OpsCenter” on page 313.
View Level Alias tab
The General tab displays the following details:
■ Name of the selected view■ Description of the view■ Date and time when the view was created■ Name of the user who has created this view
General tab
See “About OpsCenter views” on page 302.
OpsCenter view typesIn OpsCenter, each view is associated with a view type. Depending on the type ofthe view, objects are made available for assigning to that view.
You can create views of the following types from the OpsCenter console:
If you create a view of type Client, onlybackup clients are available to be assignedto the view.
Client
305Managing OpsCenter viewsAbout OpsCenter views

If you create a view of type Master Server,only Master Servers are available to beassigned to the view.
Master server
If you create a view of type Policy, onlypolicies are available to be assigned to theview.
Policy
Note: Use the OpsCenter View Builder to create any other view types.
OpsCenter user interface access for specific view typesYou may not see data in some tabs or subtabs when you have selected specificviews. This is because data for those tabs is not applicable for the specific viewtypes. For example, a Client view should display data that is relevant to Clientobjects only and not show any unrelated data like media or services.
In such a scenario, you see the following error message:
Data is not applicable for the view that you have selected. Click UI
access for specific view types for details about the applicable view
types.
Table 7-3 lists if data in specific tabs or subtabs is applicable when you select aview of a specific view type like Master Server, Policy, or Client.
Table 7-3 Tab access for specific view types
Client viewPolicy viewMaster Serverview
SubtabTab
Monitor
YesYesYesOverview
YesYesYesJobs
NoNoYesServices
YesYesYesPolicies
NoNoYesMedia
NoNoYesDevices (allsubtabs)
NoNoYesHosts > MasterServer
306Managing OpsCenter viewsAbout OpsCenter views

Table 7-3 Tab access for specific view types (continued)
Client viewPolicy viewMaster Serverview
SubtabTab
NoNoYesHosts > MediaServer
YesNoYesHosts > Client
YesYesYesAlerts
NoNoYesAudit Trails
NoNoYesCloud
NoNoYesApplianceHardware
Manage
YesYesYesAlert Policies
NoNoYesStorage >Storage Unit
NoNoYesStorage >Storage UnitGroup
NoNoYesStorage >Storage LifecyclePolicy
NoNoYesDevices (allsubtabs)
NoNoYesHosts
Note: Manage > Restore and Manage > NetBackup Licensing tabs are notdependent on any view selection. The content in these tabs is shown for all views.
About access rights for a viewWhile creating an OpsCenter view, a Security Administrator can specify the accessrights for that view.
307Managing OpsCenter viewsAbout OpsCenter views

Note: An Administrator can specify the access rights for a view from the OpsCenterView Builder.
See “Creating OpsCenter views” on page 311.
Table 7-4 lists the default access levels for specific OpsCenter or OpsCenter ViewBuilder roles.
Table 7-4 Default access levels
ALL MASTERSERVER View
PermittedView
OpsCenter RoleJVB Role
RRWSecurity Administratoradmin
RRWAdministrator
PPReporterUser
PPRestore Operator
PPOperator
In this table, RW stands for Read and Write permission, R stands for Readpermission, and P stands for Needs Permission. The Analyst user role is no longeravailable.
An Operator, Reporter, or Restore Operator cannot create or modify views. Theyalso need permission to access a view.
The concept of public or private views that existed earlier has been removed inOpsCenter 7.5. An Operator or Reporter now only has Read access for all priorpublic views. An Analyst is upgraded to OpsCenter 7.5 as a Reporter.
The following table describe the permissions available to a user for a public orprivate view after he or she upgrades.
Table 7-5 Permissions available after upgrade
Private ViewPublic ViewRole
After UpgradeExistingAfterUpgrade
Existing
RWRWRWRWSecurity Administrator
RWRWRWRWAdministrator
308Managing OpsCenter viewsAbout OpsCenter views

Table 7-5 Permissions available after upgrade (continued)
Private ViewPublic ViewRole
RRWRRWOperator
RRWRRWReporter
About OpsCenter view levelsA newly created view has only one level. You can add multiple nodes to a view atdifferent levels. You can add alias for each of these view levels.
Only a Security Administrator or an Administrator can modify views.
See “Modifying alias view levels in OpsCenter” on page 313.
Master server hosts, clients, or policies are always at the lowest levels in a view.Between the top level and the bottom level, you can create multiple intermediatelevels to organize view objects into logical groups, creating a hierarchical structurein the view.
About nodes and objectsAn OpsCenter view comprises nodes and view objects. A node is a logical entitythat you add to create a hierarchical structure of a view. Between the first level (theview name itself) and the last level (actual view object), you can add multiple nodes.
Figure 7-2 shows an example of a view comprising multiple nodes and objects.
Figure 7-2 View nodes and objects
About managing OpsCenter viewsThe following topics provide procedures to add, edit, or delete OpsCenter views.
See “Looking at OpsCenter views and their details” on page 310.
309Managing OpsCenter viewsAbout managing OpsCenter views
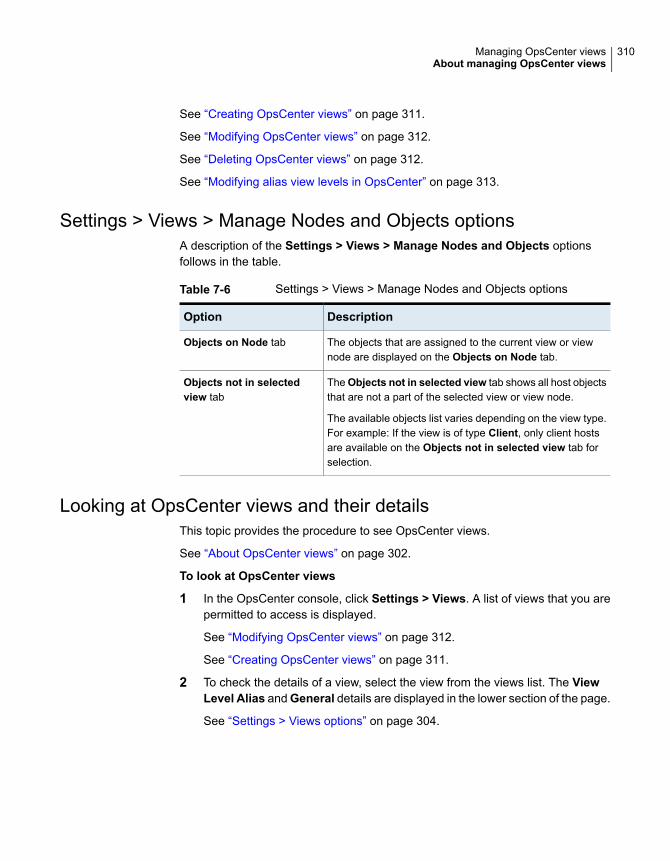
See “Creating OpsCenter views” on page 311.
See “Modifying OpsCenter views” on page 312.
See “Deleting OpsCenter views” on page 312.
See “Modifying alias view levels in OpsCenter” on page 313.
Settings > Views > Manage Nodes and Objects optionsA description of the Settings > Views > Manage Nodes and Objects optionsfollows in the table.
Table 7-6 Settings > Views > Manage Nodes and Objects options
DescriptionOption
The objects that are assigned to the current view or viewnode are displayed on the Objects on Node tab.
Objects on Node tab
TheObjects not in selected view tab shows all host objectsthat are not a part of the selected view or view node.
The available objects list varies depending on the view type.For example: If the view is of type Client, only client hostsare available on the Objects not in selected view tab forselection.
Objects not in selectedview tab
Looking at OpsCenter views and their detailsThis topic provides the procedure to see OpsCenter views.
See “About OpsCenter views” on page 302.
To look at OpsCenter views
1 In the OpsCenter console, click Settings > Views. A list of views that you arepermitted to access is displayed.
See “Modifying OpsCenter views” on page 312.
See “Creating OpsCenter views” on page 311.
2 To check the details of a view, select the view from the views list. The ViewLevel Alias andGeneral details are displayed in the lower section of the page.
See “Settings > Views options” on page 304.
310Managing OpsCenter viewsAbout managing OpsCenter views
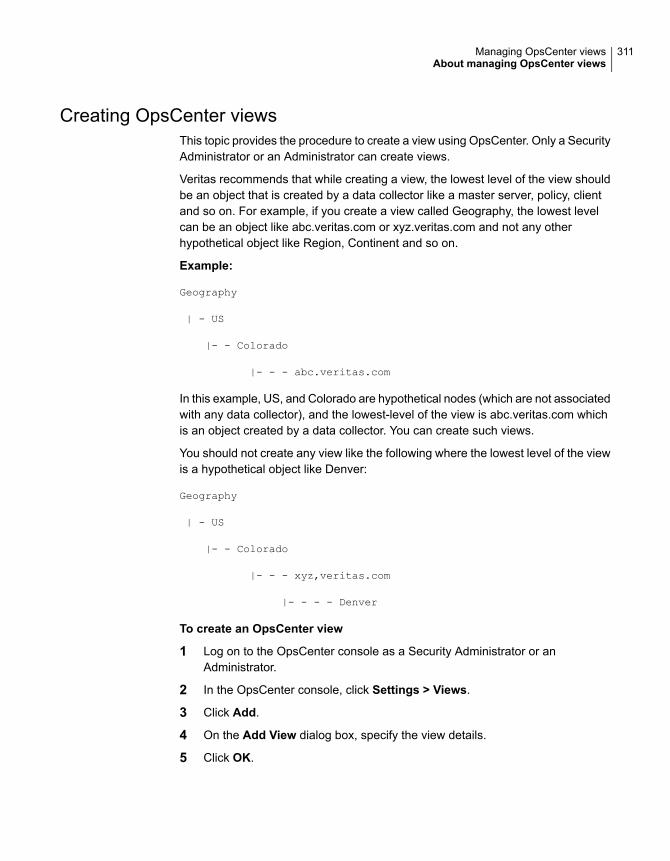
Creating OpsCenter viewsThis topic provides the procedure to create a view using OpsCenter. Only a SecurityAdministrator or an Administrator can create views.
Veritas recommends that while creating a view, the lowest level of the view shouldbe an object that is created by a data collector like a master server, policy, clientand so on. For example, if you create a view called Geography, the lowest levelcan be an object like abc.veritas.com or xyz.veritas.com and not any otherhypothetical object like Region, Continent and so on.
Example:
Geography
| - US
|- - Colorado
|- - - abc.veritas.com
In this example, US, and Colorado are hypothetical nodes (which are not associatedwith any data collector), and the lowest-level of the view is abc.veritas.com whichis an object created by a data collector. You can create such views.
You should not create any view like the following where the lowest level of the viewis a hypothetical object like Denver:
Geography
| - US
|- - Colorado
|- - - xyz,veritas.com
|- - - - Denver
To create an OpsCenter view
1 Log on to the OpsCenter console as a Security Administrator or anAdministrator.
2 In the OpsCenter console, click Settings > Views.
3 Click Add.
4 On the Add View dialog box, specify the view details.
5 Click OK.
311Managing OpsCenter viewsAbout managing OpsCenter views
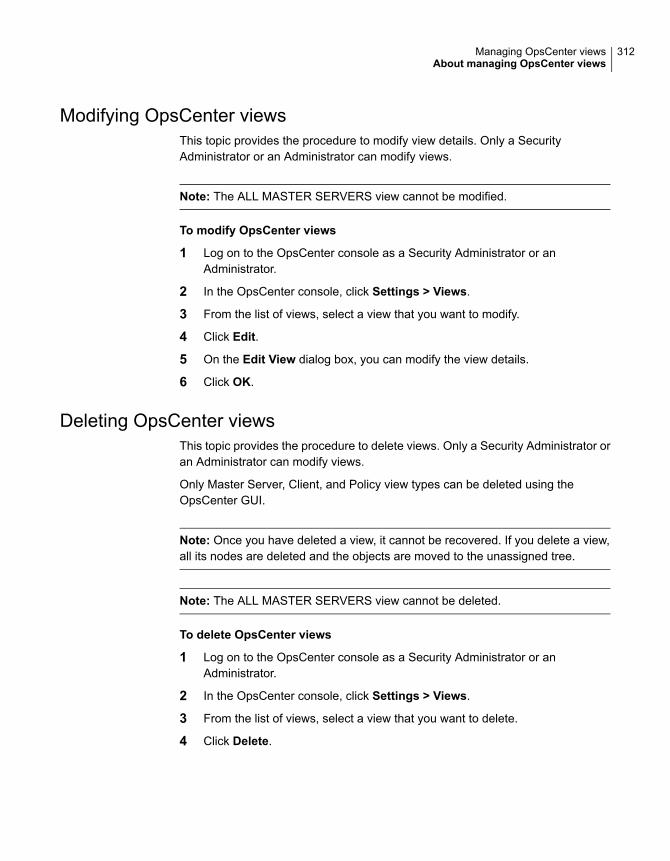
Modifying OpsCenter viewsThis topic provides the procedure to modify view details. Only a SecurityAdministrator or an Administrator can modify views.
Note: The ALL MASTER SERVERS view cannot be modified.
To modify OpsCenter views
1 Log on to the OpsCenter console as a Security Administrator or anAdministrator.
2 In the OpsCenter console, click Settings > Views.
3 From the list of views, select a view that you want to modify.
4 Click Edit.
5 On the Edit View dialog box, you can modify the view details.
6 Click OK.
Deleting OpsCenter viewsThis topic provides the procedure to delete views. Only a Security Administrator oran Administrator can modify views.
Only Master Server, Client, and Policy view types can be deleted using theOpsCenter GUI.
Note: Once you have deleted a view, it cannot be recovered. If you delete a view,all its nodes are deleted and the objects are moved to the unassigned tree.
Note: The ALL MASTER SERVERS view cannot be deleted.
To delete OpsCenter views
1 Log on to the OpsCenter console as a Security Administrator or anAdministrator.
2 In the OpsCenter console, click Settings > Views.
3 From the list of views, select a view that you want to delete.
4 Click Delete.
312Managing OpsCenter viewsAbout managing OpsCenter views

Modifying alias view levels in OpsCenterThis topic provides the procedure to modify alias of view levels. Only a SecurityAdministrator or an Administrator can modify views.
Only Master Server, Client, and Policy view types can be modified using theOpsCenter GUI.
See “Adding nodes to a view in OpsCenter” on page 314.
See “About managing nodes and objects in OpsCenter” on page 313.
To modify alias view levels in OpsCenter
1 Log on to the OpsCenter console as a Security Administrator or anAdministrator.
2 In the OpsCenter console, click Settings > Views.
3 From the list of views, select a view for which you want to modify view levelalias.
4 Click Edit Alias View Levels.
5 On the Alias View Levels dialog box, text boxes for entering aliases for allavailable view levels appear. For example, if the selected view has only onelevel, the Alias View Levels dialog box appears as follows:
6 Rename the available levels. For example, if the selected view has three levels,you can rename the levels as follows: rename Alias Level 1 as Geography,Alias Level 2 as Country, and Alias Level 3 as Region.
7 Click OK.
Aboutmanaging nodes and objects in OpsCenterThe following topics provide procedures to create, modify, and delete nodes andobjects related to a view.
Only Master Server, Client, and Policy view types can be managed using theOpsCenter GUI.
313Managing OpsCenter viewsAbout managing nodes and objects in OpsCenter
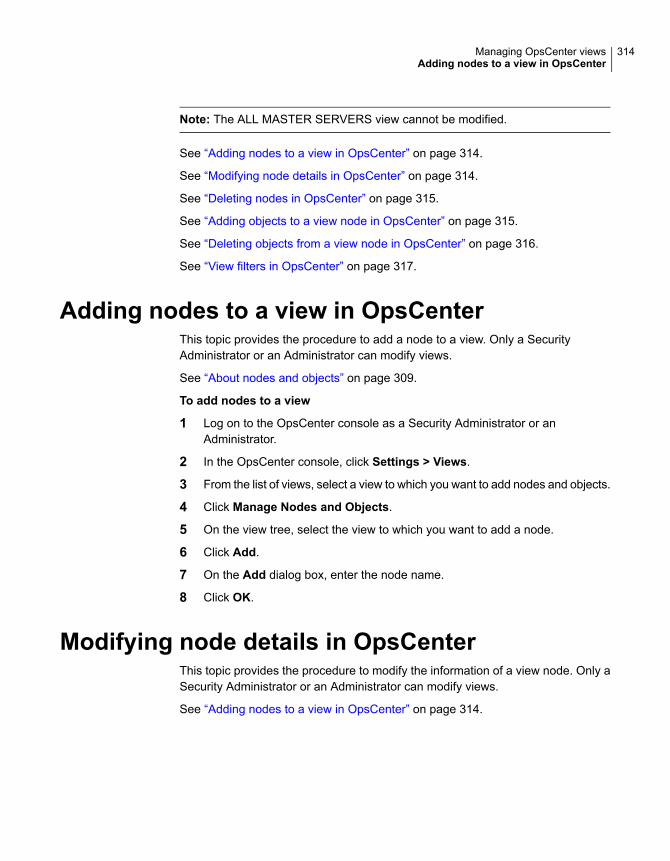
Note: The ALL MASTER SERVERS view cannot be modified.
See “Adding nodes to a view in OpsCenter” on page 314.
See “Modifying node details in OpsCenter” on page 314.
See “Deleting nodes in OpsCenter” on page 315.
See “Adding objects to a view node in OpsCenter” on page 315.
See “Deleting objects from a view node in OpsCenter” on page 316.
See “View filters in OpsCenter” on page 317.
Adding nodes to a view in OpsCenterThis topic provides the procedure to add a node to a view. Only a SecurityAdministrator or an Administrator can modify views.
See “About nodes and objects” on page 309.
To add nodes to a view
1 Log on to the OpsCenter console as a Security Administrator or anAdministrator.
2 In the OpsCenter console, click Settings > Views.
3 From the list of views, select a view to which you want to add nodes and objects.
4 Click Manage Nodes and Objects.
5 On the view tree, select the view to which you want to add a node.
6 Click Add.
7 On the Add dialog box, enter the node name.
8 Click OK.
Modifying node details in OpsCenterThis topic provides the procedure to modify the information of a view node. Only aSecurity Administrator or an Administrator can modify views.
See “Adding nodes to a view in OpsCenter” on page 314.
314Managing OpsCenter viewsAdding nodes to a view in OpsCenter
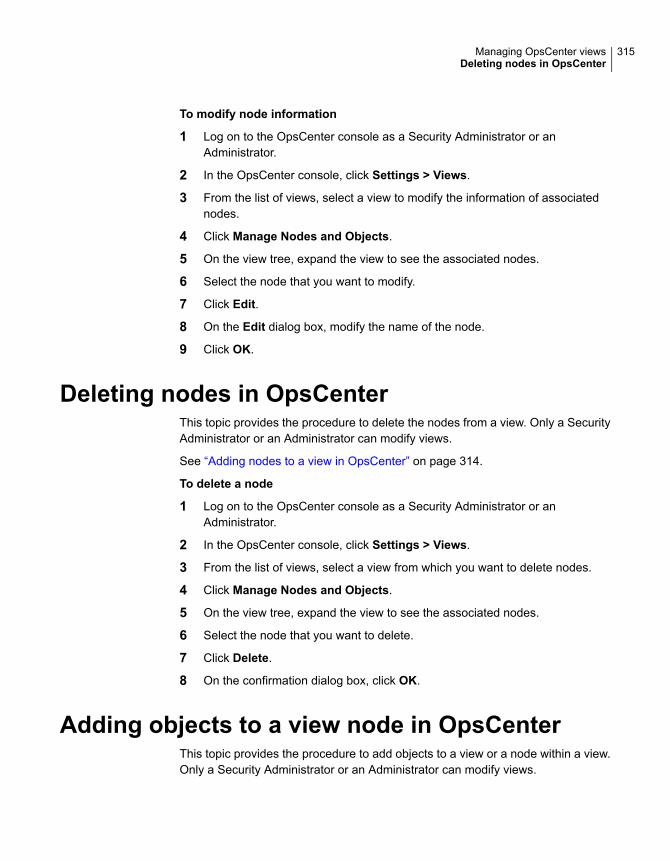
To modify node information
1 Log on to the OpsCenter console as a Security Administrator or anAdministrator.
2 In the OpsCenter console, click Settings > Views.
3 From the list of views, select a view to modify the information of associatednodes.
4 Click Manage Nodes and Objects.
5 On the view tree, expand the view to see the associated nodes.
6 Select the node that you want to modify.
7 Click Edit.
8 On the Edit dialog box, modify the name of the node.
9 Click OK.
Deleting nodes in OpsCenterThis topic provides the procedure to delete the nodes from a view. Only a SecurityAdministrator or an Administrator can modify views.
See “Adding nodes to a view in OpsCenter” on page 314.
To delete a node
1 Log on to the OpsCenter console as a Security Administrator or anAdministrator.
2 In the OpsCenter console, click Settings > Views.
3 From the list of views, select a view from which you want to delete nodes.
4 Click Manage Nodes and Objects.
5 On the view tree, expand the view to see the associated nodes.
6 Select the node that you want to delete.
7 Click Delete.
8 On the confirmation dialog box, click OK.
Adding objects to a view node in OpsCenterThis topic provides the procedure to add objects to a view or a node within a view.Only a Security Administrator or an Administrator can modify views.
315Managing OpsCenter viewsDeleting nodes in OpsCenter

To add an object to a view node
1 Log on to the OpsCenter console as a Security Administrator or anAdministrator.
2 In the OpsCenter console, click Settings > Views.
3 From the list of views, select the view to which you want to add objects.
4 Click Manage Nodes and Objects.
5 On the view tree, select the view name or a view node to which you want toadd an object.
6 In the right-hand pane, select the Objects not in selected view tab. Theavailable objects list varies depending on the view type.
For example: If the view is of type Client, only client hosts are available on theObjects not in selected view tab for selection.
The Objects not in selected view tab shows all host objects that are not apart of the selected view or view node.
You can filter the objects that are not in the selected view with the help ofdefault filters. Or you can create new filters and apply them to view the requiredobjects on the tab.
See “View filters in OpsCenter” on page 317.
7 Select the check boxes in front of the view objects that you want to add to theselected view or view node.
8 Click Add to Node.
The added view objects are removed from the Objects not in selected viewtab and appear on the Objects on Node tab.
Deleting objects from a view node in OpsCenterThis topic provides the procedure to delete the objects from a view or a view node.Only a Security Administrator or an Administrator can modify views.
To delete an object from a view node
1 Log on to the OpsCenter console as a Security Administrator or anAdministrator.
2 In the OpsCenter console, click Settings > Views.
3 From the list of views, select the view from which you want to delete objects.
4 Click Manage Nodes and Objects.
316Managing OpsCenter viewsDeleting objects from a view node in OpsCenter
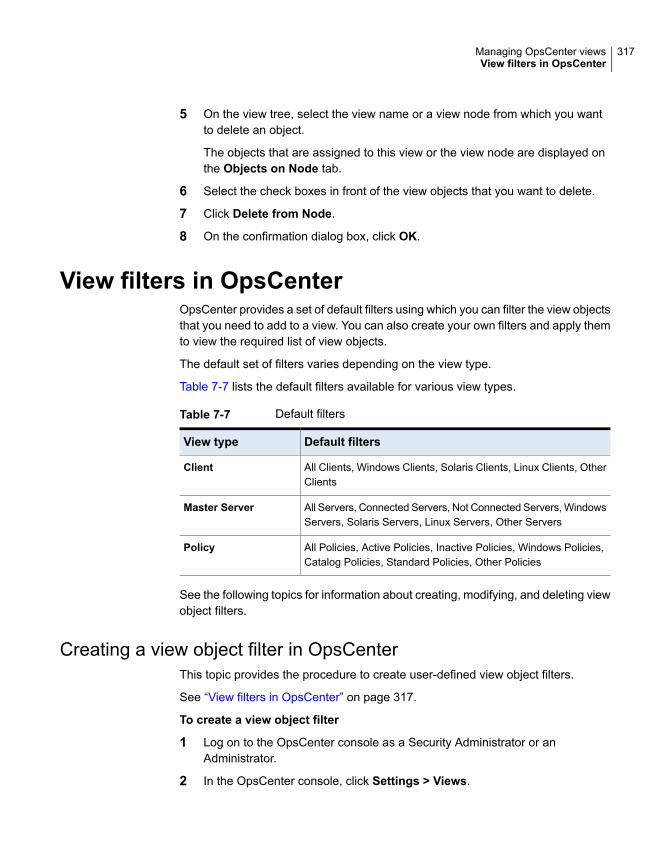
5 On the view tree, select the view name or a view node from which you wantto delete an object.
The objects that are assigned to this view or the view node are displayed onthe Objects on Node tab.
6 Select the check boxes in front of the view objects that you want to delete.
7 Click Delete from Node.
8 On the confirmation dialog box, click OK.
View filters in OpsCenterOpsCenter provides a set of default filters using which you can filter the view objectsthat you need to add to a view. You can also create your own filters and apply themto view the required list of view objects.
The default set of filters varies depending on the view type.
Table 7-7 lists the default filters available for various view types.
Table 7-7 Default filters
Default filtersView type
All Clients, Windows Clients, Solaris Clients, Linux Clients, OtherClients
Client
All Servers, Connected Servers, Not Connected Servers, WindowsServers, Solaris Servers, Linux Servers, Other Servers
Master Server
All Policies, Active Policies, Inactive Policies, Windows Policies,Catalog Policies, Standard Policies, Other Policies
Policy
See the following topics for information about creating, modifying, and deleting viewobject filters.
Creating a view object filter in OpsCenterThis topic provides the procedure to create user-defined view object filters.
See “View filters in OpsCenter” on page 317.
To create a view object filter
1 Log on to the OpsCenter console as a Security Administrator or anAdministrator.
2 In the OpsCenter console, click Settings > Views.
317Managing OpsCenter viewsView filters in OpsCenter
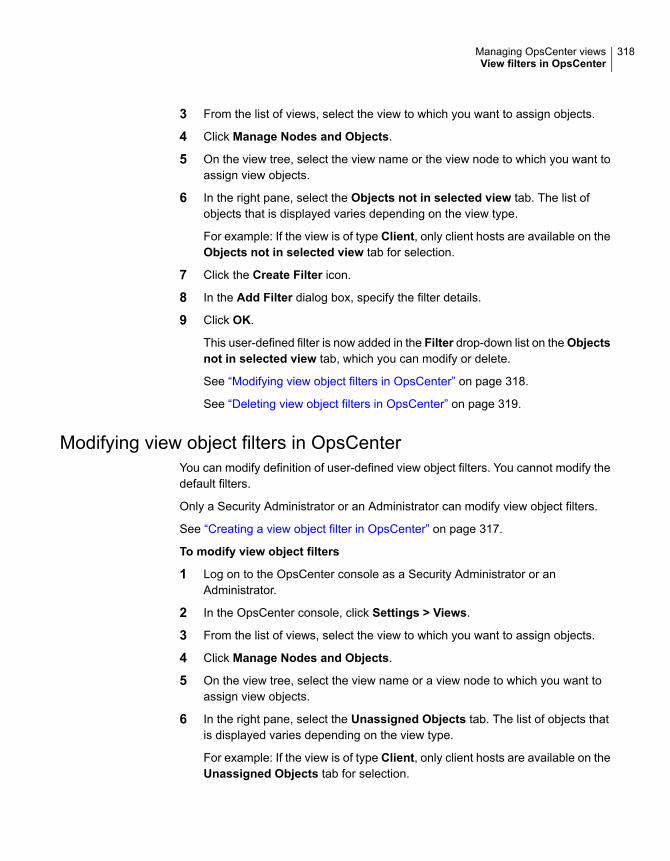
3 From the list of views, select the view to which you want to assign objects.
4 Click Manage Nodes and Objects.
5 On the view tree, select the view name or the view node to which you want toassign view objects.
6 In the right pane, select the Objects not in selected view tab. The list ofobjects that is displayed varies depending on the view type.
For example: If the view is of type Client, only client hosts are available on theObjects not in selected view tab for selection.
7 Click the Create Filter icon.
8 In the Add Filter dialog box, specify the filter details.
9 Click OK.
This user-defined filter is now added in the Filter drop-down list on the Objectsnot in selected view tab, which you can modify or delete.
See “Modifying view object filters in OpsCenter” on page 318.
See “Deleting view object filters in OpsCenter” on page 319.
Modifying view object filters in OpsCenterYou can modify definition of user-defined view object filters. You cannot modify thedefault filters.
Only a Security Administrator or an Administrator can modify view object filters.
See “Creating a view object filter in OpsCenter” on page 317.
To modify view object filters
1 Log on to the OpsCenter console as a Security Administrator or anAdministrator.
2 In the OpsCenter console, click Settings > Views.
3 From the list of views, select the view to which you want to assign objects.
4 Click Manage Nodes and Objects.
5 On the view tree, select the view name or a view node to which you want toassign view objects.
6 In the right pane, select the Unassigned Objects tab. The list of objects thatis displayed varies depending on the view type.
For example: If the view is of type Client, only client hosts are available on theUnassigned Objects tab for selection.
318Managing OpsCenter viewsView filters in OpsCenter

7 From the Filter drop-down list, select the user-defined filter that you want tomodify.
8 Select the Edit Filter icon.
If you have selected a default filter, the Edit Filter icon is disabled.
9 On the dialog box, modify name or definition of the filter.
10 Click OK.
Deleting view object filters in OpsCenterYou can delete user-defined view object filters. You cannot delete the default filters.
Only a Security Administrator or an Administrator can delete user-defined viewobject filters.
See “Creating a view object filter in OpsCenter” on page 317.
To delete view object filters
1 Log on to the OpsCenter console as a Security Administrator or anAdministrator.
2 In the OpsCenter console, click Settings > Views.
3 From the list of views, select the view to which you want to assign objects.
4 Click Manage Nodes and Objects.
5 On the view tree, select the view name or a view node to which you want toassign view objects.
6 In the right pane, select the Unassigned Objects tab. The list of objects thatis displayed varies depending on the view type.
7 From the Filter drop-down list, select the user-defined filter that you want todelete.
If you have selected a default filter, the Delete Filter icon is disabled.
319Managing OpsCenter viewsView filters in OpsCenter

Monitoring NetBackupusing OpsCenter
This chapter includes the following topics:
■ About the Monitor views
■ Controlling the scope of Monitor views
■ About monitoring NetBackup using the Overview tab
■ About monitoring NetBackup jobs
■ Monitor > Services view
■ About using the List View to monitor NetBackup media
■ Viewing the details for NetBackup media
■ Viewing the details for a master server associated with the media
■ Filtering on NetBackup media type
■ Controlling media
■ Monitor > Media Summary View options
■ Hierarchical View by Volume Pool for monitoring media
■ Viewing the details for volume pool
■ Viewing the details for media
■ Controlling media
■ Hierarchical View by Volume Group for monitoring media
8Chapter

■ Viewing the details for a volume group
■ Viewing the details for media
■ Controlling media in OpsCenter
■ Monitoring NetBackup devices
■ Monitor > Devices > Drives List View options
■ About using the List View for monitoring drives
■ Viewing the details for a single drive
■ Viewing the details for a master server associated with a drive
■ Filtering on NetBackup drive category
■ Controlling drives
■ Monitor > Devices > Drives Summary View
■ Viewing the Drive Summary by Status
■ Monitor > Devices > Disk Pools options
■ Viewing the details for a single disk pool
■ About monitoring NetBackup hosts
■ Monitor > Hosts > Master Servers view
■ Filtering by NetBackup master server type and status
■ Monitor > Hosts > Media Servers view
■ Viewing the details of a master server that is associated with a media server
■ Monitor > Hosts > Clients view
■ Viewing the details for a single master server
■ About monitoring NetBackup alerts
■ Monitor > Alerts List View
■ About using the List View to monitor NetBackup alerts
■ Viewing the details for a single alert
■ Viewing the details of a single alert for Appliance hardware failure
■ Viewing the details of the alert policy associated with an alert
321Monitoring NetBackup using OpsCenter
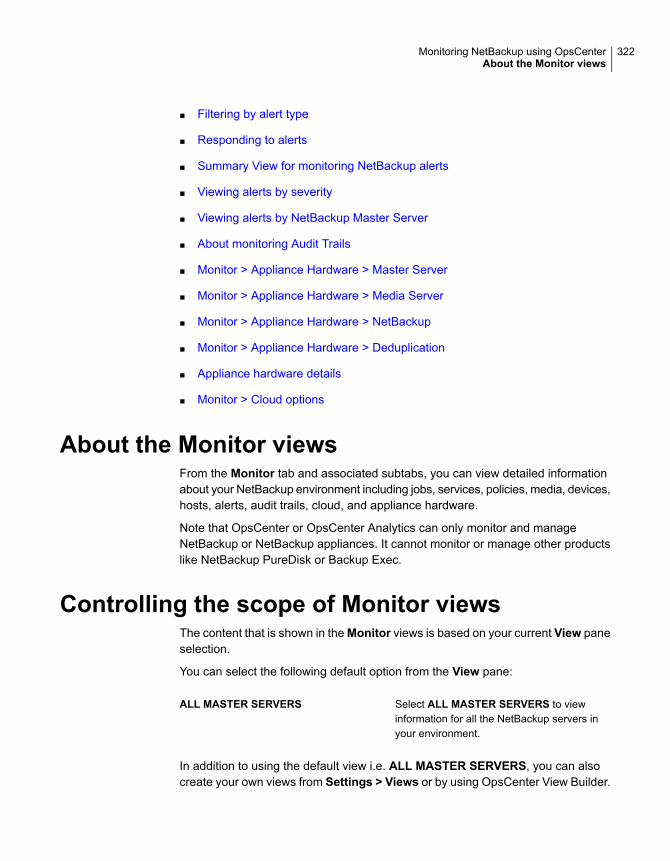
■ Filtering by alert type
■ Responding to alerts
■ Summary View for monitoring NetBackup alerts
■ Viewing alerts by severity
■ Viewing alerts by NetBackup Master Server
■ About monitoring Audit Trails
■ Monitor > Appliance Hardware > Master Server
■ Monitor > Appliance Hardware > Media Server
■ Monitor > Appliance Hardware > NetBackup
■ Monitor > Appliance Hardware > Deduplication
■ Appliance hardware details
■ Monitor > Cloud options
About the Monitor viewsFrom the Monitor tab and associated subtabs, you can view detailed informationabout your NetBackup environment including jobs, services, policies, media, devices,hosts, alerts, audit trails, cloud, and appliance hardware.
Note that OpsCenter or OpsCenter Analytics can only monitor and manageNetBackup or NetBackup appliances. It cannot monitor or manage other productslike NetBackup PureDisk or Backup Exec.
Controlling the scope of Monitor viewsThe content that is shown in the Monitor views is based on your current View paneselection.
You can select the following default option from the View pane:
Select ALL MASTER SERVERS to viewinformation for all the NetBackup servers inyour environment.
ALL MASTER SERVERS
In addition to using the default view i.e. ALL MASTER SERVERS, you can alsocreate your own views from Settings > Views or by using OpsCenter View Builder.
322Monitoring NetBackup using OpsCenterAbout the Monitor views
For example, you can create a view like Geography to view details about masterservers in a particular region like Europe.
More information about how to create views by using the Settings > Views controlis available.
See “About OpsCenter views” on page 302.
See the online OpsCenter View Builder Help to know how you can create viewsusing OpsCenter View Builder.
Use the following procedure to view details of all master servers or specific masterservers.
To view details of all master servers
◆ In the OpsCenter console, selectALLMASTERSERVERS from the drop-downlist in the View pane.
To view details of specific master servers
1 In the OpsCenter console, selectALLMASTERSERVERS from the drop-downlist in the View pane.
2 Deselect the checkbox next toALLMASTERSERVERS and select the specificmaster servers from the list of master servers. Ensure that other master serversare unchecked.
3 Click Apply Selection.
See “About time frame selection” on page 323.
About time frame selectionYou can also view data for the last 24, 48, or 72 hours for some of the Monitorviews. You can also configure an absolute or relative timeframe for specific Monitorviews.
Click Last 24 Hours, Last 48 Hours, or Last 72 Hours to view data for the last24, 48, or 72 hours respectively. These options are located on the top-right cornerof specific Monitor views. Note that by default, data for the last 24 hours is shownin these views.
You can control time frame selection for the following Monitor views:
■ Monitor >Overview (Job Summary by State, Job Summary by Exit Status, Top7 Policies by Failed Jobs, Top 7 Job Error Log Summary, and Alert Summaryby Severity sections)
323Monitoring NetBackup using OpsCenterControlling the scope of Monitor views

Note: You cannot control timeframes for Media Summary by Status, DriveSummary by Status, Services Summary, and Master Server Summary sections.These sections show all the data from the OpsCenter database.
■ Monitor > Jobs
■ Monitor > Alerts
■ Monitor > Policies (Summary View)
In addition, you can also customize the time frame selection by clicking Customizeand specifying an absolute time frame or relative time frame. Using the Customizeoption, you can view data for any time frame. Note that the Customize option islocated on the top-right corner of specific Monitor views.
You can configure an absolute or relative timeframe for the followingMonitor views:
■ Monitor > Jobs (List View, Summary View, and Hierarchical View)
■ Monitor > Alerts (List View and Summary View)
You can also configure a customize timeframe for: Monitor > Audit Trails
See “Controlling the scope of Monitor views” on page 322.
About monitoring NetBackup using the Overviewtab
This view is displayed when you select Monitor > Overview (default view). Thisview gives an overview of your NetBackup environment. This view contains thedifferent sections which display specific information about your NetBackupenvironment.
From this view, you can use links to drill down and access detailed informationabout many aspects of your NetBackup environment. Pie charts for most monitoringcategories appear. The pie segments are also links to more details for the monitoringcategory.
The following sections describe the Overview subtab in detail:
■ See “Viewing the Job Summary by State ” on page 325.
■ See “Viewing the Media Summary by Status ” on page 325.
■ See “About Top 7 Job Error Log Summary” on page 326.
■ See “Viewing the Services Summary” on page 327.
■ See “Viewing the Master Server Summary” on page 327.
324Monitoring NetBackup using OpsCenterAbout monitoring NetBackup using the Overview tab

■ See “Viewing the Job Summary by Job Status” on page 328.
■ See “Viewing the Drive Summary by Status” on page 329.
■ See “Top 7 Policies by Failed Jobs” on page 330.
■ See “Viewing the Alert Summary by Severity” on page 330.
Viewing the Job Summary by StateThe Job Summary by State section shows an overall distribution of jobs by jobstate for the current selection in the View pane and time frame selection.
This information is shown in a pie chart as well as a table. Data for the last 24 hoursis shown by default. You can also view data for the last 48 hours or 72 hours.
See “Controlling the scope of Monitor views” on page 322.
A pie chart with different colors represents the job distribution. Each color of thepie chart represents how jobs are distributed in your environment as per the jobstate in the selected time frame. You can also view the color code summary in thissection to know the colors that represent different job states. Pointing on the piechart gives the number and percentage of jobs in a particular job state in yourNetBackup environment. For example, pointing on the yellow color in the pie chartshows that in the last 24 hours, 22 jobs, or 42% jobs in your environment are in aqueued state.
You can drill down from this section to see details for failed, incomplete, queued,active jobs etc.
To view the Job Summary by job state
1 In the OpsCenter console, select Monitor > Overview.
2 In the Job Summary by State section, do either of the following:
■ Click the number of jobs (link) for a particular job state from the table. Forexample, click the number that is shown for Done jobs.Or
■ Click a colored section of the pie chart that corresponds to a particular jobstate. For example, click the yellow section of the pie chart to view detailsfor Queued jobs.
Viewing the Media Summary by StatusThe Media Summary by Status section shows an overall distribution of media bymedia status for the current selection in the View pane. This information is shownin a pie chart as well as a table.
325Monitoring NetBackup using OpsCenterAbout monitoring NetBackup using the Overview tab
Note: The timeframe selection does not affect this section. All the data from theOpsCenter database is displayed in this section irrespective of the timeframe thatyou select.
A pie chart with different colors represents media distribution in this section. Eachcolor of the pie chart represents how media are distributed in your environment asper the media status. You can also view the color code summary in this section toknow the colors that represent different media status. Moving your pointer over thepie chart triggers the appearance of the number and percentage of media with aparticular media status in your NetBackup environment. For example, pointing onthe red color in the pie chart shows that four media or 2% media in your environmentare frozen.
You can drill down from this section to see details for media with different statuslike details for frozen and active media.
To view media by media status
1 In the OpsCenter console, select Monitor > Overview.
2 In the Media Summary by Status section, do either of the following:
■ Click the number of media (link) for a particular media status from the table.For example, click the number for Frozen media.Or
■ Click a colored section of the pie chart that corresponds to a particularmedia status. For example, click the red section of the pie chart to viewdetails for Frozen media.
About Top 7 Job Error Log SummaryThe Top 7 Job Error Log Summary section lists seven exit status codesresponsible for maximum failed jobs in your environment. The content that is shownin this section is based on the current View pane selection. Data for the last 24hours is shown by default. You can also view data for the last 48 hours or 72 hours.
See “Controlling the scope of Monitor views” on page 322.
The table that appears in the section lists the top seven exit status codes responsiblefor maximum job failure. The table also lists the number of failed jobs for each exitstatus in the selected time frame. Note that the failed jobs that are shown in theFailed Job Count column are arranged in descending order in the table. By viewingthis section, you can quickly analyze the reasons behind maximum job failures inyour environment.
326Monitoring NetBackup using OpsCenterAbout monitoring NetBackup using the Overview tab
Viewing the Services SummaryThe Services Summary section provides a high-level view that shows the totalnumber of running and stopped NetBackup services for the current View paneselection.
The total number of running and stopped NetBackup services are shown in a table.You can drill down from the links in this table to see details for running or stoppedservices.
Note: The timeframe selection does not affect this section. All the data from theOpsCenter database is displayed in this section irrespective of the timeframe thatyou select.
To view running or stopped services
1 In the OpsCenter console, select Monitor > Overview.
2 In the Service Summary section, click the number that is shown in the ServiceCount column of the table. For example, click the number that is shown forRunning services to view details for the services that are running.
Viewing the Master Server SummaryThe Master Server Summary section provides the specific information about themaster servers based on the current View pane selection.
Note: The timeframe selection does not affect this section. All the data from theOpsCenter database is displayed in this section irrespective of the timeframe thatyou select.
The following information is shown in the Master Server Summary section:
■ Total number of master servers in your environment
■ Number of the master servers that appear as Connected in the OpsCenterconsole
■ Number of the master servers that appear as Not Connected in the OpsCenterconsole
■ Number of the master servers that appear asDisabled in the OpsCenter console
You can drill down from this section to see details for all the master servers in yourenvironment or the master servers that appear as connected, not connected, ordisabled.
327Monitoring NetBackup using OpsCenterAbout monitoring NetBackup using the Overview tab

To view all master servers
1 In the OpsCenter console, select Monitor > Overview.
2 In the Master Server Summary section, click the number that is shown in theTotal column.
To view the master servers that are connected
1 In the OpsCenter console, select Monitor > Overview.
2 In the Master Server Summary section, click the number that is shown in theConnected column.
To view details of the master servers that are not connected
1 In the OpsCenter console, select Monitor > Overview.
2 In the Master Server Summary section, click the number that is shown in theNot Connected column.
To view the master servers that are disabled
1 In the OpsCenter console, select Monitor > Overview.
2 In the Master Server Summary section, click the number that is shown in theDisabled column.
Viewing the Job Summary by Job StatusThe Job Summary by Job Status section shows an overall distribution of jobs byjob status or exit status based on the current View pane and time frame selection.
This information is shown in a pie chart as well as a table. Data for the last 24 hoursis shown by default. You can also view data for the last 48 hours or 72 hours.
See “Controlling the scope of Monitor views” on page 322.
A pie chart with different colors represents the job distribution by exit status in theselected time frame. Each color of the pie chart represents how jobs are distributedin your environment as per the exit status. You can also view the color codesummary in this section to know the colors that represent different exit status. Puttingyour pointer over the pie chart shows the total number and percentage of successful,partially successful, and failed jobs in your NetBackup environment. For example,pointing to the red color in the pie chart shows that in the last 24 hours, 72 jobs, or42% jobs in your environment failed. This information is also listed in a tabularformat. In addition, a table also shows the amount of data that has been backedup for the selected view and time frame.
You can drill down from this section to see details for failed, successful, or partiallysuccessful jobs.
328Monitoring NetBackup using OpsCenterAbout monitoring NetBackup using the Overview tab
To view jobs by job status
1 In the OpsCenter console, select Monitor > Overview.
2 In the Job Summary by Job Status section, do either of the following:
■ Click the number of jobs (link) corresponding to a particular exit status fromthe table.Or
■ Click a colored section of the pie chart that corresponds to a particular exitstatus. For example, click the red section of the pie chart to view details forfailed jobs.
Viewing the Drive Summary by StatusThe Drive Summary by Status section shows an overall distribution of drives bydrive status for the current View pane selection. This information is shown in a piechart as well as a table.
Note: For 7.0.1 and later master servers, the Drive Summary by Status sectiondoes not show the drives that are disabled or unreachable.
Note: The timeframe selection does not affect this section. All the data from theOpsCenter database is displayed in this section irrespective of the timeframe thatyou select.
A pie chart with different colors represents the distribution of drives by drive statusin the selected time frame. Each color of the pie chart represents how drives aredistributed in your environment as per the drive status. You can also view the colorcode summary in this section to know the colors that represent different exit status.Putting your pointer over the pie chart shows the number and percentage of driveswith up or down status in your NetBackup environment. For example, pointing tothe green color in the pie chart shows that 5 drives or 100% drives in yourenvironment are up.
You can drill down from this section to see details of all drives including up, down,or mixed drives.
To view drives by drive status
1 In the OpsCenter console, select Monitor > Overview.
2 In the Drive Summary by Status section, do either of the following:
■ Click the number of drives (link) for a particular drive status from the table.For example, click the number for Up drives
329Monitoring NetBackup using OpsCenterAbout monitoring NetBackup using the Overview tab
Or
■ Click a colored section of the pie chart that corresponds to a particular drivestatus. For example, click the green section of the pie chart to view detailsfor the drives that are up.
Top 7 Policies by Failed JobsFor information about the Top 7 Policies by Failed Jobs section, see the followingtopic.
See “About Top 7 Policies by Failed Jobs” on page 360.
Viewing the Alert Summary by SeverityThe Alert Summary by Severity section shows an overall distribution of alerts byseverity for the current View pane and time frame selection.
This information is shown in a pie chart as well as a table. Data for the last 24 hoursis shown by default. You can also view data for the last 48 hours or 72 hours.
See “Controlling the scope of Monitor views” on page 322.
A pie chart with different colors represents the alert distribution by severity in thissection. Each color of the pie chart represents how alerts are distributed in yourenvironment as per the alert severity. You can also view the color code summaryin this section to know the colors that represent different severity.
Moving your pointer over the pie chart gives the number and percentage of alertswith a particular severity in your NetBackup environment. For example, pointing tothe green color in the pie chart shows that in the last 24 hours, 200 alerts, or 17%alerts in your environment are critical.
You can drill down from this section to see details for alert categories.
To view alerts by severity
1 In the OpsCenter console, select Monitor > Overview.
2 In the Alert Summary by Severity section, do either of the following:
■ Click the number of alerts (link) for a particular alert severity from the table.For example, click the number that is shown for Critical alerts.Or
■ Click a colored section of the pie chart that corresponds to a particular alertseverity. For example, click the red section of the pie chart to view detailsfor Critical alerts.
330Monitoring NetBackup using OpsCenterAbout monitoring NetBackup using the Overview tab
About monitoring NetBackup jobsThe Monitor > Jobs view provides details of NetBackup jobs. You can use thefollowing views to see NetBackup job information:
This view is shown by default when you selectMonitor > Jobs.
This view displays detailed information aboutjobs based on the currentView pane and timeframe selection.
Note: You can only view jobs data for thelast 30 days from the List View.
See “Monitor > Jobs List View options”on page 331.
List View
The Summary View contains the differentsections which show the NetBackup jobdistribution by exit status, job state, and jobtype based on the current View pane andtime frame selection. This information isshown in pie charts and tables.
See “About using the Summary View formonitoring jobs” on page 340.
Summary View
TheHierarchical View shows all parent-childjobs in a hierarchical fashion based on thecurrent View pane and time frame selection.
Note: You can only view jobs data for thelast 30 days from the Hierarchical View.
See “About using the Hierarchical View formonitoring jobs” on page 345.
Hierarchical View
Note: You can select these views from the drop-down list. The drop-down list islocated at the top-right corner of the page.
Monitor > Jobs List View optionsThis view is displayed when you select Monitor > Jobs. The List View is shownby default. This view displays detailed information for jobs for the current ViewPane and time frame selection. Data for the last 24 hours is shown by default. Youcan also view data for the last 48 hours or 72 hours.
331Monitoring NetBackup using OpsCenterAbout monitoring NetBackup jobs
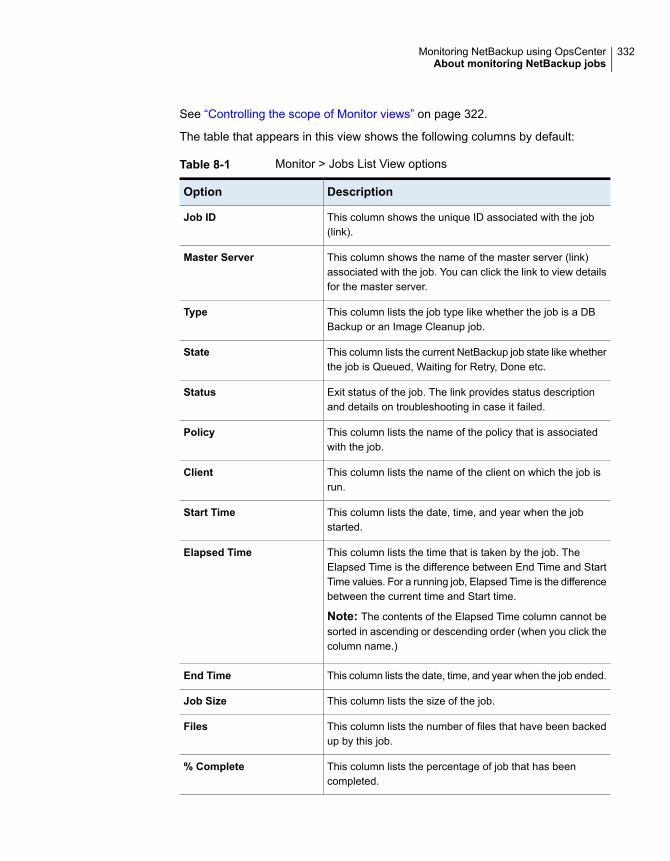
See “Controlling the scope of Monitor views” on page 322.
The table that appears in this view shows the following columns by default:
Table 8-1 Monitor > Jobs List View options
DescriptionOption
This column shows the unique ID associated with the job(link).
Job ID
This column shows the name of the master server (link)associated with the job. You can click the link to view detailsfor the master server.
Master Server
This column lists the job type like whether the job is a DBBackup or an Image Cleanup job.
Type
This column lists the current NetBackup job state like whetherthe job is Queued, Waiting for Retry, Done etc.
State
Exit status of the job. The link provides status descriptionand details on troubleshooting in case it failed.
Status
This column lists the name of the policy that is associatedwith the job.
Policy
This column lists the name of the client on which the job isrun.
Client
This column lists the date, time, and year when the jobstarted.
Start Time
This column lists the time that is taken by the job. TheElapsed Time is the difference between End Time and StartTime values. For a running job, Elapsed Time is the differencebetween the current time and Start time.
Note: The contents of the Elapsed Time column cannot besorted in ascending or descending order (when you click thecolumn name.)
Elapsed Time
This column lists the date, time, and year when the job ended.End Time
This column lists the size of the job.Job Size
This column lists the number of files that have been backedup by this job.
Files
This column lists the percentage of job that has beencompleted.
% Complete
332Monitoring NetBackup using OpsCenterAbout monitoring NetBackup jobs

Not all columns are displayed in the table by default. More columns can be addedto your view by clicking the Table Settings icon. The Table Settings icon is locatedon the top-right corner of the table.
The following columns are not displayed in the table by default:.
■ Schedule
■ Source Media Server
■ Destination Media Server
■ Destination Storage Unit
■ Attempt
■ Operation
■ Data Reduction Savings Job Size
■ PID
■ Owner
■ Parent
■ KB per sec
■ Session ID
■ Data Movement
■ Submittal Type
■ Schedule Type
■ Policy Type
■ Compression
■ Current File
■ Robot
■ Vault
■ Media to Eject
■ Copy
■ Profile
■ Active Start
■ Reconciliation Status
■ Reconciliation Reason
333Monitoring NetBackup using OpsCenterAbout monitoring NetBackup jobs
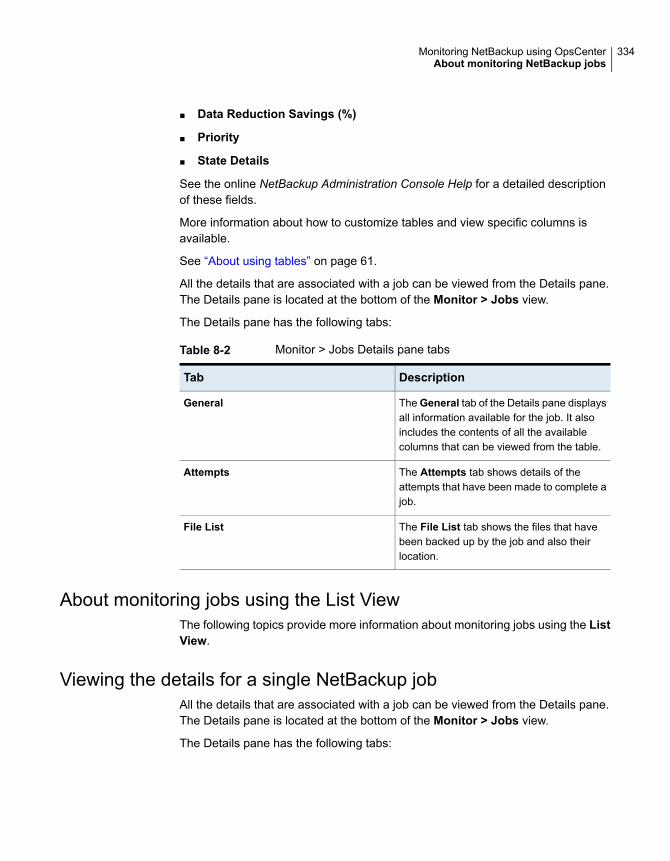
■ Data Reduction Savings (%)
■ Priority
■ State Details
See the online NetBackup Administration Console Help for a detailed descriptionof these fields.
More information about how to customize tables and view specific columns isavailable.
See “About using tables” on page 61.
All the details that are associated with a job can be viewed from the Details pane.The Details pane is located at the bottom of the Monitor > Jobs view.
The Details pane has the following tabs:
Table 8-2 Monitor > Jobs Details pane tabs
DescriptionTab
The General tab of the Details pane displaysall information available for the job. It alsoincludes the contents of all the availablecolumns that can be viewed from the table.
General
The Attempts tab shows details of theattempts that have been made to complete ajob.
Attempts
The File List tab shows the files that havebeen backed up by the job and also theirlocation.
File List
About monitoring jobs using the List ViewThe following topics provide more information about monitoring jobs using the ListView.
Viewing the details for a single NetBackup jobAll the details that are associated with a job can be viewed from the Details pane.The Details pane is located at the bottom of the Monitor > Jobs view.
The Details pane has the following tabs:
334Monitoring NetBackup using OpsCenterAbout monitoring NetBackup jobs
The General tab of the Details pane displaysall information available for the job. It alsoincludes the contents of all the availablecolumns that can be viewed from the table.
General
The Attempts tab shows details of theattempts that have been made to complete ajob.
Attempts
The File List tab shows the files that havebeen backed up by the job and also theirlocation.
File List
To view details for a single NetBackup job
1 In the OpsCenter console, select Monitor > Jobs.
2 The job details can be viewed from either List View or Hierarchical View.Select List View orHierarchical View from the drop-down list. The drop-downlist is located at the top-right corner of the view.
3 Click the ID (link) for a job from the Job ID column of the table.
4 View the job details in the Details pane.
Viewing the details for a master server associated with a jobUse the following procedure to view the details for a master server that is associatedwith a job.
To view details for the master server that is associated with a job
1 In the OpsCenter console, select Monitor > Jobs.
2 These details can be viewed from either List View orHierarchical View. SelectList View or Hierarchical View from the drop-down list. The drop-down list islocated at the top-right corner of the view.
3 Click the server name (link) associated with the job in theMaster Server columnof the table. The Monitor > Hosts page is displayed. The details of the masterserver are shown this page.
Viewing policy information for a jobUse the following procedure to view the details for the policy that is associated witha job.
335Monitoring NetBackup using OpsCenterAbout monitoring NetBackup jobs
To view policy information for a job
1 In the OpsCenter console, select Monitor > Jobs.
2 Select List View orHierarchical View from the drop-down list. The drop-downlist is located at the top-right corner of the view.
3 Click the policy name (link) for the job in the Policy column of the table.
4 A separate page appears that shows policy information on four tabs.
See “Monitor > Policies page” on page 356.
Filtering on NetBackup job type and stateYou can filter by using any of the built-in job filters. These filters are available fromthe drop-down list, which is present on top of the table.
Many job filters exist. This section lists some of the built-in job filters as follows:
Select this filter to view details of all the jobs.All Jobs (default filter)
Select this filter to view only active jobsActive Jobs
Select this filter to view only queued jobs.Queued Jobs
Select this filter to view only Done jobs.Done Jobs
Select this filter to view the jobs that havebeen suspended.
Suspended Jobs
Select this filter to view the jobs that arewaiting for retry.
Waiting for Retry Jobs
Select this filter to view the jobs that areincomplete.
Incomplete Jobs
Select this filter to view the jobs that havebeen canceled.
Canceled Jobs
Select this filter to view the jobs that areundefined.
Undefined Jobs
Select this filter to view the jobs that aresuccessful.
Successful Jobs
Select this filter to view the jobs that arepartially successful.
Partially Successful Jobs
Select this filter to view the jobs that failed.Failed Jobs
Select this filter to filter indexing related jobs.Index for Search
336Monitoring NetBackup using OpsCenterAbout monitoring NetBackup jobs

Select this filter to filter the index cleanupjobs.
Index Cleanup for Search
In addition to using the built-in filters, you can also create your own custom filters.
See “Creating, applying, editing, and removing custom view filters” on page 64.
To filter details by job state
1 Select Monitor > Jobs.
2 Select List View orHierarchical View from the drop-down list. The drop-downlist is located at the top-right corner of the view.
3 Select a filter from the drop-down list. Note that the drop-down list is locatedon top of the table.
Controlling NetBackup jobsUse the following procedure to cancel, suspend, resume, or restart a job. Beforeyou perform these tasks, manually refresh your Web browser to obtain an updatedview for all jobs.
Note: These tasks are not visible if you log on with an Analyst or a Reporter role.
To control a job
1 In the OpsCenter console, select Monitor > Jobs.
2 Select List View orHierarchical View from the drop-down list. The drop-downlist is located at the top-right corner of the view.
3 Select a job from the table. You may select one or more jobs.
4 Click Cancel, Restart, Resume, Suspend. These options are located on topof the table.
The OpsCenter console may take some time to show the updated status onceyou perform the tasks.
Reconciling NetBackup jobsYou can use the Reconcile option to prevent the jobs that failed due to reasonslike user terminating a job, host cannot be reached etc. from being billed. By usingthe Reconcile option and selecting a reason, you can let your service providerknow not to bill you for these jobs as these jobs failed due to specific issues at yourend.
337Monitoring NetBackup using OpsCenterAbout monitoring NetBackup jobs
Note: The Reconcile option is disabled in the unlicensed version (OpsCenter).
Before you perform this task, manually refresh your Web browser to obtain anupdated view for all jobs
To reconcile NetBackup jobs
1 In the OpsCenter console, select Monitor > Jobs.
2 Select List View orHierarchical View from the drop-down list. The drop-downlist is located at the top-right corner of the view.
3 Select a job from the table. You can select one or more jobs.
4 From the More drop-down list, select Reconcile.
5 In the Reconcile Jobs dialog box, select a reason for reconciling the job fromthe drop-down list.
Note that you can select Un-Reconcile from the drop-down list to undo areconciliation.
6 Click OK.
Changing the job priorityYou can change the priority that is associated with a job.
Review the following points before changing the job priority:
■ Priority can be changed only for the jobs that are in Active or Queued state.
■ Priority can be changed only for jobs from the master servers that are runningNetBackup 6.5.2 or higher versions.
To change the job priority
1 In the OpsCenter console, select Monitor > Jobs.
2 Select List View orHierarchical View from the drop-down list. The drop-downlist is located at the top-right corner of the view.
3 Select an active job or a queued job from the table.
4 From the More drop-down list, select Change Job Priority.
5 In the Change Priority dialog box, set the job priority to a particular value. Youcan also increment or decrement the job priority.
338Monitoring NetBackup using OpsCenterAbout monitoring NetBackup jobs
6 Click OK.
7 Click Finish.
The OpsCenter console may take some time to show the updated status onceyou perform this task.
Change Job Priority dialog box optionsA description of the Change Job Priority dialog box options follows in the table.
Table 8-3 Change Job Priority dialog box options
DescriptionOption
Enter a value to set the job priority.Set the job priority to
Select a value from the drop down list to increment the jobpriority.
Increment the job priorityby
Select a value from the drop down list to decrement the jobpriority.
Decrement the job priorityby
See “Changing the job priority” on page 338.
Exporting NetBackup job logsYou can export the log files that are associated with a job. You can view or savethe exported log files in an Excel format.
Note: The Export Job Logs option is not visible if you log on with an Analyst or aReporter role.
Note: Logs are not available for all job types. Before exporting a log file, ensurethat the NetBackup master server is Connected and the selected job logs areenabled.
To export the NetBackup log files for a job
1 In the OpsCenter console, select Monitor > Jobs.
2 Select List View orHierarchical View from the drop-down list. The drop-downlist is located at the top-right corner of the view.
3 Select a job from the table.
You can export only one job log at a time.
339Monitoring NetBackup using OpsCenterAbout monitoring NetBackup jobs
4 From the More drop-down list, select Export Job Logs.
5 Click Open or Save from the dialog box to view or save the log file in an Excelformat.
About using the Summary View for monitoring jobsThis view is displayed when you select Monitor > Jobs and then select SummaryView from the drop-down list. The drop-down list is located at the top-right cornerof the page.
The content that is shown in the Summary View is based on the current View Paneand time frame selection. Data for the last 24 hours is shown by default. You canalso view data for the last 48 hours or 72 hours.
See “Controlling the scope of Monitor views” on page 322.
TheSummary View contains the different sections which display specific informationabout NetBackup jobs. These sections show NetBackup job information in a tableas well as a pie chart. The table and the pie charts include links to filtered detailviews. You can use these links to drill down and access detailed information aboutNetBackup jobs.
Note: If you uncheck the Allow Multiple Selection In View Pane option, a GroupComponent Summary table is displayed when you access the Summary Viewfor Monitor > Jobs. The Group Component Summary table displays informationabout immediate NetBackup constituents of the view or node (group) that youselected in the View pane. You can uncheck the Allow Multiple Selection in ViewPane option from Settings > User Preferences > General.
The following sections describe this view in detail:
■ See “Viewing the Job Summary by Job Status” on page 340.
■ See “Viewing the Job Summary by State” on page 341.
■ See “Viewing the Job Summary by Type” on page 342.
■ See “About the Group Component Summary table” on page 343.
Viewing the Job Summary by Job StatusThe Job Summary by Job Status section shows an overall distribution of jobs byjob status or exit status.
The data that is shown in this view is based on the current View pane and timeframe selection. This information is shown in a pie chart as well as a table. Data
340Monitoring NetBackup using OpsCenterAbout monitoring NetBackup jobs

for the last 24 hours is shown by default. You can also view data for the last 48hours or 72 hours.
See “Controlling the scope of Monitor views” on page 322.
A pie chart with different colors represents the job distribution by exit status in thissection. Each color of the pie chart represents how jobs are distributed in yourenvironment as per the exit status. You can also view the color code summary inthis section to know the colors that represent different exit status. Moving yourpointer over the pie chart gives the number and percentage of jobs with a particularexit status in your NetBackup environment. For example, pointing your cursor tothe red color in the pie chart shows that in the last 24 hours, 72 jobs, or 42% jobsin your environment failed.
You can drill down from this section to see details for successful, partially successful,and failed jobs.
To view jobs by job status
1 In the OpsCenter console, select Monitor > Jobs.
2 Select Summary View from the drop-down list. Note that the drop-down listis located on the top-right corner of the page.
3 In the Job Summary by Job Status section, do either of the following:
■ Click the number of jobs (link) corresponding to a particular exit status fromthe table.Or
■ Click a colored section of the pie chart that corresponds to a particular exitstatus. For example, click the red section of the pie chart to view details forfailed jobs.
Viewing the Job Summary by StateThe Job Summary by State section shows an overall distribution of jobs by theNetBackup job state based on the current View pane and time frame selection.This information is shown in a pie chart as well as a table. Data for the last 24 hoursis shown by default. You can also view data for the last 48 hours or 72 hours.
See “Controlling the scope of Monitor views” on page 322.
A pie chart with different colors represents the job distribution by job state. Eachcolor of the pie chart represents how jobs are distributed in your environment asper the job state. You can also view the color code summary in this section to knowthe colors that represent different job states. Moving your cursor over the pie chartgives the number and percentage of jobs in a particular job state in your NetBackup
341Monitoring NetBackup using OpsCenterAbout monitoring NetBackup jobs
environment. For example, pointing to the yellow color in the pie chart shows thatin the last 24 hours, 22 jobs, or 42% jobs in your environment are in a queued state.
You can drill down from this section to see details for the jobs that failed, the jobsthat are waiting for retry, queued or active jobs, and so on.
To view jobs by job state
1 In the OpsCenter console, select Monitor > Jobs.
2 Select Summary View from the drop-down list. Note that the drop-down listis located on the top-right corner of the page.
3 In the Job Summary by State section, do either of the following:
■ Click the number of jobs (link) in a particular job state from the table. Forexample, click the number that is shown for Done jobs.Or
■ Click a colored section of the pie chart that corresponds to a particular jobstate. For example, click the yellow section of the pie chart to view detailsfor Queued jobs.
Viewing the Job Summary by TypeThe Job Summary by Type section shows an overall distribution of jobs by thejob type based on the current View pane and time frame selection. This informationis shown in a pie chart as well as a table. Data for the last 24 hours is shown bydefault. You can also view data for the last 48 hours or 72 hours.
See “Controlling the scope of Monitor views” on page 322.
A pie chart with different colors represents the job distribution by job type in thissection. Each color of the pie chart represents how jobs are distributed in yourenvironment as per the job type. You can also view the color code summary in thissection to know the colors that represent different job types. Moving your cursorover the pie chart gives the number and percentage of jobs of a particular job typein your NetBackup environment. For example, pointing to the red color in the piechart shows that in the last 24 hours, 22 jobs, or 42% jobs in your environment areDBBackup jobs.
You can drill down from this section to see details for different job types likeDBBackup, Image Cleanup etc.
342Monitoring NetBackup using OpsCenterAbout monitoring NetBackup jobs

To view jobs by job type
1 In the OpsCenter console, select Monitor > Jobs.
2 Select Summary View from the drop-down list. Note that the drop-down listis located on the top-right corner of the page.
3 In the Job Summary by Type section, do either of the following:
■ Click the number of jobs (link) corresponding to a particular job type fromthe table. For example, click the number that is shown for DBBackup jobs.Or
■ Click a colored section of the pie chart that corresponds to a particular jobtype. For example, click the red section of the pie chart to view details forDBBackup jobs.
About the Group Component Summary tableWhen you uncheck the Allow Multiple Selection In View Pane option underSettings > User Preferences > General view in the OpsCenter console, you canview the Group Component Summary table in the Summary View for Monitor >Jobs. The Group Component Summary table is displayed at the bottom of theSummary View for Monitor > Jobs. The Group Component Summary table wasalso displayed in NOM earlier.
You must select a group (view or node) from the View pane to see data in the GroupComponent Summary table. You do not see any data in the Group ComponentSummary table if you select a specific view object (master server) in the View pane.
More details about nodes and view objects is available.
See “About nodes and objects” on page 309.
The Group Component Summary table displays job summary information aboutthe immediate NetBackup constituents of the selected view or node (group) in theView pane. For example if you select theALLMASTER SERVERS view, the GroupComponent Summary table displays job summary for each master server. If youselect a view that contains multiple nodes, a job summary of the nodes (and notthe view objects for each node) is displayed.
Note: OpsCenter or OpsCenter Analytics monitors only NetBackup. Hence anyother servers (like BE or PD) do not appear in the Group Component Summarytable.
343Monitoring NetBackup using OpsCenterAbout monitoring NetBackup jobs
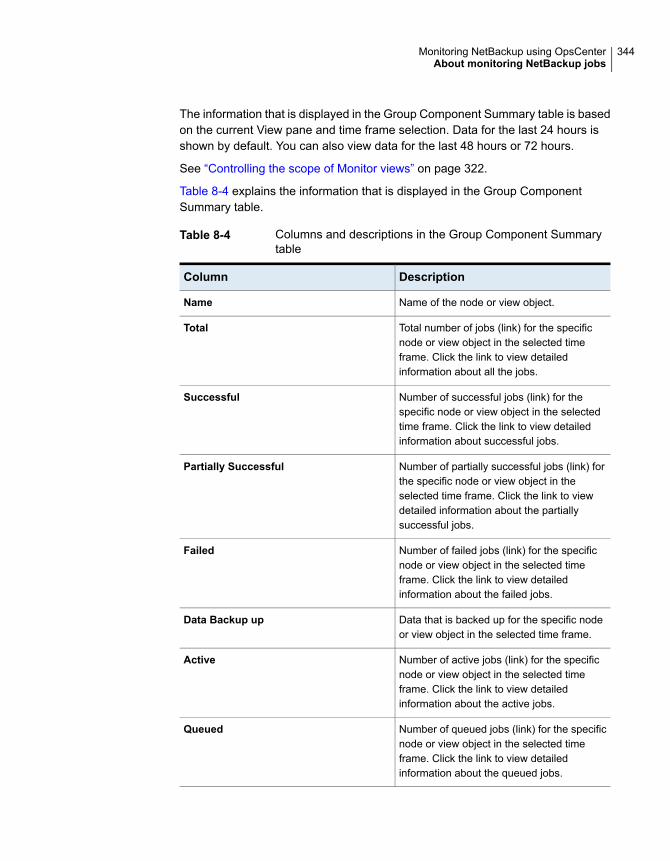
The information that is displayed in the Group Component Summary table is basedon the current View pane and time frame selection. Data for the last 24 hours isshown by default. You can also view data for the last 48 hours or 72 hours.
See “Controlling the scope of Monitor views” on page 322.
Table 8-4 explains the information that is displayed in the Group ComponentSummary table.
Table 8-4 Columns and descriptions in the Group Component Summarytable
DescriptionColumn
Name of the node or view object.Name
Total number of jobs (link) for the specificnode or view object in the selected timeframe. Click the link to view detailedinformation about all the jobs.
Total
Number of successful jobs (link) for thespecific node or view object in the selectedtime frame. Click the link to view detailedinformation about successful jobs.
Successful
Number of partially successful jobs (link) forthe specific node or view object in theselected time frame. Click the link to viewdetailed information about the partiallysuccessful jobs.
Partially Successful
Number of failed jobs (link) for the specificnode or view object in the selected timeframe. Click the link to view detailedinformation about the failed jobs.
Failed
Data that is backed up for the specific nodeor view object in the selected time frame.
Data Backup up
Number of active jobs (link) for the specificnode or view object in the selected timeframe. Click the link to view detailedinformation about the active jobs.
Active
Number of queued jobs (link) for the specificnode or view object in the selected timeframe. Click the link to view detailedinformation about the queued jobs.
Queued
344Monitoring NetBackup using OpsCenterAbout monitoring NetBackup jobs

Table 8-4 Columns and descriptions in the Group Component Summarytable (continued)
DescriptionColumn
Number of suspended jobs (link) for thespecific node or view object in the selectedtime frame. Click the link to view detailedinformation about the suspended jobs.
Suspended
Number of incomplete jobs (link) for thespecific node or view object in the selectedtime frame. Click the link to view detailedinformation about the incomplete jobs.
Incomplete
Number of undefined jobs (link) for thespecific node or view object in the selectedtime frame. Click the link to view detailedinformation about the undefined jobs.
Undefined
Number of the jobs that are waiting for retry(link) for the specific node or view object inthe selected time frame. Click the link to viewdetailed information about the jobs that arewaiting for retry.
Waiting for Retry
About using the Hierarchical View for monitoring jobsThis view is displayed when you selectMonitor > Jobs and then selectHierarchicalView from the drop-down list. The data that is shown in this view is based on thecurrent View pane and time frame selection. Data for the last 24 hours is shownby default. You can also view data for the last 48 hours or 72 hours.
Note: You can only view jobs data for the last 30 days from the Hierarchical View.
See “Controlling the scope of Monitor views” on page 322.
In the Hierarchical View, all related jobs can be grouped and you can see allparent-child jobs in a hierarchical fashion. You can view details of only the top level,parent job in this view with the ability to expand and drill into the details of child jobsif there are failures.
TheHierarchical View shows details of all jobs and also highlights the parent-childrelationship between jobs wherever applicable. All parent jobs have a +sign beforethe job ID. You can click the + sign to see all child jobs. A child job is indented tothe right-hand side in the Job ID column. If some of the child jobs are parent jobs,
345Monitoring NetBackup using OpsCenterAbout monitoring NetBackup jobs
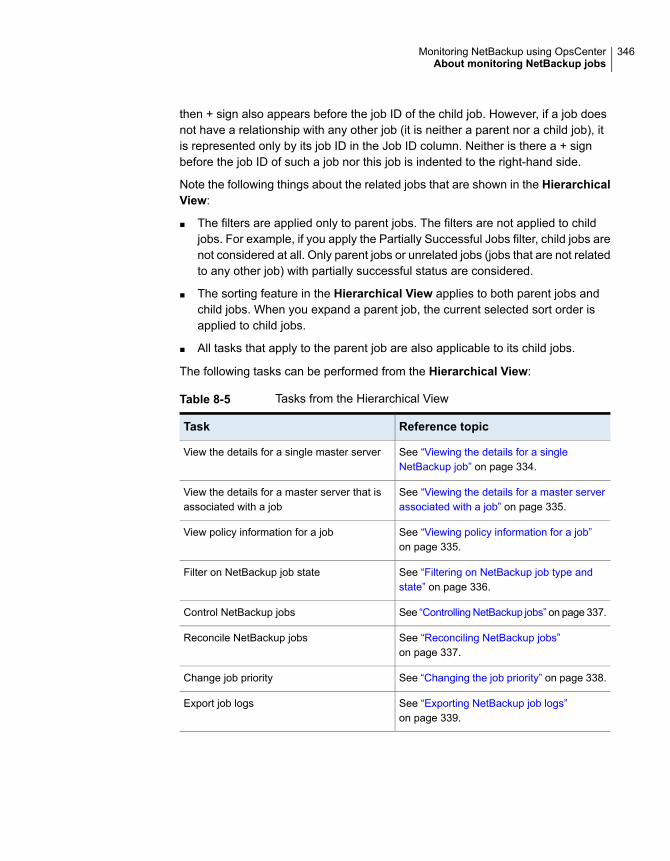
then + sign also appears before the job ID of the child job. However, if a job doesnot have a relationship with any other job (it is neither a parent nor a child job), itis represented only by its job ID in the Job ID column. Neither is there a + signbefore the job ID of such a job nor this job is indented to the right-hand side.
Note the following things about the related jobs that are shown in the HierarchicalView:
■ The filters are applied only to parent jobs. The filters are not applied to childjobs. For example, if you apply the Partially Successful Jobs filter, child jobs arenot considered at all. Only parent jobs or unrelated jobs (jobs that are not relatedto any other job) with partially successful status are considered.
■ The sorting feature in the Hierarchical View applies to both parent jobs andchild jobs. When you expand a parent job, the current selected sort order isapplied to child jobs.
■ All tasks that apply to the parent job are also applicable to its child jobs.
The following tasks can be performed from the Hierarchical View:
Table 8-5 Tasks from the Hierarchical View
Reference topicTask
See “Viewing the details for a singleNetBackup job” on page 334.
View the details for a single master server
See “Viewing the details for a master serverassociated with a job” on page 335.
View the details for a master server that isassociated with a job
See “Viewing policy information for a job”on page 335.
View policy information for a job
See “Filtering on NetBackup job type andstate” on page 336.
Filter on NetBackup job state
See “Controlling NetBackup jobs” on page 337.Control NetBackup jobs
See “Reconciling NetBackup jobs”on page 337.
Reconcile NetBackup jobs
See “Changing the job priority” on page 338.Change job priority
See “Exporting NetBackup job logs”on page 339.
Export job logs
346Monitoring NetBackup using OpsCenterAbout monitoring NetBackup jobs
Viewing the details for a single NetBackup jobAll the details that are associated with a job can be viewed from the Details pane.The Details pane is located at the bottom of the Monitor > Jobs view.
The Details pane has the following tabs:
The General tab of the Details pane displaysall information available for the job. It alsoincludes the contents of all the availablecolumns that can be viewed from the table.
General
The Attempts tab shows details of theattempts that have been made to complete ajob.
Attempts
The File List tab shows the files that havebeen backed up by the job and also theirlocation.
File List
To view details for a single NetBackup job
1 In the OpsCenter console, select Monitor > Jobs.
2 SelectHierarchical View from the drop-down list. The drop-down list is locatedat the top-right corner of the view.
3 Click the ID (link) for a job from the Job ID column of the table.
4 View the job details in the Details pane.
Viewing the details for a master server associated with a jobUse the following procedure to view the details for a master server that is associatedwith a job.
To view the details for the master server that is associated with a job
1 In the OpsCenter console, select Monitor > Jobs.
2 SelectHierarchical View from the drop-down list. The drop-down list is locatedat the top-right corner of the view.
3 Click the server name (link) associated with the job in theMaster Server columnof the table. The Monitor > Hosts page is displayed. The details of the masterserver are shown this page.
347Monitoring NetBackup using OpsCenterAbout monitoring NetBackup jobs
Viewing policy information for a jobUse the following procedure to view the details for the policy that is associated witha job.
Note: You can also view policy information from the List View.
To view policy information for a job
1 In the OpsCenter console, select Monitor > Jobs.
2 SelectHierarchical View from the drop-down list. The drop-down list is locatedat the top-right corner of the view.
3 Click the policy name (link) for the job in the Policy column of the table.
4 A separate page appears that shows policy information on four tabs.
See “Monitor > Policies page” on page 356.
Filtering on NetBackup job stateYou can filter by using any of the following built-in job filters. These filters areavailable from the drop-down list which is present on top of the table.
Some of the built-in job filters are the following:
Select this filter to view details of all the jobs.All Jobs (default filter)
Select this filter to view only active jobsActive Jobs
Select this filter to view only queued jobs.Queued Jobs
Select this filter to view only Done jobs.Done Jobs
Select this filter to view the jobs that havebeen suspended.
Suspended Jobs
Select this filter to view the jobs that arewaiting for retry.
Waiting for Retry Jobs
Select this filter to view the jobs that areincomplete.
Incomplete Jobs
Select this filter to view the jobs that areundefined.
Undefined Jobs
Select this filter to view the jobs that havebeen canceled.
Canceled Jobs
348Monitoring NetBackup using OpsCenterAbout monitoring NetBackup jobs
Select this filter to view the jobs that aresuccessful.
Successful Jobs
Select this filter to view the jobs that arepartially successful.
Partially Successful Jobs
Select this filter to view the jobs that failed.Failed Jobs
In addition to using the built-in filters, you can also create your own custom filters.
See “Creating, applying, editing, and removing custom view filters” on page 64.
To filter details by job state
1 In the OpsCenter console, select Monitor > Jobs.
2 SelectHierarchical View from the drop-down list. The drop-down list is locatedat the top-right corner of the view.
3 Select a filter from the drop-down list. Note that the drop-down list is locatedon top of the table.
Monitor > Services viewThis view is displayed when you select Monitor > Services. This view containsdetailed information for services.
The data that is shown in this view is based on the current View pane selection.
See “Controlling the scope of Monitor views” on page 322.
The table that appears in this view has the following columns:
This column lists the name of the service.Name
This column lists the name of the masterserver or media server where the service ordaemon is present.
Host Name
This column lists the NetBackup service type.
Example: Vault Manager, Device Manager,or Service Layer.
Service Type
349Monitoring NetBackup using OpsCenterMonitor > Services view

The operational status of the service ordaemon. This status can be Stopped,Running, or Other.
Other can be Not Installed, Not Licensed,Start Pending, Stop Pending, RestartPending, Failed, or Unknown.
Note: The status for some services mayshow as Stopped on theMonitor > Servicespage in the OpsCenter console. The licensefor these services is either not installed orconfigured for a specific media or masterserver.
Status
You can perform the following tasks from this view:
See “Filtering on NetBackup service type”on page 350.
Use filters to view specific services
See “Controlling NetBackup services”on page 351.
Control NetBackup services
Filtering on NetBackup service typeYou can filter by using any of the four built-in filters. These filters are available fromthe drop-down list which is present on top of the table.
The built-in filters are the following:
Select this filter to view details of all theservices.
All Services (default filter)
Select this filter to view details of the servicesthat have been stopped.
Stopped Services
Select this filter to view details of runningservices.
Running Services
Select this filter to view details of all otherservices like Not Licensed, Unknown (notrecognized by OpsCenter), or Not Applicable(some services may not be applicable toearlier versions).
Other Services
In addition to using the built-in filters, you can also create your own custom filters.
See “Creating, applying, editing, and removing custom view filters” on page 64.
350Monitoring NetBackup using OpsCenterMonitor > Services view
Use the following procedure to view details by type of service.
To filter on service type
1 In the OpsCenter console, select Monitor > Services.
2 Select a filter from the drop-down list. Note that the drop-down list is locatedon top of the table.
Controlling NetBackup servicesUnder certain circumstances there may be issues among multiple OpsCenter users.For instance, one OpsCenter user stops a service while another user tries to startthe same service.
Note: NetBackup service layer (nbsl) cannot be controlled from OpsCenter.
To control a service
1 Refresh your Web browser to obtain an updated state for all services.
2 In the OpsCenter console, select Monitor > Services.
3 Select a service from the table. You can select one or more services.
4 Click Start, Stop, or Restart. Note that these tasks are located on top of thetable.
Note: These tasks are not visible if you log on with an Analyst or a Reporterrole.
The OpsCenter console may take some time to show the updated status onceyou perform these tasks. Stop, Running, or Restart Pending appears in theStatus column until the selected action completes.
If you start or stop a service that has a dependency on another service,NetBackup ensures that any dependent services are also started or stopped.
About monitoring NetBackup policiesThe Monitor > Policies view provides details of NetBackup policies. You can usethe following views to see NetBackup policy information:
351Monitoring NetBackup using OpsCenterMonitor > Services view
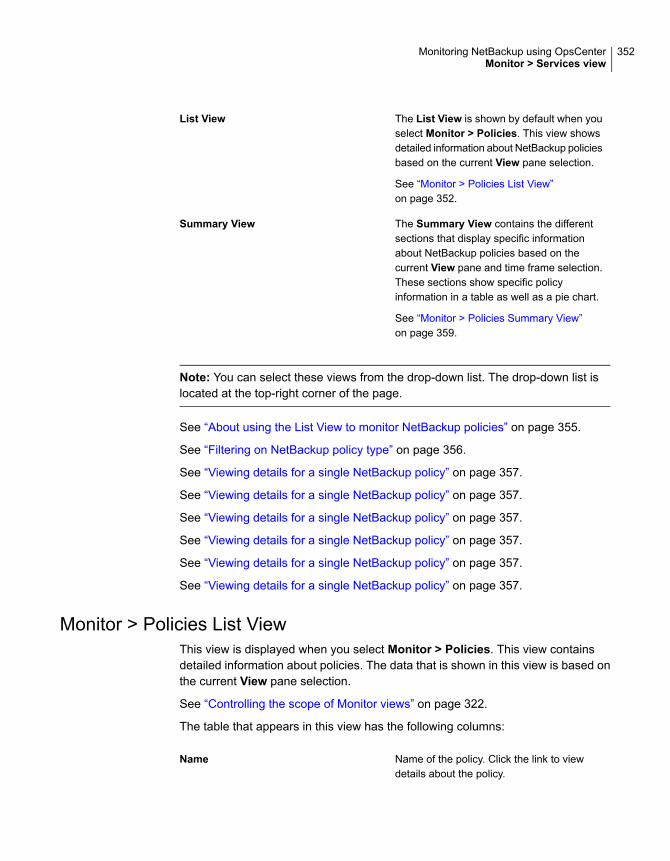
The List View is shown by default when youselect Monitor > Policies. This view showsdetailed information about NetBackup policiesbased on the current View pane selection.
See “Monitor > Policies List View”on page 352.
List View
The Summary View contains the differentsections that display specific informationabout NetBackup policies based on thecurrent View pane and time frame selection.These sections show specific policyinformation in a table as well as a pie chart.
See “Monitor > Policies Summary View”on page 359.
Summary View
Note: You can select these views from the drop-down list. The drop-down list islocated at the top-right corner of the page.
See “About using the List View to monitor NetBackup policies” on page 355.
See “Filtering on NetBackup policy type” on page 356.
See “Viewing details for a single NetBackup policy” on page 357.
See “Viewing details for a single NetBackup policy” on page 357.
See “Viewing details for a single NetBackup policy” on page 357.
See “Viewing details for a single NetBackup policy” on page 357.
See “Viewing details for a single NetBackup policy” on page 357.
See “Viewing details for a single NetBackup policy” on page 357.
Monitor > Policies List ViewThis view is displayed when you select Monitor > Policies. This view containsdetailed information about policies. The data that is shown in this view is based onthe current View pane selection.
See “Controlling the scope of Monitor views” on page 322.
The table that appears in this view has the following columns:
Name of the policy. Click the link to viewdetails about the policy.
Name
352Monitoring NetBackup using OpsCenterMonitor > Services view

Name of the master server that is associatedwith the policy. Click the link to view detailsof master server.
Master Server
This column is the policy type. Usually, thePolicy type determines the type of clients thatcan be backed up by this policy. Example:DB2, NBU-Catalog, Oracle, Sybase, Vaultetc.
Type
Storage that is associated with the policy.Click the link to view details for storage.
Storage
Volume pool that is associated with the policy.Click the link to view details of volume pool.
Volume Pool
Interval (in minutes) between two checkpointsin NetBackup.
CheckPoint Interval
The total number of jobs that are associatedwith the policy.
Jobs/Policy
Priority that you have defined for the policy.Zero means the lowest priority.
Priority
This column determines whether the policyis Active or not.
Active
Not all of the available columns appear initially in this view. The following columnsdo not appear, but can be added to your view by clicking the Table Settings icon:
■ Data Classification
■ Effective Date
■ Compression
■ Encryption
■ Block Level Increments
■ Allow Multiple Data Streams
■ Offhost
■ Follow NFS
■ Cross Mount Points
■ Individual File Restore From Raw
■ True Image Recovery
353Monitoring NetBackup using OpsCenterMonitor > Services view
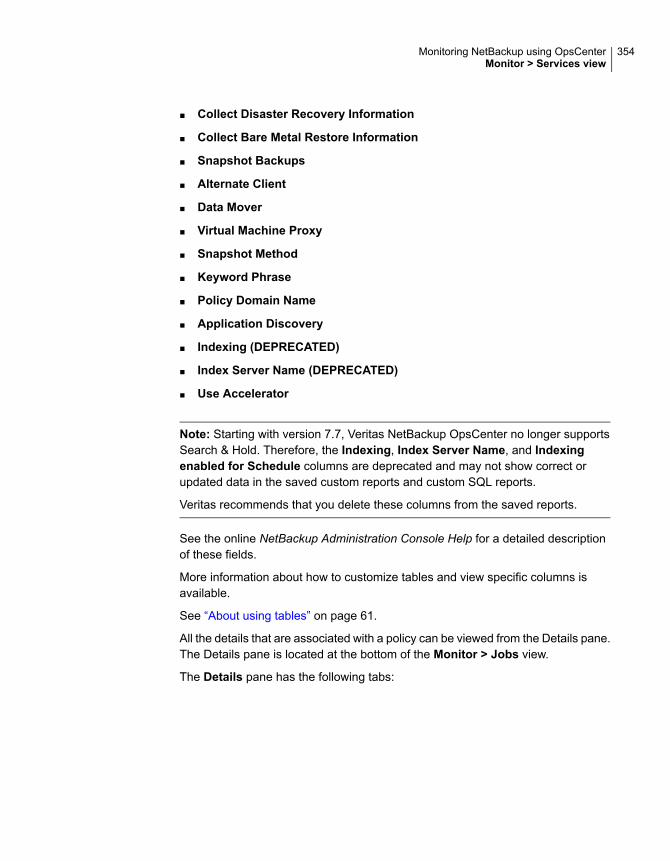
■ Collect Disaster Recovery Information
■ Collect Bare Metal Restore Information
■ Snapshot Backups
■ Alternate Client
■ Data Mover
■ Virtual Machine Proxy
■ Snapshot Method
■ Keyword Phrase
■ Policy Domain Name
■ Application Discovery
■ Indexing (DEPRECATED)
■ Index Server Name (DEPRECATED)
■ Use Accelerator
Note: Starting with version 7.7, Veritas NetBackup OpsCenter no longer supportsSearch & Hold. Therefore, the Indexing, Index Server Name, and Indexingenabled for Schedule columns are deprecated and may not show correct orupdated data in the saved custom reports and custom SQL reports.
Veritas recommends that you delete these columns from the saved reports.
See the online NetBackup Administration Console Help for a detailed descriptionof these fields.
More information about how to customize tables and view specific columns isavailable.
See “About using tables” on page 61.
All the details that are associated with a policy can be viewed from the Details pane.The Details pane is located at the bottom of the Monitor > Jobs view.
The Details pane has the following tabs:
354Monitoring NetBackup using OpsCenterMonitor > Services view

Table 8-6 Monitor > Policies Details pane tabs
DescriptionTab
The General tab of the Details pane displaysall information available for the policy. It alsoincludes the contents of all the availablecolumns that can be viewed from the table.
General
The Schedules tab shows details of theschedules that are associated with the policy.
Schedules
The Clients tab shows the clients that havebeen backed up by the policy and also theirlocation.
Clients
The Selections tab shows the files that werebacked up by the policy.
Selections
About using the List View to monitor NetBackup policiesYou can perform the following tasks from this view:
See “Filtering on NetBackup policy type”on page 356.
Use filters to view specific policies
See “Viewing details for a single NetBackuppolicy” on page 357.
View the details for a single NetBackup policy
See “Viewing the details for a master serverassociated with a policy” on page 357.
View the details for a master serverassociated with a policy
See “Viewing the details for a volume poolassociated with a policy” on page 358.
View the details for a volume pool that isassociated with a policy
See “Activating or deactivating a job policy”on page 358.
Manage a job policy
See “Starting a manual backup” on page 358.Start a manual backup
See “Viewing the history for a single job policy” on page 359.
View the history for a job policy
See “Monitor > Policies Summary View” on page 359.
355Monitoring NetBackup using OpsCenterMonitor > Services view
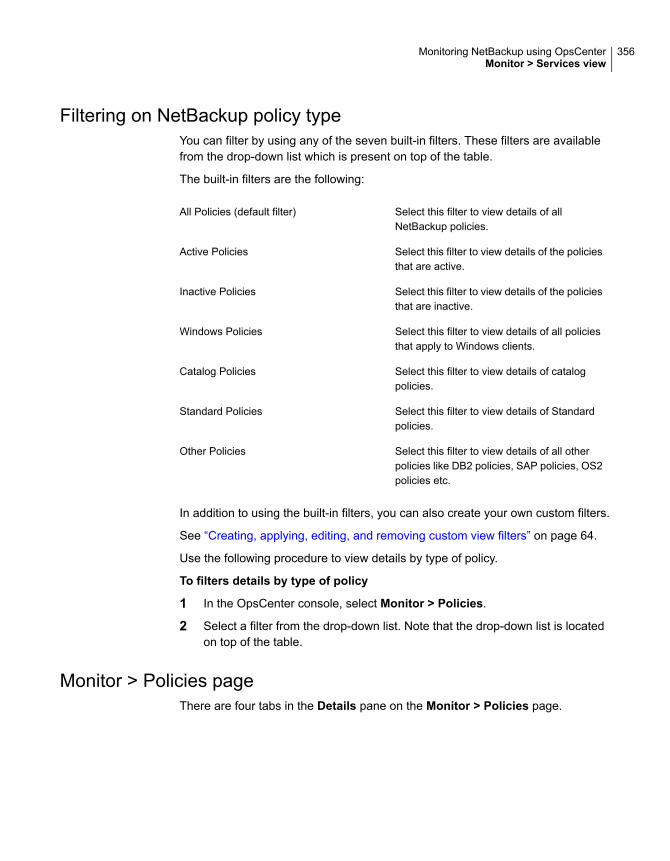
Filtering on NetBackup policy typeYou can filter by using any of the seven built-in filters. These filters are availablefrom the drop-down list which is present on top of the table.
The built-in filters are the following:
Select this filter to view details of allNetBackup policies.
All Policies (default filter)
Select this filter to view details of the policiesthat are active.
Active Policies
Select this filter to view details of the policiesthat are inactive.
Inactive Policies
Select this filter to view details of all policiesthat apply to Windows clients.
Windows Policies
Select this filter to view details of catalogpolicies.
Catalog Policies
Select this filter to view details of Standardpolicies.
Standard Policies
Select this filter to view details of all otherpolicies like DB2 policies, SAP policies, OS2policies etc.
Other Policies
In addition to using the built-in filters, you can also create your own custom filters.
See “Creating, applying, editing, and removing custom view filters” on page 64.
Use the following procedure to view details by type of policy.
To filters details by type of policy
1 In the OpsCenter console, select Monitor > Policies.
2 Select a filter from the drop-down list. Note that the drop-down list is locatedon top of the table.
Monitor > Policies pageThere are four tabs in the Details pane on the Monitor > Policies page.
356Monitoring NetBackup using OpsCenterMonitor > Services view

Table 8-7 Monitor > Policies page tabs
DescriptionTab
The General tab of the Details pane displays all informationavailable for the policy. It also includes contents of all thecolumns that can be viewed from the table.
You can also click the master server name (link) to get detailsof the master server.
General
The Schedules tab displays details of the schedules that areassociated with the policy.
Schedules
The Clients tab shows details of clients to be backed up bythe policy.
Clients
The Selections tab shows the files that have been backedup by the policy and also their location.
Selections
Viewing details for a single NetBackup policyAll the details that are associated with a policy can be viewed from the Details pane.The Details pane is located at the bottom of the Monitor > Jobs view.
The Details pane has four tabs.
See “Monitor > Policies page” on page 356.
To view details for a single NetBackup policy
1 In the OpsCenter console, select Monitor > Policies.
2 Click the name (link) for a policy from the Name column of the table.
3 View the policy details in the Details pane.
Viewing the details for a master server associated with a policyUse the following procedure to view the details for a master server that is associatedwith a policy.
To view the details for a master server that is associated with a policy
1 In the OpsCenter console, select Monitor > Policies.
2 Click the server name (link) associated with the policy from the Master Servercolumn of the table. The Monitor > Hosts page is displayed. The details ofthe master server are shown this page.
357Monitoring NetBackup using OpsCenterMonitor > Services view
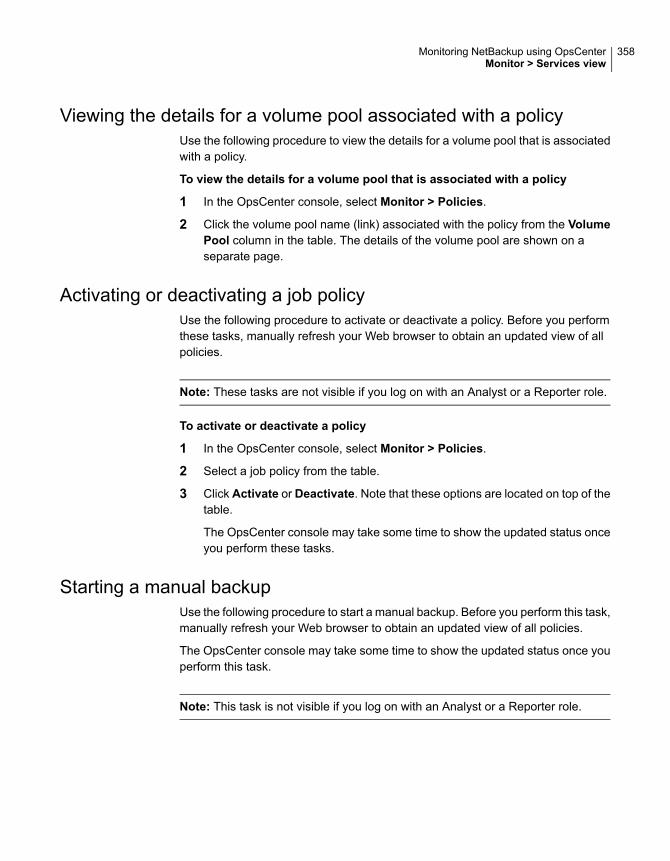
Viewing the details for a volume pool associated with a policyUse the following procedure to view the details for a volume pool that is associatedwith a policy.
To view the details for a volume pool that is associated with a policy
1 In the OpsCenter console, select Monitor > Policies.
2 Click the volume pool name (link) associated with the policy from the VolumePool column in the table. The details of the volume pool are shown on aseparate page.
Activating or deactivating a job policyUse the following procedure to activate or deactivate a policy. Before you performthese tasks, manually refresh your Web browser to obtain an updated view of allpolicies.
Note: These tasks are not visible if you log on with an Analyst or a Reporter role.
To activate or deactivate a policy
1 In the OpsCenter console, select Monitor > Policies.
2 Select a job policy from the table.
3 Click Activate or Deactivate. Note that these options are located on top of thetable.
The OpsCenter console may take some time to show the updated status onceyou perform these tasks.
Starting a manual backupUse the following procedure to start a manual backup. Before you perform this task,manually refresh your Web browser to obtain an updated view of all policies.
The OpsCenter console may take some time to show the updated status once youperform this task.
Note: This task is not visible if you log on with an Analyst or a Reporter role.
358Monitoring NetBackup using OpsCenterMonitor > Services view
To start a manual backup
1 In the OpsCenter console, select Monitor > Policies.
2 Select a policy from the table. You can select only one policy and it must bean active policy.
3 Click Manual Backup. Note that this option is located on top of the table.
4 You can select a schedule and a client from the drop-down lists for the backup,or only select a schedule or a client.
If you do not select a schedule, NetBackup uses the schedule with the highestretention level.
If you do not select a client, NetBackup backs up all scheduled clients.
Viewing the history for a single job policyUse the following procedure to view the history for a policy.
Note: This task is not visible if you log on with an Analyst or a Reporter role.
To view the history for a policy
1 In the OpsCenter console, select Monitor > Policies.
2 Select a job policy from the table.
3 Click View History. Note that this option is located on top of the table.
4 The Compare Policies tab displays the policy versions. You must select twoversions from the Policy Versions column to compare versions. The changesare highlighted in red color.
To view only the differences between the versions, click the View Differencestab.
Monitor > Policies Summary ViewThis view is displayed when you select Monitor > Policies and then selectSummary View from the drop-down list. The drop-down list is located at the top-rightcorner of the page. This view contains detailed information about policies.
The content that is shown in the Summary View is based on the current View paneand time frame selection. Data for the last 24 hours is shown by default. You canalso view data for the last 48 hours or 72 hours.
See “Controlling the scope of Monitor views” on page 322.
359Monitoring NetBackup using OpsCenterMonitor > Services view
TheSummary View contains the different sections which display specific informationabout NetBackup policies. These sections show specific policy information in atable.
The following sections describe this view in detail:
■ See “About Top 5 Policies by Data Backed up” on page 360.
■ See “About Top 7 Policies by Failed Jobs” on page 360.
■ See “About Top 7 Policies by No. of Jobs” on page 361.
About Top 5 Policies by Data Backed upThe Top 5 Policies by Data Backed up section lists the top five policies whichhave the maximum data backed up for the current View pane and time frameselection. Data for the last 24 hours is shown by default. You can also view datafor the last 48 hours or 72 hours.
See “Controlling the scope of Monitor views” on page 322.
The table that is shown in the section lists the top five policies which have maximumdata backed up. The table also shows the data that is backed up for each policy.Note that the data that is backed up (shown in Volume (Bytes) column) is arrangedin descending order in the table. From this section, you can quickly view the policieswhich have the maximum data backed up.
See “About Top 7 Policies by Failed Jobs” on page 360.
See “About Top 7 Policies by No. of Jobs” on page 361.
About Top 7 Policies by Failed JobsThe Top 7 Policies by Failed Jobs section lists seven policies which have themaximum failed jobs for the current View pane and time frame selection. Data forthe last 24 hours is shown by default. You can also view data for the last 48 hoursor 72 hours.
See “Controlling the scope of Monitor views” on page 322.
The table that is shown in the section lists the top seven policies which havemaximum failed jobs associated with them. The table also shows the total numberof failed jobs for each policy. Note that the failed jobs (shown in Total Number ofJobs column) are arranged in descending order in the table. From this section, youcan quickly view the policies which have the maximum failed jobs associated withthem.
Note: This section can also be viewed from Monitor > Overview.
360Monitoring NetBackup using OpsCenterMonitor > Services view

See “About Top 5 Policies by Data Backed up” on page 360.
See “About Top 7 Policies by No. of Jobs” on page 361.
About Top 7 Policies by No. of JobsThe Top 7 Policies by No. of Jobs section lists seven policies which have themaximum number of jobs. This data is based on the current View pane and timeframe selection. Data for the last 24 hours is shown by default. You can also viewdata for the last 48 hours or 72 hours.
See “Controlling the scope of Monitor views” on page 322.
The table that is shown in the section lists the policies which have maximum numberof jobs. The table also shows the total number of jobs for each policy. Note that thetotal number of jobs for each policy (shown in Total Number of Jobs column) arearranged in descending order in the table. From this section, you can quickly viewthe policies which have the maximum number of jobs associated with them.
See “About Top 5 Policies by Data Backed up” on page 360.
See “About Top 7 Policies by Failed Jobs” on page 360.
About monitoring NetBackup mediaThe Monitor > Media view provides details of NetBackup media. You can use thefollowing views to see details about NetBackup media:
The List View is shown by default when youselect Monitor > Media.
This view shows detailed information aboutNetBackup media for the current View paneselection.
See “Monitor > Media List View options”on page 362.
List View
TheSummary View displays the volume poolavailable for each master server for thecurrent View pane selection. It also showsother media details that are associated withthe master server like Frozen Media Count,Suspended Media Count etc.
See “Monitor > Media Summary View options”on page 367.
Summary View
361Monitoring NetBackup using OpsCenterMonitor > Services view
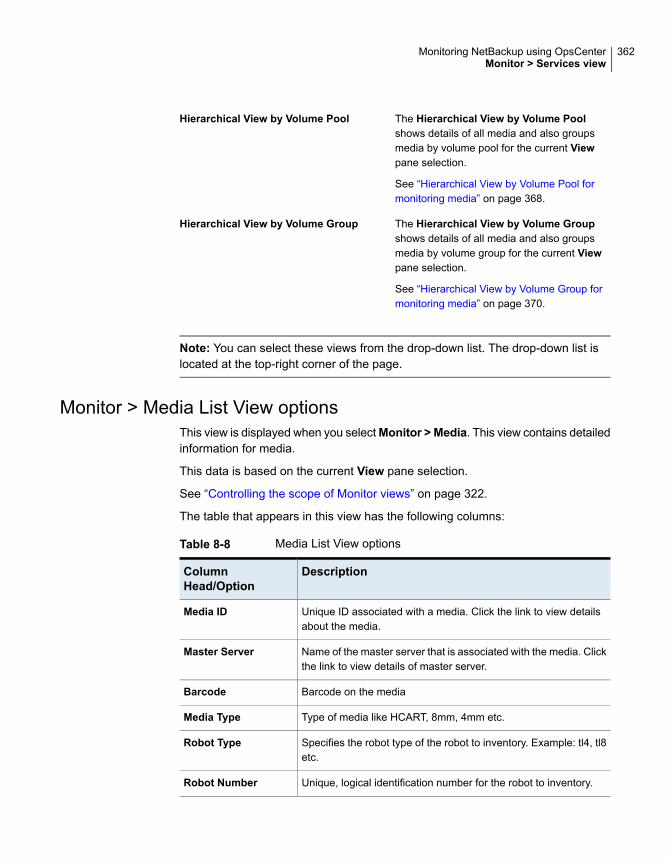
The Hierarchical View by Volume Poolshows details of all media and also groupsmedia by volume pool for the current Viewpane selection.
See “Hierarchical View by Volume Pool formonitoring media” on page 368.
Hierarchical View by Volume Pool
The Hierarchical View by Volume Groupshows details of all media and also groupsmedia by volume group for the current Viewpane selection.
See “Hierarchical View by Volume Group formonitoring media” on page 370.
Hierarchical View by Volume Group
Note: You can select these views from the drop-down list. The drop-down list islocated at the top-right corner of the page.
Monitor > Media List View optionsThis view is displayed when you selectMonitor >Media. This view contains detailedinformation for media.
This data is based on the current View pane selection.
See “Controlling the scope of Monitor views” on page 322.
The table that appears in this view has the following columns:
Table 8-8 Media List View options
DescriptionColumnHead/Option
Unique ID associated with a media. Click the link to view detailsabout the media.
Media ID
Name of the master server that is associated with the media. Clickthe link to view details of master server.
Master Server
Barcode on the mediaBarcode
Type of media like HCART, 8mm, 4mm etc.Media Type
Specifies the robot type of the robot to inventory. Example: tl4, tl8etc.
Robot Type
Unique, logical identification number for the robot to inventory.Robot Number
362Monitoring NetBackup using OpsCenterMonitor > Services view

Table 8-8 Media List View options (continued)
DescriptionColumnHead/Option
Slot in the robot that contains the volume.Slot
The number of times that the volume has been mounted.Mounts
The date when the volume was assigned for use.Time Assigned
The maximum number of mounts (or cleanings) that are allowedfor the volume. Zero (0) indicates unlimited mounts.
Max. Mounts
Date when the images on the volume expire.Data Expiration
The most recent time NetBackup used the volume for backups.Last Written
Current media status like Frozen, Active etc.Media Status
Capacity that has been used.Used Capacity
This relates to hold functionality of NetBackup. If an image on amedia is placed on hold, the status of the media is On Hold. If themedia is on hold, the value would be Yes. In other cases the valuewould be -.
On Hold
Not all of the available columns appear initially in this view. The following columnsdo not appear, but can be added to your view by clicking the Table Settings icon:
■ Last Write Host
■ Side
■ Partner
■ First Mount
■ Last Mount
■ Cleanings Remaining
■ Created
■ Description
■ Vault Name
■ Date Vaulted
■ Return Date
■ Vault Slot
363Monitoring NetBackup using OpsCenterMonitor > Services view

■ Session ID
■ Vault Container ID
■ Last Read
■ Images
■ Valid Images
■ Number of Restores
■ Conflicts
■ Origin Host
■ Media Owner
■ Cleaning Media
■ Imported
■ Multiplexed
■ Multiretention
■ Last Restore
■ Volume Expiration
■ Retention Level
See the online NetBackup Administration Console Help for a detailed descriptionof these fields.
More information about how to customize tables and view specific columns isavailable.
See “About using tables” on page 61.
About using the List View to monitor NetBackupmedia
You can perform the following tasks from this view:
See “Viewing the details for NetBackupmedia” on page 365.
View the details for a particular NetBackupmedia
See “Viewing the details for a master serverassociated with the media” on page 365.
View the details for a master server that isassociated with the media
364Monitoring NetBackup using OpsCenterAbout using the List View to monitor NetBackup media

See “Filtering on NetBackup media type”on page 365.
Use filters to view specific media
See “Controlling media” on page 366.Control media
Viewing the details for NetBackup mediaAll the details that are associated with a media can be viewed from the Detailspane. The Details pane is located at the bottom of the view.
To view the details for a particular media
1 In the OpsCenter console, select Monitor > Media.
2 Click a link from the Media ID column. View the media properties from theDetails pane. From the Details pane, you can also click the master server linkto see details about the master server that is associated with the media.
Viewing the details for amaster server associatedwith the media
Use the following procedure to view the details for a master server that is associatedwith a media.
To view the details for a master server associated with a media
1 In the OpsCenter console, select Monitor > Media.
2 Click the server name (link) associated with the media in the Master Servercolumn of the table. The details of the master server are shown on a separatepage.
Filtering on NetBackup media typeYou can sort and filter this view to focus on the specific type of media that you wantto see. For example, you can create and apply a filter that displays full media only.You can filter by using any of the built-in filters. These filters are available from thedrop-down list which is present on top of the table.
The built-in filters are the following:
Select this filter to view details of all media.All Media (default filter)
365Monitoring NetBackup using OpsCenterViewing the details for NetBackup media

Select this filter to view details of the mediathat have been assigned to an individual forfurther action.
Assigned Media
Select this filter to view details of the mediathat are unassigned.
Unassigned Media
Select this filter to view details of the mediathat are frozen.
Frozen Media
Select this filter to view details of the mediathat are full.
Full Media
Select this filter to view details of the mediathat are suspended.
Suspended Media
Select this filter to view details of all othermedia like Multi Retention Level media, BEmedia etc.
Other Media
Select this filter to view details of media withActive status.
Active Media
Select this filter to view details of cleaningmedia.
Cleaning Media
In addition to the built-in filters, you can create your own custom filters.
See “Creating, applying, editing, and removing custom view filters” on page 64.
Use the following procedure to view details by type of media.
To filter details by type of media
1 In the OpsCenter console, select Monitor > Media.
2 Select a filter from the drop-down list. Note that the drop-down list is locatedon top of the table.
Controlling mediaUse the following procedure to freeze, unfreeze, suspend, or unsuspend specificmedia. Note that to perform these tasks the media must be assigned to NetBackup.The media is assigned if there is a date in the Time Assigned column.
Note: These tasks are not visible if you log on with an Analyst or a Reporter role.
366Monitoring NetBackup using OpsCenterControlling media
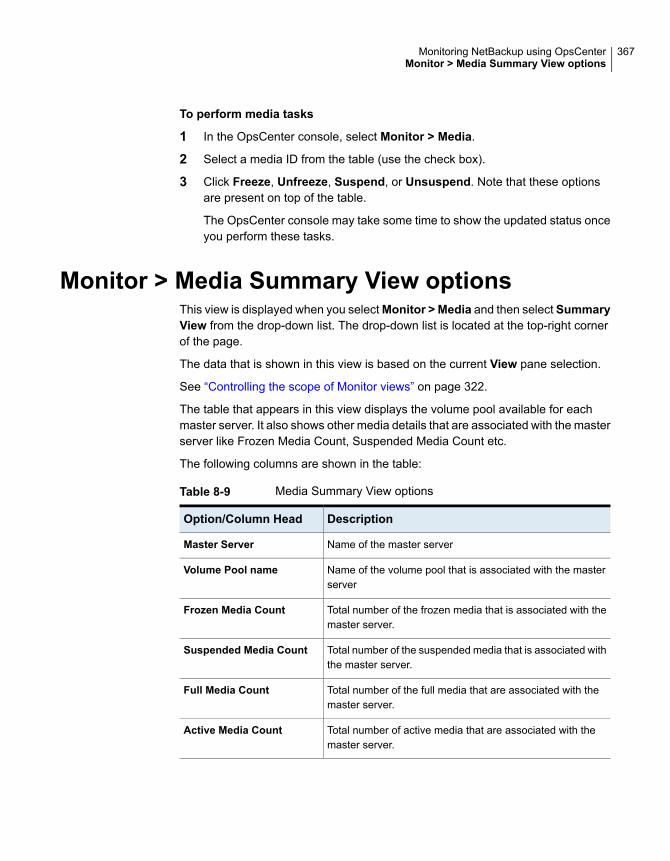
To perform media tasks
1 In the OpsCenter console, select Monitor > Media.
2 Select a media ID from the table (use the check box).
3 Click Freeze, Unfreeze, Suspend, or Unsuspend. Note that these optionsare present on top of the table.
The OpsCenter console may take some time to show the updated status onceyou perform these tasks.
Monitor > Media Summary View optionsThis view is displayed when you selectMonitor > Media and then select SummaryView from the drop-down list. The drop-down list is located at the top-right cornerof the page.
The data that is shown in this view is based on the current View pane selection.
See “Controlling the scope of Monitor views” on page 322.
The table that appears in this view displays the volume pool available for eachmaster server. It also shows other media details that are associated with the masterserver like Frozen Media Count, Suspended Media Count etc.
The following columns are shown in the table:
Table 8-9 Media Summary View options
DescriptionOption/Column Head
Name of the master serverMaster Server
Name of the volume pool that is associated with the masterserver
Volume Pool name
Total number of the frozen media that is associated with themaster server.
Frozen Media Count
Total number of the suspended media that is associated withthe master server.
Suspended Media Count
Total number of the full media that are associated with themaster server.
Full Media Count
Total number of active media that are associated with themaster server.
Active Media Count
367Monitoring NetBackup using OpsCenterMonitor > Media Summary View options

Table 8-9 Media Summary View options (continued)
DescriptionOption/Column Head
Total number of all other media like Multi Retention Levelmedia, BE media etc. that are associated with the masterserver .
Other Media Count
Total number of the media that are available for the masterserver.
Available Media Count
Total number of the media that are on hold for the masterserver.
On Hold Media Count
Hierarchical View by Volume Pool for monitoringmedia
This view is displayed when you select Monitor > Media and then selectHierarchical View by Volume Pool from the drop-down list. The drop-down list islocated at the top-right corner of the page.
The data that is shown in this view is based on the current View pane selection.
See “Controlling the scope of Monitor views” on page 322.
TheHierarchical View by Volume Pool shows details of all media and also groupsmedia by volume pool. Each volume pool that is shown in the Media ID columnhas a +sign before it. You can expand a volume pool to see all media that are apart of this volume pool. Note that the media are indented to the right-hand side inthe Media ID column.
The sorting feature in this view applies only to media in the volume pool. When youexpand a volume pool, the current selected sort order is applied to media in thepool.
The following tasks can be performed from this view:
See “Viewing the details for volume pool”on page 369.
View the details for volume pool
See “Viewing the details for media”on page 369.
View details for the media that are a part ofa specific volume pool
See “Controlling media” on page 369.Control media
368Monitoring NetBackup using OpsCenterHierarchical View by Volume Pool for monitoring media
Viewing the details for volume poolUse the following procedure to view the details for a volume pool.
To view details for a volume pool
1 In the OpsCenter console, select Monitor > Media.
2 Select Hierarchical View by Volume Pool from the drop-down list. Thedrop-down list is located at the top-right corner of the page.
3 Click a volume pool (link) from the Media ID column. Note that a volume poolhas a + sign on the left side. The details for the volume pool are shown in theGeneral tab at the bottom of this view.
Viewing the details for mediaUse the following procedure to view details for the media that are part of a specificvolume pool.
To view the details for media
1 In the OpsCenter console, select Monitor > Media.
2 Select Hierarchical View by Volume Pool from the drop-down list. Thedrop-down list is located at the top-right corner of the page.
3 Expand a volume pool from the Media ID column. This column shows themedia that are a part of the volume pool. Note that the media are indented tothe right-hand side
4 Click the media ID (link). Details for the media are shown in the General tabat the bottom of the view.
Controlling mediaUse the following procedure to freeze, unfreeze, suspend, or unsuspend specificmedia. Note that to perform these tasks the media must be assigned to NetBackup.The media is assigned if there is a date in the Time Assigned column.
Note: These tasks are not visible if you log on with an Analyst or a Reporter role.
To perform media tasks
1 In the OpsCenter console, select Monitor > Media.
2 Select Hierarchical View by Volume Pool from the drop-down list. Thedrop-down list is located at the top-right corner of the page.
369Monitoring NetBackup using OpsCenterViewing the details for volume pool

3 Expand a volume pool from the Media ID column. This view shows the mediathat are a part of the volume pool. Note that the media are indented to theright-hand side
4 Select a media ID (use the check box).
5 Click Freeze, Unfreeze, Suspend, or Unsuspend. Note that these tasks arepresent on top of the table.
The OpsCenter console may take some time to show the updated status onceyou perform these tasks.
Hierarchical View by VolumeGroup formonitoringmedia
This view is displayed when you select Monitor > Media and then selectHierarchical View by Volume Group from the drop-down list. The drop-down listis located at the top-right corner of the page.
The data that is shown in this view is based on the current View pane selection.
See “Controlling the scope of Monitor views” on page 322.
The Hierarchical View by Volume Group shows details of all media and alsogroups media by volume group. Each volume group shown in the Media ID columnhas a +sign before it. You can expand a volume group to see all media that are apart of this volume group. Note that the media are indented to the right-hand sidein the Media ID column.
The sorting feature in this view applies to media in the volume group. When youexpand a volume group, the current selected sort order is applied to media in thatgroup.
You can perform the following tasks from this view:
See “Viewing the details for a volume group”on page 370.
View the details for a volume group
See “Viewing the details for media”on page 371.
View details for the media that are part of aspecific volume group
See “Controlling media in OpsCenter”on page 371.
Control media
Viewing the details for a volume groupUse the following procedure to view the details for a specific volume group.
370Monitoring NetBackup using OpsCenterHierarchical View by Volume Group for monitoring media
To view details for a volume group
1 In the OpsCenter console, select Monitor > Media.
2 Select Hierarchical View by Volume Group from the drop-down list. Thedrop-down list is located at the top-right corner of the page.
3 Click a volume group (link) from the Media ID column. Note that a volumegroup has a + sign on the left side. The details for the volume group are shownin the General tab at the bottom of this view.
Viewing the details for mediaUse the following procedure to view details for media that are part of a specificvolume group.
To view the details for media
1 In the OpsCenter console, select Monitor > Media.
2 Select Hierarchical View by Volume Group from the drop-down list. Thedrop-down list is located at the top-right corner of the page.
3 Expand a volume group from theMedia ID column. This view shows the mediathat are a part of the volume group. Note that the media are indented to theright-hand side
4 Click the media ID (link). Details for the media are shown in the General tabat the bottom of the view.
Controlling media in OpsCenterUse the following procedure to freeze, unfreeze, suspend, or unsuspend specificmedia. Note that to perform these tasks the media must be assigned to NetBackup.The media is assigned if there is a date in the Time Assigned column.
Note: These tasks are not visible if you log on with an Analyst or a Reporter role.
To perform media tasks
1 In the OpsCenter console, select Monitor > Media.
2 Select Hierarchical View by Volume Group from the drop-down list. Thedrop-down list is located at the top-right corner of the page.
3 Expand a volume group from theMedia ID column. This view shows the mediathat are a part of the volume group. Note that the media are indented to theright-hand side
371Monitoring NetBackup using OpsCenterViewing the details for media
4 Select a media ID (use the check box).
5 Click Freeze, Unfreeze, Suspend, or Unsuspend. Note that these optionsare present on top of the table.
The OpsCenter console may take some time to show the updated status onceyou perform these tasks.
Monitoring NetBackup devicesThis view is displayed when you select Monitor > Devices.
This view contains the following two tabs:
This tab is shown by default when you selectMonitor > Devices. The contents of theDrives tab are shown by default.
This view displays the current drive statusinformation based on the current View paneselection.
See “Monitor > Devices > Drives List Viewoptions” on page 372.
See “Monitor > Devices > Drives SummaryView” on page 376.
Drives
This view displays detailed information aboutthe disk pools that are configured for use byNetBackup based on the current View paneselection.
See “Monitor > Devices > Disk Pools options”on page 378.
Disk Pools
Monitor > Devices > Drives List View optionsThis view is displayed when you select Monitor > Devices > Drives. This viewshows the current drive status information. The data that is shown in this view isbased on the current View pane selection.
See “Controlling the scope of Monitor views” on page 322.
The table that appears in this view shows the following information:
372Monitoring NetBackup using OpsCenterMonitoring NetBackup devices

Table 8-10 Drives List View options
DescriptionOption/Column Head
The name that is assigned to the drive when it was added toNetBackup.
Drive Name
The name of the device host where the drive is connected.Device Host
Name of the master server that is associated with the drive.Master Server
Type of drive like 4mm, 8mm etc.Drive Type
The type of robot that contains this drive.Robot Type
Note: For 7.0.1 and later master servers, the List View does not show a drive thatis unreachable or disabled. Similarly, if one of the paths for a drive is unreachableor disabled, it is not shown in the Paths tab that appears in the List View.
The Paths tab allows you to change the status of the selected drive: Up or Down.
Not all of the available columns appear initially in this view. The following columnsdo not appear, but can be added to your view by clicking the Table Settings icon:
■ Serial Number
■ Cleaning Frequency
■ Shared
■ Inquiry Information
■ Volume Header Path
■ ACS
■ LSM
■ Panel
■ Drive
■ Vendor Drive Identifier
■ Robot Number
■ Robot Drive Number
■ Recorded Media ID
■ Assigned Host
■ Control Host Name
373Monitoring NetBackup using OpsCenterMonitor > Devices > Drives List View options
■ Control Mode
■ Evsn
■ Control Up
■ Last Clean Time
■ Local Control
■ Mounted Time
■ NDMP
■ Occupy Index
■ Opr Comment
■ Ready
■ Request ID
■ Scan Host
■ VM Host
■ Write Enabled
See the online NetBackup Administration Console Help for a detailed descriptionof these fields.
More information about how to customize tables and view specific columns isavailable.
See “About using tables” on page 61.
About using the List View for monitoring drivesYou can perform the following tasks from this view:
See “Viewing the details for a single drive”on page 375.
View the details for a single drive
See “Viewing the details for a master serverassociated with a drive” on page 375.
View the details for a master server that isassociated with a drive
See “Filtering on NetBackup drive category”on page 375.
Use filters to view specific drives
See “Controlling drives” on page 376.Control drives
374Monitoring NetBackup using OpsCenterAbout using the List View for monitoring drives
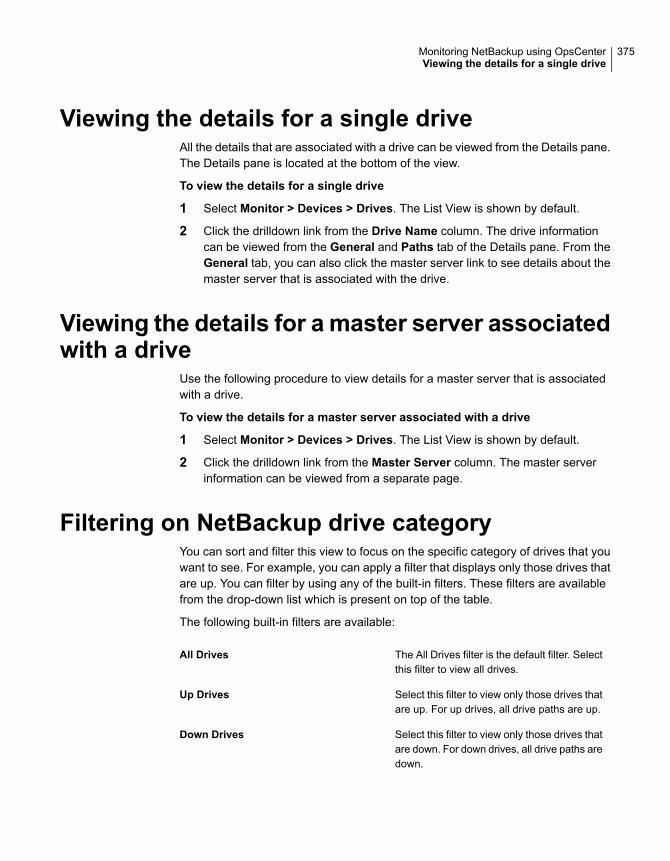
Viewing the details for a single driveAll the details that are associated with a drive can be viewed from the Details pane.The Details pane is located at the bottom of the view.
To view the details for a single drive
1 Select Monitor > Devices > Drives. The List View is shown by default.
2 Click the drilldown link from the Drive Name column. The drive informationcan be viewed from the General and Paths tab of the Details pane. From theGeneral tab, you can also click the master server link to see details about themaster server that is associated with the drive.
Viewing the details for amaster server associatedwith a drive
Use the following procedure to view details for a master server that is associatedwith a drive.
To view the details for a master server associated with a drive
1 Select Monitor > Devices > Drives. The List View is shown by default.
2 Click the drilldown link from the Master Server column. The master serverinformation can be viewed from a separate page.
Filtering on NetBackup drive categoryYou can sort and filter this view to focus on the specific category of drives that youwant to see. For example, you can apply a filter that displays only those drives thatare up. You can filter by using any of the built-in filters. These filters are availablefrom the drop-down list which is present on top of the table.
The following built-in filters are available:
The All Drives filter is the default filter. Selectthis filter to view all drives.
All Drives
Select this filter to view only those drives thatare up. For up drives, all drive paths are up.
Up Drives
Select this filter to view only those drives thatare down. For down drives, all drive paths aredown.
Down Drives
375Monitoring NetBackup using OpsCenterViewing the details for a single drive
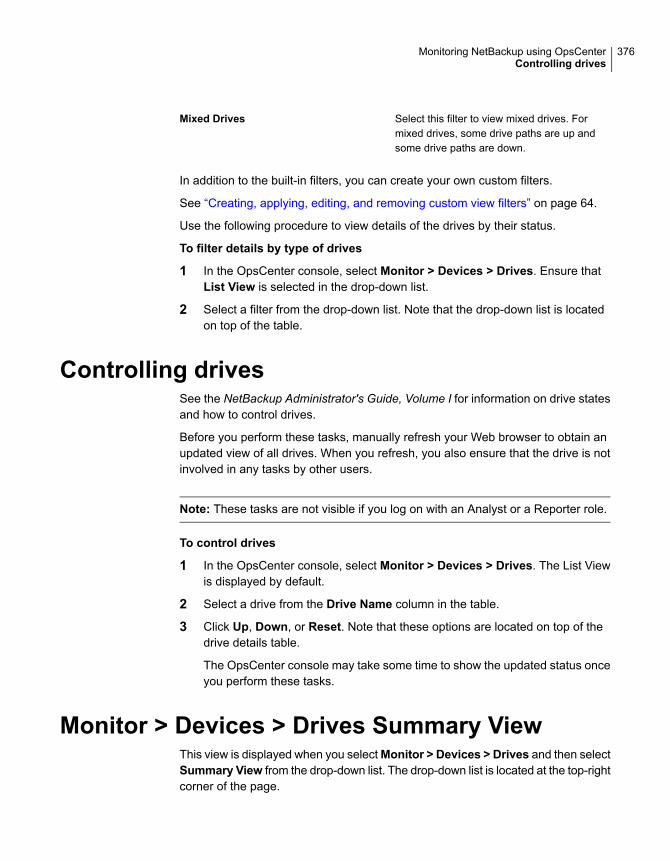
Select this filter to view mixed drives. Formixed drives, some drive paths are up andsome drive paths are down.
Mixed Drives
In addition to the built-in filters, you can create your own custom filters.
See “Creating, applying, editing, and removing custom view filters” on page 64.
Use the following procedure to view details of the drives by their status.
To filter details by type of drives
1 In the OpsCenter console, select Monitor > Devices > Drives. Ensure thatList View is selected in the drop-down list.
2 Select a filter from the drop-down list. Note that the drop-down list is locatedon top of the table.
Controlling drivesSee the NetBackup Administrator's Guide, Volume I for information on drive statesand how to control drives.
Before you perform these tasks, manually refresh your Web browser to obtain anupdated view of all drives. When you refresh, you also ensure that the drive is notinvolved in any tasks by other users.
Note: These tasks are not visible if you log on with an Analyst or a Reporter role.
To control drives
1 In the OpsCenter console, select Monitor > Devices > Drives. The List Viewis displayed by default.
2 Select a drive from the Drive Name column in the table.
3 Click Up, Down, or Reset. Note that these options are located on top of thedrive details table.
The OpsCenter console may take some time to show the updated status onceyou perform these tasks.
Monitor > Devices > Drives Summary ViewThis view is displayed when you selectMonitor > Devices > Drives and then selectSummary View from the drop-down list. The drop-down list is located at the top-rightcorner of the page.
376Monitoring NetBackup using OpsCenterControlling drives
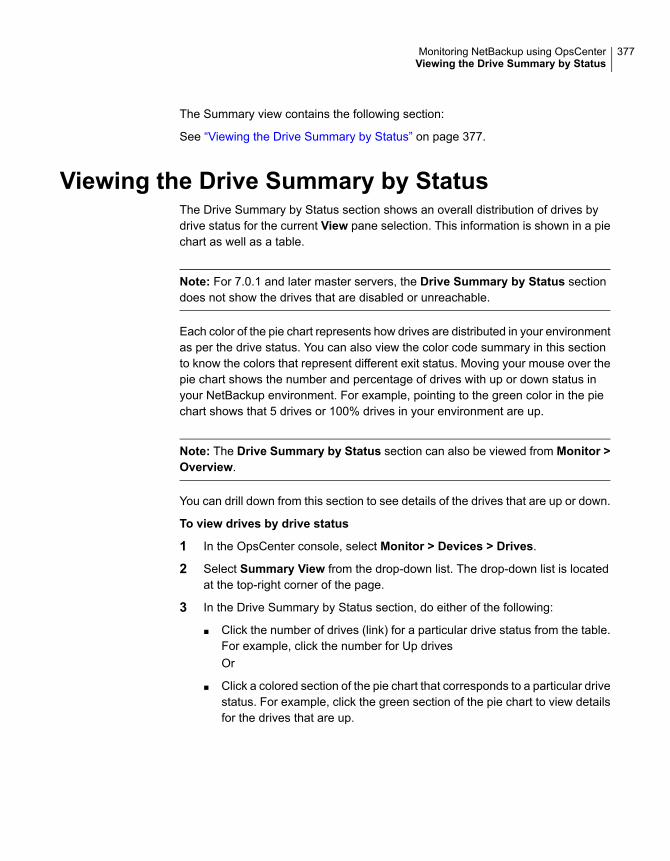
The Summary view contains the following section:
See “Viewing the Drive Summary by Status” on page 377.
Viewing the Drive Summary by StatusThe Drive Summary by Status section shows an overall distribution of drives bydrive status for the current View pane selection. This information is shown in a piechart as well as a table.
Note: For 7.0.1 and later master servers, the Drive Summary by Status sectiondoes not show the drives that are disabled or unreachable.
Each color of the pie chart represents how drives are distributed in your environmentas per the drive status. You can also view the color code summary in this sectionto know the colors that represent different exit status. Moving your mouse over thepie chart shows the number and percentage of drives with up or down status inyour NetBackup environment. For example, pointing to the green color in the piechart shows that 5 drives or 100% drives in your environment are up.
Note: The Drive Summary by Status section can also be viewed from Monitor >Overview.
You can drill down from this section to see details of the drives that are up or down.
To view drives by drive status
1 In the OpsCenter console, select Monitor > Devices > Drives.
2 Select Summary View from the drop-down list. The drop-down list is locatedat the top-right corner of the page.
3 In the Drive Summary by Status section, do either of the following:
■ Click the number of drives (link) for a particular drive status from the table.For example, click the number for Up drivesOr
■ Click a colored section of the pie chart that corresponds to a particular drivestatus. For example, click the green section of the pie chart to view detailsfor the drives that are up.
377Monitoring NetBackup using OpsCenterViewing the Drive Summary by Status
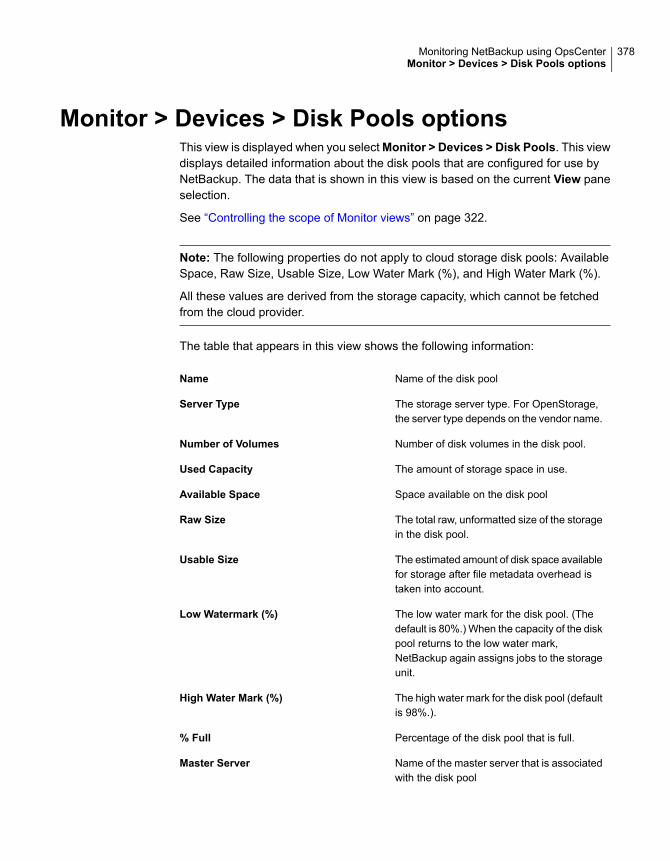
Monitor > Devices > Disk Pools optionsThis view is displayed when you selectMonitor > Devices > Disk Pools. This viewdisplays detailed information about the disk pools that are configured for use byNetBackup. The data that is shown in this view is based on the current View paneselection.
See “Controlling the scope of Monitor views” on page 322.
Note: The following properties do not apply to cloud storage disk pools: AvailableSpace, Raw Size, Usable Size, Low Water Mark (%), and High Water Mark (%).
All these values are derived from the storage capacity, which cannot be fetchedfrom the cloud provider.
The table that appears in this view shows the following information:
Name of the disk poolName
The storage server type. For OpenStorage,the server type depends on the vendor name.
Server Type
Number of disk volumes in the disk pool.Number of Volumes
The amount of storage space in use.Used Capacity
Space available on the disk poolAvailable Space
The total raw, unformatted size of the storagein the disk pool.
Raw Size
The estimated amount of disk space availablefor storage after file metadata overhead istaken into account.
Usable Size
The low water mark for the disk pool. (Thedefault is 80%.) When the capacity of the diskpool returns to the low water mark,NetBackup again assigns jobs to the storageunit.
Low Watermark (%)
The high water mark for the disk pool (defaultis 98%.).
High Water Mark (%)
Percentage of the disk pool that is full.% Full
Name of the master server that is associatedwith the disk pool
Master Server
378Monitoring NetBackup using OpsCenterMonitor > Devices > Disk Pools options

State of the disk pool (like Up, Down etc.)State
Not all of the available columns appear initially in this view. The following columnsdo not appear, but can be added to your view by clicking the Table Settings icon:
■ Imported
■ Configured for Snapshots
■ Primary
■ Replication
See the online NetBackup Administration Console Help for a detailed descriptionof these fields.
More information about how to customize tables and view specific columns isavailable.
See “About using tables” on page 61.
You can perform the following task from this view:
See “Viewing the details for a single disk pool”on page 379.
View the details for a single disk pool
Viewing the details for a single disk poolAll the details that are associated with a disk pool can be viewed from the Detailspane. The Details pane is located at the bottom of the view.
To view the details for a single disk pool
1 In the OpsCenter console, select Monitor > Devices > Disk Pools.
2 Click the drilldown link from the Name column. The disk pool information canbe viewed from the General and Disk Volume tab of the Details pane. Fromthe General tab, you can also click the master server link to see details aboutthe master server that is associated with the disk pool.
About monitoring NetBackup hostsThis view is displayed when you select Monitor > Hosts.
This view contains the following subtabs:
379Monitoring NetBackup using OpsCenterViewing the details for a single disk pool
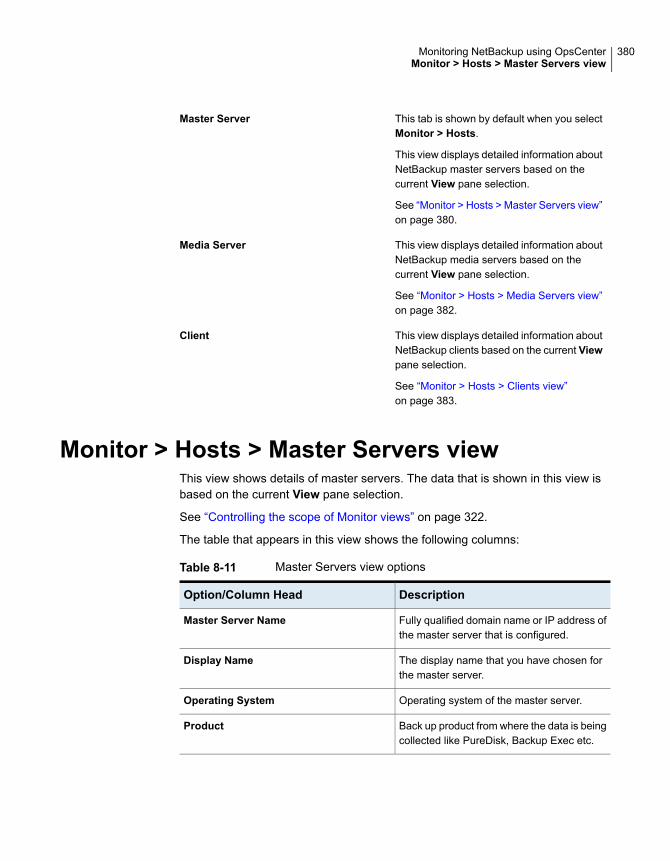
This tab is shown by default when you selectMonitor > Hosts.
This view displays detailed information aboutNetBackup master servers based on thecurrent View pane selection.
See “Monitor > Hosts > Master Servers view”on page 380.
Master Server
This view displays detailed information aboutNetBackup media servers based on thecurrent View pane selection.
See “Monitor > Hosts > Media Servers view”on page 382.
Media Server
This view displays detailed information aboutNetBackup clients based on the current Viewpane selection.
See “Monitor > Hosts > Clients view”on page 383.
Client
Monitor > Hosts > Master Servers viewThis view shows details of master servers. The data that is shown in this view isbased on the current View pane selection.
See “Controlling the scope of Monitor views” on page 322.
The table that appears in this view shows the following columns:
Table 8-11 Master Servers view options
DescriptionOption/Column Head
Fully qualified domain name or IP address ofthe master server that is configured.
Master Server Name
The display name that you have chosen forthe master server.
Display Name
Operating system of the master server.Operating System
Back up product from where the data is beingcollected like PureDisk, Backup Exec etc.
Product
380Monitoring NetBackup using OpsCenterMonitor > Hosts > Master Servers view

Table 8-11 Master Servers view options (continued)
DescriptionOption/Column Head
Shows the current state of the NetBackupMaster Server: Connected, Not Connected,or Disabled.
If the server status is 'Connected', the timesince when the OpsCenter Server and theand master server are connected is alsodisplayed. This does not necessarilyrepresent the last time that OpsCentercollected information from the master server.
See “NetBackup Master Server states inOpsCenter” on page 287.
Server Status
Reason if any for the current server status.Reason
You can perform the following task from this view:
See “Filtering by NetBackup master servertype and status” on page 381.
Use filters to view specific master servers
Filtering by NetBackup master server type andstatus
You can sort and filter this view to focus on the specific type of master servers thatyou want to see. For example, you can apply a filter that displays Windows serversonly. These filters are available from the drop-down list which is present on top ofthe table.
The built-in filters are the following:
Select this filter to view details of all masterservers.
All Servers (default filter)
Select this filter to view details of thosemaster servers that are connected.
Connected Servers
Select this filter to view details of thosemaster servers that appear as not connected.
Not Connected Servers
Select this filter to view details of Windowsservers.
Windows Servers
381Monitoring NetBackup using OpsCenterFiltering by NetBackup master server type and status
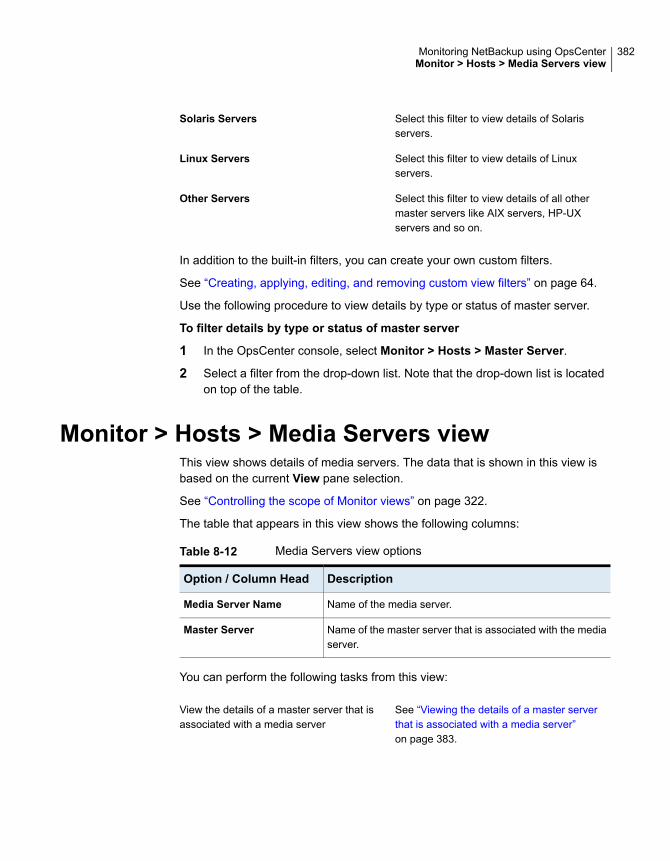
Select this filter to view details of Solarisservers.
Solaris Servers
Select this filter to view details of Linuxservers.
Linux Servers
Select this filter to view details of all othermaster servers like AIX servers, HP-UXservers and so on.
Other Servers
In addition to the built-in filters, you can create your own custom filters.
See “Creating, applying, editing, and removing custom view filters” on page 64.
Use the following procedure to view details by type or status of master server.
To filter details by type or status of master server
1 In the OpsCenter console, select Monitor > Hosts > Master Server.
2 Select a filter from the drop-down list. Note that the drop-down list is locatedon top of the table.
Monitor > Hosts > Media Servers viewThis view shows details of media servers. The data that is shown in this view isbased on the current View pane selection.
See “Controlling the scope of Monitor views” on page 322.
The table that appears in this view shows the following columns:
Table 8-12 Media Servers view options
DescriptionOption / Column Head
Name of the media server.Media Server Name
Name of the master server that is associated with the mediaserver.
Master Server
You can perform the following tasks from this view:
See “Viewing the details of a master serverthat is associated with a media server”on page 383.
View the details of a master server that isassociated with a media server
382Monitoring NetBackup using OpsCenterMonitor > Hosts > Media Servers view

Viewing the details of a master server that isassociated with a media server
Use the following procedure to view the details of a master server that is associatedwith a media server.
To view the details of a master server that is associated with a media server
1 In the OpsCenter console, select Monitor > Hosts > Media Servers.
2 Click the drilldown link from the Master Server column.
Monitor > Hosts > Clients viewThis view shows details of NetBackup clients. The data that is shown in this viewis based on the current View pane selection.
See “Controlling the scope of Monitor views” on page 322.
The table that appears in this view shows the following columns:
Table 8-13 Clients view options
DescriptionOption / Column Head
Name of the client that is to be backed up.Client Name
Name of the master server that is associated with the client.Master Server
Operating system on the client like Linux, HP-UX etc.OS Type
Hardware of the client computer like PC.Hardware
Shows Yes if the client is offline.Is Offline
Date till the client is offlineOffline Until
You can click Search Client to search for specific clients on the page. You cansearch for clients using absolute host names or substrings.
You can perform the following task from this view:
See “Viewing the details for a single masterserver” on page 384.
View the details for a single master server
383Monitoring NetBackup using OpsCenterViewing the details of a master server that is associated with a media server

Viewing the details for a single master serverAll the details for a master server that is associated with a client can be viewedfrom the General tab.
To view the details for a single master server
1 In the OpsCenter console, select Monitor > Hosts > Client.
2 Click the drilldown link in the Master Server column.
About monitoring NetBackup alertsThe Monitor > Alerts view provides details of NetBackup alerts. The data that isshown in this view is based on the current View pane and time frame selection.Data for the last 24 hours is shown by default. You can also view data for the last48 hours or 72 hours.
See “Controlling the scope of Monitor views” on page 322.
Note: The OpsCenter console displays active alerts by default (these are the alertsthat are not cleared).
You can view alerts that are specific to NetBackup Appliance 5330.
You can use the following views to see NetBackup alert information:
The List View is shown by default when youselect Monitor > Alerts. The List Viewshows active alerts by default. This view alsolets you view detailed information about allNetBackup alerts and also filter, respond toalerts.
See “Monitor > Alerts List View” on page 385.
List View
The Summary View only displays activealerts (these are the alerts that have not beencleared). The Summary View shows howactive alerts are distributed in yourenvironment as per the alert severity. Thisinformation is shown in a pie chart as well asa table.
See “Summary View for monitoringNetBackup alerts” on page 393.
Summary View
384Monitoring NetBackup using OpsCenterViewing the details for a single master server
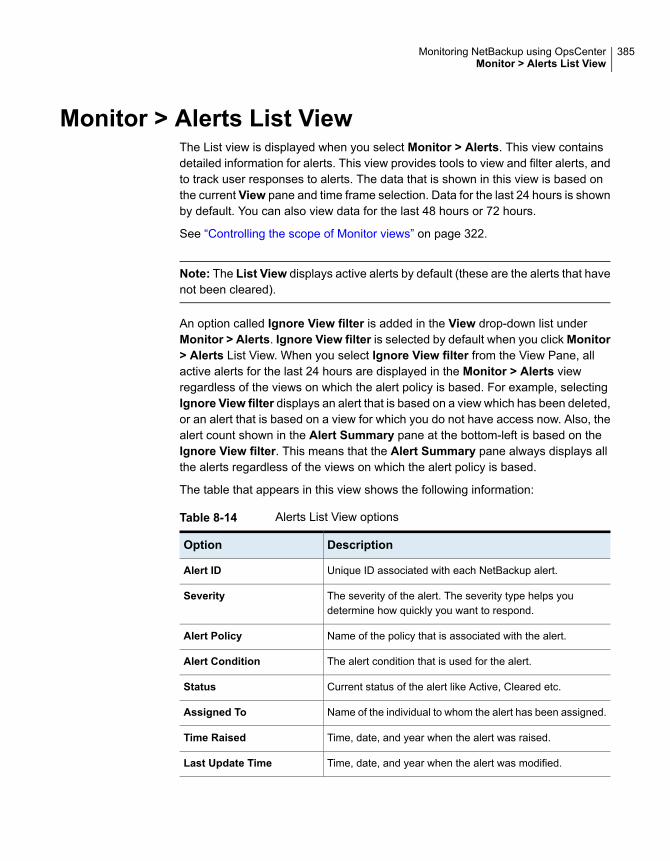
Monitor > Alerts List ViewThe List view is displayed when you select Monitor > Alerts. This view containsdetailed information for alerts. This view provides tools to view and filter alerts, andto track user responses to alerts. The data that is shown in this view is based onthe current View pane and time frame selection. Data for the last 24 hours is shownby default. You can also view data for the last 48 hours or 72 hours.
See “Controlling the scope of Monitor views” on page 322.
Note: The List View displays active alerts by default (these are the alerts that havenot been cleared).
An option called Ignore View filter is added in the View drop-down list underMonitor > Alerts. Ignore View filter is selected by default when you click Monitor> Alerts List View. When you select Ignore View filter from the View Pane, allactive alerts for the last 24 hours are displayed in the Monitor > Alerts viewregardless of the views on which the alert policy is based. For example, selectingIgnore View filter displays an alert that is based on a view which has been deleted,or an alert that is based on a view for which you do not have access now. Also, thealert count shown in the Alert Summary pane at the bottom-left is based on theIgnore View filter. This means that the Alert Summary pane always displays allthe alerts regardless of the views on which the alert policy is based.
The table that appears in this view shows the following information:
Table 8-14 Alerts List View options
DescriptionOption
Unique ID associated with each NetBackup alert.Alert ID
The severity of the alert. The severity type helps youdetermine how quickly you want to respond.
Severity
Name of the policy that is associated with the alert.Alert Policy
The alert condition that is used for the alert.Alert Condition
Current status of the alert like Active, Cleared etc.Status
Name of the individual to whom the alert has been assigned.Assigned To
Time, date, and year when the alert was raised.Time Raised
Time, date, and year when the alert was modified.Last Update Time
385Monitoring NetBackup using OpsCenterMonitor > Alerts List View
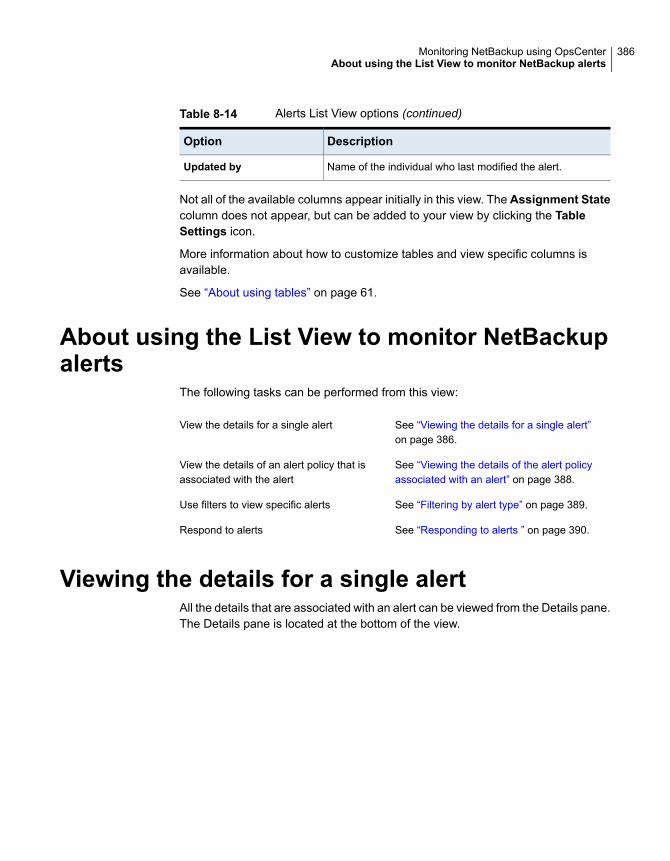
Table 8-14 Alerts List View options (continued)
DescriptionOption
Name of the individual who last modified the alert.Updated by
Not all of the available columns appear initially in this view. The Assignment Statecolumn does not appear, but can be added to your view by clicking the TableSettings icon.
More information about how to customize tables and view specific columns isavailable.
See “About using tables” on page 61.
About using the List View to monitor NetBackupalerts
The following tasks can be performed from this view:
See “Viewing the details for a single alert”on page 386.
View the details for a single alert
See “Viewing the details of the alert policyassociated with an alert” on page 388.
View the details of an alert policy that isassociated with the alert
See “Filtering by alert type” on page 389.Use filters to view specific alerts
See “Responding to alerts ” on page 390.Respond to alerts
Viewing the details for a single alertAll the details that are associated with an alert can be viewed from the Details pane.The Details pane is located at the bottom of the view.
386Monitoring NetBackup using OpsCenterAbout using the List View to monitor NetBackup alerts
To view the details of a single alert
1 In the OpsCenter console, select Monitor > Alerts.
2 Click a drill-down link from the Alert ID column. The alert details are shownunder the General and Comments tabs. In addition to the information that isshown in the table, the General tab also shows master server, policy name,job ID, and exit status information. The Comments tab shows comments onthe alert (if any), the time when these comments were provided, and theindividual who last updated the alert.
Note: For certain alert types (for example High Job Failure Rate, High DriveDown, or High Suspended Media), the Details tab is also displayed. Forexample, for the High Job Failure Rate alert type, the Details tab shows thefollowing details: % of failed jobs when the alert was raised and current failedJob count by master server, client, and policy.
See “Viewing the details of the alert policy associated with an alert” on page 388.
See “Filtering by alert type” on page 389.
See “Responding to alerts ” on page 390.
Viewing the details of a single alert for Appliancehardware failure
In OpsCenter Monitor > Alerts UI, you can view the details that are associated withan Appliance hardware failure alert.
To view the details of a single hardware failure alert
387Monitoring NetBackup using OpsCenterViewing the details of a single alert for Appliance hardware failure
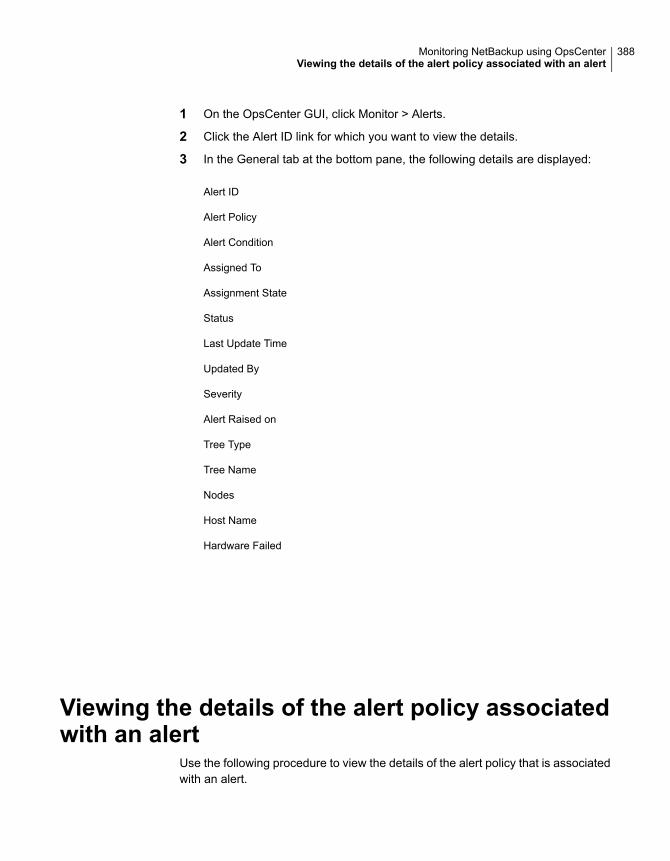
1 On the OpsCenter GUI, click Monitor > Alerts.
2 Click the Alert ID link for which you want to view the details.
3 In the General tab at the bottom pane, the following details are displayed:
Alert ID
Alert Policy
Alert Condition
Assigned To
Assignment State
Status
Last Update Time
Updated By
Severity
Alert Raised on
Tree Type
Tree Name
Nodes
Host Name
Hardware Failed
Viewing the details of the alert policy associatedwith an alert
Use the following procedure to view the details of the alert policy that is associatedwith an alert.
388Monitoring NetBackup using OpsCenterViewing the details of the alert policy associated with an alert

To view the details of alert policy associated with the alert
1 In the OpsCenter console, select Monitor > Alerts.
2 Click the drill-down link from the Alert Policy column.
See “Viewing the details for a single alert” on page 386.
See “Filtering by alert type” on page 389.
See “Responding to alerts ” on page 390.
Filtering by alert typeSince the Monitor > Alerts view can include large numbers of alerts, a filter isavailable. You can use this filter to limit the types of alerts that appear.
You can filter on various severity levels or status settings, which lets you focus ononly the specific alerts that interest you. For example, you can create and apply afilter that only displays the alerts that are acknowledged.
You can filter using any of the following built-in alert filters. These filters are availablefrom the drop-down list which is present on top of the alert details table.
Select this filter to view Active alerts. This filter does notinclude the alerts that have been cleared.
Active (default filter)
Select this filter to only view the alerts whose severity isCritical.
Critical
Select this filter to only view the alerts whose severity isMajor.
Major
Select this filter to only view the alerts whose severity isWarning.
Warning
Select this filter to only view the alerts whose severity isInformational.
Informational
Select this filter to only view the alerts that have not beenassigned to anybody.
Unassigned
Select this filter to only view the alerts that have beenassigned to other OpsCenter users.
Assigned
Select this filter to only view the alerts that have beenacknowledged by an OpsCenter user.
Acknowledged
389Monitoring NetBackup using OpsCenterFiltering by alert type
Select this filter to only view the alerts that have been cleared.
More information on cleared alerts is available.
See “Responding to alerts ” on page 390.
Cleared
Select this filter to view the details of all alerts. This filterincludes both active alerts and cleared alerts.
All Alerts
In addition to the built-in filters, you can create your own custom filters.
See “Creating, applying, editing, and removing custom view filters” on page 64.
Use the following procedure to view details by type of alerts.
To filter details by type of alert
1 In the OpsCenter console, select Monitor > Alerts.
2 Select a filter using the Filter drop-down list. For example, select All Alerts toview details of both active alerts and cleared alerts.
See “Viewing the details for a single alert” on page 386.
See “Viewing the details of the alert policy associated with an alert” on page 388.
See “Responding to alerts ” on page 390.
Responding to alertsYou can manage OpsCenter alerts from the Monitor > Alerts view by addingcomments or by assigning the alert to an individual for further review. You can alsoclear or acknowledge an alert. OpsCenter allows multiple users to process or takeaction on an alert.
When you acknowledge an alert, you inform other users who see the alert thataction on the alert occurred. If you clear an alert, you cannot perform any furtheractivity on the alert (for example, assign or acknowledge). Cleared alerts do notappear in the alert view by default.
Note:Under certain circumstances there may be issues among multiple OpsCenterusers. For instance, an OpsCenter user comments on an alert while anotherOpsCenter user tries to clear the same alert.
The OpsCenter console displays active alerts by default (these are the alerts thathave not been cleared). Some alerts (for example, Drive is Down) are clearedautomatically when the condition is resolved.
390Monitoring NetBackup using OpsCenterResponding to alerts
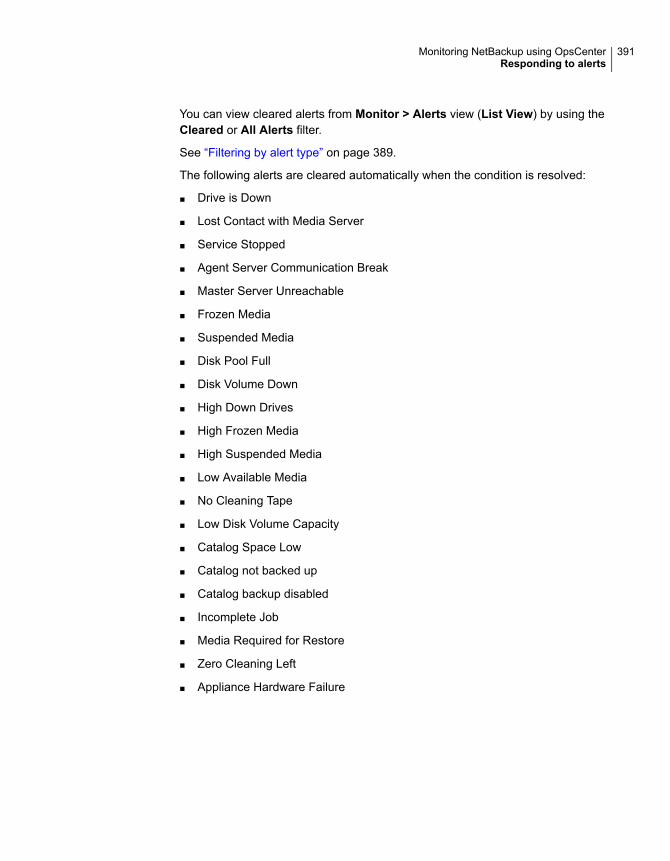
You can view cleared alerts from Monitor > Alerts view (List View) by using theCleared or All Alerts filter.
See “Filtering by alert type” on page 389.
The following alerts are cleared automatically when the condition is resolved:
■ Drive is Down
■ Lost Contact with Media Server
■ Service Stopped
■ Agent Server Communication Break
■ Master Server Unreachable
■ Frozen Media
■ Suspended Media
■ Disk Pool Full
■ Disk Volume Down
■ High Down Drives
■ High Frozen Media
■ High Suspended Media
■ Low Available Media
■ No Cleaning Tape
■ Low Disk Volume Capacity
■ Catalog Space Low
■ Catalog not backed up
■ Catalog backup disabled
■ Incomplete Job
■ Media Required for Restore
■ Zero Cleaning Left
■ Appliance Hardware Failure
391Monitoring NetBackup using OpsCenterResponding to alerts
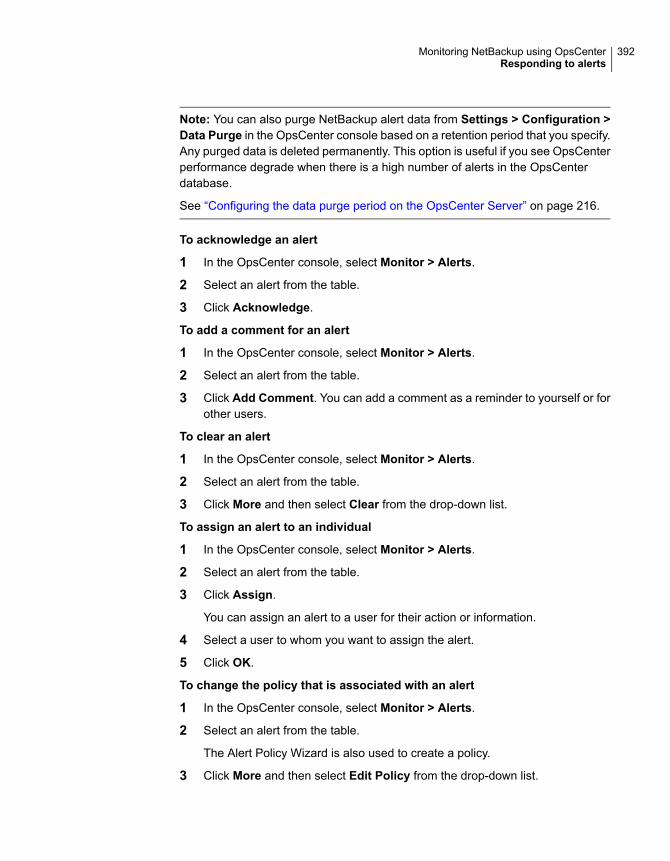
Note: You can also purge NetBackup alert data from Settings > Configuration >Data Purge in the OpsCenter console based on a retention period that you specify.Any purged data is deleted permanently. This option is useful if you see OpsCenterperformance degrade when there is a high number of alerts in the OpsCenterdatabase.
See “Configuring the data purge period on the OpsCenter Server” on page 216.
To acknowledge an alert
1 In the OpsCenter console, select Monitor > Alerts.
2 Select an alert from the table.
3 Click Acknowledge.
To add a comment for an alert
1 In the OpsCenter console, select Monitor > Alerts.
2 Select an alert from the table.
3 Click Add Comment. You can add a comment as a reminder to yourself or forother users.
To clear an alert
1 In the OpsCenter console, select Monitor > Alerts.
2 Select an alert from the table.
3 Click More and then select Clear from the drop-down list.
To assign an alert to an individual
1 In the OpsCenter console, select Monitor > Alerts.
2 Select an alert from the table.
3 Click Assign.
You can assign an alert to a user for their action or information.
4 Select a user to whom you want to assign the alert.
5 Click OK.
To change the policy that is associated with an alert
1 In the OpsCenter console, select Monitor > Alerts.
2 Select an alert from the table.
The Alert Policy Wizard is also used to create a policy.
3 Click More and then select Edit Policy from the drop-down list.
392Monitoring NetBackup using OpsCenterResponding to alerts
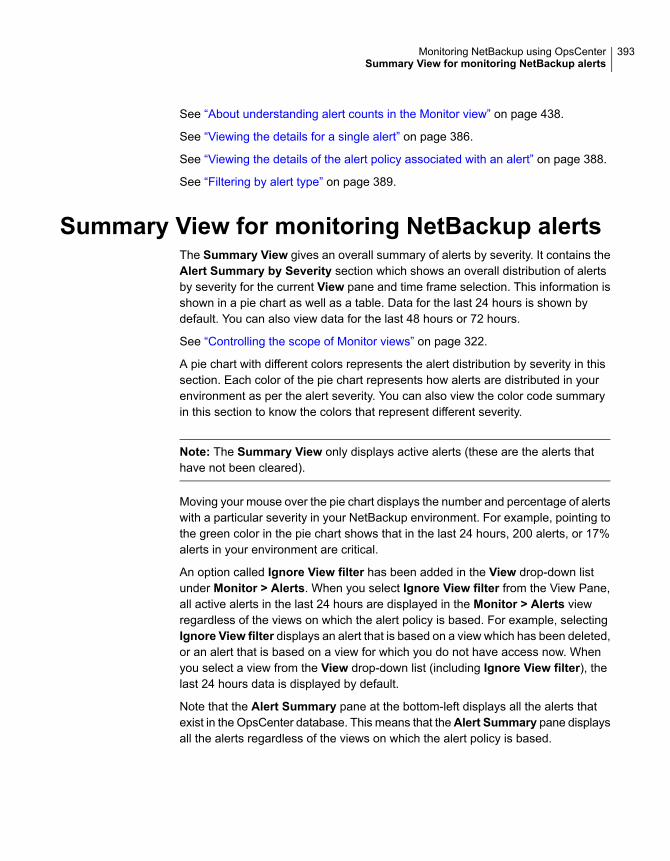
See “About understanding alert counts in the Monitor view” on page 438.
See “Viewing the details for a single alert” on page 386.
See “Viewing the details of the alert policy associated with an alert” on page 388.
See “Filtering by alert type” on page 389.
Summary View for monitoring NetBackup alertsThe Summary View gives an overall summary of alerts by severity. It contains theAlert Summary by Severity section which shows an overall distribution of alertsby severity for the current View pane and time frame selection. This information isshown in a pie chart as well as a table. Data for the last 24 hours is shown bydefault. You can also view data for the last 48 hours or 72 hours.
See “Controlling the scope of Monitor views” on page 322.
A pie chart with different colors represents the alert distribution by severity in thissection. Each color of the pie chart represents how alerts are distributed in yourenvironment as per the alert severity. You can also view the color code summaryin this section to know the colors that represent different severity.
Note: The Summary View only displays active alerts (these are the alerts thathave not been cleared).
Moving your mouse over the pie chart displays the number and percentage of alertswith a particular severity in your NetBackup environment. For example, pointing tothe green color in the pie chart shows that in the last 24 hours, 200 alerts, or 17%alerts in your environment are critical.
An option called Ignore View filter has been added in the View drop-down listunder Monitor > Alerts. When you select Ignore View filter from the View Pane,all active alerts in the last 24 hours are displayed in the Monitor > Alerts viewregardless of the views on which the alert policy is based. For example, selectingIgnore View filter displays an alert that is based on a view which has been deleted,or an alert that is based on a view for which you do not have access now. Whenyou select a view from the View drop-down list (including Ignore View filter), thelast 24 hours data is displayed by default.
Note that the Alert Summary pane at the bottom-left displays all the alerts thatexist in the OpsCenter database. This means that theAlert Summary pane displaysall the alerts regardless of the views on which the alert policy is based.
393Monitoring NetBackup using OpsCenterSummary View for monitoring NetBackup alerts
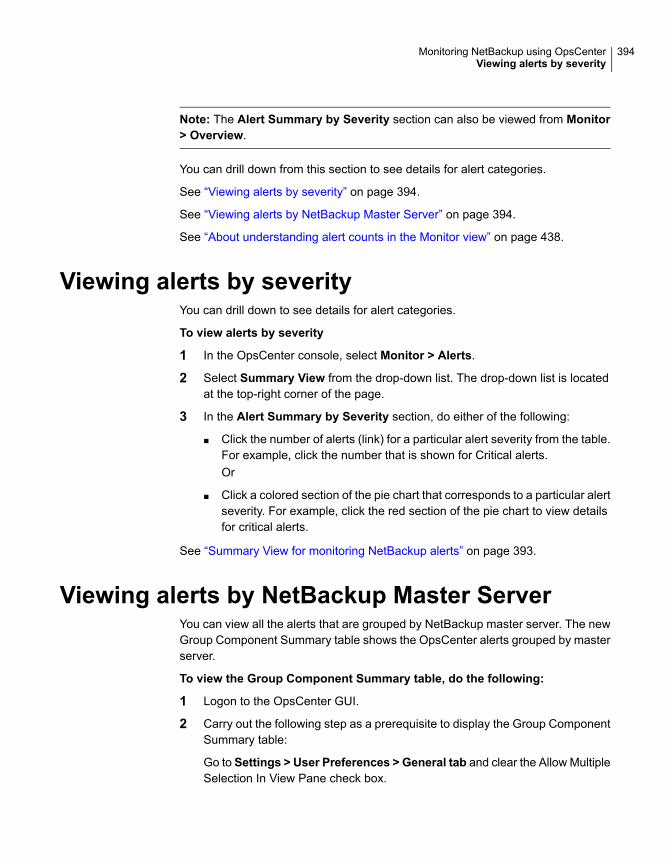
Note: The Alert Summary by Severity section can also be viewed from Monitor> Overview.
You can drill down from this section to see details for alert categories.
See “Viewing alerts by severity” on page 394.
See “Viewing alerts by NetBackup Master Server” on page 394.
See “About understanding alert counts in the Monitor view” on page 438.
Viewing alerts by severityYou can drill down to see details for alert categories.
To view alerts by severity
1 In the OpsCenter console, select Monitor > Alerts.
2 Select Summary View from the drop-down list. The drop-down list is locatedat the top-right corner of the page.
3 In the Alert Summary by Severity section, do either of the following:
■ Click the number of alerts (link) for a particular alert severity from the table.For example, click the number that is shown for Critical alerts.Or
■ Click a colored section of the pie chart that corresponds to a particular alertseverity. For example, click the red section of the pie chart to view detailsfor critical alerts.
See “Summary View for monitoring NetBackup alerts” on page 393.
Viewing alerts by NetBackup Master ServerYou can view all the alerts that are grouped by NetBackup master server. The newGroup Component Summary table shows the OpsCenter alerts grouped by masterserver.
To view the Group Component Summary table, do the following:
1 Logon to the OpsCenter GUI.
2 Carry out the following step as a prerequisite to display the Group ComponentSummary table:
Go to Settings > User Preferences > General tab and clear the Allow MultipleSelection In View Pane check box.
394Monitoring NetBackup using OpsCenterViewing alerts by severity
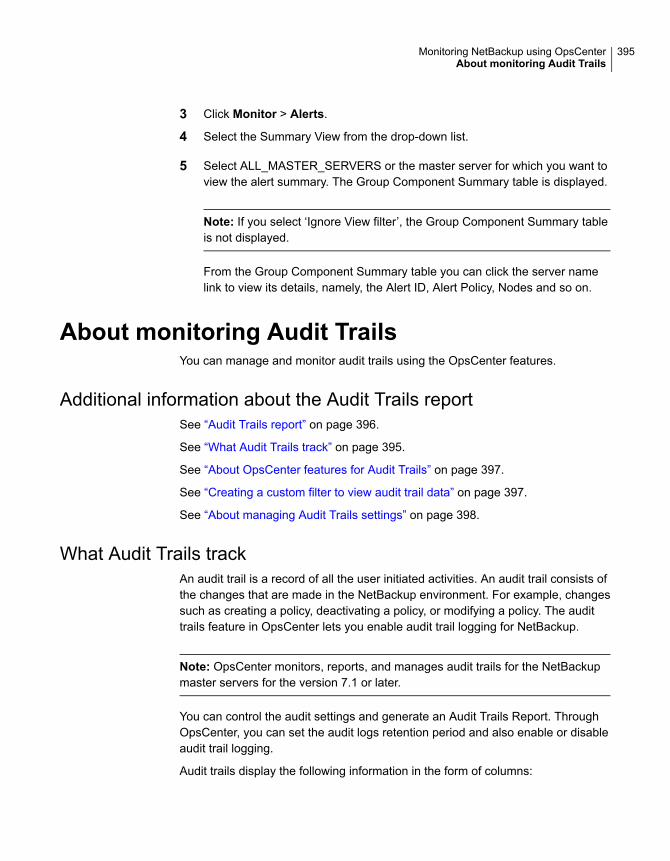
3 Click Monitor > Alerts.
4 Select the Summary View from the drop-down list.
5 Select ALL_MASTER_SERVERS or the master server for which you want toview the alert summary. The Group Component Summary table is displayed.
Note: If you select ‘Ignore View filter’, the Group Component Summary tableis not displayed.
From the Group Component Summary table you can click the server namelink to view its details, namely, the Alert ID, Alert Policy, Nodes and so on.
About monitoring Audit TrailsYou can manage and monitor audit trails using the OpsCenter features.
Additional information about the Audit Trails reportSee “Audit Trails report” on page 396.
See “What Audit Trails track” on page 395.
See “About OpsCenter features for Audit Trails” on page 397.
See “Creating a custom filter to view audit trail data” on page 397.
See “About managing Audit Trails settings” on page 398.
What Audit Trails trackAn audit trail is a record of all the user initiated activities. An audit trail consists ofthe changes that are made in the NetBackup environment. For example, changessuch as creating a policy, deactivating a policy, or modifying a policy. The audittrails feature in OpsCenter lets you enable audit trail logging for NetBackup.
Note: OpsCenter monitors, reports, and manages audit trails for the NetBackupmaster servers for the version 7.1 or later.
You can control the audit settings and generate an Audit Trails Report. ThroughOpsCenter, you can set the audit logs retention period and also enable or disableaudit trail logging.
Audit trails display the following information in the form of columns:
395Monitoring NetBackup using OpsCenterAbout monitoring Audit Trails
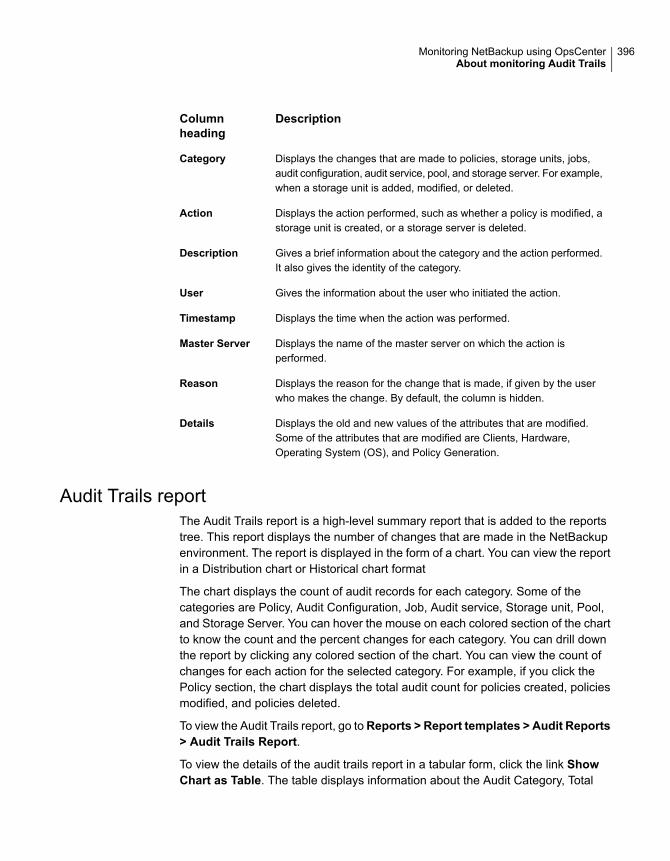
DescriptionColumnheading
Displays the changes that are made to policies, storage units, jobs,audit configuration, audit service, pool, and storage server. For example,when a storage unit is added, modified, or deleted.
Category
Displays the action performed, such as whether a policy is modified, astorage unit is created, or a storage server is deleted.
Action
Gives a brief information about the category and the action performed.It also gives the identity of the category.
Description
Gives the information about the user who initiated the action.User
Displays the time when the action was performed.Timestamp
Displays the name of the master server on which the action isperformed.
Master Server
Displays the reason for the change that is made, if given by the userwho makes the change. By default, the column is hidden.
Reason
Displays the old and new values of the attributes that are modified.Some of the attributes that are modified are Clients, Hardware,Operating System (OS), and Policy Generation.
Details
Audit Trails reportThe Audit Trails report is a high-level summary report that is added to the reportstree. This report displays the number of changes that are made in the NetBackupenvironment. The report is displayed in the form of a chart. You can view the reportin a Distribution chart or Historical chart format
The chart displays the count of audit records for each category. Some of thecategories are Policy, Audit Configuration, Job, Audit service, Storage unit, Pool,and Storage Server. You can hover the mouse on each colored section of the chartto know the count and the percent changes for each category. You can drill downthe report by clicking any colored section of the chart. You can view the count ofchanges for each action for the selected category. For example, if you click thePolicy section, the chart displays the total audit count for policies created, policiesmodified, and policies deleted.
To view the Audit Trails report, go toReports > Report templates > Audit Reports> Audit Trails Report.
To view the details of the audit trails report in a tabular form, click the link ShowChart as Table. The table displays information about the Audit Category, Total
396Monitoring NetBackup using OpsCenterAbout monitoring Audit Trails
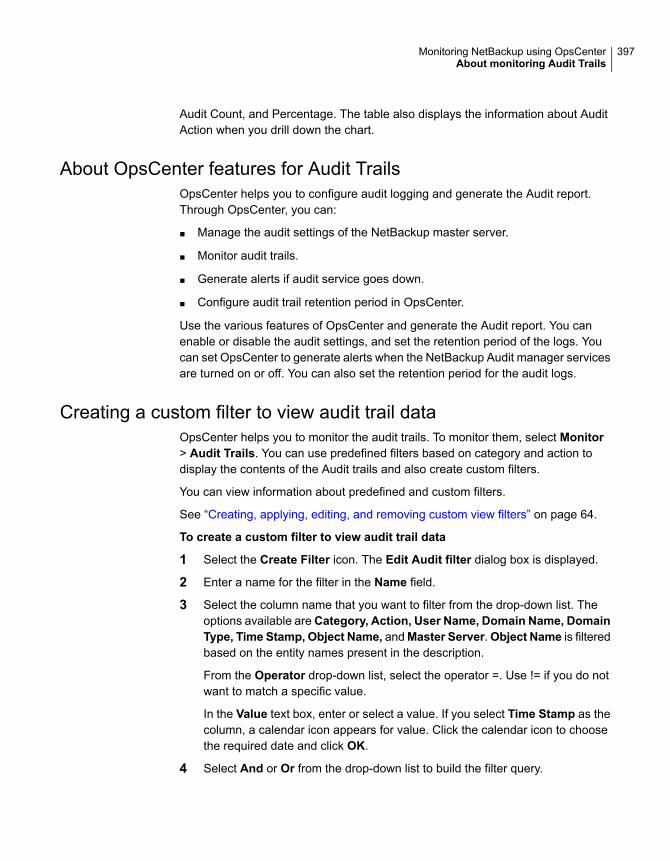
Audit Count, and Percentage. The table also displays the information about AuditAction when you drill down the chart.
About OpsCenter features for Audit TrailsOpsCenter helps you to configure audit logging and generate the Audit report.Through OpsCenter, you can:
■ Manage the audit settings of the NetBackup master server.
■ Monitor audit trails.
■ Generate alerts if audit service goes down.
■ Configure audit trail retention period in OpsCenter.
Use the various features of OpsCenter and generate the Audit report. You canenable or disable the audit settings, and set the retention period of the logs. Youcan set OpsCenter to generate alerts when the NetBackup Audit manager servicesare turned on or off. You can also set the retention period for the audit logs.
Creating a custom filter to view audit trail dataOpsCenter helps you to monitor the audit trails. To monitor them, select Monitor> Audit Trails. You can use predefined filters based on category and action todisplay the contents of the Audit trails and also create custom filters.
You can view information about predefined and custom filters.
See “Creating, applying, editing, and removing custom view filters” on page 64.
To create a custom filter to view audit trail data
1 Select the Create Filter icon. The Edit Audit filter dialog box is displayed.
2 Enter a name for the filter in the Name field.
3 Select the column name that you want to filter from the drop-down list. Theoptions available areCategory, Action, User Name, Domain Name, DomainType, Time Stamp, Object Name, andMaster Server.Object Name is filteredbased on the entity names present in the description.
From the Operator drop-down list, select the operator =. Use != if you do notwant to match a specific value.
In the Value text box, enter or select a value. If you select Time Stamp as thecolumn, a calendar icon appears for value. Click the calendar icon to choosethe required date and click OK.
4 Select And or Or from the drop-down list to build the filter query.
397Monitoring NetBackup using OpsCenterAbout monitoring Audit Trails
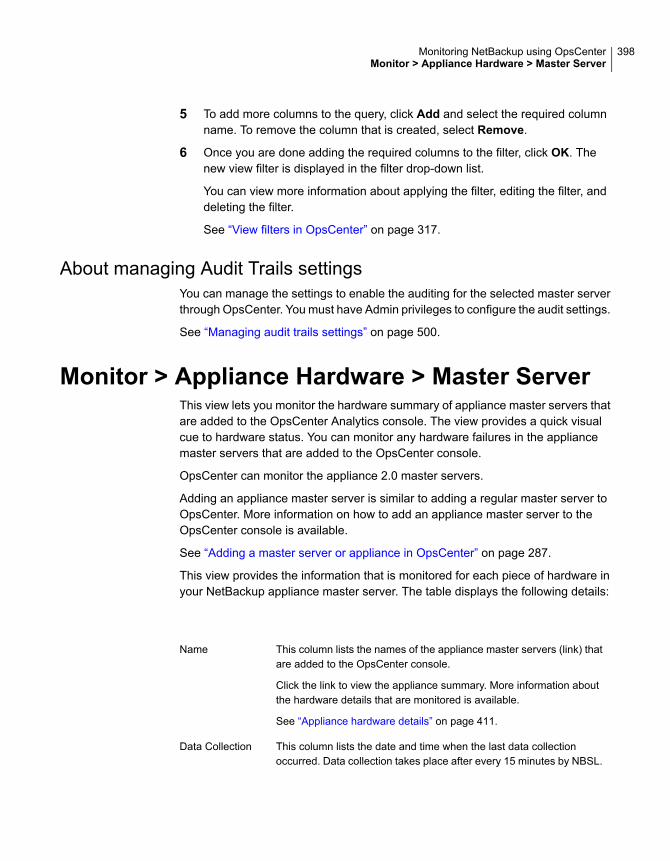
5 To add more columns to the query, click Add and select the required columnname. To remove the column that is created, select Remove.
6 Once you are done adding the required columns to the filter, click OK. Thenew view filter is displayed in the filter drop-down list.
You can view more information about applying the filter, editing the filter, anddeleting the filter.
See “View filters in OpsCenter” on page 317.
About managing Audit Trails settingsYou can manage the settings to enable the auditing for the selected master serverthrough OpsCenter. You must have Admin privileges to configure the audit settings.
See “Managing audit trails settings” on page 500.
Monitor > Appliance Hardware > Master ServerThis view lets you monitor the hardware summary of appliance master servers thatare added to the OpsCenter Analytics console. The view provides a quick visualcue to hardware status. You can monitor any hardware failures in the appliancemaster servers that are added to the OpsCenter console.
OpsCenter can monitor the appliance 2.0 master servers.
Adding an appliance master server is similar to adding a regular master server toOpsCenter. More information on how to add an appliance master server to theOpsCenter console is available.
See “Adding a master server or appliance in OpsCenter” on page 287.
This view provides the information that is monitored for each piece of hardware inyour NetBackup appliance master server. The table displays the following details:
This column lists the names of the appliance master servers (link) thatare added to the OpsCenter console.
Click the link to view the appliance summary. More information aboutthe hardware details that are monitored is available.
See “Appliance hardware details” on page 411.
Name
This column lists the date and time when the last data collectionoccurred. Data collection takes place after every 15 minutes by NBSL.
Data Collection
398Monitoring NetBackup using OpsCenterMonitor > Appliance Hardware > Master Server
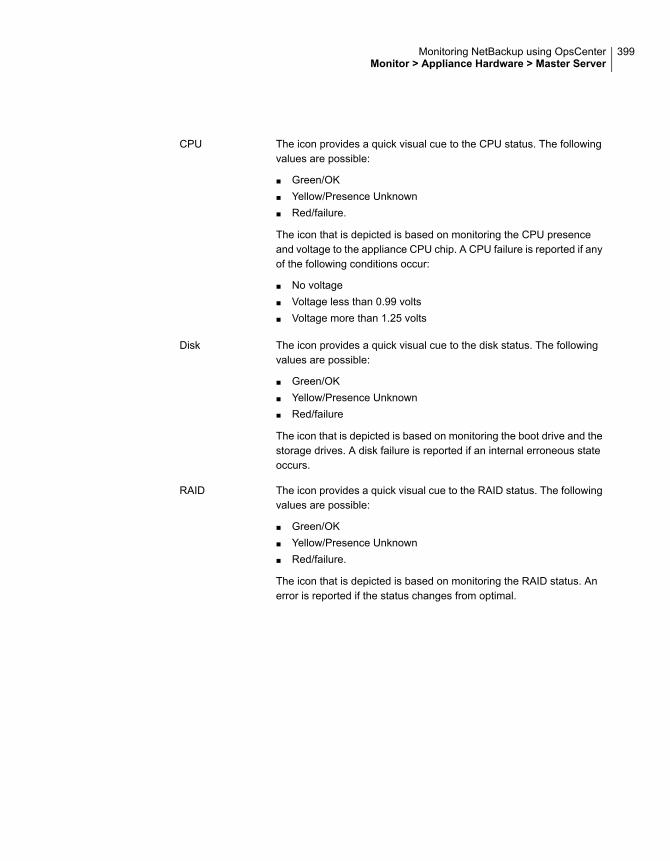
The icon provides a quick visual cue to the CPU status. The followingvalues are possible:
■ Green/OK■ Yellow/Presence Unknown■ Red/failure.
The icon that is depicted is based on monitoring the CPU presenceand voltage to the appliance CPU chip. A CPU failure is reported if anyof the following conditions occur:
■ No voltage■ Voltage less than 0.99 volts■ Voltage more than 1.25 volts
CPU
The icon provides a quick visual cue to the disk status. The followingvalues are possible:
■ Green/OK■ Yellow/Presence Unknown■ Red/failure
The icon that is depicted is based on monitoring the boot drive and thestorage drives. A disk failure is reported if an internal erroneous stateoccurs.
Disk
The icon provides a quick visual cue to the RAID status. The followingvalues are possible:
■ Green/OK■ Yellow/Presence Unknown■ Red/failure.
The icon that is depicted is based on monitoring the RAID status. Anerror is reported if the status changes from optimal.
RAID
399Monitoring NetBackup using OpsCenterMonitor > Appliance Hardware > Master Server
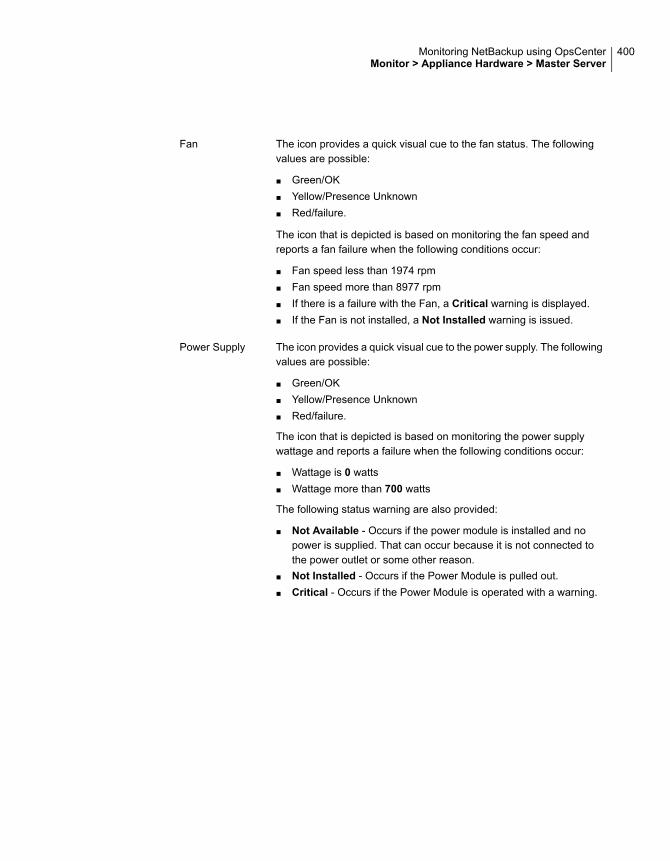
The icon provides a quick visual cue to the fan status. The followingvalues are possible:
■ Green/OK■ Yellow/Presence Unknown■ Red/failure.
The icon that is depicted is based on monitoring the fan speed andreports a fan failure when the following conditions occur:
■ Fan speed less than 1974 rpm■ Fan speed more than 8977 rpm■ If there is a failure with the Fan, a Critical warning is displayed.■ If the Fan is not installed, a Not Installed warning is issued.
Fan
The icon provides a quick visual cue to the power supply. The followingvalues are possible:
■ Green/OK■ Yellow/Presence Unknown■ Red/failure.
The icon that is depicted is based on monitoring the power supplywattage and reports a failure when the following conditions occur:
■ Wattage is 0 watts■ Wattage more than 700 watts
The following status warning are also provided:
■ Not Available - Occurs if the power module is installed and nopower is supplied. That can occur because it is not connected tothe power outlet or some other reason.
■ Not Installed - Occurs if the Power Module is pulled out.■ Critical - Occurs if the Power Module is operated with a warning.
Power Supply
400Monitoring NetBackup using OpsCenterMonitor > Appliance Hardware > Master Server
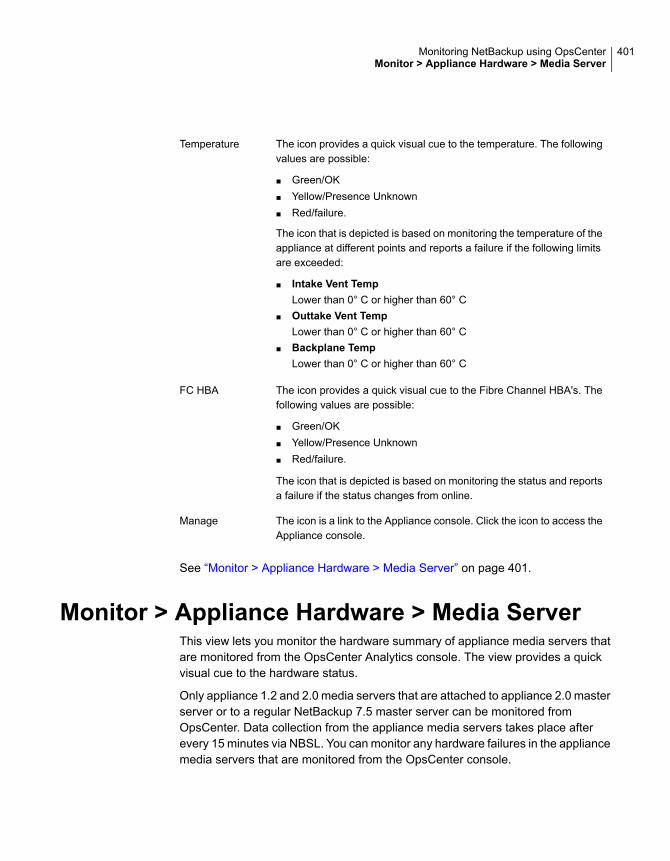
The icon provides a quick visual cue to the temperature. The followingvalues are possible:
■ Green/OK■ Yellow/Presence Unknown■ Red/failure.
The icon that is depicted is based on monitoring the temperature of theappliance at different points and reports a failure if the following limitsare exceeded:
■ Intake Vent TempLower than 0° C or higher than 60° C
■ Outtake Vent TempLower than 0° C or higher than 60° C
■ Backplane TempLower than 0° C or higher than 60° C
Temperature
The icon provides a quick visual cue to the Fibre Channel HBA's. Thefollowing values are possible:
■ Green/OK■ Yellow/Presence Unknown■ Red/failure.
The icon that is depicted is based on monitoring the status and reportsa failure if the status changes from online.
FC HBA
The icon is a link to the Appliance console. Click the icon to access theAppliance console.
Manage
See “Monitor > Appliance Hardware > Media Server” on page 401.
Monitor > Appliance Hardware > Media ServerThis view lets you monitor the hardware summary of appliance media servers thatare monitored from the OpsCenter Analytics console. The view provides a quickvisual cue to the hardware status.
Only appliance 1.2 and 2.0 media servers that are attached to appliance 2.0 masterserver or to a regular NetBackup 7.5 master server can be monitored fromOpsCenter. Data collection from the appliance media servers takes place afterevery 15 minutes via NBSL. You can monitor any hardware failures in the appliancemedia servers that are monitored from the OpsCenter console.
401Monitoring NetBackup using OpsCenterMonitor > Appliance Hardware > Media Server

Note that you cannot add an appliance media server directly to the OpsCenterconsole. You can add an appliance master server or a regular master server towhich it is connected.
See “Adding a master server or appliance in OpsCenter” on page 287.
This view provides the information that is monitored for each piece of hardware inyour NetBackup media appliance. The table displays the following details:
This column lists the names of the appliance media servers (link) thatare monitored from the OpsCenter console.
Click the link to view the appliance summary. More information aboutthe hardware details that are monitored is available.
See “Appliance hardware details” on page 411.
Name
This column lists the appliance master server or the regular NetBackupmaster server that the appliance media server is connected to.
Master Server
This column lists the date and time when the last data collectionoccurred. Data collection takes place after every 15 minutes via NBSL.
Data Collection
The icon provides a quick visual cue to the CPU status. This may havethe following values:
■ Green=OK■ Yellow=warning■ Red=failure
The icon that is depicted is based on monitoring the CPU presenceand voltage to the appliance CPU chip. A CPU failure is reported if anyof the following conditions occur:
■ No voltage■ Voltage less than 0.99 volts■ Voltage more than 1.25 volts
CPU
The icon provides a quick visual cue to the disk status. This may havethe following values:
■ Green=OK■ Yellow=warning■ Red=failure
The icon that is depicted is based on monitoring the boot drive and thestorage drives. A disk failure is reported if an internal erroneous stateoccurs.
Disk
402Monitoring NetBackup using OpsCenterMonitor > Appliance Hardware > Media Server

The icon provides a quick visual cue to the RAID status. This may havethe following values:
■ Green=OK■ Yellow=warning■ Red=failure
The icon that is depicted is based on monitoring the RAID status. Anerror is reported if the status changes from optimal.
RAID
The icon provides a quick visual cue to the fan status. This may havethe following values:
■ Green=OK■ Yellow=warning■ Red=failure
The icon that is depicted is based on monitoring the fan speed andreports a fan failure when the following conditions occur:
■ Fan speed less than 1974 rpm■ Fan speed more than 8977 rpm■ If there is a failure with the Fan, a Critical warning is displayed.■ If the Fan is not installed, a Not Installed warning is issued.
Fan
The icon provides a quick visual cue to the power supply. This mayhave the following values:
■ Green=OK■ Yellow=warning■ Red=failure
The icon that is depicted is based on monitoring the power supplywattage and reports a failure when the following conditions occur:
■ Wattage is 0 watts■ Wattage more than 700 watts
The following status warning are also provided:
■ Not Available - Occurs if the power module is installed and nopower is supplied. That can occur because it is not connected tothe power outlet or some other reason.
■ Not Installed - Occurs if the Power Module is pulled out.■ Critical - Occurs if the Power Module is operated with a warning.
Power Supply
403Monitoring NetBackup using OpsCenterMonitor > Appliance Hardware > Media Server
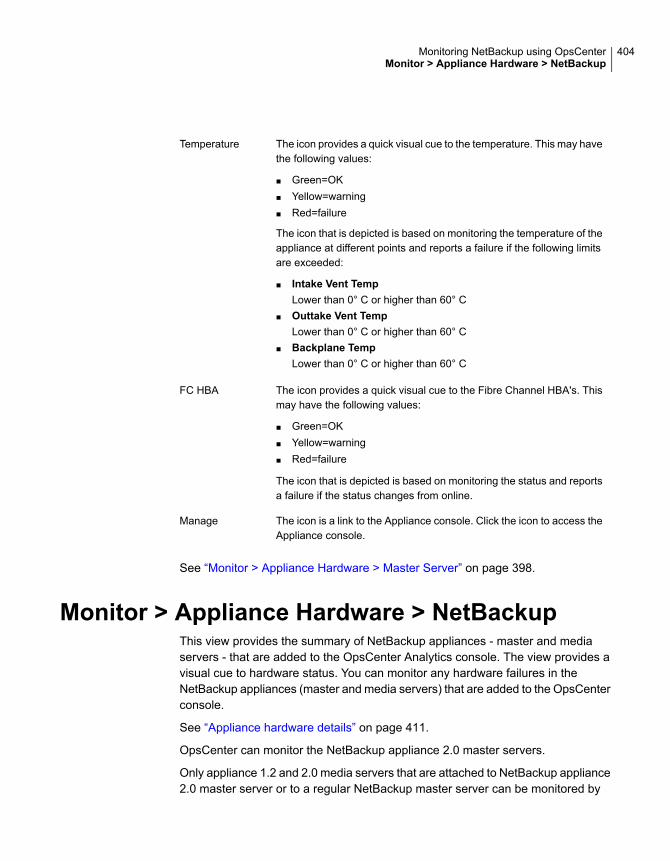
The icon provides a quick visual cue to the temperature. This may havethe following values:
■ Green=OK■ Yellow=warning■ Red=failure
The icon that is depicted is based on monitoring the temperature of theappliance at different points and reports a failure if the following limitsare exceeded:
■ Intake Vent TempLower than 0° C or higher than 60° C
■ Outtake Vent TempLower than 0° C or higher than 60° C
■ Backplane TempLower than 0° C or higher than 60° C
Temperature
The icon provides a quick visual cue to the Fibre Channel HBA's. Thismay have the following values:
■ Green=OK■ Yellow=warning■ Red=failure
The icon that is depicted is based on monitoring the status and reportsa failure if the status changes from online.
FC HBA
The icon is a link to the Appliance console. Click the icon to access theAppliance console.
Manage
See “Monitor > Appliance Hardware > Master Server” on page 398.
Monitor > Appliance Hardware > NetBackupThis view provides the summary of NetBackup appliances - master and mediaservers - that are added to the OpsCenter Analytics console. The view provides avisual cue to hardware status. You can monitor any hardware failures in theNetBackup appliances (master and media servers) that are added to the OpsCenterconsole.
See “Appliance hardware details” on page 411.
OpsCenter can monitor the NetBackup appliance 2.0 master servers.
Only appliance 1.2 and 2.0 media servers that are attached to NetBackup appliance2.0 master server or to a regular NetBackup master server can be monitored by
404Monitoring NetBackup using OpsCenterMonitor > Appliance Hardware > NetBackup

OpsCenter. Data collection from the appliance media servers takes place afterevery 15 minutes via NBSL. You can monitor any hardware failures in the appliancemedia servers that are monitored from the OpsCenter console.
Adding a NetBackup appliance master server is similar to adding a regular masterserver to OpsCenter. More information on how to add an appliance master serverto the OpsCenter console is available.
See “Adding a master server or appliance in OpsCenter” on page 287.
Note: Note that you cannot add a NetBackup appliance media server directly tothe OpsCenter console. You can add an appliance master server or a regular masterserver to which the media server is connected.
This view provides the information that is monitored for each piece of hardware inyour NetBackup appliance. The table displays the following details:
Name of the NetBackup appliance host (master or media server) thatis monitored by OpsCenter.
Host Name
Name of the NetBackup master server that is associated with thisappliance.
Master Server
Type of the NetBackup appliance host: master server appliance ormedia server appliance.
Host Type
This column lists the date and time when the last data collectionoccurred. Data collection takes place after every 15 minutes by NBSL.
Data Collection
The icon provides a quick visual cue to the CPU status. The followingvalues are possible:
■ Green/OK■ Yellow/Presence Unknown■ Red/failure.
The icon that is depicted is based on monitoring the CPU presenceand voltage to the appliance CPU chip. A CPU failure is reported if anyof the following conditions occur:
■ No voltage■ Voltage less than 0.99 volts■ Voltage more than 1.25 volts
CPU
405Monitoring NetBackup using OpsCenterMonitor > Appliance Hardware > NetBackup

The icon provides a quick visual cue to the disk status. The followingvalues are possible:
■ Green/OK■ Yellow/Presence Unknown■ Red/failure
The icon that is depicted is based on monitoring the boot drive and thestorage drives. A disk failure is reported if an internal erroneous stateoccurs.
Disk
The icon provides a quick visual cue to the RAID status. The followingvalues are possible:
■ Green/OK■ Yellow/Presence Unknown■ Red/failure.
The icon that is depicted is based on monitoring the RAID status. Anerror is reported if the status changes from optimal.
RAID
The icon provides a quick visual cue to the fan status. The followingvalues are possible:
■ Green/OK■ Yellow/Presence Unknown■ Red/failure.
The icon that is depicted is based on monitoring the fan speed andreports a fan failure when the following conditions occur:
■ Fan speed less than 1974 rpm■ Fan speed more than 8977 rpm■ If there is a failure with the Fan, a Critical warning is displayed.■ If the Fan is not installed, a Not Installed warning is issued.
Fan
406Monitoring NetBackup using OpsCenterMonitor > Appliance Hardware > NetBackup
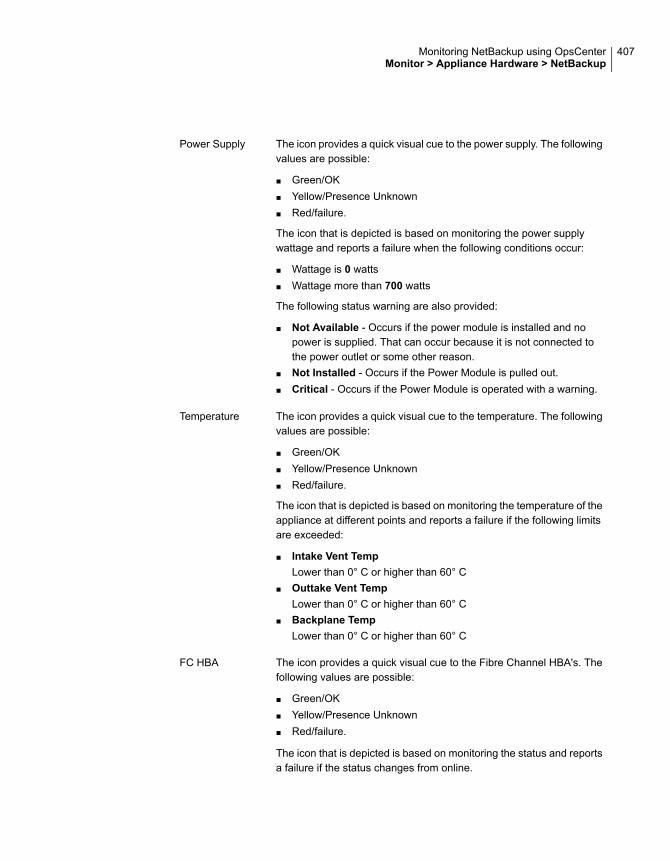
The icon provides a quick visual cue to the power supply. The followingvalues are possible:
■ Green/OK■ Yellow/Presence Unknown■ Red/failure.
The icon that is depicted is based on monitoring the power supplywattage and reports a failure when the following conditions occur:
■ Wattage is 0 watts■ Wattage more than 700 watts
The following status warning are also provided:
■ Not Available - Occurs if the power module is installed and nopower is supplied. That can occur because it is not connected tothe power outlet or some other reason.
■ Not Installed - Occurs if the Power Module is pulled out.■ Critical - Occurs if the Power Module is operated with a warning.
Power Supply
The icon provides a quick visual cue to the temperature. The followingvalues are possible:
■ Green/OK■ Yellow/Presence Unknown■ Red/failure.
The icon that is depicted is based on monitoring the temperature of theappliance at different points and reports a failure if the following limitsare exceeded:
■ Intake Vent TempLower than 0° C or higher than 60° C
■ Outtake Vent TempLower than 0° C or higher than 60° C
■ Backplane TempLower than 0° C or higher than 60° C
Temperature
The icon provides a quick visual cue to the Fibre Channel HBA's. Thefollowing values are possible:
■ Green/OK■ Yellow/Presence Unknown■ Red/failure.
The icon that is depicted is based on monitoring the status and reportsa failure if the status changes from online.
FC HBA
407Monitoring NetBackup using OpsCenterMonitor > Appliance Hardware > NetBackup

The icon is a link to the Appliance console. Click the icon to access theAppliance console.
Manage
Monitor > Appliance Hardware > DeduplicationOpsCenter can centrally monitor the hardware information of multiple deduplicationappliances. You can monitor a deduplication appliance that is deployed as astandalone Storage Pool Authority (SPA), as a Content Router (CR), or as aPureDisk deduplication option (PDDO) storage server to a NetBackup domain. Youcan add a deduplication appliance master server in OpsCenter in order to monitorit. You can also configure hardware alerts for both NetBackup and deduplicationappliances and view deduplication reports using OpsCenter.
This tab provides the summary of Deduplication appliances that are added to theOpsCenter Analytics console. The view provides a visual cue to hardware status.You can monitor any hardware failures in the Deduplication appliance master serversthat are added to the OpsCenter console.
See “Appliance hardware details” on page 411.
This view provides the information that is monitored for each piece of hardware inyour Deduplication appliance. The table displays the following details:
Name of the Deduplication appliance host that is monitored byOpsCenter.
Host Name
Type of the Deduplication appliance host: SPA or CR.Host Type
This column lists the date and time when the last data collectionoccurred. Data collection takes place after every 15 minutes .
Data Collection
408Monitoring NetBackup using OpsCenterMonitor > Appliance Hardware > Deduplication

The icon provides a quick visual cue to the CPU status. The followingvalues are possible:
■ Green/OK■ Yellow/Presence Unknown■ Red/failure.
The icon that is depicted is based on monitoring the CPU presenceand voltage to the appliance CPU chip. A CPU failure is reported if anyof the following conditions occur:
■ No voltage■ Voltage less than 0.99 volts■ Voltage more than 1.25 volts
CPU
The icon provides a quick visual cue to the disk status. The followingvalues are possible:
■ Green/OK■ Yellow/Presence Unknown■ Red/failure
The icon that is depicted is based on monitoring the boot drive and thestorage drives. A disk failure is reported if an internal erroneous stateoccurs.
Disk
The icon provides a quick visual cue to the RAID status. The followingvalues are possible:
■ Green/OK■ Yellow/Presence Unknown■ Red/failure.
The icon that is depicted is based on monitoring the RAID status. Anerror is reported if the status changes from optimal.
RAID
409Monitoring NetBackup using OpsCenterMonitor > Appliance Hardware > Deduplication

The icon provides a quick visual cue to the fan status. The followingvalues are possible:
■ Green/OK■ Yellow/Presence Unknown■ Red/failure.
The icon that is depicted is based on monitoring the fan speed andreports a fan failure when the following conditions occur:
■ Fan speed less than 1974 rpm■ Fan speed more than 8977 rpm■ If there is a failure with the Fan, a Critical warning is displayed.■ If the Fan is not installed, a Not Installed warning is issued.
Fan
The icon provides a quick visual cue to the power supply. The followingvalues are possible:
■ Green/OK■ Yellow/Presence Unknown■ Red/failure.
The icon that is depicted is based on monitoring the power supplywattage and reports a failure when the following conditions occur:
■ Wattage is 0 watts■ Wattage more than 700 watts
The following status warning are also provided:
■ Not Available - Occurs if the power module is installed and nopower is supplied. That can occur because it is not connected tothe power outlet or some other reason.
■ Not Installed - Occurs if the Power Module is pulled out.■ Critical - Occurs if the Power Module is operated with a warning.
Power Supply
410Monitoring NetBackup using OpsCenterMonitor > Appliance Hardware > Deduplication
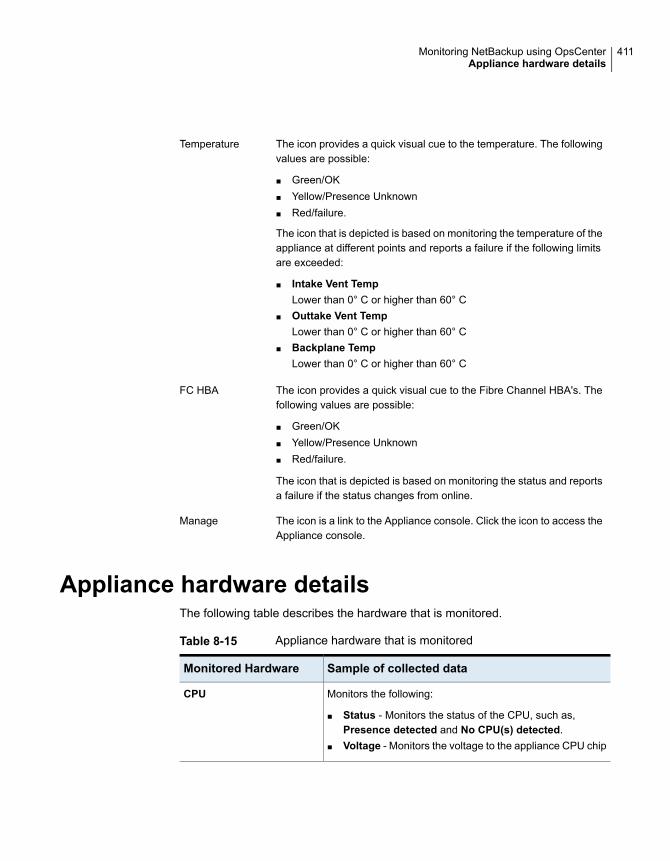
The icon provides a quick visual cue to the temperature. The followingvalues are possible:
■ Green/OK■ Yellow/Presence Unknown■ Red/failure.
The icon that is depicted is based on monitoring the temperature of theappliance at different points and reports a failure if the following limitsare exceeded:
■ Intake Vent TempLower than 0° C or higher than 60° C
■ Outtake Vent TempLower than 0° C or higher than 60° C
■ Backplane TempLower than 0° C or higher than 60° C
Temperature
The icon provides a quick visual cue to the Fibre Channel HBA's. Thefollowing values are possible:
■ Green/OK■ Yellow/Presence Unknown■ Red/failure.
The icon that is depicted is based on monitoring the status and reportsa failure if the status changes from online.
FC HBA
The icon is a link to the Appliance console. Click the icon to access theAppliance console.
Manage
Appliance hardware detailsThe following table describes the hardware that is monitored.
Table 8-15 Appliance hardware that is monitored
Sample of collected dataMonitored Hardware
Monitors the following:
■ Status - Monitors the status of the CPU, such as,Presence detected and No CPU(s) detected.
■ Voltage - Monitors the voltage to the appliance CPU chip
CPU
411Monitoring NetBackup using OpsCenterAppliance hardware details

Table 8-15 Appliance hardware that is monitored (continued)
Sample of collected dataMonitored Hardware
This view provides the following information:
■ Slot No - Slot in the robot that contains the volume.■ Status - Current status of the media. The status can be
Frozen, Active, etc.■ Capacity - Capacity that is in use.■ Type - The type of disk that is configured.■ Enclosure ID - ID of the enclosure that the disk resides
in.
Disk
Monitors the RAID status and reports an error if the statuschanges from optimal. The following data is collected:
■ Name - The name of the RAID device.■ Status - Shows the current status of the device, such as
Optimal.■ Capacity - The capacity of each device.■ Type - The type of RAID device, such as RAID1 and RAID
6.■ Disks - The disks being used .
RAID
Monitors the following:
■ Status - Monitors the status of the fan, such as, Presencedetected and No Fan(s) detected.
■ Speed - Monitors the fan speed
Fan
Monitors the power supply wattage.Power Supply
Monitors the temperature of the appliance at different points.Temperature Information
Monitors the status and reports a failure, if the status changesfrom online. The following data is collected:
■ Status - Current status of the HBA.■ World Wide Port Name - The port currently in use for a
specific device.■ Speed - Speed at which the HBA operates like 8gbit/s■ Mode - Mode that is configured for the HBA like Initiator
Fibre Channel HBA
The following details are specific to NetBackup 5330 Appliance:
412Monitoring NetBackup using OpsCenterAppliance hardware details
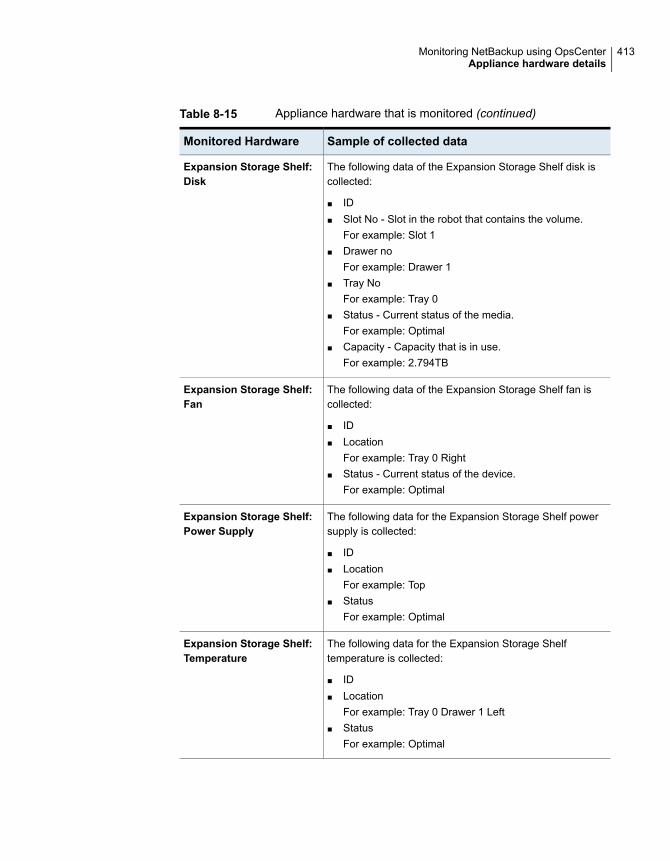
Table 8-15 Appliance hardware that is monitored (continued)
Sample of collected dataMonitored Hardware
The following data of the Expansion Storage Shelf disk iscollected:
■ ID■ Slot No - Slot in the robot that contains the volume.
For example: Slot 1■ Drawer no
For example: Drawer 1■ Tray No
For example: Tray 0■ Status - Current status of the media.
For example: Optimal■ Capacity - Capacity that is in use.
For example: 2.794TB
Expansion Storage Shelf:Disk
The following data of the Expansion Storage Shelf fan iscollected:
■ ID■ Location
For example: Tray 0 Right■ Status - Current status of the device.
For example: Optimal
Expansion Storage Shelf:Fan
The following data for the Expansion Storage Shelf powersupply is collected:
■ ID■ Location
For example: Top■ Status
For example: Optimal
Expansion Storage Shelf:Power Supply
The following data for the Expansion Storage Shelftemperature is collected:
■ ID■ Location
For example: Tray 0 Drawer 1 Left■ Status
For example: Optimal
Expansion Storage Shelf:Temperature
413Monitoring NetBackup using OpsCenterAppliance hardware details
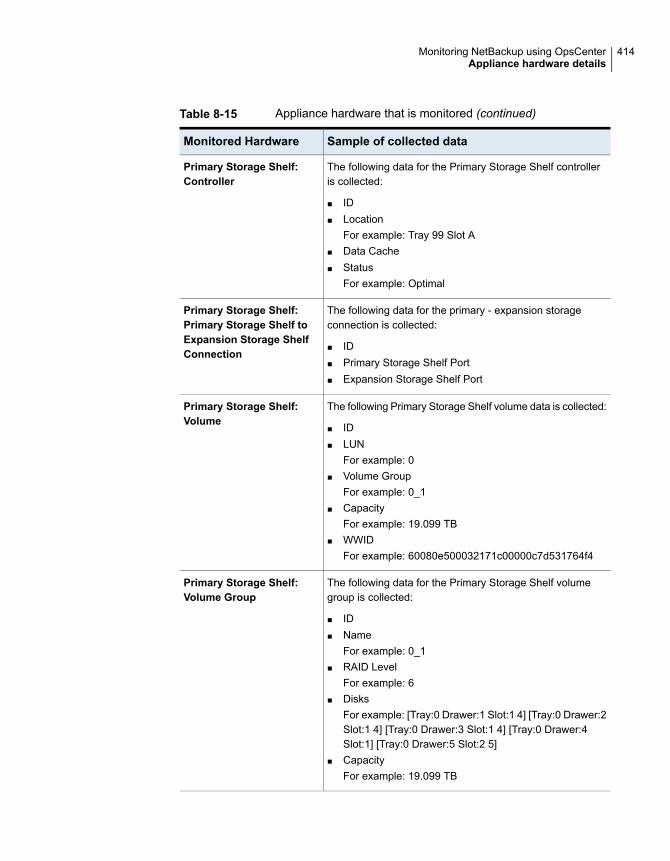
Table 8-15 Appliance hardware that is monitored (continued)
Sample of collected dataMonitored Hardware
The following data for the Primary Storage Shelf controlleris collected:
■ ID■ Location
For example: Tray 99 Slot A■ Data Cache■ Status
For example: Optimal
Primary Storage Shelf:Controller
The following data for the primary - expansion storageconnection is collected:
■ ID■ Primary Storage Shelf Port■ Expansion Storage Shelf Port
Primary Storage Shelf:Primary Storage Shelf toExpansion Storage ShelfConnection
The following Primary Storage Shelf volume data is collected:
■ ID■ LUN
For example: 0■ Volume Group
For example: 0_1■ Capacity
For example: 19.099 TB■ WWID
For example: 60080e500032171c00000c7d531764f4
Primary Storage Shelf:Volume
The following data for the Primary Storage Shelf volumegroup is collected:
■ ID■ Name
For example: 0_1■ RAID Level
For example: 6■ Disks
For example: [Tray:0 Drawer:1 Slot:1 4] [Tray:0 Drawer:2Slot:1 4] [Tray:0 Drawer:3 Slot:1 4] [Tray:0 Drawer:4Slot:1] [Tray:0 Drawer:5 Slot:2 5]
■ CapacityFor example: 19.099 TB
Primary Storage Shelf:Volume Group
414Monitoring NetBackup using OpsCenterAppliance hardware details

Table 8-15 Appliance hardware that is monitored (continued)
Sample of collected dataMonitored Hardware
The following data for the Primary Storage Shelf disk iscollected:
■ ID■ Slot No - Slot in the robot that contains the volume.
For example: Slot 1■ Drawer No
For example: Drawer 1■ Tray No
For example: Tray 0■ Status
For example: Optimal■ Capacity
For example: 2.794TB
Primary Storage Shelf: Disk
The following data for the Primary Storage Shelf fan iscollected:
■ ID■ Location
For example: Tray 99 Right■ Status
For example: Optimal
Primary Storage Shelf: Fan
The following data for the Primary Storage Shelf power supplyis collected:
■ ID■ Location
For example: Top■ Status
For example: Optimal
Primary Storage Shelf:Power Supply
The following data for the Primary Storage Shelf temperatureis collected:
■ ID■ Location
For example: Tray 99 Drawer 1 Left■ Status
For example: Optimal
Primary Storage Shelf:Temperature
415Monitoring NetBackup using OpsCenterAppliance hardware details
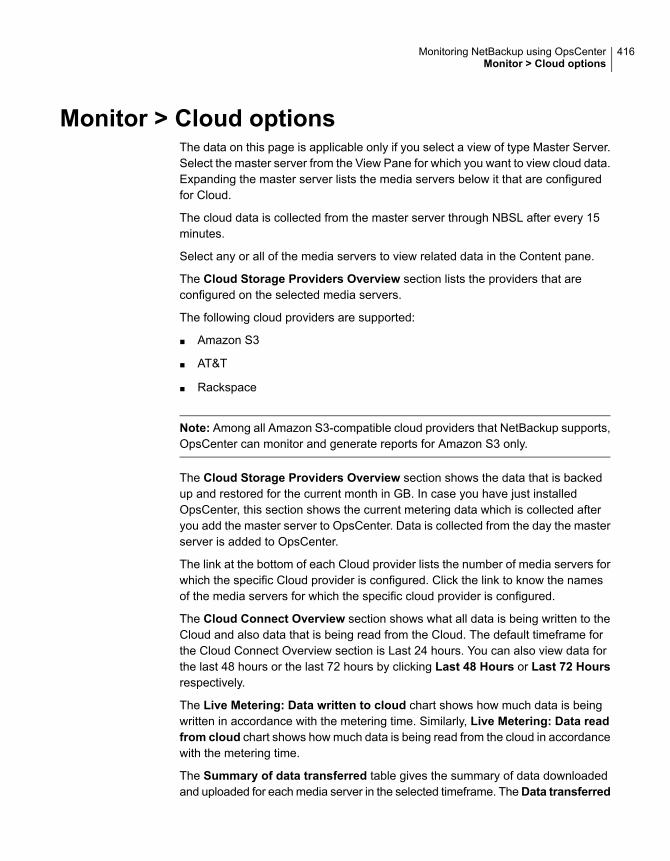
Monitor > Cloud optionsThe data on this page is applicable only if you select a view of type Master Server.Select the master server from the View Pane for which you want to view cloud data.Expanding the master server lists the media servers below it that are configuredfor Cloud.
The cloud data is collected from the master server through NBSL after every 15minutes.
Select any or all of the media servers to view related data in the Content pane.
The Cloud Storage Providers Overview section lists the providers that areconfigured on the selected media servers.
The following cloud providers are supported:
■ Amazon S3
■ AT&T
■ Rackspace
Note: Among all Amazon S3-compatible cloud providers that NetBackup supports,OpsCenter can monitor and generate reports for Amazon S3 only.
The Cloud Storage Providers Overview section shows the data that is backedup and restored for the current month in GB. In case you have just installedOpsCenter, this section shows the current metering data which is collected afteryou add the master server to OpsCenter. Data is collected from the day the masterserver is added to OpsCenter.
The link at the bottom of each Cloud provider lists the number of media servers forwhich the specific Cloud provider is configured. Click the link to know the namesof the media servers for which the specific cloud provider is configured.
The Cloud Connect Overview section shows what all data is being written to theCloud and also data that is being read from the Cloud. The default timeframe forthe Cloud Connect Overview section is Last 24 hours. You can also view data forthe last 48 hours or the last 72 hours by clicking Last 48 Hours or Last 72 Hoursrespectively.
The Live Metering: Data written to cloud chart shows how much data is beingwritten in accordance with the metering time. Similarly, Live Metering: Data readfrom cloud chart shows how much data is being read from the cloud in accordancewith the metering time.
The Summary of data transferred table gives the summary of data downloadedand uploaded for each media server in the selected timeframe. TheData transferred
416Monitoring NetBackup using OpsCenterMonitor > Cloud options
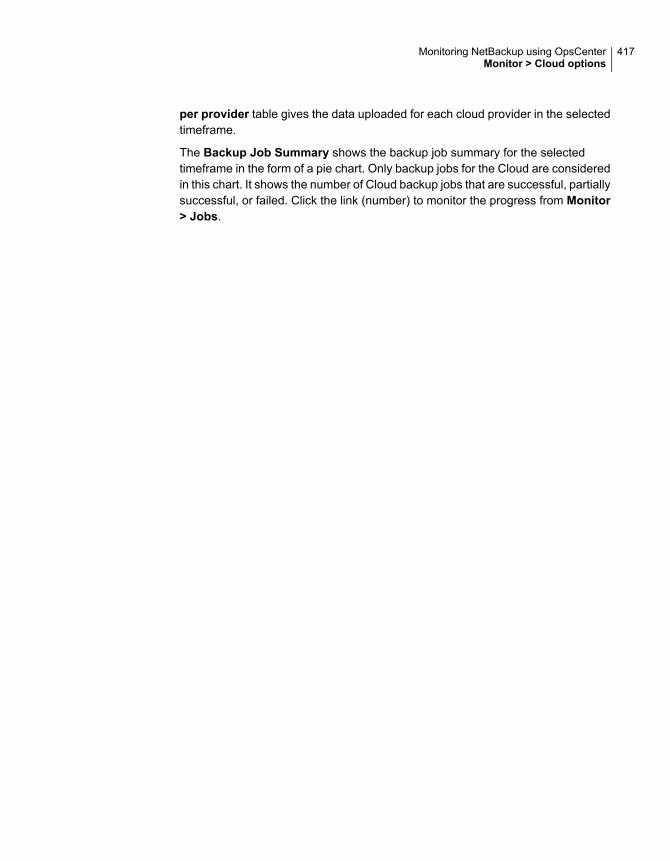
per provider table gives the data uploaded for each cloud provider in the selectedtimeframe.
The Backup Job Summary shows the backup job summary for the selectedtimeframe in the form of a pie chart. Only backup jobs for the Cloud are consideredin this chart. It shows the number of Cloud backup jobs that are successful, partiallysuccessful, or failed. Click the link (number) to monitor the progress from Monitor> Jobs.
417Monitoring NetBackup using OpsCenterMonitor > Cloud options

Managing NetBackupusing OpsCenter
This chapter includes the following topics:
■ About the Manage views
■ Controlling the scope of Manage views
■ About managing alert policies
■ About managing NetBackup storage
■ About managing NetBackup devices
■ About Operational Restore and Guided Recovery operations
■ About managing NetBackup Hosts
■ About managing NetBackup Deployment Analysis
About the Manage viewsThe NetBackup Appliance enables you to use the NetBackup Administration Consoleto manage your clients, create policies, run backups, and perform otheradministration functions. For information on how to perform these functions fromthe NetBackup Administration Console, you must refer to your NetBackup coredocumentation set. If you want to download the latest versions of this documentationset, you can do so from the Veritas Support Web site. For help using the NetBackupAdministration Console, refer to the NetBackup Administrator's Guide, Volume Ion the Support Web site.
9Chapter
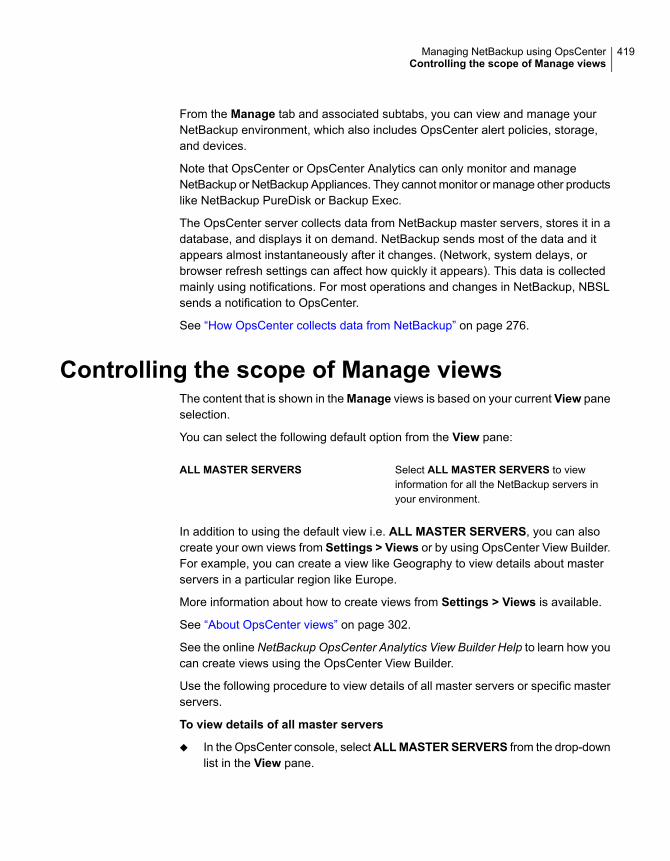
From the Manage tab and associated subtabs, you can view and manage yourNetBackup environment, which also includes OpsCenter alert policies, storage,and devices.
Note that OpsCenter or OpsCenter Analytics can only monitor and manageNetBackup or NetBackup Appliances. They cannot monitor or manage other productslike NetBackup PureDisk or Backup Exec.
The OpsCenter server collects data from NetBackup master servers, stores it in adatabase, and displays it on demand. NetBackup sends most of the data and itappears almost instantaneously after it changes. (Network, system delays, orbrowser refresh settings can affect how quickly it appears). This data is collectedmainly using notifications. For most operations and changes in NetBackup, NBSLsends a notification to OpsCenter.
See “How OpsCenter collects data from NetBackup” on page 276.
Controlling the scope of Manage viewsThe content that is shown in theManage views is based on your current View paneselection.
You can select the following default option from the View pane:
Select ALL MASTER SERVERS to viewinformation for all the NetBackup servers inyour environment.
ALL MASTER SERVERS
In addition to using the default view i.e. ALL MASTER SERVERS, you can alsocreate your own views from Settings > Views or by using OpsCenter View Builder.For example, you can create a view like Geography to view details about masterservers in a particular region like Europe.
More information about how to create views from Settings > Views is available.
See “About OpsCenter views” on page 302.
See the online NetBackup OpsCenter Analytics View Builder Help to learn how youcan create views using the OpsCenter View Builder.
Use the following procedure to view details of all master servers or specific masterservers.
To view details of all master servers
◆ In the OpsCenter console, selectALLMASTERSERVERS from the drop-downlist in the View pane.
419Managing NetBackup using OpsCenterControlling the scope of Manage views
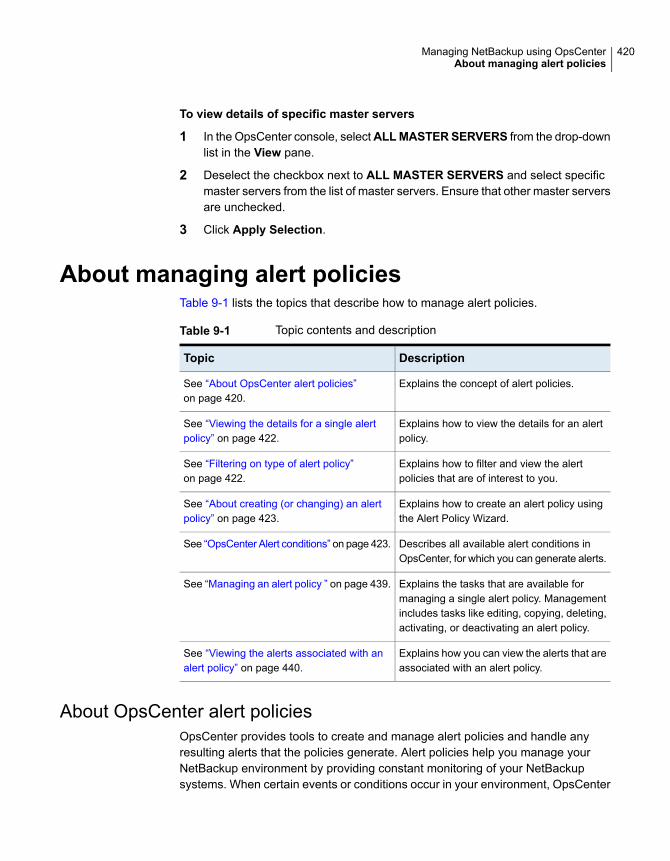
To view details of specific master servers
1 In the OpsCenter console, selectALLMASTERSERVERS from the drop-downlist in the View pane.
2 Deselect the checkbox next to ALL MASTER SERVERS and select specificmaster servers from the list of master servers. Ensure that other master serversare unchecked.
3 Click Apply Selection.
About managing alert policiesTable 9-1 lists the topics that describe how to manage alert policies.
Table 9-1 Topic contents and description
DescriptionTopic
Explains the concept of alert policies.See “About OpsCenter alert policies”on page 420.
Explains how to view the details for an alertpolicy.
See “Viewing the details for a single alertpolicy” on page 422.
Explains how to filter and view the alertpolicies that are of interest to you.
See “Filtering on type of alert policy”on page 422.
Explains how to create an alert policy usingthe Alert Policy Wizard.
See “About creating (or changing) an alertpolicy” on page 423.
Describes all available alert conditions inOpsCenter, for which you can generate alerts.
See “OpsCenter Alert conditions” on page 423.
Explains the tasks that are available formanaging a single alert policy. Managementincludes tasks like editing, copying, deleting,activating, or deactivating an alert policy.
See “Managing an alert policy ” on page 439.
Explains how you can view the alerts that areassociated with an alert policy.
See “Viewing the alerts associated with analert policy” on page 440.
About OpsCenter alert policiesOpsCenter provides tools to create and manage alert policies and handle anyresulting alerts that the policies generate. Alert policies help you manage yourNetBackup environment by providing constant monitoring of your NetBackupsystems. When certain events or conditions occur in your environment, OpsCenter
420Managing NetBackup using OpsCenterAbout managing alert policies
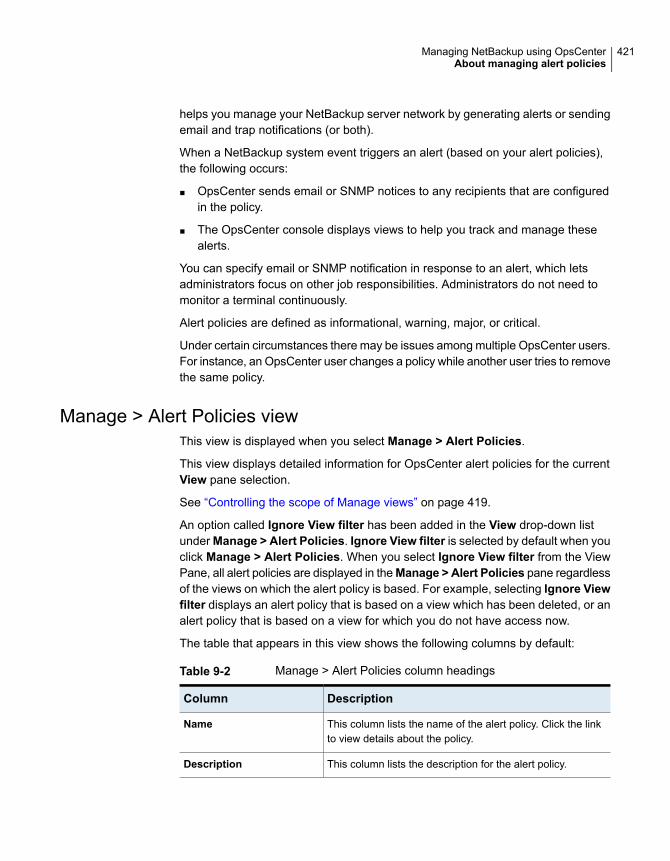
helps you manage your NetBackup server network by generating alerts or sendingemail and trap notifications (or both).
When a NetBackup system event triggers an alert (based on your alert policies),the following occurs:
■ OpsCenter sends email or SNMP notices to any recipients that are configuredin the policy.
■ The OpsCenter console displays views to help you track and manage thesealerts.
You can specify email or SNMP notification in response to an alert, which letsadministrators focus on other job responsibilities. Administrators do not need tomonitor a terminal continuously.
Alert policies are defined as informational, warning, major, or critical.
Under certain circumstances there may be issues among multiple OpsCenter users.For instance, an OpsCenter user changes a policy while another user tries to removethe same policy.
Manage > Alert Policies viewThis view is displayed when you select Manage > Alert Policies.
This view displays detailed information for OpsCenter alert policies for the currentView pane selection.
See “Controlling the scope of Manage views” on page 419.
An option called Ignore View filter has been added in the View drop-down listunder Manage > Alert Policies. Ignore View filter is selected by default when youclick Manage > Alert Policies. When you select Ignore View filter from the ViewPane, all alert policies are displayed in theManage > Alert Policies pane regardlessof the views on which the alert policy is based. For example, selecting Ignore Viewfilter displays an alert policy that is based on a view which has been deleted, or analert policy that is based on a view for which you do not have access now.
The table that appears in this view shows the following columns by default:
Table 9-2 Manage > Alert Policies column headings
DescriptionColumn
This column lists the name of the alert policy. Click the linkto view details about the policy.
Name
This column lists the description for the alert policy.Description
421Managing NetBackup using OpsCenterAbout managing alert policies

Table 9-2 Manage > Alert Policies column headings (continued)
DescriptionColumn
This column lists the alert condition that is used for the alertpolicy. Example: Hung Job, Job Finalized, High Frozen Mediaetc.
See “OpsCenter Alert conditions” on page 423.
Alert Condition
This column determines whether the alert policy is enabledor not.
Enabled
This column lists the severity that is associated with the alertpolicy.
Severity
This column lists the severity of the email or trap that is sentwhen the alert is cleared.
Clear Severity
This column lists the date and time when the alert policy wascreated.
Creation Time
This column lists the date and time when the alert policy waslast modified.
Modification Time
This column lists the OpsCenter user who last modified thealert policy.
Modified By
Viewing the details for a single alert policyAll the details that are associated with an alert policy can be viewed from the bottomof the Manage > Alert Policies view under the General tab. The General tabdisplays all the details that are shown in the table.
To view the details for a single alert policy
1 In the OpsCenter console, select Manage > Alert Policies.
2 Click a drill-down link from theName column. The alert policy details are shownat the bottom of this view under the General tab.
Filtering on type of alert policyA filter is available in the Manage > Alert Policies view to limit the types of alertpolicies that appear.
You can filter using any of the following three built-in filters. These filters are availablefrom the drop-down list which is present on top of the table.
422Managing NetBackup using OpsCenterAbout managing alert policies
Select this filter to view all alert policies.All AlertPolicies
Select this filter to view the alert policies that are enabled.Enabled AlertPolicies
Select this filter to view the alert policies that are disabled.DisabledAlertPolicies
You can also create your own filters which let you focus on only the specific alertpolicies that interest you.
See “Creating, applying, editing, and removing custom view filters” on page 64.
To filter on type of alert policy
1 In the OpsCenter console, select Manage > Alert Policies.
2 Select a filter from the drop-down list. Note that the drop-down list is locatedon top of the table.
About creating (or changing) an alert policyYou can create alert policies to detect when something goes wrong with NetBackupand troubleshoot it. You can create policies to automate responses to key eventsin your enterprise. For example, you can create a policy to alert you when a jobfails on a specific master server. You can monitor for frozen media and email theoperator when the number of frozen media exceeds a threshold value. You canthen take corrective action.
OpsCenter periodically retrieves data from NetBackup based on notifications anda wait time (of up to 15 minutes). This time delay between the NetBackup ActivityMonitor and the OpsCenter console can mean that many intermediate job statesmay be lost.
The following topics provide more information about alerts.
See “OpsCenter Alert conditions” on page 423.
See “Additional information on job policy change condition” on page 428.
See “Adding an alert policy” on page 431.
See “About understanding alert counts in the Monitor view” on page 438.
OpsCenter Alert conditionsOpsCenter comes with a set of predefined alert conditions. You can create alertpolicies based on these alert conditions to detect when something goes wrong inyour NetBackup environment and troubleshoot NetBackup. The alerts help you to
423Managing NetBackup using OpsCenterAbout managing alert policies

anticipate and handle problems before they occur. You can receive these alerts bylogging on to OpsCenter, and also by email or SNMP traps. You can specify emailand SNMP recipients while creating an alert policy.
Alert conditions can be divided into the following categories:
For these alert conditions, OpsCenterretrieves data from NetBackup based onnotifications from NBSL.
Event-based alert conditions
For these alert conditions, OpsCenterretrieves data from NetBackup based on await time (of up to 15 minutes).
Periodic alert conditions
Table 9-3 lists the alert conditions, alert category, and descriptions.
424Managing NetBackup using OpsCenterAbout managing alert policies
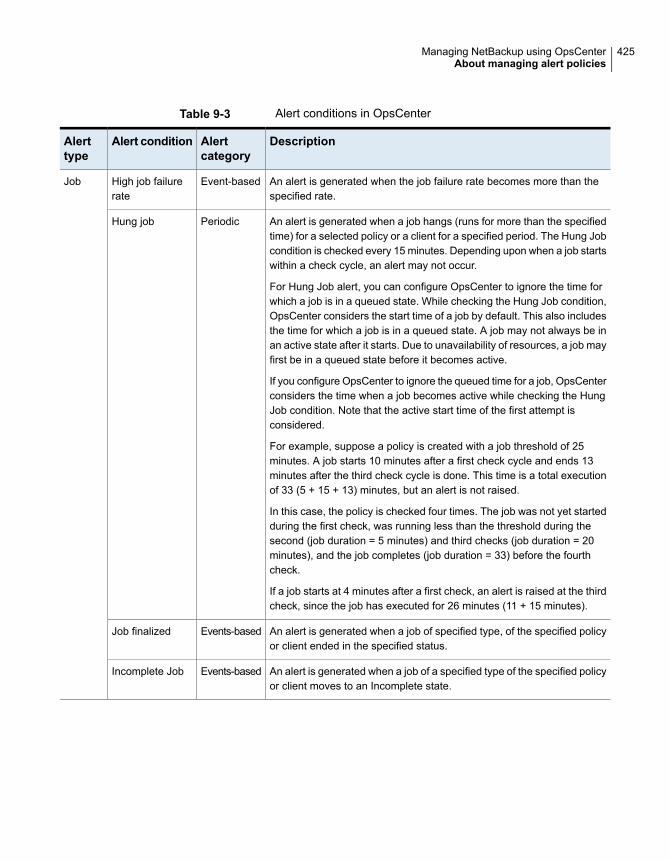
Table 9-3 Alert conditions in OpsCenter
DescriptionAlertcategory
Alert conditionAlerttype
An alert is generated when the job failure rate becomes more than thespecified rate.
Event-basedHigh job failurerate
Job
An alert is generated when a job hangs (runs for more than the specifiedtime) for a selected policy or a client for a specified period. The Hung Jobcondition is checked every 15 minutes. Depending upon when a job startswithin a check cycle, an alert may not occur.
For Hung Job alert, you can configure OpsCenter to ignore the time forwhich a job is in a queued state. While checking the Hung Job condition,OpsCenter considers the start time of a job by default. This also includesthe time for which a job is in a queued state. A job may not always be inan active state after it starts. Due to unavailability of resources, a job mayfirst be in a queued state before it becomes active.
If you configure OpsCenter to ignore the queued time for a job, OpsCenterconsiders the time when a job becomes active while checking the HungJob condition. Note that the active start time of the first attempt isconsidered.
For example, suppose a policy is created with a job threshold of 25minutes. A job starts 10 minutes after a first check cycle and ends 13minutes after the third check cycle is done. This time is a total executionof 33 (5 + 15 + 13) minutes, but an alert is not raised.
In this case, the policy is checked four times. The job was not yet startedduring the first check, was running less than the threshold during thesecond (job duration = 5 minutes) and third checks (job duration = 20minutes), and the job completes (job duration = 33) before the fourthcheck.
If a job starts at 4 minutes after a first check, an alert is raised at the thirdcheck, since the job has executed for 26 minutes (11 + 15 minutes).
PeriodicHung job
An alert is generated when a job of specified type, of the specified policyor client ended in the specified status.
Events-basedJob finalized
An alert is generated when a job of a specified type of the specified policyor client moves to an Incomplete state.
Events-basedIncomplete Job
425Managing NetBackup using OpsCenterAbout managing alert policies

Table 9-3 Alert conditions in OpsCenter (continued)
DescriptionAlertcategory
Alert conditionAlerttype
An alert is generated when any of the selected media is frozen.Events-basedFrozen mediaMedia
An alert is generated when any of the selected media is suspended.Events-basedSuspendedmedia
An alert is generated when a media exceeds the threshold number ofmounts.
Events-basedExceeded maxmedia mounts
An alert is generated when a restore operation requires media. The restoreoperation may require a specific media which contains the specific imageto be restored.
Events-basedMedia requiredfor restore
An alert is generated when the number of available media becomes lessthan the predefined threshold value.
Note: When you select All Master Server from the View drop-down list,low available media alert raises separate alerts for all the master serverslisted underAll Master Server. For example: If there are 5 master serverspresent under the All Master Servers view, opscenter will raise 5 alertsfor each master server.
PeriodicLow availablemedia
An alert is generated when the percentage of suspended media exceedsthe predefined threshold value.
PeriodicHigh suspendedmedia
An alert is generated when the percentage of frozen media exceeds thepredefined threshold value.
PeriodicHigh frozenmedia
An alert is generated when a cleaning tape has zero cleaning left.Events-basedZero CleaningLeft
426Managing NetBackup using OpsCenterAbout managing alert policies
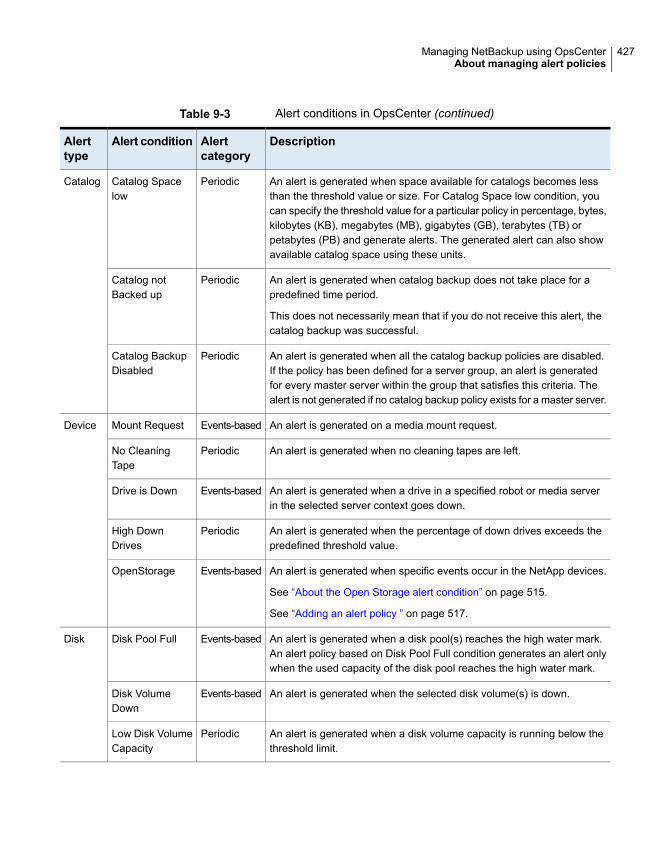
Table 9-3 Alert conditions in OpsCenter (continued)
DescriptionAlertcategory
Alert conditionAlerttype
An alert is generated when space available for catalogs becomes lessthan the threshold value or size. For Catalog Space low condition, youcan specify the threshold value for a particular policy in percentage, bytes,kilobytes (KB), megabytes (MB), gigabytes (GB), terabytes (TB) orpetabytes (PB) and generate alerts. The generated alert can also showavailable catalog space using these units.
PeriodicCatalog Spacelow
Catalog
An alert is generated when catalog backup does not take place for apredefined time period.
This does not necessarily mean that if you do not receive this alert, thecatalog backup was successful.
PeriodicCatalog notBacked up
An alert is generated when all the catalog backup policies are disabled.If the policy has been defined for a server group, an alert is generatedfor every master server within the group that satisfies this criteria. Thealert is not generated if no catalog backup policy exists for a master server.
PeriodicCatalog BackupDisabled
An alert is generated on a media mount request.Events-basedMount RequestDevice
An alert is generated when no cleaning tapes are left.PeriodicNo CleaningTape
An alert is generated when a drive in a specified robot or media serverin the selected server context goes down.
Events-basedDrive is Down
An alert is generated when the percentage of down drives exceeds thepredefined threshold value.
PeriodicHigh DownDrives
An alert is generated when specific events occur in the NetApp devices.
See “About the Open Storage alert condition” on page 515.
See “Adding an alert policy ” on page 517.
Events-basedOpenStorage
An alert is generated when a disk pool(s) reaches the high water mark.An alert policy based on Disk Pool Full condition generates an alert onlywhen the used capacity of the disk pool reaches the high water mark.
Events-basedDisk Pool FullDisk
An alert is generated when the selected disk volume(s) is down.Events-basedDisk VolumeDown
An alert is generated when a disk volume capacity is running below thethreshold limit.
PeriodicLow Disk VolumeCapacity
427Managing NetBackup using OpsCenterAbout managing alert policies

Table 9-3 Alert conditions in OpsCenter (continued)
DescriptionAlertcategory
Alert conditionAlerttype
An alert is generated when the communication between Agent andOpsCenter Server breaks. By default, this alert is automatically clearedwhen the communication is re-established.
An alert policy based on the Agent Server Communication Break conditionis always based on the ALL MASTER SERVERS view. If you created analert policy based on the Agent Server Communication Break condition,and you do not have access to the ALL MASTER SERVERS view, alertsare not generated for the alert policy.
PeriodicAgent ServerCommunicationbreak
Host
An alert is generated when OpsCenter loses contact with the masterserver. This alert condition means that the connection between OpsCenterand the managed NetBackup master server is lost. It does not necessarilymean that NetBackup backups are not working.
Events-basedMaster ServerUnreachable
An alert is generated when OpsCenter loses contact with the media server.Events-basedLost Contact withMedia Server
An alert is generated in case of OpsCenter Appliance hardware failure.Events-basedApplianceHardware Failure
An alert is generated when the selected appliance hardware fails.
You can set this alert condition to monitor your NetBackup or deduplicationappliance hardware.
Events-basedService StoppedOthers
An alert is generated when a policy attribute for a job policy is changed.Multiple alerts are generated if multiple attributes are changed for a jobpolicy
See “Additional information on job policy change condition” on page 428.
If you select a particular job policy, only the selected job policy is monitoredfor change. If you do not select any job policy, all the job policies aremonitored for changes.
Events-basedJob PolicyChange
Additional information on job policy change conditionReview the following text for job policy alert condition.
Only the following policy attributes are monitored for job policies:
Policy client typePolicy name
Check pointCheckpoint interval
428Managing NetBackup using OpsCenterAbout managing alert policies
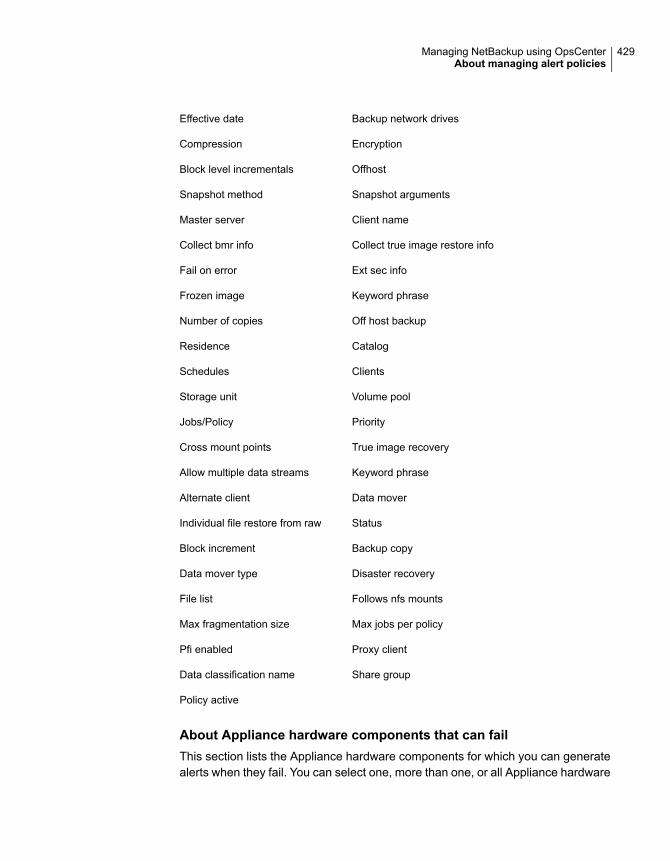
Backup network drivesEffective date
EncryptionCompression
OffhostBlock level incrementals
Snapshot argumentsSnapshot method
Client nameMaster server
Collect true image restore infoCollect bmr info
Ext sec infoFail on error
Keyword phraseFrozen image
Off host backupNumber of copies
CatalogResidence
ClientsSchedules
Volume poolStorage unit
PriorityJobs/Policy
True image recoveryCross mount points
Keyword phraseAllow multiple data streams
Data moverAlternate client
StatusIndividual file restore from raw
Backup copyBlock increment
Disaster recoveryData mover type
Follows nfs mountsFile list
Max jobs per policyMax fragmentation size
Proxy clientPfi enabled
Share groupData classification name
Policy active
About Appliance hardware components that can failThis section lists the Appliance hardware components for which you can generatealerts when they fail. You can select one, more than one, or all Appliance hardware
429Managing NetBackup using OpsCenterAbout managing alert policies
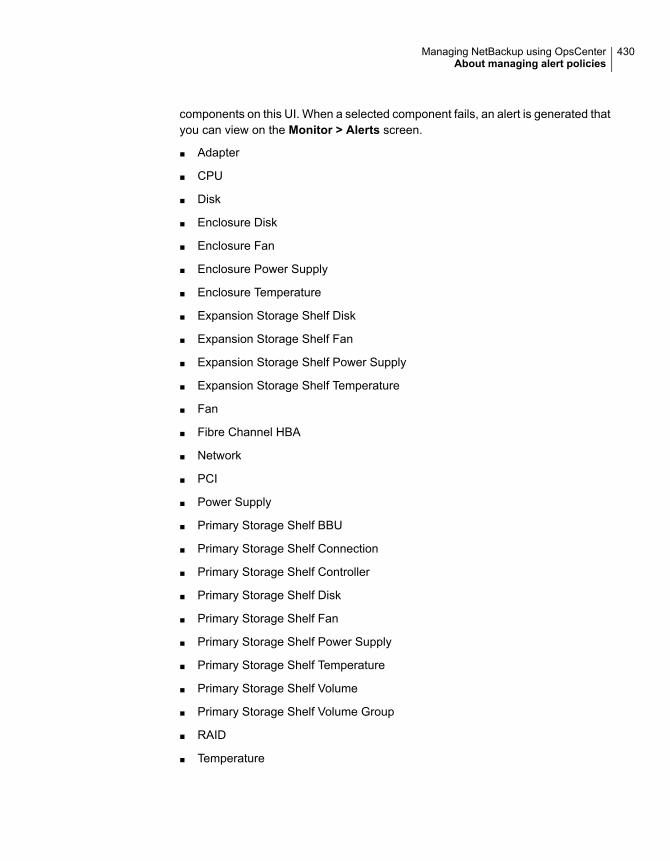
components on this UI. When a selected component fails, an alert is generated thatyou can view on the Monitor > Alerts screen.
■ Adapter
■ CPU
■ Disk
■ Enclosure Disk
■ Enclosure Fan
■ Enclosure Power Supply
■ Enclosure Temperature
■ Expansion Storage Shelf Disk
■ Expansion Storage Shelf Fan
■ Expansion Storage Shelf Power Supply
■ Expansion Storage Shelf Temperature
■ Fan
■ Fibre Channel HBA
■ Network
■ PCI
■ Power Supply
■ Primary Storage Shelf BBU
■ Primary Storage Shelf Connection
■ Primary Storage Shelf Controller
■ Primary Storage Shelf Disk
■ Primary Storage Shelf Fan
■ Primary Storage Shelf Power Supply
■ Primary Storage Shelf Temperature
■ Primary Storage Shelf Volume
■ Primary Storage Shelf Volume Group
■ RAID
■ Temperature
430Managing NetBackup using OpsCenterAbout managing alert policies
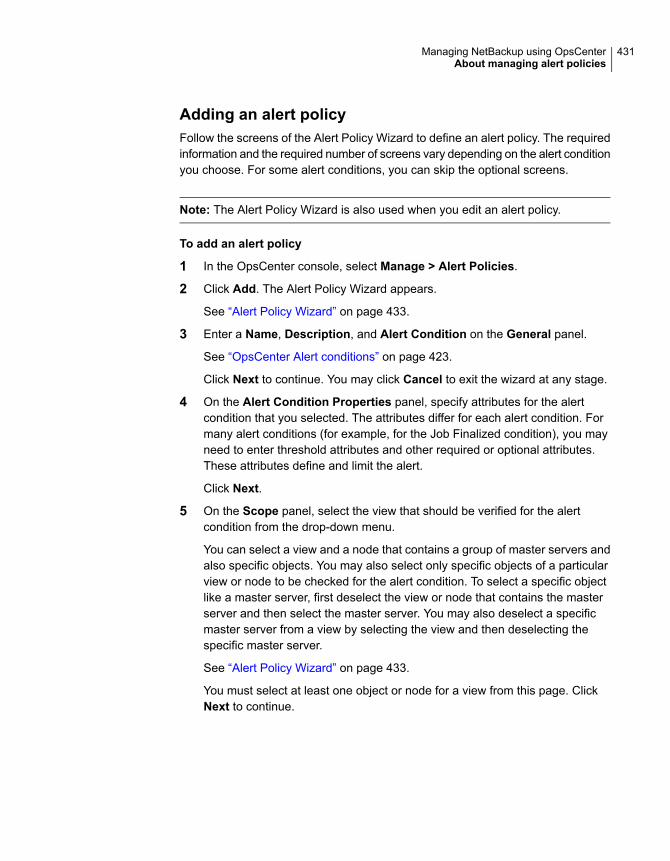
Adding an alert policyFollow the screens of the Alert Policy Wizard to define an alert policy. The requiredinformation and the required number of screens vary depending on the alert conditionyou choose. For some alert conditions, you can skip the optional screens.
Note: The Alert Policy Wizard is also used when you edit an alert policy.
To add an alert policy
1 In the OpsCenter console, select Manage > Alert Policies.
2 Click Add. The Alert Policy Wizard appears.
See “Alert Policy Wizard” on page 433.
3 Enter a Name, Description, and Alert Condition on the General panel.
See “OpsCenter Alert conditions” on page 423.
Click Next to continue. You may click Cancel to exit the wizard at any stage.
4 On the Alert Condition Properties panel, specify attributes for the alertcondition that you selected. The attributes differ for each alert condition. Formany alert conditions (for example, for the Job Finalized condition), you mayneed to enter threshold attributes and other required or optional attributes.These attributes define and limit the alert.
Click Next.
5 On the Scope panel, select the view that should be verified for the alertcondition from the drop-down menu.
You can select a view and a node that contains a group of master servers andalso specific objects. You may also select only specific objects of a particularview or node to be checked for the alert condition. To select a specific objectlike a master server, first deselect the view or node that contains the masterserver and then select the master server. You may also deselect a specificmaster server from a view by selecting the view and then deselecting thespecific master server.
See “Alert Policy Wizard” on page 433.
You must select at least one object or node for a view from this page. ClickNext to continue.
431Managing NetBackup using OpsCenterAbout managing alert policies
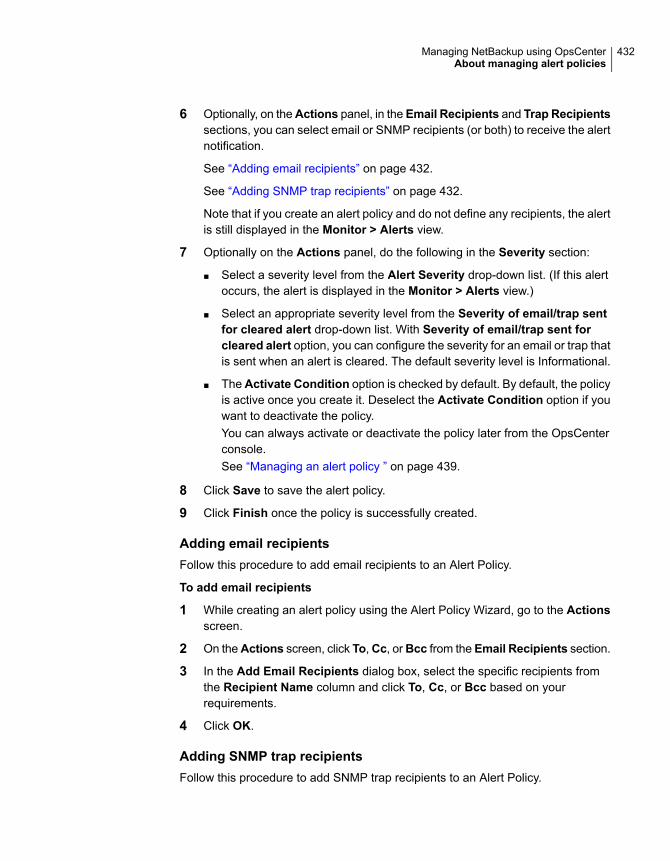
6 Optionally, on theActions panel, in the Email Recipients and Trap Recipientssections, you can select email or SNMP recipients (or both) to receive the alertnotification.
See “Adding email recipients” on page 432.
See “Adding SNMP trap recipients” on page 432.
Note that if you create an alert policy and do not define any recipients, the alertis still displayed in the Monitor > Alerts view.
7 Optionally on the Actions panel, do the following in the Severity section:
■ Select a severity level from the Alert Severity drop-down list. (If this alertoccurs, the alert is displayed in the Monitor > Alerts view.)
■ Select an appropriate severity level from the Severity of email/trap sentfor cleared alert drop-down list. With Severity of email/trap sent forcleared alert option, you can configure the severity for an email or trap thatis sent when an alert is cleared. The default severity level is Informational.
■ TheActivate Condition option is checked by default. By default, the policyis active once you create it. Deselect the Activate Condition option if youwant to deactivate the policy.You can always activate or deactivate the policy later from the OpsCenterconsole.See “Managing an alert policy ” on page 439.
8 Click Save to save the alert policy.
9 Click Finish once the policy is successfully created.
Adding email recipientsFollow this procedure to add email recipients to an Alert Policy.
To add email recipients
1 While creating an alert policy using the Alert Policy Wizard, go to the Actionsscreen.
2 On theActions screen, click To,Cc, orBcc from the Email Recipients section.
3 In the Add Email Recipients dialog box, select the specific recipients fromthe Recipient Name column and click To, Cc, or Bcc based on yourrequirements.
4 Click OK.
Adding SNMP trap recipientsFollow this procedure to add SNMP trap recipients to an Alert Policy.
432Managing NetBackup using OpsCenterAbout managing alert policies

To add SNMP trap recipients
1 While creating an alert policy using the Alert Policy Wizard, go to the Actionsscreen.
2 On the Actions screen, click To from the Trap Recipients section.
3 In the Add Trap Recipients dialog box, select the specific recipients from theRecipient Name column and click To.
4 Click OK.
Add Trap Recipients dialog boxIn the Add Trap Recipients dialog box, select the specific recipients from theRecipient Name column and click To.
Alert Policy WizardThe Alert Policy Wizard consists of four panels.
Table 9-4 Alert Policy Wizard General Panel
DescriptionSetting
Enter a name for the alert policy. The name must be unique.
Name is a required field.
Name
Enter a description for the alert policy.Description
Select an alert condition from the list of alert conditions thatare available.
See “OpsCenter Alert conditions” on page 423.
Alert Condition
433Managing NetBackup using OpsCenterAbout managing alert policies
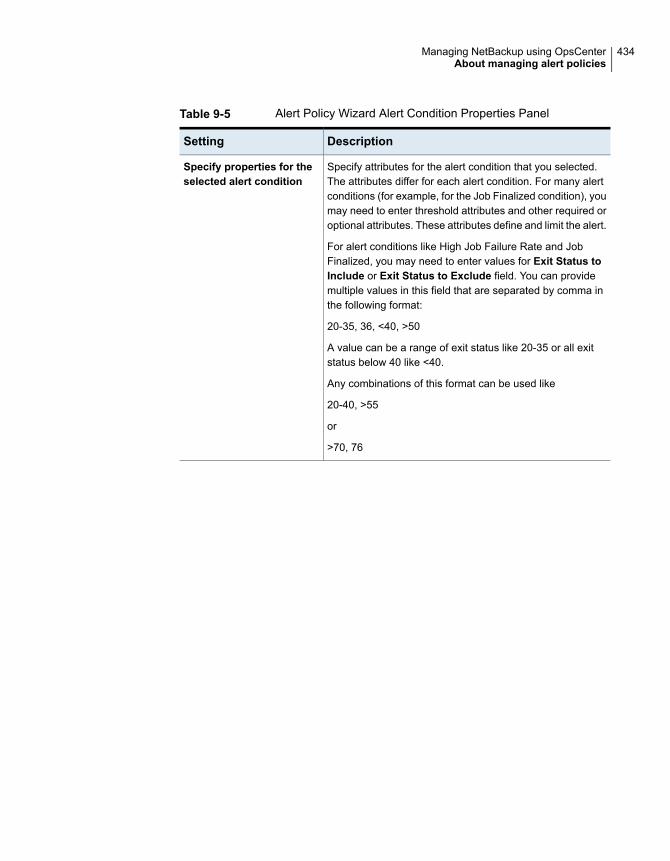
Table 9-5 Alert Policy Wizard Alert Condition Properties Panel
DescriptionSetting
Specify attributes for the alert condition that you selected.The attributes differ for each alert condition. For many alertconditions (for example, for the Job Finalized condition), youmay need to enter threshold attributes and other required oroptional attributes. These attributes define and limit the alert.
For alert conditions like High Job Failure Rate and JobFinalized, you may need to enter values for Exit Status toInclude or Exit Status to Exclude field. You can providemultiple values in this field that are separated by comma inthe following format:
20-35, 36, <40, >50
A value can be a range of exit status like 20-35 or all exitstatus below 40 like <40.
Any combinations of this format can be used like
20-40, >55
or
>70, 76
Specify properties for theselected alert condition
434Managing NetBackup using OpsCenterAbout managing alert policies

Table 9-6 Alert Policy Wizard Scope Panel
DescriptionSetting
View
435Managing NetBackup using OpsCenterAbout managing alert policies
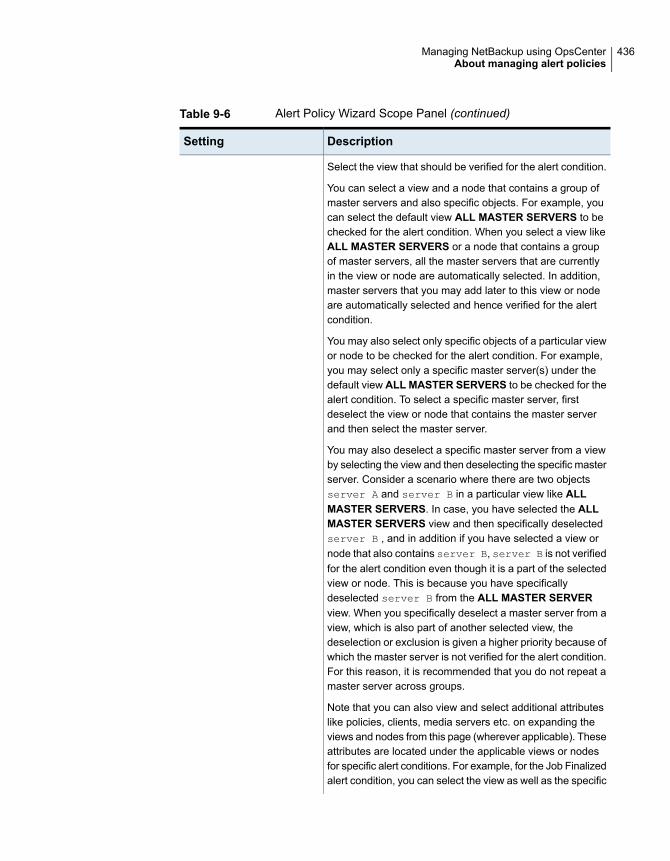
Table 9-6 Alert Policy Wizard Scope Panel (continued)
DescriptionSetting
Select the view that should be verified for the alert condition.
You can select a view and a node that contains a group ofmaster servers and also specific objects. For example, youcan select the default view ALL MASTER SERVERS to bechecked for the alert condition. When you select a view likeALL MASTER SERVERS or a node that contains a groupof master servers, all the master servers that are currentlyin the view or node are automatically selected. In addition,master servers that you may add later to this view or nodeare automatically selected and hence verified for the alertcondition.
You may also select only specific objects of a particular viewor node to be checked for the alert condition. For example,you may select only a specific master server(s) under thedefault view ALL MASTER SERVERS to be checked for thealert condition. To select a specific master server, firstdeselect the view or node that contains the master serverand then select the master server.
You may also deselect a specific master server from a viewby selecting the view and then deselecting the specific masterserver. Consider a scenario where there are two objectsserver A and server B in a particular view like ALLMASTER SERVERS. In case, you have selected the ALLMASTER SERVERS view and then specifically deselectedserver B , and in addition if you have selected a view ornode that also contains server B, server B is not verifiedfor the alert condition even though it is a part of the selectedview or node. This is because you have specificallydeselected server B from the ALL MASTER SERVERview. When you specifically deselect a master server from aview, which is also part of another selected view, thedeselection or exclusion is given a higher priority because ofwhich the master server is not verified for the alert condition.For this reason, it is recommended that you do not repeat amaster server across groups.
Note that you can also view and select additional attributeslike policies, clients, media servers etc. on expanding theviews and nodes from this page (wherever applicable). Theseattributes are located under the applicable views or nodesfor specific alert conditions. For example, for the Job Finalizedalert condition, you can select the view as well as the specific
436Managing NetBackup using OpsCenterAbout managing alert policies
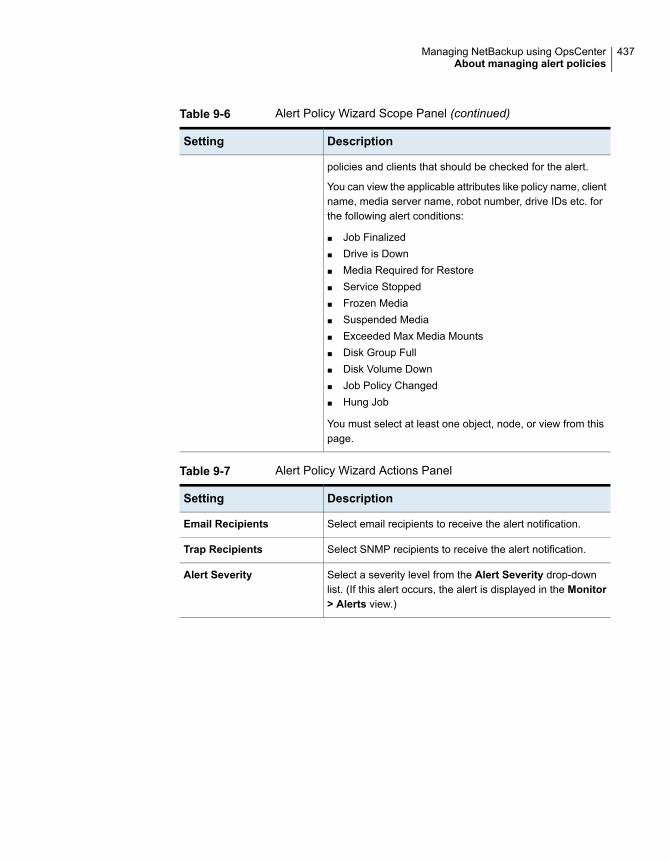
Table 9-6 Alert Policy Wizard Scope Panel (continued)
DescriptionSetting
policies and clients that should be checked for the alert.
You can view the applicable attributes like policy name, clientname, media server name, robot number, drive IDs etc. forthe following alert conditions:
■ Job Finalized■ Drive is Down■ Media Required for Restore■ Service Stopped■ Frozen Media■ Suspended Media■ Exceeded Max Media Mounts■ Disk Group Full■ Disk Volume Down■ Job Policy Changed■ Hung Job
You must select at least one object, node, or view from thispage.
Table 9-7 Alert Policy Wizard Actions Panel
DescriptionSetting
Select email recipients to receive the alert notification.Email Recipients
Select SNMP recipients to receive the alert notification.Trap Recipients
Select a severity level from the Alert Severity drop-downlist. (If this alert occurs, the alert is displayed in the Monitor> Alerts view.)
Alert Severity
437Managing NetBackup using OpsCenterAbout managing alert policies
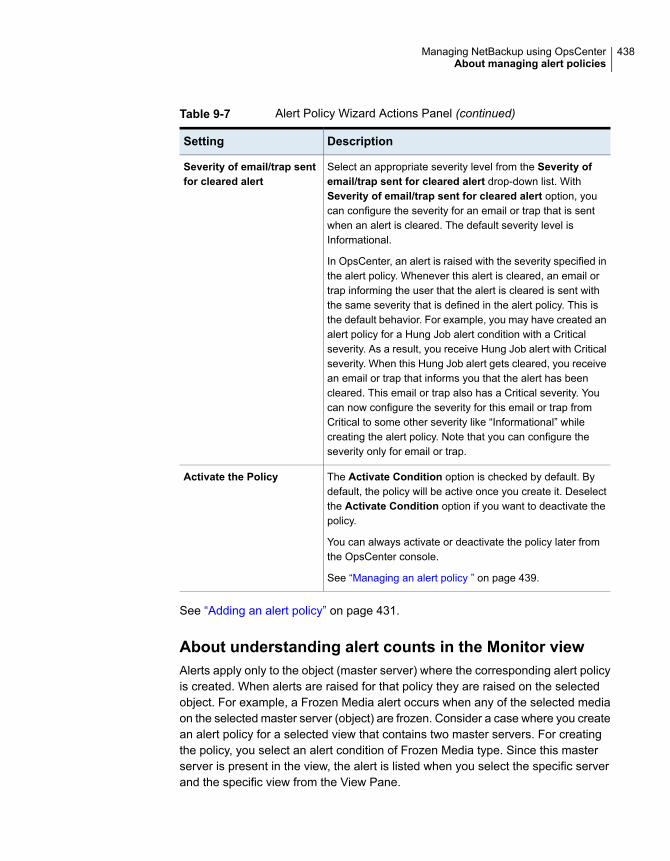
Table 9-7 Alert Policy Wizard Actions Panel (continued)
DescriptionSetting
Select an appropriate severity level from the Severity ofemail/trap sent for cleared alert drop-down list. WithSeverity of email/trap sent for cleared alert option, youcan configure the severity for an email or trap that is sentwhen an alert is cleared. The default severity level isInformational.
In OpsCenter, an alert is raised with the severity specified inthe alert policy. Whenever this alert is cleared, an email ortrap informing the user that the alert is cleared is sent withthe same severity that is defined in the alert policy. This isthe default behavior. For example, you may have created analert policy for a Hung Job alert condition with a Criticalseverity. As a result, you receive Hung Job alert with Criticalseverity. When this Hung Job alert gets cleared, you receivean email or trap that informs you that the alert has beencleared. This email or trap also has a Critical severity. Youcan now configure the severity for this email or trap fromCritical to some other severity like “Informational” whilecreating the alert policy. Note that you can configure theseverity only for email or trap.
Severity of email/trap sentfor cleared alert
The Activate Condition option is checked by default. Bydefault, the policy will be active once you create it. Deselectthe Activate Condition option if you want to deactivate thepolicy.
You can always activate or deactivate the policy later fromthe OpsCenter console.
See “Managing an alert policy ” on page 439.
Activate the Policy
See “Adding an alert policy” on page 431.
About understanding alert counts in the Monitor viewAlerts apply only to the object (master server) where the corresponding alert policyis created. When alerts are raised for that policy they are raised on the selectedobject. For example, a Frozen Media alert occurs when any of the selected mediaon the selected master server (object) are frozen. Consider a case where you createan alert policy for a selected view that contains two master servers. For creatingthe policy, you select an alert condition of Frozen Media type. Since this masterserver is present in the view, the alert is listed when you select the specific serverand the specific view from the View Pane.
438Managing NetBackup using OpsCenterAbout managing alert policies
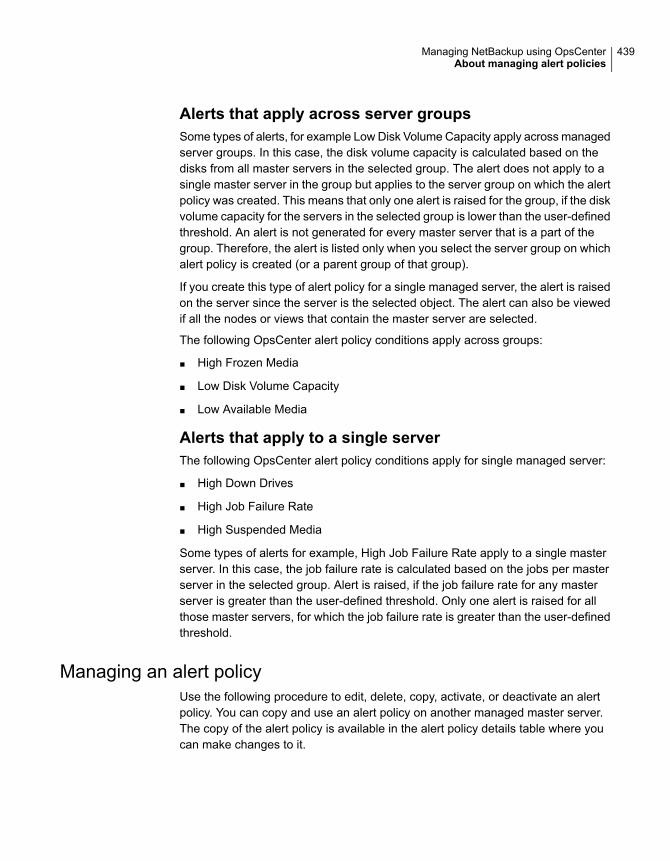
Alerts that apply across server groupsSome types of alerts, for example Low Disk Volume Capacity apply across managedserver groups. In this case, the disk volume capacity is calculated based on thedisks from all master servers in the selected group. The alert does not apply to asingle master server in the group but applies to the server group on which the alertpolicy was created. This means that only one alert is raised for the group, if the diskvolume capacity for the servers in the selected group is lower than the user-definedthreshold. An alert is not generated for every master server that is a part of thegroup. Therefore, the alert is listed only when you select the server group on whichalert policy is created (or a parent group of that group).
If you create this type of alert policy for a single managed server, the alert is raisedon the server since the server is the selected object. The alert can also be viewedif all the nodes or views that contain the master server are selected.
The following OpsCenter alert policy conditions apply across groups:
■ High Frozen Media
■ Low Disk Volume Capacity
■ Low Available Media
Alerts that apply to a single serverThe following OpsCenter alert policy conditions apply for single managed server:
■ High Down Drives
■ High Job Failure Rate
■ High Suspended Media
Some types of alerts for example, High Job Failure Rate apply to a single masterserver. In this case, the job failure rate is calculated based on the jobs per masterserver in the selected group. Alert is raised, if the job failure rate for any masterserver is greater than the user-defined threshold. Only one alert is raised for allthose master servers, for which the job failure rate is greater than the user-definedthreshold.
Managing an alert policyUse the following procedure to edit, delete, copy, activate, or deactivate an alertpolicy. You can copy and use an alert policy on another managed master server.The copy of the alert policy is available in the alert policy details table where youcan make changes to it.
439Managing NetBackup using OpsCenterAbout managing alert policies
To edit an alert policy
1 In the OpsCenter console, select Manage > Alert Policies.
2 Select an alert policy from the Name column in the table.
3 Click Edit.
The Alert Policy Wizard is used to create or edit a policy. When you edit analert policy, the alert condition specific to the policy is selected by default inthe Alert Policy Wizard. You cannot select a different alert condition whileediting an alert policy.
See “Adding an alert policy” on page 431.
To delete an alert policy
1 In the OpsCenter console, select Manage > Alert Policies.
2 Select an alert policy from the Name column in the table.
3 Click Delete.
To copy an alert policy
1 In the OpsCenter console, select Manage > Alert Policies.
2 Select an alert policy from the Name column in the table.
3 Click More and then click Copy from the drop-down list.
4 In the Copy Alert Policy dialog box, enter the new name for the alert policy.
5 Click OK.
The copy of the alert policy is available in the alert policy details table whereyou can make changes to it.
To enable or disable an alert policy
1 In the OpsCenter console, select Manage > Alert Policies.
2 Select an alert policy from the Name column in the table.
3 Click More and then click Enable or Disable from the drop-down list.
Viewing the alerts associated with an alert policyUse the following procedure to view the alerts that are associated with an alertpolicy.
440Managing NetBackup using OpsCenterAbout managing alert policies
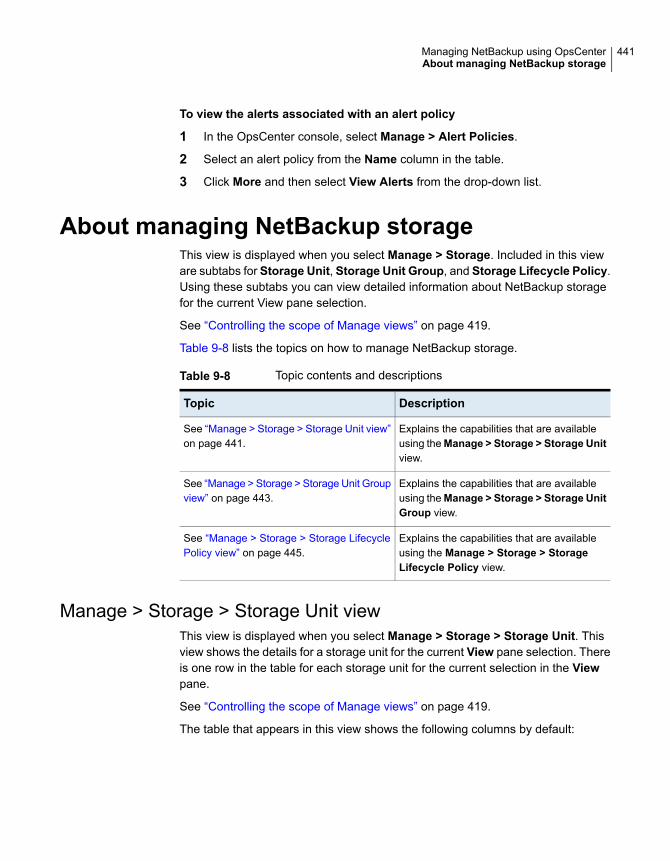
To view the alerts associated with an alert policy
1 In the OpsCenter console, select Manage > Alert Policies.
2 Select an alert policy from the Name column in the table.
3 Click More and then select View Alerts from the drop-down list.
About managing NetBackup storageThis view is displayed when you select Manage > Storage. Included in this vieware subtabs for Storage Unit, Storage Unit Group, and Storage Lifecycle Policy.Using these subtabs you can view detailed information about NetBackup storagefor the current View pane selection.
See “Controlling the scope of Manage views” on page 419.
Table 9-8 lists the topics on how to manage NetBackup storage.
Table 9-8 Topic contents and descriptions
DescriptionTopic
Explains the capabilities that are availableusing theManage > Storage > Storage Unitview.
See “Manage > Storage > Storage Unit view”on page 441.
Explains the capabilities that are availableusing theManage > Storage > Storage UnitGroup view.
See “Manage > Storage > Storage Unit Groupview” on page 443.
Explains the capabilities that are availableusing the Manage > Storage > StorageLifecycle Policy view.
See “Manage > Storage > Storage LifecyclePolicy view” on page 445.
Manage > Storage > Storage Unit viewThis view is displayed when you select Manage > Storage > Storage Unit. Thisview shows the details for a storage unit for the current View pane selection. Thereis one row in the table for each storage unit for the current selection in the Viewpane.
See “Controlling the scope of Manage views” on page 419.
The table that appears in this view shows the following columns by default:
441Managing NetBackup using OpsCenterAbout managing NetBackup storage
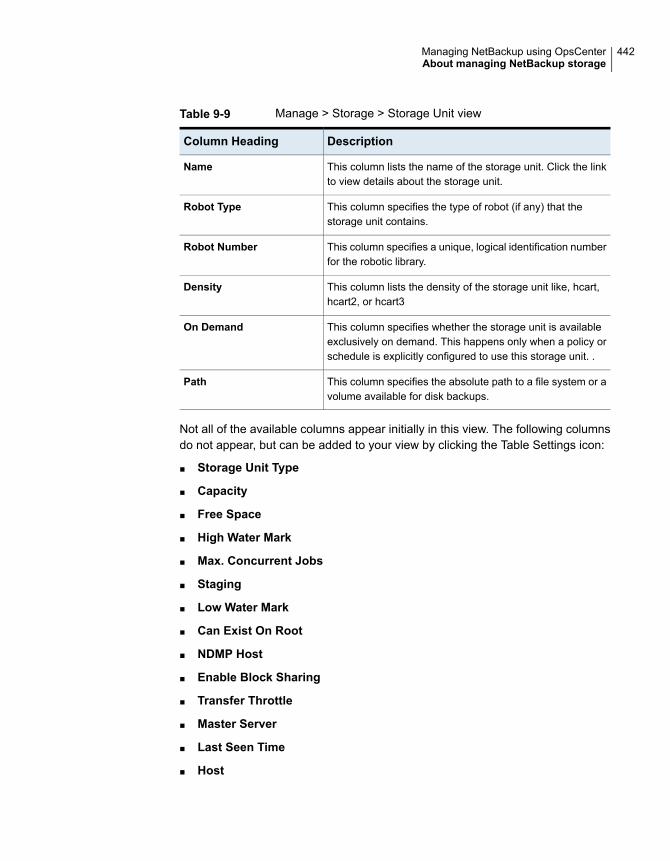
Table 9-9 Manage > Storage > Storage Unit view
DescriptionColumn Heading
This column lists the name of the storage unit. Click the linkto view details about the storage unit.
Name
This column specifies the type of robot (if any) that thestorage unit contains.
Robot Type
This column specifies a unique, logical identification numberfor the robotic library.
Robot Number
This column lists the density of the storage unit like, hcart,hcart2, or hcart3
Density
This column specifies whether the storage unit is availableexclusively on demand. This happens only when a policy orschedule is explicitly configured to use this storage unit. .
On Demand
This column specifies the absolute path to a file system or avolume available for disk backups.
Path
Not all of the available columns appear initially in this view. The following columnsdo not appear, but can be added to your view by clicking the Table Settings icon:
■ Storage Unit Type
■ Capacity
■ Free Space
■ High Water Mark
■ Max. Concurrent Jobs
■ Staging
■ Low Water Mark
■ Can Exist On Root
■ NDMP Host
■ Enable Block Sharing
■ Transfer Throttle
■ Master Server
■ Last Seen Time
■ Host
442Managing NetBackup using OpsCenterAbout managing NetBackup storage

■ Fragment Size
■ Multiplexing
■ Disk Type
■ Time Last Selected
■ Disk Pool
■ Host List
■ Configured for Snapshots
■ Primary
■ Replication
See the online NetBackup Administration Console Help for a detailed descriptionof these fields.
More information about how to customize tables and view specific columns isavailable.
See “About using tables” on page 61.
The following task can be performed from this view:
See “Viewing the details for a single storageunit” on page 443.
View the details for a single storage unit
Viewing the details for a single storage unitUse the following procedure to view the details for a single storage unit.
To view details for a single storage unit
1 In the OpsCenter console, select Manage > Storage > Storage Unit.
2 Click a storage unit name (drilldown link) from the Name column in the table.
The storage unit details are shown at the bottom of this view under theGeneraltab. This tab displays many of the available columns of the table.
Manage > Storage > Storage Unit Group viewThis view is displayed when you select Manage > Storage > Storage Unit Group.This view shows the details for a storage unit group for the current View paneselection. The table contains one row for each storage unit group for the currentselection in the View pane.
See “Controlling the scope of Manage views” on page 419.
443Managing NetBackup using OpsCenterAbout managing NetBackup storage

The table that appears in this view shows the following columns by default:
Table 9-10 Manage > Storage > Storage Unit Group view
DescriptionColumn heading
This column lists the name of the storage unitgroup. Click the link to view details about thestorage unit group.
Name
This column specifies the order that storageunits are selected when they are included ina group. .
Storage Unit Selection
This column specifies the date and time whenthe storage unit group was last seen.
Last Seen Time
Not all of the available columns appear initially in this view. The following columnsdo not appear, but can be added to your view by clicking the Table Settings icon:
■ Configured for Snapshots
■ Primary
■ Replication
The following task can be performed from this view:
See “Viewing the details for a single storageunit group” on page 444.
View the details for a single storage unitgroup
Viewing the details for a single storage unit groupUse the following procedure to view the details for a storage unit group.
The storage unit group details are shown at the bottom of this view under thefollowing tabs:
This tab shows the details of the storage unitgroup that are also shown in the table.
General
This tab shows the details of the storage unitsthat are a part of the storage unit group.
Storage Unit
To view details for a single storage unit group
1 In the OpsCenter console, select Manage > Storage > Storage Unit Group.
2 Click the name of a storage unit group (drilldown link) from the Name columnin the table.
444Managing NetBackup using OpsCenterAbout managing NetBackup storage
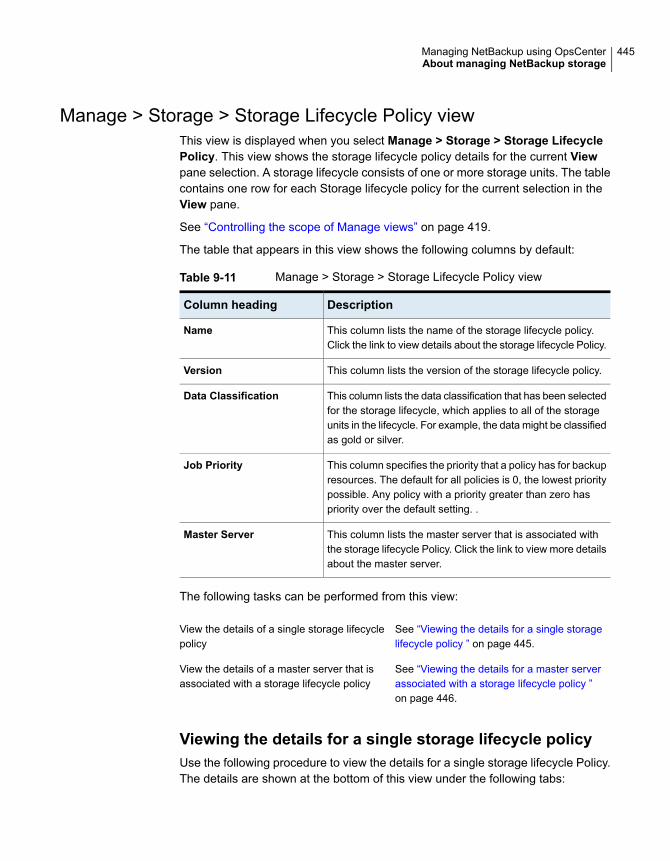
Manage > Storage > Storage Lifecycle Policy viewThis view is displayed when you select Manage > Storage > Storage LifecyclePolicy. This view shows the storage lifecycle policy details for the current Viewpane selection. A storage lifecycle consists of one or more storage units. The tablecontains one row for each Storage lifecycle policy for the current selection in theView pane.
See “Controlling the scope of Manage views” on page 419.
The table that appears in this view shows the following columns by default:
Table 9-11 Manage > Storage > Storage Lifecycle Policy view
DescriptionColumn heading
This column lists the name of the storage lifecycle policy.Click the link to view details about the storage lifecycle Policy.
Name
This column lists the version of the storage lifecycle policy.Version
This column lists the data classification that has been selectedfor the storage lifecycle, which applies to all of the storageunits in the lifecycle. For example, the data might be classifiedas gold or silver.
Data Classification
This column specifies the priority that a policy has for backupresources. The default for all policies is 0, the lowest prioritypossible. Any policy with a priority greater than zero haspriority over the default setting. .
Job Priority
This column lists the master server that is associated withthe storage lifecycle Policy. Click the link to view more detailsabout the master server.
Master Server
The following tasks can be performed from this view:
See “Viewing the details for a single storagelifecycle policy ” on page 445.
View the details of a single storage lifecyclepolicy
See “Viewing the details for a master serverassociated with a storage lifecycle policy ”on page 446.
View the details of a master server that isassociated with a storage lifecycle policy
Viewing the details for a single storage lifecycle policyUse the following procedure to view the details for a single storage lifecycle Policy.The details are shown at the bottom of this view under the following tabs:
445Managing NetBackup using OpsCenterAbout managing NetBackup storage

This tab shows the details of the storage unitgroup that are also shown in the table.
General
This tab shows the details of the storagedestinations that are a part of the storagelifecycle policy.
Storage Destinations
To view the details for a storage lifecycle policy
1 In the OpsCenter console, select Manage > Storage > Storage LifecyclePolicy.
2 Click the name of a storage lifecycle policy (drilldown link) from the Namecolumn in the table.
Viewing the details for a master server associated with astorage lifecycle policyUse the following procedure to view the details for a master server that is associatedwith a storage lifecycle policy. The details are shown on a separate page.
To view the details for a master server associated with a storage lifecyclePolicy
1 In the OpsCenter console, select Manage > Storage > Storage LifecyclePolicy.
2 Click the name of the master server (drilldown link) from the Master Servercolumn in the table.
About managing NetBackup devicesUnder certain circumstances there may be issues among multiple OpsCenter usersmanaging devices. For instance, a user brings a drive down while another usertries to bring up the same drive.
Table 9-12 lists the topics on how to manage NetBackup devices.
Table 9-12 Topic contents and descriptions
DescriptionTopic
Explains the capabilities that are availableusing the Manage > Devices > Drive view.
See “Manage > Devices > Drive view”on page 447.
Explains the capabilities that are availableusing the Manage > Devices > Robot view.
See “Manage > Devices > Robot view”on page 451.
446Managing NetBackup using OpsCenterAbout managing NetBackup devices
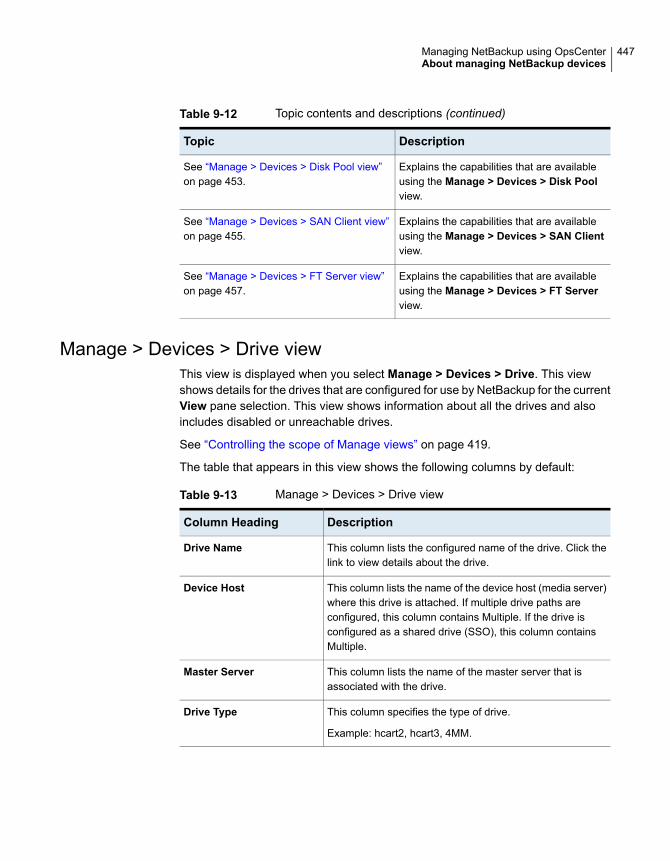
Table 9-12 Topic contents and descriptions (continued)
DescriptionTopic
Explains the capabilities that are availableusing the Manage > Devices > Disk Poolview.
See “Manage > Devices > Disk Pool view”on page 453.
Explains the capabilities that are availableusing the Manage > Devices > SAN Clientview.
See “Manage > Devices > SAN Client view”on page 455.
Explains the capabilities that are availableusing the Manage > Devices > FT Serverview.
See “Manage > Devices > FT Server view”on page 457.
Manage > Devices > Drive viewThis view is displayed when you select Manage > Devices > Drive. This viewshows details for the drives that are configured for use by NetBackup for the currentView pane selection. This view shows information about all the drives and alsoincludes disabled or unreachable drives.
See “Controlling the scope of Manage views” on page 419.
The table that appears in this view shows the following columns by default:
Table 9-13 Manage > Devices > Drive view
DescriptionColumn Heading
This column lists the configured name of the drive. Click thelink to view details about the drive.
Drive Name
This column lists the name of the device host (media server)where this drive is attached. If multiple drive paths areconfigured, this column contains Multiple. If the drive isconfigured as a shared drive (SSO), this column containsMultiple.
Device Host
This column lists the name of the master server that isassociated with the drive.
Master Server
This column specifies the type of drive.
Example: hcart2, hcart3, 4MM.
Drive Type
447Managing NetBackup using OpsCenterAbout managing NetBackup devices
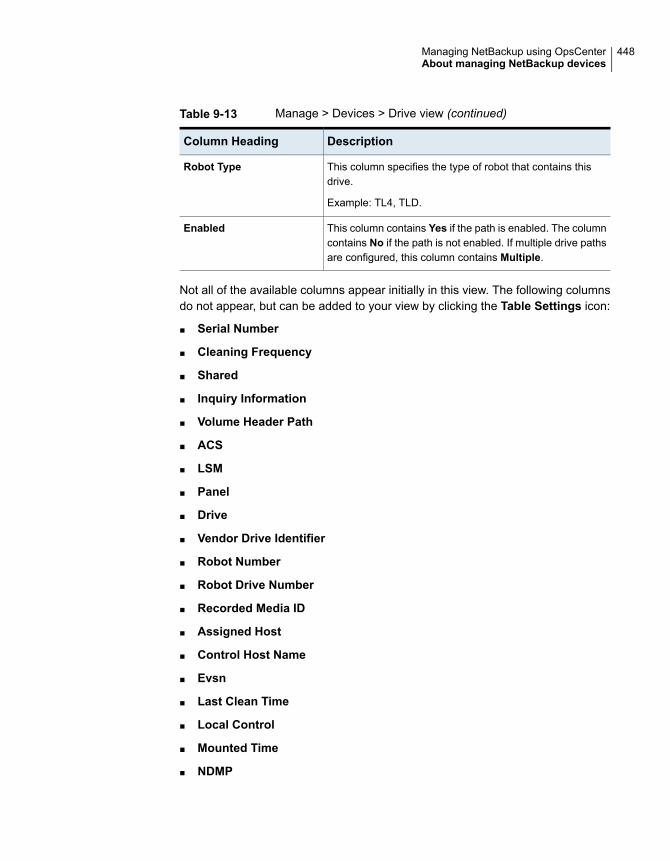
Table 9-13 Manage > Devices > Drive view (continued)
DescriptionColumn Heading
This column specifies the type of robot that contains thisdrive.
Example: TL4, TLD.
Robot Type
This column contains Yes if the path is enabled. The columncontains No if the path is not enabled. If multiple drive pathsare configured, this column contains Multiple.
Enabled
Not all of the available columns appear initially in this view. The following columnsdo not appear, but can be added to your view by clicking the Table Settings icon:
■ Serial Number
■ Cleaning Frequency
■ Shared
■ Inquiry Information
■ Volume Header Path
■ ACS
■ LSM
■ Panel
■ Drive
■ Vendor Drive Identifier
■ Robot Number
■ Robot Drive Number
■ Recorded Media ID
■ Assigned Host
■ Control Host Name
■ Evsn
■ Last Clean Time
■ Local Control
■ Mounted Time
■ NDMP
448Managing NetBackup using OpsCenterAbout managing NetBackup devices
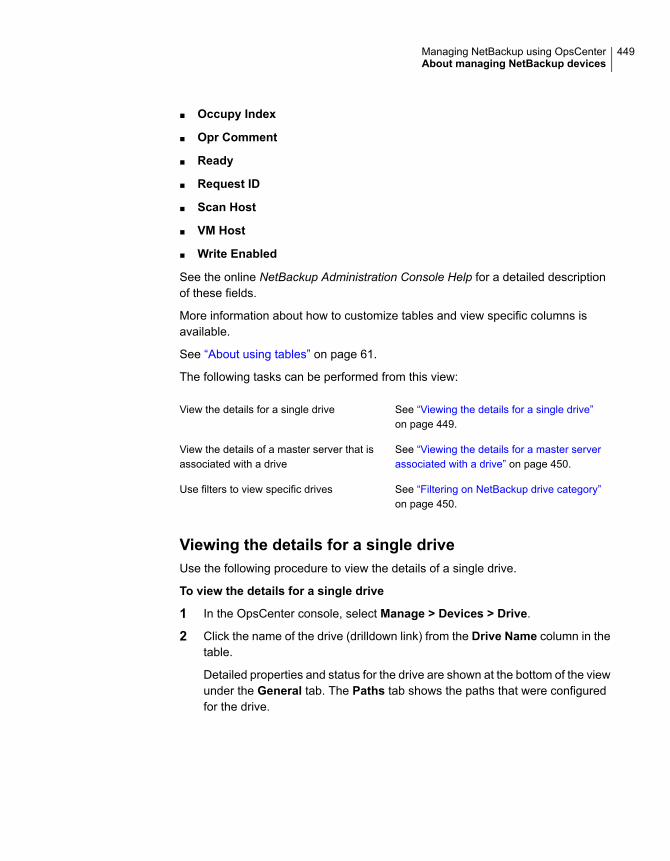
■ Occupy Index
■ Opr Comment
■ Ready
■ Request ID
■ Scan Host
■ VM Host
■ Write Enabled
See the online NetBackup Administration Console Help for a detailed descriptionof these fields.
More information about how to customize tables and view specific columns isavailable.
See “About using tables” on page 61.
The following tasks can be performed from this view:
See “Viewing the details for a single drive”on page 449.
View the details for a single drive
See “Viewing the details for a master serverassociated with a drive” on page 450.
View the details of a master server that isassociated with a drive
See “Filtering on NetBackup drive category”on page 450.
Use filters to view specific drives
Viewing the details for a single driveUse the following procedure to view the details of a single drive.
To view the details for a single drive
1 In the OpsCenter console, select Manage > Devices > Drive.
2 Click the name of the drive (drilldown link) from the Drive Name column in thetable.
Detailed properties and status for the drive are shown at the bottom of the viewunder the General tab. The Paths tab shows the paths that were configuredfor the drive.
449Managing NetBackup using OpsCenterAbout managing NetBackup devices
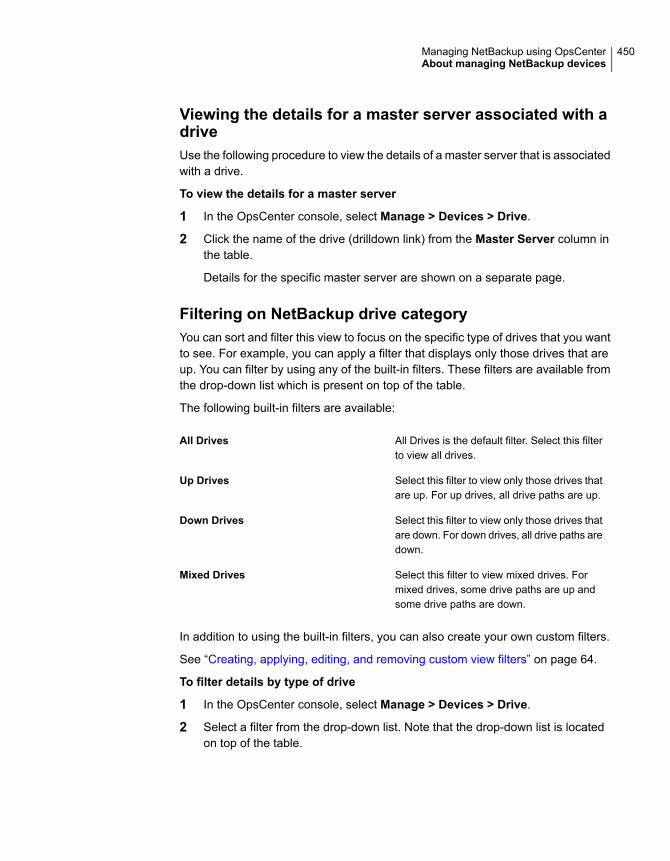
Viewing the details for a master server associated with adriveUse the following procedure to view the details of a master server that is associatedwith a drive.
To view the details for a master server
1 In the OpsCenter console, select Manage > Devices > Drive.
2 Click the name of the drive (drilldown link) from the Master Server column inthe table.
Details for the specific master server are shown on a separate page.
Filtering on NetBackup drive categoryYou can sort and filter this view to focus on the specific type of drives that you wantto see. For example, you can apply a filter that displays only those drives that areup. You can filter by using any of the built-in filters. These filters are available fromthe drop-down list which is present on top of the table.
The following built-in filters are available:
All Drives is the default filter. Select this filterto view all drives.
All Drives
Select this filter to view only those drives thatare up. For up drives, all drive paths are up.
Up Drives
Select this filter to view only those drives thatare down. For down drives, all drive paths aredown.
Down Drives
Select this filter to view mixed drives. Formixed drives, some drive paths are up andsome drive paths are down.
Mixed Drives
In addition to using the built-in filters, you can also create your own custom filters.
See “Creating, applying, editing, and removing custom view filters” on page 64.
To filter details by type of drive
1 In the OpsCenter console, select Manage > Devices > Drive.
2 Select a filter from the drop-down list. Note that the drop-down list is locatedon top of the table.
450Managing NetBackup using OpsCenterAbout managing NetBackup devices
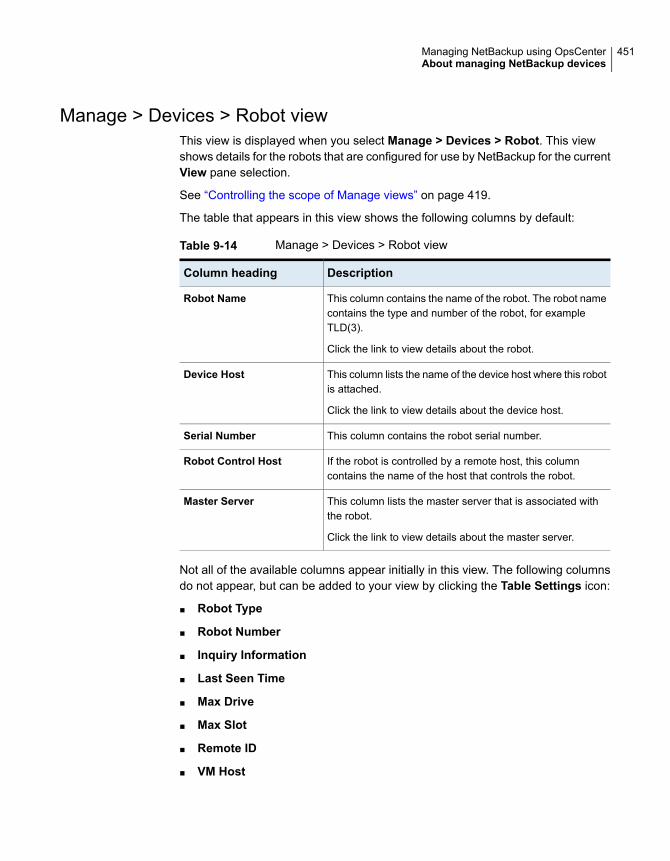
Manage > Devices > Robot viewThis view is displayed when you select Manage > Devices > Robot. This viewshows details for the robots that are configured for use by NetBackup for the currentView pane selection.
See “Controlling the scope of Manage views” on page 419.
The table that appears in this view shows the following columns by default:
Table 9-14 Manage > Devices > Robot view
DescriptionColumn heading
This column contains the name of the robot. The robot namecontains the type and number of the robot, for exampleTLD(3).
Click the link to view details about the robot.
Robot Name
This column lists the name of the device host where this robotis attached.
Click the link to view details about the device host.
Device Host
This column contains the robot serial number.Serial Number
If the robot is controlled by a remote host, this columncontains the name of the host that controls the robot.
Robot Control Host
This column lists the master server that is associated withthe robot.
Click the link to view details about the master server.
Master Server
Not all of the available columns appear initially in this view. The following columnsdo not appear, but can be added to your view by clicking the Table Settings icon:
■ Robot Type
■ Robot Number
■ Inquiry Information
■ Last Seen Time
■ Max Drive
■ Max Slot
■ Remote ID
■ VM Host
451Managing NetBackup using OpsCenterAbout managing NetBackup devices
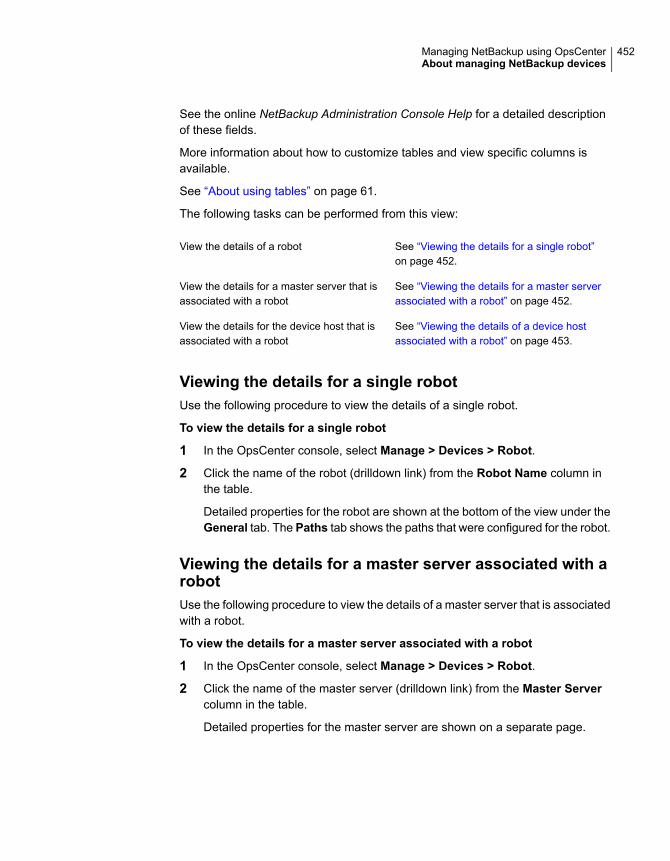
See the online NetBackup Administration Console Help for a detailed descriptionof these fields.
More information about how to customize tables and view specific columns isavailable.
See “About using tables” on page 61.
The following tasks can be performed from this view:
See “Viewing the details for a single robot”on page 452.
View the details of a robot
See “Viewing the details for a master serverassociated with a robot” on page 452.
View the details for a master server that isassociated with a robot
See “Viewing the details of a device hostassociated with a robot” on page 453.
View the details for the device host that isassociated with a robot
Viewing the details for a single robotUse the following procedure to view the details of a single robot.
To view the details for a single robot
1 In the OpsCenter console, select Manage > Devices > Robot.
2 Click the name of the robot (drilldown link) from the Robot Name column inthe table.
Detailed properties for the robot are shown at the bottom of the view under theGeneral tab. The Paths tab shows the paths that were configured for the robot.
Viewing the details for a master server associated with arobotUse the following procedure to view the details of a master server that is associatedwith a robot.
To view the details for a master server associated with a robot
1 In the OpsCenter console, select Manage > Devices > Robot.
2 Click the name of the master server (drilldown link) from the Master Servercolumn in the table.
Detailed properties for the master server are shown on a separate page.
452Managing NetBackup using OpsCenterAbout managing NetBackup devices
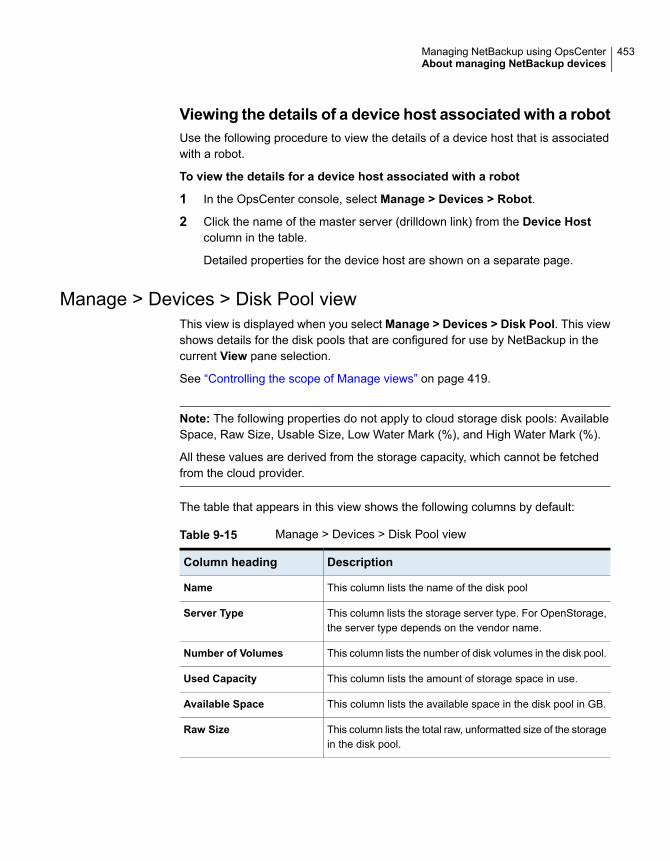
Viewing the details of a device host associatedwith a robotUse the following procedure to view the details of a device host that is associatedwith a robot.
To view the details for a device host associated with a robot
1 In the OpsCenter console, select Manage > Devices > Robot.
2 Click the name of the master server (drilldown link) from the Device Hostcolumn in the table.
Detailed properties for the device host are shown on a separate page.
Manage > Devices > Disk Pool viewThis view is displayed when you select Manage > Devices > Disk Pool. This viewshows details for the disk pools that are configured for use by NetBackup in thecurrent View pane selection.
See “Controlling the scope of Manage views” on page 419.
Note: The following properties do not apply to cloud storage disk pools: AvailableSpace, Raw Size, Usable Size, Low Water Mark (%), and High Water Mark (%).
All these values are derived from the storage capacity, which cannot be fetchedfrom the cloud provider.
The table that appears in this view shows the following columns by default:
Table 9-15 Manage > Devices > Disk Pool view
DescriptionColumn heading
This column lists the name of the disk poolName
This column lists the storage server type. For OpenStorage,the server type depends on the vendor name.
Server Type
This column lists the number of disk volumes in the disk pool.Number of Volumes
This column lists the amount of storage space in use.Used Capacity
This column lists the available space in the disk pool in GB.Available Space
This column lists the total raw, unformatted size of the storagein the disk pool.
Raw Size
453Managing NetBackup using OpsCenterAbout managing NetBackup devices
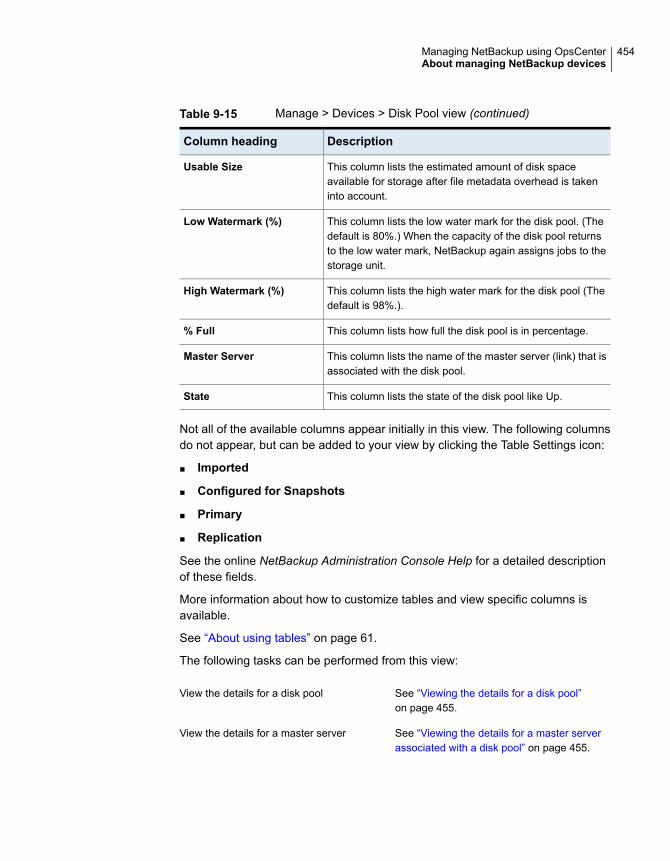
Table 9-15 Manage > Devices > Disk Pool view (continued)
DescriptionColumn heading
This column lists the estimated amount of disk spaceavailable for storage after file metadata overhead is takeninto account.
Usable Size
This column lists the low water mark for the disk pool. (Thedefault is 80%.) When the capacity of the disk pool returnsto the low water mark, NetBackup again assigns jobs to thestorage unit.
Low Watermark (%)
This column lists the high water mark for the disk pool (Thedefault is 98%.).
High Watermark (%)
This column lists how full the disk pool is in percentage.% Full
This column lists the name of the master server (link) that isassociated with the disk pool.
Master Server
This column lists the state of the disk pool like Up.State
Not all of the available columns appear initially in this view. The following columnsdo not appear, but can be added to your view by clicking the Table Settings icon:
■ Imported
■ Configured for Snapshots
■ Primary
■ Replication
See the online NetBackup Administration Console Help for a detailed descriptionof these fields.
More information about how to customize tables and view specific columns isavailable.
See “About using tables” on page 61.
The following tasks can be performed from this view:
See “Viewing the details for a disk pool”on page 455.
View the details for a disk pool
See “Viewing the details for a master serverassociated with a disk pool” on page 455.
View the details for a master server
454Managing NetBackup using OpsCenterAbout managing NetBackup devices
Viewing the details for a disk poolUse the following procedure to view the details for a disk pool. The details for thedisk pool are shown at the bottom of the Manage > Devices > Disk Pool viewunder the following tabs:
This tab shows the detailed properties for adisk pool.
Click the master server link to view detailsabout the master server that is associatedwith the disk pool.
General
This tab shows details about the disk volumesthat are associated with the disk pool.
Disk Volume
This tab shows details about the storageservers that are associated with the disk pool.
Storage Server
To view the details for a disk pool
1 In the OpsCenter console, select Manage > Devices > Disk Pool.
2 Click the name of the disk pool (drilldown link) from the Name column in thetable.
The details are shown at the bottom of this view.
Viewing the details for a master server associated with adisk poolUse the following procedure to view the details of a master server that is associatedwith a SAN client.
To view the details for a master server associated with a disk pool
1 In the OpsCenter console, select Manage > Devices > Disk Pool.
2 Click the name of the master server (drilldown link) from the Master Servercolumn in the table.
Detailed properties for the master server are shown on a separate page.
Manage > Devices > SAN Client viewThis view is displayed when you select Manage > Devices > SAN Client. Thisview shows details for the SAN clients that are configured for use by NetBackup inthe current View pane selection.
See “Controlling the scope of Manage views” on page 419.
455Managing NetBackup using OpsCenterAbout managing NetBackup devices
The table that appears in this view shows the following columns by default:
Table 9-16 Manage > Devices > SAN Client view
DescriptionColumn heading
This column lists the name of the SAN client.Name
This column lists the state of the FT device on the SAN client.
The different states can be active, disabled etc.
State
This column determines when to use the FT media server.Usage Preference
This column lists the number of NetBackup media serversthat support FT transport and that the client can send datato or receive data from.
No. of FT Media Servers
The number of minutes to wait for an FT media server for abackup operation.
Backup Wait Period
The number of minutes to wait for an FT media server for arestore operation.
Restore Wait Period
This column lists the master server that is associated withthe SAN client.
Master Server
The Version column does not appear, but can be added to your view by clickingthe Table Settings icon.
The following task can be performed from this view:
See “Viewing the details for a SAN client”on page 456.
View the details of a SAN client
See “Viewing the details for a master serverassociated with a SAN client” on page 457.
View the details of a master server that isassociated with a SAN client
Viewing the details for a SAN clientUse the following procedure to view the details of a SAN client. The details for theSAN Client are shown at the bottom of Manage > Devices > SAN Client viewunder the following tabs:
This tab shows detailed properties and statusfor the SAN client. Click the master serverlink to view details about the master serverthat is associated with the SAN client.
General
456Managing NetBackup using OpsCenterAbout managing NetBackup devices

This tab shows the FT target devicesinformation for the selected SAN client.
FT device
To view the details for a SAN client
1 In the OpsCenter console, select Manage > Devices > SAN Client.
2 Click the name of the SAN client (drilldown link) from the Name column in thetable.
The details are shown at the bottom of this view.
Viewing the details for a master server associated with aSAN clientUse the following procedure to view the details of a master server that is associatedwith a SAN client.
To view the details for a master server associated with a SAN client
1 In the OpsCenter console, select Manage > Devices > SAN Client.
2 Click the name of the master server (drilldown link) from the Master Servercolumn in the table.
Detailed properties for the master server are shown on a separate page.
Manage > Devices > FT Server viewThis view is displayed when you select Manage > Devices > FT Server. This viewshows details for the FT (Fibre Transport) media servers that are configured foruse by NetBackup for the current View pane selection.
See “Controlling the scope of Manage views” on page 419.
The table that appears in this view shows the following columns by default:
Table 9-17 Manage > Devices > FT Server view
DescriptionColumn heading
This column contains the name of the FT media server.
Click the link to view details about the robot.
Name
This column lists the state of the FT media server.State
This column lists the master server that is associated withthe FT server.
Master Server
457Managing NetBackup using OpsCenterAbout managing NetBackup devices
Table 9-17 Manage > Devices > FT Server view (continued)
DescriptionColumn heading
This column specifies the number of FT connections to allowto a media server.
Max Allowed Connections
The following tasks can be performed from this view:
See “Viewing the details for an FT server ”on page 458.
View the details of an FT server
See “Viewing the details for a master serverassociated with an FT server” on page 458.
View the details for a master server that isassociated with an FT server
Viewing the details for an FT serverUse the following procedure to view the details for an FT server. The details for theFT server are shown at the bottom of Manage > Devices > FT Server view underthe following tabs:
This tab shows detailed properties and statusfor the FT server.
General
This tab shows the FT target devicesinformation for the selected FT server.
FT device
To view the details for an FT server
1 In the OpsCenter console, select Manage > Devices > FT Server.
2 Click the name of the Fibre Transport server (drilldown link) from the Namecolumn in the table.
The details are shown at the bottom of this view.
Viewing the details for a master server associated with anFT serverUse the following procedure to view the details of a master server that is associatedwith an FT server.
458Managing NetBackup using OpsCenterAbout managing NetBackup devices
To view the details for a master server associated with an FT server
1 In the OpsCenter console, select Manage > Devices > FT Server.
2 Click the name of the master server (drilldown link) from the Master Servercolumn in the table.
Detailed properties for the master server are shown on a separate page.
About Operational Restore and Guided Recoveryoperations
Use the Manage > Restore tab to perform operational restore or Guided recoveryoperations. The Restore subtab is not visible when you log on as Reporter.
The Restore Files and Directories link is enabled only if you have permission toaccess either a client view or a master server view and if any client or master serveris connected to the OpsCenter console.
The Clone Oracle Database link is enabled only if you are permitted to access amaster server view or if a master server is connected to the OpsCenter console.
About Operational Restores from OpsCenterYou can now search for and restore the backed up files or directories from multiplesource clients easily from the OpsCenter console. The OpsCenter console lets yousearch for and view the backed up files or directories for multiple source clients ina consolidated manner.
Before restoring files and directories from the OpsCenter console, review thefollowing considerations:
■ You must have backups of files and directories that you want to restore.
■ You cannot search for or restore files and directories from NetBackup masterservers prior to 7.5.Note that you may have backed up files and directories using previous NetBackupversions. If you upgrade NetBackup, the backups that you have taken with theearlier version can be searched and restored using OpsCenter.
■ You must add the NetBackup master server to the OpsCenter console forrestoring files and directories from a client that is associated with the masterserver.
■ View-based access is used to control the clients that you can search and restoreto. Only those views are displayed that you can access.
■ Only one user session is allowed per user at a given time.
459Managing NetBackup using OpsCenterAbout Operational Restore and Guided Recovery operations
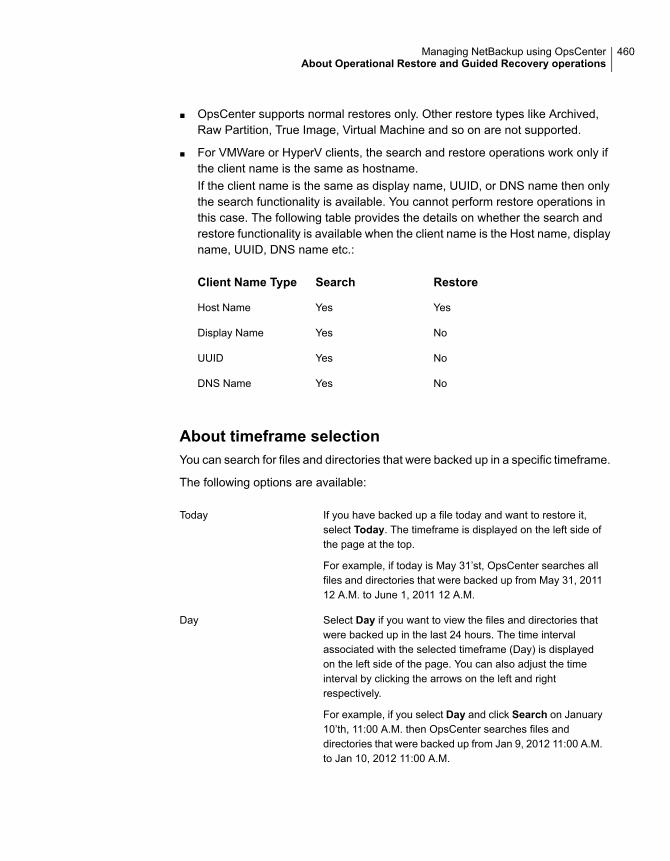
■ OpsCenter supports normal restores only. Other restore types like Archived,Raw Partition, True Image, Virtual Machine and so on are not supported.
■ For VMWare or HyperV clients, the search and restore operations work only ifthe client name is the same as hostname.If the client name is the same as display name, UUID, or DNS name then onlythe search functionality is available. You cannot perform restore operations inthis case. The following table provides the details on whether the search andrestore functionality is available when the client name is the Host name, displayname, UUID, DNS name etc.:
RestoreSearchClient Name Type
YesYesHost Name
NoYesDisplay Name
NoYesUUID
NoYesDNS Name
About timeframe selectionYou can search for files and directories that were backed up in a specific timeframe.
The following options are available:
If you have backed up a file today and want to restore it,select Today. The timeframe is displayed on the left side ofthe page at the top.
For example, if today is May 31’st, OpsCenter searches allfiles and directories that were backed up from May 31, 201112 A.M. to June 1, 2011 12 A.M.
Today
Select Day if you want to view the files and directories thatwere backed up in the last 24 hours. The time intervalassociated with the selected timeframe (Day) is displayedon the left side of the page. You can also adjust the timeinterval by clicking the arrows on the left and rightrespectively.
For example, if you select Day and click Search on January10’th, 11:00 A.M. then OpsCenter searches files anddirectories that were backed up from Jan 9, 2012 11:00 A.M.to Jan 10, 2012 11:00 A.M.
Day
460Managing NetBackup using OpsCenterAbout Operational Restore and Guided Recovery operations
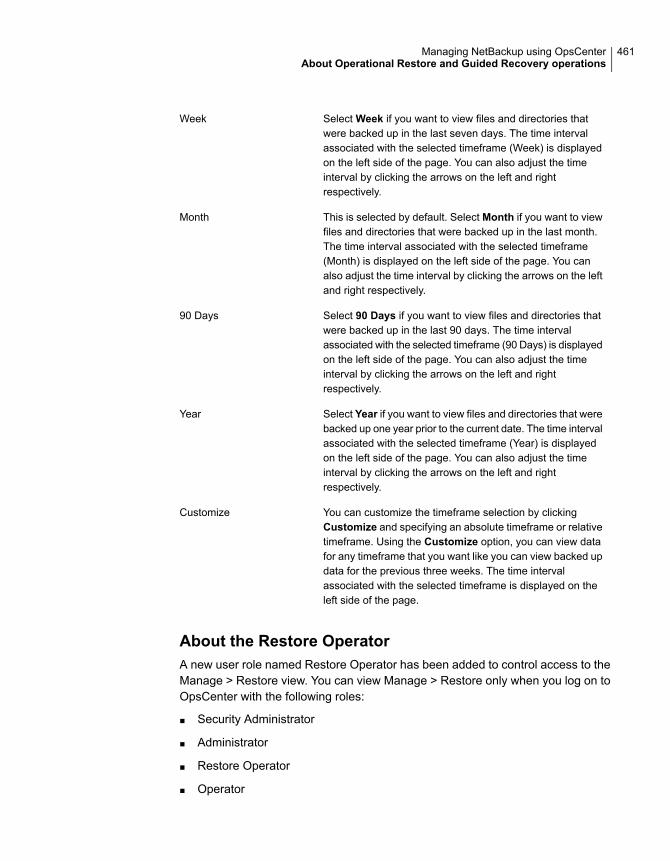
Select Week if you want to view files and directories thatwere backed up in the last seven days. The time intervalassociated with the selected timeframe (Week) is displayedon the left side of the page. You can also adjust the timeinterval by clicking the arrows on the left and rightrespectively.
Week
This is selected by default. Select Month if you want to viewfiles and directories that were backed up in the last month.The time interval associated with the selected timeframe(Month) is displayed on the left side of the page. You canalso adjust the time interval by clicking the arrows on the leftand right respectively.
Month
Select 90 Days if you want to view files and directories thatwere backed up in the last 90 days. The time intervalassociated with the selected timeframe (90 Days) is displayedon the left side of the page. You can also adjust the timeinterval by clicking the arrows on the left and rightrespectively.
90 Days
Select Year if you want to view files and directories that werebacked up one year prior to the current date. The time intervalassociated with the selected timeframe (Year) is displayedon the left side of the page. You can also adjust the timeinterval by clicking the arrows on the left and rightrespectively.
Year
You can customize the timeframe selection by clickingCustomize and specifying an absolute timeframe or relativetimeframe. Using the Customize option, you can view datafor any timeframe that you want like you can view backed updata for the previous three weeks. The time intervalassociated with the selected timeframe is displayed on theleft side of the page.
Customize
About the Restore OperatorA new user role named Restore Operator has been added to control access to theManage > Restore view. You can view Manage > Restore only when you log on toOpsCenter with the following roles:
■ Security Administrator
■ Administrator
■ Restore Operator
■ Operator
461Managing NetBackup using OpsCenterAbout Operational Restore and Guided Recovery operations
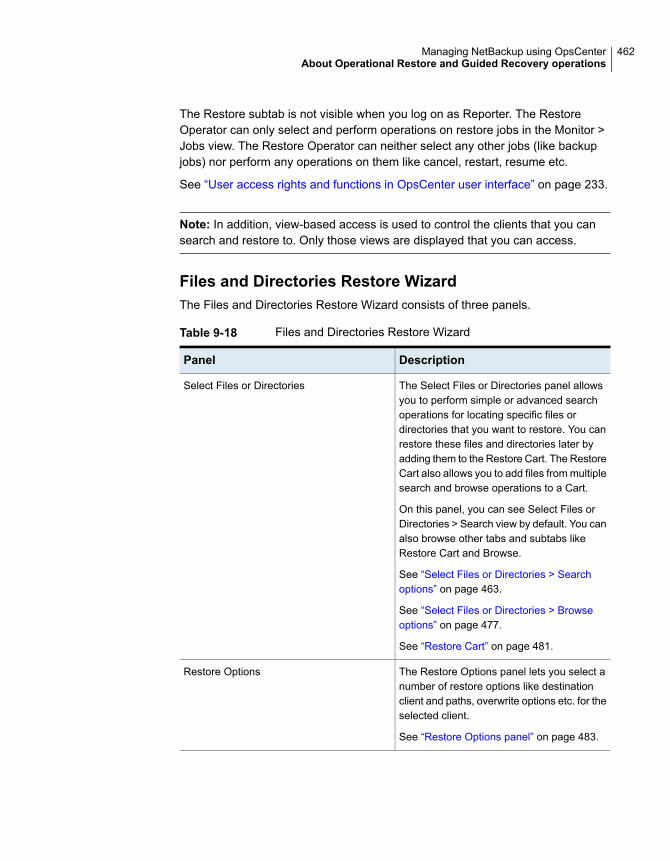
The Restore subtab is not visible when you log on as Reporter. The RestoreOperator can only select and perform operations on restore jobs in the Monitor >Jobs view. The Restore Operator can neither select any other jobs (like backupjobs) nor perform any operations on them like cancel, restart, resume etc.
See “User access rights and functions in OpsCenter user interface” on page 233.
Note: In addition, view-based access is used to control the clients that you cansearch and restore to. Only those views are displayed that you can access.
Files and Directories Restore WizardThe Files and Directories Restore Wizard consists of three panels.
Table 9-18 Files and Directories Restore Wizard
DescriptionPanel
The Select Files or Directories panel allowsyou to perform simple or advanced searchoperations for locating specific files ordirectories that you want to restore. You canrestore these files and directories later byadding them to the Restore Cart. The RestoreCart also allows you to add files from multiplesearch and browse operations to a Cart.
On this panel, you can see Select Files orDirectories > Search view by default. You canalso browse other tabs and subtabs likeRestore Cart and Browse.
See “Select Files or Directories > Searchoptions” on page 463.
See “Select Files or Directories > Browseoptions” on page 477.
See “Restore Cart” on page 481.
Select Files or Directories
The Restore Options panel lets you select anumber of restore options like destinationclient and paths, overwrite options etc. for theselected client.
See “Restore Options panel” on page 483.
Restore Options
462Managing NetBackup using OpsCenterAbout Operational Restore and Guided Recovery operations

Table 9-18 Files and Directories Restore Wizard (continued)
DescriptionPanel
The Summary panel displays the list of filesor directories that you selected for restore.
See “Summary panel” on page 489.
Summary
Select Files or Directories panelUse the Select Files or Directroies panel to search files and directories, browseclients, or use the Restore Cart.
Select Files or Directories > Search optionsThis view is shown by default when you select Manage > Restore and then clickthe Restore Files and Directories link. The Select Files or Directories > Searchview lets you perform simple or advanced search operations based on the timeframeand search options that you select. When you select a specific timeframe, only thebackups that occurred in the selected timeframe are searched. By default, the filesor directories that are backed up over the last one month are searched.
The following search options are displayed when you select Select Files orDirectories > Search:
463Managing NetBackup using OpsCenterAbout Operational Restore and Guided Recovery operations

File or Directory name
464Managing NetBackup using OpsCenterAbout Operational Restore and Guided Recovery operations

Enter the name of the file or directory that you want to searchfor. This is a mandatory field.
For UNIX clients, the search pattern may optionally beginwith a / to indicate that the matching should start at the rootdirectory.
A pattern may optionally end with a / for UNIX clients or \ forWindows clients to indicate that only directory matches arereturned.
You can search by the following methods:
■ Enter a full path name.OpsCenter searches for the specific path and file in theselected clients, timeframe, and as per any advancedsearch criteria that you entered. Use forward slash (/) asthe path delimiter for UNIX and back slash (\) as the pathdelimiter for Windows.
■ Enter a specific file or directory name.OpsCenter searches for the specific file or directory(folder) in the selected clients, timeframe, and as per anyadvanced search criteria that you entered..
■ Add a * or a ? wildcard to the entry.If you do not know the exact directory (folder) or file name,add one of these wildcards to the string. This is valid forboth Windows and UNIX clients.Examples:■ Enter *.doc to view the files that end with that suffix.■ Enter ca?.doc to view all the files that have one
character after ca and a .doc extension.■ Enter etc/hos* to view files named hos* immediately
inside directory etc.Enter C:\backup* to view files named backup*immediately inside C:.
■ Enter /etc/hos* to view files named hos* immediatelyinside directory etc. The etc directory must be a firstlevel directory.Enter trace\backup* to view files immediately insidedirectory named trace.
■ Enter etc//hos* to view files named hos* immediatelyinside etc or any subdirectory of etc.Enter C:\\backup* to view files named backup*immediately inside C: or any subdirectory of C:.
Note: You cannot search by only typing * in the text box.This is not supported.
465Managing NetBackup using OpsCenterAbout Operational Restore and Guided Recovery operations

In addition, you cannot search by using a pattern like/path/* on UNIX or path\* on Windows. To find relatedresults, you can search using path* or path.
Search within Clients
In this field, you can specify the set of clients whose backup information you want to search.You can search multiple clients that are associated with one or more views or master serversat a given time.
Select one or more clients that are associated with one master server. A table appears thatprovides details like client name, the master server that it is associated with and a link toremove the client. To add the clients that are associated with a different view or masterserver, select the view, master server, and then type in or browse for the clients.
Select a view from the View drop-down list.
Only the following views are displayed in the View drop-downlist:
■ Views that you have access to■ Client type or Master Server type views
If you select a view of type Master Server, all NetBackup 7.5master servers that are added to the view are displayed inthe Master Server drop-down list. If you select a client-typeview, the Master Server drop-down list is disabled.
View
Select a master server from the Master Server drop-downlist. All NetBackup 7.5 master servers that are a part of theselected view are displayed.
Note: Only NetBackup 7.5 master servers are displayed inthe Master Server drop-down list. Even if you have masterservers below 7.5 in the selected view, those master serversdo not appear in the Master Server drop-down list.
TheMaster Server drop-down list is disabled in the followingscenario:
■ If you select a client-type view from the View drop-downlist
■ If you have access to client-type views only
To restore backed up files and directories (folders) on a client,first ensure that the master server that is associated with theclient is added to the OpsCenter console.
Master Server
466Managing NetBackup using OpsCenterAbout Operational Restore and Guided Recovery operations
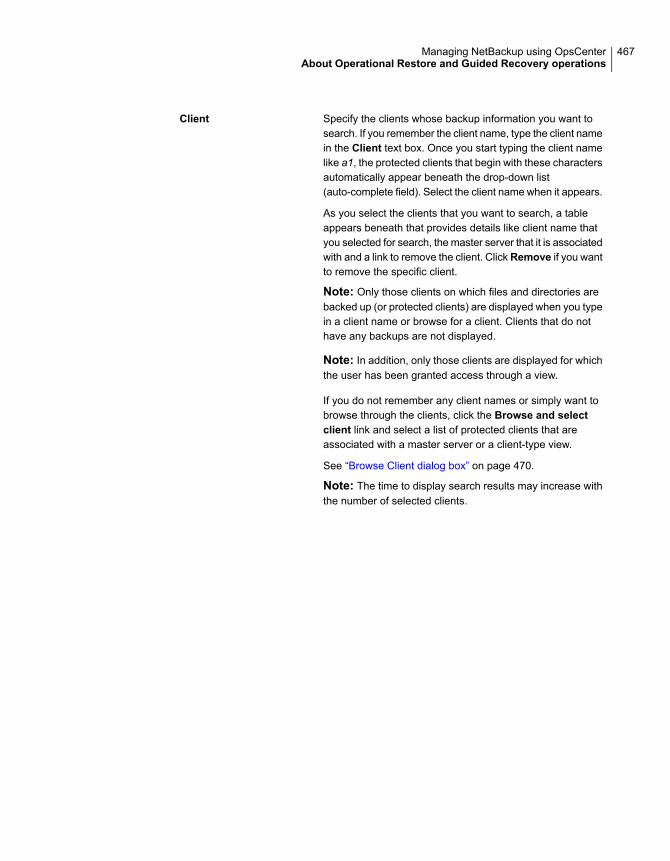
Specify the clients whose backup information you want tosearch. If you remember the client name, type the client namein the Client text box. Once you start typing the client namelike a1, the protected clients that begin with these charactersautomatically appear beneath the drop-down list(auto-complete field). Select the client name when it appears.
As you select the clients that you want to search, a tableappears beneath that provides details like client name thatyou selected for search, the master server that it is associatedwith and a link to remove the client. ClickRemove if you wantto remove the specific client.
Note: Only those clients on which files and directories arebacked up (or protected clients) are displayed when you typein a client name or browse for a client. Clients that do nothave any backups are not displayed.
Note: In addition, only those clients are displayed for whichthe user has been granted access through a view.
If you do not remember any client names or simply want tobrowse through the clients, click the Browse and selectclient link and select a list of protected clients that areassociated with a master server or a client-type view.
See “Browse Client dialog box” on page 470.
Note: The time to display search results may increase withthe number of selected clients.
Client
467Managing NetBackup using OpsCenterAbout Operational Restore and Guided Recovery operations

Advanced Search
468Managing NetBackup using OpsCenterAbout Operational Restore and Guided Recovery operations
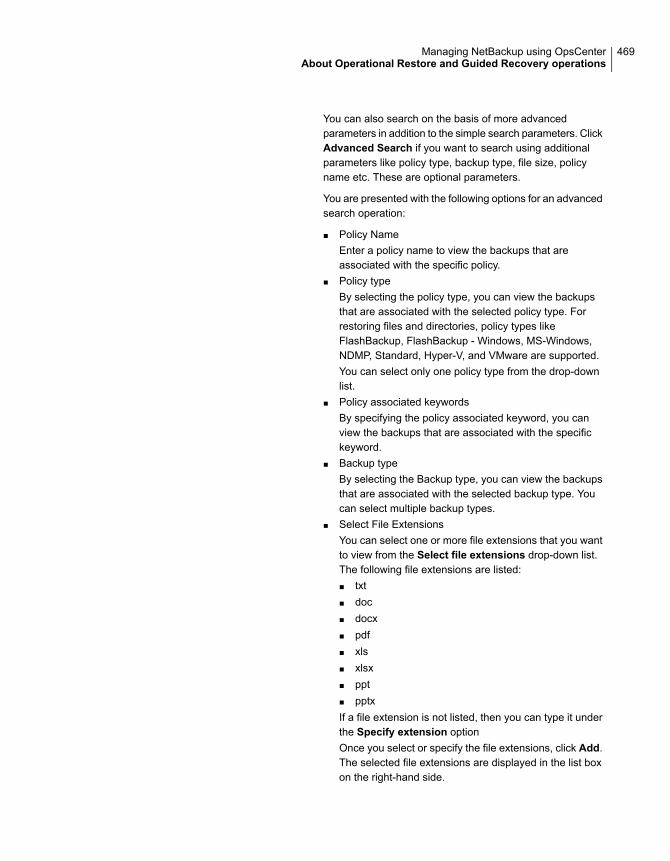
You can also search on the basis of more advancedparameters in addition to the simple search parameters. ClickAdvanced Search if you want to search using additionalparameters like policy type, backup type, file size, policyname etc. These are optional parameters.
You are presented with the following options for an advancedsearch operation:
■ Policy NameEnter a policy name to view the backups that areassociated with the specific policy.
■ Policy typeBy selecting the policy type, you can view the backupsthat are associated with the selected policy type. Forrestoring files and directories, policy types likeFlashBackup, FlashBackup - Windows, MS-Windows,NDMP, Standard, Hyper-V, and VMware are supported.You can select only one policy type from the drop-downlist.
■ Policy associated keywordsBy specifying the policy associated keyword, you canview the backups that are associated with the specifickeyword.
■ Backup typeBy selecting the Backup type, you can view the backupsthat are associated with the selected backup type. Youcan select multiple backup types.
■ Select File ExtensionsYou can select one or more file extensions that you wantto view from the Select file extensions drop-down list.The following file extensions are listed:■ txt■ doc■ docx■ pdf■ xls■ xlsx■ ppt■ pptxIf a file extension is not listed, then you can type it underthe Specify extension optionOnce you select or specify the file extensions, click Add.The selected file extensions are displayed in the list boxon the right-hand side.
469Managing NetBackup using OpsCenterAbout Operational Restore and Guided Recovery operations

Case-insensitive search■
This option is checked by default. You can uncheck thecase-insensitive search option to make your searchcase-sensitive.The case-sensitive search applies to file or directory nameand file extensions only.
■ File/Directory modification timeWith this option you can search based on when the fileor directory was last modified. The default selection isAny.In addition to other options, you can also specify anabsolute timeframe by selecting Specify date and timerange.and select From and To timeframes.
Note: A command named nbfindfile has been added that lets you search filesor directories based on simple search criteria. This command can be executed fromthe NetBackup master server (and not the OpsCenter Server).
See nbfindfile on page 638.
Browse Client dialog boxYou can also browse to view and select clients that are associated with a masterserver or a view. This option may be helpful if you do not remember any clientnames or if you want to browse through the clients that are associated with masterservers or a view.
When you click Browse and select clients link from Select files or directories >Search view, the Browse Clients dialog box is displayed.
The following options are displayed in the dialog box:
The view that you select from the Viewdrop-down list is displayed.
If you select a view of type Master Server, allNetBackup 7.5 master servers that are addedto the view are displayed under the Namecolumn. If you select a client-type view, theclients are displayed under the selected viewin the Name column.
Selected View
470Managing NetBackup using OpsCenterAbout Operational Restore and Guided Recovery operations

You may want to view specific clients whenthe client list is large.
To filter specific clients, enter client name,part of a client name, or add the * wildcard.For example, when you enter ary in the FilterClients field, then OpsCenter displays allresults that start with or contain ary string.
Click Apply Filter to apply this filter and viewthe filtered clients.
Click Clear Filter to clear the filtered viewand see all the clients.
Filter Clients
If you select a Master Server type view, theneach master server (with a yellow folder icon)is displayed under the Name column with a+ sign next to it. When you expand a masterserver, you can see the protected clients thatare associated with it.
If you select a Client-type view, you can viewclients under the Name column.
Select the checkbox next to one or moreclients and click OK.
A table appears that provides details likeclient name that are selected for search, themaster server that the client is associatedwith and a link to remove the client. ClickRemove if you want to remove the specificclient.
Note: The time to display search results mayincrease with the number of selected clients.
Name
Performing a simple or advanced searchTo restore a specific file or directory, you may first need to know the location of thefile or directory. You can either perform a simple or advanced search. For performinga simple search, you must select the timeframe, enter a file or directory name (full,partial, or wildcard) or path along with the client name. By default, timeframe of thelast one month is selected. This means that files or directories that were backedup over the last one month are searched by default.
While performing an advanced search, you can specify additional optionalparameters like policy name, policy or backup type etc. in addition to the simplesearch parameters.
471Managing NetBackup using OpsCenterAbout Operational Restore and Guided Recovery operations
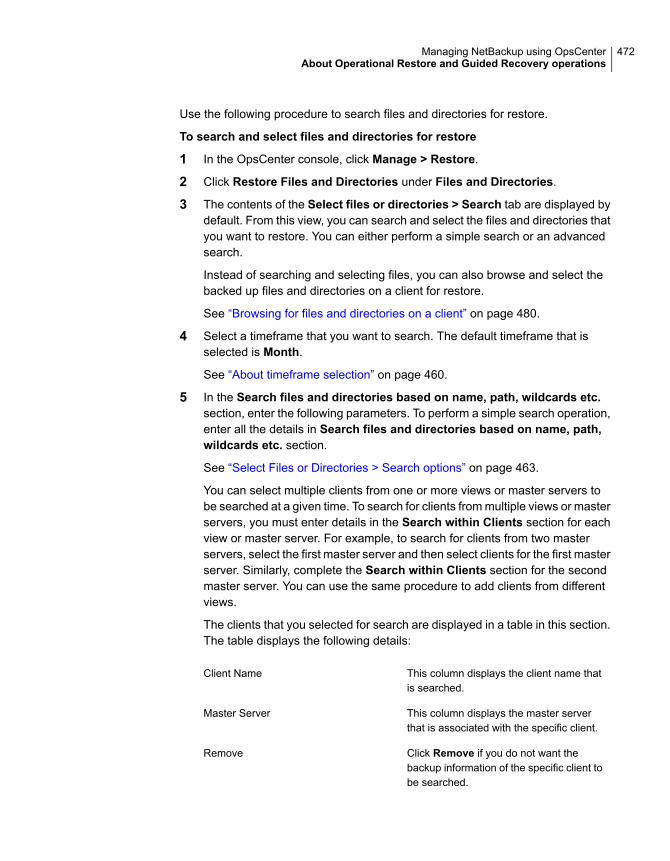
Use the following procedure to search files and directories for restore.
To search and select files and directories for restore
1 In the OpsCenter console, click Manage > Restore.
2 Click Restore Files and Directories under Files and Directories.
3 The contents of the Select files or directories > Search tab are displayed bydefault. From this view, you can search and select the files and directories thatyou want to restore. You can either perform a simple search or an advancedsearch.
Instead of searching and selecting files, you can also browse and select thebacked up files and directories on a client for restore.
See “Browsing for files and directories on a client” on page 480.
4 Select a timeframe that you want to search. The default timeframe that isselected is Month.
See “About timeframe selection” on page 460.
5 In the Search files and directories based on name, path, wildcards etc.section, enter the following parameters. To perform a simple search operation,enter all the details in Search files and directories based on name, path,wildcards etc. section.
See “Select Files or Directories > Search options” on page 463.
You can select multiple clients from one or more views or master servers tobe searched at a given time. To search for clients from multiple views or masterservers, you must enter details in the Search within Clients section for eachview or master server. For example, to search for clients from two masterservers, select the first master server and then select clients for the first masterserver. Similarly, complete the Search within Clients section for the secondmaster server. You can use the same procedure to add clients from differentviews.
The clients that you selected for search are displayed in a table in this section.The table displays the following details:
This column displays the client name thatis searched.
Client Name
This column displays the master serverthat is associated with the specific client.
Master Server
Click Remove if you do not want thebackup information of the specific client tobe searched.
Remove
472Managing NetBackup using OpsCenterAbout Operational Restore and Guided Recovery operations
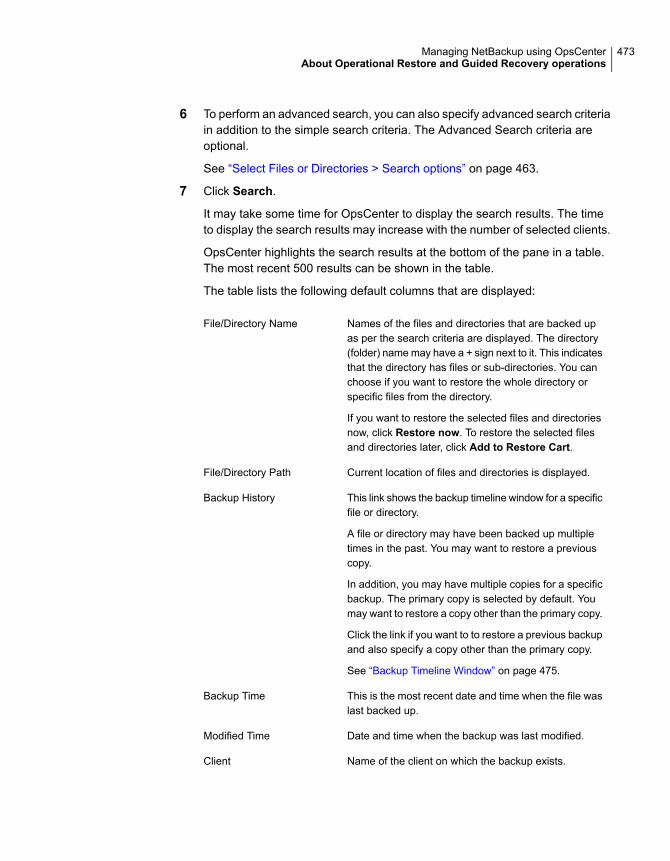
6 To perform an advanced search, you can also specify advanced search criteriain addition to the simple search criteria. The Advanced Search criteria areoptional.
See “Select Files or Directories > Search options” on page 463.
7 Click Search.
It may take some time for OpsCenter to display the search results. The timeto display the search results may increase with the number of selected clients.
OpsCenter highlights the search results at the bottom of the pane in a table.The most recent 500 results can be shown in the table.
The table lists the following default columns that are displayed:
Names of the files and directories that are backed upas per the search criteria are displayed. The directory(folder) name may have a + sign next to it. This indicatesthat the directory has files or sub-directories. You canchoose if you want to restore the whole directory orspecific files from the directory.
If you want to restore the selected files and directoriesnow, click Restore now. To restore the selected filesand directories later, click Add to Restore Cart.
File/Directory Name
Current location of files and directories is displayed.File/Directory Path
This link shows the backup timeline window for a specificfile or directory.
A file or directory may have been backed up multipletimes in the past. You may want to restore a previouscopy.
In addition, you may have multiple copies for a specificbackup. The primary copy is selected by default. Youmay want to restore a copy other than the primary copy.
Click the link if you want to to restore a previous backupand also specify a copy other than the primary copy.
See “Backup Timeline Window” on page 475.
Backup History
This is the most recent date and time when the file waslast backed up.
Backup Time
Date and time when the backup was last modified.Modified Time
Name of the client on which the backup exists.Client
473Managing NetBackup using OpsCenterAbout Operational Restore and Guided Recovery operations
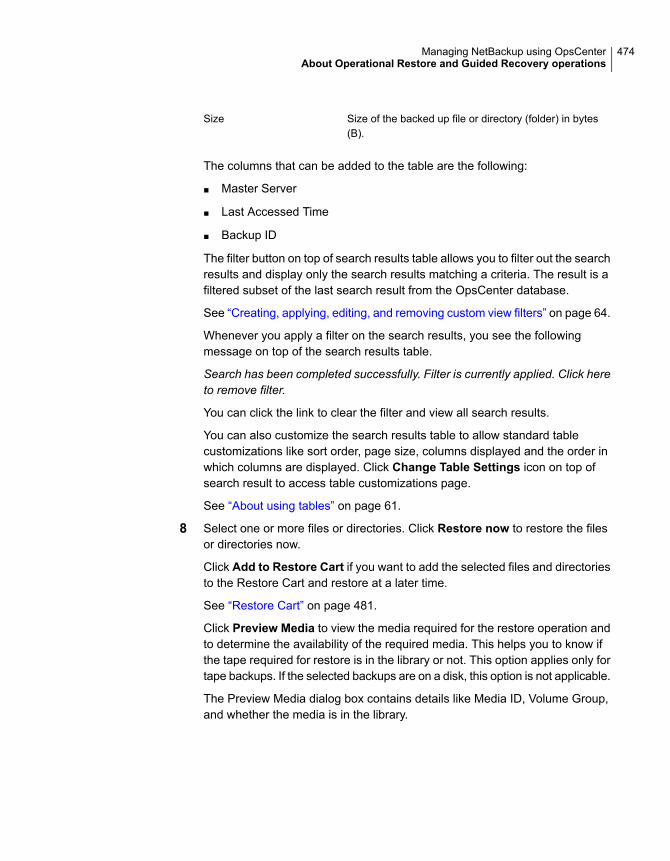
Size of the backed up file or directory (folder) in bytes(B).
Size
The columns that can be added to the table are the following:
■ Master Server
■ Last Accessed Time
■ Backup ID
The filter button on top of search results table allows you to filter out the searchresults and display only the search results matching a criteria. The result is afiltered subset of the last search result from the OpsCenter database.
See “Creating, applying, editing, and removing custom view filters” on page 64.
Whenever you apply a filter on the search results, you see the followingmessage on top of the search results table.
Search has been completed successfully. Filter is currently applied. Click hereto remove filter.
You can click the link to clear the filter and view all search results.
You can also customize the search results table to allow standard tablecustomizations like sort order, page size, columns displayed and the order inwhich columns are displayed. Click Change Table Settings icon on top ofsearch result to access table customizations page.
See “About using tables” on page 61.
8 Select one or more files or directories. Click Restore now to restore the filesor directories now.
Click Add to Restore Cart if you want to add the selected files and directoriesto the Restore Cart and restore at a later time.
See “Restore Cart” on page 481.
Click Preview Media to view the media required for the restore operation andto determine the availability of the required media. This helps you to know ifthe tape required for restore is in the library or not. This option applies only fortape backups. If the selected backups are on a disk, this option is not applicable.
The Preview Media dialog box contains details like Media ID, Volume Group,and whether the media is in the library.
474Managing NetBackup using OpsCenterAbout Operational Restore and Guided Recovery operations
9 In the Restore Options panel, select the restore options for each individualclient.
See “Restore Options panel” on page 483.
Click Next.
10 In the Summary panel, click Restore to restore all the files or directories.
See “Summary panel” on page 489.
Backup Timeline WindowThis is a timeline view of backups for a specific file or directory. By default, thesearch and browse results that are displayed in the OpsCenter console display themost recent backup that occured for the specific file or directory and is the primarybackup copy. The Backup Timeline window allows you to select a previous backupfor the specific file or directory in the selected timeframe and also select a copyother than the primary copy.
At the top of the Backup Timeline window, the name and location of the file ordirectory whose backup details are displayed is mentioned. Name of the client thatcontains the file or directory is also mentioned.
The X-axis represents the time while the Y-axis represents the device or sourcelike disk pool, volume group etc. on which the specific file or directory resides. Eachrow in the table represent the backups on a single disk pool, basic disk, or a singlevolume group.
The timeline on top displays icons for each backup of the file or directory. Eachicon represents a different backup or snapshot.
There are different icons for snapshot, disk, or tape backups. Also if single or multiplebackups occur during a single timeline unit, then it is represented through differenticons. For example, if a file was backed up twice in an hour, a different icon appearsrepresenting more than one backup.
When you open the Backup Timeline window, the latest backup (icon) in the selectedtimeline is already selected. Select another icon if you want to select a previousbackup.
Multiple backups may be displayed on the timeline. To view all the instances ofbackups, you may need to increase the scope of the timeline. You can display thetimeline in days, weeks, or months.
The following tabs are displayed:
475Managing NetBackup using OpsCenterAbout Operational Restore and Guided Recovery operations

This selection shows the backups thatoccured at different times in the day. Bydefault, the Day tab shows the day of thebackup that was shown in the search orbrowse result. For example, if search resultshows backup date for a file as June 15, 2011and that link is clicked to view the timeline,then June 15 is shown by default.
The timeline for a day is split up in 24 slotsof an hour each. Each slot of one hour is inturn split up by 30 minute slots - that is 2 cellsper hour. You can also adjust the time intervalby clicking the arrows on the left and rightrespectively.
Day
Select Week to view a weekly summary ofthe backups. By default, the Week tab showsthe week of the backup that was shown insearch or browse result. For example, ifsearch result shows backup date for a file asJune 15, 2011 and that link is clicked to viewthe timeline, then the week of June 15 isshown by default.
The timeline for week is split up in seven slotsof one day each. Each slot of one day in turnis split up by 4 hour slots- that is six cells perday. You can also adjust the time interval byclicking the arrows on the left and rightrespectively.
Week
Select Month to view a monthly summary ofthe backups. By default, the Month tab showsthe month of the backup that was shown insearch or browse result. For example, ifsearch result shows backup date for a file asJune 15, 2011 and that link is clicked to viewthe timeline, then the month of June 15 isshown by default.
The timeline for month is split up in five slotsof one week each. Each slot of one week inturn is split up in seven cells - that is sevencells per week (and 35 cells per month). Youcan also adjust the time interval by clickingthe arrows on the left and right respectively.
Month
476Managing NetBackup using OpsCenterAbout Operational Restore and Guided Recovery operations
The Backup table in the middle of the window shows information about the icon(backup) that is selected from the timeline view. Click an icon to view the details ofthe specific backup in the Backup table. The Backup table lists the details of eachbackup image that is associated with the backup. It shows several details like backuptime, policy name, policy type, backup type etc. Once you select the specific backupimage that you want to restore from the Backup table, the copies that are associatedwith the backup image are displayed in another table at the bottom. The Copies ofSelected Backup table at the bottom shows information about the copies that areassociated with the selected backup image. By default, the primary copy is selected.You can select a different copy for restore and click Add to Restore Cart to add thisto the restore cart.
Note: A multiple disk, tape, or snapshot backup may include many backup images.
Select Files or Directories > Browse optionsThis view is displayed when you select Select Files or Directories > Browse. TheSelect Files or Directories > Browse view allows you to select a client and thenbrowse and select the backed up files and directories on the client for restore. Youcan browse the contents of only one client at a given time.
You first need to select the client from the Select Client section. The followingoptions are displayed in the Select Client section:
All the views that are shown in the OpsCenterconsole are displayed in the drop-down list.Select a view from the drop-down list.
You may select a view that is of Client-typeor master server type.
Only the following views are displayed in theView drop-down list:
■ Views that you have access to■ Client type or Master Server type views
If you select a view of type Master Server, allNetBackup 7.5 master servers that are addedto the view are displayed in the MasterServer drop-down list. If you select aclient-type view, the Master Serverdrop-down list is disabled.
View
477Managing NetBackup using OpsCenterAbout Operational Restore and Guided Recovery operations

Select the master server that is associatedwith the client. Only NetBackup 7.5 masterservers that are added to the OpsCenterconsole are displayed.
TheMaster Server drop-down list is disabledin the following scenario:
■ If you select a client-type view from theView drop-down list
■ If you have access to client-type viewsonly
Master Server
Only protected clients or clients that havebackups are displayed. Select the client thatcontains the protected files and directories.
Specify the client whose backup informationyou want to browse. If you remember theclient name, type the client name in theClienttext box. Once you start typing the clientname like a1, protected clients that begin withthese characters automatically appearbeneath the drop-down list (auto-completefield). Select the client name when it appears.
Note: Only those clients on which files anddirectories are backed up (or protectedclients) are displayed when you type in aclient name or browse for a client. Clients thatdo not have any backups are not displayed.
Note: In addition, only those clients aredisplayed for which the user has been grantedaccess through a view.
If you do not remember any client names orsimply want to browse through the clients,click the Browse and select client link andselect a list of protected clients that areassociated with a master server or aclient-type view.
See “Browse Client dialog box” on page 470.
Client
Once you select a client, you can see a two-pane view. The two-pane view showsthe backed up client directories in the left pane and content of the selected directoryin the right pane (like Windows Explorer). The backed up files and directories thatare displayed is based on the timeframe that you select. The most recent backup
478Managing NetBackup using OpsCenterAbout Operational Restore and Guided Recovery operations
in the specified timeframe is shown on the top by default. This is also similar to theJava GUI or the BAR GUI browse capability. From this view, you can select one ormore files or directories for restore.
The following properties are displayed when you select Select Files or Directories> Browse:
The Change Client link lets you select adifferent client and allows you to browse theprotected files and directories on a differentclient. Note that you can browse the contentsof one client at a time.
Change Client link
The Directory structure shows the backed updirectories on the selected client in theselected timeframe. The directory (folder)name may have a + sign next to it. Thisindicates that the directory hassub-directories. Expand the directories to viewthe subdirectories.
Directory Structure
Click a directory from the left pane. Thecontents of the selected directory aredisplayed in this pane.
Contents of selected directory
The following details are displayed in the right pane that shows the contents of theselected directory:
Names of the files and directories that are apart of the selected directory in the left-paneare displayed. Select the files orsub-directories that you want to restore.
If you want to restore the selected files anddirectories now, click Restore now. Torestore the selected files and directories later,click Add to Restore Cart.
File/Directory Name
This is the most recent date and time whenthe file was last backed up.
Backup Time
Date and time when the backup was lastmodified.
Modified Time
Size of the backed up file or directory in bytes(B).
Size
479Managing NetBackup using OpsCenterAbout Operational Restore and Guided Recovery operations

This link shows the backup timeline windowfor a specific file or directory.
A file or directory may have been backed upmultiple times in the past. You may want torestore a previous copy.
In addition, you may have multiple copies fora specific backup. The primary copy isselected by default. You may want to restorea copy other than the primary copy.
Click the link if you want to to restore aprevious backup and also specify a copyother than the primary copy.
See “Backup Timeline Window” on page 475.
Backup History
Click Preview Media to view the media required for the restore operation and todetermine the availability of the required media. This helps you to know if the taperequired for restore is in the library or not. If the selected backups are all on disk,this option is not applicable. The Preview Media dialog box displays details likeMedia ID, volume group, and if the media is in library.
Browsing for files and directories on a clientYou can also browse the protected files and directories on a client. The view allowsyou to select the client to be browsed and allows you to specify a timeframe forbackup selection. You can select only one client at a time. The two pane browseview shows the backed up client directories in the left pane and content of theselected directory in the right pane. The most recent backup in the specified daterange is shown by default.
Use the following procedure to browse for files and directories for restore.
To browse for files and directories for restore
1 In the OpsCenter console, click Manage > Restore.
2 Click Restore Files and Directories under Files and Directories.
3 Select Select files or directories > Browse.
4 Select a timeframe that you want to search. The default timeframe that isselected is Month.
See “About timeframe selection” on page 460.
5 Select a view from the Views drop-down list.
6 Select a master server from the Select Master Server drop-down list.
480Managing NetBackup using OpsCenterAbout Operational Restore and Guided Recovery operations

7 Type a client name in the Client box. When you start typing a client name, alist of client names that start with the characters that you entered is displayed.Select a client from this list and then click Select Client.
You can also click Browse and select clients and then browse to select aclient. You can browse and select only one client at a time.
The directory structure of the selected client and the contents of the directoryare displayed in two panes. From this view, you can browse and select thespecific files and directories that you want to restore.
8 Click Restore now to start the restore process.
Click Add to Restore Cart if you want to add the selected files and directoriesto the Restore Cart and restore at a later time.
See “Restore Cart” on page 481.
Click Preview Media to view the media required for the restore operation andto determine the availability of the required media. If the selected backups areall on disk, this option is not applicable. The Preview Media dialog box displaysdetails like Media ID, volume group, and if the media is in library.
9 In the Restore Options panel, select the restore options for each individualclient.
See “Restore Options panel” on page 483.
Click Next.
10 In the Summary panel, click Restore to restore all the files or directories.
See “Summary panel” on page 489.
Restore CartThe files shown in the Search and Browse subtabs, can be added to a RestoreCart. The Restore Cart allows you to view file selections from multiple search andbrowse operations and restore them at a later point in time. You may choose torestore all the file or directory selections in one go. The Restore Cart selectionpersists for each user across different OpsCenter sessions. Once a file belongingto the Restore Cart is sent for restore, it is automatically removed from the Cart forthe specific user.
Click Preview Media to view the media required for the restore operation and todetermine the availability of the required media. This helps you to know if the taperequired for restore is in the library or not. This option only applies to tape backups.If the selected backups are on disk, this option is not applicable. The Preview Mediadialog box displays details like Media ID, volume group, and if the media is in library.
You can also email, export, or restore from the Restore Cart.
481Managing NetBackup using OpsCenterAbout Operational Restore and Guided Recovery operations
See “Performing operations on the Restore Cart” on page 482.
Performing operations on the Restore CartYou can perform several operations on the files and directories in the Restore Cart.You can email or export the contents of the Restore Cart. You can also restore orremove files from the Restore Cart.
Use the following procedures for performing specific Restore Cart operations.
To export the Restore Cart
1 In the OpsCenter console, click Manage > Restore.
2 Click Restore Files and Directories under Files and Directories.
3 Click Restore Cart.
4 On the top-right corner of the Restore Cart table, click the Export Report icon(in green).
5 Select the file format in which you want to export the contents of the RestoreCart such as PDF, CSV, TSV, or HTML and click OK.
6 Click Open or Save to open or save the file on your system.
To email the Restore Cart
1 In the OpsCenter console, click Manage > Restore.
2 Click Restore Files and Directories under Files and Directories.
3 Click Restore Cart.
4 In the Content pane at the right-hand side, click the Email Report icon. TheEmail Report pop-up screen opens.
5 On the Email Report pop-up screen, select the file format, such as PDF, CSV,TSV, or HTML.
6 Enter email IDs in To, Cc, and Bcc text boxes, to which you want to sendemails. Alternatively, you can add existing email recipients.
7 Enter the subject of the email.
8 Enter the message that may be a short description regarding the report datathat you want to email.
9 Click OK.
To restore the files or directories from the Restore Cart
1 In the OpsCenter console, click Manage > Restore.
2 Click Restore Files and Directories under Files and Directories.
3 Click Restore Cart.
482Managing NetBackup using OpsCenterAbout Operational Restore and Guided Recovery operations
4 Select one or more files or directories that you want to restore.
5 ClickRestore Now. When you click Restore now, the selected file or directoriesare automatically removed from the Restore Cart.
6 In the Restore Options panel, select the restore options for each individualclient.
See “Restore Options panel” on page 483.
Click Next.
7 In the Summary panel, click Restore to restore all the files or directories.
See “Summary panel” on page 489.
To remove files or directories from the Restore Cart
1 In the OpsCenter console, click Manage > Restore.
2 Click Restore Files and Directories under Files and Directories.
3 Click Restore Cart.
4 Select one or more files or directories that you want to remove from the RestoreCart.
5 Click Remove from cart.
Restore Options panelYou can specify restore options for the files and directories that you selected likedestination client and paths, overwrite options etc. This panel allows you to specifythe restore options for each source client from which a file or directory has beenselected to be restored.
Select individual clients on the left side and specify the restore options for eachclient.
You can specify the following restore options for a client:
Specify destination (where to restore selected files/directories)
483Managing NetBackup using OpsCenterAbout Operational Restore and Guided Recovery operations

This option is the default. Select this optionto restore the selected files and directories tothe same location from where they werebacked up.
This option works best when you restore fromarchived backups, since the backed up filesare deleted from their original location aftersuccessful backup.
If the original location contains items with thesame names, the restore operation (bydefault) does not replace or overwrite thoseitems.
Restore all files/directories to their original filepath location on the source client
Select this option to restore all selected filesand directories to a different location fromwhere they were backed up. You may chooseto restore at a different location on the sameclient or may choose to restore on a differentclient. Note that a different destination clientcan only be a client that is associated withthe same master server. You cannot restoreto a client that is associated with a differentmaster server.
In the Destination field, enter the path for thenew destination. You can also click Browseto locate the destination client.
Restore all files or directories to alternate filepath location (maintaining existing structure)on source client or alternate client
484Managing NetBackup using OpsCenterAbout Operational Restore and Guided Recovery operations

Restore individual directories and files todifferent locations and file paths and withdifferent names.
When you select this option, a table appearsthat lists the source files, and default valuesfor destination client and path, and thedestination file name. You can edit mostcolumns of this table (except the Source FileName) and specify the destination client, filepath, and the destination file name. Click oneach cell under these columns and selectEdit. Enter the appropriate values and clickOK.
Click the Saved Table Edited Info icon tosave your edits in the table. This icon islocated on the top-right corner of the table.
Note: A destination client can only be a clientthat is associated with the same masterserver. You cannot restore to a client that isassociated with a different master server.
Restore all files or directories to individuallyspecified path and destination client
Overwrite and access control options
By default, this option is not selected to avoidoverwriting a current file. Select this option toreplace a file with the same name in thedestination directory with the file you want torestore.
Overwrite the file that exists at the destination
Restore the file using a different name thanbefore.
Restore the file using a temporary file name(Windows clients only)
485Managing NetBackup using OpsCenterAbout Operational Restore and Guided Recovery operations

By default, this option is selected to preventthe restore operation from overwriting a filewith the same name in the destination folder.
For example, if your destination choice is setto Restore all files/directories to their originallocation, marked files with the same namesare not restored. If you deselect this optionand your destination choice is set to Restoreeverything to its original location, files in thedestination folder with the same names areoverwritten.
To avoid overwriting current files, you mustdo one of the following:
■ SelectRestore the file with different filename
■ Select a different restore destination
Do not restore the file at all
486Managing NetBackup using OpsCenterAbout Operational Restore and Guided Recovery operations
By default, files are restored with the sameaccess control attributes that existed at thetime of their backup.
On Windows systems, be aware of thefollowing if the access control attributes of afile have changed since the backup:
■ A user that was granted access to the fileafter the backup does not have access tothe file after the restore.
■ A user with previous access to the backedup file retains access to the file after therestore.
Select this option to restore files without theoriginal access control attributes.
This option is available only when thefollowing conditions exist:
■ You are logged on as the systemadministrator.
■ The Operating System of the clientcomputer is Windows Server 2003/XP,Windows Server 2008/Vista, or WindowsServer 2008 R2/Windows 7.
■ NetBackup server software is installed onthe computer where the client software isrunning.
■ The NetBackup master server, mediaserver, and client are all at the samerelease level (software version).
Restore without access control (Windowsclients only)
Other options
487Managing NetBackup using OpsCenterAbout Operational Restore and Guided Recovery operations

This option applies to UNIX and Linuxsystems only.
By default, hard link path names are restoredexactly as they exist in the backup.
Select this option to rename the hard link pathnames, if any exist.
Veritas recommends that you select thisoption in the following situation:
■ You restore system files to an alternatedisk and not to the current system disk.
■ You use the alternate disk as the systemdisk with the original file paths.
In this situation, Veritas recommends that youselect Rename hard links. Then, make surethat Rename soft links is not selected sothat you can use the alternate disk and stillhave the correct file paths.
Rename hard links
This option applies to UNIX and Linuxsystems only.
By default, soft (symbolic) link path namesare restored exactly as they exist in thebackup.
Select this option to rename the soft link pathnames, if any exist.
Veritas recommends that you do not selectthis option if you rename hard links.
Rename soft links
This option applies to UNIX and Linuxsystems only.
By default, all file systems that are mountedin the selected directories are restored.
Select this option to restore the selecteddirectories without restoring all file systemsthat are mounted in those directories.
Note: Mount points inside a backup imageare always restored whether or not this optionis selected.
Restore without crossing mount point
488Managing NetBackup using OpsCenterAbout Operational Restore and Guided Recovery operations
You can change the priority of this restore byselecting Override default priority, and thenset a priority number. The default is 90000.The available range is 0 to 99999. Highernumbers are higher priority.
Override default priority
Summary panelThe Summary panel shows the list of selected files and directories that have beenselected for restore. It also shows details like the current location of these files anddirectories and where they will be restored.
The Summary page shows a table with the following columns:
This column lists the files or directories thathave been selected for restore.
Source File Name
This column lists the current location of thefile or directory.
Source File Path
This column lists the client that contains thesource file.
Source Client
This column lists the location that youspecified for restoring the file or directory.
Destination File Path
This column lists the name of the destinationclient where you want to restore the file ordirectory. Based on your selections, thedestination client may be the same or differentfrom the source client.
Destination Client
Click Preview Media to view the media required for the restore operation and todetermine the availability of the required media. This helps you to know if the taperequired for restore is in the library or not. This option only applies to tape backups.If the selected backups are on disk, this option is not applicable. The Preview Mediadialog box displays details like Media ID, volume group, and if the media is in library.
Removing files or directories from the Summary panelYou can remove files or directories from the Summary panel. Use the followingprocedure to remove files or directories that you do not want to restore.
To remove files or directories from the Summary panel
1 On the Summary panel, select one or more files or directories that you wantto remove.
2 Click Remove files or directories.
489Managing NetBackup using OpsCenterAbout Operational Restore and Guided Recovery operations
File or Directory Restore Launch Status dialog box optionsThe following options are displayed on the File or Directory Restore Launch Statusdialog box:
Job ID of the restore jobJob ID
Name of the master server that is associatedwith the client on which the file resides.
Master Server Name
Name of the source clientClient Name
Restoring files or directories from the Summary panelUse the following procedure to restore files or directories.
To restore files or directories from the Summary panel
1 The Summary panel shows the selected files or directories that you want torestore.
Click Restore to restore all the files and directories that are displayed.
Note: If you want to restore only specific files and directories and not all thefiles and directories that are displayed, click Remove files or directories toremove files or directories that you do not want to restore.
2 The corresponding restore job(s) are triggered. The File/Directory RestoreLaunch Status dialog is displayed. This dialog box shows basic job details forthe jobs triggered. It also shows a link to access these jobs. Click the link togo to the Monitor > Jobs view and look for the specific Job ID.
See “File or Directory Restore Launch Status dialog box options” on page 490.
About OpsCenter Guided RecoveryThe use of the OpsCenter web-based user interface to guide a user through theOracle cloning operation offers several benefits:
■ The process is more automated, making the operation easier to perform.
■ OpsCenter retrieves information for you such as databases and control files,shortening the Oracle clone setup time.
■ A validation process increases the rate of successfully completing the cloningoperation.
■ You do not need access to the original database to perform the cloning operation.
490Managing NetBackup using OpsCenterAbout Operational Restore and Guided Recovery operations

Setting up for Guided Recovery cloningGuided Recovery cloning requires metadata cataloging, which enables databaseinformation to display in OpsCenter. Metadata cataloging must occur during thebackup from the Oracle database to be cloned. The collected metadata displayswithin the OpsCenter interface to guide the Clone operation. Cloning also requiresthat the Oracle destination file paths exist before the operation begins.
Do the following before you perform a Guided Recovery cloning operation:
■ Configure metadata cataloging before taking the backup, that is used for thecloning operation, using one of these methods.
■ Place the following text into a text file (for example:new_config.txt) on themaster or the media server that has access to the client:
ORACLE_METADATA=YES
Then send this configuration to the client host by using the followingbpsetconfig command:
bpsetconfig -h myoracleclient new_config.txt
The bpsetconfig command is located in the admincmd directory.Windows: install_path\NetBackup\bin\admincmdUNIX: /usr/openv/netbackup/bin/admincmd
■ Alternatively on UNIX and Linux, ensure that the Oracle metadata parameterin the client's bp.conf is set at backup time as follows:
ORACLE_METADATA=YES
■ Alternatively, the RMAN commands can include a SEND statement at thetime of the backup.
... allocate channels ...
SEND 'NB_ORA_METADATA=YES';
... backup command ...
■ Set up all destination file paths before you run the cloning operation becausethe operation does not create new file paths during the process. Ensure thatthe Oracle user has write access to these paths.
Guided Recovery cloning pre-operation checksCheck the following items before you begin the cloning process:
491Managing NetBackup using OpsCenterAbout Operational Restore and Guided Recovery operations
■ Ensure that the source and the destination systems and the source and thedestination databases are compatible. Examples are Solaris 9 to Solaris 10 andOracle 11 to Oracle 11.
■ The cloning operation does not support offline tablespaces or raw tablespaces.
■ The cloning operation does not support Oracle Automatic Storage Management(ASM).
■ To use a different user or a different group for the clone, change the permissionsof the backup image at backup time. Add the 'BKUP_IMAGE_PERM=ANY' tothe send commands during the backup of the source database.
■ If the destination client is different than the source client, perform an alternaterestore procedure.
■ On Windows systems, if the NetBackup Legacy Network Service runs as theOracle user, that user needs the right to "Replace a process level token".
■ On Oracle 9 for Windows, run the Oracle service under the Oracle user account.By default, it runs under the local system. On Oracle 10G systems and later,you can run under the local system.
■ On Windows systems, if you clone to the same system, shut down the sourcedatabase to successfully complete the operation. Otherwise, an error indicatingthe database cannot be mounted in exclusive mode appears.
■ On UNIX and Linux systems, if the cloning user shares an existing Oracle home,the user must have write access to some directories such as DBS.
■ On UNIX and Linux systems, shut down the source database before you clonein the following situation: You clone to the same system and you either use thesame user or use the same home as the source database.
Performing a Guided Recovery cloning operationYou need to log onto OpsCenter, to perform a cloning operation. OpsCenter is theweb GUI that you use to perform all guided recovery operations.
To perform a cloning operation on an Oracle database in OpsCenter
1 When you log onto OpsCenter, the first screen that appears is the MonitorOverview screen. Along the top of the screen, click Manage > Restore.
2 On the What do you want to restore? screen, click Clone Oracle Database.
3 On the small Select a Master Server dialog box, use the drop-down menu toselect the master server that you want to work with, then click OK.
See “Select a Master Server dialog” on page 494.
492Managing NetBackup using OpsCenterAbout Operational Restore and Guided Recovery operations

4 The Select Source Database screen lets you filter the list of databases bydatabase name, host name, database version, platform, and date. The defaultcondition is to display all databases that are backed up in the default daterange. Click Show Databases.
More information is available on this screen.
See “Select Source Database panel” on page 494.
5 The databases appear under the filtering part of the same screen. Click optionat the left side of the desired database entry to select the database on whichyou want to perform a cloning operation. Then click Next>.
6 The Select Control File Backup screen shows a timeline view of the controlfile backups. Select the icon for the desired control file backup from the timelineview. You can hover over the icon to display the control file details. If the iconrepresents multiple backups, you can hover over the icon to display all versionsof the backup for that time periods.
Additional information is available to verify that you have selected the correctcontrol file. The lower left corner of the screen lists three links. More informationis available about these links.
See “Select Control File Backup panel” on page 495.
Click on the icon of the control file backup you want to restore for the clone ofthe selected database. The default is the latest backup selected. Then clickNext>.
7 The Destination Host and Login screen contains parameters for thedestination of the clone to be created. Enter the destination host name in thetext box that is provided or click Browse and select from a list of availablehosts. Note the following prerequisites concerning the destination host:
■ The platform type of the source and destination must be the same.
■ A NetBackup client must be installed.
■ A compatible version of Oracle must be installed.
See “Destination host and login panel” on page 495.
For operating system authentication, enter a user name, password (Windows),and domain (Windows). Then click Next>.
8 The Define Destination Parameters screen appears. The five tabs on thisscreen are used to change database attributes, the destination paths of controlfiles, data files, redo logs, and restore options. After you have changed thedestination parameters, click Next>.
See “Destination Parameters panel” on page 496.
493Managing NetBackup using OpsCenterAbout Operational Restore and Guided Recovery operations

9 TheSelection Summary screen lets you scan the information you have enteredon the previous screens. Links to the recovery sets and destination databaseattributes let you view and verify any changes you have made. When you aresatisfied with the summary information, click Next>.
See “Selection summary panel” on page 497.
10 The Pre-clone Check screen lets you validate the database attributes and thefile paths. To validate, click the underlined word here. If a directory path doesnot already exist, the validation check flags the error. If a file already exists,the validation check also flags the error, so that the cloning operation does notoverwrite the file.
See “Pre-clone check panel” on page 497.
When you are ready to launch the cloning operation, click Launch CloningProcess. A display appears that is similar to the NetBackup Activity Monitor.
Note: In NetBackup (7.1 or greater), validation of the data files that reside in rawdevices may fail even though the Clone operation was successful. You may receivean error that states the validation for specific paths failed.
Select a Master Server dialogFrom the pulldown menu, select the NetBackup master server that collected thebackup information to be used for the cloning operation.
Select Source Database panelWhen the Select Source Database screen first appears, the lowest portion of thescreen shows a list of the latest backups for all the databases that the master serverknows about for the default date range.
The upper portion of the screen shows parameters for filtering the list of databases.If the list is long, you can filter what databases appear by database name, hostname, database version, and date range. Multiple filter parameters can be used atthe same time.
For example, to show only the Solaris databases that are backed up between11/05/2011 and 11/12/2011, select Solaris from the Platform: pulldown menu. Thenselect the dates from the calendar icons. Then click Show Databases to displaythe new filtered list of databases.
494Managing NetBackup using OpsCenterAbout Operational Restore and Guided Recovery operations

Select Control File Backup panelThe Guided Recovery Select Control File Backup screen is a timeline view of allthe control files that are backed up for the selected database. The timeline displaysan icon for each control file that is associated with the backed up database. Whenyou first enter this screen, the latest backup control file is already selected.
Hover over the icon on the timeline to display a popup that shows information aboutthat file: backup name, type of media, the size of the backup, etc.
Multiple control files may be displayed on the timeline. To view all the instances ofcontrol files, you may need to increase the scope of the timeline. You can displaythe timeline in days, weeks, months, or years. If multiple control files were backedup during a single timeline unit, a different icon appears representing more thanone control file (for example, if the database was backed up twice in an hour). Toselect from among these files, hover over the icon. A popup lists each control filein table format. It shows several items including the backup name and the type ofmedia. Click option next to the desired control file.
You can also click one of the links in the lower left of the screen to verify that youhave selected the proper control file.
■ View Database Schema shows the schema of the selected control file. It showshow the database is laid out by listing each data file name, tablespace name,and its size.
■ View Datafiles Recovery Set shows the data file backups to be used for therestore process. It also shows the backup and image information that is displayedfor each data file. The data file recovery set is generated only for the files thatare backed up as part of an incremental strategy. Even though files that arebacked up as part of a full backup do not appear in this list, the clone stillcompletes successfully.If the image spans media, only the first media is shown in the list.
■ View Archived Log Recovery Set shows the archive log backups that may beused to recover the database to the latest point in time of that control file. Thisset is generated only for the files that are backed up as part of an incrementalstrategy. Even though files that are backed up as part of a full backup do notappear in this list, the clone still completes successfully.
Destination host and login panelThe Select Destination Parameters screen lets you enter the destination host andthe Oracle logon information. For Windows, you are asked for the domain name,user name, and password. For UNIX and Linux, you are asked only for the username.
The following rules apply to the selection of the destination host:
495Managing NetBackup using OpsCenterAbout Operational Restore and Guided Recovery operations

■ The destination must be of the same platform type as the source of the clone.
■ A NetBackup client must be installed.
■ A compatible version of Oracle must be installed.
Destination Parameters panelGuided Recovery uses many values from the source database as default valuesfor the destination database. You can modify these values if not appropriate for thedestination database.
Note: The Windows information you enter on this screen is case-sensitive. Be sureto enter the Windows information appropriately.
The Destination Parameters screen contains the following tabs:
■ Database Attributes. This pane appears when you first enter the DatabaseAttributes screen. Each attribute name has identical source and destinationattributes. You can change the destination attribute of the instance name,database name, and database home. Note that the instance name iscase-sensitive while the database name is not case-sensitive.If you use a temporary tablespace or data files, and you plan to write the datafiles back to the same location, do not modify the path. If you must modify thepath, make sure that it is identical to the source path including case (upper,lower, mixed). Otherwise, the clone fails with an error that indicates the temporaryfile already exists. This limitation does not affect UNIX and Linux systems.
■ Control File Paths. This pane displays the source path and the destinationpath for each control file. You can change a control file destination path byclicking in the associated text window and entering the new path. You can alsoclick Browse to navigate to the desired path. When you change a path, a highlightbar appears around the text window as a visual indicator that this path haschanged.
■ Data File Paths. This pane lets you change the destination path for one or moredata files. Enter the path in the text window provided, then select the data fileson which to apply it, and press the Apply option.
■ Redo Log Paths. This pane displays the source path and the destination pathfor all redo logs. You can type in a new destination path or click Browse tonavigate to the desired path. When you change a path, a highlight bar appearsaround the text window as a visual indicator that this path has changed.
■ Restore Options. This pane displays restore options. The option that is displayedon this pane is Number of parallel streams for restore and recover.
496Managing NetBackup using OpsCenterAbout Operational Restore and Guided Recovery operations

When you are done making changes on this screen, clickNext>. All the informationfrom the previous screen is saved in preparation for the cloning operation. All thechanges that are made in this screen are temporary and are active only for thecloning session.
Selection summary panelThe following information appears on this screen:
■ The selected master server and the source database attributes.
■ The date and time of the selected control file backup, and the backup mediatype.
■ The database recovery set and the archived log recovery set.
■ The destination database attributes selected in the previous screen and thedatabase initialization parameters to be used for the cloning operation.
Pre-clone check panelThe Guided Recovery Pre-clone Check screen lets you validate the databaseattributes and the file paths. To validate, click the underlined word here. If a filepath does not already exist, the validation check flags the error. If a file alreadyexists, the validation check also flags the error, so that the cloning operation doesnot overwrite the file.
You can also specify an email address, so when the cloning process completes,an email is sent to you that gives you the status of the cloning operation along withother pertinent information.
Job Details panelThe Job Details screen is intended to reflect the NetBackup Activity Monitor. Moreinformation is available on the Activity Monitor.
For more information, see the NetBackup Administrator’s Guide, Volume I.
Guided Recovery post-clone operationsPerform the following after the cloning operation has completed:
■ On Windows systems, if the cloning operation fails, use the dbca utility to deletethe database. dbca sometimes removes directories, so verify before retryingthe operation.
■ On UNIX systems, update the oratab file with the appropriate instanceinformation.
497Managing NetBackup using OpsCenterAbout Operational Restore and Guided Recovery operations

■ On UNIX systems, if the cloning operation fails, do the following cleanup:
■ If the database is active, shut down the database.
■ Remove init<SID>.ora, spfile<SID>.ora, and any other files that areassociated with the SID being used, from the <$ORACLE_HOME>/DBSdirectory.
■ Remove all data files.
■ If a cloned Oracle database contains read-only tablespaces or data files, youmust make them read-write before RMAN backs them up, or RMAN cannotrestore them. After the backup (cloning operation), you can return the items toread-only.The following shows an example of the sequence of steps in the process:
■ Back up Oracle database A which contains read-only tablespace TABLE1.
■ Clone database A to database B.
■ Use the Oracle alter tablespace command to make tablespace TABLE1read-write. You may revert to read-only if you want.
■ Back up database B.
■ Use RMAN to restore database B.
Troubleshooting Guided RecoveryGuided Recovery operations are in addition to the normal NetBackup for Oracleoperations.
On UNIX and Linux systems, gather all legacy logs at VERBOSE=5. On Windowssystems, gather them at General=2, Verbose=5, and Database=5. All unified logsshould be gathered at DebugLevel=6 and DiagnosticlLevel=6.
In addition to the troubleshooting methods and evidence that you use for resolvingNetBackup for Oracle operations, there is also information that is required specificallyfor troubleshooting Guided Recovery when it fails.
For more information about NetBackup debug logs and reports, refer to theNetBackup Administrator’s Guide, Volume I.
Troubleshooting files for metadata collection operations at the timeof the backupThe information in the following log files can be helpful when you troubleshootGuided Recovery metadata collection operations.
From the Oracle client host:
■ netbackup/logs/bphdb legacy logs
498Managing NetBackup using OpsCenterAbout Operational Restore and Guided Recovery operations
■ netbackup/logs/dbclient legacy logs (The directory must be writable by the Oracleusers.)
■ ncf unified logs, OID 309, New Client Framework
■ ncforautil unified logs, OID 360, New Client Framework Oracle Utility
■ ncforaclepi, OID 348, New Client Framework Oracle Plugin
From the NetBackup media server: netbackup/logs/bpbrm legacy logs
From the NetBackup master server:
■ netbackup/logs/bprd legacy logs
■ nbars unified logs, OID 362, NetBackup Agent Request Service
■ dars unified logs, OID 363, Database Agent Request Service
For more information about NetBackup debug logs and reports, refer to theNetBackup Administrator’s Guide, Volume I.
Troubleshooting files for Guided Recovery validation operationsThe information in the following log files can be helpful when you troubleshootGuided Recovery validation operations.
From the Oracle client host:
■ netbackup/logs/vnetd legacy logs
■ ncf unified logs, OID 309, New Client Framework
■ ncfnbcs unified logs, OID 366, New Client Framework NetBackup Client Services
From the NetBackup master server:
■ netbackup/logs/vnetd legacy logs
■ nbars unified logs, OID 362, NetBackup Agent Request Service
■ dars unified logs, OID 363, Database Agent Request Service
From the Veritas OpsCenter server:
■ <SYMCOpsCenterServer>/config/log.conf file
■ opscenterserver unified logs, OID 148 (The default location is<SYMCOpsCenterServer >/logs)
■ opscentergui unified log, OID 147 (The default location is<SYMCOpsCenterGUI>/logs)
For more information about NetBackup debug logs and reports, refer to theNetBackup Administrator’s Guide, Volume I.
499Managing NetBackup using OpsCenterAbout Operational Restore and Guided Recovery operations
Troubleshooting files for Guided Recovery cloning operationsThe information in the following log files can helpful when you troubleshoot GuidedRecovery cloning operations.
From the Oracle client host:
■ netbackup/logs/bphdb legacy logs (Includes the obk_stdout and obk_stderrlogs.)
■ netbackup/logs/bpdbsbora legacy logs
■ netbackup/logs/dbclient legacy logs (The directory must be writable by the Oracleusers.)
■ A tar of netbackup/logs/user_ops (UNIX/Linux)
■ A compress of NetBackup\Logs\user_ops (Windows)
From the NetBackup master server:
■ netbackup/logs/vnetd legacy logs
■ netbackup/logs/bprd legacy logs
■ nbars unified logs, OID 362, NetBackup Agent Request Service
■ dars unified logs, OID 363, Database Agent Request Service
From the Veritas OpsCenter server:
■ <SYMCOpsCenterServer>/config/log.conf file
■ opscenterserver unified logs, OID 148 (The default location is<SYMCOpsCenterServer >/logs)
■ opscentergui unified log, OID 147 (The default location is<SYMCOpsCenterGUI>/logs)
About managing NetBackup HostsThis view is displayed when you select Manage>Hosts. This view displays detailedinformation for OpsCenter audit reports. for the current Master server selection.
Managing audit trails settingsYou can manage the settings to enable the auditing for the selected master serverthrough OpsCenter. You must have Admin privileges to configure the audit settings.
To enable the Audit trail logging
1 Log on to OpsCenter server host with administrator privileges.
2 Click Manage and click Hosts.
500Managing NetBackup using OpsCenterAbout managing NetBackup Hosts
3 From the Master Server tab, select the required master server and click EditAudit Settings.
Select the Enable audit trail logging with NetBackup Environment checkbox to enable the audit logging process.
Note: If audit logging is initiated in NetBackup, the Enable audit trail loggingwith NetBackup Environment check box appears as selected. You can disableaudit logging by clearing this check box.
4 Under Retention period, select the Always retain all audit trail logs optionto retain the logs forever. To retain logs for a specific period of time, enter thevalue in the Retain audit logs for days text box. By default, the retentionperiod is set to 90 days.
5 Click Save to save the settings.
AboutmanagingNetBackupDeployment AnalysisThis view is displayed when you select Manage > NetBackup Licensing. This viewlets you run OpsCenter traditional licensing and capacity licensing reports for all orselected master servers.
Only Administrators or Security Administrators can access Manage > NetBackupLicensing. The NetBackup Licensing subtab is not visible to any other user role.
About the traditional license reportThe traditional licensing report is helpful if you use the traditional NetBackup licensingmodel. The traditional NetBackup licensing model is based on the number ofNetBackup clients, servers, and options in use. As per this model, you purchaselicenses based on the number of NetBackup clients, servers, and options on whichyou want to run NetBackup. As you deploy additional NetBackup clients or serversor attach additional tape drives or storage to NetBackup, you must license additionalcopies of the appropriate NetBackup product.
NetBackup Server, Client, and Agent offerings are charged on the basis of theirhardware tier. Tape options are charged on a per drive basis. AdvancedDisk potionsare charged on a per terabyte basis.
The traditional licensing report is generated in the form of an Excel sheet. BasicallyOpsCenter invokes the nbdeployutil executable on the master server to collectthe required data. OpsCenter invokes the nbdeployutil executable (bundled withOpsCenter) to analyze the collected data.
501Managing NetBackup using OpsCenterAbout managing NetBackup Deployment Analysis
More information about nbdeployutil is available in the NetBackup Administrator'sGuide, Volume II.
The traditional license report provides details about your utilization of the NetBackupcomponents. The report lists all the NetBackup components and the associatedtier for each component. The traditional licensing report also provides detailedinformation about each master server, clients, tapes, capacity etc.
The traditional license report is a Microsoft Excel spreadsheet with seven tabs:
■ SummaryThis tab shows the final details about master servers, media servers, and clients.This tab lists the source data for generating the report. The number of mediaservers and the number of clients is provided, as well as capacity information.
■ HostsThis tab provides a listing of host names, along with associated computerinformation. The associated information includes information such as: platform,computer type, database software installed, SAN media server, and NDMP.
■ NDMPThis tab shows the computers that the utility determined are NDMP servers andthe corresponding tier number of the client. When you reconcile the report, youneed to address the clients that are found on this tab.
■ Virtual ServersThis tab shows the number of virtual servers or virtual hosts detected in theenvironment.
■ DrivesThis tab details the type of drives as well as the host or the library where thedrive resides. The tab provides the host names that are associated with eachdrive as well as information about virtual tape libraries, shared drives, and vaulteddrives.
■ Interpreting the resultsThis tab provides a general overview of how to reconcile the information in thereport which your actual environment.
■ DisclaimerThis tab shows text explaining the limits of the report’s calculations and properuse of the data. For example, the figures should not be used to audit compliance.
Much of the report information does not affect the final values on the Summarytab. This information is useful for having a better understanding of your environment.
More information about the traditional licensing report is available in the NetBackupAdministrator's Guide, Volume II.
502Managing NetBackup using OpsCenterAbout managing NetBackup Deployment Analysis
Prerequisites and data collection for a traditional licensing reportConsider the following prerequisites before running the traditional licensing report:
■ For the Traditional License report, you must install the nbdeployutil on masterservers lower than 7.5.This utility automatically gets installed when you install a NetBackup 7.5 masterserver. Hence you do not need to install this utility on 7.5 master servers.The nbdeployutilutility is issued as an Emergency Engineering Binary (EEB)and must be installed on all master servers lower than 7.5.http://www.veritas.com/docs/000081541More information about installing EEBs is available on the Veritas Support site.
Note: The nbdeployutil utility was earlier shipped with 7.1.x master servers.However the utility that is shipped with NetBackup 7.1.x does not supporttraditional license reporting.
More information about the utility is available in NetBackup Administrator'sGuide, Volume II.
■ You must enable traditional license deployment data collection for the masterserver. The NetBackup user name and password is a must for the user to accessa remote NetBackup master server (a master server is remote if it is not installedon the OpsCenter Server).
■ Only Administrators or Security Administrators can accessManage >NetBackupLicensing subtab and hence run this report.
■ At any point of time, only a single user is allowed to generate the traditionallicensing report.Once a traditional licensing report is generated successfully, the last report isoverwritten.
Traditional Licensing pageThe traditional licensing page displays the last successfully created traditionallicense report (if applicable) and also lets you create a new traditional licensingreport.
Create Traditional Licensing Report WizardThe Create Traditional Licensing Report Wizard consists of the following panels:
■ Data Collection
■ Export or Email Report Options
503Managing NetBackup using OpsCenterAbout managing NetBackup Deployment Analysis
The Data Collection panel shows the following options:
Select this option if you want to run thetraditional license report for all the masterservers that are configured on the OpsCenterconsole.
When you select this option, the panel showsthe number of configured master servers. Thisis the number of master servers that arecurrently added to the OpsCenter console.
The panel also displays the number anddetails of master servers for which theprerequisite status is Incomplete (or notsuccessful) in a table. The table only showsthose master servers that did not pass theprerequisite check.
Click the link under the Prerequisite Statuscolumn to know and troubleshoot the issue.Note that the master servers for which thePrerequisite Status is Incomplete are notincluded in the traditional licensing report.
Collect data and run report for allconfigured master servers
Select this option if you want to run thetraditional license report for only specificmaster servers.
When you select this option, you can view atable underneath that shows the availablemaster servers by default. From the list ofavailable master servers, you can select themaster servers for which you want to run thetraditional licensing report. You must selectat least one master server.
Once you select the master servers from thelist of available master servers, click SelectedMaster Servers tab to view details for theselected master servers.
Collect data and run report for specificmaster servers
A table in the middle of the Data Collection panel displays the following columns:
504Managing NetBackup using OpsCenterAbout managing NetBackup Deployment Analysis
This column displays the name of master servers for whichthe report is generated.
If you select Collect data and run report for allconfigured master servers, this column displays onlythose master servers for which the prerequisite status isincomplete.
Master Server:
This column displays the status of traditional licensingdata collection for the specific master server.
Licensing Data CollectionStatus
This column displays the date and time when the lastlicensing data was collected. The column shows a blankwhen the data collection fails.
Last Licensing Data CollectionDate
This column displays the reason for data collection failure.Exceptions
This column displays a link named Incomplete whenone or more of the prerequisites are not met. Click thelink to know the details about the prerequisites that needto be completed for each master server. When theprerequisite check is successful, a green checkmarkappears in this column.
The following prerequisites are checked for each masterserver:
■ Is an Agent configured for data collection?■ Is the Enable Traditional License Deployment Data
Collection option checked?■ Did you enter a user name or password to access the
master server?
Besides the prerequisites that are listed above, there areother prerequisites that must be satisfied. Moreinformation about all the prerequisites is available.
See “Prerequisites and data collection for a traditionallicensing report” on page 503.
Prerequisites Status
In the Export or Email Report Options panel, you must specify email recipientsand optionally can choose to export the report. It is mandatory that you email thereport so that you have the report for future reference.
The Export or Email Report Options panel displays the following options:
Enter the recipients email address in these fields. The recipients receiveemails when the report generation is complete.
To, CC, orBCC fields
505Managing NetBackup using OpsCenterAbout managing NetBackup Deployment Analysis

This field displays the default text Traditional Licensing Report. You canchange the subject line if required.
Subject
Enter a message in this field.Message
Select this option to export report toINSTALL_PATH\server\export\NDAReportExport directory on Windowsand INSTALL_PATH/SYMCOpsCenterServer/export/NDAReportExportdirectory on UNIX.
You can change the export location from Settings > Configuration >Report Export Location.
Export report
Generating a Traditional Licensing reportThe Traditional Licensing report is generated in the form of an Excel sheet. Thisreport can be emailed or exported in the XLS format to the required email addressor location.
To generate a Traditional Licensing report
1 Before running a traditional licensing report, review the prerequisites in thefollowing topic.
See “Prerequisites and data collection for a traditional licensing report”on page 503.
2 In the OpsCenter console, click Manage > NetBackup Licensing.
3 The Traditional Licensing page contains details about the previously createdreport, log file, and data collection. You can view the previously generatedreport by clicking Download. A calculation log file is also created when thetraditional license report is generated. You can view the calculation log file byclicking the View Log link.
4 ClickNewReport to generate a new report. TheCreate Traditional LicensingReport wizard is displayed.
5 Select the Collect data and run report for all configured master serversto generate a report for all the master servers.
Select the Collect data and run report for specific master servers togenerate a report for specific master servers. Select the required master serversfrom the Available Master Servers tab. The master servers that you selectare displayed in the Selected Master Servers tab.
6 Click Next.
506Managing NetBackup using OpsCenterAbout managing NetBackup Deployment Analysis
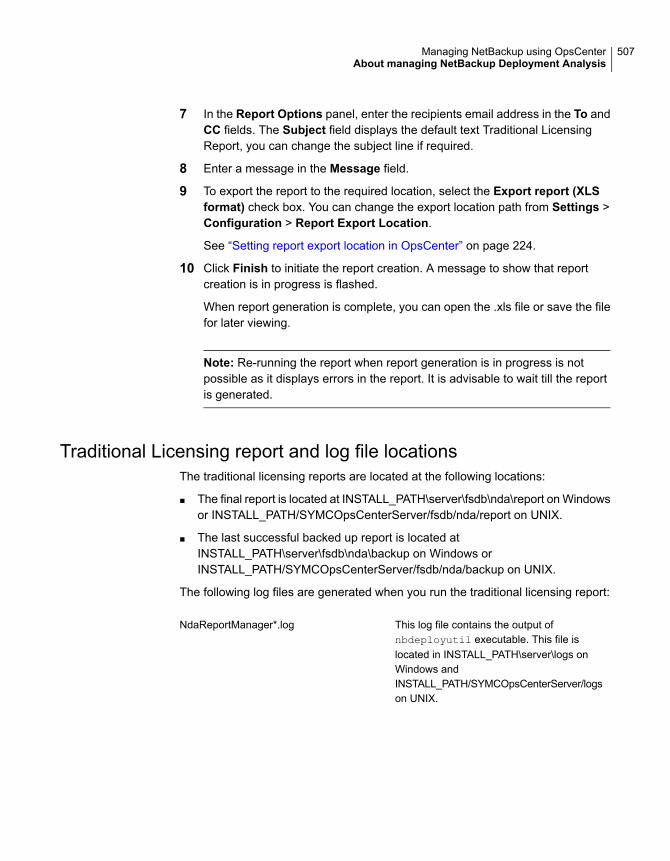
7 In the Report Options panel, enter the recipients email address in the To andCC fields. The Subject field displays the default text Traditional LicensingReport, you can change the subject line if required.
8 Enter a message in the Message field.
9 To export the report to the required location, select the Export report (XLSformat) check box. You can change the export location path from Settings >Configuration > Report Export Location.
See “Setting report export location in OpsCenter” on page 224.
10 Click Finish to initiate the report creation. A message to show that reportcreation is in progress is flashed.
When report generation is complete, you can open the .xls file or save the filefor later viewing.
Note: Re-running the report when report generation is in progress is notpossible as it displays errors in the report. It is advisable to wait till the reportis generated.
Traditional Licensing report and log file locationsThe traditional licensing reports are located at the following locations:
■ The final report is located at INSTALL_PATH\server\fsdb\nda\report on Windowsor INSTALL_PATH/SYMCOpsCenterServer/fsdb/nda/report on UNIX.
■ The last successful backed up report is located atINSTALL_PATH\server\fsdb\nda\backup on Windows orINSTALL_PATH/SYMCOpsCenterServer/fsdb/nda/backup on UNIX.
The following log files are generated when you run the traditional licensing report:
This log file contains the output ofnbdeployutil executable. This file islocated in INSTALL_PATH\server\logs onWindows andINSTALL_PATH/SYMCOpsCenterServer/logson UNIX.
NdaReportManager*.log
507Managing NetBackup using OpsCenterAbout managing NetBackup Deployment Analysis

This log file contains the OpsCenter logs fortraditional licensing report. This file is locatedin INSTALL_PATH\server\logs on WindowsandINSTALL_PATH/SYMCOpsCenterServer/logson UNIX.
*148*.log
You can validate the data in the traditionallicensing report using the calculation log file.The calculation log files contain the logs forreport generation which can be used to checkthe authenticity of the final report.
This file is located inINSTALL_PATH\server\fsdb/nda/logs onWindows andINSTALL_PATH/SYMCOpsCenterServer/fsdb/nda/logson UNIX.
Calculation log file (log_timestamp.log)
Possible Traditional License report issuesThe Traditional Licensing report requires a user to enable master servers andconfigure Agents to generate the correct report. When the master server is notenabled or when the Agents are not configured, the report is not generated andshows errors. Another cause of errors when a report is not generated is the networkconnectivity issue. Make sure that you have network connectivity.
Always review the list of prerequisites before running a traditional license report.
See “Prerequisites and data collection for a traditional licensing report” on page 503.
Table 9-19 describes the possible Traditional License report issues and their solution.
Table 9-19 Traditional License report issues, causes, and solution
SolutionError and cause
Confirm that the master server is connected.Master server notconnected or itmight be disabled
Master server is notconnected ordisabled
508Managing NetBackup using OpsCenterAbout managing NetBackup Deployment Analysis

Table 9-19 Traditional License report issues, causes, and solution (continued)
SolutionError and cause
You must install nbdeployutil on master servers lower than 7.5.
This utility is issued as emergency engineering binary (EEB). Moreinformation about installing EEBs is available on the Veritas Supportsite.
More information about the utility is available in NetBackupAdministrator's Guide, Volume II.
Data collectionfailed as theNetBackupDeploymentAnalysis utility hasnot been installedon the masterserver. You mustinstall the utility torun the TraditionalLicense report.Refer the AdminGuide for moredetails.
You must always enter the user name and password to access aremote NetBackup master server. If the credentials are not present,you must re-enter them.
You can re-enter credentials while adding or editing a master serverby clicking Settings > Configuration > NetBackup.
Unable to log in intoNetBackup Masterserver. Logincredentials might beincorrect.
Capacity License reportA Capacity Licensing report gives a summary of the amount of data that is protected.The report is classified by the options Enterprise Disk, PureDisk, and RealTime.
The report gives capacity totals for each client, thus making it easier to verify capacitytotals for each client. The report displays totals on the basis of the number of policiesand subtotals for each capacity tier. A log file is also created, which gives informationabout how the totals are calculated.
The report is generated in the form of an Excel sheet. The report contains informationabout capacity totals backed up for each client. The report displays details such asnumber of policies per client and their name and the total kilobytes backed up. Thereport also gives information about the terabytes stored on:
■ BasicDisk
■ Physical Tape
■ OpenStorage
■ Visual Tape Library
■ Flexible Disk
509Managing NetBackup using OpsCenterAbout managing NetBackup Deployment Analysis

■ Enterprise Disk Subtotal
■ NDMP
■ NASSnapVault
■ PureDisk
■ RealTime
Using the details of the Capacity Licensing report you can compare the actualamount of data that is backed up with the licensed amount. You can thus ensurethat the data that is backed up is within the permitted license amount. The reportdisplays the amount of data with the licensed amount for the Capacity Totals forEnterprise Disk, PureDisk, and RealTime.
See “Data compilation for the Capacity License report” on page 510.
See “Possible Capacity License report issues” on page 513.
Data compilation for the Capacity License reportCapacity Licensing is a way of determining the total terabytes of data NetBackupprotects. The data can either be on the clients or the devices where the softwareis installed. The data can also be on the software that is used to provide the backupfunctionality.
About determining the capacity licensingThe bpimagelist command is used to obtain image and fragment information forall backups for the past 90 days. The NetBackup Deployment Analyzer examinesthe image headers in the NetBackup catalog to determine the amount of data thatNetBackup protects.
The data is measured in terabytes. The final total is the sum of terabytes for eachclient and policy combination that the analyzer examines. The Deployment Analyzercalculates the total data that needs to be protected. The analyzer uses the size ofthe last full backup for the last 90 days.
A day is defined as the 24 hour period from midnight to midnight. The analyzersums all backups that started within that period. For some policy types, the analyzerconsiders the day with the largest total volume of protected data as an estimate ofthe approximate size of active data under protection for the client and policy.
510Managing NetBackup using OpsCenterAbout managing NetBackup Deployment Analysis
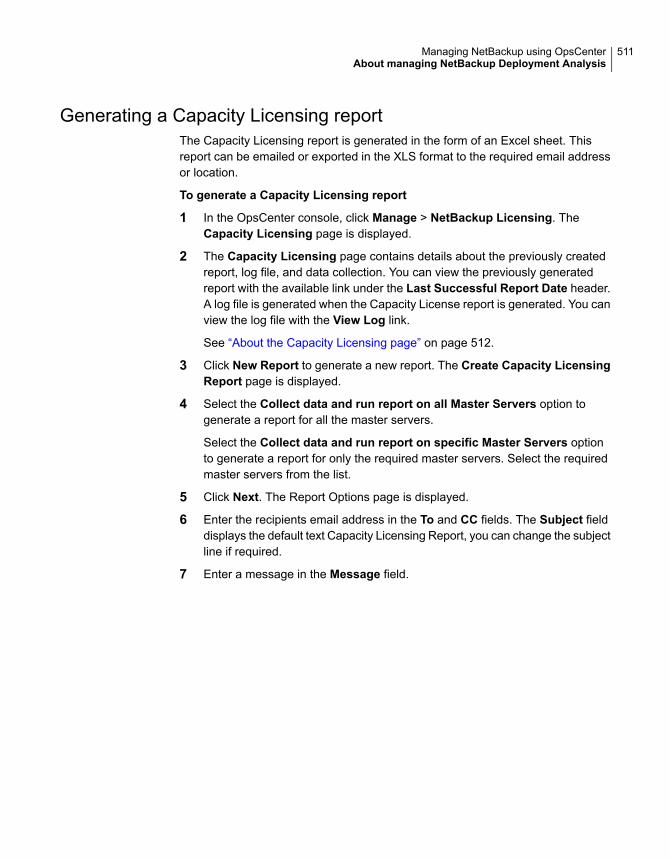
Generating a Capacity Licensing reportThe Capacity Licensing report is generated in the form of an Excel sheet. Thisreport can be emailed or exported in the XLS format to the required email addressor location.
To generate a Capacity Licensing report
1 In the OpsCenter console, click Manage > NetBackup Licensing. TheCapacity Licensing page is displayed.
2 The Capacity Licensing page contains details about the previously createdreport, log file, and data collection. You can view the previously generatedreport with the available link under the Last Successful Report Date header.A log file is generated when the Capacity License report is generated. You canview the log file with the View Log link.
See “About the Capacity Licensing page” on page 512.
3 Click New Report to generate a new report. The Create Capacity LicensingReport page is displayed.
4 Select the Collect data and run report on all Master Servers option togenerate a report for all the master servers.
Select the Collect data and run report on specific Master Servers optionto generate a report for only the required master servers. Select the requiredmaster servers from the list.
5 Click Next. The Report Options page is displayed.
6 Enter the recipients email address in the To and CC fields. The Subject fielddisplays the default text Capacity Licensing Report, you can change the subjectline if required.
7 Enter a message in the Message field.
511Managing NetBackup using OpsCenterAbout managing NetBackup Deployment Analysis
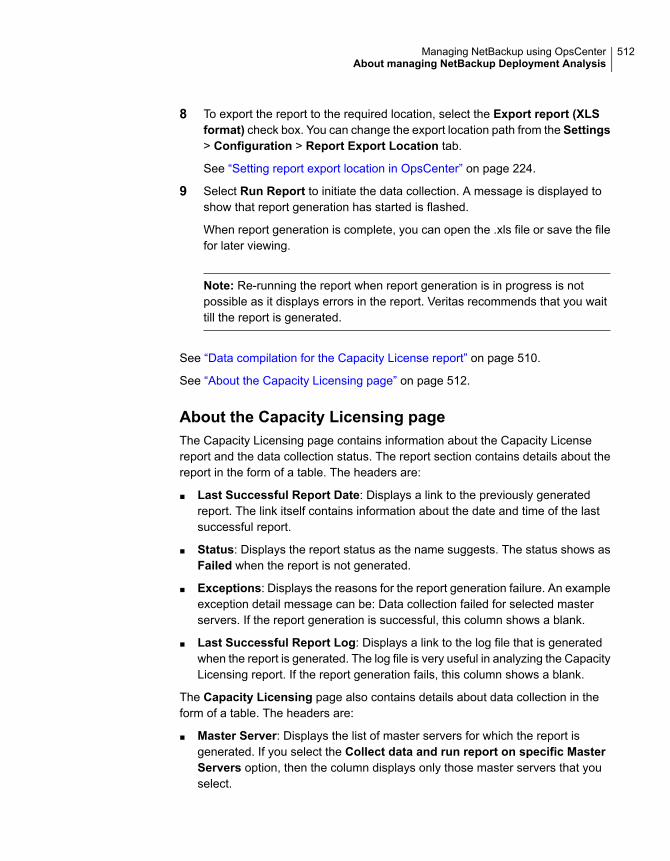
8 To export the report to the required location, select the Export report (XLSformat) check box. You can change the export location path from the Settings> Configuration > Report Export Location tab.
See “Setting report export location in OpsCenter” on page 224.
9 Select Run Report to initiate the data collection. A message is displayed toshow that report generation has started is flashed.
When report generation is complete, you can open the .xls file or save the filefor later viewing.
Note: Re-running the report when report generation is in progress is notpossible as it displays errors in the report. Veritas recommends that you waittill the report is generated.
See “Data compilation for the Capacity License report” on page 510.
See “About the Capacity Licensing page” on page 512.
About the Capacity Licensing pageThe Capacity Licensing page contains information about the Capacity Licensereport and the data collection status. The report section contains details about thereport in the form of a table. The headers are:
■ Last Successful Report Date: Displays a link to the previously generatedreport. The link itself contains information about the date and time of the lastsuccessful report.
■ Status: Displays the report status as the name suggests. The status shows asFailed when the report is not generated.
■ Exceptions: Displays the reasons for the report generation failure. An exampleexception detail message can be: Data collection failed for selected masterservers. If the report generation is successful, this column shows a blank.
■ Last Successful Report Log: Displays a link to the log file that is generatedwhen the report is generated. The log file is very useful in analyzing the CapacityLicensing report. If the report generation fails, this column shows a blank.
The Capacity Licensing page also contains details about data collection in theform of a table. The headers are:
■ Master Server: Displays the list of master servers for which the report isgenerated. If you select the Collect data and run report on specific MasterServers option, then the column displays only those master servers that youselect.
512Managing NetBackup using OpsCenterAbout managing NetBackup Deployment Analysis
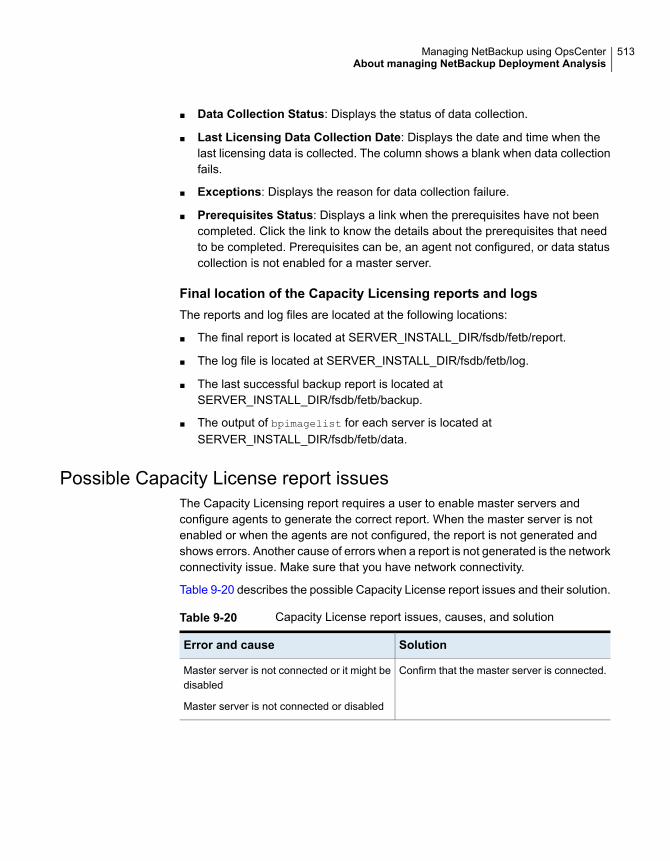
■ Data Collection Status: Displays the status of data collection.
■ Last Licensing Data Collection Date: Displays the date and time when thelast licensing data is collected. The column shows a blank when data collectionfails.
■ Exceptions: Displays the reason for data collection failure.
■ Prerequisites Status: Displays a link when the prerequisites have not beencompleted. Click the link to know the details about the prerequisites that needto be completed. Prerequisites can be, an agent not configured, or data statuscollection is not enabled for a master server.
Final location of the Capacity Licensing reports and logsThe reports and log files are located at the following locations:
■ The final report is located at SERVER_INSTALL_DIR/fsdb/fetb/report.
■ The log file is located at SERVER_INSTALL_DIR/fsdb/fetb/log.
■ The last successful backup report is located atSERVER_INSTALL_DIR/fsdb/fetb/backup.
■ The output of bpimagelist for each server is located atSERVER_INSTALL_DIR/fsdb/fetb/data.
Possible Capacity License report issuesThe Capacity Licensing report requires a user to enable master servers andconfigure agents to generate the correct report. When the master server is notenabled or when the agents are not configured, the report is not generated andshows errors. Another cause of errors when a report is not generated is the networkconnectivity issue. Make sure that you have network connectivity.
Table 9-20 describes the possible Capacity License report issues and their solution.
Table 9-20 Capacity License report issues, causes, and solution
SolutionError and cause
Confirm that the master server is connected.Master server is not connected or it might bedisabled
Master server is not connected or disabled
513Managing NetBackup using OpsCenterAbout managing NetBackup Deployment Analysis
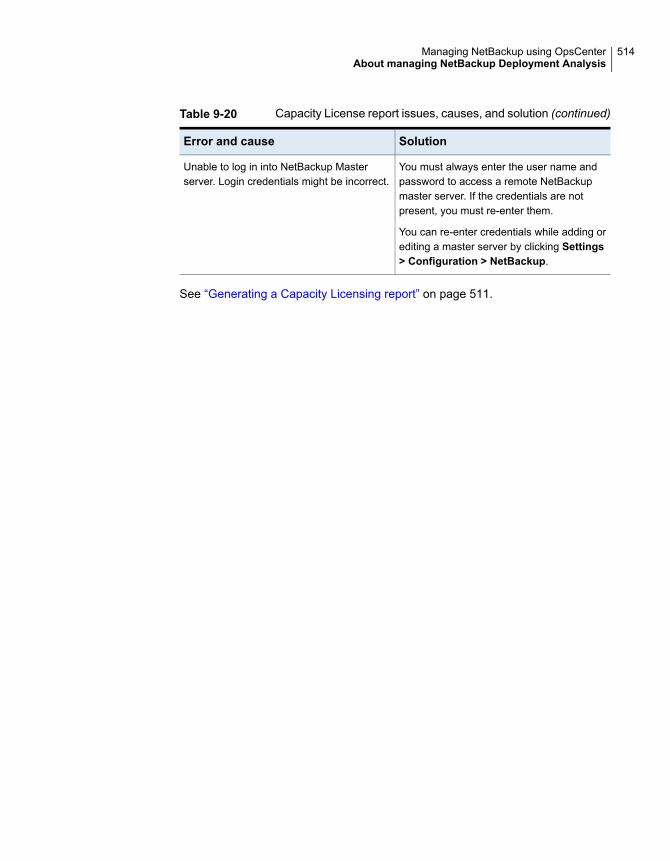
Table 9-20 Capacity License report issues, causes, and solution (continued)
SolutionError and cause
You must always enter the user name andpassword to access a remote NetBackupmaster server. If the credentials are notpresent, you must re-enter them.
You can re-enter credentials while adding orediting a master server by clicking Settings> Configuration > NetBackup.
Unable to log in into NetBackup Masterserver. Login credentials might be incorrect.
See “Generating a Capacity Licensing report” on page 511.
514Managing NetBackup using OpsCenterAbout managing NetBackup Deployment Analysis
Supporting ReplicationDirector in OpsCenter
This chapter includes the following topics:
■ About monitoring Replication Director from OpsCenter
■ About the Open Storage alert condition
■ How the events are generated
■ Adding an alert policy
■ About monitoring replication jobs
■ Disk pool monitoring
■ Storage lifecycle policy reporting
■ Reporting on storage units, storage unit groups, and storage lifecycle policies
About monitoring Replication Director fromOpsCenter
OpsCenter lets you monitor, alert, and report on the Replication Director functionalityin NetBackup. The following sections provide an overview of the changes that havebeen made in OpsCenter with regards to the Replication Director functionality.
About the Open Storage alert conditionA new event-based alert condition named Open Storage has been added underthe Device alert category in OpsCenter. For event-based alert conditions like Open
10Chapter
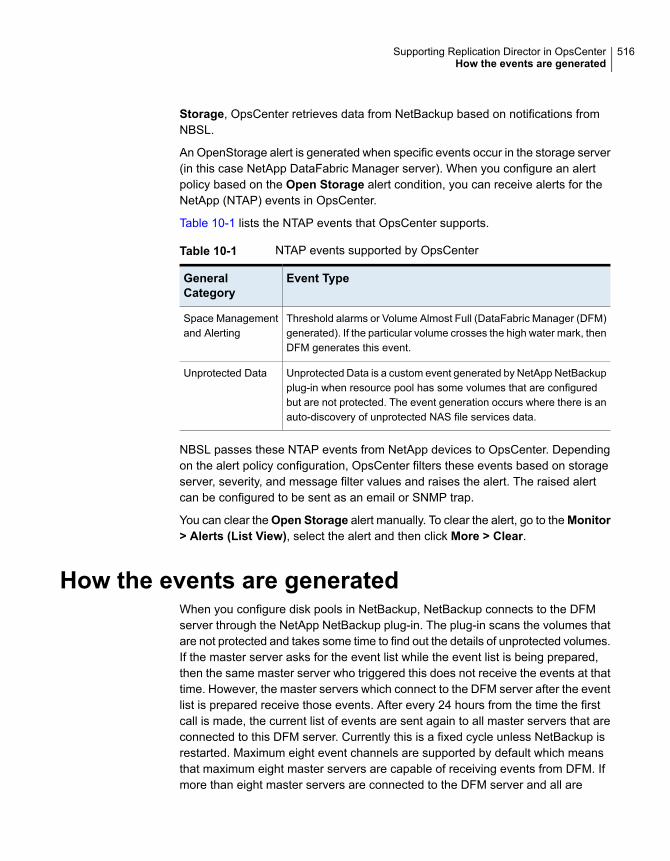
Storage, OpsCenter retrieves data from NetBackup based on notifications fromNBSL.
An OpenStorage alert is generated when specific events occur in the storage server(in this case NetApp DataFabric Manager server). When you configure an alertpolicy based on the Open Storage alert condition, you can receive alerts for theNetApp (NTAP) events in OpsCenter.
Table 10-1 lists the NTAP events that OpsCenter supports.
Table 10-1 NTAP events supported by OpsCenter
Event TypeGeneralCategory
Threshold alarms or Volume Almost Full (DataFabric Manager (DFM)generated). If the particular volume crosses the high water mark, thenDFM generates this event.
Space Managementand Alerting
Unprotected Data is a custom event generated by NetApp NetBackupplug-in when resource pool has some volumes that are configuredbut are not protected. The event generation occurs where there is anauto-discovery of unprotected NAS file services data.
Unprotected Data
NBSL passes these NTAP events from NetApp devices to OpsCenter. Dependingon the alert policy configuration, OpsCenter filters these events based on storageserver, severity, and message filter values and raises the alert. The raised alertcan be configured to be sent as an email or SNMP trap.
You can clear theOpen Storage alert manually. To clear the alert, go to theMonitor> Alerts (List View), select the alert and then click More > Clear.
How the events are generatedWhen you configure disk pools in NetBackup, NetBackup connects to the DFMserver through the NetApp NetBackup plug-in. The plug-in scans the volumes thatare not protected and takes some time to find out the details of unprotected volumes.If the master server asks for the event list while the event list is being prepared,then the same master server who triggered this does not receive the events at thattime. However, the master servers which connect to the DFM server after the eventlist is prepared receive those events. After every 24 hours from the time the firstcall is made, the current list of events are sent again to all master servers that areconnected to this DFM server. Currently this is a fixed cycle unless NetBackup isrestarted. Maximum eight event channels are supported by default which meansthat maximum eight master servers are capable of receiving events from DFM. Ifmore than eight master servers are connected to the DFM server and all are
516Supporting Replication Director in OpsCenterHow the events are generated
monitored by OpsCenter then it is not predictable which eight master servers receivethose events.
The value for maximum number of event channels is configurable in a file on theNetBackup plug-in host (usually the same as DFM host):
C:\Program Files\netapp\NBUPlugin\config\NBUPlugin.cfgWindows
/usr/NetApp/NBUPlugin/config/NBUPlugin.cfg ([ NBUPlugin:NumEvCh ]Value=8)
UNIX
It is recommended that the value for maximum event channels is configured as 8.Increasing the value may affect the DFM performance.
Consider a scenario where one master server is connected to one DFM server andis monitored by OpsCenter. When NetBackup initially connects to the NetAppNetBackup plug-in, then it does not receive any event until the complete cycle of24 hours assuming that the event cycle is of 24 hours. After 24 hours, the eventsare sent to OpsCenter by NBSL. So even if the condition like Volume almost Fullhas occurred, you see events only after the cycle is complete.
Consider a scenario where multiple master servers monitored by OpsCenter areconnected to one DFM server. In this scenario, the first master server that connectsto the DFM server by NetApp NetBackup plug-in never receives the event for thefirst cycle. The master servers which connect later receive events only if they areconnected after DFM prepares the event list. No events are sent in the time betweenwhen the first master server connected to DFM server and the time DFM is readywith events. If some master server connects during that time then it does not receiveany events. Which master servers receive the events depends a lot on when theyconnect to the NetApp NetBackup plug-in. But after 24 hours, all master serversshould receive the events from NetApp NetBackup plug-in provided that maximumeight master servers are connected.
Adding an alert policyUse the following procedure to create an alert policy based on the Open Storagealert condition.
To add an alert policy
1 In the OpsCenter console, select Manage > Alert Policies.
2 Click Add. The Alert Policy Wizard appears.
3 Enter a Name, Description, and Alert Condition on theGeneral panel. For AlertCondition, select Open Storage under Device.
4 Click Next.
517Supporting Replication Director in OpsCenterAdding an alert policy
5 On the Alert Condition Properties panel, specify attributes for the OpenStorage alert condition. These attributes or filters define and limit the alert.You can select or define the following attributes:
Select the event severity that should be evaluated for the alertcondition. By default, All event severities are selected.
Event Severity
Specify words from the event message to get alerts on specificevents.
Event messagecontains words
Specify words for vendor type to get alerts on specific events.Event vendortype containswords
6 Click Next.
7 On the Scope panel, select the storage server that should be verified for theOpen Storage alert condition. You must select at least one object, node, orview from this page. Click Next to continue.
8 From the Actions panel, you can send the alert as an email or SNMP trap.You can also assign severity for the alert. In the Email Recipients and TrapRecipients sections, select email or SNMP recipients (or both) to receive thealert notification.
Note that if you create an alert policy and do not define any recipients, the alertis still displayed in the Monitor > Alerts view. In the Severity section, do thefollowing:
■ Select a severity level from the Alert Severity drop-down list. (If this alertoccurs, the alert is displayed in the Monitor > Alerts view.)
■ Select an appropriate severity level from the Severity of email/trap sentfor cleared alert drop-down list. With Severity of email/trap sent forcleared alert option, you can configure the severity for an email or trap thatis sent when an alert is cleared. The default severity level is Informational.
■ TheActivate Condition option is checked by default. By default, the policyis active once you create it. Deselect the Activate Condition option if youwant to deactivate the policy. You can always activate or deactivate thepolicy later from the OpsCenter console.
About monitoring replication jobsA new filter named Snapshot Replication has been added in the Monitor > Jobs(List View). To view the replication jobs in the OpsCenter console, go to Monitor
518Supporting Replication Director in OpsCenterAbout monitoring replication jobs
> Jobs (List View or Hierarchical View) and select the Snapshot Replicationfilter from the Filter drop-down list.
The duplication method is shown in the Method column. The Method field is alsoavailable in the Details pane under the General tab.
You can also view the data that is transferred for each of the replication jobs. Thisis reflected in the Job Size column when you select Monitor > Jobs (List View orHierarchical View).
Disk pool monitoringTo view disk pool details, select the Monitor tab, and then the Devices subtab.
Select theDisk Pools tab above the table. Disk pool monitoring is divided into threetabs:
The General tab (Figure 10-1) contains informationabout the selected disk pool, including the used andavailable space in the selected disk pool andwhether the images in the disk pool have beenimported.
The table also contains the following columns thatpertain to snapshot replication:
■ Configured for SnapshotsIdentifies whether the disk pool is configured tocontain snapshots, making it eligible for snapshotreplication.
■ Mirror■ Primary■ Replication
General tab
The Disk Volume tab contains information aboutthe selected disk pool, including the location or pathto the volume, and whether the volume is configuredfor snapshots.
Disk Volume tab
The Storage Server tab (Figure 10-2) containsinformation about the selected disk pool, includingthe server type and the number of active jobs forthe storage server.
The table also contains a Configured forSnapshots column, which identifies whether thestorage server is configured to contain snapshots.
Storage Server tab
519Supporting Replication Director in OpsCenterDisk pool monitoring
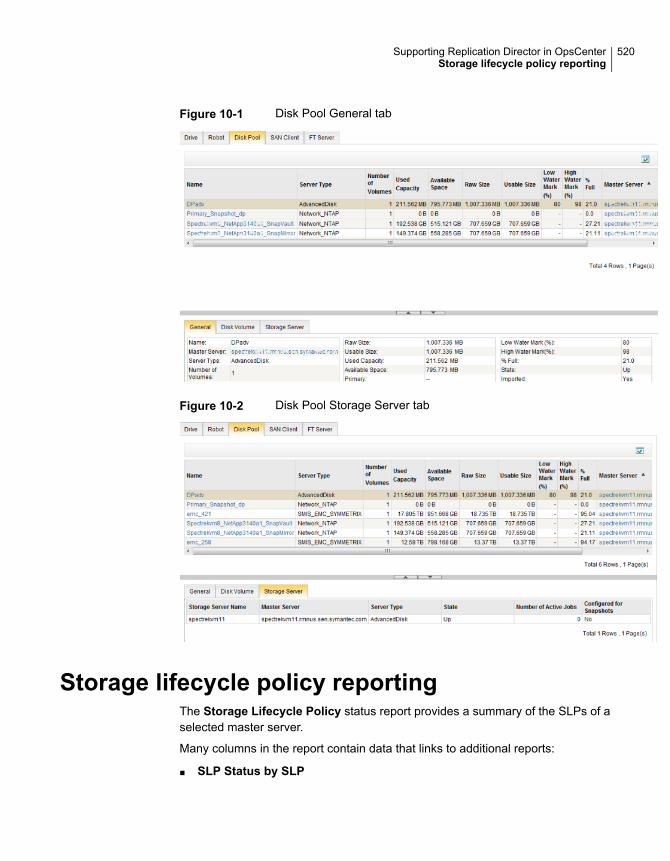
Figure 10-1 Disk Pool General tab
Figure 10-2 Disk Pool Storage Server tab
Storage lifecycle policy reportingThe Storage Lifecycle Policy status report provides a summary of the SLPs of aselected master server.
Many columns in the report contain data that links to additional reports:
■ SLP Status by SLP
520Supporting Replication Director in OpsCenterStorage lifecycle policy reporting

■ SLP Status by Client
■ SLP Status by Image
■ SLP Status by Image Copy
The SLP Status by Image Copy report displays the details of any snapshot copythat is a part of a SLP.
Reporting on storage units, storage unit groups,and storage lifecycle policies
To view the details of storage units, storage unit groups, and storage lifecyclepolicies, select the Manage tab, and then the Storage subtab.
Select the Storage Unit tab above the table to display storage unit details, includingwhether the storage unit is enabled for snapshots and the name of the disk pool towhich the storage unit belongs.
TheGeneral tab (Figure 10-3) contains information about the selectedstorage unit.
The table also contains the following columns that pertain to snapshotreplication:
■ Configured for SnapshotsIdentifies whether the storage unit is configured to containsnapshots, making it eligible for snapshot replication.
■ Mirror■ Primary■ Replication
Storage Unit tab
The Storage Unit Group tab contains information about the selectedstorage unit group.
The table contains a Configured for Snapshots column whichidentifies whether the storage unit group can contain snapshots.
Storage Unit Group tab
The Storage Lifecycle Policy tab contains two subtabs:
■ GeneralDisplays SLP details, including whether the SLP is configured topreserve multiplexing, and the data classification on the SLP.
■ Operations
Displays the operation type and storage unit that is assigned to eachoperation in the SLP.
Storage Lifecycle Policy tab
521Supporting Replication Director in OpsCenterReporting on storage units, storage unit groups, and storage lifecycle policies
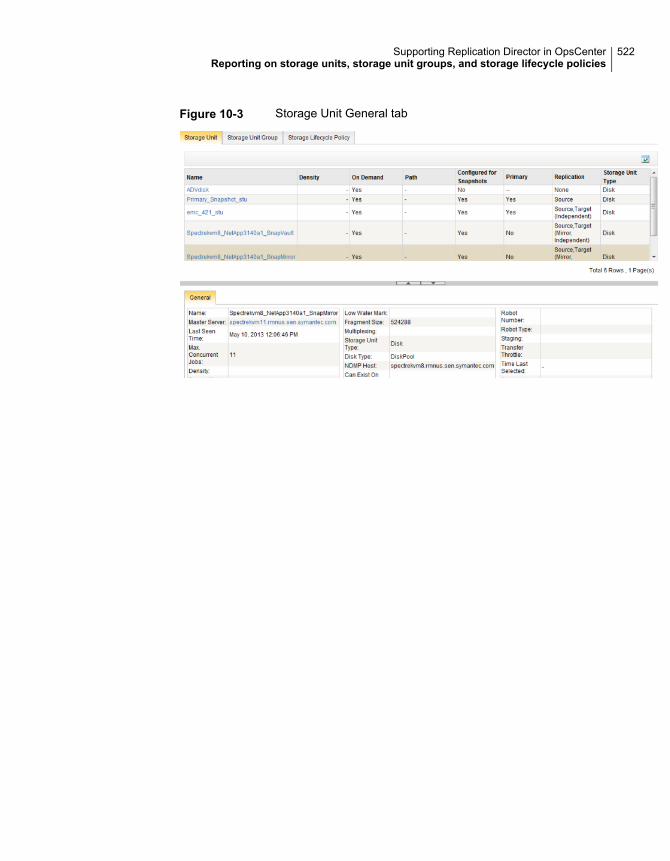
Figure 10-3 Storage Unit General tab
522Supporting Replication Director in OpsCenterReporting on storage units, storage unit groups, and storage lifecycle policies

Understanding andconfiguring OpsCenteralerts
This chapter includes the following topics:
■ About using SNMP
■ About managing OpsCenter alerts using Microsoft System Center OperationsManager 2007
■ About managing OpsCenter alerts using HP OpenView Network Node Manager7.50/7.51 on Windows
About using SNMPThis section provides information about SNMP and how OpsCenter uses SNMP.
See “About SNMP” on page 524.
See “About SNMP versions” on page 524.
See “ SNMP versions supported in OpsCenter” on page 525.
See “About the Management Information Base (MIB) and OpsCenter support”on page 525.
See “Configuring the SNMP trap community name for OpsCenter” on page 540.
See “Configuring the SNMP version for sending SNMP traps” on page 541.
See “Frequently asked SNMP and OpsCenter questions” on page 543.
11Chapter
About SNMPThe Simple Network Management Protocol (SNMP) is an application layer protocolthat facilitates the exchange of management information between network devices.It is part of the Transmission Control Protocol/Internet Protocol (TCP/IP) protocolsuite. SNMP enables network administrators to manage network performance, findand solve network problems, and plan for network growth.
SNMP is based on the manager model and agent model. This model consists of amanager, an agent, a database of management information, managed objects, andthe network protocol.
The manager provides the interface between the human network manager and themanagement system. The agent provides the interface between the manager andthe physical devices being managed.
The manager and agent use a Management Information Base (MIB) and a relativelysmall set of commands to exchange information. The MIB is organized in a treestructure with individual variables, such as point status or description, beingrepresented as leaves on the branches. A numeric tag or object identifier (OID) isused to distinguish each variable uniquely in the MIB and in SNMP messages.
About SNMP versionsMany versions of SNMP are available.
The versions of SNMP protocol are as follows:
■ SNMPv1The SNMPv1 version is the first version of the protocol and is defined by RFC1157. This document replaces the earlier versions that were published as RFC1067 and RFC 1098. Security is based on community strings.
■ SNMPv2It was created as an update of SNMPv1 adding several features. The keyenhancements to SNMPv2 are focused on the SMI, manager-to-managercapability, and protocol operations.SNMPv2c combines the Community-based approach of SNMPv1 with theprotocol operation of SNMPv2 and omits all SNMPv2 security features.
■ The original SNMPv2 (SNMPv2p)
■ Community-based SNMPv2 (SNMPv2c)
■ User-based SNMPv2 (SNMPv2u)
■ SNMPv2 star (SNMPv2*).
■ SNMPv3
524Understanding and configuring OpsCenter alertsAbout using SNMP
This version of the protocol is a combination of user-based security and theprotocol operations and data types from SNMPv2p, and support for proxies.The security is based on that found in SNMPv2u and SNMPv2*. RFC 1905,RFC 1906, RFC 2261, RFC 2262, RFC 2263, RFC 2264, and RFC 2265 definethis protocol.
SNMP versions supported in OpsCenterOpsCenter supports the following SNMP versions:
■ SNMPv1
■ SNMPv2c
■ SNMPv3
About the Management Information Base (MIB) and OpsCentersupport
Each SNMP element manages specific objects with each object having specificcharacteristics. Each object and characteristic has a unique object identifier (OID)that is associated with it. Each OID consists of the numbers that are separated bydecimal points (for example, 1.3.6.1.4.1.2682.1).
These OIDs form a tree. The MIB associates each OID with a readable label andvarious other parameters that are related to the object. The MIB then serves as adata dictionary that is used to assemble and interpret SNMP messages.
See “SNMP traps” on page 525.
See “Alert descriptions in OpsCenter” on page 528.
SNMP trapsThis section explains the content of an SNMP trap that is sent from VeritasNetBackup OpsCenter.
Each OpsCenter trap contains 2 standard object identifiers and 12OpsCenter-specific object identifiers. An object identifier (or OID) is a numeric stringthat is used to uniquely identify an object.
The following table shows the contents of a trap that is sent from OpsCenter. Atotal of 14 bindings (or 14 name-value pairs) are present in each trap that is sentfrom OpsCenter. Each binding associates a particular Management InformationBase (MIB) object instance with its current value.
Table 11-1 shows the name-value pairs that the traps pass to the SNMP manager.
525Understanding and configuring OpsCenter alertsAbout using SNMP
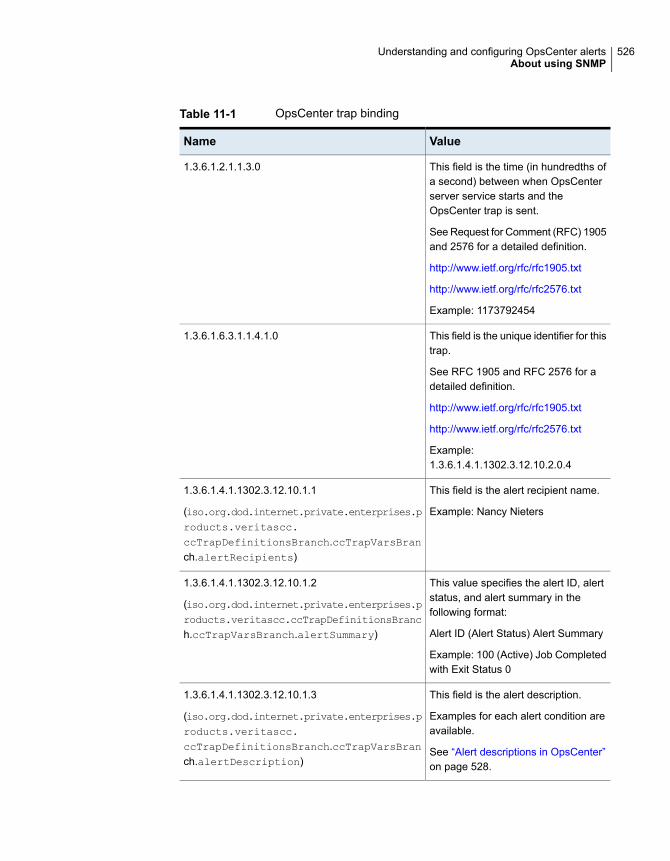
Table 11-1 OpsCenter trap binding
ValueName
This field is the time (in hundredths ofa second) between when OpsCenterserver service starts and theOpsCenter trap is sent.
See Request for Comment (RFC) 1905and 2576 for a detailed definition.
http://www.ietf.org/rfc/rfc1905.txt
http://www.ietf.org/rfc/rfc2576.txt
Example: 1173792454
1.3.6.1.2.1.1.3.0
This field is the unique identifier for thistrap.
See RFC 1905 and RFC 2576 for adetailed definition.
http://www.ietf.org/rfc/rfc1905.txt
http://www.ietf.org/rfc/rfc2576.txt
Example:1.3.6.1.4.1.1302.3.12.10.2.0.4
1.3.6.1.6.3.1.1.4.1.0
This field is the alert recipient name.
Example: Nancy Nieters
1.3.6.1.4.1.1302.3.12.10.1.1
(iso.org.dod.internet.private.enterprises.products.veritascc.ccTrapDefinitionsBranch.ccTrapVarsBranch.alertRecipients)
This value specifies the alert ID, alertstatus, and alert summary in thefollowing format:
Alert ID (Alert Status) Alert Summary
Example: 100 (Active) Job Completedwith Exit Status 0
1.3.6.1.4.1.1302.3.12.10.1.2
(iso.org.dod.internet.private.enterprises.products.veritascc.ccTrapDefinitionsBranch.ccTrapVarsBranch.alertSummary)
This field is the alert description.
Examples for each alert condition areavailable.
See “Alert descriptions in OpsCenter”on page 528.
1.3.6.1.4.1.1302.3.12.10.1.3
(iso.org.dod.internet.private.enterprises.products.veritascc.ccTrapDefinitionsBranch.ccTrapVarsBranch.alertDescription)
526Understanding and configuring OpsCenter alertsAbout using SNMP

Table 11-1 OpsCenter trap binding (continued)
ValueName
This field is the alert policy name.1.3.6.1.4.1.1302.3.12.10.1.4
(iso.org.dod.internet.private.enterprises.products.veritascc.ccTrapDefinitionsBranch.ccTrapVarsBranch.policyName)
This field is blank and not used.1.3.6.1.4.1.1302.3.12.10.1.5
(iso.org.dod.internet.private.enterprises.veritas.products.veritascc.ccTrapDefinitionsBranch.ccTrapVarsBranch.objectType)
This field is blank and not used.1.3.6.1.4.1.1302.3.12.10.1.6
(iso.org.dod.internet.private.enterprises.veritas.products.veritascc.ccTrapDefinitionsBranch.ccTrapVarsBranch.collectorNam e)
This field is the IP address of theOpsCenter server.
Example: 10.212.12.148
1.3.6.1.4.1.1302.3.12.10.1.7
(iso.org.dod.internet.private.enterprises.veritas.products.veritascc.ccTrapDefinitionsBranch.ccTrapVarsBranch.ccHost)
This field is blank and not used.1.3.6.1.4.1.1302.3.12.10.1.8
(iso.org.dod.internet.private.enterprises.veritas.products.veritascc.ccTrapDefinitionsBranch.ccTrapVarsBranch.sourceId)
This field is blank and not used.1.3.6.1.4.1.1302.3.12.10.1.9
(iso.org.dod.internet.private.enterprises.veritas.products.veritascc.ccTrapDefinitionsBranch.ccTrapVarsBranch.ccObject)
This field is blank and not used.1.3.6.1.4.1.1302.3.12.10.1.10
(iso.org.dod.internet.private.enterprises.veritas.products.veritascc.ccTrapDefinitionsBranch.ccTrapVarsBranch.sampleData)
527Understanding and configuring OpsCenter alertsAbout using SNMP

Table 11-1 OpsCenter trap binding (continued)
ValueName
This field shows the alert severity level.
Example: Informational
1.3.6.1.4.1.1302.3.12.10.1.11
(iso.org.dod.internet.private.enterprises.veritas.products.veritascc.ccTrapDefinitionsBranch.ccTrapVarsBranch.ccAlertSeverity)
This field shows the time when thealert gets cleared.
Example: 13-10-2008 06:57:34 00
1.3.6.1.4.1.1302.3.12.10.1.12
(iso.org.dod.internet.private.enterprises.veritas.products.veritascc.ccTrapDefinitionsBranch.ccTrapVarsBranch.ccAlertTime)
The first two OIDs listed in the table are standard SNMP OIDs. The other OIDsstarting from 1.3.6.1.4.1.1302.3.12.10.1.1 to 1.3.6.1.4.1.1302.3.12.10.1.12 areOpsCenter OIDs. As per SNMPv2c trap definition, the two standard SNMP OIDsmust be present as part of every trap.
All the 12 OpsCenter OIDs are defined in the OpsCenter MIB files. However, thetwo standard OIDs are not defined in the OpsCenter MIB files.
Alert descriptions in OpsCenterThis section shows the content that is sent for each OpsCenter alert as OID1.3.6.1.4.1.1302.3.12.10.1.3.
In
Note: 1.3.6.1.4.1.1302.3.12.10.1.3 representsiso.org.dod.internet.private.enterprises.products.veritascc.ccTrapDefinitionsBranch.ccTrapVarsBranch.alertDescription.
Most of the alert information in OpsCenter is sent as OID1.3.6.1.4.1.1302.3.12.10.1.3.
Table 11-2 shows the content that each OpsCenter alert sends as OID1.3.6.1.4.1.1302.3.12.10.1.3.
528Understanding and configuring OpsCenter alertsAbout using SNMP
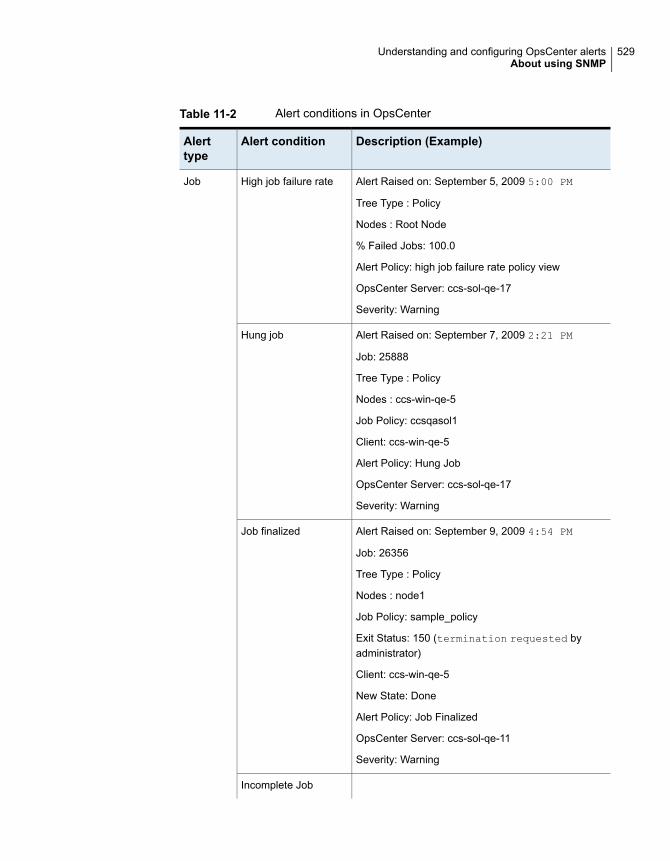
Table 11-2 Alert conditions in OpsCenter
Description (Example)Alert conditionAlerttype
Alert Raised on: September 5, 2009 5:00 PM
Tree Type : Policy
Nodes : Root Node
% Failed Jobs: 100.0
Alert Policy: high job failure rate policy view
OpsCenter Server: ccs-sol-qe-17
Severity: Warning
High job failure rateJob
Alert Raised on: September 7, 2009 2:21 PM
Job: 25888
Tree Type : Policy
Nodes : ccs-win-qe-5
Job Policy: ccsqasol1
Client: ccs-win-qe-5
Alert Policy: Hung Job
OpsCenter Server: ccs-sol-qe-17
Severity: Warning
Hung job
Alert Raised on: September 9, 2009 4:54 PM
Job: 26356
Tree Type : Policy
Nodes : node1
Job Policy: sample_policy
Exit Status: 150 (termination requested byadministrator)
Client: ccs-win-qe-5
New State: Done
Alert Policy: Job Finalized
OpsCenter Server: ccs-sol-qe-11
Severity: Warning
Job finalized
Incomplete Job
529Understanding and configuring OpsCenter alertsAbout using SNMP

Table 11-2 Alert conditions in OpsCenter (continued)
Description (Example)Alert conditionAlerttype
Alert Raised on: September 9, 2009 4:54 PM
Job: 26356
Tree Type : Policy
Nodes : node1
Job Policy: sample_policy
Client: ccs-win-qe-5
Alert Policy: Incomplete Job
OpsCenter Server: ccs-sol-qe-11
Severity: Warning
530Understanding and configuring OpsCenter alertsAbout using SNMP
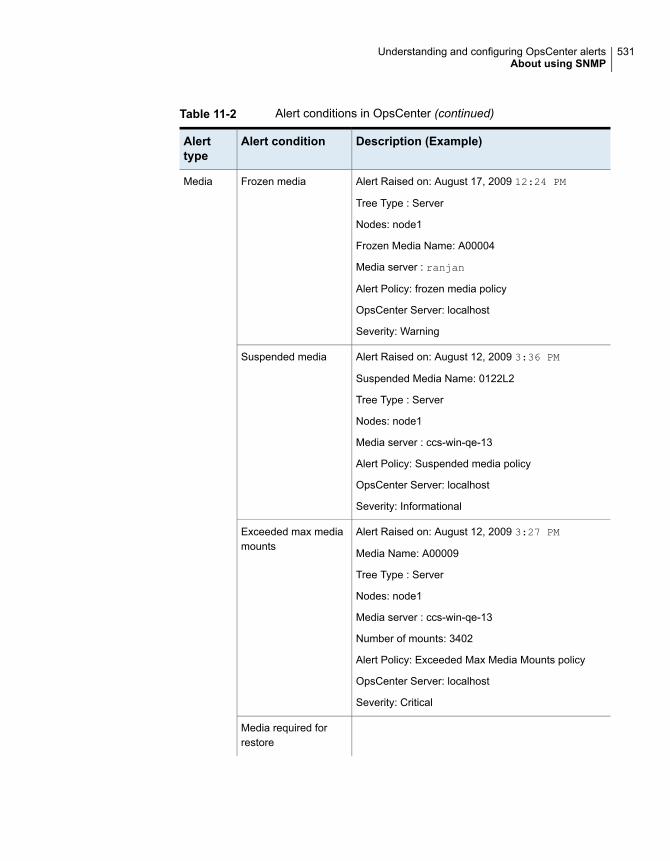
Table 11-2 Alert conditions in OpsCenter (continued)
Description (Example)Alert conditionAlerttype
Alert Raised on: August 17, 2009 12:24 PM
Tree Type : Server
Nodes: node1
Frozen Media Name: A00004
Media server : ranjan
Alert Policy: frozen media policy
OpsCenter Server: localhost
Severity: Warning
Frozen mediaMedia
Alert Raised on: August 12, 2009 3:36 PM
Suspended Media Name: 0122L2
Tree Type : Server
Nodes: node1
Media server : ccs-win-qe-13
Alert Policy: Suspended media policy
OpsCenter Server: localhost
Severity: Informational
Suspended media
Alert Raised on: August 12, 2009 3:27 PM
Media Name: A00009
Tree Type : Server
Nodes: node1
Media server : ccs-win-qe-13
Number of mounts: 3402
Alert Policy: Exceeded Max Media Mounts policy
OpsCenter Server: localhost
Severity: Critical
Exceeded max mediamounts
Media required forrestore
531Understanding and configuring OpsCenter alertsAbout using SNMP

Table 11-2 Alert conditions in OpsCenter (continued)
Description (Example)Alert conditionAlerttype
Alert Raised on: December 4, 2008 4:39 PM
Tree Type : Server
Nodes: node1
Media: 000_00000_TL4 Required for restore
Master server: omwin12(omwin12)
Client: omwin12
Media server: macy
Restore Job ID: 615
Alert Policy: Media Required for Restore_root
OpsCenter Server: ccs-sol-qe-10
Severity: Warning
Alert Raised on: September 13, 2012 4:53 PM
Tree Type: Server
Tree Name : ALL MASTER SERVERS
Nodes: omhp5
Available Media: 0
Alert Policy: Low Available Media
OpsCenter Server: ccs-sol-qe-12
Severity: Informational
Low available media
Alert Raised on: August 12, 2009 11:40 AM
Tree Type : Server
Nodes: node1
Suspended Media: 1
% Suspended Media: 25.0
Alert Policy: high percentage suspended media
OpsCenter Server: localhost
Severity: Warning
High suspended media
High frozen media
532Understanding and configuring OpsCenter alertsAbout using SNMP
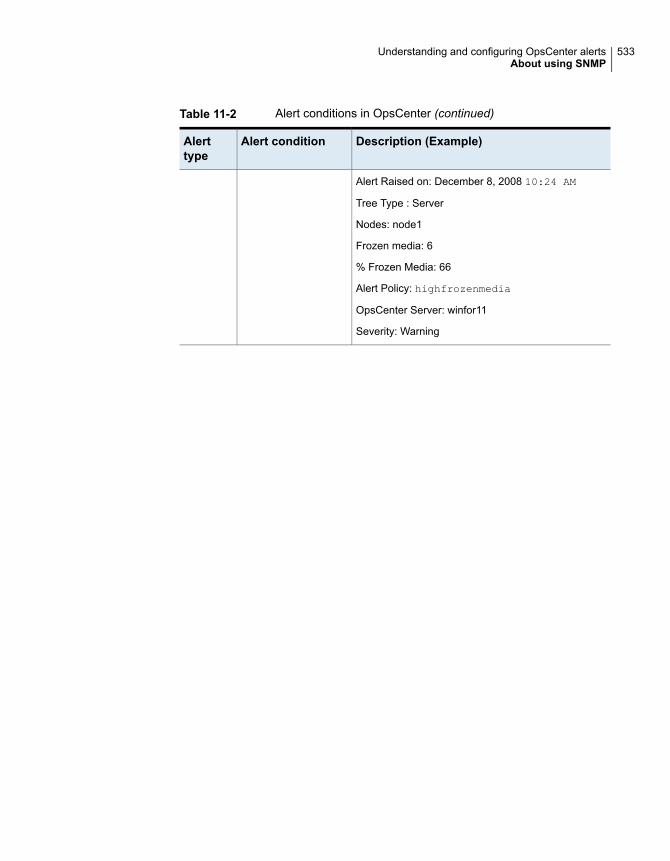
Table 11-2 Alert conditions in OpsCenter (continued)
Description (Example)Alert conditionAlerttype
Alert Raised on: December 8, 2008 10:24 AM
Tree Type : Server
Nodes: node1
Frozen media: 6
% Frozen Media: 66
Alert Policy: highfrozenmedia
OpsCenter Server: winfor11
Severity: Warning
533Understanding and configuring OpsCenter alertsAbout using SNMP
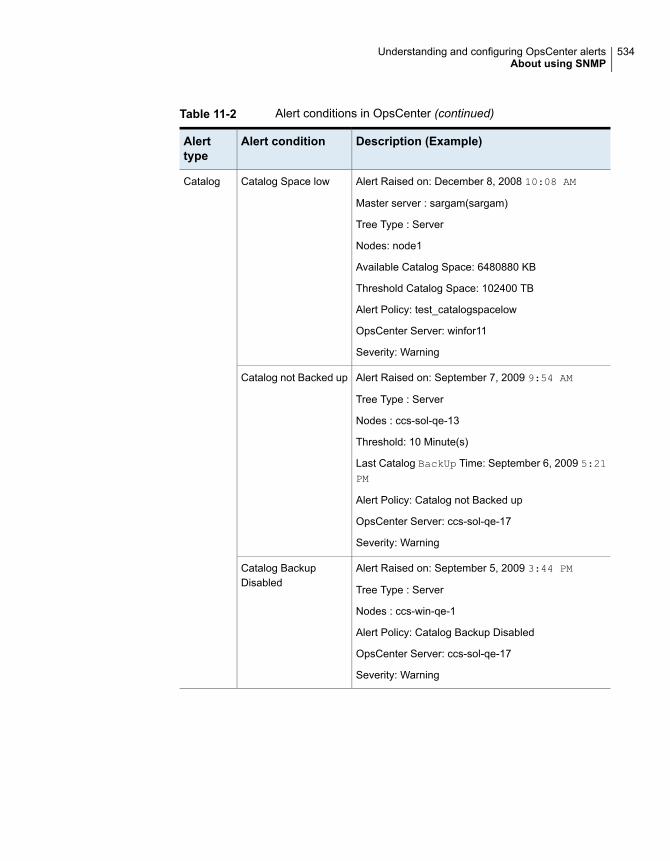
Table 11-2 Alert conditions in OpsCenter (continued)
Description (Example)Alert conditionAlerttype
Alert Raised on: December 8, 2008 10:08 AM
Master server : sargam(sargam)
Tree Type : Server
Nodes: node1
Available Catalog Space: 6480880 KB
Threshold Catalog Space: 102400 TB
Alert Policy: test_catalogspacelow
OpsCenter Server: winfor11
Severity: Warning
Catalog Space lowCatalog
Alert Raised on: September 7, 2009 9:54 AM
Tree Type : Server
Nodes : ccs-sol-qe-13
Threshold: 10 Minute(s)
Last Catalog BackUp Time: September 6, 2009 5:21PM
Alert Policy: Catalog not Backed up
OpsCenter Server: ccs-sol-qe-17
Severity: Warning
Catalog not Backed up
Alert Raised on: September 5, 2009 3:44 PM
Tree Type : Server
Nodes : ccs-win-qe-1
Alert Policy: Catalog Backup Disabled
OpsCenter Server: ccs-sol-qe-17
Severity: Warning
Catalog BackupDisabled
534Understanding and configuring OpsCenter alertsAbout using SNMP

Table 11-2 Alert conditions in OpsCenter (continued)
Description (Example)Alert conditionAlerttype
Alert Raised on: September 7, 2009 6:52 PM
Tree Type : Server
Nodes : ccs-win-qe-1
Barcode: 000014
Density: dlt
evsn: 000014
Mode: 82
Request ID: 120
rvsn: 000014
User: - Volume Group: 000_00000_TLD
Request Time: February 4, 1991 12:56 AM
Alert Policy: Mount Request
OpsCenter Server: ccs-sol-qe-12
Severity: Warning
Mount RequestTape
Alert Raised on: August 17, 2009 12:30 PM
Tree Type : Server
Nodes : ccs-win-qe-1
Media server : ranjan
Robot Number: 0
Alert Policy: no cleaning tape left
OpsCenter Server: localhost
Severity: Warning
No Cleaning Tape
Zero Cleaning Left
535Understanding and configuring OpsCenter alertsAbout using SNMP

Table 11-2 Alert conditions in OpsCenter (continued)
Description (Example)Alert conditionAlerttype
Alert Raised on: December 13, 2008 12:02 PM
Tree Type : Server
Nodes : ccs-win-qe-1
Master server : ORLP-SPEECH01
Media server : ORLP-SPEECH01
Robot Number: 0
Cleaning Tape: CLN084
Alert Policy: test_zerocleaningleft_public
OpsCenter Server: winfor11
Severity: Warning
536Understanding and configuring OpsCenter alertsAbout using SNMP

Table 11-2 Alert conditions in OpsCenter (continued)
Description (Example)Alert conditionAlerttype
Alert Raised on: August 20, 2009 5:25 PM
Tree Type : Server
Nodes : ccs-win-qe-1
Disk Pool ID: SSOD_Pool
Disk Pool Name: SSOD_Pool
Total Capacity: 1007664128 KB
Used Capacity: 1005702144 KB
Alert Policy: Disk Pool Full
OpsCenter Server: localhost
Severity: Informational
Disk Pool FullDisk
Alert Raised on: August 17, 2009 5:08 PM
Tree Type : Server
Nodes : ccs-win-qe-1
Disk Volume ID: /vol/luns/nbusd_sun10
Disk Pool ID: SSOD_Pool
Alert Policy: disk volume down pol
OpsCenter Server: localhost
Severity: Informational
Disk Volume Down
Alert Raised on: August 26, 2009 10:35 AM
Tree Type : Server
Nodes : ccs-win-qe-1
Disk Volume Free Capacity: 106 MB
Threshold: 20 %
OpsCenter Server: localhost
Severity: Major
Low Disk VolumeCapacity
Drive is Down
537Understanding and configuring OpsCenter alertsAbout using SNMP
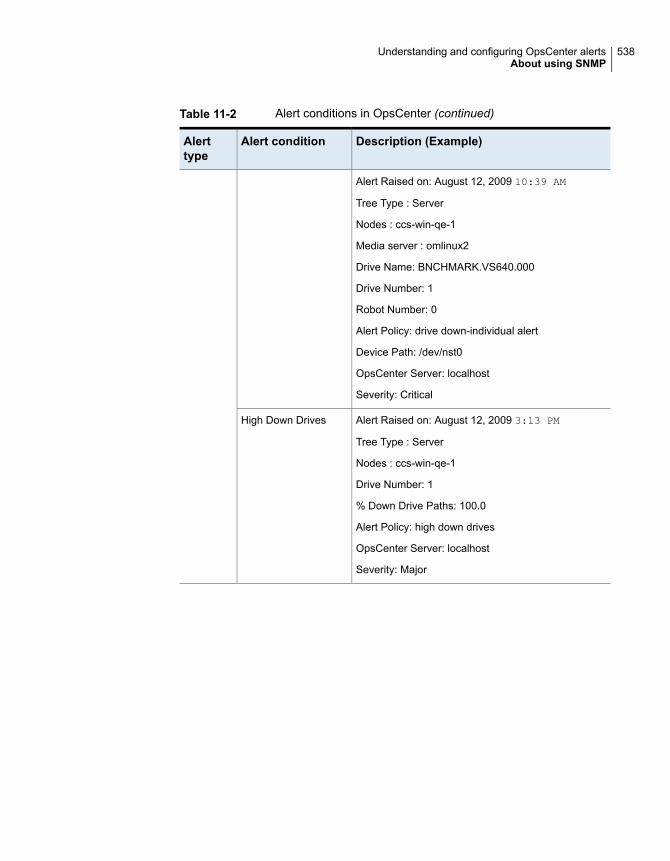
Table 11-2 Alert conditions in OpsCenter (continued)
Description (Example)Alert conditionAlerttype
Alert Raised on: August 12, 2009 10:39 AM
Tree Type : Server
Nodes : ccs-win-qe-1
Media server : omlinux2
Drive Name: BNCHMARK.VS640.000
Drive Number: 1
Robot Number: 0
Alert Policy: drive down-individual alert
Device Path: /dev/nst0
OpsCenter Server: localhost
Severity: Critical
Alert Raised on: August 12, 2009 3:13 PM
Tree Type : Server
Nodes : ccs-win-qe-1
Drive Number: 1
% Down Drive Paths: 100.0
Alert Policy: high down drives
OpsCenter Server: localhost
Severity: Major
High Down Drives
538Understanding and configuring OpsCenter alertsAbout using SNMP

Table 11-2 Alert conditions in OpsCenter (continued)
Description (Example)Alert conditionAlerttype
Agent Host Name : pinacolada
Server Host Name : PINACOLADA
Severity: Warning
Agent ServerCommunication Break
Host
Alert Raised on: October 23, 2009 12:20 AM
Alert Policy: MasterServer
Unreachable OpsCenter Server: CCSQAWINSP1
Severity: Major
Master ServerUnreachable
Alert Raised on: February 18, 2008 1:33 PM
Master server : pmsun22
Media server : pmsun22
Alert Policy: lcm
OpsCenter Server: pmwin9
Severity: Warning
Lost Contact withMedia Server
Appliance HardwareFailure
539Understanding and configuring OpsCenter alertsAbout using SNMP
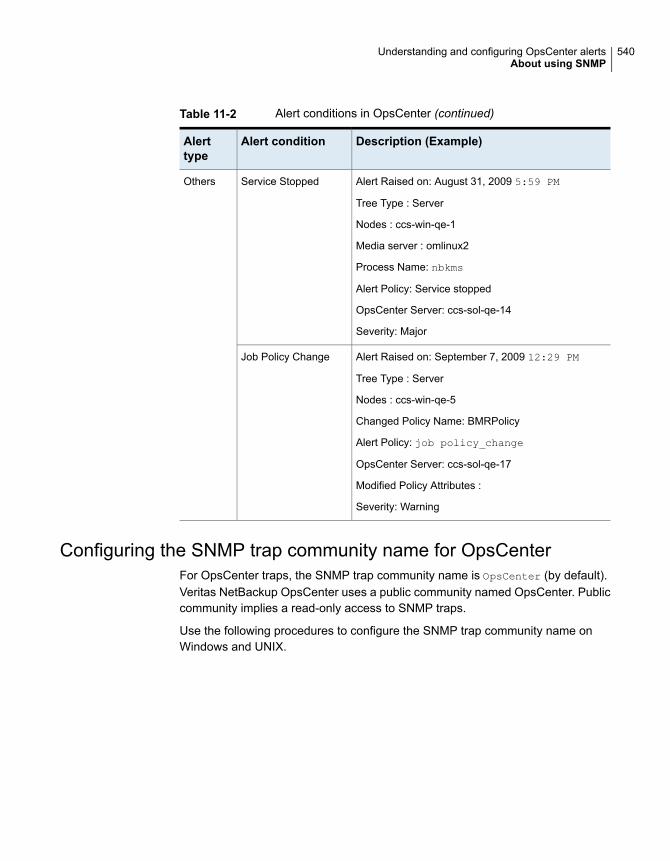
Table 11-2 Alert conditions in OpsCenter (continued)
Description (Example)Alert conditionAlerttype
Alert Raised on: August 31, 2009 5:59 PM
Tree Type : Server
Nodes : ccs-win-qe-1
Media server : omlinux2
Process Name: nbkms
Alert Policy: Service stopped
OpsCenter Server: ccs-sol-qe-14
Severity: Major
Service StoppedOthers
Alert Raised on: September 7, 2009 12:29 PM
Tree Type : Server
Nodes : ccs-win-qe-5
Changed Policy Name: BMRPolicy
Alert Policy: job policy_change
OpsCenter Server: ccs-sol-qe-17
Modified Policy Attributes :
Severity: Warning
Job Policy Change
Configuring the SNMP trap community name for OpsCenterFor OpsCenter traps, the SNMP trap community name is OpsCenter (by default).Veritas NetBackup OpsCenter uses a public community named OpsCenter. Publiccommunity implies a read-only access to SNMP traps.
Use the following procedures to configure the SNMP trap community name onWindows and UNIX.
540Understanding and configuring OpsCenter alertsAbout using SNMP

To configure the SNMP trap community name for OpsCenter traps onWindows
1 On the OpsCenter server host, stop all the OpsCenter server services.
INSTALL_PATH\OpsCenter\server\bin\opsadmin.bat stop
2 Navigate to INSTALL_PATH\OpsCenter\server\config directory and openthe nm.conf file.
The file shows the following entry:
nm.trapCommunity=OpsCenter
Modify the value of nm.trapCommunity from OpsCenter to some other name.
3 Save the nm.conf file after making the changes.
4 Restart all OpsCenter services.
INSTALL_PATH\OpsCenter\server\bin\opsadmin.bat start
To configure the SNMP trap community name for OpsCenter traps on UNIX
1 On the OpsCenter server host, stop all the OpsCenter services.
<INSTALL_PATH>/SYMCOpsCenterServer/bin/opsadmin.sh stop
2 Navigate to <INSTALL_PATH>/SYMCOpsCenterServer/config directory andopen the nm.conf file.
The file shows the following entry:
nm.trapCommunity=OpsCenter
Modify the value of nm.trapCommunity from OpsCenter to some other name.
3 Save the nm.conf file after making the changes.
4 Restart all OpsCenter services.
<INSTALL_PATH>/SYMCOpsCenterServer/bin/opsadmin.sh start
Configuring the SNMP version for sending SNMP trapsThe default SNMP version through which SNMP traps are sent in OpsCenter isSNMPv2c. However, this SNMP version can be changed by modifying aconfiguration file.
The following procedure explains how to configure the default SNMP version onWindows and UNIX.
541Understanding and configuring OpsCenter alertsAbout using SNMP
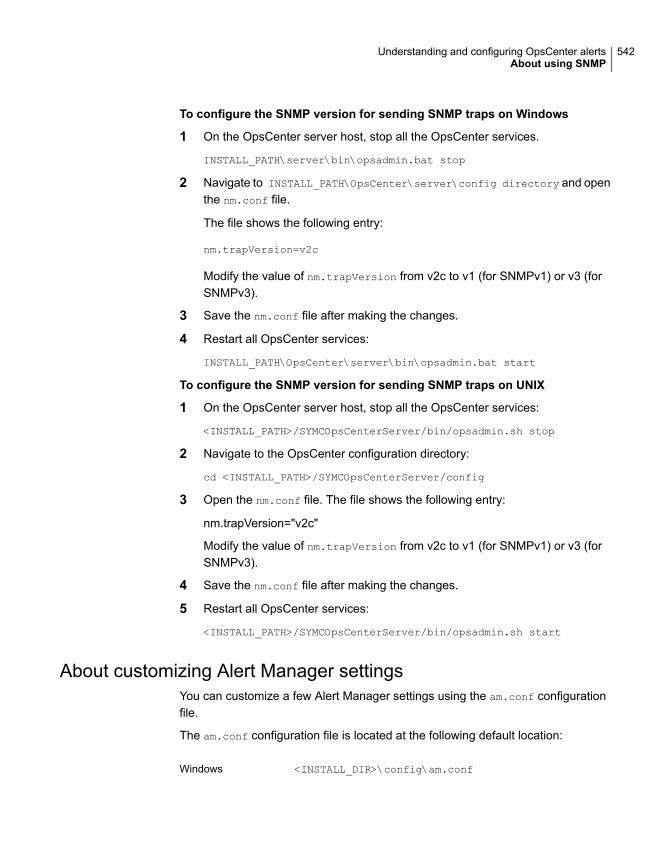
To configure the SNMP version for sending SNMP traps on Windows
1 On the OpsCenter server host, stop all the OpsCenter services.
INSTALL_PATH\server\bin\opsadmin.bat stop
2 Navigate to INSTALL_PATH\OpsCenter\server\config directory and openthe nm.conf file.
The file shows the following entry:
nm.trapVersion=v2c
Modify the value of nm.trapVersion from v2c to v1 (for SNMPv1) or v3 (forSNMPv3).
3 Save the nm.conf file after making the changes.
4 Restart all OpsCenter services:
INSTALL_PATH\OpsCenter\server\bin\opsadmin.bat start
To configure the SNMP version for sending SNMP traps on UNIX
1 On the OpsCenter server host, stop all the OpsCenter services:
<INSTALL_PATH>/SYMCOpsCenterServer/bin/opsadmin.sh stop
2 Navigate to the OpsCenter configuration directory:
cd <INSTALL_PATH>/SYMCOpsCenterServer/config
3 Open the nm.conf file. The file shows the following entry:
nm.trapVersion="v2c"
Modify the value of nm.trapVersion from v2c to v1 (for SNMPv1) or v3 (forSNMPv3).
4 Save the nm.conf file after making the changes.
5 Restart all OpsCenter services:
<INSTALL_PATH>/SYMCOpsCenterServer/bin/opsadmin.sh start
About customizing Alert Manager settingsYou can customize a few Alert Manager settings using the am.conf configurationfile.
The am.conf configuration file is located at the following default location:
<INSTALL_DIR>\config\am.confWindows
542Understanding and configuring OpsCenter alertsAbout using SNMP
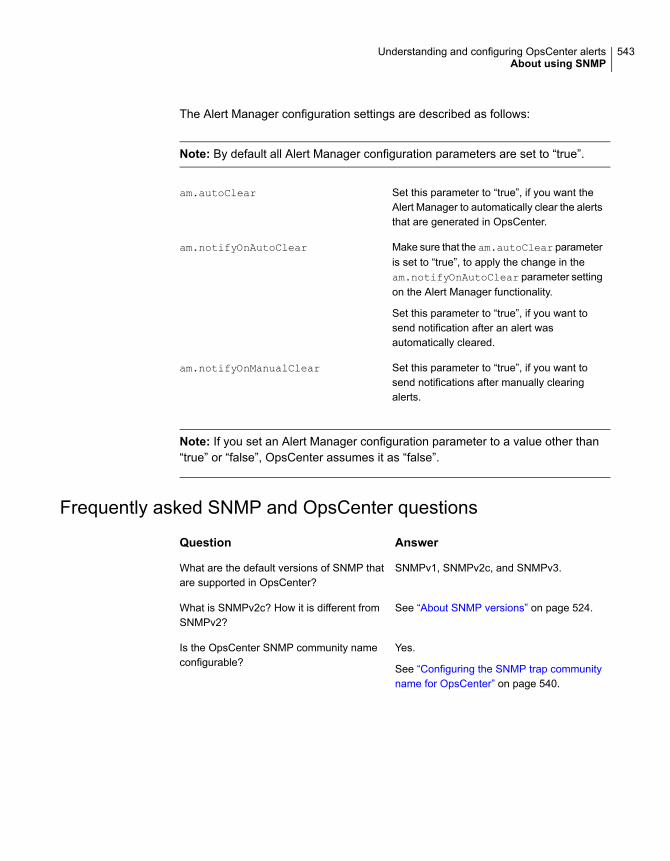
The Alert Manager configuration settings are described as follows:
Note: By default all Alert Manager configuration parameters are set to “true”.
Set this parameter to “true”, if you want theAlert Manager to automatically clear the alertsthat are generated in OpsCenter.
am.autoClear
Make sure that the am.autoClear parameteris set to “true”, to apply the change in theam.notifyOnAutoClear parameter settingon the Alert Manager functionality.
Set this parameter to “true”, if you want tosend notification after an alert wasautomatically cleared.
am.notifyOnAutoClear
Set this parameter to “true”, if you want tosend notifications after manually clearingalerts.
am.notifyOnManualClear
Note: If you set an Alert Manager configuration parameter to a value other than“true” or “false”, OpsCenter assumes it as “false”.
Frequently asked SNMP and OpsCenter questions
AnswerQuestion
SNMPv1, SNMPv2c, and SNMPv3.What are the default versions of SNMP thatare supported in OpsCenter?
See “About SNMP versions” on page 524.What is SNMPv2c? How it is different fromSNMPv2?
Yes.
See “Configuring the SNMP trap communityname for OpsCenter” on page 540.
Is the OpsCenter SNMP community nameconfigurable?
543Understanding and configuring OpsCenter alertsAbout using SNMP

AnswerQuestion
The "OpsCenter" community used byOpsCenter is public, but the community nameis maintained as "OpsCenter".
Generally, the "default read community string"for the public community is "public". Publiccommunity means read-only access to SNMPtraps.
How is the OpsCenter community related tothe public community?
Is the default community name of"OpsCenter" just a name for the community,but still considered public because of certainattributes?
AboutmanagingOpsCenter alerts usingMicrosoftSystem Center Operations Manager 2007
Microsoft System Center Operations Manager 2007 (SCOM), formerly MicrosoftOperations Manager (MOM), is a next-generation performance and event-monitoringproduct from Microsoft. Microsoft System Center Operations Manager ManagementPack for NetBackup lets you monitor and manage NetBackup alerts using MicrosoftSystem Center Operations Manager 2007 (SCOM 2007). By detecting and alertingyou on critical conditions, this Management Pack helps prevent possible serviceoutages.
The SCOM Management Pack for NetBackup and the documentation is availablefor download on the Veritas Support Web site.
http://www.veritas.com/docs/000008818
About managing OpsCenter alerts using HPOpenView Network Node Manager 7.50/7.51 onWindows
You can monitor and manage NetBackup alerts using HP OpenView Network NodeManager 7.50 or 7.51 on Windows. By detecting and alerting you on criticalconditions, HP OpenView Network Node Manager (NNM) can help you to preventpossible service outages.
You can download and use the nom_trapd.conf file to monitor and manageNetBackup alerts using HP OpenView Network Node Manager 7.50 or 7.51. Byusing nom_trapd.conf file and configuring NNM and OpsCenter, NNM can receivethe SNMP traps that have been configured in OpsCenter. As a result, NNM can beused for the centralized management of NetBackup alerts.
544Understanding and configuring OpsCenter alertsAbout managing OpsCenter alerts using Microsoft System Center Operations Manager 2007
Note: The term HP OpenView Network Node Manager (NNM) in this section refersspecifically to HP OpenView Network Node Manager 7.50 or 7.51.
nom_trapd.conf file and the documentation is available for download on the supportsite.
http://www.veritas.com/docs/000090030
More information about OpsCenter alerts is available.
See “OpsCenter Alert conditions” on page 423.
545Understanding and configuring OpsCenter alertsAbout managing OpsCenter alerts using HP OpenView Network Node Manager 7.50/7.51 on Windows
Reporting in OpsCenterThis chapter includes the following topics:
■ About OpsCenter reports
■ Report Templates in OpsCenter
■ About managing reports in OpsCenter
■ Creating a custom report in OpsCenter
■ Creating an OpsCenter report using SQL query
■ About managing My Reports
■ About managing My Dashboard
■ About managing reports folders in OpsCenter
■ Using report schedules in OpsCenter
■ Reports > Schedules options
■ About managing report schedules in OpsCenter
■ About managing time schedules in OpsCenter
About OpsCenter reportsOpsCenter is a Web-based software application that helps organizations by providingvisibility into their data protection environment. By using OpsCenter, you can trackthe effectiveness of data backup and archive operations by generatingcomprehensive business-level reports.
OpsCenter displays customizable, multi-level views of backup and archive resourcesand customizable reports for tracking service usage and expenditures. It also
12Chapter

contains tools for defining cost metrics and chargeback formulas or handling alerts.A wide range of audiences benefit from the reporting and the managementcapabilities of OpsCenter. The audiences include IT (Information Technology)managers, application owners, IT finance teams, external compliance auditors,legal teams, line-of-business managers, external customers, IT architects, andcapacity planning teams.
OpsCenter reporting user interfaceThe OpsCenter reports UI consists of the following components:
This tab lists all Report Templates (or standard or cannedreports) that are available in OpsCenter. You can modify thedefault parameter values of a Report Template as requiredand generate a new report of that kind.
For example, use the existing Backup > Job Activity >Client Count Report Template, change the relativetimeframe to four weeks (default timeframe is two weeks)and generate a new Client Count report. You can see allclients that are backed up over the last four weeks.
For report template descriptions, refer to the OpsCenterReporting Guide at the following location:
http://www.veritas.com/docs/000003387
Report Templates tab
You can save generated reports for your future use. Thesesaved reports are stored in the My Reports tab. Use thissection to view the saved reports or modify the parametersof the saved reports and generate new reports out of them.You can also delete the saved reports using the My Reportstab.
See “About managing My Reports” on page 579.
See “Saving an OpsCenter report” on page 557.
My Reports tab
Your saved reports are preserved in My Reports tab, whichyou can select and publish on My Dashboard tab. You canselect multiple reports and add them in the same dashboardsection. Thus, you can create multiple dashboard sectioncontaining a number of reports.
See “About managing My Dashboard” on page 582.
My Dashboard tab
This tab contains all report schedules.
You can create, edit, or delete schedules using this tab.
See “Using report schedules in OpsCenter” on page 586.
Schedules tab
547Reporting in OpsCenterAbout OpsCenter reports
Use this tab to manage folders where you have saved yourreports.
See “About managing reports folders in OpsCenter”on page 584.
Manage Folders tab
Report creation wizards in OpsCenterOpsCenter provides wizards, which guide you through the entire report creationprocedure.
To create a report, in the OpsCenter console on the Reports tab, click Create NewReport. The following report creation options are available on the Select ReportCreation Option panel:
■ Create a report using an existing Report Template .See “Creating an OpsCenter report using a Report Template” on page 553.
■ Create a custom report.See “Creating a custom report in OpsCenter” on page 564.
■ Create a report using SQL Query.See “Creating an OpsCenter report using SQL query” on page 577.
Reports > Report TemplatesThis section provides details of the Report Templates that are available inOpsCenter.
OpsCenter provides a number of Report Templates (or standard or canned reports)that you can modify and generate a new report of that kind.
In the OpsCenter console, when you click the Reports tab, the Report Templateshome page is displayed.
From the Reports > Report Templates page, you can click any of the ReportTemplates to view the respective report with default parameter values.
For description about each report template, refer to the OpsCenter Reporting Guide.
http://www.veritas.com/docs/000003387
You can also click the following options on the Reports > Report Templates page:
ClickCreate New Report to create a standard report, custom report,or run an SQL query.
Create New Report
548Reporting in OpsCenterAbout OpsCenter reports
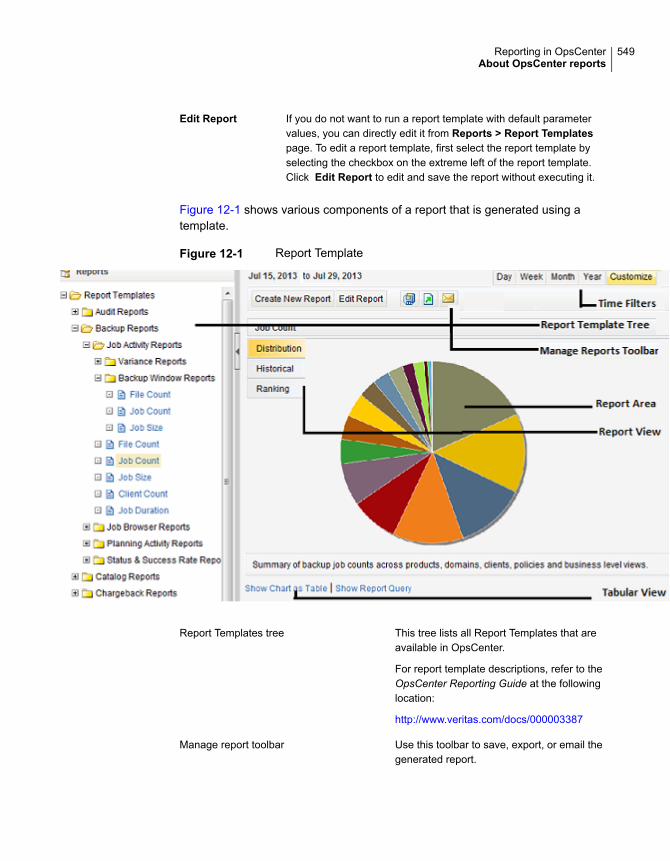
If you do not want to run a report template with default parametervalues, you can directly edit it from Reports > Report Templatespage. To edit a report template, first select the report template byselecting the checkbox on the extreme left of the report template.Click Edit Report to edit and save the report without executing it.
Edit Report
Figure 12-1 shows various components of a report that is generated using atemplate.
Figure 12-1 Report Template
This tree lists all Report Templates that areavailable in OpsCenter.
For report template descriptions, refer to theOpsCenter Reporting Guide at the followinglocation:
http://www.veritas.com/docs/000003387
Report Templates tree
Use this toolbar to save, export, or email thegenerated report.
Manage report toolbar
549Reporting in OpsCenterAbout OpsCenter reports
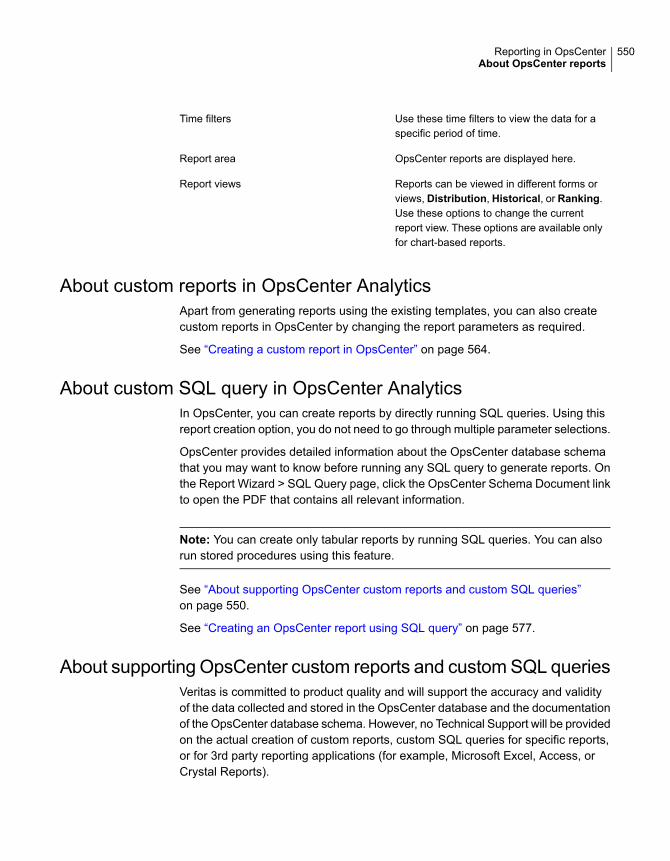
Use these time filters to view the data for aspecific period of time.
Time filters
OpsCenter reports are displayed here.Report area
Reports can be viewed in different forms orviews, Distribution, Historical, or Ranking.Use these options to change the currentreport view. These options are available onlyfor chart-based reports.
Report views
About custom reports in OpsCenter AnalyticsApart from generating reports using the existing templates, you can also createcustom reports in OpsCenter by changing the report parameters as required.
See “Creating a custom report in OpsCenter” on page 564.
About custom SQL query in OpsCenter AnalyticsIn OpsCenter, you can create reports by directly running SQL queries. Using thisreport creation option, you do not need to go through multiple parameter selections.
OpsCenter provides detailed information about the OpsCenter database schemathat you may want to know before running any SQL query to generate reports. Onthe Report Wizard > SQL Query page, click the OpsCenter Schema Document linkto open the PDF that contains all relevant information.
Note: You can create only tabular reports by running SQL queries. You can alsorun stored procedures using this feature.
See “About supporting OpsCenter custom reports and custom SQL queries”on page 550.
See “Creating an OpsCenter report using SQL query” on page 577.
About supporting OpsCenter custom reports and custom SQL queriesVeritas is committed to product quality and will support the accuracy and validityof the data collected and stored in the OpsCenter database and the documentationof the OpsCenter database schema. However, no Technical Support will be providedon the actual creation of custom reports, custom SQL queries for specific reports,or for 3rd party reporting applications (for example, Microsoft Excel, Access, orCrystal Reports).
550Reporting in OpsCenterAbout OpsCenter reports
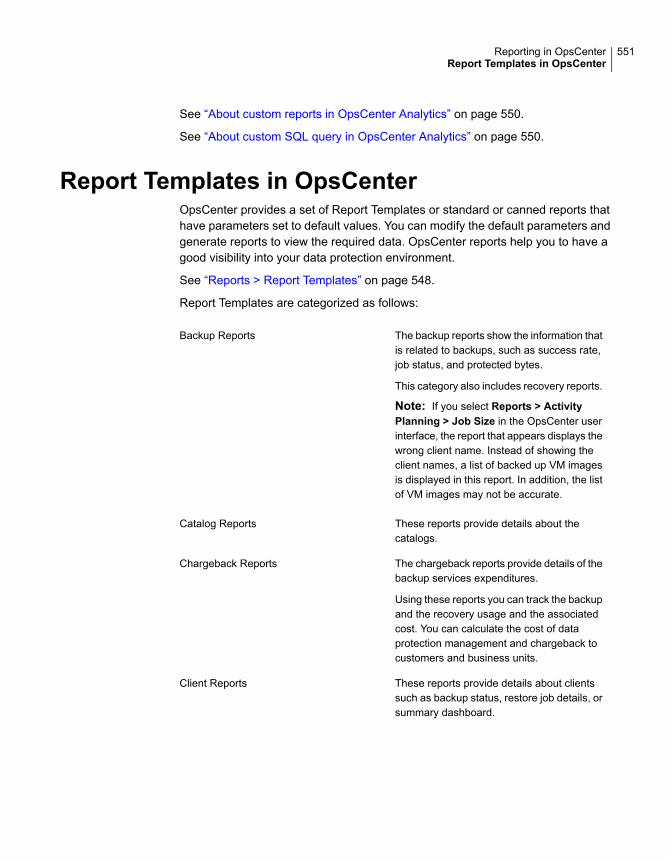
See “About custom reports in OpsCenter Analytics” on page 550.
See “About custom SQL query in OpsCenter Analytics” on page 550.
Report Templates in OpsCenterOpsCenter provides a set of Report Templates or standard or canned reports thathave parameters set to default values. You can modify the default parameters andgenerate reports to view the required data. OpsCenter reports help you to have agood visibility into your data protection environment.
See “Reports > Report Templates” on page 548.
Report Templates are categorized as follows:
The backup reports show the information thatis related to backups, such as success rate,job status, and protected bytes.
This category also includes recovery reports.
Note: If you select Reports > ActivityPlanning > Job Size in the OpsCenter userinterface, the report that appears displays thewrong client name. Instead of showing theclient names, a list of backed up VM imagesis displayed in this report. In addition, the listof VM images may not be accurate.
Backup Reports
These reports provide details about thecatalogs.
Catalog Reports
The chargeback reports provide details of thebackup services expenditures.
Using these reports you can track the backupand the recovery usage and the associatedcost. You can calculate the cost of dataprotection management and chargeback tocustomers and business units.
Chargeback Reports
These reports provide details about clientssuch as backup status, restore job details, orsummary dashboard.
Client Reports
551Reporting in OpsCenterReport Templates in OpsCenter
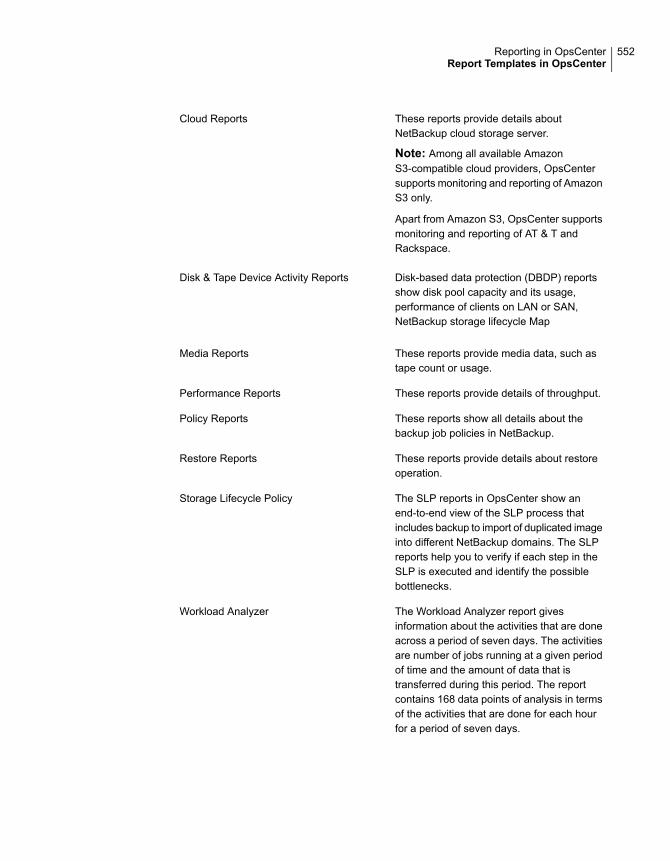
These reports provide details aboutNetBackup cloud storage server.
Note: Among all available AmazonS3-compatible cloud providers, OpsCentersupports monitoring and reporting of AmazonS3 only.
Apart from Amazon S3, OpsCenter supportsmonitoring and reporting of AT & T andRackspace.
Cloud Reports
Disk-based data protection (DBDP) reportsshow disk pool capacity and its usage,performance of clients on LAN or SAN,NetBackup storage lifecycle Map
Disk & Tape Device Activity Reports
These reports provide media data, such astape count or usage.
Media Reports
These reports provide details of throughput.Performance Reports
These reports show all details about thebackup job policies in NetBackup.
Policy Reports
These reports provide details about restoreoperation.
Restore Reports
The SLP reports in OpsCenter show anend-to-end view of the SLP process thatincludes backup to import of duplicated imageinto different NetBackup domains. The SLPreports help you to verify if each step in theSLP is executed and identify the possiblebottlenecks.
Storage Lifecycle Policy
The Workload Analyzer report givesinformation about the activities that are doneacross a period of seven days. The activitiesare number of jobs running at a given periodof time and the amount of data that istransferred during this period. The reportcontains 168 data points of analysis in termsof the activities that are done for each hourfor a period of seven days.
Workload Analyzer
552Reporting in OpsCenterReport Templates in OpsCenter
About report filters in OpsCenterThere can be hundreds of records or thousands of MB of the data that you may notbe concerned about. For example, you want to view only those jobs that weresuccessful. To view this specific data, you need to use the ‘status’ filter. By settingthis filter to Successful while generating the Job Count report, you can view alljobs that were successful.
OpsCenter provides a number of filters that you can use to view the required data.For each report category there is a different set of filters.
Note the following considerations with respect to using the report filters:
■ If you edit certain standard reports and selectBackup from Snapshot Job typefrom the Filters section, incorrect data is shown if data for Backup from Snapshotjobs exists. This also happens when you create image-related reports via customreporting and apply Backup from Snapshot job type filter.The following standard reports display incorrect data when you select Backupfrom Snapshot job type from the Filters section:
■ Backup > Planning Activity > Stored Backup Images > Duplicate copies
■ Backup > Planning Activity > Stored Backup Images > Stored Backup Imageson Media
■ Backup > Planning Activity > Stored Backup Images > Valid Backup Images
■ Backup > Planning Activity > Capacity Planning > Forecasted Size
■ Backup > Planning Activity > Capacity Planning > Historical Size
■ The Backup Media Role filter when applied to the Tapes Expiring In Future andTapes Expiring Now reports does not return any data as data is miscalculatedin OpsCenter.
Creating an OpsCenter report using a Report TemplateThis section provides the procedure to create a report using an existing ReportTemplate .
553Reporting in OpsCenterReport Templates in OpsCenter
To create a report using an existing Report Template
1 In the OpsCenter console, click Reports.
2 On the Report Template tab, click Create New Report.
To view a report output of a template, select a template in the reports tree. Thereport output is as per the default parameter values. You cannot modify anyof the report parameters.
By clicking the Create New Report option, you can launch the report creationwizard that guides you through the entire report creation procedure. Here youcan modify the report parameters and view the required data.
3 In the Report Wizard, retain the default selection Create a report using anexisting Report Template and click Next.
4 On the Report Templates list, expand a report category to see the ReportTemplates within it. Select the Report Template that you want to create a reportfrom.
Click Next.
5 Select time frame and other filters as required and click Next.
6 Modify display options and click Next.
Using report formatsThe following formats are available for standard reports in OpsCenter.
About report formatsReport formats are described as follows:
Display a horizontal bar graph showing all the data for each viewlevel object, from greatest to least, within the selected time frame.
Rankings reports
Display a pie chart showing all the data for each view level objectwithin the selected time frame.
Distribution reports
Display a stacked (segmented) bar graph with a trend linesuperimposed over it, showing the average upward and downwardtrends of the data over time.
For example the total size of each day’s backup jobs broken outby geography. Some backup reports use a different bar chart format,displaying clustered columns for easy comparison between twoclasses of objects or events
Historical reports
Display backup data in a tableTabular reports
554Reporting in OpsCenterReport Templates in OpsCenter
About viewing data in a graphical reportGraphical reports present data in a convenient, ‘at a glance’ fashion. However,some precision may be lost when you use this format. When you are viewing agraphical report, tool tips are available to provide the precise numerical data. Toview the numerical data on which a graphical report is based, move your mousepointer over an area of the graph.
You can also click Show Chart as Table at the bottom of the report to view thedata in a tabular format.
When you are viewing a backup report, you can easily view lower-level reports. Ona graphical report, when you click an area within a graph, the report refreshes todisplay data for the next lowest object level.
For example, in a Geography view, you can click a bar labeled Canada to displaya bar chart showing data for Toronto and Vancouver. You can select the bar for ahost to display data for the host’s file systems.
About managing reports in OpsCenterThis section provides information on the operations that you can carry out on thestandard reports that you generate in OpsCenter.
You can carry out the following operations:
■ Saving a reportSee “Saving an OpsCenter report” on page 557.
■ Exporting a reportSee “Exporting an OpsCenter report” on page 558.
■ Emailing a reportSee “Emailing a report in OpsCenter” on page 561.
Save report and email report dialog boxesA description of the Save report and Email report dialog box options follows inthe table.
555Reporting in OpsCenterAbout managing reports in OpsCenter

Table 12-1 Save report dialog box options
DescriptionOption
Enter the report name. For example, if you generated theJob Count standard report with the group by option that isselected as Policy Type and report view as Historical, youcan name this report NumberofJobsbyPolicies.
When you select this report on the Saved Reports tab, thereport is displayed with the saved filters and in the reportview that were selected when the reports were saved, withrespect to the current time.
Review the following points about report names:
■ The report name must be unique in the folder where youcreate it. For example, if you create a report in the PrivateReports folder under My Reports, the report name thatyou specify must be unique in the Private Reports folder.The same user can have two reports with the same name- like one in Public Reports and one in Private Reportsfolder.
■ The report name must not contain any special characterslike (/ \ * ? | ")
■ The report name must not be more than 220 characters.
Report name
Enter the short description for the report.Description
Select Public or Private folder. If you save the report in apublic folder, all other OpsCenter users can view it. If yousave the report in a private folder, only you can view it.
Expand the Public or Private folder and select a folder whereyou want to save the report. Depending on the folder typethat you have selected - public or private - the foldersdisplayed for selection vary.
Folder
Click this option to create a new public or private folder.Clicking this option changes the view of Folder. Enter thefolder name and click OK.
This folder is made available in the Folder tree for selection.Select this newly created folder where you want to save thereport.
Create New
556Reporting in OpsCenterAbout managing reports in OpsCenter
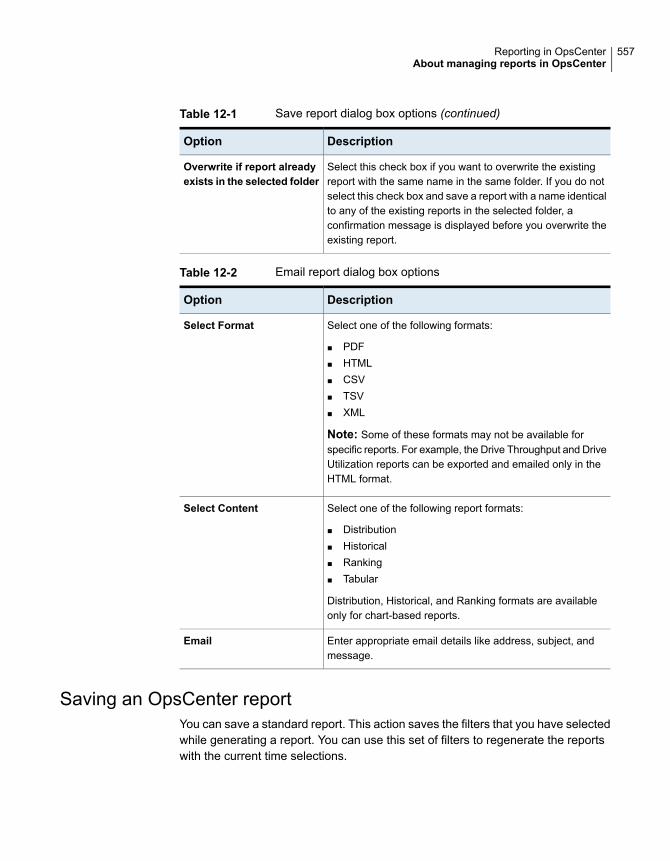
Table 12-1 Save report dialog box options (continued)
DescriptionOption
Select this check box if you want to overwrite the existingreport with the same name in the same folder. If you do notselect this check box and save a report with a name identicalto any of the existing reports in the selected folder, aconfirmation message is displayed before you overwrite theexisting report.
Overwrite if report alreadyexists in the selected folder
Table 12-2 Email report dialog box options
DescriptionOption
Select one of the following formats:
■ PDF■ HTML■ CSV■ TSV■ XML
Note: Some of these formats may not be available forspecific reports. For example, the Drive Throughput and DriveUtilization reports can be exported and emailed only in theHTML format.
Select Format
Select one of the following report formats:
■ Distribution■ Historical■ Ranking■ Tabular
Distribution, Historical, and Ranking formats are availableonly for chart-based reports.
Select Content
Enter appropriate email details like address, subject, andmessage.
Saving an OpsCenter reportYou can save a standard report. This action saves the filters that you have selectedwhile generating a report. You can use this set of filters to regenerate the reportswith the current time selections.
557Reporting in OpsCenterAbout managing reports in OpsCenter
These reports are saved in the OpsCenter database, which you can view using theMy Reports tab.
You cannot save a report whose name contains any special characters like (/ \ * ?| ").
See “About managing My Reports” on page 579.
To save a report
1 In the OpsCenter console, click Reports > Report Templates.
2 From the Reports tree, select the report template that you want to save.
3 In the right-hand report view area, click the Save As Report icon. The SaveReport pop-up screen opens.
4 On the Save Report screen, enter the required details.
See “Save report and email report dialog boxes” on page 555.
5 Click OK.
After a successful save, My Reports tab is displayed with this report selected.
Note: You cannot save a report name that contains special characters like (/\ * ? | ")
Exporting an OpsCenter reportUsing OpsCenter, you can preserve report data in files or print the data.
See “ File formats available in OpsCenter” on page 559.
You can open the exported file using other applications, such as a spreadsheetprogram or a text editor.
To export a report
1 In the OpsCenter console, click Reports > Report Templates.
You can also export reports that you may have created from Reports > MyReports.
2 From the Reports tree, select the report template or report that you want toexport.
3 In the report view area at the right-hand side, click the Export Report icon.The Export Report pop-up screen opens.
558Reporting in OpsCenterAbout managing reports in OpsCenter
4 On the Export Report pop-up screen, select the export options that you wantto export the report with: File format, such as PDF, HTML, CSV, TSV, or XMLand content or report view, such as Tabular, Distribution, Historical, orRanking.
Note that only the applicable formats and report views appear for specificreports.
See “Save report and email report dialog boxes” on page 555.
5 Click OK. The system displays the export options pertaining to the file formatyou have selected. Select those options and export the report.
File formats available in OpsCenterYou can export or email OpsCenter reports in the following file formats:
Can be viewed using a PDF reader, such as Adobe ReaderPDF (PortableDocument Format)
Use with spreadsheet programs, such as Microsoft Excel.CSV(comma-separatedvalues)
Compatible with word-processing applications and text editorsTSV (tab-separatedvalues)
Can be opened using with Web browsersHTML (hypertextmarkup language )
Can be imported (using user-written scripts) by other programs likedatabases or billing applications.
XML (ExtensibleMarkup Language)
The XML format has been enhanced in OpsCenter 7.5. Some of the fields that werepresent in other formats like PDF, CSV, TSV, and HTML are now also shown inthe XML format.
The following was the older XML format:
<Report>
{Report Name}
<Disclaimer> {customer message} </Disclaimer>
<Table>
<Header>
<Row>…</Row>
</Header>
<Rows>
<Row>…</Row> …
559Reporting in OpsCenterAbout managing reports in OpsCenter

</Rows>
</Table>
<Table>
<Header>
<Row>…</Row>
</Header>
<Rows>
<Row>…</Row> …
</Rows>
</Table>
{footer}
</Report>
In the old XML format, for each view (like distribution, timeline, etc) there is one<Table> tag that contains information for that view.
The following is the new XML format:
<Report>
<ReportView>
<Name> {nameValue} </Name>
<Description> {descriptionForReportView} </Description>
<TimeDuration> {timeValue} </TimeDuration>
<ViewName> {viewNameValue} </ViewName>
<ViewSelections>
<SelectedItem value="{selectedNodeNameValue1}">
<ExcludedItem> {excludedNodeName1} </ExcludedItem>
<ExcludedItem> {excludedNodeName2} </ExcludedItem>
...
</SelectedItem>
<SelectedItem value="{selectedNodeNameValue2}">
<ExcludedItem> {excludedNodeName3} </ExcludedItem>
<ExcludedItem> {excludedNodeName4} </ExcludedItem>
...
</SelectedItem>
</ViewSelections>
<Table>
<Header>
<Row>…</Row>
</Header>
560Reporting in OpsCenterAbout managing reports in OpsCenter

<Rows>
<Row>…</Row> …
</Rows>
</Table>
</ReportView>
<ReportView>
</Report>
In the new format <Table> has been moved under a new tag called <ReportView>.If multiple views (distribution, historical, ranking) are selected for export or email,each of the views will have one <ReportView> tag corresponding to it. Name,Description and TimeDuration tags inside ReportView tag will always be presentfor each view. However, ViewName, GroupBy, and ViewSelections tags will bepresent only if applicable. If report is edited and view selections are changed, thesetags will be added in export.
Emailing a report in OpsCenterUsing OpsCenter, you can email report data to the selected recipients. You canemail a report in a number of different file formats.
See “ File formats available in OpsCenter” on page 559.
To email a report
1 In the OpsCenter console, click Reports > Report Templates.
You can also export reports that you may have created from Reports > MyReports.
2 From the Reports tree, select the report template or the report that you wantto email.
3 In the report view area at the right-hand side, click the Email Report icon. TheEmail Report pop-up screen opens.
See “Save report and email report dialog boxes” on page 555.
4 On the Email Report pop-up screen, select the email options: File format, suchas PDF, HTML, CSV, TSV, or XML and content or report view, such as Tabular,Distribution, Historical, or Ranking
Note that only the applicable formats and report views appear for specificreports.
561Reporting in OpsCenterAbout managing reports in OpsCenter
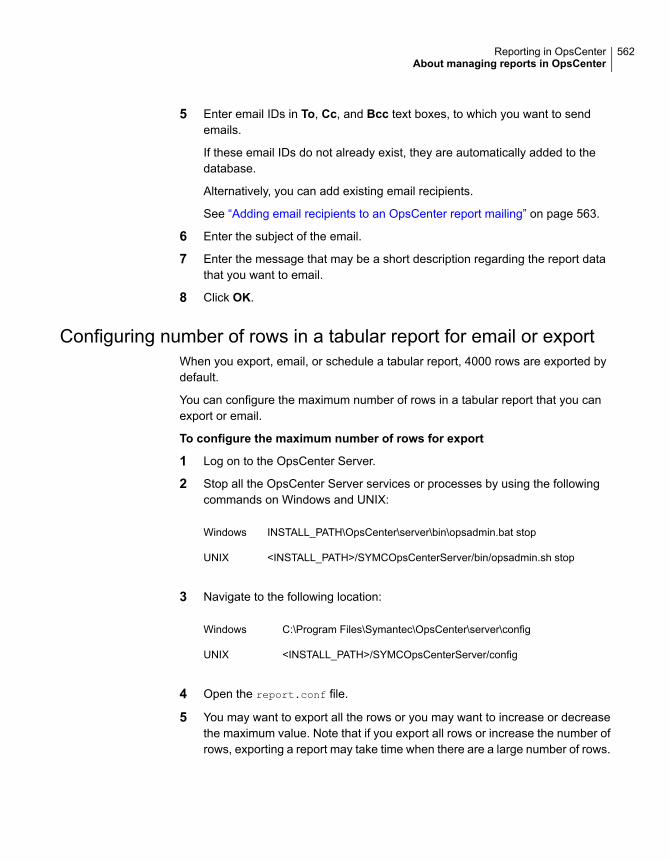
5 Enter email IDs in To, Cc, and Bcc text boxes, to which you want to sendemails.
If these email IDs do not already exist, they are automatically added to thedatabase.
Alternatively, you can add existing email recipients.
See “Adding email recipients to an OpsCenter report mailing” on page 563.
6 Enter the subject of the email.
7 Enter the message that may be a short description regarding the report datathat you want to email.
8 Click OK.
Configuring number of rows in a tabular report for email or exportWhen you export, email, or schedule a tabular report, 4000 rows are exported bydefault.
You can configure the maximum number of rows in a tabular report that you canexport or email.
To configure the maximum number of rows for export
1 Log on to the OpsCenter Server.
2 Stop all the OpsCenter Server services or processes by using the followingcommands on Windows and UNIX:
INSTALL_PATH\OpsCenter\server\bin\opsadmin.bat stopWindows
<INSTALL_PATH>/SYMCOpsCenterServer/bin/opsadmin.sh stopUNIX
3 Navigate to the following location:
C:\Program Files\Symantec\OpsCenter\server\configWindows
<INSTALL_PATH>/SYMCOpsCenterServer/configUNIX
4 Open the report.conf file.
5 You may want to export all the rows or you may want to increase or decreasethe maximum value. Note that if you export all rows or increase the number ofrows, exporting a report may take time when there are a large number of rows.
562Reporting in OpsCenterAbout managing reports in OpsCenter

■ To export all the rows, you can either comment outreport.schedule.max.tabular.rows parameter or specify any value lessthan or equal to -1 for report.schedule.max.tabular.rows parameter.To comment out report.schedule.max.tabular.rows parameter, addtwo forward slashes before the parameter in this manner://report.schedule.max.tabular.rows=4000
orEdit the value 4000 in report.schedule.max.tabular.rows=4000 to -1.report.schedule.max.tabular.rows=-1
■ To change the maximum number of rows to say 5000, you can set the valueof report.schedule.max.tabular.rows as 5000.Configure report.schedule.max.tabular.rows=5000
6 Start all OpsCenter Server services or processes by using the followingcommand for Windows and UNIX:
INSTALL_PATH\OpsCenter\server\bin\opsadmin.bat startWindows
<INSTALL_PATH>/SYMCOpsCenterServer/bin/opsadmin.sh startUNIX
Adding email recipients to an OpsCenter report mailingThis section provides information on how to add email recipients to whom you wantto send emails. This procedure assumes you've already started the email reportprocedure. More information is available about this procedure.
See “Emailing a report in OpsCenter” on page 561.
To add email recipients
1 On the Add Email Recipients screen, select the check boxes in front of theemail recipients to whom you want to send emails.
See “Add email recipients dialog box options” on page 564.
Click To.., Cc.., or Bcc.. depending on where you want to add the selectedrecipients.
2 Click OK.
563Reporting in OpsCenterAbout managing reports in OpsCenter

Add email recipients dialog box optionsTable 12-3 Add email recipients dialog box options
DescriptionOption
Select the check boxes in front of the email recipients towhom you want to send emails.
Recipient Name/EmailAddress
Click To.., Cc.., or Bcc.. depending on where you want toadd the selected recipients.
To.../Cc.../Bcc...
Creating a custom report in OpsCenterIn addition to using the reports that come by default with OpsCenter, you can usethe Custom Report Wizard to create custom reports that are unique to yourinstallation.
After creating a custom report, you can modify the report, print, save, and email it.
As you work with different report categories, the Report Wizard displays differentparameters. Many of the parameters are used for multiple report categories, andthey appear in different combinations for each type.
You can create a custom report by using the parameters that are available in theCustom Report Wizard.
See “About Custom Report Wizard parameters” on page 570.
To create a custom report
1 In the OpsCenter console, click Reports > Report Templates.
2 Click Create New Report.
3 On the Select Report Creation Option page, click Create a Custom Reportto start the Custom Report Wizard.
4 Select a report category from the Category drop-down list:
Select this category if you want to know about the configuredAgents on the OpsCenter Server.
Agent
Select this category to create reports on jobs, disk pool, logs,image, media, tape drive etc.
Backup/Recovery
564Reporting in OpsCenterCreating a custom report in OpsCenter
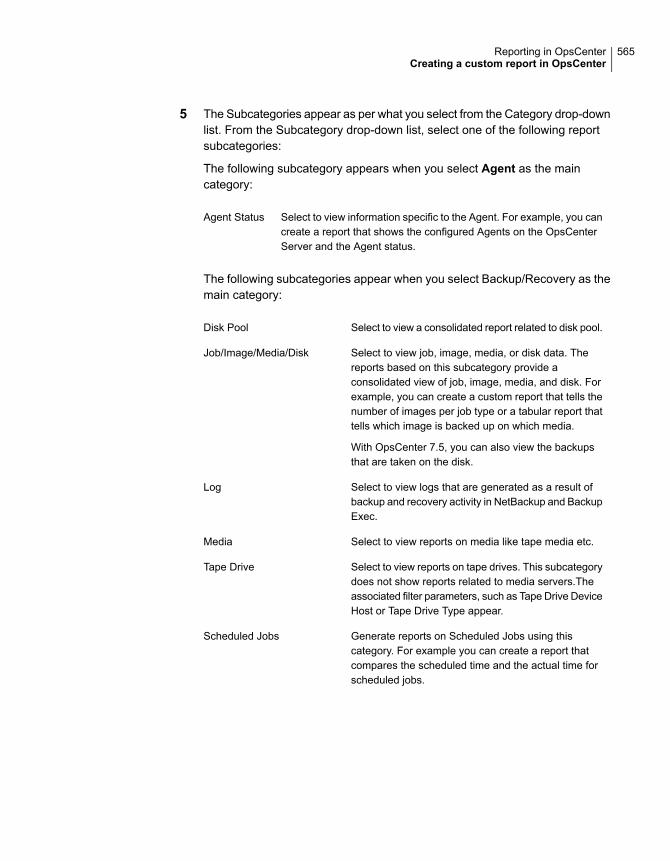
5 The Subcategories appear as per what you select from the Category drop-downlist. From the Subcategory drop-down list, select one of the following reportsubcategories:
The following subcategory appears when you select Agent as the maincategory:
Select to view information specific to the Agent. For example, you cancreate a report that shows the configured Agents on the OpsCenterServer and the Agent status.
Agent Status
The following subcategories appear when you select Backup/Recovery as themain category:
Select to view a consolidated report related to disk pool.Disk Pool
Select to view job, image, media, or disk data. Thereports based on this subcategory provide aconsolidated view of job, image, media, and disk. Forexample, you can create a custom report that tells thenumber of images per job type or a tabular report thattells which image is backed up on which media.
With OpsCenter 7.5, you can also view the backupsthat are taken on the disk.
Job/Image/Media/Disk
Select to view logs that are generated as a result ofbackup and recovery activity in NetBackup and BackupExec.
Log
Select to view reports on media like tape media etc.Media
Select to view reports on tape drives. This subcategorydoes not show reports related to media servers.Theassociated filter parameters, such as Tape Drive DeviceHost or Tape Drive Type appear.
Tape Drive
Generate reports on Scheduled Jobs using thiscategory. For example you can create a report thatcompares the scheduled time and the actual time forscheduled jobs.
Scheduled Jobs
565Reporting in OpsCenterCreating a custom report in OpsCenter
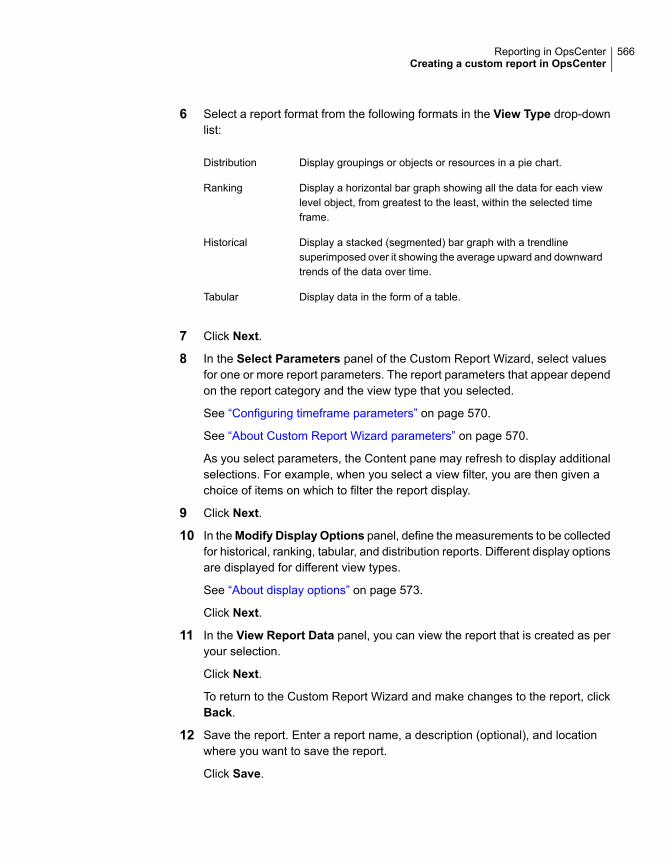
6 Select a report format from the following formats in the View Type drop-downlist:
Display groupings or objects or resources in a pie chart.Distribution
Display a horizontal bar graph showing all the data for each viewlevel object, from greatest to the least, within the selected timeframe.
Ranking
Display a stacked (segmented) bar graph with a trendlinesuperimposed over it showing the average upward and downwardtrends of the data over time.
Historical
Display data in the form of a table.Tabular
7 Click Next.
8 In the Select Parameters panel of the Custom Report Wizard, select valuesfor one or more report parameters. The report parameters that appear dependon the report category and the view type that you selected.
See “Configuring timeframe parameters” on page 570.
See “About Custom Report Wizard parameters” on page 570.
As you select parameters, the Content pane may refresh to display additionalselections. For example, when you select a view filter, you are then given achoice of items on which to filter the report display.
9 Click Next.
10 In theModify Display Options panel, define the measurements to be collectedfor historical, ranking, tabular, and distribution reports. Different display optionsare displayed for different view types.
See “About display options” on page 573.
Click Next.
11 In the View Report Data panel, you can view the report that is created as peryour selection.
Click Next.
To return to the Custom Report Wizard and make changes to the report, clickBack.
12 Save the report. Enter a report name, a description (optional), and locationwhere you want to save the report.
Click Save.
566Reporting in OpsCenterCreating a custom report in OpsCenter

Example 1: You may want to create a custom report based on your specificrequirements. For example, you may want to create a daily status report of theclients that are backed up everyday.
This report gives the detailed tabular information of the jobs directory being backedup, its status (if it’s successful, partially successful or failed), Level Type(Incremental, Full, Differential Incremental), the job file count and job size in thedatacenter . You can enhance this report by adding more available columns basedon the report requirement.
See the procedure to know how you can create a daily status report of the clientsthat are backed up everyday.
To create a daily status report of the clients that are backed up everyday
1 In the OpsCenter console, click Reports.
2 On the Report Templates tab, click Create New Report.
3 On the Report Wizard, select the Create a custom report option and clickNext.
4 Select the Report Category as Backup/Recovery and the Subcategory asJob/Images/Media/Disk.
5 Select the Report View type as Tabular.
Click Next.
6 Select the appropriate timeframe for which you want to view the data.
7 Select the Job filter. Select the Column as Backup Job data type, Operatoras =, and Value as Yes. Click Add.
8 Click Next.
9 Under Tabular Report Properties, select the Time Basis as Job End Time.Change the Display Unit as per your requirement.
10 Select Available columns from the list that appears:
■ Backup Job File Count
■ Backup Job Size
■ Job Directory
■ Job End Time
■ Job Start Time
■ Job Status
■ Job Status Code
567Reporting in OpsCenterCreating a custom report in OpsCenter
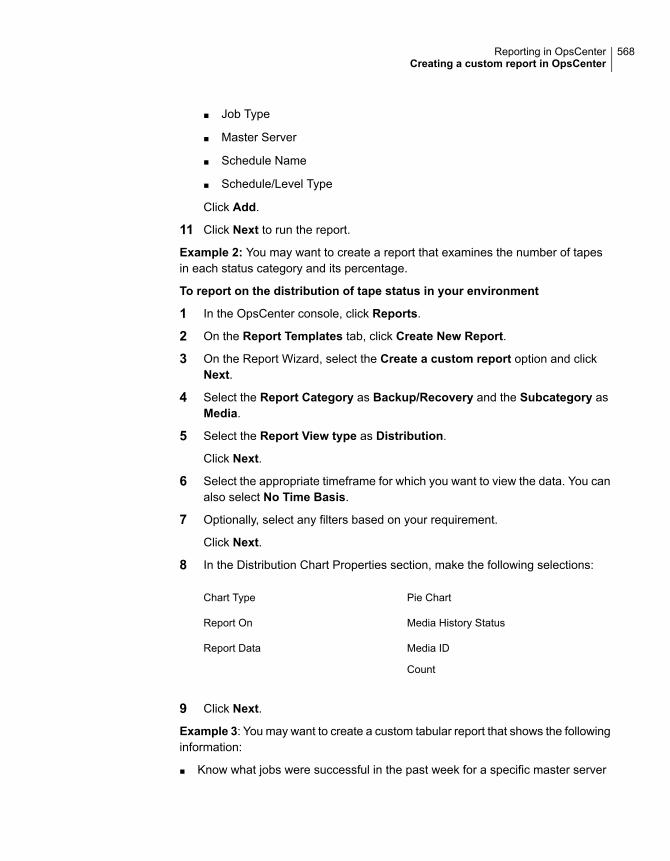
■ Job Type
■ Master Server
■ Schedule Name
■ Schedule/Level Type
Click Add.
11 Click Next to run the report.
Example 2: You may want to create a report that examines the number of tapesin each status category and its percentage.
To report on the distribution of tape status in your environment
1 In the OpsCenter console, click Reports.
2 On the Report Templates tab, click Create New Report.
3 On the Report Wizard, select the Create a custom report option and clickNext.
4 Select the Report Category as Backup/Recovery and the Subcategory asMedia.
5 Select the Report View type as Distribution.
Click Next.
6 Select the appropriate timeframe for which you want to view the data. You canalso select No Time Basis.
7 Optionally, select any filters based on your requirement.
Click Next.
8 In the Distribution Chart Properties section, make the following selections:
Pie ChartChart Type
Media History StatusReport On
Media ID
Count
Report Data
9 Click Next.
Example 3: You may want to create a custom tabular report that shows the followinginformation:
■ Know what jobs were successful in the past week for a specific master server
568Reporting in OpsCenterCreating a custom report in OpsCenter
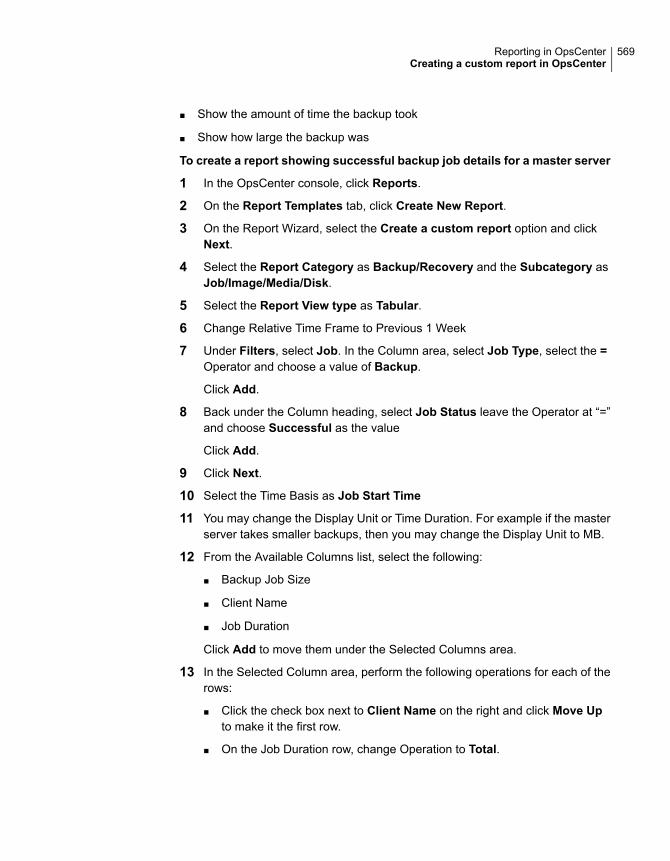
■ Show the amount of time the backup took
■ Show how large the backup was
To create a report showing successful backup job details for a master server
1 In the OpsCenter console, click Reports.
2 On the Report Templates tab, click Create New Report.
3 On the Report Wizard, select the Create a custom report option and clickNext.
4 Select the Report Category as Backup/Recovery and the Subcategory asJob/Image/Media/Disk.
5 Select the Report View type as Tabular.
6 Change Relative Time Frame to Previous 1 Week
7 Under Filters, select Job. In the Column area, select Job Type, select the =Operator and choose a value of Backup.
Click Add.
8 Back under the Column heading, select Job Status leave the Operator at “=”and choose Successful as the value
Click Add.
9 Click Next.
10 Select the Time Basis as Job Start Time
11 You may change the Display Unit or Time Duration. For example if the masterserver takes smaller backups, then you may change the Display Unit to MB.
12 From the Available Columns list, select the following:
■ Backup Job Size
■ Client Name
■ Job Duration
Click Add to move them under the Selected Columns area.
13 In the Selected Column area, perform the following operations for each of therows:
■ Click the check box next to Client Name on the right and click Move Upto make it the first row.
■ On the Job Duration row, change Operation to Total.
569Reporting in OpsCenterCreating a custom report in OpsCenter
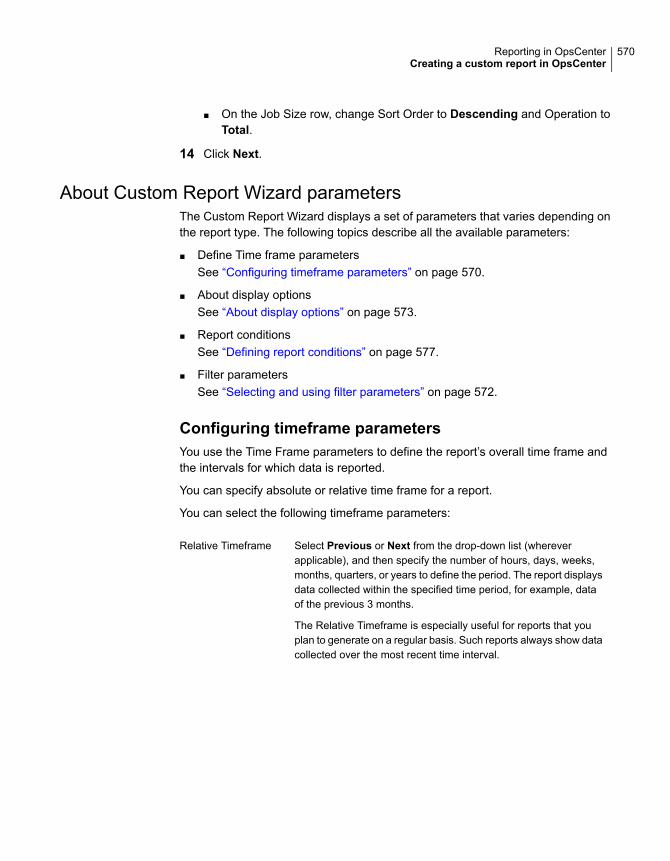
■ On the Job Size row, change Sort Order to Descending and Operation toTotal.
14 Click Next.
About Custom Report Wizard parametersThe Custom Report Wizard displays a set of parameters that varies depending onthe report type. The following topics describe all the available parameters:
■ Define Time frame parametersSee “Configuring timeframe parameters” on page 570.
■ About display optionsSee “About display options” on page 573.
■ Report conditionsSee “Defining report conditions” on page 577.
■ Filter parametersSee “Selecting and using filter parameters” on page 572.
Configuring timeframe parametersYou use the Time Frame parameters to define the report’s overall time frame andthe intervals for which data is reported.
You can specify absolute or relative time frame for a report.
You can select the following timeframe parameters:
Select Previous or Next from the drop-down list (whereverapplicable), and then specify the number of hours, days, weeks,months, quarters, or years to define the period. The report displaysdata collected within the specified time period, for example, dataof the previous 3 months.
The Relative Timeframe is especially useful for reports that youplan to generate on a regular basis. Such reports always show datacollected over the most recent time interval.
Relative Timeframe
570Reporting in OpsCenterCreating a custom report in OpsCenter
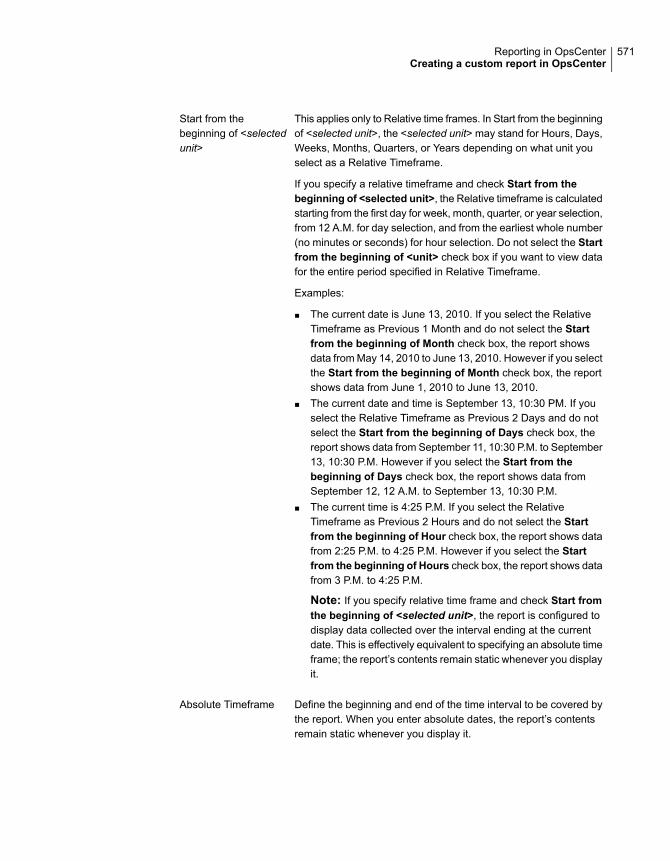
This applies only to Relative time frames. In Start from the beginningof <selected unit>, the <selected unit> may stand for Hours, Days,Weeks, Months, Quarters, or Years depending on what unit youselect as a Relative Timeframe.
If you specify a relative timeframe and check Start from thebeginning of <selected unit>, the Relative timeframe is calculatedstarting from the first day for week, month, quarter, or year selection,from 12 A.M. for day selection, and from the earliest whole number(no minutes or seconds) for hour selection. Do not select the Startfrom the beginning of <unit> check box if you want to view datafor the entire period specified in Relative Timeframe.
Examples:
■ The current date is June 13, 2010. If you select the RelativeTimeframe as Previous 1 Month and do not select the Startfrom the beginning of Month check box, the report showsdata from May 14, 2010 to June 13, 2010. However if you selectthe Start from the beginning of Month check box, the reportshows data from June 1, 2010 to June 13, 2010.
■ The current date and time is September 13, 10:30 PM. If youselect the Relative Timeframe as Previous 2 Days and do notselect the Start from the beginning of Days check box, thereport shows data from September 11, 10:30 P.M. to September13, 10:30 P.M. However if you select the Start from thebeginning of Days check box, the report shows data fromSeptember 12, 12 A.M. to September 13, 10:30 P.M.
■ The current time is 4:25 P.M. If you select the RelativeTimeframe as Previous 2 Hours and do not select the Startfrom the beginning of Hour check box, the report shows datafrom 2:25 P.M. to 4:25 P.M. However if you select the Startfrom the beginning of Hours check box, the report shows datafrom 3 P.M. to 4:25 P.M.
Note: If you specify relative time frame and check Start fromthe beginning of <selected unit>, the report is configured todisplay data collected over the interval ending at the currentdate. This is effectively equivalent to specifying an absolute timeframe; the report’s contents remain static whenever you displayit.
Start from thebeginning of <selectedunit>
Define the beginning and end of the time interval to be covered bythe report. When you enter absolute dates, the report’s contentsremain static whenever you display it.
Absolute Timeframe
571Reporting in OpsCenterCreating a custom report in OpsCenter

This applies only to Absolute timeframes. Check this option to viewall the data on and before the To date that you enter in the Absolutetimeframe.
Example: Suppose you specify an absolute timframe: From March1, 2004, 12:00 A.M. to April 30, 2004, 12:00 A.M. The reportdisplays data from the time period between the start and end dates.Now if you check Ignore From Date, the report ignores the FromDate and displays all data before April 30, 2004, 12:00 A.M.
Ignore From Date
This applies only to Absolute timeframes. Check this option to viewall data on and after the From date that you enter in the Absolutetimeframe.
Example: Suppose you specify an absolute timframe: From March1, 2004, 12:00 A.M. to April 30, 2004, 12:00 A.M. The reportdisplays data from the time period between the start and end dates.Now if you check IgnoreTo Date, the report ignores the To Dateand displays all data on and after March 1, 2004, 12:00 A.M.
Ignore To Date
This signifies that the data shown should not be grouped with time.The report includes all the data in the OpsCenter databaseirrespective of time. The timeframe grouping is not applicable.
No Time Basis
Day Window is applicable when you specify an Absolute or Relativetimeframe. From the Day Window, you can specify the time intervalthat constitutes one day. Select values from the From and Todrop-down lists.
Example: 6:00 PM to 6:00 AM
Example: 12:00 AM (midnight) to 12:00 PM (noon)
Day Window
This option appears only when you select a Historical view type.
Select the time interval by which you want to group the records.For example, if you selected 1 month as the Report Time Frameand 10 days as the Group By interval, the report shows records inthree chunks of data grouped by 10 days.
Report Time FrameGrouping
Selecting and using filter parametersYou can use filter parameters to obtain additional filtering capability for the reportthat you want to display. For example depending on the category or subcategorythat you select, you may filter on the following:
■ Client Operating System
■ Client is Active
572Reporting in OpsCenterCreating a custom report in OpsCenter

■ Policy Active: Select Yes to view policies that are active. Select No to viewpolicies that are not active.
■ Media is On Hold column has been added under the Media filter.
■ Image is on hold and Image Copy is on hold columns have been added underthe Image filter.
To specify additional filtering criteria
1 On the Custom Reports Wizard, select a report category, subcategory andview type. Click Next.
2 On the Select Parameters panel, the respective filters appear in the Filterssection.
The list of filters that appear depend on the report category and view type thatyou select.
3 Click the filter that you want to use, and then specify one or more values usingthe fields provided.
About display optionsUse theModify Display Options panel to define the measurements to be collectedfor historical, ranking, tabular, and distribution reports. Different display options aredisplayed for different view types.
About Historical view display optionsThe following display options are available for historical reports. The followingparameters are displayed:
Define the report’s scope using the drop-down list. This field denotesthe entity on which grouping is required. For example, when youselect the Report On parameter as Client, the Y-axis report data isgrouped per client.
Example: Job Status, Image type etc.
Report On
Description to display along with the report. If you leave this fieldblank, no description is provided by default.
Description
X-Axis
For Historical reports, a label for the horizontal (X) axis. If you leavethis field blank, a default label is provided.
Display Name
573Reporting in OpsCenterCreating a custom report in OpsCenter

The metric used to define the graph’s horizontal (X) axis.
Examples: Attempt End Time, Client Name
If you choose a Report Data parameter like Client Name which isnot time-based, another parameter called Time Basis appears.
Report Data
This parameter appears if you select a Report Data parameter likeClient Name that is not related to time. Time Basis resembles thetime attribute on which time filter is applied as criteria. This attributeis not shown if you select No Time Basis while configuring thetimeframe in the Wizard. Time Basis is the metric used for assigninga time to each item in the report, if not specified by the Report Dataparameter.
Example: The start time or the end time for each backup job.
Time Basis
Y1 or Y2 -Axis
For Historical reports, a label for the horizontal (Y1 or Y2) axis. Ifyou leave this field blank, a default label is provided.
Display Name
For Historical reports, the metric used to define the graph’s vertical(Y1 or Y2) axis.
Examples: Job Size, Status Code etc.
Report Data
For numeric data types, such as Job Size, the units in which todisplay the data. This is applicable only for size-related attributeslike Job size, image size, fragment size etc.
Examples: MB, GB.
Display Unit
The report format. Additional formats may be available dependingon the values specified in Report Data.
Chart Type
Use the Trendline and Forecast parameters to project future trendsby averaging actual data from the recent past. Check Showforecast with forecast periods, and use the drop-down list tospecify a number of forecast periods (intervals). This displays aforecast line extending to future dates, using linear regression topredict values based on the trend of data within the report’s timeframe.
Example: 12 shows forecast data for the next 12 months (if theTime Frame Group By is 1 month).
The following Web site helps in calculating the forecast:
http://easycalculation.com/statistics/regression.php
Show Forecast withforecast periods
574Reporting in OpsCenterCreating a custom report in OpsCenter
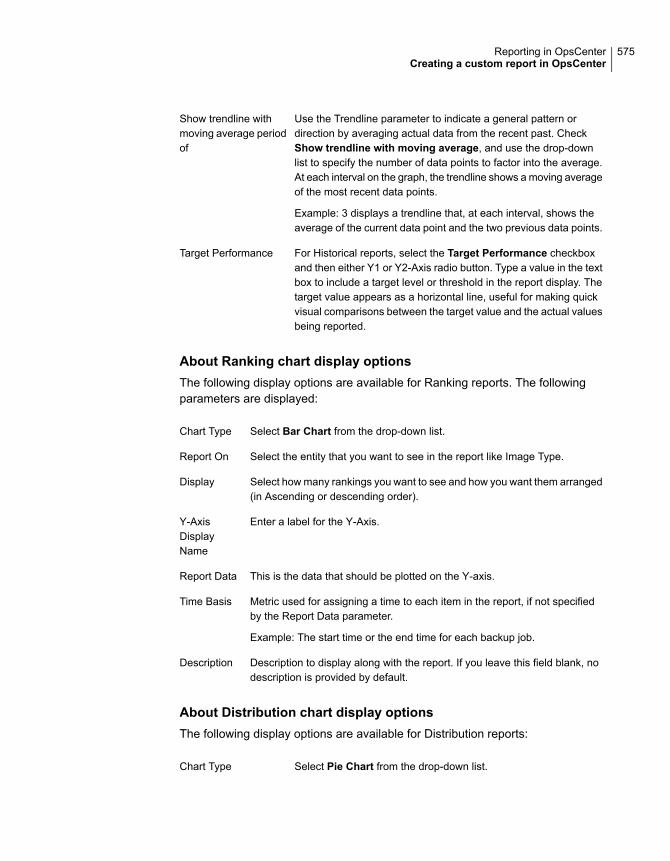
Use the Trendline parameter to indicate a general pattern ordirection by averaging actual data from the recent past. CheckShow trendline with moving average, and use the drop-downlist to specify the number of data points to factor into the average.At each interval on the graph, the trendline shows a moving averageof the most recent data points.
Example: 3 displays a trendline that, at each interval, shows theaverage of the current data point and the two previous data points.
Show trendline withmoving average periodof
For Historical reports, select the Target Performance checkboxand then either Y1 or Y2-Axis radio button. Type a value in the textbox to include a target level or threshold in the report display. Thetarget value appears as a horizontal line, useful for making quickvisual comparisons between the target value and the actual valuesbeing reported.
Target Performance
About Ranking chart display optionsThe following display options are available for Ranking reports. The followingparameters are displayed:
Select Bar Chart from the drop-down list.Chart Type
Select the entity that you want to see in the report like Image Type.Report On
Select how many rankings you want to see and how you want them arranged(in Ascending or descending order).
Display
Enter a label for the Y-Axis.Y-AxisDisplayName
This is the data that should be plotted on the Y-axis.Report Data
Metric used for assigning a time to each item in the report, if not specifiedby the Report Data parameter.
Example: The start time or the end time for each backup job.
Time Basis
Description to display along with the report. If you leave this field blank, nodescription is provided by default.
Description
About Distribution chart display optionsThe following display options are available for Distribution reports:
Select Pie Chart from the drop-down list.Chart Type
575Reporting in OpsCenterCreating a custom report in OpsCenter
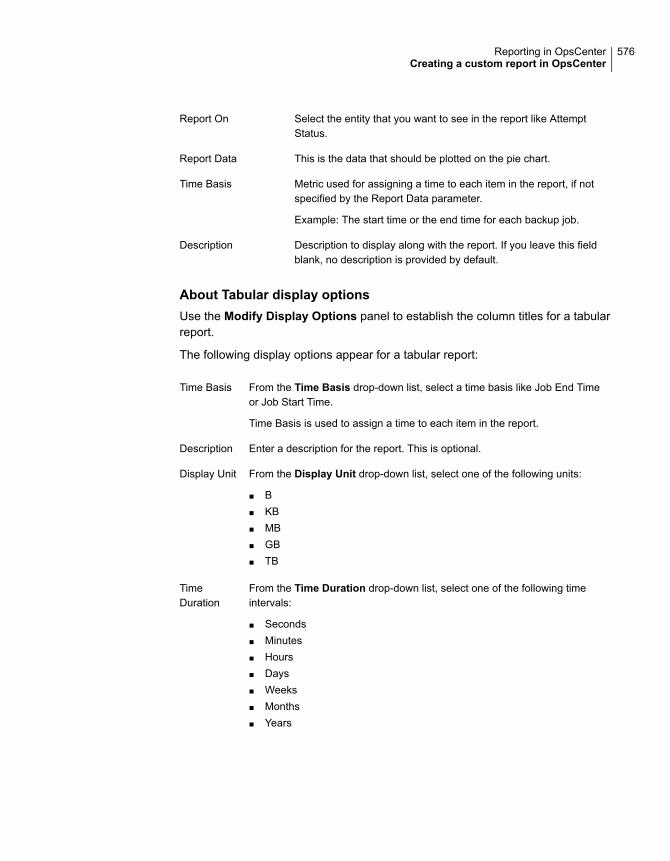
Select the entity that you want to see in the report like AttemptStatus.
Report On
This is the data that should be plotted on the pie chart.Report Data
Metric used for assigning a time to each item in the report, if notspecified by the Report Data parameter.
Example: The start time or the end time for each backup job.
Time Basis
Description to display along with the report. If you leave this fieldblank, no description is provided by default.
Description
About Tabular display optionsUse the Modify Display Options panel to establish the column titles for a tabularreport.
The following display options appear for a tabular report:
From the Time Basis drop-down list, select a time basis like Job End Timeor Job Start Time.
Time Basis is used to assign a time to each item in the report.
Time Basis
Enter a description for the report. This is optional.Description
From the Display Unit drop-down list, select one of the following units:
■ B■ KB■ MB■ GB■ TB
Display Unit
From the Time Duration drop-down list, select one of the following timeintervals:
■ Seconds■ Minutes■ Hours■ Days■ Weeks■ Months■ Years
TimeDuration
576Reporting in OpsCenterCreating a custom report in OpsCenter
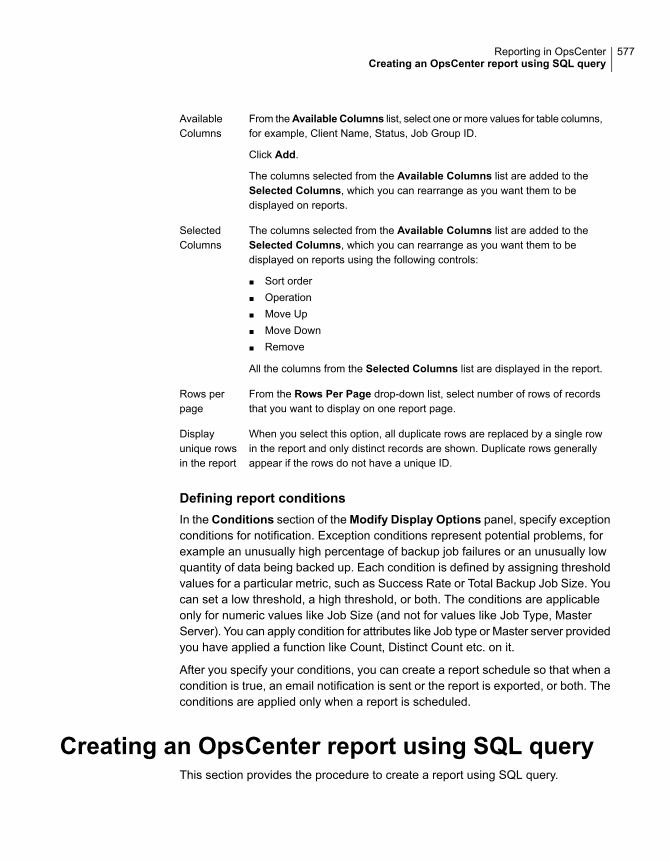
From theAvailable Columns list, select one or more values for table columns,for example, Client Name, Status, Job Group ID.
Click Add.
The columns selected from the Available Columns list are added to theSelected Columns, which you can rearrange as you want them to bedisplayed on reports.
AvailableColumns
The columns selected from the Available Columns list are added to theSelected Columns, which you can rearrange as you want them to bedisplayed on reports using the following controls:
■ Sort order■ Operation■ Move Up■ Move Down■ Remove
All the columns from the Selected Columns list are displayed in the report.
SelectedColumns
From the Rows Per Page drop-down list, select number of rows of recordsthat you want to display on one report page.
Rows perpage
When you select this option, all duplicate rows are replaced by a single rowin the report and only distinct records are shown. Duplicate rows generallyappear if the rows do not have a unique ID.
Displayunique rowsin the report
Defining report conditionsIn the Conditions section of the Modify Display Options panel, specify exceptionconditions for notification. Exception conditions represent potential problems, forexample an unusually high percentage of backup job failures or an unusually lowquantity of data being backed up. Each condition is defined by assigning thresholdvalues for a particular metric, such as Success Rate or Total Backup Job Size. Youcan set a low threshold, a high threshold, or both. The conditions are applicableonly for numeric values like Job Size (and not for values like Job Type, MasterServer). You can apply condition for attributes like Job type or Master server providedyou have applied a function like Count, Distinct Count etc. on it.
After you specify your conditions, you can create a report schedule so that when acondition is true, an email notification is sent or the report is exported, or both. Theconditions are applied only when a report is scheduled.
Creating an OpsCenter report using SQL queryThis section provides the procedure to create a report using SQL query.
577Reporting in OpsCenterCreating an OpsCenter report using SQL query
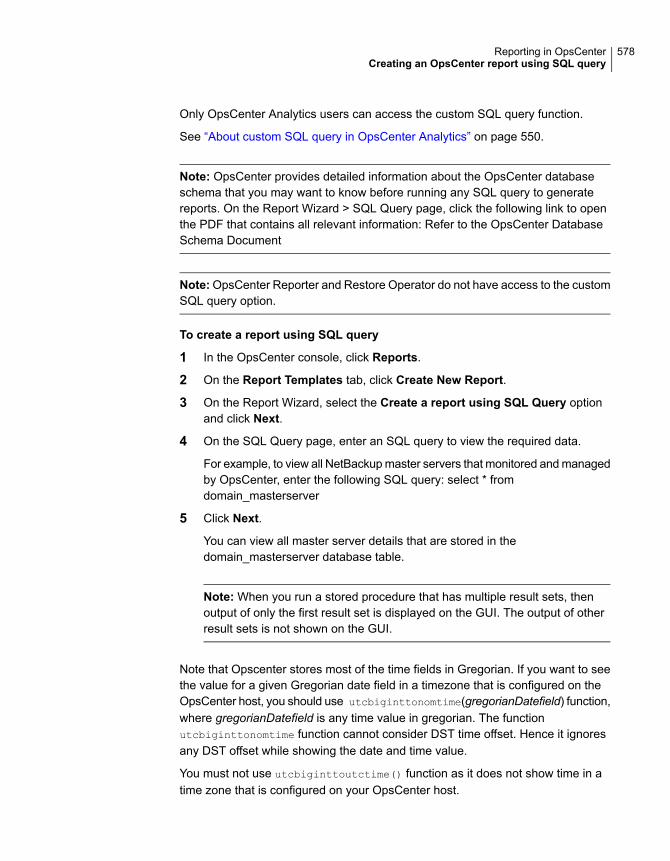
Only OpsCenter Analytics users can access the custom SQL query function.
See “About custom SQL query in OpsCenter Analytics” on page 550.
Note: OpsCenter provides detailed information about the OpsCenter databaseschema that you may want to know before running any SQL query to generatereports. On the Report Wizard > SQL Query page, click the following link to openthe PDF that contains all relevant information: Refer to the OpsCenter DatabaseSchema Document
Note:OpsCenter Reporter and Restore Operator do not have access to the customSQL query option.
To create a report using SQL query
1 In the OpsCenter console, click Reports.
2 On the Report Templates tab, click Create New Report.
3 On the Report Wizard, select the Create a report using SQL Query optionand click Next.
4 On the SQL Query page, enter an SQL query to view the required data.
For example, to view all NetBackup master servers that monitored and managedby OpsCenter, enter the following SQL query: select * fromdomain_masterserver
5 Click Next.
You can view all master server details that are stored in thedomain_masterserver database table.
Note: When you run a stored procedure that has multiple result sets, thenoutput of only the first result set is displayed on the GUI. The output of otherresult sets is not shown on the GUI.
Note that Opscenter stores most of the time fields in Gregorian. If you want to seethe value for a given Gregorian date field in a timezone that is configured on theOpsCenter host, you should use utcbiginttonomtime(gregorianDatefield) function,where gregorianDatefield is any time value in gregorian. The functionutcbiginttonomtime function cannot consider DST time offset. Hence it ignoresany DST offset while showing the date and time value.
You must not use utcbiginttoutctime() function as it does not show time in atime zone that is configured on your OpsCenter host.
578Reporting in OpsCenterCreating an OpsCenter report using SQL query
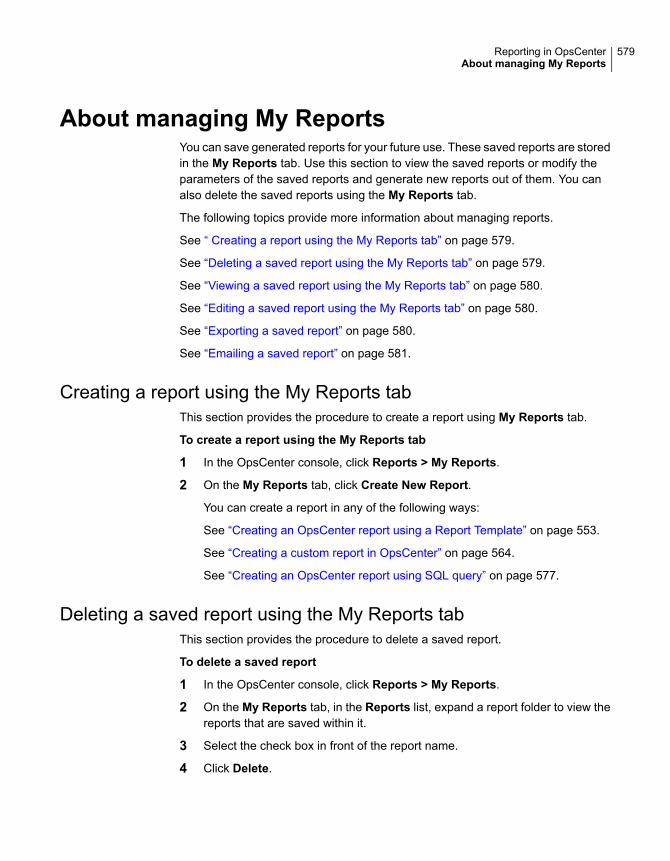
About managing My ReportsYou can save generated reports for your future use. These saved reports are storedin the My Reports tab. Use this section to view the saved reports or modify theparameters of the saved reports and generate new reports out of them. You canalso delete the saved reports using the My Reports tab.
The following topics provide more information about managing reports.
See “ Creating a report using the My Reports tab” on page 579.
See “Deleting a saved report using the My Reports tab” on page 579.
See “Viewing a saved report using the My Reports tab” on page 580.
See “Editing a saved report using the My Reports tab” on page 580.
See “Exporting a saved report” on page 580.
See “Emailing a saved report” on page 581.
Creating a report using the My Reports tabThis section provides the procedure to create a report using My Reports tab.
To create a report using the My Reports tab
1 In the OpsCenter console, click Reports > My Reports.
2 On the My Reports tab, click Create New Report.
You can create a report in any of the following ways:
See “Creating an OpsCenter report using a Report Template” on page 553.
See “Creating a custom report in OpsCenter” on page 564.
See “Creating an OpsCenter report using SQL query” on page 577.
Deleting a saved report using the My Reports tabThis section provides the procedure to delete a saved report.
To delete a saved report
1 In the OpsCenter console, click Reports > My Reports.
2 On the My Reports tab, in the Reports list, expand a report folder to view thereports that are saved within it.
3 Select the check box in front of the report name.
4 Click Delete.
579Reporting in OpsCenterAbout managing My Reports
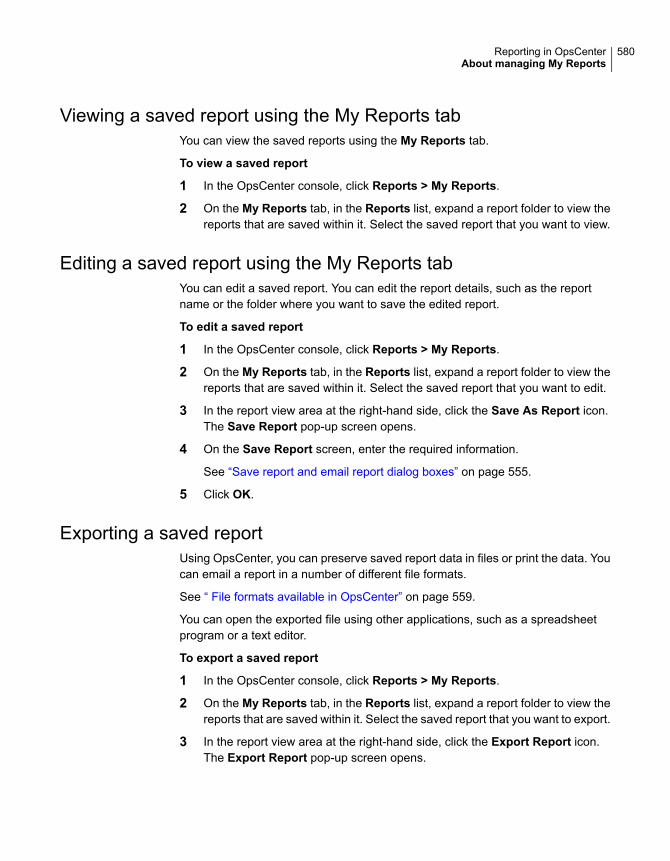
Viewing a saved report using the My Reports tabYou can view the saved reports using the My Reports tab.
To view a saved report
1 In the OpsCenter console, click Reports > My Reports.
2 On the My Reports tab, in the Reports list, expand a report folder to view thereports that are saved within it. Select the saved report that you want to view.
Editing a saved report using the My Reports tabYou can edit a saved report. You can edit the report details, such as the reportname or the folder where you want to save the edited report.
To edit a saved report
1 In the OpsCenter console, click Reports > My Reports.
2 On the My Reports tab, in the Reports list, expand a report folder to view thereports that are saved within it. Select the saved report that you want to edit.
3 In the report view area at the right-hand side, click the Save As Report icon.The Save Report pop-up screen opens.
4 On the Save Report screen, enter the required information.
See “Save report and email report dialog boxes” on page 555.
5 Click OK.
Exporting a saved reportUsing OpsCenter, you can preserve saved report data in files or print the data. Youcan email a report in a number of different file formats.
See “ File formats available in OpsCenter” on page 559.
You can open the exported file using other applications, such as a spreadsheetprogram or a text editor.
To export a saved report
1 In the OpsCenter console, click Reports > My Reports.
2 On the My Reports tab, in the Reports list, expand a report folder to view thereports that are saved within it. Select the saved report that you want to export.
3 In the report view area at the right-hand side, click the Export Report icon.The Export Report pop-up screen opens.
580Reporting in OpsCenterAbout managing My Reports

4 On the Export Report pop-up screen, select the export options that you wantto export the report with. Select file format, such as PDF, CSV, or XML andcontent or report view, such as Distribution, Historical, or Ranking.
5 Click OK. The system displays the export options pertaining to the file formatyou have selected. Select those options and export the saved report.
Emailing a saved reportUsing OpsCenter, you can email the saved report data to the selected recipients.You can email the report in the following file formats:
Can be viewed using a PDF reader, such as Adobe ReaderPDF (PortableDocument Format)
Use with spreadsheet programs, such as Microsoft Excel.CSV(comma-separatedvalues)
Compatible with word-processing applications and text editorsTSV (tab-separatedvalues)
Can be opened using with Web browsersHTML (hypertextmarkup language )
Can be imported (using user-written scripts) by other programs likedatabases or billing applications
XML (ExtensibleMarkup Language)
To email a report
1 In the OpsCenter console, click Reports > Saved Reports.
2 On the My Reports tab, in the Reports list, expand a report folder to view thereports that are saved within it. Select the saved report that you want to email.
3 In the report view area at the right-hand side, click the Email Report icon. TheEmail Report pop-up screen opens.
4 On the Email Report pop-up screen, select the email options: File format, suchas PDF, CSV, or XML and content or report view, such as Distribution,Historical, or Ranking.
5 Enter email IDs in To, Cc, and Bcc text boxes, to which you want to sendemails.
6 Enter the subject of the email.
581Reporting in OpsCenterAbout managing My Reports
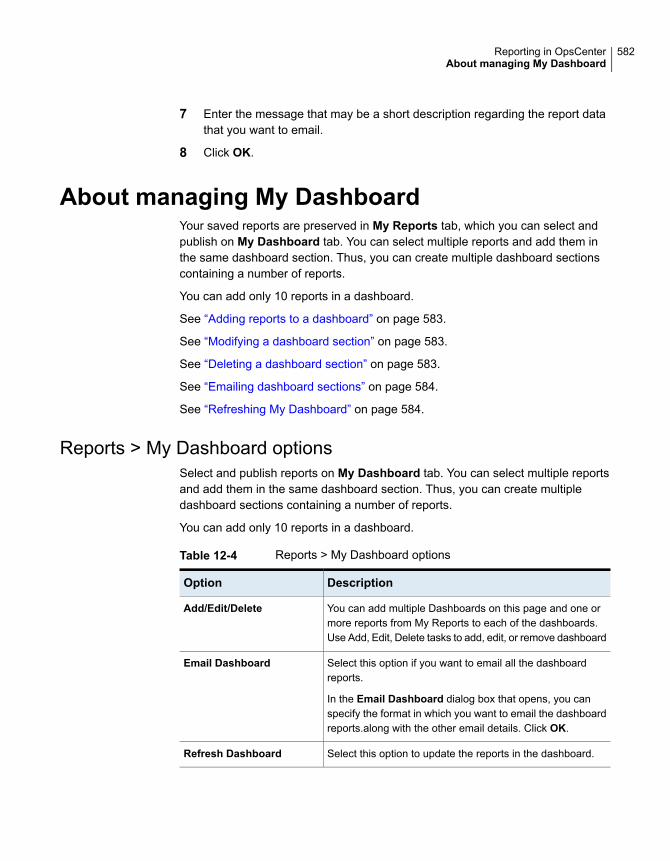
7 Enter the message that may be a short description regarding the report datathat you want to email.
8 Click OK.
About managing My DashboardYour saved reports are preserved in My Reports tab, which you can select andpublish on My Dashboard tab. You can select multiple reports and add them inthe same dashboard section. Thus, you can create multiple dashboard sectionscontaining a number of reports.
You can add only 10 reports in a dashboard.
See “Adding reports to a dashboard” on page 583.
See “Modifying a dashboard section” on page 583.
See “Deleting a dashboard section” on page 583.
See “Emailing dashboard sections” on page 584.
See “Refreshing My Dashboard” on page 584.
Reports > My Dashboard optionsSelect and publish reports on My Dashboard tab. You can select multiple reportsand add them in the same dashboard section. Thus, you can create multipledashboard sections containing a number of reports.
You can add only 10 reports in a dashboard.
Table 12-4 Reports > My Dashboard options
DescriptionOption
You can add multiple Dashboards on this page and one ormore reports from My Reports to each of the dashboards.Use Add, Edit, Delete tasks to add, edit, or remove dashboard
Add/Edit/Delete
Select this option if you want to email all the dashboardreports.
In the Email Dashboard dialog box that opens, you canspecify the format in which you want to email the dashboardreports.along with the other email details. Click OK.
Email Dashboard
Select this option to update the reports in the dashboard.Refresh Dashboard
582Reporting in OpsCenterAbout managing My Dashboard
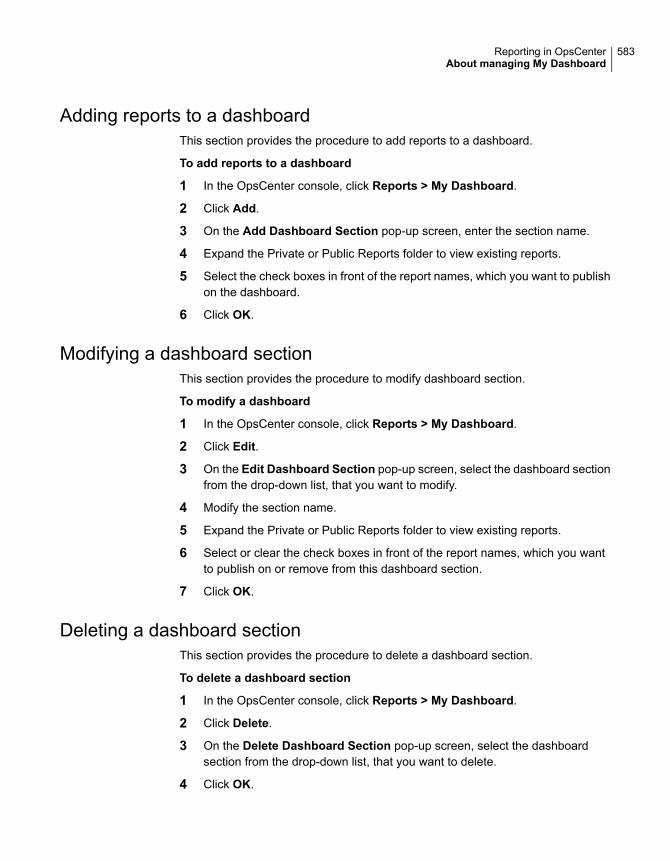
Adding reports to a dashboardThis section provides the procedure to add reports to a dashboard.
To add reports to a dashboard
1 In the OpsCenter console, click Reports > My Dashboard.
2 Click Add.
3 On the Add Dashboard Section pop-up screen, enter the section name.
4 Expand the Private or Public Reports folder to view existing reports.
5 Select the check boxes in front of the report names, which you want to publishon the dashboard.
6 Click OK.
Modifying a dashboard sectionThis section provides the procedure to modify dashboard section.
To modify a dashboard
1 In the OpsCenter console, click Reports > My Dashboard.
2 Click Edit.
3 On the Edit Dashboard Section pop-up screen, select the dashboard sectionfrom the drop-down list, that you want to modify.
4 Modify the section name.
5 Expand the Private or Public Reports folder to view existing reports.
6 Select or clear the check boxes in front of the report names, which you wantto publish on or remove from this dashboard section.
7 Click OK.
Deleting a dashboard sectionThis section provides the procedure to delete a dashboard section.
To delete a dashboard section
1 In the OpsCenter console, click Reports > My Dashboard.
2 Click Delete.
3 On the Delete Dashboard Section pop-up screen, select the dashboardsection from the drop-down list, that you want to delete.
4 Click OK.
583Reporting in OpsCenterAbout managing My Dashboard

Emailing dashboard sectionsYou can email your dashboards.
To email a dashboard
1 In the OpsCenter console, click Reports > My Dashboard.
2 Click the Email Dashboard icon.
3 On the Email Dashboard pop-up screen, select the format in which you wantto send the email.
4 Select email recipients from the To.., Cc.., and Bcc.. as appropriate.
Alternatively, enter new email recipients, which are added into the database.
5 Enter the email subject and message.
6 Click OK.
Refreshing My DashboardThis section provides the procedure to refresh My Dashboard.
To refresh My Dashboard
1 In the OpsCenter console, click Reports > My Dashboard.
2 Click the Refresh icon.
About managing reports folders in OpsCenterOpsCenter provides a way to manage folders where you have saved your reports.They can be both private reports and public reports.
Using the Manage Folders tab in the Reports section, you can add new reportfolders, edit names of the existing folders, or delete them.
You can also select reports in a particular folder and delete them using this tab.
See “Adding a reports folder in OpsCenter” on page 585.
See “Editing a reports folder in OpsCenter” on page 585.
See “Deleting reports folders in OpsCenter” on page 585.
See “Deleting reports from a folder in OpsCenter” on page 586.
Reports > Manage Folders optionsUsing the Manage Folders tab in the Reports section, you can add new reportfolders, edit names of the existing folders, or delete them.
584Reporting in OpsCenterAbout managing reports folders in OpsCenter
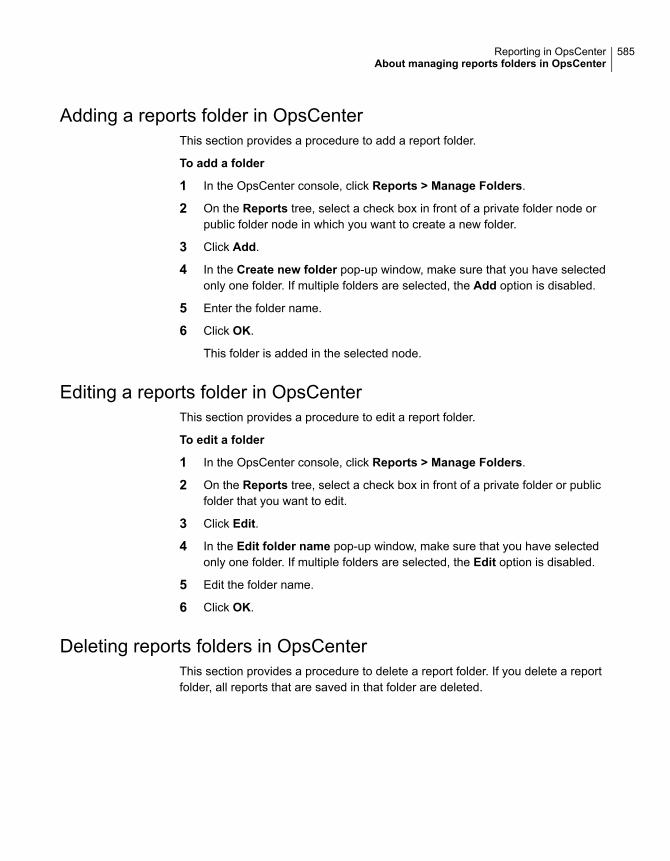
Adding a reports folder in OpsCenterThis section provides a procedure to add a report folder.
To add a folder
1 In the OpsCenter console, click Reports > Manage Folders.
2 On the Reports tree, select a check box in front of a private folder node orpublic folder node in which you want to create a new folder.
3 Click Add.
4 In the Create new folder pop-up window, make sure that you have selectedonly one folder. If multiple folders are selected, the Add option is disabled.
5 Enter the folder name.
6 Click OK.
This folder is added in the selected node.
Editing a reports folder in OpsCenterThis section provides a procedure to edit a report folder.
To edit a folder
1 In the OpsCenter console, click Reports > Manage Folders.
2 On the Reports tree, select a check box in front of a private folder or publicfolder that you want to edit.
3 Click Edit.
4 In the Edit folder name pop-up window, make sure that you have selectedonly one folder. If multiple folders are selected, the Edit option is disabled.
5 Edit the folder name.
6 Click OK.
Deleting reports folders in OpsCenterThis section provides a procedure to delete a report folder. If you delete a reportfolder, all reports that are saved in that folder are deleted.
585Reporting in OpsCenterAbout managing reports folders in OpsCenter
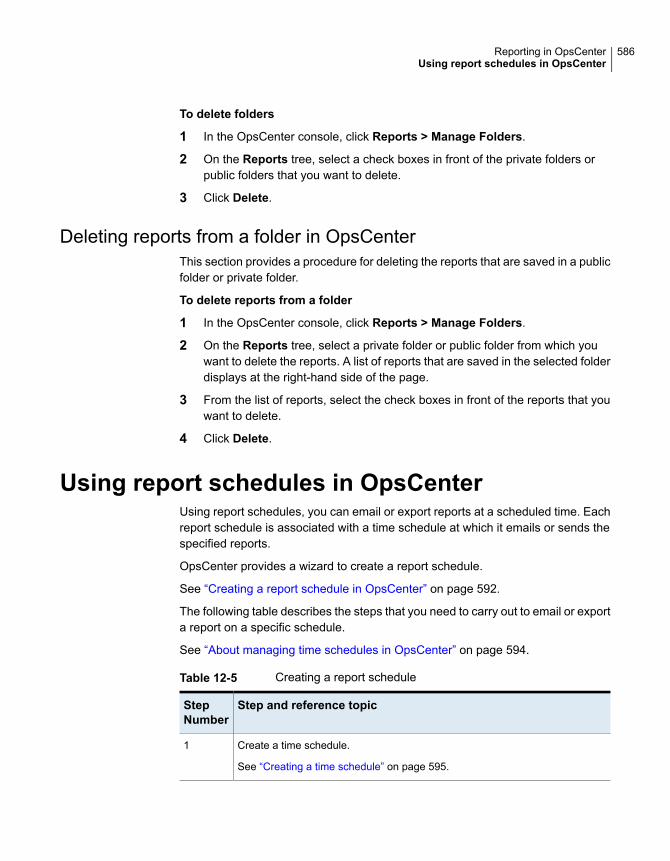
To delete folders
1 In the OpsCenter console, click Reports > Manage Folders.
2 On the Reports tree, select a check boxes in front of the private folders orpublic folders that you want to delete.
3 Click Delete.
Deleting reports from a folder in OpsCenterThis section provides a procedure for deleting the reports that are saved in a publicfolder or private folder.
To delete reports from a folder
1 In the OpsCenter console, click Reports > Manage Folders.
2 On the Reports tree, select a private folder or public folder from which youwant to delete the reports. A list of reports that are saved in the selected folderdisplays at the right-hand side of the page.
3 From the list of reports, select the check boxes in front of the reports that youwant to delete.
4 Click Delete.
Using report schedules in OpsCenterUsing report schedules, you can email or export reports at a scheduled time. Eachreport schedule is associated with a time schedule at which it emails or sends thespecified reports.
OpsCenter provides a wizard to create a report schedule.
See “Creating a report schedule in OpsCenter” on page 592.
The following table describes the steps that you need to carry out to email or exporta report on a specific schedule.
See “About managing time schedules in OpsCenter” on page 594.
Table 12-5 Creating a report schedule
Step and reference topicStepNumber
Create a time schedule.
See “Creating a time schedule” on page 595.
1
586Reporting in OpsCenterUsing report schedules in OpsCenter
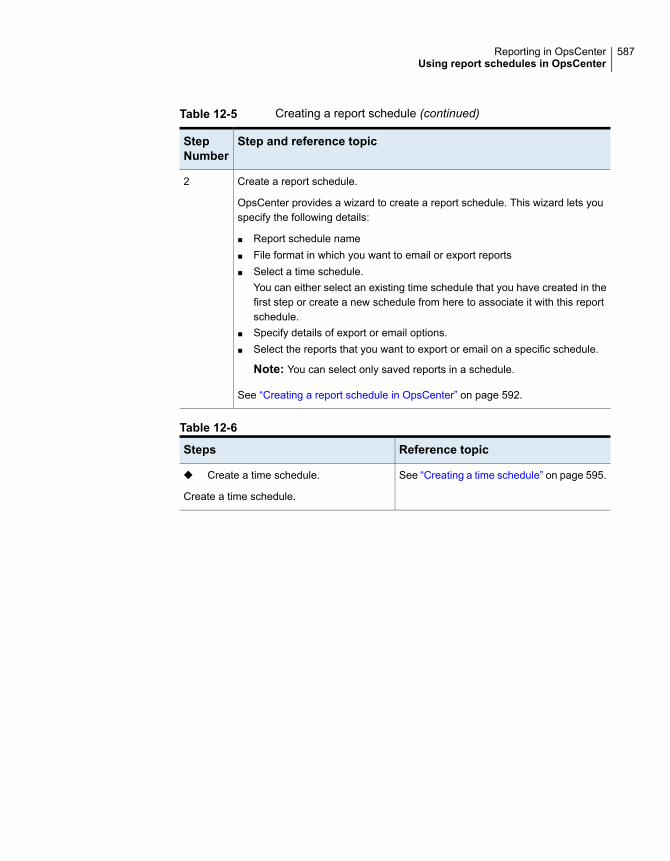
Table 12-5 Creating a report schedule (continued)
Step and reference topicStepNumber
Create a report schedule.
OpsCenter provides a wizard to create a report schedule. This wizard lets youspecify the following details:
■ Report schedule name■ File format in which you want to email or export reports■ Select a time schedule.
You can either select an existing time schedule that you have created in thefirst step or create a new schedule from here to associate it with this reportschedule.
■ Specify details of export or email options.■ Select the reports that you want to export or email on a specific schedule.
Note: You can select only saved reports in a schedule.
See “Creating a report schedule in OpsCenter” on page 592.
2
Table 12-6
Reference topicSteps
See “Creating a time schedule” on page 595.◆ Create a time schedule.
Create a time schedule.
587Reporting in OpsCenterUsing report schedules in OpsCenter
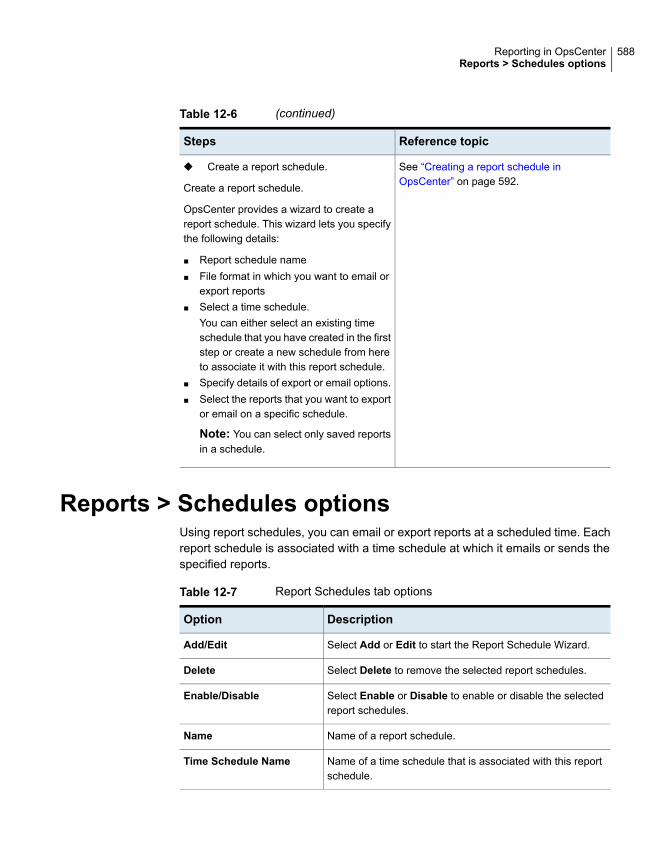
Table 12-6 (continued)
Reference topicSteps
See “Creating a report schedule inOpsCenter” on page 592.
◆ Create a report schedule.
Create a report schedule.
OpsCenter provides a wizard to create areport schedule. This wizard lets you specifythe following details:
■ Report schedule name■ File format in which you want to email or
export reports■ Select a time schedule.
You can either select an existing timeschedule that you have created in the firststep or create a new schedule from hereto associate it with this report schedule.
■ Specify details of export or email options.■ Select the reports that you want to export
or email on a specific schedule.
Note: You can select only saved reportsin a schedule.
Reports > Schedules optionsUsing report schedules, you can email or export reports at a scheduled time. Eachreport schedule is associated with a time schedule at which it emails or sends thespecified reports.
Table 12-7 Report Schedules tab options
DescriptionOption
Select Add or Edit to start the Report Schedule Wizard.Add/Edit
Select Delete to remove the selected report schedules.Delete
Select Enable or Disable to enable or disable the selectedreport schedules.
Enable/Disable
Name of a report schedule.Name
Name of a time schedule that is associated with this reportschedule.
Time Schedule Name
588Reporting in OpsCenterReports > Schedules options
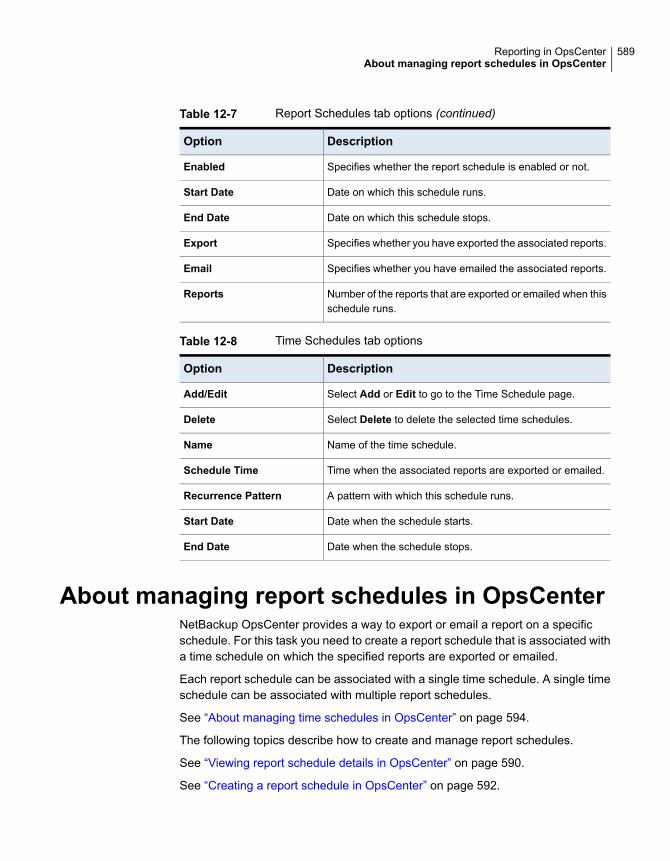
Table 12-7 Report Schedules tab options (continued)
DescriptionOption
Specifies whether the report schedule is enabled or not.Enabled
Date on which this schedule runs.Start Date
Date on which this schedule stops.End Date
Specifies whether you have exported the associated reports.Export
Specifies whether you have emailed the associated reports.Email
Number of the reports that are exported or emailed when thisschedule runs.
Reports
Table 12-8 Time Schedules tab options
DescriptionOption
Select Add or Edit to go to the Time Schedule page.Add/Edit
Select Delete to delete the selected time schedules.Delete
Name of the time schedule.Name
Time when the associated reports are exported or emailed.Schedule Time
A pattern with which this schedule runs.Recurrence Pattern
Date when the schedule starts.Start Date
Date when the schedule stops.End Date
About managing report schedules in OpsCenterNetBackup OpsCenter provides a way to export or email a report on a specificschedule. For this task you need to create a report schedule that is associated witha time schedule on which the specified reports are exported or emailed.
Each report schedule can be associated with a single time schedule. A single timeschedule can be associated with multiple report schedules.
See “About managing time schedules in OpsCenter” on page 594.
The following topics describe how to create and manage report schedules.
See “Viewing report schedule details in OpsCenter” on page 590.
See “Creating a report schedule in OpsCenter” on page 592.
589Reporting in OpsCenterAbout managing report schedules in OpsCenter
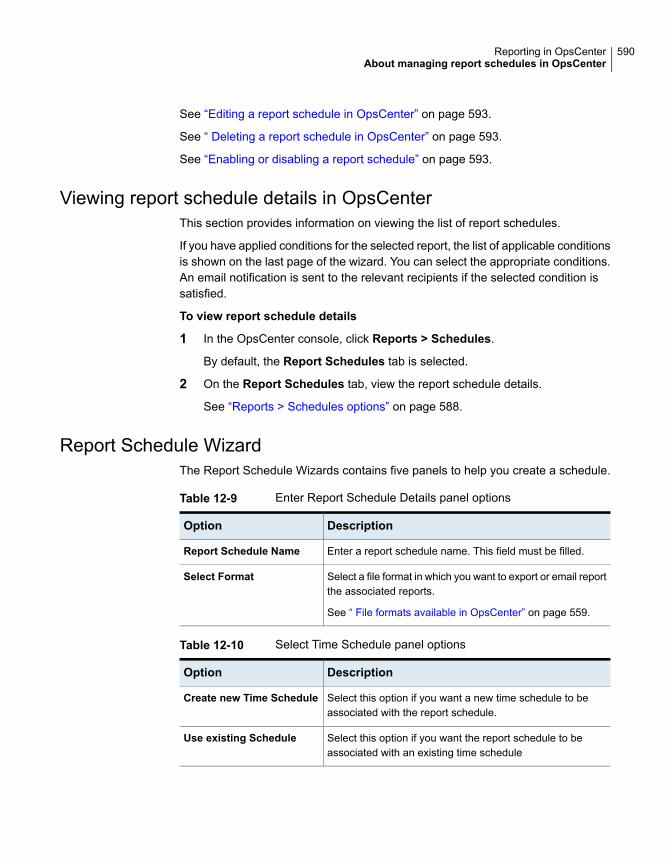
See “Editing a report schedule in OpsCenter” on page 593.
See “ Deleting a report schedule in OpsCenter” on page 593.
See “Enabling or disabling a report schedule” on page 593.
Viewing report schedule details in OpsCenterThis section provides information on viewing the list of report schedules.
If you have applied conditions for the selected report, the list of applicable conditionsis shown on the last page of the wizard. You can select the appropriate conditions.An email notification is sent to the relevant recipients if the selected condition issatisfied.
To view report schedule details
1 In the OpsCenter console, click Reports > Schedules.
By default, the Report Schedules tab is selected.
2 On the Report Schedules tab, view the report schedule details.
See “Reports > Schedules options” on page 588.
Report Schedule WizardThe Report Schedule Wizards contains five panels to help you create a schedule.
Table 12-9 Enter Report Schedule Details panel options
DescriptionOption
Enter a report schedule name. This field must be filled.Report Schedule Name
Select a file format in which you want to export or email reportthe associated reports.
See “ File formats available in OpsCenter” on page 559.
Select Format
Table 12-10 Select Time Schedule panel options
DescriptionOption
Select this option if you want a new time schedule to beassociated with the report schedule.
Create new Time Schedule
Select this option if you want the report schedule to beassociated with an existing time schedule
Use existing Schedule
590Reporting in OpsCenterAbout managing report schedules in OpsCenter

Table 12-11 Select Export/Email Report Options panel options
DescriptionOption
Select this check box if you want to export the reports thatare associated with this schedule.
See “ File formats available in OpsCenter” on page 559.
Export
Enter a directory path where you want to save the exportedreport or click Browse to select the desired location.
Location
Select this check box if you want to overwrite a file thatalready exists at the specified location.
Overwrite if file exists
Select this check box if you want to email the reports that areassociated with this schedule.
Select email IDs to which you want to email reports.To
Select email IDs to add in the Cc list of email.Cc
Select email IDs to add in the Bcc list email.Bcc
Type the email subject. For example: Daily Job Count ReportSubject
Type any other related information.Message
Table 12-12 Select Reports panel options
DescriptionOption
Select private reports from the list that you want to schedule.You can select both public reports and private reports.
Private Reports
Select public reports from the list that you want to schedule.You can select both public reports and private reports.
Public Reports
Table 12-13 Select a report condition to be applied panel options
DescriptionOption
Check this option if you want the report to be emailed only ifit meets one or more of the selected conditions. You cancreate conditions for custom reports while editing the report.
Send email only if thereport meets one or moreselected conditions
The custom reports that have conditions and are selected tobe scheduled are displayed.
Report Name
The condition that is associated with the custom report isdisplayed. You can create a condition only for custom reports.
Condition
591Reporting in OpsCenterAbout managing report schedules in OpsCenter
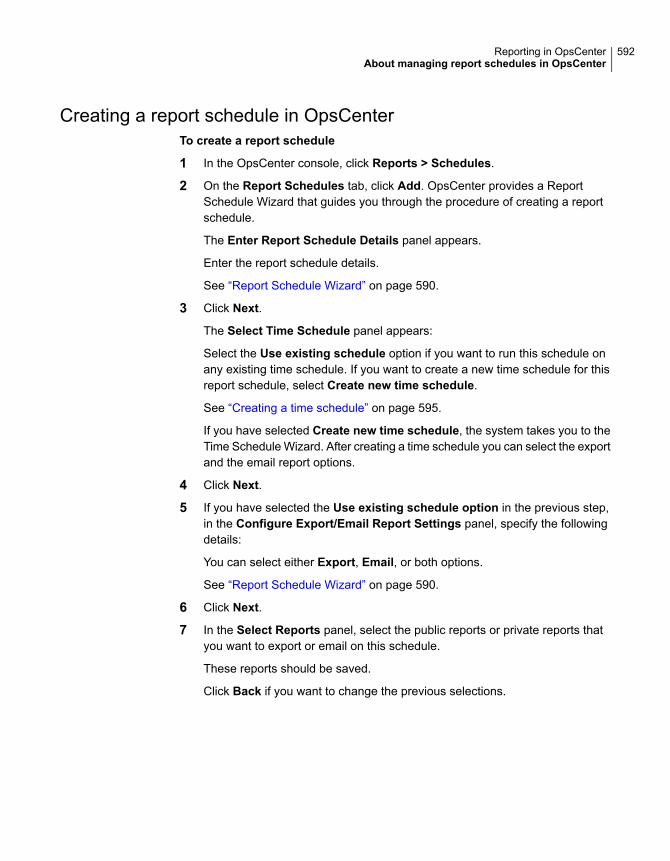
Creating a report schedule in OpsCenterTo create a report schedule
1 In the OpsCenter console, click Reports > Schedules.
2 On the Report Schedules tab, click Add. OpsCenter provides a ReportSchedule Wizard that guides you through the procedure of creating a reportschedule.
The Enter Report Schedule Details panel appears.
Enter the report schedule details.
See “Report Schedule Wizard” on page 590.
3 Click Next.
The Select Time Schedule panel appears:
Select the Use existing schedule option if you want to run this schedule onany existing time schedule. If you want to create a new time schedule for thisreport schedule, select Create new time schedule.
See “Creating a time schedule” on page 595.
If you have selected Create new time schedule, the system takes you to theTime Schedule Wizard. After creating a time schedule you can select the exportand the email report options.
4 Click Next.
5 If you have selected the Use existing schedule option in the previous step,in the Configure Export/Email Report Settings panel, specify the followingdetails:
You can select either Export, Email, or both options.
See “Report Schedule Wizard” on page 590.
6 Click Next.
7 In the Select Reports panel, select the public reports or private reports thatyou want to export or email on this schedule.
These reports should be saved.
Click Back if you want to change the previous selections.
592Reporting in OpsCenterAbout managing report schedules in OpsCenter
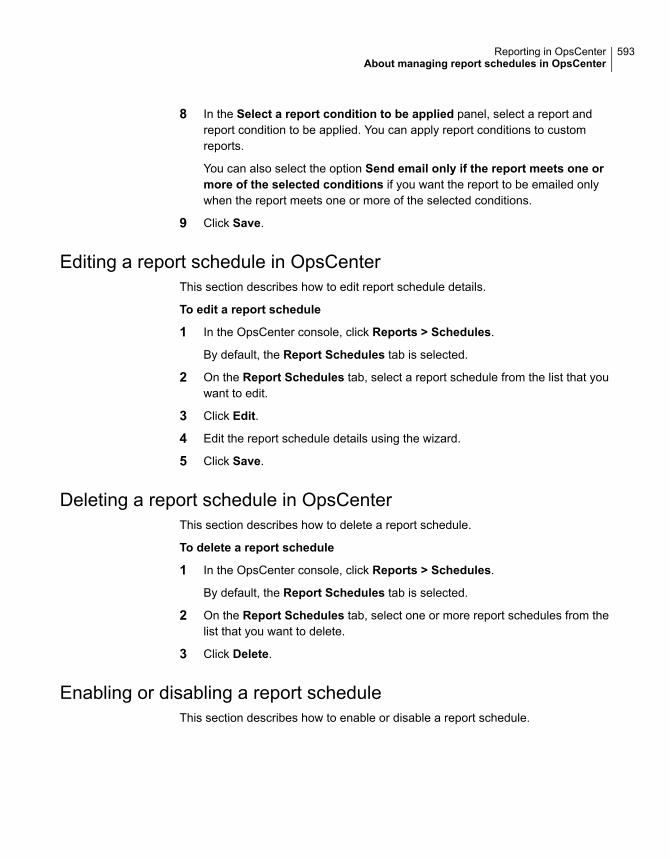
8 In the Select a report condition to be applied panel, select a report andreport condition to be applied. You can apply report conditions to customreports.
You can also select the option Send email only if the report meets one ormore of the selected conditions if you want the report to be emailed onlywhen the report meets one or more of the selected conditions.
9 Click Save.
Editing a report schedule in OpsCenterThis section describes how to edit report schedule details.
To edit a report schedule
1 In the OpsCenter console, click Reports > Schedules.
By default, the Report Schedules tab is selected.
2 On the Report Schedules tab, select a report schedule from the list that youwant to edit.
3 Click Edit.
4 Edit the report schedule details using the wizard.
5 Click Save.
Deleting a report schedule in OpsCenterThis section describes how to delete a report schedule.
To delete a report schedule
1 In the OpsCenter console, click Reports > Schedules.
By default, the Report Schedules tab is selected.
2 On the Report Schedules tab, select one or more report schedules from thelist that you want to delete.
3 Click Delete.
Enabling or disabling a report scheduleThis section describes how to enable or disable a report schedule.
593Reporting in OpsCenterAbout managing report schedules in OpsCenter
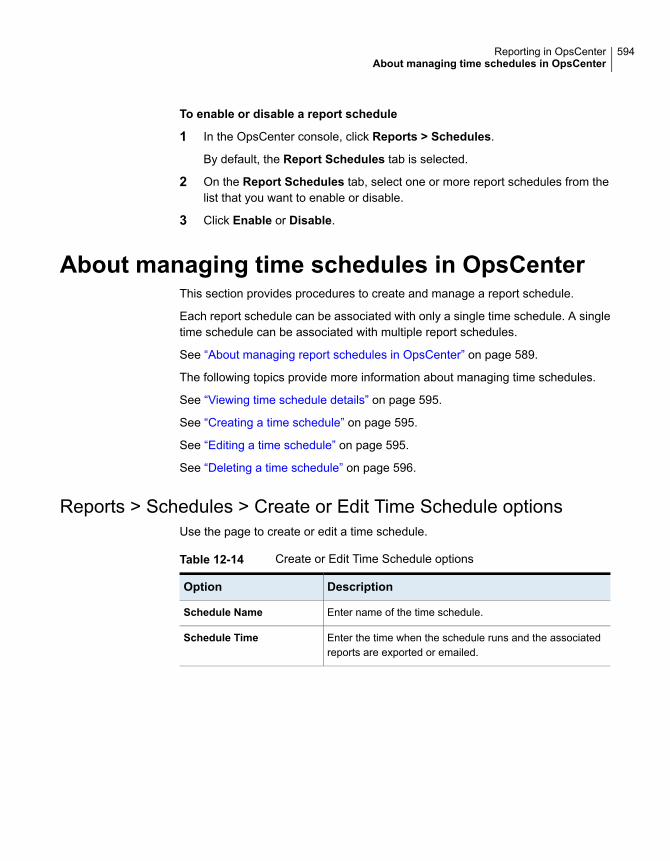
To enable or disable a report schedule
1 In the OpsCenter console, click Reports > Schedules.
By default, the Report Schedules tab is selected.
2 On the Report Schedules tab, select one or more report schedules from thelist that you want to enable or disable.
3 Click Enable or Disable.
About managing time schedules in OpsCenterThis section provides procedures to create and manage a report schedule.
Each report schedule can be associated with only a single time schedule. A singletime schedule can be associated with multiple report schedules.
See “About managing report schedules in OpsCenter” on page 589.
The following topics provide more information about managing time schedules.
See “Viewing time schedule details” on page 595.
See “Creating a time schedule” on page 595.
See “Editing a time schedule” on page 595.
See “Deleting a time schedule” on page 596.
Reports > Schedules > Create or Edit Time Schedule optionsUse the page to create or edit a time schedule.
Table 12-14 Create or Edit Time Schedule options
DescriptionOption
Enter name of the time schedule.Schedule Name
Enter the time when the schedule runs and the associatedreports are exported or emailed.
Schedule Time
594Reporting in OpsCenterAbout managing time schedules in OpsCenter
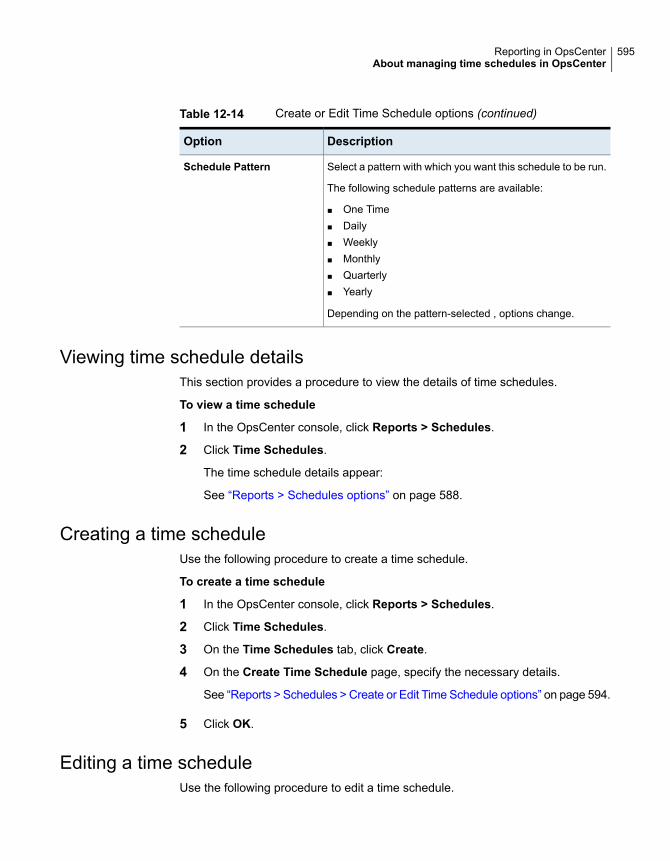
Table 12-14 Create or Edit Time Schedule options (continued)
DescriptionOption
Select a pattern with which you want this schedule to be run.
The following schedule patterns are available:
■ One Time■ Daily■ Weekly■ Monthly■ Quarterly■ Yearly
Depending on the pattern-selected , options change.
Schedule Pattern
Viewing time schedule detailsThis section provides a procedure to view the details of time schedules.
To view a time schedule
1 In the OpsCenter console, click Reports > Schedules.
2 Click Time Schedules.
The time schedule details appear:
See “Reports > Schedules options” on page 588.
Creating a time scheduleUse the following procedure to create a time schedule.
To create a time schedule
1 In the OpsCenter console, click Reports > Schedules.
2 Click Time Schedules.
3 On the Time Schedules tab, click Create.
4 On the Create Time Schedule page, specify the necessary details.
See “Reports > Schedules > Create or Edit Time Schedule options” on page 594.
5 Click OK.
Editing a time scheduleUse the following procedure to edit a time schedule.
595Reporting in OpsCenterAbout managing time schedules in OpsCenter

To edit a time schedule
1 In the OpsCenter console, click Reports > Schedules.
2 Click Time Schedules.
3 On the Time Schedules tab, in the table, select the time schedule that youwant to edit.
4 Click Edit.
5 Edit the time schedule details.
6 Click OK.
Deleting a time scheduleUse the following procedure to delete a time schedule.
To delete a time schedule
1 In the OpsCenter console, click Reports > Schedules.
2 Click Time Schedules.
3 On the Time Schedules tab, in the table, select the time schedules that youwant to delete.
4 Click Delete.
596Reporting in OpsCenterAbout managing time schedules in OpsCenter

Additional information onPureDisk data collection
This appendix includes the following topics:
■ About AT configuration in OpsCenter
■ About Scenario 1: Root brokers on local hosts
■ About Scenario 2: Local root broker for OpsCenter server and remote root brokerfor PureDisk SPA
■ Setting up a trust between the PureDisk SPA AT host and the OpsCenter Serverhost
About AT configuration in OpsCenterThe user authentication service (Symantec Product Authentication Service or AT)is embedded with OpsCenter Server. Each OpsCenter setup has its own ATconfiguration, which is called OpsCenter AT.
See “About OpsCenter AT” on page 27.
OpsCenter Server has local AT configuration that no other product can share. In asimilar way, PureDisk SPA will also have local or integrated AT configuraion.
To collect PureDisk data from OpsCenter Server, you need to set up a unidirectionaltrust between the OpsCenter Server host and PureDisk SPA host. You need toestablish trust between the authentication brokers of OpsCenter and PureDisk SPAfor secure communication. This set up is a pre-requisite for PureDisk data collectionfrom OpsCenter.
AAppendix
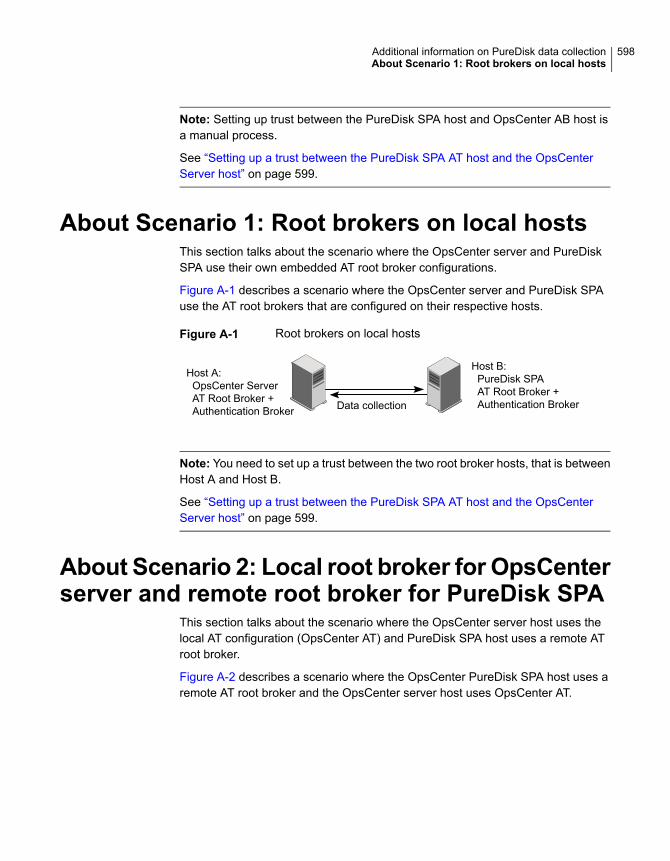
Note: Setting up trust between the PureDisk SPA host and OpsCenter AB host isa manual process.
See “Setting up a trust between the PureDisk SPA AT host and the OpsCenterServer host” on page 599.
About Scenario 1: Root brokers on local hostsThis section talks about the scenario where the OpsCenter server and PureDiskSPA use their own embedded AT root broker configurations.
Figure A-1 describes a scenario where the OpsCenter server and PureDisk SPAuse the AT root brokers that are configured on their respective hosts.
Figure A-1 Root brokers on local hosts
Data collection
Host B:PureDisk SPAAT Root Broker +Authentication Broker
Host A:OpsCenter ServerAT Root Broker +Authentication Broker
Note: You need to set up a trust between the two root broker hosts, that is betweenHost A and Host B.
See “Setting up a trust between the PureDisk SPA AT host and the OpsCenterServer host” on page 599.
About Scenario 2: Local root broker for OpsCenterserver and remote root broker for PureDisk SPA
This section talks about the scenario where the OpsCenter server host uses thelocal AT configuration (OpsCenter AT) and PureDisk SPA host uses a remote ATroot broker.
Figure A-2 describes a scenario where the OpsCenter PureDisk SPA host uses aremote AT root broker and the OpsCenter server host uses OpsCenter AT.
598Additional information on PureDisk data collectionAbout Scenario 1: Root brokers on local hosts

Figure A-2 Local root broker for OpsCenter server and remote root brokerfor PureDisk SPA
Data collection
Host B:PureDisk SPAAT Authentication Broker
Host A:OpsCenter ServerAT AuthenticationBroker
Host C:AT Root Broker
AT hierarchy
Note: You need to set up a trust between the two root broker hosts, that is betweenHost A and Host C.
Setting up a trust between the PureDisk SPA AThost and the OpsCenter Server host
This section provides the steps that are required to set up trust between theOpsCenter Server host and PureDisk SPA AT host.
Note: The OpsCenter Server host has a local AT configuration (OpsCenter AT).
See “About OpsCenter AT” on page 27.
599Additional information on PureDisk data collectionSetting up a trust between the PureDisk SPA AT host and the OpsCenter Server host

To set up a trust between the OpsCenter server host and PureDisk SPA AThost
◆ On the OpsCenter server host, run the following command depending on theOpsCenter server operating system :
These are the default directory paths.
C:\ProgramFiles\Symantec\OpsCenter\server\authbroker\bin>vssat.batsetuptrust --broker <PureDiskSPAAThost:port>--securitylevel high
Windows 64-bit
/opt/VRTSat/bin/vssat setuptrust --broker<PureDiskSPAAThost:port> --securitylevel high
UNIX
The registered port for authentication is 2821. If the AT root broker is configuredwith another port number, contact your security administrator for moreinformation.
After successfully setting up a trust between the OpsCenter server host andPureDisk SPA AT host, the following message is displayed:
setuptrust
----------------------
----------------------
Setup Trust With Broker: PureDiskSPAAThost
After setting up the trust between OpsCenter Server host and PureDisk SPA host,logon to the OpsCenter GUI and configure PureDisk data collector to start collectingPureDisk data.
See “Configuring PureDisk data collector” on page 300.
600Additional information on PureDisk data collectionSetting up a trust between the PureDisk SPA AT host and the OpsCenter Server host

Attributes of NetBackupdata
This appendix includes the following topics:
■ Backup data attributes
Backup data attributesThis section lists all attributes pertaining to data that OpsCenter collects fromNetBackup. You can select these attributes while generating custom reports.
The following tables list all NetBackup attributes that OpsCenter collects.
■ Table B-1
■ Table B-2
■ Table B-3
■ Table B-4
■ Table B-5
■ Table B-6
■ Table B-7
■ Table B-8
■ Table B-9
■ Table B-10
■ Table B-11
■ Table B-12
BAppendix
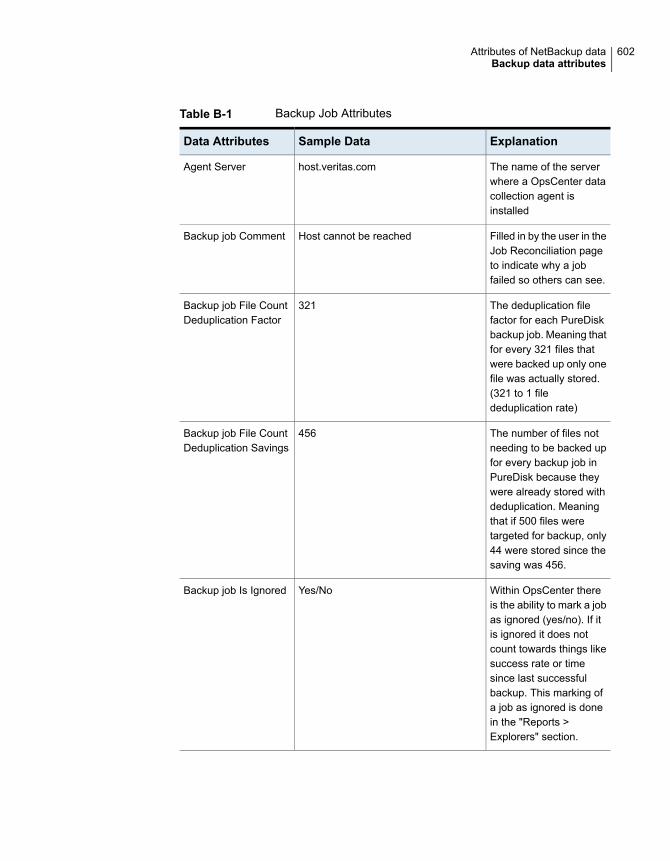
Table B-1 Backup Job Attributes
ExplanationSample DataData Attributes
The name of the serverwhere a OpsCenter datacollection agent isinstalled
host.veritas.comAgent Server
Filled in by the user in theJob Reconciliation pageto indicate why a jobfailed so others can see.
Host cannot be reachedBackup job Comment
The deduplication filefactor for each PureDiskbackup job. Meaning thatfor every 321 files thatwere backed up only onefile was actually stored.(321 to 1 filededuplication rate)
321Backup job File CountDeduplication Factor
The number of files notneeding to be backed upfor every backup job inPureDisk because theywere already stored withdeduplication. Meaningthat if 500 files weretargeted for backup, only44 were stored since thesaving was 456.
456Backup job File CountDeduplication Savings
Within OpsCenter thereis the ability to mark a jobas ignored (yes/no). If itis ignored it does notcount towards things likesuccess rate or timesince last successfulbackup. This marking ofa job as ignored is donein the "Reports >Explorers" section.
Yes/NoBackup job Is Ignored
602Attributes of NetBackup dataBackup data attributes

Table B-1 Backup Job Attributes (continued)
ExplanationSample DataData Attributes
The number of files thatare processed in aPureDisk backup. Notethat this number is notactually stored since it isbefore deduplication.
400 filesBackup job ProtectedFile Count
The size in byes of aPureDisk backup jobbefore deduplication.
200GBBackup job ProtectedSize
The deduplication sizefactor for each PureDiskbackup job. Meaning thatfor every 567KB thatwere backed up only 1KBwas stored.
567Backup job SizeDeduplication Factor
The number of KB's notneeding to be backed upfor every backup job inPureDisk because theywere already stored withdeduplication. Meaningthat if 346KB werebacked up, the savings of345KB means only 1 KBwas needed to be stored.
345Backup job SizeDeduplication Savings
Each directory under ajob and it's type ofbackup.
Catalog, File System, MS Exchange,NDMP, Sybase
Backup job Sub Type
The transport that wasused to move the backupfrom backup client tomedia server
LAN, SANBackup job TransportType
The number of times abackup job had to beattempted before beingsuccessful or reachingthe maximum allowablenumber of retries
4Job Attempt Count
603Attributes of NetBackup dataBackup data attributes
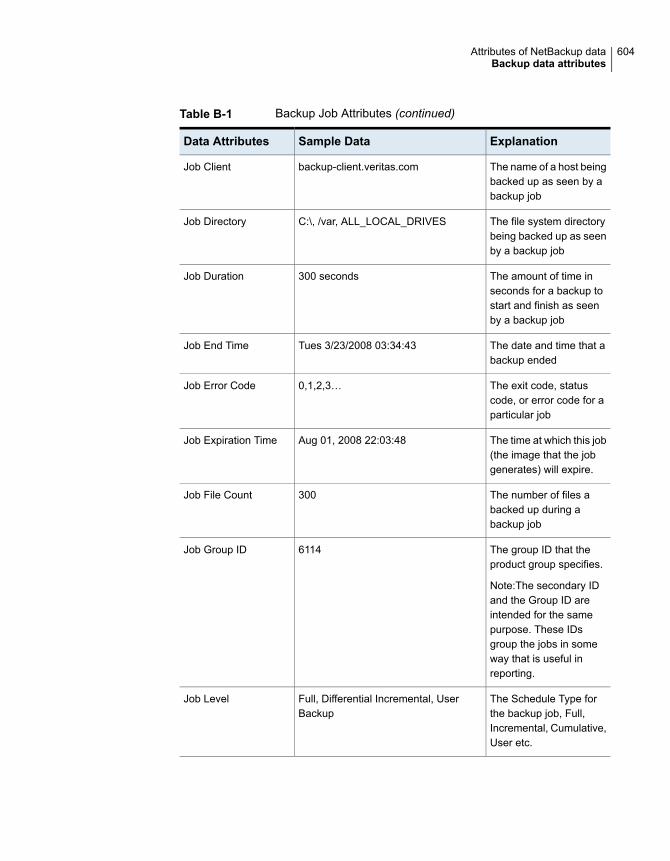
Table B-1 Backup Job Attributes (continued)
ExplanationSample DataData Attributes
The name of a host beingbacked up as seen by abackup job
backup-client.veritas.comJob Client
The file system directorybeing backed up as seenby a backup job
C:\, /var, ALL_LOCAL_DRIVESJob Directory
The amount of time inseconds for a backup tostart and finish as seenby a backup job
300 secondsJob Duration
The date and time that abackup ended
Tues 3/23/2008 03:34:43Job End Time
The exit code, statuscode, or error code for aparticular job
0,1,2,3…Job Error Code
The time at which this job(the image that the jobgenerates) will expire.
Aug 01, 2008 22:03:48Job Expiration Time
The number of files abacked up during abackup job
300Job File Count
The group ID that theproduct group specifies.
Note:The secondary IDand the Group ID areintended for the samepurpose. These IDsgroup the jobs in someway that is useful inreporting.
6114Job Group ID
The Schedule Type forthe backup job, Full,Incremental, Cumulative,User etc.
Full, Differential Incremental, UserBackup
Job Level
604Attributes of NetBackup dataBackup data attributes
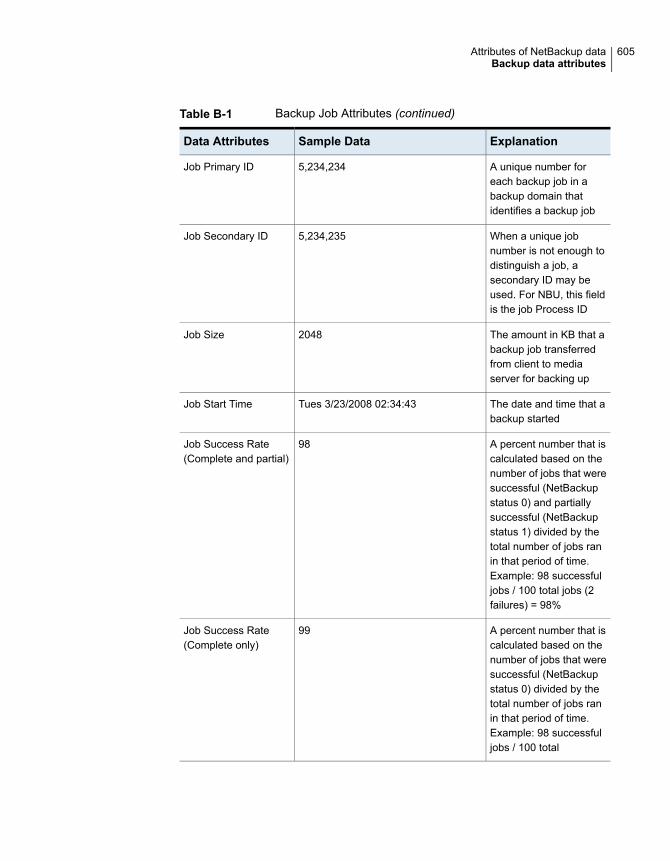
Table B-1 Backup Job Attributes (continued)
ExplanationSample DataData Attributes
A unique number foreach backup job in abackup domain thatidentifies a backup job
5,234,234Job Primary ID
When a unique jobnumber is not enough todistinguish a job, asecondary ID may beused. For NBU, this fieldis the job Process ID
5,234,235Job Secondary ID
The amount in KB that abackup job transferredfrom client to mediaserver for backing up
2048Job Size
The date and time that abackup started
Tues 3/23/2008 02:34:43Job Start Time
A percent number that iscalculated based on thenumber of jobs that weresuccessful (NetBackupstatus 0) and partiallysuccessful (NetBackupstatus 1) divided by thetotal number of jobs ranin that period of time.Example: 98 successfuljobs / 100 total jobs (2failures) = 98%
98Job Success Rate(Complete and partial)
A percent number that iscalculated based on thenumber of jobs that weresuccessful (NetBackupstatus 0) divided by thetotal number of jobs ranin that period of time.Example: 98 successfuljobs / 100 total
99Job Success Rate(Complete only)
605Attributes of NetBackup dataBackup data attributes

Table B-1 Backup Job Attributes (continued)
ExplanationSample DataData Attributes
The speed of a backupjob in Kbytes/sec. This isthe speed of the overalljob which takes in toaccount transfer timefrom client to mediaserver and media serverto disk or tape storage. Itis not just the speed of atape drive.
3,234Job Throughput(Kbytes/sec)
The type of operationdone by the backupproduct
Backup, Restore, duplication, archive,label, erase
Job Type
The Schedule Type forthe backup job groupedinto just two options. Fullvs. Other
Full, Differential Incremental, UserBackup
Level Type
The name of the masterserver that executed thebackup job
nbu-master.example.comMaster Server
The name of the mediaserver that performed thebackup job
nbu-media.example.comMedia Server
The name of the backuppolicy as seen by abackup job
Oracle Backup Policy, User BackupPolicy, File System Backup Policy
Policy
The user-defineddescription of a policy asseen by a backup job
‘This policy is for doing Oracle backups’Policy Description
The backup product thata backup policy executeda job from
NetBackup Policy Domain, PureDiskPolicy Domain
Policy Domain Name
The type of policy asseen by a backup job
Standard, NT, Oracle, ExchangePolicy Type
606Attributes of NetBackup dataBackup data attributes
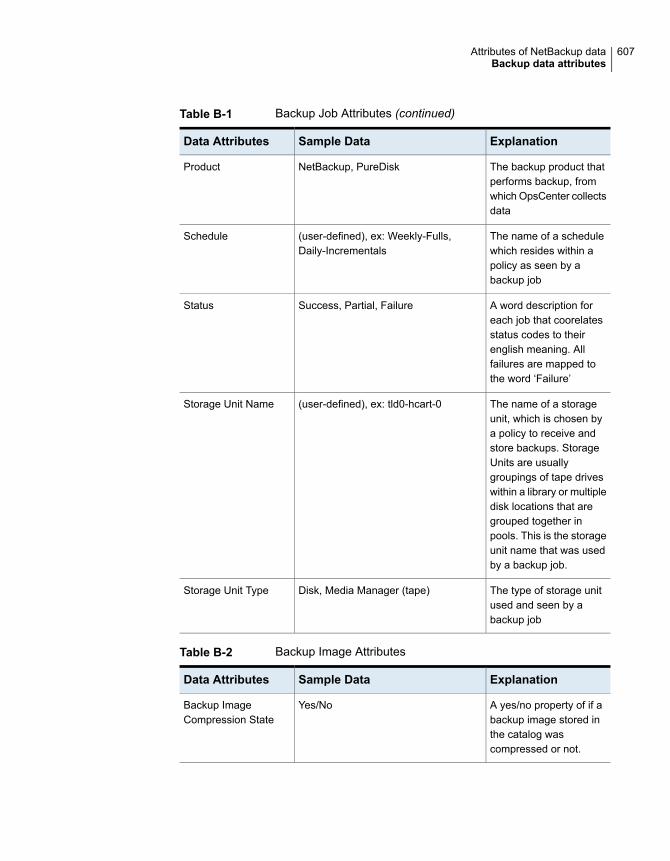
Table B-1 Backup Job Attributes (continued)
ExplanationSample DataData Attributes
The backup product thatperforms backup, fromwhich OpsCenter collectsdata
NetBackup, PureDiskProduct
The name of a schedulewhich resides within apolicy as seen by abackup job
(user-defined), ex: Weekly-Fulls,Daily-Incrementals
Schedule
A word description foreach job that coorelatesstatus codes to theirenglish meaning. Allfailures are mapped tothe word ‘Failure’
Success, Partial, FailureStatus
The name of a storageunit, which is chosen bya policy to receive andstore backups. StorageUnits are usuallygroupings of tape driveswithin a library or multipledisk locations that aregrouped together inpools. This is the storageunit name that was usedby a backup job.
(user-defined), ex: tld0-hcart-0Storage Unit Name
The type of storage unitused and seen by abackup job
Disk, Media Manager (tape)Storage Unit Type
Table B-2 Backup Image Attributes
ExplanationSample DataData Attributes
A yes/no property of if abackup image stored inthe catalog wascompressed or not.
Yes/NoBackup ImageCompression State
607Attributes of NetBackup dataBackup data attributes
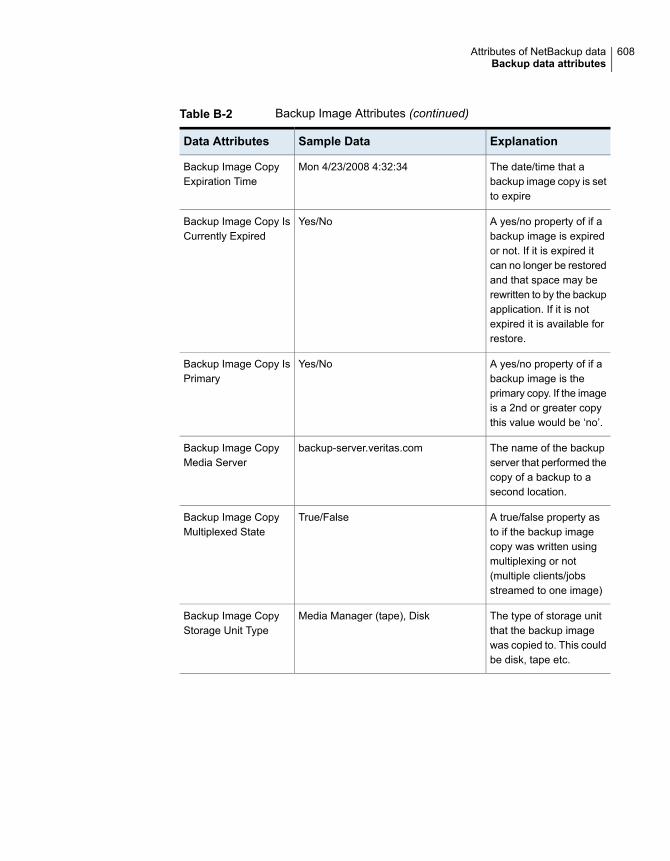
Table B-2 Backup Image Attributes (continued)
ExplanationSample DataData Attributes
The date/time that abackup image copy is setto expire
Mon 4/23/2008 4:32:34Backup Image CopyExpiration Time
A yes/no property of if abackup image is expiredor not. If it is expired itcan no longer be restoredand that space may berewritten to by the backupapplication. If it is notexpired it is available forrestore.
Yes/NoBackup Image Copy IsCurrently Expired
A yes/no property of if abackup image is theprimary copy. If the imageis a 2nd or greater copythis value would be ‘no’.
Yes/NoBackup Image Copy IsPrimary
The name of the backupserver that performed thecopy of a backup to asecond location.
backup-server.veritas.comBackup Image CopyMedia Server
A true/false property asto if the backup imagecopy was written usingmultiplexing or not(multiple clients/jobsstreamed to one image)
True/FalseBackup Image CopyMultiplexed State
The type of storage unitthat the backup imagewas copied to. This couldbe disk, tape etc.
Media Manager (tape), DiskBackup Image CopyStorage Unit Type
608Attributes of NetBackup dataBackup data attributes
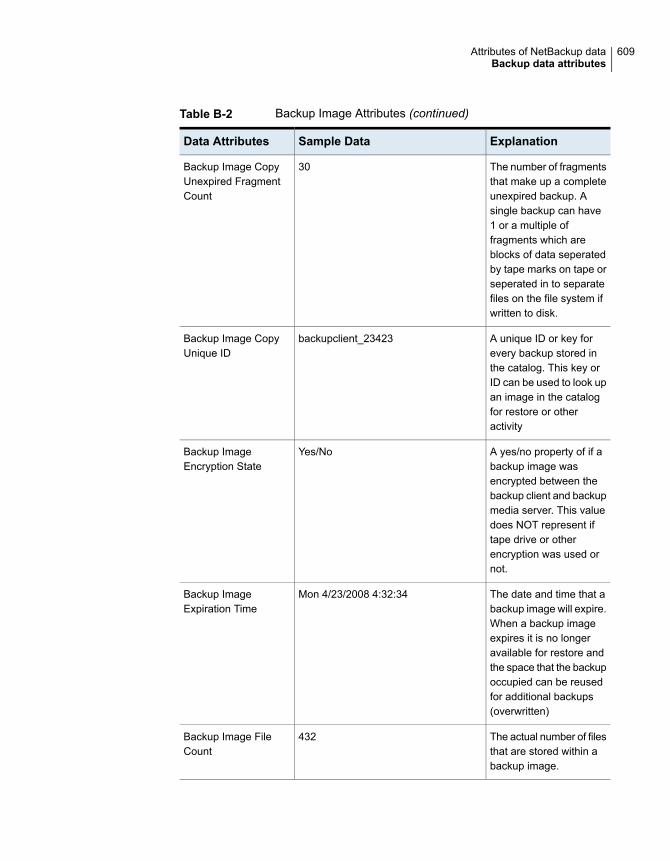
Table B-2 Backup Image Attributes (continued)
ExplanationSample DataData Attributes
The number of fragmentsthat make up a completeunexpired backup. Asingle backup can have1 or a multiple offragments which areblocks of data seperatedby tape marks on tape orseperated in to separatefiles on the file system ifwritten to disk.
30Backup Image CopyUnexpired FragmentCount
A unique ID or key forevery backup stored inthe catalog. This key orID can be used to look upan image in the catalogfor restore or otheractivity
backupclient_23423Backup Image CopyUnique ID
A yes/no property of if abackup image wasencrypted between thebackup client and backupmedia server. This valuedoes NOT represent iftape drive or otherencryption was used ornot.
Yes/NoBackup ImageEncryption State
The date and time that abackup image will expire.When a backup imageexpires it is no longeravailable for restore andthe space that the backupoccupied can be reusedfor additional backups(overwritten)
Mon 4/23/2008 4:32:34Backup ImageExpiration Time
The actual number of filesthat are stored within abackup image.
432Backup Image FileCount
609Attributes of NetBackup dataBackup data attributes

Table B-2 Backup Image Attributes (continued)
ExplanationSample DataData Attributes
The date/time that thebackup image fragmentis set to expire
Mon 4/23/2008 4:32:34Backup ImageFragment ExpirationTime
A yes/no property of if thebackup image fragmentis expired or not. Even ifa backup fragment isexpired, that space cannot be reused until thewhole backup image isexpired (disk) or thewhole backup tape mediais expired (tape)
Yes/NoBackup ImageFragment Is CurrentlyExpired
The true image restorestatus for a backup imagefragment. True imagerestores allow a restoreto take place at thedirectory level withoutoverwriting files thatweren't backed up but arestill in the directory. Forthis to be possible a ‘trueimage restore’ backupimage must exist.
TIR Info on Disk, TIR Rsv Synthetic Infoon Disk
Backup ImageFragment Is TIR
The size of the backupimage fragment. Bydefault NetBackup uses1TB fragments (ie nofragments) but this canbe configured to differentvalues
2048Backup ImageFragment Size
A unique ID associatedwith every backup imagefragment
backupimagefragment_124Backup ImageFragment Unique ID
A yes/no property as to ifthe backup image isexpired or not
Yes/NoBackup Image IsCurrently Expired
610Attributes of NetBackup dataBackup data attributes
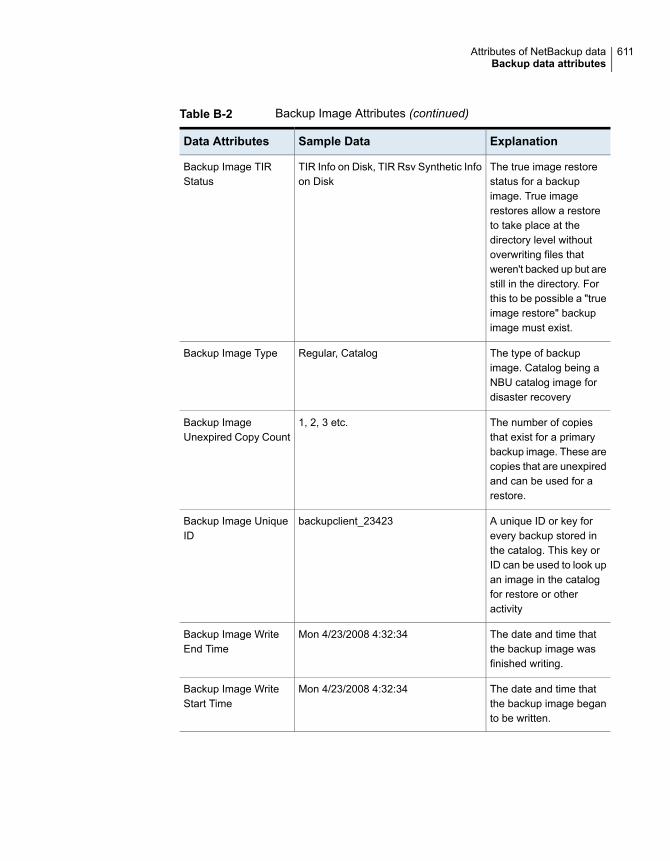
Table B-2 Backup Image Attributes (continued)
ExplanationSample DataData Attributes
The true image restorestatus for a backupimage. True imagerestores allow a restoreto take place at thedirectory level withoutoverwriting files thatweren't backed up but arestill in the directory. Forthis to be possible a "trueimage restore" backupimage must exist.
TIR Info on Disk, TIR Rsv Synthetic Infoon Disk
Backup Image TIRStatus
The type of backupimage. Catalog being aNBU catalog image fordisaster recovery
Regular, CatalogBackup Image Type
The number of copiesthat exist for a primarybackup image. These arecopies that are unexpiredand can be used for arestore.
1, 2, 3 etc.Backup ImageUnexpired Copy Count
A unique ID or key forevery backup stored inthe catalog. This key orID can be used to look upan image in the catalogfor restore or otheractivity
backupclient_23423Backup Image UniqueID
The date and time thatthe backup image wasfinished writing.
Mon 4/23/2008 4:32:34Backup Image WriteEnd Time
The date and time thatthe backup image beganto be written.
Mon 4/23/2008 4:32:34Backup Image WriteStart Time
611Attributes of NetBackup dataBackup data attributes
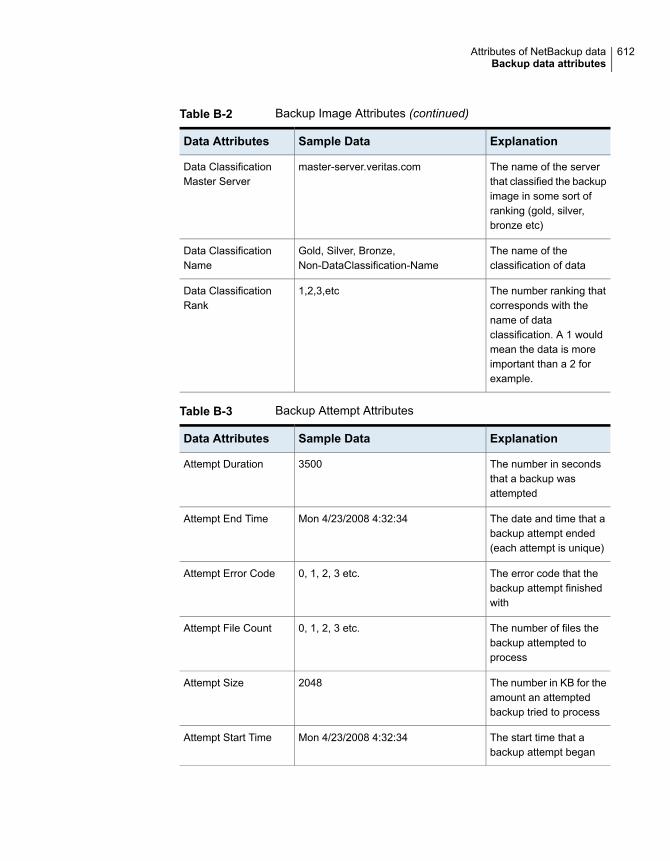
Table B-2 Backup Image Attributes (continued)
ExplanationSample DataData Attributes
The name of the serverthat classified the backupimage in some sort ofranking (gold, silver,bronze etc)
master-server.veritas.comData ClassificationMaster Server
The name of theclassification of data
Gold, Silver, Bronze,Non-DataClassification-Name
Data ClassificationName
The number ranking thatcorresponds with thename of dataclassification. A 1 wouldmean the data is moreimportant than a 2 forexample.
1,2,3,etcData ClassificationRank
Table B-3 Backup Attempt Attributes
ExplanationSample DataData Attributes
The number in secondsthat a backup wasattempted
3500Attempt Duration
The date and time that abackup attempt ended(each attempt is unique)
Mon 4/23/2008 4:32:34Attempt End Time
The error code that thebackup attempt finishedwith
0, 1, 2, 3 etc.Attempt Error Code
The number of files thebackup attempted toprocess
0, 1, 2, 3 etc.Attempt File Count
The number in KB for theamount an attemptedbackup tried to process
2048Attempt Size
The start time that abackup attempt began
Mon 4/23/2008 4:32:34Attempt Start Time
612Attributes of NetBackup dataBackup data attributes

Table B-3 Backup Attempt Attributes (continued)
ExplanationSample DataData Attributes
A named status thatmaps to the error codenumbers in the backupapplication (for examplea status 0 in NetBackupis a success, a status 1is partial and all othernumbers are failures)
Success, Partial, FailureAttempt Status
The average successrate across all attemptsin all backups. Examplewould be the average of2 backups were eachwas attempted 3 times.The success rate wouldbe the success rateaverage of the 3 attemptswithin each backup job.(Note that this is differentthan the success rateacross all jobs whichdoes not take in toaccount attempts)
98%Attempt Success Rate
The speed of a backupattempt in Kbytes/sec.This is different than theoverall KB/sec for a jobwhich would take in toaccount all attempts.
2048Kbytes/secAttempt Throughput
613Attributes of NetBackup dataBackup data attributes
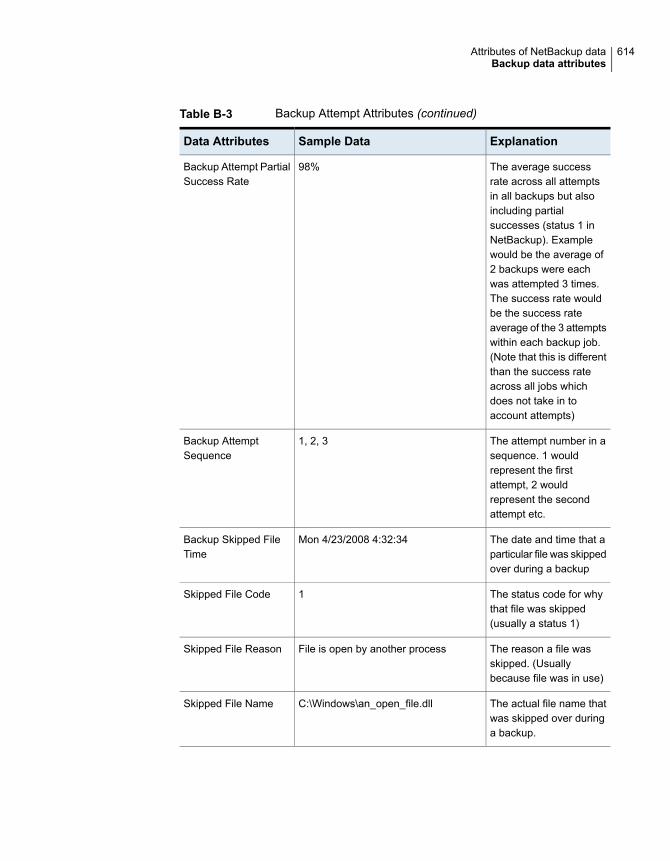
Table B-3 Backup Attempt Attributes (continued)
ExplanationSample DataData Attributes
The average successrate across all attemptsin all backups but alsoincluding partialsuccesses (status 1 inNetBackup). Examplewould be the average of2 backups were eachwas attempted 3 times.The success rate wouldbe the success rateaverage of the 3 attemptswithin each backup job.(Note that this is differentthan the success rateacross all jobs whichdoes not take in toaccount attempts)
98%Backup Attempt PartialSuccess Rate
The attempt number in asequence. 1 wouldrepresent the firstattempt, 2 wouldrepresent the secondattempt etc.
1, 2, 3Backup AttemptSequence
The date and time that aparticular file was skippedover during a backup
Mon 4/23/2008 4:32:34Backup Skipped FileTime
The status code for whythat file was skipped(usually a status 1)
1Skipped File Code
The reason a file wasskipped. (Usuallybecause file was in use)
File is open by another processSkipped File Reason
The actual file name thatwas skipped over duringa backup.
C:\Windows\an_open_file.dllSkipped File Name
614Attributes of NetBackup dataBackup data attributes
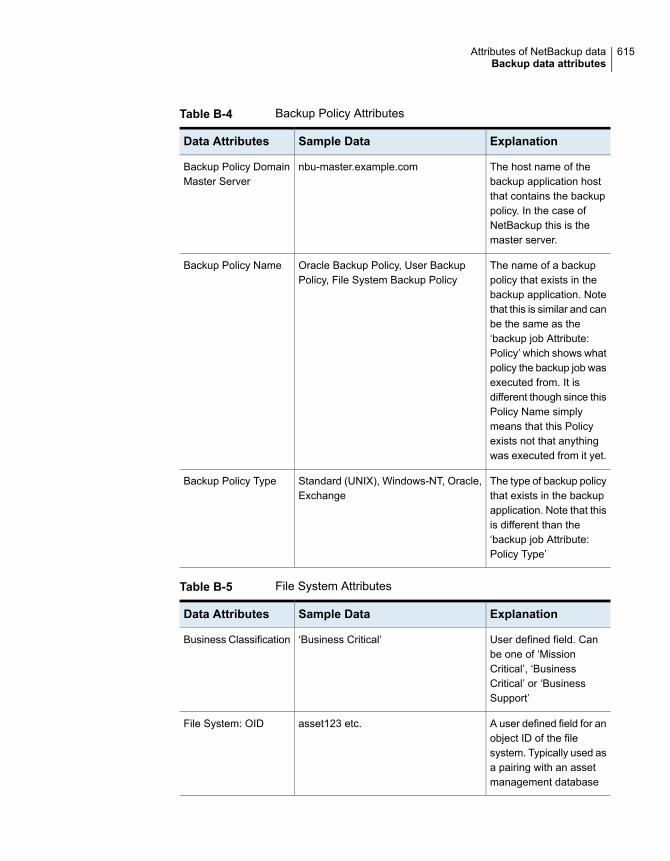
Table B-4 Backup Policy Attributes
ExplanationSample DataData Attributes
The host name of thebackup application hostthat contains the backuppolicy. In the case ofNetBackup this is themaster server.
nbu-master.example.comBackup Policy DomainMaster Server
The name of a backuppolicy that exists in thebackup application. Notethat this is similar and canbe the same as the‘backup job Attribute:Policy’ which shows whatpolicy the backup job wasexecuted from. It isdifferent though since thisPolicy Name simplymeans that this Policyexists not that anythingwas executed from it yet.
Oracle Backup Policy, User BackupPolicy, File System Backup Policy
Backup Policy Name
The type of backup policythat exists in the backupapplication. Note that thisis different than the‘backup job Attribute:Policy Type’
Standard (UNIX), Windows-NT, Oracle,Exchange
Backup Policy Type
Table B-5 File System Attributes
ExplanationSample DataData Attributes
User defined field. Canbe one of ‘MissionCritical’, ‘BusinessCritical’ or ‘BusinessSupport’
‘Business Critical’Business Classification
A user defined field for anobject ID of the filesystem. Typically used asa pairing with an assetmanagement database
asset123 etc.File System: OID
615Attributes of NetBackup dataBackup data attributes

Table B-5 File System Attributes (continued)
ExplanationSample DataData Attributes
The file system directorybeing backed up.
C:\Documents and Settings\All Users\Filesystem Name
A user-defined field (thisis not collectedautomatically) of whattype of file system wasbacked up.
NTFS, UFS, ZFS, EXT3Filesystem Type
Table B-6 Host Attributes
ExplanationSample DataData Attributes
User defined field (this isnot automaticallycollected) for filling inarchitecture type such asx86, x86-64, SPARC,POWER, PA-RISC, IA64etc
SPARC, x86Host Architecture
A user defined field forinserting any extrainformation regarding ahost
Pete's serverHost: Misc Info
A user defined field forinserting an object IDfrom an assetmanagement database
asset123, etc.Host: OID
The name of the hostobject that contains filesystems.
hostname.example.comHostname
The version of theoperating system. Usuallygrouped with OperatingSystem name since thiswill have values like ‘10’(i.e. Solaris 10), or ‘2003’(i.e. Windows 2003)
2003, 10O.S. Version
The operating systemname of the host
Windows, SolarisOperating System
616Attributes of NetBackup dataBackup data attributes

Table B-7 Backup Media Attributes
ExplanationSample DataData Attributes
The name of theOpsCenter agent thatcollected the mediainformation.
ops-agent.example.comAgent Server
The date/time that apiece of media was firstallocated or had it's firstbackup written to it. Oncethe media expires it willhave a new allocationdate/time when it isreused
Mon 3/4/2008 3:34:34Backup MediaAllocation Time
How much is left on tapein KB. Value here persample is either the freecapacity if the media isactive, or 0 otherwise.
500,000 KBBackup MediaAvailable FreeCapacity
Total capacity of the tapein KB. Value here persample is either the totalcapacity if the media isactive, or 0 otherwise.
19,000,000KBBackup MediaAvailable TotalCapacity
The full barcode as readyby the physical robot.This can be longer thanthe 6 characters used bya NetBackup Media.
JFP000L2Backup Media Barcode
The date/time that abackup media is set toexpire
Mon 3/4/2008 3:34:34Backup MediaExpiration Time
How much is left on tapein KB. This number maybe estimated using analgorithm.
500,000 KBBackup Media FreeCapacity
617Attributes of NetBackup dataBackup data attributes

Table B-7 Backup Media Attributes (continued)
ExplanationSample DataData Attributes
A yes/no property of aparticular tape indicatingwhether the tape hasbeen sampled in the lasttwo collections.
Yes/NoBackup Media Is Active
A yes/no property of aparticular tape indicatingwhether it can still bewritten to.
Yes/NoBackup Media IsAvailable
A yes/no property of if thebackup media exists inthe current configuration(and not historical)
Yes/NoBackup Media IsCurrent
A yes/no property of if thebackup media hasexpired data on it or not
Yes/NoBackup Media Is DataExpired
A yes/no property of if thebackup media is markedas full (no more backupscan be written to it)
Yes/NoBackup Media Is Full
A yes/no property of if thebackup media wasimported. Imported mediasimply means that thispaticular backup domaindid not originally write thedata to the media. Thiscould be due to disasterrecovery where thecatalog could not bemoved from an existingdomain so the tapes wereread individually todetermine what data wason them. It also iscommonly used to importBackup Exec media toNetBackup.
Yes/NoBackup Media IsImported
618Attributes of NetBackup dataBackup data attributes

Table B-7 Backup Media Attributes (continued)
ExplanationSample DataData Attributes
A yes/no property of if thephysical media is expiredor not. Once all thebackup images (data)has been expired on atape that entire cartridgeis marked as PhysicallyExpired=Yes and it canbe overwritten or used byfuture backups.
Yes/NoBackup Media IsPhysically Expired
Since capacity of a tapeis often estimated usingan algorithm. Thisspecifies whether it wasactually calculated, orprovided exactly by theDP product.
Yes/NoBackup Media Is TotalCapacity Estimated
A date/time that thebackup media was lastused to be read(restored)
Mon 3/4/2008 3:34:34Backup Media LastRead Time
A date/time that thebackup media was lastused to be written to(duplicates, backups)
Mon 3/4/2008 3:34:34Backup Media LastWrite Time
The physical slot numberthat a given piece ofmedia resides in
1, 2, 3 etc.Backup Media LibrarySlot Number
A yes/no property of if agiven piece of tape mediawill allow for multipleexpiration dates. Multipleexpiration dates meansthat the whole tape cannot be reused until thelast backup has expiredon the media.
Yes/NoBackup Media MultipleRetention LevelsAllowed
619Attributes of NetBackup dataBackup data attributes
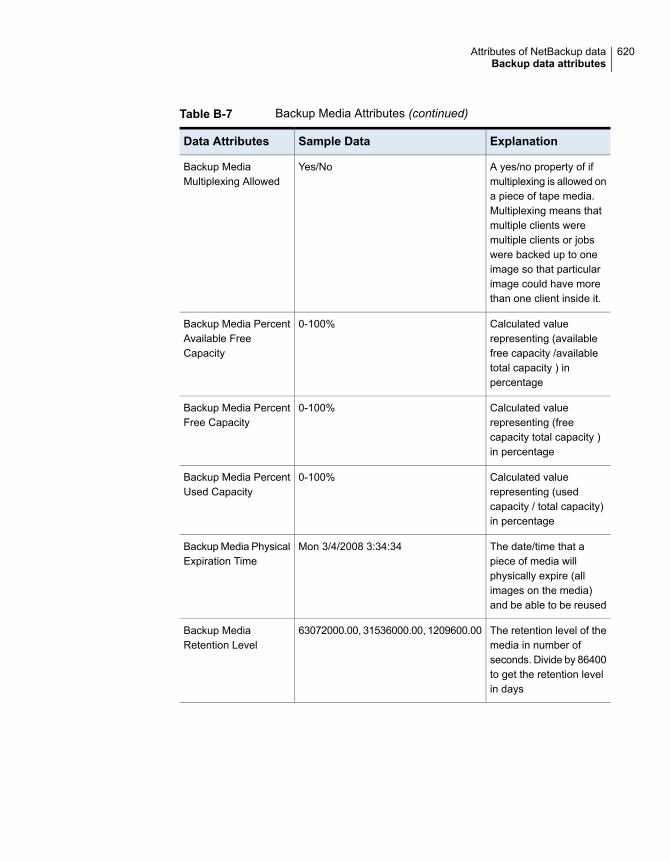
Table B-7 Backup Media Attributes (continued)
ExplanationSample DataData Attributes
A yes/no property of ifmultiplexing is allowed ona piece of tape media.Multiplexing means thatmultiple clients weremultiple clients or jobswere backed up to oneimage so that particularimage could have morethan one client inside it.
Yes/NoBackup MediaMultiplexing Allowed
Calculated valuerepresenting (availablefree capacity /availabletotal capacity ) inpercentage
0-100%Backup Media PercentAvailable FreeCapacity
Calculated valuerepresenting (freecapacity total capacity )in percentage
0-100%Backup Media PercentFree Capacity
Calculated valuerepresenting (usedcapacity / total capacity)in percentage
0-100%Backup Media PercentUsed Capacity
The date/time that apiece of media willphysically expire (allimages on the media)and be able to be reused
Mon 3/4/2008 3:34:34Backup Media PhysicalExpiration Time
The retention level of themedia in number ofseconds. Divide by 86400to get the retention levelin days
63072000.00, 31536000.00, 1209600.00Backup MediaRetention Level
620Attributes of NetBackup dataBackup data attributes
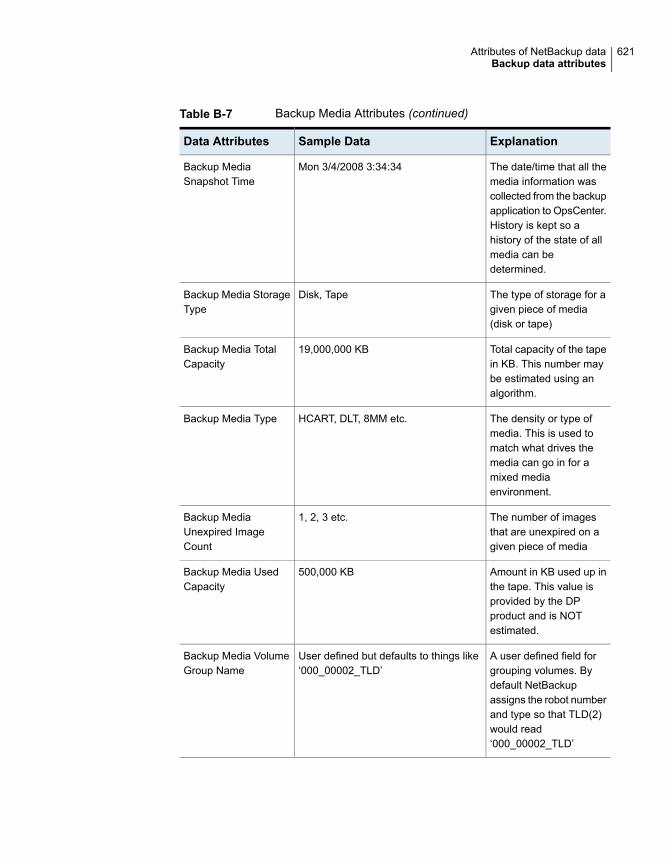
Table B-7 Backup Media Attributes (continued)
ExplanationSample DataData Attributes
The date/time that all themedia information wascollected from the backupapplication to OpsCenter.History is kept so ahistory of the state of allmedia can bedetermined.
Mon 3/4/2008 3:34:34Backup MediaSnapshot Time
The type of storage for agiven piece of media(disk or tape)
Disk, TapeBackup Media StorageType
Total capacity of the tapein KB. This number maybe estimated using analgorithm.
19,000,000 KBBackup Media TotalCapacity
The density or type ofmedia. This is used tomatch what drives themedia can go in for amixed mediaenvironment.
HCART, DLT, 8MM etc.Backup Media Type
The number of imagesthat are unexpired on agiven piece of media
1, 2, 3 etc.Backup MediaUnexpired ImageCount
Amount in KB used up inthe tape. This value isprovided by the DPproduct and is NOTestimated.
500,000 KBBackup Media UsedCapacity
A user defined field forgrouping volumes. Bydefault NetBackupassigns the robot numberand type so that TLD(2)would read‘000_00002_TLD’
User defined but defaults to things like‘000_00002_TLD’
Backup Media VolumeGroup Name
621Attributes of NetBackup dataBackup data attributes
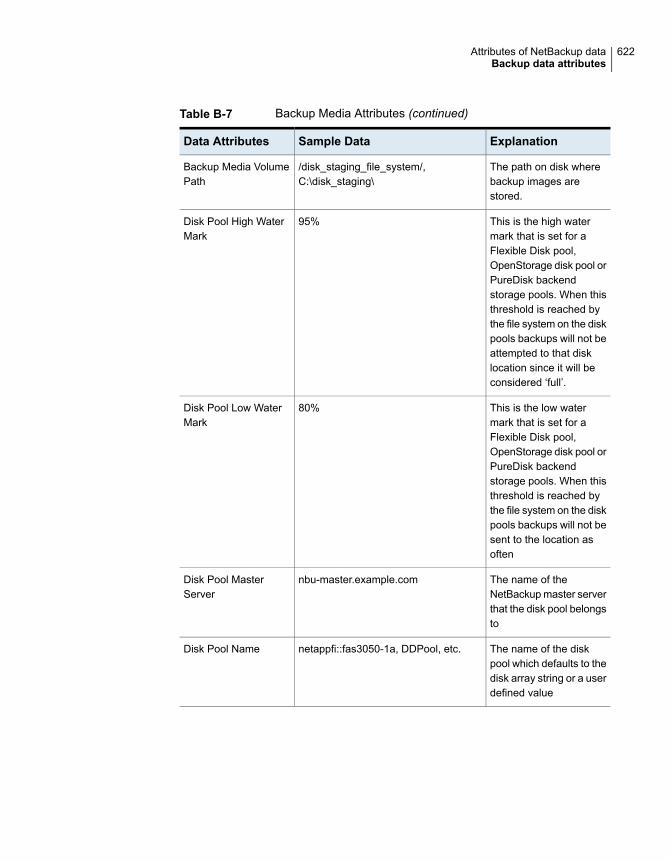
Table B-7 Backup Media Attributes (continued)
ExplanationSample DataData Attributes
The path on disk wherebackup images arestored.
/disk_staging_file_system/,C:\disk_staging\
Backup Media VolumePath
This is the high watermark that is set for aFlexible Disk pool,OpenStorage disk pool orPureDisk backendstorage pools. When thisthreshold is reached bythe file system on the diskpools backups will not beattempted to that disklocation since it will beconsidered ‘full’.
95%Disk Pool High WaterMark
This is the low watermark that is set for aFlexible Disk pool,OpenStorage disk pool orPureDisk backendstorage pools. When thisthreshold is reached bythe file system on the diskpools backups will not besent to the location asoften
80%Disk Pool Low WaterMark
The name of theNetBackup master serverthat the disk pool belongsto
nbu-master.example.comDisk Pool MasterServer
The name of the diskpool which defaults to thedisk array string or a userdefined value
netappfi::fas3050-1a, DDPool, etc.Disk Pool Name
622Attributes of NetBackup dataBackup data attributes

Table B-7 Backup Media Attributes (continued)
ExplanationSample DataData Attributes
The raw size is the sizeof the disk volume(s) in adisk pool. Raw size doesnot mean you canactually write to thatamount (that's whatusable size is) but justtells you there is morepossible disk space thatcould be allocated fromraw to usable.
69,990.40Disk Pool Raw Size
The type of flexible diskthat the pool is
AdvancedDisk, SharedDiskDisk Pool Server Type
The date/time that asnapshot was taken toproduce the backupimage that exists in thedisk pool
Mon 3/4/2008 3:34:34Disk Pool SnapshotTime
Similar to tape drivestatus, this tells if the diskpool is UP meaning it isusable and can be usedor DOWN meaning it isnot usable. When in theDOWN state jobs will notattempt to use the diskpool.
UP, DOWNDisk Pool Status
The usable size is thesize of the formatted filesystem and tells you howmuch data can be writtento the disk pool
1,208,893.44Disk Pool Usable Size
The number of diskvolumes that make up thedisk pool
4Disk Pool VolumeCount
623Attributes of NetBackup dataBackup data attributes

Table B-7 Backup Media Attributes (continued)
ExplanationSample DataData Attributes
The type of tape mediaas defined by the backupapplication. ForNetBackup this is alsocalled the ‘density’ andspecifies what types ofdrive the tape can go in.
HCART, DLT, 8MM etc.Media Density
Optical media headersize of a backup image
1024Media Hsize
The Media ID for a givenpiece of media, usually asubset of the barcode.For NetBackup this is a6-digit ID.
JFP000Media ID
The number of backupimages on a given pieceof tape media or disk pool
54Media Image Count
Logical block address ofthe beginning of the blockthat a backup imageexists
2048Media L Offset
The number of times agiven piece of backupmedia has been used forrestores.
0, 1, 2, 3, etc.Media Restore Count
Optical media sector sizeof a backup image.
1024Media Ssize
The ID of the oppositeside of a optical platter. Ifon side A of a platter thiswould show Side B
A/BPartner
The backup product thatthis piece of mediabelongs to
NetBackupProduct
624Attributes of NetBackup dataBackup data attributes
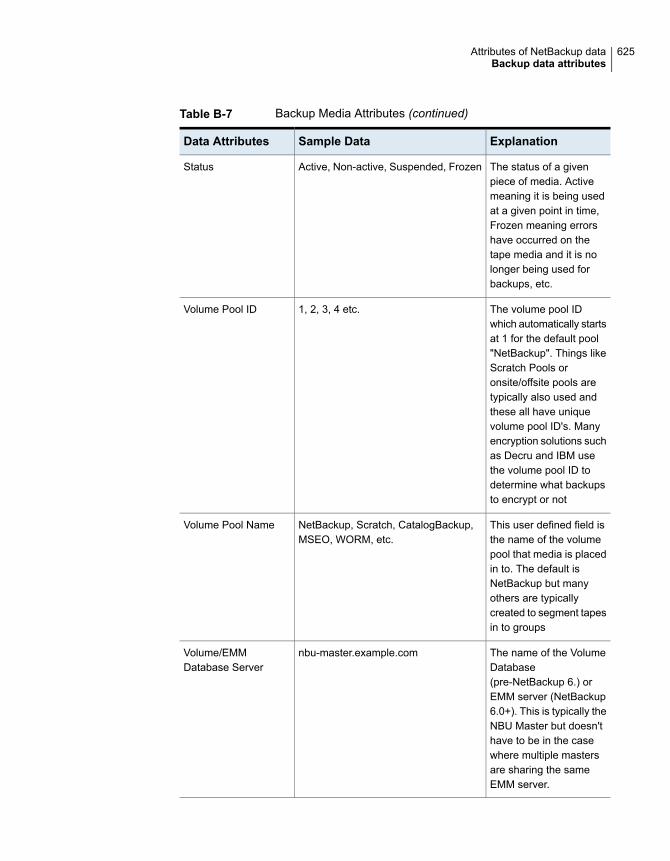
Table B-7 Backup Media Attributes (continued)
ExplanationSample DataData Attributes
The status of a givenpiece of media. Activemeaning it is being usedat a given point in time,Frozen meaning errorshave occurred on thetape media and it is nolonger being used forbackups, etc.
Active, Non-active, Suspended, FrozenStatus
The volume pool IDwhich automatically startsat 1 for the default pool"NetBackup". Things likeScratch Pools oronsite/offsite pools aretypically also used andthese all have uniquevolume pool ID's. Manyencryption solutions suchas Decru and IBM usethe volume pool ID todetermine what backupsto encrypt or not
1, 2, 3, 4 etc.Volume Pool ID
This user defined field isthe name of the volumepool that media is placedin to. The default isNetBackup but manyothers are typicallycreated to segment tapesin to groups
NetBackup, Scratch, CatalogBackup,MSEO, WORM, etc.
Volume Pool Name
The name of the VolumeDatabase(pre-NetBackup 6.) orEMM server (NetBackup6.0+). This is typically theNBU Master but doesn'thave to be in the casewhere multiple mastersare sharing the sameEMM server.
nbu-master.example.comVolume/EMMDatabase Server
625Attributes of NetBackup dataBackup data attributes

Table B-8 Tape Library Attributes
ExplanationSample DataData Attributes
The backup applicationthat controls the tapedrive
NetBackupTape Library AgentProduct
The server host namethat the OpsCenter agentis installed on that is usedto collect tape driveinformation.
ops-agent.example.comTape Library AgentServer
The device databaseserver that is controllingthe particular library. Thisis the Enterprise MediaManager server (EMM) inNetBackup 6.0+ or thedevice control host in 5.1and below.
NBU-device-host.example.comTape Library DeviceDatabase Server
The manufacturer asdetermined by the SCSIinquiry string in thebackup application.
STK, Quantum, IBM etc.Tape LibraryManufacturer
The serial number,unique, to each tapelibrary
ADIC203100468_LL0Tape Library SerialNumber
The total number of slotsthat exist in a tape library
40, 120, 360Tape Library SlotCount
The type of tape library(TLD, ACS, 8MM, 4MM,TLM, TLH etc)
Tape Library DLT, Tape Library 8MM,Tape Library ACS
Tape Library Type
The unique number givento each tape library in theEMM database. This IDis put together with thelibrary type in the NBUGUI to show TLD(0),TLD(1) etc.
0, 1, 2 etc.Tape Library Unique ID
626Attributes of NetBackup dataBackup data attributes

Table B-9 Tape Drive Attributes
ExplanationSample DataData Attributes
The name of a tape driveas given by the backupapplication, usuallydefault names are basedon SCSI inquiry stringsthat contain themanufacturer name andmodel number
IBM.ULTRIUM-TD2.000Name
The number of a tapedrive as given by thebackup application whichis unique for eachphysical drive (a numbercould be shared betweenmedia servers though)
0, 1, 2, 3 etc.Number
A simple true/false onweather the tape drive isshared across backupservers or not
true/falseShared
The device host (MediaServer) that the tapedrive is connected to.
NBU-device-host.example.comTape Drive DeviceHost
A simple true/false onweather the tape driveexists in the currentconfiguration (true) or if itis historical and no longerexists (false)
true/ falseTape Drive Is Current
The unique serial numberfor a physical tape drive
768ZD03034Tape Drive SerialNumber
The storage unit that thetape drive is assigned to
dcdell214-dlt-robot-tld-0Tape Drive StorageUnit Name
627Attributes of NetBackup dataBackup data attributes

Table B-9 Tape Drive Attributes (continued)
ExplanationSample DataData Attributes
The type of tape drive asdefined by the backupapplication. ForNetBackup this is alsocalled the ‘density’ andspecifies what types oftape can go in the drive.
hcart, hcart2, dlt, 8mm etc.Tape Drive Type
The tape drive numberinside the library
1, 2, 3, 4, 5, 6 etc.Tape Drive Unique IDfor Library
Table B-10 Tape Usage Attributes
ExplanationSample DataData Attributes
The storage unit groupthat the storage unit thatthe tape drive belongs to
Storage Unit Tape GroupStorage Unit GroupName
The host (Media Server)that the tape drive isassigned to for use attime of tape driveinformation collection
nbu-host.example.comTape Drive Assigned
The robot type that iscontrolling the tape driveand it's associated statusof up or down at time oftape drive informationcollection
TLD, ACS, DOWN-TLD, DOWN-ACSetc.
Tape Drive Control
A true / false for if thetape drive was enabledat the time of tape driveinformation collection
true / falseTape Drive Enabled
A true / false for if thetape drive was in use atthe time of tape driveinformation collection
true / falseTape Drive In Use
628Attributes of NetBackup dataBackup data attributes

Table B-10 Tape Usage Attributes (continued)
ExplanationSample DataData Attributes
The tape that was in thedrive at the time of tapedrive informationcollection
VT0036Tape Drive RecordedMedia ID
The date and time thatthe tape drive informationwas collected whensnapshot was taken
Apr 05, 2008 22:57:17Tape Drive SnapshotTime
Table B-11 Backup Log Attributes
ExplanationSample DataData Attributes
The host name of theOpsCenter server wherethe database and webinterface resides
ops-server.example.comBackup Log AgentServer
The detailed statusmessages for each job
backup of client dcdell211 exited withstatus 71 (none of the files in the file listexist)
Backup Log Message
The host server with thebackup application thatlogged the error message
nbu-host.example.comBackup Log SourceHost
The backup client thatwas associated with thelogged error message
nbu-client.example.comBackup Log Client
The process or daemonname that wrote the errormessage
bptm, ndmpagent, nbpem, bpbrmBackup Log DaemonName
The group ID that can bespecified by the backupproduct to group them ina certain way. Note:Thesecondary ID and theGroup ID are basicallyintended for the samepurpose, that is to groupthe jobs in some way thatis useful in reporting.
5980Backup Log Job GroupID
629Attributes of NetBackup dataBackup data attributes
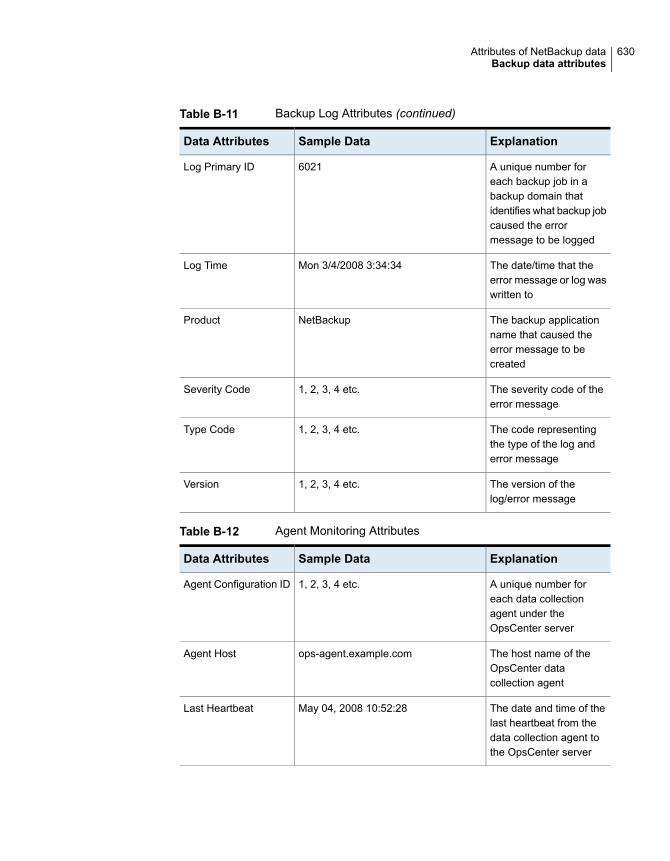
Table B-11 Backup Log Attributes (continued)
ExplanationSample DataData Attributes
A unique number foreach backup job in abackup domain thatidentifies what backup jobcaused the errormessage to be logged
6021Log Primary ID
The date/time that theerror message or log waswritten to
Mon 3/4/2008 3:34:34Log Time
The backup applicationname that caused theerror message to becreated
NetBackupProduct
The severity code of theerror message
1, 2, 3, 4 etc.Severity Code
The code representingthe type of the log anderror message
1, 2, 3, 4 etc.Type Code
The version of thelog/error message
1, 2, 3, 4 etc.Version
Table B-12 Agent Monitoring Attributes
ExplanationSample DataData Attributes
A unique number foreach data collectionagent under theOpsCenter server
1, 2, 3, 4 etc.Agent Configuration ID
The host name of theOpsCenter datacollection agent
ops-agent.example.comAgent Host
The date and time of thelast heartbeat from thedata collection agent tothe OpsCenter server
May 04, 2008 10:52:28Last Heartbeat
630Attributes of NetBackup dataBackup data attributes
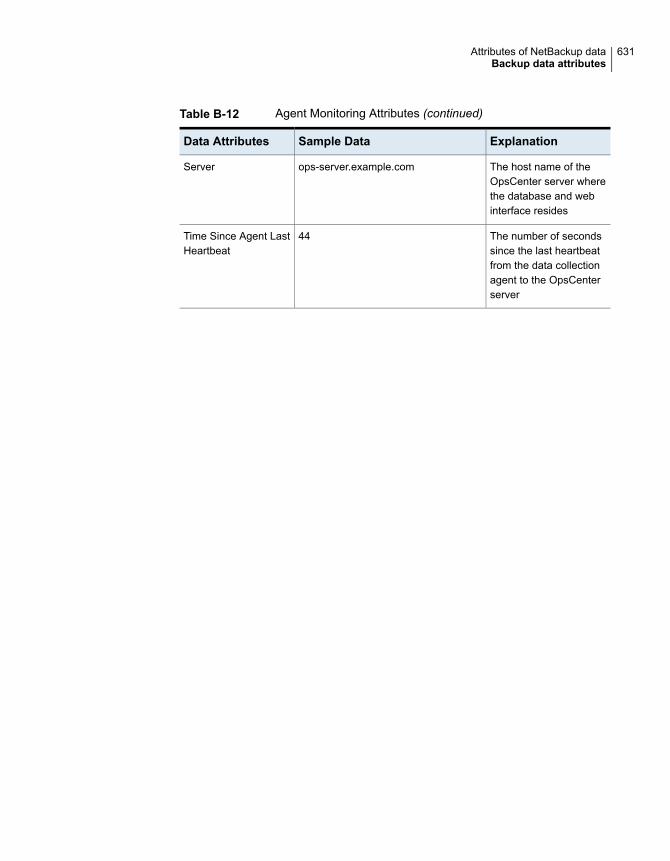
Table B-12 Agent Monitoring Attributes (continued)
ExplanationSample DataData Attributes
The host name of theOpsCenter server wherethe database and webinterface resides
ops-server.example.comServer
The number of secondssince the last heartbeatfrom the data collectionagent to the OpsCenterserver
44Time Since Agent LastHeartbeat
631Attributes of NetBackup dataBackup data attributes

Man pages for CLIsThis appendix includes the following topics:
■ changeDbPassword
■ configurePorts
■ dbbackup
■ dbdefrag
■ nbfindfile
■ opsadmin
■ opsCenterAgentSupport
■ opsCenterSupport
■ runstoredquery
■ startagent
■ startdb
■ startgui
■ startserver
■ stopagent
■ stopdb
■ stopgui
■ stopserver
■ view_exportimport
CAppendix
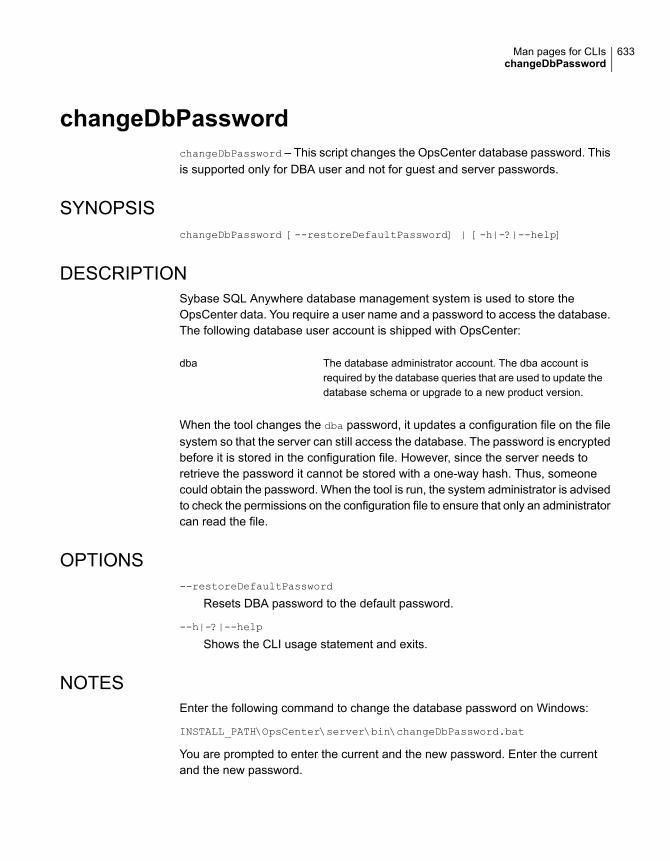
changeDbPasswordchangeDbPassword – This script changes the OpsCenter database password. Thisis supported only for DBA user and not for guest and server passwords.
SYNOPSISchangeDbPassword [--restoreDefaultPassword] | [-h|-?|--help]
DESCRIPTIONSybase SQL Anywhere database management system is used to store theOpsCenter data. You require a user name and a password to access the database.The following database user account is shipped with OpsCenter:
The database administrator account. The dba account isrequired by the database queries that are used to update thedatabase schema or upgrade to a new product version.
dba
When the tool changes the dba password, it updates a configuration file on the filesystem so that the server can still access the database. The password is encryptedbefore it is stored in the configuration file. However, since the server needs toretrieve the password it cannot be stored with a one-way hash. Thus, someonecould obtain the password. When the tool is run, the system administrator is advisedto check the permissions on the configuration file to ensure that only an administratorcan read the file.
OPTIONS--restoreDefaultPassword
Resets DBA password to the default password.
--h|-?|--help
Shows the CLI usage statement and exits.
NOTESEnter the following command to change the database password on Windows:
INSTALL_PATH\OpsCenter\server\bin\changeDbPassword.bat
You are prompted to enter the current and the new password. Enter the currentand the new password.
633Man pages for CLIschangeDbPassword

Enter the following command to change the database password on UNIX:
<INSTALL_PATH>/SYMCOpsCenterServer/bin/changeDbPassword.sh
You are prompted to enter the current and the new password. Enter the currentand the new password.
634Man pages for CLIschangeDbPassword

configurePortsconfigurePorts – This script is used to configure Web server ports on UNIX orLinux systems.
SYNOPSISconfigurePorts.sh [-status]|[-httpPort <httpPort>][-httpsPort
<httpsPort>][-shutdownPort <shutdownPort>]
DESCRIPTIONThe configurePorts script is used for the following purposes:
■ For configuring http, https and Tomcat shutdown ports
■ For querying the current values for the above ports
OPTIONS-status
Queries the current values for http, https, and Tomcat shutdown ports
This option is to be used exclusive of other attributes.
-httpPort <httpPort>
Modifies the httpPort to the new value in web.xml of Tomcat
-httpsPort <httpsPort>
Modifies the httpsPort to the new value in web.xml of Tomcat
- shutdownPort <shutdownPort>
Modifies the shutdownPort to the new value in web.xml of Tomcat
NOTESTo know the HTTP and HTTPS port that OpsCenter uses, run the configurePorts
utility.
Run the following command on Windows:
INSTALL_PATH\OpsCenter\gui\bin\goodies\configurePorts.cmd -status
Run the following command on UNIX:
<INSTALL_PATH>/SYMCOpsCenterGUI/bin/goodies/configurePorts.sh -status
635Man pages for CLIsconfigurePorts
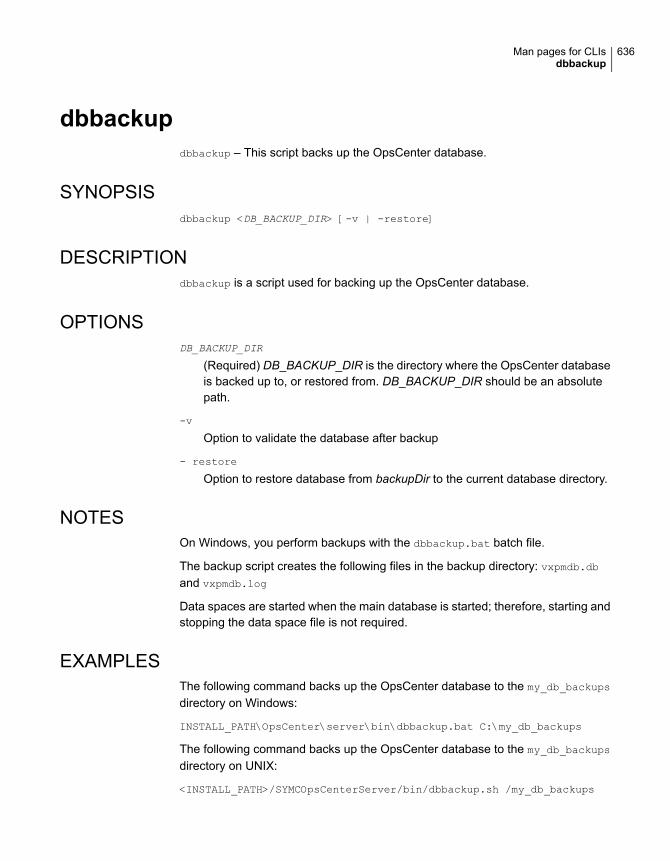
dbbackupdbbackup – This script backs up the OpsCenter database.
SYNOPSISdbbackup <DB_BACKUP_DIR> [-v | -restore]
DESCRIPTIONdbbackup is a script used for backing up the OpsCenter database.
OPTIONSDB_BACKUP_DIR
(Required) DB_BACKUP_DIR is the directory where the OpsCenter databaseis backed up to, or restored from. DB_BACKUP_DIR should be an absolutepath.
-v
Option to validate the database after backup
- restore
Option to restore database from backupDir to the current database directory.
NOTESOn Windows, you perform backups with the dbbackup.bat batch file.
The backup script creates the following files in the backup directory: vxpmdb.dband vxpmdb.log
Data spaces are started when the main database is started; therefore, starting andstopping the data space file is not required.
EXAMPLESThe following command backs up the OpsCenter database to the my_db_backups
directory on Windows:
INSTALL_PATH\OpsCenter\server\bin\dbbackup.bat C:\my_db_backups
The following command backs up the OpsCenter database to the my_db_backups
directory on UNIX:
<INSTALL_PATH>/SYMCOpsCenterServer/bin/dbbackup.sh /my_db_backups
636Man pages for CLIsdbbackup
dbdefragdbdefrag – This script defragments the OpsCenter database.
SYNOPSISdbdefrag
DESCRIPTIONThe dbdefrag script is used to defragment the OpsCenter database.
OPTIONSNot applicable
NOTESTo defragment the OpsCenter database run the following commands.
Run the following command on Windows:
INSTALL_PATH\OpsCenter\server\bin\dbdefrag.bat
Run the following command on UNIX:
<INSTALL_PATH>/SYMCOpsCenterServer/bin/dbdefrag.sh
637Man pages for CLIsdbdefrag
nbfindfilenbfindfile – This utility searches for files or folders based on simple search criteria.This utility must be run on the master server and not the OpsCenter Server.
SYNOPSISnbfindfile -c client_name[,...] -p search_pattern [-s mm/dd/yyyy
[HH:MM:SS] | -s_ut unix_time] [-e mm/dd/yyyy [HH:MM:SS] | -e_ut
unix_time] [-backupid backup_id] [-policy policy_name] [-keyword
"keyword_phrase"] [-extn file_extn[,...]] [-st sched_type] [-pt
policy_type] [-kb_min min_size_kb] [-kb_max max_size_kb] [-mtime_min
mm/dd/yyyy [HH:MM:SS]] [-mtime_max mm/dd/yyyy [HH:MM:SS]] [-atime_min
mm/dd/yyyy [HH:MM:SS]] [-atime_max mm/dd/yyyy [HH:MM:SS]] [-ctime_min
mm/dd/yyyy [HH:MM:SS]] [-ctime_max mm/dd/yyyy [HH:MM:SS]] [-only_dirs
| -only_files] [-max_results number] [-I] [-l [-ctime | -atime] |
-raw] [-help | -h]
On UNIX and Linux systems, the directory path to this command is
/usr/openv/netbackup/bin/admincmd/
On Windows systems, the directory path to this command is
<install_path>\NetBackup\bin\admincmd\
DESCRIPTIONThe nbfindfile command lets you search files or folders based on simple searchcriteria like file name and path including wildcard and backup date range. Userscan specify a set of clients, possibly belonging to different master servers, for whichbackups are to be searched. You can specify advanced search criteria includingpolicy type, schedule type, policy name, policy associated keywords, file extensions,file modification date range, and file size.
OPTIONS-atime
When used with the -l option, -atime displays the last access time in placeof the last modification time.
-atime_max mm/dd/yyyy [HH:MM:SS]
Specifies the maximum last access time of objects to be returned. The defaultis infinite.
638Man pages for CLIsnbfindfile

-atime_min mm/dd/yyyy [HH:MM:SS]
Specifies the minimum last access time of objects to be returned. The defaultis 01/01/1970 00:00:00.
-backupid backup_id
The backup ID of the backup image that should be searched.
-c client_name[,...]
Specifies the names of the NetBackup clients whose backups need to besearched. The client names must be specified as they appear in the NetBackupconfiguration. Multiple clients can be specified as a list that is separated bycommas.
-ctime
When used with the -l option, -ctime displays the last change time in place ofthe last modification time.
-ctime_max mm/dd/yyyy [HH:MM:SS]
Specifies the maximum last change time of objects to be returned. The defaultis infinite.
-ctime_min mm/dd/yyyy [HH:MM:SS]
Specifies the minimum last change time of objects to be returned. The defaultis 01/01/1970 00:00:00.
-e mm/dd/yyyy [HH:MM:SS] | -e_ut unix_time
Specifies the end date for the search. Backups that occurred at or before thespecified date and time are searched. The default is the current date and time.
-extn file_extn[,...]
Returns only the files with the specified extensions. For example, -extntxt,do*,jp?.
-h | -help
Displays usage information.
-i
Performs case insensitive matching.
-kb_max max_size_kb
Specifies the maximum size in kilobytes (1024 bytes) of files to be returned.The default is infinite.
-kb_min min_size_kb
Specifies the minimum last modification time of objects to be returned. Thedefault is 01/01/1970 00:00:00.
639Man pages for CLIsnbfindfile
-keyword "keyword_phrase"
Searches only the backup images that contain a matching keyword phrase aresearched. The keyword phrase can contain wildcards (*, ?) and square bracketexpressions. Examples are [Kk]ey*, [a-z]e?, and [!K]ey.
-l
Displays output in long list format. The default condition is the last modificationtime of objects.
-max_results number
Specifies the maximum number of results to be displayed. The default is infinite.
-mtime_max mm/dd/yyyy [HH:MM:SS]
Specifies the maximum last modification time of objects to be returned. Thedefault is infinite.
-mtime_min mm/dd/yyyy [HH:MM:SS]
Specifies the minimum last modification time of objects to be returned. Thedefault is 01/01/1970 00:00:00.
-only_dirs | -only_files
Specifies the type of objects to be returned.
-p search_pattern
Specifies the search pattern. File and directory entries matching this patternare displayed.
-policy policy_name
Searches only backup images that are created using the specified policy.
-pt policy_type
Searches only the backups with the specified policy type. Valid values forpolicy_type: Any, Standard, FlashBackup, MS-Windows, NDMP,FlashBackup-Windows.
-r
Displays raw output.
-s mm/dd/yyyy [HH:MM:SS] | -s_ut unix_time
Specifies the start date for the search. Backups that occurred at or after thespecified date and time are searched. The default is 30 days before the enddate.
-st sched_type
Specifies a schedule type for the image selection. The default is any scheduletype. Valid values, in either uppercase or lowercase, are as follows:
■ ANY
640Man pages for CLIsnbfindfile

■ FULL (full backup)
■ INCR (differential-incremental backup)
■ CINC (cumulative-incremental backup)
■ UBAK (user backup)
■ UARC (user archive)
■ SCHED
■ USER (user backup and user archive)
■ NOT_ARCHIVE (all backups except user archive)
641Man pages for CLIsnbfindfile
opsadminopsadmin – This script is used to monitor/start/stop the OpsCenter services onUNIX or Linux systems
SYNOPSISopsadmin.sh {start|stop|monitor}
DESCRIPTIONThe opsadmin script is used for monitoring/starting/stopping the OpsCenter services.
OPTIONSstart
Starts all OpsCenter services. These services include OpsCenter database,OpsCenter server, and Web server services.
stop
Stops all OpsCenter services. These services include OpsCenter database,OpsCenter server, and Web server services.
monitor
Monitors all OpsCenter services and also Authentication Service) and PBX(Symantec Private Branch Exchange) services. This option is not available forWindows.
NOTESopsadmin
opsadmin.sh resides by default in the <INSTALL_PATH>/SYMCOpsCenterServer/bin
directory.
EXAMPLESEXAMPLE 1
The following command starts all OpsCenter services:
<INSTALL_PATH>/SYMCOpsCenterServer/bin/opsadmin.sh start
EXAMPLE 2
The following command monitors OpsCenter services:
642Man pages for CLIsopsadmin

<INSTALL_PATH>/SYMCOpsCenterServer/bin/opsadmin.sh monitor
643Man pages for CLIsopsadmin
opsCenterAgentSupportopsCenterAgentSupport – This script collects OpsCenter Agent configuration filesand logs.
SYNOPSISopsCenterAgentSupport
DESCRIPTIONThe opsCenterAgentSupport script collects OpsCenter Agent configuration filesand logs for troubleshooting.
OPTIONSNot applicable
NOTESRun the following commands to execute the support scripts for OpsCenter Agent.
Run the following command on Windows:
INSTALL_PATH\OpsCenter\Agent\bin\opsCenterAgentSupport.bat
You can view the following status messages on the command prompt:
Stopping the OpsCenter Agent Service...
Support Directory Exists. This will be deleted...
Support Directory Deleted...
Created Support Directory... Zipping Support Folder...
Please collect Support.zip file from
C:\PROGRA~1\Symantec\OPSCEN~1\Agent\temp\support.zip
Starting the OpsCenter Agent...
C:\Program Files\Symantec\OpsCenter\Agent\bin>
644Man pages for CLIsopsCenterAgentSupport

opsCenterSupportopsCenterSupport – This script collects OpsCenter server configuration files andlogs for troubleshooting.
SYNOPSISopsCenterSupport
DESCRIPTIONopsCenterSupport is a script used for collecting OpsCenter server configurationfiles and logs for troubleshooting.
OPTIONSNot applicable
NOTESRun the following command to collect OpsCenter server configuration information:
Run the following command on UNIX:
<INSTALL_PATH>/SYMCOpsCenterServer/bin/opsCenterSupport.sh
Run the following command on Windows:
INSTALL_PATH\OpsCenter\server\bin\opsCenterSupport.bat
You can view the following statuses on the command prompt:
Support Directory Exists. This will be deleted...
Support Directory Deleted...
Created Support Directory...
SupportDir=E:\OPSCEN~1\OPSCEN~1\server\temp\support
Collecting Installed Paths Collecting System Properties
Collecting Memory & Processor Properties
Collecting Disk Allocation for OpsCenter Installed Drive
Collecting Directory Structure for OpsCenter Collecting version file
Collecting Version File...
Getting Customized Collections...
645Man pages for CLIsopsCenterSupport

Do you want to Collect Configuration files [y/n]: (y)y
Do you want to Collect Application Log files [y/n]: (y)y
Do you want to Collect OpsCenter GUI(147) Log files [y/n]: (y)y
Collecting 147 files...
Do you want to Collect OpsCenter Server(148) Log files [y/n]: (y)y
Collecting 148 files...
Do you want to Collect db Log files [y/n]: (y)y
Collecting db logs...
Do you want to Collect WebServer Log files [y/n]: (y)y
Collecting WebServer logs...
Do you want to Collect setEnv file [y/n]: (y)y
Collecting setenv file...
Do you want to Collect Database files [y/n]: (y)y
Collecting vxpmdb file...
Collecting vxpmdb.log file...
If this is an Upgrade scenario Do you want to Collect Old Database
files and logs [y/n]: (y)y
Enter the location where the database files of the previous OpsCenter
version were stored. The opsCenterSupport utility backs up these
files at
OPSCENTER_INSTALL_DIR/server/temp/OpsCenterServerSupport/upgrade
You can revert to this database version in case of upgrade failure.
For example: C:\\Program
Files\Symantec\OpsCenter_SavedData\OpsCenter\server\db\data
or
:/var/symantec/OpsCenterServer_backup/SYMCOpsCenterServer/db/data
Collecting old db files
646Man pages for CLIsopsCenterSupport
Note: If the location that you have provided is not valid, the utility dipslays thefollowing message:
The opsCenterSupport utility cannot back up the database files of
the previous OpsCenter version because the file location that you
have provided is not valid
Collecting upgrade logs...
Do you want to collect OpsCenter usage data [y/n]: (y)y
Note: If you opt for this option, the utility collects the Telemetry data.
Starting usage collection...
Do you want to collect OpsCenter startup config files [y/n]: (y)y
Zipping Support Folder...
Please collect Support.zip file from
E:\OPSCEN~1\OPSCEN~1\server\temp\support.zip
647Man pages for CLIsopsCenterSupport
runstoredqueryrunstoredquery –
SYNOPSISrunStoredQuery <Report Name> <User Name> <Domain Name> <Domain Type>
[<Output Type> pdf | csv]
DESCRIPTIONThe runstoredquery script runs saved customSQL and the OpsCenter Administratorgenerates output in the desired format.
OPTIONSReport Name
Name of the report (surrounded with double-quotes)
Example: runStoredQuery "My Report" admin OpsCenterUsers vx pdf
User Name
Name of the user who has saved the report
Domain Name
Domain name for the user
Domain Type
Domain type for the user
Output Type
Report output type (pdf/csv). The default is csv.
EXAMPLErunStoredQuery "My Report" admin OpsCenterUsers vx pdf
648Man pages for CLIsrunstoredquery
startagentstartagent – This script starts the OpsCenter Agent service.
SYNOPSISstartagent
DESCRIPTIONThe startagent script is used to start the OpsCenter Agent service.
OPTIONSNot applicable
NOTESEnter the following command to start the OpsCenter Agent service on Windows:
INSTALL_PATH\OpsCenter\Agent\bin\startagent.bat
649Man pages for CLIsstartagent

startdbstartdb – This script starts the OpsCenter database.
SYNOPSISstartdb
DESCRIPTIONThe startdb script is used to start the OpsCenter database.
OPTIONSNot applicable
NOTESTo start the database server, enter the following command on Windows:
INSTALL_PATH\OpsCenter\server\bin\startdb.bat
To start the database server, enter the following command on UNIX:
<INSTALL_PATH>/SYMCOpsCenterServer/bin/startdb
650Man pages for CLIsstartdb
startguistartgui – This script is used to start the OpsCenter Web server service.
SYNOPSISstartgui.sh
DESCRIPTIONThe startgui script is used for starting the OpsCenter Web server service.
OPTIONSNot applicable
NOTESThe following command starts the OpsCenter WebServer service on Windows:
INSTALL_PATH\OpsCenter\gui\bin\startgui.cmd
The following command starts the OpsCenter WebServer service on UNIX:
<INSTALL_PATH>/SYMCOpsCenterGUI/bin/startgui.sh
651Man pages for CLIsstartgui

startserverstartserver – This script starts the OpsCenter Server.
SYNOPSISstartserver
DESCRIPTIONThe startserver script is used to start the OpsCenter Server.
OPTIONSNot applicable
NOTESRun the following command to start the OpsCenter Server on Windows:
INSTALL_PATH\OpsCenter\server\bin\startserver.bat
Run the following command to start the OpsCenter Server on UNIX:
<INSTALL_PATH>/SYMCOpsCenterServer/bin/startserver
652Man pages for CLIsstartserver

stopagentstopagent – This script is used to stop the OpsCenter Agent.
SYNOPSISstopagent
DESCRIPTIONThe stopagent script is used to stop the OpsCenter Agent.
OPTIONSNot applicable
NOTESRun the following command to stop the OpsCenter Agent on Windows:
<INSTALL_PATH>\OpsCenter\Agent\bin\stopagent.bat
653Man pages for CLIsstopagent
stopdbstopdb – This script is used to stop the OpsCenter database.
SYNOPSISstopdb
DESCRIPTIONThe stopdb script is used to stop the OpsCenter database.
OPTIONSNot applicable
NOTESRun the following command to stop the OpsCenter database on Windows:
INSTALL_PATH\OpsCenter\server\bin\stopdb.bat
Run the following command to stop the OpsCenter database on UNIX:
<INSTALL_PATH>/SYMCOpsCenterServer/bin/stopdb
654Man pages for CLIsstopdb

stopguistopgui – used to stop the OpsCenter Web server service.
SYNOPSISstopgui.sh
DESCRIPTIONThe stopgui script is used for stopping the OpsCenter Web server service.
OPTIONSNot applicable
NOTESThe following command stops the OpsCenter Web server service on Windows:
INSTALL_PATH\OpsCenter\gui\bin\stopgui.cmd
The following command stops the OpsCenter Web server process on UNIX:
<INSTALL_PATH>/SYMCOpsCenterGUI/bin/stopgui.sh
655Man pages for CLIsstopgui
stopserverstopserver – This script stops the OpsCenter Server.
SYNOPSISstopserver
DESCRIPTIONThe stopserver script is used to stop the OpsCenter Server.
OPTIONSNot applicable
NOTESRun the following command to stop the OpsCenter Server on Windows:
INSTALL_PATH\OpsCenter\server\bin\stopserver.bat
Run the following command to stop the OpsCenter Server on UNIX:
<INSTALL_PATH>/SYMCOpsCenterServer/bin/stopserver
656Man pages for CLIsstopserver

view_exportimportview_exportimport – The view_exportimport script is used to import, export,alias, or merge your CSV, TSV, or XML files. You can create CSV, TSV, or XMLfiles that describe the views that you want to create. You can then import the CSV,TSV, or XML file into OpsCenter by using this utility.
SYNOPSISview_exportimport {-i|-e|-m|-a} {-f <file name>} {-type <xml|csv|tsv}
{-host <host name>} {-port <port number>} {-usr <user name>} {-pass
<password>} {-domain <domain>} {-domaintype <type>} [-l <logfile
name>] [-v <Level #>]
DESCRIPTIONYou can use the OpsCenter console to create views, but you may find it faster andmore convenient to create CSV, TSV, or XML files that describe the views that youwant to create. You can then import the CSV, TSV, or XML file into the OpsCenterdatabase. This script lets you import, export, alias, or merge a CSV, TSV, or XMLfile.
Note: You can also use the View Builder GUI to import, export, merge, or alias aCSV, TSV, or XML file. See the OpsCenter View Builder help for more information.
See the Appendix titled Creating views using CSV, TSV, and XML files for detailedinformation on how to create CSV, TSV, or XML files.
OPTIONS-i
Imports the view structure as defined in the XML, CSV, or TSV file into theOpsCenter database. It can import multiple views at a time.
-e
Exports the entire view structure existing in the OpsCenter database into XML,CSV, or TSV files. You can update these XML, CSV, or TSV files accordingto the business needs and then import these files in the OpsCenter database.
This option exports all the views that are present in the OpsCenter database.
657Man pages for CLIsview_exportimport

-m
Merge multiple objects simultaneously that are saved in XML, CSV, or TSVfile. Note that the source hosts and destination hosts that you merge must beof the same type (masterservers/mediaservers/clients).
A merge objects file (XML, CSV, or TSV) contains the following object details:
DB ID of the resultant objectFirst column
Primary display name of the resultantobject
Second column
DB ID of the object that is mergedThird column
Primary display name of the object that ismerged
Fourth column
Here is a typical example of a file that contains details of objects to be merged:
Fourth ColumnThird ColumnSecond ColumnFirst Column
host1.veritas.com1000host11500
host22355host2.abc.com2100
10.209.19.103000host34000
Note: After successfully merging the two objects, the object being merged(second object in a record) is deleted and the resultant object is retained.However all aliases that are designated for both objects - object being mergedand resultant object - are retained and assigned to the resultant object.
-a
Using the -a option, you can give an alternate name to a host. You can aliasmultiple hosts simultaneously that are saved in XML, CSV, or TSV file.
Caution: The alias names should be compatible with your hosts’ DNS names.Alternatively, they should be compatible with the names by which they areknown to applications such as NetBackup and Backup Exec. For example: Ifyou use an alias that is unknown to NetBackup, the explorer stops collectinginformation from the NetBackup host. It attempts to collect data from a hostwith the alias name.
A host alias file (XML, CSV, or TSV) typically contains the following details:
658Man pages for CLIsview_exportimport
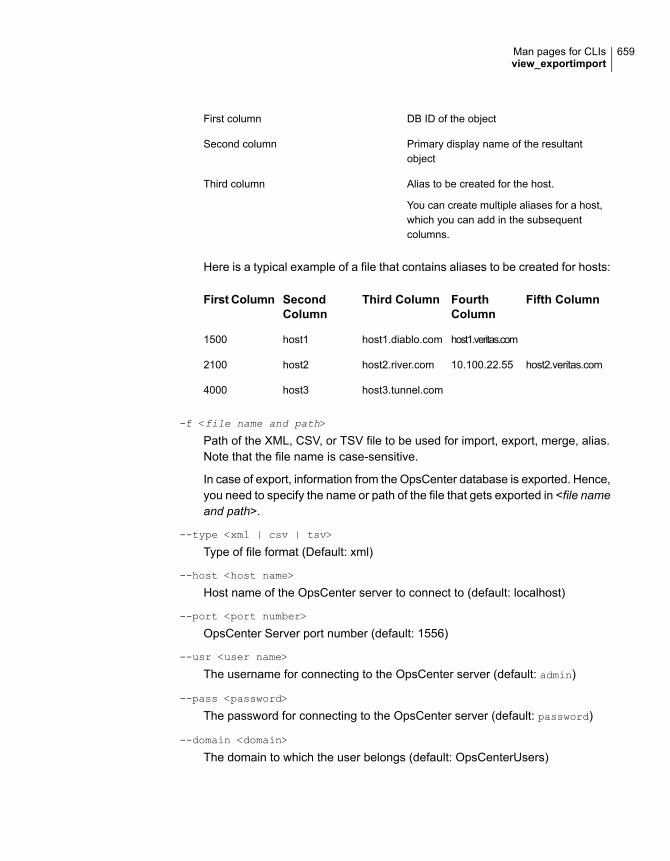
DB ID of the objectFirst column
Primary display name of the resultantobject
Second column
Alias to be created for the host.
You can create multiple aliases for a host,which you can add in the subsequentcolumns.
Third column
Here is a typical example of a file that contains aliases to be created for hosts:
Fifth ColumnFourthColumn
Third ColumnSecondColumn
First Column
host1.veritas.comhost1.diablo.comhost11500
host2.veritas.com10.100.22.55host2.river.comhost22100
host3.tunnel.comhost34000
-f <file name and path>
Path of the XML, CSV, or TSV file to be used for import, export, merge, alias.Note that the file name is case-sensitive.
In case of export, information from the OpsCenter database is exported. Hence,you need to specify the name or path of the file that gets exported in <file nameand path>.
--type <xml | csv | tsv>
Type of file format (Default: xml)
--host <host name>
Host name of the OpsCenter server to connect to (default: localhost)
--port <port number>
OpsCenter Server port number (default: 1556)
--usr <user name>
The username for connecting to the OpsCenter server (default: admin)
--pass <password>
The password for connecting to the OpsCenter server (default: password)
--domain <domain>
The domain to which the user belongs (default: OpsCenterUsers)
659Man pages for CLIsview_exportimport
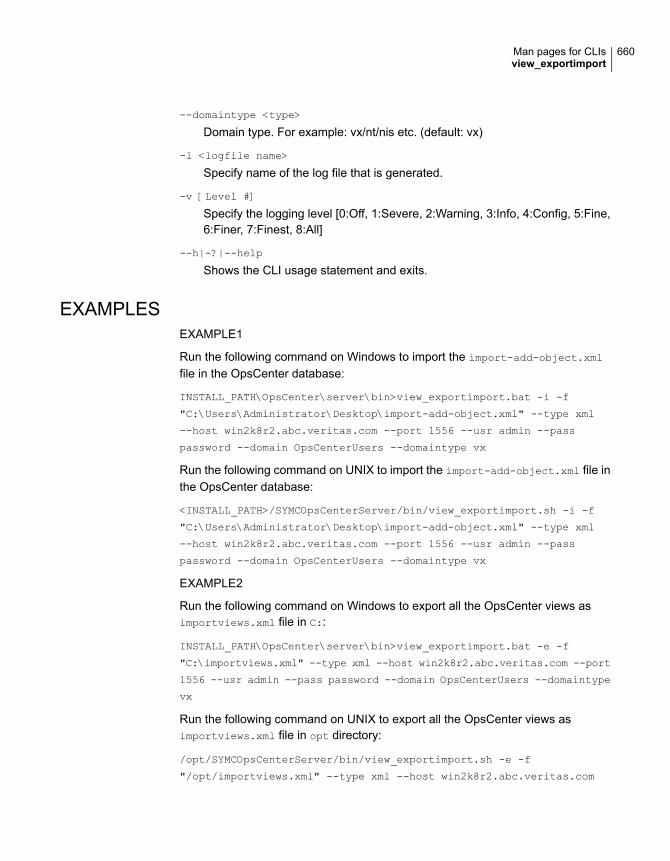
--domaintype <type>
Domain type. For example: vx/nt/nis etc. (default: vx)
-l <logfile name>
Specify name of the log file that is generated.
-v [Level #]
Specify the logging level [0:Off, 1:Severe, 2:Warning, 3:Info, 4:Config, 5:Fine,6:Finer, 7:Finest, 8:All]
--h|-?|--help
Shows the CLI usage statement and exits.
EXAMPLESEXAMPLE1
Run the following command on Windows to import the import-add-object.xml
file in the OpsCenter database:
INSTALL_PATH\OpsCenter\server\bin>view_exportimport.bat -i -f
"C:\Users\Administrator\Desktop\import-add-object.xml" --type xml
--host win2k8r2.abc.veritas.com --port 1556 --usr admin --pass
password --domain OpsCenterUsers --domaintype vx
Run the following command on UNIX to import the import-add-object.xml file inthe OpsCenter database:
<INSTALL_PATH>/SYMCOpsCenterServer/bin/view_exportimport.sh -i -f
"C:\Users\Administrator\Desktop\import-add-object.xml" --type xml
--host win2k8r2.abc.veritas.com --port 1556 --usr admin --pass
password --domain OpsCenterUsers --domaintype vx
EXAMPLE2
Run the following command on Windows to export all the OpsCenter views asimportviews.xml file in C::
INSTALL_PATH\OpsCenter\server\bin>view_exportimport.bat -e -f
"C:\importviews.xml" --type xml --host win2k8r2.abc.veritas.com --port
1556 --usr admin --pass password --domain OpsCenterUsers --domaintype
vx
Run the following command on UNIX to export all the OpsCenter views asimportviews.xml file in opt directory:
/opt/SYMCOpsCenterServer/bin/view_exportimport.sh -e -f
"/opt/importviews.xml" --type xml --host win2k8r2.abc.veritas.com
660Man pages for CLIsview_exportimport

--port 1556 --usr admin --pass password --domain OpsCenterUsers
--domaintype vx
661Man pages for CLIsview_exportimport
Creating views using CSV,TSV, and XML files
This appendix includes the following topics:
■ About using CSV, TSV, and XML files to create views
■ About creating CSV files
■ About creating TSV files
■ About creating XML files
■ XML DTD structure
■ DTD elements
■ DTD <application> element
■ DTD <objects> and <object> elements
■ DTD <attribute> elements
■ DTD <view> element
■ DTD <node> elements
■ DTD <aliaslevel> elements
■ Examples of XML files
■ Example 1: Adding an object
■ Example 2: Adding a view
■ Example 3: Updating an object
DAppendix
■ Example 4: Merging objects
About using CSV, TSV, and XML files to createviews
You can use the OpsCenter Analytics console to create views. However, you mayfind it faster and more convenient to create the CSV, TSV, or XML files that describethe views that you want to create.
This Appendix describes how you can create views using CSV, TSV, or XML files.
You can then import, export, merge, or alias the CSV, TSV, or XML file into theOpsCenter database from the OpsCenter View Builder GUI or by using theview_exportimport script.
Refer to the Opscenter View Builder help for information on how to import, export,merge, or alias a CSV, TSV, or XML file using the OpsCenter View Builder GUI.
Information on how to import, export, merge, or alias a CSV, TSV, or XML file toOpsCenter Analytics by using the view_exportimport utility is available.
About creating CSV filesYou can create views in OpsCenter Analytics by creating and importing thecomma-separated values (CSV) file that describes the views. You can create theCSV files in a text editor or Microsoft Excel and save the file as filename.csv.Note that you can only create objects of type Generic when you create views usinga CSV file.
Note: You can export and import view structures using the CSV file. However, youcannot export or import attributes that are collected by OpsCenter data collectorsusing a CSV file.
A CSV file typically contains the following details:
663Creating views using CSV, TSV, and XML filesAbout using CSV, TSV, and XML files to create views
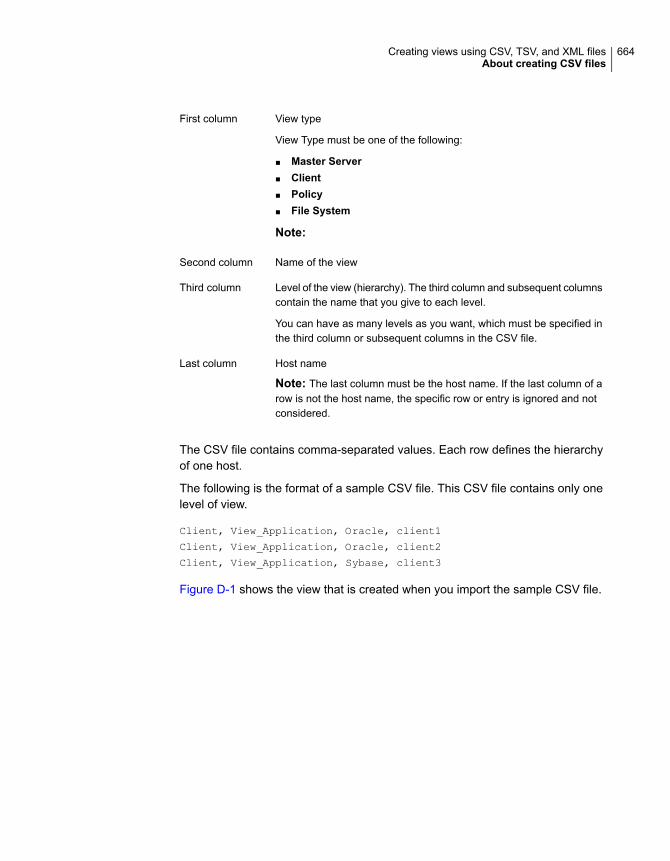
View type
View Type must be one of the following:
■ Master Server■ Client■ Policy■ File System
Note:
First column
Name of the viewSecond column
Level of the view (hierarchy). The third column and subsequent columnscontain the name that you give to each level.
You can have as many levels as you want, which must be specified inthe third column or subsequent columns in the CSV file.
Third column
Host name
Note: The last column must be the host name. If the last column of arow is not the host name, the specific row or entry is ignored and notconsidered.
Last column
The CSV file contains comma-separated values. Each row defines the hierarchyof one host.
The following is the format of a sample CSV file. This CSV file contains only onelevel of view.
Client, View_Application, Oracle, client1
Client, View_Application, Oracle, client2
Client, View_Application, Sybase, client3
Figure D-1 shows the view that is created when you import the sample CSV file.
664Creating views using CSV, TSV, and XML filesAbout creating CSV files
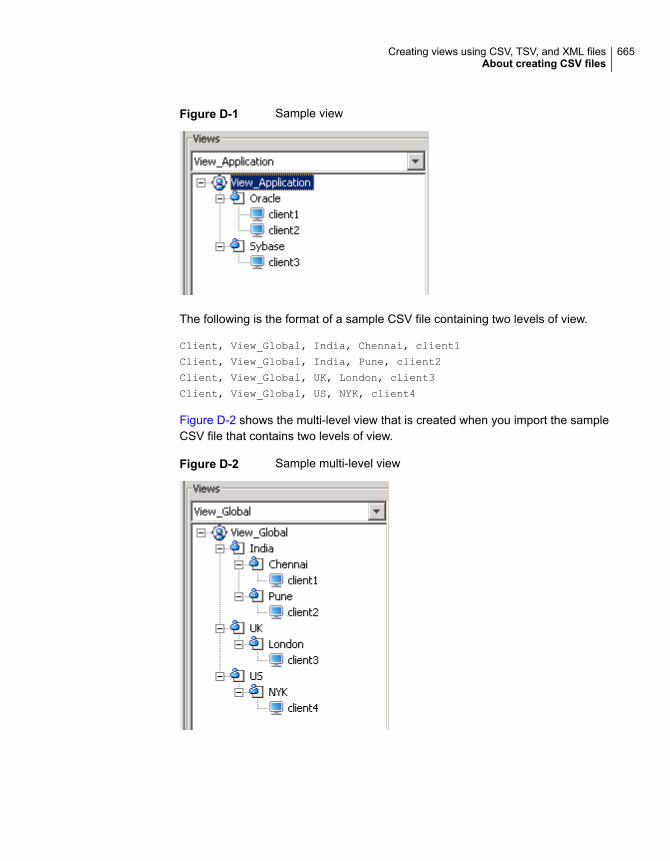
Figure D-1 Sample view
The following is the format of a sample CSV file containing two levels of view.
Client, View_Global, India, Chennai, client1
Client, View_Global, India, Pune, client2
Client, View_Global, UK, London, client3
Client, View_Global, US, NYK, client4
Figure D-2 shows the multi-level view that is created when you import the sampleCSV file that contains two levels of view.
Figure D-2 Sample multi-level view
665Creating views using CSV, TSV, and XML filesAbout creating CSV files
Note: If you create a view using a CSV file that already exists in OpsCenterAnalytics, the view gets deleted. You cannot modify an existing view by using aCSV file.
About creating TSV filesYou can create views in OpsCenter Analytics by creating and importing theTab-separated values (TSV) file that describes the views. You can create the TSVfiles in any text editor, Excel etc. and save the file as filename.tsv. Note that youcan only create objects of type Generic when you create views using a TSV file.
Note: You can export and import view structures using the TSV file. However, youcannot export or import attributes using a TSV file.
A TSV file typically contains the following details:
View type
View Type must be one of the following:
■ Master Server■ Client■ Policy■ File System
First column
Name of the viewSecond column
Level of the view. The third column and subsequent columns containthe name that you give to each level.
You can have as many levels as you want, which must be specified inthe third column or subsequent columns in the TSV file.
Third column
Host name
Note: The last column must be the host name. If the last column of arow is not the host name, the specific row or entry is ignored and notconsidered.
Last column
The TSV file contains tab-separated values. Each row defines the hierarchy of onehost.
The following is the format of a sample TSV file containing one level of view.
666Creating views using CSV, TSV, and XML filesAbout creating TSV files
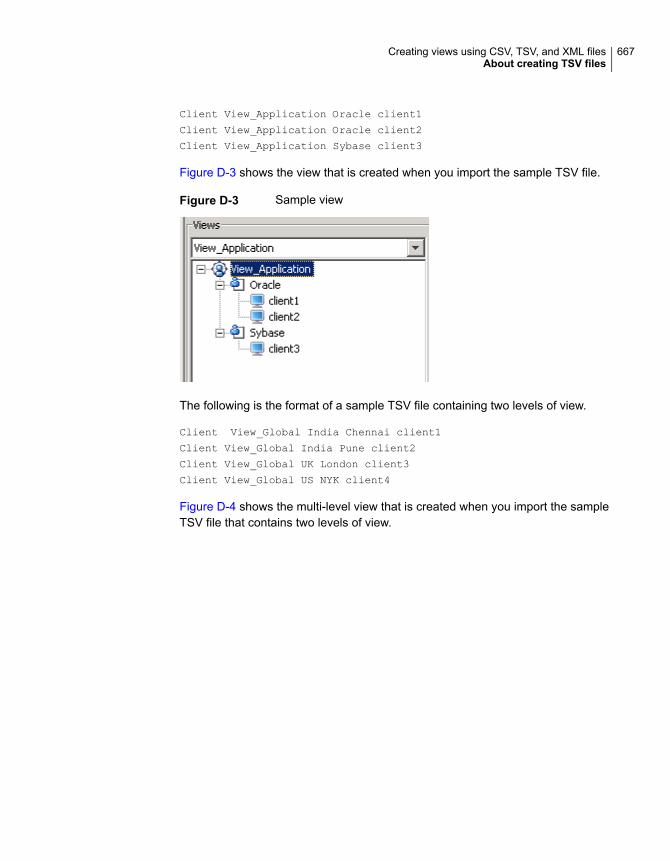
Client View_Application Oracle client1
Client View_Application Oracle client2
Client View_Application Sybase client3
Figure D-3 shows the view that is created when you import the sample TSV file.
Figure D-3 Sample view
The following is the format of a sample TSV file containing two levels of view.
Client View_Global India Chennai client1
Client View_Global India Pune client2
Client View_Global UK London client3
Client View_Global US NYK client4
Figure D-4 shows the multi-level view that is created when you import the sampleTSV file that contains two levels of view.
667Creating views using CSV, TSV, and XML filesAbout creating TSV files
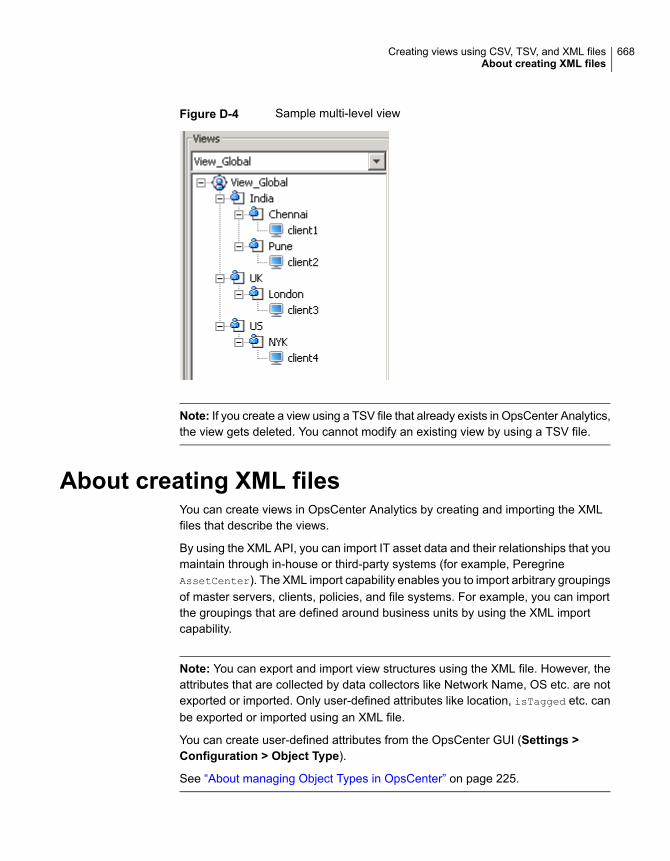
Figure D-4 Sample multi-level view
Note: If you create a view using a TSV file that already exists in OpsCenter Analytics,the view gets deleted. You cannot modify an existing view by using a TSV file.
About creating XML filesYou can create views in OpsCenter Analytics by creating and importing the XMLfiles that describe the views.
By using the XML API, you can import IT asset data and their relationships that youmaintain through in-house or third-party systems (for example, PeregrineAssetCenter). The XML import capability enables you to import arbitrary groupingsof master servers, clients, policies, and file systems. For example, you can importthe groupings that are defined around business units by using the XML importcapability.
Note: You can export and import view structures using the XML file. However, theattributes that are collected by data collectors like Network Name, OS etc. are notexported or imported. Only user-defined attributes like location, isTagged etc. canbe exported or imported using an XML file.
You can create user-defined attributes from the OpsCenter GUI (Settings >Configuration > Object Type).
See “About managing Object Types in OpsCenter” on page 225.
668Creating views using CSV, TSV, and XML filesAbout creating XML files
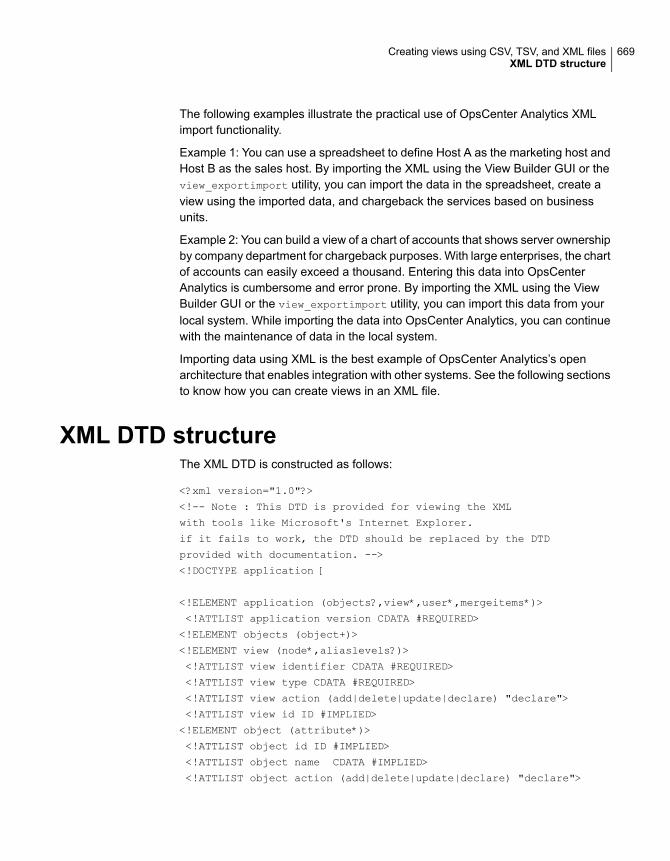
The following examples illustrate the practical use of OpsCenter Analytics XMLimport functionality.
Example 1: You can use a spreadsheet to define Host A as the marketing host andHost B as the sales host. By importing the XML using the View Builder GUI or theview_exportimport utility, you can import the data in the spreadsheet, create aview using the imported data, and chargeback the services based on businessunits.
Example 2: You can build a view of a chart of accounts that shows server ownershipby company department for chargeback purposes. With large enterprises, the chartof accounts can easily exceed a thousand. Entering this data into OpsCenterAnalytics is cumbersome and error prone. By importing the XML using the ViewBuilder GUI or the view_exportimport utility, you can import this data from yourlocal system. While importing the data into OpsCenter Analytics, you can continuewith the maintenance of data in the local system.
Importing data using XML is the best example of OpsCenter Analytics’s openarchitecture that enables integration with other systems. See the following sectionsto know how you can create views in an XML file.
XML DTD structureThe XML DTD is constructed as follows:
<?xml version="1.0"?>
<!-- Note : This DTD is provided for viewing the XML
with tools like Microsoft's Internet Explorer.
if it fails to work, the DTD should be replaced by the DTD
provided with documentation. -->
<!DOCTYPE application [
<!ELEMENT application (objects?,view*,user*,mergeitems*)>
<!ATTLIST application version CDATA #REQUIRED>
<!ELEMENT objects (object+)>
<!ELEMENT view (node*,aliaslevels?)>
<!ATTLIST view identifier CDATA #REQUIRED>
<!ATTLIST view type CDATA #REQUIRED>
<!ATTLIST view action (add|delete|update|declare) "declare">
<!ATTLIST view id ID #IMPLIED>
<!ELEMENT object (attribute*)>
<!ATTLIST object id ID #IMPLIED>
<!ATTLIST object name CDATA #IMPLIED>
<!ATTLIST object action (add|delete|update|declare) "declare">
669Creating views using CSV, TSV, and XML filesXML DTD structure
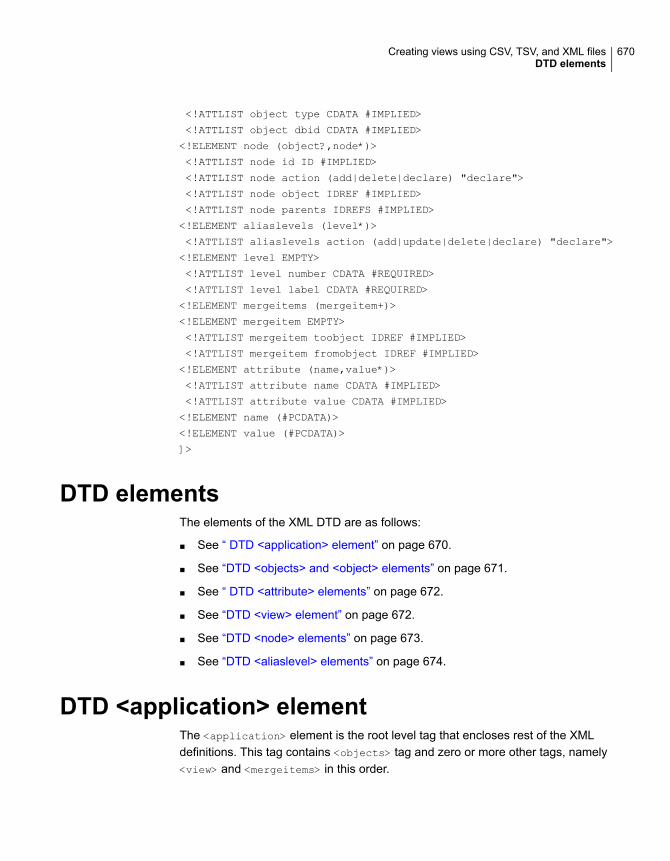
<!ATTLIST object type CDATA #IMPLIED>
<!ATTLIST object dbid CDATA #IMPLIED>
<!ELEMENT node (object?,node*)>
<!ATTLIST node id ID #IMPLIED>
<!ATTLIST node action (add|delete|declare) "declare">
<!ATTLIST node object IDREF #IMPLIED>
<!ATTLIST node parents IDREFS #IMPLIED>
<!ELEMENT aliaslevels (level*)>
<!ATTLIST aliaslevels action (add|update|delete|declare) "declare">
<!ELEMENT level EMPTY>
<!ATTLIST level number CDATA #REQUIRED>
<!ATTLIST level label CDATA #REQUIRED>
<!ELEMENT mergeitems (mergeitem+)>
<!ELEMENT mergeitem EMPTY>
<!ATTLIST mergeitem toobject IDREF #IMPLIED>
<!ATTLIST mergeitem fromobject IDREF #IMPLIED>
<!ELEMENT attribute (name,value*)>
<!ATTLIST attribute name CDATA #IMPLIED>
<!ATTLIST attribute value CDATA #IMPLIED>
<!ELEMENT name (#PCDATA)>
<!ELEMENT value (#PCDATA)>
]>
DTD elementsThe elements of the XML DTD are as follows:
■ See “ DTD <application> element” on page 670.
■ See “DTD <objects> and <object> elements” on page 671.
■ See “ DTD <attribute> elements” on page 672.
■ See “DTD <view> element” on page 672.
■ See “DTD <node> elements” on page 673.
■ See “DTD <aliaslevel> elements” on page 674.
DTD <application> elementThe <application> element is the root level tag that encloses rest of the XMLdefinitions. This tag contains <objects> tag and zero or more other tags, namely<view> and <mergeitems> in this order.
670Creating views using CSV, TSV, and XML filesDTD elements
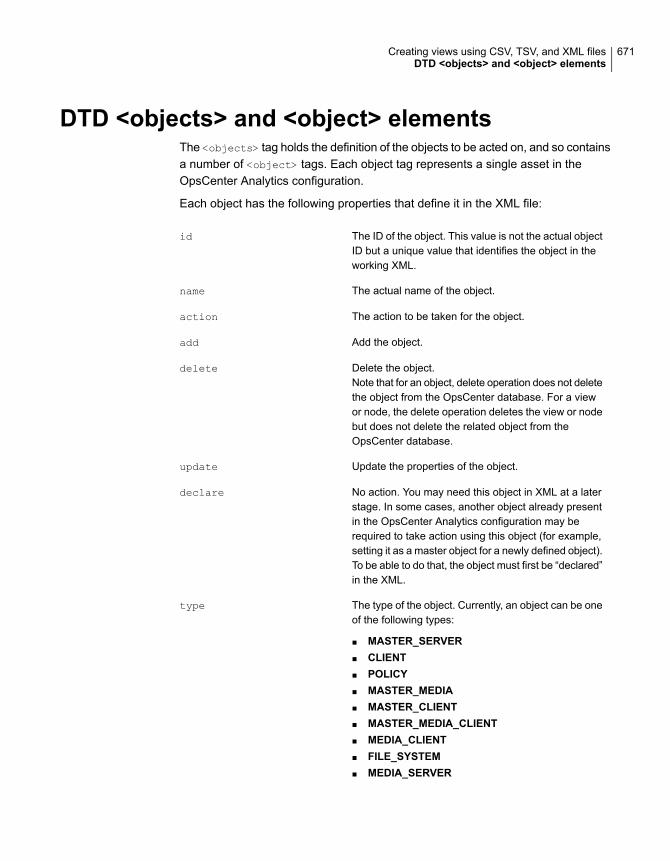
DTD <objects> and <object> elementsThe <objects> tag holds the definition of the objects to be acted on, and so containsa number of <object> tags. Each object tag represents a single asset in theOpsCenter Analytics configuration.
Each object has the following properties that define it in the XML file:
The ID of the object. This value is not the actual objectID but a unique value that identifies the object in theworking XML.
id
The actual name of the object.name
The action to be taken for the object.action
Add the object.add
Delete the object.Note that for an object, delete operation does not deletethe object from the OpsCenter database. For a viewor node, the delete operation deletes the view or nodebut does not delete the related object from theOpsCenter database.
delete
Update the properties of the object.update
No action. You may need this object in XML at a laterstage. In some cases, another object already presentin the OpsCenter Analytics configuration may berequired to take action using this object (for example,setting it as a master object for a newly defined object).To be able to do that, the object must first be “declared”in the XML.
declare
The type of the object. Currently, an object can be oneof the following types:
■ MASTER_SERVER■ CLIENT■ POLICY■ MASTER_MEDIA■ MASTER_CLIENT■ MASTER_MEDIA_CLIENT■ MEDIA_CLIENT■ FILE_SYSTEM■ MEDIA_SERVER
type
671Creating views using CSV, TSV, and XML filesDTD <objects> and <object> elements
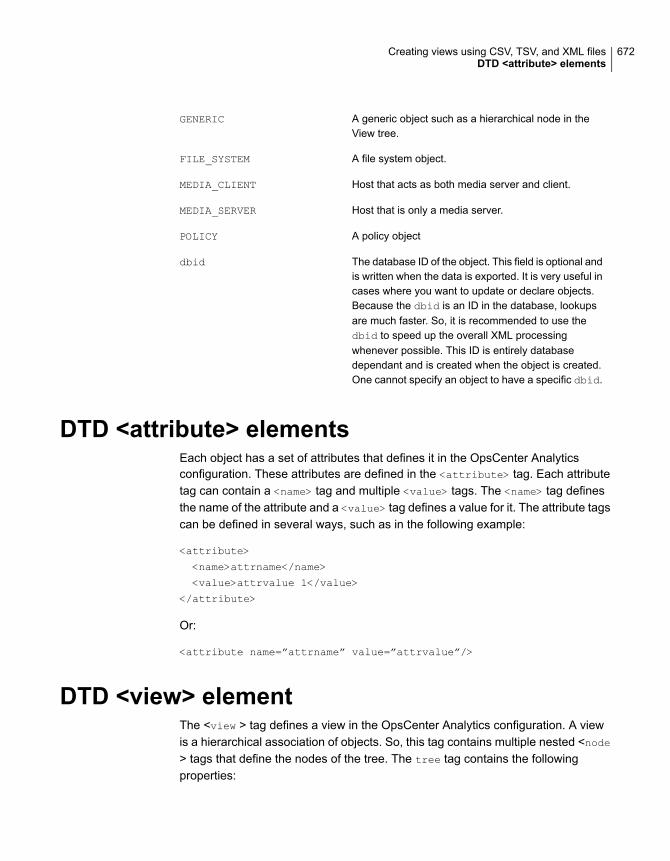
A generic object such as a hierarchical node in theView tree.
GENERIC
A file system object.FILE_SYSTEM
Host that acts as both media server and client.MEDIA_CLIENT
Host that is only a media server.MEDIA_SERVER
A policy objectPOLICY
The database ID of the object. This field is optional andis written when the data is exported. It is very useful incases where you want to update or declare objects.Because the dbid is an ID in the database, lookupsare much faster. So, it is recommended to use thedbid to speed up the overall XML processingwhenever possible. This ID is entirely databasedependant and is created when the object is created.One cannot specify an object to have a specific dbid.
dbid
DTD <attribute> elementsEach object has a set of attributes that defines it in the OpsCenter Analyticsconfiguration. These attributes are defined in the <attribute> tag. Each attributetag can contain a <name> tag and multiple <value> tags. The <name> tag definesthe name of the attribute and a <value> tag defines a value for it. The attribute tagscan be defined in several ways, such as in the following example:
<attribute>
<name>attrname</name>
<value>attrvalue 1</value>
</attribute>
Or:
<attribute name=”attrname” value=”attrvalue”/>
DTD <view> elementThe <view > tag defines a view in the OpsCenter Analytics configuration. A viewis a hierarchical association of objects. So, this tag contains multiple nested <node> tags that define the nodes of the tree. The tree tag contains the followingproperties:
672Creating views using CSV, TSV, and XML filesDTD <attribute> elements
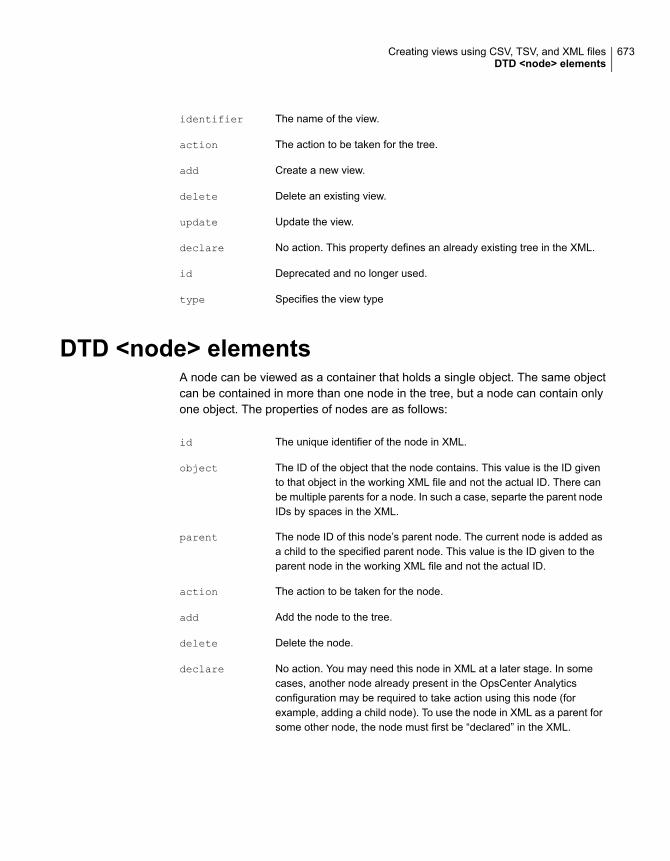
The name of the view.identifier
The action to be taken for the tree.action
Create a new view.add
Delete an existing view.delete
Update the view.update
No action. This property defines an already existing tree in the XML.declare
Deprecated and no longer used.id
Specifies the view typetype
DTD <node> elementsA node can be viewed as a container that holds a single object. The same objectcan be contained in more than one node in the tree, but a node can contain onlyone object. The properties of nodes are as follows:
The unique identifier of the node in XML.id
The ID of the object that the node contains. This value is the ID givento that object in the working XML file and not the actual ID. There canbe multiple parents for a node. In such a case, separte the parent nodeIDs by spaces in the XML.
object
The node ID of this node’s parent node. The current node is added asa child to the specified parent node. This value is the ID given to theparent node in the working XML file and not the actual ID.
parent
The action to be taken for the node.action
Add the node to the tree.add
Delete the node.delete
No action. You may need this node in XML at a later stage. In somecases, another node already present in the OpsCenter Analyticsconfiguration may be required to take action using this node (forexample, adding a child node). To use the node in XML as a parent forsome other node, the node must first be “declared” in the XML.
declare
673Creating views using CSV, TSV, and XML filesDTD <node> elements
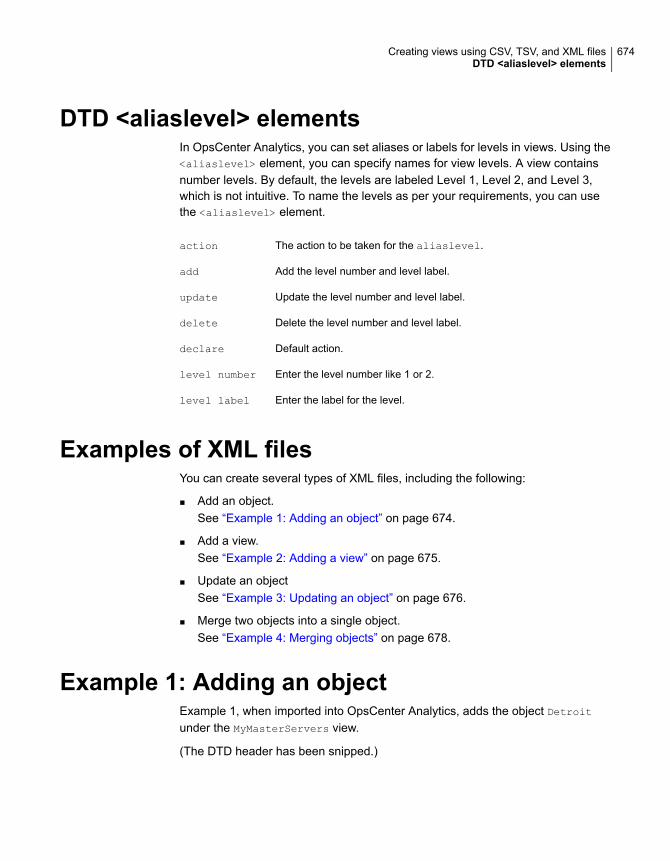
DTD <aliaslevel> elementsIn OpsCenter Analytics, you can set aliases or labels for levels in views. Using the<aliaslevel> element, you can specify names for view levels. A view containsnumber levels. By default, the levels are labeled Level 1, Level 2, and Level 3,which is not intuitive. To name the levels as per your requirements, you can usethe <aliaslevel> element.
The action to be taken for the aliaslevel.action
Add the level number and level label.add
Update the level number and level label.update
Delete the level number and level label.delete
Default action.declare
Enter the level number like 1 or 2.level number
Enter the label for the level.level label
Examples of XML filesYou can create several types of XML files, including the following:
■ Add an object.See “Example 1: Adding an object” on page 674.
■ Add a view.See “Example 2: Adding a view” on page 675.
■ Update an objectSee “Example 3: Updating an object” on page 676.
■ Merge two objects into a single object.See “Example 4: Merging objects” on page 678.
Example 1: Adding an objectExample 1, when imported into OpsCenter Analytics, adds the object Detroitunder the MyMasterServers view.
(The DTD header has been snipped.)
674Creating views using CSV, TSV, and XML filesDTD <aliaslevel> elements
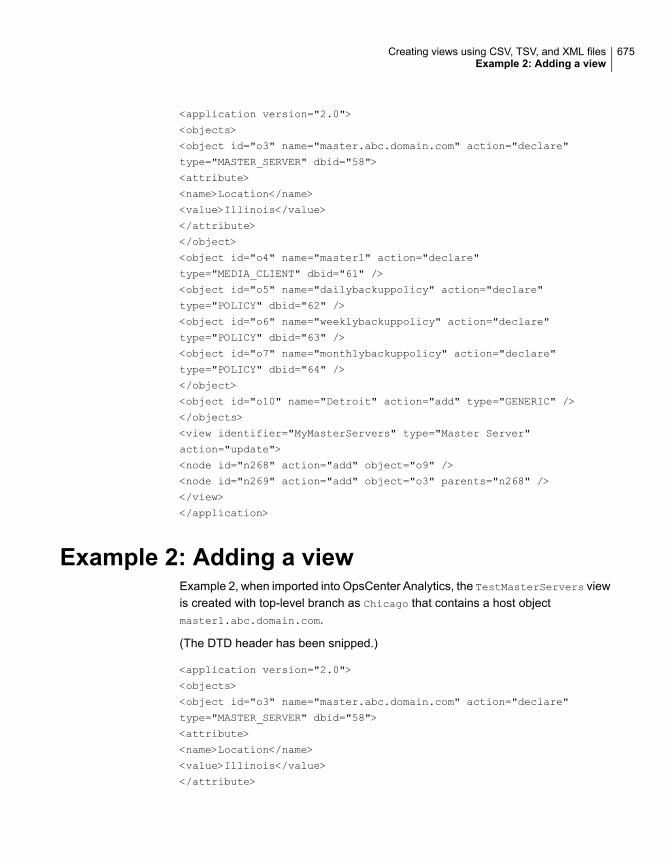
<application version="2.0">
<objects>
<object id="o3" name="master.abc.domain.com" action="declare"
type="MASTER_SERVER" dbid="58">
<attribute>
<name>Location</name>
<value>Illinois</value>
</attribute>
</object>
<object id="o4" name="master1" action="declare"
type="MEDIA_CLIENT" dbid="61" />
<object id="o5" name="dailybackuppolicy" action="declare"
type="POLICY" dbid="62" />
<object id="o6" name="weeklybackuppolicy" action="declare"
type="POLICY" dbid="63" />
<object id="o7" name="monthlybackuppolicy" action="declare"
type="POLICY" dbid="64" />
</object>
<object id="o10" name="Detroit" action="add" type="GENERIC" />
</objects>
<view identifier="MyMasterServers" type="Master Server"
action="update">
<node id="n268" action="add" object="o9" />
<node id="n269" action="add" object="o3" parents="n268" />
</view>
</application>
Example 2: Adding a viewExample 2, when imported into OpsCenter Analytics, the TestMasterServers viewis created with top-level branch as Chicago that contains a host objectmaster1.abc.domain.com.
(The DTD header has been snipped.)
<application version="2.0">
<objects>
<object id="o3" name="master.abc.domain.com" action="declare"
type="MASTER_SERVER" dbid="58">
<attribute>
<name>Location</name>
<value>Illinois</value>
</attribute>
675Creating views using CSV, TSV, and XML filesExample 2: Adding a view
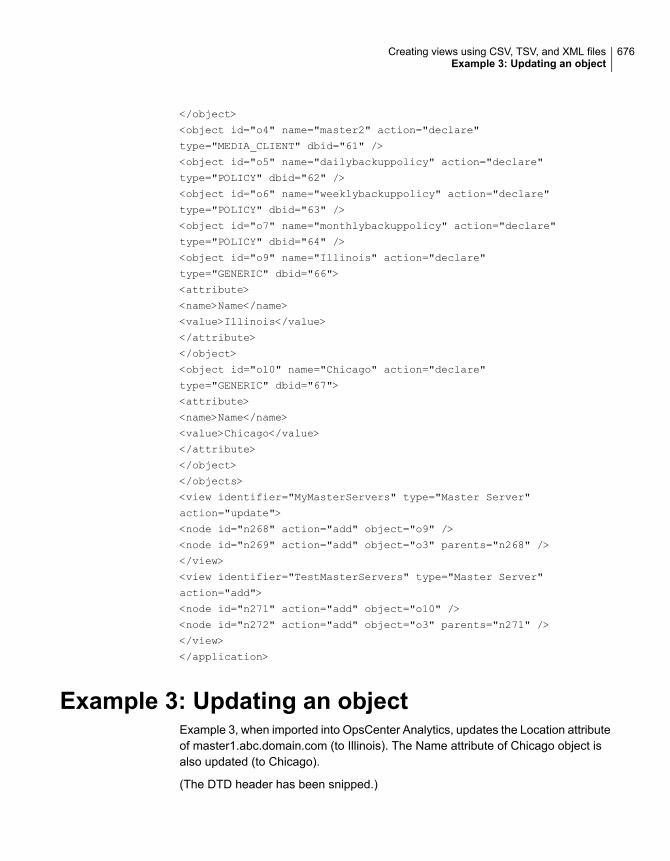
</object>
<object id="o4" name="master2" action="declare"
type="MEDIA_CLIENT" dbid="61" />
<object id="o5" name="dailybackuppolicy" action="declare"
type="POLICY" dbid="62" />
<object id="o6" name="weeklybackuppolicy" action="declare"
type="POLICY" dbid="63" />
<object id="o7" name="monthlybackuppolicy" action="declare"
type="POLICY" dbid="64" />
<object id="o9" name="Illinois" action="declare"
type="GENERIC" dbid="66">
<attribute>
<name>Name</name>
<value>Illinois</value>
</attribute>
</object>
<object id="o10" name="Chicago" action="declare"
type="GENERIC" dbid="67">
<attribute>
<name>Name</name>
<value>Chicago</value>
</attribute>
</object>
</objects>
<view identifier="MyMasterServers" type="Master Server"
action="update">
<node id="n268" action="add" object="o9" />
<node id="n269" action="add" object="o3" parents="n268" />
</view>
<view identifier="TestMasterServers" type="Master Server"
action="add">
<node id="n271" action="add" object="o10" />
<node id="n272" action="add" object="o3" parents="n271" />
</view>
</application>
Example 3: Updating an objectExample 3, when imported into OpsCenter Analytics, updates the Location attributeof master1.abc.domain.com (to Illinois). The Name attribute of Chicago object isalso updated (to Chicago).
(The DTD header has been snipped.)
676Creating views using CSV, TSV, and XML filesExample 3: Updating an object

<application version="2.0">
<objects>
<object id="o3" name="master.abc.domain.com" action="update"
type="MASTER_SERVER" dbid="58">
<attribute>
<name>Location</name>
<value>Illinois</value>
</attribute>
</object>
<object id="o4" name="master3" action="declare"
type="MEDIA_CLIENT" dbid="61" />
<object id="o5" name="dailybackuppolicy" action="declare"
type="POLICY" dbid="62" />
<object id="o6" name="weeklybackuppolicy" action="declare"
type="POLICY" dbid="63" />
<object id="o7" name="monthlybackuppolicy" action="declare"
type="POLICY" dbid="64" />
<object id="o9" name="Illinois" action="declare"
type="GENERIC" dbid="66">
<attribute>
<name>Name</name>
<value>Illinois</value>
</attribute>
</object>
<object id="o10" name="Chicago" action="update"
type="GENERIC" dbid="67">
<attribute>
<name>Name</name>
<value>Chicago</value>
</attribute>
</object>
</objects>
<view identifier="MyMasterServers" type="Master Server"
action="update">
<node id="n268" action="add" object="o9" />
<node id="n269" action="add" object="o3" parents="n268" />
</view>
</application>
677Creating views using CSV, TSV, and XML filesExample 3: Updating an object
Example 4: Merging objectsExample 4, when imported into OpsCenter Analytics, merges object “o2” into theobject “o1.” Objects “o1” and “o2” represent the same host. One has a host nameof “hostA.veritas.com” and the other has the host name as“hostXYZ.somedomain.veritas.com.” While merging object “o2” into object “o1,”you can specify “hostXYZ.somedomain.veritas.com” as an alias for object “o1.”After merging object “o2,” it is deleted and only object “o1” remains.
In Example 4, a host object has the hostname “hostA.veritas.com” which also goesby the name “hostXYZ.somedomain.veritas.com.” The XML export of this objectlooks like the following:
(The DTD header has been snipped.)
<object id="o1" action="declare" type="Host" dbid="50">
</object>
This example has another host object whose host name is “hostA” and whose XMLexport is as follows:
<object id="o2" action="declare" type="Host" dbid="70">
</object>
Now, whenever a particular OpsCenter Analytics Agent refers to a host as “hostA,”the OpsCenter Analytics Server identifies the object since one of its host namesmatches this object. After this object update, you can merge the two hosts with thefollowing syntax:
<mergeitems>
<mergeitem toobject = "o1" fromobject = "o2"/>
</mergeitems>
Merging of two hosts moves all data from the hostA object to the newly updatedobject and deletes the hostA object.
678Creating views using CSV, TSV, and XML filesExample 4: Merging objects

Error messages inOpsCenter
This appendix includes the following topics:
■ OpsCenter Error Messages
OpsCenter Error MessagesFollowing table lists OpsCenter error messages with the possible root cause of theproblem and details about the solutions that can be applied.
Table E-1 OpsCenter Error codes with Description
SolutionRoot CauseDescriptionError Code
Make sure that user running thereport has permission on the viewselected. If no permission for theview then user can edit the reportand re-run by selecting availableviews.
This error occurs when user ‘A’ savesthe report with a given view ‘V’(master/media/client) in public folder.Later in time, if administrator changespermission on the view ‘V’ for user ‘A’,then next time on running the report byuser ‘A’, will raise this exception.
The user does not havepermissions of the selectedview.
401
There is no direct way tosolve this problem. Bestway is to re-create thereport and re-run it.
This error occurs when user ‘A’ savesthe report ‘S’ in public folder and later intime if administrator delete user ‘A’ , andif User ‘B’ or Admin runs the savedreport ‘S’ , will fail to run because theoriginal user does not exists.
Provided user details areinvalid.
402
EAppendix
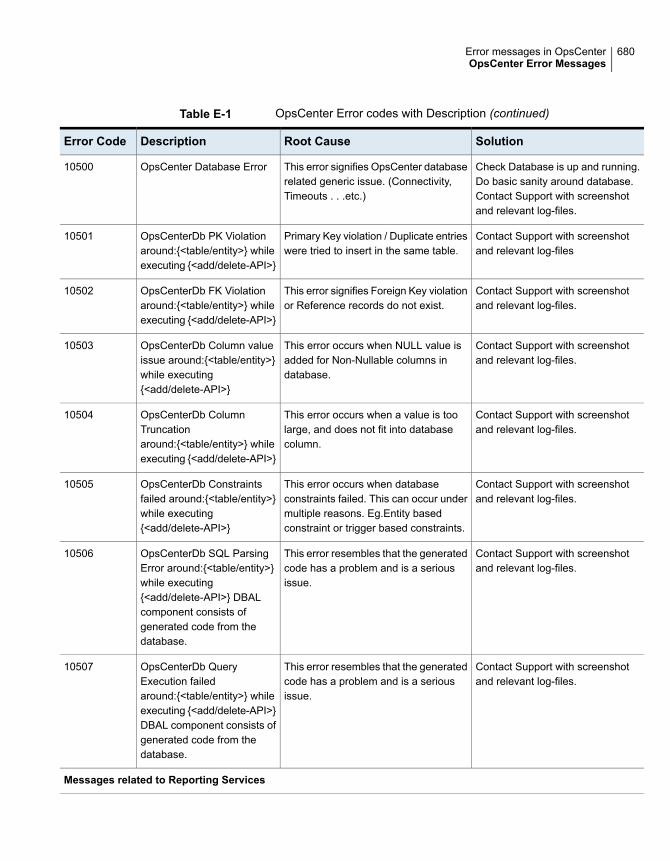
Table E-1 OpsCenter Error codes with Description (continued)
SolutionRoot CauseDescriptionError Code
Check Database is up and running.Do basic sanity around database.Contact Support with screenshotand relevant log-files.
This error signifies OpsCenter databaserelated generic issue. (Connectivity,Timeouts . . .etc.)
OpsCenter Database Error10500
Contact Support with screenshotand relevant log-files
Primary Key violation / Duplicate entrieswere tried to insert in the same table.
OpsCenterDb PK Violationaround:{<table/entity>} whileexecuting {<add/delete-API>}
10501
Contact Support with screenshotand relevant log-files.
This error signifies Foreign Key violationor Reference records do not exist.
OpsCenterDb FK Violationaround:{<table/entity>} whileexecuting {<add/delete-API>}
10502
Contact Support with screenshotand relevant log-files.
This error occurs when NULL value isadded for Non-Nullable columns indatabase.
OpsCenterDb Column valueissue around:{<table/entity>}while executing{<add/delete-API>}
10503
Contact Support with screenshotand relevant log-files.
This error occurs when a value is toolarge, and does not fit into databasecolumn.
OpsCenterDb ColumnTruncationaround:{<table/entity>} whileexecuting {<add/delete-API>}
10504
Contact Support with screenshotand relevant log-files.
This error occurs when databaseconstraints failed. This can occur undermultiple reasons. Eg.Entity basedconstraint or trigger based constraints.
OpsCenterDb Constraintsfailed around:{<table/entity>}while executing{<add/delete-API>}
10505
Contact Support with screenshotand relevant log-files.
This error resembles that the generatedcode has a problem and is a seriousissue.
OpsCenterDb SQL ParsingError around:{<table/entity>}while executing{<add/delete-API>} DBALcomponent consists ofgenerated code from thedatabase.
10506
Contact Support with screenshotand relevant log-files.
This error resembles that the generatedcode has a problem and is a seriousissue.
OpsCenterDb QueryExecution failedaround:{<table/entity>} whileexecuting {<add/delete-API>}DBAL component consists ofgenerated code from thedatabase.
10507
Messages related to Reporting Services
680Error messages in OpsCenterOpsCenter Error Messages

Table E-1 OpsCenter Error codes with Description (continued)
SolutionRoot CauseDescriptionError Code
Edit the saved report and select theviews which are currently availableand try again.
A view which is used in the saved reporthas been deleted. View can be deletedwithout validating that it is associatedwith a report.
The selected view for thisreport is not available. Theview that was associated withthis report might have beendeleted.
10802
User can see reports created by thatuser itself or the reports from apublic folder.
The user accessing the report may nothave permission to run/view the report.User is actually trying to access theprivate reports of other user bymodifying the URL parameters.
You have no permissions tosee the report {0}.
10804
Undefined filter should be definedproperly in filter definition xml file.
Incorrectly or undefined filter may causethe problem.
Filter {0} is not defined in XMLdefinition file. Please definethe filter inFilterAttributeList.xml.
10805
Make sure thatOPS_INSTALL_DIR/definitions/reports.zipfile is not corrupted or modified.
Each report is associated with xmldefinition file. This error occurs whenthere is no corresponding definition filefor a report.
Failed to load the XMLdefinition file {0}. Pleasecontact customer support forassistance.
10806
Make sure that no process is usingthe XML definition file.
XML definition file may be in use andtherefore cannot be read.
Failed to read the XML file.10807
Based on stack trace message, it ispossible to figure out where theproblem exists in the storedprocedure.
Stored procedure may fail due toformation of invalid query inside theprocedure.
Failed to execute storedprocedure {0}.
10808
Stack trace helps in finding the rootcause.
DBAL component exposes connectionto reporting.
Failed to get the databaseconnection.
10809
Make sure that the table has entryfor the running report.
Each report has an entry inreport_cannedReportMapping table.This table keeps the mapping betweenreport ID and XML file. If there is nomapping for the running report, then thiserror occurs.
Definition mapping for reportID {0} is failed to load fromthe database. Please checkreport_cannedReportMappingtable for the mapping.
10810
Stack trace helps in finding the rootcause.
Exception occurred while running thequery at the database level.
Failed to fetch the scheduleworkflow details from thedatabase.
10811
681Error messages in OpsCenterOpsCenter Error Messages
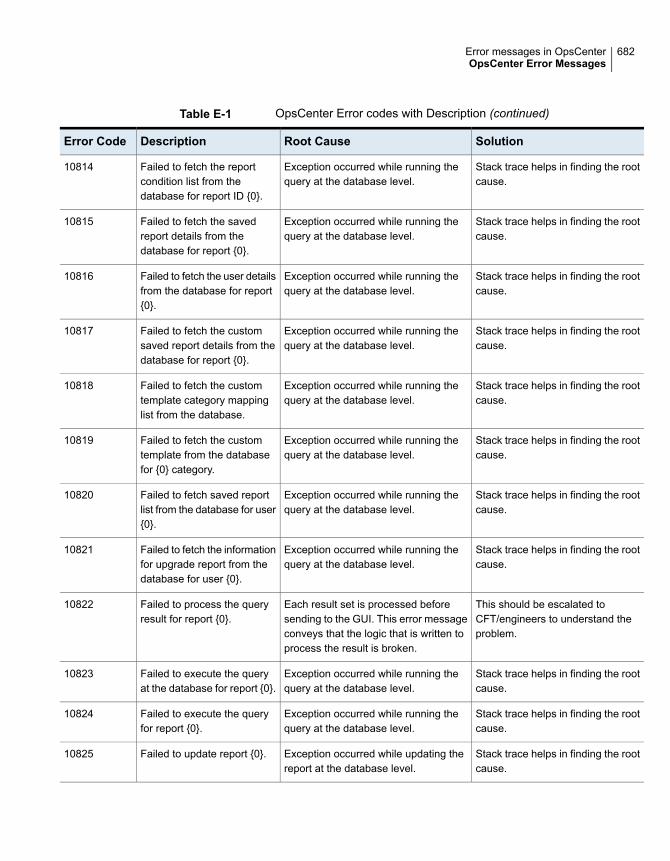
Table E-1 OpsCenter Error codes with Description (continued)
SolutionRoot CauseDescriptionError Code
Stack trace helps in finding the rootcause.
Exception occurred while running thequery at the database level.
Failed to fetch the reportcondition list from thedatabase for report ID {0}.
10814
Stack trace helps in finding the rootcause.
Exception occurred while running thequery at the database level.
Failed to fetch the savedreport details from thedatabase for report {0}.
10815
Stack trace helps in finding the rootcause.
Exception occurred while running thequery at the database level.
Failed to fetch the user detailsfrom the database for report{0}.
10816
Stack trace helps in finding the rootcause.
Exception occurred while running thequery at the database level.
Failed to fetch the customsaved report details from thedatabase for report {0}.
10817
Stack trace helps in finding the rootcause.
Exception occurred while running thequery at the database level.
Failed to fetch the customtemplate category mappinglist from the database.
10818
Stack trace helps in finding the rootcause.
Exception occurred while running thequery at the database level.
Failed to fetch the customtemplate from the databasefor {0} category.
10819
Stack trace helps in finding the rootcause.
Exception occurred while running thequery at the database level.
Failed to fetch saved reportlist from the database for user{0}.
10820
Stack trace helps in finding the rootcause.
Exception occurred while running thequery at the database level.
Failed to fetch the informationfor upgrade report from thedatabase for user {0}.
10821
This should be escalated toCFT/engineers to understand theproblem.
Each result set is processed beforesending to the GUI. This error messageconveys that the logic that is written toprocess the result is broken.
Failed to process the queryresult for report {0}.
10822
Stack trace helps in finding the rootcause.
Exception occurred while running thequery at the database level.
Failed to execute the queryat the database for report {0}.
10823
Stack trace helps in finding the rootcause.
Exception occurred while running thequery at the database level.
Failed to execute the queryfor report {0}.
10824
Stack trace helps in finding the rootcause.
Exception occurred while updating thereport at the database level.
Failed to update report {0}.10825
682Error messages in OpsCenterOpsCenter Error Messages
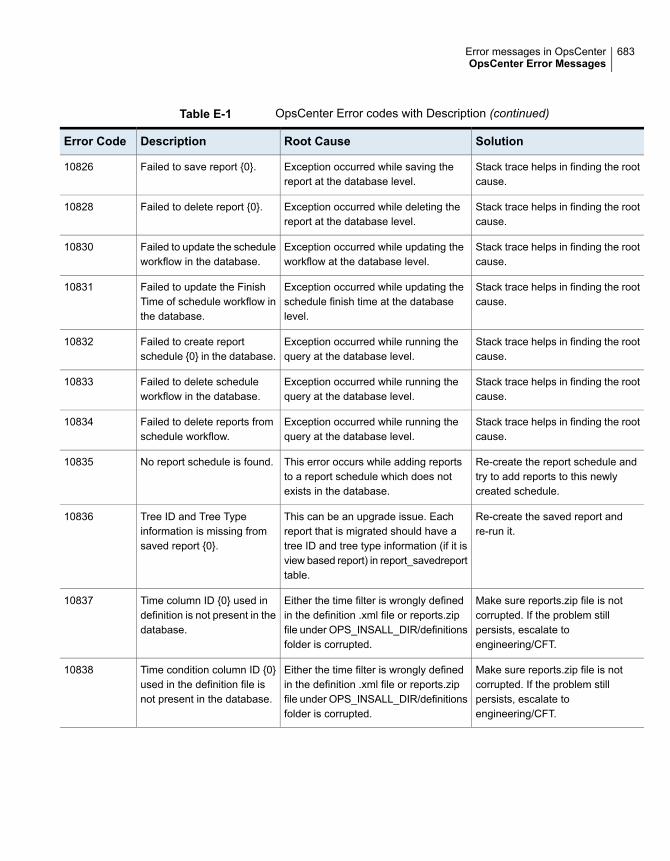
Table E-1 OpsCenter Error codes with Description (continued)
SolutionRoot CauseDescriptionError Code
Stack trace helps in finding the rootcause.
Exception occurred while saving thereport at the database level.
Failed to save report {0}.10826
Stack trace helps in finding the rootcause.
Exception occurred while deleting thereport at the database level.
Failed to delete report {0}.10828
Stack trace helps in finding the rootcause.
Exception occurred while updating theworkflow at the database level.
Failed to update the scheduleworkflow in the database.
10830
Stack trace helps in finding the rootcause.
Exception occurred while updating theschedule finish time at the databaselevel.
Failed to update the FinishTime of schedule workflow inthe database.
10831
Stack trace helps in finding the rootcause.
Exception occurred while running thequery at the database level.
Failed to create reportschedule {0} in the database.
10832
Stack trace helps in finding the rootcause.
Exception occurred while running thequery at the database level.
Failed to delete scheduleworkflow in the database.
10833
Stack trace helps in finding the rootcause.
Exception occurred while running thequery at the database level.
Failed to delete reports fromschedule workflow.
10834
Re-create the report schedule andtry to add reports to this newlycreated schedule.
This error occurs while adding reportsto a report schedule which does notexists in the database.
No report schedule is found.10835
Re-create the saved report andre-run it.
This can be an upgrade issue. Eachreport that is migrated should have atree ID and tree type information (if it isview based report) in report_savedreporttable.
Tree ID and Tree Typeinformation is missing fromsaved report {0}.
10836
Make sure reports.zip file is notcorrupted. If the problem stillpersists, escalate toengineering/CFT.
Either the time filter is wrongly definedin the definition .xml file or reports.zipfile under OPS_INSALL_DIR/definitionsfolder is corrupted.
Time column ID {0} used indefinition is not present in thedatabase.
10837
Make sure reports.zip file is notcorrupted. If the problem stillpersists, escalate toengineering/CFT.
Either the time filter is wrongly definedin the definition .xml file or reports.zipfile under OPS_INSALL_DIR/definitionsfolder is corrupted.
Time condition column ID {0}used in the definition file isnot present in the database.
10838
683Error messages in OpsCenterOpsCenter Error Messages
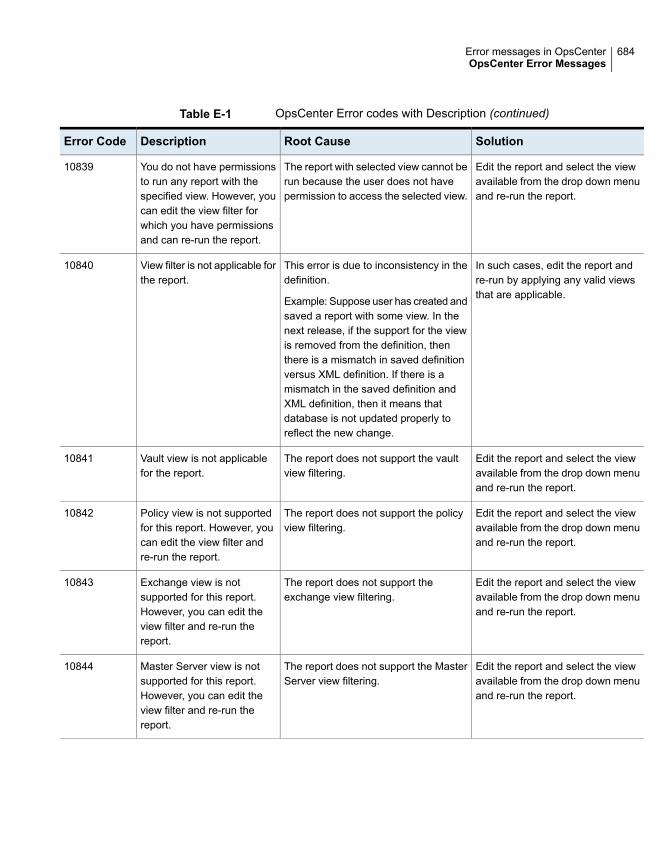
Table E-1 OpsCenter Error codes with Description (continued)
SolutionRoot CauseDescriptionError Code
Edit the report and select the viewavailable from the drop down menuand re-run the report.
The report with selected view cannot berun because the user does not havepermission to access the selected view.
You do not have permissionsto run any report with thespecified view. However, youcan edit the view filter forwhich you have permissionsand can re-run the report.
10839
In such cases, edit the report andre-run by applying any valid viewsthat are applicable.
This error is due to inconsistency in thedefinition.
Example: Suppose user has created andsaved a report with some view. In thenext release, if the support for the viewis removed from the definition, thenthere is a mismatch in saved definitionversus XML definition. If there is amismatch in the saved definition andXML definition, then it means thatdatabase is not updated properly toreflect the new change.
View filter is not applicable forthe report.
10840
Edit the report and select the viewavailable from the drop down menuand re-run the report.
The report does not support the vaultview filtering.
Vault view is not applicablefor the report.
10841
Edit the report and select the viewavailable from the drop down menuand re-run the report.
The report does not support the policyview filtering.
Policy view is not supportedfor this report. However, youcan edit the view filter andre-run the report.
10842
Edit the report and select the viewavailable from the drop down menuand re-run the report.
The report does not support theexchange view filtering.
Exchange view is notsupported for this report.However, you can edit theview filter and re-run thereport.
10843
Edit the report and select the viewavailable from the drop down menuand re-run the report.
The report does not support the MasterServer view filtering.
Master Server view is notsupported for this report.However, you can edit theview filter and re-run thereport.
10844
684Error messages in OpsCenterOpsCenter Error Messages
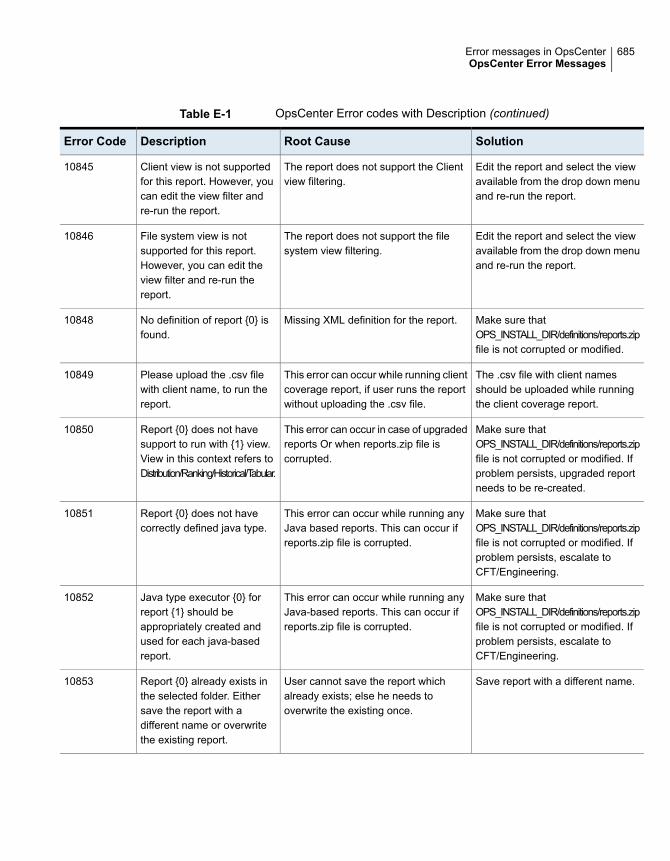
Table E-1 OpsCenter Error codes with Description (continued)
SolutionRoot CauseDescriptionError Code
Edit the report and select the viewavailable from the drop down menuand re-run the report.
The report does not support the Clientview filtering.
Client view is not supportedfor this report. However, youcan edit the view filter andre-run the report.
10845
Edit the report and select the viewavailable from the drop down menuand re-run the report.
The report does not support the filesystem view filtering.
File system view is notsupported for this report.However, you can edit theview filter and re-run thereport.
10846
Make sure thatOPS_INSTALL_DIR/definitions/reports.zipfile is not corrupted or modified.
Missing XML definition for the report.No definition of report {0} isfound.
10848
The .csv file with client namesshould be uploaded while runningthe client coverage report.
This error can occur while running clientcoverage report, if user runs the reportwithout uploading the .csv file.
Please upload the .csv filewith client name, to run thereport.
10849
Make sure thatOPS_INSTALL_DIR/definitions/reports.zipfile is not corrupted or modified. Ifproblem persists, upgraded reportneeds to be re-created.
This error can occur in case of upgradedreports Or when reports.zip file iscorrupted.
Report {0} does not havesupport to run with {1} view.View in this context refers toDistribution/Ranking/Historical/Tabular.
10850
Make sure thatOPS_INSTALL_DIR/definitions/reports.zipfile is not corrupted or modified. Ifproblem persists, escalate toCFT/Engineering.
This error can occur while running anyJava based reports. This can occur ifreports.zip file is corrupted.
Report {0} does not havecorrectly defined java type.
10851
Make sure thatOPS_INSTALL_DIR/definitions/reports.zipfile is not corrupted or modified. Ifproblem persists, escalate toCFT/Engineering.
This error can occur while running anyJava-based reports. This can occur ifreports.zip file is corrupted.
Java type executor {0} forreport {1} should beappropriately created andused for each java-basedreport.
10852
Save report with a different name.User cannot save the report whichalready exists; else he needs tooverwrite the existing once.
Report {0} already exists inthe selected folder. Eithersave the report with adifferent name or overwritethe existing report.
10853
685Error messages in OpsCenterOpsCenter Error Messages
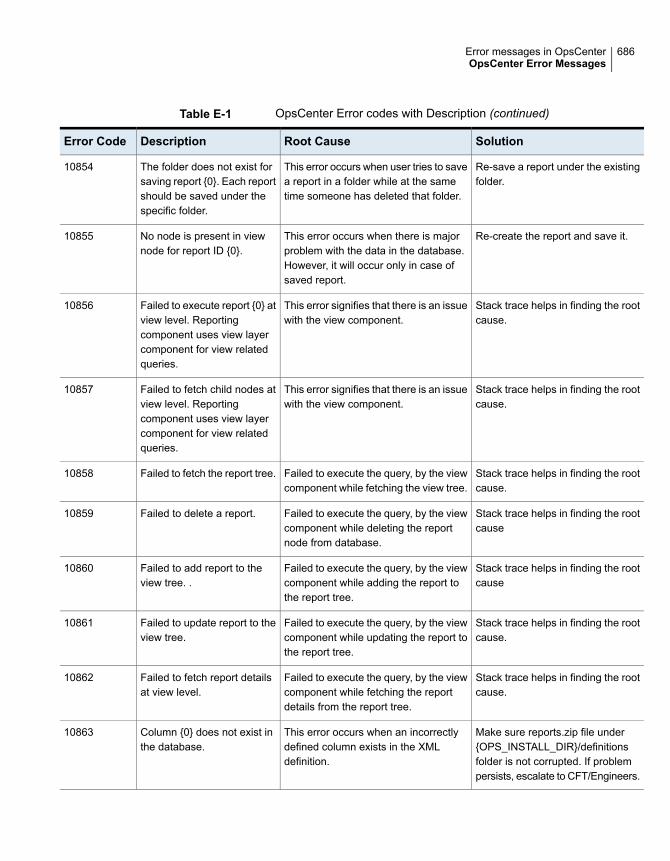
Table E-1 OpsCenter Error codes with Description (continued)
SolutionRoot CauseDescriptionError Code
Re-save a report under the existingfolder.
This error occurs when user tries to savea report in a folder while at the sametime someone has deleted that folder.
The folder does not exist forsaving report {0}. Each reportshould be saved under thespecific folder.
10854
Re-create the report and save it.This error occurs when there is majorproblem with the data in the database.However, it will occur only in case ofsaved report.
No node is present in viewnode for report ID {0}.
10855
Stack trace helps in finding the rootcause.
This error signifies that there is an issuewith the view component.
Failed to execute report {0} atview level. Reportingcomponent uses view layercomponent for view relatedqueries.
10856
Stack trace helps in finding the rootcause.
This error signifies that there is an issuewith the view component.
Failed to fetch child nodes atview level. Reportingcomponent uses view layercomponent for view relatedqueries.
10857
Stack trace helps in finding the rootcause.
Failed to execute the query, by the viewcomponent while fetching the view tree.
Failed to fetch the report tree.10858
Stack trace helps in finding the rootcause
Failed to execute the query, by the viewcomponent while deleting the reportnode from database.
Failed to delete a report.10859
Stack trace helps in finding the rootcause
Failed to execute the query, by the viewcomponent while adding the report tothe report tree.
Failed to add report to theview tree. .
10860
Stack trace helps in finding the rootcause.
Failed to execute the query, by the viewcomponent while updating the report tothe report tree.
Failed to update report to theview tree.
10861
Stack trace helps in finding the rootcause.
Failed to execute the query, by the viewcomponent while fetching the reportdetails from the report tree.
Failed to fetch report detailsat view level.
10862
Make sure reports.zip file under{OPS_INSTALL_DIR}/definitionsfolder is not corrupted. If problempersists, escalate to CFT/Engineers.
This error occurs when an incorrectlydefined column exists in the XMLdefinition.
Column {0} does not exist inthe database.
10863
686Error messages in OpsCenterOpsCenter Error Messages

Table E-1 OpsCenter Error codes with Description (continued)
SolutionRoot CauseDescriptionError Code
Save the report schedule with adifferent name.
Duplicate report schedule names arenot allowed.
Report schedule {0} alreadyexists. Please specify adifferent name.
10864
Make sure that agent is configuredcorrectly. Stack trace helps infinding the root cause.
This error occurs only when we runexplicit data collection for License report(Capacity and Traditional). It implies thatagent is not able to collect the data fromthe Master Server.
Data collection failed forselected Master Servers.
10865
Stack trace helps in finding theexact issue.
This error occurs only while runninglicense report (Capacity /Traditional). Itresembles that an error has occurredwhile performing File IO operation.
An error has occurred whilerunning the licensing report.
10866
From the log file, check if anyexception is thrown by nbdeployutil.Since this is an executable, itcreates its own log file which isshown as a link in the License reportGUI.
This error is caused while runningnbdeployutil. Capacity license report isgenerated via nbdeployutil executableand any error thrown will be the rootcause.
Generating license report isfailed due to {0}.
10867
From the log file, check if anyexception is thrown by nbdeployutil.Since this is an executable, itcreates its own log file which isshown as a link in the License reportGUI.
Capacity license report generationdepends on nbdeployutil executable.
Generating license report isfailed. From the log file, checkif any exception is thrown bynbdeployutil.
10868
Configure Master Server for whichlicense report needs to begenerated.
License report (Capacity /Traditional)can be executed only when at least oneMaster Server is configured inOpsCenter.
No Master Server isconfigured for collecting thelicensing data.
10869
Make sure you run the report onlywhen previous request for run iscompleted.
This error occurs when user tries to runlicense report multiple times at the sametime. User cannot run license reportmultiple times at any given point in time.
License Data Collection orReport Generation is alreadyin progress.
10870
Log file will help in finding the exactroot cause.
This error occurs when Licensing report(Capacity /Traditional) fails to performsome of the database activity likefetching status of the failed masterserver.
Failed to fetch licensingdetails from the database.
10871
687Error messages in OpsCenterOpsCenter Error Messages
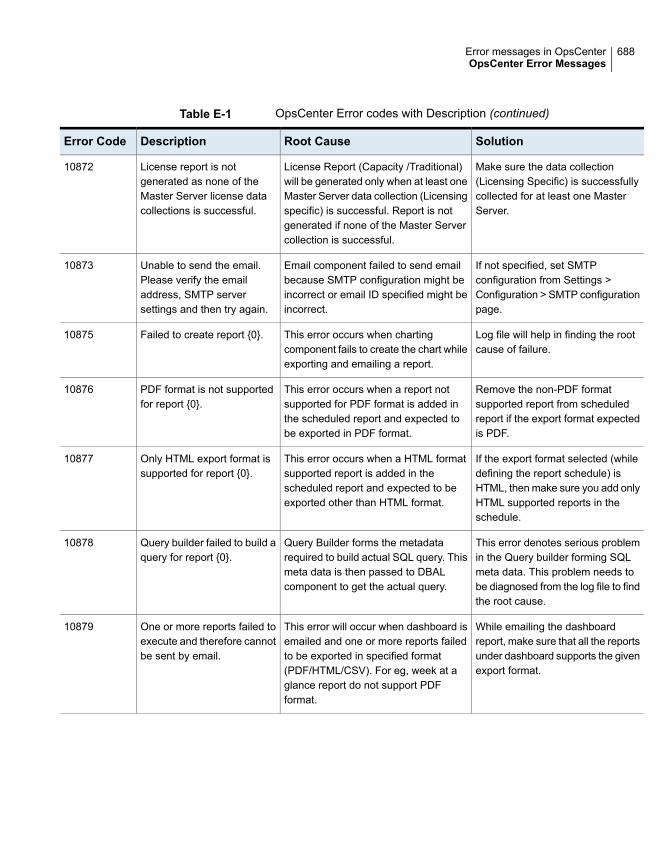
Table E-1 OpsCenter Error codes with Description (continued)
SolutionRoot CauseDescriptionError Code
Make sure the data collection(Licensing Specific) is successfullycollected for at least one MasterServer.
License Report (Capacity /Traditional)will be generated only when at least oneMaster Server data collection (Licensingspecific) is successful. Report is notgenerated if none of the Master Servercollection is successful.
License report is notgenerated as none of theMaster Server license datacollections is successful.
10872
If not specified, set SMTPconfiguration from Settings >Configuration > SMTP configurationpage.
Email component failed to send emailbecause SMTP configuration might beincorrect or email ID specified might beincorrect.
Unable to send the email.Please verify the emailaddress, SMTP serversettings and then try again.
10873
Log file will help in finding the rootcause of failure.
This error occurs when chartingcomponent fails to create the chart whileexporting and emailing a report.
Failed to create report {0}.10875
Remove the non-PDF formatsupported report from scheduledreport if the export format expectedis PDF.
This error occurs when a report notsupported for PDF format is added inthe scheduled report and expected tobe exported in PDF format.
PDF format is not supportedfor report {0}.
10876
If the export format selected (whiledefining the report schedule) isHTML, then make sure you add onlyHTML supported reports in theschedule.
This error occurs when a HTML formatsupported report is added in thescheduled report and expected to beexported other than HTML format.
Only HTML export format issupported for report {0}.
10877
This error denotes serious problemin the Query builder forming SQLmeta data. This problem needs tobe diagnosed from the log file to findthe root cause.
Query Builder forms the metadatarequired to build actual SQL query. Thismeta data is then passed to DBALcomponent to get the actual query.
Query builder failed to build aquery for report {0}.
10878
While emailing the dashboardreport, make sure that all the reportsunder dashboard supports the givenexport format.
This error will occur when dashboard isemailed and one or more reports failedto be exported in specified format(PDF/HTML/CSV). For eg, week at aglance report do not support PDFformat.
One or more reports failed toexecute and therefore cannotbe sent by email.
10879
688Error messages in OpsCenterOpsCenter Error Messages
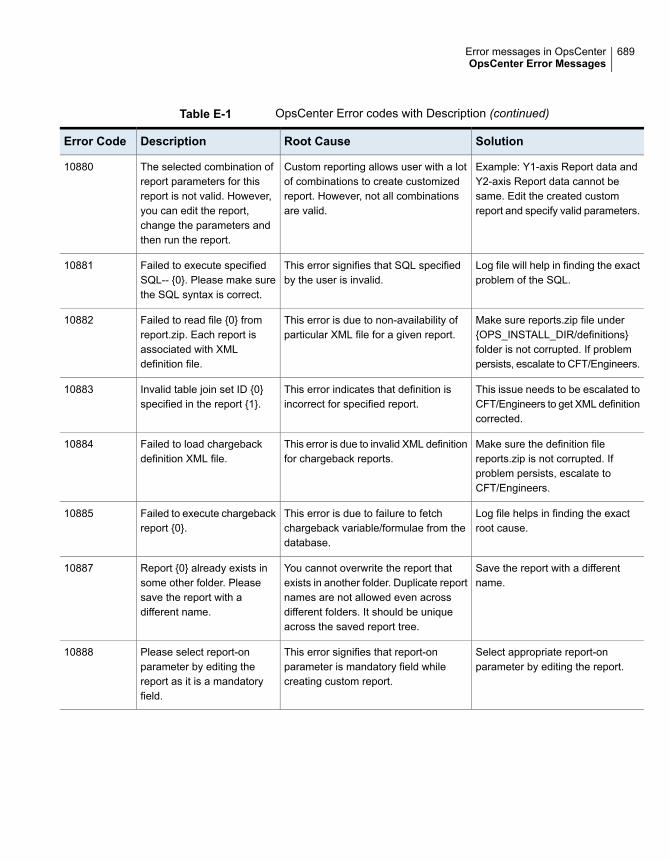
Table E-1 OpsCenter Error codes with Description (continued)
SolutionRoot CauseDescriptionError Code
Example: Y1-axis Report data andY2-axis Report data cannot besame. Edit the created customreport and specify valid parameters.
Custom reporting allows user with a lotof combinations to create customizedreport. However, not all combinationsare valid.
The selected combination ofreport parameters for thisreport is not valid. However,you can edit the report,change the parameters andthen run the report.
10880
Log file will help in finding the exactproblem of the SQL.
This error signifies that SQL specifiedby the user is invalid.
Failed to execute specifiedSQL-- {0}. Please make surethe SQL syntax is correct.
10881
Make sure reports.zip file under{OPS_INSTALL_DIR/definitions}folder is not corrupted. If problempersists, escalate to CFT/Engineers.
This error is due to non-availability ofparticular XML file for a given report.
Failed to read file {0} fromreport.zip. Each report isassociated with XMLdefinition file.
10882
This issue needs to be escalated toCFT/Engineers to get XML definitioncorrected.
This error indicates that definition isincorrect for specified report.
Invalid table join set ID {0}specified in the report {1}.
10883
Make sure the definition filereports.zip is not corrupted. Ifproblem persists, escalate toCFT/Engineers.
This error is due to invalid XML definitionfor chargeback reports.
Failed to load chargebackdefinition XML file.
10884
Log file helps in finding the exactroot cause.
This error is due to failure to fetchchargeback variable/formulae from thedatabase.
Failed to execute chargebackreport {0}.
10885
Save the report with a differentname.
You cannot overwrite the report thatexists in another folder. Duplicate reportnames are not allowed even acrossdifferent folders. It should be uniqueacross the saved report tree.
Report {0} already exists insome other folder. Pleasesave the report with adifferent name.
10887
Select appropriate report-onparameter by editing the report.
This error signifies that report-onparameter is mandatory field whilecreating custom report.
Please select report-onparameter by editing thereport as it is a mandatoryfield.
10888
689Error messages in OpsCenterOpsCenter Error Messages

Table E-1 OpsCenter Error codes with Description (continued)
SolutionRoot CauseDescriptionError Code
User needs to fire only thosequeries which will NOT corruptOpsCenter database
This can be harmful if user firesdelete/update query on OpsCenterdatabase and thus getting corrupted.This error denotes that user do not havepermission to execute the specifiedSQL. However he can fire update/deleteon tables which he has created onOpsCenter Database.
You do not have permissionto execute the SQL-- {0}.Custom SQL allows user tofire any SQL as per choice.
10889
Select appropriate Y-axis reportdata parameter by editing the report.
This error signifies that Y-axis reportdata parameter is mandatory field whilecreating a custom report.
Please select Y-axisreport-data parameter byediting the report as it is amandatory field.
10890
Select appropriate Time-basisparameter by editing the report.
This error signifies that Time-basisparameter is mandatory field whilecreating custom report.
Please select Time-basisparameter by editing thereport as it is a mandatoryfield.
10891
Select appropriate Y-axis functionparameter by editing the report.
This error signifies that Y-axis functionparameter is mandatory field whilecreating custom report.
Please select Y-axis functionparameter by editing thereport as it is a mandatoryfield.
10892
Select appropriate X-axis reportdata parameter by editing the report.
This error signifies that X-axis Reportdata parameter is mandatory field whilecreating custom report.
Please select X-axisReport-data parameter byediting the report as it is amandatory field.
10893
Remove all invalid columns andre-run the report.
This error signifies that one or morecolumns in custom tabular reportcreated are invalid. The label of theinvalid columns is usually “-“. Removeall such columns that are selected andre-run the report. This issue usuallyoccurs in case of upgraded reports. Ifone or more columns are not mappedcorrectly while upgrading, then suchissue occurs.
One or more selectedcolumns are invalid. Pleaseedit the report and removeinvalid columns.
10894
Messages related to SCL
690Error messages in OpsCenterOpsCenter Error Messages
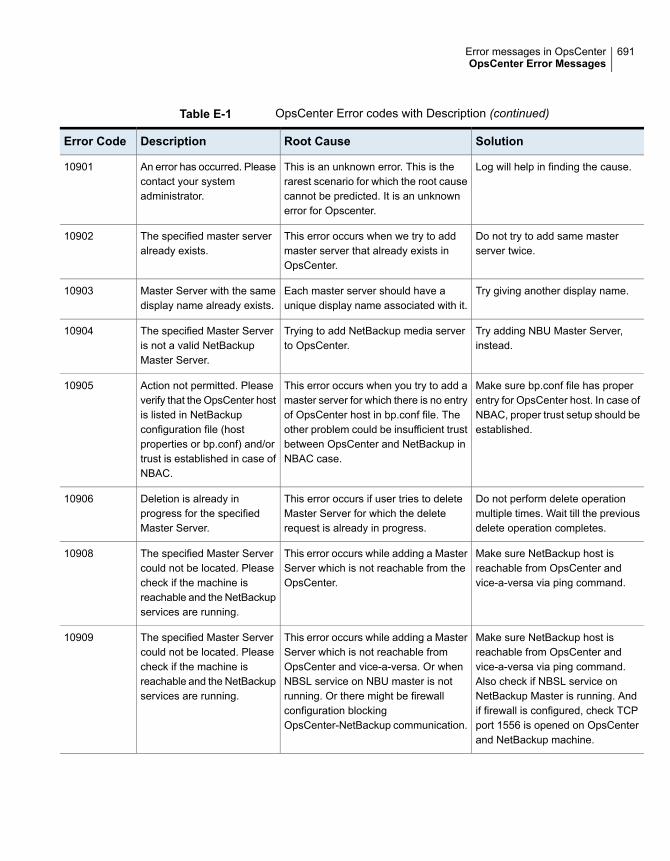
Table E-1 OpsCenter Error codes with Description (continued)
SolutionRoot CauseDescriptionError Code
Log will help in finding the cause.This is an unknown error. This is therarest scenario for which the root causecannot be predicted. It is an unknownerror for Opscenter.
An error has occurred. Pleasecontact your systemadministrator.
10901
Do not try to add same masterserver twice.
This error occurs when we try to addmaster server that already exists inOpsCenter.
The specified master serveralready exists.
10902
Try giving another display name.Each master server should have aunique display name associated with it.
Master Server with the samedisplay name already exists.
10903
Try adding NBU Master Server,instead.
Trying to add NetBackup media serverto OpsCenter.
The specified Master Serveris not a valid NetBackupMaster Server.
10904
Make sure bp.conf file has properentry for OpsCenter host. In case ofNBAC, proper trust setup should beestablished.
This error occurs when you try to add amaster server for which there is no entryof OpsCenter host in bp.conf file. Theother problem could be insufficient trustbetween OpsCenter and NetBackup inNBAC case.
Action not permitted. Pleaseverify that the OpsCenter hostis listed in NetBackupconfiguration file (hostproperties or bp.conf) and/ortrust is established in case ofNBAC.
10905
Do not perform delete operationmultiple times. Wait till the previousdelete operation completes.
This error occurs if user tries to deleteMaster Server for which the deleterequest is already in progress.
Deletion is already inprogress for the specifiedMaster Server.
10906
Make sure NetBackup host isreachable from OpsCenter andvice-a-versa via ping command.
This error occurs while adding a MasterServer which is not reachable from theOpsCenter.
The specified Master Servercould not be located. Pleasecheck if the machine isreachable and the NetBackupservices are running.
10908
Make sure NetBackup host isreachable from OpsCenter andvice-a-versa via ping command.Also check if NBSL service onNetBackup Master is running. Andif firewall is configured, check TCPport 1556 is opened on OpsCenterand NetBackup machine.
This error occurs while adding a MasterServer which is not reachable fromOpsCenter and vice-a-versa. Or whenNBSL service on NBU master is notrunning. Or there might be firewallconfiguration blockingOpsCenter-NetBackup communication.
The specified Master Servercould not be located. Pleasecheck if the machine isreachable and the NetBackupservices are running.
10909
691Error messages in OpsCenterOpsCenter Error Messages
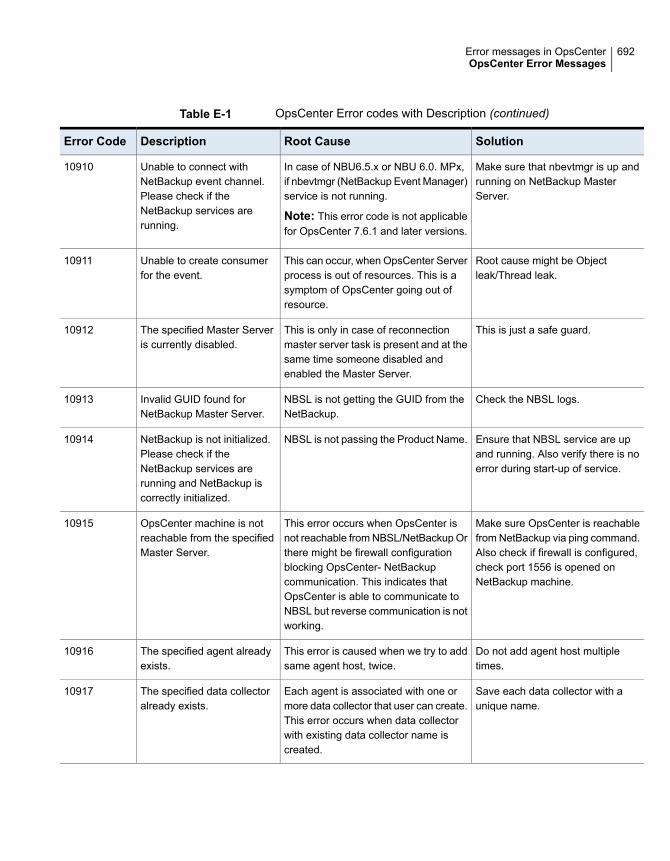
Table E-1 OpsCenter Error codes with Description (continued)
SolutionRoot CauseDescriptionError Code
Make sure that nbevtmgr is up andrunning on NetBackup MasterServer.
In case of NBU6.5.x or NBU 6.0. MPx,if nbevtmgr (NetBackup Event Manager)service is not running.
Note: This error code is not applicablefor OpsCenter 7.6.1 and later versions.
Unable to connect withNetBackup event channel.Please check if theNetBackup services arerunning.
10910
Root cause might be Objectleak/Thread leak.
This can occur, when OpsCenter Serverprocess is out of resources. This is asymptom of OpsCenter going out ofresource.
Unable to create consumerfor the event.
10911
This is just a safe guard.This is only in case of reconnectionmaster server task is present and at thesame time someone disabled andenabled the Master Server.
The specified Master Serveris currently disabled.
10912
Check the NBSL logs.NBSL is not getting the GUID from theNetBackup.
Invalid GUID found forNetBackup Master Server.
10913
Ensure that NBSL service are upand running. Also verify there is noerror during start-up of service.
NBSL is not passing the Product Name.NetBackup is not initialized.Please check if theNetBackup services arerunning and NetBackup iscorrectly initialized.
10914
Make sure OpsCenter is reachablefrom NetBackup via ping command.Also check if firewall is configured,check port 1556 is opened onNetBackup machine.
This error occurs when OpsCenter isnot reachable from NBSL/NetBackup Orthere might be firewall configurationblocking OpsCenter- NetBackupcommunication. This indicates thatOpsCenter is able to communicate toNBSL but reverse communication is notworking.
OpsCenter machine is notreachable from the specifiedMaster Server.
10915
Do not add agent host multipletimes.
This error is caused when we try to addsame agent host, twice.
The specified agent alreadyexists.
10916
Save each data collector with aunique name.
Each agent is associated with one ormore data collector that user can create.This error occurs when data collectorwith existing data collector name iscreated.
The specified data collectoralready exists.
10917
692Error messages in OpsCenterOpsCenter Error Messages

Table E-1 OpsCenter Error codes with Description (continued)
SolutionRoot CauseDescriptionError Code
User will see the refreshed list byagain accessing the agent homepage.
This occurs when one user is editing theagent and another user deleted thesame agent from another session.Basically one user is working on staledata.
The specified agent is alreadydeleted.
10925
User will see the refreshed list byagain accessing the agent homepage.
This occurs when one user is editing thedata collector and another user hasdeleted the same data collector fromanother session. Basically one user isworking on stale data.
The specified data collectoris already deleted. Comeback to agent home page anduser will see the refreshedlist.
10926
Try updating after some timeassuming that other user hascompleted updating.
While updating agent information, thereare chances that multiple users try tomodify the same agent at the same time.This can make database inconsistentand hence the error message.
The specified agent has beenupdated by other user. Pleasetry again.
10927
Try updating after some timeassuming that other user hascompleted updating.
While updating data collectorinformation, there are chances thatmultiple users try to modify the samedata collector at the same time. This canmake database inconsistent and hencethe error message.
The specified data collectorhas been updated by otheruser. Please try again.
10928
Install agent on Windows platform.This error signifies that agent is notinstalled on the supported platform.
The specified platform is notsupported. Agent is supportedon Windows platform.
10929
Make sure Point Product host isreachable from OpsCenter andvice-a-versa via ping command.
This error occurs while adding a pointproduct host which is not reachable fromOpsCenter. Or there might be firewallconfiguration blockingOpsCenter,-NetBackup communication.
Unable to connect withspecified target host.
10930
Install the appropriate license forpoint product data collection.
This occurs when product is not licensedfor data collection.
The specified product is notlicensed.
10931
Make sure that agent host isreachable from OpsCenter host andvice-a-versa.
This error occurs when OpsCenter isunable to connect with agent host.
Unable to connect with agent.Please check if the machineis reachable and the agentservice is running.
10932
693Error messages in OpsCenterOpsCenter Error Messages
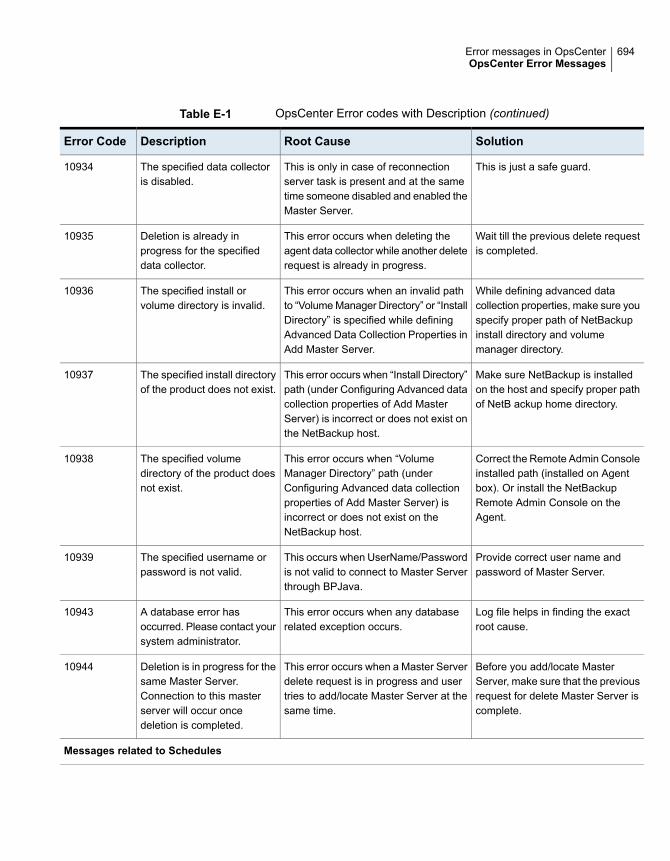
Table E-1 OpsCenter Error codes with Description (continued)
SolutionRoot CauseDescriptionError Code
This is just a safe guard.This is only in case of reconnectionserver task is present and at the sametime someone disabled and enabled theMaster Server.
The specified data collectoris disabled.
10934
Wait till the previous delete requestis completed.
This error occurs when deleting theagent data collector while another deleterequest is already in progress.
Deletion is already inprogress for the specifieddata collector.
10935
While defining advanced datacollection properties, make sure youspecify proper path of NetBackupinstall directory and volumemanager directory.
This error occurs when an invalid pathto “Volume Manager Directory” or “InstallDirectory” is specified while definingAdvanced Data Collection Properties inAdd Master Server.
The specified install orvolume directory is invalid.
10936
Make sure NetBackup is installedon the host and specify proper pathof NetB ackup home directory.
This error occurs when “Install Directory”path (under Configuring Advanced datacollection properties of Add MasterServer) is incorrect or does not exist onthe NetBackup host.
The specified install directoryof the product does not exist.
10937
Correct the Remote Admin Consoleinstalled path (installed on Agentbox). Or install the NetBackupRemote Admin Console on theAgent.
This error occurs when “VolumeManager Directory” path (underConfiguring Advanced data collectionproperties of Add Master Server) isincorrect or does not exist on theNetBackup host.
The specified volumedirectory of the product doesnot exist.
10938
Provide correct user name andpassword of Master Server.
This occurs when UserName/Passwordis not valid to connect to Master Serverthrough BPJava.
The specified username orpassword is not valid.
10939
Log file helps in finding the exactroot cause.
This error occurs when any databaserelated exception occurs.
A database error hasoccurred. Please contact yoursystem administrator.
10943
Before you add/locate MasterServer, make sure that the previousrequest for delete Master Server iscomplete.
This error occurs when a Master Serverdelete request is in progress and usertries to add/locate Master Server at thesame time.
Deletion is in progress for thesame Master Server.Connection to this masterserver will occur oncedeletion is completed.
10944
Messages related to Schedules
694Error messages in OpsCenterOpsCenter Error Messages
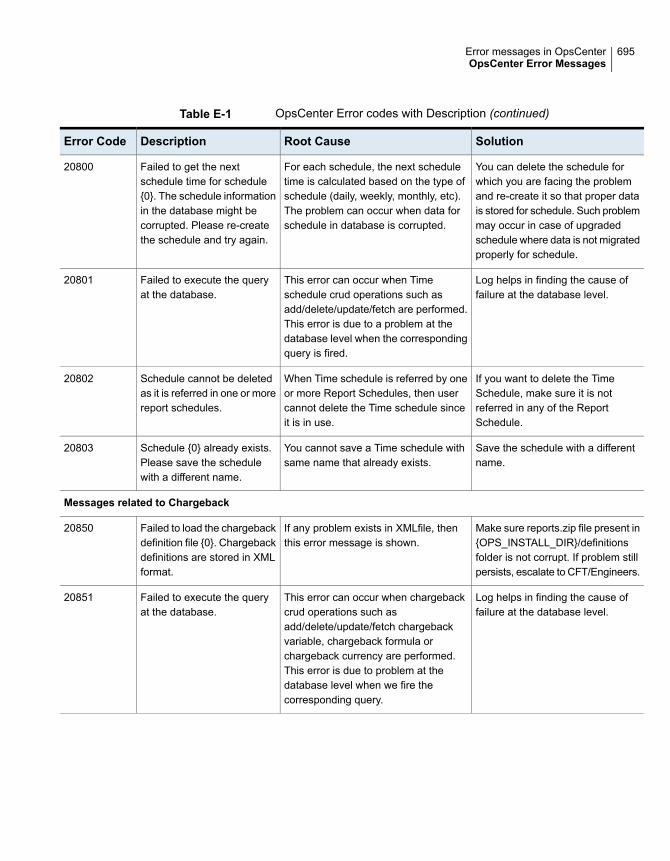
Table E-1 OpsCenter Error codes with Description (continued)
SolutionRoot CauseDescriptionError Code
You can delete the schedule forwhich you are facing the problemand re-create it so that proper datais stored for schedule. Such problemmay occur in case of upgradedschedule where data is not migratedproperly for schedule.
For each schedule, the next scheduletime is calculated based on the type ofschedule (daily, weekly, monthly, etc).The problem can occur when data forschedule in database is corrupted.
Failed to get the nextschedule time for schedule{0}. The schedule informationin the database might becorrupted. Please re-createthe schedule and try again.
20800
Log helps in finding the cause offailure at the database level.
This error can occur when Timeschedule crud operations such asadd/delete/update/fetch are performed.This error is due to a problem at thedatabase level when the correspondingquery is fired.
Failed to execute the queryat the database.
20801
If you want to delete the TimeSchedule, make sure it is notreferred in any of the ReportSchedule.
When Time schedule is referred by oneor more Report Schedules, then usercannot delete the Time schedule sinceit is in use.
Schedule cannot be deletedas it is referred in one or morereport schedules.
20802
Save the schedule with a differentname.
You cannot save a Time schedule withsame name that already exists.
Schedule {0} already exists.Please save the schedulewith a different name.
20803
Messages related to Chargeback
Make sure reports.zip file present in{OPS_INSTALL_DIR}/definitionsfolder is not corrupt. If problem stillpersists, escalate to CFT/Engineers.
If any problem exists in XMLfile, thenthis error message is shown.
Failed to load the chargebackdefinition file {0}. Chargebackdefinitions are stored in XMLformat.
20850
Log helps in finding the cause offailure at the database level.
This error can occur when chargebackcrud operations such asadd/delete/update/fetch chargebackvariable, chargeback formula orchargeback currency are performed.This error is due to problem at thedatabase level when we fire thecorresponding query.
Failed to execute the queryat the database.
20851
695Error messages in OpsCenterOpsCenter Error Messages
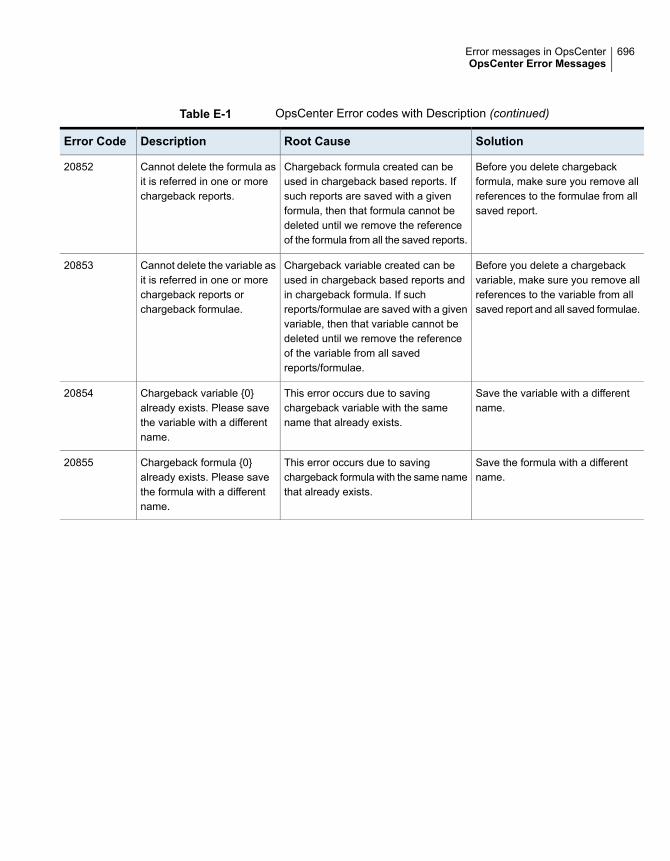
Table E-1 OpsCenter Error codes with Description (continued)
SolutionRoot CauseDescriptionError Code
Before you delete chargebackformula, make sure you remove allreferences to the formulae from allsaved report.
Chargeback formula created can beused in chargeback based reports. Ifsuch reports are saved with a givenformula, then that formula cannot bedeleted until we remove the referenceof the formula from all the saved reports.
Cannot delete the formula asit is referred in one or morechargeback reports.
20852
Before you delete a chargebackvariable, make sure you remove allreferences to the variable from allsaved report and all saved formulae.
Chargeback variable created can beused in chargeback based reports andin chargeback formula. If suchreports/formulae are saved with a givenvariable, then that variable cannot bedeleted until we remove the referenceof the variable from all savedreports/formulae.
Cannot delete the variable asit is referred in one or morechargeback reports orchargeback formulae.
20853
Save the variable with a differentname.
This error occurs due to savingchargeback variable with the samename that already exists.
Chargeback variable {0}already exists. Please savethe variable with a differentname.
20854
Save the formula with a differentname.
This error occurs due to savingchargeback formula with the same namethat already exists.
Chargeback formula {0}already exists. Please savethe formula with a differentname.
20855
696Error messages in OpsCenterOpsCenter Error Messages
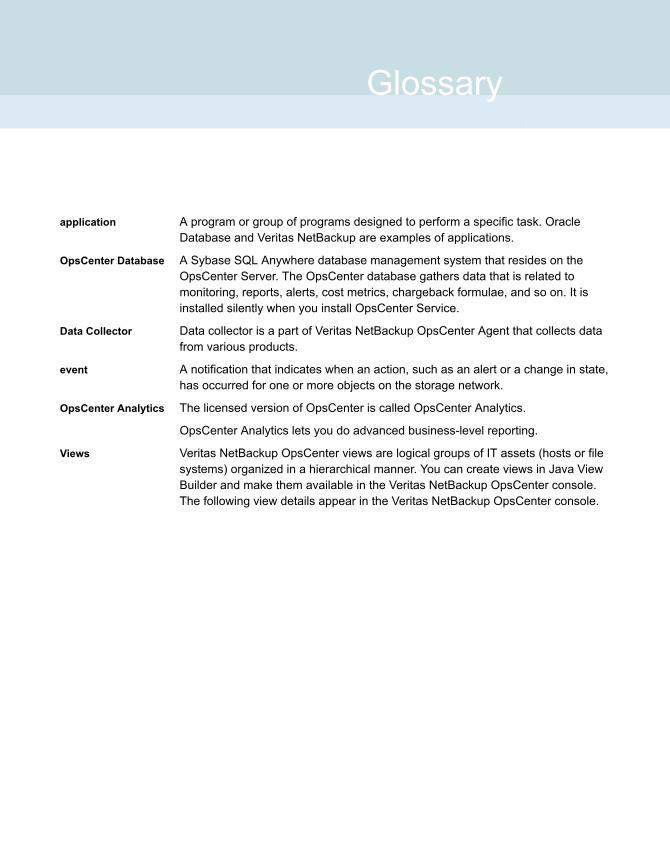
application A program or group of programs designed to perform a specific task. OracleDatabase and Veritas NetBackup are examples of applications.
OpsCenter Database A Sybase SQL Anywhere database management system that resides on theOpsCenter Server. The OpsCenter database gathers data that is related tomonitoring, reports, alerts, cost metrics, chargeback formulae, and so on. It isinstalled silently when you install OpsCenter Service.
Data Collector Data collector is a part of Veritas NetBackup OpsCenter Agent that collects datafrom various products.
event A notification that indicates when an action, such as an alert or a change in state,has occurred for one or more objects on the storage network.
OpsCenter Analytics The licensed version of OpsCenter is called OpsCenter Analytics.
OpsCenter Analytics lets you do advanced business-level reporting.
Views Veritas NetBackup OpsCenter views are logical groups of IT assets (hosts or filesystems) organized in a hierarchical manner. You can create views in Java ViewBuilder and make them available in the Veritas NetBackup OpsCenter console.The following view details appear in the Veritas NetBackup OpsCenter console.
Glossary

Aabout OpsCenter 19about OpsCenter Analytics 20access OpsCenter console 34ActiveX 32add
master server 287, 293, 295NetBackup 7.0 master server 288
add email recipientoptions 247
add email recipient options 247Add Master Server options 293add SNMP trap recipient
options 249add SNMP trap recipient options 249adding
existing user 238, 240new user 238, 240
adding AD / LDAP domain in OpsCenter 230adding users 228Agent
overview 27agent
delete 268modify 268
Agent options 266agent.conf file 29alert policies
alert conditions 424Open Storage alert condition 515
alertsfiltering by type 389responding to 390view by master server 394
application logs 201
Bbacking up
OpsCenter database 185Backup Exec 297
bookmarksusing with OpsCenter 68
breakup jobs 281–282viewing 282
Breakup Jobs option 277business planning 23
Ccapacity license 509Change Job Priority dialog box
options 339Change Job Priority dialog box options 339changeDbPassword 633chargeback
cost variables 254, 256formulae 257modeling 258
cluster 139installing OpsCenter server
Windows 144, 147limitations
Windows 143OpsCenter server
Windows 143prerequisites
Windows 143supported OS 140supported solutions 140uninstalling OpsCenter server
Windows 151color use
in OpsCenter 59compliance reporting 22configure
session timeout interval 47configure SMTP 218configurePorts 635Content pane
enlarging 59Summary and Hierarchical views 57
Index
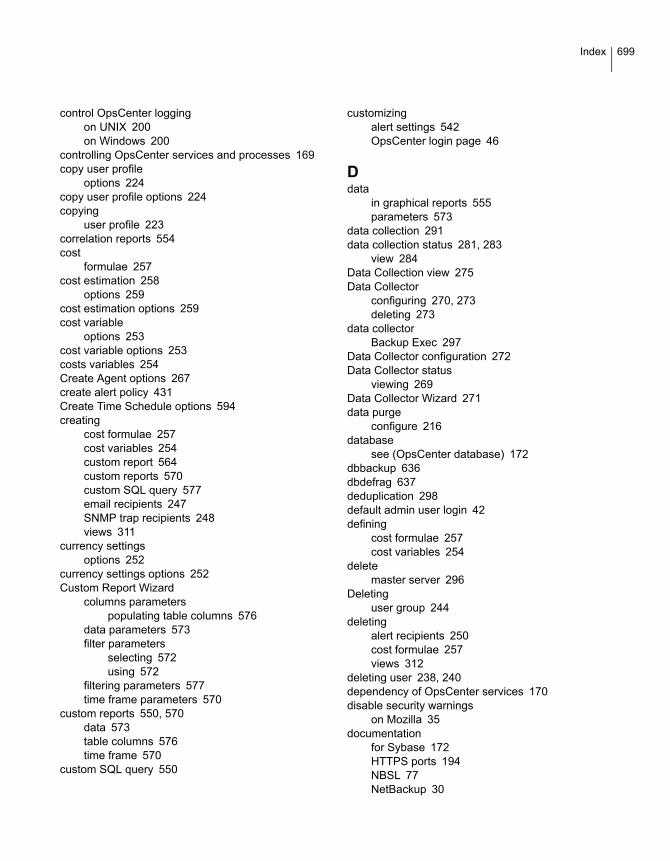
control OpsCenter loggingon UNIX 200on Windows 200
controlling OpsCenter services and processes 169copy user profile
options 224copy user profile options 224copying
user profile 223correlation reports 554cost
formulae 257cost estimation 258
options 259cost estimation options 259cost variable
options 253cost variable options 253costs variables 254Create Agent options 267create alert policy 431Create Time Schedule options 594creating
cost formulae 257cost variables 254custom report 564custom reports 570custom SQL query 577email recipients 247SNMP trap recipients 248views 311
currency settingsoptions 252
currency settings options 252Custom Report Wizard
columns parameterspopulating table columns 576
data parameters 573filter parameters
selecting 572using 572
filtering parameters 577time frame parameters 570
custom reports 550, 570data 573table columns 576time frame 570
custom SQL query 550
customizingalert settings 542OpsCenter login page 46
Ddata
in graphical reports 555parameters 573
data collection 291data collection status 281, 283
view 284Data Collection view 275Data Collector
configuring 270, 273deleting 273
data collectorBackup Exec 297
Data Collector configuration 272Data Collector status
viewing 269Data Collector Wizard 271data purge
configure 216database
see (OpsCenter database) 172dbbackup 636dbdefrag 637deduplication 298default admin user login 42defining
cost formulae 257cost variables 254
deletemaster server 296
Deletinguser group 244
deletingalert recipients 250cost formulae 257views 312
deleting user 238, 240dependency of OpsCenter services 170disable security warnings
on Mozilla 35documentation
for Sybase 172HTTPS ports 194NBSL 77NetBackup 30
699Index
documentation (continued)SymcOpsCenterWebServer 72VxUL 72
Eedit
master server 295Edit Agent options 267edit currency list
options 253edit currency list options 253Edit Time Schedule options 594editing
currency list 252editing user profile 238, 240editing users 228email
options 245report 561
email options 245email recipients
creating 247exporting
report 558
Ffile formats 559filtering
parameters 577firewall considerations 190firewalls
Symantec Private Branch Exchange 25forecast
reports 554
Ggetting started with typical OpsCenter tasks 65Guided Recovery 490
Destination host and login screen 495Job Details screen 497metadata 491, 498Performing a cloning operation 492Post-clone operations 497Pre-clone check screen 497Pre-operation checks 491Select Control File Backup screen 495Select Destination Parameters screen 496Select Master Server dialog 494
Guided Recovery (continued)Select Source Database 494Selection summary screen 497Troubleshooting 498
Hhost alias
adding 220viewing 220
Iicons for managed server status 59install
clustering. See clusterOpsCenter DVD 75
install and upgrade checklist 82install OpsCenter
on UNIX 94on Windows 89
Installing OpsCenter 88
JJavaScript 32Jobs List View
options 331Jobs List View options 331jre (Java Run Time Environment) 71
Llicense
viewing 214license keys 72
adding 215deleting 216viewing 215
license report issues 508, 513licensed OpsCenter features 73licenses
adding 214managing 214
licensing model 72licensing page 512log files
on UNIX servers 204–205on Windows servers 202
loggingon to OpsCenter 42out of OpsCenter 46
700Index
MManage Folders options 584Manage views
controlling scope 419manage alert policies 421manage devices 446manage storage 441
managed master server considerations 75managed server icons 59Management Information Base (MIB) 525managing
folders 584master server 291
add 287details 283general details 283
modelingchargeback 258
modifyingalert recipients 250cost formulae 257cost variables 256report export location 224views 312
Monitor viewscontrolling scope 322
monitor viewsmonitoring alerts 384monitoring appliance hardware
Deduplication 408master server 398media server 401NetBackup 404
monitoring cloud 416monitoring devices 372monitoring hosts 379monitoring jobs 331, 339monitoring media 361monitoring policies 351monitoring services 349
My Dashboard options 582My Dashboard tab 582My Reports tab 579
Nnbfindfile command 638nbproxy process 171NetBackup 7.0 master server
add 288
NetBackup Data Collectionconcept 276
NetBackup data collectionadding a master server 287deleting a master server 296editing a master server 295enabling or disabling data collection 296supported data types and collection status 285
NetBackup licensing 501NetBackup master server state
disabled 287not connected 287
NetBackup master server statesconnected 287
NetBackup options 274NetBackup PureDisk data collector
configuring 300NetBackup Service Layer (NBSL) 77, 194, 276Network Address Translation (NAT) network
considerations 76numeric data
viewing 555
Oobject merger
options 222object type
add 226add attribute 227delete 226delete attribute 227modify 227options 225
object type options 225object types 225objects (hosts)
merging 221operational restore
backup timelines 475browse a client 470browse files and directories 480restore cart 481simple or advanced search 471
opsadmin 642OpsCenter 519–521
color use 59database 78installing
UNIX 94
701Index
OpsCenter (continued)installing (continued)
Windows 89sanity check after installing 135sizing 77status bar 59store database and logs on separate disk 175Sybase database used 72tasks performed on startup 137uninstalling
UNIX 139Windows 138
OpsCenter alertsabout alert policies 420alert conditions 423creating alert policy 423managing alert policy 439understanding alert counts 438
OpsCenter Analytics and OpsCenter 72OpsCenter Analytics XML
DTD 669DTD elements 670
OpsCenter AnalyticsXMLexample files 674
OpsCenter architecturedatabase 26
OpsCenter back up and restore procedures 185OpsCenter console
alert summary pane 56content pane 57description 48quick links 56tabs and subtabs 51title bar 50View pane 52
OpsCenter context-sensitive helplocating 30
OpsCenter databaseback up using backupDB script 185backing up 185restoring 187
OpsCenter database password file 187OpsCenter database utilities
change database administrator password 173OpsCenter documentation 68OpsCenter DVD layout 75OpsCenter installation
hardware requirements 77install checklist 82
OpsCenter installation (continued)master server considerations 75web browser considerations 31
OpsCenter login pagecustomizing 46
OpsCenter post-installationstarting to use OpsCenter 136
OpsCenter processeson UNIX 166
OpsCenter reports 546OpsCenter Server 24OpsCenter server scripts
on Windows and UNIX 167OpsCenter services on Windows 165OpsCenter start-up tasks 137OpsCenter system requirements
see OpsCenter 77OpsCenter upgrade procedures 115OpsCenter user profiles 186OpsCenter View Builder 30OpsCenter views
managing 309–310overview 302, 304
opsCenterAgentSupport 644opsCenterSupport 645originator ID 199
Pparameters
Custom Report Wizard 570password
changing 213PBX 25PDOS 298pie chart reports 554policy
filtering by type 356port numbers
backup and archive products 193HTTPS 194key OpsCenter components 190
portsSymantec Private Branch Exchange 25
product ID 199PureDisk reports
table columns 576
702Index
Qquick links
minimizing 56quick start for OpsCenter tasks 65
Rranking reports 554refresh OpsCenter console 51report export 225report export location
options 225report export location options 225report formats 554report schedules 589report templates 548reports
conditions 577custom
creating 570formats 554graphical
formats 554numeric data 555
notificationcondition parameters 577
ToolTips in 555reports custom
filtering parameters 577restore cart
about 481using 482
restoringOpsCenter 187
runstoredquery 648
Ssaving
report 557schedules 586Schedules options 588scripts
runstoredquery 648search files
using OpsCenter 463services
controlling 351filtering by type 350
settingdefault currency 251
Simple Network Management Protocol (SNMP) 524configuring community name 540configuring SNMP version 541SNMP traps 525supported SNMP versions 525
Single Instance StorageSIS 298
SISsingle instance storage 576
SMTP server options 219options 219
SNMP port 195SNMP trap recipient
options 246SNMP trap recipient options 246SNMP trap recipients
creating 248software components used by OpsCenter 71start-up tasks
OpsCenter server 137startagent 649startdb 650startgui 651starting
runstoredquery 648startserver 652status icons 59stopagent 653stopdb 654stopgui 655stopserver 656storage lifecycle policies
reporting 521storage unit groups
reporting 521storage units
reporting 521supported backup products 23supported upgrade paths 78Symantec Private Branch Exchange 25
Ttables in OpsCenter
applying filters 65creating custom filters 64customizing 61selecting rows 64
703Index

tables in OpsCenter (continued)using filters 64viewing hidden columns 61viewing multiple pages 63
tape librarymodifying 222
thresholdsreport 577
time framesparameters 570
time schedule 594tool tips 59ToolTips 555trending reports
format 554troubleshooting
accessing OpsCenter 36OpsCenter console logon issues 43OpsCenter server issues 47support script in OpsCenter 196
Uunified logging (VxUL) 199uninstalling
OpsCenterUNIX 139
OpsCenter on Windows 138UNIX
installingOpsCenter 94
upgrading 129upgrading
OpsCenterUNIX 129Windows 121
user access rights 233user groups
creating 243options 243
user groups options 243user preferences
options 210user preferences options 210user profiles
viewing 237
VVeritas Java Web Server
(SymcOpsCenterWebServer) 72Veritas NetBackup PureDisk
PDOS 298Veritas Private Branch Exchange
port number configuration 71Veritas Private Branch Exchange (PBX) 71Veritas Technical Support
OpsCenter custom reports 550OpsCenter custom SQL queries 550
Veritas Unified Logging (VxUL) 72log files 199originator IDs used by OpsCenter 199
viewaccessing 307level 309
view OpsCenter alertsusing HP OV NNM 544using HP OV NNM 7.50/7.51 on Windows 544
view OpsCenteralertsusing SCOM 2007 544
View panemaking selections 53using 52
view_exportimport.bat 657viewing
alerts by master server 394email recipients 245
viewing alertsusing List View 385using Summary View 393
viewing alerts by NetBackup Master Server 394views
view type 305Views options 304visual keys
in the OpsCenter console 59
Wweb browser
book marks 68pop-up blockers 31UTF-8 32
Windowsinstalling
OpsCenter 89uninstalling
OpsCenter 138
704Index

Windows (continued)upgrading OpsCenter 121
wizardsCustom Report Wizard 570
XXML
DTD 669examples for importing 674importing 669
705Index