version 2 - information today, inc
TRANSCRIPT
Fletcher Library at the west campus
Version 2.0
DRAFT March 9, 2005

Forward This document is a draft of the “Build Station” component of the E3 project version 2. The three component documents consist of the Build Station, Development Station, and Boot Server. Information contained within this document may include errors and inconsistencies which will be edited for the final version. Additions, changes, and deletions may occur before the final version. A forthcoming development portal Web site is scheduled to go online during the summer of 2005. This site will allow other institutions to download, contribute, and exchange information, files, and contributions to the project. Version 1 project documentation can be retrieved from http://wlibinfo.westlib.asu.edu under past projects. Perry Horner Coordinator of Library Technology Support & Development ASU Fletcher Library at the West Campus [email protected] March 9, 2005
ASU West Library Public Workstation Version 2 November 2004
ASU West Library Public Workstation Version 2 The following outlines the creation of a client image for network booting. Some areas may be more detailed than others. Create From Scratch Version 2 uses the stock Fedora Core 2 distribution as the building block for our custom system. We begin by installing onto a fresh hard drive using the stock anaconda installer.
1. When it comes to creating drive partitions, do not use up all remaining space. Make the partitions the sizes for the client RAMdisk image. Install only the packages you want to use on the client image. We will call this machine the BUILD-STATION.
2. Perform a second installation on a different machine which uses the same identical hardware. This installation you will want to load all of the development utilities and libraries to build custom software for the client image. You can use the same machine for both if you have a removable hard drive tray installed in the case of the system. We will call this machine the DEV-STATION.
3. Build a third machine that does not have a hard drive in it. This will be a copy of what a client workstation would be. We will call this machine the CLIENT-TEST-STATION.
After both installations are complete, set the /etc/yum.conf file to point to the latest yum archive and perform a yum update on both systems. This will update both systems to the latest versions of their respective installed software. NOTE: Any script that you modify you should include a unique word in a comment field. We use” E3-“ for remarks, comments, and script prefixes. This helps when you want to grep for what has been customized. DEV STATION This station is to be used to compile custom apps and source code distributions. These applications can then be copied over to the Build Station. BUILD STATION The Build Station contains all of the components of the Client Station with the addition of a hard drive and dvd rom drive. This station has special scripts which are used to create the boot image served by the boot servers. You will want to perform all of your software installations using the root account. Any preferences you set will be stored in resource files in the /root directory. These preferences can then be copied over to /etc/skel which will be copied to each new workstation user’s /home directory for default settings.
Preinstallation 1
ASU West Library Public Workstation Version 2 November 2004
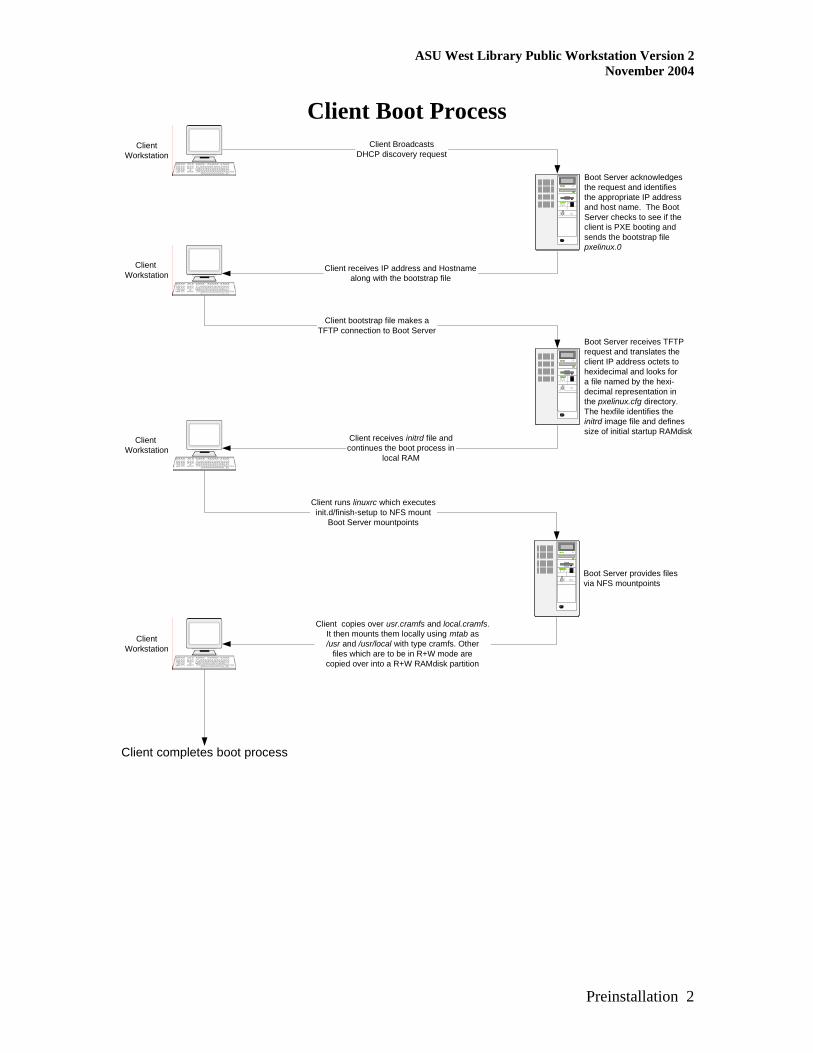
Client Boot Process
Boot Server acknowledgesthe request and identifiesthe appropriate IP addressand host name. The BootServer checks to see if theclient is PXE booting andsends the bootstrap filepxelinux.0
ClientWorkstation
Client BroadcastsDHCP discovery request
Client Workstation
Client receives IP address and Hostnamealong with the bootstrap file
Client Workstation
Boot Server receives TFTPrequest and translates theclient IP address octets tohexidecimal and looks fora file named by the hexi-decimal representation inthe pxelinux.cfg directory.The hexfile identifies theinitrd image file and definessize of initial startup RAMdisk
Client bootstrap file makes aTFTP connection to Boot Server
Client receives initrd file andcontinues the boot process in
local RAM
Boot Server provides filesvia NFS mountpoints
Client runs linuxrc which executesinit.d/finish-setup to NFS mount
Boot Server mountpoints
ClientWorkstation
Client copies over usr.cramfs and local.cramfs.It then mounts them locally using mtab as/usr and /usr/local with type cramfs. Other
files which are to be in R+W mode arecopied over into a R+W RAMdisk partition
Client completes boot process
Preinstallation 2
ASU West Library Public Workstation Version 2 January 27, 2005
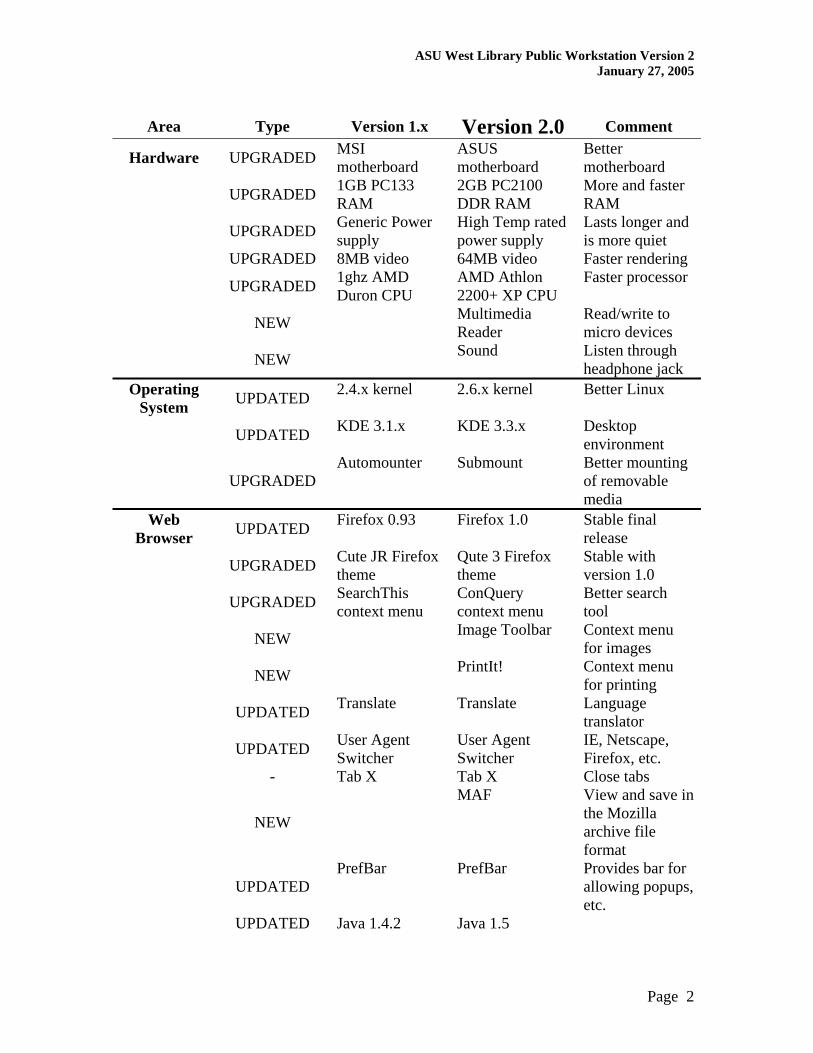
Changes & Enhancements Fletcher Library Public Machine Image Version 2.0 Spring 2005 Version 2.0 of the Library’s PAC image has been developed from the ground up. TS&D decided not to build upon the previous 1.5 image since no documentation existed covering its development and specifications. Version 2.0 may look similar to version 1.5, but under the hood, it is a completely different system. TS&D has created the development documentation at every step during the build process. The amount of time invested in its development is almost half that of the Version 1. This is a milestone in our process. Version 2 took into account all issues and enhancement requests placed during the past 9 months as well as feedback from end users through the “Talk Back” feature on each workstation. The following is a descriptive of what Version 2.0 has to offer. An item identified as NEW indicates something that was not on previous versions. UPDATED indicates the item has been upgraded to a new version or a bug has been fixed. REMOVED identifies an item that was on previous images but is not included in Version 2. UPGRADED indicates hardware and device enhancements.
Page 1
ASU West Library Public Workstation Version 2 January 27, 2005
Area Type Version 1.x Version 2.0 Comment
Hardware UPGRADED MSI motherboard
ASUS motherboard
Better motherboard
UPGRADED 1GB PC133 RAM
2GB PC2100 DDR RAM
More and faster RAM
UPGRADED Generic Power supply
High Temp rated power supply
Lasts longer and is more quiet
UPGRADED 8MB video 64MB video Faster rendering
UPGRADED 1ghz AMD Duron CPU
AMD Athlon 2200+ XP CPU
Faster processor
NEW Multimedia Reader
Read/write to micro devices
NEW Sound Listen through headphone jack
Operating System UPDATED 2.4.x kernel 2.6.x kernel Better Linux
UPDATED KDE 3.1.x KDE 3.3.x Desktop environment
UPGRADED Automounter Submount Better mounting
of removable media
Web Browser UPDATED Firefox 0.93 Firefox 1.0 Stable final
release
UPGRADED Cute JR Firefox theme
Qute 3 Firefox theme
Stable with version 1.0
UPGRADED SearchThis context menu
ConQuery context menu
Better search tool
NEW Image Toolbar Context menu for images
NEW PrintIt! Context menu for printing
UPDATED Translate Translate Language translator
UPDATED User Agent Switcher
User Agent Switcher
IE, Netscape, Firefox, etc.
- Tab X Tab X Close tabs
NEW
MAF View and save in the Mozilla archive file format
UPDATED PrefBar PrefBar Provides bar for
allowing popups, etc.
UPDATED Java 1.4.2 Java 1.5
Page 2
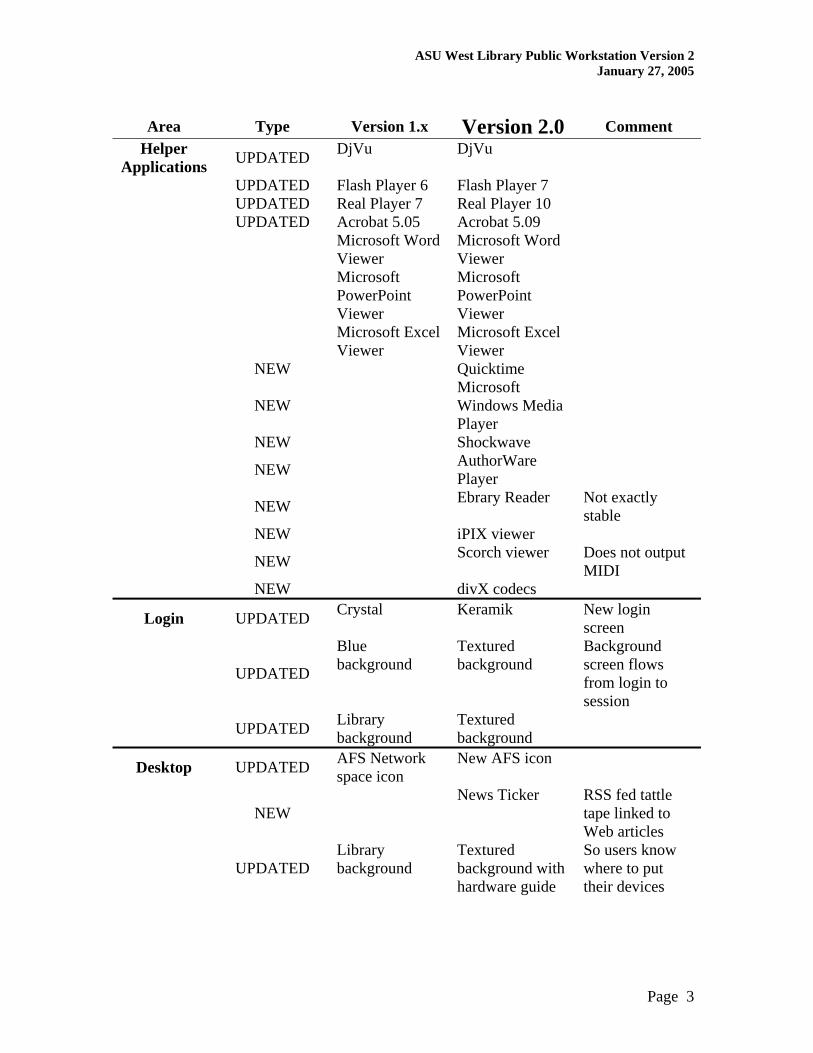
ASU West Library Public Workstation Version 2 January 27, 2005
Area Type Version 1.x Version 2.0 Comment
Helper Applications UPDATED DjVu DjVu
UPDATED Flash Player 6 Flash Player 7 UPDATED Real Player 7 Real Player 10 UPDATED Acrobat 5.05 Acrobat 5.09
Microsoft Word Viewer
Microsoft Word Viewer
Microsoft PowerPoint Viewer
Microsoft PowerPoint Viewer
Microsoft Excel Viewer
Microsoft Excel Viewer
NEW Quicktime
NEW Microsoft
Windows Media Player
NEW Shockwave
NEW AuthorWare Player
NEW Ebrary Reader Not exactly stable
NEW iPIX viewer
NEW Scorch viewer Does not output MIDI
NEW divX codecs
Login UPDATED Crystal Keramik New login screen
UPDATED
Blue background
Textured background
Background screen flows from login to session
UPDATED Library background
Textured background
Desktop UPDATED AFS Network space icon
New AFS icon
NEW News Ticker RSS fed tattle
tape linked to Web articles
UPDATED Library background
Textured background with hardware guide
So users know where to put their devices
Page 3
ASU West Library Public Workstation Version 2 January 27, 2005
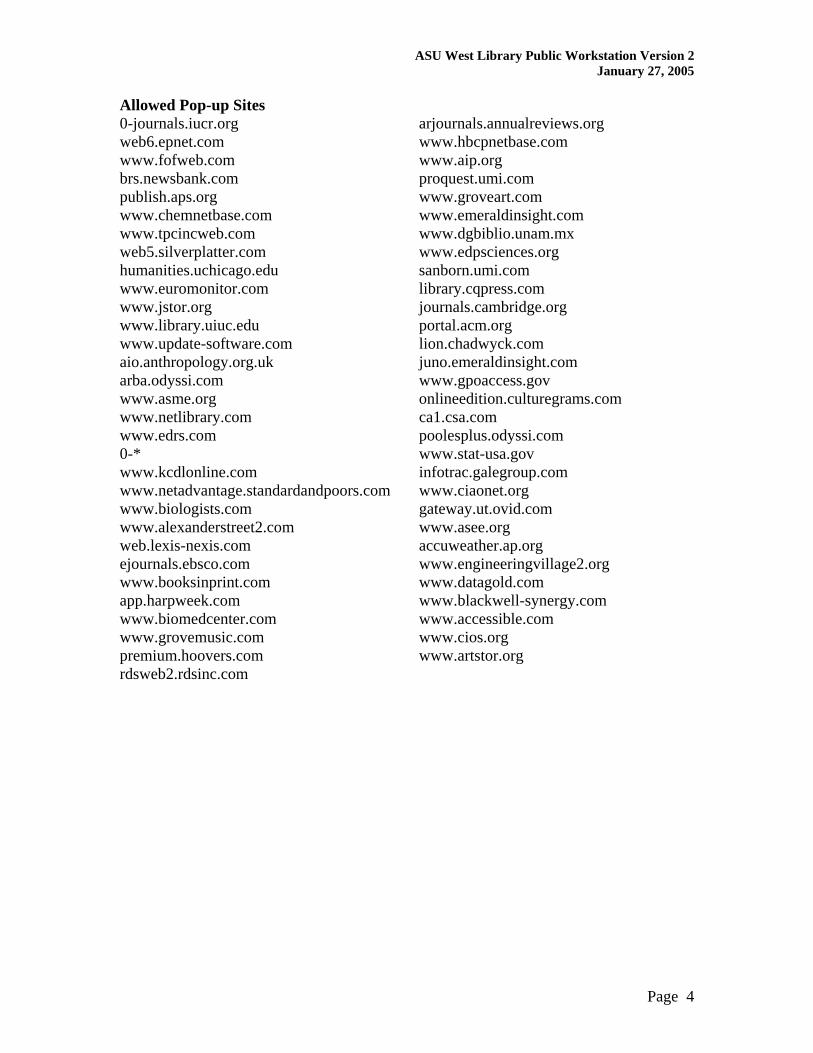
Allowed Pop-up Sites 0-journals.iucr.org web6.epnet.com www.fofweb.com brs.newsbank.com publish.aps.org www.chemnetbase.com www.tpcincweb.com web5.silverplatter.com humanities.uchicago.edu www.euromonitor.com www.jstor.org www.library.uiuc.edu www.update-software.com aio.anthropology.org.uk arba.odyssi.com www.asme.org www.netlibrary.com www.edrs.com 0-* www.kcdlonline.com www.netadvantage.standardandpoors.com www.biologists.com www.alexanderstreet2.com web.lexis-nexis.com ejournals.ebsco.com www.booksinprint.com app.harpweek.com www.biomedcenter.com www.grovemusic.com premium.hoovers.com rdsweb2.rdsinc.com
arjournals.annualreviews.org www.hbcpnetbase.com www.aip.org proquest.umi.com www.groveart.com www.emeraldinsight.com www.dgbiblio.unam.mx www.edpsciences.org sanborn.umi.com library.cqpress.com journals.cambridge.org portal.acm.org lion.chadwyck.com juno.emeraldinsight.com www.gpoaccess.gov onlineedition.culturegrams.com ca1.csa.com poolesplus.odyssi.com www.stat-usa.gov infotrac.galegroup.com www.ciaonet.org gateway.ut.ovid.com www.asee.org accuweather.ap.org www.engineeringvillage2.org www.datagold.com www.blackwell-synergy.com www.accessible.com www.cios.org www.artstor.org
Page 4

ASU West Library Public Workstation Version 2 January 27, 2005
Evaluation Checklist Login Screen
Fonts readable Heading instructions clear Background and theme are pleasant and inviting Transition from login to desktop session is smooth
Desktop
Background screen appropriate Icon placement satisfactory Icon labels satisfactory AFS icon appears with ASURITE login AFS icon does not appear with generic login Right click on desktop context menu disabled Right click on kicker bar context menu disabled Cannot delete desktop items Icons appropriate Drag and drop files between disks and storage devices Screensaver initiates after 10 minutes of no keyboard or mouse activity Screensaver can be canceled by moving the mouse or pressing a key
Kicker Bar
Kicker bar buttons correctly placed Kicker bar buttons appropriate and understandable News ticker connects to alert Clock is readable Clock time correct Talk Back button goes to feedback Web page Open Web button goes to acceptance page for ASURITE Open Web button goes to guest user info page for generic user Disk Formatter button opens disk formatter application Logout Button logs out session Kill button terminates all Windows applications
Applications
Disk Formatter application formats disks Firefox defaults with all themes and extensions loaded Adobe Acrobat should default save to user Home directory
Page 5
ASU West Library Public Workstation Version 2 January 27, 2005
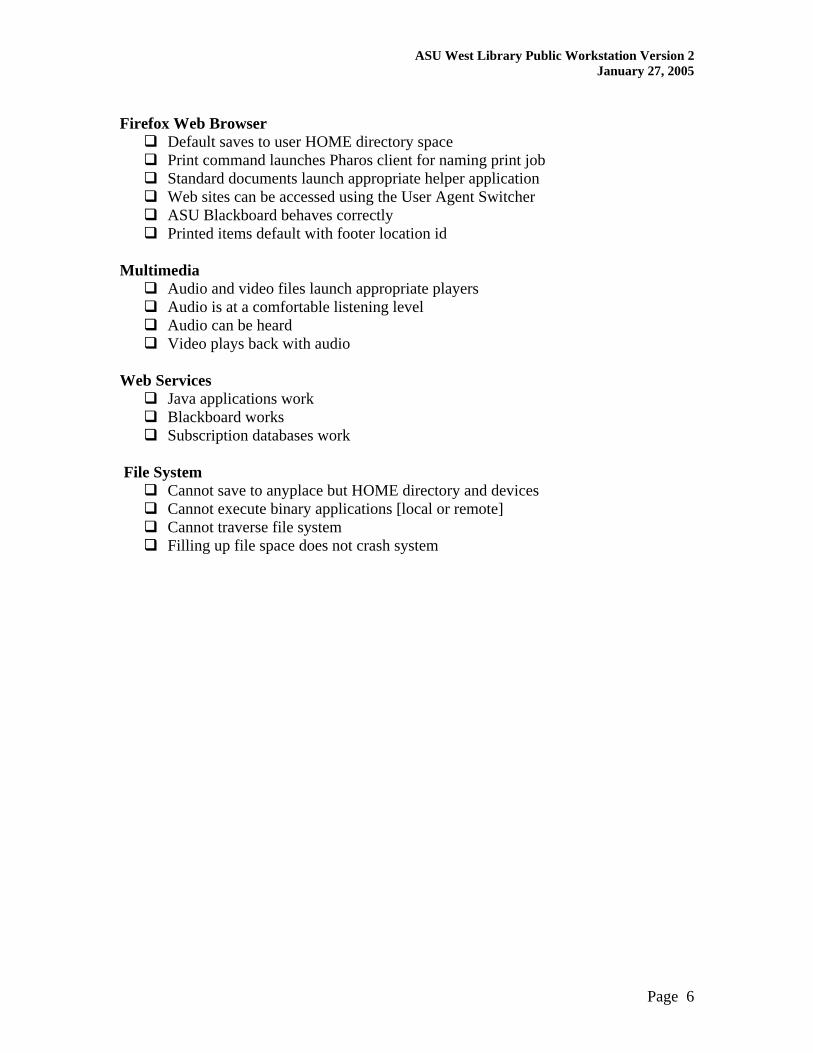
Firefox Web Browser
Default saves to user HOME directory space Print command launches Pharos client for naming print job Standard documents launch appropriate helper application Web sites can be accessed using the User Agent Switcher ASU Blackboard behaves correctly Printed items default with footer location id
Multimedia
Audio and video files launch appropriate players Audio is at a comfortable listening level Audio can be heard Video plays back with audio
Web Services
Java applications work Blackboard works Subscription databases work
File System
Cannot save to anyplace but HOME directory and devices Cannot execute binary applications [local or remote] Cannot traverse file system Filling up file space does not crash system
Page 6
ASU West Library Public Workstation Version 2 February 7, 2005
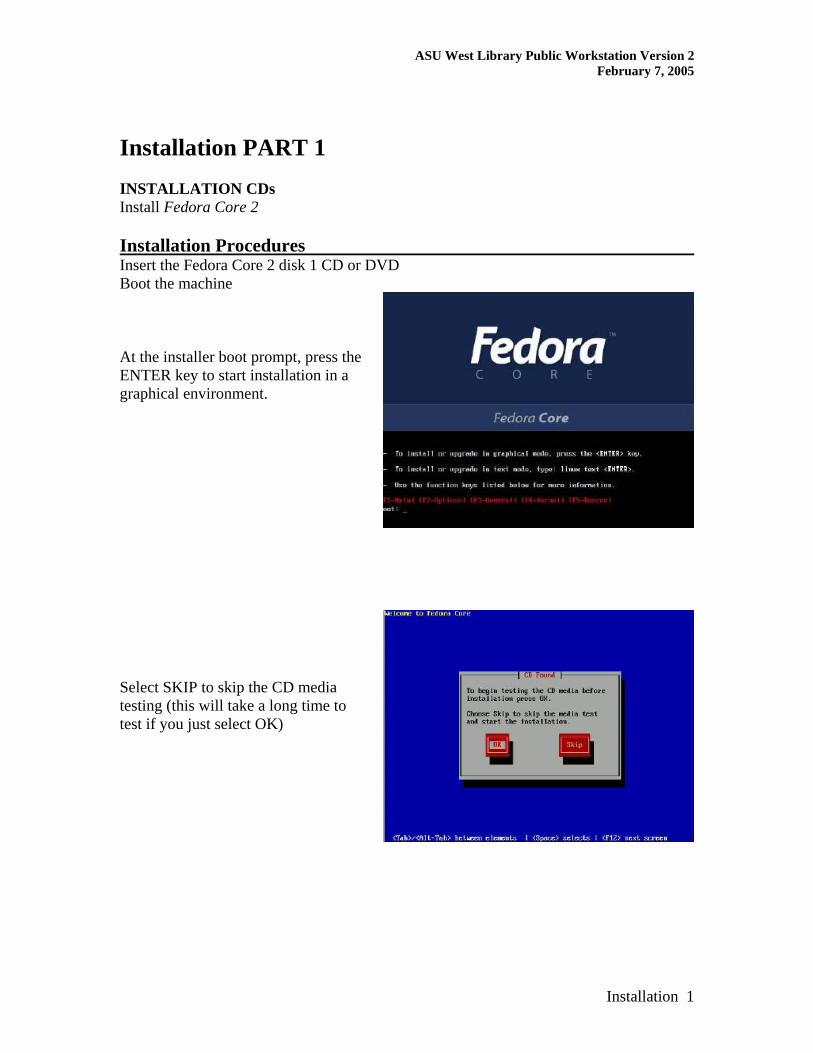
Installation PART 1 INSTALLATION CDs Install Fedora Core 2 Installation Procedures Insert the Fedora Core 2 disk 1 CD or DVD Boot the machine
At the installer boot prompt, press the ENTER key to start installation in a graphical environment. Select SKIP to skip the CD media testing (this will take a long time to test if you just select OK)
Installation 1
ASU West Library Public Workstation Version 2 February 7, 2005
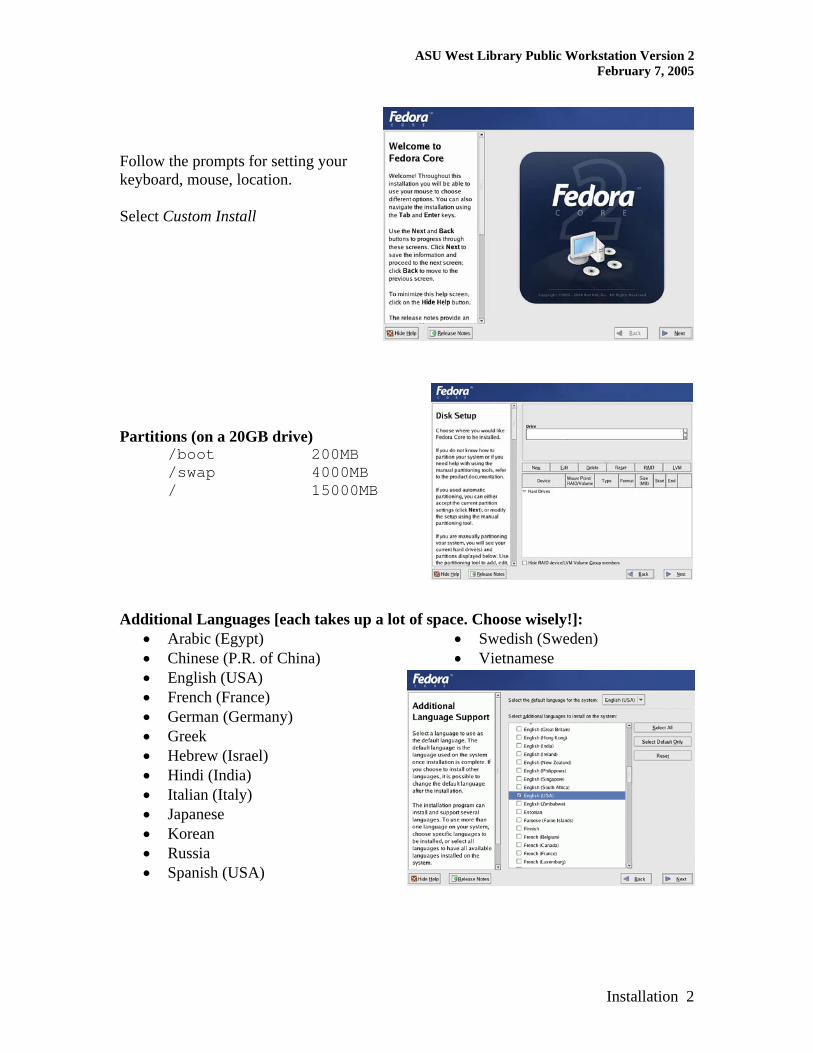
Follow the prompts for setting your keyboard, mouse, location. Select Custom Install Partitions (on a 20GB drive) /boot 200MB /swap 4000MB / 15000MB Additional Languages [each takes up a lot of space. Choose wisely!]:
• Arabic (Egypt) • Chinese (P.R. of China) • English (USA) • French (France) • German (Germany) • Greek • Hebrew (Israel) • Hindi (India) • Italian (Italy) • Japanese • Korean • Russia • Spanish (USA)
• Swedish (Sweden) • Vietnamese
Installation 2

ASU West Library Public Workstation Version 2 February 7, 2005
Select DHCP for network configuration and NO firewall.
Installation 3
ASU West Library Public Workstation Version 2 February 7, 2005
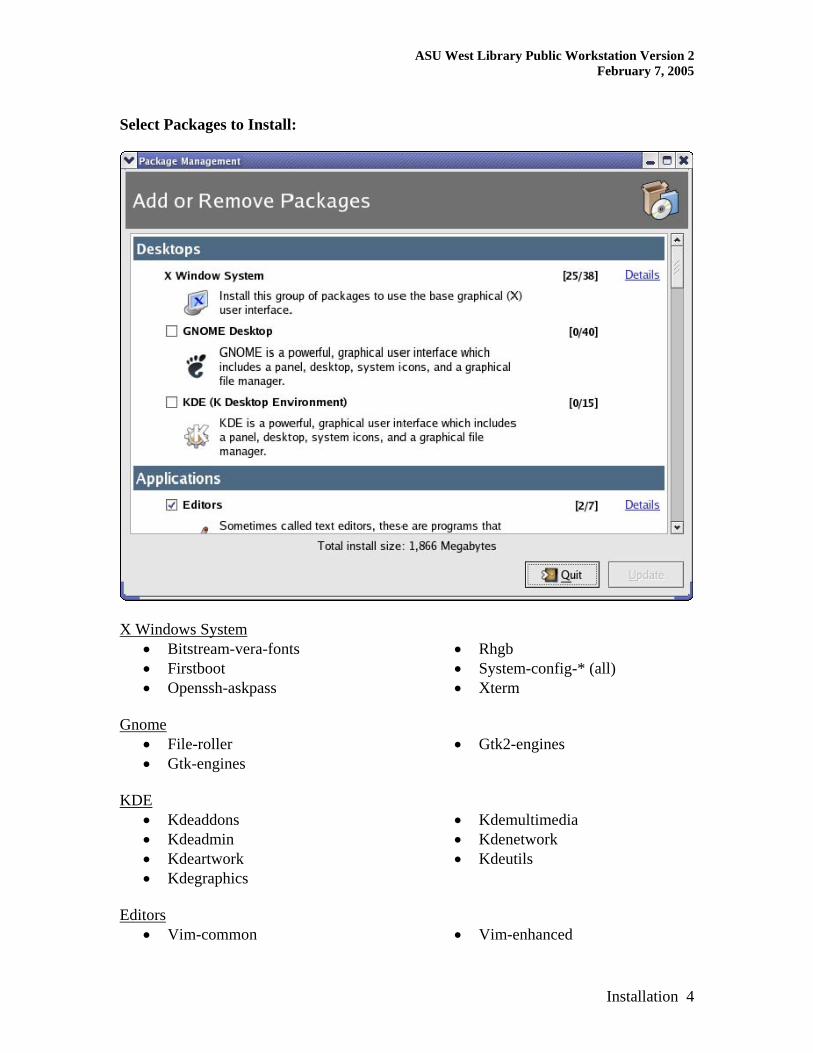
Select Packages to Install:
X Windows System
• Bitstream-vera-fonts • Firstboot • Openssh-askpass
• Rhgb • System-config-* (all) • Xterm
Gnome
• File-roller • Gtk-engines
• Gtk2-engines
KDE
• Kdeaddons • Kdeadmin • Kdeartwork • Kdegraphics
• Kdemultimedia • Kdenetwork • Kdeutils
Editors
• Vim-common • Vim-enhanced
Installation 4
ASU West Library Public Workstation Version 2 February 7, 2005
Graphical Internet
• (none) Text-based Internet
• (none) Sound and Video
• Kdemultimedia • Mikmod
• Vorbis-tools • Xmms
Authoring and Publishing
• (none) Graphics
• Imagemagik • Kdegraphics Games and Entertainment
• (none) Administration Tools
• System-config-* (all) Printing Support
• A2ps • Cups • Enscript
• Hpijs • Tttprint
After installation is complete, select the REBOOT button to restart the BUILD machine.
Installation 5
ASU West Library Public Workstation Version 2 February 7, 2005
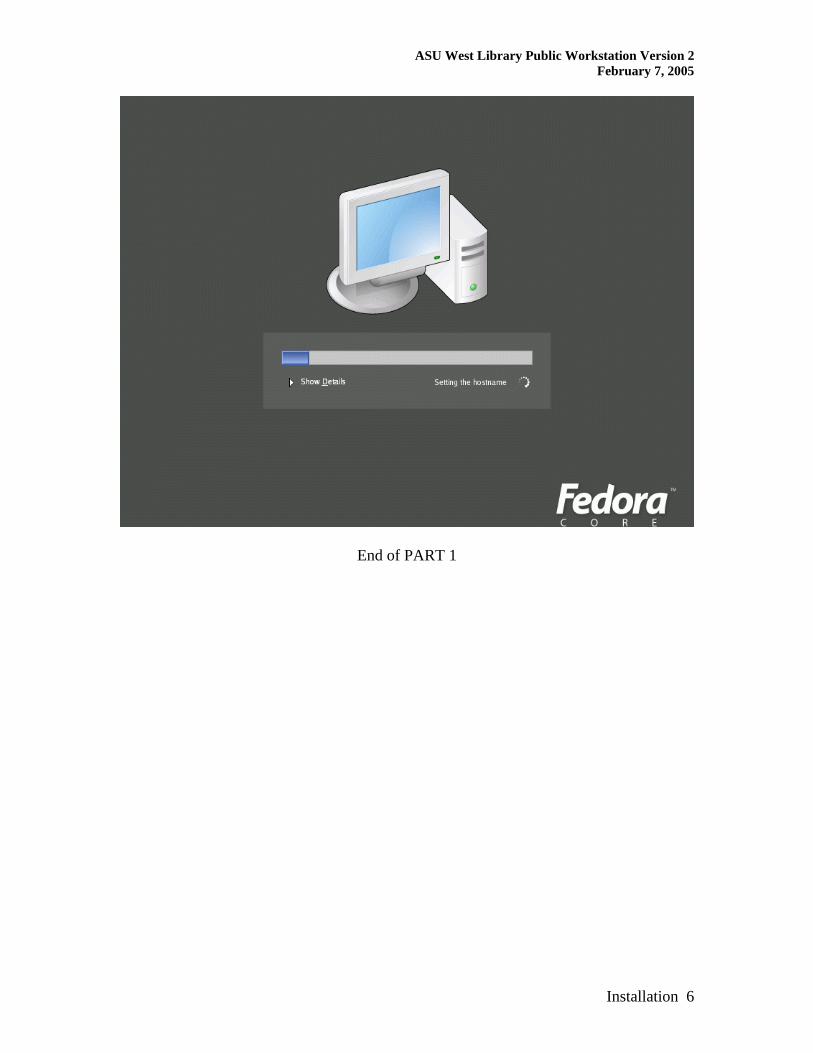
End of PART 1
Installation 6
ASU West Library Public Workstation Version 2 February 7, 2005
Installation PART 2 After the final REBOOT from PART 1: Login as root at the greeter prompt Open a terminal window (console, xterm, etc) to get a shell prompt Execute switchdesk kde to set the default desktop to KDE Initial Package Removal We need to remove some packages that were installed during PART 1. Do the following in the terminal window:
rpm –e firstboot rpm –e desktop-printing rpm –e gnome-utils rpm –e gnome-session rpm –e control-center rpm –e --nodeps nautilus-cd-burner rpm –e nautilus rpm –e gnome-ufs2-smb rpm –e eog
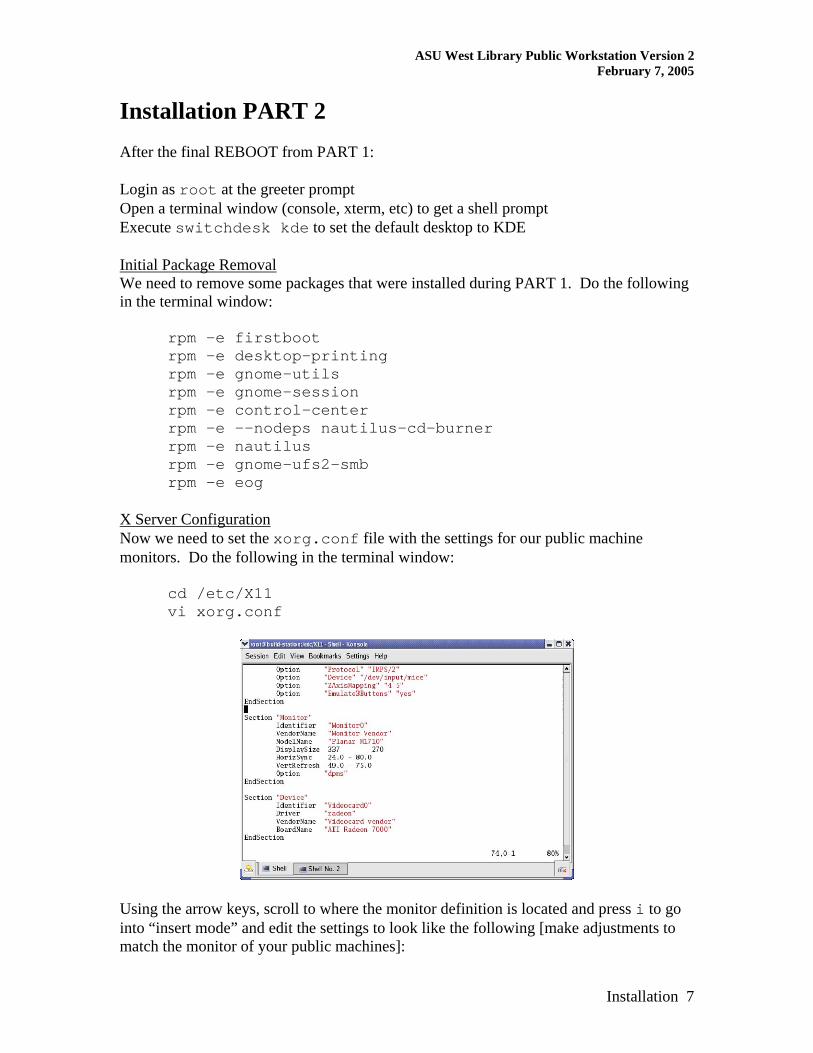
X Server Configuration Now we need to set the xorg.conf file with the settings for our public machine monitors. Do the following in the terminal window:
cd /etc/X11 vi xorg.conf
Using the arrow keys, scroll to where the monitor definition is located and press i to go into “insert mode” and edit the settings to look like the following [make adjustments to match the monitor of your public machines]:
Installation 7
ASU West Library Public Workstation Version 2 February 7, 2005
Section “Monitor” ModelName “Planar M1710” DisplaySize 337 270 HorizSync 24.0-80.0 VertRefresh 49.0-75.0 #option “dpms”
If a dpms option exists, comment it out. Add a new section with the following entries. Options that are enabled are in bold. Section "ServerFlags" # Uncomment this to disable the <Crtl><Alt><Fn> VT switch sequence # (where n is 1 through 12). This allows clients to receive these key # events. Option "DontVTSwitch" # Uncomment this to disable the <Crtl><Alt><BS> server abort sequence # This allows clients to Option "DontZap"
receive this key event.
# Uncomment this to disable the <Crtl><Alt><KP_+>/<KP_-> mode switching # sequences. This allows clients to receive these key events. Option "DontZoom" # Uncomment this to disable tuning with the xvidtune client. With # it the client can still run and fetch card and monitor attributes, # but it will not be allowed to change them. If it tries it will # receive a protocol error. # Option "DisableVidModeExtension" # Uncomment this to enable the use of a non-local xvidtune client. # Option "AllowNonLocalXvidtune" # Uncomment this to disable dynamically modifying the input device # (mouse and keyboard) settings. # Option "DisableModInDev" # Uncomment this to enable the use of a non-local client to # change the keyboard or mouse settings (currently only xset). # Option "AllowNonLocalModInDev" # Set the basic blanking screen saver timeout. Option "blank time" "0" # 0=no screensaver # Set the DPMS timeouts. These are set here because they are global # rather than screen-specific. These settings alone don't enable DPMS. # It is enabled per-screen (or per-monitor), and even then only when # the driver supports it. # Option "standby time" "20" # Option "suspend time" "30" # Option "off time" "60" EndSection
Installation 8
ASU West Library Public Workstation Version 2 February 7, 2005
Now press the “ESC” escape key to get out of insert mode and you should be able to type wq at the bottom of the vi editor window to “write and quit”. If all goes well, you should be back at the terminal window with a shell prompt. Yum Update Now we can update our installation with the latest updates to the kernel and all our installed packages. This is done through the use of the yum application. We have a server that has a default yum.conf file available for download which has all the settings necessary to facilitate the update. In the terminal window, do the following, where validuser is an account name which has been granted access to the server:
cd /etc sftp [email protected]
This will connect to the WLIBTRIS server in secure ftp mode. Type in the correct password when prompted. Once connected, enter the following:
cd .. cd web cd html cd fedora cd 2 get yum.conf exit
You now have downloaded the current yum.conf file to be used by the yum updater. In the terminal window, do the following:
yum update This will start yum downloading all the available header files for what is on the yum repository. It will then check the list against what is loaded on the BUILD workstation. When it is done checking and identified any additional packages you need downloaded, it will present you with a list of packages that can be updated. Answer Y to start the updates. It will then start the update process. When this process is complete, logout of your session and have the system REBOOT by selecting this option under the Menu pull-down menu from the login (greeter) screen.
Installation 9
ASU West Library Public Workstation Version 2 February 7, 2005
Additional Actions After the system reboots, logon as root and open a terminal window. We will now turn of some services. Type the following at the shell prompt:
chkconfig kudzu off chkconfig isdn off chkconfig rhnsd off chkconfig pcmcia off chkconfig cpuspeed off chkconfig mdmpd off
We also need to disable IPV6. IPV6 comes as a default in FC2 but has been known to slow down DNS queries. To disable this, edit the /etc/modprobe.conf file:
cd /etc vi modprobe.conf
Use the arrow keys to move to the end of the last line and press “i” to go into insert mode. Insert a new line with the following statement.
alias net-pf-10 off This will turn off IPV6. Press the “ESC” escape key and type “wq” to write and quit editing the file. New Directories Now we will make some new directories to be used later. At the shell prompt, type the following:
cd / mkdir e3image mkdir e3custom mkdir packages
We now should have three new directories in the root / directory. e3image is where the actual disk image files will be stored. e3custom is where any custom files and settings will be stored for building the image. packages is where any rpms or tarballed files that are installed will be placed. It is time to once again, logout of this session and REBOOT the machine from the login screen Action item selection. Final Cleanup When the system has restarted and presents you with a login prompt, login as root and open up a terminal window and type the following:
Installation 10
ASU West Library Public Workstation Version 2 February 7, 2005
cd /var/log cat messages
You can use the page up and page down keys or scrollbar to view the messages file. Look for any problems encountered and address them.
cat dmesg Examine the dmesg content to see if any issues were encountered during boot and address them (or ignore them). If all is well, then we can remove them so that they will be fresh when the system boots the next time. Type the following at the shell prompt:
rm /var/log/dmesg rm /var/log/messages
We also need to rid ourselves of the Redhat Network Update stuff. Type the following at the shell prompt:
rm /usr/bin/rhn_register rm –rdf /etc/sysconfig/rhn
Another service we do not need is the cron scheduling of logwatch. Do the following:
rpm –e logwatch Now we need the locater database to reflect all of the changes we have made so far. To do this, type the following at the shell prompt:
updatedb Since the kernel has been updated to the latest version, and since the DEVELOP station will need to compile some applications against this kernel version, we need to edit the yum.conf file to exclude all new kernel updates.
cd /etc vi yum.conf
Under [main] add the entry:
exclude=kernel* Do this also on the DEVELOP station.
Installation 11

ASU West Library Public Workstation Version 2 February 7, 2005
Now all should be well and we are ready to duplicate the hard drive so we have a fresh backup copy. Logout and perform a shutdown of the system. Take the hard drive out and use our hard drive duplicator to make a copy to the “master” BUILD station drive.
End of PART 2
Installation 12