version 3.13 080911 issuer: lennart sideb¤ck - ceur-ws.org
TRANSCRIPT

Version 3.13
080911
Issuer: Lennart Sidebäck
Editor: Johan Johnsson
Copyright © 2008 Volvo Information Technology. All rights reserved.

GENERAL LOGIN TO VINST................................................................................................................5 SETTING TIME ZONE ..........................................................................................................5 VERIFY USER CONNECTION .................................................................................................7 ADJUST START-UP SCREEN .................................................................................................8 NAVIGATION .....................................................................................................................9 Screens ..........................................................................................................................10 Views .............................................................................................................................10 Categories ......................................................................................................................11 Drill-downs......................................................................................................................11 CHANGE COLUMN LAYOUT.................................................................................................11 TAB LAYOUT....................................................................................................................12 NEW TERMINOLOGY .........................................................................................................13 SHORTCUTS ....................................................................................................................14 TIPS AND TRICKS ............................................................................................................16 CHANGE DEFAULT SUPPORT TEAM......................................................................................17 REPORTS AND PRINTING CHANGE DEFAULT SUPPORT TEAM......................................................................................19 GENERAL PRINTING RULES................................................................................................20 SERVICE REQUEST SUMMARY REPORT AND PRODUCT DEFECT SUMMARY REPORT ....................20 How to print a report: .......................................................................................................21 SERVICE REQUEST AUDIT REPORT VISITS AND PRODUCT DEFECT AUDIT REPORT VISITS..........21 QUERY EXPORT AND PRINTING FROM OTHER PROGRAMS ......................................................23 CREATING OUTBOUND E-MAILS EMAIL COMMUNICATION FUNCTIONALITY? ..........................................................................24 SETUP EMAIL COMMUNICATION FUNCTIONALITY..................................................................24 Step 1: Create a Personal Profile ........................................................................................24 Step 2: Setting Outbound Communication Preferences ..........................................................26 Step 3: Creating Email Templates.......................................................................................27 Step 4: Using Email Communications ..................................................................................31 Step 5: Viewing Sent Emails ..............................................................................................34 E-MAIL TEMPLATES - CHANGING THE FROM ADDRESS ..........................................................35 SERVICE REQUESTS REGISTER SERVICE REQUEST............................................................................................37 USING TEMPLATES...........................................................................................................38 Create a new template......................................................................................................38 Apply a template on an SR ................................................................................................39 Create a new SR from a template .......................................................................................39 Create a new SR from the last template ..............................................................................39 ACTIVITY PLAN ................................................................................................................40 ADD TEXT TO A SERVICE REQUEST ....................................................................................40 ADD ATTACHMENT ...........................................................................................................41 GET CONTACT HISTORY WHILE CREATING A SR'S ................................................................41 WORK WITH A SERVICE REQUEST ......................................................................................42 REQUEST NOTIFICATION ABOUT A SERVICE REQUEST ..........................................................43 CHANGE POSITION...........................................................................................................43 WORK EFFORT.................................................................................................................44

SET WORK EFFORT TO MANDATORY FOR A ST MEMBER.........................................................47 TEMPLATE FUNCTIONALITY................................................................................................48 Applying a Template .........................................................................................................49 RESOLVE SERVICE REQUEST .............................................................................................49 Email when a solved/closed Service Request is rejected/reopened...........................................50 CLOSE IN CALL ................................................................................................................50 CLOSE SERVICE REQUEST.................................................................................................52 ASSIGN SERVICE REQUEST ...............................................................................................52 Select ST function ............................................................................................................52 Assign SR function ...........................................................................................................52 ACCEPT SERVICE REQUEST ...............................................................................................53 ESCALATION_MATRIX.......................................................................................................53 SR TYPE - EVENT .............................................................................................................54 SOLUTIONS ABOUT SOLUTIONS ..........................................................................................................55
RELATE A SOLUTION ........................................................................................................55 CREATE A NEW SOLUTION ................................................................................................56 WORK WITH A SOLUTION..................................................................................................56 ADD RELATED DOCUMENTS...............................................................................................57
SUPPORT TEAM MANAGER ABOUT SUPPORT TEAM MANAGER ......................................................................................58 SUPPORT TEAM SKILLS.....................................................................................................58 SUPPORT TEAM AUTHORIZATION .......................................................................................58 Set up Authorization Assignment Rules................................................................................59 SUPPORT TEAM TRANSFER CONTROL..................................................................................59 Monitor the ST's the team is accessing ................................................................................59 Create requests ...............................................................................................................60 SUPPORT TEAM MEMBERSHIP ............................................................................................60 ADMINISTER SOLUTION....................................................................................................61 Publish a solution .............................................................................................................61 CREATE ACTIVITY TEMPLATE .............................................................................................62
REFERENCE CONTACT INFORMATION...................................................................................................63 REFERENCES ...................................................................................................................63 COMPANIES ....................................................................................................................63 AGREEMENTS ONLINE IN VINST.........................................................................................63
AUDIT TRAIL AND AIRPORT AUDIT TRAIL FOR A SERVICE REQUEST...............................................................................65 AIRPORT - MONITOR OPEN CASE .......................................................................................65 What is AIRPORT? ............................................................................................................65 How to use AIRPORT ........................................................................................................65
SEARCH AND FOLLOW UP

SEARCH FOR SERVICE REQUEST ........................................................................................69 EXPORT DATA TO EXCEL ...................................................................................................69 QUERIES.........................................................................................................................71 SEARCH BY QUERY...........................................................................................................71 SEARCH BY QUERY ASSISTANT ..........................................................................................71 QUERY OPERATORS..........................................................................................................72 QUERY TUTORIALS...........................................................................................................73 PRE-DEFINED QUERIES (PDQ'S).........................................................................................75 DAY-TO-DAY FOLLOW UP ..................................................................................................77 SUPPORT KNOWLEDGE BASE SUPPORT KNOWLEDGE BASE? ...........................................................................................77

Login to VINST
This is only applicable for users not using Active Directory. Other users will be logged in automatically.
When opening the VINST application you are first presented with a login dialog.
1. In User ID, enter your user identification.
2. In Password, enter your VINST password.
3. Click the arrow to the right. The VINST application is opened.
The first time a user log into the application, he/she will get a message about setting the Time zone in the User Preferences screen. This to ensure that the Time Displayed for your Service Requests will be correct.
Setting time zone

The first time a user log into the application, he/she will get a message about setting the Time zone in the User Preferences screen. This to ensure that the Time Displayed for your Service Requests will be correct.
To edit your Time Zone, do as follows:
1. Open the [User Preferences] screen.
2. Select the [Profile] category.
3. Click the Time Zone [select] button.
4. Select your Time Zone and click [OK].

5. Finally click [Save].
Note: All changes made in the User Preferences screen must be saved to take effect.
Verify user connection You can always verify the current login information and the database to which you are connected.
1. Under <Help> in the toolbar, select <Technical Support>. The Technical Support window is displayed.

2. Click [OK] to close the window.
Adjust start-up screen The start-up screen is by default the Home screen and you can change the look of it to accommodate to your wishes.
1. Click [Edit Layout] in the top-right corner of the Home screen.
2. The Edit Layout screen is displayed.
3. The Edit Layout screen lets you access more advanced layout editing functions, such as showing hidden lists or forms, collapsing or expanding all the available lists and forms at once, and restoring the default layout.
4. The Edit Layout screen lets you access more advanced layout editing functions, such as showing hidden lists or forms, collapsing or expanding all the available lists and forms at once, and restoring the default layout.
5. The changes you make remain in effect until you change the layout again.

6. Make your changes by clicking the controls that appear on each list or form:
Collapse the list or form to its minimal size, showing no records.
Expand the list or form to its standard size.
Move the list or form up on the screen to be positioned above other forms or lists.
Move the list or form down on the screen to be positioned below other forms or lists.
Hide the list or form in the Home screen.
Show a previously hidden list or form on the Home screen.
7. To apply the same action to all lists and forms at the same time, select one of the following options from the menu drop-down list.
Hide All Applets
Removes all lists and forms from the Home screen.
Show All Applets
Shows all lists and forms on the Home screen.
Collapse All Collapses all lists and forms to their minimal size.
Expand All Expands all lists and forms to their standard size.
By clicking [Default Layout] the Home screen returns to its default state.
8. Click [Done]. The Home screen is displayed with the new settings.
Navigation In the top left of the window you find the menu bar and the toolbar.

The buttons in the toolbar are:
1. Site Map
2. Logout
3. How do I...
4. Quick Print
5. Reports
The application is built up by screens, views, applets and fields . When starting the application you select your preferred working screen by clicking on one of the tabs.
Screens
Home - This is the start-up screen for the VINST application. You can edit the layout to adjust to your needs.
Service - This is the most used screen, where you handle the Service Requests. You can select one of the following views:
My SR's
My Support Teams SR's
My Support Teams SR's (only available for employees with the responsibility of Help Desk)
All SR's
Solutions - Here you can create new solutions.
Companies - Here you find information about different companies.
Contacts - Here you find information about the contacts.
Reference - Here you find information about employees and support teams.
User Preferences - Here you can modify additional settings, such as the tab layout or the user profile.
There are three more screens available and you can choose if you want them to be visible or not. See Tab layout for more information.
Views

There are different views available, depending on which screen you are looking at and also what authorization you have.
Categories
There are different categories available, depending on which screen you are looking at and also what authorization you have.
Drill-downs
By clicking the link of an object, you can drill it down to a detailed view.
Change column layout You can change the appearance of the different columns that are currently shown on screen by hiding, showing, or moving them.
To change the appearance of the columns, do as follows:
1. Select <View> <Columns Displayed>. The Columns Displayed dialog is displayed.

2. Make your changes by selecting desired column and clicking the controls that appear beside each list:
Show the column.
Hide the column.
Show all columns.
Hide all columns.
Move column to the top of the list.
Move column up one step.
Move column down one step.
Move column to the bottom of the list
3. Click [Save] to close the dialog and apply the changes.
By clicking [Reset Defaults] the columns return to their default state.
Tab layout In the User Preferences screen, you can adjust the layout of tabs in the application to make them fit with your needs.
To change the tab layout, do as follows:
1. In the User Preferences screen, select <Tab Layout>.
2. In the Name list, find the tab you want to adjust.
3. In Hide, make sure the checkbox for the concerned tab is unselected if you want the tab to be visible.
If the User Preferences tab is not visible, you can open it by selecting <Tools><User Preferences> in the menu bar.

New terminology
VINST 3.11 Definition
Support Team (ST)
A group of persons providing support for one or more Products or Services.
ST Manager A person key responsible for the day to day management and performance of an ST.
Service Request Just as it says - a request for service which can be made by or on behalf of an End User or Machine. A Service Request can be of several types as set by the Service Request "SR Type".
Service Request Type (SR Type)
A description for what the Service Request is about. The setting can also affect the way in which the SR behaves regarding what fields are mandatory and which are not. For example, Cause is mandatory for SR Type "Incident" but not for SR Type "Request".
SR Type - Incident
An example of one of several Service Request "SR Types". Typically an End User reported issue, but can be machine generated, where a used product or service is operating outside of agreed service parameters. See ITIL and new VISITS 3.x for further description. (The short story: when something is broke!)
SR Type - Request
An example of one of several Service Request "SR Types". An expanded and simplified form of today's Business Request. Now covers any type of Request or Orders submitted by an End User which needs to be recorded in VINST.
SR Type - Event The purpose of SR Type= "Event" is to handle all SR's created by operators using the semi-automated function within MO and T/EC from the OFP's when right-clicking an Alert.
NOTE!! The SR Type "Event" is not to be used for any other purpose!
Consolidated to one naming standard of Help Desk
Groups which provide direct End User/System Product or Service Support. Roughly equivalent to ITIL Service Desk. Can be seen as 1st Level Support groups.
Back Office Groups typically responsible for Maintenance Issues for Products or Services. Can be seen as 2nd Level Support

groups.
Specialist Groups typically responsible for Development of Products or Services. Can be seen as 3rd Level Support groups.
My Service Desk SR's
A special view in the Service Screen for persons working in Help Desk Support Teams. This view allows for follow-up of all SR's across the Organization and is the only view where it is possible to "Close" or "Reopen" an SR.
Affected Statistics, Corrected Statistics
Functionality around Statistics and Categories in today's VINST has been combined into one in the new VINST. The Level 2 selection you make in the Affect Statistics structure now does the same task as the old Category selection in the current VINST. Over time, the data in the Statistic section will be changed to more closely reflect Volvo IT's actual Service and Product catalog.
Company This is the Standard Company name as taken directly from the Volvo Corporate Directory. We have standardized the name to match what is seen in VCD, Outlook, SAP, etc.
Solutions This is the section of the application where solutions may be created and published. It has been somewhat enhanced from the previous VINST to make it more usable.
Position This is the setting in the tool which shows which Support Team (PRG) you are currently active in by default. This is important in many of the views. You may control this yourself in the User Preference Screen by changing your Position to tell the system which ST you would like to be working in.
Activity Plans Activity Plans can be found in the Service Request Detailed View along with Notes, etc. Support Team Managers may now create their own Activity Plans.
Reference Screen, User Preference Screen
The old Reference Screen has been split up into two. The new Reference Screen is concerned with Group or System level View. The User Preference Screen is concerned with actions specific to the logged in User.
Shortcuts To simplify the daily work with the VINST application, there are shortcuts available for the most common procedures.
Record Management Shortcut

New Record CTRL + N
Copy Record CTRL + B
Delete Record CTRL + D
Save Record CTRL + S
Undo Record CTRL + U
Select All Records in List CTRL + A
Record Navigation Shortcut
Next Record CTRL + DOWN ARROW
Next Page of Records ALT + DOWN ARROW
Last Page of Records ALT + L
Previous Record CTRL + UP ARROW
Previous Page of Records ALT + UP ARROW
First Page of Records ALT + F
Query Management Shortcut
New Query ALT + Q
Execute Query ALT + ENTER
Save Query ALT + S
Refine Query ALT + R
General Navigation Shortcut
Go to Site Map CTRL + SHIFT + A
Open Search Center CTRL + F

Run Report CTRL + SHIFT + R
Activate Field Control F2
Layout Management Shortcut
Define Columns Displayed CTRL + SHIFT + K
Define Sort Order CTRL + SHIFT +O
Online Help Shortcut
Open Online Help CTRL + H
Help with Record CTRL + ALT + K
Technical Support CTRL + ALT + J
Application Management Shortcut
Connect as New User CTRL + SHIFT + W
Log Out CTRL + SHIFT + X
Tips and tricks • To see how many records are in the list, click [Menu] and select <Record Count>. A pop-
up window is displayed, showing the total record count.
• To be able to leave a new record without having to fill in all the mandatory fields, click [Menu] and select <Undo Record>. This will delete the record.
• By clicking the function key F11 you can see the application in full-screen mode.
• The key combination SHIFT + CTRL + K will give you access to the Columns Displayed dialog.

Change default Support Team Working in VINST you see the Service Request for your Support Team by default. If you are a member of several Support Teams you might want to change your default Support Team.
To change default your Support Team, proceed as follows:
1. Select <Profile> under the User Preferences screen.
This view will show with the Position And Responsibility area to the far right.
2. You can then change your default position by clicking on the icon next to the current position.
3. In the pop-up window then tick what position to be default and then click OK.


REPORTS AND PRINTING Change default Support Team Working in VINST you see the Service Request for your Support Team by default. If you are a member of several Support Teams you might want to change your default Support Team.
To change default your Support Team, proceed as follows:
1. Select <Profile> under the User Preferences screen.
This view will show with the Position And Responsibility area to the far right.
2. You can then change your default position by clicking on the icon next to the current position.
3. In the pop-up window then tick what position to be default and then click OK.

General printing rules In the top left of the window you find the menu bar and the toolbar.
Information from VINST may be exported and printed in three different standard methods. .
• Service Request Summary Report and Product Defect Summary Report
• Service Request Audit Report VISITS and Product Defect Audit Report VISITS
• Query Export and Printing from other Programs
Note: Never Use Internet Explorer File/Print or the Quick Print Function in VINST.
Service Request Summary Report and Product Defect Summary Report In the top left of the window you find the menu bar and the toolbar.
Summary Reports are designed to give an overview of one or more Service Requests/Product Defects as displayed in a List Applet.
In order to activate a Summary Report you must:
1. Activate a List Applet (My Support Teams SR's for example)
2. Query for the Information you wish to display in the report
3. Press the <Report Icon>.
4. Select the <Summary Report>.
A new Internet Explorer window will be spawned and you will see a preformatted Summary Report which contains the information resulting from your Query.
The Summary Report contains the following fields and can not be edited:
• Contact First Name
• Contact Last Name
• Account Name
• Contact Account
• Severity
• Date Opened

• Owner
• Status
• Abstract
*The fields may vary slightly between the SR and PD Reports.
Once the Report is displayed, you may choose to Save or Print the Report. How to save a report:
1. Click the <Save> Icon in the <Reports> window and you will be presented with instructions regarding the different file types you may Save the Report as.
How to print a report: 1. Click the <Print> Icon.
2. Internet Explorer should spawn a new Window and the IE Print Functions. From there you can select some basic formatting and choose what printers to send the Report to.
Some clients which have Adobe Products installed will also spawn the Adobe Acrobat Reader application. From here you can use Acrobat to manipulate the reports prior to printing. However, the results and options may vary depending on your version of Adobe Acrobat and your printers.
Notes Regarding Summary Reports • Summary Reports are formatted to print Landscape but there can be a problem with
this due to various paper sizes and printers.
• Summary Reports will print everything in your List Applet Query.
Be careful that you do not ask it to report/print 10,000 records!!
•
• Many windows are spawned when printing Reports.
• Some functions in Printing are based on your IE browser and plug-ins such as Adobe. It is not possible to say that every browser will perform as described above.
Service Request Audit Report VISITS and Product Defect Audit Report VISITS In the top left of the window you find the menu bar and the toolbar.

Audit Reports are designed to give detailed information on one or more Service Requests/Product Defects as displayed in a List Applet.
In order to activate an Audit Report you must:
1. Activate a List Applet (My Support Teams SR's for example).
2. Query for the Information you wish to display in the report.
3. Drill down on one of the selected results.
4. Press the <Report Icon>.
5. Select the <Audit Report>.
A new Internet Explorer window will be spawned and you will see a preformatted Audit Report which contains the information resulting from your Query.
Note: The Audit Report will display the Current Query or the Current Record selected.
The Audit Report contains the many fields and can not be edited. The major sections in the Report include:
• SR/PD Info
• Contact Info
• Ownership Info
• Description
• Notes
• Audit Trail (all info from here)
• Work effort details
*The fields may vary slightly between the SR and PD Reports.
Once the Report is displayed, you may choose to Save or Print the Report. This works exactly as described for the Summary Reports.
Notes Regarding Audit Reports • Summary Reports are formatted to print Landscape but there can be a problem with this due
to various paper sizes and printers.
• Audit Reports might print everything in your List Applet Query - be careful that you do not ask it to report/print 10,000 records.
• Many windows are spawned when printing Reports.
• Some functions in Printing are based on your IE browser and plug-ins such as Adobe. It is not possible to say that every browser will perform as described above.

Tip: The fastest way to get a single SR/PD for output on an Audit Report is to use the Binoculars Search on the specific SR number you are interested in. This will result in a single SR "hit" which can be drilled down on. The resulting Audit Report will then print only that specific SR. This is not the best solution, but it does help.
Query Export and Printing from other Programs In the top left of the window you find the menu bar and the toolbar.
The final method for Query and Printing is to use the File/Export Data Map function from the VINST File Menu Option.
This allows you to produce a Query, then export the results to HTML or a formatted text file to be used in Excel.
This works from any List Applet as follows:
1. Perform your Query as normal to select the data you wish to work with.
2. You may limit the fields which will be exported by using the <Columns Displayed> function.
3. Select <File> then <Export Data Map>.
4. You will be provided with a choice of file types to Save your Query results and can specify the file name.
For best results, <Save> as Tab Delimited Text File and open with Excel.

Creating Outbound emails Email Communication Functionality? Email Communication allows a VINST User the ability to:
• create an email directly from the VINST Tool without having to rely on a separate email system such as Outlook. In addition, each email sent from VINST can be generated from a user-defined Email Template. This can be very useful when wanting to send information from the tool such as Notes, SR Information, etc - Email Templates allow you to do so without using copy/paste into another email system!
• Additionally, all communications made using the Email Communication Functionality are automatically stored within the VINST System on the specific Service Request they are sent from. This means that other persons working on the SR will have access to the emails which have been sent regarding the SR which would normally not be available to them if sent from a separate email system.
Setup Email Communication Functionality The following instructions describe how to setup and use the Email Communication Functionality in VINST. We recommend following these steps and settings only.
This section comprises:
Step 1: Create a Personal Profile Step 2: Setting Outbound Communication Preferences Step 3: Creating Email Templates Step 4: Using Email Communications Step 5: Viewing Sent Emails
Step 1: Create a Personal Profile In order to generate emails from VINST, you must use a profile which will define how the basic email behaves. The profile defines what email driver the application should use to send the email, as well as controlling some basic information in the email such as the From field.
The system automatically defines a profile for all users. This default profile is titled VINST and is used for all outbound emails from VINST. Unless you create a personal Profile, the system will use the default with the From equal to [email protected].
By creating personal Profiles, you can control what is entered in the From for the emails you send from VINST. It is possible to create multiple Profiles to support sending emails from your personal email and group emails "on the fly" when working in VINST.
1. Access the Siebel Global Navigation Window by clicking the small globe icon in the upper left corner of the VINST Application window - it is under the <File> menu option.

2. In the <Screen> View, select the Screen titled <Communications>.
3. Open the main <Communications> Screen.
4. Click the <My Profiles> View.
5. In the <Profile> Applet, click <New>.
6. Enter a name for the new profile in the <Name> field, it will only be visible to you.
7. Select a driver from the list in the <Driver> field. This entry MUST be "VINST eMail Driver".

8. In the <Profile Parameters Override> Applet, click <New>.
9. In the <Name> field, choose From Address from the drop down list.
10. In the <Values> field, enter the email address you whish to associate with this Profile.
11. Step off the Screen to Save your Profile record. You have now created a Personal Profile.
You may create as many Personal Profiles as you wish with different emails. You will use these later when sending emails to choose what email you wish to send From.
Step 2: Setting Outbound Communication Preferences The next step in activating the Email Communication Functionality is to setup your default settings for Outbound Communications. This step simply tells the system which Personal Profile and other settings you wish to use on the majority of your emails. You may always choose other profiles and settings when creating a new email.
1. Open the <User Preferences> Screen.
2. Click the <Outbound Communications> View.
3. You will see three settings areas labeled - Send Email - Receive Email - Advanced Features.

Only the Send Email settings need to be adjusted.
4. Select the field labeled Upon Sending Messages Generate: and set it to "Public activities".
5. Select Default Profile and set it to the profile you created which you will use most often. If you did not create a profile, choose the default profile titled "VINST" .
6. Select Default Recipient Class: and set it to "To".
7. Select Default Message Format: and set it to "Plain Text".
8. Click <Save>. You have now set your Outbound Communications Preferences.
Step 3: Creating Email Templates Email Templates allow you to preset one of more email "forms" that can be used to fill out basic information when you create new emails from within VINST.
In addition, you can insert special commands within the Email Template which will pull information directly from the VINST Service Request you are sending the email from.
For example, you can build an Email Template which would always include the SR Number, Abstract and Notes every time you send an email using that Email Template. This saves a lot of copy paste!
1. Access the Siebel Global Navigation Window by clicking the small globe icon in the upper left corner of the VINST Application window. It is under the File menu option

2. In the <Screen> View, select the Screen titled <Communications>.
3. Open the main <Communications> Screen.
4. Click the <My Templates> View.
5. In the Templates Applet, click <New>.
6. Enter a name for the new template in the <Name> field
7. Enter a description of the template in the <Description> field if you wish
8. Ensure Channel Type equals Email!
9. Leave the other fields as default.

10. Select the <Simple> Tab Screen.
11. You will see three settings areas labeled - Template Properties - Choose Template - Pick Available Substitutions.
12. Template Properties displays the same information you entered when first creating the template. In addition, you may choose whether the template is visible on a Private or Public level. You can read more about this below.

13. Ensure Template Type equals body.
14. Choose Template allows you to define the default text which will appear in your emails Subject and Body area. You may enter any text you wish.
15. You may also place Call Tags to pull information out of the Service Request you are working with when you use the template. The possible Call Tags appear below:
• Security ID: [Service Request.Security Id]
• Caller Name: [Service Request.Caller Name]
• Phone #: [Service Request.Phone # VINST]
• E-Mail: [Service Request.E-Mail VINST]
• Asset #: [Service Request.Asset Number]
• Asset Info: [Service Request.Asset]
• Company: [Service Request.Contact Account]
• Location: [Service Request.Location VINST]
• Abstract: [Service Request.Abstract]
• Description: [Service Request.Description]
• Support Team: [Service Request.Owned By Position Name]
• Creator ST: [Service Request.Creator PRG]
• Action Owner: [Service Request.Owner]
• SR #: [Service Request.SR Number]
• SR Type: [Service Request.SR Type]
• Business Impact: [Service Request.Severity]
• Priority: [Service Request.Priority]
• Affected Str. 1: [Service Request.Affected Area]
• Affected Str. 2: [Service Request.Affected Sub-Area]
• Affected Str. 3: [Service Request.Affected Child Sub Area]

• Corrected Str. 1: [Service Request.Area]
• Corrected Str. 2: [Service Request.Sub-Area]
• Corrected Str. 3: [Service Request.Child Sub Area]
• Status: [Service Request.Status]
• Sub-Status: [Service Request.Sub-Status]
• Created: [Service Request.Created]
• Resolved: [Service Request.Resolved Date]
• Closed: [Service Request.Closed Date - VINST]
• Cause: [Service Request.Cause]
16. Enter the text and Call Tags you wish to use in your template. There is no need to edit fields
in Pick Available Substitutions area or the <Advanced and Template Items> Tab Screens.
17. Step off the Screen to <Save> the template. You have now created your first template.
You may create as many templates as you wish. Each must have a unique name. When creating a new email, you will be able to choose which template to use.
By default, all templates are for your private and personal use only. They can not be seen by other VINST Users. If you choose the Public setting when creating your template, it will become visible to ALL other VINST Users. If you choose to do this, you must enter a Description explaining the purpose of the template and why it is available to all users. VINST Administration may choose to remove the Public setting on a template if it does not have a global use.
Step 4: Using Email Communications To date, the Email Communications have only been tested from within the Service Screen. It is possible that this functionality may work from the Home Screen or Product Defect Screen, but these other screens may give results different from what is described below.
1. Open the <Service> Screen.
2. Select or Drill Down on a Service Request.
3. Press the <F9 key>.
4. The <Pick Recipient> pop up window will appear. Here you choose who will receive the email you are sending.

Your choices are:
• Service Request Contact - Will send the email to the email address entered in the Email Field in the Contact Information section of the selected Service Request
• Service Request Owner - Will send the email to the Action Owner displayed in the Ownership section of the selected Service Request
• Service Request ST - Will send the email to the Group Email box set for the Support Team Responsible for the Service Request as displayed in the Support Team field in the Ownership section of the selected Service Request
• Service Request Notify Me - Will send the email to all persons who have pressed the Notify Me button for the selected Service Request
5. Make a selection and click <OK>.

6. The <Send Email> pop up window will now be displayed.
7. In the From field you should see the name of your default Profile you built and set in Steps 1 and 2. This control what email address the email will be sent from. You may choose other Profiles you may have built (thus switching the From email) by using the drop down selection list on the From field.
8. The To field shows the person(s) the email will be sent to from your selection in the <Pick Recipient> pop up window.
9. You may add additional emails in the To, CC and BCC fields.
10. By default, the Subject and Body fields will be blank.
11. You may type anything you wish to create a "one off" email just like in Outlook.
12. If you have created an Email Templates in Step 3, you may select it from the drop down list in the Body field. Do this before you manual type in text as it will overwrite anything you have manually entered.
13. After you have completed entries for Subject and Body fields, you are ready to send the email by simply pressing the <OK> button.
You may also use the Attachment Icon to add attachments and the Spell check Button if you wish. Note that the Spell-check is only available in English - ENU.
Once you have clicked the OK button, the email will be sent to the recipients. A copy of the email will also be saved on the selected Service Request as explained below.

Step 5: Viewing Sent Emails All Email Communications sent from a Service Request will be saved on the Service Request for others to view. To see the sent emails, follow the steps below.
1. Open the <Service> Screen.
2. Select or Drill Down on the Service Request you are interested in.
3. Select the <Activities> Tab Screen.
4. Here you will see all the Email Communications associated with this Service Request. They are saved as Activities Type Email - Outbound.
5. Note that all fields are not displayed by default in the Activities Tab Screen. To see the Subject and Body fields for the emails, you must make them visible in the applet.
6. In the Activities Tab Screen, click <Menu> drop down and select <Columns Displayed>.

7. [*]Add the fields Description and Comments, this adds the Subject and Body fields.
You may also add other fields to see additional information if you wish.
E-Mail Templates - Changing the FROM address If you use e-mail templates, you'll like this feature. You can create different Profiles in order to customize the FROM address used for sending e-mails.
For instance, you want to send an e-mail to the customer but using a custom address to that the customer can reply to your desired address, for example [email protected].
You can do it by following these easy steps:
1. Go to <Site Map> --> <Communications> --> <My Profiles>. (If you can't find this view, you may need to log-out and log-in again.)
2. In the <Profiles> applet, click the <New> button to create a new Profile.
3. Complete the following information:
1. Name. Use a representative name, for example, PRINTERS GROUP.
2. Driver. Set to VINST eMail Driver.
This is important, otherwise your e-mail will not work.
4. Now, you need to customize the FROM address. In the <Profile Parameter Overrides> applet, click the <New> button.
5. Open the popup in the Name field and choose <From Address>.
6. Now, complete the <Value> field using your desired address, for example [email protected].
7. Don't change any other parameter.
You have now created your own e-mail Profile!
You can repeat this process as many times for every different FROM address you want to use. Just make sure you use a different Profile name and the Driver is set to VINST eMail Driver.
Note: you need to create a separate Profile for each different FROM address you want to

use.
There's an additional step you may want to do. You can choose what's your default Profile. Just go to User Preferences -> Outbound Communications and choose your Default Profile.

Service Requests
Register Service Request When registering a new Service Request you can choose to work in the list applet or in the form applet. However, the description below is based on the form applet.
An SR may be created on a Contact, on an Asset, or on both Contact and Asset combined. However, Company is mandatory information.
The Security ID field is automatically in focus and after entering the information you move to the next field by pressing TAB. All required fields are marked with a red star (*).
To register a new Service Request, do as follows:
1. In the Service screen, click [New]. A new SR record is created.
Enter contact information:
2. In Security ID, enter the customer's security ID. All other fields concerning the customer will be filled in automatically.
If you press TAB after entering a digit in the field, the Contact dialog will be displayed where you will be able to search for a security ID.
3. In Phone #, enter a telephone number for the customer.
4. In E-Mail, enter the e-mail address for the customer, if it was not filled in automatically.
5. In Location, enter the location of the customer.
6. In Reference, enter a reference. Enter a description:
7. In Abstract, enter a short description of the SR.
8. In Description, enter a detailed description of the SR. Enter ownership information:
9. In Support Team, make sure that the correct support team is selected. Your default support team, derived from your active position, is automatically filled in.
10. In Action Owner, make sure that the correct action owner is selected. The creator's ID is automatically filled in. Enter the Service Request information:
11. In SR Type, select the type of SR from the drop-down list. Available types are: Incident, Question, Complaint, Request and Event.

12. In Impact, set a value for how this SR affects the Volvo business.
13. In Urgency, choose the appropriate value for the SR. The value is used together with the Impact value you set. The available values are: High: (High, Medium, Low) Medium: (High, Medium, Low) Low: (High, Medium, Low)
14. The Priority value is automatically set based on the values of the Urgency and Impact fields and is automatically changed when these fields are changed. The values are: Major: 1-3 High: 4-6 Medium: 7-9 Low: 10-12
15. In Parent SR, enter a possible origin SR.
16. In Asset #, select an asset number.
17. In Sub-Status, select a sub-status from the drop-down list.* Enter Statistics:
18. Select an appropriate structure from the drop-down lists Affected Str. 1, Affected Str. 2 and Affected Str. 3.
Using templates When registering new SR's you might want to use templates in order to reduce work. You can either create a template from a new record, or use an existing template when registering a new SR.
Create a new template 1. Create a new SR and fill in all appropriate fields.

2. Click [Menu] and select <Save as Template>. The Save Template As dialog is displayed.
3. In Template Name, enter a name for the template.
4. In Template Description, enter a description of the template.
5. Click [Save].
If you want to replace an existing template, click [Overwrite].
Apply a template on an SR 1. Create a new SR.
2. Click [Menu] and select <Apply Template>. The Pick Template dialog is displayed.
3. Select desired template from the list and click [OK]. The selected template is applied to the SR.
4. Fill in any remaining fields for the SR.
Create a new SR from a template 1. Click [Menu] and select <New From Template>. The Pick Template dialog is displayed.
2. Select desired template from the list and click [OK]. A new SR is created, based on the selected template.
3. Fill in all required fields for the SR.
Create a new SR from the last template 1. Click [Menu] and select <New From Last Template>. A new SR is created, based on the
last used template.
2. Fill in all required fields for the SR.

Activity Plan An activity plan is like a check list when working with a Service Request. You can set it to different templates depending on the type of SR you are working with. It is replacing Questions from the earlier VINST version.
To set an activity plan for an SR, do as follows:
1. Open the SR.
2. Open the Activity Plans tab in the bottom of the screen. The activity plan for the SR is displayed.
3. Click [New]. A new activity plan record is created.
4. In Planned Start, select the planned start date for the activity. Today's date is displayed as default.
5. In Template, select a template from the drop-down list.
6. Press ENTER. The Activities list below is filled out according to the template.
7. (Optional) In Description, enter a brief description of the activity.
The templates can only be created by ST Managers and Support Coordinators. See Create activity template for more information.
Add text to a Service Request When working at the Help Desk, Back Office or as a Specialist, you will need to add information to the SR. This might be information from the contact or internal communication.
To add text to an SR, do as follows:
1. Open the SR for which you want to add notes.
2. In the Additional Information tab in the bottom of the screen, under Notes, click [New]. The Note field is in focus.
3. Enter the appropriate text in the field.
If you want to write a longer text you can click on the icon to the right in the field. A new window will be displayed where you can enter the text.
4. In Type, select the type of note from the drop-down list. Available values are: Information (General information) Question (Question regarding the SR) Cancellation Reason (Reason for cancelling the SR)

5. In Internal Only - select the checkbox if you do not want the note to be public.
6. The Notes checkbox is selected for the current SR. This text is now accessible to you and your colleagues at any time.
Add attachment Attachments are files created in another program. You may want to associate these files with a Service Request because they provide valuable information about the SR. For instance, the attachment could contain error message information or screen dumps.
To associate an attachment with an SR, do as follows:
1. Open the SR for which you want to add an attachment.
2. In the Additional Information tab in the bottom of the screen, under Attachments, click [New File] / [New URL]. The Add Attachment dialog is displayed.
3. Select the file/URL you want to add to the SR and click [Open] / [Add]. The dialog is closed.
4. The Attachments checkbox is selected for the current SR.
This file is now accessible to you and your colleagues at any time. You open the attachment by clicking the link in the Additional Information tab.
Get Contact History while Creating a SR's In the top left of the window you find the menu bar and the toolbar.
1. Click the Binoculars Search Icon in the top right corner of the VINST Application window.
2. This will open the search window as a side bar screen. It stays open and available no matter what you do in the main VINST Application Window. It will stay open when you Change Screens, Views and even when you create New Service Requests! So, it is like having two separate application windows.
3. Now, using the Binocular Search Window, you may search for SR #, Security ID, Abstract, and other fields from either the Service Screen, the Product Defects Screen or the Asset Screen.
4. The results of the searches are shown in the Binocular Search Window - NOT the main Application Window. This means you can BOTH Create a New SR And Search for existing SR's at the same time!
Tip: The Binocular Search Window is a very good tool to facilitate your work and should preferably be open at all times.

Work with a Service Request In the Service screen you can view Service Requests, but to access a more detailed view you have to drill-down the SR.
To drill-down an SR, do as follows:
1. In the Service screen, find the desired SR in the list applet.
2. In SR #, click the link for the SR. The SR is opened in a detailed view.
At the top of the form applet, there is a row of buttons:
New - Used to create a new SR record.
Assign - Used to assign an SR to someone else.
Accept - Used to accept an SR assigned to you.
Cancel - Used to cancel an SR.
Resolve - Used to resolve an SR.
Unresolve - Used when a previously resolved SR needs to be unresolved.
Close In Call - Used when an SR can be closed in call.
Close - Used to close an SR.
Reopen - Used to reopen an SR. (Only available for employees with the responsibility of Help Desk)
Notify Me - Used when you wish to be notified when an SR is resolved.
Verify (not working yet) - A function which is under development and will be used in the future.
To do additional work on the SR, select one of the tabs:
Additional Information - Here you can add text or attach files to the SR.
Child SR's - Here you can find possible child SR's. The information is read-only.
Work Effort - Here you can maintain the work effort for the SR.
Solutions - Here you can add a solution to the SR.
Audit Trail - Here you can follow the changes made to the SR.
Activity Plans - Here you can set an activity plan for the SR.

Request notification about a Service Request When you work with a Service Request without solving it, you can request to be notified when the Service Request is set to resolved. This is a useful possibility when you want to follow-up Service Requests that you are especially interested in.
To request a notification, do as follows:
1. Open the SR.
2. Click [Notify Me].
When the Service Request is set to status Completed - Resolved, you will automatically be notified about it.
Change position When you work in VINST, you may be a member of one or more Support Teams (ST's). The position setting in VINST defines which Support Team you are actively working in. Thus, your current position is the Active Support Team.
All actions you take in the tool are registered on or applied to the ST you currently have set as Active.
Even though you select a specific Support Team to be active in, the Views will show you all Service Requests across all ST's you are a member of.
Above the list applet in the Service screen you see the name of your current Support Team.
To change to another ST, do as follows:
1. In the Service screen, click <Click here to switch to a different support team> above the list applet.
The User Preferences screen is displayed.

2. Select a Support Team in the list and click [Change Position].
Remember to click the [Change Position] button in order for the change to take effect.
Work effort
Work effort is the time (in minutes) a VINST user works with the Service Request.
VINST is calculating a suggested time for work effort based on the Service Requests sub-status. The calculation starts when a Service Request is created any continues all the time a case is set to Accepted/ In Progress. It will not be stopped until the case is changed from this status.
All Work Effort is saved by the system any time the case is transferred or resolved and stored in the Work Effort list.
To manually add Work effort you need to use the Work effort tab.
If Work Effort is NOT set to Mandatory
• The user will not need to verify the calculated Work effort.
• The Work Effort will be visible in the Work Effort field.
• The Security ID for the logged in user will populate the Action Owner field in the Work Effort list

If Work Effort is set to Mandatory
When a user has Work effort set to mandatory, verification is needed for verifying correct Work Effort.
When a user has Work effort mandatory, this will impact ALL Support Teams he/she is a member of.
On a Close in Call
• The user do not need to verify the suggested time from VINST
• Work effort will be written to the work effort object and no verification of current work effort is required
• The Work Effort Verified column box is not ticked.
When Resolving or Transferring a Service Request
1. The user needs to verify the suggested time from VINST. To do this tick the Verified box next to the Work Effort field. If you haven't ticked the box, a message will appear telling to verify your Work Effort.

2. If Work Effort is filled in manually before a Service request is transferred, resolved or if sub-status is changed from “In Progress”, the Work Effort Verified check box will automatically be checked.
3. The calculated Work Effort (in Minutes) will be visible in the Work Effort tab.
4. You can also see that Work Effort Verified is ticked.
Note: Anyone can add a work effort but only the creator of a work effort record can update it (same rules as for Notes).

Set Work Effort to mandatory for a ST member
The Support Team Managers have possibility to set Work Effort mandatory on members in their Team(s). They do this in the view “My Support Team Members”.
Mandatory Work effort is set per Support Team member.
To set Work effort to mandatory for a ST Member, proceed as follows:
1. Got to Reference tab.
2. Select Support Teams.
3. In the Member List Applet, select My ST Members list.
4. Highlight the user record (member) you want to and click Toggle Work Effort to toggle between Yes (Y) and No (N).
Y - Work Effort is mandatory and verification will be needed N - Work Effort is not mandatory, no verification will be needed

When a Support Team manager sets Work effort mandatory for a ST member, this will impact ALL Support Teams he/she is a member of.
Template functionality Templates are used for giving required information to a receiving Support Team about a specific product stored in Affected Structure 2 field. They are stored together with the handshake information (Authorize Assign).
A Support Team manager can apply a specific template by selecting it in the Reference screen / tab Authorize Assign /sub-view “My ST Created Requests”.
Note: The template data have to be created before this function is useful. The creation of template data will be done as needed by the appointed personnel in the business. (There is a special role for creating templates in the application.)

Applying a Template When working with Service Requests, a suitable template can be found by pushing the button [Template]. A pop-up window will show the available templates. They are chosen based on the Support Team of the Action Owner and the Affected Structure 2 field.
1. The Action Owner selects a template and the template text is copied into a new Note of type “Template”. The name of the receiving Support Team connected to this template is copied and put at the end of the new Note.
2. The Action Owner updates the Note with required information. This Note can be updated by another user.
esolve Service Request Resolving a Service Request means that you in some way provide a solution to a SR. The SR will be marked as resolved and sent back to the SR owner for verification towards the contact. Note that you as action owner also can verify the solution and thereby be able to close the SR immediately. The SR will be closed automatically within 24 hours if Solution Verified i checked, otherwise the SR will be closed after 7 calender days.
The Service Requests assigned to you are displayed in the My SR's view.
To solve an SR, do as follows:
1. In the Service screen, select the My SR's view. Your assigned SR's are displayed.
2. Open the SR by clicking on it. The SR is opened in detailed view.
R

3. (Optional) Add a Note and type the solution text in the Note field.
4. Under Statistics, select an appropriate structure from the drop-down lists Corrected Str. 1, Corrected Str. 2 and Corrected Str. 3.
These list boxes are mandatory fields and are meant to be used for setting the actual category for the Service Request when it is solved. This is later used for statistical follow-up.
5. If you have verified the solution with the user, select the checkbox Solution Verified.
Solution Verified means that the action owner of the Service Request have verified the solution with the user. Do not select this option without making sure that the contact is satisfied with the solution and the pr
oblem is solved.
6. (Mandatory for SR of type Incident) In Cause, select a cause for the SR from the drop-down list.
7. Click [Resolve].
The status of the SR will be changed to Completed – Resolved.
Email when a solved/closed Service Request is rejected/reopened If the so ed/closed Service Request is rejected/reopened an Email notification will now be sent to the
pport team and another sent to the Contact saying that the Service Request is active again.
If thSR r to per
lvSu The email is sent when :
• A Service Request has been resolved or closed and the status is put back to In Progress.
• A Contact rejects the solution.
Close In Call e problem is solved at the Help Desk, there will be no transferring of the SR. This means that the
can be closed after confirming with the contact. The following steps are necessary in ordeform a Close In Call.
1. Create a new SR as described in Register Service Request.
2. Click [Close In Call] to close the SR.
The values in Stats are used to set a "closing structure" for the SR. This is primarily done for statistical use.


Close Service Request To close an SR means that you act as the incident owner. Before you close an SR you must make sure that it has been resolved and that the contact is satisfied with the solution.
To close an SR, so as follows:
1. Open the Service screen and select My SR's.
2. Click [Queries], to the right in the toolbar, and select <All Resolved>.
3. Open the SR you want to close.
If the checkbox Solution Verified is not selected, it is your responsibility to verify the solution with the user before manually closing the SR.
4. Click [Close].
Assign Service Request If the problem can not be solved it might have to be transferred to another Support Team. This can be done in two ways:
Select ST function To select an ST from a list of all ST's in the system, do as follows:
1. Open the SR.
2. In the Support Team field, click the Load button ( ). The Pick Position dialog is displayed.
3. Select a Support Team from the list and click [OK].
Assign SR function This will perform a search for ST's based on what ST the user belongs to and what structure is chosen for the SR. By default the list is empty until a member picks a new ST from the Select ST list. Then it will appear in the Assign SR list for all members in the ST.
To select an ST from a logical list, do as follows:
1. Open the SR.
2. Click [Assign]. The Positions dialog is displayed.
3. Select a Support Team from the list and click [Assign].
A mail is sent to the contact when the SR is created and later when it is resolved. A mail is also sent to the chosen ST, saying that the ST in question now has an SR pending in their queue.

Accept Service Request Accepting a Service Request means that you take responsibility for handling the SR. In the process, you automatically accept the role as the action owner.
To accept an SR, do as follows:
1. In the Service screen, select the SR you want to accept.
2. Click [Accept].
If an SR, which you are the action owner of, has been changed, the Updated checkbox is selected the next time you open it.
If you do not want a notification to be sent out to the contact, select the Suppress Notify checkbox.
Escalation_matrix This is the VISITS Process Escalation matrix. The higher Impact - the higher Urgency and Priority.
The priority is set based on the values of the Urgency and Impact fields and is automatically changed when these fields are changed. The priority escalation process will continue to set higher priority according to the escalation matrix.
Impact Low Medium High Major
Urgency Low Medium High Low Medium High Low Medium High Low Medium High
Priority 12 11 10 9 8 7 6 5 4 3 2 1
OLD VALUE
16+15 14 13 12+11 10 9 8+7 6 5 4+3 2 1
Base Time before increase
3w 1w 3d
D 1w 3d 1d D 3d 1d 4h D 4h 2h D

Email notifications on Priority changes are only sent on the “D” ( Decision) events in the Base-row in the table above.
SR Type - Event
The purpose of SR Type Event is to handle all SR's created by operators using the semi-automated function within MO and T/EC from the Operator Focal Point's when right-clicking an Alert.
NOTE!! SR Type Event is not to be used for any other purpose!
Rules and regulation
An Event can escalate and turn into an Incident and this is manually changed by changing the value from SR Type Event to SR Type Incident.
An Incident can NEVER change back to be an Event by definition.
Definition of Event, Event Creator and Alert:
Event An occurrence within the IT environment (usually a deviation or fault) detected by an Event Creator.
Event Creator Events are detected by approved customized software, normally Monitors (but can be SNMP traps, Knowledge based scripts, Adapters or other type of code). The Event Creator must be consistent with pre-defined threshold values that require some sort of action, immediately or long

term.
Alert A subset of the Event definition, specifically limited to Events that are shown on an Operator Focal Point and need immediate attention.
About solutions Solutions are objects in the database that are separate from Service Requests and Product Defects. After an SR is successfully resolved, you can associate the SR with a solution for reference in case the SR is reopened at a later date. Recording the solution also makes it possible for you to resolve similar SR's without doing extensive research.
Relate a solution More information will follow.
To add a solution to an SR, do as follows:
1. Open the desired SR.
2. In the Solutions tab, click [New]. The Add Solution dialog is displayed.
3. Select the desired solution.
4. Click [Add].
The solution is now added to the SR.
If you wish to leave the dialog without selecting a solution, click [Cancel].

Create a new solution To create a new solution, do as follows:
1. In the Solutions screen, click [New]. A new solution record is displayed.
2. In Name, enter a name for the solution.
To make the solution easier to find, begin the name with the application concerned.
3. (Optional) In FAQ, enter a frequently asked question concerning the solution.
If the solution shall be visible for VISITOR users, a text should be entered in FAQ.
4. In Status, select a status from the drop-down list. Available values are: Draft - used when the solution is not yet complete. Final - used when the solution is ready to be published. Approved - can only be set by the ST Manager or the Support Coordinator. Obsolete - can only be set by the ST Manager or the Support Coordinator.
5. (Optional) In Solution, enter a description of the solution.
Work with a solution In the Solutions screen you can view solutions and you can choose to view all solutions or just the solutions created by you. To access a more detailed view you have to drill-down the solution.
To drill-down a solution, do as follows:
1. In the Solutions screen, find the desired solution in the list applet.
2. In Name, click the link for the solution. The solution is opened in a detailed view.
To do additional work on the solution, select one of the tabs:
Resolution Documents - Here you can add related documents to the solution.
Service Requests - Here you can find SR's related to the solution.

Add related documents When creating new solution, there is a possibility to add related documents or URL's.
To add a related document, do as follows:
1. Open the desired solution.
2. In the Resolution Documents tab, click [New]. The Add Resolution Document dialog is displayed.
3. (If the document is available in the list) Select the document, or the URL, from the list and click [Add].
4. (If the document is not available in the list) Click [New]. A new document record is created.
5. In File Name, click the Load button ( ). The Add Attachment dialog is displayed.
6. Select the file/URL you want to add to the SR and click [Add]. The dialog is closed.
7. (Optional) In Description, enter a brief description of the document.

About Support Team Manager Support Team Managers (STM's) are a critical part of the new VINST application. In general, it is the responsibility of every STM to ensure that the Support Team for which they are responsible performs according to applicable Customer Agreements, Operational Level Agreements, and the overall VISITS Support Process. Furthermore, the STM should ensure that the Support Team behaves in a correct manner and provides good customer minded service and support both to Volvo IT End Users and our co-workers who also use the VINST tool.
In order for a Support Team to function correctly, the STM must take an active role in the tool, otherwise the Support Team Members performance will suffer and have a less effective tool to work in. With this in mind, it is critical that every STM be aware of their role and responsibility in VINST and that they understand how to use the functionality to best support and guide their Support Team Members.
In short, a Support Team Manager is assigned to every Support Team in the VINST tool and is responsible for the day to day running of the ST. The ST Manager is assigned by the Manager responsible for the overall performance of the ST and works on behalf of the Manager to ensure correct performance of the ST.
Support Team Skills
You must be an Administrator to manage Support Team Skills.
Support Team Skills are an important concept in VINST. Skills can be a number of different selections which describe the type of support the ST provides.
Primarily, these settings will affect the ranking an ST receives when a user wants to assign an SR. Based on what information is entered in the SR, VINST will compare it to the skills set for the various ST's in the system, and present he most appropriate ST at the top of the assign list.
To see the current ST Skill settings, do as follows:
1. Select the ST you wish to administer.
2. In the Reference screen, select the Support Teams category. A list of all ST's is displayed.
3. In ST, click the link for the ST you wish to view. A detailed view of the ST is displayed.
4. Open the Assignment Skills tab.
Information of the assignment skills is displayed.
The values in Stats are used to set a "closing structure" for the SR. This is primarily done for statistical use.
Support Team Authorization Support Team Authorization is a function in VINST which allows Support Team Managers to control which ST's should be allowed to transfer to one another.

Activating the Authorization function will block a sending ST from being able to transfer future SR's to your ST. This block will stay in place until you remove it.
This functionality is available to all STM's, but only a few ST's are allowed to use this and yshould always check with your Support Coordinator before activating a block.
ou
Set up Authorization Assignment Rules To set up Authorization Assignment Rules, do as follows:
1. Select the ST you wish to administer.
2. In the Reference screen, select the Authorize Assign category.
3. Select the My ST Received Requests view. The active ST is displayed together with the Authorization Request list showing all ST's assignment requests your team has received by SR transfer.
4. Select a request.
5. To approve the request, click [Approve].
6. To reject the request, click [Reject]. The sending ST is blocked.
If you take no action on a received request, it will continue to function as if you have approved the request.
If you reject a request, the sending ST will no longer be allowed to send SR's to your ST.
Support Team Transfer Control Support Team Managers have the ability to monitor and control the ST which their ST Members transfer to. This is useful for ensuring that the ST Members are addressing the correct ST's when transferring SR's and that they are following agreed support methods and handshakes.
There are two methods for transfer:
The Select ST function is a basic method to find ST's and is available to all users of VINST. It provides a simple list of all ST's in the system, minus those that have blocked authorization from other ST's due to handshake rules. Any user may pick an ST from this list and transfer an SR.
The Assign SR function is a bit more advanced and is easier for users to access. It is a logical list of ST's which are ranked in priority of most appropriate ST's for the SR you are working on, based on the settings chosen when creating the SR.
This is a list which can be managed by the STM. By default, the Assign SR list is empty. When an ST member picks a new ST from the Select ST list, it will then appear in the Assign SR list for all other ST members in the ST. This action will also create a Transfer Request which appears in both the sending STM's and the receiving STM's Authorization Request list.
Monitor the ST's the team is accessing To monitor the ST's, do as follows:

1. Select the ST you wish to administer.
2. In the Reference screen, select the Authorize Assign category.
3. Select the My ST Created Requests view.
The active ST is displayed together with the Authorization Request list showing all ST's your team has contacted by SR Transfer.
Create requests To manually create requests, do as follows:
1. Open the Authorization Request list as described above.
2. Click [New].
3. In Target ST, click the Load button ( ). The Pick Support Team dialog is displayed.
4. Select the desired ST and click [OK].
5. (Optional) In Comments, add a comment.
6. Click [Submit].
The request is sent to the STM and the ST will now appear in your team's Assign SR list.
Support Team Membership The Support Team Manager may add or remove ST Members from the ST's for which they are responsible. This can only be done for persons who have an account in VINST. The STM can not create new VINST accounts, only manage membership to the ST's they are responsible for.
To add or remove members, do as follows:
1. Select the ST you wish to administer.
2. In the Reference screen, select the Support Teams category.
3. Select the My ST Members List view. The active ST is displayed together with a list of current ST members.
4. To add a member, click [New].
5. To remove a member, highlight a member and click [Delete].
When highlighting a member, do not click the link in Login Name since this will open up another screen.
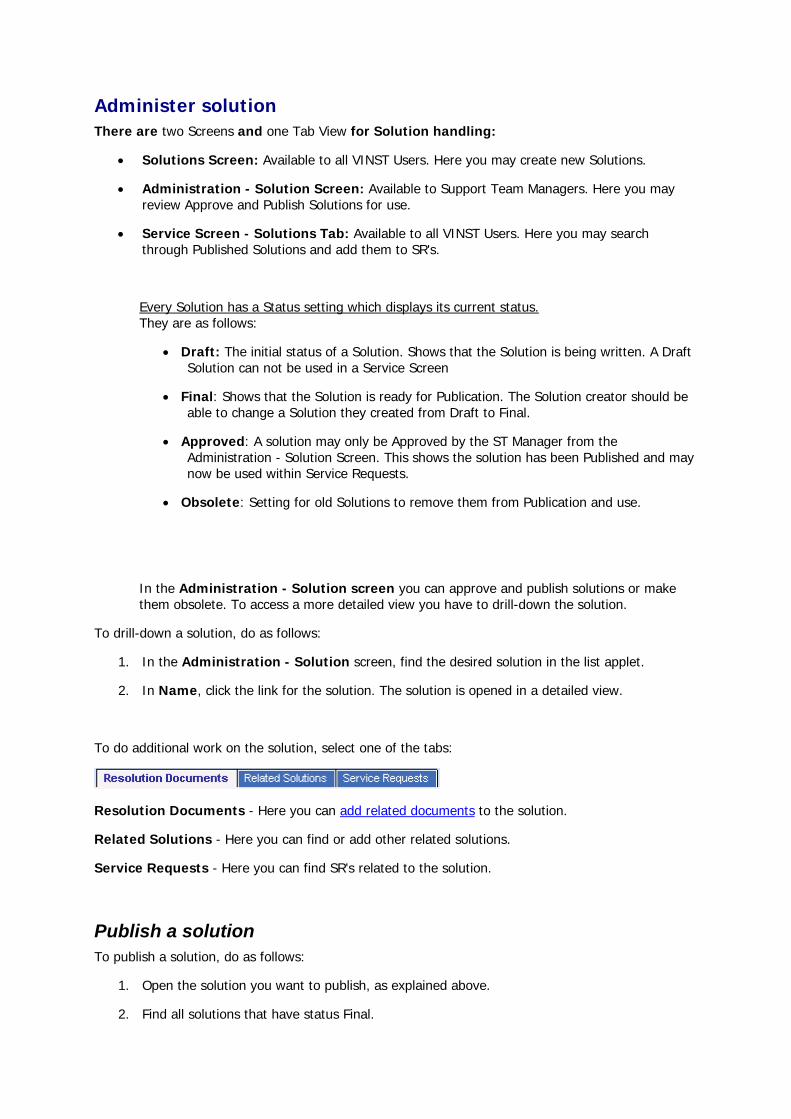
Administer solution There are two Screens and one Tab View for Solution handling:
• Solutions Screen: Available to all VINST Users. Here you may create new Solutions.
• Administration - Solution Screen: Available to Support Team Managers. Here you may review Approve and Publish Solutions for use.
• Service Screen - Solutions Tab: Available to all VINST Users. Here you may search through Published Solutions and add them to SR's.
Every Solution has a Status setting which displays its current status. They are as follows:
• Draft: The initial status of a Solution. Shows that the Solution is being written. A Draft Solution can not be used in a Service Screen
• Final: Shows that the Solution is ready for Publication. The Solution creator should be able to change a Solution they created from Draft to Final.
• Approved: A solution may only be Approved by the ST Manager from the Administration - Solution Screen. This shows the solution has been Published and may now be used within Service Requests.
• Obsolete: Setting for old Solutions to remove them from Publication and use.
In the Administration - Solution screen you can approve and publish solutions or make them obsolete. To access a more detailed view you have to drill-down the solution.
To drill-down a solution, do as follows:
1. In the Administration - Solution screen, find the desired solution in the list applet.
2. In Name, click the link for the solution. The solution is opened in a detailed view.
To do additional work on the solution, select one of the tabs:
Resolution Documents - Here you can add related documents to the solution.
Related Solutions - Here you can find or add other related solutions.
Service Requests - Here you can find SR's related to the solution.
Publish a solution To publish a solution, do as follows:
1. Open the solution you want to publish, as explained above.
2. Find all solutions that have status Final.

3. In Status, change the status to Approved.
4. Select the checkboxes if you want the solution to be published internally and/or externally.
Internal solutions will be visible to VIT users, while external solutions will be visible for VISITOR users.
If you want the solution to be published both internally and externally you must select both checkboxes.
Create activity template Activity templates are another function in VINST which can be managed by Support Team Managers. Activity templates are a temporary solution meant to present a list of default questions which can be asked by a creator of a new SR to ensure that the correct information is collected during SR creation.
To create an activity template, do as follows:
1. Click the Site Map button ( ) and select Administration - Data.
2. Select Activity Templates. A list of all activity templates is displayed.
3. Click [New]. A new template record is displayed.
4. In Name, enter a name for the template.
5. In Type, select Service Request from the drop-down list.
6. (Optional) In Description, enter a suitable description of the template.
7. In the Activity Template Details tab, click [New].
8. In Description, type the question that will be displayed to the ST member. The following fields are hidden, but it is important to verify their values.
9. In Type, select a value from the drop-down list.
10. In Category, select Other from the drop-down list.
11. In Display In, select Activities Only from the drop-down list.
If one or more of the fields are not visible, right-click anywhere in the list applet and select Columns Displayed. See Column Layout for further information.

Reference
Contact information Contacts are the customers that the supporting organisations deliver service to. Every SR must be related to a contact or an asset or both. The contacts are related to a supporting organisation (the designated help desk) that is responsible for taking care of the SR's that are reported by the contact. The contact's own organisation is the supported organisation. The service agreements are defined between the supported and the supporting organisation.
The contact information is loaded into VINST from several user databases. One of them is the VCD (Volvo Corporate Directory) where information about every employee within the Volvo Group is stored. If the contact information in VINST is inaccurate, the change must be done in one of the sources, not in VINST.
Phone Number and Location are not required fields, but the information is very helpful fe.g. the HelpDesk when they need to contact the customer.
or
References In the Reference screen you can find lists of all VINST users (employees) as well as all support teams. When you drill-down a record in the list, a more detailed view is displayed.
The list can only be administered by ST Managers, who will have an additional view called My ST members list. Here they can add and remove members from the different ST's.
A third category, called Authorization Administration, is also available to the Administrators.
Companies In the Companies screen you can find lists of all companies listed in VINST. When you drill-down a record in the list, a more detailed view is displayed.
You can select two different views when studying the list. The My Supported Companies view will only show the companies concerning your SR's and it is only available for Help Desk members. The All Companies view will show all companies connected to VINST.
Agreements online in VINST
Agreements in VINST are used to store the support demands of an agreement with the customer. The demands are named Entitlements in VINST.
An Agreement can be made for a Company or specific Contact (for example VIP Support) or combined with one or many Products. This is done by a special role in the VINST application.
When working with Service Requests, a suitable Agreement can be found by pushing the button [Verify]. A pop-up window will show the available Entitlements and Agreements. They are chosen

based on the Contact, Company and the Affected Structure 2 fields. The Action Owner selects an Entitlement and following values will be set in the Service Request: Impact, Response Time, Resolve Time and chosen Entitlement.
Before using Agreements, agreements data have to be created. This will be done by the appointed personnel in the business. (There is a special role for creating agreement data in the application.)

Audit Trail and Airport
Audit trail for a Service Request The audit trail is the source if you want to see what has happened with an SR. All SR's have their own audit trails in which every single change to the SR is recorded. From there you can see what has happened, who did the change, and also when the change was made. You can also make a query to find specific changes.
To review the audit trail for an SR, do as follows:
1. Open the desired SR.
2. Open the Audit Trail tab in the bottom of the screen. The audit trail for the SR is displayed.
To make a query, do as follows:
1. In the Audit Trail tab, click [Query].
2. Fill in the appropriate fields in order to find the desired changes.
3. Click [Go]. The matching changes are displayed.
The record creation date and time is used for Audit Trail logging.
For a more refined search you can use the Query Assistant.
Airport - Monitor open case
What is AIRPORT? AIRPORT is a tool used to show the ongoing work with Service Requests in VINST. You can monitor which Service Requests for selected Support Teams or Support Team members that are taking a long time to solve etc.
It can be used by any Support Team member and you access it on http://vinst.got.volvo.net/airport/index.asp.
How to use AIRPORT

1. Select the Support Team initials from the drop-down list [Support Team starting with].
2. Mark the Support Team(s) you want to monitor from left side list and then click on the [arrow] to move them to the right side list. From the right side of the screen you can:
3. Monitor all Support Teams in your list or select one specific Support Team.
4. Monitor a certain SR status.
5. Choose SR type (Incident, Question, Complaint, Request and/or Event).
6. Monitor all action owner of your selected Support Team or one specific action owner.
7. Specify escalation time (minutes) of the SR's to be monitored. Either show all SR's or enter time in the Severe, Major, Minor and Minimal fields.
8. Choose if you want to display the search result in big or small mode (Font size).
9. Finally click on [Search].
10. If you know the Abstract of the SR's you can enter it in the text field at the bottom to narrow your search.

11. The search result shows all SR's matching your search criteria. At the top of the screen you can get a good overview of the number of SR's for the specific Support Team(s)/Member etc, such as: - TOTAL SR's - Queued - Accepted - Wait - Major - High - Medium - Low
12. Any deviation from normal is marked with a red color. It could be: - Status Queued - Running time to long - Impact High or Major
13. At the bottom of the screen ALL High and Major SR's are displayed.


Search and Follow up
Search for Service Request To search for a Service Request, do as follows:
1. Click the Search button ( ) in the top right corner of the screen. A search view is displayed to the right.
2. In Look in, select Service Requests in the drop-down list. Several search fields are displayed.
3. Fill in relevant search fields and click [Search]. A list is displayed below the search fields.
4. Find the desired SR in the list.
5. In SR Number, click the link for the SR. The SR is opened in detailed view to the left.
6. To close the search view, click the Close button ( ) in the top right corner.
If you want to do another search, click [Reset] to clear the search fields.
Export data to Excel You can at any time export records from a list applet in VINST into another application such as Excel, where you have huge possibilities to sort, filter, and create charts.
To export a list of records, do as follows:
1. Perform a search, as described in the section Search by Query, or enter a view containing the list you want to export.

2. Select <File> <Export Data Map>. The Export dialog is displayed.
3. In Rows to Export, select if you want to export all rows in the query or just the current row.
4. In Columns to Export, select if you want to export all columns or just the ones that are visible.
5. In Output Format, select how you want the list to be presented.
If you want to export the data into Excel columns, use the alternative Tab Delimited Text File.
6. Click [Next]. The File Download dialog is displayed.
7. Click [Save] to browse to the desired folder and save the file to disk.
The data is exported. Now you can use e.g. the Excel functionality to sort, filter, and arrange the data.

Queries
Search by Query You can use queries to find SR's. By entering optional information in one or many of the search fields you can find the SR's you are looking for.
1. Under <Query> in the toolbar, select <New Query> . All fields are cleared.
2. Fill in the appropriate fields in order to find the requested SR(s).
3. Under <Query> in the toolbar, select <Execute Query> . A list of all matching SR's is displayed.
You can also use the buttons and in the top right corner of the screen to create new queries and execute them.
When a query runs for a long time, this window is displayed. Clicking <Cancel> will stop the query.
Search by Query Assistant If you want to create a more refined query you can use the Query Assistant which allows you to set conditions for different search fields. You can also save these queries and use them several times.
1. Under <Query> in the toolbar, select <New Query> . All fields are cleared.

2. Click [Query Assistant]. The Query Assistant window is displayed.
3. Select the desired field in the drop-down list.
4. Set a condition for the search text.
5. Enter appropriate text for the field.
6. (Optional) To save the query, click [Save Query], enter a name for the query and then click [OK].
7. Click [Go] to execute the query.
Query operators When conducting searches or queries, there are some useful operators one can use to simplify the search.
Query Operator Purpose
* Wildcard. Placed anywhere in a string, returns records containing the string plus any additional characters at the position at which the asterisk appears, including a space. Car* finds Car, Carson, and Carbon.
? Wildcard. Placed anywhere in the string, returns records containing the characters specified in the string, such that any single character may appear at the location of the ?. T?pe finds tape, type, but not tripe.
= Placed before a value, returns records containing a value equal to the query value. =Incident placed in the ST Type field

returns all incident records.
>, < , <> Any of these, placed before a value, returns records containing a value that is greater than (>), less than (<), or not equal to (<>) the query value. >2001-04-25 retrieves all records after April 25, 2001.
<= or >= Placed before a value, returns records containing a value greater than or equal to (>=) or less than or equal to (<=) the query value. >=500 finds records in which the value in the query field is greater than or equal to 500.
LIKE, like, NOT LIKE, not like Placed before a value, returns records containing the value. LIKE Smi* finds all records in which the value in the query field starts with Smi.
Use NOT LIKE to find records where the value in the query field does not start with Smi.
IS NULL, is null, IS NOT NULL, is not null
Placed in the query field, returns records for which the query field is blank. Enter IS NULL in the Location query field to find all records for which the Location field is blank.
Query tutorials Here are How to do some queries in VINST when more than 1 condition or a combination of conditions must be met. Here are some scenarios on How to do some queries in VINST when more than 1 condition or a combination of conditions must be met. The scenarios will walk you through the main tips for querying in VINST.
Scenario A
User Need: List SR's where Company starts with RENAULT.
1. Query typing any of the following values in <Company> field:
• RENAULT*
• LIKE RENAULT*
• like RENAULT*
• ~LIKE renault*
• ~like renault*
please note that the tilde sign (~) makes the search to be case-insensitive.

2. Execute the query.
Scenario B
User Need: List SR's where Company starts with RENAULT, but only active SR's (that is, Status is Queued or Accepted).
1. (Same as step 1 in scenario A)
2. Type any of the following values in <Status> field:
• Accepted OR Queued
• ~like accep* or ~like queu*
• like RENAULT*
• ~LIKE renault*
• ~like renault*
3. Execute the query.
Scenario C
User Need: List SR's where Company starts with RENAULT and there is an Asset involved.
1. (Same as step 1 in scenario A)
2. Type any of the following values in <Asset Information> field:
• IS NOT NULL (if you use IS NULL instead of IS NOT NULL, then the output of the query will be SR's where Asset Info is blank)
• *
3. Execute the query.
Scenario D
User Need: List SR's where Affected Structure 2 includes "OUTLOOK" but excluding "OUTLOOK DISTRIBUTION LIST".
1. Type any of the following values in Affected Structure 2 field:
• *OUTLOOK* AND <> OUTLOOK DISTRIBUTION LIST
• LIKE *OUTLOOK* AND NOT = OUTLOOK DISTRIBUTION LIST

2. Execute the query.
Searching using Date Ranges
You can also query on date fields (Created, Resolved, Closed) using date intervals or ranges. See the following examples:
Example 1 For SR's created from Jan 1st 2006 until today. Query the Created field using the following search criteria: >= 01/01/2006 AND <= TODAY()
Example 2 For SR's created from Jan 1st 2006 until Jan 10th 2006. Query the Created field using the following search criteria: >= 01/01/2006 AND <= 01/10/2006
Example 3 For SR's created prior to from Jan 1st 2006. Query the Created field using the following search criteria: < 01/01/2006
Please keep in mind the following tips:
• Case-sensitive fields may affect your search results. Today the whole application is case-sensitve, except for a few fields (Security Id, Support Team, Asset Info and Statistics fields). So, make sure you use the right case when searching.
• Parentheses can be used to combine conditions (see attached document for further explanation).
• Wildcards (* and ?) can be used but keep in mind that the performance will be affected.
Pre-Defined Queries (PDQ's)
The VINST application have a set of Pre Defined Queries, so called PDQ's. They are View specific and the user cannot modify search after the PDQs is created and selected.
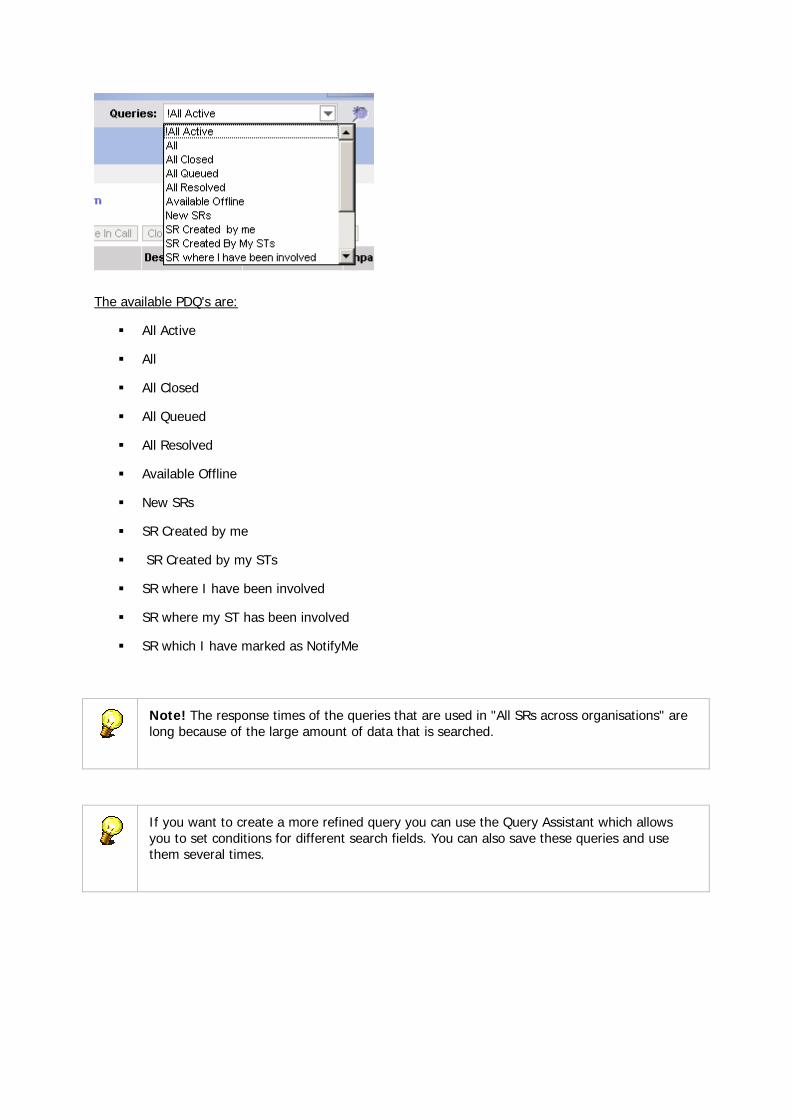
The available PDQ's are:
All Active
All
All Closed
All Queued
All Resolved
Available Offline
New SRs
SR Created by me
SR Created by my STs
SR where I have been involved
SR where my ST has been involved
SR which I have marked as NotifyMe
Note! The response times of the queries that are used in "All SRs across organisations" are long because of the large amount of data that is searched.
If you want to create a more refined query you can use the Query Assistant which allows you to set conditions for different search fields. You can also save these queries and use them several times.

Day-to-day follow up To follow up and evaluate is an important part of the VISITS process. This includes different aspects of the support business. Among the most important aspects are:
-- Follow-up on a personal level. This is something that all VINST users do. Perhaps they want to find specific SR's or search for SR's with certain properties.
-- Follow-up on an ST level. This work is intended to make sure that the ST's are working in an optimal way.
-- Follow-up on a line organization level. A line organization can be responsible for one or several ST's. One important thing is to see to that ST's are working in a way that supports the business process.
-- Follow-up on a customer level. This means that we make sure that the agreements with our customers are fulfilled.
If you are manager for an ST you might be interested to see the SR's in the ST. You might also be interested to see priority aging and Impact aging of the SR's.
As a VINST user you might also want to see and analyze your own SR's in the same matter.
For more statistical and long-term follow-up, there are two external tools developed: VISITS Analysis and OLS Analysis. These tools use a copy from the VINST database. To learn more about these external tools, visit the page http://help.volvo.se/VISITS/reportshome/index.htm.
Support Knowledge Base? Support Knowledge Base (Support KB) is a global tool for reusing knowledge throughout the Volvo IT support organization.
Please refer to http://webhotel.volvo.net/school/SupportKB/userguide/ for more information on Support KB.