veterinary microbiologyveterinarymicrobiology.in/wp-content/uploads/2018/07/vmc-unit-4... ·...
TRANSCRIPT

Department of Veterinary Microbiology
College of Veterinary & Animal Sciences, Udgir
MAHARASHTRA ANIMAL & FISHERY SCIENCES UNIVERSITY, NAGPUR
V E T E R I N A R Y M I C R O B I O L O G Y
VMC Unit- IV

1
LABORATORY MANUAL
FOR
VETERINARY MICROBIOLOGY
VMC
(New Syllabus As Per MSVE 2016)
Unit – IV
Veterinary Microbiology
Compiled by
Dr. Ashok V. Bhosle Sectional Head
DEPARTMENT OF VETERINARY MICROBIOLOGY COLLEGE OF VETERINARY AND ANIMAL SCIENCES UDGIR –413517
MAHARASHTRA ANIMAL & FISHERY SCIENCES UNIVERSITY, NAGPUR

2
LABORATORY MANUAL
FOR VETERINARY MICROBIOLOGY
CERTIFICATE
Certified that this is a bonafide record of practical work done in the laboratory
for the course of VETERINARY MICROBIOLOGY (VMC) Unit IV during the year.
Name of the student: _
Registration No.: _______________________________________________
Exam seat No.: ________________________________________________
Course Teacher
ANNUAL EXAMINATION
Evaluated the practical record submitted for the Annual Practical Examination held on ______________.
Course Teacher Sectional Head
Examiner
3
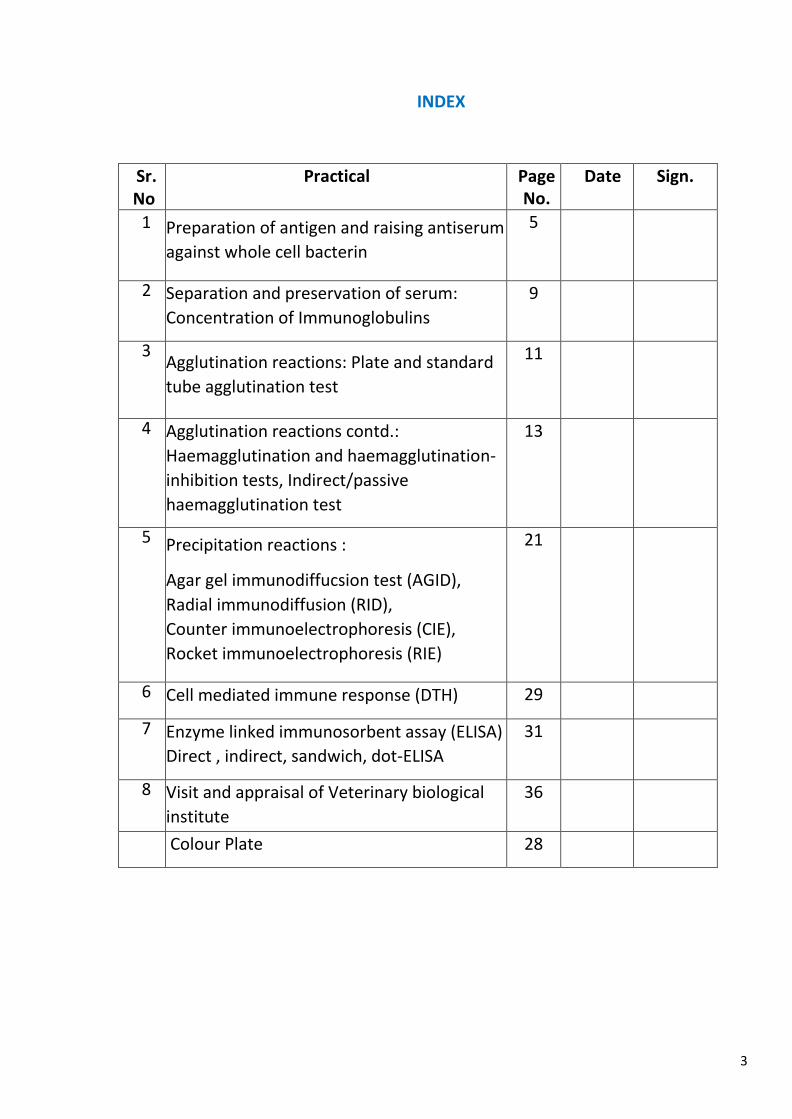
INDEX
Sr. No.
Practical Page No.
Date Sign.
1 Preparation of antigen and raising antiserum
against whole cell bacterin
5
2 Separation and preservation of serum:
Concentration of Immunoglobulins
9
3 Agglutination reactions: Plate and standard
tube agglutination test
11
4 Agglutination reactions contd.:
Haemagglutination and haemagglutination-
inhibition tests, Indirect/passive
haemagglutination test
13
5 Precipitation reactions :
Agar gel immunodiffucsion test (AGID),
Radial immunodiffusion (RID),
Counter immunoelectrophoresis (CIE),
Rocket immunoelectrophoresis (RIE)
21
6 Cell mediated immune response (DTH) 29
7 Enzyme linked immunosorbent assay (ELISA)
Direct , indirect, sandwich, dot-ELISA
31
8 Visit and appraisal of Veterinary biological
institute
36
Colour Plate 28

4
COLOUR PLATE
PLATE 1
1. RBPT: Plate Agglutination Positive Test 2. RBPT: Plate Agglutination Negative Test 3. Hemagglutination Inhibition test 4. Radial Immunodiffusion Test 5. Counter Immuno-electrophoresis
5
Practical 1
PREPARATION OF ANTIGEN AND RAISING ANTISERUM AGAINST WHOLE CELL BACTERIN
PREPARATION OF ANTIGEN
I. Heat killed / formalinized whole cell bacterin
1. Plate out the bacterial culture from appropriate stock culture onto a BHI agar plate,
or other suitable medium. Incubate overnight at 37°C (±2°C).
2. Bacterial Growth is transferred to normal saline solution.Thoroughly mixed .
3. Expose to heat by heating the broth culture for 30 min at 100°C (Free Steam). OR
Add Formalin (40% w/v) was added to the broth culture at a final concentration of
0.5% (V/V) and left 48 hrs at room temperature.
4. Centrifuge the killed bacterial suspension and resuspend the sediment in a small
volume of normal saline. Repeat the step twice or thrice.
5. Adjust the opacity of suspension to the tube No.4 of Mac Farlands nephlelometer
by adding required amount of normal saline.
6.The antigen thus prepared can be used for immunization or testing antibodies
against specific antigen by agglutination tests.
Preparation of somatic antigen Salmonella typhi antigen-Widal Test
i) Plate out the Salmonella culture from the appropriate stock culture onto a BHI agar
plate,or other suitable medium, for single colony growth. Incubate overnight at 37°C
(±2°C).
ii) Using a Pasteur pipette, wash off the culture, preferably inside a safety cabinet,
with approximately 2 ml of absolute alcohol, and transfer into a sterile universal
container.
vi) Leave the antigen for 4–6 hours at room temperature to enable the alcohol to kill
the bacteria and detach flagellae.

6
vii) Spin the universal container in a bench-top centrifuge for 5 minutes at 1000 g.
Pour off the liquid and add enough phenol saline to make the antigen up to an opacity
equivalent to suspension with approximately 108 colony-forming units/ml.
viii) Carry out standard titration with known serum to ensure that the antigen is
positive for the required factor.
ix) Store in a refrigerator at 4°C until required.
Preparation of Reagents and Standards:
McFarland’s standard McFarland standards are used as a reference to adjust the turbidity of bacterial suspensions so that the number of bacteria will be within a given range to standardize microbial testing. An example of such testing is antibiotic susceptibility testing by measurement of minimum inhibitory concentration which is routinely used in medical microbiology and research. If a suspension used is too heavy or too dilute, an erroneous result (either falsely resistant or falsely susceptible) for any given anti microbial agent could occur. Original McFarland standards were mixing specified amounts of barium chloride and sulfuric acid together. Mixing the two compounds forms a barium sulfate precipitate, which causes turbidity in the solution. A 0.5 McFarland standard is prepared by mixing 0.05 mL of 1.175% barium chloride dihydrate (BaCl2•2H2O), with 9.95 mL of 1% sulfuric acid (H2SO4). The standard can be compared visually to a suspension of bacteria in sterile saline or nutrient broth. If the bacterial suspension is too turbid, it can be diluted with more diluent. If the suspension is not turbid enough, more bacteria can be added.
McFarland Nephelometer Standards
McFarland Standard No. 0.5 1 2 3 4
1.0% Barium chloride (ml) 0.05 0.1 0.2 0.3 0.4
1.0% Sulfuric acid (ml) 9.95 9.9 9.8 9.7 9.6
Approx. cell density (1X10^8 CFU/mL) 1.5 3.0 6.0 9.0 12.0
% Transmittance* 74.3 55.6 35.6 26.4 21.5
Absorbance* 0.08 to 0.1 0.257 0.451 0.582 0.669
*at wavelength of 600 nm
Normal saline 0.9% NaCl Add 9g NaCl to 1000 ml D/W. Autoclave at 15 lbs for 15 minutes.
7
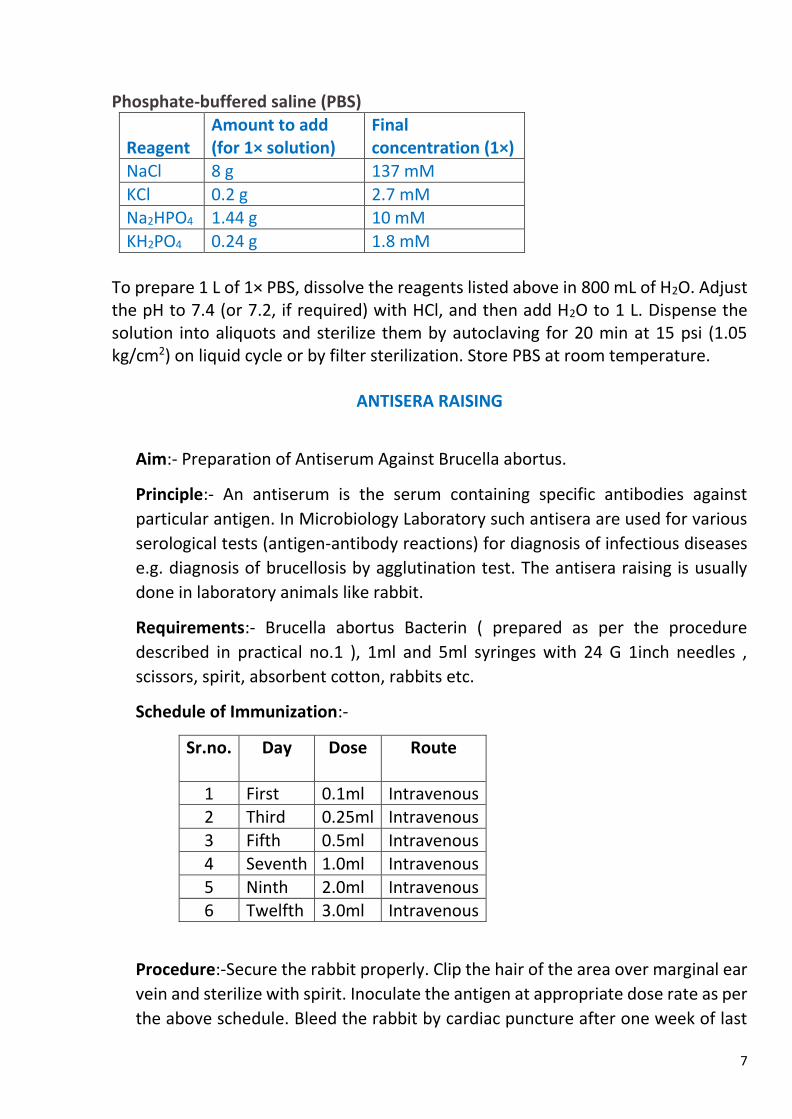
Phosphate-buffered saline (PBS)
Reagent Amount to add (for 1× solution)
Final concentration (1×)
NaCl 8 g 137 mM
KCl 0.2 g 2.7 mM Na2HPO4 1.44 g 10 mM
KH2PO4 0.24 g 1.8 mM
To prepare 1 L of 1× PBS, dissolve the reagents listed above in 800 mL of H2O. Adjust the pH to 7.4 (or 7.2, if required) with HCl, and then add H2O to 1 L. Dispense the solution into aliquots and sterilize them by autoclaving for 20 min at 15 psi (1.05 kg/cm2) on liquid cycle or by filter sterilization. Store PBS at room temperature.
ANTISERA RAISING
Aim:- Preparation of Antiserum Against Brucella abortus.
Principle:- An antiserum is the serum containing specific antibodies against
particular antigen. In Microbiology Laboratory such antisera are used for various
serological tests (antigen-antibody reactions) for diagnosis of infectious diseases
e.g. diagnosis of brucellosis by agglutination test. The antisera raising is usually
done in laboratory animals like rabbit.
Requirements:- Brucella abortus Bacterin ( prepared as per the procedure
described in practical no.1 ), 1ml and 5ml syringes with 24 G 1inch needles ,
scissors, spirit, absorbent cotton, rabbits etc.
Schedule of Immunization:-
Sr.no. Day Dose Route
1 First 0.1ml Intravenous 2 Third 0.25ml Intravenous
3 Fifth 0.5ml Intravenous 4 Seventh 1.0ml Intravenous
5 Ninth 2.0ml Intravenous 6 Twelfth 3.0ml Intravenous
Procedure:-Secure the rabbit properly. Clip the hair of the area over marginal ear
vein and sterilize with spirit. Inoculate the antigen at appropriate dose rate as per
the above schedule. Bleed the rabbit by cardiac puncture after one week of last

8
injection, separate the serum, inactivate at 56 0C for 30 minutes, add merthiolate
as a preservative and store in screw cap vial in refrigerator.
Exercise 1. Explain: a. Antigen
b. Bacterin 2. Enlist bacterial antigens in veterinary use 3. Define Hyperimmune serum. References Joseph Mcfarland,M.D. Jama. (1907).The nephelometer: An instrument for estimating the number of bacteria in suspensions used for calculating the opsonic index and for vaccines.; XLIX(14):1176-1178. Alsever, J.B., and Ainslie, R.(1941).N.Y. State J. Med.,41, 126.
*****

9
Practical 2
SEPARATION AND PRESERVATION OF SERUM: CONCENTRATION OF IMMUNOGLOBULINS
Materials and reagents 1. Luria-Bertani broth (LB) medium: Bacto-tryptone, yeast extract 2. RNAase 3. Isopropanol 4. Ethanol
Equipment
1. Table-top centrifuge
Procedure
Objective: To separate the immunoglobulins from serum
Principle: The blood serum contains a number of different proteins. Among
these largest amounts are made up by albumin and globulin. The globulins play
an important role in defense mechanism of body since they are endowed with
antibody activity and globulin processing antibody activity is referred as
immunoglobulins.
The globulin can be separated from albumin on the basis of certain
physical, chemical properties, which include their solubility in salts and solvents,
electrophoretic mobility, molecular size and sedimentation in ultracentrifuge.
The globulin may be precipitated with saturated ammonium sulphate
solution. Globulins are of two types’ euglobulin and pseudo globulins.
Euglobulins are gamma globulins (antibodies) and are insoluble in distilled water
while pseudo globulins are alpha & beta globulin & are soluble in distilled water.
Requirements:-Pipette 5ml, immune serum 5ml, saturated ammonium sulphate
solution 5ml, dialysis tube, distilled water, normal saline, centrifuge, etc.
Procedure:-
1. Add 5ml of saturated ammonium sulphate solution slowly to 5ml serum in a test tube. Mix the contents by continuous swirling of tube without agitating excessively.
2. Allow the mixture to stand for 5 min. so that globulin precipitates. 3. Centrifuge the material for 10 min. at high speed. This will make the
precipitate to settle down at the bottom of test tube.

10
4. Pour off the supernatant liquid (containing albumin) and dissolve the precipitate in 3ml distilled water.
5. Put the dissolved precipitate in a semi permeable cellophane tube and tie each end of the tube and place it in the distilled water beaker. The distilled water should be frequently changed to dialyze out (NH4)2SO4 ions completely.
6. Dissolve the contents of cellophane tube in 5ml normal saline and preserve the material for further use.
Exercise 1. What are immunoglobulins? state various classes of immunoglobulins. 2. Why antibodies are called as immunoglobulins. 3. Write down the important characteristics of immunoglobulin classes in a tabular
form.
*****

11
Practical 3
AGGLUTINATION REACTIONS: PLATE AND STANDARD TUBE AGGLUTINATION TEST
Agglutination Test
Principle:
When a particulate antigen is mixed with the specific antibody in the presence
of electrolytes at suitable temperature and pH ,clumps are formed at the
bottom of the tube i.e., agglutination reaction is seen. STAT and Rose Bengal
Plate tests are based on the principle of agglutination reaction.
1.Rose Bengal Plate Test
The test is used for preliminary screening and is of qualitative test.
Material required
Brucella colored antigen, test serum, positive serum, Negative serum, and slide
or gooch plate.
Procedure
1.place one drop of suspected serum on the slide/plate.
2Place a drop of colored antigen next to the serum sample.
3.Mix the reagents with the toothpick and rotate the slide/plate
gently.
4.After few minutes, in case of positive reaction, clumping takes
Place and confirm the reaction with suitable controls.
2.Standard Tube Agglutination Test (STAT)
Material Required
Brucella plain antigen, test serum positive serum, Negative serum, Carbol
saline (Normal saline with 0.5%carbolic acid), Agglutination tubes 8 Nos., Rack
for holding test tubes.

12
Procedure
1.Place 8 agglutination tubes in a rack, number serially 1 to 8.
2.Add 0.9 ml of diluent to the first test tube and 0.5 ml to rest of the tubes.
3.Add 0.1ml of serum to the first test tube mix it well and transfer 0.5 ml to
the 2nd tube.
4.Mix thoroughly and transfer 0.5ml to the third tube and continue
this process up to 7th tube. Keep 8th tube as antigen control.
5.Discard 0.5 ml i.e., diluted serum from 7th tube.
6.Add 0.5 ml of Brucella plain antigen to all the tubes. Mix and
incubate at 37 OC for 24 hours.
7.Keep positive control.
Interpretation
If agglutination occurs, the clumps of antigen and antibody complexes will
settle down leaving the clean supernatant. In case of no agglutination, the
turbid suspension remains the same.
Exercise 1. What is particulate antigen?
*****

13
Practical 4
HAEMAGGLUTINATION AND HAEMAGGLUTINATION-INHIBITION TESTS, INDIRECT / PASSIVE HAEMAGGLUTINATION TEST
HAEMAGGLUTINATION TEST
Some of the viruses belonging to Paramyxovirus, Orthomyxovirus,
Reovirus, Enterovirus & Pox viruses agglutinate suspensions of washed RBC’s of
various species of animals. This haemagglutination property (ability to
agglutinate erythrocytes) has been successfully used for identifying the viruses.
Principle of Haemagglutination Test:
Some of the viruses contain in their outer coat virus coded glycoproteins
(Haemagglutinin) capable of binding to the mucoprotein receptors (Sialic acid)
over the surface of the erythrocytes. Such viruses bridge the gap between the
erythrocytes leads to the formation of lattice. This reaction is seen in micro
plates/Perspex plates in the form of mat formation.
Material Required: Perspex plate1ml pipettes, rubber bulb, beaker, conical flask,
Pasteur pipette, centrifuge, measuring cylinder.
Reagents: 1% Chicken RBCs, Phosphate buffer saline (pH7.2), Allantoic fluid
(collected from ECE on inoculation of suspected material for RD virus isolation)
Procedure:
1. Add 0.5 ml each of PBS in all the wells in a row of Perspex plate with the help of 1ml pipette and rubber bulb. 2. Add 0.5 ml of undiluted allantoic fluid in the first well (only). 3. With the help of pipette mix PBS and allantoic fluid (containing RD virus) from
the first well properly and transfer 0.5ml from 1st well to 2nd well (Two fold
dilution). Again in 2nd well mix the contents with the help of pipette and
transfer 0.5ml from 2nd well to 3rd well. Repeat till 9th well and discard 0.5ml

14
(diluted allantoic fluid containing RD virus) from 9th well.
4. Add 0.5 ml of 1% chicken RBC suspension to all the wells including 10th
well (RBC control).
5. Shake the plate well to mix the contents and incubate the plate at
room temperature.
6. Read the test at intervals of 15,30,45 and 60 minutes.
Interpretation:
1. The presence of haemagglutinating virus in the allantoic fluid will
result in mat formation (layer of uniformly agglutinated cells
covering the bottom). The mat formation depends on the
concentration of virus present in the suspension.
2. A negative test consists of a compact, sharply demarcated disc of
sedimented red blood cells at the bottom of the wells i.e., button
formation.
3. The end point of HA activity of the RD virus is the highest dilution
of the virus showing mat formation i.e., haemagglutination. The
virus titre i8s expressed as HA unit contained in undiluted allantoic
fluid. HA titre is the reciprocal of the highest dilution showing mat
formation i.e., haemagglutination.
HAEMAGGLUTINATION INHIBITION TEST
The haemagglutination inhibition test is used for assess the titres of
haemagglutinating-inhibiting antibodies against RD virus in the serum of
suspected/healthy bird used for diagnosis and monitoring the vaccine titres.
Principle:
HI-Test is based on the haemagglutination property of RD virus. Haemagglutinin
binds to the mucoprotein receptors (Sialic acid) over the surface of the
erythrocytes& bridges the gap between the erythrocytes leads to the formation
of lattice. This reaction is seen in microtitre / Perspex plates in the form of mat

15
formation. But In the presence of antibodies (in the serum), abs interacts with
the virus and thus makes the virus unavailable for agglutination of red blood cells.
Red blood cells settles at the bottom of the wells thereby giving i.e., button
formation in the presence of haemagglutinating-inhibiting antibodies against RD
virus.
Material Required: Perspex plate, 1ml pipettes, rubber bulb, beaker, conical
flask, Pasteur pipette, centrifuge, measuring cylinder.
Reagents: 1% Chicken RBCs, Phosphate buffer saline (pH7.2), 4HA Unit RD virus, and Test serum)
Procedure:
1. Add 50ul each of PBS in all the wells in a row of Perspex plate with the help of
1ml pipette and rubber bulb.
2. Add 50ul of undiluted Test serum in the first well (only) .
3. With the help of pipette mix PBS and Test serum in the first well properly
and transfer 50ul from 1st well to 2nd well (Two fold dilution). Again in 2nd
well mix the contents with the help of pipette and transfer 50ul from 2nd
well to 3rd well. Repeat till 8th well and discard 50ul (diluted test serum)
from 8th well.
4. Add 50ul each of 4 HA unit virus upto 9th well (Virus control).
5. Allow it to stand for 10 minutes at room temperature.
6. Add 50ul each of 1% chicken RBC suspension to all the wells including
10thwell (RBC control).
7. Shake the plate well to mix the contents and incubate the plate at
room temperature.
8. Read the test at intervals of 15,30,45 and 60 minutes. Interpretation:
1. The presence of haemagglutinating-inhibiting antibodies against RD
virus in the test serum binds to the RD virus and makes RD virus

16
unavailable for haemagglutination of Red blood cells. Resulting into
sedimented red blood cells at the bottom of the wells i.e., button
formation.
2. A negative test consists of absence of haemagglutinating-inhibiting antibodies
against RD virus in the test serum results in the availability of RD virus
for haemagglutination of Red blood cells. Resulting into mat
formation (layer of uniformly agglutinated cells covering the bottom).
3. The end point of haemagglutination inhibition test. The titre is
expressed as HI titre of haemagglutinating-inhibiting antibodies
against RD virus in the test serum .HI titre is the reciprocal of
the highest dilution showing button formation i.e.,
haemagglutination inhibition.
Protocol for Haemagglutination Inhibition test: 0.5ml
(Diluted test serum)
Well No.
Reagent
PBS
1
0.5ml
2
0.5ml
3
0.5ml
4
0.5ml
5
0.5ml
6
0.5ml
7
0.5ml
8
0.5ml
9 10
0.5ml
0.5ml 0.5ml 0.5ml 0.5ml 0.5ml 0.5ml 0.5ml 0.5ml 0.5ml 0.5ml
Test serum 0.5ml
4HA unit
Discard 0.5ml
RD virus 0.5ml 0.5ml 0.5ml 0.5ml 0.5ml 0.5ml 0.5ml 0.5ml 0.5ml 0.5ml
Dilution of Test serum
1%Chicke
1:2 1:4 1:8 1:16 1:32 1:64 1:128 1:256 1:512 1:1024
n RBC 0.5ml 0.5ml 0.5ml 0.5ml 0.5ml 0.5ml 0.5ml 0.5ml 0.5ml 0.5ml
Control Virus control
RBC control

17
Passive/ Indirect Haemagglutination Test (HI)
Principle:
In the passive haemagglutination, a soluble antigen is adsorbed on
particulate matters like Red Blood Cells (RBCs) and therefore can participate
indirectly in the agglutination reaction. Passive haemagglutination (PHA) is very
sensitive test. Sheep red blood cells acquire the property of adsorbing soluble
antigen (like blood sera, virus) after they have been treated with dilute solution
of tannic acid. Antigen coated red blood cells are agglutinated by specific
antibody to adsorbed protein antigen.
Materials:
1. Test tubes for diluting antiserum (10 nos.) and for test (12 nos.)
2. PBS & NSS
3. Rabbit antiserum (1 ml.)
4. Sheep blood
5. Sodium citrate solution as anticoagulant (4 %)
6. Tannic acid
7. Pipettes (10 ml., 1 ml. )
Procedure:
1) Tanning of sheep red blood cells: Using 0.5 ml. sodium citrate solution collect
5 ml sheep blood, centrifuge the blood to sediment obtain PCV, discard blood
plasma and wash cells thrice and prepare 2% cell suspension in N.S.S. Add
equal volume of 2%
R.B.C. in 1: 20,000 freshly prepared tannic acid solution, incubate the mixture
at 37°C for 10 minutes and then wash the cells with N.S.S. Resuspend the
cells in saline and prepare 2% cells suspension.

18
2) Sensitization of sheep red blood cells: The tanned sheep red blood cells are
sensitized by mixing equal volume of antigen. Allow the coating at room
temperature for 10 minutes and wash off excess antigen by centrifugation at
2000 rpm for 3 minutes, wash cells once again in N.S.S. and prepare 2% cell
suspension.
3) Prepare 2 fold serial dilutions of rabbit antiserum as shown in table
below: Use separate pipette for each dilution and mix the contents thoroughly.
Tube No. Rabbit Antiserum Diluent Final dilution
1. 0.1 ml. of antiserum 9.9 ml. 1 : 100
2. 1 ml. from tube 1 1 ml. 1 : 200
3. 1 ml. from tube 2 1 ml. 1 : 400
4. 1 ml. from tube 3 1 ml. 1 : 800
5. 1 ml. from tube 4 1 ml. 1 : 1600
6. 1 ml. from tube 5 1 ml. 1 : 3200
7. 1 ml. from tube 6 1 ml. 1 : 6400
8. 1 ml. from tube 7 1 ml. 1 : 12800
9. 1 ml. from tube 8 1 ml. 1 : 25600
10. 1 ml. from tube 9 1 ml. 1: 51200
4)Place the test tubes in a rack and number the tube from 1 - 12. Add the
reagents in following quantity.
Reagent (ml) Tubes
1 2 3 4 5 6 7 8 9 10 (Ab)
11 (Ag )
12 (RBC)
Diluent/ PBS 0.5 0.5
Diluted
rabbi
t antiserum
0.5 0.5 0.5 0.5 0.5 0.5 0.5 0.5 0.5 0.5
Antigen coated
RBCs 0.5 0.5 0.5 0.5 0.5 0.5 0.5 0.5 0.5 0.5
Non-coated
RBCs 0.5 0.5
Tube no. 10, 11 & 12 are kept as Antibody, Antigen & RBC control respectively
o Mix the content of tubes by gentle shaking and incubate the tubes at
room temperature for 2 - 3 hours. Examine the tubes for agglutination
and record the result.
19
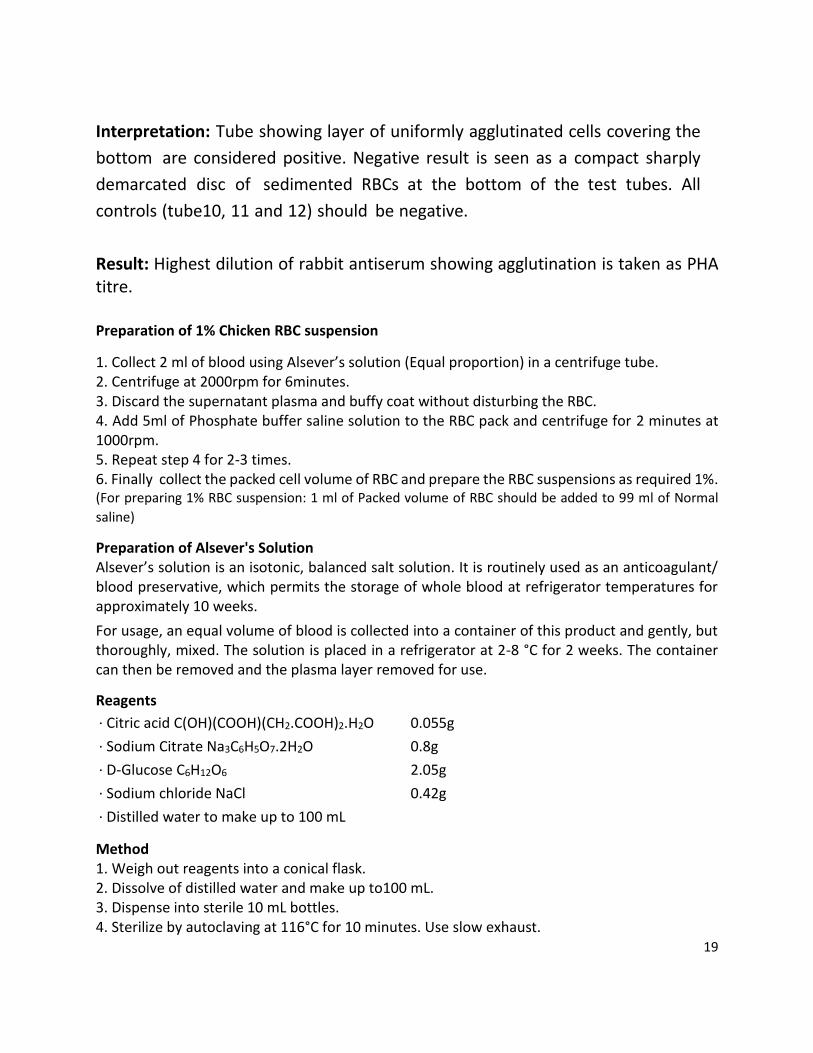
Interpretation: Tube showing layer of uniformly agglutinated cells covering the
bottom are considered positive. Negative result is seen as a compact sharply
demarcated disc of sedimented RBCs at the bottom of the test tubes. All
controls (tube10, 11 and 12) should be negative.
Result: Highest dilution of rabbit antiserum showing agglutination is taken as PHA titre.
Preparation of 1% Chicken RBC suspension
1. Collect 2 ml of blood using Alsever’s solution (Equal proportion) in a centrifuge tube. 2. Centrifuge at 2000rpm for 6minutes. 3. Discard the supernatant plasma and buffy coat without disturbing the RBC. 4. Add 5ml of Phosphate buffer saline solution to the RBC pack and centrifuge for 2 minutes at 1000rpm. 5. Repeat step 4 for 2-3 times. 6. Finally collect the packed cell volume of RBC and prepare the RBC suspensions as required 1%. (For preparing 1% RBC suspension: 1 ml of Packed volume of RBC should be added to 99 ml of Normal
saline)
Preparation of Alsever's Solution Alsever’s solution is an isotonic, balanced salt solution. It is routinely used as an anticoagulant/ blood preservative, which permits the storage of whole blood at refrigerator temperatures for approximately 10 weeks.
For usage, an equal volume of blood is collected into a container of this product and gently, but thoroughly, mixed. The solution is placed in a refrigerator at 2-8 °C for 2 weeks. The container can then be removed and the plasma layer removed for use.
Reagents
· Citric acid C(OH)(COOH)(CH2.COOH)2.H2O 0.055g
· Sodium Citrate Na3C6H5O7.2H2O 0.8g
· D-Glucose C6H12O6 2.05g
· Sodium chloride NaCl 0.42g
· Distilled water to make up to 100 mL
Method 1. Weigh out reagents into a conical flask. 2. Dissolve of distilled water and make up to100 mL. 3. Dispense into sterile 10 mL bottles. 4. Sterilize by autoclaving at 116°C for 10 minutes. Use slow exhaust.

20
5. Allow to cool, then tighten the lids and label the bottles. 6. Store in the refrigerator.
Exercise 1. Plot the protocol for Hemagglutination test in tabular form. 2. Calculate 4HA unit of RD Virus. If the given titre of HA virus is 256 HA unit. 3. Differentiate between Direct and Indirect / Passive HA.
Reference: Passive HA Test-VMC IV Lab Manual Dr.(Mrs.) R. S. Gadge, BVC, Mumbai
*****
21
Practical 5
PRECIPITATION REACTIONS
AGAR GEL IMMUNODIFFUCION TEST
Principle: When soluble antigen combines with specific antibodies in the presence
of proper electrolytes at, optimum temperature, optimum pH, the antigen-
antibody complex forms an insoluble precipitate.
The precipitation test can be carried out as qualitative or as quantitative Test.
Precipitation Test can be performed using liquid media or using gel such as
agarose as in Agar Gel Precipitation Test.
Agar Gel Precipitation Test:
Double agar gel immunodiffusion test (Ouchterlony method):
The double agar gel immunodiffusion test can be used to diagnose viral
infections. Viral (or other microbial) antigen is placed in the center well, and serum
samples are placed in the wells surrounding the center well. The reactants will
diffuse through the agar at a rate inversely related to their molecular weights. If
antibodies to the antigen are present, a precipitate will be seen between the center
well and sample well; the antibodies in the serum diffuse out and bind antigen that
is diffusing from the center well to form large insoluble complexes.
Material Required: 1.2% Agarose, Soluble antigen, Known Positive Serum and
Negative serum sample, Gel Punch, Pasteur Pippette, Clean glass slide and needle.
Procedure:
1. Select a clean flat bottom petri dish and pour 12 ml of 0.9% agarose
prepared in normal saline/PBS 7.2 solution. To avoid contamination add
merthiolate in concentration of 1: 10,000 in molten agarose.
2. After solidification of agarose, Punch one central well and 6 peripheral
wells of about 5.3 in diameter and 2.4 mm apart. The thickness of agarose
should be 2.8 to 3 mm.
3. The agarose from the cut wells should be removed with the help of needle.
4. Seal the bottom of each well, with the help of drops of molten agarose.
22
5. Ad Known standard test serum in central well and test antigens in
peripheral wells. 50-60 Ul.
6. Cover the plate and keep in the incubator at room temperature for 24
hours in humid atmosphere.
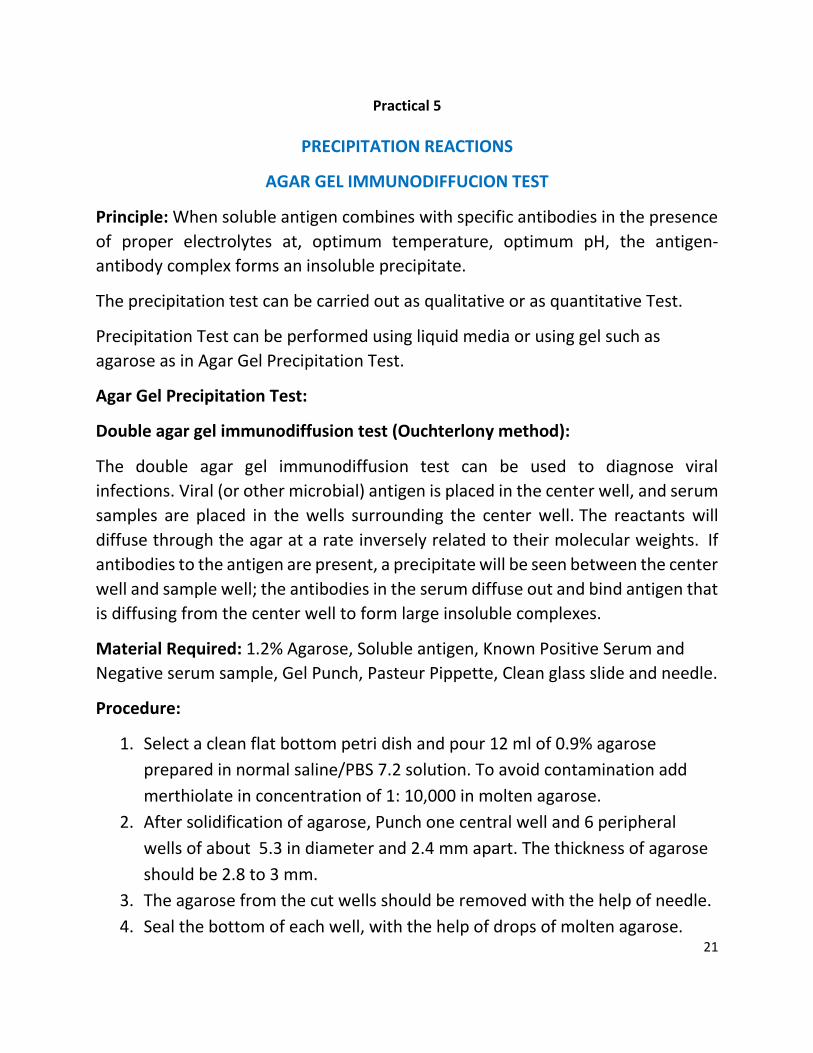
Result: Formation of precipitation line in between central and peripheral well is
indicative of reaction of known antibody with specific antigen.
In the figure shown, all samples are positive except b and d.
Interpretation:
Line of Identity: When two similar antigens are placed in adjacent peripheral wells,
reacts with homologous antiserum in the central well, the lines produced by them
joins producing a continuous line in the form of an angle i.e., line of identity.
Line of Non-Identity: When two different antigenic preparations are allowed to
react with a serum containing specificities for both, precipitation bands formed will
cross each other. This is called as lines of non-identity.
Line of Partial Identity: If only one of the two antigenic preparations possesses
specificity with the serum and other two possess two antigens (one specific and
other non-specific), precipitation will be formed in the form of spur. This is called
as line of partial identity.

23
SINGLE RADIAL IMMUNODIFFUSION (SRID)
The anti serum (antibody) is incorporated in agar gel on slide or Petri dish.
The wells are cut on the surface of gel. Antigen is added to the well. The antigen
diffuses radially and ring shaped bands of precipitation (halos) are formed around
the well. The diameter of the ring is directly proportional to the concentration of
antigen
Material required
Agarose, SRID slides, PBS (without KCL, pH 7.4), antiserum, antigen, moist
chamber, oven, drier, water bath, brilliant blue stain, destain, std antigen, scale
Procedure
1) Wash the SRID glass slide, make it grease free and let it dry
2) Prepare 2% suspension of agarose (3ml) in PBS, melt it and spread on the
slide
3) Keep this slide in a hot oven for drying.
4) Prepare 2% suspension of agarose (65ml) in PBS and melt it
5) Mix predetermined quantity of antibody in 6ml PBS and keep it at 560 0C in
water bath
6) Let the temperature of antibody solution rise to 560 0C and also that of
melted agar by keeping in water bath. Now mix agarose gel with antibody
dilution without forming bubbles
7) Pour the mixture on dried gel in such a way that it shall form a agar gel
layer of uniform thickness on slide. Let the gel solidify
8) Keep this gel at 40 0C for 10 mins
9) Punch the wells of 2mm diameter in agar gel using borer as show in the
template leaving 10 ml space between two adjacent wells
10) Remove the gel from wells by using needles
11) Fill upper three wells with serial dilution of known standard soluble antigen
using a pasture pipette and rubber bulb
12) Add a known positive and negative control antigen and test antigen in a
remaining well in same fashion

24
13) Do never overflow the wells with antigen samples. Let the contents of
wells diffuse in the agar gel
14) Cover the plate with the lead and incubate the plate 370 0C temperature
in humid atmosphere for 24- 48 hrs
15) Dry the gel in gel dry and stain with 0.1% brilliant blue for 12 hrs followed
by destining
16) Measure the diameter of stained precipitation rings produced
17) Plot a graph of standard (log diameter against concentration) and decide
the antigen concentration in unknown samples. the SRID can also employed
for estimation of the serum immunoglobulin concentration
Applications:
a) It has been widely employed for estimation of immunoglobulin classes
that is IgG, IgM, IgA in sera
b) It has also been used for screening in sera for antibodies to influenza
viruses
COUNTER IMMUNOELECTROPHORESIS (CIE)
Principle: Electrophoretic migration of antigen and antibody towards each other
in a agarose gel using a suitable buffer system results in a precipitation reaction at
point intermediate between their origin. it is possible to enhance the speed of the
reaction by driving antigen and antibody together by creating a electrical field.
Material required: Agarose, Barbital buffer, antigen solution, antiserum, and glass
plates, Micropipettes with tips, gel punch and Electrophoresis unit with power
supply
Procedure:
1) Prepare 1% agar gel in barbital buffer on counter-immuno-electrophoresis plate
2) Using a template cut two rows of wells in the gel
3) Take out the cut gel pieces with the needle without damaging the edges of the
wells
25
4) Seal the bottom of the well with a little drop of molten agarose in each well
5) Load one row of wells with different antigen samples in a volume of 5µl/well
6) Load the other row of wells with the antiserum in a volume of 5µl / well
7) Place the gel plate carefully in the electrophoresis unit and make its connection
with the power supply. Buffer tank through the filter paper wick
8) Connect the unit to the power supply and run electrophoresis at 5-10 V/cm.
For about 15-30 Min. for the development of precipitation lines/arcs
9) Dry the gel and stain with amido-black stain followed by destining as done in
Agar Gel.
Results:
Positive: Formation of precipitation arc/line between the opposing anodic and
cathodic wells by the migration of antigen toward the anode and antibody towards
the cathode in opposite directions under the influence of electric current.
ROCKET IMMUNOELECTROPHORESIS (RIE)
Rocket immune-electrophoresis (RIEP), also known as electro-
immunoassay, is a simple, quick and reproducible method for quantitation of a
specific protein in a mixture by using monospecific antibody in the agarose gel.
When a particular antigen in different concentration is electrophoresed in
agarose having specific antibody in a suitable buffer system, antigen-antibody
reaction at the zone of equivalence results in precipitation of the Ag-Ab complexes.
The shape of the precipitating complex is like a rocket and the peak height and
hence area of the rocket is proportional to the antigen concentration.
Material required: Antigen, Antiserum, Agarose, Glass plates, Glass pipette,
Electrophoresis unit

26
Procedure:
1) Melt I% agarose in barbitone buffer by keeping in a boiling water bath, cool it
to 50°c and place jt in water bath maintained at 50°c
2) Take about 10 ml of the agarose with a pre warmed pipette and transfer it to
the beaker.
3) Quickly add between 75-100 µl of the prewarmed antiserum at 45-50°c and mix
properly.
4) Pour onto the clean glass plate I0 ml of the antiserum mixed-molten agarose as
soon as possible with the help of a 10 ml glass pipette, and wait for its gelling.
5) After the gel is set, cut 8-10 wells of 1-2 mm diameter in a row, toward the
cathode end The position of the row being dependent on the nature of the
proteins.
6) Place the glass plate on the cooling plate of the electrophoresis unit and make
its firm contact with filter paper wicks soaked in the electrode buffer.
7) Fill the well with different dilutions of the samples in a volume of 2-5µl/sample
well as quickly as possible.
8) Connect the electrophoresis unit to the power supply and run the gel at 2-5/cm
for 15 min and then at 25-30V/cm for next 4-5 hrs
9) Disconnect the power supply. Take out the gel, observe 'rockets' of the
precipitate and record the results as peek heights from the centers of the wells
10) Stain the gel as in AGPT
Observation:
Record the reading as peek heights from the center of the wells
Results:
Draw a calibration curve of peak heights of rockets on y- axis against antigen
concentration on x- axis and record Ag concentration in the unknown samples
using its peak heights obtained in gel.

27
Exercise
1. Give diagrammatic representation illustrating simultaneous comparison
of different antigenic preparation against an antiserum
2. What are advantages of electrophoresis over simple immunodiffusion test?
3. Give few examples of disease where AGID can be used as a diagnostic tool?
4. Perform the test and plot a standard graph and calculate antigen concentration in given samples by RID.
Reference:
1. www.microbelibrary.org/library/laboratory-test/3097-the-double-agar-
gel-immunodiffusion-test-for-viral-infection
******

28
PLATE 1
1.RBPT- Plate Agglutination positive test 2.RBPT- Plate Agglutination negative test
3. Haemagglutination Inhibition Test
4.Radial Immunodiffusion Test https://www.fishersci.com/shop/products/edvotek-radial-immunodiffusion-kit-radial-immunodiffusion-kit/s90248nd
5. Counter Immuno-electrophoresis https://en.wikipedia.org/wiki/Counterimmunoelectroph
oresis

29
Practical 6
CELL MEDIATED IMMUNE RESPONSE (DTH)
Delayed‐type hypersensitivity (DTH) is an in vivo assay of cell‐mediated immune function. DTH reactions are often divided into two phases: the sensitization phase, referring to the initial immunization with specific antigen, and the efferent or challenge phase of the DTH response, which usually follows 6 to 14 days after sensitization.
The diagnosis of bovine tuberculosis is based on tuberculin test, which involves the intradermal injection of bovine tuberculin purified protein derivative (PPD) and the subsequent detection of swelling (delayed hypersensitivity) at the site of injection 72 hours later. This may be performed using bovine tuberculin alone or as a comparative test using avian and bovine tuberculins. The tuberculin test is usually performed on the mid-neck, but the test can also be performed in the caudal fold of the tail. The skin of the neck is more sensitive to tuberculin than the skin of the caudal fold. To compensate for this difference, higher doses of tuberculin may be used in the caudal fold. Turning red and swelling, pain, increase in temperature of local injection site are considered as a signs of inflammation. Measure the diameter of the inflamed area using a ruler or, better yet, a caliper. The maximum swelling should occur between 24 and 72 hours.
Test procedure
i) The injection sites must be clipped and cleaned. A fold of skin within each clipped area is measured with callipers and the site marked prior to injection. A short needle, with tuberculin attached, is inserted obliquely into the deeper layers of the skin. The dose of tuberculin is then injected. The dose of tuberculin injected must be no lower than 2000 International Units (IU) of bovine or avian tuberculin. A correct injection is confirmed by palpating a small pea-like swelling at each site of injection. The distance between the two injections should be approximately 12–15 cm. The skin-fold thickness of each injection site is re-measured 72 hours after injection. The same person should measure the skin before the injection and when the test is read.

30
ii) In the interpretation of the intradermal comparative test, a reaction is usually considered to be positive if the increase in skin thickness at the bovine site of injection is more than 4 mm coupled with all signs of inflammation.
Exercise
1. Write the interpretation of test.
******

31
Practical 7
ENZYME LINKED IMMUNOSORBENT ASSAY (ELISA) DIRECT , INDIRECT,
SANDWICH, DOT-ELISA
DIRECT ELISA
Principle: Antigen which is to be detected is coated on a solid surface and
the known antibody coupled to the enzyme is then reacted upon and the
presence of the enzyme activity is the indication of the positive reaction.
FLOW CHART :
Passive adsorption of test antigen (Unknown) in defined buffer to the microtitre plate by incub
ation
↓
Wash 3 times in PBS-Tween
↓
Add & incubate with enzyme labelled antibody (known)
↓
Wash 3 times in PBS-Tween
↓
Add & incubate Substrate and chromogen
↓
Wash 3 times in PBS-TWEEN
↓
Reaction stopped & plate read at specified absorption
INDIRECT ELISA
Principle : For antibody detection, the wells microtiter plate are coated with an
tigen. Sera to be tested are added in these coater wells. If antibody is present in sp
ecimen, it binds to coated antigen. To detect this antigen antibody reaction, a goa
t antihuman immunoglobulin antibody conjugated with enzyme added. Enzyme co
njugated anti human immunoglobulin binds to substrate to produce colour in a po
sitive reaction. This procedure is named as INDIRECT ELISA.

32
Colour intensity can be read by spectrophotometer or ELISA reader. Colour c
hange can also be seen by naked eyes. Positive and negative controls are always p
ut up along with test serum. Incubation and washing is done at every step to wash
off unbound enzyme. The enzyme (Horse radish peroxidase, alkaline phosphatase)
gives rise to a colour change by adding specific substrate (O-phenyl-diamine dihyd
rochloride for peroxidase, p-nitrophenyl phosphate for alkaline phosphatase). Alka
line phosphatase with this substrate produces a yellow colour.
FLOW CHART :
Wells of microtiter plate are coated with antigen 40C Overnight
↓
Wash 3 times with PBST
↓
Blocking with BSA (37○C for 2 hrs.)
↓
Wash 3 times with PBST
↓
Add test sera sample (37○C for 2 hrs.)
↓
Wash 3 times with PBST
↓
Add anti species Ig conjugate (37○C for 2 hrs.)
↓
Wash 3 times in PBS-Tween
↓
Allow reaction with substrate solution for 15 min.
↓
Yellow colour develops in +ve samples
↓
Stop reaction by washing in dist. Water
↓
Read the reaction (492 nm filter)

33
COMPETITIVE ELISA
Principle: There are two specific antibodies, one conjugated with enzyme & oth
e present in serum,compitition occurs between two antibodies for same antigen.P
ositive result shows no colour where as appearence of colour indicate a negative t
est.
FLOW CHART :
Microtitre wells are coated with HIV antigen
↓
Add & incubate serum samples ( 37○C )
↓
Wash it off
↓
Enzyme labelled specific HIV antibodies are added
↓
Wash it off
↓
Add & incubate Substrate
↓
+ve result show no colour.
SANDWICH ELISA
Principle: Enzyme labeled antibody can be produced in the same animal that pro
duced passively adsorbed antibody, or from a different species immunized with th
e same antigen that is captured. Unbound conjugate is washed out and substrate i
s added. After another incubation, the degree of substrate hydrolysis is measured.
The amount of substrate hydrolyzed is proportional to the amount of antigen in th
e test solution.

34
FLOW CHART :
Microtitre wells are coated with specific antibody
↓
Add & incubate test antigen (Unknown)
↓
Wash it off
↓
Add & incubate antiserum (antibody) conjugated with enzyme
↓
Wash it off
↓
Add & incubate Substrate
↓
Wash it off
↓
Read the intensity of colour produced.
AVIDIN - BIOTIN ELISA
Principle: The secondary antibody is labelled with biotin which is detected either
avidin labelled with peroxidase or bridged avidin biotin method or avidin-biotin co
mplex. The secondary antibody is conjugated with biotin and peroxidase is conjug
ated with avidin producing Yellow colour.

35
FLOW CHART :
Microtiter wells are coated with antigen (4○C Overnight)
↓
Wash 3 times with PBST
↓
Blocking with BSA (37○ C for 2 hrs )
↓
Wash 3 times with PBST
↓
Add test sera sample (37○C for 90 min.)
↓
Wash 3 times with PBST
↓
Add secondary conjugated antibody Anti bovine Ig
(37○C for 90 min.)
↓
Wash 3 times in PBS-Tween
↓
Avidin peroxidase (37○C for 30 min.)
↓
Wash 3 times in PBS-Tween
↓
Allow reaction with substrate (OPD) soln. for 15 min.
↓
Dev. of Yellow in positive samples
↓
Stop reaction & plate reaction (492 nm filter )
Exercise
Q1. Write the applications of ELISA.
Q2. Write different enzymes (conjugate) and substance used in ELISA.
*****

36
Practical 8
VISIT AND APPRAISAL OF VETERINARY BIOLOGICAL INSTITUTE
Institute of Veterinary Biological Products, Pune
"Pioneering National Institute" Imperial Bacteriological Laboratory was established in 1889 at Pune. The Institute was subsequently shifted to Mukteshwar and renamed as Indian Veterinary Research Institute. This was the only institute in India catering to the needs of veterinary biologicals. Thereafter the Serum Institute was established at Bombay in the year 1947 to meet he need of the then Bombay State. Initially only three products viz. Hemorrhagic Septicemia, Black Quarter, Goat blood Rinderpest disease vaccines were produced at Bombay. The Ranikhet Disease vaccine was produced in a specially established unit at Pune.
The institute from Bombay was shifted to Pune during the year 1959 and since then it is working in 25 hectors of land with necessary building and facilities. The Institute is manufacturing various types of vaccines, antigens and diluents. In all 8 type of bacterial vaccines 10 types of viral vaccines, 4 types of diagnostic antigens & regents and 4 types of diluents are manufactured. On an average 600 lakh doses are manufactured annually.
The Institute is headed by the Joint Commissioner of Animal Husbandry and assisted by different technical and non-technical staff. The total strength of the staff is 153.
All the biologicals are produced as per the Drugs and Cosmetics Act 1940.There are 15 Production Laboratories and 4 main sections.
• Bacterial Vaccine Section • Viral Vaccine Section • Small Animal Breeding Center • Test and Quality Control Section.
The biologicals produced are mainly supplied free of cost to state institutes. Some of the biologicals are sold on cash within the state and outside the state also.

37
The Institute is unique of its type functioning at the state level under Govt. sector, in the production of veterinary biologicals and is headed by Joint Commissioner Animal Husbandry.
The institute is presently undergoing overall up gradation as required under Schedule M of Drugs and Cosmetics Act, 1940. The bacterial vaccines HS, BQ and ET are also planned to be manufactured by using fermenter technology.
Institute of Animal Health and Veterinary Biologicals, Bangalore
The Institute of Animal Health and Veterinary Biologicals had a modest beginning as “Mysore Serum Institute” founded by 1926 by the erstwhile Maharaja of Mysore to produce hyper-immune serum for the control of Rinderpest Disease in the state. The name of the Institute was changed from “Mysore Serum Institute ” to "Institute of Animal Health and Veterinary Biologicals" in view of the multifaceted activities undertaken by the Institute in the production of various veterinary biologicals and problem-oriented research on existing, exotic and emerging diseases of livestock.
The Institute was registered as Scientific Society under the societies registration act in 1978 to give a broader perspective and autonomous status to organize and manage its diversified activities of production of biologicals and diagnostic services through a network of units in the state.
The objectives includes large scale production of various biologicals for prophylaxis and diagnostic agents for speedy and prompt diagnosis of various livestock and poultry diseases. Produces 7 Bacterial Vaccines, 9 Viral vaccines and Diagnostic antigens. To adopt new technologies in the development of cost effective and efficient biologicals and diagnostic aids. And to provide prompt and effective diagnostic services for identification of disease problems with an aim to eradicate them.
Biological Product Division, IVRI, Izzatnagar, Bareilly
The Biological Products Division was originally founded as Imperial Veterinary Serum Institute in 1930 to produce antisera against rinderpest and hemorrhagic septicemia the most devastating diseases of cattle. In 1936 with the reorganization of the Institute, it was renamed as Division of Biological Products. The divisional activities are organized under three sections viz. viral vaccines, bacterial vaccines

38
and diagnostics. These are directed towards research and development on improvement of biological products, up-scaling of technologies to production level, introduction of newer vaccines, diagnostics and other biological products, production and supply of veterinary biologicals and transfer of technology on veterinary biologicals. In addition to it organization of training programmes for the state biological production units through national diploma and specialized short-term training courses, besides rendering advisory and consultancy services on veterinary biologicals are also important activities.
Exercise
1. Visit the veterinary biological institutes and record your observations.
******
COVASU
Ashok V Bhosle
Veterinary Microbiology
Practical Manual
Unit IV (As per MSVE 2016)
Department of Veterinary Microbiology
College of Veterinary & Animal Sciences, Udgir
MAHARASHTRA ANIMAL & FISHERY SCIENCES UNIVERSITY, NAGPUR