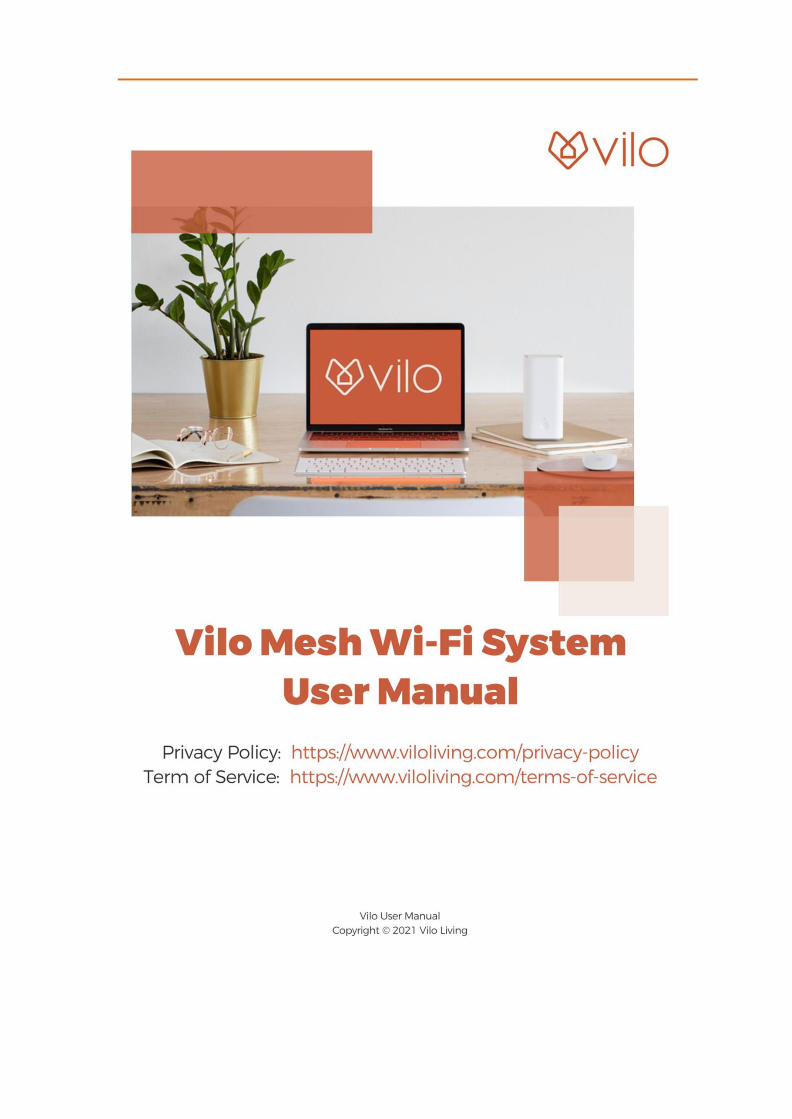
vilo mesh wi-fi system
TRANSCRIPT

Vilo Mesh Wi-Fi System
2
Table of Contents SETTING UP YOUR VILOS .................................................................................................................... 4
BEFORE YOU BEGIN ........................................................................................................................................ 5 SETTING UP YOUR MAIN VILO .......................................................................................................................... 6
Adding Sub-Vilos .................................................................................................................................... 7 Adding Sub-Vilos from the Same Three Pack ......................................................................................... 7 Adding Sub-Vilos from a Different Package ........................................................................................... 8
CHANGING NETWORK SETTINGS ...................................................................................................... 10
CHANGING WI-FI SETTINGS ........................................................................................................................... 11 CHANGING NOTIFICATIONS SETTINGS .............................................................................................................. 12 CHANGING INTERNET CONNECTIONS SETTINGS ................................................................................................. 14 MANUALLY UPGRADING FIRMWARE ................................................................................................................ 15 RESTARTING YOUR WI-FI NETWORK ................................................................................................................ 16 OPTIMIZING WI-FI PERFORMANCE .................................................................................................................. 17 BLOCKING OR UNBLOCKING A DEVICE ON THE NETWORK .................................................................................... 17
Blocking an Unauthorized Device from the Network ........................................................................... 17 Unblocking a Device to Enable Network Access .................................................................................. 18
CHANGING VILO SETTINGS ............................................................................................................... 18
CHANGING A VILO NAME ............................................................................................................................... 18 TURNING A VILO INDICATOR LIGHT ON OR OFF ................................................................................................. 19
MANAGING DEVICES ON A VILO NETWORK ...................................................................................... 20
CHANGING A DEVICE NAME ........................................................................................................................... 20 CHANGING A DEVICE TYPE ............................................................................................................................. 22 ENABLING OR DISABLING INTERNET ACCESS FOR A DEVICE .................................................................................. 24
USAGE REPORT ................................................................................................................................ 25
UNDERSTANDING THE USAGE REPORT ............................................................................................................. 25 TURNING DATA ON OR OFF FOR THE USAGE REPORT ......................................................................................... 25 VIEWING THE USAGE REPORT ......................................................................................................................... 25
USER ACCOUNT................................................................................................................................ 26
MANAGING YOUR USER ACCOUNT .................................................................................................................. 26 CHANGING YOUR PROFILE PICTURE ................................................................................................................. 26 EDITING YOUR PROFILE NICKNAME ................................................................................................................. 27 CHANGING YOUR ACCOUNT PASSWORD .......................................................................................................... 27
VILO SUPPORT ................................................................................................................................. 28
ACCESSING VILO SUPPORT ............................................................................................................................. 28 SUBMITTING A LOG ....................................................................................................................................... 28 DIAGNOSTIC LOG REPORTING ......................................................................................................................... 29
SETTING UP A GUEST WI-FI NETWORK .............................................................................................. 30
SETTING PARENTAL CONTROLS ........................................................................................................ 32
SELECTING A DEVICE TO CONTROL ................................................................................................................... 32 TURNING INTERNET ACCESS ON OR OFF IMMEDIATELY ....................................................................................... 33

Vilo Mesh Wi-Fi System
3
Turning Internet Access On Immediately ............................................................................................. 33 Turning Internet Access Off Immediately............................................................................................. 33
SCHEDULING SPECIFIC TIMES TO AUTOMATICALLY TURN OFF INTERNET ACCESS ..................................................... 34 Adding or Editing a Schedule ............................................................................................................... 34 Deleting a Schedule .............................................................................................................................. 36
ENABLING OR DISABLING AN EXISTING SCHEDULE .............................................................................................. 36 BLOCKING WEBSITES ........................................................................................................................ 36
BLOCKING A SPECIFIC WEBSITE FOR THE FIRST TIME ........................................................................................... 37 BLOCKING SPECIFIC WEBSITES FOR A NEW DEVICE ............................................................................................. 37 EDITING A BLOCKED WEBSITE URL .................................................................................................................. 38 DELETING/UNBLOCKING A BLOCKED WEBSITE................................................................................................... 38
DELETING A VILO.............................................................................................................................. 39
DELETING A MAIN VILO ................................................................................................................................. 39 DELETING A SUB-VILO ................................................................................................................................... 39
RESTORING A VILO TO FACTORY SETTINGS ....................................................................................... 40

Vilo Mesh Wi-Fi System
4
Setting Up Your Vilos Setting up your Vilo Mesh Wi-Fi System is easy. Use the following guide to prepare the necessary items and follow each step of the instructions for a quick and easy set up. Remember to be patient. It can take a few minutes for your Vilo to connect and show up as connected in your Vilo app.
Vilo Living provides support in addition to this user manual. If you need assistance, you can contact us through our website: https://support.viloliving.com/hc/en-us
Vilo Mesh Wi-Fi System
5
Before You Begin Before you begin setting up your Vilo home network, you need to know the following:
• where your modem is located
• whether you already have a router attached to your modem
• whether you have any devices directly connected to your current router
• the name and password for your current Wi-Fi network
To set up your Vilo home network, you will need the following:
• an active Internet service with a working modem,
• a spare power outlet near that modem,
• a smartphone or tablet,
• an Ethernet cable,
− If you purchased the single pack, you will need to use your own Ethernet cable.
− If you purchased the three pack, an Ethernet cable comes with it.
• one or more Vilos
Before you begin to set up your Vilo home network, please do the following on your smartphone or tablet:
• make sure you can access your email account through a cellular connection or another Wi-Fi network.
• download the Vilo app:
− If you have an Android phone, use the Google Play store.
− If you have an iPhone, use the Apple App Store.
• create a Vilo account
Creating a Vilo Account
To create a Vilo account:
1. Open the Vilo app. 2. Follow the instructions to add an email address and password.
Your password must contain:
1. a minimum of 8 characters 2. at least 1 number 3. at least 1 uppercase letter 4. at least 1 lowercase letter
Attention
You will receive a verification to log in to the Vilo app through your email. You must be able to access the email address you use to log in to the Vilo app through your
phone or other device using a cellular connection or another Wi-Fi network.

Vilo Mesh Wi-Fi System
6
Setting Up Your Main Vilo Your main Vilo is the one you choose to connect to your modem. It can be any Vilo you purchased.
1. Open the Vilo App on your phone. Ensure you are logged in to your Vilo account. 2. Tap Add Vilo 3. Follow the onscreen instructions that will guide you through the following steps:
a. Plug your main Vilo into a power outlet using the power cable provided b. Plug the Ethernet cable into the WAN/LAN port on the back of your main Vilo c. Plug the other end of the Ethernet cable into the network port on the modem d. Wait for the light on your Vilo to change from solid red to solid amber.
4. The last page of instructions is Connect To Wi-Fi. 5. Connect to Wi-Fi following the instructions on your phone.
Connecting to Wi-Fi Using an iPhone 1. If necessary, enable access to the phone camera. Otherwise, go to the next step.
If this step is necessary, a dialog will display telling you to enable access.
2. Use your phone camera to scan the QR code on the bottom of your Vilo to connect to the Wi-Fi.
3. Tap Join. 4. Press Add Vilo to My Account. 5. Depending on the type of home network you have installed, the Vilo app will require
different actions:
Note: You do not need to know what type of home network you have or what the codes mean. Vilo will automatically detect the type of network and prompt you if it is necessary for you to enter additional data.
• DHCP: When Success displays on the Add Vilo page, your network is set up.
• PPPoE (and your ISP does not require you to type in login credentials): When Success displays on the Add Vilo page, your network is setup.
• PPPoE (and your ISP require you to provide a login credential)
i. Enter a username and password provided by your Internet Service Provider in the displayed fields for the PPPoE network.
6. Tap Next. 7. You now have the option to change the Wi-Fi name and password. For more
information, go to: Changing Wi-Fi Settings.
The Wi-Fi name and password are displayed in the Vilo app. So, you can choose to look them up or change them at any time in the future.

Vilo Mesh Wi-Fi System
7
Connecting to Wi-Fi Using an Android Phone 1. Tap Manually Connect to Wi-Fi. The Wi-Fi settings page on your phone will display. 2. Select the Wi-Fi network with the name matching the Wi-Fi name on the bottom of your Vilo. 3. Use the password on the bottom of your Vilo to connect to the Vilo Wi-Fi network. 4. Once successfully connected to the Vilo Wi-Fi network, return to the Vilo app. You should
see the Add Vilo page in the app. 5. Press Add Vilo to My Account. 6. Depending on the type of home network you have installed, the Vilo app will require different
actions: Note: You do not need to know what type of home network you have or what the codes mean.
Vilo will automatically detect the type of network and prompt you, if it is necessary for you to enter additional data.
• DHCP: When Success displays on the Add Vilo page, your network is set up.
• PPPoE (and your ISP does not require you to type in login credentials): When Success displays on the Add Vilo page, your network is setup.
• PPPoE (and your ISP require you to provide a login credential):
i. Enter a username and password provided by your Internet Service Provider in the displayed fields for the PPPoE network.
7. Tap Next. 8. You now have the option to change the Wi-Fi name and password. For more information, go to:
Changing Your Wi-Fi Name and Password. The Wi-Fi name and password are stored in the Vilo app. So, you can choose to look
them up or change them at any time in the future.
Adding Sub-Vilos
Note: It can take a few minutes for your Vilos to connect and show up as connected in your Vilo app
When you purchase a three pack of Vilos, you will use one as the main Vilo and the rest will be sub-Vilos. Any of the Vilos can be used as the main Vilo. Three Vilos can cover up to 4,500 square feet. If you have a space larger than 4,500 square feet or an odd layout with lots of interference, we suggest adding additional Vilos. A maximum of eight Vilos is recommended for your home network.
Place your sub-Vilos within 30 feet of your main Vilo.
Adding Sub-Vilos from the Same Three Pack Once your main Vilo is setup, place the remaining two Vilos from the same package within 30 feet of your main Vilo and plug them in using the power cords provided.
You do not need to perform any additional actions. The sub-Vilos from the same package will automatically be added to your Vilo network.
The lights on the sub-Vilos will change from red, through amber, and eventually to solid blue.
Attention
Some physical objects, such as brick walls or other electronic devices can cause connection problems. If you find a sub-Vilo is not connecting after several minutes, try
moving it to a different location.

Vilo Mesh Wi-Fi System
8
When the lights on the sub-Vilos change to blue, they are connected to the main Vilo and added to your Vilo network.
Adding Sub-Vilos from a Different Package Once your main Vilo is set up, place the additional sub-Vilos from a different package within 30 feet of your main Vilo and plug them in using the power cords provided.
To add a new sub-Vilo from a different package to an existing Vilo network:
1. In the Vilo app, there are two ways you can add a new sub-Vilo:
Tap + in the upper right of the page and Tap Add to an existing Wi-Fi network. Go to step 4.
or
Tap the network to which you want to add the sub-Vilo. Go to the next step.
The network page will display.
2. Tap Vilos.
The My Vilos page displays with the main Vilo listed.

Vilo Mesh Wi-Fi System
9
3. Tap + Add Another Vilo from the bottom of the page.
4. The Add Another Vilo page displays.
5. Tap From a Different Package.

Vilo Mesh Wi-Fi System
10
6. The Power It On page displays.
7. Wait for the light on the new sub-Vilo to turn from red, through flashing red, to
amber. 8. When the light has turned amber, Tap the Solid Amber Light Confirmed button in the
app. Then the Press the Mesh Button page displays
9. Press and hold the mesh button on the front of the new sub-Vilo until the light
Flashes amber.
It should take about 3 seconds for the amber light to begin flashing.
10. Tap Next.
The Find Vilo page displays with the Search animation.
11. Wait for the search to complete.
The new sub-Vilo will display on the Find Vilo page.
12. Tap Next.
The Add to My Account page displays with the Add animation followed by the Syncing
Information animation.
13. Wait for the Add and Sync to complete.
The page will display Success!
14. Tap Setup Complete.
The My Vilos page will display with all the Vilos in your Vilo network.
When the lights on the sub-Vilos change to blue, they are connected to the main Vilo and are
added to the network.
Changing Network Settings You might have multiple networks visible in your Vilo app.
You can access the settings for each Vilo network in the Vilo app.
To access network settings through the network page:
1. In the Vilo app, Tap the network for which you want to change settings.
The network page will display.
2. Tap in the top right –hand corner of the network page.
The settings page will display.
Select the setting you want to view or change:
• Wi-Fi Settings
• Notifications
• Internet Connections
• Firmware Upgrade

Vilo Mesh Wi-Fi System
11
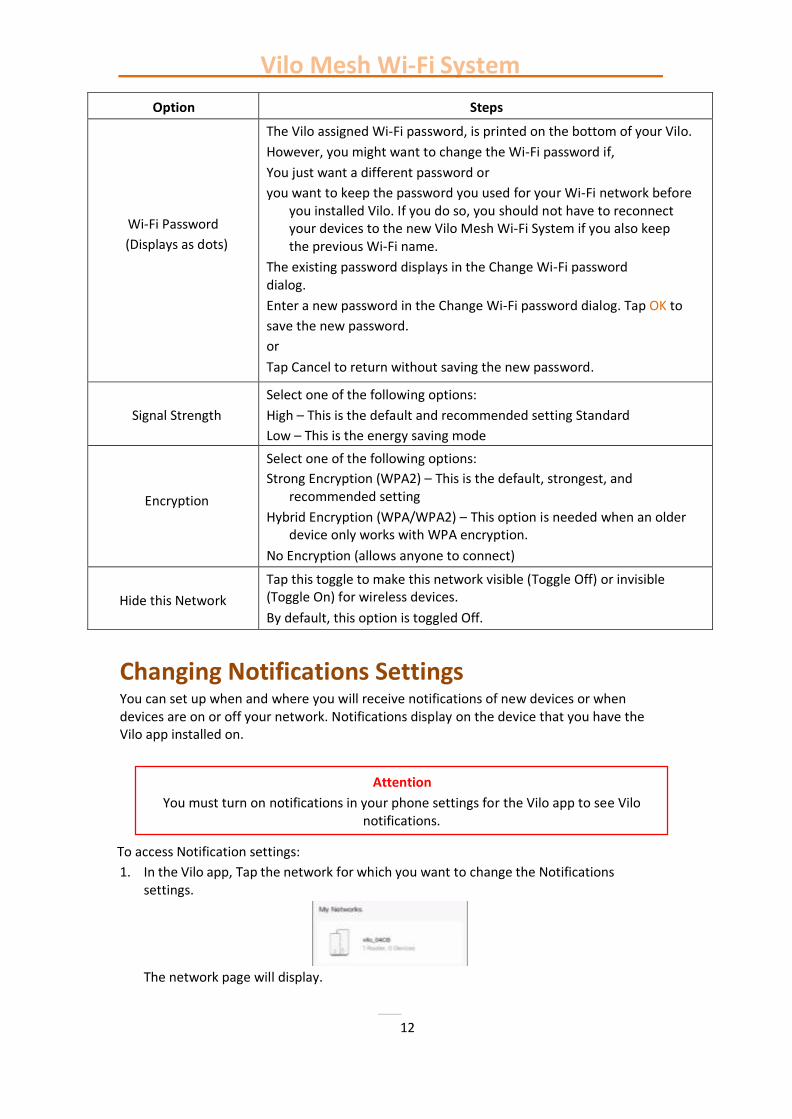
Changing Wi-Fi Settings
To access Wi-Fi Settings from the Settings page:
1. In the Vilo app, Tap the network for which you want to change the Wi-Fi settings.
The network page will display.
2. Tap in the top right –hand corner of the network page.
The settings page will display.
3. Tap Wi-Fi Settings.
The Wi-Fi Settings page will display.
4. Refer to the following table for information about editing the Wi-Fi Settings:
Option Steps
Band Steering
If band steering is toggled on, Vilo will automatically connect your device to the band 2.4 GHz or 5 GHz to optimize performance.
If band steering is toggled off, the current Wi-Fi network will split into two Wi-Fi networks with the same password:
2.4 GHz only and
5 GHz only
Wi-Fi settings on your phone will show two Wi-Fi networks. You will have to manually choose which network to use.
If you prefer, you can also choose to hide either or both networks by turning on the Hide This Network option on this page.
By default, this option is toggled On.
Wi-Fi Name
(displays name)
The Vilo assigned Wi-Fi name is printed on the bottom of your Vilo.
However, you might want to change the Wi-Fi name if, you just
want a different name
or
you want to keep the name you used for your Wi-Fi network before you installed Vilo. If you do so, you should not have to reconnect your devices to the new Vilo Mesh Wi-Fi System if you also keep the previous Wi-Fi password.
The existing name displays in the Change Wi-Fi name dialog. Enter a new
name in the Change Wi-Fi name dialog.
Tap OK to save the new name.
or
Tap Cancel to return without saving the new name.
Attention
If you change the Wi-Fi settings you might need to reconnect your devices to the network.
Vilo Mesh Wi-Fi System
12
Changing Notifications Settings You can set up when and where you will receive notifications of new devices or when devices are on or off your network. Notifications display on the device that you have the Vilo app installed on.
To access Notification settings:
1. In the Vilo app, Tap the network for which you want to change the Notifications settings.
The network page will display.
Option Steps
Wi-Fi Password
(Displays as dots)
The Vilo assigned Wi-Fi password, is printed on the bottom of your Vilo.
However, you might want to change the Wi-Fi password if,
You just want a different password or
you want to keep the password you used for your Wi-Fi network before you installed Vilo. If you do so, you should not have to reconnect your devices to the new Vilo Mesh Wi-Fi System if you also keep the previous Wi-Fi name.
The existing password displays in the Change Wi-Fi password dialog.
Enter a new password in the Change Wi-Fi password dialog. Tap OK to
save the new password.
or
Tap Cancel to return without saving the new password.
Signal Strength
Select one of the following options:
High – This is the default and recommended setting Standard
Low – This is the energy saving mode
Encryption
Select one of the following options:
Strong Encryption (WPA2) – This is the default, strongest, and recommended setting
Hybrid Encryption (WPA/WPA2) – This option is needed when an older device only works with WPA encryption.
No Encryption (allows anyone to connect)
Hide this Network
Tap this toggle to make this network visible (Toggle Off) or invisible (Toggle On) for wireless devices.
By default, this option is toggled Off.
Attention
You must turn on notifications in your phone settings for the Vilo app to see Vilo notifications.
Vilo Mesh Wi-Fi System
13
2. Tap in the top right –hand corner of the network page.
The settings page will display.
3. Tap Notifications.
The Notifications page will display.
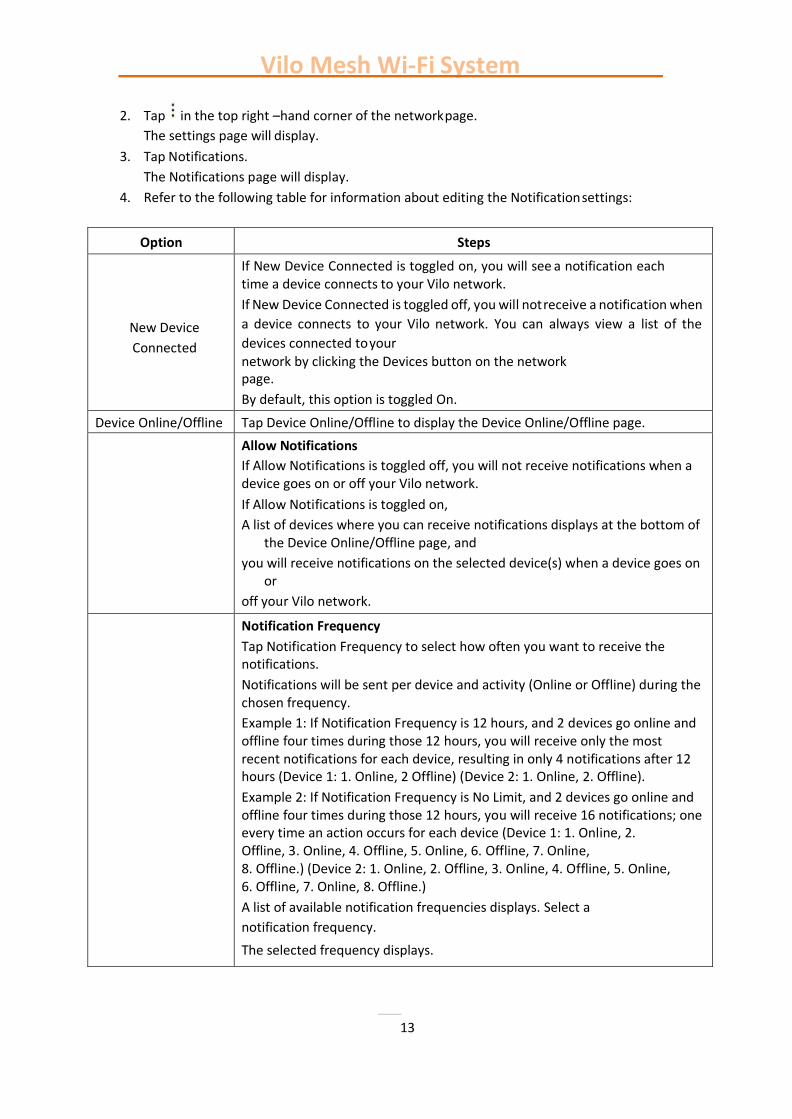
4. Refer to the following table for information about editing the Notification settings:
Option Steps
New Device
Connected
If New Device Connected is toggled on, you will see a notification each time a device connects to your Vilo network.
If New Device Connected is toggled off, you will not receive a notification when
a device connects to your Vilo network. You can always view a list of the
devices connected to your
network by clicking the Devices button on the network page.
By default, this option is toggled On.
Device Online/Offline Tap Device Online/Offline to display the Device Online/Offline page.
Allow Notifications
If Allow Notifications is toggled off, you will not receive notifications when a device goes on or off your Vilo network.
If Allow Notifications is toggled on,
A list of devices where you can receive notifications displays at the bottom of the Device Online/Offline page, and
you will receive notifications on the selected device(s) when a device goes on or
off your Vilo network.
Notification Frequency
Tap Notification Frequency to select how often you want to receive the notifications.
Notifications will be sent per device and activity (Online or Offline) during the chosen frequency.
Example 1: If Notification Frequency is 12 hours, and 2 devices go online and offline four times during those 12 hours, you will receive only the most recent notifications for each device, resulting in only 4 notifications after 12 hours (Device 1: 1. Online, 2 Offline) (Device 2: 1. Online, 2. Offline).
Example 2: If Notification Frequency is No Limit, and 2 devices go online and offline four times during those 12 hours, you will receive 16 notifications; one every time an action occurs for each device (Device 1: 1. Online, 2. Offline, 3. Online, 4. Offline, 5. Online, 6. Offline, 7. Online, 8. Offline.) (Device 2: 1. Online, 2. Offline, 3. Online, 4. Offline, 5. Online, 6. Offline, 7. Online, 8. Offline.)
A list of available notification frequencies displays. Select a
notification frequency.
The selected frequency displays.

Vilo Mesh Wi-Fi System
14
Changing Internet Connections Settings
When you set up your Wi-Fi, you do not need to know what type of broadband connection you have. Vilo will automatically detect the type of internet connection and prompt you if it is necessary for you to enter additional information.
However, if you change Internet Service Providers (ISP) or something changes, you might need to change your internet connections settings.
To access Internet Connections settings:
Option Steps
Select device(s) to receive notifications
When Allow Notifications is toggled on, a list of devices where you can receive notifications displays at the bottom of the Device Online/Offline page.
Enable or disable a notification on a device:
To disable an enabled device, Tap the toggle to off. or
To enable a disabled device, Tap the toggle to on.
Do Not Disturb
DND for Notifications
When DND for Notifications is toggled off, notifications can be received at any time of the day or night.
When DND for Notifications is toggled on, notifications will not be received during the specified time period (for example, when you are asleep).
Start Time
1. Tap Start Time.
A time selector displays.
2. Select the time when you want to turn off notifications.
Note: Be sure you are aware of whether you have selected AM or PM for the time.
3. Tap Confirm to accept the selected start time.
End Time
1. Tap End Time.
A time selector displays.
2. Select the time when you want to turn on notifications.
Note: Be sure you are aware of whether you have selected AM or PM for the time.
3. Tap Confirm to accept the selected end time.
Attention
If you change the Internet Connections settings, you might need to restart your Wi-Fi network.
Vilo Mesh Wi-Fi System
15
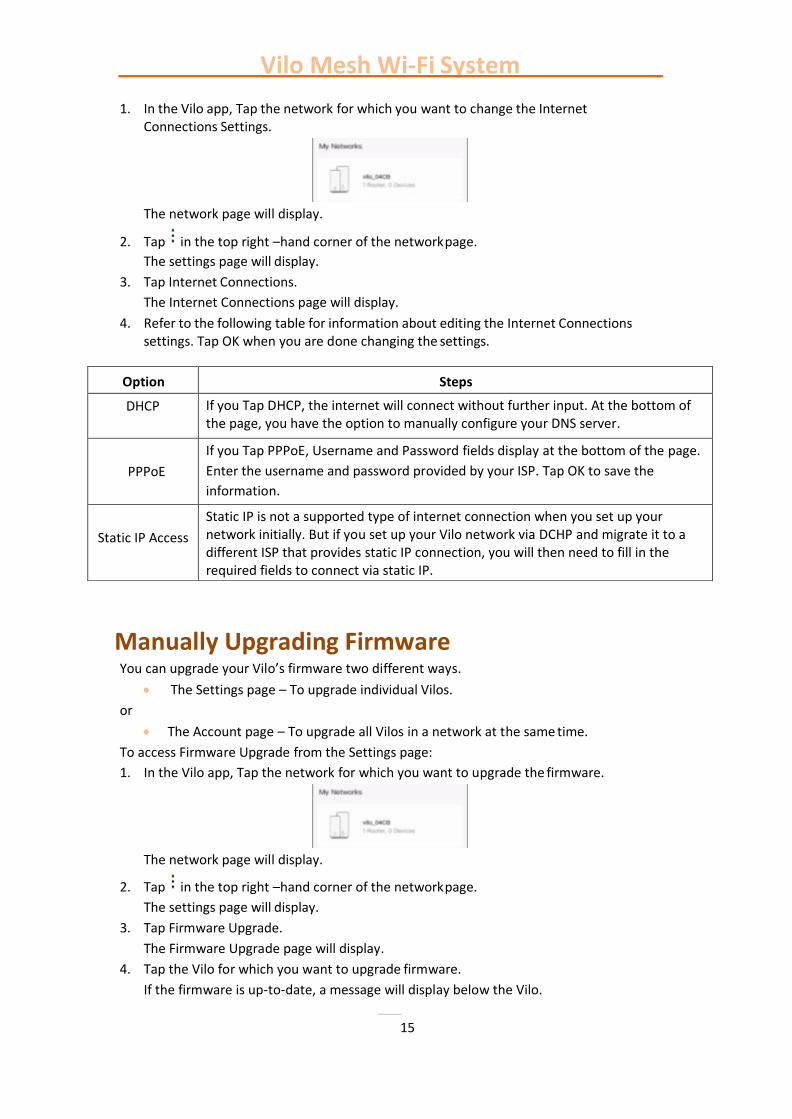
1. In the Vilo app, Tap the network for which you want to change the Internet Connections Settings.
The network page will display.
2. Tap in the top right –hand corner of the network page.
The settings page will display.
3. Tap Internet Connections.
The Internet Connections page will display.
4. Refer to the following table for information about editing the Internet Connections settings. Tap OK when you are done changing the settings.
Manually Upgrading Firmware You can upgrade your Vilo’s firmware two different ways.
• The Settings page – To upgrade individual Vilos.
or
• The Account page – To upgrade all Vilos in a network at the same time.
To access Firmware Upgrade from the Settings page:
1. In the Vilo app, Tap the network for which you want to upgrade the firmware.
The network page will display.
2. Tap in the top right –hand corner of the network page.
The settings page will display.
3. Tap Firmware Upgrade.
The Firmware Upgrade page will display.
4. Tap the Vilo for which you want to upgrade firmware.
If the firmware is up-to-date, a message will display below the Vilo.
Option Steps
DHCP If you Tap DHCP, the internet will connect without further input. At the bottom of the page, you have the option to manually configure your DNS server.
PPPoE
If you Tap PPPoE, Username and Password fields display at the bottom of the page.
Enter the username and password provided by your ISP. Tap OK to save the
information.
Static IP Access
Static IP is not a supported type of internet connection when you set up your network initially. But if you set up your Vilo network via DCHP and migrate it to a different ISP that provides static IP connection, you will then need to fill in the required fields to connect via static IP.

Vilo Mesh Wi-Fi System
16
5.To access Firmware Upgrade from the Account page:
6. In the Vilo app, Tap from the bottom of the first page.
Your account page displays with your profile picture and nickname at the top.
7. Tap Firmware Upgrade.
The Firmware Upgrade page will display with your Vilo networks.
8. If you have multiple networks, Tap the network you want to upgrade. Otherwise, go directly to step 4.
9. Tap Upgrade All to upgrade the firmware on all networks.
If the firmware is up-to-date, a message will display below the network saying “Latest version”
Restarting Your Wi-Fi Network Restarting your Wi-Fi regularly optimizes your Wi-Fi performance.
By default, all your Vilos are scheduled to automatically restart weekly. All your Vilos will restart at the same time.
To edit, enable, or disable automatic restarts:
1. In the Vizlo app, Tap the network for which you want to schedule regular restarts.
The network page will display.
2. Tap on the network page.
The Select Restart Option will display.
3. To restart your Wi-Fi immediately, Tap Restart Now. Otherwise, go to the next step. 4. Tap Schedule Regular Restarts.
The Schedule Regular Restarts page will display.
5. Enable or disable automatic restarts:
To disable an enabled schedule, Tap the toggle to off.
or
To enable a disabled schedule, Tap the toggle to on.
6. Tap Restart Time.
A time selector displays.
7. Select the time when you want to restart your Vilos.
It is recommended you select a time when no-one is expected to be logged into your
Vilo network, such as early in the morning or late at night .
Note: Be sure you are aware of whether you have selected AM or PM for the time.
8. Tap OK to accept the selected restart time. 9. Tap Repeat.
The Repeat page displays.
10. To select the days of the week on which you want the scheduled times to be used:

Vilo Mesh Wi-Fi System
17
Tap a checked day to clear it.
The schedule will not be repeated on unchecked days.
or
Tap an unchecked day to check it.
The schedule will be repeated on checked days.
11. Tap OK. 12. The selected days of the week will display on the Schedule Regular Restarts page.
Optimizing Wi-Fi Performance You can also use the Vilo app to optimize your Wi-Fi performance by choosing the highest quality channels with the least interference.
1. In the Vilo app, Tap the network for which you want to optimize Wi-Fi performance.
The network page will display.
2. Tap in the center of the network page.
The System Dashboard page will display.
3. Tap Wi-Fi Interference. The Wi-Fi Interference page will display.
4. Tap Optimize Wi-Fi. 5. The Vilo app will determine the best channels and use them.
Blocking or Unblocking a Device on the Network
Blocking an Unauthorized Device from the Network To block an unauthorized device:
1. In the Vilo app, Tap the network for which you want to block an unauthorized device.
The network page will display.
Attention
Blocking an unauthorized device from your network is not the same as using Parental Controls to block internet access for a device. A device blocked from internet access using Parental Controls is still on your network. It just cannot access the internet. If a
device is not on your network, you cannot set Parental Controls for it.
If you do not want an unauthorized user on your network, block the device from your
network completely.

Vilo Mesh Wi-Fi System
18
2. Tap Devices on the network page.
The Devices page will display with all devices on your network.
3. Tap the device you want to block. 4. The device detail page will display for the selected device. 5. Tap Block from Network at the bottom of the page. 6. A confirmation box will appear, Tap ok 7. The Devices page redisplays with the blocked device listed under Blocked at the
bottom of the page.
Unblocking a Device to Enable Network Access To unblock a device:
1. In the Vilo app, Tap the network for which you want to block an unauthorized device.
The network page will display.
2. Tap Devices on the network page.
The Devices page will display with all devices on your network.
3. Tap the device you want to unblock from the list below Blocked at the bottom of the page.
4. The device detail page will display for the selected device. 5. Tap Unblock at the bottom of the page. 6. The device data page redisplays. 7. When you return to the Devices page, the unblocked device will redisplay under either
Online or Offline.
Changing Vilo Settings Changing a Vilo Name To make it easier to track information by each Vilo in your network, you might want to give each Vilo a more descriptive name, such as Study Room, or Office.
Once you change a Vilo name, the Vilo will be labelled with the new name in all areas of the Vilo app.
Note: You can always find the original name of the Vilo on the bottom of the Vilo device.
To change the name of a Vilo:
1. In the Vilo app, Tap the network from which you want to select a device to control.
The network page will display.
2. Tap Vilos on the network page.
The My Vilos page displays with all Vilos on your network.
3. Tap the Vilo you want to change.
The Sub Vilo or Main Vilo page will display.
4. Tap in the upper right corner of the page.

Vilo Mesh Wi-Fi System
19
5. The Change Your Vilo Name displays with the current Vilo name and a list of recommended names.
6. Change the Vilo name:
Enter a new name.
or
Tap a name from the list of recommended names.
7. Tap Save.
The Sub Vilo or Main Vilo page redisplays with the Vilo labelled with the new name.
Turning a Vilo Indicator Light On or Off Once you have your Vilo Wi-Fi network set up, you might want to turn off the indicator light. Since your Vilos are part of your home décor, you might find the indicator light makes the Vilo too noticeable or it is distracting when you are trying to sleep. It is easy to use the Vilos app to turn the indicator light on or off for each Vilo on your Wi-Fi network.
To turn a Vilo indicator light on or off:
1. In the Vilo app, Tap the network from which you want to select a device to control.
The network page will display.
2. Tap Vilos on the network page.
The My Vilos page displays with all Vilos on your network.
3. Tap the Vilo you want to control.
The Sub Vilo or Main Vilo page will display.
4. Turn the indicator light on or off:
Attention
Take note of the Vilos for which you turned off the indicator light. If you are troubleshooting an issue with your network, the indicator light on a Vilo is a useful
tool. So, if you have an issue with your network, you will want to turn on the indicator light.

Vilo Mesh Wi-Fi System
20
5. To turn off the indicator light, Tap the toggle to off.
or
To turn on the indicator light, Tap the toggle to on.
The light on the selected Vilo will be turned off or on.
Managing Devices on a Vilo Network Once you have set up your Vilo network, you can use the Vilo app to personalize and control information about the devices you have on your network.
The Devices portion of the Vilo app makes it easy to personalize a device name and type. It also enables you to block any authorized or unwanted devices from the network or turn internet access on or off for a specific device.
Changing a Device Name To make it easier to track information about devices on your network, you might want to give each device a more descriptive name, such as George-PC or George-Work.
Once you change a device name, the device will be labelled with the new name in all areas of the Vilo app.
To change the name of a device:
1. In the Vilo app, Tap the network from which you want to select a device to control.
The network page will display.
2. Tap Devices on the network page.
The Devices page displays with all devices that have been on your network, whether they are online or offline.
3. Tap the device you want to change.
Vilo Mesh Wi-Fi System
21
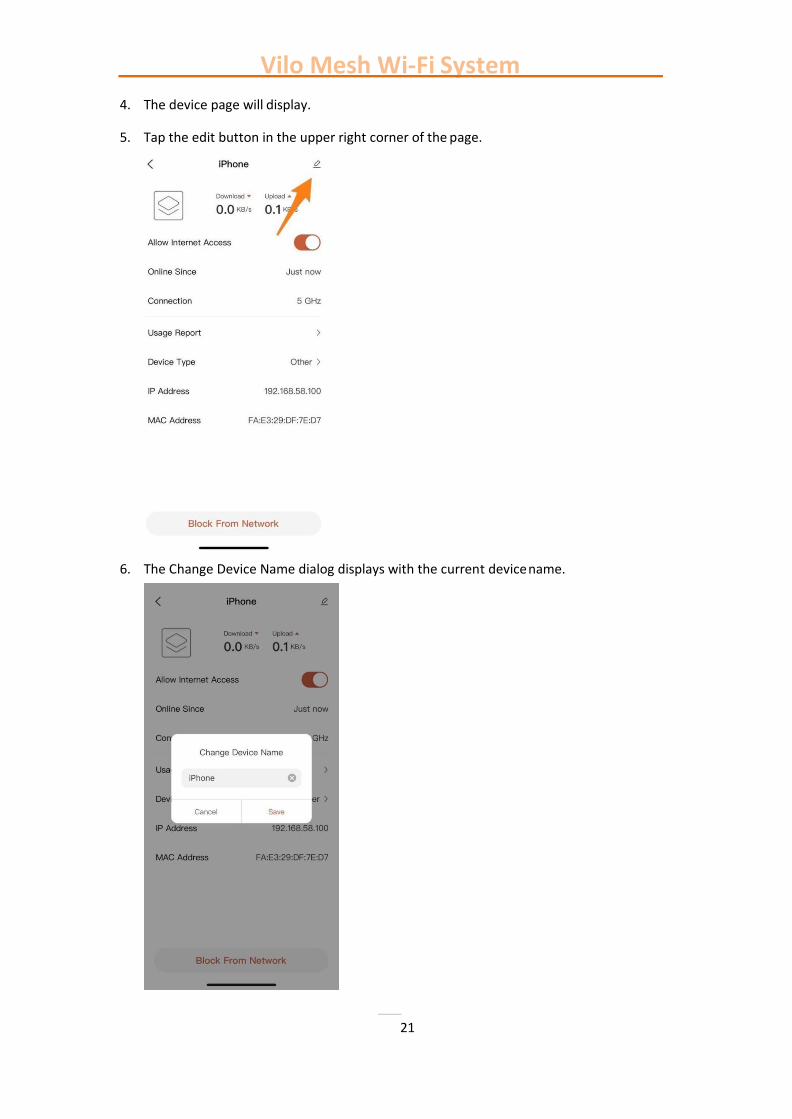
4. The device page will display.
5. Tap the edit button in the upper right corner of the page.
6. The Change Device Name dialog displays with the current device name.

Vilo Mesh Wi-Fi System
22
7. Enter a new device name 8. Tap Save.
The device page redisplays with the new device name at the top of the page.
Changing a Device Type To make it easier for you to track the types of devices on your network, the Vilo app enables you to assign a device type, such as tablet or desktop.
To change the name of a device:
1. In the Vilo app, Tap the network from which you want to select a device to control.
The network page will display.
2. Tap Devices on the network page.
The Devices page displays with all devices that have been on your network, whether
they are online or offline.
3. Tap the device you want to change
4. The device page will display.

Vilo Mesh Wi-Fi System
23
5. Tap Device Type.
6. The Device Type page will display with a list of device types and icons organized by
category.
7. Tap the type you want to assign to the device.
The device page will redisplay with the selected device type icon near the top of the page.
The selected device type icon will display beside the device name wherever the device displays in the Vilo app.
Vilo Mesh Wi-Fi System
24
Enabling or Disabling Internet Access for a Device
To enable or disable internet access for a device:
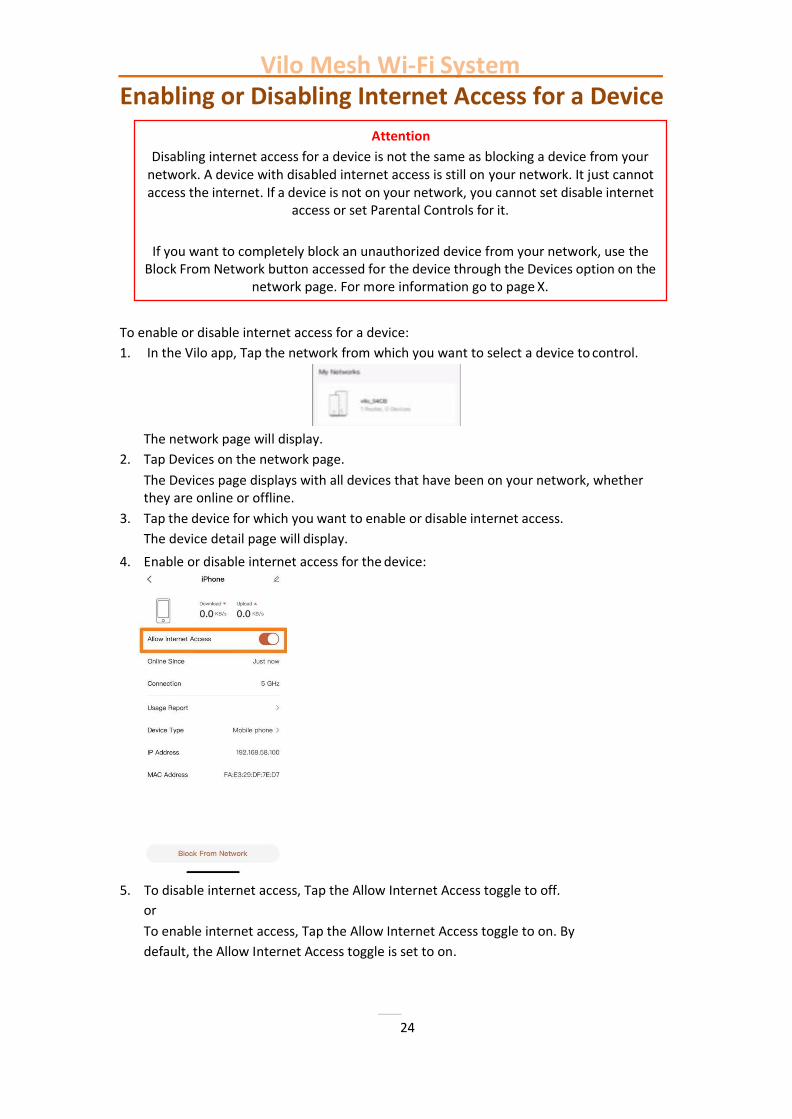
1. In the Vilo app, Tap the network from which you want to select a device to control.
The network page will display.
2. Tap Devices on the network page.
The Devices page displays with all devices that have been on your network, whether they are online or offline.
3. Tap the device for which you want to enable or disable internet access.
The device detail page will display.
4. Enable or disable internet access for the device:
5. To disable internet access, Tap the Allow Internet Access toggle to off.
or
To enable internet access, Tap the Allow Internet Access toggle to on. By
default, the Allow Internet Access toggle is set to on.
Attention
Disabling internet access for a device is not the same as blocking a device from your network. A device with disabled internet access is still on your network. It just cannot access the internet. If a device is not on your network, you cannot set disable internet
access or set Parental Controls for it.
If you want to completely block an unauthorized device from your network, use the
Block From Network button accessed for the device through the Devices option on the network page. For more information go to page X.
Vilo Mesh Wi-Fi System
25
Usage Report
Understanding the Usage Report The Usage report provides current and historical information about the amount of data uploaded and downloaded by Wi-Fi network or individual devices.
Information is available for the current day, week, and month.
The Usage report is not automatically available. To use it, you must turn on data usage reporting.
Turning Data On or Off for the Usage Report To turn data usage report on or off:
1. In the Vilo app, Tap the network from which you want to turn on or off the usage report.
The network page will display.
2. Tap on the network page.
The Usage Report page will display.
3. Access the Usage Report Settings page:
If data collection is not on for the Usage report, Tap
at the bottom of the page.
or
If data collection is on, Tap in the upper right corner of the page.
The Usage Report Settings page displays.
4. Enable or disable the Usage report:
To disable usage report, Tap the toggle to off.
or
To enable usage report, Tap the toggle to on.
Once usage report is turned on, usage data will display at the next whole hour. However, if historical data is available, it will show immediately.
Viewing the Usage Report At the next whole hour after data collection was turned on for the Usage report, usage data will be available.
1. In the Vilo app, Tap the network from which you want to view the usage report.
The network page will display.

Vilo Mesh Wi-Fi System
26
2. Tap on the network page.
The Usage Report page will display with the data used on the current day for your Wi- Fi network and each device connected to the network.
3. Swipe to view data for week or month.
Daily data is displayed by hour,
Weekly data is displayed by day, and
Monthly data is displayed by week.
4. Tap a device or the image for the Wi-Fi network to see a bar graph of the data uploaded and downloaded for the selected item.
Uploaded data is displayed in a pale bar and beside an upward triangle.
Downloaded data is displayed in a darker bar and beside a downward triangle.
Daily data is displayed by hour,
Weekly data is displayed by day, and
Monthly data is displayed by week.
5. Tap a bar on a daily, weekly, or monthly graph to view the data for that specific bar.
User Account Managing Your User Account You must have set up a Vilo user account to use your Vilo Mesh Wi-Fi System.
You created your Vilo account in one of two ways:
• You may have created an account on the https://www.viloliving.com website during the purchase process. You can use the same email and password you used on the website to log into the Vilo app.
• If you purchased your Vilo from Amazon.com or another location, you will need to create an account by entering your email and creating a password through the Vilo app. You will use this account to login and set up your Vilo.
You can use the My Account page in the Vilo app to:
• Change your profile picture
• Edit your profile nickname
• Change your account password
Changing Your Profile Picture You can use the Vilo app to add a picture to display with your profile nickname.
To change your profile picture:
1. In the Vilo app, Tap from the bottom of the first page.
Attention
You cannot change the email address associated with our account. If you want to use a different email address, you will need to create a new account with that email
address.
Vilo Mesh Wi-Fi System
27
Your account page displays with your profile picture and nickname at the top.
2. Tap beside your profile nickname.
The My Account page displays.
3. Tap Profile Photo. 4. Tap one of the following options from the bottom of the page:
Photo Gallery – select an existing photo from your photo gallery.
Take New Photo – use your phone to take a new picture.
The selected photo will display beside Profile Photo on the My Account page.
Editing Your Profile Nickname Your account nickname defaults to your email address.
1. In the Vilo app, Tap from the bottom of the first page.
Your account page displays with your profile picture and nickname at the top.
5. Tap beside your profile nickname.
The My Account page displays.
6. Tap Nickname.
The Change Nickname dialog displays.
7. Enter a new nickname for your profile. 8. Tap Save.
The new name displays beside Nickname.
Changing Your Account Password You can use the Vilo app to change your account password.
1. In the Vilo app, Tap from the bottom of the first page.
Your account page displays with your profile picture and nickname at the top.
2. Tap beside your profile nickname.
The My Account page displays.
3. Tap Password.
The Change Password page displays.
4. Enter your current password. 5. Enter your new password.
Your new password must contain all of the following:
a minimum of 8 characters
at least 1 number
at least 1 uppercase letter
at least 1 lowercase letter
6. Re-enter your new password to confirm it. 7. Tap OK. 8. The My Account page redisplays.

Vilo Mesh Wi-Fi System
28
Vilo Support You can use the web page or the Vilo app to access Vilo Support and submit an error log.
Accessing Vilo Support You can access support and submit a ticket directly from the Vilo web page or the Vilo app.
To access the Vilo Living support page from a browser, go to:
https://support.viloliving.com/hc/en-us
To access Vilo Support from the Vilo app:
1. In the Vilo app, Tap from the bottom of the first page.
Your account page displays with your profile picture and nickname at the top.
2. Tap Vilo Support.
The Vilo Support page displays.
3. Tap Help Center.
The Vilo Living Support website displays.
4. Search the website, look at the support articles by category, or tap the help bot to ask a question.
Submitting a Log Log data is important information about your Wi-Fi network and Vilo devices that can help troubleshoot technical issues you may run into. Submitting a log creates a message directly to the Vilo support team. You can include a description of the problem and a picture or video of the issue you found.
To submit a log from the Vilo app:
1. In the Vilo app, Tap from the bottom of the first page.
Your account page displays with your profile picture and nickname at the top.
2. Tap Vilo Support.
The Vilo Support page displays.
3. Tap Submit a Log.
The Submit a Log page displays.
4. Enter a description of your issue, a customer support ticket number (if you have one), and a picture or video of the problem (if you have one).
5. Tap Submit.
A message displays.
You should receive a response within 24 hours.
Submitting a Local Log If your Vilo is unable to connect to the Internet and you need to report the problem to the Vilo support team, you will need to submit a local log. Tap Submit a Local Log on the Submit a Log page and follow the steps on the subsequent screens.

Vilo Mesh Wi-Fi System
29
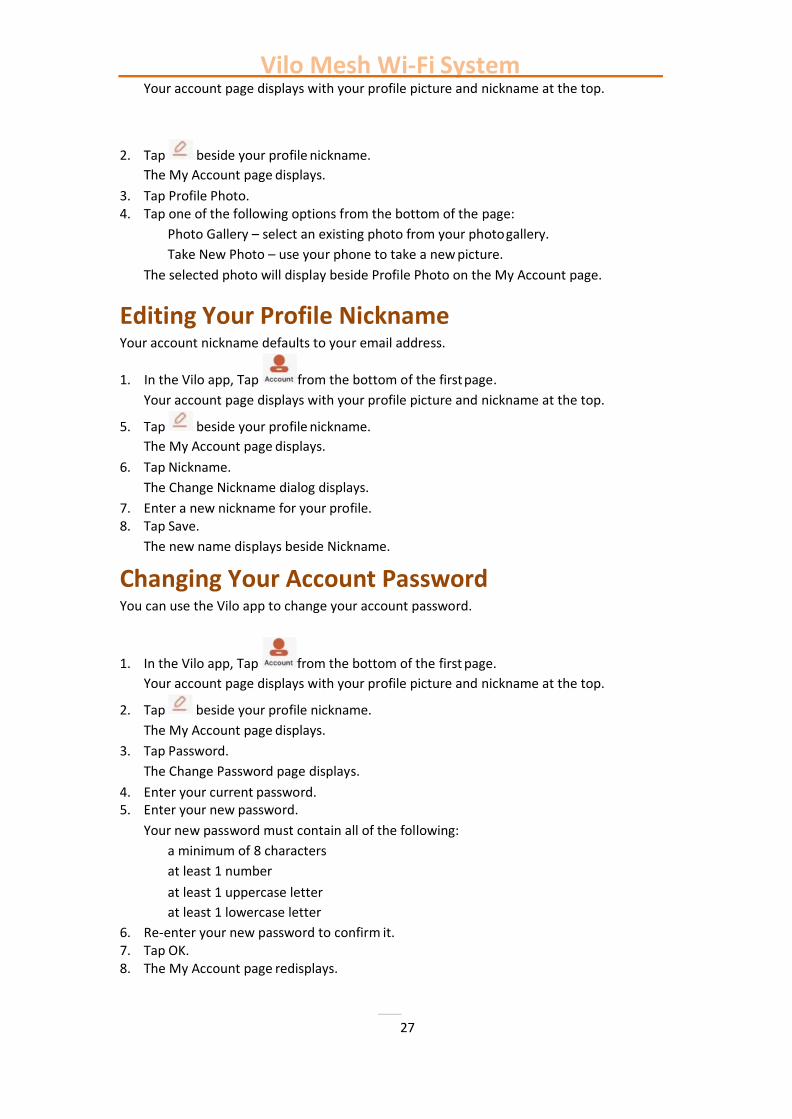
Diagnostic Log Reporting Diagnostic log reporting allows information needed for diagnostic purposes to be submitted to the Vilo support team. This feature automatically turns off within 3 days. If you are experiencing issues with your network a Vilo customer service representative may ask you to turn on Diagnostic Log Reporting so that we are able to get an accurate picture of what is happening with your network.
How to Turn on Diagnostic Log Reporting
1. Tap on Account 2. Go to Vilo Support
3. Go to Diagnostic Log Reporting
Vilo Mesh Wi-Fi System
30
4. Under the My Networks section toggle the button to on or off for the desired network. When toggled on the app will securely transmit data to our AWS servers.
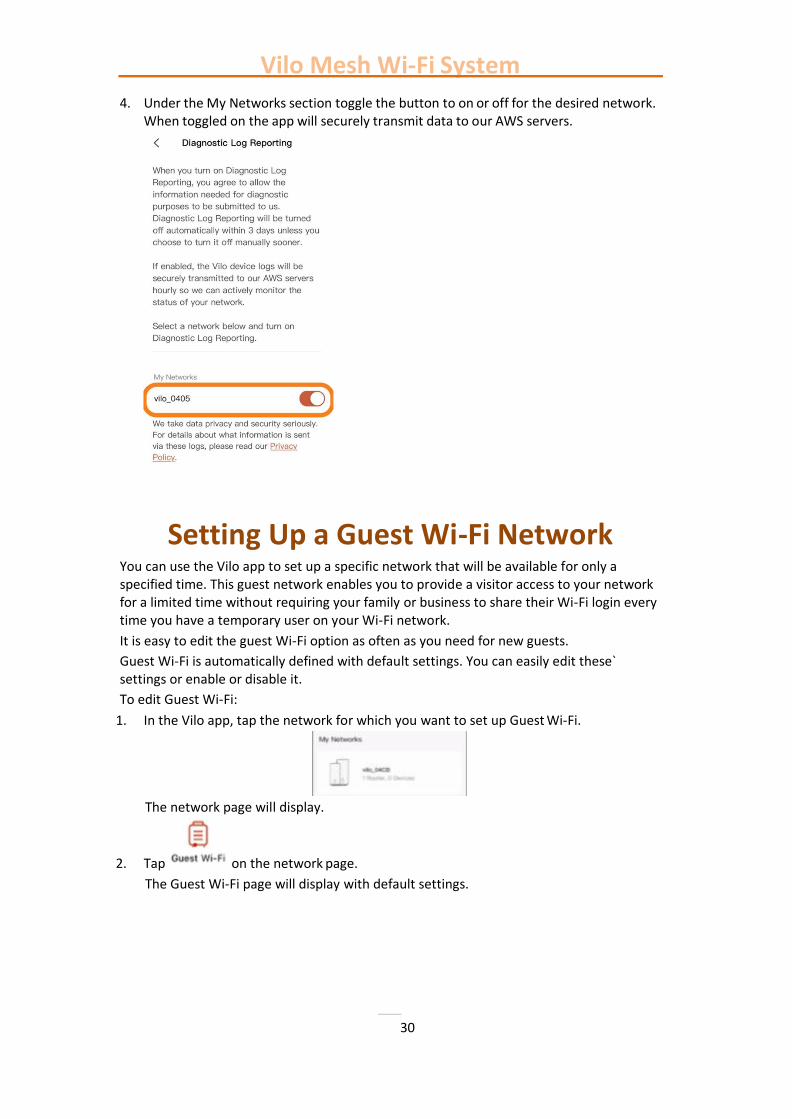
Setting Up a Guest Wi-Fi Network You can use the Vilo app to set up a specific network that will be available for only a specified time. This guest network enables you to provide a visitor access to your network for a limited time without requiring your family or business to share their Wi-Fi login every time you have a temporary user on your Wi-Fi network.
It is easy to edit the guest Wi-Fi option as often as you need for new guests.
Guest Wi-Fi is automatically defined with default settings. You can easily edit these` settings or enable or disable it.
To edit Guest Wi-Fi:
1. In the Vilo app, tap the network for which you want to set up Guest Wi-Fi.
The network page will display.
2. Tap on the network page.
The Guest Wi-Fi page will display with default settings.

Vilo Mesh Wi-Fi System
31
3. Enable or disable the Guest Wi-Fi:
4. To disable an enabled Guest Wi-Fi, tap the toggle to off.
or To enable a disabled Guest Wi-Fi, tap the toggle to on. Note: You can also disable Guest Wi-Fi by changing the Wi-Fi name and/or password. If guest had the previous Wi-Fi name and/or password, they will no longer be able to log into your network.
5. Tap Wi-Fi Name. 6. The existing name displays in the Change Wi-Fi Name dialog. 7. Enter a new name in the Change Wi-Fi Name dialog. 8. Save or cancel your change:
Tap OK to save the new name. or Tap Cancel to return without saving the new name. The Change Wi-Fi Name dialog closes.
9. Tap Wi-Fi Password. The existing password displays in the Change Wi-Fi Password dialog. Note: The Wi-Fi Password does not display on the Guest Wi-Fi page.
10. Enter a new password in the Change Wi-Fi Password dialog. 11. Save or cancel your change:
Tap OK to save the new password. or Tap Cancel to return without saving the new password. The Change Wi-Fi Password dialog closes.

Vilo Mesh Wi-Fi System
32
12. Tap Duration.
A list of duration options displays.
13. Select the length of time you want the Guest Wi-Fi to be enabled.
The selected duration displays with the end date and time of the duration.
Setting Parental Controls The Vilo app includes parental controls enabling you to control internet access and website access for a specific device.
Use the Vilo Parental Controls to control the following for specific devices:
• turn internet access on or off immediately
• schedule specific times to turn off internet access
• block specific websites
Selecting a Device to Control Parental controls are set up for specific devices on a network. You must set up the controls for each device separately.
To select a specific device to control:
1. In the Vilo app, tap the network from which you want to select a device to control.
The network page will display.
2. Tap on the network page.
The Parental Controls page will display.
3. Select or add a device:

Vilo Mesh Wi-Fi System
33
If you already added the device for parental controls, it will display. Go to step 5.
or
If you have not yet added the device for parental controls, go to step 4.
4. Tap .
A list of all devices attached to your network and not already set up in Parental Controls displays.
5. Tap the device for which you want to set parental controls.
A page containing the parental controls for the selected device displays.
6. Refer to the following pages for information about setting the controls:
Turning Internet Access On or Off Immediately on page x.
Scheduling Specific Times to Automatically Turn Off Internet Access on page x.
Blocking Specific Websites on page x.
Turning Internet Access On or Off Immediately
Turning Internet Access On Immediately If this is the first time you accessed the parental controls for this device, by default the Allow Internet Access radio button will be selected.
The Allow Internet Access radio button will not be selected if:
• you already scheduled specific times to automatically turn off internet access. In this case, whether the device is accessing the internet is specified by the scheduled time.
• you already selected the Disable Access Now radio button.
To immediately enable internet access:
If the Allow Internet Access radio button is not selected, select it.
The device will immediately be given access to the internet through your network.
Turning Internet Access Off Immediately To immediately disable internet access:
1. Select the Disable Access Now button.
The Duration option will display as set to Forever.
2. Tap Duration to select a specific duration.
A list of defined durations will display.
3. Select the duration you want.
Attention
Using Parental Controls to block internet access for a device is not the same as blocking a device from your network. A device blocked from internet access is still on
your network. It just cannot access the internet. If a device is not on your network, you cannot set Parental Controls for it.
If you want to completely block an unauthorized device from your network, use the Block From Network button from the Devices option on the network page. For more
information go to page X.

Vilo Mesh Wi-Fi System
34
If you tap the Custom Duration, you can select a custom number of minutes, hours, or days to block internet access.
The maximum number of minutes is 59.
The maximum number of hours is 24.
The maximum number of days is 7.
The time internet access will be restored is calculated based on the selected duration and will display below the selected Disable Access Now radio button.
Scheduling Specific Times to Automatically Turn Off Internet Access You can create multiple scheduled times to automatically disable internet access for a device. For example, you might want to turn off internet access for an iPad during the time your child:
• does homework every day (repeated five days a week)
• needs to focus on family time every Saturday (repeated every Saturday)
• is not allowed to use their iPad during a specific event (not to be repeated)
If this is the first time you accessed the parental controls for this device, by default the Select Off Time radio button will not be selected.
The Select Off Time radio button will be selected if the Allow Internet Access and Disable Access Now radio buttons are not selected.
Adding or Editing a Schedule The steps to add or edit a schedule are similar.
To add or edit a schedule:
1. Select the Schedule Off Time radio button. 2. Any existing schedules will display below the radio button.
The Add a Schedule button will display below existing schedules, if any.

Vilo Mesh Wi-Fi System
35
3. Choose whether to add a new schedule or edit an existing schedule:
To add a new schedule, tap Add a Schedule.
or
To edit an existing schedule, tap on the schedule to edit.
Note: It does not matter whether the schedule is enabled (toggle on) or disabled (toggle off) when you edit it.
The Schedule Off Time page will display.
4. Tap Start Time.
A time selector displays.
5. Select the time when you want to turn off internet access for this device.
Note: Be sure you are aware of whether you have selected AM or PM for the time.
6. Tap OK to accept the selected start time. 7. Tap End Time.
A time selector displays.
8. Select the time when you want to turn on internet access for this device.
Note: Be sure you are aware of whether you have selected AM or PM for the time.
9. Tap OK to accept the selected end time. 10. Tap Repeat to select whether you want the scheduled time off to repeat. 11. Select an option:
Never – displays by default. If, selected, this option displays. Go to step 14.
Daily – if selected, this option displays. Go to step 14.
Custom (which days you want it to repeat) – go to step 11.
12. If you select Custom, the Custom Repeat page displays.

Vilo Mesh Wi-Fi System
36
13. To select the days of the week on which you want the scheduled times to be used:
Tap a checked day to clear it.
The schedule will not be repeated on unchecked days.
or
Tap an unchecked day to check it.
The schedule will be repeated on checked days.
14. Tap OK.
The selected days of the week will display on the Schedule Off Time page.
15. Tap OK.
The newly scheduled time will display with an On toggle below the Schedule Off Time radio button.
Deleting a Schedule Deleting a schedule is not the same as disabling a schedule. A deleted schedule cannot be enabled at a later date. It must be added again. A disabled schedule can be enabled again. For more information, go to Enabling or Disabling an Existing Schedule below.
To delete a schedule:
1. Select the Schedule Off Time radio button.
The existing schedules display below the radio button.
Note: It does not matter whether the schedule is enabled (toggle on) or disabled (toggle off) when you delete it.
2. Tap the schedule to delete.
The Schedule Off Time page will display.
3. Tap .
The selected schedule will be deleted from below the Schedule Time Off radio button.
Enabling or Disabling an Existing Schedule To enable or disable a schedule:
1. Select the Schedule Off Time radio button.
The existing schedules display below the radio button.
2. Enable or disable an existing schedule:
To disable an enabled schedule, Tap the toggle to off.
or
To enable a disabled schedule, Tap the toggle to on.
Blocking Websites You can block a device from accessing a specific website through your network.
Attention
Blocking a website through the Vilo app works only when the device is connected to the internet through your Vilo network. If the device is connected to the internet
through a different network (for example, in someone else’s home or business), the device will still be able to access the blocked website.
Vilo Mesh Wi-Fi System
37
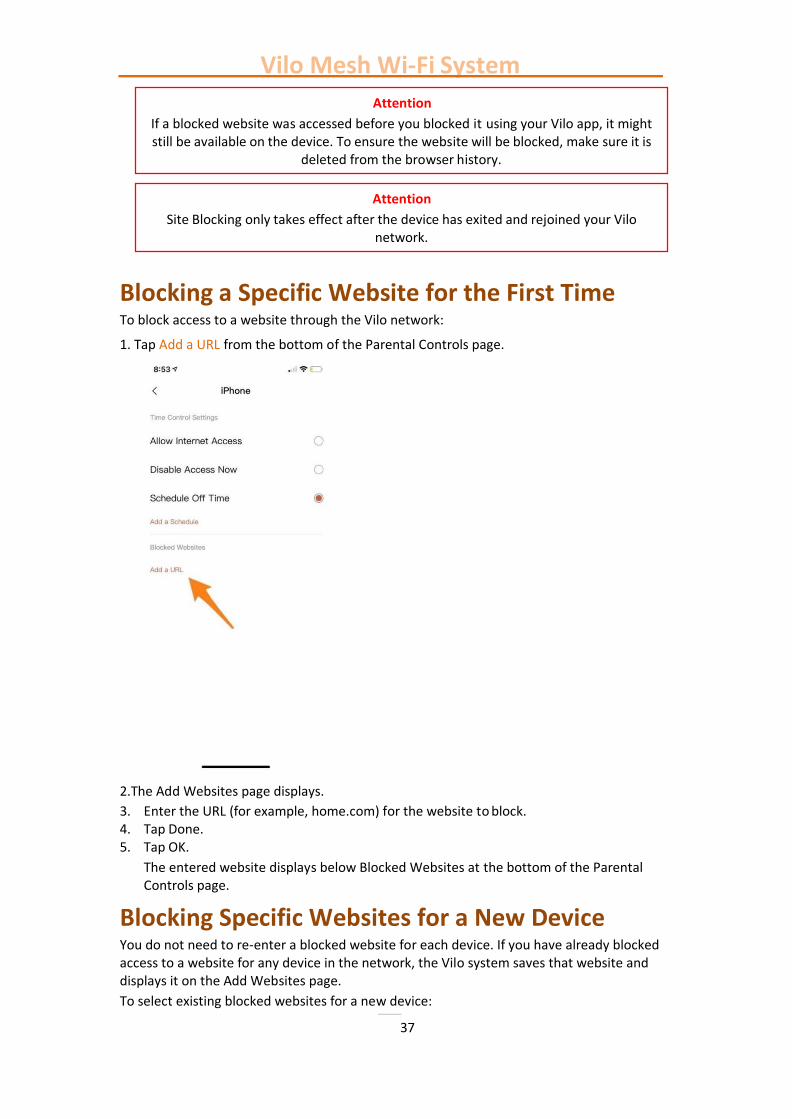
Blocking a Specific Website for the First Time To block access to a website through the Vilo network:
1. Tap Add a URL from the bottom of the Parental Controls page.
2.The Add Websites page displays.
3. Enter the URL (for example, home.com) for the website to block. 4. Tap Done. 5. Tap OK.
The entered website displays below Blocked Websites at the bottom of the Parental Controls page.
Blocking Specific Websites for a New Device You do not need to re-enter a blocked website for each device. If you have already blocked access to a website for any device in the network, the Vilo system saves that website and displays it on the Add Websites page.
To select existing blocked websites for a new device:
Attention
If a blocked website was accessed before you blocked it using your Vilo app, it might still be available on the device. To ensure the website will be blocked, make sure it is
deleted from the browser history.
Attention
Site Blocking only takes effect after the device has exited and rejoined your Vilo network.

Vilo Mesh Wi-Fi System
38
6. Tap Add a URL from the bottom of the Parental Controls page.
The Add Websites page displays.
7. Select the websites to block:
Tap the Quick Add URL radio button to select all blocked websites.
or
Tap the radio button beside each website to block for the device.
8. Tap OK.
The selected websites display below Blocked Websites at the bottom of the Parental Controls page.
Editing a Blocked Website URL If the URL of a website is misspelled, it will not be blocked.
To correct the spelling of a misspelled URL:
1. Tap the URL below Blocked Websites at the bottom of the Parental Controls page.
The Modify Website page displays.
2. Edit the URL. 3. Tap OK.
The edited URL displays below Blocked Websites at the bottom of the Parental Controls page.
Deleting/Unblocking a Blocked Website
You can unblock a website by deleting the URL from the list of Blocked Websites at the bottom of the Parental Controls page.
To unblock a website:
1. Tap the URL below Blocked Websites at the bottom of the Parental Controls page.
The Modify Website page displays.
2. Tap .
The URL will no longer display below Blocked Websites at the bottom of the Parental Controls page.
Attention
If a website is blocked for multiple devices, deleting it will only remove it from the list of blocked websites for the current device. If you want to delete it from multiple
devices, you will have to delete it from each individual device where it was blocked.

Vilo Mesh Wi-Fi System
39
Deleting a Vilo Deleting Vilos enables you to move or adjust your network. You need to delete your main Vilo if you are getting rid of your network. You need to delete a sub-Vilo if you find you do not need it as part of an existing network or want to move it to a different network.
Deleting a Main Vilo
To delete a main Vilo:
1. In the Vilo app, tap the network you want to delete.
The network page will display.
2. Tap in the top right –hand corner of the network page.
The settings page will display.
3. Tap the button.
The network will be deleted.
Deleting a Sub-Vilo
To delete a sub-Vilo:
4. In the Vilo app, Tap the network from which you want to delete a sub-Vilo.
Attention
Deleting a main Vilo deletes the entire network.
Attention
Once you delete a sub-Vilo, it will no longer be recognized as part of a package of Vilos. You will need to add it manually to a network.
For more information, go to Adding Sub-Vilos from a Different Package on page x.
Attention
Only delete a sub-Vilo from your network if you need to remove it completely from the network. If you just need to delete the information saved on the sub-Vilo, restore it to factory settings. It will remain part of the network. For more information, go to
Restoring a Vilo to Factory Settings on page x.

Vilo Mesh Wi-Fi System
40
The network page will display.
5. Tap Vilos on the network page.
The My Vilos page displays with all Vilos in the network.
6. Tap the sub-Vilo you want to delete.
The Vilo page will display.
7. Tap the button at the bottom of the
page. The confirmation dialog will display.
8. Tap OK.
The Delete Vilo page displays with Action animation.
When the sub-Vilo is deleted, the Delete Vilo page displays Success!
9. Tap Back to return to the My Vilos page.
The deleted sub-Vilo will no longer be displayed.
Restoring a Vilo to Factory Settings
You might need to restore a Vilo to factory settings if you are setting up a new network or adding a sub-Vilo to a new network. Restoring a Vilo to factory settings erases all information stored on the Vilo, such as the Vilo name. So, once you restore it, you can use it as though it is brand new.
Restoring a Vilo to Factory Settings Using the Vilo App If the Vilo is available through the Vilo app, you can restore it there.
To restore factory settings for a Vilo through the Vilo app:
1. In the Vilo app, Tap the network containing the Vilo to restore to factory settings.
The network page will display.
2. Tap Vilos on the network page.
Attention
Restore a Vilo to factory settings to delete the information saved on it. It will automatically reconnect to the network once the restore is complete.
Delete a Vilo from your network if you need to remove it completely from the network. For more information, go to Deleting a Vilo on page.

Vilo Mesh Wi-Fi System
41
The My Vilos page displays with all Vilos in the network.
3. Tap the Vilo you want to restore to factory settings.
The Vilo page will display.
4. Tap near the bottom of the page.
The confirmation dialog displays.
5. Tap OK.
6. The action animation displays.
7. The My Vilos page redisplays without the restored Vilo.
8. Wait a few minutes for the factory settings to reset.
9. The indicator light on the Vilo will go from red to amber to blue. When the indicator light is blue, the Vilo is reconnected to the network.
10. If the Vilo does not redisplay in the Vilo app, close the app and open it again.
Restoring a Vilo to Factory Settings on the Vilo You can restore a Vilo to factory settings directly on the Vilo.
To restore factory settings directly on the Vilo:
1. You will need a paperclip, dull pin, or dull thumbtack to perform the factory reset. 2. On the back of your Vilo, find the small hole above the ports (WAN/LAN, LAN2, LAN1). 3. Place the end of your paperclip, pin, or thumbtack in the small hole.
4. Press and hold for up to 20 seconds:
• If the indicator light flashes red (usually after about 6 seconds), stop pressing.
5. or
• If the indicator light is off, or does not change, stop pressing after 20 seconds.
6. Wait a few minutes for the factory settings to reset.
7. The indicator light on the Vilo will go from red to amber to blue. When the indicator light is blue, the Vilo has reset and is reconnected to the network.
Attention
Wait a few minutes after plugging it in to try resetting your Vilo. You want to make sure your Vilo is completely powered on before performing a factory reset.