vintage reversible apron - pellonprojects.com · vintage reversible apron designed by jenny raymond...
TRANSCRIPT
PERMISSION IS GIVEN TO REPRODUCE FOR PERSONAL USE©2011-PCP GROUP, LLC
Materials Needed:
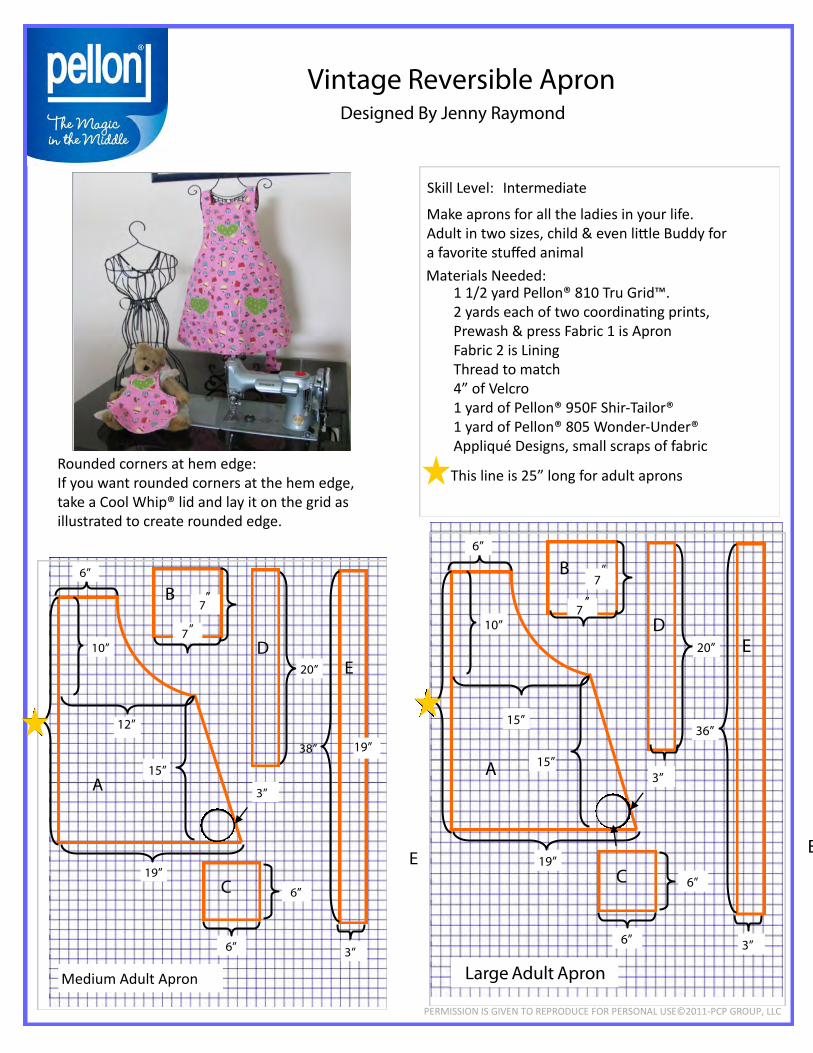
Skill Level: Intermediate
Vintage Reversible Apron Designed By Jenny Raymond
Make aprons for all the ladies in your life. Adult in two sizes, child & even little Buddy for a favorite stuffed animal
1 1/2 yard Pellon® 810 Tru Grid™.2 yards each of two coordinating prints,Prewash & press Fabric 1 is ApronFabric 2 is LiningThread to match4” of Velcro1 yard of Pellon® 950F Shir-Tailor®1 yard of Pellon® 805 Wonder-Under®Appliqué Designs, small scraps of fabric
19”
10” 7
7
20”
3”
36”
3”6”
6”
B
C
DE
A
6”
E
This line is 25” long for adult aprons
”
”
15”
15”
Large Adult Apron
19”
10” 7
7
20”
3”
38”
3”6”
6”
B
C
DE
A
6”
E
”
”
12”
15”
19”
Medium Adult Apron
Rounded corners at hem edge:If you want rounded corners at the hem edge, take a Cool Whip® lid and lay it on the grid as illustrated to create rounded edge.

2
Pattern Letter Adult Pattern Child Pattern Buddy Pattern
A - Apron 1 6 11
B - Large pocket 2 7 12
C - Bodice pocket 3 8 13
D - Neck tie 4 9 14
E - Waist tie 5 10 15
4” C
4”
4”
15
5”
9”
19” this is
fold line A
12
D
3”
20
3”
E
B
5”
5”
5”
8” this is
fold line for
Buddy Apron
C B
E - 2
” x 8
”
D - 2
” x 1
0”
A
Buddy Pocket B is 3” sq.
Buddy Pocket C is 2” sq.
1
2
3
4
5
2
6
7
14
9
7
8
10 12 12
15
13
11
Layout for adult, child & buddy
Fold line of fabric
Selvages
1
Fold line. Fold line.
Child Apron
Buddy Apron
Tools Needed Sewing Machine and thread,
fabric scissors and/or rotary
cutting tools [cutting mat,
cutting ruler and rotary cut-
ter] pins, iron and ironing
mat.

3
Apron Assembly
All sizes are assembled the same.
Interfacing On your apron pattern A. trace out 2 1/2” from the
top & arm edge as illustrated to the right.
Trace a copy of the interfacing pattern on Grid. Cut
1 of Pellon® 950F Shir-Tailor® for apron lining
Fabric 2. Fuse on back side of fabric according to
product instructions. Do the same for all sizes.
Cut 2 1/2” wide strips of Pellon® 950F Shir-Tailor®
the width of the three pockets. Press Shir-Tailor® on
the back side of pocket lining following product in-
structions.
Appliqué Trace appliqué designs (page 5) onto the paper of
805 Wonder-Under®. Do not cut out individual de-
sign but leave margin around design.
For adult size use appropriate size heart and hands
for the pockets.
For child & Buddy size aprons use appropriate size
heart appliqué designs.
Press Wonder-Under®/design onto the wrong side of
design fabric and press in place following the in-
structions on 805 Wonder-Under®.
Cut out designs, peel off paper, place on pocket and
press in place as illustrated. Stitch around design with
stitch of your choice.
Pockets Pockets B & C are envelope lined. Place right sides
together and stitch as illustrated to the right.
Adult size aprons 1/2” seam allowance for pockets.
Child & Little Buddy 1/4” seam allowance for pock-
ets.
Clip corners of pockets as illustrated so they turn
nicely.
Arrange pockets as illustrated on both Apron Fabric
1 & Apron Fabric 2. This makes the Apron, two for
one, because it’s reversible.
Stitch in place using your favorite machine decora-
tive stitches.
A
Do not stitch here, leave
open to turn pocket.
Interfacing

4
Fabric 1 Fabric 2
Lining
Neck & Waist Tie On adult aprons, the ties are finished 2” wide.
Take strips D & E, placing two fabrics right
sides together and stitch together 1/2” seam al-
lowance as illustrated. Leave one end open. Clip
the corners, trim seam allowance and turn.
The Child & Buddy apron straps finish 1” wide.
Stitch as illustrated and trim seam allowance.
A good way to turn the straps is using the eraser
end of a long pencil. After turned, work out the
points with pin or seam ripper, so they are nice
& sharp.
Arrange ties on Apron lining (Fabric 2) as illus-
trated with raw end lined up with raw edge of
apron. Pin in place.
Place the two aprons right sides together.
Pin all around the outside edge of the apron.
Stitch around all edges, leaving opening at bot-
tom.
Carefully clip corners as illustrated being sure to
not cut stitches.
Turn to right side through opening in bottom
edge.
Press well and stitch around outside edge of
apron with decorative stitch.
On loose end of neck tie, stitch one side of Vel-
cro, stitch the other side to opposite side of top to
make a loop.
Pattern directions & illustrations written & edited by
Jenny Raymond, www.jennyraymond.com
Free scissor clip art downloaded from www.Clker.com

5
Position the hands top of the pockets as if they were
down in the pockets with the thumbs pointing inward.
Copy this hand and flip to create the opposite hand.
You can enlarge and reduce the size on any copier.