violin viola setup guide-d2
TRANSCRIPT

VIOLIN& VIOLA
SETUP GUIDEENGLISH

VIOLIN & VIOLA
ENGLISH
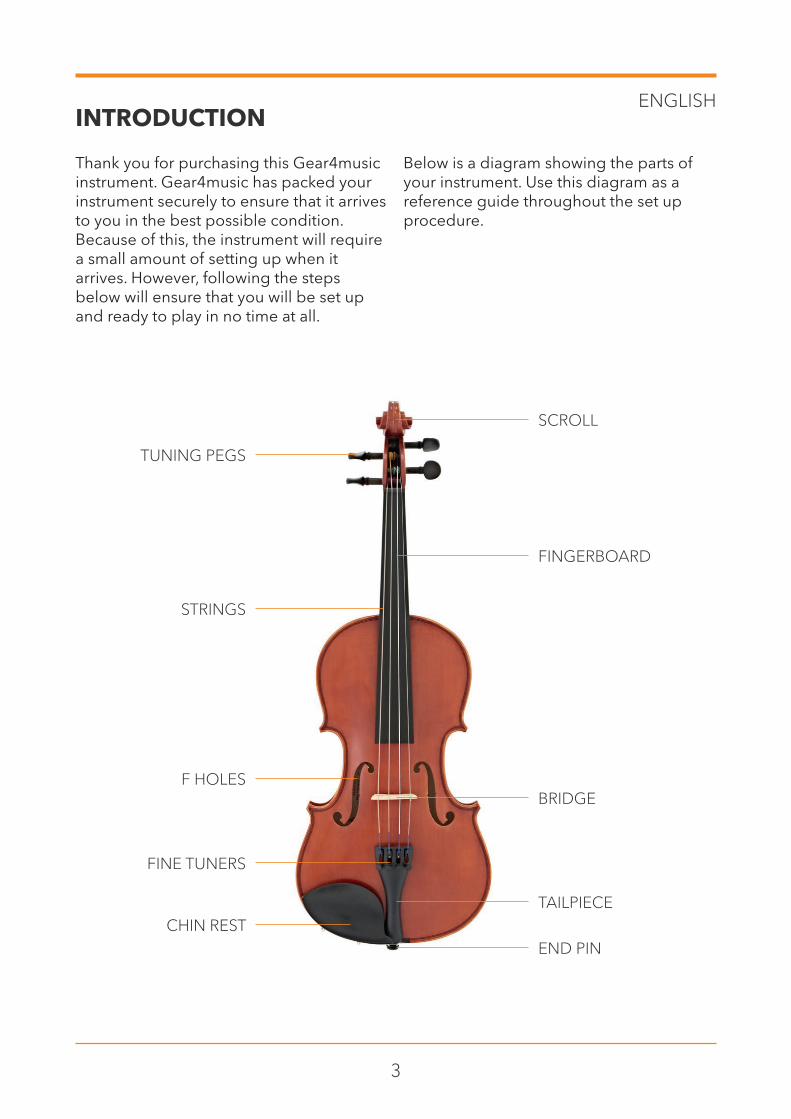
Below is a diagram showing the parts of your instrument. Use this diagram as a reference guide throughout the set up procedure.
Thank you for purchasing this Gear4music instrument. Gear4music has packed your instrument securely to ensure that it arrives to you in the best possible condition. Because of this, the instrument will require a small amount of setting up when it arrives. However, following the steps below will ensure that you will be set up and ready to play in no time at all.
INTRODUCTION
SCROLL
FINGERBOARD
BRIDGE
TAILPIECECHIN REST
FINE TUNERS
F HOLES
STRINGS
TUNING PEGS
END PIN
3

it underneath the tailpiece to avoid any damage. You will find the bridge neatly wrapped in protective paper, like in the photo below. Carefully remove the bridge, protective wrapping and thin strip of paper from the instrument, then unwrap the bridge.
the bridge are different heights. The high side of the bridge should be on the same side as the chin rest.
The bridge is the fitted piece of wood that holds the strings in place at the correct height over the fingerboard. You will notice when you open the case that there is no bridge in place initially. To avoid the bridge coming loose and scratching the instrument while in transit, we have packed
Once you have unwrapped the bridge, the next step is positioning it in to the correct location. You will notice that each side of
STEP 1: THE BRIDGEENGLISH
4

string on the right (like the diagram below). There are already four grooves cut out on the top of the bridge, so placing the strings on top is easy to do.
Bear in mind that the bridge should not be stuck or glued in to position and therefore can move around once it has been put in place.
The bridge should then be placed in the middle of the two f holes on the instrument’s body. Note, there are two notches in each f hole. The feet of the bridge want to be situated in between both notches on both horizontal and vertical axes. The loose strings should then be placed on top of the bridge with the thickest string on the left, and the thinnest
THE BRIDGE CONTINUED...ENGLISH
5

by the two inner strings, closely watching the bridge as you do so. You may notice the bridge will begin to pivot towards the scroll. If this happens, simply pull the bridge back to its upright position before continuing. This will ensure that the bridge stays upright as you continue the tuning process.
It is common to take a little time for the strings to stay in tune for prolonged periods of time. This is owing to temperature and humidity, a little elasticity in the strings, and the seating of the tuning pegs inside the pegbox. Therefore, if the instrument is not holding tune initially, try pushing the tuning pegs in further as you retune. With time this should become easier, and the pegs should hold their tune for longer.
Note – it is expected that you will need to tune the instrument before every performance or practice. This is common place and is not a fault with the instrument.
The tuning pegs are already in position with the strings attached, but the strings require tightening before you can play. Now that the strings are in place on the bridge, you can tighten each peg.
The tuning pegs are tapered, so the further in you push them, the tighter they will become. The easiest way to tune the strings is to turn the peg to the point where the string is close to the optimum string pitch (a tuner is recommended for this task), and then push the peg in as you tighten the strings to their final desired pitch. From there, small adjustments to tuning can be made using the fine tuner screws on the tailpiece of the instrument. Do note however that these fine tuners only make small adjustments, so it is recommended to get as close as you can to the desired pitch using the tuning pegs.
When first tuning the instrument and putting the bridge up, it is recommended to tune the two outer strings first, followed
STEP 2: TUNINGENGLISH
6

in the bottom right corner of the photo below). Turning the nut clockwise tightens the bow hairs and turning anti-clockwise loosens them.
To make the bow sound correctly, rosin needs to be applied. Rosin allows the bow to grip the strings and make the instrument resonate clearly. First, scrape the rosin with a knife to roughen the surface, which creates a white powder on the surface. To apply the rosin, rub the bow backwards and forwards on the roughened rosin surface. This will create a sticky residue on the bow. It may take several applications of rosin to make a new bow perform correctly.
All Gear4music violins and violas are provided with a bow and rosin. The hair on the bow has been loosened for transit to protect it from damage. On one end of the bow there is a hexagonal metal nut (seen
The first step is to tighten the hairs on the bow. To do this you need to turn the nut on the end of the bow clockwise. You will notice that a loose bow has a large curve to the wooden part. Tighten the bow until the wood is close to being straight, but still with a gentle curve. If you are unsure how tight it should be, do not overtighten and consult either a teacher, or an online instruction video. The bow should be loosened fully whenever stored or not in use. To do this, turn the nut anti-clockwise until the hair is fully slackened.
STEP 3: THE BOWENGLISH
7

If you have any more questions about this product, please do not hesitate to contact the Gear4music Customer Service Team on: +44 (0) 330 365 4444 or [email protected]
8