virtual terminal plus -...
TRANSCRIPT

www.vantiv.com
Virtual Terminal Plus A Vantiv Payment Application
Application User Guide – for Merchants
Edition: 3.1
Updated: Friday, October 20, 2017
Information contained within this guide is subject to change without notice based on available application
features and capabilities.
VTP Application Support
Email Support: [email protected]
Support Hub: http://info.vantiv.com/vtp.html
Company Website: www.vantiv.com
Product info, FAQs, password reset, and to schedule a support call, please visit www.virtualterminal.com

2 www.vantiv.com
Document History If you, as the reader of this document, are not the intended recipient, please be advised that any use,
dissemination or copying of the concepts or contents of this document is respectfully prohibited. If you
received this document in error please notify the sender immediately; thank you.
Date Name Change Description Version
08.29.2016 Product Published Merchant User Guide 1.3
08.30.2016 Product Added Multi-Merchant Support
Added Multi-Merchant User 1.4
09.19.2016 Product Added Recurring Payments 1.5
10.12.2016 Product Added FSA / HSA Acceptance
Added Level 3 Payments 1.6
11.11.2016 Product
Changed Helpdesk Telephone Number Changed Helpdesk Email Address
Updated Support Section
Updated ID Tech Secure Key PN# and Ordering
1.7
11.16.2016 Product Added Commodity Code Online Resource
Added External Email Receipt Option and Offline Storage
1.8
11.17.2016 Product Added Hardware / Card Reader Pictures 1.9
02.01.2017 Product
Added Support Hub
Added Electronic Receipts
Added Reprint Receipts Update Level 3 Required Fields
2.0
02.02.2017 Product Added IDTech SREDKey Menu Options 2.1
02.10.2017 Product Added Expired Password Detection 2.2
10.18.2017 Product
Updated screen captures Added Card Storage
Added Group Payments
Added Check Services (Check Commerce)
3.0
3 www.vantiv.com
Table of Contents Document History ...............................................................................................................................2
Device Support ...................................................................................................................................6
Login .................................................................................................................................................6
Password Guidelines ........................................................................................................................6
Reset Password ..................................................................................................................................7
Force Password Reset ......................................................................................................................8
Home Page ........................................................................................................................................9
Navigation ......................................................................................................................................9
Multi-Merchant Selection................................................................................................................... 10
How to select a store location?........................................................................................................ 10
Process Transaction........................................................................................................................... 11
Acceptance................................................................................................................................... 11
How to capture a sale? ................................................................................................................... 11
Transaction Types.......................................................................................................................... 11
Entry Types................................................................................................................................... 12
Transaction Information ................................................................................................................. 12
Card Storage ................................................................................................................................. 13
Billing Information ......................................................................................................................... 13
Custom Fields ............................................................................................................................... 14
Shipping Information ..................................................................................................................... 14
Level 2 Acceptance ........................................................................................................................ 15
Level 3 Acceptance ........................................................................................................................ 16
How to enable Level 3 acceptance on my account? ............................................................................ 16
How to select a Commodity Code? ................................................................................................... 16
How to enable Level 3 acceptance inside the VTP application? ............................................................. 16
How to accept a Level 3 commercial card? ........................................................................................ 17
Receipt Details .............................................................................................................................. 18
Duplicate Checking ........................................................................................................................ 19
4 www.vantiv.com
Transaction Receipts ...................................................................................................................... 19
How to print receipts to PDF, or save them to my desktop? ................................................................. 20
How to print or email a receipt? ...................................................................................................... 20
Group Payments ............................................................................................................................... 21
How to use Group Payments? ......................................................................................................... 21
How to use Group Payments and Level 2? ......................................................................................... 22
How to use Group Payments transaction status?................................................................................ 22
Check Services .................................................................................................................................. 23
How to setup a Check Services account? ........................................................................................... 23
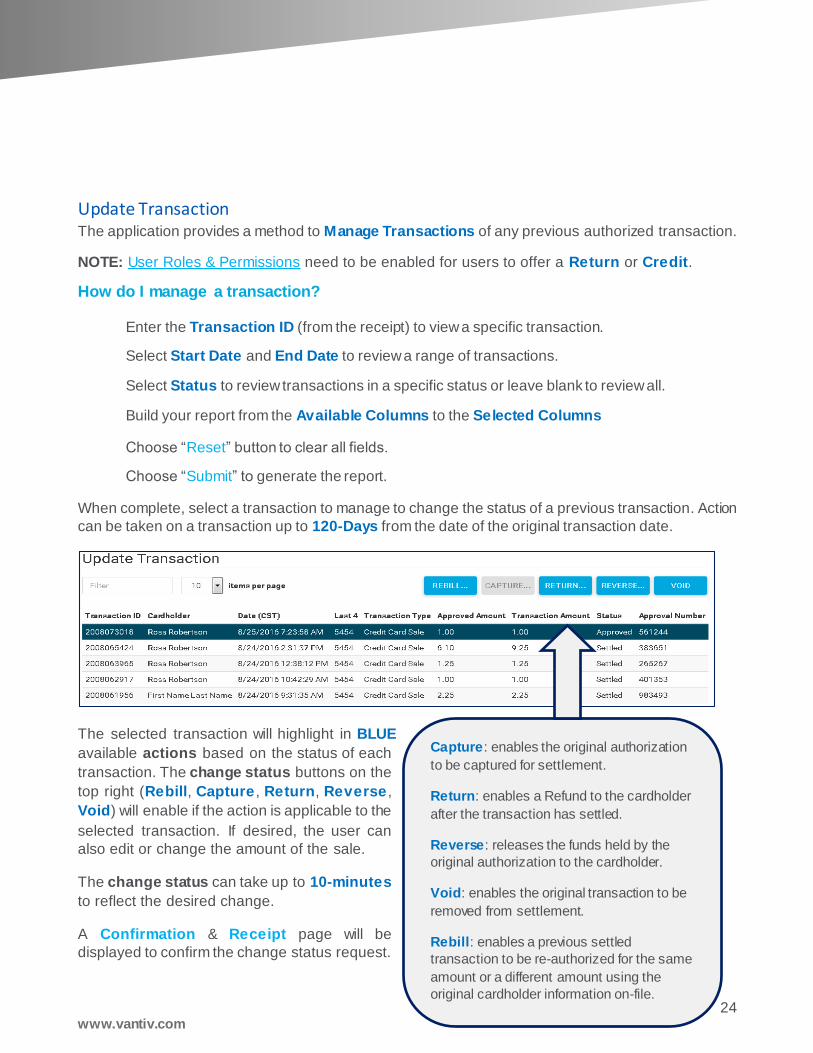
Update Transaction ........................................................................................................................... 24
How do I manage a transaction? ...................................................................................................... 24
Reporting......................................................................................................................................... 25
How do I run a report? ................................................................................................................... 25
Recurring ......................................................................................................................................... 26
How to perform a recurring transaction? .......................................................................................... 26
Add New Customer................................................................................................................. 26
Add Payment Method ............................................................................................................. 27
Add Recurring ........................................................................................................................ 28
How to change a future recurring payment?...................................................................................... 29
Edit Schedule ......................................................................................................................... 29
Delete Schedule ..................................................................................................................... 29
Settings ........................................................................................................................................... 30
Account Profile.............................................................................................................................. 30
Terminal Setup.............................................................................................................................. 31
How do I add a Custom Field? ......................................................................................................... 31
Users............................................................................................................................................... 32
How do I create a new User? ........................................................................................................... 32
Multi-location User Access .............................................................................................................. 32
Support ........................................................................................................................................... 33
Device Support.............................................................................................................................. 33
5 www.vantiv.com
Device Pictures.............................................................................................................................. 33
ID Tech SREDKey Device Menu ........................................................................................................ 34
Device Support Roadmap ............................................................................................................... 35
Change Status ............................................................................................................................... 36
User Roles & Permissions................................................................................................................ 37
Application Support ....................................................................................................................... 38
6 www.vantiv.com
Virtual Terminal Plus
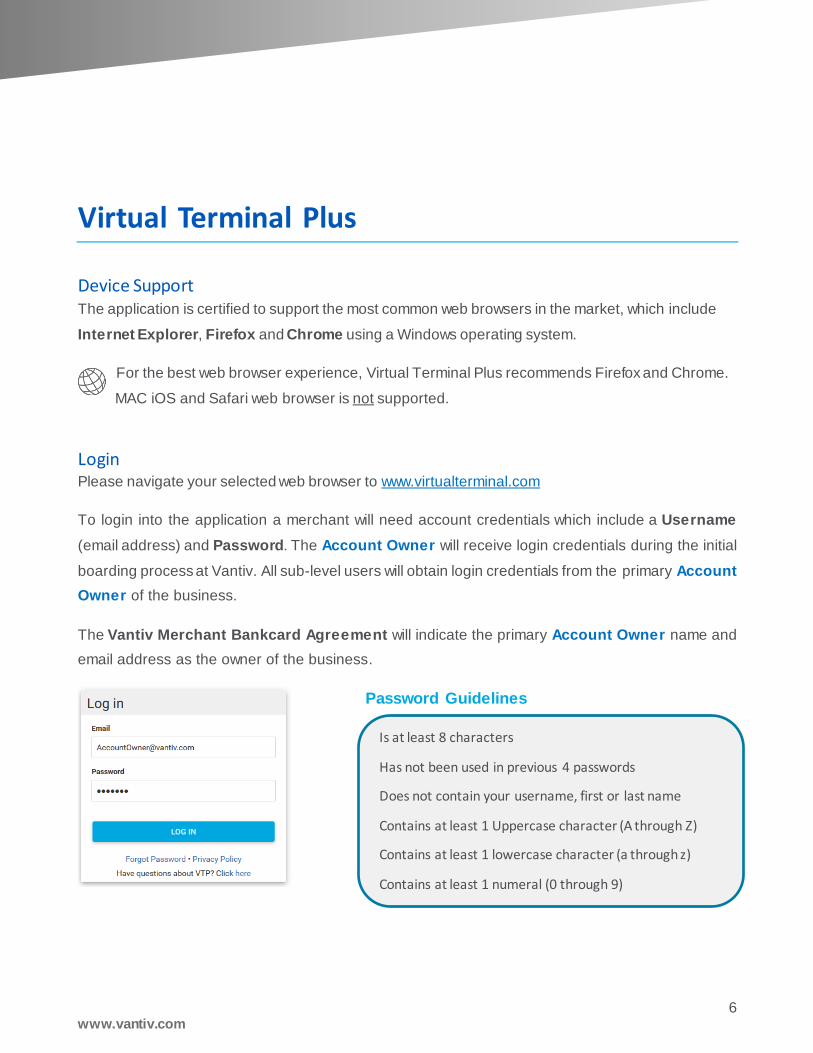
Device Support The application is certified to support the most common web browsers in the market, which include
Internet Explorer, Firefox and Chrome using a Windows operating system.
For the best web browser experience, Virtual Terminal Plus recommends Firefox and Chrome.
MAC iOS and Safari web browser is not supported.
Login Please navigate your selected web browser to www.virtualterminal.com
To login into the application a merchant will need account credentials which include a Username
(email address) and Password. The Account Owner will receive login credentials during the initial
boarding process at Vantiv. All sub-level users will obtain login credentials from the primary Account
Owner of the business.
The Vantiv Merchant Bankcard Agreement will indicate the primary Account Owner name and
email address as the owner of the business.
Password Guidelines
Is at least 8 characters
Has not been used in previous 4 passwords
Does not contain your username, first or last name
Contains at least 1 Uppercase character (A through Z)
Contains at least 1 lowercase character (a through z)
Contains at least 1 numeral (0 through 9)

7 www.vantiv.com
Reset Password Forget your password? It’s simple to reset it. Please select the “Forgot Password” link from the
www.virtualterminal.com login page.
If password attempt is unsuccessful more than 3x times the account will be frozen for 30- minutes.
You can thaw your account by following the “Forgot Password” link on login page.
Enter the email address of the user that requires the password reset. When complete, select the
“SEND EMAIL” button.
The user will receive an email invitation from [email protected] to establish a new account
password. The email invitation will require the user to select the secure link contained within the body
of the email message labeled “here” to establish a new password.
Once the user has selected a new password that
meets the Password Guidelines of the application the
“UPDATE” button can be selected to enable the
password change.
Account Owners and Administrators can
manage all sub-level users from the
Settings>User section of the application.
8 www.vantiv.com
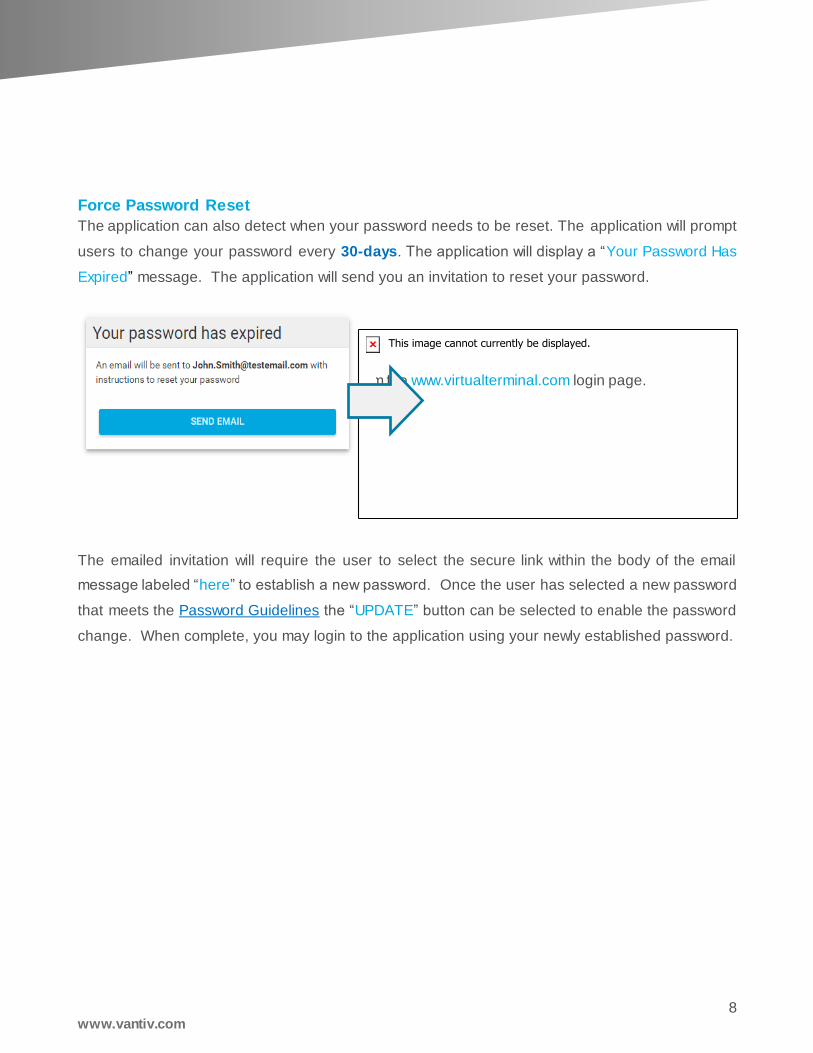
Force Password Reset
The application can also detect when your password needs to be reset. The application will prompt
users to change your password every 30-days. The application will display a “Your Password Has
Expired” message. The application will send you an invitation to reset your password.
Please select the “Forgot Password” link from the www.virtualterminal.com login page.
The emailed invitation will require the user to select the secure link within the body of the email
message labeled “here” to establish a new password. Once the user has selected a new password
that meets the Password Guidelines the “UPDATE” button can be selected to enable the password
change. When complete, you may login to the application using your newly established password.

9 www.vantiv.com
Home Page The application contains a HOME page that is designed to welcome customers to the application, and
provides a dashboard for important product notifications and announcements.
Navigation
The application toolbar consists of five primary pages to navigate.
1. Home : returns to the main landing page.
2. Process Transaction: to process a credit card transaction.
3. Update Transaction: to manage a previous transaction.
4. Reporting: to generate a report.
5. Settings: allows the Account Owner or Administrator to manage users and settings:
a. Account Profile: displays merchant address and contact information.
b. Terminal Setup: enables changes to the PROCESS TRANSACTION page
1. Custom Fields
2. Transaction Types
c. Users: create additional sub-level users.
The HOME page is used to display important product notifications and announcements such
as product updates, new features, and change notifications.
NOTE: Application changes are subject to occur without advance notice.
10 www.vantiv.com
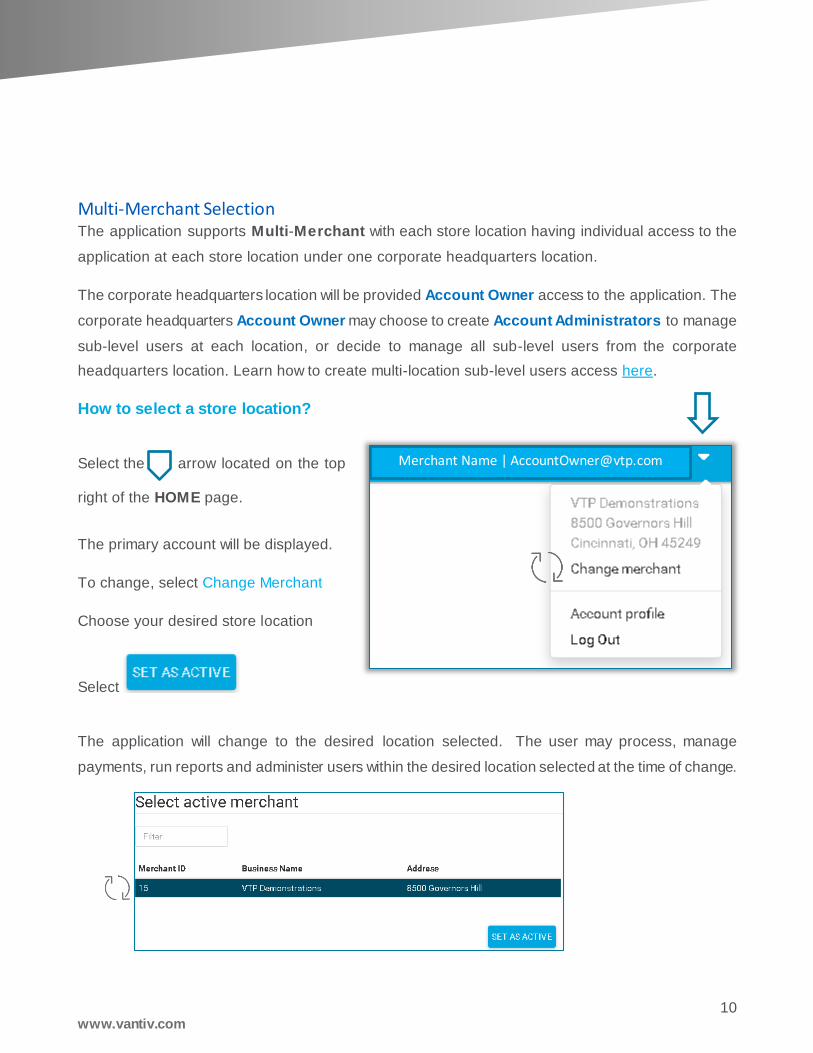
Multi-Merchant Selection The application supports Multi-Merchant with each store location having individual access to the
application at each store location under one corporate headquarters location.
The corporate headquarters location will be provided Account Owner access to the application. The
corporate headquarters Account Owner may choose to create Account Administrators to manage
sub-level users at each location, or decide to manage all sub-level users from the corporate
headquarters location. Learn how to create multi-location sub-level users access here.
How to select a store location?
Select the arrow located on the top
right of the HOME page.
The primary account will be displayed.
To change, select Change Merchant
Choose your desired store location
Select
The application will change to the desired location selected. The user may process, manage
payments, run reports and administer users within the desired location selected at the time of change.
Merchant Name | [email protected]
11 www.vantiv.com
Process Transaction The PROCESS TRANSACTION page provides access to the virtual terminal payment page to
process a credit card transaction, add or store customer information and capture non-payment related
information for reporting after the sale is complete.
Acceptance
The application accepts all major card brands for Credit, Debit and HSA/FSA card types with a
Healthcare Industry MCC code. PIN Debit is supported with certified devices. Virtual Terminal Plus
welcomes business-to-business and commercial purchase card acceptance.
Level 2 acceptance for Visa, MasterCard, and American Express
Level 3 acceptance for Visa and MasterCard. (American Express is not supported)
Virtual Terminal Plus does not guarantee reduced Interchange qualification with the
cardholder bank.
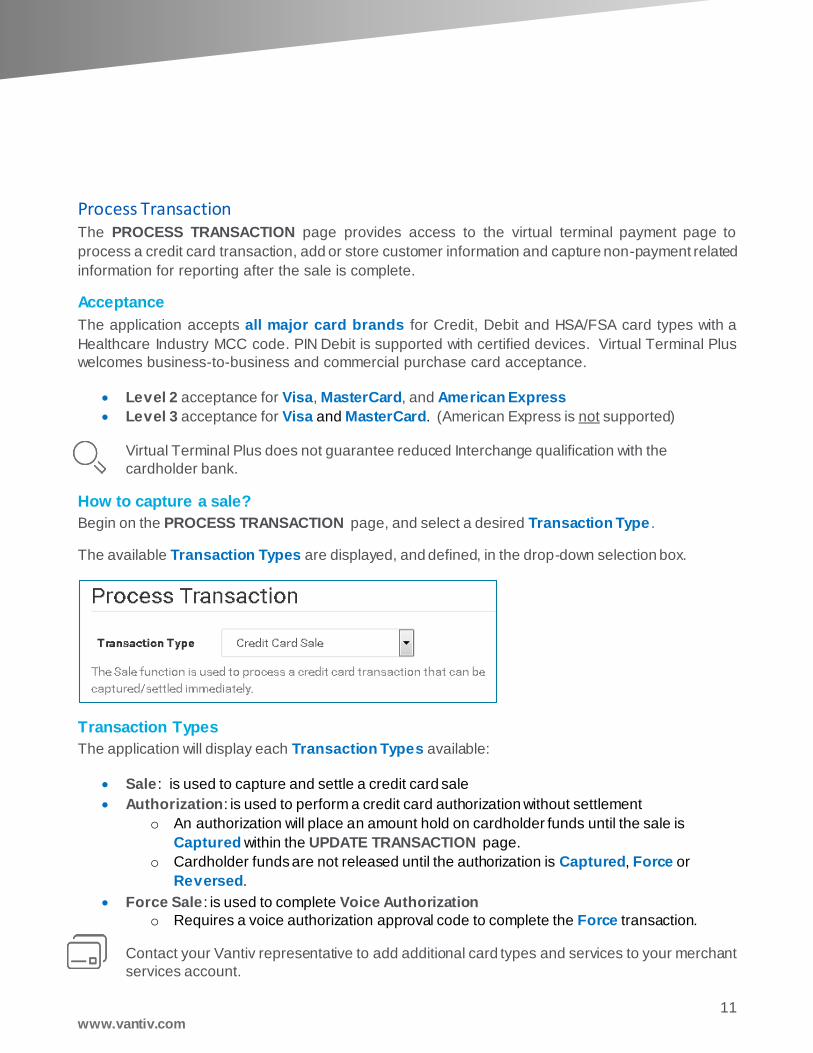
How to capture a sale?
Begin on the PROCESS TRANSACTION page, and select a desired Transaction Type .
The available Transaction Types are displayed, and defined, in the drop-down selection box.
Transaction Types
The application will display each Transaction Types available:
Sale : is used to capture and settle a credit card sale
Authorization: is used to perform a credit card authorization without settlement
o An authorization will place an amount hold on cardholder funds until the sale is
Captured within the UPDATE TRANSACTION page.
o Cardholder funds are not released until the authorization is Captured, Force or
Reversed.
Force Sale : is used to complete Voice Authorization
o Requires a voice authorization approval code to complete the Force transaction.
Contact your Vantiv representative to add additional card types and services to your merchant
services account.
12 www.vantiv.com
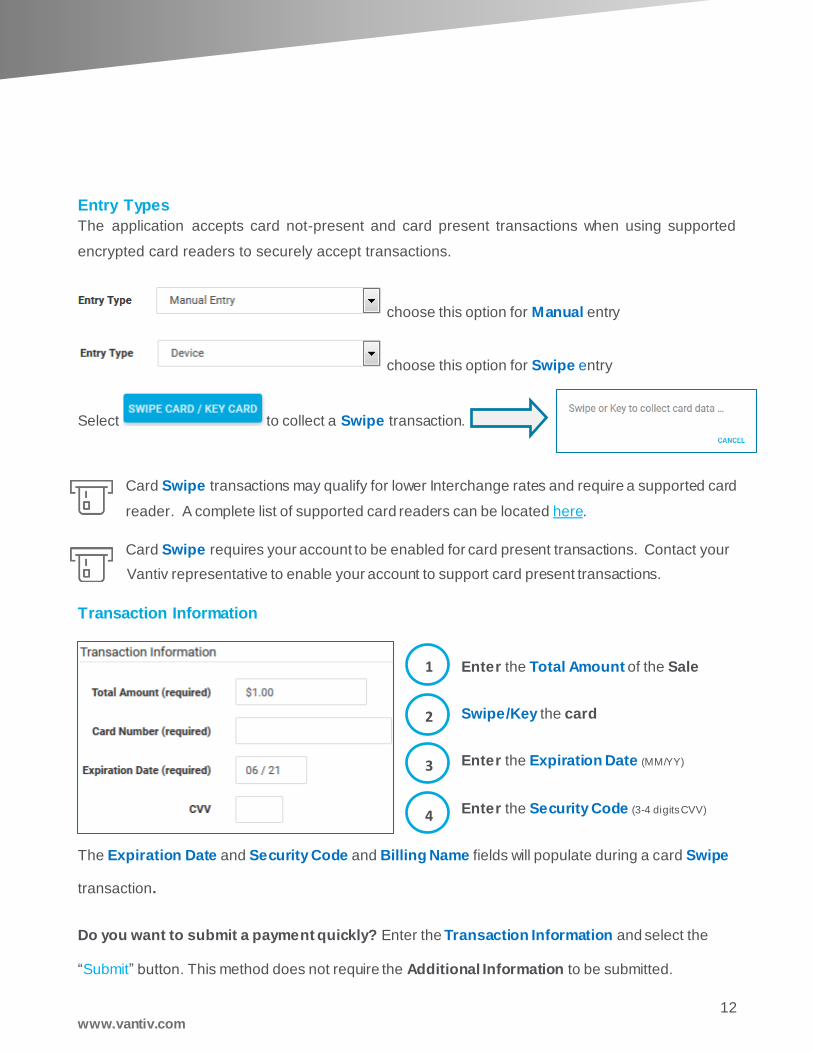
Entry Types
The application accepts card not-present and card present transactions when using supported
encrypted card readers to securely accept transactions.
choose this option for Manual entry
choose this option for Swipe entry
Select to collect a Swipe transaction.
Card Swipe transactions may qualify for lower Interchange rates and require a supported card
reader. A complete list of supported card readers can be located here.
Card Swipe requires your account to be enabled for card present transactions. Contact your
Vantiv representative to enable your account to support card present transactions.
Transaction Information
Enter the Total Amount of the Sale
Swipe/Key the card
Enter the Expiration Date (MM/YY)
Enter the Security Code (3-4 digits CVV)
The Expiration Date and Security Code and Billing Name fields will populate during a card Swipe
transaction.
Do you want to submit a payment quickly? Enter the Transaction Information and select the
“Submit” button. This method does not require the Additional Information to be submitted.
1
2
3
4

13 www.vantiv.com
Card Storage
The application enables card storage of cardholder information for repeat customers and recurring
payments.
Select “Save Card Details”
Enter the First Name and Last Name
The application will save the cardholder information to the Recurring Payments page to enable
future payments or scheduled payments.
Billing Information
The application enables the capture of the cardholder information for reporting, administration and
reconciliation. Please enter the Billing Information registered with the cardholder bank. Swipe
transactions will pre-populate the Customer Full Name field as it appears on the card.
Select “VERIFY ADDRESS” to perform an AVS Check (address verification service) from the
cardholder issuing bank to validate the billing address matches the cardholder statement for extra
security.
NOTE: A transaction fee will be charged for all AVS Check inquiries.
The numerical Street Address and Zip Code must match the billing information registered
with the cardholder bank to obtain a successful AVS Check (address verification service)
response from the issuer. A card that does not match will not prevent the user from accepting
the payment.
Enter cardholder Name (as it appears on the card)
Enter the Address (where the cardholder statement is registered)
Enter the State
Enter the Zip
Enter the Phone number
1
2
14 www.vantiv.com
Custom Fields
The application supports Custom Fields that enables capture of non-payment related information at
the time of purchase for reporting purposes. Custom Fields stores non-payment related information
with the transaction details inside the application, and is not passed with the authorization request
accessible outside the Virtual Terminal Plus application.
Custom Fields can be created in the Terminal Setup located under the Settings page.
Custom Fields Character Size
Field Labels 41
Entry Fields 21
It is not recommended to capture private or sensitive information such as Social Security
in the Custom Fields section.
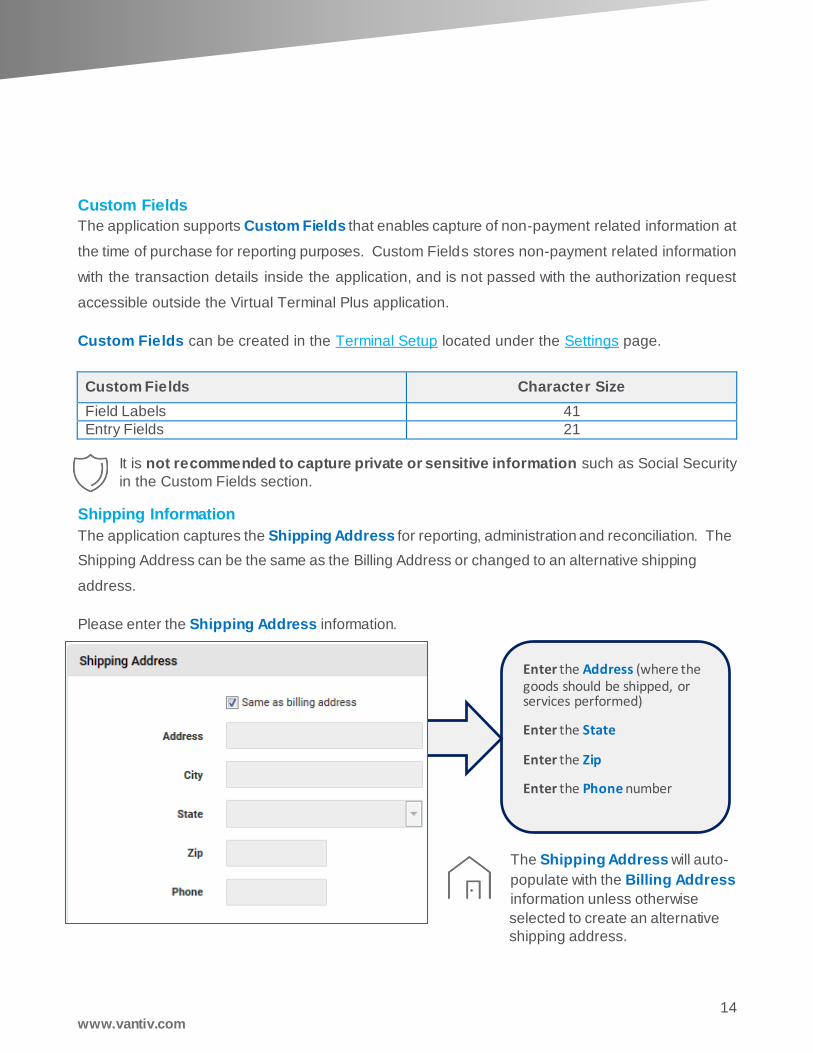
Shipping Information
The application captures the Shipping Address for reporting, administration and reconciliation. The
Shipping Address can be the same as the Billing Address or changed to an alternative shipping
address.
Please enter the Shipping Address information.
The Shipping Address will auto-
populate with the Billing Address
information unless otherwise
selected to create an alternative
shipping address.
Enter the Address (where the goods should be shipped, or services performed)
Enter the State
Enter the Zip
Enter the Phone number
15 www.vantiv.com
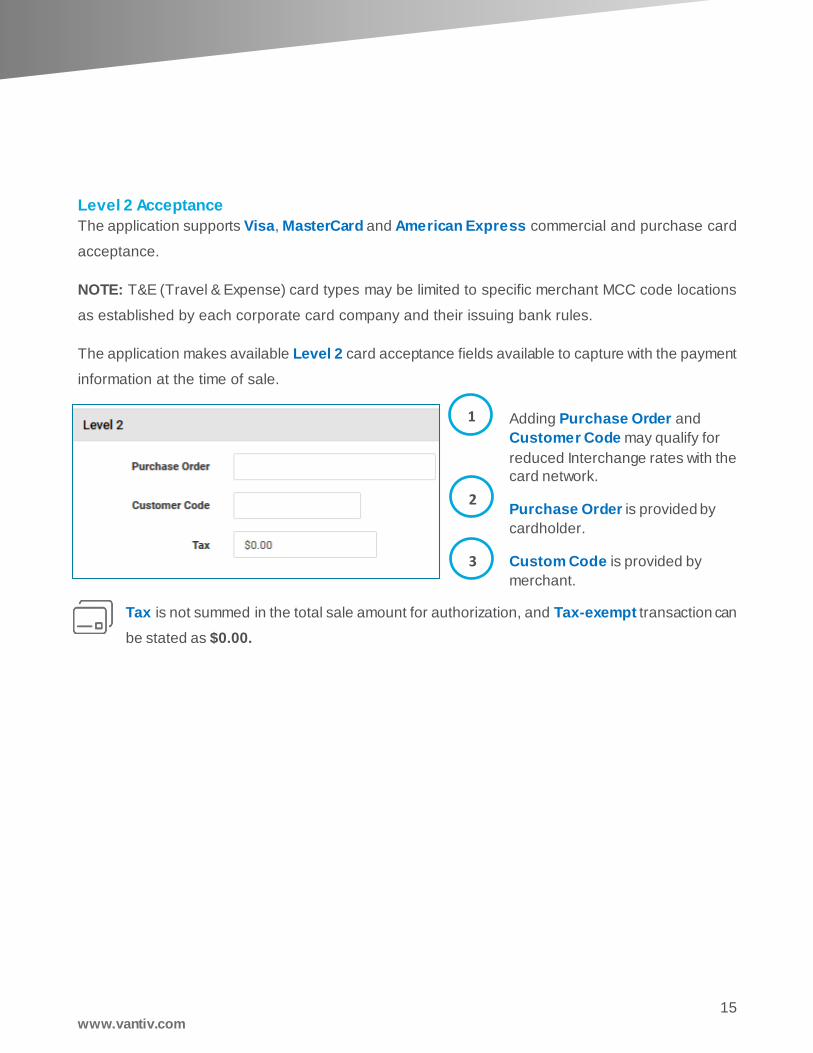
Level 2 Acceptance
The application supports Visa, MasterCard and American Express commercial and purchase card
acceptance.
NOTE: T&E (Travel & Expense) card types may be limited to specific merchant MCC code locations
as established by each corporate card company and their issuing bank rules.
The application makes available Level 2 card acceptance fields available to capture with the payment
information at the time of sale.
Adding Purchase Order and
Customer Code may qualify for
reduced Interchange rates with the
card network.
Purchase Order is provided by
cardholder.
Custom Code is provided by
merchant.
Tax is not summed in the total sale amount for authorization, and Tax-exempt transaction can
be stated as $0.00.
1
2
3

16 www.vantiv.com
Level 3 Acceptance
The application supports Level 3 commercial card payment acceptance for Visa and MasterCard
card brands.
How to enable Level 3 acceptance on my account?
Please contact your Vantiv representative to make sure your merchant services account is enabled
for Level 3 payment acceptance.
How to select a Commodity Code?
Please select a Commodity Code that best matches your business type and goods and services
sold to process Level 3 payments successfully using this application. Vantiv recommends visiting the
online resources below for additional information.
http://www.unspsc.org
http://bhs.econ.census.gov/bhs/cfs/Commodity%20Code%20Manual%20(CFS-1200).pdf
http://www.foreign-trade.com/reference/hscode.htm
How to enable Level 3 acceptance inside the VTP application?
The Account Owner or Administrator may self-enable Level 3 through the Settings page.
Enable Level 3 Processing when navigating to Settings>Terminal Setup page.
Select the “Level 3 Processing” radio button to enable Level 3 fields on the PROCESS
TRANSACTION page.
When the merchant services account has been enabled for Level 3 payments, and the Virtual
Terminal Plus application is enabled through the Settings>Terminal Setup page, the application is
ready to accept commercial card customers.

17 www.vantiv.com
How to accept a Level 3 commercial card?
The cardholder Billing Information section and Level 2 information (i.e. Customer Code, Purchase
Order and Tax) is *required* to proceed and process a Level 3 transaction. Tax-exempt is $0.00.
Total Order
Enter Discount Amount
Enter Shipping Amount
Enter Duty Amount
Select to enter Item Details
Level 3 enables you to capture purchase Item Details that are passed with the authorization at the
time of sale. Each field is *required* to be populated and $0.00 is considered a field populated. The
commercial cardholder issuing bank will make the decision if the transaction qualifies for Level 3
reduced Interchange discounts.
Per Item
Select industry Commodity Code
Enter Description of purchase (e.g. landscape)
Enter Product Code (e.g. SKU#, PN#)
Enter Quantity
Select Unit of Measure (e.g. Number)
Enter Unit Cost amount
Enter Discount amount
Enter Total amount
Select SAVE
To prevent transaction downgrades, Level 3 Line Items Details and Amounts should balance ((item
Unit Cost * item Quantity) + total Sales Tax Amount = total Transaction Amount). This must
be the case for the totals of all line items. Vantiv does not guarantee reduced Interchange discounts
and/or qualification from the commercial cardholder issuing bank.

18 www.vantiv.com
Receipt Details
The application Receipt Details allows a user to associates purchase details at the time of sale for
reporting and receipt printing.
NOTE: Including Receipt Details does not allow a transaction to qualify for reduced Interchange rates
and/or qualification discounts.
choose ‘Add New Item” to Add, Delete, Edited the Item Details within the
PROCESS TRANSACTION page.
Item#: Enter the product SKU number associated with the purchase
Description: Enter a Description of the item(s) purchased
Price : Enter the Unit Price of the item(s) purchased
Quantity: Enter the Quantity of the item(s) purchased
When Receipt Details is complete, choose the “Submit” button at the bottom
of the PROCESS TRANSACTION page to complete the transaction. If you
make a mistake, click the “Reset” button to clear all fields.
If the submission is Successful a Confirmation page will be displayed.
19 www.vantiv.com
Duplicate Checking
The application offers Duplicate Check as a feature that is enabled for each account and every
transaction. It provides a means to identify a duplicate transaction by the following parameters within
the application.
Same Card Number and Same Amount
Specific Transaction Type (Sale, Return, etc.)
Within 25 transactions in the Same Batch (nightly)
Please contact [email protected] to request Duplicate Detection be disabled on your
account.
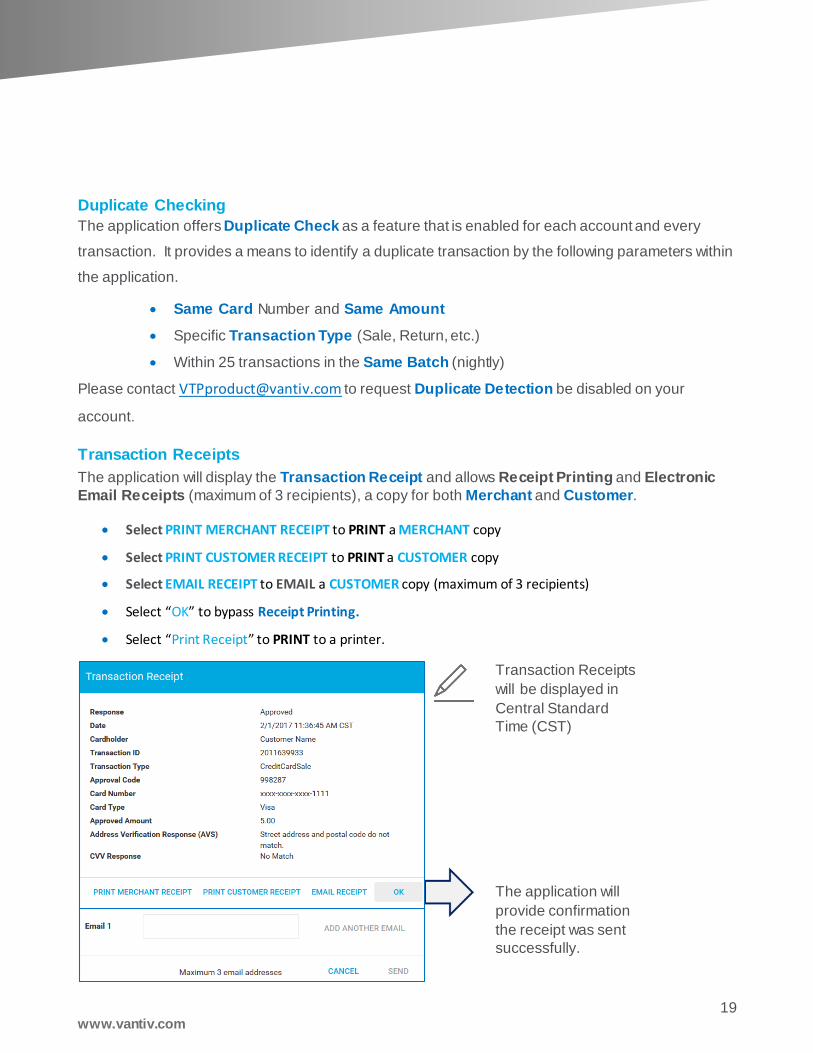
Transaction Receipts
The application will display the Transaction Receipt and allows Receipt Printing and Electronic
Email Receipts (maximum of 3 recipients), a copy for both Merchant and Customer.
Select PRINT MERCHANT RECEIPT to PRINT a MERCHANT copy
Select PRINT CUSTOMER RECEIPT to PRINT a CUSTOMER copy
Select EMAIL RECEIPT to EMAIL a CUSTOMER copy (maximum of 3 recipients)
Select “OK” to bypass Receipt Printing.
Select “Print Receipt” to PRINT to a printer.
Transaction Receipts
will be displayed in
Central Standard
Time (CST)
The application will
provide confirmation
the receipt was sent
successfully.

20 www.vantiv.com
How to print receipts to PDF, or save them to my desktop?
Select “Print Receipt” to PRINT
Select the name of the desired Format. (e.g. Adobe, Foxit
Reader)
Select the number of Copies desired.
Choose a File Name ; select the Desktop as the file location and
SAVE.
The Receipt will begin to print in the desired format and place the copy on your desk. Receipts can
be emailed using an external mail service of your choosing.
How to print or email a receipt?
Merchants can easily reprint a receipt from a previous transaction from the UPDATE TRANSACTION
or REPORTS page.
Select UPDATE TRANSACTION:
Enter Search Criteria (e.g. Date Range, Transaction ID, etc.)
Select the desired transaction from the search
Select the RECEIPT button
The application will display the Receipt Transaction page to PRINT or EMAIL receipts.
Select PRINT MERCHANT RECEIPT to PRINT a MERCHANT copy
Select PRINT CUSTOMER RECEIPT to PRINT a CUSTOMER copy
Select EMAIL RECEIPT to EMAIL a CUSTOMER copy (maximum of 3 recipients)

21 www.vantiv.com
Group Payments The application supports Group Payments for data entry environments, and lockbox merchant
services accounts. Group Payments enable transactions to be processed individually or
simultaneously as a group of multiple credit card transitions on one page.
Before a merchant can use Group Payments the Account Owner will need to enable the feature on
the Terminal Setup page by selecting the Group Payments option..
How to use Group Payments? The Group Payments page gives merchants the ability to manually key multiple transactions at
once.
Enter Card Number
Enter Expiry Date
Enter Amount
Enter CVV
1
1
22 www.vantiv.com
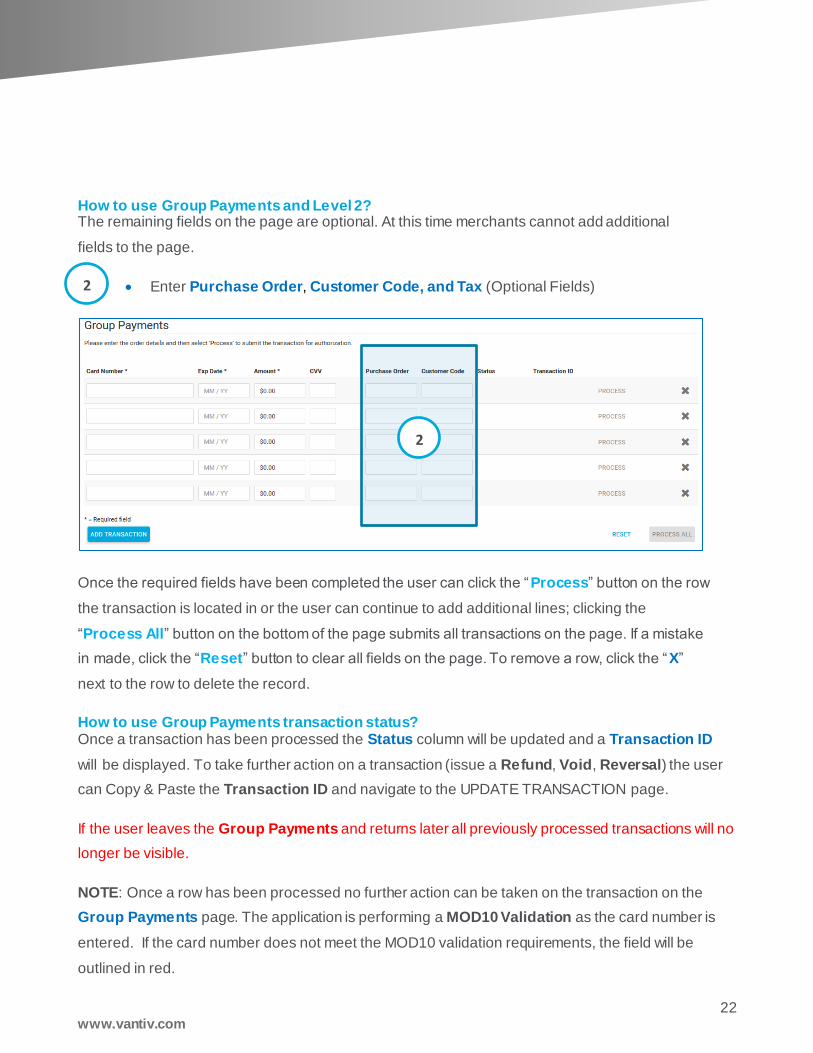
How to use Group Payments and Level 2? The remaining fields on the page are optional. At this time merchants cannot add additional
fields to the page.
Enter Purchase Order, Customer Code, and Tax (Optional Fields)
Once the required fields have been completed the user can click the “Process” button on the row
the transaction is located in or the user can continue to add additional lines; clicking the
“Process All” button on the bottom of the page submits all transactions on the page. If a mistake
in made, click the “Reset” button to clear all fields on the page. To remove a row, click the “X”
next to the row to delete the record.
How to use Group Payments transaction status? Once a transaction has been processed the Status column will be updated and a Transaction ID
will be displayed. To take further action on a transaction (issue a Refund, Void, Reversal) the user
can Copy & Paste the Transaction ID and navigate to the UPDATE TRANSACTION page.
If the user leaves the Group Payments and returns later all previously processed transactions will no
longer be visible.
NOTE: Once a row has been processed no further action can be taken on the transaction on the
Group Payments page. The application is performing a MOD10 Validation as the card number is
entered. If the card number does not meet the MOD10 validation requirements, the field will be
outlined in red.
2
2

23 www.vantiv.com
Check Services The Check Services (ACH e-check) allows merchants to electronically collect payments from their
customers for ether one-time or recurring payments by directly debiting the customers checking
or savings account. Before a merchant can use Check Services the Account Owner will need to
enable the feature on the Terminal Setup page.
In order to use the Check Services feature merchants will need to sign-up for e-check services
through Check Commerce. Once Check Services has been enabled it will appear on the left
navigational tool bar. Click on the Check Services page and a new page will be displayed within the
application.
To utilize the Check Services feature click on the “Client Login” button. The application will open a
new web browser window and redirect to Check Commerce virtual terminal landing page to enter
your login credentials, and accept a check payment.
How to setup a Check Services account? Please contact your Vantiv representative to learn more about Check Services.
24 www.vantiv.com
Capture: enables the original authorization
to be captured for settlement.
Return: enables a Refund to the cardholder
after the transaction has settled.
Reverse: releases the funds held by the
original authorization to the cardholder.
Void: enables the original transaction to be
removed from settlement.
Rebill: enables a previous settled
transaction to be re-authorized for the same
amount or a different amount using the
original cardholder information on-file.
Update Transaction The application provides a method to Manage Transactions of any previous authorized transaction.
NOTE: User Roles & Permissions need to be enabled for users to offer a Return or Credit.
How do I manage a transaction?
Enter the Transaction ID (from the receipt) to view a specific transaction.
Select Start Date and End Date to review a range of transactions.
Select Status to review transactions in a specific status or leave blank to review all.
Build your report from the Available Columns to the Selected Columns
Choose “Reset” button to clear all fields.
Choose “Submit” to generate the report.
When complete, select a transaction to manage to change the status of a previous transaction. Action
can be taken on a transaction up to 120-Days from the date of the original transaction date.
The selected transaction will highlight in BLUE
available actions based on the status of each
transaction. The change status buttons on the
top right (Rebill, Capture , Return, Reverse ,
Void) will enable if the action is applicable to the
selected transaction. If desired, the user can
also edit or change the amount of the sale.
The change status can take up to 10-minutes
to reflect the desired change.
A Confirmation & Receipt page will be
displayed to confirm the change status request.

25 www.vantiv.com
Reporting Transaction reports made easy. The application Transaction Reports are used to view previously
processed transaction stored in the application and can be displayed on-screen, or exported to a
desired report format.
Transaction Reports are available for up to 12-Months from the original transaction date.
How do I run a report?
Select the Start Date
Select the End Date
Select the report Format (optional)
Build your report from the Available Columns to the Selected Columns
Select “Preview” to display the report
Select “Generate Report” in .CSV or .XML file formats (.PDF – coming soon!)
Select “Reset” to clear all fields and start a new report
If a large date range is selected, please be patient as the data will display.
Use arrow keys to
display fields in
the desired order
on-screen or in
the generated
report format.

26 www.vantiv.com
Recurring The application Recurring Payments is a unique type of transaction where consumers authorize
merchants to bill a specific card/cardholder on a regular basis (e.g. monthly membership fees). Each
recurring payment is established at the time of sale for the same dollar amount. Recurring
transactions can be scheduled for different payment frequencies including a one-time future payment.
The automated scheduled task process for recurring payments will occur at 6:30 AM CST each day.
The application enables merchants to store customer information and include multiple card
brands/types in a secure vault to protect cardholder information and simplify the recurring payments
process for both merchant and repeat customers.
Prepaid (reloadable / gift cards) is not a recommend card type to setup for recurring payments.
How to perform a recurring transaction?
Add New Customer
Select button
Enter Customer Name
Enter Email Address
Enter Phone
Select SAVE
CONTINUE to Add Payment Method
27 www.vantiv.com
Add Payment Method
Select button
Enter Card Number
Enter Expiration Date
Enter Address, City, State and Zip Code (optional)
Select SAVE
CONTINUE to Add Recurring

28 www.vantiv.com
Add Recurring
Select button
Enter Start Date
Enter Amount
Enter Payment Method
Select Frequency
Enter Number of Payments
Select Run until Deleted (optional)
Select SAVE
DONE, the Recurring Payment is now scheduled!
9 Payment Frequencies:
One Time Future Daily
Weekly Bi-Weekly
Monthly Bi-Monthly
Quarterly Simi-annually
Annually
29 www.vantiv.com
How to change a future recurring payment?
Recurring payment schedules can be edited by selecting EDIT SELECTED within each section of the
RECURRING page.
Edit Schedule
Filter Cardholders by Customer Name or Email Address in the search
Select the desired Customer Name
Select the desired section Customer Name , Payment Method or Recurring
Select the desired record to edit
Select EDIT SELECTED to make the desired change
Select SAVE to update the payment record
Delete Schedule
Recurring payments can be removed when using DELETED SELECTED option.
DONE, the Recurring Payment schedule (and information) has now been updated!

30 www.vantiv.com
Settings The SETTINGS tab contains Account Profile, Terminal Setup, and Users (User Management)
sections.
Account Profile: to view the Merchant Information
Terminal Setup: to add Custom Fields
Users: to add, remove, edit Users.
Credit Card Credit (Blind Credit) can be enabled
on the account. Permission is assigned to the
Transaction Analyst II and Administration
user.
Account Owners and Administrators can
manage all Users in the application and view the
Account Profile and Terminal Setup pages.
Account Profile
If the business has multiple store locations, Account Owners and Administrators can view each
Merchant ID displayed on a separate line. Select the row to view merchant details for each location.
Users are provided access to multiple store locations from the Settings>Users section of the
application.
Please contact your Vantiv representative to make changes to the merchant services
account, or to add a new store location.
31 www.vantiv.com
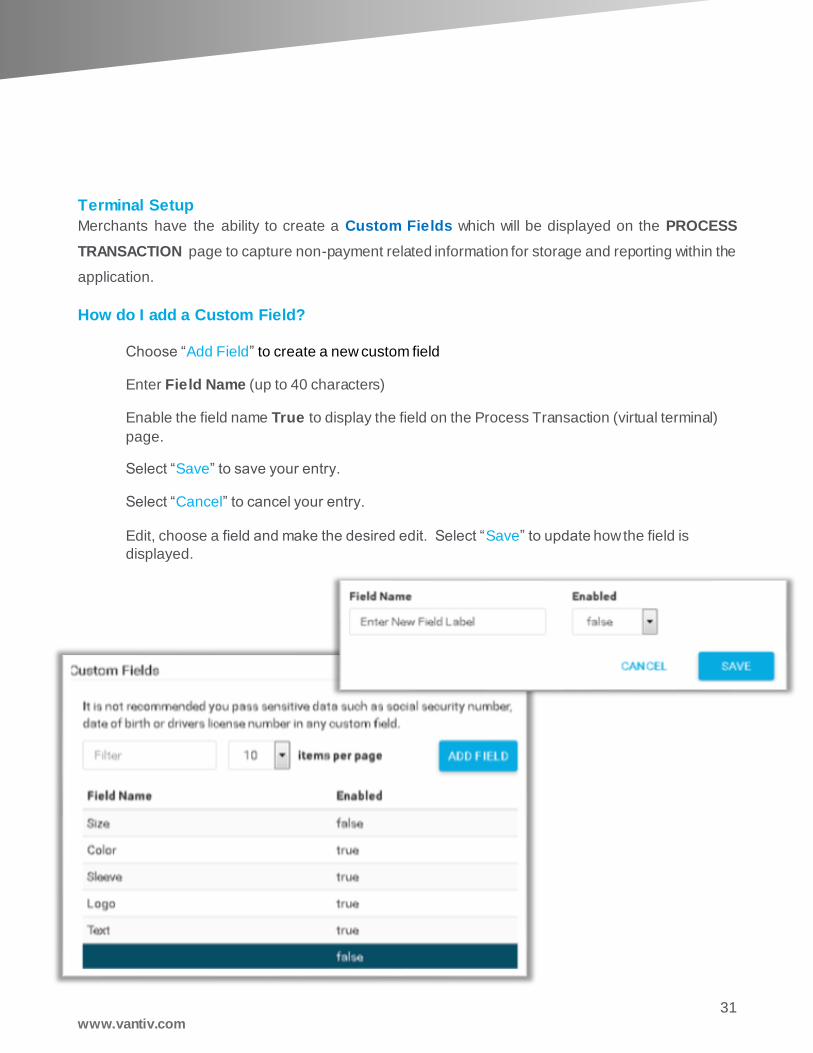
Terminal Setup
Merchants have the ability to create a Custom Fields which will be displayed on the PROCESS
TRANSACTION page to capture non-payment related information for storage and reporting within the
application.
How do I add a Custom Field?
Choose “Add Field” to create a new custom field
Enter Field Name (up to 40 characters)
Enable the field name True to display the field on the Process Transaction (virtual terminal)
page.
Select “Save” to save your entry.
Select “Cancel” to cancel your entry.
Edit, choose a field and make the desired edit. Select “Save” to update how the field is
displayed.

32 www.vantiv.com
Users How to create a new User is easy. It requires the Account Owner or Administrator to add, create
or modify a sub-level user.
How do I create a new User?
Select
Enter First Name and Last Name
Enter Email Address
Select Role
Visit User Roles & Permissions
Save to save the user
Cancel to clear all of the fields
New Users will receive a Welcome Letter from Virtual Terminal Plus which will allow them
to login and establish a new password.
Multi-location User Access
The Account Owner or Administrator can provide access to multi-store locations.
Select EDIT MERCHANT ACCESS
Select each Merchant Location accessible to your new user or “ADD ALL”
New users will also display which Merchant Locations are not accessible.
Select “REMOVE ALL” removes all Merchant Locations from the new user.
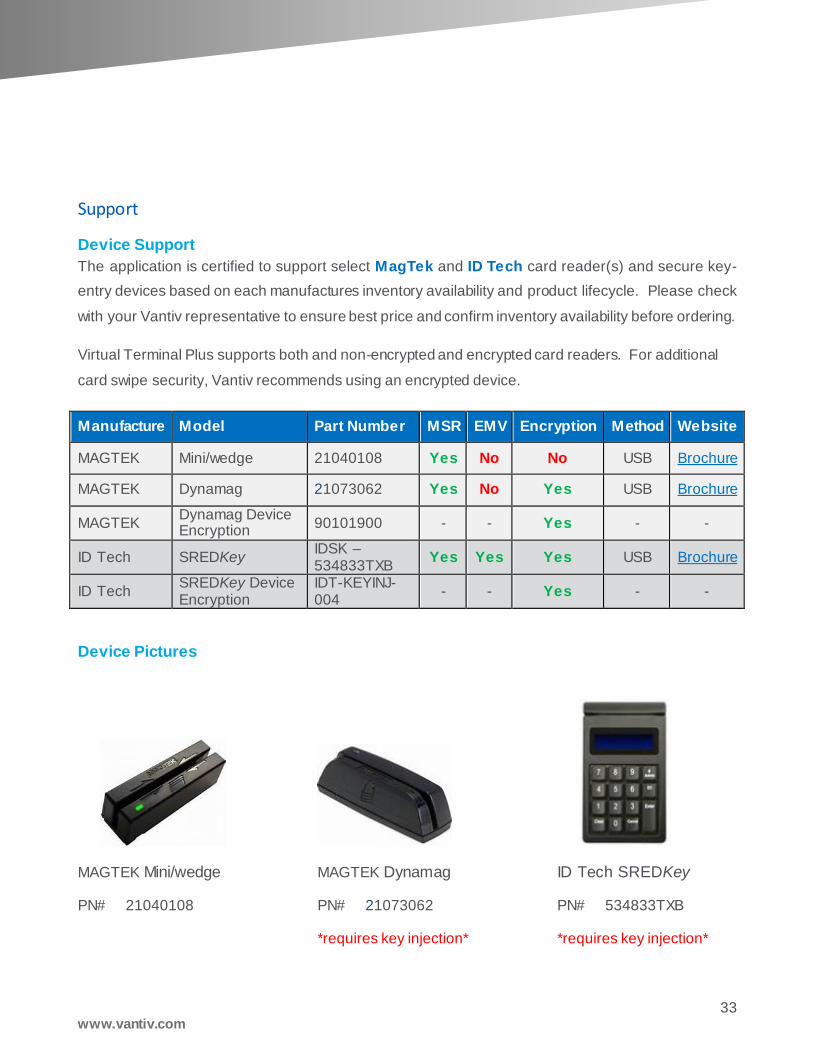
33 www.vantiv.com
Support
Device Support
The application is certified to support select MagTek and ID Tech card reader(s) and secure key-
entry devices based on each manufactures inventory availability and product lifecycle. Please check
with your Vantiv representative to ensure best price and confirm inventory availability before ordering.
Virtual Terminal Plus supports both and non-encrypted and encrypted card readers. For additional
card swipe security, Vantiv recommends using an encrypted device.
Manufacture Model Part Number MSR EMV Encryption Method Website
MAGTEK Mini/wedge 21040108 Yes No No USB Brochure
MAGTEK Dynamag 21073062 Yes No Yes USB Brochure
MAGTEK Dynamag Device Encryption
90101900 - - Yes - -
ID Tech SREDKey IDSK – 534833TXB
Yes Yes Yes USB Brochure
ID Tech SREDKey Device Encryption
IDT-KEYINJ-004
- - Yes - -
Device Pictures
MAGTEK Mini/wedge MAGTEK Dynamag ID Tech SREDKey
PN# 21040108 PN# 21073062 PN# 534833TXB
*requires key injection* *requires key injection*
34 www.vantiv.com
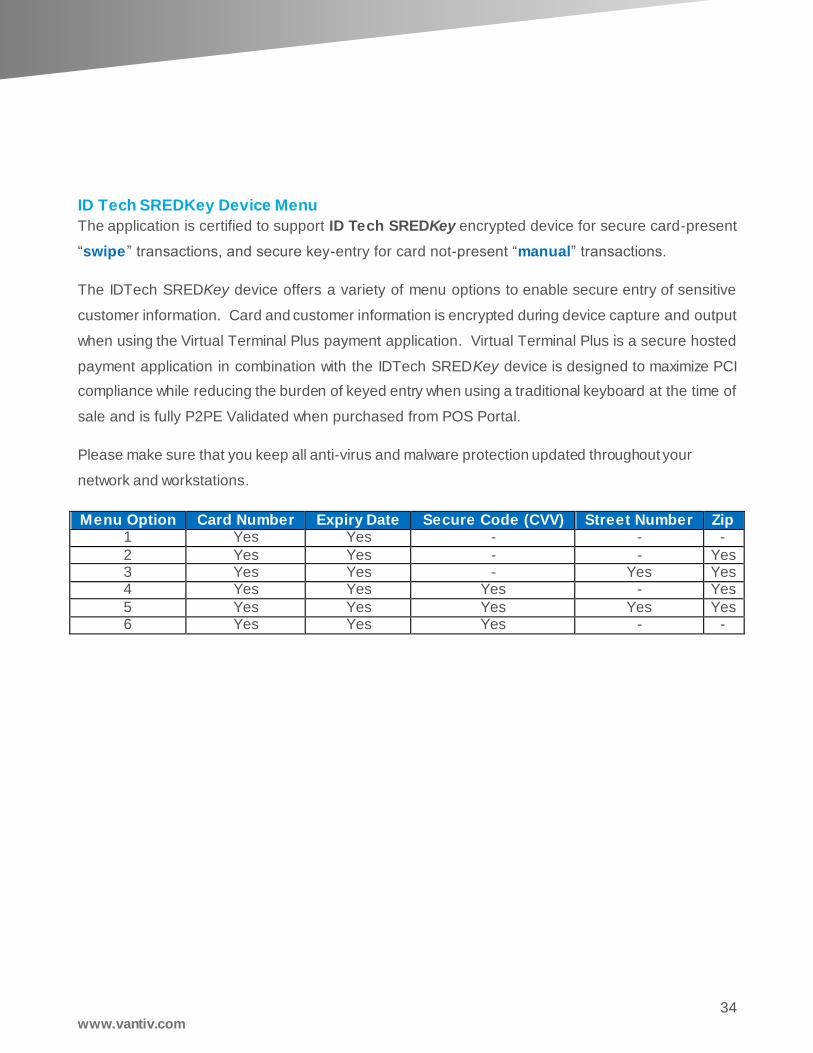
ID Tech SREDKey Device Menu
The application is certified to support ID Tech SREDKey encrypted device for secure card-present
“swipe” transactions, and secure key-entry for card not-present “manual” transactions.
The IDTech SREDKey device offers a variety of menu options to enable secure entry of sensitive
customer information. Card and customer information is encrypted during device capture and output
when using the Virtual Terminal Plus payment application. Virtual Terminal Plus is a secure hosted
payment application in combination with the IDTech SREDKey device is designed to maximize PCI
compliance while reducing the burden of keyed entry when using a traditional keyboard at the time of
sale and is fully P2PE Validated when purchased from POS Portal.
Please make sure that you keep all anti-virus and malware protection updated throughout your
network and workstations.
Menu Option Card Number Expiry Date Secure Code (CVV) Street Number Zip 1 Yes Yes - - -
2 Yes Yes - - Yes 3 Yes Yes - Yes Yes 4 Yes Yes Yes - Yes
5 Yes Yes Yes Yes Yes 6 Yes Yes Yes - -
35 www.vantiv.com
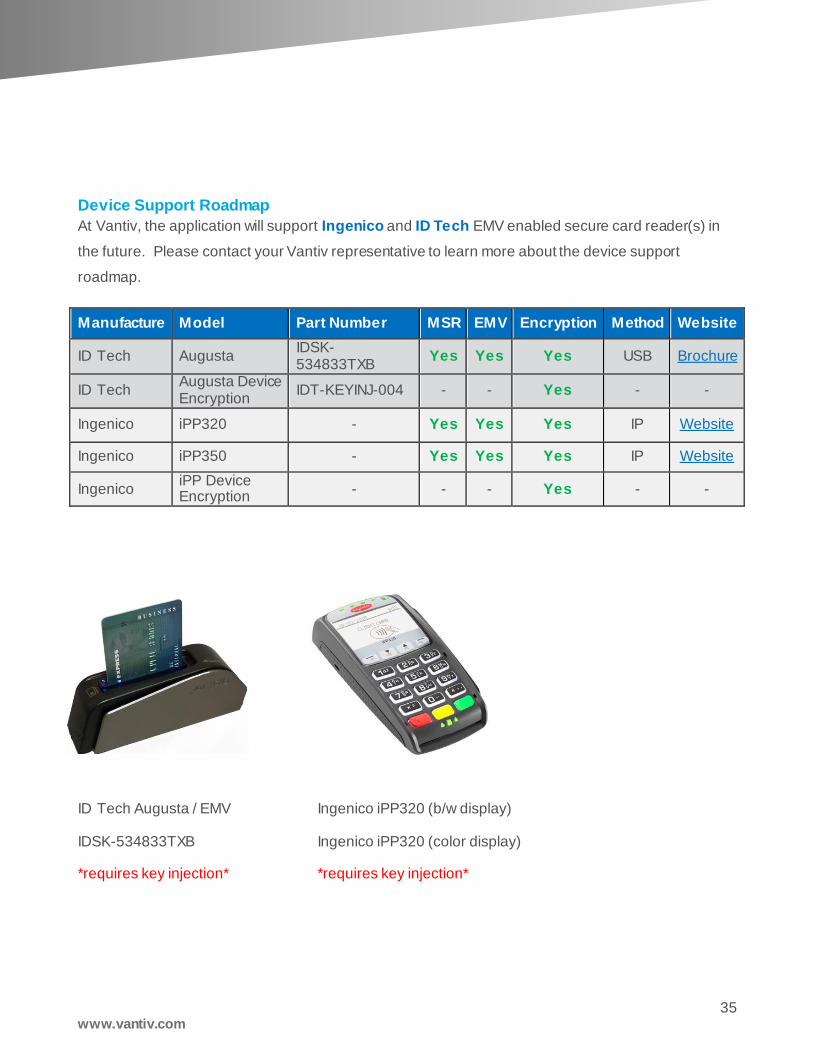
Device Support Roadmap
At Vantiv, the application will support Ingenico and ID Tech EMV enabled secure card reader(s) in
the future. Please contact your Vantiv representative to learn more about the device support
roadmap.
Manufacture Model Part Number MSR EMV Encryption Method Website
ID Tech Augusta IDSK-534833TXB
Yes Yes Yes USB Brochure
ID Tech Augusta Device Encryption
IDT-KEYINJ-004 - - Yes - -
Ingenico iPP320 - Yes Yes Yes IP Website
Ingenico iPP350 - Yes Yes Yes IP Website
Ingenico iPP Device Encryption
- - - Yes - -
ID Tech Augusta / EMV Ingenico iPP320 (b/w display)
IDSK-534833TXB Ingenico iPP320 (color display)
*requires key injection* *requires key injection*
36 www.vantiv.com
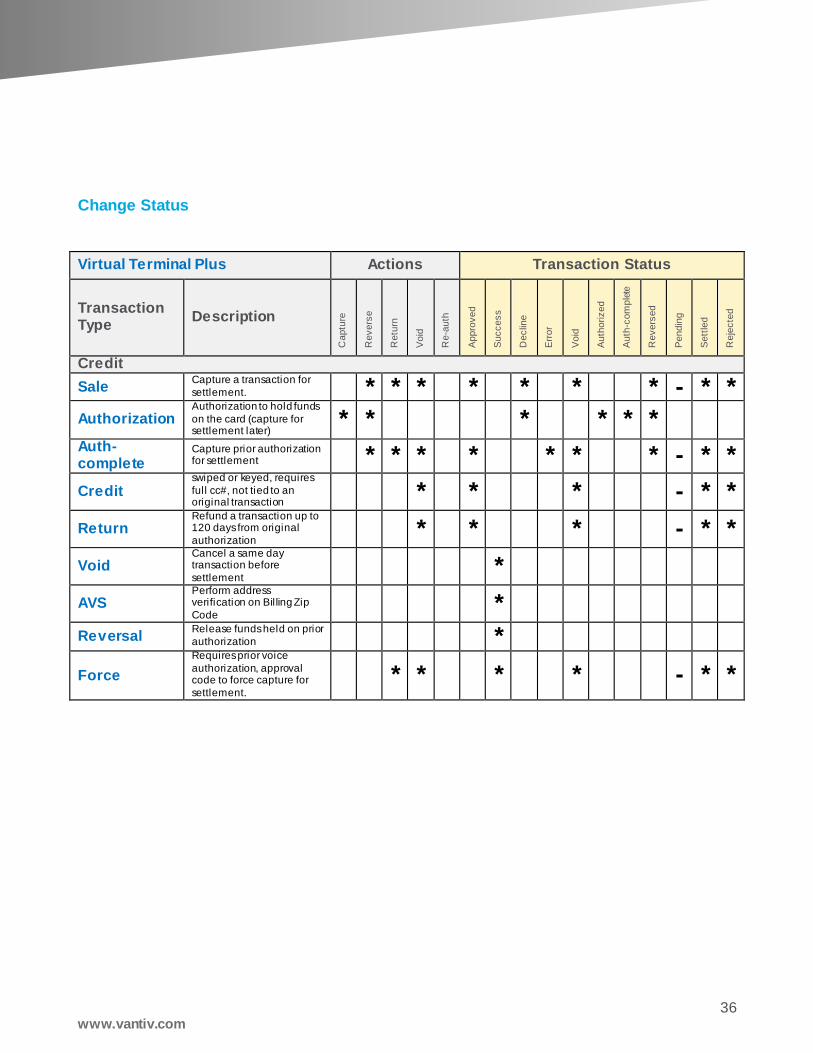
Change Status
Virtual Terminal Plus Actions Transaction Status
Transaction Type
Description
Ca
ptu
re
Re
ve
rse
Re
turn
Void
Re
-au
th
Ap
pro
ve
d
Su
cce
ss
De
clin
e
Err
or
Void
Au
tho
rize
d
Au
th-c
om
ple
te
Re
ve
rse
d
Pendin
g
Se
ttle
d
Re
jecte
d
Credit
Sale Capture a transaction for
settlement. * * * * * * * - * *
Authorization Authorization to hold funds
on the card (capture for settlement later)
* * * * * * Auth-complete
Capture prior authorization for settlement * * * * * * * - * *
Credit swiped or keyed, requires
full cc#, not tied to an original transaction
* * * - * *
Return Refund a transaction up to 120 days from original
authorization * * * - * *
Void Cancel a same day transaction before
settlement *
AVS Perform address verification on Billing Zip
Code *
Reversal Release funds held on prior
authorization *
Force
Requires prior voice
authorization, approval code to force capture for
settlement.
* * * * - * *
37 www.vantiv.com
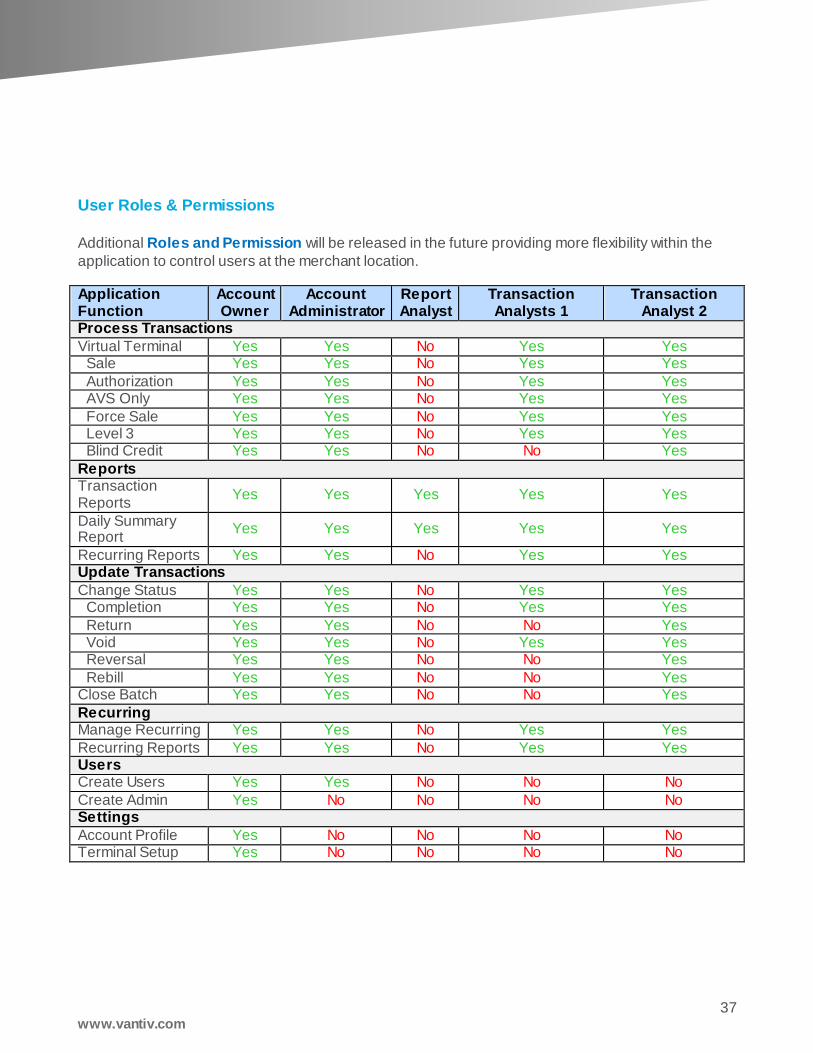
User Roles & Permissions
Additional Roles and Permission will be released in the future providing more flexibility within the
application to control users at the merchant location.
Application Function
Account Owner
Account Administrator
Report Analyst
Transaction Analysts 1
Transaction Analyst 2
Process Transactions
Virtual Terminal Yes Yes No Yes Yes Sale Yes Yes No Yes Yes
Authorization Yes Yes No Yes Yes AVS Only Yes Yes No Yes Yes
Force Sale Yes Yes No Yes Yes Level 3 Yes Yes No Yes Yes Blind Credit Yes Yes No No Yes
Reports Transaction Reports
Yes Yes Yes Yes Yes
Daily Summary Report
Yes Yes Yes Yes Yes
Recurring Reports Yes Yes No Yes Yes Update Transactions
Change Status Yes Yes No Yes Yes Completion Yes Yes No Yes Yes
Return Yes Yes No No Yes Void Yes Yes No Yes Yes Reversal Yes Yes No No Yes
Rebill Yes Yes No No Yes Close Batch Yes Yes No No Yes
Recurring Manage Recurring Yes Yes No Yes Yes
Recurring Reports Yes Yes No Yes Yes Users Create Users Yes Yes No No No
Create Admin Yes No No No No Settings
Account Profile Yes No No No No Terminal Setup Yes No No No No
38 www.vantiv.com
Application Support
Have a Virtual Terminal Plus application question?
Please visit the Support Hub located here to schedule a support call, or email
[email protected] to send a product question or inquiry.
Product information, FAQ, user guides and to schedule a support call, please visit
www.virtualterminal.com