virtualized oracle database deployments using red hat enterprise
TRANSCRIPT
Virtualized Oracle Database
Deployments using Red Hat
Enterprise Linux with KVM
End-to-end hardware infrastructure from Dell allows business continuity with seamless VM migrations
Sanjay Rao, Tim Wilkinson
Performance Engineering
Version 1.0
October 2012
1801 Varsity Drive™Raleigh NC 27606-2072 USAPhone: +1 919 754 3700Phone: 888 733 4281Fax: +1 919 754 3701PO Box 13588Research Triangle Park NC 27709 USA
Linux is a registered trademark of Linus Torvalds. Red Hat, Red Hat Enterprise Linux and the Red Hat "Shadowman" logo are registered trademarks of Red Hat, Inc. in the United States and other countries.
Intel, the Intel logo and Xeon are registered trademarks of Intel Corporation or its subsidiaries in the United States and other countries.
Dell, the Dell logo, EqualLogic, PowerConnect and PowerEdge are trademarks of Dell, Inc.
Oracle is a registered trademark of Oracle.
All other trademarks referenced herein are the property of their respective owners.
© 2012 by Red Hat, Inc. This material may be distributed only subject to the terms and conditions set forth in the Open Publication License, V1.0 or later (the latest version is presently available at http://www.opencontent.org/openpub/).
The information contained herein is subject to change without notice. Red Hat, Inc. shall not be liable for technical or editorial errors or omissions contained herein.
Distribution of modified versions of this document is prohibited without the explicit permission of Red Hat Inc.
Distribution of this work or derivative of this work in any standard (paper) book form for commercial purposes is prohibited unless prior permission is obtained from Red Hat Inc.
The GPG fingerprint of the [email protected] key is:CA 20 86 86 2B D6 9D FC 65 F6 EC C4 21 91 80 CD DB 42 A6 0E
Send feedback to [email protected]
www.redhat.com 2 [email protected]
Table of Contents1 Executive Summary......................................................................................... 1
2 Test Configuration............................................................................................ 2
2.1 Hardware Configuration.................................................................................................... 3
2.2 Software Configuration...................................................................................................... 4
2.2.1 Storage Configuration.................................................................................................. 42.2.1.1 Volumes and Access.............................................................................................. 52.2.1.2 Discovery and Login............................................................................................. 17
2.2.2 KVM Storage Pool Configuration............................................................................... 192.3 Configuring the Hosts for Migration................................................................................. 22
2.4 Virtual Machine Creation................................................................................................. 22
2.5 Install Oracle.................................................................................................................... 22
3 Testing ........................................................................................................... 23
3.1 Performing the Migration................................................................................................. 23
3.2 Migration Performance.................................................................................................... 26
4 Tuning and Monitoring Tools.......................................................................... 27
4.1 RHEL Performance Tuning and Optimization................................................................. 27
4.1.1 Tuned......................................................................................................................... 274.1.2 Numad....................................................................................................................... 28
4.2 RHEL Performance Monitoring....................................................................................... 28
4.2.1 Perf............................................................................................................................. 284.2.2 Tuna........................................................................................................................... 284.2.3 Numastat.................................................................................................................... 29
4.3 Dell EqualLogic Storage Tools ....................................................................................... 29
5 What Does It All Mean?.................................................................................. 30
Appendix A: References and Further Information............................................ 31
Appendix B: Network Configuration Files......................................................... 32
B.1 Ifcfg-em2......................................................................................................................... 32
[email protected] 3 www.redhat.com
B.2 ifcfg-p2p1........................................................................................................................ 32
B.3 ifcfg-p2p2........................................................................................................................ 32
B.4 ifcfg-br1........................................................................................................................... 32
B.5 ifcfg-br2........................................................................................................................... 33
Appendix C: KVM Configuration Files.............................................................. 34
C.1 vm1.xml........................................................................................................................... 34
C.2 kvm1.xml......................................................................................................................... 36
Appendix D: Host Scripting Tools - Automation Script..................................... 37
D.1 kvmsetup.py.................................................................................................................... 37
D.2 voldata.py........................................................................................................................ 38
www.redhat.com 4 [email protected]
1 Executive SummaryRed Hat partnered with Dell to demonstrate deploying an Oracle database in a virtualized environment on an end-to-end Dell hardware infrastructure. The test configuration includes Oracle 11g R2 running on Red Hat Enterprise Linux 6 with the Kernel-based Virtual Machine (KVM) hypervisor on Dell PowerEdge R710 servers with Dell EqualLogic PS6010 virtualized iSCSI storage. The architecture is a set of Dell rack-mount servers connected to the PS Series iSCSI-based storage array over 10 Gigabit Ethernet (10 GbE).This document includes the specifications and instructions for recreating the deployment of virtual machines (VMs), achieving consistent performance, and a high-availability scenario for the Oracle database.
Multiple VMs running Oracle are set up on two physical hosts and an online transaction processing (OLTP) workload is executed on each of them in order to illustrate how to make mission-critical Oracle deployments highly available in a virtualized environment,. The VMs are then migrated back and forth between hosts while the OLTP workload continues to run uninterrupted.
Migrating VMs between hosts demonstrates one aspect of the enterprise-class service capability of Red Hat Enterprise Linux and inherent scalability and stability of a KVM-based virtualization infrastructure.
[email protected] 1 www.redhat.com
2 Test ConfigurationThe following commercially available, industry-standard hardware and software components are used to build the system under test (SUT) configuration.
Table 1: Hardware Configuration
Server
Dell PowerEdge R710 server2 Socket – 8 CoresIntel (R) Xeon(R) X56570 @2.93 GHz64 GB RAM (32 GB per NUMA node)Dual port Intel 82599EB 10-Gigabit HBA
Storage Dell EqualLogic PS6010 array
Network Switch Dell PowerConnect 8024F
Table 2: Software Configuration
Operating System (Host)Red Hat Enterprise Linux 6.3 (2.6.32.279.el6.x86_64)qemu-kvm-0.12.1.2-2.295.el6.x86_64
Operating System (Virtual Machines)
Red Hat Enterprise Linux 6.3 (2.6.32.279.el6.x86_64)
Database Oracle Database 11g Release 2 (11.2.0.3)
Storage Dell EqualLogic Host Integration Tools for Linux 1.2
www.redhat.com 2 [email protected]
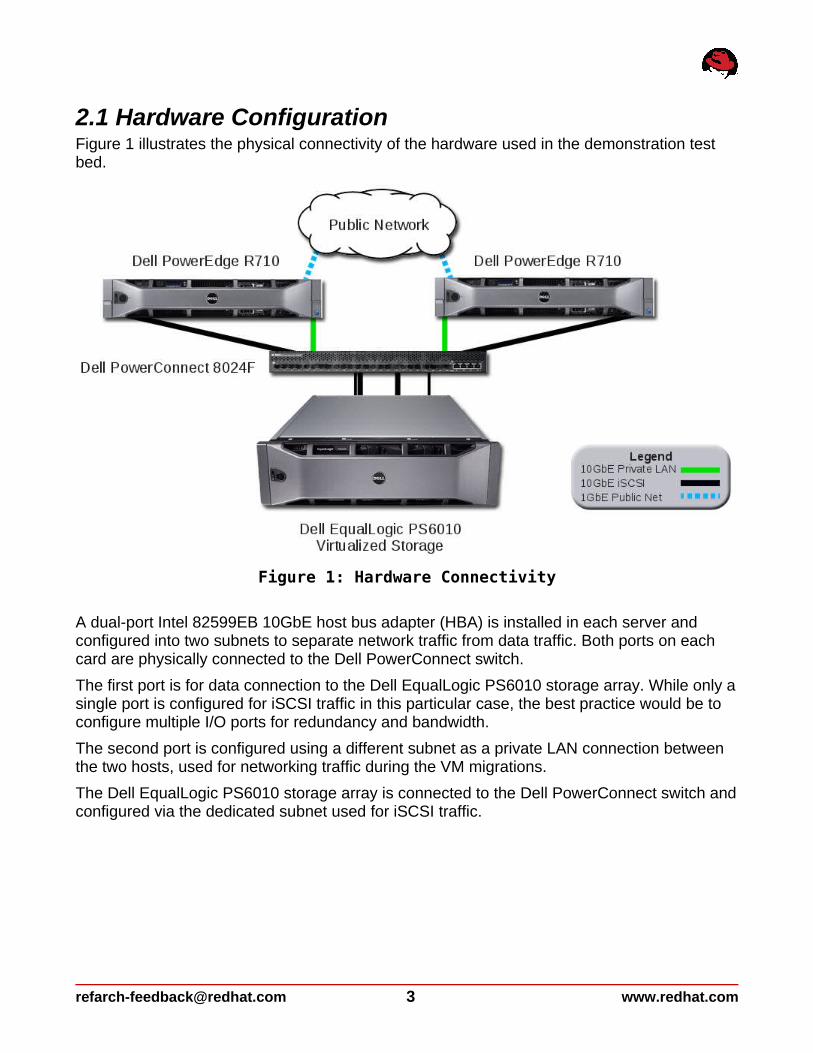
2.1 Hardware ConfigurationFigure 1 illustrates the physical connectivity of the hardware used in the demonstration test bed.
A dual-port Intel 82599EB 10GbE host bus adapter (HBA) is installed in each server and configured into two subnets to separate network traffic from data traffic. Both ports on each card are physically connected to the Dell PowerConnect switch.
The first port is for data connection to the Dell EqualLogic PS6010 storage array. While only a single port is configured for iSCSI traffic in this particular case, the best practice would be to configure multiple I/O ports for redundancy and bandwidth.
The second port is configured using a different subnet as a private LAN connection between the two hosts, used for networking traffic during the VM migrations.
The Dell EqualLogic PS6010 storage array is connected to the Dell PowerConnect switch and configured via the dedicated subnet used for iSCSI traffic.
[email protected] 3 www.redhat.com
Figure 1: Hardware Connectivity
2.2 Software ConfigurationThe Red Hat Enterprise Linux 6 operating system is installed on two identically configured Dell PowerEdge R710 servers by selecting the Virtual Host optional package group during the installation. This option installs the kernel as well as the KVM and Virtual Machine Manager tools required to create a host for VMs.
Additional details and screen captures of the installation procedures using the Virtual Host option are documented in Chapter 16.19 of the Red Hat Enterprise Linux 6 installation guide located at https://access.redhat.com/knowledge/docs/en-US/Red_Hat_Enterprise_Linux/6/html/Installation_Guide/index.html.
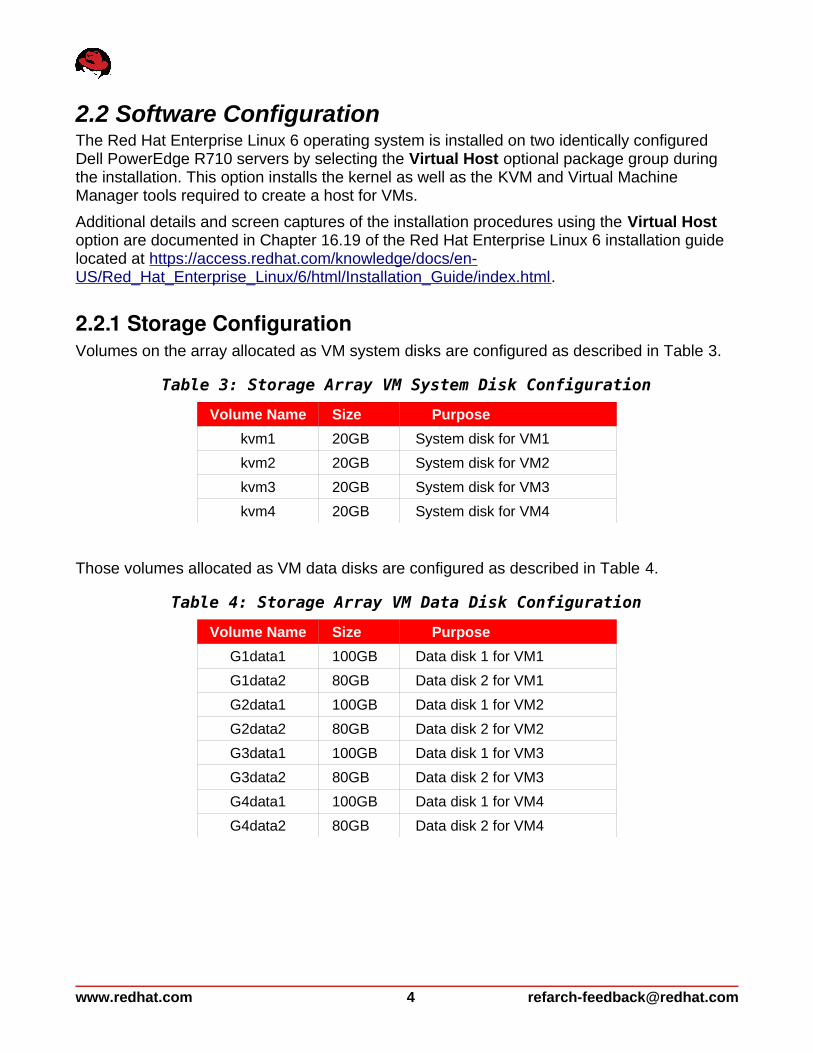
2.2.1 Storage ConfigurationVolumes on the array allocated as VM system disks are configured as described in Table 3.
Table 3: Storage Array VM System Disk Configuration
Volume Name Size Purpose
kvm1 20GB System disk for VM1
kvm2 20GB System disk for VM2
kvm3 20GB System disk for VM3
kvm4 20GB System disk for VM4
Those volumes allocated as VM data disks are configured as described in Table 4.
Table 4: Storage Array VM Data Disk Configuration
Volume Name Size Purpose
G1data1 100GB Data disk 1 for VM1
G1data2 80GB Data disk 2 for VM1
G2data1 100GB Data disk 1 for VM2
G2data2 80GB Data disk 2 for VM2
G3data1 100GB Data disk 1 for VM3
G3data2 80GB Data disk 2 for VM3
G4data1 100GB Data disk 1 for VM4
G4data2 80GB Data disk 2 for VM4
www.redhat.com 4 [email protected]
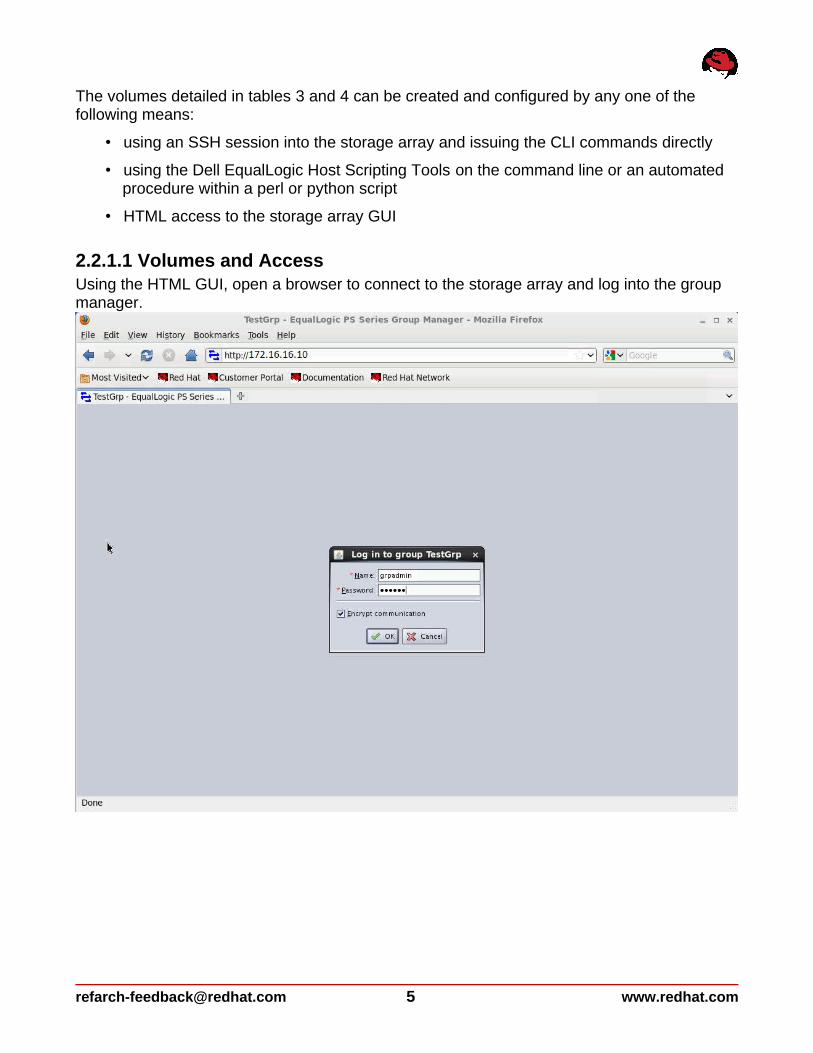
The volumes detailed in tables 3 and 4 can be created and configured by any one of the following means:
• using an SSH session into the storage array and issuing the CLI commands directly
• using the Dell EqualLogic Host Scripting Tools on the command line or an automated procedure within a perl or python script
• HTML access to the storage array GUI
2.2.1.1 Volumes and AccessUsing the HTML GUI, open a browser to connect to the storage array and log into the group manager.
[email protected] 5 www.redhat.com
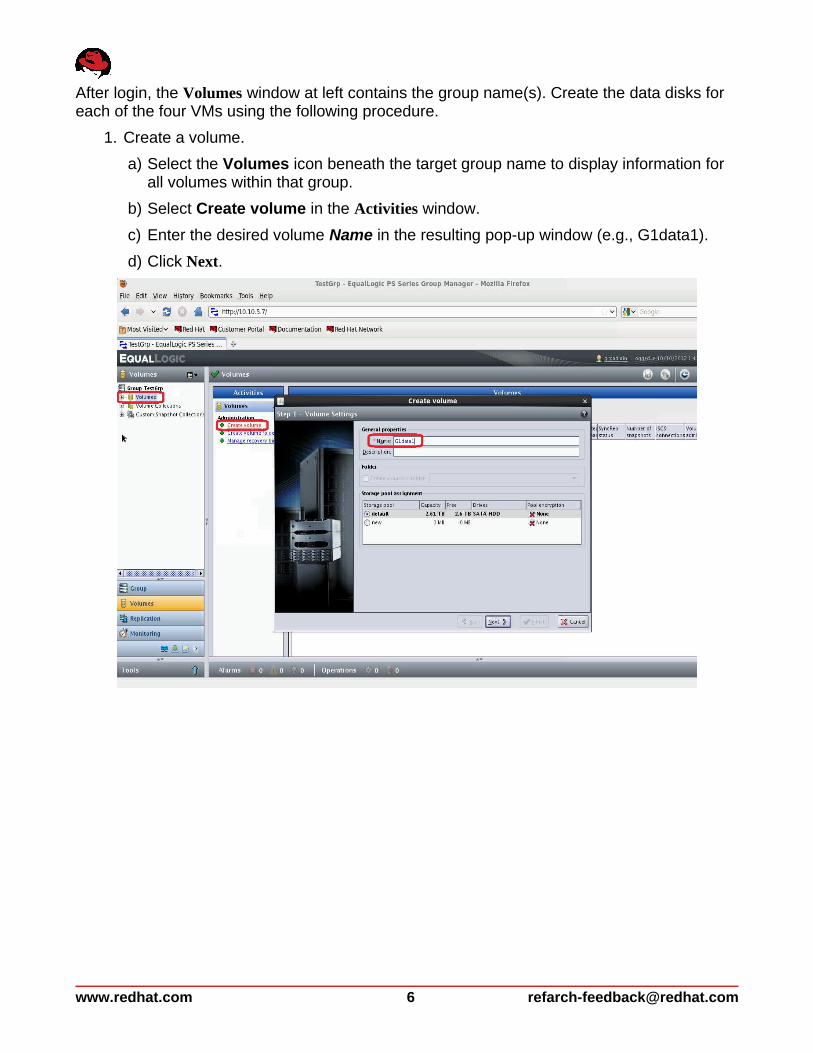
After login, the Volumes window at left contains the group name(s). Create the data disks for each of the four VMs using the following procedure.
1. Create a volume.
a) Select the Volumes icon beneath the target group name to display information for all volumes within that group.
b) Select Create volume in the Activities window.
c) Enter the desired volume Name in the resulting pop-up window (e.g., G1data1).
d) Click Next.
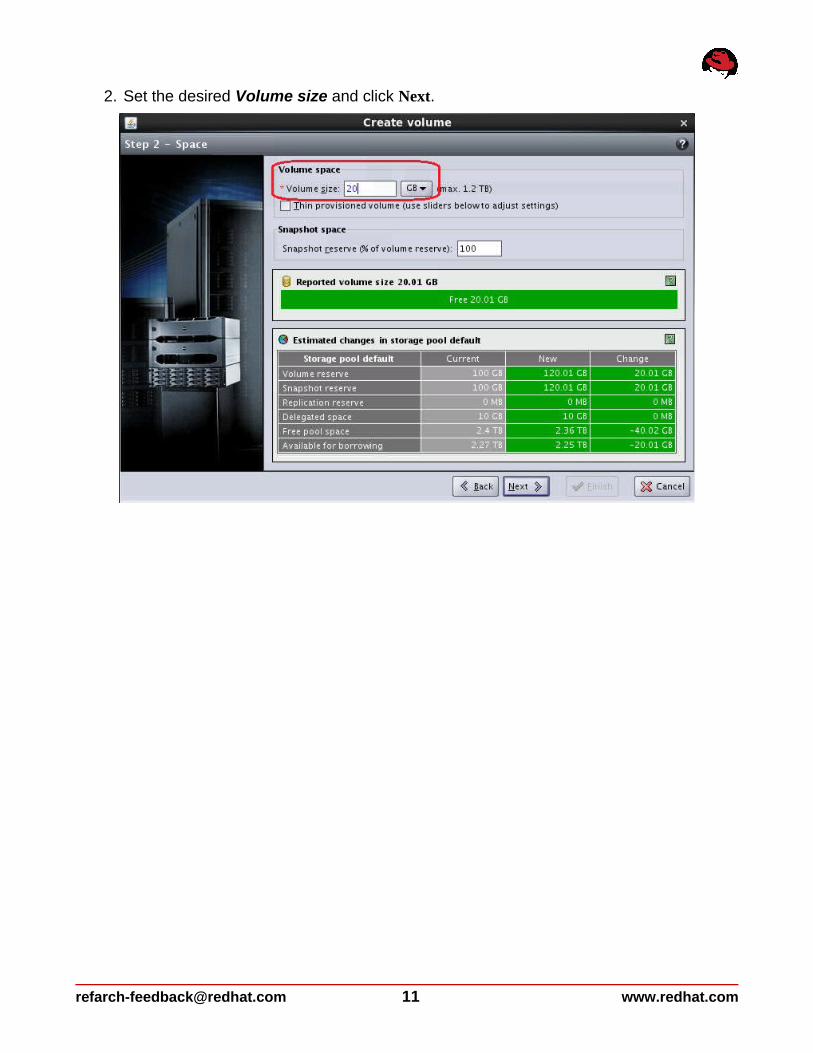
www.redhat.com 6 [email protected]
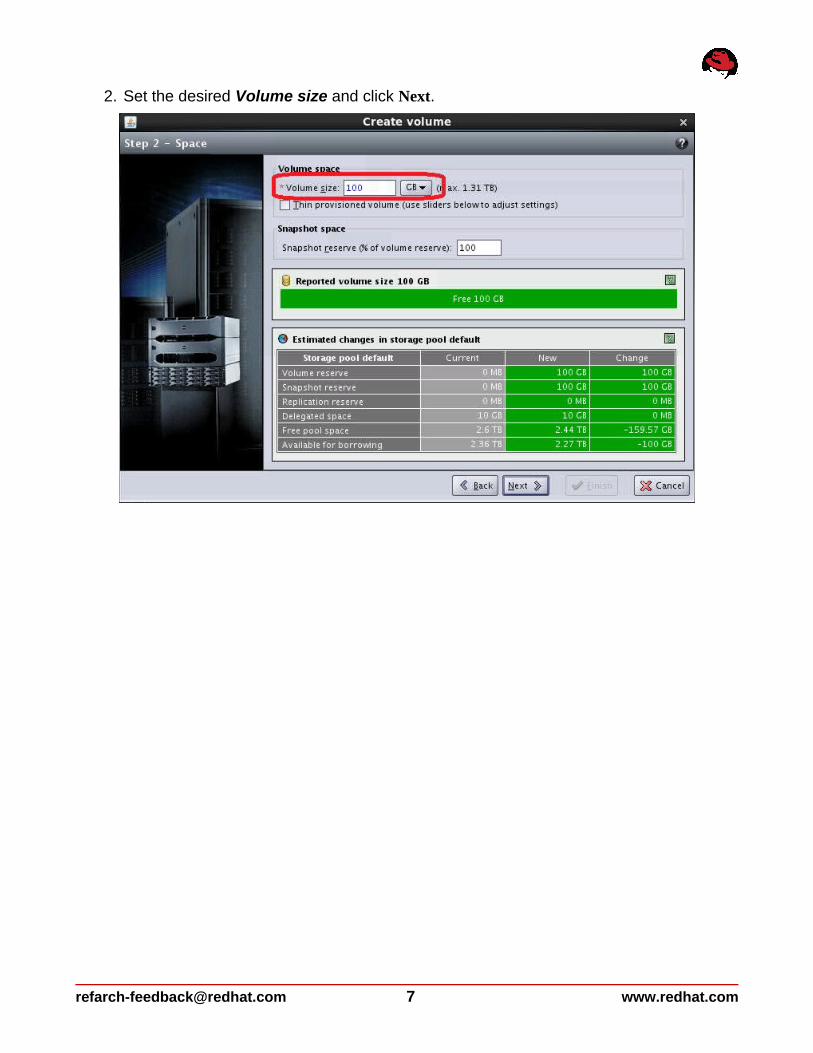
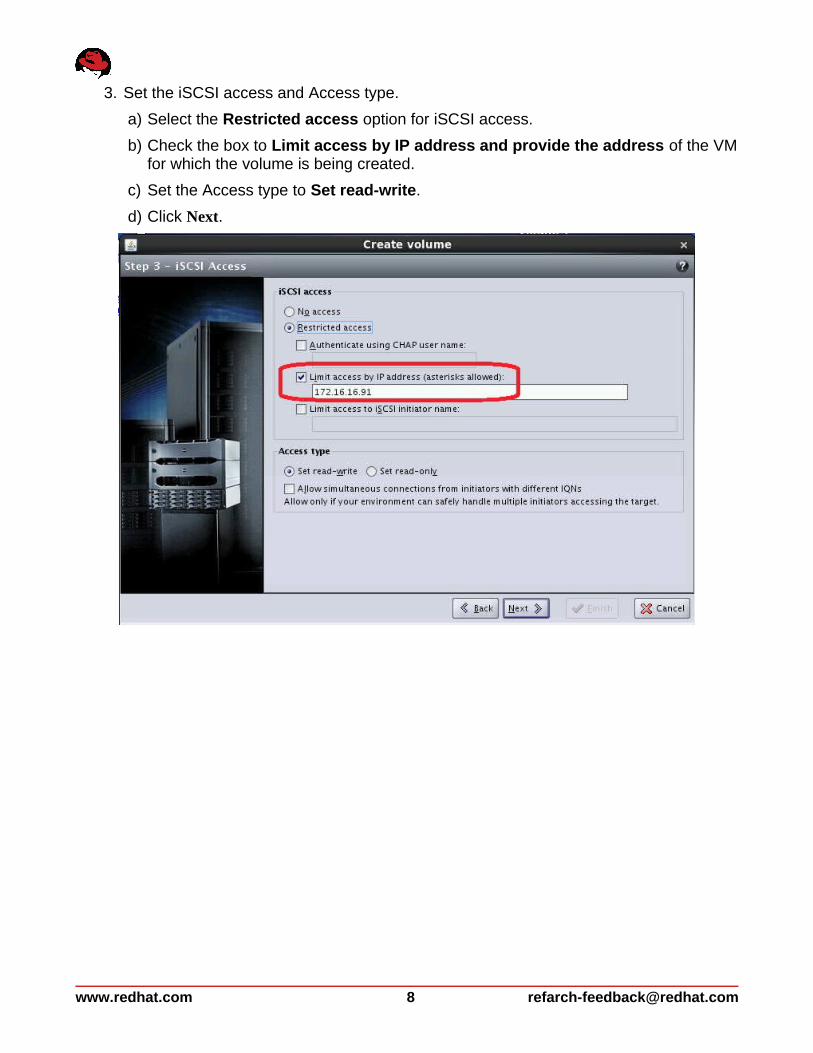
3. Set the iSCSI access and Access type.
a) Select the Restricted access option for iSCSI access.
b) Check the box to Limit access by IP address and provide the address of the VM for which the volume is being created.
c) Set the Access type to Set read-write.
d) Click Next.
www.redhat.com 8 [email protected]
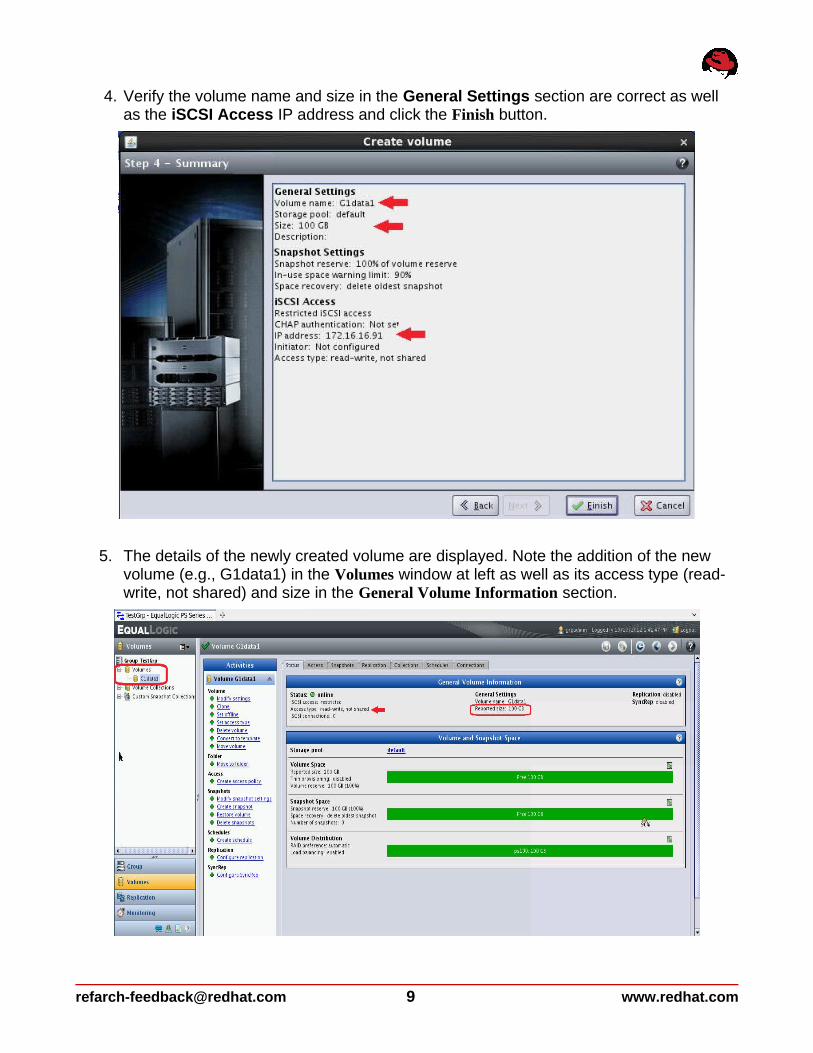
4. Verify the volume name and size in the General Settings section are correct as well as the iSCSI Access IP address and click the Finish button.
5. The details of the newly created volume are displayed. Note the addition of the new volume (e.g., G1data1) in the Volumes window at left as well as its access type (read-write, not shared) and size in the General Volume Information section.
[email protected] 9 www.redhat.com
6. Repeat steps 1 through 5 to create the two data disks for each of the four VMs as described in Table 4.
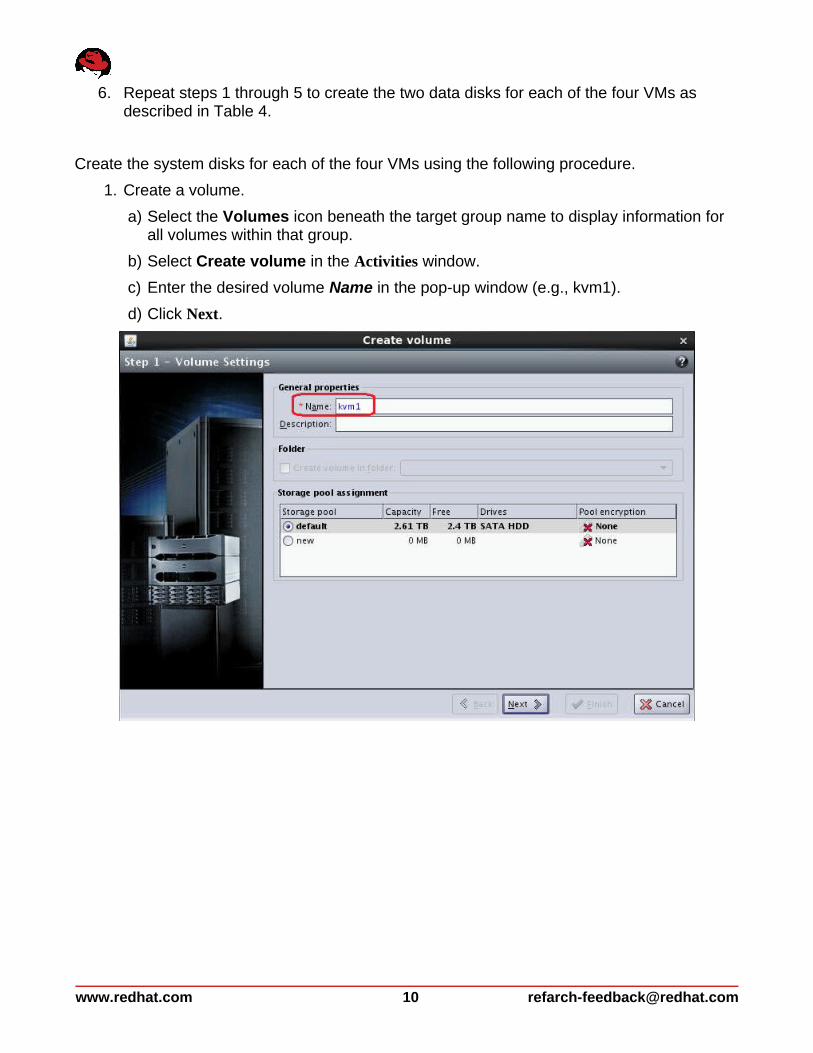
Create the system disks for each of the four VMs using the following procedure.
1. Create a volume.
a) Select the Volumes icon beneath the target group name to display information for all volumes within that group.
b) Select Create volume in the Activities window.
c) Enter the desired volume Name in the pop-up window (e.g., kvm1).
d) Click Next.
www.redhat.com 10 [email protected]
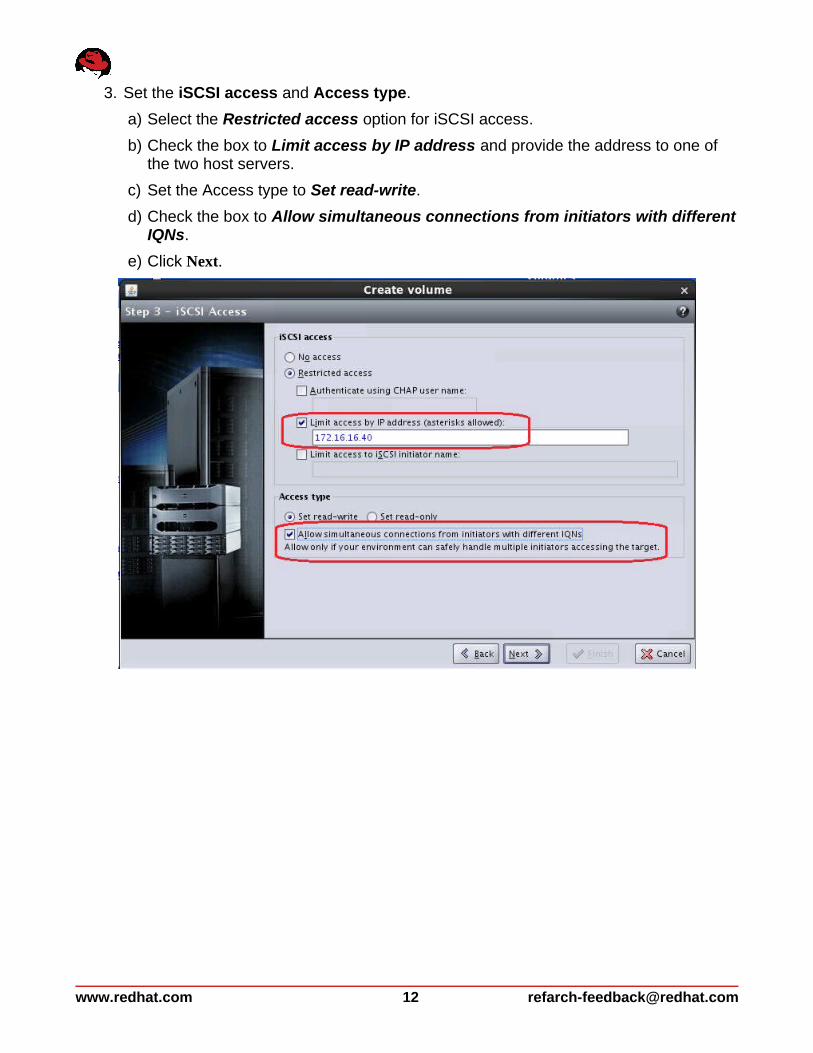
3. Set the iSCSI access and Access type.
a) Select the Restricted access option for iSCSI access.
b) Check the box to Limit access by IP address and provide the address to one of the two host servers.
c) Set the Access type to Set read-write.
d) Check the box to Allow simultaneous connections from initiators with different IQNs.
e) Click Next.
www.redhat.com 12 [email protected]
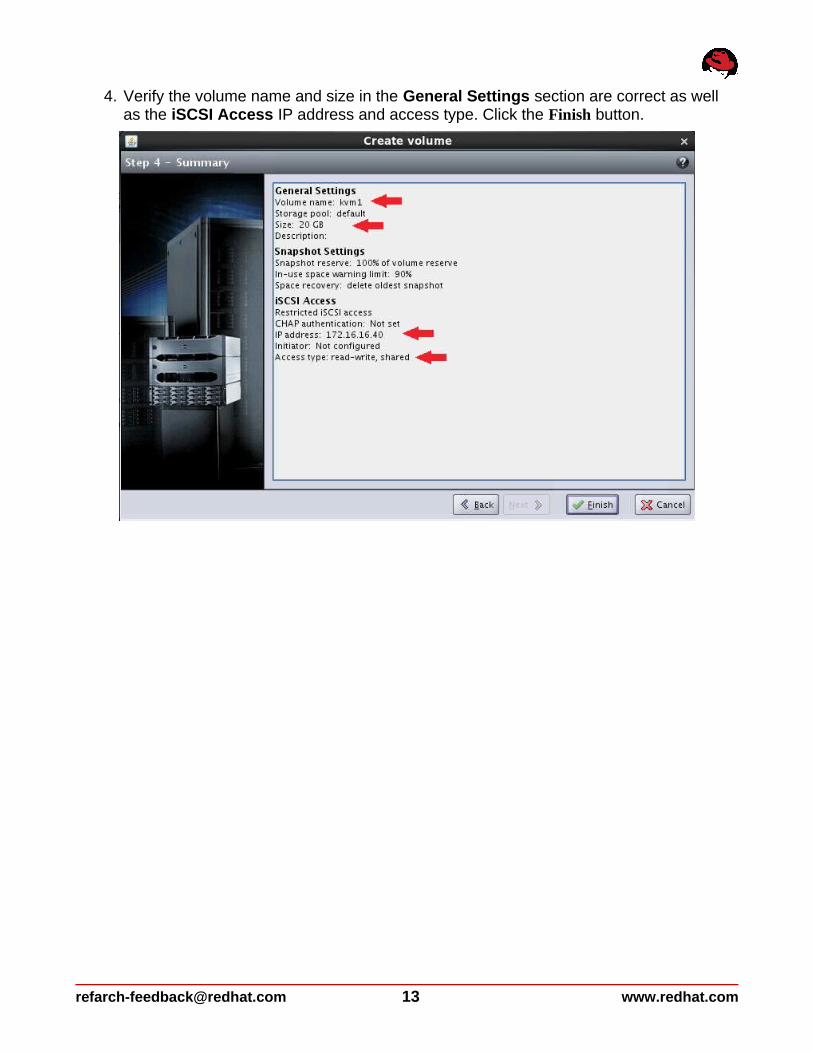
4. Verify the volume name and size in the General Settings section are correct as well as the iSCSI Access IP address and access type. Click the Finish button.
[email protected] 13 www.redhat.com
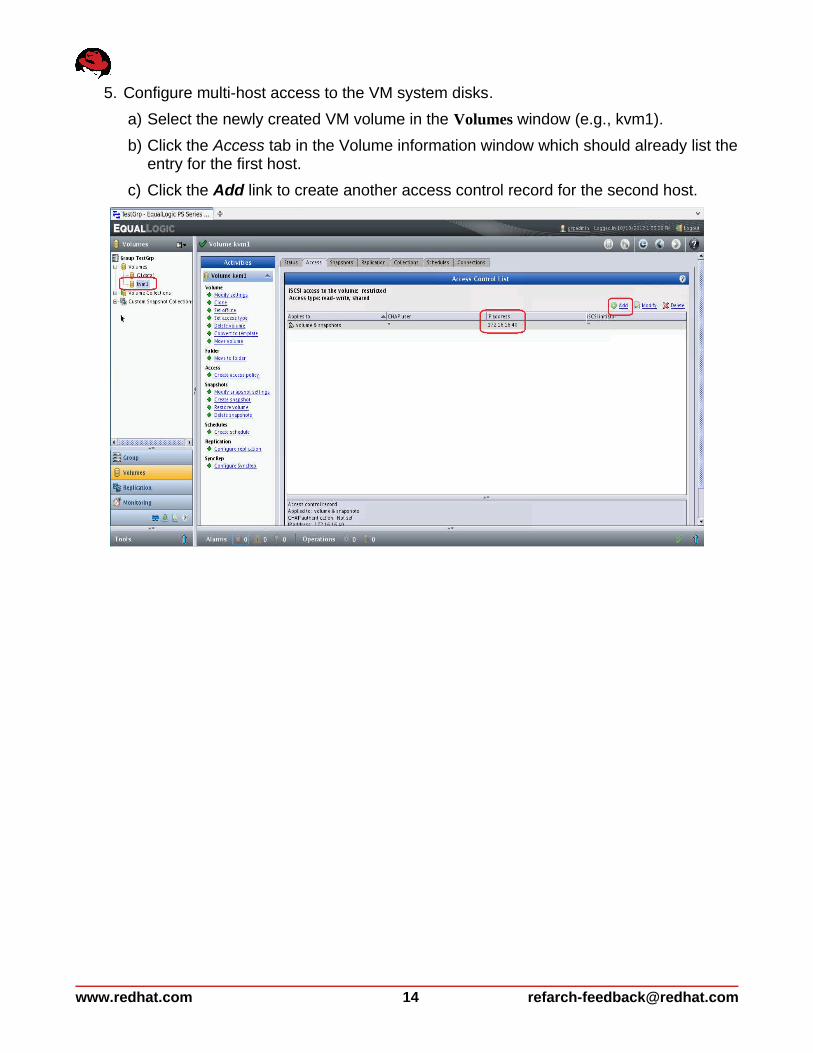
5. Configure multi-host access to the VM system disks.
a) Select the newly created VM volume in the Volumes window (e.g., kvm1).
b) Click the Access tab in the Volume information window which should already list the entry for the first host.
c) Click the Add link to create another access control record for the second host.
www.redhat.com 14 [email protected]
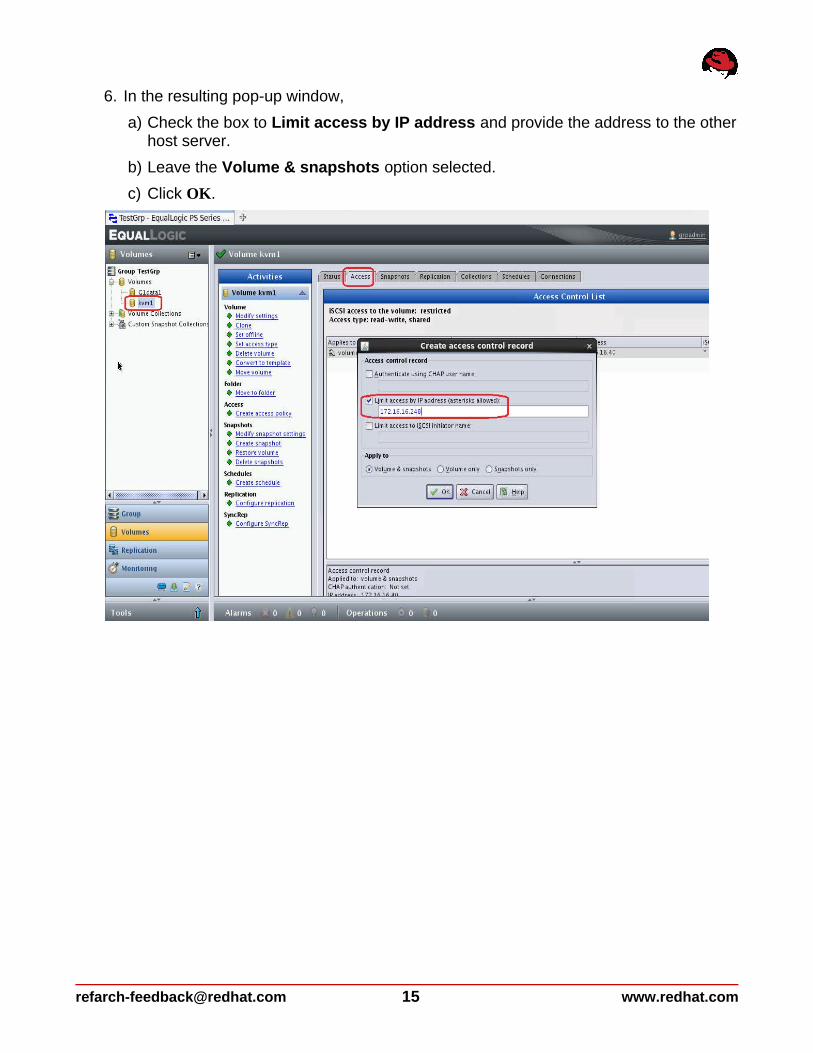
6. In the resulting pop-up window,
a) Check the box to Limit access by IP address and provide the address to the other host server.
b) Leave the Volume & snapshots option selected.
c) Click OK.
[email protected] 15 www.redhat.com
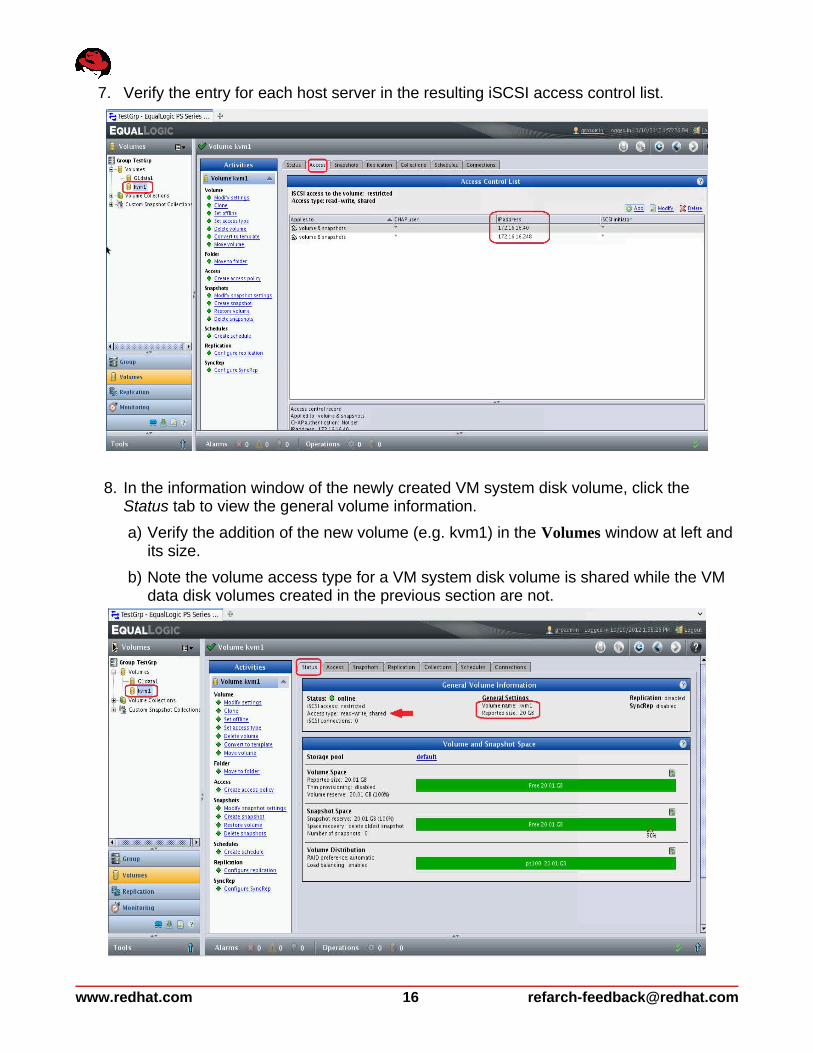
7. Verify the entry for each host server in the resulting iSCSI access control list.
8. In the information window of the newly created VM system disk volume, click the Status tab to view the general volume information.
a) Verify the addition of the new volume (e.g. kvm1) in the Volumes window at left and its size.
b) Note the volume access type for a VM system disk volume is shared while the VM data disk volumes created in the previous section are not.
www.redhat.com 16 [email protected]
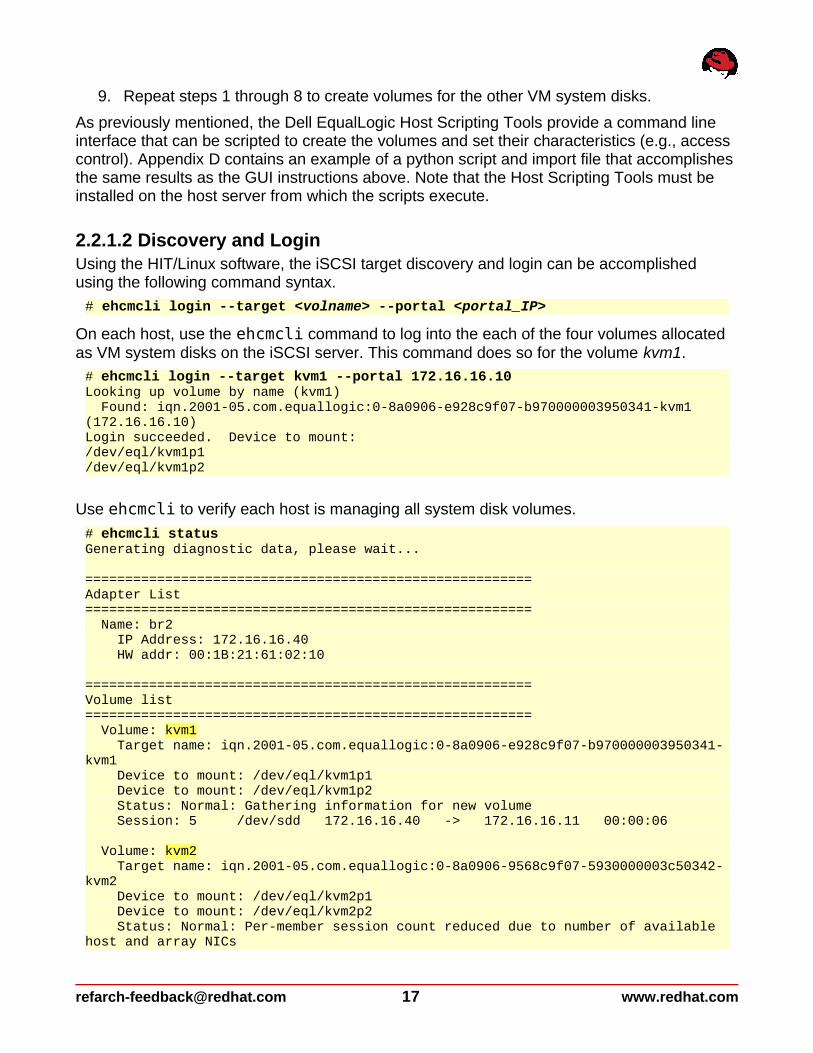
9. Repeat steps 1 through 8 to create volumes for the other VM system disks.
As previously mentioned, the Dell EqualLogic Host Scripting Tools provide a command line interface that can be scripted to create the volumes and set their characteristics (e.g., access control). Appendix D contains an example of a python script and import file that accomplishes the same results as the GUI instructions above. Note that the Host Scripting Tools must be installed on the host server from which the scripts execute.
2.2.1.2 Discovery and LoginUsing the HIT/Linux software, the iSCSI target discovery and login can be accomplished using the following command syntax.
# ehcmcli login --target <volname> --portal <portal_IP>
On each host, use the ehcmcli command to log into the each of the four volumes allocated as VM system disks on the iSCSI server. This command does so for the volume kvm1.
# ehcmcli login --target kvm1 --portal 172.16.16.10Looking up volume by name (kvm1) Found: iqn.2001-05.com.equallogic:0-8a0906-e928c9f07-b970000003950341-kvm1 (172.16.16.10)Login succeeded. Device to mount:/dev/eql/kvm1p1/dev/eql/kvm1p2
Use ehcmcli to verify each host is managing all system disk volumes.
# ehcmcli statusGenerating diagnostic data, please wait...
========================================================Adapter List======================================================== Name: br2 IP Address: 172.16.16.40 HW addr: 00:1B:21:61:02:10
========================================================Volume list======================================================== Volume: kvm1 Target name: iqn.2001-05.com.equallogic:0-8a0906-e928c9f07-b970000003950341-kvm1 Device to mount: /dev/eql/kvm1p1 Device to mount: /dev/eql/kvm1p2 Status: Normal: Gathering information for new volume Session: 5 /dev/sdd 172.16.16.40 -> 172.16.16.11 00:00:06
Volume: kvm2 Target name: iqn.2001-05.com.equallogic:0-8a0906-9568c9f07-5930000003c50342-kvm2 Device to mount: /dev/eql/kvm2p1 Device to mount: /dev/eql/kvm2p2 Status: Normal: Per-member session count reduced due to number of available host and array NICs
[email protected] 17 www.redhat.com
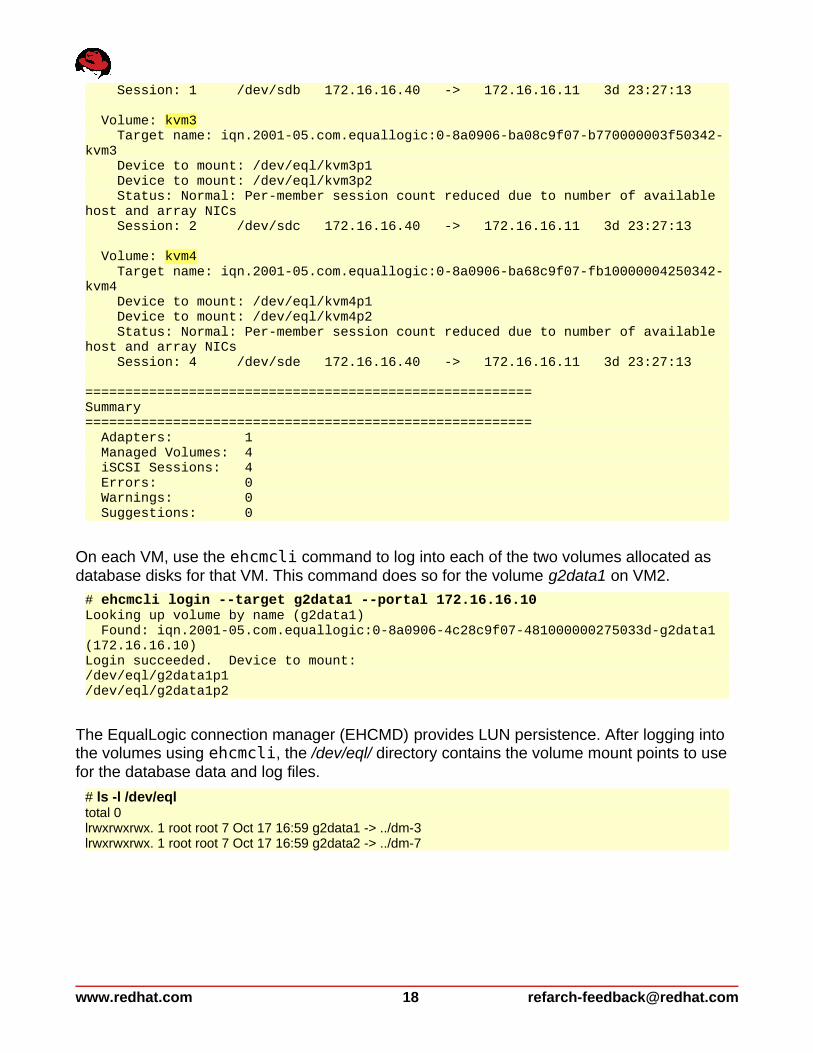
Session: 1 /dev/sdb 172.16.16.40 -> 172.16.16.11 3d 23:27:13
Volume: kvm3 Target name: iqn.2001-05.com.equallogic:0-8a0906-ba08c9f07-b770000003f50342-kvm3 Device to mount: /dev/eql/kvm3p1 Device to mount: /dev/eql/kvm3p2 Status: Normal: Per-member session count reduced due to number of available host and array NICs Session: 2 /dev/sdc 172.16.16.40 -> 172.16.16.11 3d 23:27:13
Volume: kvm4 Target name: iqn.2001-05.com.equallogic:0-8a0906-ba68c9f07-fb10000004250342-kvm4 Device to mount: /dev/eql/kvm4p1 Device to mount: /dev/eql/kvm4p2 Status: Normal: Per-member session count reduced due to number of available host and array NICs Session: 4 /dev/sde 172.16.16.40 -> 172.16.16.11 3d 23:27:13
========================================================Summary======================================================== Adapters: 1 Managed Volumes: 4 iSCSI Sessions: 4 Errors: 0 Warnings: 0 Suggestions: 0
On each VM, use the ehcmcli command to log into each of the two volumes allocated as database disks for that VM. This command does so for the volume g2data1 on VM2.
# ehcmcli login --target g2data1 --portal 172.16.16.10Looking up volume by name (g2data1) Found: iqn.2001-05.com.equallogic:0-8a0906-4c28c9f07-481000000275033d-g2data1 (172.16.16.10)Login succeeded. Device to mount:/dev/eql/g2data1p1/dev/eql/g2data1p2
The EqualLogic connection manager (EHCMD) provides LUN persistence. After logging into the volumes using ehcmcli, the /dev/eql/ directory contains the volume mount points to use for the database data and log files.
# ls -l /dev/eqltotal 0lrwxrwxrwx. 1 root root 7 Oct 17 16:59 g2data1 -> ../dm-3lrwxrwxrwx. 1 root root 7 Oct 17 16:59 g2data2 -> ../dm-7
www.redhat.com 18 [email protected]
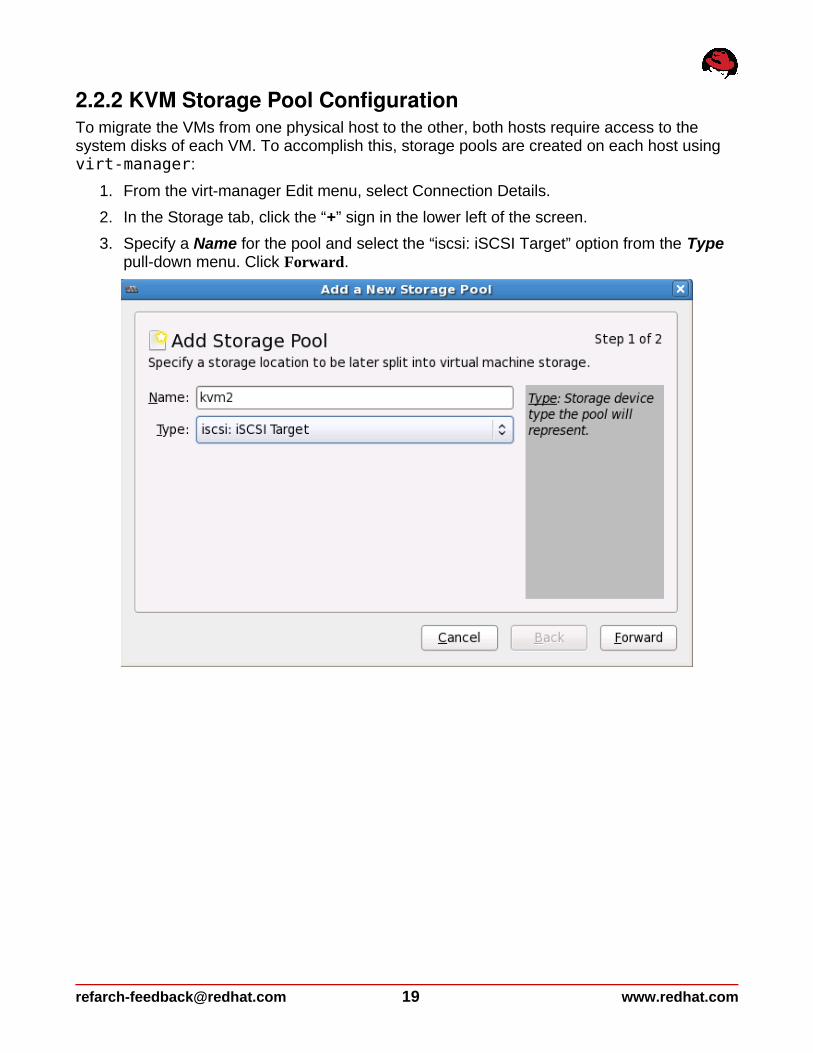
2.2.2 KVM Storage Pool ConfigurationTo migrate the VMs from one physical host to the other, both hosts require access to the system disks of each VM. To accomplish this, storage pools are created on each host using virt-manager:
1. From the virt-manager Edit menu, select Connection Details.
2. In the Storage tab, click the “+” sign in the lower left of the screen.
3. Specify a Name for the pool and select the “iscsi: iSCSI Target” option from the Type pull-down menu. Click Forward.
[email protected] 19 www.redhat.com
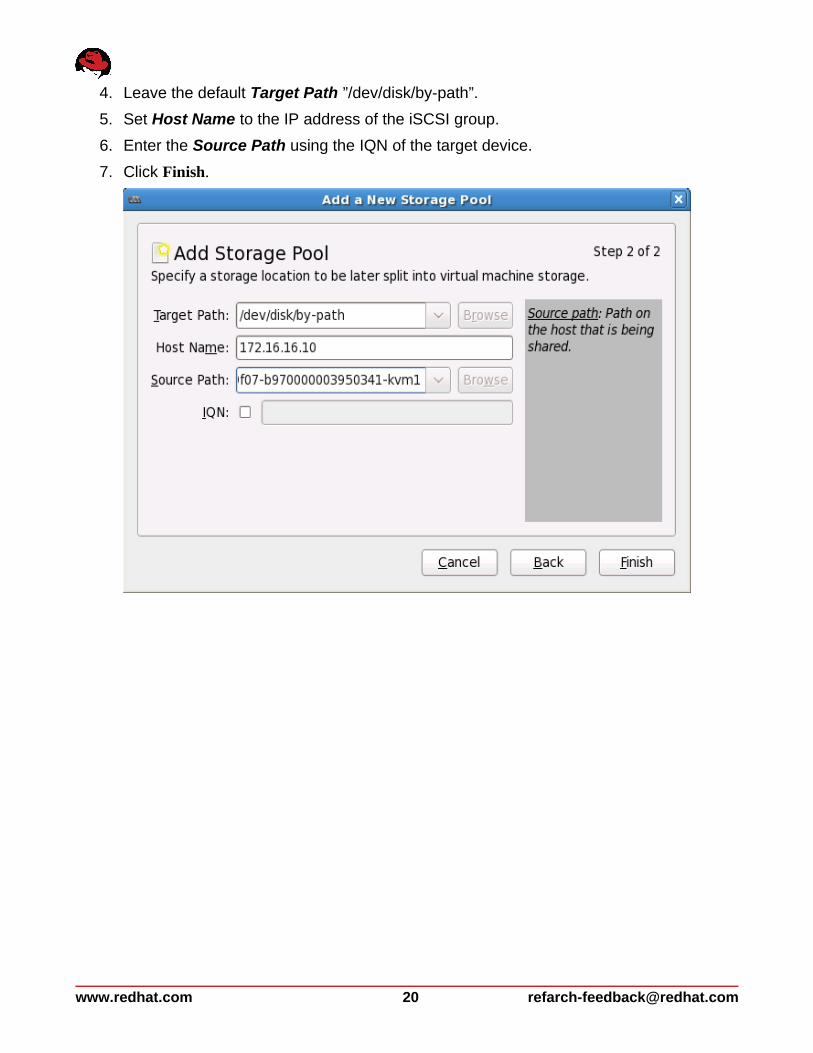
4. Leave the default Target Path ”/dev/disk/by-path”.
5. Set Host Name to the IP address of the iSCSI group.
6. Enter the Source Path using the IQN of the target device.
7. Click Finish.
www.redhat.com 20 [email protected]
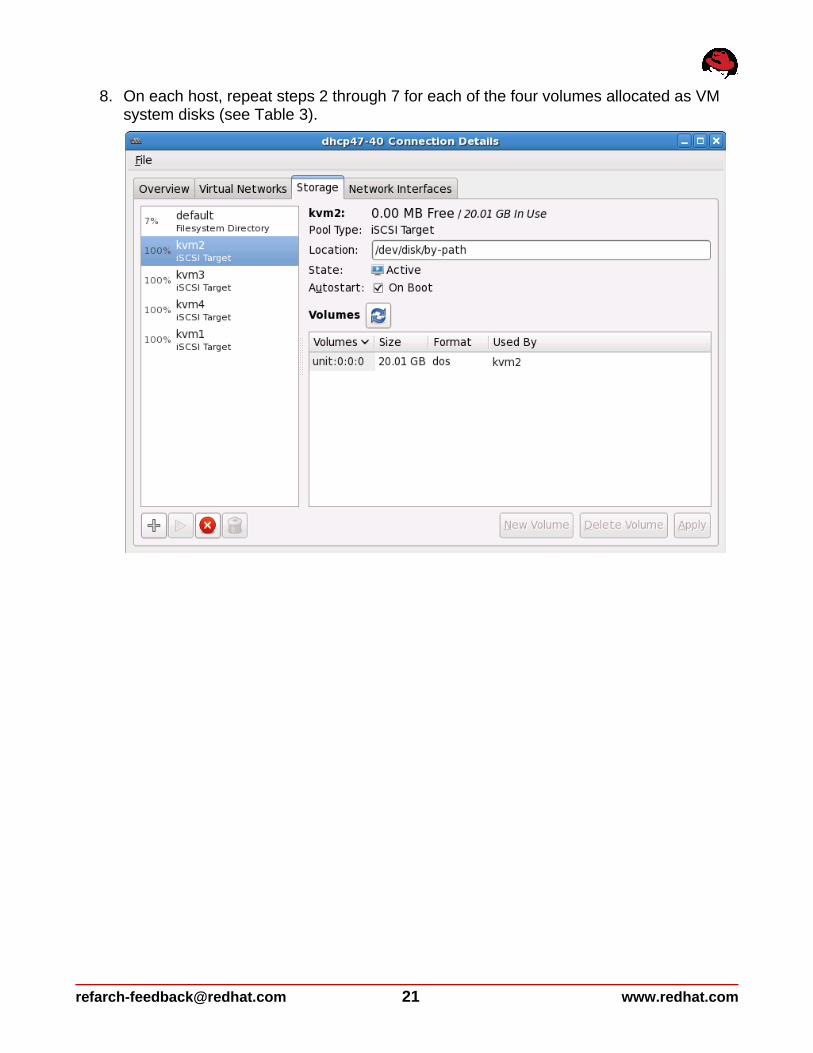
8. On each host, repeat steps 2 through 7 for each of the four volumes allocated as VM system disks (see Table 3).
[email protected] 21 www.redhat.com

2.3 Configuring the Hosts for MigrationA private LAN subnet is created exclusively for the VM migration and to minimize the impact of additional network traffic on the public LAN. The private LAN is created using 10 GbE to provide adequate bandwidth required for the VM migration. The time required to migrate a VM from one physical host to another is directly proportional to the size of VM’s memory and the amount of memory activity occurring at the time of migration.
Two network bridges are created to provide each VM access to the public network and the iSCSI storage. One bridge (br0, using interface em1) is used for public network traffic and the other (br2, using interface p2p1) for the iSCSI storage traffic. The iSCSI storage traffic interface is configured to use jumbo frames.
The network interface configuration files used in this demonstration are included in Appendix B.
Add firewall rules to allow SSH and libvirt traffic.
# iptables -A INPUT -p tcp --dport 22 -j ACCEPT # iptables -A OUTPUT -p tcp --sport 22 -j ACCEPT # iptables -I INPUT -p tcp --dport 49152:49261 -j ACCEPT
Configure passwordless SSH between hosts and VMs.
# ssh-keygen -t rsa -P "" # for i in 1 2 3 4 ; do ssh-copy-id -i ~/.ssh/id_rsa.pub vm$i ; done
Set the maximum migration bandwidth to take advantage of the 10GbE interconnect.
# virsh migrate-setspeed vm1 100000 # virsh migrate-setspeed vm2 100000 # virsh migrate-setspeed vm3 100000 # virsh migrate-setspeed vm4 100000
2.4 Virtual Machine CreationFour VMs are created using the four volumes in the storage pool as system disks. Two virtual network interfaces are created on each VM, one using br0 and the other using br2. Red Hat Enterprise Linux 6 is installed on each VM.
2.5 Install OracleAfter the VMs are installed and configured, install the RPMs for the Oracle database on each. The database software and OLTP workload kit are then installed. Each VM accesses and mounts the database data and log disks allocated for it (e.g., /dev/eql/g1data1, /dev/eql/g1data2).
www.redhat.com 22 [email protected]
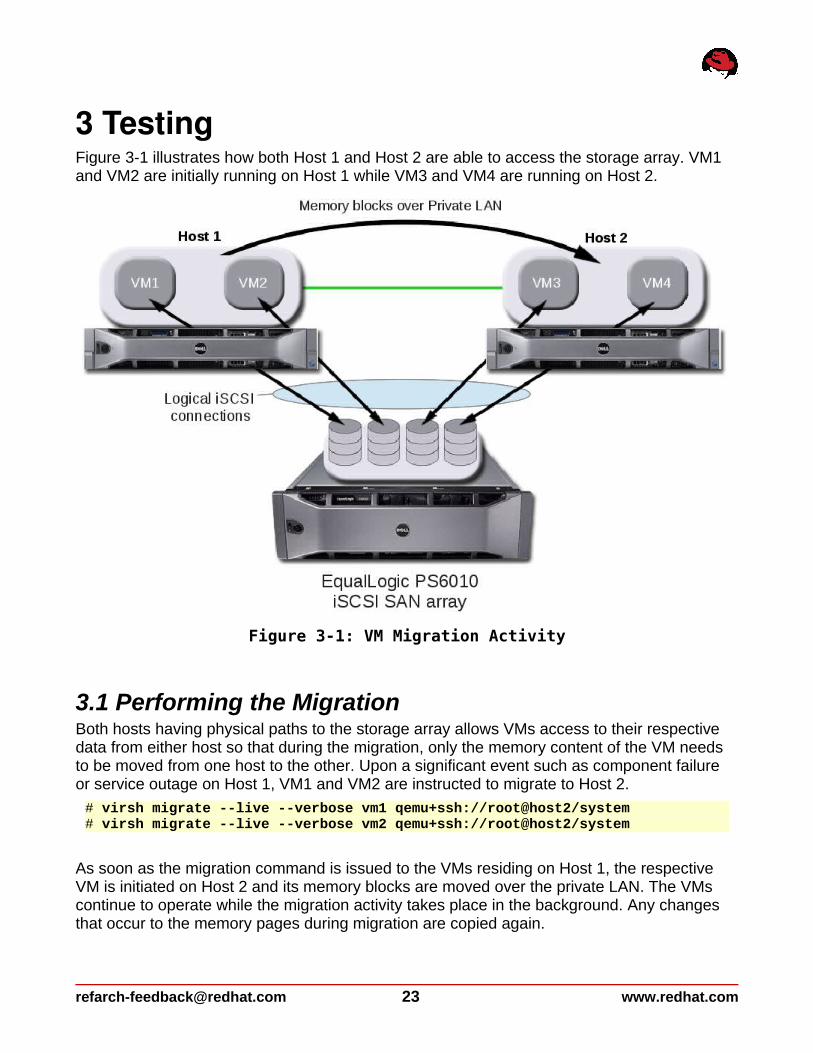
3 Testing Figure 3-1 illustrates how both Host 1 and Host 2 are able to access the storage array. VM1 and VM2 are initially running on Host 1 while VM3 and VM4 are running on Host 2.
3.1 Performing the MigrationBoth hosts having physical paths to the storage array allows VMs access to their respective data from either host so that during the migration, only the memory content of the VM needs to be moved from one host to the other. Upon a significant event such as component failure or service outage on Host 1, VM1 and VM2 are instructed to migrate to Host 2.
# virsh migrate --live --verbose vm1 qemu+ssh://root@host2/system# virsh migrate --live --verbose vm2 qemu+ssh://root@host2/system
As soon as the migration command is issued to the VMs residing on Host 1, the respective VM is initiated on Host 2 and its memory blocks are moved over the private LAN. The VMs continue to operate while the migration activity takes place in the background. Any changes that occur to the memory pages during migration are copied again.
[email protected] 23 www.redhat.com
Figure 3-1: VM Migration Activity
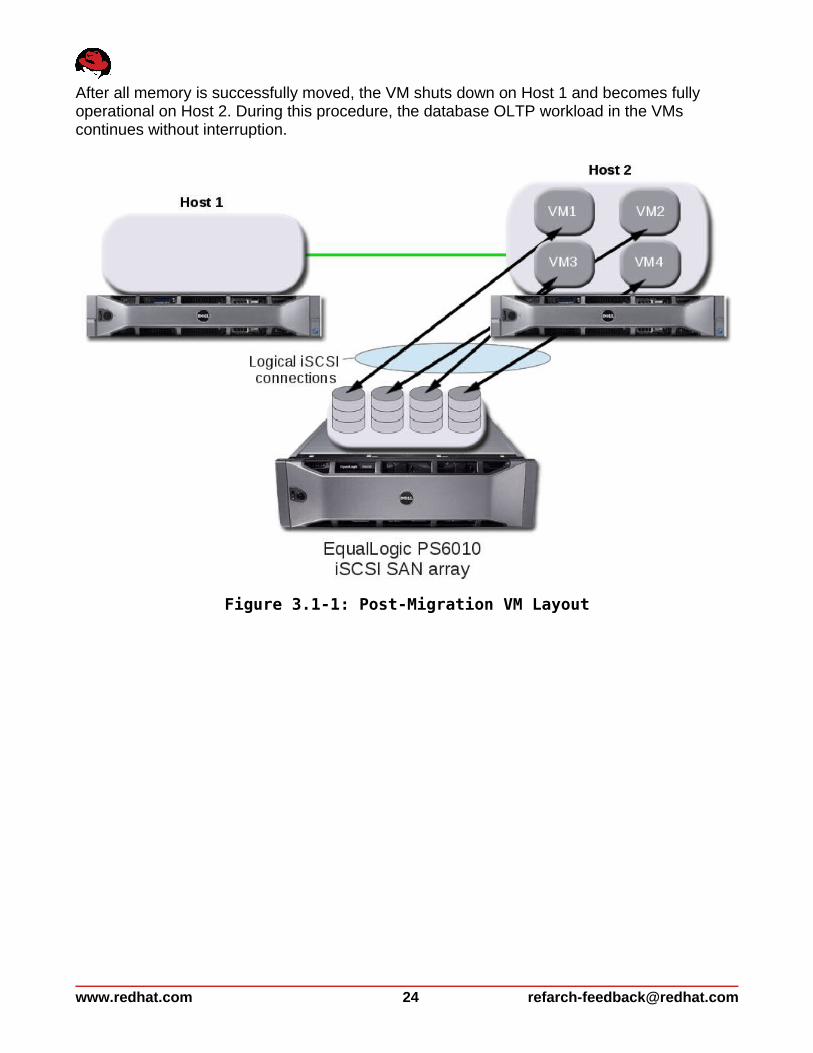
After all memory is successfully moved, the VM shuts down on Host 1 and becomes fully operational on Host 2. During this procedure, the database OLTP workload in the VMs continues without interruption.
www.redhat.com 24 [email protected]
Figure 3.1-1: Post-Migration VM Layout
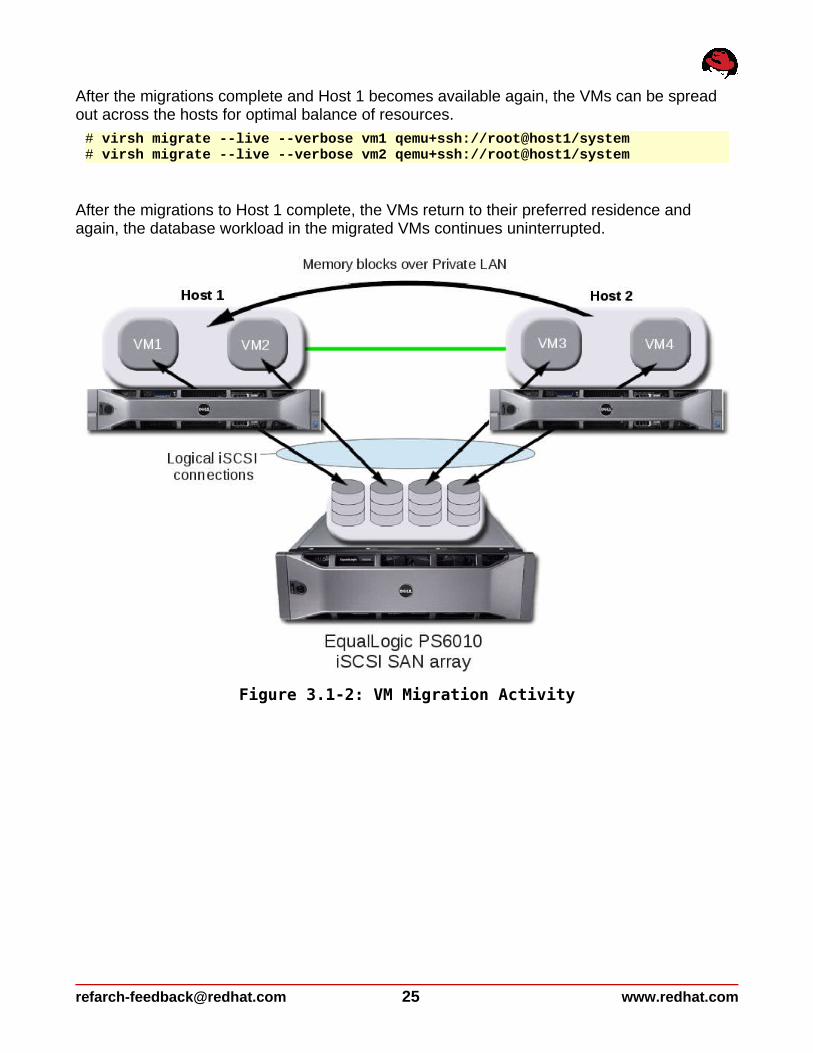
After the migrations complete and Host 1 becomes available again, the VMs can be spread out across the hosts for optimal balance of resources.
# virsh migrate --live --verbose vm1 qemu+ssh://root@host1/system# virsh migrate --live --verbose vm2 qemu+ssh://root@host1/system
After the migrations to Host 1 complete, the VMs return to their preferred residence and again, the database workload in the migrated VMs continues uninterrupted.
[email protected] 25 www.redhat.com
Figure 3.1-2: VM Migration Activity
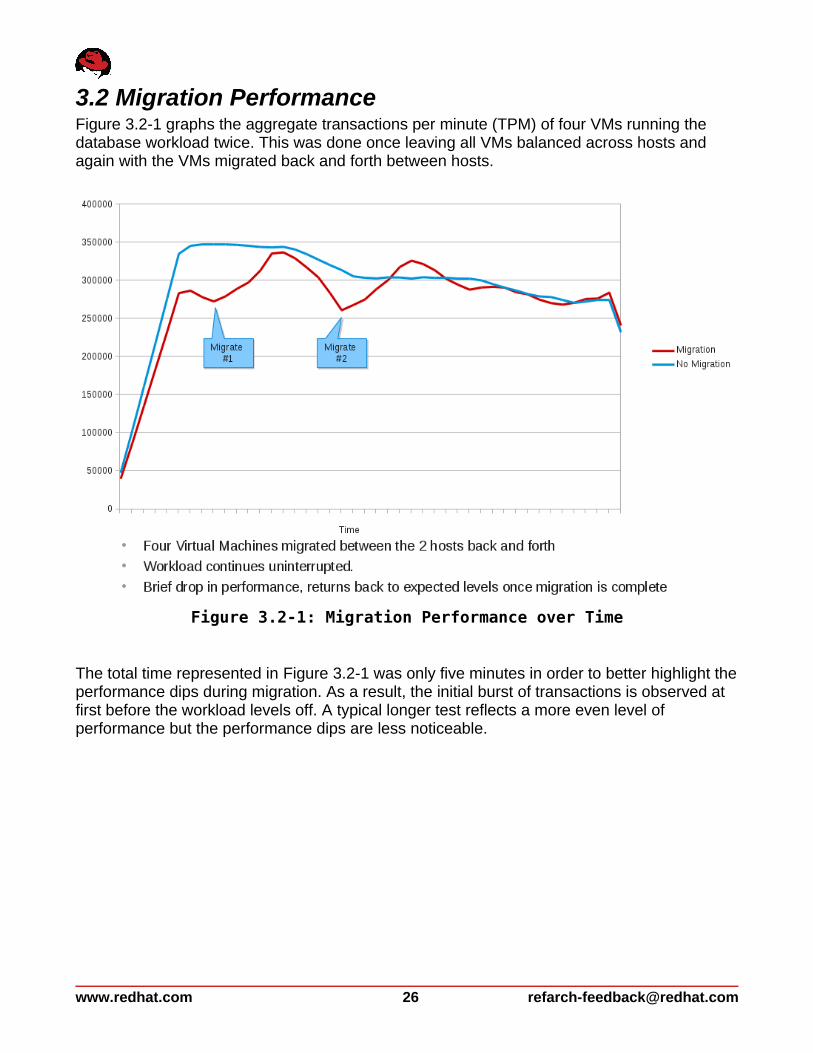
3.2 Migration PerformanceFigure 3.2-1 graphs the aggregate transactions per minute (TPM) of four VMs running the database workload twice. This was done once leaving all VMs balanced across hosts and again with the VMs migrated back and forth between hosts.
The total time represented in Figure 3.2-1 was only five minutes in order to better highlight the performance dips during migration. As a result, the initial burst of transactions is observed at first before the workload levels off. A typical longer test reflects a more even level of performance but the performance dips are less noticeable.
www.redhat.com 26 [email protected]
Figure 3.2-1: Migration Performance over Time
4 Tuning and Monitoring Tools
4.1 RHEL Performance Tuning and OptimizationThis section describes the tools used for optimizing performance.
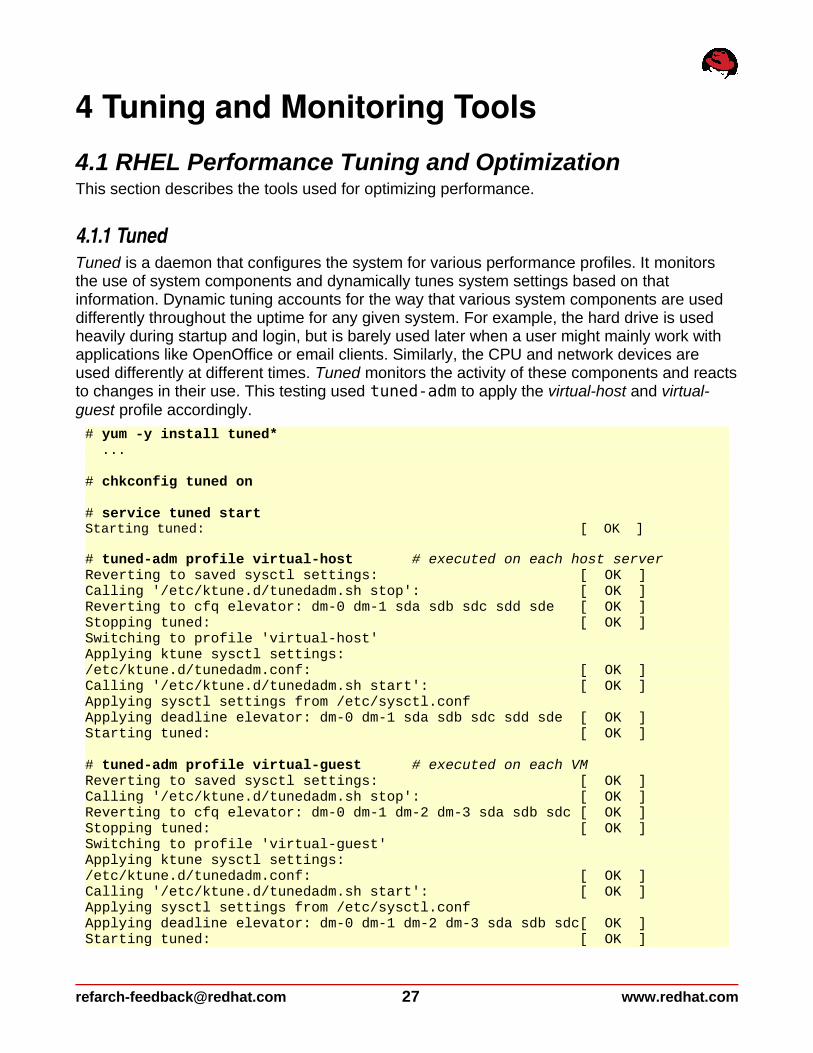
4.1.1 TunedTuned is a daemon that configures the system for various performance profiles. It monitors the use of system components and dynamically tunes system settings based on that information. Dynamic tuning accounts for the way that various system components are used differently throughout the uptime for any given system. For example, the hard drive is used heavily during startup and login, but is barely used later when a user might mainly work with applications like OpenOffice or email clients. Similarly, the CPU and network devices are used differently at different times. Tuned monitors the activity of these components and reacts to changes in their use. This testing used tuned-adm to apply the virtual-host and virtual-guest profile accordingly.
# yum -y install tuned* ...
# chkconfig tuned on
# service tuned start Starting tuned: [ OK ]
# tuned-adm profile virtual-host # executed on each host serverReverting to saved sysctl settings: [ OK ]Calling '/etc/ktune.d/tunedadm.sh stop': [ OK ]Reverting to cfq elevator: dm-0 dm-1 sda sdb sdc sdd sde [ OK ]Stopping tuned: [ OK ]Switching to profile 'virtual-host'Applying ktune sysctl settings:/etc/ktune.d/tunedadm.conf: [ OK ]Calling '/etc/ktune.d/tunedadm.sh start': [ OK ]Applying sysctl settings from /etc/sysctl.confApplying deadline elevator: dm-0 dm-1 sda sdb sdc sdd sde [ OK ]Starting tuned: [ OK ]
# tuned-adm profile virtual-guest # executed on each VMReverting to saved sysctl settings: [ OK ]Calling '/etc/ktune.d/tunedadm.sh stop': [ OK ]Reverting to cfq elevator: dm-0 dm-1 dm-2 dm-3 sda sdb sdc [ OK ]Stopping tuned: [ OK ]Switching to profile 'virtual-guest'Applying ktune sysctl settings:/etc/ktune.d/tunedadm.conf: [ OK ]Calling '/etc/ktune.d/tunedadm.sh start': [ OK ]Applying sysctl settings from /etc/sysctl.confApplying deadline elevator: dm-0 dm-1 dm-2 dm-3 sda sdb sdc[ OK ]Starting tuned: [ OK ]
[email protected] 27 www.redhat.com
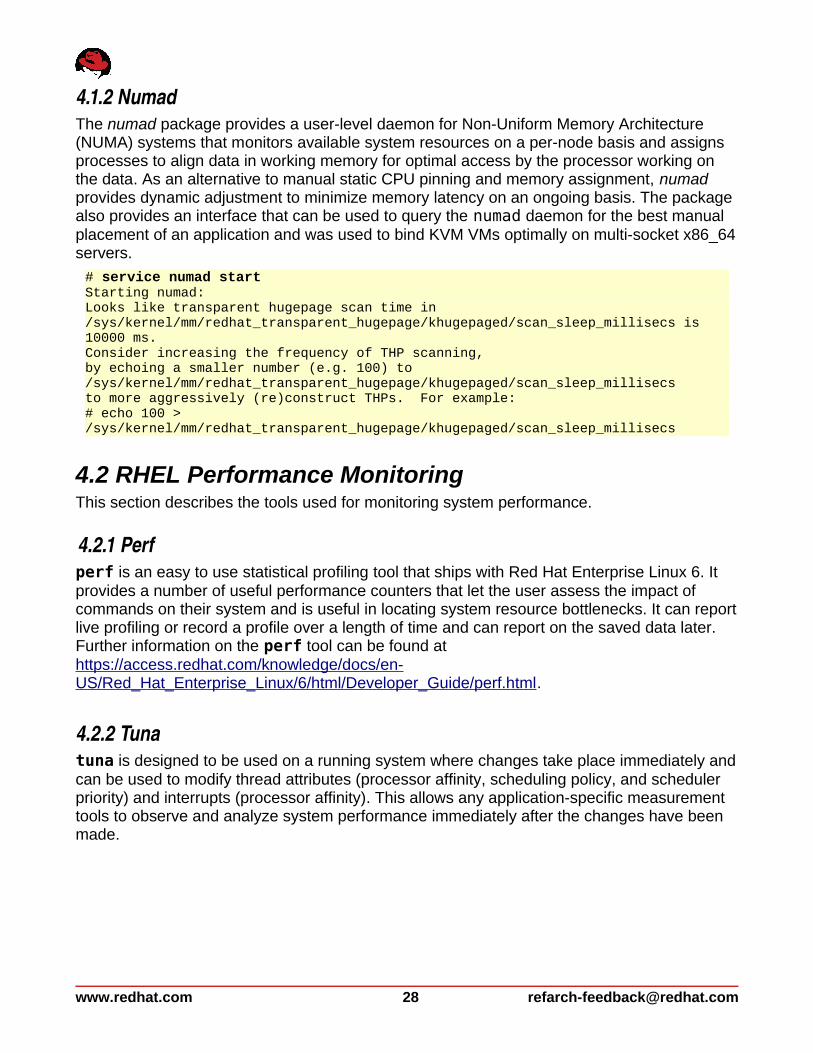
4.1.2 NumadThe numad package provides a user-level daemon for Non-Uniform Memory Architecture (NUMA) systems that monitors available system resources on a per-node basis and assigns processes to align data in working memory for optimal access by the processor working on the data. As an alternative to manual static CPU pinning and memory assignment, numad provides dynamic adjustment to minimize memory latency on an ongoing basis. The package also provides an interface that can be used to query the numad daemon for the best manual placement of an application and was used to bind KVM VMs optimally on multi-socket x86_64 servers.
# service numad startStarting numad: Looks like transparent hugepage scan time in /sys/kernel/mm/redhat_transparent_hugepage/khugepaged/scan_sleep_millisecs is 10000 ms.Consider increasing the frequency of THP scanning,by echoing a smaller number (e.g. 100) to /sys/kernel/mm/redhat_transparent_hugepage/khugepaged/scan_sleep_millisecsto more aggressively (re)construct THPs. For example:# echo 100 > /sys/kernel/mm/redhat_transparent_hugepage/khugepaged/scan_sleep_millisecs
4.2 RHEL Performance MonitoringThis section describes the tools used for monitoring system performance.
4.2.1 Perfperf is an easy to use statistical profiling tool that ships with Red Hat Enterprise Linux 6. It provides a number of useful performance counters that let the user assess the impact of commands on their system and is useful in locating system resource bottlenecks. It can report live profiling or record a profile over a length of time and can report on the saved data later. Further information on the perf tool can be found at https://access.redhat.com/knowledge/docs/en-US/Red_Hat_Enterprise_Linux/6/html/Developer_Guide/perf.html.
4.2.2 Tunatuna is designed to be used on a running system where changes take place immediately and can be used to modify thread attributes (processor affinity, scheduling policy, and scheduler priority) and interrupts (processor affinity). This allows any application-specific measurement tools to observe and analyze system performance immediately after the changes have been made.
www.redhat.com 28 [email protected]
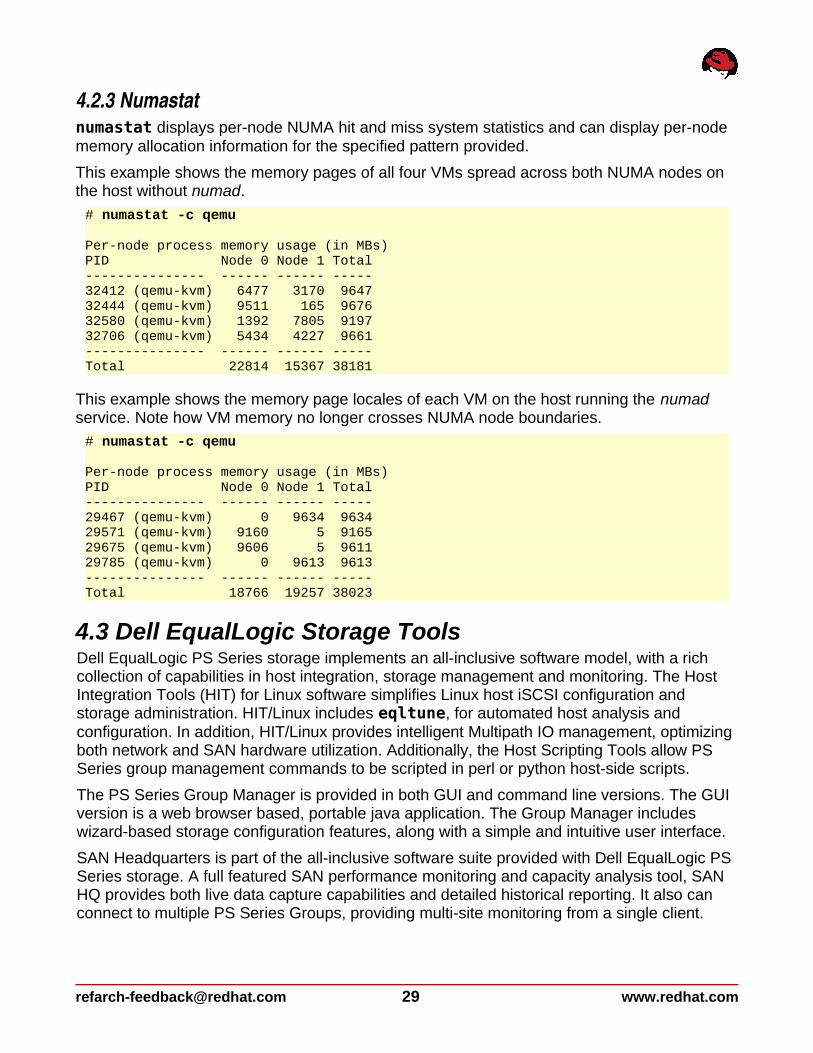
4.2.3 Numastatnumastat displays per-node NUMA hit and miss system statistics and can display per-node memory allocation information for the specified pattern provided.
This example shows the memory pages of all four VMs spread across both NUMA nodes on the host without numad.
# numastat -c qemu
Per-node process memory usage (in MBs)PID Node 0 Node 1 Total--------------- ------ ------ -----32412 (qemu-kvm) 6477 3170 964732444 (qemu-kvm) 9511 165 967632580 (qemu-kvm) 1392 7805 919732706 (qemu-kvm) 5434 4227 9661--------------- ------ ------ -----Total 22814 15367 38181
This example shows the memory page locales of each VM on the host running the numad service. Note how VM memory no longer crosses NUMA node boundaries.
# numastat -c qemu
Per-node process memory usage (in MBs)PID Node 0 Node 1 Total--------------- ------ ------ -----29467 (qemu-kvm) 0 9634 963429571 (qemu-kvm) 9160 5 916529675 (qemu-kvm) 9606 5 961129785 (qemu-kvm) 0 9613 9613--------------- ------ ------ -----Total 18766 19257 38023
4.3 Dell EqualLogic Storage Tools Dell EqualLogic PS Series storage implements an all-inclusive software model, with a rich collection of capabilities in host integration, storage management and monitoring. The Host Integration Tools (HIT) for Linux software simplifies Linux host iSCSI configuration and storage administration. HIT/Linux includes eqltune, for automated host analysis and configuration. In addition, HIT/Linux provides intelligent Multipath IO management, optimizing both network and SAN hardware utilization. Additionally, the Host Scripting Tools allow PS Series group management commands to be scripted in perl or python host-side scripts.
The PS Series Group Manager is provided in both GUI and command line versions. The GUI version is a web browser based, portable java application. The Group Manager includes wizard-based storage configuration features, along with a simple and intuitive user interface.
SAN Headquarters is part of the all-inclusive software suite provided with Dell EqualLogic PS Series storage. A full featured SAN performance monitoring and capacity analysis tool, SAN HQ provides both live data capture capabilities and detailed historical reporting. It also can connect to multiple PS Series Groups, providing multi-site monitoring from a single client.
[email protected] 29 www.redhat.com
5 What Does It All Mean?The testing conducted by Red Hat and Dell proves that Red Hat Enterprise Linux with the KVM hypervisor is an ideal platform for building highly-available virtualized Oracle databases on commodity x86 hardware. Built on top of end-to-end Dell hardware infrastructure, this solution represents collaborative efforts in which Red Hat and its industry partners participate to ensure interoperability and performance that directly benefit their mutual customers. The Dell EqualLogic Host Integration Tools simplify configuration and automate iSCSI storage operations. This type of testing removes the burden from customers of having to try out every solution in their own environment or the uncertainty of having to deploy an untested solution.
Testing also demonstrates that customers deploying databases and applications in virtualized environments not only have an opportunity to increase physical server utilization, but also increase availability of their enterprise infrastructure by seamlessly migrating VM instances to different physical hardware without degradation of services provided. Additionally, customers could rely on VM migrations in the following cases:
• Hardware upgrades – By moving the VMs to newer hardware, users can take advantage of performance improvements without having to change the operating environment of their applications.
• Hardware maintenance – Users do not have to bring down their operating environments for standard maintenance, but instead can migrate to different hardware, complete the maintenance effort on affected systems, and migrate the VMs back to the original hardware.
• Failover – In the event of a physical host failure VMs can be started on another (standby or even active) host. When the outage ends, those VMs can be migrated without interruption back to the original host. While that automated functionality is outside the scope of this document it could be accomplished with Red Hat Cluster Suite (RHCS) software. Refer to list of supporting documentation in Appendix A for further information.
In conclusion, if your organization is looking to ensure business continuity by maintaining access to your mission-critical databases, Red Hat and Dell offer best practices and proven implementation steps for setting up the Oracle Database and storage, and configuring, running, and migrating VMs. The latest features of Red Hat Enterprise Linux automatically manage memory locality and the footprint of several VMs in multi-tenancy environments.
www.redhat.com 30 [email protected]
Appendix A: References and Further Information
1. For details on how to deploy Oracle Database 11g on Red Hat Enterprise Linux 6 for several types of back-end storage, including Fusion-io ioDrives, see Oracle Database 11g Release 2 on Red Hat Enterprise Linux 6: Deployment Recommendations March 2012, http://www.redhat.com/resourcelibrary/reference-architectures/deploying-oracle-11gr2-on-rhel-6
2. For more information on Red Hat Cluster Suite deployment and best practices watch this free webinar, Deploying a highly available service with Red Hat Cluster Suite, https://www.redhat.com/about/events-webinars/webinars/2012-05-08-taste-of-training-deploying-a-highly-available-service-with-red-hat-cluster-suite
3. Other Red Hat Reference Architectures and performance briefs including Red Hat Enterprise Linux KVM Hypervisor I/O are located on the Red Hat Reference Architecture page at http://www.redhat.com/resourcelibrary/reference-architectures/
4. For information on Dell EqualLogic PS Series virtualized storage, http://www.dell.com/equallogic
5. To download Dell EqualLogic PS Series software (HIT/Linux, Host Scripting Tools, …), log on to the EqualLogic Support site, https://support.equallogic.com/secure/login.aspx
6. For information on Dell PowerEdge Servers, http://www.dell.com/poweredge
7. For information on Dell PowerConnect Switches, http://www.dell.com/us/enterprise/p/switch-powerconnect
[email protected] 31 www.redhat.com
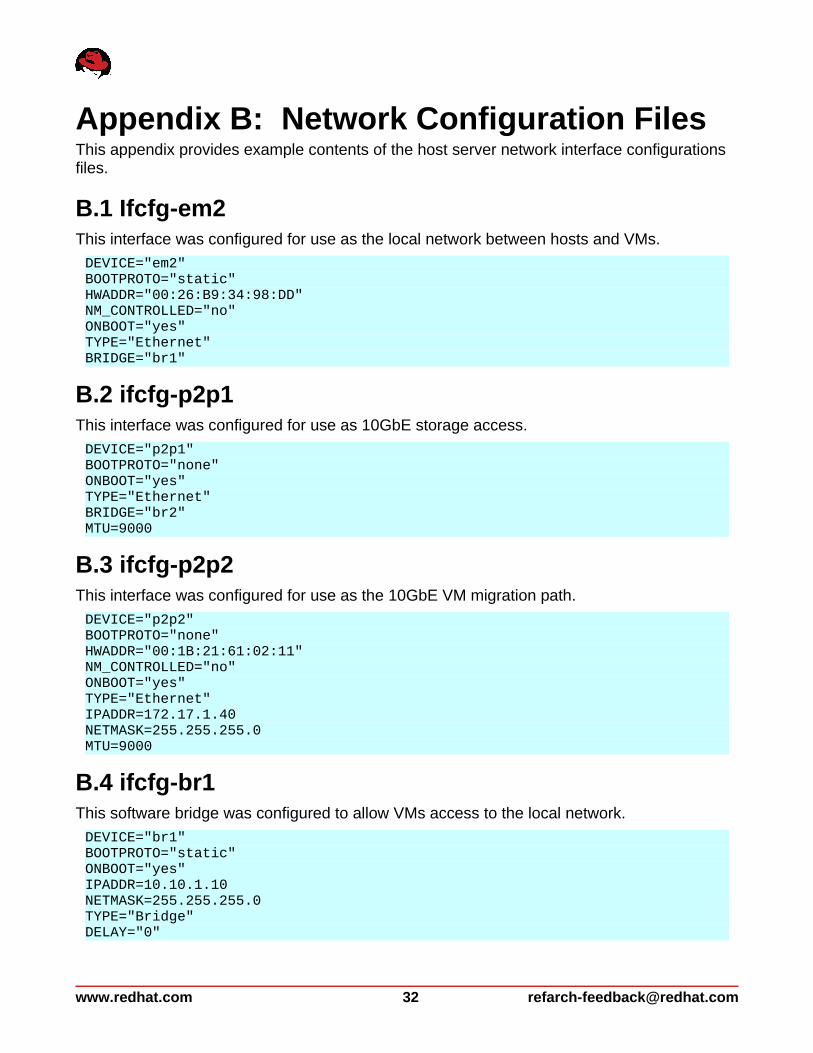
Appendix B: Network Configuration FilesThis appendix provides example contents of the host server network interface configurations files.
B.1 Ifcfg-em2This interface was configured for use as the local network between hosts and VMs.
DEVICE="em2" BOOTPROTO="static" HWADDR="00:26:B9:34:98:DD" NM_CONTROLLED="no" ONBOOT="yes" TYPE="Ethernet" BRIDGE="br1"
B.2 ifcfg-p2p1This interface was configured for use as 10GbE storage access.
DEVICE="p2p1" BOOTPROTO="none" ONBOOT="yes" TYPE="Ethernet" BRIDGE="br2" MTU=9000
B.3 ifcfg-p2p2This interface was configured for use as the 10GbE VM migration path.
DEVICE="p2p2" BOOTPROTO="none" HWADDR="00:1B:21:61:02:11" NM_CONTROLLED="no" ONBOOT="yes" TYPE="Ethernet" IPADDR=172.17.1.40 NETMASK=255.255.255.0 MTU=9000
B.4 ifcfg-br1This software bridge was configured to allow VMs access to the local network.
DEVICE="br1" BOOTPROTO="static" ONBOOT="yes" IPADDR=10.10.1.10 NETMASK=255.255.255.0 TYPE="Bridge" DELAY="0"
www.redhat.com 32 [email protected]
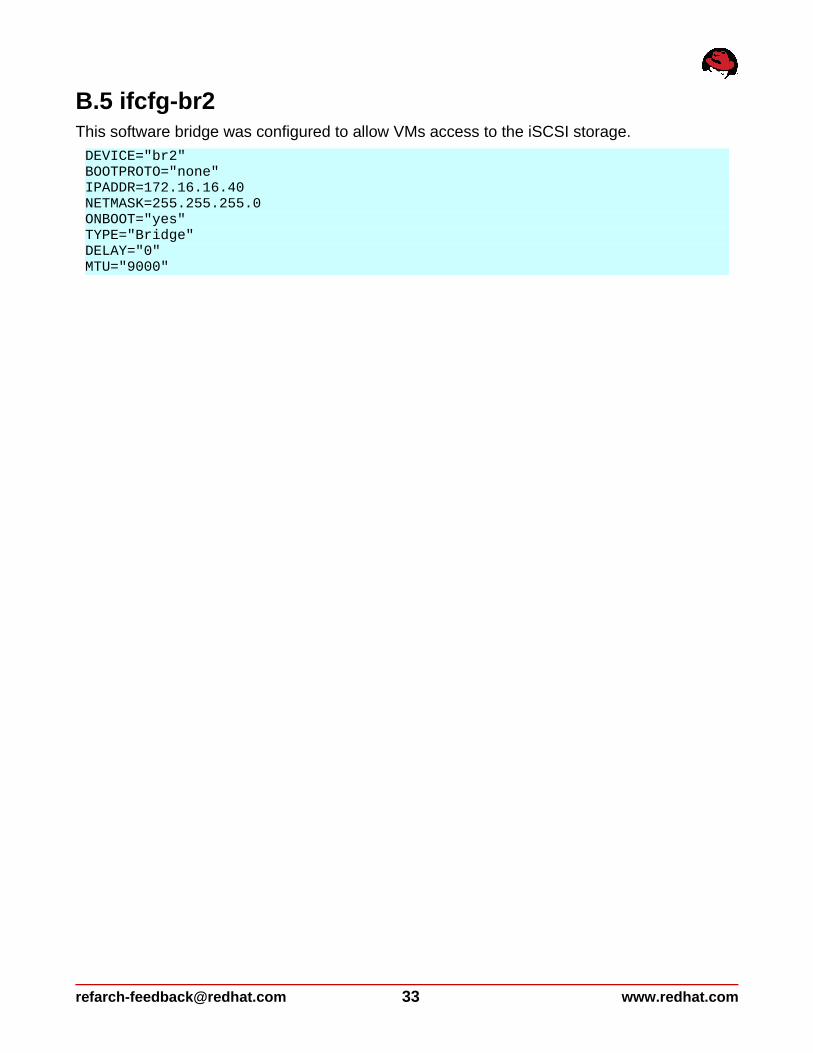
B.5 ifcfg-br2This software bridge was configured to allow VMs access to the iSCSI storage.
DEVICE="br2" BOOTPROTO="none" IPADDR=172.16.16.40 NETMASK=255.255.255.0 ONBOOT="yes" TYPE="Bridge" DELAY="0" MTU="9000"
[email protected] 33 www.redhat.com
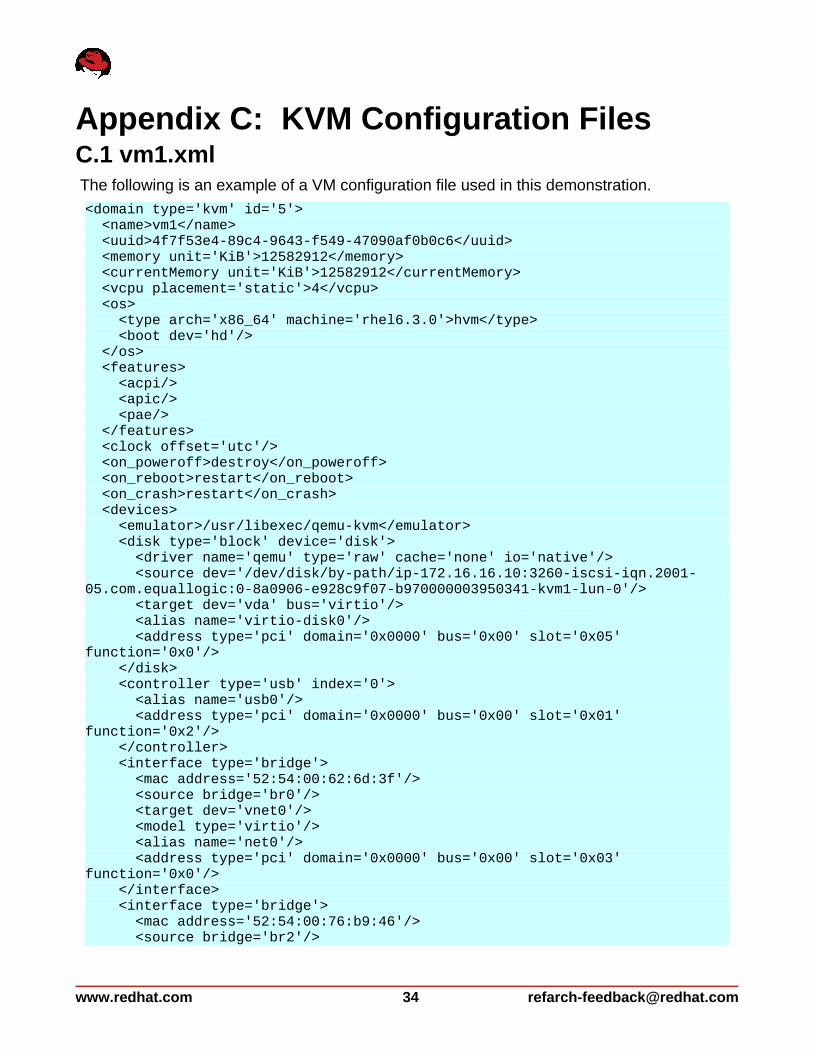
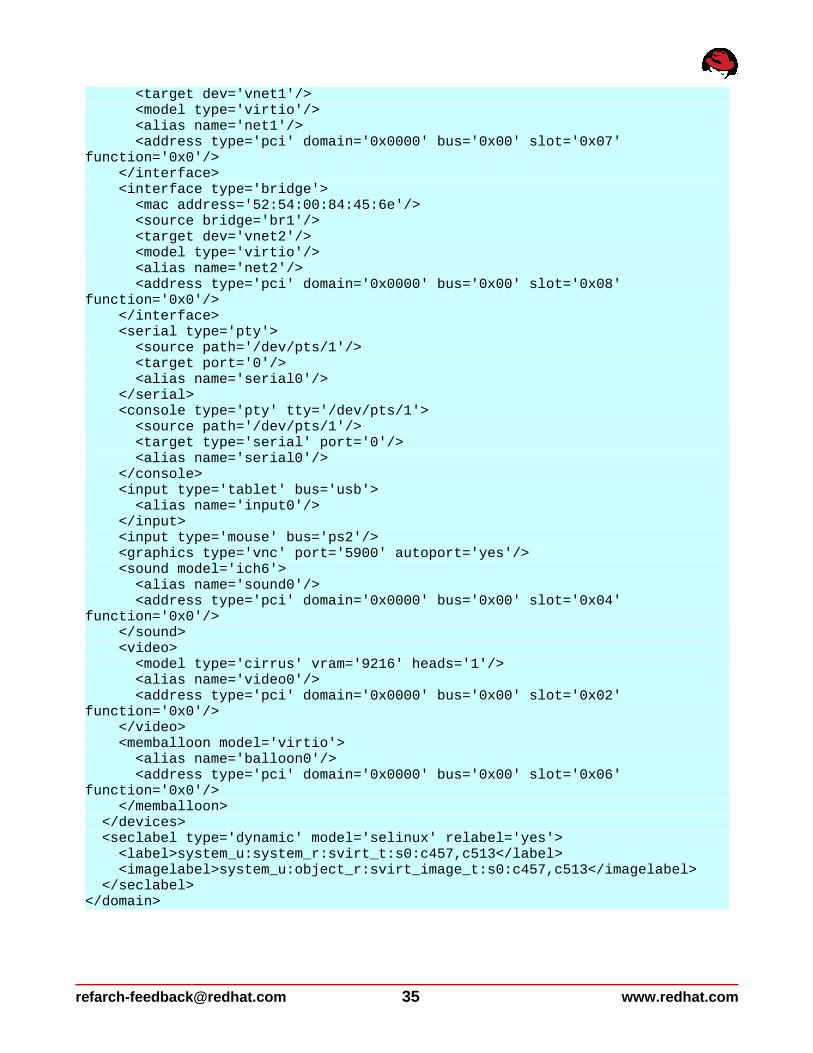
Appendix C: KVM Configuration FilesC.1 vm1.xml The following is an example of a VM configuration file used in this demonstration.
<domain type='kvm' id='5'> <name>vm1</name> <uuid>4f7f53e4-89c4-9643-f549-47090af0b0c6</uuid> <memory unit='KiB'>12582912</memory> <currentMemory unit='KiB'>12582912</currentMemory> <vcpu placement='static'>4</vcpu> <os> <type arch='x86_64' machine='rhel6.3.0'>hvm</type> <boot dev='hd'/> </os> <features> <acpi/> <apic/> <pae/> </features> <clock offset='utc'/> <on_poweroff>destroy</on_poweroff> <on_reboot>restart</on_reboot> <on_crash>restart</on_crash> <devices> <emulator>/usr/libexec/qemu-kvm</emulator> <disk type='block' device='disk'> <driver name='qemu' type='raw' cache='none' io='native'/> <source dev='/dev/disk/by-path/ip-172.16.16.10:3260-iscsi-iqn.2001-05.com.equallogic:0-8a0906-e928c9f07-b970000003950341-kvm1-lun-0'/> <target dev='vda' bus='virtio'/> <alias name='virtio-disk0'/> <address type='pci' domain='0x0000' bus='0x00' slot='0x05' function='0x0'/> </disk> <controller type='usb' index='0'> <alias name='usb0'/> <address type='pci' domain='0x0000' bus='0x00' slot='0x01' function='0x2'/> </controller> <interface type='bridge'> <mac address='52:54:00:62:6d:3f'/> <source bridge='br0'/> <target dev='vnet0'/> <model type='virtio'/> <alias name='net0'/> <address type='pci' domain='0x0000' bus='0x00' slot='0x03' function='0x0'/> </interface> <interface type='bridge'> <mac address='52:54:00:76:b9:46'/> <source bridge='br2'/>
www.redhat.com 34 [email protected]
<target dev='vnet1'/> <model type='virtio'/> <alias name='net1'/> <address type='pci' domain='0x0000' bus='0x00' slot='0x07' function='0x0'/> </interface> <interface type='bridge'> <mac address='52:54:00:84:45:6e'/> <source bridge='br1'/> <target dev='vnet2'/> <model type='virtio'/> <alias name='net2'/> <address type='pci' domain='0x0000' bus='0x00' slot='0x08' function='0x0'/> </interface> <serial type='pty'> <source path='/dev/pts/1'/> <target port='0'/> <alias name='serial0'/> </serial> <console type='pty' tty='/dev/pts/1'> <source path='/dev/pts/1'/> <target type='serial' port='0'/> <alias name='serial0'/> </console> <input type='tablet' bus='usb'> <alias name='input0'/> </input> <input type='mouse' bus='ps2'/> <graphics type='vnc' port='5900' autoport='yes'/> <sound model='ich6'> <alias name='sound0'/> <address type='pci' domain='0x0000' bus='0x00' slot='0x04' function='0x0'/> </sound> <video> <model type='cirrus' vram='9216' heads='1'/> <alias name='video0'/> <address type='pci' domain='0x0000' bus='0x00' slot='0x02' function='0x0'/> </video> <memballoon model='virtio'> <alias name='balloon0'/> <address type='pci' domain='0x0000' bus='0x00' slot='0x06' function='0x0'/> </memballoon> </devices> <seclabel type='dynamic' model='selinux' relabel='yes'> <label>system_u:system_r:svirt_t:s0:c457,c513</label> <imagelabel>system_u:object_r:svirt_image_t:s0:c457,c513</imagelabel> </seclabel> </domain>
[email protected] 35 www.redhat.com
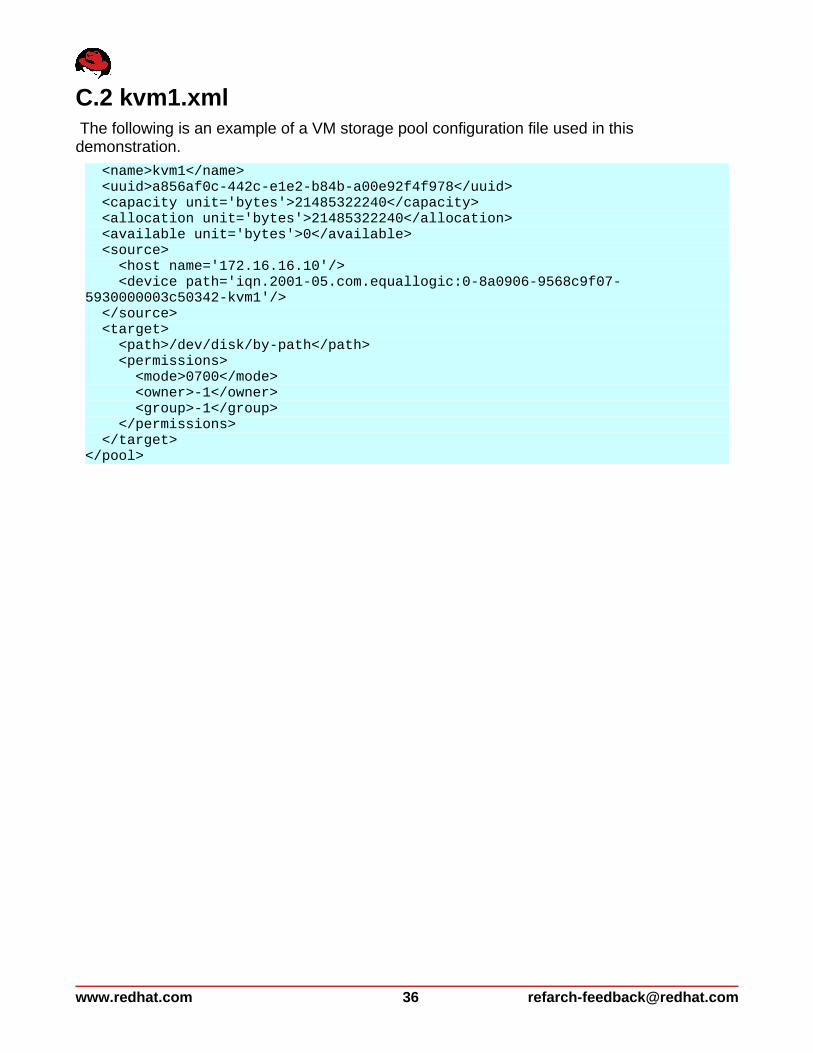
C.2 kvm1.xml The following is an example of a VM storage pool configuration file used in this demonstration.
<name>kvm1</name> <uuid>a856af0c-442c-e1e2-b84b-a00e92f4f978</uuid> <capacity unit='bytes'>21485322240</capacity> <allocation unit='bytes'>21485322240</allocation> <available unit='bytes'>0</available> <source> <host name='172.16.16.10'/> <device path='iqn.2001-05.com.equallogic:0-8a0906-9568c9f07-5930000003c50342-kvm1'/> </source> <target> <path>/dev/disk/by-path</path> <permissions> <mode>0700</mode> <owner>-1</owner> <group>-1</group> </permissions> </target></pool>
www.redhat.com 36 [email protected]
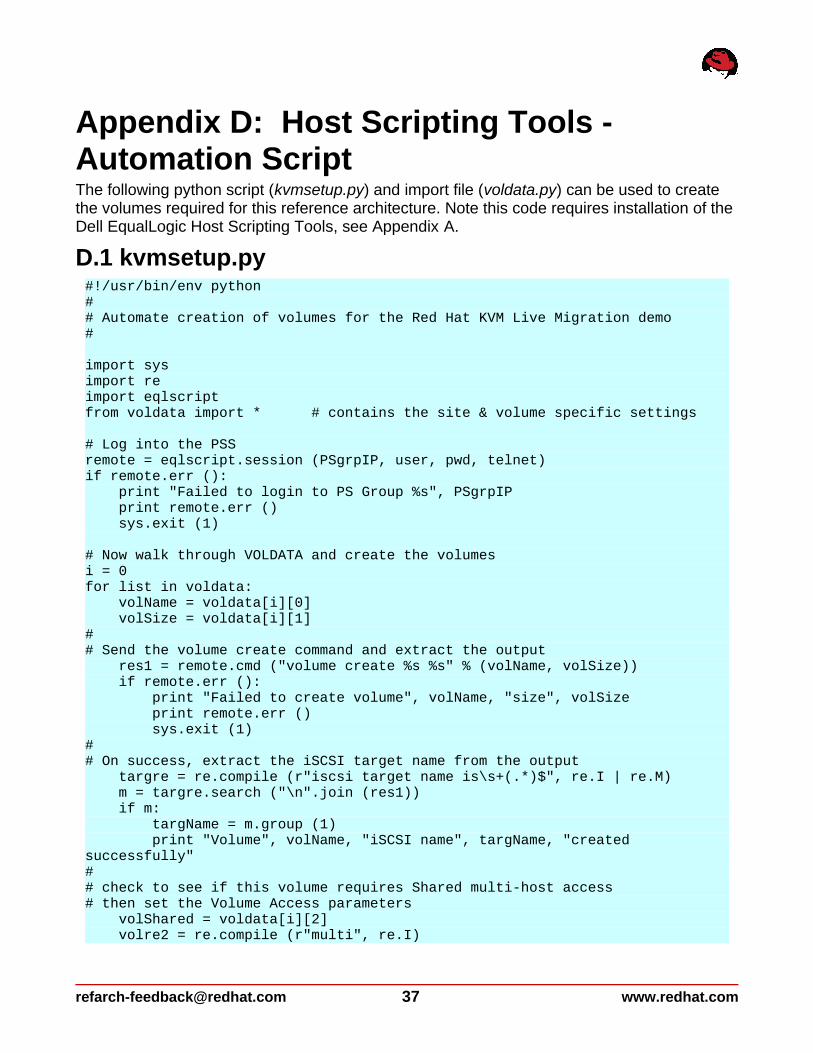
Appendix D: Host Scripting Tools - Automation ScriptThe following python script (kvmsetup.py) and import file (voldata.py) can be used to create the volumes required for this reference architecture. Note this code requires installation of the Dell EqualLogic Host Scripting Tools, see Appendix A.
D.1 kvmsetup.py#!/usr/bin/env python## Automate creation of volumes for the Red Hat KVM Live Migration demo#
import sysimport reimport eqlscriptfrom voldata import * # contains the site & volume specific settings
# Log into the PSSremote = eqlscript.session (PSgrpIP, user, pwd, telnet)if remote.err (): print "Failed to login to PS Group %s", PSgrpIP print remote.err () sys.exit (1)
# Now walk through VOLDATA and create the volumesi = 0for list in voldata: volName = voldata[i][0] volSize = voldata[i][1]## Send the volume create command and extract the output res1 = remote.cmd ("volume create %s %s" % (volName, volSize)) if remote.err (): print "Failed to create volume", volName, "size", volSize print remote.err () sys.exit (1)## On success, extract the iSCSI target name from the output targre = re.compile (r"iscsi target name is\s+(.*)$", re.I | re.M) m = targre.search ("\n".join (res1)) if m: targName = m.group (1) print "Volume", volName, "iSCSI name", targName, "created successfully"## check to see if this volume requires Shared multi-host access# then set the Volume Access parameters volShared = voldata[i][2] volre2 = re.compile (r"multi", re.I)
[email protected] 37 www.redhat.com

if volre2.match (volShared): volIP1 = voldata[i][3] volIP2 = voldata[i][4] res2 = remote.cmd ("volume select %s multihost-access enable" % (volName)) res2 = remote.cmd ("volume select %s access create ipaddress %s" % (volName, volIP1)) res2 = remote.cmd ("volume select %s access create ipaddress %s" % (volName, volIP2)) print "Multi-host access set to: ", volIP1, volIP2 else: volIP = voldata[i][3] res2 = remote.cmd ("volume select %s access create ipaddress %s" % (volName, volIP)) print "Single host access set to: ", volIP## set list index for next voldata i = i + 1
# END FOR
remote.logout ()print "Complete - created %s volumes on %s" % (i, PSgrpIP)sys.exit (0)
D.2 voldata.py#!/usr/bin/env python## Defines site specific values, storage array group settings# and Volume characteristics#
# PS Group settingsPSgrpIP = "172.16.25.20"user = "grpadmin"pwd = "<password>"telnet = False
# Volume characteristics: name, size, access, IP(s)voldata = [['G1data1', '100GB', 'single', '172.16.16.91'],['G1data2', '80GB', 'single', '172.16.16.91'],['G2data1', '100GB', 'single', '172.16.16.92'],['G2data2', '80GB', 'single', '172.16.16.92'],['G3data1', '100GB', 'single', '172.16.16.93'],['G3data2', '80GB', 'single', '172.16.16.93'],['G4data1', '100GB', 'single', '172.16.16.94'],['G4data2', '80GB', 'single', '172.16.16.94'],['kvm1', '20GB', 'multi', '172.16.16.40', '172.16.16.248'],['kvm2', '20GB', 'multi', '172.16.16.40', '172.16.16.248'],['kvm3', '20GB', 'multi', '172.16.16.40', '172.16.16.248'],['kvm4', '20GB', 'multi', '172.16.16.40', '172.16.16.248']]# END voldata
www.redhat.com 38 [email protected]