vision quick reference guide for clinicians quick reference... · 2014-07-17 · 5 vision quick...
TRANSCRIPT

Copyright © INPS Ltd 2014
The Bread Factory, 1A Broughton Street, Battersea, London, SW8 3QJ T: +44 (0) 207 501700 F:+44 (0) 207 5017100 W: www.inps.co.uk
Vision 3
Vision Quick Reference Guide for Clinicians
Locums
Registrars
New Clinical Users
Refresher for Existing Users

Copyright Notice
© 2014 INPS
All Rights Reserved.
No part of this document may be photocopied, reproduced, stored in a retrieval system or
transmitted in any form or by any means, whether electronic, mechanical, or otherwise,
without the prior written permission of INPS.
No warranty of accuracy is given concerning the contents of the information contained in
this publication. To the extent permitted by law, no liability (including liability to any person
by reason of negligence) will be accepted by INPS, its subsidiaries or employees for any
direct or indirect loss or damage caused by omissions from or inaccuracies in this
document.
INPS reserves the right to change without notice the contents of this publication and the
software to which it relates.
Product and company names herein may be the trademarks of their respective owners.
INPS Ltd.
The Bread Factory
1a Broughton Street
London
SW8 3QJ
Website: www.inps.co.uk

iii
Contents
VISION QUICK REFERENCE GUIDE FOR CLINICIANS 5
What this Quick Reference Guide covers 5 Who is the Quick Reference Guide designed for? 5
Starting Vision and Sign on 6
Vision Front Screen 7
Consultation Manager Overview 9 Starting a Consultation 10 Select a Patient 11 Appointments List 12 Finding Data 13 Adding Data 14 Updating an Entry 17 Add Acute Prescription and Print 18
Drug Checks 21 Add Medication to problem 22 Print the Prescription 22
Make an Acute into a Repeat 24 Add Repeat Prescription 24 Issue Repeat Prescription 26
What if you cannot find the repeat master in Step 5 27 Re-authorise Repeat 28 Drug Check Displays 29
Drug Interactions warning signals 29 Drug Doubling Warning Signals 30 Contraindication warning signals 30
Add Drug Allergy 31 Add Med 3 32 Add Smoker / Non-smoker/ Ex-Smoker / Smoking Cessation advice 33
Add Smoker 33 Add Smoking Cessation Advice 33 Add Non-Smoker 33 Add Ex-Smoker 34
Add Blood Pressure and List BPs and Graph 34 Graphs 35 Add Weight and Height 36 Add Immunisations 37
Add Contraindicated immunisations 39 Add Parental Consent 39
Add Contraception and Prescribe Oral Contraceptive 40 Add Peak Flow Record 41 List Test Results 42 Add Cervical Cytology 43 Add a Referral (non-electronic) 44

iv
Medical Insurance Report 45
Exit from Vision front menu 46
INDEX 47
5
Vision Quick Reference Guide for Clinicians
What this Quick Reference Guide covers This Quick Reference Guide is designed to help a clinical user find the simplest and
quickest method to carry out a task in an unambiguous way. It concentrates on which
keys to press. There may well be other ways to carry out the same task and many of
these are explored in other relevant sections of the INPS user guides with
accompanying screenshots.
Some of these basic tasks in Vision are covered:
Login to Vision
Getting Started in Vision
How to select a patient
Using your Appointments List
How to find and add clinical data in Consultation Manager
Adding and issuing therapy
Who is the Quick Reference Guide designed for?
Locums
Registrars
New clinical users to Vision
Users just trained, wanting an aide-memoire
Any user wanting a quick recap of a simple task

6
Starting Vision and Sign on To sign in to Vision:
Note – If you are in England and are logging into Vision with your
Smartcard, you need to authenticate your card first by putting it in the
card reader and entering your passcode.
1. Either double click with the left-hand mouse button on the Vision icon;
or click on the minimised Vision icon on your Task bar.
Vision Login screen
2. At the Vision Login screen, select your Login Name.
If the Login Name box appears empty (this is may be your practice setting),
type in your login name - if you are not sure what this is, see your system
administrator.
3. Once your login name is displayed, click in the Password box and enter your
password. ******** display as you type.
4. If you have more than one surgery location, select your required location from
the Site list.
5. Click OK.
6. The Vision front screen is displayed.
Note - If you are in England and have authenticated your
Smartcard, you are taken to the Vision front screen after double
clicking on the Vision icon. You do not need to enter a password on the
Vision login page.

7
Vision Front Screen The Vision front menu gives quick access to Vision modules.
There are five main sections: Home, Reporting, Messaging, Utilities and Management Tools, each with options to further Vision modules.
The Home menu includes Consultation Manager - where clinical entries are made and where you can access your appointment list.
The modules that are visible for selection are the ones that you, as the logged
on user, are permitted to see.

8
Vision Front Menu

9
Consultation Manager Overview

10
Starting a Consultation
In Consultation Manager, you cannot add new data until a consultation is started. It
is usual for a Consultation to be started automatically, however:
1. If there is no consultation open, the Consultation icon looks like this
and the status bar displays the text No Open Consultation:
No Open Consultation on bottom task bar
2. Clicking on this icon starts a consultation.
3. You can tell a consultation is open by the following:
The Consultation icon appears depressed on the toolbar.
The status bar at the bottom of the screen, just above the Windows Task
Bar, shows your name (as the current user signed on), the date, and the
start time of the consultation, followed by the current time (so you know
how long the consultation has been). Any data entry will bear your initials on the audit trail.
Surgery Consultation open displayed on bottom task bar
Note - The easiest way to start a consultation automatically when
you select a patient is to set this up in advance. Click on Consultation
(top menu) – Options - Setup. On the Consultation tab, tick Start
New Consultation Automatically When a Patient is Selected.
Also tick Deselect the Patient Automatically When a
Consultation is Closed. Click OK.

11
Select a Patient
This section explains how to select a patient.
1. Within Consultation Manager, click on the Select Patient icon .
2. In Search Details, type a few letters of the patient's surname, space, then the
first letter(s) of the forename, e.g. SMI CH for Charles Smith, and then press
Enter. This should list patients who match what you typed in.
Example of Select Patient screen
3. Once the patient list is displayed, find the patient you want (you may need to
scroll down) and double click on that patient line, or single click and click OK.
Note - If you are in England and have logged into Vision with your
Smartcard, patient demographics in Vision are checked against those
held on the Spine and you may be prompted with a screen showing any
discrepancies, you can accept or ignore differenecs.
4. When the patient has been selected, their name and address appears on the
title bar at the very top of the screen.
5. Their Patient Record screen is displayed, and a consultation is usually started
automatically.
Note - The view of the Patient Record that is displayed is the one
that has been chosen by this user currently logged on. The setting up of
the screen is very flexible and can vary from practice to practice.

12
Appointments List
To view your Appointment list and call the next patient in:
1. In Consultation Manager, click on the Appointments tab or List
Appointments icon .
Consultation Manager Appointments tab
2. Your own appointment book is displayed by default as the user signed on. If
you cannot see your list, click on to the right of Booked only and select
your name or the correct session.
3. The appointment list defaults to Today AM if it is morning or Today PM if it is
afternoon.
4. Select Next Patient by double clicking on a booked appointment line –
This brings up their patient record.
5. If the patient is not marked as Waiting by the receptionist, then a warning may
be shown telling you the patient has not arrived: Are you sure you wish to
select the patient? The patient has not arrived; click either Yes to select the
patient, or No to cancel selection.
Call Patient button or right click – This is only for practices using an
appointment call display system. It selects and displays the patient's record and visually calls the patient in.
Select Patient button or right click - selects the highlighted patient's
record.
6. Once the patient is selected, a consultation is either started or not. This
depends on the set up (see Whenever you are adding data, start a consultation
first (page 10))

13
7. When the Patient Record is displayed, switch to the Journal tab for a Read
Term Add (page 14) window, or to the Therapy (page 18) tab to prescribe.
Note - Press this Refresh icon now and again so that any last
minute appointments or waiting status are updated on your
Appointments list.
Finding Data
The easiest way to view patient clinical information in Consultation Manager is to use
the navigation pane:
Click on to expand the text beneath a heading. Click on collapse to collapse text to
the heading only. For keyboard users, press to collapse and arrow to expand the
subheadings when the focus is on a heading.
You can also use the tabs in your Consultation Manager view (your tab set depends on
your practice configuration):
Or the icons and menus at the top of the screen:

14
Adding Data
Vision stores its records either in a generalised Medical History or in Structured Data
Areas, such as Blood Pressure, Epilepsy, Serum Cholesterol, and so on. You can let
the system do all this for you.
1. In Consultation Manager, select the patient , or select from the
Appointments list. Make sure a consultation is started .
2. Go to the Journal tab of the patient record.
Read Term – Add at the bottom of the Consultation Manager screen
3. In the Read Term - Add window either:
Type in a keyword, such as headache, cough, asthma and press Enter.
This should display the first matching entry. Then use the up and down
keys to display the next or previous entry until you find what you want.
Click OK.
Enter a known Read code preceded by #, e.g. #H33 (for Asthma) and
press Enter.

15
If this is not the correct entry, double click or press the <F3> function
key to display a Read Dictionary screen which gives a list based on the
keyword entered. This will include Read descriptions from different parts
of the Read dictionary, shown by the different codes, e.g. chapter 1
History and Symptoms, 7 Operations, N Musculo-skeletal and connective tissue diseases.
Read Dictionary screen
If the required entry is shown on the list, double click on it.
The following options are available if the required entry is not listed:
Deselect Display from Formulary by removing the tick from the box
(click with the left mouse button). This will display all matching entries
from the whole Read dictionary.

16
Bearing in mind the fact that many Read Terms do not have keywords, it
may be necessary to display entries by Read code. To do this, highlight a suitable line and click on Display by Hierarchy to tick/check the box.
Read Dictionary by Hierarchy
A Find Read Code screen will be displayed (see above). To open one of
the closed folders and view the contents of that branch of the hierarchy,
double click on the symbol . The path through the hierarchy is clearly
visible by following the open folder symbol up the branch. The selected
entry is highlighted. To close an open folder, double click on . Any
entries with a 'piece of paper' symbol cannot be expanded any
further - they are at the bottom of that branch of the hierarchy and can
be selected.
Once the correct entry has been found and highlighted, click on the OK button.
4. Vision will then present you with the appropriate Add screen. In many cases
this will be a History Add screen, for example, after entering headache or
cough. For others, such as peak flow, diet, exercise, you will see the
appropriate Add screen.
5. Complete this screen - you can open up the picklist in Read Term by clicking on
if you want to select another term.
6. Click OK.
17
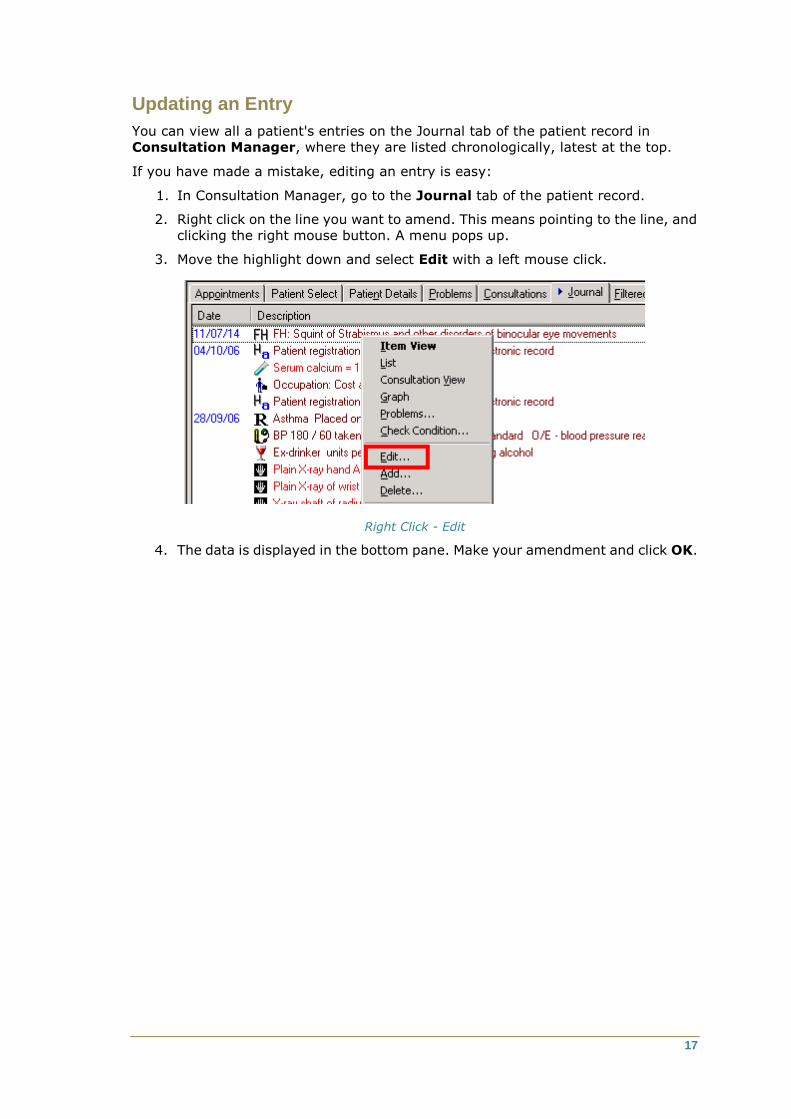
Updating an Entry
You can view all a patient's entries on the Journal tab of the patient record in
Consultation Manager, where they are listed chronologically, latest at the top.
If you have made a mistake, editing an entry is easy:
1. In Consultation Manager, go to the Journal tab of the patient record.
2. Right click on the line you want to amend. This means pointing to the line, and
clicking the right mouse button. A menu pops up.
3. Move the highlight down and select Edit with a left mouse click.
Right Click - Edit
4. The data is displayed in the bottom pane. Make your amendment and click OK.

18
Add Acute Prescription and Print
An acute prescription is for a one-off therapy item which you do not envisage
repeating. If you find later that you do want to prescribe it again, you will enter a
second acute prescription, copy this one or set up a new repeat master prescription.
1. In Consultation Manager, select the patient - Either click on , or select
from the Appointments list (see page ). Make sure a consultation is started
.
2. On the Patient Record, click on the Therapy tab.
Acute Therapy – Add screen
3. Click on the Current tab which lists all repeat masters , and any acutes
issued within a recent period.
4. Press Esc to display the Acute Therapy - Add screen in the bottom pane, if it
is not already displayed.
Note - You may find you have by mistake selected Repeat Master -
Add. If so, press Cancel. Click on the Current tab and press Esc to
display the Acute Therapy - Add screen.
5. The cursor is flashing in the Drug selection window. Type in the first few letters
of the drug name, e.g. losec (optionally followed by a space and the form -
caps, tabs etc, followed by a space and the strength, e.g. losec cap 10) and
press Enter. Alternatives at the Drug name window are to press F3, or just to
double click, without typing anything in first. Both go straight to the Select
Drug screen.
6. If the displayed drug is the correct one, move to Step 8.
If the displayed drug is not the correct one, you have the following options:
Use the up and down arrow keys to display the next or previous entry.
Click on the Switch to generic button to replace the selected
drug with a generic.

19
Double click or <F3> on the Drug field to access the Gemscript dictionary on the Select drug screen.
Select Drug screen
The Select Drug screen lists the drug dictionary or formulary from the nearest
match you typed in. When the required drug name has been found, click on the
button to confirm.
7. Further options on the Select Drug screen:
When typing a drug name, you do not need to specify the form and
strength at this stage – just type the first few letters of the therapy item and press Enter, e.g. LOS Enter.
To find appliances or codes, type in # then the code.
The red box in the middle displays Drug Allergy and Intolerance
information for the patient.
The bottom pane has more Gemscript product information about the selected therapy item. Clicking on an individual heading can expand it.
Check the currently highlighted drug against the patient's other therapy
and clinical data, by pointing to it and clicking with the right mouse,
selecting Drug Check for any potential contra-indications, interactions or drug doubling.

20
8. You are returned to the Acute Therapy-Add screen. The dosage and
quantity are entered automatically for most drugs (if in Consultation –
Options – Setup – General – the option Use Gemscript Posology
defaults is selected).
Consultation Manager with completed Acute Therapy – Add screen
9. Quantity, Preparation, Packs – Pack Information for the selected drug can
be displayed by clicking on the bottle icon by Preparation. This lists packs
for the therapy item, whether divisible or indivisible, and the number per pack.
If more than one pack, select a suitable pack or quantity by double clicking.
You can amend a quantity by overtyping in Quantity.
Note - The prescription will show the quantity and preparation
exactly as displayed on the screen.
If the preparation details need to be changed, delete the displayed details and
enter the required preparation, e.g. 5 ml bottle(s)

21
10. Dosage - Click in the Dosage field and enter the dosage, e.g. 1 tds. The
system accepts standard dosage codes, e.g. 1 om, which can be displayed by
right mouse clicking anywhere on the screen and selecting Dosage Codes and
List from the displayed menus. You can build up the dosage message, for
example, od ac (Every day before food). Any free text can be typed in the
Dosage field and this will be printed exactly on the prescription, e.g. a flavour
– chocolate – for some children's preparations.
11. Check the other default entries are correct.
12. If you have chosen a brand name, you can change to its generic equivalent
by clicking on . Once you have done this, the icon will disappear.
13. If you need to re-select the drug, double click within the Drug name window
to return to the Select Drug screen.
14. To add free text that will print on the right-hand side of the prescription form,
click on the Additional Information button , type in your free text and
OK. The icon is then ticked.
15. Finally, after checking the entries and entering the dosage and quantity (see
below), accept Acute Therapy - Add screen by clicking OK.
Drug Checks
1. Drug Checks are then performed, showing any warnings of contraindications,
interactions or drug doubling before you proceed with the prescription (see
page ). Depending how it is set up in Consultation – Options – Setup –
Drug Checks, you will either see a full Drug Check Results screen; or flags on
the status bar which you can double click on to display the full screen:
Drug check indicators on the bottom task bar
If you answer Yes to Do you still wish to prescribe this drug? The Therapy
Records screen is re-displayed, from which you can print the prescription.

22
Add Medication to problem
1. Some practices have switched on the option medication linked to problems. If
you see the following screen, then tick the appropriate related diagnosis or
problem associated with this medication.
Add Medication to Problem screen
Print the Prescription
1. To print the prescription, press <F9> or press (depending on your
country, you may have a Finalise button instead of Print).
The Therapy Print Records / Prescription Manager screen is displayed after the first F9. All acutes added with today's date will be listed.
At the Therapy Print Records – Add / Prescription Manager screen,
check the prescriber (Doctor to sign prescription) – this is the GP
signed on, but you can change it to another (if the setup allows on
Consultation – Options – Setup – General, check the box Print
Signing GP Name), so the name of whichever doctor is selected in Doctor to sign prescription will print on the prescription.

23
Proceed to print by clicking on the Print icon or pressing <F9>
again (depending on your country, you may have a Finalise button
instead of Print).. The second Print command starts the
printing.
Consultation Manager with Prescription Manager – Add displayed

24
Make an Acute into a Repeat
1. Find the acute prescription on the Current tab.
2. Hold down the left mouse button over this line and start to drag the line away.
A Floating Drop Target is displayed.
3. Drag until the cursor is over the "pill" icon (Make Acute into Repeat) and
drop it by releasing the mouse button. Then complete the Repeat details on the
Repeat Prescription Master - Add then click on OK.
4. Alternatively, you can drag an acute line on to the Another icon for a copy
of the Acute Therapy with the same drug, details and dosage already selected.
Fill in the details and click OK.
Add Repeat Prescription
Note - This is the same as adding an acute item EXCEPT in addition
you enter a number in the field Repeats before pressing OK.
A repeat master is for therapy items which the patient can repeat, usually in a month
from the initial prescription, and for some months after that before the repeat master
needs re-authorising by the GP. Each repeat has a repeat master line, from which
issues are printed.
Adding a repeat is very similar to adding an acute therapy, with a few extra fields.
Note in step 3, however, that the starting screen is different.
1. In Consultation Manager, select the patient - Either click on , or select
from the Appointments list. Make sure a consultation is started .
2. On the Patient Record, click on the Therapy tab, then Repeats tab.
Repeat Master – Add screen
3. Press Esc to display the Repeat Master Add screen if not already displayed.
4. Enter the first few letters of the drug name, eg ibupro and press Enter. Follow
the steps to add the required medication.

25
5. BEFORE PRESSING OK, move the cursor to the Repeats field (nearly top right
of the Repeat Master - Add under Private / Print Script) Enter the required
maximum number of repeats that the patient can make of a prescription,
before the GP must see him or her again in order to re-authorise the
prescription (e.g. 6 repeats). This is a mandatory entry.
6. Repeat Until Date is an optional field. Note that a drug will become expired if
either the maximum number or the Repeat Until date is reached. To enter a
date, use the date abbreviated format: e.g., 56D (56 days) 3M (three months),
or 6W (six weeks). 1Y (one year).
7. Days between Issues is an optional field. Note that a drug will not be
prescribable if the maximum number of days between issues has been
exceeded and / or the minimum number of days between issues has not been
reached.
8. When the number of issues (Issues Made) equals the maximum number
allowed (the figure in Number of Repeats), no further prescriptions can be
issued until the repeat is re-authorised. The repeat master is then said to have
expired and will be listed under Expired with this icon on Repeat Masters.
On the Repeat Prescription Master - Add screen:
9. If Force Re-Authorise is blank, anyone can re-authorise a repeat master.
If this box is checked, prescribers can re-authorise the master (Prescribers are
all GPs or clinicians entered with a GMP number).
IMPORTANT: The field should only be checked
if only prescribers are to re-authorise the medication. Otherwise, to
enable any user to re-authorise the medication when it expires, do not
check this field.
10. If you have Gemscript defaults switched on in Consultation – Options –
Setup – General – Use Gemscript Posology defaults, the dosage and
quantity will be entered automatically. If not, enter these now manually e.g. 2
bd
11. Quantity, Preparation, Packs – See step 9 of Add an Acute Prescription.
12. Dosage - See step 10 of Add an Acute Prescription.
13. To add free text, which will print on the right-hand side of the prescription
form, click on the Notes for Patients button , type in your free text and
OK. The icon is then ticked.
14. Check the details and click on the button to confirm the new entry.
15. At the Drug Checks screen, look for warnings of any possible
contra-indications, interactions or drug doubling. See Drug Checks (page 21).
To continue, answer Yes to Do you still wish to prescribe this drug?
16. See Add Medication to problem (page 22) if necessary.
17. The new repeat master can now be issued.

26
Issue Repeat Prescription
Summary - First select the repeat items on the Therapy - Repeat
tab, then press <F9> and <F9> again as follows:
Betnovate is ticked as the repeat to be printed. Note that the other repeats have a blank symbol - they have "expired" and need re-authorising before being re-issued.
1. In Consultation Manager, select the patient: Either click on the Select Patient
icon , or select from Appointments list. Make sure a consultation is
started .
2. If you are a receptionist issuing repeat scripts and this is a fresh consultation,
keep the consultation statistics accurate by changing the Consultation Type
from Surgery Consultation to Repeat Issue – double click on the name or
Surgery on the status bar at the bottom of the screen to display the
Consultation Update screen, and re-select the Type of Consultation as Repeat
Issue, then OK.
3. Click on the Therapy tab then on the Repeats tab, or press <F5>.
4. When the Therapy Repeats screen is displayed, check that the requested
items are shown.
If this is the case, continue to Step 6.
If the requested item(s) is not shown, click on Filter Expired Repeats
and Filter Inactive Repeats to give a list of valid repeats
(leave Filter Valid repeats undepressed).
If the required items are still not shown, proceed to Step 11. There may be an expired item that needs reauthorising.
Valid repeat master which can be issued
Expired repeat master which needs reauthorising before issuing
Inactivated repeat master, i.e. discontinued
Prescribed out of practice
5. Select the lines to be issued (see back to screenshot above):
Either click in the checkbox by each item required to tick it.
Or, if all items are to be selected, click on the Select All icon to select all and tick.

27
Or, if all except one or two items are to be selected, click on the Select All icon to select All, then single click on any items NOT required.
6. Click on the Print icon or press the <F9> function key to issue the
required items (depending on your country, you may have a Finalise button
instead of Print).. This displays the Print Therapy or Prescription
Manager screen.
7. When the Prescription Manager screen is displayed, check the Doctor to
Sign Prescription (the Prescriber) is correct.
8. Click on the Print icon or press <F9> again to print the prescription
(depending on your country, you may have a Finalise button
instead of Print)..
9. Give the patient the prescription and the right-hand repeat re-order form.
What if you cannot find the repeat master in Step 5
1. If a required item is not shown in Step 5 above, click on Filter Inactive Repeats
and Filter Valid repeats to give a list of Expired Repeats.
2. To re-authorise an expired repeat, click on the required item to tick it, and then
click on the Re-authorise icon . This will display the Therapy details screen
and allow you to make changes if required (e.g. change the maximum number
or the dosage). Click on the button to confirm the details. The
repeat master is now valid.
3. Click on Filter Expired Repeats and Filter Inactive Repeats to give a
list of valid repeats (leave Filter Valid repeats undepressed).
4. If the requested item is not shown under the expired view, it may have been
inactivated (discontinued). Click on Filter Valid repeats and Expired
Repeats to list any inactive repeat masters . If the drug is shown here
and it can be reactivated (check with the GP first), click on the required item to
tick it, and then click on the Reactivate icon. This will make the repeat
master active again. It may still need to be re-authorised as well (see Step 12).
5. If a requested item is not shown at all and needs to be added, see Add repeat
prescription (page 24).
6. NHS prescriptions are printed on the left-hand side of the prescription paper,
and a repeat re-order form is printed on the right. The repeat re-order form can
be customised with your own practice message in Consultation – Options –
Repeat Therapy Reorder Form.

28
Re-authorise Repeat
Once a repeat master has been issued a maximum number of times (determined by
the GP when he or she originally adds the repeat), then the repeat becomes "expired"
with the icon on the Repeats tab list in Therapy.
1. On the Therapy tab, click on the Repeats tab.
2. Click on Filter Inactive Repeats and Filter Valid repeats to give
a list of Expired Repeats masters.
3. To re-authorise an expired repeat, click on the required item to tick it.
4. Then click on the Re-authorise icon .
5. This will display the Therapy details screen and allow you to make changes if
required (e.g. change the maximum number or the dosage).
6. Click on the button to confirm the details.
If you are a member of staff and find the system prevents you from re-authorising a
repeat master, this may be because a GP has ticked the box Force Re-authorise on
the original Repeat Master Add screen. In this case, only clinicians can re-authorise
the repeat.
Reauthorised Repeat Master – Add screen

29
Drug Check Displays
The Drug Check Results and status bar signal if there are any drug interactions,
drug doubling or contraindications of which you should be aware. This checks against
the currently selected patient's data.
Drug interactions (circles), Contra-Indications (red bars)
Example Drug Check Results screen
If you answer Yes to Do you wish to prescribe this drug? You are encouraged to enter
a free text reason why you are overriding the prescriber warning. This is logged in the
Event Log Viewer.
Drug Interactions warning signals
The left-hand circles and bars warn of drug interactions, between the drug currently
selected and the patient’s existing therapy.
Green light - No Drug Interactions
Yellow light - Context sensitive interactions exist e.g., elderly
or females, those on digoxin etc.
Red single bar - Warn that mild interaction exists
Red double bar - Avoid if possible - serious interaction exists
Red triple bar - Life threatening interaction exists

30
Drug Doubling Warning Signals
Checks are also made for drug doubling. This looks at the patient's current therapy to
see if there is any item that has the same ingredients, or is in the same action group,
or is the same drug, as the therapy being added. The doubling drug check warnings
are shown as a series of blue bars:
One blue bar - Same action group
Two blue bars - Same ingredient
Three blue bars - Same drug
Contraindication warning signals
The contraindications warning signals are shown as flags on the right on the status
bar:
Green flag No Contraindications exist
Yellow flag General warnings exist for Contraindications
Red flag Patient specific Contraindications
Contraindications are checked against the patient’s clinical history and also include
precautions, prescriber warnings and special morbidities such as pregnancy and
lactation.

31
Add Drug Allergy
1. To enter a drug allergy, first select a patient and start a consultation.
2. From the Add menu, select Drug Allergy/Adverse Reaction.
3. If the patient gives a history of previous allergy or intolerance, then enter the
approximate date in Date of Recording and remove the tick from the In
Practice box.
Drug Allergy and Intolerance – Add screen
Read Term for Allergy – 14L.. H/O drug allergy is the default Read
code. Click on the picklist arrow to display further options and click on the Read code required.
Drug - Double click in the Drug window, and select the drug to which the
patient is allergic. In Name on the Drug Select screen, type in the drug name, e.g. penicillin, and click on Find. Click on OK.
Read Term for Reaction - Selection here is optional.
Reaction Type - The choice is Allergy, Adverse Effect or Intolerance.
Severity is a mandatory entry. The options are: Blank (no entry),
Minimal, Mild, Moderate, Severe, Very severe, Potentially Fatal
Certainty is a mandatory entry. The options are: Blank (no entry), Tentative, Unlikely, Possible, Likely, Certain, Absolute.
4. Enter any free text notes, or recall date, if required.
5. Once you are satisfied with your entry, click on OK.
6. The allergy or adverse effect warning is shown on the Repeat Master or Acute
Therapy Add screen. If you try to prescribe items with a severity of Potentially
Fatal. The Drug Sensitivities warning is displayed stating that "It will not be
possible to prescribe this item due to the presence of potentially fatal reaction.

32
Add Med 3
To access the MED3 form area in Consultation Manager, and create an electronic
MED3 form:
Important – Only GPs with a GMC code recorded in Vision can
create and print new or follow-on MED3 statements.
1. From Consultation Manager, select a patient and open a consultation.
2. First, enter data as you normally would during a consultation, or at the very
least, a diagnosis or symptoms. If you open an active problem, the Problem
Header Read term is used to populate the Diagnosis fields.
3. To invoke the MED3 data entry form, select Add – MED3.
4. The MED3 form appears for completion:
5. The MED3 Doctor’s Statement form is arranged into the following four
sections:Standard Information, MED3 Information, Additional Information,
Printing the MED3 form
6. Fill in the appropriate boxes. Mandatory entries are marked with a red asterisk
and print the form.
7. Click OK to save.
Note – Practices in Northern Ireland cannot create an Issued by
Hand or Duplicate form or print MED3 Statements.

33
Add Smoker / Non-smoker/ Ex-Smoker / Smoking Cessation advice
Add Smoker
1. Select the patient and make sure a consultation is started.
2. From the Add menu, select Smoking.
3. At the Smoking – Add screen, change the Smoking Status to Smoker.
4. In Smoking Read term, click on the selection arrow and scroll down,
selecting a suitable Read term, e.g. 1373.00 Light smoker – 1-9 cigs. /day.
When the line is highlighted, press Enter.
5. Optionally, enter a figure in Tobacco Consumption, e.g. 5 in Cigarettes per day.
6. If you have talked to the patient about giving up smoking, then click on the
Health Promotion icon to record smoking cessation advice.
7. Click OK.
Smoking – Add screen
Add Smoking Cessation Advice
1. Select the patient and make sure a consultation is started and the Patient
Record displayed.
2. From the Add menu, select Health Promotion Interventions - Smoker.
3. At the Health Promotion - Smoking - Add screen, click OK.
Add Non-Smoker
1. From the Add menu, select Smoking.
2. At the Smoking – Add screen, the Smoking Status will be set to Never Smoked,
as this is the default selection if the patient has no previous smoking record.
3. In Smoking Read term, the default becomes 1371.00 Never smoked tobacco.
4. Click OK.

34
Add Ex-Smoker
1. From the Add menu, select Smoking.
2. At the Smoking – Add screen, change the Smoking Status to Ex-Smoker.
3. In Smoking Read term, the default becomes 1375.00 Ex smoker.
4. An optional step - Press the Tab key to reach Date Started, and type in a year,
e.g. 1964, press the Tab key and enter a year in Date Stopped, e.g. 1980.
5. Optionally, enter a figure in Tobacco Consumption, e.g. 15 in Cigarettes per
day.
6. Click OK.
Add Blood Pressure and List BPs and Graph
1. Select the patient and make sure a consultation is started and the Patient
Record displayed.
2. From the Add menu, select Blood Pressure.
Blood Pressure – Add screen
3. At the Blood Pressure - Add screen, the cursor is in Systolic. Type in a
reading and press the Tab key, and type in a Diastolic.
4. Optionally, using , change Laterality (<None>), Position (Sitting), Cuff
(Standard).
5. Click OK.
6. Find the BP entry you have just made at the top of the Journal tab, or select
Blood Pressure from the List menu.
7. Right mouse click on this line and select Graph with a left mouse click.
8. This graphs all the patient's BP records. To focus on a particular set of dates:
either double click within an area of the graph to expand those dates.
Or you can position the cursor to the left and above the area you are
interested in, hold down the left mouse button and drag the resulting
square around the area. Let the mouse button go. The area will now be expanded.
Clicking on the Fit to Graph icon to revert it to the way it was initially.
Print the graph out using the print icon .
Print Preview first before printing out.
9. Click on Close on the left to close the graph and exit.

35
Graphs
Note - You can right click and select Graph for any numerical result
line, such as BP, weight, or test results.
Blood pressure graph
Once the graph is displayed:
Expand the area you are interested in by positioning the cursor to the left
and above the area, holding down the left mouse and dragging the
resulting square around that result. Let the mouse button go. The area will now be expanded.
To revert to the way it was - i.e. unexpand it - use the Fit to Graph
icon
Print the graph out using the print icon.
Print Preview first before printing out.
Close graph and exit.

36
Add Weight and Height
1. Select the patient and make sure a consultation is started and the Patient
Record displayed.
2. From the Add menu, select Height.
3. Height records are stored in metres, but you can enter the height in either
metric or imperial. For example, either type in 1.68, which the system will
understand as 1.68 metres; or type in 5'6", or 5ft 6in, which converts into a
metric equivalent. Height can be recorded to three decimal places, e.g. 1.765
M, or 35.4 cms. Click OK.
4. From the Add menu, select Weight.
Weight – Add screen
5. Weight records are stored in kilograms, but you can enter the weight in either
metric or imperial. For example, type in 72.5 for 72.5 kg, or 11st 6lb, which will
automatically convert to its metric equivalent, when you press Enter or the Tab
key. Optionally, change the Read Term by clicking on the selection arrow
and select another Read term. Click OK.
The height and weight together are used to work out the BMI, the Body Mass
Index for adult screens. The BMI is automatically calculated by dividing the
weight in kg by the height squared in metres. If the BMI falls outside the
normal range of 19-24 for women and 20-25 for men, the word Overweight will
be displayed when viewing this record. Once 30 or over, the patient is classed
as Obese.
A Target Weight is given for overweight patients, and the weight they should
lose to achieve this. To see this in stones and lbs, click in the Imperial box.
6. For subsequent weight records, start at step 5 above. There is no need to keep
re-entering the height.
7. Point to any weight or height entry on a form, List screen, e.g. Journal tab,
right click and select Graph to graph all the patient's weight records. To focus
on a particular set of dates, double click within an area of the graph to expand
those dates. Or position the cursor to the left and above the area you are
interested in, hold down the left mouse button and drag the resulting square
around the area; let the mouse button go to expand the area. Click on Fit to
Graph icon reverts it to the way it was initially. Print or Print
Preview. Click on Close on the left to close the graph and exit.

37
Add Immunisations
Immunisations Add record immunisations given. You may also enter refusals to start
or complete a course in the Status field, having first selected the type of
immunisation.
1. First select a patient and start a consultation.
2. To check what immunisations the patient already has, click on for the
Immunisations Summary screen which lists what are due and those that
have already been given.
Immunisation Summary screen

38
3. Display Immunisations – Add by right clicking on Immunisations
Summary and selecting Add. If you skipped step 2, then from the Add menu,
select Immunisations.
Immunisation – Add screen
4. On the Immunisations – Add screen, select the Type of Immunisation
either by clicking on and scrolling down, and clicking on your choice. For a
full list of immunisations, see on-screen help.
5. Select the Stage – e.g. 1st, 2nd, 3rd, booster. Status defaults to Given. Due Date
depends on the Type of Immunisation and is worked out automatically.
Method depends on the Type of Immunisation, e.g. Oral for polio.
6. Click in Batch Number and type in the batch number on the vial.
7. In Reason - Routine, Epidemic, Special Risk Group or Traveller. This is
optional.
8. In Country / Nature of Risk, this depends on the Type of Immunisations and
what you have selected in Reason. If you have selected Traveller, click on
under Country and select the area to the visited. If you have selected Special
Risk Group, in Nature of Risk, type in the risk, e.g. Animal lab technician.
9. Click OK at the Immunisations – Add screen to save and exit, or click on
Next to enter another immunisation.
10. If you have added a Tetanus or Cholera booster for an adult, you may be
reminded if you have not entered the first, second and third stages of Tetanus
or Cholera immunisation. Click on Yes to continue. There is no obligation to
record the previous stages.
11. Click OK.

39
Add Contraindicated immunisations
You can record that a vaccination or immunisation is contra-indicated, and whether it
has parental consent.
1. Click on , or Summary - Immunisations. The Immunisations - Summary
screen is displayed.
2. To add Contraindicated information: Point to the Contraindicated? Line, right
mouse click (it should be headed Immunisation contraindicated) and select
Add.
3. Check the box Contraindicated on the Immunisation Contraindicated - Add
screen, and optionally select one of the available Read terms.
4. Enter the vaccination type, e.g. Measles, which is contra-indicated in the free
text notes window before you click on OK. Any free text is shown on the front
screen.
Example of Immunisation Contraindicated – Add screen
Add Parental Consent
1. To add a Parental Consent entry – Display the Immunisations Summary .
2. Point to the row Parental Consent, right click and select Add.
3. In Read Term, scroll down and choose from the various Read terms of parental
consent status. For example:
Consent status for immunisation - i.e. no consent, full consent,
Immunisation refused
Immunisation contra-indicated (C/I)
4. In Type of Consent, choose from <None>, Full consent, partial consent, No
consent.
5. Enter any free text notes that will be displayed on the front screen.
6. Click on OK.

40
Add Contraception and Prescribe Oral Contraceptive
1. First select the patient and start a consultation.
2. To list the patient's contraceptive entries, From the List menu, select
Contraception.
3. To enter a contraception record, from the Add menu, select Contraception to
display the Contraception Services - Add screen.
4. Service Type - The default is <None>. Display the other options by clicking on
the down arrow and select as required:
Either First Service if this is the start of treatment for contraceptive services (this was more relevant under Items of Service)
Or Subsequent Service if there is a previous claim and this is continuation of care.
Service End - If contraceptive services have ended (e.g. pregnancy,
menopause), select Service End.
5. Service Read term. Click on and scroll down to choose another more
specific Read term, e.g. 614.. 00 Oral Contraception.
6. Date Seen - This defaults to today. If you recording an entry of contraceptive
services given by an outside source, block highlight the date then change it
(e.g. type –7D for seven days ago).
7. In Practice: This box is ticked by default, i.e. contraceptive services provided
from your practice under GMS. Untick the box if the services were provided by
an outside source.
8. New Claim Expiry Date – This is no longer relevant.
9. Date IUCD Fitted: Leave blank unless a coil has been fitted, in which case
enter the fitting date.
10. Recall, Notes: To enter either free text notes and recall dates, click on these
respective icons . Note that you may want to record a recall date that may be
different from the Claim Expiry date. Recall due dates for contraception are
usually displayed alongside existing contraception records, for example, on the
Journal tab of the Patient Record.
11. OK: Once you are satisfied with your entry, click on OK.

41
Add Peak Flow Record
1. Select the patient and make sure a consultation is started and the Patient
Record displayed.
2. Click on the Journal tab.
3. To record a peak flow, display the Peak Flow Current - Add screen by typing
pfr in Read Term Add, and press Enter for 3395.12 PFR - peak flow rate.
Note - If you type peak flow in step 3, you will enter 3393.11 Peak
flow rate normal which leads to the Pulmonary Function Tests - Add
screen. The picklist on this screen shows a different selection. This does
not shows Predicted Peak Flow, Previous Best Ever or Percentage of
Best Ever.
Peak Flow Current – Add screen
4. On the Peak Flow Current – Add screen, the default in Read Term for
Characteristic is 3395.12 PFR - Peak flow rate Use the picklist to select
another Read term and press Enter.
5. Enter the Device Type - either Wright or EN 13826. This affects the calculation
of predicted peak flow.
6. Enter the value into the Value field.
7. Click OK.
The Predicted Peak Flow and Previous Best Ever calculations are shown
automatically in the bottom left of the Peak Flow Current – Add screen, together
with the Percentage of Best Ever. The calculation of Predicted Peak Flow is
dependent on a height record being present, and on selection of the correct Device
Type.
Predicted peak flow will NOT be calculated for children under 16.

42
List Test Results
To list test results, click on the Tests tab. Listings are chronological, but by
clicking on the column heading of Description, you can resort the test results
by type, or by Read code, or alphabetically by Description. You can also see the
result and the action via the Mail for Patient button in the Consultation
Manager toolbar.
Test results can also be listed by clicking on the All Test Results line on the
left-hand navigation pane. All test results are listed under the Filtered List
tab.
If you first click on the + by All Test Results line, then click on, e.g.
Haematology, the Filtered List shows only these specific haematology results.
Note - Any results that have the Result Qualifier selected as
Abnormal will be shown in red on the test results list.
Consultation Manager – Test tab selected

43
Add Cervical Cytology
This method first records that you have taken a smear. The idea is that when the
result is through a few weeks later, you update this record with the actual result.
1. In Consultation Manager, select the patient .
2. Make sure a consultation is started.
3. Click on the Add menu and select Cytology.
4. At the Cervical Cytology – Add screen, just press UNLESS you
want to change the Date Smear Performed (defaults to today's date).
Usually all the defaults can be accepted as displayed. For this first smear
entry, do not enter a recall record at this stage, or change the Read
term
Cervical Cytology – Add screen

44
Add a Referral (non-electronic)
1. Click on the Referral icon to display the Referral Add screen.
2. Read Term for Referral Reason – This is the condition for which the patient
needs the referral, e.g. sciatica, dyspepsia.
3. Referral Type must be completed to appear in Referral Report. Optionally
change: Source, Attendance Type, Urgency, Contract Status.
4. Action Date defaults to 3 weeks from the referral date so you can keep track
of responses. This is the date by which you would expect treatment to have
started. You can enter a time period here, for example, 7D for seven days, or
3M for three months, which will act as an offset date. Once a default referral is
related to a patient, you can search on Action Dates in Searches, but there is no
other action triggered once overdue.
5. Select the Provider Unit, Department and Consultant – these details will all
merge on to the referral letter. The picklist depends on the organisations you
have set up in File Maintenance and ticked as Provider Units.
6. Optionally select the relevant NHS Specialty and TP Specialty.
7. If you want to generate a referral letter, click on the Letter icon (you
need to have letter templates set up beforehand).
8. Otherwise, complete the referral by clicking on OK.
Consultation Manager with Referral – Add selected
Note - The protocol for adding referrals may be different to the below depending on the country that you are in.

45
Medical Insurance Report
A template allows Vision users to create a medical report for insurance purposes as a
Word document. It automatically extracts data from the Vision database to produce a
report that can then be edited.
1. From Consultation Manager, select the patient required, and open an
Administration consultation.
2. From the Add menu, select Correspondence to display Clinical
Correspondence – Add.
3. Select Medical Report in the Type of Letter field.
4. Under Summary enter Medical Report for Insurance Purposes and the name of
the insurance Company requesting the report.
5. Click on the Letter button .
6. Highlight the Insurance_Report.doc from the offered files on Select patient
Template to Open and click on Open.
7. This will open the Insurance Report, and after a few seconds delay the
hourglass will be displayed indicating that the report is been constructed by
merging in the patient's data. The cursor shape will return to normal on
completion of the report; this may take a while on patients with a lot of data.
8. The report will now need to be edited. Some of the sections in the report have
Yes/No printed at the end; one of these will need deleting each time and then
further comments added if necessary. The data that is imported from Vision
can be edited and deleted as required. To alter text, highlight it and type the
required text. To delete unwanted text, right click on the line, select Delete
Cells and then Delete entire row. This then does not leave a blank line. To
delete several rows, first highlight the rows, right click and select Delete Rows.
To delete text, highlight it and use the Delete key.
9. To alter text, highlight it and type the required text. To delete text, highlight it
and use the delete key
10. Print the report using the Print button from the tool bar.
11. When the report is closed, a prompt will appear asking if you want to save
changes for this report, for example, Do you want to save the changes to
00473000.CLI? . Remember this is just for this patient's report - it does not
affect the template.
12. Click on Yes to save the changes made. A red tick will now appear on the Letter
button showing a Report has been created.
13. To save the record click on the OK button. To cancel the whole process, press
the Cancel button.

46
Exit from Vision front menu On the Modules menu, there is a Close All Modules option that shuts down all open
Vision modules.
Important - You need to ensure that all users are properly signed
out of Vision every night. INPS records show that on average, 15-20%
of sites fail to sign all users out. This prevents practices from receiving
updates and will stop the overnight re-index running. Please ensure all
of your users know of the need to properly sign out of Vision and close
down their workstations every night. It will also result in an invalid
backup.
Please:
Don't leave a patient record up on screen if you leave the workstation.
Other Vision users can only view details for that patient while you are
editing it. Note that a screensaver will be triggered after a certain period
of time, or can be invoked with Ctrl-Alt-F12.
You must log out of Vision when you are not using it, both for security reasons and in order for the daily backup to complete cleanly.
Close each Vision module down when you have finished and return to the
Vision Front menu:
Click on the at the top right of the screen;
or click on File, then Exit;
In Consultation Manager, click on Consultation, and then click on Exit
Consultation Manager.
To exit from Vision Front menu, click on the top left exit ; or select Modules – Exit.

47
Index
A
Add a Referral (non-electronic) • 44 Add Acute Prescription and Print • 13, 18 Add blood pressure and list BPs and graph • 34 Add cervical cytology • 43 Add contraception and prescribe oral contraceptive • 40 Add Contraindicated immunisations • 39 Add drug allergy • 31 Add Ex-Smoker • 34 Add Immunisations • 37 Add Med 3 • 32 Add Medication to problem • 22, 25 Add Non-Smoker • 33 Add Parental Consent • 39 Add Peak Flow Record • 41 Add Repeat Prescription • 24, 27 Add Smoker • 33 Add Smoker / Non-smoker/ Ex-Smoker / Smoking
Cessation advice • 33 Add Smoking Cessation Advice • 33 Add Weight and Height • 36 Adding Data • 13, 14 Appointments List • 12
C
Consultation Manager Overview • 9 Contraindication warning signals • 30 Copyright Notice • ii
D
Drug check displays • 29 Drug Checks • 21, 25 Drug Doubling Warning Signals • 30 Drug Interactions warning signals • 29
E
Exit from Vision front menu • 46
F
Finding Data • 13
G
Graphs • 35
I
Issue Repeat Prescription • 26
L
List Test Results • 42
M
Make an Acute into a Repeat • 24 Medical Insurance Report • 45
P
Print the Prescription • 22
R
Re-authorise repeat • 28
S
Select a Patient • 11 Starting a Consultation • 10, 12 Starting Vision and Sign on • 6
U
Updating an entry if you have made a mistake • 17
V
Vision Front Screen • 7 Vision Quick Reference Guide for Clinicians • 5
W
What if you cannot find the repeat master in Step 5 • 27 What this Quick Reference Guide covers • 5 Who is the Quick Reference Guide designed for? • 5