visual workplace handbook - · pdf filevisual workplace handbook. 2 ... types of visuals ......
TRANSCRIPT

Visual Workplace HANDBOOK
2Chapter 1
TABLE OF CONTENTS Chapter 1: What is “Visual Workplace?” .................................................................................................Pages 3-4
Chapter 2: Types of Visuals .........................................................................................................................Page 5
Chapter 3: Visual Workplace & Lean ...........................................................................................................Page 6
Chapter 4: Incorporating Visuals into Lean Activities .............................................................................Pages 7-8
Chapter 5: Identifying Information Deficits ...................................................................................................Page 9
Chapter 6: Common Lean Visual Applications ...................................................................................Pages 10-18
a) Facility / process visuals ..................................................................................................Pages 10-11
b) Storage location visuals ...................................................................................................Pages 11-13
c) Safety visuals ...................................................................................................................Pages 13-14
d) Production & inventory control visuals ............................................................................Pages 14-15
e) Standard work visuals .....................................................................................................Pages 15-16
f) Equipment care visuals ...................................................................................................Pages 16-18
Brady Solutions for Visual Workplace .................................................................................................Pages 19-21
3Chapter 1
CHAPTER 1: What is a Visual Workplace?
Visual Workplace is a lean manufacturing concept that emphasizes the need for placing critical information at the point of use.
Also known as Visual Factory or Visual Management, the concept of visual workplace is to embed critical information in the physical workplace through the use of signs, labels, placards, displays and other markings. These visuals create a safer, more efficient working environment by eliminating the need for repetitive training and constant supervision.
Visual systems and devices play a critical role in many of the most popular lean tools, including 5S, Standard Work, Total Productive Maintenance, Quick Changeover, and Kanban (Pull Production). In fact, Visual Workplace serves as the key sustaining force for these initiatives, because it ensures that improvements remain clearly visible, readily understood, and consistently adhered to long after the kaizen or rapid improvement event is over.
What are the benefits of a Visual Workplace?Visual communication tools offer a number of substantial benefits to workplace safety and productivity. Below are some of the top benefits companies can expect to experience by embedding visual devices throughout their workplace.
Eliminates Waste & Information Deficits
Companies are often surprised to learn that only a fraction of their activities actually add value for their customers. It’s not uncommon that 50% or more of a facility’s activities are considered waste!
A primary cause of waste is information deficits – employees simply lack the knowledge they need to do their jobs efficiently and effectively. To find the information they need, employees oftentimes waste valuable time and motion searching, waiting, retrieving, reworking… or just plain giving up!
In a visual workplace, information that is critical to the manufacturing process is built right into the physical environment. Visual devices are positioned at the point of use and can be easily understood at a glance. By eliminating the information deficits, these visual devices can generate significant improvements in productivity, quality, customer satisfaction, safety, and more.
A visual workplace is a work environment that is self-ordering, self-explaining, self-regulating and self-improving – where what is supposed to happen does happen, on time, every time, because of visual devices.
From “Visual Workplace, Visual Thinking” by Dr. Gwendolyn Galsworth
We Live In a Visual World: Traffic Visuals
To better understand the importance of visual communications, think about the visual devices used on our roads and highways:
O Lane indicators guide our path O Traffic signals control flow at
intersections O Street signs provide direction O Parking spaces instruct us
where to store our vehicles when not in use
These visual communications are so embedded in the environment that we hardly even notice them, but their function is critical to the smooth and safe flow of goods and people along our roadways. Visuals are just as important in the workplace!
CUSTOMER
VALUE STREAM MAP:
SUPPLIER
PoorReliability
ExcessInventory
WastedMotion
Rework /Scrap
LongSetup
4Chapter 1
Enhanced Knowledge Acquisition
One of the primary reasons plants around the world have implemented a visual workplace is because of the benefits it offers for knowledge acquisition among employees. Research shows that people gain 75% of what they know visually, 13% through hearing, and 12% through smell, touch, and taste.
Because employees tend to learn by seeing, workplace visuals can play an important role in job training. Visuals make it easier for employees to do their jobs and get their tasks done on time, with fewer mistakes and less stress. A good visual will tell employees exactly what they need to know - and when they need to know it.
In the lexicon of Lean, receiving parts and supplies exactly when they are needed is called "Just in Time" (JIT) inventory management. Similarly, you can think of visuals used on the shop floor as a just-in-time system that provides critical information exactly when and where it is needed. Visuals eliminate non-value-added waste and ensure that workplace standards are adhered to.
Productivity Gains
In her book "Visual Workplace, Visual Thinking," Dr. Gwendolyn Galsworth states that effective implementations of visual communications systems have resulted in the following dramatic improvements:
The impact that visuals can have on productivity, cost, quality, on-time delivery, inventory and equipment reliability is truly enormous. These improvements not only boost bottom-line profits, but also help to build a sustainable competitive edge in the marketplace.
13% 12%
ENHANCED LEARNING:
75%
!1. Turn Knob
2. Throw Switch
3. Feed Material Here
Visuals help Bridge the Looming Knowledge Gap
With more than 78 million baby boomers expected to retire over the next 10-15 years, manufacturing facilities will face a serious knowledge loss, especially in the technical trades. One well-known consumer goods manufacturer recently forecasted that 70% of its maintenance staff would have less than 5 years of relevant job experience.
Coupled with a declining number of graduates from technical vocational programs, this knowledge loss could be a perfect storm for the manufacturing base; those entering the workforce not only have less experience, but also less basic skills training than the outgoing generation of workers.
On-the-job training will obviously play a critical role in bridging the gap, but this alone does not represent the optimal solution. Visual systems can have a significant impact for helping less experienced employees. Facilities need to become visually instructive workplaces where information embedded in the environment helps employees learn and work effectively, efficiently and safely.
5Chapter 2
CHAPTER 2: Types of Visuals
A visual can be something as simple as a line, shape, or color band – often created using marking tape, marking pens, or paint.
It is critical that visuals be understandable at a glance. Color has the most immediate visual impact.
Placards, charts & one-point lessonsOne of the key goals of a visual is to extract critical information from detailed reports stored on computers or in binders and post them at the point of need or use. As such, procedure placards, standard work charts, schedules, and one-point lessons that are posted in the work area can also be considered workplace visuals.
Banners & postersLarger visuals include banners and posters, which are frequently used to reinforce training. They can be placed throughout a facility as general reminders of Lean policies, goals and key concepts.
Visual displaysLarge displays such as team boards, production tracking boards, and idea submission boards are also widely used in companies that have adopted lean daily management practices. These types of visuals are used to facilitate communication between different team members, departments and shifts. They communicate information about goals, progress tracking, status updates and plans between management and employees.
Signs, labels & tagsSigns, labels, and tags are also commonly used visuals in manufacturing workplaces. These visuals convey more information than color through the use of text and images; they are often used in conjunction with color to enhance clarity.
6Chapter 3
CHAPTER 3: Visual Workplace and Lean Manufacturing
Visuals support lean manufacturing activities by reinforcing standards and highlighting abnormalities. This is especially important during the initial phase of lean when companies are using concepts such as 5S, Standard Work, and Total Productive Maintenance to create standards and establish a base of operational stability.
Visual are the most effective way to reinforce the standards that are put in place during your lean activities.
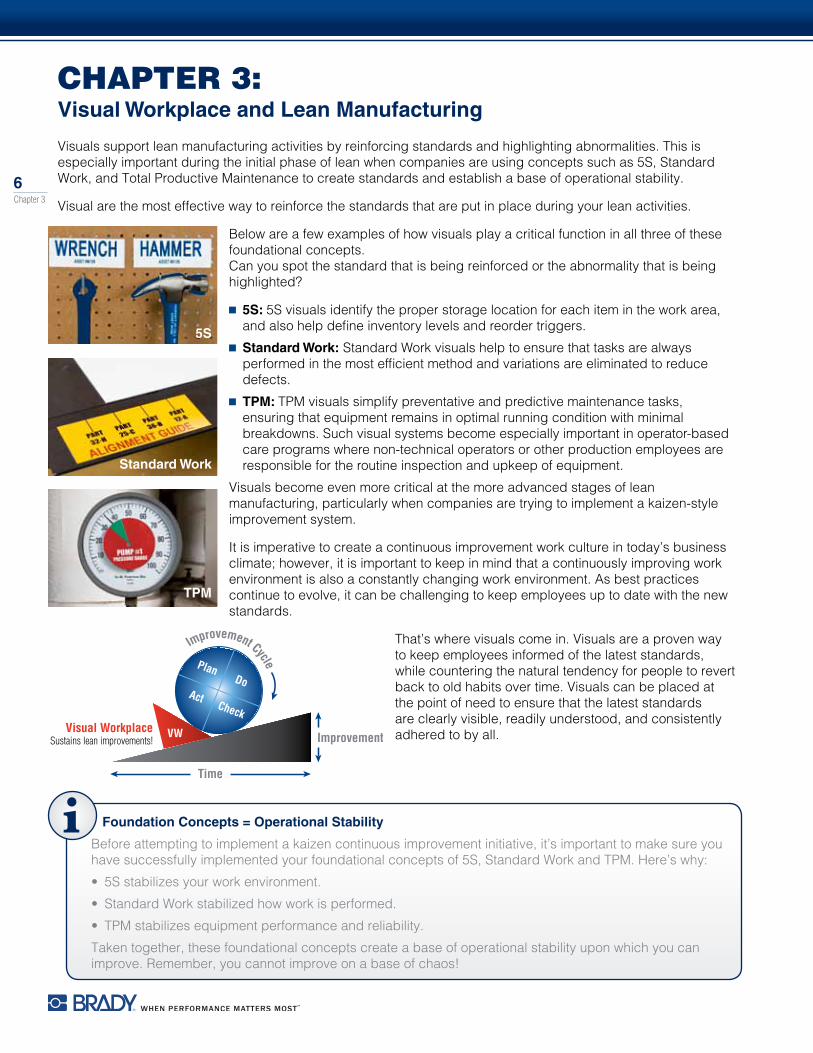
Below are a few examples of how visuals play a critical function in all three of these foundational concepts. Can you spot the standard that is being reinforced or the abnormality that is being highlighted?
O 5S: 5S visuals identify the proper storage location for each item in the work area, and also help define inventory levels and reorder triggers.
O Standard Work: Standard Work visuals help to ensure that tasks are always performed in the most efficient method and variations are eliminated to reduce defects.
O TPM: TPM visuals simplify preventative and predictive maintenance tasks, ensuring that equipment remains in optimal running condition with minimal breakdowns. Such visual systems become especially important in operator-based care programs where non-technical operators or other production employees are responsible for the routine inspection and upkeep of equipment.
Visuals become even more critical at the more advanced stages of lean manufacturing, particularly when companies are trying to implement a kaizen-style improvement system.
It is imperative to create a continuous improvement work culture in today’s business climate; however, it is important to keep in mind that a continuously improving work environment is also a constantly changing work environment. As best practices continue to evolve, it can be challenging to keep employees up to date with the new standards.
That’s where visuals come in. Visuals are a proven way to keep employees informed of the latest standards, while countering the natural tendency for people to revert back to old habits over time. Visuals can be placed at the point of need to ensure that the latest standards are clearly visible, readily understood, and consistently adhered to by all.
Improvement Cycle
Visual WorkplaceSustains lean improvements!
VW
Time
Improvement
PlanDo
ActCheck
Foundation Concepts = Operational Stability
Before attempting to implement a kaizen continuous improvement initiative, it’s important to make sure you have successfully implemented your foundational concepts of 5S, Standard Work and TPM. Here’s why:
• 5Sstabilizesyourworkenvironment.
• StandardWorkstabilizedhowworkisperformed.
• TPMstabilizesequipmentperformanceandreliability.
Taken together, these foundational concepts create a base of operational stability upon which you can improve. Remember, you cannot improve on a base of chaos!
Standard Work
5S
TPM
7Chapter 4
CHAPTER 4: Incorporating Visuals in Lean Activities
In Chapter 3, you learned that visuals are especially important in the foundational concepts of 5S Workplace Organization, Standard Work and Total Productive Maintenance. But it doesn’t stop there. As you continue reading this handbook, you’ll learn that visuals are also widely used in production control concepts, such as Kanban Pull Production and Just-In-Time inventory management, as well as quality control lean concepts, such as Pokayoke and Quality At The Source. All of these lean concepts rely on visuals to reinforce standards and detect abnormalities.
In this chapter, we’ll show you three ways that you can incorporate visual concepts and techniques into your lean activities. This includes:
1) incorporating visual thinking into existing kaizen or rapid improvement events;
2) holding kaizen events where the main focus is enhancing the visuality of a specific work area or process, and;
3) instilling visual thinking into lean daily management practices.
1. Incorporate visuals into existing lean eventsThe most common approach to creating a visual workplace is to incorporate visual concepts and techniques into your facility’s existing lean events.
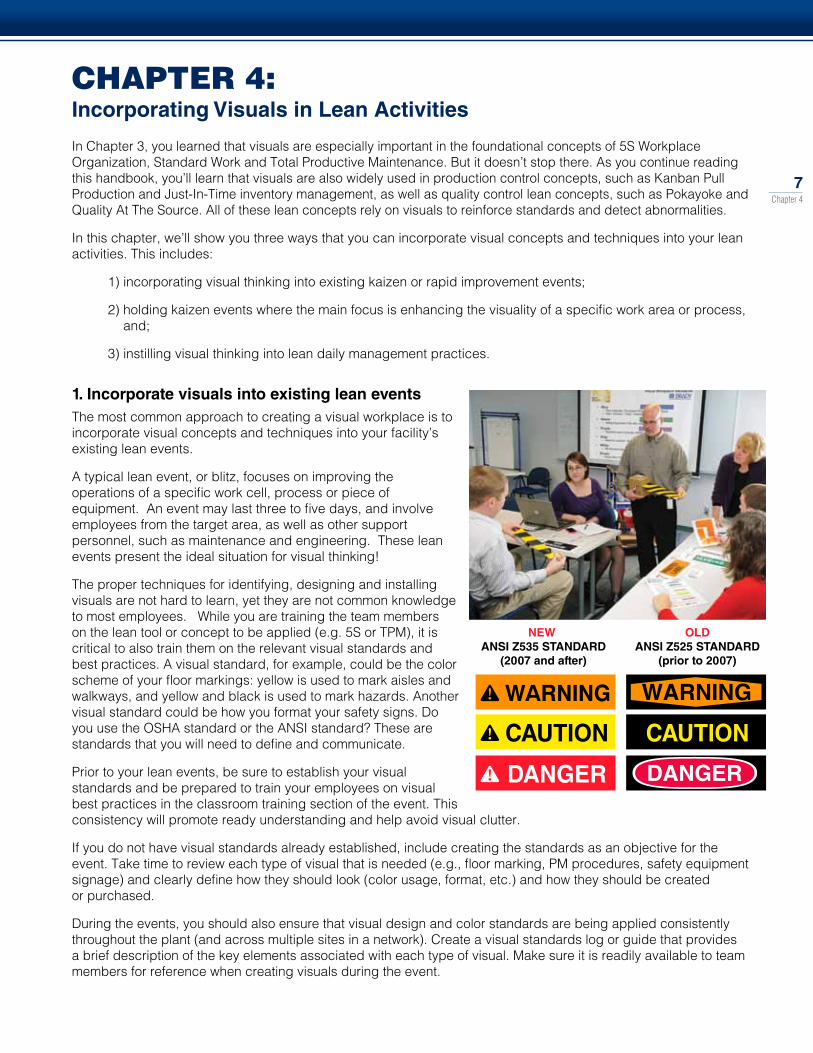
A typical lean event, or blitz, focuses on improving the operations of a specific work cell, process or piece of equipment. An event may last three to five days, and involve employees from the target area, as well as other support personnel, such as maintenance and engineering. These lean events present the ideal situation for visual thinking!
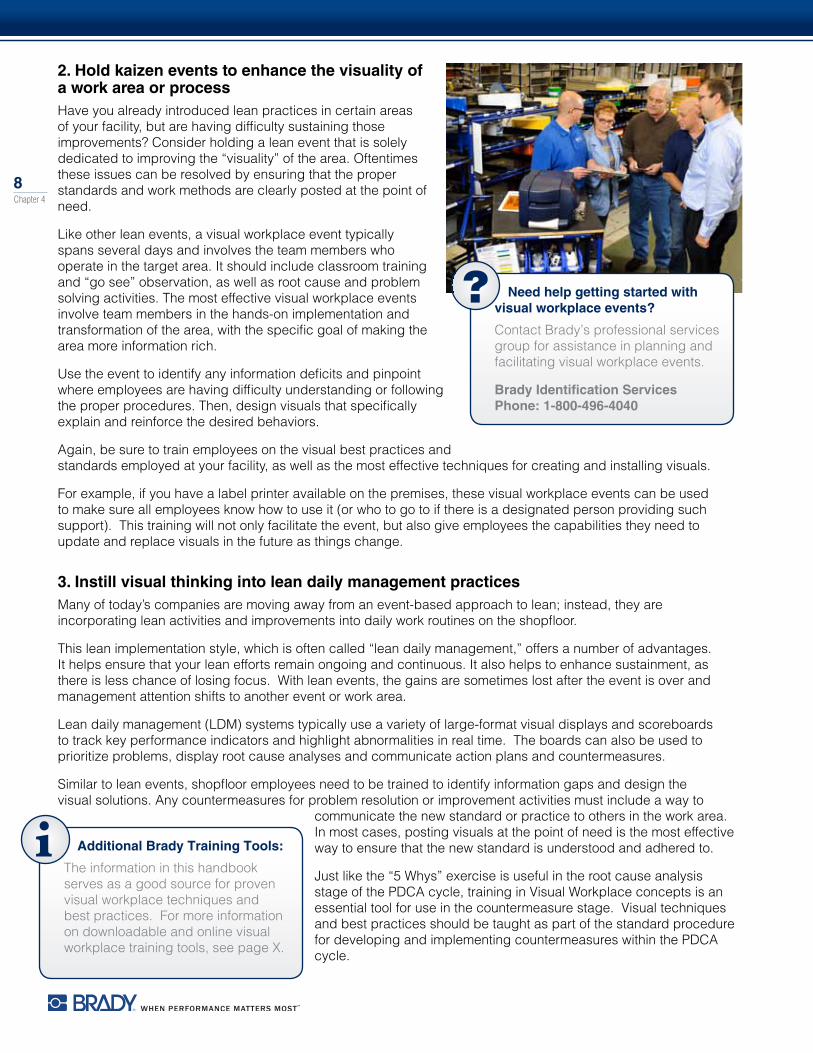
The proper techniques for identifying, designing and installing visuals are not hard to learn, yet they are not common knowledge to most employees. While you are training the team members on the lean tool or concept to be applied (e.g. 5S or TPM), it is critical to also train them on the relevant visual standards and best practices. A visual standard, for example, could be the color scheme of your floor markings: yellow is used to mark aisles and walkways, and yellow and black is used to mark hazards. Another visual standard could be how you format your safety signs. Do you use the OSHA standard or the ANSI standard? These are standards that you will need to define and communicate.
Prior to your lean events, be sure to establish your visual standards and be prepared to train your employees on visual best practices in the classroom training section of the event. This consistency will promote ready understanding and help avoid visual clutter.
If you do not have visual standards already established, include creating the standards as an objective for the event. Take time to review each type of visual that is needed (e.g., floor marking, PM procedures, safety equipment signage) and clearly define how they should look (color usage, format, etc.) and how they should be created or purchased.
During the events, you should also ensure that visual design and color standards are being applied consistently throughout the plant (and across multiple sites in a network). Create a visual standards log or guide that provides a brief description of the key elements associated with each type of visual. Make sure it is readily available to team members for reference when creating visuals during the event.
CAUTION CAUTION
DANGER
NEW ANSI Z535 STANDARD
(2007 and after)
OLDANSI Z525 STANDARD
(prior to 2007)
8Chapter 4
2. Hold kaizen events to enhance the visuality of a work area or process Have you already introduced lean practices in certain areas of your facility, but are having difficulty sustaining those improvements? Consider holding a lean event that is solely dedicated to improving the “visuality” of the area. Oftentimes these issues can be resolved by ensuring that the proper standards and work methods are clearly posted at the point of need.
Like other lean events, a visual workplace event typically spans several days and involves the team members who operate in the target area. It should include classroom training and “go see” observation, as well as root cause and problem solving activities. The most effective visual workplace events involve team members in the hands-on implementation and transformation of the area, with the specific goal of making the area more information rich.
Use the event to identify any information deficits and pinpoint where employees are having difficulty understanding or following the proper procedures. Then, design visuals that specifically explain and reinforce the desired behaviors.
Again, be sure to train employees on the visual best practices and standards employed at your facility, as well as the most effective techniques for creating and installing visuals.
For example, if you have a label printer available on the premises, these visual workplace events can be used to make sure all employees know how to use it (or who to go to if there is a designated person providing such support). This training will not only facilitate the event, but also give employees the capabilities they need to update and replace visuals in the future as things change.
3. Instill visual thinking into lean daily management practicesMany of today’s companies are moving away from an event-based approach to lean; instead, they are incorporating lean activities and improvements into daily work routines on the shopfloor.
This lean implementation style, which is often called “lean daily management,” offers a number of advantages. It helps ensure that your lean efforts remain ongoing and continuous. It also helps to enhance sustainment, as there is less chance of losing focus. With lean events, the gains are sometimes lost after the event is over and management attention shifts to another event or work area.
Lean daily management (LDM) systems typically use a variety of large-format visual displays and scoreboards to track key performance indicators and highlight abnormalities in real time. The boards can also be used to prioritize problems, display root cause analyses and communicate action plans and countermeasures.
Similar to lean events, shopfloor employees need to be trained to identify information gaps and design the visual solutions. Any countermeasures for problem resolution or improvement activities must include a way to
communicate the new standard or practice to others in the work area. In most cases, posting visuals at the point of need is the most effective way to ensure that the new standard is understood and adhered to.
Just like the “5 Whys” exercise is useful in the root cause analysis stage of the PDCA cycle, training in Visual Workplace concepts is an essential tool for use in the countermeasure stage. Visual techniques and best practices should be taught as part of the standard procedure for developing and implementing countermeasures within the PDCA cycle.
Need help getting started with visual workplace events?
Contact Brady’s professional services group for assistance in planning and facilitating visual workplace events.
Brady Identification Services Phone: 1-800-496-4040
Additional Brady Training Tools:
The information in this handbook serves as a good source for proven visual workplace techniques and best practices. For more information on downloadable and online visual workplace training tools, see page X.
9Chapter 5
CHAPTER 5: Identifying Information Deficits
Information deficits are one of the primary causes of waste. If employees do not have the information they need to do their job properly, they will spend time asking, searching and waiting for answers.
These information deficits, however, are not always easy to identify. Employees seldom think about why information is missing, or what could be done to make the information more available. Work is simply completed in the manner in which it always has been; thus the problem falls outside their state of awareness and they simply work around it.
Like waste, it requires training, experience and special observational techniques to recognize that information deficits exist around you.
In this chapter, we’ll share several different techniques that can help you identify information deficits – and adequately eliminate them to create a more visual, effective work environment.
Trigger QuestionsIn her book “Visual Workplace, Visual Thinking,” Dr. Gwendolyn Galsworth recommends using two trigger questions to help your employees see and recognize information deficits.
Trigger #1: “What do I need to know?”
If you find yourself asking a question, it could be an indication that there is an information deficit. Always consider whether it would be beneficial to post the information you receive at the point of need.
Trigger #2: “What do I need to share?”
If you are asked a question more than once, this should serve as a signal that a visual solution may be in order. A visual device could answer the question – so no more time is wasted asking the question (or answering the question) in the future.
As you can see, it’s important to pay attention to questions: they put the spotlight on information deficits. Take the time to evaluate what questions are being asked (or what questions should be asked, but are not, and thus resulting in misunderstandings) in order to identify the presence of information deficits and the need for visual solutions.
Visual ChecklistsAnother way to identify information deficits is with a visual checklist. Choose one work area or process to focus on, and use the list below as a guide for reviewing visuality of the area. Consider how each type of information is handled, and whether any improvements are warranted.
Visual Checklist:
1. Facility & process visuals2. Storage location visuals3. Safety visuals4. Production & nventory control visuals5. Standard work visuals6. Equipment care visuals
This visual checklist will help to focus your attention on the specific aspects of the production environment that frequently benefit from visuals, and help you more clearly highlight any information deficits.
In the next chapter, we’ll get into more detail about the different types of visuals mentioned above, and provide specific examples to help you get started in your facility.
What do I needto know?
What do I needto share?
What do I needto know?
What do I needto share?

10Chapter 6
CHAPTER 6: Common Lean Visual Applications
In Chapters 1 through 5, you learned about the concept of visual workplace and how it can significantly benefit your facility. In this chapter, we’re going to dig even deeper into visual workplace and show you how to start applying visual techniques in your facility.
Using the six types of visuals in the Visual Checklist (see chapter 5), we’ll provide examples of common lean visual applications.
1. Facility & Process VisualsTo start, let’s take a look at how visuals can be incorporated into your facility to improve navigation and process flow. Along the way, we’ll provide examples of visual devices for the following applications:
Wayfinding
Take a second and think about your facility. Is it easy to navigate throughout the building?
In most facilities, there are a number of opportunities for improvement; visuals are an easy and effective way to do so. Start by posting direction or wayfinding signs throughout your facility to help people find their way around the building. Mark all of your rooms and offices with visual identifiers, and then post facility diagrams throughout your facility to help people pinpoint where they are.
Production Processes and Work Cells
Are your work areas, departments and cells properly identified so that it is easy for people to understand the content and sequence of work being performed?
A common goal in lean manufacturing is that anyone should be able to walk into a production area and - within several minutes - be able to identify what is being produced and the flow of product through the cells or line. To achieve this, all processes and work cells must be properly identified.
Best practice for creating work cell or process identification visuals is to include the following information:
O Wayfinding O Production processes and work cells O Equipment
O Components and piping O Electrical disconnects
O Name of the area or cell O What processes are performed
O What type of product is being produced O Next upstream or downstream process
(if applicable)
Pipe Marking Yields Big Savings
One company invested tens of thousands of dollars to mark all of their piping systems. When asked how they could justify the investment, they said that it was taking their employees and contractors approximately 20 minutes to track down the right line during breakdowns. Each minute they were not producing product
cost the company $500. After labeling all of their piping, they reduced the search time to 5 minutes. By adding visuals, they saved an average of $7500 on every breakdown – and they’ll continue to reap those savings year after year.

11Chapter 6
Equipment ID
Visual devices should also be placed directly on to your equipment to facilitate easy asset care and management. Equipment identification is important for a number of reasons, including:
O Asset tracking O Clear direction when reporting problems (enabling maintenance people to readily
know which machine to investigate) O Better equipment histories (If maintenance and repair tasks are tracked,
identifying the equipment ensures that the data is properly assigned.)
Pipe Marking
For components that form part of a larger network or system, like pipe markers, consider identifying the upstream and downstream components on the label as well.
For example, pipe markers should show not only the content and flow direction, but also the source and destination. This simplifies and expedites the process of tracing pipes through the facility when you need to shut down a specific section or process.
Electrical Marking
Nothing is more dangerous than choosing the wrong disconnect when attempting to de-energize a piece of equipment.
To make sure your employees can easily identify and locate the appropriate switch, every piece of equipment that is electrically-powered should be marked with a clear, easy-to-understand label. On the label, be sure to identify the location of the disconnect switches or other energy isolating devices. This will help ensure that the equipment is properly de-energized before servicing, avoiding accidents and possibly even saving lives.
2. Storage Location Visuals (5S)One of the most visually intensive lean activities is 5S: it focuses on identifying what each item in the work area is and where it belongs. The goal of 5S is to create a storage home for everything that remains in the work area. In fact, best practice is to place a border around “everything that casts a shadow.”
Floor Marking
When creating 5S visuals, it’s a best practice to begin by marking locations on the floor, and then work your way up throughout the facility.
In a busy plant, controlling the flow of people and vehicles is an important safety concern. Therefore, one of the first things to mark is vehicle traffic lanes and pedestrian walkways. Marking your permanent aisles and passageways is not just a good practice - it is an OSHA requirement (see OSHA CFR 1910.22). In addition to marking lanes, consider using precautionary signals or floor signs at intersections where people and vehicle traffic unavoidably meet.
Next, place borders around all equipment, fixtures, storage shelves, tables, stands, carts and other items that rest on the floor. Remember, everything that casts a shadow should have a marked storage location.
SWITCH 237ACP-1 MAIN DISCONNECT
AIR COMPRESSOR #1
ACP-1DISCONNECT: SWITCH 237
Electrical Equipment Regulations
All electrical equipment should also be marked with both shock and arc flash hazard warnings, as required by NFPA70E and the National Electric Code. To learn more about these requirements, visit www.BradyID.com/arcflash and download Brady’s Arc Flash Labeling whitepaper.

12Chapter 6
It is also just as important to mark where things do not belong. For example, its best practice to use striped tape to mark off areas that need to be kept clear for operation reasons. The stripes demand more attention and help enforce compliance. Diagonal lines placed inside the border can also be included for additional visual impact.
Shelf and Bin Labeling
After you’ve finished marking your floors, the next step is to mark your shelves, flow racks, totes, and other stocking fixtures. Here are some best practices for marking:
O Include a brief description alongside the part number or bar code. O Make labels large enough to read at a glance. O Use symbols and pictograms to help to employees locate items faster &
reduce mistakes. O Use labels that are designed for industrial use and stick securely to a variety of
surfaces. (Falling off is a frequent problem, as these types of labels are usually adhered to vertical surfaces.)
If subject to frequent reorganization, use magnets or labels with a repositionable adhesive.
Tool Boards and Workbenches
Be sure to mark storage locations on all of your tool boards and workbenches. Use adhesive vinyl sheets, magic markers or paint to create shadows that are the exact shape and size of the tool; these shadows will help your employees easily identify what is missing at a glance. Above each tool shadow, use a label to show the name or ID number of the tool.
Some companies use actual photos of the tools instead of simple outlines or shadows. This technique makes it virtually mistake-proof to identify a tool and its proper storage place. However, there is one potential drawback to this technique: it can be difficult to tell if the tool is actually there or not. To eliminate any confusion, be sure to make your photos smaller than life-size (but still visible from a distance), or only show half the tool in the photo.
It’s important to store tools in convenient locations that minimize operator motion. If creating a board is not practical, consider storing the tools right on the machine using hooks or magnets.
Brady’s Floor Marking Color Standards
To assist lean practitioners, Brady developed a comprehensive floor marking color scheme that many companies have used to standardize their floor markings. This color scheme will help you visually delineate work areas and pathways, and enable your employees to identify designated storage locations for materials, product, tools and equipment – all at first glance.
Brady’s floor marking color scheme intentionally limits the number of colors to promote easy learning and memorization. It can be modified as needed in order to suit the specific operational priorities, processes, and characteristics of your individual facility.
For more information on floor marking, download the Brady Floor Marking Guide at: www.BradyID.com/visualworkplace.
5s floor marking color standard
Use as the border color for:Yellow Aisleways, traffic lanes & work cells
White Equipment & fixtures (workstations, carts, floor stand displays, racks, etc.) not otherwise color coded
Blue, Green, and/or Black
Materials and components, including raw materials, work-in-progress & finished goods
Orange Materials or product held for inspectionRed Defects, scrap, rework, and red tag areas
Red & White
Areas to be kept clear for safety/compliance reasons (e.g., areas in front of electrical panels, firefighting and safety equip. (Ex. as eyewash stations, safety showers and first aid stations)
Black & White
Areas to be kept clear for operational purposes (not related to safety and compliance)
Black & Yellow
Areas that may expose employees to special physical or health hazards
13Chapter 6
Drawers, Cabinets and Toolboxes
Finally, all drawers, cabinets, toolboxes, and other organizers should be marked on the outside to clearly indicate what is contained within. They should also be marked on the inside to show where each item is stored. Use foam cutouts or anti-slip mats to prevent the items from rolling around and shifting in the drawers.
When you are marking your cabinets, consider taking the doors off to make the contents more visible. This will encourage employees to keep the cabinets organized,
and helps prevent them from becoming cluttered with junk. Some companies even put angled “roofs” on cabinets to ensure that items are not inappropriately stored on top.
3. Safety VisualsSafety visuals are a critical component to visual workplace; they alert employees and visitors to potentially hazardous situations and control actions to prevent unsafe conditions. In fact, some lean practitioners have begun to add a sixth “S” to their 5S programs to ensure adequate focus is placed on safety.
The most effective way to identify existing hazards is to have a trained safety inspector survey your work area. The inspector can tour the area alongside your 5S team and point out any hazard they may come into contact with. If the hazards are identified early in your process, your employees can organize the area to mitigate or minimize any dangers and put visual warnings in place during the “Set-in-
Order” stage of 5S. Afterwards, be sure to have trained safety personnel inspect the results to make sure the countermeasures are safe and in adherence to company standards and government regulations.
Here are a few safety visual best practices to keep in mind: O Provide hazard warnings and safe work instructions at the point of need. O Make sure the locations of firefighting equipment, eye wash stations,
first aid stations, safety showers, and other safety equipment are clearly marked.
O Ensure the proper personal protection equipment is easy to access and ready for use.
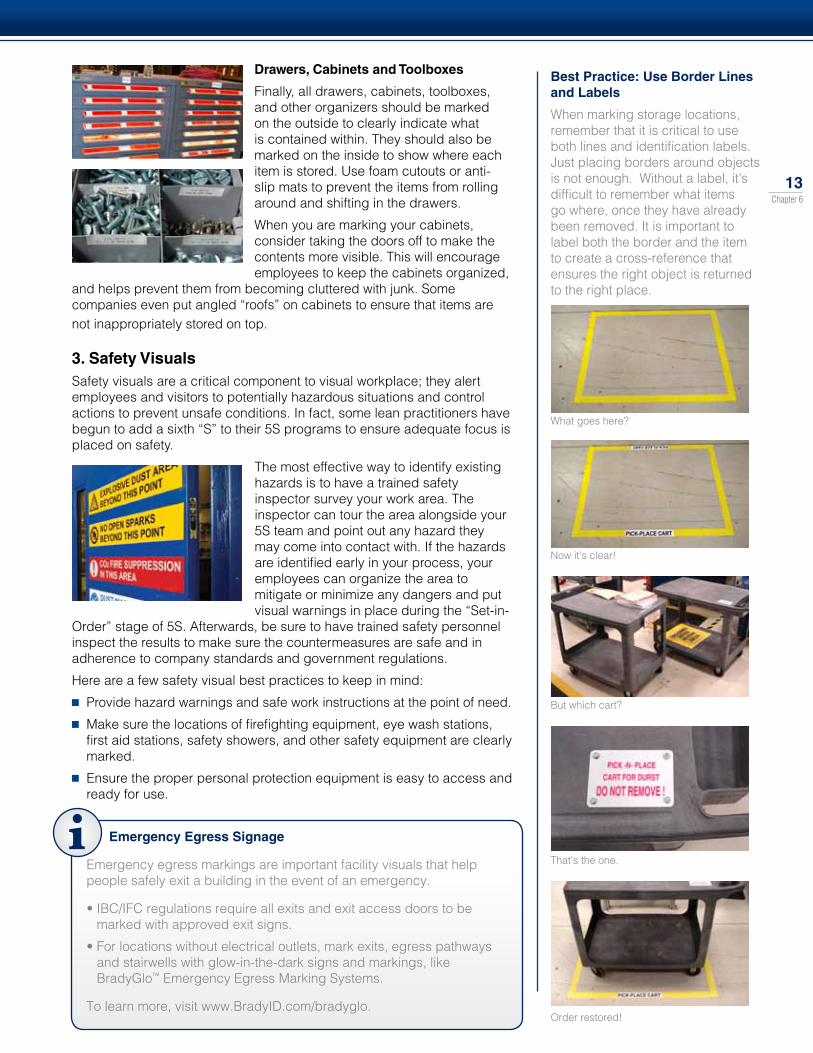
Best Practice: Use Border Lines and Labels
When marking storage locations, remember that it is critical to use both lines and identification labels. Just placing borders around objects is not enough. Without a label, it’s difficult to remember what items go where, once they have already been removed. It is important to label both the border and the item to create a cross-reference that ensures the right object is returned to the right place.
What goes here?
Now it's clear!
But which cart?
That's the one.
Order restored!
Emergency Egress Signage
Emergency egress markings are important facility visuals that help people safely exit a building in the event of an emergency.
•IBC/IFCregulationsrequireallexitsandexitaccessdoorstobemarked with approved exit signs.
•Forlocationswithoutelectricaloutlets,markexits,egresspathwaysand stairwells with glow-in-the-dark signs and markings, like BradyGlo™ Emergency Egress Marking Systems.
To learn more, visit www.BradyID.com/bradyglo.
14Chapter 6
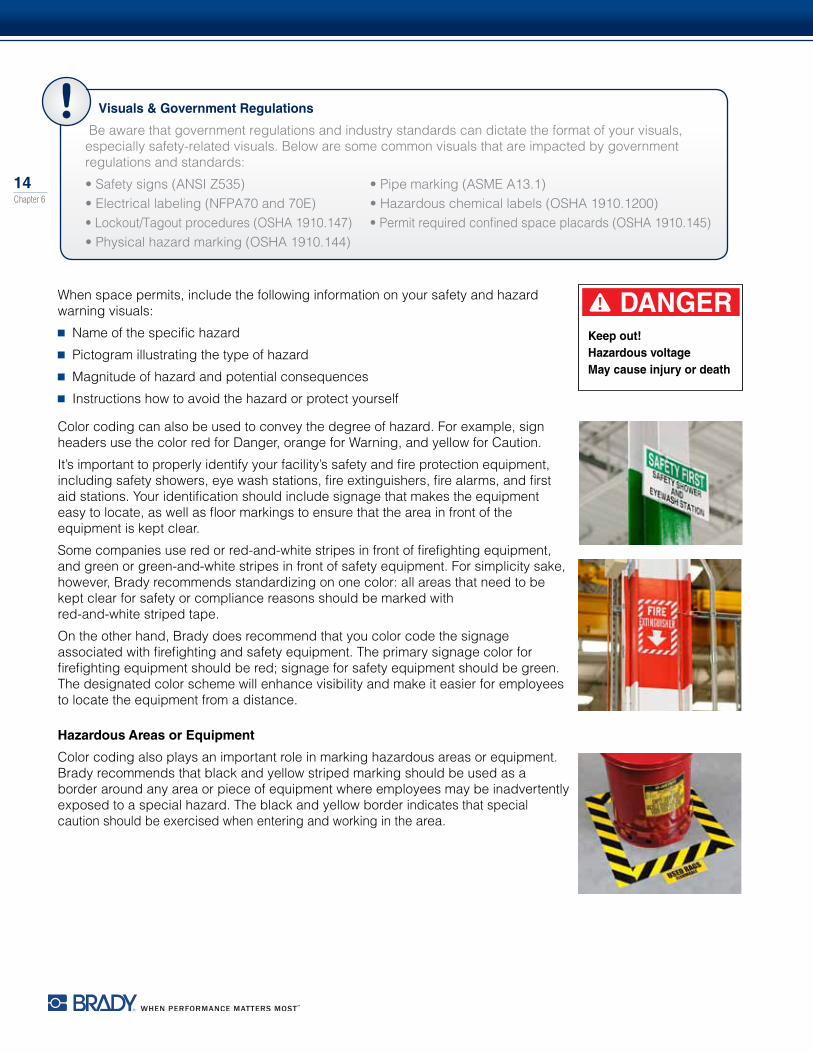
When space permits, include the following information on your safety and hazard warning visuals:
O Name of the specific hazard O Pictogram illustrating the type of hazard O Magnitude of hazard and potential consequences O Instructions how to avoid the hazard or protect yourself
Color coding can also be used to convey the degree of hazard. For example, sign headers use the color red for Danger, orange for Warning, and yellow for Caution.
It’s important to properly identify your facility’s safety and fire protection equipment, including safety showers, eye wash stations, fire extinguishers, fire alarms, and first aid stations. Your identification should include signage that makes the equipment easy to locate, as well as floor markings to ensure that the area in front of the equipment is kept clear.
Some companies use red or red-and-white stripes in front of firefighting equipment, and green or green-and-white stripes in front of safety equipment. For simplicity sake, however, Brady recommends standardizing on one color: all areas that need to be kept clear for safety or compliance reasons should be marked with red-and-white striped tape.
On the other hand, Brady does recommend that you color code the signage associated with firefighting and safety equipment. The primary signage color for firefighting equipment should be red; signage for safety equipment should be green. The designated color scheme will enhance visibility and make it easier for employees to locate the equipment from a distance.
Hazardous Areas or Equipment
Color coding also plays an important role in marking hazardous areas or equipment. Brady recommends that black and yellow striped marking should be used as a border around any area or piece of equipment where employees may be inadvertently exposed to a special hazard. The black and yellow border indicates that special caution should be exercised when entering and working in the area.
Visuals & Government Regulations
Be aware that government regulations and industry standards can dictate the format of your visuals, especially safety-related visuals. Below are some common visuals that are impacted by government regulations and standards:
•Safetysigns(ANSIZ535) •Pipemarking(ASMEA13.1)•Electricallabeling(NFPA70and70E) •Hazardouschemicallabels(OSHA1910.1200)•Lockout/Tagoutprocedures(OSHA1910.147) •Permitrequiredconfinedspaceplacards(OSHA1910.145)•Physicalhazardmarking(OSHA1910.144)
DANGERKeep out!Hazardous voltageMay cause injury or death

15Chapter 6
4. Production & Inventory Control VisualsAlso called Material Pull or Kanban visuals. A key goal of lean is to eliminate excess inventory. In storerooms, inventory management is a critical – and often problematic – issue that needs to be actively monitored. It's important to have what's needed on hand at all times - without resorting to overstocking.
There are a number of ways visuals should be incorporated into these strategies to improve inventory management. Visual reorder indicators can be used to control stocking levels for inventory, and kanban cards can be used to simplify the process of producing or reordering stock. Here are a few examples:
Maximum/minimum level indicators
A maximum level indicator is used to visually reinforce stock limits and highlight overstock situations. It can help you avoid unnecessarily high inventory levels. Excess inventory ties up capital that could be used more efficiently elsewhere.
You can also add a minimum level indicator to show the point at which stock should be reordered. If the number of stock rolls falls beneath the green line, employees know that they need to reorder to ensure that replacement stock can be delivered before they run out. The minimum level reorder visual ensures that the stock is sufficient to meet operational demands.
Kanban Cards
On a slightly more sophisticated level, consider using a kanban system to not only control inventory, but also make the reordering process more visual and efficient.
Kanban cards can take a variety of forms (e.g. tags or magnets) and can include product descriptions and ordering information, depending on the need.
Kanban Bins
When using a two-bin system to manage inventory and reordering, consider printing kanban information on a label and attaching the label to the bin. In this case, the entire bin becomes the kanban signal, and is sent to the central stocking area for refilling. This provides several benefits. First, it saves steps by avoiding having to put parts in a transport container, then transfer them to the bin at the flow racks on the production line. Second, it helps to eliminate lost cards, which are often misplaced or accidentally put in a pocket and taken home!
Step 4
Nylon Gloves Nylon Gloves
Step 2
REORDER KANBAN
Take to team leader
Nylon Gloves
Part #2222
Order 10 packs
Step 1
Nylon Gloves
REORDER KANBANTake to team leader
Nylon GlovesPart #4444
Order 10 packs
USE KANBAN TO REORDERWHEN BIN IS EMPTY
USE KANBAN TO REORDERWHEN BIN IS EMPTY
Nylon Gloves
Step 3
KANBAN BOARD
REORDER ON ORDER
REORDER KANBAN
Take to team leader
Nylon Gloves
Part #2222
Order 10 packs
REORDER KANBAN
Take to team leader
Nylon Gloves
Part #2222
Order 10 packs
Nylon Gloves Nylon GlovesREORDER KANBAN
Take to team leader
Nylon Gloves
Part #2222
Order 10 packs
USE KANBAN TO REORDERWHEN BIN IS EMPTY
KANBAN BOARD
Kanban cards for Inventory Management
Kanban cards can be used to create a simple, elegant inventory control system that removes the need for inventory audits and eliminates questions about whether out-of-stock items have been reordered or not.
Example: A two-bin system was used to control and manage inventory of nylon gloves used on a shop floor.
Step 1: Each time a bin empties, it's time to reorder.
Step 2: Employees take the magnetic kanban card from the cart and place it on the supervisor's reorder board. All the order information the supervisor needs is on the card; no need to look up part numbers or other info!
Step 3: After the gloves have been ordered, the supervisor moves the same kanban card to the “On Order” board.
Step 4: When the gloves arrive, the new stock is placed in the empty bin and the kanban card is returned to the cart.
16Chapter 6
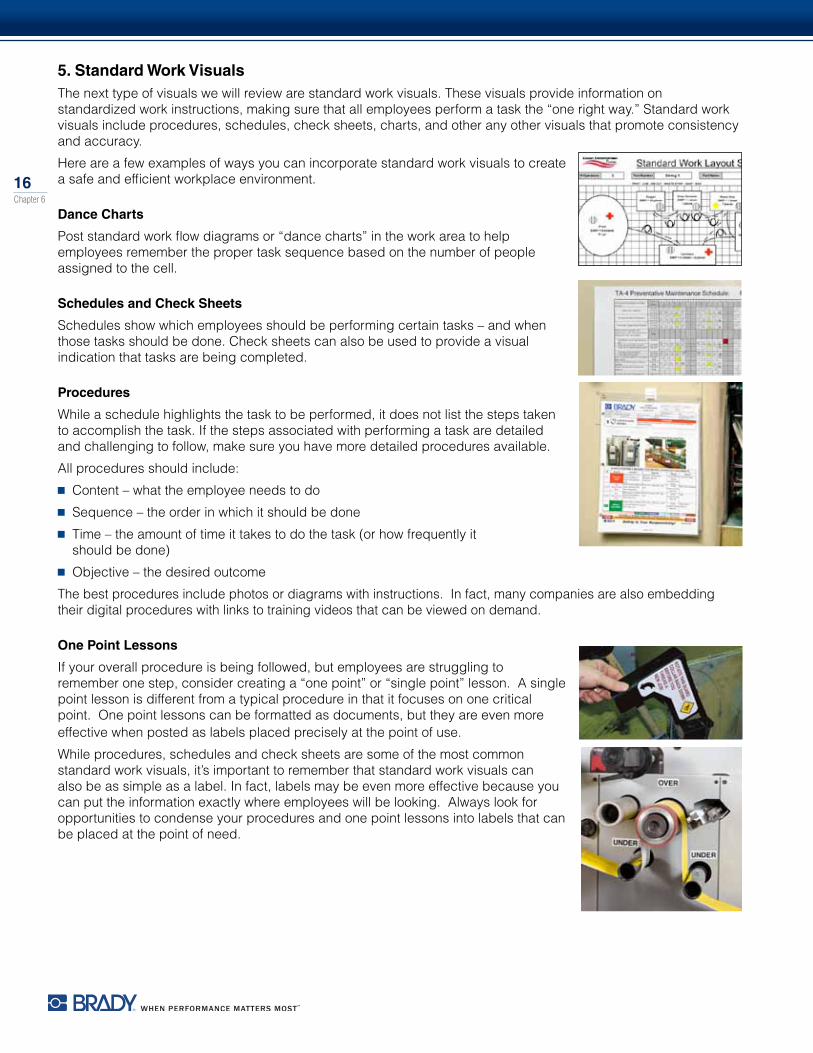
5. Standard Work VisualsThe next type of visuals we will review are standard work visuals. These visuals provide information on standardized work instructions, making sure that all employees perform a task the “one right way.” Standard work visuals include procedures, schedules, check sheets, charts, and other any other visuals that promote consistency and accuracy.
Here are a few examples of ways you can incorporate standard work visuals to create a safe and efficient workplace environment.
Dance Charts
Post standard work flow diagrams or “dance charts” in the work area to help employees remember the proper task sequence based on the number of people assigned to the cell.
Schedules and Check Sheets
Schedules show which employees should be performing certain tasks – and when those tasks should be done. Check sheets can also be used to provide a visual indication that tasks are being completed.
Procedures
While a schedule highlights the task to be performed, it does not list the steps taken to accomplish the task. If the steps associated with performing a task are detailed and challenging to follow, make sure you have more detailed procedures available.
All procedures should include: O Content – what the employee needs to do O Sequence – the order in which it should be done O Time – the amount of time it takes to do the task (or how frequently it
should be done) O Objective – the desired outcome
The best procedures include photos or diagrams with instructions. In fact, many companies are also embedding their digital procedures with links to training videos that can be viewed on demand.
One Point Lessons
If your overall procedure is being followed, but employees are struggling to remember one step, consider creating a “one point” or “single point” lesson. A single point lesson is different from a typical procedure in that it focuses on one critical point. One point lessons can be formatted as documents, but they are even more effective when posted as labels placed precisely at the point of use.
While procedures, schedules and check sheets are some of the most common standard work visuals, it’s important to remember that standard work visuals can also be as simple as a label. In fact, labels may be even more effective because you can put the information exactly where employees will be looking. Always look for opportunities to condense your procedures and one point lessons into labels that can be placed at the point of need.
17Chapter 6
6. Equipment Care Visuals (TPM)As your company goes lean, it’s even more essential to ensure optimum equipment performance and reliability. If there are interruptions in your production, it could negatively impact shipments and on-time delivery metrics. There is a little room for error: your equipment needs to be in optimal operating condition at all times.
To achieve this goal, many companies turn to the lean concept of Total Productive Maintenance (TPM). TPM focuses on eliminating losses associated with equipment downtime, slowdowns and quality defects.
TPM shifts the maintenance focus from a "repair" mentality to a "reliability" mentality. The approach is proactive: instead of waiting for equipment to break down, maintenance, operators and engineering work together to avoid potential failures before they occur. By shifting the focus to reliability over repair, TPM practitioners achieve enhanced equipment effectiveness, increased maintenance efficiency, and lower asset management costs.
Equipment care visuals play a critical role in the success of any TPM program. Visuals can provide the following benefits: O Simplify operator and maintenance training O Clearly highlight what is considered normal, making abnormalities or problems easy to detect at a glance O Allow inspections to be conducted while equipment is running, resulting in less need for planned downtime O Facilitate route-based inspections O Simplify storeroom management, making it easier to find the necessary tools, parts, and supplies
Autonomous maintenance, or operator-based care (OBC) programs, are being adopted in a growing number of facilities. Operators work with the machines on a daily basis, and are the most familiar with them; they are in the best position to detect problems when they arise. However, it’s important to remember that operators are not trained maintenance professionals. Training and supervision are therefore required – and that’s where visuals can offer significant value.
Instructions can be embedded in the physical work environment and posted at the point of need, where they can't be missed. The use of preventative maintenance check sheets, lube point labels, oil level indicators, and other visuals can supplement training. These visuals can serve as "just in time" information that will help your operators remember when and what they need to do to keep their equipment in optimal condition.
Here are several examples of how you can incorporate visuals into your TPM programs:
Lube Point Labels
It’s recommended to identify your PM points with tags or labels. Lubrication points, for example, should be marked with a label that identifies the PM point, and provides critical information about the proper grease quantity and frequency.
Too much lubrication can be just as damaging as not enough lubrication. It is important to make this type of information visible to all employees.
Using the wrong kind of lubricant can also result in serious damage to the equipment. To avoid any mix ups, consider color coding the lube point label to match the label on the appropriate grease gun or oil dispensor.
Oil Level Indicators
An oil level indicator can be applied behind an oil sight tube to assist in determining if oil needs to be added. By placing green and red striped labels behind the sight tube, operators can quickly detect when oil levels are too high or too low. The optical properties of the oil cause the stripes to enlarge and deflect downward, making it easy to tell whether the amount of oil falls in the green “good-to-go” range.
Drive Tension Guides
Operators in an autonomous maintenance environment are often assigned to inspect the area’s belts and chains. Visuals can simplify a number of these tasks, and ensure that each operator follows the same standard.
Drive tension guides, for example, are simple visuals that can be put into place to help operators inspect for proper tension on the drive system. Using red and green color blocks, these visuals indicate when a chain is too loose, or when the operators should replace the chain.
Repair
TPM
Reliability

18Chapter 6
Gauge Labels
Visuals can also be used to identify abnormalities – and ideally prevent those abnormalities from degenerating into catastrophic failures.
Note the gauge label in the photo to the left. Without the label, it would take a trained inspector to know if the temperature or pressure setting is correct. Adding a simple gauge label enables any employee to easily detect abnormalities at a glance and at a distance.
Normal / Safe State Visuals
Consider using visuals to clearly indicate whether valves and air dumps are normally closed or open. These visuals can help prevent accidents when employees are putting equipment into a safe working condition (or zero energy state).
Predictive Maintenance Targets
Today’s maintenance workers must become competent with a growing number of sophisticated predictive maintenance technologies, including vibration analysis, ultrasound, thermal imaging, and oil analysis. These predictive maintenance technologies are used to detect potential failures before they cause serious problems, allowing service to be scheduled and the necessary parts to be ordered in advance.
When performing predictive maintenance activities, it is essential that the location of the readings remains consistent. This can be problematic when reliability engineers are asked to use inspection routes to streamline the process and maximize efficiency. In such cases, the technician may not be familiar with every piece of equipment. Unless care is taken, readouts may vary across different machines, especially if the same route is serviced by different people at different times.
The use of predictive maintenance targets ensures that vibration and ultrasound probes are positioned for maximum repeatability, regardless of who takes the reading.
Replacement Part Visuals
Surveys have shown that roughly 25% of equipment downtime can be attributed to parts-related issues: identifying the correct part, looking for parts, or ordering parts that are not in stock, among other situations. Much of this wasted time can be eliminated through the effective use of visuals.
For example, equipment can be labeled to make it easy to identify and find replacement parts. In the image on the left, not only is the appropriate part number for the replacement filter identified, but the storage location for the replacement part is also shown, reducing search time.
Maintenance costs can be reduced by displaying the cost of replacement parts right on the equipment. When you clearly communicate the cost of each part, the practice of replacing parts unnecessarily will be inherently discouraged.
Additional Resources available at: www.BradyID.com/visualworkplace
To learn more about visual workplace, visit Brady’s visual workplace website at www.BradyID.com/visualworkplace. This site includes a wide variety of informational resources on lean and visual workplace concepts, including articles, handbooks, webcasts and more.
Here are a few other Brady downloads that you may be interested in:
• 5S Handbook: This handbook offers step-by-step guidance on how to implement an effective 5S program.
• TPM Webcast: “Using Visual Controls to Achieve World Class Reliability” This webcast on TPM visuals is presented by the leading TPM authority Robert Williamson, author of “Lean Machines For World Class Manufacturing & Maintenance.”

19
Brady Labeling Solutions for Visual WorkplaceThe right printing system can be an essential tool for creating an orderly and visually instructive workplace. Brady’s printers can print on a wide range of materials allowing you to make signs, labels, tags, and more on demand.
Create the visuals you need
O Create professional-quality visuals that are easy to read at a glance O Create visuals for significantly less than custom-ordered graphics from outside vendors O Predefined templates help promote a consistent look throughout the workplace
Quick and easy printing
O Print what you want when you need it. No waiting! O Built-in-keyboard and display facilitate use by everyone on the shop floor O Vinyl labels stick to a wide variety of surfaces and stand up to harsh environments
ToughJet™ Durable Adhesive SheetsJust print, peel and stick!
Create durable, professional-looking safety signs, procedures and charts with your inkjet printer! With Brady’s new ToughJet™ Durable Adhesive Sheets, there’s no need for laminating, tape, or document holders. ToughJet sheets are designed for use in the workplace, including harsh environments.
O Create letter-sized safety signs, procedures & placards O Water, chemical and abrasion resistant O No tearing, fading or yellowing when used indoors O Permanent or removable adhesives O Print multicolor and crisp photographs
For more information on ToughJet Durable Adhesive Sheets, visit www.BradyID.com/ToughJet
THE PORTABLE LEAN LABELER
THE ULTIMATE VISUAL WORKPLACE
SYSTEM
THE PERFECT 5S LABEL PRINTER
Printer specifications
globalmark®2 industrial labeler
BBP®31 sign & label Printer
Powermark™
sign & labelerminimark™
industrial labeler BmP®21 label Printer BmP®51 label maker BmP®71 label PrinterPart Number 76801 BBP31 13500 52041 BMP21 75447314707 BMP71Tape Width ½" - 4" ½" - 4¼" 4" - 10" ½" - 4" 3/8" - ¾" ½" - 1½" ½" - 2"Built-in Display with keyboard Yes Yes Yes No Yes Yes Yes
PC Connectivity Yes Yes Yes Yes No Optional Yes
Plotter Yes (Color & Cut only) No No No No No No
Color Multiple Spot & Process Colors Single Spot Color Multiple Spot Color Single Spot Color Single Spot Color Single Spot Color Single Spot Color
Media Types
Indoor/outdoor vinyl, repositionable vinyl, poly tag stock, magnetic, reflective, phosphorescent, tamper resistant, metalized polyester, and more.
Indoor/outdoor vinyl, tag stock, reflective, phosphorescent, repositionable vinyl, raised equipment labels & more.
Indoor/outdoor vinyl,poly tag stock, reflective, phosphorescent, polyester, and more.
Indoor/outdoor vinyl, tamper resistant, and more.
Vinyl, self-laminating, sleeves, polyester, wire & cable marking
Data communications & audio/visual labeling, facility, safety & maintenance identification, electrical ID, product ID, laboratory ID.
Indoor/outdoor vinyl, repositionable vinyl, economy polyester, reflective, tamper resistant, raised panel, wire & cable marking.
20
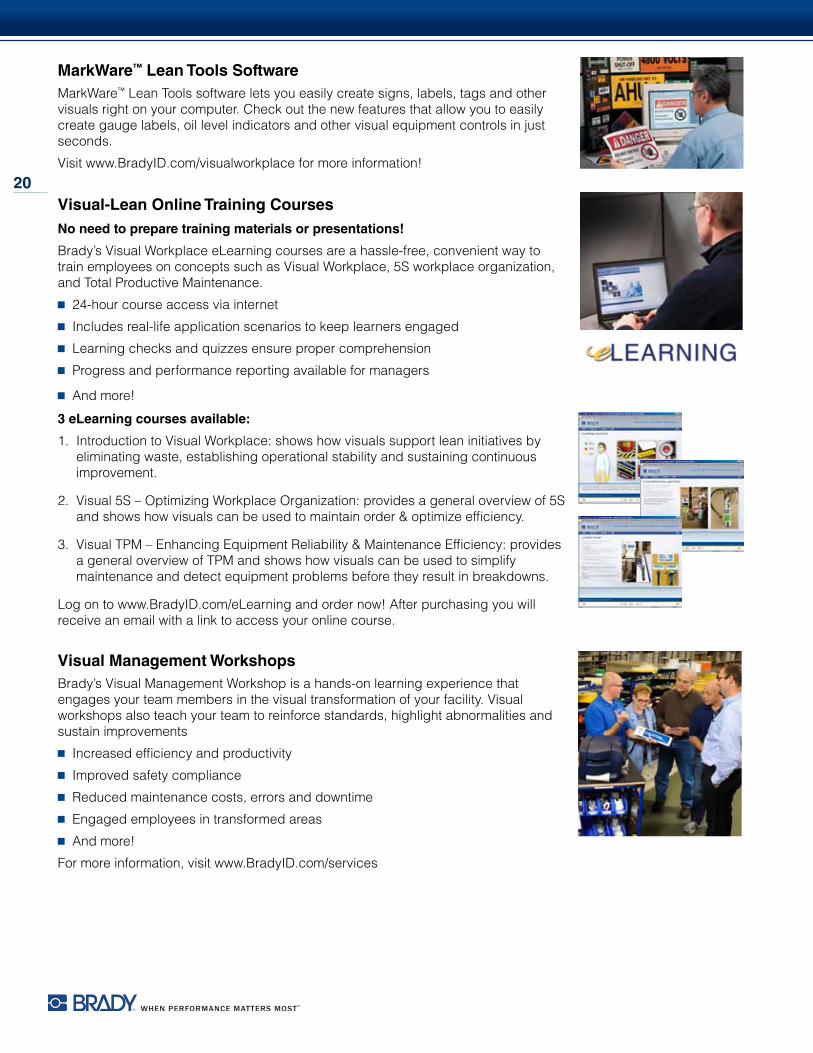
MarkWare™ Lean Tools SoftwareMarkWare™ Lean Tools software lets you easily create signs, labels, tags and other visuals right on your computer. Check out the new features that allow you to easily create gauge labels, oil level indicators and other visual equipment controls in just seconds.
Visit www.BradyID.com/visualworkplace for more information!
Visual-Lean Online Training CoursesNo need to prepare training materials or presentations!
Brady’s Visual Workplace eLearning courses are a hassle-free, convenient way to train employees on concepts such as Visual Workplace, 5S workplace organization, and Total Productive Maintenance.
O 24-hour course access via internet O Includes real-life application scenarios to keep learners engaged O Learning checks and quizzes ensure proper comprehension O Progress and performance reporting available for managers
O And more!
3 eLearning courses available:
1. Introduction to Visual Workplace: shows how visuals support lean initiatives by eliminating waste, establishing operational stability and sustaining continuous improvement.
2. Visual 5S – Optimizing Workplace Organization: provides a general overview of 5S and shows how visuals can be used to maintain order & optimize efficiency.
3. Visual TPM – Enhancing Equipment Reliability & Maintenance Efficiency: provides a general overview of TPM and shows how visuals can be used to simplify maintenance and detect equipment problems before they result in breakdowns.
Log on to www.BradyID.com/eLearning and order now! After purchasing you will receive an email with a link to access your online course.
Visual Management WorkshopsBrady’s Visual Management Workshop is a hands-on learning experience that engages your team members in the visual transformation of your facility. Visual workshops also teach your team to reinforce standards, highlight abnormalities and sustain improvements
O Increased efficiency and productivity O Improved safety compliance O Reduced maintenance costs, errors and downtime O Engaged employees in transformed areas O And more!
For more information, visit www.BradyID.com/services

21
USA Customer Service: 1-888-272-3946 Inside Sales: 1-888-311-0775 www.BradyID.com
Canada Customer Service: 1-800-263-6179 www.BradyCanada.ca
Mexico Customer Service: 1-800-262-7777 Inside Sales: 1-800-262-7777 ext 177 www.BradyLatinAmerica.com
© 2012 Brady Worldwide Inc. ALL RIGHTS RESERVED
Toolboard & Workbench Marking SuppliesSelf-adhesive vinyl sheets and tapes designed for use on tool boards, work benches, storage shelves and other non-floor surfaces.
O Sticks securely to a wide range of surface types O Won’t peel, crack or fade when exposed to common cleaners O Made of industrial grade adhesive and resists scratching
Shadow Vinyl:
O Quickly and easily create tool shadows to exact size and shape
Corner Marks:
O Use corner marks to define storage locations on workbenches, desktops & shelves
Border Marking Tape:
O Use to create full-line storage borders and as colored bands to identify tools
For more information, visit www.BradyID.com/visualworkplace
ToughStripe® Floor Marking TapeThe most durable floor marking tape!
Brady’s ToughStripe Floor Marking Tape is easy to apply, easy to remove and delivers the same glossy, high visibility look of painted floor markings! Toughstripe Tape employs a stiff polyester so the tape won’t stretch or wrinkle—making it easy to apply in straight lines.
O Withstands forklift traffic without tearing or lifting O No special floor preparation required- just clean with common cleansers O Dispenser box and liner enables easy application by one person working alone O Painless to remove-comes up in one piece and leave no adhesive residue O And more!
AdditionalToughstripe Floor Marking Products:
Diecut Shapes: available in dashes, dots, arrows, footprints and corner marks (Ls, Ts and crosses)
Floor Marking Signs: 17” signs that feature a strong adhesive backing and clear anti-slip surfaces and communicate important safety and warning messages to workers.
Customized Floor Markings: Order floor marking tape in preferred colors with custom-printed text or graphics to meet specific facility needs and 5S standards.
For more information, visit www.BradyID.com/Toughstripe
Visual 5S Marking KitsBrady’s 5S Marking Kits provide everything you need to create a visual workplace and maximize efficiency. Each kit contains an assortment of our most popular floor and
workbench marking supplies. Kits that include portable printers, such as the BMP®71 and IDXPERT™ label makers are also available.
Want more information? Visit www.BradyID.com/visualworkplace