vm9312 - quadratec · • 7" tft active matrix lcd w/ anti-glare coating ... • 18 gauge wire...
TRANSCRIPT
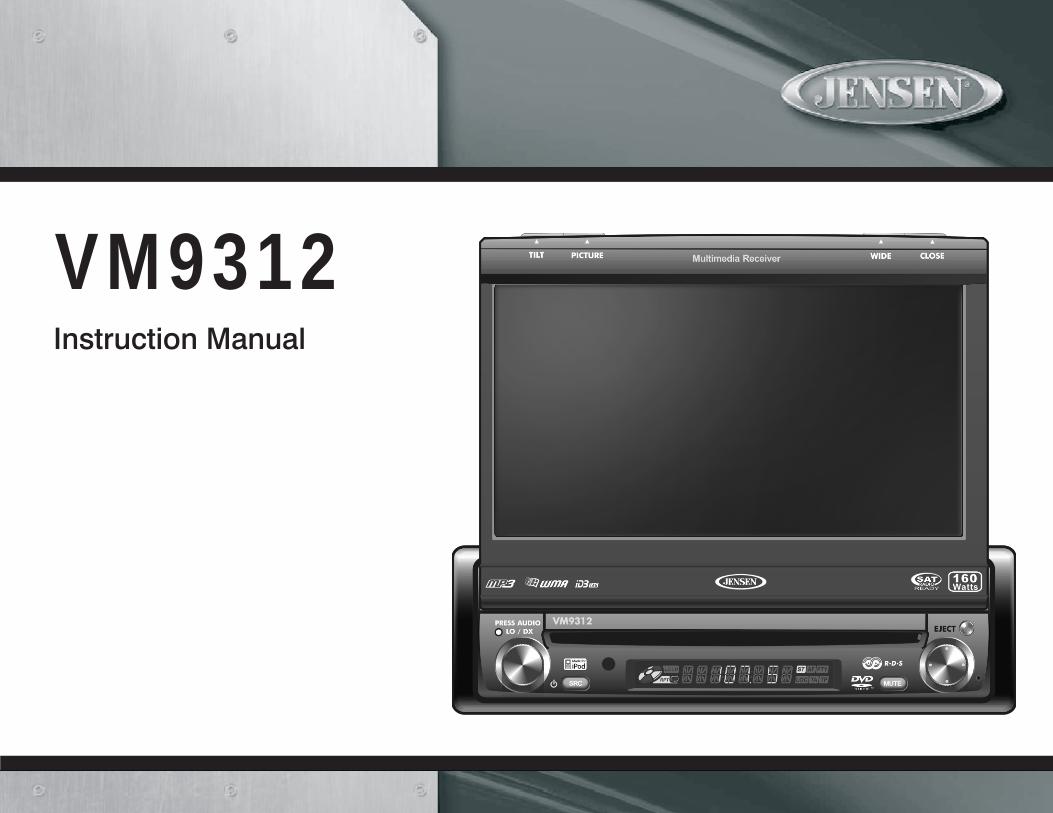
Instruction Manual
VM9312


i
CONTENTSThank you for choosing a Jensen product. We hope you will find the instructions in this owner’s manual clear and easy to follow. If you take a few minutes to look through it, you’ll learn how to use all the features of your new Jensen VM9312 Mobile Multimedia Receiver for maximum enjoyment.Preparation............................................................................................................................ 1Installation ............................................................................................................................. 2Controls and Indicators ......................................................................................................... 5Controls and Indicators ......................................................................................................... 6Remote Control ..................................................................................................................... 7Using the TFT Monitor ........................................................................................................ 10Operating Instructions ......................................................................................................... 12Setup Menu......................................................................................................................... 13Tuner Operation .................................................................................................................. 15Satellite Radio Operation .................................................................................................... 17DVD/VCD Video Operation ................................................................................................. 19DVD/CD Audio Operation ................................................................................................... 22MP3/WMA Operation .......................................................................................................... 23iPod Operation .................................................................................................................... 25Troubleshooting .................................................................................................................. 26Specifications ...................................................................................................................... 29

ii

1
VM9312
PREPARATIONCongratulations on your purchase of the Jensen VM9312 Mobile Multimedia Receiver.It’s a good idea to read all of the instructions before beginning the installation. We recommend having your Jensen VM9312 installed by a reputable installation shop.
FeaturesDVD• Aspect Ratio - Full and Normal• Fast Forward - 2X, 4X, 8X and 32X• Slow Motion - 1/2, 1/4, 1/6 and 1/7 • Play, Pause, Stop, Next Chapter and Previous ChapterCD / MP3 / WMA• CD-Text Compatible• ID3 Tag Compatible• Directory Search (MP3 / WMA Only)• Direct Track Access via Remote Control• Burn up to 1500 MP3 and WMA Files onto a DVD+R /
RW• Audible Forward / Reverse Track Search (CD-DA Only)• Random, Repeat and Intro• Play, Pause, Stop, Next Track and Previous TrackAM-FM • USA / Europe / Latin America / Asia Frequency Spacing• 30 Station Presets (18 FM / 12 AM)• Auto Stereo / Mono• Local / Distance• Auto Store / Preview Scan • RDS - Radio Data SystemSat Radio Ready• Compatible with XM and Sirius Tuners (Sold Separately)• Requires XMDJEN100 and JXMC Cables (Sold
Separately)• Satellite Channel Name, Artist, Song and Categories
Displayed• On TFT ScreenjLinkDirect• High Speed Direct Connect Interface to Access iPod
Playlists, Artists, Albums, Songs, **Photos and **Video (** Requires Photo or Video iPod)
• Intuitive Interface for easy iPod Navigation• Power Management charges iPod while connected• Requires jLinkCable (Sold Separately)MediaLink• Under dash Interface allows Portable Media Devices to
be connected• MediaLink1 includes the following connectivity:
• jLinkDirect 8-pin DIN for iPod• 3.5mm audio only Input• RCA Audio / Video Input
Chassis• 1.0 DIN (Import / ISO-DIN Mountable)• Motorized Flip-Out / Flip-Up LCD Screen• 8 Character / Segment Type Secondary LCD Display• 7" TFT Active Matrix LCD w/ Anti-Glare Coating• 336,960 Sub Pixels (1440W X 234H)• Pixel Pitch - 0.321W X 0.370H• Screen Tilt / Angle Adjustment• Beep Tone Confirmation (On-OFF Option)• Heat Management System - Forced Air Cooling to keep
the chip sets operating at nominal temperaturesGeneral• 44-Key Infrared Remote Control• Two Composite Video Outputs for Additional Screens• Two Audio / Video Auxiliary Inputs for Game Console,
Camcorder, Navigation, etc.• Three-Band Tone control (Bass, Mid and Treble) w/
Eight Preset EQ Curves • Front, Rear and Subwoofer Line Output• Subwoofer Phase Control - 0 ~ 180 degrees• Programmable Volume Control• Rear Camera Input (Normal and Mirror Image View)• Touch Screen Calibration Mode• 100-Ohm Preamp Line Output - All Audio Channels• 2VRMS Line Output - All Channels• Rotary Encoder Audio Control• 5-Way Joystick
Tools and SuppliesYou will need these tools and supplies to install your VM9312:• Torx type, flat-head and Philips screwdrivers• Wire cutters and strippers• Tools to remove existing radio (screwdriver, socket
wrench set or other tools)• Electrical tape• Crimping tool• Volt meter/test light• Crimp connections• 18 gauge wire for power connections• 16 – 18 gauge speaker wire
WARNING! Only connect the unit to a12-volt power supply with proper grounding.
WARNING! Never install this unit where operation and viewing could interfere with safe driving conditions.
WARNING! To reduce the risk of a traffic accident (except when using for rear view video camera) never use the video display function while driving the vehicle. This is a violation of federal law.
WARNING! Never disassemble or adjust the unit.
WARNING! To prevent injury from shock or fire, never expose this unit to moisture or water.
WARNING! Never use irregular discs.
WARNING! To prevent damage to the mechanism inside this unit, avoid impact to the TFT monitor.
WARNING! Using an improper fuse may cause damage to the unit and result in a fire.
WARNING! The monitor employs an automatic motorized mechanism. To prevent damage to the core mechanism, please do not push, pull or swivel the monitor manually.
Optional Accessories• jLinkCable - iPod interface Cable
Disconnecting the BatteryTo prevent a short circuit, be sure to turn off the ignition and remove the negative (-) battery cable prior to installation.
NOTE: If the VM9312 is to be installed in a car equipped with an on-board drive or navigation computer, do not disconnect the battery cable. If the cable is disconnected, the computer memory may be lost. Under these conditions, use extra caution during installation to avoid causing a short circuit.

2
VM9312
INSTALLATIONPre-installation1. Press the metal levers on both sides to remove the half-
sleeve from the radio.
2. Install the half-sleeve.a. Install adapter if necessary (optional).b. Install half-sleeve into adapter or dashboard (use
only the supplied screws). Do not force the sleeve into the opening or cause it to bend or bow.
c. Locate the series of bend-tabs along the top, bottom and sides of the mounting sleeve. With the sleeve fully inserted into the dashboard opening, bend as many of the tabs outward as necessary so that the sleeve is firmly secured to the dashboard.
d. Install support strap to make the unit more stable.
CAUTION! Be careful not to damage the car wiring.
3. Place the radio in front of the dashboard opening so the wiring can be brought through the mounting sleeve.
WiringComplete wiring as illustrated in the wiring diagram on page 3. Once the wiring is complete, reconnect the battery negative terminal. If there is no ACC available, connect the ACC lead to the power supply with a switch.
NOTE: When replacing a fuse, be sure to use correct type and amperage to avoid damaging the radio. The VM9312 uses one 10 amp mini-ATM fuse, located in the black filter box in-line with the main wire harness.
Final InstallationAfter completing the wiring connections, turn the unit on to confirm operation (ignition switch must be on). If unit does not operate, recheck all wiring until problem is corrected. Once proper operation is achieved, turn off the ignition switch and proceed with final mounting of the chassis.1. Connect wiring adapter to existing wiring harness.2. Connect antenna lead.3. Carefully slide the radio into the half-sleeve, making
sure it is right-side-up, until it is fully seated and the spring clips lock it into place.
NOTE: For proper operation of the CD/DVD player, the chassis must be mounted within 20° of horizontal. Make sure the unit is mounted within this limitation.
4. Attach one end of the perforated support strap (supplied) to the screw stud on the rear of the chassis using the hex nut provided. Fasten the other end of the perforated strap to a secure part of the dashboard either above or below the radio using the screw and hex nut provided. Bend the strap to position it as necessary.
CAUTION! The rear of the radio must be supported with the strap to prevent damage to the dashboard from the weight of the radio or improper operation due to vibration.
5. Replace any items you removed from the dashboard.
Final ISO-DIN Installation1. Remove trim ring.2. Mount factory brackets on new radio using existing
screws from old radio.3. Slide radio chassis into dash opening and secure.4. Reinstall dash panel.
AS/PS
BAND
DISPOPEN
LO/DX
EJECT
VM9312
PRESS AUDIO
SRC
MUTE
PREPARE RADIO
INSTALL HALF SLEEVE
2
1
3
45
AS/PS
BAND
DISPOPEN
LO/DX
EJECT
VM9312
PRESS AUDIO
SRC
MUTE
FINAL INSTALLATION
3
4
2
1
AS/PS
BAND
DISPOPEN
LO/DX
EJECT
VM9312
PRESS AUDIO
SRC
MUTE
FINAL ISO-DIN INSTALLATION

3
VM9312
Antenna Jack
Harness Cord
ACC
Auto antenna control (connect to antennacontrol lead & power supply of antennaamplifier)
External power amplifier control
GND
BATT
ACC
ANT.CONT
P.CONT
REAR L
FRONT L
FRONT R
REAR R
PINK
BLACK
BLUE
BLUE/WHITE
WHITE/BLACK -
GREEN/BLACK -
YELLOW
YELLOW
RED
WHITE +
GREEN +
PURPLE +
PURPLE/BLACK -
GREY/BLACK -
GREY +
FRONT L+
FRONT L-
FRONT R+
FRONT R-
REAR R+
REAR R-
REAR L+
REAR L-
Car
Antenna
FUSE (15A)
Battery
Ignition Switch
Rear Video 2
BATTERY
External Power Amplifier
BATTERY +
Ground
WHITE
YELLOW
RED
Mute (leave open if not connected)
MUTE
BROWN
Car Phone
SUB.W
REAR L
REAR R
BLUE
RED
WHITE
FRONT L
FRONT R
RED
WHITE
WHITE
RED
Rear Video 1YELLOW
WHITE
YELLOW
RED
Rear ViewVideo Camera
External AV System
YELLOW
BLACKMZ-TFT Touch Screen
(Sold Separately)
MediaLinkBus
SAT Radio
AU
XIN
1
SAT L
SAT R
VIDEO OUT 1
VIDEO OUT 2
MZ-TFT
CAMERA
AU
XIN
2
PRK SW
See the MediaLink and Satellite Connections diagram for more informationabout connecting a satellite receiver and an iPod (through the MediaLink).*
*MediaLink
* SatelliteReceiverConnections
PARKING BRAKE
REVERSE +REVERSE +GREEN/WHITE
WIRING DIAGRAM

4
VM9312
*
**
jLink iPod Cable(Sold Separately)
iPod NanoiPod MiniiPodiPod Video
SAT Radio
SAT L
SAT R
To
He
ad
Un
it
VIDEO LEFT RIGHT3.5mm - Audio
MediaLink
MEDIALINK AND SATELLITE CONNECTIONS
*SAT Cable Kit: JXMC or XMDJEN100 (sold separately)
**XM or Sirius satellite tuner (sold separately)

5
VM9312
TILT PICTURE WIDE CLOSE
AS/PSBAND DISP OPEN
160Watts
7
LO/DXEJECT
VM9312
15
14
13
12
16
86
5
10 119
PRESS AUDIO
SRC MUTE
124 3
17
SATREADY
CONTROLS AND INDICATORSButton Operation1. OPEN Press to activate the automatic mechanical system and move the TFT monitor into viewing position. Press again to close the TFT.2. WIDE/DISPPress to adjust the display aspect of the picture to one of two settings: Full or Normal.With the monitor closed, press the DISP button to cycle through information available on the LCD screen.3. PICTURE/AS/PSPress to adjust the Brightness and Contrast. Press the AUDIO button (5) to move between Brightness to Contrast. Turn the rotary encoder (5) to adjust the setting for the selected option.With the monitor closed, press AS/PS to automatically store strong radio stations in the six preset channels in the current band.4. TILT/BANDPress to activate the tilt function. Use the joystick to make adjustments while the red tilt icon is flashing. Press once to adjust the downward tilt angle of the screen one step at a time or press and hold to adjust the angle in a continuous motion. With the monitor closed, press the BAND button to change the AM, FM or SAT band.5. AUDIO/LO/DXRotate to adjust the volume. Press and release to enter and/or confirm audio settings. Press and hold to activate the Local (LOC) setting.6. SRCPress once to select playing mode. 7. LCD Display8. MUTEPress to silence the receiver. Press again to resume previous volume level.
NOTE: The VM9312 features Softmute, which will allow the volume to increase or decrease gradually when the MUTE function is activated or deactivated.

6
VM9312
CONTROLS AND INDICATORS9. IR Remote Control Receiver10. ( )DVD Mode: Press once to play back the previous chapter/track.TUNER Mode: Press once to auto-search for the previous available radio station. MENU Mode: Press once to move the cursor to the left. 11. ( )DVD Mode: Press once for slow forward/slow reverse.TUNER Mode: Press to go down one frequency step.MENU Mode: Press once to move the cursor down.12. RESET Press to reset system settings to factory default (except the password and parental lock setting).13.Pause/Play/EnterPress to pause or resume plaback or to confirm current selection.14. ( )DVD Mode: Press once to enter the next chapter or track.TUNER Mode: Press once to auto-search the next available radio station. MENU Mode: Press once to move the cursor to the right.15. ( )DVD Mode: Press once for fast forward/fast reverse.TUNER Mode: Press to go up one frequency step.MENU Mode: Press once to move the cursor up. 16. ( ) Press once for disc insertion/ejection.Press and hold to reset core mechanism position.17. TFT Display
TILT PICTURE WIDE CLOSE
AS/PSBAND DISP OPEN
160Watts
7
LO/DXEJECT
VM9312
15
14
13
12
16
86
5
10 119
PRESS AUDIO
SRC MUTE
124 3
17
SATREADY

7
VM9312
REMOTE CONTROL
3
4
5
9
6
7
26
27
15
16
34
33
19
32
23
24
31
30
8
35
1
2
10
13
28
25
11
12
14
20
18
17
22
21
29
MUSIC PHOTOS VIDEO iPod
DISP
WIDE
PRESET
SLOW
TILT
MENU
SETUP
CLEAR
NOTE: Your remote control may differ slightly from the one pictured here. The above diagram is for illustrative purposes only.

8
VM9312
Table 1: Remote Control Functions
Button Function
Name Ref# DVD VCD TUNER CD/MP3 SATELLITE iPod
MENU 1 Enters the main menu of the disc
Turns on/off PBC when play-ing VCD
Displays diagnostics screen Selects Photo mode
TITLE 2 Enters the title menu of the disc
Plays first ten seconds of each chapter/title
Selects Music mode
MUTE 3 Toggles on/off audio output Toggles on/off audio output Toggles on/off audio output Toggles on/off audio output Toggles on/off audio output Toggles on/off audio output
POWER/ 4 Turns the power on/off Turns the power on/off Turns the power on/off Turns the power on/off Turns the power on/off Turns the power on/off
AUDIO 5 Changes the audio language for disc playback
Selects Video mode
REPT A-B 6 Setup to repeat playback from time frame A to time frame B
Setup to repeat playback from time frame A to time frame B
REPT 7 Repeats playback of current chapter
Repeats playback of current chapter
Repeats playback of current track
Repeats playback of current track
SRC 8 Selects playing mode Selects playing mode Selects playing mode Selects playing mode Selects playing mode Selects playing mode
SUBTITLE 9 Language selection for subti-tle
DISP 10 Displays playing information Displays playing information Displays playing information Display playing information Displays playing information
PRESET 11 Navigates the preset station list
PRESET 12 Navigates the preset station list
ANGLE 13 Plays back disc in different angle for a scene
Plays back Picture CD with different angle of picture dis-played
14 Fast forwards the disc content Fast forwards the disc content Fast forwards the disc content Accesses iPod Menu
VOL - 15 Decreases volume Decreases volume Decreases volume Decreases volume Decreases volume Decreases volume
VOL + 16 Increases volume Increases volume Increases volume Increases volume Increases volume Increases volume
17 Selects the previous chapter for playback
Selects the previous chapter for playback
Searches an available radio station by decreasing tuning frequency
Selects the previous track for playback
Searches an available radio station by decreasing tuning frequency
Pauses playback/starts play-back
18 Pauses playback/starts play-back
Pauses playback/starts play-back
Pauses playback/starts play-back
Toggles the on-screen menu between CAT/CH mode
19 Selects the next chapter for playback
Selects the next chapter for playback
Searches an available radio station by increasing tuning frequency
Selects the next track for play-back
Searches an available radio station by increasing tuning frequency
Selects the next track for play-back
BAND 20 Stops playback Stops playback Selects FM/AM band Stops playback Selects SAT1, SAT2, or SAT3 band
GOTO 21 Goes to specific time frame and playback
Goes to specific time frame and playback
22 Slow playback/slow rewind playback
Slow playback/slow rewind playback
ZOOM 23 Zooms in/out on an image Zooms in/out on an image
PIC 24 Displays set-up parameters Displays set-up parameters

9
VM9312
OPEN/CLOSE
25 Opens/closes the TFT moni-tor
Opens/closes the TFT moni-tor
Opens/closes the TFT moni-tor
Opens/closes the TFT moni-tor
Opens/closes the TFT monitor Opens/Closes the TFT monitor
26 Decreases monitor tilt angle Decreases monitor tilt angle Decreases monitor tilt angle Decreases monitor tilt angle Decreases monitor tilt angle Decreases monitor tilt angle
27 Increases monitor tilt angle Increases monitor tilt angle Increases monitor tilt angle Increases monitor tilt angle Increases monitor tilt angle Increases monitor tilt angle
DISP 28 Selects display mode: FULL or NORMAL
Selects display mode: FULL or NORMAL
1, 2, 3, 4, 5, 6, 7, 8, 9, 0 (Numeric Keypad)
29 Directly accesses chapter 1-6 selects preset for current band
Directly accesses track 1-6 selects preset for current band
CLEAR 30 Delete entry or move back-wards to correct error in Direct Access mode
Delete entry or move back-wards to correct error in Direct Access mode
Delete entry or move back-wards to correct error in Direct Access mode
Delete entry or move back-wards to correct error in Direct Access mode
Delete entry or move back-wards to correct error in Direct Access mode
Delete entry or move back-wards to correct error in Direct Access mode
SETUP 31 Displays Setup menu Displays Setup menu Displays Setup menu Displays Setup menu Displays Setup menu Displays Setup menu
SEL 32
RDM 33 Plays all chapters in random order
Plays all tracks in random order
Plays all tracks in random order
SCN 34 Plays the first ten seconds of each track
EJECT 35 Ejects disc Ejects disc Ejects disc Ejects disc Ejects disc Ejects disc
Table 1: Remote Control Functions
Button Function
Name Ref# DVD VCD TUNER CD/MP3 SATELLITE iPod

10
VM9312
USING THE TFT MONITOROpen/Close TFT MonitorOpen TFT MonitorPress the OPEN button (1) on the front panel or press the ( ) button (25) on the remote control to activate the mechanism that moves the display panel into the viewing position.Close TFT MonitorPress the OPEN button (1) on the front panel or press the ( ) button (25) on the remote control to load the display panel back into the compartment.
TFT Monitor Auto OpenIf “TFT Auto Open” is “on” when the unit is turned on, the monitor automatically moves to the viewing position.If “TFT Auto Open” is ”off” when the unit is turned on, press the OPEN button (1) or ( ) button (25) on the remote control to move the monitor into the viewing position.If “TFT Auto Open” is set to ”Manual”, the TFT will not close when the key is turned off.
Monitor Tilt Angle AdjustmentA known characteristic of LCD panels is the quality of the display in relationship to the viewing angle. The monitor angle can be adjusted for optimum viewing using one of the following methods:Step by Step Angle AdjustmentPress the ( ) or ( ) button on the remote control to adjust the tilt angle of the screen one step at a time.Continuous Angle AdjustmentPress and hold the ( ) or ( ) button on the remote control to adjust the tilt angle in a continuous motion.
Aspect RatioPress the DISP button (28) on the remote control or DISP/WIDE button (2) on the monitor to adjust the aspect ratio as follows:
Image SettingTable 2 shows the video output mode for each playing source.
*CVBS – Composite Video Baseband SignalParameter Adjustment Procedure1. Enter Picture Quality Setting Mode:
Press the PIC button (24) on the remote control or the PICTURE/AS/PS button (3) on the monitor.
2. Select Item to Set:Press the AUDIO button (5) on the control panel to select “BRIGHT” or “CONTRAST”.
3. Set Parameters:Press the +/– buttons (15, 16) on the remote or turn the rotary encoder (5) on the control panel.
4. Exit Picture Quality Setting Mode:Press the PIC button (24) on the remote control or the PICTURE/AS/PS button (3) on the monitor
Parking BrakeParking Brake InhibitWhen the pink "Parking" wire is connected to the vehicle brake switch, the front TFT monitor will display video only when the parking brake sequence is engaged. Before starting the parking brake sequence, the radio must be on with the video media disc inserted and playing.Parking Brake SequenceThere are two situations that can start the Parking Brake Sequence (this is the preferred method). The timing window is between 3 ~ 5 seconds.• Parking brake is engaged (on) when the vehicle is
started or the accessory/ignition is turned on. To activate video, the following sequence of events must be completed:a. Release parking brake for 3 ~ 5 seconds.b. Reapply parking brake.c. Video should be displayed on the TFT monitor
within 1 ~ 2 seconds. • Parking break is disengaged (off) when the vehicle
is started or the accessory/ignition is turned on. To activate video, the following sequence of events must be completed:a. Set parking brake for 3 ~ 5 seconds.b. Release parking brake for 3 ~ 5 seconds.c. Reapply parking brake. d. Video should be displayed on the TFT monitor
within 1 ~ 2 seconds.
Monitor Movement MechanismIf an obstruction occurs in the monitor path, the following protective measurements can be executed to prevent damage to the mechanism or monitor:
Table 2: Video Output Modes
Playing Source Video Output Modes
AM/FM TUNER RGB Mode
SAT TUNER RGB Mode
iPod RGB Mode
DVD RGB Mode
AUX IN CVBS Mode
FULLThe entire screen is extended horizontally to the aspect ratio of 16 to 9. The extension ratio is the same at any point.NORMALThe conventional display image has a 4 to 3 ratio of horizontal to vertical, leaving a blank area on the right and left sides of the display.
Table 3: Monitor Protective Measures
Obstruction Self Protection
OPEN Button Pressed
Power Reconnected
Monitor loading out horizontally
Monitor is automati-cally loaded into unit
Monitor fully extended horizontally
Monitor is automati-cally loaded into unit
Monitor loading in horizontally
Unit stops at obstruction point
Monitor fully extended horizontally
Monitor is automati-cally loaded into unit

11
VM9312
After the protective procedure is executed, normal operation is resumed by pressing the OPEN button (1) or disconnecting and reconnecting the power.
Monitor loading out vertically
Unit stops at obstruction point
Monitor swivels back to the unit
Monitor swiv-els back to the unit
Monitor loading in vertically
Unit stops at obstruction point
Monitor swivels back to the unit
Monitor swiv-els back to the unit
Table 3: Monitor Protective Measures
Obstruction Self Protection
OPEN Button Pressed
Power Reconnected

12
VM9312
OPERATING INSTRUCTIONSPower On / OffPress the /SRC button (6) on the unit (or the button (4) on the remote control) to turn the unit on. The buttons on the front of the unit light up and the current mode status appears in the LCD (7). You can also turn on the unit by pressing the OPEN button (1) and opening the TFT screen.
Press and hold the button to power off the unit.The monitor is drawn back into the main compartment.
Audible Beep ConfirmationAn audible beep tone confirms each function selection. The Beep tone can be disabled through the Setup menu.
MutePress the MUTE button (8) on the front panel or the MUTE button (3) on the remote to mute the volume from the unit. Press the MUTE button again to restore the volume. “MUTE” is displayed on the LCD. Adjusting the volume or using any of the audio setup features cancels the mute function.
Playing Source SelectionPress the SRC button (6) on the front panel or the SRC button (8) on the remote to change between available playing sources in the following order: AM/FM, DISC, AUX IN1, AUX IN2, SAT, and CAMERA. The playing mode is displayed on the TFT and LCD screens.External peripheral devices can be connected to this unit via RCA output or MediaLink. Select “AUX-IN1” or “AUX IN2” mode to access and control connected auxiliary devices.
Volume AdjustmentTo increase or decrease the volume level, turn the rotary encoder (5) on the front panel or press the VOL+/ VOL- buttons (15, 16) on remote control. When the volume level reaches “0” or “40”, a beep sounds, indicating that the adjustment limit has been reached. The volume ranges from “0” to “40”. The LCD or TFT screen displays the volume level for 3 seconds.
Audio Control MenuThe Audio Control feature allows you to easily adjust your audio system to meet the acoustical characteristics of your vehicle, which vary depending on the type of vehicle and its measurements. Proper setting of the Fader and Balance boosts the effects of the cabin equalizer.Press the AUDIO button (5) on the front panel once to display the audio menu. To adjust an audio feature:1. Turn the rotary encoder (5) on the front panel, press the
(>>|)/(|<<) buttons (14, 22) on the remote control, or use the joystick to highlight the audio feature to be adjusted.
2. Press the joystick button (13) to select the highlighted option.
3. Rotate the AUDIO button (5), press the |<<, >>|, >>, or << buttons (17, 19, 14, 22) on the remote control, or use the joystick to adjust the selected feature to the desired setting.
NOTE: The EQ mode will automatically change to “USER” when individual audio functions are adjusted.
The Audio menu will automatically exit after a few seconds of inactivity. To exit quickly, touch the top left corner of the screen or press and hold the AUDIO button (5).
System ResetTo correct a system halt or other illegal operation, use the tip of a pen to press the reset button (12) located on the front bottom-right corner of the unit. After a system reset, the unit restores all factory default settings.
NOTE: If the unit is reset while a DVD is playing, the DVD resumes play once the reset is complete.
Line MuteIf the “MUTE” wire is connected, audio output mutes when a telephone call is received by the car phone or when verbal navigation is performed.
Table 4: Audio Adjustments
Audio Function Adjustable RangeEQ User
AcousticUrbanRaveLatinDanceHip HopRock
BASS -14 to +14MID -14 to +14TREBLE -14 to +14SUB -14 to 0FAD GridBAL Grid
[RESET] Button

13
VM9312
SETUP MENUTo access system settings, press the SETUP button (31) on
the remote control or touch the button on the screen to enter the “SETUP” menu. The “GENERAL” sub-menu appears highlighted in blue.
Accessing Menu ItemsTouch the sub-menu name, press the <<, >>, |<<, or >>| direction buttons (22,14, 17, 19) on the remote control, or use the joystick to select a sub-menu (Language, Audio, RDS, etc.).
The features available for adjustment under the highlighted sub-menu option will appear in the center of the screen.
Adjusting a Feature1. Use the touchscreen or press the /\ or V buttons (18, 19)
on the joystick to select the feature to be adjusted.2. Enter the option field for the feature you want to adjust
by using the touchscreen or pressing the >/|| button (18) on the remote or the ENTER (joystick) button (13) on the unit. A submenu appears in a second row with the selected option highlighted in blue.
3. Select a new value by using the touchscreen or pressing the >> or << buttons (14, 22) on the remote control or the /\ or V buttons (18, 19) on the joystick.
4. Use the touchscreen or press the >/|| button (18) on the remote control or press the joystick button (13) to confirm setup.
General Sub-menu Features
Language Sub-menu FeaturesIf a DVD supports more than 1 Subtitle or Audio language, all the languages are available for selection during playback. If the selected language is not supported by the DVD, then the default language is used.
Audio Sub-menu Features
RADIORADIO SETUP
RDS
Rating
Hardware
P.VOL
TS Cal
General Language Audio BACK
Clock Mode 12Hr
Clock 04 : 31 AM
Tuner Region USA
Beep On
DIRECTION BUTTONS
Setting Options FunctionClock Mode 12Hr Clock displays 12 hour time
using AM and PM.24Hr Clock displays 24 hour time up
to 23:59.Clock (HH:MM) Clock appears in the top right
corner of the screen and on the LCD screen during certain operations. NOTE: The AM/PM indication will change as you continue to adjust the hour past 12.
Tuner Region
USA • AM Frequency Spacing - 10kHz • AM Frequency Band -
530kHz~1720kHz• FM Frequency Spacing - 200kHz• FM Frequency Band -
87.5MHz~107.9MHz
S.Amer1 • AM Frequency Spacing - 10kHz • AM Frequency Band -
530kHz~1720kHz• FM Frequency Spacing - 100kHz• FM Frequency Band -
87.5MHz~108.0MHz
Arabia • AM Frequency Spacing - 9kHz • AM Frequency Band -
531kHz~1620kHz• FM Frequency Spacing - 100kHz• FM Frequency Band -
87.5MHz~108.0MHz
China • AM Frequency Spacing - 9kHz • AM Frequency Band -
522kHz~1620kHz• FM Frequency Spacing - 100kHz• FM Frequency Band -
87.5MHz~108.0MHz
S. Amer2 • AM Frequency Spacing - 5kHz • AM Frequency Band -
520kHz~1600kHz• FM Frequency Spacing - 100kHz• FM Frequency Band -
87.5MHz~108.0MHz
Europe • AM Frequency Spacing - 9kHz • AM Frequency Band -
522kHz~1620kHz• FM Frequency Spacing - 50kHz• FM Frequency Band -
87.5MHz~108.0MHz
Korea • AM Frequency Spacing - 9kHz • AM Frequency Band -
531kHz~1602kHz• FM Frequency Spacing - 200kHz• FM Frequency Band -
88.1MHz~107.9MHz
Beep On When turned on, an audible beep tone confirms each func-tion selection.
Off No beep sounds.
Setting Options FunctionOSD English On Screen Display appears in
English.DVD Audio English DVD Audio is heard in English
when the option is available.DVD Subti-tle
English DVD subtitles automatically appear in English when avail-able.
Auto DVD subtitles appear accord-ing to the default subtitle lan-guage specified on the disc.
Off DVD subtitles do not appear automatically.
Disc Menu English DVD menu (if applicable) is displayed in English.
Setting Options FunctionDRC Off Employ the Dynamic Range
Control for better playback for low volumes.On
Subwoofer Off Turn the subwoofer on/off.On
Setting Options Function

14
VM9312
RDS Sub-menu Features
Rating Sub-menu FeaturesThe DVD system has a built-in parental lock feature to prevent unauthorized persons from viewing restricted disc content. By default, the rating system is unlocked. Once setup, the parental lock is released only by entering the correct password. Once the password is entered, rating is available for setup.
To reset the password, access the “RATING” menu and enter the current password. Once the correct password is entered, you can access the “Password” field and enter a new one.
NOTE: Record the password and keep it in a safe place for future reference. The rating for each disc is marked on the disc, disc packing, or documentation. If the rating is not available on the disc, the parental lock feature is unavailable. Some discs restrict only portions of the disc and the appropriate content will play. For details, please refer to the disc description.
Hardware Sub-menu FeaturesIf the rear-view video camera is connected, the unit is on, and the TFT monitor is retracted inside the unit, the TFT monitor automatically moves into the viewing position and Camera mode is selected upon shifting into REVERSE gear. When shifting into DRIVE gear, the TFT monitor is retracted back inside unit.
If the monitor is in display mode, the monitor automatically switches to CAMERA mode upon reverse driving. When the
reverse driving stops, the monitor return to its original input mode.P.VOL Sub-menu Features
TS Cal (Screen Calibration)To access the “Screen Calibration” function from the SETUP menu, select the “TS CAL” option.
After entering calibration mode, a crosshair appears in a corner quadrant of the screen. To begin calibration, press and hold the crosshair for one second until it moves to the next quadrant. Continue for each quadrant until the calibration is completed.
Exiting the System Setup MenuTo exit setup mode and resume normal playback, press the SETUP button (31) on the remote control or touch the BACK button on the screen.
Sub.W Phase
0 Subwoofer output IN phase180 Subwoofer output OUT OF
phaseNOTE: Depending on your installation, reversing the sub-woofer phase may increase Bass output.
Sub Filter 80Hz Selecting a crossover fre-quency sets a cut-off frequency of the subwoofer's LPF (low-pass filter) and the “SMALL” speakers' HPF (high-pass fil-ter). The Crossover frequency setting has no effect if the sub-woofer is set to “OFF” and any other speaker is set to “LARGE”.
100Hz120Hz
Setting Options FunctionRDS On Unit will display Radio Data
System information when avail-able.
Off
Setting Options FunctionPassword _ _ _ _ Enter a 4-digit password to
activate the “Rating” feature.Rating 1. Kid Safe Select the appropriate rating
level for the intended audience.
You may override higher rat-ings by using your password.
2. G3. PG4. PG-135. PG-R6. R7. NC-178. Adult
Setting Options FunctionLoad Fac-tory
Reset Select “Reset” to restore the factory default settings for the Rating system only.
Setting Options FunctionCamera In Normal
MirrorTFT Auto Open
On The TFT panel automatically opens when the unit is turned on.
Off You must press the OPEN but-ton (1) to open the TFT panel.
Manual When the ignition is turned OFF, the TFT panel DOES NOT retract if it was previously out
Video Input(Input cir-cuitry auto-detects the video sig-nal from the Aux In source).
NTSC The color signals are output in the standard NTSC format.
PAL The color signals are output in the standard PAL format.
Auto The color signal output is switched automatically based on the current video input sig-nal - NTSC or PAL.
Setting Options Function
Setting Options FunctionSource iPod Choose a source for which you
would like to increase the rela-tive volume (LEVEL).Disc
RadioSATAUX IN1AUX IN2
Level 0-6 Increase relative volume for specified source up to 6 decib-bels.

15
VM9312
TUNER OPERATIONTuner TFT Display
1. Current radio band indicator2. Radio frequency indicator3. Clock4. Stereo broadcasting indicator5. Strong Local signal broadcasting indicator6. Preset radio stations: Touch to recall preset stations7. RDS Information: PS (Program Service), PTY (Program
Type), RT (Radio Text)8. Touch for q23uick access to Equalizer level settings9. Touch to access the direct entry screen10. Current preset station indicator11. |<<: Touch to seek backward12. >>|: Touch to seek forward13. <<: Touch to tune backward one step14. >>: Touch to tune forward one step
15. BAND: Touch to change between AM/FM bands16. AS: Touch to automatically store stations17. Touch to view the SOURCE MENU and select a new
playback source18. MEM: View screen used to enter current channel into
preset memory19. 1/2 or 2/2: Touch this page button to view a second page
of on-screen buttons
20. : Touch to view the SETUP menu21. PS (Preview Scan): Touch to scan all stations available,
stopping for 5 seconds at each and continuing until a station is selected
22. LOC: Touch to tune to strong local stations23. PTY: When PTY is pressed, the Program Type
categories are listed, allowing listeners to find similar programming by genre. When a PTY category is selected from the touch screen menu, the radio will start scanning for the selected category.
24. Indicates the PTY function is activated25. Indicates the RDS function is activated
Switch to Radio Tuner source• Touch the top left corner of the screen (the RADIO
circle) to view the SOURCE MENU. Touch “Radio”. • Press the SRC button (6) on the front panel or remote
control (8) to switch to the AM/FM or RADIO source.
Select FM/AM BandTouch the BAND button (15) on the screen, or press the BAND button on the unit (4) or remote control (20) to change between the following bands: FM1, FM2, FM3, AM1, and AM2.
NOTE: The BAND button on the unit only works when the TFT is closed.
Seek TuningTo seek the next higher station:• Touch the >>| button on screen.• Press the >>| button (19) on remote control.• Press the > button on the joystick (17).To seek the next lower station:• Touch the |<<| button on screen.• Press the |<< button (17) on the remote control.• Press the < button on the joystick (16).
Manual TuningTo increase or decrease the tuning frequency one step:
• Touch the or buttons on screen.• Press the >> or << buttons (14, 22)on the remote
control.• Press the /\ or V buttons (18, 19) on the joystick.
Direct TuningTo enter a radio station directly, touch the button or press the GOTO button (21) on the remote control to display the direct entry menu.
Enter the desired radio station using the on-screen number pad. Press the enter button (arrow) to tune to the selected station. To exit the screen without changing the station, touch Exit. To clear your entry and start over, touch Clear.
Using Preset StationsSix numbered preset buttons store and recall stations for each band. All six stored stations (P1-P6) for the current band appear on the screen.Storing a Station1. Select a band (if needed), then select a station.2. Touch the on-screen MEM button (18) to open the
preset screen.
41 10 25
7
8 3
6
17
RADIO FM-1 P1 87.5 MHz01:02 PM
EQ
AS
BAND 1/2 MEM
P1 87.5 MHz
P2 90.1 MHz
P3 98.1 MHz
P4 106.1 MHz
P5 107.9 MHz
P6 102.9 MHz
PS:
ST LOC PTY RDS
24 25
9
11 12
13
14
15
16
AS
BAND 1/2 MEM
19 18
20
21
23
PTY
PS 2/2 LOC
22
FM: _ _ _ . _ MHz
1 2 3
4 5 6
7 8 9
0 Clear
Exit
Preset: _
E x i t
P1 P2 P3
P4 P5 P6

16
VM9312
3. Touch the preset number in which you would like to store the current station (or press EXIT to cancel and close the menu). The preset number and station appears highlighted.
Recalling a Station1. Select a band (if needed).2. Touch an on-screen preset button (6) to select the
corresponding stored station.
Auto Store (AS)To select six strong stations and store them in the current band:1. Select a band (if needed).2. Press the AS/PS button (3) on the control panel or touch
AS (16) on the screen for 2 seconds to activate the Auto Store function.
The new stations replace stations already stored in that band.
Preview Scan (PS)To scan the AM or FM band for a preview of available stations in your particular area, touch the PS button (21) on page two of the on-screen controls. Touch again to stop preview scan.
Local Radio Station Seeking (LOC)When the Local function is on, only radio stations with a strong local radio signal are played. To activate the Local function in AM/FM tuner mode, press and hold the AUDIO/LO/DX button (5) on the front panel. Press and hold AUDIO/LO/DX again to turn Local off. When the Local function is active, the LOC indicator at the top of the screen is illuminated.
P1 87.5 MHz
P2 90.1 MHz
P3 98.1 MHz
P4 106.1 MHz
P5 107.9 MHz
P6 102.9 MHz

17
VM9312
SATELLITE RADIO OPERATION
Listeners can subscribe to XM® Radio on the Web by visiting www.xmradio.com, or by calling (800) 967-2346. Customers should have their Radio ID ready (see “Displaying the Identification (ID) Code”). Customers can receive a limited number of free-to-air channels without activation.
Listeners can subscribe to Sirius® Radio on the Web by visiting www.sirius.com, or by calling (888) 539-SIRIUS. Customers should have their Sirius ID ready (Sirius ID is located on the Satellite Radio Tuner, sold separately). Customers can listen to music samples by tuning to channel 184.
Accessing Satellite Radio ModePress the SRC button (8) on the front panel or remote control (8) to switch to the SAT source.
1. SAT channel name2. SAT channel number3. SAT band4. Time5. Song title6. Artist name7. Song category8. Signal Strength Indicator9. Current preset channels/on-screen preset buttons10. CH -: Select the previous channel11. CH +: Select the next channel12. CAT +: Select next channel in current category only
13. CAT -: Select previous channel in current category only14. Touch to enter channel directly using keypad on screen15. CG: Access Channel/Category Guide mode16. BAND: Change between SAT1, SAT2 and SAT3 bands
17. : Touch to view the SETUP menu18. Touch this area to view the SOURCE MENU and select
a new playback source19. MEM: View screen used to enter current channel into
preset memory20. DIAG: This feature is reserved for use by service
professionals for troubleshooting.
Displaying the Identification (ID) CodeBefore you listen to satellite radio, you must subscribe to the service using your radio’s identification number. To display the radio ID, press the < or > buttons (16, 17) on the joystick or the CH - or CH + buttons on the touch screen repeatedly to tune to channel “000”. The screen displays the radio ID where the channel name is usually displayed.
Selecting a StationPress the < or > buttons (16, 17) on the joystick, the |<< or >>| buttons (17, 19) on remote control, or the CH - or CH + buttons on the touch screen to change to another station.
Preset ModeTo enter preset mode, touch the BAND button on the screen, or press the BAND button on the unit (14) or remote control (20) to change between the following bands: SAT1, SAT2, or SAT3 (indicated in the top left corner of the TFT screen).Six numbered preset buttons store and recall stations for each band. All six stored stations (P1-P6) for the current band appear on the TFT screen.Storing a Station1. Select a band (if needed), then select a station.2. Touch the on-screen MEM button (18) to open the
preset screen.
3. Touch the preset number in which you would like to store the current station (or press EXIT to cancel and close the menu). The preset number and station appears highlighted.
Recalling a Station1. Select a band (if needed).2. Touch an on-screen preset button to select the
corresponding stored station.
Direct TuningTo enter a radio station directly, touch the button or press the GOTO button (21) on the remote control to display the direct entry menu.
Enter the desired radio station using the on-screen number pad. Press the enter button (arrow) to tune to the selected station. To exit the screen without changing the station, touch Exit. To clear your entry and start over, touch Clear.
Channel/Category Guide ModeThere are two search modes to help navigate through channels and or categories. To access the Channel/Category Guide mode press, the ZOOM button (23) on the remote control or the CG button on the touch screen.Channel Guide is the default search mode. To access Category Guide, press the TITLE button (2) on the remote control or touch CAT on the touch screen. To return to Channel Guide, touch CH on the screen or press the SUBTITLE button (9) on the remote control.Channel Guide ModeWhen Channel Guide mode is selected, the first six satellite channels are displayed in the boxes in the bottom left of the TFT screen and the on-screen menu changes to facilitate search mode.
SAT SAT1 CH00101:02
EQ
CG
BAND MEM DIAG
P1 XM Preview
P2 XM Preview
P3 XM Preview
P4 XM Preview
P5 XM Preview
Title: Fridays XM144!
XM Preview Preview
CAT+
CAT
-
CHCH+-
10
11
12
13
14
15
18 43 21
5 16
17
6
7 8
9 19 20
CH###
E x i t
P1 P2 P3
P4 P5 P6
CH: _ _ _ /255
1 2 3
4 5 6
7 8 9
0 Clear
Exit

18
VM9312
• While in Search Mode, to switch between Channel and Category search modes, press the CH or CAT buttons in the touch screen.
• Use the scroll bar and arrows on the touch screen to view the next/previous page of stations. Each page contains six channels to select from.
• Press the on-screen SCN button to preview each of the 6 channels displayed for 10 seconds.
• Press the CG button to return to the Preset Mode screen.
• To select a channel while in Channel Guide mode, touch the channel name on the screen. The channel will begin playing and the unit will return to the Preset Mode.
Category Guide ModeWhen Category Mode is selected, folder icons appear on the screen next to category choices. • While in Search Mode, to switch between Channel and
Category search modes, press the CH or CAT buttons in the touch screen.
• Use the scroll bar and arrows on the touch screen to view the next/previous page of categories. Each page contains six categories to select from.
• To select a category, touch the corresponding category name or folder icon. The channels in that category will be displayed on the screen.
• Use the scroll bar and arrows on the touch screen to view the next/previous six stations in the selected category.
• Touch the on-screen SCN button to preview each channel in the selected category for 10 seconds.
• Touch the channel name to play that channel.• Touch the on-screen CG button to return to the Preset
Mode screen.
SAT SAT1 CH00101:02
EQ
CG
SCN MEM DIAG
########
001 XM Preview
004 The 40s
005 The 50s
006 The 60s
007 The 70s
Title: www.xmradio.com
XM Preview Preview
CH
CAT

19
VM9312
DVD/VCD VIDEO OPERATIONNOTE: When properly installed, DVD video cannot be displayed on the main TFT screen unless the parking brake is applied. If you attempt to play a DVD while the vehicle is moving, the TFT screen displays “PARKING” with a blue background. Rear video screens, if applicable, will operate normally.
Opening/Closing the TFT Video ScreenOpening the TFT ScreenTo open the TFT video screen, press the OPEN button (1). The unit beeps and then opens.Closing the TFT ScreenPress the OPEN button (1) again to close the TFT screen. If the screen is in the “IN” position, it moves out before closing.
Insert/Eject DiscUpon inserting a DVD disc, DVD mode is entered and disc play begins.
NOTE: If Parental Lock (Rating) is activated and the disc inserted is not authorized, the 4-digit code must be entered and/or the disc must be authorized (see “General Sub-menu Features” on page 13).
You cannot insert a disc if there is already a disc in the unit or if the power is off.
NOTE: DVD-R and DVD-RW will not play unless the recording session is finalized and the DVD is closed.
Ejecting a Disc Press the button (21) on the unit or remote control (35) to eject the disc. The unit automatically reverts to Tuner mode. You may eject a disc with the unit powered off. The unit will remain off after the disc is ejected.
Reset the Loading MechanismIf the disc loads abnormally or an abnormal core mechanism operation occurs, press and hold the button (21) on the unit or remote control (35) to reset the loading mechanism. Normal operation resumes.
Accessing DVD ModeTo switch to DVD mode when a disc is already inserted, press the SRC button (15) on the front panel or remote control (8) until “DISC” appears at the bottom of the screen.
Using the Touch-Screen ControlsThe touch key areas for DVD playback are outlined below.
A – Displays playing informationB – Displays on-screen control menu
Controlling PlaybackTo access the on-screen controls, touch the bottom 1/3 of the screen (section B). Touch the 1/2 button to view a second page of controls
Stopping PlaybackTouch the stop button ( ) on the screen or press the /BAND button (20) on the remote control to stop DVD play.Pausing PlaybackTouch the play/pause button (>) on the screen or press the >/|| button on the remote control (18) to suspend or resume disc play.
Slow Motion PlaybackPress the << button (22) on the remote control, the V button (11) on the joystick, or the << button on the screen to play the current title in slow motion. Keep pressing and releasing the button to increase the rate from “2X” to “4X”, “8X”, and “20X”. Press >/|| (18) on the remote control or touch the onscreen play button (>) to resume normal play. Fast Forward PlaybackPress the >> button (14) on the remote control, the /\ button (15) on the joystick, or the >> button on the screen to fast forward. Keep pressing and releasing the button to increase the rate from “2X” to “4X”, “8X”, and “20X”.Press >/|| (18) on the remote control or touch the onscreen play button (>) to resume normal play. Repeat PlaybackPress the REPT button (7) on the remote control or the button on screen to alter repeat mode according to the following:• DVD: Repeat Chapter, Repeat TItle, Repeat Off• VCD (PBC Off): Repeat Single, Repeat Off
NOTE: For VCD play, the repeat function is not available if PBC is on.
Sectional Repeat Function (A-B)Use the A-B function to define a specific area of a disc to repeat.• Press the REPT A-B button (6) on the remote control (or
the A-B button on screen) to set the start point (A) of the repeated section.
• Press the REPT A-B button again once you reach the desired end point (B) of the repeated section. The selected portion of the DVD will now repeat continuously.
• Press the REPT A-B button again to cancel the A-B section setting and stop repeat play.
Random PlaybackWith a DVD, VCD, or CD playing, press the RDM button (33) on the remote control to activate random playback and play all chapters/tracks in random order. “On” appears on the screen. Press the >>| button (19) on the remote control or the > button on the joystick (17) to play the next random track.Press the RDM button again to turn random play off.
A
B
1/2
BACK
MENU 2/2
BACK
DISP
EQ
AUDIO
A-B
TITLE
SUBTITLE

20
VM9312
NOTE: When a VCD is playing with PBC turned “On”, activating random playback automatically turns PBC off.
Accessing the DVD MenuPress the MENU button (1) on the remote control to recall the main DVD menu. Use the directional (arrow) buttons (<, >, /\ & V) on the joystick (16, 17, 18, 19) to select a title from the menu or touch the title on screen.Press the TITLE button (2) on the remote control or on screen to select a different title for playback.Press the >/|| button (18) on the remote control or the ENTER (joystick) button (20) to confirm your selection and begin playback. You can also select a title using the touch screen.
Moving Through ChaptersPress the >>| button (19) on the remote control, the > button on the joystick (17) or the >>| button on screen to advance to the next chapter on the DVD. Press the |<< button (17) on the remote control, the < button on the joystick (16), or the |<< button on screen to move to the previous chapter.
Goto SearchDuring DVD or VCD playback, perform the following steps to use the GOTO feature to access a specific location on a disc: 1. Press the GOTO button (21) on remote control to enter
“GO TO” mode.2. Press the >> or << buttons (14, 22) on the remote
control or the < or > buttons (16, 17) on the joystick to select a category (highlighted in blue).• For DVD mode, you can choose Time or Title/
Chapter search.
• For VCD mode, press the GOTO button to choose between Track Search, Disc Search and Exit.
3. Enter a time into the field using the numeric keypad (29) on the remote control.
4. Press the >/|| button (18) on the remote control or the ENTER (joystick) button (20) to go to the specified location on the disc.
5. Press the GOTO button again to exit.
Direct Chapter / Track SelectionRemote Control Direct EntryDuring DVD, VCD and CD playback, you can use the numeric keypad on the remote control (29) to access a track directly.
Touch Screen Direct Entry
To select a chapter/track directly, touch the button on screen control to display the direct entry menu.
Enter the desired chapter/track using the on-screen number pad. Press the enter button (arrow) to tune to the selected station. To exit the screen without changing the station, touch Exit. To clear your entry and start over, touch Clear.
Viewing an Alternate Picture Angle (DVD Only)Some DVDs contain scenes that have been shot simultaneously from different angles. For discs recorded with multiple angles, press the ANGLE button (13) on the remote control to toggle available angles of the on-screen image.
ZoomingPress the ZOOM button (23) on the remote control to enlarge and pan through the video image using the following options: “Q1”, “Q2”, “Q3”, and “OFF”.
Multi-Language Discs (DVD Only)Changing Audio LanguageIf you are watching a disc recorded in multiple languages, press the AUDIO button (5) on the remote control to choose a language.Changing Subtitle LanguageIf you are watching a disc recorded in multiple languages with subtitles, press the SUBTITLE button (9) on the remote control to choose the language in which you would like the subtitles to appear.
NOTE: During VCD playback, press the AUDIO button (5) on the remote control to choose between Left Channel, Right Channel, and Stereo.
PBC (Play Back Control - VCD Only)For VCDs with play back functionality, play back control (PBC) provides additional controls for VCD playback.Press the MENU button (1) on the remote control to toggle the PBC function “On”/”Off”. Once PBC is on, playback starts from track one of the play list.
NOTE: When PBC is activated, fast forward, slow playback, and previous/next track are available. Repeat and direct track selection are not available.
When PBC is activated, selecting random, scan, or search playback automatically deactivates PBC.
Playback InformationDuring DVD and VCD playback, press the INFO button (10) on the remote control to display playback information on the
DVD SearchTime – Go to specific time in current titleTitle/Chapter – Go to specific time in a chapter
VCD Track SearchTime – Go to specific time in the current trackTrack – Go to specific trackVCD Disc SearchTime – Go to specific time on discTrack – Go to specific track
Chapter: _ _
1 2 3
4 5 6
7 8 9
0 Clear
Exit

21
VM9312
screen, including the media playing and current playback time. DVD Playback InformationThe following information is displayed at the top of the screen during DVD playback:
• T : 5/8 – “5 / 8" indicates the fifth of 8 titles on the DVD is currently playing.
• C : 2/16 – “2 / 16" indicates that the second of 16 titles on the DVD is currently playing.
• 00:41:28 – “00:41:28” indicates the playback time of the current title.
• 2 / 6 Eng – The language display information indicates the second language out of 6 (English) is currently being used.
VCD Playback InformationThe following information is displayed at the top of the screen during VCD playback:
• VCD2.0 – Format of current disc.• T: 6/18 – “6/18” indicates the sixth of 18 tracks on the
VCD is currently playing.• 00:02:18 – “00:02:18” indicates the playback time of the
current track.
General Disc InformationTable 5: Disc Properties
Symbol 12cm Disc Properties Max Play
Time
Single side single layer (DVD-5)Single side double layer (DVD-9)Double side single layer (DVD-10)Double side double layer (DVD-18)
(MPEG 2 Method)
133 minutes242 minutes266 minutes484 minutes
Single side single layer (VCD)(MPEG 1 Method)
74 minutes
Single side single layer 74 minutes
Table 6: Disc Symbols
Symbol MeaningNumber of voice languages recorded. The number inside the icon indicates the num-ber languages on the disc (maximum of 8).Number of subtitle languages available on the disc (maximum of 32).
Number of angles provided (maximum of 9).
Aspect ratios available. “LB” stands for Let-ter Box and “PS” stands for Pan/Scan. In the example on the left, the 16:9 video can be converted to Letter Box video.Indicates the region code where the disc can be played.• Region 1: USA, Canada, East Pacific Ocean
Islands• Region 2: Japan, Western Europe, Northern
Europe, Egypt, South Africa, Middle East• Region 3: Taiwan, Hong Kong, South Korea,
Thailand, Indonesia, South-East Asia• Region 4: Australia, New Zealand, Middle and
South America, South Pacific Ocean Islands/Oceania
• Region 5: Russia, Mongolia, India, Middle Asia, Eastern Europe, North Korea, North Africa, North-West Asia
• Region 6: Mainland China• ALL: All regions

22
VM9312
DVD/CD AUDIO OPERATIONInstructions for TFT control and Insert/Eject are the same for DVD and CD operation. Please see the DVD/Disc Video Operation section for information about these topics.The VM9312 will play music or other audio files from the following disc media:• CD-DA• CD-R/RW• DVD• DVD+R/RW• DVD-R/RWUpon inserting a disc with the TFT screen open, the disc and track title (if available), along with the track number and playing time appear on the screen.
CD Player User InterfaceThe on-screen indicators and touch key areas for CD playback are outlined below.
1. Current track and total number of tracks on disc2. Elapsed playing time3. Current time4. Track titles5. Disc title6. : Touch to play/pause disc playback7. : Touch to stop disc playback8. >>|: Touch to move to next track 9. |<<: Touch to move to previous track10. >>: Touch to fast forward current track11. <<: Touch to rewind current track12. Touch to activate/deactivate Repeat play mode13. Touch to activate/deactivate Random mode
14. Touch to access the direct entry screen
15. : Touch to view the SETUP menu16. Touch for quick access to Equalizer level settings17. Touch to view the SOURCE MENU and select a new
playback source
Controlling PlaybackStopping PlaybackTouch the button on screen or press the /BAND button (20) on the remote control to stop disc play.To resume playback, touch the button on screen, press the joystick button (13) on the front panel, or press the >/|| button on the remote control (18).Pausing PlaybackTouch the button on screen, press the joystick button (13) on the front panel, or press the >/|| button on the remote control (18) to suspend or resume disc play.Moving Through TracksPress the >>| button (19) on the remote control or on screen or use the > button on the joystick (14) to advance to the next track on the disc. Press the |<< button (17) on the remote control or on screen or use the < button on the joystick (10) to move to the previous track.Repeat PlaybackTouch the button on screen or press the REPT button (7) on the remote control to alter repeat mode according to the following:• DVD: Repeat Chapter, Repeat Title, Repeat Off• CD-DA: Repeat Single, Repeat Off• CD-R/RW: Repeat Single, Repeat Off• DVD-R/RW: Repeat Single, Repeat OffTrack Scan Select (CD-DA discs only)During disc play, press the SCN button (34) on the remote control to play the first 10 seconds of each track. When a desired track is reached, press the SCN button again to cancel the function and play the selected track. Random Play SelectWhile disc play is stopped, touch the button on screen or the RDM button (33) on the remote control to play the tracks on the disc in a random, shuffled order. Touch the (RDM) button again to cancel Random Play mode.
NOTE: CD-R and CD-RW will not play unless the recording session is finalized.
Fast ForwardTouch the >> button on screen, press the >> button (14) on the remote control, or press the /\ button (18) on the joystick to fast forward. Keep pressing and releasing the button to increase the rate from “2X” to “4X”, “8X”, and “20X”.
Direct Track EntryTo select a track directly, touch the button on screen control to display the direct entry menu.
Enter the desired track using the on-screen number pad. Press the enter button (arrow) to tune to the selected station. To exit the screen without changing the station, touch Exit. To clear your entry and start over, touch Clear.
151
7
2
135
16
12
317
DISCCD T: 1/10 00:00:23
01:02
EQ Track 1
Track 2
Track 3
Track 4
Track 5
Track 6
14
4 9 11
10
8
6
Chapter: _ _
1 2 3
4 5 6
7 8 9
0 Clear
Exit

23
VM9312
MP3/WMA OPERATIONInstructions for TFT control and Insert/Eject are the same for DVD and MP3 operation. Please see the DVD/Disc Video Operation section for information about these topics.
Media and File RequirementsThis player allows you to play back MP3 and WMA files recorded onto CD-R/RWs, DVD+R/RWs, and DVD-R/RWs. For CD-RW discs, please make sure it is formatted using the full method and not the quick method to prevent illegal disc operation.Up to 1500 songs/files can be burned onto a disc for a MEGA DVD music mix. Do not exceed this number of songs/files or disc readability problems may occur.MP3 Format CompatibilityThe file naming formats listed below are compatible with this unit:• ISO 9660 – file name: 12 characters, file extension: 3
characters• ISO 9660 – file name: 31 characters, file extension: 3
characters• Joliet – 64 charactersIf the file or folder name does not conform to ISO 9660 file system standards, it may not be displayed or played back correctly. Use the following settings when compressing audio data for your MP3 disc:• Transfer Bit Rate: 128kbps• Sampling Frequency: 48kHzWhen recording MP3 up to the maximum disc capacity, disable additional writing. For recording on an empty disc up to maximum disc capacity, use the "Disc at once" setting.
MP3 Playing OrderWhen selected for play, files and folders (Folder Search, File Search or Folder Select) are accessed in the order they were written by the CD writer. As a result, the order in which they are expected to be played may not match the order in which they are actually played. You may be able to set the order in which MP3/WMA files are to be played by writing them onto a medium such as a CD-R with their file names beginning with play sequence numbers such as "01" to "99". For example, a medium with the following folder/file hierarchy is subject to Folder Search, File Search or Folder Select, as shown below.
The VM9312 player will only recognize three folder levels and does not display folders containing only other folders. In the example above, the unit will display folders 3, 4, 6, and 8, but not 2 and 7 since they do not contain any tracks directly. Folder 5 is not recognized at all since it is at the fourth level.
MP3 Player User InterfaceThe on-screen indicators and touch key areas for MP3 playback are outlined below.
1. Current track and total number of tracks on disc2. Elapsed playing time3. Current time4. Track titles5. ID3 information6. : Touch to play/pause disc playback7. : Touch to stop disc playback8. >>|: Touch to move to next track 9. |<<: Touch to move to previous track10. : Touch to view the next page of songs11. : Touch to view the previous page of songs12. DIR -: Touch to view the previous folder13. DIR +: Touch to view the next folder14. Touch to access the direct entry screen
15. : Touch to view the SETUP menu16. Touch for quick access to Equalizer level settings17. Touch to view the SOURCE MENU and select a new
playback source18. Folder name
151
7
2
135
16
12
317
DISCMP3 4/84 00:00:23
01:02 AM
EQ 1 Cherry Poppin Dad
2 Chris Isaak - Baby
3 Crazy Town - Butt
4 Phish - Birds Of A
5 Phish - Bouncin' R
6 Phish - Freebird (L
14
4 9 11
10
8
6
DIR - DIR +
(Root)
18

24
VM9312
Controlling PlaybackPlaying MP3/WMA FilesAfter inserting a MP3/WMA disc, files will play in the sequence of the “Root’ directory.
NOTE: When burning MP3 / WMA files onto a DVD disc, use the 2X or 4X burning option, if available. This slower burning speed will help eliminate buffer errors and increase disc reading reliability. Also, use folders when burning large numbers of songs / files to a disc for easy music navigation. Select the "Disc at Once" option and close your disc.
Stopping PlaybackTouch the button on screen or press the /BAND button (20) on the remote control to stop disc play.To resume playback, touch the button on screen, press the joystick button (13) on the front panel, or press the >/|| button on the remote control (18).Pausing PlaybackTouch the button on screen, press the joystick button (13) on the front panel, or press the >/|| button on the remote control (18) to suspend or resume disc play.Moving Through TracksPress the >>| button (19) on the remote control or on screen or use the > button on the joystick (14) to advance to the next track on the disc. Press the |<< button (17) on the remote control or on screen or use the < button on the joystick (10) to move to the previous track.Repeat PlaybackTouch the button on screen or press the REPT button (7) on the remote control to alter repeat mode according to the following: Repeat Single, Folder Repeat, Repeat OffRandom Play SelectPress the RDM button (33) on the remote control to play the files on the disc in a random, shuffled order. Press RDM again to cancel Random Play mode.
NOTE: CD-R and CD-RW will not play unless the recording session is finalized.
Direct Track EntryUse the numeric keypad (29) on the remote control to access files directly or press the button (see “Direct Track Entry” on page 22).

25
VM9312
IPOD OPERATION
NOTE: Be sure your iPod has the latest Apple firmware installed to avoid connectivity issues.
Accessing iPod ModeThe unit will automatically switch to iPod mode when an iPod is plugged into the MediaLink. To return to the iPod menu from any other source menu, press the SRC button (6) on the front panel or remote control (8) until the iPod menu appears on the screen. The on-screen indicators and touch key areas for iPod playback are outlined below.
1. Elapsed playing time for current file2. File number and total number of files on the disc3. Current time4. File titles5. ID3 information (Artist/Album)6. Touch to “Enter”7. Touch to access the Photo menu8. >>|: Touch to move to next track 9. |<<: Touch to move to previous track10. MENU: Touch to view the iPod main menu11. : Touch to play/pause disc playback12. Touch to access the Music menu13. Touch to access the Video menu
14. : Touch to view the SETUP menu15. Touch for quick access to Equalizer level settings16. Touch to view the SOURCE MENU and select a new
playback source17. Current file title18. Touch to access the direct entry screen
Controlling your iPodTouch the MENU button to access the main iPod menu. The following touch screen icons and remote control buttons are used to access the iPod menus:
Use the touchscreen, the joystick, or the directional keys on the remote control to navigate the iPod menus.Music Playback
To access music files, touch the button on screen or press the TITLE button (2) on the remote control.• Touch the > || button on screen to play/pause.• Touch >>| on screen, press the >>| button (19) on the
remote control, or press the > button on the joystick (17) to move to the next item on the menu.
• Touch |<< on screen, press the |<< button (17) on the remote control, or press the < button on the joystick (16) to move to the previous item on the menu.
• Use the touch screen or press the >/|| button (18) on the remote control or the joystick ENTER button (20) on the head unit to select the highlighted menu option.
• Press the >> button (14) on the remote control or the /\ button (18) on the joystick, or touch the MENU button on screen, to return to the previous menu.
Fast Forward/Fast ReversePress and hold the |<< or >>| buttons on screen or on the remote control (17, 19) for 1 second and continue to hold for fast forward or fast reverse. Release to resume normal play. Search Playlist/Artist/Album/SongTo search through Playlists, Artists, Albums and Songs, press the 1 button (29) on the remote control keypad while in one of the following directories: Playlist, Artist, Album or Song. The selected directory will be accessed with the number of pages and files in that directory displayed at the top of the page. To access the page or file, enter the page or file number directly from the remote control keypad. Press the |<< or >>| button (17, 19) on the remote control or the < or > button (16, 17) on the joystick to select the desired song or file.
Direct Track Entry
To select a track directly, touch the button on screen control to display the direct entry menu.
Enter the desired track using the on-screen number pad. Press the enter button (arrow) to tune to the selected station. To exit the screen without changing the station, touch Exit. To clear your entry and start over, touch Clear.Photo PlaybackWhile iPod photos can be viewed on the VM9312 screen, you must use the iPod to control photo playback options.
Touch the icon on screen or press the MENU button (1) on the remote control to access the iPod PHOTO mode. The VM9312 will release control back to the iPod so you can select video media to be displayed on the TFT monitor. To exit PHOTO mode, touch the screen. Video PlaybackWhile iPod video can be viewed on the VM9312 screen, you must use the iPod to control video playback options. Touch the button on screen or press the AUDIO button (5) on the remote control to access iPod VIDEO mode. The VM9312 will release control back to the iPod so you can select video media to be displayed on the TFT monitor. To exit VIDEO mode, touch the screen, press the >> button (14) on the remote control, or press the MENU button on the iPod.
NOTE: To transmit the video from your iPod to the VM9312 screen, you must set the following options through the iPod video settings menu: TV Out = On, TV Signal = NTSC, and Widescreen = On.
NOTE: After disconnecting your iPod, the VM9312 will always return to the last mode accessed when the iPod is plugged back into the unit.
141
7
2
135
15
12
316
iPod1:08 2/124
01:02 AM
EQ 0001 A Rush Of Blood to
0002 40
0003 4th of July
0004 A Little Less Convers
0005 A Message
0006 A Sort of Homecomin
4 9 11
10
8
6
17
A Rush of Blood to the Head
MENU
Artist: Coldplay
Enter
18
Menu Touch Screen Remote Control
Music TITLE
Photos MENU
Videos AUDIO
TRACK: _ _ _
1 2 3
4 5 6
7 8 9
0 Clear
Exit

26
VM9312
TROUBLESHOOTINGTable 7: Troubleshooting
Problem Cause Corrective ActionGENERALUnit will not power on Radio Fuse blown Install new fuse with correct rating
Car battery fuse blown Install new fuse with correct ratingIllegal operation Press the RESET button located in the bottom right corner of the front panel
Remote control does not function Battery depleted Replace battery with new oneBattery installed incorrectly Remove battery and install correctly
No/low audio output Improper audio output connection Check wiring and correctVolume set too low Increase volume levelImproper “MUTE” connection Review wiring diagram and check “MUTE” connectionSpeakers damaged Replace speakersHeavily biased volume balance Adjust the channel balance to the center positionSpeaker wiring is in contact with metal part of car Insulate all speaker wiring connections
Poor sound quality or distortion Pirated disc is in use Use original copySpeaker power rating not compatible with unit Connect proper speakersSpeaker is shorted Check speaker contact
Tel-Mute malfunction “MUTE” wire is grounded Check that “MUTE” connection is not grounded and that it’s properly insulated Unit resets itself when engine is off Incorrect connection between ACC and positive
battery wireCheck wiring and correct
TFT MONITORMonitor does not open automatically TFT Auto Open is turned off Turn TFT Auto Open onNo image Incorrect connection to parking brake wire Check wiring and correct
PRK SW is activated and parking brake is not engaged
Stop vehicle in safe place and apply parking brake
Flashing image or interference appears on screen
DVD is not compatible with current TV system settings
Change setup to accommodate disc
Improper video signal connections Check wiring and correctProlonged image or improper height/width ratio display
Improper aspect ratio setup Use correct aspect ratio setting
Monitor stops at incorrect position Moving path is blocked Press OPEN key to restart monitor movementTUNERWeak station searching Auto antenna is not fully extended Connect the auto antenna control cable properly
Auto antenna not properly connected Connect the auto antenna control cable properlyLOCAL function is activated Turn LOCAL function off
Cannot insert disc Disc already inside unit Eject current disc and insert new one

27
VM9312
Error Messages
Disc does not play back Disc is warped or scratched Use disc in good conditionDisc is dirty or wet Clean disc with soft clothLaser pickup is dirty Clean laser pickup with cleaning discIncompatible disc is used Use compatible discDisc rating exceeds Parental Lock rating limit Change Parental Lock settings to lower restrictionDisc region code is not compatible with unit Use disc with proper region codeDisc is inserted upside down Insert disc with label side up
Image blurred, distorted, or dark Disc is illegally copied Use original discPBC cannot be used during VCD playback PCB is not available on the discNo repeat or searching while playing VCD PCB is on Turn PCB offMP3Interruption occurred during playback Disc is dirty or scratched Clean disc or replace
File is damaged/bad recording Recreate disc with good filesIncorrect playback message displayed Message is longer than LCD can displaySAT RADIONo Sound Incorrect cable connections Check RCA cablesSatellite source not available Incorrect cable connections Check Satellite Data cable“ANTENNA” appears on the Satellite radio main screen
Antenna not connected Check satellite antenna connection
IPODiPod source not available Incorrect cable connections Check jLink and MediaLink cablesCannot see video and photo media on TFT screen
Wrong iPod Video Settings Change iPod video settings to TV Out = On
Table 7: Troubleshooting
Problem Cause Corrective Action
Table 8: Error Messages
Message Displayed Cause Corrective Action
Loading Disc is being read
No Disc Disc is dirty Clean disc with soft cloth
Disc is upside down Insert disc with label side up
Disc not present in loading compartment Insert disc
Bad Disc Disc is dirty Clean disc with soft cloth
Disc is upside down Insert disc with label side up
Unknown disc Disc format is not compatible with this unit
Region Error DVD is not compatible with region code of unit

28
VM9312
Care and Maintenance1. Use only a clean silicone cloth and neutral detergent to
clean the front panel or monitor. A rough cloth and non-neutral detergent (such as alcohol) may result in scratching or discoloration.
2. Do not get water or cleaning fluids on the unit.3. If the temperature inside the player gets too hot, a
protective circuit automatically stops play of the disc. If this occurs, allow the unit to cool before operating the player again.
4. Never insert anything other than a 5” (12 cm) compact disc into the player as the mechanism can be damaged by foreign objects.
5. Do not attempt to use a 3” (8 cm) CD-Single disc in this unit, either with or without an adaptor, as damage to the player and/or disc may occur. Such damage is not covered by the Warranty on this product.
6. The CD player may not operate properly in extreme hot or cold. If such conditions occur, allow the interior of the vehicle to reach a normal temperature before using player.
7. When the vehicle warms up during cold weather or under damp conditions, condensation may appear on the LCD panel. Should this occur, the screen will not operate properly until the moisture has evaporated.
8. We suggest you use a cleaning disc in this unit more frequently than in the unit in your home due to the environmental conditions of the vehicle.
Error Illegal mechanism operation Press EJECT key for 5 seconds to reset loading mechanism
Table 8: Error Messages
Message Displayed Cause Corrective Action

29
VM9312
SPECIFICATIONSDVD/CD PlayerCompatible Disc Media: DVD + R / RW (Single and Dual Layer) and CD-R / RWCompatible Media Formats: CD-DA, MP3, WMA, VCD, SVCD, AVI, MPEG1 / 2, XviD, DivX and Kodak picture CD (JPEG). Signal to Noise Ratio: >95dBADynamic Range: >95dBFrequency Response: 20Hz to 20 kHz, -3dBChannel Separation: > 60dB @ 1 kHzD/A Converter: High performance 24-bit / 192 kHz sample rate, Multi-Bit Sigma-Delta Modulator VideoFormat: NTSC, PAL (auto-detection)Output: 1Vp-p (75-ohm)Input: 1Vp-p (75-ohm)FM TunerTuning Range: 87.5MHz - 107.9MHzMono Sensitivity (-30dB): 9dBfQuieting Sensitivity (-50dB): 15dBfAlternate Channel Selectivity: 70dBSignal to Noise Ratio @ 1 kHz: 58dB Image Rejection: 80dBStereo Separation @ 1 kHz: >30dBFrequency Response: 30Hz - 15 kHz, -3dBAM TunerTuning Range: 530 kHz - 1720 kHzSensitivity (-20dB): 15uVSignal to Noise Ratio @ 1 kHz: 50dBImage Rejection: 60dBFrequency Response: 50Hz - 2 kHz, -3dBMonitorScreen Size: 7.0" (Measured diagonally), 16:9 Widescreen
• 6.06" (154.1mm) W X 3.42" (87mm) HScreen Type: TFT Liquid Crystal Display (LCD) active matrixResponse Time: 30mSec rise time, 50mSec fall timeResolution:
• 336,960 sub pixels, 1440 (W) X 234 (H)Viewing angle:
• 65 degrees left or right• 40 degrees up• 65 degrees down
General Auxiliary Input impedance: 10k Power Supply: 11 to 16VDC, negative groundPower Antenna (Blue): 500mA max, current limited protection
Amplifier Remote (Blue/White): 500mA max, current limited protectionOperating Temperature: -20C ~ 65CFuse: 15-amp, mini ATM typeDIN chassis dimensions: 7" X 7" X 2" (178mm x 178mm x 50mm)CEA Power Ratings
Power Output: 13 Watts RMS x 4 channels into 4-Ohms @ < 1% THD+N Signal to Noise Ratio: 70dBA below reference (Reference: 1 Watt, 4-Ohms)Frequency Response: 20 Hz - 20 kHz, -3dB. (Aux Input used as reference input)Reference Supply Voltage: 14.4VDC
*Specifications subject to change without notice.

30
VM9312

Limited Warranty DO NOT RETURN THIS PRODUCT TO THE STORE CD or Multimedia Radios/Headunits
Audiovox Electronics Corporation (“the Company”) is committed to quality and customer service, and are pleased to offer you this Warranty. Please read it thoroughly and contact the Company at 1-800-323-4815 with any questions. Who is covered? The Company extends this warranty to the original retail purchaser of products purchased through an authorized Audiovox retailer in the U.S.A., Puerto Rico or Canada. This warranty is not transferable or assignable. Proof of purchase is required in the form of an original sales receipt. What is covered? The Company warrants that should this product or any part thereof, under normal use, be proven defective in material or workmanship within 12 months from the date of original purchase, such defect(s) will be repaired or replaced with a new or reconditioned product (at the Company's option) without charge for parts and repair labor. What is not covered? This Warranty does not cover the following: • Damage incurred during shipping or transporting the product to the
Company or a service center • Elimination of car static or motor noise • Defects in cosmetic, decorative or non-operative structural parts • Correction of antenna problems • Costs incurred for installation, removal or reinstallation of the product • Consequential damage to compact discs, USB devices, digital media
cards, accessories or vehicle electrical systems • Damage caused by improper installation, mishandling, misuse, neglect,
accident, blown fuse, battery leakage, theft or improper storage • Products whose factory serial number/bar code label(s) or markings
have been removed or defaced • Damage resulting from moisture, humidity, excessive temperature,
extreme environmental conditions or external natural causes Please review the “Care and Maintenance” section of your Installation and Operation Manual for additional information regarding the proper use of your product.
Limitations THE EXTENT OF THE COMPANY'S LIABILITY UNDER THIS WARRANTY IS LIMITED TO THE REPAIR OR REPLACEMENT PROVIDED ABOVE AND, IN NO EVENT, SHALL THE COMPANY'S LIABILITY EXCEED THE PURCHASE PRICE PAID BY PURCHASER FOR THE PRODUCT. This Warranty is in lieu of all other express warranties or liabilities. ANY IMPLIED WARRANTIES, INCLUDING ANY IMPLIED WARRANTY OF MERCHANTABILITY, SHALL BE LIMITED TO THE DURATION OF THIS WRITTEN WARRANTY. ANY ACTION FOR BREACH OF ANY WARRANTY HEREUNDER INCLUDING ANY IMPLIED WARRANTY OF MERCHANTABILITY MUST BE BROUGHT WITHIN A PERIOD OF 24 MONTHS FROM DATE OF ORIGINAL PURCHASE. IN NO CASE SHALL THE COMPANY BE LIABLE FOR ANY CONSEQUENTIAL OR INCIDENTAL DAMAGES FOR BREACH OF THIS OR ANY OTHER WARRANTY, EXPRESS OR IMPLIED, WHATSOEVER. No person or representative is authorized to assume for the Company any liability other than expressed herein in connection with the sale of this product. Some states do not allow limitations on how long an implied warranty lasts or the exclusion or limitation of incidental or consequential damage so the above limitations or exclusions may not apply to you. This Warranty gives you specific legal rights and you may also have other rights which vary from state to state. Obtaining Warranty Service
• To obtain repair or replacement within the terms of this Warranty, call 1-800-323-4815 for the location of a warranty station serving your area.
• You must prepay the initial shipping charges to the Company. The Company will pay the return shipping charges for all warranteed products returned to an address within the U.S.A., Puerto Rico or Canada.
• Please package the product securely to avoid shipping damage. We recommend using a carrier that provides tracking service to prevent lost packages. Lost or damaged packages are not covered by this warranty.
• Provide a detailed description of the problem(s) for which you require service.

Audiovox Electronics CorporationHauppauge, NY 11788
Technical Assistance: 1-800-323-4815www.jensen.com
© 2007 AudiovoxVer. 020107
Printed in China