vms(video management system)user manual · 2016-05-17 · vms(video management system)user manual...
TRANSCRIPT
VMS(VideoVMS(VideoVMS(VideoVMS(VideoManagementManagementManagementManagement System)UserSystem)UserSystem)UserSystem)UserManualManualManualManual
ContentsContentsContentsContents
CONTENTSCONTENTSCONTENTSCONTENTS........................................................................................................................................................................................................................................................................................................................................................................................................................................................................................................................................................................1111
1.1.1.1.SOFTWARESOFTWARESOFTWARESOFTWARE INSTALLATIONINSTALLATIONINSTALLATIONINSTALLATION............................................................................................................................................................................................................................................................................................................................................................................................................................................................ 2222
1.1 SOFTWARE INSTALLATION................................................................................................... 2
2.2.2.2. VMSVMSVMSVMSUSERUSERUSERUSERMANUALMANUALMANUALMANUAL............................................................................................................................................................................................................................................................................................................................................................................................................................................................................................ 2222
2.1 CLIENT'S INSTRUCTIONS...............................................................................................................................22.1.1 LOGIN....................................................................................................................................................... 2
2.1.2 ADD HARDWARE DEVICE......................................................................................................................... 4
2.1.2.1 SCAN HARDWARE DEVICE................................................................................................................ 5
2.1.2.1.1 Scan the specified ip address hardware..................................................................................5
2.1.2.1.2 Scan the specified manufacturer hardware............................................................................5
2.1.2.1.3 Automatic configuration verification...................................................................................... 6
2.1.2.1.4 Scan all hardware..................................................................................................................... 6
2.1.2.1.5 Manually verify hardware........................................................................................................7
2.1.2.1.6 Complete Adding Hardware.....................................................................................................7
2.1.2.2 MANUALLY ADD HARDWARE........................................................................................................... 7
2.1.2.2.1 Add hardware via IP address................................................................................................8
2.1.2.2.2 Add hardware via serial number ........................................................................................8
2.1.2.3 EDIT HARDWARE PROPERTIES...................................................................................................... 9
2.1.2.3.1 Modify the hardware device name.................................................................................... 10
2.1.2.3.2 Modify thce hardware device port number, user name and password...........................10
2.1.2.3.3 Modify the channel name...................................................................................................11
2.1.3 STORAGE CONFIGURATION.......................................................................................................................12
2.1.3.1 Configure the storage path, stream type, retention time..........................................................13
2.1.3.2 Configure the recording type, schedule.......................................................................................13
2.1.3.3 Template configuration....................................................................................................................13
2.1.4 SERVER ACCESS........................................................................................................................................ 14
2.1.5 USER MANAGEMENT................................................................................................................................ 15
2.1.5.1 Edit User Information.......................................................................................................................15
2.1.5.2 Edit User Permission.........................................................................................................................15
2.1.6 SERVICE..................................................................................................................................................16
2.2 CLIENT OPERATION MANUAL................................................................................................................................. 17
2.2.1 Login.........................................................................................................................................................17
2.2.2 Live Preview............................................................................................................................................. 18
2.2.2.1 Live preview function ....................................................................................................................18
2.2.2.2 View Switches To Video.................................................................................................................. 19
2.2.2.3Select the Camera to Preview Video..........................................................................................19
2.2.2.4 PTZ Control....................................................................................................................................20
2.2.2.5 Video Window Toolbar Function Description............................................................................................ 20
2.2.3 PLAYBACK.....................................................................................................................................................21
2.2.3.1 Playback Interface Function Introduction.................................................................................... 21
2.2.3.2 Switching View to Playback Recording......................................................................................... 22
2.2.3.3 Select Camera Recording Playback...............................................................................................22
2.2.3.4 Search Recording............................................................................................................................22
2.2.3.4.1 Auto Search Recording.........................................................................................................22
2.2.3.5 Playback Recording.....................................................................................................................23
2.2.3.5.1 Playback recording synchronously.............................................................................................................23
2.2.3.5.2 Playback recording independently............................................................................................................ 24
2.2.3.5.3 Loop playback recording............................................................................................................................... 24
2.2.3.6 Export Recording............................................................................................................................25
2.2.4 MANAGEMENT FUNCTION...............................................................................................................................27
2.2.4.1 Export List.......................................................................................................................................27
2.2.4.2 View Setting....................................................................................................................................28
2.2.4.3 System Parameter Options............................................................................................................33
2.2.5 EXIT........................................................................................................................................................ 34
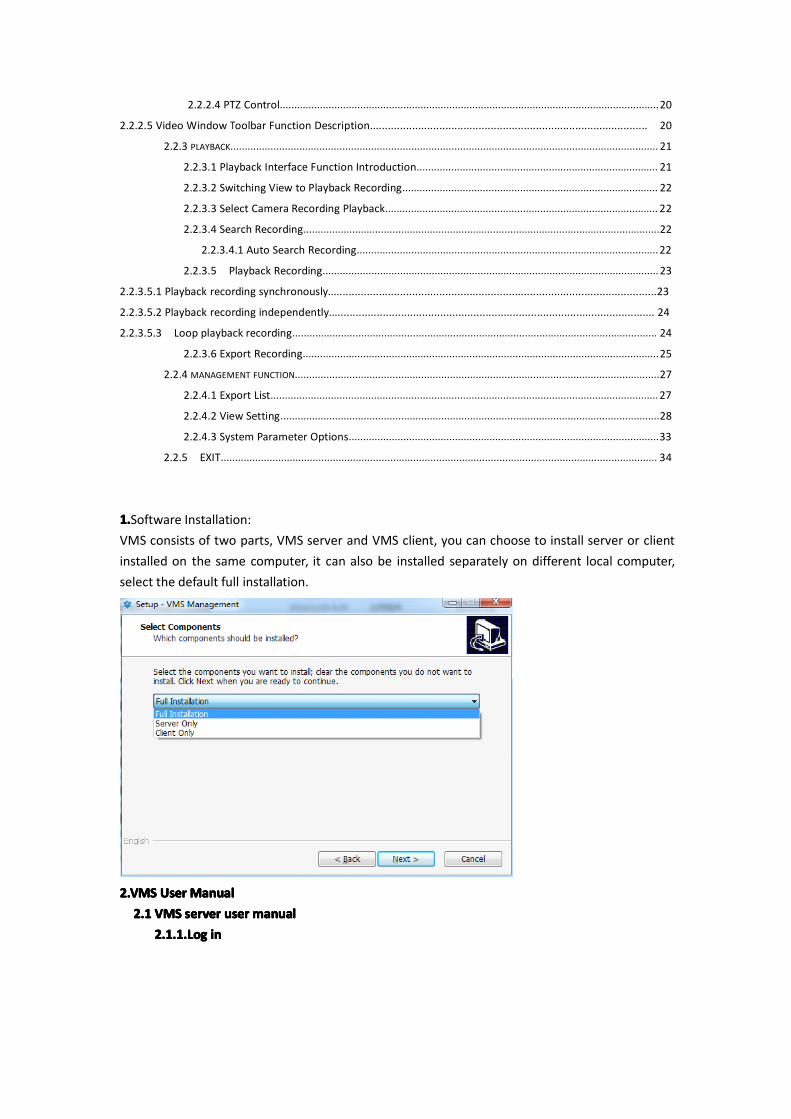
1.1.1.1.Software Installation:VMS consists of two parts, VMS server and VMS client, you can choose to install server or clientinstalled on the same computer, it can also be installed separately on different local computer,select the default full installation.
2.VMS2.VMS2.VMS2.VMS UserUserUserUserManualManualManualManual2.12.12.12.1 VMSVMSVMSVMS serverserverserverserver useruseruserusermanualmanualmanualmanual
2.1.1.Log2.1.1.Log2.1.1.Log2.1.1.Log inininin
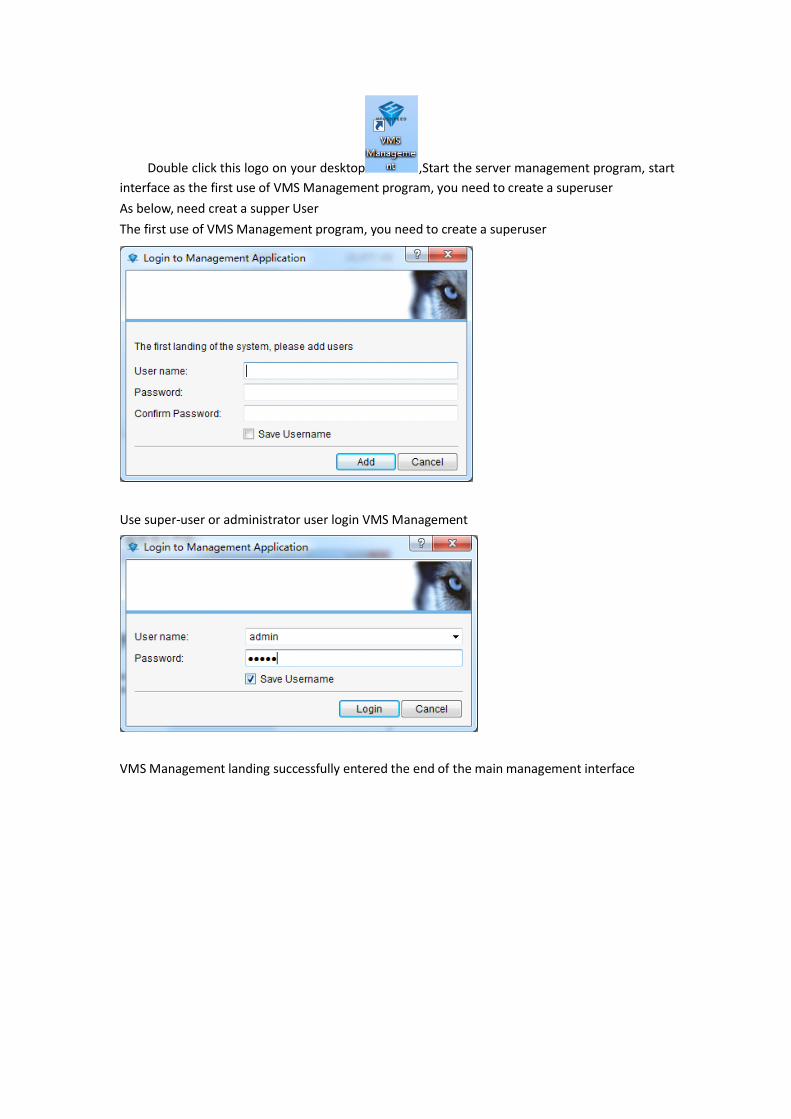
Double click this logo on your desktop ,Start the server management program, startinterface as the first use of VMS Management program, you need to create a superuserAs below, need creat a supper UserThe first use of VMSManagement program, you need to create a superuser
Use super-user or administrator user login VMS Management
VMSManagement landing successfully entered the end of the main management interface

2.1.22.1.22.1.22.1.2 AddAddAddAdd hardwarehardwarehardwarehardwareClick getting Started, then click add hardware
Pop-up dialog box to add add hardware, the hardware scan can scan directly inside the LANhardware device, you can also scan the specified network hardware; manually add thehardware is added directly to know the address or the serial number of hardware

devic
2.1.2.12.1.2.12.1.2.12.1.2.1 ScanScanScanScan hardwarehardwarehardwarehardware
2.1.2.1.1 Scan the specified IP address hardwareIP range can be set to filter search equipment, if you do not specify IP range can click Next to skip.

2.1.2.1.2 Scan the specified manufacturers hardwaremanufacturers can be set to filter search equipment, if you do not specify manufacturers can clickNext to skip,default all manufacturers.
2.1.2.1.3 Automatic Configuration verificationAdd default User name and password, automatic verification scanned hardware devices, (noneed to configure automatic verification directly to the next step)
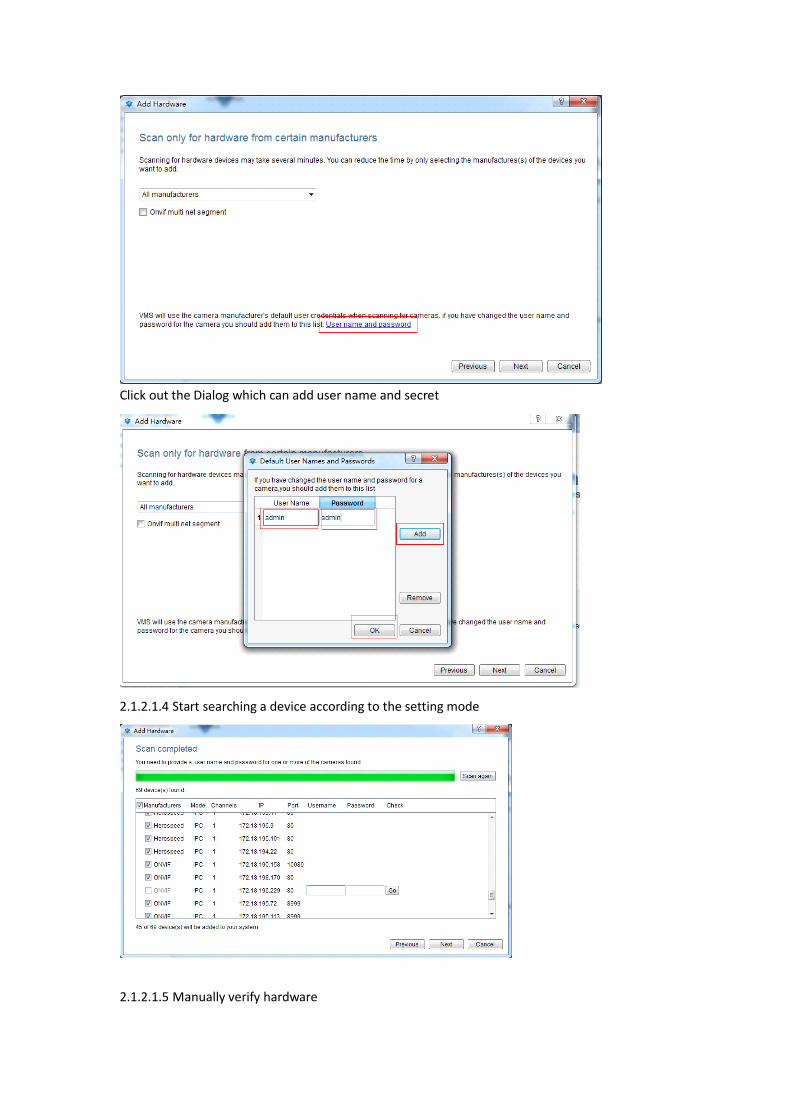
Click out the Dialog which can add user name and secret
2.1.2.1.4 Start searching a device according to the setting mode
2.1.2.1.5 Manually verify hardware
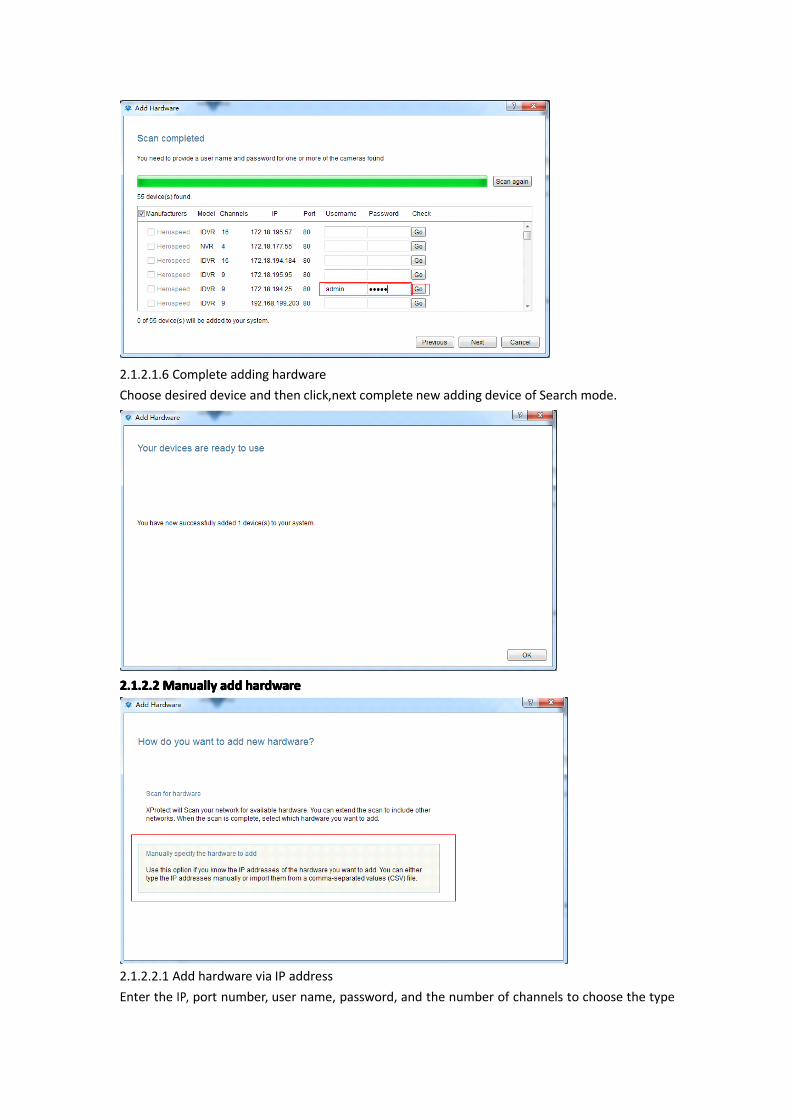
2.1.2.1.6 Complete adding hardwareChoose desired device and then click,next complete new adding device of Search mode.
2.1.2.22.1.2.22.1.2.22.1.2.2ManuallyManuallyManuallyManually addaddaddadd hardwarehardwarehardwarehardware
2.1.2.2.1 Add hardware via IP addressEnter the IP, port number, user name, password, and the number of channels to choose the type
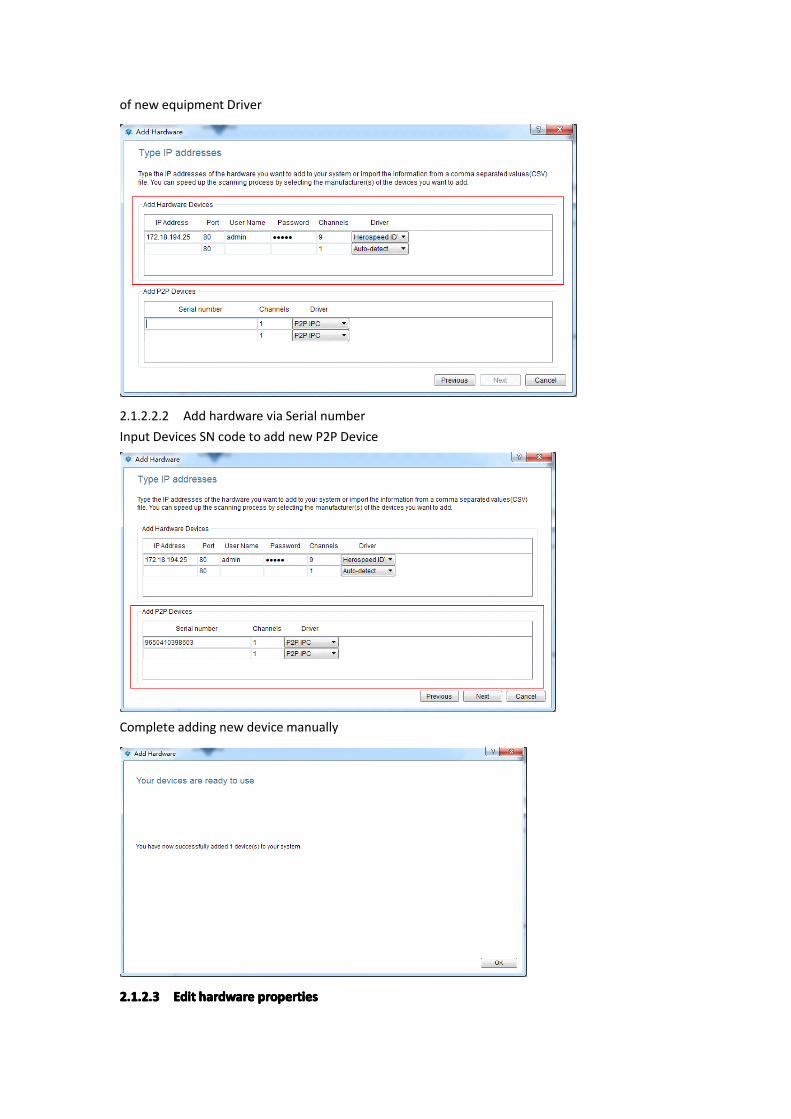
of new equipment Driver
2.1.2.2.2 Add hardware via Serial numberInput Devices SN code to add new P2P Device
Complete adding new device manually
2.1.2.32.1.2.32.1.2.32.1.2.3 EditEditEditEdit hardwarehardwarehardwarehardware propertiespropertiespropertiesproperties
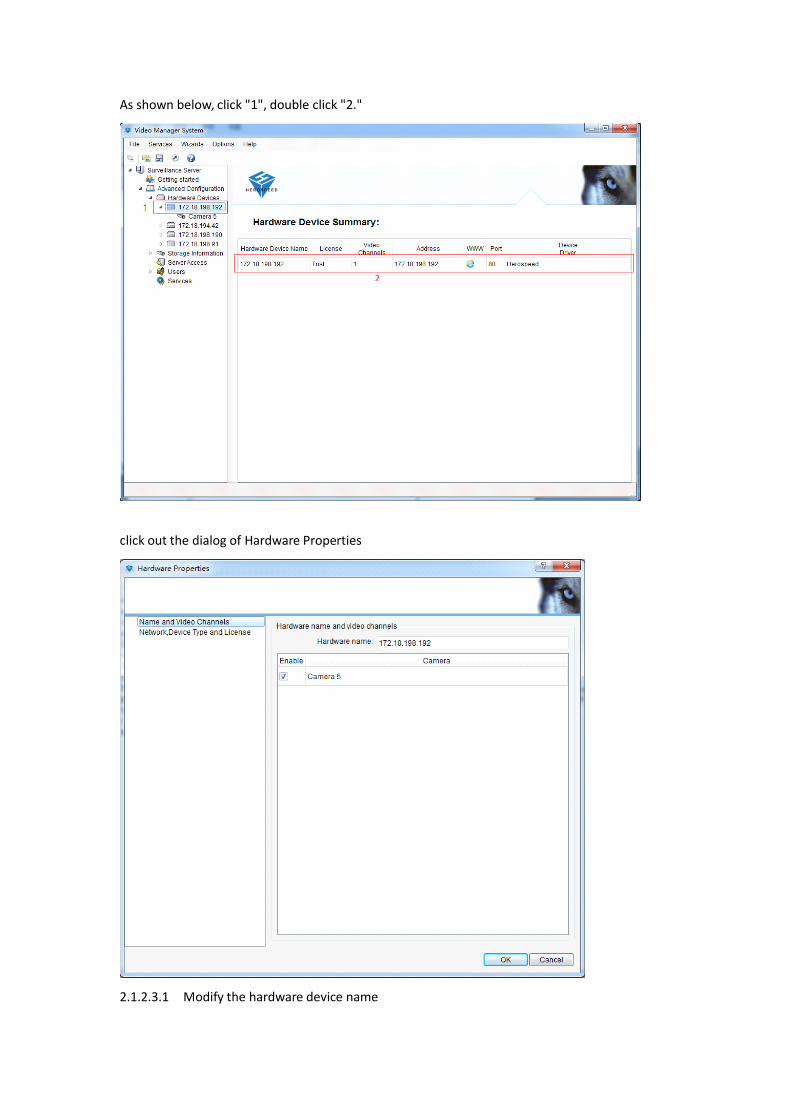
As shown below, click "1", double click "2."
click out the dialog of Hardware Properties
2.1.2.3.1 Modify the hardware device name

2.1.2.3.2 Modify the hardware device port number, user name and password
2.1.2.3.32.1.2.3.32.1.2.3.32.1.2.3.3MMMModifyodifyodifyodify CCCChannelhannelhannelhannel namenamenamename

As shown below, click the "1", double click the "2".
Open camera properties dialog box to modify
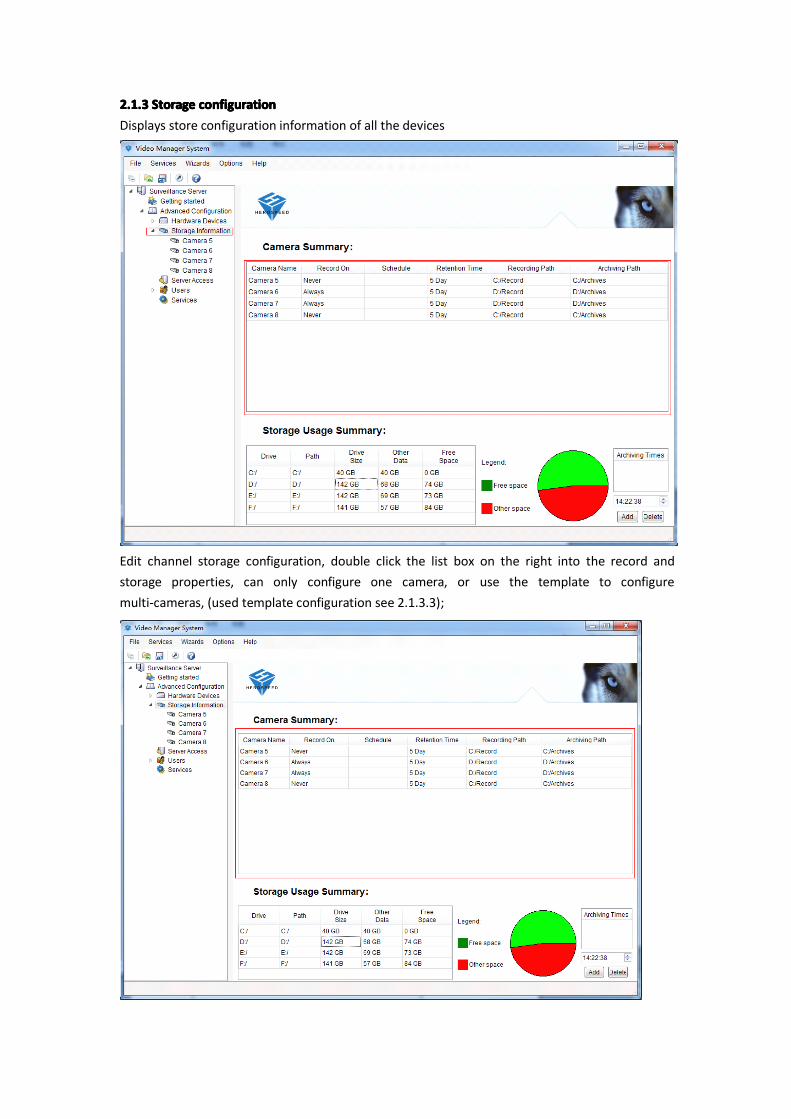
2.1.32.1.32.1.32.1.3 StorageStorageStorageStorage cccconfigurationonfigurationonfigurationonfigurationDisplays store configuration information of all the devices
Edit channel storage configuration, double click the list box on the right into the record andstorage properties, can only configure one camera, or use the template to configuremulti-cameras, (used template configuration see 2.1.3.3);
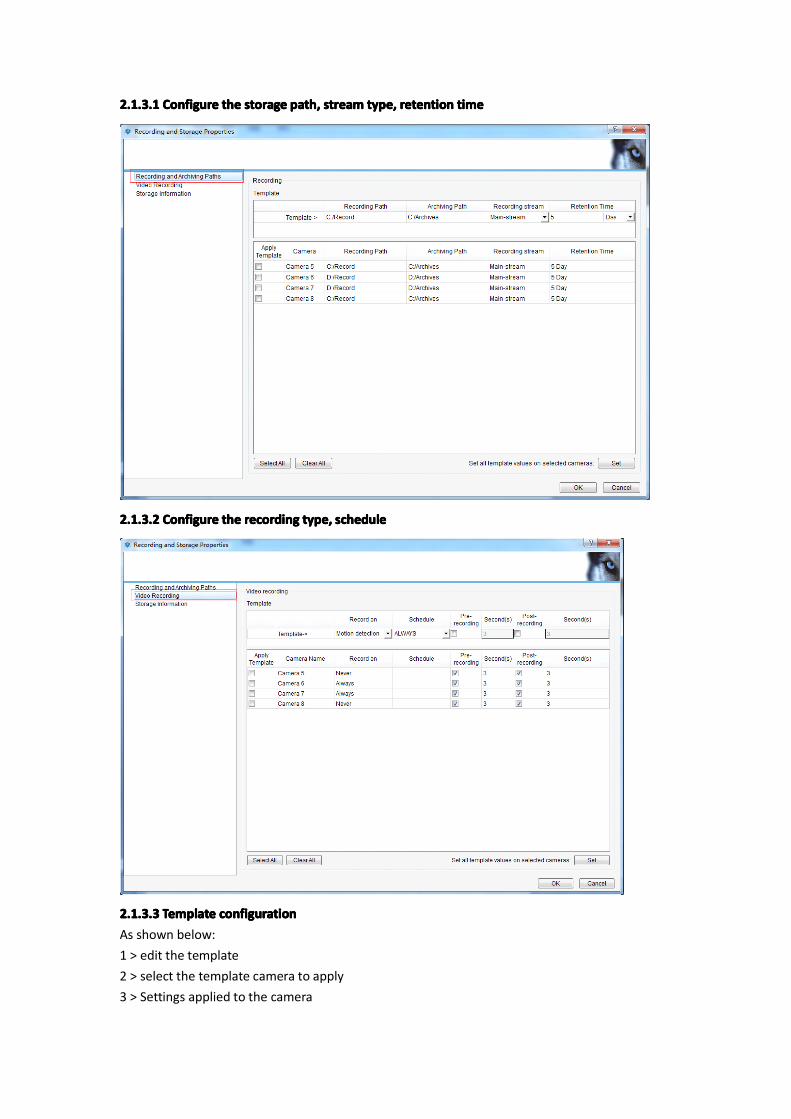
2.1.3.12.1.3.12.1.3.12.1.3.1 ConfigureConfigureConfigureConfigure thethethethe storagestoragestoragestorage path,path,path,path, streamstreamstreamstream type,type,type,type, retentionretentionretentionretention timetimetimetime
2.1.3.22.1.3.22.1.3.22.1.3.2 ConfigureConfigureConfigureConfigure thethethethe recordingrecordingrecordingrecording type,type,type,type, scheduleschedulescheduleschedule
2.1.3.32.1.3.32.1.3.32.1.3.3 TTTTemplateemplateemplateemplate configurationconfigurationconfigurationconfigurationAs shown below:1 > edit the template2 > select the template camera to apply3 > Settings applied to the camera

2.1.42.1.42.1.42.1.4 ServerServerServerServer accessaccessaccessaccessSet the local port number used for VMS Smart Client logining port number
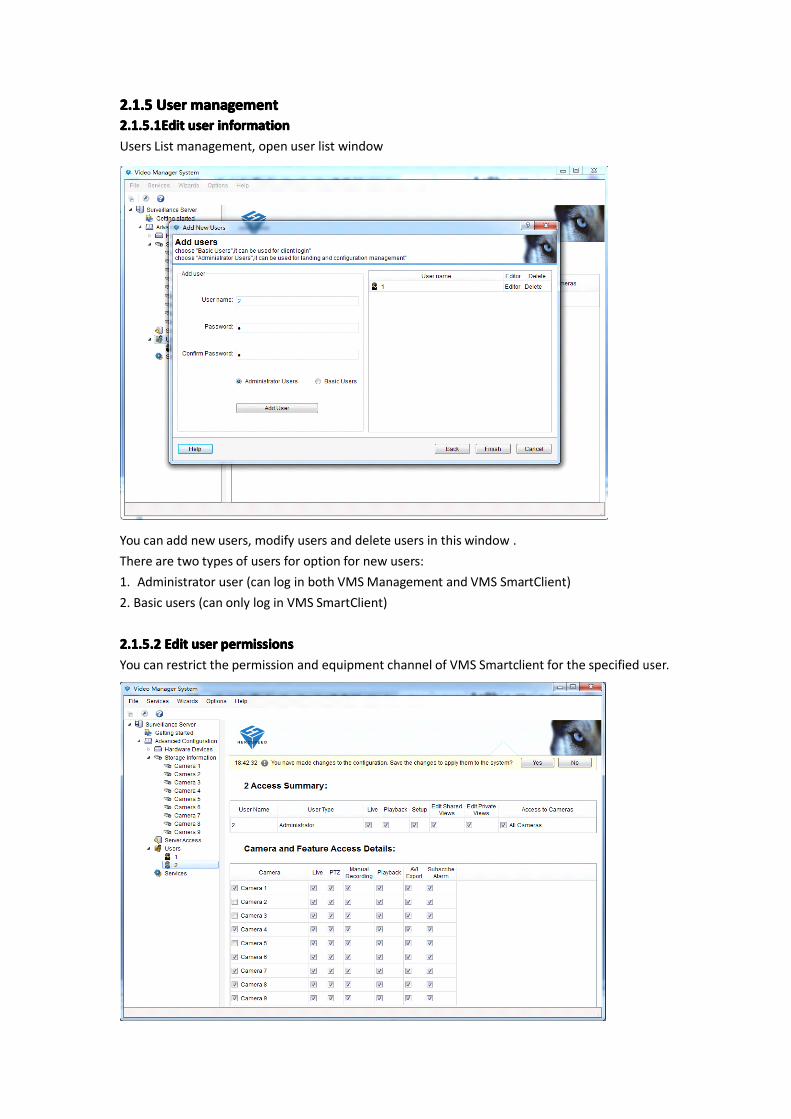
2.1.52.1.52.1.52.1.5 UserUserUserUser managementmanagementmanagementmanagement2.1.5.12.1.5.12.1.5.12.1.5.1EditEditEditEdit useruseruseruser informationinformationinformationinformationUsers List management, open user list window
You can add new users, modify users and delete users in this window .There are two types of users for option for new users:1. Administrator user (can log in both VMSManagement and VMS SmartClient)2. Basic users (can only log in VMS SmartClient)
2.1.5.22.1.5.22.1.5.22.1.5.2 EEEEditditditdit useruseruseruser permissionspermissionspermissionspermissionsYou can restrict the permission and equipment channel of VMS Smartclient for the specified user.
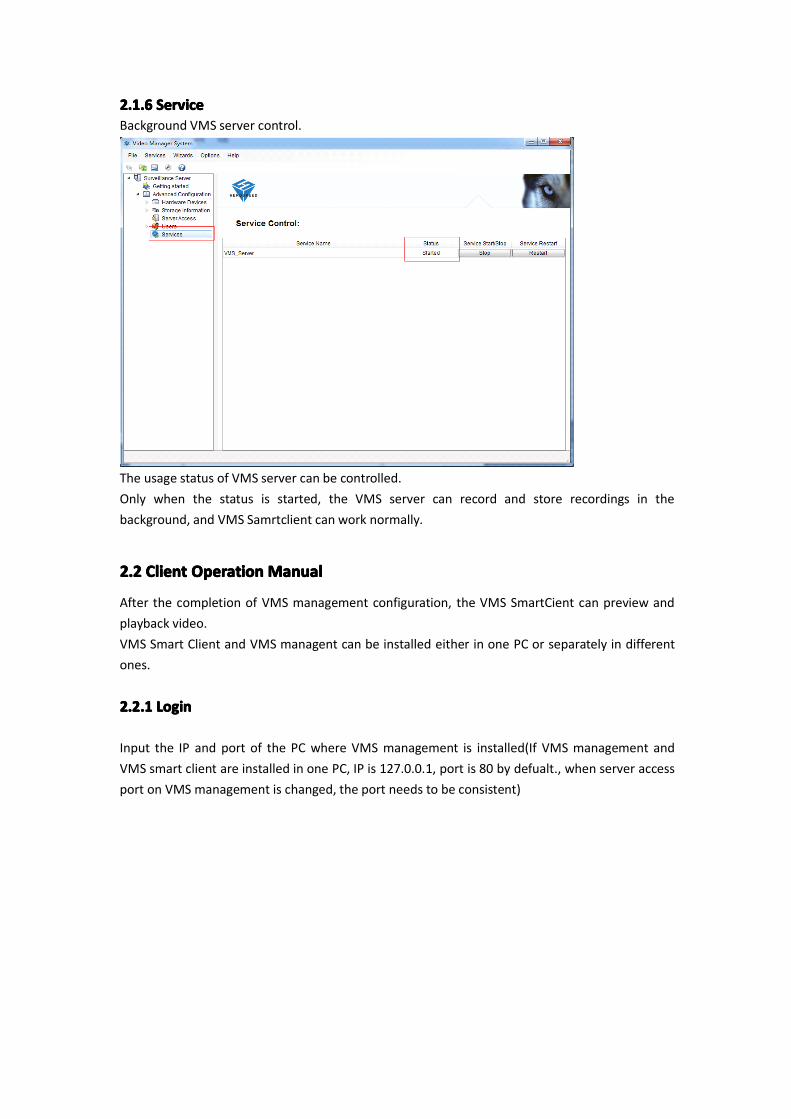
2.1.62.1.62.1.62.1.6 ServiceServiceServiceServiceBackground VMS server control.
The usage status of VMS server can be controlled.Only when the status is started, the VMS server can record and store recordings in thebackground, and VMS Samrtclient can work normally.
2.22.22.22.2 ClientClientClientClient OperationOperationOperationOperationManualManualManualManual
After the completion of VMS management configuration, the VMS SmartCient can preview andplayback video.VMS Smart Client and VMS managent can be installed either in one PC or separately in differentones.
2.2.12.2.12.2.12.2.1 LoginLoginLoginLogin
Input the IP and port of the PC where VMS management is installed(If VMS management andVMS smart client are installed in one PC, IP is 127.0.0.1, port is 80 by defualt., when server accessport on VMS management is changed, the port needs to be consistent)
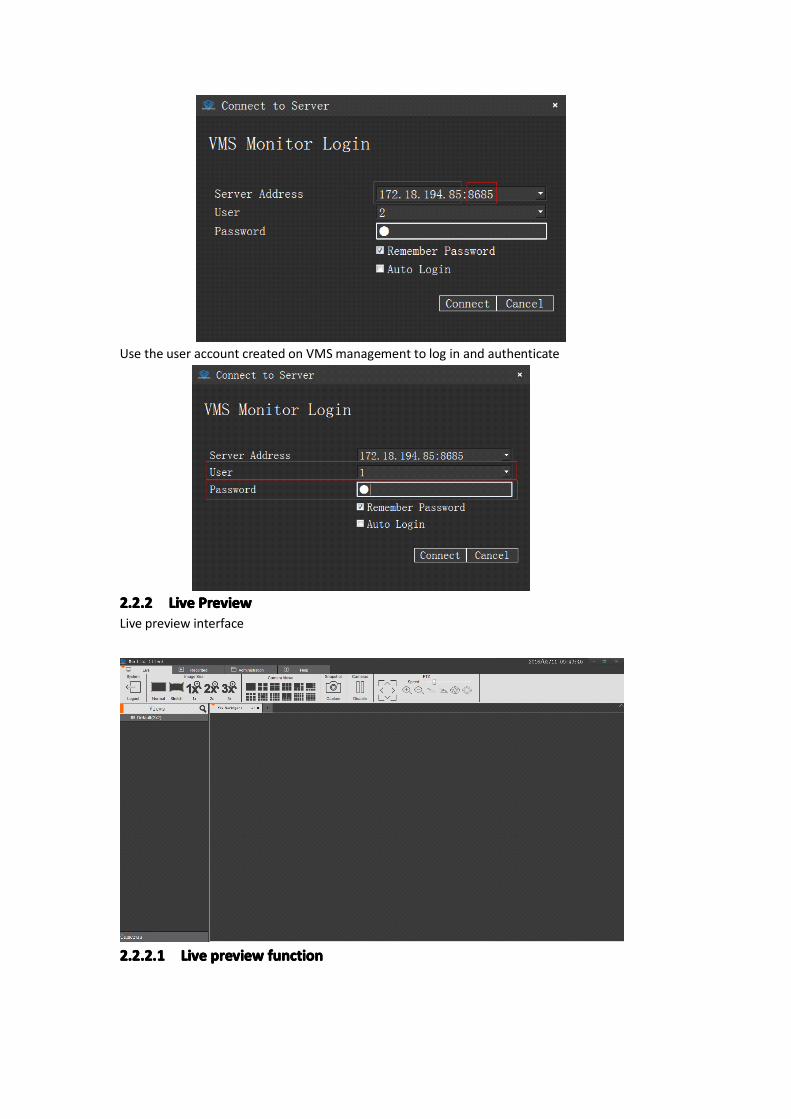
Use the user account created on VMSmanagement to log in and authenticate
2.2.22.2.22.2.22.2.2 LiveLiveLiveLive PreviewPreviewPreviewPreviewLive preview interface
2.2.2.12.2.2.12.2.2.12.2.2.1 LiveLiveLiveLive previewpreviewpreviewpreview functionfunctionfunctionfunction
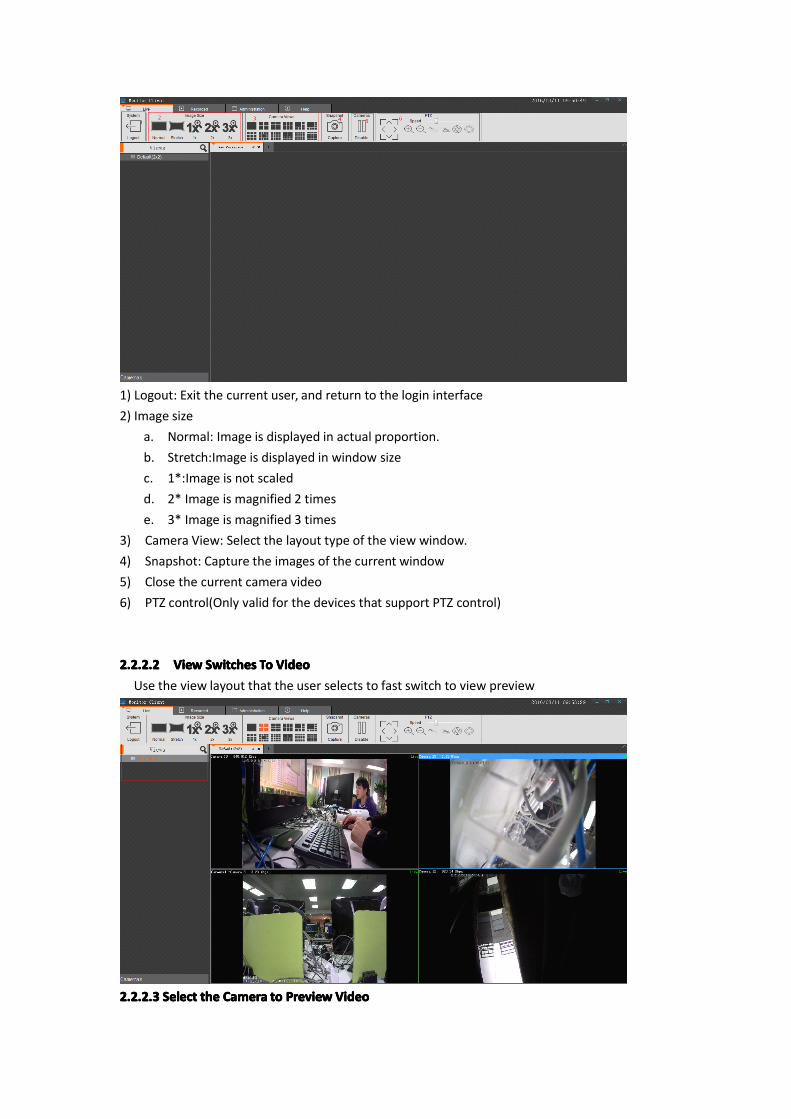
1) Logout: Exit the current user, and return to the login interface2) Image size
a. Normal: Image is displayed in actual proportion.b. Stretch:Image is displayed in window sizec. 1*:Image is not scaledd. 2* Image is magnified 2 timese. 3* Image is magnified 3 times
3) Camera View: Select the layout type of the view window.4) Snapshot: Capture the images of the current window5) Close the current camera video6) PTZ control(Only valid for the devices that support PTZ control)
2.2.2.22.2.2.22.2.2.22.2.2.2 ViewViewViewView SSSSwitcheswitcheswitcheswitches TTTToooo VVVVideoideoideoideoUse the view layout that the user selects to fast switch to view preview
2.2.2.32.2.2.32.2.2.32.2.2.3 SelectSelectSelectSelect thethethethe CameraCameraCameraCamera totototo PreviewPreviewPreviewPreview VideoVideoVideoVideo
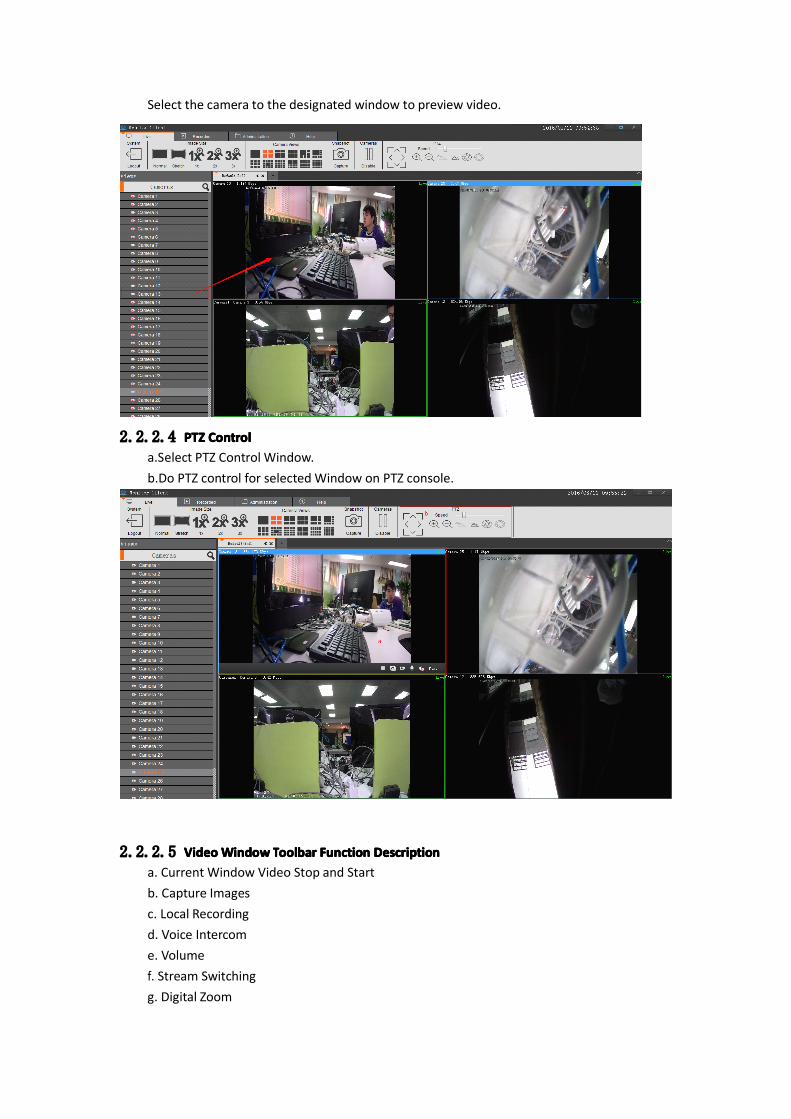
Select the camera to the designated window to preview video.
2.2.2.4 PTZPTZPTZPTZ ControlControlControlControla.Select PTZ Control Window.b.Do PTZ control for selectedWindow on PTZ console.
2.2.2.5 VVVVideoideoideoideoWWWWindowindowindowindow TTTToolbaroolbaroolbaroolbar FunctionFunctionFunctionFunction DescriptionDescriptionDescriptionDescriptiona. Current Window Video Stop and Startb. Capture Imagesc. Local Recordingd. Voice Intercome. Volumef. Stream Switchingg. Digital Zoom

2.2.3 PlaybackPlaybackPlaybackPlaybackPlayback can be operated under the VMS Server with configuration only.2.2.3.1 Playback Interface Function Introduction
1>Recording Location: according to the selected time & position to locate to the specified placequickly.2>Image Size:
a. Regular: image be displayed as actual proportion.b. Stretch: image be displayed as the window size.c. 1 times: image be not scaled.d. 2 times: image be magnified 2 times.e. 3 times: image be magnified 3 times.

2.2.3.2 SwitchingSwitchingSwitchingSwitching VVVViewiewiewiew totototo PPPPlaybacklaybacklaybacklayback RecordingRecordingRecordingRecordingUsing user edited view to switch recording Playback fast.
2.2.3.3 SelectSelectSelectSelect CameraCameraCameraCamera recordingrecordingrecordingrecording PPPPlaybacklaybacklaybacklaybackSelect the camera to be playback and drag to the specified window.
2.2.3.4 SearchSearchSearchSearch RecordingRecordingRecordingRecording2.2.3.4.1 Auto Search RecordingEnter or under playback interface to switch view,it will search the recording time of all windowsview automatically,and display them on time Axis.

Time Axis Type:1> The top Time Axis shows the recording time-line of current selected window.2> The bottom Time Axis shows the set of all cameras' recording time-lines in current view.
2.2.3.5 Playback recording2.2.3.5.1 Play back recording synchronouslyClick out Play button to start playback, this play mode is to play view synchronously, that’s to say,the video in all windows will be played back synchronously.
Synchronously playback tools function introduction:
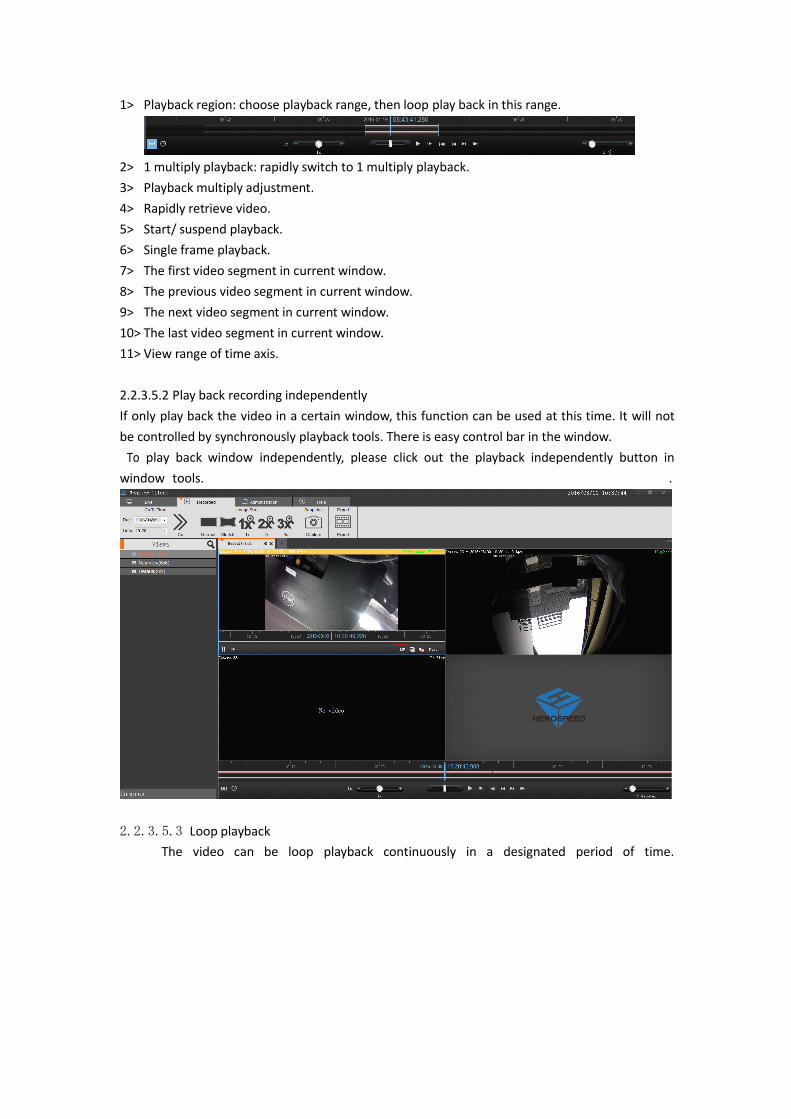
1> Playback region: choose playback range, then loop play back in this range.
2> 1 multiply playback: rapidly switch to 1 multiply playback.3> Playback multiply adjustment.4> Rapidly retrieve video.5> Start/ suspend playback.6> Single frame playback.7> The first video segment in current window.8> The previous video segment in current window.9> The next video segment in current window.10> The last video segment in current window.11> View range of time axis.
2.2.3.5.2 Play back recording independentlyIf only play back the video in a certain window, this function can be used at this time. It will notbe controlled by synchronously playback tools. There is easy control bar in the window.To play back window independently, please click out the playback independently button in
window tools. .
2.2.3.5.3 Loop playbackThe video can be loop playback continuously in a designated period of time.
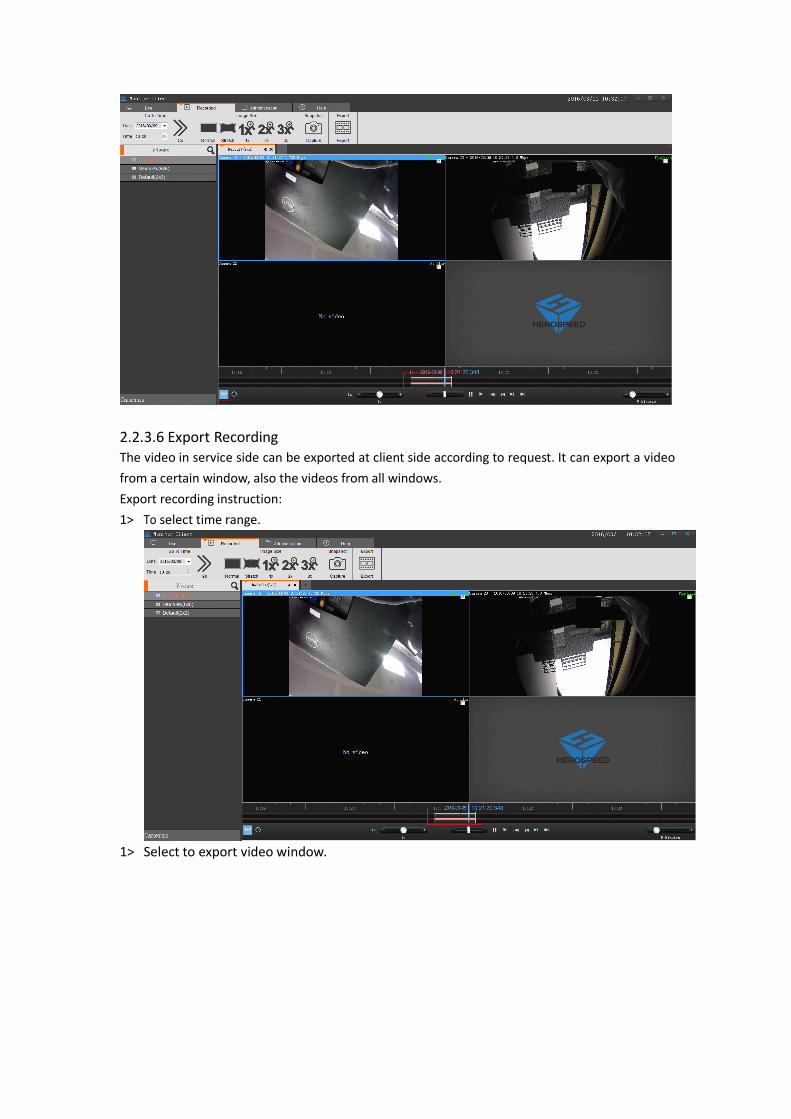
2.2.3.6 Export RecordingThe video in service side can be exported at client side according to request. It can export a videofrom a certain window, also the videos from all windows.Export recording instruction:1> To select time range.
1> Select to export video window.
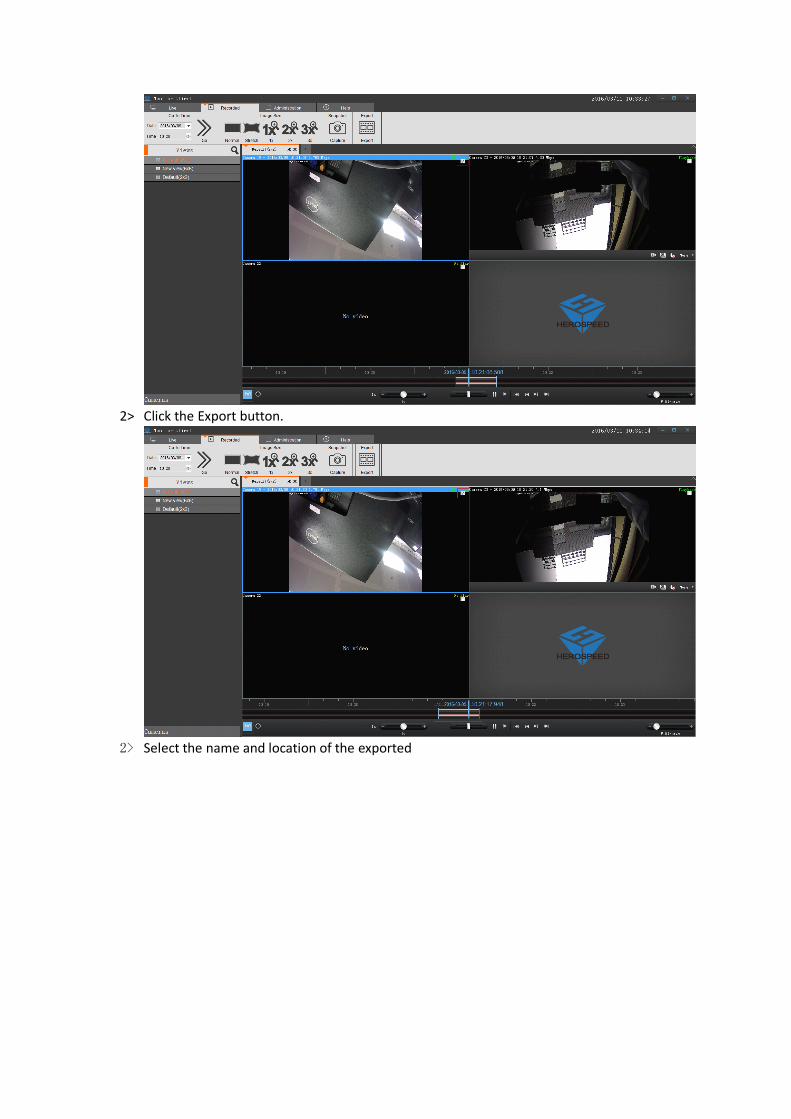
2> Click the Export button.
2> Select the name and location of the exported

3> After the export is completed,in management functions you can view details in theexport list
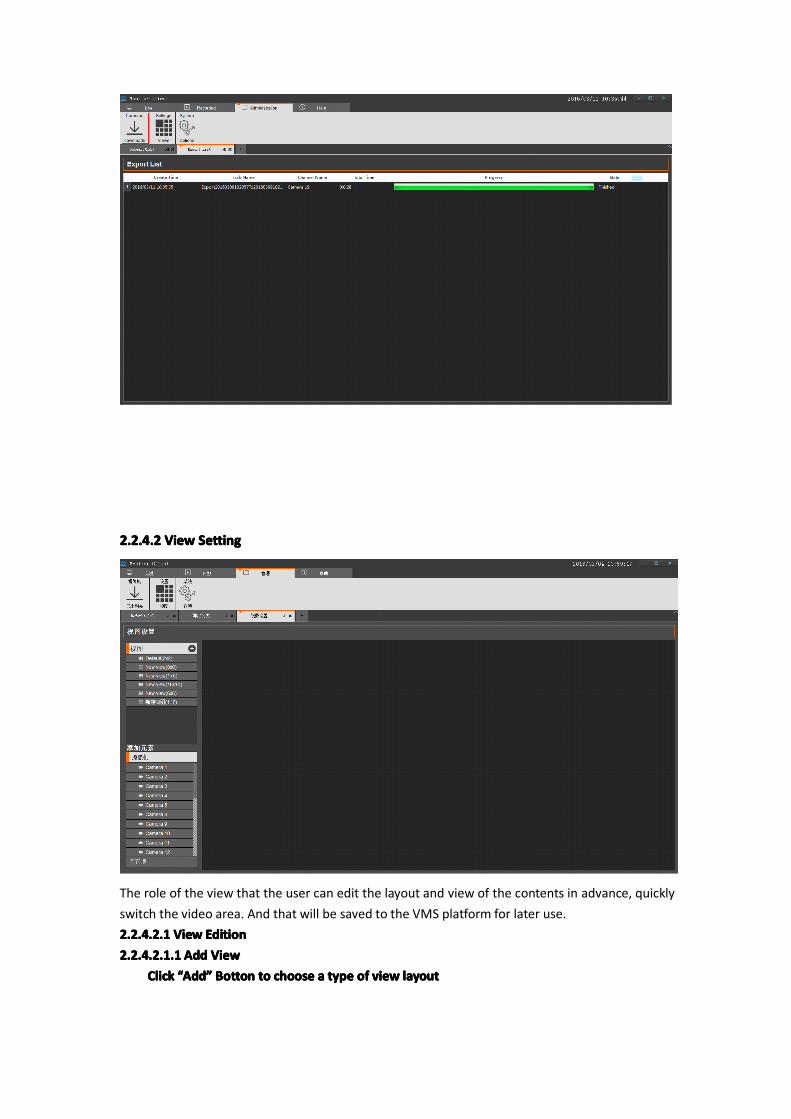
2.2.42.2.42.2.42.2.4 MMMManagementanagementanagementanagement FFFFunctionunctionunctionunction2.2.4.12.2.4.12.2.4.12.2.4.1 ExportExportExportExport ListListListListSee video of the export list information
2.2.4.22.2.4.22.2.4.22.2.4.2 ViewViewViewView SettingSettingSettingSetting
The role of the view that the user can edit the layout and view of the contents in advance, quicklyswitch the video area. And that will be saved to the VMS platform for later use.2.2.4.2.12.2.4.2.12.2.4.2.12.2.4.2.1 ViewViewViewView EditionEditionEditionEdition2.2.4.2.1.12.2.4.2.1.12.2.4.2.1.12.2.4.2.1.1 AddAddAddAdd ViewViewViewView
ClickClickClickClick ““““AddAddAddAdd”””” BottonBottonBottonBotton totototo choosechoosechoosechoose aaaa typetypetypetype ofofofof viewviewviewview layoutlayoutlayoutlayout

2.2.4.2.1.22.2.4.2.1.22.2.4.2.1.22.2.4.2.1.2View Edition4 types of view content, 1.camera 2.photo 3.HTML website 4. Video carousel
Select the view for editing
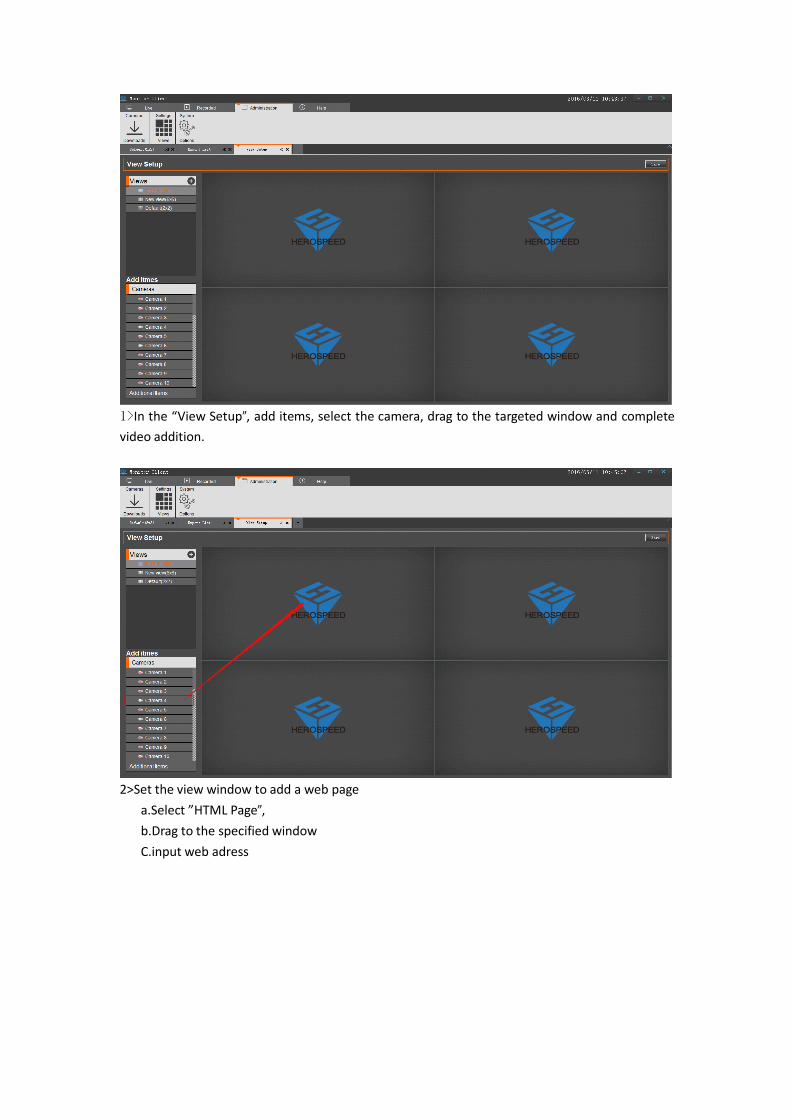
1>In the “View Setup”, add items, select the camera, drag to the targeted window and completevideo addition.
2>Set the view window to add a web pagea.Select ”HTML Page”,b.Drag to the specified windowC.input web adress

3> set the view window to add picturesa.click”Image”.b.Drag to the specified windowc.Select pictures.
4>Set the view window to add video toura.Select "Carousel”b.Drag to the specified windowc.Select channel of equipment to be round tourd.Video round tour timee.the video stream type
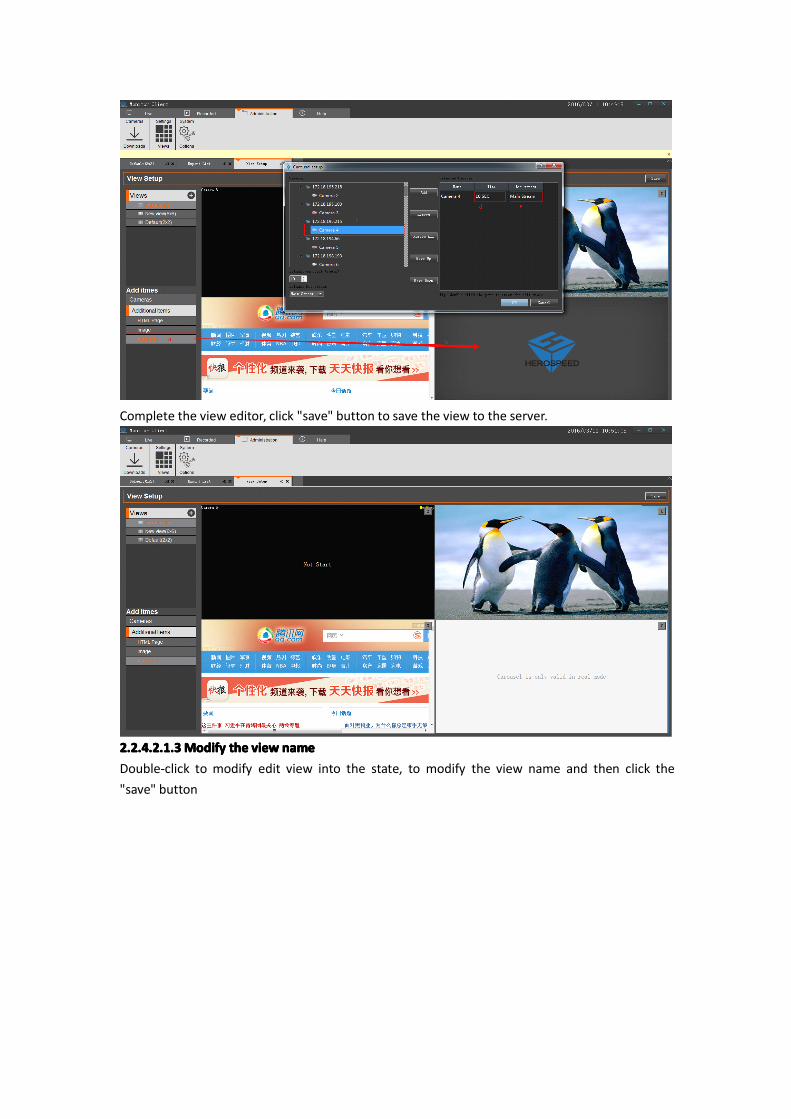
Complete the view editor, click "save" button to save the view to the server.
2.2.4.2.1.32.2.4.2.1.32.2.4.2.1.32.2.4.2.1.3ModifyModifyModifyModify thethethethe viewviewviewview namenamenamenameDouble-click to modify edit view into the state, to modify the view name and then click the"save" button
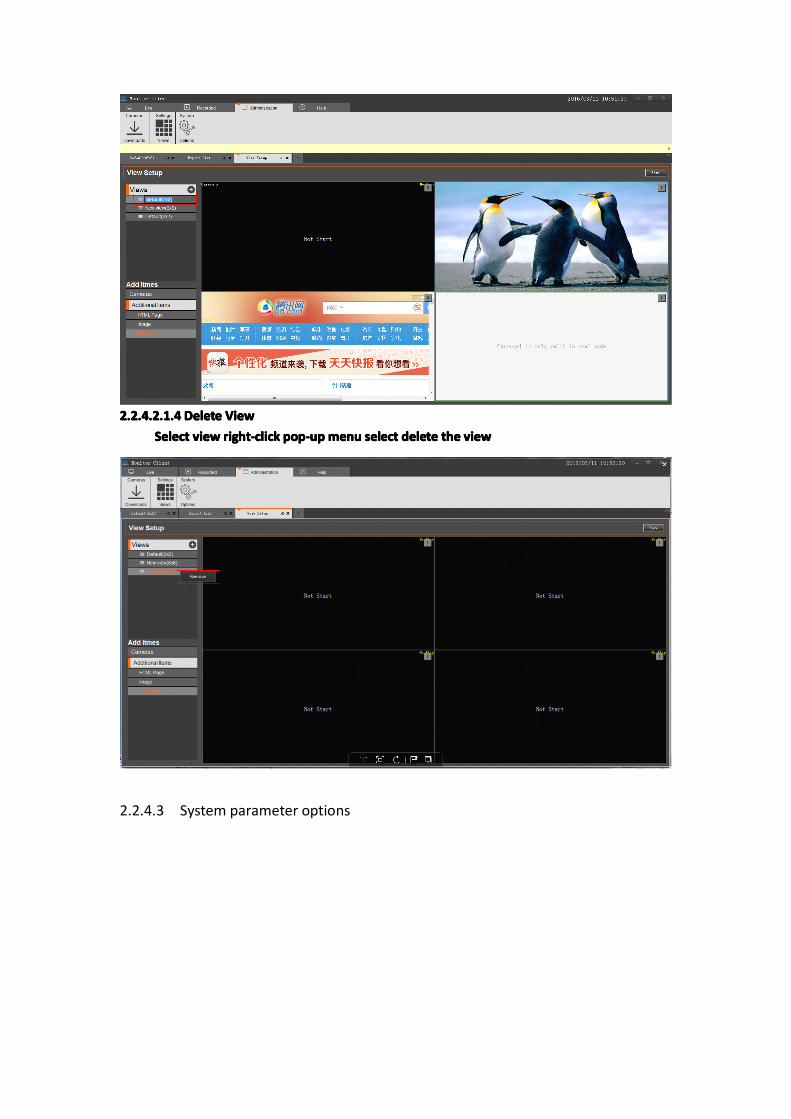
2.2.4.2.1.42.2.4.2.1.42.2.4.2.1.42.2.4.2.1.4 DeleteDeleteDeleteDelete ViewViewViewViewSelectSelectSelectSelect viewviewviewview right-clickright-clickright-clickright-click pop-uppop-uppop-uppop-upmenumenumenumenu selectselectselectselect deletedeletedeletedelete thethethethe viewviewviewview
2.2.4.3 System parameter options

1> General Optionslogin options: a. remember the password, b. auto loginLanguage option: choose the different language.storage options: a. client local video path, b. capture path, c. video export path.
2.2.5 EXIT