vmware evo sddc overview and bring- up guide · vmware evo sddc overview and bring-up guide vmware...
TRANSCRIPT

VMware EVO SDDC Overview and Bring-Up Guide
VMware EVO SDDC 1.2
This document supports the version of each product listed andsupports all subsequent versions until the document isreplaced by a new edition. To check for more recent editions ofthis document, see http://www.vmware.com/support/pubs.
EN-001781-01

VMware EVO SDDC Overview and Bring-Up Guide
2 VMware, Inc.
You can find the most up-to-date technical documentation on the VMware Web site at:
http://www.vmware.com/support/
The VMware Web site also provides the latest product updates.
If you have comments about this documentation, submit your feedback to:
Copyright © 2015, 2016 VMware, Inc. All rights reserved. Copyright and trademark information.
VMware, Inc.3401 Hillview Ave.Palo Alto, CA 94304www.vmware.com

Contents
About the EVO SDDC Overview and Bring-Up Guide 5
1 About EVO SDDC 7
SDDC Deployment Challenges 8EVO SDDC Simplifies SDDC Phases 8Physical Topology 9Network Topology 11Storage Topology 11
2 EVO SDDC Architecture 13
VIA 15EVO SDDC Manager 15Hardware Management Services and Hardware Plugins 18SDDC Components of EVO SDDC 19
3 EVO SDDC Use Cases 21
Virtual Infrastructure 21Virtual Desktop Infrastructure 22
4 Preparing your Site for the EVO SDDC System 23
5 Bringing-Up the EVO SDDC System 25
Connect Rack 1 to Your Power Source and Network 26Bring-Up EVO SDDC on Rack 1 27Change Passwords of Rack Components 45Locate EVO SDDC Manager IP Address 46Change EVO SDDC Manager Password 47
6 Adding Racks to your EVO SDDC System 49
Power on Additional Rack and Connect it to Spine Switches 49Bootstrap Additional Rack 50Manual Steps for Rack Addition 53Bring-Up on Additional Rack 54Changing Passwords of Rack Components 58Change EVO SDDC Manager Password on Each Additional Rack 59
7 Alerts List 61
8 Troubleshooting EVO SDDC Deployment 65
Manually Power On Virtual Machines When Setting Up Your EVO SDDC System 65Restart HMS 66
VMware, Inc. 3

9 Additional VMware Product Documentation 67
Index 69
VMware EVO SDDC Overview and Bring-Up Guide
4 VMware, Inc.
About the EVO SDDC Overview and Bring-UpGuide
The EVO SDDC Overview and Bring-Up Guide provides an overview of the VMware EVO™SDDC™ productand its components and describes the steps for setting up and configuring an EVO SDDC system.
Intended AudienceThe EVO SDDC Overview and Bring-Up Guide is intended for data center cloud administrators who deploy anEVO SDDC system in their organization's data center. The information in this guide is written forexperienced data center cloud administrators who are familiar with:
n Concepts of virtualization and software-defined data centers
n Networking and concepts such as uplinks, NICs, and IP networks
n Hardware components such as top-of-rack (ToR) switches, spine switches, servers with direct attachedstorage, cables, and power supplies
n Methods for setting up physical racks in your data center
n Using the VMware vSphere® Web Client™ to work with virtual machines
Related PublicationsThe Administering VMware EVO SDDC contains detailed information about how to administer and operateyour data center's deployed EVO SDDC system.
Your EVO SDDC system includes various VMware software products and components. You can find thedocumentation for those VMware software products at www.vmware.com/support/pubs.
VMware Technical Publications GlossaryVMware Technical Publications provides a glossary of terms that might be unfamiliar to you. For definitionsof terms as they are used in VMware technical documentation, go to http://www.vmware.com/support/pubs.
VMware, Inc. 5

VMware EVO SDDC Overview and Bring-Up Guide
6 VMware, Inc.

About EVO SDDC 1EVO SDDC is a hyper-converged infrastructure (HCI) solution based on defined hardware configurationspre-integrated with the VMware software-defined data center (SDDC) software. The EVO SDDC solutionenables customers to deploy a fully self-contained Infrastructure-as-a-Service (IaaS) and/or Virtual DesktopInfrastructure (VDI) private cloud based on a complete SDDC architecture. EVO SDDC is built inpartnership with select hardware partners and systems integrators leveraging VMware best practices.
Figure 1‑1. EVO SDDC Solution
VMware, Inc. 7
This chapter includes the following topics:
n “SDDC Deployment Challenges,” on page 8
n “EVO SDDC Simplifies SDDC Phases,” on page 8
n “Physical Topology,” on page 9
n “Network Topology,” on page 11
n “Storage Topology,” on page 11
SDDC Deployment ChallengesThere are a lot of factors today that go into defining a SDDC. These range from the networking ingredientNSX, storage ingredient Virtual SAN, and many other vCloud Suite pieces making it difficult to knowwhere to begin the process. For all of this to come together, a data center administrator needs to touch manydifferent parts of an IT infrastructure. Typically, these departments are heavily siloed. There is a set ofpeople responsible for the network part of the data center, another set responsible for compute, storage, andso on. These folks have different motivations and different budgeting processes. Getting these groups ofpeople to come together for an SDDC is difficult and may require the enterprise to change its procurementand deployment processes. In addition, the whole process requires a broad range of expertise from a set ofadministrators. The end user then needs to manage the full life cycle of the SDDC - not just the VMwareproducts that are part of it, but also the associated hardware all the way up to the application layer.
EVO SDDC Simplifies SDDC PhasesEVO SDDC simplifies the bring up of an SDDC by providing a self-contained private cloud instance that canbe easily deployed in a corporate network. You begin by working with VMware to define workloads youwant to run in your SDDC and to determine provisioning and capacity. VMware works with a hardwarepartner to select the hardware components used to support the SDDC. Hardware components include spineswitches, Top of Rack switches, a management switch, and up to 24 servers in a physical rack. The hardwarepartner assembles the hardware components and installs the necessary software using a prescriptivesoftware bundle and imaging utility from VMware. By creating a virtual abstraction across physical racks ofinfrastructure, this approach pools compute, storage, and network. This abstracted resource pool, called avirtual rack, is used as a unit of SDDC instantiation and operation. After imaging, the rack is shipped to you.You plug the rack in and cable it according to instructions from VMware. With power and networkconnectivity established, you can begin configuring EVO SDDC.
To summarize, you can bring up a virtual rack of within a matter of hours once the physical rack(s) is withinyour data center. This enables you, the end user, to focus on your workloads in the SDDC without beingconcerned about the underlying hardware. The EVO SDDC user interface provides a single point of controlfor configuring and deploying new workloads and managing your entire infrastructure.
EVO SDDC adds value to your organization by reducing:
n procurement time - single purchase order and SOW
n time-to-market - the equipment arrives preassembled and can be used immediately
n complexity of configuration
n downtime
n training costs
EVO SDDC also offers automated Lifecycle Management (LCM) with full inventory of relevant software andhardware components down to specific editions, versions, and latest patch bundles.
VMware EVO SDDC Overview and Bring-Up Guide
8 VMware, Inc.
Physical TopologyEVO SDDC is a logical instance of up to 8 physical racks. Each rack includes up to four smart PDUs forredundancy.
Spine SwitchesThe EVO SDDC system contains two spine switches. These switches extend the network fabric of the top ofrack (ToR) switches between racks. The hardware vendor connects the available uplink ports of the ToRswitches to the spine switches.
Spine switches are not required if you do not plan to purchase multiple physical racks.
Management SwitchThe management switch provides Out-Of-Band (OOB) connectivity through a baseboard managementcontroller (BMC).
The management network fabric does not carry vSphere management, Virtual SAN, or vMotion traffic. Thattraffic resides on the network fabric created by the TOR and spine switches. As a result the managementswitch is a non-redundant component in the physical rack. If this switch goes down, some functionalitysuch as monitoring may not be available until it comes back up. Workloads will continue to run, but theinfrastructure associated with them cannot be modified or controlled.
Top of Rack SwitchesA physical rack contains two top of rack (ToR) switches, each of which has 48 10GigE ports and 4 40GigEuplink ports. The ToR and spine switches carry all network traffic from the servers including VM network,VM management, Virtual SAN, and vMotion traffic. On rack 1 in a multi-rack EVO SDDC, the ToRs alsocarry traffic to the enterprise network via two of the uplink ports. The ToR switches provide higherbandwidth as well as redundancy for continued operation in case one of the ToR switches goes down.
If the rack has spine switches, the hardware partner connects two uplink ports from each ToR switch to eachspine switch.
ServersYou can purchase a physical rack with a minimum of 8 dual-socket 1U servers (1/3 rack). You can then addservers one at a time with the maximum number of servers being 24, which makes up a full rack. Minimumserver specifications are as follows.
n 2 Intel E5-2600 series v3 CPUs
n 384 GE DDR4 ECC
n 2 x 10 GE ethernet network interfaces
Each 10 GE interface is connected to a separate ToR switch to ensure redundancy.
n 1 GE out-of-band management interface
The out-of-band management interface is connected to the management switch by using a 1 GEinterface.
n Up to 10 storage slots with 8 mechanical drives and 2 x SSDs
n Disc controller with RAID turned off
Chapter 1 About EVO SDDC
VMware, Inc. 9
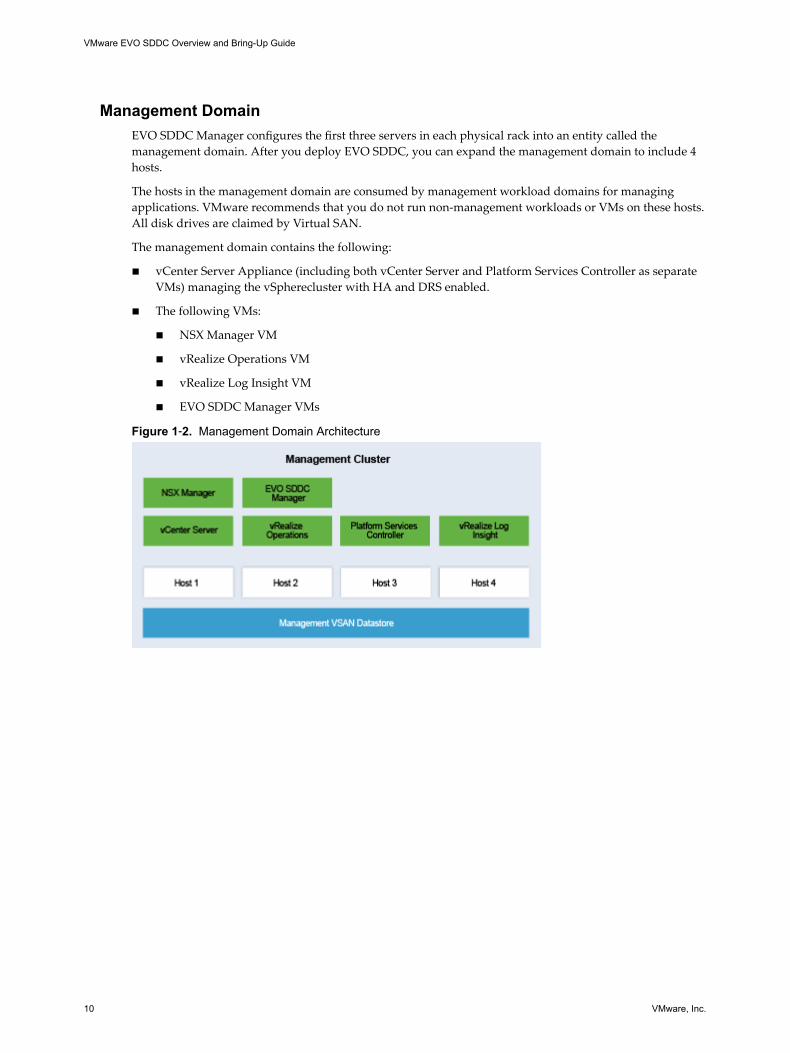
Management DomainEVO SDDC Manager configures the first three servers in each physical rack into an entity called themanagement domain. After you deploy EVO SDDC, you can expand the management domain to include 4hosts.
The hosts in the management domain are consumed by management workload domains for managingapplications. VMware recommends that you do not run non-management workloads or VMs on these hosts.All disk drives are claimed by Virtual SAN.
The management domain contains the following:
n vCenter Server Appliance (including both vCenter Server and Platform Services Controller as separateVMs) managing the vSpherecluster with HA and DRS enabled.
n The following VMs:
n NSX Manager VM
n vRealize Operations VM
n vRealize Log Insight VM
n EVO SDDC Manager VMs
Figure 1‑2. Management Domain Architecture
VMware EVO SDDC Overview and Bring-Up Guide
10 VMware, Inc.

Network TopologyAll hosts in a physical rack are connected to both the two ToR switches with 10Gb links. On each host, NICport 1 is connected to ToR switch 1 and NIC port 2 is connected to ToR switch 2 with Link Aggregation(LAG).
Figure 1‑3. EVO SDDC Network Topology
Host
Spine 1 Spine 2
ToR 1
Host
ToR 1
Rack 1 Rack 2
ToR 2 ToR 2
Datacenter network
The BMC on each host is connected to the management switch over a 1G connection. This connection is usedfor OOB management. Both ToR switches are further connected to a pair of spine switches in a dual-LAGconfiguration using 40 G links. The spine switches are an aggregation layer for connecting multiple racks.
EVO SDDC is designed to be resilient to certain network failures. The datapath between hosts and ToRswitches can tolerate a failure of one link between the host and ToR switches. Between the ToR and spineswitches, the system can tolerate the failure of a ToR switch and/or spine switch.
Storage TopologyThe primary source of storage for EVO SDDC is Virtual SAN. Each host in the physical rack has up to 8mechanical disks and up to 2 SSD disks. These disks are divided into 2 groups, each with 4 capacity disksand 1 cache disk. All disks are claimed by Virtual SAN for storage.
The amount of available physical storage in workload domains depends on the number of physical hosts.The amount of usable capacity depends on availability requirements.
Storage traffic is carried over the 10 G links between the hosts and ToR switches. All Virtual SAN memberscommunicate over this 10 G network.
Network QoS is managed by vSphere Network I/O Control (NIOC), which is enabled automatically by EVOSDDC Manager.
Chapter 1 About EVO SDDC
VMware, Inc. 11

VMware EVO SDDC Overview and Bring-Up Guide
12 VMware, Inc.

EVO SDDC Architecture 2EVO SDDC is a logical instance of orchestrating, provisioning, and deploying an SDDC. It maps aconverged view of physical resources (e.g., CPU, memory, storage, and network) to a logical abstractioncalled a virtual rack. EVO SDDC overlays a software suite on top of the physical hardware for operationsmanagement, event reporting, and auditing. This enables EVO SDDC to provide consistent hardwaremanagement across switches, servers, and storage, as well as a distributed management solution across yourSDDC.
Figure 2‑1. EVO SDDC Logical Instance Maps to Physical Resources
Though there is an EVO SDDC instance on each physical rack, EVO SDDC's distributed architectureprovides the EVO SDDC Manager (ESM) as a single point-of-control web-based interface for managinginfrastructure and deploying workloads.
VMware, Inc. 13
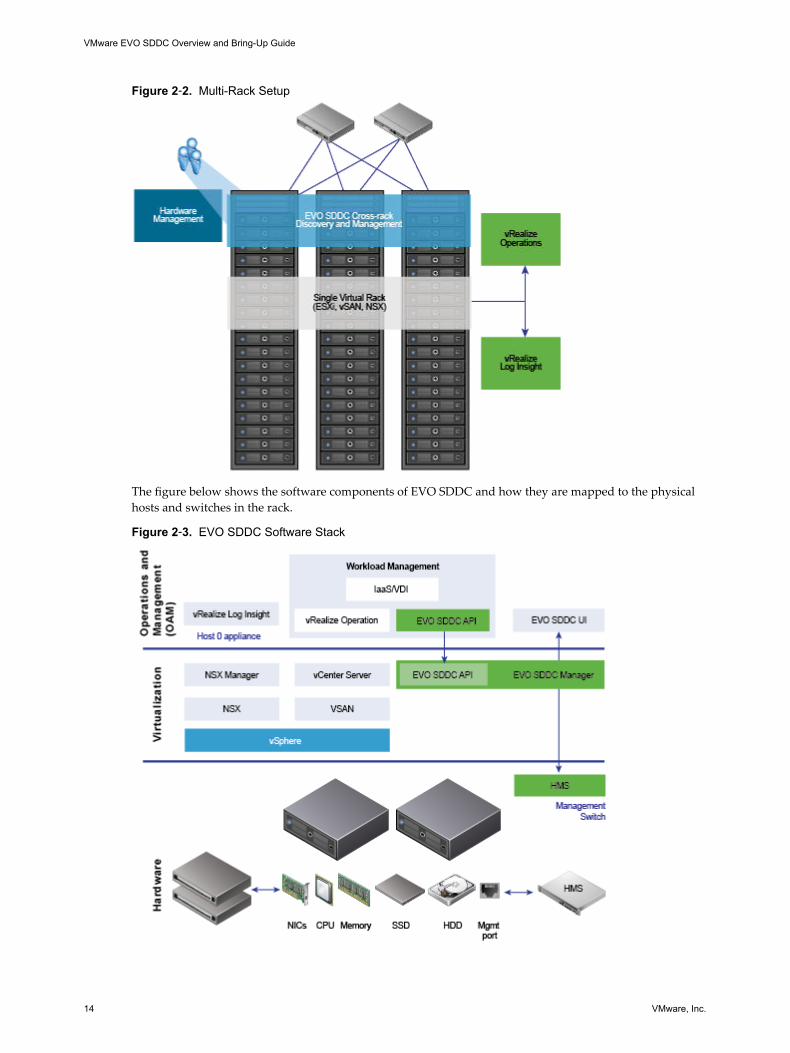
Figure 2‑2. Multi-Rack Setup
The figure below shows the software components of EVO SDDC and how they are mapped to the physicalhosts and switches in the rack.
Figure 2‑3. EVO SDDC Software Stack
VMware EVO SDDC Overview and Bring-Up Guide
14 VMware, Inc.

This chapter includes the following topics:
n “VIA,” on page 15
n “EVO SDDC Manager,” on page 15
n “Hardware Management Services and Hardware Plugins,” on page 18
n “SDDC Components of EVO SDDC,” on page 19
VIAVIA is used by system integrators to prepare physical racks for shipping to customers by imaging the rackcomponents with VMware SDDC software.
EVO SDDC ManagerThe EVO SDDC Manager provisions, manages, and monitors the logical and physical resources ofEVO SDDC.
The EVO SDDC Manager is responsible for EVO SDDC configuration, operations, and managementfunctions by:
n Abstracting and aggregating the physical resources of an SDDC into a logical entity.
n Performing physical resource management such as adding and removing hosts or switches to the rack,adding new racks to scale, failure management, and maintaining and upgrading hosts and switches.
n Orchestrating the shutdown and boot-up of logical software and management plane components ofEVO SDDC such as ESXi, vCenter Server, vRealize Operations, vRealize Log Insight, NSX, andVirtual SAN.
n Generating the logical resource mapping structures based on workload profiles, physical events, andphysical operations (such as vCenter clusters, cluster expansion operations, etc.).
n Interacting with the EVO SDDC software components, such as vCenter Server for cluster andVirtual SAN management, Hardware Management Services for hardware management,vRealize Operations for health monitoring; NSX Manager for network management, and thevRealize Automation suite for workload management.
Chapter 2 EVO SDDC Architecture
VMware, Inc. 15
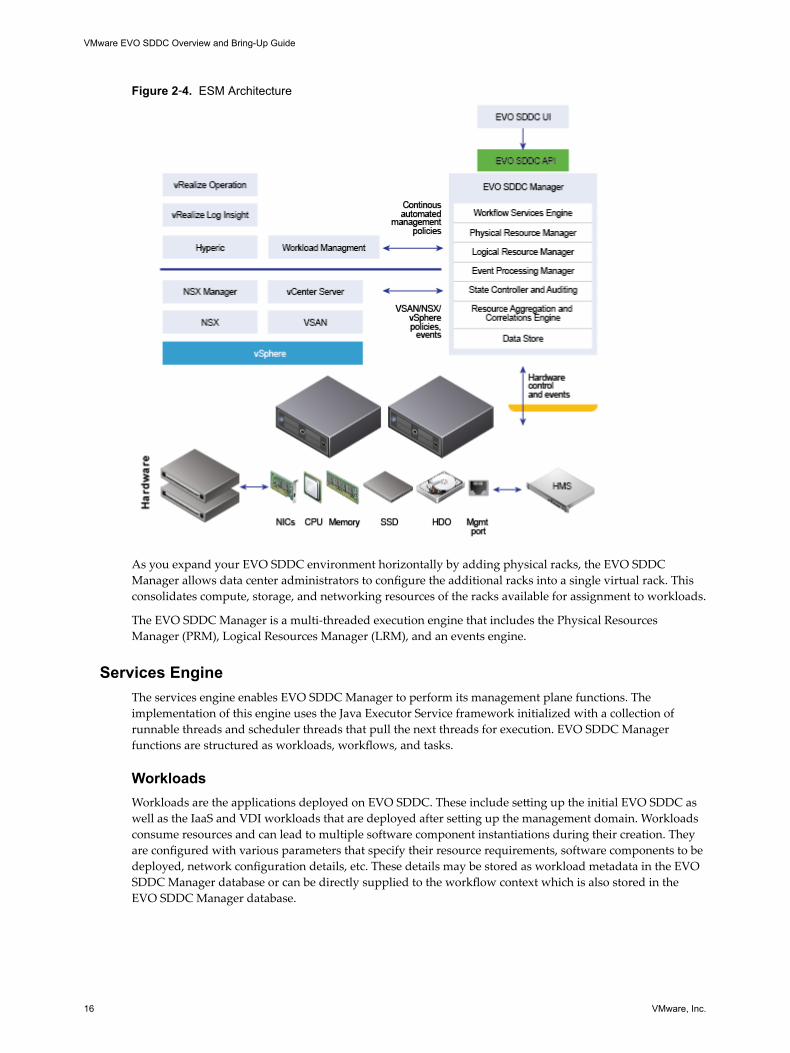
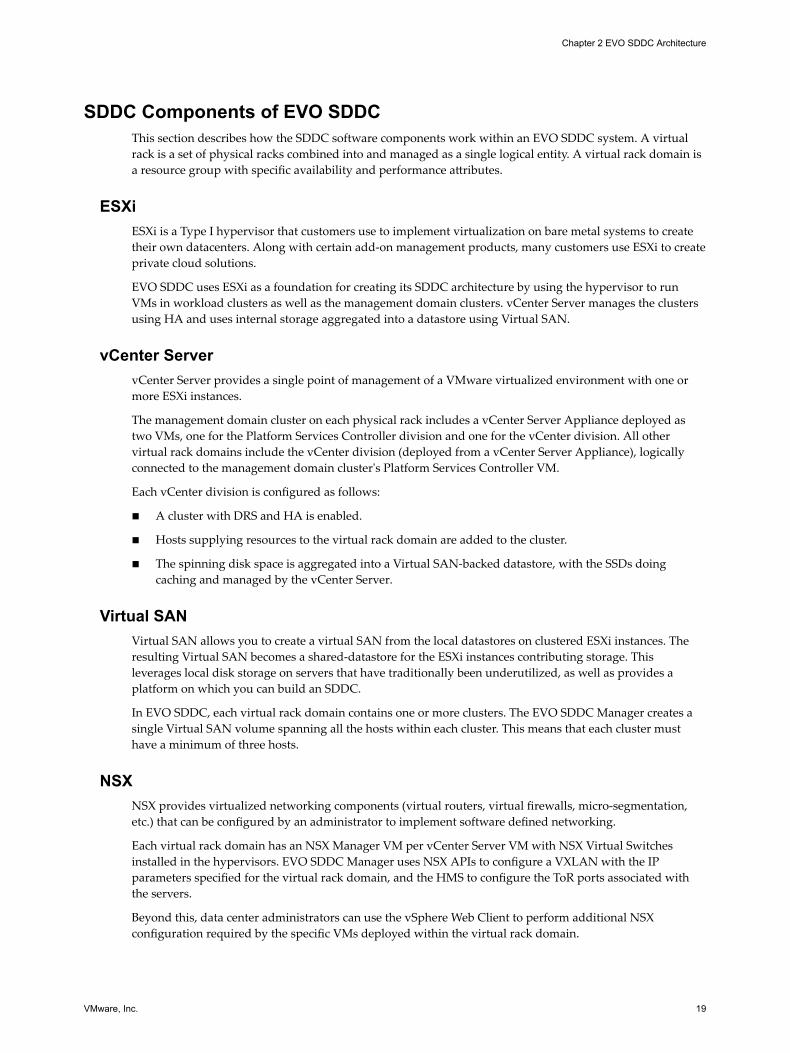
Figure 2‑4. ESM Architecture
As you expand your EVO SDDC environment horizontally by adding physical racks, the EVO SDDCManager allows data center administrators to configure the additional racks into a single virtual rack. Thisconsolidates compute, storage, and networking resources of the racks available for assignment to workloads.
The EVO SDDC Manager is a multi-threaded execution engine that includes the Physical ResourcesManager (PRM), Logical Resources Manager (LRM), and an events engine.
Services EngineThe services engine enables EVO SDDC Manager to perform its management plane functions. Theimplementation of this engine uses the Java Executor Service framework initialized with a collection ofrunnable threads and scheduler threads that pull the next threads for execution. EVO SDDC Managerfunctions are structured as workloads, workflows, and tasks.
WorkloadsWorkloads are the applications deployed on EVO SDDC. These include setting up the initial EVO SDDC aswell as the IaaS and VDI workloads that are deployed after setting up the management domain. Workloadsconsume resources and can lead to multiple software component instantiations during their creation. Theyare configured with various parameters that specify their resource requirements, software components to bedeployed, network configuration details, etc. These details may be stored as workload metadata in the EVOSDDC Manager database or can be directly supplied to the workflow context which is also stored in theEVO SDDC Manager database.
VMware EVO SDDC Overview and Bring-Up Guide
16 VMware, Inc.

WorkflowsWorkflows are a long running group of tasks that change the state of a workload. Examples of workflowsinclude creating an instance of a workload, changing the allocated capacity, or removing the workload andreclaiming its associated resources.
TasksA task is a unit of work from a workflow. A task can do calculations, allocate resources, and/or requestresources. A workflow task obtains the input parameters from either the workflow context or workloadmetadata and then sets the output parameters. A task can include multiple steps.
If the task fails, it is resumed from right before the point of failure. Since a task can include multiple steps,the step that follows the last successful step in the task can be the point where the task is resumed.
DatabaseWorkload and workflow metadata is stored in the EVO SDDC Manager database. Workload metadataincludes information that is always important to the system such as a list of racks, hosts, etc. Workflow datais temporary and stops to exist when a workflow changes a workload or when the workflow is successfullyexecuted.
Physical Resources ManagerThe Physical Resources Manager (PRM) manages the physical components of a physical rack and maintainsa corresponding software physical rack object.
The PRM does the following:
n defines the interfaces that access the physical resource abstractions.
n retrieves the physical hardware state by interfacing with the HMS layer.
n exports the interfaces as HTTP Rest endpoints to the PRM UI controller for the administrator to viewthe physical resources in EVO SDDC (e.g., hosts, switches, and switch topology) for each component.
n relays HMS events to the EVO SDDC Manager engine.
Logical Resource ManagerThe Logical Resource Manager (LRM) manages the logical resource state of EVO SDDC.
LRM ControllerThe LRM controller is exported as a logical managed view, which is comprised of vCenters deployed andcluster of hosts and resource stats per vCenter.
Examples of logical resource types include the following:
n VM
n distributed virtual switch
n distributed virtual portgroup
n host system
n datastore
n total storage
Chapter 2 EVO SDDC Architecture
VMware, Inc. 17

LRM Logical ResourcesLRM builds its logical resource view of EVO SDDC components by interfacing with vCenter using vSphereAPIs.
LRM ServicesAn example of an LRM service is the LRM alarm service that fetches alarms from vCenter periodically.
Events EngineThe events engine pushes EVO SDDC Manager events to vRealize Log Insight. The events engine processcan also display events information on the EVO SDDC Manager UI dashboard.
EVO SDDC Manager in a Multi-Rack SetupWhen an EVO SDDC instance includes multiple physical racks, bare-metal provisioning and subsequentinstallation and configuration of software components (e.g., vCenter, NSX, EVO SDDC Manager on host 0)is executed on each rack sequentially. Though there is an instance of EVO SDDC Manager on each physicalrack, you can control and manage your EVO SDDC system through a single interface.
EVO SDDC Manager is highly available. The EVO SDDC Manager on host 0 of rack 1 is the leader, while themanager processes on host 0 of the other racks are secondary. To manage this cluster of EVO SDDC Managerservices, EVO SDDC uses Zookeeper as a distributed cluster management service. Zookeeper is also used asa shared distributed datastore.
Zookeeper runs as a ZK server process instance within the EVO SDDC Manager VM on host 0. The EVOSDDC Manager process communicates with Zookeeper servers using a Zookeeper client handle. TheZookeeper server listens on port 2181 for incoming client connections. The IP address to access Zookeeperneeds to be a public IP so that Zookeeper server nodes are accessible across all physical racks.
In the event of Zookeeper failure, EVO SDDC Manager continues running but it may lose some workflowstate or the ability to create a new Zookeeper state.
Hardware Management Services and Hardware PluginsThe Hardware Management Services (HMS) provides the necessary functions required for discovering,bootstrapping, and monitoring the hardware in a physical rack in the system. The HMS runs on themanagement switch of each physical rack.
The HMS is an abstracted software mechanism that manages the physical hardware in the physical racks,such as servers and network switches. The HMS provides this abstraction to enable integration of supportedhardware from different sources and give the EVO SDDC Manager the capability to interact with thehardware. The HMS is only accessed through the EVO SDDC Manager and is not visible to systemadministrators directly. With the HMS you can discover, bootstrap, and monitor the hardware by pollingreceived hardware events and handling hardware state changes. The HMS obtains these hardware eventsand state changes from software plugins that hardware partners create and provide to work with theirspecific hardware.
VMware EVO SDDC Overview and Bring-Up Guide
18 VMware, Inc.
SDDC Components of EVO SDDCThis section describes how the SDDC software components work within an EVO SDDC system. A virtualrack is a set of physical racks combined into and managed as a single logical entity. A virtual rack domain isa resource group with specific availability and performance attributes.
ESXiESXi is a Type I hypervisor that customers use to implement virtualization on bare metal systems to createtheir own datacenters. Along with certain add-on management products, many customers use ESXi to createprivate cloud solutions.
EVO SDDC uses ESXi as a foundation for creating its SDDC architecture by using the hypervisor to runVMs in workload clusters as well as the management domain clusters. vCenter Server manages the clustersusing HA and uses internal storage aggregated into a datastore using Virtual SAN.
vCenter ServervCenter Server provides a single point of management of a VMware virtualized environment with one ormore ESXi instances.
The management domain cluster on each physical rack includes a vCenter Server Appliance deployed astwo VMs, one for the Platform Services Controller division and one for the vCenter division. All othervirtual rack domains include the vCenter division (deployed from a vCenter Server Appliance), logicallyconnected to the management domain cluster's Platform Services Controller VM.
Each vCenter division is configured as follows:
n A cluster with DRS and HA is enabled.
n Hosts supplying resources to the virtual rack domain are added to the cluster.
n The spinning disk space is aggregated into a Virtual SAN-backed datastore, with the SSDs doingcaching and managed by the vCenter Server.
Virtual SANVirtual SAN allows you to create a virtual SAN from the local datastores on clustered ESXi instances. Theresulting Virtual SAN becomes a shared-datastore for the ESXi instances contributing storage. Thisleverages local disk storage on servers that have traditionally been underutilized, as well as provides aplatform on which you can build an SDDC.
In EVO SDDC, each virtual rack domain contains one or more clusters. The EVO SDDC Manager creates asingle Virtual SAN volume spanning all the hosts within each cluster. This means that each cluster musthave a minimum of three hosts.
NSXNSX provides virtualized networking components (virtual routers, virtual firewalls, micro-segmentation,etc.) that can be configured by an administrator to implement software defined networking.
Each virtual rack domain has an NSX Manager VM per vCenter Server VM with NSX Virtual Switchesinstalled in the hypervisors. EVO SDDC Manager uses NSX APIs to configure a VXLAN with the IPparameters specified for the virtual rack domain, and the HMS to configure the ToR ports associated withthe servers.
Beyond this, data center administrators can use the vSphere Web Client to perform additional NSXconfiguration required by the specific VMs deployed within the virtual rack domain.
Chapter 2 EVO SDDC Architecture
VMware, Inc. 19

vRealize OperationsvRealize Operations provides an integrated insight into performance, capacity and configuration, and healthof your virtualized environment. These insights help administrators provide a high quality of service whilemaintaining compliance and efficiently detecting and resolving any issues that may arise in the datacenter.
EVO SDDC configures vRealize Operations so that administrators can monitor operations of both thephysical and virtual components through a single interface.
vRealize Log InsightWhile vRealize Operations primarily allows administrators to monitor physical and virtual infrastructureand proactively look for pending failures and performance issues, vRealize Log Insight provides them theability to quickly perform root cause analysis (RCA) when failures, either in resources or in policies, occurand quickly remediate them.
Each physical rack contains a management domain cluster that contains an instance of thevRealize Log Insight virtual appliance. When deploying EVO SDDC in a multi rack setup, the bring-upprocess federates the vRealize Log Insight virtual appliances together for redundancy and scalability.Further, the bring-up process configures vRealize Log Insight to receive and process log events for everydevice in the rack including servers, switches, and PDUs.
VMware EVO SDDC Overview and Bring-Up Guide
20 VMware, Inc.
EVO SDDC Use Cases 3EVO SDDC comes with two pre-packaged workloads, Infrastructure as a Service (IaaS) and Virtual DesktopInfrastructure (VDI). The following sub-sections discuss how EVO SDDC implements each of these usecases.
This chapter includes the following topics:
n “Virtual Infrastructure,” on page 21
n “Virtual Desktop Infrastructure,” on page 22
Virtual InfrastructureYou can use EVO SDDC to offer Virtual Infrastructure (VI) to your consumer. In a VI model, EVO SDDChosts hardware, software, servers, storage and other infrastructure components on behalf of its users. VIproviders also host users' applications and handle tasks including system maintenance, backup andresiliency planning. VI can thus be utilised by enterprise customers to create cost effective and easilyscalable IT solutions where the complexities and expenses of managing the underlying hardware areoutsourced to the cloud provider. VI can be used to provide a location for departments to store data or runapplications or to provide enterprise infrastructure at a fraction of the cost.
Common benefits of VI include cost savings (shared hardware), scalability, accessibility, and security (nosingle point of failure).
VI configures a flexible virtual datacenter including the following:
n OS instances in the form of VMs with vCPUs, vRAM, and vDisk including storage and networkingresources.
n Networking infrastructure to connect the servers to one another in a multi-tenant datacenterimplementation where a customer cannot see another customer's servers via datacenter infrastructure.Typically, the service provider instantiates a new VLAN or VxLAN for each customer and places theirVMs on it.
n Internet connectivity with public IP addresses but no default firewalling.
You can acquire modular EVO SDDC units to match your consumers' data center capacity requirements andoffer the resulting virtual infrastructure to your consumers with minimal overhead. EVO SDDC Managerdeploys the following for a VI workload:
n Physical compute
The servers specified by the administrator or API call are deployed. Each server includes processing,storage, and network connectivity.
n Virtual infrastructure
VMware, Inc. 21
The specified number of vCenter Server VM are deployed, which connect to the Platform ServicesController in the management domain for credentials and licenses. It creates workload domainsaccording to the specifications, adding hosts and creating Virtual SAN datastores from the storage onthose hosts. It also deploys and configures NSX switches into the ESXi instance on each host.
n Physical networking
EVO SDDC Manager uses the HMS to configure the ToR switches to accept traffic for the VLANscreated in the virtual infrastructure and to route traffic for the public logical networks of the virtual rackdomain.
n Management
EVO SDDC allows administrators to monitor and manage the virtual rack domain usingvRealize Operations Manager, vRealize Log Insight, and vRealize Automation.
Virtual Desktop InfrastructureWith EVO SDDC, you can deliver virtual or hosted desktops and applications through a single VirtualDesktop Infrastructure (VDI) platform with VMware Horizon. End users can access all of their desktops andapplications through a single unified workspace.
When you deploy a VDI workload, EVO SDDC reserves the necessary hardware resources and deploys therequired SDDC components. Your EVO SDDC system auto-configures the physical infrastructure. EVOSDDC Manager deploys the following for a VDI workload:
n Physical compute
The servers specified by the administrator or API call are deployed. Each server includes processing,storage, and network connectivity.
n Virtual infrastructure
The specified number of vCenter Server VM are deployed, which connect to the Platform ServicesController in the management domain clusters for credentials and licenses. It creates clusters accordingto the specifications, adding hosts and creating Virtual SAN datastores from the storage on those hosts.It also deploys and configures NSX switches into the ESXi instance on each host.
n Physical networking
EVO SDDC Manager uses the HMS to configure the ToRs to accept traffic for the VLANs created in thevirtual infrastructure and to route traffic for the public logical networks of the virtual rack domain.
n Management
EVO SDDC allows administrators to monitor and manage the virtual rack domain usingvRealize Operations Manager, vRealize Log Insight, and vRealize Automation.
n VDI
Horizon 6 provides the VDI environment.
With VDI, you can:
n Create additional users for access to the Horizon 6 environment, probably connecting it to an LDAP orActive Directory server for authenticating enterprise users
n Configure desktop environments including persistence, application access, etc.
n Migrate VMs from VDI infrastructure outside the virtual rack domain into the virtual rack domain'scluster(s). This is made possible because the EVO SDDC Manager creates the management virtualnetwork as a public one (traffic can flow in and out of the virtual rack domain and physical rack) andvCenter Server 6.0 allows VM migration between vCenter Servers.
VMware EVO SDDC Overview and Bring-Up Guide
22 VMware, Inc.
Preparing your Site for theEVO SDDC System 4
The datacenter facility must be prepared for the arrival of the EVO SDDC system.
Prior to the arrival of the EVO SDDC system, you completed the VMware EVO SDDC Site Readiness PlanningGuide. This document describes the prerequisites and site information you use for planning the deploymentof the physical infrastructure. Refer to this document for information on how to prepare your datacenterlocation for the arrival of the EVO SDDC system.
VMware, Inc. 23

VMware EVO SDDC Overview and Bring-Up Guide
24 VMware, Inc.

Bringing-Up the EVO SDDC System 5Bringing-up the EVO SDDC system involves multiple steps. To ensure a successful bring-up, you mustperform the tasks in the order described. If you have procured a multi-rack system, you complete these taskson rack 1 before you add additional racks to the system.
The default password on all rack components is set to EvoSddc!2016. You can change these after bring-up.
Prerequisites
Verify that you have met the following prerequisites.
n You have your completed copy of the VMware EVO SDDC Site Readiness Planning Guide . You completedthis document and provided a completed copy to your VMware representative when you startedengaging to participate in the RTP program. The completed document contains networking and otherinformation that you use in the EVO SDDC setup wizard.
n You have prepared your site, including power requirements, as described in the VMware EVO SDDCSite Readiness Planning Guide.
n You have a way for a web browser to communicate with a port on the physical racks' managementswitches. The setup wizard runs in a supported browser, such as Mozilla Firefox and Google Chrome.For the list of supported browser versions, see the Release Notes. To run the setup wizard, the browsermust be able to connect to port #48 on a rack's management switch. Some methods to accomplish thisprerequisite are:
n On the physical rack, wire the management switch's port #48 to a computer (jump host) that hasone of the supported browsers, such as a Windows laptop with its integrated monitor.
n To use a browser on a remote computer, use a switch to connect the management switch's port #48to a network that your remote computer can use to access the port.
n For troubleshooting purposes, you must have vCenter Server for Windows installed in yourenvironment. Your system arrives with virtual machines preinstalled on one of the ESXi hosts in eachrack. If one of those virtual machines do not power on when you power on the servers in a rack, youcan use the vSphere Client application to connect to manually power on the virtual machine. Somemethods to accomplish this prerequisite are:
n If you are wiring the management switch's port #48 to a jump host to meet the browserprerequisite, also install vSphere Client application on that host.
n If you are meeting the browser prerequisite using a network-and-switch connection to port #48 anda remote computer, install a vSphere Client application on that remote computer.
n The NIC on the jump VM or remote computer must support VLAN tagging.
VMware, Inc. 25

Procedure
1 Connect Rack 1 to Your Power Source and Network on page 26The EVO SDDC system arrives at your site pre-assembled in the rack configuration that you ordered.Internal cables are connected within the rack.
2 Bring-Up EVO SDDC on Rack 1 on page 27You run the EVO SDDC setup wizard on a computer that can access the management switch in thephysical rack. The wizard runs in a standard web browser, such as Mozilla Firefox and GoogleChrome.
3 Change Passwords of Rack Components on page 45EVO SDDC is deployed with factory default passwords. You must replace the default passwords withsecure system generated passwords.
4 Locate EVO SDDC Manager IP Address on page 46The EVO SDDC Manager IP address changes during bring-up. You need to look up the new IPaddress so that you can log in to change the password on the rack components.
5 Change EVO SDDC Manager Password on page 47Along with the imaged rack, your hardware partner sends you the system generated password forEVO SDDC Manager. This password is not changed during password rotation. VMware stronglyrecommends that you change this password before creating workloads.
Connect Rack 1 to Your Power Source and NetworkThe EVO SDDC system arrives at your site pre-assembled in the rack configuration that you ordered.Internal cables are connected within the rack.
The pre-assembled physical rack arrives at your datacenter with the internal cables already connectedwithin the rack.
Procedure
1 Connect the rack's power inlets to your power source.
Both power inlets are single-phase.
2 Connect port 48 of rack 1's management switch to a laptop that has a standard web browser installed,from where you will run the setup wizard.
3 Configure the NIC on the laptop to tag VLAN traffic.
4 Create two interfaces on the laptop - say interfaces 1 and 2.
a Leave interface 1 untagged and assign the 192.168.100.248/24 IP address/subnet mask to it.
Interface 1 will allow OOB access to all EVO SDDC hardware and software components.
b Tag interface 2 with the management VLAN and assign an unused IP address/subnet mask fromthe management network IPaddress pool used for management workload domains.
Interface 2 will allow for OOB access if there is an uplink mis-configuration and the system isunreachable from the upstream customer network.
5 Install a vSphere client application on the jump host.
Your EVO SDDC system arrives with virtual machines pre-installed on ESX host 192.168.100.50 in therack. If any of those virtual machines do not power on when you power on the servers in a rack, youcan use the vSphere Client application to connect to and manually power on the virtual machine.
VMware EVO SDDC Overview and Bring-Up Guide
26 VMware, Inc.

What to do next
1 Ping host 0 at 192.168.100.50. If you are unable to ping host 0, contact VMware support.
2 Open a supported browser on the jump host and navigate to https://192.168.100.40:8443/vrm-ui. For alist of the supported browser versions, see the product EVO SDDC Release Notes. If the browser does notdisplay the setup wizard, the required virtual machines might not be powered on. Verify whether therequired virtual machines are running and, if not, power them on as described in “Manually Power OnVirtual Machines When Setting Up Your EVO SDDC System,” on page 65.
Continue with the steps in “Bring-Up EVO SDDC on Rack 1,” on page 27.
Bring-Up EVO SDDC on Rack 1You run the EVO SDDC setup wizard on a computer that can access the management switch in the physicalrack. The wizard runs in a standard web browser, such as Mozilla Firefox and Google Chrome.
If you accidentally log out of the browser while the configuration process is running, the process continuesto progress. You can log back in to continue the configuration.
Prerequisites
1 Ensure that you have completed the steps in “Connect Rack 1 to Your Power Source and Network,” onpage 26.
2 Either turn off firewall on the jump host or ensure that the firewall ports required to access EVO SDDCon it are open.
Table 5‑1. Inbound Ports
Port Required for
TCP 443 vCenter, PSC, Log Insight, vRealize Operations UI
TCP 8443 EVO SDDC Manager
TCP/UDP 53 DNS resolution to EVO SDDC Manager
TCP 22 (optional) SSH access to EVO SDDC and vSphere components
Table 5‑2. Outbound Ports
Port Required for
TCP/UDP 53 Corporate DNS resolution
UDP 123 NTP access to corporate time servers
3 Ensure that uplink ports 43-46 (for 10 Gbps uplink connectivity) or 51-54 (for 40 Gbps uplinkconnectivity) are connected to the uplink switch and configured appropriately.
Procedure
1 After you connect the EVO SDDC system to your network, wait at least 10 minutes before proceeding tothe next step. This ensures that all rack components are powered on.
Chapter 5 Bringing-Up the EVO SDDC System
VMware, Inc. 27
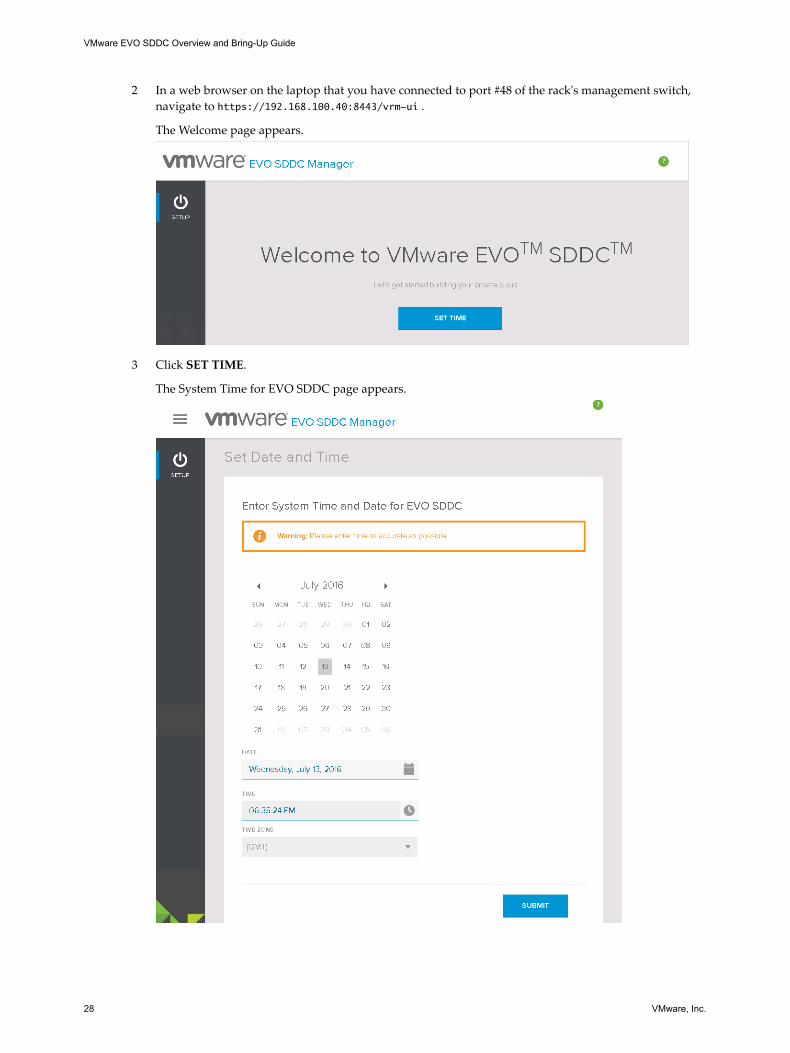
2 In a web browser on the laptop that you have connected to port #48 of the rack's management switch,navigate to https://192.168.100.40:8443/vrm-ui .
The Welcome page appears.
3 Click SET TIME.
The System Time for EVO SDDC page appears.
VMware EVO SDDC Overview and Bring-Up Guide
28 VMware, Inc.
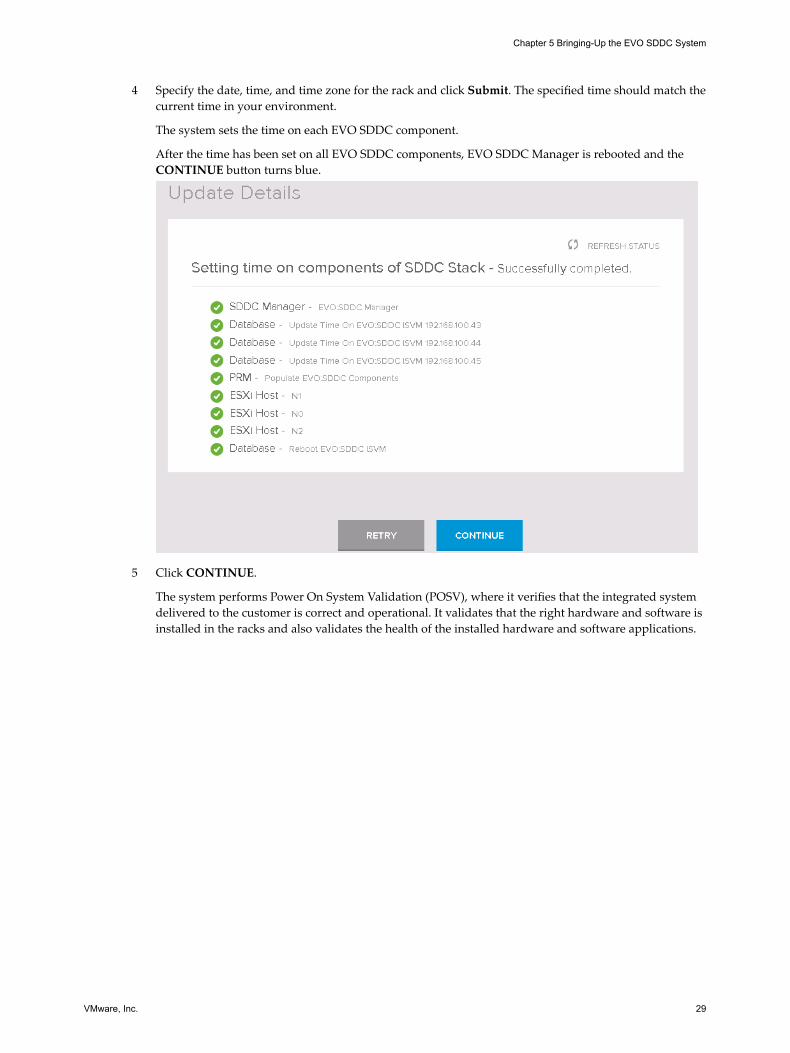
4 Specify the date, time, and time zone for the rack and click Submit. The specified time should match thecurrent time in your environment.
The system sets the time on each EVO SDDC component.
After the time has been set on all EVO SDDC components, EVO SDDC Manager is rebooted and theCONTINUE button turns blue.
5 Click CONTINUE.
The system performs Power On System Validation (POSV), where it verifies that the integrated systemdelivered to the customer is correct and operational. It validates that the right hardware and software isinstalled in the racks and also validates the health of the installed hardware and software applications.
Chapter 5 Bringing-Up the EVO SDDC System
VMware, Inc. 29

POSV verifies the presence of the following hardware components.
a Switches - ToRs, spines, and management
n Manufacturer and model
n Number of ports and speed of ports
b Servers
n Manufacturer and model
n Firmware and BIOS settings
VMware EVO SDDC Overview and Bring-Up Guide
30 VMware, Inc.

n CPUs - model, speed, number of cores
n Local boot device
n HDD and SSD - manufacturer, model, speed, and capacity
NICs - manufacturer, model, number and speed of ports
BMC name and version
Pass criteria for POSV is as follows:
a All switches (management, ToRs, and spine) are healthy
b Host 0 and at least three other hosts in the rack are healthy
For a list of POSV alerts, see Chapter 7, “Alerts List,” on page 61. You can ignore warning alerts. Acritical or error alert indicates that the component is not healthy.
After hardware validation is complete, POSV checks availability of the pre-installed software on thesystem.
If the validation page displays an error, ensure that all physical connections are in place. Then clickRETRY.
6 After the validation is complete, click CONTINUE.
The Login page appears.
7 Type the default credentials:
User name: [email protected]
Password: vmware123
Chapter 5 Bringing-Up the EVO SDDC System
VMware, Inc. 31

8 Click LOGIN.
The EVO SDDC End User License Agreement (EULA) page appears.
9 Click AGREE.
The Create a Superuser Account page appears.
10 Type a user name and password for the superuser.
The password must contain at least one each of the following:
n lowercase letter
n uppercase letter
n number
n special character such as ! or @
VMware EVO SDDC Overview and Bring-Up Guide
32 VMware, Inc.

The superuser account has the same privileges as the [email protected] account. After bring-up is complete, the password for the [email protected] account is rotated to a randompassword, but the password for the superuser account does not change. You can, thus, login to EVOSDDC Manager with the superuser user name and password without having to look up the rotatedpassword for the administrator account.
11 Click CREATE SUPERUSER.
The Initial Setup wizard appears.
12 On the General information page, enter the following information.
Field Name Description
vRack Name Name of the virtual rack
Company Name Your company name
CompanyDepartment
Your department name
Root Domain Type your root DNS domain (for example, vmware.corp). This should be the same as theActive Directory domain.
EVO SDDC SubDomain
EVO SDDC generates this based on the root domain you specified. For example, if youspecified the root domain as mycompany.example, the subdomain is auto-populated assubdomain.mycompany.example. You can edit this field.The sub domain is used for all components in EVO SDDC. So everything is namedcomponent.subdomain. Based on our example, the NSX VM would be named rack-1-nsxmanager-1.subdomain.vmware.com.
SSO Domain Type the authentication domain to be used by SSO. For example, vsphere.local.The root domain and PSC domain must be different if you plan to join Active Directory. Ifyou will not join Active Directory, they can be the same.
Chapter 5 Bringing-Up the EVO SDDC System
VMware, Inc. 33

Field Name Description
EVO SDDCLicense Key
Type the license key for EVO SDDC. If you do not have the license key now, you can enter itlater on the EVO SDDC dashboard.
Joining Active Directory during EVO SDDC bring-up can fail because of unconfigured or mis-configured uplinks, mis-configured upstream firewall, or incorrect corporate DNS configuration. Afterbring-up, you must identify and correct the cause of the failure. You can then manually connect eachPSC to Active Directory. See ESXi and vCenter Server 6.0 Documentation.
13 Click NEXT.
The Management Configuration page appears.
Five VLANs are configured while setting up networks for the bring-up phase - management, vMotion,VSAN, VXLAN, and corporate (upstream) network. The management and corporate upstreamnetworks are routable to the datacenter. The vMotion, VSAN, and VXLAN networks are routable onlywithin EVO SDDC.
Note that there is a progress bar at the top of the page. To make any changes to a previous screen, clickthe appropriate page title. After making a change, you must click NEXT for the change to take effect.
VMware EVO SDDC Overview and Bring-Up Guide
34 VMware, Inc.

14 On the Management page, enter your management network values. The DNS server here is the DNS
server for your management network.
Field Name Description
vLAN ID The supported VLAN range is 3-3299.
Subnet VMware recommends using a /22 network. This is to allow for adequate IP addresscapacity as you expand your EVO SDDC deployment by adding racks.
Subnet Mask VMware recommends using a /22 network.
Gateway Gateway address.
DNS DNS of your datacenter.
NTP NTP of your datacenter.
Exclude Individual IPAddresses
Enter a set of IP addresses to exclude from the provisioning process. For example, you canexclude those IP addresses that are already assigned to your network availability servicessuch as HSRP.To add multiple addresses, type an IP address, click the + sign, and type the next IPaddress.
Exclude IP AddressRanges
Enter a set of IP address ranges to exclude from the provisioning process. For example, youcan exclude a range of IP addresses that you want reserved for other uses in your network.To add multiple address ranges, type an IP address range, click the + sign, and type thenext IP address range.
15 Click USE DEFAULTS to allow EVO SDDC to specify system generated IP address ranges forvMOTION, VSAN, and VXLAN. Since the EVO SDDC network is an enclosed ecosystem, it isrecommended that you select this option.
16 Click NEXT.
The vMotion page appears.
Chapter 5 Bringing-Up the EVO SDDC System
VMware, Inc. 35

The progress bar is displayed with additional wizard steps.
To make any changes to a previous screen, click the appropriate page title. After making a change, youmust click NEXT for the change to take effect.
17 On the vMotion Configuration page, review or enter your network addresses for VLAN ID, Subnet,Subnet Mask, Gateway, and excluded IP addresses and IP address ranges.
Note The supported VLAN range is 3-3299. VMware recommends using a /22 network for the subnetand subnet mask. This is to allow for adequate IP address capacity as you expand your EVO SDDCdeployment by adding racks.
VMware EVO SDDC Overview and Bring-Up Guide
36 VMware, Inc.

18 Click NEXT.
The VSAN information page appears.
19 On the VSAN Information page, review or enter your Virtual SAN network addresses for the VLAN,Subnet, Subnet Mask, Gateway, and excluded IP addresses and IP address ranges..
Note The supported VLAN range is 3-3299. The subnet and subnet mask must be at least a /22network. This is to allow for adequate IP address capacity as you expand your EVO SDDC deploymentby adding racks.
Chapter 5 Bringing-Up the EVO SDDC System
VMware, Inc. 37

20 Click NEXT.
The VXLAN information page appears.
21 On the VXLAN information page, review or enter your VXLAN information for the VLAN ID, Subnet,Subnet Mask, Gateway, and excluded IP addresses and IP address ranges..
Note The supported VLAN range is 3-3299. VMware recommends using a /22 network for the subnetand subnet mask. This is to allow for adequate IP address capacity as you expand your EVO SDDCdeployment by adding racks.
VMware EVO SDDC Overview and Bring-Up Guide
38 VMware, Inc.

22 Click NEXT.
The Data Center connections page appears.
Chapter 5 Bringing-Up the EVO SDDC System
VMware, Inc. 39

23 The Data Center Connections page contains information for EVO SDDC to connect to the externalnetwork. Enter your corporate network information for the VLAN ID, Connection Name, Network StartIP, Subnet Mask, Gateway, DNS, NTP, and excluded IP addresses and IP address ranges.
Important Review these values carefully before clicking NEXT because external connections are notvalidated at this time.
The Data Center Uplink page appears.
24 If the uplink is an L2 connection, provide the following information.
Field Description
Uplink Type L2
Uplink LAG Enabled It is recommended that you select this option.
Uplink Ports Port numbers on the ToR switches that are connected tothe uplink network.
Uplink Speed Speed for uplink connections.
25 If the uplink is an L3 connection, provide the following information.
Field Description
Uplink Type L3
Uplink LAG Enabled It is recommended that you select this option.
Uplink Ports Port numbers on the ToR switches that are connected tothe uplink network.
Uplink Speed Speed for uplink connections.
Uplink IP IP address of the uplink IP on the ToR switches.
Mask IP Subnet mask for the uplink IP.
Next Hop IP IP address of the uplink switch for the data center.
VMware EVO SDDC Overview and Bring-Up Guide
40 VMware, Inc.

26 Click NEXT.
The Configuration Review page appears.
27 On the Configuration Review page, review the information carefully.
28 After you ensure that all values on the Review page are accurate, click NEXT.
After a few moments, the Component IP Allocation page appears and displays the IP addresses for theVMs that will be deployed for the Log Insight, NSX, PSC, EVO SDDC Manager, vCenter Server, andvRealize Operations software components.
Chapter 5 Bringing-Up the EVO SDDC System
VMware, Inc. 41

If you need to make any change on the IP Reallocation page, click CANCEL to make edits as required.
29 Note down the virtual machine IP addresses. You will need these later in the bring-up process.
30 After you ensure that the IP Reallocation values are correct, click CONFIRM.
The EVO SDDC configuration process begins. The Configure Systems page displays the progress andinformation about the package being compiled.
VMware EVO SDDC Overview and Bring-Up Guide
42 VMware, Inc.
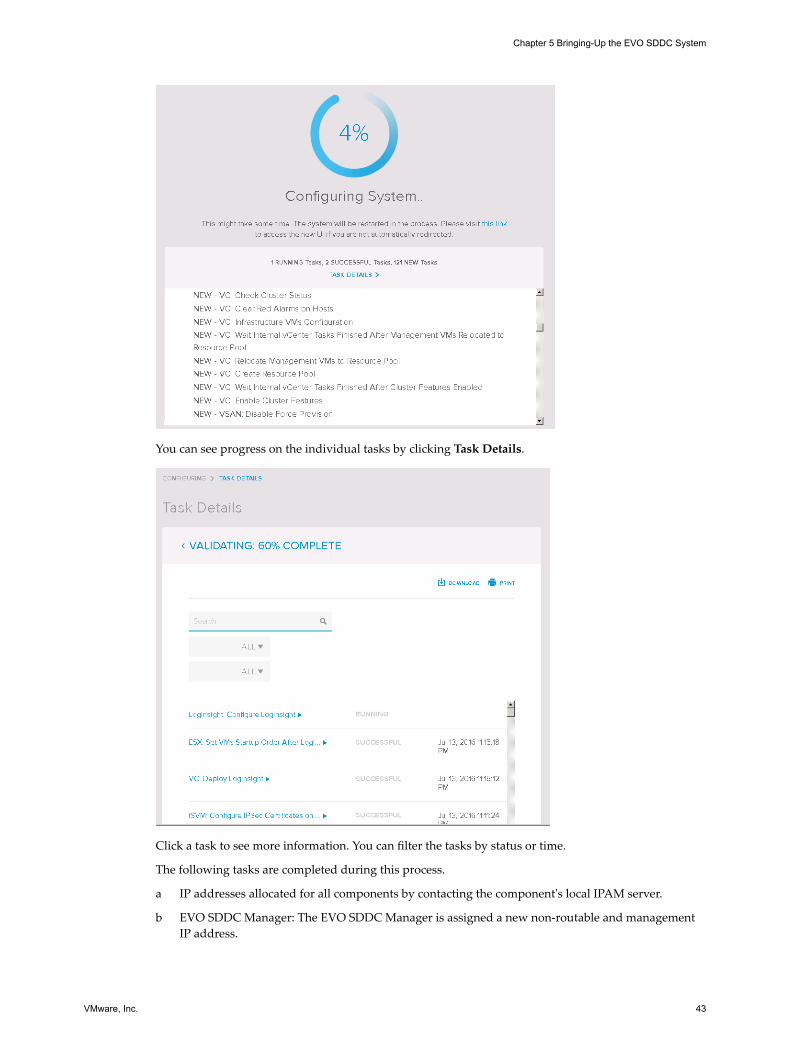
You can see progress on the individual tasks by clicking Task Details.
Click a task to see more information. You can filter the tasks by status or time.
The following tasks are completed during this process.
a IP addresses allocated for all components by contacting the component's local IPAM server.
b EVO SDDC Manager: The EVO SDDC Manager is assigned a new non-routable and managementIP address.
Chapter 5 Bringing-Up the EVO SDDC System
VMware, Inc. 43
c vCenter Server:
1 Verified that all servers are reachable and have necessary uplinks available.
2 Updated IP addresses for vCenter appliance.
3 Created data center and vSpherecluster.
4 Created vSphere Distributed Switch and port groups (vMotion, Virtual SAN, Management,Non-Routable, and VM).
5 For each server:
a Set the new IP addresses (non-routable and management).
b Added the server into a vSphere cluster.
c Created vMotion and Virtual SAN vmknics.
d Migrated VMs, vmknics, and uplinks from the standard switch to vSphere DistributedSwitch.
e Deleted the standard switch.
6 Tagged all port groups with user-specified VLAN tags.
d Virtual SAN:
1 Enabled Virtual SAN and claimed all available disks on all of the servers in the vSpherecluster.
2 Created Virtual SAN policies.
3 Applied Virtual SAN policies to all VMs.
e NSX:
1 Deployed NSX Manager.
2 Registered with vCenter Server.
3 Created NSX Controller cluster, with three servers.
4 Configured VXLAN across the vSphere cluster.
5 Created the appropriate segment range and transport zone.
f Log Insight:
1 Deployed Log Insight.
2 Configured Log Insight.
g vRealize Operations: Deployed.
h Enabled vSphere HA and DRS.
If there is an error during the configuration of the system, an error page appears. Click RETRY. Theconfiguration process remembers where it was in the sequence and start over from that point. If anerror occurs even after you rerun, contact VMware Support.
VMware EVO SDDC Overview and Bring-Up Guide
44 VMware, Inc.

After the system configuration is completed, the EVO SDDC Manager is restarted. When EVO SDDCManager comes up, the Password Rotation page is displayed. For information on rotating the systempasswords, see “Change Passwords of Rack Components,” on page 45.
31 Note the IP address on the URL. If you accidentally close the browser, you will need this IP address tonavigate to the Dashboard.
32 Leave this browser window open.
33 Configure DNS delegation for automatic resolution of all names in EVO SDDC.
EVO SDDC Manager runs on an internal DNS server so that name resolution works during theEVO SDDC bring-up. You must now configure the corporate DNS server to delegate zone control forthe EVO SDDC domain to EVO SDDC Manager.
For example, if your corporate domain is mycompany.example, and the EVO SDDC Sub Domain issubdomain. mycompany.example, the corporate DNS server must be configured to delegate control ofsubdomain. mycompany.example to EVO SDDC Manager.
a Install DNS on your jump server by adding a new role through Server Manager and selecting DNS.
b Ensure that your jump server uses the local DNS for name resolution.
c Configure the primary zone (mycompany.example) as a zone managed by Windows DNS.
d Right-click the zone and select New Delegation.
e Enter the name of the sub-domain (subdomain).
f In the Server fully qualified domain name (FQDN) field, type the IP address of EVO SDDCManager and click Resolve.
g Click OK.
The new zone appears as a delegated zone under your primary domain.
h In a command line window, ping psc.EVO_SDDC_Sub_Domain (psc.subdomain.mycompany.example in our example).
Change Passwords of Rack ComponentsEVO SDDC is deployed with factory default passwords. You must replace the default passwords withsecure system generated passwords.
Note In a multi-rack setup, you must change the passwords on rack 1 before bringing-up additional racks.
Chapter 5 Bringing-Up the EVO SDDC System
VMware, Inc. 45

Prerequisites
You must have completed bring-up on the rack and the Password Rotation blocker screen must have beendisplayed.
Procedure
1 In a command line window, SSH to one of the base IP addresses for EVO SDDC Manager on the rack.See “Locate EVO SDDC Manager IP Address,” on page 46.
2 Stop the services on EVO SDDC Manager:
service vrm-watchdogserver stop
service vrm-tcserver stop
3 Navigate to /home/vrack/bin.
4 Type the following command:
./vrm-cli.sh lookup-password
The output displays the passwords and IP addresses for all components.
5 Save the output to a secure location so that you can access it later.
6 Save a copy of the /home/vrack/Vmware/vRack/vrm.properties file to a secure location where you canaccess it later.
7 In the EVO SDDC Manager console window, navigate to /home/vrack/bin.
8 Type the following command:
./vrm-cli.sh rotate-all
This command changes the passwords of physical and logical components on the rack. Wait for 10minutes before proceeding to the next step.
9 In the EVO SDDC Manager console window, type the following command again:
./vrm-cli.sh lookup-password
Save the output. Compare the output file you saved in step 5 with the output file you saved now andensure that all passwords have been changed. Note the password for the administrator account, whichyou will need for logging in to the EVO SDDC dashboard.
10 Restart EVO SDDC Manager services by typing the following command.
service vrm-watchdogserver start
service vrm-tcserver start
11 Refresh the browser window where you were running the Initial Setup wizard.
The EVO SDDC Dashboard is displayed.
Locate EVO SDDC Manager IP AddressThe EVO SDDC Manager IP address changes during bring-up. You need to look up the new IP address sothat you can log in to change the password on the rack components.
Procedure
1 Look up the vCenter Server IP address from the notes you took when the Component IP Allocationpage of the Initial Setup wizard displayed the IP addresses allocated to the virtual machines.
2 Login to this IP address via the vSphere Web Client. Use your superuser account credentials for the username and password.
VMware EVO SDDC Overview and Bring-Up Guide
46 VMware, Inc.
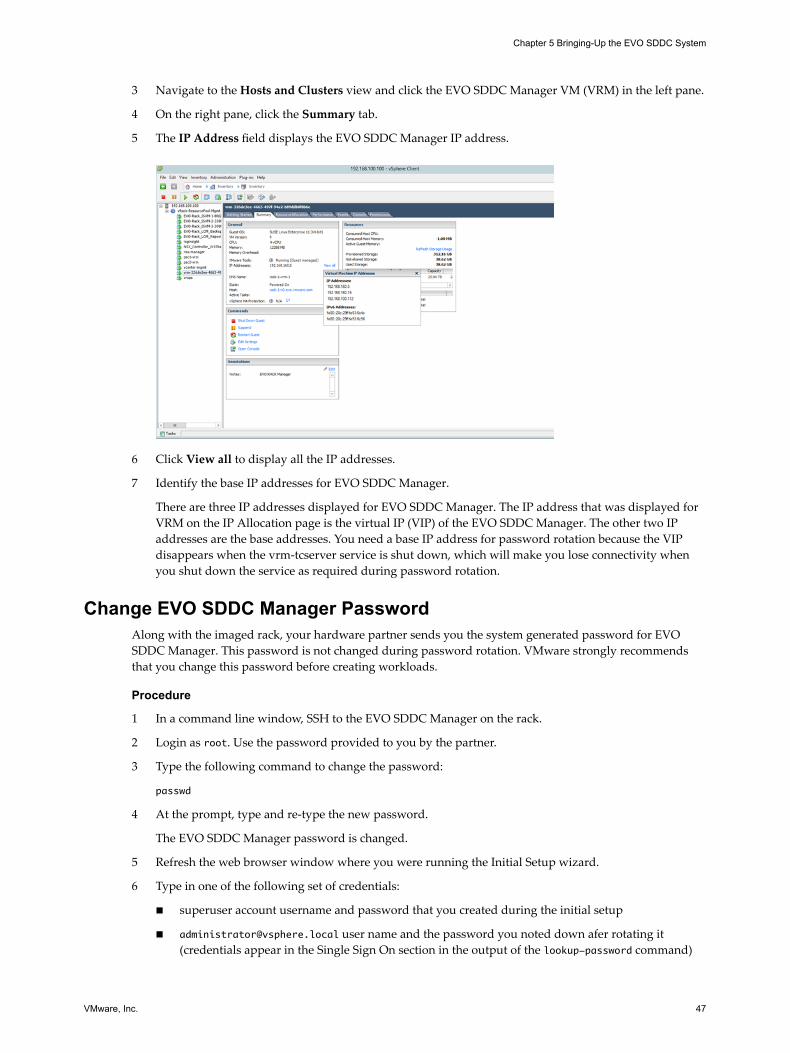
3 Navigate to the Hosts and Clusters view and click the EVO SDDC Manager VM (VRM) in the left pane.
4 On the right pane, click the Summary tab.
5 The IP Address field displays the EVO SDDC Manager IP address.
6 Click View all to display all the IP addresses.
7 Identify the base IP addresses for EVO SDDC Manager.
There are three IP addresses displayed for EVO SDDC Manager. The IP address that was displayed forVRM on the IP Allocation page is the virtual IP (VIP) of the EVO SDDC Manager. The other two IPaddresses are the base addresses. You need a base IP address for password rotation because the VIPdisappears when the vrm-tcserver service is shut down, which will make you lose connectivity whenyou shut down the service as required during password rotation.
Change EVO SDDC Manager PasswordAlong with the imaged rack, your hardware partner sends you the system generated password for EVOSDDC Manager. This password is not changed during password rotation. VMware strongly recommendsthat you change this password before creating workloads.
Procedure
1 In a command line window, SSH to the EVO SDDC Manager on the rack.
2 Login as root. Use the password provided to you by the partner.
3 Type the following command to change the password:
passwd
4 At the prompt, type and re-type the new password.
The EVO SDDC Manager password is changed.
5 Refresh the web browser window where you were running the Initial Setup wizard.
6 Type in one of the following set of credentials:
n superuser account username and password that you created during the initial setup
n [email protected] user name and the password you noted down afer rotating it(credentials appear in the Single Sign On section in the output of the lookup-password command)
Chapter 5 Bringing-Up the EVO SDDC System
VMware, Inc. 47

The dashboard page appears.
For information on how to administer and operate your data center's EVO SDDC system, see theAdministering VMware EVO SDDC.
VMware EVO SDDC Overview and Bring-Up Guide
48 VMware, Inc.

Adding Racks to your EVO SDDCSystem 6
Once EVO SDDC is running on rack 1, you can bring up EVO SDDC on additional physical racks in yourenvironment
Procedure
1 Power on Additional Rack and Connect it to Spine Switches on page 49This procedure refers to the rack being added as rack 2. Follow the same procedure for adding anyrack.
2 Bootstrap Additional Rack on page 50Bootstrap EVO SDDC Manager on rack 2 from EVO SDDC Manager on rack 1.
3 Manual Steps for Rack Addition on page 53Complete these steps before bringing-up the additional rack.
4 Bring-Up on Additional Rack on page 54Complete bring-up on the rack you are adding to your EVO SDDC system.
5 Changing Passwords of Rack Components on page 58EVO SDDC is deployed with factory default passwords. It is highly recommended that you replace thedefault passwords with secure system generated passwords.
6 Change EVO SDDC Manager Password on Each Additional Rack on page 59Along with each imaged rack, your hardware partner sends you the system generated password forEVO SDDC Manager. During password rotation, the EVO SDDC Manager is not changed. VMwarestrongly recommends that you change this password on each rack before creating workloads.
Power on Additional Rack and Connect it to Spine SwitchesThis procedure refers to the rack being added as rack 2. Follow the same procedure for adding any rack.
Prerequisites
1 Make the following connections while rack 2 is powered down so that there is no connectivity betweenrack 1 and rack 2:
n Rack 1 ToR 1 port 49 to spine 1 port 1 on rack 2
n Rack 1 ToR 1 port 50 to spine 2 port 1 on rack 2
n Rack 1 ToR 2 port 49 to spine 1 port 2 on rack 2
n Rack 1 ToR 2 port 50 to spine 2 port 2 on rack 2
2 Verify that the ports on the spine switches on rack 2 are up.
VMware, Inc. 49

3 Verify that the link connectivity LED between the racks is up.
4 The bring-up process must have been completed successfully on rack 1. Rack 1 Dashboard must beaccessible and the EVO SDDC Manager VM (VRM) on rack 1 must be powered on.
5 Password rotation must have been completed on rack 1.
Procedure
1 Power on rack 2.
Wait at least 10 minutes before proceeding to the next step. This ensures that all rack components arepowered on.
2 Ensure that you can ping EVO SDDC Manager on rack 2 from rack 1.
a SSH to EVO SDDC Manager on rack 1 with your superuser account credentials.
b Ping EVO SDDC Manager on rack 2 (192.168.100.40).
What to do next
Bootstrap additional rack.
Bootstrap Additional RackBootstrap EVO SDDC Manager on rack 2 from EVO SDDC Manager on rack 1.
Procedure
1 On the EVO SDDC Manager Dashboard for rack 1, click SETTINGS > Physical Rack Settings.
2 Click the Additional Rack tab.
The thumbprint of rack 2 is displayed here.
VMware EVO SDDC Overview and Bring-Up Guide
50 VMware, Inc.

3 Click ADD RACK.
The Add a Rack wizard appears.
4 Compare the thumbprint displayed on the screen with the thumbprint you received from the partner.
5 If the thumbprints match, click CONFIRM.
The Validation page appears.
Chapter 6 Adding Racks to your EVO SDDC System
VMware, Inc. 51

6 On the Validation page, type the bootstrap password and click CONFIRM.
The Confirmation page confirms that the additional rack has been added to the EVO SDDC system.
7 Click DONE.
The Additional Rack page displays the thumbprint of the rack you just added. The CONFIGUREbutton is grayed out until you complete the manual steps required at this point. See “Manual Steps forRack Addition,” on page 53.
8 Leave this browser window open.
What to do next
Complete manual steps for rack addition.
VMware EVO SDDC Overview and Bring-Up Guide
52 VMware, Inc.

Manual Steps for Rack AdditionComplete these steps before bringing-up the additional rack.
Procedure
1 Copy the file encryption keys from rack 1 to rack 2. This file will be used to perform encryption anddecryption while saving and retrieving the ESXi and PSC passwords to and from Zookeeper.
a In a command line window, SSH to the EVO SDDC Manager on rack 2.
b Run the following script:
/home/vrack/VMware/vRack/copycryptokeys.sh
c Specify the source file to copy. The default is /home/vrack/VMware/vRack/etc/vrm-security.keystore on EVO SDDC Manager on rack 1.
d Specify the destination path. The default is /home/vrack/VMware/vRack/etc/vrm-security.keystoreon EVO SDDC Manager on rack 2.
If the files are copied successfully, appropriate rights are assigned (chgrp vfabric destination, chmod640 destination) and the message File copied successfully is displayed.
2 Confirm that the ISVMs on rack 2 are deleted.
3 In an SSH session on EVO SDDC Manager, stop watchdog and tcserver.
service vrm-watchdogserver stop
service vrm-tcserver stop
4 Navigate to /home/vrack/bin.
5 Sync the EVO SDDC Manager properties by typing the following command.
./vrm-cli.sh sync-properties
6 Restart EVO SDDC Manager services by typing the following command.
service vrm-watchdogserver start
service vrm-tcserver start
Wait till the tcserver starts.
Chapter 6 Adding Racks to your EVO SDDC System
VMware, Inc. 53
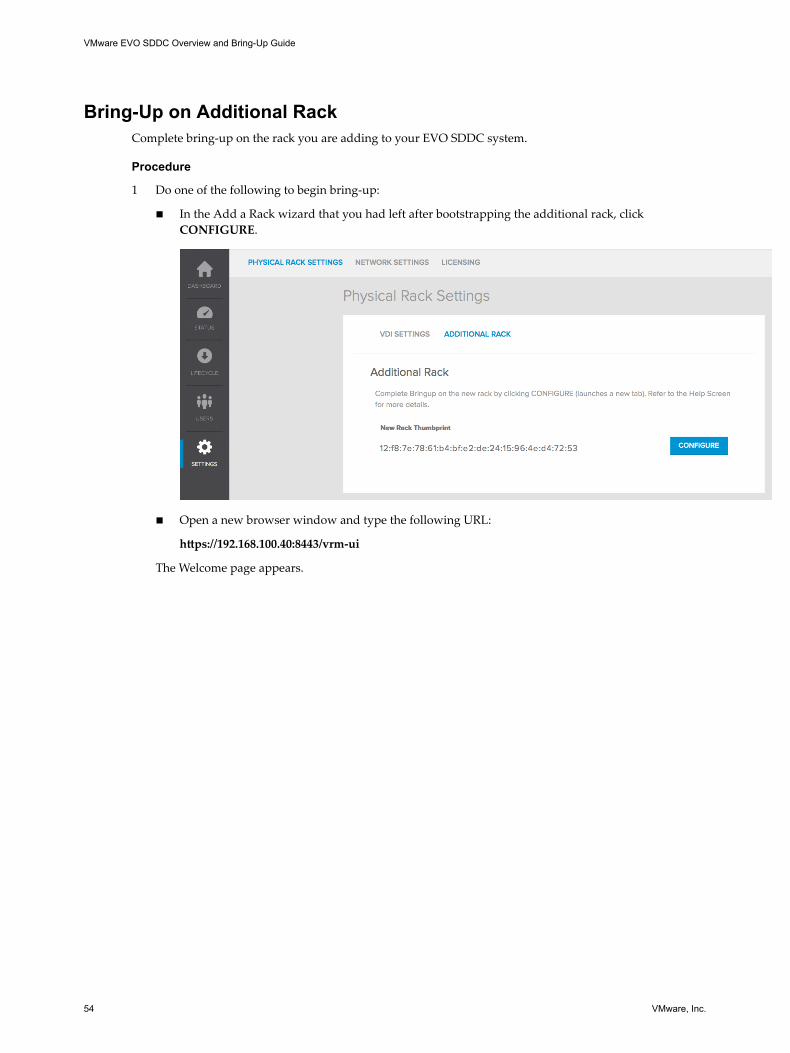
Bring-Up on Additional RackComplete bring-up on the rack you are adding to your EVO SDDC system.
Procedure
1 Do one of the following to begin bring-up:
n In the Add a Rack wizard that you had left after bootstrapping the additional rack, clickCONFIGURE.
n Open a new browser window and type the following URL:
https://192.168.100.40:8443/vrm-ui
The Welcome page appears.
VMware EVO SDDC Overview and Bring-Up Guide
54 VMware, Inc.

2 Click SET TIME.
The System Time for EVO SDDC page appears.
3 Specify the date, time, and time zone for the rack and click Submit. The specified time should match thecurrent time in your environment.
The system sets the time on each EVO SDDC component.
Chapter 6 Adding Racks to your EVO SDDC System
VMware, Inc. 55

After the time has been set on all EVO SDDC components, EVO SDDC Manager is rebooted and theCONTINUE button turns blue.
4 Click CONTINUE.
The system performs Power On System Validation (POSV), where it verifies that the integrated systemdelivered to the customer is correct and operational. It validates that the right hardware and software isinstalled in the racks and also validates the health of the installed hardware and software applications.
If the validation page displays an error, ensure that all physical connections are in place and that theVMs listed in “Manually Power On Virtual Machines When Setting Up Your EVO SDDC System,” onpage 65 are powered on. Then click RETRY.
VMware EVO SDDC Overview and Bring-Up Guide
56 VMware, Inc.
5 Log in using the default credentials:
User name: [email protected]
Password: vmware123
6 Click LOGIN.
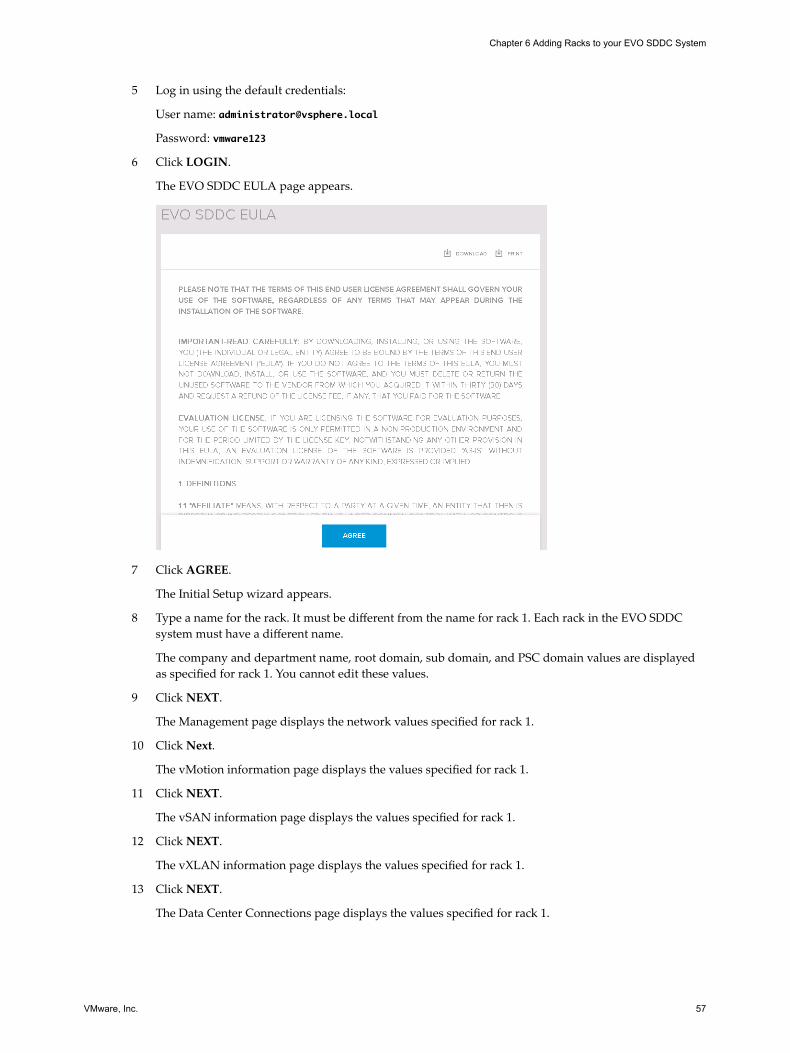
The EVO SDDC EULA page appears.
7 Click AGREE.
The Initial Setup wizard appears.
8 Type a name for the rack. It must be different from the name for rack 1. Each rack in the EVO SDDCsystem must have a different name.
The company and department name, root domain, sub domain, and PSC domain values are displayedas specified for rack 1. You cannot edit these values.
9 Click NEXT.
The Management page displays the network values specified for rack 1.
10 Click Next.
The vMotion information page displays the values specified for rack 1.
11 Click NEXT.
The vSAN information page displays the values specified for rack 1.
12 Click NEXT.
The vXLAN information page displays the values specified for rack 1.
13 Click NEXT.
The Data Center Connections page displays the values specified for rack 1.
Chapter 6 Adding Racks to your EVO SDDC System
VMware, Inc. 57

14 Click NEXT.
The Configuration Review page displays the values specified for rack 1.
15 Click NEXT.
The Review page appears.
16 Review the information.
17 Click CONNECT.
After a few minutes, the Component IP Allocation page appears and displays the IP addresses for theVMs that will be deployed for the NSX, EVO SDDC Manager, vCenter Server, and vRealize Operationssoftware components. Ignore the Log Insight IP address. Log Insight is only deployed on rack 1.
18 After you ensure that the IP Reallocation values are correct, click CONFIRM.
The Configuring System page displays the task that is running and the list of tasks that need to becompleted. Click TASK DETAILS to view additional details for the tasks. Click next to the task to seefurther details. You can filter tasks by status (Running, Successful, or New) or time range.
In case a task fails, click RETRY to run the task again.
19 After the system configuration is completed, the EVO SDDC Manager is restarted. When EVO SDDCManager comes up, the Password Rotation page is displayed.
20 Leave this browser window open.
21 Rotate passwords on rack 2. See “Change EVO SDDC Manager Password on Each Additional Rack,” onpage 59.
You cannot access the EVO SDDC Manager Dashboard on rack 1 till you complete this step.
22 If DNS delegation for automatic resolution is configured in your environment, you are redirected to thelogin page in the browser window you had left open. Log in using the superuser credentials or thesystem administrator account name (administrator@domainName) and password that you noted downafter password rotation. The Dashboard page appears. The Physical Resources on the Dashboardincludes both rack1 and rack 2.
Changing Passwords of Rack ComponentsEVO SDDC is deployed with factory default passwords. It is highly recommended that you replace thedefault passwords with secure system generated passwords.
You must change the passwords on each rack that you add to your EVO SDDC system.
Note The additional rack must have successfully completed bring-up before you change the passwords.
1 In a command line window, SSH to one of the base IP addresses for EVO SDDC Manager on the rack.See “Locate EVO SDDC Manager IP Address,” on page 46.
2 Stop the services on EVO SDDC Manager:
service vrm-watchdogserver stop
service vrm-tcserver stop
3 Navigate to /home/vrack/bin.
4 Type the following command:
./vrm-cli.sh lookup-password
The output displays the passwords and IP addresses for all components on rack 1.
VMware EVO SDDC Overview and Bring-Up Guide
58 VMware, Inc.

5 Save the output to a secure location so that you can access it later.
6 Save a copy of the /home/vrack/VMware/vRack/vrm.properties file to a secure location where you canaccess it later.
7 In the EVO SDDC Manager console window for rack 1, navigate to /home/vrack/bin.
8 Type the following command:
./vrm-cli.sh rotate-all
This command changes the passwords of the physical components on rack 1 and logical components onall racks in your environment.
9 In the EVO SDDC Manager console window, type the following command:
./vrm-cli.sh lookup-password
Save the output. Compare the output file you saved in step 5 with the output file you saved now andensure that all passwords have been changed.
10 Restart EVO SDDC Manager services by typing the following command.
service vrm-watchdogserver start
service vrm-tcserver start
11 Refresh the browser window where you were running the Initial Setup wizard.
The EVO SDDC Dashboard is displayed.
Change EVO SDDC Manager Password on Each Additional RackAlong with each imaged rack, your hardware partner sends you the system generated password for EVOSDDC Manager. During password rotation, the EVO SDDC Manager is not changed. VMware stronglyrecommends that you change this password on each rack before creating workloads.
Procedure
1 In a command line window, SSH to the EVO SDDC Manager on the rack.
2 Login as root. Use the password provided to you by the partner.
3 Type the following command to change the password:
passwd
4 At the prompt, type and re-type the new password.
The EVO SDDC Manager password is changed.
Chapter 6 Adding Racks to your EVO SDDC System
VMware, Inc. 59

VMware EVO SDDC Overview and Bring-Up Guide
60 VMware, Inc.

Alerts List 7An alert is a record of a known detected problem. Alerts can be raised at Power On System Validation(POSV), at a set interval when the system polls the alert catalog, or when an event is generated. An event is arecord of a system condition that is potentially significant or interesting to you, such as a degradation,failure, or user-initiated configuration change.
Table 7‑1. EVO SDDC Alerts
Alert Name Short DescriptionSeverityLevel
DetectedBy
BMC_AUTHENTICATION_FAILURE_ALERT The system is unable to authenticate tothe server's out-of-band (OOB)management port.
ERROR Event
BMC_MANAGEMENT_FAILURE_ALERT The system failed to perform amanagement operation using the server'sOOB management port.
ERROR Event
BMC_NOT_REACHABLE_ALERT The system is unable to communicatewith the BMC server's out-of-band (OOB)management port.
ERROR Event
COORDINATION_SERVICE_DOWN_ALERT Cannot establish connection withZookeeper.
ERROR
CPU_CAT_FAILURE_ALERT A processor has shutdown due to acatastrophic error.
ERROR Event
CPU_EXTRA_ALERT Mismatch between CPU spec in manifestfile and physical CPU inventory reportedby HMS. An extra CPU is present in thephysical inventory.
WARNING Event
CPU_INITIALIZATION_ERROR_ALERT The system detected that a CPUinitialization error has occurred.
ERROR Event
CPU_INVALID_ALERT The polling detected a type of CPU in theserver that does not match what isexpected according to the manifest.
ERROR POSV andsystempoll
CPU_MACHINE_CHECK_ERROR_ALERT A server CPU has failed due to CPUMachine Check Error.
ERROR Event
CPU_POST_FAILURE_ALERT A server CPU has shut down due toPOST failure.
ERROR Event
CPU_TEMPERATURE_ABOVE_UPPER_THRESHOLD_ALERT
A CPU temperature has reached itsmaximum safe operating temperature.
WARNING Event
CPU_TEMPERATURE_BELOW_LOWER_THRESHOLD_ALERT
A CPU temperature has reached itsminimum safe operating temperature.
WARNING Event
VMware, Inc. 61

Table 7‑1. EVO SDDC Alerts (Continued)
Alert Name Short DescriptionSeverityLevel
DetectedBy
CPU_THERMAL_TRIP_ERROR_ALERT A server CPU has shut down due tothermal error.
ERROR Yes
CPU_UNDETECTED_ALERT A CPU matching the manifest was notdetected.
ERROR Event
DIMM_ECC_MEMORY_ERROR_ALERT The system detected an uncorrectableError Correction Code (ECC) error for aserver's memory.
ERROR Event
DIMM_TEMPERATURE_ABOVE_THRESHOLD_ALERT
Memory temperature has reached itsmaximum safe operating temperature.
WARNING Event
DIMM_THERMAL_TRIP_ALERT Memory has shut down due to thermalerror.
ERROR Event
EVO_SDDC_BUNDLE_INCOMPLETE_ALERT The EVO SDDC ISO file is missing someelements.
CRITICAL POSV
EVO_SDDC_BUNDLE_INVALID_ALERT MD5 checksum generated on the EVOSDDC ISO bundle does not match theMD5 checksum provided by VIA in theVirtual SAN datastore.
CRITICAL POSV
EVO_SDDC_BUNDLE_MISSING_ALERT The EVO SDDC bundle ISO file orMD5checksum file is missing.
CRITICAL POSV
HDD_DOWN_ALERT Operational status is down for an HDD. ERROR Event
HDD_EXCESSIVE_READ_ERRORS_ALERT Excessive read errors reported for anHDD.
WARNING Event
HDD_EXCESSIVE_WRITE_ERRORS_ALERT Excessive write errors reported for anHDD
WARNING Event
HDD_EXTRA_ALERT Additional HDD detected that does notmatch the manifest.
WARNING POSV andsystempoll
HDD_INVALID_ALERT Detected HDD does not match themanifest.
ERROR POSV andsystempoll
HDD_TEMPERATURE_ABOVE_THRESHOLD_ALERT
HDD temperature has reached itsmaximum safe operating temperature .
WARNING Event
HDD_UNDETECTED_ALERT HDD matching the manifest was notdetected.
ERROR POSV andsystempoll
HDD_WEAROUT_ABOVE_THRESHOLD_ALERT
Wear-out state of an HDD is above itsdefined threshold.
WARNING Event
HMS_AGENT_DOWN_ALERT A physical rack's Hardware ManagementServices agent is down.
CRITICAL POSV
HMS_DOWN_ALERT The HMS is down. CRITICAL POSV andevent
HOST_AGENT_NOT_ALIVE_ALERT ESXi on a server in a physical rack is notrunning.
POSV
MANAGEMENT_SWITCH_DOWN_ALERT Operational status is down for a physicalrack's management switch.
WARNING POSV,systempoll, andevent
VMware EVO SDDC Overview and Bring-Up Guide
62 VMware, Inc.
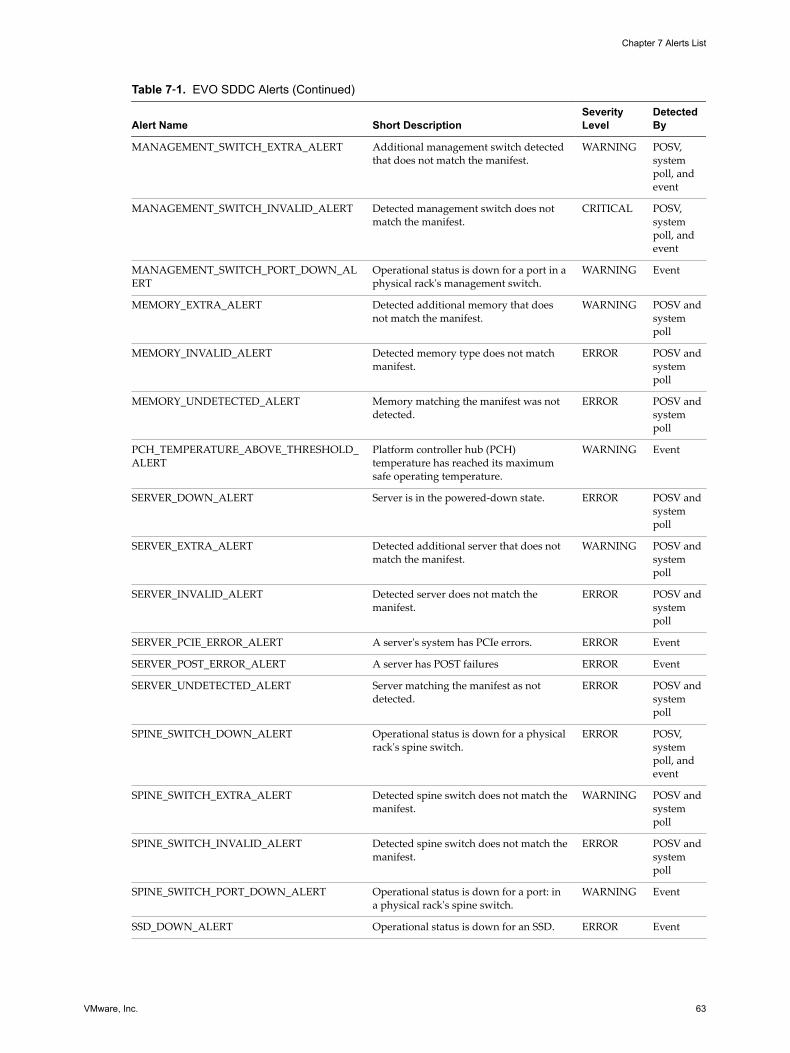
Table 7‑1. EVO SDDC Alerts (Continued)
Alert Name Short DescriptionSeverityLevel
DetectedBy
MANAGEMENT_SWITCH_EXTRA_ALERT Additional management switch detectedthat does not match the manifest.
WARNING POSV,systempoll, andevent
MANAGEMENT_SWITCH_INVALID_ALERT Detected management switch does notmatch the manifest.
CRITICAL POSV,systempoll, andevent
MANAGEMENT_SWITCH_PORT_DOWN_ALERT
Operational status is down for a port in aphysical rack's management switch.
WARNING Event
MEMORY_EXTRA_ALERT Detected additional memory that doesnot match the manifest.
WARNING POSV andsystempoll
MEMORY_INVALID_ALERT Detected memory type does not matchmanifest.
ERROR POSV andsystempoll
MEMORY_UNDETECTED_ALERT Memory matching the manifest was notdetected.
ERROR POSV andsystempoll
PCH_TEMPERATURE_ABOVE_THRESHOLD_ALERT
Platform controller hub (PCH)temperature has reached its maximumsafe operating temperature.
WARNING Event
SERVER_DOWN_ALERT Server is in the powered-down state. ERROR POSV andsystempoll
SERVER_EXTRA_ALERT Detected additional server that does notmatch the manifest.
WARNING POSV andsystempoll
SERVER_INVALID_ALERT Detected server does not match themanifest.
ERROR POSV andsystempoll
SERVER_PCIE_ERROR_ALERT A server's system has PCIe errors. ERROR Event
SERVER_POST_ERROR_ALERT A server has POST failures ERROR Event
SERVER_UNDETECTED_ALERT Server matching the manifest as notdetected.
ERROR POSV andsystempoll
SPINE_SWITCH_DOWN_ALERT Operational status is down for a physicalrack's spine switch.
ERROR POSV,systempoll, andevent
SPINE_SWITCH_EXTRA_ALERT Detected spine switch does not match themanifest.
WARNING POSV andsystempoll
SPINE_SWITCH_INVALID_ALERT Detected spine switch does not match themanifest.
ERROR POSV andsystempoll
SPINE_SWITCH_PORT_DOWN_ALERT Operational status is down for a port: ina physical rack's spine switch.
WARNING Event
SSD_DOWN_ALERT Operational status is down for an SSD. ERROR Event
Chapter 7 Alerts List
VMware, Inc. 63

Table 7‑1. EVO SDDC Alerts (Continued)
Alert Name Short DescriptionSeverityLevel
DetectedBy
SSD_EXCESSIVE_READ_ERRORS_ALERT Excessive read errors reported for anSSD.
WARNING Event
SSD_EXCESSIVE_WRITE_ERRORS_ALERT Excessive write errors reported for anSSD.
WARNING Event
SSD_EXTRA_ALERT Detected additional SSD that does notmatch the manifest.
WARNING POSV andsystempoll
SSD_INVALID_ALERT Detected SSD does not match themanifest.
ERROR POSV andsystempoll
SSD_TEMPERATURE_ABOVE_THRESHOLD_ALERT
SSD temperature has reached itsmaximum safe operating temperature
WARNING Event
SSD_UNDETECTED_ALERT SSD matching the manifest was notdetected.
ERROR POSV andsystempoll
SSD_WEAROUT_ABOVE_THRESHOLD_ALERT
Wear-out state of an SSD is above itsdefined threshold.
WARNING Event
STORAGE_CONTROLLER_DOWN_ALERT Operational status is down for a storageadapter.
ERROR Event
TOR_SWITCH_DOWN_ALERT Operational status is down for a physicalrack's ToR switch.
ERROR POSV andsystempoll
TOR_SWITCH_EXTRA_ALERT Detected extra ToR switch that does notmatch the manifest.
WARNING POSV andsystempoll
TOR_SWITCH_INVALID_ALERT Detected ToR switch does not match themanifest.
ERROR POSV andsystempoll
TOR_SWITCH_PORT_DOWN_ALERT Operational status is down for a port in aphysical rack's ToR switch.
WARNING Event
VMware EVO SDDC Overview and Bring-Up Guide
64 VMware, Inc.

Troubleshooting EVO SDDCDeployment 8
You can troubleshoot issues that you might experience during deployment of your EVO SDDC system.
This chapter includes the following topics:
n “Manually Power On Virtual Machines When Setting Up Your EVO SDDC System,” on page 65
n “Restart HMS,” on page 66
Manually Power On Virtual Machines When Setting Up YourEVO SDDC System
When you power on a rack, the virtual machines that are preinstalled on host 0 are supposed to power on. Ifthe preinstalled virtual machines do not power on, you can manually power them on using the vSphereClient application.
Problem
You open your browser to the address for the EVO SDDC Manager setup wizard, and you do not see thewizard's starting screen. Instead of displaying the wizard, the browser shows there is no connection.
Cause
The setup wizard requires the preinstalled EVO SDDC Manager VM to be running. If it is not powered onwhen the ESXi host powers on, the setup wizard cannot run.
Solution
1 On the machine that is connected to port #48 on the management switch, start the vSphere Client andopen it to IP address 192.168.100.100.
2 Log in to the host.
3 In the vSphere Client, navigate to the Inventory view to see the vrm VM. Ensure that it is powered on. Ifa virtual machine does not have a green arrow icon, it is not powered on.
The EVO SDDC LCM Repository and 3 Zookeeper VMs are also preinstalled. Once the vrm VM ispowered on, it powers on the 3 Zookeeper VMs. The LCM Repository VM is activated during theEVO SDDC deployment.
4 If vrm VM is not powered on, power it on.
VMware, Inc. 65
Restart HMSYou may need to restart HMS while deploying the EVO SDDC system.
Problem
While deploying the EVO SDDC system, the following error message is displayed:
vRack has encountered an error. Problem connecting with HMS host: http://localhost:8080/hms-
local at the moment.
Cause
HMS may have stopped running.
Solution
1 Verify if HMS is running by connecting to the management switch and typing the following commands:
jobs
ps –lef |grep -i hms
2 If HMS is not running, restart HMS by typing the following commands.
cd /opt/vrack/hms
service starthms.sh start
VMware EVO SDDC Overview and Bring-Up Guide
66 VMware, Inc.

Additional VMware ProductDocumentation 9
Refer to the appropriate documentation for help with VMware SDDC products that are part of EVO SDDC.
Product Name Documentation
VMware ESXi andvCenter Server
ESXi and vCenter Server 6.0 Documentation at http://pubs.vmware.com/vsphere-60/topic/com.vmware.ICbase/Welcome/welcome.html
Virtual SAN Administering VMware Virtual SAN at http://pubs.vmware.com/vsphere-60/topic/com.vmware.ICbase/PDF/virtual-san-61-administration-guide.pdf
NSX NSX for vSphere Documentation at http://pubs.vmware.com/NSX-62/topic/com.vmware.ICbase/Welcome/welcome.html
vRealize Operations VMware vRealize Operations Manager Documentation at https://www.vmware.com/support/pubs/vrealize-operations-manager-pubs.html
vRealize Log Insight VMware vRealize Log Insight Documentation at http://pubs.vmware.com/log-insight-30/topic/com.vmware.ICbase/Welcome/welcome.html
VMware, Inc. 67

VMware EVO SDDC Overview and Bring-Up Guide
68 VMware, Inc.

Index
Aabout the Hardware Management System
(HMS) 18about the Overview and Bring-Up Guide 5adding another rack 49alerts 61another rack, adding 49architecture, EVO RACK 13arrival onsite 23
Cchange passwords
multi-rack environment 58single-rack 45
change password, EVO SDDC Manager 47configuration, system 27connecting the system at your location 26
Ddata center network, connecting to 26deploying your system 25deployment, troubleshooting 65
EEVO SDDC Manager:about 15EVO SDDC Manager
Database 17Events Engine 18in a multi-rack setup 18Logical Resources Manager 17Physical Resources Manager 17Services Engine 16
Gglossary 5
HHardware Management System, about 18
IIaaS workloads 21intended audience 5introducing EVO SDDC 7
Llocation preparation 23
Mmanagement domain 10
Nnetwork topology 11
Pphysical topology 9power requirements 23power source, connecting to 26pre-packaged workloads 21
SSDDC components 19servers 9setting up your system 25setup wizard 27site preparation 23spine switches 9storage topology 11system, setting up 25system configuration 27
Ttop-of-rack switches 9troubleshooting, during system setup 65
Uuse cases, VDI 22
VVDI use case 22VDI workloads 21VI use case 21VIA 15Virtual Desktop Infrastructure, use case 22VMware SDDC product documentation 67
Wworkload use cases, VI 21workloads, pre-packaged 21
VMware, Inc. 69

VMware EVO SDDC Overview and Bring-Up Guide
70 VMware, Inc.