vmware tools user guide - vmware tools 11.0...tools, vmware tools 10.2.0 brings in several...
TRANSCRIPT

VMware Tools User Guide
VMware Tools 11.0.0
You can find the most up-to-date technical documentation on the VMware website at:
https://docs.vmware.com/
If you have comments about this documentation, submit your feedback to
VMware, Inc.3401 Hillview Ave.Palo Alto, CA 94304www.vmware.com
Copyright © 2019 VMware, Inc. All rights reserved. Copyright and trademark information.
VMware Tools User Guide
VMware, Inc. 2

Contents
About This Book 5
Updated Information 6
1 Introduction to VMware Tools 7VMware Tools Services 8
VMware Tools Lifecycle Management 9
VMware Tools Device Drivers 11
VMware User Process 13
Using Open VM Tools 14
Operating System Specific Packages for Linux Guest Operating Systems 16
2 Installing VMware Tools 17Disable Access Protection from the McAfee Antivirus Virus Scan Console 18
Integration of VMware AppDefense with VMware Tools 19
Exclude AppDefense Component During Installation 20
Automating VMware Tools Installation for Multiple Windows Virtual Machines 21
Suppress Prompts About Unsigned Drivers on Windows Operating Systems Before Vista 21
Add VMware as a Trusted Publisher to Suppress Driver Prompts 22
Names of VMware Tools Features Used in Silent Installations 23
Manually Installing VMware Tools on a Windows Virtual Machine 25
Manually Installing VMware Tools on a Linux Virtual Machine 27
Installing open-vm-tools 30
Manually Installing VMware Tools in a macOS Virtual Machine 31
Manually Installing VMware Tools on a Solaris Virtual Machine 32
3 Upgrading VMware Tools 34Configure Virtual Machines to Automatically Upgrade VMware Tools 36
Manually upgrading VMware Tools in virtual machines 36
Performing an Automatic Upgrade of VMware Tools 37
VMware Tools Installer Logging to the Host 38
4 Configuring VMware Tools Components 41Configuration File Location 41
Configuring Network Interface Information 42
Exclude Specific File Systems from Quiesced Snapshots 43
Security Considerations for Configuring VMware Tools 44
Using the VMware Tools Configuration Utility 46
VMware, Inc. 3

Configuring Time Synchronization Between Guest and Host Operating Systems 47
Disabling Time Synchronization 49
Use Device Connect or Disconnect 49
Using Custom VMware Tools Scripts 51
Retrieving Status Information About the Virtual Machine 55
Configuring appInfo 57
Configuring Automatic Upgrade and Installation or Removal of a Component 58
5 Configuring Customer Experience Improvement Program 60Categories of Information That VMware Receives 60
Join the Customer Experience Improvement Program in the vSphere Web Client 60
6 Troubleshooting VMware Tools Installation and Upgrade Issues 62Installing or Upgrading to VMware Tools 10.3.0 62
7 Troubleshooting VMware Tools Components 64Repair or Change Modules in Windows Virtual Machines 64
Starting the VMware User Process Manually If You Do Not Use a Session Manager 65
8 Uninstalling VMware Tools 67
9 FAQs about VMware Tools 68
VMware Tools User Guide
VMware, Inc. 4

About This Book
The VMware Tools Guide describes how to install, upgrade, and configure VMware Tools.
Intended AudienceThis information is intended for anyone who wants to install, upgrade, and configure VMware Tools. The information is written for system administrators who are familiar with virtualization.
VMware Technical Publications GlossaryVMware Technical Publications provides a glossary of terms that might be unfamiliar to you. For definitions of terms as they are used in VMware technical documentation, go to http://www.vmware.com/support/pubs.
VMware, Inc. 5

Updated Information
This VMware Tools User Guide is updated with each release of the product or when necessary.
This table provides the update history of the VMware Tools User Guide.
Revision Description
12 JUL 2018 Initial release.
VMware, Inc. 6

Introduction to VMware Tools 1VMware Tools is a set of services and modules that enable several features in VMware products for better management of, and seamless user interactions with, guests operating systems.
For example, VMware Tools has the ability to:
n Pass messages from the host operating system to the guest operating system.
n Customize guest operating systems as a part of the vCenter Server and other VMware products.
n Run scripts that help automate guest operating system operations. The scripts run when the power state of the virtual machine changes.
n Synchronize the time in the guest operating system with the time on the host operating system
VMware Tools Lifecycle Management provides a simplified and scalable approach for installation and upgrade of VMware Tools. It includes a number of feature enhancements, driver-related enhancements, and support for new guest operating systems. Run the latest version of VMware Tools or use open-vm-tools distributed with the Linux OS distribution. Although a guest operating system can run without VMware Tools, always run the latest version of VMware Tools in your guest operating systems to access the latest features and updates. You can configure your virtual machine to automatically check for and apply VMware Tools upgrades each time you power on your virtual machines. For information about enabling automatic upgrade of VMware Tools on your virtual machines, see vSphere Virtual Machine Administration Guide
This chapter includes the following topics:
n VMware Tools Services
n VMware Tools Lifecycle Management
n VMware Tools Device Drivers
n VMware User Process
n Using Open VM Tools
n Operating System Specific Packages for Linux Guest Operating Systems
VMware, Inc. 7

VMware Tools ServicesThe VMware Tools services start when the guest operating system starts. The service passes information between host and guest operating systems.
n VMware Alias Manager and Ticket Service or VGAuthService: VGAuthService in taskmgr provides support for SAML based authentication for vSphere Guest Operations, see guest.SAMLTokenAuthentication and vim.vm.guest.GuestOperationsManager.
n VMware Snapshot Provider Service: VMware Snapshot Provider Service provides support for freezing or thawing file systems for VSS (Volume Shadow Copy Service).
Note This is applicable for Windows guest operating systems only.
n VMware Tools Daemon Service: This application runs in the background. It is called vmtoolsd.exe on Windows guest operating systems, vmware-tools-daemon on Mac OS X guest operating systems, and vmtoolsd on Linux, FreeBSD, and Solaris guest operating systems. The VMware Tools service performs the following tasks using the plug-ins:
n autohidpi - Set guest screen resolution for Mac OS X guest operating systems.
n autoLogon - Bypasses the guest operating system login when powering on a VM.
n autoUpgrade - Handles VMware Tools upgrade operations.
n bitMapper - Creates a bit map of disk blocks used by the guest operating system, used in vMotion.
n deployPkg - Handles guest customization operations.
n desktopEvents - Starting or stopping VMware Tools user service based on screen/X11 changes.
Note This is a VMware Tools user service plugin.
n disableGuestHibernate - Disables option for hibernation in guest operating system.
n diskWiper - Releases unused guest disk blocks so they can be reclaimed by the hypervisor.
n dndcp - Drag and drop, copy and paste operations. Enables copying and pasting of text, graphics, and files between guest operating systems and hosts or client desktops. This is a VMware Tools user service plugin.
n appInfo - Collects the information about running applications inside the guest and publishes the information to a guest variable.
n guestInfo - Collects and reports guest information and statistics to hypervisor.
n hgfsServer - HGFS server for transferring files, drag and drop and VMware Tools upgrade operations.
n hgfsUsability - Handles mapping HGFS folders to special user folders, adds HGFS links to the desktop.
n hwUpgradeHelper - Handles changes due to virtual hardware upgrade.
VMware Tools User Guide
VMware, Inc. 8

n powerOps - Handles graceful shutdown and reboot of the guest, and execution of scripts for a power operation.
n resolutionKMS - Handles communicating guest user interface topology to the vmwgfx drm (direct rendering manager) driver.
Note This plugin is for Linux only.
n resolutionSet - Handles guest screen re-sizing when vmwgfx drm (direct rendering manager) driver is not available.
n timeSync - Synchronizes guest clock with host clock at power on or resume.
n vmbackup - Handles freezing and thawing file systems during a quiesced snapshot operation.
n vmtray - Provides VMware Tools tray icon and pop-up menu.
Note This is a VMware Tools user service plugin.
n vsep - Manages NSX file and network introspection.
n vix - Handles guest operations related to files, processes and registry.
VMware Tools Lifecycle ManagementStarting with a major version 10.1.0, VMware tools added simplified and scalable approach for install and upgrade of VMware Tools, reboot less upgrade for newer Linux Tools, support for OSP upgrades, enhanced version reporting using UI and status reporting using API and UI. This version was released with a number of feature enhancements, driver related enhancements and support for new guest operating systems. With offline bundles and the integration with SCCM to distribute and upgrade VMware Tools, VMware Tools 10.2.0 brings in several improvements to lifecycle management.
n Offline bundles with VMware Tools VIB that can be installed on vSphere 5.5.x, 6.0.x and 6.5.x releases using vSphere Update Manager.
n Microsoft System Center Configuration Manager (SCCM) is used to manage the deployment of Windows applications across an enterprise and can be used to deploy VMware Tools. For more information, see Deploying VMware Tools using SCCM.
VMware Tools 10.3.0 depends on and ships Microsoft Visual C++ 2017 Redistributable version 14.x. While preparing the system for VMware Tools 10.3.0 installation, Microsoft Visual C++ 2017 Redistributable is installed on the system as a prerequisite. For more information, see Installing or Upgrading to VMware Tools 10.3.0.
VMware Tools User Guide
VMware, Inc. 9
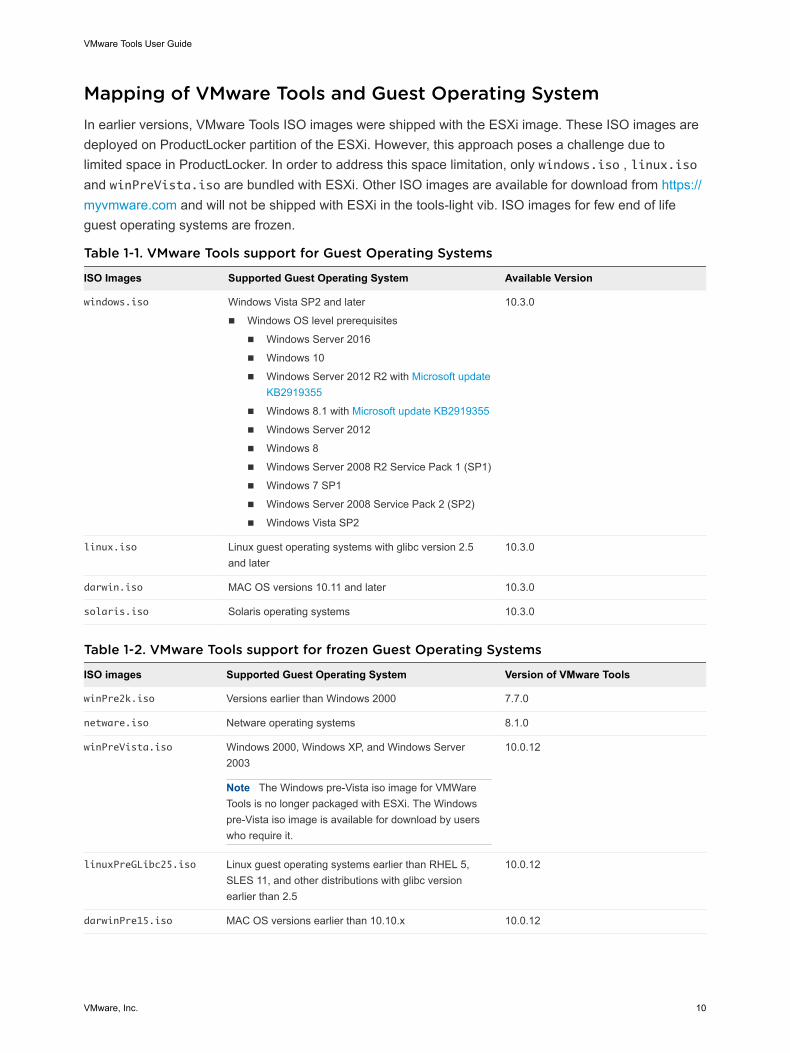
Mapping of VMware Tools and Guest Operating SystemIn earlier versions, VMware Tools ISO images were shipped with the ESXi image. These ISO images are deployed on ProductLocker partition of the ESXi. However, this approach poses a challenge due to limited space in ProductLocker. In order to address this space limitation, only windows.iso , linux.iso and winPreVista.iso are bundled with ESXi. Other ISO images are available for download from https://myvmware.com and will not be shipped with ESXi in the tools-light vib. ISO images for few end of life guest operating systems are frozen.
Table 1-1. VMware Tools support for Guest Operating Systems
ISO Images Supported Guest Operating System Available Version
windows.iso Windows Vista SP2 and later
n Windows OS level prerequisites
n Windows Server 2016
n Windows 10
n Windows Server 2012 R2 with Microsoft update KB2919355
n Windows 8.1 with Microsoft update KB2919355
n Windows Server 2012
n Windows 8
n Windows Server 2008 R2 Service Pack 1 (SP1)
n Windows 7 SP1
n Windows Server 2008 Service Pack 2 (SP2)
n Windows Vista SP2
10.3.0
linux.iso Linux guest operating systems with glibc version 2.5 and later
10.3.0
darwin.iso MAC OS versions 10.11 and later 10.3.0
solaris.iso Solaris operating systems 10.3.0
Table 1-2. VMware Tools support for frozen Guest Operating Systems
ISO images Supported Guest Operating System Version of VMware Tools
winPre2k.iso Versions earlier than Windows 2000 7.7.0
netware.iso Netware operating systems 8.1.0
winPreVista.iso Windows 2000, Windows XP, and Windows Server 2003
Note The Windows pre-Vista iso image for VMWare Tools is no longer packaged with ESXi. The Windows pre-Vista iso image is available for download by users who require it.
10.0.12
linuxPreGLibc25.iso Linux guest operating systems earlier than RHEL 5, SLES 11, and other distributions with glibc version earlier than 2.5
10.0.12
darwinPre15.iso MAC OS versions earlier than 10.10.x 10.0.12
VMware Tools User Guide
VMware, Inc. 10

VMware Tools Device DriversDevice drivers improve sound, graphics, networking, and storage performance. If you perform a custom VMware Tools installation or reinstallation, you can choose which drivers to install.
The set of drivers that are installed when you install VMware Tools depends on the guest operating system and the VMware product. For detailed information about the features or functionality that these drivers enable, including configuration requirements, best practices, and performance, see the documentation for your VMware product. The following device drivers can be included with VMware Tools.
SVGA driver
This virtual driver enables 32-bit displays, high display resolution, and faster graphics performance. When you install VMware Tools, a virtual SVGA driver replaces the default VGA driver, which allows for only 640 X 480 resolution and 16-color graphics.
On Windows guest operating systems whose operating system is Windows Vista or later, the VMware SVGA 3D (Microsoft - WDDM) driver is installed. This driver provides the same base functionality as the SVGA driver, and it adds Windows Aero support.
Paravirtual SCSI driver
When you create a virtual machine, if you specify that you want the virtual machine to use a BusLogic adapter, the guest operating system uses the SCSI driver that VMware Tools provides. A VMware Paravirtual SCSI driver is included for use with Paravirtual SCSI devices. This driver for VMware Paravirtual SCSI adapters enhances the performance of some virtualized applications. Drivers for other storage adapters are either bundled with the operating system, or they are available from third-party vendors.
For example, Windows Server 2008 defaults to LSI Logic SAS, which provides the best performance for that operating system. In this case, the LSI Logic SAS driver provided by the operating system is used.
VMware supplies a special SCSI driver for virtual machines that are configured to use the BusLogic virtual SCSI adapter. Virtual machines do not need this driver if they do not need to access any SCSI devices or if they are configured to use the LSI Logic virtual SCSI adapter.
The driver is included as part of the VMware Tools package or comes bundled with VMware ESX/ ESXi. It is available on the host as a floppy image at /vmimages/floppies/vmscsi.flp. The driver can be used in Windows XP, Windows Server 2003, or Windows 2000.
VMXNet NIC drivers
The VMXNET and VMXNET3 networking drivers improve network performance. The set of drivers that are used depends on how you configure device settings for the virtual machine. Search the VMware Knowledge Base for information on which guest operating systems support these drivers.
When you install VMware Tools, a VMXNET NIC driver replaces the default vlance driver.
Mouse driver
VMware Tools User Guide
VMware, Inc. 11

The virtual mouse driver improves mouse performance. This driver is required if you use third-party tools such as Microsoft Terminal Services.
Audio driver
This sound driver is required for 64-bit Windows XP, 32-bit Windows Server 2003, 64-bit Windows Server 2003, Windows Server 2008, Windows 7, and Windows Vista guest operating systems.
Guest Introspection Driver
The two Guest Introspection drivers are the File Introspection driver and the Network Introspection driver. You can install the two drivers separately. When you install VMware Tools, by default, the Guest Introspection drivers are not installed.
n File Introspection Driver: The File Introspection driver uses the hypervisor to perform antivirus scans without a bulky agent. This strategy avoids resource bottlenecks and optimizes memory use.
n Network Introspection Driver: The Network Introspection driver supports NSX for vSphere Activity Monitoring.
Memory control driver
This driver is required for memory ballooning and is recommended if you use VMware vSphere. Excluding this driver hinders the memory management capabilities of the virtual machine in a vSphere deployment.
Modules and drivers that support making automatic backups of virtual machines
If the guest operating system is Windows Vista, Windows Server 2003, or other newer Windows operating systems, a Volume Shadow Copy Services (VSS) module is installed. For other, earlier Windows operating systems, the Filesystem Sync driver is installed. These modules allow external third-party back up software that is integrated with vSphere to create application-consistent snapshots. During the snapshot process, certain processes are paused and virtual machine disks are quiesced. The modules also support quiescing snapshot on Linux OS
VMCI and VMCI Sockets drivers
The Virtual Machine Communication Interface driver supports fast and efficient communication between virtual machines and the hosts they run on. Developers can write client-server applications to the VMCI Sock (vsock) interface to make use of the VMCI virtual device.
VMware drivers for Linux
The drivers for Linux are automatically installed during your operating system installation, eliminating the need to separately install drivers after OS installation. VMware actively maintains the source code for VMware Paravirtual drivers, VMXNET, VMXNET3 and kernel modules, and any Linux distributions creating new OS releases automatically include the latest VMware drivers.
Do not delete or replace existing inbox drivers for Linux that are distributed by your OS vendors. Deleting or replacing these drivers might cause conflict with future updates to the drivers. Contact your OS vendor or OS community for availability of specific updates to drivers.
VMware Tools User Guide
VMware, Inc. 12

See http://kb.vmware.com/kb/2073804 for information about availability, maintenance, and support policy for inbox drivers for Linux.
VMHGFS driver
If you use Workstation or Fusion, you can install the Shared Folders component. With Shared Folders, you can easily share files among virtual machines and the host computer. The VMHGFS driver is a file system redirector that allows file system redirection from the guest operating system to the host file system. This driver is the client component of the Shared Folders feature and provides an easy to use alternative to NFS and CIFS file sharing that does not rely on the network. For Linux distributions with kernel version 3.10 and later, a new FUSE based Shared Folders client is used as a replacement for the kernel mode client.
Appdefense
VMware Tools installation include the VMware AppDefense, a security management and monitoring solution. AppDefense agent can be installed on the guest virtual machine using the VMware Tools installer. However, VMware Tools cannot install the AppDefense component automatically. You need to install the component manually.
VMware User ProcessWith the VMware user process, you can use such features as copy and paste, drag and drop with VMware products that support these features.
In Linux, Solaris, Windows and FreeBSD guest operating systems, VMware Tools uses the VMware User process executable file that implements fit-guest-to-window feature.
The user process starts automatically when you log in to a Windows guest operating system. On Linux, the user process starts when you start a Desktop Environment session. The user process can also be started manually.
The program file for this process is called vmtoolsd.exe on Windows guest operating systems and vmtoolsd on Linux, Solaris, and FreeBSD guest operating systems. In POSIX, it is vmtoolsd with -n vmusr on command line interface. The user process supports the following tasks:
n Enables copy and paste of text between guest operating system and the vSphere Web Client or the Workstation, Fusion, or Player host operating system. For virtual machines that are used with Workstation or Fusion, you can copy and paste files between the host operating system and Windows, Linux, Solaris, and FreeBSD guest operating systems.
n On Linux, Solaris, Windows, and FreeBSD guest operating systems, grabs and releases the pointer if the SVGA driver is not installed.
n On Linux, Solaris, and FreeBSD guest operating systems, fits the screen display resolution of the guest to the screen resolution of the vSphere Web Client or the Workstation, Fusion, or Player host operating system, if running in full screen mode. If running in normal (windowed) mode, fits the screen resolution of the guest to the size of the window on the client or host.
VMware Tools User Guide
VMware, Inc. 13

n For virtual machines used with Workstation or Fusion, allows you to drag files between the host operating system and Windows, Linux, Solaris, and FreeBSD guest operating systems.
Using Open VM ToolsOpen VM Tools (open-vm-tools) is the open source implementation of VMware Tools for Linux guest operating systems.
The open-vm-tools suite is bundled with some Linux operating systems and is installed as a part of the OS, eliminating the need to separately install the suite on guest operating systems. All leading Linux vendors support the open-vm-tools suite on vSphere, Workstation, and Fusion, and bundle open-vm-tools with their product releases. For information about OS compatibility check for the open-vm-tools suite, see the VMware Compatibility Guide at http://www.vmware.com/resources/compatibility.
Note Use of open-vm-tools with a OS distribution which is not listed under VMware Compatibility Guide must be certified by VMware.
Bundling open-vm-tools with Linux OS releases reduces virtual machine downtime because all updates to the open-vm-tools suite are included with the OS maintenance patches and updates. You do not have to maintain separate maintenance cycles for open-vm-tools suite updates. This is also applicable for VMware guest operating system drivers.
In some cases, open-vm-tools is installed by default when you install your guest operating systems. In other cases, the open-vm-tools suite is not installed by default, unless specifically selected during installation.
Follow the installation instructions provided by your OS vendor for your specific release or check the partner Web site at http://partnerweb.vmware.com/GOSIG/home.html.
VMware fully supports open-vm-tools that are developed in collaboration with OS vendors and open source communities and recommends using open-vm-tools that are redistributed by your OS vendors.
Open VM Tools PackagesFor better managing guest operating systems, the open-vm-tools suite includes the following packages:
n The core open-vm-tools package contains the core open-vm-tools user space utilities, application programs, and libraries, including vmtoolsd, to help effectively manage communication between your host and guest OSs. This package includes features as, synchronizing guest OS clocks with the virtualization platform, transferring files between hosts and guests, sending heartbeat information from guest OSs to the virtualization infrastructure to support vSphere High Availability (HA), publishing resource utilization and networking information of the guest OSs to the virtualization platform, and so on.
VMware Tools User Guide
VMware, Inc. 14

n The open-vm-tools-desktop package is optional and includes additional user programs and libraries to improve the interactive functionality of desktop operations of your virtual machines. The package enables you to resize a guest display to match its host console window or the VMware Remote Console Window for vSphere. The package also allows you to copy and paste between host and guest OSs, as well as to drag and drop between guests and a host for the VMware Workstation and VMware Fusion products.
n The open-vm-tools-devel package contains libraries and additional documentation for developing vmtoolsd plug-ins and applications.
n The open-vm-tools-debuginfo package contains the source code for open-vm-tools and binary files. For the latest copy of the Open VM Tools source code, see the GitHub Web site at https://github.com/vmware/open-vm-tools.
List of operating systems with open-vm-tools
n Red Hat Enterprise Linux 7.0 and later releases
n SUSE Linux Enterprise 12 and later releases
n Ubuntu 14.04 and later releases
n CentOS 7 and later releases
n FreeBSD 10.3, 10.4 & 11.1
n Debian 7.x and later releases
n Oracle Linux 7 and later
n Fedora 19 and later releases
n openSUSE 11.x and later releases
Note To manually install open-vm-tools on a FreeBSD virtual machine, see FreeBSD 10.x and FreeBSD 11.x
.
Important If you use an open-vm-tools, the VMware Tools status is Guest Managed on the virtual machine Summary tab. The status Guest Managed means that you cannot use the vCenter Server to manage VMware Tools and you cannot use vSphere Update Manager to upgrade VMware Tools.
For information about the open-vm-tools support policy and availability, see the VMware knowledge base article at http://kb.vmware.com/kb/2073803.
VMware Tools User Guide
VMware, Inc. 15

Operating System Specific Packages for Linux Guest Operating SystemsFor vSphere deployments, VMware provides operating system specific packages (OSPs) as a packaging and distribution mechanism for VMware Tools. These VMware Tools OSPs are packaged using native package formats and standards such as rpm and deb.
Note Operating System Specific Packages are not provided for new Linux operating systems that have open-vm-tools. For information about compatibility support for guest operating system, see the VMware Compatibility Guide.
Using OSPs provides the following benefits:
n You can use the native update mechanisms of the guest operating system to download, install, and manage VMware Tools.
n You can upgrade to the latest version of VMware Tools without having to upgrade to the latest version of vSphere.
n Because VMware Tools OSPs follow the best practices and standards of the specific Linux operating system, OSPs use standard mechanisms for determining dependencies among packages. These mechanisms allow you to audit the packages on virtual machines with or without graphics components.
n You can use standard operating system tools to examine OSPs during VMware Tools installation. This process allows you to easily determine which components to install and to verify the validity of the packaging.
Important Use OSPs if you want to use native update mechanisms, rather than vCenter Server, to manage updates for VMware Tools. If you use an OSP, the VMware Tools status is Guest Managed on the virtual machine Summary tab. The status Guest Managed means that you cannot use the vCenter Server to manage VMware Tools and you cannot use vSphere Update Manager to upgrade VMware Tools.
For more information, go to the VMware Operating System Specific Packages Web site, at https://www.vmware.com/download/packages.html. For more information on installing OSPs, see the VMware Tools Installation Guide for Operating System Specific Packages for ESX/ESXi version 4.1 and later at https://packages.vmware.com/tools/docs/manuals/osp-esx-41-install-guide.pdf and ESXi versions 5.x and 6.x at https://packages.vmware.com/tools/docs/manuals/osp-esxi-51-install-guide.pdf
VMware Tools User Guide
VMware, Inc. 16

Installing VMware Tools 2Installing VMware Tools is part of the process of creating a new virtual machine, and upgrading VMware Tools is part of the process of keeping your virtual machine up to current standards. Although your guest operating systems can run without VMware Tools, many VMware features are not available until you install VMware Tools. When you install VMware Tools, the utilities in the suite enhance the performance of the guest operating system in your virtual machine and improve the management of your virtual machines.
For information about creating virtual machines, see the documentation for the applicable VMware product.
The installers for VMware Tools are ISO image files. The CD-ROM in your guest operating system detects the ISO image file. Each type of guest operating system, including Windows, Linux, and Mac OS X, has an ISO image file. When you select the command to install or upgrade VMware Tools, the virtual machine’s first virtual CD-ROM disk drive temporarily connects to the VMware Tools ISO file for your guest operating system.
If you are using VMware Fusion, Workstation Player, or Workstation Pro, you can use the Windows Easy Install or Linux Easy Install feature to install VMware Tools as soon as the operating system is finished installing.
If you are using VMware Fusion, Workstation Player, or Workstation Pro, the most recent versions of the ISO files are stored on a VMware Web site. When you select the command to install or upgrade VMware Tools, the VMware product determines whether it has downloaded the most recent version of the ISO file for the specific operating system. If the latest version was not downloaded or if no VMware Tools ISO file for that operating system was ever downloaded, you are prompted to download the file.
n VMware Tools installer from windows.iso automatically detects the windows version. It does not proceed with the installation on guest operating systems earlier than Windows Vista.
n VMware Tools installer from winPreVista.iso does not proceed with the installation on Windows Vista and later.
n VMware Tools installer from linux.iso does not proceed with installation on Linux guest operating system versions earlier than RHEL5, SLES 11, Ubuntu 10.04, and other Linux distributions with glibc version earlier than 2.5.
VMware, Inc. 17

n VMware Tools installer from darwinPre15.iso does not proceed with installation on MAC OS X guest operating systems versions 10.11 or later.
n VMware Tools installer from darwin.iso does not proceed with installation on MAC OS X guest operating systems versions earlier than 10.11.
Note On ESXi hosts, for guest operating systems that do not have the necessary VMware Tools ISOs bundled, users must set up the ProductLockerLocation variable on all the VMware Tools ISO images to manage VMware Tools on these guests. Attempts to upgrade or install without setting up the ProductLockerLocation variable fails with missing ISO error. For more information, see the VMware Knowledge base article at https://kb.vmware.com/kb/2129825.
The installation procedure varies, depending on the operating system. For information about installing or upgrading VMware Tools on your guest operating systems, see the topic about upgrading virtual machines in the Virtual Machine Administration Guide. For general instructions about installing VMware Tools, see the VMware Knowledge base article http://kb.vmware.com/kb/1014294.
This chapter includes the following topics:
n Disable Access Protection from the McAfee Antivirus Virus Scan Console
n Integration of VMware AppDefense with VMware Tools
n Automating VMware Tools Installation for Multiple Windows Virtual Machines
n Manually Installing VMware Tools on a Windows Virtual Machine
n Manually Installing VMware Tools on a Linux Virtual Machine
n Installing open-vm-tools
n Manually Installing VMware Tools in a macOS Virtual Machine
n Manually Installing VMware Tools on a Solaris Virtual Machine
Disable Access Protection from the McAfee Antivirus Virus Scan ConsoleAccess Protection has to be disabled in the McAfee Antivirus Scan Console before installing VMware Tools in a Windows guest operating system. For more information, see the VMware Knowledge Base article https://kb.vmware.com/kb/1009965
Prerequisites
n Power on the virtual machine
n Use McAfee Antivirus in Standard Mode
VMware Tools User Guide
VMware, Inc. 18

Procedure
1 Install VMware Tools before installing McAfee Antivirus on the Windows guest operating system.
Note McAfee Antivirus will, however, prevent VMware Tools upgrade if run in Maximum Protection mode.
2 Disable Access Protection from the McAfee Antivirus Virus Scan Console when either installing or upgrading VMware Tools.
a Select Start > Programs > McAfee > Virus Scan Console.
b Right-click the Access Protection icon in the Tasks window and select Disable from the pop-up menu.
What to do next
n Install VMware Tools.
n Re-activate Access Protection when your VMware Tools upgrade or installation is complete.
Integration of VMware AppDefense with VMware ToolsVMware Tools installation includes the VMware AppDefense, a security management, and monitoring solution. This data center security solution is based on application control, detection, and response. AppDefense is divided into two parts giappdef.sys, and glxgi.sys. glxgi.sys driver ensures Guest-Integrity and giappdef.sys driver ensures Process and Network attestation. This enables AppDefense drivers to be upgraded without reboot, thus keeping system protection intact. The new Guest-Integrity driver will be up on next reboot. AppDefense agent can be installed on the guest virtual machine using the VMware Tools installer. Virtual machines with VMware Tools installed are monitored and managed when they start on an ESXi host that has the solution installed. However, VMware Tools cannot install the AppDefense component automatically. The component must be installed manually.
Prerequisites
n If you have installed VMware AppDefense version older than 1.2.1.0 using VMware AppDefense installer, uninstall the older version.
n Ensure that the guest virtual machine is hosted on ESXi 6.5 or later.
n This feature is available on a fresh installation or custom installation of VMware Tools. It is not available by default.
n Ensure that the guest virtual machine has a supported version of Windows installed. AppDefense component supports the following Windows 64-bit guest operating systems running on a ESXi server.
n Windows 2008 R2
n Windows 2012
n Windows 2012 R2
n Windows 2016
VMware Tools User Guide
VMware, Inc. 19

n Windows 2019
Procedure
1 Follow the procedure Manually Installing VMware Tools on a Windows Virtual Machine.
2 After you select the Custom setup in step 4, choose Appdefense from the list.
3 Follow the remaining steps in the procedure.
Results
VMware AppDefense component is installed in your guest operating system.
Exclude AppDefense Component During InstallationInstalling VMware Tools without the AppDefense driver.
Procedure
1 For a silent installation, run the command.
setup64.exe /s /v"/qn ADDLOCAL=All
REMOVE=AppDefense,FileIntrospection,NetworkIntrospection
2 In a manual installation,
AppDefense is not part of the typical install option.
AppDefense is unselected by default in the custom install option.
3 Using the Full Install option, AppDefense is installed during installation,
AppDefense must be removed manually using the Add/Remove Programs option in your operating system.
a Select VMware Tools.
b Right click and select Change. VMware Tools installer is launched.
c Select Modify.
d Click Next.
e Navigate to AppDefense node in the tree.
f Right click and select Entire feature will be unavailable.
g Click Next.
h Click Change.
i Click Finish.
Results
AppDefense driver is not installed while installing VMware Tools.
VMware Tools User Guide
VMware, Inc. 20
Automating VMware Tools Installation for Multiple Windows Virtual MachinesIf you are installing VMware Tools in multiple virtual machines with Windows guest operating systems, you can automate its installation and specify options for the components to include or exclude.
Prerequisites
n Power on the virtual machine.
n Log in to the guest operating system as an administrator.
n If you plan to use the setup.exe command at the command line to run the VMware Tools installation, edit the virtual machine settings to connect the virtual CD/DVD drive to the VMware Tools ISO image. In VMware Workstation Pro and Workstation Player, the windows.iso file is on the host in the directory where you installed Workstation Pro or Workstation Player.
n If you plan to use MSI arguments to specify options regarding the silent installation, go to the Windows Installer page on the MSDN Web site to familiarize yourself with the syntax. You can use these arguments with the setup.exe command or place them in the vCenter Server dialog box for automatic installations and upgrades.
n To prevent some VMware Tools components from being installed, familiarize yourself with the VMware Tools component names so that you can specify which components to exclude. See Names of VMware Tools Components Used in Silent Installations.
n If you are installing VMware Tools from a beta or release candidate of a VMware product, suppress prompts about unsigned drivers. See Suppress Prompts About Unsigned Drivers on Windows Operating Systems Before... and Add VMware as a Trusted Publisher to Suppress Driver Prompts....
Procedure
1 In the vSphere Web Client inventory, select the host, cluster, or datacenter and click the Virtual Machines tab.
2 Select the virtual machines, right-click and select Guest OS > Install VMware Tools.
3 Provide the installation or upgrade configuration information.
Suppress Prompts About Unsigned Drivers on Windows Operating Systems Before VistaIf you are installing a beta or RC version of VMware Tools in a Windows Server 2003 or earlier guest operating system, you can use a computer properties setting to suppress prompts that interfere with automatic installation of VMware Tools.
VMware Tools User Guide
VMware, Inc. 21

The version of VMware Tools included in a beta or release candidate version of a VMware product usually has some drivers that are signed only by VMware. If you are installing one of these versions in many virtual machines that run Windows Server 2003 or earlier guest operating systems, or if you plan to install VMware Tools from the command line, you can suppress prompts about unsigned drivers. If you do not suppress the prompts, during a VMware Tools installation, a message box appears several times and requires you to click Continue Anyway to complete the installation.
Prerequisites
n Power on the virtual machine.
n Log in to the guest operating system as an administrator.
Procedure
1 In the Windows Server 2003 or earlier guest operating system, in the Start menu, right-click My Computer and select Properties.
2 In the System Properties dialog box, click the Hardware tab and click Driver Signing.
3 In the Driver Signing Options dialog box, click Ignore, click OK, and click OK again.
Results
When you run the VMware Tools installer, no prompts appear in the guest operating system.
What to do next
Install VMware Tools.
Add VMware as a Trusted Publisher to Suppress Driver PromptsIf you are installing a beta or RC version of VMware Tools in a Windows Vista or later guest operating system, you can add a VMware certificate to suppress prompts that interfere with automatic installation of VMware Tools.
The version of VMware Tools included in a beta or release candidate version of a VMware product usually has some drivers that are signed only by VMware. If you are installing one of these versions in many virtual machines that run Windows Vista or later guest operating systems, or if you plan to install VMware Tools from the command line, add a VMware security certificate to the trusted publishers group. If you do not add the VMware certificate, during a VMware Tools installation, a message box appears several times and prompts you to install device software from VMware.
Prerequisites
n Power on the virtual machine.
n Log in to the guest operating system as an administrator.
n Obtain a copy of the certmgr.exe application and copy it to the guest operating system on which you plan to install VMware Tools. The certmgr.exe application is included in the Windows SDK
Note This is applicable only for Beta or RC version of VMware Tools.
VMware Tools User Guide
VMware, Inc. 22

Procedure
1 Use the certificate export wizard to create a VMware certificate file.
a Locate a signed VMware file, such as a VMware .exe or .sys file.
b Right-click the file and select Properties.
c Click the Digital Signatures tab and select View Certificate.
d Click the Details tab and click Copy to File.
e Follow the prompts and name the exported certificate vmware.cer.
2 Copy the exported VMware certificate to the guest operating system on which you plan to install VMware Tools.
3 In the guest operating system, run the certmgr.exe command to add the VMware certificate to the trusted publishers group.
certmgr.exe -add vmware.cer -c -s -r localMachine TrustedPublisher
Results
When you run the VMware Tools installer, no prompts appear in the guest operating system.
What to do next
Install VMware Tools.
Names of VMware Tools Features Used in Silent InstallationsIn Windows virtual machines, when running an automatic installation or running an installation of VMware Tools using the command line, you can specify which VMware Tools components to install.
Because VMware Tools contains so many components, if you do not want to install particular components, you specify which ones to exclude rather than which ones to include. The syntax is ADDLOCAL=ALL REMOVE=component. The valid values for VMware Tools components are listed in the following table.
Component names are case-sensitive. Not all components are installed on all operating systems.
VMware Tools User Guide
VMware, Inc. 23

Table 2-1. VMware Tools Component Values
Valid Component Values Description
DriversAudio
Audio driver for 64-bit operating systems and Windows Vista and later systems.
BootCamp
Driver for Mac BootCamp support.
MemCtl
VMware memory control driver. Use this driver if you plan to use this virtual machine in a vSphere environment. Excluding this feature hinders the memory management capabilities of the virtual machine running in a vSphere environment.
Mouse
VMware mouse driver. Excluding this feature decreases mouse performance in your virtual machine.
PVSCSI
Driver for VMware Paravirtual SCSI adapters, which enhance the performance of some virtualized applications.
SVGA
VMware SVGA driver. Excluding this feature limits the display capabilities of your virtual machine.
Sync
Filesystem Sync driver, which enables backup applications to create application-consistent snapshots. This driver ensures that no I/O is written during snapshot creation. This driver is used if the guest operating system is earlier than Windows Server 2003. Newer operating systems use the VSS driver.
ThinPrint
Driver that enables printers added to the host operating system to appear in the list of available printers in the virtual machine. This virtual printing feature does not require any additional printer drivers to be installed in the virtual machine.
Note VMware Tools does not support ThinPrint features for vSphere 5.5 and later
VMCI
Virtual Machine Communication Interface driver. This driver allows virtual machines to communicate with the hosts on which they run without using the network. Developers can write client-server applications to the VMCI Sock (vsock) interface to make use of the VMCI virtual device.
Hgfs
VMware shared folders driver. Use this driver if you plan to use this virtual machine with VMware Workstation, Player, or Fusion. Excluding this feature prevents you from sharing a folder between your virtual machine and the host system.
VMXNet
VMware VMXnet networking driver.
VMware Tools User Guide
VMware, Inc. 24

Table 2-1. VMware Tools Component Values (continued)
Valid Component Values Description
VMXNet3
Next-generation VMware VMXnet networking driver for virtual machines that use virtual hardware version 7 and higher. For more information, see the VMware Knowledge Base article 1001805. VMXNET 3 adds several new features, such as multiqueue support (also known as Receive Side Scaling in Windows), IPv6 offloads, and MSI/MSI-X interrupt delivery. VMXNET 3 is not related to VMXNET or VMXNET 2. Receive Side Scaling is enabled by default. VMware Tools 10.3.0 adds receive data ring support for Windows VMXNET3 driver.
Virtual hardware version 7 corresponds to ESX/ESXi 4.x compatibility.
FileIntrospection
NSX File Introspection driver, vsepflt.sys. The first of the two guest introspection drivers. You can install it separately, without installing the NSX Network Introspection driver.
NetworkIntrospection
NSX Network Introspection driver, vnetflt.sys. The second of the two guest introspection drivers. VMware Tools 10.2.5 supports vnetWFP driver for Windows 7 and later.
VSS
Driver for creating automatic backups. This driver is used if the guest operating system is Windows Vista, Windows Server 2003, or other newer operating system. Linux and older Windows operating systems use the Filesystem Sync driver.
AppDefense
VMware AppDefense component. The AppDefense components consists of glxgi.sys,giappdef.sys kernel mode drivers and gisvc.exe user mode service.
ToolboxPerfmon
Driver for WMI performance logging.
Important One way to determine the component values to use is to run the interactive VMware Tools installer with full logging turned on, select the components that you want installed, and then search the log files for the ADDLOCAL and REMOVE properties. The log files show the names used by the program. The following command runs the interactive installer with full logging turned on:
Setup.exe /s /v"/qn /l*v ""%TEMP%\vmmsi.log"""
Manually Installing VMware Tools on a Windows Virtual MachineGuest operating system Windows 2000 and earlier, Windows XP, Windows Server 2003, Windows Vista, and later support VMware Tools.
VMware Tools User Guide
VMware, Inc. 25

Prerequisites
n Power on the virtual machine.
n Verify that the guest operating system is running.
n For vSphere virtual machines, determine whether you have the latest version of VMware Tools. In the vSphere Client inventory, select the virtual machine and click the Summary tab.
n For Workstation Player, Fusion, and Workstation Pro virtual machines, if you connected the virtual machine’s virtual CD/DVD drive to an ISO image file when you installed the operating system, change the setting so that the virtual CD/DVD drive is configured to autodetect a physical drive.
The autodetect setting enables the virtual machine's first virtual CD/DVD drive to detect and connect to the VMware Tools ISO file for a VMware Tools installation. This ISO file looks like a physical CD to your guest operating system. Use the virtual machine settings editor to set the CD/DVD drive to autodetect a physical drive.
n Log in as an administrator unless you are using an older Windows operating system. Any user can install VMware Tools in a Windows 95, Windows 98, or Windows ME guest operating system. For operating systems later than these, you must log in as an administrator.
n If you use vSphere and plan to install the Guest Introspection Thin Agent driver, see the system requirements listed in the vShield Quick Start Guide. The vShield component is not installed by default. You must perform a custom installation and include that component.
n The AppDefense component is not installed by default. You must perform a custom installation and include that component.
Procedure
1 Select the menu command to mount the VMware Tools virtual disk on the guest operating system.
VMware Product Action
vSphere Client (HTML5) Right-click the virtual machine and select Guest OS > Install (or Upgrade) Tools
vSphere Client Inventory > Virtual Machine > Guest > Install/Upgrade VMware
vSphere Web Client Right-click the virtual machine and select Guest OS > Install (or Upgrade) VMware Tools
Fusion Virtual Machine > Install (or Upgrade) VMware Tools
Workstation Pro VM > Install (or Upgrade) VMware Tools
Workstation Player Player > Manage > Install (or Upgrade) VMware Tools
2 If you are using vCenter Server and are performing an upgrade or reinstallation, in the Install/Upgrade VMware Tools dialog box, select Interactive Tools Installation or Interactive Tools Upgrade and click OK.
The process starts by mounting the VMware Tools virtual disc on the guest operating system.
VMware Tools User Guide
VMware, Inc. 26

3 If you are installing VMware Tools for the first time, click OK on the Install VMware Tools information page.
If autorun is enabled for the CD-ROM drive on the guest operating system, the VMware Tools installation wizard starts.
If autorun is not enabled, to manually launch the wizard, click Start > Run and enter D:\setup.exe, where D: is your first virtual CD-ROM drive. Use D:\setup64.exe for 64-bit Windows guest operating system.
4 Follow the on-screen prompts.
If you use vSphere, to install nondefault components, such as the Guest Introspection Thin Agent driver, select the Custom setup.
Note If NSX Guest Introspection (GI) drivers are installed and you are using ‘Custom’ installation option in the Tools installer for upgrade, ensure that all installed GI drivers are upgraded during upgrade.
5 If the New Hardware wizard appears, follow the prompts and accept the defaults.
Note If you are installing a beta or RC version of VMware Tools and you see a warning that a package or driver is not signed, click Install Anyway to complete the installation.
6 When prompted, reboot the virtual machine.
Results
If you are using vCenter Server, the VMware Tools label on the Summary tab changes to OK.
What to do next
If you upgraded VMware Tools as part of a vSphere upgrade, next determine whether to upgrade the virtual machines in your environment. To review and compare the hardware available for different compatibility levels, see the vSphere Virtual Machine Administration documentation.
Manually Installing VMware Tools on a Linux Virtual MachineFor Linux virtual machines, you manually install VMware Tools from the command line. For later Linux distributions, use the integrated open-vm-tools version.
Prerequisites
For more information on OS compatibility for open-vm-tools, see the VMware Compatibility Guide at https://www.vmware.com/resources/compatibility/search.php.
n Power on the virtual machine.
n Verify that the guest operating system is running.
VMware Tools User Guide
VMware, Inc. 27

n Because the VMware Tools installer is written in Perl, verify that Perl is installed in the guest operating system.
n For vSphere virtual machines, determine whether you have the latest version of VMware Tools. In the vSphere Client inventory, select the virtual machine and click the Summary tab.
Procedure
1 Select the menu command to mount the VMware Tools virtual disk on the guest operating system.
VMware Product Action
vSphere Client (HTML5) Right-click the virtual machine and select Guest OS > Install (or Upgrade) Tools
vSphere Client Inventory > Virtual Machine > Guest > Install/Upgrade VMware
vSphere Web Client Right-click the virtual machine and select Guest OS > Install (or Upgrade) VMware Tools
Fusion Virtual Machine > Install (or Upgrade) VMware Tools
Workstation Pro VM > Install (or Upgrade) VMware Tools
Workstation Player Player > Manage > Install (or Upgrade) VMware Tools
2 In the virtual machine, open a terminal window.
3 Run the mount command with no arguments to determine whether your Linux distribution automatically mounted the VMware Tools virtual CD-ROM image.
If the CD-ROM device is mounted, the CD-ROM device and its mount point are listed in a manner similar to the following output:
/dev/cdrom on /mnt/cdrom type iso9660 (ro,nosuid,nodev)
4 If the VMware Tools virtual CD-ROM image is not mounted, mount the CD-ROM drive.
a If a mount point directory does not already exist, create it.
mkdir /mnt/cdrom
Some Linux distributions use different mount point names. For example, on some distributions the mount point is /media/VMware Tools rather than /mnt/cdrom. Modify the command to reflect the conventions that your distribution uses.
b Mount the CD-ROM drive.
mount /dev/cdrom /mnt/cdrom
Some Linux distributions use different device names or organize the /dev directory differently. If your CD-ROM drive is not /dev/cdrom or if the mount point for a CD-ROM is not /mnt/cdrom, modify the command to reflect the conventions that your distribution uses.
5 Change to a working directory, for example, /tmp.
cd /tmp
VMware Tools User Guide
VMware, Inc. 28

6 (Optional) Delete any previous vmware-tools-distrib directory before you install VMware Tools.
The location of this directory depends on where you placed it during the previous installation. Often this directory is placed in /tmp/vmware-tools-distrib.
7 List the contents of the mount point directory and note the file name of the VMware Tools tar installer.
ls mount-point
8 Uncompress the installer.
tar zxpf /mnt/cdrom/VMwareTools-x.x.x-yyyy.tar.gz
The value x.x.x is the product version number, and yyyy is the build number of the product release.
9 If necessary, unmount the CD-ROM image.
umount /dev/cdrom
If your Linux distribution automatically mounted the CD-ROM, you do not need to unmount the image.
10 Run the installer and configure VMware Tools as a root user
cd vmware-tools-distrib
sudo ./vmware-install.pl
Usually, the vmware-config-tools.pl configuration file runs after the installer file finishes running. If you attempt to install a tar installation over an RPM installation, or the reverse, the installer detects the previous installation and must convert the installer database format before continuing.
Note For newer Linux distributions, users are prompted to choose the integrated open-vm-tools.
11 Follow the prompts to accept the default values, if appropriate for your configuration.
12 Follow the instructions at the end of the script.
Depending on the features you use, these instructions can include restarting the X session, restarting networking, logging in again, and starting the VMware User process. You can alternatively reboot the guest operating system to accomplish all these tasks.
Results
If you are using vCenter Server, the VMware Tools label on the Summary tab changes to OK.
What to do next
If you upgraded VMware Tools as part of a vSphere upgrade, next determine whether to upgrade the virtual machines in your environment. To review and compare the hardware available for different compatibility levels, see the vSphere Virtual Machine Administration documentation.
VMware Tools User Guide
VMware, Inc. 29

Installing open-vm-toolsMost Linux distributions include open-vm-tools and some distributions install open-vm-tools by default. Most users will find open-vm-tools provided by Linux distrubutions to meet most of their needs. Note that different distributions update their version of open-vm-tools at different times. Users can update their open-vm-tools from the package repository provided by the Linux distribution.
Installation instructions would vary depending on the package management system used by the distribution. Sometimes another package repository can be configured to install a newer version from the OS vendor. For detailed instructions, refer to the documentation of the OS vendor.
Generally, open-vm-tools is supported for OSs that use three different package management systems:
n Ubuntu, Debian and other OSes from this family use apt to install Debian (*.deb) packages
n Redhat, Fedora and CentOS use dnf or yum to install RPM (*.rpm) packages
n SuSE Linux Enterprise (SLE) and OpenSuSE use zypper to install RPM (*.rpm) packages
All distributions split the package into a system and a desktop component. The latter is useful on systems that have a graphical UI (X11, Wayland, and so on). The package names are 'open-vm-tools' and 'open-vm-tools-desktop'. SLE and OpenSuSE ship another package 'libvmtools' as a dependency. The package management system will automatically install this dependency when 'open-vm-tools' or 'open-vm-tools-desktop' are installed
Prerequisites
Like installing any other software on the guest, set up the package repository properly for the guest.
Procedure
1 Ubuntu, Debian, and related
a Make sure the package index is updated:
sudo apt-get update
b The command to install and upgrade are the same. If the VM has a GUI (X11, and so on), install or upgrade open-vm-tools-desktop:
sudo apt-get install open-vm-tools-desktop
c Otherwise, install open-vm-tools:
sudo apt-get install open-vm-tools
2 RHEL, Fedora and CentOS
a If the VM has a GUI (X11, and so on), install or upgrade open-vm-tools-desktop:
sudo yum install open-vm-tools-desktop
VMware Tools User Guide
VMware, Inc. 30

b Otherwise, install open-vm-tools:
sudo yum install open-vm-tools
3 SLE and OpenSuSE
a If the VM has a GUI (X11, and so on), install or upgrade open-vm-tools-desktop:
zypper install open-vm-tools-desktop
b Otherwise, install open-vm-tools:
zypper install open-vm-tools
Manually Installing VMware Tools in a macOS Virtual MachineFor macOS virtual machines you install or upgrade VMware Tools using an installer assistant.
If you use VMware Fusion or ESXi on a computer with an Apple label, you can create Mac OS X Server (10.5 or later) virtual machines and install VMware Tools.
Prerequisites
n Power on the virtual machine.
n Verify that the guest operating system is running.
Procedure
1 Select the menu command to mount and open the VMware Tools virtual disc on the guest operating system.
VMware Product Menu Command
vSphere Client Inventory > Virtual Machine > Guest > Install/Upgrade VMware Tools and select Interactive Tools Installation or Interactive Tools Upgrade
vSphere Web Client Right-click the virtual machine in the vCenter inventory and select All vCenter Actions > Guest OS > Install/Upgrade VMware Tools
Fusion Virtual Machine > Install (or Upgrade) VMware Tools
2 Open Install VMware Tools on the VMware Tools virtual disc, follow the prompts in the installer assistant, and click OK.
Results
The virtual machine restarts to have VMware Tools take effect.
VMware Tools User Guide
VMware, Inc. 31

Manually Installing VMware Tools on a Solaris Virtual MachineFor Solaris virtual machines, you manually install or upgrade VMware Tools by using the command line.
Prerequisites
n Power on the virtual machine.
n Verify that the guest operating system is running.
n Because the VMware Tools installer is written in Perl, verify that Perl is installed in the guest operating system.
n For vSphere virtual machines, determine whether you have the latest version of VMware Tools. In the vSphere Client inventory, select the virtual machine and click the Summary tab.
Procedure
1 Select the menu command to mount the VMware Tools virtual disk on the guest operating system.
VMware Product Action
vSphere Client (HTML5) Right-click the virtual machine and select Guest OS > Install (or Upgrade) Tools
vSphere Client Inventory > Virtual Machine > Guest > Install/Upgrade VMware
vSphere Web Client Right-click the virtual machine and select Guest OS > Install (or Upgrade) VMware Tools
Fusion Virtual Machine > Install (or Upgrade) VMware Tools
Workstation Pro VM > Install (or Upgrade) VMware Tools
Workstation Player Player > Manage > Install (or Upgrade) VMware Tools
2 In the virtual machine, log in to the guest operating system as root and open a terminal window.
3 If the Solaris volume manager does not mount the CD-ROM under /cdrom/vmwaretools, restart the volume manager.
/etc/init.d/volmgt stop
/etc/init.d/volmgt start
4 Change to a working directory, for example, /tmp.
cd /tmp
5 Extract VMware Tools.
gunzip -c /cdrom/vmwaretools/vmware-solaris-tools.tar.gz | tar xf -
6 Run the installer and configure VMware Tools.
cd vmware-tools-distrib
./vmware-install.pl
VMware Tools User Guide
VMware, Inc. 32

Usually, the vmware-config-tools.pl configuration file runs after the installer file finishes running.
7 Follow the prompts to accept the default values, if appropriate for your configuration.
8 Follow the instructions at the end of the script.
Depending on the features you use, these instructions can include restarting the X session, restarting networking, logging in again, and starting the VMware User process. You can alternatively reboot the guest operating system to accomplish all these tasks.
Results
If you are using vCenter Server, the VMware Tools label on the Summary tab changes to OK.
What to do next
If you upgraded VMware Tools as part of a vSphere upgrade, next determine whether to upgrade the virtual machines in your environment. To review and compare the hardware available for different compatibility levels, see the vSphere Virtual Machine Administration documentation.
VMware Tools User Guide
VMware, Inc. 33

Upgrading VMware Tools 3You can upgrade VMware Tools manually, or you can configure virtual machines to check for and install newer versions of VMware Tools.
The guest operating system checks the version of VMware Tools when you power on a virtual machine. The status bar of your virtual machine displays a message when a new version is available.
For vSphere virtual machines,
A newer version of Tools is available for this VM
is displayed when the installed version of VMware Tools is out of date.
In Windows virtual machines, you can set VMware Tools to notify you when an upgrade is available. If this notification option is enabled, the VMware Tools icon in the Windows taskbar includes a yellow caution icon when a VMware Tools upgrade is available.
To install a VMware Tools upgrade, you can use the same procedure that you used for installing VMware Tools the first time. Upgrading VMware Tools means installing a new version.
For Windows and Linux guest operating systems, you can configure the virtual machine to automatically upgrade VMware Tools. Although the version check is performed when you power on the virtual machine, on Windows guest operating systems, the automatic upgrade occurs when you power off or restart the virtual machine. The status bar displays the message Installing VMware Tools ... when an upgrade is in progress. The procedure is mentioned below.
Note Upgrading VMware Tools on Windows guest operation systems automatically installs the WDDM graphics drivers. The WDDM graphics driver allows the sleep mode available in guest OS power settings to adjust the sleep options. For example, you can use the sleep mode setting Change when the computer sleeps to configure your guest OS to automatically go to sleep mode after a certain time or prevent your guest OS from automatically switching to sleep mode after being idle for some time.
For vSphere virtual machines, you can use one of the following processes to upgrade multiple virtual machines at the same time.
n Log in to vCenter Server, select a host or cluster, and on the Virtual Machines tab specify the virtual machines on which to perform a VMware Tools upgrade.
VMware, Inc. 34

n Use vSphere Lifecycle Manager to perform an orchestrated upgrade of virtual machines at the folder or data center level.
Some features in a particular release of a VMware product might depend on installing or upgrading to the version of VMware Tools included in that release. Upgrading to the latest version of VMware Tools is not always necessary. Newer versions of VMware Tools are compatible with several host versions. To avoid unnecessary upgrades, evaluate whether the added features and capabilities are necessary for your environment.
Table 3-1. Virtual Machine Compatibility Options
Compatibility Description
ESXi 7.0 and later This virtual machine (hardware version 17) is compatible with ESXi 7.0 and later.
ESXi 6.7 Update 2 and later This virtual machine (hardware version 15) is compatible with ESXi 6.7 Update 2 and ESXi 7.0.
ESXi 6.7 and later This virtual machine (hardware version 14) is compatible with ESXi 6.7, ESXi 6.7 Update 2, and ESXi 7.0.
ESXi 6.5 and later This virtual machine (hardware version 13) is compatible with ESXi 6.5, ESXi 6.7, ESXi 6.7 Update 2, and ESXi 7.0.
ESXi 6.0 and later This virtual machine (hardware version 11) is compatible with ESXi 6.0, ESXi 6.5, ESXi 6.7, ESXi 6.7 Update 2, and ESXi 7.0.
ESXi 5.5 and later This virtual machine (hardware version 10) is compatible with ESXi 5.5, ESXi 6.0, ESXi 6.5, ESXi 6.7, ESXi 6.7 Update 2, and ESXi 7.0.
ESXi 5.1 and later This virtual machine (hardware version 9) is compatible with ESXi 5.1, ESXi 5.5, ESXi 6.0, ESXi 6.5, ESXi 6.7, ESXi 6.7 Update 2, and ESXi 7.0.
ESXi 5.0 and later This virtual machine (hardware version 8) is compatible with ESXi 5.0, ESXi 5.1, ESXi 5.5, ESXi 6.0, ESXi 6.5, ESXi 6.7, ESXi 6.7 Update 2, and ESXi 7.0.
ESX/ESXi 4.x and later This virtual machine (hardware version 7) is compatible with ESX/ESXi 4.x, ESXi 5.0, ESXi 5.1, ESXi 5.5, ESXi 6.0, ESXi 6.5, ESXi 6.7, ESXi 6.7 Update 2, and ESXi 7.0.
ESX/ESXi 3.5 and later This virtual machine (hardware version 4) is compatible with ESX/ESXi 3.5, ESX/ESXi 4.x, ESXi 5.1, ESXi 5.5, ESXi 6.0, ESXi 6.5, ESXi 6.7, ESXi 6.7 Update 2, and ESXi 7.0. It is also compatible with VMware Server 1.0 and later. ESXi 5.0 does not allow creation of virtual machines with ESX/ESXi 3.5 and later compatibility, but you can run such virtual machines if they were created on a host with different compatibility.
For more information, see the VMware Compatibility Guide at http://www.vmware.com/resources/compatibility.
This chapter includes the following topics:
n Configure Virtual Machines to Automatically Upgrade VMware Tools
n Manually upgrading VMware Tools in virtual machines
n Performing an Automatic Upgrade of VMware Tools
n VMware Tools Installer Logging to the Host
VMware Tools User Guide
VMware, Inc. 35

Configure Virtual Machines to Automatically Upgrade VMware ToolsYou can configure virtual machines to automatically update VMware Tools.
Note Automatic VMware Tools upgrade is not supported for virtual machines with Solaris or NetWare guest operating systems.
Prerequisites
n Verify that the virtual machines have a version of VMware Tools shipped with ESX/ESXi 3.5 or later installed.
n Verify that the virtual machines are hosted on ESX/ESXi 3.5 or later and vCenter Server 3.5 or later.
n Verify that the virtual machines are running a Linux or Windows guest OS that ESX/ESXi 3.5 or later and vCenter Server 3.5 or later support.
Procedure
1 Right-click the virtual machine and click Edit Settings.
2 Click the VM Options tab and select VMware Tools.
3 Select Check and upgrade VMware Tools before each power on.
4 Click OK to save your changes and close the dialog box.
Results
The next time the virtual machine is powered on, it checks the ESX/ESXi host for a newer version of VMware Tools. If one is available, it is installed and the guest operating system is restarted (if required).
Manually upgrading VMware Tools in virtual machinesYou can upgrade VMware Tools in one or more virtual machines by using the vSphere Web Client.
Procedure
1 Start the vSphere Web Client and log in to the vCenter Server.
2 Select the virtual machines.
a Select a datacenter, folder, cluster, resource pool, or host.
b Click the VMs tab.
3 Power on the virtual machines to upgrade.
4 Right-click your selections.
5 Select Guest OS > Install/Upgrade VMware Tools and click OK.
6 Select Interactive Upgrade or Automatic Upgrade and click Upgrade.
VMware Tools User Guide
VMware, Inc. 36

7 If you chose the interactive upgrade for a virtual machine with a Linux guest operating system, reboot the operating system by running the reboot command from a command-line prompt so that you can use the new network modules.
Note a This upgrade procedure is not applicable for operating systems that are installed with OSPs or
Open VM Tools
b If NSX Guest Introspection (GI) drivers are installed and you are using ‘Custom’ installation option in the Tools installer for upgrade, ensure that all installed GI drivers are upgraded during upgrade.
Results
VMware Tools are upgraded.
Performing an Automatic Upgrade of VMware ToolsWhen you start an automatic upgrade of VMware Tools, you do not need to perform any operations in the guest operating system that is running on the virtual machine. The automatic upgrade uninstalls the previous version of VMware Tools, installs the latest version that is available for your ESXi host.
Automatic VMware Tools upgrade is supported only for virtual machines with Windows guest operating system.
Prerequisites
The following requirements are for each virtual machine in the upgrade:
n Power on the virtual machine.
n Verify that the guest operating system is running.
Procedure
1 Select Automatic Tools Upgrade.
VMware Tools User Guide
VMware, Inc. 37

2 (Optional) In the Advanced Options text box, enter advanced options for the Windows or Linux guest operating systems.
Option Action
Microsoft Windows Guest Operating Systems
For the Windows guest operating system:
n Enter /s /v "/qn" /l "Microsoft_Windows_location\filename.log" to perform a silent upgrade of VMware Tools and create a log file in the specified location on the guest operating system.
Linux Guest Operating Systems For the Linux guest operating system:
n Enter --default to perform a silent upgrade of VMware Tools and install the bin, lib, and doc files in the default /usr directory.
This is the default behavior.
n Enter --prefix=binary_location,lib_location,doc_location to perform a silent upgrade of VMware Tools and install thebin, lib, and doc files in the specified locations.
3 Click OK.
Results
The VMware Tools label on the Summary tab changes to OK.
VMware Tools Installer Logging to the HostWhen GSS support team collects the vm-support bundle from the customers, the installer log files are also included in it. The installer logs reside in the virtual machine as well as the host. The installer log files are critical for diagnosis and triaging of installation related issues.
The Windows installer log files are all guest only and go to the %Temp% folder of the user account which launches the bootstrapper setup application.
The log files generated are:
Install log (vminst.log): Contains VMware controlled components log output.
MSI log (vmmsi.log): Contains Microsoft MSI controlled log output. To enable or disable MSI logging output, see the Microsoft knowledge base article KB 22330.
Prerequisites
Install the VMware Tools version 11.0.0 and vSphere 7.0 (and later).
VMware Tools User Guide
VMware, Inc. 38

Procedure
1 For new installation or uninstallation or upgrade, vmx.log.guest.level option is used to enable or disable the installer logging to the host.
The allowed values to be set for this option are listed below:
Value Description
vmx.log.guest.level = "off" Logging to host is disabled.
This is the default value.
vmx.log.guest.level = "error" The installer logs vminst.log and vmmsi.log are not sent to the host. Both the installer logs remain in the virtual machine.
vmx.log.guest.level = "warning" The installer logs vminst.log and vmmsi.log are not sent to the host. Both the installer logs remain in the virtual machine.
vmx.log.guest.level = "notice" The installer logs vminst.log and vmmsi.log are not sent to the host. Both the installer logs remain in the virtual machine.
vmx.log.guest.level = "info" The installer log vminst.log is sent to the host but vmmsi.log remains in the virtual machine.
vmx.log.guest.level = "verbose" Both the installer logs vminst.log and vmmsi.log are sent to the host.
vmx.log.guest.level = "trivia" Both the installer logs vminst.log and vmmsi.log are sent to the host.
Note Guest admin can use "/mg" or "LOGMODE=G" command line options to control and suppress logging to the host.
For example:
setup.exe /mg
setup.exe /v "LOGMODE=G"
setup.exe /S /v "/qn LOGMODE=G"
setup.exe /S /mg /v "/qn LOGMODE=G"
VMware Tools User Guide
VMware, Inc. 39

2 For auto upgrade, install-vmxGuestLogDisabled is read and parsed instead of vmxGuestLogDisabled in tools.conf file.
The allowed values to be set for this setting are listed as below:
Value Description
install-vmxGuestLogDisabled =
true
The installer logs are not sent to the host during auto upgrade.
This is the default value.
install-vmxGuestLogDisabled =
false
The installer logs are sent to the host during auto upgrade.
Note These settings go into the logging section. For example:
Under the [logging] group,
[logging]
install-vmxGuestLogDisabled = false
3 vMotion Impact:
a New Host to Old Host:
For VMware Tools 11.0.0 and later versions, before vMotion, logs went to host guest log. After vMotion, logs stopped going to the host.
For versions earlier to VMware Tools 11.0.0, before vMotion, logs went to guest %TEMP% folder only. After vMotion, logs go to guest %TEMP% folder only.
b Old Host to New Host:
For VMware Tools 11.0.0 and later versions, before vMotion, logs went to guest %TEMP% folder only. After vMotion, logs go to guest %TEMP% folder only.
For versions earlier to VMware Tools 11.0.0, before vMotion, logs went to guest %TEMP% folder only. After vMotion, logs go to guest %TEMP% folder only.
Note vSphere administrator can set the VM option to redirect to host guest log after vMotion.
VMware Tools User Guide
VMware, Inc. 40

Configuring VMware Tools Components 4VMware Tools provides drivers and services that enhance the performance of virtual machines and make several vSphere features easy to use. When VMware Tools is installed, you can configure many of these utilities and change their characteristics.
You can use one of the following methods to configure VMware Tools.
n The command-line configuration utility in the guest operating system. You can modify VMware Tools settings, shrink virtual disks, and connect and disconnect virtual devices.
n Custom scripts.
n Menu commands and dialog boxes.
n By editing the configuration file tools.conf
For information about installing and configuring VMware Tools in other VMware products, see the documentation for your product. For information about VMware Tools in hosts that are provisioned with vSphere Auto Deploy, see VMware Knowledge Base article http://kb.vmware.com/kb/2004018.
This chapter includes the following topics:
n Configuration File Location
n Configuring Network Interface Information
n Exclude Specific File Systems from Quiesced Snapshots
n Security Considerations for Configuring VMware Tools
n Using the VMware Tools Configuration Utility
n Configuring Automatic Upgrade and Installation or Removal of a Component
Configuration File LocationVMware Tools uses a configuration file called tools.conf to configure different operations such as logging, upgrade, guest info, and so on. Admins can configure VMware Tools by editing this tools.conf file.
Configuration File Location
VMware, Inc. 41

The table lists down the location of configuration file for various Guest OSs:
Guest OS Path [1]
Windows XP, Windows Server 2000, and Windows Server 2003 C:\Documents and Settings\All Users\Application
Data\VMware\VMware Tools\tools.conf [2]
Windows Vista, Windows 7, and Windows Server 2008 [3] C:\ProgramData\VMware\VMware Tools\tools.conf [4]
Linux, Solaris and FreeBSD /etc/vmware-tools/tools.conf
FreeBSD with open-vm-tools 10.1.x or later /usr/local/share/vmware-tools/tools.conf
Mac OS X /Library/Application Support/VMware Tools/
tools.conf
1 If the configuration file does not exist, create it.
2 The Application Data folder is hidden.
3 You can edit this file as Administrator.
For example: Right click Start > All Programs > Accessories > Notepad and select Run as administrator.
4 The Program Data folder is hidden
Note There is no need to restart the tools service when the file is edited. The tools service will check this file every 5 seconds (by default) for changes and apply them.
Example Configuration FileVMware Tools installs an example configuration file in the same directory as the location for tools.conf. This file lists the available options with possible values but commented out (with a leading '#' character), together with a description. If you want to change the options, uncomment them and copy this file to tools.conf, or copy parts of it into the tools.conf file.
Configuring Network Interface InformationYou can exclude network interfaces from GuestInfo and set primary and low priority network interfaces. The configuration option is added to the tools.conffile.
Exclude specific interfaces from GuestInfoTo exclude specific interfaces from GuestInfo, set the option exclude-nics to a comma separated list of network interfaces.
Example
[guestinfo]
exclude-nics=docker*,veth*
The configuration will exclude all interfaces with the names matching the patterns docker* and veth* from GuestInfo.
VMware Tools User Guide
VMware, Inc. 42

Set primary and low priority interfacesThe options primary-nicsand low-priority-nics accept a list of comma separated patterns for interface names which are considered as primary or low priority network interfaces. This will cause the interface information to be put on top of the list for primary interfaces, and to the bottom for low priority interfaces.
Example
[guestinfo]
primary-nics=eth1
The configuration ensures that the IP address for eth1 will be sorted on top of the list of IP addresses.
Example
[guestinfo]
primary-nics=eth*
This configuration ensures that any address in the interfaces matching eth* is sorted on top of the list of IP addresses.
Example
[guestinfo]
low-priority-nics=eth*
This configuration ensures that any address in the interfaces matching eth* is sorted at the bottom of the list of IP addresses.
Note After the limit of the number of interfaces to be reported is reached, low priority interfaces are the first to be skipped.
Exclude Specific File Systems from Quiesced SnapshotsOn the Linux guest operating systems, the configuration setting excludedFileSystems allows file systems to be excluded from a quiesced snapshot operation. This setting, if specified, is listed in the section of vmbackup of the tools.conf file.
The value of excludedFileSystems is a comma-separated list of glob-style patterns specifying the file systems to be excluded from quiesced snapshots. The patterns may use '*' (wildcard) to represent any string of characters and '?" (joker) to represent any single character. Note that the characters represented by these patters, '*' and '?" may include any characters, including '/'
Procedure
1 Open the tools.conf file from /etc/vmware-tools/tools.conf in your Linux guest operating system.
2 Add a vmbackup section in the file, if it does not exist.
[vmbackup]
VMware Tools User Guide
VMware, Inc. 43

3 In the vmbackup section, set excludedFileSystems to the preferred list of patterns.
excludedFileSystems = <list of patterns>
Example
For example, this setting excludes the file system mounted at /fs1 from a quiesced snapshot operation.
[vmbackup]
excludedFileSystems = /fs1
As another example, this setting excludes all the file systems whose mount points start with /fs or /dev from a quiesced snapshot operation.
[vmbackup]
excludedFileSystems = /fs*,/dev/*
Security Considerations for Configuring VMware ToolsSome VMware Tools settings might expose security risks. For example, VMware Tools enables you to connect virtual devices such as serial and parallel ports to virtual machines. A connected device might be a potential channel of attack. To harden a virtual machine and reduce security risks as much as possible, disable the VMware Tools features that might be vulnerable to security threats.
For complete information about securely deploying VMware vSphere in a production environment, including security recommendations for hosts, virtual machines, management components, and a networking infrastructure, see the vSphere Hardening Guide. VMware Tools settings relate only to the virtual machine aspect of a deployment.
Virtual machines are encapsulated in a small number of files. Of these, the configuration file (.vmx file) governs the performance of the virtual hardware and other settings. You can use several methods to see and modify the configuration settings:
n Use the vSphere Web Client to edit virtual machine settings. In the vSphere Web Client, editing these configuration parameters is an advanced option in the virtual machine Edit Settings dialog box.
n Use the vSphere Host Client to edit virtual machine settings. In the vSphere Host Client, editing these configuration parameters is an advanced option in the virtual machine Edit Settings dialog box.
n Use a vSphere API-based tool, such as Power CLI, to view and modify .vmx parameters.
After you edit a setting, the change does not take effect until you restart the virtual machine.
You can eliminate several potential threats by setting parameters appropriately in the corresponding VMware Tools parameters to set in the virtual machine's .vmx file. The defaults for many of these parameters are already set to protect virtual machines from these threats.
Threats Associated with Unprivileged User Accounts
Copy and paste
VMware Tools User Guide
VMware, Inc. 44

By default, the ability to copy and paste text, graphics, and files is disabled, as is the ability to drag and drop files. When this option is enabled, you can copy and paste rich text, and depending on the VMware product, graphics and files from your clipboard to the guest operating system in a virtual machine. That is, when the console window of a virtual machine gains focus, nonprivileged users and processes running in the virtual machine can access the clipboard on the computer where the console window is running. To avoid risks associated with this feature, retain the following .vmx settings, which disable copying and pasting:
isolation.tools.copy.disable = "TRUE"
isolation.tools.paste.disable = "TRUE"
Threats Associated with Virtual Devices
Connecting and modifying devices
By default, the ability to connect and disconnect devices is disabled. When this feature is enabled, users and processes without root or administrator privileges can connect devices such as network adapters and CD-ROM drives, and they can modify device settings. That is, a user can connect a disconnected CD-ROM drive and access sensitive information on the media that is in the drive. A user can also disconnect a network adapter to isolate the virtual machine from its network, which is a denial of service. To avoid risks associated with this feature, retain the following .vmx settings, which disable the ability to connect and disconnect devices or to modify device settings:
isolation.device.connectable.disable = "TRUE"
isolation.device.edit.disable = "TRUE"
Threats Associated with Virtual Machine Information Flow
VMX file size
By default the configuration file is limited to a size of 1 MB because uncontrolled size for the file can lead to a denial of service if the datastore runs out of disk space. Informational messages are sometimes sent from the virtual machine to the .vmx file. These setinfo messages define virtual machine characteristics or identifiers by writing name-value pairs to the file. You might need to increase the size of the file if large amounts of custom information must be stored in the file. The property name is tools.setInfo.sizeLimit, and you specify the value in kilobytes. Retain the following .vmx setting:
tools.setInfo.sizeLimit = "1048576"
Sending performance counters into PerfMon
You can integrate virtual machine performance counters for CPU and memory into PerfMon for Linux and Microsoft Windows guest operating systems. This provides detailed information about the physical host available to the guest operating system. A malicious user could potentially use this
VMware Tools User Guide
VMware, Inc. 45

information to perform further attacks on the host. By default this feature is disabled. Retain the following .vmx setting to prevent host information from being sent to the virtual machine:
tools.guestlib.enableHostInfo = "FALSE"
This setting blocks some but not all metrics. If you set this property to FALSE, the following metrics are blocked:
n GUESTLIB_HOST_CPU_NUM_CORES
n GUESTLIB_HOST_CPU_USED_MS
n GUESTLIB_HOST_MEM_SWAPPED_MB
n GUESTLIB_HOST_MEM_SHARED_MB
n GUESTLIB_HOST_MEM_USED_MB
n GUESTLIB_HOST_MEM_PHYS_MB
n GUESTLIB_HOST_MEM_PHYS_FREE_MB
n GUESTLIB_HOST_MEM_KERN_OVHD_MB
n GUESTLIB_HOST_MEM_MAPPED_MB
n GUESTLIB_HOST_MEM_UNMAPPED_MB
Features not exposed in vSphere that could cause vulnerabilities
Because VMware virtual machines run in many VMware products in addition to vSphere, some virtual machine parameters do not apply in a vSphere environment. Although these features do not appear in vSphere user interfaces, disabling them reduces the number of vectors through which a guest operating system could access a host. Use the following .vmx setting to disable these features:
isolation.tools.unity.push.update.disable = "TRUE"
isolation.tools.ghi.launchmenu.change = "TRUE"
isolation.tools.ghi.autologon.disable = "TRUE"
isolation.tools.hgfsServerSet.disable = "TRUE"
isolation.tools.memSchedFakeSampleStats.disable = "TRUE"
isolation.tools.getCreds.disable = "TRUE"
Using the VMware Tools Configuration UtilityThe VMware Tools configuration utility is a command-line interface that you can use in the guest operating system to modify VMware Tools settings, shrink virtual disks, and connect and disconnect virtual devices.
The VMware Tools configuration utility provides a command-line interface for functionality that was previously available only in the VMware Tools control panel. The name of this program depends on the guest operating system.
VMware Tools User Guide
VMware, Inc. 46

Table 4-1. VMware Tools Configuration Utilities for Guest Operating Systems
Guest Operating System Utility
Windows VMwareToolboxCmd.exe
Mac OS X vmware-tools-cli
Because the VMware Tools installer does not modify any PATH environment variables on Mac OS X operating systems, you must type ./ before the command.
Linux, FreeBSD, Solaris vmware-toolbox-cmd
Use the utility's help command to display complete usage information and syntax.
The VMware Tools configuration utility is included in the following VMware products:
n VMware vSphere 4.1 and later
n VMware Workstation 7.0 and later
n VMware Fusion 3.0 and later
n VMware Player 3.0 and later
n VMware ACE 2.6 and later
Configuring Time Synchronization Between Guest and Host Operating SystemsWhen you enable periodic time synchronization, VMware Tools sets the time of the guest operating system to be the same as the time of the host.
After time synchronization occurs, VMware Tools checks once every minute to determine whether the clocks on the guest and host operating systems still match. If not, the clock on the guest operating system is synchronized to match the clock on the host.
If the clock on the guest operating system falls behind the clock on the host, VMware Tools moves the clock on the guest forward to match the clock on the host. If the clock on the guest operating system is ahead of the clock on the host, VMware Tools causes the clock on the guest to run more slowly until the clocks are synchronized.
Native time synchronization software, such as Network Time Protocol (NTP) for Linux and the Mac OS X, or Microsoft Windows Time Service (Win32Time) for Windows, is typically more accurate than VMware Tools periodic time synchronization. Use only one form of periodic time synchronization in your guests. If you are using native time synchronization software, disable VMware Tools periodic time synchronization.
Regardless of whether you turn on VMware Tools periodic time synchronization, time synchronization occurs after certain operations:
n When you start the VMware Tools daemon, such as during a reboot or power on operation
n When you resume a virtual machine from a suspend operation
n After you revert to a snapshot
n After you shrink a disk
VMware Tools User Guide
VMware, Inc. 47

When the operating system starts or restarts, and when you first turn on periodic time synchronization, if the time.synchronize.tools.startup.backward parameter is not enabled in the .vmx file, the guest clock is set to forward. For other events, synchronization is forward in time.
To disable time synchronization completely, you must edit the configuration file (.vmx file) of the virtual machine and set several synchronization properties to FALSE.
Prerequisites
n Disable other periodic time synchronization mechanisms. For example, some guests might have NTP or Win32Time clock synchronization turned on by default.
n If you plan to script the commands used in this procedure and need to know what the exit codes are, see Exit Codes for the VMware Tools Configuration Utility.
Note Mac OS X guest operating systems use NTP and do not become out of sync with the host. For Mac OS X guest operating systems, there is no need to turn on VMware Tools time synchronization.
Procedure
1 Open a command prompt or terminal in the guest operating system.
2 Change to the VMware Tools installation directory.
Operating System Default Path
Windows C:\Program Files\VMware\VMware Tools
Linux and Solaris /usr/sbin
FreeBSD /usr/local/sbin
Mac OS X /Library/Application Support/VMware Tools
3 Type the command to determine whether time synchronization is enabled.
utility-name timesync status
For utility-name use the guest-specific program name.
Operating System Program Name
Windows VMwareToolboxCmd.exe
Linux, Solaris, and FreeBSD vmware-toolbox-cmd
MAC OS X vmware-tools-cli
4 Type the command to enable or disable periodic time synchronization.
utility-name timesync subcommand
For subcommand, use enable or disable.
VMware Tools User Guide
VMware, Inc. 48

Results
The VMware Tools service enables or disables periodic time synchronization, as you specified. Disabling periodic time synchronization does not disable all VMware Tools time synchronization.
What to do next
If you need to keep a fictitious time in a virtual machine, such that the clock in the guest operating system is never synchronized with that on the host, disable time synchronization completely for the guest operating system.
Disabling Time SynchronizationA virtual machine occasionally synchronizes time with the host even if you do not turn on periodic time synchronization. To completely disable time synchronization, you must set some properties in the virtual machine configuration file.
Prerequisites
Power off the virtual machine.
Procedure
1 Open the configuration (.vmx) file of the virtual machine in a text editor.
2 Add lines for the time synchronization properties and set the properties to FALSE.
tools.syncTime = "FALSE"
time.synchronize.continue = "FALSE"
time.synchronize.restore = "FALSE"
time.synchronize.resume.disk = "FALSE"
time.synchronize.shrink = "FALSE"
time.synchronize.tools.startup = "FALSE"
3 Save and close the file.
What to do next
Power on the virtual machine.
Use Device Connect or DisconnectYou can connect and disconnect removable devices such as floppy drives, DVD/CD-ROM drives, ISO images, USB devices, sound adapters, and network adapters.
n Some devices cannot be shared between the host and guest operating systems or between two guest operating systems. For example, only one virtual machine or the host can access the physical CD-ROM drive at any one time.
n The controls for connecting and disconnecting devices might not be available, depending on whether your system administrator has enabled them.
VMware Tools User Guide
VMware, Inc. 49

You can run the configuration utility to connect and disconnect virtual devices. For security reasons, this ability is disabled by default. To connect or disconnect devices, you must first change the settings in the configuration file.
Prerequisites
If you plan to script commands to connect or disconnect a virtual device, and for the exit codes are, see Exit Codes for the VMware Tools Configuration Utility.
Procedure
1 Configure the virtual machine to allow devices to connect or disconnect.
a Edit the configuration (.vmx) file of the virtual machine with a text editor.
b If the following properties are not listed in the file, add them and set them to FALSE.
isolation.device.connectable.disable = "FALSE"
isolation.device.edit.disable = "FALSE"
c Save and close the file.
2 Open a command prompt or terminal in the guest operating system.
3 Change to the VMware Tools installation directory.
Operating System Default Path
Windows C:\Program Files\VMware\VMware Tools
Linux and Solaris /usr/sbin
FreeBSD /usr/local/sbin
Mac OS X /Library/Application Support/VMware Tools
4 Type utility-name device list to list available devices.
For utility-name, use the guest-specific application name.
Operating System Utility Name
Windows VMwareToolboxCmd.exe
Linux, Solaris, and FreeBSD vmware-toolbox-cmd
Mac OS X vmware-tools-cli
5 (Optional) Type the command to determine whether a device is connected.
utility-name device status device-name
For device-name, use one of the names displayed when you used the list subcommand.
VMware Tools User Guide
VMware, Inc. 50

6 Type the command to connect or disconnect the device.
utility-name device device-name subcommand
Option Action
device-name Use one of the names displayed when you used the list subcommand.
subcommand Use enable or disable.
Results
The device is connected or disconnected, as you specified.
Using Custom VMware Tools ScriptsYou can associate custom scripts with power operations.
When VMware Tools is installed, one or more default scripts run on the guest whenever you change the power state of the virtual machine. You change the power state by using menu commands or by clicking the Suspend, Resume, Power On, and Power Off buttons. For example, when you power off a virtual machine, by default the poweroff-vm-default script runs.
Default VMware Tools ScriptsVMware Tools includes one or more default scripts for each power state. The default script behavior depends in part on the guest operating system.
Microsoft Windows Guest Operating Systems
On most Microsoft Windows guest operating systems, the default script that runs when you suspend a virtual machine releases the IP address of the virtual machine. The default script that runs when you resume a virtual machine renews the IP address of the virtual machine. This behavior affects only virtual machines configured to use DHCP.
On Windows guest operating systems, the default scripts are located in the Program Files\VMware\VMware Tools folder.
Note You cannot run scripts on NetWare, Windows NT, Me, Windows 98, and Windows 95 guest operating systems.
Linux, Mac OS X, Solaris, and Free BSD Guest Operating Systems
On most Linux, Mac OS X, Solaris, and FreeBSD guest operating systems, the default script that runs when you suspend a virtual machine stops networking for the virtual machine. The default script that runs when you resume a virtual machine starts networking for the virtual machine.
On Linux, Solaris, and FreeBSD guest operating systems, the default scripts are located in the /etc/vmware-tools directory. On Mac OS X operating systems the default scripts are located in the /Library/Application Support/VMware Tools directory.
VMware Tools User Guide
VMware, Inc. 51

Table 4-2. Default VMware Tools Scripts
Script Name Description
poweroff-vm-default Runs when the virtual machine is being powered off or reset.
Has no effect on networking for the virtual machine.
poweron-vm-default Runs when the virtual machine is being powered on rather than resumed.
Also runs after virtual machine restarts.
Has no effect on networking for the virtual machine.
resume-vm-default Runs when the virtual machine is resumed after it was suspended.
On Windows guest operating systems, if the virtual machine is configured to use DHCP, this script renews the IP address of the virtual machine.
On Linux, Mac OS X, Solaris, and FreeBSD guest operating systems, this script starts networking for the virtual machine.
suspend-vm-default Runs when the virtual machine is being suspended.
On Windows guest operating systems, if the virtual machine is configured to use DHCP, this script releases the IP address of the virtual machine.
On Linux, Mac OS X, Solaris, and FreeBSD , this script stops networking for the virtual machine.
For information about how to configure power operations, see the documentation for the VMware product you are using.
Use Custom VMware Tools Scripts in Windows GuestsOn Windows guest operating systems, you can write scripts to automate guest operating system operations when you change the power state of a virtual machine.
For Windows guest operating systems, you can write new scripts or modify default scripts, save them with new names, and configure VMware Tools to use your custom script instead of the default script.
Scripts are run by the VMware Tools service, or daemon (vmtoolsd). Because vmtoolsd is run as System on Windows, the scripts are run in a separate session from the session of the logged-in user. The VMware Tools daemon does not detect desktop sessions, which means that it cannot display graphical applications. Do not attempt to use custom scripts to display graphical applications.
Note You cannot run scripts on NetWare, Windows NT, Me, Windows 98, and Windows 95 guest operating systems.
Prerequisites
n Familiarize yourself with the default VMware Tools scripts. See Default VMware Tools Scripts .
n If you plan to script commands and need to know what the exit codes are, see Exit Codes for the VMware Tools Configuration Utility.
VMware Tools User Guide
VMware, Inc. 52

Procedure
1 Write a new script or modify default scripts and save them as .bat files with new names.
The default scripts for power-on and power-off operations are placeholders only. These scripts are located in the Program Files\VMware\VMware Tools directory.
The scripts for suspend and resume operations contain a line that releases or renews the IP address for the virtual machine. You must add this line first when you write custom scripts for these operations.
Default Script Required IP Address Line
suspend @%SYSTEMROOT%\system32\ipconfig /release
resume @%SYSTEMROOT%\system32\ipconfig /renew
2 Open a command prompt in the guest operating system.
3 Change directories to the VMware Tools installation directory.
The default installation directory is C:\Program Files\VMware\VMware Tools.
4 Type the command to enable the script.
VMwareToolboxCmd.exe script script-name enable
5 Type the command to use the custom script that you created.
VMwareToolboxCmd.exe script script-name set script-path
For script-path, use the full path to the file, such as C:\Temp\poweron-my-vm.bat.
6 Type the command to verify that the custom script that you specified is now being used.
VMwareToolboxCmd.exe script script-name current
Results
The VMware Tools service runs the script whenever the specified power operation occurs.
Using Custom Scripts in Operating Systems Other Than WindowsOn Linux, Mac OS X, Solaris, and FreeBSD guest operating systems, you can write scripts to automate guest operating system operations when you change the power state of a virtual machine.
For Linux, Mac OS X, Solaris, and FreeBSD guests, you can write scripts and place them in a certain directory, and then VMware Tools runs your scripts in addition to the default scripts. For power-on and resume operations, the default scripts run before the custom scripts. For suspend and power-off, the default scripts run after the custom scripts. This way, VMware Tools stops services only after the custom scripts finish their work, and restores the same services before the custom scripts attempt to use the services.)
VMware Tools User Guide
VMware, Inc. 53

Scripts are run by the VMware Tools service, or daemon (vmtoolsd). Because vmtoolsd is run as root on Linux, Solaris, and FreeBSD, the scripts are run in a separate session from the session of the logged-in user. The VMware Tools daemon does not detect desktop sessions, which means that it cannot display graphical applications. Do not attempt to use custom scripts to display graphical applications.
Prerequisites
n Familiarize yourself with the default VMware Tools scripts. See Default VMware Tools Scripts .
n On Linux, Mac OS X, Solaris, and FreeBSD guest operating systems, if you plan to test, edit, or disable the running of a script, log in as root.
n If you plan to script commands and need to know what the exit codes are, see Exit Codes for the VMware Tools Configuration Utility.
Procedure
1 Log in to the guest operating system as root.
2 Write the custom scripts and place them in the correct directory, as instructed by the comments in the default script files for each power operation.
Guest Operating System Directory
Linux, Solaris, FreeBSD /etc/vmware-tools
Mac OS X /Library/Application Support/VMware Tools
Do not make changes to the default scripts.
Results
The VMware Tools service runs the script whenever the specified power operation occurs.
Disable a VMware Tools ScriptDefault scripts for suspending and resuming a virtual machine are written to work together. If you disable the script for one of these actions, you must also disable the script for the other action.
Note You cannot run scripts on NetWare, Windows NT, Me, Windows 98, and Windows 95 guest operating systems.
Prerequisites
On Linux, Solaris, and FreeBSD guest operating systems, to test, edit, or disable the running of a script, log in as root.
Procedure
1 Open a command prompt or terminal in the guest operating system.
VMware Tools User Guide
VMware, Inc. 54

2 Change to the VMware Tools installation directory.
Operating System Default Path
Windows C:\Program Files\VMware\VMware Tools
Linux and Solaris /usr/sbin
FreeBSD /usr/local/sbin
Mac OS X /Library/Application Support/VMware Tools
3 Type the command to disable the script.
utility-name script script-name disable
Option Action
utility-name On Windows Use VMwareToolboxCmd.exe.
utility-name On Linux, Solaris, and FreeBSD
Use vmware-toolbox-cmd.
utility-name On MAC OS Use vmware-tools-cli.
script-name Use power, resume, suspend, or shutdown.
4 (Optional) If you disabled the script for suspending a virtual machine, repeat this procedure for resuming the virtual machine.
5 (Optional) If you disabled the script for resuming a virtual machine, also disable the script for suspending the virtual machine.
Retrieving Status Information About the Virtual MachineYou can view information about host time and CPU speed. For virtual machines hosted in a vSphere environment, you can view additional information about memory and CPU reservations and limits.
Prerequisites
n Determine the status information to display. See Subcommands for the stat Command .
n If you plan to script commands and need to know what the exit codes are, see Exit Codes for the VMware Tools Configuration Utility.
Procedure
1 Open a command prompt or terminal in the guest operating system.
2 Change to the VMware Tools installation directory.
Operating System Default Path
Windows C:\Program Files\VMware\VMware Tools
Linux and Solaris /usr/sbin
VMware Tools User Guide
VMware, Inc. 55

Operating System Default Path
FreeBSD /usr/local/sbin
Mac OS X /Library/Application Support/VMware Tools
3 Type the command to display the status information.
utility-name stat subcommand
Option Action
utility-name (On Windows) Use VMwareToolboxCmd.exe.
utility-name (On Linux, Solaris, and FreeBSD)
Use vmware-toolbox-cmd.
utility-name (On Mac OS X) Use vmware-tools-cli.
subcommand Use hosttime or, speed, one of the subcommands available for virtual machines hosted in a vSphere environment.
Subcommands for the stat CommandYou can use the vmware-toolbox-cmd help stat command to display information such as host time and CPU speed. Additional subcommands are available for virtual machines in a vSphere environment.
Table 4-3. Subcommands for the stat Command
Subcommand Name Description
hosttime Displays the date and time on the host.
speed Displays the CPU speed, in MHz.
Exit Codes for the VMware Tools Configuration UtilityYou can use exit codes to integrate the VMware Tools configuration utility commands with a scripting tool.
Table 4-4. Exit Codes
Code Number Applicable Command Description
0 All commands The command was successful.
1 All commands A error occurred.
For the shrink command, 1 indicates that although shrinking is enabled, the shrink command cannot be carried out.
64 All commands The command-line argument is not valid.
66 script The file name does not exist.
69 device and stat For the device command, 69 indicates that the specified device does not exist. Use the list subcommand to display valid names of devices.
For the stat command, 69 indicates that the program could not communicate with the host (EX_UNAVAILABLE).
VMware Tools User Guide
VMware, Inc. 56

Table 4-4. Exit Codes (continued)
Code Number Applicable Command Description
75 stat The host does not support the query, perhaps because the host is not an ESX/ESXi host (EX_TEMPFAIL).
77 All commands Permission error occurred
guestinfo VariablesYou can use the guestinfo variables to query information such as version and build information.
For guestinfo samples-related PowerCLI scripts, see PowerCLI-Example-Scripts
Table 4-5. guestinfo Variables for VMware Tools
Variable Name Description
guestinfo.vmtools.description Reports the version description.
guestinfo.vmtools.versionString Reports the version string.
guestinfo.vmtools.versionNumber Reports the version number.
guestinfo.vmtools.buildNumber Reports the build number.
guestinfo.toolsInstallErrCode Reports the error code of last VMware Tools installation.
Note VMware Tools installation and upgrade on Windows often requires a reboot the guest operating system for the changes to take effect. If a reboot has not occurred, the guestinfo variable guestinfo.toolsInstallErrCode is set 3010.
guestinfo.driver.[driver name].version
For example,
guestinfo.driver.pvscsi.version
guestinfo.driver.vmhgfs.version
guestinfo.driver.vmxnet3.version
Reports the running version of the driver.
1.3.10.0
11.0.34.0
1.8.3.0
Configuring appInfoThe appInfo plugin collects the information about running applications inside the guest and publishes the information to a guest variable.
Procedure
1 Retrieving the data: The data collected by appInfo plugin is retrieved as follows:
n From inside the guest
Linux guest
n vmtoolsd --cmd “info-get guestinfo.appInfo”
n vmware-rpctool “info-get guestinfo.appInfo”
VMware Tools User Guide
VMware, Inc. 57

Windows guest
n rpctool.exe “info-get guestinfo.appInfo”
2 Changing the poll-interval: The appInfo plugin captures the information in every 30 minutes by default. Guest admin can configure this poll-interval at anytime as follows:
n Linux
vmware-toolbox-cmd config set appinfo poll-interval <new value in seconds>
n Windows
VMwareToolboxCmd.exe config set appinfo poll-interval <new value in seconds>
3 Disabling the appInfo plugin: Guest admin can disable the appInfo plugin as follows:
n Linux guest
vmware-toolbox-cmd config set appinfo disabled true or
vmware-toolbox-cmd config set appinfo poll-interval 0
n Windows guest
VMwareToolboxCmd.exe config set appinfo disabled true or
VMwareToolboxCmd.exe config set appinfo poll-interval 0
Configuring Automatic Upgrade and Installation or Removal of a ComponentThe guest admin can control the automatic upgrade, installation or removal of a component using the configuration options provided in tools.conf file of VMware Tools .
Procedure
1 Automatic Upgrade: The guest admin can control automatic upgrade using the allow-upgrade option.
The allow-upgrade option controls whether automatic upgrades (or re-installations) are allowed or not. This option has the values:
n allow-upgrade=true: Enables automatic upgrade of VMware Tools.
This is the default value.
n allow-upgrade=false: Disables automatic upgrade of VMware Tools.
Note The allow-upgrade option affects all the auto upgradable tools.
VMware Tools User Guide
VMware, Inc. 58

2 Add or Remove a Feature: The guest admin can control adding or removing a feature from VMware Tools using the following options:
n allow-add-feature: This option controls whether adding a feature from VMware Tools is allowed or not. This option has the values:
n allow-add-feature=true: Enables adding a feature from VMware Tools.
This is the default value.
n allow-add-feature=false: Disables adding a feature from VMware Tools.
n allow-remove-feature: This option controls whether removing a feature from VMware Tools is allowed or not. This option has the values:
n allow-remove-feature=true: Enables removing a feature from VMware Tools.
This is the default value.
n allow-remove-feature=false: Disables removing a feature from VMware Tools.
Note a The allow-add-feature and allow-remove-feature options affect Windows tools only.
b If the guest admin disables the automatic upgrade option (allow-upgrade=false), the feature modification options (allow-add-feature and allow-remove-feature) get disabled as well.
VMware Tools User Guide
VMware, Inc. 59

Configuring Customer Experience Improvement Program 5When you choose to participate in the Customer Experience Improvement Program (CEIP), VMware receives anonymous information to improve the quality, reliability, and functionality of VMware products and services.
This chapter includes the following topics:
n Categories of Information That VMware Receives
n Join the Customer Experience Improvement Program in the vSphere Web Client
Categories of Information That VMware ReceivesThis product participates in VMware's Customer Experience Improvement Program ("CEIP").
Details regarding the data collected through CEIP and the purposes for which it is used by VMware are set forth at the Trust & Assurance Center at http://www.vmware.com/trustvmware/ceip.html. To join or leave the CEIP for this product, see .
Join the Customer Experience Improvement Program in the vSphere Web ClientYou can choose to join your vCenter Server to the Customer Experience Improvement Program (CEIP), or leave the CEIP at any time. To leave and rejoin your host to the CEIP, see the vSphere Single Host Management - VMware Host Client documentation.
Prerequisites
Verify that you are a member of the [email protected] group.
Procedure
1 Log in to the vCenter Server instance as a member of [email protected] group by using the vSphere Web Client.
2 On the vSphere Web Client Home page, under Administration, click Customer Experience Improvement Program.
VMware, Inc. 60

3 Click Join to enable the CEIP or Leave to disable the Program.
VMware Tools User Guide
VMware, Inc. 61

Troubleshooting VMware Tools Installation and Upgrade Issues 6VMware Tools installation and Upgrade issues.
This chapter includes the following topics:
n Installing or Upgrading to VMware Tools 10.3.0
Installing or Upgrading to VMware Tools 10.3.0VMware Tools 10.3.0 depends on and ships Microsoft Visual C++ 2017 Redistributable version 14.0. While preparing the system for VMware Tools 10.3.0 installation, Microsoft Visual C++ 2017 Redistributable is installed on the system as a prerequisite.
Problem
When installing or upgrading to VMware Tools 10.3.0, different symptoms might be encountered as described:
n Installing or upgrading to VMware Tools 10.3.0 on Windows versions before Windows 10 might fail with an error message if Windows OS level pre-requisites are not met.
n Installing or upgrading to VMware Tools 10.3.0 on Windows versions before Windows 10 may appear stuck with "VMware Product Installation" dialog box carrying "Preparing 'VMware Tools' for installation..." message.
n Installing or upgrading to VMware Tools 10.3.0 on Windows versions before Windows 10 asks for restarting the system without completing the install or upgrade.
n Installing or upgrading to VMware Tools 10.3.0 on Windows versions after Windows 10 asks for restarting the system without completing the install or upgrade.
Cause
Since VMware Tools 10.3.0 depends on and ships Microsoft Visual C++ 2017 Redistributable version 14.0, it requires the Windows operating system to be at a certain service pack level. Microsoft Visual C++ 2017 Redistributable also includes Windows Update KB2999226.
Installing Windows Update KB2999226 on the system may take a while and may also need a system restart depending on the state of the system as mentioned in the article Update for Universal C Runtime in Windows
VMware, Inc. 62

The installation might take a long time as described in the article Stuck while installing Visual Studio 2015 (Update for Microsoft Windows KB2999226)
Note VMware tries to ensure that all external links provided are correct at the time of inclusion on the website but does not guarantee the accuracy of such information. VMware provides these links merely as a convenience. Third-party URLs might change. If you find a URL in VMware documentation that is out of date, provide feedback on the VMware Docs website. You might be able to locate a third-party document by searching from the third-party home page.
NOTE: This issue applies to only Windows Vista, Windows 7, Windows 8, Windows 8.1, Windows Server 2008, Windows Server 2008 R2, Windows Server 2012, and Windows Server 2012 R2.
Windows operating system might need a restart for different reasons
n For pre-Windows 10 versions it might be either due to KB2999226 or due to the presence of an existing older version of Microsoft Visual C++ 2017 Redistributable DLL on the system that is already loaded by other applications.
n For Windows 10 and later, the latter reason is a common cause of system restart.
Solution
1 Keep your Windows operating system up-to-date with latest updates.
2 Install the Microsoft Visual C++ 2017 Redistributable manually before installing or upgrading VMware Tools to version 10.3.0.
3 Alternatively, install Windows Update KB2999226 manually before installing or upgrading VMware Tools, as it reduces some of the issues for Windows versions before Windows 10.
4 Update the Windows operating system, Microsoft Visual C++ 2017 Redistributable and other Microsoft applications before installing or upgrading to VMware Tools 10.3.0.
5 When the VMware Tools installation or upgrade is invoked with "REBOOT=ReallySuppress" argument, system might require a manual restart for completing Microsoft Visual C++ 2017 Redistributable installation. Reattempt the VMware Tools installation or upgrade after restarting the Windows system. vSphere Client can detect this situation by noticing no change in VMware Tools version and "guestinfo.toolsInstallErrCode=3010" in the guest variables or in the advanced configuration of the VM.
6 When the VMware Tools installation or upgrade is invoked without any arguments, a system restart may occur automatically to complete Microsoft Visual C++ 2017 Redistributable install. After Windows system restarts, reattempt the VMware Tools installation or upgrade.
VMware Tools User Guide
VMware, Inc. 63

Troubleshooting VMware Tools Components 7Usually when you upgrade VMware Tools, the modules are upgraded and new features are added. If some features do not work correctly after an upgrade, you must change or repair modules. On operating systems other than Windows and Linux, you must manually start the VMware User process after an upgrade.
This chapter includes the following topics:
n Repair or Change Modules in Windows Virtual Machines
n Starting the VMware User Process Manually If You Do Not Use a Session Manager
Repair or Change Modules in Windows Virtual MachinesIf you have problems with enhanced graphics display or mouse actions or with features that depend on VMware Tools, you might need to repair or modify installed modules.
Occasionally, some new modules are not installed during a VMware Tools upgrade. You can manually install new modules by modifying installed modules.
Important Do not use the guest operating system’s Add/Remove Programs item in the Windows Control Panel to repair or modify VMware Tools.
Prerequisites
n Power on the virtual machine.
n Log in to the guest operating system.
Procedure
1 Select the menu command to mount the VMware Tools virtual disk on the guest operating system.
VMware Product Action
vSphere Client (HTML5) Right-click the virtual machine and select Guest OS > Install (or Upgrade) Tools
vSphere Client Inventory > Virtual Machine > Guest > Install/Upgrade VMware
vSphere Web Client Right-click the virtual machine and select Guest OS > Install (or Upgrade) VMware Tools
VMware, Inc. 64
VMware Product Action
Fusion Virtual Machine > Install (or Upgrade) VMware Tools
Workstation Pro VM > Install (or Upgrade) VMware Tools
Workstation Player Player > Manage > Install (or Upgrade) VMware Tools
2 On the host, from the Workstation menu bar, select VM > Install VMware Tools.
If an earlier version of VMware Tools is installed, the menu item is Update VMware Tools.
3 If autorun is not enabled for the CD-ROM drive, to manually launch the VMware Tools installation wizard, click Start > Run and enter D:\setup.exe, where D: is your first virtual CD-ROM drive.
4 On the Welcome page of the wizard, click Next.
5 Specify whether to repair or modify the modules.
n Click Repair to repair the files, registry settings, and so on of components that are already installed.
n Click Modify to select which modules are installed.
6 Follow the on-screen prompts.
What to do next
If features still do not work, uninstall and reinstall VMware Tools.
Starting the VMware User Process Manually If You Do Not Use a Session ManagerVMware Tools in Linux, Solaris, and FreeBSD guest operating systems uses the VMware user process. This program implements the fit-guest-to-window and other features.
Normally, this process starts after you configure VMware Tools, log out of the desktop environment, and log back in. You can invoke the VMware user process by running the vmtoolsd -n vmusr command. The startup script that you need to modify depends on your system. You must start the process manually in the following environments:
n If you run an X session without a session manager. For example, if you use startx to start a desktop session and do not use xdm, kdm, or gdm.
n If you are using an older version of GNOME without gdm or xdm.
n If you are using a session manager or environment that does not support the Desktop Application Autostart Specification, available from http://standards.freedesktop.org.
n If you upgrade VMware Tools.
VMware Tools User Guide
VMware, Inc. 65

Procedure
u Start the VMware User process.
Option Action
Start the VMware User process when you start an X session.
Add vmtoolsd -n vmusr to the appropriate X startup script, such as the .xsession or .xinitrc file.
Start the process after a VMware Tools software upgrade, or if certain features are not working.
Open a terminal window and type the vmtoolsd -n vmusr command.
VMware Tools User Guide
VMware, Inc. 66

Uninstalling VMware Tools 8If the upgrade process of VMware Tools is incomplete, you can uninstall and then reinstall the VMware Tools.
In a vSphere and open-vm-tools deployment, if you decide to use packages specific to Linux operating systems to manage VMware Tools, and if you already used vSphere to install VMware Tools, you must uninstall the existing VMware Tools. For more information about Linux OSPs for VMware Tools, see Operating System Specific Packages for Linux Guest Operating Systems .
Prerequisites
n Power on the virtual machine.
n Log in to the guest operating system.
Procedure
u Select a method to uninstall VMware Tools.
Operating System Action
Windows 7, 8, 8.1, or Windows 10 In the guest operating system, select Programs > Uninstall a program.
Windows Vista and Windows Server 2008
In the guest operating system, select Programs and Features > Uninstall a program.
Windows XP and earlier In the guest operating system, select Add/Remove Programs.
Linux Log in as root and enter vmware-uninstall-tools.pl in a terminal window.
Mac OS X, OS X, or macOS Use the Uninstall VMware Tools application, found in /Library/Application Support/VMware Tools.
What to do next
Reinstall VMware Tools.
VMware, Inc. 67

FAQs about VMware Tools 9n Can my OS run without VMware Tools?
Although a guest operating system can run without VMware Tools, always run the latest version of VMware Tools in your guest operating systems to access the latest features and updates. You can configure your virtual machine to automatically check for and apply VMware Tools upgrades each time you power on your virtual machines.
n How is VMware Tools released?
ISOs (containing installers): These are packaged with the product and are installed in a number of ways, depending upon the VMware product and the guest operating system installed in the virtual machine. For more information, see the Installing VMware Tools section. VMware Tools provides a different ISO file for each type of supported guest operating system: Mac OS X, Windows, Linux, NetWare, Solaris, and FreeBSD.
Operating System Specific Packages (OSPs): Downloadable binary packages that are built and provided by VMware for particular versions of Linux distributions. OSPs are typically available for older releases, such as RHEL 6. Most current versions of Linux include Open VM Tools, eliminating the need to separately install OSPs. To download OSPs and to find important information and instructions, see VMware Tools Operating System Specific Packages (OSPs). For a list of supported guest operating systems, see VMware Compatibility Guide.
open-vm-tools (OVT): This is the open source implementation of VMware Tools intended for Linux distribution maintainors and virtual appliance vendors. OVTs are generally included in the current versions of popular Linux distributions, allowing administrators to effortlessly install and update VMware Tools alongside other Linux packages. For more information, see KB VMware support for Open VM Tools (2073803)
n Which operating systems are supported by open-vm-tools?
n Red Hat Enterprise Linux 7.0 and later releases
n SUSE Linux Enterprise 12 and later releases
n Ubuntu 14.04 and later releases
n CentOS 7 and later releases
n FreeBSD 10.3, 10.4 & 11.1
VMware, Inc. 68

n Debian 7.x and later releases
n Oracle Linux 7 and later
n Fedora 19 and later releases
n openSUSE 11.x and later releases
n Are there VMware Tools VIB available?
Offline bundles with VMware Tools VIB can be installed on vSphere 5.5.x, 6.0.x and 6.5.x versions using vSphere Update Manager. Offline bundles are supported from 10.2.0 and later.
VMware Tools User Guide
VMware, Inc. 69