vmware workspace portal administrator's guide - workspace...
TRANSCRIPT

VMware Workspace PortalAdministrator's Guide
Workspace Portal 2.0
This document supports the version of each product listed andsupports all subsequent versions until the document isreplaced by a new edition. To check for more recent editionsof this document, see http://www.vmware.com/support/pubs.
EN-001478-00
VMware Workspace Portal Administrator's Guide
2 VMware, Inc.
You can find the most up-to-date technical documentation on the VMware Web site at:
http://www.vmware.com/support/
The VMware Web site also provides the latest product updates.
If you have comments about this documentation, submit your feedback to:
Copyright © 2014 VMware, Inc. All rights reserved. Copyright and trademark information.
VMware, Inc.3401 Hillview Ave.Palo Alto, CA 94304www.vmware.com
Contents
1 About the VMware Workspace Portal Administrator's Guide 7
2 Introduction to Workspace for Administrators 9
3 Monitor Workspace System and Module Information 13
4 Integrating Workspace with Active Directory 15
Single Active Directory Domain Environment 15Multi-Domain, Single Forest Active Directory Environment 15Multi-Forest Active Directory Environment 16
Add a User Store for a Multi-Forest Active Directory Environment 16Edit a User Store for a Multi-Forest Active Directory Environment 17
5 Configuring Workspace User Authentication 19
Overview of Workspace User Authentication 19Add or Edit a Network Range 21Add or Edit a User Authentication Method 22Add and Configure an Identity Provider Instance 23Overview of Configuring Workspace to Use a Third-Party Identity Provider Instance 26
Obtain the Workspace SAML Information Required to Configure a Third-Party IdentityProvider Instance 27
Editing the Default Access Policy Set 27
6 Managing Access Policy Sets 29
Overview of Access Policy Settings 29Managing Web-Application-Specific Access Policy Sets 30Edit an Access Policy Set 32Add a Web-Application-Specific Access Policy Set 33Apply a Web-Application-Specific Access Policy Set 34
7 Managing Users and Groups 35
Workspace User and Group Types 35Manage Workspace Groups 36
Modify Workspace Group Membership 36Workspace Group Information 39
Manage Workspace Users 41Workspace User Information 41Prevent Users from Accessing Workspace 43
Update the Settings That Select Workspace Users from Active Directory 43
VMware, Inc. 3

8 Managing the Workspace Catalog 45Overview of Workspace Resource Types 46Overview of Using Resource Categories 47
Create a Resource Category 47Apply a Category to Resources 48Remove or Delete a Category 48
View Workspace Resources 49Add Resources to Your Catalog 50
9 Search for Users, Groups, or Catalog Resources 51
10 Providing Access to View Desktop and Application Pools 53
Enable the View Module to Integrate View with Workspace 54View User and Group Entitlements to View Desktop and Application Pools 54View the Connection Information for a View Desktop and Application Pools 55Add View Pods to Workspace 55Reducing Resource Usage and Increasing Performance of Workspace for Windows In Non-
Persistent View Desktops 56
11 Providing Access to Web Applications 59
Enable the Web Applications Module to Provide Web Application Access 59Establish Secure Single Sign-On to Your Web Applications Through Workspace 60
Mapping Attributes in the Workspace Connector 61Converting Office 365 to a Federated Domain for Single Sign-On and Changing Office 365
Parameters to Workspace 61Adding Web Applications to Your Organization's Catalog 63
Add a Web Application to Your Catalog from the Cloud Application Catalog 63Add a Web Application to Your Catalog by Creating a New Application Record 65Add a Web Application to Your Catalog by Importing a ZIP or JAR File 66
Entitle Users and Groups to Web Applications 67
12 Providing Access to Citrix-Based Applications 69
Enable the Citrix Published Applications Module to Integrate Workspace with Your CitrixDeployment 69
View User and Group Entitlements to Citrix-Based Applications 70Editing Workspace Application Delivery Settings for Citrix-Based Applications 71
Edit the Workspace Application Delivery Settings Globally for All Citrix-Based Applications 71Edit the Workspace Application Delivery Settings for a Single Citrix-Based Application 71
Managing Categories for Citrix-Based Applications 72
13 Providing Access to VMware ThinApp Packages 75
Enable the ThinApp Packages Module after Integrating Your ThinApp Repository with YourWorkspace System 76
Distributing and Managing ThinApp Packages with Workspace 76Offline Grace Period and ThinApp Packages 79Using the Command-Line HorizonThinAppCtrl.exe Application 80
Entitle Users and Groups to ThinApp Packages 81
VMware Workspace Portal Administrator's Guide
4 VMware, Inc.
Updating Managed ThinApp Packages After Deployment in Workspace 83Update a Managed ThinApp Package 84
Delete ThinApp Packages from Workspace 88Make Existing ThinApp Packages Compatible with Workspace 89
Add ThinApp Packages to the Network Share 91
14 Configuring Workspace for Windows 93
Command-Line Installer Options for Workspace for Windows 93Install the Workspace for Windows Application with Identical Settings to Multiple Windows
Systems 99
15 Viewing Workspace Reports 101
Generate an Audit Event Report 101
16 Configuring Workspace Settings for Administrators 103
Overview of Workspace Administrative Settings 103Customize Workspace Branding 104Use hznAdminTool Commands to Make Changes to Your Workspace System 107
17 Troubleshooting Workspace for Administrators 109
Blank Screen Displays When Installing Update to Workspace for Windows 109ThinApp Packages Fail to Launch from the User Portal 110A User Login Attempt Results in a Timeout Error 113Users Accessing Citrix-based Applications Recive an Encryption Error 113
Index 115
Contents
VMware, Inc. 5

VMware Workspace Portal Administrator's Guide
6 VMware, Inc.
About the VMware Workspace PortalAdministrator's Guide 1
The VMware Workspace Portal Administrator's Guide provides information and instructions about using andmaintaining VMware® Workspace™ Portal. With Workspace you can customize a catalog of resources foryour organization's applications and provide secure, multi-device, managed-user access to those resources.Such resources include Web applications, mobile applications, Windows applications captured as ThinApppackages, Citrix-based applications, and View™ desktop and application pools. Workspace provides userswith a unified experience and offers your IT department unified security and management for all servicesand applications across multiple devices.
Intended AudienceThe VMware Workspace Portal Administrator's Guide is intended for enterprise administrators. Thisinformation is written for experienced Windows or Linux system administrators who are familiar withvirtual machine technology, identity management, Kerberos, and directory services. Knowledge of othertechnologies, such as VMware® ThinApp®, View™, Citrix application virtualization, RSA SecurID, andAndroid app distribution is helpful if you plan to implement those features.
Workspace Administrator's Guide OverviewUse the VMware Workspace Portal Administrator's Guide after you install Workspace. See Installing andConfiguring VMware Workspace Portal.
To administer Workspace, you predominantly use the Workspace Admin Console, logged in as anadministrator. You occasionally need to access the Configurator Web interface, the Connector Web interface,and the virtual appliance interfaces. See “Workspace Web Interface URLs,” on page 10.
The key task you perform as a Workspace administrator is to entitle users to resources. Other tasks supportthis key task by providing you with more detailed control over which users or groups are entitled to whichresources under which conditions.
The tasks you perform as an administrator vary depending on the resource types you plan to manage. Youcan manage View desktop and application pools, Windows applications (ThinApp packages), Citrix-basedapplications, and Web applications. The actual resource types you manage vary according to the needs ofyour organization. To entitle a resource type, you must first perform the respective preconfiguration tasks asdescribed in the Installing and Configuring VMware Workspace Portal.
VMware, Inc. 7

VMware Workspace Portal Administrator's Guide
8 VMware, Inc.
Introduction to Workspace forAdministrators 2
Workspace provides you with a centralized Web management console with which you can customize yourorganization's catalog, and manage entitlements to resources in that catalog. Your catalog contains yourorganization's applications and View desktops as resources.
Workspace detects users' attributes and enforces policies across the applications. A user's workspaceconsists of their set of entitled resources. For each user, you can customize the delivery of Windows, Web,and Software-as-a-Service (SaaS) applications with the ability to access those applications from a singleportal, while providing users with self-service access to applications.
Workspace Server ComponentsWorkspace server consists of the following virtual appliances.
Table 2‑1. Workspace Server Components
Workspace Server Component Description
VMware Workspace Portal Configurator configurator-va You start configuring Workspace with this virtualappliance, using both its console and the Configurator Webinterface. The configurations you make with theconfigurator-va configurator-va are distributed to the othervirtual appliances in the vApp.
VMware Workspace Portal Manager service-va This virtual appliance gives you access to the MyApps andthe Workspace Admin Console, from which you canmanage users, groups, and resources.
VMware Workspace Portal Connector connector-va The connector-va provides the following services: userauthentication (identity provider), directorysynchronization, and View pool synchronization.
VMware Workspace Portal Gateway gateway-va The Workspace Gateway is the single endpoint for all enduser communication. User requests come to the gateway-vavirtual machine, which then routes the request to theappropriate virtual appliance.
Workspace User ComponentsUsers can access entitled resources using the Workspace App Portal (an agentless client) and they can accessvirtualized Windows applications captured as ThinApp packages from Workspace for Windows.
VMware, Inc. 9
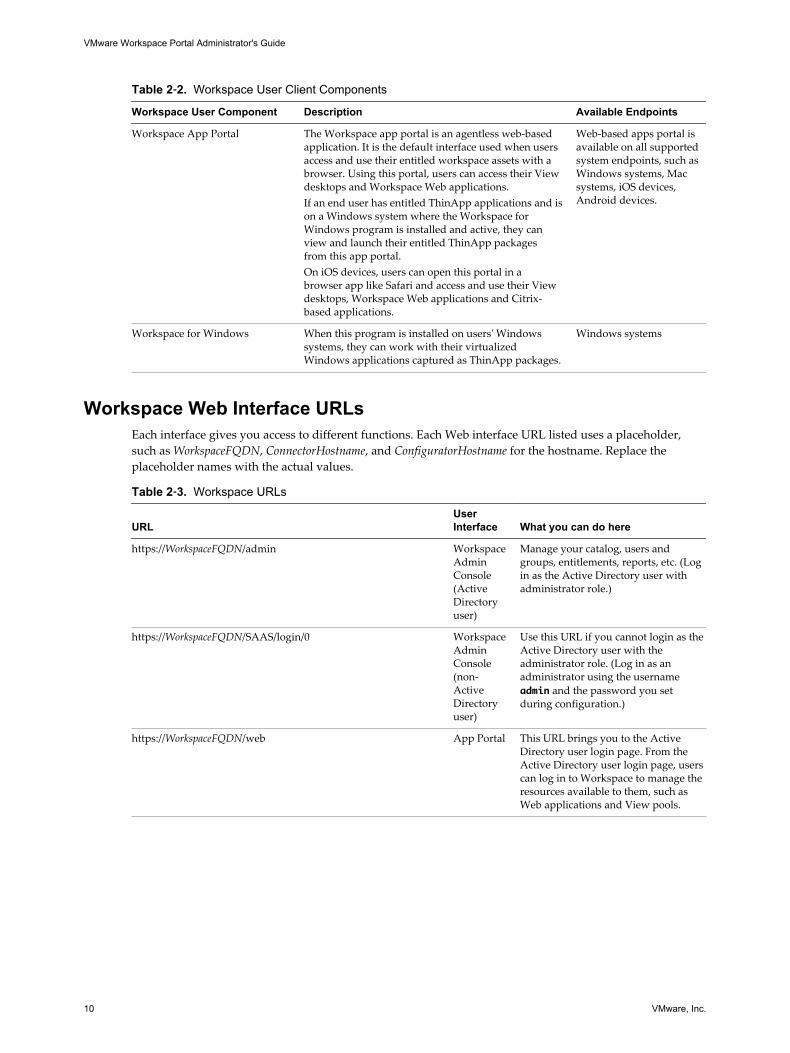
Table 2‑2. Workspace User Client Components
Workspace User Component Description Available Endpoints
Workspace App Portal The Workspace app portal is an agentless web-basedapplication. It is the default interface used when usersaccess and use their entitled workspace assets with abrowser. Using this portal, users can access their Viewdesktops and Workspace Web applications.If an end user has entitled ThinApp applications and ison a Windows system where the Workspace forWindows program is installed and active, they canview and launch their entitled ThinApp packagesfrom this app portal.On iOS devices, users can open this portal in abrowser app like Safari and access and use their Viewdesktops, Workspace Web applications and Citrix-based applications.
Web-based apps portal isavailable on all supportedsystem endpoints, such asWindows systems, Macsystems, iOS devices,Android devices.
Workspace for Windows When this program is installed on users' Windowssystems, they can work with their virtualizedWindows applications captured as ThinApp packages.
Windows systems
Workspace Web Interface URLsEach interface gives you access to different functions. Each Web interface URL listed uses a placeholder,such as WorkspaceFQDN, ConnectorHostname, and ConfiguratorHostname for the hostname. Replace theplaceholder names with the actual values.
Table 2‑3. Workspace URLs
URLUserInterface What you can do here
https://WorkspaceFQDN/admin WorkspaceAdminConsole(ActiveDirectoryuser)
Manage your catalog, users andgroups, entitlements, reports, etc. (Login as the Active Directory user withadministrator role.)
https://WorkspaceFQDN/SAAS/login/0 WorkspaceAdminConsole(non-ActiveDirectoryuser)
Use this URL if you cannot login as theActive Directory user with theadministrator role. (Log in as anadministrator using the usernameadmin and the password you setduring configuration.)
https://WorkspaceFQDN/web App Portal This URL brings you to the ActiveDirectory user login page. From theActive Directory user login page, userscan log in to Workspace to manage theresources available to them, such asWeb applications and View pools.
VMware Workspace Portal Administrator's Guide
10 VMware, Inc.
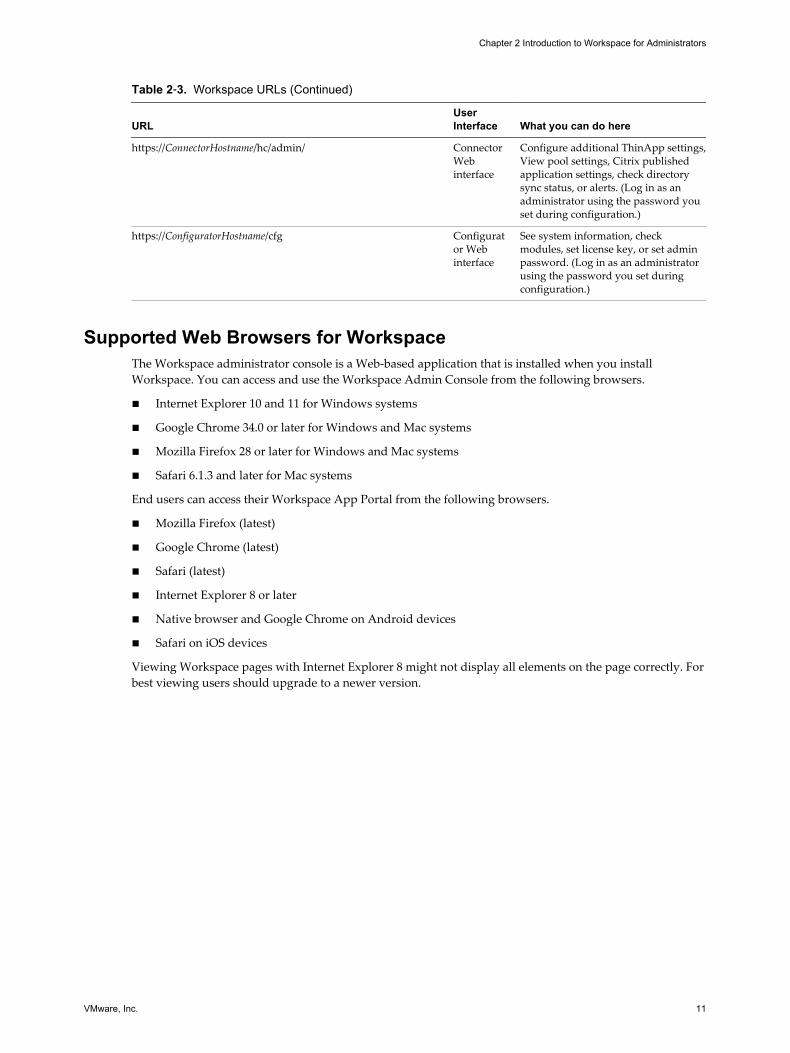
Table 2‑3. Workspace URLs (Continued)
URLUserInterface What you can do here
https://ConnectorHostname/hc/admin/ ConnectorWebinterface
Configure additional ThinApp settings,View pool settings, Citrix publishedapplication settings, check directorysync status, or alerts. (Log in as anadministrator using the password youset during configuration.)
https://ConfiguratorHostname/cfg Configurator Webinterface
See system information, checkmodules, set license key, or set adminpassword. (Log in as an administratorusing the password you set duringconfiguration.)
Supported Web Browsers for WorkspaceThe Workspace administrator console is a Web-based application that is installed when you installWorkspace. You can access and use the Workspace Admin Console from the following browsers.
n Internet Explorer 10 and 11 for Windows systems
n Google Chrome 34.0 or later for Windows and Mac systems
n Mozilla Firefox 28 or later for Windows and Mac systems
n Safari 6.1.3 and later for Mac systems
End users can access their Workspace App Portal from the following browsers.
n Mozilla Firefox (latest)
n Google Chrome (latest)
n Safari (latest)
n Internet Explorer 8 or later
n Native browser and Google Chrome on Android devices
n Safari on iOS devices
Viewing Workspace pages with Internet Explorer 8 might not display all elements on the page correctly. Forbest viewing users should upgrade to a newer version.
Chapter 2 Introduction to Workspace for Administrators
VMware, Inc. 11

VMware Workspace Portal Administrator's Guide
12 VMware, Inc.

Monitor Workspace System andModule Information 3
You can monitor Workspace system information and information about the Workspace modules: the WebApplications module, the View module, the ThinApp Packages module, and the Citrix PublishedApplications module.
Workspace system information and information about the xxx modules is available on the Dashboard pagein the Workspace Admin Console.
Prerequisites
Install and configure Workspace. During the configuration process, enable those modules for the resourcetypes that you want to make available in your users' workspaces. If you do not enable a module duringinstallation, you can configure it later using the Workspace Admin Console (admin console).
Procedure
n Select Dashboard > Modules to view the module information.
You can view details about each module, including which modules are enabled and how many usersare entitled to the resources provided by each module.
n Select Dashboard > System InfoWorkspace to view system information.
What to do next
If you want to entitle resource types to your users that are provided by modules that are not enabled in yoursystem, enable those modules. See the appropriate topic.n “Enable the Web Applications Module to Provide Web Application Access,” on page 59
n “Enable the View Module to Integrate View with Workspace,” on page 54
n “Enable the ThinApp Packages Module after Integrating Your ThinApp Repository with YourWorkspace System,” on page 76
n “Enable the Citrix Published Applications Module to Integrate Workspace with Your CitrixDeployment,” on page 69
VMware, Inc. 13

VMware Workspace Portal Administrator's Guide
14 VMware, Inc.

Integrating Workspace with ActiveDirectory 4
You can integrate Workspace with an Active Directory environment that consists of a single ActiveDirectory domain, multiple domains in a single Active Directory forest, or multiple domains across multipleActive Directory forests.
You can add additional identity provider instances, which are either Connector instances or third-partyidentity provider instances.
Add additional identity provider instances for the purpose of high availability, to provide additional userauthentication methods, and in multi-forest environments to add additional user stores.
If you do not integrate Workspace with a multi-forest Active Directory environment, your Workspacedeployment contains a single user store named default.
During the proof-of-concept phase of your Workspace installation, connect Workspace to a single ActiveDirectory domain or forest. For the production phase of deployment, integrate Workspace into your existingActive Directory environment.
This chapter includes the following topics:
n “Single Active Directory Domain Environment,” on page 15
n “Multi-Domain, Single Forest Active Directory Environment,” on page 15
n “Multi-Forest Active Directory Environment,” on page 16
Single Active Directory Domain EnvironmentA single Active Directory deployment allows you to sync users and groups from a single Active Directorydomain. By definition, this is a single forest deployment.
To install Workspace in a single Active Directory domain environment, see instructions for establishing aconnection to Active Directory specifically for a single domain in Installing and Configuring Workspace. Forinformation about configuring Workspace user authentication, see Chapter 5, “Configuring Workspace UserAuthentication,” on page 19.
Multi-Domain, Single Forest Active Directory EnvironmentA multi-domain, single forest Active Directory deployment allows you to sync users and groups frommultiple Active Directory domains within a single forest and is based on the Active Directory global cataloginstead of LDAP.
To install Workspace in a multi-domain, single forest Active Directory environment, see the configuringmulti-domain, single forest Active Directory instructions in Installing and Configuring Workspace. Forinformation about configuring Workspace user authentication, see Chapter 5, “Configuring Workspace UserAuthentication,” on page 19.
VMware, Inc. 15
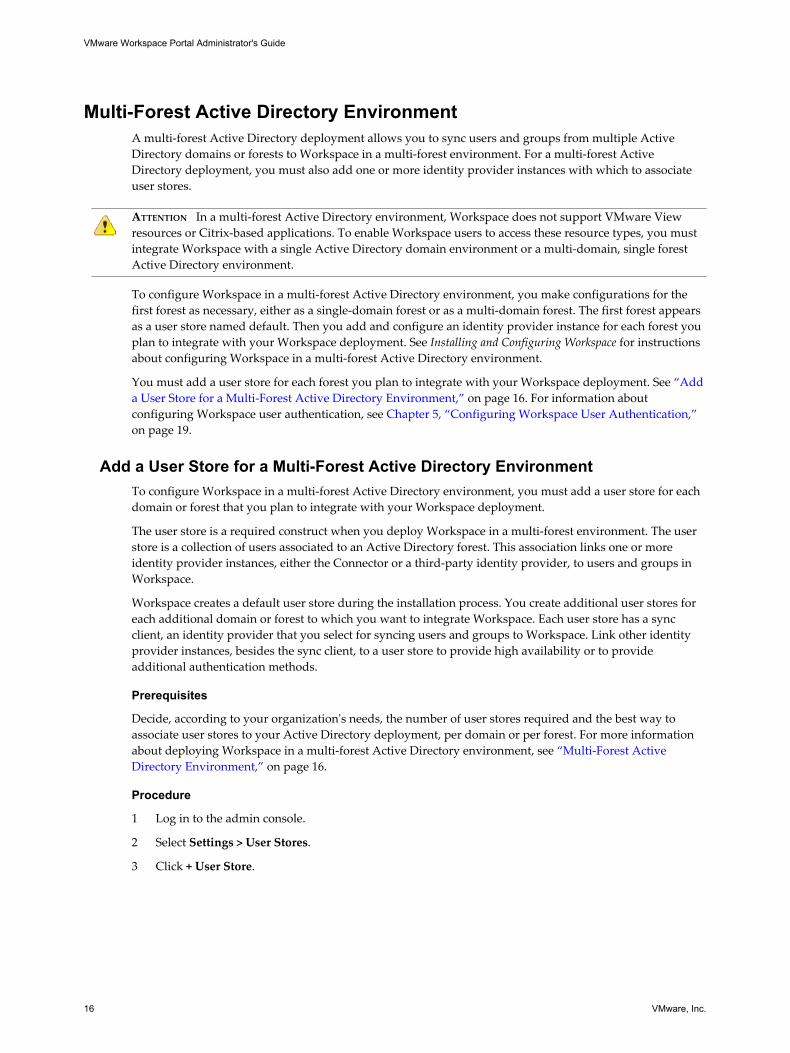
Multi-Forest Active Directory EnvironmentA multi-forest Active Directory deployment allows you to sync users and groups from multiple ActiveDirectory domains or forests to Workspace in a multi-forest environment. For a multi-forest ActiveDirectory deployment, you must also add one or more identity provider instances with which to associateuser stores.
ATTENTION In a multi-forest Active Directory environment, Workspace does not support VMware Viewresources or Citrix-based applications. To enable Workspace users to access these resource types, you mustintegrate Workspace with a single Active Directory domain environment or a multi-domain, single forestActive Directory environment.
To configure Workspace in a multi-forest Active Directory environment, you make configurations for thefirst forest as necessary, either as a single-domain forest or as a multi-domain forest. The first forest appearsas a user store named default. Then you add and configure an identity provider instance for each forest youplan to integrate with your Workspace deployment. See Installing and Configuring Workspace for instructionsabout configuring Workspace in a multi-forest Active Directory environment.
You must add a user store for each forest you plan to integrate with your Workspace deployment. See “Adda User Store for a Multi-Forest Active Directory Environment,” on page 16. For information aboutconfiguring Workspace user authentication, see Chapter 5, “Configuring Workspace User Authentication,”on page 19.
Add a User Store for a Multi-Forest Active Directory EnvironmentTo configure Workspace in a multi-forest Active Directory environment, you must add a user store for eachdomain or forest that you plan to integrate with your Workspace deployment.
The user store is a required construct when you deploy Workspace in a multi-forest environment. The userstore is a collection of users associated to an Active Directory forest. This association links one or moreidentity provider instances, either the Connector or a third-party identity provider, to users and groups inWorkspace.
Workspace creates a default user store during the installation process. You create additional user stores foreach additional domain or forest to which you want to integrate Workspace. Each user store has a syncclient, an identity provider that you select for syncing users and groups to Workspace. Link other identityprovider instances, besides the sync client, to a user store to provide high availability or to provideadditional authentication methods.
Prerequisites
Decide, according to your organization's needs, the number of user stores required and the best way toassociate user stores to your Active Directory deployment, per domain or per forest. For more informationabout deploying Workspace in a multi-forest Active Directory environment, see “Multi-Forest ActiveDirectory Environment,” on page 16.
Procedure
1 Log in to the admin console.
2 Select Settings > User Stores.
3 Click + User Store.
VMware Workspace Portal Administrator's Guide
16 VMware, Inc.

4 Provide the user store settings.
Option Description
Name Type a name for the user store.NOTE Workspace displays the text in the Name text box in English. You can change the textto a different language.
Sync Client This drop-down menu includes all the service clients registered with Workspace.Select a service client with which the user store syncs users and groups. If you set aConnector instance as the sync client, set an automated sync schedule for that Connectorinstance.
AuthenticatingIdentity Providers
This text box lists all identity provider instances registered with Workspace.Select the identity provider instances that you want to link to this user store. You canassociate multiple identity provider instances with a single user store. For example, theidentity provider instance selected as the sync client, identity provider instances added forhigh availability purposes, and identity provider instances added to provide additionalmethods of authentication.
5 Click Save.
What to do next
n Initiate the user and group sync process of the configured sync client (a Connector or a third-partyidentity provider service client).
n After you sync the user and group information with Active Directory, you can configure the user loginscreen to present users with user store names instead of domain names. See “Edit a User Store for aMulti-Forest Active Directory Environment,” on page 17
n Associate the user store with one or more authenticating identity provider instance. See “Add andConfigure an Identity Provider Instance,” on page 23.
Edit a User Store for a Multi-Forest Active Directory EnvironmentYou can edit an existing user store to change the settings. To configure the user login screen to present userswith user store names instead of domain names you must edit the existing user stores.
When you add a user store, Workspace does not give you the option of providing users logging in with thename of the user store instead of a domain name. That option is available when you edit the user store aftersyncing the service client you selected as the sync client with Active Directory. In a multi-forest ActiveDirectory environment, users logging in must ensure that the correct domain name or user store domain isselected on the login screen. Depending on the complexity of the deployment, using user store names mightbe simpler to manage than using domain names.
Prerequisites
Add user stores to your deployment as necessary. See “Add a User Store for a Multi-Forest Active DirectoryEnvironment,” on page 16.
Procedure
1 Log in to the admin console.
2 Select Settings > User Stores.
3 Click Edit for the user store you want to configure.
Chapter 4 Integrating Workspace with Active Directory
VMware, Inc. 17

4 Edit the user store settings.
Option Description
Name To change the name, replace the name for this user store.NOTE Workspace displays the text in the Name text box in English. You can edit this text,which includes changing the text to a different language.
Sync Client To change the sync client, select a different service client with which the user store syncsusers and groups. If you set a Connector instance as the sync client, set an automated syncschedule for that Connector instance.
Authenticating IdentityProviders
To change the selected authenticating identity provider instances, select the identityprovider instances that you now want to link to this user store. For example, the identityprovider instance selected as the sync client, identity provider instances added for highavailability purposes, and identity provider instances added to provide additionalmethods of authentication.
Display user storename instead ofdomain name for enduser authentication
To provide users logging in with the user store name, as it appears in the Name text box,instead of the domain names, click the checkbox for this option.If you do not select the check box, users are presented with the domain names listed in theUser Domains section.
User Domains This read-only section lists the domain names that Workspace presents to users on the log-in screen if you do not select the preceding check box.Confirm that the domain names listed are correct.
5 Click Save.
What to do next
n If you changed the sync client, initiate the user and group sync process of the newly configured syncclient (a Connector or a third-party identity provider service client).
n If you have not already done so, associate the user store with an identity provider instance. See “Addand Configure an Identity Provider Instance,” on page 23.
VMware Workspace Portal Administrator's Guide
18 VMware, Inc.

Configuring Workspace UserAuthentication 5
Workspace user authentication requires the use of one or more identity provider instances, which can beConnector instances, third-party identity provider instances, or a combination of both. The identity providerinstances authenticate users with Active Directory within the enterprise network
To configure and add identity provider instances to your Workspace deployment, you must perform severalprerequisites to ensure that Workspace can properly access your Active Directory deployment.
This chapter includes the following topics:
n “Overview of Workspace User Authentication,” on page 19
n “Add or Edit a Network Range,” on page 21
n “Add or Edit a User Authentication Method,” on page 22
n “Add and Configure an Identity Provider Instance,” on page 23
n “Overview of Configuring Workspace to Use a Third-Party Identity Provider Instance,” on page 26
n “Editing the Default Access Policy Set,” on page 27
Overview of Workspace User AuthenticationWorkspace attempts to authenticate users based on several configurations you make. For example, whenyou configure the authentication methods, the default access policy set, network ranges, and the identityprovider instances.
The identity provider instances that you use with Workspace create an in-network federation authority thatcommunicates with Workspace using SAML 2.0 assertions. The identity provider instances authenticate theuser with Active Directory within the enterprise network (using existing network security).
Workspace supports the following authentication methods with the Connector by default: Active Directorypassword, Kerberos, and RSA SecurID. However, your third-party identity provider might supportadditional authentication methods, such as smart-card based authentication, that you can use with yourWorkspace deployment.
VMware, Inc. 19

WorkspaceAuthentication TypesSupported by Default Description
Password Without any configuration, Workspace supports Active Directory password authentication.This method authenticates users directly against Active Directory.
Kerberos When properly configured, Kerberos authentication provides domain users with single sign-on access to Workspace, eliminating the requirement for domain users to log in to Workspaceafter they log in to the enterprise network. The identity provider instance validates userdesktop credentials using Kerberos tickets distributed by the key distribution center (KDC).
RSA SecurID RSA SecurID authentication requires users to use a token-based authentication system. RSASecurID is the recommended authentication method for users accessing Workspace fromoutside the enterprise network.
To implement Kerberos authentication or RSA SecurID authentication, you can use an existing identityprovider instance or you can deploy one or more additional identity provider instances, depending on yourdeployment.
When a user attempts to log in, Workspace must determine which identity provider instance to authenticatethe user against. The identity provider instance can be either a Connector instance or a third-party identityprovider instance.
To make the determination, Workspace evaluates the default access policy set to select which policy in theset to apply. The applied policy dictates the minimum authentication score required for that login event.Workspace then filters and sorts the available authentication methods based on the minimum authenticationscore required and the order of the methods, which you can set as necessary to meet your organization'srequirements. Workspace selects the first identity provider instance that meets the authentication methodand network range requirements of the policy and forwards the user authentication request to that instancefor authentication. If authentication fails, the identity provider selection process continues down the list.
CAUTION When you remove or reset an identity provider instance, you must remove the correspondingidentity provider name from the Identity Providers page.
You can deploy Workspace to use the identity provider selection process in a variety of ways, one of whichis summarized in the example that follows.
External RSA SecurIDand Internal PasswordAuthentication orHigher Example
This is one possible way to configure Workspace to use the Active Directorypassword or Kerberos authentication method for internal users and RSASecurID authentication method for external users in the same Workspacedeployment.
n Internal Policy - You use the Workspace admin console to create a policyin the default access policy set with a minimum authentication score thataccepts Active Directory password as the authentication method. Toensure that Workspace attempts to authenticate users with Kerberosauthentication first, you make the authentication score of the Kerberosmethod higher than the authentication score of the password methodand you place Kerberos at the top of the list on the AuthenticationMethods page. You also assign a network range for internal users.
n External Policy - You use the Workspace admin console to create apolicy in the default access policy set with a minimum authenticationscore that ensures the RSA SecurID authentication method is used toauthenticate users. You also assign a network range that includes allpossible users, 0.0.0.0 to 255.255.255.255.
VMware Workspace Portal Administrator's Guide
20 VMware, Inc.
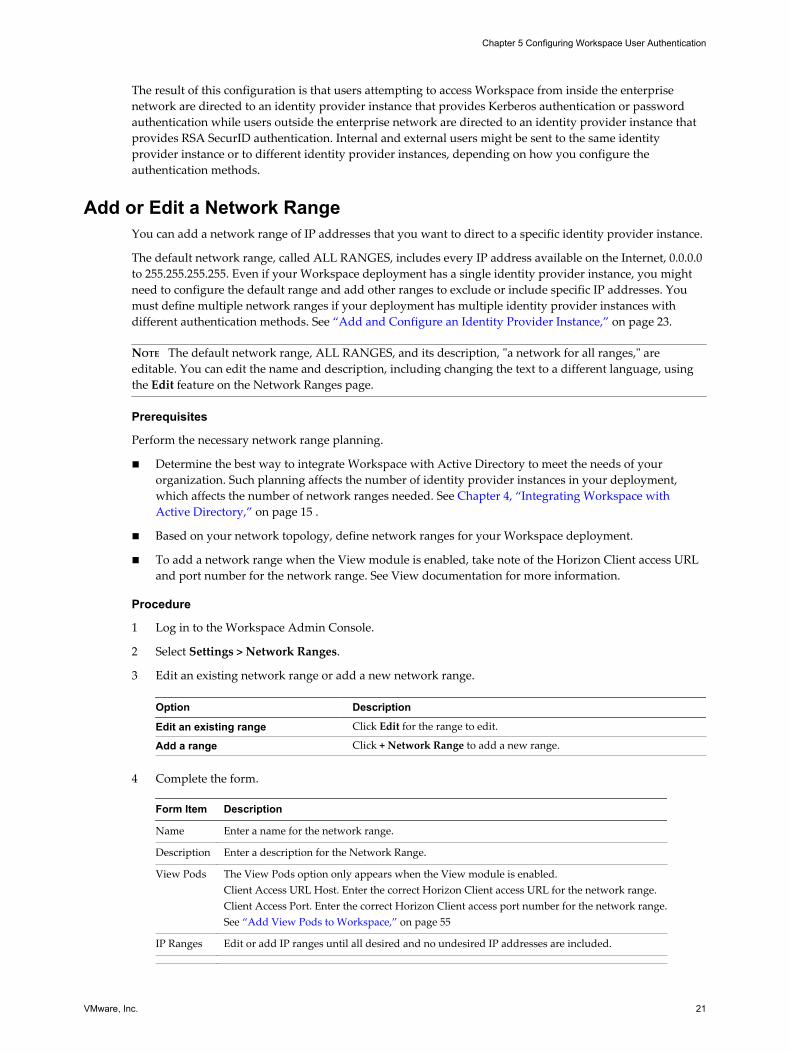
The result of this configuration is that users attempting to access Workspace from inside the enterprisenetwork are directed to an identity provider instance that provides Kerberos authentication or passwordauthentication while users outside the enterprise network are directed to an identity provider instance thatprovides RSA SecurID authentication. Internal and external users might be sent to the same identityprovider instance or to different identity provider instances, depending on how you configure theauthentication methods.
Add or Edit a Network RangeYou can add a network range of IP addresses that you want to direct to a specific identity provider instance.
The default network range, called ALL RANGES, includes every IP address available on the Internet, 0.0.0.0to 255.255.255.255. Even if your Workspace deployment has a single identity provider instance, you mightneed to configure the default range and add other ranges to exclude or include specific IP addresses. Youmust define multiple network ranges if your deployment has multiple identity provider instances withdifferent authentication methods. See “Add and Configure an Identity Provider Instance,” on page 23.
NOTE The default network range, ALL RANGES, and its description, "a network for all ranges," areeditable. You can edit the name and description, including changing the text to a different language, usingthe Edit feature on the Network Ranges page.
Prerequisites
Perform the necessary network range planning.
n Determine the best way to integrate Workspace with Active Directory to meet the needs of yourorganization. Such planning affects the number of identity provider instances in your deployment,which affects the number of network ranges needed. See Chapter 4, “Integrating Workspace withActive Directory,” on page 15 .
n Based on your network topology, define network ranges for your Workspace deployment.
n To add a network range when the View module is enabled, take note of the Horizon Client access URLand port number for the network range. See View documentation for more information.
Procedure
1 Log in to the Workspace Admin Console.
2 Select Settings > Network Ranges.
3 Edit an existing network range or add a new network range.
Option Description
Edit an existing range Click Edit for the range to edit.
Add a range Click + Network Range to add a new range.
4 Complete the form.
Form Item Description
Name Enter a name for the network range.
Description Enter a description for the Network Range.
View Pods The View Pods option only appears when the View module is enabled.Client Access URL Host. Enter the correct Horizon Client access URL for the network range.Client Access Port. Enter the correct Horizon Client access port number for the network range.See “Add View Pods to Workspace,” on page 55
IP Ranges Edit or add IP ranges until all desired and no undesired IP addresses are included.
Chapter 5 Configuring Workspace User Authentication
VMware, Inc. 21

What to do next
n Associate each network range with an identity provider instance. See “Add and Configure an IdentityProvider Instance,” on page 23.
n Associate network ranges with access policy sets as appropriate. See Chapter 6, “Managing AccessPolicy Sets,” on page 29.
Add or Edit a User Authentication MethodYou can edit existing user authentication methods. When you add a third-party identity provider, you canconfigure user authentication methods that Workspace does not support by default. You can also createaccess policies to associate authentication methods with specific Web applications.
Workspace supports Active Directory password, Kerberos, and RSA SecurID user authentication methods.See Chapter 5, “Configuring Workspace User Authentication,” on page 19. By adding a third-party identityprovider that supports another authentication method, such as smart-card based authentication, you canenable Workspace to enforce that authentication method. See “Add and Configure an Identity ProviderInstance,” on page 23. See “Overview of Configuring Workspace to Use a Third-Party Identity ProviderInstance,” on page 26 for a complete list of tasks related to configuring Workspace to use a third-partyidentity provider instance.
The minimum authentication score of a method and the order of the method on the Authentication Methodspage are significant in the process Workspace follows to select an identity provider instance for userauthentication. To require users to use an authentication method of a specified minimum authenticationscore to access a Web application, see “Managing Web-Application-Specific Access Policy Sets,” onpage 30.
The number of attempts Workspace makes using a given authentication method varies. Workspace onlymakes one Kerberos authentication attempt. If Kerberos is not successful in logging in the user, the nextauthentication method on the list is attempted. The maximum number of failed login attempts for ActiveDirectory password or RSA SecurID authentication is five. When the user has five failed login attempts,Workspace attempts to log in the user with the next authentication method on the list. When allauthentication methods are exhausted, Workspace issues an error message.
Prerequisites
n Deploy the authentication systems that you plan to integrate with Workspace. For example, if you planto integrate RSA SecurID into your Workspace deployment, verify that RSA SecurID is installed andconfigured on your network.
n Use your own criteria to determine the security levels, on a scale from 1, the lowest security, to 5, thehighest security, of the authentication methods you plan to use in your Workspace deployment.
Procedure
1 Log in to the Workspace Admin Console.
2 Select Settings > Authentication Methods.
3 Edit an existing authentication method or add a new authentication method.
Option Description
Edit an Existing AuthenticationMethod
Click Edit for the existing authentication method to configure.
Add a New Authentication Method Click + Add Authentication Method to add a new authentication method.For example, when adding a new third-party identity provider instance toyour deployment.
VMware Workspace Portal Administrator's Guide
22 VMware, Inc.
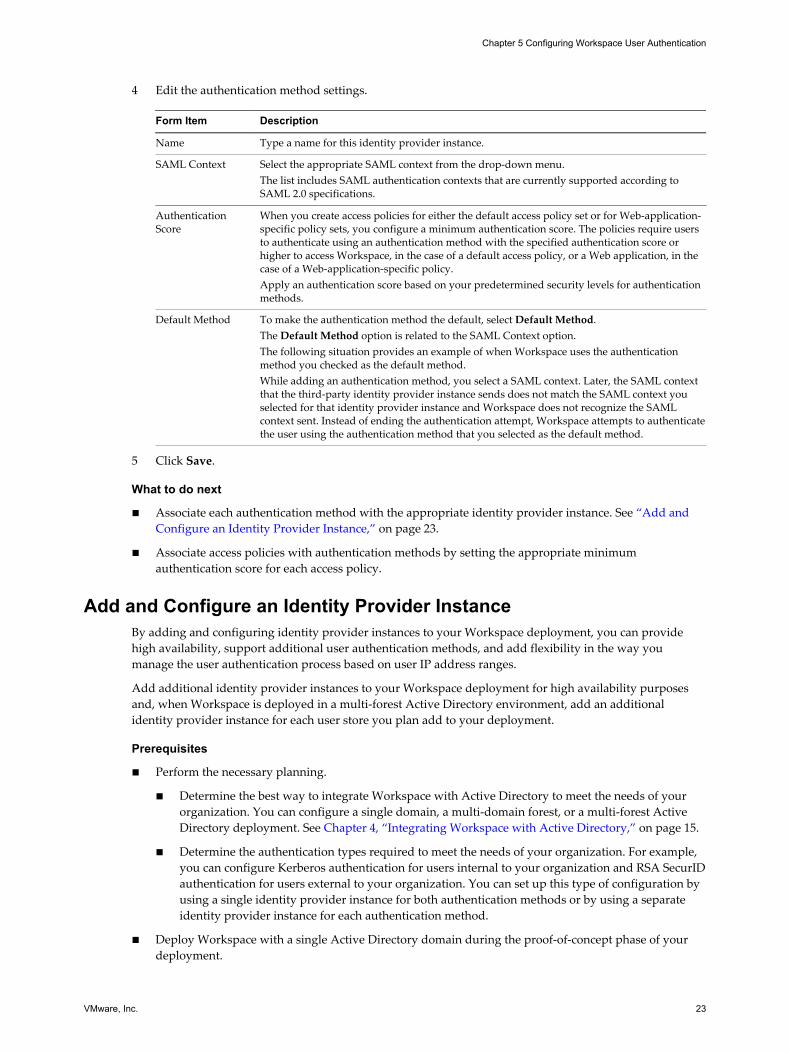
4 Edit the authentication method settings.
Form Item Description
Name Type a name for this identity provider instance.
SAML Context Select the appropriate SAML context from the drop-down menu.The list includes SAML authentication contexts that are currently supported according toSAML 2.0 specifications.
AuthenticationScore
When you create access policies for either the default access policy set or for Web-application-specific policy sets, you configure a minimum authentication score. The policies require usersto authenticate using an authentication method with the specified authentication score orhigher to access Workspace, in the case of a default access policy, or a Web application, in thecase of a Web-application-specific policy.Apply an authentication score based on your predetermined security levels for authenticationmethods.
Default Method To make the authentication method the default, select Default Method.The Default Method option is related to the SAML Context option.The following situation provides an example of when Workspace uses the authenticationmethod you checked as the default method.While adding an authentication method, you select a SAML context. Later, the SAML contextthat the third-party identity provider instance sends does not match the SAML context youselected for that identity provider instance and Workspace does not recognize the SAMLcontext sent. Instead of ending the authentication attempt, Workspace attempts to authenticatethe user using the authentication method that you selected as the default method.
5 Click Save.
What to do next
n Associate each authentication method with the appropriate identity provider instance. See “Add andConfigure an Identity Provider Instance,” on page 23.
n Associate access policies with authentication methods by setting the appropriate minimumauthentication score for each access policy.
Add and Configure an Identity Provider InstanceBy adding and configuring identity provider instances to your Workspace deployment, you can providehigh availability, support additional user authentication methods, and add flexibility in the way youmanage the user authentication process based on user IP address ranges.
Add additional identity provider instances to your Workspace deployment for high availability purposesand, when Workspace is deployed in a multi-forest Active Directory environment, add an additionalidentity provider instance for each user store you plan add to your deployment.
Prerequisites
n Perform the necessary planning.
n Determine the best way to integrate Workspace with Active Directory to meet the needs of yourorganization. You can configure a single domain, a multi-domain forest, or a multi-forest ActiveDirectory deployment. See Chapter 4, “Integrating Workspace with Active Directory,” on page 15.
n Determine the authentication types required to meet the needs of your organization. For example,you can configure Kerberos authentication for users internal to your organization and RSA SecurIDauthentication for users external to your organization. You can set up this type of configuration byusing a single identity provider instance for both authentication methods or by using a separateidentity provider instance for each authentication method.
n Deploy Workspace with a single Active Directory domain during the proof-of-concept phase of yourdeployment.
Chapter 5 Configuring Workspace User Authentication
VMware, Inc. 23

n Prepare additional identity provider instances for your Workspace deployment.
n To add additional Connector instances, use the hznAdminTool addvm command in the configurator-va virtual machine to manually add instances. That command registers the Connector instance andadds its name to the Identity Providers page. See Installing and Configuring Workspace.
NOTE To add Connector instances for a multi-forest deployment, see the hznAdminTool addvminstructions that specify the command line options --useGatewayAsIDP=n and--activateOnly=y. The --activateOnly=y option activates the Connector instance withoutautomating the configuration process. Use the Connector Web interface to manually configure eachof these instances.
n To add a third-party identity provider instance, perform the following tasks. See “Overview ofConfiguring Workspace to Use a Third-Party Identity Provider Instance,” on page 26 for acomplete list of tasks related to configuring Workspace to use a third-party identity providerinstance.
n Verify that the third-party instances are SAML 2.0 compliant and that Workspace can reachthem.
n Determine how Workspace obtains the metadata from the third-party instance and copy andsave the appropriate metadata information from the third-party instance that you can pasteinto the Workspace Admin Console during configuration. The metadata information youobtain from the third-party instance is either the URL to the metadata or the actual metadata.
n To enable Workspace to use additional authentication methods, use the admin console toconfigure the additional authentication methods. See “Add or Edit a User AuthenticationMethod,” on page 22.
n Use the admin console to configure network ranges. See “Add or Edit a Network Range,” on page 21
n To integrate Workspace into a multi-forest Active Directory deployment, use the admin console to addthe necessary number of user stores. See “Add a User Store for a Multi-Forest Active DirectoryEnvironment,” on page 16.
Procedure
1 Log in to the Workspace Admin Console.
2 Select Settings > Identity Providers.
3 Edit an existing Connector instance or add a third-party identity provider instance.
IMPORTANT Use the Add Identity Provider option for adding third-party identity provider instances.Do not use the option to add a Connector instance unless VMware technical support instructs you to doso.
Option Description
Connector Click Edit for the Connector instance to configure. You add additionalConnector instances from the command line as a prerequisite to this task.That command registers the Connector instance and adds its name to theIdentity Providers page.
Third-Party Identity Provider Click Add Identity Provider. This option prompts you for information thatenables Workspace to register an existing third-party identity providerinstance.
VMware Workspace Portal Administrator's Guide
24 VMware, Inc.
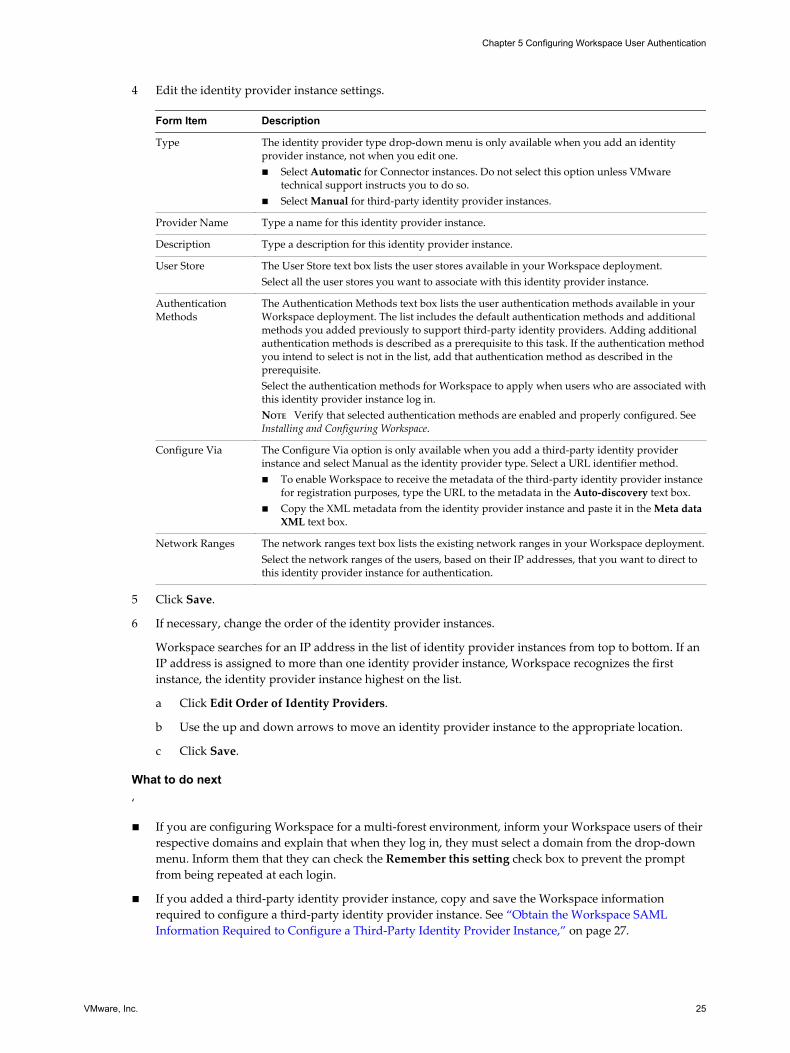
4 Edit the identity provider instance settings.
Form Item Description
Type The identity provider type drop-down menu is only available when you add an identityprovider instance, not when you edit one.n Select Automatic for Connector instances. Do not select this option unless VMware
technical support instructs you to do so.n Select Manual for third-party identity provider instances.
Provider Name Type a name for this identity provider instance.
Description Type a description for this identity provider instance.
User Store The User Store text box lists the user stores available in your Workspace deployment.Select all the user stores you want to associate with this identity provider instance.
AuthenticationMethods
The Authentication Methods text box lists the user authentication methods available in yourWorkspace deployment. The list includes the default authentication methods and additionalmethods you added previously to support third-party identity providers. Adding additionalauthentication methods is described as a prerequisite to this task. If the authentication methodyou intend to select is not in the list, add that authentication method as described in theprerequisite.Select the authentication methods for Workspace to apply when users who are associated withthis identity provider instance log in.NOTE Verify that selected authentication methods are enabled and properly configured. SeeInstalling and Configuring Workspace.
Configure Via The Configure Via option is only available when you add a third-party identity providerinstance and select Manual as the identity provider type. Select a URL identifier method.n To enable Workspace to receive the metadata of the third-party identity provider instance
for registration purposes, type the URL to the metadata in the Auto-discovery text box.n Copy the XML metadata from the identity provider instance and paste it in the Meta data
XML text box.
Network Ranges The network ranges text box lists the existing network ranges in your Workspace deployment.Select the network ranges of the users, based on their IP addresses, that you want to direct tothis identity provider instance for authentication.
5 Click Save.
6 If necessary, change the order of the identity provider instances.
Workspace searches for an IP address in the list of identity provider instances from top to bottom. If anIP address is assigned to more than one identity provider instance, Workspace recognizes the firstinstance, the identity provider instance highest on the list.
a Click Edit Order of Identity Providers.
b Use the up and down arrows to move an identity provider instance to the appropriate location.
c Click Save.
What to do next
‘
n If you are configuring Workspace for a multi-forest environment, inform your Workspace users of theirrespective domains and explain that when they log in, they must select a domain from the drop-downmenu. Inform them that they can check the Remember this setting check box to prevent the promptfrom being repeated at each login.
n If you added a third-party identity provider instance, copy and save the Workspace informationrequired to configure a third-party identity provider instance. See “Obtain the Workspace SAMLInformation Required to Configure a Third-Party Identity Provider Instance,” on page 27.
Chapter 5 Configuring Workspace User Authentication
VMware, Inc. 25
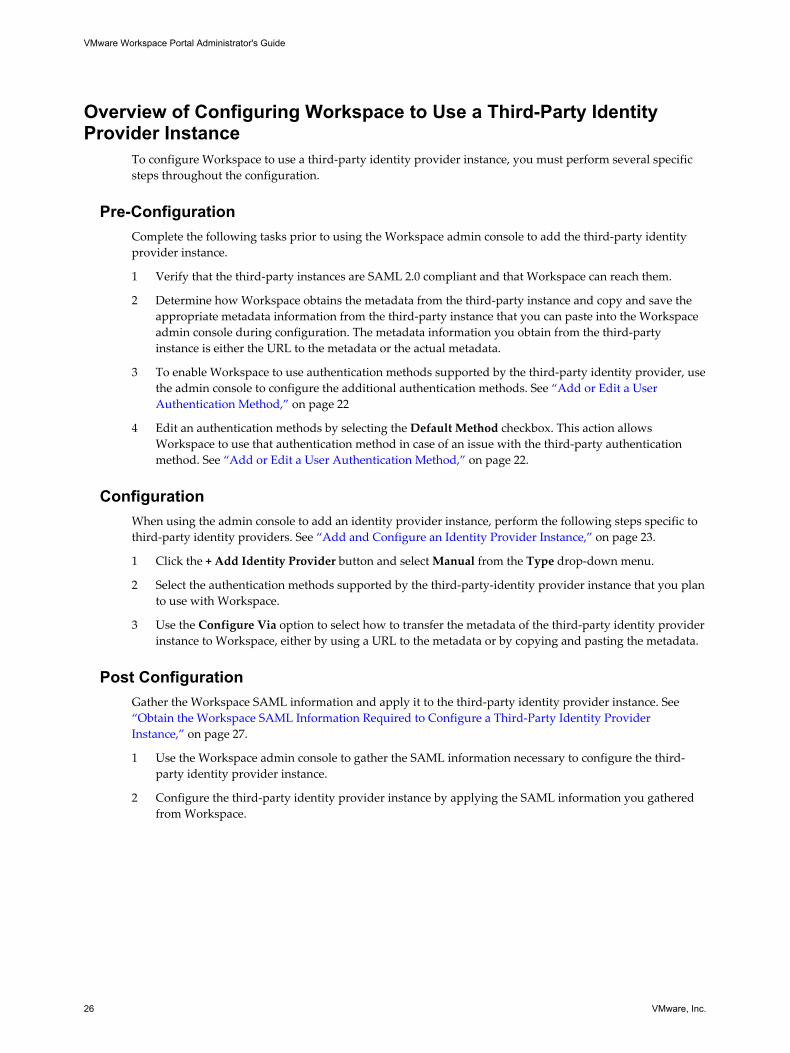
Overview of Configuring Workspace to Use a Third-Party IdentityProvider Instance
To configure Workspace to use a third-party identity provider instance, you must perform several specificsteps throughout the configuration.
Pre-ConfigurationComplete the following tasks prior to using the Workspace admin console to add the third-party identityprovider instance.
1 Verify that the third-party instances are SAML 2.0 compliant and that Workspace can reach them.
2 Determine how Workspace obtains the metadata from the third-party instance and copy and save theappropriate metadata information from the third-party instance that you can paste into the Workspaceadmin console during configuration. The metadata information you obtain from the third-partyinstance is either the URL to the metadata or the actual metadata.
3 To enable Workspace to use authentication methods supported by the third-party identity provider, usethe admin console to configure the additional authentication methods. See “Add or Edit a UserAuthentication Method,” on page 22
4 Edit an authentication methods by selecting the Default Method checkbox. This action allowsWorkspace to use that authentication method in case of an issue with the third-party authenticationmethod. See “Add or Edit a User Authentication Method,” on page 22.
ConfigurationWhen using the admin console to add an identity provider instance, perform the following steps specific tothird-party identity providers. See “Add and Configure an Identity Provider Instance,” on page 23.
1 Click the + Add Identity Provider button and select Manual from the Type drop-down menu.
2 Select the authentication methods supported by the third-party-identity provider instance that you planto use with Workspace.
3 Use the Configure Via option to select how to transfer the metadata of the third-party identity providerinstance to Workspace, either by using a URL to the metadata or by copying and pasting the metadata.
Post ConfigurationGather the Workspace SAML information and apply it to the third-party identity provider instance. See “Obtain the Workspace SAML Information Required to Configure a Third-Party Identity ProviderInstance,” on page 27.
1 Use the Workspace admin console to gather the SAML information necessary to configure the third-party identity provider instance.
2 Configure the third-party identity provider instance by applying the SAML information you gatheredfrom Workspace.
VMware Workspace Portal Administrator's Guide
26 VMware, Inc.
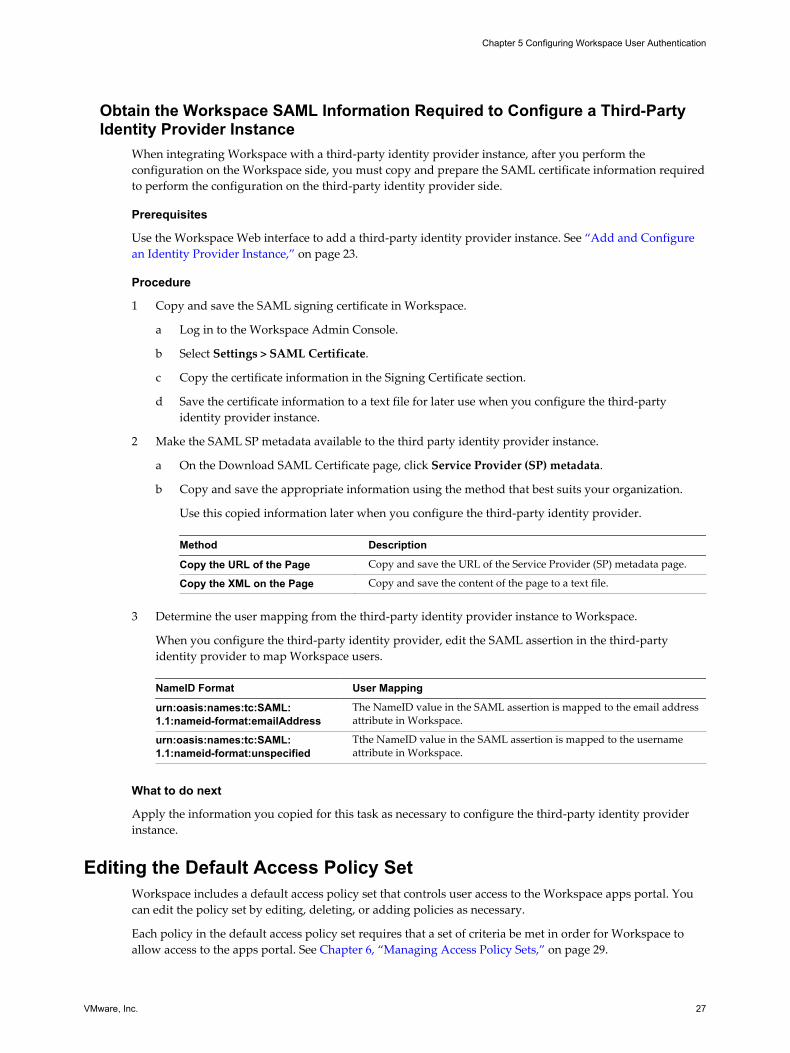
Obtain the Workspace SAML Information Required to Configure a Third-PartyIdentity Provider Instance
When integrating Workspace with a third-party identity provider instance, after you perform theconfiguration on the Workspace side, you must copy and prepare the SAML certificate information requiredto perform the configuration on the third-party identity provider side.
Prerequisites
Use the Workspace Web interface to add a third-party identity provider instance. See “Add and Configurean Identity Provider Instance,” on page 23.
Procedure
1 Copy and save the SAML signing certificate in Workspace.
a Log in to the Workspace Admin Console.
b Select Settings > SAML Certificate.
c Copy the certificate information in the Signing Certificate section.
d Save the certificate information to a text file for later use when you configure the third-partyidentity provider instance.
2 Make the SAML SP metadata available to the third party identity provider instance.
a On the Download SAML Certificate page, click Service Provider (SP) metadata.
b Copy and save the appropriate information using the method that best suits your organization.
Use this copied information later when you configure the third-party identity provider.
Method Description
Copy the URL of the Page Copy and save the URL of the Service Provider (SP) metadata page.
Copy the XML on the Page Copy and save the content of the page to a text file.
3 Determine the user mapping from the third-party identity provider instance to Workspace.
When you configure the third-party identity provider, edit the SAML assertion in the third-partyidentity provider to map Workspace users.
NameID Format User Mapping
urn:oasis:names:tc:SAML:1.1:nameid-format:emailAddress
The NameID value in the SAML assertion is mapped to the email addressattribute in Workspace.
urn:oasis:names:tc:SAML:1.1:nameid-format:unspecified
Tthe NameID value in the SAML assertion is mapped to the usernameattribute in Workspace.
What to do next
Apply the information you copied for this task as necessary to configure the third-party identity providerinstance.
Editing the Default Access Policy SetWorkspace includes a default access policy set that controls user access to the Workspace apps portal. Youcan edit the policy set by editing, deleting, or adding policies as necessary.
Each policy in the default access policy set requires that a set of criteria be met in order for Workspace toallow access to the apps portal. See Chapter 6, “Managing Access Policy Sets,” on page 29.
Chapter 5 Configuring Workspace User Authentication
VMware, Inc. 27

The following access policy set serves as an example of how you can configure the default access policy setto control access to the Workspace apps portal. See “Edit an Access Policy Set,” on page 32 for instructions.
Example Default Access Policy SetThis example illustrates how you can edit the default access policy set.
Policy Name Network Minimum Authentication Score TTL (hours)
Internal Internal Range 1 8
External All Ranges 3 4
Policies are evaluated in the preceding order. You can drag a policy in a policy set up or down to change thepriority for evaluation.
The preceding example policy set applies to the following use case.
Default Access Policy, Browser Use Case1 n Internal. To access Workspace from an internal (Internal Range) network, Workspace presents
users with the Active Directory password authentication method. To ensure that Workspaceattempts to authenticate users with Kerberos authentication first, you make the authenticationscore of the Kerberos method higher than the authentication score of the password method andyou place Kerberos at the top of the list on the Authentication Methods page. You also assign anetwork range for internal users. The user logs in using a browser and now has access to the userportal for an eight-hour session.
n External. To access Workspace from an external (All Ranges) network, the user is required to loginwith SecurID, which for this example has an authentication score of 3. The user logs in using abrowser and now has access to the apps portal for a four-hour session.
2 When a user attempts to access a resource, except for a Web application covered by a Web-application-specific policy set, the default portal access policy set applies.
For example, the time-to-live (TTL) for such resources matches the TTL of the default portal accesspolicy set. If the TTL for a user who logs in to the apps portal is 8 hours according to the default portalaccess policy set, when the user attempts to launch a resource during the TTL session, the applicationlaunches without requiring the user to reauthenticate.
VMware Workspace Portal Administrator's Guide
28 VMware, Inc.

Managing Access Policy Sets 6You can configure the default access policy set to specify criteria that must be met for users to access theirWorkspace App Portal. You can also create Web-application-specific access policy sets to specify criteria thatmust be met for users to launch specified Web applications.
To apply an access policy, you create the policy as a part of an access policy set. Each policy in an accesspolicy set can specify the following information.
n Where users are allowed to log in from, such as inside or outside the enterprise network.
n The minimum authentication score, which defines the authentication methods allowed for that policy.
n The number of hours of access users are provided.
NOTE Workspace access policies do not control the length of time that a Web application session lasts. Theycontrol the amount of time that users have to launch a Web application.
Workspace has a default access policy set that you can edit. This access policy set controls access toWorkspace as a whole. See “Editing the Default Access Policy Set,” on page 27. To control access to specificWeb applications, you can create additional access policy sets. If you do not apply an access policy set to aWeb application, the default access policy set applies.
This chapter includes the following topics:
n “Overview of Access Policy Settings,” on page 29
n “Managing Web-Application-Specific Access Policy Sets,” on page 30
n “Edit an Access Policy Set,” on page 32
n “Add a Web-Application-Specific Access Policy Set,” on page 33
n “Apply a Web-Application-Specific Access Policy Set,” on page 34
Overview of Access Policy SettingsAn access policy set contains one or more access policies. Each access policy consists of settings that you canconfigure to manage user access to the Workspace App Portal as a whole or to specified Web applications.
Each access policy links a network range to a minimum authentication score. A user logging in from an IPaddress within the applied policy's specified network range is presented with an authentication method thatis equal to or higher than the minimum authentication score of the policy. Each identity provider instance inyour Workspace deployment also links network ranges with authentication methods. When you configurean access policy, ensure that the network range and authentication score pairing that you create are coveredby an existing identity provider instance.
When you create an access policy, you can configure the following settings.
VMware, Inc. 29
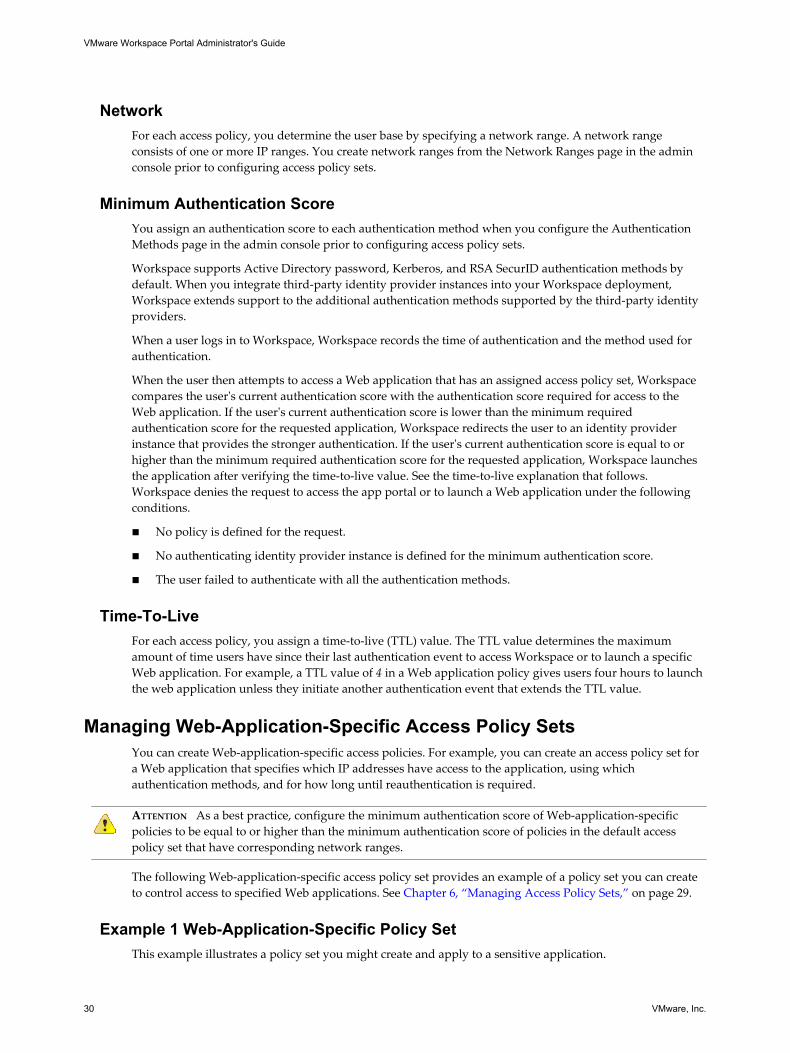
NetworkFor each access policy, you determine the user base by specifying a network range. A network rangeconsists of one or more IP ranges. You create network ranges from the Network Ranges page in the adminconsole prior to configuring access policy sets.
Minimum Authentication ScoreYou assign an authentication score to each authentication method when you configure the AuthenticationMethods page in the admin console prior to configuring access policy sets.
Workspace supports Active Directory password, Kerberos, and RSA SecurID authentication methods bydefault. When you integrate third-party identity provider instances into your Workspace deployment,Workspace extends support to the additional authentication methods supported by the third-party identityproviders.
When a user logs in to Workspace, Workspace records the time of authentication and the method used forauthentication.
When the user then attempts to access a Web application that has an assigned access policy set, Workspacecompares the user's current authentication score with the authentication score required for access to theWeb application. If the user's current authentication score is lower than the minimum requiredauthentication score for the requested application, Workspace redirects the user to an identity providerinstance that provides the stronger authentication. If the user's current authentication score is equal to orhigher than the minimum required authentication score for the requested application, Workspace launchesthe application after verifying the time-to-live value. See the time-to-live explanation that follows.Workspace denies the request to access the app portal or to launch a Web application under the followingconditions.
n No policy is defined for the request.
n No authenticating identity provider instance is defined for the minimum authentication score.
n The user failed to authenticate with all the authentication methods.
Time-To-LiveFor each access policy, you assign a time-to-live (TTL) value. The TTL value determines the maximumamount of time users have since their last authentication event to access Workspace or to launch a specificWeb application. For example, a TTL value of 4 in a Web application policy gives users four hours to launchthe web application unless they initiate another authentication event that extends the TTL value.
Managing Web-Application-Specific Access Policy SetsYou can create Web-application-specific access policies. For example, you can create an access policy set fora Web application that specifies which IP addresses have access to the application, using whichauthentication methods, and for how long until reauthentication is required.
ATTENTION As a best practice, configure the minimum authentication score of Web-application-specificpolicies to be equal to or higher than the minimum authentication score of policies in the default accesspolicy set that have corresponding network ranges.
The following Web-application-specific access policy set provides an example of a policy set you can createto control access to specified Web applications. See Chapter 6, “Managing Access Policy Sets,” on page 29.
Example 1 Web-Application-Specific Policy SetThis example illustrates a policy set you might create and apply to a sensitive application.
VMware Workspace Portal Administrator's Guide
30 VMware, Inc.

Policy Name Network Minimum Authentication Score TTL (hours)
Internal Internal Range 1 8
External All Ranges 3 4
Policies are evaluated in the preceding order. You can drag a policy in a policy set up or down to change thepriority for evaluation.
The preceding example policy set applies to the following use cases.
Strict Web-Application-Specific Access Policy Set, Browser Use Case1 To access Workspace from outside the enterprise network, the user is required to login with RSA
SecurID, which has a minimum authentication score of 3 according to the example. See the Externalpolicy example in “Editing the Default Access Policy Set,” on page 27. The user logs in using a browserand now has access to the app portal for a four hour session as provided by the default access policyset.
2 After four hours, the user tries to launch a Web application with the Example 1 Web-application -specific policy set applied.
3 Workspace checks the policies in the Example 1 policy set and applies the External policy with the AllRanges network range since the user request is coming from a Web browser and from the All Rangesnetwork range.
The user is logged in with a minimum authentication score of 3, an appropriate authentication score tolaunch the sensitive application, but the TTL of the policy just expired. Therefore, the user is redirectedfor reauthentication. The reauthentication provides the user with another four hour session and theability to launch the application. For the next four hours the user can continue to launch the applicationwithout having to re-authenticate.
Example 2 Web-Application-Specific Policy SetThis example illustrates a policy set you might create and apply to an especially sensitive application.
Policy Name Network Minimum Authentication Score TTL (hours)
ExtraSensitive All Ranges Level 3 1
The preceding example policy set applies to the following use case.
Extra Strict Web-Application-Specific Access Policy Set Use Case1 User logs in from an inside the enterprise network using the Password authentication method, which is
level 1 according to the example. See the Internal policy example in “Editing the Default Access PolicySet,” on page 27.
Now, the user has access to the app portal for eight hours.
2 The user immediately tries to launch a Web application with the Example 2 policy set applied. whichrequires level 3 or above authentication
3 The user is redirected to an identity provider that provides level 3 or higher authentication strength,such as a Connector instance requiring RSA SecurID authentication.
4 After the user successfully logs in, Workspace launches the application and saves the authenticationevent.
The user can continue to launch this application for up to an hour but is asked to reauthenticate after anhour unless the user initiated a level 3 or higher authentication event within an hour of the launch, asdictated by the policy.
Chapter 6 Managing Access Policy Sets
VMware, Inc. 31

Edit an Access Policy SetYou can edit the default access policy set, which is a pre-existing policy set that controls user access toWorkspace as a whole, or you can edit Web-application-specific policy sets that you previously createdmanually.
You can remove an entire Web-application-specific access policy set at anytime. The default access policy setis permanent. You can edit it, but you cannot remove it.
You can edit an existing policy set, either the default access policy set or a Web-application-specific accesspolicy set, by removing existing policies from the set, editing existing policies in the set, or adding newpolicies to the set. For an overview of access policy sets, see Chapter 6, “Managing Access Policy Sets,” onpage 29.
For information and examples of policy sets, see the appropriate topic.
n “Editing the Default Access Policy Set,” on page 27.
n “Managing Web-Application-Specific Access Policy Sets,” on page 30.
Prerequisites
n Configure the appropriate identity providers for your deployment. See “Add and Configure an IdentityProvider Instance,” on page 23.
n Configure the appropriate network ranges for your Workspace deployment. See “Add or Edit aNetwork Range,” on page 21.
n Configure the appropriate authentication methods for your deployment. See “Add or Edit a UserAuthentication Method,” on page 22.
Procedure
1 Log in to the Workspace Admin Console.
2 Select Policies > Access Policy Sets.
3 (Optional) To permanently delete a Web-application-specific access policy set, click Remove for thepolicy set.
The Remove option is not available for the default access policy set. The default access policy set cannotbe deleted.
4 Click Edit for the existing policy set to configure.
5 (Optional) If appropriate, change the policy set name and description in the respective text boxes.
NOTE Workspace displays the text in the Policy Set Name and Description text boxes in English. Youcan edit this text, which includes changing the text to a different language.
VMware Workspace Portal Administrator's Guide
32 VMware, Inc.

6 (Optional) If appropriate, edit an existing policy, remove an existing policy, or add a new policy.
As a best practice, configure the minimum authentication score of Web-application-specific policies tobe equal to or higher than the minimum authentication score of policies in the default access policy setthat have corresponding network ranges.
Option Description
Edit an Existing Policy a Click the name of the policy to configure.b Change policy settings as appropriate.c Click Apply.
Remove an Existing Policy a Click the name of the policy to remove.b Click Remove.
Add a New Policy a Click + Access Policy to add a new policy.b Configure policy settings as appropriate.c Click Add.
7 Click Save.
The edited access policy set takes effect immediately.
What to do next
If the policy set is a Web-application-specific access policy set that is not yet applied, apply the policy set toone or more Web applications.
Add a Web-Application-Specific Access Policy SetYou can create Web-application-specific policy sets to manage user access to specific Web applications.
For an overview of access policy sets, see Chapter 6, “Managing Access Policy Sets,” on page 29. Forinformation and examples of Web-application-specific access policy sets, see “Managing Web-Application-Specific Access Policy Sets,” on page 30.
Prerequisites
n Configure the appropriate identity providers for your deployment. See “Add and Configure an IdentityProvider Instance,” on page 23.
n Configure the appropriate network ranges for your Workspace deployment. See “Add or Edit aNetwork Range,” on page 21.
n Configure the appropriate authentication methods for your deployment. See “Add or Edit a UserAuthentication Method,” on page 22.
n Especially when initially configuring Workspace, if you plan to edit the default portal access policy set(to control user access to Workspace as a whole), configure it before creating Web-application-specificpolicy sets.
Procedure
1 Log in to the Workspace Admin Console.
2 Select Policies > Access Policy Sets.
3 Click + Access Policy Set to add a new policy set.
4 Add a policy set name and description in the respective text boxes.
5 Click + Access Policy to add the first policy.
Chapter 6 Managing Access Policy Sets
VMware, Inc. 33

6 Configure policy settings as appropriate.
ATTENTION As a best practice, configure the minimum authentication score of Web-application-specificpolicies to be equal to or higher than the minimum authentication score of policies in the default accesspolicy set that have corresponding network ranges.
7 Click Add.
8 (Optional) Repeat the steps to add policies until the policy set suits the needs of your organization.
9 Click Save to save the policy set.
What to do next
Apply the policy set to one or more Web applications.
Apply a Web-Application-Specific Access Policy SetAfter you create a Web-application-specific access policy set, you can apply the set to specific Webapplications to control user access to those applications.
Workspace applies the default access policy set to all new Web applications. You must apply a Web-application-specific policy set to a Web application to override the default access policy set.
Prerequisites
If not already created, create a Web-application-specific access policy set to control user access to a specificWeb application. See “Add a Web-Application-Specific Access Policy Set,” on page 33
Procedure
1 Click the Catalog tab.
2 Click Any Application Type > Web Applications.
3 Click the Web application to which to apply a Web-application-specific access policy set.
The information page for the Web application appears with the Entitlements tab selected by default.
4 Click Access Policies.
5 From the Access Policy Set drop-down menu, select the Web-application-specific access policy set toapply to the application.
6 Click Save.
The access policy set now controls user access to the application.
VMware Workspace Portal Administrator's Guide
34 VMware, Inc.

Managing Users and Groups 7You can manage and monitor users and groups, which includes the users and groups imported from ActiveDirectory, guest users, and Workspace groups.
In the Workspace admin console, the Users & Groups page provides a user-and-group-centric view ofWorkspace. For example, from the Entitlements page for a user, you can entitle that user to a resource, andfrom the Entitlements page of a group, you can entitle that group to a resource. Alternatively, you can take aresource-centric view of Workspace by using the Catalog page. For example, from the Entitlements page fora resource, you can entitle that resource to a user or group.
This chapter includes the following topics:
n “Workspace User and Group Types,” on page 35
n “Manage Workspace Groups,” on page 36
n “Manage Workspace Users,” on page 41
n “Update the Settings That Select Workspace Users from Active Directory,” on page 43
Workspace User and Group TypesWith the Workspace admin console, you can manage users, guest users, and groups.
UsersWorkspace users are users imported from Active Directory or, if you are deploying Workspace inevaluation mode, the Demo User Store. The Workspace user base is updated according to your directoryserver synchronization schedule.
GroupsThe types of groups that can appear in the Workspace Admin Console are groups imported from yourdirectory server and Workspace groups, which are groups you create yourself using Workspace.
VMware, Inc. 35
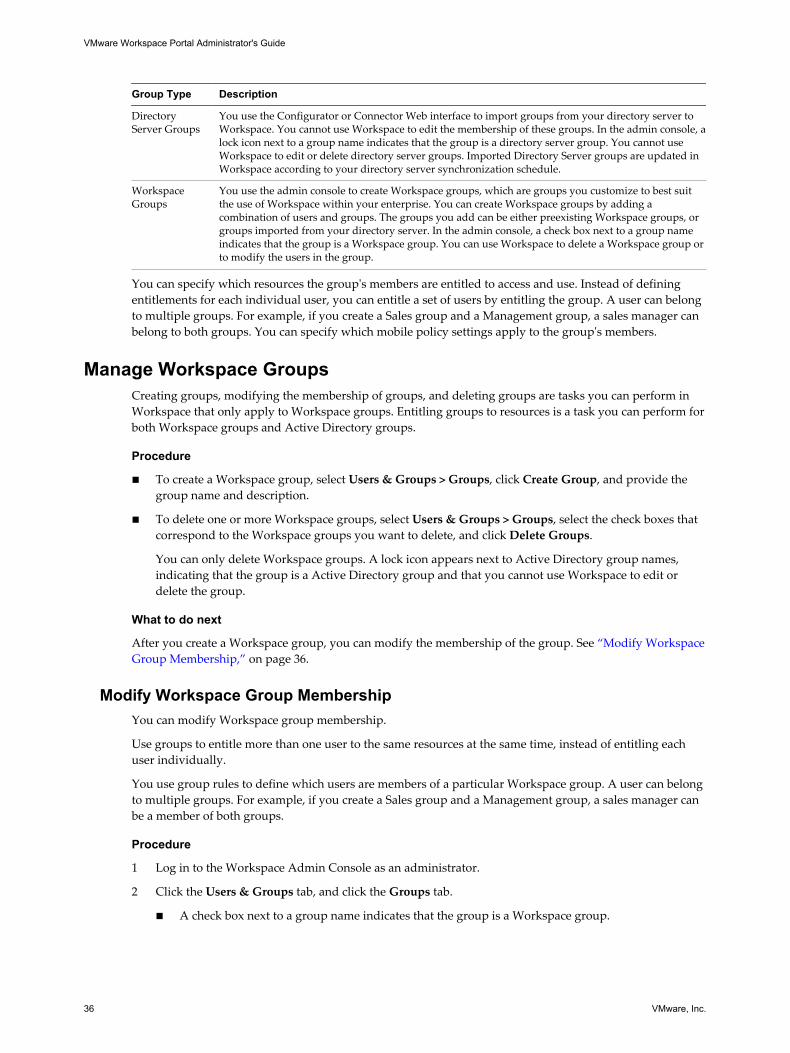
Group Type Description
DirectoryServer Groups
You use the Configurator or Connector Web interface to import groups from your directory server toWorkspace. You cannot use Workspace to edit the membership of these groups. In the admin console, alock icon next to a group name indicates that the group is a directory server group. You cannot useWorkspace to edit or delete directory server groups. Imported Directory Server groups are updated inWorkspace according to your directory server synchronization schedule.
WorkspaceGroups
You use the admin console to create Workspace groups, which are groups you customize to best suitthe use of Workspace within your enterprise. You can create Workspace groups by adding acombination of users and groups. The groups you add can be either preexisting Workspace groups, orgroups imported from your directory server. In the admin console, a check box next to a group nameindicates that the group is a Workspace group. You can use Workspace to delete a Workspace group orto modify the users in the group.
You can specify which resources the group's members are entitled to access and use. Instead of definingentitlements for each individual user, you can entitle a set of users by entitling the group. A user can belongto multiple groups. For example, if you create a Sales group and a Management group, a sales manager canbelong to both groups. You can specify which mobile policy settings apply to the group's members.
Manage Workspace GroupsCreating groups, modifying the membership of groups, and deleting groups are tasks you can perform inWorkspace that only apply to Workspace groups. Entitling groups to resources is a task you can perform forboth Workspace groups and Active Directory groups.
Procedure
n To create a Workspace group, select Users & Groups > Groups, click Create Group, and provide thegroup name and description.
n To delete one or more Workspace groups, select Users & Groups > Groups, select the check boxes thatcorrespond to the Workspace groups you want to delete, and click Delete Groups.
You can only delete Workspace groups. A lock icon appears next to Active Directory group names,indicating that the group is a Active Directory group and that you cannot use Workspace to edit ordelete the group.
What to do next
After you create a Workspace group, you can modify the membership of the group. See “Modify WorkspaceGroup Membership,” on page 36.
Modify Workspace Group MembershipYou can modify Workspace group membership.
Use groups to entitle more than one user to the same resources at the same time, instead of entitling eachuser individually.
You use group rules to define which users are members of a particular Workspace group. A user can belongto multiple groups. For example, if you create a Sales group and a Management group, a sales manager canbe a member of both groups.
Procedure
1 Log in to the Workspace Admin Console as an administrator.
2 Click the Users & Groups tab, and click the Groups tab.
n A check box next to a group name indicates that the group is a Workspace group.
VMware Workspace Portal Administrator's Guide
36 VMware, Inc.

n A lock next to a group name indicates that the group is a directory server group. You managedirectory server groups directly in the directory server. You cannot use Workspace to define themembership of directory server groups.
3 Click the name of the Workspace group whose membership you want to modify.
4 Click the Users in this Group tab.
The system displays the list of users that are currently members in the group.
5 Click Modify Users in This Group.
6 Select an option from the drop-down menu.
Option Action
Any of the following Grants group membership when any of the conditions for groupmembership are met. This option works like an OR condition. Forexample, if you select Any of the following for the rules Group Is Salesand Group Is Marketing, sales and marketing staff are grantedmembership to this group.
All of the following Grants group membership when all of the conditions for groupmembership are met. This works like an AND condition. For example, ifyou select All of the following for the rules Group Is Sales and EmailStarts With 'western_region', only sales staff in the western region aregranted membership to this group. Sales staff in other regions are notgranted membership.
Chapter 7 Managing Users and Groups
VMware, Inc. 37
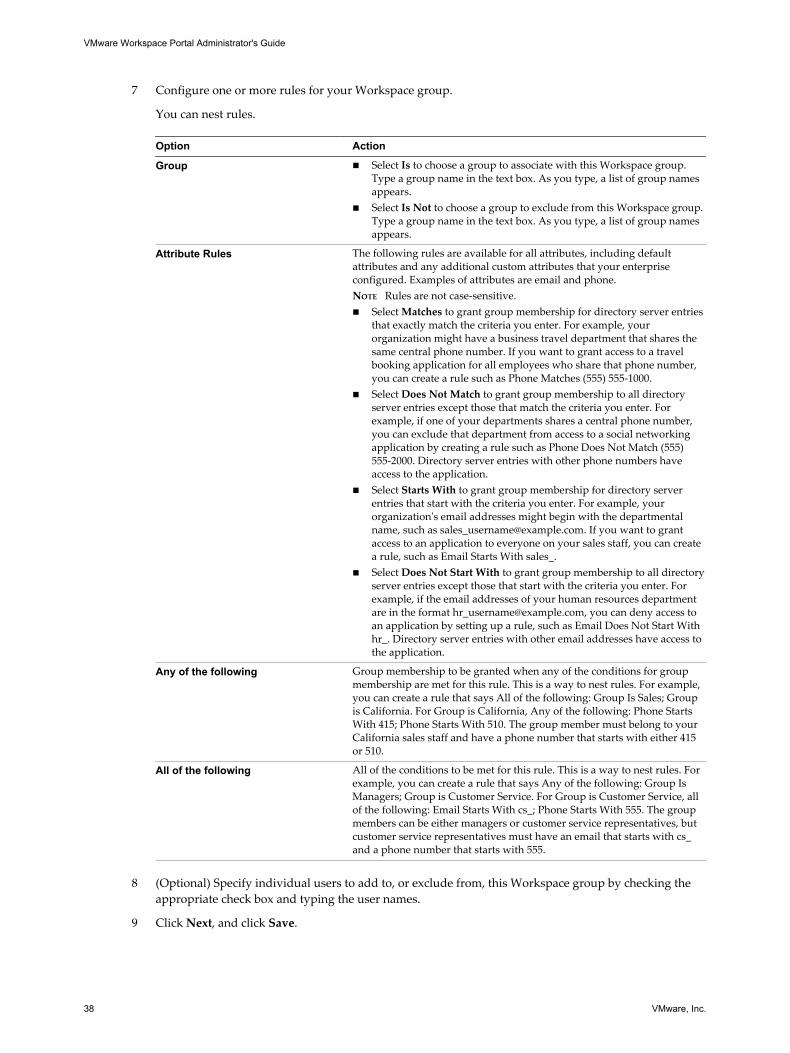
7 Configure one or more rules for your Workspace group.
You can nest rules.
Option Action
Group n Select Is to choose a group to associate with this Workspace group.Type a group name in the text box. As you type, a list of group namesappears.
n Select Is Not to choose a group to exclude from this Workspace group.Type a group name in the text box. As you type, a list of group namesappears.
Attribute Rules The following rules are available for all attributes, including defaultattributes and any additional custom attributes that your enterpriseconfigured. Examples of attributes are email and phone.NOTE Rules are not case-sensitive.n Select Matches to grant group membership for directory server entries
that exactly match the criteria you enter. For example, yourorganization might have a business travel department that shares thesame central phone number. If you want to grant access to a travelbooking application for all employees who share that phone number,you can create a rule such as Phone Matches (555) 555-1000.
n Select Does Not Match to grant group membership to all directoryserver entries except those that match the criteria you enter. Forexample, if one of your departments shares a central phone number,you can exclude that department from access to a social networkingapplication by creating a rule such as Phone Does Not Match (555)555-2000. Directory server entries with other phone numbers haveaccess to the application.
n Select Starts With to grant group membership for directory serverentries that start with the criteria you enter. For example, yourorganization's email addresses might begin with the departmentalname, such as [email protected]. If you want to grantaccess to an application to everyone on your sales staff, you can createa rule, such as Email Starts With sales_.
n Select Does Not Start With to grant group membership to all directoryserver entries except those that start with the criteria you enter. Forexample, if the email addresses of your human resources departmentare in the format [email protected], you can deny access toan application by setting up a rule, such as Email Does Not Start Withhr_. Directory server entries with other email addresses have access tothe application.
Any of the following Group membership to be granted when any of the conditions for groupmembership are met for this rule. This is a way to nest rules. For example,you can create a rule that says All of the following: Group Is Sales; Groupis California. For Group is California, Any of the following: Phone StartsWith 415; Phone Starts With 510. The group member must belong to yourCalifornia sales staff and have a phone number that starts with either 415or 510.
All of the following All of the conditions to be met for this rule. This is a way to nest rules. Forexample, you can create a rule that says Any of the following: Group IsManagers; Group is Customer Service. For Group is Customer Service, allof the following: Email Starts With cs_; Phone Starts With 555. The groupmembers can be either managers or customer service representatives, butcustomer service representatives must have an email that starts with cs_and a phone number that starts with 555.
8 (Optional) Specify individual users to add to, or exclude from, this Workspace group by checking the
appropriate check box and typing the user names.
9 Click Next, and click Save.
VMware Workspace Portal Administrator's Guide
38 VMware, Inc.
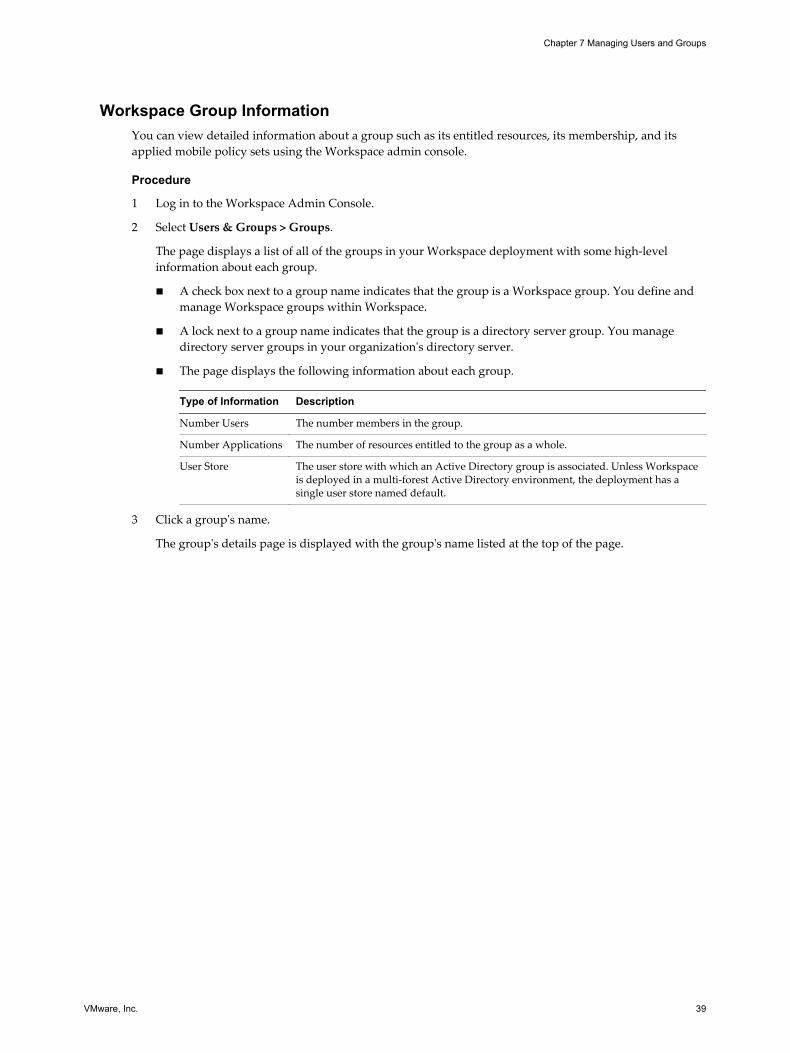
Workspace Group InformationYou can view detailed information about a group such as its entitled resources, its membership, and itsapplied mobile policy sets using the Workspace admin console.
Procedure
1 Log in to the Workspace Admin Console.
2 Select Users & Groups > Groups.
The page displays a list of all of the groups in your Workspace deployment with some high-levelinformation about each group.
n A check box next to a group name indicates that the group is a Workspace group. You define andmanage Workspace groups within Workspace.
n A lock next to a group name indicates that the group is a directory server group. You managedirectory server groups in your organization's directory server.
n The page displays the following information about each group.
Type of Information Description
Number Users The number members in the group.
Number Applications The number of resources entitled to the group as a whole.
User Store The user store with which an Active Directory group is associated. Unless Workspaceis deployed in a multi-forest Active Directory environment, the deployment has asingle user store named default.
3 Click a group's name.
The group's details page is displayed with the group's name listed at the top of the page.
Chapter 7 Managing Users and Groups
VMware, Inc. 39

4 Click the tab that corresponds to the information you want to view.
Option Description
Entitlements The group's Entitlements page is displayed. In this page, you can:n View the list of resources entitled to the users of the group.n Click Add entitlement to entitle the group's users to the individual
resources that are available in your catEntitlementsalog.n Click the name of a listed entitled resource to display that resource's
Edit page.n For resource types that have an Edit button, you can click the button to
entitle or unentitle the group's users to resources of that type, or tocustomize the options for each entitled resource. From theEntitlements page, you can make the following changes:n For web applications, click Edit to change the group's entitlements
to the web applications or the type of deployment for the group'sentitled web applications. Select Automatic to have the Webapplication displayed by default in the user portal. Select User-Activated to allow the users to add the web application to theuser's My Apps area from the App Center collection ofapplications available to that user.
n For View desktop and application pools, you can view the group'sexisting entitlements to the View pools that are integrated withyour Workspace system. Entitlements to View desktop andapplication pools are configured in the View Connection Serverinstances that are integrated with your Workspace system. Youcannot change entitlements to View pools using the group'sEntitlements page.
n For ThinApp packages, click Edit to change the group'sentitlements to the ThinApp packages or the type of deploymentfor the group's entitled ThinApp packages. Select Automatic tohave the ThinApp package displayed by default in the My Appsarea of the user portal. Select User-Activated to allow the users tomanually add the ThinApp package from the App Catalog to theirMy Apps area.
n For Citrix Published Applications, you can view the group'sexisting entitlements to the Citrix-based applications that areintegrated with your Workspace system. Entitlements to Citrix-based applications are configured in the Citrix deployments thatare integrated with your Workspace system. You cannot changeentitlements to Citrix-based applications using the group'sEntitlements page.
n For resources types that have an Unentitle button, you can click thebutton to remove the group's access to use that specific resource.
NOTE The Provisioning Status column is not used. By default, for the tablerows that have filled-in entries on this page, the Provisioning Statuscolumns display Not Enabled, and you cannot change this value.
Users in this Group The group's membership page is displayed. In this page, you can:n View the list of users that belong to the group.n Click a user's name to display the details page for that user.n Click Modify Users in This Group to view and configure the rules
that define membership to the Workspace group. The Modify Users inThis Group option is available for Workspace groups, but not fordirectory server groups.
VMware Workspace Portal Administrator's Guide
40 VMware, Inc.

Manage Workspace UsersYou can manage Workspace users, the users imported from Active Directory, using the Workspace AdminConsole.
Managing users in Workspace includes tasks such as entitling the users to resources, adding users to theappropriate Workspace groups, and managing the state of users' provisioned workspaces.
Workspace User InformationYou can view detailed information about a user such as the user's entitled resources, group affiliations, andprovisioned desktop systems and mobile devices using the Workspace Admin Console.
User attributes are among the user information you can view, such as the Data Node Hostname attributeand additional attributes that you configured Workspace to retrieve from your directory server duringsynchronizations. The usefulness of viewing the additional directory server attributes for an individual userdepends on how you use such attributes in your deployment. You can use these additional attributes in thefollowing ways:
n To modify membership of a Workspace group. For example, if you use the manager attribute in ActiveDirectory, you can map the manager attribute to Workspace. You can create a group where the grouprules restrict membership to users with the manager attribute in their Workspace user record.
n To enable users to access Web applications with specific attribute requirements. For example, a financialapplication might restrict access to users with the employee ID attribute in their Workspace user record.
Procedure
1 Log in to the Workspace Admin Console.
2 Select Users & Groups > Users .
The page displays a list of all your Workspace users.
3 Click a user's name.
The user's details page is displayed. The user's name, email address, and role are listed at the top of thepage.
4 (Optional) Click the name of the displayed role, User or Administrator, to change the user's role.
You can promote users to the administrator role, allowing them access to configure the Workspaceadmin console. Individuals assigned the administrator role can still access the their app portal from theWeb as a user. The URL to access the admin console is different than the URL to access the app portal.
For the following URLs, replace the WorkspaceFQDN placeholder with the actual value.
Web Interface Required Role URL Example
Workspace Admin Console Administrator https://WorkspaceFQDN/admin
Workspace App Portal User https://WorkspaceFQDN/web
5 (Optional) Click Show additional attributes to see additional attributes assigned to the user, such asdirectory server attributes.
Chapter 7 Managing Users and Groups
VMware, Inc. 41

6 Click the tab that corresponds to the information you want to view.
Option Description
Entitlements The user's Entitlements page is displayed. In this page, you can:n View the list of resources entitled to the user.n Click Add entitlement to entitle the user to resources that are available
in your catalog.n Click the name of a listed entitled resource to display that resource's
Edit page.n For resource types that have an Edit button, you can click the button to
entitle or unentitle the group's users to resources of that type, or tocustomize the options for each entitled resource. From theEntitlements page, you can make the following changes:n For web applications, click Edit to change the user's entitlements
to the web applications or the type of deployment for each of theuser's entitled web applications. Select Automatic to have the webapplication displayed by default in the user portal. Select User-Activated to allow the user to add the web application to the user'sMy Apps area from the App Center collection of applicationsavailable to that user.
n For View desktop and application pools, you can view the user'sexisting entitlements to the View pools that are integrated withyour Workspace system. Entitlements to View desktop andapplication pools are configured in the View Connection Serverinstances that are integrated with your Workspace system. Youcannot change entitlements to View pools using the user'sEntitlements page.
n For ThinApp packages, click Edit to change the user's entitlementsto the ThinApp packages or the type of deployment for the user'sentitled ThinApp packages. Select Automatic to have the ThinApppackage displayed by default in the My Apps area of the userportal. Select User-Activated to allow the user to manually add theThinApp package from the App Catalog to the My Apps area.
n For Citrix Published Applications, you can view the user's existingentitlements to the Citrix-based applications that are integratedwith your Workspace system. Entitlements to Citrix-basedapplications are configured in the Citrix deployments that areintegrated with your Workspace system. You cannot changeentitlements to Citrix-based applications using the user'sEntitlements page.
n For resources types that have an Unentitle button, you can click thebutton to remove the user's access to use that resource.
NOTE The Provisioning Status column is not used. By default, for the tablerows that have filled-in entries on this page, the Provisioning Statuscolumns display Not Enabled, and you cannot change this value.
Group Affiliations A list of the groups to which the user belongs is displayed. Each groupname represents a group to which the user is a member. You can click agroup's name to display the details page for that group.
Workspaces The user's Workspaces page is displayed. In this page, you can view thedesktop workspace that have been provisioned to the user's desktopsystems, including the current status of the workspace.n For a desktop system, you can click Delete to remove the
corresponding system from Workspace. You might want to remove asystem from Workspace because the system is lost, stolen, or no longerin use.
VMware Workspace Portal Administrator's Guide
42 VMware, Inc.
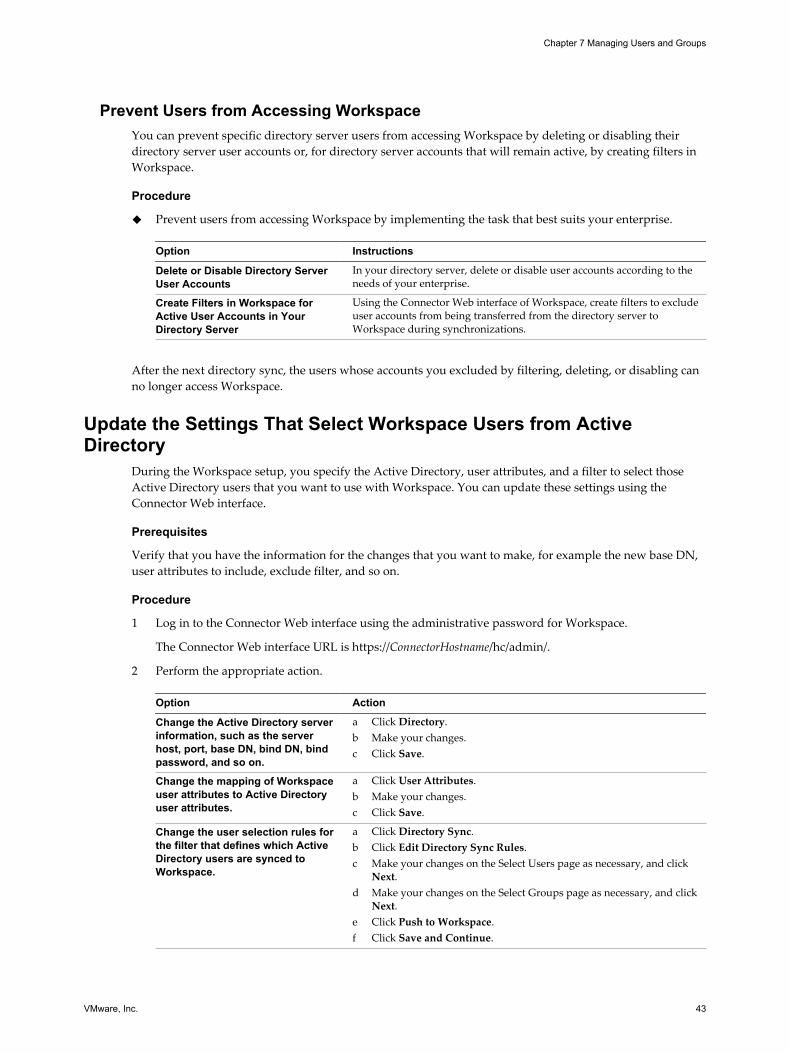
Prevent Users from Accessing WorkspaceYou can prevent specific directory server users from accessing Workspace by deleting or disabling theirdirectory server user accounts or, for directory server accounts that will remain active, by creating filters inWorkspace.
Procedure
u Prevent users from accessing Workspace by implementing the task that best suits your enterprise.
Option Instructions
Delete or Disable Directory ServerUser Accounts
In your directory server, delete or disable user accounts according to theneeds of your enterprise.
Create Filters in Workspace forActive User Accounts in YourDirectory Server
Using the Connector Web interface of Workspace, create filters to excludeuser accounts from being transferred from the directory server toWorkspace during synchronizations.
After the next directory sync, the users whose accounts you excluded by filtering, deleting, or disabling canno longer access Workspace.
Update the Settings That Select Workspace Users from ActiveDirectory
During the Workspace setup, you specify the Active Directory, user attributes, and a filter to select thoseActive Directory users that you want to use with Workspace. You can update these settings using theConnector Web interface.
Prerequisites
Verify that you have the information for the changes that you want to make, for example the new base DN,user attributes to include, exclude filter, and so on.
Procedure
1 Log in to the Connector Web interface using the administrative password for Workspace.
The Connector Web interface URL is https://ConnectorHostname/hc/admin/.
2 Perform the appropriate action.
Option Action
Change the Active Directory serverinformation, such as the serverhost, port, base DN, bind DN, bindpassword, and so on.
a Click Directory.b Make your changes.c Click Save.
Change the mapping of Workspaceuser attributes to Active Directoryuser attributes.
a Click User Attributes.b Make your changes.c Click Save.
Change the user selection rules forthe filter that defines which ActiveDirectory users are synced toWorkspace.
a Click Directory Sync.b Click Edit Directory Sync Rules.c Make your changes on the Select Users page as necessary, and click
Next.d Make your changes on the Select Groups page as necessary, and click
Next.e Click Push to Workspace.f Click Save and Continue.
Chapter 7 Managing Users and Groups
VMware, Inc. 43

VMware Workspace Portal Administrator's Guide
44 VMware, Inc.
Managing the Workspace Catalog 8Your Workspace catalog is the repository of all the resources that you can entitle to users. The availability ofparticular resource types in your catalog is controlled by which modules are enabled in Workspace.
Display your catalog by clicking the Catalog tab in the Workspace admin console. On the Catalog page, youcan perform the following tasks:
n Add new resources to your catalog.
n View the resources to which you can currently entitle users.
n Access information about each resource in your catalog.
Depending on their type, some resources can be added to your catalog directly using the Catalog page.Other resource types require you to take action outside the admin console.
Resource How to See the Resource in Your Catalog
Web application Enable the Web Applications module. Using the admin console, select the Web Applicationsapplication type on the Catalog page.
Virtualized Windowsapplication captured asa ThinApp package
Enable the ThinApp Packages module. Using the Connector Web interface, sync ThinApppackages to your catalog. Using the admin console, select the ThinApp Packages applicationtype on the Catalog page.
View Desktop Pool Enable the View module. Using the Connector Web interface, synch View Pools to yourcatalog. Using the admin console, select the View Desktop Pools application type on theCatalog page.
View HostedApplications
Enable the View module. Using the Connector Web interface, synch View Pools to yourcatalog. Using the admin console, select the View Hosted Application as the application typeon the Catalog page.
Citrix-based application Enable the Citrix Published Applications module. Using the Connector Web interface, syncCitrix-based applications to your catalog. Using the admin console, select the CitrixPublished Applications application type on the Catalog page.
This chapter includes the following topics:
n “Overview of Workspace Resource Types,” on page 46
n “Overview of Using Resource Categories,” on page 47
n “View Workspace Resources,” on page 49
n “Add Resources to Your Catalog,” on page 50
VMware, Inc. 45
Overview of Workspace Resource TypesThe types of resources that you can define in your catalog for entitlement and distribution to users are Webapplications, Windows applications captured as VMware ThinApp packages, Citrix-based applications,VMware View desktop pools and View Hosted Applications.
Before you can entitle a particular resource to your users, you must populate your catalog with thatresource. The method you use to populate your catalog with a resource depends on what type of resource itis.
Web ApplicationsYou populate your catalog with Web applications directly on the Catalog page of the Workspace adminconsole. When you click a Web application displayed on the Catalog page, information about thatapplication is displayed. From the displayed page, you can configure the Web application, such as byproviding the appropriate SAML attributes to configure single sign-on between Workspace and the targetWeb application. When the Web application is configured, you can then entitle users and groups to thatWeb application. See “Add Resources to Your Catalog,” on page 50.
ThinApp PackagesYou populate your catalog with Windows applications captured as ThinApp packages by performing thefollowing tasks.
1 If the ThinApp packages to which you want to provide users access do not already exist, createThinApp packages that are compatible with Workspace. See the VMware ThinApp documentation.
2 Create a network share and populate it with the compatible ThinApp packages. See Installing andConfiguring Workspace for the requirements on the network share and the directory structure.
3 Configure Workspace to integrate with the packages on the network share. See Installing andConfiguring Workspace.
4 If not already enabled, enable the ThinApp Package module on the Dashboard page of the adminconsole.
After you perform these tasks, the virtualized Windows applications, the ThinApp packages that you addedto the network share, are now available as resources in your catalog. You can then entitle users to thoseresources.
To launch and run the ThinApp packages that are distributed and managed by Workspace, users must havethe Workspace for Windows installed on their Windows systems. See “Distributing and Managing ThinAppPackages with Workspace,” on page 76.
Citrix Published ApplicationsYou populate your catalog with Citrix-based applications, by performing the following tasks.
1 If not already deployed, deploy Citrix servers, which includes entitling users to Citrix-basedapplications. See the appropriate Citrix documentation.
2 Integrate your Workspace deployment with Citrix servers. See Installing and Configuring Workspace.
3 If not already enabled, enable the Citrix Published Applications module on the Dashboard page of theadmin console. See “Enable the Citrix Published Applications Module to Integrate Workspace withYour Citrix Deployment,” on page 69.
After you perform these tasks, the Citrix-based applications you entitled to users with Citrix servers are nowavailable as resources in your catalog.
VMware Workspace Portal Administrator's Guide
46 VMware, Inc.
View Desktop PoolsYou populate your catalog with View desktop pools, and the corresponding View desktops, by performingthe following tasks.
1 If not already deployed, deploy View desktop pools in VMware View, which includes entitling users todesktops. See the VMware View documentation.
2 Integrate your Workspace deployment with VMware View. See Installing and Configuring Workspace.
3 If not already enabled, enable the View module on the Dashboard page of the admin console. See “Enable the View Module to Integrate View with Workspace,” on page 54.
After you perform these tasks, the View desktops that you entitled to users with VMware View are nowavailable as resources in your catalog.
View Hosted ApplicationsYou populate your catalog with View application pools by performing the following tasks.
1 Make sure that application pools are deployed in View as a remote desktop service. See the Viewdocumentation.
2 Integrate your Workspace deployment with View. See Installing and Configuring Workspace.
3 If not already enabled, enable the View module on the Dashboard page of the admin console. See “Enable the View Module to Integrate View with Workspace,” on page 54.
After you perform these tasks, the hosted application pools that you entitled to users with View are nowavailable as resources in your catalog.
Overview of Using Resource CategoriesThe default method of searching for catalog resources, is by resource type. You can also search by category.
To enable a search of Workspace catalog resources by category, create categories and apply them toresources
Create a Resource CategoryYou can create a Workspace resource category without immediately applying it or you can create and applya category at the same time.
Procedure
1 Log in to the Workspace Admin Console.
2 Click the Catalog tab.
3 Click the checkbox of one or more resources.
A checked resource activates the Apply Categories button, which is a requirement for creating acategory. To create and apply categories at the same time, click the checkboxes of all the resources towhich to apply the new category. If you want to create a category without immediately applying it, theresource selected is not meaningful. In that situation, you can click the checkbox of any resource in thecatalog.
4 Click Apply Categories.
5 Type a new category name in the Search categories text box.
Chapter 8 Managing the Workspace Catalog
VMware, Inc. 47
6 Click Add category....
Workspace creates the new category, but does not apply it.
7 (Optional) To apply the category to the selected resources, click the checkbox for the new categoryname.
Workspace applies the category to the selected resources..
What to do next
If appropriate, apply the category to resources. See “Apply a Category to Resources,” on page 48.
Apply a Category to ResourcesAfter you create a category, you can apply that category to any of the resources in the catalog
Prerequisites
Create a resource category.
Procedure
1 Log in to the Workspace Admin Console.
2 Click the Catalog tab.
3 Click the checkboxes of all the resources to which to apply the category.
4 Click Apply Categories and select the name of the category to apply.
The category is applied to the selected resources.
Remove or Delete a CategoryYou can disassociate a category from a resource and you can permanently remove a category from thecatalog.
You can remove the category label to disassociate the category from the resource. You can also delete thecategory permanently from the catalog. When you permanently delete a category, the category disappearsfrom catalog. It no longer appears in the Any Category drop-down menu or as a label to any resource towhich you previously applied it.
Procedure
1 Log in to the Workspace Admin Console.
2 Click the Catalog tab.
3 Click the checkbox of one or more resources.
A checked resource activates the Apply Categories button, which is a requirement for removing anddeleting a category. To remove a category label from one or more resources, click the checkboxes of allthe resources from which to remove the category label. If you want to permanently delete a category,the resource selected is not meaningful. In that situation, you can click the checkbox of any resource inthe catalog.
4 Click Apply Categories.
Option Description
Remove Category from Resources The checkbox of the label is selected. Click that check box to remove thecategory label from the selected resource.
Delete Category Permanently Hover over the category. An x appears. Click the x to permanently removethe category from the catalog.
VMware Workspace Portal Administrator's Guide
48 VMware, Inc.
View Workspace ResourcesAccess your catalog to view information about the resources to which you can entitle users, such asWorkspace Web applications, ThinApp packages, Citrix-based applications, and View desktop pools. Youcan view resources by application type or by category.
Prerequisites
n Enable the resource modules that correspond to the resource types to which you want to entitle users.The Web Applications module, Mobile Management module, View module, ThinApp Packagesmodule, and Citrix Published Applications module are available.
n Add resources to the catalog to meet the needs of your enterprise. See Chapter 8, “Managing theWorkspace Catalog,” on page 45.
n To view resources by category, create and apply categories. See “Overview of Using ResourceCategories,” on page 47.
Procedure
1 Log in to the Workspace Admin Console.
2 Click the Catalog tab.
Workspace lists all the resources in the catalog.
3 (Optional) To change the sort method click Application or Application type.
4 (Optional) To view resources by a specific type, select a resource type from the Any Application Typedrop-down menu.
Application types that you have not added to Workspace do not appear in the drop-down menu.
Option Description
Any Application Type Lists all of the resources in your catalog.
Web Applications Lists only Web applications in your catalog. Web applications include SaaSapplications and Web applications managed internally by your enterprise.
ThinApp Packages Lists only Windows applications captured as ThinApp packages. ThinApppackages appear in your catalog if you add ThinApp packages to yourdeployment while configuring Workspace prior to accessing the adminconsole.
View Desktop Pools Lists only the View desktop pools. View desktop pools appear in yourcatalog if you integrate Workspace with VMware View prior to accessingthe Workspace Admin Console.
View Hosted Applications Lists only the View hosted zpplications. View Hosted Applications appearin your catalog if you integrate Workspace with View prior to accessingthe admin console.
Citrix Published Applications Lists only Citrix-based applications. Citrix-based applications appear inyour catalog if you integrate Workspace with your Citrix deployment priorto accessing the admin console.
5 (Optional) To view resources by a specific category, select one or more category names from the Any
Category drop-down menu.
Workspace lists all the resources that meet the criteria you selected.
n If you select one category, Workspace lists all the resources marked with that category label.
n If you select more than one category, Workspace only lists resources that marked with all of thosecategory labels.
Chapter 8 Managing the Workspace Catalog
VMware, Inc. 49

6 Click the icon for a specific resource to view the details of that resource.
Add Resources to Your CatalogYou can add Web applications and upload Android mobile applications to your catalog directly using theCatalog page of the Workspace admin console.
See the appropriate topic for detailed instructions about adding a Web application or mobile application toyour catalog:
n “Add a Web Application to Your Catalog from the Cloud Application Catalog,” on page 63
n “Add a Web Application to Your Catalog by Creating a New Application Record,” on page 65
n “Add a Web Application to Your Catalog by Importing a ZIP or JAR File,” on page 66
The following instructions provide an overview of the steps involved in adding these types of resources toyour catalog.
Procedure
1 Log in to the Workspace Admin Console.
2 Click the Catalog tab.
3 Click + Add Application.
4 Click an option depending on the resource type, and the location of the application. When importing anAndroid workspace image, you do not have to click an option in this step.
Link Name Resource Type Description
Web Application ...from thecloud application catalog
Webapplication
Workspace includes access to several default Web applications,available in the cloud application catalog, that you can add toyour catalog as resources.
Web Application ... create anew one
Webapplication
By filling out the appropriate form, you can create anapplication record for the Web applications you want to add toyour catalog as resources.
Web Application ... import aZIP or JAR file
Webapplication
You can import a Web application that you previouslyconfigured in Workspace. You might want to use this methodto roll a Workspace deployment from staging to production. Insuch a situation, you export a Web application from the stagingdeployment as a ZIP file. You then import the ZIP file into theproduction deployment.
5 Follow the prompts to finish adding resources to the catalog.
VMware Workspace Portal Administrator's Guide
50 VMware, Inc.

Search for Users, Groups, or CatalogResources 9
Use the search text box in the Workspace Admin Console to search for Workspace users, groups, orresources in your catalog.
Procedure
1 Log in to the Workspace Admin Console.
2 Enter a string into the search text box.
For example, to search for all users that have an email address mycompany.com, enter mycompany.com.
The Search Results page displays with the returned results listed on three tabs, according to the followingrules.
Users tab The typed-in string matches the starting characters of any word within theWorkspace user's first name, last name, or user principal name.
Groups tab The typed-in string matches the starting characters of any word within thegroup's name or description.
Catalog tab The typed-in string matches the starting characters of any word within thecatalog resource's name or description.
NOTE Up to 100 results are returned for each record type. For example, if the string appears in the recordsof more than 100 users, a maximum of 100 results is listed on the Users tab. You cannot change thismaximum.
VMware, Inc. 51

VMware Workspace Portal Administrator's Guide
52 VMware, Inc.

Providing Access to View Desktopand Application Pools 10
By integrating your organization's View™ Connection Server instance with your Workspace system, yougive your VMware Workspace Portal users the ability to use the Workspace App Portal to access theirentitled View desktop and applications pools. Additionally, when the View module is enabled, you can usethe Workspace admin console to see the associations between Workspace users and groups and theirentitled View pools.
NOTE You use the View Connection Server instance and its associated View Administrator managementWeb interface to entitle users and groups to View desktop and application pools. See the Viewdocumentation.
Typically, you integrate View with your Workspace system as part of the process of installing andconfiguring your Workspace system. To complete the integration of View with your Workspace system, youenable the View module. Enabling the View module provides the following capabilities:
n You can use the Workspace admin console to monitor user and group entitlements to View desktop andapplication pools.
n Your Workspace users can use the Workspace App Portal to access their entitled View desktop andapplication pools.
To ensure the best user experience on iPads, users should install the Horizon Client for iOS on theirdevices.
If the View module was not enabled during the installation and configuration of your Workspace system,you can enable the module after integrating your organization's View Connection Server instance with yourWorkspace system. See “Enable the View Module to Integrate View with Workspace,” on page 54.
This chapter includes the following topics:
n “Enable the View Module to Integrate View with Workspace,” on page 54
n “View User and Group Entitlements to View Desktop and Application Pools,” on page 54
n “View the Connection Information for a View Desktop and Application Pools,” on page 55
n “Add View Pods to Workspace,” on page 55
n “Reducing Resource Usage and Increasing Performance of Workspace for Windows In Non-PersistentView Desktops,” on page 56
VMware, Inc. 53
Enable the View Module to Integrate View with WorkspaceIf you did not enable the View module in the Configurator Web interface when you installed andconfigured Workspace, you can enable it later starting from the Modules tab on the Dashboard page of theWorkspace Admin Console.
See Installing and Configuring Workspace for detailed instructions about the configurations required onVMware View and on Workspace, such as in the Connector Web interface.
Procedure
1 Log in to the Workspace Admin Console.
2 Select Dashboard > Modules, if not already selected.
3 In the View module, click Enable this module.
4 Perform the configurations required to complete the integration of View with Workspace.
The View module is enabled.
If a message displays telling you to go to the Connector, then the integration is not fully in place. Ensure thatyour Workspace system is integrated with your View system according to the steps in Installing andConfiguring Workspace before enabling the View module.
What to do next
Monitor user and group entitlements to View pools. See “View User and Group Entitlements to ViewDesktop and Application Pools,” on page 54.
View User and Group Entitlements to View Desktop and ApplicationPools
You can see the View pools to which your Workspace users and groups are entitled.
IMPORTANT You cannot use Workspace to make changes to View desktop and application pools. If a Viewadministrator makes any changes to View desktop or application pools, such as entitling and unentitlingusers or changing the supported client types, you must force a sync to propagate the changes to yourWorkspace system. Use the Workspace Connector Web interface to force a sync.
Prerequisites
n Verify that your Workspace system is integrated with your View system according to the steps inInstalling and Configuring Workspace.
n Synchronize information and the respective entitlements from the View Connection Server instanceswith your Workspace system. You can force a sync using the following steps:
1 Open the Connector Web interface in your browser. The Connector Web interface URL ishttps://ConnectorHostname/hc/admin/, where ConnectorHostname is the hostname for your WorkspaceConnector.
2 Log in to the Connector Web interface using the administrative password for your Workspace system.
3 Click View pools and click Sync Now.
Procedure
1 Log in to the Workspace Admin Console.
VMware Workspace Portal Administrator's Guide
54 VMware, Inc.
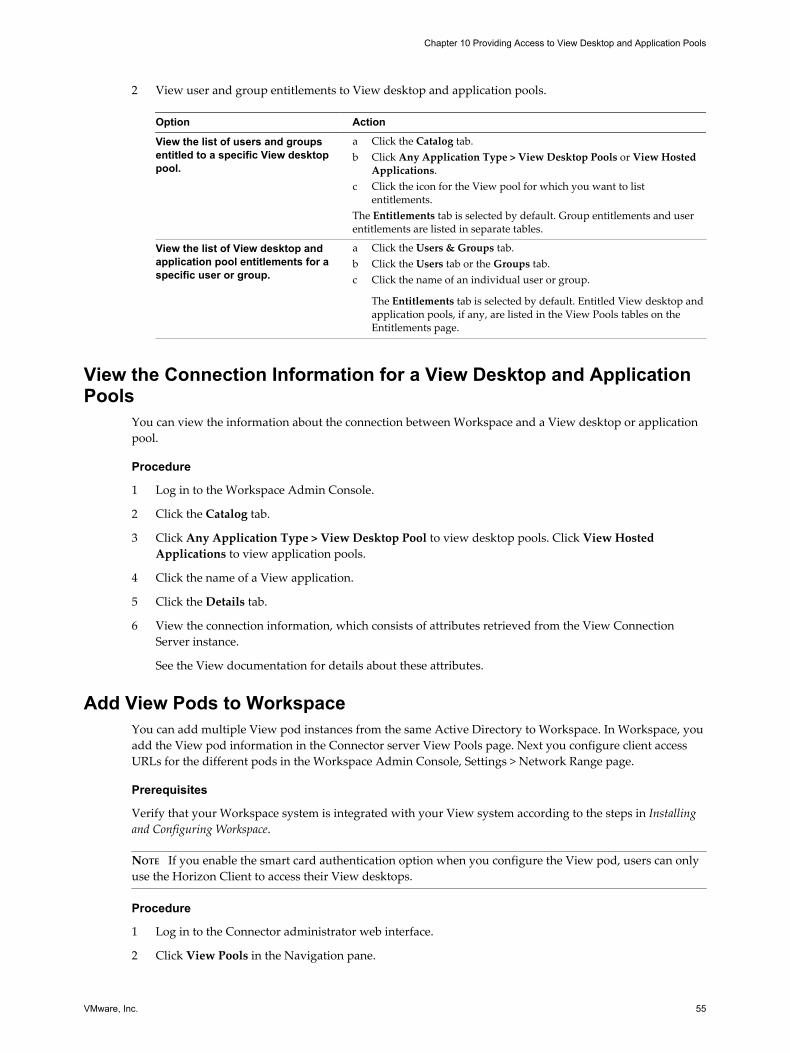
2 View user and group entitlements to View desktop and application pools.
Option Action
View the list of users and groupsentitled to a specific View desktoppool.
a Click the Catalog tab.b Click Any Application Type > View Desktop Pools or View Hosted
Applications.c Click the icon for the View pool for which you want to list
entitlements.The Entitlements tab is selected by default. Group entitlements and userentitlements are listed in separate tables.
View the list of View desktop andapplication pool entitlements for aspecific user or group.
a Click the Users & Groups tab.b Click the Users tab or the Groups tab.c Click the name of an individual user or group.
The Entitlements tab is selected by default. Entitled View desktop andapplication pools, if any, are listed in the View Pools tables on theEntitlements page.
View the Connection Information for a View Desktop and ApplicationPools
You can view the information about the connection between Workspace and a View desktop or applicationpool.
Procedure
1 Log in to the Workspace Admin Console.
2 Click the Catalog tab.
3 Click Any Application Type > View Desktop Pool to view desktop pools. Click View HostedApplications to view application pools.
4 Click the name of a View application.
5 Click the Details tab.
6 View the connection information, which consists of attributes retrieved from the View ConnectionServer instance.
See the View documentation for details about these attributes.
Add View Pods to WorkspaceYou can add multiple View pod instances from the same Active Directory to Workspace. In Workspace, youadd the View pod information in the Connector server View Pools page. Next you configure client accessURLs for the different pods in the Workspace Admin Console, Settings > Network Range page.
Prerequisites
Verify that your Workspace system is integrated with your View system according to the steps in Installingand Configuring Workspace.
NOTE If you enable the smart card authentication option when you configure the View pod, users can onlyuse the Horizon Client to access their View desktops.
Procedure
1 Log in to the Connector administrator web interface.
2 Click View Pools in the Navigation pane.
Chapter 10 Providing Access to View Desktop and Application Pools
VMware, Inc. 55

3 To permit access to the View Pools from Workspace, check the box Enable View Pools.
4 Click Add View Pod.
5 In the Connector Server text box, type the name of the View Connect Server.
6 In the Username text box, type the administrator's username for this View pod.
7 In the Password text box, enter the administrator's password for this View pod.
8 If users use smart card authentication to sign in to this View pod instead of passwords, enable the checkbox.
9 Select how often you want this information to sync from the View Connection Server.
10 Click Sync Now.
11 Log in to the Workspace Admin Console to finish the View Pod configuration.
a Select Settings > Network Ranges.
b Select an existing network range and click Edit.
c In the View Pods section of the form, enter the View Pod client access URL host name and portnumber for the network range.
Reducing Resource Usage and Increasing Performance of Workspacefor Windows In Non-Persistent View Desktops
To reduce resource usage and increase performance when using the Workspace App Portal in non-persistent desktops, also known as stateless desktops, you can configure the client with settings optimizedfor using it in a non-persistent View desktop.
Problem
When a non-persistent View desktop has the Workspace for Windows application installed in the Viewdesktop, each time a user starts a session, an increased amount of resources are used, such as storage I/Os.
Cause
Non-persistent View desktops are inherently stateless. Such View desktops are also known as floatingdesktops, and new sessions can be created when the floating desktops are recomposed or the user is given anew desktop from the pool. Unless the Workspace for Windows application used in the non-persistentdesktops is configured with settings that are optimized for this scenario, the users might experiencedegraded performance when ThinApp packages.
Typically, you configure the Workspace for Windows application for the View desktops using thecommand-line installer options. See “Command-Line Installer Options for Workspace for Windows,” onpage 93.
Solution
u Install the Workspace for Windows application in the template that is used for the non-persistent Viewdesktops using the recommended command-line installer options.
/v Installer Option Description
ENABLE_AUTOUPDATE = 0 Prevents the automatic update of the Workspace for Windows application to anewer version. Typically, your View administrator updates the application inthe template.
VMware Workspace Portal Administrator's Guide
56 VMware, Inc.

/v Installer Option Description
INSTALL_MODE =RUN_FROM_SHARE
If you plan to have the users use ThinApp packages in these View desktops, usethis option to have the ThinApp packages streamed from the server instead ofdownloaded to the Windows system.
This code sample is an example of installing the Workspace for Windows application with an optimalconfiguration for non-persistent View desktops where the users are expected to use ThinApp packages.The HORIZONURL option specifies the Workspace server for this installation.
Workspace-n.n.n-nnnnnnn.exe /v HORIZONURL=https://server.company.com ENABLE_AUTOUPDATE=0
INSTALL_MODE=RUN_FROM_SHARE
Chapter 10 Providing Access to View Desktop and Application Pools
VMware, Inc. 57

VMware Workspace Portal Administrator's Guide
58 VMware, Inc.
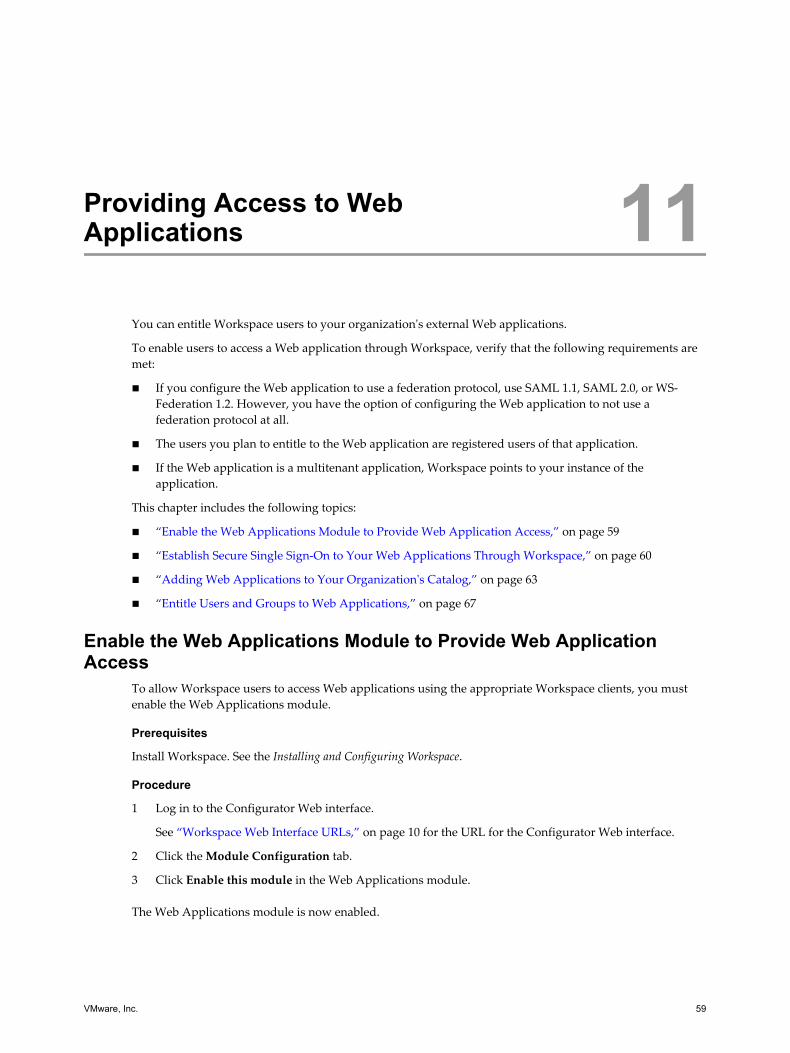
Providing Access to WebApplications 11
You can entitle Workspace users to your organization's external Web applications.
To enable users to access a Web application through Workspace, verify that the following requirements aremet:
n If you configure the Web application to use a federation protocol, use SAML 1.1, SAML 2.0, or WS-Federation 1.2. However, you have the option of configuring the Web application to not use afederation protocol at all.
n The users you plan to entitle to the Web application are registered users of that application.
n If the Web application is a multitenant application, Workspace points to your instance of theapplication.
This chapter includes the following topics:
n “Enable the Web Applications Module to Provide Web Application Access,” on page 59
n “Establish Secure Single Sign-On to Your Web Applications Through Workspace,” on page 60
n “Adding Web Applications to Your Organization's Catalog,” on page 63
n “Entitle Users and Groups to Web Applications,” on page 67
Enable the Web Applications Module to Provide Web ApplicationAccess
To allow Workspace users to access Web applications using the appropriate Workspace clients, you mustenable the Web Applications module.
Prerequisites
Install Workspace. See the Installing and Configuring Workspace.
Procedure
1 Log in to the Configurator Web interface.
See “Workspace Web Interface URLs,” on page 10 for the URL for the Configurator Web interface.
2 Click the Module Configuration tab.
3 Click Enable this module in the Web Applications module.
The Web Applications module is now enabled.
VMware, Inc. 59
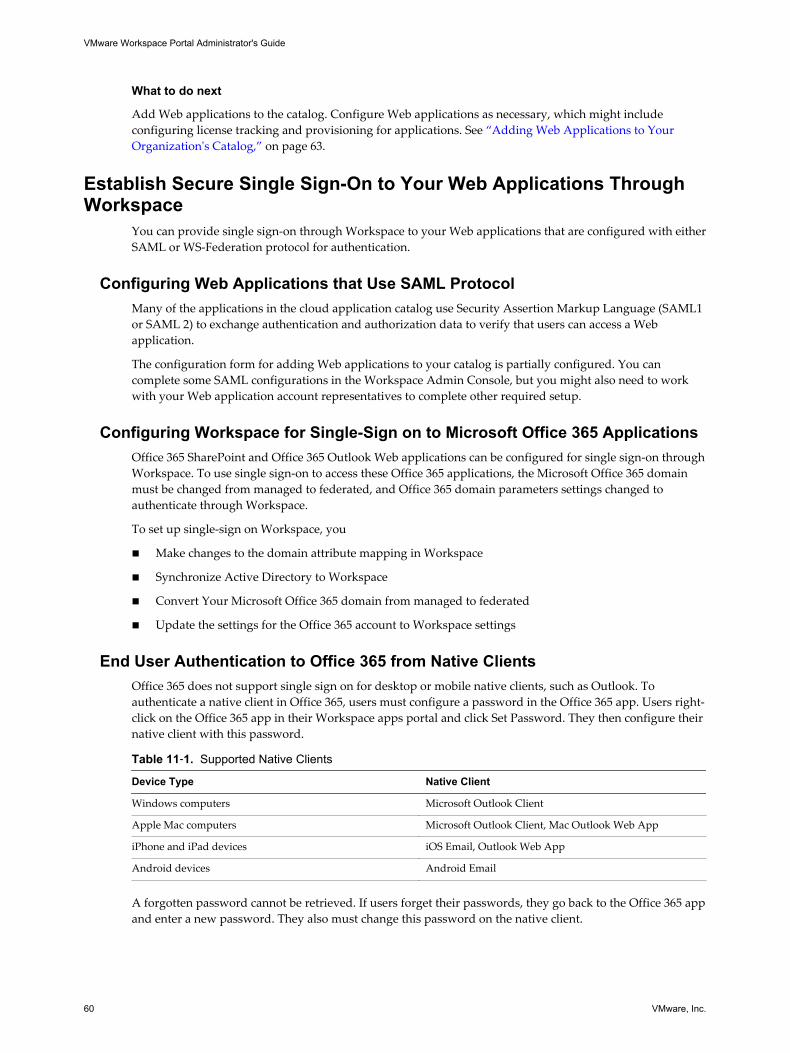
What to do next
Add Web applications to the catalog. Configure Web applications as necessary, which might includeconfiguring license tracking and provisioning for applications. See “Adding Web Applications to YourOrganization's Catalog,” on page 63.
Establish Secure Single Sign-On to Your Web Applications ThroughWorkspace
You can provide single sign-on through Workspace to your Web applications that are configured with eitherSAML or WS-Federation protocol for authentication.
Configuring Web Applications that Use SAML ProtocolMany of the applications in the cloud application catalog use Security Assertion Markup Language (SAML1or SAML 2) to exchange authentication and authorization data to verify that users can access a Webapplication.
The configuration form for adding Web applications to your catalog is partially configured. You cancomplete some SAML configurations in the Workspace Admin Console, but you might also need to workwith your Web application account representatives to complete other required setup.
Configuring Workspace for Single-Sign on to Microsoft Office 365 ApplicationsOffice 365 SharePoint and Office 365 Outlook Web applications can be configured for single sign-on throughWorkspace. To use single sign-on to access these Office 365 applications, the Microsoft Office 365 domainmust be changed from managed to federated, and Office 365 domain parameters settings changed toauthenticate through Workspace.
To set up single-sign on Workspace, you
n Make changes to the domain attribute mapping in Workspace
n Synchronize Active Directory to Workspace
n Convert Your Microsoft Office 365 domain from managed to federated
n Update the settings for the Office 365 account to Workspace settings
End User Authentication to Office 365 from Native ClientsOffice 365 does not support single sign on for desktop or mobile native clients, such as Outlook. Toauthenticate a native client in Office 365, users must configure a password in the Office 365 app. Users right-click on the Office 365 app in their Workspace apps portal and click Set Password. They then configure theirnative client with this password.
Table 11‑1. Supported Native Clients
Device Type Native Client
Windows computers Microsoft Outlook Client
Apple Mac computers Microsoft Outlook Client, Mac Outlook Web App
iPhone and iPad devices iOS Email, Outlook Web App
Android devices Android Email
A forgotten password cannot be retrieved. If users forget their passwords, they go back to the Office 365 appand enter a new password. They also must change this password on the native client.
VMware Workspace Portal Administrator's Guide
60 VMware, Inc.

Office 365 RequirementsWork with your Microsoft service provider to make sure that your managed Office 365 environment iscorrectly set up before you configure Workspace for single sign-on. The Office 365 directory synchronizationtool must have synchronized your Active Directory to the Office 365 account, and the Windows PowerShellmust be installed on the Windows server.
Mapping Attributes in the Workspace ConnectorTo enable Workspace to interact with Office 365, you must map the following Workspace user attributes tothe Active Directory user attributes.
Procedure
1 Log in to the Connector Web interface using the administrative password for your Workspace server.
The Connector Web interface URL is https://ConnectorHostname/hc/admin/.
2 Verify that the Workspace userPrincipalName attribute is mapped to the Directory userPrincipalNameattribute.
3 Click Add and add the Workspace attribute objectGUID and map it to the Directory attributeobjectGUID.
4 Click Save.
5 To sync your changes to Active Directory immediately, select Directory Sync and click Edit DirectorySync Rules to run the Workspace Connector Sync wizard, otherwise your changes are synced to ActiveDirectory at your next scheduled sync interval.
6 Exit the Connector.
What to do next
Convert your Office 365 managed domain to a federated domain for single sign-on and update the settingsfor the Office 365 account to Workspace settings.
Converting Office 365 to a Federated Domain for Single Sign-On and ChangingOffice 365 Parameters to Workspace
You must convert your Office 365 managed domain to a federated domain for single sign-on and update thesettings for the Office 365 account to Workspace settings.
Prepare your Office 365 domain to use Workspace for authentication.
Prerequisites
Run the Microsoft Powershell Convert-MsolDomanToFederated cmdlet to convert the Office 365 domain fromstandard authentication to single sign-on. Refer to your Microsoft Windows 365 documentation forinformation about how to run the cmdlet.
Chapter 11 Providing Access to Web Applications
VMware, Inc. 61

Procedure
1 Run the Set-MsolDomainAuthentication cmdlet to change the following variables to the Workspacesettings.
Table 11‑2. Replacing the Cmdlet Variables
Line of cmdlet cmdlet Variable or Variables Replace with
–DomainName domain_name The name of the Workspace domain that isregistered with Microsoft.example.mycompanydomain_name.com.
–IssuerUri horizon_org_name The unique identifier of the domain in theOffice 365 identity platform used inWorkspace, such as example.
-FederationBrandName Federation_server_name The name of the string value shown to userswhen signing in, such as Mycompany Inc.
-PassiveLogOnUri host and port The URL that Web-based clients are directed towhen signing in, such ashttps://example123.mycompany.com:443/SAAS/API/1.0/POST/sso.
-ActiveLogOnUri host and port The URL that specifies the end point used byactive clients when authenticating withdomain set up for single sign-on. such ashttps://example123.mycompany.com/SAAS/auth/wsfed/activelogon.
-LogOffUri host and port The URL clients are redirected to when theysign out, such ashttps://login.microsoftonline.com/logout.srf.
-MetadataExchangeUri host and port The URL that specifies the metadata exchangeend point used for authentication, such ashttps://example123.mycompany.com/SAAS/auth/wsfed/services/mex.
-SigningCertificate SAML signing cert from ApplicationManager
The Workspace Manager signing certificate.On the Workspace Admin Console, go toSettings > SAML Certificate, and copy theSigning Certificate and paste this as the valuefor SigningCertificate. Exclude “-----BEGIN CERTIFICATE-----” and “-----ENDCERTIFICATE-----” Exclude "-----BEGINCERTIFICATE-----" and “-----ENDCERTIFICATE-----" from the certificatecontent.NOTE Make sure you do not includeadditional spaces or extra line returns whenyou paste the certificate or it will not work.
2 Verify the federation settings. Type Get-MsolDomainFederationSettings -DomainName <YOUR DOMAIN>
Example: Example of Output From Powershell CmdletSet-MsolDomainAuthentication
–DomainName example.mycompanydomain_name.com
–Authentication Federated
–IssuerUri example
-FederationBrandName Mycompany, Inc.
-PassiveLogOnUri https://host:port/SAAS/API/1.0/POST/sso
-LogOffUri https://login.microsoftonline.com/logout.srf
-ActiveLogOnUri https://host:port/SAAS/auth/wsfed/active/logon
-MetadataExchangeUri https://host:port/SAAS/auth/wsfed/services/mex
VMware Workspace Portal Administrator's Guide
62 VMware, Inc.
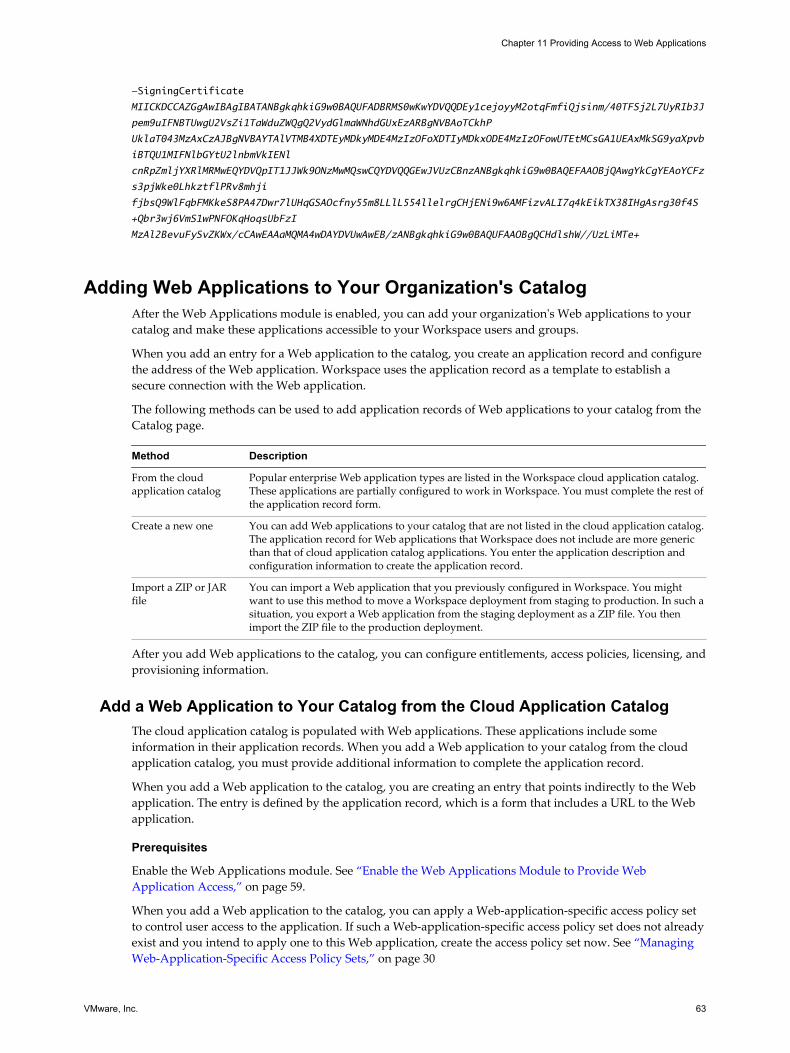
-SigningCertificate
MIICKDCCAZGgAwIBAgIBATANBgkqhkiG9w0BAQUFADBRMS0wKwYDVQQDEy1cejoyyM2otqFmfiQjsinm/40TFSj2L7UyRIb3J
pem9uIFNBTUwgU2VsZi1TaWduZWQgQ2VydGlmaWNhdGUxEzARBgNVBAoTCkhP
UklaT043MzAxCzAJBgNVBAYTAlVTMB4XDTEyMDkyMDE4MzIzOFoXDTIyMDkxODE4MzIzOFowUTEtMCsGA1UEAxMkSG9yaXpvb
iBTQU1MIFNlbGYtU2lnbmVkIENl
cnRpZmljYXRlMRMwEQYDVQpIT1JJWk9ONzMwMQswCQYDVQQGEwJVUzCBnzANBgkqhkiG9w0BAQEFAAOBjQAwgYkCgYEAoYCFz
s3pjWke0LhkztflPRv8mhji
fjbsQ9WlFqbFMKkeS8PA47Dwr7lUHqGSAOcfny55m8LLlL554llelrgCHjENi9w6AMFizvALI7q4kEikTX38IHgAsrg30f4S
+Qbr3wj6VmS1wPNFOKqHoqsUbFzI
MzAl2BevuFySvZKWx/cCAwEAAaMQMA4wDAYDVUwAwEB/zANBgkqhkiG9w0BAQUFAAOBgQCHdlshW//UzLiMTe+
Adding Web Applications to Your Organization's CatalogAfter the Web Applications module is enabled, you can add your organization's Web applications to yourcatalog and make these applications accessible to your Workspace users and groups.
When you add an entry for a Web application to the catalog, you create an application record and configurethe address of the Web application. Workspace uses the application record as a template to establish asecure connection with the Web application.
The following methods can be used to add application records of Web applications to your catalog from theCatalog page.
Method Description
From the cloudapplication catalog
Popular enterprise Web application types are listed in the Workspace cloud application catalog.These applications are partially configured to work in Workspace. You must complete the rest ofthe application record form.
Create a new one You can add Web applications to your catalog that are not listed in the cloud application catalog.The application record for Web applications that Workspace does not include are more genericthan that of cloud application catalog applications. You enter the application description andconfiguration information to create the application record.
Import a ZIP or JARfile
You can import a Web application that you previously configured in Workspace. You mightwant to use this method to move a Workspace deployment from staging to production. In such asituation, you export a Web application from the staging deployment as a ZIP file. You thenimport the ZIP file to the production deployment.
After you add Web applications to the catalog, you can configure entitlements, access policies, licensing, andprovisioning information.
Add a Web Application to Your Catalog from the Cloud Application CatalogThe cloud application catalog is populated with Web applications. These applications include someinformation in their application records. When you add a Web application to your catalog from the cloudapplication catalog, you must provide additional information to complete the application record.
When you add a Web application to the catalog, you are creating an entry that points indirectly to the Webapplication. The entry is defined by the application record, which is a form that includes a URL to the Webapplication.
Prerequisites
Enable the Web Applications module. See “Enable the Web Applications Module to Provide WebApplication Access,” on page 59.
When you add a Web application to the catalog, you can apply a Web-application-specific access policy setto control user access to the application. If such a Web-application-specific access policy set does not alreadyexist and you intend to apply one to this Web application, create the access policy set now. See “ManagingWeb-Application-Specific Access Policy Sets,” on page 30
Chapter 11 Providing Access to Web Applications
VMware, Inc. 63
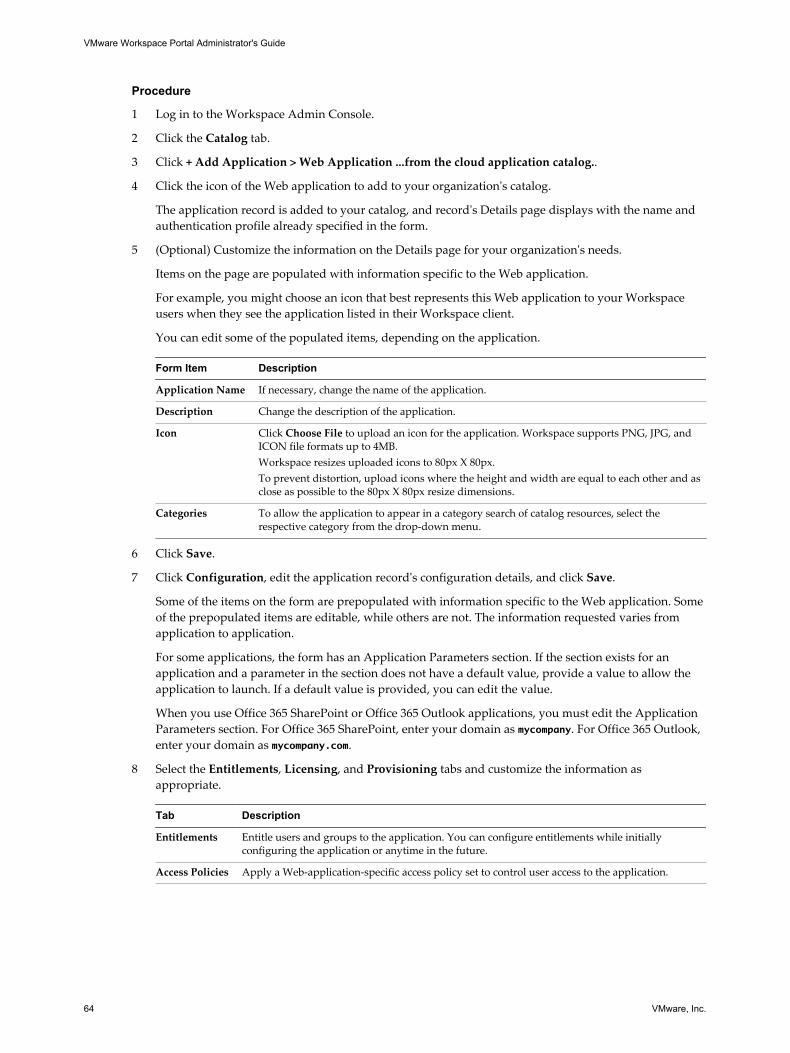
Procedure
1 Log in to the Workspace Admin Console.
2 Click the Catalog tab.
3 Click + Add Application > Web Application ...from the cloud application catalog..
4 Click the icon of the Web application to add to your organization's catalog.
The application record is added to your catalog, and record's Details page displays with the name andauthentication profile already specified in the form.
5 (Optional) Customize the information on the Details page for your organization's needs.
Items on the page are populated with information specific to the Web application.
For example, you might choose an icon that best represents this Web application to your Workspaceusers when they see the application listed in their Workspace client.
You can edit some of the populated items, depending on the application.
Form Item Description
Application Name If necessary, change the name of the application.
Description Change the description of the application.
Icon Click Choose File to upload an icon for the application. Workspace supports PNG, JPG, andICON file formats up to 4MB.Workspace resizes uploaded icons to 80px X 80px.To prevent distortion, upload icons where the height and width are equal to each other and asclose as possible to the 80px X 80px resize dimensions.
Categories To allow the application to appear in a category search of catalog resources, select therespective category from the drop-down menu.
6 Click Save.
7 Click Configuration, edit the application record's configuration details, and click Save.
Some of the items on the form are prepopulated with information specific to the Web application. Someof the prepopulated items are editable, while others are not. The information requested varies fromapplication to application.
For some applications, the form has an Application Parameters section. If the section exists for anapplication and a parameter in the section does not have a default value, provide a value to allow theapplication to launch. If a default value is provided, you can edit the value.
When you use Office 365 SharePoint or Office 365 Outlook applications, you must edit the ApplicationParameters section. For Office 365 SharePoint, enter your domain as mycompany. For Office 365 Outlook,enter your domain as mycompany.com.
8 Select the Entitlements, Licensing, and Provisioning tabs and customize the information asappropriate.
Tab Description
Entitlements Entitle users and groups to the application. You can configure entitlements while initiallyconfiguring the application or anytime in the future.
Access Policies Apply a Web-application-specific access policy set to control user access to the application.
VMware Workspace Portal Administrator's Guide
64 VMware, Inc.
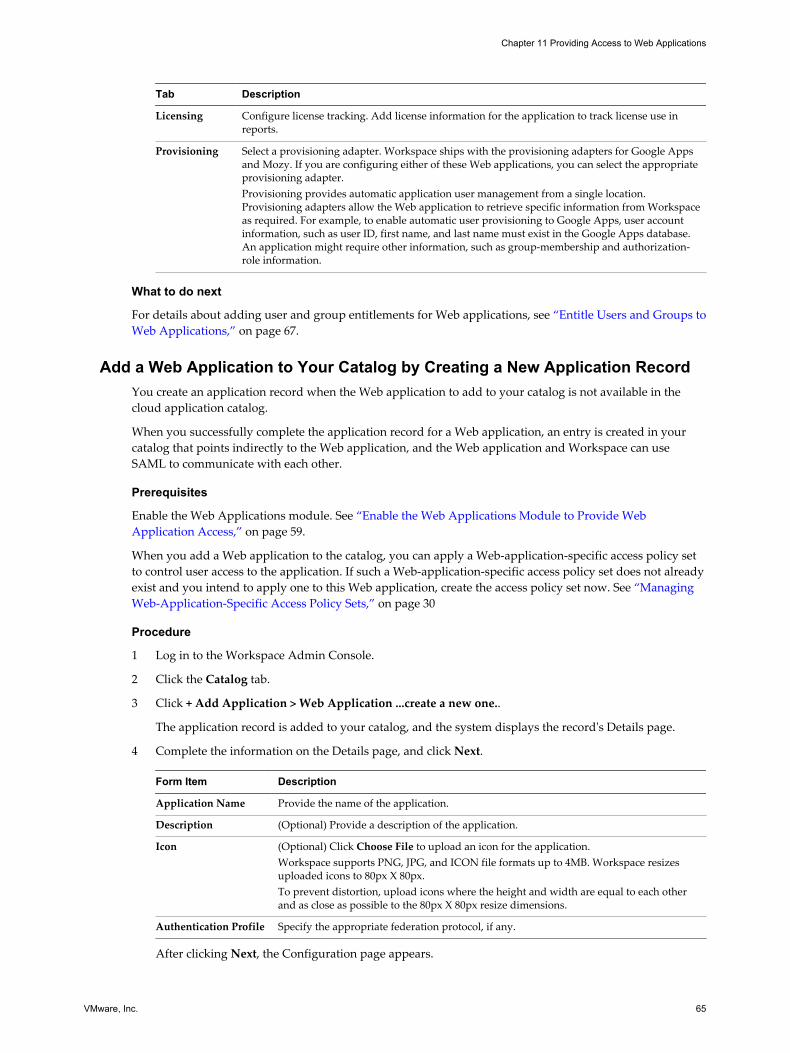
Tab Description
Licensing Configure license tracking. Add license information for the application to track license use inreports.
Provisioning Select a provisioning adapter. Workspace ships with the provisioning adapters for Google Appsand Mozy. If you are configuring either of these Web applications, you can select the appropriateprovisioning adapter.Provisioning provides automatic application user management from a single location.Provisioning adapters allow the Web application to retrieve specific information from Workspaceas required. For example, to enable automatic user provisioning to Google Apps, user accountinformation, such as user ID, first name, and last name must exist in the Google Apps database.An application might require other information, such as group-membership and authorization-role information.
What to do next
For details about adding user and group entitlements for Web applications, see “Entitle Users and Groups toWeb Applications,” on page 67.
Add a Web Application to Your Catalog by Creating a New Application RecordYou create an application record when the Web application to add to your catalog is not available in thecloud application catalog.
When you successfully complete the application record for a Web application, an entry is created in yourcatalog that points indirectly to the Web application, and the Web application and Workspace can useSAML to communicate with each other.
Prerequisites
Enable the Web Applications module. See “Enable the Web Applications Module to Provide WebApplication Access,” on page 59.
When you add a Web application to the catalog, you can apply a Web-application-specific access policy setto control user access to the application. If such a Web-application-specific access policy set does not alreadyexist and you intend to apply one to this Web application, create the access policy set now. See “ManagingWeb-Application-Specific Access Policy Sets,” on page 30
Procedure
1 Log in to the Workspace Admin Console.
2 Click the Catalog tab.
3 Click + Add Application > Web Application ...create a new one..
The application record is added to your catalog, and the system displays the record's Details page.
4 Complete the information on the Details page, and click Next.
Form Item Description
Application Name Provide the name of the application.
Description (Optional) Provide a description of the application.
Icon (Optional) Click Choose File to upload an icon for the application.Workspace supports PNG, JPG, and ICON file formats up to 4MB. Workspace resizesuploaded icons to 80px X 80px.To prevent distortion, upload icons where the height and width are equal to each otherand as close as possible to the 80px X 80px resize dimensions.
Authentication Profile Specify the appropriate federation protocol, if any.
After clicking Next, the Configuration page appears.
Chapter 11 Providing Access to Web Applications
VMware, Inc. 65
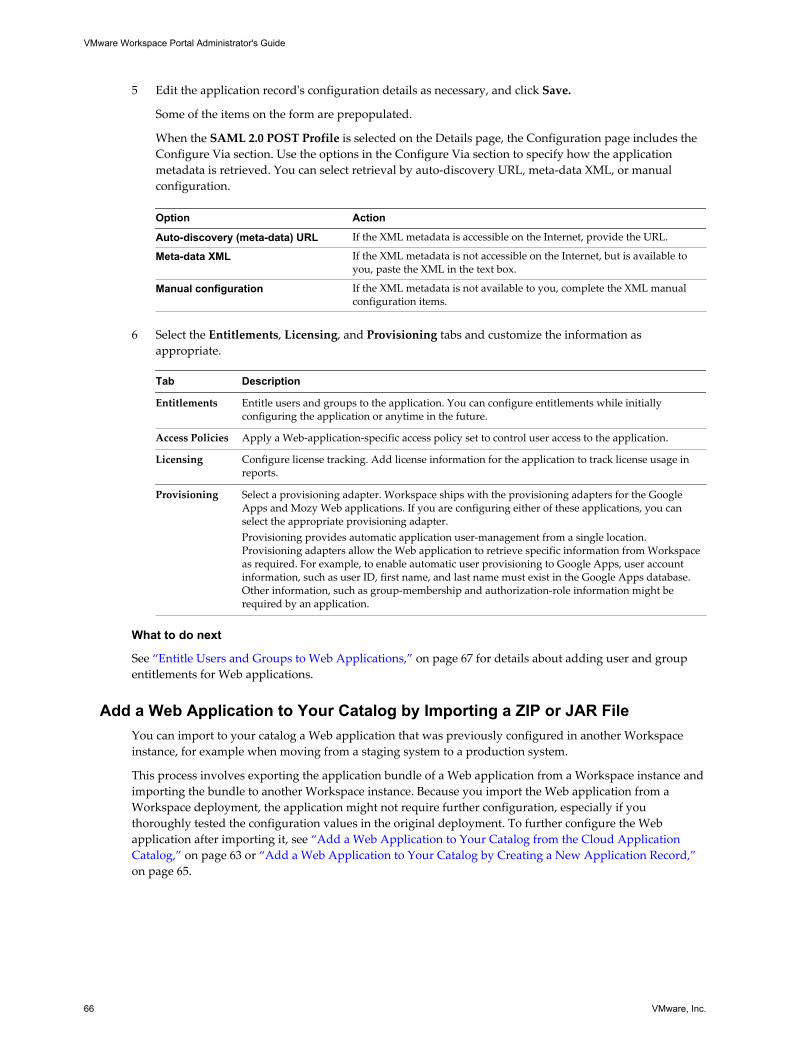
5 Edit the application record's configuration details as necessary, and click Save.
Some of the items on the form are prepopulated.
When the SAML 2.0 POST Profile is selected on the Details page, the Configuration page includes theConfigure Via section. Use the options in the Configure Via section to specify how the applicationmetadata is retrieved. You can select retrieval by auto-discovery URL, meta-data XML, or manualconfiguration.
Option Action
Auto-discovery (meta-data) URL If the XML metadata is accessible on the Internet, provide the URL.
Meta-data XML If the XML metadata is not accessible on the Internet, but is available toyou, paste the XML in the text box.
Manual configuration If the XML metadata is not available to you, complete the XML manualconfiguration items.
6 Select the Entitlements, Licensing, and Provisioning tabs and customize the information as
appropriate.
Tab Description
Entitlements Entitle users and groups to the application. You can configure entitlements while initiallyconfiguring the application or anytime in the future.
Access Policies Apply a Web-application-specific access policy set to control user access to the application.
Licensing Configure license tracking. Add license information for the application to track license usage inreports.
Provisioning Select a provisioning adapter. Workspace ships with the provisioning adapters for the GoogleApps and Mozy Web applications. If you are configuring either of these applications, you canselect the appropriate provisioning adapter.Provisioning provides automatic application user-management from a single location.Provisioning adapters allow the Web application to retrieve specific information from Workspaceas required. For example, to enable automatic user provisioning to Google Apps, user accountinformation, such as user ID, first name, and last name must exist in the Google Apps database.Other information, such as group-membership and authorization-role information might berequired by an application.
What to do next
See “Entitle Users and Groups to Web Applications,” on page 67 for details about adding user and groupentitlements for Web applications.
Add a Web Application to Your Catalog by Importing a ZIP or JAR FileYou can import to your catalog a Web application that was previously configured in another Workspaceinstance, for example when moving from a staging system to a production system.
This process involves exporting the application bundle of a Web application from a Workspace instance andimporting the bundle to another Workspace instance. Because you import the Web application from aWorkspace deployment, the application might not require further configuration, especially if youthoroughly tested the configuration values in the original deployment. To further configure the Webapplication after importing it, see “Add a Web Application to Your Catalog from the Cloud ApplicationCatalog,” on page 63 or “Add a Web Application to Your Catalog by Creating a New Application Record,”on page 65.
VMware Workspace Portal Administrator's Guide
66 VMware, Inc.
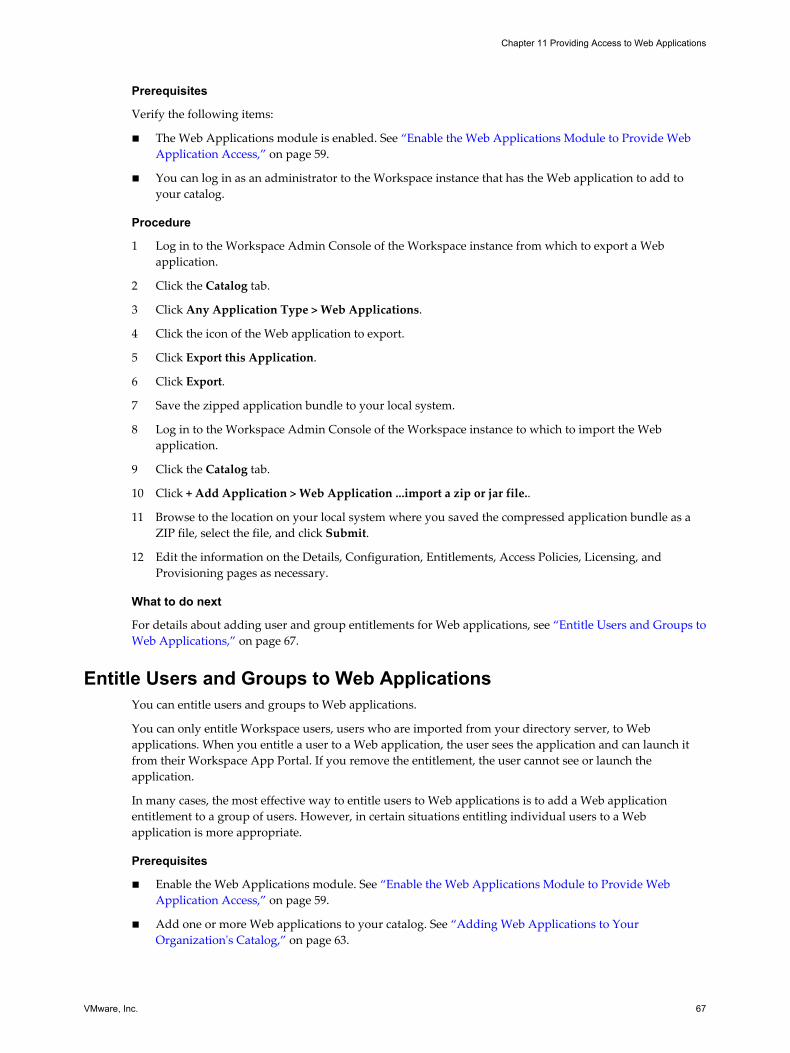
Prerequisites
Verify the following items:
n The Web Applications module is enabled. See “Enable the Web Applications Module to Provide WebApplication Access,” on page 59.
n You can log in as an administrator to the Workspace instance that has the Web application to add toyour catalog.
Procedure
1 Log in to the Workspace Admin Console of the Workspace instance from which to export a Webapplication.
2 Click the Catalog tab.
3 Click Any Application Type > Web Applications.
4 Click the icon of the Web application to export.
5 Click Export this Application.
6 Click Export.
7 Save the zipped application bundle to your local system.
8 Log in to the Workspace Admin Console of the Workspace instance to which to import the Webapplication.
9 Click the Catalog tab.
10 Click + Add Application > Web Application ...import a zip or jar file..
11 Browse to the location on your local system where you saved the compressed application bundle as aZIP file, select the file, and click Submit.
12 Edit the information on the Details, Configuration, Entitlements, Access Policies, Licensing, andProvisioning pages as necessary.
What to do next
For details about adding user and group entitlements for Web applications, see “Entitle Users and Groups toWeb Applications,” on page 67.
Entitle Users and Groups to Web ApplicationsYou can entitle users and groups to Web applications.
You can only entitle Workspace users, users who are imported from your directory server, to Webapplications. When you entitle a user to a Web application, the user sees the application and can launch itfrom their Workspace App Portal. If you remove the entitlement, the user cannot see or launch theapplication.
In many cases, the most effective way to entitle users to Web applications is to add a Web applicationentitlement to a group of users. However, in certain situations entitling individual users to a Webapplication is more appropriate.
Prerequisites
n Enable the Web Applications module. See “Enable the Web Applications Module to Provide WebApplication Access,” on page 59.
n Add one or more Web applications to your catalog. See “Adding Web Applications to YourOrganization's Catalog,” on page 63.
Chapter 11 Providing Access to Web Applications
VMware, Inc. 67

Procedure
1 Log in to the Workspace Admin Console.
2 Entitle users to a Web application.
Method Description
Access a Web application andentitle users or groups to it.
a Click the Catalog tab.b Click Any Application Type > Web Applications.c Click the Web application to which to entitle users and groups.
The information page for the Web application appears with theEntitlements tab selected by default. Group entitlements are listed inone table, user entitlements are listed in another table.
d Click Add group entitlement or Add user entitlement.e Type the names of the groups or users.
You can search for users or groups by starting to type a search stringand allowing the autocomplete feature to list the options, or you canclick browse to view the entire list.
f Use the drop-down menu to select how to activate each selected Webapplication.n Automatic displays the application by default in an entitled user's
list of Web applications the next time that user logs in using theirWorkspace client.
n User-Activated requires that an entitled user must add the Webapplication to their list of Web applications using their Workspaceclient before the user can use the application.
g Click Save.
Access a user or group and addWeb application entitlements to thatuser or group.
a Click the Users & Groups tab.b Click the Users or Groups tab.c Click the name of a user or group.d Click Add Entitlement.e Select the check boxes next to the Web applications to which you want
to entitle the user or group.f Use the drop-down menu to select how to activate each selected Web
application.n Automatic displays the application by default in an entitled user's
list of Web applications the next time that user logs in using theirWorkspace client.
n User-Activated requires that an entitled user must add the Webapplication to their list of Web applications using their Workspaceclient before the user can use the application.
g Click Save.
The selected user or group is now entitled to use the Web application.
VMware Workspace Portal Administrator's Guide
68 VMware, Inc.

Providing Access to Citrix-BasedApplications 12
You can provide Workspace users access to Citrix-based applications.
When you integrate a Citrix deployment with Workspace, Workspace users can use Citrix Receiver on theirsystems and devices to access their entitled Citrix-based applications.
NOTE After you integrate Workspace with your Citrix deployment, you use the Citrix deployment tomanage Citrix-based applications and to entitle users to the applications. You can then use the WorkspaceAdmin Console to view the Citrix-based applications and their entitlements.
Typically, you integrate your Citrix deployment with Workspace while deploying Workspace. To completethe integration, you can enable the Citrix Published Applications module using the admin console.
Workspace provides default global application delivery settings for Citrix-based applications. For example,you can edit the settings that control application streaming and application security. You can configure thedelivery settings globally, for all the Citrix-based applications in the Workspace catalog, or for individualCitrix-based applications.
This chapter includes the following topics:
n “Enable the Citrix Published Applications Module to Integrate Workspace with Your CitrixDeployment,” on page 69
n “View User and Group Entitlements to Citrix-Based Applications,” on page 70
n “Editing Workspace Application Delivery Settings for Citrix-Based Applications,” on page 71
n “Managing Categories for Citrix-Based Applications,” on page 72
Enable the Citrix Published Applications Module to IntegrateWorkspace with Your Citrix Deployment
If you did not enable the Citrix Published Applications module when you installed and configuredWorkspace, you can enable it later from the Modules tab on the Dashboard page of the Workspace AdminConsole.
See Installing and Configuring Workspace for detailed instructions about the configurations required on yourCitrix deployment and on Workspace, such as in the Connector Web interface.
Procedure
1 Log in to the Workspace Admin Console.
2 Select Dashboard > Modules.
3 In the Citrix Published Applications module, click Enable this module.
VMware, Inc. 69
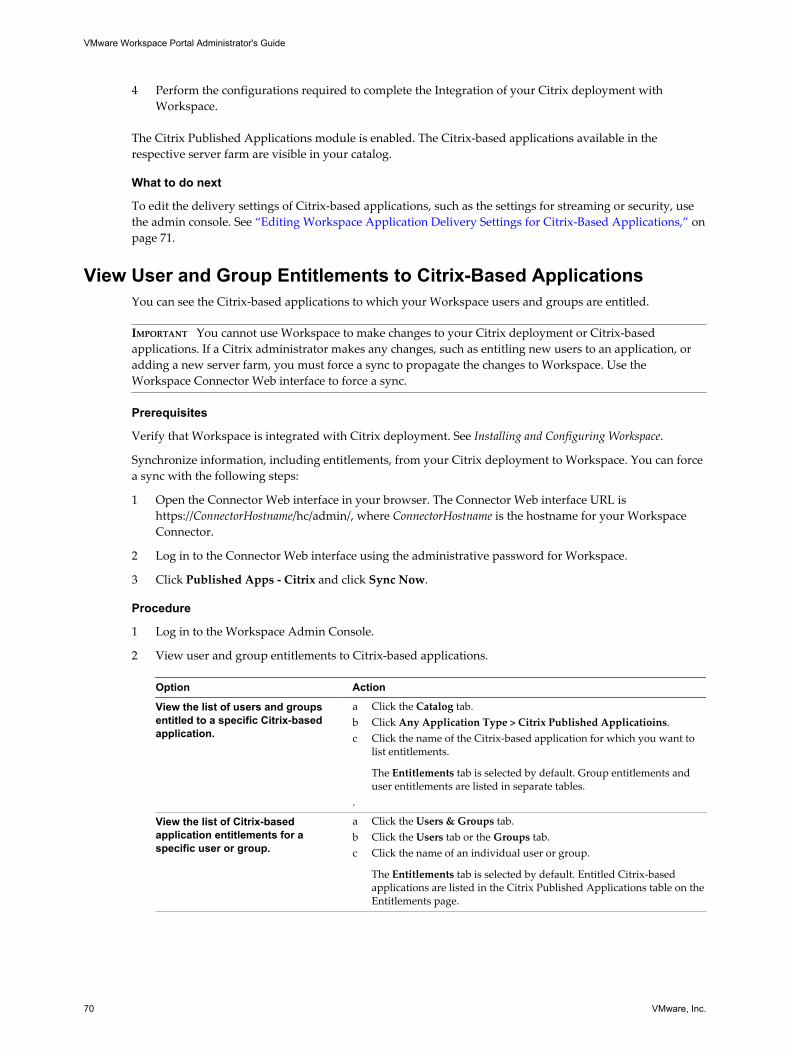
4 Perform the configurations required to complete the Integration of your Citrix deployment withWorkspace.
The Citrix Published Applications module is enabled. The Citrix-based applications available in therespective server farm are visible in your catalog.
What to do next
To edit the delivery settings of Citrix-based applications, such as the settings for streaming or security, usethe admin console. See “Editing Workspace Application Delivery Settings for Citrix-Based Applications,” onpage 71.
View User and Group Entitlements to Citrix-Based ApplicationsYou can see the Citrix-based applications to which your Workspace users and groups are entitled.
IMPORTANT You cannot use Workspace to make changes to your Citrix deployment or Citrix-basedapplications. If a Citrix administrator makes any changes, such as entitling new users to an application, oradding a new server farm, you must force a sync to propagate the changes to Workspace. Use theWorkspace Connector Web interface to force a sync.
Prerequisites
Verify that Workspace is integrated with Citrix deployment. See Installing and Configuring Workspace.
Synchronize information, including entitlements, from your Citrix deployment to Workspace. You can forcea sync with the following steps:
1 Open the Connector Web interface in your browser. The Connector Web interface URL ishttps://ConnectorHostname/hc/admin/, where ConnectorHostname is the hostname for your WorkspaceConnector.
2 Log in to the Connector Web interface using the administrative password for Workspace.
3 Click Published Apps - Citrix and click Sync Now.
Procedure
1 Log in to the Workspace Admin Console.
2 View user and group entitlements to Citrix-based applications.
Option Action
View the list of users and groupsentitled to a specific Citrix-basedapplication.
a Click the Catalog tab.b Click Any Application Type > Citrix Published Applicatioins.c Click the name of the Citrix-based application for which you want to
list entitlements.
The Entitlements tab is selected by default. Group entitlements anduser entitlements are listed in separate tables.
.
View the list of Citrix-basedapplication entitlements for aspecific user or group.
a Click the Users & Groups tab.b Click the Users tab or the Groups tab.c Click the name of an individual user or group.
The Entitlements tab is selected by default. Entitled Citrix-basedapplications are listed in the Citrix Published Applications table on theEntitlements page.
VMware Workspace Portal Administrator's Guide
70 VMware, Inc.
Editing Workspace Application Delivery Settings for Citrix-BasedApplications
You can use the Workspace Admin Console to edit the delivery settings of Citrix-based applications.
You can edit the delivery settings globally for all of the Citrix-based applications available from yourWorkspace deployment, or individually for specific Citrix-based applications.
You configure the delivery settings by editing Independent Computing Architecture (ICA) properties. ICAis a Citrix proprietary protocol. A wide range of ICA properties are available, controlling areas such assecurity, display, and compression. For more information about configuring ICA properties, see Citrixdocumentation.
Workspace includes default global settings that define how the configured Citrix deployment deliversCitrix-based applications to users. You can use the admin console to configure the default Workspacesettings and to add new settings.
You can also use the admin console to specify delivery settings for individual applications. Settings forindividual applications take precedence over global settings. When you provide ICA properties for thedelivery of a specific application, list all the properties necessary for the Citrix deployment to deliver theapplication in the manner you expect. When delivery settings exist in Workspace for an individualapplication, Workspace applies only those settings and ignores all global application delivery settings.
Edit the Workspace Application Delivery Settings Globally for All Citrix-BasedApplications
You can use the Workspace Admin Console to edit the global settings for the Citrix-based applications inyour Workspace deployment.
The ICA properties text boxes for the global application delivery settings are populated with default settingsuntil you edit them.
Prerequisites
Enable the Citrix Published Applications module. See “Enable the Citrix Published Applications Module toIntegrate Workspace with Your Citrix Deployment,” on page 69
Procedure
1 Log in to the Workspace Admin Console as an administrator.
2 Select Settings > Citrix Published Applications.
3 Edit the ICA properties according to Citrix guidelines.
The ICA Client Properties and the ICA Launch Properties text boxes work together. They must bothhave content or they must both be empty.
4 Click Save.
Unless individual applications have their own application delivery settings, your Citrix deployment appliesthe global ICA properties when it delivers Citrix-based applications available through Workspace to users.
Edit the Workspace Application Delivery Settings for a Single Citrix-BasedApplication
You can use the Workspace Admin Console to edit the settings for individual Citrix-based applications inyour Workspace deployment.
The ICA properties text boxes for individual applications are empty until you manually add properties.
Chapter 12 Providing Access to Citrix-Based Applications
VMware, Inc. 71
When you edit the application delivery settings, the ICA properties, of an individual Citrix-basedapplication, those settings take precedence over the global settings. You can configure the global ICAproperty settings from the Citrix Published Applications page by selecting Settings > Citrix PublishedApplication.
Prerequisites
Enable the Citrix Published Applications module. See “Enable the Citrix Published Applications Module toIntegrate Workspace with Your Citrix Deployment,” on page 69
Procedure
1 Log in to the Workspace Admin Console as an administrator.
2 Click the Catalog tab.
3 Click Any Application Type > Citrix Published Applications.
4 Click the name of the Citrix-based application to edit.
5 Click Configuration.
6 View the information about the application as carried forward from your Citrix deployment.
The page provides several details about the application, such as the application name, application ID,server name, and so on. Also, the page displays information about the application's enablement. If theEnabled check box is not selected, the application is disabled in your Citrix deployment.
7 If the Enabled check box is not selected and you want to hide the application from users, select theHide When Disabled check box.
8 In the ICA properties text boxes, add properties or edit existing properties according to Citrixguidelines.
The ICA Client Properties and the ICA Launch Properties text boxes work together. They must bothhave content or they must both be empty.
9 Click Save.
Your Citrix deployment applies the ICA properties listed on the Workspace Configuration page of anapplication when it delivers the Citrix-based application to users.
Managing Categories for Citrix-Based ApplicationsYou can use the Workspace Admin Console and your Citrix deployment to manage Citrix-based applicationcategories.
In your Citrix deployment, you give an application a category name by editing the Client application foldertext box in the application's properties. When you integrate your Citrix deployment with Workspace,existing category names for Citrix-based applications are carried over to Workspace.
After the integration, you can continue to create categories in your Citrix deployment. Those categories arecarried over to Workspace during the next sync. You can also create categories directly in Workspace. See “Overview of Using Resource Categories,” on page 47.
In the admin console, you can create and view categories of all Citrix-based applications by clicking theCatalog tab and clicking Any Application type > Citrix Published Applications. You can view and edit thecategories of a specific Citrix-based application by clicking the name of the application and selectingDetails.
When you create a category in Workspace, the category never appears in your Citrix deployment.
VMware Workspace Portal Administrator's Guide
72 VMware, Inc.

When you create a category in your Citrix deployment, the category appears in Workspace at the next sync.When you update a category name in your Citrix deployment, the updated category name appears inWorkspace while the original category name remains. If you want to remove the original category namefrom Workspace, you must remove it manually.
Chapter 12 Providing Access to Citrix-Based Applications
VMware, Inc. 73

VMware Workspace Portal Administrator's Guide
74 VMware, Inc.
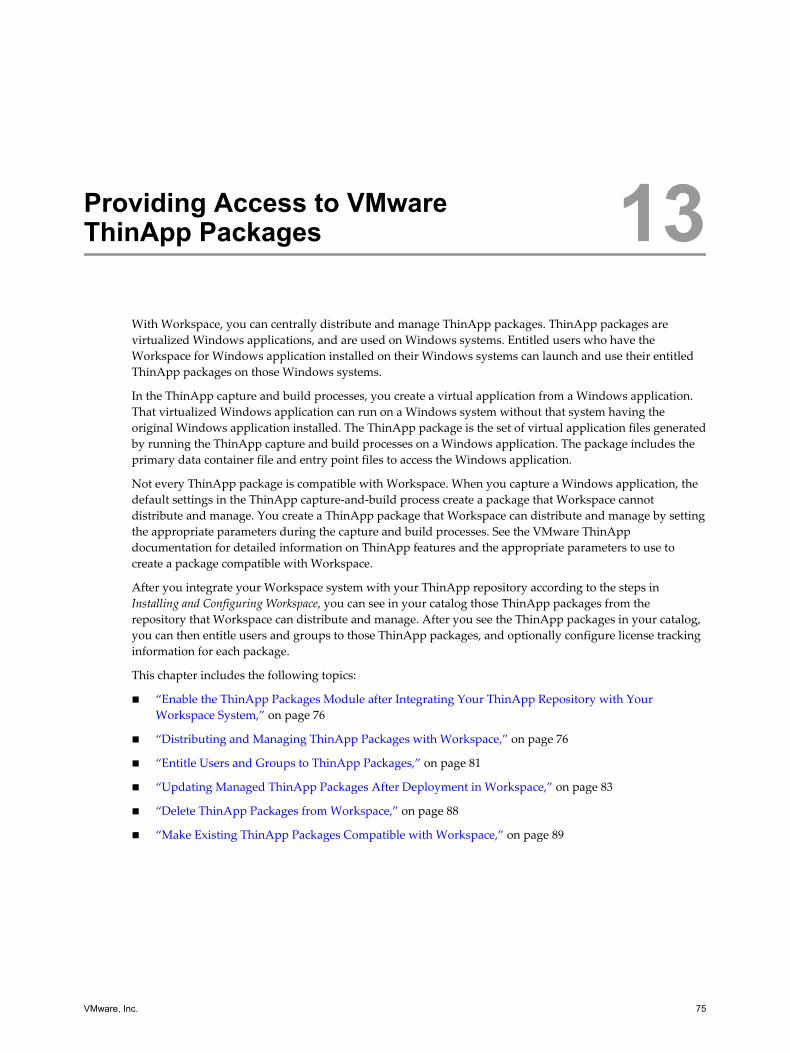
Providing Access to VMwareThinApp Packages 13
With Workspace, you can centrally distribute and manage ThinApp packages. ThinApp packages arevirtualized Windows applications, and are used on Windows systems. Entitled users who have theWorkspace for Windows application installed on their Windows systems can launch and use their entitledThinApp packages on those Windows systems.
In the ThinApp capture and build processes, you create a virtual application from a Windows application.That virtualized Windows application can run on a Windows system without that system having theoriginal Windows application installed. The ThinApp package is the set of virtual application files generatedby running the ThinApp capture and build processes on a Windows application. The package includes theprimary data container file and entry point files to access the Windows application.
Not every ThinApp package is compatible with Workspace. When you capture a Windows application, thedefault settings in the ThinApp capture-and-build process create a package that Workspace cannotdistribute and manage. You create a ThinApp package that Workspace can distribute and manage by settingthe appropriate parameters during the capture and build processes. See the VMware ThinAppdocumentation for detailed information on ThinApp features and the appropriate parameters to use tocreate a package compatible with Workspace.
After you integrate your Workspace system with your ThinApp repository according to the steps inInstalling and Configuring Workspace, you can see in your catalog those ThinApp packages from therepository that Workspace can distribute and manage. After you see the ThinApp packages in your catalog,you can then entitle users and groups to those ThinApp packages, and optionally configure license trackinginformation for each package.
This chapter includes the following topics:
n “Enable the ThinApp Packages Module after Integrating Your ThinApp Repository with YourWorkspace System,” on page 76
n “Distributing and Managing ThinApp Packages with Workspace,” on page 76
n “Entitle Users and Groups to ThinApp Packages,” on page 81
n “Updating Managed ThinApp Packages After Deployment in Workspace,” on page 83
n “Delete ThinApp Packages from Workspace,” on page 88
n “Make Existing ThinApp Packages Compatible with Workspace,” on page 89
VMware, Inc. 75

Enable the ThinApp Packages Module after Integrating Your ThinAppRepository with Your Workspace System
If you did not enable the ThinApp Packages module when you installed and configured your Workspacesystem, you can enable it later from the Modules tab on the Dashboard page of the Workspace AdminConsole.
Typically, after you complete the steps to integrate the source of your ThinApp packages with yourWorkspace system, the Dashboard page automatically indicates that the ThinApp Packages module isenabled. Sometimes, the module might not appear enabled, and you can use these steps to complete theenablement.
Prerequisites
Verify that your Workspace system is integrated with the source of the ThinApp packages, according to thesteps in Installing and Configuring Workspace.
Procedure
1 Log in to the Workspace Admin Console.
2 Select Dashboard > Modules.
3 In the ThinApp Packages module, click Enable this module.
The ThinApp Packages module is enabled. The ThinApp packages that are available at the source locationare visible in your catalog.
If a message tells you to go to all connector instances, then the prerequisite integration is not fully in place.Ensure that your Workspace system is integrated with the source of the ThinApp packages according to thesteps in Installing and Configuring Workspace before you enable the ThinApp Packages module.
What to do next
As appropriate, distribute the Workspace Client for Windows to users' Windows systems for those users towhom you want to entitle ThinApp packages. See “Deploying the Workspace for Windows Application ToUse ThinApp Packages,” on page 77.
Distributing and Managing ThinApp Packages with WorkspaceBefore your Workspace users can run their ThinApp packages that are registered to them using Workspace,those users must have the Workspace for Windows application installed and running on their Windowssystems.
ThinApp packages are virtualized Windows applications. The ThinApp packages are distributed toWindows systems, and a user logged into the Windows system can launch and run those ThinApp packagesthat are registered on that Windows system. Workspace can distribute and manage ThinApp packages thatare compatible with Workspace. See Installing and Configuring Workspace for a description of therequirements on ThinApp packages for use with Workspace.
To successfully launch and run one of these virtualized applications in the user's logged-in Windowssession, the following elements are required:
n The virtualized application's ThinApp package is registered for that user's use by the Workspace server.
n A particular DLL is available on that Windows system.
n The HorizonThinAppClient.exe process is running.
VMware Workspace Portal Administrator's Guide
76 VMware, Inc.

When a compatible ThinApp package is created, it is configured to load a particular DLL when the logged-in user launches the virtualized application in their logged-in Windows session. At that time, the virtualizedapplication attempts to load the DLL. When the DLL is loaded, it attempts to verify with the locally installedWorkspace ThinApp client whether that ThinApp package is registered on that Windows desktop for thatuser. The locally installed ThinApp client determines whether that application is registered for that userwithout communicating with the Workspace server. If the application is registered on that Windowsdesktop for that user, the ThinApp client checks to see when it last synched with the Workspace server. Ifthe ThinApp client confirms that the time from the last synch is within the offline grace period configuredfor the installed client, the client allows the application to run.
Because that DLL is available on the Windows system only if the Workspace for Windows application isinstalled, and because the HorizonThinAppClient.exe process is running if the Workspace for Windowsapplication is running on that system, the Workspace for Windows application must be installed on theWindows system to run ThinApp packages that are distributed and managed by your Workspace server.
Deploying the Workspace for Windows Application To Use ThinApp PackagesThe Workspace for Windows application can be installed by either double-clicking its installer EXE file,running the executable file using the command-line options, or running a script that uses the command-lineoptions. Local administrator privileges are required to install the application. For information aboutinstalling the Workspace for Windows application by double-clicking its installer EXE file, see the WorkspaceUser Guide.
The configuration of the installed application determines how a ThinApp package that is distributed byWorkspace is deployed to that Windows system. By default, when the Workspace for Windows applicationis installed by double-clicking its installer EXE file, the client is configured to deploy ThinApp packagesusing the COPY_TO_LOCAL deployment mode, with the AUTO_TRY_HTTP option enabled. Those defaultinstaller options result is what is called a download deployment mode. With the COPY_TO_LOCAL andAUTO_TRY_HTTP default settings, the client application first tries to download the ThinApp packages bycopying them to the Windows system endpoint, and if the first attempt fails, the client application tries todownload the ThinApp packages using HTTP. If your Workspace Connector is configured for account-based access to your ThinApp repository, the client application can download the ThinApp packages usingHTTP. After the ThinApp packages are downloaded to the local Windows system, the user runs thevirtualized applications on the local system.
To avoid having the virtualized applications downloaded to the local Windows system and using space onthe Windows system, you can have users run the ThinApp packages from the network share by using whatis called a streaming deployment mode. To have your users run the ThinApp packages using streamingmode, you must install the Workspace for Windows application on the Windows systems using acommand-line installation process. The installer has command-line options that you can use to set theruntime deployment mode for the ThinApp packages. To set the runtime deployment mode to stream theThinApp packages, use the RUN_FROM_SHARE installer option.
One method for installing the Workspace for Windows application to multiple Windows systems is to use ascript to install the application silently to the Windows systems. You can install the client silently to multipleWindows systems at the same time.
NOTE A silent installation does not display messages or windows during the install process.
You set a value in the script to indicate whether the clients installed by that script deploy ThinApp packagesusing the ThinApp streaming mode, or RUN_FROM_SHARE option, or one of the ThinApp downloadmodes, such as the COPY_TO_LOCAL or HTTP_DOWNLOAD option. See “Install the Workspace forWindows Application with Identical Settings to Multiple Windows Systems,” on page 99.
Chapter 13 Providing Access to VMware ThinApp Packages
VMware, Inc. 77

Determining the Appropriate Deployment Mode for ThinApp Packages onWindows Endpoints
The configuration of the Workspace for Windows application on the Windows endpoint determineswhether a ThinApp package that is distributed using Workspace is deployed using ThinApp streamingmode, RUN_FROM_SHARE, or one of the ThinApp download modes, COPY_TO_LOCAL orHTTP_DOWNLOAD. When you create the script to silently install Workspace for Windows to Windowsendpoints, such as desktop and laptop computers, you set the options that set the ThinApp packagedeployment mode. Choose the deployment mode that best fits the network environment for the selectedendpoints, considering details such as network latency.
With streaming mode, when the Workspace for Windows application synchronizes with Workspace, theclient downloads application shortcuts for the ThinApp packages' virtualized Windows applications to theWindows desktop, and when the user launches the ThinApp packages, the virtualized Windowsapplications run from the file share on which the ThinApp packages reside. Therefore, streaming mode isbest appropriate for systems that will always be connected to the network share, such as View desktops.With download mode, at the first use or update of a ThinApp package, the user must wait for the ThinApppackage to download to the Windows system first, and shortcuts are created. After the initial download, theuser launches and runs the virtualized Windows application on the local Windows system.
IMPORTANT For non-persistent View desktops, also known as floating or stateless View desktops, you areexpected to set the client to use ThinApp streaming mode by using the command-line installer option /vINSTALL_MODE=RUN_FROM_SHARE when installing the client. The RUN_FROM_SHARE option provides themost optimal runtime experience for using ThinApp packages in floating View desktops. See “Command-Line Installer Options for Workspace for Windows,” on page 93.
VMware Workspace Portal Administrator's Guide
78 VMware, Inc.
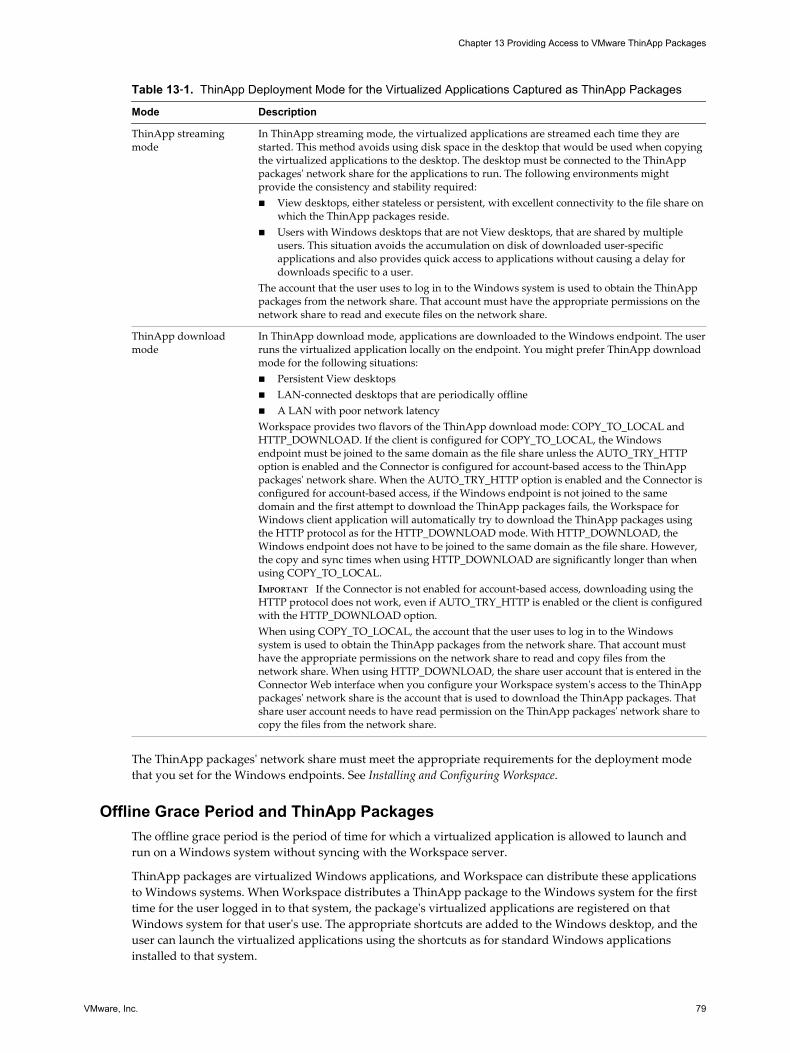
Table 13‑1. ThinApp Deployment Mode for the Virtualized Applications Captured as ThinApp Packages
Mode Description
ThinApp streamingmode
In ThinApp streaming mode, the virtualized applications are streamed each time they arestarted. This method avoids using disk space in the desktop that would be used when copyingthe virtualized applications to the desktop. The desktop must be connected to the ThinApppackages' network share for the applications to run. The following environments mightprovide the consistency and stability required:n View desktops, either stateless or persistent, with excellent connectivity to the file share on
which the ThinApp packages reside.n Users with Windows desktops that are not View desktops, that are shared by multiple
users. This situation avoids the accumulation on disk of downloaded user-specificapplications and also provides quick access to applications without causing a delay fordownloads specific to a user.
The account that the user uses to log in to the Windows system is used to obtain the ThinApppackages from the network share. That account must have the appropriate permissions on thenetwork share to read and execute files on the network share.
ThinApp downloadmode
In ThinApp download mode, applications are downloaded to the Windows endpoint. The userruns the virtualized application locally on the endpoint. You might prefer ThinApp downloadmode for the following situations:n Persistent View desktopsn LAN-connected desktops that are periodically offlinen A LAN with poor network latencyWorkspace provides two flavors of the ThinApp download mode: COPY_TO_LOCAL andHTTP_DOWNLOAD. If the client is configured for COPY_TO_LOCAL, the Windowsendpoint must be joined to the same domain as the file share unless the AUTO_TRY_HTTPoption is enabled and the Connector is configured for account-based access to the ThinApppackages' network share. When the AUTO_TRY_HTTP option is enabled and the Connector isconfigured for account-based access, if the Windows endpoint is not joined to the samedomain and the first attempt to download the ThinApp packages fails, the Workspace forWindows client application will automatically try to download the ThinApp packages usingthe HTTP protocol as for the HTTP_DOWNLOAD mode. With HTTP_DOWNLOAD, theWindows endpoint does not have to be joined to the same domain as the file share. However,the copy and sync times when using HTTP_DOWNLOAD are significantly longer than whenusing COPY_TO_LOCAL.IMPORTANT If the Connector is not enabled for account-based access, downloading using theHTTP protocol does not work, even if AUTO_TRY_HTTP is enabled or the client is configuredwith the HTTP_DOWNLOAD option.When using COPY_TO_LOCAL, the account that the user uses to log in to the Windowssystem is used to obtain the ThinApp packages from the network share. That account musthave the appropriate permissions on the network share to read and copy files from thenetwork share. When using HTTP_DOWNLOAD, the share user account that is entered in theConnector Web interface when you configure your Workspace system's access to the ThinApppackages' network share is the account that is used to download the ThinApp packages. Thatshare user account needs to have read permission on the ThinApp packages' network share tocopy the files from the network share.
The ThinApp packages' network share must meet the appropriate requirements for the deployment modethat you set for the Windows endpoints. See Installing and Configuring Workspace.
Offline Grace Period and ThinApp PackagesThe offline grace period is the period of time for which a virtualized application is allowed to launch andrun on a Windows system without syncing with the Workspace server.
ThinApp packages are virtualized Windows applications, and Workspace can distribute these applicationsto Windows systems. When Workspace distributes a ThinApp package to the Windows system for the firsttime for the user logged in to that system, the package's virtualized applications are registered on thatWindows system for that user's use. The appropriate shortcuts are added to the Windows desktop, and theuser can launch the virtualized applications using the shortcuts as for standard Windows applicationsinstalled to that system.
Chapter 13 Providing Access to VMware ThinApp Packages
VMware, Inc. 79
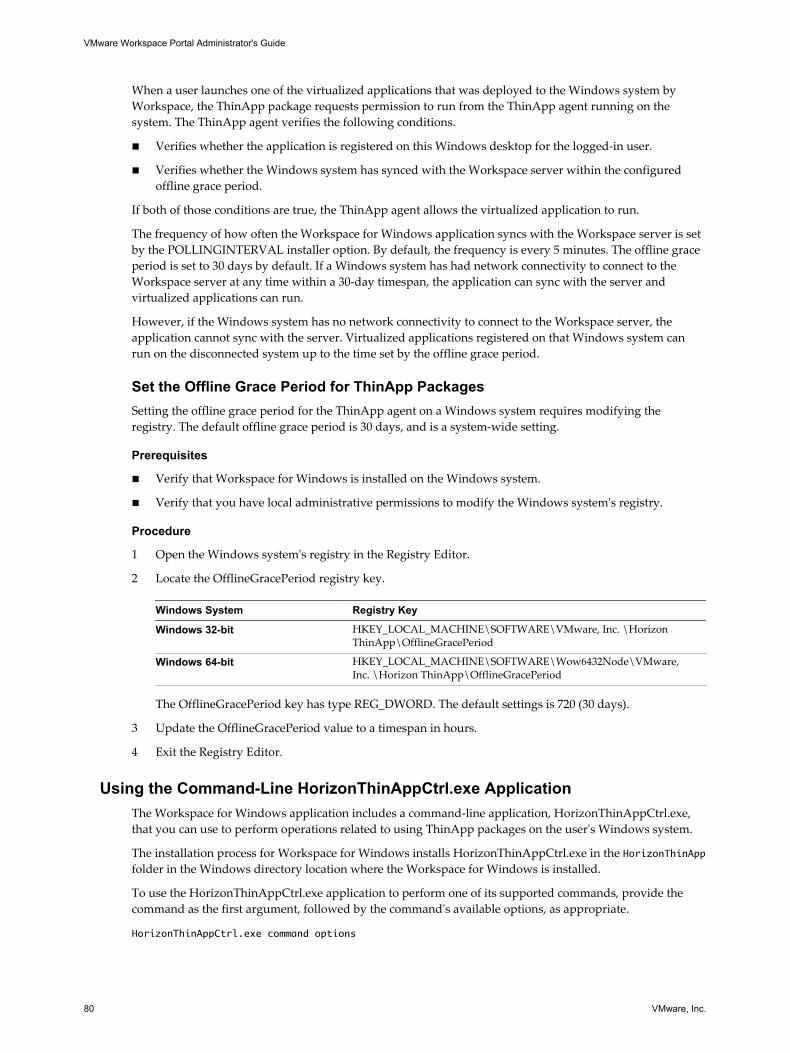
When a user launches one of the virtualized applications that was deployed to the Windows system byWorkspace, the ThinApp package requests permission to run from the ThinApp agent running on thesystem. The ThinApp agent verifies the following conditions.
n Verifies whether the application is registered on this Windows desktop for the logged-in user.
n Verifies whether the Windows system has synced with the Workspace server within the configuredoffline grace period.
If both of those conditions are true, the ThinApp agent allows the virtualized application to run.
The frequency of how often the Workspace for Windows application syncs with the Workspace server is setby the POLLINGINTERVAL installer option. By default, the frequency is every 5 minutes. The offline graceperiod is set to 30 days by default. If a Windows system has had network connectivity to connect to theWorkspace server at any time within a 30-day timespan, the application can sync with the server andvirtualized applications can run.
However, if the Windows system has no network connectivity to connect to the Workspace server, theapplication cannot sync with the server. Virtualized applications registered on that Windows system canrun on the disconnected system up to the time set by the offline grace period.
Set the Offline Grace Period for ThinApp PackagesSetting the offline grace period for the ThinApp agent on a Windows system requires modifying theregistry. The default offline grace period is 30 days, and is a system-wide setting.
Prerequisites
n Verify that Workspace for Windows is installed on the Windows system.
n Verify that you have local administrative permissions to modify the Windows system's registry.
Procedure
1 Open the Windows system's registry in the Registry Editor.
2 Locate the OfflineGracePeriod registry key.
Windows System Registry Key
Windows 32-bit HKEY_LOCAL_MACHINE\SOFTWARE\VMware, Inc. \HorizonThinApp\OfflineGracePeriod
Windows 64-bit HKEY_LOCAL_MACHINE\SOFTWARE\Wow6432Node\VMware,Inc. \Horizon ThinApp\OfflineGracePeriod
The OfflineGracePeriod key has type REG_DWORD. The default settings is 720 (30 days).
3 Update the OfflineGracePeriod value to a timespan in hours.
4 Exit the Registry Editor.
Using the Command-Line HorizonThinAppCtrl.exe ApplicationThe Workspace for Windows application includes a command-line application, HorizonThinAppCtrl.exe,that you can use to perform operations related to using ThinApp packages on the user's Windows system.
The installation process for Workspace for Windows installs HorizonThinAppCtrl.exe in the HorizonThinAppfolder in the Windows directory location where the Workspace for Windows is installed.
To use the HorizonThinAppCtrl.exe application to perform one of its supported commands, provide thecommand as the first argument, followed by the command's available options, as appropriate.
HorizonThinAppCtrl.exe command options
VMware Workspace Portal Administrator's Guide
80 VMware, Inc.

Command Description
HorizonThinAppCtrl.exerecheck
This command immediately does an entitlement check of the ThinApp packages thatare associated with the user account that is logged into the Workspace for Windowsclient. Any newly entitled or updated ThinApp packages are synced.
HorizonThinAppCtrl.exe setInstallMode=install_mode
This command changes the ThinApp deployment mode used for ThinApp packageson this Windows system. Because this command changes the registry keys associatedwith the ThinApp deployment mode, only administrators with the appropriateregistry permissions are able to change the install mode using this command.Available values for install_mode are:n CopyToLocal
n RunFromShare
n HttpDownload
HorizonThinAppCtrl.exeauthorizeguid=ThinApp_GUIDpath=package_path
This command verifies whether a ThinApp package can be launched. This commanddoes not actually launch the ThinApp package. Provide the ThinApp package'sGUID and the path to the package's executable file. If ThinApp download mode isused for the packages on the Windows client system, the path is relative to the localcache root folder, which is the same as the path relative to the repository root. Anexample isHorizonThinAppCtrl.exe authorize guid= 436E1D7D-552C-4F70-8197-DB1B05D30394 path="FileZilla Client 3.3.2/FileZilla.exe"
You can see the ThinApp package's GUID, application path, and executable file nameon its resources page in the admin console.
HorizonThinAppCtrl.exequit
This command tells the Workspace for Windows to exit cleanly.
HorizonThinAppCtrl.exelaunch app=package_pathurl=launch_url
This command is used to manually launch a ThinApp package, where package_path isthe path to the package's executable file, and launch_url is the Workspace protocolURL for that package, in the form horizon://package_path. An example isHorizonThinAppCtrl.exe launch app="FileZilla Client 3.3.2/FileZilla.exe" url="horizon://FileZilla Client 3.3.2/FileZilla.exe"
This command is not typically used by end users, who can launch their entitledThinApp packages from their My Apps area in the user portal. This command istypically used for debugging.
Entitle Users and Groups to ThinApp PackagesYou can entitle users and groups to Windows applications that are captured as ThinApp packages.
You can only entitle Workspace users, users who are imported from your directory server, to ThinApppackages. When you entitle a user to a ThinApp package, the user sees the application and can start it fromthe Workspace for Windows application on their system. If you remove the entitlement, the user cannot seeor start the application.
Often, the most effective way to entitle users to ThinApp packages is to add a ThinApp package entitlementto a group of users. In certain situations entitling individual users to a ThinApp package is moreappropriate.
Prerequisites
Configure Workspace to sync ThinApp packages to your Workspace catalog. When the ThinApp packagesare synced to your catalog, you can entitle them to your users and groups.
Use the Configurator Web Interface or the Connector Web Interface to sync ThinApp packages to yourcatalog. You cannot add ThinApp packages directly to your catalog from the Workspace Admin Console.
Procedure
1 Log in to the Workspace Admin Console.
Chapter 13 Providing Access to VMware ThinApp Packages
VMware, Inc. 81
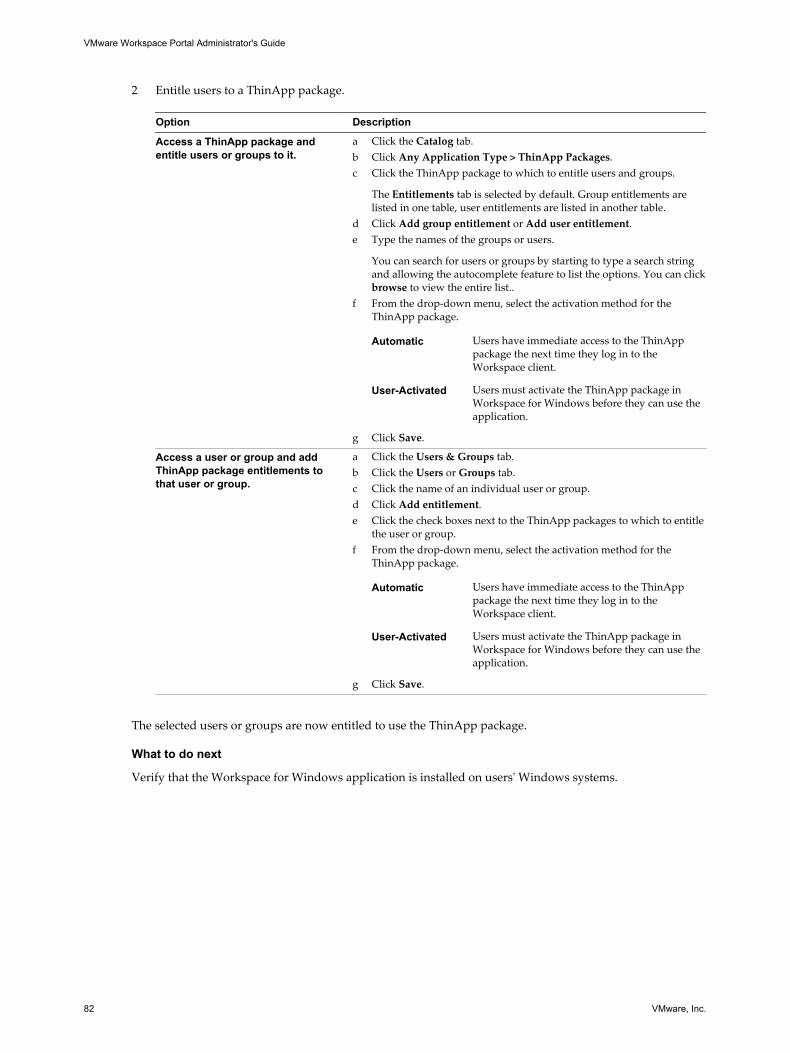
2 Entitle users to a ThinApp package.
Option Description
Access a ThinApp package andentitle users or groups to it.
a Click the Catalog tab.b Click Any Application Type > ThinApp Packages.c Click the ThinApp package to which to entitle users and groups.
The Entitlements tab is selected by default. Group entitlements arelisted in one table, user entitlements are listed in another table.
d Click Add group entitlement or Add user entitlement.e Type the names of the groups or users.
You can search for users or groups by starting to type a search stringand allowing the autocomplete feature to list the options. You can clickbrowse to view the entire list..
f From the drop-down menu, select the activation method for theThinApp package.
Automatic Users have immediate access to the ThinApppackage the next time they log in to theWorkspace client.
User-Activated Users must activate the ThinApp package inWorkspace for Windows before they can use theapplication.
g Click Save.
Access a user or group and addThinApp package entitlements tothat user or group.
a Click the Users & Groups tab.b Click the Users or Groups tab.c Click the name of an individual user or group.d Click Add entitlement.e Click the check boxes next to the ThinApp packages to which to entitle
the user or group.f From the drop-down menu, select the activation method for the
ThinApp package.
Automatic Users have immediate access to the ThinApppackage the next time they log in to theWorkspace client.
User-Activated Users must activate the ThinApp package inWorkspace for Windows before they can use theapplication.
g Click Save.
The selected users or groups are now entitled to use the ThinApp package.
What to do next
Verify that the Workspace for Windows application is installed on users' Windows systems.
VMware Workspace Portal Administrator's Guide
82 VMware, Inc.
Updating Managed ThinApp Packages After Deployment inWorkspace
After adding a ThinApp package to your organization's catalog and entitling your Workspace users to thatThinApp package, your organization might want to update that package and have the users use a newer, orrebuilt, version of the ThinApp package, without having to unentitle the users from the current package andthen entitling them to the newer package.
An updated ThinApp package might be made available because a newer version of the Windowsapplication for that package is released, or because the packager of the application has changed the values ofparameters used by the package.
ThinApp 4.7.2 and newer versions provide an update mechanism for ThinApp packages used in aWorkspace system. This ThinApp update mechanism is different from other update mechanisms forThinApp packages used outside of a Workspace environment. The updated ThinApp package must havebeen updated with this mechanism for you to be able to deploy the updated package in Workspace andhave users automatically see the newer version.
For ThinApp packages that are managed in a Workspace system, two Package.ini parameters are used byWorkspace to determine that a package is an updated version of another package.
AppID The unique identifier for the ThinApp package in Workspace. All entrypoints (executables) for the package's application are assigned the sameAppID. After a ThinApp package is synced to your organization'sWorkspace catalog, the package's AppID is displayed in the GUID column inthe ThinApp package's resource page. This value consists of alphanumericcharacters in a pattern of character sets, each set separated by dashes, such asin the following example:
XXXXXXXX-XXXX-XXXX-XXXX-XXXXXXXXXXXX
Workspace considers any ThinApp package with the same AppID to beversions of the same application.
VersionID The version number of the ThinApp package. Workspace uses the VersionIDto keep track of different versions of the managed ThinApp package. Youincrement the VersionID value by one (1) to mark that ThinApp package asan update of another package, retaining the same AppID.
You place the updated package in a new folder in the network share folder configured for the managedThinApp packages. See Installing and Configuring Workspace. When Workspace performs the scheduled syncwith the network share folder and it encounters an application that has the same AppID as anotherapplication, it compares the VersionID values. The ThinApp package with the highest VersionID is used asthe most recent update. Workspace automatically incorporates the previous user entitlements to theThinApp package with the highest VersionID, and shortcuts on the users' systems are synced to point to theupdated package.
IMPORTANT The standard ThinApp InventoryName parameter is important to successful updates of managedThinApp packages. Both the previous and updated ThinApp packages must have the same value for theInventoryName parameter. If the person creating the ThinApp package changes the InventoryName in apackage, and then creates an updated package, you must make sure the InventoryName values match for theupdates to work properly in your Workspace system.
See the ThinApp Package.ini Parameters Reference Guide for details about the various parameters that are usedin a ThinApp package's Package.ini file.
Chapter 13 Providing Access to VMware ThinApp Packages
VMware, Inc. 83

Update a Managed ThinApp PackageUpdating a ThinApp package that is already managed by Workspace and in your organization's cataloginvolves multiple steps. The updated ThinApp package might be provided to you by another group in yourorganization. To ensure that your Workspace system can automatically use the updated package in place ofthe existing one for the entitled users, you must ensure the updated package was created using the sameAppID as the current package, has a VersionID value that is higher than the existing package's VersionIDvalue, and is enabled for management by Workspace.
Prerequisites
Verify that you have access to the location where your managed ThinApp packages reside and can createsubfolders at that location.
Procedure
1 Obtain the AppID and VersionID values of a Managed ThinApp Package on page 84To ensure that Workspace automatically uses the updated ThinApp package in place of the currentone, the updated ThinApp package must be created using the AppID of the currently managedThinApp package and a higher VersionID value than the current version.
2 Create the Updated ThinApp Package on page 85The AppID and VersionID values of the currently managed ThinApp package are used for creating theupdated package. The updated package uses the same AppID value and a higher VersionID value.
3 Copy an Updated ThinApp Package to the Network Share on page 87After you create the updated ThinApp package, you copy the appropriate files to a new subfolder atthe same level as the existing subfolder on the network share.
What to do next
Your Workspace catalog displays the new version of the updated ThinApp package after the next sync ofyour Workspace system with your ThinApp package location. If you want to see the new version reflectedin the ThinApp package's resources page, you can manually sync using the ThinApp Packages page of theConnector Web interface. See Installing and Configuring Workspace.
Obtain the AppID and VersionID values of a Managed ThinApp PackageTo ensure that Workspace automatically uses the updated ThinApp package in place of the current one, theupdated ThinApp package must be created using the AppID of the currently managed ThinApp package anda higher VersionID value than the current version.
When the Setup Capture process is used to create an updated ThinApp package, the AppID value isautomatically retrieved by the Setup Capture program from the existing ThinApp package's executables,and the VersionID value is automatically incremented. However, the person who is creating the updatedThinApp package might use a different method for creating the updated package. When the Setup Captureprocess is not used to create the updated ThinApp package, the person creating the package must obtain theAppID and VersionID values for the ThinApp package that is currently managed by your Workspace system.The AppID and VersionID values are displayed on pages in the ThinApp package's resource page in theWorkspace Admin Console.
Procedure
1 Click the Catalog tab.
2 Click Any Application Type > ThinApp Packages.
3 Click the ThinApp package to open its resource page.
4 Click Details.
VMware Workspace Portal Administrator's Guide
84 VMware, Inc.

5 Make note of the value listed in the Version field on the Details page.
6 Click ThinApp Package to display the ThinApp Package page.
7 Make note of the AppID value listed in the GUID column.
The value listed in the GUID column is the value that Workspace uses to identify this ThinApppackage.
What to do next
The person who is creating the updated ThinApp package should complete the steps in “Create theUpdated ThinApp Package,” on page 85.
Create the Updated ThinApp PackageThe AppID and VersionID values of the currently managed ThinApp package are used for creating theupdated package. The updated package uses the same AppID value and a higher VersionID value.
Sometimes the updated ThinApp package is provided to you by another team in your organization. Theperson who creates the updated ThinApp package can use one of the described methods.
Prerequisites
Verify that you have the AppID and VersionID values of the current ThinApp package by completing thesteps in “Obtain the AppID and VersionID values of a Managed ThinApp Package,” on page 84.
Verify that you have a version of the ThinApp program that is compatible with your version of Workspace.For information about specific ThinApp versions, see the VMware Product Interoperability Matrixes athttp://www.vmware.com/resources/compatibility/sim/interop_matrix.php.
Chapter 13 Providing Access to VMware ThinApp Packages
VMware, Inc. 85
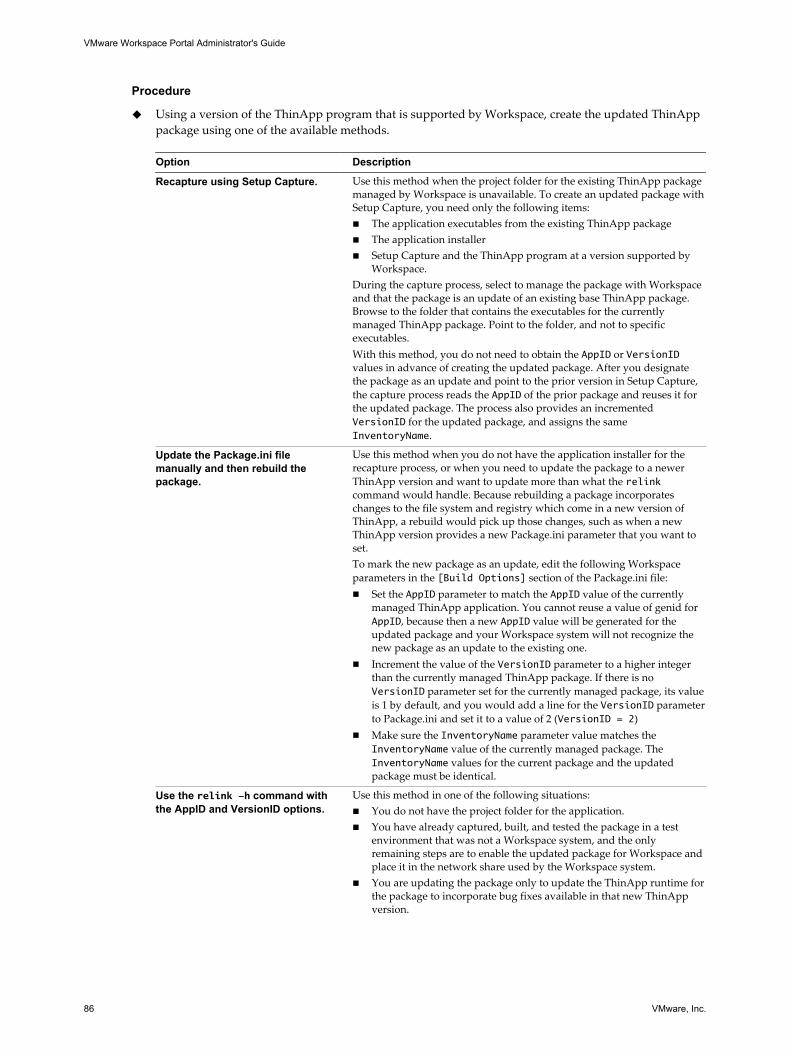
Procedure
u Using a version of the ThinApp program that is supported by Workspace, create the updated ThinApppackage using one of the available methods.
Option Description
Recapture using Setup Capture. Use this method when the project folder for the existing ThinApp packagemanaged by Workspace is unavailable. To create an updated package withSetup Capture, you need only the following items:n The application executables from the existing ThinApp packagen The application installern Setup Capture and the ThinApp program at a version supported by
Workspace.During the capture process, select to manage the package with Workspaceand that the package is an update of an existing base ThinApp package.Browse to the folder that contains the executables for the currentlymanaged ThinApp package. Point to the folder, and not to specificexecutables.With this method, you do not need to obtain the AppID or VersionIDvalues in advance of creating the updated package. After you designatethe package as an update and point to the prior version in Setup Capture,the capture process reads the AppID of the prior package and reuses it forthe updated package. The process also provides an incrementedVersionID for the updated package, and assigns the sameInventoryName.
Update the Package.ini filemanually and then rebuild thepackage.
Use this method when you do not have the application installer for therecapture process, or when you need to update the package to a newerThinApp version and want to update more than what the relinkcommand would handle. Because rebuilding a package incorporateschanges to the file system and registry which come in a new version ofThinApp, a rebuild would pick up those changes, such as when a newThinApp version provides a new Package.ini parameter that you want toset.To mark the new package as an update, edit the following Workspaceparameters in the [Build Options] section of the Package.ini file:n Set the AppID parameter to match the AppID value of the currently
managed ThinApp application. You cannot reuse a value of genid forAppID, because then a new AppID value will be generated for theupdated package and your Workspace system will not recognize thenew package as an update to the existing one.
n Increment the value of the VersionID parameter to a higher integerthan the currently managed ThinApp package. If there is noVersionID parameter set for the currently managed package, its valueis 1 by default, and you would add a line for the VersionID parameterto Package.ini and set it to a value of 2 (VersionID = 2)
n Make sure the InventoryName parameter value matches theInventoryName value of the currently managed package. TheInventoryName values for the current package and the updatedpackage must be identical.
Use the relink -h command withthe AppID and VersionID options.
Use this method in one of the following situations:n You do not have the project folder for the application.n You have already captured, built, and tested the package in a test
environment that was not a Workspace system, and the onlyremaining steps are to enable the updated package for Workspace andplace it in the network share used by the Workspace system.
n You are updating the package only to update the ThinApp runtime forthe package to incorporate bug fixes available in that new ThinAppversion.
VMware Workspace Portal Administrator's Guide
86 VMware, Inc.

Option Description
For example, if you have changed the project directory, including thePackage.ini file, for a virtual application, rebuilt the package, and testedthe package, the test environment might not have been Workspace. Thefinal stage of updating the application is to enable it for Workspace. At thatpoint, the easiest route is to use the relink -h command, instead ofrecapturing or rebuilding.NOTE The ThinApp runtime is always updated when you run the relink-h command on a ThinApp package.You can run the relink command from the ThinApp Program Filesdirectory to get help on the command's syntax.When the existing ThinApp package is already enabled for use byWorkspace, you can run the following command to reuse the package'sexisting AppID and increment the VersionID:relink -h -VersionID + executable-folder/*.*
Where executable-folder is a folder containing the executables of theThinApp package you want to update..IMPORTANT When you use the relink command, you cannot point itdirectly to the folder of package executables on the network share used forthe ThinApp packages in the Workspace environment. The commandconverts the old executables to BAK files when it updates the ThinAppruntime, and it writes those BAK files, as well as the new files, to thefolder. Because the network share typically does not allow writing to it,you must point relink to a copy of the folder of executables.Other use cases for the relink command, including enabling a ThinApppackage for use in a Workspace environment, are covered in the VMwareknowledge base article at http://kb.vmware.com/kb/2021928.
You have a set of files (EXE files, and optionally DAT files) for the updated ThinApp package.
What to do next
Copy the files to a new subfolder on the network share, by completing the steps in “Copy an UpdatedThinApp Package to the Network Share,” on page 87.
Copy an Updated ThinApp Package to the Network ShareAfter you create the updated ThinApp package, you copy the appropriate files to a new subfolder at thesame level as the existing subfolder on the network share.
Prerequisites
Verify that you have the files for the updated ThinApp package, as a result of completing the steps in “Create the Updated ThinApp Package,” on page 85 and incrementing the VersionID value.
Verify that you have access to the network share and can make subfolders and copy files to it.
Procedure
1 In the network share folder, create a new subfolder for the updated ThinApp package.
Retain the existing subfolder for the ThinApp package that you are updating, and do not alter itscontents.
After the next scheduled sync, Workspace ignores the older package, when it recognizes the newpackage has the same AppID value and a higher VersionID value.
Chapter 13 Providing Access to VMware ThinApp Packages
VMware, Inc. 87
Typically, you name the subfolder to match the name of the ThinApp application, or indicate whatapplication is in the folder. For example, if the network share is named appshare on a host namedserver, and the application is called abceditor, the subfolder for the ThinApp packageis \\server\appshare\abceditor.
NOTE Do not use non-ASCII characters when you create your network share subfolder names forThinApp packages to distribute by using Workspace. Non-ASCII characters are not supported.
2 Copy the EXE and DAT files for the updated ThinApp package into that new subfolder.
3 (Optional) If you do not want to wait for the next scheduled sync time, you can manually sync yourWorkspace system with the network share using the ThinApp Packages page of the Connector Webinterface.
When Workspace performs the scheduled sync with the network share folder and it encounters anapplication that has the same AppID as another application, it compares the VersionID values. TheThinApp package with the highest VersionID is used as the most recent update. Workspaceautomatically incorporates the previous user entitlements to the ThinApp package with the highestVersionID, and shortcuts on the users' systems are synced to point to the updated package.
Delete ThinApp Packages from WorkspaceYou can permanently remove a ThinApp package from Workspace.
When you delete a ThinApp package from Workspace, you permanently remove it. You can no longerentitle users to the ThinApp package unless you add it back to Workspace.
Procedure
1 Delete the ThinApp package subfolder from the network file share that is the ThinApp packagerepository connected to your Workspace system.
2 Delete the application from Workspace.
a Log in to the Workspace Admin Console.
b Click the Catalog tab.
c Click Any Application Type > ThinApp Packages.
d Search for the ThinApp package to delete.
e Click the ThinApp package name to display its resource page.
f Click Delete, read the message, and if you agree, click Yes.
The ThinApp package does not exist in your Workspace catalog.
VMware Workspace Portal Administrator's Guide
88 VMware, Inc.
Make Existing ThinApp Packages Compatible with WorkspaceYou can convert a ThinApp package from one that is not compatible with Workspace to one that Workspacecan distribute and manage. You can use one of the following methods: use the ThinApp 4.7.2 relinkcommand, rebuild the package from its ThinApp project files after editing the project's Package.ini file toadd the necessary Workspace parameters. or recapture the Windows application with the appropriateWorkspace settings selected in the ThinApp Setup Capture program.
NOTE A ThinApp package that is compatible with Workspace can only be used for a Workspacedeployment. Only Workspace users who have the Workspace Client for Windows installed can launch andrun these enabled packages. At runtime, the ThinApp package loads a specifically named DLL, and usesthat DLL to verify the user's entitlement with their Workspace system. Because the DLL is installed with theWorkspace Client for Windows, such ThinApp packages can only be run on Windows systems on whichthat client is installed.
Prerequisites
Verify that you have access to the necessary items for your chosen method.
n If you are using the relink command, verify that you have the executable files for the ThinApp packagethat you are converting and the ThinApp 4.7.2 relink.exe application.
n If you are updating the ThinApp project's Package.ini file and rebuilding the package, verify that youhave the project files needed by the ThinApp 4.7.2 program to rebuild the package.
n If you are recapturing the Windows application, verify that you have the ThinApp 4.7.2 Setup Captureprogram and the application installer and other items that the program needs to recapture theapplication. See the ThinApp User's Guide for details.
Verify that you have access to the ThinApp network share used by your Workspace system, and can makesubfolders and copy files to it.
Chapter 13 Providing Access to VMware ThinApp Packages
VMware, Inc. 89
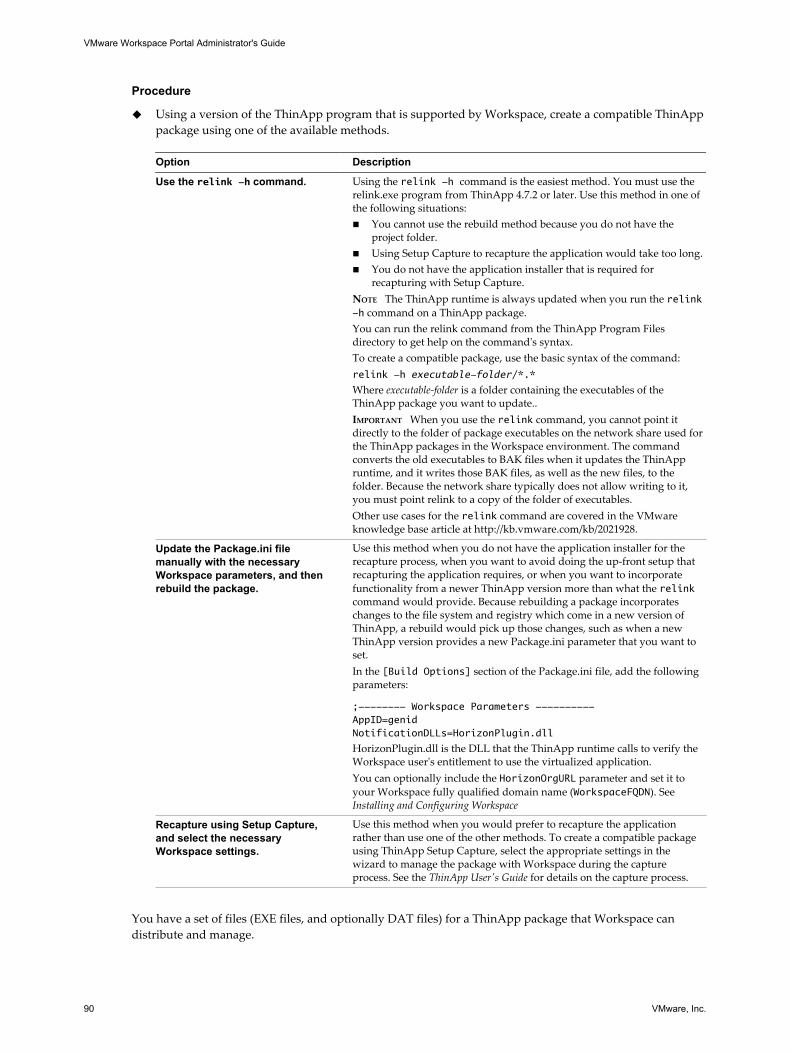
Procedure
u Using a version of the ThinApp program that is supported by Workspace, create a compatible ThinApppackage using one of the available methods.
Option Description
Use the relink -h command. Using the relink -h command is the easiest method. You must use therelink.exe program from ThinApp 4.7.2 or later. Use this method in one ofthe following situations:n You cannot use the rebuild method because you do not have the
project folder.n Using Setup Capture to recapture the application would take too long.n You do not have the application installer that is required for
recapturing with Setup Capture.NOTE The ThinApp runtime is always updated when you run the relink-h command on a ThinApp package.You can run the relink command from the ThinApp Program Filesdirectory to get help on the command's syntax.To create a compatible package, use the basic syntax of the command:relink -h executable-folder/*.*
Where executable-folder is a folder containing the executables of theThinApp package you want to update..IMPORTANT When you use the relink command, you cannot point itdirectly to the folder of package executables on the network share used forthe ThinApp packages in the Workspace environment. The commandconverts the old executables to BAK files when it updates the ThinAppruntime, and it writes those BAK files, as well as the new files, to thefolder. Because the network share typically does not allow writing to it,you must point relink to a copy of the folder of executables.Other use cases for the relink command are covered in the VMwareknowledge base article at http://kb.vmware.com/kb/2021928.
Update the Package.ini filemanually with the necessaryWorkspace parameters, and thenrebuild the package.
Use this method when you do not have the application installer for therecapture process, when you want to avoid doing the up-front setup thatrecapturing the application requires, or when you want to incorporatefunctionality from a newer ThinApp version more than what the relinkcommand would provide. Because rebuilding a package incorporateschanges to the file system and registry which come in a new version ofThinApp, a rebuild would pick up those changes, such as when a newThinApp version provides a new Package.ini parameter that you want toset.In the [Build Options] section of the Package.ini file, add the followingparameters:
;-------- Workspace Parameters ----------AppID=genidNotificationDLLs=HorizonPlugin.dll
HorizonPlugin.dll is the DLL that the ThinApp runtime calls to verify theWorkspace user's entitlement to use the virtualized application.You can optionally include the HorizonOrgURL parameter and set it toyour Workspace fully qualified domain name (WorkspaceFQDN). SeeInstalling and Configuring Workspace
Recapture using Setup Capture,and select the necessaryWorkspace settings.
Use this method when you would prefer to recapture the applicationrather than use one of the other methods. To create a compatible packageusing ThinApp Setup Capture, select the appropriate settings in thewizard to manage the package with Workspace during the captureprocess. See the ThinApp User's Guide for details on the capture process.
You have a set of files (EXE files, and optionally DAT files) for a ThinApp package that Workspace candistribute and manage.
VMware Workspace Portal Administrator's Guide
90 VMware, Inc.

What to do next
Add the ThinApp package to the repository that your Workspace system uses, by completing the steps in “Add ThinApp Packages to the Network Share,” on page 91.
Add ThinApp Packages to the Network ShareTo make ThinApp packages available for your Workspace to distribute them, you add the packages to theThinApp packages repository that is integrated with your Workspace system. This repository is a networkshare that is connected to your Workspace server
Prerequisites
Verify that your Workspace system is integrated with your ThinApp packages repository, according to thesteps in Installing and Configuring Workspace.
Verify that you have access to the network share and can make subfolders and copy files to it.
Verify that the ThinApp packages are compatible with Workspace, and you have all of the EXE and DATfiles for the packages.
Procedure
1 In the network share, create a network share subfolder for each ThinApp package.
Typically, you name the subfolder to match the name of the ThinApp application, or indicate whatapplication is in the folder. For example, if the network share is named appshare on a host namedserver, and the application is called abceditor, the subfolder for the ThinApp packageis \\server\appshare\abceditor.
NOTE Do not use non-ASCII characters when you create your network share subfolder names forThinApp packages to distribute by using Workspace. Non-ASCII characters are not supported.
2 For each ThinApp package, copy its files, such as its EXE and DAT files, to the subfolder that is namedfor that package's virtualized application.
After copying the files, you have a set of subfolders and files that are similar to these files:
n \\server\appshare\abceditor\abceditor.exe
n \\server\appshare\abceditor\abceditor.dat
3 (Optional) If you do not want to wait for the next scheduled sync time, you can manually sync yourWorkspace system with the network share using the ThinApp Packages page of the Connector Webinterface.
The ThinApp packages are available for your Workspace server to distribute and manage.
Chapter 13 Providing Access to VMware ThinApp Packages
VMware, Inc. 91

VMware Workspace Portal Administrator's Guide
92 VMware, Inc.
Configuring Workspace for Windows 14Before your Workspace users can run their ThinApp packages that are registered to them using Workspace,those users must have the Workspace for Windows application installed and running on their Windowssystems.
The Workspace for Windows application can be installed by either double-clicking its installer EXE file,running the executable file using the command-line options, or running a script that uses the command-lineoptions. Local administrator privileges are required to install the application.
The configuration of the Workspace for Windows application on the Windows endpoint determineswhether a ThinApp package that is distributed using Workspace is deployed using ThinApp streamingmode, RUN_FROM_SHARE, or one of the ThinApp download modes, COPY_TO_LOCAL orHTTP_DOWNLOAD. When you create the script to silently install Workspace for Windows to Windowsendpoints, such as desktop and laptop computers, you set the options that set the ThinApp packagedeployment mode. Choose the deployment mode that best fits the network environment for the selectedendpoints, considering details such as network latency.
NOTE If any browser windows are open during installation of the Workspace for Windows application,problems might occur with launching ThinApp packages from the user portal. Either close all browserwindows before installing the application, or immediately after installing the application, restart yourbrowsers. See “ThinApp Packages Fail to Launch from the User Portal,” on page 110.
This chapter includes the following topics:
n “Command-Line Installer Options for Workspace for Windows,” on page 93
n “Install the Workspace for Windows Application with Identical Settings to Multiple WindowsSystems,” on page 99
Command-Line Installer Options for Workspace for WindowsYou can set various options for the Workspace for Windows client application when you run its installerprogram using the command line or a deployment script. Because this client application provides featuresrelated to the use of the file-sharing and ThinApp package capabilities, you typically use these installeroptions to set runtime options associated with those features.
Available Command-Line Options for the Workspace for Windows InstallerAfter you download the EXE file for the client application's installer to a Windows system, you can see a listof the installation options by running the following command,
Workspace-n.n.n-nnnnnnn /?
VMware, Inc. 93

where n.n.n-nnnnnnn represents the file's version and build number. A dialog box appears that lists theavailable installation options that you can pass to the installer when installing the client application usingthe command line or a deployment script.
Table 14‑1. Installer Command-Line Options
InstallerOption
Value Description Long FormAlternative
/c path to configurationfile/filename
Provides a configuration file to use in theinstallation process.
/cfgfile
/T path to temporary directory Provides a directory to use as a temporaryextraction location during the installationprocess.
/Temp
/S path to search for files Provides a set of paths for the installer to searchfor files, in addition to the installer package file.
/SearchPaths
/P path to package file/filename Provides a package file to use in the installationprocess.
/Package
/s No values Runs the installation silently. A silent installationdoes not display messages or windows duringdeployment.You typically use this option when using adeployment script to run the installer program inan unattended install process, and you want tosuppress the display of interactive messages andwindows.You can use this option with the /x or /uninstoption to silently uninstall the application.
/silent
/nsr No values Suppresses an automatic reboot after a successfulsilent installation process.
/noSilentReboot
/f2 path to log file Provides the location of the installation log file. /log
/d No values Write debugging information to the installationlog file.
/debug
/V No values Sets verbose logging. /verbose
/L English language name orlocalized language name orthree-letter languageabbreviation or languageidentifier
Runs the installer in the named language, forexample,Workspace-n.n.n-nnnnnnn /lang French
where n.n.n-nnnnnnn is the file version and buildnumber for your downloaded installer program.
/lang
/v key-value pairs Provides a set of arguments to use in theinstallation process as a key-value pair, providedin the format key=value. These arguments arepassed to the MSI file and configure runtime forthe ThinApp packages capabilities provided bythe Windows application.
/msi_args
/x No values Uninstalls the application. /uninst
/clean No values Cleans out the installation registrationinformation.
No long formalternative
Key-Value Pairs for the /v OptionThe following table describes the available key-value pairs used for the /v installer option.
VMware Workspace Portal Administrator's Guide
94 VMware, Inc.

Table 14‑2. Keys for the /v Installer Command-Line Option
Keys for the /vOption
Values Description
HORIZONURL URL Provides the URL to your Workspace system, where HTTPS is the requiredprotocol, to allow the Windows application to communicate with your Workspacesystem, for example HORIZONURL=https://WorkspaceFQDN.NOTE The value must include the full URL, including the protocol portion, such ashttps://.
PROMPTFORAUTH
0 or 1 Presents users with a login window if Kerberos authentication fails.Set the value of this variable to 1 to enable the client application to respond to aKerberos failure by prompting users to log in from a browser window.Workspace-n.n.n-nnnnnnn/v PROMPTFORAUTH=1
Setting the value of this variable to 0 is the same as not including the variable inthe command. The result is that upon a Kerberos failure the client application doesnot automatically open the login in a browser window. However, the user receivesan indication in the Windows system tray that the client is not authenticated to theserver yet and can start the process manually.
Chapter 14 Configuring Workspace for Windows
VMware, Inc. 95
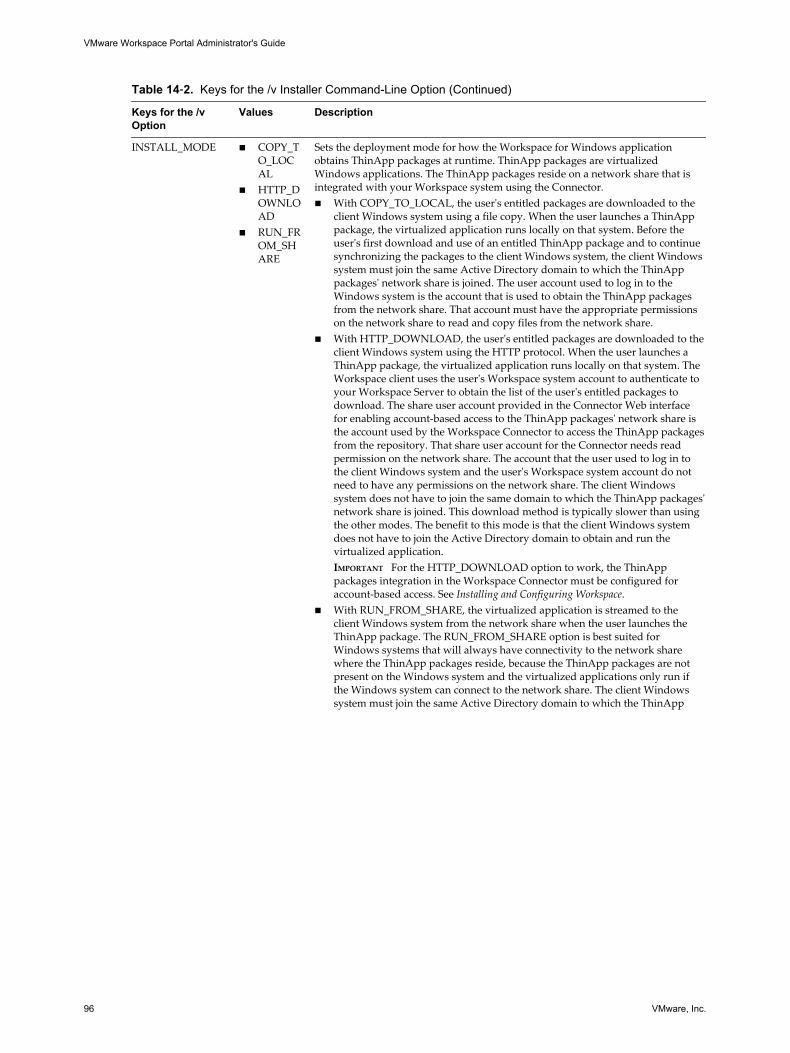
Table 14‑2. Keys for the /v Installer Command-Line Option (Continued)
Keys for the /vOption
Values Description
INSTALL_MODE n COPY_TO_LOCAL
n HTTP_DOWNLOAD
n RUN_FROM_SHARE
Sets the deployment mode for how the Workspace for Windows applicationobtains ThinApp packages at runtime. ThinApp packages are virtualizedWindows applications. The ThinApp packages reside on a network share that isintegrated with your Workspace system using the Connector.n With COPY_TO_LOCAL, the user's entitled packages are downloaded to the
client Windows system using a file copy. When the user launches a ThinApppackage, the virtualized application runs locally on that system. Before theuser's first download and use of an entitled ThinApp package and to continuesynchronizing the packages to the client Windows system, the client Windowssystem must join the same Active Directory domain to which the ThinApppackages' network share is joined. The user account used to log in to theWindows system is the account that is used to obtain the ThinApp packagesfrom the network share. That account must have the appropriate permissionson the network share to read and copy files from the network share.
n With HTTP_DOWNLOAD, the user's entitled packages are downloaded to theclient Windows system using the HTTP protocol. When the user launches aThinApp package, the virtualized application runs locally on that system. TheWorkspace client uses the user's Workspace system account to authenticate toyour Workspace Server to obtain the list of the user's entitled packages todownload. The share user account provided in the Connector Web interfacefor enabling account-based access to the ThinApp packages' network share isthe account used by the Workspace Connector to access the ThinApp packagesfrom the repository. That share user account for the Connector needs readpermission on the network share. The account that the user used to log in tothe client Windows system and the user's Workspace system account do notneed to have any permissions on the network share. The client Windowssystem does not have to join the same domain to which the ThinApp packages'network share is joined. This download method is typically slower than usingthe other modes. The benefit to this mode is that the client Windows systemdoes not have to join the Active Directory domain to obtain and run thevirtualized application.IMPORTANT For the HTTP_DOWNLOAD option to work, the ThinApppackages integration in the Workspace Connector must be configured foraccount-based access. See Installing and Configuring Workspace.
n With RUN_FROM_SHARE, the virtualized application is streamed to theclient Windows system from the network share when the user launches theThinApp package. The RUN_FROM_SHARE option is best suited forWindows systems that will always have connectivity to the network sharewhere the ThinApp packages reside, because the ThinApp packages are notpresent on the Windows system and the virtualized applications only run ifthe Windows system can connect to the network share. The client Windowssystem must join the same Active Directory domain to which the ThinApp
VMware Workspace Portal Administrator's Guide
96 VMware, Inc.
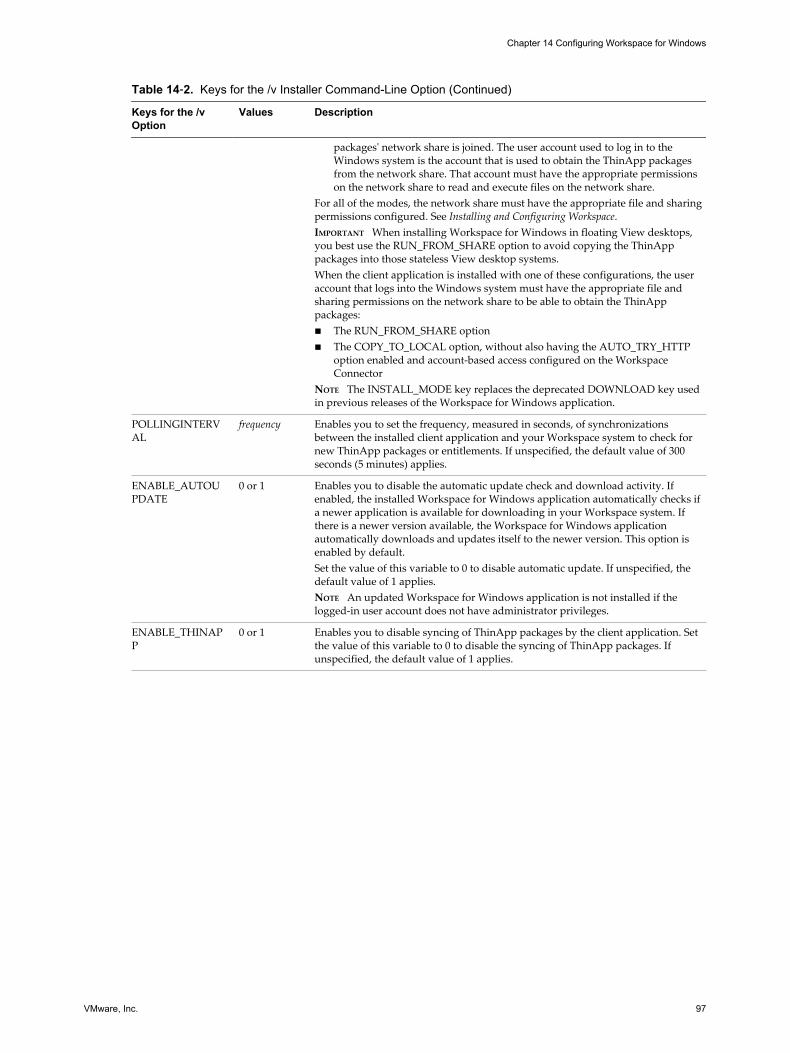
Table 14‑2. Keys for the /v Installer Command-Line Option (Continued)
Keys for the /vOption
Values Description
packages' network share is joined. The user account used to log in to theWindows system is the account that is used to obtain the ThinApp packagesfrom the network share. That account must have the appropriate permissionson the network share to read and execute files on the network share.
For all of the modes, the network share must have the appropriate file and sharingpermissions configured. See Installing and Configuring Workspace.IMPORTANT When installing Workspace for Windows in floating View desktops,you best use the RUN_FROM_SHARE option to avoid copying the ThinApppackages into those stateless View desktop systems.When the client application is installed with one of these configurations, the useraccount that logs into the Windows system must have the appropriate file andsharing permissions on the network share to be able to obtain the ThinApppackages:n The RUN_FROM_SHARE optionn The COPY_TO_LOCAL option, without also having the AUTO_TRY_HTTP
option enabled and account-based access configured on the WorkspaceConnector
NOTE The INSTALL_MODE key replaces the deprecated DOWNLOAD key usedin previous releases of the Workspace for Windows application.
POLLINGINTERVAL
frequency Enables you to set the frequency, measured in seconds, of synchronizationsbetween the installed client application and your Workspace system to check fornew ThinApp packages or entitlements. If unspecified, the default value of 300seconds (5 minutes) applies.
ENABLE_AUTOUPDATE
0 or 1 Enables you to disable the automatic update check and download activity. Ifenabled, the installed Workspace for Windows application automatically checks ifa newer application is available for downloading in your Workspace system. Ifthere is a newer version available, the Workspace for Windows applicationautomatically downloads and updates itself to the newer version. This option isenabled by default.Set the value of this variable to 0 to disable automatic update. If unspecified, thedefault value of 1 applies.NOTE An updated Workspace for Windows application is not installed if thelogged-in user account does not have administrator privileges.
ENABLE_THINAPP
0 or 1 Enables you to disable syncing of ThinApp packages by the client application. Setthe value of this variable to 0 to disable the syncing of ThinApp packages. Ifunspecified, the default value of 1 applies.
Chapter 14 Configuring Workspace for Windows
VMware, Inc. 97

Table 14‑2. Keys for the /v Installer Command-Line Option (Continued)
Keys for the /vOption
Values Description
SHARED_CACHE 0 or 1 Determines whether the ThinApp package cache is located in a common folder inthe Windows system to which the client application is being installed. Set the valueof this variable to 1 to specify that all user accounts on the Windows system share acommon cache location. By default, the common folder is C:\ProgramData\VMware\Horizon ThinApp.If unspecified, the default value of 0 applies, and each Windows user account getsits own cache, and its default location is %LOCALAPPDATA%\VMware\HorizonThinApp\PackageCache.NOTE If you specify a shared cache, the Workspace for Windows application doesnot automatically delete ThinApp packages from this shared cache. BecauseSHARED_CACHE=1 indicates that all user accounts on the Windows system sharethe same location, the packages must remain in the shared location so that entitledusers can use them, even when you unentitle one user. When you unentitle a userfrom a ThinApp package, the Workspace for Windows application unregisters thatpackage for that user. Other entitled users on that Windows system can continue touse the ThinApp package. You can delete the common cache manually to reclaimthe space if no user accounts on that Windows system are entitled to use theThinApp packages. Each ThinApp package has its own folder under the cachelocation.
AUTO_TRY_HTTP 0 or 1 When the Workspace for Windows application is installed with theCOPY_TO_LOCAL option and account-based access is configured for theWorkspace Connector, the AUTO_TRY_HTTP option determines whether theclient should automatically try downloading the user's entitled ThinApp packagesusing the HTTP protocol, as for the HTTP_DOWNLOAD option, if the firstattempt to download fails. This option is enabled by default. Set the value of thisoption to 0 to disable automatically trying the HTTP protocol for the download. Ifunspecified, the default value of 1 applies.IMPORTANT For the AUTO_TRY_HTTP option to work, the ThinApp packagesintegration in the Workspace Connector must be configured for account-basedaccess. See Installing and Configuring Workspace.
Example: Example of Using the Workspace for Windows Command-LineInstaller Options
If your Workspace instance has a URL of https://WorkspaceFQDN, and your Connector is configured foraccount-based access to your ThinApp packages' network share, and you want to silently install theWorkspace for Windows application to multiple desktops of that Workspace instance with these options:
n The ThinApp install option set to HTTP_DOWNLOAD, because you expect these Windows systemswill not be likely to join the domain. The Connector is appropriately configured for account-basedaccess to the ThinApp packages' network share.
n The clients check for new packages and entitlements with the Workspace system every 60 seconds.
You would create a script that invokes the following command:
VMware-Horizon-Workspace-n.n.n-nnnnnnn.exe /s
/v HORIZONURL=https://WorkspaceFQDN INSTALL_MODE=HTTP_DOWNLOAD POLLINGINTERVAL=60
where you replace the n.n.n-nnnnnnn portion of the file name to match the name of your downloadedWorkspace for Windows installer.
Deprecated Command-Line OptionsThe following options were used in previous Workspace releases and are no longer used in the currentrelease.
n The /z SSLBYPASS option is ignored if provided on the command line.
VMware Workspace Portal Administrator's Guide
98 VMware, Inc.
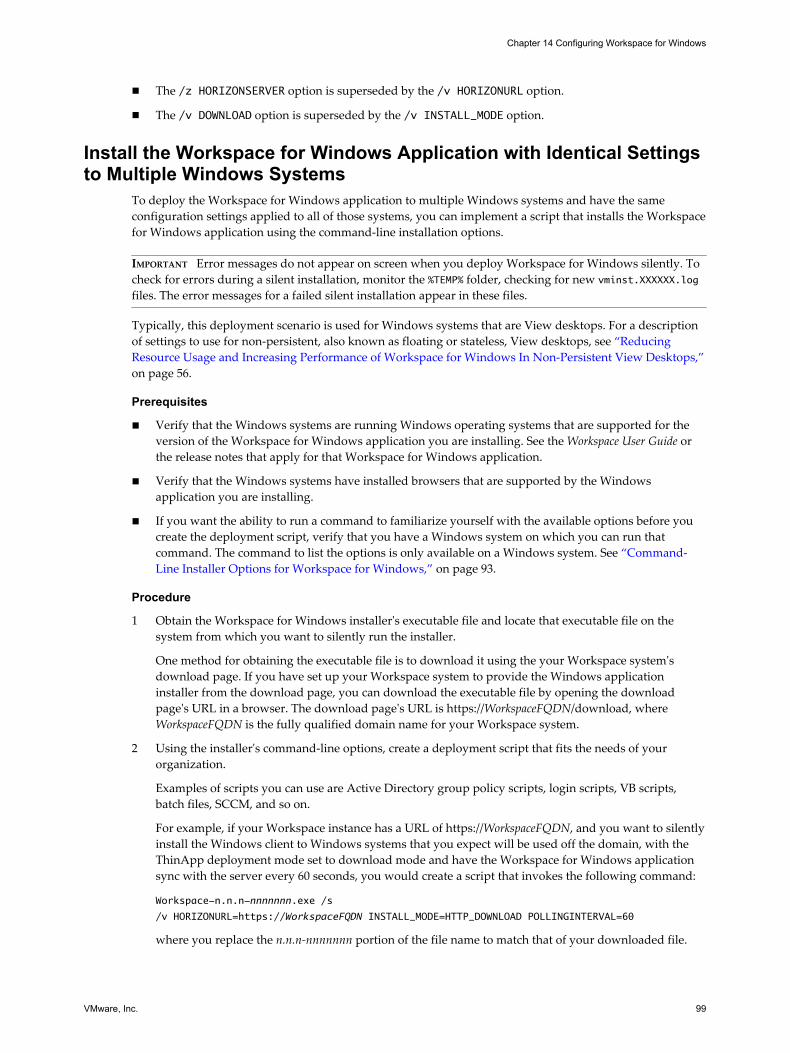
n The /z HORIZONSERVER option is superseded by the /v HORIZONURL option.
n The /v DOWNLOAD option is superseded by the /v INSTALL_MODE option.
Install the Workspace for Windows Application with Identical Settingsto Multiple Windows Systems
To deploy the Workspace for Windows application to multiple Windows systems and have the sameconfiguration settings applied to all of those systems, you can implement a script that installs the Workspacefor Windows application using the command-line installation options.
IMPORTANT Error messages do not appear on screen when you deploy Workspace for Windows silently. Tocheck for errors during a silent installation, monitor the %TEMP% folder, checking for new vminst.XXXXXX.logfiles. The error messages for a failed silent installation appear in these files.
Typically, this deployment scenario is used for Windows systems that are View desktops. For a descriptionof settings to use for non-persistent, also known as floating or stateless, View desktops, see “ReducingResource Usage and Increasing Performance of Workspace for Windows In Non-Persistent View Desktops,”on page 56.
Prerequisites
n Verify that the Windows systems are running Windows operating systems that are supported for theversion of the Workspace for Windows application you are installing. See the Workspace User Guide orthe release notes that apply for that Workspace for Windows application.
n Verify that the Windows systems have installed browsers that are supported by the Windowsapplication you are installing.
n If you want the ability to run a command to familiarize yourself with the available options before youcreate the deployment script, verify that you have a Windows system on which you can run thatcommand. The command to list the options is only available on a Windows system. See “Command-Line Installer Options for Workspace for Windows,” on page 93.
Procedure
1 Obtain the Workspace for Windows installer's executable file and locate that executable file on thesystem from which you want to silently run the installer.
One method for obtaining the executable file is to download it using the your Workspace system'sdownload page. If you have set up your Workspace system to provide the Windows applicationinstaller from the download page, you can download the executable file by opening the downloadpage's URL in a browser. The download page's URL is https://WorkspaceFQDN/download, whereWorkspaceFQDN is the fully qualified domain name for your Workspace system.
2 Using the installer's command-line options, create a deployment script that fits the needs of yourorganization.
Examples of scripts you can use are Active Directory group policy scripts, login scripts, VB scripts,batch files, SCCM, and so on.
For example, if your Workspace instance has a URL of https://WorkspaceFQDN, and you want to silentlyinstall the Windows client to Windows systems that you expect will be used off the domain, with theThinApp deployment mode set to download mode and have the Workspace for Windows applicationsync with the server every 60 seconds, you would create a script that invokes the following command:
Workspace-n.n.n-nnnnnnn.exe /s
/v HORIZONURL=https://WorkspaceFQDN INSTALL_MODE=HTTP_DOWNLOAD POLLINGINTERVAL=60
where you replace the n.n.n-nnnnnnn portion of the file name to match that of your downloaded file.
Chapter 14 Configuring Workspace for Windows
VMware, Inc. 99
3 Run the deployment script against the Windows systems.
If the silent installation is successful, the Workspace for Windows application is deployed to the Windowssystems. Users logged in to those Windows systems can access their entitled assets from those systems.
NOTE A user's entitled ThinApp package is streamed or downloaded and cached to the user's Windowssystem after the polling interval elapses. As a result, users might see the ThinApp package displayed whenthey log in to the Workspace browser-based user portal. The ThinApp package does not start until the clientsyncs the application on the next polling interval.
What to do next
Verify that Workspace for Windows is properly installed on the Windows systems by trying some of thetypical user tasks.
VMware Workspace Portal Administrator's Guide
100 VMware, Inc.
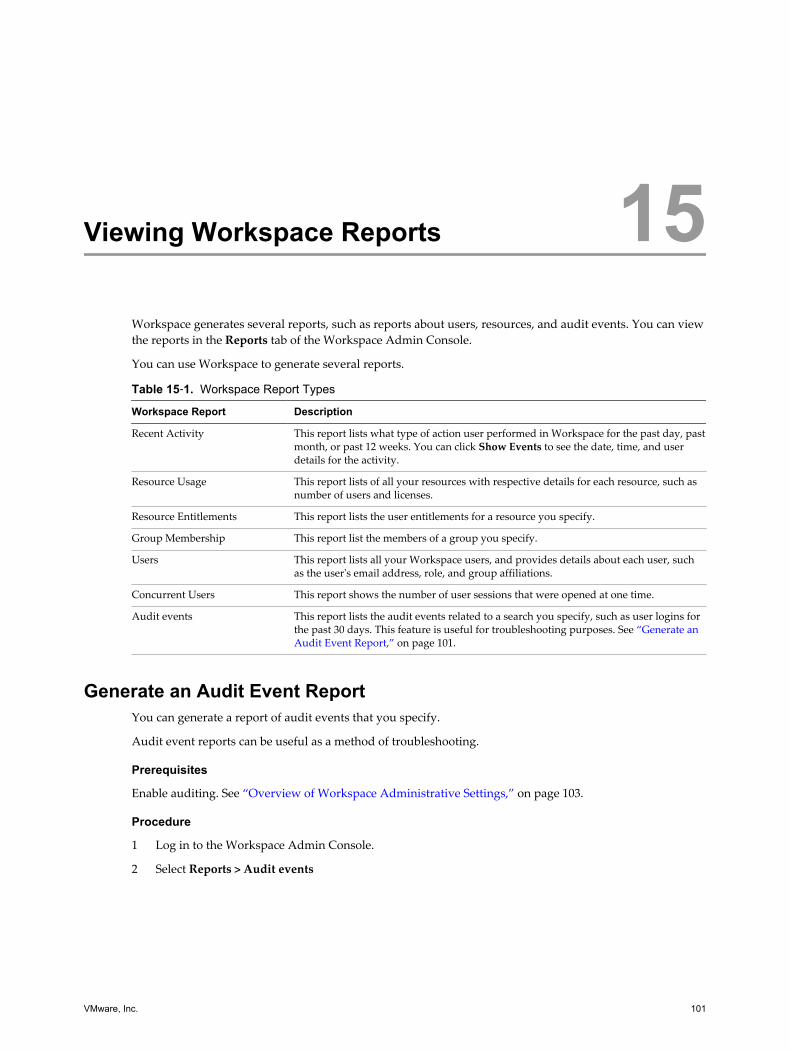
Viewing Workspace Reports 15Workspace generates several reports, such as reports about users, resources, and audit events. You can viewthe reports in the Reports tab of the Workspace Admin Console.
You can use Workspace to generate several reports.
Table 15‑1. Workspace Report Types
Workspace Report Description
Recent Activity This report lists what type of action user performed in Workspace for the past day, pastmonth, or past 12 weeks. You can click Show Events to see the date, time, and userdetails for the activity.
Resource Usage This report lists of all your resources with respective details for each resource, such asnumber of users and licenses.
Resource Entitlements This report lists the user entitlements for a resource you specify.
Group Membership This report list the members of a group you specify.
Users This report lists all your Workspace users, and provides details about each user, suchas the user's email address, role, and group affiliations.
Concurrent Users This report shows the number of user sessions that were opened at one time.
Audit events This report lists the audit events related to a search you specify, such as user logins forthe past 30 days. This feature is useful for troubleshooting purposes. See “Generate anAudit Event Report,” on page 101.
Generate an Audit Event ReportYou can generate a report of audit events that you specify.
Audit event reports can be useful as a method of troubleshooting.
Prerequisites
Enable auditing. See “Overview of Workspace Administrative Settings,” on page 103.
Procedure
1 Log in to the Workspace Admin Console.
2 Select Reports > Audit events
VMware, Inc. 101

3 Select audit event criteria.
AuditEventCriteria Description
User This text box allows you to narrow the search of audit events to those generated by a specific user.
Type This drop-down list allows you to narrow the search of audit events to a specific audit event type.The drop-down list does not display all potential audit event types. The list only displays event typesthat have occurred in your Workspace deployment. Audit event types that are listed with alluppercase letters are access events, such as LOGIN and LAUNCH, which do not generate changes inthe database. Other audit event types generate changes in the database.
Action This drop-down list allows you to narrow your search to specific actions. The list displays events thatmake specific changes to the database. If you select an access event in the Type drop-down list, whichsignifies a non-action event, do not specify an action in the Action drop-down list.
Object This text box allows you to narrow the search to a specific object. Examples of objects are groups,users, and devices. Objects are identified by a name or an ID number.
Date range These text boxes allow you to narrow your search to a date range in the format of "From ___ days agoto ___ days ago." The maximum date range is 30 days. For example, from 90 days ago to 60 days agois a valid range while 90 days ago to 45 days ago is an invalid range because it exceeds the 30 daymaximum.
4 Click Show.
An audit event report appears according to the criteria you specified.
NOTE At times when the auditing subsystem is restarting, the Audit Events page might display anerror message and not render the report. If you see such an error message about not rendering thereport, wait a few minutes and then try again.
5 For more information about an audit event, click View Details for that audit event.
VMware Workspace Portal Administrator's Guide
102 VMware, Inc.

Configuring Workspace Settings forAdministrators 16
After you install Workspace and perform the initial configuration, you can configure several administrativesettings.
This chapter includes the following topics:
n “Overview of Workspace Administrative Settings,” on page 103
n “Customize Workspace Branding,” on page 104
n “Use hznAdminTool Commands to Make Changes to Your Workspace System,” on page 107
Overview of Workspace Administrative SettingsYou can configure several Workspace administrative settings.
You access the administrative settings using the Workspace Admin Console.
Setting Description
VA Configuration Select Settings > VA Configuration to access the Configurator Web interface. The ConfiguratorWeb interface allows you to use a Web interface to edit the underlying Configurator virtualappliance. You can perform actions such as the following from the Configurator Web interface:n View system information.n Change the database from internal to external.n Configure an SSL certificate for external access to Workspace.n Enable modules: Web Applications, Mobile Management, View, ThinApp Packages, and Citrix
Published Applications.n Enter a new license key.n Change the admin user password for the service-va, configurator-va, and connector-va.n View a list of the log file locations.On the VA Configuration page, click View Virtual Appliance System Configuration to load thelogin page of the Configurator Web interface in your browser.
PasswordRecovery
Select Settings > Password Recovery to configure the behavior of user password recovery. Thissetting allows you to configure the behavior of the Forgot password link on the user log in page.
User Stores Select Settings > User Stores to configure user stores, which are required when you configureWorkspace in a multi-forest Active Directory environment. See “Add a User Store for a Multi-Forest Active Directory Environment,” on page 16.
Network Ranges Select Settings > Network Ranges to configure network ranges for your organization, so that youcan associate IP address ranges with identity provider instances. See “Add or Edit a NetworkRange,” on page 21.
AuthenticationMethods
Select Settings > Authentication Methods to configure the default authentication methods or toadd authentication methods not supported by Workspace directly, but supported indirectlythrough third-party identity providers. See “Add or Edit a User Authentication Method,” onpage 22.
VMware, Inc. 103
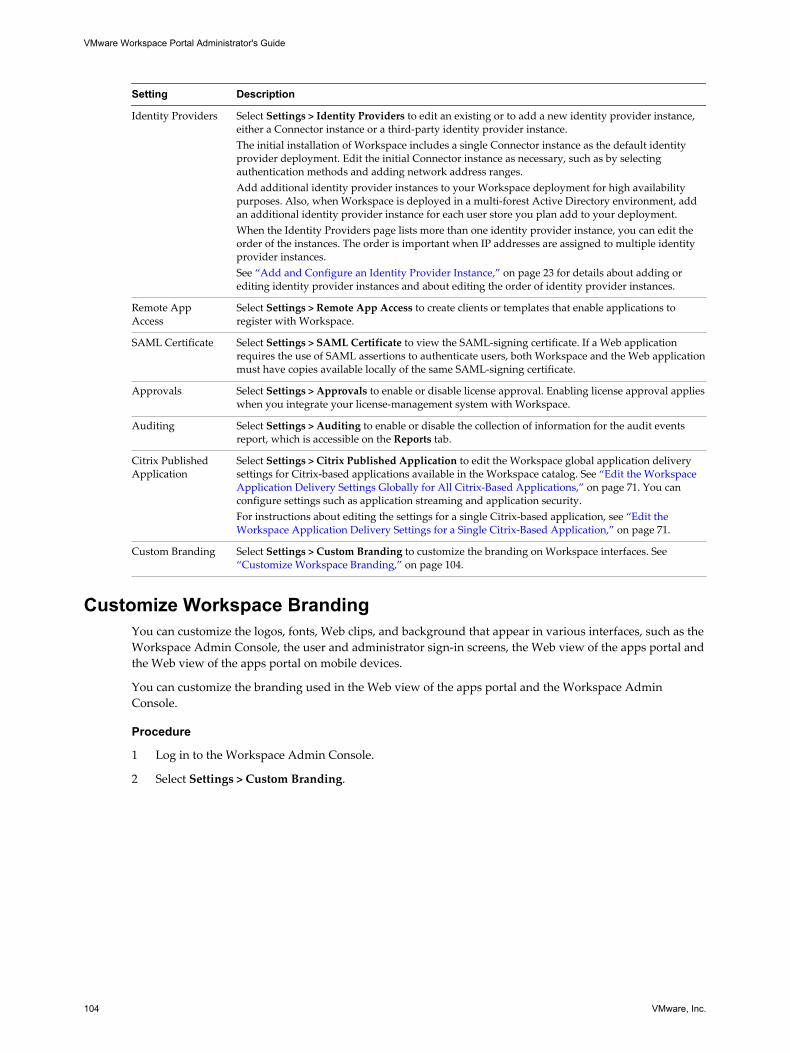
Setting Description
Identity Providers Select Settings > Identity Providers to edit an existing or to add a new identity provider instance,either a Connector instance or a third-party identity provider instance.The initial installation of Workspace includes a single Connector instance as the default identityprovider deployment. Edit the initial Connector instance as necessary, such as by selectingauthentication methods and adding network address ranges.Add additional identity provider instances to your Workspace deployment for high availabilitypurposes. Also, when Workspace is deployed in a multi-forest Active Directory environment, addan additional identity provider instance for each user store you plan add to your deployment.When the Identity Providers page lists more than one identity provider instance, you can edit theorder of the instances. The order is important when IP addresses are assigned to multiple identityprovider instances.See “Add and Configure an Identity Provider Instance,” on page 23 for details about adding orediting identity provider instances and about editing the order of identity provider instances.
Remote AppAccess
Select Settings > Remote App Access to create clients or templates that enable applications toregister with Workspace.
SAML Certificate Select Settings > SAML Certificate to view the SAML-signing certificate. If a Web applicationrequires the use of SAML assertions to authenticate users, both Workspace and the Web applicationmust have copies available locally of the same SAML-signing certificate.
Approvals Select Settings > Approvals to enable or disable license approval. Enabling license approval applieswhen you integrate your license-management system with Workspace.
Auditing Select Settings > Auditing to enable or disable the collection of information for the audit eventsreport, which is accessible on the Reports tab.
Citrix PublishedApplication
Select Settings > Citrix Published Application to edit the Workspace global application deliverysettings for Citrix-based applications available in the Workspace catalog. See “Edit the WorkspaceApplication Delivery Settings Globally for All Citrix-Based Applications,” on page 71. You canconfigure settings such as application streaming and application security.For instructions about editing the settings for a single Citrix-based application, see “Edit theWorkspace Application Delivery Settings for a Single Citrix-Based Application,” on page 71.
Custom Branding Select Settings > Custom Branding to customize the branding on Workspace interfaces. See “Customize Workspace Branding,” on page 104.
Customize Workspace BrandingYou can customize the logos, fonts, Web clips, and background that appear in various interfaces, such as theWorkspace Admin Console, the user and administrator sign-in screens, the Web view of the apps portal andthe Web view of the apps portal on mobile devices.
You can customize the branding used in the Web view of the apps portal and the Workspace AdminConsole.
Procedure
1 Log in to the Workspace Admin Console.
2 Select Settings > Custom Branding.
VMware Workspace Portal Administrator's Guide
104 VMware, Inc.
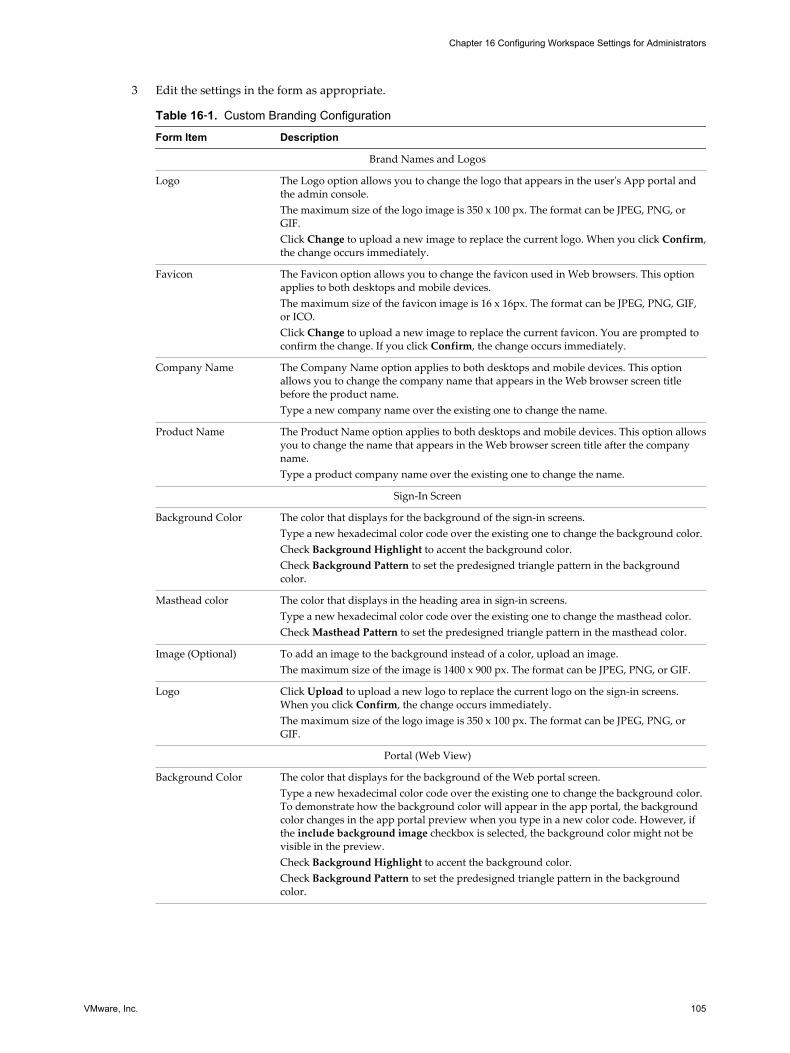
3 Edit the settings in the form as appropriate.
Table 16‑1. Custom Branding Configuration
Form Item Description
Brand Names and Logos
Logo The Logo option allows you to change the logo that appears in the user's App portal andthe admin console.The maximum size of the logo image is 350 x 100 px. The format can be JPEG, PNG, orGIF.Click Change to upload a new image to replace the current logo. When you click Confirm,the change occurs immediately.
Favicon The Favicon option allows you to change the favicon used in Web browsers. This optionapplies to both desktops and mobile devices.The maximum size of the favicon image is 16 x 16px. The format can be JPEG, PNG, GIF,or ICO.Click Change to upload a new image to replace the current favicon. You are prompted toconfirm the change. If you click Confirm, the change occurs immediately.
Company Name The Company Name option applies to both desktops and mobile devices. This optionallows you to change the company name that appears in the Web browser screen titlebefore the product name.Type a new company name over the existing one to change the name.
Product Name The Product Name option applies to both desktops and mobile devices. This option allowsyou to change the name that appears in the Web browser screen title after the companyname.Type a product company name over the existing one to change the name.
Sign-In Screen
Background Color The color that displays for the background of the sign-in screens.Type a new hexadecimal color code over the existing one to change the background color.Check Background Highlight to accent the background color.Check Background Pattern to set the predesigned triangle pattern in the backgroundcolor.
Masthead color The color that displays in the heading area in sign-in screens.Type a new hexadecimal color code over the existing one to change the masthead color.Check Masthead Pattern to set the predesigned triangle pattern in the masthead color.
Image (Optional) To add an image to the background instead of a color, upload an image.The maximum size of the image is 1400 x 900 px. The format can be JPEG, PNG, or GIF.
Logo Click Upload to upload a new logo to replace the current logo on the sign-in screens.When you click Confirm, the change occurs immediately.The maximum size of the logo image is 350 x 100 px. The format can be JPEG, PNG, orGIF.
Portal (Web View)
Background Color The color that displays for the background of the Web portal screen.Type a new hexadecimal color code over the existing one to change the background color.To demonstrate how the background color will appear in the app portal, the backgroundcolor changes in the app portal preview when you type in a new color code. However, ifthe include background image checkbox is selected, the background color might not bevisible in the preview.Check Background Highlight to accent the background color.Check Background Pattern to set the predesigned triangle pattern in the backgroundcolor.
Chapter 16 Configuring Workspace Settings for Administrators
VMware, Inc. 105

Table 16‑1. Custom Branding Configuration (Continued)
Form Item Description
Name and Icon Color The color of the font that is used for resource names listed on the app portal screen. Thename of the resource is located directly under the icon of the resource.Type a hexadecimal color code over the existing one to change the font color. The AppName text in the app portal preview changes when you type in a new color code todemonstrate how the text will appear in the app portal.
Lettering effect Select the type of lettering to use for the text on the MyApps screen.
Image (Optional) To add an image to the background on the app portal screen instead of a color, upload animage.
Portal (Mobile and Tablet Views)
Background Color Type a hexadecimal color code over the existing one to change the background color ofthe My Apps screen viewed from a mobile device.
Title bar color Type a hexadecimal color code over the existing one to change the title bar color viewedfrom a mobile device.Select Title Bar pattern to set the predesigned triangle pattern in the title bar color.
Title color Type a hexadecimal color code over the existing one to change the font color used in thetitle bar heading.
Name color The color of the font that is used for resource names listed on the app portal screen. Thename of the resource is located directly under the icon of the resource.Type a hexadecimal color code over the existing one to change the font color of theapplication names.
Lettering effect Select the type of lettering to use for the text on the MyApps screen.
Use the same valuesfor both the Launcherand the Catalog
If you want to use the same branding design for the App Center sceen view as used forthe My Apps screen view on mobile devices, check this box. If you want to design the AppCenter screen differently, leave this box unchecked and configure the background, titlebar color and title color for the App Center screen.
First-Time User Tour
First-Time User Tour When first time users launch their app portal, they are shown a slideshow about theWorkspace features.You can remove the checkmark to disable this feature.
Mobile Devices
Web Clip Icon The Workspace icon, that appears when users save the App Portal URL as a bookmark totheir mobile device home screens. This Web clip icon launches the Workspace App Portal.The maximum size of the image is 512 x 512 px. The format can be JPEG or PNG.Click Change to upload a new image to replace the current Web clip icon. You areprompted to confirm the change. If you click Confirm, the change occurs immediately.
Web Clip Title The title that accompanies the Workspace Web clip icon. The tile must be less than 20characters.
4 Click Save.
Custom branding updates to Workspaceare applied across the Connectors within five minutes after youclick Save.
What to do next
Check the appearance of the branding changes in the various interfaces.
VMware Workspace Portal Administrator's Guide
106 VMware, Inc.

Use hznAdminTool Commands to Make Changes to Your WorkspaceSystem
When you need to update settings related to the vCenter instance or SMTP system configured for yourWorkspace system, or to reset the password for the admin user that is used to log in to the ConfiguratorWeb interface, use the hznAdminTool command in the configurator-va virtual appliance interface.
Prerequisites
Verify that you can log in to the configurator-va virtual appliance interface, either directly using the vSphereclient and the root account and password, or remotely using ssh and the sshuser account and password. Thepassword for the root account is set during installation when you configure basic Workspace settings usingthe configurator-va virtual appliance interface. See Installing and Configuring Workspace.
Procedure
1 Log in to the configurator-va virtual machine using the configurator-va virtual appliance interface.
2 Enter the hzAdminTool with the appropriate option for the configuration setting that you want toupdate.
To see a list of all editable properties for the hzAdminTool editproperty command, run hznAdminTooleditproperty -- list. To set an editable property, run hznAdminTool editproperty --set=property:value, where property is the property and value is the value you want to set.
Option Description
hzAdminTool resetpasswd Run this command to set the password for the default administratoraccount, named admin, that is typically used to log in to the ConnectorWeb interface.
hzAdminTool editproperty --set=vim_host:your_vCenter_host
Run this command to set the address for the vCenter instance associatedwith this Workspace system.
hzAdminTool editproperty --set=vim_port:your_vCenter_port
Run this command to set the port number for the vCenter instance that isassociated with this Workspace system.
hzAdminTool editproperty --set=vim_username:username
Run this command to configure your Workspace system with the nameused for the associated vCenter instance's administrator account.
hzAdminTool editproperty --set=vim_password:password
Run this command to configure your Workspace system with thepassword used for the associated vCenter instance's administrator account.
hzAdminTool editproperty --set=smtp_host:your_smtp_host
Run this command to set the address for the SMTP server associated withthis Workspace system.
hzAdminTool editproperty --set=smtp_port:your_smtp_port
Run this command to set the port for the associated SMTP server.
hzAdminTool editproperty --set=smtp_username:username
Run this command to configure your Workspace system with the nameused to access the SMTP server to send email messages. The Workspacefile-sharing service sends email using the configured SMTP server when auser shares a folder or file with another user. Set this SMTP usernamewhen your SMTP server requires credentials to access it so that the file-sharing service can send emails.
hzAdminTool editproperty --set=smtp_password:password
Run this command to configure your Workspace system with thepassword for the username that is used to access the SMTP server to sendemail messages.
3 Apply the changes to your Workspace system by running the configurator-tc restart command to
restart the configurator-va's Tomcat server.
After the Tomcat server restarts, your changes go into effect.
Chapter 16 Configuring Workspace Settings for Administrators
VMware, Inc. 107

VMware Workspace Portal Administrator's Guide
108 VMware, Inc.
Troubleshooting Workspace forAdministrators 17
You can troubleshoot issues that you or your Workspace users might experience after you install andconfigure Workspace.
This chapter includes the following topics:
n “Blank Screen Displays When Installing Update to Workspace for Windows,” on page 109
n “ThinApp Packages Fail to Launch from the User Portal,” on page 110
n “A User Login Attempt Results in a Timeout Error,” on page 113
n “Users Accessing Citrix-based Applications Recive an Encryption Error,” on page 113
Blank Screen Displays When Installing Update to Workspace forWindows
When you have the Workspace for Windows application already installed, and then you download a morerecent version, and start to install it, a blank screen displays.
Problem
When you already have the Workspace for Windows application installed, and you start the installer for amore recent version, sometimes a blank screen displays and you cannot complete the installation.
When you look at the log files for the installer, you see lines at the end of file similar to the following lines:
20130918112739:INFO CBootstrapCmd::LuaUIShow: calling StartSequence('reboot_prompt')
20130918112739:INFO CHtmlUI::StartSequence: About to Run UI Sequence reboot_prompt 00000120
01F3B6F8 1
20130918112739:INFO CHtmlUI::StartSequence: Running UI Sequence reboot_prompt
20130918112739:ERROR** CHtmlDialog::CallJScript: Failed to obtain required required jscript ID;
COM Error: -2147352570
Cause
This problem can occur if one or more registry key settings are incorrect. For descriptions of similarsymptoms and other potential solution steps, see the VMware knowledge base article athttp://kb.vmware.com/kb/1027986 and the Microsoft Knowledge Base article 831430 athttp://support.microsoft.com/kb/831430.
Solution
1 Reboot the Windows system, and then try running the installer again.
If rebooting the system does not resolve the problem, continue with the next step.
VMware, Inc. 109

2 Re-register the jscript.dll and vbscript.dll files.
a Open a command prompt on the Windows system.
b Run the following commands to re-register the necessary files and details.
If the system is a 32-bit version of Windows, run these commands:
regsvr32 jscript.dll
regsvr32 vbscript.dll
If the system is a 64-bit version of Windows, run these commands:
cd C:\windows\syswow64
regsvr32 C:\windows\system32\jscript.dll
regsvr32 C:\windows\system32\vbscript.dll
3 Restart Windows.
ThinApp Packages Fail to Launch from the User PortalWhen a user tries to launch a ThinApp package from the user portal, a browser message might appear thatprompts the user to download and install Workspace for Windows even when the application is alreadyinstalled and running.
Problem
After installing Workspace for Windows, when the user opens the user portal in a browser on that Windowssystem, logs in, and tries to launch a ThinApp package, a message might appear stating that Workspace forWindows must be installed on the system, and prevents the ThinApp package from starting. This messagemight appear even when the Workspace process is running on the Windows system. The Workspace forWindows client might report that all files are up to date.
Cause
This problem can occur for multiple reasons.
VMware Workspace Portal Administrator's Guide
110 VMware, Inc.

Cause Description
The Workspace forWindows browserplugin is notproperly installed orit is not activated inthe browserwindow for thebrowser in whichthe user is trying tolaunch the ThinApppackage.
Because installation of the Workspace for Windows application is required to run ThinApppackages on the Windows system, the user portal uses a browser plugin to verify whether theapplication is installed before launching the ThinApp package from the user portal. When the userclicks the icon for a ThinApp package in the user portal, the Workspace for Windows browserplugin checks to see if the application is installed before launching the package. If the browserplugin is not installed and active in the browser, the verification cannot happen, the messageappears, and the package does not launch.If there are browser windows open during the Workspace for Windows installation process, thebrowser plugin might not be properly installed for that browser. The browser plugin mightbecome deactivated in the browser if the user disabled the plugin in the browser's add-ons orplug-ins page.
The custom protocolhandler used tolaunch the ThinApppackage from thebrowser has beendisabled for thebrowser in whichthe user is trying tolaunch the ThinApppackage.
On the My Apps page in the user portal, ThinApp packages are represented using a link with ahorizon:// protocol. When the Workspace for Windows client is installed, the installer registersa protocol handler for that horizon:// protocol. The protocol handler is an executable namedHorizonThinAppLauncher.exe, and is registered as a handler by the registry entryHKEY_CLASSES_ROOT\horizon\shell\open\command. When the user tries to launch a ThinApppackage from its icon in My Apps, this HorizonThinAppLauncher.exe application is launched.If the user has disabled the use of all protocol handlers in the browser, or disabled the use of thehandler for the horizon:// protocol, ThinApp packages will not launch using their icons in theMy Apps page. Some browsers present a warning when protocol handlers are launched and givethe user the option to select to execute the protocol handler. One way in which the user mighthave disabled the use of the horizon:// protocol handler is when the user clicked one of theThinApp package icons for the first time, when the browser warning dialog appeared to ask forpermission to run the protocol handler, the user selected No or a similar choice to prevent thelaunch, and also selected Remember my selection or a similar choice that prevents the launch forall such links. Because permission to run the protocol handler was not given and is remembered,none of the ThinApp packages launch from the My Apps page.
Solution
1 Verify the user has signed into the Workspace for Windows client with the user's Workspace useraccount.
The user signs into the client using the Workspace icon in the Windows system tray.
2 If this problem appears shortly after the application is installed on the system, close all open browserwindows, reopen the browser, log in to the user portal, and try launching the ThinApp package.
Chapter 17 Troubleshooting Workspace for Administrators
VMware, Inc. 111

3 If the problem appears even after closing the open browser windows and reopening the browser, verifythe browser plugin appears in the browser's list of plugins and is active.
Browser Description
InternetExplorer
For Internet Explorer, a COM server is registered instead of a browser plugin or add-on. To testwhether the COM server is installed, create a test HTML file with the following contents and openthat file in Internet Explorer. The result tells whether the COM server is installed or not.<html><script type="text/vbscript">On Error Resume Next
dim objNameobjName = "HorizonAgentFinder.HorizonFinder"dim objSet obj = CreateObject(objName)
document.write(objName & " is ")if IsEmpty(obj) then document.write("not installed") else document.write("installed")end if</script></html>
Firefox Open Firefox's Add-ons Manager by clicking Tools > Add-ons. On the Plugins page, verify theVMware Horizon Agent Finder browser plugin is listed and set it to always activate.
Chrome Open Chrome's content settings by opening the Settings page and clicking Show advanced settings> Content settings. Click Disable individual plug-ins to display the list of plugins. Verify theVMware Horizon Agent Finder browser plugin is listed and set it to always activate.
Safari forWindows
Open Safari's list of installed plugins by clicking Help > Installed Plug-ins. Verify the VMwareHorizon Agent Finder browser plugin is listed. Verify that plugin is activated for Safari.
4 Verify the registry entry HKEY_CLASSES_ROOT\horizon\shell\open\command exists and has a value that isa path that points to the location of the required protocol handler, namedHorizonThinAppLauncher.exe, where Workspace for Windows was installed on the Windows system.
If the registry entry does not exist, or does not have a value that points to the location where Workspacefor Windows was installed, uninstall Workspace for Windows and reinstall it.
5 If the registry entry exists and has a value that points to the location of theHorizonThinAppLauncher.exe executable, verify the executable exists at that location and has not beenmoved or deleted.
If the registry entry does not exist, or does not have a value that points to the location where Workspacefor Windows was installed, uninstall Workspace for Windows and reinstall it.
6 If the registry entry exists and has a value that points to the location of theHorizonThinAppLauncher.exe executable, verify that the (Default) value for the registry entryHKEY_CLASSES_ROOT\horizon has a Data value of URL:horizon Protocol and that the URL Protocol valuefor the HKEY_CLASSES_ROOT\horizon entry exists.
If the Data value for the (Default) value of the HKEY_CLASSES_ROOT\horizon registry entry is not set toURL:horizon Protocol, update the Data value to set it to URL:horizon Protocol. If the URL Protocolvalue does not exist for the HKEY_CLASSES_ROOT\horizon entry, you can create it using a value name URLProtocol and no value data.
VMware Workspace Portal Administrator's Guide
112 VMware, Inc.

7 Determine if the user disabled the horizon:// protocol for the browser, or if all protocol handlers aredisabled in the browser, and if so, enable the protocol handler for the browser as appropriate for yourorganization's needs.
In most situations, the browsers rely on the settings in the registry for information about the protocolhandlers available for that Windows system. For some browsers, when the user clicks a link that isassociated with a protocol handler, a dialog prompt appears that asks the user a question such as Doyou want to allow this website to open a program on your computer? or This link needs to beopened with an application or a similar statement about needing to launch an external application tohandle the link. Typically, the dialog provides the user with the option of not launching the externalapplication and to remember that choice for all links of that type. The steps to re-enable the ability tolaunch the application associated with the protocol handler are usually different depending on thebrowser type. Consult the documentation for the user's type of browser on how to enable protocolhandlers for that browser type.
A User Login Attempt Results in a Timeout ErrorThe gateway timeout limit might be insufficient for your deployment.
Problem
A user attempting to log in to Workspace receives a 502 Gateway timeout error.
Cause
A situation where user authentication takes longer than allowed by the default timeout limit. For example,the user exists in another Active Directory forest or domain that is not part of the identity providerinstance's base DN.
Solution
1 Log in to the gateway-va virtual machine as root.
2 Open the /opt/vmware/ngix/conf/proxy-timeout.conf file.
The file has two attributes. The default value for both attributes is 2m, for two minutes.
3 Increase both values according to your Active Directory deployment structure.
NOTE When you upgrade Workspace, changes that were made to the proxy-timeout.conf file arecarried forward to the update release.
Users Accessing Citrix-based Applications Recive an EncryptionError
The XenApp ICA properties on the Workspace server must include the encryption property set to the sameencryption level as configued on the XenApp servers in the farm, otherwise users cannot access theirXenapp application.
Problem
When a user connects to a Citrix application from Workspace, the following error message is displayed.
You do not have the proper encryption level to access this Session
Cause
Workspace does not set encryption levels. If the encrption level set on the XenApp server is set higher thanthe default setting used in the Citrix-Receiver users see this error.
You must set a higher encryption level in Workspace.
Chapter 17 Troubleshooting Workspace for Administrators
VMware, Inc. 113
Solution
1 Log in to the Workspace Admin Console as an administrator.
2 Select Settings > Citrix Published Applications.
3 Edit the ICA Client Propertiestext box. To set the encryption level to 128, enterEncryptionLevelSession=EncRC5-128.
4 Edit the ICA Launch Properties text box. To set the encryption level to 128, enter as
[EncRC5-128]
DriverNameWin16=pdc128w.dll
DriverNameWin32=pdc128n.dll
VMware Workspace Portal Administrator's Guide
114 VMware, Inc.

Index
Aaccess events 101access policies
Auth Strength 27Client Type 27minimum authentication score 29, 30network 29, 30Network 27relationship to identity providers 29, 32, 33TTL 27, 29, 30Web-application-specific 30, 32–34
access policy setapplying 34default 33, 34portal 34
access policy setscreating 33default 27, 29, 32editing 32portal 29, 33Web-application-specific 30, 32–34, 63, 65,
66Active Directory
deployment 23domain 16, 17forest 16, 17multi-domain 15multi-forest 15–17single domain 15
Add Identity Provider button 23additional user attributes 41admin user, reset password 107administrative settings 103administrator settings 103App Portal, URL 9application records
Web applications 65Web applications from the cloud application
catalog 63applications
mobile 50Web 50, 59, 63, 65, 66
audience 7Audit Event report 101authentication method 22, 23
authentication methods, relationship to accesspolicies 29, 32, 33
Bbranding 104branding elements 103
Ccatalog
managing 45viewing resources 49Web applications 63
categoriesapplying 48creating 47deleting 48removing 48
Citrix deployment 69Citrix-based, delivery settings 71Citrix-based applications
categories 72Client application folder 72global application settings 71hide disabled 71individual application settings 71
Citrix-Based Application Error 113cloud application catalog, Web applications 63company logo 103Configurator Web interface, access 103configure SAML protocol 60configure Web applications 60Connector 19, 23Connector Web interface, URL 9
Ddesktop systems, configuring 93directory server groups 35
Eentitlements
ThinApp packages 81Web applications 67
VMware, Inc. 115

GGroup Membership report 101groups
Active Directory 35, 36membership report 101modify membership rules 36searching for 51viewing information 39Workspace 35, 36
guest users 9, 35
Hhzn-admin tool 9, 103hznAdminTool command 107
IICA properties 71identity provider
Connector 19third-party 19, 27
identity providersrelationship to access policies 29third-party 26
identity provider instancesadding 103editing 103editing the order 103selection 19
identity provider selection, configuring 23Independent Computing Architecture 71installation options, Windows application 93IP range 21
Llicense, approval 103
Mmobile applications, resource type 46modules
Citrix Published Applications 69ThinApp Packages 76View 54viewing information 13Web Applications 59
multiple desktop systems, deploying theWindows application 99
multitenant Web applications 59
Nnetwork range 21, 23network ranges, relationship to access
policies 29, 32, 33
OOffice 365
convert to Workspace authentication 61example of Powershell cmdlet 61mapping attributes to AD user attributes 61powershell 61
Ppassword recovery, user 103proof-of-concept 23
Rremoving user access 43reports 101Resource Entitlement report 101Resource Usage report 101resources, categories 47, 48roles 41
SSAML
certificate 27metadata 27third-party identity providers 26
SAML certificate 103settings, administrative 103single sign-on to Web applications 60single sign-on, Office 365 61sync client 16, 17system information 13
TThinApp packages
adding to the network share 91deleting 88deploying Workspace for Windows 99enabling for management 89entitling to users and groups 81HorizonThinAppCtrl.exe 80modifying the offline grace period 80offline grace period 79overview 76providing access 75setting options when installing the Windows
application 93updating 83–85, 87
ThinApp download mode 76ThinApp package AppID, obtaining 84ThinApp Packages module 76ThinApp streaming mode 76third-party identity provider 23timeout error 113token 43
VMware Workspace Portal Administrator's Guide
116 VMware, Inc.
troubleshootinglaunching a ThinApp package 110updating Workspace for Windows 109
Uuser password, recovery 103user authentication method 22user store 16, 17, 23, 103users
Active Directory 35adding to groups 36attributes 41removing access 43searching for 51updating the sync filter to Active Directory 43View Hosted Applications 54viewing information 41viewing entitlements to Citrix-based
applications 70viewing entitlements to View desktop pools 54Workspace 35
Users report 101
VView entitlements 55View application pools 55View Connection Server 55View desktop pools, See View desktop poolsView desktop pools View desktop pools,
providing access 53View Hosted Application 55View pods 55virtual appliances, Workspace Workspace 9
WWeb applications
adding 59, 63entitling 67multitenant 59
Web Applications module 59Web application bundle 66Windows application
deploying to multiple systems 99installer options 93
Windows applications 46Workspace, virtual appliances 9workspace images 46Workspace for Windows, troubleshooting 109Workspace groups Workspace groups 35Workspaces page 41WS-Federation protocol 60
Index
VMware, Inc. 117

VMware Workspace Portal Administrator's Guide
118 VMware, Inc.