voa5 variable fiber optic attenuator user’s guide · voa5 variable fiber optic attenuator...
TRANSCRIPT

A
VOA5 Variable Fiber Optic Attenuator
User’s Guide

B
C
VOA5 Variable Fiber Optic Attenuator
User’s Guide
© 2002-2010, AFL Telecommunications, all rights reserved. VOA5-00-1000 Revision E, 2010-02-12 Specifications are subject to change without notice.

D
Limited WarrantyOne Year Limited WarrantyAll Noyes products are warranted against defective material and workmanship for a period of one year from the date of shipment to the original customer. Any product found to be defective within the warranty period will be repaired or replaced by Noyes. In no case will Noyes liabilities exceed the original purchase price of the product.
ExclusionsThe warranty on your equipment shall not apply to defects resulting from the following:
• Unauthorized repair or modification• Misuse, negligence, or accident
CE InformationThese instruments have been designed and tested to comply with the relevant sections of any applicable
specifications including full compliance with all essential requirements of all applicable EU Directives.
Returning EquipmentTo return equipment, please contact Noyes to obtain additional information and a Service Request (S.R.) number. To allow us to serve you more efficiently, please include a brief description specifying the reasons for the return of the equipment.
AFL Telecommunications Noyes Test & Inspection 16 Eastgate Park Road Belmont, NH 03220 Phone: 800-321-5298 603-528-7780 Fax: 603-528-2025
I
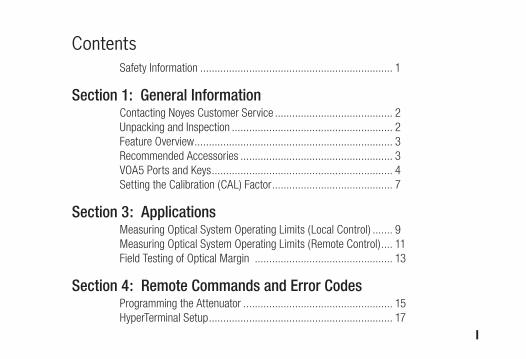
ContentsSafety Information ................................................................... 1
Section 1: General InformationContacting Noyes Customer Service ......................................... 2Unpacking and Inspection ........................................................ 2Feature Overview ..................................................................... 3Recommended Accessories ..................................................... 3VOA5 Ports and Keys ............................................................... 4Setting the Calibration (CAL) Factor .......................................... 7
Section 3: ApplicationsMeasuring Optical System Operating Limits (Local Control) ....... 9Measuring Optical System Operating Limits (Remote Control) .... 11Field Testing of Optical Margin ................................................ 13
Section 4: Remote Commands and Error CodesProgramming the Attenuator .................................................... 15HyperTerminal Setup ................................................................ 17

II
Command Summery ................................................................ 18Remote Commands ................................................................. 19
Section 5: MaintenanceCleaning the Optical Ports ........................................................ 26Repair and Calibration .............................................................. 27Battery Replacement ............................................................... 27
Section 6: SpecificationsSpecifications .......................................................................... 28

1
Safety Information
CAUTION! To avoid serious eye injury, never look directly into the optical outputs of fiber optic network equipment, test equipment, patch cords, or test jumpers. Always assume that optical outputs are on.
NOTICE! VOA5 Variable Optical Attenuators contain no user serviceable parts. Except for changing batteries and cleaning optical ports, these units must be returned to Noyes or authorized agents for repair and calibration.
IMPORTANT! Proper care in handling should be taken when using any precision optical test equipment. Scratched or contaminated optical connectors can impact the performance of the instrument. It is important to keep the dust caps in place when the unit is not being used.
!
!
!

2
Section 1: General InformationThank you for purchasing a Noyes VOA5 Variable Fiber Optic Attenuator. The purpose of this user’s guide is to explain how to use and maintain this test equipment. Please check our web site at www.AFLtele.com/go/Noyes for updates to this manual, software updates, and additional application information. If you have any questions about your instrument and recommended accessories, or if you need technical or sales support, please contact Noyes Customer Service.
Contacting Noyes Customer ServiceYou may call Noyes Customer Service between 8 a.m. and 5 p.m., United States Eastern Time, as follows:
Phone: 800-321-5298 (North America)
603-528-7780
Fax: 603-528-2025
Mail [email protected]
Unpacking and InspectionThis instrument has been carefully packed in accordance with standard shipping procedures.

3
Examine the equipment for damage that may have occurred during shipment. If you find any damage, or if any of the following items are not included, please contact Noyes.
The VOA5 unit is shipped with protective rubber boot, (2) AA batteries, warranty registration card, user’s guide, and carry case.
Feature OverviewThe VOA5-MM (multimode) are handheld, rugged variable optical attenuators suited for a wide range of fiber link certification and production test applications. The VOA5 offers high bi-directional return loss and will maintain the set attenuation level when the unit is powered down.
Recommended AccessoriesYou will need fiber optic test jumpers to connect the VOA5 to the system under test. Test jumpers must have the same core and cladding size as the fiber under test. Test jumpers require the appropriate connectors on each end to interface the system’s connectors and the output and input connectors on the VOA5.
Test jumpers with a variety of lengths and connector styles are available from Noyes.
An optical quality cleaning fluid such as AFL FCC2 connector cleaning fluid and AFL CCT molded cleaning tips is recommended for cleaning connector end faces on VOA5 and test jumpers.
4
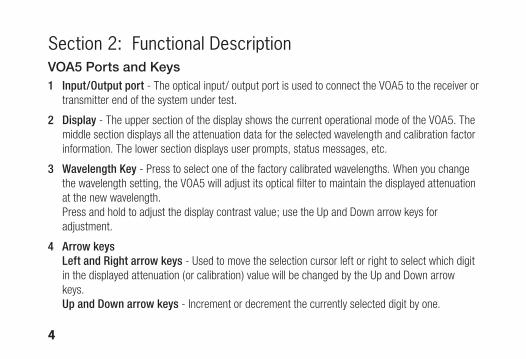
Section 2: Functional DescriptionVOA5 Ports and Keys1 Input/Output port - The optical input/ output port is used to connect the VOA5 to the receiver or
transmitter end of the system under test.
2 Display - The upper section of the display shows the current operational mode of the VOA5. The middle section displays all the attenuation data for the selected wavelength and calibration factor information. The lower section displays user prompts, status messages, etc.
3 Wavelength Key - Press to select one of the factory calibrated wavelengths. When you change the wavelength setting, the VOA5 will adjust its optical filter to maintain the displayed attenuation at the new wavelength. Press and hold to adjust the display contrast value; use the Up and Down arrow keys for adjustment.
4 Arrow keys Left and Right arrow keys - Used to move the selection cursor left or right to select which digit in the displayed attenuation (or calibration) value will be changed by the Up and Down arrow keys. Up and Down arrow keys - Increment or decrement the currently selected digit by one.

5
Input/Output port
Power key
12V I0I0I
NOYESAFL Telecommunications
Variable Optical Attenuator
Port 1 Port 2
Zero
Cal
VOA5
λ
Display
Wavelength key
Calibration key
Zero keyArrow keys
Power port Serial port
Input/Output port

6
5 Zero key - When this key is pressed, the VOA5 will reset the filter attenuation to zero and therefore display an attenuation factor equal to the current value of CAL, the calibration factor (insertion loss) of your attenuator and jumper cables.
6 CAL (calibration) key - Pressing and holding the CAL key for approximately three seconds will enter the VOA5 into the calibration adjustment mode. Use the Arrow keys to adjust the calibration value. When adjustments are done, press the CAL key to return the VOA5 to the normal attenuation adjustment mode.
7 Power key - Press to turn power on or off.
8 Battery compartment - The battery compartment is located on the back side of the VOA5 and may be accessed by removing the protective rubber boot.
9 Power port - The VOA5 may be powered from the supplied 120 or 220 volt AC adapter. Once external power adapter is applied to the VOA5, the unit will turn on automatically.
10 Serial port - The serial port is used for connecting the VOA5 to a computer via a serial cable for remote control.
7
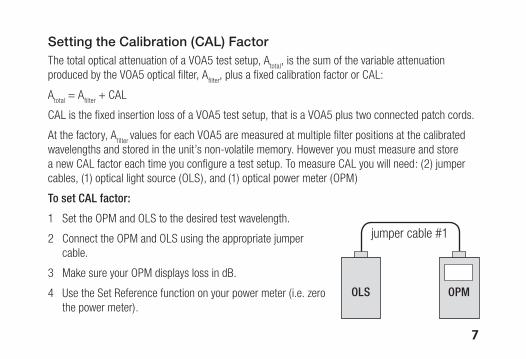
Setting the Calibration (CAL) FactorThe total optical attenuation of a VOA5 test setup, A
total, is the sum of the variable attenuation
produced by the VOA5 optical filter, Afilter
, plus a fixed calibration factor or CAL:
Atotal
= Afilter
+ CAL
CAL is the fixed insertion loss of a VOA5 test setup, that is a VOA5 plus two connected patch cords.
At the factory, Afilter
values for each VOA5 are measured at multiple filter positions at the calibrated wavelengths and stored in the unit’s non-volatile memory. However you must measure and store a new CAL factor each time you configure a test setup. To measure CAL you will need: (2) jumper cables, (1) optical light source (OLS), and (1) optical power meter (OPM)
To set CAL factor:
1 Set the OPM and OLS to the desired test wavelength.
2 Connect the OPM and OLS using the appropriate jumper cable.
3 Make sure your OPM displays loss in dB.
4 Use the Set Reference function on your power meter (i.e. zero the power meter).
jumper cable #1
OLS OPM
8
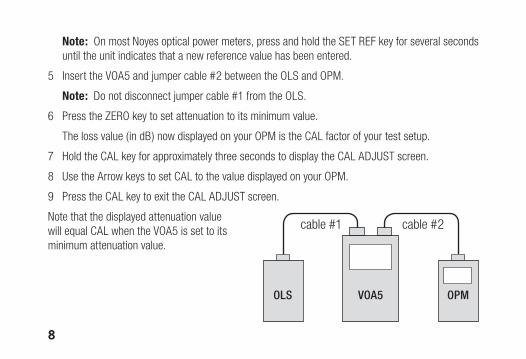
Note: On most Noyes optical power meters, press and hold the SET REF key for several seconds until the unit indicates that a new reference value has been entered.
5 Insert the VOA5 and jumper cable #2 between the OLS and OPM.
Note: Do not disconnect jumper cable #1 from the OLS.
6 Press the ZERO key to set attenuation to its minimum value.
The loss value (in dB) now displayed on your OPM is the CAL factor of your test setup.
7 Hold the CAL key for approximately three seconds to display the CAL ADJUST screen.
8 Use the Arrow keys to set CAL to the value displayed on your OPM.
9 Press the CAL key to exit the CAL ADJUST screen.
Note that the displayed attenuation value will equal CAL when the VOA5 is set to its minimum attenuation value.
cable #1
OLS OPMVOA5
cable #2

9
Section 3: ApplicationsThis section describes the operation of the VOA5 in two applications: as a field instrument testing optical margin, and as a lab instrument measuring an optical system operating limits (under local and remote control).
Measuring Optical System Operating Limits (Local Control)Once you have set the calibration (CAL) factor you can use your VOA5 to determine the operating limits of an optical transmission system. Operating limits are the minimum and maximum optical span loss values at which your optical system still meets its performance requirements, for example a given bit error ratio (BER).
1 Set the calibration (CAL) factor (refer to section “Setting the calibration (CAL) factor”).
NOTE: Do not disconnect jumper cables from the VOA5.
2 Set VOA5 attenuation to the approximate mid-range optical span loss value for your optical system. For example if your system is designed to operate over optical spans with 10 to 50 dB of loss, set VOA5 attenuation to about 30 dB.
3 Connect the free end of jumper cable #1 to the output or your transmitter and the free end of jumper cable #2 to the input of your receiver.
10
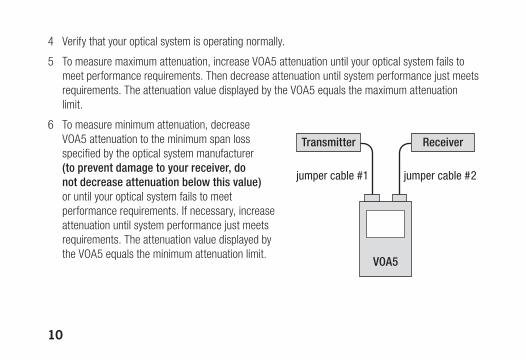
4 Verify that your optical system is operating normally.
5 To measure maximum attenuation, increase VOA5 attenuation until your optical system fails to meet performance requirements. Then decrease attenuation until system performance just meets requirements. The attenuation value displayed by the VOA5 equals the maximum attenuation limit.
6 To measure minimum attenuation, decrease VOA5 attenuation to the minimum span loss specified by the optical system manufacturer (to prevent damage to your receiver, do not decrease attenuation below this value) or until your optical system fails to meet performance requirements. If necessary, increase attenuation until system performance just meets requirements. The attenuation value displayed by the VOA5 equals the minimum attenuation limit.
jumper cable #1
Transmitter
VOA5
Receiver
jumper cable #2
11
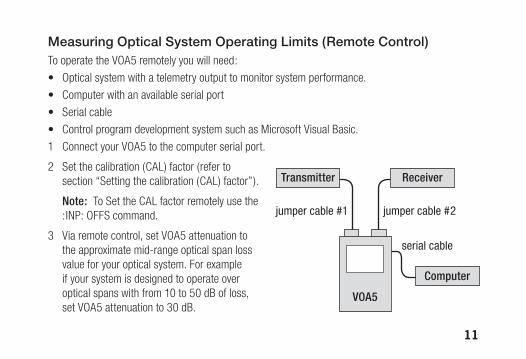
Measuring Optical System Operating Limits (Remote Control)To operate the VOA5 remotely you will need:
• Optical system with a telemetry output to monitor system performance.
• Computer with an available serial port
• Serial cable
• Control program development system such as Microsoft Visual Basic.
1 Connect your VOA5 to the computer serial port.
2 Set the calibration (CAL) factor (refer to section “Setting the calibration (CAL) factor”).
Note: To Set the CAL factor remotely use the :INP: OFFS command.
3 Via remote control, set VOA5 attenuation to the approximate mid-range optical span loss value for your optical system. For example if your system is designed to operate over optical spans with from 10 to 50 dB of loss, set VOA5 attenuation to 30 dB.
jumper cable #1
Transmitter
VOA5
Receiver
jumper cable #2
Computer
serial cable
12
Note: Set attenuation using the :INP:ATT command.
4 Connect jumper cable #1 to the output or your transmitter and jumper cable #2 to the input of your receiver.
Do not disconnect either jumper cable from the VOA5.
5 Your control program should monitor the telemetry output of your optical system to verify it is operating normally.
6 To measure the maximum attenuation limit your control program should increase the VOA5 attenuation until telemetry indicates that optical system performance does not meet requirements. Then it should decrease attenuation until system performance just meets requirements. This applied attenuation value equals the maximum attenuation limit.
7 To measure the minimum attenuation limit your control program should decrease the VOA5 attenuation until the minimum allowed optical span attenuation is reached or telemetry indicates that optical system performance does not meet requirements. Then it should increase attenuation until performance just meets requirements. This applied attenuation value equals the minimum attenuation limit.
13
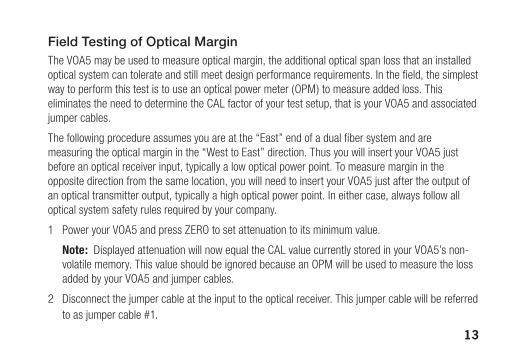
Field Testing of Optical Margin The VOA5 may be used to measure optical margin, the additional optical span loss that an installed optical system can tolerate and still meet design performance requirements. In the field, the simplest way to perform this test is to use an optical power meter (OPM) to measure added loss. This eliminates the need to determine the CAL factor of your test setup, that is your VOA5 and associated jumper cables.
The following procedure assumes you are at the “East” end of a dual fiber system and are measuring the optical margin in the “West to East” direction. Thus you will insert your VOA5 just before an optical receiver input, typically a low optical power point. To measure margin in the opposite direction from the same location, you will need to insert your VOA5 just after the output of an optical transmitter output, typically a high optical power point. In either case, always follow all optical system safety rules required by your company.
1 Power your VOA5 and press ZERO to set attenuation to its minimum value.
Note: Displayed attenuation will now equal the CAL value currently stored in your VOA5’s non-volatile memory. This value should be ignored because an OPM will be used to measure the loss added by your VOA5 and jumper cables.
2 Disconnect the jumper cable at the input to the optical receiver. This jumper cable will be referred to as jumper cable #1.
14
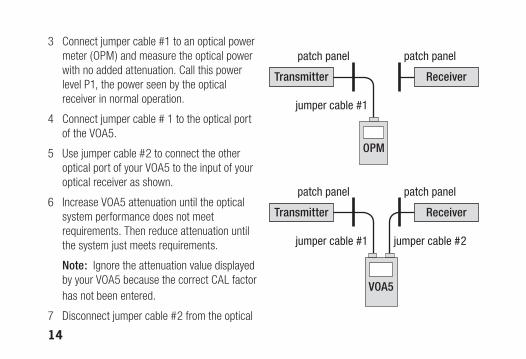
3 Connect jumper cable #1 to an optical power meter (OPM) and measure the optical power with no added attenuation. Call this power level P1, the power seen by the optical receiver in normal operation.
4 Connect jumper cable # 1 to the optical port of the VOA5.
5 Use jumper cable #2 to connect the other optical port of your VOA5 to the input of your optical receiver as shown.
6 Increase VOA5 attenuation until the optical system performance does not meet requirements. Then reduce attenuation until the system just meets requirements.
Note: Ignore the attenuation value displayed by your VOA5 because the correct CAL factor has not been entered.
7 Disconnect jumper cable #2 from the optical
jumper cable #1
Transmitter Receiver
OPM
patch panel patch panel
jumper cable #1
Transmitter Receiver
patch panel patch panel
VOA5
jumper cable #2

15
receiver and connect it to the OPM to measure the power with the added attenuation. Call this power level P2.
8 Calculate optical margin = P1 - P2.
For example, if P1 = -30 dBm and P2 = -35 dBm,
then optical margin equals -30 - -35 = +5 dB.
9 On dual fiber systems, repeat the above procedure in the other direction of transmission.
Section 4: Remote Commands and Error CodesThe following general information is provided to develop a control program to automate the operation of your VOA5.
Programming the AttenuatorThe interface used by the VOA5 is RS-232. This is the interface used for communications between a personal computer and the VOA5. Use the following RS-232 settings to communicate with the VOA5:

16
Baud Rate: 9600 bps
Data Bits: 8
Parity: none
Stop Bits: 1
Flow Control: none
The VOA5 RS-232 interface is configured as Data Communications Equipment. A one to one, 9-pin serial cable is recommended for communication between a personal computer and the VOA5. A null modem is not required for communication between a personal computer and the VOA5. For more information regarding RS-232 communication refer to www.beyondlogic.org
All commands sent to the VOA5 end with a carriage return and line feed. When the VOA5 receives a command it returns an ACK (♠-0x06) or NAK (§ -0x015) followed by a carriage return and line feed. If the VOA5 recognizes a command, it will respond with an ACK followed by carriage return and line feed. If the VOA5 does not recognize a command it will respond with an NAK followed by a carriage return and line feed.
17
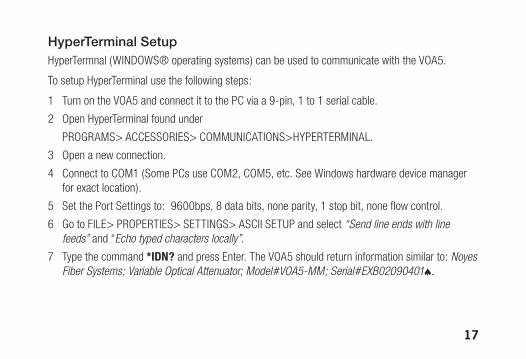
HyperTerminal SetupHyperTermnal (WINDOWS® operating systems) can be used to communicate with the VOA5.
To setup HyperTerminal use the following steps:
1 Turn on the VOA5 and connect it to the PC via a 9-pin, 1 to 1 serial cable.
2 Open HyperTerminal found under
PROGRAMS> ACCESSORIES> COMMUNICATIONS>HYPERTERMINAL.
3 Open a new connection.
4 Connect to COM1 (Some PCs use COM2, COM5, etc. See Windows hardware device manager for exact location).
5 Set the Port Settings to: 9600bps, 8 data bits, none parity, 1 stop bit, none flow control.
6 Go to FILE> PROPERTIES> SETTINGS> ASCII SETUP and select “Send line ends with line feeds” and “Echo typed characters locally”.
7 Type the command *IDN? and press Enter. The VOA5 should return information similar to: Noyes Fiber Systems; Variable Optical Attenuator; Model#VOA5-MM; Serial#EXB02090401♠.

18
Command SummeryThe VOA5 commands are defined according to SCPI (Standard Commands for Programmable Instruments). The following is a summery of the commands:
Command Function
*IDN: Commands the instrument to identify itself
:INP:SER? Query VOA5 for serial number
:INP:MOD? Query VOA5 for model number
:INP:VER? Query VOA5 for firmware version
:INP:ATT <VALUE> Set VOA5 attenuation to <VALUE> dB
:INP:ATT? Query VOA5 for current attenuation value
:INP:WAV <VALUE> Set VOA5 wavelength to <VALUE> nm
:INP:WAV? Query VOA5 for current wavelength
:INP:OFFS <VALUE> Set VOA5 CAL factor to <VALUE> dB
:INP:OFFS? Query VOA5 for current CAL factor
:VOA:HOME Set VOA5 attenuation to minimum value
:INP:POW? Query VOA5 for current power supply (AC, Alk bat, NiMH bat)
19
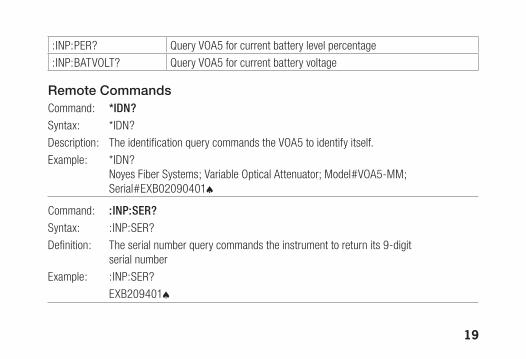
:INP:PER? Query VOA5 for current battery level percentage
:INP:BATVOLT? Query VOA5 for current battery voltage
Remote CommandsCommand: *IDN?Syntax: *IDN?
Description: The identification query commands the VOA5 to identify itself.
Example: *IDN? Noyes Fiber Systems; Variable Optical Attenuator; Model#VOA5-MM; Serial#EXB02090401♠
Command: :INP:SER? Syntax: :INP:SER?
Definition: The serial number query commands the instrument to return its 9-digit serial number
Example: :INP:SER?
EXB209401♠
20
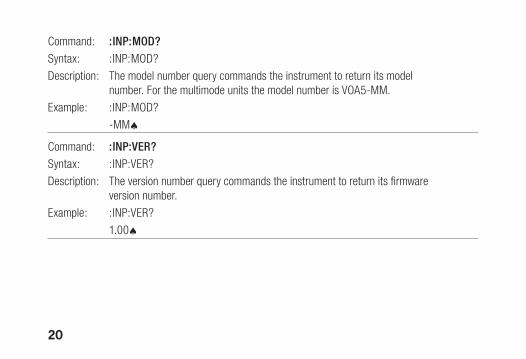
Command: :INP:MOD?Syntax: :INP:MOD?
Description: The model number query commands the instrument to return its model number. For the multimode units the model number is VOA5-MM.
Example: :INP:MOD?
-MM♠
Command: :INP:VER?Syntax: :INP:VER?
Description: The version number query commands the instrument to return its firmware version number.
Example: :INP:VER?
1.00♠
21
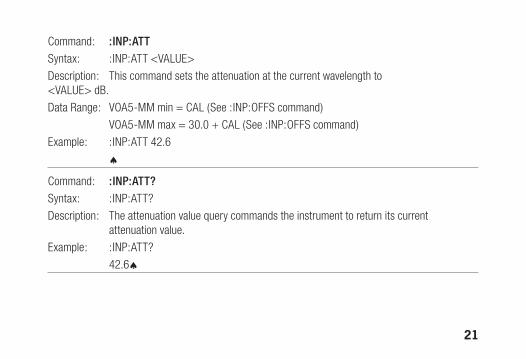
Command: :INP:ATTSyntax: :INP:ATT <VALUE>
Description: This command sets the attenuation at the current wavelength to <VALUE> dB.
Data Range: VOA5-MM min = CAL (See :INP:OFFS command)
VOA5-MM max = 30.0 + CAL (See :INP:OFFS command)
Example: :INP:ATT 42.6
♠
Command: :INP:ATT? Syntax: :INP:ATT?
Description: The attenuation value query commands the instrument to return its current attenuation value.
Example: :INP:ATT?
42.6♠
22
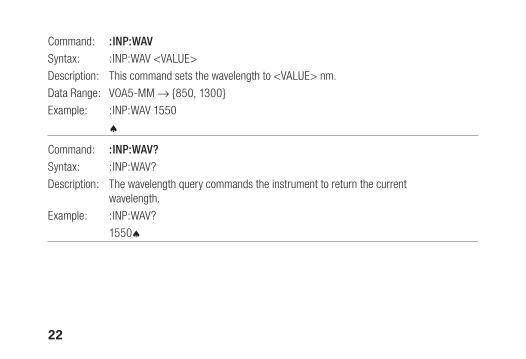
Command: :INP:WAV Syntax: :INP:WAV <VALUE>
Description: This command sets the wavelength to <VALUE> nm.
Data Range: VOA5-MM → {850, 1300}
Example: :INP:WAV 1550
♠
Command: :INP:WAV?Syntax: :INP:WAV?
Description: The wavelength query commands the instrument to return the current wavelength.
Example: :INP:WAV?
1550♠

23
Command: :INP:OFFS
Syntax: :INP:OFFS <VALUE>
Description: This command sets the insertion loss (CAL) to <VALUE> dB.
Data Range: VOA5-MM min = 0.0
VOA5-MM max = 39.9
Example: :INP:OFFS 1.5
♠
Command: :INP:OFFS?Syntax: :INP:OFFS?
Description: The insertion loss (CAL) query commands the instrument to return the current insertion loss (CAL).
Example: :INP:OFFS?
1.5♠
24
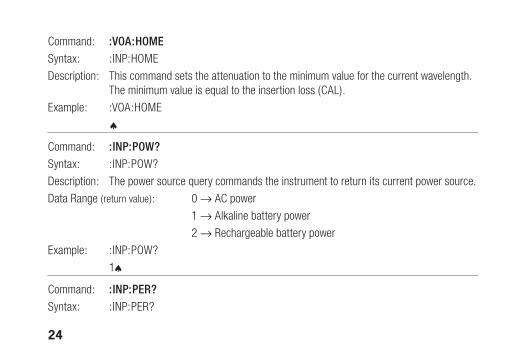
Command: :VOA:HOMESyntax: :INP:HOME
Description: This command sets the attenuation to the minimum value for the current wavelength. The minimum value is equal to the insertion loss (CAL).
Example: :VOA:HOME
♠
Command: :INP:POW?Syntax: :INP:POW?
Description: The power source query commands the instrument to return its current power source.
Data Range (return value): 0 → AC power
1 → Alkaline battery power
2 → Rechargeable battery power
Example: :INP:POW?
1♠
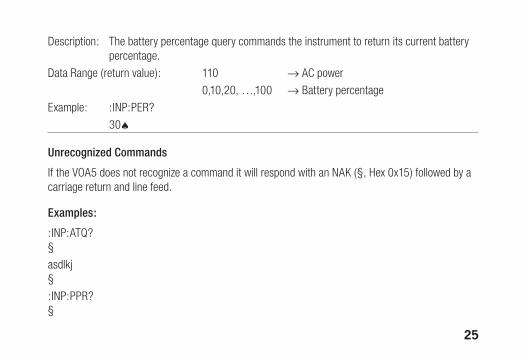
Command: :INP:PER?Syntax: :INP:PER?
25
Description: The battery percentage query commands the instrument to return its current battery percentage.
Data Range (return value): 110 → AC power
0,10,20, …,100 → Battery percentage
Example: :INP:PER?
30♠
Unrecognized Commands
If the VOA5 does not recognize a command it will respond with an NAK (§, Hex 0x15) followed by a carriage return and line feed.
Examples:
:INP:ATQ?§
asdlkj§
:INP:PPR?§

26
Section 5: Maintenance
Cleaning the Optical Ports
! CAUTION: Before conducting the following procedures be sure to have the unit turned OFF.
Optical ports must be kept free from dirt or other contaminates to ensure accurate measurements and operation.
1 Rotate the adapter base counterclockwise approximately four times.
2 Pull the adapter directly out away from the universal adapter mount.
3 Perform one of the following:
If using Noyes Cleaning Supplies• Leaning the FCC2 can back (30°), press the button on the FCC2 to fill the well.
• Dip the CCTP tip into the well of the FCC2 to dampen the tip with optical cleaning fluid.
• Place the damp tip over the ferrule to be cleaned.
• Rotate the tip clockwise 10 revolutions while applying varying pressure to create a gentle pumping action where the tip contacts the ferrule.

27
• Discard the CCTP stick after using both tips.
If using lint-free optical cleaning pads and isopropyl alcohol• Be sure to use 99% IPA that has not been contaminated.
• Dampen the wipe with the alcohol and gently wipe the exposed ferrule. Then dry the ferrule using a new optical wipe
4 Once completed, replace the adapter.
Repair and CalibrationRepair of the VOA5 instrument in the field is NOT recommended. If repair is necessary, please contact Noyes. Calibration is recommended every 36 months. Please contact Noyes for proper calibration.
Battery ReplacementWhen the battery gas gauge is low, AA batteries require replacement.
To replace AA batteries:
1 Remove the protective rubber boot from the instrument.
2 Remove the battery compartment cover located on the back of the instrument.
28
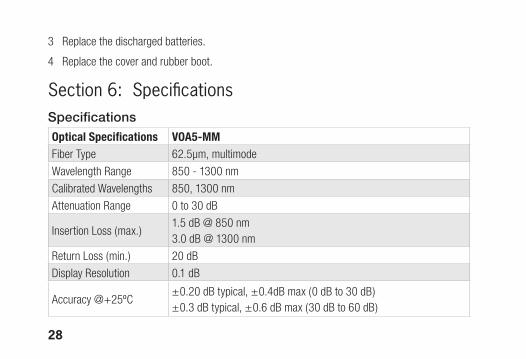
3 Replace the discharged batteries.
4 Replace the cover and rubber boot.
Optical Specifications VOA5-MMFiber Type 62.5µm, multimode
Wavelength Range 850 - 1300 nm
Calibrated Wavelengths 850, 1300 nm
Attenuation Range 0 to 30 dB
Insertion Loss (max.)1.5 dB @ 850 nm3.0 dB @ 1300 nm
Return Loss (min.) 20 dB
Display Resolution 0.1 dB
Accuracy @+25ºC±0.20 dB typical, ±0.4dB max (0 dB to 30 dB)±0.3 dB typical, ±0.6 dB max (30 dB to 60 dB)
Section 6: SpecificationsSpecifications

29
Repeatability @+25ºC ± 0.25 dB*
Maximum Input Level + 24 dBm
General Specifications VOA5-MMBattery Life (alkaline) 10 hrs
Speed 0-30dB in less than 5 seconds
Power 2 AA alkaline, 120/220 AC adapter, or NiMH battery pack (optional)
Size (H x W X D) 18.5 x 11.1 x 4.6 cm (7.3 x 4.4 x 1.8 in)
Weight 0.55 kg (1.22 lb)
Operating Temperature 0° to +50° C
Storage Temperature -20° to +60° C
Relative Humidity 0 to 90% (non-condensing
Available Connectors SC/UPC, FC/UPC, ST/UPC
* Repeatability is defined as the mean plus one standard deviation-typical value

30

Thank you for choosing Noyes Test & Inspection
16 Eastgate Park Road Belmont, NH 03220 Phone: 800-321-5298 603-528-7780Fax: 603-528-2025www.AFLtele.com/go/Noyes
CERTIFIED
ISO9001
NOYES