volume - muziekhuis da capo · pdf filedd105. setup caution! ... for details on assembling the...
TRANSCRIPT
dd105
VOLUME
0
5
25
75
95
100
aw_DD401_Manual_G02_130717
2013� � 7� � 17� � �10�54�04
INFORMATION FOR YOUR SAFETY!
THE FCC REGULATION WARNING (for USA)
This equipment has been tested and found to comply with the limits for a Class B digital device, pursuant to Part 15 of the FCC Rules.These limits are designed to provide reasonable protection against harmful interference in a residential installation. This equipment generates, uses, and can radiate radio frequency energy and, if not installed and used in accordance with the instructions, may cause harmful interference to radio communications. However, there is no guarantee that interference will not occur in a particular installation.If this equipment does cause harmful interference to radio or television reception, which can be determined by turning the equipment off and on, the user is encouraged to try to correct the interference by one or more of the following measures:
Reorient or relocate the receiving antenna. Increase the separation between the equipment and receiver. Connect the equipment into an outlet on a circuit different from that to which the receiver is connected. Consult the dealer or an experienced radio/TV technician for help.
Unauthorized changes or modification to this system can void the user’s authority to operate this equipment.
CAUTIONThe normal function of the product may be disturbed by Strong Electro Magnetic Interference. If so, simply reset the product to resume normal operation by following the owner’s manual. In case the function could not resume, please use the product in other location.
PRECAUTIONS
PLEASE READ CAREFULLY BEFORE PROCEEDING
Please keep this manual in a safe place for future reference.
Power SupplyPlease connect the designated AC adaptor to an AC outlet of the correct voltage.
Do not connect it to an AC outlet of voltage other than that for which your instrument is intended.
Unplug the AC power adaptor when not using the instrument, or during electrical storms.
ConnectionsBefore connecting the instrument to other devices, turn off the power to all units. This will help prevent malfunction and / or damage to other devices.
LocationDo not expose the instrument to the following conditions to avoid deformation, discoloration, or more serious damage:
Direct sunlight Extreme temperature or humidity Excessive dusty or dirty location Strong vibrations or shocks Close to magnetic fields
Interference with other electrical devicesRadios and televisions placed nearby may experience reception interference. Operate this unit at a suitable distance from radios and televisions.
CleaningClean only with a soft, dry cloth.Do not use paint thinners, solvents, cleaning fluids, or chemical-impregnated wiping cloths.
HandlingDo not apply excessive force to the switches or controls.
Do not let paper, metallic, or other objects into the instrument. If this happens, unplug the AC adaptor from the wall outlet. Then have the instrument inspected by qualified service personnel.
Disconnect all cables before moving the instrument.
2
CAUTIONUnder the environment with electrostatic discharge and radio interference field, the sample may malfunctionand need user power reset to recover sometimes.
0
5
25
75
95
100
aw_DD401_Manual_G02_130717
2013� � 7� � 17� � 10:54:05
Contents
3
QU
ICK
STA
RT
AD
VA
NC
ED
US
E
AP
PE
ND
ICE
S
Panel & Display Description
Front Panel.................................................................4
Rear Panel..................................................................4
QUICK START
Setup
Connecting Pads and Pedals......................................5
Connections
Connecting an Audio Equipment.................................6
Connecting a set of Headphones................................6
Connecting an MP3/CD Player...................................6
Connecting a Computer..............................................6
Power Supply & Switch...............................................6
Performing
Operation Feature.......................................................7
Playing the Pads.........................................................7
Selecting a Drum Kit...................................................7
Playing along with Patterns.........................................8
Using the Metronome/Click Feature...........................8
Adjusting the Tempo...................................................8
Coach/Beat Check......................................................9
ADVANCED USE
Playing with Drum Kit
About the Drum Kits..................................................10
Selecting a Drum Kit.................................................10
Adjusting the Volume of a Drum Kit..........................10
Setting the Metronome
About Metronome......................................................11
Switching the Click on/off..........................................11
Adjusting the Click Volume........................................11
Adjusting the Click Tempo.........................................11
Selecting the Click Voice...........................................11
Setting the Time Signature........................................12
Setting the Interval....................................................12
Playing Back Pattern
About Patterns..........................................................13
Selecting a Pattern....................................................13
Adjusting the Pattern Volume....................................13
Practicing in Coach Mode
About Coach Mode...................................................14
Coach Mode Control …….........................................14
Judging your Timing accuracy by Indicates..............14
Beat Check……….....................................................15
Gradual up/down……………...….……......................16
Change UP………………...………....…....................17
Follow Me……………...………....….....…..................18
Drum Mute……………...………....….....…................19
Making the Setting for MIDI
About MIDI................................................................20
Connecting with an External Sound Device..............20
Using the Digital Drum as a Sound Module..............20
Troubleshooting................................................21
Specifications.....................................................21
APPENDICES
Kit List.......................................................................22
GM Kit List................................................................23
GM Backing Instrument List......................................24
Pattern List................................................................25
Loop List...................................................................26
MIDI Implementation Chart.......................................27
Playing Back a Pattern..............................................13
0
5
25
75
95
100
aw_DD401_Manual_G02_130717
2013� � 7� � 17� � 10�54�06
Panel Description
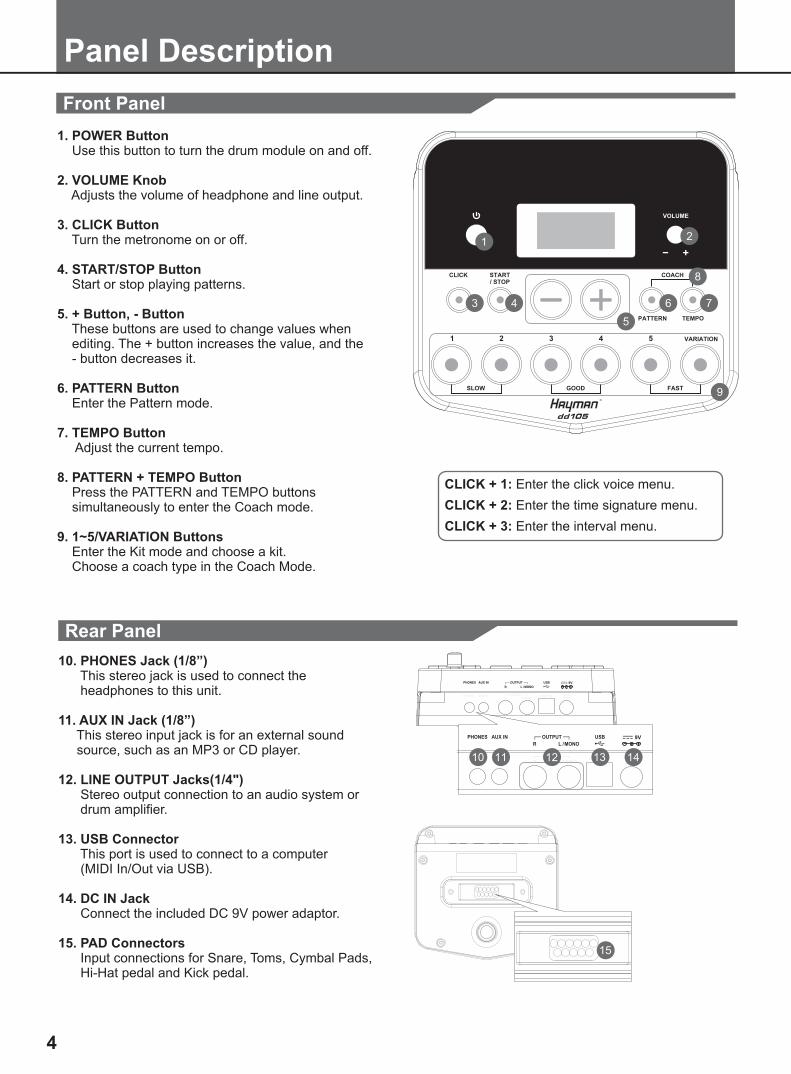
Front Panel
1. POWER Button Use this button to turn the drum module on and off.
2. VOLUME Knob Adjusts the volume of headphone and line output.
3. CLICK Button Turn the metronome on or off.
4. START/STOP Button Start or stop playing patterns.
5. + Button, - Button These buttons are used to change values when editing. The + button increases the value, and the - button decreases it.
6. PATTERN Button Enter the Pattern mode.
7. TEMPO Button Adjust the current tempo.
8. PATTERN + TEMPO Button Press the PATTERN and TEMPO buttons simultaneously to enter the Coach mode.
9. 1~5/VARIATION Buttons Enter the Kit mode and choose a kit. Choose a coach type in the Coach Mode.
4
Rear Panel
10. This stereo jack is used to connect the headphones to this unit.
11. AUX IN Jack (1/8”) This stereo input jack is for an external sound source, such as an MP3 or CD player.
12. LINE OUTPUT Jacks(1/4") Stereo output connection to an audio system or drum amplifier.
13. USB Connector This port is used to connect to a computer (MIDI In/Out via USB).
14. DC IN Jack Connect the included DC 9V power adaptor.
15. PAD Connectors Input connections for Snare, Toms, Cymbal Pads, Hi-Hat pedal and Kick pedal.
PHONES Jack (1/8”)
CLICK + 1: Enter the click voice menu.
CLICK + 2: Enter the time signature menu.
CLICK + 3: Enter the interval menu.
VOLUME
0
5
25
75
95
100
aw_DD401_Manual_G02_130717
2013� � 7� � 17� � 10�54�0�
dd105
Setup
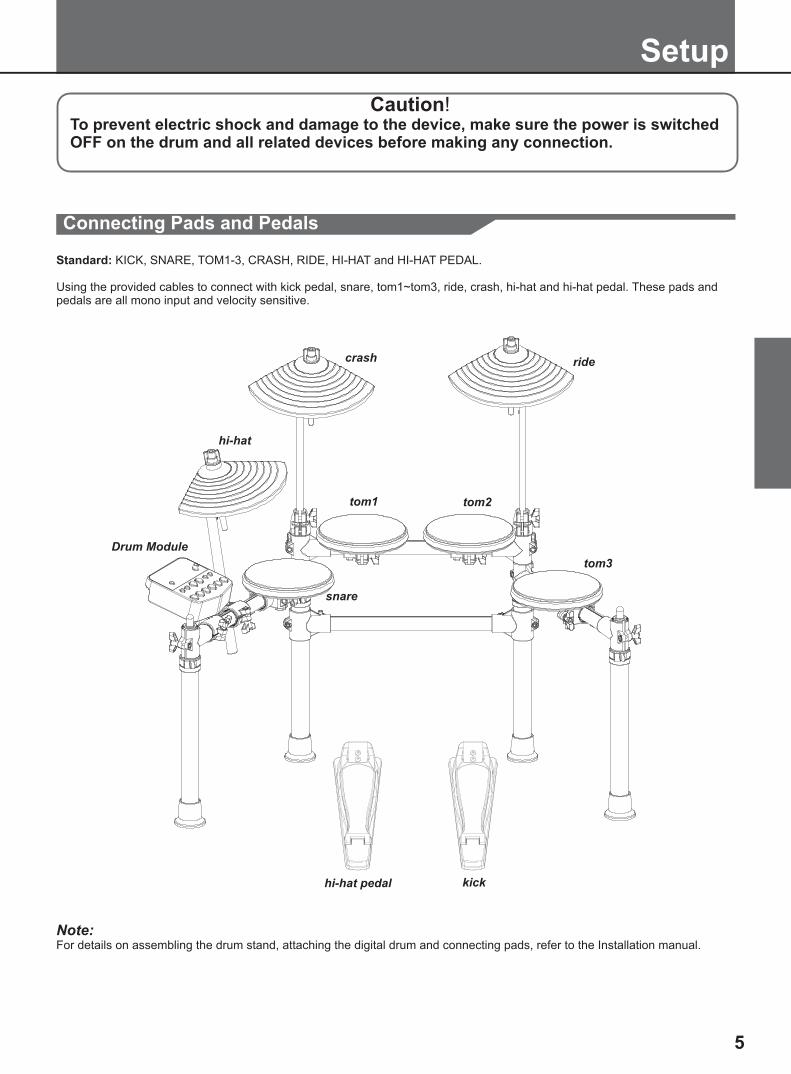
Caution!To prevent electric shock and damage to the device, make sure the power is switched OFF on the drum and all related devices before making any connection.
Connecting Pads and Pedals
Standard: KICK, SNARE, TOM1-3, CRASH, RIDE, HI-HAT and HI-HAT PEDAL.
Using the provided cables to connect with kick pedal, snare, tom1~tom3, ride, crash, hi-hat and hi-hat pedal. These pads and pedals are all mono input and velocity sensitive.
Note: For details on assembling the drum stand, attaching the digital drum and connecting pads, refer to the Installation manual.
5
Drum Module
hi-hat
crash ride
tom1 tom2
snare
hi-hat pedal kick
tom3
0
5
25
75
95
100
aw_DD401_Manual_G02_130717
2013� � 7� � 17� � 10�54�07
Connections
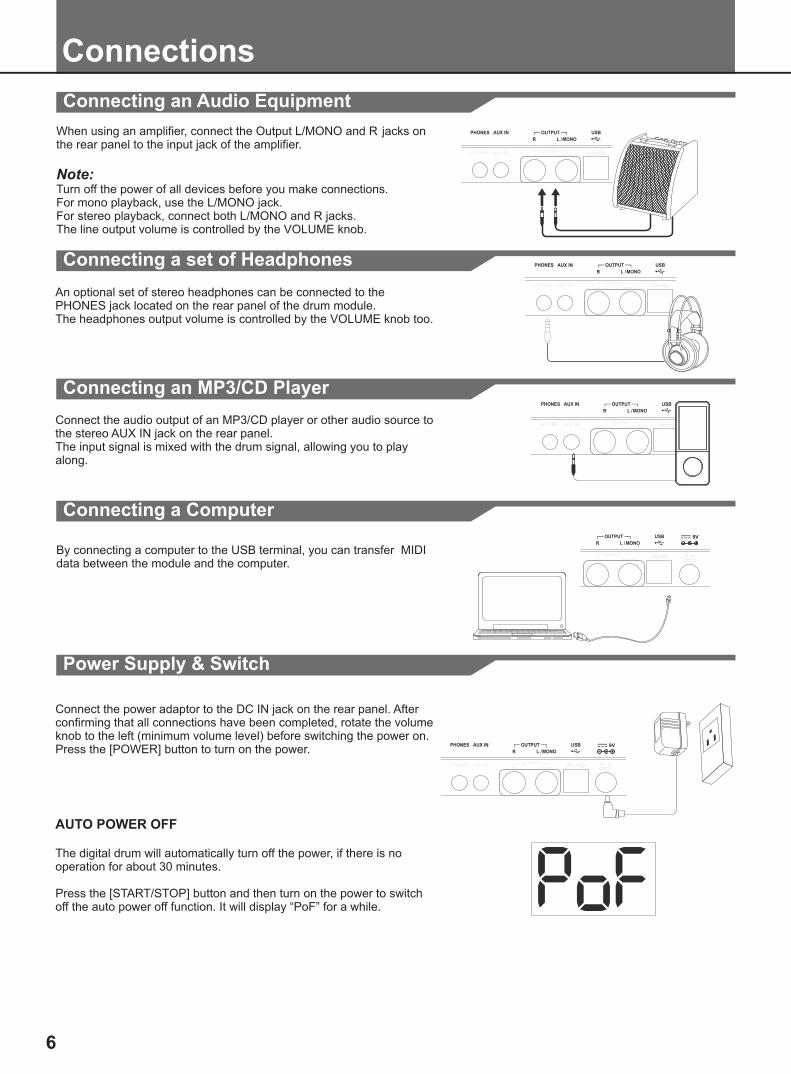
Connecting an Audio Equipment
When using an amplifier, connect the Output L/MONO and R jacks on the rear panel to the input jack of the amplifier.
Note:Turn off the power of all devices before you make connections.For mono playback, use the L/MONO jack.For stereo playback, connect both L/MONO and R jacks.The line output volume is controlled by the VOLUME knob.
Connecting a set of Headphones
An optional set of stereo headphones can be connected to the PHONES jack located on the rear panel of the drum module.The headphones output volume is controlled by the VOLUME knob too.
Connecting an MP3/CD Player
Connect the audio output of an MP3/CD player or other audio source to the stereo AUX IN jack on the rear panel.The input signal is mixed with the drum signal, allowing you to play along.
Connecting a Computer
By connecting a computer to the USB terminal, you can transfer MIDI data between the module and the computer.
Power Supply & Switch
Connect the power adaptor to the DC IN jack on the rear panel. After confirming that all connections have been completed, rotate the volume knob to the left (minimum volume level) before switching the power on. Press the [POWER] button to turn on the power.
AUTO POWER OFF
The digital drum will automatically turn off the power, if there is no operation for about 30 minutes.
Press the [START/STOP] button and then turn on the power to switch off the auto power off function. It will display “PoF” for a while.
6
0
5
25
75
95
100
aw_DD401_Manual_G02_130717
2013� � 7� � 17� � 10�54�0�
Performing
Operation Feature
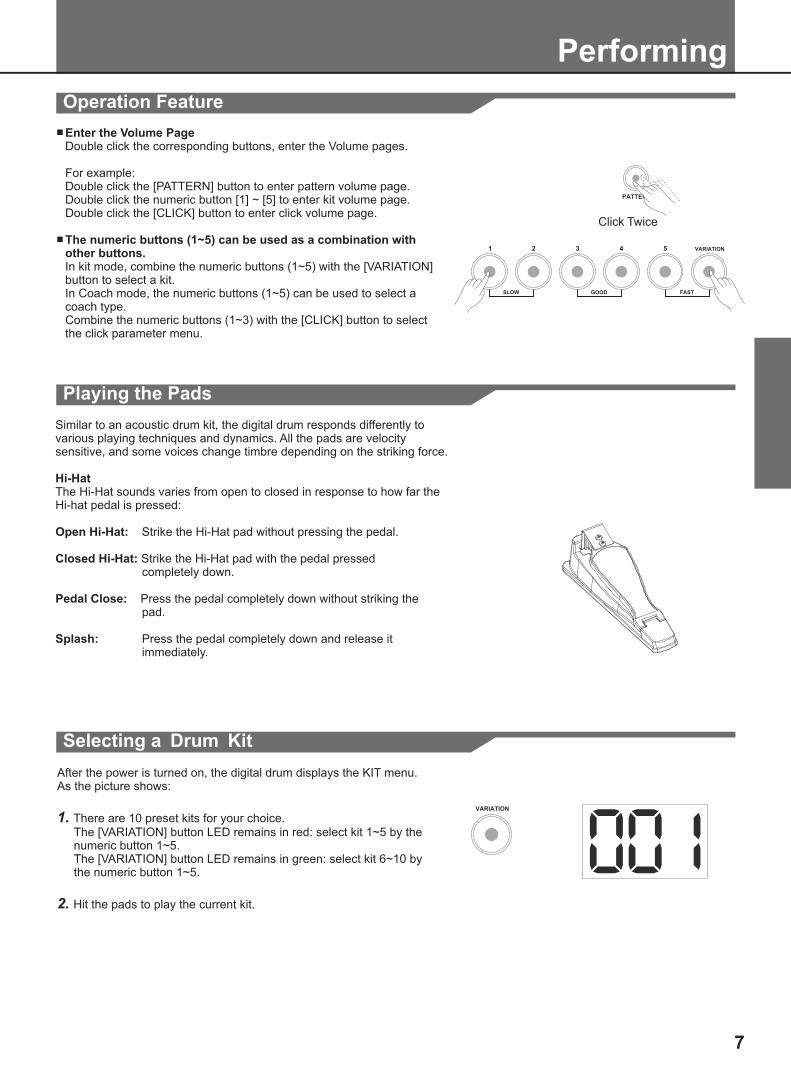
Enter the Volume PageDouble click the corresponding buttons, enter the Volume pages.
For example: Double click the [PATTERN] button to enter pattern volume page.Double click the numeric button [1] ~ [5] to enter kit volume page.Double click the [CLICK] button to enter click volume page.
The numeric buttons (1~5) can be used as a combination with other buttons.In kit mode, combine the numeric buttons (1~5) with the [VARIATION] button to select a kit.In Coach mode, the numeric buttons (1~5) can be used to select a coach type.Combine the numeric buttons (1~3) with the [CLICK] button to select the click parameter menu.
Playing the Pads
Similar to an acoustic drum kit, the digital drum responds differently to various playing techniques and dynamics. All the pads are velocity sensitive, and some voices change timbre depending on the striking force.
Hi-HatThe Hi-Hat sounds varies from open to closed in response to how far the Hi-hat pedal is pressed:
Open Hi-Hat: Strike the Hi-Hat pad without pressing the pedal.
Closed Hi-Hat: Strike the Hi-Hat pad with the pedal pressed completely down.
Pedal Close: Press the pedal completely down without striking the pad.
Splash: Press the pedal completely down and release it immediately.
7
Click Twice
Selecting a Drum Kit
After the power is turned on, the digital drum displays the KIT menu.As the picture shows:
1. There are 10 preset kits for your choice. The [VARIATION] button LED remains in red: select kit 1~5 by the numeric button 1~5. The [VARIATION] button LED remains in green: select kit 6~10 by the numeric button 1~5.
2. Hit the pads to play the current kit.
0
5
25
75
95
100
aw_DD401_Manual_G02_130717
2013� � 7� � 17� � 10:54:0�
Performing
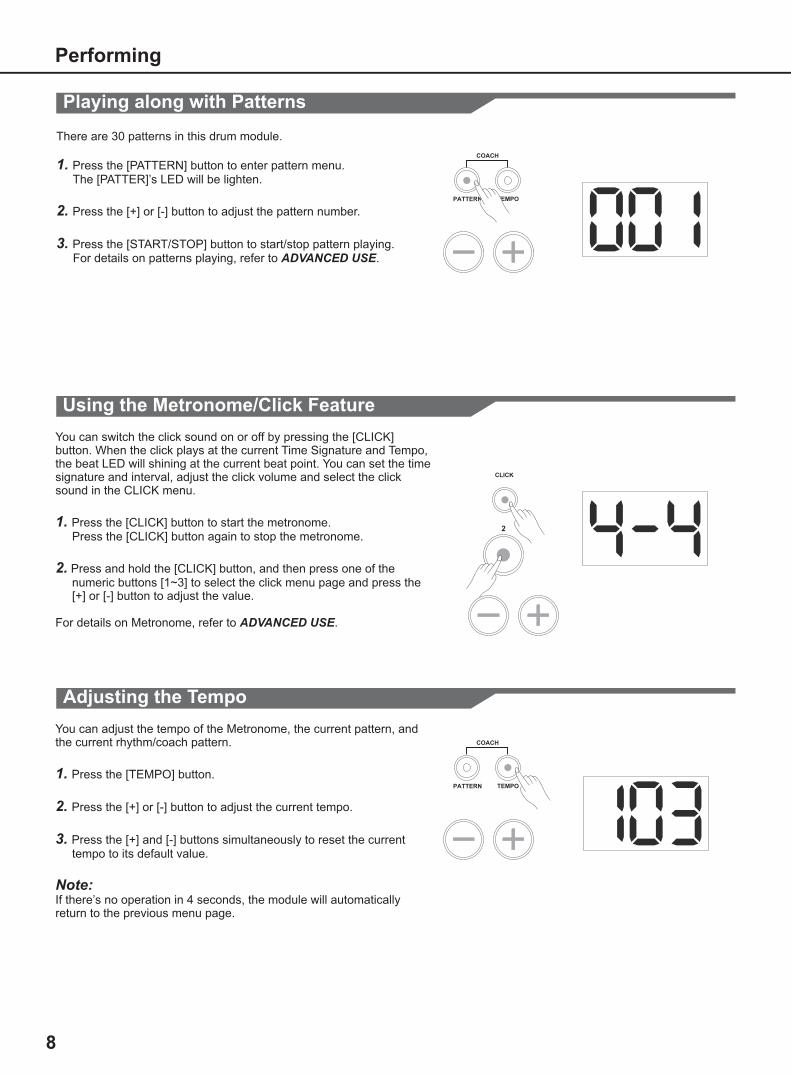
Playing along with Patterns
There are 30 patterns in this drum module.
1. Press the [PATTERN] button to enter pattern menu. The [PATTER]’s LED will be lighten.
2. Press the [+] or [-] button to adjust the pattern number.
3. Press the [START/STOP] button to start/stop pattern playing. For details on patterns playing, refer to ADVANCED USE.
Using the Metronome/Click Feature
You can switch the click sound on or off by pressing the [CLICK] button. When the click plays at the current Time Signature and Tempo, the beat LED will shining at the current beat point. You can set the time signature and interval, adjust the click volume and select the click sound in the CLICK menu.
1. Press the [CLICK] button to start the metronome. Press the [CLICK] button again to stop the metronome.
2. Press and hold the [CLICK] button, and then press one of the numeric buttons [1~3] to select the click menu page and press the [+] or [-] button to adjust the value. For details on Metronome, refer to ADVANCED USE.
Adjusting the Tempo
You can adjust the tempo of the Metronome, the current pattern, and the current rhythm/coach pattern.
1. Press the [TEMPO] button.
2. Press the [+] or [-] button to adjust the current tempo.
3. Press the [+] and [-] buttons simultaneously to reset the current tempo to its default value.
Note:If there’s no operation in 4 seconds, the module will automatically return to the previous menu page.
8
0
5
25
75
95
100
aw_DD401_Manual_G02_130717
2013� � 7� � 17� � 10�54�0�

Performing
Coach/Beat Check
Beat Check type is designed for training your accurate beat with metronome.
1. can enter the coach mode. The LED of [PATTERN] and [TEMPO] buttons will be lighted. In coach mode, press the [1] button. Select the Beat Check training type.
2. Press the [START/STOP] or [CLICK] button. Start or stop practicing. You can hit pads following with the metronome. The 6 LEDs on the bottom of the drum module will show your hitting accuracy.
Note:1. You can set the beat type (3-4,4-4,etc)before start practicing; refer to the Setting the Metronome for more details.
2. Before starting practicing, you can adjust the tempo value at the same time.
For more about coach type, please refer to ADVANCED USE.
Press the [PATTERN] and [TEMPO] buttons simultaneously, you
9
On the Beat
Before the Beat
After the Beat
0
5
25
75
95
100
aw_DD401_Manual_G02_130717
2013� � 7� � 17� � 10�54�0�

Playing with Drum Kit
About the Drum Kits
Selecting a Drum Kit
Adjusting the Volume of a Drum Kit
It is very easy to select a drum kit to play. What’s more, you can also adjust the volume of each kit.
There are 10 kits in this digital drum.
Press the numeric button [1] ~ [5] with [VARIATION] button to select a drum kit.
1. The [VARIATION] button’s back LED can toggle between red and green by pressing the [VARIATION] button.
2. When the [VARIATION] button’s back LED in red, you can select kit 1~5 by pressing the numeric button [1] ~ [5].
3. When the [VARIATION] button’s back LED in green, you can select kit 6~10 by pressing the numeric button [1] ~ [5].
Each drum kit has its own volume value, and it can be set independently.
1. By double clicking the numeric button [1] ~ [5], you can select the volume page of a kit.
2. You can adjust the volume of current kit from 0~32 by pressing the [+] or [-] button. If there isn’t any operation more than 4 seconds, the drum machine will automatically exit the volume page. The default value is 28.
10
[VARIATION]
RED
GREEN
[1]
KIT1
KIT6
[2]
KIT2
KIT7
[3]
KIT3
KIT8
[4]
KIT4
KIT9
[5]
KIT5
KIT10
0
5
25
75
95
100
aw_DD401_Manual_G02_130717
2013� � 7� � 17� � 10�54�08
Setting the Metronome
About Metronome
Switching the Click on/off
Adjusting the Click Volume
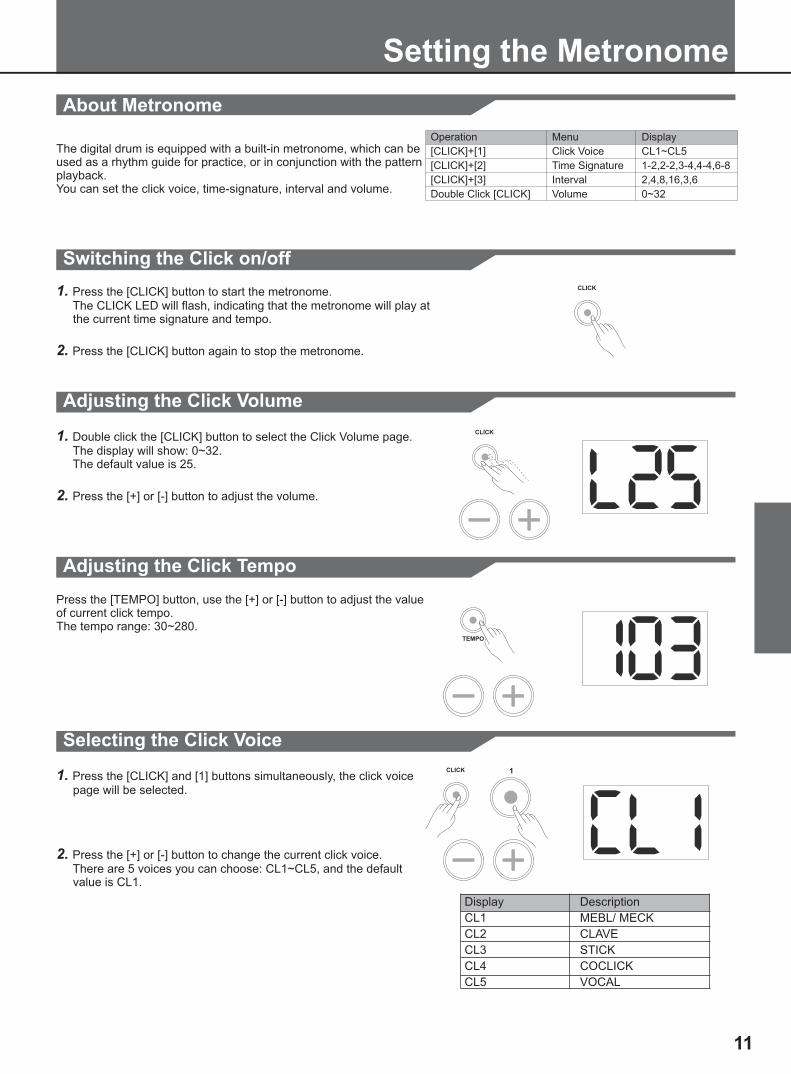
The digital drum is equipped with a built-in metronome, which can be used as a rhythm guide for practice, or in conjunction with the pattern playback. You can set the click voice, time-signature, interval and volume.
1. Press the [CLICK] button to start the metronome. The CLICK LED will flash, indicating that the metronome will play at the current time signature and tempo.
2. Press the [CLICK] button again to stop the metronome.
1. Double click the [CLICK] button to select the Click Volume page. The display will show: 0~32. The default value is 25.
2. Press the [+] or [-] button to adjust the volume.
11
Adjusting the Click Tempo
Press the [TEMPO] button, use the [+] or [-] button to adjust the value of current click tempo.The tempo range: 30~280.
Selecting the Click Voice
1. Press the [CLICK] and [1] buttons simultaneously, the click voice page will be selected.
2. Press the [+] or [-] button to change the current click voice. There are 5 voices you can choose: CL1~CL5, and the default value is CL1.
Display
CL1
CL2
CL3
CL4
CL5
Description
MEBL/ MECK
CLAVE
STICK
COCLICK
VOCAL
Operation
[CLICK]+[1]
[CLICK]+[2]
[CLICK]+[3]
Double Click [CLICK]
Menu
Click Voice
Time Signature
Interval
Volume
Display
CL1~CL5
1-2,2-2,3-4,4-4,6-8
2,4,8,16,3,6
0~32
0
5
25
75
95
100
aw_DD401_Manual_G02_130717
2013� � 7� � 17� � 10:54:08

Setting the Metronome
Setting the Time Signature
1. Press the [CLICK] and [2] buttons simultaneously, the time signature page will be selected.
2. Press the [+] or [-] button to change the current time signature. There are 5 types you can choose: 1-2, 2-2, 3-4, 4-4 and 6-8, the default value is 4-4.
Setting the Interval
1. Press the [CLICK] and [3] buttons simultaneously, the interval page will be selected.
2. Press the [+] or [-] button to change the current interval. There are 6 types you can choose: 2, 4, 8, 16, 3 and 6, the default value is 4.
Notes: If the length of the interval is longer than a beat, it can’t be selected.
For example: If the time signature is 4-4, a beat is a quarter note. The interval of 2 is longer than it, so it can’t be selected.
12
Display
2
4
8
16
3
6
Description
half note
quarter note
eighth note
sixteenth note
triplet
sextuplet
0
5
25
75
95
100
aw_DD401_Manual_G02_130717
2013� � 7� � 17� � 10:54:08
Playing Back Pattern
About Patterns
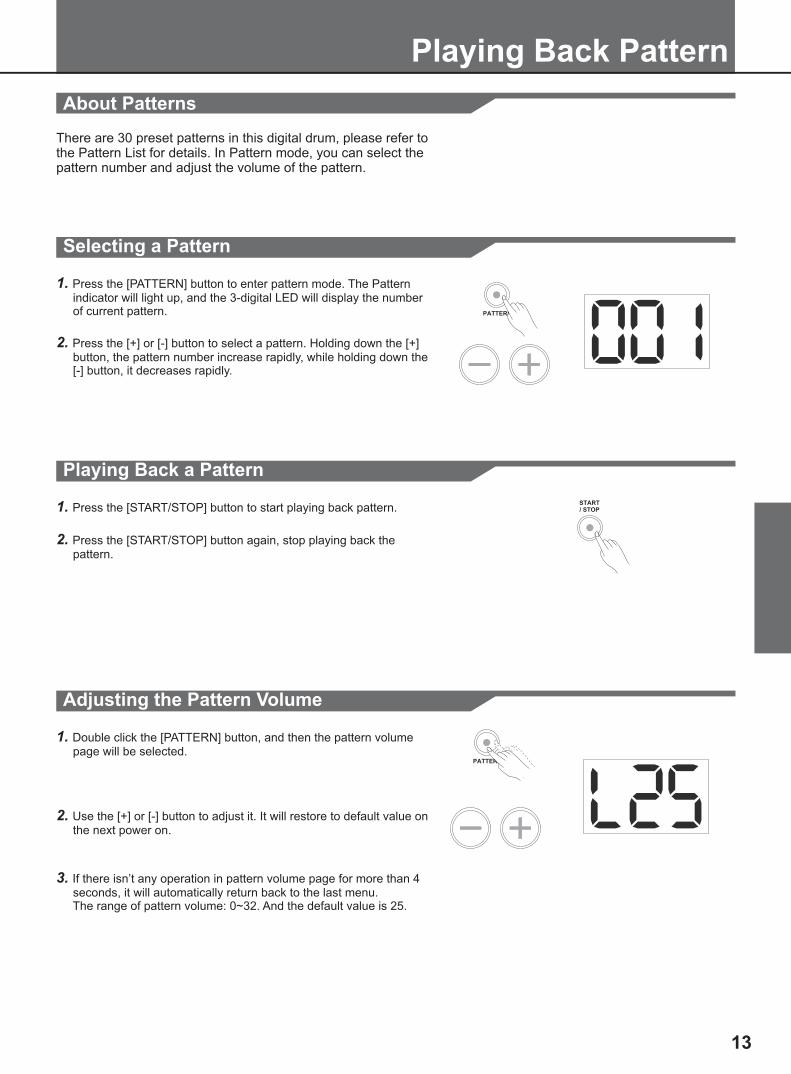
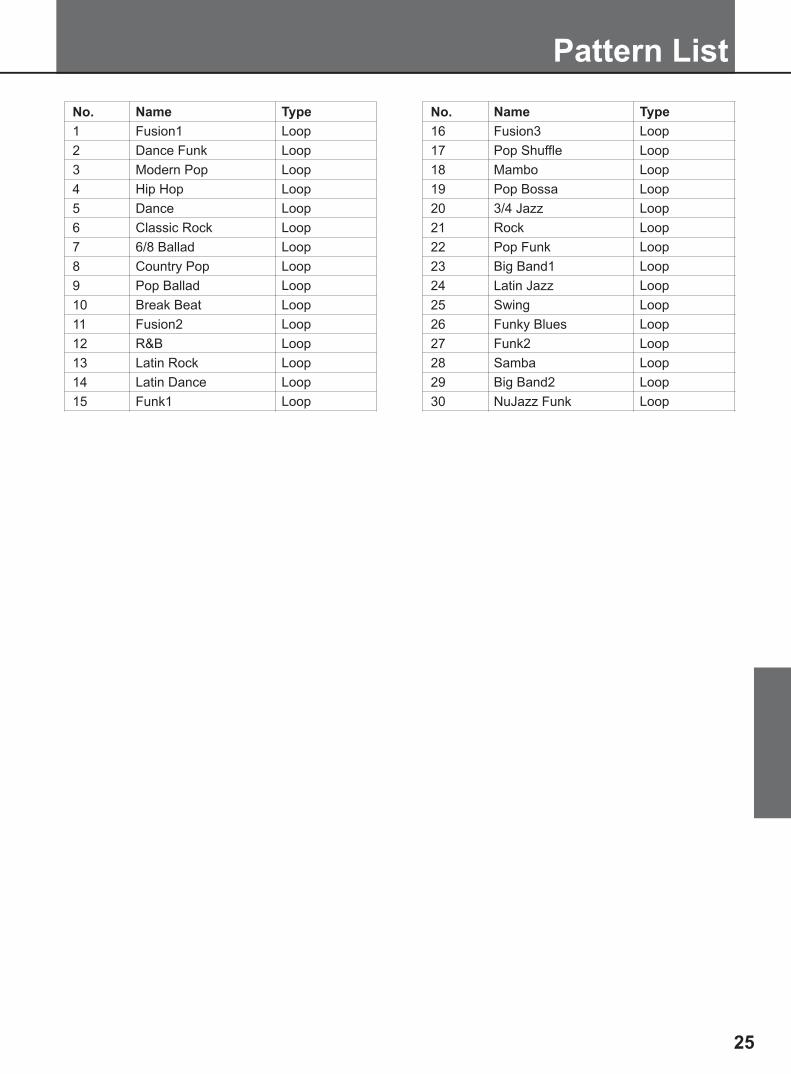
There are 30 preset patterns in this digital drum, please refer to the Pattern List for details. In Pattern mode, you can select the pattern number and adjust the volume of the pattern.
13
Selecting a Pattern
1. Press the [PATTERN] button to enter pattern mode. The Pattern indicator will light up, and the 3-digital LED will display the number of current pattern.
2. Press the [+] or [-] button to select a pattern. Holding down the [+] button, the pattern number increase rapidly, while holding down the [-] button, it decreases rapidly.
Adjusting the Pattern Volume
1. Double click the [PATTERN] button, and then the pattern volume page will be selected.
2. Use the [+] or [-] button to adjust it. It will restore to default value on the next power on.
3. If there isn’t any operation in pattern volume page for more than 4 seconds, it will automatically return back to the last menu. The range of pattern volume: 0~32. And the default value is 25.
Playing Back a Pattern
1. Press the [START/STOP] button to start playing back pattern.
2. Press the [START/STOP] button again, stop playing back the pattern.
0
5
25
75
95
100
aw_DD401_Manual_G02_130717
2013� � 7� � 17� � 10:54:0�
Practicing in Coach Mode
About Coach Mode
The Coach mode is a unique set of exercises. Specifically designed for those learners who want to improve their tempo, accuracy and stamina, as well as developing a better drum skill.
According to you present skills, you can select an appropriate coach type to practice.
There are 5 coach types in this digital drum:
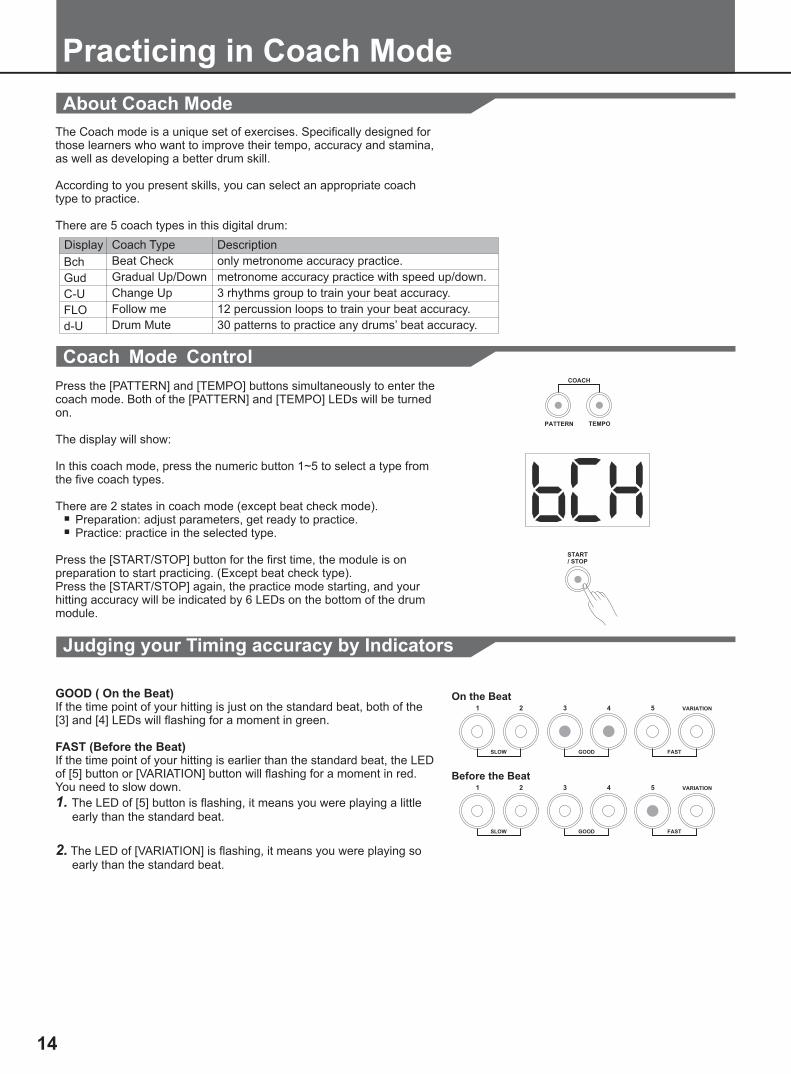
Press the [PATTERN] and [TEMPO] buttons simultaneously to enter the coach mode. Both of the [PATTERN] and [TEMPO] LEDs will be turned on.
The display will show:
In this coach mode, press the numeric button 1~5 to select a type from the five coach types.
There are 2 states in coach mode (except beat check mode). Preparation: adjust parameters, get ready to practice. Practice: practice in the selected type.
Press the [START/STOP] button for the first time, the module is on preparation to start practicing. (Except beat check type).Press the [START/STOP] again, the practice mode starting, and your hitting accuracy will be indicated by 6 LEDs on the bottom of the drum module.
GOOD ( On the Beat)If the time point of your hitting is just on the standard beat, both of the [3] and [4] LEDs will flashing for a moment in green.
FAST (Before the Beat)If the time point of your hitting is earlier than the standard beat, the LED of [5] button or [VARIATION] button will flashing for a moment in red. You need to slow down.
1. The LED of [5] button is flashing, it means you were playing a little early than the standard beat.
2. The LED of [VARIATION] is flashing, it means you were playing so early than the standard beat.
14
On the Beat
Before the Beat
Coach Type
Beat Check
Gradual Up/Down
Change Up
Follow me
Drum Mute
Description
only metronome accuracy practice.
metronome accuracy practice with speed up/down.
3 rhythms group to train your beat accuracy.
12 percussion loops to train your beat accuracy.
30 patterns to practice any drums’ beat accuracy.
Display
Bch
Gud
C-U
FLO
d-U
Coach Mode Control
Judging your Timing accuracy by Indicators
0
5
25
75
95
100
aw_DD401_Manual_G02_130717
2013� � 7� � 17� � 10:54:0�
Practicing in Coach Mode
Beat Check
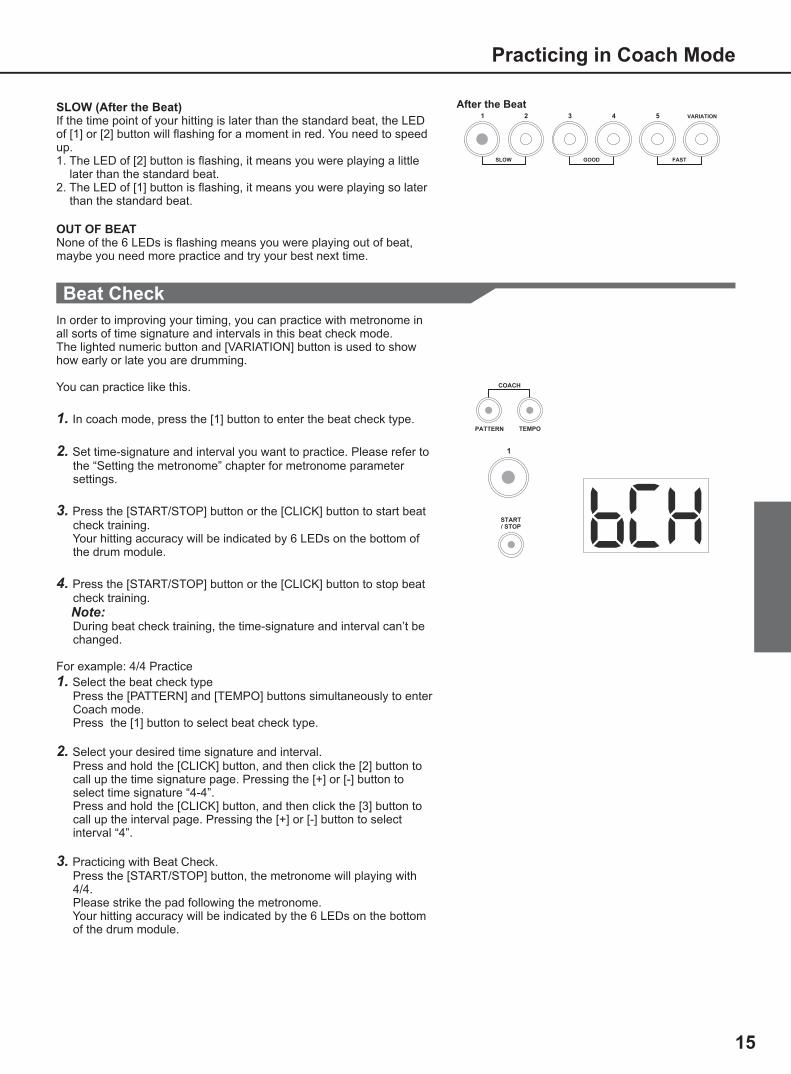
In order to improving your timing, you can practice with metronome in all sorts of time signature and intervals in this beat check mode.The lighted numeric button and [VARIATION] button is used to show how early or late you are drumming.
You can practice like this.
1. In coach mode, press the [1] button to enter the beat check type.
2. Set time-signature and interval you want to practice. Please refer to the “Setting the metronome” chapter for metronome parameter settings.
3. Press the [START/STOP] button or the [CLICK] button to start beat check training. Your hitting accuracy will be indicated by 6 LEDs on the bottom of the drum module.
4. Press the [START/STOP] button or the [CLICK] button to stop beat check training. Note: During beat check training, the time-signature and interval can’t be changed.
For example: 4/4 Practice
1. Select the beat check type Press the [PATTERN] and [TEMPO] buttons simultaneously to enter Coach mode. Press the [1] button to select beat check type.
2. Select your desired time signature and interval. Press and hold the [CLICK] button, and then click the [2] button to call up the time signature page. Pressing the [+] or [-] button to select time signature “4-4”. Press and hold the [CLICK] button, and then click the [3] button to call up the interval page. Pressing the [+] or [-] button to select interval “4”.
3. Practicing with Beat Check. Press the [START/STOP] button, the metronome will playing with 4/4. Please strike the pad following the metronome. Your hitting accuracy will be indicated by the 6 LEDs on the bottom of the drum module.
15
SLOW (After the Beat)If the time point of your hitting is later than the standard beat, the LED of [1] or [2] button will flashing for a moment in red. You need to speed up.1. The LED of [2] button is flashing, it means you were playing a little later than the standard beat.2. The LED of [1] button is flashing, it means you were playing so later than the standard beat.
OUT OF BEATNone of the 6 LEDs is flashing means you were playing out of beat, maybe you need more practice and try your best next time.
After the Beat
0
5
25
75
95
100
aw_DD401_Manual_G02_130717
2013� � 7� � 17� � 10:54:09
Practicing in Coach Mode
Gradual up/down
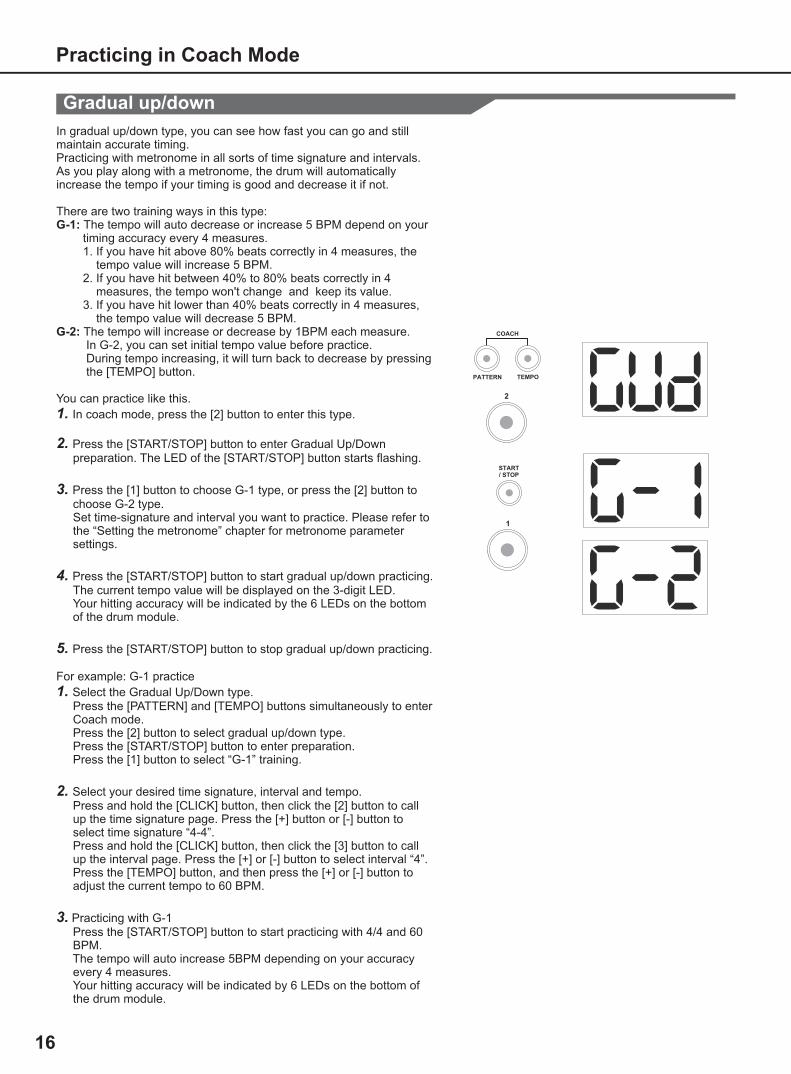
In gradual up/down type, you can see how fast you can go and still maintain accurate timing.Practicing with metronome in all sorts of time signature and intervals. As you play along with a metronome, the drum will automatically increase the tempo if your timing is good and decrease it if not.
There are two training ways in this type:G-1: The tempo will auto decrease or increase 5 BPM depend on your timing accuracy every 4 measures. 1. If you have hit above 80% beats correctly in 4 measures, the tempo value will increase 5 BPM. 2. If you have hit between 40% to 80% beats correctly in 4 measures, the tempo won't change and keep its value. 3. If you have hit lower than 40% beats correctly in 4 measures, the tempo value will decrease 5 BPM. G-2: The tempo will increase or decrease by 1BPM each measure. In G-2, you can set initial tempo value before practice. During tempo increasing, it will turn back to decrease by pressing the [TEMPO] button.
You can practice like this.
1. In coach mode, press the [2] button to enter this type.
2. Press the [START/STOP] button to enter Gradual Up/Down preparation. The LED of the [START/STOP] button starts flashing.
3. Press the [1] button to choose G-1 type, or press the [2] button to choose G-2 type. Set time-signature and interval you want to practice. Please refer to the “Setting the metronome” chapter for metronome parameter settings.
4. Press the [START/STOP] button to start gradual up/down practicing. The current tempo value will be displayed on the 3-digit LED. Your hitting accuracy will be indicated by the 6 LEDs on the bottom of the drum module.
5. Press the [START/STOP] button to stop gradual up/down practicing.
For example: G-1 practice
1. Select the Gradual Up/Down type. Press the [PATTERN] and [TEMPO] buttons simultaneously to enter Coach mode. Press the [2] button to select gradual up/down type. Press the [START/STOP] button to enter preparation. Press the [1] button to select “G-1” training.
2. Select your desired time signature, interval and tempo. Press and hold the [CLICK] button, then click the [2] button to call up the time signature page. Press the [+] button or [-] button to select time signature “4-4”. Press and hold the [CLICK] button, then click the [3] button to call up the interval page. Press the [+] or [-] button to select interval “4”. Press the [TEMPO] button, and then press the [+] or [-] button to adjust the current tempo to 60 BPM.
3. Practicing with G-1 Press the [START/STOP] button to start practicing with 4/4 and 60 BPM. The tempo will auto increase 5BPM depending on your accuracy every 4 measures. Your hitting accuracy will be indicated by 6 LEDs on the bottom of the drum module.
16
0
5
25
75
95
100
aw_DD401_Manual_G02_130717
2013� � 7� � 17� � 10:54:09
Practicing in Coach Mode
Change UP
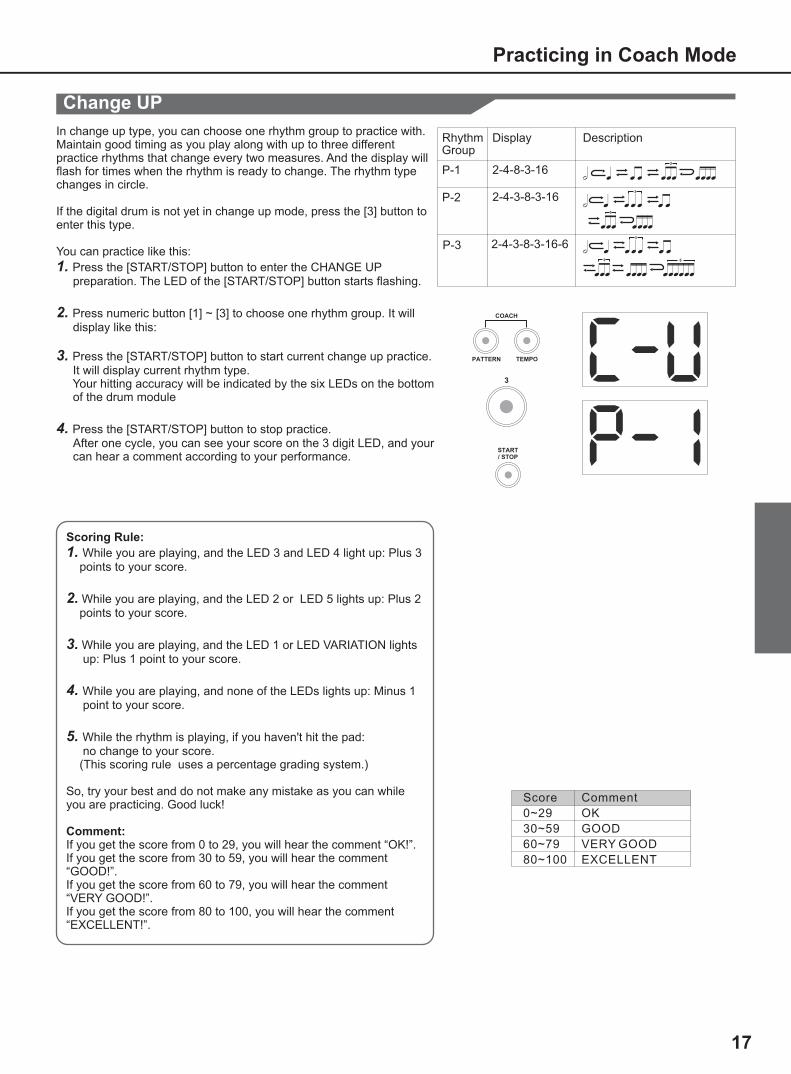
In change up type, you can choose one rhythm group to practice with. Maintain good timing as you play along with up to three different practice rhythms that change every two measures. And the display will flash for times when the rhythm is ready to change. The rhythm type changes in circle.
If the digital drum is not yet in change up mode, press the [3] button to enter this type.
You can practice like this:
1. Press the [START/STOP] button to enter the CHANGE UP preparation. The LED of the [START/STOP] button starts flashing.
2. Press numeric button [1] ~ [3] to choose one rhythm group. It will display like this:
3. Press the [START/STOP] button to start current change up practice. It will display current rhythm type. Your hitting accuracy will be indicated by the six LEDs on the bottom of the drum module
4. Press the [START/STOP] button to stop practice. After one cycle, you can see your score on the 3 digit LED, and your can hear a comment according to your performance.
Score
0~29
30~59
60~79
80~100
Comment
OK
GOOD
VERY GOOD
EXCELLENT
17
h qq qq3
qqq
qqq3
h q q
qq3
qqq
qqq3
h q q
qq3
qqq qq qq6
Rhythm Group
P-1
P-2
P-3
Display
2-4-8-3-16
2-4-3-8-3-16
2-4-3-8-3-16-6
Description
Scoring Rule:
1. While you are playing, and the LED 3 and LED 4 light up: Plus 3 points to your score.
2. While you are playing, and the LED 2 or LED 5 lights up: Plus 2 points to your score.
3. While you are playing, and the LED 1 or LED VARIATION lights up: Plus 1 point to your score.
4. While you are playing, and none of the LEDs lights up: Minus 1 point to your score.
5. While the rhythm is playing, if you haven't hit the pad: no change to your score. (This scoring rule uses a percentage grading system.)
So, try your best and do not make any mistake as you can while you are practicing. Good luck!
Comment:If you get the score from 0 to 29, you will hear the comment “OK!”.If you get the score from 30 to 59, you will hear the comment “GOOD!”.If you get the score from 60 to 79, you will hear the comment “VERY GOOD!”.If you get the score from 80 to 100, you will hear the comment “EXCELLENT!”.
0
5
25
75
95
100
aw_DD401_Manual_G02_130717
2013� � 7� � 17� � 10:54:09
Practicing in Coach Mode
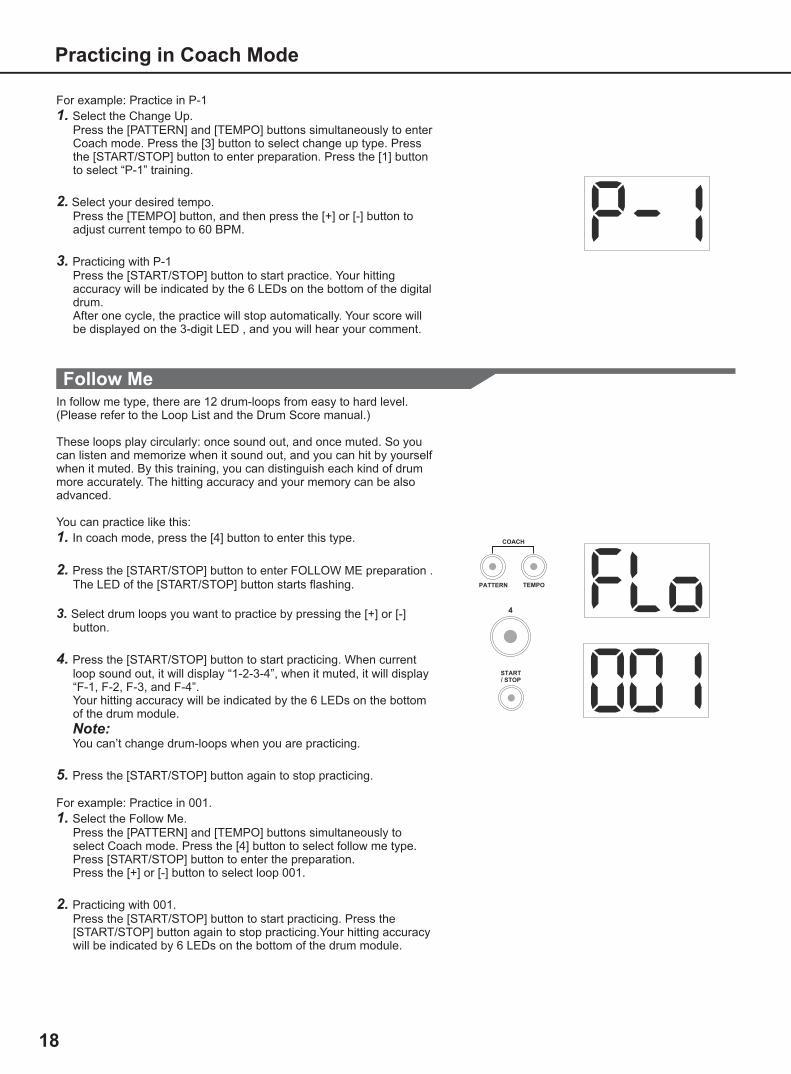
Follow MeIn follow me type, there are 12 drum-loops from easy to hard level.(Please refer to the Loop List and the Drum Score manual.)
These loops play circularly: once sound out, and once muted. So you can listen and memorize when it sound out, and you can hit by yourself when it muted. By this training, you can distinguish each kind of drum more accurately. The hitting accuracy and your memory can be also advanced.
You can practice like this:
1. In coach mode, press the [4] button to enter this type.
2. Press the [START/STOP] button to enter FOLLOW ME preparation . The LED of the [START/STOP] button starts flashing.
3. Select drum loops you want to practice by pressing the [+] or [-] button.
4. Press the [START/STOP] button to start practicing. When current loop sound out, it will display “1-2-3-4”, when it muted, it will display “F-1, F-2, F-3, and F-4”. Your hitting accuracy will be indicated by the 6 LEDs on the bottom of the drum module.
Note: You can’t change drum-loops when you are practicing.
5. Press the [START/STOP] button again to stop practicing.
For example: Practice in 001.
1. Select the Follow Me. Press the [PATTERN] and [TEMPO] buttons simultaneously to select Coach mode. Press the [4] button to select follow me type. Press [START/STOP] button to enter the preparation. Press the [+] or [-] button to select loop 001.
2. Practicing with 001. Press the [START/STOP] button to start practicing. Press the [START/STOP] button again to stop practicing.Your hitting accuracy will be indicated by 6 LEDs on the bottom of the drum module.
18
For example: Practice in P-1
1. Select the Change Up. Press the [PATTERN] and [TEMPO] buttons simultaneously to enter Coach mode. Press the [3] button to select change up type. Press the [START/STOP] button to enter preparation. Press the [1] button to select “P-1” training.
2. Select your desired tempo. Press the [TEMPO] button, and then press the [+] or [-] button to adjust current tempo to 60 BPM.
3. Practicing with P-1 Press the [START/STOP] button to start practice. Your hitting accuracy will be indicated by the 6 LEDs on the bottom of the digital drum. After one cycle, the practice will stop automatically. Your score will be displayed on the 3-digit LED , and you will hear your comment.
0
5
25
75
95
100
aw_DD401_Manual_G02_130717
2013� � 7� � 17� � 10:54:09
Practicing in Coach Mode
Drum Mute
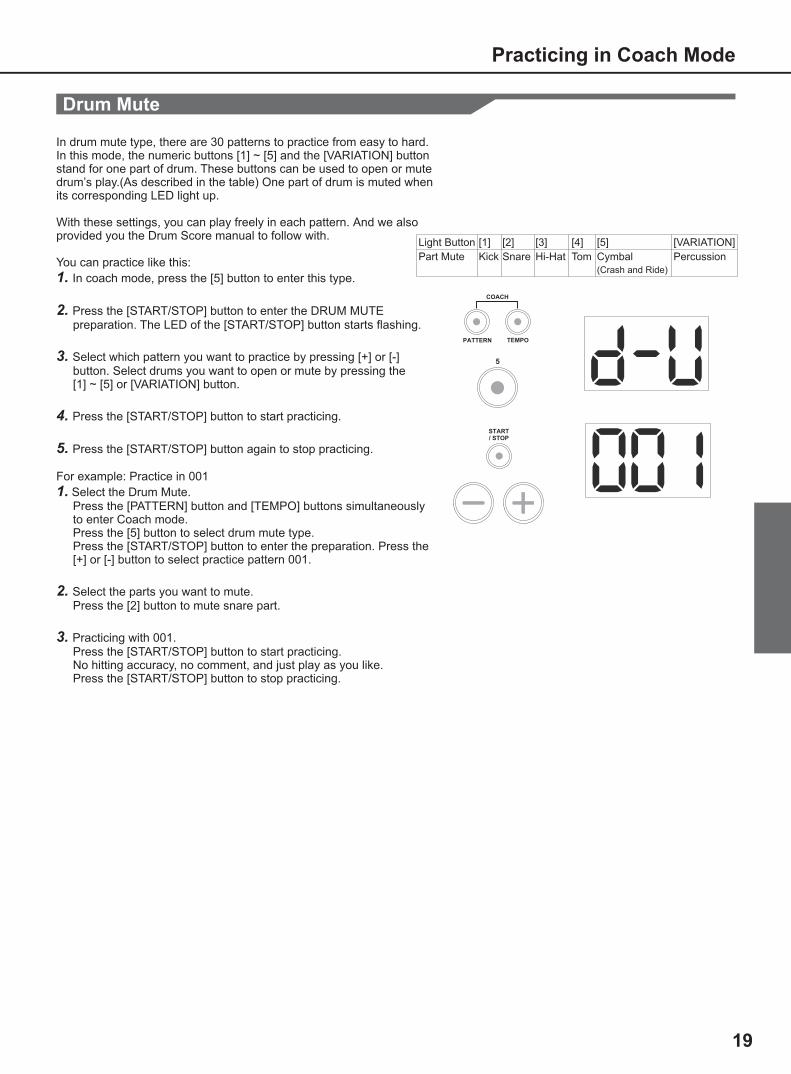
In drum mute type, there are 30 patterns to practice from easy to hard. In this mode, the numeric buttons [1] ~ [5] and the [VARIATION] button stand for one part of drum. These buttons can be used to open or mute drum’s play.(As described in the table) One part of drum is muted when its corresponding LED light up.
With these settings, you can play freely in each pattern. And we also provided you the Drum Score manual to follow with.
You can practice like this:
1. In coach mode, press the [5] button to enter this type.
2. Press the [START/STOP] button to enter the DRUM MUTE preparation. The LED of the [START/STOP] button starts flashing.
3. Select which pattern you want to practice by pressing [+] or [-] button. Select drums you want to open or mute by pressing the [1] ~ [5] or [VARIATION] button.
4. Press the [START/STOP] button to start practicing.
5. Press the [START/STOP] button again to stop practicing. For example: Practice in 001
1. Select the Drum Mute. Press the [PATTERN] button and [TEMPO] buttons simultaneously to enter Coach mode. Press the [5] button to select drum mute type. Press the [START/STOP] button to enter the preparation. Press the [+] or [-] button to select practice pattern 001.
2. Select the parts you want to mute. Press the [2] button to mute snare part.
3. Practicing with 001. Press the [START/STOP] button to start practicing. No hitting accuracy, no comment, and just play as you like. Press the [START/STOP] button to stop practicing.
19
Light Button
Part Mute
[1]
Kick
[VARIATION]
Percussion
[2]
Snare
[3]
Hi-Hat
[4]
Tom
[5]
Cymbal(Crash and Ride)
0
5
25
75
95
100
aw_DD401_Manual_G02_130717
2013� � 7� � 17� � 10:54:09
Making the Settings for MIDI
MIDI (Musical Instrument Digital Interface) is a standard that allows performance data and other information to be exchanged among electronic musical instruments and computers. With a MIDI cable connecting MIDI connectors equipped device, you can play multiple instruments with a single electronic musical instrument, have multiple instruments perform in ensemble, program the settings to change kits automatically to match the performance as the song progress, and more.
USB Connection The USB connector allows you to connect the digital drum directly to your computer. It can be connected without installing a driver in Windows XP/Vista/Win7 or MAC OSX environments. The digital drum will be recognized as a “USB Audio device” to receive and transmit MIDI messages through a single USB cable. The USB port is used only for MIDI messages (MIDI via USB)
Note: When the USB port is connected to a computer, all MIDI messages will be received and transmitted via USB.
20
About MIDI
Connecting with an External Sound Device
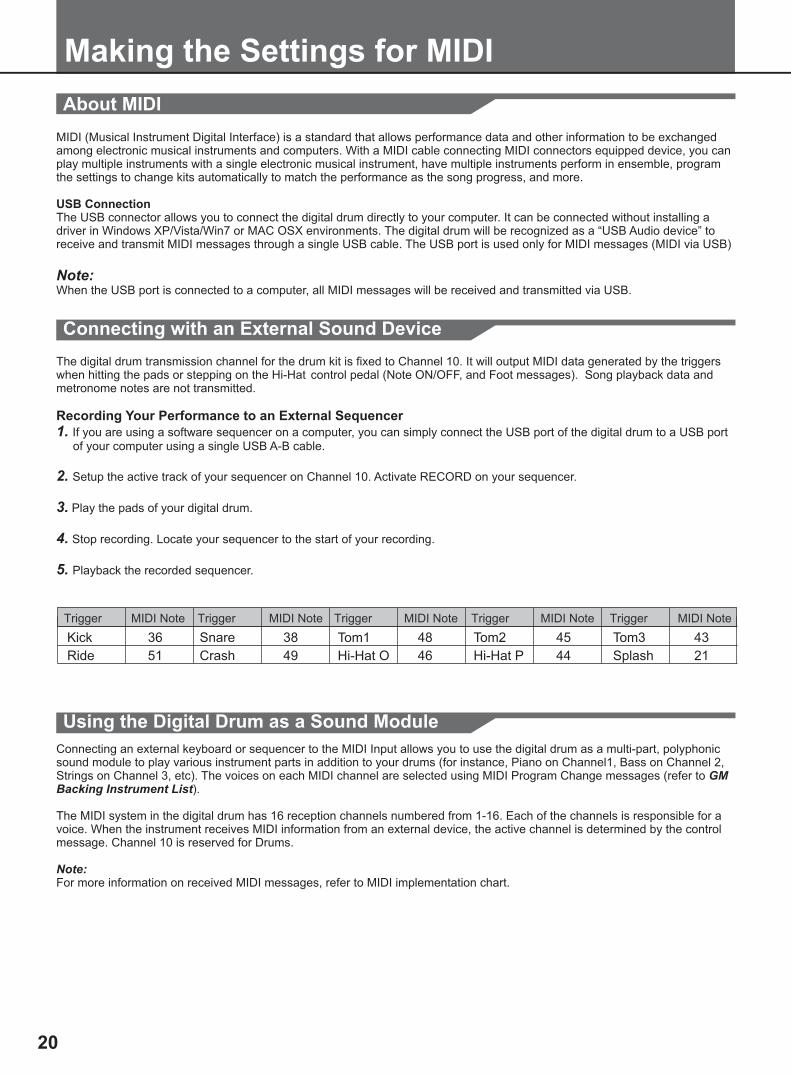
The digital drum transmission channel for the drum kit is fixed to Channel 10. It will output MIDI data generated by the triggers when hitting the pads or stepping on the Hi-Hat control pedal (Note ON/OFF, and Foot messages). Song playback data and metronome notes are not transmitted.
Recording Your Performance to an External Sequencer 1. If you are using a software sequencer on a computer, you can simply connect the USB port of the digital drum to a USB port of your computer using a single USB A-B cable.
2. Setup the active track of your sequencer on Channel 10. Activate RECORD on your sequencer.
3. Play the pads of your digital drum.
4. Stop recording. Locate your sequencer to the start of your recording.
5. Playback the recorded sequencer.
Snare
Crash
Tom1
Hi-Hat O
38
49
48
46
Kick
Ride
36
51
Tom3
Splash
43
21
Tom2
Hi-Hat P
45
44
Using the Digital Drum as a Sound Module
Connecting an external keyboard or sequencer to the MIDI Input allows you to use the digital drum as a multi-part, polyphonic sound module to play various instrument parts in addition to your drums (for instance, Piano on Channel1, Bass on Channel 2, Strings on Channel 3, etc). The voices on each MIDI channel are selected using MIDI Program Change messages (refer to GM Backing Instrument List).
The MIDI system in the digital drum has 16 reception channels numbered from 1-16. Each of the channels is responsible for a voice. When the instrument receives MIDI information from an external device, the active channel is determined by the control message. Channel 10 is reserved for Drums.
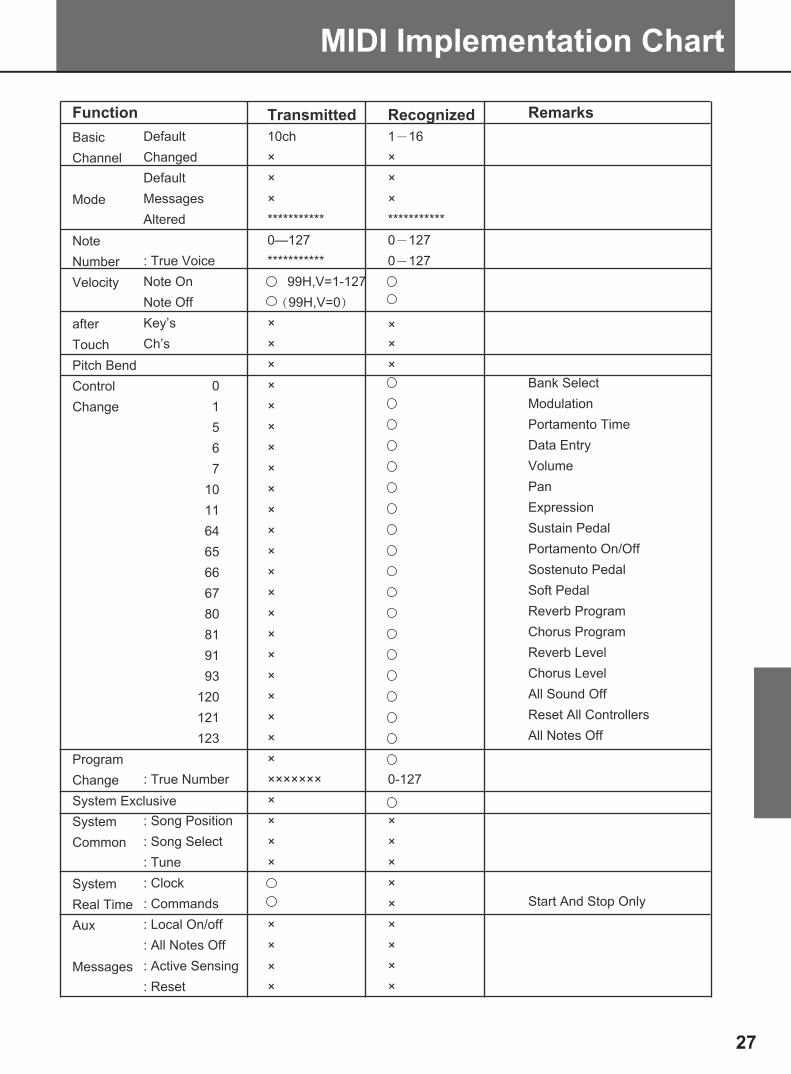
Note:For more information on received MIDI messages, refer to MIDI implementation chart.
0
5
25
75
95
100
aw_DD401_Manual_G02_130717
2013� � 7� � 17� � 10�54�09
Troubleshooting
21
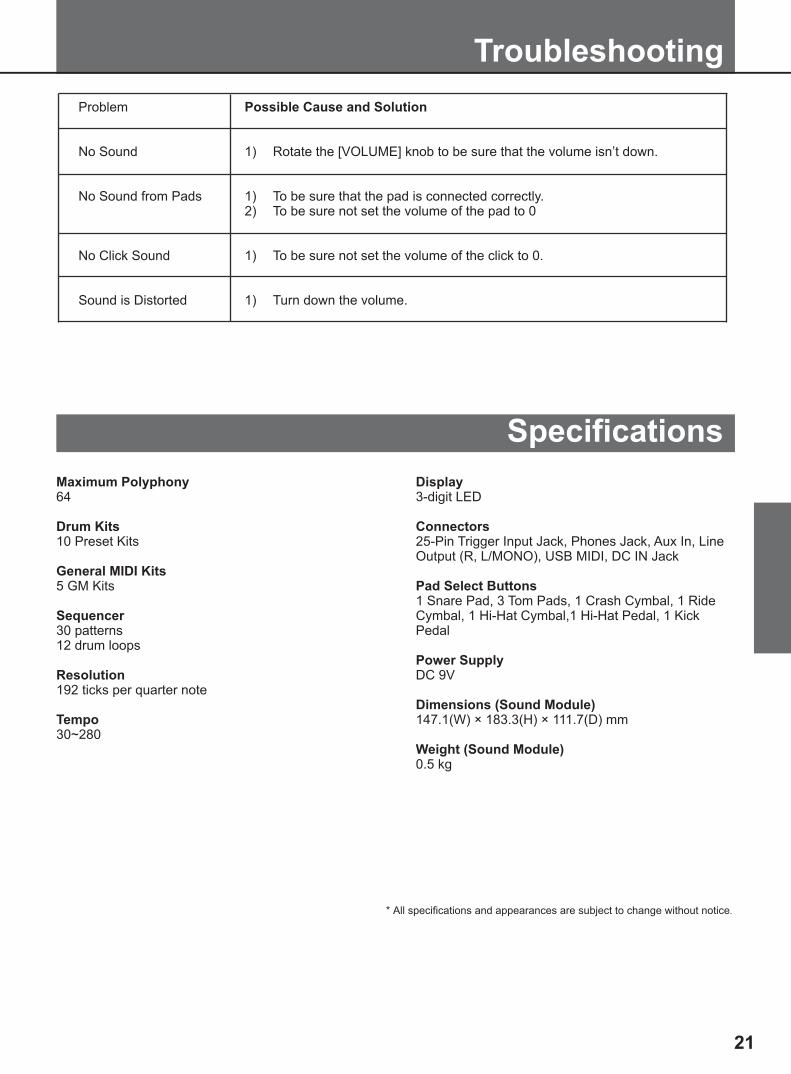
Possible Cause and Solution
1) Rotate the [VOLUME] knob to be sure that the volume isn’t down.
1) To be sure that the pad is connected correctly.2) To be sure not set the volume of the pad to 0
1) To be sure not set the volume of the click to 0.
1) Turn down the volume.
Problem
No Sound
No Sound from Pads
No Click Sound
Sound is Distorted
Specifications
Maximum Polyphony64
Drum Kits10 Preset Kits
General MIDI Kits5 GM Kits
Sequencer30 patterns12 drum loops
Resolution192 ticks per quarter note
Tempo30~280
Display3-digit LED
Connectors25-Pin Trigger Input Jack, Phones Jack, Aux In, Line Output (R, L/MONO), USB MIDI, DC IN Jack
Pad Select Buttons1 Snare Pad, 3 Tom Pads, 1 Crash Cymbal, 1 Ride Cymbal, 1 Hi-Hat Cymbal,1 Hi-Hat Pedal, 1 Kick Pedal
Power SupplyDC 9V
Dimensions (Sound Module)147.1(W) × 183.3(H) × 111.7(D) mm
Weight (Sound Module)0.5 kg
* All specifications and appearances are subject to change without notice.
0
5
25
75
95
100
aw_DD401_Manual_G02_130717
2013� � 7� � 17� � 10�54�09
Kit List
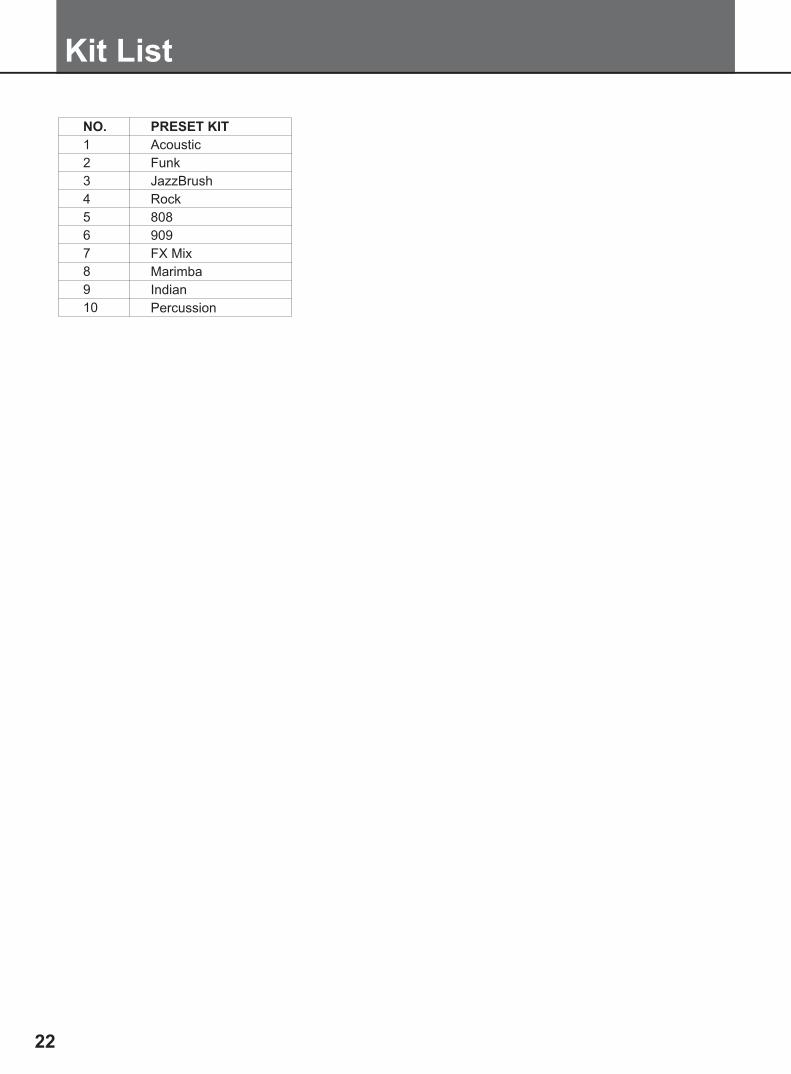
PRESET KIT
Acoustic
Funk
JazzBrush
Rock
808
909
FX Mix
Marimba
Indian
Percussion
NO.
1
2
3
4
5
6
7
8
9
10
22
0
5
25
75
95
100
aw_DD401_Manual_G02_130717
2013� � 7� � 17� � 10�54�09
GM Kit List
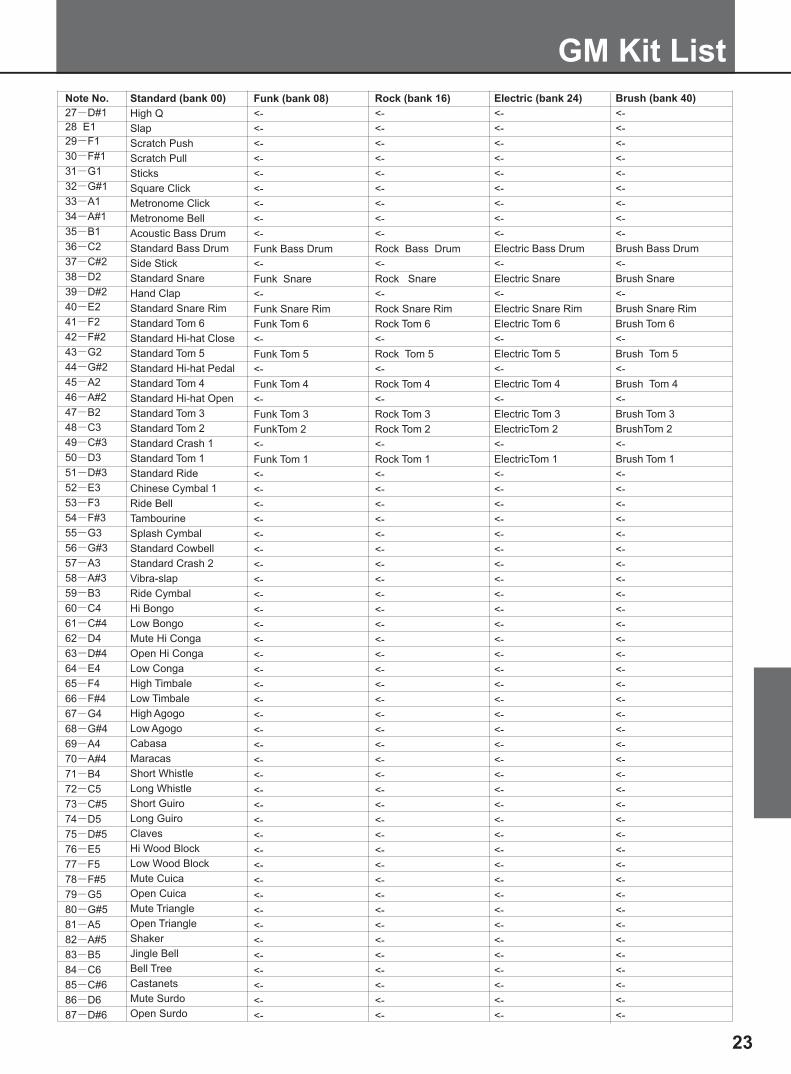
Note No.
27-D#1
28 E1
29-F1
30-F#1
31-G1
32-G#1
33-A1
34-A#1
35-B1
36-C2
37-C#2
38-D2
39-D#2
40-E2
41-F2
42-F#2
43-G2
44-G#2
45-A2
46-A#2
47-B2
48-C3
49-C#3
50-D3
51-D#3
52-E3
53-F3
54-F#3
55-G3
56-G#3
57-A3
58-A#3
59-B3
60-C4
61-C#4
62-D4
63-D#4
64-E4
65-F4
66-F#4
67-G4
68-G#4
69-A4
70-A#4
71-B4
72-C5
73-C#5
74-D5
75-D#5
76-E5
77-F5
78-F#5
79-G5
80-G#5
81-A5
82-A#5
83-B5
84-C6
85-C#6
86-D6
87-D#6
Standard (bank 00)
High Q
Slap
Scratch Push
Scratch Pull
Sticks
Square Click
Metronome Click
Metronome Bell
Acoustic Bass Drum
Standard Bass Drum
Side Stick
Standard Snare
Hand Clap
Standard Snare Rim
Standard Tom 6
Standard Hi-hat Close
Standard Tom 5
Standard Hi-hat Pedal
Standard Tom 4
Standard Hi-hat Open
Standard Tom 3
Standard Tom 2
Standard Crash 1
Standard Tom 1
Standard Ride
Chinese Cymbal 1
Ride Bell
Tambourine
Splash Cymbal
Standard Cowbell
Standard Crash 2
Vibra-slap
Ride Cymbal
Hi Bongo
Low Bongo
Mute Hi Conga
Open Hi Conga
Low Conga
High Timbale
Low Timbale
High Agogo
Low Agogo
Cabasa
Maracas
Short Whistle
Long Whistle
Short Guiro
Long Guiro
Claves
Hi Wood Block
Low Wood Block
Mute Cuica
Open Cuica
Mute Triangle
Open Triangle
Shaker
Jingle Bell
Bell Tree
Castanets
Mute Surdo
Open Surdo
Funk (bank 08)
<-
<-
<-
<-
<-
<-
<-
<-
<-
Funk Bass Drum
<-
Funk Snare
<-
Funk Snare Rim
Funk Tom 6
<-
Funk Tom 5
<-
Funk Tom 4
<-
Funk Tom 3
FunkTom 2
<-
Funk Tom 1
<-
<-
<-
<-
<-
<-
<-
<-
<-
<-
<-
<-
<-
<-
<-
<-
<-
<-
<-
<-
<-
<-
<-
<-
<-
<-
<-
<-
<-
<-
<-
<-
<-
<-
<-
<-
<-
Rock (bank 16)
<-
<-
<-
<-
<-
<-
<-
<-
<-
Rock Bass Drum
<-
Rock Snare
<-
Rock Snare Rim
Rock Tom 6
<-
Rock Tom 5
<-
Rock Tom 4
<-
Rock Tom 3
Rock Tom 2
<-
Rock Tom 1
<-
<-
<-
<-
<-
<-
<-
<-
<-
<-
<-
<-
<-
<-
<-
<-
<-
<-
<-
<-
<-
<-
<-
<-
<-
<-
<-
<-
<-
<-
<-
<-
<-
<-
<-
<-
<-
Brush (bank 40)
<-
<-
<-
<-
<-
<-
<-
<-
<-
Brush Bass Drum
<-
Brush Snare
<-
Brush Snare Rim
Brush Tom 6
<-
Brush Tom 5
<-
Brush Tom 4
<-
Brush Tom 3
BrushTom 2
<-
Brush Tom 1
<-
<-
<-
<-
<-
<-
<-
<-
<-
<-
<-
<-
<-
<-
<-
<-
<-
<-
<-
<-
<-
<-
<-
<-
<-
<-
<-
<-
<-
<-
<-
<-
<-
<-
<-
<-
<-
23
Electric (bank 24)
<-
<-
<-
<-
<-
<-
<-
<-
<-
Electric Bass Drum
<-
Electric Snare
<-
Electric Snare Rim
Electric Tom 6
<-
Electric Tom 5
<-
Electric Tom 4
<-
Electric Tom 3
ElectricTom 2
<-
ElectricTom 1
<-
<-
<-
<-
<-
<-
<-
<-
<-
<-
<-
<-
<-
<-
<-
<-
<-
<-
<-
<-
<-
<-
<-
<-
<-
<-
<-
<-
<-
<-
<-
<-
<-
<-
<-
<-
<- 0
5
25
75
95
100
aw_DD401_Manual_G02_130717
2013� � 7� � 17� � 10�54�09
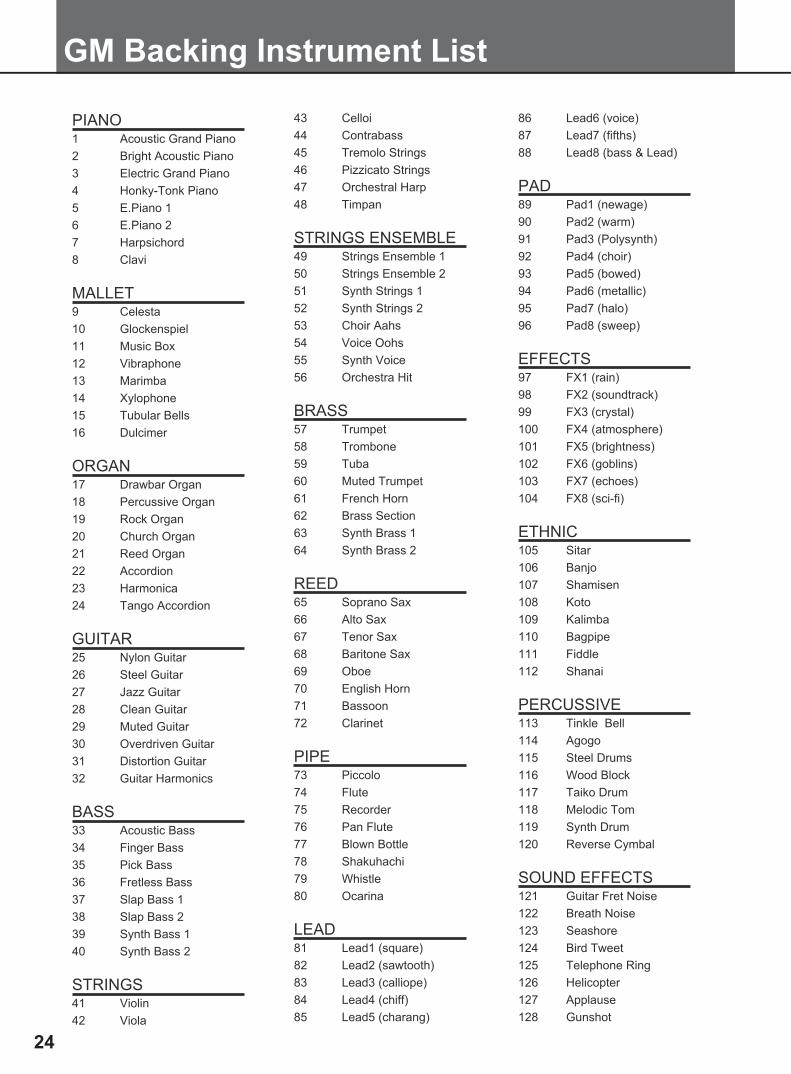
GM Backing Instrument List
24
0
5
25
75
95
100
aw_DD401_Manual_G02_130717
2013� � 7� � 17� � �10�54�10
Pattern List
No.
1
2
3
4
5
6
7
8
9
10
11
12
13
14
15
Name
Fusion1
Dance Funk
Modern Pop
Hip Hop
Dance
Classic Rock
6/8 Ballad
Country Pop
Pop Ballad
Break Beat
Fusion2
R&B
Latin Rock
Latin Dance
Funk1
Type
Loop
Loop
Loop
Loop
Loop
Loop
Loop
Loop
Loop
Loop
Loop
Loop
Loop
Loop
Loop
25
No.
16
17
18
19
20
21
22
23
24
25
26
27
28
29
30
Name
Fusion3
Pop Shuffle
Mambo
Pop Bossa
3/4 Jazz
Rock
Pop Funk
Big Band1
Latin Jazz
Swing
Funky Blues
Funk2
Samba
Big Band2
NuJazz Funk
Type
Loop
Loop
Loop
Loop
Loop
Loop
Loop
Loop
Loop
Loop
Loop
Loop
Loop
Loop
Loop
0
5
25
75
95
100
aw_DD401_Manual_G02_130717
2013� � 7� � 17� � 10�54�10

Number
1
2
3
4
5
6
7
8
9
10
11
12
Name
Loop 1
Loop 2
Loop 3
Loop 4
Loop 5
Loop 6
Loop 7
Loop 8
Loop 9
Loop 10
Loop 11
Loop 12
Loop List
26
0
5
25
75
95
100
aw_DD401_Manual_G02_130717
2013� � 7� � 17� � 10�54�10
MIDI Implementation Chart
27
0
5
25
75
95
100
aw_DD401_Manual_G02_130717
2013� � 7� � 17� � �10�54�10

DD-1050
5
25
75
95
100
aw_DD401_Manual_G02_130717
2013� � 7� � 17� � �10�54�10