volvo car volvo navigation system (vns)...
TRANSCRIPT

VOLVO NAVIGATION SYSTEM (VNS)Volvo CarCorporation
WEB EDITION

Types of roads Color
Freeways Orange
Main roads Dark gray
Secondary main roads Gray
Normal roads Light gray
Local roads White
Text and symbols on the screen
Direction to take at next guidance point
Distance to the next guidance point
Name of next street or road
Stored location
Symbol for Final destination
Remaining time to destination
Starting point
Remaining distance to destination
Intermediate destination
Speed limit at the vehicle’s current location [18]. Not on modelswith RSI.
Compass
Traffic information (not available in all markets)
Extent of street/road with traffic problem (not available in all mar-kets)
Current road (the vehicle’s current location [18])
Symbol for a Point of Interest – POI (Restaurant with seafood)
Final destination
Route
The vehicle’s current location
Completed section of the route
Next guidance point
Map scale

VOLVO NAVIGATION SYSTEM (VNS) WITH RTTVNS is a navigation system developed byVolvo that is designed to help guide you tothe destination of your choice and provide
information along the way.
RTT1 (Real Time Traffic) is an information systemdeveloped by Volvo, which can detect roads/streets with traffic disruptions and make it possi-ble to select an alternative route past the problemarea.
The system includes features that enable you toset itineraries, search for certain types of points ofinterest along your route, store special destina-tions, obtain traffic informaton en route, etc.
The system indicates the vehicle’s current loca-tion, and shows part or all of the route to your
destination, depending on the settings you havemade. If at any time you should decide to deviatefrom the route originally set by the system, a newroute to the destination will automatically be cal-culated.
By enabling you to reach your destination quicklyand by the most direct route, Volvo's navigationsystem also helps contribute to improving theenvironment.
NAVTEQ DATABASE End-User License Agree-ment
See the information on page 78.
1 Option. Not available in all markets.
Contents
2
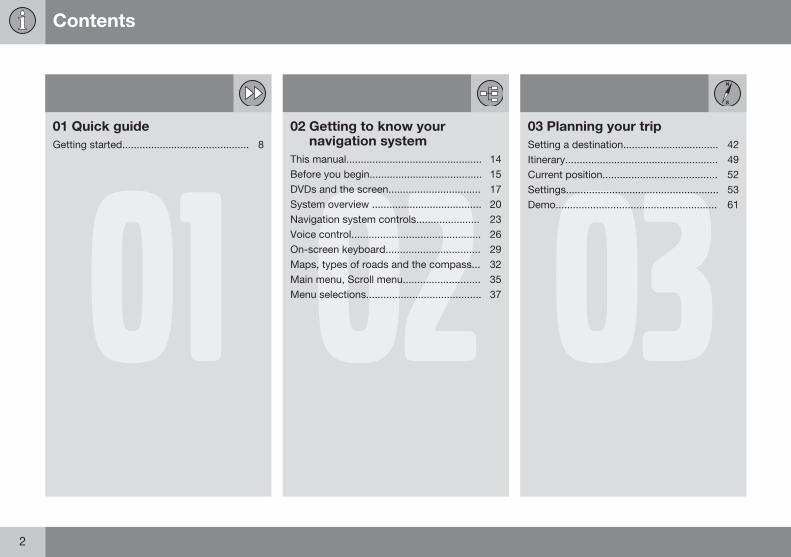
0101 Quick guideGetting started............................................ 8
0202 Getting to know your
navigation systemThis manual............................................... 14Before you begin....................................... 15DVDs and the screen................................ 17System overview ...................................... 20Navigation system controls...................... 23Voice control............................................. 26On-screen keyboard................................. 29Maps, types of roads and the compass... 32Main menu, Scroll menu........................... 35Menu selections........................................ 37 03
03 Planning your tripSetting a destination................................. 42Itinerary..................................................... 49Current position........................................ 52Settings..................................................... 53Demo........................................................ 61

Contents
3
0404 Traffic informationIntroduction............................................... 64Reading information.................................. 66Dealing with traffic problems.................... 68
0505 Symbols on the mapPoints of interest (POIs)............................ 72
0606 Questions & AnswersFrequently asked questions...................... 76EULA – License agreement....................... 78

Contents
4
0707 IndexIndex......................................................... 82

Contents
5

6
Getting started.......................................................................................... 8

QUICK GUIDE

01 Quick guide
Getting started 01
8
Activating the systemWith the ignition switched on (see the section"Ignition modes" in the Owner's Manual):
1. Press the remote key fully into the ignitionslot to activate ignition mode I.
2. If the navigation system does not startwithin a few seconds, press NAV on thecenter console control panel.
DisclaimerWhen the system is started, it displays thefollowing text, which must be confirmed:
• Press the OK button.
For additional information, see page 15.
NOTE
The system can be used even when theengine is not running. To help avoid bat-tery drain, the system should be turned offwhen it is not in use.
Demo mode (simulated guidance)The system has a Demonstration mode thatcan be used to help acquaint you with thenavigation system, see page 61.
Navigation system optionsThe Volvo Navigation System can be oper-ated in several ways:
• With the right side steering wheel keypad
• With the controls in the center console
• With a remote control
• With voice commands
See page 23 for a description of the func-tions.
The navigation system also contains optionsfor adjusting map, guidance, and system set-tings. For detailed information, see page 53.
Main commandsThe controls in the steering wheel keypad areused in both of the following examples (Guid-ance to a street address and Guidance toPoints of Interest (POI)).
• Navigate and make selections by turningthe thumb wheel (1).
• Confirm a selection by pressing thethumb wheel (written in the followingexamples as "+ OK").
• Go back in the menus or cancel by press-ing EXIT.
Controls in the center consoleThe following apply if the center console con-trols are used instead of the steering wheelkeypad:

01 Quick guide
Getting started 01
}}9
Steering wheelkeypad
Center consolecontrols
Turn the thumbwheel
Turn TUNE
Press the thumbwheel
Press OK/MENU
Press EXIT Press EXIT
Guidance to a street address
Step Screen/menu
Action
1 Do as followsif a map isnot displayedon thescreen:
Press the NAVbutton on the cen-ter console.
2 Map Press NAV to dis-play a shortcutmenu.
3 Shortcutmenu, seepage 35.
Select Setaddress + OK.
4 Address: Scroll to City: +OK.
Step Screen/menu
Action
5 Text wheel –seepage 29.
Turn the thumbwheel to selectcharacters andenter them bypressing OK. A listof alternatives willbe displayed suc-cessively.
6 Text wheel Select a destina-tion from the list +OK.
7 Navigationmenu
Scroll to Set sin-gle destination +OK.
8 Map The system willbegin guiding youto your destina-tion.
The system will now calculate the route anddistance to the specified destination. You willbe provided with guidance and instructionsregarding intersections, etc.
If you leave the planned route during the trip,the system will automatically calculate a newroute to the destination.
Guidance to Points of Interest (POI)
Step Screen/menu
Action
1 Do as followsif a map is notdisplayed onthe screen:
Press the NAVbutton on thecenter console.
2 Map Press NAV to dis-play a shortcutmenu.
3 Shortcutmenu, seepage 35.
Scroll to SetPoint Of Interest+ OK.
4 Point ofinterest (POI)
Scroll to e.g.,Near the car +OK.
5 Latest 5 POItypes
Scroll to e.g., Alltypes + OK.
6 All POI types Scroll to e.g., Air-port + OK.
7 Results list Scroll to thedesired alterna-tives in the list +OK.

01 Quick guide
Getting started 01
10
Step Screen/menu
Action
8 Navigationmenu
Scroll to Set sin-gle destination+ OK.
9 Map The system willbegin guiding youto your destina-tion.

01 Quick guide
01
11

12
This manual............................................................................................. 14Before you begin..................................................................................... 15DVDs and the screen.............................................................................. 17System overview .................................................................................... 20Navigation system controls..................................................................... 23Voice control........................................................................................... 26On-screen keyboard............................................................................... 29Maps, types of roads and the compass................................................. 32Main menu, Scroll menu......................................................................... 35Menu selections...................................................................................... 37

GETTING TO KNOW YOUR NAVIGATION SYSTEM

02 Getting to know your navigation system
This manual
02
14
Heading level 1
Heading level 2This is a sub-heading of Heading level 1.
Heading level 3This is a sub-heading of Heading level 2.
Heading level 4
This is a sub-heading of Heading level 3.
Using this manualA quick guide is available to help you getstarted with the basic functions as quickly aspossible, see page 8.
The rest of the manual is divided into chap-ters and sections describing the navigationsystem's features and functions in greaterdetail.
Menu selections/PathsMenu selections are shown in gray text in themanual, for example Enter street.
Menu paths are written as follows:
Set destination Address Street:
or Set destination Address Street:
FootnotesCertain pages of this manual contain informa-tion in the form of footnotes at the bottom of
the page. This information supplements thetext that the footnote number refers to (a let-ter is used if the footnote refers to text in atable).
Options and accessoriesOptional or accessory equipment describedin this manual is indicated by an asterisk (*).
Optional or accessory equipment may not beavailable in all countries or markets. Pleasenote that some vehicles may be equipped dif-ferently, depending on special legal require-ments.
Contact your Volvo retailer for additionalinformation.
Changes in the manualThe specifications, design features, and illus-trations in this manual are not binding.
We reserve the right to make modificationswithout prior notice.
© Volvo Car Corporation

02 Getting to know your navigation system
Before you begin
02
15
General informationThe Volvo Navigation System uses theWGS84 reference system, which provides thevehicle's location in terms of longitude andlatitude.
The VNS system can be used even if a desti-nation has not been specified.
WARNING
• Always use good judgment when fol-lowing navigation system guidance,and do not follow guidance that seemscontrary to your own best judgment.
• Never use the navigation system orany other feature in your vehicle in away that distracts you from the task ofdriving safely. Distraction can lead to aserious accident.
• Set and make changes in your naviga-tion system only with the vehicleparked.
• Be aware of the current traffic situa-tion.
• Always comply with relevant trafficregulations.
Map modeWhen the system is started, it displays thefollowing text, which must be confirmed bypressing the OK/MENU button:
• This system provides routeinformation to help you reach yourdestination. Due to road conditions,some recommendations may not beaccurate. Obey all traffic laws anddrive based on your own goodjudgement. Always concentrate onyour driving by keeping your eyes andmind on the road.
When this has been done, a map showing thecurrent area will be displayed with the vehicleshown as a blue triangle.
SettingsThe system is delivered with default settingsbut after these settings have been modifiedby the user, it will start with the most recentlyused settings.
The system has a reset function that enablesyou to return to the default settings, seepage 60.
On/Off
On1. Press the remote key into the ignition
slot.
2. The display activates automatically whenignition is in mode I (see the section "Igni-tion modes" in your Owner's Manual foradditional information).
3. Press the NAV button on the center con-sole control panel if the system does notstart automatically.
4. Press OK when the start-up text is dis-played (see the previous section "Mapmode").
It may take the system several seconds todetermine the vehicle's location and directionof travel.
OffThe system shuts down automatically whenthe remote key is removed from the ignitionslot.
Once activated, the navigation system cannotbe switched off manually and is always activein the background after the start-upsequence. However, if you prefer to not startthe system when the ignition is switched on:

02 Getting to know your navigation system
Before you begin
02
16
• Press EXIT when the start-up text is dis-played (see the previous section "Mapmode").
NOTE
The system can be used even when theengine is not running. To help avoid bat-tery drain, the system should be turned offwhen it is not in use.
Demo (simulated guidance)For an overview of how guidance functions,specify a destination.
If the vehicle is at a standstill, guidance canbe simulated to the specified destination, seepage 61.

02 Getting to know your navigation system
DVDs and the screen
02
17
Contents of DVDsNew DVDs are issued regularly with updatedmaps and the most current system software.The latest DVDs can be purchased from aVolvo retailer.
NOTE
The map information may not fully cover allareas/countries.
The area covered by the system is con-stantly being expanded, which is whyoccasional updates are required.
See also www.volvocars.com/navi for addi-tional information about maps, etc.
Map areasThe areas included in the system's maps varyaccording to market/country. The followingmain maps are available:
• Australia & New Zealand (Pacific)
• China
• Europe
• Hong Kong
• Japan
• North America
• Russia
• South America
• South Africa
• Southeast Asia
• The Middle East
• Turkey
If it is necessary to change the system's mapinformation, contact a Volvo retailer forinstructions.
Map updatesWhen the system is updated, new informationis copied from DVDs to the vehicle's naviga-tion system, which is done using the infotain-ment system's media player.
NOTE
• While an update is in progress, manyof the infotainment system's featureswill be unavailable or will have reducedfunction.
• It is advisable to read through theinstructions before initiating an update.
Contact your Volvo retailer for any questionsregarding updates.
License codeA license code is required in order to activatean update. This code can be obtained on theInternet.
1. Go the website listed in the informationincluded with the update DVDs.
2. Enter the vehicle's VIN number and theowner's email address in the fields provi-ded and click to submit the information.(The VIN number can be found on thelabel at the lower edge of the windshieldon the driver's side or in the menu systemunder MY CAR SettingsInformation VIN number.)
3. Write down the license code displayed.The code will also be sent to the emailaddress that was entered.
Updating the systemTo update the map/system information:
1. Start the engine.2. Insert the first DVD in the infotainment
system's media player and follow theinstructions displayed. If the update is onmore than one DVD1, insert the discs innumbered order.
1 This varies from market to market
02 Getting to know your navigation system
DVDs and the screen
02
18
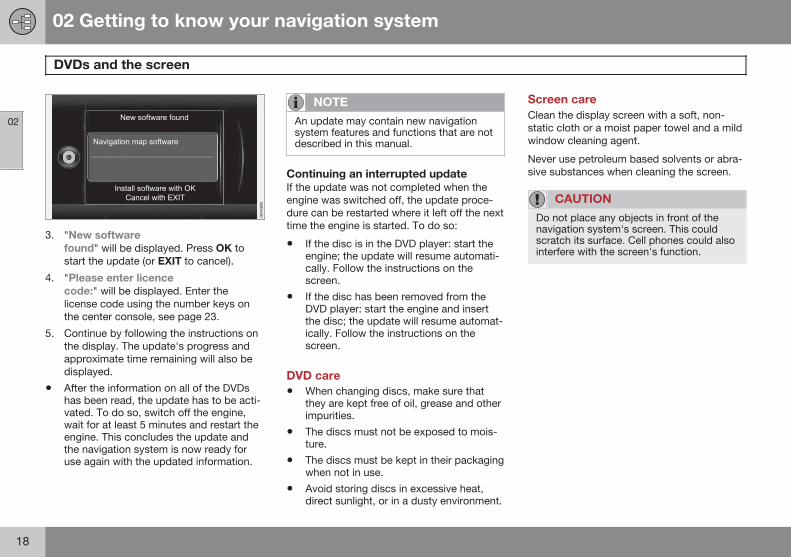
3. "New softwarefound" will be displayed. Press OK tostart the update (or EXIT to cancel).
4. "Please enter licencecode:" will be displayed. Enter thelicense code using the number keys onthe center console, see page 23.
5. Continue by following the instructions onthe display. The update's progress andapproximate time remaining will also bedisplayed.
• After the information on all of the DVDshas been read, the update has to be acti-vated. To do so, switch off the engine,wait for at least 5 minutes and restart theengine. This concludes the update andthe navigation system is now ready foruse again with the updated information.
NOTE
An update may contain new navigationsystem features and functions that are notdescribed in this manual.
Continuing an interrupted updateIf the update was not completed when theengine was switched off, the update proce-dure can be restarted where it left off the nexttime the engine is started. To do so:
• If the disc is in the DVD player: start theengine; the update will resume automati-cally. Follow the instructions on thescreen.
• If the disc has been removed from theDVD player: start the engine and insertthe disc; the update will resume automat-ically. Follow the instructions on thescreen.
DVD care• When changing discs, make sure that
they are kept free of oil, grease and otherimpurities.
• The discs must not be exposed to mois-ture.
• The discs must be kept in their packagingwhen not in use.
• Avoid storing discs in excessive heat,direct sunlight, or in a dusty environment.
Screen careClean the display screen with a soft, non-static cloth or a moist paper towel and a mildwindow cleaning agent.
Never use petroleum based solvents or abra-sive substances when cleaning the screen.
CAUTION
Do not place any objects in front of thenavigation system's screen. This couldscratch its surface. Cell phones could alsointerfere with the screen's function.

02 Getting to know your navigation system
DVDs and the screen
02
19

02 Getting to know your navigation system
System overview
02
20
The above illustration is schematic; certain details may vary, depending on the car model and market

02 Getting to know your navigation system
System overview
02
* Option/accessory, for more information, see Introduction. 21
Global Positioning System (GPS)antennaThe antenna is integrated into the roof mod-ule.
Voice controlA number of navigation system commandscan be voice controlled. The microphone isnear the driver's sun visor (2a) and the voicecontrol button is located on the steeringwheel keypad (2b). For additional information,see page 26.
Main unitThe main unit is located in and behind thecenter console and includes the followingfunctions:
• Determining the vehicle’s location.
• Calculating a route to the selected desti-nation.
• Voice guidance.
• Processing traffic information.
The GPS and TMC receivers are integratedinto the main unit.
Vehicle locationThe navigation system uses signals from theGlobal Positioning System, the vehicle’s
speedometer and a gyroscopic sensor to cal-culate the vehicle’s current location anddirection.
This also helps the system calculate directionand location if the GPS signal is temporarilyinterrupted, such as when driving through atunnel.
Traffic information (TMC)*The Traffic Message Channel (TMC) is astandardized code system for transmittingtraffic information. The receiver automaticallytunes to the correct frequency and receptionis handled by the audio system’s FM antenna.
NOTE
TMC is not available in all areas/countries.The area covered by the system is beingsteadily expanded, which makes occa-sional updates necessary.
See page 17 for information about updatingmaps and system software.
ScreenThe screen displays the maps and providesdetailed information about routes, distances,etc.
For information about caring for the screen,see page 18.
Center console controlsThe number keys in the center console canbe used together with the OK/MENU, TUNEand EXIT buttons to navigate in menus, con-firm selections or to go back in a menu, seepage 23.
Volume control and IR transceiverUse the vehicle’s audio system volume con-trol during voice guidance to raise or lowerthe volume. See also page 33. The volumecan also be adjusted in the MY CAR menu.
Point the remote control toward the centerconsole, where the Infrared (IR) transceiver islocated.

02 Getting to know your navigation system
System overview
02
22
Steering wheel keypadThe thumb wheel on the steering wheel key-pad can be turned to navigate in lists andmenus and pressed to confirm a selection.Use the EXIT button to go back in a menu orto cancel a selection.
For additional information, see page 23.
SpeakersSound from the navigation system comesfrom the infotainment system's front speak-ers.
02 Getting to know your navigation system
Navigation system controls
02
}}23
About Navigation system controlsThe navigation system can be operated withthe controls in the center console, the steer-ing wheel keypad or with a remote control(certain models only). The buttons in all casesfunction similarly but differ in appearance andthe way in which they are operated. Theremay also be differences from market to mar-ket.
The system can also be operated using voicecommands.
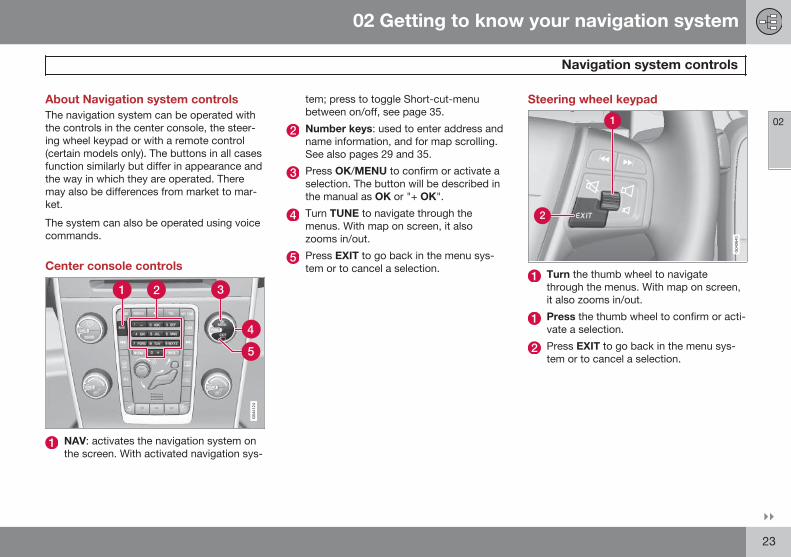
Center console controls
NAV: activates the navigation system onthe screen. With activated navigation sys-
tem; press to toggle Short-cut-menubetween on/off, see page 35.
Number keys: used to enter address andname information, and for map scrolling.See also pages 29 and 35.
Press OK/MENU to confirm or activate aselection. The button will be described inthe manual as OK or "+ OK".
Turn TUNE to navigate through themenus. With map on screen, it alsozooms in/out.
Press EXIT to go back in the menu sys-tem or to cancel a selection.
Steering wheel keypad
Turn the thumb wheel to navigatethrough the menus. With map on screen,it also zooms in/out.
Press the thumb wheel to confirm or acti-vate a selection.
Press EXIT to go back in the menu sys-tem or to cancel a selection.

02 Getting to know your navigation system
Navigation system controls
02
24
Voice controlSee the section "Voice control" beginning onpage 26.
Remote control1
The remote control can be used to controlvarious functions in the vehicle. The functionsdescribed in this section pertain to the navi-gation system.
• To use the remote control, point it towardthe center console.
Buttons on the remote control
NAV: activates the navigation system onthe screen. With activated navigation sys-tem; press to toggle Short-cut-menubetween on/off, see page 35.
EXIT: go back one step in a menu, cancela function or delete entered characters.
OK/MENU: confirm a selection. This but-ton is described in the manual as the "OKbutton" or "+ OK".
Arrow keys: use to move the cursoramong menu selections.
Number key pad: use to e.g., enter aname/address or to scroll on a map.
NOTE
The batteries' normal service life rangesfrom 1-4 years, depending on how oftenthe remote is used. If the remote is notworking properly, try replacing the fourAA/LR6 batteries.
WARNING
To help avoid the risk of injuries in theevent of sudden braking or a collision,always stow loose objects such as theremote control, cell phones, cameras, etc.in the glove compartment or other storagecompartments when not in use.
1 Available in certain models only.

02 Getting to know your navigation system
Navigation system controls
02
25
Additional information
In certain cases, more information may beavailable than is currently displayed on thescreen. In this case, the line of text will endwith the # sign. Press the INFO button to dis-play all of the available information.

02 Getting to know your navigation system
Voice control
02
26 * Option/accessory, for more information, see Introduction.
IntroductionThe navigation system's voice control featureenables you to voice-activate certain systemfunctions.
Voice commands offer convenience and helpavoid distractions so that you can concen-trate on driving and focus your attention onroad and traffic conditions.
Additional information about using voicecommands can also be found in yourOwner's Manual, in the Infotainment chap-ter's "Cell phone voice control" section.
WARNING
As the driver, you have full responsibilityfor operating the vehicle safely and adher-ing to all applicable traffic regulations.
The voice control feature uses the samemicrophone as the Bluetooth® hands-freesystem and system prompts are providedthrough the infotainment system's frontspeakers.
Since the microphone is positioned directly infront of the driver, voice commands given byother occupants of the vehicle may not beunderstood.
Getting started
Steering wheel keypad
Voice control button
Activating the system• Press the voice control button (1) to acti-
vate the system and after the tone, initiatea command dialogue.
While using the voice control system, keepthe following points in mind:
• When giving commands, speak at yourusual speed and in a normal tone of voiceafter the tone
• The vehicle's doors, windows and moon-roof should be closed when using thevoice control system
• Avoid background noises in the cabinwhen using the system
See the "Tutorial" section on page 27 foradditional information about using voice com-mands to control the navigation system.
NOTE
If you are uncertain of the commands thatyou can use, saying "help" after the tonewill prompt the system to provide a num-ber of commands that can be used in aspecific situation.
Voice control commands can be cancelledby:
• Saying "cancel"
• Not speaking
• Pressing and holding the voice controlbutton for several seconds
• Pressing EXIT
• Pressing any of the other mode but-tons on the center console: NAV,RADIO, MEDIA, MY CAR or CAM*.

02 Getting to know your navigation system
Voice control
02
27
Using voice commands1. To initiate a command, press the voice
control button briefly. Commonly usedcommands will be shown in the display.
2. After the tone, say, for example,"Navigation" clearly and in a normal toneof voice.
3. The text on the screen will change to"Repeat instruction/Navigation go toaddress/Itinerary." Say "Itinerary."
When a dialogue has been initiated, grayed-out texts or texts in parentheses are not partof the spoken command.
NOTE
Grayed-out menu alternatives on thescreen can currently not be selected.
Commands can be given in severalwaysFor example, the command "Navigation goto address" can be spoken as:
• "Navigation > Go to… > Address."Begin by saying "Navigation," wait for asystem response in the form of on-screenalternatives. Continue by saying "Goto…" and finish by saying "Address."
or
• give the entire command at one time:"Navigation go to address."
Useful tips• Initiate a voice command by pressing the
voice control button and speaking at yourusual speed and in a normal tone ofvoice.
• To respond to a system prompt, speakafter the tone at the end of the question.
• To cancel a voice control dialogue, pressand hold the voice control button or EXITfor several seconds.
• Saying "Help" after the tone will promptthe system to provide a number of com-mands that can be used in a specific sit-uation.
• A command dialogue with the system canbe speeded up by interrupting a systemprompt by pressing the voice control but-ton briefly. Wait for the tone and begin tospeak.
• The system will give a prompt 3 times. Ifthe driver does not respond, the com-mand dialogue will be cancelled.
ExamplesHere are a few of the most common com-mands:
• Navigation go to address
• Navigation go to POI
• Navigation delete next waypoint
• Navigation cancel guidance.
NOTE
A complete list of short cut commands canbe found by pressing the MY CAR buttonon the center console and turning TUNE toscroll to Settings Voice settingsVoice command list Navigationcommands.
Tutorial and settingsThe menus in MY CAR contain a tutorial tohelp the driver become familiar with the voicecontrol system. See your Owner's Manual fora more detailed description of the MY CARmenus.
TutorialVoice tutorial gives the driver step-by-stepinstructions about how to use the voice con-trol system.
The tutorial feature can be started in twoways:

02 Getting to know your navigation system
Voice control
02
28
NOTE
The tutorial feature can only be startedwhen the vehicle is parked and the parkingbrake is applied.
• By pressing the voice control button andsaying "Voice tutorial."
• By pressing MY CAR and going toSettings Voice settings Voicetutorial. Press OK to begin the tutoriallesson.
Voice trainingThe Voice training feature enables the voicecontrol system to become familiar with yourvoice and pronunciation, and allows you toset up user profiles. Two user profiles can becreated.
• To start the voice training procedure,press MY CAR and go to SettingsVoice settings Voice training. SelectUser 1 or User 2 and press OK to begin.
NOTE
The menu selection Default setting canonly be changed to User 1 after a Voicetraining session has been completed.
Other voice control settings found inMY CAR• Voice user setting: Two user profiles can
be set by pressing MY CAR and going toSettings Voice settings Voice usersetting. Select User 1 or User 2.
• Voice output volume: Press MY CARand go to Settings Voice settingsVoice output volume and select thedesired level.
The system's voice volume can also bechanged by turning TUNE during a systemprompt.
LanguagesThe voice control system is constantly beingdeveloped and at the time of printing, the fol-lowing languages were available:
• Dutch
• English (UK)
• English (US)
• French (CAN)
• French (FRA)
• German
• Italian
• Spanish (EU)
• Spanish (US)
• Swedish
NOTE
Voice control for the navigation system willonly function in the languages listed.
To change languages, go to SettingsSystem options Language.
The available languages have this iconin the list.
Language-dependent user profileThe voice control feature will only understandthe languages set in System options.
For example, assume that the profile User 1has been stored by a French-speaking driverand the language set to Canadian French. Ifthe driver then changes the system languageto English, the profile User 1 can no longerbe selected because the system will now onlyunderstand English and expect English to bespoken. The alternative Default setting willbe active instead.
To improve the system's capability to under-stand the driver's English pronunciation, carryout voice training and store the results in theprofile User 2 with the language set to Eng-lish (which will make both languages availa-ble) or change the language profile for User 1to English.

02 Getting to know your navigation system
On-screen keyboard
02
}}29
Entering text and making selections
Screen view showing the free-text field
The navigation system uses a text wheel forentering various types of information.
Activating a selectionWhen the desired function/menu selectionhas been chosen by turning the thumb wheelon the steering wheel keypad or TUNE on thecenter console control panel, press thethumb wheel/OK to display the function/menu's next level.
Entering characters
The text wheel
1. Mark (highlight) a text field.2. Press OK to display the text wheel.
3. Select a character with the thumb wheel/TUNE and enter it by pressing the thumbwheel/OK.
Numeric keyboardThe center console number keys 0–9, * and #can also be used to enter characters.
For example, press 91 to display all of thecharacters that can be entered by pressingthis key, which can be for example: w, x, y, zand 9. Press the button briefly to move thecursor to each available character.
• Stop on the desired character to select itand it will appear in the text field.
• Delete or cancel with EXIT.
Other charactersThe inset menu in the text wheel shows otherspecial characters or numbers. Note thatgrayed-out characters cannot be selected inthe current context:
• Select More + OK to access the textwheel for special characters.
• 123 + OK: numbers are displayed in thewheel.
• => + OK: the cursor moves to the list atthe right of the screen. Selections can bemade here by pressing OK.
• Last 5 + OK: lists the five most recentsearches. Mark one of them and pressOK.
List of alternatives
A list matching the characters entered
1 The characters for each respective key may vary, depending on the language selected d and the market
02 Getting to know your navigation system
On-screen keyboard
02
30
The number 5 in the upper right corner of thescreen indicates that the there are five alter-natives containing the characters entered(BEZ).
No listAn empty list and the characters *** in theupper right corner indicates that there areover 1,000 alternatives containing the charac-ters entered. If there are fewer alternatives,they will automatically be displayed.
To reduce the number of alternatives on thelist, enter additional characters.

02 Getting to know your navigation system
On-screen keyboard
02
31

02 Getting to know your navigation system
Maps, types of roads and the compass
02
32
Map views
The above illustration is schematic; certain details may vary, depending on the car model and market

02 Getting to know your navigation system
Maps, types of roads and the compass
02
33
Map views of the current locationThe way in which the map is displayeddepends on the vehicle’s location and thesettings that have been made in the system,such as map scale, geographic location, thesymbols that have been selected for display,etc.
An explanation of the text, signs, and sym-bols that may be displayed on the screen canbe found on the inside of the front cover ofthis manual.
The name of the current route can be viewedat the bottom of the screen without setting adestination.
Along a highway. The screen showspoints of interest along the highway.
Detailed intersection information. Thescreen shows the direction in which youshould turn at the next intersection1.(Alternative lanes are only displayed formajor roads.) Visual information is alwaysaccompanied by voice guidance.
Two maps. The screen shows the samemap, but with two different scales. Themap(s) can also be displayed in 2D or 3D,see page 55.
Map scroll mode, see page 35.
Voice guidanceOnce a destination has been entered and thevehicle is approaching an intersection or anexit, a voice will provide guidance about dis-tance and type of action to be taken. Adetailed map of the intersection is also dis-played. The voice guidance is repeated as thevehicles approaches the intersection.
Adjust the volume with the audio system’svolume control (this must be done while guid-ance is being given).
To repeat guidance• Press OK twice.
See also Settings Guidance optionsVoice guidance, see page 57.
NOTE
Voice guidance will not be provided duringa call on a Bluetooth©-connected cellphone.
To select a male or female voice and alanguage• Go into the MY CAR menu system (by
pressing this button on the center con-sole control panel). The volume for voiceguidance can also be adjusted here. See
your Owner's Manual for additional infor-mation.
CompassThe red point on the com-pass needle points north onthe map and the white end ofthe needle points south
Go to Settings Map options Compassto hide/show the compass. See also page56 for more information.
Unverified roadsA small number of roads in the system maybe unverified. This means that information onsigns, one-way streets, left turns, etc., maynot be accurate.
An itinerary containing unverified roads will bedisplayed in grey on the map.
The system’s default setting is to avoidunverified roads, and for this reason, no itin-eraries are planned on them. These settingscan be changed under Settings Routeoptions Customise route, see page 54.
1 This function can be expanded, see page 58.

02 Getting to know your navigation system
Maps, types of roads and the compass
02
34
The system provides information when anunverified road is added to an itinerary andwhen the vehicle begins to travel on one ofthese roads.

02 Getting to know your navigation system
Main menu, Scroll menu
02
35
The menu systemThe various sections of this manual presentall of the navigation system's menus andalternatives.
NOTE
Grayed-out menu alternatives on thescreen can currently not be selected.
ShortcutsAfter pressing the NAV button to start thenavigation system, pressing NAV again willdisplay a shortcut menu with commonly usedsystem features.
These shortcuts are:
• Set address – see also page 42.
• Set Point Of Interest – see also page43.
• Previous destinations – see also page46.
• Traffic events on route – see also page68.
• Cancel guidance – this deletes the cur-rent itinerary. Pause guidance is alsoavailable, see page 36.
Displaying the shortcuts from the mapview• Press the NAV button.
Main menu
The main menu is at the top of the menustructure.
Display the main menu from the mapview• Press OK MENU.
Return to the main menu from a sub-menu• Press NAV followed by OK MENU.
or
• Press EXIT repeatedly until the mainmenu is displayed.
Returning to the main menuIt is always possible to return to the mainmenu by pressing EXITrepeatedly.
Returning to the mapThere is a quick way to display the map onthe screen again, regardless of where you arein the menu structure:
• Press and hold EXIT for several seconds.
Scroll menu

02 Getting to know your navigation system
Main menu, Scroll menu
02
36
The Scroll menu makes it possible to movethe crosshairs across the map using the num-ber keys in the center console.
To activate the Scroll menu when themap is displayed• Press one of the number keys (0–9).
To scroll• Press one of the following number keys
1-2-3-4-6-7-8-9: an arrow indicating thescrolling direction will be displayed in themargins combined with the number keyto be used to scroll in the desired direc-tion.
To zoom in/out• Turn TUNE.
To exit the Scroll menu• Press EXIT.
The crosshairsPressing OK MENU will display a menu forthe point on the map that the crosshairs arecurrently pointing to. This menu contains thefollowing alternatives:
• Set single destination – deletes anypreviously set destinations in the itineraryand begins guidance on the map.
• Add waypoint – Adds the marked loca-tion to the itinerary.
• POIs nearby: makes it possible to searchfor/see any points of interest that may bearound the marked position.
• Read traffic message: makes it possibleto search for/see any current traffic mes-sages1 around the marked position.
• Information: displays any informationthat may be available about the markedposition.
• Store: makes it possible to store themarked position in the system's memoryand opens the menu Set destinationStored location Edit, see page 45.
Pause guidance
Pause guidance
Move the cursor to Pause guidance andpress OK MENU to temporarily stop all typesof guidance and Resume guidance will bedisplayed. However, the system's "car" sym-bol will continue to show the vehicle's posi-tion on the map.
To resume guidance• Mark Resume guidance and press OK
MENU.
1 This feature may not be available in all areas/states/markets

02 Getting to know your navigation system
Menu selections
02
}}37
Three levels of the menu structure are shownhere. A number of the third level menus alsohave sub-menus, which are described indetail in their respective sections in this man-ual.
The menus are structured as follows:
Menu level 1
Menu level 2
Menu level 3
Menu level 4
p. x
Menu system overview
Repeat voice guidance p. 33
Set destination
Address
Area:
City:
Street:
Number:
Junction:
Set single destination
Add as waypoint
Information
p. 42
Point of interest (POI)
By name
Near the car
Along the route
Around point on map
Along the street
Along the motorway
MyPOI near the car
MyPOI aroundpoint on map
p. 43
Stored location
Set single destination
Add as waypoint
Information
Edit
Sort by
Delete
p. 45
Previous destination
Set single destination
Add as waypoint
Information
Store
Delete
Delete all
p. 46
Return trip
Start guidance
Add as waypoint
Edit itinerary
p. 46
Postcode p. 47

02 Getting to know your navigation system
Menu selections
02
38
Latitude & longitude p. 47
Select point on map p. 47
Route details
Itinerary
Start guidance
Add another waypoint
Edit itinerary
p. 49
Avoid p. 50
Next destination p. 50
Route instructions p. 51
Map of entire route p. 51
Map of remaining route p. 51
Start demo
or
Stop demo
p. 61
Traffic information p. 64
Read traffic message p. 66
Traffic events on route
or
Traffic events ahead
p. 68
Avoided traffic events p. 68
Current position p. 52
Settings
Traffic informationA
Traffic message
p. 53
Route options
Route type
Route proposals
Customise route
Route learning
Reset route learning
p. 53
Map options
Map colours
Show dual map mode
Single map settings
Right map settings
Left map settings
POI on map
Show full-screen map
POI on map
Compass
Show current road name
Show speed limitsB
p. 55

02 Getting to know your navigation system
Menu selections
02
* Option/accessory, for more information, see Introduction. 39
Guidance options
Voice guidance
Voice output volume
Street names invoice guidance
Turn-by-turn navigation *
Time of arrival format
Always showintersection map
MyPOI Alert
p. 57
System information
GPS information
Map version:
Map loading progress
p. 58
Import/edit MyPOI p. 59
Reset navigation settings p. 60
Delete all user data p. 60
Pause guidance
or
Resume guidance
p. 36
A Not available in all areas/countries.B Not in car with Road Sign Information.

40
Setting a destination............................................................................... 42Itinerary................................................................................................... 49Current position...................................................................................... 52Settings................................................................................................... 53Demo....................................................................................................... 61

PLANNING YOUR TRIP

03 Planning your trip
Setting a destination
03
42
Address
There are several different ways of program-ming a destination.
It is enough to only enter the name of a town,village, etc. to be guided to the center of thespecified town/villages.
If you know the destination's latitude and lon-gitude, this information can also be used.
See page 29 for information about enteringtext/numbers in the system's various textfields.
NOTE
The definition of a city or area may varyfrom state to state, and also within thesame state. It will sometimes be an entirecity, or a particular section of a city.
City or street
Street is marked first
Set destination Address
Searching for a destination:
1. With the previous illustration's view onthe screen, press OK to activate the pre-selected text field.
2. Enter a name in the Street: field using thetext wheel or the center console keypadand then select City:.
3. Or select City: + OK and begin enteringthe name.
The following search criteria can be used:
• Area: (country)
• City:
• Postcode: a zip code can also be usedfor a search under City:
• Street:
• Number:
• Junction: (intersection) select an inter-section as a destination.
• Set single destination – deletes anydestinations in the itinerary and startsguidance to the selected destination.
• Add as waypoint: mark the selection +OK to add the address to the itinerary.
• Information: mark the information + OKto display information about the selecteddestination.

03 Planning your trip
Setting a destination
03
43
NOTE
If the number entered does not exist for astreet address, the system will provideinformation to this effect.
More about Information
Select an address/street + OK to select thefollowing:
• Map: displays a map of the location withadditional information when available.
• Call: call the location if a phone numberis given.
• Related POI: lists points of interest rela-ted to the selected location.
• Parking nearby: lists parking areas in thevicinity along with their distance from thedestination.
Points of interest (POI)
Set destination Point of interest (POI)
The system contains a large number of POIsthat can be searched for and set as destina-tions. The list of POIs can be shortened byspecifying the type(s) of POIs to be includedin the search:
• Select Type: and specify the types ofPOIs to be included in the search.
To select the POIs to be permanently dis-played on the map, go to the menu Settings
POI on map – see page 56.
All searches are performed as described inthe previous section (City or street):
1. Specify an Area:/City:/Type:/Name:.2. Then select Set single destination, Add
as waypoint or Information + OK.
By name
In addition to searching for a POI by generalcategory (e.g., restaurants), the POI's namecan be used. The procedure is the same aswhen searching by address, see page 42.
When searching for a Name: such as "Rick'sRestaurant" all names matching the combina-tion of letters will be shown as the letters inthe name are entered. The list of names willbecome more specific as more letters areentered.
NOTE
There are sub-categories of restaurants tosimplify the search.
Near the carThis performs a search of the area around thevehicle's current position.

03 Planning your trip
Setting a destination
03
44
Along the route
This searches for POIs along a route in theitinerary.
Around point on mapThis search is performed by scrolling thecrosshairs on the map, see page 35.
• The scroll map will be displayed. Movethe crosshairs to the desired position andpress OK.
Along the street
A search will be made on a specific street/road.
Along the highway
This search lists the points of interest that areeasy to reach from the highway, such as
service stations along the road or near anexit.
NOTE
The vehicle must be on this road for thelist to be displayed.
My POI near the car
This function makes it possible to search forPOIs in the area around the vehicle's currentlocation that the user has added to the MyPOI list.1
The search covers a radius of approx.20 miles (32 km).
1 For information about adding POIs (My POI) to the map database, see page 59.

03 Planning your trip
Setting a destination
03
45
NOTE
My POI icons will be displayed at a mapscale of "0.5 miles" ("1.0 km") or lower.
My POI around point on map
This function initiates a search for POIs thatthe user has added to the My POI list1 nearthe cursor's position on the map. The searchcovers a radius of approx. 20 miles (32 km.
The search is carried out with the scroll func-tion's crosshairs, see page 35.
• The scroll map is displayed. Place thecrosshairs on the desired My POI + OK.
Stored locations
Set destination Stored location
A large number of locations can be stored inthe system, which can then be used toquickly set or change an itinerary.
Storing a locationTo store the location of your choice:
1. Use the scroll function (see page 35) toselect the location to be saved.
2. Press OK to open the crosshairs' menu.
3. Select Store location + OK. The locationis now saved and will be added to theStored location list.
Select a stored location on the list + OK andchoose one of the following alternatives:
Set single destinationThe alternative Set single destination dele-tes any existing destinations in the itineraryand starts guidance on the map.
Add as waypointThe alternative Add as waypoint opens thesame window as for Set destinationAddress Add as waypoint, see page 49.
InformationThis alternative opens the same window asfor Set destination Address Add aswaypoint Information, see page 43.
Edit
This opens the selected stored location andmakes it possible to change/update the fol-lowing:
1 For information about adding POIs (My POI) to the map database, see page 59.

03 Planning your trip
Setting a destination
03
46
• Name: enter the name of the location ofyour choice
• Icon: select a symbol to represent thelocation on the map
• Address: enter an address
• Phone: enter a phone number
• Edit voice tag: record a voice tag. Followthe on-screen instructions.
• Show name on map: select whether toshow or hide the location's name on themap.
• Store: save the changes by pressing OK.
Sort bySelect to sort the entries in the list by:
• Name
• Icon
• Distance
• Chronological
Delete• Delete a stored location.
Previous destination
Existing destinations are stored here. Selectone of them and then do one of the following:
• Set single destination
• Add as waypoint
• Information
• Store: see the following illustration formore information.
• Delete
• Delete all.
Store displays this editing menu
Store displays the same editing menu as forStored location Edit.
For more information, see page 45.
• To supplement or change the informationfor a destination, select Store + OK.
Return tripThis alternative enables you to return to theitinerary's starting point and can be selectedat any time during an itinerary.
Select among:
• Start guidance
• Add as waypoint
• Edit itinerary: select between Clearitinerary and Route options.

03 Planning your trip
Setting a destination
03
47
Zip code (post code)
Set destination Postcode
Search for a destination using its zip code:
1. Select Postcode + OK to display the textwheel.
2. Select characters with TUNE and enterthem by pressing OK (or use the centerconsole number keys).
NOTE
Zip codes/post codes may be presenteddifferently, depending on the country/area.
Searching by latitude/longitude
Set destination Latitude & longitude
Select a destination using its GPS coordi-nates:
1. Highlight the number to be changed andpress OK to "activate" the character'swindow.
2. Enter a number using the center consolenumber keys (or turn TUNE) and finish bypressing OK. The previous character'swindow will no longer be "active".
3. Highlight the next number to be changedand repeat the procedure.
4. The two right-most character windowsare for entering the direction. Use thenumber keys or turn TUNE. N = 6, S = 7,W = 9 and E = 3.
5. When both coordinates have beenentered, select Add as waypoint + OKto add the location to the itinerary.
Add to itineraryAdd the selected coordinates for the locationon the map to the itinerary.
InformationThis displays any available information aboutthe location.
Searching for a location on the map

03 Planning your trip
Setting a destination
03
48
Set destination Select point on map
This displays a map with the current locationmarked. See also "Scroll menu" on page 35.
• Turn TUNE to change the map scale.
1. Move the crosshairs using the numberkeys on the center console ((6 MNO) tomove right, (8 TUV) to move down, etc).
2. When you have moved to the desiredlocation, press OK.

03 Planning your trip
Itinerary
03
49
Menu overview
Route details
The system can handle one Itinerary at a timewith a maximum of 8 intermediate destina-tions.
The first destination entered becomes thefinal destination and any others are treated asintermediate destinations.
NOTE
The menu selection Itinerary becomesaccessible after a destination has beenselected.
NOTE
The most recently added intermediatedestination always becomes Intermediatedestination 1. Existing ones will be raisedone step (i.e., existing intermediate desti-nation 1 becomes intermediate destination2 and so on).
If you would like to reorder these inter-mediate destinations in the itinerary, go toRoute details Itinerary, Select anintermediate destination and Movein list.
Setting an itinerary
Route details Itinerary
Set up an itinerary with several stops alongthe way to avoid adding intermediate destina-tions during your trip.
Up to 8 intermediate destination can be set.
Start guidanceMove the cursor to Start guidance andpress OK to activate the current itinerary.
The result with "Itinerary 3" selected
If the setting to show 3 alternative itinerariesis selected, one of them can be chosen, seethe menu Settings Route optionsRoute proposals on page 54.
Add another waypointAdd another waypoint adds an intermediatedestination (uses the same menu as "Setdestination.") See also page 42.
Editing an itineraryThe alternatives are:

03 Planning your trip
Itinerary
03
50
• Clear itinerary: erase the current itiner-ary.
• Route options: opens a shortcut toSettings Route options, seepage 53.
Intermediate destinations in an itinerary
Each intermediate destination in the itinerarycan be updated by marking it and pressingOK.
• Information: complete name/address/phone number (where applicable), andlongitude and latitude. If a phone numberis displayed, a call can be made througha Bluetooth®-enabled cell phone. See thesection "Bluetooth® hands-free connec-tion" in your Owners's Manual for addi-tional information. Any POIs or parking
areas near the destination or will beshown.
• Delete: remove the intermediate destina-tion from the itinerary.
• Move in list: change the order in whichthe intermediate destinations appear inthe itinerary.
• Adjust on map: uses crosshairs on themap to mark a position. The crosshairscan be scrolled (moved) to another posi-tion, which can be selected by pressingOK. See page 35 for more information onthe scroll function.
• Store: opens the menu Set destinationStored location Edit, see page 45.
Avoiding areas
This feature makes it possible to avoid certainparts of the route (due to traffics jams, con-
struction, etc.) The various distances shownon the screen are calculated from the vehi-cle's current position. The system will thenselect another route.
• Mark a selection and press OK.
Next destination
Route details Next destination

03 Planning your trip
Itinerary
03
51
This shows the location of the next intermedi-ate destination on the map with its name,address, estimated time of arrival and theremaining distance to this destination. It alsooffers the following alternatives:
• Delete: remove the current intermediatedestination and show the next one.
• Map: show a position on the map withthe Scroll menu, see page 35.
• >>: go to the next intermediate destina-tion in the itinerary (at the end of the list,this will loop back to the beginning).
• Call: call the destination (where applica-ble).
Route instructions
Route details Route instructions
This lists the points along the route whereinstructions will be provided.
Map of the entire route
Route details Map of entire route
This displays the entire route scaled down sothat it fits on the map.
Otherwise, the functions are the same as forthe Scroll menu, see page 35.
Map of the remaining route
Route details Map of remaining route
This is similar to the view showing the entireroute but only shows the remaining part ofthe route to the destination from the vehicle'scurrent position.
Otherwise, the functions are the same as forthe Scroll menu, see page 35.

03 Planning your trip
Current position
03
52
Where am I?
Current position
This feature displays a map with the vehicle'scurrent location and information such as thelocation's name and coordinates.

03 Planning your trip
Settings
03
53
Traffic information
Settings Traffic information
Additional settings that can be made for Traf-fic information, see also page 66.
Traffic messages
Traffic message
Several selections can be made here for dis-playing traffic messages.
• All: information about all reported trafficdisruptions will be displayed.
• Most serious: this will display informa-tion about e.g., closed roads due to acci-dents or other serious problems.
• None: No traffic messages will be dis-played.
NOTE
This setting affects the way that the sys-tem calculates a route.
Route options
Settings Route options
Route type
The following types of routes can beselected:
• Fast: Major roads such as highways areprioritized. In some cases, this may notoffer the shortest travel time or route
• Short: the shortest route is prioritized. Insome cases, the route may use secon-dary roads
• Easy: the system will prioritize roads thatdo not entail difficult driving situations ornumerous intersections

03 Planning your trip
Settings
03
54
Route proposal
When the Start guidance command hasbeen given, two alternatives will be presen-ted:
• Select 1 if the route type is chosen basedon Route type in the previous section
• Select 3 if the driver chooses among thethree route types before guidance begins
See page 49 for more information.
Route options1
Customize route.
Select roads or other things that the systemshould avoid as far as possible when settinga route:
• Avoid motorways
• Avoid toll roads
• Avoid ferries
• Avoid unverified roads
• Avoid borders
• Avoid time-restricted roads
• Avoid season-restricted roads
NOTE
• If a route has already been set whenone or more of these alternatives arechanged, there may be a slight delayin guidance as the system recalculatesthe route.
• If the system has been set to avoid tollroads, highways, etc., roads of thistype will only be used when there areno other alternatives.
Route learningAn itinerary must be set. If the driver deviatesfrom the proposed route and takes a differentone to the final destination, the system willmemorize the route that the driver haschosen.
If the same itinerary is selected two moretimes and the driver uses his/her "own" routeagain, the system will show the driver's route.
If this alternative is marked and the sameroute is driven three times, this new route willbe stored and replace the original itinerary.
Reset route learningThis deletes the "learned" route.
1 These options vary, depending on the area/market/state.

03 Planning your trip
Settings
03
}}55
Map options
Settings Map options
Map colorsChoose between:
• Automatic: a light sensor detects if it isday or night.
• Day (see the previous illustration)
• Night
Single map settings• Map orientation: select Heading or
North.
North: the map will always have north at thetop of the screen. The "car" symbol will movein the current direction on the screen.
Heading: the "car" symbol will be in the cen-ter of the map and will always point upward.The map will rotate under the symbol,depending on the direction of the road.
• Map view: select 2D or 3D2.
2D: the "car" symbol and map will always beviewed from above.
3D: the "car" symbol and map will be viewedat an angle from above or from the side.
Show dual map mode
The map can be displayed over the entirescreen or two split-screen maps can be dis-played at the same time.
Select split-screen by marking Show dualmap mode and pressing OK, followed byEXIT.
2 Only if Map orientation > Heading is selected.
03 Planning your trip
Settings
03
56
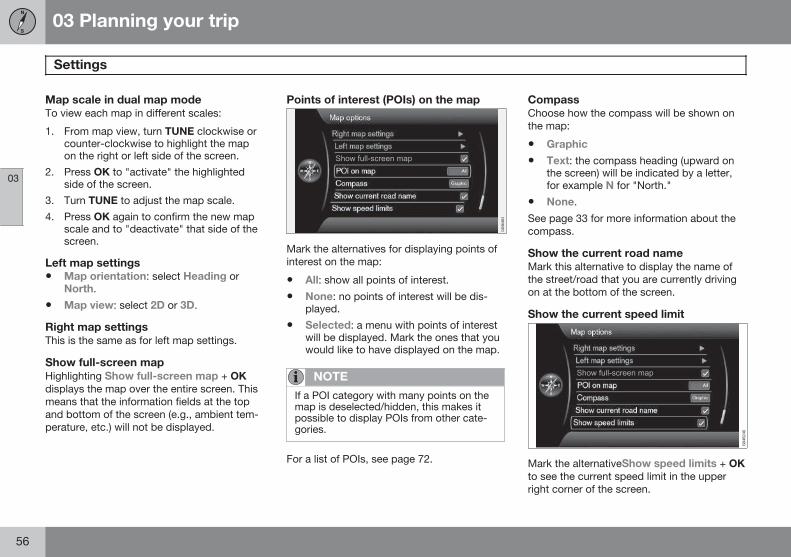
Map scale in dual map modeTo view each map in different scales:
1. From map view, turn TUNE clockwise orcounter-clockwise to highlight the mapon the right or left side of the screen.
2. Press OK to "activate" the highlightedside of the screen.
3. Turn TUNE to adjust the map scale.
4. Press OK again to confirm the new mapscale and to "deactivate" that side of thescreen.
Left map settings• Map orientation: select Heading or
North.
• Map view: select 2D or 3D.
Right map settingsThis is the same as for left map settings.
Show full-screen mapHighlighting Show full-screen map + OKdisplays the map over the entire screen. Thismeans that the information fields at the topand bottom of the screen (e.g., ambient tem-perature, etc.) will not be displayed.
Points of interest (POIs) on the map
Mark the alternatives for displaying points ofinterest on the map:
• All: show all points of interest.
• None: no points of interest will be dis-played.
• Selected: a menu with points of interestwill be displayed. Mark the ones that youwould like to have displayed on the map.
NOTE
If a POI category with many points on themap is deselected/hidden, this makes itpossible to display POIs from other cate-gories.
For a list of POIs, see page 72.
CompassChoose how the compass will be shown onthe map:
• Graphic
• Text: the compass heading (upward onthe screen) will be indicated by a letter,for example N for "North."
• None.
See page 33 for more information about thecompass.
Show the current road nameMark this alternative to display the name ofthe street/road that you are currently drivingon at the bottom of the screen.
Show the current speed limit
Mark the alternativeShow speed limits + OKto see the current speed limit in the upperright corner of the screen.

03 Planning your trip
Settings
03
}}* Option/accessory, for more information, see Introduction. 57
Vehicles with Road Sign Information(RSI)*
Speedometer with RSI.
Vehicles equipped with Road SignInformation only display the current speedlimit on the speedometer. The speed limit willnot be displayed on the navigation system'smap.
Consult your owner's manual for additionalinformation about RSI.
Guidance options
Settings Guidance options
Voice guidanceMark Voice guidance if you would like spo-ken instructions. See page 26 for additionalinformation.
Voice volumeThis displays a volume control on the screenfor setting the level for voice guidance.
• Adjust by turning TUNE and pressing OK.
See page 21 for more information.
Street names in voice guidanceIn addition to voice guidance informationabout distance and direction, this functioncan also say the name of the street/road. Toactivate:
• Mark Street names in voice guidance.
Navigation with Turn-by-turn
Moving the cursor to Turn-by-turnnavigation + OK activates the function,which means that the next turning point in the

03 Planning your trip
Settings
03
58
itinerary, as well as the distance to it, will beshown on the instrument panel.
Time informationSelect the time-related information to be dis-played:
• ETA (Estimated Time of Arrival)
• RTA (Remaining Time until Arrival)
Always show intersection mapThe navigation system can work in the back-ground while other information (radio, phone,etc.) is displayed.
Select Always show intersection map +OK to select the function that displaysdetailed map information on half of the screenwhile other sources/programs are being used,see page 33.
Alert for My POISelect MyPOI Alert + OK to activate a presetaudible alert when the vehicle approaches aMyPOI location, see page 59.
System information
Settings System information
GPS information
The screen shows:
• Number of received satellites:
• Received position
• Map-matched position
• Altitude:
• The geographic name of the current posi-tion.
Map version
The screen will display:
• Software version:
• Map version:
• Map market:
Map loading progressThis indicates the progress of a map/systemupdate. See page 17 for more information.

03 Planning your trip
Settings
03
59
Import/Edit MyPOI
Settings Import/edit MyPOI
Many companies offer POI files on their websites, which allows the user to supplementVolvo's map database by showing POIs fromother sources.
NOTE
• Supplementing the map databaserequires a certain knowledge of com-puters.
• The POI file formats and proceduresfor downloading these files are set bythe respective manufacturers/distribu-tors. This means that there is nostandard procedure for downloadingthese files and these instructions can-not give exact step-by-step instruc-tions for doing so.
• Contact your Volvo retailer if you haveany questions about downloading POIfiles.
The following is a general example of the pro-cedure for downloading a POI file from theInternet:
1. Go to the source's web site and searchfor the POI file to be downloaded.
2. Select a POI file with the "gpx" formatand download it. If the file is not availablein the gpx format, it will have to be con-verted to this format after it has beendownloaded3.
3. Copy the POI file to a USB flash drive.
4. Insert the flash drive in the vehicle's USBsocket, located under the center consolearmrest. In the infotainment system'smenus, go to Settings Import/editMyPOI.
5. Select Import + OK and follow theinstructions on the screen.
When the files have been imported, certainsettings can be made for the new MyPOIgroup:
• The name can be changed
• The MyPOI map icon can be changed (ifan icon was included with the importedPOI file, it will automatically be preselec-ted)
• One of three different audible alerts canbe selected (to alert the driver when thevehicles approaches the MyPOI icon onthe map, see page 58)
• Choose to display/hide MyPOI icons onthe map.
When all of the choices have been made,select Store + OK to complete the procedureor to import/edit a new POI group.
All POIs that have been added will be placedunder the heading "My POI".
3 Free conversion programs can be downloaded from the Internet.

03 Planning your trip
Settings
03
60
NOTE
The type of information that may be dis-played on the map is regulated by nationallegislation. For the latest information, go towww.volvocars.com/navi.
100 MyPOI groups (or 50, 000 MyPOI loca-tions in the GPX 1.1 format) can be added tothe map database.
Reset navigation settings
Settings Reset navigation settings
This function returns all settings to the origi-nal (factory) system settings.
The menu alternative Settings Resetnavigation settings + OK displays: Reset allnavigation settings?, Continue with OKCancel with EXIT.
Delete all user data
Settings Delete all user data
The menu alternative Settings Delete alluser data + OK displays: Do you want todelete all navigation user data?, Continuewith OK Cancel with EXIT
Pressing OK will delete the following informa-tion:
• all stored locations
• the Last 5 locations
• previous destinations
• route learning information
• imported MyPOI information
• changes to factory settings

03 Planning your trip
Demo
03
61
Start the demo (system simulation)
Route details Start demo
When the vehicle is at a standstill, this func-tion offers simulated guidance to the currentlyset destination.
To interrupt the simulation:
• The previous memo selection (Startdemo) changes to Stop demo. Mark itand press OK.
NOTE
The demonstration function can only beused if a destination has been selected.

G000000
62
Introduction............................................................................................. 64Reading information................................................................................ 66Dealing with traffic problems.................................................................. 68

TRAFFIC INFORMATION
04 Traffic information
Introduction
04
64
Display and receptionBroadcast traffic information is alwaysreceived and presented, even if no destina-tion is specified.
The way in which traffic information is pre-sented can be set and changed in Settings
Traffic information, see page 53.
The way in which traffic information is pre-sented is also affected by the way in which itis broadcast.
NOTE
Traffic information is not available in allareas/states/provinces.
The transmission range for traffic informa-tion is being increased continuously.
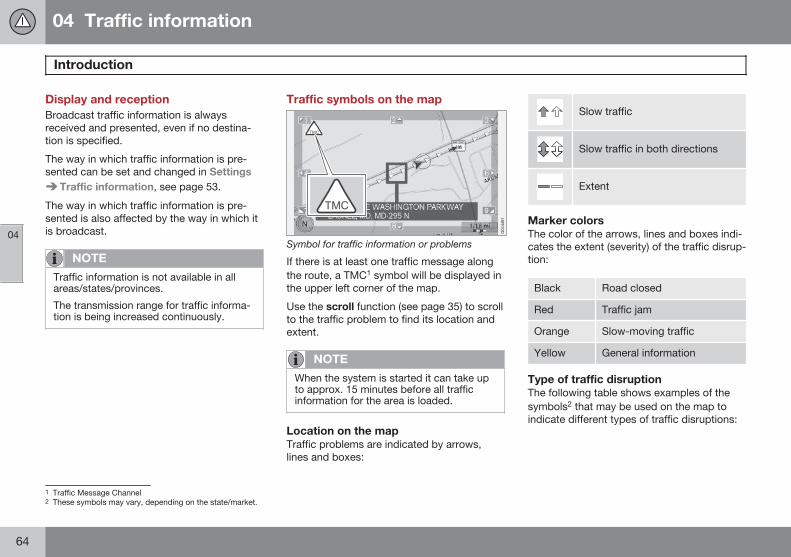
Traffic symbols on the map
Symbol for traffic information or problems
If there is at least one traffic message alongthe route, a TMC1 symbol will be displayed inthe upper left corner of the map.
Use the scroll function (see page 35) to scrollto the traffic problem to find its location andextent.
NOTE
When the system is started it can take upto approx. 15 minutes before all trafficinformation for the area is loaded.
Location on the mapTraffic problems are indicated by arrows,lines and boxes:
Slow traffic
Slow traffic in both directions
Extent
Marker colorsThe color of the arrows, lines and boxes indi-cates the extent (severity) of the traffic disrup-tion:
Black Road closed
Red Traffic jam
Orange Slow-moving traffic
Yellow General information
Type of traffic disruptionThe following table shows examples of thesymbols2 that may be used on the map toindicate different types of traffic disruptions:
1 Traffic Message Channel2 These symbols may vary, depending on the state/market.

04 Traffic information
Introduction
04
65
Accident
Contraflow (two-way traffic, singlelanes in each direction)
Detour (diversion)
Information
Narrow road
Parking information
Traffic jam
Road work
Slippery road
Other hazard
Road closed
Extent
Certain traffic messages also contain infor-mation on the extent of the traffic obstruction.
In addition to the symbol, a yellow, orange,red or black line along the route is shown onall scales up to 3 miles. The length of the lineis corresponds to the extent (distance) of thetraffic problem.
Scale of the area for traffic informationThe map scale determines the amount of traf-fic information that can be displayed; thelarger the area on the map shown on thescreen, the greater the amount of informationdisplayed.
04 Traffic information
Reading information
04
66
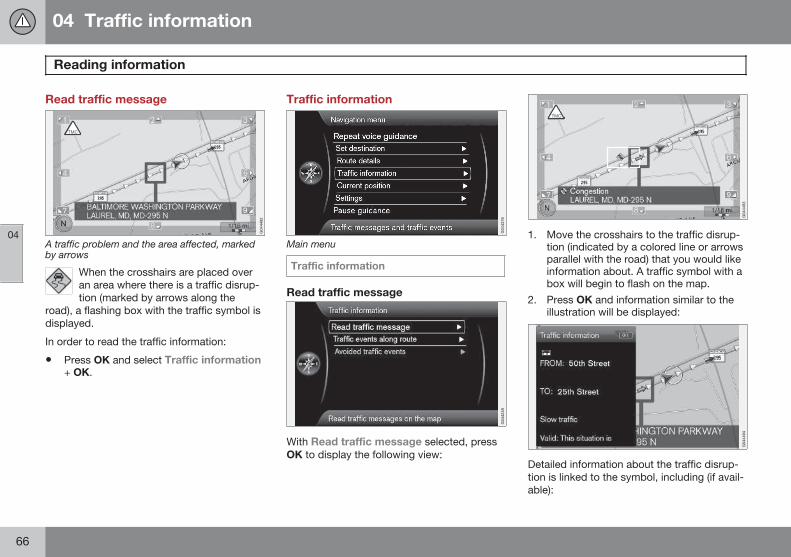
Read traffic message
A traffic problem and the area affected, markedby arrows
When the crosshairs are placed overan area where there is a traffic disrup-tion (marked by arrows along the
road), a flashing box with the traffic symbol isdisplayed.
In order to read the traffic information:
• Press OK and select Traffic information+ OK.
Traffic information
Main menu
Traffic information
Read traffic message
With Read traffic message selected, pressOK to display the following view:
1. Move the crosshairs to the traffic disrup-tion (indicated by a colored line or arrowsparallel with the road) that you would likeinformation about. A traffic symbol with abox will begin to flash on the map.
2. Press OK and information similar to theillustration will be displayed:
Detailed information about the traffic disrup-tion is linked to the symbol, including (if avail-able):
04 Traffic information
Reading information
04
67
• expected duration
• limitations (speed, vehicle width/height,etc.)
• roads affected
If there is more than one traffic disruptionwithin the box, press OK to display informa-tion about the problem closest to the centerof the crosshairs first.
Numbers, such as "2/5" at the top of thescreen, indicate that the currently displayedtraffic message is number 2 of a total of 5 inthe box. Display the other messages bypressing OK.
• Return to the map screen by pressingEXIT.

04 Traffic information
Dealing with traffic problems
04
68
Avoiding traffic disruptions
Traffic events ahead
Menu row 2 when no itinerary has been set.
With Traffic events ahead selected, pressOK to list the current traffic disruptions.
Traffic events along route
Menu row 2 with a set itinerary.
This is the same menu row as in the previoussection, but with a set itinerary. The text then
changes from Traffic events ahead toTraffic events on route. You can opt tohave the system guide you around the trafficdisruption on another route.
Press OK to list the traffic disruptions alongthe route.
A list with one disruption along the itinerary'sroute.
The driver can avoid traffic disruptions by let-ting the system choose another route. To doso:
1. Select the traffic disruption to be avoidedand press OK to mark the selection.
2. A number of areas can be marked to beavoided. Up to 15 areas with traffic dis-ruptions can be selected.
3. Continue by marking Calculate newroute + OK.
The system will then calculate a new route toavoid the traffic disruption.
To get detailed information about a listed traf-fic disruption:
• Select one from the list and press # INFO(on the center console control panel) todisplay the information.
Avoided traffic events
The marked traffic problems are listed here.

04 Traffic information
Dealing with traffic problems
04
69
A list with one alternative that can be edited.
The following can be done:
• Clear all: unmark all alternatives.
• Select one of the alternatives + OK: thealternative will be unmarked.
• Select one of the alternatives + # INFO:detailed information and a map will bedisplayed.
Detailed information, return to the menu bypressing EXIT.
• Return to the map by pressing EXIT orselect Calculate new route + OK: theitinerary will be adjusted according to thechanges made.

70
Points of interest (POIs).......................................................................... 72

SYMBOLS ON THE MAP

05 Symbols on the map
Points of interest (POIs)
05
72
Specify individual POIs to be shown on themap or select All or None, see page 56.
Marked POIs will be shown on the map
Settings Map options POI on mapSelected
To do so:
• Select/deselect a POI by turning TUNEand pressing OK. Finish by pressingEXIT.
The number of POIs displayed is limited Inorder to avoid too much clutter on the map.Zoom in on a specific area to see a greaternumber of POIs.
NOTE
• The icons used for POIs and the num-ber of POIs available may vary fromcountry to country.
• New icons may be added/removedwhen the system is updated. Theicons for all available POIs can alwaysbe found under Settings in the navi-gation system's menus.
Some examples of symbols that can beselected to be displayed on the map:
Gas station
Gas station with CNG (biogas)
Gas station with LPG (liquid petro-leum gas)
Car wash
Auto service & maintenance
Rental Car Agency
Car race track
Volvo dealer
Parking
Parking garage
Parking for large vehicles
Tourist information
Historical monument
Tourist attraction
Hockey rink
Sports complex
Exercise area
Ski resort
Movie theater
Amusement park

05 Symbols on the map
Points of interest (POIs)
05
73
Opera house/theater
Bar/nightclub
Zoo
Restaurant
Restaurant
Restaurant, Chinese
Restaurant, sea food
Fast food
Café
Grocery store
Shopping mall
Dry cleaner
News stand
Barber shop/hair salon
Park & Recreation
Rest area
Hotel
Convention/exhibition center
Train/commuter train station
Airport
Bus station
Ferry terminal
Marina
Municipal/government office
Higher education/university
City center
Police station
Fire station
Library
Hospital
Pharmacy
Bank
ATM
Post
School/daycare center
Campground

74
Frequently asked questions.................................................................... 76EULA – License agreement..................................................................... 78

QUESTIONS & ANSWERS

06 Questions & Answers
Frequently asked questions
06
76
The vehicle’s position on the map isincorrect.The Global Positioning System (GPS) indi-cates the car’s position with an accuracy ofabout 65 feet (20 meters).
Accuracy may be even less when driving onroads lying parallel to another road, windingroads, roads on several levels, and also afterdriving a long distance without making anydistinct turns.
Tall buildings and mountains, tunnels, via-ducts, over/underpasses etc., also have anegative affect on the reception of GPS sig-nals, which means that the estimation of thecar’s position may not be precise.
VNS does not always calculate thefastest/shortest route.Parameters such as distance, width of road,type of road, number of right or left turns,traffic circles etc., are all taken into accountwhen calculating the best theoretical route.Experience and local knowledge may, how-ever, lead to a better choice of route.
The VNS system chooses toll roads,freeways, and ferries even though Ihave opted to avoid them.When calculating routes over longer dis-tances, for technical reasons the system canonly use major roads. If you select NO for toll
roads and freeways, they will be avoided asmuch as possible, but will be used if no otherreasonable alternative is available.
After being transported, the car’sposition on the map is incorrect.If the car is transported, for example by ferryor train, or in such a way as to impede thereception of GPS signals, it can take up to5 minutes to calculate the car’s new positioncorrectly.
The vehicle’s position on the map isincorrect after its battery has beendisconnected.If power has been cut from the GPS antenna,it can take more than 5 minutes for the GPSsignals to be received correctly and the car’sposition to be calculated.
The car symbol on the map moveserratically after a tire changeIn addition to the GPS receiver, the vehicle’sspeedometer and an onboard gyro are alsoused to calculate the vehicle’s current loca-tion and direction of travel. If the spare tire isput on the vehicle, or is a change is madefrom summer to winter tires (or vice versa),the navigation system must "learn" the newdimensions of the tire(s). Therefore, it may benecessary to drive for several miles, including
a number of turns, for the system to makethis adjustment.
The map image does not correspond toactual conditions.Factors such as the constant expansion andrebuilding of the road network, new trafficregulations constantly being introduced etc.,mean that the digital map database is notalways complete.
The maps and data on the DVDs are static.They will not automatically update to reflectreal-life changes to road and traffic patterns.Updated DVDs are produced periodically.Please contact your Volvo retailer for moreinformation about availability.
The map scale sometimes changes.There is no detailed map information for cer-tain areas. If this is the case, the system auto-matically changes the map scale.
Certain menu options are not available.Check the settings that you have made.Select Reset to default for the particularoption to return to the default settings.
The car symbol on screen jumpsforward or spins.The system may need a few seconds tosense the position and movement of the carbefore you drive off.

06 Questions & Answers
Frequently asked questions
06
77
1. Switch off the VNS system and the igni-tion.
2. Switch on the ignition again and restartVNS, but remain at a standstill for a shorttime before driving off.
I am planning a long trip but do notwant to specify destinations in the citiesthat I will be passing through. What isthe easiest way to set up an itinerary?Select the final destination directly on themap using the cross hairs. The system willautomatically guide you to the final destina-tion even if you drive past intermediate desti-nations.
The system’s map information is notup-to-dateContact your Volvo retailer for updated mapinformation.
WARNING
Navigating safely
Always use good judgment when followingnavigation system guidance, and do notfollow guidance that seems contrary toyour own best judgment.
See also www.volvocars.com/navi for addi-tional information about maps, etc.
What is the easiest way to check thecurrent map version?See Settings System information Mapversion: for information about the map ver-sion and which geographic area it covers.

06 Questions & Answers
EULA – License agreement
06
78
END-USER TERMSThe Map Data Disc ("Data") is provided foryour personal, internal use only and not forresale. It is protected by copyright, and issubject to the following terms and conditionswhich are agreed to by you, on the one hand,and NAVTEQ North America, LLC ("NT")and its licensors (including their licensors andsuppliers) on the other hand.
© 2006-2014 NAVTEQ. All rights reserved.
The Data for areas of Canada includes infor-mation taken with permission from Canadianauthorities, including: © Her Majesty theQueen in Right of Canada, © Queen’s Printerfor Ontario, © Canada Post Corporation,GeoBase®.
NAVTEQ holds a non-exclusive licensefrom the United States Postal Service® topublish and sell ZIP+4® information.
©United States Postal Service® 2005. Pricesare not established, controlled or approvedby the United States Postal Service®. Thefollowing trademarks and registrations areowned by the USPS: United States PostalService, USPS, and ZIP+4.
TERMS AND CONDITIONS
Personal Use OnlyYou agree to use this Data for the solely per-sonal, non-commercial purposes for whichyou were licensed, and not for servicebureau, time-sharing or other similar purpo-ses. Accordingly, but subject to the restric-tions set forth in the following paragraphs,you may copy this Data only as necessary foryour personal use to (I) view it, and (ii) save it,provided that you do not remove any copy-right notices that appear and do not modifythe Data in any way.
You agree not to otherwise reproduce, copy,modify, decompile, disassemble or reverseengineer any portion of this Data, and maynot transfer or distribute it in any form, for anypurpose, except to the extent permitted bymandatory laws.
You may transfer the Data and all accompa-nying materials on a permanent basis if youretain no copies and the recipient agrees tothese End-User Terms. Data provided inmulti-disc sets may not be transferred or soldon a divided or single disc basis.
RestrictionsExcept where you have been specificallylicensed to do so by NT and without limitingthe preceding paragraph, you may not (a) usethis Data with any products, systems, or
applications installed or otherwise connectedto or in communication with vehicles, capableof vehicle navigation, positioning, dispatch,real time route guidance, fleet managementor similar applications; or (b) with or in com-munication with any positioning devices orany mobile or wireless-connected electronicor computer devices, including without limita-tion cellular phones, palmtop and handheldcomputers, pagers, and personal digitalassistants or PDAs.
WarningThe Data may contain inaccurate or incom-plete information due to the passage of time,changing circumstances, sources used andthe nature of collecting comprehensive geo-graphic data, any of which may lead to incor-rect results.
No WarrantyThis Data is provided to you "as is," and youagree to use it at your own risk. NT and itslicensors (and their licensors and suppliers)make no guarantees, representations or war-ranties of any kind, express or implied, arisingby law or otherwise, including but not limitedto, content, quality, accuracy, completeness,effectiveness, reliability, fitness for a particu-lar purpose, usefulness, use or results to beobtained from this Data, or that the Data orserver will be uninterrupted or error-free.

06 Questions & Answers
EULA – License agreement
06
}}79
Disclaimer of WarrantyNT AND ITS LICENSORS (INCLUD-ING THEIR LICENSORS AND SUP-PLIERS) DISCLAIM ANY WARRAN-TIES, EXPRESS OR IMPLIED, OFQUALITY, PERFORMANCE, MER-CHANTABILITY, FITNESS FOR APARTICULAR PURPOSE OR NON-INFRINGEMENT.Some States, Territories and Countries do notallow certain warranty exclusions, so to thatextent the above exclusion may not apply toyou.
Disclaimer of LiabilityNT AND ITS LICENSORS (INCLUD-ING THEIR LICENSORS AND SUP-PLIERS) SHALL NOT BE LIABLE TOYOU IN RESPECT OF ANY CLAIM,DEMAND OR ACTION, IRRESPEC-TIVE OF THE NATURE OF THECAUSE OF THE CLAIM, DEMANDOR ACTION ALLEGING ANY LOSS,INJURY OR DAMAGES, DIRECT ORINDIRECT, WHICH MAY RESULTFROM THE USE OR POSSESSIONOF THE INFORMATION; OR FOR
ANY LOSS OF PROFIT, REVENUE,CONTRACTS OR SAVINGS, ORANY OTHER DIRECT, INDIRECT,INCIDENTAL, SPECIAL OR CONSE-QUENTIAL DAMAGES ARISINGOUT OF YOUR USE OF OR INABIL-ITY TO USE THIS INFORMATION,ANY DEFECT IN THE INFORMA-TION, OR THE BREACH OF THESETERMS OR CONDITIONS,WHETHER IN AN ACTION IN CON-TRACT OR TORT OR BASED ON AWARRANTY, EVEN IF NT OR ITSLICENSORS HAVE BEEN ADVISEDOF THE POSSIBILITY OF SUCHDAMAGES.Some States, Territories and Countries do notallow certain liability exclusions or damageslimitations, so to that extent the above maynot apply to you.
Export ControlYou agree not to export from anywhere anypart of the Data provided to you or any directproduct thereof except in compliance with,and with all licenses and approvals requiredunder, applicable export laws, rules and regu-lations.
Entire AgreementThese terms and conditions constitute theentire agreement between NT (and its licen-sors, including their licensors and suppliers)and you pertaining to the subject matterhereof, and supersedes in their entirety anyand all written or oral agreements previouslyexisting between us with respect to suchsubject matter.
Governing LawThe above terms and conditions shall be gov-erned by the laws of the State of Illinois, with-out giving effect to (I) its conflict of laws pro-visions, or (ii) the United Nations Conventionfor Contracts for the International Sale ofGoods, which is explicitly excluded.
You agree to submit to the jurisdiction of theState of Illinois for any and all disputes,claims and actions arising from or in connec-tion with the Data provided to you hereunder.
Government End UsersIf the Data is being acquired by or on behalfof the United States government or any otherentity seeking or applying rights similar tothose customarily claimed by the UnitedStates government, this Data is a "commer-cial item" as that term is defined at 48 C.F.R.("FAR") 2.101, is licensed in accordance withthese End User Terms, and each copy of the

06 Questions & Answers
EULA – License agreement
06
80
Data delivered or otherwise furnished shall bemarked and embedded as appropriate withthe following "Notice of Use," and shall betreated in accordance with such Notice:
NOTICE OF USE
CONTRACTOR (MANUFACTURER/SUPPLIER) NAME: NAVTEQ
CONTRACTOR (MANUFACTURER/SUPPLIER) ADDRESS: 222 Merchan-dise Mart Plaza, Suite 900, Chicago, Illinois60654
This Data is a commercial item as defined inFAR 2.101 and is subject to the End UserTerms under which this Data was provided.
© 2006-2014 NAVTEQ – All rights reserved.
If the Contracting Officer, federal governmentagency, or any federal official refuses to usethe legend provided herein, the ContractingOfficer, federal government agency, or anyfederal official must notify NAVTEQ prior toseeking additional or alternative rights in theData.
DensoHereby, DENSO CORPORA-TION declares that this DN-NS-020 isin compliance with the essential
requirements and other relevant provisions ofDirective 1999/5/EC.

06 Questions & Answers
06
81

07 Index
07
82
A
About this manual...................................... 14
Activating the system.................................. 8
Addressentering................................................. 42
Avoiding an area........................................ 50
C
Change scale of traffic information............ 65
Compass................................................... 33
D
Demo......................................................... 61
Destinationnext intermediate destination............... 50points of interest................................... 43setting................................................... 42street address....................................... 42
DVDcare....................................................... 18changing............................................... 17contents................................................ 17
E
End-User terms......................................... 78
Extent......................................................... 65
F
Factory settings................................... 15, 60
Frequently asked questions....................... 76
G
GPS information........................................ 58
Guidanceoptions.................................................. 57pausing................................................. 36starting.................................................. 42to a point of interest............................... 9to a street address.................................. 9voice..................................................... 33
I
Intermediate destination............................ 50
Intersections.............................................. 42
Itineraryclearing................................................. 50start guidance....................................... 49
L
Locationsstoring................................................... 45
M
Mapcolors.................................................... 55current position..................................... 52direction................................................ 55location on............................................ 47options.................................................. 55screens........................................... 32, 55scrolling................................................ 35

07 Index
07
83
symbols on........................................... 72version.................................................. 58
Map areas.................................................. 17
Map mode................................................. 15
Map scale.................................................. 47
Menuscroll..................................................... 35system overview................................... 37
Menu system............................................. 14
My POI..................................... 44, 45, 58, 59
N
Navigation system controls....................... 23
O
On/Off........................................................ 15
P
Points of interest........................................ 56as a destination.................................... 43symbols on the map............................. 72
Q
Questions & Answers................................. 76
Quick guide.................................................. 8
R
Read traffic message................................. 66
Remote control.......................................... 24
Return trip.................................................. 46
Roads, unverified....................................... 33
Route options...................................... 53, 54
S
Scalechange............................................ 47, 65
Screencare....................................................... 18
Scrolling..................................................... 35
Scroll menu................................................ 35
Searchlocation on map.................................... 47
Setting a destination.................................. 42
Settings...................................................... 15resetting................................................ 60
Simulated guidance (demo)....................... 61
Start guidance........................................... 49
Steering wheelkeypad.................................................. 22
Stored locations................................... 45, 46adding information................................ 45
Street address, as destination................... 42
Symbols on the map.................................. 72
System options.......................................... 58
System overview........................................ 20

07 Index
07
84
System settings......................................... 15delete user data.................................... 60resetting................................................ 60
T
Traffic information.......................... 21, 53, 66broadcasts............................................ 64selections.............................................. 53transmission......................................... 53
Traffic symbols.......................................... 64
U
Unverified roads........................................ 33
V
Voiceguidance............................................... 33
Voice commands....................................... 26
Volvo Navigation Systemactivating................................................ 8demo..................................................... 61
end-user terms..................................... 78general information............................... 15GPS receiver......................................... 21overview................................................ 20questions & answers............................ 76quick guide............................................. 8switching on/off.................................... 15system menus...................................... 37unverified roads.................................... 33
Z
Zip code, as a destination......................... 47


Volvo Car Corporation TP 16373 (USA & Canada), AT 1320, Printed in Sweden, Göteborg 2013, Copyright © 2000-2013 Volvo Car Corporation