vox amplification ltd. · blues: clean crunch: lead lead: boost 1 boost 2: boost 3 3. aux jack...
TRANSCRIPT

- 1 -
PrecautionsLocationUsing the unit in the following locations can result in a malfunction.• In direct sunlight• Locations of extreme temperature or humidity• Excessively dusty or dirty locations• Locations of excessive vibration• Close to magnetic fieldsPower supplyBe sure to turn off the power when the unit is not in use. Remove the battery in order to prevent it from leaking when the unit is not in use for extended periods.Interference with other electrical devicesRadios and televisions placed nearby may experience reception interfer-ence. Operate this unit at a suitable distance from radios and televisions.HandlingTo avoid breakage, do not apply excessive force to the switches or controls.CareIf the exterior becomes dirty, wipe it with a clean, dry cloth. Do not use liquid cleaners such as benzene or thinner, or cleaning compounds or flam-mable polishes.Keep this manualAfter reading this manual, please keep it for later reference.Keeping foreign matter out of your equipmentNever set any container with liquid in it near this equipment. If liquid gets into the equipment, it could cause a breakdown, fire, or electrical shock. Be careful not to let metal objects get into the equipment.
Notice regarding disposal (EU only)If this symbol is shown on the product, manual, battery, or pack-age, you must dispose of it in the correct manner to avoid harm to human health or damage to the environment. Contact your local administrative body for details on the correct disposal method. If the battery contains heavy metals in excess of the regulated amount, a chemical symbol is displayed below the symbol on the battery or battery package.
THE FCC REGULATION WARNING (for USA)NOTE: This equipment has been tested and found to comply with the lim-its for a Class B digital device, pursuant to Part 15 of the FCC Rules. These limits are designed to provide reasonable protection against harmful interference in a residential installation. This equipment generates, uses, and can radiate radio frequency energy and, if not installed and used in accordance with the instructions, may cause harmful interference to radio communications. However, there is no guarantee that interference will not occur in a particular installation. If this equipment does cause harmful interference to radio or television reception, which can be determined by turning the equipment off and on, the user is encouraged to try to correct the interference by one or more of the following measures:• Reorient or relocate the receiving antenna.• Increase the separation between the equipment and receiver.• Connect the equipment into an outlet on a circuit different from that to
which the receiver is connected.• Consult the dealer or an experienced radio/TV technician for help.If items such as cables are included with this equipment, you must use those included items.Unauthorized changes or modification to this system can void the user’s authority to operate this equipment.
This device complies with Part 15 of the FCC Rules.Operation is subject to the following two conditions: (1) This device may not cause harmful interference, and (2) this device must accept any interference received, including interference that may cause undesired operation.CAN ICES-3 B / NMB-3 B
IMPORTANT NOTICE TO CONSUMERSThis product has been manufactured according to strict specifications and volt-age requirements that are applicable in the country in which it is intended that this product should be used. If you have purchased this product via the internet, through mail order, and/or via a telephone sale, you must verify that this product is intended to be used in the country in which you reside.WARNING: Use of this product in any country other than that for which it is in-tended could be dangerous and could invalidate the manufacturer’s or distribu-tor’s warranty. Please also retain your receipt as proof of purchase otherwise your product may be disqualified from the manufacturer’s or distributor’s warranty.
* All product names and company names are the trademarks or registered trade-marks of their respective owners.
PrécautionsEmplacementL’utilisation de cet instrument dans les endroits suivants peut en entraîner le mau-vais fonctionnement.• En plein soleil• Endroits très chauds ou très humides• Endroits sales ou fort poussiéreux• Endroits soumis à de fortes vibrations• A proximité de champs magnétiquesAlimentationLorsque vous n’utilisez pas l’appareil, n’oubliez pas de le mettre hors tension. Reti-rez les piles pour éviter toute fuite lorsque l’appareil ne sera pas utilisé pendant de longues périodes de temps.Interférences avec d’autres appareils électriquesLes postes de radio et de télévision situés à proximité peuvent par conséquent souffrir d’interférences à la réception. Veuillez dès lors faire fonctionner cet appa-reil à une distance raisonnable de postes de radio et de télévision.ManiementPour éviter de les endommager, manipulez les commandes et les boutons de cet instrument avec soin.EntretienLorsque l’instrument se salit, nettoyez-le avec un chiffon propre et sec. Ne vous servez pas d’agents de nettoyage liquides tels que du benzène ou du diluant, voire des produits inflammables.Conservez ce manuelAprès avoir lu ce manuel, veuillez le conserver soigneusement pour toute réfé-rence ultérieure.Evitez toute intrusion d’objets ou de liquideNe placez jamais de récipient contenant du liquide près de l’instrument. Si le li-quide se renverse ou coule, il risque de provoquer des dommages, un court-circuit ou une électrocution. Veillez à ne pas laisser tomber des objets métalliques dans le boîtier (trombones, par ex.).
Note concernant les dispositions (Seulement EU)Si ce symbole apparait sur le produit, le manuel, les piles ou les packs de piles, cela signifie que vous devez le recycler d’une manière correcte afin de prévenir les dommages pour la santé humaine et les dommages po-tentiels pour l’environnement. Contactez votre administration locale pour de plus amples renseignements concernant la bonne méthode de recyclage. Si la pile contient des métaux lourds au-delà du seuil régle-menté, un symbole chimique est affiché en dessous du symbole de la
poubelle barrée d’une croix sur la pile ou le pack de piles.
REMARQUE IMPORTANTE POUR LES CLIENTSCe produit a été fabriqué suivant des spécifications sévères et des besoins en tension applicables dans le pays où ce produit doit être utilisé. Si vous avez acheté ce produit via l’internet, par vente par correspondance ou/et vente par téléphone, vous devez vérifier que ce produit est bien utilisable dans le pays où vous résidez.ATTENTION: L’utilisation de ce produit dans un pays autre que celui pour lequel il a été conçu peut être dangereuse et annulera la garantie du fabricant ou du distributeur. Conservez bien votre récépissé qui est la preuve de votre achat, faute de quoi votre produit ne risque de ne plus être couvert par la garantie du fabricant ou du distributeur.
* Tous les noms de produits et de sociétés sont des marques commerciales ou déposées de leur détenteur respectif.
1 Harrison Close, Knowlhill, Milton Keynes, MK5 8PA. UK
www.voxamps.com© 2017 VOX AMPLIFICATION LTD.
Vox Amplification Ltd.
(¬p.2)(¬p.5)(¬S.6)(¬p.7)(¬p.8)

- 2 -
VOX amPlug 2 Owner’s ManualThank you for purchasing the VOX amPlug 2 Headphone Guitar Amplifier. To take full advantage of this product and to ensure trouble-free operation, please read this owner’s manual carefully and use the product as directed.
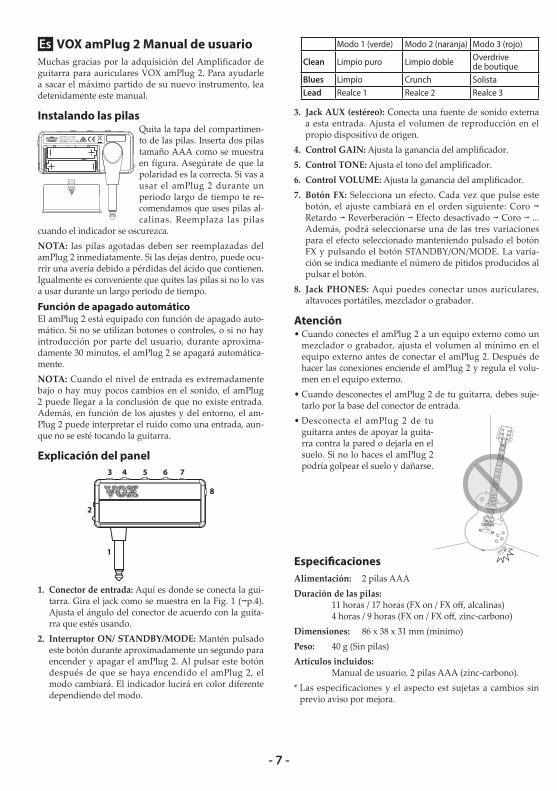
Installing BatteriesRemove the battery compartment cover. Insert two AAA batteries as shown in the figure to the left. Be sure to observe the correct polarity when installing the batteries. If you’ll be using amPlug 2 for an ex-tended period of time, we recom-mend that you use alkaline batteries. Replace the batteries when the indi-
cator becomes dark.NOTE: Depleted batteries must be removed from the amPlug 2 immediately. If you leave them in, malfunctions such as bat-tery leakage may occur. You should also remove the batteries if you will not be using the amPlug 2 for an extended period of time.
Auto Power-Off FunctionamPlug 2 is equipped with an auto power-off function. If no buttons or controls are used or there is no user input for ap-proximately 30 minutes, the amPlug 2 automatically turns off.NOTE: When the input level is extremely low or there is very little change in the sound, the amPlug 2 may conclude that there is no input. In addition, depending on the settings and environment, the amPlug 2 may interpret noise as input, even if the guitar is not being played.
Guided Panel Tour
1
2
3 4 5 6 7
8
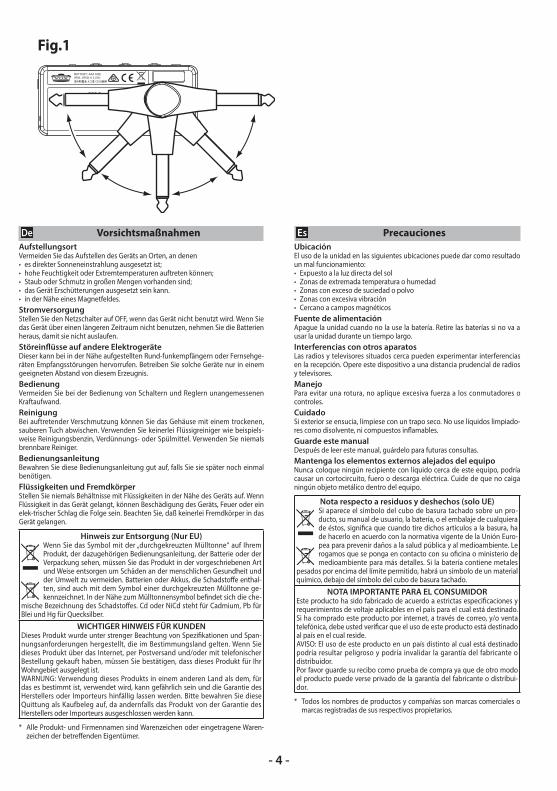
1. Input plug: This is where you would connect your guitar. Swivel the plug as shown in Fig. 1 (¬p.4). Adjust the plug angle according to the guitar being used.
2. STANDBY/ON/MODEbutton,indicator: Hold down this button for approximately one second to turn the amPlug 2 on or off. Pressing this button after the amPlug 2 has been turned on switches the mode. The indicator lights up in a different color depending on the mode.
Mode 1 (green) Mode 2 (orange) Mode 3 (red)Clean Pure Clean Twin Clean Boutique ODBlues Clean Crunch LeadLead Boost 1 Boost 2 Boost 3
3. AUXjack(stereo): This is where you would connect an external audio device. Adjust the playback volume on the connected player accordingly.
4. GAINcontrol: This adjusts the amp gain.5. TONEcontrol: This adjusts the tone.6. VOLUMEcontrol: This adjusts the overall volume of
the amplifier.7. FXbutton: This selects an effect. Each press of this but-
ton switches the setting in the following order: Chorus ¬ Delay ¬ Reverb ¬ Effect off ¬ Chorus ... In addition, one of three variations for the selected effect can be selected by holding down the FX button and pressing the STANDBY/ON/MODE button. The variation is indicated by the number of beeps produced when the button is pressed.
8. PHONES jack: This is where you would connect headphones, portable speakers, a mixer or a recording device.
Caution• When connecting amPlug 2 to external equipment
such as a mixer or recorder, turn down the volume to the minimum position on your external equipment before you connect amPlug 2 to it. After connecting it, power-on amPlug 2 and then adjust the volume of your external equipment accordingly.
• When disconnecting amPlug 2 from your guitar, you must grasp amPlug 2 near the base of its Input plug. If you grasp it at the end, you risk breaking amPlug 2.
• Disconnect amPlug 2 from your guitar before leaning your guitar against a wall or laying it on the floor. If you fail to do so, amPlug 2 or your guitar may strike the floor and be damaged.
SpecificationsPowersupply: two AAA batteriesBatterylife:
11 hours / 17 hours (FX on / FX off, alkaline)4 hours / 9 hours (FX on / FX off, zinc-carbon)
Dimensions(WxDxH):86 x 38 x 31 (mm) / 3.39” x 1.50” x 1.22”(minimum)
Weight: 40 g / 1.41 oz. (Not including batteries)Includeditems:
Owner’s Manualtwo AAA batteries (zinc-carbon)
* Specifications and appearance are subject to change without notice for improvement.

- 3 -
安全上のご注意火災・感電・人身傷害の危険を防止するには
以下の指示を守ってください
警告この注意事項を無視した取り扱いをすると、死亡や重傷を負う可能性があります。
・次のような場合には、直ちに電源を切る。 ○異物が内部に入ったとき ○製品に異常や故障が生じたとき 修理が必要なときは、お客様相談窓口へ依頼してください。・本製品を分解したり改造したりしない。・修理、部品の交換などで、取扱説明書に書かれていること以外は絶対にしない。
・大音量や不快な程度の音量で長時間使用しない。 大音量で長時間使用すると、難聴になる可能性があります。
万一、聴力低下や耳鳴りを感じたら、専門の医師に相談してください。
・本製品に異物(燃えやすいもの、硬貨、針金など)を入れない。 ・温度が極端に高い場所(直射日光の当たる場所、暖房機器の近
く、発熱する機器の上など)での使用や保管はしない。 ・振動の多い場所で使用や保管はしない。 ・ホコリの多い場所で使用や保管はしない。・風呂場、シャワー室で使用や保管はしない。・雨天時の野外のように、湿気の多い場所や水滴のかかる場所で、使用や保管はしない。
・本製品の上に、花瓶のような液体が入ったものを置かない。 ・本製品に液体をこぼさない。・濡れた手で本製品を使用しない。
注意この注意事項を無視した取り扱いをすると、傷害を負うまたは物理的損害が発生する可能性があります。
・ラジオ、テレビ、電子機器などから十分に離して使用する。 ラジオやテレビ等に接近して使用すると、本製品が雑音を受
けて誤動作する場合があります。また、ラジオ、テレビ等に雑音が入ることがあります。
・外装のお手入れは、乾いた柔らかい布を使って軽く拭く。 ・長時間使用しないときは、電池の液漏れを防ぐために電池を
抜く。 ・電池は幼児の手の届かないところへ保管する。・電池を過度の熱源(日光、火など)にさらさない。
・スイッチやツマミなどに必要以上の力を加えない。 故障の原因になります。 ・外装のお手入れに、ベンジンやシンナー系の液体、コンパウ
ンド質、強燃性のポリッシャーは使用しない。
*すべての製品名および会社名は、各社の商標または登録商標です。
保証規定(必ずお読みください)本保証書は、保証期間中に本製品を保証するもので、付属品類(ヘッドホンなど)は保証の対象になりません。保証期間内に本製品が故障した場合は、保証規定によって無償修理いたします。1. 本保証書の有効期間はお買い上げ日より1か年です。2. 次の修理等は保証期間内であっても有償となります。• 消耗部品(電池、スピーカー、真空管、フェーダーなど)の交換。• お取扱い方法が不適当のために生じた故障。• 天災(火災、浸水等)によって生じた故障。• 故障の原因が本製品以外の他の機器にある場合。• 不当な改造、調整、部品交換などにより生じた故障または損傷。• 保証書にお買い上げ日、販売店名が未記入の場合、または字句が書き替えられている場合。• 本保証書の提示がない場合。
尚、当社が修理した部分が再度故障した場合は、保証期間外であっても、修理した日より3か月以内に限り無償修理いたします。
3. 本保証書は日本国内においてのみ有効です。 ThiswarrantyisvalidonlyinJapan.4. お客様が保証期間中に移転された場合でも、保証は引き続きお使いいただけます。詳しくは、お客様相談窓口までお問い合わせください。
5. 修理、運送費用が製品の価格より高くなることがありますので、あらかじめお客様相談窓口へご相談ください。発送にかかる費用は、お客様の負担とさせていただきます。
6. 修理中の代替品、商品の貸し出し等は、いかなる場合においても一切行っておりません。
本製品の故障、または使用上生じたお客様の直接、間接の損害につきましては、弊社は一切の責任を負いかねますのでご了承ください。本保証書は、保証規定により無償修理をお約束するためのもので、これよりお客様の法律上の権利を制限するものではありません。■お願い1. 保証書に販売年月日等の記入がない場合は無効となります。記入できないときは、お買い上げ年月日を証明できる領収書等と一緒に保管してください。
2. 保証書は再発行致しませんので、紛失しないように大切に保管してください。
アフターサービス修理または商品のお取り扱いについてのご質問、ご相談は、お客様相談窓口へお問い合わせください。
お客様相談窓口 PHS等一部の電話ではご利用できません。固定電話または携帯電話からおかけください。受付時間月曜~金曜10:00~17:00(祝祭日、窓口休業日を除く)
●サービス・センター: 〒168-0073東京都杉並区下高井戸1-18-16 2F
輸入販売元:KORGImportDivision〒206-0812東京都稲城市矢野口4015-2http://www.korg.com/jp/kid/
VOX amPlug 2Clean / Blues / Lead 保 証 書
本保証書は、保証規定により無償修理をお約束するものです。
お買い上げ日
販売店名
年 月 日
- 4 -
Fig.1
VorsichtsmaßnahmenAufstellungsortVermeiden Sie das Aufstellen des Geräts an Orten, an denen• es direkter Sonneneinstrahlung ausgesetzt ist;• hohe Feuchtigkeit oder Extremtemperaturen auftreten können;• Staub oder Schmutz in großen Mengen vorhanden sind;• das Gerät Erschütterungen ausgesetzt sein kann.• in der Nähe eines Magnetfeldes.StromversorgungStellen Sie den Netzschalter auf OFF, wenn das Gerät nicht benutzt wird. Wenn Sie das Gerät über einen längeren Zeitraum nicht benutzen, nehmen Sie die Batterien heraus, damit sie nicht auslaufen.Störeinflüsse auf andere ElektrogeräteDieser kann bei in der Nähe aufgestellten Rund-funkempfängern oder Fernsehge-räten Empfangsstörungen hervorrufen. Betreiben Sie solche Geräte nur in einem geeigneten Abstand von diesem Erzeugnis.BedienungVermeiden Sie bei der Bedienung von Schaltern und Reglern unangemessenen Kraftaufwand.ReinigungBei auftretender Verschmutzung können Sie das Gehäuse mit einem trockenen, sauberen Tuch abwischen. Verwenden Sie keinerlei Flüssigreiniger wie beispiels-weise Reinigungsbenzin, Verdünnungs- oder Spülmittel. Verwenden Sie niemals brennbare Reiniger.BedienungsanleitungBewahren Sie diese Bedienungsanleitung gut auf, falls Sie sie später noch einmal benötigen.Flüssigkeiten und FremdkörperStellen Sie niemals Behältnisse mit Flüssigkeiten in der Nähe des Geräts auf. Wenn Flüssigkeit in das Gerät gelangt, können Beschädigung des Geräts, Feuer oder ein elek-trischer Schlag die Folge sein. Beachten Sie, daß keinerlei Fremdkörper in das Gerät gelangen.
Hinweis zur Entsorgung (Nur EU)Wenn Sie das Symbol mit der „durchgekreuzten Mülltonne“ auf Ihrem Produkt, der dazugehörigen Bedienungsanleitung, der Batterie oder der Verpackung sehen, müssen Sie das Produkt in der vorgeschriebenen Art und Weise entsorgen um Schäden an der menschlichen Gesundheit und der Umwelt zu vermeiden. Batterien oder Akkus, die Schadstoffe enthal-ten, sind auch mit dem Symbol einer durchgekreuzten Mülltonne ge-kennzeichnet. In der Nähe zum Mülltonnensymbol befindet sich die che-
mische Bezeichnung des Schadstoffes. Cd oder NiCd steht für Cadmium, Pb für Blei und Hg für Quecksilber.
WICHTIGER HINWEIS FÜR KUNDENDieses Produkt wurde unter strenger Beachtung von Spezifikationen und Span-nungsanforderungen hergestellt, die im Bestimmungsland gelten. Wenn Sie dieses Produkt über das Internet, per Postversand und/oder mit telefonischer Bestellung gekauft haben, müssen Sie bestätigen, dass dieses Produkt für Ihr Wohngebiet ausgelegt ist.WARNUNG: Verwendung dieses Produkts in einem anderen Land als dem, für das es bestimmt ist, verwendet wird, kann gefährlich sein und die Garantie des Herstellers oder Importeurs hinfällig lassen werden. Bitte bewahren Sie diese Quittung als Kaufbeleg auf, da andernfalls das Produkt von der Garantie des Herstellers oder Importeurs ausgeschlossen werden kann.
* Alle Produkt- und Firmennamen sind Warenzeichen oder eingetragene Waren-zeichen der betreffenden Eigentümer.
PrecaucionesUbicaciónEl uso de la unidad en las siguientes ubicaciones puede dar como resultado un mal funcionamiento:• Expuesto a la luz directa del sol• Zonas de extremada temperatura o humedad• Zonas con exceso de suciedad o polvo• Zonas con excesiva vibración• Cercano a campos magnéticosFuente de alimentaciónApague la unidad cuando no la use la batería. Retire las baterías si no va a usar la unidad durante un tiempo largo.Interferencias con otros aparatosLas radios y televisores situados cerca pueden experimentar interferencias en la recepción. Opere este dispositivo a una distancia prudencial de radios y televisores.ManejoPara evitar una rotura, no aplique excesiva fuerza a los conmutadores o controles.CuidadoSi exterior se ensucia, límpiese con un trapo seco. No use líquidos limpiado-res como disolvente, ni compuestos inflamables.Guarde este manualDespués de leer este manual, guárdelo para futuras consultas.Mantenga los elementos externos alejados del equipoNunca coloque ningún recipiente con líquido cerca de este equipo, podría causar un cortocircuito, fuero o descarga eléctrica. Cuide de que no caiga ningún objeto metálico dentro del equipo.
Nota respecto a residuos y deshechos (solo UE)Si aparece el símbolo del cubo de basura tachado sobre un pro-ducto, su manual de usuario, la batería, o el embalaje de cualquiera de éstos, significa que cuando tire dichos artículos a la basura, ha de hacerlo en acuerdo con la normativa vigente de la Unión Euro-pea para prevenir daños a la salud pública y al medioambiente. Le rogamos que se ponga en contacto con su oficina o ministerio de medioambiente para más detalles. Si la batería contiene metales
pesados por encima del límite permitido, habrá un símbolo de un material químico, debajo del símbolo del cubo de basura tachado.
NOTA IMPORTANTE PARA EL CONSUMIDOREste producto ha sido fabricado de acuerdo a estrictas especificaciones y requerimientos de voltaje aplicables en el país para el cual está destinado. Si ha comprado este producto por internet, a través de correo, y/o venta telefónica, debe usted verificar que el uso de este producto está destinado al país en el cual reside.AVISO: El uso de este producto en un país distinto al cual está destinado podría resultar peligroso y podría invalidar la garantía del fabricante o distribuidor.Por favor guarde su recibo como prueba de compra ya que de otro modo el producto puede verse privado de la garantía del fabricante o distribui-dor.
* Todos los nombres de productos y compañías son marcas comerciales o marcas registradas de sus respectivos propietarios.

- 5 -
VOX amPlug 2 Manuel d’utilisationNous vous remercions d’avoir choisi l’ampli de guitare pour casque amPlug 2 de VOX. Pour profiter au mieux de votre nouvel instrument, veuillez lire attentivement ce manuel et suivre ses consignes.
Installation des pilesRetirez le couvercle du compar-timent à piles. Insérez deux piles AAA comme illustré. Veil-lez à loger chaque pile en res-pectant la polarité. Si vous comptez utiliser amPlug 2 assez longtemps, nous vous recom-mandons d’utiliser des piles al-calines. Remplacez les piles
quand le témoin s’éteint.ATTENTION: Ne tardez jamais à retirer des piles usées du amPlug 2. Elles pourraient en effet se mettre à couler et ainsi endommager l’unité. Retirez également les piles si vous n’avez pas l’intention d’utiliser l’amPlug 2 pendant un période prolongée.
Fonction de coupure d’alimentation automatiqueL’amPlug est doté d’une fonction de coupure automa-tique de l’alimentation. Si vous n’utilisez aucun bouton ni commande pendant environ 30 minutes, l’amPlug 2 se met automatiquement hors tension.ATTENTION: Quand le niveau du signal d’entrée est extrêmement bas ou que le son ne change pratiquement pas, l’amPlug 2 pourrait en déduire qu’il n’y a pas de signal d’entrée. En outre, selon les réglages et la configu-ration envisagée, l’amPlug 2 pourrait interpréter du bruit comme un signal d’entrée, même si vous ne jouez pas sur votre guitare.
Visite guidée du panneau avant
1
2
3 4 5 6 7
8
1. Fiched’entrée: Branchez cette fiche à votre instrument. Faites pivoter la fiche comme illustré sur la Fig. 1 (¬p.4). Réglez l’angle de la fiche en fonction de l’instrument utilisé.
2. Commutateur et témoinON/STANDBY/MODE: Maintenez ce bouton enfoncé pendant environ une seconde pour mettre l’amPlug 2 sous/hors tension. Une fois que l’amPlug 2 est sous tension, ce bouton sert à changer de mode. La couleur du témoin change selon le mode actif.
Mode 1 (vert) Mode 2 (orange) Mode 3 (rouge)Clean Clair pur Twin clair Boutique ODBlues Clair Crunch SoloLead Boost 1 Boost 2 Boost 3
3. PriseAUX(stéréo): Cette prise permet de brancher une source audio externe. Le volume de ce signal doit être réglé sur la source même.
4. CommandeGAIN: Cette commande règle le gain de l’am-pli.
5. CommandeTONE: Règle le timbre.6. CommandeVOLUME: Détermine le volume global de
l’ampli.7. BoutonFX: Sélectionne un effet. Chaque pression sur ce
bouton change d’effet dans l’ordre suivant: Chorus ¬ Delay ¬ Reverb ¬ Effet coupé ¬ Chorus, ... L’instrument propose en outre trois variations pour l’effet sélectionné. Choisissez la variation voulue en maintenant le bouton FX enfoncé tout en appuyant sur le bouton STANDBY/ON/MODE. La variation choisie est indiquée par le nombre de bips pro-duits quand vous appuyez sur ce bouton.
8. PrisePHONES: Vous pouvez y brancher un casque, des enceintes portatives, un mélangeur ou un enregistreur.
Attention• Avant de brancher amPlug 2 à du matériel externe comme
un mélangeur ou un enregistreur, réglez le volume du matériel externe au minimum. Après avoir effectué les connexions, mettez amPlug 2 sous tension puis réglez le vo-lume des périphériques.
• Pour débrancher amPlug 2 de la guitare, tenez amPlug 2 près de la base de sa fiche d’entrée. Si vous le tenez à l’extré-mité, vous risquez d’endommager amPlug 2.
• Débranchez amPlug 2 de la gui-tare avant de la poser contre un mur ou de la déposer par terre. Faute de quoi, amPlug 2 ou la guitare risque de heurter le sol et de s’endommager.
Fiche techniqueAlimentation: deux piles de type “AAA”.Autonomiedelapile:
11 heures/17 heures (FX on/FX off, alkalines)4 heures/9 heures (FX on/FX off, zinc-carbone)
Dimensions(LxPxH): 86 x 38 x 31 mm (minimum)Poids: 40 g (sans les piles)Accessoiresfournis:
Manuel d’utilisation, deux piles AAA (zinc-carbone).* Les caractéristiques et l’aspect du produit sont susceptibles
d’être modifiés sans avis préalable en vue d’une améliora-tion.

- 6 -
VOX amPlug 2 BedienungsanleitungVielen Dank für Ihre Entscheidung zu einem amPlug 2 Kopfhörergitarren verstärker von VOX. Bitte lesen Sie diese Anleitung sorgsam durch, um das Beste aus Ihrem neuen Inst-rument herausholen zu können.
Einlegen der BatterienEntnehmen Sie die Blende des Batte-riefachs. Legen Sie zwei AAA-Batte-rien wie in der Abbildung gezeigt ein. Beachten Sie beim Einlegen die Polarität. Wenn Sie den amPlug 2 längere Zeit am Stück verwenden möchten, sollten Sie sich für Alkali-batterien entscheiden. Wenn die Di-ode nur noch schwach oder gar nicht
mehr leuchtet, müssen die Batterien ausgewechselt werden.ACHTUNG: Erschöpfte Batterien müssen so schnell wie mög-lich aus dem amPlug 2 entfernt werden, weil sie sonst even-tuell auslaufen und Schäden verursachen. Entfernen Sie die Batterien außerdem, wenn Sie den amPlug 2 längere Zeit nicht verwenden möchten.
EnergiesparfunktionDer amPlug 2 besitzt eine Energiesparfunktion. Falls über etwa 30 Minuten hinweg keine Tasten und Regler bedient werden und keine Benutzereingaben erfolgen, schaltet sich der amPlug 2 automatisch aus.ACHTUNG: Bei extrem niedrigem Eingangspegel oder bei minimalsten Klangänderungen werden Benutzereingaben eventuell vom amPlug 2 nicht also solche erkannt. Anderer-seits kann je nach Einstellung und Umgebung Rauschen vom amPlug 2 als Benutzereingabe interpretiert werden, selbst wenn die Gitarre nicht gespielt wird.
Führung entlang der Bedienoberfläche
1
2
3 4 5 6 7
8
1. Input-Stecker: Hiermit schließen Sie das Gerät an Ihre Gi-tarre an. Schwenken Sie den Stecker wie in Abb. 1 gezeigt (¬S.4). So können Sie den Winkel des Steckers an Ihre Gi-tarre anpassen.
2. ON/STANDBY/MODE-Schalter&Diode: Halten Sie diese Taste etwa eine Sekunde lang gedrückt, um den amPlug 2 ein- oder auszuschalten. Wenn Sie bei eingeschaltetem amPlug 2 diese Taste drücken, schalten Sie den Modus um. Die LED zeigt durch unterschiedliche Farben den aktuellen Modus an.
Modus 1 (grün) Modus 2 (orange) Modus 3 (rot)Clean Pure Clean Twin Clean Boutique ODBlues Clean Crunch LeadLead Boost 1 Boost 2 Boost 3
3. AUXBuchse(stereo): Hier kann eine externe Signal-quelle angeschlossen werden. Die Wiedergabelautstär-ke muss auf dem betreffenden Gerät selbst eingestellt werden.
4. GAIN-Regler: Hiermit regeln Sie die Pegelanhebung des Vorverstärkers.
5. TONE-Regler: Regelt die Klangfarbe.6. VOLUME-Regler: Hiermit kann die allgemeine Laut-
stärke des Amps eingestellt werden.7. FX-Taste: Zur Auswahl eines Effekts Mit jedem Druck
auf diese Taste schalten Sie den Effekt in folgender Rei-henfolge um: Chorus ¬ Delay ¬ Reverb ¬ Effect aus ¬ Chorus ... Zudem können Sie eine von drei Variationen für den jeweils eingestellten Effekt auswählen, indem Sie die FX-Taste gedrückt halten und gleichzeitig die STANDBY/ON/MODE-Taste drücken. Die Variation wird durch die Anzahl der Piepstöne beim Drücken der Taste angezeigt.
8. PHONES-Buchse: Hier kann ein Kopfhörer, ein kom-paktes Boxenpaar, ein Mischpult oder ein Recorder angeschlossen werden.
Vorsicht• Vor Anschließen des amPlug an ein externes Gerät wie
ein Mischpult oder einen Recorder müssen Sie die Laut-stärke jenes Geräts auf den Mindestwert stellen. Schal-ten Sie den amPlug nach Herstellen der Verbindung ein und stellen Sie erst danach die gewünschte Lautstärke auf dem externen Gerät ein.
• Beim Lösen der Verbindung zwischen dem amPlug und der Gitarre sollten Sie vor allem am Sockel in der Nähe des Input-Steckers am amPlug ziehen. Wenn Sie beim Ziehen die Seiten festhalten, könnten Sie den amPlug beschädigen.
• Ziehen Sie den amPlug aus der Gitarrenbuchse, bevor Sie letztere an eine Wand lehnen oder flach auf den Boden legen. Wenn Sie das nämlich vergessen, könnte entweder der amPlug oder die Gitarre beim Abstellen beschädigt werden.
Technische DatenStromversorgung: zwei „AAA“-BatterienBatterielebensdauer:
11 Stunden / 17 Stunden (FX on/FX off, Alkalibatterien)4 Stunden / 9 Stunden (FX on/FX off, Zink-Kohlenstoff)
Abmessungen(BxTxH): 86 x 38 x 31 (mm, minimum)Gewicht: 40 g (ohne Batterien)Lieferumfang:
Bedienungsanleitungzwei „AAA“-Batterien (Zink-Kohlenstoff).
* Änderungen der technischen Daten und des Designs ohne vorherige Ankündigung vorbehalten.
- 7 -
VOX amPlug 2 Manual de usuarioMuchas gracias por la adquisición del Amplificador de guitarra para auriculares VOX amPlug 2. Para ayudarle a sacar el máximo partido de su nuevo instrumento, lea detenidamente este manual.
Instalando las pilasQuita la tapa del compartimen-to de las pilas. Inserta dos pilas tamaño AAA como se muestra en figura. Asegúrate de que la polaridad es la correcta. Si vas a usar el amPlug 2 durante un periodo largo de tiempo te re-comendamos que uses pilas al-calinas. Reemplaza las pilas
cuando el indicador se oscurezca.NOTA: las pilas agotadas deben ser reemplazadas del amPlug 2 inmediatamente. Si las dejas dentro, puede ocu-rrir una avería debido a pérdidas del ácido que contienen. Igualmente es conveniente que quites las pilas si no lo vas a usar durante un largo periodo de tiempo.
Función de apagado automáticoEl amPlug 2 está equipado con función de apagado auto-mático. Si no se utilizan botones o controles, o si no hay introducción por parte del usuario, durante aproxima-damente 30 minutos, el amPlug 2 se apagará automática-mente.NOTA: Cuando el nivel de entrada es extremadamente bajo o hay muy pocos cambios en el sonido, el amPlug 2 puede llegar a la conclusión de que no existe entrada. Además, en función de los ajustes y del entorno, el am-Plug 2 puede interpretar el ruido como una entrada, aun-que no se esté tocando la guitarra.
Explicación del panel
1
2
3 4 5 6 7
8
1. Conectordeentrada: Aquí es donde se conecta la gui-tarra. Gira el jack como se muestra en la Fig. 1 (¬p.4). Ajusta el ángulo del conector de acuerdo con la guita-rra que estés usando.
2. InterruptorON/STANDBY/MODE: Mantén pulsado este botón durante aproximadamente un segundo para encender y apagar el amPlug 2. Al pulsar este botón después de que se haya encendido el amPlug 2, el modo cambiará. El indicador lucirá en color diferente dependiendo del modo.
Modo 1 (verde) Modo 2 (naranja) Modo 3 (rojo)
Clean Limpio puro Limpio doble Overdrivede boutique
Blues Limpio Crunch SolistaLead Realce 1 Realce 2 Realce 3
3. JackAUX(estéreo): Conecta una fuente de sonido externa a esta entrada. Ajusta el volumen de reproducción en el propio dispositivo de origen.
4. ControlGAIN: Ajusta la ganancia del amplificador.5. ControlTONE: Ajusta el tono del amplificador.6. ControlVOLUME: Ajusta la ganancia del amplificador.7. BotónFX: Selecciona un efecto. Cada vez que pulse este
botón, el ajuste cambiará en el orden siguiente: Coro ¬ Retardo ¬ Reverberación ¬ Efecto desactivado ¬ Coro ¬ ... Además, podrá seleccionarse una de las tres variaciones para el efecto seleccionado manteniendo pulsado el botón FX y pulsando el botón STANDBY/ON/MODE. La varia-ción se indica mediante el número de pitidos producidos al pulsar el botón.
8. JackPHONES: Aquí puedes conectar unos auriculares, altavoces portátiles, mezclador o grabador.
Atención• Cuando conectes el amPlug 2 a un equipo externo como un
mezclador o grabador, ajusta el volumen al mínimo en el equipo externo antes de conectar el amPlug 2. Después de hacer las conexiones enciende el amPlug 2 y regula el volu-men en el equipo externo.
• Cuando desconectes el amPlug 2 de tu guitarra, debes suje-tarlo por la base del conector de entrada.
• Desconecta el amPlug 2 de tu guitarra antes de apoyar la guita-rra contra la pared o dejarla en el suelo. Si no lo haces el amPlug 2 podría golpear el suelo y dañarse.
EspecificacionesAlimentación: 2 pilas AAADuracióndelaspilas:
11 horas / 17 horas (FX on / FX off, alcalinas)4 horas / 9 horas (FX on / FX off, zinc-carbono)
Dimensiones: 86 x 38 x 31 mm (minimo)Peso: 40 g (Sin pilas)Artículosincluidos:
Manual de usuario, 2 pilas AAA (zinc-carbono).* Las especificaciones y el aspecto est sujetas a cambios sin
previo aviso por mejora.
- 8 -
VOX amplug 2 取扱説明書このたびはVOX amPlug 2 Headphone guitar amplifierをお買い上げいただきまして、まことにありがとうございます。本製品を末永くご愛用いただくためにも、取扱説明書をよくお読みになって、正しい方法でご使用ください。
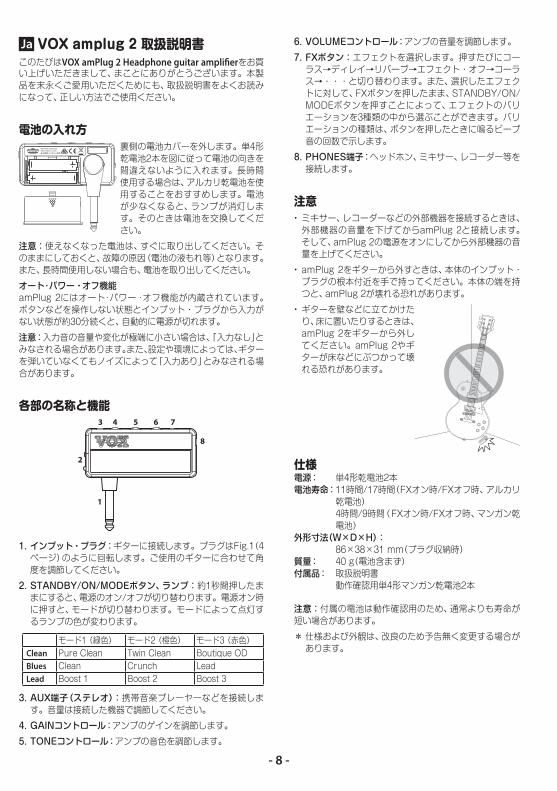
電池の入れ方裏側の電池カバーを外します。単4形乾電池2本を図に従って電池の向きを間違えないように入れます。長時間使用する場合は、アルカリ乾電池を使用することをおすすめします。電池が少なくなると、ランプが消灯します。そのときは電池を交換してください。
注意:使えなくなった電池は、すぐに取り出してください。そのままにしておくと、故障の原因(電池の液もれ等)となります。また、長時間使用しない場合も、電池を取り出してください。
オート・パワー・オフ機能amPlug2にはオート・パワー ・オフ機能が内蔵されています。ボタンなどを操作しない状態とインプット・プラグから入力がない状態が約30分続くと、自動的に電源が切れます。
注意:入力音の音量や変化が極端に小さい場合は、「入力なし」とみなされる場合があります。また、設定や環境によっては、ギターを弾いていなくてもノイズによって「入力あり」とみなされる場合があります。
各部の名称と機能
1
2
3 4 5 6 7
8
1. インプット・プラグ:ギターに接続します。プラグはFig.1(4ページ)のように回転します。ご使用のギターに合わせて角度を調節してください。
2. STANDBY/ON/MODEボタン、ランプ:約1秒間押したままにすると、電源のオン/オフが切り替わります。電源オン時に押すと、モードが切り替わります。モードによって点灯するランプの色が変わります。
モード1(緑色) モード2(橙色) モード3(赤色)Clean PureClean TwinClean BoutiqueODBlues Clean Crunch LeadLead Boost1 Boost2 Boost3
3. AUX端子(ステレオ):携帯音楽プレーヤーなどを接続します。音量は接続した機器で調節してください。
4. GAINコントロール:アンプのゲインを調節します。
5. TONEコントロール:アンプの音色を調節します。
6. VOLUMEコントロール:アンプの音量を調節します。
7. FXボタン:エフェクトを選択します。押すたびにコーラス→ディレイ→リバーブ→エフェクト・オフ→コーラス→・・・と切り替わります。また、選択したエフェクトに対して、FXボタンを押したまま、STANDBY/ON/MODEボタンを押すことによって、エフェクトのバリエーションを3種類の中から選ぶことができます。バリエーションの種類は、ボタンを押したときに鳴るビープ音の回数で示します。
8. PHONES端子:ヘッドホン、ミキサー、レコーダー等を接続します。
注意•ミキサー、レコーダーなどの外部機器を接続するときは、外部機器の音量を下げてからamPlug2と接続します。そして、amPlug2の電源をオンにしてから外部機器の音量を上げてください。
• amPlug2をギターから外すときは、本体のインプット・プラグの根本付近を手で持ってください。本体の端を持つと、amPlug2が壊れる恐れがあります。
•ギターを壁などに立てかけたり、床に置いたりするときは、amPlug2をギターから外してください。amPlug2やギターが床などにぶつかって壊れる恐れがあります。
仕様電源: 単4形乾電池2本電池寿命:11時間/17時間(FXオン時/FXオフ時、アルカリ
乾電池) 4時間/9時間(FXオン時/FXオフ時、マンガン乾
電池)外形寸法(W×D×H): 86×38×31mm(プラグ収納時)質量: 40g(電池含まず)付属品: 取扱説明書 動作確認用単4形マンガン乾電池2本
注意:付属の電池は動作確認用のため、通常よりも寿命が短い場合があります。
*仕様および外観は、改良のため予告無く変更する場合があります。