vs-v univ manual - keystone vie manual publication no. 6012 vision screening with the vs-v universal...
TRANSCRIPT

Instruction Manual PUBLICATION NO. 6012
Vision Screeningwith the VS-V Universal
Vision Screener Model # 1156
www.keystoneview.com
DIVISION OF MAST CONCEPTS, INC.

2
Contents
VS-V Universal: Features and Capabilities. . . . . . . . . . . . . . . . . . . . . . . . . . . . . . . . . . . . . . . . …….3 Test Instrument. . . . . . . . . . . . . . . . . . . . . . . . . . . . . . . . . . . . . . . . . . . . . . . .. . . . . . . . . . . . . . ……4 Hand Control Unit . . . . . . . . . . . . . . . . . . . . . . . . . . . . . . . . . . . . . . . . . . . . . . . . .. . . . . . . . . . . . . . .5 The Tests . . . . . . . . . . . . . . . . . . . . . . . . . . . . . . . . . . . . . . . . . . . . . . . . . . . . . . . . . . . . . . . . . . . . . 6
Preparation for Testing . . . . . . . . . . . . . . . . . . . . . . . . . . . . . . . . . . . . . . . . . . . . . . . . . . . . . . . . . . . 7 The Record Form. …………….... . . . . . . . . . . . . . . . . . . . . . . . . . . ………..... . . . . . . . . . . . . . . . . . 9
Test Procedures. . . . . . . . . . . . . . . . . . . . . . . . . . . . . . . . . . . . . . . . . . . . . . . . . . . . . . . . . . . . . . …10
Interpreting Test Results . . . . . . . . . . . . . . . . . . . . . . . . . . . . . . . . . . . . . . . . . . . . . . . . . . . . ……..17
Routine Maintenance….. . . . . . . . . . . . . . . . . . . . . . . . . . . . . . . . . . . . . . . . . . . . . . . . . . . . . . .......18
Detailed Explanation of Stereo Vision….. . . . . . . . . . ….... . . . . . . . . . . . . . . . . . . . . . . . . . . . . . . .19
Glossary of Vision Terms.. . . . . .. . . . .. . . . . . . . . . .. . . . . . . . .. . . . . . . . . . . . .. . . . . .. . . . ... . . . .20
IMPORTANT NOTICE: The instrument is held closed by a magnetic latch. To free the latch, place thumbs on top edge of base and press up on bottom of chassis (see illustration). DO NOT lift up on black eyeshield assembly.

3
VS-V UNIVERSAL SCREENING
With the introduction of the VS-type instrument, vision screening becomes more complete and convenient than ever before. Eight stereoscopic targets, a unique multi-lens system including a 2.00 diopter plus lens, and long-life LED lamps can provide sixteen tests of eight visual functions: acuity, farsightedness, vertical and lateral phoria, amblyopia or suppressions, depth perception, color perception and horizontal visual fields. Binocular testing is a significant advantage for this type of instru-ment. Certain tests designed to check the acuity of one eye are given with both eyes open. This design format models how the eyes are used in an individual’s everyday environment. This technique also discloses if there is suppression (blocking of vision) in one eye. This condition cannot be detected when one eye is simply occluded during tests (as with the wall-chart tech-nique). The vision screener employs a unique multi-distance lens sys-tem which allows a single test target to be used for far (20 feet/6m), near (16 inches/40 cm), and intermediate (26 inches/66 cm) distances, and a +2.00 diopter plus lens. The four lenses have different focal lengths and convergence character-istics. This exclusive technique triples the test target capacity since each presentation has the equivalent of far, near and in-termediate distances.
GENERAL TEST PROCEDURE The screening process is extremely easy to administer. All tests are operated using the Elliptech hand control or Keystone View VisionaryTM software. The subject sits or stands before the instrument and looks into the target slides and lamps. The examiner explains the targets and the subject reports what he/she sees. His/her responses are checked on a record form or via the software program. Testing is quick and enjoyable for all ages. The total screening series can be given in under five minutes.
FOUR TESTING LENSES The screener measures visual skills at far point, near point, with a plus lens for hyperopia, and at an intermediate distance of 26 inches (66 cm). “Far point”, often indicated by the symbol “∞”, is the equivalent of an actual distance of 20 feet (6 meters). “Near point” is the equivalent of about 16 inches (40 cm) and is usually referred to as “reading distance”.
All distances are produced optically by the unique lens system. This conserves space and allows an operator to switch lenses on the same presentation merely by pushing a membrane on the hand control.
TEST SIGNIFICANCE Please bear in mind screening is not intended to provide de-tailed diagnostic data. The various screening tests should not be compared directly with clinical findings in an ophthalmologist or optometrist’s office. Yet the tests are accurate and dependable based on Keystone’s forty plus years of vision screening leadership. All tests are psy-chologically sound and given under standardized conditions.
Introduction
* Throughout the manual the VS-V Universal maybe be referred to as the VS-V.

4
The Test Instrument The VS-V Universal is designed for standardized and confidential testing. Targets are enclosed in the unit so subjects cannot see or study the target in advance. Internal target illumination ensures consistency of operating conditions, and the unit pivots through a 55-degree arc to adjust to the eye level of any subject.
Only 10 inches (25 cm) wide, 15 1/2 inches (39 cm) long and 7 inches (17 cm) high, the VS-V is compact and completely self-contained; easily sharing desk or table space with a desktop personal computer. When not in use, a magnetic catch holds the unit closed. The total unit weight is less than 11 pounds (5 kg). The VS-V operates from a standard 110 or 220 volt a.c. power outlet.
Type B Device
In accordance with Directive 93/42/EEC
1. Control unit: The VS-V places test operations under push-button com-mand with the Elliptech Soft-Touch hand control.
2. Unique lens system: The automated lens system allows the examiner to easily change between far, near, hy-peropia and intermediate distances with a push of a button.
3. Periometer test: Horizontal periph-eral vision fields are measured using light-emitting diode lamps, positioned between the lenses and recessed in the temple areas of the viewing head so eyeglass frames do not interfere with testing.
4. Headrest: Accommodates a wide variety of eyeglass frames. During testing, the subject’s forehead should rest lightly against this specially-designed strip.
5. Power Switch: Accessible from the rear panel of the unit is the power “on/off” switch, a fuse holder for a 3/4 amp
fuse, the main power receptacle and a convenient storage area, which stores the instruction manual and record forms.
6. Transformer: To eliminate electrical and heat hazards, power for the VS-V is converted to 12 volts DC. To ensure safe operation of the equipment, the VS-V must only be used with the trans-former supplied by the manufacturer. Use of any other transformer not ap-proved by the manufacturer could re-sult in safety problems.
Part No. 818-470
INPUT: 110/240 VAC 50/60Hz
OUTPUT: 12V DC –.83 A
The Class II symbol on the transformer label indicates that the transformer does not only rely on basic insulation to protect against electric shock, but has double insulation as an additional safety precaution.
Recommended Environment
Operating temperature: 0 to 40°C
Storage temperature: -20 to 70°C
4
3
2
5
1 6

5
Target drum and illumination lamps are readily accessible by removing the top cover of the case. The drum accommo-dates eight permanently-mounted stereo-scopic tests that may be removed if re-quired. (Instructions for re-installation are presented on page 18).
The VS-V adjusts effortlessly to the eye level of any test subject. It pivots through a 55º arc with free floating action fully con-trolled by the subject. When not in use, a magnetic catch holds the unit closed.
A convenient storage area, accessible from the rear, is built into the base of the instrument. The instruction manual and extra record forms may be stored here when the VS-V not in use. Accessible on the rear panel of the VS-V is the: - main power switch “on/off” - fuse holder for 3/4 amp fuse - main power receptacle
55º
Elliptech Control Unit The VS-V Elliptech Soft-Touch hand control unit makes for easy operations of the vision screener. The comfortable design makes it suitable for hand-held or desktop operation. By pressing the appropriate buttons on this compact panel you can:
A) Occlusion is controlled by pushing separate buttons for each eye. B) Stereo tests are listed on the front of the control unit. A lamp next to each test description signals when that target is being pre-
sented. C) Peripheral vision target lamps are lit by pressing these buttons. A signal lamp indicates which eye is being tested. D) The test distance buttons will switch the lens to the corresponding distance. (Hyperopia lens is put in place by pushing the “INT
1” button) E) Touch these buttons and the stereo target drum either advances or reverses to the next test. Keep the button depressed and the
drum will continue to rotate.
F) Head Sensor override button allows operation of the machine without an examinee’s head properly placed inside the headrest.
D C
B
F A E
• Advance or reverse stereo tests • Select near, far, or intermediate test dis-
tances • Occlude either of the subject’s eyes • Selectively light the peripheral vision test
lamps
6
Positive occlusion The VS-V incorporates a unique system for occluding (blocking out) the stereoscopic test target image seen by either eye. Each side of the test target is illuminated by a separate lamp. Occlusion of the desired eye is accomplished quickly and effectively by turning off the appropriate lamp using the Visionary Software interface or control panel. A major function of occlusion is to determine the existence of visual suppression: the mental blocking out of the image seen by one eye so the only image registering in the brain is the one seen by the other eye. Normally, the images seen by the two eyes are fused into a sin-gle, integrated image. Because the VS-V requires the eyes to work together, any suppression will become evident during the first two tests if the subject reports the image that should be visible to one eye does not appear. In such cases, occlude the vision of the opposite eye. This usually causes the “non-seeing” eye to work hard enough so the “missing” image becomes visible. If it does not, it may be concluded the test subject is blind in that eye. The occlusion system is also used with certain tests to provide official medico-legal data.
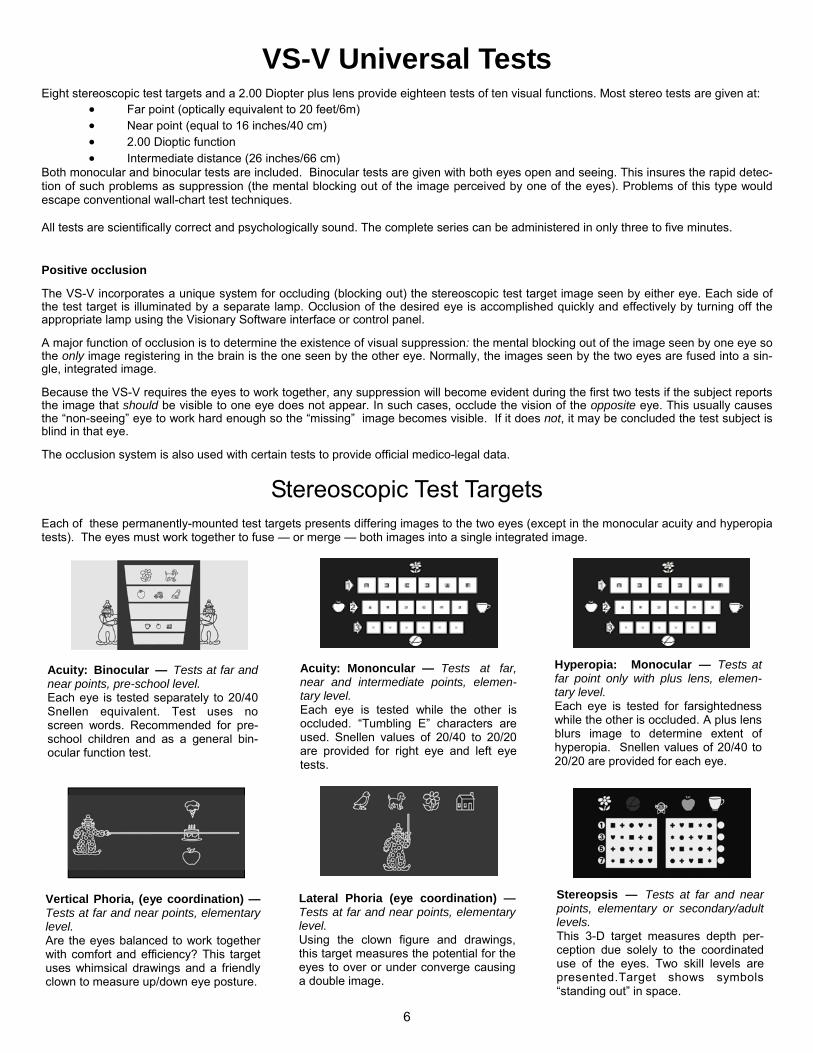
Eight stereoscopic test targets and a 2.00 Diopter plus lens provide eighteen tests of ten visual functions. Most stereo tests are given at: • Far point (optically equivalent to 20 feet/6m) • Near point (equal to 16 inches/40 cm) • 2.00 Dioptic function • Intermediate distance (26 inches/66 cm)
Both monocular and binocular tests are included. Binocular tests are given with both eyes open and seeing. This insures the rapid detec-tion of such problems as suppression (the mental blocking out of the image perceived by one of the eyes). Problems of this type would escape conventional wall-chart test techniques. All tests are scientifically correct and psychologically sound. The complete series can be administered in only three to five minutes.
VS-V Universal Tests
Stereoscopic Test Targets Each of these permanently-mounted test targets presents differing images to the two eyes (except in the monocular acuity and hyperopia tests). The eyes must work together to fuse — or merge — both images into a single integrated image.
Acuity: Binocular — Tests at far and near points, pre-school level. Each eye is tested separately to 20/40 Snellen equivalent. Test uses no screen words. Recommended for pre-school children and as a general bin-ocular function test.
Acuity: Mononcular — Tests at far, near and intermediate points, elemen-tary level. Each eye is tested while the other is occluded. “Tumbling E” characters are used. Snellen values of 20/40 to 20/20 are provided for right eye and left eye tests.
Hyperopia: Monocular — Tests at far point only with plus lens, elemen-tary level. Each eye is tested for farsightedness while the other is occluded. A plus lens blurs image to determine extent of hyperopia. Snellen values of 20/40 to 20/20 are provided for each eye.
Vertical Phoria, (eye coordination) — Tests at far and near points, elementary level. Are the eyes balanced to work together with comfort and efficiency? This target uses whimsical drawings and a friendly clown to measure up/down eye posture.
Lateral Phoria (eye coordination) — Tests at far and near points, elementary level. Using the clown figure and drawings, this target measures the potential for the eyes to over or under converge causing a double image.
Stereopsis — Tests at far and near points, elementary or secondary/adult levels. This 3-D target measures depth per-ception due solely to the coordinated use of the eyes. Two skill levels are presented.Target shows symbols “standing out” in space.

7
Acuity: Binocular — Tests at far and near points, secondary/adult level. Single target presentation tests right eye and left eye only, as well as both eyes together. Snellen values of 20/70 to 20/20 are provided.
Phoria (Eye Coordination) — Tests at far and near points, secondary/adult level. Are the eyes balanced to work together with comfort and efficiency? This target measures vertical and lateral phorias (the tendency of an eye to turn in, out, up or down) in prism diopters.
Horizontal Fields — Tests at far point, secondary/adult level. Miniature lamp (LED) targets between the lenses and recessed in the side areas of the viewing head show how far to the side a sub-ject’s visual field extends. “Tunnel vision” is quickly identified.
Colour Perception - One target at far This target presents numbers in pseudo-isochromatic symbols. They indicate if a severe (red/green) or mild (blue/violet) dis-crimination deficiency exists, but do not fur-ther clarify the disorder.
Preparation for Testing Place the VS-V Universal on a table, desk, or counter which pro-vides sufficient space for the instrument, control unit, record forms, and/or computer. A desk/table height of 26-30 inches (66-76 cm) is recommended.
Position the instrument near the edge of the desk or counter. If sub-jects are tested while seated, be sure sufficient knee room is pro-vided. Chairs for both the examiner and test subject should be straight-backed.
Equipment readiness Before testing, check the VS-V Universal to ensure it is in proper working condition.
The unit should be connected to a standard 110 or 220 volt a.c. outlet and both target illumination lamps should light when the power switch is turned on. Please note the optical sensor device included with your VS-V can be turned on and off via the hand con-trol or software. If turned on, the lamps will light only when an indi-vidual's head is within the viewing area or when the sensor light beam is interrupted.
Next check to determine if the drum holding the test targets is prop-erly synchronized with the control. Compare the tests presented through the lenses with the indicator lamps on the panel; they should correspond. If they do not, or if portions of two test targets are presented simultaneously, follow the procedures outlined on page 18 of this manual to align the drum. Once it is properly posi-tioned, no realignment should be necessary unless the drum is re-moved.
Make sure that:
1. The horizontal field target lamps illuminate as the appropri-ate buttons on the control panel are depressed.
2. The corresponding target illumination lamp goes out when each of the "Occlude" buttons is pressed.
The viewing lenses are changed with the Elliptech Soft-Touch hand control. Lens position can be checked by pushing the far, near, intermediate 1 and intermediate 2 lens distance buttons. The corre-sponding indicator light will turn on as you push each button.
It may also be advisable to dust the VS-V and clean the lenses with soap and water and a soft cloth.
General test conditions Whenever possible, VS-V screening tests should be given in a rea-sonably quiet room. Testing can be performed in virtually any area where traffic, noise or interruptions do not disconcert either the test subject or examiner and do not interfere with the accuracy or speed of the tests.
Extremely bright room lighting or glare may adversely affect the operation of VS-V units equipped with head-position optical sensor switches. For the best possible conditions, subdued room lighting is recommended.
Examinees should be admitted to the test area one at a time. This will prevent those waiting to take the exam from obtaining informa-tion concerning responses that could affect test validity. (Only the subject can see the test targets, but oral remarks may be overheard by others.)
The examiner may be positioned anywhere in the immediate vicinity of the test subject where space is available for the control unit and record forms.
Corrective lenses If the subject wears corrective lenses (regular eyeglasses or con-tact lenses) the tests should be conducted with the lenses worn as usual.
If lenses are worn only for reading or distance vision, they should be removed when testing that type of vision for which the lenses were not prescribed.
Exercise caution when testing a person recently fitted with new glasses. Many vision specialists do not fit a patient with full-correction lenses, but rely on the patient to help him/herself as time progresses. Therefore, poor scores on the screening tests shortly after such a fitting may not be truly accurate. A retest after two months is recommended.
Test subject's posture Good body posture is important to good vision and must be main-tained during testing. An uncomfortable position will cause strain and distract the test subject. The subject's back and head should be erect and the shoulders level. His/her forehead should rest com-fortably against the instrument's headrest throughout the testing period.

8
Adjustment of the height and angle of the VS-V is under direct con-trol of the test subject. He/she may wish to grasp the side of the unit with one or both hands and the elbows resting on the desk or counter.
Do not allow the subject to pull back or away from the instrument between individual tests. Caution him/her against tilting the head to the side at anytime.
When vision screening is conducted, it is important an organized procedure is followed and standardized questions be used. Only in this way can consistent results be assured. The sequence of the tests and the instructions can affect the examinee’s performance. The descriptions on the following pages have been found to evoke quick responses from the average test subject. However, as the individual examiner becomes experienced in administering the tests, he/she may wish to adapt the specific wording of each ques-tion to his or her own style. Examinee’s responses should be prompt. Allow a few seconds after the question is asked for the subject to become oriented to the target scene and report what is seen. An obvious hesitation indi-cates an effort to guess. Since there is no “penalty” for an “incorrect” answer, encourage the subject to be as frank as possi-ble in telling what he/she sees. When acknowledging the responses be careful not to indicate ap-proval or disapproval, praise or disappointment. Do not “lead” the subject into giving the type of response that you, the examiner, wish. Keep the amount of conversation during testing to a minimum to help preserve the objectivity of the tests and save examination time.
Recording the findings Speed of recording will depend entirely on the examiner’s familiarity with the test targets and what type of recording is in use. The re-cording form has been designed to show expected and abnormal responses, so scoring can be done by checking the appropriate space. The software program allows recording with the click of a mouse. If undesirable visual characteristics are noted, responses are likely to be slower than usual and the examiner should allow additional response time. Even in such cases the complete screening exami-nation should take no more than five minutes. Record form identification section Space is provided at the top of the record form for noting subject identification data. Be sure the basic data is entered before testing begins. If a number of individuals are to be tested in one session, it may be preferable to have basic information pre-recorded. The information on whether the individual wears corrective lenses is obtained at the time of testing. As mentioned, lenses should be worn at all times if both near and far points are given with the pre-scription. If lenses are worn only for reading or distance vision, they should be used only for the appropriate section of the test series. Mark the record form to indicate if glasses are worn during testing. For instance, a check mark may be used to indicate correct re-sponses when glasses are not worn. Use a diagonal line or a circle when glasses are worn. If a subject is to be scheduled for a retest, record the appropriate information on the record form.
Test Administration

9
Tests have been selected to provide the most widely requested vision screening information for children in pre-school, ele-mentary, secondary grades and for adult subjects. The record form groups the test by age level as well as by the four testing lenses. Selected tests are located by rotating the drum with the “Advance” or “Reverse” buttons on the Elliptech hand control or via the software. The LED located next to the call outs on the hand control will light as each test is in position for viewing. These call outs match the test descriptions on the record form. Some tests are repeated for the different testing lenses. Be sure to place the correct lenses in place according to the record form instructions. Tests not used in a particular sequence are by-passed by holding down the “Advance” button on the hand control. For instance: The Pediatric level tests are located in the first four drum positions. The stereopsis and color tests located in the second four locations and are optional for this age level but included in the pediatric section of the record form. If only the first four tests are used, these are presented at “FAR” point and repeated at “NEAR” point. Merely switch to “NEAR” on the Elliptech hand control and rotate the drum back to the first test. Any available test can be skipped or added to a test sequence by rotating the drum to the given location. The record form groups pediatric tests (pre-school and elementary level) on the front half and the secondary/adult level tests on the back. Any combination of tests can be used according to your re-quirements. The record form is easy to use. Symbols or characters used on the test targets appear on the form. Acuity and other val-ues are also printed on the form to give you immediate evaluation information.
The Record Form

10
Pediatric Section FAR POINT (Indicator lamp on “FAR” Position) ACUITY (A)
Description: This test slide is designed to screen the visual abilities of preschool and children between the ages of 3 to 6 years old. It can also be used with older children with specific learning disabilities and as a general test of binocular function. Be sure the child can identify the symbols used in the test by reviewing this manual page or the record form before testing is begun. The clown figures appearing in the test slide are designed to help the child relax and concentrate on the test presentation. The clown and test symbols shown above are also used in the vertical and lateral phoria and stereopsis tests, so familiarity is important. Test symbols used are also printed on the record form to allow the operator to better interpret the child’s responses. If the “Dog” figure is identified as “Puppy”, the figure is correctly identified. The Snellen equivalents for the symbols are 20/100, 20/70, and 20/40. Each eye is tested separately, but both are open and seeing. Suppression should be readily apparent, and can be noted in the “Binocular Information” area of the record form. All symbols should be identified for a passing score. Ask the child to begin at the top (20/100 monocular symbols) and move down. Line four is 20/40, right eye only. Line five is 20/40, left eye only. Question: “Please identify the symbols you see in the top row.” Assuming the first row of symbols is correctly identified, have the child move down the chart until all rows are completed. Response: The child should identify all rows correctly in order to pass. It is important for the examiner to be conscious that 20/70 and 20/40 are tested separately for the right and left eyes. Recording: Check the symbols identified correctly on the record form. All symbols should be identified correctly.
Flower Dog Cake Apple Ball
Car Bird House Ice Cream Cone Cup
Test Symbols:
Testing Procedure
Note: Visionary Software users do not need to change the machine settings. Unless otherwise noted, settings will change automatically as you change the computer screen.

11
Description: The widely accepted “Tumbling E” target is used for acuity testing at the elementary level. This is a monocular test, so one eye must be occluded by holding down the appropriate “occlude” button on the hand control. Occlude the left eye and test the right eye first. Three acuity levels are presented — 20/40 (Line 1), 20/30 (Line 2), 20/20 (Line 3). The three lines are also color coded, so a particular line can be identified by color (1 = red, 2 = yellow, 3 = green) or number. Es facing up point towards the flower. Es facing right point towards the cup. Es facing down point towards the ball. Es facing left point towards the apple. Question: Please tell me which way the Es are pointing beginning with the top row next to the red arrow. Proceed through the second row (yellow arrow) and third row (green arrow). If a child has difficulty on Line 1 (20/40) switch to “Near” point to determine if the difficulty is an acuity problem or an “understanding” problem. If the “E” positions can be identified at near and not at far, the child has low acuity. Note: the handheld control must be used for this option. Response: The child may call out the direction the “Es” are pointing by saying, “Up”, “Down”, “Right”, or “Left” or point to indicate the direction or say towards the apple, flower, cup or ball. Recording: Check correct responses on the record form.
Occlude Right Eye
ACUITY (B) Right Eye
ACUITY (B) Left Eye
Description: Occlude the right eye and proceed as in previous test (Acuity (B) Right Eye). Question: Please tell me which way the Es are pointing beginning with the top row next to the red arrow. Proceed through the second row (yellow arrow) and third row (green arrow). If a child has difficulty on Line 1 (20/40) switch to “Near” point to determine if the difficulty is an acuity problem or an “understanding” problem. If the “E” positions can be identified at near and not at far, the child has low acuity. Note: the handheld control must be used for this option. Response: The child may call out the direction the “Es” are pointing by saying, “Up”, “Down”, “Right”, or “Left”, point to indicate the, or say towards the apple, flower, cup or ball. Recording: Check correct responses on the record form.
Occlude Left Eye
12
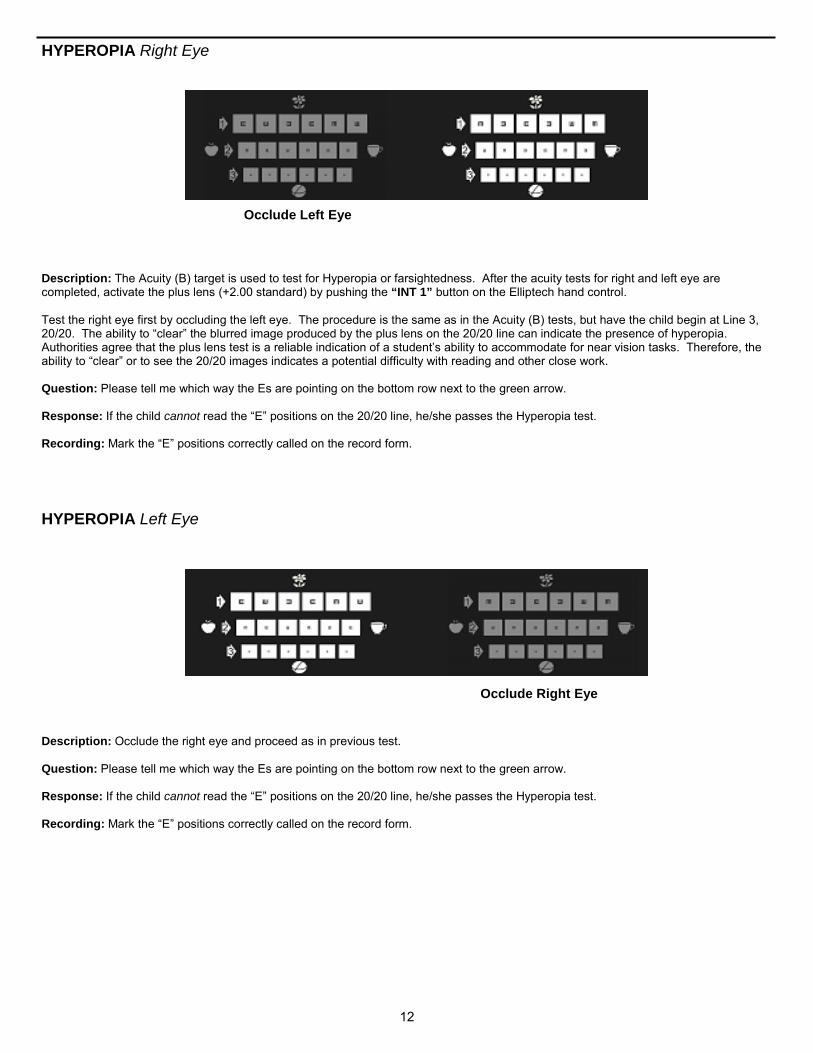
Description: The Acuity (B) target is used to test for Hyperopia or farsightedness. After the acuity tests for right and left eye are completed, activate the plus lens (+2.00 standard) by pushing the “INT 1” button on the Elliptech hand control. Test the right eye first by occluding the left eye. The procedure is the same as in the Acuity (B) tests, but have the child begin at Line 3, 20/20. The ability to “clear” the blurred image produced by the plus lens on the 20/20 line can indicate the presence of hyperopia. Authorities agree that the plus lens test is a reliable indication of a student’s ability to accommodate for near vision tasks. Therefore, the ability to “clear” or to see the 20/20 images indicates a potential difficulty with reading and other close work. Question: Please tell me which way the Es are pointing on the bottom row next to the green arrow. Response: If the child cannot read the “E” positions on the 20/20 line, he/she passes the Hyperopia test. Recording: Mark the “E” positions correctly called on the record form.
Occlude Left Eye
Occlude Right Eye
HYPEROPIA Right Eye
HYPEROPIA Left Eye
Description: Occlude the right eye and proceed as in previous test. Question: Please tell me which way the Es are pointing on the bottom row next to the green arrow. Response: If the child cannot read the “E” positions on the 20/20 line, he/she passes the Hyperopia test. Recording: Mark the “E” positions correctly called on the record form.

13
VERTICAL PHORIA (Return lens to FAR)
Description: This test determines how the eyes are positioned in relation to each other on a vertical axis (up and down). The clown figure and the familiar symbols from the Acuity (A) test are used. The clown holds a pointer which should touch one of the symbols. Question: Ask the child which of the symbols the clown’s pointer is touching. Response: The normal response is “The clown is touching or pointing to the cake.” If the pointer is between two symbols, determine its location and mark the location on the record form. Any response indicating that the pointer is above or below the “cake” symbol is a “failure”.
If only the clown or only the three symbols are seen, a suppression is indicated. The record form should be marked in the “Binocular Information” column. Any suppression is cause for referral to a vision specialist. The clown’s pointer may seem to occasionally disappear where it passes through a symbol. This is normal and should not cause alarm. The “cake” is a 2 prism diopter figure. The pointer should pass through its middle at orthophoria. The passing range is 1 prism diopter right hyperphoria (from center to top of cake) and 1 prism diopter left hyperphoria (from center to top of cake). Each symbol is 2 prism diopters high. The space between symbols is 1 prism diopter.
PASS ORTHO
2 ∆
1 ∆
2 ∆
1 ∆
2 ∆
LATERAL PHORIA (FAR)
Description: This test determines if the eyes tend to point inward (convergence) or outward (divergence) from normal (orthophoria). Again the friendly clown and familiar symbols are used. Question: The child should see the clown pointing to or between two symbols. The clown and his pointer may appear to drift left or right. Help the child establish a location by momentarily occluding the left eye. The clown will disappear. When the “occlude” button is released, the clown will reappear. Have the child report the location as soon as he/she sees the clown. Note: You must use the handheld control for this option.
Response: Determine where the child sees the clown pointing and mark the record form. The passing range is “Bird”, “Dog”, “Flower” or between “Flower” and “Bird”. This range shows 6 prism diopters of esophoria (overconvergence) and 4 prism diopters of exophoria (underconvergence). If only the clown or only the symbols are seen, the child is suppressing vision in one eye. Mark the “Binocular Information” column to show the suppressing eye.
2 ∆ 2 ∆ 2 ∆ 2 ∆ 2 ∆ 2 ∆ 2 ∆ ESO EXO
PASS

14
STEREOPSIS (FAR)
Description: This presents four optional tests for elementary level children. Stereopsis or depth perception is sometimes not fully developed in young children. No referral would be indicated for a “failure” on this test. The information may be useful for classroom teachers and parents. The test also presents two important primary colors (red and green) for identification. These colors are important as they are the basis for traffic signal directions. The top line shows four of the familiar symbols the child has seen in earlier tests and a little clown wearing a hat and a bow tie. Two of the symbols stand out from the line, nearer to the child than the other symbols. The Red Ball is closer than the Flower and the Green Apple is closer than the Red Ball. The little clown provides a unique suppression clue. If the right eye is not seeing, the clown wears only a bow tie. If the left eye is not seeing, the clown wears only a hat. If both eyes are open and seeing, the clown wears both the bow tie and hat. If the clown is seen with both tie and hat and the child cannot determine which symbol is closer than the others, lack of steropsis or visual immaturity is indicated. If a further evaluation of stereopsis is desired, use the bottom portion of the test target. On each of the eight lines, one symbol stands out from the others. The child reports which symbol is nearer to him/her than the others. This test is primarily intended for secondary age and older children and can be important for physical education and sports activities. Question: “Please identify the colors of the symbols located at the top of the screen” Response: The child should see a yellow flower, red ball, yellow clown face, green apple, and a yellow cup. Question: “Please identify the colors of the symbols located at the top of the target. Which of the symbols is closer?” Response: The child should see a yellow flower, red ball, yellow clown face, green apple, and a yellow cup. The red ball should appear closer than the flower and the cup and the green apple is closer than all the shapes. Question: “Do you see a clown in the middle of the target?” If the child answers yes, ask him/her to describe what the clown is wearing on his head. Ask him/her to describe what is just below the clown’s face. Response: The child should describe the clown as wearing a pointy hat and a bow-tie. If he/she cannot identify both symbols there are indications of suppressions. If the right eye is not seeing, the clown wears only a bow-tie. If the left eye is not seeing, the clown wears only a hat. Question: Please identify the shapes that stand out on each of the eight lines in the bottom portion of the test target. Response: One shape per line should be identified as appearing closer to the subject. The inability to identify the closer shape correctly identifies problems with depth perception.
COLOR SEVERE (red/green) AND MILD (blue/violet)
Description: This color test is optional and no referral for “failure” is required. A subject may not know he/she is color “blind”. This target presents test for severe color blindness (red/green) on the top row and mild color blindness (blue/violet) on the bottom row.
Question: Here you have two rows, each containing three circles. Each circle contains a number that the examinee needs to identify. "What number do you see in the circle on the top left? In the circle to the right?" Etc…. Recording: Check the number of circles on which all three numerals are correctly identified. Correctly naming two out of three numerals in each row is the minimum acceptable answer. Even this could indicates some possible colour blindness.
Adult Section STEREOPSIS: See above for test instruction.

15
HORIZONTAL FIELD TESTING (Peripheral Vision Testing) Miniature lamp (LED) targets between the lenses and recessed in the temple (side) areas of the viewing head show how far to the side a subject’s visual field extends when he/she looks straight ahead. Persons with “tunnel vision”, a grossly-restricted peripheral field, are quickly identified. The horizontal targets are selectively lit by individual buttons on the control panel or software screen to show a 45º nasal field and to check temporal fields at angles of 85º, 70º, and 55º. (A total field of from 45º to 130º can be measured for each eye). The eyes may be tested separately or together. This test is best given following the Colour Test. Question: “Keep looking at the test panel (if this test is done after the Colour Test, the subject can focus on one of the coloured circles.) Tell the subject that, at any time, a light may flash to the left or right side. Response: The subject should respond “left side” or “right side.” Subjects should be able to respond to at least the 55 degree and 70 degree temporal tests for each eye. If they cannot, visual problems may exist, and referrals should be made for a full professional eye examination. The “N” button tests 45 degrees across the nose, in the nasal field. (Testing right eye nasal will yield a “left side” response.) ACUITY (A) FAR POINT This acuity test is designed to test each eye separately, but under binocular conditions. The left eye sees only Column A and C. The right eye sees Column B and C. Acuity values for each eye separately and both eyes combined are easily determined. Question: Please read the numbers in row 5, starting with the first (A) column. Response: If the subject misses no more than one character per column on Row 5, he/she is considered to have 20/20 acuity. There is no need to test further. If the 20/20 line is failed move up the columns until at least 4 characters in the same row are read correctly. Recording: Check each character read correctly on the record form. Be sure to record responses for each column. It's important to determine if the acuity differs between eyes. More than one line difference between left and right eye should be cause for referral for professional evaluation.
PHORIA: LATERAL AND VERTICAL (The red line measures lateral phoria. The green line measure vertical phoria). Question: “Do you see a scale of numbers and dots with two crossed lines running through it?” “At what number, or between what numbers, does the green line pass through the scale?” (Record response) “At what number, or between what numbers, does the red line pass?” Response: The expected answer for both lines is “Between 4 and 5.” Response may be delayed by the apparent movement of the red line. To assist in speeding a response, ask for a number within the range of movement. When this has been obtained, determine how far each way the movement continues. Recording: Check the appropriate spaces on the record form to show exactly what the test subject reports. If the red line continues to fluctuate, draw a line between the numbers between which it moves. If it keeps moving in one direction, wait until it stops before checking the record form. Remarks: If a subject with binocular vision sees only the crossed lines, he/she is either suppressing or suffers from amblyopia (“lazy eye”), strabismus, or a similar deviated eye condition. Discontinue testing. Some test subjects may report one or both of the lines seems to break before and after passing through the scale. This is not important. However, a decided head tilt is important and can significantly affect the finding. Be sure proper posture is maintained. Should a subject wearing glasses report that the green line passes through the scale at some point other than between 4 and 5, test him/her a second time without glasses. If, on the retest, the line passes correctly between 4 and 5, the probable cause of the discrepancy is bent eyeglass frames. Recommend to the subject that he/she have an optician check the glasses soon. Unusually high vertical or lateral phoria, a high deviation from the expected, can result in headache or visual fatigue. Such fatigue can be confirmed if the test subject has experienced occasional “double vision”.

16
INTERMEDIATE ACUITY Switch to the intermediate lens 2 (INT 2) on the hand control. Right Eye
Description: The widely accepted “Tumbling E” target is used for acuity testing at the elementary level. This is a monocular test, so one eye must be occluded by holding down the appropriate “occlude” button on the hand control. Occlude the left eye and test the right eye first. Three acuity levels are presented — 20/40 (Line 1), 20/30 (Line 2), 20/20 (Line 3). The three lines are also color coded, so a particular line can be identified by color (1 = red, 2 = yellow, 3 = green) or number. Es facing up point towards the flower. Es facing right point towards the cup. Es facing down point towards the ball. Es facing left point towards the apple. Question: Please tell me which way the Es are pointing beginning with the top row next to the red arrow. Proceed through the second row (yellow arrow) and third row (green arrow). If a child has difficulty on Line 1 (20/40) switch to “Near” point to determine if the difficulty is an acuity problem or an “understanding” problem. If the “E” positions can be identified at near and not at far, the child has low acuity. Note: the handheld control must be used for this option. Response: The examinee may call out the direction the “Es” are pointing by saying, “Up”, “Down”, “Right”, or “Left” or point to indicate the direction or say towards the apple, flower, cup or ball. Recording: Check correct responses on the record form. Left Eye Occlude the right eye and follow the above instructions.
Occlude Left Eye

17
Interpreting Test Results The results of the VS-V Universal screening tests should not be considered separately, but as a whole. Taken in entirety, results provide reliable indication of the test subject’s visual efficiency.
It must be remembered the test series is designed to identify per-sons who may benefit from professional vision care. It is not in-tended to provide diagnostic or clinical data.
SUGGESTED VISUAL STANDARDS If all of an individual’s test scores are recorded in the clear area of the “Acceptable” column on the record form, it may be assumed that he/she has adequate visual skills for normal living.
If some scores are marked in the lightly shaded area of the “Acceptable” columns, the subject can be considered to have “doubtful performance.”
Some authorities will accept 20/40 acuity as a passing minimum and many driver licensing agencies accept 20/40 as a minimum standard. Also, if a subject’s occupation demands good vision at the reading distance but not at far point, consider 20/30 as a mini-mum score for near point and 20/40 as the minimum score at far point. The opposite would apply if visual skills are critical at far but not at near points, as in the case of a crane operator.
Consider scores in the clear area as good general standards for visual abilities, but allow scores in the lightly shaded areas if those visual tasks are not in demand.
Scores falling in the darkly shaded “Unacceptable” areas of the record form indicate the subject will benefit from a professional vision examination. Be sure to test subjects with their eye glasses on if glasses have been prescribed.
Do not refer for professional consultation for “Unacceptable” per-formance on the colour test. No remedy has yet been perfected for defective colour vision. However, for reasons of safety, persons who are colour blind should be made aware of their deficiency.
Stereopsis is a highly developed visual skill subject to maturation factors. Persons over the age of 25 years may do better in this test than those under 25. However, adults whose occupations involve moving machinery or materials should (for safety reasons) score in at least the lightly shaded “Acceptable” area. This level indicates 75% stereopsis in the Shepherd-Fry Scales.
Phoria readings are important and “failure” can indicate reasons for headaches and fatigue. The record form gives the following pass-ing ranges:
Distance (F-5) Phoria, Lateral: Not more than 6 prism diopters esophoria or 4 prism diopters exophoria
Near (N-4) Phoria, Vertical: Not more than 4 prism diopters esophoria or 6 prism diopters exophoria Not more than 1 prism diopter right or left hyperphoria
TEST KEY
NORMAL COLOUR VISION
Test (F-8) “Colour Vision (red/green)” Severe—Examinees must identify numerals 32, 79, and 23
Test (F-8) “Colour Vision (blue/violet)” Mild—Examinees must iden-tify numeral 92, 56, and 63.
NORMAL DEPTH PERCEPTION (STEREOPSIS) Test (F-8 and N-6) Identification of the stand-out symbol in line 4
TEST KEY
Important: Refer for professional consultation if suppression is indi-cated on the phoria test and only the yellow numbered line is seen or only the crossed red and green lines are seen.
HORIZONTAL PERIPHERAL VISION
This test is particularly significant in the case of vehicle operators. A person with normal lateral vision will be able to see a moving object when it is 90º (or at right angle) to his eye on the temporal (outside) side. No exact standards have been developed that show the point where diminution of lateral fields has an effect on accidents. Yet authorities state that a field more restricted than 60º would be a serious danger to a vehicle or a cyclist. A temporal reading of 70º should be considered the minimum stan-dard for safety. (The U.S. Interstate Commerce Commission re-quires a lateral field of at least 70º for each eye). It is suggested when anyone who holds a motor vehicle operator’s license demonstrates a severely restricted field, even though his/her other visual skills are normal, he/she be referred to a vision specialist for examination and professional opinion. Additional aids to test interpretation Some children may not be able to read at the expected level before age seven, because the maturation of their binocular visual skills has not kept pace with their chronological age.
Therefore, younger children who fail the lateral phoria and fusion tests may be visually immature rather than visually deficient.
With individuals of any age, definite vertical phoria which is not due to bent eyeglass frames will provoke a tendency to diploma (seeing double). At far point, this presents a definite safety hazard. At near point, it can adversely affect work or study performance.
Periodic retesting An individual’s vision is not static. It changes with time and can be affected by such factors as age, general health, emotional distur-bances, fatigue and working conditions. It is thus desirable that visual skills be periodically re-screened.
Line 1 2 3 4 5 Symbol Box Heart Cross Star Cross Shepherd-Fry 10% 30% 60% 75% 85% Scale

18
VS-V UNIVERSAL MAINTENANCE Under normal use conditions, the VS-V instrument requires mini-mum attention if it is protected by the dust cover when it is not in use. Virtually no repair or adjustment is needed, since all oper-ating components are protected and solid-state circuitry assures exceptionally high reliability.
Cleaning Periodically, some cleaning will be necessary. Be sure to disconnect the unit from its power supply before cleaning. The main instrument housing and control unit should be dusted from time to time with a soft cloth or brush, and the lenses washed with soap-and-water dampened cloth and dried with a soft cloth or tissue. If the instrument has become very soiled, it may be cleaned with a mild soap-and-water dampened or general purpose cleaner dampened cloth. Other solvents are not recommended. When the VS-V is used in a heavy industrial environment, such as that of a foundry, it is possible that some dust may accumu-late on the stereo targets. In this case, remove the top cover of the instrument and care-fully dust the target with a soft camel’s hair brush. The drum should not be removed. Instead, rotate the drum using the test advance button on the control panel.
Lamp Replacement Two Nichia NSPW515BS Long-Life Daylight LED lamps provide illumination of the stereo targets. Though they are rated for long duration of continuous use, replacement may eventually be re-quired. Replacement lamps may be ordered from your local dis-tributor or from Keystone view (866.574.6360).
Fuse Replacement A standard 3/4 ampere automotive-type fuse is incorporated in the circuitry of the VS-V to protect the unit against possible electrical malfunction. Should replacement ever be required, order a 3 AG 3/4 amp. Fuse (1,25 inches long) from your distributor (Part No. 297-800). Installation And Synchronization Of The Stereo Test Target Drum The VS-V Screen is shipped ready for op-eration, with the target drum installed and synchronized with the control panel. It is recommended that instrument owners do not remove the drum except for replace-ment or in an emergency situation.
Drum removal: Wear light cotton gloves or use a facial tissue to protect the stereo target areas from finger prints. Try to handle the drum near the end cap gears. Push the spring clips, “A” and “B”, outward from the ends of the drum. Slide the drum towards the rear of the instrument - away from gears “C” and “D” - and lift it out. Drum replacement and synchronization: 1. Turn the power switch on. Slowly rotate gear “C” until gear
“D” stops moving. Observe which signal light on the control panel is lit: This shows how the drum is to be installed.
2. To synchronize the target drum with the control, the drum must be inserted with the corresponding target facing the lens opening at the front. Insert the drum downward be-tween the spring clips (“A” and “B”); slide it forward toward the lenses until the clips snap in toward the drum. The drum gear cogs should now be engaged with gears “C” and “D”.
3. Press the test advance button on the control to move the drum to the next target. Look through the lenses to deter-mine if the target is centered vertically in the lens openings.
4. If a centering adjustment is required, move only spring clip “A” away from the drum and move the left end of the drum backward and away from gear “C”. Gear “C” must be dis-engaged from the drum cogs. Rotate drum backward or forward to accomplish adjustment. Snap drum back into position, re-engaging gear “C”. Recheck target alignment by looking through lenses.
5. Repeat step 4 if required. For other maintenance data, contact your equipment distributor or Keystone View at 866.574.6360.
A B
C D

19
Detailed Explanation of Stereo Vision Two Eyes = Two Separate Views! The eyes of a human being are positioned side-by-side. Each eye takes a view of the same area from a slightly different angle. The two eye views have plenty in common, but each eye picks up visual information the other doesn't. Two Eyes = Three Dimensions (3D)! Each eye captures its own view and the two separate images are sent on to the brain for processing. When the two images arrive simultaneously in the back of the brain they are united into one picture. The mind combines the two images by matching up the similarities and adding in the small differences. The small differences between the two images add up to a big difference in the final picture! The combined image is more than the sum of its parts. It is a three-dimensional stereo picture. The word "stereo" comes from the Greek word "stereos" which means firm or solid. With stereo vision you see an object as solid in three spatial dimensions--width, height and depth--or x, y and z. It is the added perception of the depth dimension that make stereo vision so rich and special. Stereo Vision Has Many Advantages Stereo vision--or stereoscopic vision --likely evolved as a means of survival. With stereo vision, we can see where objects are in relation to our own bodies with much greater precision--especially when objects are moving toward or away from us in the depth dimension. We can see some around solid objects without moving our heads and can even perceive and measure "empty" space with our eyes and brains. If You've Got Stereo Vision, Count Your Blessings! According to the web site of the American Academy of Ophthalmology, September, 1996: "many occupations are not open to people who have good vision in one eye only [people without stereo vision]" Here are a few examples of occupations that depend heavily on stereo vision: • Baseball player • Waitress • Driver • Architect • Surgeon • Dentist Here are just a few examples of general actions that depend heavily on stereo vision: • Throwing, catching or hitting a ball • Driving and parking a car • Planning and building a three-dimensional object • Threading a needle and sewing • Reaching out to shake someone's hand • Pouring into a container • Stepping off a curb or step Make sure your examinees have Stereo Vision Persons who do not have stereo vision often do not know what they're missing, because they've never had it. Vision testing with the Keystone View vision screener will allow you to identify if examinees have stereo vision problems. If defects are found refer the examinee to an optometrist or ophthalmologist for a full eye exam. Vision therapies are available to aid persons who have problems with stereo vision.
(Info provided by Optometrist Network www.optometrists.org)

20
Accomodation: The power to adjust the focus of the eyes for seeing objects distinctly at different distances. Acuity, visual: Sharpness of vision. Ability to distinguish detail. Amblyopia: Sometimes referred to as "lazy eye", amblyopia is decreased vision in one or both eyes not caused by anatomical damage. Vision therapy often is used to treat amblyopia, since the condition is usually uncorrectable by optical means (e.g. eyeglasses). Astigmatism: a common condition, often occurring with near-sightedness or far-sightedness, where all of the rays of light entering the eye do not focus on the same plane, resulting in out of focus vision. The cause is unknown. A minor degree of astigmatism is considered normal and does not need correction. B i n o c u l a r : U s i n g t w o e y e s simultaneously. Binocular Vision: The ability to use the two eyes simultaneously to focus on the same object and to fuse the two images into a single image. Color blindness: an inherited condition most commonly seen in men and with the colors red and green. It is caused by a deficiency of certain "cones", or color detectors, in the eye. Although there is no cure, this condition does not significantly impact most day to day vision functions. Convergence: the inward movement of eyes toward each other. Depth perception: or stereopsis - is how a person judges how far away an object is from him/her, combining such factors as the apparent size of the object, its apparent rate of motion, the object's height in the field of vision, the image's clarity and various shadows. Diplopia: commonly known as "double vision," when a person sees two images of an object instead of one. Binocular diplopia - double vision in both eyes - is caused by a misalignment of the eyes and is often treated with vision therapy. Monocular diplopia - double vision in only one eye - can be caused by factors including astigmatism, dry eye and retinal problems. Esophoria - commonly referred to as "being cross-eyed" or under convergence
- occurs when the two eyes do not aim simultaneously at the same object and instead point in different directions - in this case inward. Esophoria impacts binocular vision - the ability of both eyes to work together - and depth perception. Exophoria - commonly referred to as "being wall-eyed" or Over convergence - occurs when the two eyes do not aim simultaneously at the same object and instead point in different directions - in this case outward. Esophoria impacts binocular vision - the ability of both eyes to work together - and depth perception. Far Point: 6 meters (20 feet) to infinity. Fusion: the term that defines how well both eyes work together to combine the images each see into one clear, coherent joined image. Heterophoria: a squint due to weak eye muscles. Hyperopia - or farsightedness: occurs when light rays focus behind a person's retina, as opposed to directly on it. A farsighted person can see distant objects clearly but has difficulty seeing objects close by. Ishihara test: A test that screens individuals for color blindness. Monocular: Pertaining to one eye. Muscle Balance: The tendency of either eye to remain in the position of fixation, when fusion of images is prevented; orthophoria. Muscle Imbalance: The tendency of either eye to turn away from the position of fixation, when fusion of images is prevented; esophoria or exophoria. Myopia - or nearsightedness: occurs when light rays focus in front of a person's retina, as opposed to directly on it. A nearsighted person can see objects close to them clearly but has difficulty seeing objects that are far away. Near Point: The average reading distance, 14 to 16 inches. Occluders: any device used by a vision health professional to temporarily obscure vision in one or both eyes while testing eye functions. Orthophoria: Expected position of eyes in
relation to each other. Peripheral vision: refers to the areas at the edges of the vision field - what a person sees "out of the corner of their eyes." Loss of peripheral vision - often called "tunnel vision" - can be caused by stroke, glaucoma, migraine headaches or retinal damage. Phoria, Lateral: Descriptive of the relative horizontal position assumed by the eyes when dissociated (no fusion). When the tendency is to turn outward from a given position, the condition is known as exophoria. When the tendency is inward, the condition is known as esophoria. Phoria are indices of the accommodative-convergence relationship and indicate a lack of coordination between the eyes. Phoria, Vertical: Description of the relative, vertical position assumed by the eye when dissociated. When the tendency is for the right eye to turn upward, the condition is known as right hyperphoria. When the left eye tends to turn up, the condition is left hyperphoria. Snellen Chart: Printed letters of a special design, arranged in groups of different sizes on a test card and used to determine visual acuity. Strabismus: or "crossed eyes" - is a condition where a person cannot correctly align both of his/her eyes - one or both eyes turn up, down, in or out. To correct for the double vision that results from this, people with strabismus often "suppress" the visual input from one of the eyes, causing the non-suppressed eye being stronger than the suppressed one. Stereopsis: See Depth Perception Stereotarget: A pair of photographs or reproductions mounted in an instrument designed to present each eye with a separate image. Suppression: The voluntary or involuntary non-use of vision, usually by one eye. Vision Screening: A test for many facets of functional vision, designed to identify subjects who can benefit from an examination by a vision specialist. Vision Specialist: Ophthalmologist or Optometrist.
VISION TERMS GLOSSARY

21
SNELLEN EQUIVALENTS
20/20 = 6/6
20/25 = 6/7.5
20/30 = 6/9
20/40 = 6/12
20/50 = 6/15
20/60 = 6/18
20/70 = 6/21
20/100 = 6/30
20/200 = 6/60
NEAR VISION EQUIVALENTS
20/20 = N.4 / J.1
20/25 = N.5 / J.2
20/30 = N.6 / J.4
20/40 = N.8 / J.6
20/50 = N.10 / J.8
20/60 = N.12 / J.10
20/70 = N.14 / J.12
20/100 = N.18 / J.14
20/200 = N.36
2200 Dickerson Road, Reno NV 89503 Phone: (775) 324-2799 (800) 806-6569
Fax: (775) 324-5375 (800) 893-9018 Email: [email protected]