vw mkiii total front suspension rebuild
TRANSCRIPT

GENERAL INFORMATION ABOUT SUSPENSIONS
Rebuilding the suspension is no small task. In this case, the rebuild consisted of an H&R Cup Kit and the replacement of two control arms with new Prothane polyeurethane bushings. The Cup Kit, bushings, and a "suspension refresh" kit were purchased from Potterman's. The control arms were purchased from Adirondack Auto Brokers. Here is a photo of the Cup Kit:
There are some things to know about doing the suspension before you go jumping into it. Most cars are equipped with some type of MacPherson strut suspension, and according to Chassis Engineering by Herb Adams,
"...strut-type front suspensions became popular on production cars in the late 1970's because they offered a simple and inexpensive configuration that doesn't take up much space. It is particularly well-suited to front-wheel-drive production cars, because it allows room for the front drive axle to pass through the front hub."(40)
Adams then goes on to explain that a MacPherson strut setup is not used very often on true race cars because
1) It does not allow for wide tires and wheels without rolling fenders or increasing the scrub radius 2) There is little camber gain possible 3) Strut suspensions require large cowl heights, so it limits the lowering height of a low-profile race car
Given that the Mk III VW was originally built with economy rather than performance in mind, it is only logical that the engineers in Wolfsburg opted for a MacPherson strut front suspension and a trailing arm rear suspension on these vehicles. These cars were also originally designed for comfort, so the suspensions were tuned to the soft side. This excerpt from the 1993-1999 Jetta/Golf/Cabrio Bentley Service Manual explains much of the logic behind Mk III suspension design:
"Volkswagen Jetta, Golf, GTI, and Cabrio models are equipped with a strut-type independent front suspension and a torsion-type rear axle beam with trailing arms. The front suspension struts are integral spring and shock absorber units, while the rear suspension has separate shocks mounted inside the coil springs. This type of suspension system provides excellent steering and handling in a compact size with comparatively light weight.
Total
Suspension
Rebuild (Almost)

"Two suspension systems are used on the Jetta, Golf, GTI, and Cabrio models. The 'base' suspension is used on most 4-cylinder models, while the 'plus' suspension is used on the more performance-oriented 6-cylinder models. The plus suspension features larger anti-sway bars and brakes, different front struts, and five lug wheels (the base suspension uses four lug wheels). "...The front suspension struts have been designed to provide a negative steering roll radius. That is, the steering axis of each strut intersects the road surface at a point outboard of the wheel's vertical centerline. This geometry tends to steer the car automatically in the direction of a skid caused by unequal front wheel traction. Conventional front suspension geometry, which places the steering axes inboard of the tire centerlines, tends to steer the car in the opposite direction, thereby increasing the severity of the skid."
Note that "...steer(ing) the car automatically in the direction of a skid caused by unequal front wheel traction" is the textbook definition of understeer, a dynamic quality with which all VW driving enthusiasts are intimately familiar.
The Bentley service manual says this about the rear suspension:
"The rear suspension has been designed for low unsprung weight, easy replacement of springs and shock absorbers, and good ride and handling qualities. A "V" profile independent torsion beam rear axle with integral trailing arms and sway bar is used on both the base and sport suspension models. The advantage of this design is that the rear wheel camber and toe remain virtually unaffected by suspension movement. The torsion beam rear axle is mounted to the vehicle with track-correcting bushings. These bushings are asymmetrically shaped and minimize steering effect from the rear wheels during cornering. The rear axle beam is somewhat flexible. Uneven rear suspension loads cause the axle beam to twist slightly, thus acting as a stabilizer bar. This suspension design yields many desired performance benefits."
The picture below illustrates a trailing arm suspension similar to that of the A3 VW, though it is from a mk2. Trailing arm suspensions are on almost all VWs since most of them are front wheel drive cars. However, the rare non-North American cars equipped with "Syncro", VW's early viscous coupling AWD system have an independent rear suspension with a modified gas tank.
This trailing arm suspension is what gives a VW its "typical cornering attitude", as described by Per Schroeder in Volkswagen Sport Tuning and Competition. The Scirocco pictured below illustrates this nicely.
Volkswagens that are truly designed and altered for racing have had significant time and money dumped into their suspensions, like the Mk III Golf pictured below.

When I began researching suspensions, I was hoping to reduce understeer, reduce wheel hop, improve my handling in the corners, and suppress some of these typical VW handling habits. Like I said before, I opted for the H&R Cup Kit, which essentially replaces the stock strut setup with an aftermarket kit that is lower and stiffer. The car is actually much lower with the H&R kit, dropping the car an additional inch beyond the drop afforded to the car by the previously-installed Neuspeed lowering springs.
If one wants a wide range of adjustability, a coilover setup might be a better alternative. Coilover suspensions offer ride height and dampening adjustability in a compact design, but ultimately the performance of the Mk III will be limited by its factory strut/trailing arm design.
By lowering the car, one might worry that he or she will compromise ride comfort and handling. The H&R Cup Kit is rather stiff, but the benefits to the handling of the vehicle are well worth it. The Cup Kit's stiffness and handling ability is far superior to that of the stock suspension.
There are debates that will rage eternally about lowering the car. Some fear that handling will be compromised, as this photo from the VWVortex forums suggests:
The fear is that the control arm is positioned well above the horizontal and that the cornering ability of the car is therefore limited. In addition, there is the worry that camber will be offset.

Before I lowered the vehicle with the Cup Kit, the Neuspeed lowering springs had left my control arms just below the horizontal. After lowering the vehicle, the control arms are now slightly above the horizontal, though not to the extreme that the photo above illustrates. My handling has been greatly improved, as are the looks of the vehicle. I am not disappointed. If there are downsides to this setup, I have not yet found them.
SUGGESTED TOOLSSUGGESTED TOOLSSUGGESTED TOOLSSUGGESTED TOOLS
As always, get out your Bentley.
Other tools:
- Spring compressor of some sort - Strut nut tool - An air compressor is a big plus! - Maybe a press, or at least a vise.
And of course, you're going to need all of your sockets, wrenches, screwdrivers, visegrips, and even a hammer or two. This is a big job.
FRONT CONTROL ARMSFRONT CONTROL ARMSFRONT CONTROL ARMSFRONT CONTROL ARMS
In most cases, the stock control arms are fine for daily driving. For added performance, however, one can simply change the bushings in the OEM control arms with polyeurethane bushings. I purchased my new bushings from

Potterman's. In addition to replacing the bushings, I replaced the ball joints, which I purchased from Adirondack Auto Brokers in addition to new bolts for each. The ball joint replacement is an easy swap.
To remove the control arms you must disconnect the stabilizer bar, the ball joint, and the bolts through the front and rear bushings. While doing this, you might as well be preparing yourself for removing the strut at the same time. The link rod connection to the stabilizer bar looks like this (photo courtesy of European Car Web Magazine, since my camera kind of sucks):
With new bushings in hand, it was time to remove my old bushings. Since I am not in possession of a hydraulic press, I was ready to attempt any number of pressing/pulling tricks to remove the old rubber bushings. My first attempt with the puller was a failure.
I attempted to position the puller such that it was braced on the edge the control arm, pressing on the bushing. I had to use a socket to give the puller shaft uniform pressure on the bushing centerpiece, but alas, the bushing remained stuck. So, I decided to go at it the easy way. My friend Chris let me use his Sawzall to fix the problem. With the Sawzall, a drill, the puller, and plenty of WD-40, I was able to do away with the OEM bushing threat.

With the opponents to progress successfully removed, I was ready to insert the new bushings. The Prothane control arm bushing kit came with a small tube of lithium grease, ideal for pressing in these pieces. Pressing the rear bushing can be done easily with a vise, as shown below. First, one must grease the bushing:
Next, one can position the control arm in the vise with the bushing ready for pressing. I used two pieces of wood to protect the bushing from the teeth in the vise. The bushing went in easily.

The finished product (rear bushing, before metal sleeve):
The front bushings went in without difficulty (no tools necessary!), as they are a two-piece design. Each side goes into the arm and the metal sleeve slides in easily.
With the bushings pressed in, the control arms are ready to go back into the vehicle.
A word about the control arms...
Removing the control arms is somewhat labor intensive. The driver's side arm comes off without much work, but the bolt which connects the front bushing on the passenger's side arm cannot be removed as long as the oil pan is in the way! There are two ways to get the arm out.
1) Remove the oil pan, and consider it an act of preventative maintenance as you clean it, replace the gasket, and change your oil. 2) Loosen two of the three engine mounts (front and passenger rear), and jack the engine up a few inches to clear the control arm bolt.
In our case, we chose the latter of the two options. I did not have the materials necessary to revamp the oil pan, and although I had been warned on VWVortex that the oil pan would be a problem, I had assumed that I would be able to lift the engine out of the way. Luckily, I was. Using a typical floor jack, friendly helper Zach and I braced the engine's oil pan with a piece of wood and lifted it enough to clear the control arm bolt.

Putting the new control arms in was not easy, either. It might be easier to do this with the strut already removed, as it will only get in the way. The rear Prothane bushing is rather thick, and we had trouble forcing it back into its position. Some members of the forums testified to sanding the bushings down with a belt sander. Though I am ready to hack away at old parts, I am more reluctant to "customize" my brand new custom parts. So, I greased the control arm liberally, and as Zach squirmed under the car, I braced the arm with a large block of wood and hammered away with a sledge. Zach did his best to guide the control arm while I slugged away at it. Eventually, after a lot of cursing, the control arm found its way into position. Once the metal sleeve in the bushing is visible through the bolt hole, one can wiggle it into place with a bolt or screwdriver. With the holes aligned, insert the bolts and secure the arm, and lower the engine back in place.
FRONT STRUTSFRONT STRUTSFRONT STRUTSFRONT STRUTS
Removing the front struts is a simple affair. First, disconnect your ABS sensor, if you have it. Second, remove the brake line from the strut. Then, undo the two bolts that connect the strut to the wheel bearing housing, as shown below (European Car once again supplies a good photo):
Removing these guys is easily done with two wrenches on either side. Use one to stabilize the assembly while you crank away with the other. You should be careful to support everything as you loosen bolts so that nothing goes crashing to the hard concrete floor. When I did this, I was doing my brakes at the same time, so I didn't have the caliper and rotors to get in the way.
Assuming everything is supported, loosen the flange nut on top of the tower. An impact wrench is very effective for this, but if you do not have such a nifty tool, then you might find this special tool useful.

Not to be confused with a regular socket, this strut nut tool has a hole in the top, allowing you to insert a hex wrench in order to secure the shock absorber shaft, which would otherwise spin as you try to unscrew the strut nut. This nifty tool is available from Potterman's for the ridiculous price of $28. Yeah, I bought one. The tool nicely attaches to the top of the strut nut (shown below). Some people have testified to using a spark plug socket as a substitute.
With everything loose, you can remove the entire strut. Now you can assemble the new strut, using some of the old parts. H&R will have probably included a big yellow flier in your kit that says
"!!ATTENTION!! THE ORIGINAL FACTORY FRONT & REAR DUST BOOT AND
BUMPSTOPS MUST BE RE-INSTALLED ON THE H&R SHOCK RODS."
Take heed. Your warranty could be voided otherwise (though H&R quality is quite good, hopefully negating the need for the warranty). I replaced the bumpstops with new ones from Potterman's, included in my suspension refresh kit.
To disassemble your old struts, you need spring compressors. There are many different types. The first, and best,
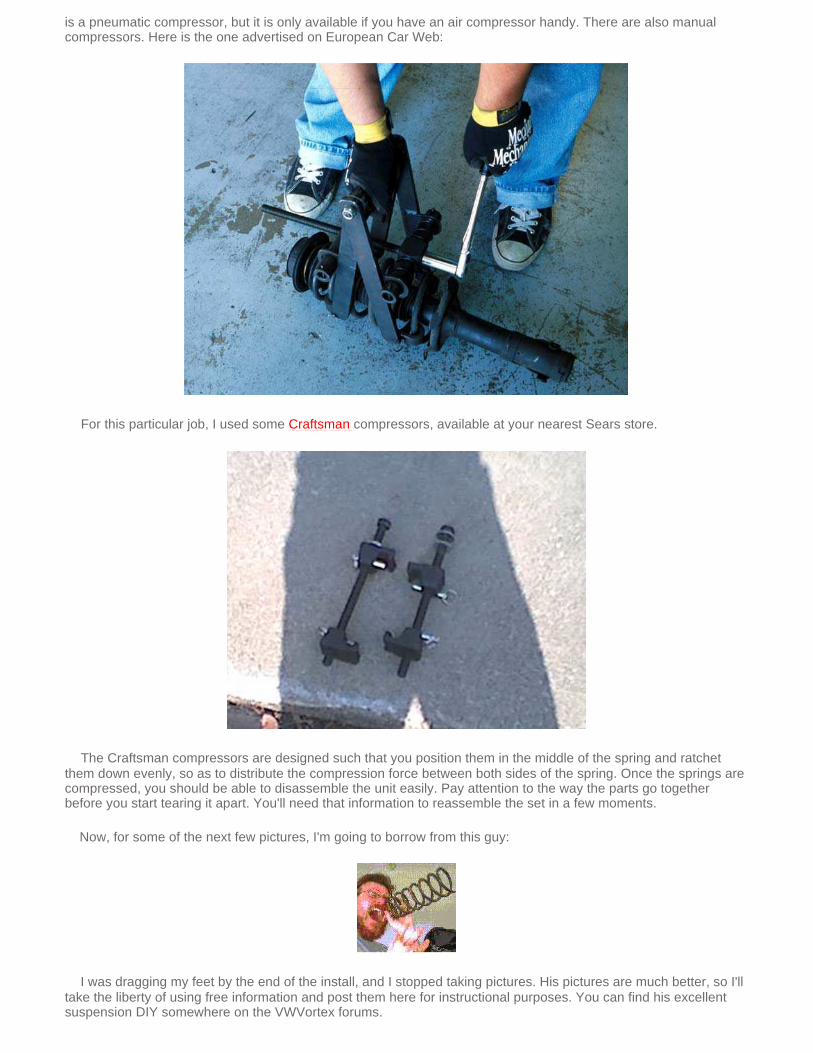
is a pneumatic compressor, but it is only available if you have an air compressor handy. There are also manual compressors. Here is the one advertised on European Car Web:
For this particular job, I used some Craftsman compressors, available at your nearest Sears store.
The Craftsman compressors are designed such that you position them in the middle of the spring and ratchet them down evenly, so as to distribute the compression force between both sides of the spring. Once the springs are compressed, you should be able to disassemble the unit easily. Pay attention to the way the parts go together before you start tearing it apart. You'll need that information to reassemble the set in a few moments.
Now, for some of the next few pictures, I'm going to borrow from this guy:
I was dragging my feet by the end of the install, and I stopped taking pictures. His pictures are much better, so I'll take the liberty of using free information and post them here for instructional purposes. You can find his excellent suspension DIY somewhere on the VWVortex forums.

Here, Spring-in-the-eye-guy has his spring compressed, with a hex tool in the shock shaft and a wrench on the nut, tightening the assembly down. With the whole thing assembled, it can now go back into the car.
More spring compression:

Replace your strut bearings. If you bought the suspension refresh kit from Potterman's you've got all the necessary parts to do this. Pay attention to torque specifications. Now, bolt that sucker in.
Congratulations, you've finished! Just kidding... now you've got to do the rear.

REAR SUSPENSIONREAR SUSPENSIONREAR SUSPENSIONREAR SUSPENSION
The rear suspension is somewhat simpler than the front, especially since you won't be messing around with any control arms. Also, the Cup Kit rear shocks and springs needed no compression for assembly. We were able to do it with just our hands.
You'll have to place your jackstands somewhere that won't interfere with your installation. I suggest a point just before the pivot for the trailing arm, where the welds at the frame are good and strong. If you place the stands there, you won't inadvertently compress your springs.
The rear shock mounts to the trailing arm with a single bolt. Detach it there to loosen things up. Then, open your rear doors and fold down the rear seat. Just under the front of the rear deck, you'll find the top of your rear shock towers (after you remove the cap).
Getting at these guys is kind of difficult, because you have to squeeze wrenches in there and turn the nut only a few turns at a time. It gets fairly tedious, but it comes out soon enough. You'll have to first remove the lock nut and dished washer. Then you will find a lower nut which secures the upper mounting hardware. The shock assembly should be ready to fall out after you unscrew that. It won't come out of the wheel well very easily. In my case, I had a friend step on the trailing arm so that I could yank the shock assembly out.
Now, hopefully you paid close attention to the disassembly of the stock unit, because you're going to have to

rebuild it on your new H&R unit. Here is Zach with a job well done. He's ready to reinstall. Nice work, Zach.
Your new H&R kit has pretty colors. Too bad nobody sees 'em. Replace your bumpstops (if you bought new ones), use the old dust cover, and replace any other parts you can. If you are installing a Cup Kit, there are spacers that should be inserted at this point that give you a little more ride height in the rear, which is especially useful if you plan to have people sitting in the back on a regular basis. I didn't use them, and the car sits low and sleek. If anyone does sit in the back, however, the car is virtually riding on the bumpstops in the rear. Note the correct assembly of the rear strut.
With your new shock assembled, simply stick that thing back in the car. It's going to take forever to tighten the nuts on the top down because you only have a few inches of clearance to work with. Be patient, and make sure that you have all of the caps, washers, supports, and seats in order.

Let 'er down, son, and enjoy your new ride!

Product Detail
Suspension Kit Refresh Parts Kit A1/A2/A3Buying Springs/shocks, Cup Kit, Coliovers? Refresh your worn out Suspension Parts with this Kit. Includes Front Upper Strut mounts and bearings, Front Bumpstops, Rear Bumpstops, Rear Poly Upper Shock Bushing set.PLEASE INCLUDE YEAR AND MODEL OF CAR and WHAT SUSPENSION YOUR INSTALLING IN SPECIAL INSTRUCTIONS OF ORDER OR YOUR ORDER COULD BE DELAYED Note to 96 A3 Golf/Jetta
2.0 8V owners: We need to know if your car has early (A2 style) or late (VR6 Style) The VR6 Style has no
plastic cover but has a rubber ring around the edge with part # 357412319B on it.
Part Number: 191498/598KIT
Category: Suspension
Price: $100.00
Shipping Category: brown
Add to Trunk Back to List
©Copyright 1997-2007, Virtual World Parts, Inc. Terms & Conditions
Use of the names and manufacturer logos Audi®, Volkswagen®, VW® and others referred to herein are trademarks or registered trade names of
their respective companies or mark holders and used for descriptive purposes only. Virtual World Parts, Inc. is not associated with or endorsed by
Audi AG, Volkswagen AG, Audi of America, or Volkswagen of America. Prices are subject to change without notice.