wakanda - how to create a custom widgetdownload.wakanda.org/documentation/v4/wakanda-custom...how to...
TRANSCRIPT
http://doc.wakanda.org/ManualPrint/1/696825/print.en.html[11/02/2013 17:42:31]
How to Create a Custom WidgetOverview
In addition to Wakanda’s own powerful widgets, you also have the possibility to create customwidgets or add widgets created from other Ajax Frameworks to Wakanda. Wakanda offers youthe following benefits for your custom widgets:
Drag and drop support of the widget,Graphical representation of your widget in Wakanda Studio,Define the widget’s properties to display in the GUI Designer,Manage events for your widget (along with automatically generating JavaScript code in theInterface page’s JavaScript page),Define which styles can be customizable in the Styles tab.
You can create widgets using a number of different frameworks, like Dojo, jQuery, YUI, Wijmo,and extJS.
Current Process & Package Support
This manual covers the current process for creating and installing a widget in Wakanda:
Define your widget’s properties in the configuration file.Create the constructor for your widget.Install your widget into Wakanda Server and Wakanda Studio.
Note: We are currently working on making the installation process for custom widgets simpler.
Conventions
The name of your widget must be in lower camelCase (“widgetName”) and the name of yourconstructor in upper camelCase (“WidgetName”).
Your widget’s name must be specified in the following folders and files:
Widget folder (located in the “widgets” folder of both Wakanda Studio and Wakanda Server)Configuration file (widget-widgetName-conf.js)Constructor file (widget-widgetName.js)PNG file representing the widget’s icon (widget-widgetName.png)
Steps for Creating a Widget
In this example, we will show you how to create a simple widget in Wakanda.
Here are the basic steps for creating a widget where {widgetName} is the name of your widget:
1. Duplicate the “template” folder, located at “Wakanda Studio/Resources/WebComponents/walib/WAF/widget/”.
2. Rename the folder from “template” to “widgetName”.
You’ll need to eventually duplicate this folder to Wakanda Server’s widget folder, but it’s best towork in Wakanda Studio to create the necessary files.
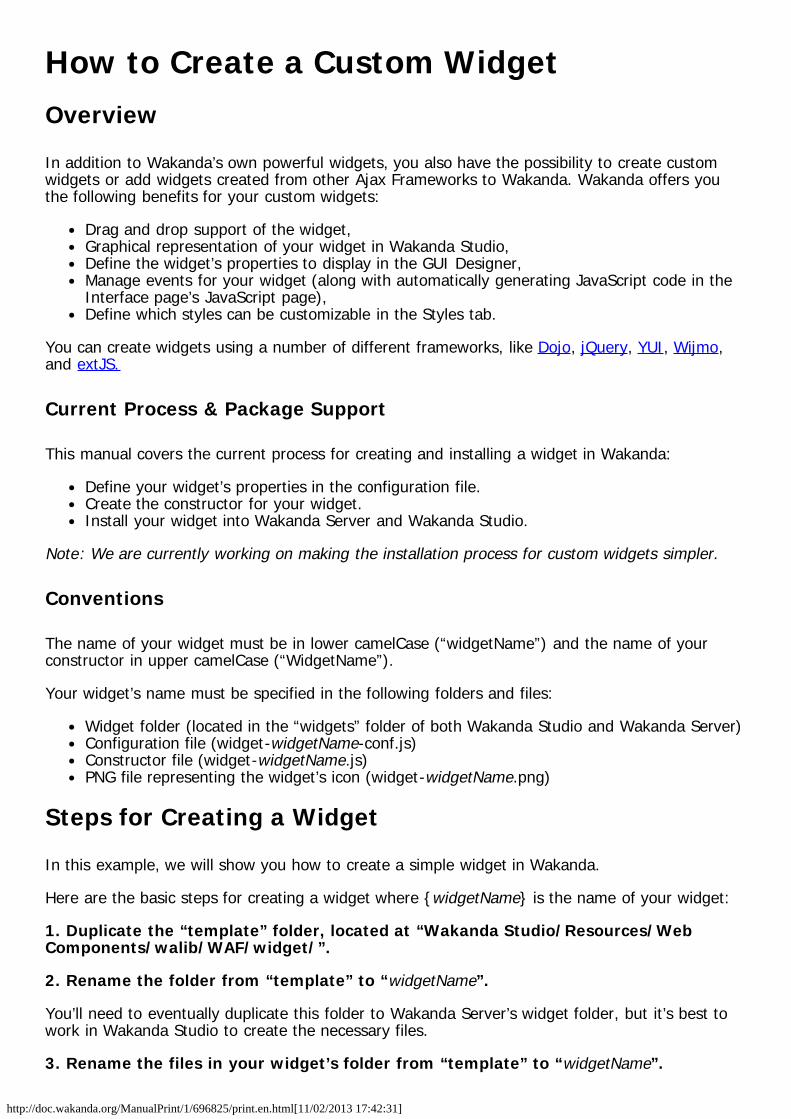
3. Rename the files in your widget’s folder from “template” to “widgetName”.
http://doc.wakanda.org/ManualPrint/1/696825/print.en.html[11/02/2013 17:42:31]
For the configuration and class constructor files as well as the PNG file in the “icons” folder,change “template” to “widgetName”:
Class constructor file: The “widget-{widgetName}.js” file is where you write the code foryour widget.Configuration file: The “widget-{widgetName}-conf.js” file is where you configure yourwidget so that it takes full advantage of Wakanda’s power.“icons” folder: This folder contains the PNG for your widget that is visible in the GUIDesigner. The PNG file for your widget must be named “widget-{widgetName}.png”.
In our example, we have named our widget “hyperlink”:
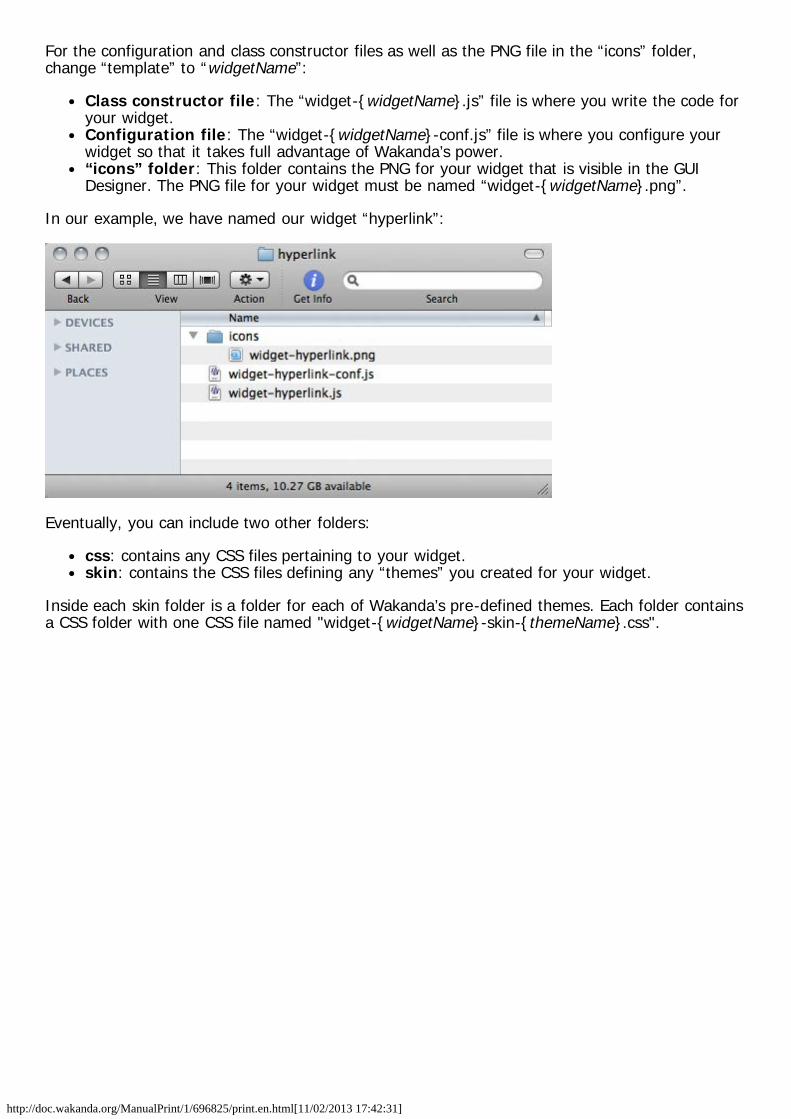
Eventually, you can include two other folders:
css: contains any CSS files pertaining to your widget.skin: contains the CSS files defining any “themes” you created for your widget.
Inside each skin folder is a folder for each of Wakanda’s pre-defined themes. Each folder containsa CSS folder with one CSS file named "widget-{widgetName}-skin-{themeName}.css".
http://doc.wakanda.org/ManualPrint/1/696825/print.en.html[11/02/2013 17:42:31]
4. Configure your widget to define the properties you want to access in the GUIDesigner.
The “widget-{widgetName}-conf.js” file allows you to define the properties for your widget. Formore information, please refer to “Setting the Properties in the Configuration File.”
5. Write the code for your widget’s constructor file.
The “widget-{widgetName}.js” file is where you write the code that will render your widget inboth the Studio and in your browser (in runtime). For more information, please refer to “Definingthe Widget in its Constructor File.”
6. Install your widget in Wakanda Studio and Wakanda Server.
Follow the directions in the “Installing a Custom Widget” section.
Setting the Properties in the Configuration File
In the configuration file ({widgetName}/widget-{widgetName}-conf.js), you define how yourwidget will be displayed in the GUI Designer. In this file, you pass the widget descriptor as aparameter to the WAF.addWidget method.
In this descriptor, you can configure some portions of your widget’s Properties area: Properties(containing information about the widget), Events (JavaScript events for your widget), andStyles (the graphical representation of your widget, such as the font, background, and border).You also describe the widget’s behavior in the GUI Designer and in runtime mode in the onInitand onDesign functions.
http://doc.wakanda.org/ManualPrint/1/696825/print.en.html[11/02/2013 17:42:31]
The widget descriptor has the following properties:
Property Type Descriptiontype String Widget name that appears in the code (HTML and JavaScript)lib String Library used – value to insert by default “WAF”description String Widget title that appears in the GUI Designercategory String Category in which the widget is displayed in the GUI Designerimg String Image used for the Widgets and Outline area of the GUI Designercss Array Array of CSS files needed by widget (optional)include Array Array of JavaScript files needed by widget (optional)tag String HTML tag, by default Wakanda uses “div”attributes Array Properties to display for the widget in the Properties tab.events Array Events to include in the Events tab for the widget’s properties
style Array Height and width of the widget when it is created automatically from theWidget list.
properties Object Enable/disable the properties for your Widget in the Properties areastructure Array Define the sub elements of your widget to display in the Styles tabmenu Array Include a button on the widget to perform a specific actiononInit Function Function to call when the widget is loaded by the browser (at runtime)onDesign Function Function to call when the widget is displayed by the GUI DesigneronCreate Function Function to call when the widget is created in the GUI Designer
type Property
This first property identifies the name of your widget in the HTML and JavaScript code that isgenerated:
type : 'hyperlink'
lib Property
This property specifies the library your widget uses for managing events. By default, the value is“WAF,” but you can also specify “jQuery,” “YUI,” or “extJS”:
lib : 'WAF'
Note: Verify the libraries provided by Wakanda to make sure the events you want to manage areavailable.
description Property
The description property is a string identifying the name of your widget, which will be displayed inthe Widget list and help tip:
description : 'Hyperlink'
category Property
This property specifies the category under which your widget will be listed in the GUI Designer'sWidgets panel. You can either create a new category or use one of the existing ones in the GUIDesigner. Your widget will be listed in alphabetical order.
category : 'Misc. Controls'
http://doc.wakanda.org/ManualPrint/1/696825/print.en.html[11/02/2013 17:42:31]
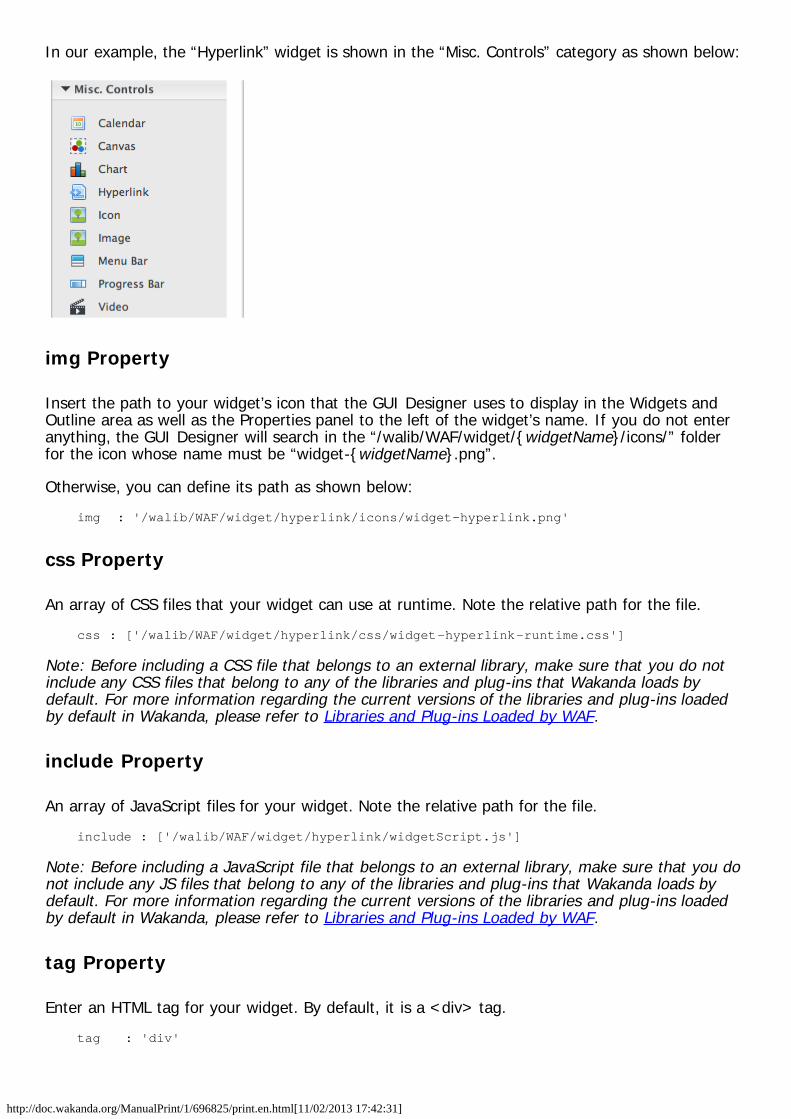
In our example, the “Hyperlink” widget is shown in the “Misc. Controls” category as shown below:
img Property
Insert the path to your widget’s icon that the GUI Designer uses to display in the Widgets andOutline area as well as the Properties panel to the left of the widget’s name. If you do not enteranything, the GUI Designer will search in the “/walib/WAF/widget/{widgetName}/icons/” folderfor the icon whose name must be “widget-{widgetName}.png”.
Otherwise, you can define its path as shown below:
img : '/walib/WAF/widget/hyperlink/icons/widget-hyperlink.png'
css Property
An array of CSS files that your widget can use at runtime. Note the relative path for the file.
css : ['/walib/WAF/widget/hyperlink/css/widget-hyperlink-runtime.css']
Note: Before including a CSS file that belongs to an external library, make sure that you do notinclude any CSS files that belong to any of the libraries and plug-ins that Wakanda loads bydefault. For more information regarding the current versions of the libraries and plug-ins loadedby default in Wakanda, please refer to Libraries and Plug-ins Loaded by WAF.
include Property
An array of JavaScript files for your widget. Note the relative path for the file.
include : ['/walib/WAF/widget/hyperlink/widgetScript.js']
Note: Before including a JavaScript file that belongs to an external library, make sure that you donot include any JS files that belong to any of the libraries and plug-ins that Wakanda loads bydefault. For more information regarding the current versions of the libraries and plug-ins loadedby default in Wakanda, please refer to Libraries and Plug-ins Loaded by WAF.
tag Property
Enter an HTML tag for your widget. By default, it is a <div> tag.
tag : 'div'
http://doc.wakanda.org/ManualPrint/1/696825/print.en.html[11/02/2013 17:42:31]
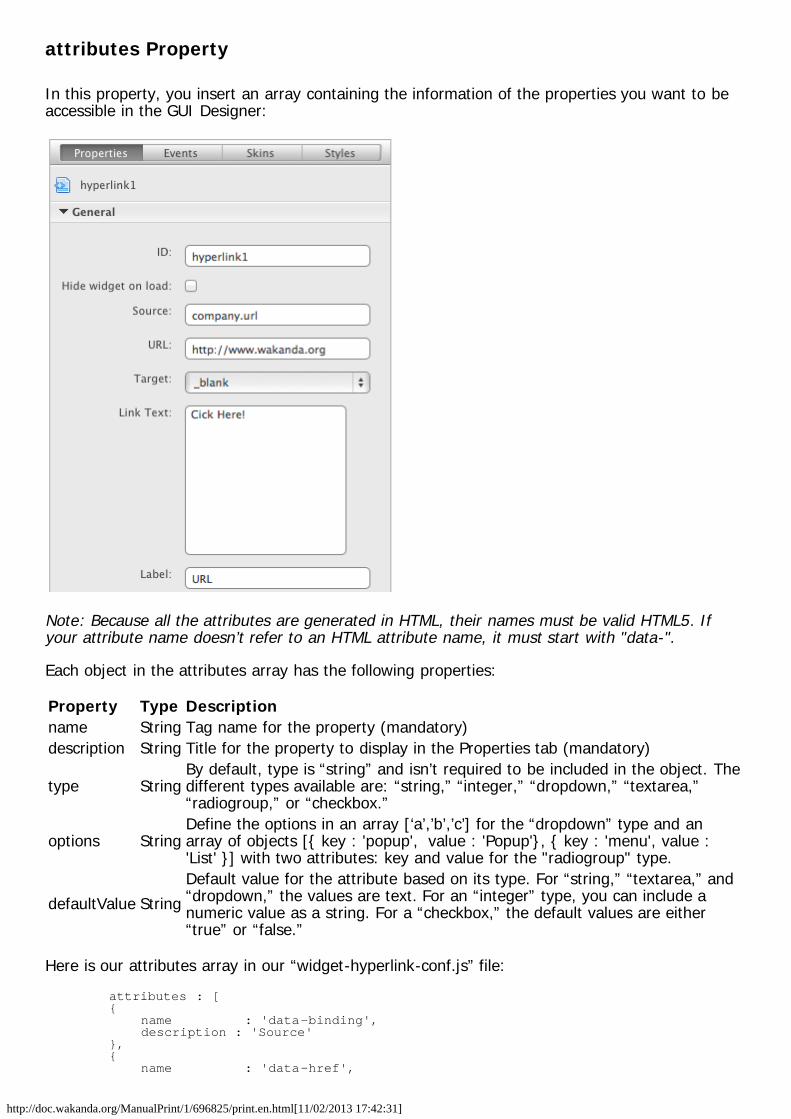
attributes Property
In this property, you insert an array containing the information of the properties you want to beaccessible in the GUI Designer:
Note: Because all the attributes are generated in HTML, their names must be valid HTML5. Ifyour attribute name doesn’t refer to an HTML attribute name, it must start with "data-".
Each object in the attributes array has the following properties:
Property Type Descriptionname String Tag name for the property (mandatory)description String Title for the property to display in the Properties tab (mandatory)
type StringBy default, type is “string” and isn’t required to be included in the object. Thedifferent types available are: “string,” “integer,” “dropdown,” “textarea,”“radiogroup,” or “checkbox.”
options StringDefine the options in an array [‘a’,’b’,’c’] for the “dropdown” type and anarray of objects [{ key : 'popup', value : 'Popup'}, { key : 'menu', value :'List' }] with two attributes: key and value for the "radiogroup" type.
defaultValue StringDefault value for the attribute based on its type. For “string,” “textarea,” and“dropdown,” the values are text. For an “integer” type, you can include anumeric value as a string. For a “checkbox,” the default values are either“true” or “false.”
Here is our attributes array in our “widget-hyperlink-conf.js” file:
attributes : [ { name : 'data-binding', description : 'Source' }, { name : 'data-href',
http://doc.wakanda.org/ManualPrint/1/696825/print.en.html[11/02/2013 17:42:31]
description : 'URL', type : 'string' }, { name : 'data-target', description : 'Target', defaultValue : '_blank', type : 'dropdown', options : ['_blank', '_self'] }, { name : 'data-text', description : 'Link Text', type : 'textarea' } , { name : 'data-label', description : 'Label', type : 'string' }, { name : 'data-label-position', description : 'Label position', defaultValue: 'left' } ]
You can also add ARIA attributes to enhance the accessibility of your widgets in this part of yourwidget’s configuration file.
name Property
Besides giving names to your own properties, Wakanda has a few reserved ones that you canuse:
Property Type Descriptiondata-binding String A datasource (attribute) to bind to the widget
data-label StringThe widget’s label, which is a widget managed by Wakanda. Wakandaautomatically adds the “Label Text” and “Label Size & Position” sections in theStyles tab when you select the “Label” element for your widget.
data-label-position
StringDefine the default label position modifiable in the “Label Size & Position” sectionof the Styles tab. You must define this property if you want the “Label Size &Position” section to appear in the Styles tab when you select the “Label”element.
data-text String Wakanda manages this internal tag to automatically display the text entered foryour widget on the Page in Wakanda Studio.
All these properties are accessible in the WAF.Widget.provide static method’s data property as“data.binding,” “data.label,” “data.text,” etc. Refer to the WAF.Widget.provide for moreinformation.
If the attribute doesn’t exist in the HTML tag, you should name it “data-attributeName” for it tobe valid HTML5.
type Property
In the type parameter, you can enter the type of the property field that you want to display inyour widget’s Properties tab:
Value Description Valuesstring String String value (default and can be left unspecified)textarea Text Area String valueinteger Integer Numeric value

http://doc.wakanda.org/ManualPrint/1/696825/print.en.html[11/02/2013 17:42:31]
dropdown Dropdown menu Array of values defined in the options property ['a','b','c']radiogroup Radio button group Array of objects defined in the options propertycheckbox Checkbox True or False
options Property
Define the values for a “dropdown” or a “radio” in an array in the options property. In ourexample, the two following strings appear in the dropdown for our Target property:
options : ['_blank', '_self']
defaultValue Property
The defaultValue property defines which value will be selected by default for a radio button ordropdown, either true or false for a checkbox, the value entered in a string, textarea, or integer.
style Property
The style property is an array of objects in which you define the default height and width of yourwidget in the GUI Designer. Here are the two parameters provided:
Property Type Descriptionname String Either “height” or “width”defaultValue String Size in pixels, expressed as “200px”
An example of how to set up the style array is shown below:
style: [ { name : 'width', defaultValue : '200px' }, { name : 'height', defaultValue : '20px' } ]
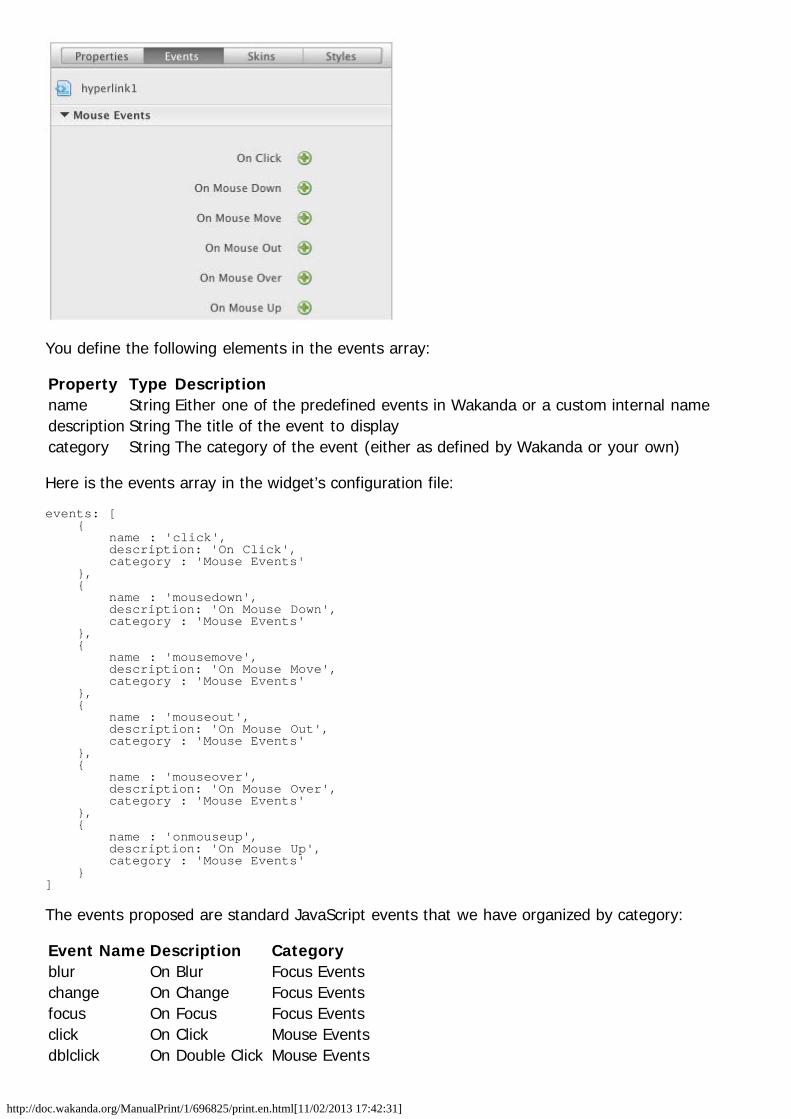
events Property
The events array of objects allows you to define which events to display in the Events tab foryour widget.
http://doc.wakanda.org/ManualPrint/1/696825/print.en.html[11/02/2013 17:42:31]
You define the following elements in the events array:
Property Type Descriptionname String Either one of the predefined events in Wakanda or a custom internal namedescription String The title of the event to displaycategory String The category of the event (either as defined by Wakanda or your own)
Here is the events array in the widget’s configuration file:
events: [ { name : 'click', description: 'On Click', category : 'Mouse Events' }, { name : 'mousedown', description: 'On Mouse Down', category : 'Mouse Events' }, { name : 'mousemove', description: 'On Mouse Move', category : 'Mouse Events' }, { name : 'mouseout', description: 'On Mouse Out', category : 'Mouse Events' }, { name : 'mouseover', description: 'On Mouse Over', category : 'Mouse Events' }, { name : 'onmouseup', description: 'On Mouse Up', category : 'Mouse Events' }]
The events proposed are standard JavaScript events that we have organized by category:
Event Name Description Categoryblur On Blur Focus Eventschange On Change Focus Eventsfocus On Focus Focus Eventsclick On Click Mouse Eventsdblclick On Double Click Mouse Events

http://doc.wakanda.org/ManualPrint/1/696825/print.en.html[11/02/2013 17:42:31]
keydown On Key Down Keyboard Eventskeypress On Key Press Keyboard Eventskeyup On Key Up Keyboard Eventsmousedown On Mouse Down Mouse Eventsmousemove On Mouse Move Mouse Eventsmouseout On Mouse Out Mouse Eventsmouseover On Mouse Over Mouse Eventsmouseup On Mouse Up Mouse Eventsselect On Select User Interface Events
You can also create your own events for your widget or use those in the library you are using(e.g., jQuery, extJS, YUI).
properties Property
The properties property is made up of a style object that allows you to define the settings fordifferent aspects of the Skins and Styles tabs:
If you have defined the “data-label” and “data-label-position” properties in the attributesProperty, the following section will be available from the element dropdown at the top of theStyles tab if a Label has been added in the properties for your widget:
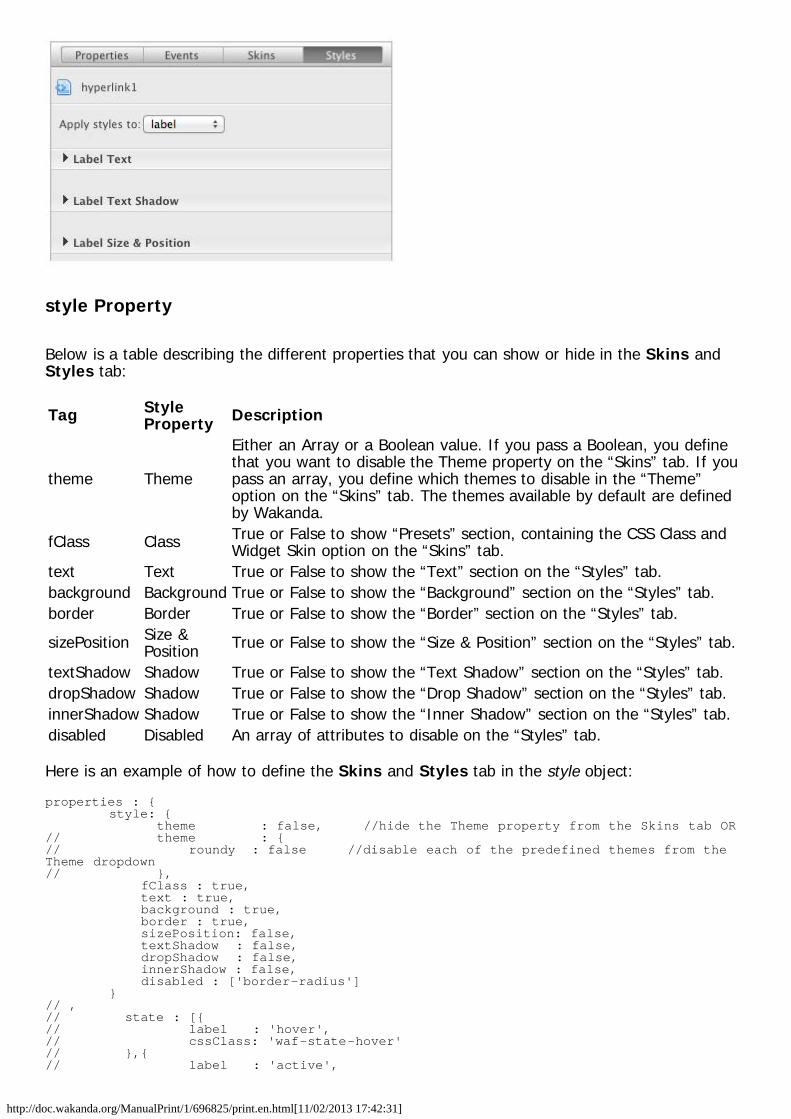
http://doc.wakanda.org/ManualPrint/1/696825/print.en.html[11/02/2013 17:42:31]
style Property
Below is a table describing the different properties that you can show or hide in the Skins andStyles tab:
Tag StyleProperty Description
theme Theme
Either an Array or a Boolean value. If you pass a Boolean, you definethat you want to disable the Theme property on the “Skins” tab. If youpass an array, you define which themes to disable in the “Theme”option on the “Skins” tab. The themes available by default are definedby Wakanda.
fClass Class True or False to show “Presets” section, containing the CSS Class andWidget Skin option on the “Skins” tab.
text Text True or False to show the “Text” section on the “Styles” tab.background Background True or False to show the “Background” section on the “Styles” tab.border Border True or False to show the “Border” section on the “Styles” tab.
sizePosition Size &Position True or False to show the “Size & Position” section on the “Styles” tab.
textShadow Shadow True or False to show the “Text Shadow” section on the “Styles” tab.dropShadow Shadow True or False to show the “Drop Shadow” section on the “Styles” tab.innerShadow Shadow True or False to show the “Inner Shadow” section on the “Styles” tab.disabled Disabled An array of attributes to disable on the “Styles” tab.
Here is an example of how to define the Skins and Styles tab in the style object:
properties : { style: { theme : false, //hide the Theme property from the Skins tab OR// theme : {// roundy : false //disable each of the predefined themes from the Theme dropdown// }, fClass : true, text : true, background : true, border : true, sizePosition: false, textShadow : false, dropShadow : false, innerShadow : false, disabled : ['border-radius'] }// ,// state : [{// label : 'hover',// cssClass: 'waf-state-hover'// },{// label : 'active',
http://doc.wakanda.org/ManualPrint/1/696825/print.en.html[11/02/2013 17:42:31]
// cssClass: 'waf-state-active'// }] }
theme Property in the style Array
In this property, you pass either a Boolean value to hide the “Theme” property completely fromthe Skins tab or you pass an array defining which predefined themes you want to hide from thedropdown. By default, all of Wakanda’s themes are enabled if you pass nothing to this property.
With the current version of Wakanda, you can only disable the following skins:
Property Display Name Description‘default’ Default This is the default value for the widget.‘inherited’ Inherited This property means that the skin will be inherited from the Page.roundy Roundy Roundy skin (current version of Wakanda)light Light Light skin (current version of Wakanda)metal Metal Metal skin (current version of Wakanda)
disabled Property in the style Array
In this property, you define which of the individual items in the Styles tab you’d like todisable/hide. The sections that are not accessible are the “X” and “Y” properties in the “Size &Position” section as well as the “Label Text” and “Label Size & Position” sections, which aremanaged internally as mentioned above.
Section Style Property TagText Font font-family
Size font-sizeColor colorBold font-weightItalic font-styleUnderline text-decorationText Align text-alignLetter-Spacing letter-spacing
Background Background backgroundBackground Image background-imageBackground Repeat background-repeatGradient background-gradient
Border Color border-colorStyle border-styleSize border-sizeRadius border-radius
Size & Position Width widthHeight heightz-index z-indexLeft leftTop top
The disabled property is an array in which you define the style properties to hide per section:
http://doc.wakanda.org/ManualPrint/1/696825/print.en.html[11/02/2013 17:42:31]
disabled: ['border-radius','background-image','background-repeat']
Note: Even if an individual element cannot be hidden in the Styles tab (i.e., “X” and “Y”properties in the “Size & Position” section), you can still hide the entire section in the styleproperty by setting sizePosition to false.
Note: The “letter-spacing” tag hides the “Letter Spacing” field in both the “Text” and “Label Text”sections on the Styles tab.
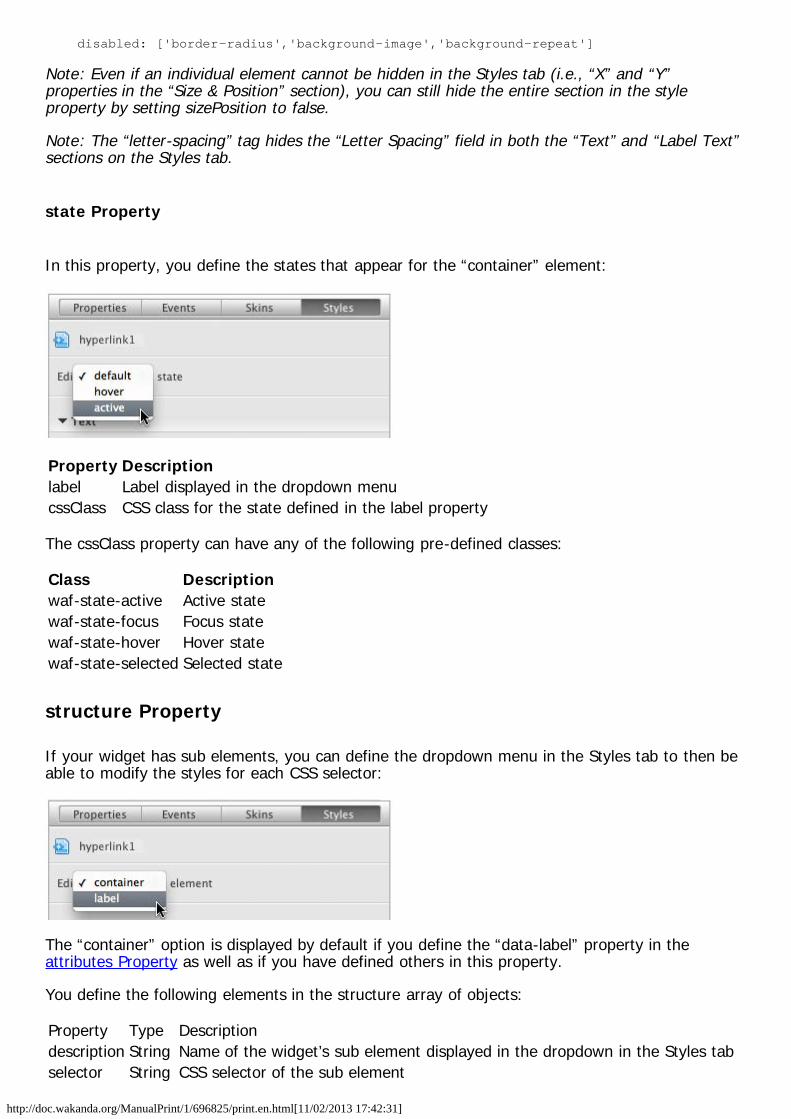
state Property
In this property, you define the states that appear for the “container” element:
Property Descriptionlabel Label displayed in the dropdown menucssClass CSS class for the state defined in the label property
The cssClass property can have any of the following pre-defined classes:
Class Descriptionwaf-state-active Active statewaf-state-focus Focus statewaf-state-hover Hover statewaf-state-selected Selected state
structure Property
If your widget has sub elements, you can define the dropdown menu in the Styles tab to then beable to modify the styles for each CSS selector:
The “container” option is displayed by default if you define the “data-label” property in theattributes Property as well as if you have defined others in this property.
You define the following elements in the structure array of objects:
Property Type Descriptiondescription String Name of the widget’s sub element displayed in the dropdown in the Styles tabselector String CSS selector of the sub element
http://doc.wakanda.org/ManualPrint/1/696825/print.en.html[11/02/2013 17:42:31]
style Object Define which sections in the Styles tab to displaystate Array An array of objects defining the label and CSS class for each state
The structure property is defined as shown below. If you omit any of the properties, it will befalse by default. The theme and fClass properties can only be defined for the main element of thewidget, not its sub elements.
structure: [{ description : 'input', selector : 'input', style: { text : true, background : true, textShadow : true, innerShadow : true, border : true }, state : [{ label : 'hover', cssClass: 'waf-state-hover' },{ label : 'active', cssClass: 'waf-state-active' }] }]
For more information regarding the style and state properties, please refer to style Propertysection.
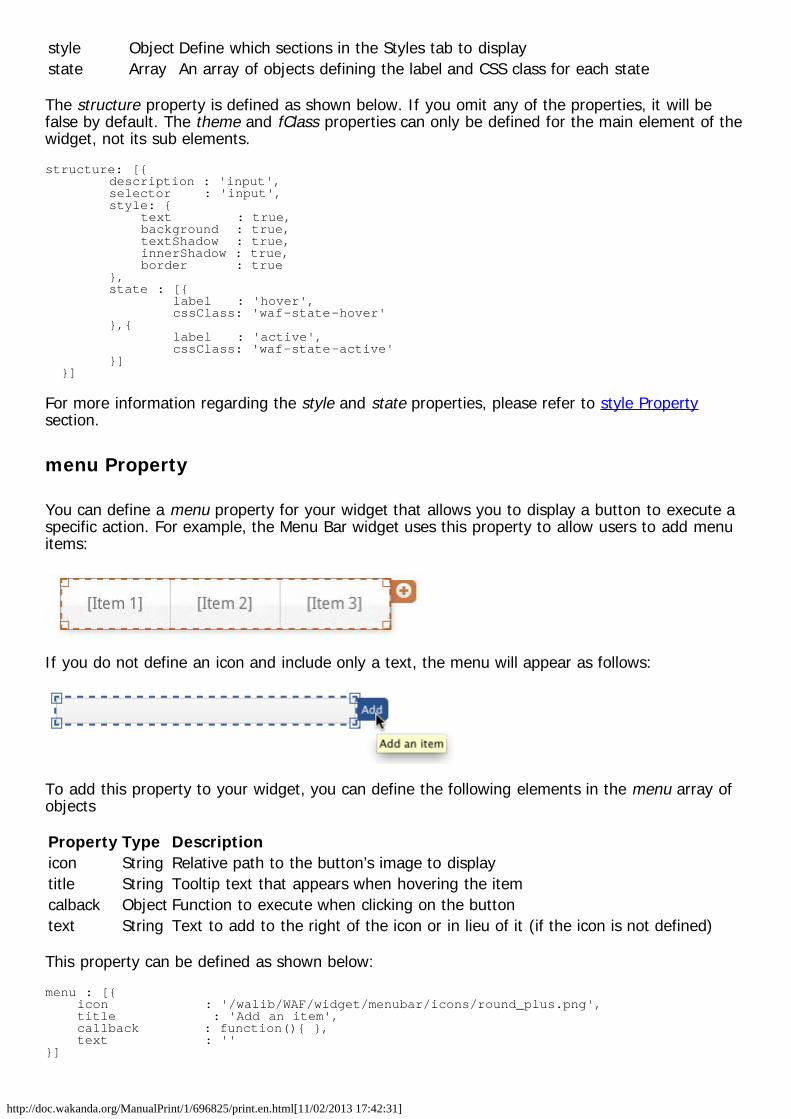
menu Property
You can define a menu property for your widget that allows you to display a button to execute aspecific action. For example, the Menu Bar widget uses this property to allow users to add menuitems:
If you do not define an icon and include only a text, the menu will appear as follows:
To add this property to your widget, you can define the following elements in the menu array ofobjects
Property Type Descriptionicon String Relative path to the button’s image to display title String Tooltip text that appears when hovering the itemcalback Object Function to execute when clicking on the buttontext String Text to add to the right of the icon or in lieu of it (if the icon is not defined)
This property can be defined as shown below:
menu : [{ icon : '/walib/WAF/widget/menubar/icons/round_plus.png', title : 'Add an item', callback : function(){ }, text : ''}]
http://doc.wakanda.org/ManualPrint/1/696825/print.en.html[11/02/2013 17:42:31]
onInit Property
This property defines the function to be called when a browser loads your widget:
onInit: function (config) { var widget = new WAF.widget.Hyperlink(config); return widget; }
This is all you need to write for your widget to be published by Wakanda after defining yourwidget’s constructor file.
onDesign Property
The onDesign property specifies how to render your widget in Wakanda Studio, which can bedefined as shown below:
onDesign: function (config, designer, tag, catalog, isResize) { var widget = new WAF.widget.Hyperlink(config); //$('#' + config.id).text(tag.getAttribute('data-text').getValue()); //display only the value entered in the data-text since we have a datasource //we can’t display in the Studio}
In our example, instead of accessing the datasource value we have defined in Wakanda Studio,we show the name of the datasource.
Generated HTML Code for the Widget
Once you have placed your widget on an Page, its generated HTML code (for a widget with itstag defined as “div”) will be as follows:
<div id="hyperlink1" data-type="hyperlink" data-lib="WAF" data-target="_blank" class="waf-widget waf-hyperlink default inherited" data-binding="company.url" data-text="Click Here!"></div>
Defining the Widget in its Constructor File
In the constructor file for your widget, we provide a WAF.Widget.provide static method. In thisfile, you must fill out the information in the appropriate locations:
1. Enter the description of your widget.
At the line that says “TODO: Write a description of this WAF widget” in the constructor file, writeup a brief description.
2. Insert the name of your widget in uppercase CamelCase.
You can insert it at the line that says “TODO: set the widget constructor name in CamelCase”.
3. Insert the code for your widget.
You can do this at the line that says “PUT THE CODE OF THE WIDGET HERE.”
4. Insert code to handle events for your widget.
Where it says “PUT THE CODE TO EXECUTE WHEN THE EVENT HAPPENS HERE” in theeventHandlerFunction, add your code there.
WAF.Widget.provide

http://doc.wakanda.org/ManualPrint/1/696825/print.en.html[11/02/2013 17:42:31]
By passing the following four parameters, the widget’s constructor is created and is referenced inWAF:
Parameter Type Descriptionname String Name of the widget constructor.shared Object The private properties and methods shared between all the instances.construct Function The internal constructor used to create the widget instance.proto Object The public shared properties and methods inherited by all the instances.
Widget Default API
WAF.Widget.provide() will generate a widget constructor inheriting from the global Widget API,and make it accessible as WAF.widget.{WidgetConstructorName}. In our example, it is calledWAF.widget.Hyperlink().
The inherited properties of your custom widgets are:
Property Descriptionid Widget ID (whose value also corresponds to the ID of the main HTML element)kind Name of your widget in lower camelcase (e.g., "widgetname")containerNode Main HTML element of the widgetlabel The label widget created for this widget (automatically linked to this widget)
errorDivThe ID of the div HTML element in which the error messages will be displayed.(In the future, this property might be modified to be the HTML node instead ofthe ID)
format The format entered for the widget.source Name of the datasource associated to the widget. For example, “company.url”.
sourceAtt The object corresponding to att, which is the attribute in the datasource. It is onthis property that you can bind listeners.
The inherited methods of your custom widgets are:
Method Description
clearErrorMessage() This method allows you to clear the error message. This method is onlyavailable if an errorDiv has been defined for your widget.
setErrorMessage() This method allows you to set the error message in the errorDiv. Thismethod is only available if an errorDiv has been defined for your widget.
getFormattedValue() This method returns the formatted value of the datasource binded to yourwidget.
Example
Here is the code for our “Hyperlink” widget using WAF.Widget.provide:
WAF.Widget.provide( 'Hyperlink', //Name of our constructor { /*private shared*/ }, function WAFWidget(config, data, shared) { $('#' + config.id).text(data.text); if ('sourceAtt' in this) { this.sourceAtt.addListener(function(e) { var link, title, target; link = this.attribute.getValue(); // Get the attribute value for the widget target = config['data-target']; //Get the value for target entered in the properties if(link=="") {

http://doc.wakanda.org/ManualPrint/1/696825/print.en.html[11/02/2013 17:42:31]
link = config['data-href']; //Get the default URL entered in the properties title = config['data-text']; //Get the default title entered in the properties } else { title = link; //Make the title the same as the link } $('#' + this.id).removeAttr('data-text'); //Remove these two attributes from the div $('#' + this.id).removeAttr('data-target'); //Add our href to the div tag $('#' + this.id).html('<a href="' + link + '" title="' + title + '" target = "'+ target +'">' + title + '</a>'); },{ listenerID : config.id, listenerType : 'hyperlink' },{ text : data.text }); } }, { /* prototype */ });
Installing a Custom Widget
We are currently working on optimizing the installation process for custom widgets. In the currentversion of Wakanda, you must follow the steps below to install your custom widget in WakandaServer and Wakanda Studio:
1. Copy your “widgetName” folder to Wakanda Server
Your “widgetName” folder must be copied to Wakanda Server in the folder indicated so thatWakanda Server can process it in runtime mode.
To access this folder on Macintosh, you must first select “Show Package Contents” from theapplication’s contextual menu and then open the “Contents” folder. Here is the path to each ofthe folders depending on your operating system:
On Windows: Wakanda Server/walib/WAF/widget/On Macintosh: Contents/walib/WAF/widget/

http://doc.wakanda.org/ManualPrint/1/696825/print.en.html[11/02/2013 17:42:31]
2. Copy your “widgetName” folder to Wakanda Studio
Your “widgetName” folder must be in the appropriate Wakanda Studio folder indicated below sothat your widget is accessible from the Wakanda Studio in the GUI Designer. To access this folderon Macintosh, you must first select “Show Package Contents” from the application’s contextualmenu and then open the “Contents” folder.
Here is the path to each of the folders depending on your operating system:
On Windows: Wakanda Studio/Resources/Web Components/walib/WAF/widget/On Macintosh: Contents/Resources/Web Components/walib/WAF/widget/
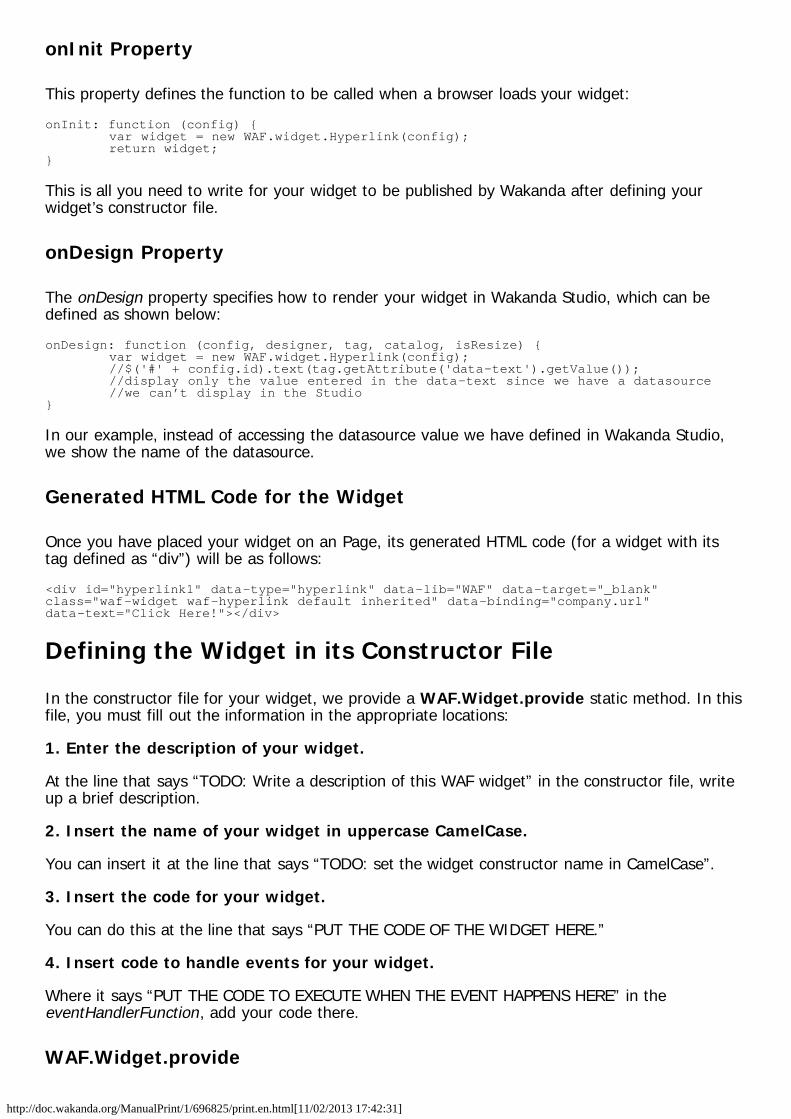
3. Add references to your widget’s constructor and configuration files inWakanda Studio’s “guidesigner.html” file
http://doc.wakanda.org/ManualPrint/1/696825/print.en.html[11/02/2013 17:42:31]
Add the references to your widget configuration and constructor files to the “guidesigner.html” fileafter the “<!-- ADD LINKS TO THE JS FILES FOR YOUR CUSTOM WIDGETS HERE -->” tag.
Here is the path to the file depending on your operating system:
On Windows: Wakanda Studio/Resources/Web Components/GUIDesigner/guidesigner.htmlOn Macintosh: Contents/Resources/Web Components/GUIDesigner/guidesigner.html
In the screenshot below, you will see where we added the reference to our “Hyperlink” widget:
3a. For mobile, add references to your widget's constructor andconfiguration files in Wakanda Studio's "guidesigner-mobile.html" file
Add the references to your widget configuration and constructor files to the “guidesigner-mobile.html” file after the “<!-- ADD LINKS TO THE JS FILES FOR YOUR CUSTOM WIDGETSHERE -->” tag if you want it to be accessible for mobile.
Here is the path to the file depending on your operating system:
On Windows: Wakanda Studio/Resources/Web Components/GUIDesigner/guidesigner-mobile.htmlOn Macintosh: Contents/Resources/Web Components/GUIDesigner/guidesigner-mobile.html
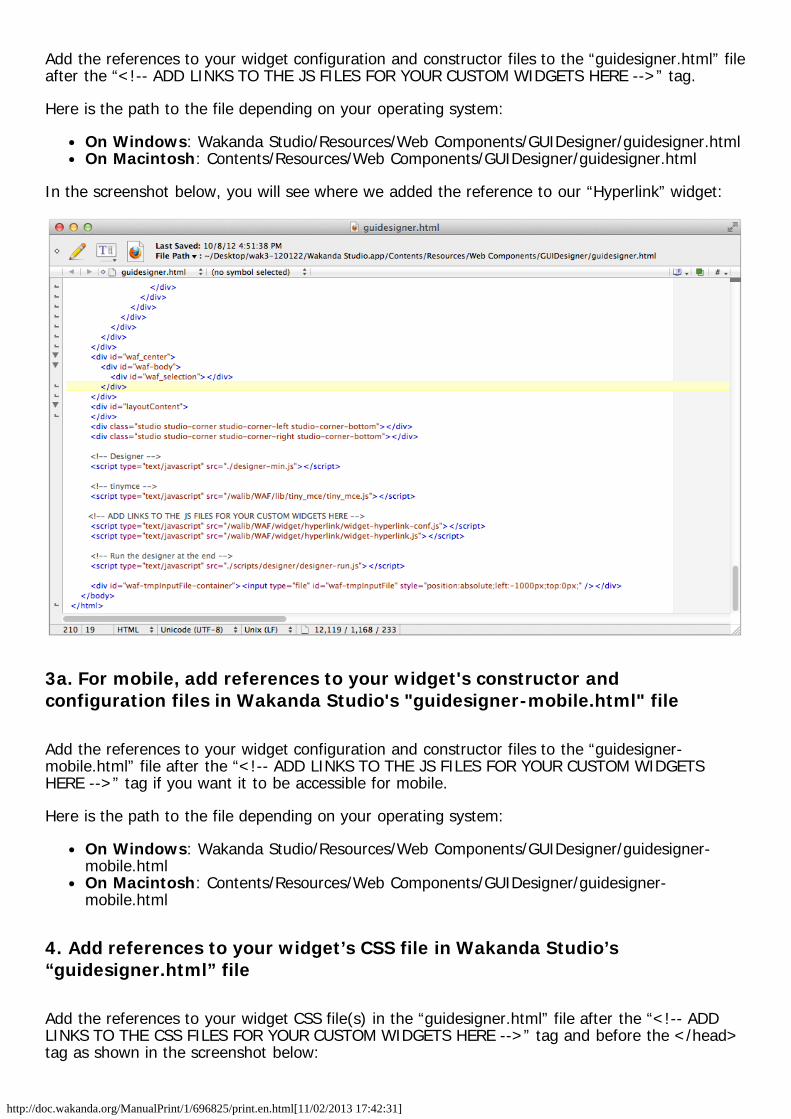
4. Add references to your widget’s CSS file in Wakanda Studio’s“guidesigner.html” file
Add the references to your widget CSS file(s) in the “guidesigner.html” file after the “<!-- ADDLINKS TO THE CSS FILES FOR YOUR CUSTOM WIDGETS HERE -->” tag and before the </head>tag as shown in the screenshot below:
http://doc.wakanda.org/ManualPrint/1/696825/print.en.html[11/02/2013 17:42:31]
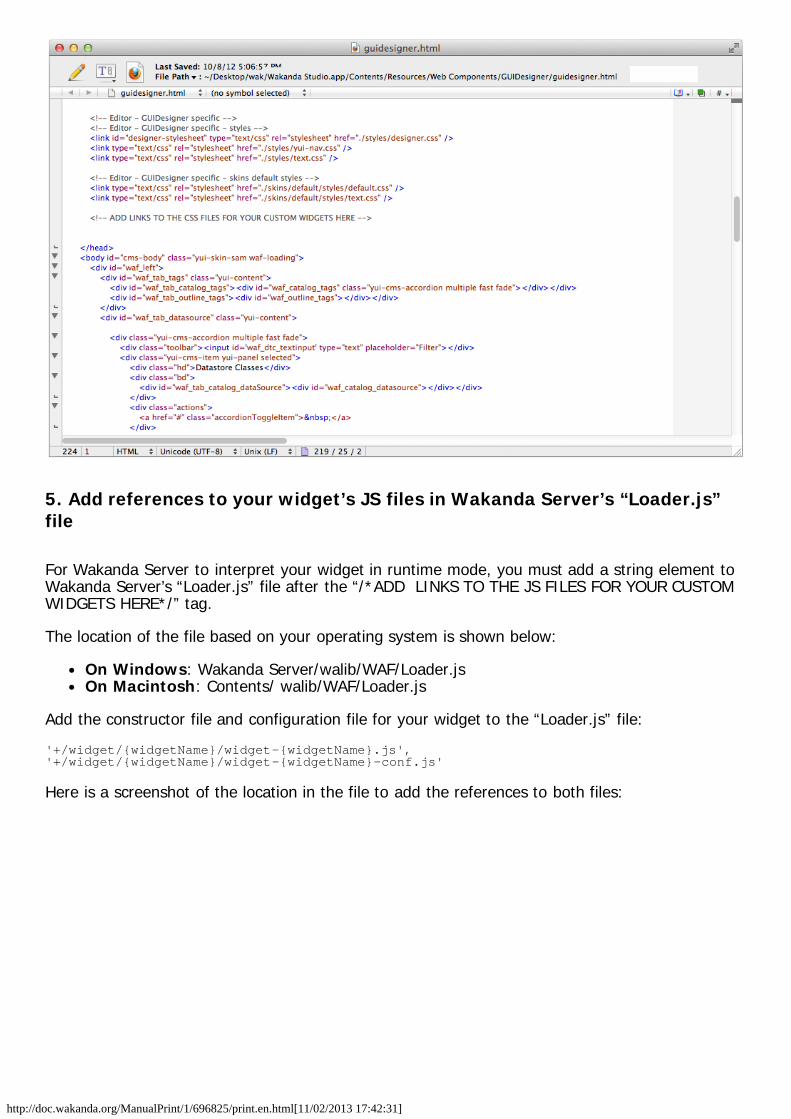
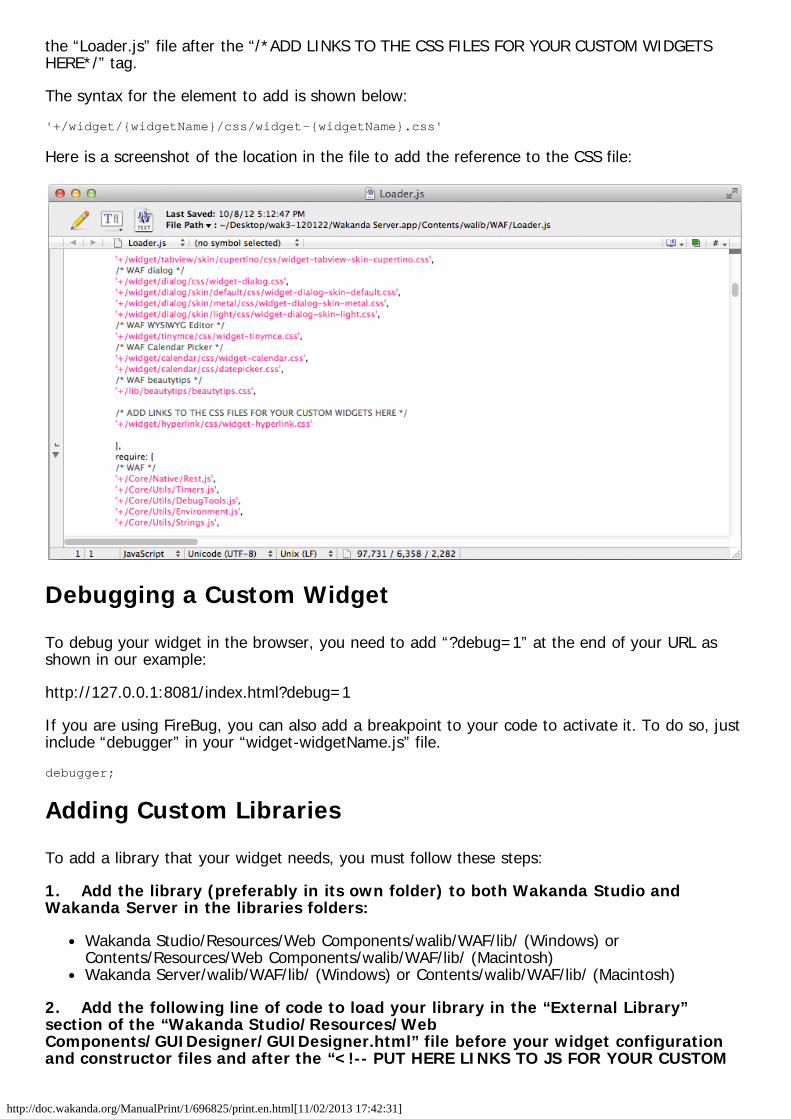
5. Add references to your widget’s JS files in Wakanda Server’s “Loader.js”file
For Wakanda Server to interpret your widget in runtime mode, you must add a string element toWakanda Server’s “Loader.js” file after the “/*ADD LINKS TO THE JS FILES FOR YOUR CUSTOMWIDGETS HERE*/” tag.
The location of the file based on your operating system is shown below:
On Windows: Wakanda Server/walib/WAF/Loader.jsOn Macintosh: Contents/ walib/WAF/Loader.js
Add the constructor file and configuration file for your widget to the “Loader.js” file:
'+/widget/{widgetName}/widget-{widgetName}.js','+/widget/{widgetName}/widget-{widgetName}-conf.js'
Here is a screenshot of the location in the file to add the references to both files:
http://doc.wakanda.org/ManualPrint/1/696825/print.en.html[11/02/2013 17:42:31]
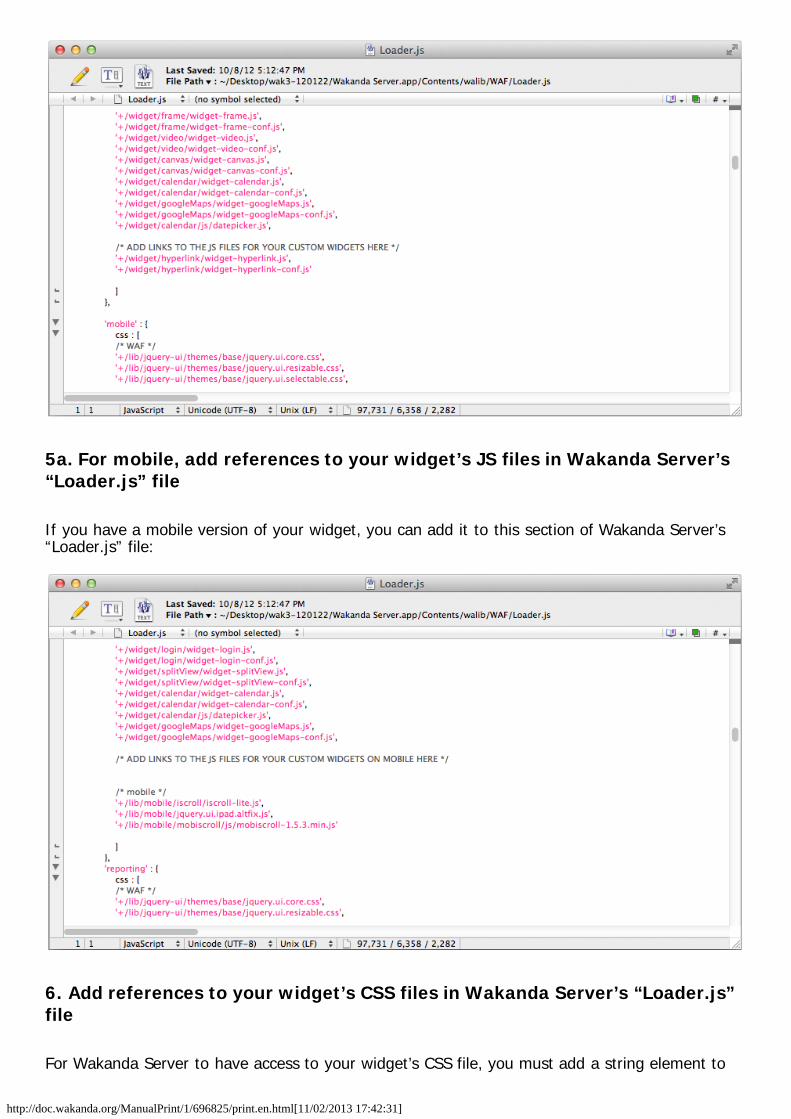
5a. For mobile, add references to your widget’s JS files in Wakanda Server’s“Loader.js” file
If you have a mobile version of your widget, you can add it to this section of Wakanda Server’s“Loader.js” file:
6. Add references to your widget’s CSS files in Wakanda Server’s “Loader.js”file
For Wakanda Server to have access to your widget’s CSS file, you must add a string element to
http://doc.wakanda.org/ManualPrint/1/696825/print.en.html[11/02/2013 17:42:31]
the “Loader.js” file after the “/*ADD LINKS TO THE CSS FILES FOR YOUR CUSTOM WIDGETSHERE*/” tag.
The syntax for the element to add is shown below:
'+/widget/{widgetName}/css/widget-{widgetName}.css'
Here is a screenshot of the location in the file to add the reference to the CSS file:
Debugging a Custom Widget
To debug your widget in the browser, you need to add “?debug=1” at the end of your URL asshown in our example:
http://127.0.0.1:8081/index.html?debug=1
If you are using FireBug, you can also add a breakpoint to your code to activate it. To do so, justinclude “debugger” in your “widget-widgetName.js” file.
debugger;
Adding Custom Libraries
To add a library that your widget needs, you must follow these steps:
1. Add the library (preferably in its own folder) to both Wakanda Studio andWakanda Server in the libraries folders:
Wakanda Studio/Resources/Web Components/walib/WAF/lib/ (Windows) orContents/Resources/Web Components/walib/WAF/lib/ (Macintosh)Wakanda Server/walib/WAF/lib/ (Windows) or Contents/walib/WAF/lib/ (Macintosh)
2. Add the following line of code to load your library in the “External Library”section of the “Wakanda Studio/Resources/WebComponents/GUIDesigner/GUIDesigner.html” file before your widget configurationand constructor files and after the “<!-- PUT HERE LINKS TO JS FOR YOUR CUSTOM
http://doc.wakanda.org/ManualPrint/1/696825/print.en.html[11/02/2013 17:42:31]
WIDGETS -->” tag. The line to include is written as follows relative to the “walib”folder:
<script type="text/javascript" src="/walib/WAF/lib/dojo/dojo-dijitFormDropDownButton.js"></script>
3. Add the name of the JavaScript file to include in the “inc” property of the“{widgetName}-conf.js” file so that it is accessed at runtime.
Future Optimizations
Besides the installation process, we are also working on optimizing how the configuration fileworks as well as the WAF.Widget.provide static method.
We are working on the following optimizations:
Publish a forkable official repository (potentially on github),Making the installation process simpler, andMaking it simpler to define which of Wakanda’s built-in events you want to include in theEvents tab.