walk-behind lawn mower - southland power …€¦ · look inside for: page safety definitions 1...
TRANSCRIPT

Look Inside for: PageSafety Definitions 1 Important Safety Information 2-5Product Specifications 6Parts & Features 6Safety Decals 7Assembly 8-11Operation 12-14Routine Maintenance 15-18Storage 18Troubleshooting 19Technical Service 20Warranty 20-23
12/20/2010 Printed in China A101105
Operator’s ManualWALK-BEHIND LAWN MOWER
Record the following for future reference:Model No: ___________________Mfg. Date Code: ______________________Date of Purchase: Attach a copy of your sales receipt.Consumer Toll Free Number: 1-800-737-2112
KEEP THIS MANUAL FOR FUTURE REFERENCE
MODEL NO.s SM2010
If you have a question or problem...CALL TOLL FREE: 1-800-737-2112
Refer to the website for electronic manual and parts book.www.southlandpowerequipment.com
WARNING CALIFORNIA PROPOSITION 65 WARNING
Engine exhaust, some of its constituents, and certain product components contain or emit chemicals known to the State of California to cause cancer and birth defects or other reproductive harm.
IMPORTANT: This manual provides complete instructions for safely operating and maintaining your mower. Read and save these instructions. Refer to this manual each time before using your mower.

Questions? Call Toll Free at 1-800-737-2112 Copyright © 2011 MAT Engine Technologies, LLC
PUSH TO PRIME
Push primer 3 times before starting a cold engine . Important: Do not prime to restart a warm engine.
Oil Fill LocationDo Not Overfill
Indicates WARNING, DANGER, or CAUTION. Use common sense. Watch what you are doing.
Do not mow when children or others are around.
Read all instructions carefully.
This mower can throw small objects at high speed causing personal injury or property damage. Remove objects that could be thrown by the blade.
Keep hands and feet away from rotating parts.
Wear eye protection that meets or exceeds the requirements of ANSI Z87.1.
Do not mow slopes greater than 15°. Mow across slopes, never up and down.
Extremely hot surface. The muffler and engine become hot and can burn you. Do not touch.
DANGERKEEP HANDS and FEET AWAY
DANGERThe mower is capable of amputating hands and feet. To avoid risk or seri-ous injury, do not put hands or feet near or under the mower. Keep clear of the discharge opening at all times.
Safety Definitions• Save these instructions
Safety Warning Symbols
Control and Operating Symbols
Indicates an imminently hazardous situation which, if not avoided, will result in death or serious injury.
Indicates a potentially hazardous situation which, if not avoided, could result in death or serious injury.
Indicates a potentially hazardous situation which, if not avoided, may result in minor/moderate injury, or equipment/property damage.
DANGER
CAUTION
WARNING
The symbols below identify important safety information in this manual. Become familiar with these symbols and the warnings associated with these symbols.
Safety Alert Symbols
Become familiar with and understand the meaning of the warning symbols found on your mower.Important Safety Inform
ation
1

Questions? Call Toll Free at 1-800-737-2112 Copyright © 2011 MAT Engine Technologies, LLC
Important Safety Information• Save all instructions
BEFORE OPERATING THE MOWER1. READ AND UNDERSTAND ALL INSTRUCTIONS BEFORE OPERATING THE MOWER.
DANGERThe mower is capable of amputating hands and feet and throwing objects. Read and follow all warnings and safety instructions on the mower and in this manual. Failure to do so can result in serious injury or death to you or bystanders.
2. Avoid Dangerous Environments a. Do not operate the mower while under the influence of alcohol, medications, or drugs. b. Do not operate the mower when you are tired. c. Do not use this mower if you are mentally or physically unable to operate safely.3. Make sure all fasteners are tight and safety devices (guards, shields, blade control, etc.) are in place and working correctly. Inspect mower for damaged parts. Replace any damaged parts.4. Dress properly when operating the mower. a. Always wear substantial footwear that provides protection and reliable footing. Never operate the mower in bare feet or sandals. b. Heavy long pants, steel-toed boots, gloves, and a long-sleeve shirt are recommended. c. Do not wear loose clothing or jewelry that can get caught in the moving parts of the mower.5. Always wear eye protection that meets or exceeds the requirements of ANSI Z87.1.6. Operate the mower only in daylight or good lighting conditions.7. Thoroughly inspect the area where the mower is to be used and remove all foreign objects such as rocks, wire, toys, etc., which could be thrown by the blade.
WARNINGThis mower can throw small objects at high speed causing personal injury or property damage.
WHILE OPERATING THE MOWER1. Stay alert. Use common sense. Watch what you are doing.2. Do not operate the mower if it is damaged or not securely and fully assembled.
DANGERNever start or run the mower inside a closed room or building; breathing exhaust fumes can kill.
WARNINGTragic accidents can occur if you are not alert to the presence of children. Children are often attracted to the mower and mow-ing activity. Never assume that children will remain where you last saw them.
3. Only well instructed and responsible adults should operate the mower. Never allow children to operate the mower.4. Keep children and bystanders out of the mowing area. Keep children under the watchful care of a responsible adult other than the operator. 5. Be alert and turn the mower engine off if anyone enters the mowing area.6. Use extreme care when approaching blind corners, shrubs, trees or other objects that may block your view of a child.7. Never leave a running mower unattended.8. Do not pull the mower backwards unless absolutely necessary. When moving the mower backwards, look down and behind for small children and foreign objects. Take extreme care when moving the mower backwards to keep your feet clear of the mower and to maintain your footing and balance.
DANGERDo not put hands or feet near or under the mower. Keep clear of the discharge opening at all times.
9. Do not operate mower without the entire discharge guard, trailing rear shield, blade control or other safety protective devices in place and working.
Impo
rtan
t Saf
ety
Info
rmat
ion
2

Questions? Call Toll Free at 1-800-737-2112 Copyright © 2011 MAT Engine Technologies, LLC
Important Safety Information (Continued)• Save all instructions
WARNINGDisconnect spark plug wire before servicing blade or cleaning underneath mower deck. Failure to disconnect spark plug wire could lead to incidental engine starting resulting in serious injury or death.
10. Stop the engine (motor) and wait for the blade to completely stop before cleaning the mower or unclogging the discharge guard.11. Maintain your balance and proper footing at all times. Always be sure of your footing; walk; never run. 12. The blade control lever is a safety device. Do not attempt to bypass or override the blade control lever. Doing so may cause severe personal injury from contact with a rotating blade. Stay behind the handle when the engine is running.13. Never direct the mower’s discharge toward anyone. Avoid discharging the mower against a wall or other obstruction. Objects may ricochet back toward the operator or bystanders. Stop the engine when crossing gravel drives and walkways.14. Do not force mower. It will do the job better, last longer and with less likelihood of a risk of injury at the rate for which it was designed.15. If the mowers starts to vibrate abnormally, stop the engine and check for the cause immediately. Vibration is generally a warning of trouble.16. The muffler and engine become hot and can burn you. Do not touch.
WHILE OPERATING THE MOWER ON SLOPES
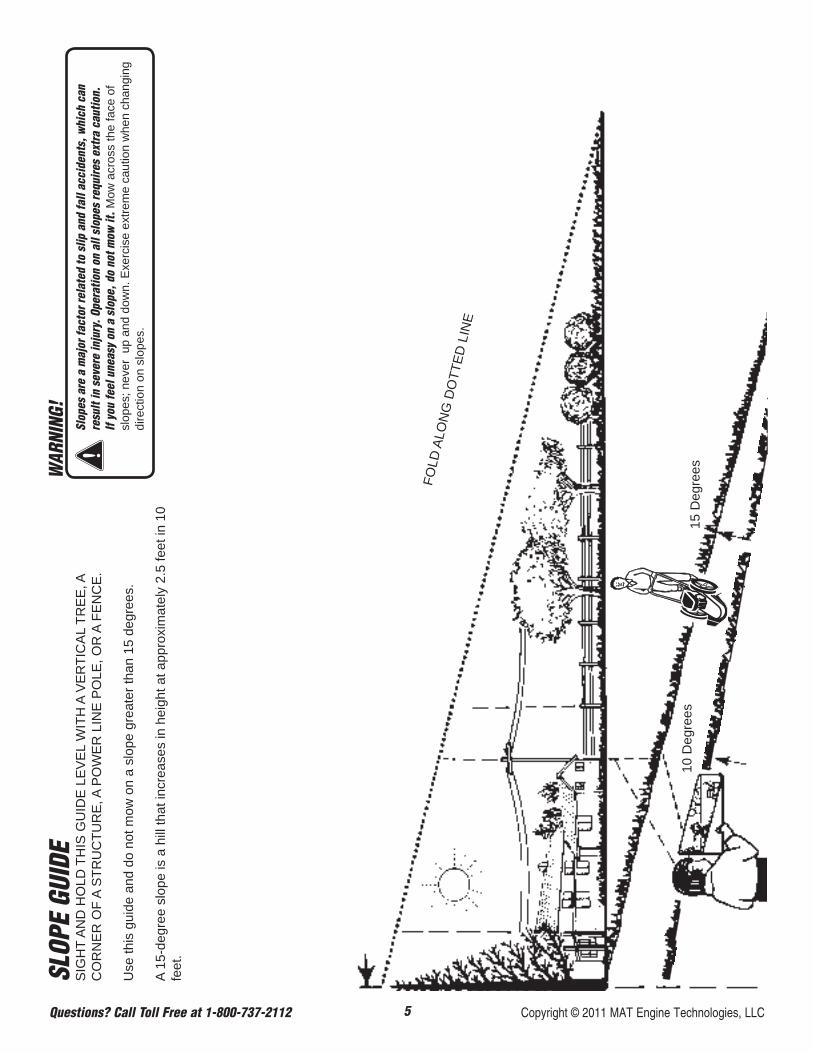
WARNINGSlopes are a major factor related to slip and fall accidents, which can result in severe injury. Operation on all slopes requires extra caution. If you feel uneasy on a slope, do not mow it.
1. If a slope is greater than 15 degrees, do not mow. Use the slope gauge inside this manual (see pg. 5) to measure slopes before operating this mower on a slope or hilly area.2. Mow across the face of slopes; never up and down. Exercise extreme caution when changing direction on slopes.3. Watch for holes, ruts, bumps, rocks, or other hidden objects. Uneven terrain could cause a slip and fall accident. Tall grass can hide obstacles.4. Do not mow on wet grass or excessively steep slopes. Poor footing could cause a slip and fall accident.5. Do not mow near drop-offs. ditches, or embankments. You could lose your footing or balance.6. If you do lose your balance, release the handle and blade control lever immediately.
FUEL SAFETY
WARNING To avoid personal injury or property damage, use extreme care when handling gasoline. Gasoline is extremely flammable and the vapors are explosive.
1. Do not smoke or allow smoking near fuel or the mower. Extinguish all cigarettes, cigars, pipes and other sources of ignition. 2. Never refuel the mower indoors. Refuel outdoors WHERE THERE ARE NO SPARKS OR FLAMES.3. Use a container approved for gasoline.4. Never fill containers inside a vehicle or on a truck or trailer bed with a plastic liner. Always place containers on the ground away from your vehicle before filling.5. Do not lock the fuel dispensing nozzle in the open position.6. Remove gas-powered equipment from the truck or trailer and refuel it on the ground. Always refuel the mower using a portable container. Never refuel mower from a fuel dispensing nozzle.7. Never remove the fuel cap or add fuel with the engine running. Always stop engine and allow to cool before removing fuel cap. Remove fuel cap slowly.8. Never overfill fuel tank. Avoid spilling fuel or oil. Wipe up all fuel spills.9. After refueling, replace fuel cap and tighten securely.10. If fuel is spilled on clothing, change clothing immediately.11. Move at least 10 feet (3 meters) away from fueling site before starting engine.
Important Safety Inform
ation
3

Questions? Call Toll Free at 1-800-737-2112 Copyright © 2011 MAT Engine Technologies, LLC
MAINTENANCE AND STORAGE OF THE MOWER1. Disconnect the spark plug before performing maintenance.2. Maintain the mower with care. Inspect the mower periodically. If the mower is not working properly or damaged, have it repaired by a qualified service center.3. Check for misalignment of moving parts, binding of moving parts, broken parts, mounting, and any other condition that may affect its operation.4. Check guards frequently and keep guards in place and in working order.5. A guard or other part that is damaged should be properly repaired or replaced by a qualified service center.6. Use only genuine Southland™ replacement parts and accessories. Use of any non-Southland™ parts or accessories could lead to injury, damage to the unit, and void your warranty. 7. Maintain or replace safety and instruction labels as necessary. Do not remove safety or any labels from the mower for any reason.8. Do not change engine governor setting or overspeed the engine.9. Do not remove or modify any parts. Removing or modifying parts could lead to injury, damage the mower and will void the warranty.10. Keep machine free of grass, leaves or other debris build-up. Clean up oil or fuel spills and remove any fuel-soaked debris. 11. Allow engine to cool and empty the fuel tank before storing or transporting in vehicle. Use up remaining fuel in the carburetor by starting the engine and letting it run until it stops.12. Use extra caution when servicing mower blades. Disconnect spark plug wire before servicing blade or cleaning underneath mower deck. Blades are sharp. To protect your hands, wrap the blade or wear gloves when handling.13. Store unit and fuel in area where fuel vapors cannot reach sparks or open flames from water heaters, electric motors or switches, furnaces, or where power tools are operated.14. When not in use, store the mower in a clean, dry and well ventilated area. Im
port
ant S
afet
y In
form
atio
n
Important Safety Information (Continued)• Save all instructions
4
Questions? Call Toll Free at 1-800-737-2112 Copyright © 2011 MAT Engine Technologies, LLC
19 F-050204L
15 D
egre
es10
Deg
rees
FOLD
ALO
NG D
OTT
ED L
INE
SLOP
E GU
IDE
SIG
HT
AND
HO
LD T
HIS
GU
IDE
LEVE
L W
ITH
A V
ERTI
CAL
TR
EE, A
C
OR
NER
OF
A ST
RU
CTU
RE,
A P
OW
ER L
INE
POLE
, OR
A F
ENC
E.
Use
this
gui
de a
nd d
o no
t mow
on
a sl
ope
grea
ter t
han
15 d
egre
es.
A 15
-deg
ree
slop
e is
a h
ill th
at in
crea
ses
in h
eigh
t at a
ppro
xim
atel
y 2.
5 fe
et in
10
feet
.
WAR
NING
!
Slop
es a
re a
maj
or fa
ctor
rela
ted
to s
lip a
nd fa
ll ac
cide
nts,
whi
ch c
an
re
sult
in s
ever
e in
jury
. Ope
ratio
n on
all
slop
es re
quire
s ex
tra
caut
ion.
If yo
u fe
el u
neas
y on
a s
lope
, do
not m
ow it
. Mow
acr
oss
the
face
of
slo
pes;
nev
er u
p an
d do
wn.
Exe
rcise
ext
rem
e ca
utio
n w
hen
chan
ging
dire
ctio
n on
slo
pes.
5

Questions? Call Toll Free at 1-800-737-2112 Copyright © 2011 MAT Engine Technologies, LLC
Product Specifications• Save all instructions
To be able to operate your mower safely and get the best performance, become familiar with the key product fea-tures (shown below) and all warning and instructions in this manual.1. Blade Control Lever 2. Primer Bulb3. Starter Rope Handle4. Starter Rope Guide 5. Discharge Guard 6. Gasoline Fill 7. Oil Fill 8. Lower Handle 9. Upper Handle 10. Air Filter11. Muffler12. Spark Plug
Parts & Features
If you need assistance or have any questions, CALL TOLL FREE: 1-800-737-2112.
6
Cutting Width . . . . . . . . . . . . . . . . . . . . . . . . 20 in (510 mm)Cutting Heights. . . . . . . . . . . . . . . . .2.25-3.5 in (57-89 mm)Engine Speed. . . . . . . . . . . . . . . . . . . . . . . . . . . .3000 RPMUnit Weight. . . . . . . . . . . . . . . . . . . . . . . . . 48.5 lb (22.0 kg)Gasoline Type . . . . . . Regular Unleaded – 87 Octane (min.)Gasoline Capacity . . . . . . . . . . . . . . . . . . . . . . . 1.06 qt (1L)Oil Type (API SG, SH, SJ or higher) 10W-30 is recommended for all service temperatures. See page 11 for
additional information.Oil Capacity . . . . . . . . . . . . . . . . . . . . . . . . . 17 oz (500 ml)
Spark Plug Model . . . . . . . . . . TORCH F7TC/ NGK BP6ES/Champion RN9YC4
Spark Plug Gap . . . . . . . . . .0.028-0.031 in (0.70-0.80 mm)Engine Type . . . . . . . . . . . . . 4 stroke, single cylinder, OHVDisplacement . . . . . . . . . . . . . 139cc (EPA), 149cc (CARB)Torque Rating . . . . . . . . . . . . . . . . .5.0 ft-lb (6.8 N•m) (EPA) . . . . . . . . . . . . . . . . . . . . . . . . . . . . . .5.9 (8.0 N•m) (CARB)
gross torque per SAE J1940Wheel Size . . . . . . . . . . . . . . . . . . . . . . . . . . . . . . . . . . . . .7˝
3
1
2
4
5
6
7
8
9
10
11 12

Safety Decals• Save all instructions
This mower has been designed and manufactured to provide you with the safety and reliability you would expect from an industry leader in outdoor power equipment manufacturing.
Although reading this manual and the safety instructions it contains will provide you with the necessary basic knowl-edge to operated this equipment safely and effectively, we have placed several safety labels on the mower to remind you of this important information while you are operating the unit.
These important safety labels are illustrated below, and are shown here to help familiarize you with the location and con-tent to the safety messages you will see as you perform nor-mal mowing operations. Please review these labels now. If you have any questions regarding their meaning or how to comply with these instructions, reread the complete safety instruction text on the preceding pages, or contact your local dealer.
Should any of the safety labels become unreadable because of being worn, faded, or otherwise damaged during the use of your mower, please contact your local authorized dealer to order replacement label.
The safety labels are easily applied, and will act as a con-stant visual reminder to you and others who may use the equipment. Following the safety instructions is necessary for safe, effective operation of your mower.
7

Questions? Call Toll Free at 1-800-737-2112 Copyright © 2011 MAT Engine Technologies, LLC
Assembly• Save all instructions
NOTE: ALL REFERENCES TO RIGHT OR LEFT SIDE OF THE MOWER ARE FROM THE OPERATOR’S POSITION BEHIND THE UNIT.
IMPORTANT: THE ASSEMBLY INSTRUCTIONS WERE WRITTEN FOR PERSONS WITH SOME MECHANICAL ABILITY AND EXPERIENCE. ALL STEPS ARE NOT INCLUDED IN THESE INSTRUCTIONS. PERSONS WITH SOME MECHANICAL ABILITY ARE FAMILIAR WITH TIGHTENING FASTENERS SO THESE STEPS ARE NOT INCLUDED. DO NOT ATTEMPT TO ASSEMBLE BEYOND YOUR ABILITY.
WARNINGDo not operate the mower if it is damaged or not securely and fully assembled.
PARTS INCLUDED WITH THE PACKED MOWER
Item in Figure 2 QTY
13 Upper Handle 114 Lower Handle 115 Discharge Guard 116 Wheels 4
not shown
Parts Bag 1Operator’s Manual 1Quick Start Guide 14-Stroke Engine Oil 17 oz (500 ml) 1
Item in Figure 1 QTY
1 Bolt, Axle - 3/8 in 42 Bolt, Hex Head Shoulder - 3/8 in 23 Bolt, Round Head Square Neck - 3/8 in 24 Bolt, Hex Head -1/4 in 25 Locknut - 1/4 in 26 Spacer 27 Washer - 1/4 in 28 Clip, Cable 19 Washer - 3/8 in 6
10 Wingnut, Plastic 211 Nut, Flange (Serrated Bottom) - 3/8 in 412 Nut, Flange (Smooth Bottom) - 3/8 in 2
If you need assistance or have any questions, CALL TOLL FREE: 1-800-737-2112.
8
Figure 1
Figure 2
Questions? Call Toll Free at 1-800-737-2112 Copyright © 2011 MAT Engine Technologies, LLC
Assembly (Continued)• Save all instructions
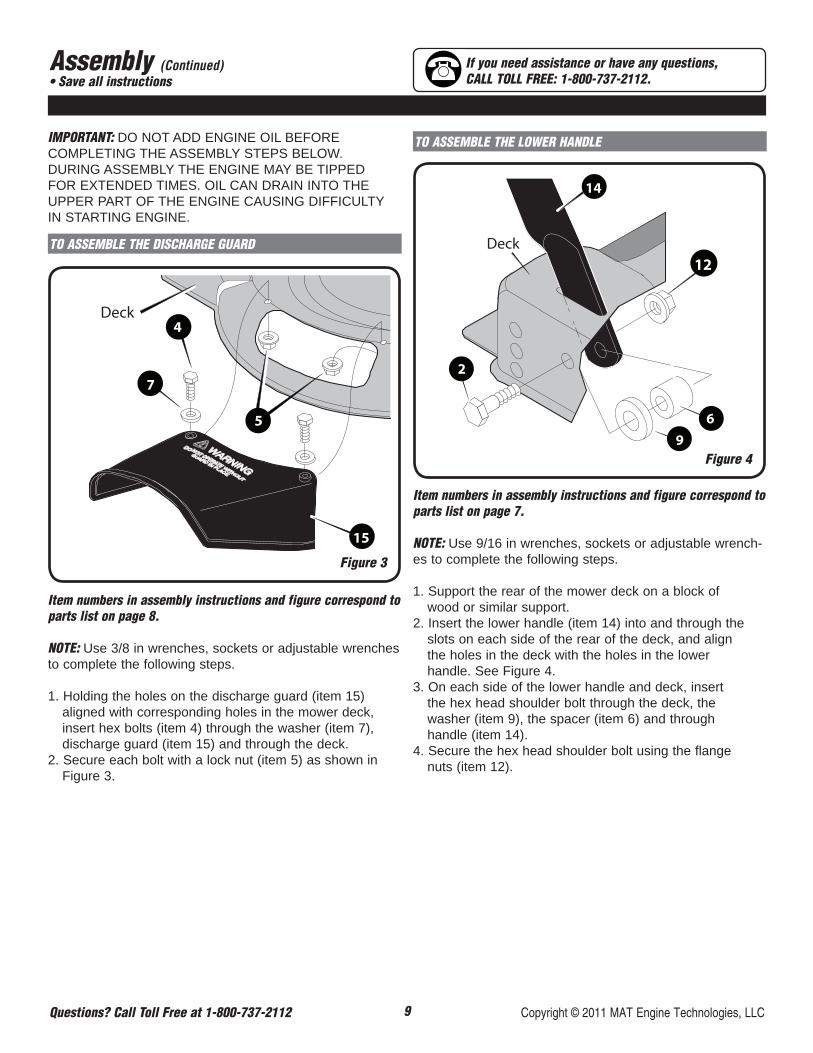
IMPORTANT: DO NOT ADD ENGINE OIL BEFORE COMPLETING THE ASSEMBLY STEPS BELOW. DURING ASSEMBLY THE ENGINE MAY BE TIPPED FOR EXTENDED TIMES. OIL CAN DRAIN INTO THE UPPER PART OF THE ENGINE CAUSING DIFFICULTY IN STARTING ENGINE.
TO ASSEMBLE THE DISCHARGE GUARD
Item numbers in assembly instructions and figure correspond to parts list on page 8.
NOTE: Use 3/8 in wrenches, sockets or adjustable wrenches to complete the following steps.
1. Holding the holes on the discharge guard (item 15) aligned with corresponding holes in the mower deck, insert hex bolts (item 4) through the washer (item 7), discharge guard (item 15) and through the deck.2. Secure each bolt with a lock nut (item 5) as shown in Figure 3.
TO ASSEMBLE THE LOWER HANDLE
Item numbers in assembly instructions and figure correspond to parts list on page 7.
NOTE: Use 9/16 in wrenches, sockets or adjustable wrench-es to complete the following steps.
1. Support the rear of the mower deck on a block of wood or similar support. 2. Insert the lower handle (item 14) into and through the slots on each side of the rear of the deck, and align the holes in the deck with the holes in the lower handle. See Figure 4.3. On each side of the lower handle and deck, insert the hex head shoulder bolt through the deck, the washer (item 9), the spacer (item 6) and through handle (item 14).4. Secure the hex head shoulder bolt using the flange nuts (item 12).
If you need assistance or have any questions, CALL TOLL FREE: 1-800-737-2112.
9
Figure 3
Figure 4

Questions? Call Toll Free at 1-800-737-2112 Copyright © 2011 MAT Engine Technologies, LLC
Assembly (Continued)• Save all instructions
Item numbers in assembly instructions and figure correspond to parts list on page 7.
1. Place the upper handle (item 13) in position over the lower handle (item 14). See Figure 5.2. Insert the round head, square neck bolts (item 3) through the holes in each side of the upper and lower handles, and secure with the large wing nuts (item 10).3. Pull the recoil starter and thread the rope through the rope guide, as shown in Figure 5.
If you need assistance or have any questions, CALL TOLL FREE: 1-800-737-2112.
10
Figure 5
TO ASSEMBLE THE BLADE CONTROL ASSEMBLY
Recoil HandleRope Guide
1. Insert the T-Bar pin into the Bracket as shown in Figure 6.Note: It may be necessary to temporarily remove the pre-assembled cable clip from the upper handle, to get enough slack in the cable. Reassemble the clip after the pin is inserted.2. Secure the cable to the upper handle with the cable clip (item 8). See Figure 7. 3. Insert the opposite side (left) end of the blade control lever into the hole in the upper handle. See Figure 5.Important: After completing these steps, pull the Blade Control Lever down against the upper handle. This should actuate the spring loaded brake lever on the engine. The Blade Control Lever should spring back to the upper posi-tion when released.
WARNINGThe Blade Control Assembly is required to be able to stop the engine and brake the blade. Never run the lawn mower without the Blade Control Assembly correctly assembled.
Figure 6
Pre-assembledCable Clip
Bracket
TO ASSEMBLE THE UPPER HANDLE
Figure 7
T-Bar Pin Blade Control Lever

Questions? Call Toll Free at 1-800-737-2112 Copyright © 2011 MAT Engine Technologies, LLC
Assembly (Continued)• Save all instructions
If you need assistance or have any questions, CALL TOLL FREE: 1-800-737-2112.
11
TO ASSEMBLE THE WHEELS (See Figure 8)
IMPORTANT: Before assembling the wheels, consider your lawn and decide which available cutting height is best for your lawn. For best results, never cut off more than one-third of the total length of the grass.
NOTE: Use 3/4 and 9/16 in. wrenches, sockets or adjustable wrenches to complete the following steps.
Each corner of the mower deck has a group of 3 vertical holes representing the 3 possible cutting height settings. The cutting height is fixed and adjusted with the choice of hole the wheels are assembled. Make sure to assemble the wheels in the same choice of hole for each corner of the deck.
Item numbers in assembly instructions and figure correspond to parts list on page 7.
1. Secure each wheel to the deck by inserting the axle bolt (item 1) into and through the wheel (item16), washer (item 9), and hole in the deck. Secure with flange nut (item 11).
a. To adjust the cutting height, disassemble each wheel and re-assemble to your new choice of hole location / cutting height.
NOTE: Make sure all four (4) wheels are assembled in the same wheel height position.
Figure 8
Hole for 2.25”cutting heightHole for 2.88”cutting height
Hole for 3.5”cutting height
Questions? Call Toll Free at 1-800-737-2112 Copyright © 2011 MAT Engine Technologies, LLC
Operation• Save all instructions
BEFORE STARTING ENGINE
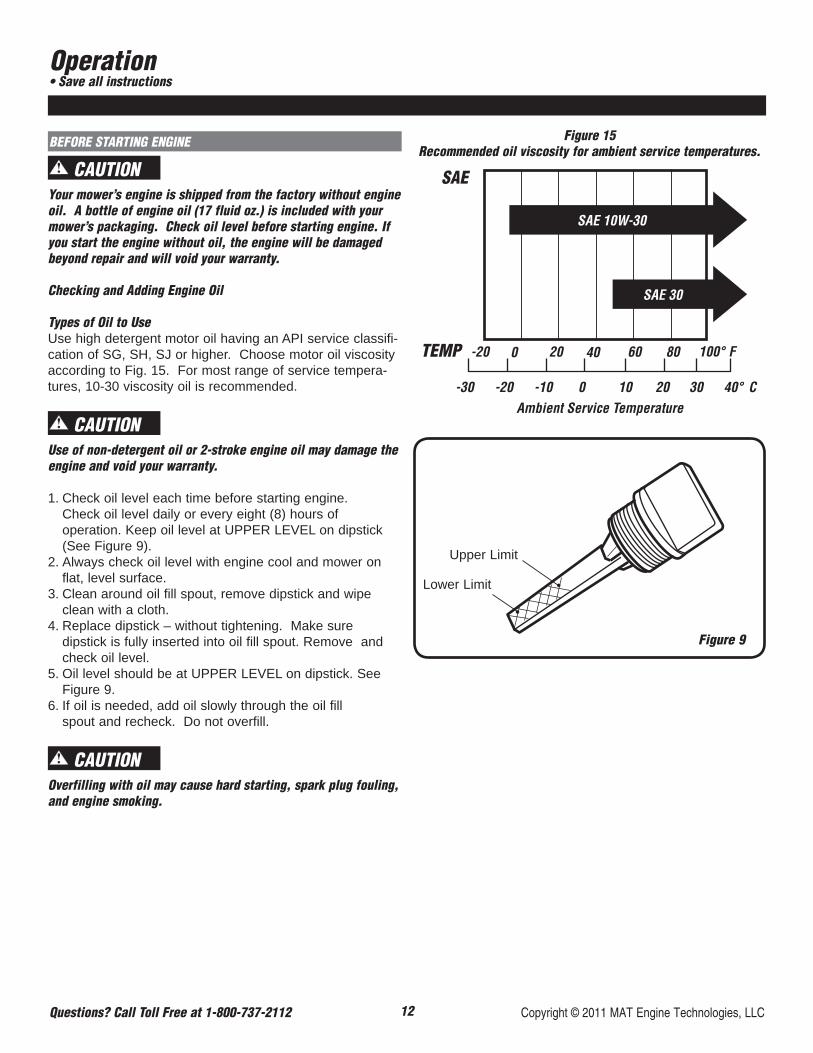
CAUTIONYour mower’s engine is shipped from the factory without engine oil. A bottle of engine oil (17 fluid oz.) is included with your mower’s packaging. Check oil level before starting engine. If you start the engine without oil, the engine will be damaged beyond repair and will void your warranty.
Checking and Adding Engine Oil
Types of Oil to UseUse high detergent motor oil having an API service classifi-cation of SG, SH, SJ or higher. Choose motor oil viscosity according to Fig. 15. For most range of service tempera-tures, 10-30 viscosity oil is recommended.
CAUTIONUse of non-detergent oil or 2-stroke engine oil may damage the engine and void your warranty.
1. Check oil level each time before starting engine. Check oil level daily or every eight (8) hours of operation. Keep oil level at UPPER LEVEL on dipstick (See Figure 9).2. Always check oil level with engine cool and mower on flat, level surface.3. Clean around oil fill spout, remove dipstick and wipe clean with a cloth.4. Replace dipstick – without tightening. Make sure dipstick is fully inserted into oil fill spout. Remove and check oil level.5. Oil level should be at UPPER LEVEL on dipstick. See Figure 9.6. If oil is needed, add oil slowly through the oil fill spout and recheck. Do not overfill.
CAUTION Overfilling with oil may cause hard starting, spark plug fouling, and engine smoking.
Figure 15 Recommended oil viscosity for ambient service temperatures.
12
SAE
TEMP 100° F
40° C
-20
-20-30 -10
0
0
20
2010
40 60 80
30Ambient Service Temperature
SAE 10W-30
SAE 30
Figure 9
Upper Limit
Lower Limit

Questions? Call Toll Free at 1-800-737-2112 Copyright © 2011 MAT Engine Technologies, LLC
Primer Bulb
Push 3Times
13
Operation (Continued)• Save all instructions
BEFORE STARTING ENGINE
Filling the Fuel Tank
WARNING To avoid personal injury or property damage, use extreme care when handling gasoline. Gasoline is extremely flammable and the vapors are explosive. Do not smoke or allow smoking near fuel or the mower. Extinguish all cigarettes, cigars, pipes and other sources of ignition. Never refuel the mower indoors. Refuel outdoors WHERE THERE ARE NO SPARKS OR FLAMES. Never remove the fuel cap or add fuel with the engine running. Always stop engine and allow to cool before removing fuel cap. Remove fuel cap slowly. Never overfill fuel tank. Avoid spilling fuel or oil. Wipe up all fuel spills.
Use fresh, clean regular unleaded gasoline with a minimum 87 octane. Fresh fuel prevents buildup of varnish and gum in the carburetor and fuel system. Commonly available fuel additives which reduce varnish and gum in your engine’s fuel system can be added according to the manufacturer’s instructions. Do not use gasoline which contains methanol. Do not mix oil with gasoline.
1. Remove cap slowly. Fill tank to approximately 1-1/2 inches below the top of the filler neck to allow for fuel expansion. Never overfill fuel tank.2. After refueling, replace fuel cap and tighten securely. 3. If fuel is spilled on clothing, change clothing immediately.4. Move at least 10 feet (3 meters) away from fueling site before starting engine.
STARTING THE ENGINE
DANGER Never start or run the mower inside a closed room or building; breathing exhaust fumes can kill. Do not put hands or feet near or under the mower. Keep clear of the discharge opening at all times. Keep children and bystanders away when starting the engine and out of the mowing area.
1. Push the primer slowly three times – waiting about 2 seconds between each push (see fig. 10a) When tem- peratures are below 55ºF, press primer five times. When restarting a warm engine, do not use the primer.2. Stand behind the mower handle, grasp the blade control lever – holding it firmly against the upper handle. See fig. 10b.3. Grasp the starter rope handle and pull slowly until resistance is felt, then pull rapidly to start engine.
CAUTIONRapid retraction of the starter rope (kickback) will pull your hand and arm back toward the engine faster than you can let go. Broken bones, fractures, bruises or sprains could result.
4. Slowly return starter rope handle to the starter rope guide and release.IMPORTANT: To avoid damage to the engine’s starter, do not allow the starter rope to snap back against the rope guide.
Figure 10a
Figure 10b
Recoil Handle Starter
Upper Handle
Blade Control Lever

Questions? Call Toll Free at 1-800-737-2112 Copyright © 2011 MAT Engine Technologies, LLC
Operation (Continued)• Save all instructions
STOPPING THE ENGINE AND BLADE
WARNINGWait for the blade to come to a complete stop before attempt-ing to perform any work on the mower.
1. Release blade control lever to stop the engine and the blade.
ADJUSTING CUTTING HEIGHTReassemble the wheels in the desired wheel height posi-tion. Refer to the “To assemble the wheels” section in the assembly portion of the manual
MOWING TIPSThoroughly inspect the area where the mower is to be used and remove all foreign objects such as rocks, wire, toys, etc.
WARNINGThis mower can throw small objects at high speed causing per-sonal injury or property damage.
CAUTION If you strike a foreign object or if the mower starts to vibrate abnormally, stop the engine. Remove spark plug boot from the spark plug, thoroughly inspect the mower for any damage, and repair the damage before restarting and operating the mower. Vibration is generally a warning of trouble.
For best results:a) Do not cut wet grass b) Never cut off more than one-third of the total length of the grass.c) Plan ahead and use a mowing path in a counterclockwise direction that discharges the new grass clippings away from the remaining area to mow.d) Adjust your mowing speed to the condition of the lawn. Do not force mower. It will do the job better, last longer and with less likelihood of a risk of injury at the rate for which it was designed.e) New grass, thick grass or wet grass may require you to use less than the mower’s full advertised cutting width.f) When mowing very tall grass, adjust the mower height to its highest setting and make a first cut. Adjust mower to the desired height for a second cut.
14

Questions? Call Toll Free at 1-800-737-2112 Copyright © 2011 MAT Engine Technologies, LLC15
Routine Maintenance• Save all instructions
WARNINGDisconnect the spark plug before performing maintenance.
Maintain the mower with care. Inspect the mower periodi-cally. If the mower is not working properly or damaged, have it repaired by a qualified service center. Do not change engine governor setting or overspeed the engine. Do not remove or modify any parts. Removing or modify-ing parts could lead to injury, damage the mower and will void the warranty. Use only genuine Southland™ replace-ment parts and accessories. Use of any non-Southland™ parts or accessories could lead to injury, damage to the unit, and void your warranty.
GENERAL MOWER CARE1. After each use, remove any grass clippings or debris from the top of the mower deck and engine area with a brush or lawn and garden blower. 2. Periodically clean underside of the mower deck to pre vent buildup of grass clippings, etc. a) Before cleaning the underside of the deck, always drain the fuel tank by running the engine till the tank is empty. Disconnect the spark plug wire before performing this or any other maintenance. b) Tip the mower to expose the underside of the mowing deck.
CAUTION Always tip the mower so it is resting on the side of the deck and the air filter side of the engine is facing up. Make sure the lawn mower is resting in a stable position before beginning to clean the deck. Never tip the mower more than 90 degrees in any direction and do not leave the mower tipped for extended periods of time. Oil can drain into the top part of the engine and cause starting problems.
c) Scrape excess grass clippings with an appropriate tool. Do not spray deck with water.3. Using a light lubricating oil: a) lubricate pivot points on the blade control lever at least once each season. b) lubricate the wheels at least once each season.
BLADE CARE
CAUTIONUse extra care when servicing mower blades. Blades are sharp. To protect your hands, wrap the blade or wear gloves when handling.1. Periodically inspect the blade and blade adapter for
wear or damage, especially if you strike a foreign object. Replace when necessary. a. Before tipping the mower to inspect the blade area, always drain the fuel tank by running the engine untill the tank is empty. Disconnect the spark plug wire before performing this or any other maintenance. b. Tip the mower to expose the underside of the mowing deck.
To remove / replace the blade:
1. Remove the bolt and the washers holding the blade and the blade adapter to the engine crankshaft. See Figure 11
2. Remove blade and adapter from the crankshaft. 3. The blade can be sharpened with a file or on a grinding wheel. Do not attempt to sharpen the blade while it is still on the mower. When sharpening the blade, follow the original angle of grind. Grind each cutting edge equally to keep the blade balanced. To check for blade balance, place blade on a round shaft screwdriver. Remove blade material from the heavy side until it balances evenly.
CAUTIONAn unbalanced blade will cause excessive vibration when rotat-ing at high speeds. It may cause damage to mower and could break causing personal injury.
4. Lubricate the engine crankshaft and the inner surface of the blade adapter with light oil. Slide the blade adapter onto the engine crankshaft.
Blade Adapter
Blade Adapter
Blade
Blade
Disk Spring Washer
Disk Spring Washer
Flat Washer
Flat Washer
Bolt
Bolt
Crankshaft
Figure 11

Questions? Call Toll Free at 1-800-737-2112 Copyright © 2011 MAT Engine Technologies, LLC
Routine Maintenance (Continued)• Save all instructions
5. Position the blade onto the blade adapter in the correct orientation. On each end of the blade, a blade “lift” portion lies on the opposite side of the blade from the sharpened edge. When positioning the blade onto the blade adapter, make sure the blade “lift” portion is facing towards the mower deck. See Figure 11.6. Assemble the retaining bolt through the flat washer, (2) disc spring washers, blade, and blade adapter. Make sure the flat washer and (2) disc spring washers are in the proper order and orientation shown in fig. 11. 7. Tighten the retaining bolt to 30 – 37 ft –lbs (40-50 N-m). 8. To ensure safe operation of your mower, periodically check the blade bolt for correct torque
ENGINE CARE
A list of key engine maintenance items required for good performance by the mower is given below.
1. Check engine oil level before each use and maintain oil level to the full mark on the dipstick. See section titled “Checking and Adding Engine Oil” on page 11.2. Service air filter every 25 hours under normal conditions. Clean every few hours under extremely dusty conditions. Poor engine performance and flooding usually indicates that the air cleaner should be serviced. Never run the engine without an air filter installed. Running the engine without the filter can cause excessive engine wear and damage. 3. Clean engine regularly with a cloth or brush. Keep the top of the engine free of debris to permit proper air circulation. Remove all grass, dirt and combustible material from muffler area.
Service Item Each Use First 5 to 8 hours Every Season or 25 hours
Every Season or 50 hours
Every Season or 100 hours
Service Date Record
Check Engine Oil √Change Engine Oil √ √Check Air Filter √Service Air Filter √Check Spark Plug √Service Spark Plug √Clean Around Muffler √
16

Questions? Call Toll Free at 1-800-737-2112 Copyright © 2011 MAT Engine Technologies, LLC17
Routine Maintenance (Continued)• Save all instructions
TO SERVICE THE AIR FILTER1. Remove the air filter cover. See Figure 12.2. Carefully remove the foam pre-filter (if equipped). Clean the foam pre-filter with warm soapy water. Squeeze out excess water. Allow pre-filter to air dry prior to installation. DO NOT add oil to the pre-filter. Replace the foam pre- filter if damaged.3. Carefully remove the paper filter element to prevent debris from falling into the carburetor.4. Clean debris from the paper filter by gently tapping the filter on a hard surface. Do not use compressed air to clean the paper filter as this could damage the filter. Replace the paper filter if required.5. Clean all dirt and debris from the inside of the air filter box. Be careful not to allow any dirt or debris to enter the carburetor.6. Replace the paper filter and foam pre-filter (if equipped).7. Install the air filter cover. Be sure the air filter cover is snapped securely in place.
TO SERVICE THE SPARK PLUG1. Clean the spark plug and reset the gap once a season. Spark plug replacement is recommended at the start of each mowing season. See “PRODUCT SPECIFICATIONS” on page 6 for correct plug type and gap specifications.
WARNING Do not check for spark with spark plug removed. Do not crank engine with spark plug removed.
For good engine operation, the spark plug must be free of deposits or excessive electrode wear.
2. Remove the spark plug wire and remove spark plug with a spark plug wrench.
CAUTIONIf the engine has been running, the muffler will be very hot. Be careful not to touch the muffler.
3. Visually inspect the spark plug. Discard the spark plug if there is apparent wear, or if the insulator is cracked or chipped. Clean the spark plug with a wire brush if it is to be reused.4. Measure the spark plug gap with a feeler gauge. Adjust plug gap as required by bending electrode. See Figure 13
5. Reinstall the spark plug – starting by hand to prevent cross-threading.6. After the spark plug is seated, tighten with a spark plug wrench an additional ¼ turn (18 ft-lbs )IMPORTANT: The spark plug must be securely tightened. An improperly tightened spark plug can become very hot and may damage the engine.
Air Filter Element
Air Filter Housing
Air Filter Cover
Figure 12
0.028 - 0.031 in.0.7 - 0.8 mm
Figure 13

Questions? Call Toll Free at 1-800-737-2112 Copyright © 2011 MAT Engine Technologies, LLC
Routine Maintenance (Continued)• Save all instructions
TO CHANGE THE OIL1. Change engine oil after every season or 50 hours of operation. 2. Drain the fuel tank by running the engine till tank is empty.
3. Clean around oil fill spout, remove dipstick.4. Place a suitable container next to mower to catch the used oil, and then tilt the mower on its right side. The used oil will drain through the filler neck. Allow oil to drain com-pletely. See Figure 14.Note: Oil will drain more freely when warm.Important: Used oil is hazardous waste. Place oil in a sealed container and take to your local recycling center. Do NOT discard with household waste. 5. Refill engine with oil. Pour slowly. Do not overfill. See “Checking and Adding Engine Oil” on page 12.
STORAGEMowers stored over 30 days need to be drained of fuel to prevent deterioration and gum from forming in the engines fuel system. If the gasoline in your engine deteriorates during storage, you may need to have the carburetor, and other fuel system components, serviced or replaced. Commonly available fuel additives which reduce var-nish and gum in your engine’s fuel system can be added according to the manufacturer’s instructions.
1. Remove all fuel from tank by running engine until it stops from lack of fuel.2. Change oil. See the section “ To Change the Oil”.3. Remove spark plug and pour about 1/2 an ounce of engine oil into cylinder. Replace spark plug and slowly pull the starter rope several times to distribute oil.4. Clean grass and debris from around engine, and under, around and behind muffler.5. Store in a clean, dry and well ventilated area away from water heaters, electric motors or switches, furnaces, or where power tools are operated.6. Keep the engine level in storage. Tilting can cause fuel or oil leakage.
18
Figure 14

Questions? Call Toll Free at 1-800-737-2112 Copyright © 2011 MAT Engine Technologies, LLC19
Troubleshooting• Save all instructions
PROBLEM POSSIBLE CAUSE(S) SOLUTION(S)Engine will not start 1. Fuel tank is empty
2. Blade control lever is not depressed
3. Engine not primed
4. Spark plug wire disconnected5. Fouled spark plug6. Clogged air filter7. Engine is flooded
8. Clogged fuel filter
9. Blocked fuel line10. Stale or contaminated fuel
11. Other
1. Add fresh fuel.2. Grasp and hold blade control lever firmly against handle while pulling starter rope handle.3. Prime engine as instructed in “Starting The Engine” on page 124. Attach spark plug wire to spark plug5. Service spark plug as instructed on page 166. Service air filter as instructed on page 167. Wait a few minutes and restart engine without priming8. Remove fuel filter. Inspect. Replace if necessary9. Clear or replace fuel line.10. Drain fuel tank. Clean fuel tank. Fill with fresh fuel11. Take unit to an authorized service center.
Engine runs rough 1. Loose spark plug wire2. Fouled spark plug3. Incorrect spark plug gap4. Clogged air filter5. Clogged vent in fuel cap6. Clogged fuel filter7. Partially blocked fuel line8. Stale or contaminated fuel9. Other
1. Securely attach spark plug wire to spark plug2. Service spark plug as instructed on page 163. Service spark plug as instructed on page 164. Service air filter as instructed on page 165. Clear vent in fuel cap6. Remove fuel filter. Inspect. Replace if necessary7. Clear or replace fuel line8. Drain fuel tank. Clean fuel tank. Fill with fresh fuel9. Take unit to an authorized service center
Low Engine Power 1. Grass too high, too thick or wet grass
2. Buildup of grass and debris under mower deck
3. Clogged air filter
4. Engine oil level too high
5. Other
1. Raise cutting height or reduce cutting width as instruced in “Mowing Tips” on page 13. Let grass dry before cutting.2. Clean debris on the underside of the mower deck as instructed in “General Mower Care” on page 143. Service air filter as instructed in “To Service the Air Filter” on page 164. Check engine oil as instructed in “Checking and Adding Engine Oil” on page 11; drain and adjust oil level as necessary.5. Take unit to an authorized service center.
Engine overheats 1. Engine oil level low
2. Clogged air filter
3. Other
1. Add engine oil as instructed in “Checking and Adding Engine Oil” on page “11”2. Service air filter as instructed in “To Service the Air Filter” on page 163. Take unit to an authorized service center.
Excessive Vibration 1. Mower blade loose or unbalanced
2. Bent cutting blade
1. Tighten blade retaining bolt or balance blade as instructed in “Blade Care” on page 142. Replace with a new blade. If vibration continues, take unit to an authorized service center
Rough or uneven cut 1. Wheel heights not correct
2. Dull blade
3. Buildup or grass and debris under mower deck
1. Adjust wheel heights as instructed on page 102. Replace or sharpen blade as instructed in “Blade Care” on page 143. Clean debris on the underside of the mower deck as instructed in “General Mower Care” on page 14

Questions? Call Toll Free at 1-800-737-2112 Copyright © 2011 MAT Engine Technologies, LLC
Warranty• Save all instructions
Always specify model number when contacting the factory.
We reserve the right to amend these specifications at any time without notice. The only warranty applicable is our standard written warranty. We make no other warranty, expressed or implied. MAT Engine Technologies, LLC warrants this Lawn Mower and any parts thereof, to be free from defects in material and workmanship for one year (90 days for commercial use or for reconditioned unit) from the date of first purchase from an authorized dealer, provided that the product has been properly maintained and operated in ac-cordance with all applicable instructions. This warranty is extended only to the original retail purchaser. The bill of sales or proof of purchase must be presented at the time a claim is made under this warranty. This warranty does not cover commercial, industrial, or rental usage, nor does it apply to parts that are not in original condition because of normal wear and tear, or parts that fail or become damaged as a result of misuse, accident, lack of proper maintenance, tampering, or alteration. Travel, handling, transportation, and in-cidental costs associated with warranty repairs are not reimbursable under this warranty and are the responsibility of the owner. To the full extent allowed by the law of the jurisdiction that governs the sale of the product, this express warranty excludes any and all other expressed warranties and limits the duration of any and all implied warranties, including warranties of merchantability and fitness for a particular purpose to two years from the date of first purchase, and MAT Engine Technologies, LLC’s liability is hereby limited to the purchase price of the product and MAT Engine Technologies, LLC shall not be liable for any other damages whatsoever including indi-rect, incidental, or consequential damages. Some states do not allow limitation of how long an implied warranty lasts or an exclusion or limitation of incidental or consequential damages, so the above limitation of damages may not apply to you. This warranty provides the original purchaser with specific rights.
For information regarding those rights, please consult the applicable state laws.
METL Corporate Office - CORRESPONDENCE ONLYATTN: Technical Service – METL
6700 Wildlife WayLong Grove, IL 60047
Southland MOWER Limited WarrantyA
You may have further questions about assembling, operating, or maintaining this Mower. If so, you can contact our Technical Service Department at 1-800-737-2112 (English only). You may also write to:METL Corporate Office - CORRESPONDENCE ONLYATTN: Technical Service – METL6700 Wildlife WayLong Grove, IL 60047
Technical Service
When contacting the Technical Service Department, have ready:• Your Name• Your Address• Your Phone Number
• Model Number of Product• Date of Purchase (include copy of receipt for written requests)
If you need assistance or have any questions, CALL TOLL FREE: 1-800-737-2112.
20

Questions? Call Toll Free at 1-800-737-2112 Copyright © 2011 MAT Engine Technologies, LLC21
Warranty (Continued)• Save all instructions
This MAT Engine Technologies, LLC (METL) outdoor power equipment engine complies with the emissions regulations of the United States Environmental Protection Agency (“U.S. EPA”) and the State of California.
To the extent there is any conflict between this Emissions Control System Warranty and the equipment manufacturer’s warranty, this Emissions Control System Warranty shall apply except where the equipment manufacturer’s warranty may provide a longer warranty period. Please read your warranty rights and obligations carefully. Some sections of the warranty may not apply to the specific equipment model you purchased. Unless specifically noted otherwise, the terms of the Emission Control System Warranty shall apply to all product engines covered within this manual.
The California Air Resources Board, U.S. EPA and MAT Engine Technologies, LLC (METL) are pleased to explain the Emission Control Sys-tem Warranty on your new outdoor power equipment engine.California (applies only to Models SM2010)In California, new spark-ignited small off-road equipment engines must be designed, built and equipped to meet the State’s stringent anti-smog standards.Other States, U.S. TerritoriesIn other areas of the United States, your engine must be designed, built and equipped to meet the U.S. EPA emission standards for spark-ignited engines at or below 19 kilowatts.All of the United StatesMAT Engine Technologies, LLC (METL) must warrant the emissions control system on your power equipment engine for the periods of time listed below provided there has been no abuse, neglect or improper maintenance of your power equipment engine. Where a warrantable condition exists, METL will repair your power equipment engine at no cost to you including diagnosis, parts and labor.
The emissions control system is warranted for two years. If any emissions-related part on your engine is defective, the part will be repaired or replaced by METL.Owner’s Warranty ResponsibilityAs the power equipment engine owner, you are responsible for the performance of the required maintenance listed in your owner’s manual. METL recommends that you retain all receipts covering maintenance on your power equipment engine, but METL can not deny warranty solely for the lack of receipts or for your failure to ensure the performance of all scheduled maintenance.
As the power equipment engine owner, you should however be aware that METL may deny your warranty coverage if your power equip-ment engine or a part has failed due to abuse, neglect, improper maintenance or unapproved modifications.
You are responsible for presenting your power equipment engine to a distribution center or service center authorized by METL as soon as the problem exists. The warranty repairs should be completed in a reasonable amount of time, not to exceed 30 days.
If you have any questions regarding your warranty rights and responsibilities, you should contact
MAT Engine Technologies, Inc.6700 Wildlife WayLong Grove, IL 60047Tel: 1-800-737-2112
Your Warranty Rightes and Obligations:
Emisson Control System WarrantyB
Manufacturer’s Warranty Coverage:

Questions? Call Toll Free at 1-800-737-2112 Copyright © 2011 MAT Engine Technologies, LLC
METL warrants that the product engine is free from defects in materials and workmanship which cause such engine to fail to conform with the U.S. EPA or State of California emissions standards for small spark-ignited nonroad (off-road) engines – as applicable to your HCP product. Small spark-ignited off-road engines manufactured after January 1, 1995 and sold in the State of California and U.S. EPA-certified small spark-ignited nonroad engines manufactured in model year 1997 or later and sold in all of the United States are covered by this Emission Control System Warranty for a period of two years from the date of delivery to the original purchaser. This Emission Control System Warranty is transferable to each subsequent purchaser for the duration of the warranty period. Emission Control System Warranty repairs or replacements will be made without charge for diagnosis, parts or labor. A list of warranted parts is provided below. Normal maintenance items, such as spark plugs, air filters and fuel filters that are included on the list of warranted parts are warranted only up to the first scheduled required replacement interval for such item, as set forth in the Operator’s Manual. If any emission control system part is repaired or replaced under the Emission Control System Warranty, it shall be warranted for the remainder of the applicable warranty period. METL will also repair or replace other engine components damaged by a failure of any part covered by the Emission Con-trol System Warranty during the Emission Control System Warranty Period. Only parts authorized and approved by METL may be used in the performance of any Emission Control System Warranty repairs or replacements and will be provided without charge to the owner. Unapproved, add-on, modified, counterfeit and/or “gray market” parts may not be used to modify or repair the METL engine. If such a part has been used in the repair or maintenance of your engine, and an METL Authorized Service Center determines it is defective or causes a failure of a part covered under the Emission Control System Warranty, your claim for repair of your engine or product may be disallowed. METL shall not be held liable hereunder for failures of any warranted parts caused by the use of such an unapproved, add-on, modified, counterfeit and/or “gray market” part.
You must take your power equipment engine or the product on which it is installed, along with evidence of the date of the sale to the original purchaser, at your expense, to any METL Authorized Service Center during its normal business hours. To locate your nearest METL Authorized Service Center, call (800) 737-2112. The product owner shall be responsible for any expenses or charges incurred for service calls or transportation of the product or equipment engine to and from the METL Authorized Service Center, including any and all damages or losses incurred during such transportation or shipment.
Failures other than those resulting from defects in material or workmanship are not covered by this Emission Control System Warranty. This Emission Control System Warranty does not extend to emission control systems or parts which are affected or damaged by owner abuse, neglect, improper maintenance, misuse, mis-fueling, improper storage, accident and/or collision, the incorporation of, or any use of, any unapproved, add-on, modified, “graymarket” or counterfeit parts, unsuitable attachments, or the unauthorized alteration of any part. This Emission Control System Warranty does not cover the regular replacement of normal maintenance items made in connection with required maintenance services after the item’s first scheduled replacement, as set forth in the Operator’s Manual (e.g. spark plugs, air filters, fuel filters, etc...).
METL disclaims any responsibility for loss of time or use of the engine, or the equipment in which the engine is installed, transportation, commercial loss, or any other incidental or consequential damage. Any implied warranties are limited to the duration of this written limited warranty. Some states do not allow limitations on how long an implied warranty lasts and/or do not allow the exclusion or limitation of incidental or consequential damages, so the above exclusions and limitations may not apply to you.
This warranty gives you specific legal rights, and you may also have other rights which vary from state to state.
Warranty (Continued)• Save all instructions
How to Obtain Warranty Service:
Exclusions:
Limitations of Liability:
Warranty Coverage:
22

Questions? Call Toll Free at 1-800-737-2112 Copyright © 2011 MAT Engine Technologies, LLC23
Warranty (Continued)• Save all instructions
SYSTEMS COVERED BY THIS WARRANTY: PARTS DESCRIPTION:
Fuel Metering SystemCarburetor assembly (if so equipped) and its internal compo-nents; fuel filter (if so equipped), carburetor gaskets, fuel pump (if so equipped)
Air Induction System Intake pipe/ manifold, air cleaner
Ignition System Spark plug1, ignition module / coil
Exhaust System Catalytic muffler assembly (if so equipped), muffler gasket, exhaust manifold
Crankcase Breather Assembly Breather connection tube
Miscellaneous Parts Used in Above Systems Hoses, belts, connectors and assemblies
Evaporative Emissions Components² Fuel line, fuel line fittings, clamps, fuel tank, carbon canister, can-ister mounting brackets, carburetor purge port connector
1 Covered up to the first required replacement only. See the Maintenance Schedule
² As applicable to your product engine emissions certifications
Limitation of Liability (cont.):

Questions? Call Toll Free at 1-800-737-2112 Copyright © 2011 MAT Engine Technologies, LLC24