wall panels
TRANSCRIPT
8/3/2019 Wall Panels
http://slidepdf.com/reader/full/wall-panels 1/4
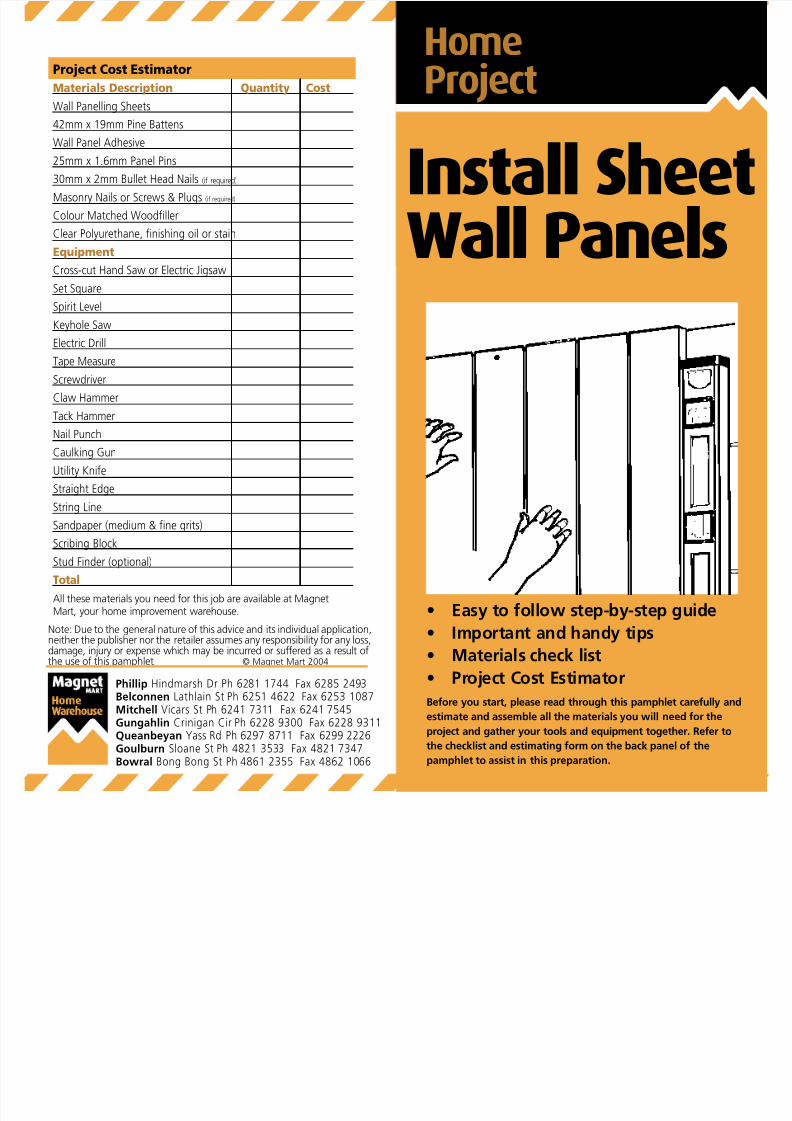
Project Cost Estimator
Materials Description Quantity Cost
Wall Panelling Sheets
42mm x 19mm Pine Battens
Wall Panel Adhesive
25mm x 1.6mm Panel Pins
30mm x 2mm Bullet Head Nails (if required)
Masonry Nails or Screws & Plugs (if required)
Colour Matched Woodfiller
Clear Polyurethane, finishing oil or stain
Equipment
Cross-cut Hand Saw or Electric Jigsaw
Set Square
Spirit Level
Keyhole Saw
Electric Drill
Tape Measure
Screwdriver
Claw Hammer
Tack Hammer
Nail Punch
Caulking Gun
Utility Knife
Straight Edge
String Line
Sandpaper (medium & fine grits)
Scribing Block
Stud Finder (optional)
Total
All these materials you need for this job are available at MagnetMart, your home improvement warehouse.
Phillip Hindmarsh Dr Ph 6281 1744 Fax 6285 2493Belconnen Lathlain St Ph 6251 4622 Fax 6253 1087Mitchell Vicars St Ph 6241 7311 Fax 6241 7545Gungahlin Crinigan Cir Ph 6228 9300 Fax 6228 9311Queanbeyan Yass Rd Ph 6297 8711 Fax 6299 2226Goulburn Sloane St Ph 4821 3533 Fax 4821 7347Bowral Bong Bong St Ph 4861 2355 Fax 4862 1066
Note: Due to the general nature of this advice and its individual application,neither the publisher nor the retailer assumes any responsibility for any loss,
damage, injury or expense which may be incurred or suffered as a result ofthe use of this pamphlet. © Magnet Mart 2004
HomeProject
MagnetMARTHome Warehouse
Install Sheet
Wall Panels
• Easy to follow step-by-step guide
• Important and handy tips
• Materials check list• Project Cost Estimator
Before you start, please read through this pamphlet carefully and
estimate and assemble all the materials you will need for the
project and gather your tools and equipment together. Refer to
the checklist and estimating form on the back panel of the
pamphlet to assist in this preparation.

8/3/2019 Wall Panels
http://slidepdf.com/reader/full/wall-panels 2/4
Give Your Walls A Lift
Sheet wall panelling suits both modern and traditional décorstyles and is easy to install, requiring only a few basic tools and alittle help from Magnet Mart. You can add the warmth and
richness of timber to just about any room using sheet panelling –there’s a solution for every decor and budget.
Wall panelling sheets come in a variety of timber finishesincluding Teak, Elm, Knotty Pine and Oregon. The sheets arerandom grooved to give the look of individual board panellingand are available pre-finished so you don’t need to apply anystain or finish once the sheets are fixed to the wall.
Sheet wall panels are easy to install to just about any wall surfaceor framing, all you need are basic DIY skills and a little advice
from Magnet Mart.
1. Estimating – How much Do I Need?
The simplest way to estimate the quantity of panelling yourequire is to bring your room or wall measurements to your localMagnet Mart store and ask our Timber Associates for assistance.We can quickly and accurately estimate the quantities of materialsrequired for your project.
If you prefer, here is a method for doing your own estimating:
• Standard wall panel sheets are 2440mm x 1220mm x 3mmthick, one sheet will cover a wall from floor to ceiling. Forhigher walls, you may need to join panels for completecoverage.
• Measure the height of the wall at each end and the width attop and bottom.
• Using graph paper, make a scale drawing of the wall usingthese measurements, adding in any windows or doors that
will not be covered by the panelling.• Mark off the widths of panelling sheets on the drawing
allowing for separate pieces to cover above door frames andabove and below windows. This should give you the numberof panels you will need for the project.
• Repeat this procedure for each wall you wish to cover.
2. Preparing the Wall
• Check the wall surface for flatness using a long straight edge(see Fig 1).
• Masonry walls are usually easy – the panelling may be fixed
direct to the wall surface using panel adhesive. Check thatthe mortar between the bricks is not damaged or loose, cleanout and replace any loose or damaged mortar prior to fixingpanelling.
• Plasterboard walls may be uneven or may even move whenpressed. To provide an even surface for the panelling you willneed to fix battens to the wall studs (see below).
• If your plasterboard is in good condition and is flat andstraight the panels may be fixed directly to the surfacewithout battens. If you choose this method, ensure that thewall is clean and dry to achieve a good adhesive bond.
Fixing Battens
• For masonry walls fix battens using masonry nails or plugsand screws, on plasterboard walls, nail or screw battens tothe wall studs – a stud finder may be necessary to help findthe studs.
• Attach horizontal battens at 400mm centres and vertical
battens at 1220mm centres (see Fig xx).
• Check the battens are exactly plumb with a spirit level, usingpacking pieces of scrap timber or masonite behind the battento maintain a flat front surface (see Fig xx).
You Can Install Sheet Wall Panelling
Fig 1 Check flatness of the wall with a long straight edge.
Fig 2 Fix battens horizontal at 400mm,vertical at 1220mm. Check witha spirit level.
Fig 3 Make sure thebattens are plumb.Use packing pieces ifnecessary.

8/3/2019 Wall Panels
http://slidepdf.com/reader/full/wall-panels 3/4
3. Fitting Panels – Using Nails
• Remove the architraves around windows and doors prior tocommencing to fit the wall panels.
• Attaching the first panel is easier if you start in the middle of
the wall and work out to each corner, this way you will haveless problems with out of square walls (even new houses arerarely exactly square).
• Place the first panel against the wall with one edge in thecentre of a vertical batten, fix the panel with a single panelpin (see Fig 4), then adjust the panel sothat it is exactly vertical using a spiritlevel before nailing all around.
• Drive panel pins every 150mm alongthe edges, alternating the angle of eachpin as you go – one pin angled left, thenext right, one up the next down, etc.
• When the panel is secured to thevertical battens, fix it to the horizontalbattens driving panel pins through thegrooves. Use a string line stretchedalong the line of the horizontal batten
to ensure the pins are driven in at thesame level (see Fig 5).
• Butt the next panel firmly to the first and nail to the battensin the same manner.
• Punch all nails below the surface with a fine nail punch andcover the holes with a coloured wood filler.
Fig 4 Pinning the first
panel in the centre ofthe vertical batten.
Fig 5 Fix to horizontal battens using string line.
4. Fitting Panels – Using Adhesive
• Apply a line of wallboard adhesive to enough battens for asingle sheet using a caulking gun (see Fig 6).
• If you are fixing direct to
the wall surface withoutbattens, apply the adhesivein lines at about 400mmcentres (see Fig 7). Applyliberally in a constant line.
• With the help of an assistant, lift the first panel into positionand tack it into place with a panel pin at the top (see Fig xx),use a spirit level to ensure the panel is vertical and press thepanel into position against the glue lines.
• Swing the panel away from the wall at the bottom and propwith scrap timber blocks (see Fig xx).
• When the adhesive is touch dry, remove the props and pressthe panel firmly into place, tapping along the glue lines witha hammer and padded timber block to ensure good contact ismade with the adhesive.
• Repeat the above steps for each panel.
Fig 6 Apply wallboard adhesiveto battens with acaulking gun.
Fig 7 Apply direct to wallin lines about400mm centres.
Fig 7 Fix first panel with
a pin at the top.Check with a spiritlevel.
Fig 8 Swing bottom ofpanel away fromthe wall. Prop withscrap timber blocks.

8/3/2019 Wall Panels
http://slidepdf.com/reader/full/wall-panels 4/4
Cutting Panels
• If you need to cut a panel, first score a line with a sharp utilityknife to prevent tearing or breaking fibres.
• If you use a hand saw, cut with the veneered side facing up,
is using an electric jigsaw, cut with the veneered side down,ensuring that the surface is padded where it rests on sawhorses or your bench.
• Lightly sand the cut edge with medium grit sandpaper ifrequired.
Fitting Panels to Corners
When panelling a single wall:
• If panelling a single wall, cover any slight gap between the
panel and the corner with quad beading glued into placewith woodworking adhesive.
• Alternatively, to measure a panel for a flush fit to the corner,first cut the sheet about 100mm wider than you need, hold itto the corner, ensuring it is vertical with a spirit level andmark with a scribing block (see Fig 9) to match the wallcontour.
• Cut the panel along this line, check that it fits the corner,then mark the top and bottom edges where it overlaps the
previously fitted panel.
• Join the marks with a straight edge and cut to size.
When panelling two or more walls,
• For an internal corner, butt one sheet into the corner thenbutt the next sheet at a right angle to the first (see Fig xx).
• For an external corner, overlap the end of one sheet with the
next (see Fig 11) leaving the overlap slightly proud of the firstsheet so that it may be sanded flush with a fine gritsandpaper later.
5. Finishing
• Replace and door and window architraves over the panelling.
• Cut and fix any beading required to cover minor gaps incorners or around doors and windows.
• If your panelling is pre-finished, there is no need to do
anything more. If you need to apply a clear finish to thepanelling, a polyurethane finish will provide excellentprotection and highlight the timber veneer grain. If you needadvice, drop in and chat with a Magnet Mart paint specialistwho will be pleased to assist you with your choice.
Fig 9 Mark with ascribing block whenfitting panels flushto corners.
Fig 10 Butt fitting twopanels to internalcorners.
Fig 11 Finishing panelsfor the externalcorner.