warehouse management system...
TRANSCRIPT

Microsoft Dynamics™ NAV 5.0
Warehouse Management Systems Technical Whitepaper This Paper will give you an overview of the Warehouse Management Systems granule in Microsoft Dynamics™ NAV. It is written with the aim of helping anyone in the Microsoft Navision channel who is consulting on or implementing a business solution using the Warehouse Management Systems granule. Date: January, 2007 www.microsoft.com/dynamics/nav
MANAGE

2
WAREHOUSE MANAGEMENT SYSTEMS – TECHNICAL WHITEPAPER
Table of Contents
Introduction .......................................................................................................................... 4
The Purpose and Functionality of WMS...................................................................... 5
Warehouse Structure ......................................................................................................... 7
Conceptual Design ............................................................................................................. 8 Workflow.............................................................................................................................................................................................8
Inbound Flow........................................................................................................................................8 Outbound Flow ...................................................................................................................................10 Movements within the Warehouse ...........................................................................................................12
Development Design .......................................................................................................13 Solution Concept........................................................................................................................................................................... 13
Integration...........................................................................................................................14 WMS with Warehouse Management (WM)........................................................................................................................ 14 WMS with Manufacturing.......................................................................................................................................................... 14
Internal Put-Aways and Internal Picks .......................................................................................................14 Automatic Flushing ..............................................................................................................................14 User Interface Changes ...................................................................................................................14 Using Automatic Flushing in a WMS Location .................................................................................15
WMS with Inventory .................................................................................................................................................................... 16 Physical Inventory ................................................................................................................................16 Warehouse Inventory Adjustments to the Item Ledger ..................................................................................17 Available Qty. to Pick and Reservation Feature ............................................................................................17 Available Quantity to Pick...............................................................................................................17 Calculating the Available Quantity to Pick......................................................................................18 Where the Calculation is Used ........................................................................................................20 Limitations ......................................................................................................................................20 Reservation Feature ........................................................................................................................20 New Calculation .............................................................................................................................21 Where the Calculation is Used.........................................................................................................22 Limitations ......................................................................................................................................23 Undo Receipt ......................................................................................................................................23 User Interface Changes ...................................................................................................................23 To Undo a Warehouse Receipt .......................................................................................................23
Implementation Assistance............................................................................................24 WMS Setup...................................................................................................................................................................................... 24
Bin Types ...........................................................................................................................................24 Creating Bins ......................................................................................................................................24 Warehouse Classes...............................................................................................................................24 Setting Maximum Quantities for Bins ........................................................................................................24 Pick According to FEFO (Version 5.00) .......................................................................................................25

3
WAREHOUSE MANAGEMENT SYSTEMS – TECHNICAL WHITEPAPER
Specific Features................................................................................................................26 The Warehouse Reclassification Journal (Version 5.0) .................................................................................................... 26 Filtering ............................................................................................................................................................................................. 26 Posting versus Registering......................................................................................................................................................... 26 Cross-docking................................................................................................................................................................................. 26
Changes in earlier versions.....................................................................................................................26 Batch Job to Enable a Location for WMS ............................................................................................................................ 27
User Interface Changes ...................................................................................................................27 Enabling a Location for WMS ..........................................................................................................27
Glossary ................................................................................................................................30
Appendix A: Demonstration Data Specifications....................................................35 (Date: May 8, 2002) ........................................................................................................................35
Goals .................................................................................................................................................................................................. 35 Setup Forms .................................................................................................................................................................................... 35 Put-away templates...................................................................................................................................................................... 35
STD ..................................................................................................................................................35 VAR..................................................................................................................................................36
Location Card ................................................................................................................................................................................. 36 White Location ....................................................................................................................................36
Bin Type ............................................................................................................................................................................................ 36 Special Equipment ........................................................................................................................................................................ 37 Warehouse Classes ....................................................................................................................................................................... 37 Zones ................................................................................................................................................................................................. 37 Bins ..................................................................................................................................................................................................... 38 Physical Inventory ......................................................................................................................................................................... 41
Phys. Invt. Cycles .................................................................................................................................41 Dynamic Data ................................................................................................................................................................................. 41
Items ................................................................................................................................................41 Items used for Production order ..............................................................................................................45 BOM.................................................................................................................................................45 Item Variant .......................................................................................................................................45 SKU on White location...........................................................................................................................46 Customers..........................................................................................................................................46 Vendors.............................................................................................................................................46 Purchase orders (Location WHITE) ...........................................................................................................47 Sales orders (Location WHITE).................................................................................................................47 Transfer orders to White ........................................................................................................................48 Transfer orders from White ....................................................................................................................48 Production Order: ................................................................................................................................48 Items by location .................................................................................................................................49
Warehouse Movement................................................................................................................................................................ 50 Warehouse Pick ............................................................................................................................................................................. 50 Pick worksheet ............................................................................................................................................................................... 50 Warehouse Put-away................................................................................................................................................................... 50 Put-away worksheet..................................................................................................................................................................... 50 Warehouse Source Filter selection ......................................................................................................................................... 50

4
WAREHOUSE MANAGEMENT SYSTEMS – TECHNICAL WHITEPAPER
Introduction Warehouse Management Systems (WMS) for Microsoft Dynamics™ NAV is developed as an integrated offering for the Microsoft Navision application. It is a solution for the Microsoft Navision customer that has a need for managing inventory and distributing items in a warehouse environment. It is especially developed for warehouses that function by using specific zones and bins. WMS provides functionality for more advanced warehouse operations than the functionality in the basic Warehouse Management (WM) solution. To obtain the WMS offering you need to buy the Advanced Management granule as well as the following granules:
4180 Put Away 4190 Warehouse Receipt 4200 Pick 4210 Warehouse Shipment 4620 Warehouse Management Systems
Optional 4630 Internal Picks and Put Aways 4660 Bin Set-Up 4640 Automated Data Capture System

5
WAREHOUSE MANAGEMENT SYSTEMS – TECHNICAL WHITEPAPER
The Purpose and Functionality of WMS Before Microsoft Navision 3.10, there was no independent functionality that focused on warehouse processes. It was only possible to receive and ship from the order documents. But in distribution and manufacturing companies, the sales, purchase and warehouse functions are normally performed in different departments, and so it is not very process oriented to let warehouse staff work in the same documents as the sales and purchase staff. For example, warehouse workers don’t need all the customer and vendor information, but in order to do their jobs efficiently they do need to see information from the sales and purchase orders arranged especially for their requirements. WMS is designed to help reduce costs through effective warehouse processes. It is aimed at those companies that need to receive and ship goods, while maintaining an optimum utilization of space and knowing specifically where all goods are stored at any given time. Items can be stored either in predetermined bins or in random bins – depending on the need for optimization and the expertise of the warehouse personnel. It is also possible for WMS to keep track of the quantity of items within each bin. The WMS granule provides functionality for handling advanced warehouse processes that involve zones and bins, directed picks and put-aways, as well as automated data capture systems. To perform directed pick and put away, it is necessary to divide the warehouse into zones and bins. A zone could be a receiving zone or a stocking zone, and each zone can consist of one or several bins. A bin is a storage device designed to hold discrete parts. It can be a space on a shelving unit that is portioned with physical dividers, or it can be any space defined within the warehouse to hold items. Each bin must have a type attached, as explained in the Implementation Assistance section of this paper. Depending on the bin type, different processes and tasks are possible. You can also determine whether the bin content in a bin is fixed or floating. In Microsoft Navision, a fixed bin is one that holds an item or items that have been dedicated to it; it is not fixed to hold one specific item. It is predefined which specific item(s) can be placed in fixed bins, whereas floating bins are non-discriminatory – they have no particular items assigned to them. In general, the more floating bins there are in a warehouse, the better the space is utilized. However, stricter data discipline is necessary for the operation of floating bins in order to keep track of where items have been put away. You can assign a warehouse class to items, zones and bins. For example, frozen (-20˚C) or cold (+5˚C). The warehouse class is an extra criterion for the program to use in determining where items should be stored. It is possible to divide any zone into several warehouse classes. For example, items in the receiving zone can be stored under different conditions. If necessary, you can block items in a bin (the bin content) from warehouse activities, for example, if they are found to be defective or are being inspected for quality control. You can block any item for any bin from inbound activity, outbound activity or for all activity. For example, if an item is blocked in a bin for outbound activity, the program will not use the bin for picking or movements. This blocked bin content is excluded from the available-to-pick calculation. The put-away process is improved with the introduction of a put-away template and bin ranking combined with a filtering logic similar to that for the pick side in the Warehouse Management granule, (3.10). The put-away template specifies how to find a suitable bin for an inbound item. The capacity of a bin can be controlled for quantity, total cubage, and weight.
6
WAREHOUSE MANAGEMENT SYSTEMS – TECHNICAL WHITEPAPER
All the picking methods that are available in WM are also available in WMS. To optimize the pick process, all zones and bins are ranked and the pick is performed according to the bin ranking as well as bin type and blocked status. The program will suggest picking the items from the bins with the higher ranking first. To optimize the general processes and the usage of warehouse space, the program can suggest replenishing higher ranking bins with goods from lower ranking bins – if this has been set up. Thereby, the forward picking areas (consisting of the bins with higher ranking) will always be filled. Cycle counting based on items is provided to help keep the stock balance accurate for items that are available for sale. The option is available to assign how many times per year an item or stock keeping unit (SKU) must be counted. It is possible to initiate warehouse processes without a source document by using the Internal Put-aways and Internal Picks features. For example, you can pick items for production, or for special projects or tests, and afterwards either consume them or put them away. Source documents in Microsoft Navision consist of the following outbound and inbound document types: Outbound documents: • Sales Order • Outbound Transfer Order • Purchase Return Order • Released Production Orders Inbound documents: • Purchase Order • Inbound Transfer Order • Sales Return Order The Warehouse Shipment form in both WM and WMS enables you to keep track of outgoing deliveries, provides you with the opportunity to pick items to stage, and ensures complete shipment of the delivery. The Warehouse Receipt form in both WM and WMS enables you to plan the receipt of purchase orders, sales return orders and transfer orders.

7
WAREHOUSE MANAGEMENT SYSTEMS – TECHNICAL WHITEPAPER
Warehouse Structure The layout of a typical warehouse structure as it relates to WMS is shown in the illustration below. It shows an example of how a warehouse can be organized by using zones and bins. Note that the warehouse class code is shown only to illustrate an example of how items can be placed in a separate area in the warehouse.
Typical Warehouse Flow Layout
ReceivingDock
ShippingDock
Cross-dock
ReceivingZone
Stocking Zone(Whse. Class -Hand Tools)
Forward PickZone
Stocking Zone(Whse. Class -
Electrical)
Stocking Zone(Whse. Class -
Hazardous)
Bulk Storage
Cross-dockBin
StagingZone
ShippingZone

8
WAREHOUSE MANAGEMENT SYSTEMS – TECHNICAL WHITEPAPER
Conceptual Design
Workflow The layout of the WMS main menu is oriented to reflect the workflow of a typical warehouse operation. It is designed to correspond with the inbound, outbound and internal flow of items through the warehouse. The illustration below shows the WM/WMS overall workflow as it relates to orders.
Inbound Flow
The inbound flow of the warehouse begins with the items coming into the warehouse and the warehouse personnel registering those items into the program. Each item is identified and matched to a corresponding inbound source document. An inbound source document can be one of the following
Suppliers Receiving
Put-away
Picking
Manufacturing
Put-awayProduction Order
Inbound Order
Outbound Order Shipping
Movement/Replenishment
Inventory
Transportation
Cross-dock

9
WAREHOUSE MANAGEMENT SYSTEMS – TECHNICAL WHITEPAPER
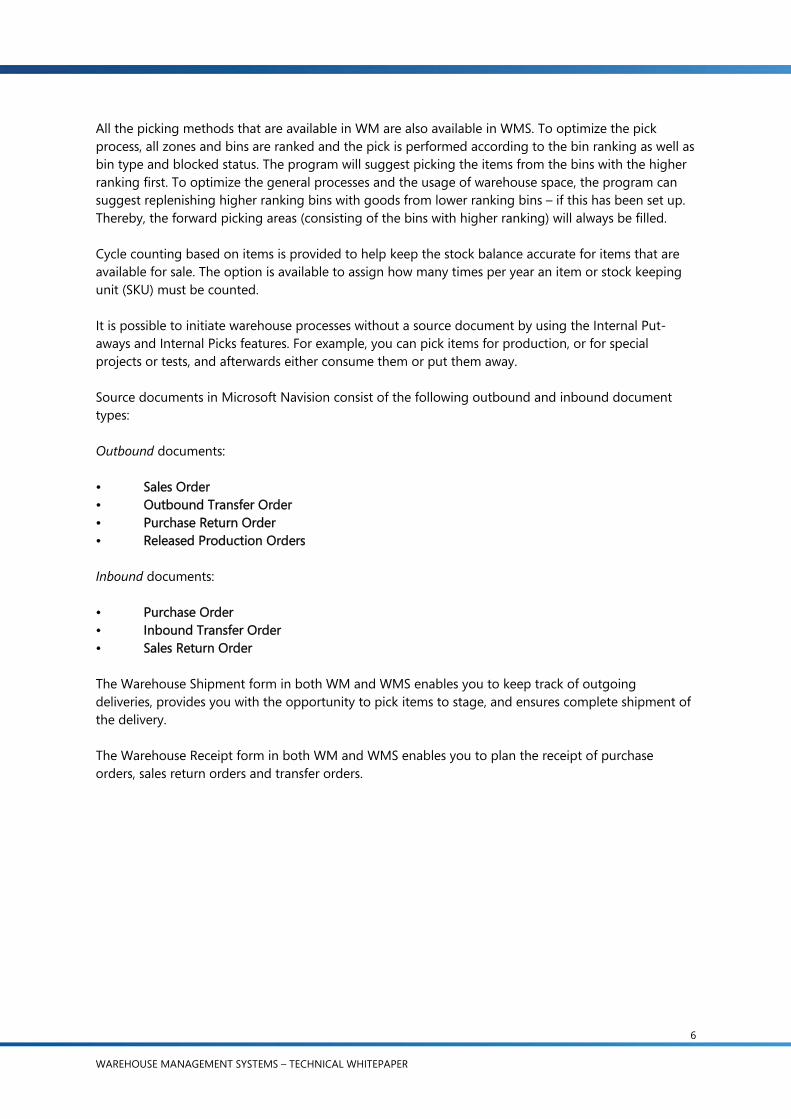
three types: purchase order, inbound transfer, or sales return order. The following numbered steps correspond with the diagram Inbound Flow, shown below: 1. Warehouse Inbound Request
During the release of the purchase order (sales return order, inbound transfer order), an inbound warehouse request is created by the program. It contains references to the source document type and number and is not visible to the user.
2. Warehouse Receipt Goods arrive in the warehouse and in the warehouse receipt order window the responsible employee makes a request to the program to retrieve the necessary source document lines. Based on this inbound warehouse request, warehouse receipt order lines are created and displayed in the warehouse receipt order window.
3. The employee can update the created warehouse receipt order, fill in “qty. to handle” (this can be done automatically if allowed by the warehouse setup per location), and select the receiving zone and bin.
4. Receipt Posting From the Warehouse Receipt window, the employee can use the “Post” function: The purchase order (inbound transfer order, sales return order) is posted as received, and a posted receipt and a posted warehouse receipt order are created. The warehouse receipt order cannot be deleted until the quantity registered in the warehouse is posted as received and put away. A warehouse receipt order line is deleted if it is completely posted and put away. If all warehouse receipt order lines are completely posted as received and put away, the warehouse receipt order is deleted.
5. Internal Put-away The employee creates an internal put-away for items that have to be put away in the warehouse (for example, production output), and enters quantity, zone and bin; from where the items should be put away.
6. The employee releases the internal put-away and the program creates an internal put-away request.
7. Put-away Worksheet In the Put-away Worksheet, the employee instructs the program to retrieve the lines to be put away. The program creates put-away lines, which are displayed in the worksheet.
8. The employee selects the lines to put away and then fills in the “qty. to handle.” (Note: The program will automatically fill this in if it is set up per location.) The employee then instructs the program to create corresponding warehouse instructions. When the program has done this, it deletes the put-away assignment lines – after they are fully assigned.
9. Warehouse Instructions – Put-away The employee physically handles the put-away according to the warehouse instructions and updates the warehouse instructions document in the program accordingly. The employee posts the warehouse instructions document and the program creates warehouse entries and deletes put-away request and warehouse instructions journal lines – if fully handled. The Qty. Put Away field on the warehouse receipt order lines is updated.
10. Variation Depending on the warehouse setup per location, the program immediately creates a warehouse
10
WAREHOUSE MANAGEMENT SYSTEMS – TECHNICAL WHITEPAPER
instruction document when the employee creates a put-away request. In this case, steps 7 and 8 can be omitted.
Warehouse Inbound Flow Diagram
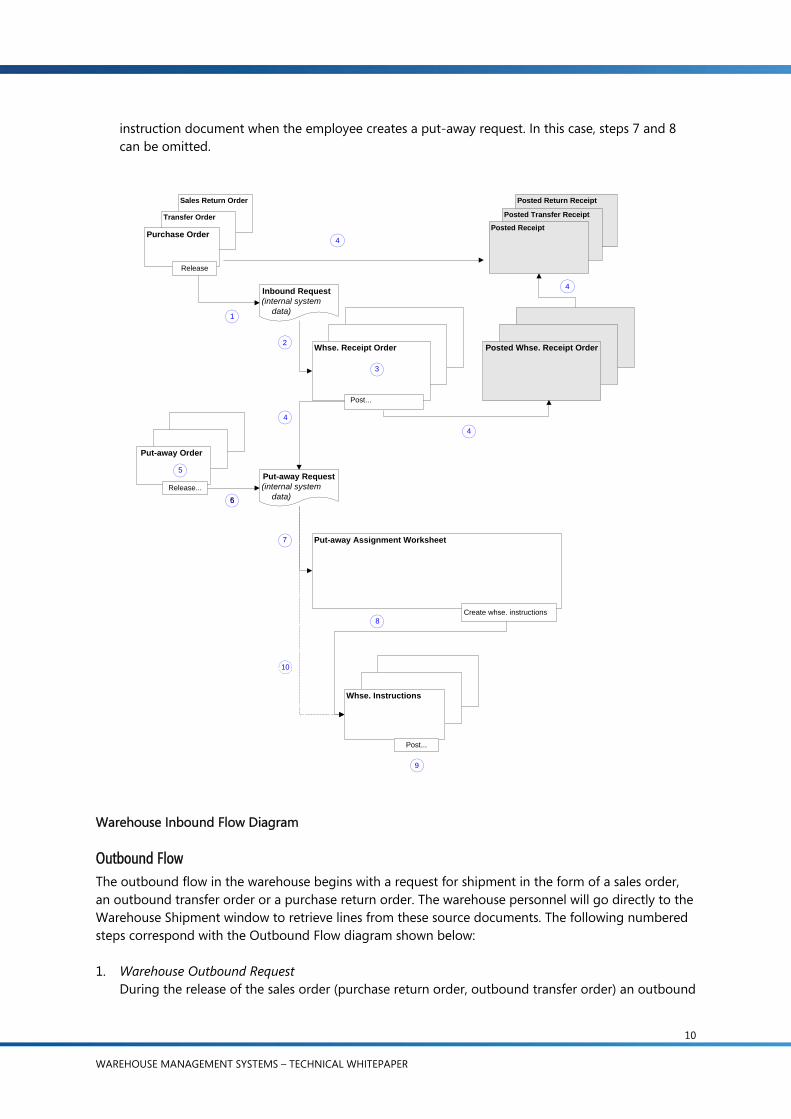
Outbound Flow The outbound flow in the warehouse begins with a request for shipment in the form of a sales order, an outbound transfer order or a purchase return order. The warehouse personnel will go directly to the Warehouse Shipment window to retrieve lines from these source documents. The following numbered steps correspond with the Outbound Flow diagram shown below: 1. Warehouse Outbound Request
During the release of the sales order (purchase return order, outbound transfer order) an outbound
Inbound Request(internal system
data)
Whse. Receipt Order Posted Whse. Receipt Order
Post...
Put-away Request(internal system
data)
Put-away Order
Release...
Put-away Assignment Worksheet
Create whse. instructions
Whse. Instructions
Post...
1
2
3
4
65
7
Sales Return Order
Transfer Order
Purchase Order
Release
Posted Return Receipt
Posted Transfer Receipt
Posted Receipt
8
9
10
5
4
4
4

11
WAREHOUSE MANAGEMENT SYSTEMS – TECHNICAL WHITEPAPER
warehouse request is created. It contains references to source document type and number and is not visible to the user.
2. Warehouse Shipments In the Warehouse Shipment window, the warehouse manager instructs the program to retrieve source document lines that need to be shipped. The manager has the possibility to combine several source document lines into one warehouse shipment order.
3. The warehouse manager decides to start the picking process for some shipment orders, selects the lines to be picked and specifies a bin to place picked items (a shipping bin or a staging bin). The manager calls a function to initiate picking and pick request lines are created – invisible to the user – which contain references to warehouse document type and number.
4. Internal Pick The warehouse employee creates a pick order for items that have to be picked in the warehouse but should not be shipped (for example, production components), enters the lines and specifies the bin in which picked items are to be placed. The employee releases the order and pick request lines are created – invisible to the user – which contain references to warehouse document type and number.
5. Planning the Picking Process The warehouse manager starts planning the picking process and, in the Pick Worksheet window, instructs the program to retrieve the lines that need to be picked. Pick lines based on pick requests are created and displayed in the Pick Worksheet window.
6. The warehouse manager enters the qty. to handle on the pick assignment lines (which can be filled in automatically if this is permitted by the location’s warehouse setup), specifies a picking method for optimization of the warehouse handling, and then goes to the Create Pick function. Warehouse instructions are created and pick lines are deleted (if fully assigned).
7. Pick The warehouse employee picks items according to the warehouse instructions and posts the documents. • Warehouse instructions are deleted if fully handled. • Pick requests are deleted if fully handled. If picking was initiated by a pick order, a posted pick order is created and the pick order is updated or deleted if fully handled. If picking was initiated by a warehouse shipment order, the status of the corresponding warehouse shipment header is changed to “Completely Picked”, “Partially Picked”, “Partially Shipped”, or “Completely Shipped.”
8. Re-pick If items for a warehouse shipment order have been staged for a while, a repicking process should be initiated before shipping in order to move the items from a staging bin to a shipping bin. In the Warehouse Shipment window, the user specifies a shipping bin and calls the “Create Pick” function, steps 3, 5, 6, 7 above are repeated, and the status of the warehouse shipment order lines change to indicate that shipping (step 9) is now possible.
9. Ship After the items have been picked and moved to shipping bins, the user goes to the post shipment function. Sales orders, transfer orders and purchase return orders are posted as shipped. A posted warehouse shipment is created, and the warehouse shipment is deleted when it is fully posted. The outbound warehouse request is deleted if fully handled, and warehouse entries are created.

12
WAREHOUSE MANAGEMENT SYSTEMS – TECHNICAL WHITEPAPER
Warehouse Outbound Flow Diagram
Movements within the Warehouse The flow of items from bin to bin within a warehouse location can be controlled by using the Movement Worksheets. Movements are exclusive of pick and put-away and can be limited only by blocking or warehouse classes.
Purchase ReturnOrder
Transfer Order
Sales Order
Release
Posted ReturnShipment
Posted TransferShipment
PostedSales Shipment
1
9
Whse. Shipment Order
Post...
5
Pick Order
Release
4
Pick...
Pick Assignment Worksheet
Create Pick...
6
2
3
9
9
Status
8
8
8
Outbound Request(internal system
data)
Posted Whse.Shipment Order
Pick Request(internal system
data)
Whse. Instructions
Post...
10
7

13
WAREHOUSE MANAGEMENT SYSTEMS – TECHNICAL WHITEPAPER
Development Design
Solution Concept To enable the handling of items on the zone and bin level, all the information must be traced for each transaction or movement in the warehouse. Therefore, an entry-table, Warehouse Entry, is used. Each transaction is stored in the warehouse register. Warehouse documents and the warehouse journal are used to register item movements within the warehouse. Every time an item in the warehouse is moved (receipt, put-away, pick, shipment, adjustment, and so on), warehouse entries are posted in order to store the physical information regarding zone, bin, and quantity. The Bin Content table is used to handle all the different dimensions of the contents of a bin per item (unit of measure, maximum qty., minimum qty., and so on). This table also contains flow fields to the warehouse entries, warehouse instructions and warehouse journal lines, which enable the program to very quickly and simply calculate the availability of an item per bin and the availability of a bin for an item. A default adjustment bin per location is used whenever an item posting is made outside the warehouse module. During the physical inventory of the warehouse, movements instead of adjustments will be posted to move any discrepancies between the calculated and counted quantities to the adjustment bins. You can read more about adjustments in the section WMS with Inventory in the Integration chapter. Additionally, WMS is now integrated with item tracking. The integration is provided by the reservation/item tracking functionality.

14
WAREHOUSE MANAGEMENT SYSTEMS – TECHNICAL WHITEPAPER
Integration
WMS with Warehouse Management (WM) With the development of WMS, there have been some changes made to the basic functionality of Warehouse Management. The functions that are available in the WM form Warehouse Assignment are now accessible in the Warehouse Shipments form. You can set up each individual location to run differently to the others by selecting whether or not to use the zones and bins option.
WMS with Manufacturing
Internal Put-Aways and Internal Picks The Internal Put-aways and Internal Picks menu items provide access to the integration of the warehouse and the manufacturing application area. The main connection between warehouse and the manufacturing production orders can be found on the Released Production Order form: you can create a warehouse pick from a released production order. Another link is through the inbound and outbound production bins and the open shop bin – all of which you define on the Zones and Bins tab of the location card.
Automatic Flushing In version 3.60, when a user is working with a production order where the items were picked from a WMS location, the user could not use automatic flushing. Instead, he had to manually flush the components that had been picked and placed in the inbound production bin, a process that could be quite time-consuming. This problem has been solved since version 3.70 (and also by Hot Fix releases) by creating two options for defining an item’s flushing method: “Pick + Forward” and “Pick + Backward”. When one of these two flushing methods has been defined for the item, the program will ensure that the item has been picked in the warehouse before automatically flushing the item, either forwards with a routing link code or backwards. Note that the "Pick + Forward" and "Pick + Backward" settings only work for a location that uses WMS.
User Interface Changes These options appear in two places in the program. One is on the Replenishment tab on the Item Card:

15
WAREHOUSE MANAGEMENT SYSTEMS – TECHNICAL WHITEPAPER
The other is in the Prod. Order Components window:
The program uses these options when the user creates a pick from the production order.
Using Automatic Flushing in a WMS Location To get a better understanding of how the changes are implemented, imagine the following scenario: In the CRONUS company, the warehouse location that stores items for production is the White location. This is a WMS location that uses zones and bins and where the warehouse employees use pick documents to register the picking information. A production order for 15 PCS of item LS-100 is received. Some of the items on the component list must be manually flushed and other items on the list can simply be picked and automatically backward flushed. The items that can be automatically flushed have a flushing method of “Pick + Backward”. The following steps describe in detail the actions that the user takes and how the program reacts: 1. The production manager releases the order. The program subtracts the inventory from the open
shop floor bin for any items with the flushing method “Forward” that do not have a routing link code.
2. The production manager creates a pick from the production order by clicking Functions, Warehouse, Create Pick. The program creates a warehouse pick for items with flushing methods “Manual”, “Pick + Backward”, and “Pick + Forward” (with a routing link code). These items will be placed in the inbound production bin.
3. The warehouse manager assigns the picks to warehouse employees.

16
WAREHOUSE MANAGEMENT SYSTEMS – TECHNICAL WHITEPAPER
4. The warehouse employee picks the items from the appropriate bins and places them in the inbound production bin.
5. The warehouse employee registers the pick. The program subtracts the appropriate quantities from the pick bins and adds the appropriate quantities to the inbound production bin. The program also updates the Qty. Picked field on the component list for all picked items.
6. The production employee informs the production manager that the items are finished.
7. The production manager uses the consumption journal to post the consumption for the items using the flushing method “Manual” and for the items with flushing method “Forward” with routing link code and “Pick + Forward” with a routing link code.
8. The production manager posts the output from the production order and finishes the released production order. The program subtracts the quantities for the components with flushing method “Backward” from the open shop floor bin and with flushing method “Pick + Backward” from the inbound production order bin.
WMS with Inventory The Warehouse Management and Inventory granules mainly interact with one another in physical inventory and inventory adjustment. The item card has a Warehouse tab where you must set up certain parameters defining how the item is handled within the warehouse. You can also see warehouse information regarding the item by clicking the Item button and selecting Bin Contents.
Physical Inventory The warehouse physical inventory journal is used in conjunction with the physical inventory journal for all locations where WMS is used. The program calculates the inventory on bin level and provides a printed list for the warehouse employee detailing which items in which bins need to be counted. The warehouse employee enters the quantity that has been counted in the warehouse physical inventory journal (this process is similar to the existing physical inventory journal). Then the warehouse manager posts the warehouse physical inventory journal. If the counted quantity is greater than the quantity on the warehouse physical inventory journal line, a movement is posted for this difference from the default adjustment bin to the counted bin. This increases the quantity in the counted bin and decreases the quantity in the default adjustment bin. If the quantity counted is less than the quantity on the warehouse physical inventory journal line, a movement for this difference is posted from the counted bin to the default adjustment bin. This decreases the quantity in the counted bin and increases the quantity in the default adjustment bin. The bookkeeper can use the existing phys. inventory journal to post the adjustments. If WMS is used for a location, the program retrieves the Quantity (Calculated) from the item ledger entries and the Quantity (Phys. Inventory) from warehouse entries – excluding the adjustment bin content. The program fills in the Quantity field as a difference between the first two – which should be equal to the contents of the adjustment bin. When the bookkeeper posts the physical inventory journal, the inventory and the default adjustment bin are updated.

17
WAREHOUSE MANAGEMENT SYSTEMS – TECHNICAL WHITEPAPER
Warehouse Inventory Adjustments to the Item Ledger You can use the existing item journal to adjust inventory on the item ledger in accordance with an adjustment that has been made to the item quantity in a warehouse bin. In order to create a link between the inventory and the warehouse, you have to define a default adjustment bin per location. This default adjustment bin is used to register items in the warehouse when posting an increase for the inventory. However, if you post a decrease, the quantity on the default bin is also decreased. In both cases item ledger entries and warehouse entries are created. This bin is not included in the availability calculation. If you want to adjust the bin content, you can use the warehouse item journal, from which you can enter the item number, zone code, bin code, and quantity that you want to adjust. If you enter a positive quantity and post the line, the inventory stored in the bin will increase and the quantity of the default adjustment bin will decrease correspondingly. If you enter a negative quantity and post the line, the inventory stored in the bin is decreased and the quantity of the default adjustment bin is increased.
Available Qty. to Pick and Reservation Feature In Microsoft Dynamics NAV, calculation of item quantities can be made in both the "warehouse" area of the application and in the "inventory" area of the application. These two areas contain different information related to where the items are stored and how the items are used: the "warehouse" calculation takes into account the bins and bin types where the items are stored, and the "inventory" calculation takes into account reservations placed on the items. The Available Qty. to Pick and Reservation feature address the problem of creating a link between the quantities calculated in warehouse management and those calculated in inventory, especially in the areas of picking and reservation. The changes made to the pick and reservation quantity calculations do not take the following into consideration:
- Special order flow - Blocked bins - “Allow Breakbulk” setting on the location
Available Quantity to Pick In version 3.60, prior to the Critical Update release, calculation of the available quantity to pick, which takes place in the “warehouse” part of the application, did not take into account any quantities that had been reserved for outgoing orders. The result was that, even if some items had been reserved for a customer whose order was shipping later, those items might be picked for a different sales order that was shipping earlier. The calculation of the available quantity to pick has been changed with the Critical Update so that the calculation subtracts the reserved quantities of sales orders, quantities on pick orders and "picked but not shipped" quantities.

18
WAREHOUSE MANAGEMENT SYSTEMS – TECHNICAL WHITEPAPER
Calculating the Available Quantity to Pick In version 3.60, prior to the Critical Update release, the Available Qty. to Pick (A) was defined as the quantity on all bins with bin type "Pick" (B) minus quantities already assigned to picks (C). With this definition, the Available Qty. to Pick sometimes included items that had been reserved from the bins with bin type "Pick". The Available Qty. to Pick (A) is therefore re-defined as the quantity on all bins with bin type "Pick" (B) minus quantities already assigned to picks (C) AND minus the quantities that have been reserved from bins with bin type "Pick". The complication of this re-defined calculation is that the quantity on all bins with bin type "Pick" (B) and the quantities assigned to picks (C) both come from the Warehouse Entry table, while the quantities of reserved items come from the Reservation Entry table, which is connected to the Item Ledger Entry (ILE) table. In our new calculation, we must create a relation between the warehouse entries, which specify a bin type, and the reserved quantities from the item ledger entries, which do not specify a bin type. We assume that all already-created reservations will primarily affect bins with bin types other than "Pick" (e.g. bins with bin type "Receive", "Put-away", etc.). If there are more items reserved than there are items in these bins in warehouse, the quantity that exceeds this must be reserved on bins with bin type "Pick". We create a relation between reservation on ILE and items in the warehouse by calculating the quantity in warehouse on all bins (I) except shipment bin, inbound production bin, open shop floor bin and adjustment bin (J) and except all quantities that are on bins with bin type "Pick" (B). If this quantity (H) is smaller than the total reserved quantity (D) then the difference must be reserved from bins with bin type "Pick". So this difference (D – H) must be subtracted from (A). If quantity (H) is greater than the total reserved quantity (D) then all reserved items are on bins that do not have bin type "Pick", and so nothing must be subtracted from quantity (A). If there are reserved quantities that are already assigned to picks as well as on shipments after the pick was registered, these quantities were already subtracted from (A) by quantities already assigned to picks (C). So we would subtract these reserved quantities twice if we just subtract the quantity D – H. Therefore we must add these quantities (E) again. And finally, we must add the reserved quantity for the current line (F) because this quantity is also part of the total reserved quantity. If we suppose that no items have been reserved from "Pick" bins, the calculation of "Available Qty. to Pick" is as follows:

19
WAREHOUSE MANAGEMENT SYSTEMS – TECHNICAL WHITEPAPER
A = B – C A = Available quantity to Pick B = Quantities on bins with bin type "Pick" in warehouse (CALCSUMS in table 7312 Warehouse Entry) C = Quantities that are already on picks ("Qty. Assigned to Pick") However, when some items have been reserved from the "Pick" bins, the calculation will be as follows:
A = B – C + G A = Available quantity to Pick

20
WAREHOUSE MANAGEMENT SYSTEMS – TECHNICAL WHITEPAPER
B = Quantities on bins with bin type "Pick" in warehouse (CALCSUMS in table 7312 Warehouse Entry) C = Quantities that are already on picks ("Qty. Assigned to Pick") G = H - D + E + F (this quantity is always smaller than or equal to 0, with the condition for E and F below) H = I – J – B I = Total available quantity in warehouse (CALCSUMS in table 7312) J = Sum of quantities that are on outgoing bins (CALCSUMS in table 7312) D = Reserved quantities ("Reserved Qty. on Inventory") E = Quantities that are on picks and are reserved (new calculation: CALCSUMS in table 7312 warehouse entry on the field Reserved Pick & Ship Qty.) F = Reserved quantity for the current line for which calculation is called (“Current Reserved Quantity”) If D - H < E + F then E = D – H – F The sum E + F must not be greater than the total remaining reserved quantity D – H so E might be set to a smaller value than actually calculated because the other values H and F are fixed. If H < D, then there is a reserved quantity on bins with bin type "Pick" that has to be regarded in the calculation. Else if H >= D, then all reserved quantities are on bins with bin types other than "Pick", so they need not be regarded in the calculation.
Where the Calculation is Used This calculation is used in two places in the program, the Pick Worksheet and the Warehouse Shipment. In the Pick Worksheet, the calculation of the “Available Qty. to Pick” field takes place in table 7326 Whse. Worksheet Line. In the Warehouse Shipment, the calculation is performed when the user creates a pick from a shipment. The calculation here is performed by a procedure in codeunit 7312 Create Pick.
Limitations In order to handle the fact that a given quantity of an item can be allocated both by reservations and in the warehouse, a field has been added to the Reservation table (Reserved Pick & Ship Qty). This field protects against double allocation. It is filled in by the system when a pick line is created, and it follows the transaction into the shipping bin (or inbound production bin) when the user registers the pick. When you start to use the updated system, this field will be empty. Consequently, you might find that the availability is under-calculated when you first start using it, but only regarding the reserved orders that have been picked and have not left the warehouse/inventory. After approximately 1 to 3 days when the items picked before the update was implemented have been shipped, the calculation of available quantity will work correctly. The less time it takes from the time the pick is created until it is finally shipped (or consumed), the sooner the system can adjust itself.
Reservation Feature In version 3.60, prior to the Critical Update release, calculation of the available quantity to reserve, which takes place in the "inventory" area of the application, did not take into account items that had been allocated for outbound movements in the warehouse. The result was that it was possible to place a reservation on items that had already been allocated for a pick or a shipment.

21
WAREHOUSE MANAGEMENT SYSTEMS – TECHNICAL WHITEPAPER
The calculation of available quantity to reserve has been changed so that it does not include quantities on not-registered picks or quantities in outbound bins, such as the shipment bin, inbound production bin, open shop floor bin and the adjustment bin. User Interface Changes One field called “Qty. Allocated in Warehouse” has been added to form 498 Reservation to show what quantity of the item on the reservation line has been allocated in the warehouse.
New Calculation It should be possible to reserve all items in inventory, except those that have started to be processed, meaning that they are allocated to production on the inbound production bins or allocated to the shipment bin from a registered pick where the shipment is not yet posted. The changed Available Qty. to Reserve is defined as the quantity on all bin types in the warehouse except the following "outbound" bins:
• Shipment bin • Inbound production bin • Open shop floor bin • Adjustment bin
The program also subtracts the quantities on created picks that are not yet registered from the Available Qty. to Reserve as well. In general, bin types like QA or Bulk or Blocked are not considered as they are assumed to be the responsibility of the warehouse manager (or other persons responsible for the business flow in the warehouse) and in order to ensure that these quantities are available for sales/reservation. The calculation of the “Available Qty. to Reserve” is as follows:
22
WAREHOUSE MANAGEMENT SYSTEMS – TECHNICAL WHITEPAPER
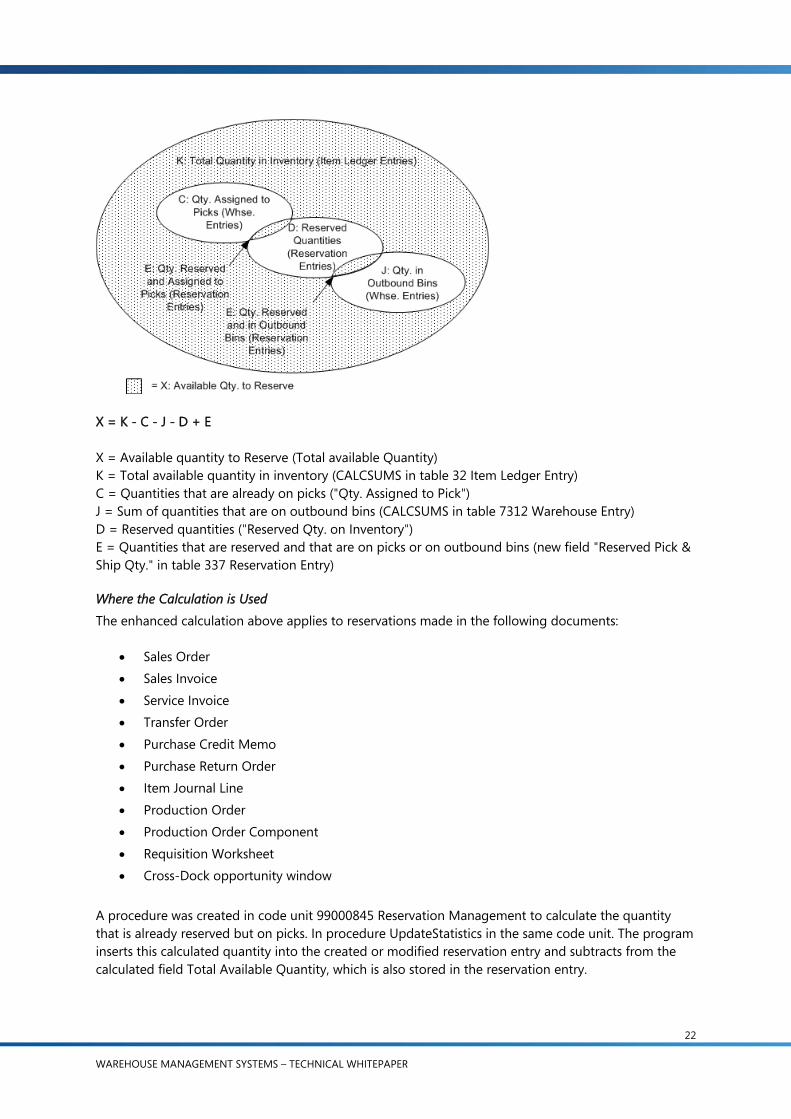
X = K - C - J - D + E X = Available quantity to Reserve (Total available Quantity) K = Total available quantity in inventory (CALCSUMS in table 32 Item Ledger Entry) C = Quantities that are already on picks ("Qty. Assigned to Pick") J = Sum of quantities that are on outbound bins (CALCSUMS in table 7312 Warehouse Entry) D = Reserved quantities ("Reserved Qty. on Inventory") E = Quantities that are reserved and that are on picks or on outbound bins (new field "Reserved Pick & Ship Qty." in table 337 Reservation Entry)
Where the Calculation is Used The enhanced calculation above applies to reservations made in the following documents:
• Sales Order • Sales Invoice • Service Invoice • Transfer Order • Purchase Credit Memo • Purchase Return Order • Item Journal Line • Production Order • Production Order Component • Requisition Worksheet • Cross-Dock opportunity window
A procedure was created in code unit 99000845 Reservation Management to calculate the quantity that is already reserved but on picks. In procedure UpdateStatistics in the same code unit. The program inserts this calculated quantity into the created or modified reservation entry and subtracts from the calculated field Total Available Quantity, which is also stored in the reservation entry.

23
WAREHOUSE MANAGEMENT SYSTEMS – TECHNICAL WHITEPAPER
Limitations It is not possible to sporadically reserve lot or serial numbers from inventory. The reason for this is that with the current design of the system, it is not possible to know the exact whereabouts of remaining quantities of item-tracked items in the warehouse when some entries contain item-tracking information and some do not. (free entry Item tracking code is not supported) For example, suppose you create inventory in the WHITE location for 200 PCS of a lot-tracked item, TEST, with 2 lots, LOT01 and LOT02, of 100 PCS each. You then create a sales order for 50 PCS of the item, and you create a shipment and pick from LOT01, without specifying the lot number until you pick the item. If you were then to create a new sales order for 90 PCS of the item, specifying that you wanted to pick from LOT01, the program would allow you to reserve the full quantity from LOT01, even though a pick had already been registered 50 PCS of that lot. The workaround to this problem is to always enter the item-tracking information when reserving items from the warehouse. This ensures that each entry contains item-tracking information so that the quantities available for item-tracked items can be properly calculated.
Undo Receipt Prior to the Critical Update release for version 3.60, the undo receipt functionality for posted receipts from purchases or sales returns has not been available for those users who receive their items into a WMS location with the Warehouse Receipt document. The change to the Undo Receipt functionality allows users to undo a posted receipt of an item that was posted as received into the warehouse using a Warehouse Receipt. The precondition for the undo is that the item cannot yet be put-away. If the user has created a put-away but has not yet registered the lines, the program will give the user an error message stating that the receipt cannot be undone until the put-away lines have been deleted.
User Interface Changes This change does not affect the user interface. The Undo Receipt function continues to be available only from the Posted Purchase Receipt and from the Posted Sales Return Receipt forms.
To Undo a Warehouse Receipt When a user performs an undo receipt for an item that was received into the warehouse, the program performs the following steps:
1. Create a new line for a negative quantity in the posted receipt document.
2. Update the Qty. to Receive in the original document (purchase order or sales return order), just as it does in the current application.
3. Create a new line in the Posted Whse. Receipt for the negative quantity of the undone line.
4. Create and post a Warehouse Entry for the new negative line, thereby also creating a Warehouse Register.
5. If the Warehouse Receipt was only partially posted, the undone quantity will be added to the Qty. to Receive on the Warehouse Receipt line.
6. If the Warehouse Receipt line included cross-docking, the corresponding sales order lines will also be updated.

24
WAREHOUSE MANAGEMENT SYSTEMS – TECHNICAL WHITEPAPER
Implementation Assistance
WMS Setup
Bin Types A bin is the smallest container unit in the WMS warehouse. You can restrict the activities that are allowed for a bin by assigning a bin type to it, and you use the Bin Type table to assign types to bins. There are eight possible bin types, and each type is a warehouse activity or a combination of two activities that can be assigned to a bin. They are as follows:
1. Receive 2. Put-away 3. Pick 4. Ship 5. Receive and Pick 6. Put-away and Pick 7. Receive and Ship 8. None
You can assign any code name you want to each one of these types, but you can only have a total of eight, and you cannot have more than one code for each bin type. The program will not perform any activity other than that which is allowed for the bin by its bin type. For example, a bin that has the type Receive and Pick will be seen by the program as a bin that can only be received into and/or picked from. However, you can override these restrictions by manually assigning additional bin activities.
Creating Bins The WMS warehouse model is organized using racks, sections, and levels. Each bin within the warehouse is identified by an individual bin code that is unique to that bin. The unique code is a number of 20 characters that is made up of the rack, section and level number where the bin is located.
Warehouse Classes The program checks the warehouse class of a receiving and shipping bin so that when you work with warehouse classes and a default receiving/shipping bin, you must manually fill in the appropriate bins in the warehouse receipt and shipment lines. No warehouse class is checked for the production bins. Note: When you set up an item with a warehouse class code, you must also assign the same warehouse class to a bin in the receiving zone; and any other area you want that item to reside in.
Setting Maximum Quantities for Bins On each item card, you can assign a unit of measure (UOM) for each item: pieces, pallets, liters, grams, boxes and so forth. You can also have a base UOM for an item and specify larger UOMs that are based on it. For example, you can define a pallet to equal 16 pieces – the latter being the base UOM. In a situation where you want to set a maximum quantity of a specific item to be stored in an individual bin and the item has more than one UOM, you must set the maximum quantity for every UOM that exists on the item card. For example, if a specific item has been set up on the item card for pieces and
25
WAREHOUSE MANAGEMENT SYSTEMS – TECHNICAL WHITEPAPER
pallets, then the Max.Qty. field for that item in the bin must also be in pieces and pallets. Otherwise, the program will not correctly calculate the allowable quantity for that bin. Note: Before you set capacity restrictions for bin contents on a bin, you must first ensure that the UOM and dimensions of the item have been set up on the item card.
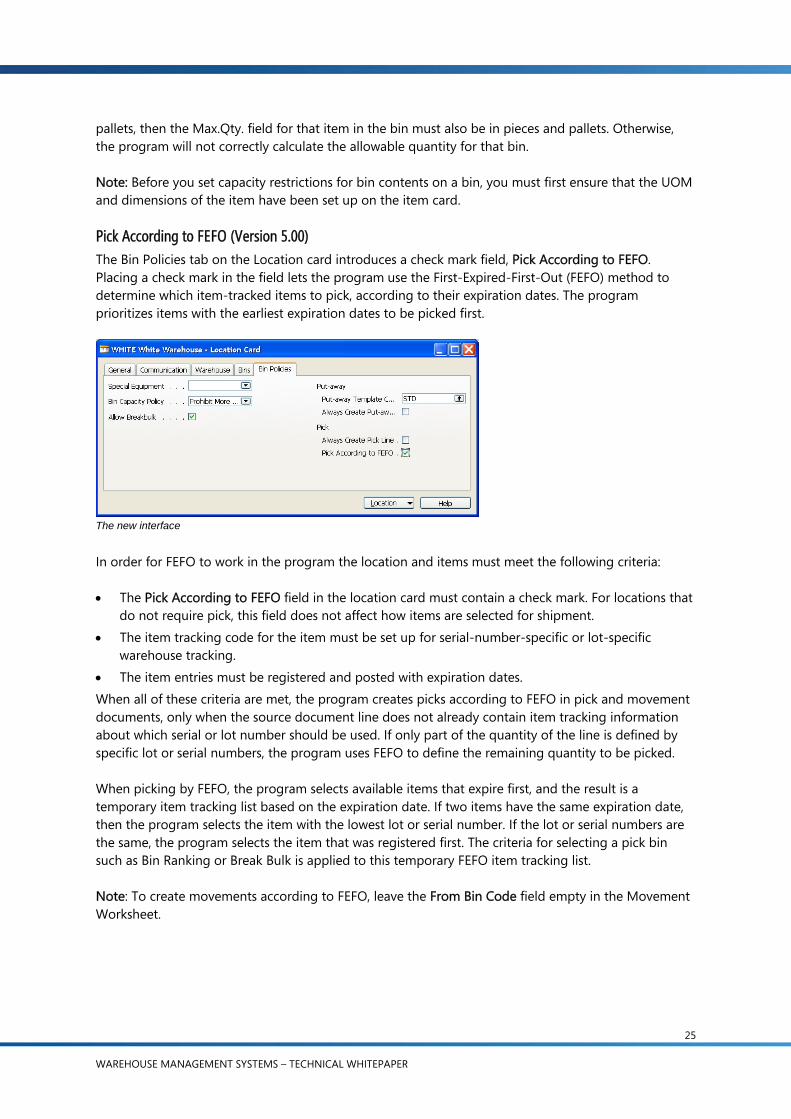
Pick According to FEFO (Version 5.00) The Bin Policies tab on the Location card introduces a check mark field, Pick According to FEFO. Placing a check mark in the field lets the program use the First-Expired-First-Out (FEFO) method to determine which item-tracked items to pick, according to their expiration dates. The program prioritizes items with the earliest expiration dates to be picked first.
The new interface
In order for FEFO to work in the program the location and items must meet the following criteria: • The Pick According to FEFO field in the location card must contain a check mark. For locations that
do not require pick, this field does not affect how items are selected for shipment. • The item tracking code for the item must be set up for serial-number-specific or lot-specific
warehouse tracking. • The item entries must be registered and posted with expiration dates. When all of these criteria are met, the program creates picks according to FEFO in pick and movement documents, only when the source document line does not already contain item tracking information about which serial or lot number should be used. If only part of the quantity of the line is defined by specific lot or serial numbers, the program uses FEFO to define the remaining quantity to be picked. When picking by FEFO, the program selects available items that expire first, and the result is a temporary item tracking list based on the expiration date. If two items have the same expiration date, then the program selects the item with the lowest lot or serial number. If the lot or serial numbers are the same, the program selects the item that was registered first. The criteria for selecting a pick bin such as Bin Ranking or Break Bulk is applied to this temporary FEFO item tracking list. Note: To create movements according to FEFO, leave the From Bin Code field empty in the Movement Worksheet.

26
WAREHOUSE MANAGEMENT SYSTEMS – TECHNICAL WHITEPAPER
Specific Features
The Warehouse Reclassification Journal (Version 5.0) Besides being used as a movement journal, this journal can also be used for classification of bins, such as deleting or renaming bins. Restrictions have been implemented on the usage of reclassification journals when using the Item Tracking system in version 5.0. For Location using WMS, reclassification of item tracking information MUST start in the Whse Reclassification Journal, and registering this information will automatically trigger a posting of the Item Reclassification Journal. This has been improved in order to ensure rigorous synchronization between Whse entries and Item Ledger entries.
Filtering The Use Filters to Get Source Documents function is available from the Warehouse Receipt and the Warehouse Shipment windows. It enables the user to set up and use filters to retrieve relevant source document lines for creating receipts or shipments. You can create different filter variations and save them for future use. You can create a new filter variation, save it, and give it a code name from the Source Document Filter card. Most of the fields in this card are filter fields; therefore, the program will accept any combination of characters in the non-date fields without validating them. For example, you can enter an invalid customer number in the Sell-to-Customer No. field and the program will accept it without giving you a message that the number is invalid.
Posting versus Registering Within the activities of the warehouse, WMS introduces a type of posting called registering. With this, you can register certain warehouse activities such as picks, put-aways and movements (within the warehouse). By registering something, you are creating an entry in the program that records an action completed in the warehouse. Registering differs from posting in that it does not create any entries in the general ledger or the inventory item ledger. In WMS, you can post a receipt and a shipment.
Cross-docking Cross-docking with WMS requires that cross-docking bins be set up per location to pick from and put away to. From the receipt side, the program can calculate any cross-dock opportunities that exist when an inbound order is received.
Changes in earlier versions The Cross-Dock Available field on the put-away line that exists in Microsoft Navision 3.10 (Form 5770, Table 5767) is not available in Microsoft Navision 3.60 WMS. The purpose of this field was to automatically notify the user before the item was put away that a cross-dock opportunity was available but, because the receiving and put-away process is somewhat different in WMS than in 3.10, this field has been removed in order to maintain a high level of performance and provide the user with updated relevant data for decision-making. In WMS, a field corresponding to the old Cross-Dock Available field could have to be placed on the Receipt form, however, the program would have had to make a calculation for each line as you entered items during the receipt process, and the receipt process would therefore be slower than it now is in WMS. In Microsoft Navision 3.10, the Cross-Dock Available field was calculated during the posting of the receipt and, therefore, the user did not find the calculation a hindrance to performance. This field would have to be present on the Receipt form in WMS, but the program would have had to perform a

27
WAREHOUSE MANAGEMENT SYSTEMS – TECHNICAL WHITEPAPER
more complicated calculation than if it were from the put-away line. This, in turn, would decrease the performance of the WMS processes. Regarding the issue of updated valid data, a check mark in such a field would only be valid for the moment that you entered the line on the receipt. In a multiple-user environment, this information could be outdated very quickly. In the 3.60 release, you get a valid quantity to cross dock from the Calculate Cross-Dock function because the calculation includes the quantity on outbound documents and the quantity already in the cross-dock bin.
Batch Job to Enable a Location for WMS In the current application, it is not possible to use the existing warehouse functionality (warehouse adjustments and the warehouse physical inventory journal) to enable an existing location with inventory to be a WMS location that uses zones and bins. With this Critical Update, running a specific batch enables an existing inventory location to use zones and bins and to operate as a WMS location. The batch job to create a warehouse location creates initial warehouse entries for the warehouse adjustment bin for all items that have inventory in the location. These initial entries will be balanced when warehouse physical inventory entries are entered after the batch job is run. It is assumed that even for a conversion of an existing location, the business flow will include a subsequent physical inventory counting. The physical inventory posting is not part of this batch job and must be done by the user manually after the batch job has completed. As preconditions for running the batch job, it is necessary that all negative inventories and any open warehouse documents be cleared before the batch job runs. To help users identify the negative inventory and open warehouse documents, the Critical Update also contains a report that prints a list of items with negative inventory and prints which types of warehouse documents are open for the location.
User Interface Changes In version 3.60, a new menu item was added to the Periodic Activities menu in the Warehouse Management main menu: Check on Negative Inventory. This option runs the report to check for items with negative inventory in a location and open warehouse documents. In version 3.70, two new menu items were added to the Periodic Activities menu in the Warehouse Management main menu, Check on Negative Inventory and Create Whse. Location. The Check on Negative Inventory option runs the report to check for items with negative inventory. The Create Whse. Location option starts the batch job to enable the location to use zones and bins.
Enabling a Location for WMS To enable a location to be a WMS location, the user will create a new bin (and, in version 3.60 a new zone) to act as the new adjustment bin for the location. The system manager will then enable the key group containing the necessary key for this batch job. In version 3.60, the user will place a check mark in the “Use Zones and Bins” field on the Location Card. If the location contains inventory, the program will ask the user if the location should be enabled as a WMS location with a warning that this process is irreversible.

28
WAREHOUSE MANAGEMENT SYSTEMS – TECHNICAL WHITEPAPER
In version 3.70, to start the batch job, the user will run the Create Whse. Location batch job from the Periodic Activities on the Warehouse Management menu. As in 3.60, if the location contains inventory, the program will warn the user that the process is irreversible and ask for confirmation. If the user confirms this message, the following request form will then open:
In this window, the user enters the Bin Code for the location’s new adjustment bin. When the user clicks OK, the program will run through the following steps to enable the location to become a WMS location: 1. The program runs a series of checks to ensure that:
• The bin entered in the Adjustment Bin Code field on the request form really exists in the Bin table.
• There are no warehouse entries for this location. • There are no unposted warehouse documents for this location. • The field Adjustment Bin Code on the Location Card is empty.
2. Using the open entries for the specified location from the Item Ledger Entry (ILE) table, the
program creates a sum for each combination of Item No., Variant Code, Unit of Measure Code, and, if necessary, Lot No. and Serial No. The program creates a temporary warehouse journal line for each of these combinations. The warehouse journal lines will have the following values:
• Location Code = Location Code to be converted • Bin Code = Adjustment Bin Code of the location to be converted • Entry Type = Positive Adjustment • Item No. = Current Item No. from ILE • Variant Code = Current Variant Code from ILE if not empty • Unit of Measure Code = Current Unit of Measure Code from ILE • Lot No. = Current Lot No. from ILE, if not empty • Serial No. = Current Serial No. from ILE, if not empty • Quantity = the sum just calculated for this combination of fields
NOTE: If the program finds that one of these sums is negative, it will show an error stating that the location cannot have negative inventory.

29
WAREHOUSE MANAGEMENT SYSTEMS – TECHNICAL WHITEPAPER
3. Once all of the item ledger entries have been processed, the program will post the warehouse journal lines. In posting these lines, the program will perform the following:
• Create warehouse entries to place all the items in the adjustment bin. • Create a warehouse register. • Set the Adjustment Bin Code field on the Location Card to the adjustment bin code entered on
the request form for the batch job. To see which items were added to the adjustment bin during the batch job, the user can run the Whse. Adjustment Bin report from the Reports menu on the Warehouse Management main menu. Once the batch job has completed, the users must perform and post a warehouse physical inventory. The user can create zones and bins either before or after the conversion. The only bin that must be created before the conversion is the one that is to be used as the future adjustment bin. It is recommended that the user run this batch job at a time when it will not impact the daily work in the system. This job processes each entry in the Item Ledger Entry table, and if there are a large number of item ledger entries, the job can last several hours. For those locations that did not use warehouse management documents before the conversion, users must re-open and release any source documents that were partially received or partially shipped before the conversion.

30
WAREHOUSE MANAGEMENT SYSTEMS – TECHNICAL WHITEPAPER
Glossary
adjustment bin A virtual bin that is used by the program for purposes of reconciling inventory adjustments.
batch picking APICS: A method of picking orders in which order requirements are aggregated by product across orders to reduce movement to and from product locations. The aggregated quantities of each product are then transported to a common area where the individual orders are constructed.
bin A physical storage unit that is used for placing and storing items in. This can be anything from a small container box to an open space on a pallet rack. The smallest unit of the warehouse logical structure. APICS: 1. A storage device designed to hold small discrete parts. 2. A shelving unit with physical dividers separating the storage locations.
bin content The contents that are contained within the bin, including the physical quantity of items in the bin, as well as information about volume and status (e.g. defective). Bin content is the basis for the pick and put-away creation in the program.
bin ranking A measure for prioritizing replenishment movements. This indicates which bin should be replenished first. The greater the number the higher the priority. For example, the program will replenish a bin with the bin ranking of 200 before it replenishes a bin with the ranking of 100.
bin replenishment Relocating material from a bulk storage area to an order pick storage area, and documenting this relocation. This is so that the proper quantity of items is maintained for that bin so that the performance of the warehouse is kept at an optimum level. APICS: Replenishment: Relocating material from a bulk storage area to an order pick storage area, and documenting this relocation.
bin type A classification for the type of activity that is performed from a particular bin. For example, a bin that has the bin type “receiving,” should contain only items that have been received into the warehouse but have not been put away. Some examples of bin types are: receiving, shipping, picking and put-away.

31
WAREHOUSE MANAGEMENT SYSTEMS – TECHNICAL WHITEPAPER
break-bulk APICS: Dividing truckloads of homogeneous items into smaller, more appropriate quantities for use. (See break-package.)
break-package To break a larger unit of measure down to a lower unit of measure during the picking process in order to fulfill the correct quantity for the picking order.
bulk storage APICS: Large-scale storage for raw materials, intermediates, or finished products. Each vessel normally contains a mixture of lots and materials that may be replenished and withdrawn for use or pack-out simultaneously.
cross-docking To move items directly from the receiving area to the shipping area, thereby minimizing handling and storage and allowing sales orders to be shipped sooner. Additional Information: The program systematically compares inventory receipts with outstanding sales orders and suggests a cross-docking opportunity.
cycle counting APICS: An inventory accuracy audit technique where inventory is counted on a cyclic schedule rather than once a year. A cycle inventory count is usually taken on a regular defined basis (often more frequently for high-value or fast-moving items and less frequently for low-value or slow-moving items). Most effective cycle counting systems require the counting of a certain number of items every workday with each item counted at a prescribed frequency.
dedicated bin This is a synonym for fixed bin. It was used in previous versions in the Warehouse Management applications. (See fixed bin.)
directed pick A process where information on the warehouse document directs the warehouse worker to the bin that is most efficient to pick from.
directed put-away A process where information on the warehouse document directs the warehouse worker to the bin that is most efficient to put items away in.

32
WAREHOUSE MANAGEMENT SYSTEMS – TECHNICAL WHITEPAPER
fixed bin A bin that has been specified to hold items which are dedicated to that particular bin. (In Microsoft Navision, an item is fixed to a bin, but a bin is not fixed to a specific item. Therefore, a fixed bin can still contain several different items.) Syn: fixed-location storage (APICS): A method of storage in which a relatively permanent location is assigned for the storage of each item in a storeroom or warehouse Although more space is needed to store parts than in a random-location storage system, fixed locations become familiar, and therefore a locator file may not be needed. See: random-location storage.
floating bin Any bin that is not fixed to store a specific item or type of item and are used to store items as they come into the warehouse Syn: random-location storage (APICS): A storage technique in which parts are placed in any space that is empty when they arrive at the storeroom. Although this random method requires the use of a locator file to identify part locations, it often requires less storage space than a fixed-location storage method. Syn: floating inventory location system. See: fixed-location storage.
flushing A method of issuing components from inventory. Methods include issuing the component when the production order is released (forward flushing), and issuing the component when the production order is finished (backward flushing).
forward picking zone An area in the warehouse where items are to be picked from first. (See bin ranking)
location A physical structure or place where inventory is received, stored and shipped. A location can be a warehouse, service car, showroom, plant or area within a plant.
movement The physical or virtual movement of items from one bin to another bin within the same warehouse A virtual movement would take place, for example, in a bin content adjustment. Note: A movement does not affect the availability of an item, a pick or put-away does.
order picking APICS: Selecting or `picking` the required quantity of specific products for movement to a packaging area (usually in response to one or more shipping orders) and documenting that the material was moved from one location to shipping.
physical inventory APICS: The determination of inventory quantity by actual count. Physical inventories can be taken on a continuous, periodic, or annual basis. Syn: annual inventory count, annual physical inventory.

33
WAREHOUSE MANAGEMENT SYSTEMS – TECHNICAL WHITEPAPER
picking APICS: The process of withdrawing from stock the components to make the products or the finished goods to be shipped to a customer. Note: In the WMS application, once an item has been registered as picked, the program considers it no longer available.
posting The final registration of an amount on an account. Once you have posted in Microsoft Navision, the amount cannot be deleted, so errors can be corrected only by posting reversing or adjusting entries.
pick-to-stage The process where the warehouse worker picks items and puts them away in a staging area to be arranged for shipping. The items are then picked again for shipment.
put-away APICS: Removing the material from the dock (or other location of receipt), transporting the material to a storage area, placing that material in a staging area and then moving it to a specific location, and recording the movement and identification of the location where the material has been placed. Note: In the WMS application, items are available to pick only after they have been registered as put-away.
put-away template A form in the application that is used to setup the parameters that the program uses during the put-away process. Multiple templates may be entered and assigned for use per location or per item.
registering Creating an entry in the program that records an action completed in the warehouse. For example, you can register the put-away, picking or movement of an item into or from a specific bin. Registering differs from posting in that it does not create any entries in the general ledger or the inventory item ledger.
staging APICS: Pulling material for an order from inventory before the material is required. This action is often taken to identify shortages, but it can lead to increased problems in availability and inventory accuracy. See: accumulating.
warehouse adjustment The process of adjusting bin content records. A negative adjustment decreases the quantity of items in the bin. A positive adjustment increases the quantity of items in the bin.
warehouse adjustment bin
A virtual bin in the program that provides a place for the result of the adjustment calculation to be recorded. For example, if a negative quantity for an item exists the adjustment bin, then a positive adjustment has been made for that item in a bin in the warehouse. This quantity stays in the adjustment bin until the adjustment has been posted in the item journal.

34
WAREHOUSE MANAGEMENT SYSTEMS – TECHNICAL WHITEPAPER
warehouse assignment The procedure of prioritizing several pick and/or put-away requests in one or more warehouse documents and allocating tasks to users.
warehouse class The categorization of items, zones, and bins according to special conditions or special equipment that are required for the storage of items. Examples of warehouse classes can be: frozen, dry, hazardous, and so on.
warehouse instructions Instructs the warehouse personnel what items to pick or put-away and where and when to perform those activities.
warehouse receipt The physical acceptance and recording in the program of an item arriving into a warehouse location.
warehouse request An internal system table that contains references to warehouse source documents that are ready for shipment or receipt. Used to initiate warehouse processes.
warehouse shipment The act of shipping items from a warehouse location and recording the shipment in the program.
zone A continuous area within a warehouse location that is usually distinguished from adjoining areas by the function for which it is used.

35
WAREHOUSE MANAGEMENT SYSTEMS – TECHNICAL WHITEPAPER
Appendix A: Demonstration Data Specifications
(Date: May 8, 2002) This is the specification for all the required demonstration data for the Warehouse Management Systems functionality. The demonstration data serves several purposes: training developers can use it to create scenarios for training purposes; training instructors can use it in their training courses for Microsoft Certified Business Solutions Partners; and sales persons can use it to demonstrate the functionality to potential customers.
Goals It should be possible to perform scenarios for basic warehouse management processes without the need for further setup or change; this includes all use cases in the functional specification (except for the Set Up use case). All forms must have valid data. • Data must be adjusted and balanced to each other. • Data have to include ongoing orders. • Data should be based on source documents.
Setup Forms Warehouse Mgt. Setup WMS Numbering Number series
Whse. Receipt Order number series WMS-RCPT
Posted Receipt Order number series WMS-RCPT+
Whse. Shipment Order number series WMS-SHIP
Posted Whse. Shipment Order number series WMS-SHIP+
Put-away Order number series WMS-PUT
Posted Put-away Order number series WMS-PUT+
Pick Order number series WMS-PICK
Pick Order number series WMS-PICK+
WHSE. Instructions Number series INSTRDOC
Put-away templates
STD Dedicated Floating Find Same
Item Unit of Measure Code Match
Find Bin less than Min. Qty
Find Empty Bin
True True True True True True True True True True True True True True

36
WAREHOUSE MANAGEMENT SYSTEMS – TECHNICAL WHITEPAPER
Dedicated Floating Find Same Item
Unit of Measure Code Match
Find Bin less than Min. Qty
Find Empty Bin
True True True
VAR
Dedicated Floating Find Same Item
Unit of Measure Code Match
Find Bin less than Min. Qty
Find Empty Bin
True True True True True True
Location Card
White Location
Field text Code Code WHITE Name White Warehouse Address Merrily Grove Avenue 6 Post code GB-V295 City Onbrook Country/region GB Phone +44-(0)50 4567 9771 Use WMS True Receipt Zone code Receive Receipt Bin code W-08-0001 Shipment Zone code Ship Shipment Bin code W-09-0001 Adjustment Zone code Adjustment Adjustment Bin code W-11-0001 Production Zone code Production Open shop floor bin no W-07-0001 Inbound Production Bin W-07-0002 Outbound Production Bin W-09-0003 Check Bin capacity Prohibit excess Allow break bulk Checked Default Adjustment Zone QA Put Away Template Code STD Autofill qty. To handle True
Bin Type The following Bin Types will be created.
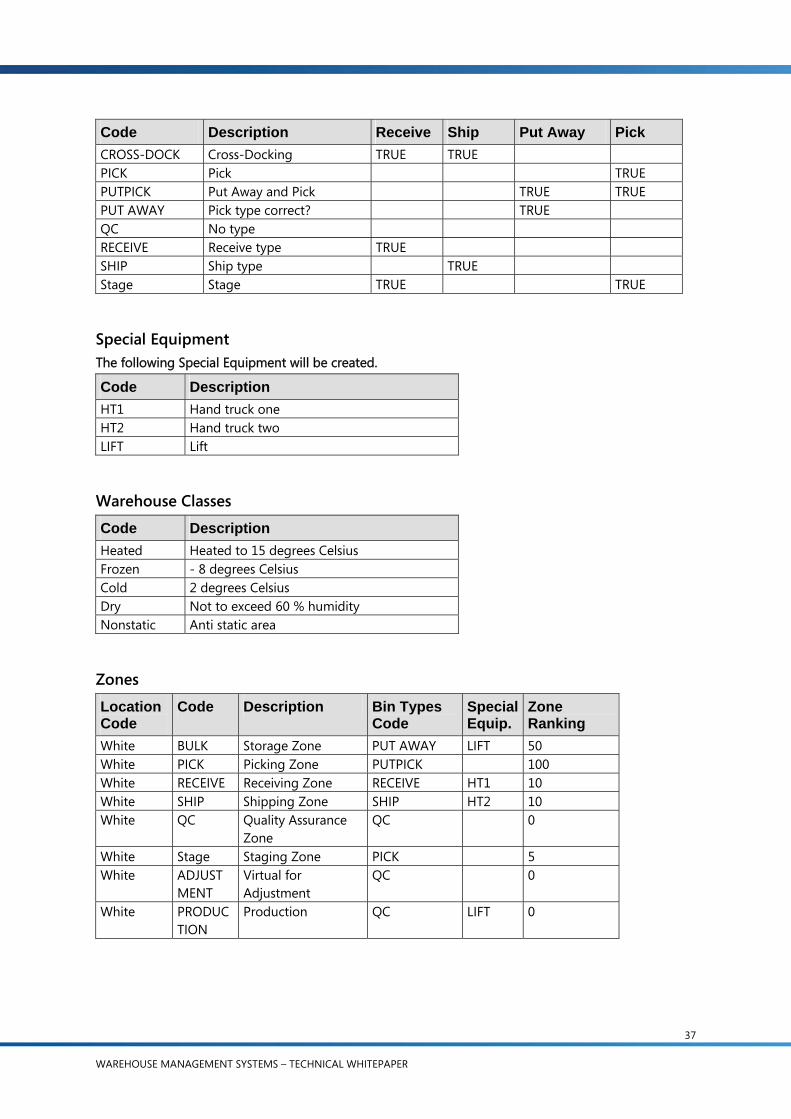
37
WAREHOUSE MANAGEMENT SYSTEMS – TECHNICAL WHITEPAPER
Code Description Receive Ship Put Away Pick CROSS-DOCK Cross-Docking TRUE TRUE PICK Pick TRUE PUTPICK Put Away and Pick TRUE TRUE PUT AWAY Pick type correct? TRUE QC No type RECEIVE Receive type TRUE SHIP Ship type TRUE Stage Stage TRUE TRUE
Special Equipment The following Special Equipment will be created.
Code Description HT1 Hand truck one HT2 Hand truck two LIFT Lift
Warehouse Classes
Code Description Heated Heated to 15 degrees Celsius Frozen - 8 degrees Celsius Cold 2 degrees Celsius Dry Not to exceed 60 % humidity Nonstatic Anti static area
Zones
Location Code
Code Description Bin Types Code
Special Equip.
Zone Ranking
White BULK Storage Zone PUT AWAY LIFT 50 White PICK Picking Zone PUTPICK 100 White RECEIVE Receiving Zone RECEIVE HT1 10 White SHIP Shipping Zone SHIP HT2 10 White QC Quality Assurance
Zone QC 0
White Stage Staging Zone PICK 5 White ADJUST
MENT Virtual for Adjustment
QC 0
White PRODUCTION
Production QC LIFT 0

38
WAREHOUSE MANAGEMENT SYSTEMS – TECHNICAL WHITEPAPER
Bins Erecting bins for White BULK
Bin No.
Maximum Cubage
Maximum Weight
Whs. Class code
Bin Ranking
Fixed Item no. Min qty.
Max qty.
UOM
W-05-0001
1500 1000 Heated 60 Yes LS-MAN-10
2500 Pcs
W-05-0002
1500 1000 Heated 60 Yes LS-S15 500 pcs
W-05-0003
1500 1000 Heated 60 Yes LS-10PC 400 box
W-05-0004
1500 1000 Heated 60 Yes LS-10PC 400 box
W-05-0005
1500 1000 Heated 60 Yes LS-120 30 pcs
W-05-0006
1500 1000 Heated 50 Yes LS-120 30 pcs
W-05-0007
1500 1000 Heated 50 Yes LS-150 20 pcs
W-05-0008
1500 1000 Heated 50 Yes LS-150 20 pcs
W-05-0009
1500 1000 Heated 50 Yes LS-2 1200 box
W-05-0010
1500 1000 Heated 50 Yes LS-75 40 pcs
W-05-0011
1500 1000 Heated 50 Yes LS-75 40 pcs
W-05-0012
1500 1000 Heated 50
W-05-0013
3000 2000 Heated 50
W-05-0014
3000 2000 Heated 50
W-05-0015
3000 2000 Heated 50
W-05-0016
3000 2000 Heated 50
W-05-0017
3000 2000 Heated 50

39
WAREHOUSE MANAGEMENT SYSTEMS – TECHNICAL WHITEPAPER
Erecting bins for White PICK
Bin No. Max. Cubage
Max. Weight
Whs. Class code
Bin Ranking
Fixed Item no. Min qty.
Max qty.
UOM
W-01-0001
2500 15000 Heated 100 Yes LS-75 12 40 pcs
W-01-0002
250 150 Heated 90 Yes LS-75 2 8 pcs
W-01-0003
250 150 Heated 90 Yes LS-10PC 100 400 box
W-02-0001
2500 15000 Heated 100 Yes LS-120 10 30 pcs
W-02-0002
250 150 Heated 90 Yes LS-120 6 10 pcs
W-02-0003
250 150 Heated 90 Yes LS-S15 10 50 pcs
W-03-0001
2500 15000 Heated 100 Yes LS-150 10 20 pcs
W-03-0002
280 200 Heated 90 Yes LS-150 2 6 pcs
W-03-0003
280 200 Heated 90 Yes LS-2 20 200 box
W-04-0001
250 150 Heated 100 Yes LS-10PC 10 40 box
W-04-0002
250 150 Heated 90 Yes LS-MAN-10 1000 2500 pcs
W-04-0003
250 150 90
W-04-0004
250 150 90
W-04-0005
250 150 90
W-04-0006
250 150 90
W-04-0007
250 150 90
W-04-0008
250 150 90
W-04-0009
250 150 90
W-04-00010
250 150 90
W-04-00011
250 150 90
W-04-00012
250 150 90
W-04-00013
250 150 90
W-04-00014
250 150 90
W-04-00015
250 150 90

40
WAREHOUSE MANAGEMENT SYSTEMS – TECHNICAL WHITEPAPER
Erecting bins for White RECEIVE
Bin No. Maximum Cubage Maximum Weight W-08-0001 10000 10000 W-08-0002 10000 10000 W-08-0003 10000 10000 W-08-0004 10000 10000
Erecting bins for White SHIP
Bin No. Maximum Cubage Maximum Weight W-09-0001 20000 30000 W-09-0002 20000 30000 W-09-0003 20000 30000 W-09-0004 20000 30000 W-09-0005 20000 30000 W-09-0006 20000 30000
Erecting bins for White QC
Bin No. Maximum Cubage Maximum Weight W-10-0001 20000 30000 W-10-0002 20000 30000
Erecting bins for STAGE
Bin No. Maximum Cubage Maximum Weight W-06-0001 10000 30000 W-06-0002 10000 30000 W-06-0003 3000 3000 W-06-0004 3000 3000 W-06-0005 300 300 W-06-0006 300 300
Erecting bins for Bins for Production
Bin No. Maximum Cubage Maximum Weight W-07-0001 20000 30000 W-07-0002 20000 30000 W-07-0003 20000 30000 W-07-0004 20000 30000
Erecting bins for Bins for Adjustment
Bin No. Maximum Cubage Maximum Weight W-11-0001 W-11-0002
The adjustment bin is an “account” bin, it is not really physically existing, therefore max. cubage and weight should not be defined.

41
WAREHOUSE MANAGEMENT SYSTEMS – TECHNICAL WHITEPAPER
Physical Inventory
Phys. Invt. Cycles
Code Description Count frequency FAST Fast movers or high value 6 Normal Normal sale or medium value 2 SLOW Slow movers or low value 1
Dynamic Data
Items Item No.: LS-75
Field Name Value No. LS-75 Description Loudspeaker, Cherry, 75 W Base Unit of Measure PCS Unit of Measure PCS – Qty. Per Unit of Measure =1 UoM Length 2 UoM Width 2 UoM Height 4 Total Volume 16 Total Weight 16 Unit of Measure Pallet – Qty. Per Unit of Measure = 16 UoM Length 8 UoM Width 4 UoM Height 8 Total Volume 256 Total Weight 256 Costing Method FIFO Unit Cost 36,00 Unit price 79,00 Gen.Prod.posting group Retail VAT Prod.posting group VAT25 Inventory posting group RESALE Sales Unit of Measure PCS Purchase Unit of Measure PALLET Put-away Unit of Measure PALLET
Item No.: LS-120
Field Name Value No. LS-120 Description Loudspeaker, Black, 120 W Base Unit of Measure PCS Unit of Measure PCS – Qty. Per Unit of Measure =1

42
WAREHOUSE MANAGEMENT SYSTEMS – TECHNICAL WHITEPAPER
Field Name Value UoM Length 3 UoM Width 3 UoM Height 6 Total Volume 54 Total Weight 66 Unit of Measure Pallet – Qty. Per Unit of Measure =12 UoM Length 9 UoM Width 6 UoM Height 12 Total Volume 648 Total Weight 780 Costing Method FIFO Unit Cost 45,00 Unit price 88,00 Gen.Prod.posting group Retail VAT Prod.posting group VAT25 Inventory posting group RESALE Sales Unit of Measure PCS Purchase Unit of Measure PCS Put-away Unit of Measure PCS
Item No.: LS-150
Field Name Value No. LS-150 Description Loudspeaker, Cherry, 150 W Base Unit of Measure PCS Unit of Measure PCS – Qty. Per Unit of Measure =1 UoM Length 3 UoM Width 5 UoM Height 6 Total Volume 90 Total Weight 99 Unit of Measure Pallet – Qty. Per Unit of Measure =6 UoM Length 6 UoM Width 5 UoM Height 12 Total Volume 360 Total Weight 400 Costing Method FIFO Unit Cost 72,00 Unit price 129,00 Gen.Prod.posting group Retail VAT Prod.posting group VAT25 Inventory posting group RESALE Sales Unit of Measure PCS Purchase Unit of Measure PCS

43
WAREHOUSE MANAGEMENT SYSTEMS – TECHNICAL WHITEPAPER
Field Name Value Put-away Unit of Measure PCS
Item No.: LS-10PC
Field Name Value No. LS-10PC Description Loudspeakers, White for PC Base Unit of Measure Box Unit of Measure Box – Qty. Per Unit of Measure =1 UoM Length 2 UoM Width 2,5 UoM Height 1 Total Volume 5 Total Weight 4 Costing Method FIFO Unit Cost 25,00 Unit price 59,00 Gen.Prod.posting group Retail VAT Prod.posting group VAT25 Inventory posting group RESALE Sales Unit of Measure BOX Purchase Unit of Measure BOX Put-away Unit of Measure BOX
Item No.: LS-Man-10
Field Name Value No. LS-Man-10 Description Manual for Loudspeakers Base Unit of Measure PCS Unit of Measure PCS Unit of Measure =1 UoM Length 1 UoM Width 1 UoM Height 1 Total Volume 1 Total Weight 1,2 Costing Method FIFO Unit Cost 12,00 Unit price 0,00 Gen.Prod.posting group Retail VAT Prod.posting group VAT25 Inventory posting group RESALE Sales Unit of Measure PCS Purchase Unit of Measure PCS Put-away Unit of Measure PCS

44
WAREHOUSE MANAGEMENT SYSTEMS – TECHNICAL WHITEPAPER
Item No.: LS-2
Field Name Value No. LS-2 Description Cables for Loudspeakers Base Unit of Measure Box Unit of Measure Box Unit of Measure =1 UoM Length 1 UoM Width 1 UoM Height 1,1 Total Volume 1,1 Total Weight 0,9 Costing Method FIFO Unit Cost 15,00 Unit price 21,00 Gen.Prod.posting group Retail VAT Prod.posting group VAT25 Inventory posting group RESALE Sales Unit of Measure BOX Purchase Unit of Measure BOX Put-away Unit of Measure BOX
Item No.: LS-S15
Field Name Value No. LS-S15 Description Stand for Loudspeakers LS-150 Base Unit of Measure PCS Unit of Measure PCS Unit of Measure =1 UoM Length 2 UoM Width 3 UoM Height 3 Total Volume 18 Total Weight 26 Costing Method FIFO Unit Cost 45,00 Unit price 79,00 Gen.Prod.posting group Retail VAT Prod.posting group VAT25 Inventory posting group RESALE Sales Unit of Measure PCS Purchase Unit of Measure PCS Put-away Unit of Measure PCS

45
WAREHOUSE MANAGEMENT SYSTEMS – TECHNICAL WHITEPAPER
Items used for Production order Data are equal to item LS-2 with the following exceptions:
Field Value UOM: PCS Purchase UoM Sales UoM
Item Description Requisition system
Requisition method code
LS-100 Loudspeaker 100W Oakwood Deluxe
Prod. order M-T-S
LSU-15 Bass speaker unit 15” 100W
Purchase Purchase
LSU-8 Middletone speaker unit 8” 100W
Purchase Purchase
LSU-4 Tweeter speaker unit 4” 100W
Purchase Purchase
FF-100 Frequency filter for LS-100
Purchase Purchase
C-100 Cabling for LS-100 Purchase Purchase HS-100 Housing for LS-100,
Oakwood 120 liters Purchase Purchase
SPK-100 Spike for LS-100 Purchase Purchase
BOM
Unit Quantity LSU-15 1 LSU-8 1 LSU-4 1 FF-100 1 C-100 1 HS-100 1
LS-100 (Base UOM 1)
SPK-100 4
Item Variant
Item No. Variant Code Description LS-75 LS-75-B Black LS-10PC LS-10PC-B Black

46
WAREHOUSE MANAGEMENT SYSTEMS – TECHNICAL WHITEPAPER
SKU on White location
Item No. Variant Code
Put-away template code
Put-away UoM
Requisition system
Vendor no.
Reorder point
Reorder quantity
LS-75 LS-75-B STd. Pcs. Purchase 30000 12 40 LS-120 STd. Pcs. Purchase 40000 10 36 LS-150 STd. Pcs. Purchase 50000 6 32 LS-10PC LS-10PC-B STd. Pcs. Purchase 40000 30 100 LS-Man-10 Var. Pcs. Purchase 30000 200 100 LS-2 Var. Box Transfer Green 100 60 LS-S15 Var. Pcs. Transfer Blue 50 30
Customers
New Customer 1 New Customer 2 New Customer 3 No. 35654165 843613654 93466354 Name HiFi Shop Sound&Vision The Device shop Address 28 Baker street 159 Fairway 273 Basin Street City London London London Country/Region code GB GB GB Search name HiFi Shop Sound&Vision Electronics ltd.
Correct? Sales person Code JR PS PS Respons. center London London London Gen.bus. posting group National National National VAT bus. posting group National National National Customer posting group Domestic Domestic Domestic Application Method Manual Manual Manual Payment term code 1M(8D) 1M(8D) 14Days Reminder terms code Domestic Domestic Domestic Fin. Charge terms 1.5 DOM. 1.5 DOM. 1.5 DOM. Location WHITE WHITE WHITE Combine shipments Checked Checked Checked Reserve OPTIONAL OPTIONAL OPTIONAL Shipping Advice Partial Complete Partial Shipment method code EXW EXW EXW Shipping Agent code DHL FEDEX UPS
Vendors
New Vendor 1 New Vendor 2 New Vendor 3 No 6735654165 678465466 26498498 Name Gadgets Ltd. Electronics ltd. Walker Address 8 One way 354 Oxford street 116 Kensington Rd. City London London London Country/Region code GB GB GB

47
WAREHOUSE MANAGEMENT SYSTEMS – TECHNICAL WHITEPAPER
Search name HiFi Shop correct? Electronics ltd. Walker Purchaser Code RQ RQ RQ Respons. Center London London London Gen. bus. posting group National National National VAT bus. posting group National National National Customer posting group Domestic Domestic Domestic Application Method Manual Manual Manual Payment term code COD COD COD Priority 1 2 3 Locations code WHITE WHITE WHITE Shipment method code CIF CPT CFR
Currency code
Purchase orders (Location WHITE)
P.O.no. Vendor no. Item no. Quantity Status 104001 30000 LS-Man-10 100 Received, put-away printed 104001 30000 LS-75 50 Received, put-away printed 104002 40000 LS-120 10 Received, put-away printed 104002 40000 LS-10PC 22 Received, put-away printed 104003 50000 LS-150 8 Received, put-away printed 104004 40000 LS-10PC 40 Released, not Received 104004 40000 LS-150 20 Released, not Received 104005 50000 LS-150 12 Released, not Received 104006 30000 LS-Man-10 50 Released, not Received 104006 30000 LS-2 100 Released, not Received 104007 40000 LS-S15 20 Released, not Received 104008 6735654165 LS-75 20 Released, not Received 104008 6735654165 LS-120 10 Released, not Received 104008 6735654165 LS-150 12 Released, not Received 104009 678465466 LS-Man-10 100 Released, not Received 104009 678465466 LS-10PC 60 Released, not Received 104010 26498498 LS-2 40 Released, not Received 104010 26498498 LS-10PC 100 Released, not Received
Sales orders (Location WHITE)
S.O. no. Cust. no. Item no. Quantity Status 2001 10000 LS-Man-10 4 Picked 2002 20000 LS-75 10 Picked 2002 20000 LS-120 6 Picked 2002 20000 LS-10PC 20 Picked 2003 30000 LS-150 8 Picked 2004 40000 LS-10PC 30 Picked 2005 50000 LS-150 16 Released 2005 50000 LS-150 22 Released 2006 10000 LS-Man-10 10 Released
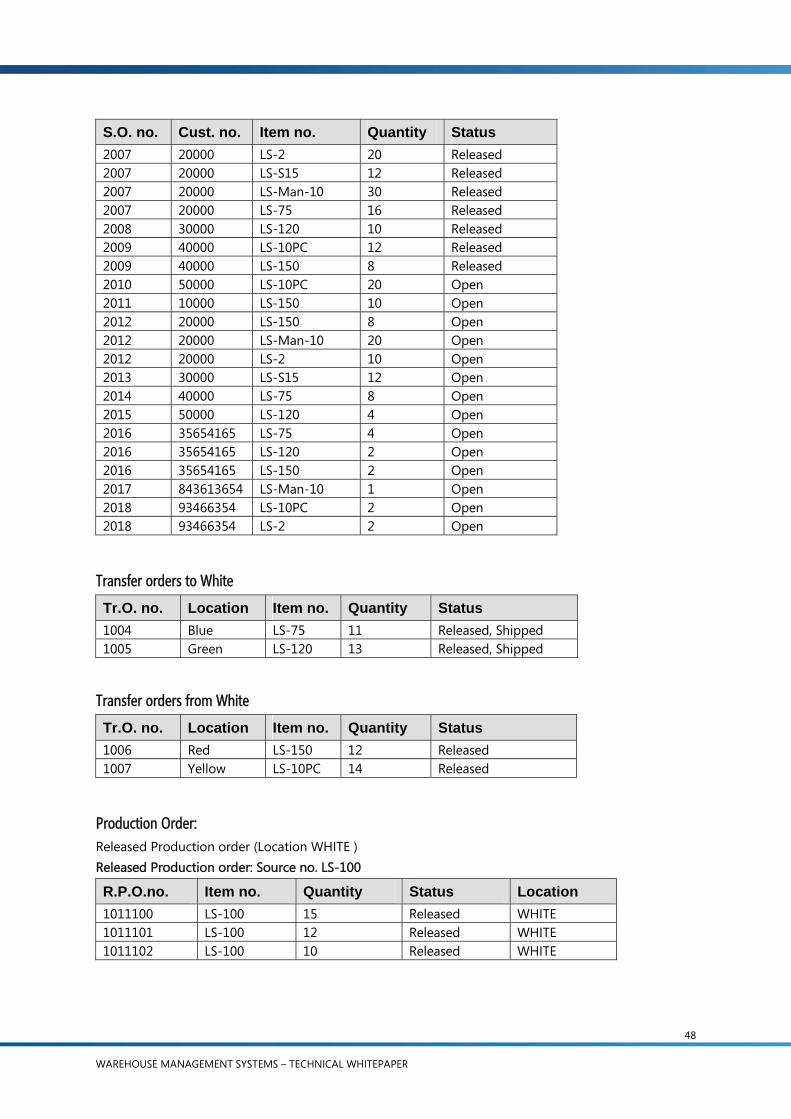
48
WAREHOUSE MANAGEMENT SYSTEMS – TECHNICAL WHITEPAPER
S.O. no. Cust. no. Item no. Quantity Status 2007 20000 LS-2 20 Released 2007 20000 LS-S15 12 Released 2007 20000 LS-Man-10 30 Released 2007 20000 LS-75 16 Released 2008 30000 LS-120 10 Released 2009 40000 LS-10PC 12 Released 2009 40000 LS-150 8 Released 2010 50000 LS-10PC 20 Open 2011 10000 LS-150 10 Open 2012 20000 LS-150 8 Open 2012 20000 LS-Man-10 20 Open 2012 20000 LS-2 10 Open 2013 30000 LS-S15 12 Open 2014 40000 LS-75 8 Open 2015 50000 LS-120 4 Open 2016 35654165 LS-75 4 Open 2016 35654165 LS-120 2 Open 2016 35654165 LS-150 2 Open 2017 843613654 LS-Man-10 1 Open 2018 93466354 LS-10PC 2 Open 2018 93466354 LS-2 2 Open
Transfer orders to White
Tr.O. no. Location Item no. Quantity Status 1004 Blue LS-75 11 Released, Shipped 1005 Green LS-120 13 Released, Shipped
Transfer orders from White
Tr.O. no. Location Item no. Quantity Status 1006 Red LS-150 12 Released 1007 Yellow LS-10PC 14 Released
Production Order: Released Production order (Location WHITE ) Released Production order: Source no. LS-100
R.P.O.no. Item no. Quantity Status Location 1011100 LS-100 15 Released WHITE 1011101 LS-100 12 Released WHITE 1011102 LS-100 10 Released WHITE

49
WAREHOUSE MANAGEMENT SYSTEMS – TECHNICAL WHITEPAPER
Items by location Items in Receive zone and Ship zone must be based on a source document.
Location Zone Bin Item Quantity WHITE BULK W-05-0001 LS-75 12 WHITE BULK W-05-0002 LS-120 6 WHITE BULK W-05-0003 LS-150 7 WHITE BULK W-05-0004 LS-10PC 38 WHITE BULK W-05-0010 LS-Man-10 100 WHITE BULK W-05-0011 LS-2 200 WHITE BULK W-05-0012 LS-S15 60 WHITE PICK W-01-0001 LS-75 14 WHITE PICK W-02-0001 LS-120 22 WHITE PICK W-02-0003 LS-150 37 WHITE PICK W-05-00012 LS-10PC 58 WHITE PICK W-05-00013 LS-Man-10 122 WHITE PICK W-05-00014 LS-2 17 WHITE PICK W-04-00015 LS-S15 12 WHITE RECEIVE W-08-0001 LS-Man-10 100 WHITE RECEIVE W-08-0002 LS-75 10 WHITE RECEIVE W-08-0003 LS-120 10 WHITE RECEIVE W-08-0004 LS-10PC 22 WHITE RECEIVE W-08-0004 LS-150 8 WHITE SHIP W-09-0001 LS-Man-10 4 WHITE SHIP W-09-0001 LS-75 10 WHITE SHIP W-09-0001 LS-120 6 WHITE SHIP W-09-0002 LS-10PC 20 WHITE SHIP W-09-0002 LS-150 8 WHITE SHIP W-09-0002 LS-10PC 30 WHITE QA W-10-0001 LS-150 1 WHITE STAGE W-06-0001 LS-Man-10 40 BLUE/OWNLOG. N/A N/A LS-75 11 GREEN/OWNLOG. N/A N/A LS-120 13 WHITE BULK W-05-0007 LS-100 32 WHITE BULK W-05-0008 LSU-15 28 WHITE BULK W-05-0009 LSU-8 15 WHITE BULK W-05-0010 LSU-4 100 WHITE BULK W-05-0011 FF-100 42 WHITE BULK W-05-0012 C-100 33 WHITE BULK W-05-0013 HS-100 56 WHITE BULK W-05-0014 SPK-100 78

50
WAREHOUSE MANAGEMENT SYSTEMS – TECHNICAL WHITEPAPER
Warehouse Movement These movements must be based on a movement journal: Header
No Location ADMIN WM000001 WHITE
Lines
Activity Item no. Zone Bin Qty. Qty. to handle Pick LS-120 PICK W-02-0001 2 0 Put-away LS-120 QC W-10-0001 2 0 Pick LS-Man-10 BULK W-05-0010 40 0 Put-away LS-Man-10 Stage W-06-0001 40 0
Warehouse Pick Blank.
Pick worksheet Blank.
Warehouse Put-away Blank.
Put-away worksheet Blank.
Warehouse Source Filter selection
Field Value Code DHL_FILTER Description Filters for Shipping agent DHL Shipping Agent code filter
DHL
Field Value Code OwnLog Description Filters for Transfer order with Own
Logistics In Transit code filter Own Logistics
Field Value Code Customers Description All customers Sell to customer no. filter
1..999999

51
WAREHOUSE MANAGEMENT SYSTEMS – TECHNICAL WHITEPAPER
The information contained in this document represents the current view of Microsoft Corporation on the issues discussed as of the date of publication. Because Microsoft must respond to changing market conditions, this document should not be interpreted to be a commitment on the part of Microsoft, and Microsoft cannot guarantee the accuracy of any information presented after the date of publication.
This White Paper is for informational purposes only. MICROSOFT MAKES NO WARRANTIES, EXPRESS, IMPLIED, OR STATUTORY, AS TO THE INFORMATION IN THIS DOCUMENT.
Complying with all applicable copyright laws is the responsibility of the user. Without limiting the rights under copyright, no part of this document may be reproduced, stored in or introduced into a retrieval system, or transmitted in any form or by any means (electronic, mechanical, photocopying, recording, or otherwise), or for any purpose, without the express written permission of Microsoft Corporation.
Microsoft may have patents, patent applications, trademarks, copyrights, or other intellectual property rights covering subject matter in this document. Except as expressly provided in any written license agreement from Microsoft, the furnishing of this document does not give you any license to these patents, trademarks, copyrights, or other intellectual property.
© 2007 Microsoft Corporation. All rights reserved. Microsoft, The Microsoft Dynamics Logo, Microsoft Dynamics NAV are either registered trademarks or trademarks of Microsoft Corporation or Microsoft Development Center Copenhagen in the United States and/or other countries. Microsoft Development Center Copenhagen is a subsidiary of Microsoft Corporation.