washing machine - appliances onlinemanuals.appliancesonline.com.au/sw65v9wip/sw65v9wip.pdf ·...
TRANSCRIPT
Washing Machineuser manual
imagine the possibilitiesThank you for purchasing a Samsung product.To receive a more complete service, please register your product at
www.samsung.com/register
SW75V9WSW65V9W
2_ features
features1. Water Saving course
Designed to address concerns on water consumption. Less water is used per wash, while continuing to deliver a clean and effective washing performance. It has been certified from WELS(Water Efficiency Labelling and Standards) of Australia.
2. Air Turbo Drying SystemAir Turbo technology spins hard and fast so you can spend less time drying.Time Saving AIR TURBO saves your time, ensuring your clothes are dried 30%-40% faster than line drying alone. Especially during the rainy season and in high-humid weather, laundry that once took days to drip-dry, such as heavy jeans, bulky sweaters, and thick blankets are dried more rapidly. Easy-to-iron AIR TURBO is perfect for delicates and clothes made of synthetic fabrics. No more hanging and waiting. Simply iron straight-out-of-the washer, since AIR TURBO eliminates just enough moisture to keep clothes adequately damp for ironing.
3. Diamond DrumThe diamond shaped drum creates a high water pressure, removing dirt from the laundry effectively. The diamond drum minimizes fabric damage extending the lifetime of the fabric. The glittering inner tube is both beautiful and powerful in the wash effect it creates.
4. Fuzzy ControlFuzzy control operates with best washing program by sensing the washload like artificial intelligence.
5. Tempered Transparent DoorTempered Transparent Door lets you observe while the washer is operating. Check on your laundry’s progress at any time.
6. Double Storm Pulsator- Less Tangle, Better Washing PerformanceTangle Free - Multi-dimensional water currents help clothes stay tangle free.Water current technology designed specifically to enhance washing performance. The power of tornado-like multi-dimensional water currents guarantee excellent washing performance.
7. Magic FilterThis unique magic Filter ensures that all the lint inside the tub is captured for top quality filtering results to deliver consistently effective cleaning results.
8. CHILD-LOCK FunctionThis is a device to protect children from being accidentally hurt while playing with the washer.(For more information, see page 11,14.)
safety instructions _3
safety informationThroughout this manual, you’ll see Warning and Caution notes. These warnings, cautions, and the important safety instructions that follow do not cover all possible conditions and situations that may occur. It’s your responsibility to use common sense, caution, and care when installing, maintaining, and operating your washer. Samsung is not liable for damages resulting from improper use.
IMPORTANT SAFETY SYMBOLS AND PRECAUTIONS
What the icons and signs in this user manual means:
WARNING
Hazards or unsafe practices that may result in severe personal injury or death.
CAUTION
Hazards or unsafe practices that may result in minor personal injury or property damage.
CAUTION
To reduce the risk of fire, explosion, electric shock, or personal injury when using your washer, follow these basic safety precautions:
Do NOT attempt.
Do NOT disassemble.
Do NOT touch.
Follow directions explicitly.
Unplug the power plug from the wall socket.
Make sure the machine is grounded to prevent electric shock.
Call the service center for help.
Notice
These warning signs are here to prevent injury to you and others. Please follow them explicitly.After reading this section, keep it in a safe place for future reference.
Read all instructions before using the appliance.
As with all any equipment using electricity and moving parts, potential hazards exist. To safely operate this appliance, become familiar with its operation and exercise care when using it.
Install and store your washer inside, away from exposure to weather.
Install and level your washer on a floor that can support its weight.
Your washer must be properly grounded. Never plug it into an ungrounded outlet.
Position the washer so that a wall plug is accessible after the installation is completed.
4_ safety instructions
To reduce the risk of fire or explosion:
• Do not wash items that have been washed, soaked, or treated with gasoline, dry cleaning solvents, or other flammable or explosive substances. They give off vapors that could ignite or explode. Rinse by hand any material that has been exposed to cleaning solvent or other flammable liquids or solids before putting in your washer. Be sure that all traces of such liquids, solids, and fumes have been removed. Dangerous substances include acetone, denatured alcohol, gasoline, kerosene, certain liquid household cleaners and spot removers, turpentine, waxes, and wax removers.
• Do not put gasoline, dry cleaning solvents, or other flammable or explosive substances into the washer.
• Under certain conditions, hydrogen gas may be produced in a hot water system – such as your hot water heater - that has not been used for two weeks or more. HYDROGEN GAS IS EXPLOSIVE. If your hot water system has not been used for two weeks or more, turn on all hot water faucets in your home, and let the water flow for several minutes before using your washer. This will release any hydrogen gas build–up. Since hydrogen gas is flammable, do not smoke or light an open flame during this time.
Ventilate immediately without touching the power plug if there is a gas leak.
Unplug the power cord before servicing your washer.
Do not reach into the appliance when the tumbler is moving.
Do not reach under the appliance with your hands or with an object as you may be injured by the spinning board beneath the washer.
Do not let children play on or in your washer. The washer door does not open easily from the inside, and children may be seriously injured if trapped inside.
Do not let children attempt to look into the washer as falling into the washer is extremely dangerous and may be fatal.
This appliance is not intended for use by persons (including children) with reduced physical, sensory or mental capabilities, or lack of experience and knowledge, unless they have been given supervision or instruction concerning use of the appliance by a person responsible for their safety.
Children should be supervised to ensure that they do not play with the appliance.
Do not repair, replace, or service any part of your washer yourself unless you fully understand the recommended user–repair instructions and have the skills to carry them out. Work done by an unauthorized person may void your warranty.
Store laundry detergents and other laundry supplies in a cool, dry place out of children’s reach.
Disconnect the hoses and turn off the water when not using the washer.
If the power cord is damaged, it must be replaced by the manufacturer, a service agent or similarly qualified person in order to avoid a hazard.
Do not forcefully bend the power cable or place any heavy objects on the cable.
Do not touch the power cord with wet hands.
Do not overload the power outlet with too many appliances.
safety informationCAUTION
WARNING
WARNING
WARNING
safety instructions _5
Do not install the washer nearby electrical implements and do not place any candles or cigarettes on the washer.
Do not go near the washer if it is flooded or under water, as there is a risk of electric shock. Unplug the washer and drain the water completely.
Do not combine chlorine bleach, ammonia, or acids (such as vinegar or rust remover) in the same wash. The fumes that can form when any of these items are combined are hazardous.
Do not machine wash fiberglass materials. Small particles can stick to fabrics washed in subsequent loads and cause skin irritation.
If this appliance is supplied from a cord extension set or electrical portable outlet device, the cord extension set or electrical portable outlet device must be positioned so that it is notsubject to splashing or ingress of moisture.
Before disposing of your washer, remove the door so that children or small animals cannot get trapped inside.
Connect the washer to the main water supply using a new set of hoses. Do not reuse an old set of hoses.
Water inlet hoses deteriorate over time. Check the hoses periodically for bulges, kinks, cuts, wear, and leaks, and replace them as needed and at least every five years.
Before each wash, empty the pockets of your laundry. Small, irregularly shaped hard objects, such as coins, knives, pins, and paperclips could damage your washer. Do not wash clothing with large buckles, buttons, or other heavy metal objects.
If the washer does not stop within 15 seconds after you open the lid, call a service agent immediately.
Connect the grounding wire to the shell plate, and bury it under at least 10 in (25 cm) of earth: Alternatively, connect the ground wire to the appropriate pin on a properly grounded power receptacle. Never connect the wire to a telephone line, lightning rod, or gas pipe.
For washers with ventilation openings in the base, that a carpet must not obstruct the openings.
WARNING
CAUTION
6_ contents
contentsSETTING UP YOUR WASHER
77 Description of part10 How to wash automatically depends on the
laundry11 Control Panel
MANUAL FUNCTIONS
1515 Manual functions
INSTALLATION & MAINTENANCE
1616 Environment16 Levelling16 Connecting the water supply hose18 How to connect the drain hose19 Assembling the rat protection panel19 How to put the detergent in19 How to add the fabric softener19 Water supply connector filter20 Cleaning the filter20 Cleaning the pump filter20 Precautions
TROUBLESHOOTING
2121 Troubleshooting
WASHING MACHINE WON’T WORK?
2222 Washing machine won’t work?
SPECIFICATION
2323 Specification
setting up your washer _7
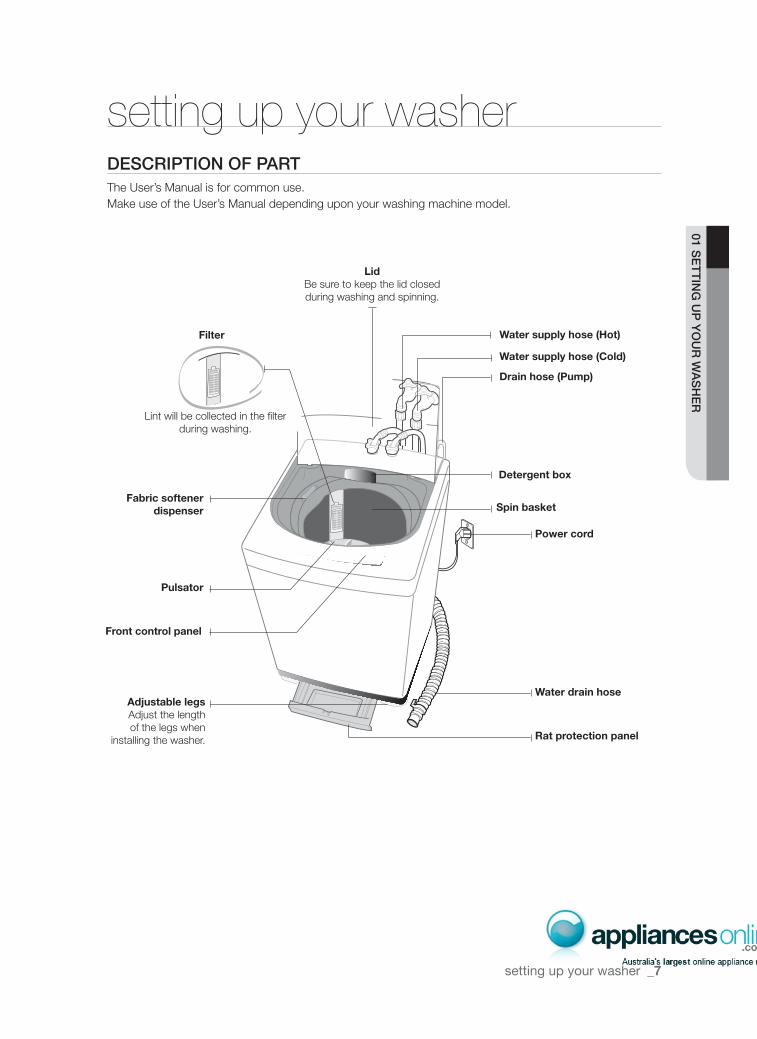
setting up your washerDESCRIPTION OF PARTThe User’s Manual is for common use.Make use of the User’s Manual depending upon your washing machine model.
01 SE
TT
ING
UP
YO
UR
WA
SH
ER
Water supply hose (Hot)
Water supply hose (Cold)
Drain hose (Pump)
Detergent box
Spin basket
Power cord
Water drain hose
Rat protection panel
Front control panel
Pulsator
Adjustable legsAdjust the length of the legs when
installing the washer.
Fabric softener dispenser
LidBe sure to keep the lid closed during washing and spinning.
Lint will be collected in the filter during washing.
Filter
8_ setting up your washer
setting up your washerCHECKING BEFORE WASHING AND CARING FOR GARMENTS
Must follow the checkpoints in order to avoid machine problems or damages on garments.• If the below problems are caused by customer’s faults, separate service fee will be charged.
Checkpoints Before Starting WashingCheck if the clothes are bleaching or not.• Add liquid detergent to a white towel and the garment where you can’t notice well. Then, rub
together strongly. Check if the color transferred to the towel.• Be careful for scarves and imported clothes since they are easily discoloring.• Check for stains or partial dirt.• If stains are found, use the towel wet with detergents to rub on in a single direction.• Before washing, the sleeves, collar, dress hem and pockets are pre-treated by brushing with
detergents.The wrinkle-processed clothes made of wool are specially treated by fixing them with threads before washing. The threads shall be removed after the clothes are dried.Not washable laundryClothes those are easily transformable even by soaking in water.• Even by soaking in water, neckties, brassieres, jackets, suits and coats can be easily
transformed like shrinking and discoloring on the garment surfaces because they are mostly made of rayon, polynosic, cuff and their blend fabrics.
• The wrinkle-processed, embossed, or resin processed products are easy to transform even by soaking in water.
• Easily discoloring products made of cotton and wool, wrinkled silk, leather products, leather accessory, leather ornamented clothes and its accessory.
• Don’t wash those clothes without handling guideline or material indication tag.About Detergent• When detergents are not dissolving well, use warm water (about 40°C) to dissolve the
detergent.• Use an appropriate amount.• Even if excess amount of detergent is used, there is not much difference in washing
result. It may cause damages to the garments because rinsing is not enough.• The bleaching agent may cause damages to garments since it is strong alkali.• Do sufficient rinsing because the powder detergent is easily remained on the garments
causing bad odors.• If too much detergent is used or cold water is used, it doesn’t dissolve completely and
remain on the garments, hose or spin basket, causing contamination on clothes.• In case of reserved washing, detergents must be put in the detergent box. If the powder
detergents are spread on laundry directly, it may cause discoloration.
CAUTION
setting up your washer _9
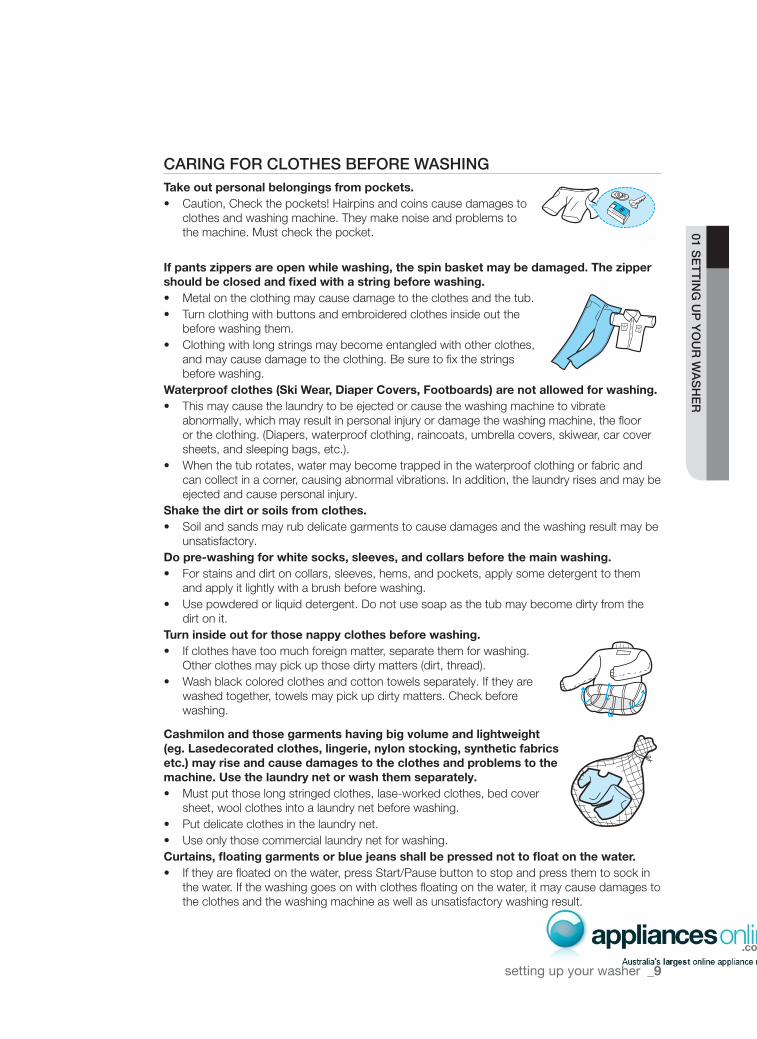
CARING FOR CLOTHES BEFORE WASHINGTake out personal belongings from pockets.• Caution, Check the pockets! Hairpins and coins cause damages to
clothes and washing machine. They make noise and problems to the machine. Must check the pocket.
If pants zippers are open while washing, the spin basket may be damaged. The zipper should be closed and fixed with a string before washing.• Metal on the clothing may cause damage to the clothes and the tub.• Turn clothing with buttons and embroidered clothes inside out the
before washing them.• Clothing with long strings may become entangled with other clothes,
and may cause damage to the clothing. Be sure to fix the strings before washing.
Waterproof clothes (Ski Wear, Diaper Covers, Footboards) are not allowed for washing.• This may cause the laundry to be ejected or cause the washing machine to vibrate
abnormally, which may result in personal injury or damage the washing machine, the floor or the clothing. (Diapers, waterproof clothing, raincoats, umbrella covers, skiwear, car cover sheets, and sleeping bags, etc.).
• When the tub rotates, water may become trapped in the waterproof clothing or fabric and can collect in a corner, causing abnormal vibrations. In addition, the laundry rises and may be ejected and cause personal injury.
Shake the dirt or soils from clothes.• Soil and sands may rub delicate garments to cause damages and the washing result may be
unsatisfactory.Do pre-washing for white socks, sleeves, and collars before the main washing.• For stains and dirt on collars, sleeves, hems, and pockets, apply some detergent to them
and apply it lightly with a brush before washing.• Use powdered or liquid detergent. Do not use soap as the tub may become dirty from the
dirt on it.Turn inside out for those nappy clothes before washing.• If clothes have too much foreign matter, separate them for washing.
Other clothes may pick up those dirty matters (dirt, thread).• Wash black colored clothes and cotton towels separately. If they are
washed together, towels may pick up dirty matters. Check before washing.
Cashmilon and those garments having big volume and lightweight (eg. Lasedecorated clothes, lingerie, nylon stocking, synthetic fabrics etc.) may rise and cause damages to the clothes and problems to the machine. Use the laundry net or wash them separately.• Must put those long stringed clothes, lase-worked clothes, bed cover
sheet, wool clothes into a laundry net before washing.• Put delicate clothes in the laundry net.• Use only those commercial laundry net for washing.Curtains, floating garments or blue jeans shall be pressed not to float on the water.• If they are floated on the water, press Start/Pause button to stop and press them to sock in
the water. If the washing goes on with clothes floating on the water, it may cause damages to the clothes and the washing machine as well as unsatisfactory washing result.
01 SE
TT
ING
UP
YO
UR
WA
SH
ER
10_ setting up your washer
setting up your washerHOW TO WASH AUTOMATICALLY DEPENDS ON THE LAUNDRYBefore starting washing, check the following;• Connect the water supply hose to the water tap. Leave a tap open. Plug the power cord in. Make sure
to lay down the drain hose.
Washing for the first timeBefore washing clothes for the first time, you must run a complete cycle without clothes.To do this:1. Press the Power button.2. Open the detergent drawer and insert a little detergent.3. Turn on the water supply to the washing machine.4. Press the Start/Pause button.
This will remove any water from the manufacturer’s test run remaining in the machine.
Special notes!Clothes loading order• When loading the clothes into this machine ensure the following loading order is used for
maximum washing effectiveness T shirts, bath towels, table cloths, business shirts, bed sheets, pillow cases, under shorts, wash cloths then finally handkerchiefs.
Automatic Sensing Function• At every program (except wool program) the amount of laundry is automatically sensed and
then appropriate water level, washing time, rinsing cycle, and spinning time are automatically selected for automatic washing.
• After the power is on, a program is selected and Start/Pause button is pressed. Then, the washing board starts spinning without water. This action senses how much laundry is in the washing basket, not a machine problem. After this sensing process, water supplies automatically.
Adding Detergent and Softener• It senses the amount of laundry and indicates the water level and amount of detergent. Then,
it starts water supply right away.• During the water supply, it is possible to open the detergent box and add detergent.
However, it is better to press Start/Pause button to stop water supply and add detergent. Close the lid and press Start/Pause button again. This way is much more convenient.
• If the softener is inserted in the softener dispenser, it automatically adds in at the last rinsing cycle.
Put the laundry into the washer and add detergent, too.• Be careful not to overload. Use right detergent for the fabrics you are washing.
• If the lid is open while running, the washing machine is stopped automatically for safety. (Except, water supply continues while the lid is open.)
• When hot water is selected, both cold and hot water are supplied for the first 20 seconds in order to protect the clothes.
• Possible to control the washing time, rinsing cycle, and spinning time at every program during the washing.
setting up your washer _11
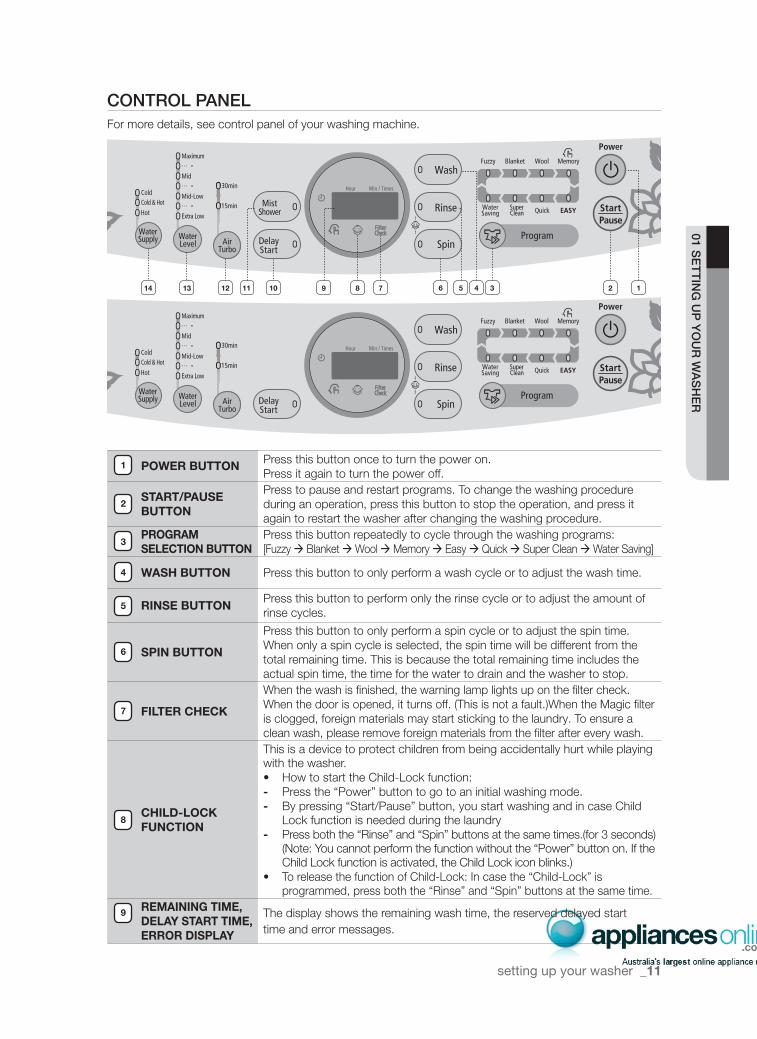
CONTROL PANELFor more details, see control panel of your washing machine.
POWER BUTTON Press this button once to turn the power on.Press it again to turn the power off.
START/PAUSE BUTTON
Press to pause and restart programs. To change the washing procedure during an operation, press this button to stop the operation, and press it again to restart the washer after changing the washing procedure.
PROGRAM SELECTION BUTTON
Press this button repeatedly to cycle through the washing programs:[Fuzzy Blanket Wool Memory Easy Quick Super Clean Water Saving]
WASH BUTTON Press this button to only perform a wash cycle or to adjust the wash time.
RINSE BUTTON Press this button to perform only the rinse cycle or to adjust the amount of rinse cycles.
SPIN BUTTON
Press this button to only perform a spin cycle or to adjust the spin time.When only a spin cycle is selected, the spin time will be different from the total remaining time. This is because the total remaining time includes the actual spin time, the time for the water to drain and the washer to stop.
FILTER CHECK
When the wash is finished, the warning lamp lights up on the filter check. When the door is opened, it turns off. (This is not a fault.)When the Magic filter is clogged, foreign materials may start sticking to the laundry. To ensure a clean wash, please remove foreign materials from the filter after every wash.
CHILD-LOCK FUNCTION
This is a device to protect children from being accidentally hurt while playing with the washer.• How to start the Child-Lock function:- Press the “Power” button to go to an initial washing mode.- By pressing “Start/Pause” button, you start washing and in case Child
Lock function is needed during the laundry- Press both the “Rinse” and “Spin” buttons at the same times.(for 3 seconds)
(Note: You cannot perform the function without the “Power” button on. If the Child Lock function is activated, the Child Lock icon blinks.)
• To release the function of Child-Lock: In case the “Child-Lock” is programmed, press both the “Rinse” and “Spin” buttons at the same time.
REMAINING TIME, DELAY START TIME, ERROR DISPLAY
The display shows the remaining wash time, the reserved delayed starttime and error messages.
01 SE
TT
ING
UP
YO
UR
WA
SH
ER
7
6
5
4
3
2
1
6 5 4 3 121012 111314 8 79
8
9
12_ setting up your washer
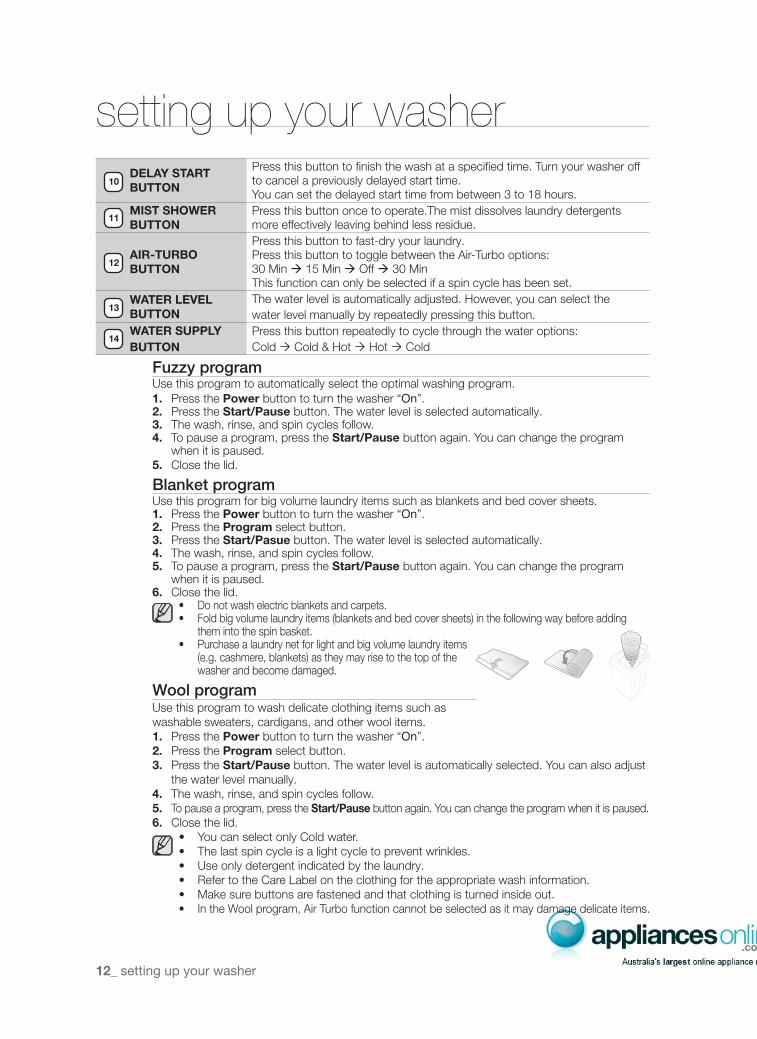
setting up your washerDELAY START BUTTON
Press this button to finish the wash at a specified time. Turn your washer off to cancel a previously delayed start time.You can set the delayed start time from between 3 to 18 hours.
MIST SHOWER BUTTON
Press this button once to operate.The mist dissolves laundry detergents more effectively leaving behind less residue.
AIR-TURBO BUTTON
Press this button to fast-dry your laundry.Press this button to toggle between the Air-Turbo options:30 Min 15 Min Off 30 MinThis function can only be selected if a spin cycle has been set.
WATER LEVEL BUTTON
The water level is automatically adjusted. However, you can select thewater level manually by repeatedly pressing this button.
WATER SUPPLYBUTTON
Press this button repeatedly to cycle through the water options:Cold Cold & Hot Hot Cold
Fuzzy programUse this program to automatically select the optimal washing program. 1. Press the Power button to turn the washer “On”. 2. Press the Start/Pause button. The water level is selected automatically. 3. The wash, rinse, and spin cycles follow.4. To pause a program, press the Start/Pause button again. You can change the program
when it is paused. 5. Close the lid.
Blanket program Use this program for big volume laundry items such as blankets and bed cover sheets.1. Press the Power button to turn the washer “On”. 2. Press the Program select button. 3. Press the Start/Pasue button. The water level is selected automatically. 4. The wash, rinse, and spin cycles follow.5. To pause a program, press the Start/Pause button again. You can change the program
when it is paused. 6. Close the lid.
• Do not wash electric blankets and carpets.• Fold big volume laundry items (blankets and bed cover sheets) in the following way before adding
them into the spin basket.• Purchase a laundry net for light and big volume laundry items
(e.g. cashmere, blankets) as they may rise to the top of the washer and become damaged.
Wool program Use this program to wash delicate clothing items such as washable sweaters, cardigans, and other wool items.1. Press the Power button to turn the washer “On”. 2. Press the Program select button. 3. Press the Start/Pause button. The water level is automatically selected. You can also adjust
the water level manually.4. The wash, rinse, and spin cycles follow.5. To pause a program, press the Start/Pause button again. You can change the program when it is paused. 6. Close the lid.
• You can select only Cold water.• The last spin cycle is a light cycle to prevent wrinkles.• Use only detergent indicated by the laundry.• Refer to the Care Label on the clothing for the appropriate wash information.• Make sure buttons are fastened and that clothing is turned inside out.• In the Wool program, Air Turbo function cannot be selected as it may damage delicate items.
10
11
12
13
14
setting up your washer _13
Memory programUse this program to create your very own favorite or frequently used programs and store them in the washer so that you can select them at any time.1. Press the Power button to turn the washer “On”. 2. Press the Program select button. 3. Select your frequently used functions.
Select Wash, Rinse, or Spin according to your requirements.4. Press the Start/Pause button to store them.
Only stored when the Wash + Rinse + Spin steps are selected.
5. Add detergent and softener according to the water level and close the lid.• If you select the Memory program after turning the washer “On”, the stored settings are
automatically retrieved.• To change the stored settings, select the Memory program, reconfigure the settings and
then press the Start/Pause button. Then, the changes are stored.
Easy programIf you choose EASY, you will enjoy full access to all of Samsung Washing Machine’s userfriendly functions at your fingertips. When selecting this program, Air Turbo is selected automatically.1. Press the Power button to “On”.2. Press the Program select button four times.3. Press the Start/Pause button. Water level is selected automatically. Washing rinsing, and
spinning follow. If you want to pause, press the Start/Pause button again. You can change the Program when paused.
4. Close the lid.
Quick programThe Quick program is good for light or slightly stained laundry. 1. Press the Power button to turn the washer “On”. 2. Press the Program select button. 3. Press the Start/Pause button. The water level is selected automatically. 4. The wash, rinse, and spin cycles follow.5. To pause a program, press the Start/Pause button again. You can change the program
when it is paused. 6. Close the lid.
Super Clean programUse this program to achieve the cleanest wash.This program provides you with the optimum in washing performance through the 5-step super clean system.1. Press the Power button to turn the washer “On”.2. Press the Program select button.3. Press the Start/Pause button. The water level is automatically selected.
The water level is selected between Maximum and Mid or at the mid-level between Mid and Mid-low.
4. Close the lid.
Water Saving ProgramThis program reduces water consumption. Water saving wash, maximum water level, cold & hot water temperature program is suitable for a normally soiled cotton load.1. Press the Power button to turn the washer “On”.2. Press the Program select button.3. Press the Start/Pause button.4. The wash, rinse, and spin cycles follow.5. To pause a program, press the Start/Pause button again. You can change the program
when it is paused.6. Close the lid.
01 SE
TT
ING
UP
YO
UR
WA
SH
ER
14_ setting up your washer
setting up your washerDelay StartUse this to specify a time for the wash cycle to start, for example, when you need to go out and are unable to monitor the washer.1. Press the Power button to turn the washer “On”. 2. Press the Delay Start button once.
You may set the delay end time using the Delay Start button from between 3 to 18 hours.3. Press the Start/Pause button and add the appropriate amount of detergent into the
detergent drawer. 4. Close the lid.
The wash will finish by the set time.Add detergent and softener according to the water level and close the lid.
• Detergent must be added into the detergent drawer.• If detergent is added onto the laundry directly, some clothes may become discolored
because the start has been delayed.• To cancel a Delay Start, press the Power button.
Air TurboThis program saves you valuable time, ensuring that your clothes dry faster than from line drying.1. Press the Power button to turn the washer “On”. 2. Press the Air Turbo button.
Each time the Air Turbo button is pressed, the operations are performed in the following order: 30 Min 15 Min Off 30 Min
3. Close the lid.4. Press the Start/Pause button.
• This can be selected as an additional option for all programs except for Wool program.• The Air Turbo function is only available when spin cycle is selected.• Select this when you want to half-dry the laundry.
Child LockThis function is for protecting children, the elderly and the frail.1. Press the Power button.2. To activate the Child Lock function, press and hold both the Rinse and Spin buttons down
simultaneously for 3 seconds. (If the Child Lock function is activated, the Child Lock icon blinks.)3. Operations after activating the Child Lock function.
• Even if the Child Lock function is activated, every button works until the door opens.• When you open the door during the Child Lock is being activated, the alarm sounds and an
error message appears. In 30 seconds, draining begins automatically. However, if you close the door within 30 seconds, water will not be drained. (Displayed error message “ CL”, “ dE ”).
• To add laundry after activating the Child Lock function, you must deactivate the Child Lock function.4. To deactivate the Child Lock function, press and hold both the Rinse and Spin buttons simultaneously
for 3 seconds again. (If the Child Lock function is deactivated, the Child Lock icon is turned off.)5. To clear “CL” display, after draining is complete, close the door of the washing turn the
power off and then on.
- This function is for preventing injury and malfunction of the product because of inappropriate operations or actions by children, the elderly or the frail.
- If the door opens when the Child Lock function is activated, the water is drained by force to prevent children from drowning.
- To add laundry after activating the Child Lock function, you must deactivate the Child Lock.- Even if the power is turned off and then on when the Click Lock is activated, the Child
Lock remains activated.- Once Child Lock is activated, even when the power is turned off, if the door is opened,
water is automatically drained in 30 seconds.- The Child Lock function cannot be deactivated when CL is displayed. (However, the
Child Lock function can be deactivated when the dE error is displayed.)
CAUTION
manual functions _15
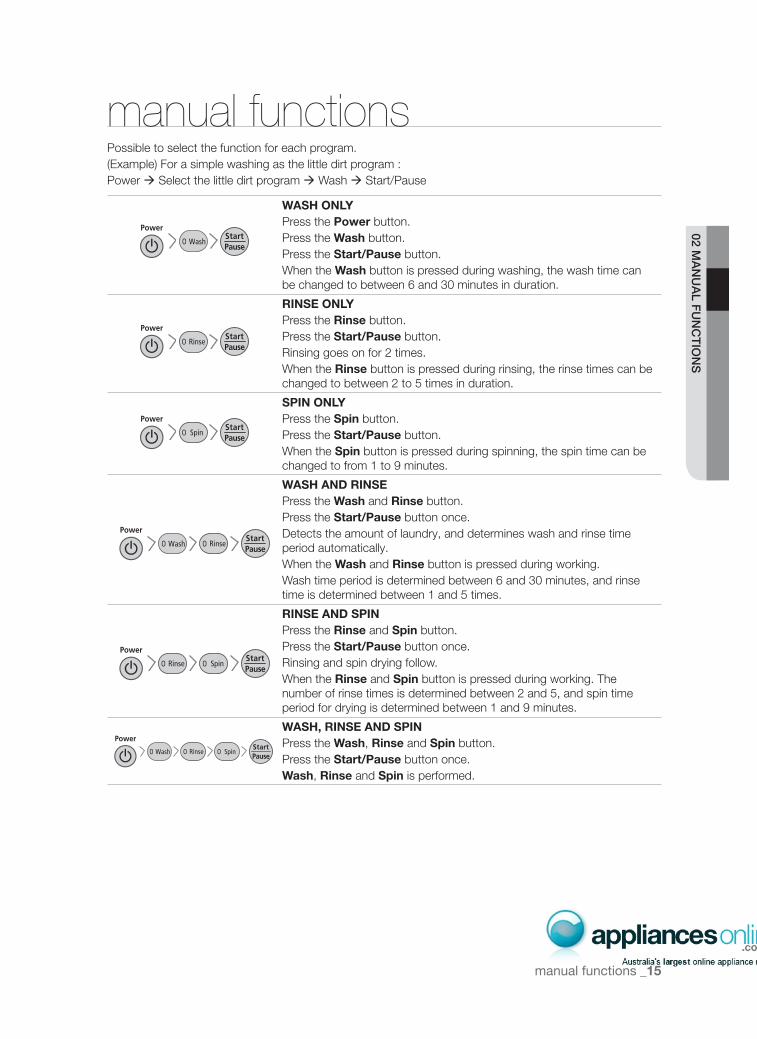
manual functionsPossible to select the function for each program.(Example) For a simple washing as the little dirt program : Power Select the little dirt program Wash Start/Pause
WASH ONLYPress the Power button.Press the Wash button.Press the Start/Pause button.When the Wash button is pressed during washing, the wash time can be changed to between 6 and 30 minutes in duration.
RINSE ONLYPress the Rinse button.Press the Start/Pause button.Rinsing goes on for 2 times.When the Rinse button is pressed during rinsing, the rinse times can be changed to between 2 to 5 times in duration.
SPIN ONLYPress the Spin button.Press the Start/Pause button.When the Spin button is pressed during spinning, the spin time can be changed to from 1 to 9 minutes.
WASH AND RINSEPress the Wash and Rinse button.Press the Start/Pause button once.Detects the amount of laundry, and determines wash and rinse time period automatically.When the Wash and Rinse button is pressed during working.Wash time period is determined between 6 and 30 minutes, and rinse time is determined between 1 and 5 times.
RINSE AND SPINPress the Rinse and Spin button.Press the Start/Pause button once.Rinsing and spin drying follow.When the Rinse and Spin button is pressed during working. The number of rinse times is determined between 2 and 5, and spin time period for drying is determined between 1 and 9 minutes.
WASH, RINSE AND SPINPress the Wash, Rinse and Spin button.Press the Start/Pause button once.Wash, Rinse and Spin is performed.
02 MA
NU
AL F
UN
CT
ION
S
16_ installation & maintenance
installation & maintenanceThe User’s Manual is for common use.Make use of the User’s Manual depending upon your washing machine model.
ENVIRONMENTLeave some spaceMaintain at least 10cm between the washer and the wall.Place the washer on a sturdy flat surface.If the washer is placed on an uneven or weak surface, noise or vibration occurs. (Allowable is 1˚)Adjust the legs for even placement.Never install the washer near water.Do not place the washer in steamy rooms or where the washer is directly exposed to rain. Moisture may destroy the electrical insulation causing an electrical shock hazard.Avoid direct sunlight or heaters.As plastic an electrical components are affected by direct heat, never place the washer near furnaces, boilers, etc. Do not place under direct sunlight.
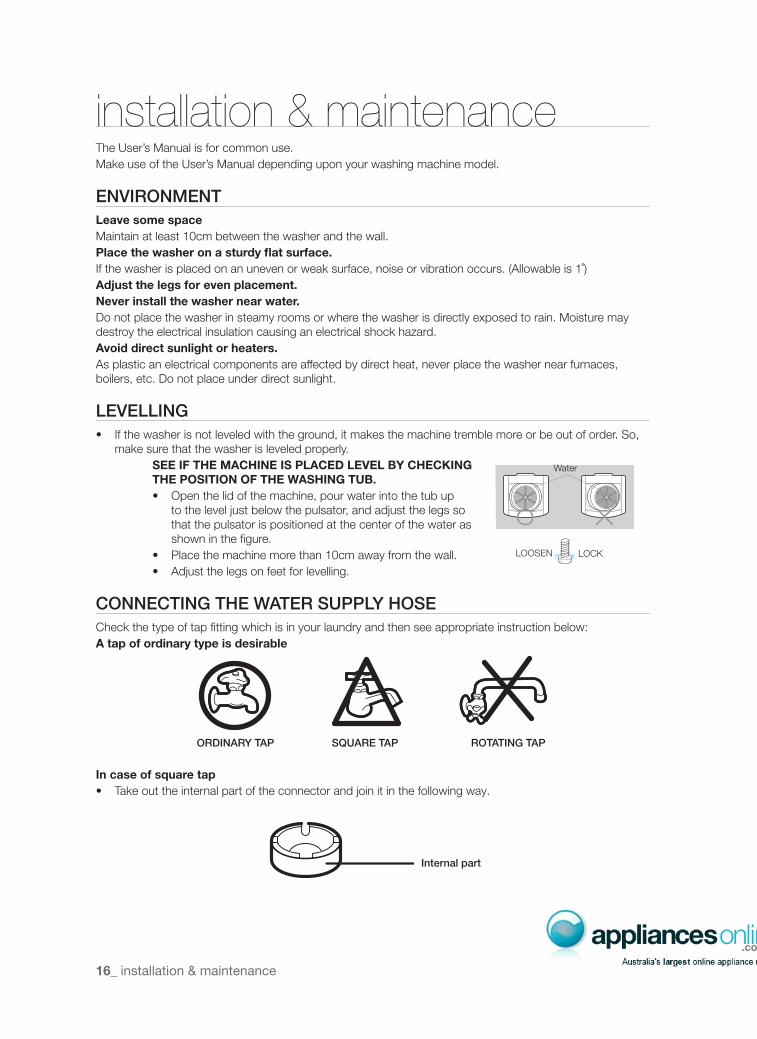
LEVELLING• If the washer is not leveled with the ground, it makes the machine tremble more or be out of order. So,
make sure that the washer is leveled properly.SEE IF THE MACHINE IS PLACED LEVEL BY CHECKING THE POSITION OF THE WASHING TUB.• Open the lid of the machine, pour water into the tub up
to the level just below the pulsator, and adjust the legs so that the pulsator is positioned at the center of the water as shown in the figure.
• Place the machine more than 10cm away from the wall.• Adjust the legs on feet for levelling.
CONNECTING THE WATER SUPPLY HOSECheck the type of tap fitting which is in your laundry and then see appropriate instruction below:A tap of ordinary type is desirable
In case of square tap• Take out the internal part of the connector and join it in the following way.
Water
LOOSEN LOCK
ORDINARY TAP SQUARE TAP ROTATING TAP
Internal part

installation & maintenance _17
CONNECTING THE WATER SUPPLY HOSE
1. Remove the adaptor from the water supply hose.
2. First, using a “+” type screw driver, loosen the four screws on the adaptor. Next, take the adaptor and turn part(b) following the arrow for gap about 5 mm between them.
3. Connect adaptor to the water tap by tightening the screws firmly. Then, turn part(b) following the arrow and put (a) and (b) together.
4. Connect the water supply hose to the adaptor. Pull down the part (c) of the water supply hose. When the part (c) is released, the hose is automatically connected to the adaptor making a ‘click’ sound.
5. Connect the other end of the water supply hose to the inlet water valve at the back of the washer. Screw the hose clockwise all the way in.
5-1. Connect the other end of the water supply hose to the inlet water valve at the top of the washer. Screw the hose clockwise all the way in.
If the water tap is a screw type, assemble a water supply hose that fits to the tap as shown. After completing connection, if water leaks from the hose, then repeat the same steps.
After completing connection, if water leaks from the hose, then repeat the same steps. Use the most conventional type of faucet for water supply. In case the faucet is square or too big, remove the spacing ring before inserting the faucet into the adaptor.
03 INS
TALLAT
ION
& M
AIN
TE
NA
NC
E
a
b
c
18_ installation & maintenance
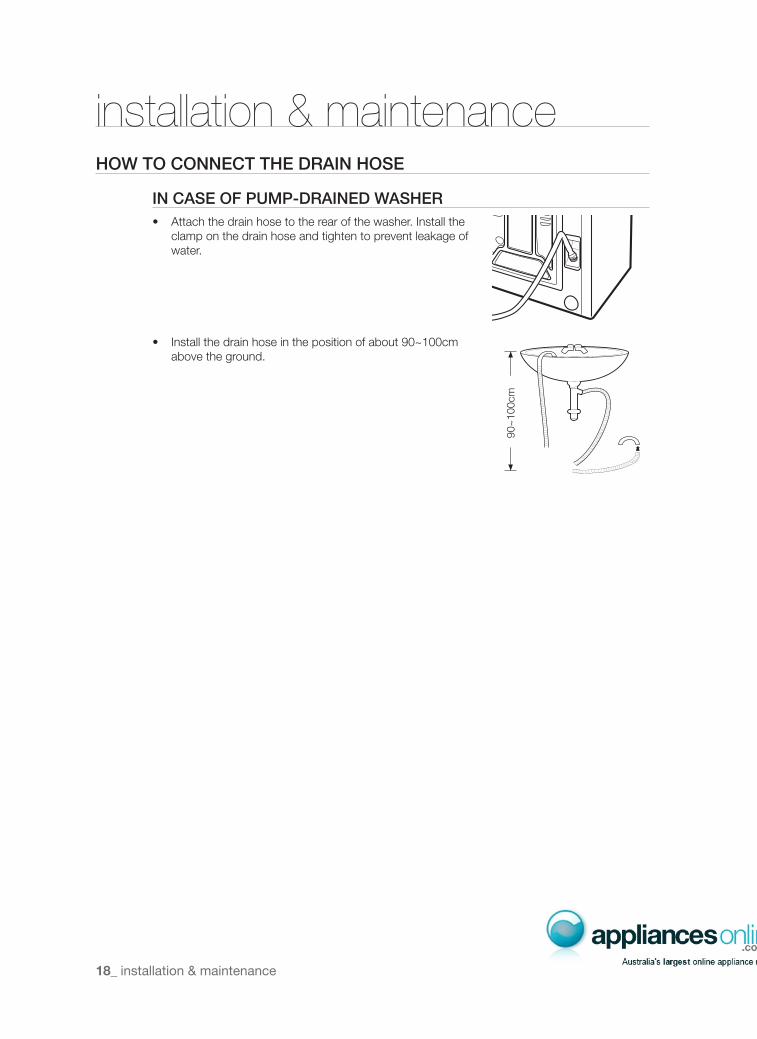
installation & maintenanceHOW TO CONNECT THE DRAIN HOSE
IN CASE OF PUMP-DRAINED WASHER• Attach the drain hose to the rear of the washer. Install the
clamp on the drain hose and tighten to prevent leakage of water.
• Install the drain hose in the position of about 90~100cm above the ground.
90~
100c
m

installation & maintenance _19
ASSEMBLING THE RAT PROTECTION PANEL
1. It is easier engaging the shutter when the set is lifted up a little, as shown in the figure below.
2. Insert the shutter completely through the engagement hole from the back.
HOW TO PUT THE DETERGENT IN1. Open the detergent box by pulling in the direction of the arrow as shown in the
figure and then put the powder detergent in the detergent box.2. Put in one-time amount of detergent evenly so the detergent may not brim over
the box.
HOW TO ADD THE FABRIC SOFTENERSlide and open the cover in the direction of the arrow, insert the rinse detergent, and slide and close it in the reverse direction.• When a proper amount (one time does) of fabric softener is stored in the
softener inlet,it is automatically put in at the last rinsing cycle.• Do not use detergent, bleach or starch into the Softener Inlet.• Using too much softener may produce unsatisfactory results.• Do not open the lid during the Spin Dry cycle. If added too early, its effectiveness
will decrease.• Do not leave the softener into the Softener Dispenser for a long time. Because
softner became stiff.
WATER SUPPLY CONNECTOR FILTER
1. Pull out the filter and wash well.
2. Pull in the filter and connect the hose to the inlet water valve tightly.
3. Check if there is a leakage. Note to tighten up the connector.
03 INS
TALLAT
ION
& M
AIN
TE
NA
NC
E

20_ installation & maintenance
installation & maintenanceCLEANING THE FILTERClean the filter net often to keep the washer clean.
1. Push the upper part of the Magic filter and pull in.
2. Open the cover as shown in the figure.
3. Clean the Magic filter. 4. Close the cover and insert the lower part of the filter in the basket first and then push the filter with “click” sound.
CLEANING THE PUMP FILTER1. Place a rag or towel under the wash filter to avoid wetting the floor, and rotate the filter counterclockwise
and pull it out.2. Remove any dirt from the filter.3. Return the filter to its place by rotating the filter clockwise until it locks into position.
PRECAUTIONSWARNING! NOTE THE FOLLOWING PRECAUTIONS TO PREVENT ELECTRICITYLEAKAGE AND THE POSSIBILITY OF ELECTRIC SHOCK.Earthing is necessary to prevent leakage or electric shocks caused by the electric currents leaked from the machine.
How to earth an outlet with earthing terminals when an earthed power load is not fitted.Outlet with earthing terminals:• Even when the internal wires of the earthing terminals are joined,
connect the earthing conductor (green) of the machine to the tap.When using an extension cord and a boosting transformer:• Make sure that the earthing conductor is connected.
Never make an earthing to• The telephone line, lightning rod, or gas pipe as it is
extremely dangerous in case of lightning strikes.
321
Earthing terminals
Gas pipe
Earthing conductor
Earthing conductor

troubleshooting _21
troubleshootingPROBLEM CHECK
Washing machine won’t work - Is the water tap opened?- Is the washer plugged in?- Is the power cut off?- Is there enough water?
Water dose not drain - Is the drain hose down?(No pump)- Is the drain hose frozen?- Is the drain hose clogged?- If the water dose not drain in 15 minutes, a
buzzer will sound, and the remaining time indicator will show “5E”.
Water is not supplied - Is the water tap opened?- Is the water cut off?- Is the water supply hose or hose connection
clogged?- Is the water tap frozen?- If the water supply is not finished in 1 hour or
there is no change in the water level 4 minutes after the water supply has started, the buzzer rings and “4E” is displayed on the remaining time indicator.
Spinning does not work - Is the laundry spread out evenly in the washer?
- In the washer set on a sturdy flat surface?
Water is overflowed - Restart after spinning.- If the error sign still indicates, call agency.
This indicates that a Child Lock error occurred
- The error message blinks and the water is drained with an alarm sound. Draining cannot be stopped. (Displayed message: “ CL” or “ dE ”)
- This function is to prevent children from drowning when falling into the wash tub. When draining is complete and you turn the power off and then on, the washing machine will operate normally.
- To clear “CL” display, after draining is complete, close the door of the washing machine, turn the power off and then on.
04 TR
OU
BLE
SH
OO
TIN
G
22_ washing machine won’t work?
washing machine won’t work?PROBLEM CHECK & SOLUTION
The power is cut off. Is the electric voltage normal?
Is the washer plugged in? Plug in the electric cord. Water does not drain.
Is the drain hose down? Put the drain hose down.
Is the drain hose folded? Unfold the drain hose.
Is the drain hose outlet clogged? Remove the waste cleanly.
Washing machine won’t work. Is the washer lid open? Close the lid.
Is the Pause button on? Press the Start/Pause button one more time and check if the
washer starts.
Is enough water filled to the water level? If the water pressure is low, it takes a long time to start
washing.
Is the faucet closed? Open the faucet to supply water.
If the drain hose and spin basket are frozen, do as follows.
• Add hot water to the frozen water tap and remove the drain hose. Soak into hot water.
• Pour hot water into the spin basket for about 10 minutes.• Put a hot water towel on the drain hose connector.• If the drain hose defrosts, connect again and check for proper
water draining.
The water drains out immediately. • The drain is clogged with coins or pins. The drain hose is hung over the drain hose hook. Half fill the spin basket with water and try for spinning again.
The water leaks at the water supply hose connector.
If the faucet connecting part is loose, water may leak. Repeat the assembling steps again. (Refer to “Connecting the
water supply hose”)
Check if the rubber packing of water supply hose is in the right position. Screw tightly again.
Is the water supply hose folded? Unfold the hose.
If the water supply is too strong, water may leak. Close the faucet a little.
Is water leaking from the faucet itself? Fix the faucet. Water is not supplied.
Did you press the Start/Pause button after selecting the water supply? If the Start/Pause button is not pressed, water is not
supplied. Press the Start/Pause button.
Is the faucet closed? Turn on the faucet.
specifi cation _23
PROBLEM CHECK
The water leaks at the water supply hose connector.
Is the filter net at the water supply hose connector clogged with dirty matters? Clean the filter net by brushing with a toothbrush.
Is the water supply cut off? If the water supply is suspended, turn off the faucet and
power off.
Spinning makes loud noises and vibrations.
Check if the laundry is spread evenly in the washer. Spread out the laundry evenly and start again.
Check if the washing machine levels on a sturdy flat floor. Set the machine at level.
Is the handle for leveling legs loose? Adjust the legs on the feet for leveling.
Is around the washing machine filled with unnecessary stuffs? Remove those unnecessary things away from the wash
machine.
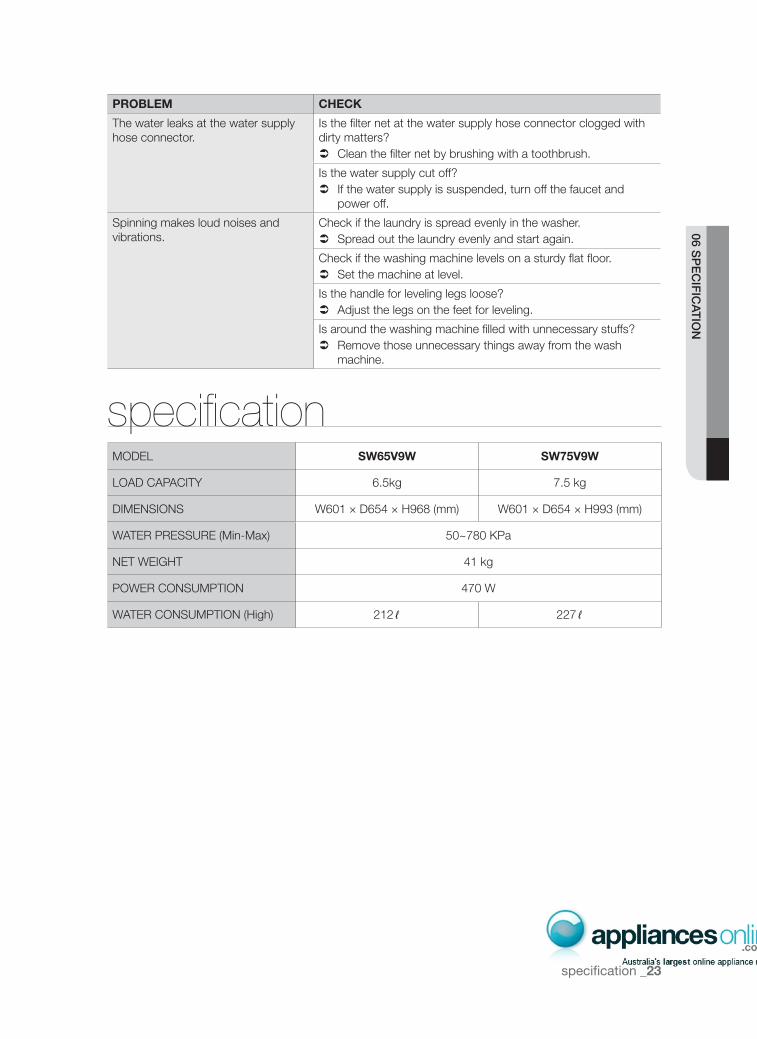
specificationMODEL SW65V9W SW75V9W
LOAD CAPACITY 6.5kg 7.5 kg
DIMENSIONS W601 × D654 × H968 (mm) W601 × D654 × H993 (mm)
WATER PRESSURE (Min-Max) 50~780 KPa
NET WEIGHT 41 kg
POWER CONSUMPTION 470 W
WATER CONSUMPTION (High) 212ℓ 227ℓ
06 SP
EC
IFIC
ATIO
N
QUESTIONS OR COMMENTS?Country CALL OR VISIT US ONLINE AT
AUSTRALIA 1300 362 603 www.samsung.com/au
Code No. DC68-02604K_EN