waste returns spreadsheet guide - welcome to gov.uk · pdf filewaste permit tonnage returns...
TRANSCRIPT

Waste Permit Tonnage Returns - Using the Excel Spreadsheet Application
A guide to using the Waste Permit Tonnage Returns Spreadsheet Application

2 Using the Waste Permit Tonnage Returns Spreadsheet Environment Agency
Reference Number GOR/WT/2009 V1.6.4 - March 2011
We are the Environment Agency. It's our job to look after your
environment and make it a better place - for you, and for future
generations.
Your environment is the air you breathe, the water you drink
and the ground you walk on. Working with business,
Government and society as a whole, we are making your
environment cleaner and healthier.
The Environment Agency - out there, making your environment
a better place.
Published by:
Environment Agency
Horizon House
Deanery Road
Bristol
BS1 5AH
Tel: 03708 506506
Email: [email protected]
www.environment-agency.gov.uk
© Environment Agency
All rights reserved. This document may be reproduced with prior permission of the Environment
Agency.
Document Version: 1.6.4
Last Updated: 30 March 2011

Environment Agency Using the Waste Permit Tonnage Returns Spreadsheet 3
Aims of this Document ........................................................................................................................ 4
Data Protection Notice ........................................................................................................................ 5
Commercial in Confidence Claims ....................................................................................................... 5
Introduction ........................................................................................................................................ 6
How Often Should A Return Be Sent To The Environment Agency? ............................................... 7
In What Format Must The Return Be Provided?. ............................................................................ 7
Other Ways of Submitting a Return ................................................................................................ 7
Where Can I Find Advice About Submitting My Return? ................................................................ 8
Getting Started with the Waste Permit Tonnage Returns Spreadsheet ............................................. 9
System Requirements ................................................................................................................... 10
Operating System & Microsoft Office ....................................................................................... 10
Screen Resolution ..................................................................................................................... 10
Obtaining the Returns Spreadsheet .............................................................................................. 11
Opening the Spreadsheet .............................................................................................................. 12
Enabling Macros ............................................................................................................................ 13
Creating a Copy of the Spreadsheet.............................................................................................. 14
Using the Excel Spreadsheet ............................................................................................................. 15
Process Overview .......................................................................................................................... 16
Entering General Return Details .................................................................................................... 17
Entering Returns ...........................................................................................................................19
The Return Header Details Window.......................................................................................... 20
Understanding the Returns Page .............................................................................................. 22
Entering Waste Received Details .............................................................................................. 23
Entering Waste Removed Details .............................................................................................. 26
Using Copy & Paste to Add Returns ......................................................................................... 29
Editing an Existing Return ............................................................................................................. 30
Deleting an Existing Return ........................................................................................................... 32
Validating Returns ......................................................................................................................... 33
Handling Validation Errors ........................................................................................................ 34
Saving Returns. .............................................................................................................................. 35
Creating the Final Returns File ...................................................................................................... 36
Submitting the Returns File to the Environment Agency .............................................................. 38

4 Using the Waste Permit Tonnage Returns Spreadsheet Environment Agency
Aims of this Document
This document aims to provide a user guide to creating an electronic return for Waste Permit Tonnage, using the Environment Agency’s spreadsheet application.
You must provide electronic returns in a specific format, which is called XML (extensible mark-up language). We have provided a tool to do this, so you do not require any technical expertise or knowledge about XML, in order to submit an electronic return.
The tool we provide uses Microsoft Excel. To provide us with a valid XML return, enter your data into the spreadsheet according to the advice in this guide, and then validate that information to ensure that there are no errors.
Once the data has been validated, simply click on ‘Create Return’ and the XML is created for you. Save the XML file on your computer then send it to us.
We advise that you read this document in full before compiling your return.
Information provided in this guide is based on what we know at the moment and may be subject to change if there are changes in Law, if guidance from the Government changes, or as a result of our experience in regulating Waste Permit Tonnage.

Environment Agency Using the Waste Permit Tonnage Returns Spreadsheet 5
Data Protection Notice
We, the Environment Agency, will process the information you provide so that we can deal with your application, make sure you keep to the conditions of the licence, permit or registration, process renewals and keep the public registers up to date. We may also process or release the information to:
• offer you documents or services relating to environmental matters
• consult the public, public organisations and other organisations (for example, the Health and Safety Executive, local authorities, the emergency services, the Department for Environment, Food and Rural Affairs) on environmental issues
• carry out research and development work on environmental issues
• provide information from the public register to anyone who asks
• prevent anyone from breaking environmental law, investigate cases where environmental law may have been broken, and take any action that is needed
• assess whether customers are satisfied with our service, and to improve our service
• respond to requests for information under the Freedom of Information Act 2000 and the Environmental Information Regulations 2004 (if the Data Protection Act allows)
We may pass the information on to our agents or representatives to do these things for us.
Commercial in Confidence Claims
If you wish to make a claim for your returns data to be classed by us as commercial in confidence, please contact our National Customer Contact Services number 03708 506 506.
6 Using the Waste Permit Tonnage Returns Spreadsheet Environment Agency
Introduction
We need to know about the types and quantities of controlled waste you handled at each licensed facility within your site.
These records are submitted to the Environment Agency in the form of Waste Permit Tonnage ‘returns’.
The Waste Permit Tonnage Returns spreadsheet provides an efficient way of supplying Waste Permit Tonnage returns to the Environment Agency, in the required (XML) format. It allows for the provision of multiple returns across multiple permits, and also allows for nil returns.
When completing this return, you will need:
• a copy of the European Waste Catalogue (EWC) classification codes
• a list of district/county councils within the UK
• picklist values for the spreadsheet
These documents should be provided as part of the package you receive with the spreadsheet but if not, or if you are unsure, please contact the GOR team.

Environment Agency Using the Waste Permit Tonnage Returns Spreadsheet 7
How Often Should A Return Be Sent To The
Environment Agency?
Waste Permit Tonnage licence holders are required to provide four returns in a year, each one covering a three-month period (or quarter).The quarters are:
• January to March
• April to June
• July to September
• October to December
There is a specific time that you must provide the return, shown below:
Quarter From / To Return must be provided by...
1 January - March 30th
April in the same year as the quarter falls
2 April - June 31st
July in the same year as the quarter falls
3 July - September 31st
October in the same year as the quarter falls
4 October - December 31st
January in the year after the one in which the quarter falls
The person who compiles the return must be familiar with this guide. The person who sends it to us must be authorised to do so by your organisation. We will contact this person if we have a question we need to ask about the return.
In What Format Must The Return Be Provided?
The Environment Agency sets the format of returns.
The electronic return must be sent to us in a specific format called XML. Using the Waste Permit Tonnage Returns spreadsheet to enter returns data and create a returns file ensures that your return is submitted in the required format.
Other Ways of Submitting a Return
There are three other ways to submit a Waste return:
• key your returns directly into the Generic Operator Returns (GOR) system, accessed from the Environment Agency website
• submit a paper form. Separate guidance is provided for sending returns on paper.
• if you are familiar with XML, you can produce your return without using the spreadsheet application. Separate guidance is provided for this approach.
8 Using the Waste Permit Tonnage Returns Spreadsheet Environment Agency
@
�
Where Can I Find Advice About Submitting My
Return?
Please contact the GOR Team using one of the following channels:
Email [email protected]
Please do not send returns to this email address; it is for correspondence only
℡ Telephone 03708 506 506
Post The GOR Team
The Environment Agency, Quadrant 2, 99 Parkway Avenue, Sheffield, S9 4WF.

Environment Agency Using the Waste Permit Tonnage Returns Spreadsheet 9
Getting Started with the Waste Permit Tonnage
Returns Spreadsheet
In order to use the Waste Permit Tonnage Returns spreadsheet, you must first:
• check system requirements
• obtain a copy of the spreadsheet
10 Using the Waste Permit Tonnage Returns Spreadsheet Environment Agency
System Requirements
Minimum system requirements for using the returns spreadsheet are summarised below.
Operating System & Microsoft Office
In order to use the Waste Permit Tonnage Returns spreadsheet, you will need Microsoft Excel on a Windows operating system. Supported versions are Windows 2000 / MS Office 97 and Windows XP / MS Office 2003.
The spreadsheet may function on other versions of Excel or different operating system / version combinations; however we cannot provide any guarantees regarding this. If you are in any doubt about whether you have a compatible version, please check with your IT Administrator.
Screen Resolution
For best results, screen resolution should be set to at least 1024 x 768.
Environment Agency Using the Waste Permit Tonnage Returns Spreadsheet 11
Obtaining the Returns Spreadsheet Application
The Waste Permit Tonnage Returns spreadsheet can be obtained in two ways:
• download it from the Environment Agency Website at: www.environment-agency.gov.uk then by following these links: Business & Industry>How we regulate you>Better Regulation>Integrated regulation>GOR
• request it via email from: [email protected]
Environment Agency Using the Waste Permit Tonnage Returns Spreadsheet 12
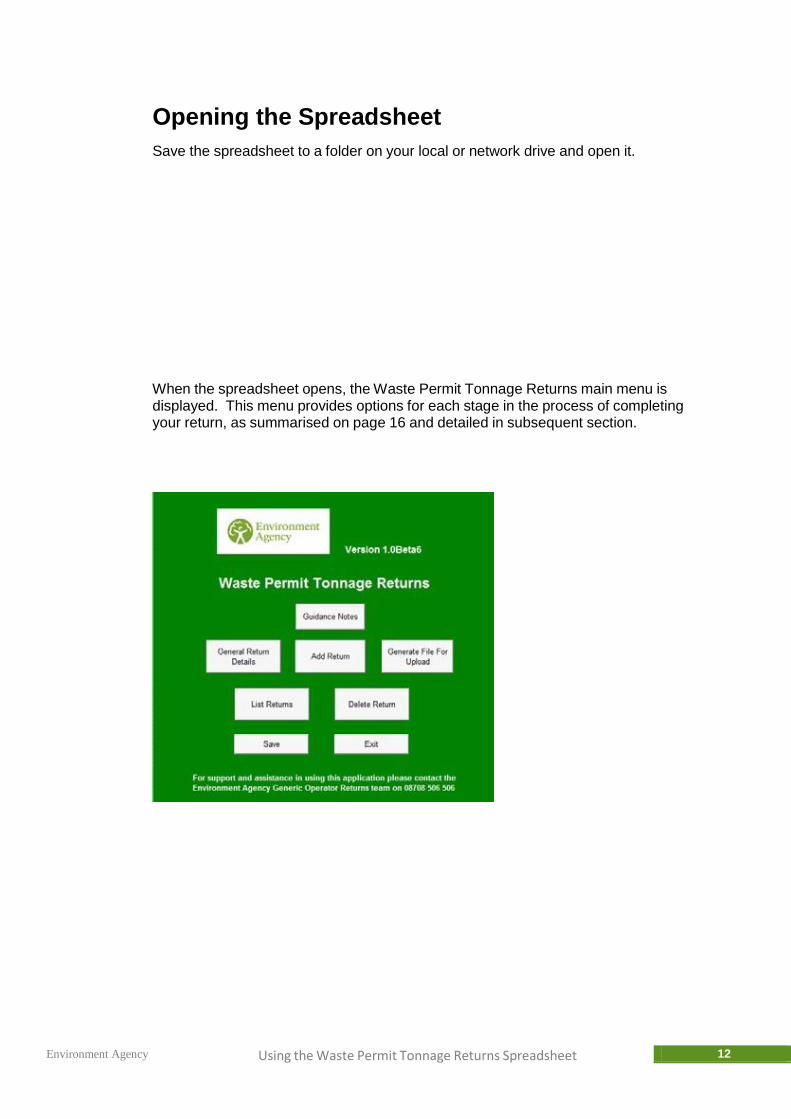
Opening the Spreadsheet
Save the spreadsheet to a folder on your local or network drive and open it.
When the spreadsheet opens, the Waste Permit Tonnage Returns main menu is displayed. This menu provides options for each stage in the process of completing your return, as summarised on page 16 and detailed in subsequent section.
13 Using the Waste Permit Tonnage Returns Spreadsheet Environment Agency
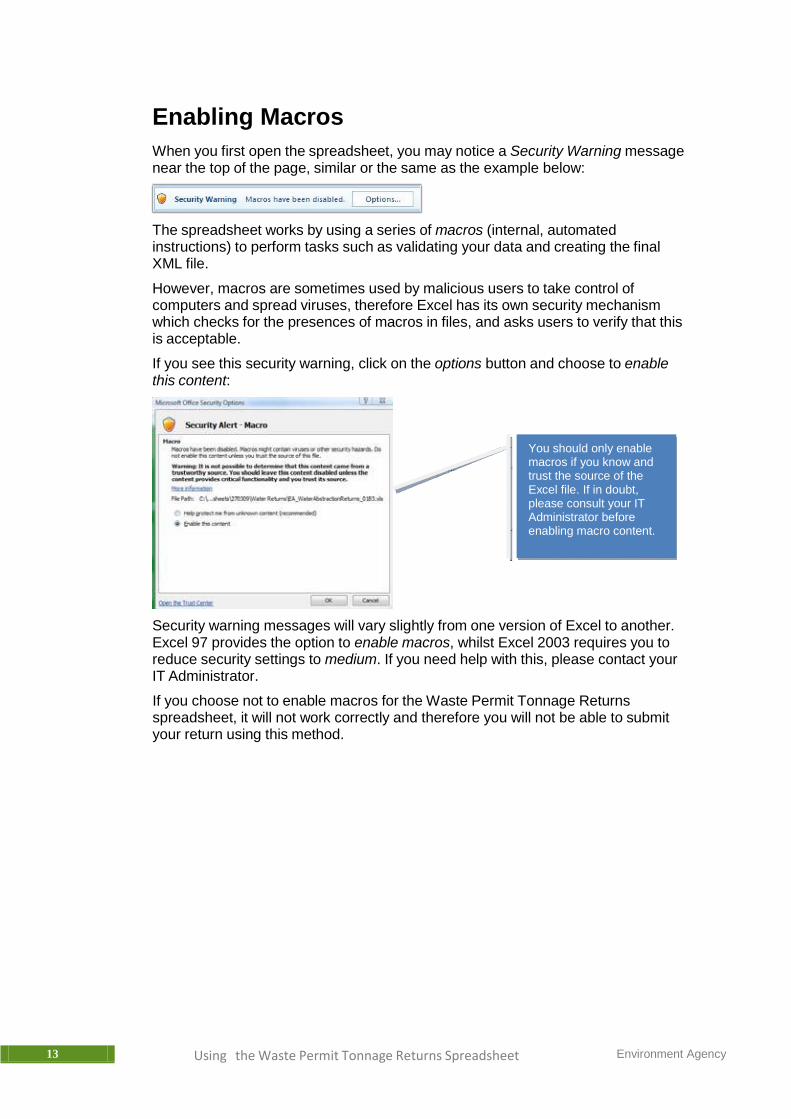
Enabling Macros
When you first open the spreadsheet, you may notice a Security Warning message near the top of the page, similar or the same as the example below:
The spreadsheet works by using a series of macros (internal, automated instructions) to perform tasks such as validating your data and creating the final XML file.
However, macros are sometimes used by malicious users to take control of computers and spread viruses, therefore Excel has its own security mechanism which checks for the presences of macros in files, and asks users to verify that this is acceptable.
If you see this security warning, click on the options button and choose to enable this content:
You should only enable macros if you know and trust the source of the Excel file. If in doubt, please consult your IT Administrator before enabling macro content.
Security warning messages will vary slightly from one version of Excel to another. Excel 97 provides the option to enable macros, whilst Excel 2003 requires you to reduce security settings to medium. If you need help with this, please contact your IT Administrator.
If you choose not to enable macros for the Waste Permit Tonnage Returns spreadsheet, it will not work correctly and therefore you will not be able to submit your return using this method.

Environment Agency Using the Waste Permit Tonnage Returns Spreadsheet 14
Creating a Copy of the Spreadsheet
Before you start working with the spreadsheet, you are advised to save a copy in its blank state, so the ‘clean’, master copy remains available should you need to start again for any reason. To do this, follow the steps below:
1. With the spreadsheet open at the main menu, select the Save As from the File menu:
Change the filename but always keep the .xls extension (if shown). If you remove this extension, the spreadsheet may not function correctly.
2. Change the File name (at the bottom of the window) to anything that is suitable for you, but be sure to keep the .xls extension if it is shown.
3. Click Save to save the file. You are now ready to start work with the returns spreadsheet.

15 Using the Waste Permit Tonnage Returns Spreadsheet Environment Agency
Using the Excel Spreadsheet
The Waste Permit Tonnage Returns spreadsheet has been designed to make the process of entering data and creating your return as simple and efficient as possible.
Having opened the spreadsheet, main options are displayed; you can think of this as the main menu, which sets out the required process:
Environment Agency Using the Waste Permit Tonnage Returns Spreadsheet 16
Process Overview
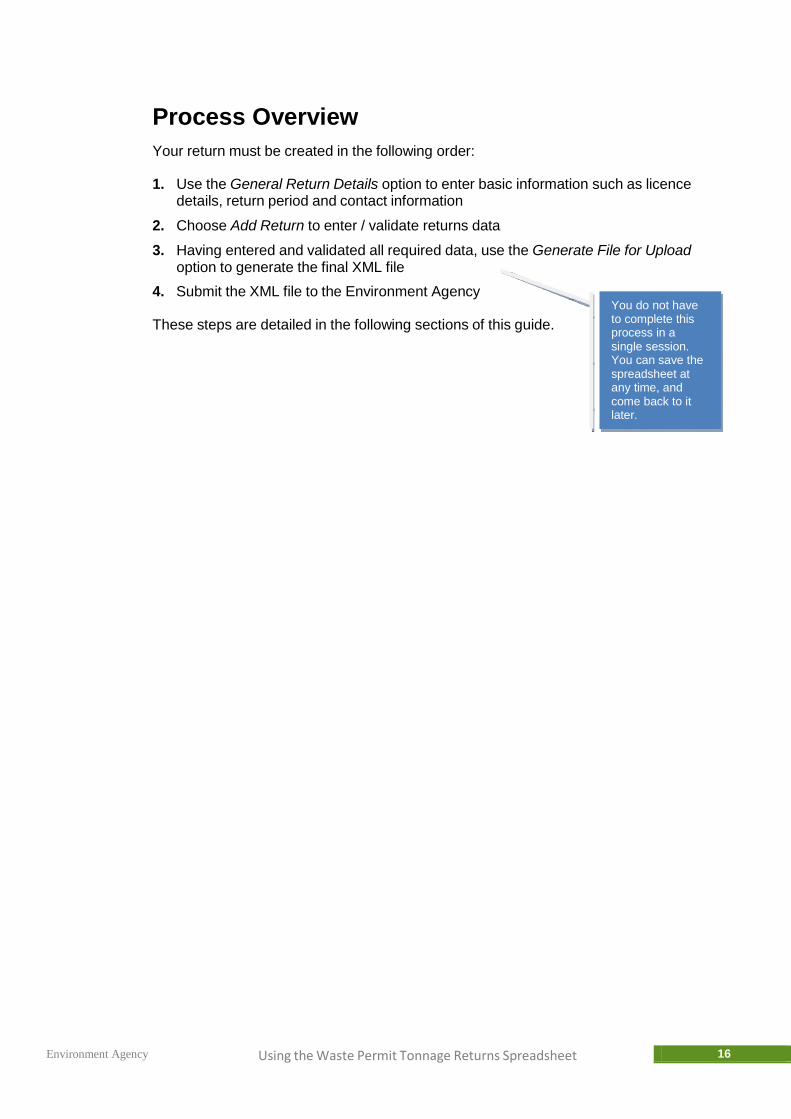
Your return must be created in the following order:
1. Use the General Return Details option to enter basic information such as licence details, return period and contact information
2. Choose Add Return to enter / validate returns data
3. Having entered and validated all required data, use the Generate File for Upload option to generate the final XML file
4. Submit the XML file to the Environment Agency
These steps are detailed in the following sections of this guide.
You do not have to complete this process in a single session. You can save the spreadsheet at any time, and come back to it later.

17 Using the Waste Permit Tonnage Return Spreadsheet Environment Agency
Entering General Return Details
Contact information and basic returns information is entered in the General Return Details window.
Use the information icon to view hints about completing fields in this window.
Mandatory fields are indicated by an asterisk (*)
after the field name.
Use the tab key to move between fields, as summarised below:
Field Required Information
Organisation name* The name of the organisation for which waste returns are being submitted.
Return Period Start Date*
Return Period End Date*
Return contact name*
Return contact position*
Return contact telephone number*
The start date for the return reporting period. This date should be entered in the form dd/mm/yyyy - for example, 01/04/2008. The date provided must be within a valid returns period (see page 7) or it will not be accepted.
The end date for the return reporting period. This date should be entered in the form dd/mm/yyyy - for example, 01/04/2009. The date provided must be within a valid returns period (see page 7) or it will not be accepted.
The name of the person designated as the main contact for returns.
The position (within your organisation) of the person specified above.
A telephone number for the person designated as return contact.
.../continued

Environment Agency Using the Waste Permit Tonnage Returns Spreadsheet 18
Field Required Information
Return contact email address*
Return contact address
Return contact postcode
An email address for the person designated as return contact.
A postal address for the person designated as return contact.
The postcode for the address specified above.
Authoriser name* The name of the person designated to authorise returns under this licence.
Authorised date The date that the return was authorised. This date should be entered in the form dd/mm/yyyy - for example, 01/04/2009.
Authoriser telephone number*
Authoriser email address*
A telephone number for the person designated to authorise returns under this licence.
An email address for the person designated to authorise returns under this licence.
Points to note:
• Information entered here relates to the organisation, and covers all returns entered. As such, you only need to enter it once
• Mandatory fields are indicated by an asterisk (*)
• Having completed General Return Details information, click the Exit button to return to the main menu and select Add Return to start adding returns data (see page 19)
• You can select the General Return Details option from the main menu at any time, to amend information that you have already entered

19 Using the Waste Permit Tonnage Returns Spreadsheet Environment Agency
Entering Returns
Return details are entered using the Add Return option from the main menu:
You can add a maximum of 20 returns into this spreadsheet. If you have more than 20 returns, you should complete additional copies of the Waste Permit Tonnage spreadsheet, as required.
Where multiple spreadsheets are used, you must complete the entire process for each one - i.e. you must enter returns data, validate that data and create a final returns file.

Environment Agency Using the Waste Permit Tonnage Returns Spreadsheet 20
The Return Header Details Window
Having selected the Add Return option from the main menu, a Return Header Details window is opened:
Mandatory fields are indicated with an asterisk (*) symbol.
Here, you need to provide general information for the return you are about to enter. You must provide these details before you can proceed to enter Waste Received and/or Waste Removed totals. Use the table below as a guide to completing Return Header Details fields:
Field Required Information
Permit number* Your permit number for this return. This number is checked to ensure that it matches the number that the Environment Agency holds for you.
Local Authority for the site* Select the appropriate code from the drop‐down list.
Nil return?* Use the drop-down list to specify whether you are entering a nil return.
Reason for Nil Return Use drop-down options to specify why a nil return is being entered (only applies if you answered ‘Yes’ to Nil Return?).
Type of Facility Copy this information from your Waste Tonnage licence or permit.
Was a weighbridge used? Use the drop-down list to specify whether you used a weighbridge (either at your facility or a public weighbridge) before deposit.
Percentage weighed Enter the weighed proportion of waste, as a percentage (only applies if you answered ‘Yes’ to Was a weighbridge used?).
.../continued

21 Using the Waste Permit Tonnage Returns Spreadsheet Environment Agency
Field Required Information
Are you operating a landfill?*
Remaining void space covered by this permit
Method of calculating void space
Date last surveyed or estimated
Use the drop-down list to specify whether you operate a landfill site.
Please enter the remaining landfill void space covered by
your licence or permit in cubic metres at 31st
March in the current year. ‘Void space’ is the licensed/permitted capacity remaining at your site and this should only include areas covered by a Waste Tonnage license or permit and planning permission (only applies if you answered ‘Yes’ to Are you operating a landfill?).
Use the drop-down list to specify how your void space figure was calculated only applies if you answered ‘Yes’ to Are you operating a landfill?).
Enter the date that your landfill site was last surveyed, in the form dd/mm/yyyy – for example, 31/12/2008 (only applies if you answered ‘Yes’ to Are you operating a landfill?).
Having entered all required details, click the Save button to update the spreadsheet. Behind the Return Header Details window, you will see the spreadsheet being prepared, ready for you to enter return totals:
From here, you can choose to enter Waste Received (see page 23) or Waste Removed (see page 26) totals, or click the Exit button to close the Return Header Details window and access the spreadsheet directly.
If you need to update Return Header Details later, you can access this window again by selecting the List Returns option from the main menu (see page 30 for further information about editing an existing return).

Environment Agency Using the Waste Permit Tonnage Returns Spreadsheet 22
Understanding the Returns Page
As soon as Return Header Details are saved, the spreadsheet is updated with two new tabs - for example:
Waste Received for this return
Waste Removed for this return
The tabs are named in a common format:
Waste Received tabs: <permit number>_Waste In
Waste Removed tabs: <permit number>_Waste Out
When adding a return, you may have totals for Waste Received, Waste Removed, or both.
You can access these tabs via the Waste Received and Waste Removed options at the bottom of the Return Header Details window, or just by selecting the appropriate tab in the spreadsheet.
The name of each tab is automatically assigned by the system. Do not change the name of any tabs; otherwise the spreadsheet may not function as expected.
23 Using the Waste Permit Tonnage Returns Spreadsheet Environment Agency
Entering Waste Received Details
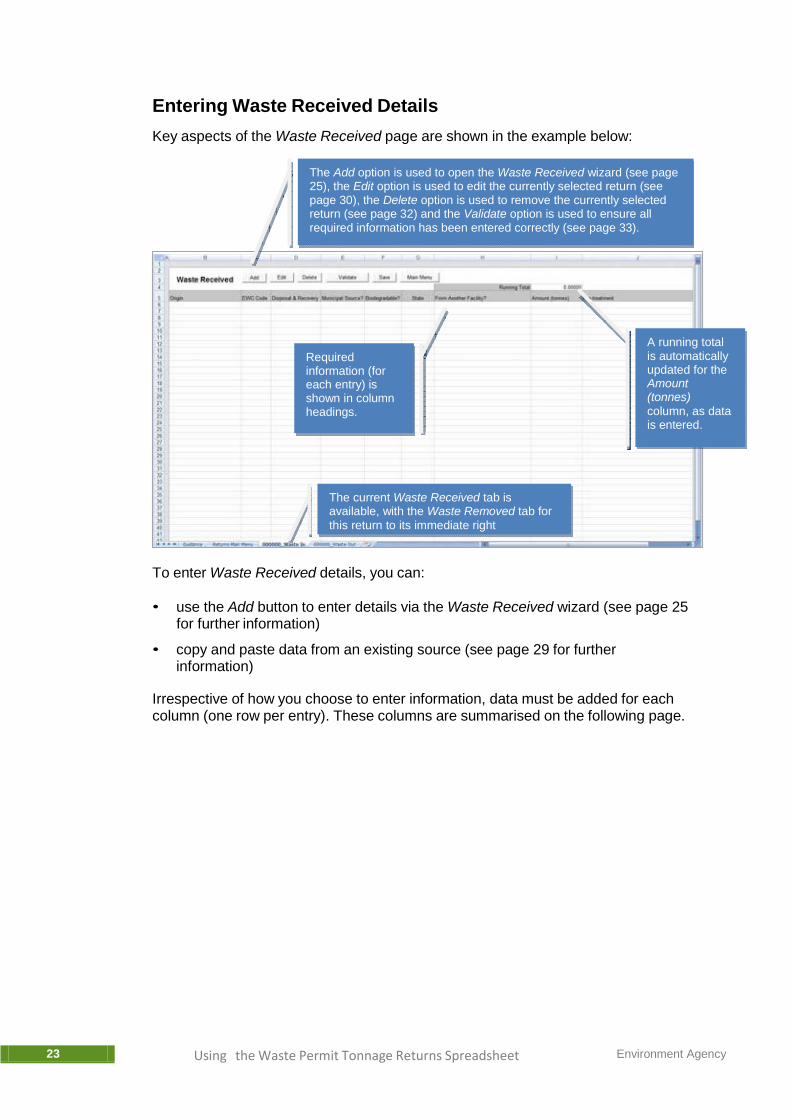
Key aspects of the Waste Received page are shown in the example below:
The Add option is used to open the Waste Received wizard (see page 25), the Edit option is used to edit the currently selected return (see page 30), the Delete option is used to remove the currently selected return (see page 32) and the Validate option is used to ensure all required information has been entered correctly (see page 33).
Required information (for each entry) is shown in column headings.
A running total is automatically updated for the Amount (tonnes)
column, as data is entered.
The current Waste Received tab is available, with the Waste Removed tab for
this return to its immediate right
To enter Waste Received details, you can:
• use the Add button to enter details via the Waste Received wizard (see page 25
for further information)
• copy and paste data from an existing source (see page 29 for further information)
Irrespective of how you choose to enter information, data must be added for each column (one row per entry). These columns are summarised on the following page.

Environment Agency Using the Waste Permit Tonnage Returns Spreadsheet 24
Required Information for Waste Received
Columns on Waste Received tabs are summarised below:
These fields are summarised below (mandatory fields are indicated by an asterisk):
Field Required Information
Origin* Enter the district where the waste originated. If the district is not known, enter the planning region where the waste originated.
EWC Code* Enter the European Waste Catalogue classification code, as specified in the List of Waste Regulations 2005 (or any subsequent amendments). For example – 170103.
Disposal & Recovery* Enter the appropriate method of disposal and recovery.
Municipal Source?* State whether the waste has arisen from a municipal source (Yes / No or Y/ N). Municipal waste is defined as waste from households and other waste that, because of its nature or composition, is similar to waste from households. Note that if waste is from a municipal source and it is going for disposal at a landfill site, you will need to enter an option in the Pre- treatment column.
Biodegradable?* State whether the waste is biodegradable (Yes / No or Y/ N). Examples of biodegradable waste include paper and cardboard.
State* Enter the physical state of the waste (whether it is solid, powder, sludge, liquid or gas). Please do not use other terms to describe the waste.
From Another Facility?* If the waste is from another facility, enter the type of facility – for example, (IN) - Incinerator. Use the accompanying picklist booklet as a guide.
Amount (tonnes)* Enter the weight of each specific waste type received from each district of origin.
Pre-treatment* If you answered ‘Yes’ for Municipal Source and the waste is going to a landfill site, please specify the relevant pre- treatment option (use the accompanying picklist booklet as a guide, if required).
Having entered all required information, you should use the Validate option to ensure that it is correct. Please see page 33 for further information about the validation process.
25 Using the Waste Permit Tonnage Returns Spreadsheet Environment Agency
Using the Waste Received Wizard
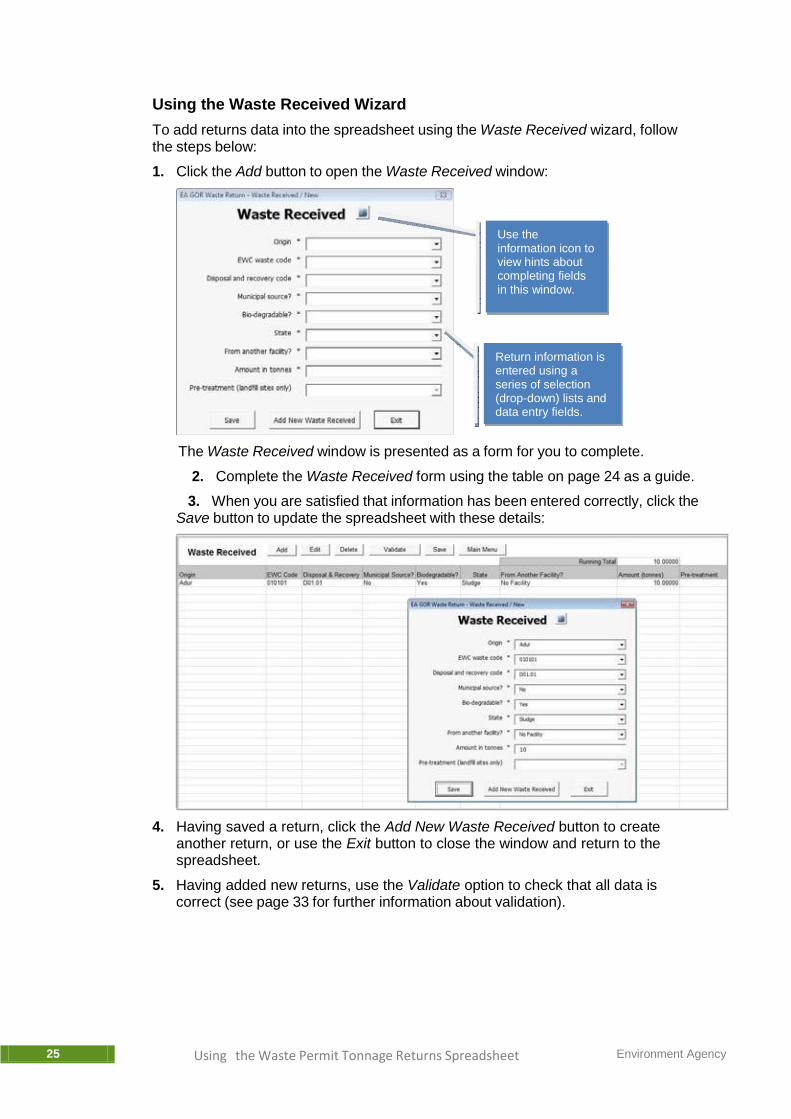
To add returns data into the spreadsheet using the Waste Received wizard, follow the steps below:
1. Click the Add button to open the Waste Received window:
Use the information icon to view hints about completing fields in this window.
Return information is entered using a series of selection (drop-down) lists and data entry fields.
The Waste Received window is presented as a form for you to complete.
2. Complete the Waste Received form using the table on page 24 as a guide.
3. When you are satisfied that information has been entered correctly, click the Save button to update the spreadsheet with these details:
4. Having saved a return, click the Add New Waste Received button to create another return, or use the Exit button to close the window and return to the spreadsheet.
5. Having added new returns, use the Validate option to check that all data is correct (see page 33 for further information about validation).

Environment Agency Using the Waste Permit Tonnage Returns Spreadsheet 26
Entering Waste Removed Details
Key aspects of the Waste Removed page are shown in the example below:
The Add option is used to open the Waste Removed wizard (see page 28), the Edit option is used to edit the currently selected return (see page 30), the Delete option is used to remove the currently selected return (see page 32) and the Validate option is used to ensure all required information has been entered correctly (see page 33).
Required information (for each entry) is shown in column headings.
A running total is automatically updated for the Amount (tonnes) column, as data is entered.
The current Waste Removed tab is available, with the Waste Received tab for this return to its immediate left.
To enter Waste Removed details, you can:
• use the Add button to enter details via the Waste Removed wizard (see page 28 for further information)
• copy and paste data from an existing source (see page 29 for further information)
Irrespective of how you choose to enter information, data must be added for each column (one row per entry). These columns are summarised on the following page.
27 Using the Waste Permit Tonnage Returns Spreadsheet Environment Agency
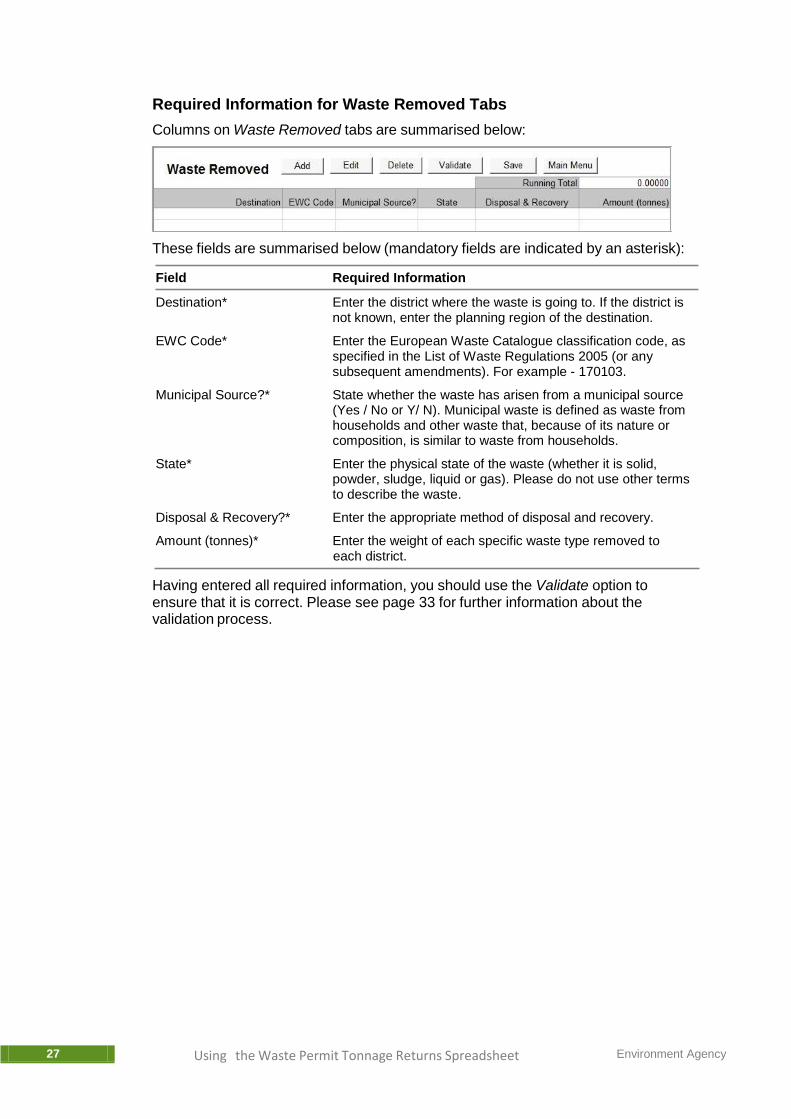
Required Information for Waste Removed Tabs
Columns on Waste Removed tabs are summarised below:
These fields are summarised below (mandatory fields are indicated by an asterisk):
Field Required Information
Destination* Enter the district where the waste is going to. If the district is not known, enter the planning region of the destination.
EWC Code* Enter the European Waste Catalogue classification code, as specified in the List of Waste Regulations 2005 (or any subsequent amendments). For example - 170103.
Municipal Source?* State whether the waste has arisen from a municipal source (Yes / No or Y/ N). Municipal waste is defined as waste from households and other waste that, because of its nature or composition, is similar to waste from households.
State* Enter the physical state of the waste (whether it is solid, powder, sludge, liquid or gas). Please do not use other terms to describe the waste.
Disposal & Recovery?* Enter the appropriate method of disposal and recovery.
Amount (tonnes)* Enter the weight of each specific waste type removed to each district.
Having entered all required information, you should use the Validate option to ensure that it is correct. Please see page 33 for further information about the validation process.

Environment Agency Using the Waste Permit Tonnage Returns Spreadsheet 28
Using the Waste Removed Wizard
To add returns data into the spreadsheet using the Waste Removed wizard, follow the steps below:
1. Click the Add button to open the Waste Removed window:
Use the information icon to view hints about completing fields in this window.
Return information is entered using a series of selection (drop-down) lists and data entry fields.
The Waste Removed window is presented as a form for you to complete.
2. Complete the Waste Removed form using the table on page 28 as a guide.
3. When you are satisfied that information has been entered correctly, click the Save button to update the spreadsheet with these details:
4. Having saved a return, click the Add New Waste Removed button to create another return, or use the Exit button to close the window and return to the spreadsheet.
5. Having added new returns, use the Validate option to check that all data is correct (see page 33 for further information about validation).
29 Using the Waste Permit Tonnage Returns Spreadsheet Environment Agency
Using Copy & Paste to Add Returns
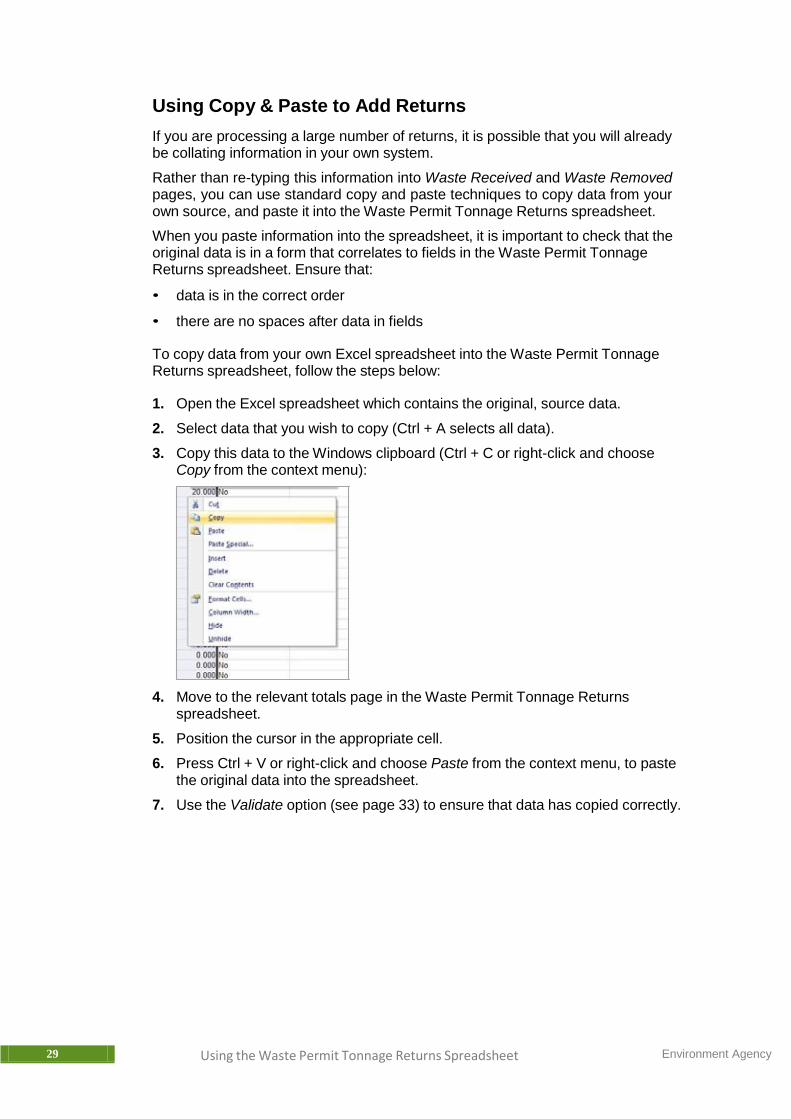
If you are processing a large number of returns, it is possible that you will already be collating information in your own system.
Rather than re-typing this information into Waste Received and Waste Removed pages, you can use standard copy and paste techniques to copy data from your own source, and paste it into the Waste Permit Tonnage Returns spreadsheet.
When you paste information into the spreadsheet, it is important to check that the original data is in a form that correlates to fields in the Waste Permit Tonnage Returns spreadsheet. Ensure that:
• data is in the correct order
• there are no spaces after data in fields
To copy data from your own Excel spreadsheet into the Waste Permit Tonnage Returns spreadsheet, follow the steps below:
1. Open the Excel spreadsheet which contains the original, source data.
2. Select data that you wish to copy (Ctrl + A selects all data).
3. Copy this data to the Windows clipboard (Ctrl + C or right-click and choose Copy from the context menu):
4. Move to the relevant totals page in the Waste Permit Tonnage Returns spreadsheet.
5. Position the cursor in the appropriate cell.
6. Press Ctrl + V or right-click and choose Paste from the context menu, to paste the original data into the spreadsheet.
7. Use the Validate option (see page 33) to ensure that data has copied correctly.

Environment Agency Using the Waste Permit Tonnage Returns Spreadsheet 30
Editing an Existing Return
If you wish to amend (or add to) an existing return in the spreadsheet, follow the steps below:
1. Select the Menu tab at the bottom of the spreadsheet:
The main menu is displayed:
2. Click the List Returns button to open the List Site Details window:
All returns added so far are listed here, by permit number.
3. Select the return (permit number) that you wish to access.

31 Using the Waste Permit Tonnage Returns Spreadsheet Environment Agency
4. Click the Edit button to open Return Header Details for the selected permit:
From here, you can update header details, or select Waste Received / Waste Removed options to access returns data that you entered previously.
5. Having edited returns, use the Validate option to check that all data is correct (see page 33 for further information about validation).

Environment Agency Using the Waste Permit Tonnage Returns Spreadsheet 32
Deleting an Existing Return
If you have entered a return in error and wish to remove it from the spreadsheet, follow the steps below:
1. Select the Menu tab at the bottom of the spreadsheet:
The main menu is displayed:
2. Click the Delete Return button to open List Site Details window:
All returns added so far are listed here, by permit number.
3. Select the return (permit number) that you wish to remove.
4. Click the Delete button. You are asked to confirm the deletion.
5. If you are satisfied that the correct return has been selected for deletion, click Yes. If you are unsure, or wish to abandon this operation, click No.
6. Having deleted a return in this way, the associated tabs are removed from the spreadsheet. Click the Close button to return to the main menu.

33 Using the Waste Permit Tonnage Returns Spreadsheet Environment Agency
Validating Returns
Before a final returns file can be created (in XML format) any data that you have added to the spreadsheet must be validated. Validation checks are made to ensure that:
• all required information has been entered for each return
• only valid data exists
• duplicate returns have not been entered
To validate returns in the spreadsheet, follow the steps below:
1. Position the cursor anywhere in a Waste Received or Waste Removed page.
2. Click the Validate button:
3. The validation process starts. If errors are found, associated cells are highlighted in red (duplicate entries are shown in yellow) and an error summary is displayed in a pop-up window:
4. If validation errors are found, you must correct them before a final returns file can be created.
5. Repeat this process for all returns in the spreadsheet.
Environment Agency Using the Waste Permit Tonnage Returns Spreadsheet 34
Handling Validation Errors
If validation errors are identified in your returns data, they must be corrected before a final returns file can be created. You can make corrections in two possible ways:
• update cells directly - type required information into cells with errors
• use the List Returns option (from the main menu) to access / update Return Header Details (see page 30).
Note that any duplicate entries must be amalgamated into a single row.
Having made corrections, you should perform another validation to ensure that all previous errors are cleared, and no new errors have been introduced.
Repeat the correction / validation process until no errors are found.
35 Using the Waste Permit Tonnage Returns Spreadsheet Environment Agency
Saving Returns
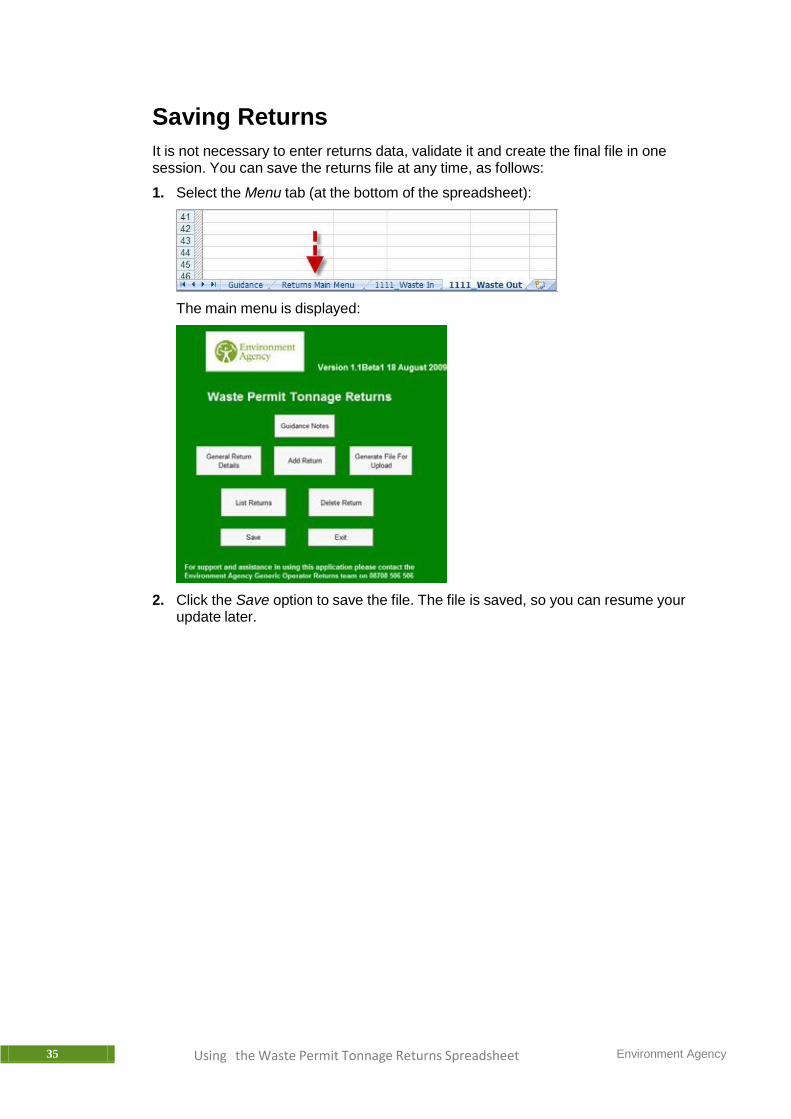
It is not necessary to enter returns data, validate it and create the final file in one session. You can save the returns file at any time, as follows:
1. Select the Menu tab (at the bottom of the spreadsheet):
The main menu is displayed:
2. Click the Save option to save the file. The file is saved, so you can resume your update later.
Environment Agency Using the Waste Permit Tonnage Returns Spreadsheet 36
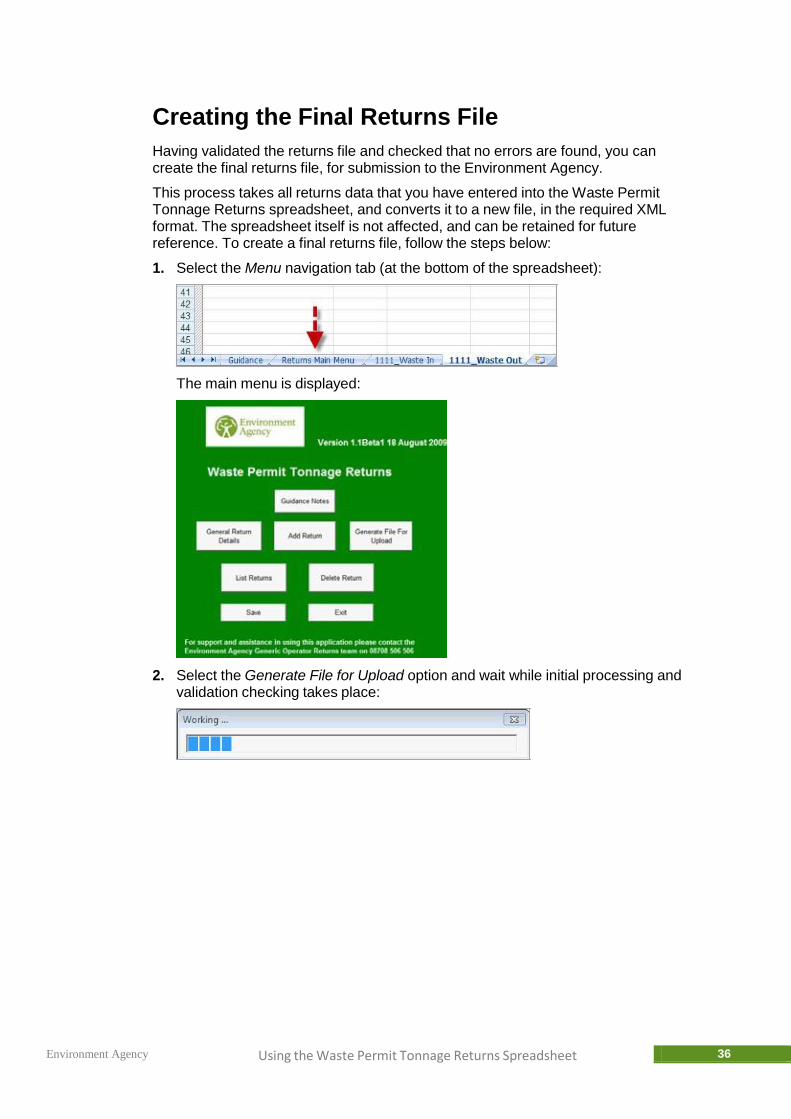
Creating the Final Returns File
Having validated the returns file and checked that no errors are found, you can create the final returns file, for submission to the Environment Agency.
This process takes all returns data that you have entered into the Waste Permit Tonnage Returns spreadsheet, and converts it to a new file, in the required XML format. The spreadsheet itself is not affected, and can be retained for future reference. To create a final returns file, follow the steps below:
1. Select the Menu navigation tab (at the bottom of the spreadsheet):
The main menu is displayed:
2. Select the Generate File for Upload option and wait while initial processing and validation checking takes place:

37 Using the Waste Permit Tonnage Returns Spreadsheet Environment Agency
After a few seconds, you are prompted to choose a location in which to save the final returns (XML) file:
The default filename includes the date, which makes it a unique identifier. As such, you are advised to keep this name.
3. Navigate to the required folder (there is no right or wrong location - choose somewhere that you can easily find afterwards).
4. Click the Save button to save the file. Processing takes place and you are returned to the spreadsheet’s main menu upon completion.
You are now ready to submit the file to the Environment Agency - see page 38 for further details.
To exit from the spreadsheet, select Close from the File menu, or simply use the exit cross in the top right-hand corner. You will be prompted to save the file:
You are strongly advised to save the file for future reference, or in case there is a query with your return.

Environment Agency Using the Waste Permit Tonnage Returns Spreadsheet 38
Submitting the Returns File to the Environment
Agency
Having created a final returns file, it should be submitted to the Environment Agency via the GOR website. To do this, follow the steps below:
1. Open your Internet browser (for example, Internet Explorer).
2. Type the following URL to access the GOR website: https://gor.environment-agency.gov.uk/GORExt
3. From the website, select the option to upload a returns file for this period. From here, a File Upload page is displayed:
4. Click the Browse button, located to the right of the File location field. A File Upload window is opened, from which you can browse folders on your computer, to locate the final returns file (XML) that you created previously (see page 36 for information about creating this file):
5. Navigate drives and folders on your computer and select the final returns file.
39 Using the Waste Permit Tonnage Returns Spreadsheet Environment Agency
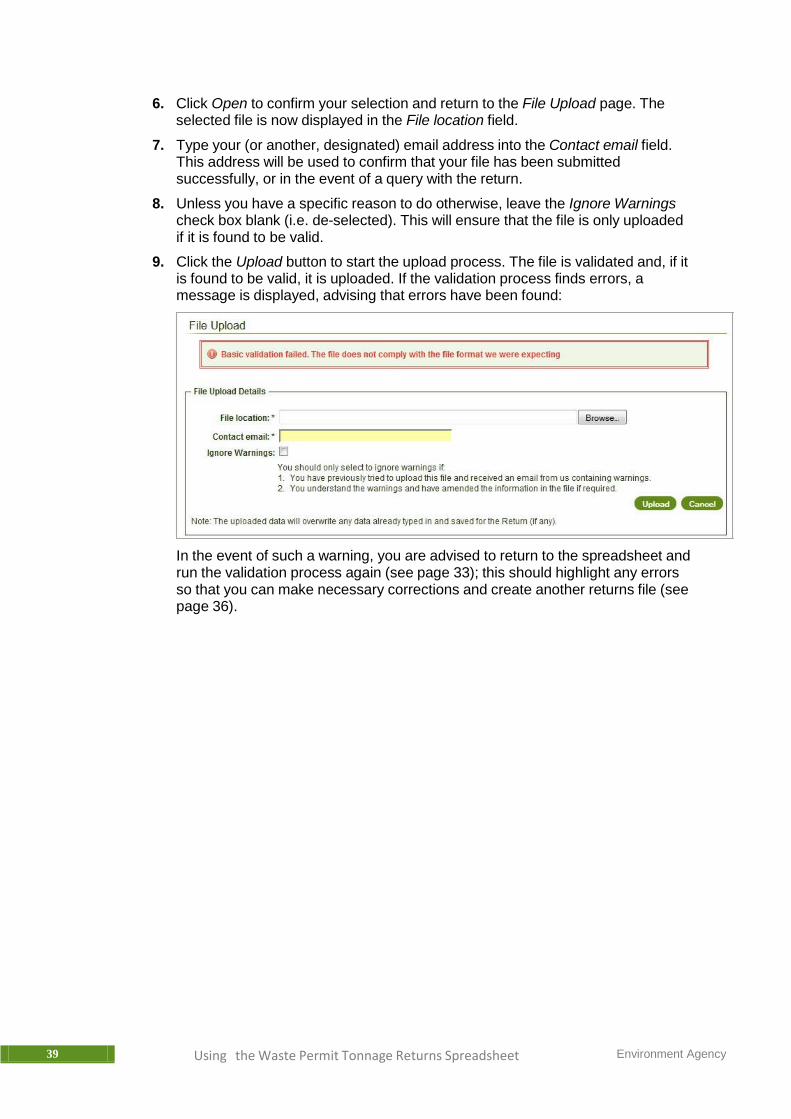
6. Click Open to confirm your selection and return to the File Upload page. The selected file is now displayed in the File location field.
7. Type your (or another, designated) email address into the Contact email field. This address will be used to confirm that your file has been submitted successfully, or in the event of a query with the return.
8. Unless you have a specific reason to do otherwise, leave the Ignore Warnings check box blank (i.e. de-selected). This will ensure that the file is only uploaded if it is found to be valid.
9. Click the Upload button to start the upload process. The file is validated and, if it is found to be valid, it is uploaded. If the validation process finds errors, a message is displayed, advising that errors have been found:
In the event of such a warning, you are advised to return to the spreadsheet and run the validation process again (see page 33); this should highlight any errors so that you can make necessary corrections and create another returns file (see page 36).