we are ready to help
TRANSCRIPT
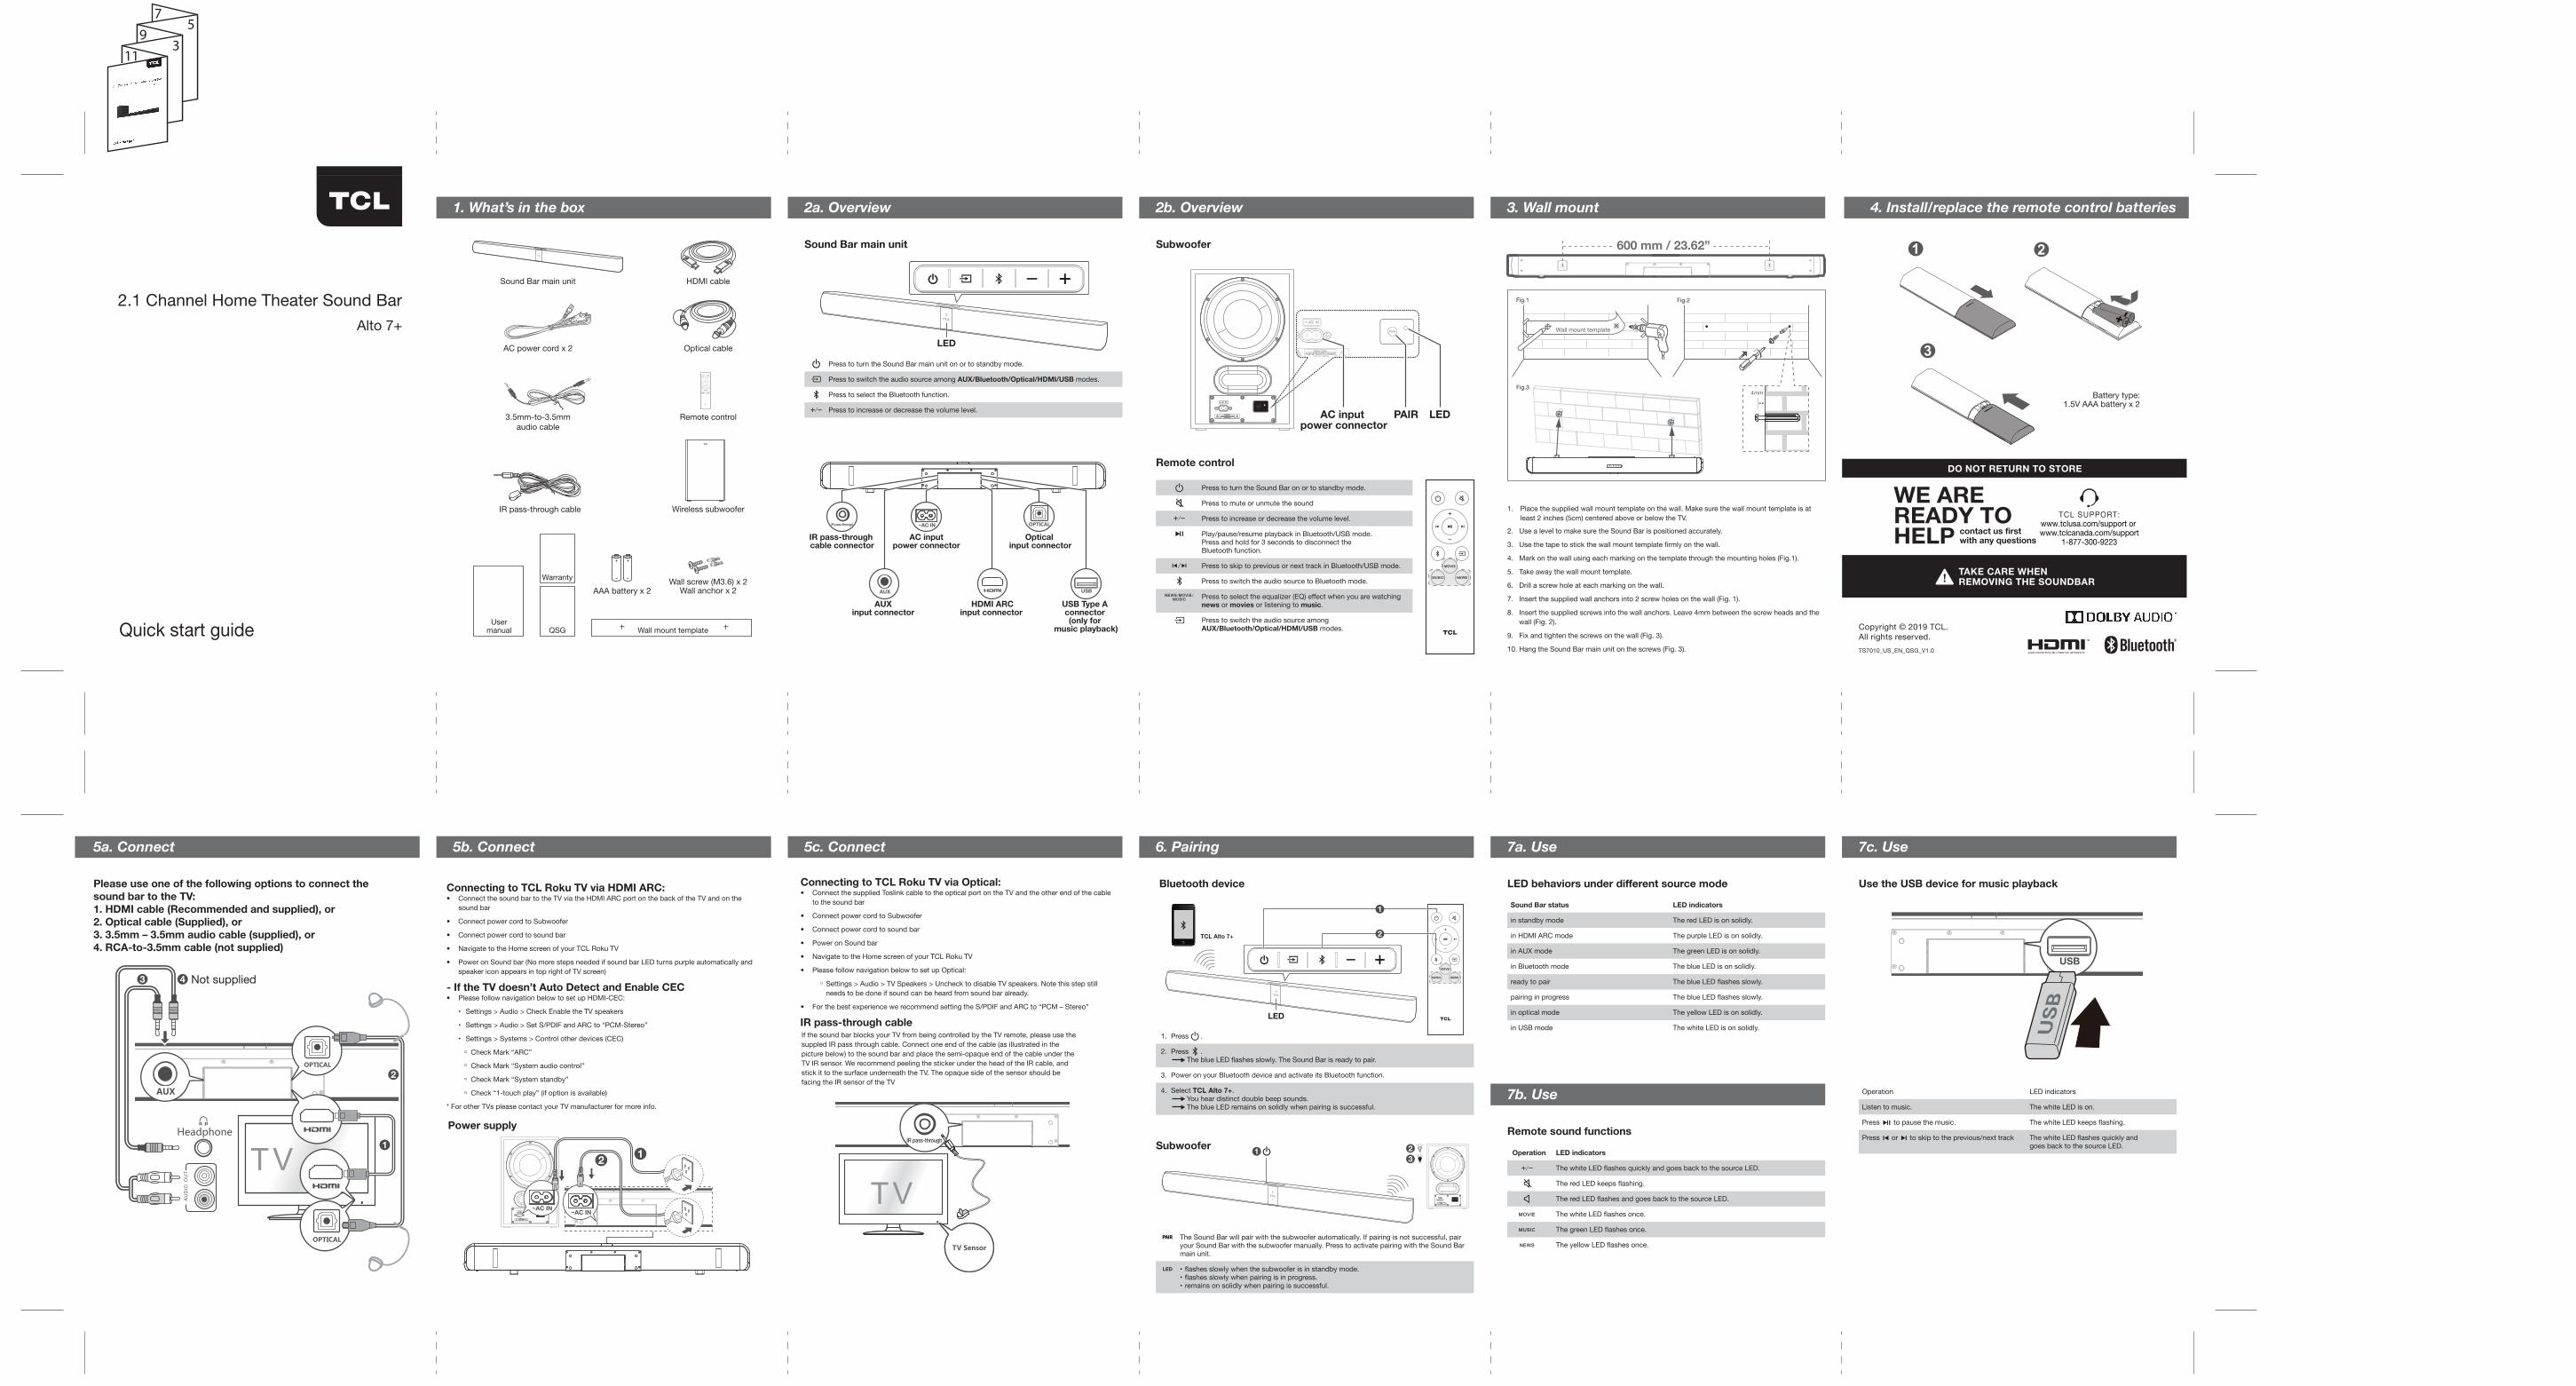
Sound Bar main unit
AC power cord x 2
3.5mm-to-3.5mmaudio cable
IR pass-through cable
Remote control
Wireless subwoofer
AAA battery x 2
QSG Wall mount template
Warranty
Usermanual
1. Place the supplied wall mount template on the wall. Make sure the wall mount template is at least 2 inches (5cm) centered above or below the TV.
2. Use a level to make sure the Sound Bar is positioned accurately.
3. Use the tape to stick the wall mount template firmly on the wall.
4. Mark on the wall using each marking on the template through the mounting holes (Fig.1).
5. Take away the wall mount template.
6. Drill a screw hole at each marking on the wall.
7. Insert the supplied wall anchors into 2 screw holes on the wall (Fig. 1).
8. Insert the supplied screws into the wall anchors. Leave 4mm between the screw heads and the wall (Fig. 2).
9. Fix and tighten the screws on the wall (Fig. 3).
10. Hang the Sound Bar main unit on the screws (Fig. 3).
Press to turn the Sound Bar main unit on or to standby mode.
Press to switch the audio source among AUX/Bluetooth/Optical/HDMI/USB modes.
Press to select the Bluetooth function.
Press to increase or decrease the volume level.
Sound Bar status LED indicators
in standby mode The red LED is on solidly.
in HDMI ARC mode The purple LED is on solidly.
in AUX mode The green LED is on solidly.
in Bluetooth mode The blue LED is on solidly.
ready to pair The blue LED flashes slowly.
pairing in progress The blue LED flashes slowly.
in optical mode The yellow LED is on solidly.
in USB mode The white LED is on solidly.
Optical cable
Operation LED indicators
Listen to music. The white LED is on.
Press to pause the music. The white LED keeps flashing.
Press or to skip to the previous/next track The white LED flashes quickly and goes back to the source LED.
Remote control
1 23
LED
The Sound Bar will pair with the subwoofer automatically. If pairing is not successful, pair your Sound Bar with the subwoofer manually. Press to activate pairing with the Sound Bar main unit.
• flashes slowly when the subwoofer is in standby mode.• flashes slowly when pairing is in progress.• remains on solidly when pairing is successful.
Operation LED indicators
The white LED flashes quickly and goes back to the source LED.
The red LED keeps flashing.
The red LED flashes and goes back to the source LED.
The white LED flashes once.
The green LED flashes once.
The yellow LED flashes once.
TCL Alto 7+
Copyright © 2019 TCL. All rights reserved.TS7010_US_EN_QSG_V1.0
2.1 Channel Home Theater Sound BarAlto 7+
Quick start guide
1. What’s in the box 2a. Overview 2b. Overview 3. Wall mount
Sound Bar main unit Subwoofer
7a. Use 7c. Use6. Pairing
Bluetooth device LED behaviors under different source mode
7b. Use
Use the USB device for music playback
SubwooferRemote sound functions
7
35
911
Wall screw (M3.6) x 2Wall anchor x 2
HDMI cable
LED
PAIR LEDAC input power connector
Press to turn the Sound Bar on or to standby mode.
Press to mute or unmute the sound
Press to increase or decrease the volume level.
Play/pause/resume playback in Bluetooth/USB mode. Press and hold for 3 seconds to disconnect the Bluetooth function.
Press to skip to previous or next track in Bluetooth/USB mode.
Press to switch the audio source to Bluetooth mode.
Press to select the equalizer (EQ) effect when you are watching news or movies or listening to music.
Press to switch the audio source among AUX/Bluetooth/Optical/HDMI/USB modes.
LED
1
2
1. Press .
2. Press . The blue LED flashes slowly. The Sound Bar is ready to pair.
3. Power on your Bluetooth device and activate its Bluetooth function.
4. Select TCL Alto 7+. You hear distinct double beep sounds. The blue LED remains on solidly when pairing is successful.
USB
USB
IR pass-through cable connector
AUXinput connector
AC inputpower connector
HDMI ARCinput connector
Optical input connector
USB Type A connector (only for
music playback)
~AC INIR pass-through
Fig.1
Fig.3
Fig.2
Wall mount template
4mm
600 mm / 23.62”
Battery type: 1.5V AAA battery x 2
1 2
3
www.tclusa.com/support or www.tclcanada.com/support
1-877-300-9223
TCL SUPPORT:
WE AREREADY TOHELP contact us first
with any questions
DO NOT RETURN TO STORE
TAKE CARE WHENREMOVING THE SOUNDBAR
4. Install/replace the remote control batteries
5c. Connect
IR pass-through
Please use one of the following options to connect the sound bar to the TV:1. HDMI cable (Recommended and supplied), or2. Optical cable (Supplied), or3. 3.5mm – 3.5mm audio cable (supplied), or4. RCA-to-3.5mm cable (not supplied)
Not supplied43
1
2
Connecting to TCL Roku TV via HDMI ARC:� Connect the sound bar to the TV via the HDMI ARC port on the back of the TV and on the
sound bar
� Connect power cord to Subwoofer
� Connect power cord to sound bar
� Navigate to the Home screen of your TCL Roku TV
� Power on Sound bar (No more steps needed if sound bar LED turns purple automatically and speaker icon appears in top right of TV screen)
- If the TV doesn’t Auto Detect and Enable CEC� Please follow navigation below to set up HDMI-CEC:
• Settings > Audio > Check Enable the TV speakers
• Settings > Audio > Set S/PDIF and ARC to “PCM-Stereo”
• Settings > Systems > Control other devices (CEC)
⸋ Check Mark “ARC”
⸋ Check Mark “System audio control”
⸋ Check Mark “System standby”
⸋ Check “1-touch play” (if option is available)
* For other TVs please contact your TV manufacturer for more info.
Connecting to TCL Roku TV via Optical:� Connect the supplied Toslink cable to the optical port on the TV and the other end of the cable
to the sound bar
� Connect power cord to Subwoofer
� Connect power cord to sound bar
� Power on Sound bar
� Navigate to the Home screen of your TCL Roku TV
� Please follow navigation below to set up Optical:
⸋ Settings > Audio > TV Speakers > Uncheck to disable TV speakers. Note this step still needs to be done if sound can be heard from sound bar already.
� For the best experience we recommend setting the S/PDIF and ARC to “PCM – Stereo”
5b. Connect 5a. Connect
Power supply
12
~AC IN~AC IN
If the sound bar blocks your TV from being controlled by the TV remote, please use the suppled IR pass through cable. Connect one end of the cable (as illustrated in the picture below) to the sound bar and place the semi-opaque end of the cable under the TV IR sensor. We recommend peeling the sticker under the head of the IR cable, and stick it to the surface underneath the TV. The opaque side of the sensor should be facing the IR sensor of the TV
IR pass-through cable