web 1000 access: - mc.vanderbilt.edu · web viewremoving java 5.0 ... ms vista and ie v.7 are not...
TRANSCRIPT

PACS WebPhysician User Guide
Web1000 ver. 4.1
Radiology Informatics
Updated May 13, 2023

For questions or comments, please contact: 345-HELP
2

Contents(Click on the subject title to jump to the page)
Subject Page
PACS Web Access . . . . . . . . . . . . . . . . . . . . . . . . . . . . . . . . . . . . . . . . . . . . . . . 3
Study Window . . . . . . . . . . . . . . . . . . . . . . . . . . . . . . . . . . . . . . . . . . . . . . . 5
Search Wizards . . . . . . . . . . . . . . . . . . . . . . . . . . . . . . . . . . . . . . . . . . . . . . . 7
Thumbnail Window . . . . . . . . . . . . . . . . . . . . . . . . . . . . . . . . . . . . . . . . . . . . . . . 8
Display Window . . . . . . . . . . . . . . . . . . . . . . . . . . . . . . . . . . . . . . . . . . . . . . . 9
Cine Viewer . . . . . . . . . . . . . . . . . . . . . . . . . . . . . . . . . . . . . . . . . . . . . . 11
Split Screen . . . . . . . . . . . . . . . . . . . . . . . . . . . . . . . . . . . . . . . . . . . . . . 12
Removing JAVA 5.0 . . . . . . . . . . . . . . . . . . . . . . . . . . . . . . . . . . . . . . . . . . . . . . 13
Uninstalling Internet Explorer Version 7 . . . . . . . . . . . . . . . . . . . . . . . . . . . . . . . . . . 16
3

PACS Web Access:
MS Vista and IE v.7 are not supported by PACS Web and may not respond as expected as of 9/28/07. (See page 16 for instructions to remove IE v. 7.)
Access this URL through MS Internet Explorer:
https://pacsweb2.mc.vanderbilt.edu/ssl.html
When prompted, enter your User ID and your password.
Please call 3-Help if you experience difficulties with passwords.
4

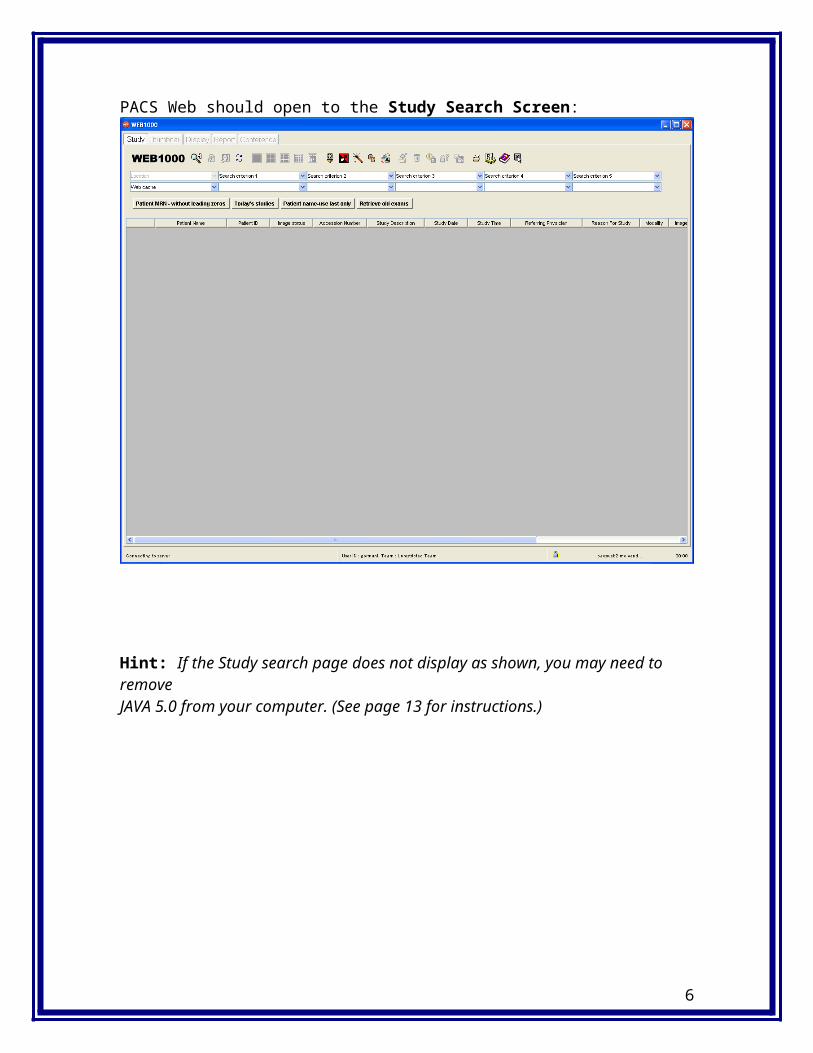
PACS Web should open to the Study Search Screen:
Hint: If the Study search page does not display as shown, you may need to remove JAVA 5.0 from your computer. (See page 13 for instructions.)
5
Study Window
Study Window Toolbar:
The study window is the default window upon logging into PACS Web. You may select a search criterion to find a study to display. Up to five different criteria may be chosen to narrow your search. The icons at the top of the toolbar assist in selecting or manipulating studies.
Common Toolbar Icons:
Search For Studies
Viewing Format
Enable Lossy Compression
Study Information
Preferences
6
Your User ID determines which tools are available for you to use.

Online Help
Exit
To begin viewing studies, select your search criteria from the drop down menu in each of the search windows. At least one and not more than five criteria may be used. Enter the information available beneath each of the criteria you have chosen.
Search Criteria:1. Date2. Date Range3. Referring
Physician4. Modality5. Patient ID
(MRN)6. Patient Name
7. Accession Number
8. Patient Location
9. Body part10. Status 11. Gender12. Department
Select the location of the images. If a search is unsuccessful, change the location of the images to All locations.
Toolbars may be customized by selecting the Toolbar layout tab of the Preferences icon
7
You may switch from one window to another by clicking on the desired tab. Use the Study tab to select another exam.

8
Your User ID determines which tools are available for you to use.

Search Wizards
Routine and often repeated search criteria may be entered into a search wizard to facilitate exam searches.
Search Wizards:
1. To program a Wizard, first clear the current search
criteria by clicking the Reset icon .2. Enter the search criteria and click the Wizard tool
.
3. You will be prompted to enter the name you wish to assign to the search. Click OK.
(Checking Startup Wizard will activate this wizard whenever you sign into PACS Web.)
You may also enter new wizards, edit existing wizards or delete selected wizards by accessing the Preferences tool
. Select the Wizards tab to select the Wizard you wish to edit/delete. (Click the New button to enter a new Wizard.)
9

Edit the criteria for the selected wizard. Choosing the Startup Wizard option activates that wizard upon login.
10
Selecting the View images when study matches finder criteria activates the results of the search into the Display window.

Thumbnail Window
The Thumbnail Window displays the selected study series in thumbnail format.
To view images in an exam from the Thumbnails page:
1. Perform a study search and highlight the study you wish to view. Click the Thumbnails tab. Images from the study series will be displayed in the thumbnail format.
2. Open/close each series by clicking the toggle arrow to the left of each series.
3. Select the image or images you wish to view.4. Select the viewing format from the toolbar
11
Select all images
Deselect all images

12
Scroll through images in a series using the scroll bar or the middle wheel of your mouse.

Display Window
The Display Window allows the user to view the selected study and manipulate the images.
Viewing Images in the Display Window
To view images in an exam from the Study page:1. Perform an inquiry and click on the Search for Studies
icon.
2. Right click on the exam you wish to view and select View Images.
You may also select the display format to view the exam in that window.
Adjust Window level by moving the mouse while holding the left mouse button down. This will adjust the window level for that image.
Image manipulation and measurement tools are found on the Floating Toolbar. Activate the toolbar by Right clicking in the image.
Right click on the image again (off of the tools box) will hide the tools box.
Hint: Options for the Floating toolbar can be changed through the preferences icon of the Study Page.
13

14

An image locator is available with a scrolling slice indicator for CT and MRI exams. Activate the Scout Viewer by
clicking from the Display Window toolbar.
The floating scout window may be placed anywhere in the viewing window.
15

Cine Viewer
The Cine Viewer displays the series in sequential order at a preset rate. To activate Cine Viewer, click the projector icon
located on the toolbar.
Exam information is not available when viewing in Cine mode.
To exit Cine Viewer, click the projector icon.
16
Control Cine Viewer by this toolbar.

Split Screen
Viewing images in Split Screen Mode: Select the Split Screen Mode icon beneath the Study Window tab.
Notice: individual display controls exist for each screen.
When more than one study is selected for viewing, Split Screen Mode will display a different study in each window. You may scroll through the available studies using the Exam Scroll Bar.
Different series in an exam may be viewed in a window with the Series Scroll Bar.
17
Series scroll barExam scroll bar
Different studies may be viewed side by side in Split Screen Mode. First, select the exams you wish to compare from the Study tab. Hold down the Control key to select more than one exam. Click on the display format or the Display tab to display the exam. Select Split Screen Mode and use the exam scroll bar to switch between exams.

Removing JAVA 5.0
If you see the screen above, after you log on to PAC’s Web please do the following steps:
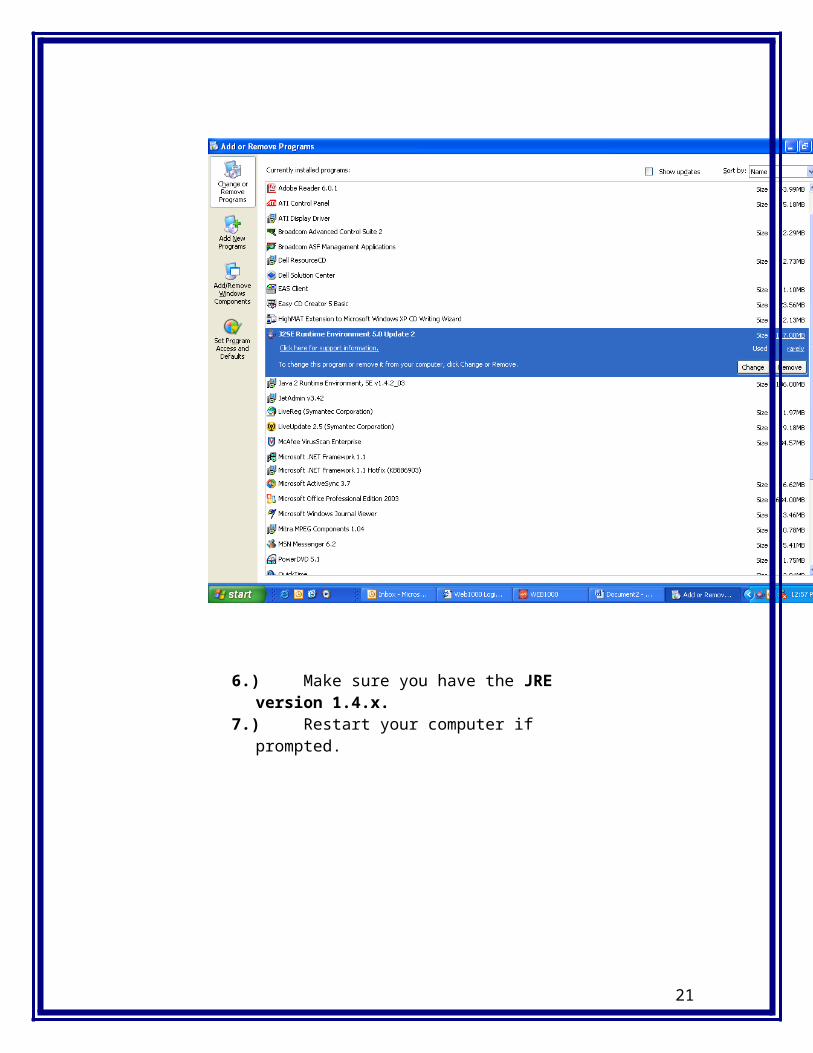
1.) Click Start 2.) Point your mouse to Settings3.) Choose Control Panel4.) Select Add or Remove Programs5.) Look for J2SE Runtime Environment 5.0 Update 2,
highlight and select Remove. (See example on next page.)
18

6.) Make sure you have the JRE version 1.4.x.7.) Restart your computer if prompted.
19

8.) Open the Java Plug-in from Control panel:
9.) Select the Update tab and uncheck the box “Check for Updates Automatically”. Apply change and Close.
20
1
3
2
Select Java Plug-in from your Control Panel list.
21

Uninstalling Internet Explorer Version 7
1. Click on Start—Settings—Control Panel
2. Click on Add/Remove Programs
22
3
2
1

3. Make sure the box next to Show Updates is marked
4. This may take a few minutes as it will load all the
updates you have applied to your computer.
5. Scroll down until you see the Internet Explorer Ver
7 update.
6. Click on it and click Remove Program.
7. When removal is complete, you will need to reboot
your computer.
23