web development with myeclipse and jboss - …read.pudn.com/downloads66/ebook/239906/j2ee_dev.pdfweb...
TRANSCRIPT

Web Development with MyEclipse and JBoss – Part 3
Web Development with MyEclipse and JBoss
Part 3 – J2EE Application Development with MyEclipse
The WebStock Case Study
The WebStoThe WebStock Case Study Study
Module 1By Karim Djaafar
and Sebastian Hennebrueder
J2EE Application Development with MyEclipse

Web Development with MyEclipse and JBoss – Part 3
Table of ContentsThe WebStock Case Study.................................................................................................. 1
About the authors.......................................................................................................................4 Struts Overview.......................................................................................................................... 4
What is Struts and why should I use Struts in my J2EE applications?...................... 4Architecture of Struts........................................................................................................... 6The View...................................................................................................... 6Form beans.................................................................................................. 7Struts model component............................................................................8Struts Controller component.....................................................................9MyEclipse and Struts......................................................................................................... 10Struts Development Process............................................................................................. 15
Designing the WebStock web parts application with MyEclipse and Struts.............. 17Introduction......................................................................................................................... 17Designing the flow of WebStock Application..............................................................18Building the WebStock Application............................................................................... 21Editing the ApplicationResources.properties file................................22Creating and editing the web pages................................................................................22Creating the administration JSP pages..................................................22Creating the ActionForm and Action.................................................... 25Logout action.............................................................................................31Login Action..............................................................................................33Logout Action........................................................................................... 34login.jsp...................................................................................................... 35Deploying and testing..............................................................................36Use case show item list...................................................................................................... 36ItemList action...........................................................................................39itemlist.jsp..................................................................................................39Use case Adding items....................................................................................................... 40JSP............................................................................................................... 43Action......................................................................................................... 43Admin JSP..................................................................................................45
Conclusion................................................................................................................................. 45 Outlook.......................................................................................................................................45
Table of Figures Figure 1 - MVC Application Structure................................................................................... 5Figure 2 - Struts Architecture.................................................................................................... 6Figure 3 - The MyEclipse J2EE Wizard in Action................................................................11
Figure 4 - The newly created web project, WebStockWeb................................................12Figure 5 - Adding Struts capabilities to a Web Project 1/2................................................ 13
J2EE Application Development with MyEclipse

Web Development with MyEclipse and JBoss – Part 3
Figure 6 - Adding Struts capabilities to a Web Project 2/2............................................... 14Figure 7 - The webstockweb directory structure after adding Struts support...............15Figure 8 - Login flow for user2................................................................................................18Figure 9 - WebStock application flow................................................................................... 19Figure 10 - Log out action.........................................................................................................20Figure 11 - Editing Struts-config.xml.....................................................................................21Figure 12 - Configure the JSP Wizard....................................................................................23Figure 13 - Struts Designer showing our JSP page............................................................. 24Figure 14 - Using New Form, Action, JSP Wizard from Struts Designer....................... 26Figure 15 - Struts form wizard ½............................................................................................ 27Figure 16 - Struts form wizard 2/2.......................................................................................... 28Figure 17 - Selecting methods to generate............................................................................ 28Figure 18 - Selecting methods to generate............................................................................ 29Figure 19 - Action configuration part 1................................................................................. 30Figure 20 - Action configuration part 2................................................................................. 31Figure 21 - Creating logout action.......................................................................................... 32Figure 22 - Logout forward...................................................................................................... 33Figure 23 - Use case item list................................................................................................... 37Figure 24 - Forward to itemlist.jsp......................................................................................... 38Figure 25 - Design Overview if webstock application.......................................................38Figure 26 - Adding Item part 1................................................................................................ 41Figure 27 - Adding Methods....................................................................................................41Figure 28 - Create JSP................................................................................................................42Figure 29 – DispatchAction......................................................................................................42Figure 30 - Parameter for DispatchAction............................................................................ 43Figure 31 - Definition of forwards......................................................................................... 43
J2EE Application Development with MyEclipse

Web Development with MyEclipse and JBoss – Part 3
About the authors
This three part series about J2EE development with MyEclipse and JBoss is a collaborative effort between Karim Djaafar from oceaneconsulting.com in France and Sebastian Hennebrueder from laliluna.de in Germany. Karim and Sebastian cooperate to offer a wide choice of seminars in the English, French and German languages on their E-Learning platform java-learning.com.
Karim works as senior consultant for large companies in France and is author of a book focusing on development with Eclipse and JBoss. Sebastian works as consultant and developer and runs the platform laliluna.de which provides a large number of tutorials about J2EE, Hibernate, Struts and JavaServer Faces.
This part of the series J2EE development with MyEclipse and JBoss implements the case study explained in the book J2EE Applications with Eclipse and JBoss authored by Karim Djaafar.
Struts OverviewIn this first section, the following topics are covered:
• Struts Overview
• What is Struts and why use Struts in Web development
• The main components and configuration of a Struts web project
What is Struts and why should I use Struts in my J2EE applications?
Struts is an open source framework that promotes the use of the Model-View-Controller design pattern and architecture for designing large scale applications. The Model-View-Controller architecture consists of three major parts: the Model, the View and the Controller. Each component has a unique responsibility and is independent of the other component, see Figure 1.
Model: The model is responsible for holding the data. It is a Java class of type ActionForm. The business logic can put data, loaded from the database, into the model. Data input from an HTML form is saved in the Model. Before the data is saved, it can be validated by the Struts model as the model handles the storage of data for input or output.
J2EE Application Development with MyEclipse

Web Development with MyEclipse and JBoss – Part 3
View: The view represents the user view of the application; moreover, view components are used to construct the user interface. Views are responsible for taking the input from the user, and dispatching the request to the controller. Views are called from the controller to display the results to the user. HTML, JSP, Custom Tag Libraries and Resources files are the part of the view components.
Controller: The controller is the intermediary between the model and view components and is responsible for receiving the request from the client. The controller knows from its configuration file which business logic to call and which view to dispatch, once the business logic has finished execution. When the request from the client is received the following process occurs:
In sequence, the controller:• Looks up which business logic it has to call• Fills the model with the data from the request • Validates the data• Continues to the business logic• Shows the view.
The ActionServlet, Action, ActionForm and struts-config.xml are the part of controller mechanism.
Figure 1 - MVC Application Structure
The Struts framework has gained considerable attention because of its ease of use and ability to fit the needs of today’s developers in building applications fast. Struts combines servlets, JSP, custom tags and message resources into a unified infrastructure and saves the developer the considerable time it takes to code an entire MVC model. The framework launched in May 2000 by Craig R. McClanahan includes a set of custom tag libraries and their associated Java classes, along with various utility classes. The most powerful aspect of the Struts framework is its
J2EE Application Development with MyEclipse

Web Development with MyEclipse and JBoss – Part 3
support for creating and processing web-based forms. Latest version of struts can be downloaded from http://jakarta.apache.org/. We are using the current and stable version jakarta-struts-1.2.8 and JBoss 4.1.2 for this tutorial.
Architecture of Struts
Main Struts components and features of Struts include (see Figure 2):• The View – a JSP or HTML page• The Model – a Java Object (called an ActionForm)• Central Controller – ActionServlet
• URI to ActionMapping (Action class) located in struts-config.xml• Action classes which are adaptors between business layer and web tier
• Validation, Internationalization, custom tags for creating HTML, presentation logic and templating
Figure 2 - Struts Architecture
Browser
JSP
HTML Form/ Struts Custom
Tags
Form Beans Struts-config.xml EntityBean
Database
Action Servlet
ModelControllerView
Action Beans
JavaBeans
SessionBean
Below we briefly examine the MVC components, but the reader who wants further information may have a look at the links and references in the bibliography section.
The View
The View in the Struts framework is represented by JSP pages, which can use an ActionForm bean to get output model data to display. The Struts framework contains a series of custom tags to facilitate the dynamic content generation.
J2EE Application Development with MyEclipse
Web Development with MyEclipse and JBoss – Part 3
Form beans
A form bean is an instance of a subclass that extends the org.apache.struts.action.ActionForm class; moreover, the form bean stores form data from a submitted client request or holds data for output in the JSP. An HTML or JSP form contains fields in which the user can enter information. When a browser submits an HTML form, the Struts ActionServlet does the following:
1. Looks at the field names from the HTML form2. Matches them to the properties' names in the form bean3. Automatically calls the setter methods of these variables to put the values
retrieved from the HTML form
The form bean can be used to collect data from the user, to validate what the user entered, and by the JSP to repopulate the form fields. In the case of validation errors, Struts provides functionality to display error messages in the JSP view. It automatically invokes the ActionForm.validate method whenever the JSP page containing the form corresponding to this ActionForm submits the form. Any type of validation can be performed in this method. The only requirement is that it return a set of ActionError objects in the return value. Each ActionError corresponds to a single validation failure, which maps to a specific error message. These error messages are held in a properties file to which the Struts application refers.
Custom tags
Struts provides a large set of JSP custom tags. There are tags to support Action Form beans:
• to support the pre-population of an HTML form with data from an Action Form bean
• to support internationalization, such as providing text that is determined by the user's locale
• to support logic, such as showing a different title for a page based on how it's being used.
HTML documents
Although HTML documents generate only static content, you can use standard HTML documents within your Struts application. Of course, they will not be able to render any dynamic data, but they are still valid to use whenever the view is static. For example, a login page may just be an ordinary HTML document that invokes a Struts login action.
To conclude this part dedicated to the view part of the Struts framework, here is an example:
<%@ page language="java" %><%@ taglib uri="/WEB-INF/struts-bean.tld" prefix="bean" %>
J2EE Application Development with MyEclipse

Web Development with MyEclipse and JBoss – Part 3
<%@ taglib uri="/WEB-INF/struts-html.tld" prefix="html" %><html:html locale="true"><head><title><bean:message key="item.description"/></title><html:base/></head> ...<html:errors/> ...<html:form action="/displayItem.do" focus="itemid"><table border="0" width="100%"> ...<html:submit property="submit" value="Submit"/> ...</html:form> ...</html:html>
As we can plainly see in this extract, when the user selects a button the form will pass the submit parameter along with whatever message Struts finds for “item.description” in the resource bundle. In a localized application, this message could vary by the user's selected locale.
Struts model component
The model includes two major parts: the state of the application and the processes to change this state. Struts uses objects which are subclasses of org.apache.struts.action.Action to access the business logic. The business logic can be directly implemented in the action class or when the action class delegates to EJB or other Java Beans to process the business logic.
The state can be saved using Java Beans or using EJB in stateful session beans. A reference to this state can be saved in the struts session. To provide data for output the action can populate an ActionForm which is used by the view to display data.
Once the action is processed it returns a forward definition to the controller. Forward definitions are defined for each action in the configuration file.
Here an example of an Action class:
Public class EmployeeAction extends Action {public ActionForward execute(ActionMapping mapping, ActionForm form, HttpServletRequest request, HttpServletResponse response) {
J2EE Application Development with MyEclipse

Web Development with MyEclipse and JBoss – Part 3
EmployeeForm myForm = (EmployeeForm) form; String userId = myForm.getEmployeId(); try { bdelegate.updateEmployee(userId, myForm) ; return mapping.findForward(”success”); } catch (Exception e) { return mapping.findForward("failure"); } }
The Action class has one method to worry about "execute(..)." When we submit our JSP page the underlying Struts components (Action Servlet and RequestProcessor) will find the Action class that we associated with the /updateEmployee action in the struts-config.xml file and the execute method will be called. Since the /updateEmployee action uses the EmployeeForm, the EmployeeAction will have this form bean of type ActionForm. We must first cast the ActionForm into the type EmployeeForm.
Struts Controller component
The most important Struts controller responsibilities are :
• Intercepting client requests• Mapping each request to a specific business operation• Collecting results from the business operation and determining the
view to display to the client based on the current state and result of the business operation
The Struts framework uses a class of type ActionServlet as controller.
Action servlet
The Struts framework uses the org.apache.struts.action.ActionServlet class for controller servlets. The action servlet intercepts all requests from the client. The client is typically a Web browser.
For each request, the action servlet looks up a corresponding mapping in the configuration file. Then the request is dispatched to an action class implementing the business logic or directly forwarded to a view. When initialized, the action servlet parses a configuration file. The configuration file defines, among other things, the action mappings for the application.
J2EE Application Development with MyEclipse

Web Development with MyEclipse and JBoss – Part 3
MyEclipse and Struts
The Struts application development tools that are provided by MyEclipse make it easier for you to build and manage a Struts-based Web application. MyEclipse acts as follows:
• A Web project can be configured for Struts. This adds the Struts runtime (and dependent JARs), tag libraries and action servlet to the project and creates the skeleton Struts configuration and application resources files. MyEclipse provides support for Struts 1.0, Strut 1.1 and 1.2, selectable when setting up the project.
• A set of component wizards to define ActionForm classes, action classes with action forwarding information, and JSP skeletons with the tag libraries included.
• A configuration file editor to maintain the control information for the action servlet.
• A design tool to edit a graphical view of the Web application from which components (forms, actions, JSPs) can be created using the wizards.
To add support for one of these technologies to your web project use its corresponding "Add Capabilities" wizard. Each technology addition wizard is accessible by selecting the target Web Project and then invoking the wizard from either the MyEclipse context-menu (i.e., right-click menu) or the MyEclipse menu bar entry.
We will begin our study of Struts by creating a new J2EE 1.4 project :
1. Select File > New >Project > MyEclipse > Enterprise Application Project2. Select Next3. On the Project Name, enter WebStock and leave the other field to the default
as displayed in Figure 3.
J2EE Application Development with MyEclipse

Web Development with MyEclipse and JBoss – Part 3
Figure 3 - The MyEclipse J2EE Wizard in Action
4. Click Next5. On the next page you define the property of the web module:
• Project Name: WebStockWeb• Directory: set to the default• Source Folder (contains Java source code such as Java packages and their
classes and interfaces) : src• Web root folder (the root or base folder of a directory structure patterned
after the J2EE web archive (WAR) structure) : WebRoot• Context root URL (The folder that will contain the web content, WEB-
INF and its required subfolders.) : /WebStockWeb6. select Next7. set the check box “Create EJB Project Module” and click next8. Select Finish, the J2EE project is created
Completing the wizard creates and configures the WebStockWeb web project. Figure 4 depicts the structure of the new project from the MyEclipse perspective. To open the MyEclipse perspective select from the MyEclipse menu bar Window > Open Perspective > Other and select MyEclipse. The Java Package Explorer is opened by selecting Window > Show View > Java > Package Explorer.
J2EE Application Development with MyEclipse

Web Development with MyEclipse and JBoss – Part 3
Figure 4 - The newly created web project, WebStockWeb
We will now add the Struts capabilities to the newly created web project. To add support for the Struts framework to the web project WebStockWeb, select the web project in the package Explorer and select Add Struts Capabilities in the MyEclipse menu as shown in the Figure 5.
J2EE Application Development with MyEclipse

Web Development with MyEclipse and JBoss – Part 3
Figure 5 - Adding Struts capabilities to a Web Project 1/2
When the wizard appears select com.webstock.struts as a base package for the new classes and leave the other fields to the default as shown in the Figure 6.
J2EE Application Development with MyEclipse

Web Development with MyEclipse and JBoss – Part 3
Figure 6 - Adding Struts capabilities to a Web Project 2/2
When you click on the Finish button you can see the result of this operation in the package view explorer, Figure 7.
J2EE Application Development with MyEclipse

Web Development with MyEclipse and JBoss – Part 3
Figure 7 - The webstockweb directory structure after adding Struts support
Now, we can continue to the implementation of our webstock use case.
Struts Development ProcessTypically, you set up and use Struts in an application in the following manner:
1. Create a new project with Struts support. If you have an existing project, you must add Struts support to the project.
2. Use wizards to:
J2EE Application Development with MyEclipse

Web Development with MyEclipse and JBoss – Part 3
a. Draw a Struts application web diagram to visually model the application flow.
b. Develop the JSPs in the Web diagram using the custom Struts HTML and bean tags.
c. Generate templates for the ActionForm and action mapping classes and modify them to add the business logic.
d. Edit the Struts configuration file to map actions to Web pages and vice versa.
You can enable Struts support in an existing web project by using the “Add Struts capabilities” option
J2EE Application Development with MyEclipse

Web Development with MyEclipse and JBoss – Part 3
Designing the WebStock web parts application with MyEclipse and Struts
Introduction
To illustrate the use of Struts, we will create in our webstock sample a login dialog that will allow the employee to log in as either a “read access” user or a “write access” user. Depending on the user name and password submitted, the user will see a different administrative maintenance page. The “read access” user (user1) will see options to view employees in the webstock access table and items in stock. The “write access” user (user2) will see the options to view, edit, and delete items in stock. Struts will be used to first validate the user name and password entries and then, depending on the submitted values, the action will forward the user to the appropriate page. A Struts action will be used to log the user out of the administrative section of the site.
The following JSPs and Java classes are created in this sample:
• login.jsp - provides the interface to log in to the administration page
• LoginForm.java - an instance of this class is used to validate the user input
parameters from the login.jsp page
• LoginAction.java - an instance of this class is used to authenticate the user
• admin1.jsp - displays the options to view a user or an item in stock
• admin2.jsp - displays the options to edit, and delete items in stock
• LogoutAction.java - an instance of this class is used to log the user out of the
administration page and redirect the user to the login page.
The following diagram (Figure 8) illustrates the sequence of events that occur when a user attempts to log in to the administrative function of the site as a “write access” user.
J2EE Application Development with MyEclipse

Web Development with MyEclipse and JBoss – Part 3
Figure 8 - Login flow for user2
The steps in this sample will follow the same flow as outlined in the section “Struts development process”. The only difference is that after the Struts components have been created, we will integrate the login.jsp page with the rest of the application by adding a hyperlink to all of the pages.
Designing the flow of WebStock ApplicationWhen beginning a Struts project it's generally useful to lay out the flow of your application so that the development team will have a better idea how all the pieces will fit together. The easiest way to work out the flow is to graphically create it using the Struts Editor's graphical design mode. The Struts Editor provides a pallet of drag-and-drop tools that enable you to begin building your application by quickly replicating the page flow from your design mockups. The flow of the example login application looks like the diagram in Figure 9. The design view allows developers to graphically edit the struts-config.xml file descriptor. (You will create the dialogs yourself later in this paper).
J2EE Application Development with MyEclipse

Web Development with MyEclipse and JBoss – Part 3
Figure 9 - WebStock application flow
From this design layout we can see that the application will start by displaying the Login.jsp page. The login page will call the Login action to perform the login operation. If we have any validation errors or problems, the Login action will forward the user back to the Login.jsp page. However, if the login was successful, the application will forward to the Admin1.jsp or Admin2.jsp page, depending on the user name and password submitted. This process could be improved by using an LDAP directory which redirects the user or employee of the dealership’s warehouse to the appropriate page based on a profile.
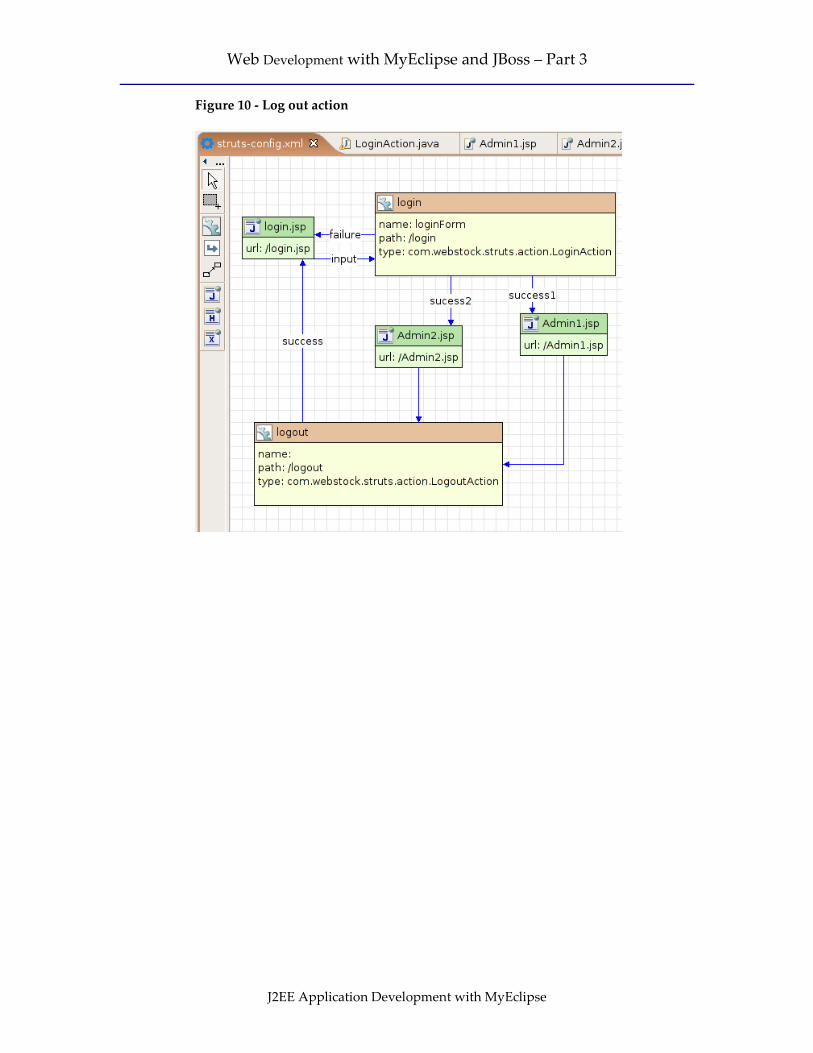
In addition to the login we also need a logout action, which can be built using the graphical wizard seen in Figure 10.
J2EE Application Development with MyEclipse
Web Development with MyEclipse and JBoss – Part 3
Figure 10 - Log out action
J2EE Application Development with MyEclipse

Web Development with MyEclipse and JBoss – Part 3
Figure 11 displays the struts-config.xml file, in the Source view, which is automatically created by the wizard.
Figure 11 - Editing Struts-config.xml
Now that the flow diagram of the webstock application is designed, we can build our application using the tools and wizards available in the MyEclipse environment.
Building the WebStock ApplicationWe will start by designing and editing the Web pages of the WebStock application. However, before we start we must first edit the ApplicationResources.properties file of the webstock application.
J2EE Application Development with MyEclipse
Web Development with MyEclipse and JBoss – Part 3
Editing the ApplicationResources.properties file
The ApplicationResources.properties file is used to specify properties that can be used throughout the application. We are going to add some properties to the file for later use in our pages. You will see how some of these are used as we go through the sample.
• Navigate to the ApplicationResources.properties file in the WebStockWeb /src/com.webstock.struts folder
• Double-click the file to open it in the default text editor• Replace the contents of the file with the text shown in the extract:
errors.header = <h3><font color=”red”>The following errors weredetected:</font></h3><ul>errors.prefix = <li>errors.suffix = </li>erros.footer = </ul>login.title = <span class=”site-page-headers”>WebStock Administration Login</span>login.username = User Namelogin.password = Passwordlogin.submitlabel = Loginlogout.label = Logoutlogout.submitlabel = Logouterror.username.required = Please specify a user name.error.password.required = Please specify a password.error.password.mismatch = Invalid username or password entered.admin1.title = <span class=”site-page-headers”>WebStock Administration Menu - ReadAccess</span>admin2.title = <span class=”site-page-headers”>WebStock Administration Menu - WriteAccess</span>
Creating and editing the web pages
Creating the administration JSP pages
We will begin by creating the admin1.jsp page first. This seems backwards by creating the last page first, but we are doing it this way so we can use the New Form, Action and JSP wizard to create the first JSP page along with the related Action and ActionForm. Let's create the admin1.jsp JSP page from our designer view by using the "JSP" palette tool. By clicking the JSP icon first and then clicking on the canvas a new JSP creation wizard appears as seen in Figure 12 below:
J2EE Application Development with MyEclipse

Web Development with MyEclipse and JBoss – Part 3
• select on the JSP Tool in the Struts designer palette • then click on the canvas where you want to position your new JSP page
After clicking on the canvas, we will be prompted with the New JSP dialog as shown in Figure 12.
Figure 12 - Configure the JSP Wizard
J2EE Application Development with MyEclipse

Web Development with MyEclipse and JBoss – Part 3
After clicking Finish, the design view, as seen in Figure 13, will show the newly created page (select Struts-config.xml to return to the Struts designer tool instead of the design view of admin1.jsp).
Figure 13 - Struts Designer showing our JSP page
Once the admin1.jsp page is created and opened in MyEclipse Page designer. When you click the Source tab you may note that the Struts HTML form tag is automatically inserted into the JSP. Since the admin1 page does not contain any input parameters, we do not need an HTML form tag. Remove the code associated with the HTML form tag. Add a message bean tag after the <BODY> tag and set the key attribute to admin1.title.
<bean:message key=”admin1.title”></bean:message>
After the message bean title tag insert the code shown in the following extract:
<body><UL><LI> <html:link action="itemList.do">View Items </html:link></LI> <LI><html:link action="logout.do"><bean:message key="logout.label"/> </html:link> </LI></UL></body>
The first link calls the itemList action which displays a list of stock items. The second link calls the logout action. The label of the logout link is read from the resource file.
J2EE Application Development with MyEclipse
Web Development with MyEclipse and JBoss – Part 3
While in the Preview page of Page designer, the admin1.jsp page should look similar to the following diagram (the Web Browser page is displayed when we deploy the webstockweb in the application server):
Save your change and exit the Page designer.We will keep the work on the Admin2.jsp page for later and just replace the content of the title tag.
<title><bean:message key="admin2.title"></bean:message></title>Save your changes and exit from the Page Designer.
Creating the ActionForm and Action
We can now create a form bean using the ActionForm wizard. An instance of this class is used to validate the input parameters from the login.jsp page. Note that it is not always necessary to create an ActionForm class for each JSP within the application. This may sound like a lot of work, but MyEclipse can streamline this considerably by way of the New Form and New Form, Action and JSP wizards. When creating the login.jsp page we need to consider the fields we want to display in this page and map those fields to the respective ActionForm. The form will store the values and ensure they get passed to the proper Action. Both of the MyEclipse wizards mentioned above, when generating the Form, offer the ability to create a JSP page along with the form. This will take all the properties of the Form and generate a JSP page with all the corresponding form fields already in it and ready to use. In this situation since we also want to create an Action to process the login, we will use the New Form, Action and JSP wizard instead of just the New Form wizard.
J2EE Application Development with MyEclipse

Web Development with MyEclipse and JBoss – Part 3
Right click on the white canvas area of the Struts designer, select new and then the New Form, Action and JSP wizard as in Figure 14.
Figure 14 - Using New Form, Action, JSP Wizard from Struts Designer
You will first be presented with the New Form wizard, since it is the first of a three step wizard. Be sure to enter a use case name so the wizard can fill in default values for you. Figure 15 shows how values will be filled in for you as you enter a use case.
J2EE Application Development with MyEclipse

Web Development with MyEclipse and JBoss – Part 3
Figure 15 - Struts form wizard ½
Next we need to add two form properties: userName and password. When adding the password field, choose password for the JSP input type field as shown in Figure 16.
Create the following properties that will be used by the form fields:
username: Type java.lang.String, JSP input type:text
password: Type java.lang.String,JSP input type:password
J2EE Application Development with MyEclipse

Web Development with MyEclipse and JBoss – Part 3
Figure 16 - Struts form wizard 2/2
Select the JSP tab to tell the wizard that you want MyEclipse to generate a skeleton JSP page having a form with these values in it, see Figure 17 below.
Figure 17 - Selecting methods to generate
J2EE Application Development with MyEclipse

Web Development with MyEclipse and JBoss – Part 3
Lastly we need to click on the Methods tab to be sure to check all the methods that the wizard can auto-generate for you in the new Form. Figure 18 shows this configuration:
Figure 18 - Selecting methods to generate
In the next step we define that the ActionForm should be validated. We can preserve the default settings for the action name.
J2EE Application Development with MyEclipse

Web Development with MyEclipse and JBoss – Part 3
Figure 19 - Action configuration part 1
Our last step is to define all the forwards that are part of the diagram seen in the Figure 9:
• success1 to Admin1.jsp• success2 to Admin2.jsp• failure to login.jsp
J2EE Application Development with MyEclipse

Web Development with MyEclipse and JBoss – Part 3
Figure 20 - Action configuration part 2
Now we have finished everything we needed for the login action. Open your struts-config.xml file to compare the design view with Figure 9.
Logout action
Before implementing the action we have just created, we will add the prototypes for the logout action. Open the Create Action dialog and input logout as the use case name. Uncheck the validate option.
J2EE Application Development with MyEclipse

Web Development with MyEclipse and JBoss – Part 3
Figure 21 - Creating logout action
Continue to the forward dialog and add a forward named success to the login.jsp.
J2EE Application Development with MyEclipse

Web Development with MyEclipse and JBoss – Part 3
Figure 22 - Logout forward
Congratulations we have finished all method prototypes now and will continue to the implementation.
Login Action
Our login action will first validate if the submitted values are not empty. Than it tries to get a user id using the business logic we created in the EJB part of the tutorial. If the action is successful it continues to the admin page, else if the action is unsuccessful it returns to the login. Below you can see the source of the execute method you need to change.public ActionForward execute(
ActionMapping mapping,ActionForm form,HttpServletRequest request,HttpServletResponse response) {LoginForm loginForm = (LoginForm) form;
J2EE Application Development with MyEclipse

Web Development with MyEclipse and JBoss – Part 3
// verify if submitted data is not emptyif (loginForm.getUserName().equals("") ||
loginForm.getPassword().equals(""))return mapping.findForward("failure");
try {// get home object from JNDI context and create session beanInitialContext context = new InitialContext();WebStockAccessLocalHome home = (WebStockAccessLocalHome)
context.lookup(WebStockAccessLocalHome.JNDI_NAME);WebStockAccessLocal webStockAccessLocal = home.create();
String userId = webStockAccessLocal.loginUser(loginForm.getUserName(), loginForm.getPassword());
if (userId == null || userId.equals(""))// when no userid could be found return to login pagereturn mapping.findForward("failure");
else{// else save userid in the session HttpSession session = request.getSession();/* it is bad style to use a static string as attribute name,
consider to use a class holding global constants strings in real applications */session.setAttribute("userid", userId);return mapping.findForward("success1");
}// lazy handling of exceptions !
} catch (NamingException e) {e.printStackTrace();
} catch (CreateException e) {e.printStackTrace();
}
return mapping.findForward("failure");}
Logout Action
The logout action cleans up the session removing the user id. Then the session is invalidated and the user is forwarded to the login.
J2EE Application Development with MyEclipse

Web Development with MyEclipse and JBoss – Part 3
public ActionForward execute(ActionMapping mapping,ActionForm form,HttpServletRequest request,HttpServletResponse response) {
// remove user_id from the session and invalidate sessionHttpSession session = request.getSession();session.removeAttribute("userid"); // once again, bad style to
use string constants --> loginActionsession.invalidate();return mapping.findForward("success");
}
login.jspThe last file we have to implement is the login.jsp. The title of the page is read from the resources file using the tag <bean:message key="login.title"/>.
The wizard already created the Struts tag which creates the HTML input tags. We will slightly change the source to read the descriptors of the fields from the resources file.<%@ page language="java"%><%@ taglib uri="http://jakarta.apache.org/struts/tags-bean" prefix="bean"%> <%@ taglib uri="http://jakarta.apache.org/struts/tags-html" prefix="html"%> <html> <head><title><bean:message key="login.title"/> </title>
</head><body><html:form action="/login"><bean:message key="login.username"/> : <html:text
property="userName"/><html:errors property="userName"/><br/><bean:message key="login.password"/> : <html:password
property="password"/><html:errors property="password"/><br/><html:submit><bean:message key="login.submitlabel"
/></html:submit> <html:cancel/></html:form>
</body></html>
J2EE Application Development with MyEclipse

Web Development with MyEclipse and JBoss – Part 3
Deploying and testingDeploy the complete Enterprise Application including the WebStockEJB module and the WebStockWeb module. Open your application in a Web browser. When you use the login we created in the second part (Hugo with h as password), you can successfully login and logout. The URL should be:
http://localhost:8080/WebStockWeb/login.jsp
Use case show item listWe will create a further use case which shows a list of items in the stock. In part two of this series we provided a method called getItemsInStock which returns a list of objects of type StockItem. In our admin2.jsp file we have already prepared a link to call this dialog. The action will load the data using the business logic we implemented and will forward to a JSP displaying the items. Open the struts-config.xml in the design mode, click with your right mouse button and select new action. Input itemList as the use case name. We do not need to validate the form, so uncheck this option.
J2EE Application Development with MyEclipse

Web Development with MyEclipse and JBoss – Part 3
Figure 23 - Use case item list
J2EE Application Development with MyEclipse

Web Development with MyEclipse and JBoss – Part 3
We will create a forward to a JSP:
Figure 24 - Forward to itemlist.jsp
Using the symbol we add some lines to show that the dialog itemList can link to the logout and that Admin1.jsp can call the itemList action. Finally you should have the following overview.
Figure 25 - Design Overview if webstock application
J2EE Application Development with MyEclipse

Web Development with MyEclipse and JBoss – Part 3
ItemList action
The itemList action uses the EJB business logic to read the stockItems from the database. Then it saves the list of items in the request to allow the JSP to output them.public ActionForward execute(
ActionMapping mapping,ActionForm form,HttpServletRequest request,HttpServletResponse response) {
// create an empty list in case EJB access is not succesfulList stockItems = new ArrayList();
// load stockitems using EJBtry {// get home object from JNDI context and create session beanInitialContext context = new InitialContext();WebStockAccessLocalHome home = (WebStockAccessLocalHome)
context.lookup(WebStockAccessLocalHome.JNDI_NAME);WebStockAccessLocal webStockAccessLocal = home.create();
stockItems = webStockAccessLocal.getItemsInStock();
// lazy handling of exceptions, not suitable for real applications !
} catch (NamingException e) {e.printStackTrace();
} catch (CreateException e) {e.printStackTrace();
}// save stockitems in the request.request.setAttribute("stockItems", stockItems);return mapping.findForward("success");
}
itemlist.jsp
The itemlist.jsp lists all stockitems that are found in the action and saved in the request. The tag <logic:iterate name="stockItems" id="stockItem"> reads the list we
J2EE Application Development with MyEclipse

Web Development with MyEclipse and JBoss – Part 3
saved under the name stockItems and makes each item available under the name stockItem. The tags <bean:write ..> show the properties of stockItem. <body> <table><tr> <TD>Part ID</TD> <TD>Description</TD> <TD>Location</TD> <TD>Quantity</TD> <TD>Shelf</TD> <TD>Weight</TD> </tr> <logic:iterate name="stockItems" id="stockItem"> <tr> <TD><bean:write name="stockItem" property="partId" /> </TD> <TD><bean:write name="stockItem" property="description" /> </TD> <TD><bean:write name="stockItem" property="location" /> </TD> <TD><bean:write name="stockItem" property="quantity" /> </TD> <TD><bean:write name="stockItem" property="shelf" /> </TD> <TD><bean:write name="stockItem" property="weight" /> </TD> </tr> </logic:iterate> </table> </body>
Use case Adding itemsWe will create a use case now to add an item in stock. This use case is intended as template for comparable use cases like edit or delete item. Open the struts-config.xml and start the new form, action and JSP wizard. Type addItem as the use case and add the properties to the form as shown below in Figure 26.
J2EE Application Development with MyEclipse

Web Development with MyEclipse and JBoss – Part 3
Figure 26 - Adding Item part 1
Select the methods to be created by the wizard.
Figure 27 - Adding Methods
Input /addItem.jsp as seen in Figure 28 and click Next to continue.
J2EE Application Development with MyEclipse

Web Development with MyEclipse and JBoss – Part 3
Figure 28 - Create JSP
Change the Super class of our action class to DispatchAction. This class condenses related events into one Action class. Typical CRUD events (create, retrieve, update, and delete) can be seen as related events.
Figure 29 – DispatchAction
In the Parameter tab define do as parameter. This parameter will allow us to distinguish which method in the DispatchAction will be called by Struts.e.g do=add - will call the add method, empty do will just show the empty JSP.
J2EE Application Development with MyEclipse

Web Development with MyEclipse and JBoss – Part 3
You could also add methods to edit or delete.
Figure 30 - Parameter for DispatchAction
Finally generate the forwards you will need.
Figure 31 - Definition of forwards
Our ActionForm should have been generated by the wizard.
JSP
Our JSP addItem.jsp was generated by the wizard. We only need to add a hidden value as parameter for our DispatchAction..........<html:form action="/addItem"> <html:hidden property="do" value="add" />
........
ActionOur action addItemAction needs two different methods:
• add• unspecified
The method add will be called when Struts finds the add parameter, i.e. when it comes from the addItem.jsp The method unspecified is called when no parameter is passed. /** * MyEclipse Struts Creation date: 12-16-2005 * * XDoclet definition: * * @struts.action path="/addItem" name="addItemForm"
J2EE Application Development with MyEclipse

Web Development with MyEclipse and JBoss – Part 3
input="/addItem.jsp" * parameter="do" scope="request" validate="true" * @struts.action-forward name="success" path="/Admin1.jsp" redirect="true" * @struts.action-forward name="failure" path="/addItem.jsp" */public class AddItemAction extends DispatchAction {
// --------------------------------------------------------- Instance// Variables
// --------------------------------------------------------- Methods
/** * Method execute * * @param mapping * @param form * @param request * @param response * @return ActionForward */
public ActionForward add(ActionMapping mapping,ActionForm form,HttpServletRequest request,HttpServletResponse response) {AddItemForm addItemForm = (AddItemForm) form;StockItem stockItem = new StockItem();stockItem.setDescription(addItemForm.getDescription());stockItem.setWeight(addItemForm.getWeight());stockItem.setLocation(addItemForm.getLocation());stockItem.setQuantity(addItemForm.getQuantity());stockItem.setShelf(addItemForm.getShelf());
// get home object from JNDI context and create session beantry{InitialContext context = new InitialContext();WebStockAccessLocalHome home = (WebStockAccessLocalHome)
context.lookup(WebStockAccessLocalHome.JNDI_NAME);WebStockAccessLocal webStockAccessLocal = home.create();webStockAccessLocal.addItem(stockItem);return mapping.findForward("success");
} catch (EJBException e){//lazy exception handle, we should forward to a failure page!!!e.printStackTrace();
} catch (NamingException e){//lazy exception handle, we should forward to a failure page!!!e.printStackTrace();
} catch (CreateException e){//lazy exception handle, we should forward to a failure page!!!e.printStackTrace();
}return mapping.findForward("failure");
}
J2EE Application Development with MyEclipse

Web Development with MyEclipse and JBoss – Part 3
@Overrideprotected ActionForward unspecified(ActionMapping mapping,
ActionForm form,HttpServletRequest request, HttpServletResponse response)throws Exception {
// forward to input pagereturn mapping.findForward("failure");
}
Admin JSPOpen the file Admin1.jsp and add the line to the list. <LI> <html:link action="addItem"><bean:message key="additem.label"/> </html:link> </LI>
Deploy the WebStock project containing the EBJ part and the Web part to the application server. When everything goes well you have successfully implemented our use case. Congratulations.
As for exercise, we suggest to implement the delete item use case. For that you need to implement in the Session bean WebStockAccess (see module 2 with the example of addItem to follow the same method).
ConclusionIn this last part of the case study we have presented the Struts framework and implemented the view part of the WebStock application using some tools and useful wizards integrated into the MyEclipse environment. We have also integrated the EJB part of the study seen in part 2 using some design practices like Data Access Object (DAO). As we have said, it will be useful to enhance this study by using some existing technologies like the message driven EJB and an LDAP directory (see our e-learning site for help and further information about this). In conclusion, we hope that this overview of the J2EE platform with MyEclipse gives you a better understanding of this great combination.
OutlookWe have not used any complex Entity Beans for relational database entity access. Integration of technologies like Message Driven Beans would allow communication between applications, for example a local stock application could store any changes to the local stock as a message. The message could even contain a serialized
J2EE Application Development with MyEclipse

Web Development with MyEclipse and JBoss – Part 3
stockItem class. Once the central application got connected it could process all changes to the local stock.
Integration of LDAP would allow a centralized repository for access information. This would preclude the need for storing user credentials in the application database. This would make the application more flexible.
We have not talked about application tuning (pooled connections for example), security, configuration and EJB handling.
The Java Management Extensions, JMX, would allow a java application to connect to the application server and retrieve information from our application. Using JMX we could develop a monitoring application for our WebStock application.
J2EE Application Development with MyEclipse