web dynpro java for newbies: a quick guide to … dynpro java for newbies: a quick guide to develop...
TRANSCRIPT

SAP DEVELOPER NETWORK | sdn.sap.com BUSINESS PROCESS EXPERT COMMUNITY | bpx.sap.com © 2008 SAP AG 1
Web Dynpro Java for Newbies: a Quick Guide to Develop Your First Application
Applies to: Web Dynpro for Java (Enhancement package 1 of SAP NetWeaver CE 7.1). For more information, visit the UUser Interface Technology homepage.
Summary If you are new to Web Dynpro Java and want to get familiar with the Web Dynpro perspective in the SAP NetWeaver Developer Studio, this is the right tutorial for you. You will learn how to develop a simple application that allows the user to enter his name and after having clicked a button, he will be navigated to another view, where this name is displayed.
Details Level of complexity: Beginner Time required for completion: 25 min. Author: Stefanie Bacher Company: SAP AG Created on: 30 September 2008
Author Bio Stefanie Bacher works as a product specialist within the SAP NetWeaver Product Management User Interaction Technology Team. She focuses on rollout and knowledge transfer for Web Dynpro for Java.

Web Dynpro Java for Newbies: a Quick Guide to Develop Your First Application
Table of Content
Creating Your First Web Dynpro Application......................................................................................................3 Creating a Web Dynpro Development Component (DC) ...................................................................................3 Creating a Web Dynpro Application ...................................................................................................................5 Creating the Second View ..................................................................................................................................6 Specifying the Navigation ...................................................................................................................................7 Creating the Controller Context ..........................................................................................................................9
Creating a context for the component controller.............................................................................................9 Mapping View Contexts to the Component Controller Context ........................................................................10 Creating Actions and Implementing Navigation................................................................................................11 Designing a View Layout ..................................................................................................................................13
Designing a layout for the WelcomeCompView............................................................................................13 Designing a layout for the ResultView ..........................................................................................................15
Deploying and Running Your Application .........................................................................................................16 Related Content................................................................................................................................................17 Copyright...........................................................................................................................................................18
SAP DEVELOPER NETWORK | sdn.sap.com BUSINESS PROCESS EXPERT COMMUNITY | bpx.sap.com © 2008 SAP AG 2

Web Dynpro Java for Newbies: a Quick Guide to Develop Your First Application
Creating Your First Web Dynpro Application In the following tutorial, you are introduced step by step to the basic concepts involved in implementing a basic Web Dynpro application. The user interface for this application consists of only two views and allows the user to navigate from one view to the other. In the first view, the user is able to enter his or her name in an input field and navigate to the next view using a button. This name is then added to a text field and displayed in the welcoming text in the second view.
The user interface for this tutorial looks as following:
Prerequisites
● A local instance of SAP NetWeaver Developer Studio is installed on your desktop
● You have access to SAP Application Server Java
Creating a Web Dynpro Development Component (DC) To manage local development objects, you need a specific DC project in the Developer Studio. A Web Dynpro DC serves as a container for Web Dynpro-specific resources and development objects such as Web Dynpro components, models, component interfaces, views, local dictionary data types, mimes. For this reason, you will use the appropriate wizard to generate a suitable project structure for the new Web Dynpro application.
Procedure ...
1. To open the Web Dynpro perspective in your Developer Studio, choose → Window → Open Perspective → Web Dynpro.
2. Choose File → New → Web Dynpro Development Component. The New Development Component wizard appears.
3. Choose a Software Component for your Development Component, for example MyComponents, and confirm with Next.
4. In the window that appears, give your DC the name welcome, leave the default settings unchanged
and choose Finish.
SAP DEVELOPER NETWORK | sdn.sap.com BUSINESS PROCESS EXPERT COMMUNITY | bpx.sap.com © 2008 SAP AG 3

Web Dynpro Java for Newbies: a Quick Guide to Develop Your First Application
The wizard generates an initial structure for your new Web Dynpro DC as shown below. The Web Dynpro Explorer provides a logical view of the structure of a Web Dynpro DC (as opposed to a pure file and folder-based one). With this project view, you can access all Web Dynpro units. In addition, each Web Dynpro DC provides access to local dictionaries, with the help of which you can create user-defined dictionary types. Additionally required projects resources, such as MIMEs or even separate Java help classes, can be added to the Web Dynpro DC through the resources node.
SAP DEVELOPER NETWORK | sdn.sap.com BUSINESS PROCESS EXPERT COMMUNITY | bpx.sap.com © 2008 SAP AG 4

Web Dynpro Java for Newbies: a Quick Guide to Develop Your First Application
Creating a Web Dynpro Application The project structure you have created does not yet include all the elements that enable you to define the specific functions of an application. These additional elements are encapsulated in a Web Dynpro component that can contain any number of windows and views for visual representation and their corresponding controllers.
Moreover, you also need an object that can be used to address and display the Web Dynpro component in the Web browser. This is why you create a Web Dynpro application as an additional object. As an independent program unit it connects to an URL that can be accessed by the user with a window in the Web Dynpro component.
Procedure 1. In the Web Dynpro Explorer, expand the Web Dynpro node in the structure of the welcome DC. 2. To start the relevant wizard, open the context menu of the Applications node and choose Create
Application. 3. Enter a name for your Web Dynpro application, such as WelcomeApp, and specify the package name
(such as com.sap.demo.welcome.welcomeapp) for the Java classes that will be generated. Then choose Next.
4. In the window that appears, you must assign a Web Dynpro component to which the application is
linked. Since a Web Dynpro component has not yet been created, the wizard creates a component at this point.
5. Accept the selection Create a new component and choose Next again.
In the next screen, you must specify some general values for the component. 6. Enter the name WelcomeComp for your Web Dynpro component and specify the package name (such
as mycom.demo.welcome.app.comp) for the Java classes to be generated.
SAP DEVELOPER NETWORK | sdn.sap.com BUSINESS PROCESS EXPERT COMMUNITY | bpx.sap.com © 2008 SAP AG 5

Web Dynpro Java for Newbies: a Quick Guide to Develop Your First Application
7. Accept the other suggested settings and choose Next. 8. Accept the predefined settings for the window, the interface view, the startup plug and the default view,
and choose Finish.
The application wizard performs several generation routines. Once it has finished, it adds the new application object to the structure, automatically opens the Properties view (in the right pane). Additionally, it inserts a substructure for the new Web Dynpro component WelcomeComp, including the view WelcomeCompView.
You can now access all parts of the project using the graphical editor called Component Modeler and use it for convenient top-down navigation through all of the layers and development objects.
Creating the Second View Users need elements within the user interface to interact with the application. The Web Dynpro concept allows you to split the user interface into an arrangement of views. You can think of each of these views as an entity encompassing the elements of a UI that belong together.
Now you create a second view to provide an application that provides two different view layouts providing different information. You define the logical user interface unit with graphical support of the Window editor tool. Later on, you will design the layout itself.
Procedure ...
1. To open the Window editor tool, double-click on the window name WelcomeWindow within Web Dynpro Explorer.
2. Click once on New View in the palette tool, then once into the graphical editor. Enter name ResultView for the new view and confirm with Finish.
© 2008 SAP AG 6
When you double-click WelcomeWindow in the DC structure you will find two views
SAP DEVELOPER NETWORK | sdn.sap.com BUSINESS PROCESS EXPERT COMMUNITY | bpx.sap.com

Web Dynpro Java for Newbies: a Quick Guide to Develop Your First Application
defined for the application. The WelcomeCompView is displayed with a bold line, since it is the default view to be displayed when the application is started.
Specifying the Navigation A view can only be displayed by the browser if it has been embedded in a window. A window always contains one or more views, which are connected by navigation links. One of these views is specified as the default view and is displayed the first time when the window is called for the first time.
To define the navigation between the views, you must create exit and entry points for each view using outbound and inbound plugs. You can then specify the navigation flow using navigation links. The navigation then can be triggered with a special method that is generated for this purpose.
Procedure ...
1. To navigate to the window, double-click the component WelcomeWindow in the Web Dynpro explorer. The graphical tool displays two rectangles representing the views.
SAP DEVELOPER NETWORK | sdn.sap.com BUSINESS PROCESS EXPERT COMMUNITY | bpx.sap.com © 2008 SAP AG 7

Web Dynpro Java for Newbies: a Quick Guide to Develop Your First Application
SAP DEVELOPER NETWORK | sdn.sap.com BUSINESS PROCESS EXPERT COMMUNITY | bpx.sap.com © 2008 SAP AG 8
2. Choose Link from the Palette and draw a line from the WelcomeCompView to the ResultView.
Result
● On the WelcomeCompView an Outbound plug called Out is created.
● On the ResultView an Inbound plug called In is created.
● An event handler with the name onPlugIn has been automatically created for the ResultView.
Web Dynpro Java for Newbies: a Quick Guide to Develop Your First Application
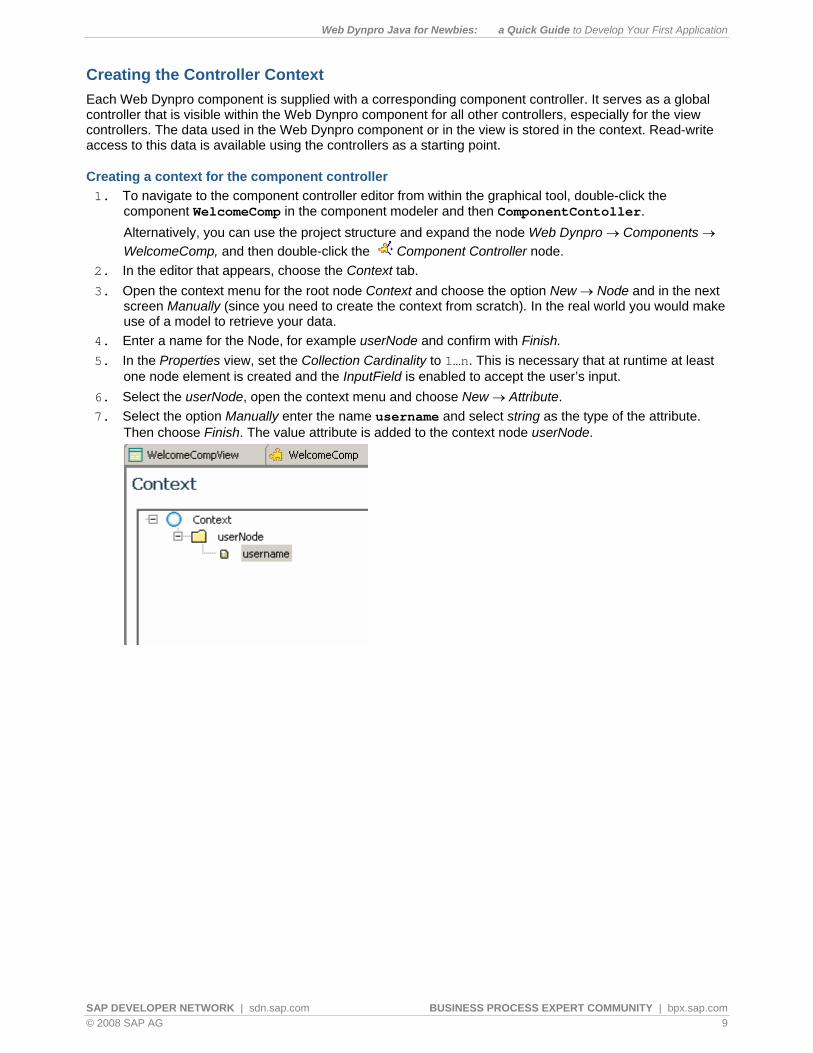
Creating the Controller Context Each Web Dynpro component is supplied with a corresponding component controller. It serves as a global controller that is visible within the Web Dynpro component for all other controllers, especially for the view controllers. The data used in the Web Dynpro component or in the view is stored in the context. Read-write access to this data is available using the controllers as a starting point.
Creating a context for the component controller 1. To navigate to the component controller editor from within the graphical tool, double-click the
component WelcomeComp in the component modeler and then ComponentContoller. Alternatively, you can use the project structure and expand the node Web Dynpro → Components → WelcomeComp, and then double-click the Component Controller node.
2. In the editor that appears, choose the Context tab. 3. Open the context menu for the root node Context and choose the option New → Node and in the next
screen Manually (since you need to create the context from scratch). In the real world you would make use of a model to retrieve your data.
4. Enter a name for the Node, for example userNode and confirm with Finish. 5. In the Properties view, set the Collection Cardinality to 1…n. This is necessary that at runtime at least
one node element is created and the InputField is enabled to accept the user’s input. 6. Select the userNode, open the context menu and choose New → Attribute. 7. Select the option Manually enter the name username and select string as the type of the attribute.
Then choose Finish. The value attribute is added to the context node userNode.
SAP DEVELOPER NETWORK | sdn.sap.com BUSINESS PROCESS EXPERT COMMUNITY | bpx.sap.com © 2008 SAP AG 9

Web Dynpro Java for Newbies: a Quick Guide to Develop Your First Application
Mapping View Contexts to the Component Controller Context To ensure data consistency inside a Web Dynpro DC, the data is stored in the Component Controller (or in a Custom controller) and the different view controller contexts reference to this data. To realize this, you have to map the relevant contexts.
Procedure ...
1. Go back to the component view using the graphical tool or alternatively expand the node Web Dynpro → Components → WelcomeComp.
2. Choose Data Link from the Palette and draw a line from the WelcomeCompView to the Component
Controller. In the wizard that appears you can map the view context to the component context. 3. Drag the userNode in the context of the component controller to the root node of the view controller
context, and drop it. 4. Select the checkbox for the username attribute and confirm with Finish.
You have now created a new node and attribute for the view context and mapped it to the corresponding component context element.
5. Repeat the last three steps to map the ResultView’s context to the Component Controller context.
Result
SAP DEVELOPER NETWORK | sdn.sap.com BUSINESS PROCESS EXPERT COMMUNITY | bpx.sap.com © 2008 SAP AG 10
The contexts of both views are now mapped to the Component Controller context. The data is stored in the component controller context and the view contexts reference to it. This ensures that the data is consistent inside a Web Dynpro DC.

Web Dynpro Java for Newbies: a Quick Guide to Develop Your First Application
Creating Actions and Implementing Navigation To navigate from one view to the next, you need an appropriate action, which you bind to a UI element event (such as a button’s event onAction). You then need to implement the event handler, which reacts to this action and triggers a view change by calling an outbound plug.
Procedure 1. To navigate to the view editor for the first view, double-click the WelcomeCompView in the graphical
tool or the corresponding node in project structure. 2. Choose the Actions tab. 3. Choose the New... pushbutton.
You can create a new action in the wizard that appears. 4. Enter the name Go for this new action. In the field Text enter Go for the text to be displayed on all UI-
elements with events bound to this action. Leave the Event Handler option unchanged. Assign the plug Out as a Fire Plug and choose Finish.
The new action, Go, and its associated event handler onActionGo are displayed in the list of actions.
SAP DEVELOPER NETWORK | sdn.sap.com BUSINESS PROCESS EXPERT COMMUNITY | bpx.sap.com © 2008 SAP AG 11

Web Dynpro Java for Newbies: a Quick Guide to Develop Your First Application
You now have created the Go action. The implementation of the navigation is automatically inserted into the associated event handler.
To check the generated source code for event handler onActionGo(), open the Java Editor for the WelcomeCompView.java class. public void onActionGo(com.sap.tc.webdynpro.progmodel.api.IWDCustomEvent wdEvent ) { //@@begin onActionGo(ServerEvent) wdThis.wdFirePlugOut(); //@@end }
To trigger navigation from the WelcomeCompView to the ResultView using the outbound plug Out, the application calls the outbound plug method wdFirePlugOut(). The predefined private variable wdThis is used for this method call. The wdThis variable is always required whenever you make method calls to the view controller’s private interface IPrivate<Name_of_View>.
In a subsequent step, you must only assign these actions to the appropriate buttons in the view layout and the navigation part of your sample application will be completely defined.
SAP DEVELOPER NETWORK | sdn.sap.com BUSINESS PROCESS EXPERT COMMUNITY | bpx.sap.com © 2008 SAP AG 12

Web Dynpro Java for Newbies: a Quick Guide to Develop Your First Application
Designing a View Layout You can now start creating the layout for your user interface. You will add UI elements to the two views and then assign the appropriate element attributes.
Designing a layout for the WelcomeCompView .
1. If you have not already done so, launch the View Designer by double-clicking the WelcomeCompView in the graphical tool or the corresponding node in project structure.
2. Choose the Layout tab. The Layout tab in the View Designer shows the WelcomeCompView with a predefined default text “Hello World !”. Simultaneously, the Outline view displays a list of the UI elements included. All the UI elements are arranged under a root node and are represented in order in the tree in the layout. If you select a UI element in the Outline view or on the Layout tab, its associated element properties are shown in the Properties view – provided you have previously selected the Properties tab.
3. Choose the root element RootElement in the Outline view and assign the following properties:
Property Value
layout GridLayout
cellPadding 5
colCount 3
stretchedHorizontally false
stretchedVertically false
In some cases, you cannot change all the values for element properties by editing them directly in the associated Value column. The values are often predefined and can be selected from a dropdown box (to the right of the Value column).
SAP DEVELOPER NETWORK | sdn.sap.com BUSINESS PROCESS EXPERT COMMUNITY | bpx.sap.com © 2008 SAP AG 13

Web Dynpro Java for Newbies: a Quick Guide to Develop Your First Application
4. Choose the DefaultTextView that was initially generated and give it the following properties:
Property Value
design header2
text Welcome to your first Web Dynpro application!
colSpan 3
5. In the Outline view, select the root element RootElement and choose Apply Template from the context menu.
6. Choose Form and then Next. 7. In the next step select the checkbox for the username attribute and choose Next again.
Now a list (in this case just for the username attribute) is displayed, where you can adapt the Editors for the different attributes. Leave all proposals unchanged and confirm with Finish. For the context attribute username an InputField and a Label is created, placed inside a TransparentContainer. The value property of the InputField is now bound to the context attribute username.
8. Select the TransparentContainer and assign the value 2 to the colCount property. 9. Select the label UI element and enter Enter your name here to the text property. 10. Select the RootElement and choose Insert Child from the context menu, followed by Button and Finish
in the next screen. 11. Select the Button and assign the Go action to the onAction event. Additionally you can change the
text property to Go. The View Designer displays the following layout for the WelcomeCompView
SAP DEVELOPER NETWORK | sdn.sap.com BUSINESS PROCESS EXPERT COMMUNITY | bpx.sap.com © 2008 SAP AG 14

Web Dynpro Java for Newbies: a Quick Guide to Develop Your First Application
Designing a layout for the ResultView ...
1. Now open the ResultView in the View Designer. 2. In the Outline view, select the DefaultTextView and change the text property to Hello . 3. Select Insert Child from the RootElement’s context menu and insert a TextView. Add a new TextView
UI element. 4. Select this TextView and bind the text property to the context attribute username.
The View Designer displays the following layout for the ResultView:
SAP DEVELOPER NETWORK | sdn.sap.com BUSINESS PROCESS EXPERT COMMUNITY | bpx.sap.com © 2008 SAP AG 15

Web Dynpro Java for Newbies: a Quick Guide to Develop Your First Application
Deploying and Running Your Application Prerequisites
• You have made sure that the SAP Web Applications Server Java has been launched. • You have checked that the application server is correctly selected in the Developer Studio. To check
the server settings, choose the menu path Window → Preferences → SAP AS Java.
Procedure ...
1. If you have not already done so, save the data for your Welcome project in their current state. 2. In the Web Dynpro Explorer, open the context menu for the application object WelcomeApp and
choose Deploy new Archive and Run. 3. Depending on the server settings, you will be asked to enter username and password to access the
server.
Result
The Developer Studio launches the Web browser and chooses the default view WelcomeCompView.
Enter a name and click the Go button. Now you are directed to the ResultView and the name you have entered is displayed in the TextView.
SAP DEVELOPER NETWORK | sdn.sap.com BUSINESS PROCESS EXPERT COMMUNITY | bpx.sap.com © 2008 SAP AG 16
Web Dynpro Java for Newbies: a Quick Guide to Develop Your First Application
Related Content Web Dynpro Java home page on SDN
Web Dynpro Java in Composition Environment 7.1
For more information, visit the User Interface Technology homepage.
SAP DEVELOPER NETWORK | sdn.sap.com BUSINESS PROCESS EXPERT COMMUNITY | bpx.sap.com © 2008 SAP AG 17

Web Dynpro Java for Newbies: a Quick Guide to Develop Your First Application
SAP DEVELOPER NETWORK | sdn.sap.com BUSINESS PROCESS EXPERT COMMUNITY | bpx.sap.com © 2008 SAP AG 18
Copyright © 2008 SAP AG. All rights reserved.
No part of this publication may be reproduced or transmitted in any form or for any purpose without the express permission of SAP AG. The information contained herein may be changed without prior notice.
Some software products marketed by SAP AG and its distributors contain proprietary software components of other software vendors.
Microsoft, Windows, Outlook, and PowerPoint are registered trademarks of Microsoft Corporation.
IBM, DB2, DB2 Universal Database, OS/2, Parallel Sysplex, MVS/ESA, AIX, S/390, AS/400, OS/390, OS/400, iSeries, pSeries, xSeries, zSeries, System i, System i5, System p, System p5, System x, System z, System z9, z/OS, AFP, Intelligent Miner, WebSphere, Netfinity, Tivoli, Informix, i5/OS, POWER, POWER5, POWER5+, OpenPower and PowerPC are trademarks or registered trademarks of IBM Corporation.
Adobe, the Adobe logo, Acrobat, PostScript, and Reader are either trademarks or registered trademarks of Adobe Systems Incorporated in the United States and/or other countries.
Oracle is a registered trademark of Oracle Corporation.
UNIX, X/Open, OSF/1, and Motif are registered trademarks of the Open Group.
Citrix, ICA, Program Neighborhood, MetaFrame, WinFrame, VideoFrame, and MultiWin are trademarks or registered trademarks of Citrix Systems, Inc.
HTML, XML, XHTML and W3C are trademarks or registered trademarks of W3C®, World Wide Web Consortium, Massachusetts Institute of Technology.
Java is a registered trademark of Sun Microsystems, Inc.
JavaScript is a registered trademark of Sun Microsystems, Inc., used under license for technology invented and implemented by Netscape.
MaxDB is a trademark of MySQL AB, Sweden.
SAP, R/3, mySAP, mySAP.com, xApps, xApp, SAP NetWeaver, and other SAP products and services mentioned herein as well as their respective logos are trademarks or registered trademarks of SAP AG in Germany and in several other countries all over the world. All other product and service names mentioned are the trademarks of their respective companies. Data contained in this document serves informational purposes only. National product specifications may vary.
These materials are subject to change without notice. These materials are provided by SAP AG and its affiliated companies ("SAP Group") for informational purposes only, without representation or warranty of any kind, and SAP Group shall not be liable for errors or omissions with respect to the materials. The only warranties for SAP Group products and services are those that are set forth in the express warranty statements accompanying such products and services, if any. Nothing herein should be construed as constituting an additional warranty.
These materials are provided “as is” without a warranty of any kind, either express or implied, including but not limited to, the implied warranties of merchantability, fitness for a particular purpose, or non-infringement.
SAP shall not be liable for damages of any kind including without limitation direct, special, indirect, or consequential damages that may result from the use of these materials.
SAP does not warrant the accuracy or completeness of the information, text, graphics, links or other items contained within these materials. SAP has no control over the information that you may access through the use of hot links contained in these materials and does not endorse your use of third party web pages nor provide any warranty whatsoever relating to third party web pages.
Any software coding and/or code lines/strings (“Code”) included in this documentation are only examples and are not intended to be used in a productive system environment. The Code is only intended better explain and visualize the syntax and phrasing rules of certain coding. SAP does not warrant the correctness and completeness of the Code given herein, and SAP shall not be liable for errors or damages caused by the usage of the Code, except if such damages were caused by SAP intentionally or grossly negligent.