web intelligence reporting basics - home - aits · web intelligence reporting basics html version ....
TRANSCRIPT
Tra
inin
g G
uid
e
Web Intelligence
Reporting Basics HTML Version

2 Web Intelligence Reporting Basics
Appropriate Use and Security of Confidential and Sensitive Information Due to the integrated nature of the various Human Resources, Finance and Student modules in Banner and the reporting information in the Enterprise Data Warehouse (EDW), you may have access to information beyond what you need to perform your assigned duties. Your access to Banner and the EDW has been granted based on business need, and it is your responsibility to ensure the information you access is used appropriately. Here are some reminders of good data stewardship to help you carry out your responsibility:
Do not share your passwords or store them in an unsecured manner. Do not leave your workstation unattended while logged on to administrative information systems. You are responsible for any activity that occurs using your logon id.
Do not share confidential and sensitive information with anyone, including colleagues, unless there is a business reason.
Retrieve printed reports quickly, and do not leave the reports lying around in plain view.
Secure reports containing confidential and sensitive information (e.g., FERPA, EEO or HIPAA protected data).
When disposing of reports containing confidential or sensitive information, shred the documents in a timely manner.
Your responsibilities regarding the protection and security of administrative information are outlined in the University of Illinois Information Security Policy posted at https://www.obfs.uillinois.edu/bfpp/section-19-business-systems-access-security/section-19-5. Any violation could subject you to disciplinary action, which could include dismissal or, in those cases where laws have been broken, legal action. You should have signed a compliance form that indicates you have read, understand and agree to comply with the University's Information Security Policy for Administrative Information. If you have not already signed the compliance form, please see your Unit Security Contact, who is responsible for maintaining these forms.
Last Printed: 8/10/2017 2:56 PM
Y:\TrainingDevelopment\Business Intelligence 4.1 Training Guides

3
Web Intelligence 4.1 Reporting Basics HTML Version
Table of Contents
About this Course ....................................................................................................................... 5
Objective............................................................................................................................................. 5 Instructor Led Course ......................................................................................................................... 5 Training Data ...................................................................................................................................... 5 Training Accounts ............................................................................................................................... 5
Chapter 1: Creating a Basic Report .......................................................................................... 7 SAP Business Objects Products ........................................................................................................... 7
EDDIE (Enterprise Data Delivery Information Environment)............................................................... 7 Web Intelligence ................................................................................................................................. 7 Terminology ........................................................................................................................................ 8
Logging into Web Intelligence from EDDIE Website ............................................................................. 8 Setting Web Intelligence Preferences ..................................................................................................10 Creating a New Document ...................................................................................................................11 Query Panel Window ...........................................................................................................................13
Sizing the Window .............................................................................................................................13 Query Window Panels .......................................................................................................................13 Query Panel Toolbar .........................................................................................................................14 Objects ..............................................................................................................................................15 Object Types .....................................................................................................................................15 Finding Objects ..................................................................................................................................15
Adding Objects to the Result Objects Panel ........................................................................................16 Predefined Query Filters ......................................................................................................................17 Running the Query and Entering Prompt Values .................................................................................19 Report Manager Window .....................................................................................................................21
Edit Query / Refresh Data..................................................................................................................21 Page Navigation ................................................................................................................................22 Saving a Web Intelligence Document ................................................................................................22
Chapter 2: Edit Query / User-defined Query Filters ............................................................... 23 Adding Objects to Existing Query ........................................................................................................23 Adding a New Object to a Table ..........................................................................................................25 User-defined Query Filters ...................................................................................................................26 Grouping Filters using the And / Or Logical Operator ..........................................................................28 No Data to Retrieve .............................................................................................................................30
Chapter 3: Prompts ................................................................................................................... 31 Building a Prompt .................................................................................................................................31
Prompt Properties ..............................................................................................................................32 Refresh Data / Changing Prompt Values .............................................................................................34
Chapter 4: Formatting .............................................................................................................. 37 Report Formatting ................................................................................................................................37
Print Preview (Page Mode) ................................................................................................................37 Changing Margin Sizes......................................................................................................................37 Apply Scale to Page ..........................................................................................................................38 Changing Page Size and Orientation ................................................................................................38
Table Formatting ..................................................................................................................................39 Removing a Column ..........................................................................................................................39 Rearranging Columns ........................................................................................................................39 Wrap Text ..........................................................................................................................................40 Resizing Columns Width....................................................................................................................40
Chapter 5: Report Analysis Features ...................................................................................... 41 Sorting Data in a Table ........................................................................................................................41
Inserting Sorts ...................................................................................................................................41

4 Web Intelligence Reporting Basics
Managing Sorts ................................................................................................................................. 42 Duplicating and Renaming a Report .................................................................................................... 44 Applying a Report Filter ....................................................................................................................... 45 Inserting a Break .................................................................................................................................. 47 Inserting Calculations........................................................................................................................... 48
Inserting a Sum ................................................................................................................................. 48 Chapter 7: Saving and Sending ............................................................................................... 50
Export to Excel .................................................................................................................................. 50 Save as CSV ..................................................................................................................................... 52 Sending a Document to another User ............................................................................................... 52 Closing a Document and logging off EDDIE ...................................................................................... 53
Appendix A – Additional Assistance ....................................................................................... 55 Decision Support Website ................................................................................................................. 55 AITS Service Desk ............................................................................................................................ 55 SAP Web Intelligence Online Help .................................................................................................... 55
Appendix B – Setting Passwords ............................................................................................ 56 Appendix C – Query Filter Operators ...................................................................................... 58
Using In list ........................................................................................................................................ 59 Using Not equal to; Not in list; and Except ........................................................................................ 59 Using wildcard characters ................................................................................................................. 59 Wildcard Description.......................................................................................................................... 59
Appendix E – Query Filter Operand Options .......................................................................... 60

5
About this Course
Objective
The objective of this course is to teach the basic functionality of the Web Intelligence editor for creating reports from the Enterprise Data Warehouse.
Instructor Led Course
This course is presented in a computer lab with an instructor. The instructor presents the information by completing the examples in each chapter on the screen. The students in the class follow by doing the same steps as the instructor.
Training Data
This course is not designed to teach about the Data, rather the Web Intelligence Reporting software used to create reports. We will use the EDW – STU – Course Schedule universe for all the examples. This universe lists current and past course schedules for the three campuses.
Training Accounts
To access the training data, we will login using training accounts. These accounts are used in training, and can be used outside of training to practice our training exercises. The account user names are dstraining01 through dstraining19, and the all have the same password: Tra1n1ng Training Account User Names: Training Account Password: dstraining01 dstraining02 Tra1n1ng dstraining03 dstraining04… dstraining19

6 Web Intelligence Reporting Basics

7
Chapter 1: Creating a Basic Report
SAP Business Objects Products
SAP Business Objects is a software suite of report creation, viewing, and distribution tools. Business Objects is composed of applications that are accessible through the web or on your desktop computer. The major components that you will interface with are:
EDDIE (Enterprise Data Delivery Information Environment)
Web Intelligence Rich Client
EDDIE (Enterprise Data Delivery Information Environment)
Enterprise Data Delivery Information Environment (EDDIE) is a secured web-based Business Objects Content Management System (CMS) that allows you to store, retrieve, view, and print Web Intelligence reports from anywhere you have internet access. The University provides a number of pre-developed, standard reports which are accessed through EDDIE in the Corporate Categories in the Document List section. We also store our Solution Library reports in EDDIE’s Corporate Categories. The Solution Library reports serve as a starting template for common reporting needs.
Web Intelligence
Web Intelligence is an easy to use report editor which allows you to create, edit, and analyze both simple and complex business intelligence reports. Web Intelligence can be accessed online through EDDIE using the HTML editor, or from your computer desktop through Web Intelligence Rich Client. This training class will focus on Web Intelligence Rich Client, but you are free to experiment with the online HTML version. The advantage of using the Web Intelligence Rich Client is that you can save your documents locally and on Shared network drives. If you create your reports through the HTML editor in EDDIE, you must save and run your reports from EDDIE. The Rich Client is a PC-based software, and cannot be installed on MAC computers. One advantage to the HTML Editor in EDDIE is that there is no software to install, and it can be used from MAC computers. Since the HTML editor is accessed through EDDIE, it also provides 2-factor Authentication, which is required for sensitive data.

8 Web Intelligence Reporting Basics
Terminology
The following are terms representing the parts of a Web Intelligence file:
Document: A document is the file created by Web Intelligence. A document can contain multiple queries and multiple reports.
Query: The query refers to the parameters set to define the data content for your report. The act of building a query refers to selecting the data to include in your report and then applying filters to limit the data returned.
Report: A report is any formatted display of data from the data providers. A report can include one or more blocks.
Block: A block is a collection of data in a particular format. In Web Intelligence, the block types are table, crosstab, and chart. Multiple blocks can appear in a single report and each block can display data from the same or different data providers.
Logging into Web Intelligence from EDDIE Website
Web Intelligence must first be installed on your computer before it can be used. (See Appendix C for installation instructions.) Once installed, the editor must be started the first time from the EDDIE website. This downloads a key to your computer. After the key is downloaded, the editor can be started from your computer desktop.
1. Open the EDDIE login page: https://eddie.ds.uillinois.edu
2. Click the Log in to EDDIE button.
The University System login page is displayed:

9
3. Enter your user name and password and then click the Log On button.
Training User Name: dstraining__ (01-19)
Training Password: ______________________
Note: When you login as yourself, you will use your University NetID and Password to access EDDIE.
The EDDIE Home Page is displayed:

10 Web Intelligence Reporting Basics
Setting Web Intelligence Preferences
There are two different versions of the Web Intelligence editor. One is web-based and one is desktop-based. You can try the different versions and use whichever you prefer. Since we will be using the HTML Report Editor, you should just verify that your preferences are set correctly.
1. Click Preferences on the EDDIE toolbar.
2. On the left-hand menu, select the Web Intelligence category.
3. Under Modify, select the HTML radio-button. (This is the default setting so you may not have to change it).
4. Click the Save & Close button in the bottom-right corner of window.
5. Click OK when you see informational message regarding changes taking effect after page reloads.

11
Creating a New Document
1. Click the Web Intelligence icon under the Applications menu.
A new Web Intelligence tab will be opened:
2. Click the Create New icon:
3. When prompted to select a data source, select and click OK

12 Web Intelligence Reporting Basics
Note: A Universe is a database interface which maps objects to fields in the database. The universe simplifies report creation by eliminating the need to know the database structure. It also provides automatic joins between database tables based on key values.
The Universe Selection window is displayed:
4. Select the EDW – STU – Course Schedule universe.
5. Click OK
The Query Panel is displayed:

13
Query Panel Window
The Query Panel window is used to create the query that retrieves data from the database. The objects and filters in the query window determine what data is included in the query results. The data returned when the query is run is called a data provider, which is stored in the document and becomes the source of the data displayed in the report.
Sizing the Window
Click and hold the Query Panel top border to move the window up. Now drag the bottom right
corner to enlarge the window. Resizes the panes by dragging the for each panel:
Query Window Panels
Universe Outline: This panel displays the objects and filters contained in the universe. They are organized by subject in folders called Classes. A class can be expanded or collapsed by clicking the + or - to the left of the folder. You can also expand/collapse all using the buttons located at the top of this panel.

14 Web Intelligence Reporting Basics
Result Objects: This panel holds the objects to be included in the report. When building a new query, each object added to the Result Objects panel is represented as a column in the initial report table.
Query Filters: This panel contains selection criteria for the query. The query filters determine which rows from the database are included in the query results.
Data Preview: Click Refresh to display a preview of the data that would be returned if the query was run.
Query Panel Toolbar
Add Query: Use drop-down menu to select data source for additional queries.
Show/Hide Universe Outline panel
Show/Hide Filter Pane
Show/Hide Data Preview Panel
Add Combined Query: Two queries on same data source. Join results as a union, intersection, or minus.
View Script: Shows the SQL select statement produced by the Query
Runs the query

15
Objects
A universe is a collection of objects, which represent fields in a database table. Object names are everyday terms which are easier to understand than the cryptic field names in the database.
Classes Classes are logical groupings of objects to make the objects easier to find. For example, all address fields might be grouped together in one class.
Object Types
Dimension
Dimension objects usually contain text or dates, such as Name, UIN, or Application Date. However, some dimension objects may contain numeric data, such as Section Enrollment.
Dimension objects represent the basic structure of the data.
Detail
A detail object is always associated with a dimension object.
A detail object provides additional information about the dimension object. For example, College Description could be a detail object associated with the College Code dimension object.
Measure
Measure objects are numeric values that are the result of calculations.
A measure’s value changes depending on the report context. For example, values displayed for a Salary object differ if the report is for one pay period or for one year.
Finding Objects
Most of the universes you will be working with contain a large number of classes and objects, which can make finding the objects difficult. You can look for objects by subject by expanding the related class folders, or you can use the Filter option to search for objects that contain certain words or phrases.

16 Web Intelligence Reporting Basics
Adding Objects to the Result Objects Panel
Once you locate the object to add to your document, there are two ways to add the object to the Result Objects panel:
Double-click the object.
Drag and drop the object to the Result Objects panel. We will now create a simple report listing COMM course sections for term 120048.
1. Expand the Section Information folder.
2. Double-click the Course Subject Code object to add it to the Result Objects panel.
3. Locate the Course Number object.
4. Drag the Course Number object from the Universe Outline panel to the right of Course Subject Code in the Result Objects panel.
5. Search for Section Number object and add it to the Result Objects.
6. Use the Filter List box and search for Section Enrollment object. Add it to the Result Objects.
7. Find and add the Section Building Name object to the Result Objects.
8. Find and add the Section Room Number object to the Result Objects.
9. Click on the Section Building Code object in the Result Objects panel.

17
Predefined Query Filters
Query filters add conditions to your query that limit the data returned from the database. Filters are vital when running queries against a large database. There are two types of query filters: predefined and user-defined. Query filters allow you to:
Retrieve only the data you need to answer a specific business question
Hide the data you don’t want specific users to see when they access the document
Minimize the quantity of data returned to the document to optimize performance Predefined query filters are time savers that are included within the universe. They are created for conditions that are complicated and/or commonly used. Predefined query filters save time because they can just be added rather than having to create the filter yourself.
Predefined filters are in indicated in the data window with the icon.
There are two ways to add a predefined filter to the Query Filters panel:
Double-click the filter.
Drag the filter to the Query Filters panel.
1. Clear your search box by clicking the X
2. Expand the Conditions class by clicking the box with the ‘+’ symbol.
3. Double-click the Current Section Enrollment filter to place it in the Query Filters panel.
This filter will limit the results to only the most recent value for the enrollment for a section.

18 Web Intelligence Reporting Basics
4. Expand the Prompts class.
5. Double-click the Select Term Code filter to add to the Query Filters panel.
This filter includes a prompt, which will allow you to enter the value(s) for the Select Term Code filter when the query is run.
6. Double-click the Select Course Subject Code filter to add to the Query Filters panel.
This filter will prompt you to enter a Course Subject Code to be included in the report.
The Query Filters Panel should look like this example:

19
Running the Query and Entering Prompt Values
1. Click the Run Query button
Since our query contains prompts, the Prompts Window is displayed:
2. Click the Select 6 Digit Term Code prompt in the Prompt Summary.
Note: The first time the list of values for an object are displayed, all values are retrieved from the database and stored in a file on the hard-drive, which can take some time. However, the next time you see the same list, the values will be read more quickly from the local file.
There are two methods for entering a prompt value:

20 Web Intelligence Reporting Basics
- Select from the list of values - Manually type a value in the “Type a value” box
Note: If you choose to use the Type a Value box, you must type the value exactly as it appears in the database. Values are case-sensitive.
7. Select 120158 from the list of values.
This will show results from Urbana 2015 Fall Semester
8. Click the button to move the value into the selected value(s) box.
9. Next, click Select Course Subject Code prompt in the Prompt Summary. Wait for the list of values to populate.
10. Type CMN in the search pattern field and click Enter.
Note: If you enter the value manually in the Type a value field, make sure to type it correctly; otherwise, you will get no data. Remember that the values are case-sensitive.
11. Double-click the value CMN to add to Select Course Subject Code list.
The Prompt Window should look like this example:
12. Click the OK button to run the query.

21
Report Manager Window
Once your query has run, the report will be displayed in the Report Manager window. This window has many toolbars and tabs that contain the various features available in Web Intelligence.
Edit Query / Refresh Data
Edit Query: Opens the Query panel to make changes to the query.
Refresh Data: Refreshes the report data and/or change Prompt Values.

22 Web Intelligence Reporting Basics
Page Navigation
By default, Web Intelligence paginates results every 100 rows. To see all results, you may need to use page navigation, located at the bottom of your report window:
Saving a Web Intelligence Document
1. On the File tab, click the Save menu icon.
2. Select Save as
The Save Document dialog box is displayed:
3. In File name: box, type Section Enrollment.
4. Click the Save button.

23
Chapter 2: Edit Query / User-defined Query Filters
Adding Objects to Existing Query
Most reports require changes to the data after the query is run the first time, such as removing or adding objects. Selecting the Edit Query button on the Standard toolbar displays the Query Panel where you can make changes to the query.
We will now add the Instructor Last Name, Meeting Days, and Start - End Time to our query:
1. Click the button to display the Query Panel window
2. Expand the Instructor class
3. Locate the Instructor Last Name object
4. Double-click the object to add to the list of result objects
5. In the Search box, enter Meeting Days
6. Double-click to add the Meeting Days Object

24 Web Intelligence Reporting Basics
7. In the Search box, enter Start Time
8. Double-click to add the Start Time — End Time object
9. Click Run Query
10. When the prompt window is displayed, click OK
The report is displayed and the new objects are shown in the available objects list:

25
Adding a New Object to a Table
Although the new object has been added to the query, it does not automatically show on the table. You must add the column to your table from the Report Manager window. Columns can be added to a table using the drag and drop method. Drag the object you want to add to the table from the Data Manager, and drop the object into the table where you want to add it:
To add the object into a new column to the left of an existing column, drag the object onto the left edge of any cell in the column.
To add the object into a new column to the right of an existing column, drag the object onto the right edge of any cell in the column. To replace an existing column with the new column, drag the object over the center of any cell in the column.
1. Select the Instructor Last Name object from the list of Available Objects.
5. Drag the object to the far right side of the Section Room Number column header. You will see a small blue rectangle on the right side of the cell.
6. Drop the object. The Instructor Last Name data is added as a column in your table.
7. Drag and drop the Meeting Days and Start Time – End Time objects into the table as shown:

26 Web Intelligence Reporting Basics
User-defined Query Filters
As we learned in Chapter 1, filters are added to a query to limit data returned from the database. If there are no predefined filters in the Universe that you can use to get the desired data, you can easily create your own User-defined Query Filter. A filter contains three elements:
1. Object: What to compare
2. Operator: How to compare it
3. Operand: What to compare it to
We will now add a query filter that will display only sections with enrollment greater than zero in our results.
1. Click the button to display the Query Panel window.
2. Drag the Section Enrollment object to the Query Filters panel.
3. Drop the object below the other Query Filters.
The Section Enrollment filter box is displayed:
4. Click the drop-down arrow next to In List, and select Greater than from the list of operators. (See Appendix G for a description of each operator option.)

27
Note: See Appendix C – Query Filter Operators for more information on operators.
5. Enter 0 in the Type a constant text box.
Note: You can also select the operand menu button for other options for entering the Operand, including Selecting Values from List and creating a Prompt.
Your filter should now look like this:
6. Click the Run Query button.
7. When the prompt window is displayed, click OK to generate your report.
Now we only see sections with enrollment greater than zero:

28 Web Intelligence Reporting Basics
Grouping Filters using the And / Or Logical Operator
Web Intelligence permits the creation of complex query filters in which filters can be grouped together. Complex query filters are created by grouping and connecting filters with logical operators.
The And operator requires that both conditions be true for the row to be included in the query.
The Or operator requires that only one of the conditions be true for the row to be returned in our query results.
We will further refine our search by including sections that have an instructor assigned, even if the enrollment is zero by using the Or operator.
1. Click the button to display the Query Panel window.
2. In the upper-right corner of the Query Filters panel, click the Add Nested Filter button.
3. Locate the Instructor Last Name object and drag it to the right of the OR operator.
4. Select the Is not null operator from the drop-down list.

29
Note: The “Is not null” operator returns only rows that have a value in the Instructor Last Name field.
5. Drag the Section Enrollment filter box to the top of the Instructor Last Name filter. When you see the red line above the Instructor Last Name filter, drop.
6. Run the query using the same prompt values.
Now we see sections that have an enrollment of 0 if the instructor name is not null (these results are from page 2 of the report).
7. Click to save the changes to the document.

30 Web Intelligence Reporting Basics
No Data to Retrieve
When working with filters, it is possible to create a situation where there are no rows that meet the created conditions. When this happens, you will receive the following message:
This means that there is no data to fetch from the database. Usually, this means you need to fix a problem with your query filters. Some reasons this may happen include:
Entering a bad value for a prompt or filter. If you manually entered values in the Type a Value box, try removing the values, and selecting from the list.
Creating two filters that are contrary to each other, for example requesting Section Enrollment greater than 0 and less than 0 in the same query, or looking for a Fund Code, but forgetting to change the Org code.
Requesting data to which you do not have security access. For example, entering a program code that is not in your deparment, or requesting college-level data when you are a department-level user.

31
Chapter 3: Prompts
A prompt is a Query Filter where the Operand can be defined each time the report is refreshed. Creating a query filter with a prompt allows the user to retrieve different data from the database without changing the filters, making the report more flexible. Each time you run a query with a prompt, you will be asked to supply the value(s) to limit the data. We will now create a query filter with a prompt which will allow us to determine what level classes to return.
Building a Prompt
We will now create a prompt that will allow us to filter our results to just show certain Course Number Levels.
1. Edit the query by clicking the button.
2. Type Level in the search box. Locate the Course Number Level object and drag it into the Query Filters panel.
3. Leave the Operator value as In list (default value)
4. Click the Operand menu button and select Prompt.

32 Web Intelligence Reporting Basics
5. Click the Prompt Properties button.
The Prompt Properties dialog box is displayed:
Prompt Properties
Prompt with List of Values
When a prompt is selected, a list of values is generated. This list can be disabled if the list of values is large and takes too much time to populate.
Select only from list Removes the Enter a Value field in the prompt window. Values must be selected from the list of values.
Keep last values selected
Saves the value(s) entered the last time the query was run.
Optional prompt User can choose to not enter a value for prompt. If a value is not entered, the filter will be not be applied to the report.
Set default values Allows you to select default values. User can modify this value at prompt.
6. Check the Optional prompt check box.
7. Click

33
8. Click
9. Select the Enter value(s) for Select Course Levels prompt.
10. Click Refresh Values to refresh the list of values
The List of Values of Course Number Level object is displayed.
11. Select 100, 200, and 300 from the list.
Note: You can select a value from the list in two ways: Double-click the value or single-
click the value and then click the > button. 12. Click
The report now only includes courses with numbers in the 100s, 200s, and 300s:

34 Web Intelligence Reporting Basics
Refresh Data / Changing Prompt Values
Since the query includes prompts, you can change or update the data by “refreshing.” We will now refresh the data for the document.
1. Click to refresh the report.
2. In the Selected Values box, click on the 120158 Term Code value.
3. Click the < button to remove the current Term Code
4. In the Type a Value box, enter 120168 and press Enter (or click the > button).
5. Leave Course Subject Code as CMN
6. Add 400 to the list of course level numbers.
7. Click to run the query.

35
When the data is refreshed, the most recent data is displayed in the report.
8. Click to save the changes to the document.

36 Web Intelligence Reporting Basics

37
Chapter 4: Formatting
Most of the formatting of a report takes place after the query has been run and the results are displayed in the Report Manager. This chapter will guide you through the process of formatting the report so that the data can all be viewed and printed.
Report Formatting
Report formatting is used when you plan to print or save to a PDF.
Print Preview (Page Mode)
Web Intelligence offers two view-modes for reports: Quick Display Mode and Page Mode. Page mode will display the reports as they will look when printed (Print Preview). To switch to Page Mode:
1. Click on the Page Setup tab.
2. Click on the Display sub-tab.
3. Click on button.
Changing Margin Sizes
In order to fit larger tables of data in your report, you may have to adjust the margin sizes of
your document.
1. Click the Page Setup tab.
2. Click the Margins sub-tab.
3. For each of the four margin settings, delete the current setting, and type the desired size.
For our example, we will change the margins to all be .5 “
4. Press Enter after you type each value

38 Web Intelligence Reporting Basics
Note: If margins are showing in Centimeters, you can change to inches. Select Properties > Application. Change the default measurement unit to inches.
Apply Scale to Page
Scale to Page allows you to specify the number of pages wide and high you want your report to fit on.
1. Click the Page Setup tab.
2. Click the Scale to Page sub-tab
3. In the Width drop-down box, select 1 Pages
Changing Page Size and Orientation
1. On the Page Setup tab, click the Page sub-tab
2. Change the Page Size from A4 to Letter

39
Table Formatting
Removing a Column
After running a query you may decide that you no longer need a column to appear in the finished report. We are going to remove the Course Subject Code column from the table, since it is displayed above the table in the Prompt Summary
1. Right-click in the Course Subject Code column.
2. Select Delete.
Rearranging Columns
One way of moving columns within Web Intelligence involves dragging and dropping a column to the desired location. Moving columns allows you to modify the way the data is presented after running the query.
1. Click on any cell in the Section Enrollment column. The entire column is highlighted.
2. Drag the column into the Instructor Start Time – End Time column. Drop it to the right of this column
3. Release the mouse to move Section Enrollment to its new location.

40 Web Intelligence Reporting Basics
Wrap Text
If your object names are too wide for the width of the cell in the table header row, you can turn on Wrap Text.
1. Click the Format tab.
2. Click in the Course Number header cell.
3. In the Alignment sub-tab, select the Wrap-text icon
4. Repeat for each of the header cells.
Resizing Columns Width
1. Double-click on the right border of the Course Number column (Auto-size) or drag the right column border and drag to desired width.
2. Resize all columns to desired width.

41
Chapter 5: Report Analysis Features
In this chapter, we will cover four features that can help you analyze the data in your reports: Sorting, Filtering, Breaks, and Calculations.
Sorting Data in a Table
Even if no sorting has been applied, the table is sorted by default. The dimension and detail objects are sorted from left to right in ascending order. Measure objects are not sorted by default. We will now override the default sorting on the previous example by specifying the sort order for some columns.
Inserting Sorts
The default sorting is in effect, so the table is sorted by Course Number in ascending order first. The table is then sorted by Section Number in ascending order. Within Section Number, it is sorted by Instructor Last Name. And so on. We will now sort the table by Section Enrollment in descending order.
1. Select the Section Enrollment column by clicking any value in the body of the column.
2. Select the Analysis tab, then Display sub-tab.
3. Click the Sort drop-down menu.
4. Select Descending. (Note: You may need to navigate back to page 1 after adding sort)
Note: You can also right-click in the column and select Sort > Descending from the right-click menu.

42 Web Intelligence Reporting Basics
The report is now sorted by Section Enrollment in descending order. Within Section Enrollment, the default sorts are still applied as shown below.
Now we will apply a secondary sort to the Course Number column using the right-click menu option:
5. Right-click anywhere in the Course Number column.
6. Select Sort from the menu.
7. Select Ascending. Note: The second sort didn’t make a major change to the order of the rows because it only affected rows with the same value for Section Enrollment.
Managing Sorts
The Advanced option in the sort menu allows you to add, edit, and remove sorts, as well as to change the priority of the sorts applied to a table. Now we will change our sort priority to sort first on Course Number, and next on Section enrollment.
1. Click anywhere in the table.
2. Select the Analysis tab, then Display sub-tab.
3. Click the Sort drop-down menu.
4. Select Advanced

43
5. Click Course Number, which is the bottom sort.
6. Under Priority, click
7. Click OK.
8. Use page navigation to return to page 1
Course Number is now the primary sort, and Section Enrollment is the secondary sort:

44 Web Intelligence Reporting Basics
Duplicating and Renaming a Report
It is good practice to first make a copy of a report before making major modifications. Each report within a document has its own tab at the bottom of the editor. Next, we will create a duplicate report so that we can save different variations of the report.
1. Locate the Report 1 tab in the bottom left corner of your report window.
2. Right-click on the Report 1 tab to display the pop-up menu.
3. Select Duplicate Report.
An exact copy of the report named Report 1 (1) is added to the document and is now the active report.
4. Right-click on the Report 1 (1) Tab and select Rename Report from the menu.
5. Type Armory on the report tab:
6. Press ENTER when done.
7. Rename the Report 1 to CMN Enrollment.
Note: Notice when you rename the Report tab, the report title automatically updates.

45
Applying a Report Filter
After running a query, you may decide that you want only certain data to be displayed in your report. If you run a report for your college, you may want to separate the report by department. Applying a report filter allows you to run a single query with all the data you need to produce a number of reports. In our case, we only want to show data for the sections held in the Armory.
1. Click the Armory report tab.
2. Click on any value in the Section Building Name column.
3. Select the Analysis Tab, then the Filters sub-tab.
4. Click Filter.
Note: You can also right-click in the Section Building Name column, then select Filter > Add Filter.
The Report Filter dialog box is displayed:
5. Double-click on Armory in the list of values
6. Click OK to apply the filter.
The report now displays only data where the Section Building Name is Armory. Additional filters could be applied to further limit the rows displayed.

46 Web Intelligence Reporting Basics
Note: To remove the filter, select the filtered column, click the arrow to the right of
the Filter icon and select Remove Filter.

47
Inserting a Break
In our example, we would like to display the sum of students enrolled not only in each section, but also a sub-total by Course Number. First we will insert a break on Course Number. Inserting a break will take a large table of data, and create sub-tables to make the information easier to understand.
1. Select the Armory report.
2. Click anywhere in the Course Number column.
3. Click the Analysis tab
4. Click the Break > Add Break
The Armory Report is now broken up by Course Number:

48 Web Intelligence Reporting Basics
Inserting Calculations
Web Intelligence calculations enable you to quickly add information to your report. Many of the calculations only work with numeric data. The type of data determines which calculation functions are available.
The following table shows the available calculations and data types:
Calculation Object Type Description
Sum
Calculates the sum of the selected data.
Count Counts distinct rows.
Counts all rows.
Average
Calculates the average of the data.
Minimum
Displays the minimum value of selected data.
Maximum
Displays the maximum value of selected data.
Percentage
Displays each row’s percentage of the total.
Inserting a Sum
The Sum calculation adds the values in a column.
1. Right-click in the Section Enrollment column.
2. Select Insert > Sum.
Note: Calculations can also be found on the Analysis tab, under the Functions sub-tab.
49
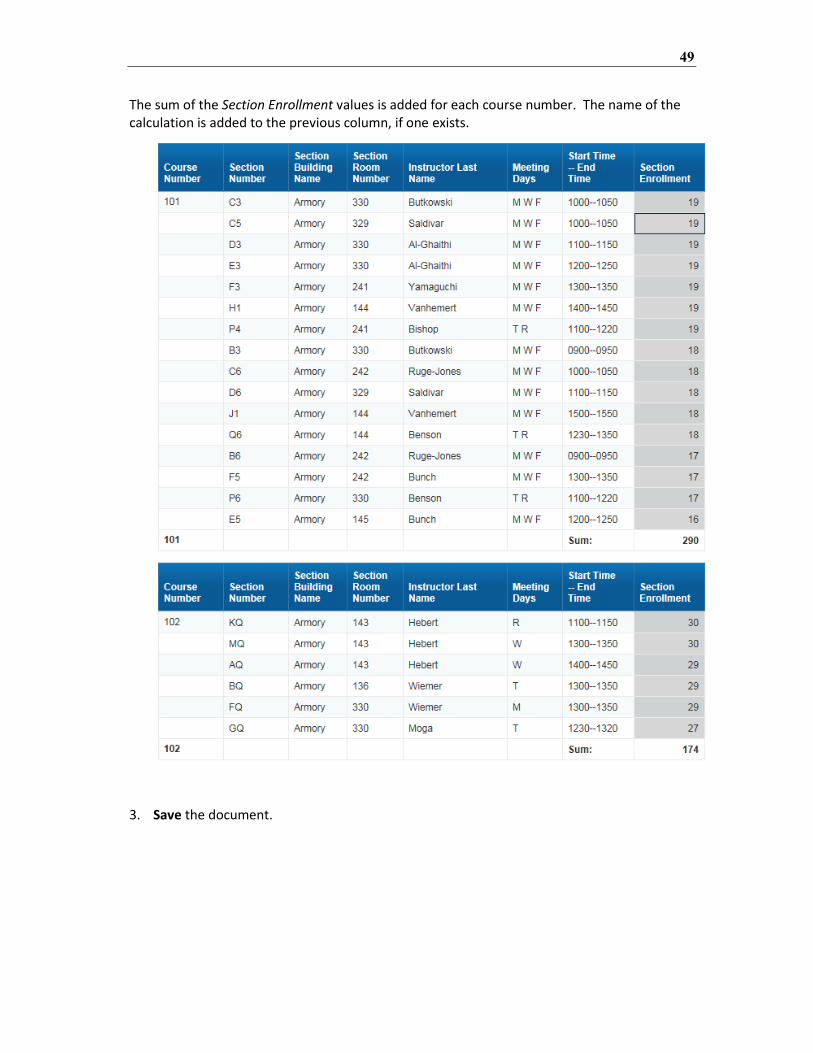
The sum of the Section Enrollment values is added for each course number. The name of the calculation is added to the previous column, if one exists.
3. Save the document.

50 Web Intelligence Reporting Basics
Chapter 7: Saving and Sending
In addition to saving a document in the standard file type (.wid), you can also save the file in different formats such as Excel, PDF, CSV, or Text. It is a good practice to save your report first as a Web Intelligence document, and then to save your results to Excel or PDF each time you refresh the report.
Export to Excel
1. On the File tab, click the Export menu icon
2. Select Export Document As > Excel 2007
3. When prompted, choose to Open the document.

51
The document will open in Excel. You may now use the Excel Save function to save the results to your computer or network drive.
4. Close the Excel file and return to Web Intelligence.

52 Web Intelligence Reporting Basics
Save as CSV
1. On the File tab, click the Export menu icon
2. Select Export Data to CSV
3. Click OK
4. Choose Open to open the file
5. The file opens in Excel. Use Excel to save the document to your computer or network drive.
Sending a Document to another User
1. Select the Mail icon
2. Select Send to User….

53
3. Enter the person’s Enterprise ID in the Find Title box and press ENTER.
4. Select the user from the available Recipients list, and click the > button to move them to Selected Recipients list.
5. Click Send
Closing a Document and logging off EDDIE
1. To close the document, click the X on the document tab
2. Click the Log Off link to log out of EDDIE.

54 Web Intelligence Reporting Basics

55
Appendix A – Additional Assistance
Decision Support Website
Additional resources and online help can be found on the Decision Support website.
Resources include user guides and quick tips on using both Web Intelligence and EDDIE.
https://www.aits.uillinois.edu/services/reports_and_data/help_and_training/
AITS Service Desk
For further assistance, or to report a problem, contact the AITS Service Desk:
Email: [email protected]
Chicago: (312) 996-4806
Urbana & Springfield: (217) 333-3102
SAP Web Intelligence Online Help
Web Intelligence provides on-line assistance and information about basic product features, as
well as information to help you troubleshoot and solve common problems.
Click the in the upper right corner of the Web Intelligence window.
Help Contents
This will take you to the SAP Web Intelligence online help.
Tutorials
This options is not enabled at this time and will take you to the main SAP website. SAP does have a limited amount of video tutorials located on their YouTube Channel.
About Web Intelligence
This contains version and licensing information.

56 Web Intelligence Reporting Basics
Appendix B – Setting Passwords
When a document retrieves data from the EDW, it accesses an Oracle database. You must have an account on that database. Business Objects then passes your user name and password to Oracle. This means your Business Objects password and your Oracle password must match. There are two ways of navigating to the Password Management Application where you can set your EDDIE and Oracle passwords. Method 1
1. Start your browser and enter the URL: https://eddie.ds.uillinois.edu
2. Under Additional Resources, click the Change EDDIE Password link.
3. Enter your Enterprise ID and password when prompted.
57
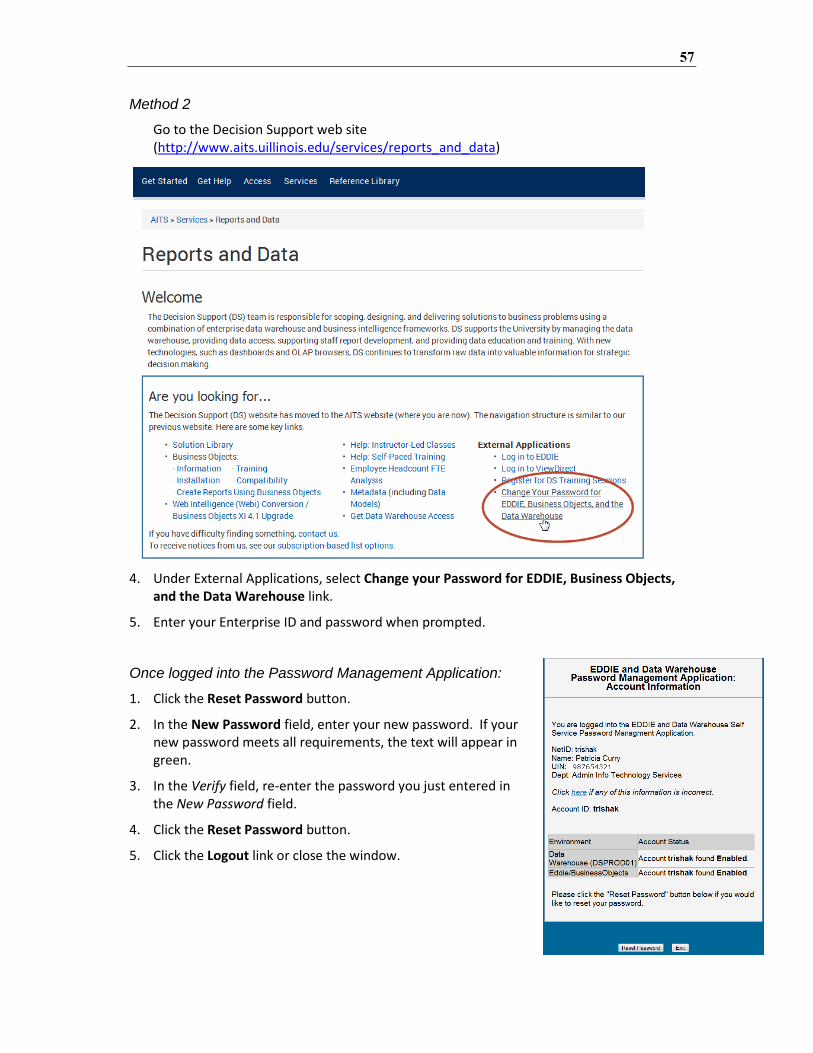
Method 2
Go to the Decision Support web site (http://www.aits.uillinois.edu/services/reports_and_data)
4. Under External Applications, select Change your Password for EDDIE, Business Objects, and the Data Warehouse link.
5. Enter your Enterprise ID and password when prompted.
Once logged into the Password Management Application:
1. Click the Reset Password button.
2. In the New Password field, enter your new password. If your new password meets all requirements, the text will appear in green.
3. In the Verify field, re-enter the password you just entered in the New Password field.
4. Click the Reset Password button.
5. Click the Logout link or close the window.

58 Web Intelligence Reporting Basics
Appendix C – Query Filter Operators
The following table helps you to select the operator you need:
Operator Description Example
Equal to Is equal to one given value Year Equal to 2005
Not Equal to Is different from, or not equal to, one given value
Employee Status Code Not Equal to T
Greater than Is greater than a given value GL Detail Credit Amount Greater than 100
Greater than or Equal to Is greater than or equal to a given value
GL Detail Credit Amount Greater than 100
Less than Is less than a given value Job Detail Annual Salary Less than 20000
Less than or Equal to Is less than or equal to a given value
Employees who are 60 or under
Between Is greater than or equal to the first given value and less than or equal to the second given value
Job Begin Date Between 1/1/2004 12:00:00 AM and 12/31/2004 11:59:59 PM
Not Between Is less than the first given value or greater than the second given value
Employee Age Not Between 18 and 60
In list Is equal to any of a list of values Employee Campus Address Code In list (C1;C2)
Not in list Is different from all of a list of values
Employee Detail Department Code Not in list (103;714;715)
Is null Contains empty rows Employee Campus Email Addr Type CD Is null
Is not null Does not contain empty rows Employee Campus Email Addr Type CD Is not null
Matches pattern Contains the same character(s) as the given pattern
Employee Last Name Matches pattern S%
Different from pattern Does not contain the same characters as the given pattern
Financial Account Code Different from pattern 9%
Both Satisfies two conditions on one object
Prior Degree Year Both 2001;2004
Except Excludes a given value Employee Status Code Except T

59
Using In list
You can type your list of values in the text field of the Type a constant text box. If you click the Operand button, you can also select Value(s) from list to select from a list of values. The maximum number of values allowed in a list is 256. When entering multiple values manually, use a semi-colon (;) to separate each value.
Using Not equal to; Not in list; and Except
Not equal to; Not in list; and Except are all operators that exclude certain data from your query results. Note also that you can only specify one value with Not equal to, but multiple values with Not in list.
Using wildcard characters
Conditions with the Matches pattern and Different from pattern operators are great for finding lists of similar values, such as customer names beginning with S.
Wildcard Description
% Replaces several characters, or in the response to a prompt. For example, N% returns all values beginning with an N (New York, Nevada, etc.)
_ The underscore character (_) replaces a single character in a constant. For example, GR_VE returns Grave, Grove, Greve, etc.

60 Web Intelligence Reporting Basics
Appendix E – Query Filter Operand Options The following table helps you select the operand option you need:
Operand Option Description Enter by…
Constant Values that you type. Note that values are case-sensitive and must be entered exactly as they appear in the database otherwise no data will be returned.
Type the values with a separator (semicolon) between each one.
Value(s) from list Values that you select from the object’s list of values
Select Value(s) from list option. Select from the populated list of values. Click Refresh values if list does not automatically populate.
Prompt Values that you will select when you run the query
Edit default prompt text in
text box. Click Prompt Properties for more options.
Results from another query
Use a list generated by another query, for example: a list of UINs from another spreadsheet. Note there is an Oracle limit of 1000 values.
Select Results from another query then select the data provider from list.