web programming assignment
TRANSCRIPT

Web Programming
(Assignment –I)
Submitted in partial fulfilment of the requirements for the degree of
Post Graduate Diploma in Information Technology
by
Vijayananda D Mohire
(Registration No.200508208)
Information Technology Department
Symbiosis Bhavan, 1065 B, Gokhale Cross
Road, Model Colony, Pune – 411016, Maharashtra, India
(2007)

2
3
Web Programming

4
Table of Contents
QUESTION 1 ......................................................................................................................................................................... 6 ANSWER 1 ............................................................................................................................................................................ 6 QUESTION 2 ......................................................................................................................................................................... 8 ANSWER 2 ............................................................................................................................................................................ 8 QUESTION 3 ....................................................................................................................................................................... 11 ANSWER 3 .......................................................................................................................................................................... 12 QUESTION 4 ....................................................................................................................................................................... 17 ANSWER 4 .......................................................................................................................................................................... 17 QUESTION 5 ....................................................................................................................................................................... 21 ANSWER 5 .......................................................................................................................................................................... 21 QUESTION 6 ....................................................................................................................................................................... 25
ANSWER 6 .......................................................................................................................................................................... 26 QUESTION 7 ....................................................................................................................................................................... 37 ANSWER 7 .......................................................................................................................................................................... 38 QUESTION 8 ....................................................................................................................................................................... 42 ANSWER 8 .......................................................................................................................................................................... 43 QUESTION 9 ....................................................................................................................................................................... 46 ANSWER 9 .......................................................................................................................................................................... 47 QUESTION 10..................................................................................................................................................................... 60 ANSWER 10 ........................................................................................................................................................................ 60 QUESTION 11..................................................................................................................................................................... 63 ANSWER 11 ........................................................................................................................................................................ 64 QUESTION 12..................................................................................................................................................................... 66 ANSWER 12 ........................................................................................................................................................................ 66 QUESTION 13..................................................................................................................................................................... 72 ANSWER 13 ........................................................................................................................................................................ 72

5
Web Programming

6
Question 1 Describe briefly about the Web Design and its related development
cycle
Answer 1
Notes:
Below provides a short description of Web Design process and life cycle.
Analyzing Your Audience and Purpose:
The first process for Web design is understanding your client's needs and
requirements. Few of the aspects that need due diligence is the Amount of work,
estimates, budget and the timelines. Careful planning is crucial. Think about who
your readers are, why they are visiting your site, and what they already know about
your subject. Do they want to print the information? To follow links to other sites? Do
they all speak English? Do they have any disabilities that you need to be aware of?
What are the classifications of data and who can view what. Also does client need to
adhere to Government rules and have Safe and Hacker proof web site.
Design the Site and Its Pages:
Basic design principles will help you create an effective design:
• Use contrast. Make your text stand out against the background. Use graphics or
colors to signal important information.
• Use spatial relationships to present information clearly. Items next to each
other appear related to each other. Items in a bulleted list are also related to each
other.
• Establish patterns. The navigation links should appear in the same place on
each page, and they should have the same design. Footers should also be the same
from page to page.
• Use moderation. Using too many colors will confuse readers. Filling every inch
of the screen with information will overwhelm readers. Including meaningless
graphics or sounds will annoy readers.
• Present a balanced look. Elements on a page should be placed so that the page
appears visually balanced, not tilting precariously in one direction
7
Create and Code the Content:
For people to view your content on the Web, you need to add HTML tags to the text
and present your graphics in one of several file formats (currently, JPEG and GIF are
the most common).
Word processors let you save files as HTML, and software programs called HTML
editors automate the process of building a site from scratch. Some of the more
popular HTML editors are FrontPage¨ (from Microsoft), Dream weaver¨ (from
Macromedia), and Page Mill (from Adobe). In addition, you can find shareware HTML
editors to download by searching the Internet for "HTML editors."
Revise and Test the Site:
What your site will look like depends on factors such as the reader's browser and
hardware. To make sure the site appears the way you want it to, you need to test it
using different browsers, different size screens, and different computers.
Launch the Site:
To launch the site--that is, to "publish" it on the Internet--you transfer your files to a
Web server, a computer that is connected to the Internet.
The process of launching a site varies. In some organizations, a particular person,
such as the network administrator, oversees Web sites. You simply give your files to
this person, who actually loads the files onto the Web server and launches the site. In
other organizations, you might have the authority to add and delete files from the
Web server.
In addition to the above process special attention needs to be given for the design
aspects as below:
• Aim for Simplicity • Make the Text Easy to Read and Understand • Create Informative Headers and Footers • Help Readers Navigate the Site by use of Sitemap, table of contents and
bread crumb navigation • Create Clear, Graceful Links • Avoid Web Clichés by giving wrong or pompous information about the site • Include Extra Features Your Readers Might Need like search page, resource
links and an FAQ
In summary Web designing is a very interesting and intensive operation that involves
the stakeholders of the website along with the Design team and the coders who make
it possible for the successful launch of a new web site, one many the billion site

8
collection on the web. Careful planning and design is very important for the success
of the website that can generate huge traffic and profit for the site owners.
Evaluator’s Comments if any:
Question 2 Write down the basic components of web technologies
Answer 2
Web Components:
The World Wide Web, WWW, W3 was created by Tim Berners-Lee who was working at
CERN at the time. In 1989, Berners-Lee proposed a global hypertext project which
would become the World Wide Web. The WWW was created under the pretense that
many people would be able to work collaboratively by putting information on a web
of hypertext documents. The WWW would be put on servers and client software,
called a browser, would allow one to access the information stored on the server.
The software calls up the information by searching for a link's URL(Uniform Resource
Locator). It then uses HTTP (Hypertext Transfer Protocol) to get the document which
is coded in HTML (Hypertext Markup Language).
The first browser was a WYSIWYG (What You See Is What You Get) hypertext
browser/editor. The WWW and browser first ran on a NeXt computer in 1990 at CERN
and were made available on the Internet in 1991.
The first browser with the point-and-click graphical user interface was NCSA Mosaic
(Feb 1993). Other GUI based browsers came from the idea behind this one.
Some major Internet timeline:
• 1976 - UUCP (Unix-to-Unix CoPy) developed at AT&T Bell Labs. • 1978 - TCP/IP

9
• 1979 - USENET started • 1984 - DNS introduced • 1988, Nov 2 - Internet Worm affects about 6,000 of the 60,000 hosts on the
Internet • 1990, November - Proposal for a Hypertext Project (CERN). • 1991 - WYSIWYG available on the Internet, first Web server in USA
(Stanford Linear Accelerator Centre in California) • 1992 - The world has 50 Web servers! • 1993, February - First X Web browser, NCSA Mosaic. About 200 Web servers. • 1994, March - Marc Anderessen and his group leave NSCA to form Netscape
with Jim Clark. • 1995, May 23 - Sun Microsystems launches Java. First search engines.
Approximately 73500 servers. • 1996 - WWW browser war between Netscape and Microsoft started. By the
end of the year about 603K Web sites exists. • 1998 - In the first quarter Web size estimates more than 300 million pages.
E-Commerce, E-Auctions, Portals. By the end about 3.5M Web sites. • 1999 - By the end of 1999 there are about 10 million Web sites.
Technologies that deal with the above are called as Web Technologies. Few
important technology terms are listed below.
• Web Mark-up : covers the principles of web mark-up languages with an emphasis on open standards (W3C recommendations in particular) and the
techniques for defining new mark-up languages.
• Web Programming : covers the principles and practice of web programming, covering both client side and server side programming using languages such as JavaScript and Java.
• Web Infrastructure : introduces the principles of transforming one mark up language into another and some common target languages such as SVG for graphics and MathML for mathematics. The module covers transformation processors such as XSLT and Xforms.
• Web Deployment : introduces the challenges and technologies for constructing advanced applications using Web Services, and VoiceXML. The module also covers the Mobile Web and security concepts for Web systems.
• Semantic Web: introduces the challenges of the semantic web for reasoning about web resources, using metadata and inference. It also introduces current research directions in this field.

10
Web Components and how they work:
Web is composed of basic Client Server technology but loosely coupled by the http
protocol. Its topology is the whole world and is netted and weaved into sub nets -
hence the name (Spider) WEB. Every PC and network can be connected to the Web
using standard Ethernet cards and Routers. Web is a No Man’s land and no single
person owns the Web. It is however managed by multiple service providers and
subscribers are charged nominal fees for this. One can register a domain and use this
for hosting the websites, search tools, mails etc..
Products and tools are developed and continuous development is going on to leverage
this Web. Some of the well known and commonly used technologies are: HTML, XML
,CGI Scripting ,HTTP ,PHP ,MIME ,HTML ,JavaScript ,CGI. Java , JavaBeans ,VRML
,JDBC ,UNIX , Web/Database Interfaces ,XML, DHTML.
The Basic process of data flow in the Web is mentioned below.
Step 1: Parsing the URL
The first thing the browser has to do is to look at the URL of the new document to
find out how to get hold of the new document. Most URLs have this basic form:
"protocol://server/request-URI". The protocol part describes how to tell the server
which document the you want and how to retrieve it. The server part tells the
browser which server to contact, and the request-URI is the name used by the web
server to identify the document
Step 2: Sending the request
Usually, the protocol is "http". To retrieve a document via HTTP the browser
transmits the following request to the server: "GET /request-URI HTTP/version",
where version tells the server which HTTP version is used. One important point here
is that this request string is all the server ever sees. So the server doesn't care if the
request came from a browser, a link checker, a validator, a search engine robot or if
you typed it in manually. It just performs the request and returns the result
Step 3: The server response
When the server receives the HTTP request it locates the appropriate document and
returns it. However, an HTTP response is required to have a particular form. It must
look like this:
HTTP/[VER] [CODE] [TEXT]
Field1: Value1
Field2: Value2

11
...Document content here...
The first line shows the HTTP version used, followed by a three-digit number (the
HTTP status code) and a reason phrase meant for humans. Usually the code is 200
(which basically means that all is well) and the phrase "OK". The first line is followed
by some lines called the header, which contains information about the document.
The header ends with a blank line, followed by the document content.
What the server does
When the server is set up it is usually configured to use a directory somewhere on
disk as its root directory and that there be a default file name (say "index.html") for
each directory. This means that if you ask the server for the file "/" (as in
"http://www.domain.tld/") you'll get the file index.html in the server root directory.
Usually, asking for "/foo/bar.html" will give you the bar.html file from the foo
directory directly beneath the server root
Apart from the above components and process there are many tools that help in
searching and browsing the Web. Search tools like AltaVista, Google are popular
search engines. Also searching using Directory and meta Data is possible. These days
Semantic web is a new jargon added to this technology.Prodcuts like Frontpage,
Dreamweaver, ASP, JSP provide suitable interface development to Web. Corporates
can use secure protocols like VPN Tunneling for private communication using the
Web.
Web is growing and it is the single largest Network existing on this planet and daily
millions of users are subscribing to various services offered on the Web. It has
become a common man's usage tools to keep themselves hooked and networked to
each other. Also business are flourishing using B2B, B2C based web sites. Thus Web is
a boon to the new world.
Question 3 Write a short note on (i) HTTP (ii) FTP

12
Answer 3
FTP:
FTP stands for File Transfer Protocol. It is a lightweight protocol tailored for
transferring large amounts of data. In its current iteration, it supports file resume
capabilities, authentication, is able to allow firewalled clients to transfer data and
supports tunneling over secure communication channels, such as SSL or TLS.
The FTP protocol works over two TCP connections. One connection is persistent, and
is called the 'control' connection. This is the connection which is used for transmitting
the FTP commands and receiving replies. The second connection is established when
data needs to be transferred, and is called the 'data' connection.
Every FTP session begins with a handshake. The handshake, like all other interactions
between the client and the server is a dialogue. The client sends textual commands,
and the server sends numeric replies. The replies are classified by their first and
second digits. The categories are as following:
• The replies of the form 1xy are positive preliminary replies. These replies
indicate that there will be another subsequent reply before the client
should send a new command. Sending a command before the second reply
arrives would be a violation of the protocol.
• Replies starting with the digit 2xy indicate positive completion. The client's
previous command succeeded and it is free to send a new command.
• Replies of the form 3xy are positive intermediate replies. These are used in
a sequence of commands to indicate that the server has accepted the
command and waits for more in order to initiate processing. A common
example is during authentication, when both username and password are
expected.
• If a reply starts with 4, it is a transient negative completion reply. This is
an indication that the command did not succeed, however the client should
try it again at a later time.
• Finally, replies of the form 5xy indicate permanent negative completion.
These replies are sent to indicate critical errors, such as the FTP server not
supporting the sequence of commands sent previous to the reply. The
client is discouraged from sending the exact same sequence again.
In addition to the above classifications, the replies are further divided into groups
based on the second digit of the reply code. If the second digit is 0, the reply was
sent to indicate a syntax error, an unimplemented command or a command that
13
doesn't fit its current usage. If the second digit is 1, it is an informational reply, such
as a status message or help information. Second digit 2 indicates replies referring to
the data and control connections. The digit 3 on the second place indicates a reply
regarding authentication and user accounting. The digit 4 is reserved, and the digit 5
is used to indicate replies about the server's file system.
The above described FTP connection was transmitted in plain-text, and the
authentication details or the transmitted data could be intercepted. There are
several extensions to the FTP protocol that are meant to make it more secure. The
first such extension is FTP over SSH, where the whole session is done over an SSH
session. This extension is not popular, because the FTP protocol uses two
connections, whereas most SSH clients are only aware of a single connection, the
control connection in case of FTP. The second extension is FTPS. The client connects
to the FTP as usual, however the first command that it sends is AUTH TLS or AUTH
SSL, to indicate that it wants to perform a TLS handshake. The handshake is also
performed before opening every data connection. This keeps the whole FTP session
secure from prying eyes.
Thus FTP is a protocol that helps transfer of data and files from one computer to
other. FTP can be used for either upload or downloading files from the server to PC
or vice versa. The main difference from HTTP is that it is a two way communication
and needs URI or File sharing permissions to do transfers. Various thin clients like
Cute FTP can be used to do the job easier. Also we can use FTP service using
Command line options and in Binary mode of data transfers. Corporate usually use a
separate FTP service along with separate server box for this. These days File servers
that can handle few Tera-bytes of data are produced by vendors like DELL.
HTTP (Hypertext Transfer Protocol) :
Is the main protocol behind the World Wide Web. It is the protocol defining how to
access the web servers and retrieve documents and other data from them. The HTTP
protocol has seen several revisions since the time it was originally proposed. The
revision in use today is HTTP/1.1, proposed in June 1999 as RFC 2616.
HTTP is a client-server TCP-based protocol, where commands and replies are plain
text. For secure communications, the HTTP protocol supports certificate-based
authentication. In this case, the protocol is known as HTTPS, where S stands for
'secure'. The protocol is message-based, and forms a dialog between the client and
server. However, the HTTP protocol is stateless - every message is treated
separately. For that purpose, all data that should be kept persistent, such as session
variables, should be transported in headers.

14
The HTTP request messages are of the following form:
• Request line: The line starts with a method name, and is usually followed
by the resource URI and the version of the HTTP protocol in use
• Headers: Headers are be used to control the web server behaviour or to
indicate how the client expects the request to be handled. The headers are
also used for transmitting cookies from and to the web server.
• Empty line: Used to indicate end of headers, consists of the CRLF
sequence.
• Message body: Optional, will contain the body of the message - i.e. the
user data submitted to server.
The protocol defines eight basic commands, or 'methods' (three in HTTP/1.0). The
methods are also classified by being 'safe' or 'unsafe' - safe methods do not have side
effects and do not change the state of the server.
1. GET: Safe method. Requests the data associated with a particular resource -
such as the contents of an HTML page. Despite being safe, modern
implementations sometimes use a simple hyperlink to initiate an action with
side effects, such as a deletion of a database record. This practice is
discouraged, and the client software may not be held responsible for the
consequences caused by this form of abuse.
2. HEAD: Safe method. Works like GET, but only retrieves the headers of a
particular resource. Useful for checking resources for changes.
3. POST: Unsafe method. Submits user data to a web server. The data is
transmitted in the request body and handled by the resource located at
location specified in Request-URI header.
4. PUT: Unsafe method. HTTP/1.1 only. Uploads data to a web server. Unlike
POST, which uses the Request-URI header to indicate the URI of the resource
that should process the data, PUT uses this header to indicate the location of
the uploaded resource - the web server must not send the data to further
processing.
5. DELETE: Unsafe method. HTTP/1.1 only. Deletes the indicated resource from a
web server. Due to the obvious security problems and abuse potential in using
this method, it is rarely implemented by web servers.
6. OPTIONS: Safe method. HTTP/1.1 only. This method is used to ask the web
server about the methods supported by a particular resource. It is permissible
to specify an asterisk ('*') in place of the Request-URI - the web server then
returns a list of methods that are server-wide. This is most useful for checking
a proxy server for HTTP/1.1 compliance - an HTTP/1.0 proxy would ignore this
method, as it is unknown in HTTP/1.0 spec.

15
7. TRACE: Safe method. HTTP/1.1 only. The TRACE method is useful for
debugging client-server interaction. Upon execution, the last web server to
receive this request (either the web server with the indicated resource, or the
proxy which gets a document with Max-Forwards header set to 0) should return
the request data that it got as the body of the reply. This is useful both for
checking whether the target web server is receiving the requests correctly, as
well as probing the proxy chain between the client and the server for potential
infinite loops.
8. CONNECT: Reserved. HTTP/1.1 only. This method is reserved for use with
proxies that support SSL tunnelling of HTTP requests.
Upon receiving and processing a request, the web server must send a reply to the
client. The general reply format is as follows:
• Status line: This line is composed of the HTTP version, the status code and
a short phrase describing the reason for the status code.
• Headers: Just like in the request, the reply has headers that are used to
affect behaviour of the web servers and clients that the reply arrives at.
For instance, the headers can be used to disallow caching of the reply.
• Empty line: Again, to separate reply body from the headers, a line
containing only CRLF is used.
• Reply body: Optional. Contains the reply body - for example, the contents
of a previously requested HTML page.
The most important part of the reply is the status code. This status code indicates a
success or a failure, as well as the location of the failure. The status codes are
divided into five groups, based on the first digit.
Codes starting with 1 are informational - they contain information about the current
request, but do not constitute a full reply. The HTTP/1.0 protocol does not define
any such codes, thus a web server must not send any to a client that identifies itself
as HTTP/1.0. An example of such code is 100 Continue, which indicates that the
server received the first part of the request, and that the client should continue
sending the rest.
Codes starting with 2 indicate success. The most popular code in this group is 200
Success which indicates that the action requested by the client was successful. This
code is followed by the appropriate reply to the client's request. Other used codes
include 204 No Content and 206 Partial Content (HTTP/1.1 only)
Codes starting with 3 specify that a redirection has taken place, and another action is
required on behalf of the client to reach the intended resource. It is the client's job

16
to detect a redirection loop. The most popular codes are 302 Found, signifying a
temporary change in the resource location and 301 Moved Permanently, signifying a
permanent change in the resource location.
The next two classes are error codes. Codes starting with 4 indicate client-side
errors, with the most popular being 401, 403 and 404, meaning Unauthorized,
Forbidden and Not Found respectively. This class of codes is sent when an error
occurs at the client. In this example, a 404 code is sent when the client attempts to
access a URL that does not exist and a 403 code is sent when the client doesn't have
rights to access the resource.
Finally, codes starting with 5 indicate an error that occurred on the server - for
example, as a result of bad configuration, or a script that returned an error upon
execution. Another cause of this error is an attempt to use the server as something
that it doesn't support, or simply trying to access an overloaded server.
An example of a page load of Google.com follows below:
Request:
GET / HTTP/1.1
Host: www.google.com
User-Agent: Mozilla/5.0 (Windows; U; Windows NT 5.1; en-US; rv:1.8.0.6)
Accept: text/xml,application/xhtml+xml,text/html;q=0.9
Accept-Language: en-us,en;q=0.5
Accept-Encoding: gzip,deflate
Accept-Charset: ISO-8859-1,utf-8;q=0.7,*;q=0.7
Keep-Alive: 300
Connection: keep-alive
Reply:
HTTP/1.1 200 OK
Cache-Control: private
Content-Type: text/html
Content-Encoding: gzip
Server: GWS/2.1
Content-Length: 1426
<html><head>...
There are some things worth mentioning in the above dump. First, the browser sends
a string identifying itself, in the User-Agent header. This header can be used to serve

17
different content based on the requesting browser. Second, the browser specifies
which types of content it expects to receive, and whether it supports compression.
Finally, it specifies that it's interested in keeping the particular TCP connection open
and receiving the reply on it, instead of closing it immediately after making the
request. These features were all introduced in the HTTP/1.1 version of the protocol.
In the reply, the two most important headers are Content-Type and Content-Length.
The former specifies the MIME type of the content - a standard identifier that can be
used by a web browser or other programs to understand how to treat and display the
incoming data. The latter simply states how long the data following the headers is,
and is vital in order for the browser to retrieve and display the whole page.
Thus HTTP is the main protocol the whole Web relies on for communication. It is
based on a Request/Response model and does not hold any state or session data.
These days there are so many products that fill up the deficiencies of HTTP. We have
Server based control over the Web which minimizes exposure of the critical code at
client end and also better control over the response by use of server side scripts.
Many companies like Microsoft, Oracle and Sun have made life of developers easier by
use of better IDE and well formed coding languages like Javascript, VB, C++, C#
etc...
Question 4 Write a short note on TCP/IP
Answer 4
TCP/IP Introduction
TCP/IP is a set of protocols developed to allow cooperating computers to share
resources across a network. It was developed by a community of researchers
centered around the ARPAnet. Certainly the ARPAnet is the best-known TCP/IP
network. However as of June, 87, at least 130 different vendors had products that
support TCP/IP, and thousands of networks of all kinds use it. The most accurate
name for the set of protocols we are describing is the "Internet protocol suite". TCP
and IP are two of the protocols in this suite. Whatever it is called, TCP/IP is a family

18
of protocols. A few provide "low-level" functions needed for many applications. These
include IP, TCP, and UDP.Others are protocols for doing specific tasks, e.g.
transferring files between computers, sending mail, or finding out who is logged in on
another computer TCP (the "transmission control protocol") is responsible for
breaking up the message into datagrams, reassembling them at the other end,
resending anything that gets lost, and putting things back in the right order. IP (the
"internet protocol") is responsible for routing individual datagrams.
TCP:
TCP, described in RFC 793, provides a virtual circuit (connection-oriented)
communication service across the network. TCP includes rules for formatting
messages, establishing and terminating virtual circuits, sequencing, flow control, and
error correction. Most of the applications in the TCP/IP suite operate over the
reliable transport service provided by TCP.
The TCP data unit is called a segment; the name is due to the fact that TCP does not
recognize messages, per se, but merely sends a block of bytes from the byte stream
between sender and receiver. The fields of the segment are:
• Source Port and Destination Port: Identify the source and destination ports
to identify the end-to-end connection and higher-layer application.
• Sequence Number: Contains the sequence number of this segment's first
data byte in the overall connection byte stream; since the sequence
number refers to a byte count rather than a segment count, sequence
numbers in contiguous TCP segments are not numbered sequentially.
• Acknowledgment Number: Used by the sender to acknowledge receipt of
data; this field indicates the sequence number of the next byte expected
from the receiver.
• Data Offset: Points to the first data byte in this segment; this field, then,
indicates the segment header length.
• Control Flags: A set of flags that control certain aspects of the TCP virtual
connection. The flags include:
• Urgent Pointer Field Significant (URG): When set, indicates that the current
segment contains urgent (or high-priority) data and that the Urgent Pointer
field value is valid.
• Acknowledgment Field Significant (ACK): When set, indicates that the value
contained in the Acknowledgment Number field is valid. This bit is usually
set, except during the first message during connection establishment.
• Push Function (PSH): Used when the transmitting application wants to force

19
TCP to immediately transmit the data that is currently buffered without
waiting for the buffer to fill; useful for transmitting small units of data.
• Reset Connection (RST): When set, immediately terminates the end-to-end
TCP connection.
• Synchronize Sequence Numbers (SYN): Set in the initial segments used to
establish a connection, indicating that the segments carry the initial
sequence number.
• Finish (FIN): Set to request normal termination of the TCP connection in
the direction this segment is travelling; completely closing the connection
requires one FIN segment in each direction.
• Window: Used for flow control, contains the value of the receive window
size which is the number of transmitted bytes that the sender of this
segment is willing to accept from the receiver.
• Checksum: Provides bit error detection for the TCP segment. The checksum
field covers the TCP segment header and data, as well as a 96-bit pseudo
header that contains the IP header Source Address, Destination Address,
and Protocol fields, as well as the TCP segment length.
• Urgent Pointer: Urgent data is information that has been marked as high-
priority by a higher layer application; this data, in turn, usually bypasses
normal TCP buffering and is placed in a segment between the header and
"normal" data. The Urgent Pointer, valid when the URG flag is set, indicates
the position of the first octet of nonexpedited data in the segment.
• Options: Used at connection establishment to negotiate a variety of
options; maximum segment size (MSS) is the most commonly used option
and, if absent, defaults to an MSS of 536. Another option is Selective
Acknowledgement (SACK), which allows out-of-sequence segments to be
accepted by a receiver
IP:
The Internet Protocol (RFC 791), provides services that are roughly equivalent to the
OSI Network Layer. IP provides a datagram (connectionless) transport service across
the network. This service is sometimes referred to as unreliable because the network
does not guarantee delivery nor notify the end host system about packets lost due to
errors or network congestion. IP datagrams contain a message, or one fragment of a
message, that may be up to 65,535 bytes (octets) in length. IP does not provide a
mechanism for flow control.
The format is consistent with the RFC; bits are numbered from left-to-right, starting
at 0. Each row represents a single 32-bit word; note that an IP header will be at least
5 words (20 bytes) in length. The fields contained in the header, and their functions,

20
are:
• Version: Specifies the IP version of the packet. The current version of IP is
version 4, so this field will contain the binary value 0100. [NOTE: Actually,
many IP version numbers have been assigned besides 4 and 6; see the IANA's
list of IP Version Numbers.]
• Internet Header Length (IHL): Indicates the length of the datagram header in
32 bit (4 octet) words. A minimum-length header is 20 octets, so this field
always has a value of at least 5 (0101). Since the maximum value of this field
is 15, the IP Header can be no longer than 60 octets.
• Type of Service (TOS): Allows an originating host to request different classes of
service for packets it transmits. Although not generally supported today in
IPv4, the TOS field can be set by the originating host in response to service
requests across the Transport Layer/Internet Layer service interface, and can
specify a service priority (0-7) or can request that the route be optimized for
either cost, delay, throughput, or reliability.
• Total Length: Indicates the length (in bytes, or octets) of the entire packet,
including both header and data. Given the size of this field, the maximum size
of an IP packet is 64 KB, or 65,535 bytes. In practice, packet sizes are limited
to the maximum transmission unit (MTU).
• Identification: Used when a packet is fragmented into smaller pieces while
traversing the Internet, this identifier is assigned by the transmitting host so
that different fragments arriving at the destination can be associated with
each other for reassembly.
• Flags: Also used for fragmentation and reassembly. The first bit is called the
More Fragments (MF) bit, and is used to indicate the last fragment of a packet
so that the receiver knows that the packet can be reassembled. The second bit
is the Don't Fragment (DF) bit, which suppresses fragmentation. The third bit is
unused (and always set to 0).
• Fragment Offset: Indicates the position of this fragment in the original packet.
In the first packet of a fragment stream, the offset will be 0; in subsequent
fragments, this field will indicates the offset in increments of 8 bytes.
• Time-to-Live (TTL): A value from 0 to 255, indicating the number of hops that
this packet is allowed to take before discarded within the network. Every
router that sees this packet will decrement the TTL value by one; if it gets to
0, the packet will be discarded.
• Protocol: Indicates the higher layer protocol contents of the data carried in
the packet; options include ICMP (1), TCP (6),UDP (17), or OSPF (89). A
complete list of IP protocol numbers can be found at the IANA's list of Protocol
Numbers. An implementation-specific list of supported protocols can be found
in the protocol file, generally found in the /etc (Linux/Unix), c:\windows

21
(Windows 9x, ME), or c:\winnt\system32\drivers\etc (Windows NT, 2000)
directory.
• Header Checksum: Carries information to ensure that the received IP header is
error-free. Remember that IP provides an unreliable service and, therefore,
this field only checks the IP header rather than the entire packet.
• Source Address: IP address of the host sending the packet.
• Destination Address: IP address of the host intended to receive the packet.
• Options: A set of options which may be applied to any given packet, such as
sender-specified source routing or security indication. The option list may use
up to 40 bytes (10 words), and will be padded to a word boundary;
Question 5 Write a Create an HTML file as follows: Time Days Monday Tuesday Wednesday Thursday 8 – 9am 9 – 10am SHORT BREAK 10.15 – 11.15am 11.15 – 12.15pm Guest Lecture The webpage should have title “Time Table”, background color dark blue. Give proper caption to table.
Answer 5
Code:
<!-- HTML Tag indicating Beginning of the Html and the namespace -->
<html xmlns="http://www.w3.org/1999/xhtml">
<!-- Begin of Head Tag -->
<head>
<!-- Begin of Meta Information like content type and charset -->
<meta http-equiv="Content-Type" content="text/html; charset=iso-8859-1" />
<!-- Title of the Web Page -->

22
<title>TIME TABLE </title>
<!-- Define inline stylesheet -->
<style type="text/css">
<!--
body {
background-color: #000099;
}
.style9 {
font-size: x-large;
font-weight: bold;
font-family: "Times New Roman", Times, serif;
}
.style11 {
font-size: xx-large;
font-weight: bold;
font-family: "Times New Roman", Times, serif;
color: #FFFFFF;
border: 0;
border-color: #000099;
}
.style16 {font-size: large; font-weight: bold; font-family: "Times New Roman", Times,
serif;
background-color:#99CCFF;
border-color: #000000;}
.style17 {
font-family: "Times New Roman", Times, serif;
font-weight: normal;
font-size: large;
background-color:#FFFFFF;
border-color: #000000;
}
.style18 {
font-family: "Times New Roman", Times, serif;
font-weight: normal;
font-size: large;
background-color:#CC99FF
}
-->

23
</style></head>
<!-- End of Head tag -->
<!-- Begin of Body tag having the main data and structure of the web page -->
<body>
<!-- Define Table with specified attributes like border, cell spacing etc.. -->
<table width="100%" border="1" align="center" cellpadding="2" cellspacing="0"
bordercolor="#000099" >
<!-- Define Table header -->
<th colspan="5" scope="col" class="style11" ><div align="center">Time
Table</div></th>
<tr>
<th rowspan="2" valign="top" scope="col" class="style16"><div align="center"
class="style16">Time</div></th>
<th colspan="4" scope="col" class="style16"><div align="center" >Days</div></th>
</tr>
<tr>
<!-- Define Horizontal header -->
<th class="style16" align="center">Monday</th>
<th class="style16" align="center">Tuesday</th>
<th class="style16" align="center">Wednesday</th>
<th class="style16" align="center">Thursday</th>
</tr>
<tr>
<!-- Define Vertical header -->
<th class="style17" align="left"> 8 -- 9am</th>
<td class="style17"> </td>
<td class="style17"> </td>
<td class="style17"> </td>
<td class="style17"> </td>
</tr>
<tr>
<th class="style17" align="left"> 9 -- 10am</th>
<td class="style17"> </td>
<td class="style17"> </td>
<td class="style17"> </td>

24
<td class="style17"> </td>
</tr>
<tr>
<th class="style9" align="center" colspan="5" bgcolor="#CCFFFF">SHORT BREAK</th>
</tr>
<tr>
<th class="style17" align="left"> 10.15 -- 11.15am</th>
<td class="style17"> </td>
<td class="style17"> </td>
<td class="style17"> </td>
<td class="style17"> </td>
</tr>
<tr>
<th class="style17" align="left"> 11.15 -- 12.15pm</th>
<td class="style17"> </td>
<td class="style17"> </td>
<!-- Define Header for Table data -TD -->
<th class="style18" align="center">Guest Lecture</th>
<td class="style17"> </td>
</tr>
</table>
</body>
</html>
<!-- End of HTML -->
Results:

25
Question 6 Create the frame structure as follows:
S C D SCDL Home About us Courses Contact us Symbiosis Centre for Distance Learning, Pune SCDL 2002 Display the name of link at the center of second frame (blank one) in bold on clicking corresponding link. There should not be border between two vertical frames. Note: The color combination and frame proportionate should be used exactly as above.

26
Answer 6
Code:
------------------------------------AboutUs.Html--------------------------------------
<html xmlns="http://www.w3.org/1999/xhtml">
<head>
<meta http-equiv="Content-Type" content="text/html; charset=iso-8859-1" />
<title>About Us</title>
<style type="text/css">
<!--
.style1 {
font-family: "Times New Roman", Times, serif;
font-weight: bold;
font-size: x-large;
}
body {
background-color: #99CCFF;
margin-left: 20%;
margin-top: 20%;
margin-right: 20%;
margin-bottom: 20%;
color: #FFFF55;
font-weight: bolder;
}
-->
</style>

27
</head>
<body>
<div align="center"><span class="style1">ABOUT US</span>
</div>
</body>
</html>
------------------------------------------bottomFrame.html---------------------------------------
<html>
<!-- Begin of Head Tag -->
<head>
<meta http-equiv="Content-Type" content="text/html; charset=iso-8859-1">
<!-- Title of the Web Page -->
<title>bottomFrame</title>
<!-- Define inline stylesheet for providing proper Margins -->
<style type="text/css">
<!--
.style1 {font-family: "Times New Roman", Times, serif}
body {
background-color: #003265;
}
.style2 {
color: #FFFFFF;
font-weight: bold;
font-size: x-large;
}
28
-->
</style>
</head>
<!-- End of Head tag -->
<!-- Begin of Body tag having the main data and structure of the web page -->
<body topmargin="1%" bottommargin="1%">
<div align="center" class="style1" >
<p class="style2" >Symbiosis Centre for Distance Learning, Pune </p>
<p class="style2">@ SCDL 2002</p>
</div>
</body>
</html>
<!-- End of HTML -->
-----------------------------------ContactUs.html------------------------------------------
<html xmlns="http://www.w3.org/1999/xhtml">
<head>
<meta http-equiv="Content-Type" content="text/html; charset=iso-8859-1" />
<title>Contact Us</title>
<style type="text/css">
<!--
.style1 {
font-family: "Times New Roman", Times, serif;
font-weight: bold;
font-size: x-large;
}
29
body {
background-color: #99CCFF;
margin-left: 20%;
margin-top: 20%;
margin-right: 20%;
margin-bottom: 20%;
color: #FFFF55;
font-weight: bolder;
}
-->
</style>
</head>
<body>
<div align="center"><span class="style1">CONTACT US</span>
</div>
</body>
</html>
----------------------------------------------Courses.html------------------------------------
<html xmlns="http://www.w3.org/1999/xhtml">
<head>
<meta http-equiv="Content-Type" content="text/html; charset=iso-8859-1" />
<title>Untitled Document</title>
<style type="text/css">
<!--
.style1 {

30
font-family: "Times New Roman", Times, serif;
font-weight: bold;
font-size: x-large;
}
body {
background-color: #99CCFF;
margin-left: 20%;
margin-top: 20%;
margin-right: 20%;
margin-bottom: 20%;
color: #FFFF55;
font-weight: bolder;
}
-->
</style>
</head>
<body>
<div align="center"><span class="style1">COURSES</span>
</div>
</body>
</html>
-------------------------------Courses.html----------------------------------------
<html xmlns="http://www.w3.org/1999/xhtml">
<head>
<meta http-equiv="Content-Type" content="text/html; charset=iso-8859-1" />

31
<title>Home</title>
<style type="text/css">
<!--
.style1 {
font-family: "Times New Roman", Times, serif;
font-weight: bold;
font-size: x-large;
}
body {
background-color: #99CCFF;
margin-left: 20%;
margin-top: 20%;
margin-right: 20%;
margin-bottom: 20%;
color: #FFFF55;
font-weight: bolder;
}
-->
</style>
</head>
<body>
<div align="center"><span class="style1">HOME</span>
</div>
</body>
</html>

32
--------------------------------index.html--------------------------------------------------
<!-- HTML Tag indicating Beginning of the Html and the namespace -->
<html>
<head>
<meta http-equiv="Content-Type" content="text/html; charset=iso-8859-1">
<title>SCDL Frameset </title>
</head>
<!-- HTML frmaeset for specifying Number of rows for top, middle and Bottom frame-
->
<frameset rows="165,*,85" frameborder="no" border="0"
framespacing="0">
<!-- HTML top frame -->
<frame src="topFrame.html" name="topFrame" scrolling="No" noresize="noresize"
id="topFrame" title="topFrame" >
<!-- HTML frameset for holding Left and Main Frames -->
<frameset cols="350,*" frameborder="no" border="0" framespacing="0" >
<frame src="leftFrame.html" name="leftFrame" scrolling="NO"
title="leftFrame">
<frame src="mainFrame.html" name="mainFrame" id="mainFrame"
title="mainFrame">
</frameset>
<!-- HTML bottom frame -->
<frame src="bottomFrame.html" name="bottomFrame" scrolling="No"
noresize="noresize" id="bottomFrame"
title="bottomFrame">
</frameset>
<!-- End of HTML frameset -->

33
<!-- Body to hold data for Browsers that dont support frameset -->
<noframes><body>
</body>
</noframes>
</html>
<!-- End of HTML -->
---------------------------------leftFrame.html----------------------------------------------
<html xmlns="http://www.w3.org/1999/xhtml">
<!-- Begin of Head Tag -->
<head>
<meta http-equiv="Content-Type" content="text/html; charset=iso-8859-1" />
<!-- Title of the Web Page -->
<title>leftFrame</title>
<!-- Define inline stylesheet for providing proper Margins -->
<style type="text/css">
<!--
.style1 {
font-family: "Times New Roman", Times, serif;
font-size: x-large;
height: 25%;
line-height: 100%;
}
body {
background-color: #99CCFF;
margin-top: 0.5%;

34
margin-bottom: 0.5%;
height: 100%;
}
-->
</style>
</head>
<!-- End of Head tag -->
<!-- Begin of Body tag having the main data and structure of the web page -->
<body >
<p class="style1"><a href ="Home.html" target ="mainFrame" >Home</a></p>
<p class="style1"><a href ="AboutUs.html" target ="mainFrame" >About Us </a></p>
<p class="style1"> <a href ="Courses.html" target ="mainFrame"
class="style1">Courses</a></p>
<p class="style1"> <a href ="ContactUs.html" target ="mainFrame"
class="style1">Contact Us</a></p>
</body>
</html>
<!-- End of HTML -->
-------------------------------mainFrame.html---------------------------------
<!-- HTML Tag indicating Beginning of the Html and the namespace -->
<html>
<!-- Begin of Head Tag -->
<head>
<!-- Begin of Meta Information like content type and charset -->
<meta http-equiv="Content-Type" content="text/html; charset=iso-8859-1">
<!-- Title of the Web Page -->

35
<title>mainFrame</title>
<!-- Define inline stylesheet -->
<style type="text/css">
<!--
.style1 {
font-family: "Times New Roman", Times, serif;
font-size: x-large;
}
body {
background-color: #99CCFF;
}
-->
</style>
</head>
<!-- End of Head tag -->
<body class="style1">
</body></html>
---------------------------------topFrame.html-----------------------------------------------
<html xmlns="http://www.w3.org/1999/xhtml">
<!-- Begin of Head Tag -->
<head>
<meta http-equiv="Content-Type" content="text/html; charset=iso-8859-1" />
<!-- Title of the Web Page -->
<title>topFrame</title>
<!-- Define inline stylesheet for providing proper Margins -->

36
<style type="text/css">
<!--
body {
background-color: #00007F;
margin-left: 40%;
margin-top: 7%;
margin-right: 40%;
}
-->
</style></head>
<!-- End of Head tag -->
<!-- Begin of Body tag having the main data and structure of the web page -->
<body text="#FFFFFF" style=" font-family: 'Times New Roman', Times, serif; font-size:
36px; font-weight: bolder; " >
<div align="center"><span class="style1">S C D L</span>
</body>
</html>
<!-- End of HTML -->
Results:

37
Question 7 Write short notes on a) DHTML b) ASP

38
Answer 7
DHTML: DHTML (first implemented in IE 4.0) is a set of innovative features which allows web developers to change the rendering and content of a document on the fly without relying on server-side programs (such as Active Server Pages or ColdFusion) or complicated sets of HTML pages to achieve special effects.
DHTML can be described as an interface which makes it possible to access the browser object model though JavaScript or VBScript scripting language. This way you can control your page more efficiently. And yes, you can actually make a page without HTML tags at all! What is DHTML? "DHTML is the combination of several built-in browser features in fourth generation browsers that enable a web page to be more dynamic". DHTML is NOT a scripting language (like JavaScript), but merely a browser feature- or enhancement- that gives your browser the ability to be dynamic. What you really want to learn is not DHTML itself, but rather, the syntax needed to use DHTML. DHTML is a collection of features that together, enable your web page to be dynamic. I think its important now to define just what is meant by Dynamic? "Dynamic" is defined as the ability of the browser to alter a web page's look and style after the document has loaded. I remember when I was learning JavaScript, I was
taught that you could use the document.write() method of JavaScript to create webpages on the fly. For example: <script> document.write("This is text created on the fly!") </script> But what if we wanted to create content not only on the fly, but on demand? We can do that, by nesting the above code in a function, and calling it via a form button: <input type="button" onClick="writecontent()" value="text"> Pressing the button will erase the entire web page and we were left with only the text the function produced. That was back then. Now, with the introduction of DHTML, we can alter content on a web page on demand, whenever we feel like it, without having the browser erase everything else. That's what DHTML is all about. The ability of the browser to change
look and style even after the document has loaded. The technology of DHTML is currently at its development stage, with NE, IE 5
39
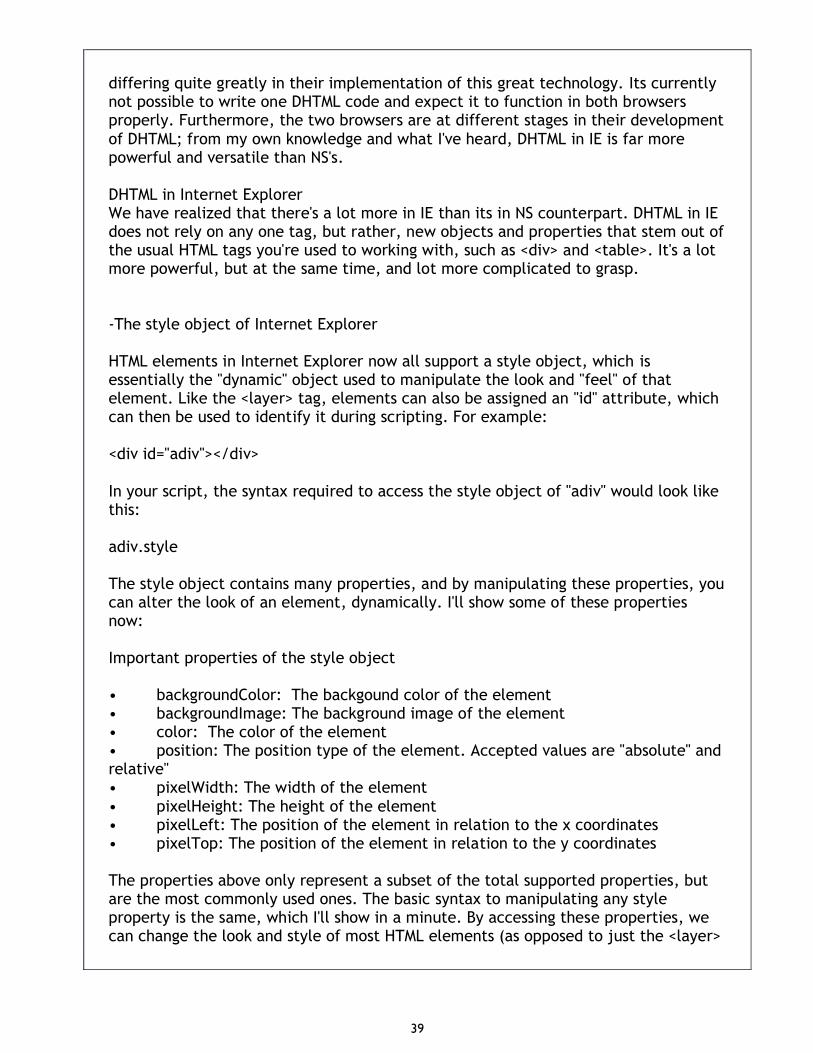
differing quite greatly in their implementation of this great technology. Its currently not possible to write one DHTML code and expect it to function in both browsers properly. Furthermore, the two browsers are at different stages in their development
of DHTML; from my own knowledge and what I've heard, DHTML in IE is far more powerful and versatile than NS's. DHTML in Internet Explorer We have realized that there's a lot more in IE than its in NS counterpart. DHTML in IE does not rely on any one tag, but rather, new objects and properties that stem out of the usual HTML tags you're used to working with, such as <div> and <table>. It's a lot more powerful, but at the same time, and lot more complicated to grasp. -The style object of Internet Explorer HTML elements in Internet Explorer now all support a style object, which is essentially the "dynamic" object used to manipulate the look and "feel" of that element. Like the <layer> tag, elements can also be assigned an "id" attribute, which can then be used to identify it during scripting. For example: <div id="adiv"></div>
In your script, the syntax required to access the style object of "adiv" would look like this: adiv.style The style object contains many properties, and by manipulating these properties, you can alter the look of an element, dynamically. I'll show some of these properties now: Important properties of the style object • backgroundColor: The backgound color of the element • backgroundImage: The background image of the element • color: The color of the element • position: The position type of the element. Accepted values are "absolute" and relative" • pixelWidth: The width of the element
• pixelHeight: The height of the element • pixelLeft: The position of the element in relation to the x coordinates • pixelTop: The position of the element in relation to the y coordinates The properties above only represent a subset of the total supported properties, but are the most commonly used ones. The basic syntax to manipulating any style property is the same, which I'll show in a minute. By accessing these properties, we can change the look and style of most HTML elements (as opposed to just the <layer>

40
tag in Netscape)! Here's a simple demonstration for DHTML. The below text changes color when the
mouse moves over it: Move your mouse here Here's the source code to the above text: <span id="sometext" onMouseover="sometext.style.color='red'" onMouseout="sometext.style.color='black'">Move your mouse here</span> Notice how we changed the text's color: sometext.style.color='red' We first used the element's id to gain access to it, then, through the style object and finally the style's color property, we were able to easily change the color of the text on demand! All style properties are read/write, and are accessed in a similar manner: element id-
>style object->property name. Thus DHTML is more powerful and easy to use that can provide better web page effects and behaviors.IE browser is better equipped to use DHTML than Netscape navigator. Use of this can bring good presentation and style to a website. ASP:
Active Server Pages (ASPs) are Web pages that contain server-side scripts in addition to the usual mixture of text and HTML (Hypertext Markup Language) tags. Server-side scripts are special commands you put in Web pages that are processed before the pages are sent from your Personal Web Server to the Web browser of someone who's visiting your Web site. . When you type a URL in the Address box or click a link on a Web page, you're asking a Web server on a computer somewhere to send a file to the Web browser (sometimes called a "client") on your computer. If that file is a normal HTML file, it looks exactly the same when your Web browser receives it as it did before the Web server sent it. After receiving the file, your Web browser displays its contents as a combination of text, images, and sounds. In the case of an Active Server Page, the process is similar, except there's an extra processing step that takes place just before the Web server sends the file. Before the Web server sends the Active Server Page to the Web browser, it runs all server-side scripts contained in the page. Some of these scripts display the current date, time, and other information. Others process information the user has just typed into a
form, such as a page in the Web site's guestbook. To distinguish them from normal HTML pages, Active Server Pages are given the ".asp"
41
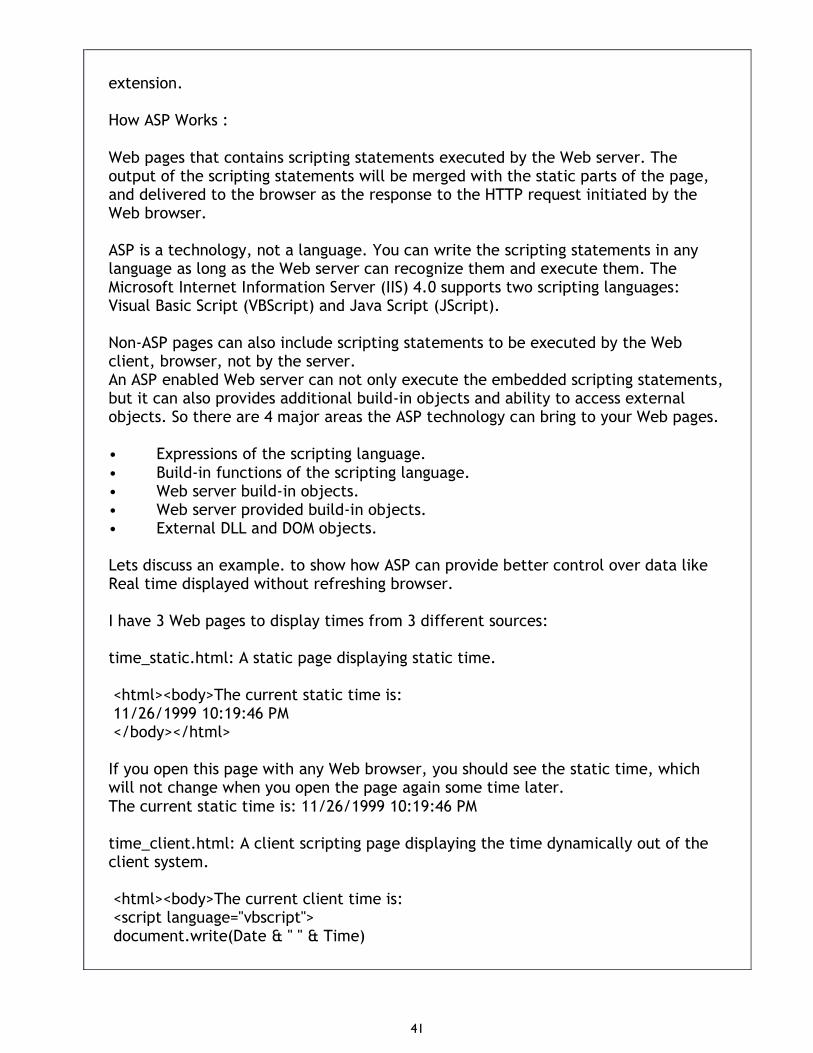
extension. How ASP Works :
Web pages that contains scripting statements executed by the Web server. The output of the scripting statements will be merged with the static parts of the page, and delivered to the browser as the response to the HTTP request initiated by the Web browser. ASP is a technology, not a language. You can write the scripting statements in any language as long as the Web server can recognize them and execute them. The Microsoft Internet Information Server (IIS) 4.0 supports two scripting languages: Visual Basic Script (VBScript) and Java Script (JScript). Non-ASP pages can also include scripting statements to be executed by the Web client, browser, not by the server. An ASP enabled Web server can not only execute the embedded scripting statements, but it can also provides additional build-in objects and ability to access external objects. So there are 4 major areas the ASP technology can bring to your Web pages. • Expressions of the scripting language.
• Build-in functions of the scripting language. • Web server build-in objects. • Web server provided build-in objects. • External DLL and DOM objects. Lets discuss an example. to show how ASP can provide better control over data like Real time displayed without refreshing browser. I have 3 Web pages to display times from 3 different sources: time_static.html: A static page displaying static time. <html><body>The current static time is: 11/26/1999 10:19:46 PM </body></html> If you open this page with any Web browser, you should see the static time, which will not change when you open the page again some time later.
The current static time is: 11/26/1999 10:19:46 PM time_client.html: A client scripting page displaying the time dynamically out of the client system. <html><body>The current client time is: <script language="vbscript"> document.write(Date & " " & Time)

42
</script> </body></html>
If you open this page with any Web browser that can execute VBScript statements, like MS Internet Explorer (IE) 5, you will see the current time of the client system. The displayed time will change when you open the page again some time later. The current client time is: 11/26/1999 10:26:08 PM time_server.asp: A server scripting (ASP) page displaying the time dynamically out of the server system. File name extension ".asp" is needed to inform Web server to be ready to execute the embedded script statements. <%@ language="vbscript"%> <html><body>The current server time is: <% response.write(Date & " " & Time) %> </body></html> Since an ASP page needs a Web server to execute the script statements, you need to copy this page to the document directory of the IIS server: copy time_server.asp
\inetpub\wwwroot If you now open this page with IE 5 at http://localhost/time_server.asp, you will see the current of the server system. The displayed time will change when you open the page again some time later. The current server time is: 11/26/1999 10:43:32 PM Thus the above example proves the worth of using ASP versus ordinary HTML in a web page. There are other features of ASP that provide better control over the code.
Question 8 Write short notes on Java Script

43
Answer 8
JavaScript is one of a new breed of Web languages called scripting languages. These are simple languages that can be used to add extra features to an otherwise dull and dreary Web page. While Java is intended for programmers, scripting languages make
it easy for nonprogrammers to improve a Web page. JavaScript was originally developed by Netscape Corporation for use in its browser, Netscape Navigator. It includes a convenient syntax, flexible variable types, and easy access to the browser's features. It can run on the browser without being compiled; the source code can be placed directly into a Web page. You can program in JavaScript easily; no development tools or compilers are required. You can use the same editor you use to create HTML documents to create JavaScript, and it executes directly on the browser (currently, Netscape or Microsoft Internet Explorer). JavaScript was originally called LiveScript, and was a proprietary feature of the Netscape browser. JavaScript has now been approved by Sun, the developer of Java, as a scripting language to complement Java. Support has also been announced by several other companies.
Although useful in working with Java, you'll find that JavaScript can be quite useful in its own right. It can work directly with HTML elements in a Web page, something Java can't handle. It is also simple to use, and you can do quite a bit with just a few JavaScript statements. You'll see examples of the power of JavaScript throughout this guide. History of JavaScript As mentioned before, the history of JavaScript begins with Java. Java was originally developed by Sun Microsystems for use in "real-time embedded systems"-in other words, consumer electronics. Java has now become the de facto standard for advanced Internet programming, but you may still see it running your cellular phone someday. Java was designed to operate on a virtual machine-a piece of software that interprets the Java code and acts on it as if it were a computer in itself. The virtual machine was designed to be simple so it could be implemented easily in a device. This is what makes it easy to implement in Web browsers.
• JavaScript can be combined directly with HTML. • The JavaScript language structure is simpler than that of Java. • The JavaScript interpreter is built into a Web browser. • JavaScript is supported on more platforms than Java. Simplified Language Structure

44
The limitations of JavaScript also make it much easier for the programmer. The syntax of the JavaScript language is more relaxed than that of Java, and variables (names used to store values) are easier to use. Here are the specifics:
• The JavaScript language is interpreted rather than compiled. Changing a script is as simple as changing an HTML page. • Rather than creating objects and classes, you can do quite a bit by simply accessing existing objects in JavaScript. • Variables are loosely typed: You do not need to declare variables before their use, and most conversions (such as numeric to string) are handled automatically. • Event handlers enable a JavaScript function to execute whenever an action is performed on part of the HTML document. For example, a form's input field can be checked for certain values whenever it is modified. Web Browser Integration JavaScript is an object-oriented language. This simply means that it can use objects. An object is a more complicated version of a variable. It can store multiple values and can also include actual JavaScript code. You can create your own objects to represent just about anything. JavaScript also includes objects that enable you to access features of the browser
directly. These objects represent actual elements of the browser and the Web page, such as windows, documents, frames, forms, links, and anchors. You can access information about the links, anchors, and form elements in the current page. You can also control the browser with JavaScript. For example, it's possible to include a "back" button on your page that will send the user back to the previous page-just like the browser's back-arrow button. Of course, when I say "browser" here, I'm talking about browsers that support JavaScript. Netscape Navigator began supporting it in version 2.0b1, and at this writing, version 3.0b6 is the latest version. It will also be supported by Microsoft Internet Explorer. Supported on More Platforms Because JavaScript is supported by Netscape on all the available platforms, it is supported more widely than Java. Until Java becomes more widely supported, using JavaScript for simple applications enables you to reach a wider audience on a wide variety of platforms. Currently, the only browser that fully supports JavaScript is
Netscape Navigator. This functionality is provided on the following platforms: • Windows 3.1, using the 16-bit version of Navigator • Windows 95 or Windows NT, using the 32-bit version of Navigator • Macintosh System 7 or higher, using the Macintosh version • Most versions of UNIX, using the X Window version of Navigator Uses for JavaScript

45
You've learned some technical details as to why JavaScript is important, but what's it really good for? What will it do for your Web pages? The following sections present some of the most important uses for JavaScript.
Including Dynamic Information JavaScript can be used to add a bit of life to a Web page by making some of the text dynamic. As a simple example, you could display an appropriate greeting-"good morning" or "good evening", depending on the time. Because you can use and control the HTML itself, you can extend this by dynamically choosing graphics or links using JavaScript. Thus, depending on the user, the time, or any factor, you can present the appropriate page. Validating Forms You've seen forms at many Web pages, and probably used them yourself. The user enters data into the form, then presses the Submit button, and the server, using a CGI program, responds to the information. This is useful, but it isn't very interactive-before you can receive a response, you have to wait for the data to travel to the server and back. Note
The biggest difference between JavaScript and CGI is that CGI works on the server and JavaScript works on the user's own machine (the client). CGI is most useful for sending data to the server and sending server data back to the user. JavaScript can add instant gratification to a Web form. You still can't send the data to the server until the Submit button is pressed, but JavaScript can act on the data in the meantime. For example, you could fill out a loan application online and, as you fill it out, instantly get feedback about the kind of payments the loan will require. After you're satisfied with the application, you can then submit it to the server. Making Pages Interactive Finally, JavaScript can be used to remove some of the drudgery from a normal Web page by giving the user some control of the page. For example, you could have a background on/off button to control the display of the background, or a button to toggle the display of a table of contents Security Considerations As JavaScript has been developed, there have been several concerns about security-
most of them legitimate. The Computer Incident Advisory Committee (CIAC), an agency of the Department of Energy that monitors computer security problems, has reported several minor problems with JavaScript. Because JavaScript is limited in its capabilities, there are no major problems-such as a method for a wayward script to erase your hard drive. All the potential problems involve the owner of the script or Web page being able to access information on your system. Here are the incidents the CIAC has reported:

46
• A JavaScript script can read your URL history and report it to the remote site. • The browser's disk cache can be read and transmitted.
• Your e-mail address can be read-and used to send an e-mail without your knowledge. • A list of files on your hard disk can be obtained. • URLs you visit can be logged by a script and transmitted. • All these problems are specific to Netscape's implementation of JavaScript. The good news is that they have all been fixed by later versions of Netscape. The first two were fixed by version 2.0; the remaining ones are fixed by versions 2.01 and 2.02. If you have the latest version of Netscape, you should be safe from these problems. However, considering that this many problems have been discovered, there is always a chance there will be more. Your Source Code Is Accessible Another problem with JavaScript is that, currently, there is no way to use a JavaScript on your Web page without making the script source available to anyone who wishes to copy it.
This means that you might spend hours working on a script, only to find that people have copied it onto their own Web pages. You may be programming in JavaScript for fun and not mind this, but it might be a serious consideration if you are making a JavaScript for pay or specifically for your own Web page. Remember that even though your source code is accessible, that doesn't mean it's free to be copied. You legally have a copyright on any script you write. If someone does copy your scripts, often the best solution is to send that person a friendly note pointing out your copyright and saying that you do not want anyone else using it. You should also clearly state this in the source code and on the Web page that contains it.
Question 9 Design an HTML page to accept Name (text box), Address (multiline textbox),Gender (radio button), Qualification (single selection), Specialization (multiple selection), Languages (checkbox), Submit and Reset button. When user clicks on Submit button, validate the contents and display accepted details in new document. The new document should be properly formatted.

47
Answer 9
Code:
-----------------------------RegisterPage2.html-------------------------------------------------
<html>
<!-- Begin of Head Tag -->
<head>
<!-- Title of the Web Page -->
<title>Register</title>
<meta http-equiv="Content-Type" content="text/html; charset=iso-8859-1">
<!-- Define inline stylesheet for providing proper Margins -->
<style type="text/css">
<!--
body,td,th {
font-family: "Times New Roman", Times, serif;
font-size: medium;
background-color: #7FBFAA;
font-weight: bolder;
}
-->
</style>
<!-- Define inline javascript for obtaining and validating the details of the User to be
registered -->
<SCRIPT LANGUAGE="JavaScript"><!--
function validate()
{
var fal = 0;
var hasChecked = false;
if(what.username.value == "")
{
alert("Please enter Name");
return false;
}
if(what.Address.value == "")
{
alert("Please enter Address");
return false;
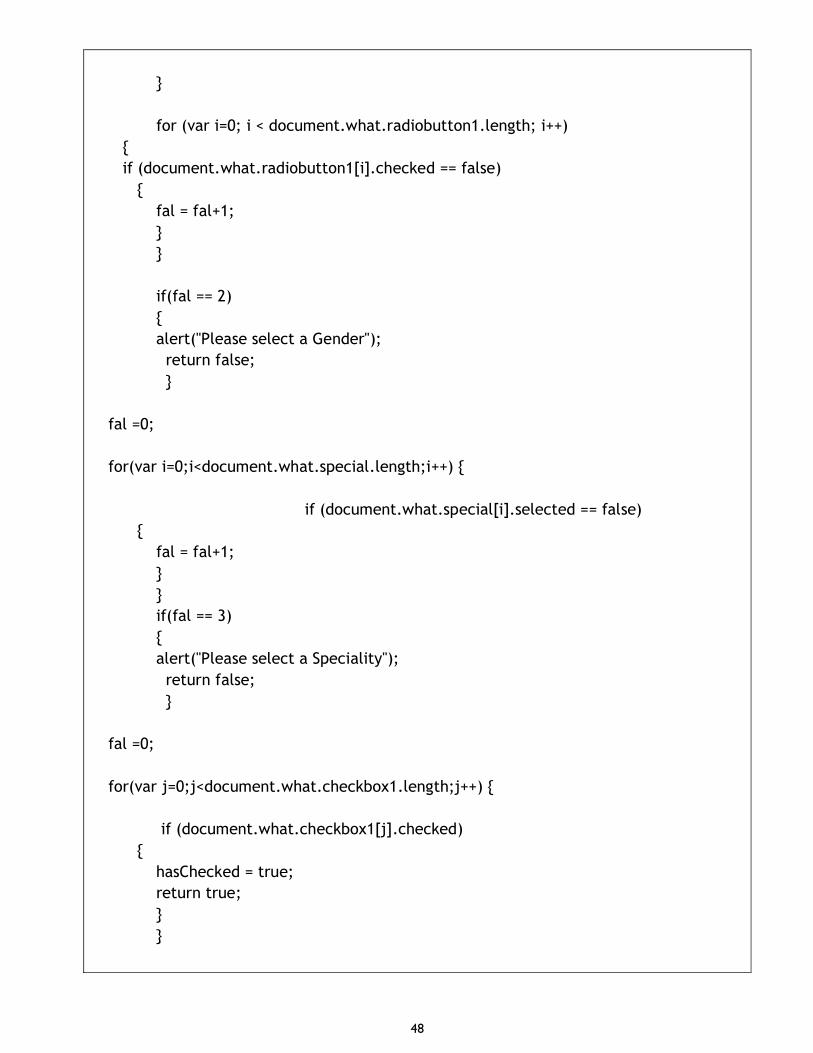
48
}
for (var i=0; i < document.what.radiobutton1.length; i++)
{
if (document.what.radiobutton1[i].checked == false)
{
fal = fal+1;
}
}
if(fal == 2)
{
alert("Please select a Gender");
return false;
}
fal =0;
for(var i=0;i<document.what.special.length;i++) {
if (document.what.special[i].selected == false)
{
fal = fal+1;
}
}
if(fal == 3)
{
alert("Please select a Speciality");
return false;
}
fal =0;
for(var j=0;j<document.what.checkbox1.length;j++) {
if (document.what.checkbox1[j].checked)
{
hasChecked = true;
return true;
}
}

49
if (!hasChecked)
{
alert("Please select at least one language.");
return false;
}
}
//--></SCRIPT>
</head>
<!-- Begin of Body tag having the main data and structure of the web page -->
<body class="sub">
<form action="Details2.html" method="get" target="_top" name="what"
onSubmit="return validate();">
<table width="71%" border="0" cellpadding="2" cellspacing="0" align="center" >
<tr style="vertical-align: top">
<td nowrap class="LabelColor" style="text-align: right"> </td>
<td nowrap class="LabelColor" style="text-align: right"> </td>
<td nowrap class="LabelColor" style="text-align: left; font-weight: bold; font-size:
x-large;">Register</td>
<td colspan="2" class="TitleColor"> </td>
</tr>
<tr style="vertical-align: top">
<td width="100" nowrap class="LabelColor" style="text-align: right"> </td>
<td width="25" nowrap class="LabelColor" style="text-align: right"> </td>
<td width="184" nowrap class="LabelColor" style="text-align: right"> </td>
<td colspan="2" class="TitleColor"> </td>
</tr>
<tr style="vertical-align: top">
<td style="text-align: right" class="LabelColor" nowrap><span class="LabelColor"
style="text-align: right">Name</span></td>
<td style="text-align: right" class="LabelColor" nowrap>:</td>
<td style="text-align: right" class="LabelColor" nowrap width="184">
<label for="username" ></label> <div align="left"><span class="TitleColor" >
<input type="text" id="username" name="txtName" width="100%"
maxlength="100" >
</span></div></td>
<td colspan="2" class="TitleColor"> </td>

50
</tr>
<tr style="vertical-align: top">
<td style="text-align: right" class="LabelColor"> </td>
<td style="text-align: right" class="LabelColor"> </td>
<td style="text-align: right" class="LabelColor"> </td>
<td colspan="2" class="TitleColor"> </td>
</tr>
<tr style="vertical-align: top">
<td style="text-align: right" class="LabelColor"><span class="LabelColor"
style="text-align: right">Address</span></td>
<td style="text-align: right" class="LabelColor">:</td>
<td style="text-align: right" class="LabelColor">
<label for="password"></label> <div align="left"><span class="TitleColor">
<textarea name="Address" id="Address" cols="16" rows="7"></textarea>
</span></div></td>
<td colspan="2" class="TitleColor"><label></label></td>
</tr>
<tr style="vertical-align: top">
<td style="text-align: right" class="LabelColor"> </td>
<td style="text-align: right" class="LabelColor"> </td>
<td style="text-align: right" class="LabelColor"> </td>
<td colspan="2"> </td>
</tr>
<tr style="vertical-align: top">
<td style="text-align: right" class="LabelColor"><span class="LabelColor"
style="text-align: right"><span class="LabelColor" style="text-align:
right">Gender</span></span></td>
<td style="text-align: right" class="LabelColor">:</td>
<td style="text-align: right" class="LabelColor"><span class="TitleColor">
<label for="male">
<div align="left">Male
<input type="radio" id="male" name="radiobutton1" value="Male" >
Female
<input type="radio" id="female" name="radiobutton1" value="Female">
</div>
</label>
<label for="female"> </label>
<div align="left"></div>
</span></td>
<td colspan="2"> <p class="TitleColor">
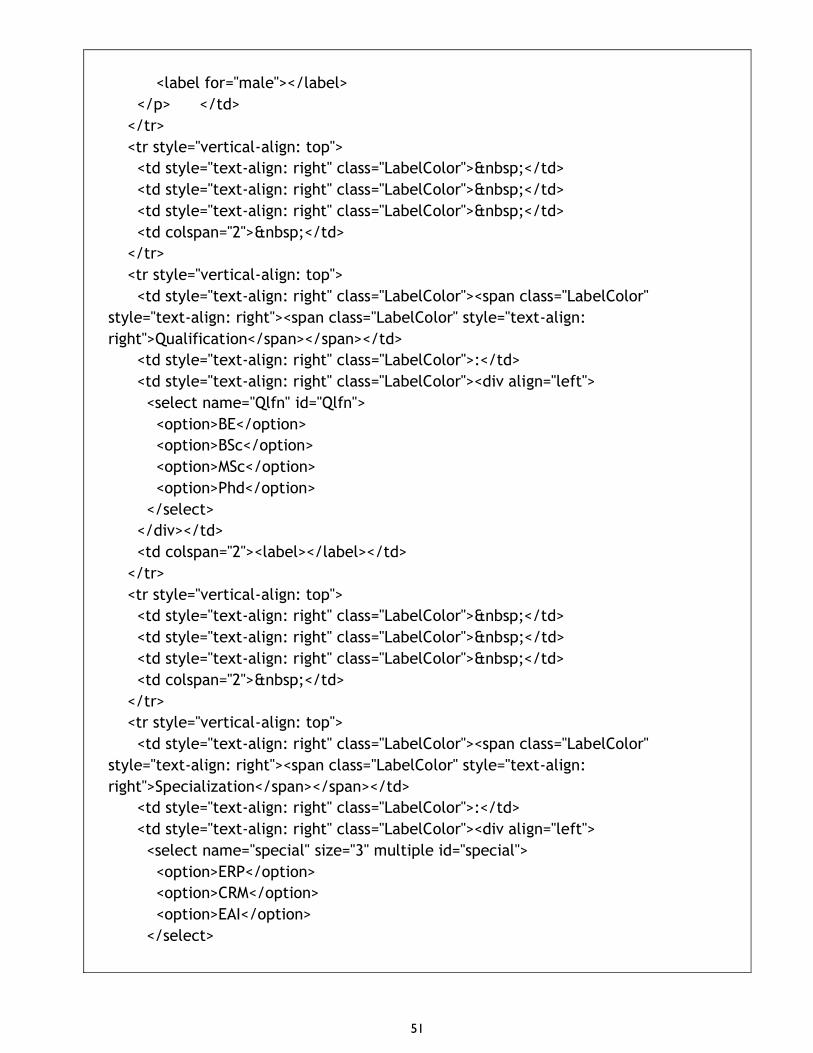
51
<label for="male"></label>
</p> </td>
</tr>
<tr style="vertical-align: top">
<td style="text-align: right" class="LabelColor"> </td>
<td style="text-align: right" class="LabelColor"> </td>
<td style="text-align: right" class="LabelColor"> </td>
<td colspan="2"> </td>
</tr>
<tr style="vertical-align: top">
<td style="text-align: right" class="LabelColor"><span class="LabelColor"
style="text-align: right"><span class="LabelColor" style="text-align:
right">Qualification</span></span></td>
<td style="text-align: right" class="LabelColor">:</td>
<td style="text-align: right" class="LabelColor"><div align="left">
<select name="Qlfn" id="Qlfn">
<option>BE</option>
<option>BSc</option>
<option>MSc</option>
<option>Phd</option>
</select>
</div></td>
<td colspan="2"><label></label></td>
</tr>
<tr style="vertical-align: top">
<td style="text-align: right" class="LabelColor"> </td>
<td style="text-align: right" class="LabelColor"> </td>
<td style="text-align: right" class="LabelColor"> </td>
<td colspan="2"> </td>
</tr>
<tr style="vertical-align: top">
<td style="text-align: right" class="LabelColor"><span class="LabelColor"
style="text-align: right"><span class="LabelColor" style="text-align:
right">Specialization</span></span></td>
<td style="text-align: right" class="LabelColor">:</td>
<td style="text-align: right" class="LabelColor"><div align="left">
<select name="special" size="3" multiple id="special">
<option>ERP</option>
<option>CRM</option>
<option>EAI</option>
</select>

52
</div></td>
<td colspan="2"><label></label></td>
</tr>
<tr style="vertical-align: top" >
<td style="text-align: right" class="LabelColor" > </td>
<td style="text-align: right" class="LabelColor"> </td>
<td style="text-align: right" class="LabelColor"> </td>
<td> </td>
<td> </td>
</tr>
<tr style="vertical-align: top">
<td style="text-align: right" class="LabelColor"><span class="LabelColor"
style="text-align: right"><span class="LabelColor" style="text-align:
right">Languages</span></span></td>
<td style="text-align: right" class="LabelColor">:</td>
<td style="text-align: right" class="LabelColor"><div align="left">
<input type="checkbox" name="checkbox1" value="English" >
English
<input type="checkbox" name="checkbox1" value="German">
German</div></td>
<td width="95"><label></label></td>
<td width="79"><label></label></td>
</tr>
<tr style="vertical-align: top">
<td style="text-align: right" class="LabelColor"> </td>
<td style="text-align: right" class="LabelColor"> </td>
<td style="text-align: right" class="LabelColor"> </td>
<td> </td>
<td> </td>
</tr>
<tr style="vertical-align: top">
<td style="text-align: right" class="LabelColor"> </td>
<td style="text-align: right" class="LabelColor"> </td>
<td style="text-align: right" class="LabelColor"><span class="LabelColor"
style="text-align: right">
<input type="submit" name="SubmitName" value="Submit" >
<span class="LabelColor" style="text-align: right">
<input name="Reset" type="reset" id="Reset" value="Reset">
</span> </span></td>
<td> </td>
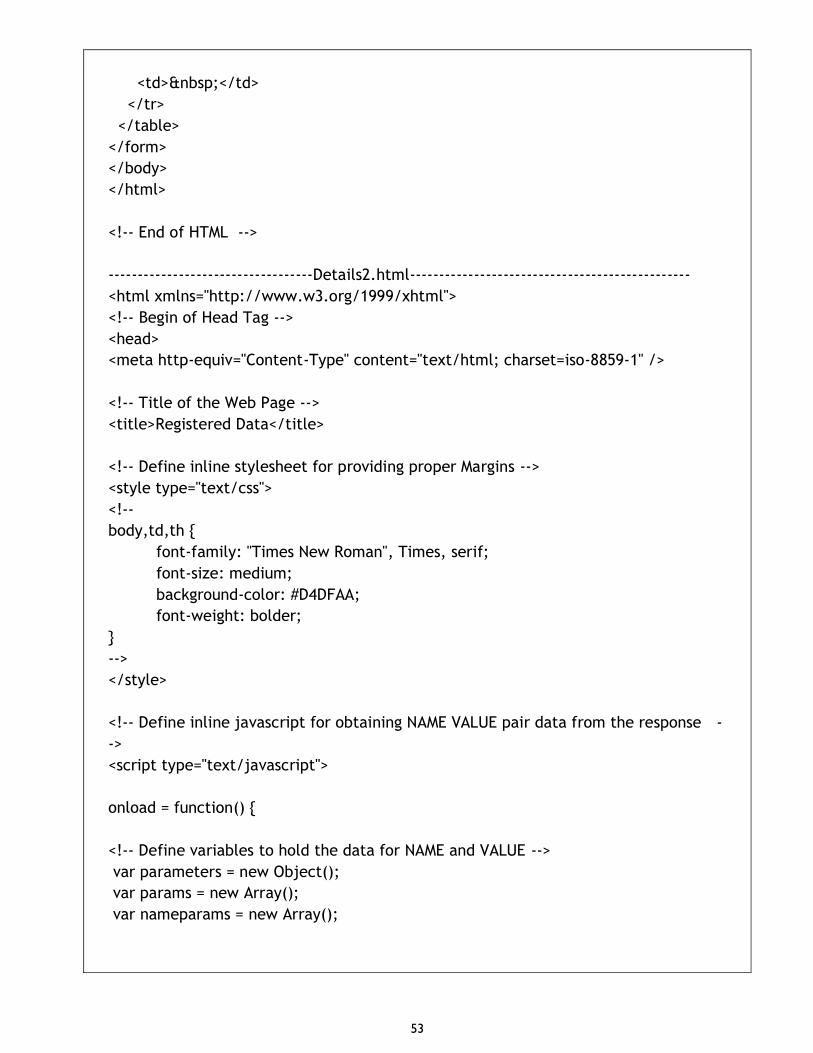
53
<td> </td>
</tr>
</table>
</form>
</body>
</html>
<!-- End of HTML -->
-----------------------------------Details2.html------------------------------------------------
<html xmlns="http://www.w3.org/1999/xhtml">
<!-- Begin of Head Tag -->
<head>
<meta http-equiv="Content-Type" content="text/html; charset=iso-8859-1" />
<!-- Title of the Web Page -->
<title>Registered Data</title>
<!-- Define inline stylesheet for providing proper Margins -->
<style type="text/css">
<!--
body,td,th {
font-family: "Times New Roman", Times, serif;
font-size: medium;
background-color: #D4DFAA;
font-weight: bolder;
}
-->
</style>
<!-- Define inline javascript for obtaining NAME VALUE pair data from the response -
->
<script type="text/javascript">
onload = function() {
<!-- Define variables to hold the data for NAME and VALUE -->
var parameters = new Object();
var params = new Array();
var nameparams = new Array();

54
<!-- Split the URL string having data -->
if(window.location.search) {
var paramArray = window.location.search.substr(1).split("&");
var length = paramArray.length;
var num = 0;
var chknum =0;
for (var index = 0;index <length; index++ ) {
var param = paramArray[index].split("=");
var name = param[0];
nameparams[index] = name;
var value =
typeof param[1] == "string"
? decodeURIComponent(param[1].replace(/\+/g, ' '))
: null;
params[index] = value;
}
}
<!-- Assign values to form elements; do processing of the MULTI VAlues for
Check boxes, List Boxes etc -->
document.forms['form1'].elements['txtinput'].value = params[0];
document.forms['form1'].elements['txtinput2'].value = params[1];
document.forms['form1'].elements['txtinput3'].value = params[2];
document.forms['form1'].elements['txtinput4'].value = params[3];
if(nameparams[4] =="special")
{num = num+1;
document.forms['form1'].elements['txtinput5'].value = params[4];
}
if(nameparams[5] =="special")
{num = num+1;
document.forms['form1'].elements['txtinput5'].value =params[4]+","+
params[5];
}
if(nameparams[6] =="special")
{ num = num+1;

55
document.forms['form1'].elements['txtinput5'].value =params[4]+","+
params[5]+","+params[6];
}
if(nameparams[7] =="special")
{num = num+1;
document.forms['form1'].elements['txtinput5'].value =params[4]+","+
params[5]+","+params[6]+","+params[7];
}
if(nameparams[5] =="checkbox1")
{
chknum = chknum+1;
document.forms['form1'].elements['txtinput6'].value = params[4 +num];
}
if(nameparams[6] =="checkbox1")
{
chknum = chknum+1;
if(chknum == 1)
document.forms['form1'].elements['txtinput6'].value = params[4
+num];
if(chknum == 2)
document.forms['form1'].elements['txtinput6'].value = params[4
+num]+","+params[5 +num];
}
if(nameparams[7] =="checkbox1")
{
chknum = chknum+1;
if(chknum == 1)
document.forms['form1'].elements['txtinput6'].value = params[4
+num];
if(chknum == 2)
document.forms['form1'].elements['txtinput6'].value = params[4
+num]+","+params[5 +num];
if(chknum == 3)
document.forms['form1'].elements['txtinput6'].value =params[4
+num]+","+ params[5 +num]+","+ params[6 + num];

56
}
if(nameparams[8] =="checkbox1")
{
chknum = chknum+1;
if(chknum == 1)
document.forms['form1'].elements['txtinput6'].value = params[4
+num];
if(chknum == 2)
document.forms['form1'].elements['txtinput6'].value = params[4
+num]+","+params[5 +num];
if(chknum == 3)
document.forms['form1'].elements['txtinput6'].value =params[4
+num]+","+ params[5 +num]+","+ params[6 + num];
}
}
</script>
</head>
<!-- Begin of Body element -->
<body >
<form name="form1" id="form1" action="" >
<!-- Define Table and related attributes to populate with the incoming data -->
<table width="100%" border="0" cellspacing="0" cellpadding="0">
<tr>
<td> </td>
<td> </td>
<td> </td>
<td style="text-align: left; font-weight: bold; font-size: x-large;">Registered
Details</td>
</tr>
<tr>
<td> </td>
<td> </td>
<td> </td>
<td> </td>
</tr>
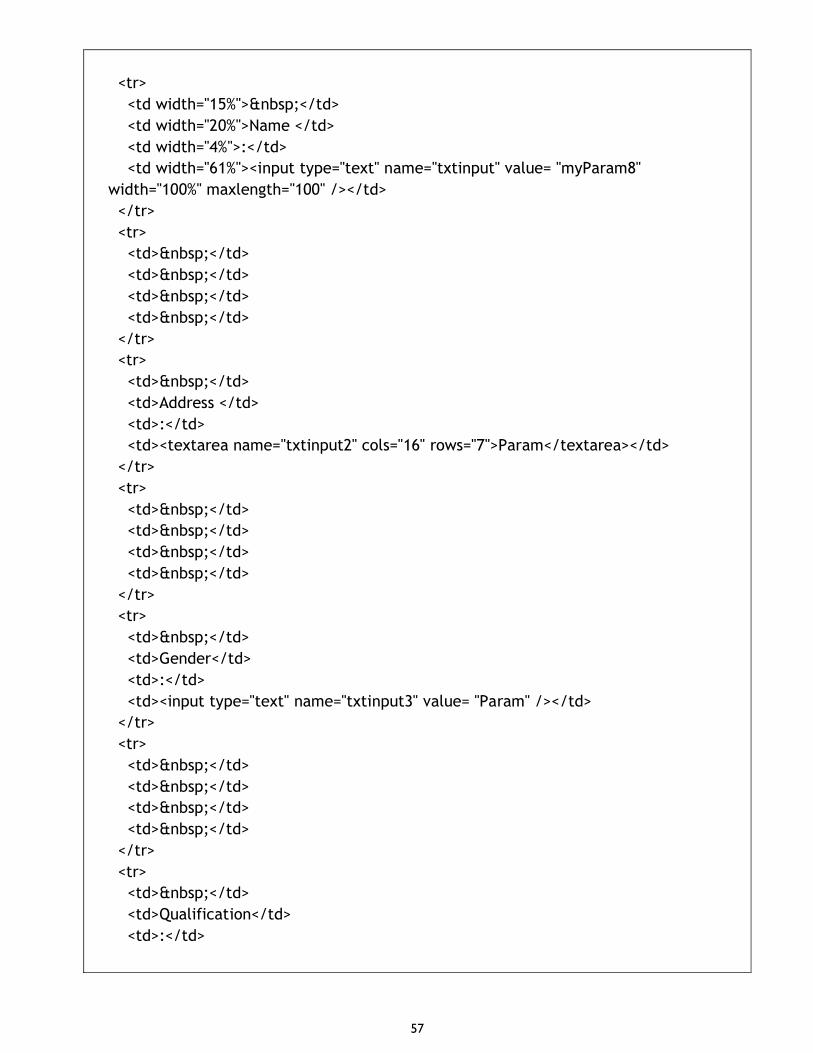
57
<tr>
<td width="15%"> </td>
<td width="20%">Name </td>
<td width="4%">:</td>
<td width="61%"><input type="text" name="txtinput" value= "myParam8"
width="100%" maxlength="100" /></td>
</tr>
<tr>
<td> </td>
<td> </td>
<td> </td>
<td> </td>
</tr>
<tr>
<td> </td>
<td>Address </td>
<td>:</td>
<td><textarea name="txtinput2" cols="16" rows="7">Param</textarea></td>
</tr>
<tr>
<td> </td>
<td> </td>
<td> </td>
<td> </td>
</tr>
<tr>
<td> </td>
<td>Gender</td>
<td>:</td>
<td><input type="text" name="txtinput3" value= "Param" /></td>
</tr>
<tr>
<td> </td>
<td> </td>
<td> </td>
<td> </td>
</tr>
<tr>
<td> </td>
<td>Qualification</td>
<td>:</td>

58
<td><input type="text" name="txtinput4" value= "Param" /></td>
</tr>
<tr>
<td> </td>
<td> </td>
<td> </td>
<td> </td>
</tr>
<tr>
<td> </td>
<td>Specialization</td>
<td>:</td>
<td><textarea name="txtinput5" cols="16" rows="3">Param</textarea></td>
</tr>
<tr>
<td> </td>
<td> </td>
<td> </td>
<td> </td>
</tr>
<tr>
<td> </td>
<td>Langauages</td>
<td>:</td>
<td><textarea name="txtinput6" cols="16" rows="3">Param</textarea></td>
</tr>
</table>
</form>
<p> </p>
</body>
</html>
<!-- End of HTML element -->
-------------------
Results:

59

60
Question 10 Design an HTML page to accept information of the employee (important 5 details). Use appropriate controls. Give title “Employee Information” with some good background color. Separate title and other controls using
horizontal line. Design the web page with relevant background image
Answer 10
Code:
-----------------------------------------Employee.html---------------------------------- <html xmlns="http://www.w3.org/1999/xhtml"> <!-- Begin of Head Tag --> <head> <meta http-equiv="Content-Type" content="text/html; charset=iso-8859-1" /> <title>Employee Information</title> <!-- Define inline stylesheet for providing proper Margins --> <style type="text/css"> <!-- body { background-color: #004040; } body,td,th {
color: #2A1F55; font-size: large; font-weight: bolder; } .style1 { font-family: "Times New Roman", Times, serif; font-size: large; font-style: italic; } --> </style> <script type="text/JavaScript"> <!-- //--> </script> </head>

61
<!-- Begin of Body tag having the main data and structure of the web page --> <body background="emp3.jpg"> <p class="style1">
<label></label> <label> <div align="center"> <h1 align="center"> Employee Details </h1> <hr /> <table width="80%" border="0" class="style1"> <tr> <td>Employee Name</td> <td> <input type="text" name="textfield" /> </td> <td>Designation</td> <td> <input type="text" name="textfield2" /> </td> </tr> <tr>
<td>Current Location</td> <td> <select name="select"> <option>Bangalore</option> <option>Delhi</option> <option>London</option> <option>NewYork</option> <option>California</option> <option>Sweden</option> </select> </td> <td>Tel (with Ext)</td> <td> <input type="text" name="textfield3" /> </td> </tr> <tr> <td>Department</td>
<td> <select name="select2" size="5" multiple="multiple"> <option>ERP</option> <option>CRM</option> <option>.Net</option> <option selected="selected">Java</option> <option>BI</option> </select>

62
</td> <td>Reporting Manager</td> <td><input type="text" name="textfield4" /></td>
</tr> <tr> <td> </td> <td> <input type="submit" name="Submit" value="Submit" /> </td> <td> <input type="reset" name="Submit2" value="Reset" /> </td> <td> </td> </tr> </table> <form action="" method="post" name="form1" class="style1" id="form1"> </form> </body> </html>
<!-- End of HTML --> -----------------------------------Emp3.jpg-------------------------------------
Results:

63
Question 11 Create the Table as follows

64
Answer 11
Code:
------------------------------Num_Image Table.html-------------------------------------------
<html xmlns="http://www.w3.org/1999/xhtml">
<!-- Begin of Head Tag -->
<head>
<meta http-equiv="Content-Type" content="text/html; charset=iso-8859-1" />
<title>Nested table with Text and Image</title>
<!-- Define inline stylesheet for providing proper Margins -->
<style type="text/css">
<!--
.style10 {
font-family: "Times New Roman", Times, serif;
border-color: #2A1F00;
}
-->
</style>
</head>
<!-- Begin of Body tag having the main data and structure of the web page -->
<body >
<p> </p>
<table width="65%" border="1" cellspacing="0" cellpadding="0" bordercolor="#2A1F00"
align="center" >
<tr >
<!-- Provide Table heading -->
<th width="50%" scope="col" title="Numbers"><table width="95%" border="1"
cellspacing="0" cellpadding="0" bordercolor="#2A1F00">
<caption>
Numbers
</caption>
<tr>
<td align="center" valign="middle" scope="col"><span

65
class="style10">10</span></td>
<td align="center" valign="middle" scope="col"><span
class="style10">20</span></td>
<td align="center" valign="middle" scope="col"><span
class="style10">30</span></td>
<td align="center" valign="middle" scope="col"><span
class="style10">40</span></td>
</tr>
<tr>
<td align="center" valign="middle"><span class="style10">50</span></td>
<td align="center" valign="middle"><span class="style10">60</span></td>
<td align="center" valign="middle"><span class="style10">70</span></td>
<td align="center" valign="middle"><span class="style10">80</span></td>
</tr>
<tr>
<td align="center" valign="middle"><span class="style10">90</span></td>
<td align="center" valign="middle"><span class="style10">100</span></td>
<td align="center" valign="middle"><span class="style10">200</span></td>
<td align="center" valign="middle"><span class="style10">300</span></td>
</tr>
<tr>
<td align="center" valign="middle"><span class="style10">400</span></td>
<td align="center" valign="middle"><span class="style10">500</span></td>
<td align="center" valign="middle"><span class="style10">600</span></td>
<td align="center" valign="middle"><span class="style10">700</span></td>
</tr>
</table></th>
<!-- Insert image with proper size -->
<th colspan="4" ><img src="Image2.jpg" alt="lilly" /></th>
</tr>
<tr >
<td > </td>
<td> </td>
<td> </td>
<td> </td>
<td> </td>
</tr>
</table>
<p> </p>
</body>
</html>

66
<!-- End of HTML -->
---------------------------------------Image2.jpg------------------------------------------
Results:
Question 12
Write a short note on a) Photoshop b) Dreamweaver
Answer 12
Dreamweaver:
Dreamweaver has features for both the beginning and advanced web page creator. Dreamweaver integrates many aspects of Web development, including page creation, site management, and web server tools, giving the user a good perspective of an
67
entire web site. Dreamweaver also supports JavaScript and Cascading Style Sheets, along with other advanced functions.
Here is a brief summary of some of the elements that Dreamweaver offers: Site Management - An integrated file transfer client and visual site map allow site navigation, file linking, and uploading/synchronization of your site. Template - Templates allow users to quickly edit all common elements, such as navigation bars, throughout a whole site. Cascading Style Sheets - CSS allow users to quickly change the appearance of text elements throughout the site. JavaScript Behaviors - Dreamweaver behaviors are those related to JavaScript that you can apply without having to deal with the necessary code. Below describes brief description of the tools and operations available in Dreamweaver. • Defining a Site:
Dreamweaver operates based upon the concept of a web site. When you first open the program, Dreamweaver makes you define a site. This helps you keep all files organized. With a simple web site, you will just need to keep a few files within a file folder. However, it is best to plan this out before you start, since folder maintenance will help greatly as your site grows and you start linking to other web pages and adding graphics. • Dreamweaver Layout: Dreamweaver allows you to insert objects and change their attributes with the floating panels and menu commands. Dreamweaver for Windows also has the option to have fixed panels instead of floating panels. Once objects have been inserted on the page, they appear as they will when the web page is published online. Once you start Dreamweaver, you may see a blank Web page with 3 floating panels: • Insert Panel: By default, this is the top menu bar on both PC and Macintosh. It has graphical buttons or icons for objects that can be inserted into a web page. These include images, tables and applets. You can select different types of objects
from the tabs at the top of the panel. The Common list is the default. • Properties Panel: By default, this panel is below your web page. It looks like a Word processor formatting toolbar. When you choose an element on the Web page, you can adjust its properties here. You can toggle the advanced properties by clicking the small white arrow in the lower right corner of the panel. • Answer Panel: By default, this panel appears at the bottom of listed panels on the right. If it does not automatically appear, click on the arrow next to Answers to

68
maximize the panel. You can quickly access the Dreamweaver tutorials and other information here.
All of Dreamweaver's panels can be moved, or opened and closed via the Window menu. • Publishing the Site Once you have the page the way you want it, you are ready to post it for all to see. What are Cascading Style Sheets? Cascading Style Sheets (CSS) are tools for formatting the appearance of Web pages They do not add content to Web pages (as can JavaScript and Server-Side Includes, for example), but rather define how page content is displayed (by choosing colors, fonts, sizes, and alignments). What's a Template? Templates are used to simplify site management. Templates are useful if you have several pages that you want to contain consistent formatting and elements. Note that you must have first defined your site (via the Site menu) before working with Templates. Before we create the new page with the template, we need to apply this
template to the page we already have so that it too gets updated when we change the template. A Web page template is a foundation that you can use to build other web pages that use the same structure and elements over and over again. A template is defined with editable and uneditable regions. Typically, Web designers want a consistent look, and templates allow a Web designer to achieve this easily. More importantly, changing the template itself changes all pages that use the template, making it easy to make site-wide changes. Rollovers and JavaScript Behaviors: A rollover image is an image that changes when the mouse cursor hovers over it Rollovers are a type of JavaScript command. You can use other JavaScript commands, such as browser checks and popup messages, using Dreamweaver's Behaviors feature. In conclusion we can say that Dreamweaver is a good tool for design and development of Web based applications that has good IDE and compliance to HTML
standards. Photoshop: I will brief about the basics of Photoshop using the topics as shown below. 1. What is Photoshop? 2. About the Work Area 3. Resizing Images and Size Guide 4. Selection

69
5. Cropping 6. Modify Color and Effects 7. Layers
8. Text Editing 9. File Type: GIF or JPG What is Photoshop? Adobe Photoshop is one of the most powerful image modification programs on the market today. It is widely used throughout the world, and has shown its handiwork to the public through altered photos of famous people, such as President Bush. It is so dominant that when we notice that an image has been altered, we say it has been “Photoshopped.” About the Work Area: The work area can be intimidating to work with because of all the complex functionality but with a quick breakdown of the available features and their uses, you will be ready to comfortably navigate the work area with ease. The work area in Photoshop has the following basic functionality and features:
• Menu Bar – this is where you can access most of the commands and features in Photoshop
• Drawing Palette – where the image being worked on will appear • Options bar • content sensitive display of tool options – changes as different tools are
selected • display using Window > Options or Click a tool in the toolbox. • Tool box - for creating an editing images (display or hide using Windows >
Tools) • Palettes - to monitor and modify images (there are 5 palettes by default) • Palette Well - to organize palettes in work area • Drag a palette’s tab into the palette well to store it in the palette well • Once in the palette well click on the palette tab to use it
Resizing Images and Size Guide: When working with images for a website, you will need to resize your images to suit your particular purpose. The units used here are pixels, which are standard units across all computer platforms. The conversion between pixels and inches is roughly 1” = 72 pixels or 1cm = 28 pixels. To use this particular unit of measure, you will need to adjust you preference settings by selecting Edit > Preferences > Units and
Rulers and changing the units and rulers to measure in pixels. Selection: There are several ways to select images or portions of images in Photoshop. Here are few basic methods to do so: Adding to a Selection and making a square • Use the rectangular Selection Tool on the Toolbox to select area to work on. • To add to a selection, hold Shift before dragging.

70
• To make the selection exactly square, start dragging, then hold Shift. • You can press Ctrl+D to "deselect" and remove the selection at any time. Elliptical Selections and subtracting Selections
• Hold down on the Selection Tool on the Toolbar, and choose the Ellipse. • To move the selection, just click inside it and drag. • Holding Alt while selecting subtracts that area from the selection Cropping: Cropping is the process of removing portions of an image to create focus or strengthen the composition. You can crop an image using the crop tool and the Crop command To crop an image using the Crop command: • Select the part of the image you want to keep by doing one of the following: • With the rectangle, rounded rectangle, or elliptical marquee, drag over the area you want to select. • Hold down Shift as you drag to constrain the marquee to a square or circle. • To drag a marquee from its center, hold down Alt (Windows) or Option (Mac OS) after you begin dragging. • Choose Image > Crop.
To crop an image using the crop tool: • Select the crop tool. • Press enter to apply the selection to the cropped area Modify Color and effects: Photoshop has many powerful tools to modify the color and effects of images. Here are brief summaries of each of them: I. Grayscale: Changes everything to different shades of gray II. Indexed Color: Uses at most 256 colors, so that your file size will be low. Best for .GIFs and simple clip art. III. RBG Color: Best one: 16.7 million colors IV. Lab Color: The intermediate color model Photoshop uses when converting from one color mode to another. V. Multichannel: Uses 256 shades of gray, based on the color value of each pixel. This is like the old western style. VI. 8 / 16 bits per channel: Distinctions in color. 16 has finer distinctions, but can also make the file twice the size as 8.
Layers: • The Layers window shows the various layers that your image is made up of. • To make a new layer, click the New Layer button (F) or selecting Layer > New > Layer in the menu bar • The background layer cannot be removed, since it has to serve as the background” for the entire image. Also, you cannot initially modify this background image because it is “locked.” In order to “unlock” it, simply double click the name

71
of the image in the Layer palette. • Additionally, if you somehow find that you cannot modify your image, it may be in the Indexed mode. If this is the case, you need to change it to RGB mode under
Image > Mode > RGB. • To work on a different layer, click on that layer. The eyeball will appear next to that layer. • You can drag layers up and down the list. • Remember – create a new layer for each part of your image. This allows you to go back and edit the layers individually. Text Editing: To edit text on the type layer: • Always use a new layer to create text • Select the horizontal type tool or the vertical type tool. • Select the type layer in the layers palette (which will appear with the icon next to it), or click the text flow to automatically select a type layer. • Click to set insertion point or select one or more characters you want to edit • Enter text and format as desired using the character palette (display character palette using: Window > Character or click Character palette tab if the window is open but not visible) • Commit changes to type layer by either:
• Click the Commit button in the options bar • Press the Enter key on the numeric keypad. • Press Ctrl+Enter on the main keyboard (Windows) or Command+Return (Mac OS). • Select any tool in the toolbox, click in the Layers, Channels, Paths, Actions, History, or Styles palette, or select any available menu command. File type: GIF or JPEG When considering what format to save images in there are three basic things to consider: color, size and compression which affects the loading time. Making image files smaller is useful for transmitting files across networks and for archiving libraries of images. This saves disk space and improves transmission time. It takes longer to decode and view a JPEG image than to view an image of a simpler format such as GIF. Thus using JPEG is essentially a time/space tradeoff: you give up some time in order to store or transmit an image more cheaply. In conclusion I would say that Photoshop is a very good tool that can be used for
creating, editing and providing advanced touchups to photo and make it suitable for use in a website. It can also be optimized and compressed as per needs as image sizes are usually big and proper cropping can compact the images.

72
Question 13 Design an HTML page to create the standard calculator. When user will click on
the button, display the caption of selected button in new document.
Answer 13
Code:
----------------------------------------calc.html--------------------------------------------
<html xmlns="http://www.w3.org/1999/xhtml">
<head>
<meta http-equiv="Content-Type" content="text/html; charset=iso-8859-1" />
<title>Calculator</title>
<script type="text/javascript">
var winPop;
<!-- Define function to open new window with particular size and color and send the
parent data to child window -->
function OpenWindow(val){
winPop = window.open("testPop.html","winPop","height=100px
width=200px,left=650,top=250,screenX=650,screenY=250");
var dat = val;
setTimeout("SendToChild('" + dat + "')",10);
}
function SendToChild(data){
winPop.document.formPop.textPop.value = data;
winPop.focus();
}
</script>
</head>
<body >

73
<FORM NAME="Calc">
<p> </p>
<TABLE BORDER=4 align="center" bordercolor="#2A3F55" bgcolor="#00DFAA" >
<TR>
<TD >
<INPUT TYPE="text" NAME="Input" Size="17" >
<br>
</TD>
</TR>
<TR>
<TD>
<!-- Define calculator button, and onclick event to open new window -->
<INPUT TYPE="button" NAME="one" VALUE=" 1 "
onclick="OpenWindow(document.Calc.one.value)">
<INPUT TYPE="button" NAME="two" VALUE=" 2 "
OnCLick="OpenWindow(document.Calc.two.value)">
<INPUT TYPE="button" NAME="three" VALUE=" 3 "
OnClick="OpenWindow(document.Calc.three.value)">
<INPUT TYPE="button" NAME="plus" VALUE=" + "
OnClick="OpenWindow(document.Calc.plus.value)" >
<br>
<INPUT TYPE="button" NAME="four" VALUE=" 4 "
OnClick="OpenWindow(document.Calc.four.value)">
<INPUT TYPE="button" NAME="five" VALUE=" 5 "
OnCLick="OpenWindow(document.Calc.five.value)">
<INPUT TYPE="button" NAME="six" VALUE=" 6 "
OnClick="OpenWindow(document.Calc.six.value)">
<INPUT TYPE="button" NAME="minus" VALUE=" -
"OnClick="OpenWindow(document.Calc.minus.value)" >
<br>
<INPUT TYPE="button" NAME="seven" VALUE=" 7 "
OnClick="OpenWindow(document.Calc.seven.value)">
<INPUT TYPE="button" NAME="eight" VALUE=" 8 "
OnCLick="OpenWindow(document.Calc.eight.value)">
<INPUT TYPE="button" NAME="nine" VALUE=" 9 "
OnClick="OpenWindow(document.Calc.nine.value)">
<INPUT TYPE="button" NAME="multi" VALUE=" x "
OnClick="OpenWindow(document.Calc.multi.value)" >
<br>

74
<INPUT TYPE="button" NAME="clear" VALUE=" c " OnClick="Calc.Input.value = ''">
<INPUT TYPE="button" NAME="zero" VALUE=" 0 "
OnClick="OpenWindow(document.Calc.zero.value)">
<INPUT TYPE="button" NAME="DoIt" VALUE=" = "
OnClick="OpenWindow(document.Calc.DoIt.value)">
<INPUT TYPE="button" NAME="div" VALUE=" /
"OnClick="OpenWindow(document.Calc.div.value)" >
<br>
</TD>
</TR>
</TABLE>
</FORM>
</body>
</html>
<!-- End of HTML -->
--------------------------------------testPop.html--------------------------------------
<html xmlns="http://www.w3.org/1999/xhtml">
<head>
<meta http-equiv="Content-Type" content="text/html; charset=iso-8859-1" />
<title>Popup Window</title>
<style type="text/css">
<!--
.style10 {
font-family: "Times New Roman", Times, serif;
font-size: medium;
font-weight: bold;
font-style: italic;
}
-->
</style>
</head>
<!-- Body element begin -->
<body bgcolor="#55DFFF" text="#553F55">
<form name="formPop" >
<input name="textPop" type="text" class="style10" />
</form>
</body>

75
</html>
<!-- End of HTML -->
Results:
DISCLAIMER : Data presented in this document is sourced from various data resources
like Library, online content etc. Author makes no claim of the data ownership. It
belongs to the original authors.