websms user manual - messagemedia · © copyright 2007 message media – the sms specialists page 9...
TRANSCRIPT

WebSMSWebSMSWebSMSWebSMS
User ManualUser ManualUser ManualUser Manual

© Copyright 2007 messagemedia – The SMS Specialists Page 2 of 28
Contents Page No. 1.0 Welcome to WebSMS 3 1.1 Overview 3 2.0 Getting Started – Logging into WebSMS 4 3.0 Managing your Phone Book 4 3.1 Individuals 5 3.2 My Groups 6 3.3 Shared Groups 7 3.4 Managing Shared Groups (Administrators Only) 7 3.5 Adding a Single Individual to a Shared Group 8 3.6 Bulk Import of Individual Contacts 8 3.7 Exporting Groups to Excel 9 3.8 Bulk Delete Contacts 10 3.9 Manage Phone Book 11 4.0 Sending Messages 12 4.1 Bulk Message Sending 13 4.2 SMS Templates 14 4.3 Creating a Template 15 4.4 Editing / Deleting a Template 15 4.5 Insert Name 16 5.0 Receiving Messages 16 5.1 Viewing your Messages 17 6.0 WebSMS Features 17 6.1 Delivery Tracking 17 6.2 Character Limit 18 6.3 Header and Footer 19 6.4 Schedule Message 20 6.5 Set Timezone 21 6.6 Auto Forwarding 22 6.7 Recipients 22 6.8 Broadcast Mode 23 6.9 Sent Items 23 6.10 Deleting All Sent Items 24 6.11 Shared Sent Items 24 6.12 Search by Date 24 6.13 Downloading Message History 25 7.0 Administrator Functions 25 7.1 Managing Users 25 7.2 Managing Shared Groups 26 8.0 Ending a Session 27 9.0 Managing your messagemedia Account 27 10.0 messagemedia Contacts 28

© Copyright 2007 messagemedia – The SMS Specialists Page 3 of 28
1.0 Welcome to WebSMS messagemedia has developed the WebSMS service with a focus on being simple to use, yet feature-rich. WebSMS allows you to log onto any computer with an internet connection, and access your computer-to-SMS service. This service has multiple features making it ideal for business SMS messaging. Importantly, we are happy to step you through the various features or answer any questions you have about using the service – Please call us on 1800 155 228
1.1 Overview The main WebSMS interface is the Compose Message window. Within this screen you are able to add and delete names from your phone book and send SMS messages.
Navigation Bar: Bar along the top, allows you to switch between screens easily
Delivery Tracking: Check this box to track delivery of your messages
Groups: Allows you to manage your user groups, and use your shared groups
Message Box: Shows characters, number of recipients and details of the message to be sent
New Individual Contact: Click here to add a new Individual to your contacts list
New Group: Click here to add a new group
Sending Messages: Check recipients by ticking, type message, click send Scheduled Messages:
Check this box to schedule a particular time and date, for the delivery of a message
© Copyright 2007 messagemedia – The SMS Specialists Page 4 of 28
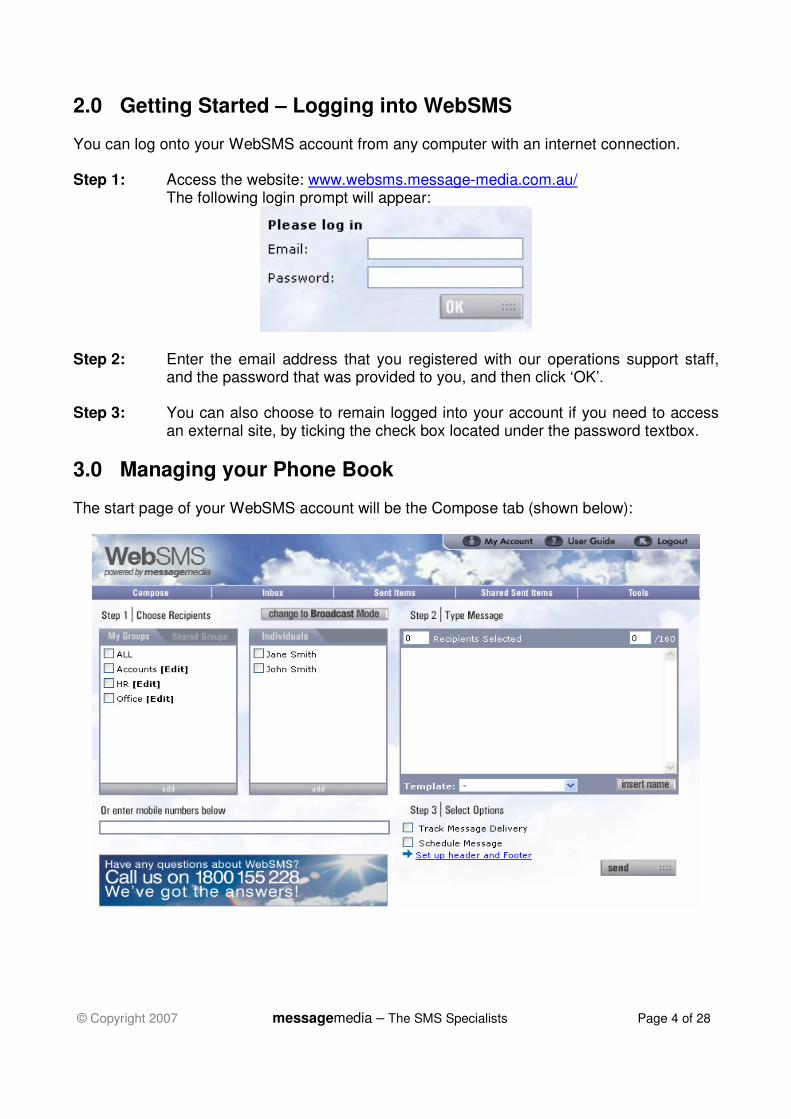
2.0 Getting Started – Logging into WebSMS You can log onto your WebSMS account from any computer with an internet connection. Step 1: Access the website: www.websms.message-media.com.au/
The following login prompt will appear:
Step 2: Enter the email address that you registered with our operations support staff,
and the password that was provided to you, and then click ‘OK’. Step 3: You can also choose to remain logged into your account if you need to access
an external site, by ticking the check box located under the password textbox.
3.0 Managing your Phone Book The start page of your WebSMS account will be the Compose tab (shown below):

© Copyright 2007 messagemedia – The SMS Specialists Page 5 of 28
3.1 Individuals You can manage your WebSMS contacts by adding groups and by adding individuals. Entries below the “Individuals” tab, display the list of individuals within the highlighted group.
Step 1: To add individuals to the ‘Individuals’ section, click the ‘add’ button, located
below the individuals list. The following screen will appear:
Step 2: Type in the name of the individual, their mobile contact number and tick any
groups that you want this individual to be listed in. Step 3: Click the ‘OK’ button (If at any time you want to cancel, click ‘Cancel’ to return
to the main screen). Note that the above process will only add individuals to groups located in the ‘My Groups’ section.

© Copyright 2007 messagemedia – The SMS Specialists Page 6 of 28
3.2 My Groups The “My Groups” tab is the location of all groups specific to your account. Any groups that you add to this section can only be viewed by logging into WebSMS with your own email and password.
Step 1: To add groups to the ‘My Groups’ section, click the ‘add’ button in the My Groups section, the following screen will appear:
Step 2: Type in the name of the group in the “Group Name” text box field and tick any
individuals that you want to add to this group. Step 3: Click the ‘OK’ button (If at any time you want to cancel, click ‘Cancel’ to return
to the main screen).

© Copyright 2007 messagemedia – The SMS Specialists Page 7 of 28
3.3 Shared Groups The “Shared Groups” tab is the location of phone book groups made available to all your company’s WebSMS users, which are set by your WebSMS administrator. Only your company’s designated administrators can manage these groups and individuals, while all your company’s WebSMS users can view and send messages to the groups.
3.4 Managing Shared Groups (Administrators Only) Step 1: To add groups to this section, click on the ‘Shared Groups’ button and then the
‘add’ button under the “My Groups” section. The following screen will appear:
Step 2: Enter the name of the Shared Group that you want to add in the “Group Name”
box. Step 3: Tick any existing Individuals that you want to add to this group in the
individuals list. Click “OK” and the group will be added to the Shared Groups list.

© Copyright 2007 messagemedia – The SMS Specialists Page 8 of 28
3.5 Adding a Single Individual to a Shared Group
Step 1: To add a single user to this section, click on the “Shared Groups” button and then click the ‘add’ button under the “Individuals” section. The following screen will appear:
Step 2: Enter the name and mobile number of the individual that you want to add. Step 3: Tick the boxes next to the groups to which you want to add the individual. Click ‘OK’ to complete.
3.6 Bulk Import of Individual Contacts
Step 1: Click on the “Tools” tab along the top of the WebSMS interface. Step 2: Click on the link labeled ‘Import Contacts’.

© Copyright 2007 messagemedia – The SMS Specialists Page 9 of 28
Step 3: Copy and paste the names and mobile numbers from a database or text formatting program. NB** Name and phone number must be separated by a tab, or a column. For example: Michelle Bishop 0412693654
Step 4: Select the group to which you want to import these individuals to (next to the heading “Import to group :”). You can import into shared groups or into your own groups within your login. In the list, ALL of your own groups will appear at the top, and ALL of your account’s shared groups will appear below (separated by a ‘–‘character). Simply select the group to which you wish to import and this will occur.
NB* you can only import into ‘Shared Groups’ if you are an account administrator. If you cannot see the options below for ‘Shared All’ etc. then contact your administrator.
Step 5: Click “Import” to complete.
3.7 Exporting Groups to Excel
WebSMS users are able to download all groups within WebSMS to a Microsoft Excel file. This file will be compatible to import in the future, and to use with other programs (or just to keep for reference). Step 1: Click on the “Tools” tab. Step 2: Click on the link labeled “Export Contacts”. Step 3: Select which group to export from the drop down list (See Below).
Step 4 A message-box will appear, prompting you to open or save the excel sheet.
Please Note: WebSMS users with non administration rights can only select the groups above the dotted line

© Copyright 2007 messagemedia – The SMS Specialists Page 10 of 28
3.8 Bulk Delete Contacts
If needed, WebSMS allows for bulk deletion of contacts. To allow for bulk deletion of contacts, exporting groups individually to an excel sheet must be completed initially. Step 1: Select the groups which contain the number of individuals/groups that need to
be removed from your WebSMS account, then continue to export the selection to an excel sheet. Please refer to section 3.7 to export contacts.
Please note: WebSMS users with non administrative rights can only select the groups above the dotted line. Step 2: Open the excel sheet which contains the individuals/group and select the
mobile numbers that need to be removed, then click “Edit” > “Copy”. Step 3: Click on the “Tools” tab and then click on the link labeled “Bulk Delete”. Step 4: Under the heading “Bulk Delete Contacts”, paste the mobile numbers into the
text box below (See below).

© Copyright 2007 messagemedia – The SMS Specialists Page 11 of 28
Step 5: Click on “Delete Contacts”. A confirmation page will appear to verify the list of contact numbers that were successfully removed from your WebSMS phone book.
3.9 Manage Phone Book The ‘Manage Phone Book” feature of WebSMS is an easy way to manage your phone book contacts. It allows you to easily view and manage the contacts in your phone book (both the My Groups and Shared Groups, but only administrators can view and edit shared groups. Step 1: Click on the “Tools” tab. Step 2: Click on the “Manage Phone Book” link. Step 3: Select a group from the list below, or enter a name or number to search for.
Step 4: To add an individual to a group(s), click the on the “add individual” button (See
Below).
Step 5: Once you have selected the appropriate group using the drop down list or appropriate individual using the search feature, you can select to delete the individual by placing a tick in the box next to there name and clicking on the “delete selected” button (See Below).

© Copyright 2007 messagemedia – The SMS Specialists Page 12 of 28
4.0 Sending Messages Now that you have populated your phone book, you are ready to send SMS Messages. To do this, use the following procedure: Step 1: Choose a group or individual to whom you wish to send a message by clicking
in the small box beside the group or individuals name. When you select a group, all of the individuals within that group will automatically have ticks placed in their boxes.
Step 2: Type your message in the highlighted box. The number of characters you have used & the number of recipients that you have selected will show in the small boxes at top.

© Copyright 2007 messagemedia – The SMS Specialists Page 13 of 28
Step 3: Choose from the messaging options if you require notification of when the message was received. Please refer to section 6.1 on Deliver Tracking.
Step 4: Click the send button. Once the message has sent, you will be taken back to the “Compose” screen.
4.1 Bulk Message Sending
When using WebSMS to send a message to a group of 50 or more individuals, a “confirmation” message box will pop-up (as below) in order to verify the sending of this message to the desired recipients. This feature is included to avoid unwanted bulk sending of messages by alerting you of the high number of recipients before the messages are actually sent.

© Copyright 2007 messagemedia – The SMS Specialists Page 14 of 28
From this point, you can simply click “OK” to proceed and send the message, or “Cancel” to discontinue sending the message, in which case, all history of this particular message is discarded.
4.2 SMS Templates When using WebSMS, continually reproducing similar SMS messages for sending can be tedious. This is why WebSMS allows for Templates to be set-up, which can populate an SMS at the click of a button.
The “Template” option allows for you to create/edit/use templates at any time (See Below).
Click on the drop down menu next to the “Template” heading. Clicking the drop-down list allows for insertion of any templates that you have previously created and have already saved to your list (See Below).

© Copyright 2007 messagemedia – The SMS Specialists Page 15 of 28
4.3 Creating a Template Clicking the drop-down list under the heading “Template” will also show an option for “Template Manager” (See Below).
Clicking “Template Manager” will display the following Window. Just tick the “New Template” Option, enter an identifying name for your template, and enter the text in the box under the heading “Template” (See Below).
4.4 Editing / Deleting a Template To Edit or Delete an existing Template, the same window as above is used. Once again, click the drop-down list under the heading “Use Template” and select the option for “Template Manager”. On the displayed window simply tick the “Edit Template” Option, and select the appropriate template from the drop down list. (See Below).

© Copyright 2007 messagemedia – The SMS Specialists Page 16 of 28
• To Delete this template, click the “Delete” link, and the template will be permanently deleted from WebSMS.
• To Edit this template, simply change the text in the “Template” box and click “OK” to confirm the changes.
NB* Template Names cannot be edited. To change the name of a template, you must delete it and then re-create it with the desired name.
4.5 Insert Name
WebSMS allows you to automatically include the recipients name in a message by clicking the “Insert Name” button (See Below).
This function is particularly useful when sending to groups, allowing you to personalize each message sent.
5.0 Receiving Messages When a message is received, the WebSMS service will send an alert to the email account that you specified when signing-up (your login email address). Furthermore, the following Internet Explorer window will appear notifying you that you have new replies:

© Copyright 2007 messagemedia – The SMS Specialists Page 17 of 28
5.1 Viewing your Messages
Step 1: Click on the “View your inbox now” link. Step 2: Your inbox will appear as the active tab on screen.
6.0 WebSMS Features
The major feature of WebSMS is that there is no requirement for software to be installed on your computer. Your messaging is done entirely via an Internet Explorer web browser and your account is set-up to be managed by yourself, for yourself. The features included in WebSMS are outlined in the following section.
6.1 Delivery Tracking
By selecting “Track Message Delivery”, SMS Messenger will highlight the date/time a message reaches the recipients handset.
You will have a record of this delivery time for any messages that you send with Delivery Tracking in your “Sent Items” box AND your “Shared Sent Items” box. When initially sent, messages with Delivery Tracking will move into these “Sent Items” boxes with a Status of “Pending” (See Below).
Once the message has been delivered to the recipient’s phone, the status will come up showing “Delivered on…” and will show the data and time that the message was received from the network onto the recipient’s phone. (See Below).

© Copyright 2007 messagemedia – The SMS Specialists Page 18 of 28
6.2 Character Limit A standard SMS message takes a maximum of 160 characters. You will notice that WebSMS has a character limit which updates as you type the characters of your message into the “Type Message” box. (See Below)
If you type a message that is over the 160 character limit, the “Type Message” box will turn red. (See Below)
The red box above means that your message will be split up and sent in sequence as multiple messages. If you click “Send” while this box is red, a screen will pop-up detailing the format in which the message will be broken up (See Below).

© Copyright 2007 messagemedia – The SMS Specialists Page 19 of 28
The above box displays how the message will be split and sent to the intended recipients. Click “OK” to send as is, and “Cancel” to cancel sending the message.
6.3 Headers and Footers
WebSMS allows you to specify a header and footer that will be displayed on all messages sent by WebSMS. The header will appear before the message text and the footer text will appear after the message text. Where there is room in the 160 character message for only one of either the header or the footer, the header will be included in preference to the footer. Where there is no room for the header or the footer neither will be included. Step 1: Under the “Tools” tab, select “Change Header and Footer”. Step 2: A pop up menu will appear (Please see below). Enter the desired text for the
header and footer. You can select a reminder to include the header and/or footer before each message is delivered by de-selecting the “Don’t remind me to set up a header and footer” checkbox.
Step 3: The “Header and Footer” confirmation screen will appear notifying you that the header and footer has been updated, please click “Close”.

© Copyright 2007 messagemedia – The SMS Specialists Page 20 of 28
Step 4: Once you have completed typing out your message, the “Message Confirmation” screen will display the full message, including the header and/or footer. Click “Ok” once you have verified the message content (See Below).
6.4 Schedule Message
The “Schedule Message” feature in WebSMS is a great tool for ensuring that messages are received at a specific time and day. Step 1: Once you have selected your message recipients and entered your message in
the “Compose” screen, click on the “Schedule Message” check box located under the “Track Message Delivery” check box (See Below).
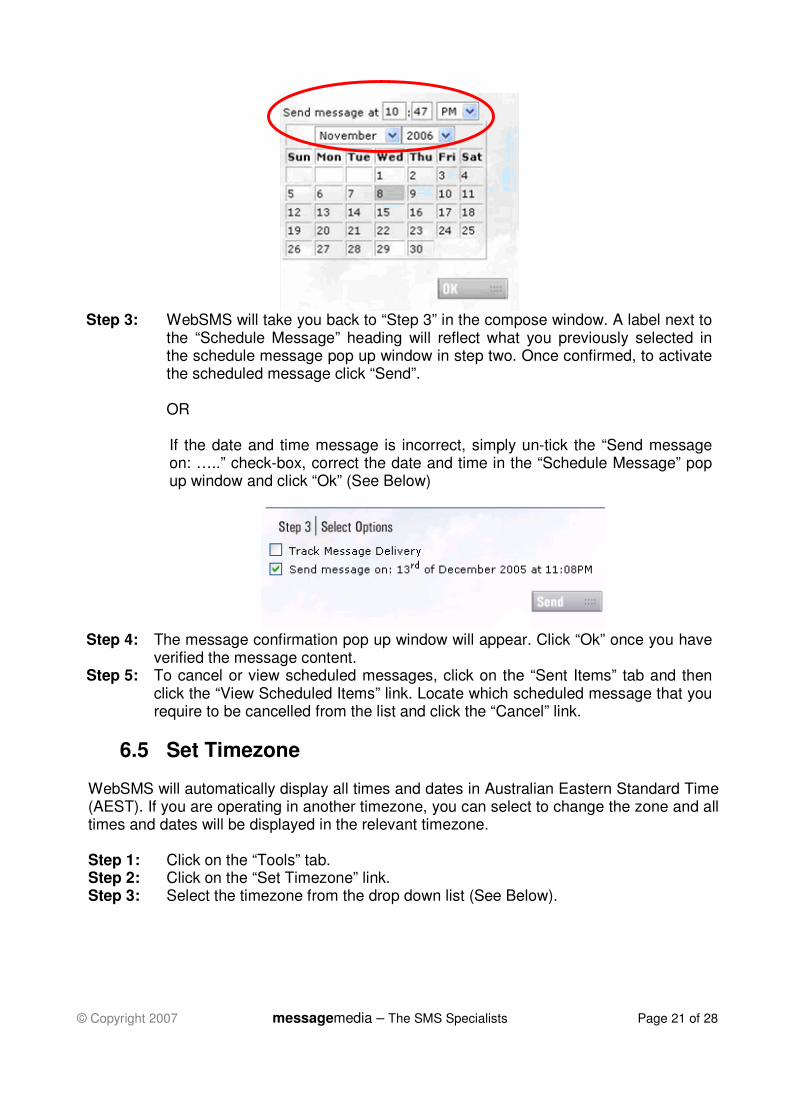
Step 2: The “Schedule Message” pop-up window will appear (Please see below). Next to the label “Send message at:” select the time you require your message to be delivered at and also the month, year and date. Click “Ok” when finished.
© Copyright 2007 messagemedia – The SMS Specialists Page 21 of 28
Step 3: WebSMS will take you back to “Step 3” in the compose window. A label next to
the “Schedule Message” heading will reflect what you previously selected in the schedule message pop up window in step two. Once confirmed, to activate the scheduled message click “Send”.
OR If the date and time message is incorrect, simply un-tick the “Send message on: …..” check-box, correct the date and time in the “Schedule Message” pop up window and click “Ok” (See Below)
Step 4: The message confirmation pop up window will appear. Click “Ok” once you have
verified the message content. Step 5: To cancel or view scheduled messages, click on the “Sent Items” tab and then
click the “View Scheduled Items” link. Locate which scheduled message that you require to be cancelled from the list and click the “Cancel” link.
6.5 Set Timezone WebSMS will automatically display all times and dates in Australian Eastern Standard Time (AEST). If you are operating in another timezone, you can select to change the zone and all times and dates will be displayed in the relevant timezone. Step 1: Click on the “Tools” tab. Step 2: Click on the “Set Timezone” link. Step 3: Select the timezone from the drop down list (See Below).

© Copyright 2007 messagemedia – The SMS Specialists Page 22 of 28
6.6 Auto Forwarding The “Auto Forwarding” feature of WebSMS is particularly useful for accessing and receiving replies straight to your mobile, when you are unable to gain access to a PC. Any reply messages that are received in WebSMS can be forwarded to a specified mobile number. The original sender's number and name (if in your phone book) are entered at the start of the message. Please note that your PC does not need to be on, or logged into WebSMS for this to work. Any messages over 160 characters will be split into two messages. Step 1: Click on the “Tools” tab. Step 2: Click on the “Enable/Disable Auto Fowarding” link. Step 3: Tick the check box next to the “Enable Auto Fowarding to mobile number” label
and type in the nominated mobile number that will receive the forwarded messages. Click “Ok” when you are finished (See Below).
6.7 Recipients When you tick the checkbox for an individual or group of recipients, the boxes ticked become the recipients of the message which you are trying to send. You will see a tallied list of recipients integrated into the “Type Message” box (See Below).

© Copyright 2007 messagemedia – The SMS Specialists Page 23 of 28
REMEMBER: If sending to more than 50 recipients, a “confirmation window” will appear before you officially send the message.
6.8 Broadcast Mode
To avoid delays when sending large batches of group messages, select “Broadcast Mode”. If “Broadcast Mode” is not selected, it will take a long time for all the individuals to be loaded into the recipient tally box, integrated into the “Type Message” box.
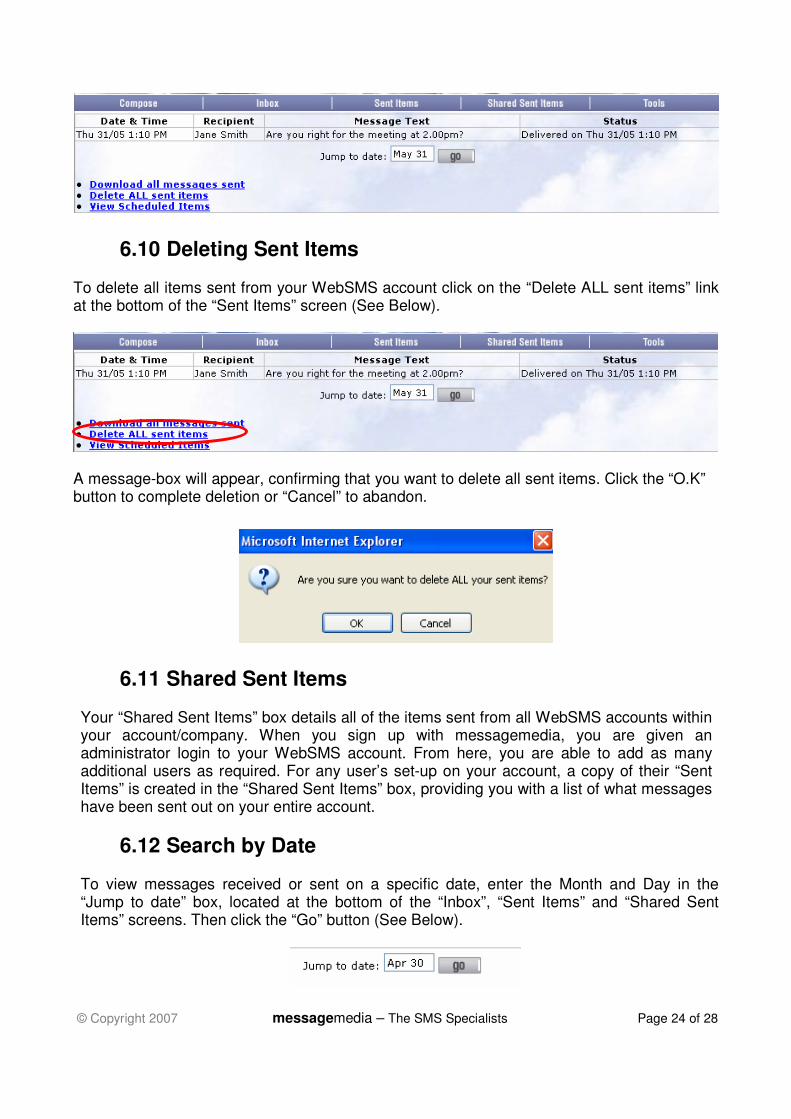
6.9 Sent Items
Your “Sent Items” box details all the items sent from your WebSMS login ONLY. Any Messages that you personally have sent from your account are stored in this box, along with the details of any delivery reports that you have requested also (See Below).
© Copyright 2007 messagemedia – The SMS Specialists Page 24 of 28
6.10 Deleting Sent Items
To delete all items sent from your WebSMS account click on the “Delete ALL sent items” link at the bottom of the “Sent Items” screen (See Below).
A message-box will appear, confirming that you want to delete all sent items. Click the “O.K” button to complete deletion or “Cancel” to abandon.
6.11 Shared Sent Items Your “Shared Sent Items” box details all of the items sent from all WebSMS accounts within your account/company. When you sign up with messagemedia, you are given an administrator login to your WebSMS account. From here, you are able to add as many additional users as required. For any user’s set-up on your account, a copy of their “Sent Items” is created in the “Shared Sent Items” box, providing you with a list of what messages have been sent out on your entire account.
6.12 Search by Date To view messages received or sent on a specific date, enter the Month and Day in the “Jump to date” box, located at the bottom of the “Inbox”, “Sent Items” and “Shared Sent Items” screens. Then click the “Go” button (See Below).
© Copyright 2007 messagemedia – The SMS Specialists Page 25 of 28
6.13 Downloading Message History
WebSMS allows you to download your entire Sent Items history to a Microsoft Excel format spreadsheet. At the bottom of both your “Sent Items” and “Shared Sent Items” boxes, you will notice the following links: Sent Items
Shared Sent Items
You can use these links at any time to download your message history to date. Sent Items Message Download – Downloads all the messages Sent specifically from your own personal login within your WebSMS company account. Shared Sent Items Message Download (all users) – Downloads all the messages Sent from your entire list of users registered with messagemedia on your WebSMS account.
7.0 Administrator Functions Administrator accounts within the WebSMS Messaging environment have the authority to perform actions that standard users are unable to do. When your WebSMS account was initially activated with messagemedia, you would have been set-up with 1 user who was checked as an account administrator.
7.1 Managing Users Administrators can manage the users of their messagemedia WebSMS accounts by simply logging into WebSMS with the designated admin email. Within this function, the administrator is able to edit passwords, designate extra administrators, delete and add users and also edit email logins. Step 1: Click on the “Tools” tab on the Navigation Bar, and select “Manage Users”. Step 2: The image below displays the structure for editing users.

© Copyright 2007 messagemedia – The SMS Specialists Page 26 of 28
Note: If you are NOT an administrator, you will see the e-mail addresses of the account administrators, when you click on the “Mange Users” link: You can contact your account administrators from here by clicking on the links to their email addresses.
7.2 Managing Shared Groups Administrators can manage all shared groups in the same way as all users manage their “My Groups”. See Section 3.3 Shared Groups
To change a user’s password, click the “Change” link corresponding to their email address, and click “Save Changes” when finished.
To delete a user, click the “Delete” link corresponding to their email address. A message box will appear, to confirm the deletion of the user from the WebSMS service.
To add a user, enter their email address and a password (tick box if Administrator). Then click “Add User”
To make a user an administrator, tick the box under the “Administrator” heading which corresponds to their email address.
© Copyright 2007 messagemedia – The SMS Specialists Page 27 of 28
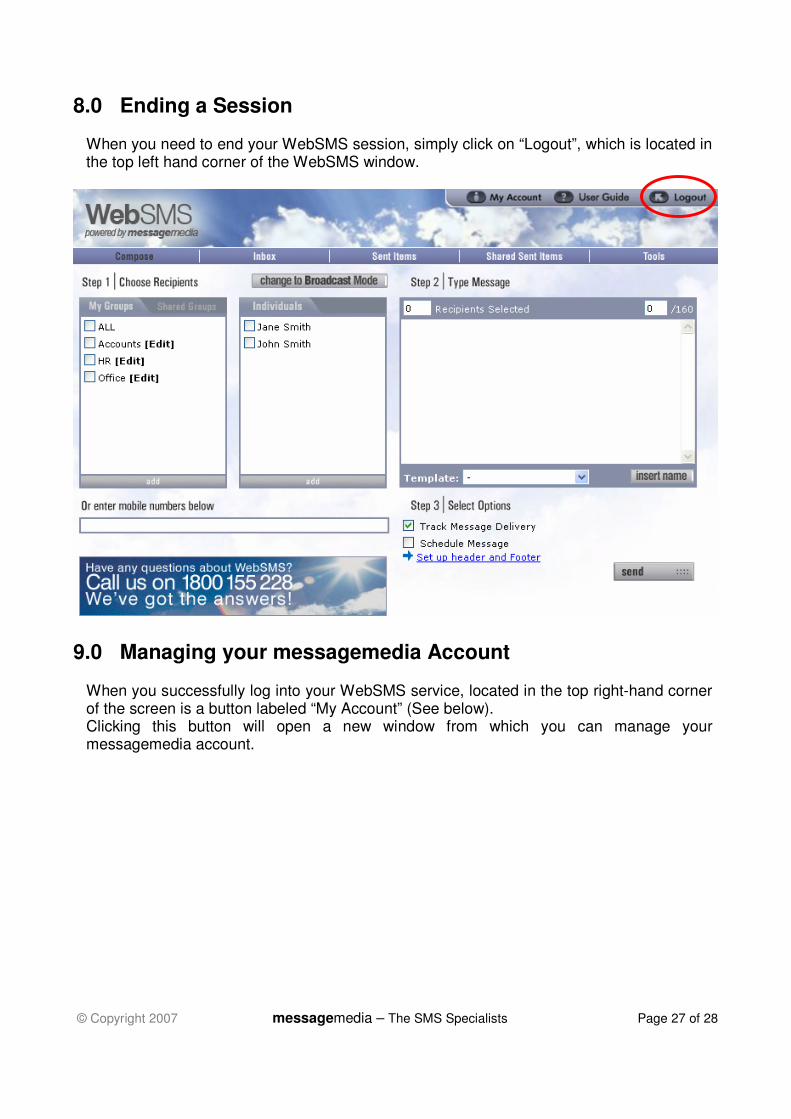
8.0 Ending a Session When you need to end your WebSMS session, simply click on “Logout”, which is located in the top left hand corner of the WebSMS window.
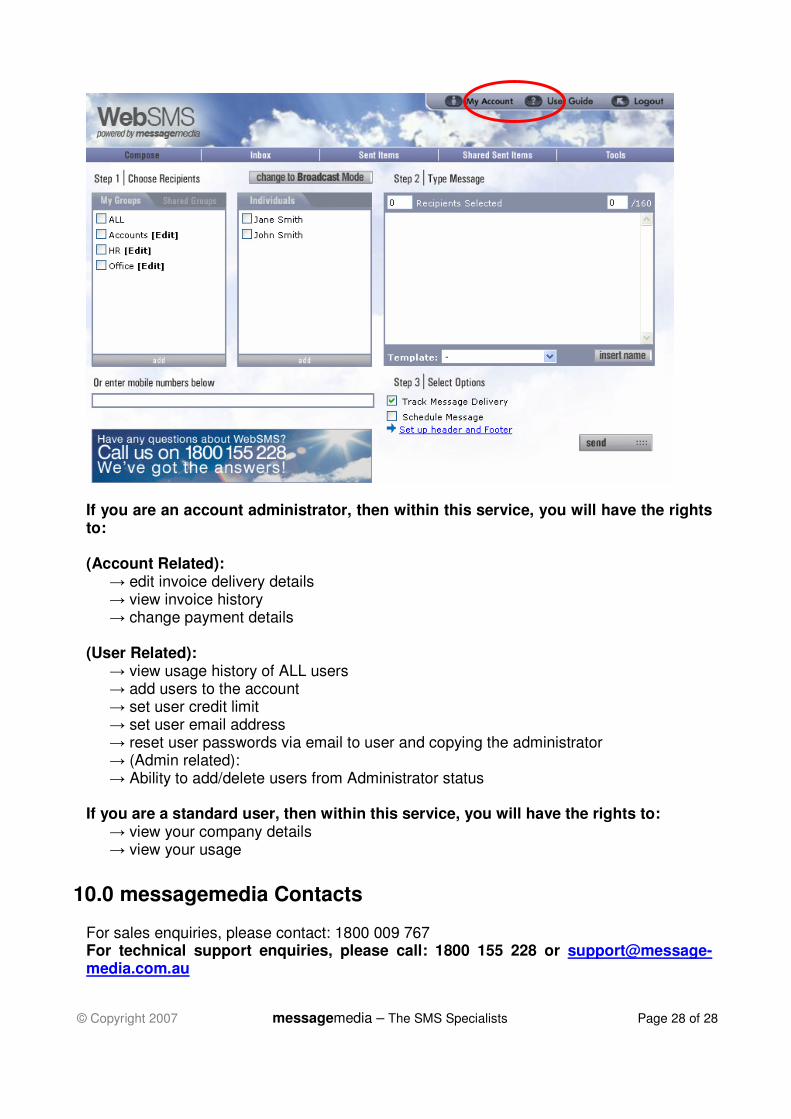
9.0 Managing your messagemedia Account
When you successfully log into your WebSMS service, located in the top right-hand corner of the screen is a button labeled “My Account” (See below). Clicking this button will open a new window from which you can manage your messagemedia account.
© Copyright 2007 messagemedia – The SMS Specialists Page 28 of 28
If you are an account administrator, then within this service, you will have the rights to: (Account Related):
→ edit invoice delivery details → view invoice history → change payment details
(User Related):
→ view usage history of ALL users → add users to the account → set user credit limit → set user email address → reset user passwords via email to user and copying the administrator → (Admin related): → Ability to add/delete users from Administrator status
If you are a standard user, then within this service, you will have the rights to:
→ view your company details → view your usage
10.0 messagemedia Contacts
For sales enquiries, please contact: 1800 009 767 For technical support enquiries, please call: 1800 155 228 or [email protected]