websphere mq eway intelligent adapter user’s guide · alerting and logging 54 the...
TRANSCRIPT

WebSphere MQ eWay Intelligent AdapterUser’s Guide
Release 5.0.2
SeeBeyond Proprietary and Confidential

The information contained in this document is subject to change and is updated periodically to reflect changes to the applicable software. Although every effort has been made to ensure the accuracy of this document, SeeBeyond Technology Corporation (SeeBeyond) assumes no responsibility for any errors that may appear herein. The software described in this document is furnished under a License Agreement and may be used or copied only in accordance with the terms of such License Agreement. Printing, copying, or reproducing this document in any fashion is prohibited except in accordance with the License Agreement. The contents of this document are designated as being confidential and proprietary; are considered to be trade secrets of SeeBeyond; and may be used only in accordance with the License Agreement, as protected and enforceable by law. SeeBeyond assumes no responsibility for the use or reliability of its software on platforms that are not supported by SeeBeyond.
SeeBeyond, e*Gate, and e*Way are the registered trademarks of SeeBeyond Technology Corporation in the United States and select foreign countries; the SeeBeyond logo, e*Insight, and e*Xchange are trademarks of SeeBeyond Technology Corporation. The absence of a trademark from this list does not constitute a waiver of SeeBeyond Technology Corporation's intellectual property rights concerning that trademark. This document may contain references to other company, brand, and product names. These company, brand, and product names are used herein for identification purposes only and may be the trademarks of their respective owners.
© 2003 by SeeBeyond Technology Corporation. All Rights Reserved. This work is protected as an unpublished work under the copyright laws.
This work is confidential and proprietary information of SeeBeyond and must be maintained in strict confidence.
Version December 22, 2003 12:11 pm.
WebSphere MQ eWay Intelligent AdapterUser’s Guide 2 SeeBeyond Proprietary and Confidential

Contents
Contents
Chapter 1
Introducing the WebSphere MQ eWay 7Overview 7
Supported Operating Systems 8
System Requirements 8External System Requirements 8
Requirements for the Topic Publish/Subscribe Connection Type 9
Chapter 2
Installing the WebSphere MQ eWay 10Installing the MQSeries eWay 10
Before installing the eWay 10Installing the MQSeries eWay on an eGate supported system 10After Installation 11
Chapter 3
Configuring the eWay Properties 12Creating and Configuring the MQSeries eWay 12
Selecting WebSphere MQ as the External Application 12Creating Custom Properties for a MQSeries eWay 13Using the Properties Sheet 14
Outbound MQSeries eWay Connectivity Map Properties 15General Settings 15
Transaction Type 15Connector 16
class 16Property.Tag 17type 17
Inbound WebSphere eWay Connectivity Map Properties 17Settings 17
Queue Name 17Schedule Interval 18
MQSeries eWay Environment Explorer Properties 18
WebSphere MQ eWay Intelligent AdapterUser’s Guide 3 SeeBeyond Proprietary and Confidential

Contents
MQSeries 18MQ Channel Name 18MQ Host Name 19MQ Queue Manager Name 19Password 19Port Number 19UserID 19
Chapter 4
Using the WebSphere MQ eWayWith eInsight 20eInsight Engine and Components 20
The MQSeries eWay With eInsight 21
MQSeries eWay eInsight Sample Projects 21
Importing a Sample Project 21
The MQ_BP_Get_ Sample Project 22Creating a Project 22Creating the BusinessProcess_MQGet Business Process 23
Configuring the Modeling Elements 24Creating a Connectivity Map 26
Select the External Applications 26Select the External Applications 26Populate the Connectivity Map 27
Binding the Project Components 27Creating an Environment 29Configuring the eWay Properties 30
Configuring the File eWay Properties 30Configuring the MQSeries eWay Properties 30
Creating and Activating the Deployment Profile 31Running the Project 32
Alerting and Logging 32
The MQ_BP_Put_ Sample Project 33Creating a Project 33Creating the BusinessProcess_MQPut Business Process 33
Configuring the Modeling Elements 35Creating a Connectivity Map 36
Select the External Applications 36Populate the Connectivity Map 36
Binding the Project Components 37Creating an Environment 38Configuring the eWay Properties 38
Configuring the File eWay Properties 38Configuring the MQSeries eWay Properties 38
Creating and Activating the Deployment Profile 39Running the Project 39
WebSphere MQ eWay Intelligent AdapterUser’s Guide 4 SeeBeyond Proprietary and Confidential

Contents
Chapter 5
Implementing a WebSphere MQ eWay Project 41MQSeries eWay Components 41
MQSeries eWay Sample Projects 42
Importing a Sample Project 42
Create the WebSphere MQ Queue 42
The MQ_JCE_Get_Sample Project 43Create a Project 43Create a Connectivity Map 43Creating the Collaboration Definition 45Using the Collaboration Editor 46Binding the eWay Components 48Creating an Environment 49Configuring the eWays 50
Configuring the File eWay Properties 51Configuring the WebSphere MQ (MQSeries) eWay Properties 51
Creating and Activating the Deployment Profile 52Running the Project 53
Alerting and Logging 54
The MQ_JCE_Put_Sample Project 55Create a Project 55Create a Connectivity Map 55
Select the External Applications 55Populate the Connectivity Map 56
Creating the Collaboration Definition 56Using the Collaboration Editor 57Binding the Project Components 60Creating an Environment 61Configuring the eWay Properties 61
Configuring the File eWay Properties 61Configuring the MQSeries eWay Properties 62
Creating and Activating the Deployment Profile 62Running the Project 62
Chapter 6
Java Classes and Methods for the WebSphere MQ eWay 64MQSeries eWay Classes and Methods 64
WebSphere MQ Javadoc 64
WebSphere MQ eWay Intelligent AdapterUser’s Guide 5 SeeBeyond Proprietary and Confidential
Contents
Appendix A
Mapping WebSphere MQ Header Fields 65Mapping Between JMS Standard Header Items and WebSphere MQ Header Fields 65
Index 66
WebSphere MQ eWay Intelligent AdapterUser’s Guide 6 SeeBeyond Proprietary and Confidential

Chapter 1
Introducing the WebSphere MQ eWay
This chapter introduces you to SeeBeyond™ eWay Intelligent Adapter for WebSphere MQ™. It includes an overview of this manual and a list of system requirements for installation.
1.1 OverviewWebSphere MQ (formerly MQSeries™) from IBM™ is a client-server message broker supporting an open API (application programming interface), available on a variety of operating systems including AIX™, Solaris™, HP-UX™, and Windows™. WebSphere MQ is “middleware” that provides commercial messaging and queuing services. Messaging enables programs to communicate with each other via messages rather than direct connection. Messages are placed in queues for temporary storage, freeing up programs to continue to work independently. This process also allows communication across a network of dissimilar components, processors, operating systems, and protocols.
The SeeBeyond eWay Intelligent Adapter for WebSphere MQ (referred to as the MQSeries eWay throughout this document) allows the eGate system to exchange data with IBM’s WebSphere MQ. The eGate Integrator, using the MQSeries eWay, uses business logic within a Collaboration or Business Process to perform operations for data identification, manipulation, and transformation. Messages are tailored to meet the communication requirements of specific applications or protocols. Queues or Topics provide non-volatile storage for data within the eGate system allowing applications to run independently of one another at different speeds and times.
The MQSeries eWay transparently integrates existing systems with IBM’s WebSphere MQ. This document explains how to install and configure the MQSeries eWay.
WebSphere MQ eWay Intelligent AdapterUser’s Guide 7 SeeBeyond Proprietary and Confidential

Chapter 1 Section 1.2Introducing the WebSphere MQ eWay Supported Operating Systems
1.2 Supported Operating SystemsThe MQSeries eWay is available on the following operating systems. See any notes below regarding your specific operating system.
! Windows 2000
! Sun Solaris 8 and 9
! AIX 5.1 and 5.2
! HP-UX 11.0 and 11i (RISC)
! HP Tru64 5.1A
! Red Hat Linux 8 (Intel)
! Red Hat Linux Advanced Server 2.1 (Intel)
For AIX operating systems, the environmental variable LDR_CNTRL for JVM may need to be adjusted in order to accommodate WebSphere MQ shared memory. Java uses 8 segments by default (this is the maximum value allowed; each segment is 256 MB). For example, the following setting changes the number of segments to 3:
setenv LDR_CNTRL MAXDATA=0x30000000
For HP-UX 11 operating systems, HP-UX Java binding support is only available for systems running the POSIX draft 10 threaded version of WebSphere MQ. The HP-UX Developers kit for Java 1.1.7, Release C.01.17.01 or above is also required.
WebLogic and WebSphere Application Server Support
In addition to the above listed Operating Systems, this eWay in outbound mode is supported on WebSphere™ and WebLogic™ Application Servers when using Java Collaborations only. For additional information see the eGate Integrator User's Guide.
1.3 System RequirementsTo use the MQSeries eWay, you need the following:
! A TCP/IP network connection.
! Windows XP SP1a, Windows 2003 Server, or Windows 2000 SP3. This is required for the User Interface.
! Microsoft Internet Explorer 6.0 SP1 or above.
Note: Open and review the Readme.txt for any additional requirements prior to installation.
1.3.1. External System RequirementsThe MQSeries eWay requires the following installed on the participating host:
WebSphere MQ eWay Intelligent AdapterUser’s Guide 8 SeeBeyond Proprietary and Confidential

Chapter 1 Section 1.3Introducing the WebSphere MQ eWay System Requirements
! IBM WebSphere MQ V5.3 or MQSeries V5.2 with SP MA88
Note: Install either the WebSphere MQ server or the WebSphere MQ client code. If the WebSphere MQ server is installed on the participating host, the eWay connects to the server in bindings mode. If the WebSphere MQ client code is installed on the participating host, the eWay connects to the server in client mode. A client mode connection cannot participate in XA transactions.
Install the following after installing IBM MQSeries V5.2:
! IBM MQSeries classes for Java 5.2.0.
! Classes for Java Message Service 5.2.0.0
WebSphere MQ V5.3 includes the WebSphere MQ classes for Java and JMS. The use of SupportPac MA88 with WebSphere MQ V5.3 product is not supported. MQSeries V5.2 requires the installation of SupportPac MA88 for all supported platforms.
The MA88 SupportPac download and installation information can be found at: http://www-4.ibm.com/software/ts/mqseries/txppacs/ma88.html.
The MA88 patch includes updates for several jar files and DLL's/shared libraries. Most notably, com.ibm.mq.jar, mqjbnd02.dll and mqxai01.dll. It is important that the patch overwrites the existing versions of these files if they are present on your machine. Alternatively, if they do not overwrite the existing versions, it is important that the new versions of these files exist on your classpath and path before the old versions. Once you have downloaded the SupportPac, make sure that all .jar files installed as part of the SupportPac are included in the classpath.
Requirements for the Topic Publish/Subscribe Connection Type
IBM SupportPac MAOC is required by both MQSeries V5.2 and WebSphere MQ V5.3. The SupportPac MAOC installation information and download can be found at:http://www-3.ibm.com/software/ts/mqseries/txppacs/ma0c.html
WebSphere MQ eWay Intelligent AdapterUser’s Guide 9 SeeBeyond Proprietary and Confidential

Chapter 2
Installing the WebSphere MQ eWay
This chapter explains how to install the MQSeries eWay.
Chapter Topics
! Before installing the eWay on page 10
! Installing the MQSeries eWay on an eGate supported system on page 10
! After Installation on page 11
2.1 Installing the MQSeries eWay During the eGate Integrator installation process, the Enterprise Manager, a web-based application, is used to select and upload eWays (eWay.sar files) from the eGate installation CD-ROM to the Repository.
When the Repository is run on a UNIX operating system, the eWays are loaded using the Enterprise Manager on a Windows computer connected to the Repository server using Internet Explorer.
Before installing the eWay
Open and review the Readme.txt for any additional information or requirements, prior to installation.
Installing the MQSeries eWay on an eGate supported system
The MQSeries eWay is installed during the installation of the eGate Integrator. The eGate installation process includes the following operations:
! Installing the eGate Repository
! Uploading products to the Repository
! Downloading components (including eGate Enterprise Designer and Logical Host)
! Viewing product information home pages
WebSphere MQ eWay Intelligent AdapterUser’s Guide 10 SeeBeyond Proprietary and Confidential

Chapter 2 Section 2.1Installing the WebSphere MQ eWay Installing the MQSeries eWay
Follow the instructions for installing the eGate Integrator in the eGate Integrator Installation Guide, and include the following steps:
1 During the procedures for uploading files to the eGate Repository using the Enterprise Manager, after uploading the eGate.sar file, select and upload the following files:
" MQSerieseWay.sar (to install the MQSeries eWay)
" FileeWay.sar (to install the File eWay, used in the sample project)
" MQSerieseWayDocs.sar (to download the WebSphere MQ eWay User’s Guide, Javadoc, and sample projects)
2 Continue installing the eGate Integrator as instructed in the eGate Integrator Installation Guide.
After Installation
Once the eWay is installed and configured it must then be incorporated into a project before it can perform its intended functions. See the eGate Integrator User’s Guide for more information on incorporating the eWay into an eGate project.
WebSphere MQ eWay Intelligent AdapterUser’s Guide 11 SeeBeyond Proprietary and Confidential

Chapter 3
Configuring the eWay Properties
This chapter describes how to create and configure the MQSeries eWay.
Chapter Topics
! Creating and Configuring the MQSeries eWay on page 12
! Using the Properties Sheet on page 14
! Outbound MQSeries eWay Connectivity Map Properties on page 15
! MQSeries eWay Environment Explorer Properties on page 18
3.1 Creating and Configuring the MQSeries eWayAll eWays contain a set of parameters with properties unique to that eWay type. After the eWays are established and an MQSeries External System is created in the project’s Environment, the eWay parameters can be modified for your specific system. The MQSeries eWay properties are modified from two locations:
! From the Connectivity Map. These properties most commonly apply to a specific eWay, and may vary from other eWays (of the same type) in the project. The MQSeries Connectivity Map properties will vary depending on whether the MQSeries is an Inbound or Outbound eWay
! From the Environment Explorer tree. These properties are commonly global, applying to all eWays (of the same type) in the project. The saved properties are shared by all eWays in the MQSeries External System window.
The properties for the MQSeries eWay must be set in both locations.
3.1.1 Selecting WebSphere MQ as the External ApplicationTo create a MQSeries eWay, you must first create an MQSeries External Application in your Connectivity Map. MQSeries eWays are located between an MQSeries External Application and a Service. Services are containers for Collaborations, Business Processes, eTL processes, and so forth.
To create the MQSeries External Application
1 From the Connectivity Map toolbar, click the External Applications icon.
WebSphere MQ eWay Intelligent AdapterUser’s Guide 12 SeeBeyond Proprietary and Confidential

Chapter 3 Section 3.1Configuring the eWay Properties Creating and Configuring the MQSeries eWay
2 Select the MQSeries External Application from the menu (see Figure 1). The selected MQSeries External Application icon appears on the Connectivity Map toolbar.
Figure 1 External Applications Selection Menu
3 Drag the new MQSeries External Application from the toolbar onto the Connectivity Map canvas. This represents an external WebSphere MQ system.
From the Connectivity Map, you can associate (bind) the External Application with the Service to establish an eWay (see Figure 2).
Figure 2 eWay Location
When MQSeries is selected as the External Application, it automatically applies the default MQSeries eWay properties, provided by the OTD, to the eWay that connects it to the Service. These properties can then be or modified for your specific system using the Properties Sheet.
3.1.2 Creating Custom Properties for a MQSeries eWayA project’s eWay properties can be modified after the eWays have been established in the Connectivity Map and the Environment has been created.
Modifying the MQSeries eWay (Connectivity Map) Properties
1 From the Connectivity Map, double click the eWay icon, located in the link between the associated External Application and the Service. A Templates dialog box appears.
2 From the Templates dialog box, select Inbound or Outbound MQSeries eWay and click OK.
3 The eWay Properties Sheet opens to the Inbound or Outbound MQSeries Connectivity Map properties. Make any necessary modifications and click OK.
Modifying the MQSeries eWay (Environment Explorer) Properties
1 From the Environment Explorer tree, right-click the Inbound or Outbound WebSphere MQ external system. Select Properties from the shortcut menu. The Properties Sheet appears.
WebSphereMQ eWay
WebSphere MQ eWay Intelligent AdapterUser’s Guide 13 SeeBeyond Proprietary and Confidential

Chapter 3 Section 3.1Configuring the eWay Properties Creating and Configuring the MQSeries eWay
2 Make any necessary modifications to the Environment parameters of the MQSeries eWays, and click OK to save the settings.
3.1.3. Using the Properties Sheet Modifications to the eWay configuration properties are made from the MQSeries eWay Properties Sheet.
To modify the default eWay configuration properties
1 Open the Properties Sheet to the MQSeries eWay default properties. An eWay has two different sets of parameters: those specific to that particular eWay (accessed from the Connectivity Map), and those that are common to all eWays of this type (accessed from the Environment Explorer tree).
2 From the upper-right pane of the Properties Sheet, select a section of the configuration directory. The parameters contained in that section are now displayed in the Properties pane of the Properties Sheet. For example, clicking on the MQSeries subdirectory displays the editable parameters in the right pane, as shown in Figure 3.
Figure 3 Properties Sheet -- WebSphere MQ Properties
WebSphere MQ eWay Intelligent AdapterUser’s Guide 14 SeeBeyond Proprietary and Confidential

Chapter 3 Section 3.2Configuring the eWay Properties Outbound MQSeries eWay Connectivity Map Properties
3 Click on any property field to make it editable. For example, click on the Password parameter to edit the Password value. If a parameter’s value is true/false or multiple choice, the field, when selected, reveals a submenu of property options .
Click on the ellipsis (. . .) in the properties field to open a separate configuration dialog box. This is helpful for large values that cannot be fully displayed in the parameter’s property field. Enter the property value in the dialog box and click OK. The value is now displayed in the parameter’s property field.
4 A description of each parameter is displayed in the Description pane when that parameter is selected, providing an explanation of any required settings or options.
5 The Comments pane provides an area for recording notes and information regarding the currently selected parameter. This is saved for future referral.
6 After modifying the configuration properties, click OK to close the Properties Sheet and save the changes.
3.2 Outbound MQSeries eWay Connectivity Map Properties
The MQSeries eWay parameters, accessed from the Connectivity Map, are organized into the following sections:
! General Settings on page 15
! Connector on page 16
3.2.1. General SettingsThis section contains the following parameters:
! Transaction Type on page 15
Transaction Type
Note: The XA-compliant Transaction Type is not supported for the WebSphere MQ eWay, version 50.
Description
String-set. Specifies the Transaction Type. There are two transaction types.
! Non-Transactional. Provides the highest level of performance, with the minimum level of message protection. No rollback is available during the send and receive period, causing the possible loss of data in the case of a system error. When the send() method is called the transaction is immediate. Non-Transactional (single-phase transaction) is subject to the user calling the commit and backout methods.
! XA-compliant. (two-phase transactional behavior) Highest level of transaction protection, providing rollback for internal and XA compliant transactions. The
WebSphere MQ eWay Intelligent AdapterUser’s Guide 15 SeeBeyond Proprietary and Confidential
Chapter 3 Section 3.2Configuring the eWay Properties Outbound MQSeries eWay Connectivity Map Properties
transaction is also extended to other XA supported data exchange applications, such as Oracle, DB2, and WebSphere MQ. When the send() method is called the transaction takes place at the end of the Collaboration.
XA can only be used in Binding mode. This means that a Host Name is not entered in the properties. A Host Name in the properties implies that the API is setup in Client mode. XA cannot be used in Client mode. In addition, when using XA:
" There must be only one queue manager.
" The method connectToQueueManager cannot be called.
" The methods commit and backout cannot be called. In Bindings mode, eGate is the transaction coordinator and is in control of these methods.
Note: Consult the XA Transaction Processing section of the eGate Integrator User's Guide for information on XA use and restrictions.
Required Value
! Select Non-Transactional or XA-compliant. Non-Transactional is the configured default.
3.2.2. ConnectorThis section contains the following top level parameters:
! class on page 16
! Property.Tag on page 17
! type on page 17
Note: The Connector properties are not applicable for WebSphere MQ eWay, version 50.
class
Note: The Connector - class property is not applicable for WebSphere MQ eWay, version 50.
Description
Specifies the connector class for MQSeriesOTD. The default value should always be used.
Required Value
The configured default is com.stc.eways.MQSeriesOTD.MQSeriesConnector.
WebSphere MQ eWay Intelligent AdapterUser’s Guide 16 SeeBeyond Proprietary and Confidential

Chapter 3 Section 3.3Configuring the eWay Properties Inbound WebSphere eWay Connectivity Map Properties
Property.Tag
Note: The Connector - Property.Tag property is not applicable for WebSphere MQ eWay, version 50.
Description
Specifies the data source identity. This parameter is required by the current EBobConnectorFactory.
Required Value
The data source package name.
type
Note: The Connector - type property is not applicable for WebSphere MQ eWay, version 50.
Description
Specifies the connector type for WebSphere MQ OTD. The default value should always be used.
Required Value
The connector type. The default value should always be used. The configured default is MQSeriesOTD.
3.3 Inbound WebSphere eWay Connectivity Map Properties
The Inbound MQSeries eWay parameters, accessed from the Connectivity Map, are organized into the following sections:
! Settings on page 17
3.3.1. SettingsThis section contains the following parameters:
! Queue Name on page 17
! Schedule Interval on page 18
Queue Name
Description
Specifies the IBM WebSphere MQ Queue name.
WebSphere MQ eWay Intelligent AdapterUser’s Guide 17 SeeBeyond Proprietary and Confidential

Chapter 3 Section 3.4Configuring the eWay Properties MQSeries eWay Environment Explorer Properties
Required Value
The name of the WebSphere MQ Queue.
Schedule Interval
Description
Specifies the polling interval by the number of milliseconds at which the WebSphere MQ Queue is polled for messages.
Required Value
The number of milliseconds at which the WebSphere MQ Queue is polled. The configured default is 5000.
3.4 MQSeries eWay Environment Explorer PropertiesThe MQSeries eWay parameters, accessed from the Environment Explorer tree, are organized into the following sections:
! MQSeries on page 18
3.4.1. MQSeriesThis section contains a set of top level parameters:
! MQ Channel Name on page 18
! MQ Host Name on page 19
! MQ Queue Manager Name on page 19
! Password on page 19
! Port Number on page 19
! UserID on page 19
MQ Channel Name
Description
Specifies the name of the channel being used. This option is only relevant with transport type 'Client' and is ignored for transport type 'Bindings'. If no channel is specified the default channel is used.
Required Value
The name of the channel.
WebSphere MQ eWay Intelligent AdapterUser’s Guide 18 SeeBeyond Proprietary and Confidential

Chapter 3 Section 3.4Configuring the eWay Properties MQSeries eWay Environment Explorer Properties
MQ Host Name
Description
Specifies the name of the host on which the Queue Manager resides. This option is only relevant with transport type “Client” and is ignored for transport type “Bindings”. As for “Bindings”, the Queue Manager must be on the same host.
Required Value
The name of the specific Queue Manager host.
MQ Queue Manager Name
Description
Specifies the name of the IBM WebSphere MQ Queue Manager.
Required Value
The name of the WebSphere MQ Queue Manager.
Password
Description
Specifies the user password required to access the Queue Manager. This parameter is optional.
Required Value
A user password that grants access to a specific WebSphere MQ Queue Manager.
Port Number
Description
Specifies the number of the port to connect to. This option is only relevant with a transport type 'Client' and is ignored for transport type 'Bindings'. If this option is left empty the default port is used.
Required Value
A port number, in the range of 1000 and 65536. The configured default is 1414.
UserID
Description
Specifies the User ID required to access the WebSphere MQ Queue Manager. This parameter is optional.
Required Value
A User ID required for the Specific WebSphere MQ Queue Manager.
WebSphere MQ eWay Intelligent AdapterUser’s Guide 19 SeeBeyond Proprietary and Confidential

Chapter 4
Using the WebSphere MQ eWayWith eInsight
This chapter describes how to use the MQSeries eWay with the ICAN Suite’s eInsight Business Process Manager and its engine’s Web Services interface.
Note: You must have the eInsight.sar file installed to use the Web Services interface.
Chapter Topics
! eInsight Engine and Components on page 20
! The MQSeries eWay With eInsight on page 21
! Importing a Sample Project on page 21
! The MQ_BP_Get_ Sample Project on page 22
! The MQ_BP_Put_ Sample Project on page 33
4.1 eInsight Engine and ComponentseGate components can be deployed as Activities in eInsight Business Processes. Once a component is associated with an Activity, eInsight invokes it using a Web Services interface. eGate components that can interface with eInsight in this way include the following:
! Java Messaging Service (JMS)
! Object Type Definitions (OTDs)
! eWays
! Collaborations
Using the Enterprise Designer and eInsight, you can add an Activity to a Business Process, then associate that Activity with an eGate component, for example, an eWay. Then, when eInsight runs the Business Process, it automatically invokes that component via its Web Services interface.
See the eInsight Business Process Manager User’s Guide for details.
WebSphere MQ eWay Intelligent AdapterUser’s Guide 20 SeeBeyond Proprietary and Confidential
Chapter 4 Section 4.2Using the WebSphere MQ eWay With eInsight The MQSeries eWay With eInsight
4.2 The MQSeries eWay With eInsightAn eInsight Business Process Activity can be associated with the MQSeries eWay during the system design phase. To make this association, select the desired operators under the eWay in the Enterprise Explorer and drag it onto the eInsight Business Process Designer canvas.
The MQSeries eWay has the following operators available:
! receive
! mqget
! mqput
The operation is automatically changed to an Activity with an icon identifying the component that is the basis for the Activity. At run time, eInsight invokes each step in the order defined in the Business Process. Using eInsight’s Web Services interface, the Activity in turn invokes the MQSeries eWay.
4.3 MQSeries eWay eInsight Sample ProjectsTwo sample projects for the MQSeries eWay using eInsight Business Processes, are included with the installation. This chapter also walks you through the creation of these sample projects:
! The MQ_BP_Get_ Sample Project on page 22
! The MQ_BP_Put_ Sample Project on page 33
4.4 Importing a Sample ProjectSample eWay projects are included as part of the installation CD-ROM package. To import a sample eWay project to the Enterprise Designer do the following:
1 The sample files are uploaded with the eWay’s documentation .sar file and downloaded from the Enterprise Manager’s Documentation tab. Extract the samples from the Enterprise Manager to a local file.
2 From the Enterprise Designer’s Project Explorer pane, right-click the Repository and select Import from the shortcut menu. The Import Manager appears.
3 Browse to the directory that contains the sample project zip file. Select the sample file (for this sample, WebSphereMQSeries_BPEL_Get_Sample.zip) and click Import. After the sample project is successfully imported, click Close.
4 When the import has successfully completed, right-click the Repository and select Refresh All from Repository from the shortcut menu.
WebSphere MQ eWay Intelligent AdapterUser’s Guide 21 SeeBeyond Proprietary and Confidential

Chapter 4 Section 4.5Using the WebSphere MQ eWay With eInsight The MQ_BP_Get_ Sample Project
5 From the Project Explorer tree, rename the project to MQ_BP_Get_ Sample.
6 Before an imported sample project can be run you must do the following:
" Install and configure a WebSphere MQ Queue on the localhost
" Create an Environment (see Creating an Environment on page 29)
" Configure the eWay properties for your specific system (see Configuring the eWay Properties on page 30)
" Create a Deployment Profile (see Creating and Activating the Deployment Profile on page 31)
4.5 The MQ_BP_Get_ Sample ProjectThe MQ_BP_Get_ Sample project demonstrates the following:
1 The MQSeries eWay, in receive mode, retrieves a message from an MQ Queue. The message is published to an outbound File eWay.
2 The File eWay published the message to an external directory.
The following pages provide step by step directions for manually creating the MQ_BP_Get_ Sample project.
4.5.1. Creating a ProjectThe first step is to create a new project in the SeeBeyond Enterprise Designer.
1 Start the Enterprise Designer.
2 From the Enterprise Explorer’s Project Explorer tab, right-click the Repository and select New Project (see Figure 4). A new project (Project1) appears on the Project Explorer tree.
Figure 4 Enterprise Explorer - New Project
3 Click twice (not double-click) on Project1 and rename the project (for this sample, MQ_BP_Get_ Sample).
WebSphere MQ eWay Intelligent AdapterUser’s Guide 22 SeeBeyond Proprietary and Confidential
Chapter 4 Section 4.5Using the WebSphere MQ eWay With eInsight The MQ_BP_Get_ Sample Project
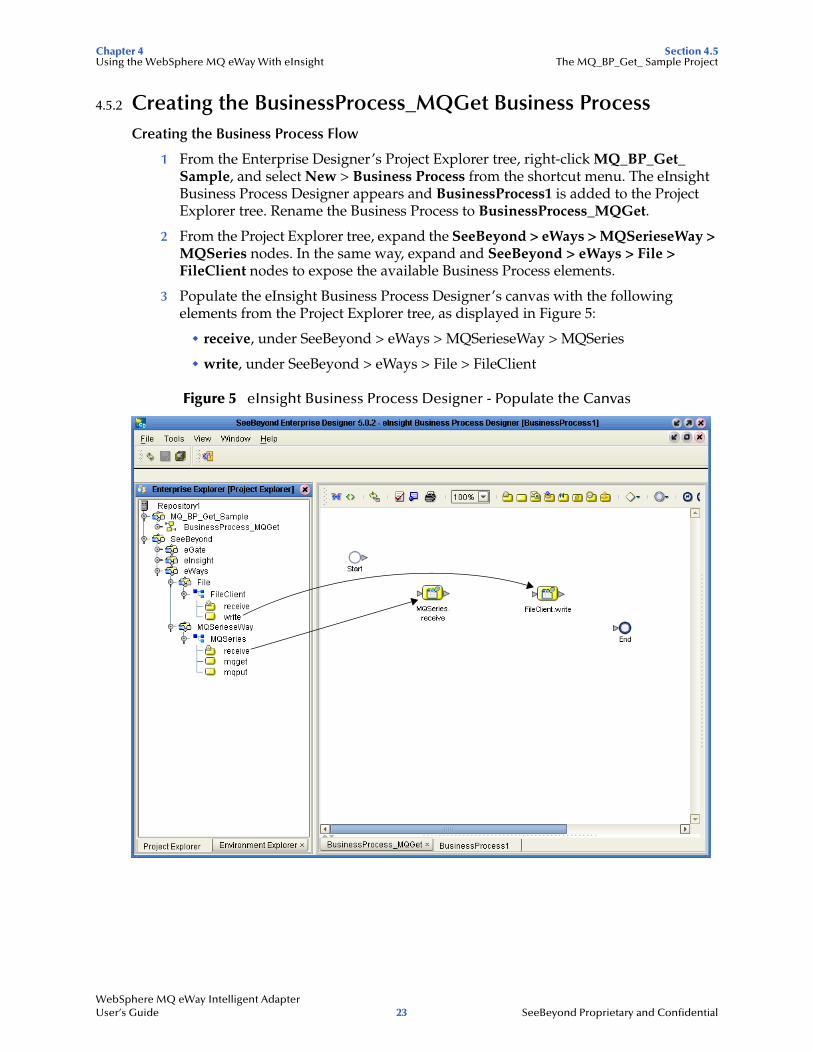
4.5.2 Creating the BusinessProcess_MQGet Business ProcessCreating the Business Process Flow
1 From the Enterprise Designer’s Project Explorer tree, right-click MQ_BP_Get_ Sample, and select New > Business Process from the shortcut menu. The eInsight Business Process Designer appears and BusinessProcess1 is added to the Project Explorer tree. Rename the Business Process to BusinessProcess_MQGet.
2 From the Project Explorer tree, expand the SeeBeyond > eWays > MQSerieseWay > MQSeries nodes. In the same way, expand and SeeBeyond > eWays > File > FileClient nodes to expose the available Business Process elements.
3 Populate the eInsight Business Process Designer’s canvas with the following elements from the Project Explorer tree, as displayed in Figure 5:
" receive, under SeeBeyond > eWays > MQSerieseWay > MQSeries
" write, under SeeBeyond > eWays > File > FileClient
Figure 5 eInsight Business Process Designer - Populate the Canvas
WebSphere MQ eWay Intelligent AdapterUser’s Guide 23 SeeBeyond Proprietary and Confidential

Chapter 4 Section 4.5Using the WebSphere MQ eWay With eInsight The MQ_BP_Get_ Sample Project
4 Link the modeling elements by clicking on the element’s connector and dragging the cursor to the next element’s connector, making the following links as displayed in Figure 6.
" Start -> MQSeries.receive
" MQSeries.receive -> FileClient.write
" FileClient.write -> End
Figure 6 eInsight Business Process Designer - Link the Modeling Elements
Configuring the Modeling Elements
Business Rules, created between the Business Process elements, define the relationship between the input and output Attributes of the elements.
1 Right-click the link between the MQSeries.receive and FileClient.write Activities and select Add Business Rules from the shortcut menu as displayed in Figure 7.
Figure 7 eInsight Business Process Designer - Adding Business Rules
2 From the eInsight Business Process Designer toolbar, click the Map Business Process Attributes button. The Business Rule Designer appears at the bottom of the eInsight Business Process Designer.
WebSphere MQ eWay Intelligent AdapterUser’s Guide 24 SeeBeyond Proprietary and Confidential

Chapter 4 Section 4.5Using the WebSphere MQ eWay With eInsight The MQ_BP_Get_ Sample Project
3 Click on the Business Rules icon in the link between MQSeries.receive and FileClient.write to display the Business Rule Output and Input Attributes in the Business Rule Designer. These Attributes can now be modified.
4 From the Business Rule Designer toolbar, click the Method Palette icon (see Figure 8). The Method Palette appears. From the String tab of the Method Palette, select bytes to text and click Close. The bytes to text icon is added to the toolbar.
5 From the Business Rule Designer toolbar, drag and drop the bytes to text icon onto the Business Rule Designer canvas. The bytes to text method box appears (see Figure 8).
Figure 8 eInsight Business Rule Designer
6 Map ByteArrayData, under MQAppconnMessage > MsgBody in the Output pane of the Business Rule Designer, to the bytes input node of the bytes to text method box. This is done by clicking on ByteArrayData and dragging the cursor to the bytes input node of the bytes to text method box.
7 Map the return text output node of the bytes to text method box to text, under FileClient.write.input in the Input pane of the Business Rule Designer. The Business Process Designer (see Figure 9).
Figure 9 eInsight Business Rule Designer
Method PaletteIcon
WebSphere MQ eWay Intelligent AdapterUser’s Guide 25 SeeBeyond Proprietary and Confidential
Chapter 4 Section 4.5Using the WebSphere MQ eWay With eInsight The MQ_BP_Get_ Sample Project
8 From the Business Process Designer toolbar, click the Synchronize Graphical Model and Business Process Code icon to synchronize the graphical interface to the Business Process code.
9 Click the Enterprise Designer’s Save All icon to save your current changes.
4.5.3 Creating a Connectivity MapThe Connectivity Map provides a canvas for assembling and configuring a project’s components.
1 From the Project Explorer tree, right-click the MQ_BP_Get_ Sample project and select New > Connectivity Map from the shortcut menu.
2 The new Connectivity Map appears and the CMap1 (Connectivity Map) node is added Project Explorer tree. Rename the CMap1 Connectivity Map to CMap_BPEL_MQGet.
Select the External Applications
In the Connectivity Map, eWays are associated with the External Applications. To create the External Applications used by the MQ_BP_Get_ Sample project do the following:
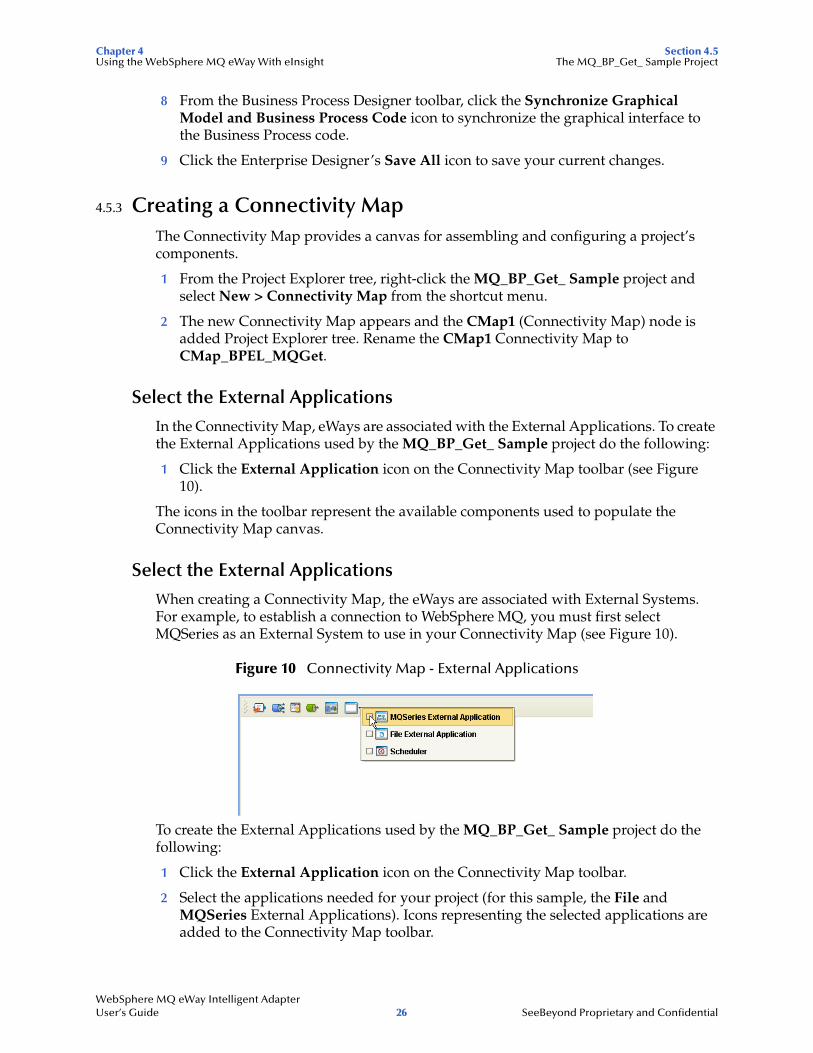
1 Click the External Application icon on the Connectivity Map toolbar (see Figure 10).
The icons in the toolbar represent the available components used to populate the Connectivity Map canvas.
Select the External Applications
When creating a Connectivity Map, the eWays are associated with External Systems. For example, to establish a connection to WebSphere MQ, you must first select MQSeries as an External System to use in your Connectivity Map (see Figure 10).
Figure 10 Connectivity Map - External Applications
To create the External Applications used by the MQ_BP_Get_ Sample project do the following:
1 Click the External Application icon on the Connectivity Map toolbar.
2 Select the applications needed for your project (for this sample, the File and MQSeries External Applications). Icons representing the selected applications are added to the Connectivity Map toolbar.
WebSphere MQ eWay Intelligent AdapterUser’s Guide 26 SeeBeyond Proprietary and Confidential

Chapter 4 Section 4.5Using the WebSphere MQ eWay With eInsight The MQ_BP_Get_ Sample Project
Populate the Connectivity Map
Add the project components to the Connectivity Map by dragging the icons from the toolbar to the canvas.
1 Drag the following components onto the Connectivity Map canvas as displayed in Figure 11:
" MQSeries External Application
" Service (A service is a container for Collaborations, Business Processes, eTL processes, and so forth) The Service may also be created by dragging the Business Process to the Connectivity Map canvas from the Project Explorer tree.
" File External Application
Figure 11 Connectivity Map with Components
2 Rename the MQSeries1 External Application to MQSeriesGet by right-clicking the object, selecting Rename from the shortcut menu, and typing in the new name.
3 Rename the File1 External Application to FileOut.
4 Rename Service1 to BusinessProcess_MQGet1.
5 Save your current changes to the Repository.
4.5.4. Binding the Project ComponentsComponents are associated and the bindings are created from the Connectivity Map.
1 Open the CMap_BPEL_MQGet Connectivity Map.
2 Drag and drop the BusinessProcess_MQGet Business Process from the Project Explorer tree to the BusinessProcess_MQGet1 service (see Figure 12 on page 28).
WebSphere MQ eWay Intelligent AdapterUser’s Guide 27 SeeBeyond Proprietary and Confidential

Chapter 4 Section 4.5Using the WebSphere MQ eWay With eInsight The MQ_BP_Get_ Sample Project
Figure 12 Connectivity Map - Binding the Components
3 Double-click the BusinessProcess_MQGet1 service. The BusinessProcess_MQGet1 binding box appears with the BusinessProcess_MQGet Rule.
4 From the BusinessProcess_MQGet1 binding box, map MQSeriesSender (under Implemented Services) to the MQSeriesGet application.
5 From the BusinessProcess_MQGet1 binding box, map FileReceiver (under Invoked Services) to the FileOut External Application (see Figure 13). .
Figure 13 Connectivity Map - Binding the Components
6 Minimize the BusinessProcess_MQGet1 binding box by clicking the chevrons in the upper-right corner and save your current changes to the Repository.
WebSphere MQ eWay Intelligent AdapterUser’s Guide 28 SeeBeyond Proprietary and Confidential

Chapter 4 Section 4.5Using the WebSphere MQ eWay With eInsight The MQ_BP_Get_ Sample Project
4.5.5. Creating an EnvironmentEnvironments include the external systems, logical hosts, integration servers and JMS IQ Managers used by a project and contain the configuration information for these components. Environments are created using the Enterprise Designer’s Environment Explorer and Environment Editor.
1 From the Enterprise Designer’s Enterprise Explorer, click the Environment Explorer tab.
2 Right-click the Repository and select New Environment. A new Environment is added to the Environment Explorer tree.
3 Rename the new Environment to MQ_BP_Get_Sample_Env.
4 From the Project Explorer tree, right-click MQ_BP_Get_Sample_Env and select New File External System. Name this External System FileExtSysOut and select Outbound File eWay as the External System Type. The FileExtSysOut window is added to the Environment Editor.
5 From the Project Explorer tree, right-click MQ_BP_Get_Sample_Env and select New MQSeries External System. Name this External System MQExtSysIn and select Inbound MQSeries eWay as the External System Type. The MQExtSysIn window is added to the Environment Editor.
6 From the Project Explorer tree, right-click MQ_BP_Get_Sample_Env and select New Logical Host. The LogicalHost1 box is added to the Environment and LogicalHost1 is added to the Environment Editor tree.
7 From the Environment Explorer tree, right-click LogicalHost1 and select New SeeBeyond Integration Server. A new Integration Server (IntegrationSvr1) is added to the Environment Explorer tree under LogicalHost1.
8 Save changes to the Repository. The Environment Explorer and Environment Editor now appear as displayed in Figure 14.
Figure 14 Environment Editor
WebSphere MQ eWay Intelligent AdapterUser’s Guide 29 SeeBeyond Proprietary and Confidential

Chapter 4 Section 4.5Using the WebSphere MQ eWay With eInsight The MQ_BP_Get_ Sample Project
4.5.6. Configuring the eWay PropertiesThe MQ_BP_Get_ Sample project contains two eWays, each represented in the Connectivity Map as a node between an External Application and a Service. eWays facilitate communication and movement of data between the external applications and the eGate system (see Figure 15).
Figure 15 eWay Configurations
The File eWay properties are configured from the Connectivity Map. The MQSeries eWay properties are set from both the Project Explorer’s Connectivity Map and the Environment Explorer tree. To configure the eWays do the following:
Configuring the File eWay Properties
1 Double-click the Outbound File eWay, select Outbound File eWay in the Templates dialog box and click OK.
2 The Properties Sheet opens to the Outbound File eWay properties. Modify the properties for your system, including the settings for the Outbound File eWay in Table 1, and click OK. The properties are saved for the eWay.
Table 1 Outbound File eWay Settings
Configuring the MQSeries eWay Properties
The MQSeries eWay properties must be set in both the Project Explorer and Environment Explorer. For more information on the MQSeries eWay properties and the Properties Sheet, see Creating and Configuring the MQSeries eWay on page 12 or see the eGate Integrator User’s Guide.
Modifying the MQSeries eWay Connectivity Map Properties
1 From the Connectivity Map, double-click the MQSeries eWay. The Properties Sheet opens to the MQSeries eWay Connectivity Map properties.
2 Modify the MQSeries eWay properties for your system and click OK.
Modifying the MQSeries eWay Environment Explorer Properties
1 From the Environment Explorer tree, right-click the Inbound MQSeries External System (MQSeriesExtSysIn in this sample), and select Properties. The Properties Sheet opens to the MQSeries eWay environment properties.
Outbound File eWay Properties
Directory C:/temp
Output file name output%.dat
Outbound File eWay
Inbound MQSeries eWay
(MQSeries.receive)
WebSphere MQ eWay Intelligent AdapterUser’s Guide 30 SeeBeyond Proprietary and Confidential

Chapter 4 Section 4.5Using the WebSphere MQ eWay With eInsight The MQ_BP_Get_ Sample Project
2 Modify the MQSeries eWay environment properties for your system, including the settings in Table 2, and click OK.
Table 2 MQSeries Environment Explorer eWay Settings
4.5.7 Creating and Activating the Deployment ProfileA Deployment Profile is used to assign Business Processes and message destinations to the integration server and JMS IQ Manager. Deployment Profiles are created using the Deployment Editor.
1 From the Enterprise Explorer’s Project Explorer, right-click the project (MQ_BP_Get_ Sample) and select New > Deployment Profile.
2 Enter a name for the Deployment Profile (for this sample MQ_BP_Get_Sample_DP). Make sure that the selected Environment is MQ_BP_Get_Sample_Env. Click OK.
3 From the left pane of the Deployment Editor, drag BusinessProcess_MQGet1 -> FileOut (External Application) to the FileExtSysOut window.
4 From the left pane of the Deployment Editor, drag the MQSeriesGet -> BusinessProcess_MQGet1 (External Application) to the MQExtSysIn window.
5 From the left pane of the Deployment Editor, drag the BusinessProcess_MQGet1 (Business Process) to IntegrationSvr1 in the LogicalHost1 window (see Figure 16).
Figure 16 Deployment Profile
MQSeries eWay Environment Explorer Properties
MQSeriesSet as directed, otherwise use the default settings.
MQ Host Name The name of the specific Queue Manager hostMQ Queue Manager Name The name of the WebSphere MQ Queue ManagerPort Number Port number to use to connect to the MQ Queue
Manager. The default is 1414.
WebSphere MQ eWay Intelligent AdapterUser’s Guide 31 SeeBeyond Proprietary and Confidential

Chapter 4 Section 4.6Using the WebSphere MQ eWay With eInsight Alerting and Logging
6 Click Activate. When activation succeeds, save the changes to the Repository.
4.5.8. Running the ProjectThe following directions assume that the Enterprise Designer was downloaded to C:\ican50. If this is not the case, replace that location in the following directions with the appropriate location.
1 From the Enterprise Manager Downloads tab, download Logical Host - for win32.
2 Extract the file to the ican50\LogicalHost1 directory. You must specify the LogicalHost1 directory for it to be created.
3 Navigate to C:\ican50\LogicalHost1\bootstrap\config directory and open the logical-host.properties file using Notepad™.
4 Enter the following information in the appropriate fields:
" Logical Host root directory: ican50\LogicalHost1
" Repository URL: http://localhost:port number/repository name
" Repository user name and password: Your user name and password
" Logical Host Environment name: MQ_BP_Get_Sample_Env
" Logical Host name: LogicalHost1
Save your changes to logical-host.properties and close the file.
5 Run the bootstrap.bat file in the ican50\LogicalHost1\bootstrap\bin directory.
6 Copy the sample input data file to the input directory.
For more information on running a project that utilizes eInsight from the SeeBeyond Enterprise Designer see the eInsight Business Process Manager User’s Guide and the eGate Integrator User’s Guide.
4.6 Alerting and LoggingeGate provides an alerting and logging feature. This allows monitoring of messages, and captures any adverse messages in order of severity based on configured severity level and higher. To enable Logging, please see the eGate Integrator User’s Guide.
Note: The alerts/status notifications for the WebSphere MQ eWay version 50 are currently limited to Started, Running, Stopping, and Stopped.
WebSphere MQ eWay Intelligent AdapterUser’s Guide 32 SeeBeyond Proprietary and Confidential

Chapter 4 Section 4.7Using the WebSphere MQ eWay With eInsight The MQ_BP_Put_ Sample Project
4.7 The MQ_BP_Put_ Sample ProjectThe MQ_BP_Put_ Sample project demonstrates the following:
1 The inbound File eWay subscribes to an external directory. The received message is the name of an MQ Queue.
2 The message is concatenated with the string "This is a message for queue" and the message from the file.
3 The queueName is set to the message from the file.
4 The message is published by the outbound MQSeries eWay to an external directory.
The MQ_BP_Put_Sample is found in the Samples file as WebSphereMQSeries_BPEL_Put_Sample.zip. To Import the project, see Importing a Sample Project on page 21.
The following pages provide step by step directions for manually creating the MQ_BP_Put_ Sample project components.
4.7.1 Creating a ProjectThe first step is to create and name a new project in eGate Enterprise Designer.
1 Start the Enterprise Designer.
2 From the Enterprise Explorer’s Project Explorer tab, select your Repository on the Project Explorer tree, right-click the Repository and select New Project. A new project appears on the Project Explorer tree.
3 Click twice on Project1 and rename the project (for this sample, MQ_BP_Put_ Sample).
4.7.2 Creating the BusinessProcess_MQPut Business ProcessCreating the Business Process Flow
1 From the Enterprise Designer’s Project Explorer tree, right-click MQ_BP_Put_ Sample, and select New > Business Process from the shortcut menu. The eInsight Business Process Designer appears and BusinessProcess1 is added to the Project Explorer tree. Rename the Business Process to BusinessProcess_MQPut.
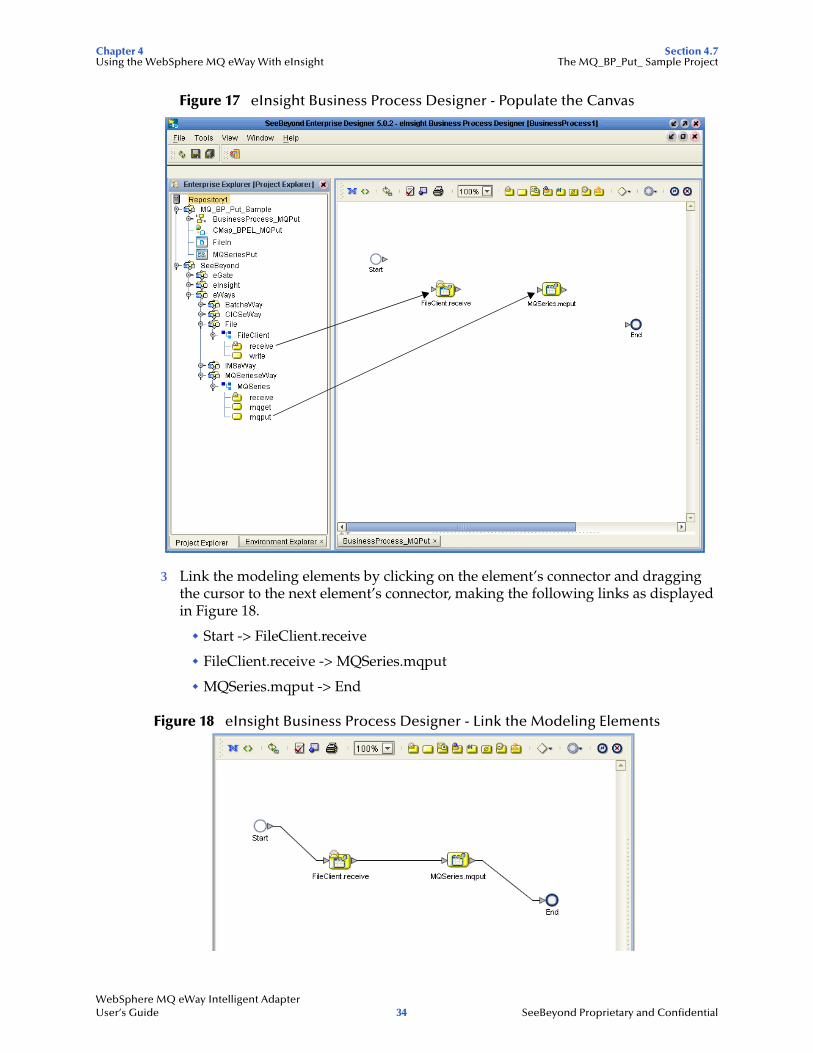
2 Populate the eInsight Business Process Designer’s modeling canvas with the following elements from the Project Explorer tree, as displayed in Figure 17 on page 34:
" receive, under SeeBeyond > eWays > File > FileClient
" mqput, under SeeBeyond > eWays > MQSerieseWay > MQSeries
WebSphere MQ eWay Intelligent AdapterUser’s Guide 33 SeeBeyond Proprietary and Confidential
Chapter 4 Section 4.7Using the WebSphere MQ eWay With eInsight The MQ_BP_Put_ Sample Project
Figure 17 eInsight Business Process Designer - Populate the Canvas
3 Link the modeling elements by clicking on the element’s connector and dragging the cursor to the next element’s connector, making the following links as displayed in Figure 18.
" Start -> FileClient.receive
" FileClient.receive -> MQSeries.mqput
" MQSeries.mqput -> End
Figure 18 eInsight Business Process Designer - Link the Modeling Elements
WebSphere MQ eWay Intelligent AdapterUser’s Guide 34 SeeBeyond Proprietary and Confidential

Chapter 4 Section 4.7Using the WebSphere MQ eWay With eInsight The MQ_BP_Put_ Sample Project
Configuring the Modeling Elements
Business Rules, created between the Business Process elements, define the relationship between the input and output Attributes of the elements.
1 Right-click the link between the FileClient.receive and MQSeries.mqput Activities and select Add Business Rule from the shortcut menu.
2 From the eInsight Business Process Designer toolbar, click the Map Business Process Attributes button. The Business Rule Designer appears at the bottom of the eInsight Business Process Designer.
3 Click on the Business Rules icon in the link between FileClient.receive and MQSeries.mqput to display the Business Process Output and Input Attributes in the Business Rule Designer. These Attributes can now be modified.
4 From the Business Rule Designer toolbar, drag and drop the concat icon to the Business Rules Designer canvas. The concat method box appears.
5 From the Business Rule Designer toolbar, drag and drop the string literal icon to the Business Rules Designer canvas. The string literal method box appears.
6 Map text under FileClient.receive.Output in the Output pane of the Business Rule Designer, to the string2 input node of the concat method box.
7 Map the ‘This is a message for queue’ output node of the string literal method box, to the string1 input node of the concat method box.
8 Map the return string output node of the concat method box, to QPutRequestStringPayLoad under MQSeries.mqput.Input > input in the Input pane of the Business Rule Designer (see Figure 19).
Figure 19 eInsight Business Rule Designer
9 Map text under FileClient.receive.Output in the Output pane of the Business Rule Designer, to queueName under MQSeries.mqput.Input > input in the Input pane of the Business Rule Designer (see Figure 20).
WebSphere MQ eWay Intelligent AdapterUser’s Guide 35 SeeBeyond Proprietary and Confidential

Chapter 4 Section 4.7Using the WebSphere MQ eWay With eInsight The MQ_BP_Put_ Sample Project
Figure 20 eInsight Business Rule Designer
10 From the Business Process Designer toolbar, click the Synchronize Graphical Model and Business Process Code icon to synchronize the graphical interface to the Business Process code.
11 Click the Enterprise Designer’s Save All icon to save your current changes.
4.7.3 Creating a Connectivity MapThe Connectivity Map provides a canvas for configuring a project’s components.
1 In Enterprise Explorer’s Project Explorer, right-click the new project (MQ_BP_Put_ Sample) and select New > Connectivity Map from the shortcut menu.
2 The New Connectivity Map appears and a node for the Connectivity Map is added under the project on the Project Explorer tree labeled CMap1. Rename the Connectivity Map CMap_BPEL_MQPut.
Select the External Applications
1 Click the External Application icon on the Connectivity Map toolbar,
2 Select the applications needed for your project (for this sample, MQSeries External Application and File External Application). Icons representing the selected applications are added to the Connectivity Map toolbar.
Populate the Connectivity Map
Add the project components to the Connectivity Map by dragging the icons from the toolbar to the canvas.
1 For the MQ_BP_Put_ Sample project, drag the following components onto the Connectivity Map canvas as displayed in Figure 21:
" Service
" MQSeries External System
WebSphere MQ eWay Intelligent AdapterUser’s Guide 36 SeeBeyond Proprietary and Confidential

Chapter 4 Section 4.7Using the WebSphere MQ eWay With eInsight The MQ_BP_Put_ Sample Project
" File External System
Figure 21 CMap_BPEL_MQPut Connectivity Map with Components
2 Rename the File1 External Application to FileIn by right-clicking the object, selecting Rename from the shortcut menu, and typing in the new name.
3 Rename the Service1 External Application to BusinessProcess_MQPut1.
4 Rename MQSeries1 to MQSeriesPut.
5 Save your current changes to the Repository
4.7.4. Binding the Project ComponentsThe components are associated and the bindings are created in the Connectivity Map.
1 From the Project Explorer, double-click the Connectivity Map CMap_BPEL_MQPut. The Enterprise Designer canvas now displays the CMap_BPEL_MQPut Connectivity Map.
2 Drag and drop the BusinessProcess_MQPut Business Process from the Project Explorer onto BusinessProcess_MQPut1 in the CMap_BPEL_MQPut Connectivity Map.
3 Double-click BusinessProcess_MQPut1. The BusinessProcess_MQPut1 binding dialog box appears.
4 From the BusinessProcess_MQPut1 binding box, map FileSender (under Implemented Services) to the FileIn application.
5 From the BusinessProcess_MQPut1 binding box, map the MQSeriesReceiver (under Invoked Services) to the MQSeriesPut External Application.
6 Minimize the BusinessProcess_MQPut1 binding box, and save the current changes to your Repository.
WebSphere MQ eWay Intelligent AdapterUser’s Guide 37 SeeBeyond Proprietary and Confidential

Chapter 4 Section 4.7Using the WebSphere MQ eWay With eInsight The MQ_BP_Put_ Sample Project
4.7.5. Creating an EnvironmentEnvironments include the external systems, Logical Hosts, integration servers and JMS IQ Managers used by a project and contain the configuration information for these components.
1 From the Enterprise Designer’s Enterprise Explorer, click the Environment Explorer tab.
2 Right-click the Repository and select New Environment. A new Environment is added to the Environment Explorer tree.
3 Rename the new Environment to MQ_BP_Put_Sample_Env.
4 Right-click MQ_BP_Put_Sample_Env and select New MQSeries External System. Name the External System MQExtSysOut and select Outbound MQSeries eWay as the External System Type. The MQExtSysOut window is added to the Environment Editor.
5 Right-click MQ_BP_Put_Sample_Env and select New File External System. Name this External System FileExtSysIn and select Inbound File eWay as the External System Type. The FileExtSysIn window is added to the Environment Editor.
6 Right-click MQ_BP_Put_Sample_Env and select New Logical Host. The LogicalHost1 box is added to the Environment and LogicalHost1 is added to the Environment Editor tree.
7 From the Environment Explorer tree, right-click LogicalHost1 and select New SeeBeyond Integration Server. A new Integration Server (IntegrationSvr1) is added to the Environment Explorer tree under Localhost2.
8 Save your current changes to the Repository.
4.7.6. Configuring the eWay PropertiesThe MQ_BP_Put_ Sample project uses two eWays, each represented in the Connectivity Map as a node between an External Application and a Service.
The File eWay properties are only configured from the Connectivity Map. The MQSeries eWay, is configured from the Project Explorer’s Connectivity Map, and the Environment Explorer. To configure the eWays do the following:
Configuring the File eWay Properties
1 Double-click the inbound File eWay, select inbound File eWay in the Templates dialog box, and click OK.
2 The Properties Sheet opens to the Inbound File eWay properties. Modify the properties for your system.
Configuring the MQSeries eWay Properties
The WebSphere MQ (MQSeries) eWay properties must be set in both the Project Explorer and Environment Explorer. For more information on the MQSeries eWay
WebSphere MQ eWay Intelligent AdapterUser’s Guide 38 SeeBeyond Proprietary and Confidential

Chapter 4 Section 4.7Using the WebSphere MQ eWay With eInsight The MQ_BP_Put_ Sample Project
properties and the Properties Sheet, see Creating and Configuring the MQSeries eWay on page 12 or see the eGate Integrator User’s Guide.
Modifying the MQSeries eWay Connectivity Map Properties
1 From the Connectivity Map, double-click the MQSeries eWay. The Properties Sheet opens to the MQSeries eWay Connectivity Map properties.
2 Modify the MQSeries eWay properties for your system and click OK.
Modifying the MQSeries eWay Environment Explorer Properties
1 From the Environment Explorer tree, right-click the Inbound MQSeries External System (MQSeriesExtSysOut in this sample), and select Properties. The Properties Sheet opens to the MQSeries eWay environment properties.
2 Modify the MQSeries eWay environment properties for your system and click OK.
4.7.7 Creating and Activating the Deployment ProfileA Deployment Profile is used to assign Business Processes and message destinations to the integration server and JMS IQ Manager. Deployment profiles are created using the Deployment Editor.
1 From the Enterprise Explorer’s Project Explorer, right-click the project (MQ_BP_Put_ Sample) and select New > Deployment Profile.
2 Enter a name for the Deployment Profile (for this sample MQ_BP_Put_Sample_DP). Make sure that the selected Environment is MQ_BP_Put_Sample_Env. Click OK.
3 From the left pane of the Deployment Editor, drag FileIn -> BusinessProcess_MQPut1 (External Application) to the FileExtSysIn window.
4 From the left pane of the Deployment Editor, drag the BusinessProcess_MQPut1 -> MQSeriesPut (External Application) to the MQExtSysOut window.
5 From the left pane of the Deployment Editor, drag BusinessProcess_MQPut1 (Business Process) to IntegrationSvr1 in the LogicalHost1 window.
6 Click Activate. When activation succeeds, save the changes to the Repository.
4.7.8. Running the ProjectThe following directions assume that the Enterprise Designer was downloaded to C:\ican50. If this is not the case, replace that location in the following directions with the appropriate location.
1 From the Enterprise Manager Downloads tab, click on Logical Host - for win32.
2 Extract the file to the ican50\LogicalHost2 directory. You must specify the LogicalHost2 directory for it to be created.
3 Navigate to C:\ican50\LogicalHost2\bootstrap\config directory and open the logical-host.properties file using Notepad™.
4 Enter the following information in the appropriate fields:
WebSphere MQ eWay Intelligent AdapterUser’s Guide 39 SeeBeyond Proprietary and Confidential

Chapter 4 Section 4.7Using the WebSphere MQ eWay With eInsight The MQ_BP_Put_ Sample Project
" Logical Host rood directory: ican50\LogicalHost2
" Repository URL: http://localhost:port number/repository name
" Repository user name and password: Your user name and password
" Logical Host Environment name: MQ_BP_Put_Sample_Env
" Logical Host name: LogicalHost2
Save your changes to logical-host.properties and close the file.
5 Run the bootstrap.bat file in the ican50\LogicalHost2\bootstrap\bin directory.
6 Copy the sample input data file to the input directory.
WebSphere MQ eWay Intelligent AdapterUser’s Guide 40 SeeBeyond Proprietary and Confidential

Chapter 5
Implementing a WebSphere MQ eWay Project
This chapter provides an introduction to the MQSeries eWay components and information about how these components are created and implemented in an eGate project. It is assumed that the reader understands the basics of creating a project using the SeeBeyond Enterprise Designer. For more information on creating an eGate project see the eGate Tutorial and the eGate Integrator User’s Guide.
Chapter Topics
! MQSeries eWay Components on page 41
! MQSeries eWay Sample Projects on page 42
! Importing a Sample Project on page 42
5.1 MQSeries eWay ComponentsThis chapter presents a sample MQSeries eWay project created using the same procedures as the sample end-to-end project provided in the eGate Tutorial. The eWay components that are unique to the MQSeries eWay include the following:
MQSeries eWay Properties file
The Properties file for the MQSeries eWay contains the parameters necessary to connect with a specific external system. These parameters are set using the Properties dialog box. For more information about the MQSeries eWay Properties file and the Properties dialog box see Configuring the eWay Properties on page 12.
MQSeriesETD OTD
The MQSeriesETD OTD is provided with the eWay and contains methods and attributes used to create the Business Rules that invoke the WebSphere MQ program.
WebSphere MQ eWay Intelligent AdapterUser’s Guide 41 SeeBeyond Proprietary and Confidential

Chapter 5 Section 5.2Implementing a WebSphere MQ eWay Project MQSeries eWay Sample Projects
5.2 MQSeries eWay Sample ProjectsTwo sample projects for the MQSeries eWay using Collaborations, are included with the installation. This chapter also walks you through the creation of these sample projects:
! The MQ_JCE_Get_Sample Project on page 43
! The MQ_JCE_Put_Sample Project on page 55
5.3 Importing a Sample ProjectSample eWay projects are included as part of the installation CD-ROM package. To import a sample eWay project to the Enterprise Designer do the following:
1 The sample files are uploaded with the eWay’s documentation .sar file and downloaded from the Enterprise Manager’s Documentation tab. Extract the samples from the Enterprise Manager to a local file.
2 From the Enterprise Designer’s Project Explorer pane, right-click the Repository and select Import from the shortcut menu. The Import Manager appears.
3 Browse to the directory that contains the sample project zip file. Select the sample file (for this sample, WebSphereMQSeries_JCE_Get_Sample.zip) and click Import. After the sample project is successfully imported, click Close.
4 When the import has successfully completed, right-click the Repository and select Refresh All from Repository from the shortcut menu.
5 From the Project Explorer tree, rename the project to MQ_JCE_Get_Sample.
6 Before an imported sample project can be run you must do the following:
" Install and configure a WebSphere MQ Queue on the localhost
" Create an Environment (see Creating an Environment on page 49)
" Configure the eWays properties for your specific system (see Configuring the eWays on page 50)
" Create a Deployment Profile (see Creating and Activating the Deployment Profile on page 52)
5.4 Create the WebSphere MQ QueueThe first step in creating the sample project is to install and configure IBM’s WebSphere MQ Server and MQ Queue Manager on the localhost.
It is assumed that the reader is experienced in the use of the WebSphere MQ Queue Manager. For more information on the MQ Queue Manager see the MQ Queue Related
WebSphere MQ eWay Intelligent AdapterUser’s Guide 42 SeeBeyond Proprietary and Confidential

Chapter 5 Section 5.5Implementing a WebSphere MQ eWay Project The MQ_JCE_Get_Sample Project
Commands section of the SeeBeyond Message Server Reference Guide. For the sample implementation do the following:
1 Open IBM WebSphere MQ Explorer.
2 Create a new Queue Manager.
3 From the WebSphere MQ Queue Manager create a new queue.
IBM WebSphere MQ Server and Queue Manager Limits and Settings
! When using MQSeries Queue Manager on UNIX, the user must be a member of the mqm group to create and start the MQ Queue Manager.
! It is essential that the WebSphere MQ Administrator regularly monitor the number of messages in the queue. Message expiration settings should be set to allow for extended storage.
! WebSphere MQ is limited in the number of messages that can be sent before a commit is executed, and the number of physical messages that can exist on the queue at any one time. This can result in exception errors when upper limits for these numbers are exceeded. Memory and performance of the specific server may also effect the results.
5.5 The MQ_JCE_Get_Sample ProjectThe MQSeries eWay MQ_JCE_Get_Sample project demonstrates the following:
1 The MQSeries eWay, in receive mode, retrieves a message from an MQ Queue. The message is published to an outbound File eWay.
2 The File eWay published the message to an external directory.
The following pages provides step by step procedures for building the MQ_JCE_Get_Sample project.
5.5.1. Create a ProjectThe first step is to create and name a new project in eGate Enterprise Designer.
1 From the Project Explorer tree, right-click the Repository and select New Project. A new project (Project1) appears on the Project Explorer tree.
2 Click twice (not double-click) Project1 to rename the project (for this sample, MQ_JCE_Get Sample).
5.5.2 Create a Connectivity MapThe Connectivity Map provides a canvas for assembling and configuring a project’s components.
1 In Enterprise Explorer’s Project Explorer, right-click the MQ_JCE_Get_Sample project and select New > Connectivity Map from the shortcut menu.
WebSphere MQ eWay Intelligent AdapterUser’s Guide 43 SeeBeyond Proprietary and Confidential

Chapter 5 Section 5.5Implementing a WebSphere MQ eWay Project The MQ_JCE_Get_Sample Project
2 The New Connectivity Map appears and a node is added under the project on the Project Explorer tree labeled CMap1. From the Project Explorer tree, rename the Connectivity Map to CMap_JCE_MQGet.
Select the External Applications
The icons on the Connectivity Map toolbar represent the available components used to populate the Connectivity Map canvas.
eWays in the Connectivity Map are associated with External Systems. For example, to establish a connection to WebSphere MQ (MQSeries), you must first select MQSeries as an External System to use in your Connectivity Map (see Figure 22).
Figure 22 Connectivity Map - External Applications
1 Click the External Application icon on the Connectivity Map toolbar,
2 Select the external systems needed for your project (for this sample, the Scheduler, and WebSphere MQ, and File External Applications). Icons representing the selected external systems are added to the Connectivity Map toolbar.
Populate the Connectivity Map
Add the project components to the Connectivity Map by dragging the icons from the toolbar to the canvas.
1 For this sample, drag and drop the following components onto the canvas as displayed in Figure 23 on page 45:
" MQSeries External System
" Service (A service is a container for Collaborations, Business Processes, eTL processes, and so forth)
" File External System
WebSphere MQ eWay Intelligent AdapterUser’s Guide 44 SeeBeyond Proprietary and Confidential

Chapter 5 Section 5.5Implementing a WebSphere MQ eWay Project The MQ_JCE_Get_Sample Project
Figure 23 Connectivity Map with Components
2 Rename the objects by right-clicking the object, selecting Rename from the shortcut menu, and typing in the new name. Change the names as follows:
3 MQSeries1 to MQSeriesGet
4 Service1 to Service_JCE_MQGet
5 File1 to FileOut
6 Click the Save All icon to save your current changes to the Repository.
5.5.3. Creating the Collaboration DefinitionThe next step in the sample is to create a Collaboration using the Collaboration Definition Wizard (Java). Once the Collaboration Definition has been created, the Business Rules of the Collaboration are written using the Collaboration Editor.
Creating the jcd_MQGet Collaboration
The jcd_MQGet Collaboration defines transactions from the WebSphere MQ External Application to the outbound File External Application.
1 From the Project Explorer, right-click the MQ_JCE_Get_Sample project and select New > Collaboration Definition (Java) from the shortcut menu. The Collaboration Definition Wizard appears.
2 Enter a Collaboration name (for this sample jcd_MQGet) and click Next.
3 For Step 2 of the wizard, from the Web Services Interfaces selection window, double-click SeeBeyond > eWays > MQSerieseWay > MQSeries > receive. The File Name field now displays receive. Click Next.
4 For Step 3 of the wizard, double-click SeeBeyond > eWays > File > FileClient. The FileClient_1 OTD is added to the Selected OTDs field (see Figure 24 on page 46).
WebSphere MQ eWay Intelligent AdapterUser’s Guide 45 SeeBeyond Proprietary and Confidential

Chapter 5 Section 5.5Implementing a WebSphere MQ eWay Project The MQ_JCE_Get_Sample Project
Figure 24 Collaboration Definition Wizard (Java) - Select Web Service Interface
5 Click Finish. The Collaboration Editor (Java) with the new jcd_MQGet Collaboration appears in the right pane of the Enterprise Designer.
5.5.4. Using the Collaboration EditorTo open the Collaboration Editor (Java), from the Project Explorer tree, double-click a Collaboration (for this sample, jcd_MQGet). The Collaboration Editor opens, in the right pane of the Enterprise Designer, to the selected Collaboration.
Creating the jcd_MQGet Collaboration Business Rule
Be careful to open all nodes specified in the directions to connect to the correct item. The jcd_MQGet Collaboration contains the Business Rule displayed in Figure 25.
Figure 25 jcd_MQGet Collaboration Business Rules
To create the jcd_MQGet Collaboration Business Rules do the following:
1 Double-click the input, MQSeries_1, and FileClient_1 in the Business Rule Designer panes to expand the nodes.
WebSphere MQ eWay Intelligent AdapterUser’s Guide 46 SeeBeyond Proprietary and Confidential

Chapter 5 Section 5.5Implementing a WebSphere MQ eWay Project The MQ_JCE_Get_Sample Project
2 To create the Copy new java.lang.String(ByteArrayData) to Text Business Rule do the following:
A From the Business Rule Designer toolbar, click the Call New Constructor icon. The Call New Constructor dialog box appears. Select String from the All Classes box, and java.lang.String(byte[] bytes) from the Constructors box. The Package value defaults to java.lang. Click OK. The java.lang.String method box appears in the Business Rule Designer canvas.
B Map ByteArrayData under input > MsgBody in the left pane of the Business Rule Designer, to the bytes (byte[]) input node of the java.lang.String method box. This is done by clicking on ByteArrayData and dragging the cursor to the bytes (byte[]) input node.
C Map the result (String) of the java.lang.String method box, to Text under FileClient_1 in the right pane of the Business Rule Designer. (see Figure 26).
Figure 26 Copy new java.lang.String(ByteArrayData) to Text Business Rule
3 To create the FileClient_1.write Business Rule do the following:
A From the Business Rules toolbar click the rule button to add a new rule.
B Right-click the FileClient_1 node in the left pane of the Business Rule Designer, and click Select a method to call. The method selection menu appears.
WebSphere MQ eWay Intelligent AdapterUser’s Guide 47 SeeBeyond Proprietary and Confidential

Chapter 5 Section 5.5Implementing a WebSphere MQ eWay Project The MQ_JCE_Get_Sample Project
C Select write() from the method selection menu. The write method box appears with an arrow connecting FileClient_1, in the left pane of the Business Rule Designer, to the FileApplication input node (seeFigure 27 ).
Figure 27 FileClient_1.write Business Rule
4 From the Enterprise Designer toolbar, click the Save All icon to save your current changes to the Repository.
For more information on how to create Business Rules using the Collaboration Editor see the eGate Integrator User’s Guide.
5.5.5. Binding the eWay ComponentsAfter the Collaborations have been written, the components are associated and Bindings are created in the Connectivity Map.
1 From the Project Explorer, double-click CMap_JCE_MQGet. The Enterprise Designer canvas now displays the Connectivity Map.
2 Drag and drop the jcd_MQGet Collaboration from the Project Explorer tree onto the Service_JCE_MQGet service. If the Collaboration was successfully associated, the Service’s “gears” icon changes from red to green (see Figure 28 on page 49).
WebSphere MQ eWay Intelligent AdapterUser’s Guide 48 SeeBeyond Proprietary and Confidential
Chapter 5 Section 5.5Implementing a WebSphere MQ eWay Project The MQ_JCE_Get_Sample Project
Figure 28 Connectivity Map - Binding the Collaborations
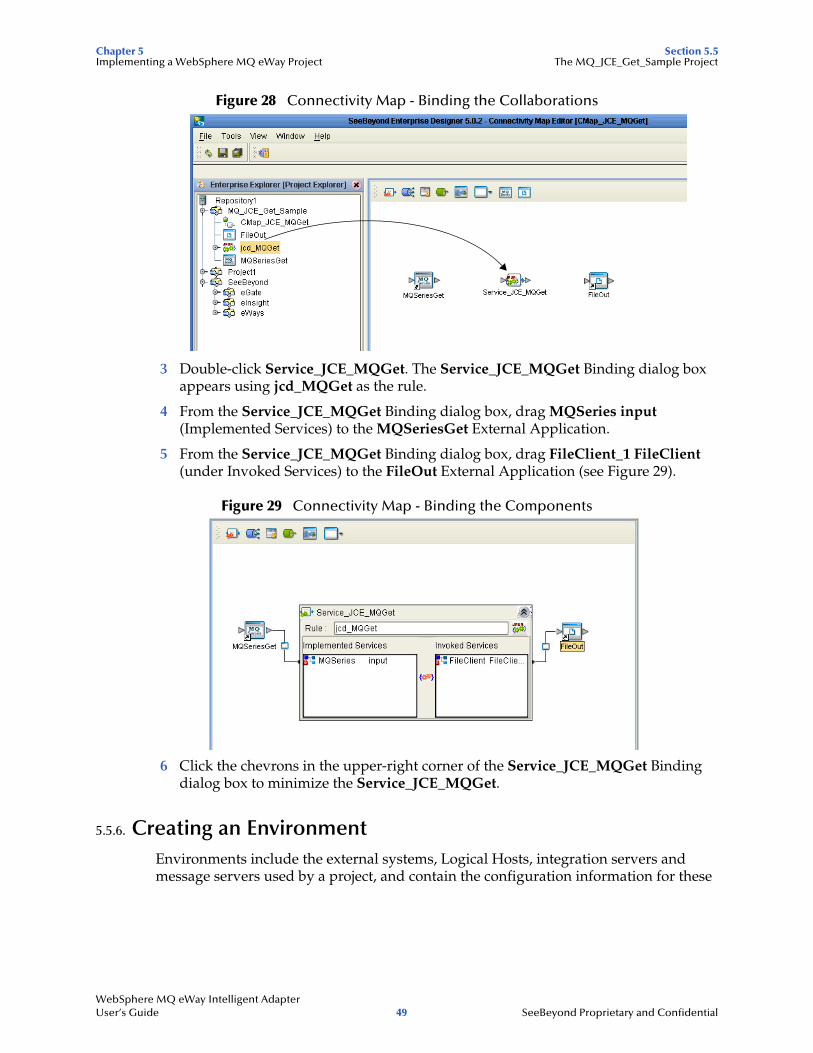
3 Double-click Service_JCE_MQGet. The Service_JCE_MQGet Binding dialog box appears using jcd_MQGet as the rule.
4 From the Service_JCE_MQGet Binding dialog box, drag MQSeries input (Implemented Services) to the MQSeriesGet External Application.
5 From the Service_JCE_MQGet Binding dialog box, drag FileClient_1 FileClient (under Invoked Services) to the FileOut External Application (see Figure 29).
Figure 29 Connectivity Map - Binding the Components
6 Click the chevrons in the upper-right corner of the Service_JCE_MQGet Binding dialog box to minimize the Service_JCE_MQGet.
5.5.6. Creating an EnvironmentEnvironments include the external systems, Logical Hosts, integration servers and message servers used by a project, and contain the configuration information for these
WebSphere MQ eWay Intelligent AdapterUser’s Guide 49 SeeBeyond Proprietary and Confidential

Chapter 5 Section 5.5Implementing a WebSphere MQ eWay Project The MQ_JCE_Get_Sample Project
components. Environments are created using the Enterprise Designer’s Environment Explorer and Environment Editor.
1 From the Enterprise Designer’s Enterprise Explorer, click the Environment Explorer tab.
2 Right-click the Repository and select New Environment. A new Environment is added to the Environment Explorer tree.
3 Rename the new Environment to MQ_JCE_Get Sample_Env.
4 Right-click MQ_JCE_Get Sample_Env and select New MQSeries External System. Name the External System MQExtSysIn and select Inbound MQSeries eWay as the type. Click OK.
5 Right-click MQ_JCE_Get Sample_Env and select New File External System. From the Create an External System dialog box, name the External System FileExtSysOut, and select Outbound File eWay as the type. Click OK.
6 Right-click MQ_JCE_Get SampleEnv and select New Logical Host. The LogicalHost1 box is added to the Environment and LogicalHost1 is added to the Environment Editor tree.
7 From the Environment Explorer tree, right-click the Logical Host environment, LogicalHost1, and select New SeeBeyond Integration Server. A new Integration Server, IntegrationSvr1, is added to the LogicalHost1 box (see Figure 30).
Figure 30 Environment Editor
8 Save your current changes to the Repository.
5.5.7. Configuring the eWaysThe MQ_JCE_Sample project uses two component eWays, each represented in the Connectivity Map as a node between its associated External Application and a Service (see Figure 31 on page 51). eWays facilitate communication and movement of data between the External Applications and the eGate system.
WebSphere MQ eWay Intelligent AdapterUser’s Guide 50 SeeBeyond Proprietary and Confidential

Chapter 5 Section 5.5Implementing a WebSphere MQ eWay Project The MQ_JCE_Get_Sample Project
Figure 31 eWays
The File eWay properties and the Scheduler parameters are configured from the Connectivity Map. The MQSeries eWay properties are set in both the Project Explorer’s Connectivity Map and the Environment Explorer. To configure the eWay properties do the following:
Configuring the File eWay Properties
1 from the Connectivity Map, double-click the File eWay. The Templates dialog box appears. Select Outbound File eWay and click OK. The Properties Sheet opens to the Outbound File eWay configuration.
2 Modify the parameters for your system, including the settings for the Outbound File eWay in Table 3, and click OK.
Table 3 Outbound File eWay Settings
Configuring the WebSphere MQ (MQSeries) eWay Properties
The MQSeries eWay parameters must be set in both the Project Explorer and Environment Explorer. For more information on the MQSeries eWay properties and the Properties Sheet, see Configuring the eWay Properties on page 12, or see the eGate Integrator User’s Guide.
Modifying the MQSeries eWay Connectivity Map Properties
1 From the Connectivity Map, double-click the MQSeriesGet eWay. The Templates dialog box appears. Select Inbound MQSeries eWay and click OK. The Properties Sheet opens to the Inbound MQSeries eWay properties.
2 Modify the MQSeriesGet eWay Connectivity Map properties for your system, including the settings in Table 4 on page 51, and click OK.
Table 4 MQSeries eWay Connectivity Map Properties
Outbound File eWay Properties
Directory C:/eGate50/data/out
Multiple records per file True
Output file name mq_out.txt
Inbound MQSeries eWay Connectivity Map Properties
Settings Set as directed, otherwise use the default settings
Queue Name MQ Queue Name
OutboundFile eWay
WebSphere MQeWay
(MQSeries.receive)
WebSphere MQ eWay Intelligent AdapterUser’s Guide 51 SeeBeyond Proprietary and Confidential

Chapter 5 Section 5.5Implementing a WebSphere MQ eWay Project The MQ_JCE_Get_Sample Project
Modifying the MQSeries eWay Environment Explorer Properties
1 From the Environment Explorer tree, right-click the MQSeries External System (MQExtSysIn in this sample), and select Properties. The Properties dialog box opens to the MQSeries eWay Environment properties.
2 Modify the MQSeries eWay Environment properties for your system, including the settings in Table 5 on page 52, and click OK.
Table 5 MQSeries eWay Environment Explorer Properties
3 Save your changes to the Repository when finished.
5.5.8 Creating and Activating the Deployment ProfileA Deployment Profile is used to assign Collaborations and message destinations to the integration server and message server. Deployment profiles are created using the Deployment Editor.
1 From the Enterprise Explorer’s Project Explorer, right-click the project (MQ_JCE_Get Sample) and select New > Deployment Profile.
2 Enter a name for the Deployment Profile (for this sample MQ_JCE_Get Sample_DP). Make sure that the selected Environment is MQ_JCE_Get Sample_Env. Click OK.
3 Drag MQSeriesGet -> Service_JCE_MQGet (External Application) to the MQExtSysIn box.
4 From the left pane of the Deployment Editor, drag the Service_JCE_MQGet -> FileOut (External Application) to the FileExtSysOut box.
5 Drag the Service_JCE_MQGet service to IntegrationSvr1 in the Logical Host (LogicalHost1) environment box (see Figure 32 on page 53).
Schedule Interval Polling Interval in milliseconds
MQSeries eWay Environment Explorer Properties
Settings Set as directed, otherwise use the default settings
MQ Host Name The name of the host on which the Queue Manager resides
MQ Queue Manager Name Name of the WebSphere MQ Queue Manager
Password Queue Manager Password
Port Number Port number on which the Queue Manager is listening
UserID User ID to access the Queue Manager
Inbound MQSeries eWay Connectivity Map Properties
WebSphere MQ eWay Intelligent AdapterUser’s Guide 52 SeeBeyond Proprietary and Confidential
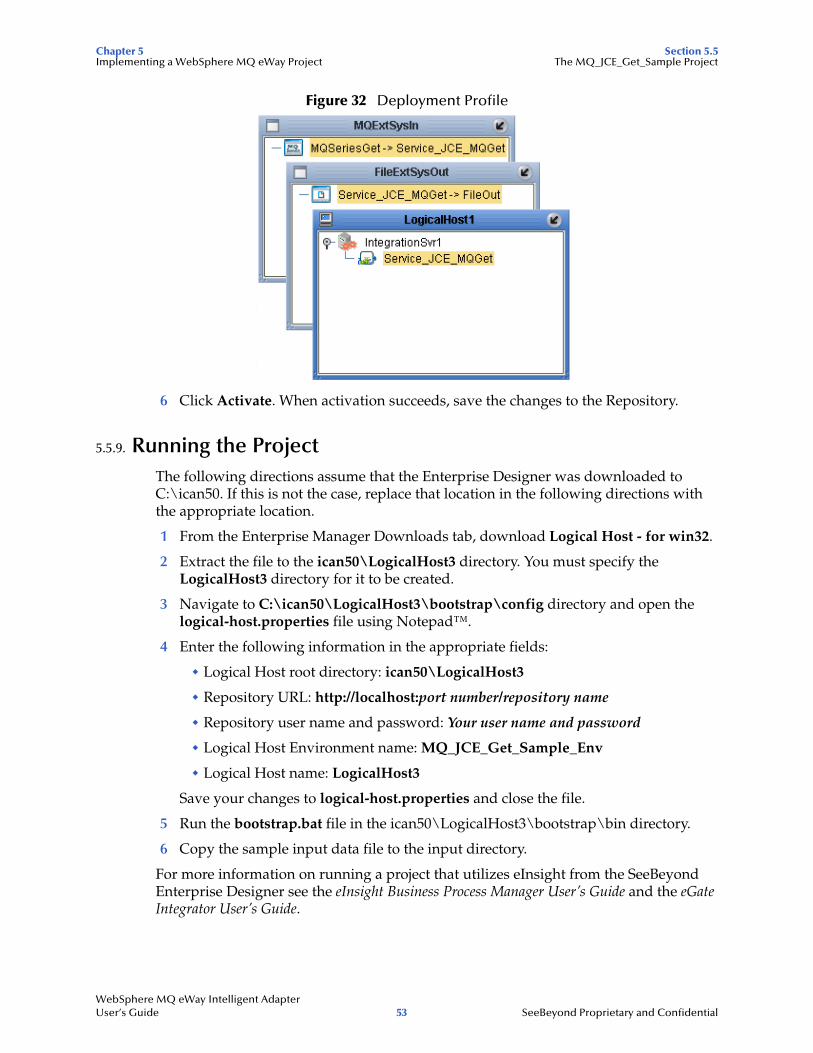
Chapter 5 Section 5.5Implementing a WebSphere MQ eWay Project The MQ_JCE_Get_Sample Project
Figure 32 Deployment Profile
6 Click Activate. When activation succeeds, save the changes to the Repository.
5.5.9. Running the ProjectThe following directions assume that the Enterprise Designer was downloaded to C:\ican50. If this is not the case, replace that location in the following directions with the appropriate location.
1 From the Enterprise Manager Downloads tab, download Logical Host - for win32.
2 Extract the file to the ican50\LogicalHost3 directory. You must specify the LogicalHost3 directory for it to be created.
3 Navigate to C:\ican50\LogicalHost3\bootstrap\config directory and open the logical-host.properties file using Notepad™.
4 Enter the following information in the appropriate fields:
" Logical Host root directory: ican50\LogicalHost3
" Repository URL: http://localhost:port number/repository name
" Repository user name and password: Your user name and password
" Logical Host Environment name: MQ_JCE_Get_Sample_Env
" Logical Host name: LogicalHost3
Save your changes to logical-host.properties and close the file.
5 Run the bootstrap.bat file in the ican50\LogicalHost3\bootstrap\bin directory.
6 Copy the sample input data file to the input directory.
For more information on running a project that utilizes eInsight from the SeeBeyond Enterprise Designer see the eInsight Business Process Manager User’s Guide and the eGate Integrator User’s Guide.
WebSphere MQ eWay Intelligent AdapterUser’s Guide 53 SeeBeyond Proprietary and Confidential

Chapter 5 Section 5.6Implementing a WebSphere MQ eWay Project Alerting and Logging
5.6 Alerting and LoggingeGate provides an alerting and logging feature. This allows monitoring of messages, and captures any adverse messages in order of severity based on configured severity level and higher. To enable Logging, please see the eGate Integrator User’s Guide.
Note: The alerts/status notifications for the WebSphere MQ eWay are currently limited to Started, Running, Stopping, and Stopped.
WebSphere MQ eWay Intelligent AdapterUser’s Guide 54 SeeBeyond Proprietary and Confidential

Chapter 5 Section 5.7Implementing a WebSphere MQ eWay Project The MQ_JCE_Put_Sample Project
5.7 The MQ_JCE_Put_Sample ProjectThe MQ_JCE_Put_Sample project demonstrates the following:
1 The inbound File eWay subscribes to an external directory. The received message is the name of an MQ Queue.
2 The message is concatenated with the string "This is a message for queue" and the message from the file.
3 The queueName is set to the message from the file.
4 The message is published by the outbound MQSeries eWay to an external directory.
The MQ_BP_Put_Sample is found in the Samples file as WebSphereMQSeries_JCE_Put_Sample.zip. To Import the project, see Importing a Sample Project on page 42.
The following pages provide step by step directions for manually creating the MQ_JCE_Put_Sample project components.
5.7.1 Create a ProjectThe first step is to create and name a new project in eGate Enterprise Designer.
1 Start the Enterprise Designer.
2 From the Enterprise Explorer’s Project Explorer tab, select your Repository on the Project Explorer tree, right-click the Repository and select New Project. A new project appears on the Project Explorer tree.
3 Click twice on Project1 and rename the project (for this sample, MQ_JCE_Put_Sample).
5.7.2 Create a Connectivity MapThe Connectivity Map provides a canvas for configuring a project’s components.
1 In Enterprise Explorer’s Project Explorer, right-click the new project (MQ_JCE_Put_Sample) and select New > Connectivity Map from the shortcut menu.
2 The New Connectivity Map appears and a node for the Connectivity Map is added under the project on the Project Explorer tree labeled CMap1. Rename the Connectivity Map CMap_JCE_MQPut.
Select the External Applications
1 Click the External Application icon on the Connectivity Map toolbar,
2 Select the applications needed for your project (for this sample, MQSeries External Application and File External Application). Icons representing the selected applications are added to the Connectivity Map toolbar.
WebSphere MQ eWay Intelligent AdapterUser’s Guide 55 SeeBeyond Proprietary and Confidential

Chapter 5 Section 5.7Implementing a WebSphere MQ eWay Project The MQ_JCE_Put_Sample Project
Populate the Connectivity Map
Add the project components to the Connectivity Map by dragging the icons from the toolbar to the canvas.
1 For the MQ_JCE_Put_Sample project, drag the following components onto the Connectivity Map canvas as displayed in Figure 33:
" Service
" MQSeries External System
" File External System
Figure 33 CMap_JCE_MQPut Connectivity Map with Components
2 Rename the File1 External Application to FileIn by right-clicking the object, selecting Rename from the shortcut menu, and typing in the new name.
3 Rename the Service1 External Application to Service_JCE_MQPut.
4 Rename MQSeries1 to MQSeriesPut.
5 Save your current changes to the Repository
5.7.3. Creating the Collaboration DefinitionThe next step in the sample is to create a Collaboration using the Collaboration Definition Wizard (Java). Once the Collaboration Definition has been created, the Business Rules of the Collaboration are written using the Collaboration Editor (Java).
Creating the jcd_MQPut Collaboration
The jcd_MQPut Collaboration defines transactions from the Inbound File External Application to the WebSphere MQ External Application.
1 From the Project Explorer, right-click the MQ_JCE_Put_Sample project and select New > Collaboration Definition (Java) from the shortcut menu. The Collaboration Definition Wizard (Java) appears.
2 Enter a Collaboration name (for this sample jcd_MQPut) and click Next.
WebSphere MQ eWay Intelligent AdapterUser’s Guide 56 SeeBeyond Proprietary and Confidential

Chapter 5 Section 5.7Implementing a WebSphere MQ eWay Project The MQ_JCE_Put_Sample Project
3 For Step 2 of the wizard, from the Web Services Interfaces selection window, double-click SeeBeyond > eWays > File > FileClient > receive. The File Name field now displays receive. Click Next.
4 For Step 3 of the wizard, double-click SeeBeyond > eWays > MQSerieseWay > MQSeries . The MQSeries OTD is added to the Selected OTDs field .
5 Click Finish. The Collaboration Editor with the new jcd_MQPut Collaboration appears in the right pane of the Enterprise Designer.
5.7.4. Using the Collaboration EditorTo open the Collaboration Editor, from the Project Explorer tree, double-click a Collaboration (for this sample, jcd_MQPut). The Collaboration Editor opens, in the right pane of the Enterprise Designer, to the selected Collaboration.
Creating the jcd_MQPut Collaboration Business Rule
Be careful to open all nodes specified in the directions to connect to the correct item. The jcd_MQPut Collaboration contains the Business Rule displayed in Figure 34.
Figure 34 jcd_MQPut Collaboration Business Rules
To create the jcd_MQPut Collaboration Business Rules do the following:
1 Double-click the input, MQSeries_1, and FileClient_1 in the Business Rule Designer panes to expand the nodes.
2 To create the Copy true to MQOO_OUTPUT Business Rule do the following:
A From the Business Rule Designer toolbar, click the Create Literal icon. The Create Literal dialog box appears. Select boolean as the Type, and true as the Value. Click OK. The Literal method box appears in the Business Rule Designer.
B Map the true output node of the Literal method box, to MQOO_OUTPUT under MQSeries_1 > queueAccessOptions in the right pane of the Business Rule Designer. This is done by clicking on true output node, and dragging the cursor to MQOO_OUTPUT (see Figure 35 on page 58).
WebSphere MQ eWay Intelligent AdapterUser’s Guide 57 SeeBeyond Proprietary and Confidential

Chapter 5 Section 5.7Implementing a WebSphere MQ eWay Project The MQ_JCE_Put_Sample Project
Figure 35 Copy true to MQOO_OUTPUT Business Rule
3 To create the Queue.accessQueue(Text) Business Rule do the following:
A From the Business Rules toolbar click the rule button to add a new rule.
B Right-click Queue underMQSeries_1 in the left pane of the Business Rule Designer, and click Select a method to call. The method selection menu appears.
C Select accessQueue(java.lang.String arg0) from the method selection menu. The accessQueue method box.
D Map Text under input in the left pane of the Business Rule Designer, to the arg0 input node of the accessQueue method box (see Figure 36).
Figure 36 Queue.accessQueue(Text) Business Rule
4 To create the Message.writeString("This is a message for queue ".concat(Text)) Business Rule do the following:
A From the Business Rules toolbar click the rule button to add a new rule.
WebSphere MQ eWay Intelligent AdapterUser’s Guide 58 SeeBeyond Proprietary and Confidential

Chapter 5 Section 5.7Implementing a WebSphere MQ eWay Project The MQ_JCE_Put_Sample Project
B From the Business Rule Designer toolbar, drag the concat icon to the Business Rules Designer canvas. The concat method box appears.
C From the Business Rule Designer toolbar, click the Create Literal icon. The Create Literal dialog box appears. Select String as the Type, enter This is a message for queue as the Value, and click OK. The Literal method box appears on the Business Rules Designer canvas.
D Right-click the Message node under MQSeries_1 in the left pane of the Business Rule Designer, and click Select a method to call. The method selection menu appears.
E Select writeString(java.lang.string arg0) from the method selection menu. The writeString method box appears.
F Map Text under input in the left pane of the Business Rule Designer, to the str (String) input node of the concat method box.
G Map the This is a message for queue output node of the Literal method box, to the String input node of the concat method box.
H Map the result (String) output node of the concat method box, to the arg0 (String) input node of the writeString method box (see Figure 37).
Figure 37 Message.writeString("This is a message for queue ".concat(Text)) Business Rule
5 To create the Queue.putWithOptions Business Rule do the following:
A From the Business Rules toolbar click the rule button to add a new rule.
B Right-click the Queue node under MQSeries_1 in the left pane of the Business Rule Designer, and click Select a method to call. The method selection menu appears.
C Select putWithOptions() from the method selection menu. The putWithOptions method box appears on the Business Rules Designer canvas (see Figure 38 on page 60).
WebSphere MQ eWay Intelligent AdapterUser’s Guide 59 SeeBeyond Proprietary and Confidential

Chapter 5 Section 5.7Implementing a WebSphere MQ eWay Project The MQ_JCE_Put_Sample Project
Figure 38 Queue.putWithOptions Business Rule
6 To create the MQSeries_1.commit Business Rule do the following:
A From the Business Rules toolbar click the rule button to add a new rule.
B Right-click MQSeries_1 in the left pane of the Business Rule Designer, and click Select a method to call. The method selection menu appears.
C Select commit() from the method selection menu. The commit method box appears on the Business Rules Designer canvas.
7 From the Enterprise Designer toolbar, click the Save All icon to save your current changes to the Repository.
8 For more information on how to create Business Rules using the Collaboration Editor see the eGate Integrator User’s Guide.
5.7.5. Binding the Project ComponentsThe eWay components are associated and the bindings are created in the Connectivity Map.
1 From the Project Explorer, double-click CMap_JCE_MQPut to open the Connectivity Map.
2 Drag and drop the jcd_MQPut Collaboration from the Project Explorer tree to Service_JCE_MQPut in the CMap_JCE_MQPut Connectivity Map.
3 Double-click Service_JCE_MQPut. The Service_JCE_MQPut binding dialog box opens.
4 From the Service_JCE_MQPut binding box, map FileClient input (under Implemented Services) to the FileIn application.
5 From the Service_JCE_MQPut binding box, map the MQSeries_1 MQSeries (under Invoked Services) to the MQSeriesPut External Application.
6 Minimize the Service_JCE_MQPut binding box, and save the current changes to your Repository.
WebSphere MQ eWay Intelligent AdapterUser’s Guide 60 SeeBeyond Proprietary and Confidential

Chapter 5 Section 5.7Implementing a WebSphere MQ eWay Project The MQ_JCE_Put_Sample Project
5.7.6. Creating an EnvironmentEnvironments include the external systems, Logical Hosts, integration servers and JMS IQ Managers used by a project and contain the configuration information for these components.
1 From the Enterprise Designer’s Enterprise Explorer, click the Environment Explorer tab.
2 Right-click the Repository and select New Environment. A new Environment is added to the Environment Explorer tree.
3 Rename the new Environment to MQ_JCE_Put_Sample_Env.
4 Right-click MQ_JCE_Put_Sample_Env and select New MQSeries External System. Name the External System MQExtSysOut and select Outbound MQSeries eWay as the External System Type. The MQExtSysOut window is added to the Environment Editor.
5 Right-click MQ_JCE_Put_Sample_Env and select New File External System. Name this External System FileExtSysIn and select Inbound File eWay as the External System Type. The FileExtSysIn window is added to the Environment Editor.
6 Right-click MQ_JCE_Put_Sample_Env and select New Logical Host. The LogicalHost1 box is added to the Environment and LogicalHost1 is added to the Environment Editor tree.
7 From the Environment Explorer tree, right-click LogicalHost1 and select New SeeBeyond Integration Server. A new Integration Server (IntegrationSvr1) is added to the Environment Explorer tree under LogicalHost1.
8 Save your current changes to the Repository.
5.7.7. Configuring the eWay PropertiesThe MQ_JCE_Put_Sample project uses two eWays, each represented in the Connectivity Map as a node between an External Application and a Service.
The File eWay properties are only configured from the Connectivity Map. The MQSeries eWay, is configured from the Project Explorer’s Connectivity Map, and the Environment Explorer. To configure the eWays do the following:
Configuring the File eWay Properties
1 Double-click the inbound File eWay, select inbound File eWay in the Templates dialog box, and click OK.
2 The Properties Sheet opens to the Inbound File eWay properties. Modify the properties for your system.
WebSphere MQ eWay Intelligent AdapterUser’s Guide 61 SeeBeyond Proprietary and Confidential

Chapter 5 Section 5.7Implementing a WebSphere MQ eWay Project The MQ_JCE_Put_Sample Project
Configuring the MQSeries eWay Properties
The WebSphere MQ (MQSeries) eWay properties must be set in both the Project Explorer and Environment Explorer. For more information on the MQSeries eWay properties and the Properties Sheet, see Creating and Configuring the MQSeries eWay on page 12 or see the eGate Integrator User’s Guide.
Modifying the MQSeries eWay Connectivity Map Properties
1 From the Connectivity Map, double-click the MQSeries eWay. The Properties Sheet opens to the MQSeries eWay Connectivity Map properties.
2 Modify the MQSeries eWay properties for your system and click OK.
Modifying the MQSeries eWay Environment Explorer Properties
1 From the Environment Explorer tree, right-click the Inbound MQSeries External System (MQSeriesExtSysOut in this sample), and select Properties. The Properties Sheet opens to the MQSeries eWay environment properties.
2 Modify the MQSeries eWay environment properties for your system and click OK.
5.7.8 Creating and Activating the Deployment ProfileA Deployment Profile is used to assign Collaborations and message destinations to the integration server and JMS IQ Manager. Deployment profiles are created using the Deployment Editor.
1 From the Enterprise Explorer’s Project Explorer, right-click the MQ_JCE_Put_Sample project and select New > Deployment Profile.
2 Enter a name for the Deployment Profile (for this sample MQ_JCE_Put_Sample_DP). Make sure that the selected Environment is MQ_JCE_Put_Sample_Env. Click OK.
3 From the left pane of the Deployment Editor, drag FileIn -> Service_JCE_MQPut (External Application) to the FileExtSysIn window.
4 From the left pane of the Deployment Editor, drag the Service_JCE_MQPut -> MQSeriesPut (External Application) to the MQExtSysOut window.
5 From the left pane of the Deployment Editor, drag Service_JCE_MQPut (Business Process) to IntegrationSvr1 in the LogicalHost1 window.
6 Click Activate. When activation succeeds, save the changes to the Repository.
5.7.9. Running the ProjectThe following directions assume that the Enterprise Designer was downloaded to C:\ican50. If this is not the case, replace that location in the following directions with the appropriate location.
1 From the Enterprise Manager Downloads tab, click on Logical Host - for win32.
2 Extract the file to the ican50\LogicalHost4 directory. You must specify the LogicalHost4 directory for it to be created.
WebSphere MQ eWay Intelligent AdapterUser’s Guide 62 SeeBeyond Proprietary and Confidential

Chapter 5 Section 5.7Implementing a WebSphere MQ eWay Project The MQ_JCE_Put_Sample Project
3 Navigate to C:\ican50\LogicalHost4\bootstrap\config directory and open the logical-host.properties file using Notepad™.
4 Enter the following information in the appropriate fields:
" Logical Host rood directory: ican50\LogicalHost4
" Repository URL: http://localhost:port number/repository name
" Repository user name and password: Your user name and password
" Logical Host Environment name: MQ_JCE_Put_Sample_Env
" Logical Host name: LogicalHost4
Save your changes to logical-host.properties and close the file.
5 Run the bootstrap.bat file in the ican50\LogicalHost4\bootstrap\bin directory.
6 Copy the sample input data file to the input directory.
WebSphere MQ eWay Intelligent AdapterUser’s Guide 63 SeeBeyond Proprietary and Confidential

WebSphere MQ eWay Intelligent AdapterUser’s Guide 64 SeeBeyond Proprietary and Confidential
Chapter 6
Java Classes and Methods for the WebSphere MQ eWay
6.1 MQSeries eWay Classes and MethodsThe MQSeries eWay contains Java methods that are used to extend the functionality of the eWay. These methods are contained in the following classes:
! MQSeriesETD Class
! GMO Class
! PMO Class
! Message Class
WebSphere MQ Javadoc
The Javadoc is uploaded with the eWay’s documentation file (MQSerieseWayDocs.sar) and downloaded from the Documentation tab of the Enterprise Manager. To access the full Javadoc, extract the Javadoc to an easily accessible folder, and double click the index.html file.

WebSphere MQ eWay Intelligent AdapterUser’s Guide 65 SeeBeyond Proprietary and Confidential
Appendix A
Mapping WebSphere MQ Header Fields
A.1 Mapping Between JMS Standard Header Items and WebSphere MQ Header Fields
JMS Standard header items and their equivalent WebSphere MQ header fields can be set using the Collaboration Editor (Java). For information on mapping between JMS header items and WebSphere MQ header fields see IBM MQSeries online documentation at:
http://www-4.ibm.com/software/ts/mqseries/library/manual01/csqzaw07/csqzaw07tfrm.htm
Table 20, at the above Web site provides JMS header fields used to set or get MQSeries header fields (only some of which are available using this procedure). The Collaboration Editor (Java) sets the header properties by calling readProperty() or writeProperty().
For detailed information on creating Business Rules using the Collaboration Editor (Java) see the eGate Integrator User’s Guide.

Index
Index
Symbols- 15
Aalerting 32
Bbuilding a project 41Business Rules
Collaboration Editor (Java) 46, 57
CChannel 18class 16Collaboration Definitions
creating 45, 56wizard 45, 56
Collaboration Editor (Java) 46, 57configuration parameters
Channel 18class 16Connector 16General Settings 15Host Name 19MQSeries 18Password 19Port Number 19Property.Tag 17Queue Manager Name 19Transaction Type 15type 17UserID 19
configuring the WebSphere MQ eWay 12Connectivity Map 43
populating 44Connector 16
DDeployment Profile 52
activation 52
creating 52
EeInsight
engine and components 20using with the WebSphere MQ eWay 20
Environment 49creating 49
eWayconfiguration parameters
Channel 18class 16Connector 16General Settings 15Host Name 19MQSeries 18Password 19Port Number 19Property.Tag 17Queue Manager Name 19Transaction Type 15type 17UserID 19
configuring the eWays 50eWay components 41External Applications
selecting 44external system requirements 8
MQSeries V5.2 8WebSphere MQ V5.3 8
FFileeWay.sar 11
GGeneral Settings 15GMO Class 64
HHeader fields
mapping 65Host Name 19
Iimplementation 41importing a project 42installation 10
after installing 11
WebSphere MQ eWay Intelligent AdapterUser’s Guide 66 SeeBeyond Proprietary and Confidential

Index
JJMS Standard Header
mapping with WebSphereMQ Header fields 65
Llogging 32
MMA88 patch 9MA88 SupportPac 9Message Class 64Methods 64Microsoft Internet Explorer 8MQSeriesETD OTD 41MQSerieseWay.sar 11MQSeriesOTD Class 64
NNon-Transactional transaction type 15
Ooperating systems
supported 8Overview 7overview
MQSeries 7
Pparameters
Channel 18class 16Connector 16General Settings 15Host Name 19MQSeries 18Password 19Port Number 19Property.Tag 17Queue Manager Name 19Transaction Type 15type 17UserID 19
Password 19PMO Class 64Port Number (JMS) 19project
creating 43importing 42
Property.Tag 17
QQueue Manager Name 19Queue Manager Name (JMS) 19
Ssample eWay project
importing a project 42supported operating systems 8system requirements 8
external system requirements 8patches 9
TTopic publish/subscribe connection type
requirements for MQSeries V5.2 9Transaction Type 15transaction type
Non-Transactional 15XA-compliant. 15
type 17
WWebLogic 8WebSphere 8WebSphere MQ eWay Classes
GMO 64Message 64MQSeriesETD 64PMO 64
WebSphere MQ Header fieldsmapping 65
WebSphere MQ JavadocJavadoc 64
WebSphere MQ Queue 42creating 42server and manager limits and settings 43
XXA-compliant transaction type 15
WebSphere MQ eWay Intelligent AdapterUser’s Guide 67 SeeBeyond Proprietary and Confidential