wedding quilt - wordpress.com · wedding quilt cindy carter ... wedding quilt available in one size...
TRANSCRIPT

Wedding Quilt Cindy Carter 2009Updated May 2011
http://carterquilter.wordpress.com/
Cindy Carter 2009 Wedding Quilt 1
Free Pattern

Copyright Information
I have created all of my quilt patterns to be used as a FREE resource to other quilters. I am not selling them and explicitly prohibit others from doing so.
That being said, all you wonderful quilters please use them to create quilts for yourself and others. You may sell any quilts you make for a profit (no mass production). You may exhibit your quilts. I would love it if you all can use the patterns as a resource to help others, gifts for others who are sick or in need, our military, charities and fundraisers of any kind. You may use the patterns to teach classes as long as you provide the patterns free of charge to your students.
Quilt store owners – You are free to reproduce any of the patterns and provide them free of charge to your customers. If you can email me photos of any projects your customers complete making these patterns, I would deeply appreciate it.
Please respect the work I have done in creating these patterns. Make sure the patterns are not altered in any way and that proper credit is given if you are reproducing and sharing the patterns with others.
If you are sharing my patterns over the web, do this by providing a link to http://carterqulter.wordpress.com. Do not copy my patterns to any other internet site and provide access to them through that site.
Feel free to contact me if you have any questions.
Cindy [email protected]
Special RequestIf you finish a quilt or quilt top using this pattern, please join my Quilt Patterns from Seattle Flickr photo group and upload a photo.http://www.flickr.com/groups/qpfs/
If you would prefer, you can email me the photo and I will upload it for [email protected]
Many thanks. Cindy
Cindy Carter 2009 Wedding Quilt 2
Free Pattern

Wedding Quilt
Available in one size – Queen/King 102” by 102”
Fabric Requirements:White Background Fabric (used in the pieced outer border only)
2 ¼ yards
Cream Background Fabric 6 ½ yards
*Green FabricI used a collection of scrappy green batiks.
2 ½ yards (or 11 FQS)
Pink FabricI used an Asian print.
2 ½ yards
Cindy Carter 2009 Wedding Quilt 3
Free Pattern

Other Requirements:
1. Triangle Magic software program for printing templates to make Half Square Triangles (HSTs). If you have another method for making HSTs please use what you know and are comfortable with. Make sure you cut your fabric to work with your method.
Triangle Magic available online from
http://www.quiltpro.com/go.php?id=Triangle_Magic_half_mainpage
2. 60 Degree ruler for the outer border.You need a 60 degree triangle ruler big enough to cut a 6 ½” wide strip of fabric. Available at most fabric stores and on the web for a reasonable price.
You may substitute a plain border that is 6 ½” wide unfinished.
Cindy Carter 2009 Wedding Quilt 4
Free Pattern

3. Tri-Rec rulers or Lazy Angle ruler or use template provided in pattern for the corners of your quilt.
If you have another tool that does the job that is great too!
Rulers available at most fabric stores and online for a reasonable price.
You may substitute a plain 6 ½” square.
I am providing a foundation at the end of the pattern. You will need to print out (4) if you prefer to use that instead of a ruler.
Disclaimer - I have no association or financial relationship with any of these companies. I am just sharing the techniques I used to make this quilt
Cindy Carter 2009 Wedding Quilt 5
Free Pattern

If you are using Fat Quarters for the green fabric here are the cutting charts to help you cut the fabric.
(12) 3 3/8” squares(60) 2 3/8” by 8” rectangles(72) 3” by 5.5” rectanglesIf you are using my method for the Half Square Triangles you need(15) 7.5” squares
Cindy Carter 2009 Wedding Quilt 6
Free Pattern

***Make HSTs – Using Triangle Magic – templates that print on your computer. Use 2.5” finished template size.
1. Print out 29 templates for the Pink and Cream HSTs.Print out 15 templates for the Green and Cream HSTs.Use Triangle Magic and print 2.5” finished size HSTs. (8) per template.
2. Cut (9) 7.5” by Width of Fabric (WOF) strips of cream fabricCut (6) 7.5” by WOF strips of pink fabricCut (3) 7.5” by WOF strips of green fabric
Cross cut each strip into 7.5” squares – (44) cream, (29) pink, (15) green
3. Put (1) 7 ½ “ pink or green square right sides together with a 7 ½ “ cream square.
4. Pin a template on top.
5. Decrease stitch length. It is 1.8 on my machine.
6. Sew on the lines with arrows.
7. Cut on the black lines.
8. Hold triangle firmly in one corner and tear off paper starting in the middle.
9. Finger press open and trim little triangles off the corners.
Pink and Cream HSTs Green and Cream HSTs
(144) HSTs in Baggie D (116) in Baggie G(48) HSTs in Baggie E(36) HSTs in Baggie F Cindy Carter 2009 Wedding Quilt 7
Free Pattern

Unit A: Make (13)Unit B: Make (8)Unit C: Make (4)
Get Out Baggies A, B and CCutting Instructions:Note: WOF is Width of Fabric
First Cut Then Cut Put in Baggies(3) 7 ½ ” by WOF strips
(13) 7 ½ ” squares
and
(7) 4“ by 7 ½“ rectangles
(13) in A
(7) in B
(1) 4“ by WOF strip
(4) 4“ squares
and
(1) 4” by 7 ½” rectangle
(4) in C
(1) in B
(5) 3” by WOF strips
(60) 3” squares (48) in A(12) in B
Cindy Carter 2009 Wedding Quilt 8
Free Pattern

First Cut Then Cut Put in Baggie
(4) 3 ¾ ” by WOF strips
(29) 3 ¾ ” squaresCut in quarters.
(60) triangles in A(40) triangles in B(16) triangles in C
(4) 8” by WOF strips
(60) 2 3/8 ” by 8” rectangles
(52) in A(8) in B
(1) 3 3/8 ” by WOF strip
(12) 3 3/8 ” squares
Then cut each square in half diagonally
(16)triangles in B(8) triangles in C
(5) 10.5” by WOF strips
(1) 3” by WOF strip
(72) 3” by 7.5” rectangles
(52)rectangles in A(16)triangles in B(4) triangles in C
Cindy Carter 2009 Wedding Quilt 9
Free Pattern

Unit D: Make (36)Unit E: Make (12)Unit F: Make (12)Get Out Baggies D, E and FCutting Instructions:Note: WOF is Width of Fabric
First Cut Then Cut Put in Baggie(5) 5 ½” by WOF strips
(72) 5 ½” by 3” rectangles
(72) in D
3” unfinishedHSTs already made.
(144) in D(48) in E(36) in F
(6) 5 ½” by WOF strips
(72) 5 ½” by 3” rectangles
(72) in D
Cindy Carter 2009 Wedding Quilt 10
Free Pattern

Unit G: HST Inner Border. Collect HSTs from Baggie G.
Step A: Make (4) using your green and cream HSTs.(14) triangles in each unit. Press to the left.
Step B: Make (4) using your green and cream HSTs. (14) triangles in each unit. Press to the right.
Step C: Cut (4) 1 ½ “ by 3” cream colored rectangles.
Step D: Join Units from steps A, B and C together according to the diagram below. Make (4).They should measure 85 ½ “ by 3”.Press to the rectangle.
Step E: Take (2) units from Step D and add a HST to either end according to the diagram. Press to the center.
Step F: Return all units to Baggie G for use later.
Cindy Carter 2009 Wedding Quilt 11
Free Pattern

Unit H: Outer Border and Corners
Directions for cutting and piecing the outer border appear at the end of the pattern. This has lots of bias edges so it is better to wait until the end when you are actually going to add it to your quilt top.
Also.. at this point you may decide you want to do plain borders and not pieced borders. If you decide you want plain borders you will be happy that you did not already cut the fabric for pieced borders.
Cindy Carter 2009 Wedding Quilt 12
Free Pattern

Step #1: Make (13) of Unit A – Use fabric in Baggie A.15 ½” square unfinished.
A. Assemble corners for Unit A.Right sides together and with pinch points matched Sew the pink triangle to the green rectangle.Press to the pink triangle.Make (60).
Cindy Carter 2009 Wedding Quilt 13
Free Pattern

Line up a ruler from the green corner to the pink tip on each side and trim excess fabric.
Measure for success – From the top of the pink triangle to the base should measure 4”.
Across the green baseline should measure 8”.
***Put (8) of this unit in Baggie B
B. Pinch the center of each side of the 7 ½” cream squares.
Cindy Carter 2009 Wedding Quilt 14
Free Pattern

D. Match the center pinch of green to the center pinches on each of the 4 sides of the square.
Press toward the green on two opposite sides.Press away from the green on the other two sides.Square up to 10 ½”.
Cindy Carter 2009 Wedding Quilt 15
Free Pattern

E. Sew (2) 3” by 10 ½” cream rectangles to your unit from D.
Press to the rectangles.
Sew (2) 3” pink squares to the ends of (2) 3” by 10 ½” cream rectangles.Press to the rectangles.
Sew to top and bottom of your block.Press to the rectangles.
Square up to 15 ½ “ . Make (13)
Cindy Carter 2009 Wedding Quilt 16
Free Pattern
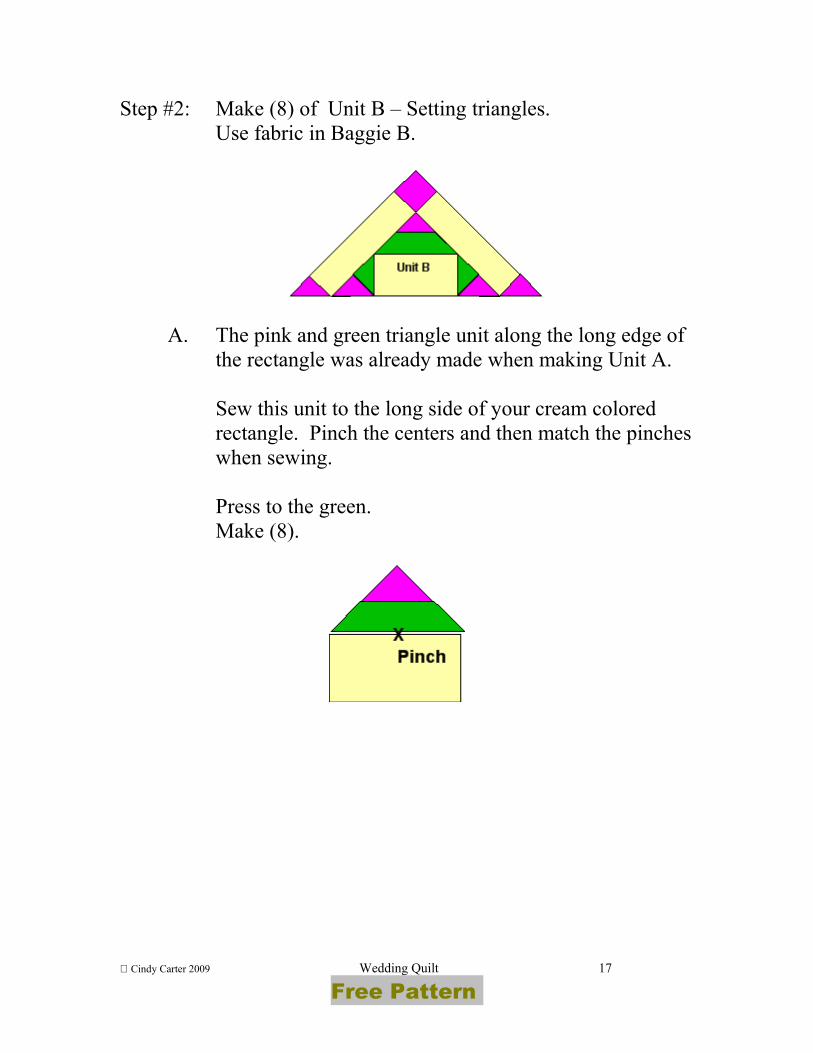
Step #2: Make (8) of Unit B – Setting triangles.Use fabric in Baggie B.
A. The pink and green triangle unit along the long edge of the rectangle was already made when making Unit A.
Sew this unit to the long side of your cream colored rectangle. Pinch the centers and then match the pinches when sewing.
Press to the green.Make (8).
Cindy Carter 2009 Wedding Quilt 17
Free Pattern

B. Side Units:Sew a pink and green triangle together according to the diagram. Make (16). Sew one to each of the shorter sides of the cream rectangle according to the diagram.
Press to the rectangle.
C. Finishing Unit B with pieces from Baggie B. Make (8) units.
Sew pink triangles and squares to cream rectangles.Press to the cream.
Sew theses to the sides to the block.Press the side unit to the rectangle.Press the top unit to the block.
Cindy Carter 2009 Wedding Quilt 18
Free Pattern

Step #3: Make (4) of Unit C (corner units) – Use fabric in Baggie C.
A. Make (4) pairs. Sew a pink triangle to a green triangle according to the diagram.
Sew the triangle units to the cream square.Press to the cream square.
B. Sew pink triangles to either side of each of your cream rectangles.
C. Sew the rectangle unit to the unit from step A.Press to the rectangle.Make (4).
Cindy Carter 2009 Wedding Quilt 19
Free Pattern

Step #4: Make (36) of Unit D - Use fabric in Baggie D.
A. Sew your HSTs together to make (72) units.
B. Sew to complete Unit D (36) units.
Cindy Carter 2009 Wedding Quilt 20
Free Pattern

Step #5: Make (12) of Unit E
A. Sew the rest (48) of your pink and cream HSTs into pairs with the seams nesting.
Cream fabric is in the Center: (24 units).
Don't press yet.
B. Finger press the seams joining your HSTs so the seams seams nest when you sew them.
Make (12) of this unit. Make sure the cream fabric is in the center.
Press.
Cindy Carter 2009 Wedding Quilt 21
Free Pattern

Step #6: Make (12) of Unit F.
A. (3) HSTs per unit.Finger press the seams joining your HSTs so the seams seams nest when you sew them.
Make sure the cream fabric is in the center.
B. Hold your ruler on the center diagonal line and trim 1/4” away. If you need to draw the line first turn the unit over and do it on the back side. I just use my ruler and am careful when cutting so the ruler line stays securely on the diagonal center line and the edge of the ruler is 1/4” away.
Cindy Carter 2009 Wedding Quilt 22
Free Pattern

Step #7: Sewing the quilt rows.
Row A: (2) of Unit C
Row B: Make (2). Press to Unit D.
Row C: Make (2). Press to Unit D.
Row D: Make (2). Press to Unit D.
Cindy Carter 2009 Wedding Quilt 23
Free Pattern

Row E: Make (2). Press to Unit D.
Row F: Make (2). Press to Unit D.
Row G: Make (1). Press to Unit D.
Cindy Carter 2009 Wedding Quilt 24
Free Pattern

Step 8: Sew your rows together, Press in either direction.The quilt top without borders measures 85.5” square.
Sew your rows together in this order from top to bottom as seen in the drawing.A – B – C – D – E – F – G – F – E – D – C – B – A
Cindy Carter 2009 Wedding Quilt 25
Free Pattern

Step 9: Add green and cream HST inner borders from Baggie G.The quilt will now measure 90 ½ “ square.
A. Sew the two shorter units to either side. Press to the HSTs.
B. Sew the two longer units to the top and bottom.Press to the HSTs.
Cindy Carter 2009 Wedding Quilt 26
Free Pattern

Step 12: Outside border and corners.
A. Borders – Cutting Directions
Cut(9) 6 ½ ” by WOF strips
(9) 6 ½ ” by WOF strips
B. Sew (1) white strip to one cream strip, right sides together so you have a long tube.
C. Cut your tube apart using your 60 degree ruler.Turn the ruler upside down for every other cut.
D. Cut (4) extra white triangles from the last length of white before you sew a tube.
Cindy Carter 2009 Wedding Quilt 27
Free Pattern

E. You should have at least (6) units like this from each cut tube. Pick out the one or two stitches at the tip of the triangle.
Press to the white. Be VERY careful about the bias edges.
F. Sew (13) of these units together for each side of the quilt.
Sew the extra white square to the end that does not have a white square.
G. Square up either end so you have a ¼ “ seam allowance on the white triangle.
NOTE: The final measurement of these borders is about ¾ “ short of the size of the quilt. You can ease in this small amount when you piece the border to the quilt. It is easier than adding an extra tiny inner border to make it fit exactly.
Cindy Carter 2009 Wedding Quilt 28
Free Pattern

H. Make your 6 ½ “ square corners.
If using specialty rulers cut and piece according to the directions for those rulers.
Or you can use this template to paper piece or to make templates.
PLEASE ADD SEAM ALLOWANCES.
Cindy Carter 2009 Wedding Quilt 29
Free Pattern

I. Sew a corner to either end of (2) border strips.Press to the outside border strip.
J. Sew two border strips without corners to either side of your quilt.Press to the outside border strip.
K. Sew the two border strips with corners to the top and bottom of your quilt.Press to the outside border strip.
Your quilt top is ready for quilting and binding.
Cindy Carter 2009 Wedding Quilt 30
Free Pattern