week 4 cookbook: gis tutorial chapter 1 introducing arcmap ... · garp 0244 online (fall 2009) week...
TRANSCRIPT
GARP 0244 Online (Fall 2009) Week 4 Cookbook
Page 1 Dr. Carsten Braun
Week 4 Cookbook: GIS Tutorial Chapter 1
Introducing ArcMap and ArcCatalog
Week 4 Overview
1. Introducing ArcMap and ArcCatalog
2. Data Organization
3. How to use your GIS Tutorial
4. Introduction to Chapter 1
5. Your Turn: GIS Tutorial Chapter 1. Please read the Preface and Table of Content first.
Step 5 will take about 1 to 2 hours.
Faster is not better – please take the time to be thorough.
6. Introducing Maps and Map Layers
7. Introducing Shapefiles
8. Making a Simple Map: Adding Shapefiles
9. Week 4 Assignment (see separate file)
The main task for this week
Start using ArcGIS – finally!
To this end you will work through Chapter 1 of the GIS Tutorial which will expose you to the basic
functionality of ArcCatalog and ArcMap.
But that’s not all. We will also cover the basics of GIS data – specifically shapefiles. Shapefiles are a bit
funky and different from what you are used to in MS Office, for example. But, the relationship between
shapefiles, map layers, and maps is crucial for you to understand from the start.
To be honest: Learning and using ArcGIS can be quite frustrating at times. The software is complicated
and you need to learn to use a new data format. But, there nothing we can do about that…you need to be
able to use the software to perform GIS analysis and to create real GIS maps.
Please remember: Help and support is always available in the GIS Lounge and in Ask Carsten.
In addition, the Week 4 folder contains a series of narrated Jings that explain the various sections of this
Week 4 Cookbook
Consider printing this cookbook for your convenience
GARP 0244 Online (Fall 2009) Week 4 Cookbook
Page 2 Dr. Carsten Braun
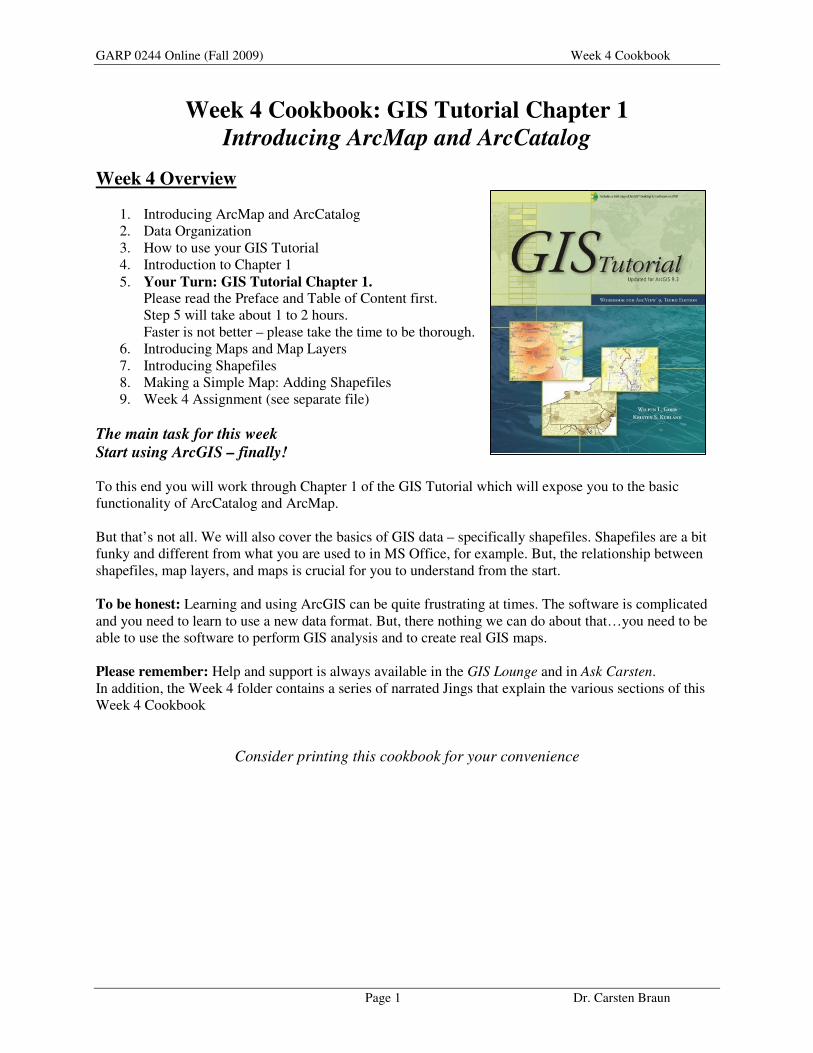
1) Introducing ArcMap and ArcCatalog
Parts of ArcGIS 9.3.1
ArcGlobe: Global GIS mapping program.
(= ESRI’s answer to Google Earth)
Arc Reader: Simple GIS viewing program.
Arc Scene: 3-D GIS mapping program (used in GARP 0344).
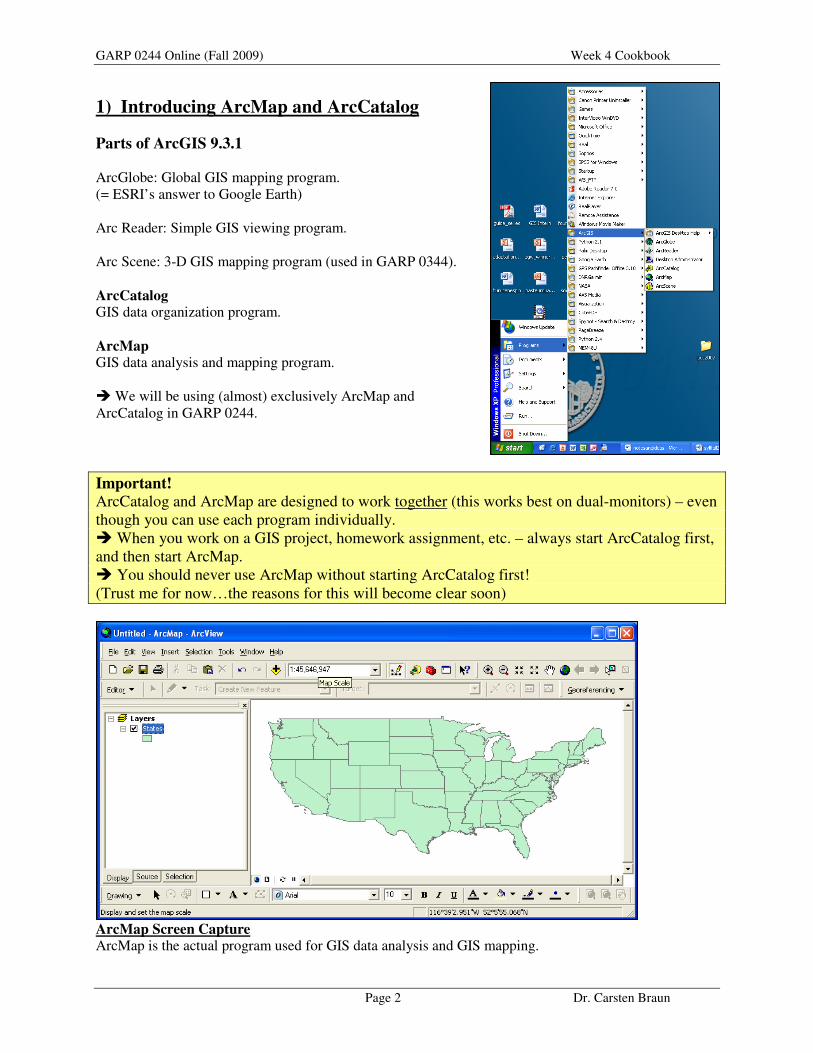
ArcCatalog GIS data organization program.
ArcMap GIS data analysis and mapping program.
� We will be using (almost) exclusively ArcMap and
ArcCatalog in GARP 0244.
Important!
ArcCatalog and ArcMap are designed to work together (this works best on dual-monitors) – even
though you can use each program individually.
� When you work on a GIS project, homework assignment, etc. – always start ArcCatalog first,
and then start ArcMap.
� You should never use ArcMap without starting ArcCatalog first!
(Trust me for now…the reasons for this will become clear soon)
ArcMap Screen Capture ArcMap is the actual program used for GIS data analysis and GIS mapping.
GARP 0244 Online (Fall 2009) Week 4 Cookbook
Page 3 Dr. Carsten Braun
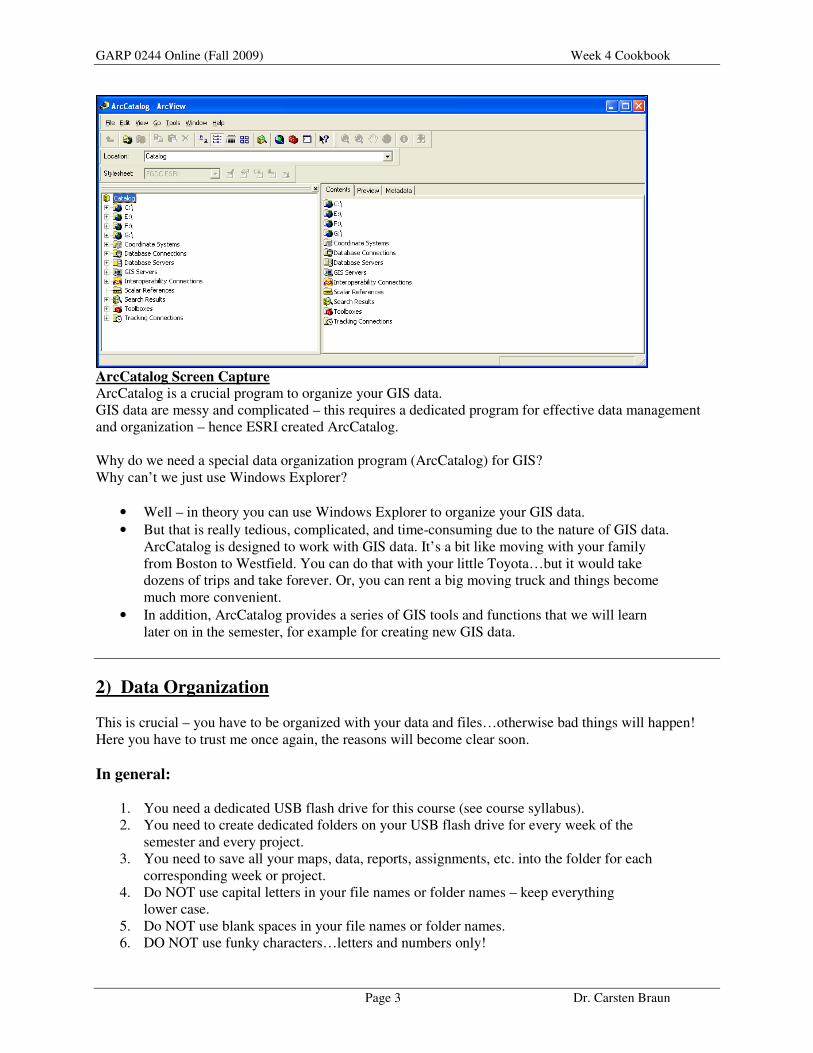
ArcCatalog Screen Capture
ArcCatalog is a crucial program to organize your GIS data.
GIS data are messy and complicated – this requires a dedicated program for effective data management
and organization – hence ESRI created ArcCatalog.
Why do we need a special data organization program (ArcCatalog) for GIS?
Why can’t we just use Windows Explorer?
• Well – in theory you can use Windows Explorer to organize your GIS data.
• But that is really tedious, complicated, and time-consuming due to the nature of GIS data.
ArcCatalog is designed to work with GIS data. It’s a bit like moving with your family
from Boston to Westfield. You can do that with your little Toyota…but it would take
dozens of trips and take forever. Or, you can rent a big moving truck and things become
much more convenient.
• In addition, ArcCatalog provides a series of GIS tools and functions that we will learn
later on in the semester, for example for creating new GIS data.
2) Data Organization
This is crucial – you have to be organized with your data and files…otherwise bad things will happen!
Here you have to trust me once again, the reasons will become clear soon.
In general:
1. You need a dedicated USB flash drive for this course (see course syllabus).
2. You need to create dedicated folders on your USB flash drive for every week of the
semester and every project.
3. You need to save all your maps, data, reports, assignments, etc. into the folder for each
corresponding week or project.
4. Do NOT use capital letters in your file names or folder names – keep everything
lower case.
5. Do NOT use blank spaces in your file names or folder names.
6. DO NOT use funky characters…letters and numbers only!

GARP 0244 Online (Fall 2009) Week 4 Cookbook
Page 4 Dr. Carsten Braun
Instructions
1. Insert your USB flash drive into a USB port.
2. Double-click on ‘My Computer’ – you should see your USB flash drive with a
drive letter assignment (this letter assignment may change from PC to PC).
3. Double-click on your USB flash drive to display its content.
4. Click on File - New - Folder and name the new folder garp0244.
Everything associated with this course goes into this folder.
5. Double-click on the new garp0244 folder to display its contents (it is empty
now).
6. Click on File - New - Folder and name the new folder week1.
7. Repeat Step 6 until you reach week15.
8. Copy/move your files from Weeks 1, 2, and 3 the newly created folders.
9. Create 3 more folders:
lyingproject
massgisproject
zoningproject
This may seem a bit odd now, and yes, we will have to modify a few things later on.
But, trust me – this data organization will help you tremendously as we dive deeper into GIS and GIS
data this semester. It is very difficult and time-consuming to clean up a data mess…so start organized and
you will be much happier in a few weeks.
3) How to use your GIS Tutorial
Step 1 Read the Preface! This will tell you what you need to know about the GIS Tutorial,
its organization, and what you are supposed to do in what order
to complete each chapter.
Step 2 Browse the Table of Content The GIS Tutorial contains 11 chapters, covering the most
important features of ArcGIS. It does not cover everything. And
it is also very much a ‘how-to-do’ things type of tutorial – it
does not contain much conceptual or theoretical information
about GIS.
Note: We will not cover every chapter this semester!
GARP 0244 Online (Fall 2009) Week 4 Cookbook
Page 5 Dr. Carsten Braun
Tips and Suggestions
1. Go through each chapter step-by-step.
Please do NOT skip steps – the sequence of steps is important.
2. Go slowly, take your time, and work meticulously.
Read the instructions carefully to avoid confusion and mistakes.
3. Pay attention to and explore the ‘Your Turn’ task boxes in each chapter.
4. Take notes as you go along.
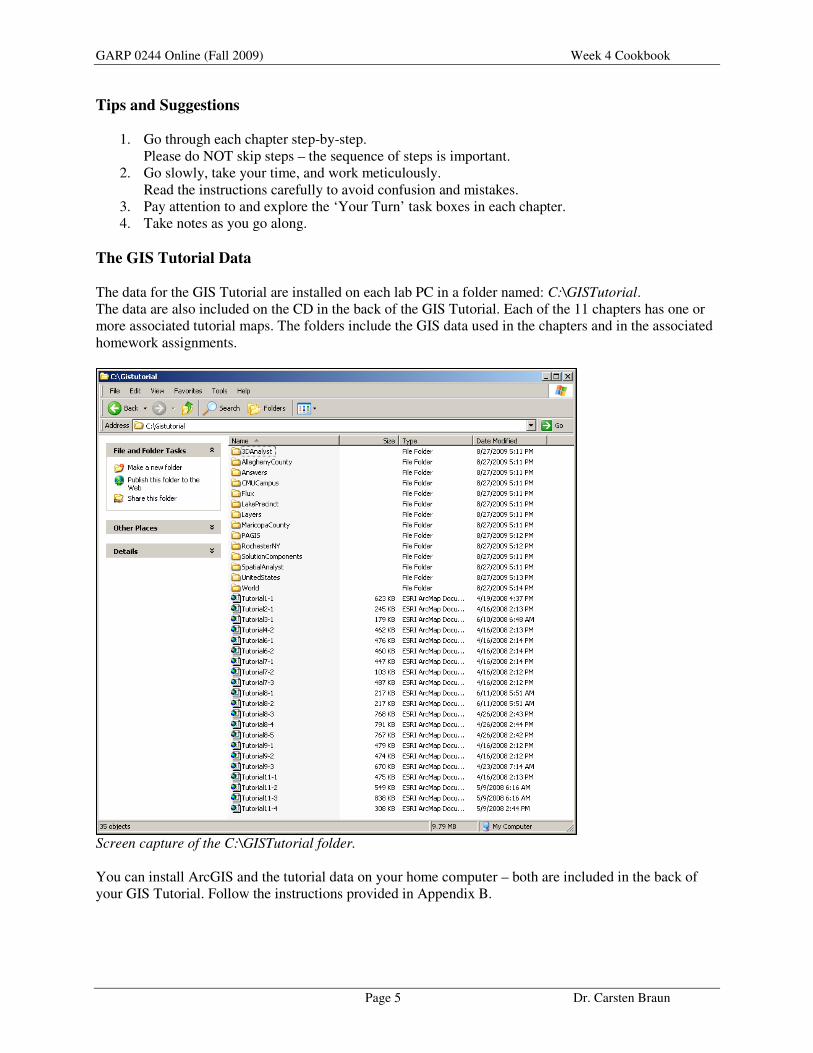
The GIS Tutorial Data
The data for the GIS Tutorial are installed on each lab PC in a folder named: C:\GISTutorial.
The data are also included on the CD in the back of the GIS Tutorial. Each of the 11 chapters has one or
more associated tutorial maps. The folders include the GIS data used in the chapters and in the associated
homework assignments.
Screen capture of the C:\GISTutorial folder.
You can install ArcGIS and the tutorial data on your home computer – both are included in the back of
your GIS Tutorial. Follow the instructions provided in Appendix B.
GARP 0244 Online (Fall 2009) Week 4 Cookbook
Page 6 Dr. Carsten Braun
Very Important!
� Never save files, maps, data, etc. to the labs PCs (even though the GIS Tutorial asks you to do that).
� Always save files, maps, data, etc. to your own USB flash drive (into the dedicated folders you created
for each week or project).
For example, at the end of Chapter 1 (Page 37): The GIS Tutorial asks you to save the project map to the
C:\GISTutorial folder, using the name Tutorial1-2.mxd.
DO NOT DO THAT!
Instead, save the project map to your USB flash drive, into the \garp0244\week4 folder you created
earlier, using the name tutorial1-2.mxd.
4) Introduction to GIS Tutorial Chapter 1
The goal for Week4 is to work through Chapter 1 (Introduction) of the GIS Tutorial.
Chapter 1 (Page 2 to 37) takes you through a series of steps and tasks to familiarize yourself with the
theme of the chapter – namely to work with map layers and features. Take your time and work through all
of it step by step – don’t skip steps! You’ll notice several ‘Your Turn’ tasks, which are designed to
reinforce the skills learned in the step-based content and to provoke critical thinking.
You will work with map layers and the underlying attribute data tables for U.S. states, counties, cities,
and streets. Each map layer represents a geographic feature and its associated attributes, for example:
States
• Polygon features, each polygon representing a state (the lower 48 plus D.C.)
• Each of the 49 polygon features has a corresponding record in its attribute table,
containing demographic information from the U.S. census.
Counties
• Polygon features, each polygon representing a county.
• Each of the 3109 polygon features has a corresponding record in its attribute
table, containing demographic information from the U.S. census.
US Cities
• Point features, each point representing a major city.
• Each of the 56 point features has a corresponding record in its attribute table,
containing demographic information from the U.S. census.
Pages 2 to 26
Here you practice how to navigate a GIS map.
Page 27 to 37
Here you work with the feature attribute table.
� You will need all these skills to complete the Week 4 Assignment.
GARP 0244 Online (Fall 2009) Week 4 Cookbook
Page 7 Dr. Carsten Braun
Important Point
Chapter 1 already shows you the single most important aspect of a GIS: you can view and analyze
geographic information as a table and as a map. For example, you can view the demographic information
for all U.S. counties in table format, very similar to MS Excel. But, the GIS software also allows you to
create an intelligent map of all U.S. counties.
How is that possible? We will come back to that after you have finished working through Chapter 1.
5) Your Turn: GIS Tutorial Chapter 1
Now it’s your turn – start working through Chapter 1.
1. Read the preface to the GIS Tutorial.
2. Read Page 1 of the GIS Tutorial, including the Table of Contents, to get
overview of the chapter tasks and objectives.
3. Work through Chapter 1 step-by-step until Page 37.
4. Don’t skip the ‘Your Turn’ boxes.
5. Page 37: Save the project map to your USB flash drive.
� Follow the instructions carefully, step-by-step, and don’t skip a step!
� If something doesn’t work – go back and try again.
� As you work along – take notes! Scribble things into the GIS Tutorial and into your notebook.
Most people will take between one and two hours to work through Chapter 1.
Very Important: Relative Path Names
This is explained on Page 36: always save your maps using relative path names. Therefore, always
confirm the following before saving your map:
Select File – Document Properties
Click on Data Source Options…
Select Store relative path names to data sources
Select Make relative paths the default for new map documents I create
Select OK
This should be configured correctly on the lab computers, but it is a good idea to always check before
saving a map…this will save you a lot of troubles down the road.
GARP 0244 Online (Fall 2009) Week 4 Cookbook
Page 8 Dr. Carsten Braun
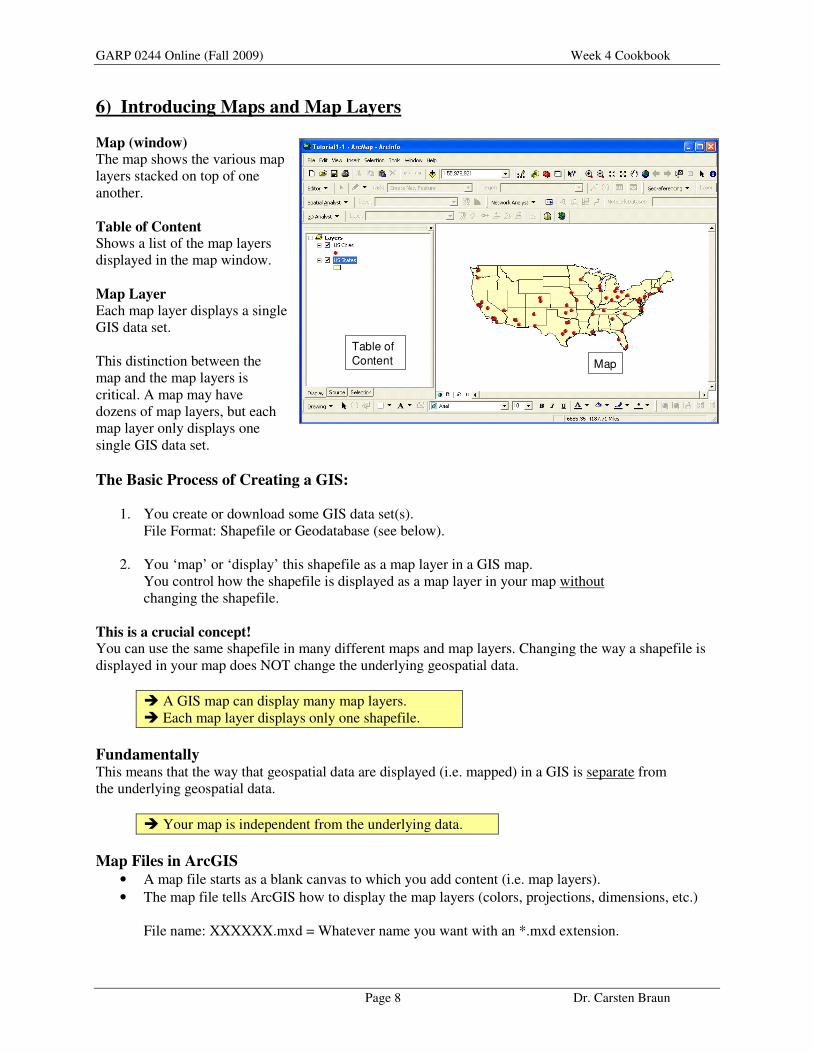
6) Introducing Maps and Map Layers
Map (window) The map shows the various map
layers stacked on top of one
another.
Table of Content Shows a list of the map layers
displayed in the map window.
Map Layer
Each map layer displays a single
GIS data set.
This distinction between the
map and the map layers is
critical. A map may have
dozens of map layers, but each
map layer only displays one
single GIS data set.
The Basic Process of Creating a GIS:
1. You create or download some GIS data set(s).
File Format: Shapefile or Geodatabase (see below).
2. You ‘map’ or ‘display’ this shapefile as a map layer in a GIS map.
You control how the shapefile is displayed as a map layer in your map without
changing the shapefile.
This is a crucial concept! You can use the same shapefile in many different maps and map layers. Changing the way a shapefile is
displayed in your map does NOT change the underlying geospatial data.
� A GIS map can display many map layers.
� Each map layer displays only one shapefile.
Fundamentally This means that the way that geospatial data are displayed (i.e. mapped) in a GIS is separate from
the underlying geospatial data.
� Your map is independent from the underlying data.
Map Files in ArcGIS • A map file starts as a blank canvas to which you add content (i.e. map layers).
• The map file tells ArcGIS how to display the map layers (colors, projections, dimensions, etc.)
File name: XXXXXX.mxd = Whatever name you want with an *.mxd extension.
Map
Table of
Content
GARP 0244 Online (Fall 2009) Week 4 Cookbook
Page 9 Dr. Carsten Braun
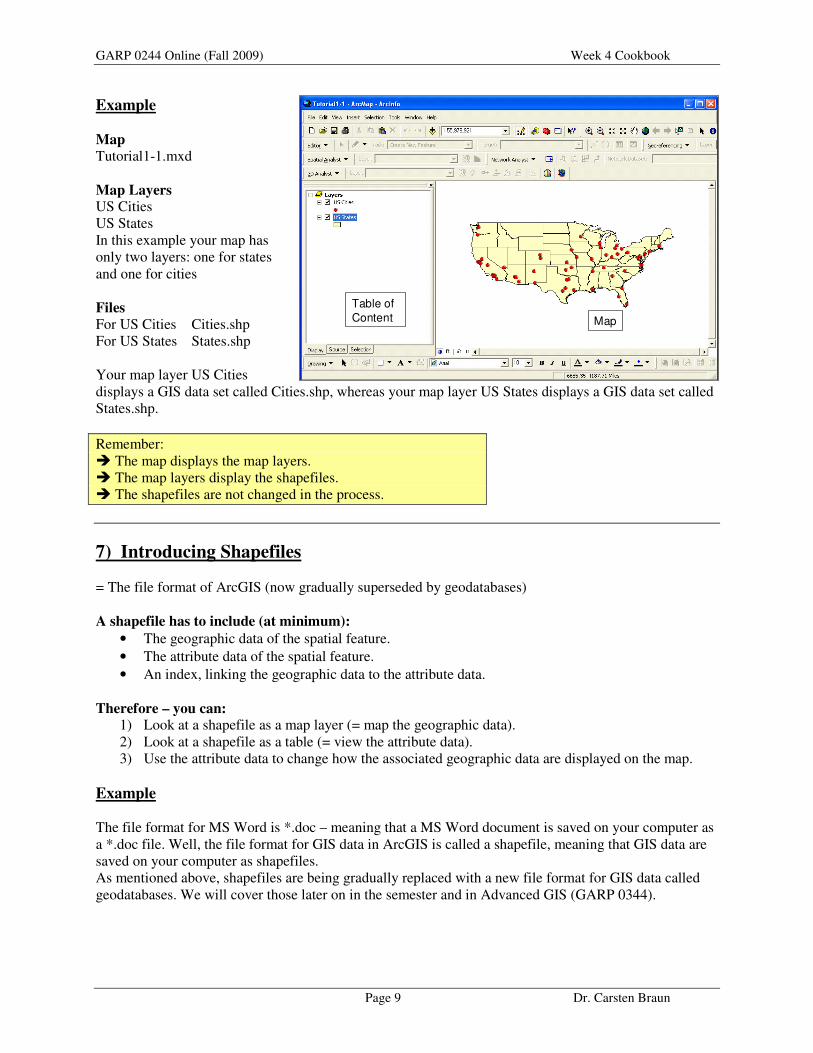
Example
Map Tutorial1-1.mxd
Map Layers US Cities
US States
In this example your map has
only two layers: one for states
and one for cities
Files For US Cities Cities.shp
For US States States.shp
Your map layer US Cities
displays a GIS data set called Cities.shp, whereas your map layer US States displays a GIS data set called
States.shp.
Remember:
� The map displays the map layers.
� The map layers display the shapefiles.
� The shapefiles are not changed in the process.
7) Introducing Shapefiles
= The file format of ArcGIS (now gradually superseded by geodatabases)
A shapefile has to include (at minimum):
• The geographic data of the spatial feature.
• The attribute data of the spatial feature.
• An index, linking the geographic data to the attribute data.
Therefore – you can: 1) Look at a shapefile as a map layer (= map the geographic data).
2) Look at a shapefile as a table (= view the attribute data).
3) Use the attribute data to change how the associated geographic data are displayed on the map.
Example
The file format for MS Word is *.doc – meaning that a MS Word document is saved on your computer as
a *.doc file. Well, the file format for GIS data in ArcGIS is called a shapefile, meaning that GIS data are
saved on your computer as shapefiles.
As mentioned above, shapefiles are being gradually replaced with a new file format for GIS data called
geodatabases. We will cover those later on in the semester and in Advanced GIS (GARP 0344).
Map
Table of
Content
GARP 0244 Online (Fall 2009) Week 4 Cookbook
Page 10 Dr. Carsten Braun
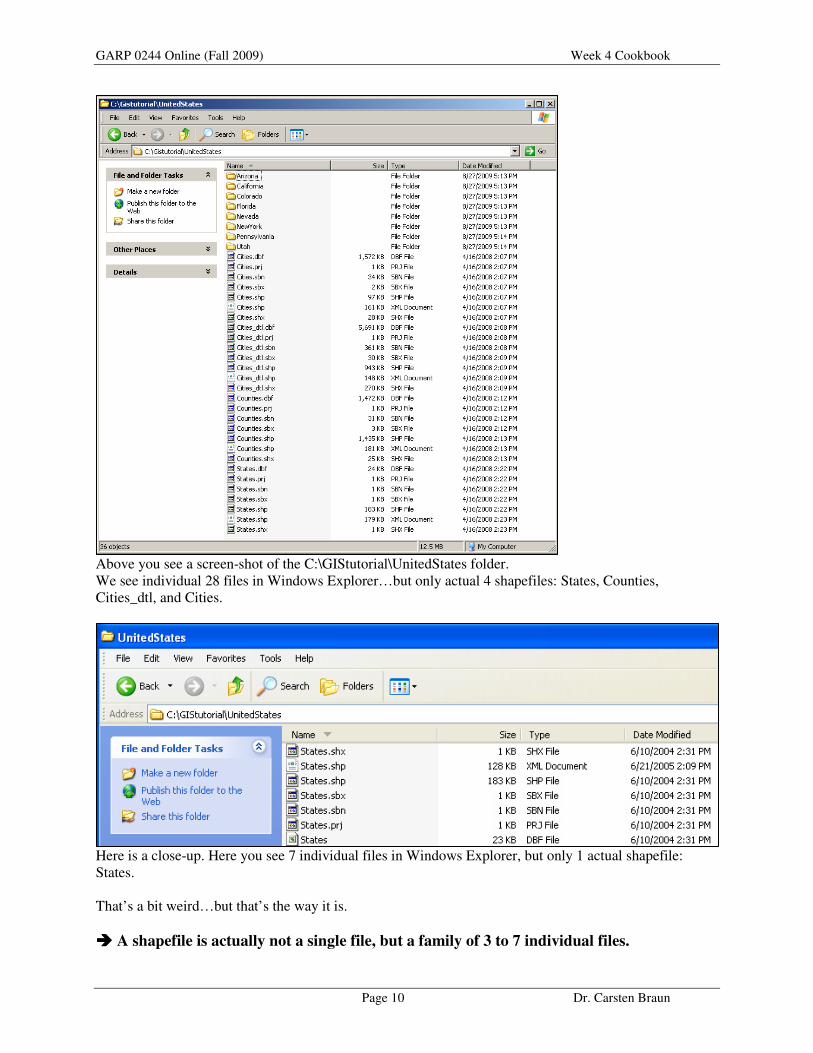
Above you see a screen-shot of the C:\GIStutorial\UnitedStates folder.
We see individual 28 files in Windows Explorer…but only actual 4 shapefiles: States, Counties,
Cities_dtl, and Cities.
Here is a close-up. Here you see 7 individual files in Windows Explorer, but only 1 actual shapefile:
States.
That’s a bit weird…but that’s the way it is.
���� A shapefile is actually not a single file, but a family of 3 to 7 individual files.
GARP 0244 Online (Fall 2009) Week 4 Cookbook
Page 11 Dr. Carsten Braun
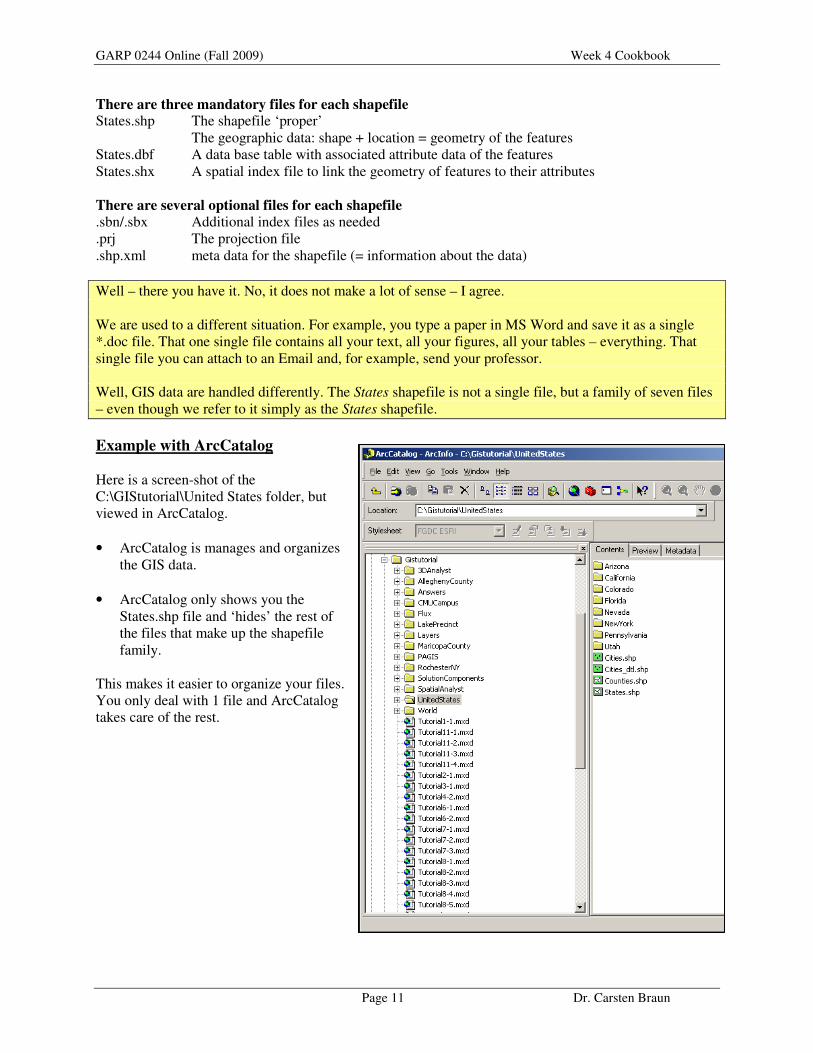
There are three mandatory files for each shapefile States.shp The shapefile ‘proper’
The geographic data: shape + location = geometry of the features
States.dbf A data base table with associated attribute data of the features
States.shx A spatial index file to link the geometry of features to their attributes
There are several optional files for each shapefile
.sbn/.sbx Additional index files as needed
.prj The projection file
.shp.xml meta data for the shapefile (= information about the data)
Well – there you have it. No, it does not make a lot of sense – I agree.
We are used to a different situation. For example, you type a paper in MS Word and save it as a single
*.doc file. That one single file contains all your text, all your figures, all your tables – everything. That
single file you can attach to an Email and, for example, send your professor.
Well, GIS data are handled differently. The States shapefile is not a single file, but a family of seven files
– even though we refer to it simply as the States shapefile.
Example with ArcCatalog
Here is a screen-shot of the
C:\GIStutorial\United States folder, but
viewed in ArcCatalog.
• ArcCatalog is manages and organizes
the GIS data.
• ArcCatalog only shows you the
States.shp file and ‘hides’ the rest of
the files that make up the shapefile
family.
This makes it easier to organize your files.
You only deal with 1 file and ArcCatalog
takes care of the rest.

GARP 0244 Online (Fall 2009) Week 4 Cookbook
Page 12 Dr. Carsten Braun
8) Making a Simple Map: Adding Shapefiles
Making a map is easy: all you need are some shapefiles!
Try the following exercise: you should be able to complete this exercise without many difficulties.
The map you create is useful for the Week 4 assignment!
1. Start ArcCatalog.
2. Browse to the C:\GIStutorial\UnitedStates folder.
3. Single-click on the States..shp shapefile and explore the Preview tab.
Preview the Geography, Table, and Metadata.
Previewing is a crucial step! Do not just add shapefiles to ArcMap without first previewing them in
ArcCatalog. You need to know what you are dealing with beforehand!
4. Start ArcMap and select A new empty map.
This gives you a blank map, without any map layers.
5. Select File – Add Data (or click on the black plus icon).
This opens the Add Data dialog box.
6. Browse to the C:\GISTutorial\UnitedStates folder.
7. Select States.shp, click add.
The shapefile States.shp is added to your map as a new map layer, named States. You can change the
name of the map layer to whatever you want – the underlying States.shp shapefile does not change.
8. Double-click on the map layer States and select the Source tab.
Here you can see which shapefile is displayed in the map layer.
9. Repeat Steps 3 to 8 for the shapefile Cities.shp.
10. Explore the attribute tables of both shapefiles and think about the data you are seeing.
11. File – Save As and save the map to your USB flash drive,
into the \garp0244\week4 folder.
12. Using ArcCatalog, browse to your USB flash drive and find the map.
Bam! You just created your first GIS map!
9) Week 4 Assignment
Please see the separate assignment sheet.
GARP 0244 Online (Fall 2009) Week 4 Cookbook
Page 13 Dr. Carsten Braun
As a reminder – here’s our course schedule for this semester: