well and water system disinfection for public drinking water
TRANSCRIPT
Water Protection Program fact sheet
Well and Water System Disinfection for Public Drinking Water Systems
7/2013
PUB2476
This fact sheet contains a step-by-step procedure for performing a simple disinfection of wells and water (plumbing) systems using chlorine bleach (sodium hypochlorite). Read the entire brochure before starting any well disinfection. If you are not comfortable with this procedure, or have complex water systems or severe contamination problems, contact a licensed well contractor or pump installer.
What is Disinfection? Contaminated drinking water may contain harmful bacteria, viruses or other microorganisms that can make you sick. Disinfection is one process of killing or inactivating microorganisms to make water safe for drinking. Disinfection can also eliminate nuisance bacteria that can cause unpleasant tastes and odors.
What Causes Well and Water System Contamination? A well or water system may become contaminated with harmful bacteria and other organisms when:
The well or plumbing is open to the environment during construction, repair or routine •maintenance.
The well casing is deteriorated or damaged.•
The pitless adapter is deteriorated.•
Thewellisflooded.•
Contamination problems can also be caused by improper plumbing connections between:Water treatment devices and wastewater piping.•
Potable water plumbing and heating and cooling systems.•
Other cross connections. •
How Often Should a Well be Tested? Typically, a well should be tested for coliform bacteria at least once a month or when there are changes in the water’s taste, odor or appearance. The coliform bacteria test analyzes for a number of bacterial species. Most of these are not harmful, but a few are. Their presence indicate surface contamination has found its way into the well, and disease organisms may also be present. The presence of E. coli or fecal coliform represents a more serious health risk and any water use should be strictly limited to nonpotable uses (not used for drinking, cooking or human contact).
Watersamplesshouldbeanalyzedforcoliformbacteriabyacertifiedlaboratory.
2
When Should a Well Be Disinfected? Well disinfection should be performed:
When water testing indicates the presence of coliform bacteria. •
Whenthewellhasbeennearfloodwaters.•
Afterinstallationorrepairofplumbingpipesandfixtures,suchassofteners,faucetsorfilters.•
After well or pump repairs. •
When iron or sulfur bacteria reduce the water supply capacity of the well or cause taste and •odor problems.
During startup of seasonal wells where plumbing, wells, or pumps have been disconnected or •the water system has otherwise been drained or opened.
Well disinfection will not solve the following problems: When contamination is originating from a continuous source such as a septic system or an •animal feedlot.
When a well or plumbing system is improperly constructed, located, or damaged and in need •of repair (disinfection should follow repair work).
If the contaminant is nitrate, arsenic, fuel, pesticides or other chemicals. •
Safety PrecautionsElectrical Safety Extreme caution is advised when disinfecting a well, as you often will be working with electricity and water. If you are not acquainted with working with electricity, seek professional advice. Your safety precautions should include:
Turn off the pump circuit breaker before removing the well cap and while working on the well. •
While the breaker is off, examine for chafed wire insulation or missing wire nuts and repair •as necessary.
Wear rubber soled shoes or boots, preferably waterproof. •
Chemical Safety Always follow the manufacturer’s use and safety directions. •
Severe eye damage may result from contact with bleach or chlorine solution. •
Avoid eye and skin contact. Wear protective goggles or a face shield and rubber gloves when •working with the bleach or chlorine solution. Do not mix chlorine with other chemicals, as it may form harmful gases.
Handle and dispose of chlorine with care – ingestion of bleach is a common cause of •poisoning of children in the United States.
Respiratory Safety Underground well pits pose an extreme hazard, as they frequently contain a build-up of toxic •gases or simply lack enough oxygen to sustain life. Access is limited, making quick escape difficult.
If the well is located in an underground well pit, • Do Not Enter It. Death can occur even in a shallow well pit.
3
Leave disinfection of wells in pits to professional, licensed well contractors or pump installers. •
Harmful gases may be generated during disinfection. Avoid inhalation of fumes and make •certain enclosed spaces have adequate ventilation before starting disinfection.
Procedure for Disinfection of the Well and Water System The following procedure is for a well that has a submersible pump with either a removable well cap or a well seal with a threaded plug in it. See Step 4 to determine whether you have a well cap or a well seal. If the well has a sanitary seal, this procedure can only be attempted if a removable threaded plug in the sanitary seal allows access into the well. If your well has a type of pump otherthanasubmersiblepump,islocatedinawellpit,isaflowingwell,orhasasanitarysealwithout a threaded plug, contact the department for advice or have your well disinfected by a licensed well contractor or licensed pump installer.
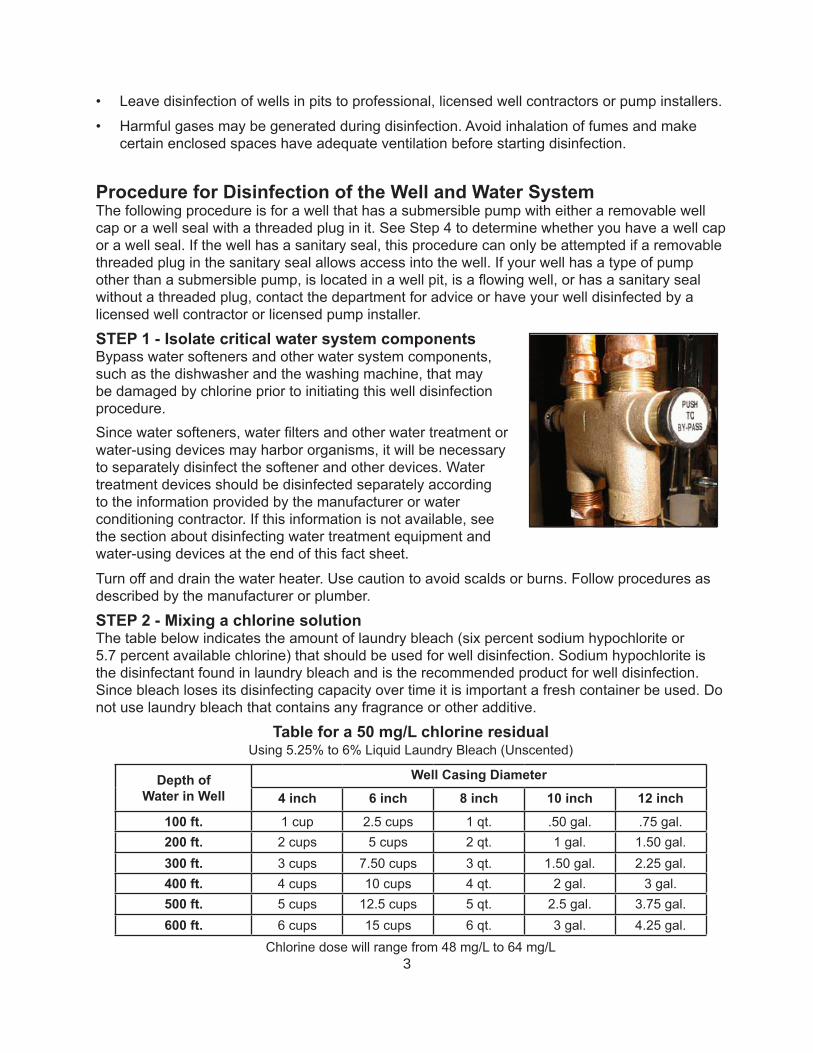
STEP 1 - Isolate critical water system components Bypass water softeners and other water system components, such as the dishwasher and the washing machine, that may be damaged by chlorine prior to initiating this well disinfection procedure. Sincewatersofteners,waterfiltersandotherwater treatment or water-using devices may harbor organisms, it will be necessary to separately disinfect the softener and other devices. Water treatment devices should be disinfected separately according to the information provided by the manufacturer or water conditioning contractor. If this information is not available, see the section about disinfecting water treatment equipment and water-using devices at the end of this fact sheet.
Turn off and drain the water heater. Use caution to avoid scalds or burns. Follow procedures as described by the manufacturer or plumber.
STEP 2 - Mixing a chlorine solutionThe table below indicates the amount of laundry bleach (six percent sodium hypochlorite or 5.7 percent available chlorine) that should be used for well disinfection. Sodium hypochlorite is the disinfectant found in laundry bleach and is the recommended product for well disinfection. Since bleach loses its disinfecting capacity over time it is important a fresh container be used. Do not use laundry bleach that contains any fragrance or other additive.
Table for a 50 mg/L chlorine residual Using 5.25% to 6% Liquid Laundry Bleach (Unscented)
Depth of Water in Well
Well Casing Diameter
4 inch 6 inch 8 inch 10 inch 12 inch
100 ft. 1 cup 2.5 cups 1 qt. .50 gal. .75 gal.200 ft. 2 cups 5 cups 2 qt. 1 gal. 1.50 gal.300 ft. 3 cups 7.50 cups 3 qt. 1.50 gal. 2.25 gal.400 ft. 4 cups 10 cups 4 qt. 2 gal. 3 gal.500 ft. 5 cups 12.5 cups 5 qt. 2.5 gal. 3.75 gal.600 ft. 6 cups 15 cups 6 qt. 3 gal. 4.25 gal.
Chlorine dose will range from 48 mg/L to 64 mg/L
4
Place a large clean bucket near the well. Add 1 gallon of water and the amount of bleach •indicated in the table and mix thoroughly.
For wells greater than 100 feet deep or with well casing diameters greater than 6 inches, •mix the bleach with 2 gallons of water. For wells greater than 200 feet deep or with well casing diameters greater than 6 inches, increase the amount of bleach proportionately. After this solution is poured into the well, it will provide a chlorine concentration of at least 50 parts per million.
In situations where an initial disinfection has not worked, (considerable iron or other solids •inthewellorasignificantnuisancebacteriaproblem)amoreconcentratedchlorinesolutionmay be used. Multiply the quantities of chlorine listed in the table by four and mix with 4 gallons of water (for example, a 4-inch diameter well that is 51 to 100 feet deep would need 4 cups of bleach mixed with 4 gallons of water). This will provide a chlorine concentration of at least 200 parts per million in the well and water system. Note: If the chlorine solution is too strong, the effectiveness of disinfection will be reduced. If the chlorine concentration greatly exceeds 200 parts per million, it can make the water too alkaline and reduce the effectiveness of the disinfection process.
Warning: If your well has not been disinfected for many years, it may have considerable scale built up. Disinfecting with a strong chlorine solution can dislodge this scale and plug or damage your pump, and cause problems elsewhere in the plumbing system. You may wish to begin with a weaker solution of chlorine. If the water runs red or brown, pump it out on the ground surface without recirculating it back into the well as described in Step 6. After the color gets lighter, mix a new chlorine solution batch as described in Step 2 and begin the process again.
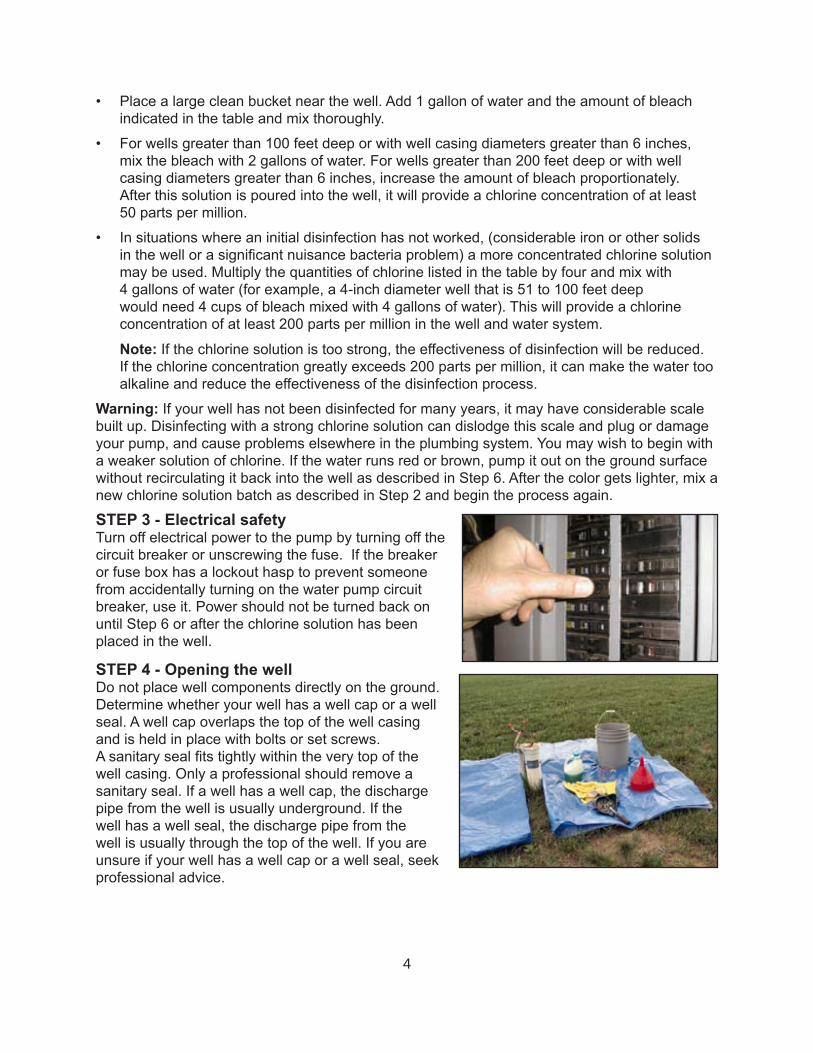
STEP 3 - Electrical safetyTurn off electrical power to the pump by turning off the circuit breaker or unscrewing the fuse. If the breaker or fuse box has a lockout hasp to prevent someone from accidentally turning on the water pump circuit breaker, use it. Power should not be turned back on until Step 6 or after the chlorine solution has been placed in the well.
STEP 4 - Opening the well Do not place well components directly on the ground. Determine whether your well has a well cap or a well seal. A well cap overlaps the top of the well casing and is held in place with bolts or set screws. Asanitarysealfitstightlywithintheverytopofthewell casing. Only a professional should remove a sanitary seal. If a well has a well cap, the discharge pipe from the well is usually underground. If the well has a well seal, the discharge pipe from the well is usually through the top of the well. If you are unsure if your well has a well cap or a well seal, seek professional advice.
5
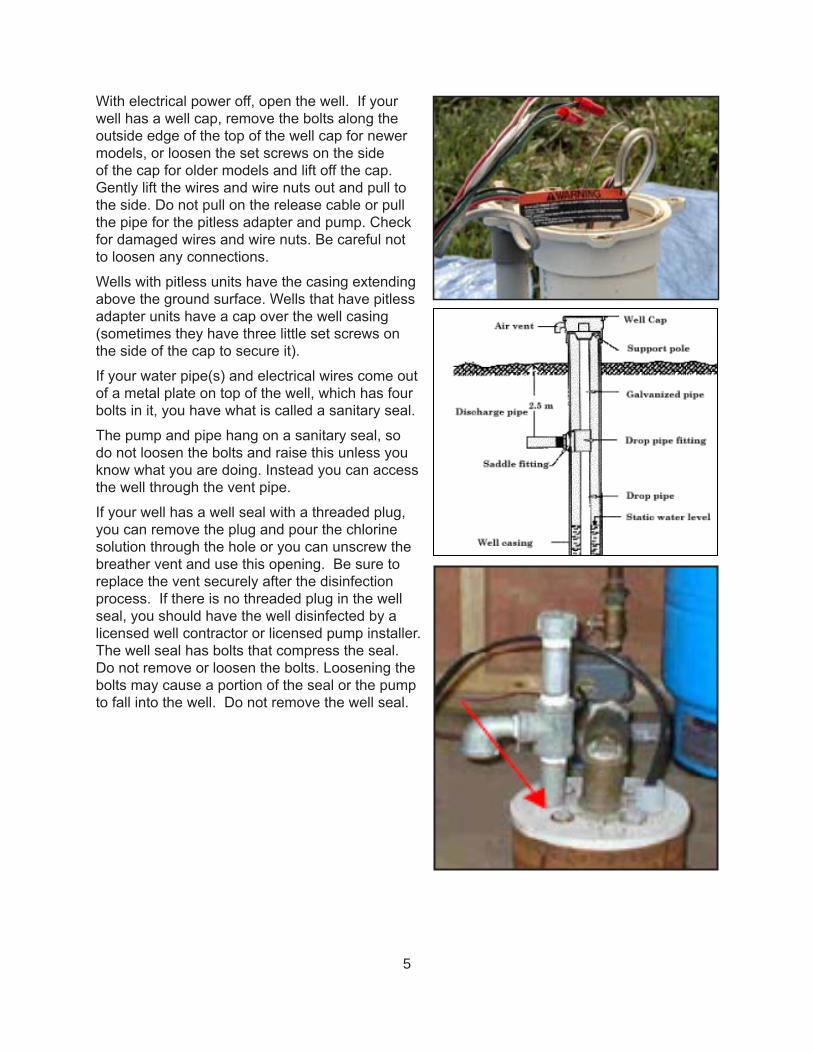
With electrical power off, open the well. If your well has a well cap, remove the bolts along the outside edge of the top of the well cap for newer models, or loosen the set screws on the side of the cap for older models and lift off the cap. Gently lift the wires and wire nuts out and pull to the side. Do not pull on the release cable or pull the pipe for the pitless adapter and pump. Check for damaged wires and wire nuts. Be careful not to loosen any connections.
Wells with pitless units have the casing extending above the ground surface. Wells that have pitless adapter units have a cap over the well casing (sometimes they have three little set screws on the side of the cap to secure it).
If your water pipe(s) and electrical wires come out of a metal plate on top of the well, which has four bolts in it, you have what is called a sanitary seal.
The pump and pipe hang on a sanitary seal, so do not loosen the bolts and raise this unless you know what you are doing. Instead you can access the well through the vent pipe.
If your well has a well seal with a threaded plug, you can remove the plug and pour the chlorine solution through the hole or you can unscrew the breather vent and use this opening. Be sure to replace the vent securely after the disinfection process. If there is no threaded plug in the well seal, you should have the well disinfected by a licensed well contractor or licensed pump installer. The well seal has bolts that compress the seal. Do not remove or loosen the bolts. Loosening the bolts may cause a portion of the seal or the pump to fall into the well. Do not remove the well seal.
6
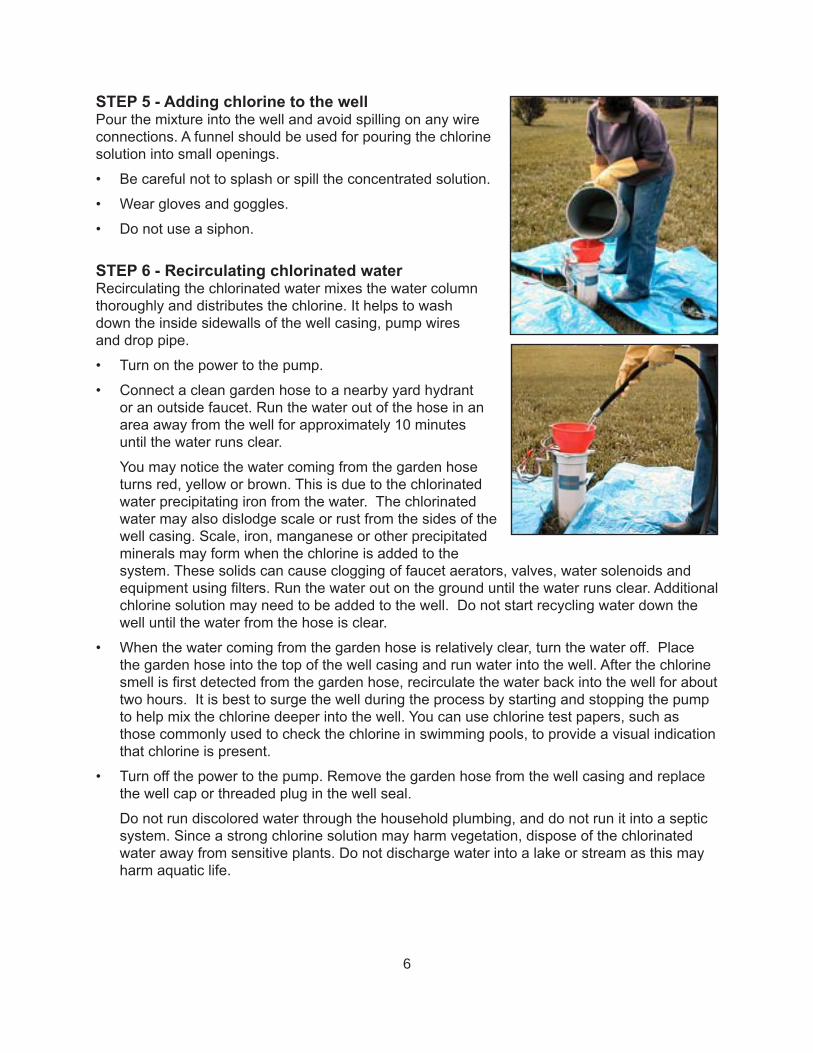
STEP 5 - Adding chlorine to the wellPour the mixture into the well and avoid spilling on any wire connections. A funnel should be used for pouring the chlorine solution into small openings.
Be careful not to splash or spill the concentrated solution.•
Wear gloves and goggles. •
Do not use a siphon. •
STEP 6 - Recirculating chlorinated water Recirculating the chlorinated water mixes the water column thoroughly and distributes the chlorine. It helps to wash down the inside sidewalls of the well casing, pump wires and drop pipe.
Turn on the power to the pump. •
Connect a clean garden hose to a nearby yard hydrant •or an outside faucet. Run the water out of the hose in an area away from the well for approximately 10 minutes until the water runs clear.
You may notice the water coming from the garden hose turns red, yellow or brown. This is due to the chlorinated water precipitating iron from the water. The chlorinated water may also dislodge scale or rust from the sides of the well casing. Scale, iron, manganese or other precipitated minerals may form when the chlorine is added to the system. These solids can cause clogging of faucet aerators, valves, water solenoids and equipmentusingfilters.Runthewateroutonthegrounduntilthewaterrunsclear.Additionalchlorine solution may need to be added to the well. Do not start recycling water down the well until the water from the hose is clear.
When the water coming from the garden hose is relatively clear, turn the water off. Place •the garden hose into the top of the well casing and run water into the well. After the chlorine smellisfirstdetectedfromthegardenhose,recirculatethewaterbackintothewellforabouttwo hours. It is best to surge the well during the process by starting and stopping the pump to help mix the chlorine deeper into the well. You can use chlorine test papers, such as those commonly used to check the chlorine in swimming pools, to provide a visual indication that chlorine is present.
Turn off the power to the pump. Remove the garden hose from the well casing and replace •the well cap or threaded plug in the well seal.
Do not run discolored water through the household plumbing, and do not run it into a septic system. Since a strong chlorine solution may harm vegetation, dispose of the chlorinated water away from sensitive plants. Do not discharge water into a lake or stream as this may harm aquatic life.
7
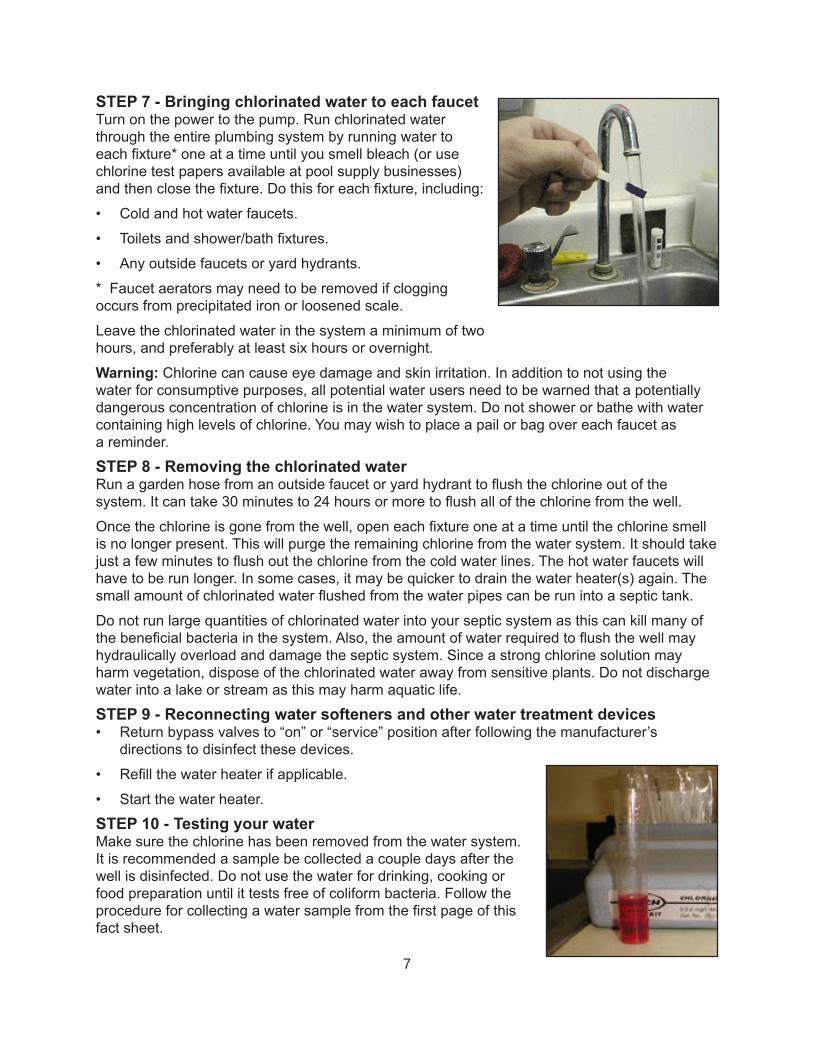
STEP 7 - Bringing chlorinated water to each faucet Turn on the power to the pump. Run chlorinated water through the entire plumbing system by running water to eachfixture*oneatatimeuntilyousmellbleach(orusechlorine test papers available at pool supply businesses) andthenclosethefixture.Dothisforeachfixture,including:
Cold and hot water faucets. •
Toiletsandshower/bathfixtures.•
Any outside faucets or yard hydrants.•
*Faucetaeratorsmayneedtoberemovedifcloggingoccurs from precipitated iron or loosened scale.
Leave the chlorinated water in the system a minimum of two hours, and preferably at least six hours or overnight.
Warning: Chlorine can cause eye damage and skin irritation. In addition to not using the water for consumptive purposes, all potential water users need to be warned that a potentially dangerous concentration of chlorine is in the water system. Do not shower or bathe with water containing high levels of chlorine. You may wish to place a pail or bag over each faucet as a reminder.
STEP 8 - Removing the chlorinated water Runagardenhosefromanoutsidefaucetoryardhydranttoflushthechlorineoutofthesystem.Itcantake30minutesto24hoursormoretoflushallofthechlorinefromthewell.
Oncethechlorineisgonefromthewell,openeachfixtureoneatatimeuntilthechlorinesmellis no longer present. This will purge the remaining chlorine from the water system. It should take justafewminutestoflushoutthechlorinefromthecoldwaterlines.Thehotwaterfaucetswillhave to be run longer. In some cases, it may be quicker to drain the water heater(s) again. The smallamountofchlorinatedwaterflushedfromthewaterpipescanberunintoaseptictank.
Do not run large quantities of chlorinated water into your septic system as this can kill many of thebeneficialbacteriainthesystem.Also,theamountofwaterrequiredtoflushthewellmayhydraulically overload and damage the septic system. Since a strong chlorine solution may harm vegetation, dispose of the chlorinated water away from sensitive plants. Do not discharge water into a lake or stream as this may harm aquatic life.
STEP 9 - Reconnecting water softeners and other water treatment devices Return bypass valves to “on” or “service” position after following the manufacturer’s •directions to disinfect these devices.
Refillthewaterheaterifapplicable.•
Start the water heater. •
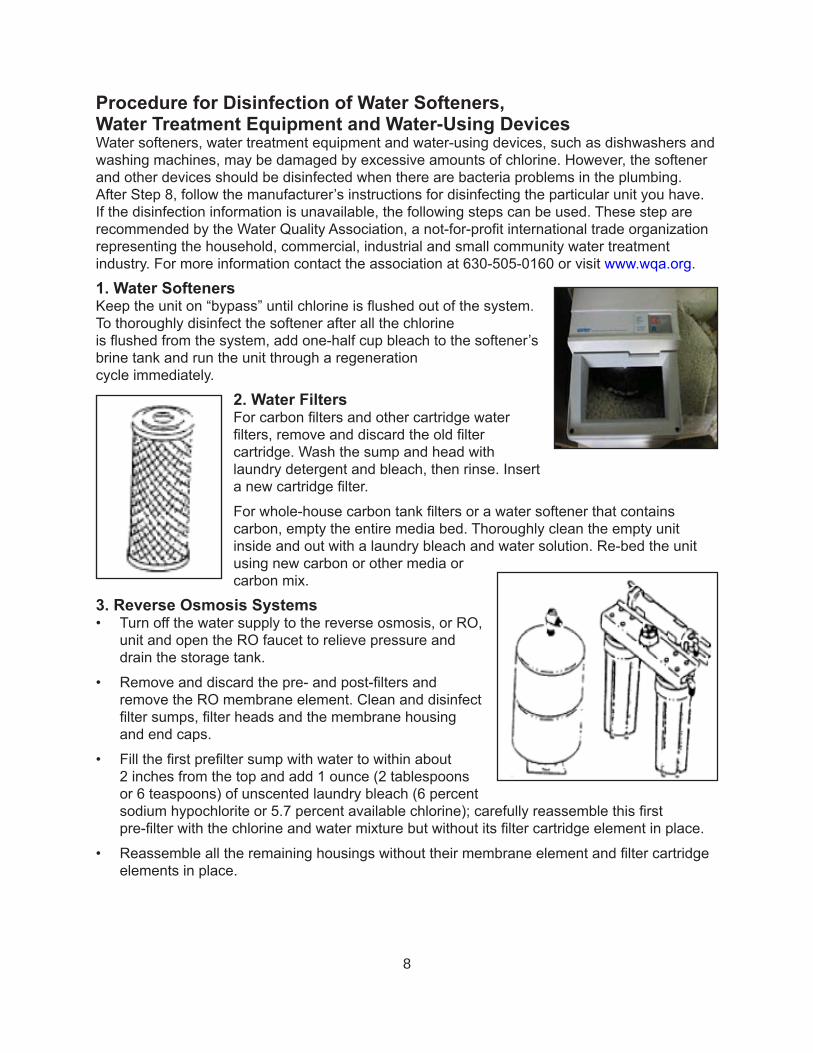
STEP 10 - Testing your water Make sure the chlorine has been removed from the water system. It is recommended a sample be collected a couple days after the well is disinfected. Do not use the water for drinking, cooking or food preparation until it tests free of coliform bacteria. Follow the procedureforcollectingawatersamplefromthefirstpageofthisfact sheet.
8
Procedure for Disinfection of Water Softeners, Water Treatment Equipment and Water-Using Devices Water softeners, water treatment equipment and water-using devices, such as dishwashers and washing machines, may be damaged by excessive amounts of chlorine. However, the softener and other devices should be disinfected when there are bacteria problems in the plumbing. After Step 8, follow the manufacturer’s instructions for disinfecting the particular unit you have. If the disinfection information is unavailable, the following steps can be used. These step are recommendedbytheWaterQualityAssociation,anot-for-profitinternationaltradeorganizationrepresenting the household, commercial, industrial and small community water treatment industry. For more information contact the association at 630-505-0160 or visit www.wqa.org.
1. Water Softeners Keeptheuniton“bypass”untilchlorineisflushedoutofthesystem.To thoroughly disinfect the softener after all the chlorine isflushedfromthesystem,addone-halfcupbleachtothesoftener’sbrine tank and run the unit through a regeneration cycle immediately.
2. Water Filters Forcarbonfiltersandothercartridgewaterfilters,removeanddiscardtheoldfiltercartridge. Wash the sump and head with laundry detergent and bleach, then rinse. Insert anewcartridgefilter.
Forwhole-housecarbontankfiltersorawatersoftenerthatcontainscarbon, empty the entire media bed. Thoroughly clean the empty unit inside and out with a laundry bleach and water solution. Re-bed the unit using new carbon or other media or carbon mix.
3. Reverse Osmosis Systems Turn off the water supply to the reverse osmosis, or RO, •unit and open the RO faucet to relieve pressure and drain the storage tank.
Removeanddiscardthepre-andpost-filtersand•remove the RO membrane element. Clean and disinfect filtersumps,filterheadsandthemembranehousingand end caps.
Fillthefirstprefiltersumpwithwatertowithinabout •2 inches from the top and add 1 ounce (2 tablespoons or 6 teaspoons) of unscented laundry bleach (6 percent sodiumhypochloriteor5.7percentavailablechlorine);carefullyreassemblethisfirst pre-filterwiththechlorineandwatermixturebutwithoutitsfiltercartridgeelementinplace.
Reassemblealltheremaininghousingswithouttheirmembraneelementandfiltercartridge•elements in place.
9
Open the water supply to the RO. Open the RO faucet and allow water to run until you •can begin to smell the chlorine bleach. (If no chlorine bleach smell is available, go back to bullet point three and increase the amount of laundry bleach added until a residual can be maintained throughout the system.)
ClosetheROfaucetandallowthestoragetanktofillandthenremainfullfor25-30minutes.•
Open the RO faucet again and leave it open until the entire chlorine bleach smell is gone. •Let the accumulated water in the RO storage tank drain completely.
Turn off the water supply to the RO. Close the RO faucet after all the pressure has been •relievedandthewaterflowstops.
Installallnewpre-andpost-filterelements,usingcarefulaseptictechniquessoastonot •re-contaminate the RO system.
Reinstall the RO membrane element in its housing. Fill the membrane element housing with •water and 1 milliliter (20 drops) of laundry bleach. Reassemble this membrane element, chlorinated water, and housing unit.
Caution: High levels of chlorine over an extended period of time can degrade polyamide thinfilmcomposite,orTFC,ROmembranes,althoughsignificantdegradationsshouldnotoccurinthesespecifiedfewminutesofchlorinecontacttime.
Immediately reopen the water supply to the RO system and reopen the RO faucet. •Let water drip from the RO faucet until the chlorine bleach smell has dissipated.
Finally,closetheROfaucet,letthestoragetankcompletelyrefill,anddiscardthefirstfull•tank of water following the completion of this procedure.
Follow-upIt is a good idea to double check the water is safe. After receiving the results of a satisfactory sampleanalysis,takeanotherwatersampleapproximately30daysafterthefirstsampleandhave the water retested. If coliform bacteria are detected again, re-disinfect the well using the same procedure.
If the well and water system have not been disinfected for many years, they may need to be disinfected more than once. If multiple disinfections are unsuccessful, and coliform bacteria persist, contact a licensed well contractor or pump installer who can use special techniques and equipment to disinfect the well. The well may have to be physically cleaned or treated with other chemicals.
The owner, well contractor, or pump installer should also inspect the well for any damage. Well casings can be cracked or well caps loosened if struck by vehicles or by garden or farming equipment. It is essential any plumbing or well defects that could allow surface water or other contaminants to enter the well be corrected. If the well cannot be successfully disinfected, the source of the contamination should be determined if possible. If the source cannot be corrected or removed, the well may need to be sealed and a new well drilled.
10
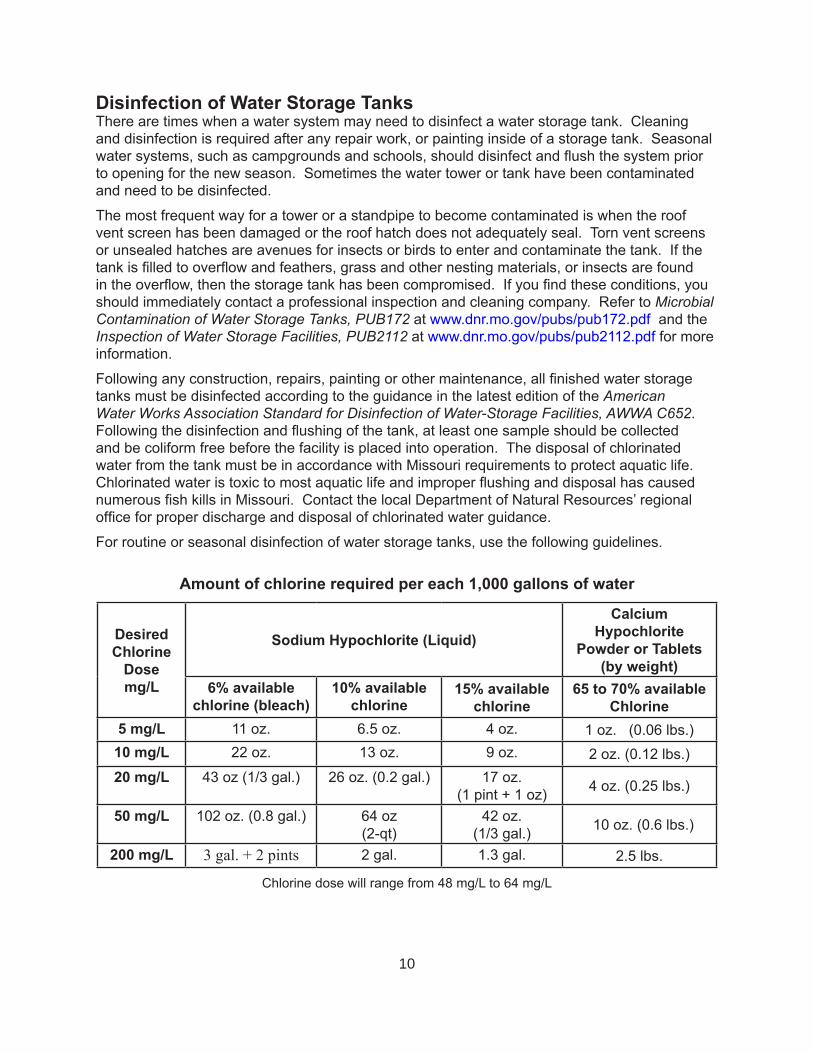
Disinfection of Water Storage TanksThere are times when a water system may need to disinfect a water storage tank. Cleaning and disinfection is required after any repair work, or painting inside of a storage tank. Seasonal watersystems,suchascampgroundsandschools,shoulddisinfectandflushthesystempriorto opening for the new season. Sometimes the water tower or tank have been contaminated and need to be disinfected.
The most frequent way for a tower or a standpipe to become contaminated is when the roof vent screen has been damaged or the roof hatch does not adequately seal. Torn vent screens or unsealed hatches are avenues for insects or birds to enter and contaminate the tank. If the tankisfilledtooverflowandfeathers,grassandothernestingmaterials,orinsectsarefoundintheoverflow,thenthestoragetankhasbeencompromised.Ifyoufindtheseconditions,youshould immediately contact a professional inspection and cleaning company. Refer to Microbial Contamination of Water Storage Tanks, PUB172 at www.dnr.mo.gov/pubs/pub172.pdf and the Inspection of Water Storage Facilities, PUB2112 at www.dnr.mo.gov/pubs/pub2112.pdf for more information.
Followinganyconstruction,repairs,paintingorothermaintenance,allfinishedwaterstoragetanks must be disinfected according to the guidance in the latest edition of the American Water Works Association Standard for Disinfection of Water-Storage Facilities, AWWA C652. Followingthedisinfectionandflushingofthetank,atleastonesampleshouldbecollectedand be coliform free before the facility is placed into operation. The disposal of chlorinated water from the tank must be in accordance with Missouri requirements to protect aquatic life. ChlorinatedwateristoxictomostaquaticlifeandimproperflushinganddisposalhascausednumerousfishkillsinMissouri.ContactthelocalDepartmentofNaturalResources’regionalofficeforproperdischargeanddisposalofchlorinatedwaterguidance.
For routine or seasonal disinfection of water storage tanks, use the following guidelines.
Amount of chlorine required per each 1,000 gallons of water
Desired Chlorine
Dose mg/L
Sodium Hypochlorite (Liquid)
Calcium Hypochlorite
Powder or Tablets(by weight)
6% available chlorine (bleach)
10% available chlorine
15% available chlorine
65 to 70% available Chlorine
5 mg/L 11 oz. 6.5 oz. 4 oz. 1 oz. (0.06 lbs.)10 mg/L 22 oz. 13 oz. 9 oz. 2 oz. (0.12 lbs.)20 mg/L 43 oz (1/3 gal.) 26 oz. (0.2 gal.) 17 oz.
(1 pint + 1 oz) 4 oz. (0.25 lbs.)
50 mg/L 102 oz. (0.8 gal.) 64 oz(2-qt)
42 oz. (1/3 gal.) 10 oz. (0.6 lbs.)
200 mg/L 3 gal. + 2 pints 2 gal. 1.3 gal. 2.5 lbs.
Chlorine dose will range from 48 mg/L to 64 mg/L
11
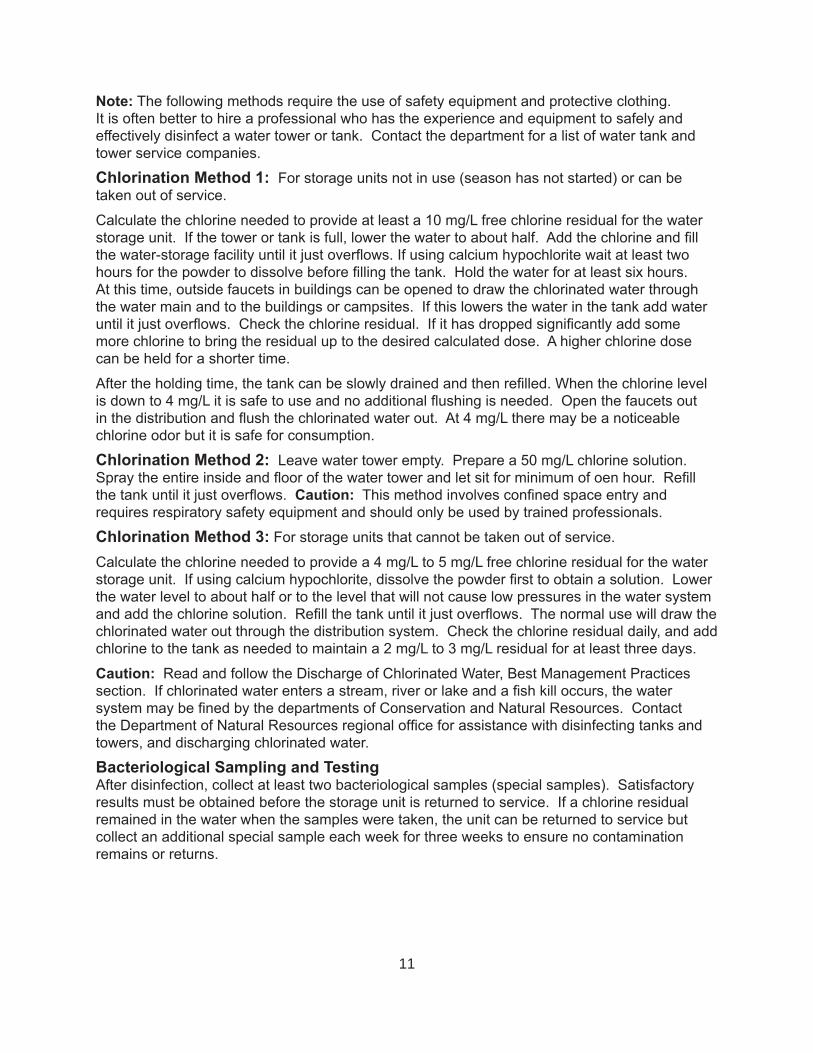
Note: The following methods require the use of safety equipment and protective clothing. It is often better to hire a professional who has the experience and equipment to safely and effectively disinfect a water tower or tank. Contact the department for a list of water tank and tower service companies.
Chlorination Method 1: For storage units not in use (season has not started) or can be taken out of service.
Calculate the chlorine needed to provide at least a 10 mg/L free chlorine residual for the water storageunit.Ifthetowerortankisfull,lowerthewatertoabouthalf.Addthechlorineandfillthewater-storagefacilityuntilitjustoverflows.Ifusingcalciumhypochloritewaitatleasttwohoursforthepowdertodissolvebeforefillingthetank.Holdthewaterforatleastsixhours. At this time, outside faucets in buildings can be opened to draw the chlorinated water through the water main and to the buildings or campsites. If this lowers the water in the tank add water untilitjustoverflows.Checkthechlorineresidual.Ifithasdroppedsignificantlyaddsome more chlorine to bring the residual up to the desired calculated dose. A higher chlorine dose can be held for a shorter time.
Aftertheholdingtime,thetankcanbeslowlydrainedandthenrefilled.Whenthechlorinelevelisdownto4mg/Litissafetouseandnoadditionalflushingisneeded.Openthefaucetsoutinthedistributionandflushthechlorinatedwaterout.At4mg/Ltheremaybeanoticeablechlorine odor but it is safe for consumption.
Chlorination Method 2: Leave water tower empty. Prepare a 50 mg/L chlorine solution. Spraytheentireinsideandfloorofthewatertowerandletsitforminimumofoenhour.Refillthetankuntilitjustoverflows.Caution:Thismethodinvolvesconfinedspaceentryandrequires respiratory safety equipment and should only be used by trained professionals.
Chlorination Method 3: For storage units that cannot be taken out of service.
Calculate the chlorine needed to provide a 4 mg/L to 5 mg/L free chlorine residual for the water storageunit.Ifusingcalciumhypochlorite,dissolvethepowderfirsttoobtainasolution.Lowerthe water level to about half or to the level that will not cause low pressures in the water system andaddthechlorinesolution.Refillthetankuntilitjustoverflows.Thenormalusewilldrawthechlorinated water out through the distribution system. Check the chlorine residual daily, and add chlorine to the tank as needed to maintain a 2 mg/L to 3 mg/L residual for at least three days.
Caution: Read and follow the Discharge of Chlorinated Water, Best Management Practices section.Ifchlorinatedwaterentersastream,riverorlakeandafishkilloccurs,thewatersystemmaybefinedbythedepartmentsofConservationandNaturalResources.ContacttheDepartmentofNaturalResourcesregionalofficeforassistancewithdisinfectingtanksandtowers, and discharging chlorinated water.
Bacteriological Sampling and TestingAfter disinfection, collect at least two bacteriological samples (special samples). Satisfactory results must be obtained before the storage unit is returned to service. If a chlorine residual remained in the water when the samples were taken, the unit can be returned to service but collect an additional special sample each week for three weeks to ensure no contamination remains or returns.
12
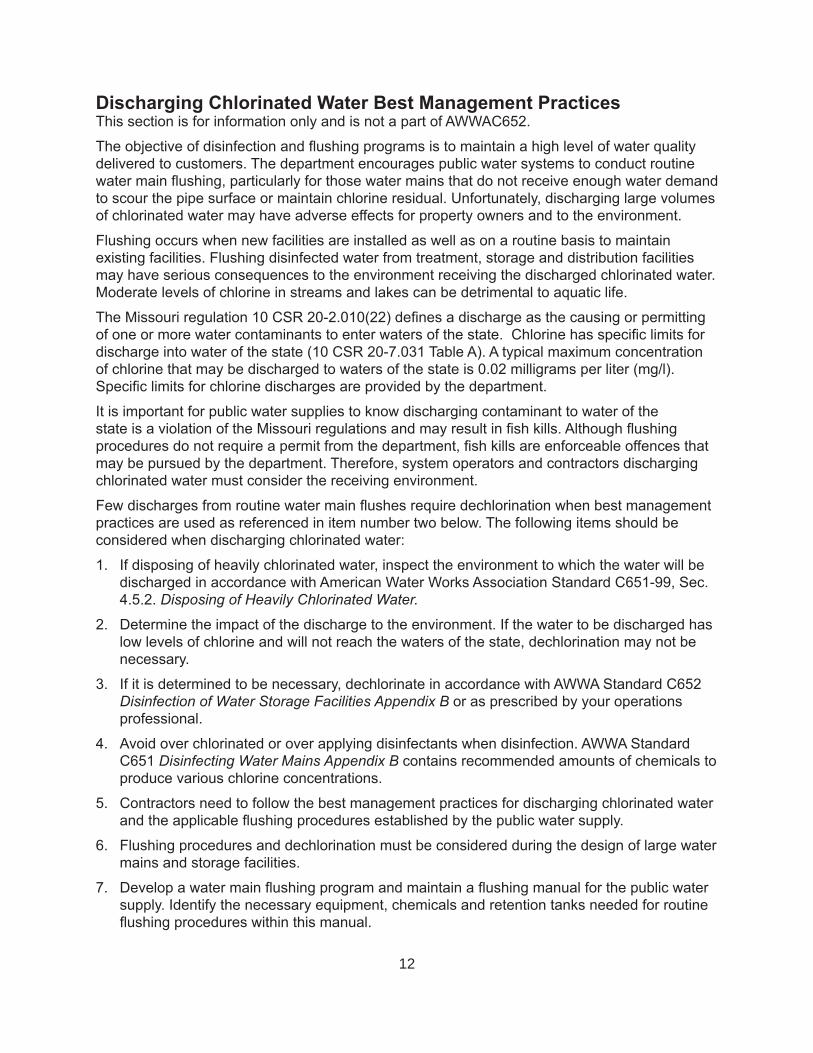
Discharging Chlorinated Water Best Management PracticesThis section is for information only and is not a part of AWWAC652.
Theobjectiveofdisinfectionandflushingprogramsistomaintainahighlevelofwaterqualitydelivered to customers. The department encourages public water systems to conduct routine watermainflushing,particularlyforthosewatermainsthatdonotreceiveenoughwaterdemandto scour the pipe surface or maintain chlorine residual. Unfortunately, discharging large volumes of chlorinated water may have adverse effects for property owners and to the environment.
Flushing occurs when new facilities are installed as well as on a routine basis to maintain existing facilities. Flushing disinfected water from treatment, storage and distribution facilities may have serious consequences to the environment receiving the discharged chlorinated water. Moderate levels of chlorine in streams and lakes can be detrimental to aquatic life.
TheMissouriregulation10CSR20-2.010(22)definesadischargeasthecausingorpermittingofoneormorewatercontaminantstoenterwatersofthestate.Chlorinehasspecificlimitsfordischarge into water of the state (10 CSR 20-7.031 Table A). A typical maximum concentration of chlorine that may be discharged to waters of the state is 0.02 milligrams per liter (mg/l). Specificlimitsforchlorinedischargesareprovidedbythedepartment.
It is important for public water supplies to know discharging contaminant to water of the stateisaviolationoftheMissouriregulationsandmayresultinfishkills.Althoughflushingproceduresdonotrequireapermitfromthedepartment,fishkillsareenforceableoffencesthatmay be pursued by the department. Therefore, system operators and contractors discharging chlorinated water must consider the receiving environment.
Fewdischargesfromroutinewatermainflushesrequiredechlorinationwhenbestmanagementpractices are used as referenced in item number two below. The following items should be considered when discharging chlorinated water:
If disposing of heavily chlorinated water, inspect the environment to which the water will be 1. discharged in accordance with American Water Works Association Standard C651-99, Sec. 4.5.2. Disposing of Heavily Chlorinated Water.
Determine the impact of the discharge to the environment. If the water to be discharged has 2. low levels of chlorine and will not reach the waters of the state, dechlorination may not be necessary.
If it is determined to be necessary, dechlorinate in accordance with AWWA Standard C652 3. Disinfection of Water Storage Facilities Appendix B or as prescribed by your operations professional.
Avoid over chlorinated or over applying disinfectants when disinfection. AWWA Standard 4. C651 Disinfecting Water Mains Appendix B contains recommended amounts of chemicals to produce various chlorine concentrations.
Contractors need to follow the best management practices for discharging chlorinated water 5. andtheapplicableflushingproceduresestablishedbythepublicwatersupply.
Flushing procedures and dechlorination must be considered during the design of large water 6. mains and storage facilities.
Developawatermainflushingprogramandmaintainaflushingmanualforthepublicwater7. supply. Identify the necessary equipment, chemicals and retention tanks needed for routine flushingprocedureswithinthismanual.
13
If possible, spray the interior of the tanks with a chlorine solution to reduce the volume of 8. water to dechlorinate.
Whenpossible,divertflushwaterfromstormdrainsandditches.Ifflushwateristoentera9. combined sewer, the receiving wastewater treatment facilities must be considered.
Avoidpersonalpropertydamage,whichincludesfloodingbasementsandyardstowashing10. outlawnsandflowerbeds.
Beawareofpossibleicehazardsonstreets,sidewalksanddrivewayswhenflushingduring11. winter months.
Itisimportanttoremembereachflushingscenarioisuniquebecauseofthreefactors.Thefirstfactor is the volume of water to be discharged. The second factor is the amount of disinfectant inthewatertobedischarged.Thefinalfactoristhedownstreamenvironmentthatmaybeaffected. It is the responsibility of each public water supply to prevent contamination of the waters of the state and to protect not only public health and our water systems but also our environment.
Check with the local sewer department for conditions of disposal to sanitary sewer and with 1. theMissouriDepartmentofNaturalResourcesforconditionsofdisposaltonaturaldrainagecourses.
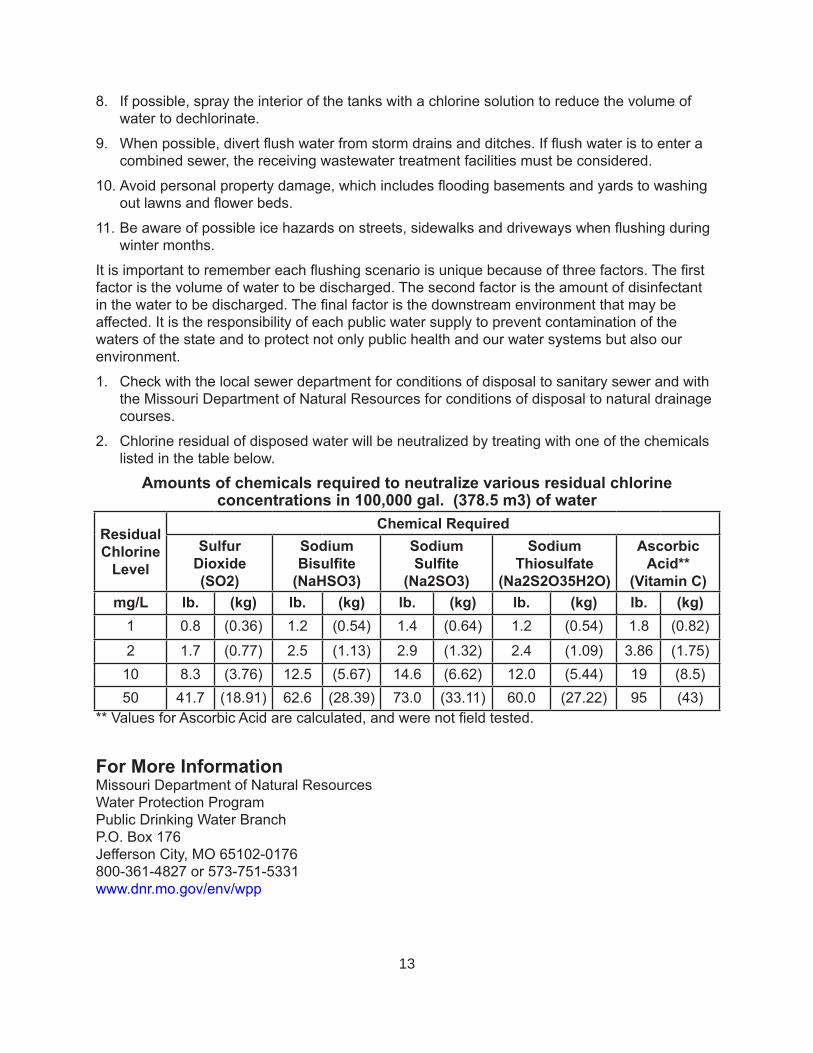
Chlorine residual of disposed water will be neutralized by treating with one of the chemicals 2. listed in the table below.
Amounts of chemicals required to neutralize various residual chlorineconcentrations in 100,000 gal. (378.5 m3) of water
Residual Chlorine
Level
Chemical RequiredSulfur
Dioxide (SO2)
Sodium Bisulfite
(NaHSO3)
Sodium Sulfite
(Na2SO3)
Sodium Thiosulfate
(Na2S2O35H2O)
Ascorbic Acid**
(Vitamin C)mg/L lb. (kg) lb. (kg) lb. (kg) lb. (kg) lb. (kg)
1 0.8 (0.36) 1.2 (0.54) 1.4 (0.64) 1.2 (0.54) 1.8 (0.82)
2 1.7 (0.77) 2.5 (1.13) 2.9 (1.32) 2.4 (1.09) 3.86 (1.75)10 8.3 (3.76) 12.5 (5.67) 14.6 (6.62) 12.0 (5.44) 19 (8.5)50 41.7 (18.91) 62.6 (28.39) 73.0 (33.11) 60.0 (27.22) 95 (43)
**ValuesforAscorbicAcidarecalculated,andwerenotfieldtested.
For More Information MissouriDepartmentofNaturalResources Water Protection Program Public Drinking Water Branch P.O. Box 176 Jefferson City, MO 65102-0176 800-361-4827 or 573-751-5331 www.dnr.mo.gov/env/wpp