what is a requestor?elclwd.xara.hosting/ /index_htm_files/ok pmp awarxe … · web viewa...
TRANSCRIPT
User Support Manual
1

Contents1 What Is a Requestor?...........................................................................................................................4
2 Registration.........................................................................................................................................5
2.1 Registration Process....................................................................................................................5
2.2 Registering as a Delegate...........................................................................................................10
2.3 Email Verification.......................................................................................................................10
2.4 Validation Documents...............................................................................................................10
2.5 Account Approved.....................................................................................................................11
3 Requestor Dashboard........................................................................................................................12
3.1 Patient Alerts.............................................................................................................................12
3.2 Recent Requests........................................................................................................................13
3.3 Delegates/Supervisors...............................................................................................................13
3.4 Announcements and Quick Links...............................................................................................13
4 RxSearch............................................................................................................................................14
4.1 Creating a Patient Request........................................................................................................14
4.1.1 Viewing the Patient Rx Request.........................................................................................15
4.1.2 Multiple Patients Identified...............................................................................................16
4.1.3 No Matching Patient Found...............................................................................................17
4.2 Request History.........................................................................................................................17
4.3 Bulk Patient Search....................................................................................................................18
4.4 MyRx (Prescriber History)..........................................................................................................20
4.5 Patient Alerts.............................................................................................................................21
5 User Profile Management..................................................................................................................22
5.1 My Profile..................................................................................................................................22
5.2 Setting Default PMPi states.......................................................................................................22
5.2.1 Using PMPi with a Patient Rx Search.................................................................................23
5.3 Delegate Management..............................................................................................................23
5.3.1 Approving and Rejecting Delegates...................................................................................24
5.3.2 Removing Delegates..........................................................................................................24
5.4 Password Management.............................................................................................................25
5.4.1 Changing Your Password....................................................................................................25
5.4.2 Reset Password..................................................................................................................25
2

6 Rx Management (Dispensers)............................................................................................................26
6.1 Correcting Errors........................................................................................................................26
6.2 Updating Records......................................................................................................................27
6.3 Enter New Rx.............................................................................................................................27
7 Assistance and Support.....................................................................................................................30
7.1 Technical Assistance..................................................................................................................30
7.2 Administrative Assistance..........................................................................................................30
8 Document Information......................................................................................................................30
8.1 Disclaimer..................................................................................................................................30
3

1 What Is a Requestor?A requestor is a PMP AWARXE account type that is typically used to review a patient’s prescription history. A requestor’s primary task within the application is to determine if a patient should be given or dispensed a prescription based on their history of prescriptions. Requestors are the strongest line of defense to prevent prescription drug abuse. Physicians and pharmacists are the most common type of request user. However, there are a myriad of roles that can be classified as a requestor, including those of Law Enforcement. A complete list of available roles that fall into the requestor category are as follows:
Healthcare Professionals Law Enforcement Other Dentist IHS Dispensers IHS Prescribers Medical Intern Medical Intern with
Prescriptive Authority Medical Residents Medical Resident with
Prescriptive Authority Military Prescribers Nurse
Practitioners/Clinical Nurse Specialist
Optometrist Pharmacist Pharmacy Technician Pharmacist’s Delegate –
Licensed Pharmacist’s Delegate –
Unlicensed Physician Assistant Physician (MD, DO) Podiatrist (DPM) Prescriber Delegate –
Licensed Prescriber Delegate –
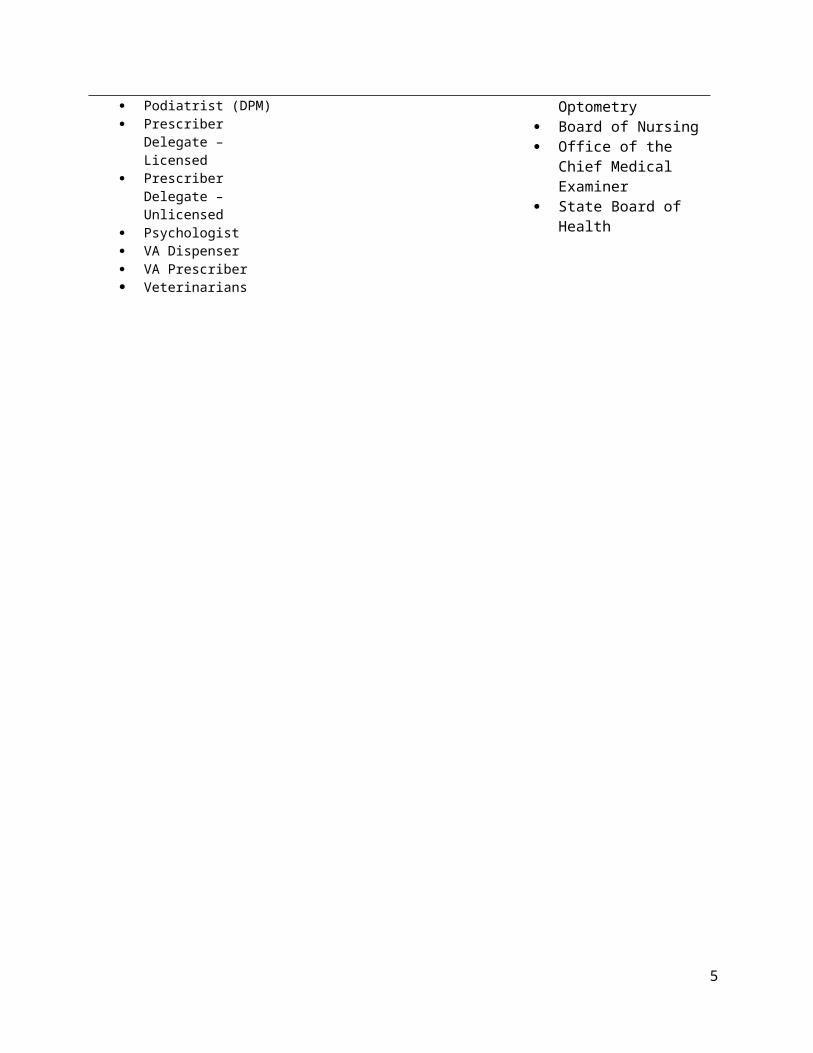
Unlicensed Psychologist VA Dispenser VA Prescriber Veterinarians
ATF Corrections DEA FBI Local Police Medicaid Fraud Units Multijurisdictional Task
Forces OBNDD Agent OIG Parole Officer Probation Officer State Attorney General State Police State Prosecutors
(District or Commonwealth Attorneys)
US Attorney
Board of Podiatric Medical Examiners
Board of Dentistry State Board of
Pharmacy State Board of Medical
Licensure and Supervision
State Board of Osteopathic Examiners
State Board of Veterinary Medical Examiners
Oklahoma Health Care Authority
Department of Mental Health and Substance Abuse Services
Board of Examiners in Optometry
Board of Nursing Office of the Chief
Medical Examiner State Board of Health
4
2 RegistrationPMP AWARXE requires that every individual register as a separate user, using their email address as their username within the system. A user is able to register as a delegate, a role which is designed to allow the user to generate reports on the behalf of another current user. An example for a delegate role would be a nurse at a small doctor’s office. The nurse would act as a delegate to the physician to create Patient Rx reports for the patients that physician would be helping that day.
The registration process is comprised of three screens: the account settings screen, the role selection screen, and the demographics screen. All three screens must be filled out before the user can successfully submit their registration for the application.
Some roles may also require additional documentation as designated by the assigned PMP Administrator. This documentation must be submitted prior to the user account being approved. The document(s) will be sent to the user after submitting their registration request. The user can then submit digital copies through AWARXE or mail it in to the state office for the PMP Administrator to review and upload.
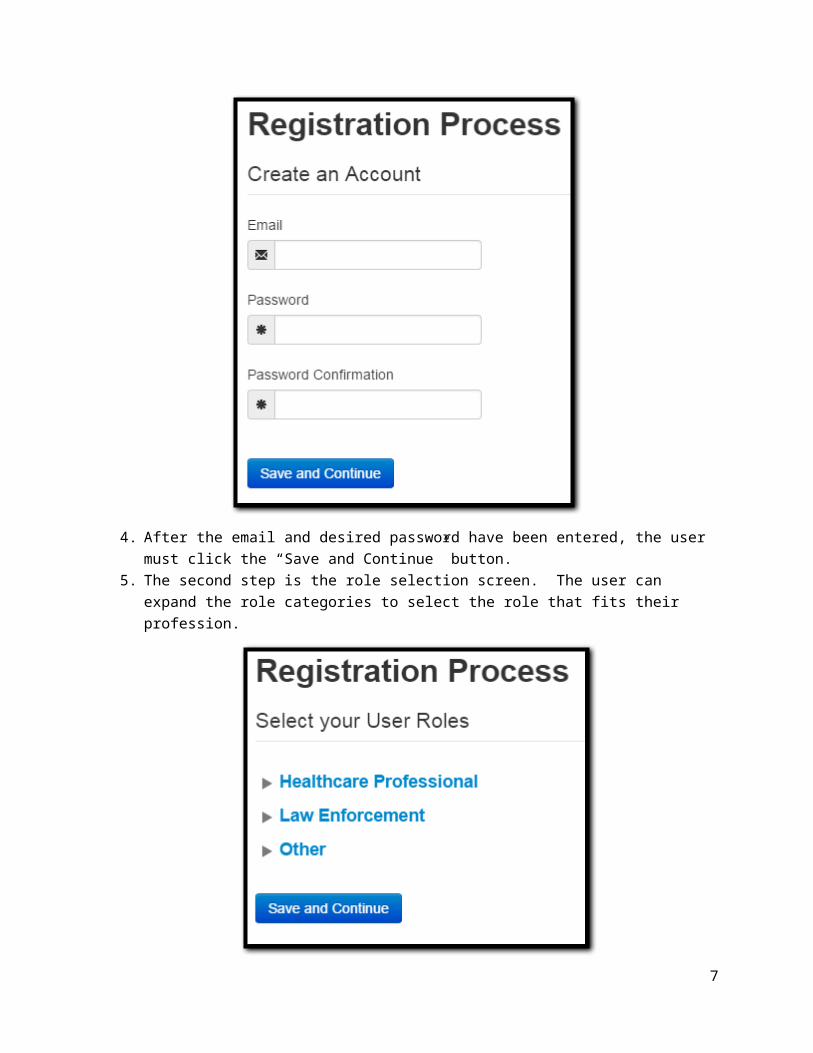
2.1 Registration Process1. To request a new account in PMP AWARXE, the user must first load the login screen for the
application. The login screen is located at https://oklahoma.pmpaware.net/login2. Once at the login screen, the user must click the “Create an account” option to begin the
process.
3. The first screen displayed requires the user to enter their current, valid email address and select a password. The password must be entered a second time for validation.
a. The password must contain at least 8 characters, including 1 capital letter and 1 special character (such as !,@,#,$)
5

4. After the email and desired password have been entered, the user must click the “Save and Continue” button.
5. The second step is the role selection screen. The user can expand the role categories to select the role that fits their profession.
6
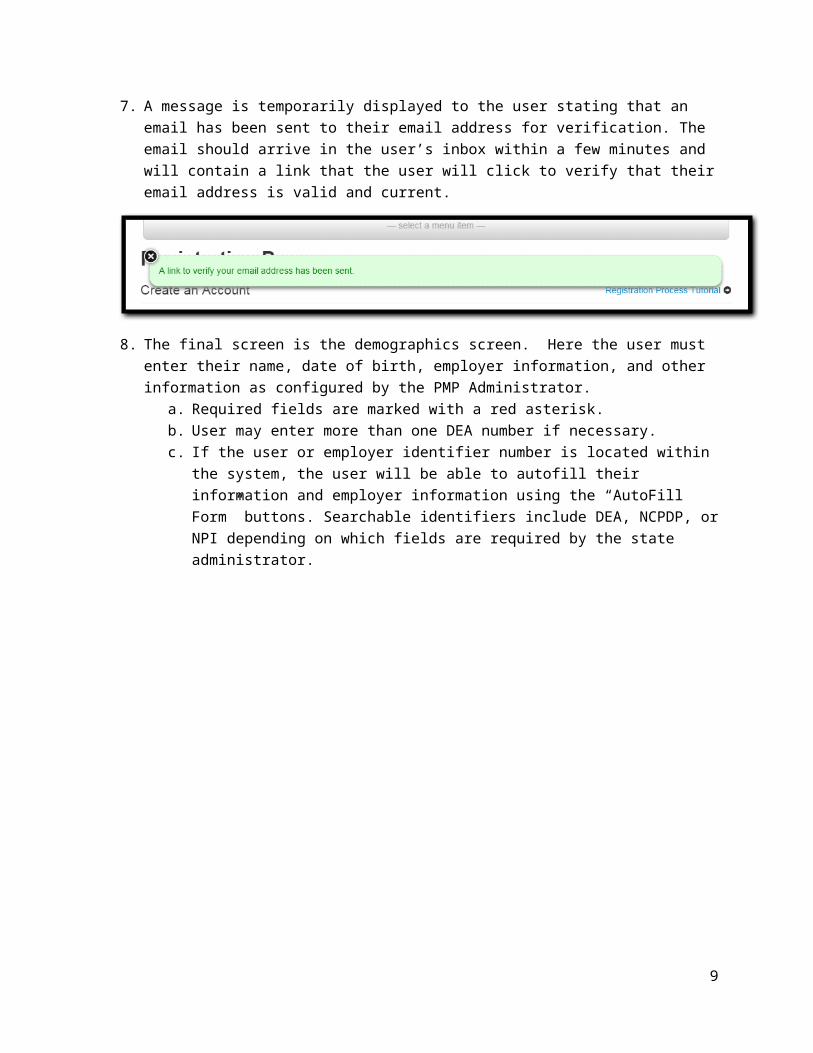
6. After the role has been selected, the user must click the “Save and Continue” button.7. A message is temporarily displayed to the user stating that an email has been sent to their email
address for verification. The email should arrive in the user’s inbox within a few minutes and will contain a link that the user will click to verify that their email address is valid and current.
7

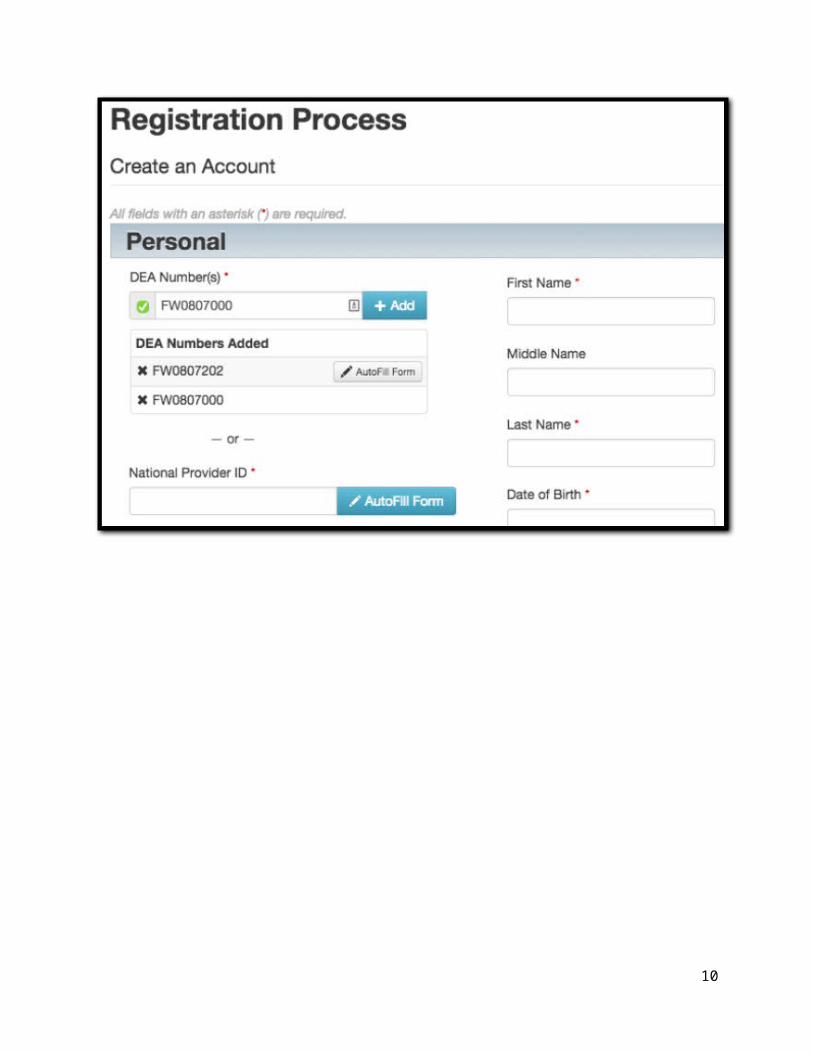
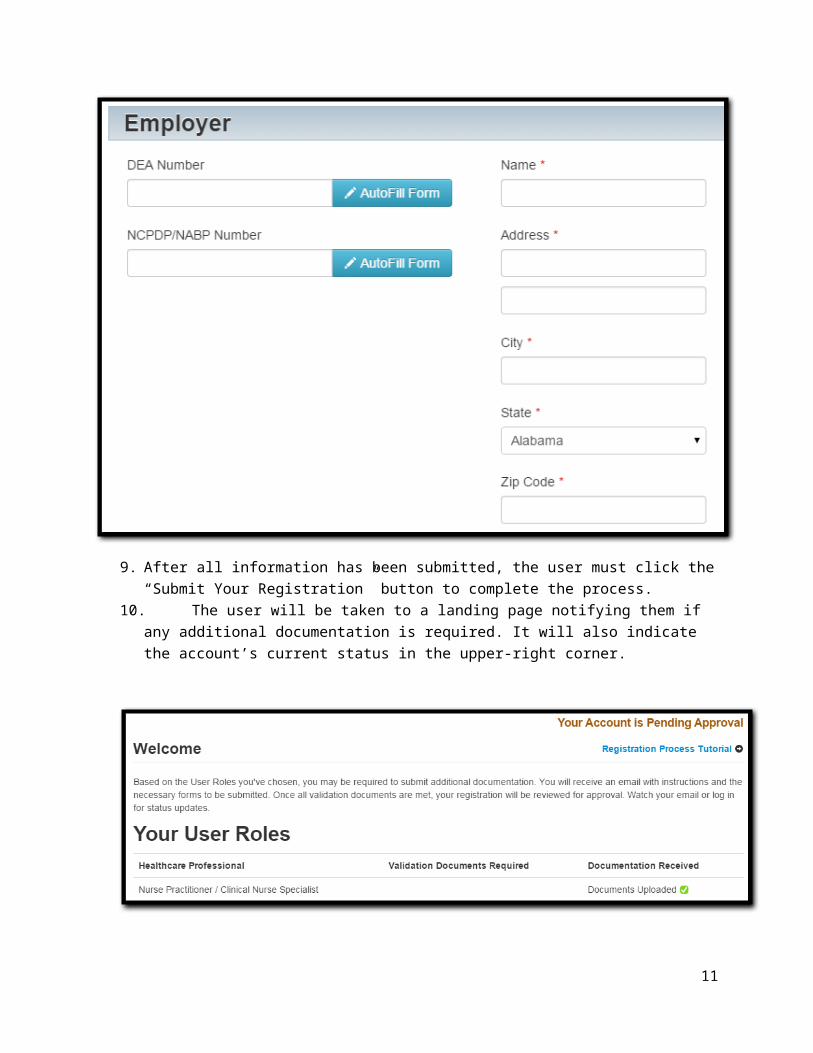
8. The final screen is the demographics screen. Here the user must enter their name, date of birth, employer information, and other information as configured by the PMP Administrator.
a. Required fields are marked with a red asterisk.b. User may enter more than one DEA number if necessary.c. If the user or employer identifier number is located within the system, the user will be
able to autofill their information and employer information using the “AutoFill Form” buttons. Searchable identifiers include DEA, NCPDP, or NPI depending on which fields are required by the state administrator.
8
9. After all information has been submitted, the user must click the “Submit Your Registration” button to complete the process.
10. The user will be taken to a landing page notifying them if any additional documentation is required. It will also indicate the account’s current status in the upper-right corner.
9
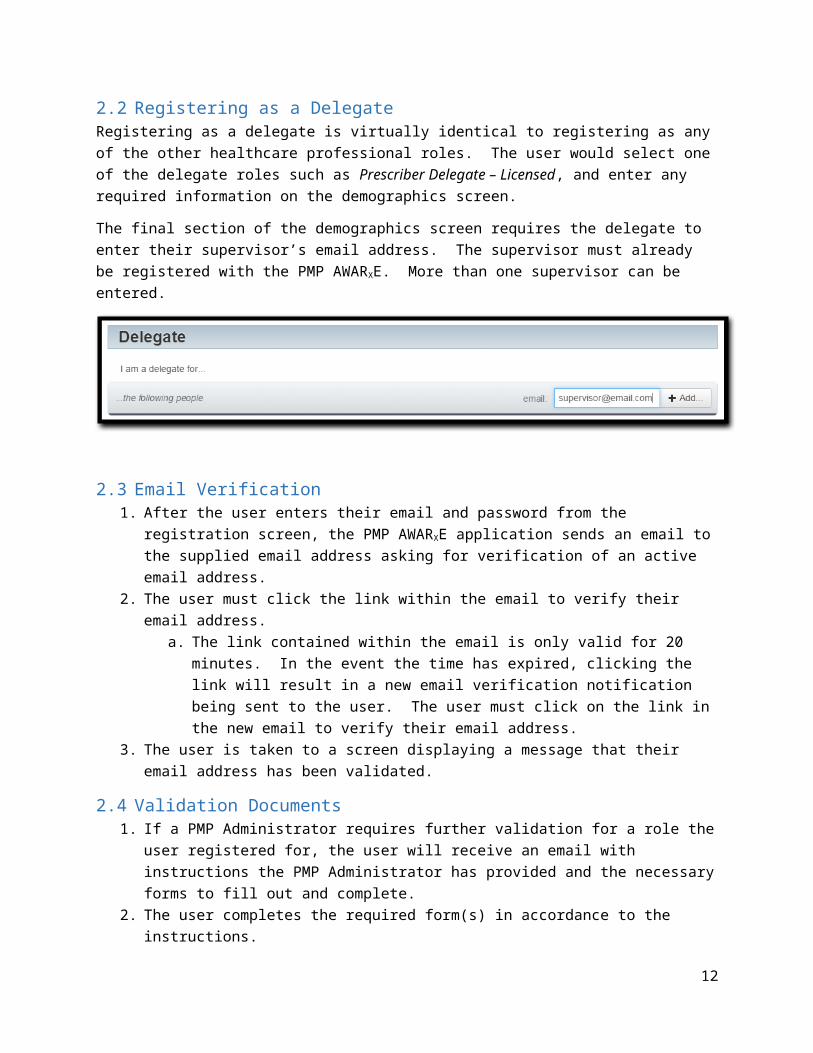
2.2 Registering as a DelegateRegistering as a delegate is virtually identical to registering as any of the other healthcare professional roles. The user would select one of the delegate roles such as Prescriber Delegate – Licensed, and enter any required information on the demographics screen.
The final section of the demographics screen requires the delegate to enter their supervisor’s email address. The supervisor must already be registered with the PMP AWARXE. More than one supervisor can be entered.
2.3 Email Verification1. After the user enters their email and password from the registration screen, the PMP AWARXE
application sends an email to the supplied email address asking for verification of an active email address.
2. The user must click the link within the email to verify their email address.a. The link contained within the email is only valid for 20 minutes. In the event the time
has expired, clicking the link will result in a new email verification notification being sent to the user. The user must click on the link in the new email to verify their email address.
3. The user is taken to a screen displaying a message that their email address has been validated.
2.4 Validation Documents1. If a PMP Administrator requires further validation for a role the user registered for, the user will
receive an email with instructions the PMP Administrator has provided and the necessary forms to fill out and complete.
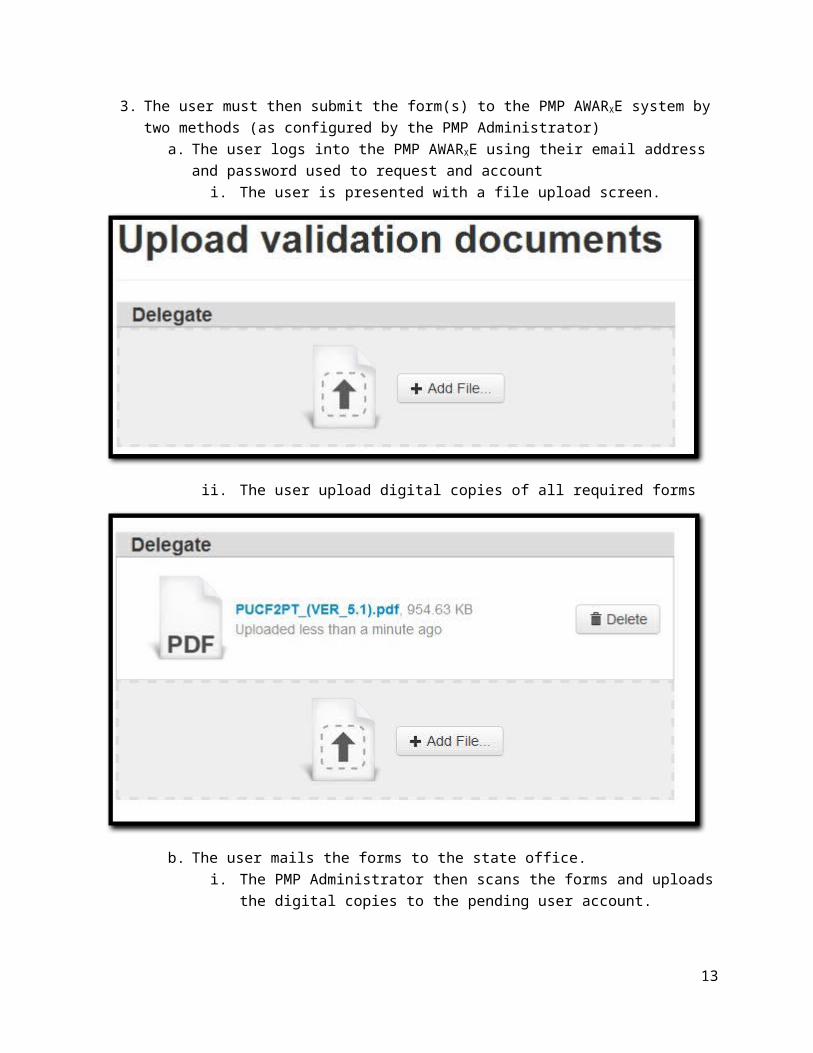
2. The user completes the required form(s) in accordance to the instructions.3. The user must then submit the form(s) to the PMP AWARXE system by two methods (as
configured by the PMP Administrator)a. The user logs into the PMP AWARXE using their email address and password used to
request and accounti. The user is presented with a file upload screen.
10
ii. The user upload digital copies of all required forms
b. The user mails the forms to the state office.i. The PMP Administrator then scans the forms and uploads the digital copies to
the pending user account.
2.5 Account Approved1. After the PMP Administrator has determined that all requirements have been met for the user
account, the account can be approved.2. The user receives an email stating that their account has been approved and is now active.3. The user can then log into the PMP AWARXE application using the email address and password
supplied during the account creation process.
11
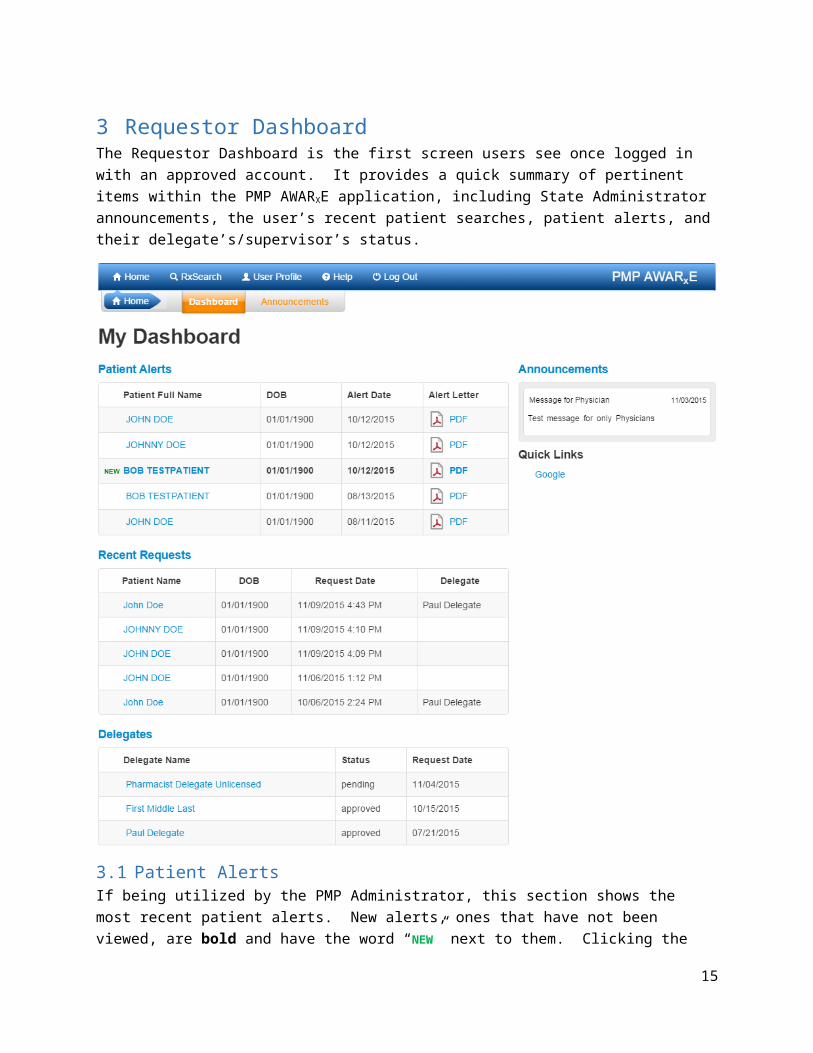
3 Requestor DashboardThe Requestor Dashboard is the first screen users see once logged in with an approved account. It provides a quick summary of pertinent items within the PMP AWARXE application, including State Administrator announcements, the user’s recent patient searches, patient alerts, and their delegate’s/supervisor’s status.
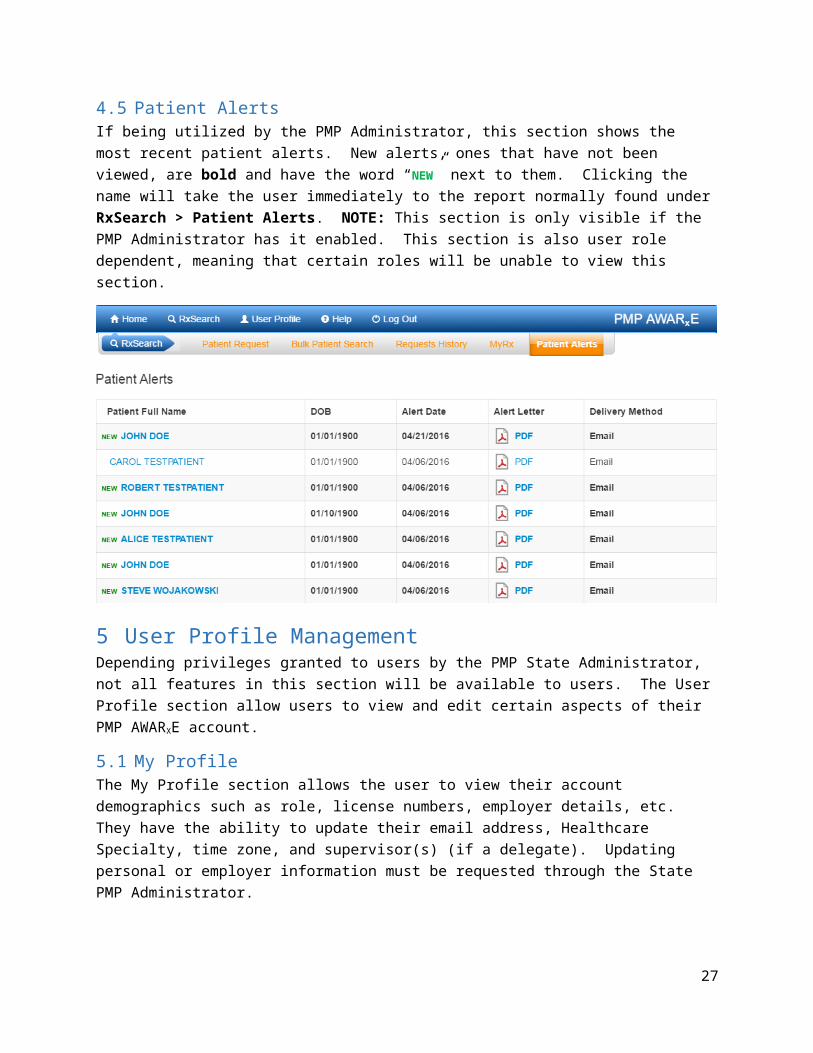
3.1 Patient AlertsIf being utilized by the PMP Administrator, this section shows the most recent patient alerts. New alerts, ones that have not been viewed, are bold and have the word “NEW” next to them. Clicking the name will take the user immediately to report normally found under RxSearch > Patient Alerts. NOTE: This section is only visible if the PMP Administrator has it enabled. This section is also user role dependent, meaning that certain roles will be unable to view this section.
12
3.2 Recent RequestsThis section shows the last few patient searches that were performed by the user or by one of the user’s delegates. Clicking the patient name will take the user to the patient report. NOTE: The report seen here is a historical report. It is what was seen when the report was initially run. For instructions on performing patient Rx history searches, see section Creating a Patient Rx Request.
3.3 Delegates/SupervisorsThis section shows the user’s delegates or supervisors depending on the user’s role. A supervisor can quickly change a delegate’s status from the dashboard by click the delegate’s name. They will be taken to the Delegate Management screen where they can approve, reject, or remove a delegate from their profile. For additional information regarding delegate management, see section Delegate Management.
3.4 Announcements and Quick LinksPMP Administrators can configure Announcements to be displayed to users in this section. The quick view on the right shows only the first few lines of text, but clicking on the Announcements button will display the full announcement text. The announcements can be configured as role specific meaning that a user whose role is physician can have an announcement whereas delegate user may not have the same announcement viewable under their profile.
PMP Administrators can also configure Quick Links to webpages outside of the PMP AWARXE application.
13

4 RxSearch
Depending on the settings the State PMP Administrator has enabled for the portal in general and the specific roles types there may be different options available. The screenshot above and the descriptions that follow in this section are all inclusive. If an option is not available/seen, then it has not been enabled by the State Administrator.
4.1 Creating a Patient RequestThe Patient Request is a report that displays the previous prescription drug activity for a specific patient.
1. A user must log into PMP AWARXE and navigate to RxSearch > Patient Request.2. The screen displays search fields to lookup a patient. All fields marked with a red asterisk (*) are
required. At a minimum, the user must enter a first and last name and date of birth for the patient. Start and end dates for prescriptions are also required.
14
a. Partial Spelling – By clicking the Partial Spelling boxes for either first or last name, users have the option to use only part of a patient’s name to perform a search. This can be very helpful when searching hyphenated names or names that are often abbreviated such as “Will” vs. “William”.
3. The user can optionally complete other fields displayed to better narrow the search to identify the correct patient.
4. If the user requires information from other states, the user can select the necessary states from the list of available PMPi states.
a. If a state is not available within the PMPi list, then state administrator has not configured the application to offer that state.
5. The user clicks the search button to begin the search.a. Certain roles may require state administrator approval before viewing patient
requests. In these cases, a pop-up message will be displayed and the request will remain pending in your Requests History section until it has been approved.
6. When a single patient has been identified, results are returned to the screen. 7. If the search could not determine a single patient match, the user will receive a message
warning of multiple patient matches.
4.1.1 Viewing the Patient Rx Request 1. The Patient Rx Request report screen is comprised of four main sections: Patient Information,
Prescriptions, Prescribers, and Dispensers.
2. At the top of the request, the report displays the date the request was run and the date range used to create the request.
3. If configured for your account type, buttons may also be present that will allow the user to save the report as a PDF document or to save the report as a CSV data file.
4. The Patient Information section displays the search criteria used to search for the patient. A table also displays all known patient names, DOB, and addresses that have been matched to the patient being searched on.
a. The table can represent instances of a patient with multiple addresses, misspellings of names, etc.
15
b. The table also lists an ID number that will match a patient’s address information to a prescription from the prescription table.
5. The Prescription table lists information related to each prescription issued to the patient within the search period used.
a. The Patient ID column is used to provide a link between a specific prescription and the patient name/location information.
6. The Prescribers table displays the information for all prescribers who issued a prescription to the patient within the search period used.
7. The Dispensers table displays the information for all Dispensers who filled a prescription to the patient within the search period used.
8. Each section is collapsible. Users can click on the triangles next to each section to expand or collapse each section.
9. Each section’s tables can be resized to show more or less records. Users can click and drag the bottom of the table with their mouse to resize. A minimum of 2 rows are required to be displayed.
10. Columns in each section can be sorted. Clicking on a column header will allow the results to be sorted in ascending or descending order based on the column selected.
a. Column sorting is saved when exporting the request.
4.1.2 Multiple Patients Identified1. When submitting a Patient Rx Request, if the entered search criteria cannot identify a single
patient, the user receives a message that multiple patients have been identified.
2. The user can refine their search criteria and rerun the report or select one or more of the patient groups identified and run the report.
16

4.1.3 No Matching Patient Found1. If a user searches for a patient and no matching patient can be found, a message is displayed on
the screen informing the user that the patient could not be found.
2. The user can modify their search information and resubmit their request.3. If a patient is identified, but contains no prescription information for the search dates provided,
the user will see a report results screen with no prescription information.
4.2 Request History1. To view a Patient Rx Request a user previously created, navigate to RxSearch > Requests History2. A list of Patient Rx Requests made in the previous 30 days are displayed.3. A user can only view Patient Rx Requests they or their delegate have created.4. Requests in the history list are identified with a status icon
a. Green check = completedb. Yellow ellipses = pendingc. Red X = rejected
5. A user can select a previous request to view the details of the request in a detail card at the bottom of the screen.
a. Search criteria is displayedb. PMPi states used during the search are displayedc. If the request is pending or was denied, the reason is displayed.
6. Results can be pending because the user’s role requires the state administrator to approve the request prior to displaying results to the user.
7. Click the View button to open the results of that requesta. Results of previous requests are not updated with new information. If a user requires
updated information to be in the request, they must generate a new request for the patient. Generating a new Rx Request from a previous request can be quickly be done by clicking the “Refresh” button. This will take the user back to Patient Request screen with all previously used search parameters already populated.
17

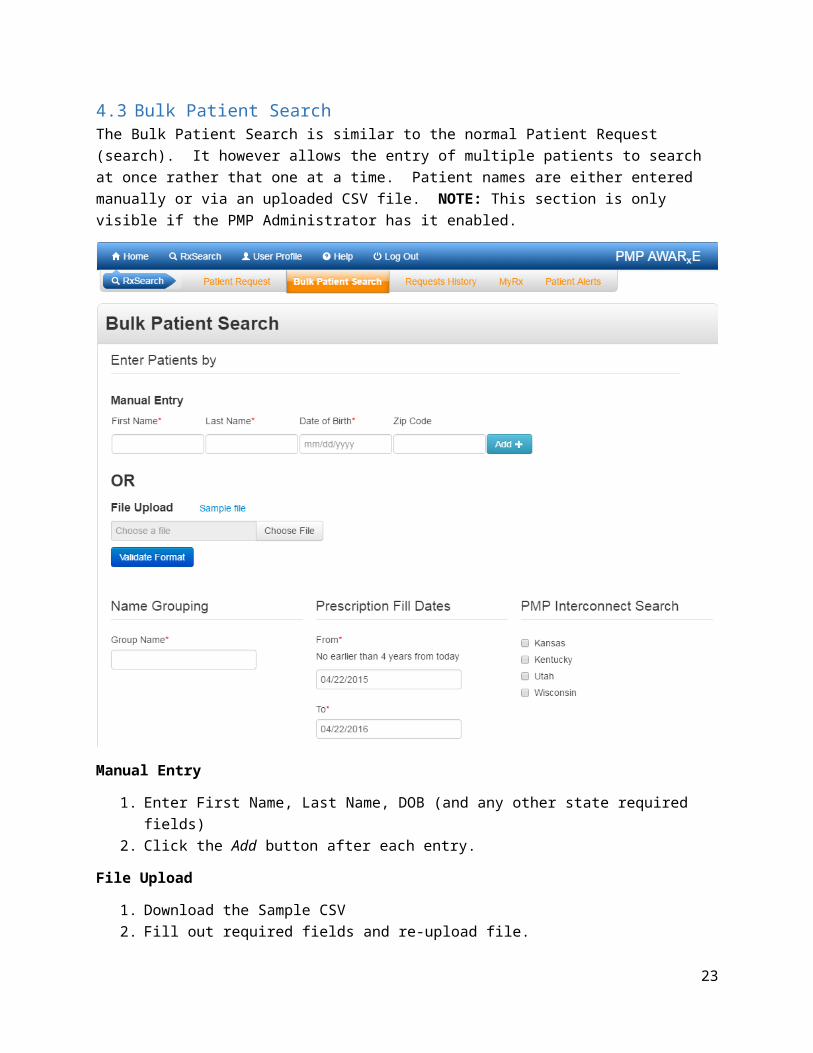
4.3 Bulk Patient SearchThe Bulk Patient Search is similar to the normal Patient Request (search). It however allows the entry of multiple patients to search at once rather that one at a time. Patient names are either entered manually or via an uploaded CSV file. NOTE: This section is only visible if the PMP Administrator has it enabled.
Manual Entry
1. Enter First Name, Last Name, DOB (and any other state required fields)2. Click the Add button after each entry.
File Upload
1. Download the Sample CSV2. Fill out required fields and re-upload file.
Then
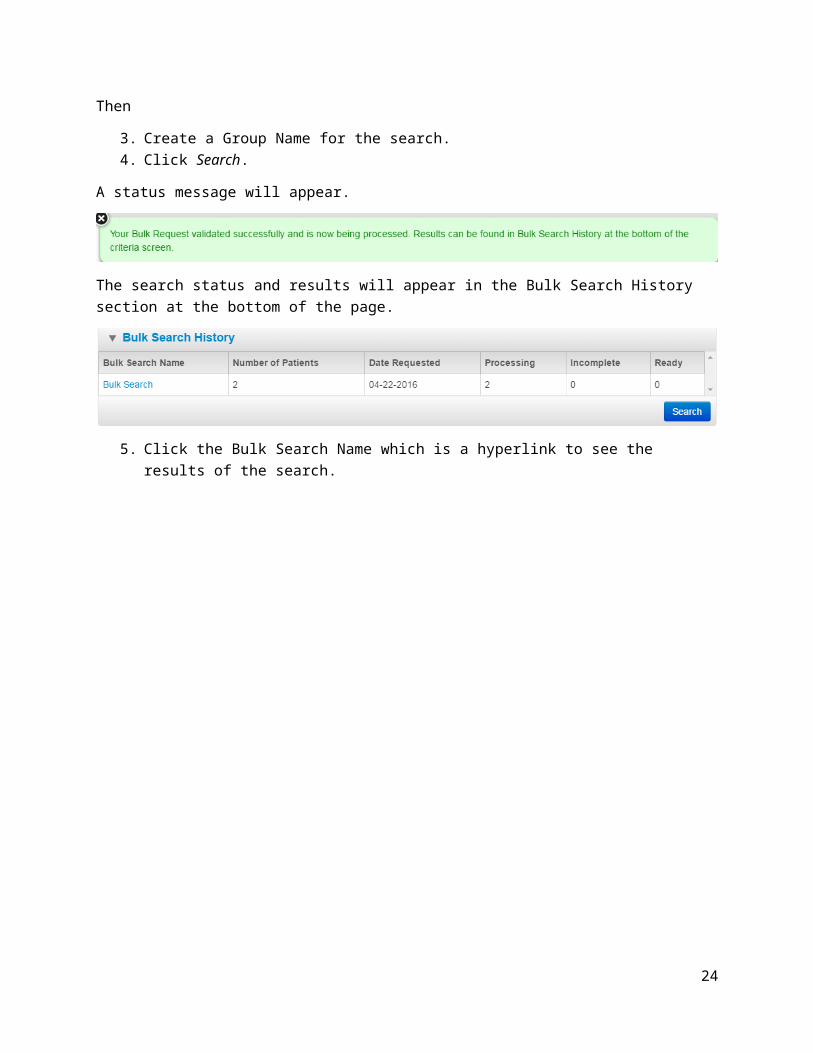
3. Create a Group Name for the search.4. Click Search.
18

A status message will appear.
The search status and results will appear in the Bulk Search History section at the bottom of the page.
5. Click the Bulk Search Name which is a hyperlink to see the results of the search.
6. Click a patient name within the search results. Details of the patient will appear at the bottom of the page.
7. Click View to see the actual Patient Report
19

4.4 MyRx (Prescriber History)MyRx gives users that have a DEA number associated with their account to run a self-report to see what prescriptions have been filled where they were listed as the prescriber. NOTE: This section is only visible if the PMP Administrator has it enabled and if the user has a DEA number associated with their User Profile.
Enter a date range to search then click the DEA number(s) you want to run a report on.
20

4.5 Patient AlertsIf being utilized by the PMP Administrator, this section shows the most recent patient alerts. New alerts, ones that have not been viewed, are bold and have the word “NEW” next to them. Clicking the name will take the user immediately to the report normally found under RxSearch > Patient Alerts. NOTE: This section is only visible if the PMP Administrator has it enabled. This section is also user role dependent, meaning that certain roles will be unable to view this section.
21

5 User Profile ManagementDepending privileges granted to users by the PMP State Administrator, not all features in this section will be available to users. The User Profile section allow users to view and edit certain aspects of their PMP AWARXE account.
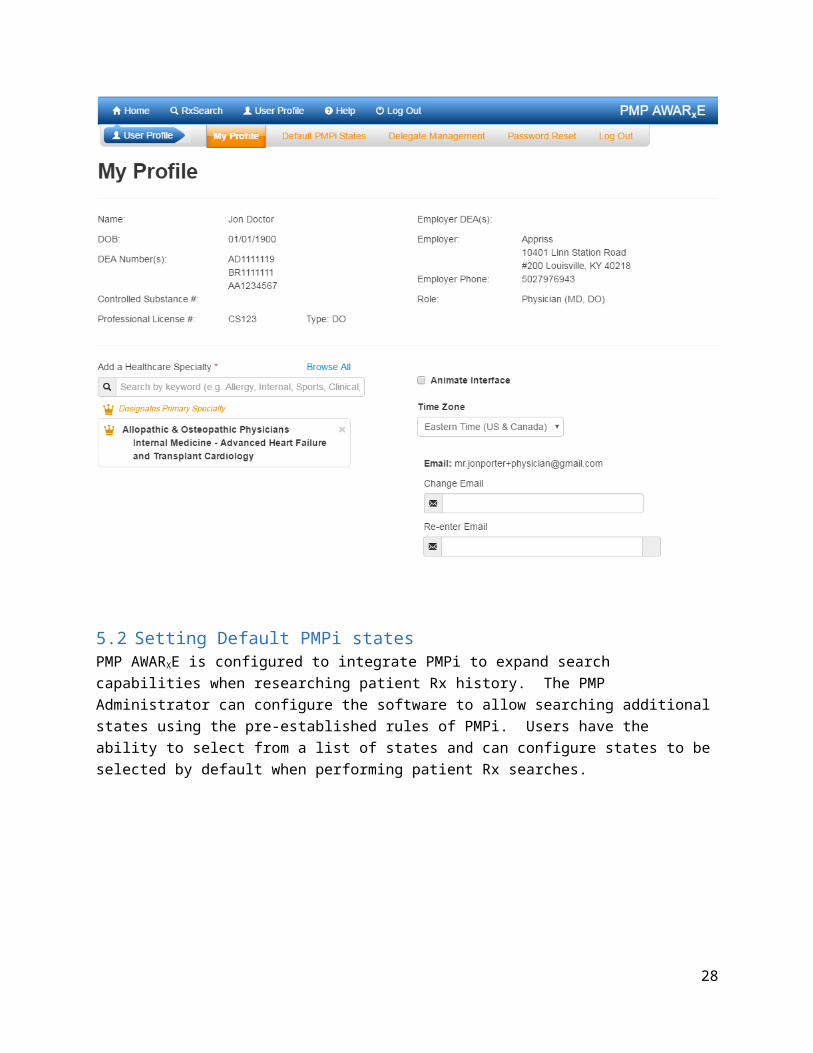
5.1 My ProfileThe My Profile section allows the user to view their account demographics such as role, license numbers, employer details, etc. They have the ability to update their email address, Healthcare Specialty, time zone, and supervisor(s) (if a delegate). Updating personal or employer information must be requested through the State PMP Administrator.
5.2 Setting Default PMPi statesPMP AWARXE is configured to integrate PMPi to expand search capabilities when researching patient Rx history. The PMP Administrator can configure the software to allow searching additional states using the pre-established rules of PMPi. Users have the ability to select from a list of states and can configure states to be selected by default when performing patient Rx searches.
22
1. The user navigates to User Profile > Default PMPi States2. A listing of available states is displayed to the user. These states are the states the PMP
Administrator has configured to be available for expanded searching within PMP AWARXE.3. The user checks the boxes next to the states they desire to always be pre-selected when
creating a new Patient Rx request.4. The user clicks the save button to save their selections.5. When the Patient Rx request screen is opened to create a new request, the selected default
states will now automatically be checked to include in the search results.a. Users can de-select default states as they choose. Having default states does not lock
the state to always be required in patient searches.
5.2.1 Using PMPi with a Patient Rx Search1. When creating a new Patient Rx request, a list of available PMPi states are listed on the right
side of the screen.2. A user can select as many states as they wish to also include Rx history information to be
obtained from those states through PMPi.3. PMP AWARXE will submit the request for the patient to the PMPi systems of the selected states.4. Results from those states are blended into the final Patient Rx report.
a. The report does not separate Rx information from a state by state basis. It incorporates all information from all sources into a single report.
5.3 Delegate ManagementDelegates associated with a user’s account are displayed in a table found at User Profile > Delegate Management. From this location, a supervisor is able to approve or reject new delegates, or remove existing delegates from their account.
23
Examples
5.3.1 Approving and Rejecting Delegates1. When a user registers as a delegate for a supervisor, the supervisor receives an email alerting
them that a delegate account is pending their approval.2. The user logs into the PMP AWARXE application (https://oklahoma.pmpaware.net/) and
navigates to User Profile > Delegate Management.3. From the Delegate management screen, the user is able to see all delegates associated with
their account. New Delegate(s) are identified with the pending symbol in the Delegate Status column.
4. The user selects the delegate to view their information in the detail card at the bottom of the screen.
5. To approve or reject the delegate, the supervisor must click the appropriate button under the delegate’s information. The delegate’s status turns to green if approved or will be removed if rejected.
5.3.2 Removing Delegates1. If a supervisor decides to remove a delegate from their account, the user navigates to User
Profile > Delegate Management.2. The user selects the active delegate from the list displayed.3. The user clicks the “Remove” button in the detail card at the bottom of the screen.4. The delegate will be placed back in the pending status as indicated by the yellow icon. The
delegate is not removed from the supervisors list.a. If a supervisor wants to add the user again at a later date, the supervisor can locate the
former delegate in their list and select approve to add the delegate to their account again.
24

b. If a supervisor wants to completely remove the delegate from their account, the supervisor can select the former delegate and click the “Reject” button. This will remove them from the supervisor’s account.
5.4 Password ManagementPassword management can be handled within PMP AWARXE by the user. The user’s password will expire after 90 days per HIPAA regulations. A user is able to proactively change their password before it expires within the application through their user profile. If a password has expired, or if the user has forgotten the password, they can use “Reset Password” to change their password.
5.4.1 Changing Your Password1. When a user wants to change their current password, they navigate to their User Profile >
Password Reset section. 2. The user must then enter their current password and enter a new password twice.3. The new password will take effect once the user has logged out of the application.
5.4.2 Reset Password1. When a user has forgotten their password or their password has expired, the user should click
on the link named “Reset Password” located on the log in screen.2. The user must enter the email address they used to register with the application.3. The user will receive an email containing a link to reset the password for the user’s account
a. The link will only be active for 20 minutes. After the time has expired, the user will need to repeat steps to generate a new password reset email.
4. The user must enter the new password twice and then save the password.
25

6 Rx Management (Dispensers)If enabled by the State PMP Administrator for the user’s role type, the Rx Management section will be available. The Rx Management section allows users to correct dispensation errors for records that were submitted via the PMP Clearinghouse. This can be extremely beneficial to data submitters that use a 3 rd party vendor to submit their dispensation records and do not have their own PMP Clearinghouse account, or pharmacists working for a large chain that do not have direct access the corporate PMP Clearinghouse account to resolve dispensation errors themselves.
Prerequisites for making corrections:
State PMP Administrator must have Rx Management enabled for user’s role type. User’s Employer Identifiers (DEA, NCPDP, or NPI) must match that of the dispenser (i.e.
Pharmacy). User must indicate that they are responsible for records submitted by that Employer Identifier.
This is done during registration or the ‘Edit Demographics’ section by the Administrator.
6.1 Correcting Errors1. Navigate to Data > Rx Management > Error Correction. A listing of error records available to
the user for correction will be displayed.2. Click the Rx Number which is a hyperlink.
3. The prescription with error is displayed. The specific error will be noted with red text. Input the missing/invalid data. NOTE: Only fields that have errors (i.e. failed validation) are editable. Updates to fields that were not flagged for errors must still be done via the PMP Clearinghouse. For example, updating the spelling of a patient’s name cannot be done from within this module.
26
4. Click the Submit button. The user will receive feedback if there are any validation issues or fi the record passed and is being processed.
6.2 Updating RecordsRecords that have been previously submitted and accepted as valid, but need to be updated/corrected can be done from the Rx Maintenance screen. A record where the patient’s name was misspelled, or date of birth had a number transposed would be examples of records that need to be updated/corrected but would not have been rejected due to being invalid.
6.3 Enter New RxThe ability to add new prescriptions to the PMP also exists within the Rx Management module. This can be extremely beneficial to smaller dispensers as they will only need to access the AWARXE portal for both the reporting of dispensed controlled substances and patient searches.
Navigate to Data > Rx Management > Rx Maintenance and click the Enter New Rx button in the upper right corner. A Manual Submission or Universal Claim Form (UCF) will be displayed. Below is a collapsed
27
view of the form. The default view has all sections already expanded for easier navigation and data entry.
Each section will have a red asterisk (*) next to fields required by the state. Leaving a required field blank will be immediately flagged with red text indicating that it is required. Once all sections and fields are filled out click Submit.
28

If all values are valid you will be returned to the initial Rx Maintenance screen and a green success message will appear. Any dispensation errors will be identified after clicking Submit. Errors will need to be corrected before being able to submit the record.
29

7 Assistance and Support7.1 Technical Assistance
If you need additional help with any of the procedures outlined in this guide, you can:
Contact Appriss at
1-855-9OK-4PMP (1-855-965-4767)
Create a support request using the following URL: https://apprisspmpclearinghouse.zendesk.com/hc/en-us/requests/new
Technical assistance is available 24 hours, 7 days a week, 365 days a year.
7.2 Administrative AssistanceIf you have non-technical questions regarding the OK PMP, please contact:
877-627-2674
8 Document Information8.1 Disclaimer
Appriss has made every effort to ensure the accuracy of the information in this document at the time of printing. However, information may change without notice.
30